

Page 1
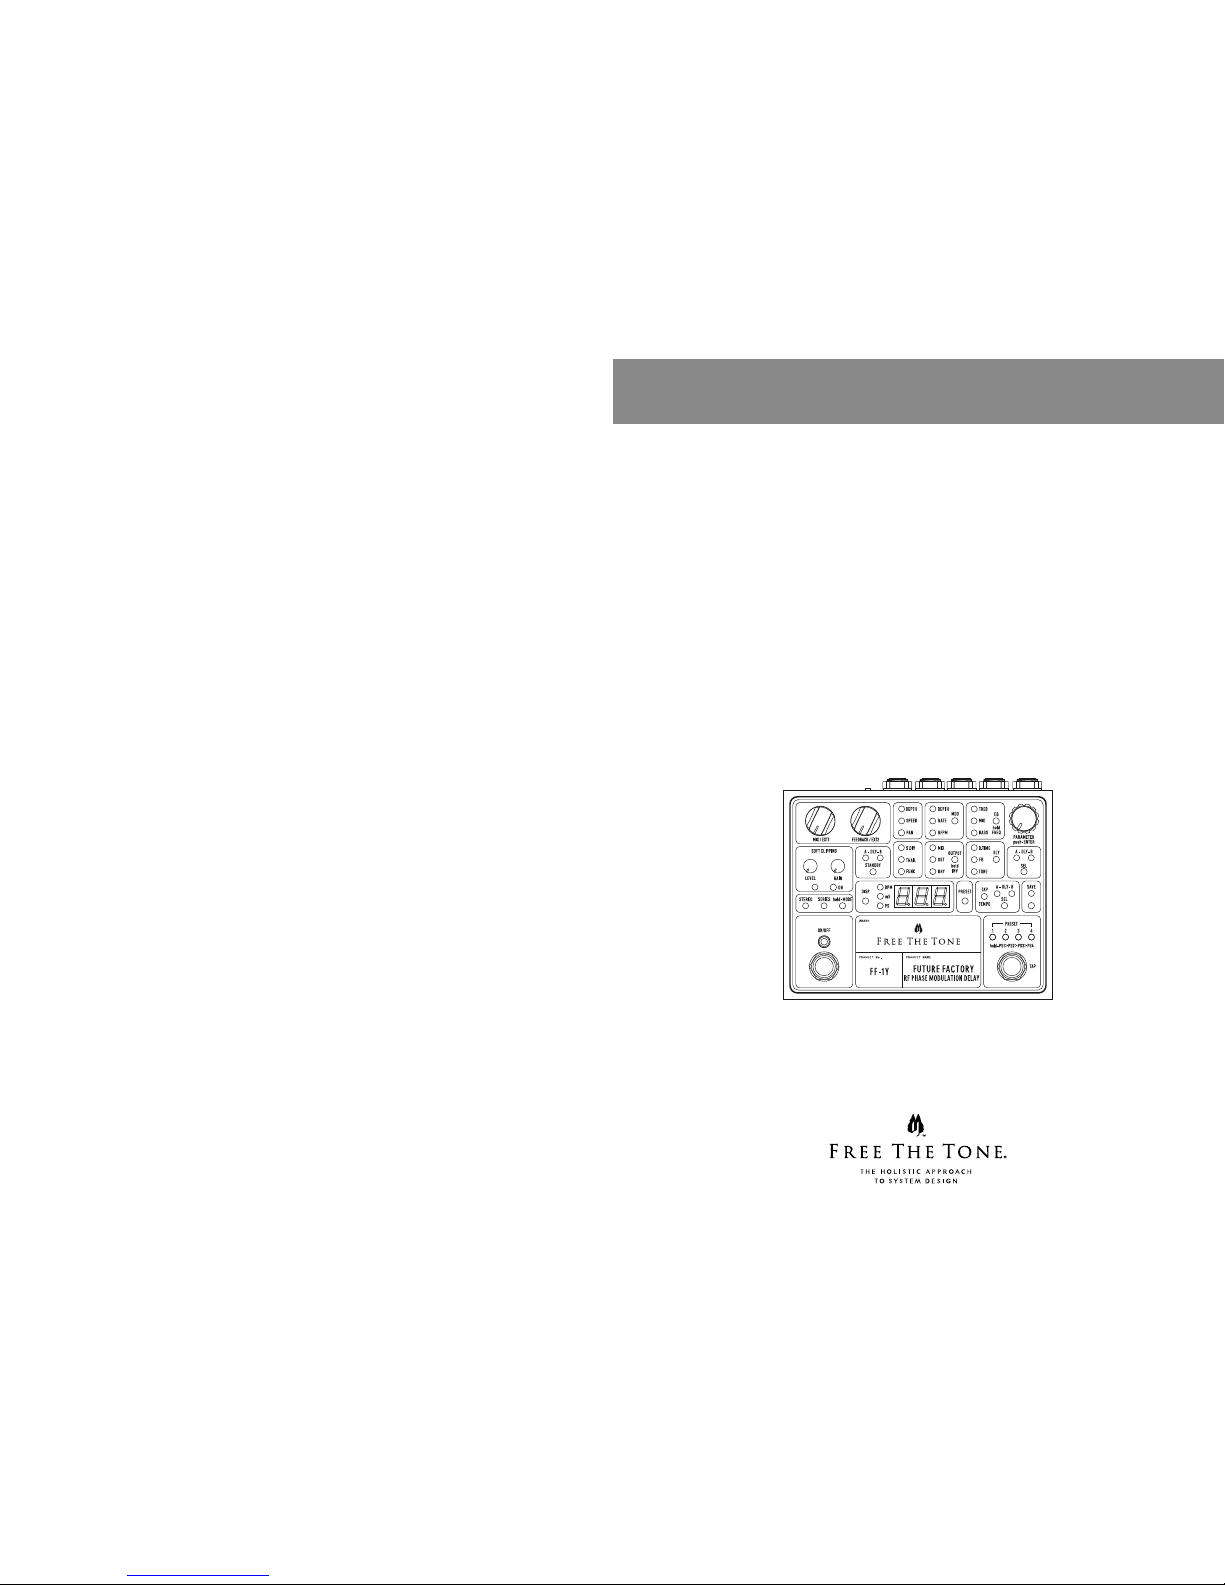
FF-1Y/FUTURE FACTORY
RF PHASE MODULATION DELAY
OWNER’S MANUAL
Ver 1.1
Page 2

2 3
Thank you for c hoosing a Free The Tone product.
In order to take ful l advantage of the f eatures and pe rforma nce it provide s, please read this owner’s
manual thoroughly, and keep it in a s afe place for future reference.
Table of Contents
Controls and I ndicators
................................................................................
4
Front Panel
...........................................................................................
4
Rear Panel
............................................................................................
6
Side Panel
............................................................................................
6
Basic Operations and How to Use E ach Function
...................................................
7
Storing Chan ges in a Preset
........................................................................
7
Confirming Recalled Preset Number
..............................................................
7
Selecting Delay Unit Connection
...................................................................
7
Outputti ng Delay Sound I ndividua lly
...............................................................
7
Confirming P revious Value af ter Parameter Ch ange
.............................................
8
Recallin g a Preset
...................................................................................
8
Switching Fou r Presets (1)
.......................................................................
8
Switching Fou r Presets (2 )
.......................................................................
8
Switching Pre sets betwee n 1 and 2 Alternate ly
...............................................
8
Recallin g Preset 128 Immediately
...............................................................
9
Recallin g Preset with PARAM ETER Encod er
..................................................
9
Recallin g Preset with PRESE T SELECT/TAP Switch
..........................................
9
Recallin g Preset with MID I Signal from E xternal D evice
......................................
9
Setting De lay Unit
....................................................................................
9
Adjusting De lay Tempo (1)
.........................................................................
10
Adjusting De lay Tempo (2) - Tap Function
........................................................
10
Adjusting De lay Tempo (3) - MID I Clock
..........................................................
10
Adjusting Fee dback Amou nt
......................................................................
11
Adjusting De lay Timbre
.............................................................................
11
Adjusting Delay Volume
............................................................................
11
Adjusting Output Volume
..........................................................................
11
Setting De lay Sound’s Phase
......................................................................
12
Setting De lay Length as Note Du ration (Su bdivisio n)
...........................................
12
Kill Dry Function
....................................................................................
12
Trail Function
........................................................................................
12
Soft Clipping Function
..............................................................................
13
Handling Precautions
• Never connect or disconnect plugs to/from the input/output terminals on the FF-1Y when the
external device that dri ves speaker s is powered. Doin g so can cause noises and damage the
speakers.
• Avoid applying exce ssive force to the fo otswitches, tact switches, and ph one jacks on the F F-1Y.
• If the unit malfu nctions or be haves erratic ally, cease oper ation at once and c ontact your lo cal
dealer or Free The Tone directly.
Panning Function (In Stereo Connection Mode)
.................................................
13
Tremolo Function (In Series Connection Mode)
.................................................
13
Modulation Function
................................................................................
14
3-Band Equalizer Function
.........................................................................
14
Useful Featur es
........................................................................................
15
Tap-Preferred Mode
................................................................................
15
Assignin g Functions to MIX /EX T1 or FEEDBACK/ EXT2 Kn ob
.................................
15
Assigning Functions to EXT Terminal
.............................................................
15
Calibrating Expression Pedal Connected to EXT Terminal
.....................................
15
Assignin g Functions to PRESE T SELECT/TAP Switch
..........................................
16
MIDI Setups
............................................................................................
16
Setting up MI DI Receivi ng Channel
...............................................................
16
Transmitting Data to /from an E xternal Device
......................................................
16
Updating Fir mware
....................................................................................
16
Initializing
...............................................................................................
16
Block Diag ram
.........................................................................................
17
Factory Pres ets
........................................................................................
18
MIDI Specifications
....................................................................................
18
List of Paramete rs
.....................................................................................
19
List of Assignable Functions
..........................................................................
20
Product Specifications
................................................................................
21
Preset Parameter Sheet
..............................................................................
22
Safety Prec autions
....................................................................................
23
Page 3
4 5
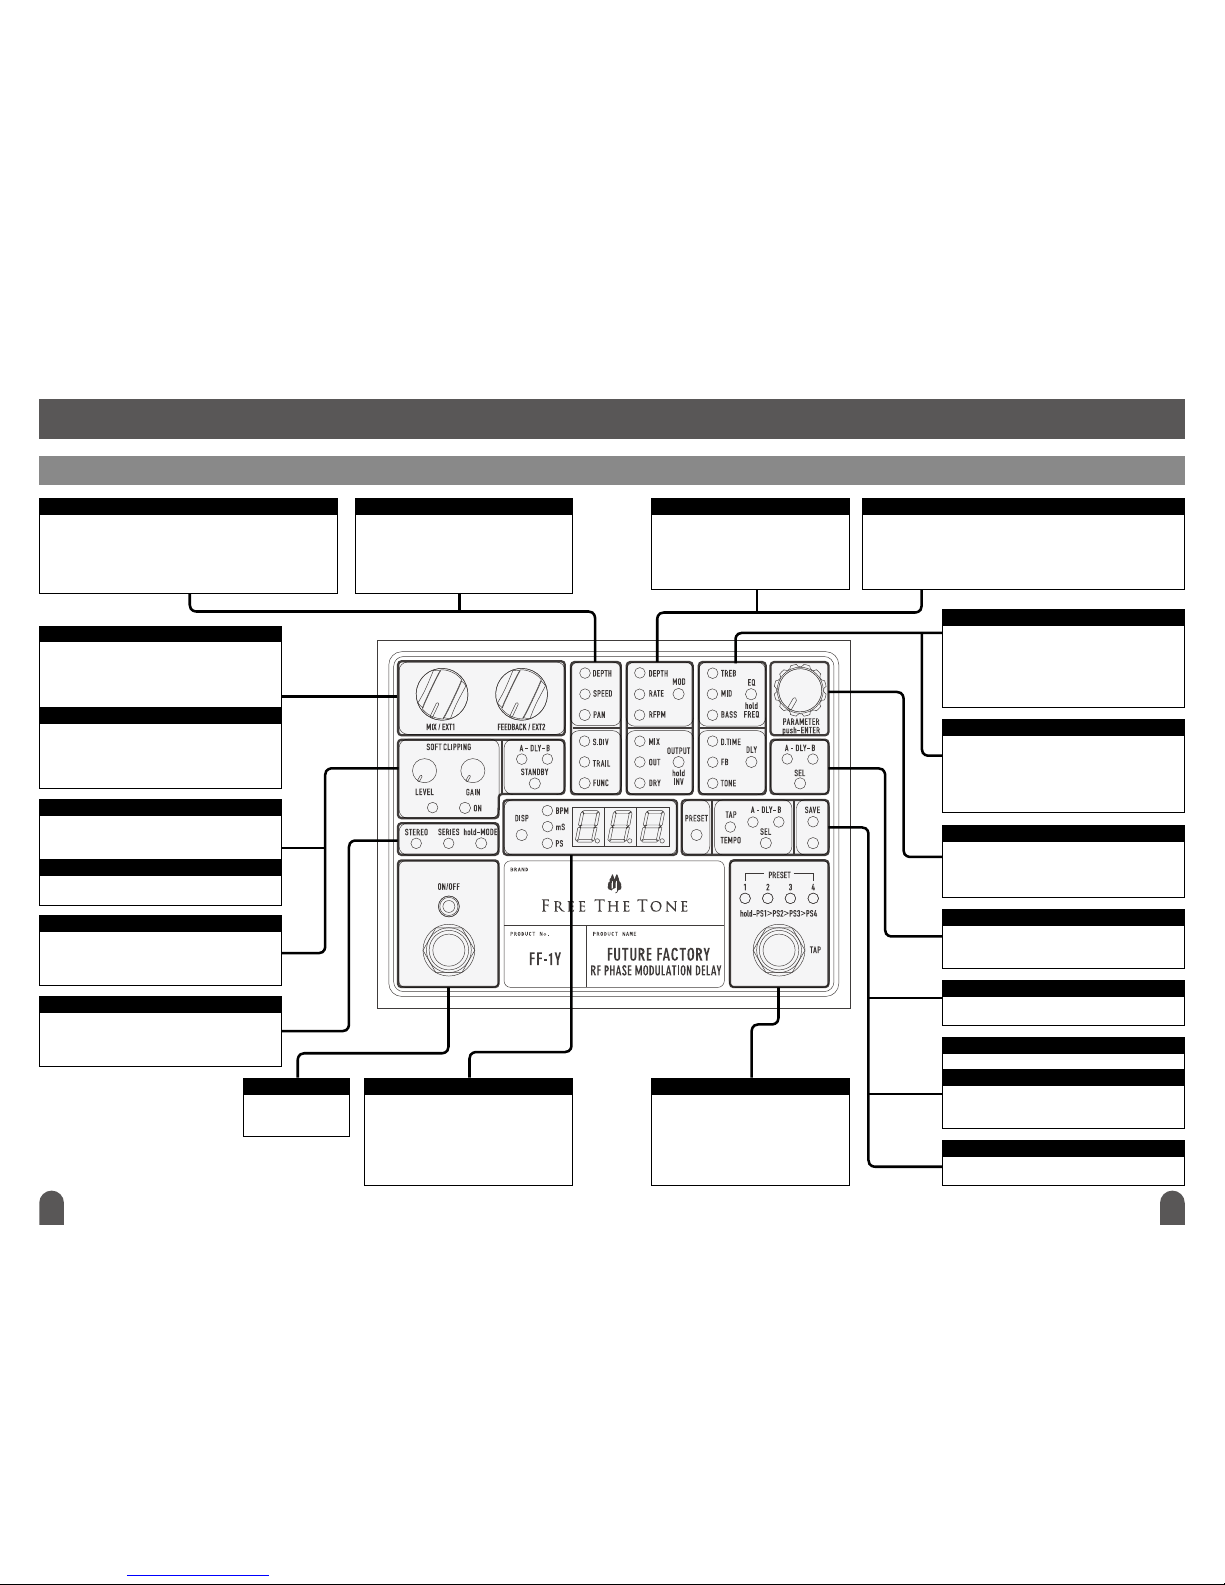
Pressing thi s switch illuminates t he
DEPTH
and
SPEED
LEDs alt ernately and the disp lay
contents ch ange accordingly. In S tereo Connect ion mode, the depth a nd speed of panning
is adjusted. I n Series Connec tion mode, the dept h and speed of tremolo i s adjusted.
Adjusting D epth of Panning
p.13
Adjusting S peed of Panning p.13
Adjusting D epth of Tremolo
p.13
Adjusting S peed of Tremolo p.13
Pressing thi s switch illuminates t he
S.DIV
and
TRAIL
LEDs
alternately and the display contents change accordingly.
Press this sw itch when settin g the delay length as no te duration
and when set ting whether to ret ain the delay sound or no t.
Setting De lay Length as No te Duration ( Subdivision )
p.12
Trail Functio n p.12
Pressing thi s switch illuminates t he
DEPTH, RATE
, and
RFPM
LEDs seq uentially and the dis play contents chan ge
accordingly.
Press this sw itch when applying t he modulation ef fect.
Modulation Function
p.14
Press this sw itch to select Pres ets 1–4. When held p ressed,
the presets c hange sequential ly in every 0.5 secon ds:
PS1
PS2
PS3
PS4
PS1
...
This switch i s also pressed when e ntering Tap tempo.
Adjusting D elay Tempo (2) - Tap Fun ction p.10
Various func tions can be assig ned to this switch.
Assigning F unctions to PR ESET SELEC T/TAP Switc h p.16
Pressing thi s switch illuminates t he
BPM, mS
, and PS LEDs
sequentially and the display contents change accordingly.
When the
BPM
or mS LED is lit, t he delay tempo is displ ayed.
Setting De lay Unit p.9
When the PS LED is lit, t he number for the sele cted preset is
displayed.
Recalling a Pr eset p.8
Press this sw itch to turn on the
delay effec t. When on, the LE D
above the swi tch illuminates.
Pressing thi s switch illuminates t he
MIX, OUT
, and
DRY
LEDs seq uentially and the dis play contents
change acco rdingly. Press this swi tch when adjusting t he Mix/Out l evel or turning on /off the dry
sound. By pre ssing this switch fo r about 2 seconds, y ou can set the phase of t he delay sound.
Adjusting Delay Volume
p.11
Adjusting Output Volume p.11
Kill Dry Fun ction
p.12
Setting De lay Sound’s Phas e p.12
PAN
Switch
FUNC
Switch
MOD
Switch
PRESET SELECT/TAP
Switch
DISP
Switch & Dis play
ON/OFF
Switch
Pressing thi s switch illuminates t he
TREB, MID
, and
BASS
LEDs sequentially
and the displa y contents change ac cordingly. Press th is switch when
applying th e equalizer to the delay s ound. By pressing t his switch for
about 2 seco nds, you can select e ach frequency poin t for the 3-band
equalizer.
3-Band Eq ualizer Functio n p.14
EQ
Switch
OUTPUT
Switch
DLY
Switch
Pressing thi s switch illuminates th e
D.TIME, FB
, and
TONE
LEDs sequentially
and the displa y contents change ac cordingly. Press th is switch when
adjusting th e delay tempo, feedba ck amount, or delay tim bre.
Adjusting D elay Tempo (1) p.10
Adjusting Feedback Amount p.11
Adjusting D elay Timbre p.11
PARAMETER
Encoder
Turn this knob wh en changing the set ting of each functio n.
Press this k nob when accepting t he change you made.
When the kno b is pressed and turn ed, the change rate in creases in a
block of 10 steps .
A-DLY-B SEL
Switch
Press this sw itch to select the de lay unit (A, B, or A +B) whose s etting is
to be changed. W hen the LED is not li t, you cannot change t he setting
(except for some functions).
SAVE
Switch
Press this sw itch to store the set ting.
Storing Ch anges in a Preset p.7
PRESET
Switch
Press this sw itch to recall a prese t.
Recalling a Pr eset p.8
MODE
Switch
Press this sw itch to select the co nnection mode ( Stereo and Seri es) of
the two dela y effect units ( delays A and B) in the F F-1Y. By pressing the
switch for ab out 2 seconds, the c onnection mode to ggles.
Selecting Delay Connection p.7
MIX/EXT1
Knob
FEEDBACK/EXT2
Knob
Turn this knob wh en adjusting the mix le vel (when in initia l setup
procedure ). You can assign va rious functions o f the FF-1Y to this knob for
direct operation.
Adjusting M ix Level
p.11
Assigning F unctions to MI X/EX T1 or FEEDBAC K/EX T2 Knob p.15
Turn this know wh en adjusting the feed back amount (whe n in initial setup
procedure ). You can assign va rious functions o f the FF-1Y to this knob for
direct operation.
Adjusting Feedback Amount p.11
Assigning F unctions to MI X/EX T1 or FEEDBAC K/EX T2 Knob p.15
STANDBY
Switch
By pressing t his switch, the
DLY A
and
DLY B
LEDs illuminates alternately.
Press this sw itch to turn off eit her of the FF-1Y’s interna l delay units (A
and B) .
Outputt ing Delay Sound In dividually p.7
SOFT CLIPPING LEVEL
&
GAIN
Knobs
Turn these knob s when adjusting the d istortion amou nt and volume of the
delay sound.
Distort ing Delay Sound p.13
SOFT CLIPPING ON
Switch
Press this sw itch when distor ting the delay sound.
Distort ing Delay Sound p.13
A-DLY-B TAP SEL
Switch
TAP TEMPO
LED
Press this sw itch when selectin g the delay unit to which t he Tap tempo is
entered. If t he LED is not lit, you c annot enter the Tap temp o.
Adjusting D elay Tempo (2) - Tap Fun ction p.10
Blinking of t his LED shows the t ap-entered temp o.
Controls and Indicators
Front Panel
Page 4
6 7
Rear Panel
Side Panel
Basic Operations and How to Use Each Function
Storing Changes in a Preset
1. Press the S AVE switch. The SAVE LED flashes.
2. The display flashes th e number for the preset cu rrently selected.
3. Tu rn the PARA METER enco der until the display sh ows the preset n umber to whic h you want to save your data. (S kip
this step if you s ave the data into th e same prese t number.)
4. Press the SAVE switch to c onfirm. The da ta is saved in the p reset.
NOTE
To cancel the stor ing operation, pr ess any switch other t han SAVE while the di splay is flashing th e preset number. Alter natively, turn the
MIX/EXT1 or FEEDBACK/EX T2 knob. The SAVE LED i s turned off and th e save operation is ca nceled. The stori ng operation is au tomatically
cancel ed by leaving the unit f or about 10 seconds wh en it is flashing its d isplay.
When a para meter in the preset i s changed, the dot be low the first digit of th e preset number ill uminates. The dot tu rns off when the
data is save d to the preset.
Conrming Recalled Preset Number
1. Press the DISP swi tch to turn on the PS LED.
2. The number for the sel ected prese t is shown in the d isplay.
NOTE
When the PRESET sw itch is pressed, the d isplay flashes the c urrently selec ted preset number e ven if it is showing an other parameter. By
pressin g the PRESET switch again, the previous BPM or msec unit display selected by the DISP switch returns. O r, the BPM or mse c unit
display re turns automatica lly after leavin g the unit for about 10 sec onds when its disp lay is flashing.
Selecting Delay Unit Connection
The FF-1Y contains the two d elay effect units (A a nd B) and their conne ction mode can be sele cted internally.
1. Press the MODE switch for more than 2 seconds.
2. When the MODE switch is presse d, the STEREO and SERIES LEDs illuminate alternately.
3. Release the switch w hen the LED for th e desired connecti on method is il luminated.
NOTE
STEREO Illuminated: The delay units are internally connected in parallel.
SERIES Illuminated: The delay units are internally connected in series.
Block Diag ram p.17
Outputting Delay Sound Individually
The two del ay effect units (A and B ) in the FF-1Y c an be setup in dividua lly.
To confirm each de lay sound dur ing sound design proc ess, either delay uni t can be put in S tandby statu s.
1. Press the STANDB Y switch to select the d elay unit to be in S tandby statu s (muted ).
NOTE
Turn on the DLY B LED if y ou want to output the de lay A sound only. Turn on the DLY A LE D if you want to output the d elay B sound only.
If the DLY A and D LY B LEDs are illu minated, the sound is o utput from both the d elay units A and B.
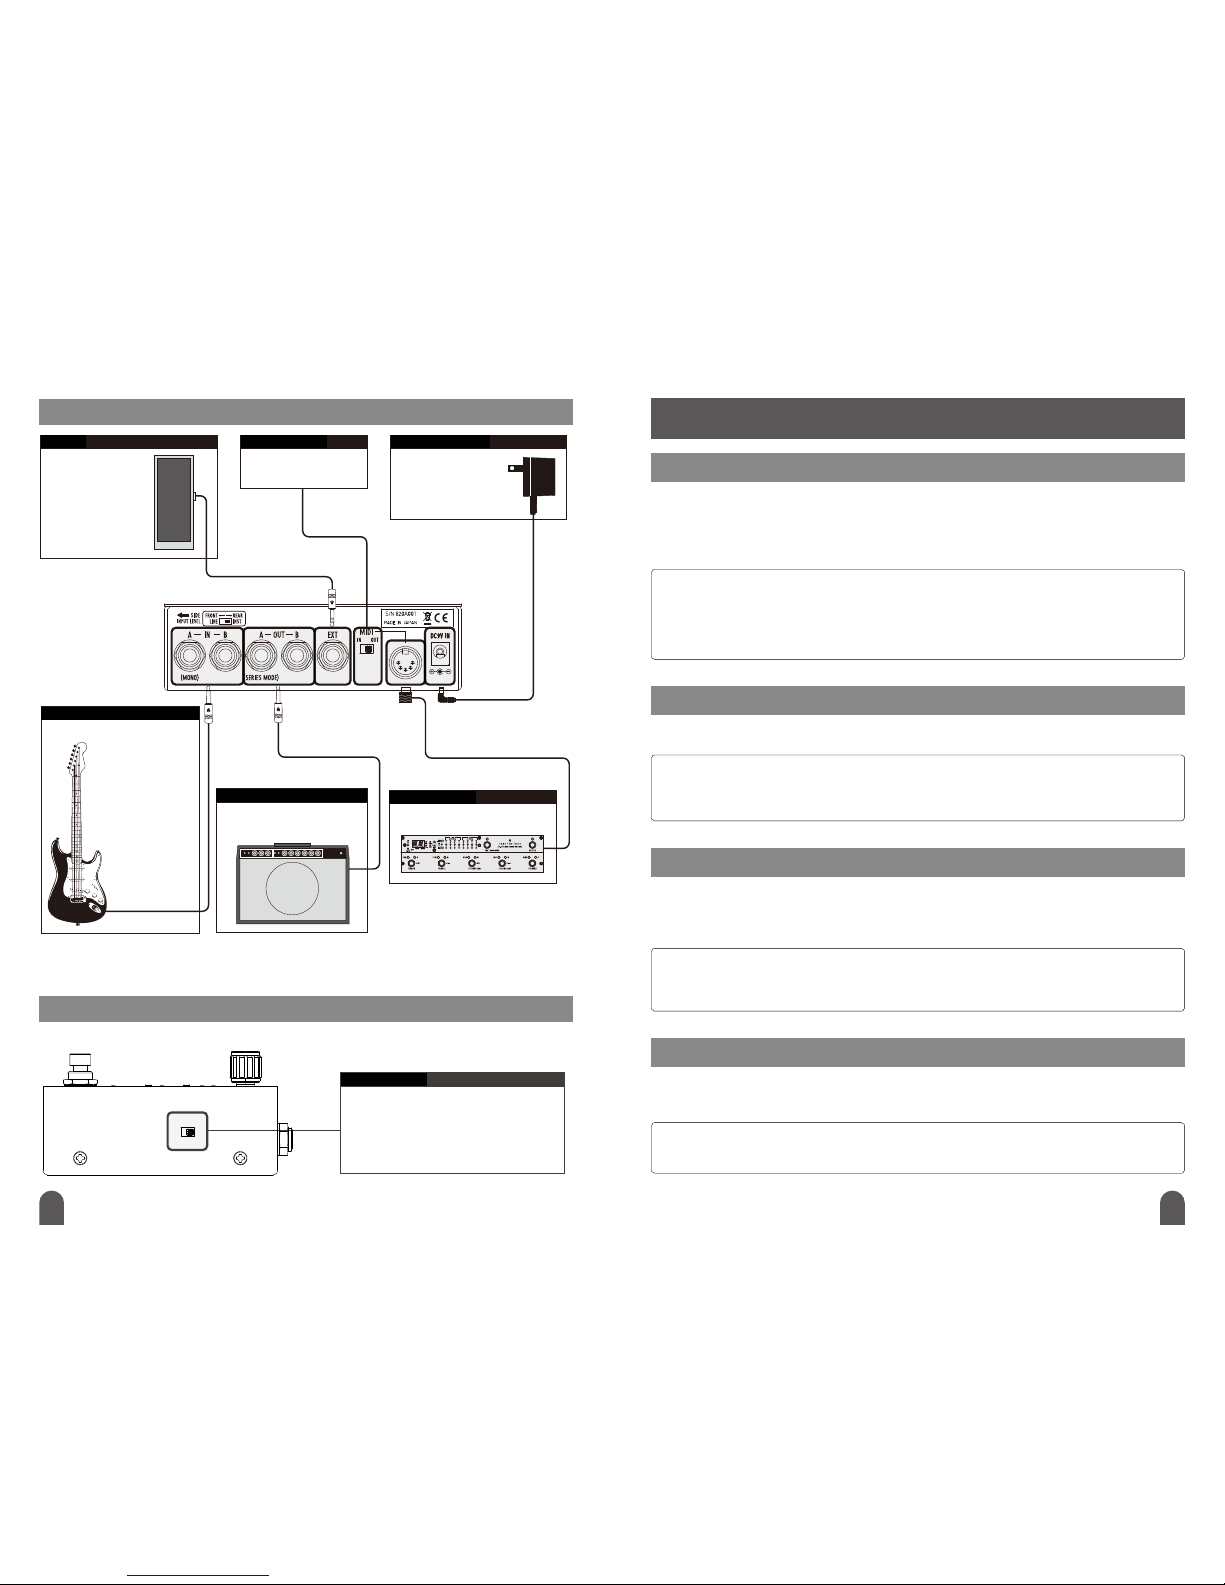
EXT
Terminal
MIDI IN/OUT
Switch
POWER DC9V IN
Terminal
By connect ing an expression
pedal or mome ntary (unlatc h)
type swit ch to this terminal,
you can activ ate the function
assigned to i t.
Assigning F unctions to E XT
Terminal p.15
Selects t he function of the M IDI
terminal.
For connec ting the dedicated A C
adapter supp lied with your FF-1Y.
MIDI
Terminal
INPUT LEVEL
Switch
Output (A (SE RIES)-OUT-B)
Terminal
Input (A (MO NO)-IN-B)
Terminal
I/O ter minal for MIDI si gnal. Its functio n is
selected by t he
MIDI IN/OUT
switch.
This switch i s used to select the F F-1Y’s input level based on t he
output leve l of the device conne cted to the INPUT terminal. To
connect an in strument level dev ice, set the switch to t he rear side
(closer t o the I/O termin als). To connect a l ine level device, set th e
switch to the f ront side. Use a small fl at-blade screwdri ver to slide
the switch.
Used to conn ect to an amplifier, mixer, etc .
To output monau ral signal, connect t o the
OUT A (SER IES) terminal.
For connec ting a guitar, another
musical inst rument, or effec ts
unit.
Connect a de vice with stereo
output to th e IN A (MONO) and IN
B terminals. To use t he unit in
monaural, connect to the IN A
(MONO) terminal only.
By implemen ting Free The
Tone’s original HT S
(Holis tic Tonal Solution )
circuit, sou nd texture is
kept the same whether
the effec t is turn on or off.
Page 5
8 9
Conrming Previous Value after Parameter Change
During or a fter adjus ting a param eter, you can confirm i ts value befor e storing your c hange.
1. Adjust the de sired parameter as de scribed i n this manua l.
2. The LEDs above the PRESET SELEC T/TAP switch illuminate to m ove left/ rightwar d showing the s tatus before c hange and
the current status.
NOTE
PRESET 1 or 2 LED Illuminated: The PARAMETER encoder is in the counterclockwise direction (minus parameter value) comparing the current
position with the preset position.
PRESET 3 or 4 LED Illuminated: The PARAMETER encoder is in the clockwise direction (plus parameter value) comparing the current position
with the preset position.
PRESET 2 and 3 LEDs Illuminated: The knob is at the PARAMETER encoder position defined in the preset (original parameter value).
Recalling a Preset
FF-1Y’s presets ca n be recalle d in various w ays depend ing on your app lication.
Switching Fou r Preset s (1)
1. Press the PRESET SELEC T/TAP switch for about 0.5 s econds.
NOTE
When the PRESET SELECT/TAP switch is pressed, the preset changes as follows: PRESET 1 PRESET 2 PRESET 3 PRESET 4 PRESET 1...
Switching Fou r Preset s (2)
1. Connect a m omentar y (unlatch) type s witch to the EXT terminal.
2. Press the PRESET switch for ab out 2 secon ds.
3. Tu rn the PARA METER enco der until the display sh ows “1-4.”
4. Press the PARAME TER encoder. The display returns to its previous status.
5. Press the externa l switch.
NOTE
Each press of the external switch immediately changes presets as follows: PRESET 1 PRESET 2 PRESET 3 PRESET 4 PRESET 1...
Switching Presets be tween 1 a nd 2 Alte rnately
1. Connect a m omentar y (unlatch) type s witch to the EXT terminal.
2. Press the PRESET switch for ab out 2 secon ds.
3. Tu rn the PARA METER enco der until the display sh ows “1-2.”
4. Press the PARAME TER encoder. The display returns to its previous status.
5. Press the externa l switch.
NOTE
Each press of the external switch toggles the presets as follows: PRESET 1 PRESET 2 PRESET 1 PRESET 2 PRESET 1...
Recall ing Pre set 128 Imme diately
1. Connect a m omentar y (unlatch) type s witch to the EXT terminal.
2. Press the PRESET switch for ab out 2 secon ds.
3. Tu rn the PARA METER enco der until the display sh ows “128.”
4. Press the PARAME TER encoder. The display returns to its previous status.
5. Press the externa l switch.
NOTE
By pressi ng the external swi tch, Preset 128 is recalle d. When the same switc h is pressed again , the previous pres et comes back.
The recal led preset is show n in the display for abo ut 0.5 seconds.
Recall ing Pre set wit h PARAM ETER En coder
1. Press the PRESE T switch to flash the dis play.
2. Tur n the PARA METER encod er to show the pre set you want to rec all.
3. Press the PARAME TER encode r to recall the se lected preset.
Recall ing Pre set wit h PRESE T SELECT/TAP Switch
You can connect a m omentar y (unlatch) type s witch to the FF-1Y’s EXT terminal and use thi s switch to reca ll presets in
several ways. T he PRESET SELECT/TAP switch can al so be used to per form the same functi on.
This enab les you to per form a preset recall an d tempo entr y in various ways.
Assigni ng Function to PR ESET SELEC T/TAP Swit ch p.16
Recall ing Pre set wit h MIDI Si gnal fr om External Device
When a MIDI s ignal cont aining a pro gram chang e number is re ceived from an extern al MIDI device, the FF-1Y changes
its preset. T he MIDI chan nel of the devi ce sendin g the program c hange numb er must be the same as the FF-1Y’s MIDI
channel.
Settin g up MIDI Receiv ing Channel p.1 6
Setting Delay Unit
Delay leng th (duration) can b e set in BPM or mse c unit.
1. Press the A-DLY-B SEL switch to select t he delay (A , B, or A+B ) whose del ay length uni t you want to set.
2. Press the DISP switch to turn on the BPM o r mS LED.
NOTE
BPM: Beat Pe r Minute. Used to show the t empo of perform ance indicated by th e number of quarte r notes (crotchets ) counted in one
minute (60 seconds).
msec: Short fo r millisecond. 1 mi llisecond is equ al to one thousand th of a second.
ex) 100 msec = 0.1 secon ds. Delay time can be s et from 1 msec to 9,999 mse c (about 10 seconds ).
Page 6
10 11
Adjusting Delay Tempo (1)
With PAR AMET ER Enco der
1. Recall th e preset for wh ich you want to adj ust the tempo.
2. Press the A-DLY-B SEL switch to sele ct the delay ( A, B, or A+B ) whose delay tempo you wa nt to adjust.
3. Press the DISP switch to turn on th e BPM or mS LED.
4. Press the DLY switch unt il the D.TIME LED flashes.
5. Turn the PARA METER enc oder to adjust t he paramete r.
6. Press the PARAM ETER encoder to accept the change.
Adjusting Delay Tempo (2) - Tap Function
With PRESET SE LECT/TAP Swi tch
1. Recall th e preset for wh ich you want to adj ust the tempo.
2. Press the A-DLY-B SEL switch to selec t the delay (A , B, or A+B ) whose del ay tempo you want to ad just.
3. Press the DISP switch to turn on th e BPM or mS LED.
4. To a djust the par ameter, press the PRE SET SELECT/TAP switch more than twice.
With Momenta ry (Unl atch) Typ e Switch Connec ted to E XT Termi nal
1. Connect a m omentar y (unlatch) type s witch to the EXT terminal.
2. Press the PRESET switch for ab out 2 secon ds.
3. Tu rn the PARA METER enco der to select TAP.
4. Press the PARAME TER encoder to confirm.
5. Press the A-DLY-B TAP SEL switch to selec t the delay (A , B, or A+B) whose de lay tempo you wan t to adjust.
6. Press the DISP switch to turn on t he BPM or mS LED.
7. To adjust th e parameter, pres s the externa l switch more than twice.
With C ontro l Chang e Number in MIDI S ignal
By receiv ing a control c hange num ber from an ex ternal MIDI device, the d elay tempo can be adjuste d in the same way
as Tap entry with a s witch. The MID I channel fo r the control c hange numb er and the FF-1Y’s MIDI channe l must be the
same.
MIDI Specifications p.18
Settin g up MIDI Receiv ing Channel p.1 6
NOTE
The Tap functi on calculates the B PM value from the time i nterval betwee n the first and secon d taps when you pres s the PRESET SELECT/
TAP switch or the external switch twice.
The tap-e ntered tempo is rec ognized as Quar ter notes and the BPM val ue is calculated fr om their duration. We re commend to set
as explai ned in Adjusting Delay Tempo (1) if you want to set the delay te mpo precisely. To set the tem po while feeling th e rhythm of
performance, the method explained in Adjusti ng Delay Tempo (2) would be more suitable.
If the TAP switch i s pressed three tim es, the last two bea ts are averaged. If it is p ressed four time s, the last three beat s are averaged,
and for five or m ore presses, the la st four beats are aver aged. If the time inter val of pressing th e TAP switch is out of the ran ge of BPM
30–6 00, it is judged as in valid and not averag ed.
Adjusting Delay Tempo (3) - MIDI Clock
The FF-1Y can synchroni ze its delay temp o to the MIDI clo ck receive d from an exter nal MIDI device.
This is app lied only to th e delay unit se lected by the A-DLY-B TAP SEL switch.
NOTE
The tempo s hown on the FF-1Y may differ from t he sent tempo due to an e rror in the device se nding the MIDI cloc k.
Adjusting Feedback Amount
1. Press the A-DLY-B SEL switch to select t he delay (A , B, or A+B ) whose feed back amoun t you want to adjus t.
2. Press the DLY switch unti l the FB LED flashes.
3. Tu rn the PARA METER enco der to adjust the paramete r.
4. Press the PARAME TER encoder to accept the change.
CAUTIO N! An excess ively high f eedback se tting can d amage your sp eakers. Be careful wi th the volume.
NOTE
Availabl e range is 0–127. When the display sho ws “127,” the feedba ck amount is 100%.
Adjusting Delay Timbre
1. Press the A-DLY-B SEL switch to select t he delay (A , B, or A+B ) whose del ay timbre you want to a djust.
2. Press the DLY switch unti l the TONE LED flashes.
3. Tu rn the PARA METER enco der to adjust the paramete r.
4. Press the PARAME TER encoder to accept the change.
NOTE
Placing th e “Off” status as a r eference, the minu s side works as a low-pa ss filter and the plus s ide as a high-pass fi lter. Both can be
set up to -10 dB. A low-pass fil ter can attain a war m delay sound like tha t obtained with a tap e echo machine. By a pplying a high-pa ss
filter to the low er frequencies , you can have setting s that will not loose th e edge of phrases.
Adjusting Delay Volume
1. Press the A-DLY-B SEL switch to select t he delay (A , B, or A+B ) whose del ay volume you wan t to adjust.
2. Press the OUTPUT switch until the MIX LED flashes.
3. Tu rn the PARA METER enco der to adjust the paramete r.
4. Press the PARAME TER encoder to accept the change.
NOTE
Availabl e range is 0–100. When “100” is d isplayed, you can obt ain the delay sound w ith 100% level (the sa me level) to the volu me of
the sound fe d to the delay effect u nit.
Adjusting Output Volume
1. Press the A-DLY-B SEL switch (LED st atus can be A , B, or A+B ).
2. Press the OUTPUT switch until the OUT LED flashes.
3. Tu rn the PARA METER enco der to adjust the paramete r.
4. Press the PARAME TER encoder to accept the change.
NOTE
This para meter setting is co mmon to the delay unit s A and B.
When “00 ” is displayed, a unit y level is attaine d in which the dry so und and the input si gnal are output at th e same volume.
When “-63” i s displayed, the outp ut is muted.
Page 7
12 13
Setting Delay Sound’s Phase
1. Press the A-DLY-B SEL switch (LED st atus can be A , B, or A+B ).
2. Press the OUTPUT switch for about 2 sec onds.
3. Tu rn the PARA METER enco der to set the delay sound’s phas e.
4. Press the PARAME TER encoder to accept the change.
NOTE
The phase setup for the delay sound is stored as an entire setting, not stored to each preset.
“I.On” in the display means out of phase and “I.oF” means in phase.
Setting Delay Length as Note Duration (Subdivision)
1. Press the A-DLY-B SEL switch to select t he delay (A , B, or A+B ) whose del ay note length you w ant to set.
2. Press the FUNC switch until the S.DIV LED flashes.
3. Tu rn the PARA METER enco der to adjust the paramete r.
4. Press the PARAME TER encoder to accept the change.
NOTE
By handling a quarter note as the reference for tempo, the delay time can be set as the duration of a note. The default value is Quarter
note [Crochet]. You can select from: Whole note [Semibreve] (01), Half note [Minim] (02), Dotted Quarter note (04.), Triplet in four (43),
Quarter note [Crochet] (04), Dotted Eighth note (08.), Triplet in two (23), Eighth note [Quaver] (08), Triplet in one (13), and Sixteenth note
[Demiquaver] (16).
If the Dotted Quarter or Dotted Eighth note is selected, then the dot LED in the first digit illuminates (dotted).
N.B. When the time display unit is “mS,” the delay time is automatically calculated and the displayed accordingly. The display will not
change when the time display unit is “BPM.”
Kill Dry Function
1. Press the A-DLY-B SEL switch to select t he delay (A , B, or A+B ) whose del ay dry soun d you want to turn on /off.
2. Press the OUTPUT switch until the DRY LED flashes.
3. Tu rn the PARA METER enco der to turn on/off the K ill Dry function.
4. Press the PARAME TER encoder to accept the change.
NOTE
When “d.On” (Dry On) is displayed, the input signal is output (default). If “d.oF” (Dry Off) is shown, the input signal is not output (Kill Dry).
Trail Function
You can select wh ether to retain the delay so und (On ) or not (Of f) when you turn of f the delay ef fect.
1. Press the A-DLY-B SEL switch (LED st atus can be A , B, or A+B ).
2. Press the FUNC switch until the T RAIL LED flashes.
3. Tu rn the PARA METER enco der to turn on/off the Trail f unction.
4. Press the PARAME TER encoder to confirm.
NOTE
This parameter setting is common to the delay units A and B. When “On” is displayed, the delay sound is retained (default). When “oFF” is
shown, the delay sound is not retained. When you switch presets, the delay sound is not retained even if the Trail function is activated.
Soft Clipping Function
The FF-1Y has a soft clipp ing (overdr ive) circuit and can d istort the d elay sound. You can u se this func tion to create a
vintage de vice like sou nd by mixing th e delayed ver sion with it s original s ound.
1. Press the SO FT CLIPPI NG ON switch (A-DLY-B SEL LED status can be A, B, o r A+B).
2. Tur n the LEVEL knob an d GAIN knob to adjus t the depth and v olume of the di stortion.
NOTE
In Stereo Co nnection mode, th e Soft Clipping fu nction can be app lied to the delay unit A o nly. No delay sound is ou tput when the LEVEL
knob is set to th e 0 (minimum) po sition.
Panning Function (in Stereo Connection Mode)
If the delay un its A and B are set to Stereo Conn ection mode, you can use t he Panning fu nction that changes th e
localiz ation of the del ay sound fed to the left and r ight spea kers.
1. Press the A-DLY-B SEL switch (LED st atus can be A , B, or A+B ).
2. Press the PAN switch to flash th e DEPTH or SPEED LED.
3. Tu rn the PARA METER enco der to adjust the paramete r.
4. Press the PARAMETE R encoder to accept the change.
NOTE
DEPTH : The changing am ount of the sound is ad justed.
SPEED: The spee d of the Panning effe ct is adjusted.
Tremolo Function (In Series Connection Mode)
Tremolo functi on is availab le (on dela y B) if the de lay units A and B a re set to Serie s Connecti on mode.
1. Press the A-DLY-B SEL switch (LED st atus can be A , B, or A+B ).
2. Press the PAN switch to flash th e DEPTH or SPEED LED.
3. Tu rn the PARA METER enco der to adjust the paramete r.
4. Press the PARAME TER encoder to accept the change.
NOTE
DEPTH: The dep th of the Tremolo effect i s adjusted.
SPEED: The spee d of the Tremolo effect is a djusted.
The Tremolo ef fect is applied to th e delay sound only.
NOTE
The Panni ng/Tremolo spe ed can be synchron ized to the Delay tempo. Pr ess the PAN switch for ab out 2 seconds. The d isplay contents
change. Turn th e PARAMETER enc oder to select the pa rameter “S.On” (SYN C = ON) or “S.oF” (SYN C = OFF).
With SYNC = ON, t his speed synchr onization actua lly occurs only wh en “the tempo is cha nged by detecting ta ps or MIDI clock (b ut
within the r ange of BPM 24–300 ).” When you recall a pr eset, the speed defi ned in the preset is re called.
Preset-Pref erred or Tap-Preferr ed mode will not have an y affect.
Page 8
14 15
Modulation Function
The FF-1Y can apply a modu lation eff ect to the delay s ound to make it mo re spaciou s.
1. Press the A-DLY-B SEL switch to select t he delay (A , B, or A+B ) to which you want to a pply the mod ulation ef fect.
2. Press the MOD switch to flash the DEP TH, RATE, or RFPM LED.
3. Tu rn the PARA METER enco der to adjust the paramete r.
4. Press the PARAME TER encoder to accept the change.
NOTE
In general, the phase of a low frequency oscillator (LFO) used in modulation circuits changes regularly at a preset frequency. However in
the FF-1Y, we succeeded in creating a new modulation sound with a unique method — RFPM (Random Fluctuating Phase Modulation) —
in which the signal’s phase changes at random when the signal crosses a certain attenuation level. This creates an unprecedented effect in
which a fluctuating spacious sound seems to float in the air. (This function works best when used in Stereo mode.)
By increasing the RATE value, the modulation speed is increased. By increasing the DEPTH value, the modulation is applied more deeply
(strongly).
3-Band Equalizer Function
The FF-1Y implements a fr equency-s electabl e 3-band equalizer for t he delay sou nd. This allow s you to create del ay
sounds suitable not only for guitars/basses but also various other instruments.
When De lay Uni ts A and B ar e in Ster eo Conn ection Mode (EQ is appli cable t o both A an d B)
1. Press the A-DLY-B SEL switch to select t he delay (A , B, or A+B ) whose EQ you wa nt to set.
2. Press the EQ switch to flash the TREB, MID, or BASS LED.
3. Tu rn the PARA METER enco der to adjust the paramete r.
4. Press the PARAME TER encoder to accept the change.
When De lay Uni ts A and B ar e in Seri es Connectio n Mode (EQ is a pplie d to B)
1. Press the A-DLY-B SEL switch (LED st atus can be A , B, or A+B ).
2. Press the EQ switch to flash the TREB, MID, or BASS LED.
3. Tu rn the PARA METER enco der to adjust the paramete r.
4. Press the PARAME TER encoder to accept the change.
Selec ting Fr equen cy to be Ad juste d by 3-Band Equalize r
1. Press the A-DLY-B SEL switch (LED st atus can be A , B, or A+B ).
2. Press the EQ switch for about 2 s econds.
3. Press the EQ switch to flash the TREB, MID, or BASS LE D.
4. Tu rn the PARA METER enco der to adjust t he paramete r.
5. Press the PARAM ETER encoder to accept the change.
NOTE
The frequency setup is stored as an entire setting, not stored in each preset.
Useful Features
Tap-Preferred Mode
In Tap-Preferre d mode, the pres et is recalled by apply ing the tempo i nformatio n lastly enter ed via the foots witch. Even
if presets a re switched af ter entering a tempo by tap ping, the temp o informati on remains th e same.
1. Simultaneously press the ON/OFF and PRESET SELECT/TAP switch es for about 2 s econds.
2. Release the switche s when the dis play shows “TAP.”
NOTE
In Preset-Preferred mode (factory default), the BPM value and delay time stored in the recalled preset are recalled. By performing the
above-mentioned operation, Tap-Preferred and Preset-Preferred modes switch alternately. In Tap-Preferred mode, your tempo change is
applied to the delay unit (A, B, or A+B) selected by the A-DLY-B TAP SEL switch, within the recalled preset.
Assigning Functions to MIX/EXT1 or FEEDBACK/EXT2 Knob
Various fun ctions can b e assigne d to the MIX/EXT1 and FEEDBACK /EXT2 knobs to chang e their parameters.
1. Press the A-DLY-B SEL switch (LED st atus can be A , B, or A+B ).
2. Press the switch for the fu nction you wan t to assign to flas h its LED.
3. While holding down the PRESET switch, turn th e MIX/EXT1 or FEEDBACK/EX T2 knob.
NOTE
When a function is assigned to the MIX/EXT1 or FEEDBACK/EXT2 knob, the knob controls the parameter of the delay unit (A, B, or A+B) selected
by the A-DLY-B SEL switch. Functions can be applied to each preset.
List of As signable Func tions p.20
Assigning Functions to EXT Terminal
After ass igning a fu nction to the EXT termi nal and con necting an ex pression pedal or ex ternal footswitch (mo mentary
type) to i t, you can chang e FF-1Y’s parame ters by using th at external c ontroller.
1. Press the PRESE T switch for about 2 se conds.
2. The display shows the function assigned to the EXT terminal.
3. Tu rn the PARA METER enco der until the desired f unction is s hown in the dis play.
4. Press the PARAME TER encoder to confirm.
List of As signable Func tions p.20
Calibrating Expression Pedal Connected to EXT Terminal
The expression pedal connected to the EXT terminal can be c alibrated. By c alibrating it, you can co ntrol the ope ration
precisel y from the minimum to max imum value s. Please us e an express ion pedal w ith the resis tance valu e ranging
fro m 10kΩ to 50k Ω.
1. Turn on the power the u nit while ho lding down th e PRESET switch.
2. Release the switch whe n the display shows “CLb.”
3. Press the PARAME TER encode r to execute the cal ibration.
4. When “Hi” is shown, set t he pedal to its to e side end (m ax.) position and pr ess the PAR AMETER encoder to confirm.
5. When “LO” is shown, set th e pedal to the he el side end ( min.) position and pre ss the PARAMET ER encoder to confirm.
NOTE
When “Err” is displayed, check the expression pedal or connecting cable.
Page 9
16 17
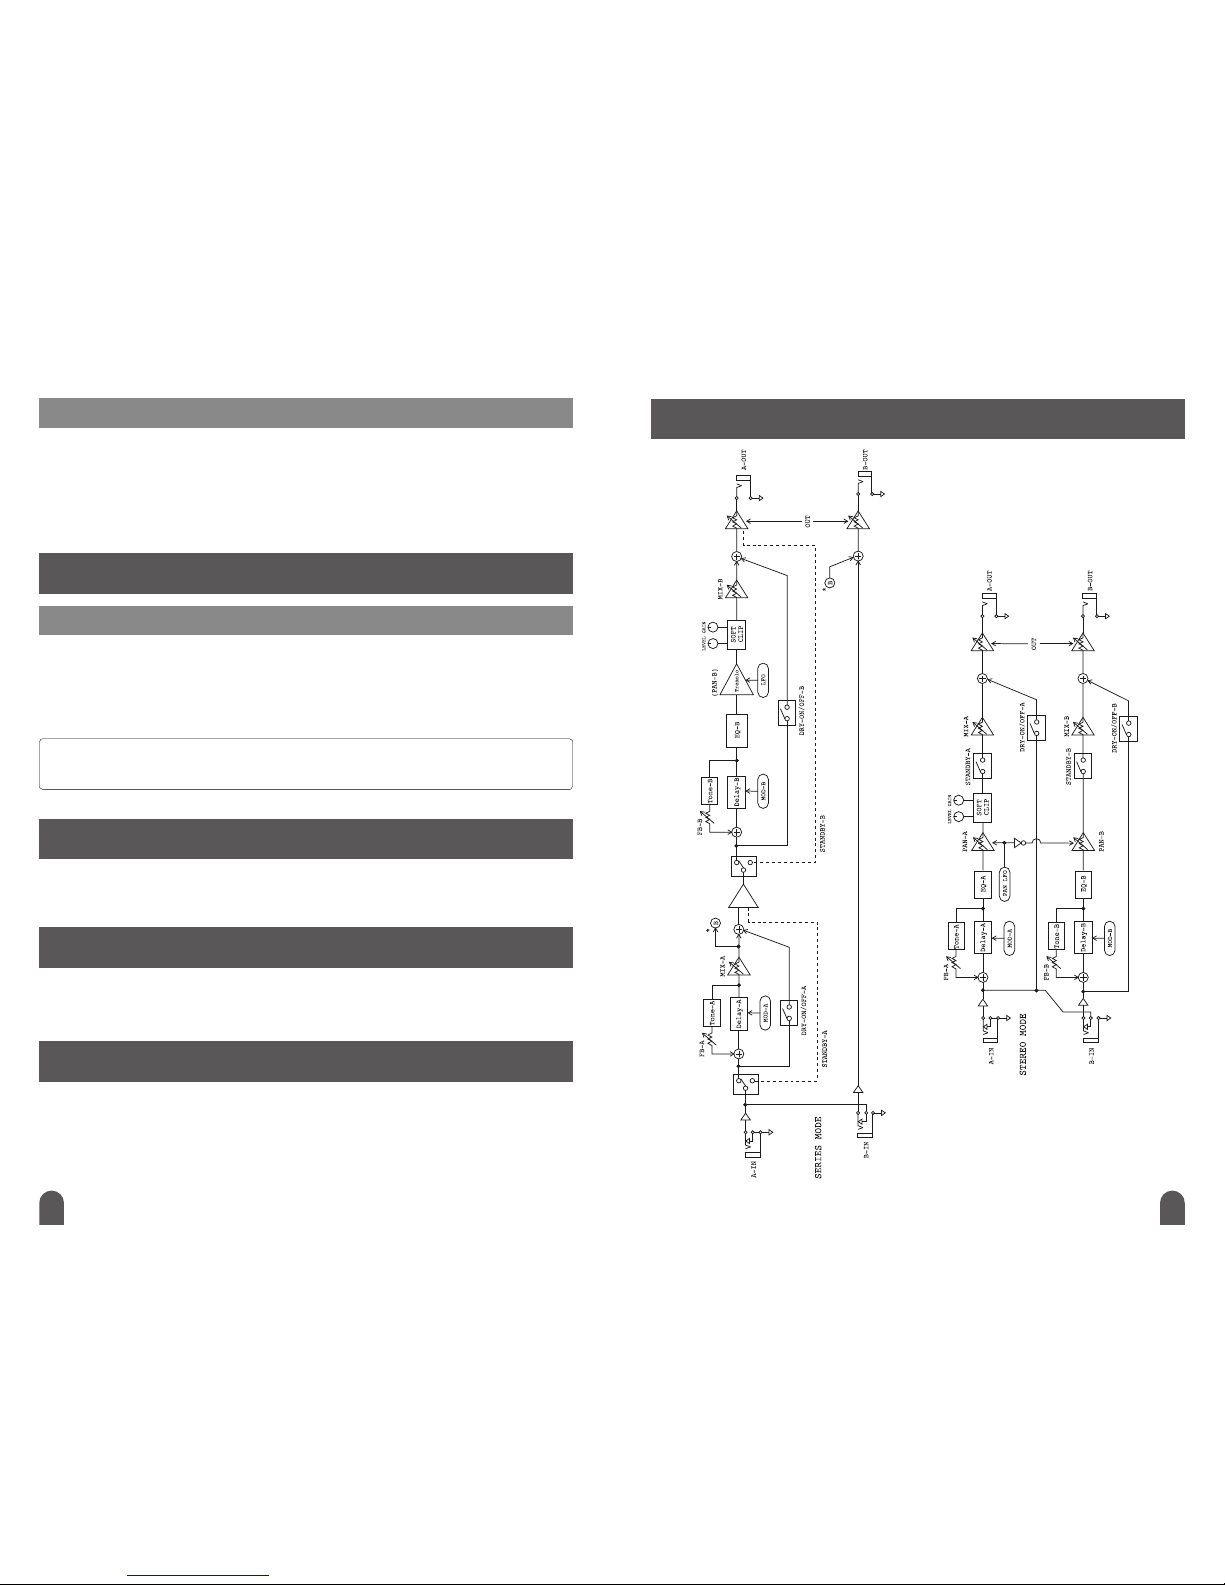
Block Diagram
* In Series mode, the dry sound of the A-IN signal (or B-IN if it exists) and the sound that comes out from the delay unit A are mixed and output from the B-OUT terminal.
However, when Standby function is turned off and DRY-B is turned off, only the dry sound is output.
Assigning Functions to PRESET SELECT/TAP Switch
The FF-1Y can assign var ious funct ions to the PRESET SELEC T/TAP switch.
1. Simultaneously press the PRESET SELECT/TAP and PRESET switches fo r about 2 sec onds.
2. The display shows the function assigned to the PRESET SELECT/TAP switch.
3. Tu rn the PARAMETER encoder unti l the desire d function i s shown in the di splay.
4. Press the PARAMETER encoder to confirm.
List of As signable Func tions p.20
MIDI Setups
Setting up MIDI Receiving Channel
Upon rece iving a prog ram change n umber inc luded in a MID I signal fro m an externa l MIDI device, the FF-1Y switches
presets instantly.
1. Turn on the power to the un it while hol ding down the PRESET SELECT/TAP switch.
2. When the unit boots up, rel ease the PRESET SELECT/ TAP switch.
3. Tu rn the PARAMETER encoder unti l the desire d MIDI recei ving channel is show n in the displa y.
4. Press the PARAMETER encoder to confirm.
NOTE
A receiving channel can be set to 1–16 channel and Omni mode (factory default) in which all channels are received. In Omni mode, the
display shows “ALL.” When set to “oFF,” no MIDI signal is received.
Transmitting Data to/from an External Device
The FF-1Y can save or recall p reset contents to/fro m a persona l computer. For con nection an d setup proce dures,
please co nfirm with the p roduct or su pport pa ge of the Free The Tone web site.
Updating Firmware
The firmwar e of the FF-1Y can updated. For the la test firmware o r connecti on and setup pr ocedures , please co nfirm
with the prod uct or suppo rt page of the Free The Tone websi te.
Initializing
Perform t he followin g steps to reset to the f actory set ting. All presets are cle ared and returned to facto ry defaul ts.
1. Turn on the power to the un it while hol ding down the DISP and SAVE swi tches at the sam e time.
2. Release the switche s when the dis play shows “In t.”
3. Press the PARAMETER encoder to execute the i nitializ ation.
Page 10
18 19
Factory Presets
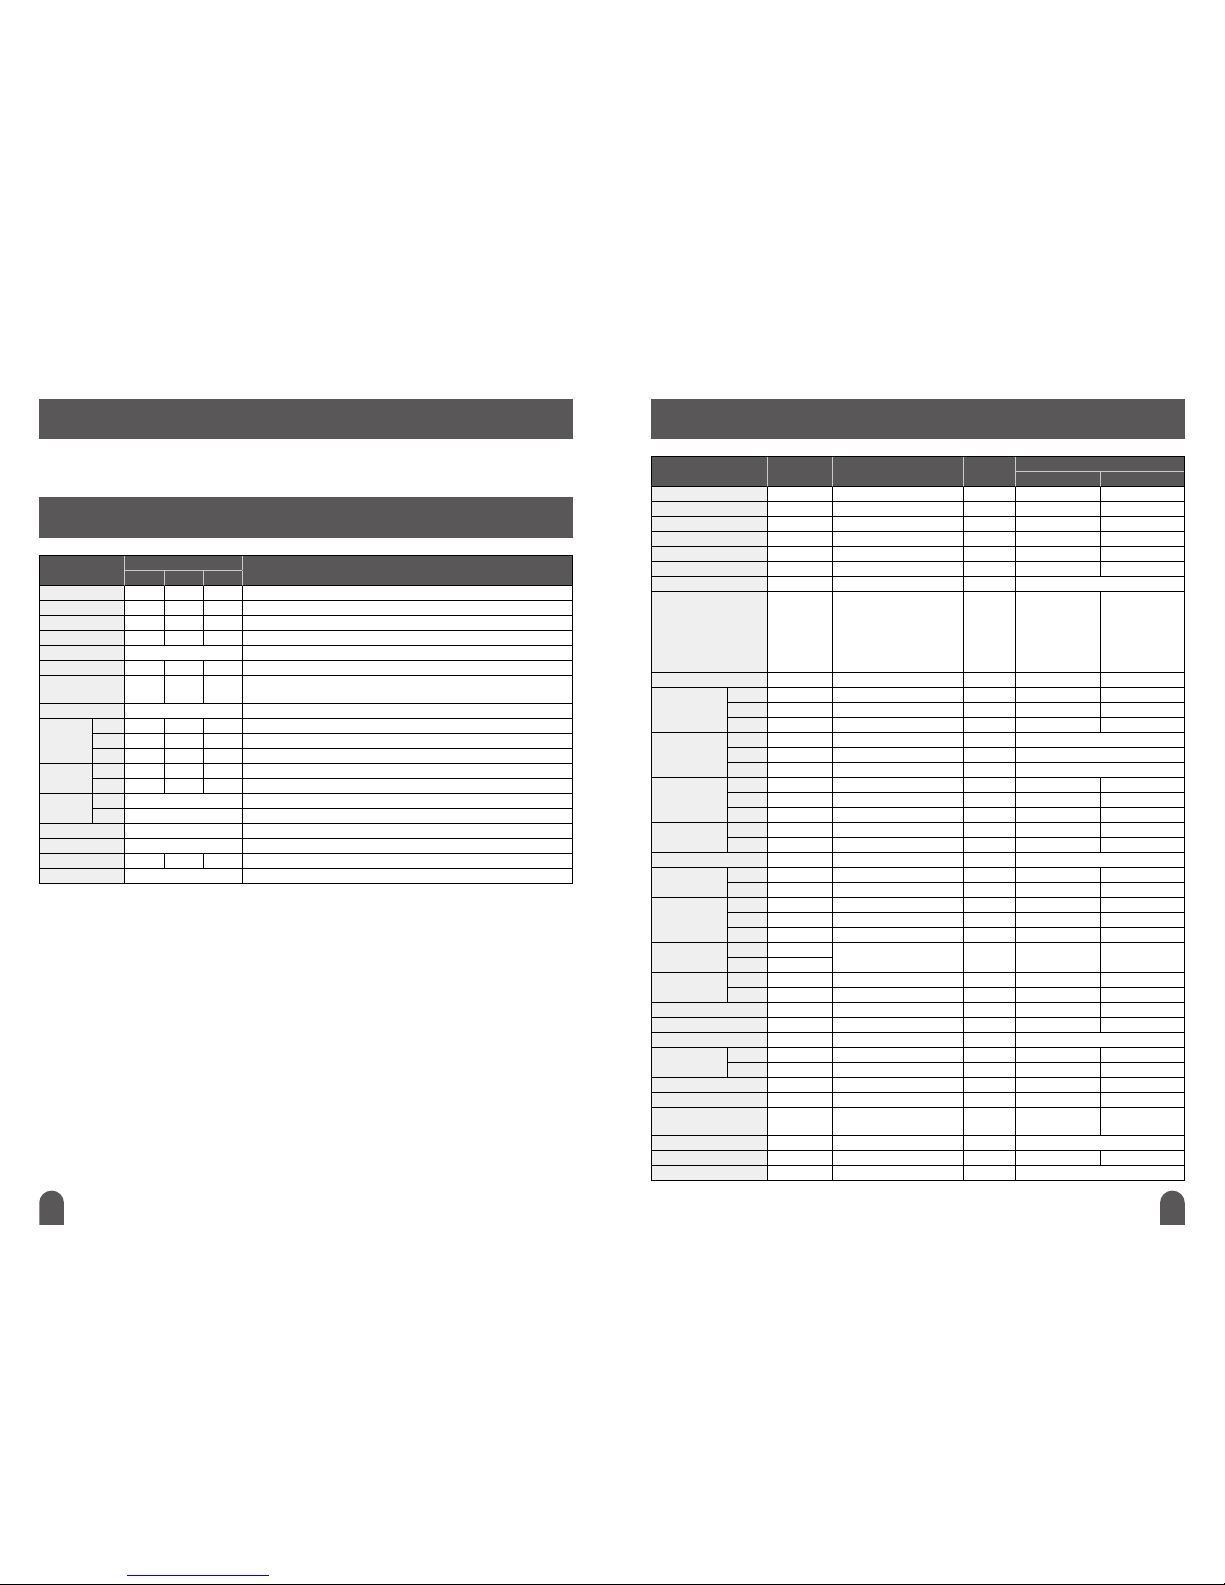
For each par ameter in the FF-1Y’s factory pre sets, pleas e refer to the prod uct page of the Fre e The Tone website.
MIDI Specications
Controls
MIDI CC numbers
Value Range
DLY-A+B DLY-A DLY-B
DELAY TIME 74 45 56 0–127
FEEDBACK 70 41 52 0–127
TONE 69 40 51 1–127
MIX LEVEL 68 39 50 0–100
OUTPUT LEVEL 84 (Common to A and B) 37–100 (-63 = 37, 0 = 100)
DRY 35 36 37 Off = 0, On = 127
SUB DIVISION 75 46 57
Whole note = 1, Half note = 2, Dotted Quarter note = 3, Triplet in four = 4, Quarter note = 5,
Dotted Eighth note = 6, Triplet in two = 7, Eighth note = 8, Triplet in one = 9, Sixteen note = 10
TRAIL 80 (Common to A and B) Off = 0, On = 127
EQ
TREBLE 73 44 55 1–127 (-15.0 dB = 1, Off = 64, +15.0 dB = 127)
MIDDLE 72 43 54 1–127 (-15.0 dB = 1, Off = 64, +15.0 dB = 127)
BASS 71 42 53 1–127 (-15.0 dB = 1, Off = 64, +15.0 dB = 127)
MODULATION
DEPTH 77 48 59 0–99
RATE 76 47 58 0–127
PAN
DEPTH 82 (Common to A and B) 0–99
SPEED 81 (Common to A and B) 0–127
SOFT CLIPPING 88 Off = 0, On = 127
SIGNAL MODE 79 Stereo = 0, Series = 127
TAP TEMPO 62 86 87 127
EFFECT ON/OFF 61 Off = 0, On = 127
List of Parameters
Item Labels on Panel Parameter Range (Displayed as) Initial Value
Storage in Preset
(Stereo) (Series)
DELAY TIME
D.TIME
1 ms (01) – 10.0 s (10.0) 1.00 sec A & B Separately A & B Separately
FEEDBACK
FB
0–127 64 A & B Separately A & B Separately
TONE
TONE
-63 – Off – +63 Off A & B Separately A & B Separately
MIX LEVEL
MIX
0 – 100 90 A & B Separately A & B Separately
OUTPUT LEVEL
OUT
-63 – 0 0 Common to A & B Common to A & B
DRY
DRY
On (d.On) / Off (d.oF) On A & B Separately A & B Separately
INV
hold-INV
On (I.On) / Off (I.oF) Off Common (global setting)
SUBDIVISION
S. DIV
Whole note (01), Half note (02),
Dotted Quarter note (04.),
Triplet in four (43), Quarter note (04),
Dotted Eighth note (08),
Triplet in two (23), Eighth note (08),
Triplet in one (13), Sixteenth note (16)
Quarter note A & B Separately A & B Separately
TRAIL
TRAIL
On / Off Off Common to A & B Common to A & B
EQ
TREBLE
TREB
-63 – Off – +63 Off A & B Separately B only
MIDDLE
MID
-63 – Off – +63 Off A & B Separately B only
BASS
BASS
-63 – Off – +63 Off A & B Separately B only
FREQUENCY
(hold-FREQ)
TREBLE
TREB
1.5k, 2.0k, 3.5k 2.0k Common (global setting)
MIDDLE
MID
500, 750, 1.0k 750 Common (global setting)
BASS
BASS
100, 200, 300 200 Common (global setting)
MODULATION
DEPTH
DEPTH
0 – 99 0 A & B Separately A & B Separately
RATE
RATE
0 – 127 0 A & B Separately A & B Separately
RFPM
RFPM
ON (r.On) / OFF (r.oF) On Common to A & B Common to A & B
PAN
DEPTH
DEPTH
0 – 99 0 Common to A & B B only
SPEED
SPEED
0 – 127 0 Common to A & B B only
PAN SPEED SYNC
-
On (S.On) / Off (S.oF) Off Common (global setting)
A-DLY-B SEL
DLY-A
DLY-A
On/Off On - -
DLY-B
DLY-B
On/Off On - -
SOFT CLIPPING
ON/OFF
ON
On/Off Off A only B only
GAIN
GAIN
- - - -
LEVEL
LEVEL
- - - -
SIGNAL MODE
STEREO
STEREO
One of the two is turned On Stereo
◯ ◯
SERIES
SERIES
A-DLY-B TAP Select
DLY-A
DLY-A
On/Off On
◯ ◯
DLY-B
DLY-B
On/Off On
◯ ◯
EXT1 Knob
MIX/EXT1
See List of Assignable Functions Mix
◯ ◯
EXT2 Knob
FEEDBACK/EXT2
See List of Assignable Functions Feedback
◯ ◯
EXT Terminal
EXT
See List of Assignable Functions Tap Common (global setting)
STANDBY
DLY-A
DLY-A
On/Off Off - -
DLY-B
DLY-B
On/Off Off - -
SAVE
SAVE
- - - -
PRESE
PRESET
- - - -
PARAMETER
PARAMETER
push-ENTER
- - - -
PRESET SELECT/TAP Switch
TAP
See List of Assignable Functions TAP hold PS Common (global setting)
EFFECT ON/OFF Switch
ON/OFF
On/Off Off - -
MIDI Channel
-
ALL, 1–16, Off ALL Common (global setting)
Page 11
20 21
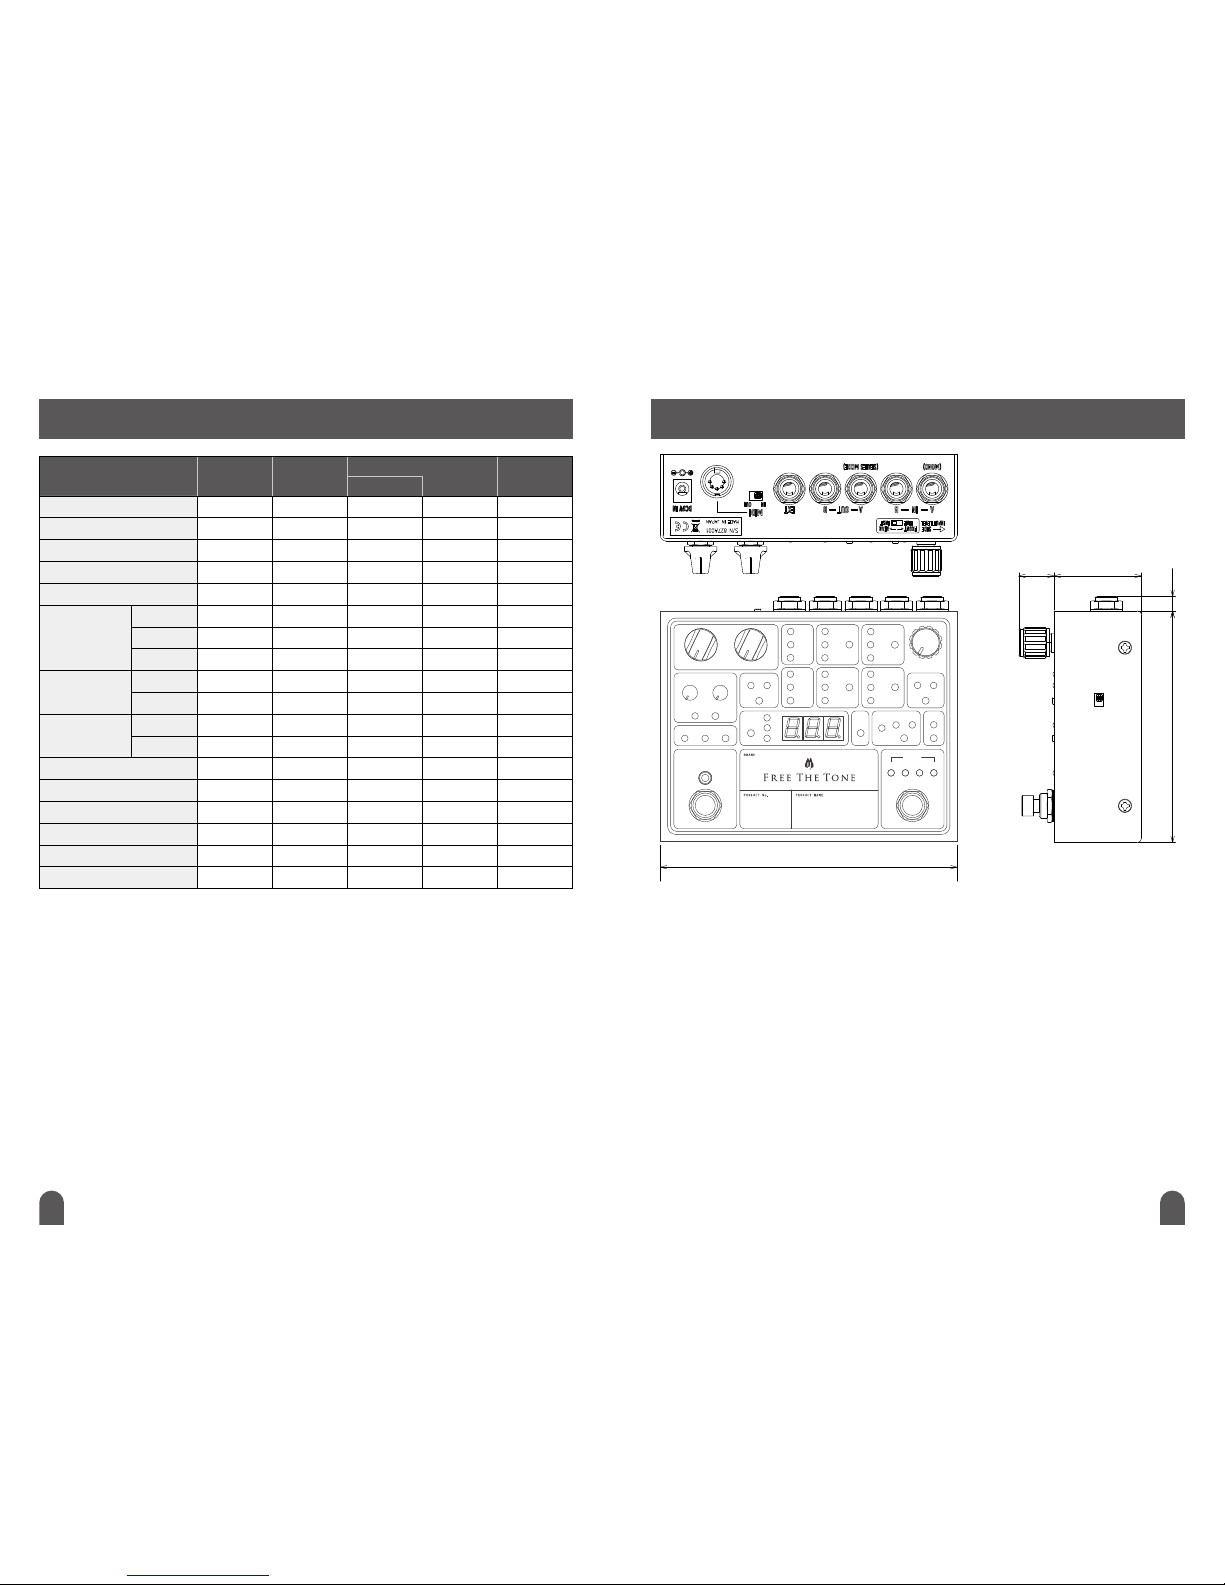
List of Assignable Functions
Item EXT1 EXT2
PRESET SELECT/TAP Switch
EXT Terminal
Displayed as
DELAY TIME
◯ ◯
- -
◯
FEEDBACK
◯ ◯
- -
◯
TONE
◯ ◯
- -
◯
MIX LEVEL
◯ ◯
- -
◯
OUTPUT LEVEL
◯ ◯
- -
◯
EQ
TREBLE
◯ ◯
- -
◯
MIDDLE
◯ ◯
- -
◯
BASS
◯ ◯
- -
◯
MODULATION
DEPTH
◯ ◯
- -
◯
RATE
◯ ◯
- -
◯
PAN
DEPTH
◯ ◯
- -
◯
SPEED
◯ ◯
- -
◯
PRESET SELECT/TAP Switch - - T.h.P
◯
-
TAP Switch - - TA P
◯ ◯
A-DLY-B TAP Select - - T.SL
◯ ◯
PRESET1/2 Switching - - 1-2
◯ ◯
PRESET1-4 Switching - - 1-4
◯ ◯
PRESET128 Recall - - 128
◯ ◯
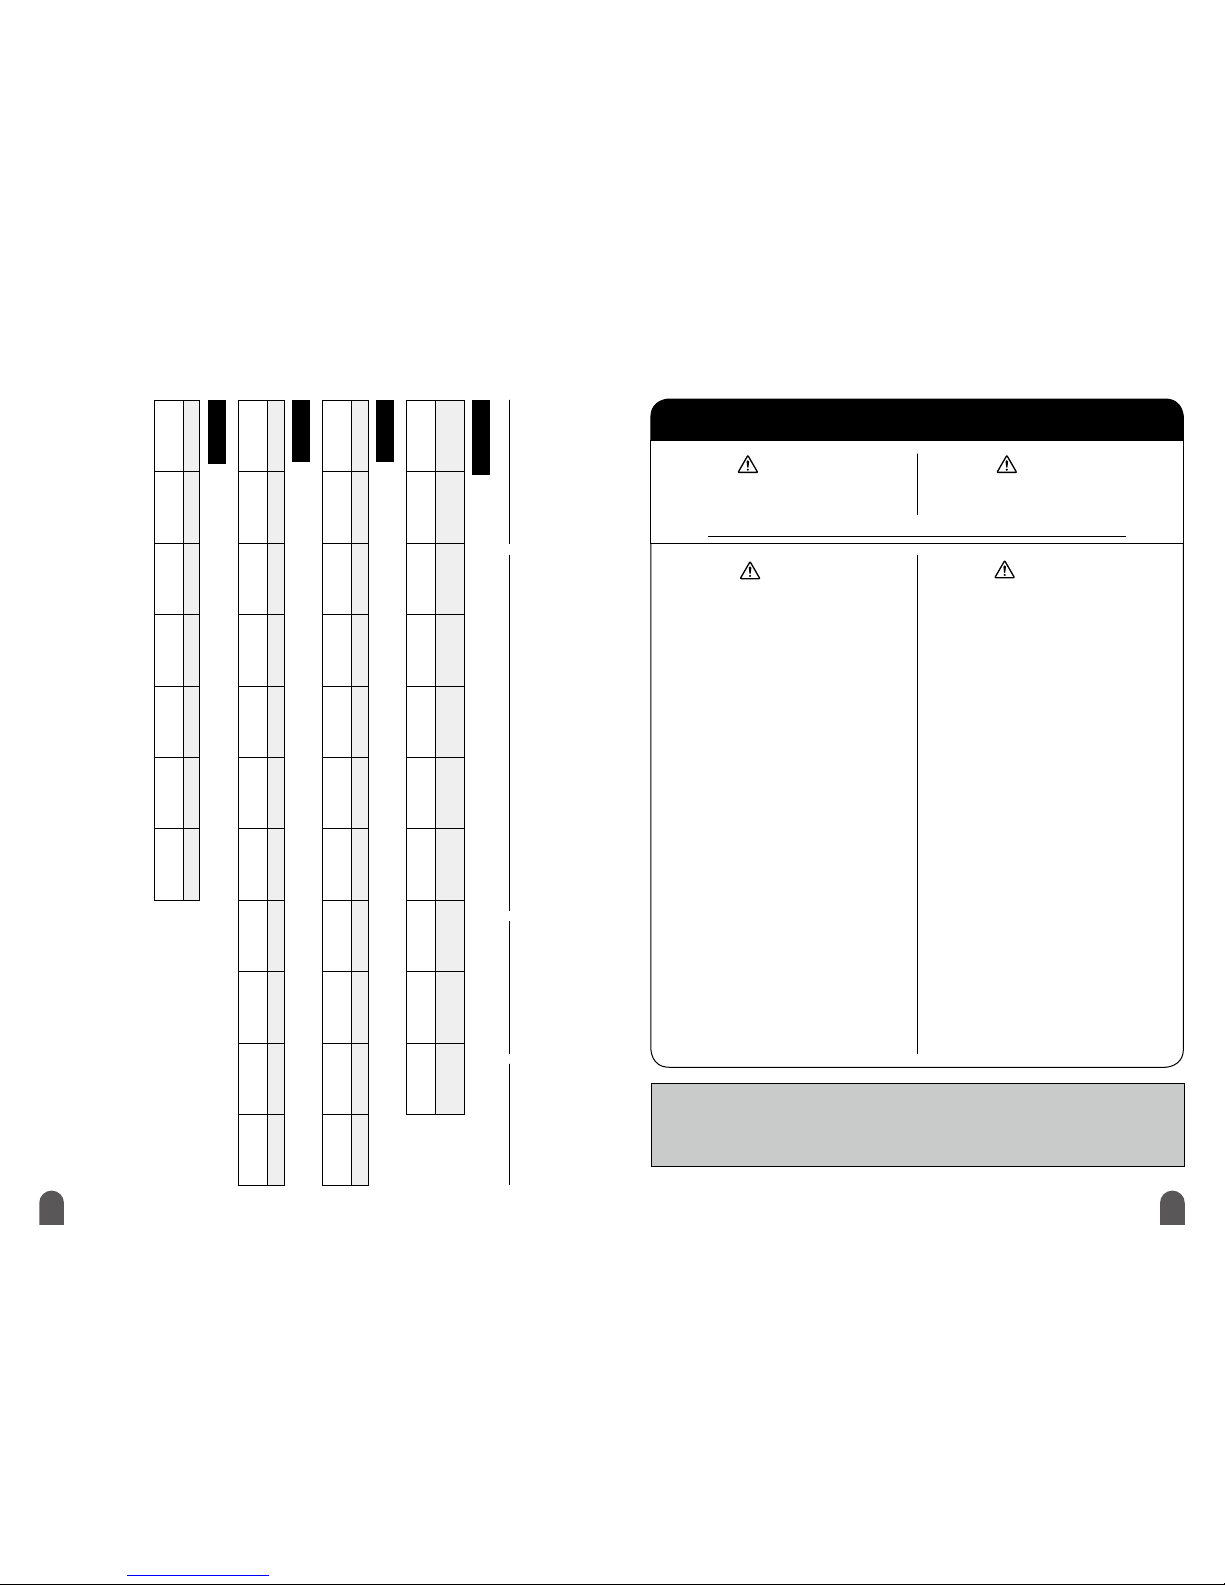
Product Specications
PARAME TER
push-ENTER
ON
LEVEL
MIX / EXT1
FEEDBACK / EXT2
GAIN
SOFT CLIPP ING
ON/OFF
STEREO
SERIES hold-MODE
MOD
DEPTH
DEPTH
RATE
RFPM
FREQ
EQ
TREB
MID
BASS
SPEED
PAN
BPM
mS
PS
DISP
PRESET
hold-PS1>PS2>PS3>PS4
TAP
1 2 3 4
FUT URE FACT ORY
RF PHASE MODUL ATION DELAY
FF -1Y
PRESET
MIX
OUT
DRY
D.TIME
FB
TONE
S.DIV
TRAIL
FUNC
STANDBY
TAP
TEMPO
SEL
SEL
DLY
A - DLY - B
A - DLY - B
A - DLY - B
SAVE
hold
INV
hold
OUTPUT
145.4
(17.3) 42.7
113.5 (7)
• Number of presets: 128
• Input impedance: min. 500 k
Ω
• Output load impedance: min. 10 k
Ω
• Maximum input level: INST +3.5 dBm / LINE +11 dBm
• Terminals:
5 x Standard 1/4" phone jacks (A-IN, B-IN, A-OUT, B-OUT, and EXT),
1 x DC9V input jack (for connecting AC adapter),
1 x DIN 5-pin connector (IN or OUT selected)
• Power supply: Dedicated AC adapter
• Current consumption: 350 mA
• Dimensions (W x D x H): 145.4 x 120.5 x 60 mm, 5.72 x 4.74 x 2.36 inches
(including protuberances such as jacks, etc.)
• Weight: approx. 470 grams, 1.04 lbs
Specifications and appearance subject to change without notice.
Page 12
22 23
Caution
Do not use or stor e the unit in env ironments where it
will be expo sed to:
Extrem e temperatu res (dire ct rays of the sun, h eat
sources su ch as radiators or stoves.)
High humidity or moisture.
Excessi ve dust or sand.
Excessi ve vibration or shock.
Whenever l eaving the unit unatte nded for long
periods, b e sure to unplug the AC adapter f rom the
power sourc e to avoid creatin g a fire hazar d.
Take care not to drop the un it, and do not su bject it
to excessive p ressure or we ight.
Do not press t he switches o n the unit with a b are
foot, or unexpected injury may result.
Do not use sol vents (suc h as benzin e, paint thinn er)
on the unit, si nce these may d ull the finis h or damage
the surfa ce.
Warning
Never try to d isassemb le, or modify the unit.
Stop using th e unit if you noti ce smoke or a str ange
odor comi ng from it and u nplug the AC ada pter from
the outlet.
Never try to re pair the unit or replac e parts unl ess so
instructe d by the user’s manu al. For other rep air or
parts rep lacement contact yo ur local de aler or Free
The Tone.
Never unpl ug the AC adapter w hile your han ds are
wet.
Do not apply to o much press ure or tension or place
a heavy ob ject on the powe r cord. Doing so may
damage the p ower cord and c reate a dange r of fire
or electrical shock.
Turn off the unit a nd unplug th e AC adapter from th e
outlet and c ontact your l ocal deal er or Free The Tone
for repair i n the case of any of th e following :
The power co rd is damage d.
Foreign objects (coins, pins, etc.) or liquid enter
the unit.
The unit ge ts wet from rain o r other liqui d.
The unit is o ut of order.
Be carefu l of heat radiat ion from the un it.
Never cover th e AC adapter with c loth or other
objects. B uilt-up heat ca n deform the case or caus e
a fire haza rd.
SAFET Y PRECAUTION S
Precau tions are ide ntifie d by the two t ypes of symbo ls below :
Caution
This symbol indicates that a risk of serious personal
injury or material damage may result if precautions are
ignored.
Warning
This symbol indicates that a risk of death or serious
personal injury may result if precautions are ignored.
Be sure t o read th ese prec autions and t he user ’s manua l before u sing th is prod uct.
Support/Service
Contact th e following fo r suppor t and/or re pair ser vice.
e-mail address: [email protected]
FUTUREFACTORY/FF-1YPRESETPARAMETERSHEET
PresetNumber: PresetTitle: Author: Date:
CommonSetting
GlovalSetting
DELAYTIME SUBDIVISION MODDEPTH MODRATE MIXLEVEL TONE FEEDBACK EQLOW EQMIDDLE EQTREBLE DRYON/OFF
MODE
OUTPUTLEVEL TRAILON/OFF PANDEPTH PANSPEED SOFTCLIPPING TAPSEL(A,B,A&B) RFPMON/OFF EXT1KNOB EXT2KNOB
DLY-ASetting
DELAYTIME SUBDIVISION MODDEPTH MODRATE MIXLEVEL TONE FEEDBACK EQLOW EQMIDDLE EQTREBLE DRYON/OFF
DELAYINVERT EQFREQLOW EQFREQMID EQFREQTREB PANSPEEDSYNC EXTJACK MIDICHANNEL
DLY-BSetting
*Glovalsettingsarereflectedinallpresets.
(STEREO/SERIES)
 Loading...