

Free The Tone FUTURE FACTORY, FF-1Y Owner's Manual

FF-1Y/FUTURE FACTORY
RF PHASE MODULATION DELAY
OWNER’S MANUAL
Ver 1.1

2 3
Thank you for c hoosing a Free The Tone product.
In order to take ful l advantage of the f eatures and pe rforma nce it provide s, please read this owner’s
manual thoroughly, and keep it in a s afe place for future reference.
Table of Contents
Controls and I ndicators
................................................................................
4
Front Panel
...........................................................................................
4
Rear Panel
............................................................................................
6
Side Panel
............................................................................................
6
Basic Operations and How to Use E ach Function
...................................................
7
Storing Chan ges in a Preset
........................................................................
7
Confirming Recalled Preset Number
..............................................................
7
Selecting Delay Unit Connection
...................................................................
7
Outputti ng Delay Sound I ndividua lly
...............................................................
7
Confirming P revious Value af ter Parameter Ch ange
.............................................
8
Recallin g a Preset
...................................................................................
8
Switching Fou r Presets (1)
.......................................................................
8
Switching Fou r Presets (2 )
.......................................................................
8
Switching Pre sets betwee n 1 and 2 Alternate ly
...............................................
8
Recallin g Preset 128 Immediately
...............................................................
9
Recallin g Preset with PARAM ETER Encod er
..................................................
9
Recallin g Preset with PRESE T SELECT/TAP Switch
..........................................
9
Recallin g Preset with MID I Signal from E xternal D evice
......................................
9
Setting De lay Unit
....................................................................................
9
Adjusting De lay Tempo (1)
.........................................................................
10
Adjusting De lay Tempo (2) - Tap Function
........................................................
10
Adjusting De lay Tempo (3) - MID I Clock
..........................................................
10
Adjusting Fee dback Amou nt
......................................................................
11
Adjusting De lay Timbre
.............................................................................
11
Adjusting Delay Volume
............................................................................
11
Adjusting Output Volume
..........................................................................
11
Setting De lay Sound’s Phase
......................................................................
12
Setting De lay Length as Note Du ration (Su bdivisio n)
...........................................
12
Kill Dry Function
....................................................................................
12
Trail Function
........................................................................................
12
Soft Clipping Function
..............................................................................
13
Handling Precautions
• Never connect or disconnect plugs to/from the input/output terminals on the FF-1Y when the
external device that dri ves speaker s is powered. Doin g so can cause noises and damage the
speakers.
• Avoid applying exce ssive force to the fo otswitches, tact switches, and ph one jacks on the F F-1Y.
• If the unit malfu nctions or be haves erratic ally, cease oper ation at once and c ontact your lo cal
dealer or Free The Tone directly.
Panning Function (In Stereo Connection Mode)
.................................................
13
Tremolo Function (In Series Connection Mode)
.................................................
13
Modulation Function
................................................................................
14
3-Band Equalizer Function
.........................................................................
14
Useful Featur es
........................................................................................
15
Tap-Preferred Mode
................................................................................
15
Assignin g Functions to MIX /EX T1 or FEEDBACK/ EXT2 Kn ob
.................................
15
Assigning Functions to EXT Terminal
.............................................................
15
Calibrating Expression Pedal Connected to EXT Terminal
.....................................
15
Assignin g Functions to PRESE T SELECT/TAP Switch
..........................................
16
MIDI Setups
............................................................................................
16
Setting up MI DI Receivi ng Channel
...............................................................
16
Transmitting Data to /from an E xternal Device
......................................................
16
Updating Fir mware
....................................................................................
16
Initializing
...............................................................................................
16
Block Diag ram
.........................................................................................
17
Factory Pres ets
........................................................................................
18
MIDI Specifications
....................................................................................
18
List of Paramete rs
.....................................................................................
19
List of Assignable Functions
..........................................................................
20
Product Specifications
................................................................................
21
Preset Parameter Sheet
..............................................................................
22
Safety Prec autions
....................................................................................
23

4 5
Pressing thi s switch illuminates t he
DEPTH
and
SPEED
LEDs alt ernately and the disp lay
contents ch ange accordingly. In S tereo Connect ion mode, the depth a nd speed of panning
is adjusted. I n Series Connec tion mode, the dept h and speed of tremolo i s adjusted.
Adjusting D epth of Panning
p.13
Adjusting S peed of Panning p.13
Adjusting D epth of Tremolo
p.13
Adjusting S peed of Tremolo p.13
Pressing thi s switch illuminates t he
S.DIV
and
TRAIL
LEDs
alternately and the display contents change accordingly.
Press this sw itch when settin g the delay length as no te duration
and when set ting whether to ret ain the delay sound or no t.
Setting De lay Length as No te Duration ( Subdivision )
p.12
Trail Functio n p.12
Pressing thi s switch illuminates t he
DEPTH, RATE
, and
RFPM
LEDs seq uentially and the dis play contents chan ge
accordingly.
Press this sw itch when applying t he modulation ef fect.
Modulation Function
p.14
Press this sw itch to select Pres ets 1–4. When held p ressed,
the presets c hange sequential ly in every 0.5 secon ds:
PS1
PS2
PS3
PS4
PS1
...
This switch i s also pressed when e ntering Tap tempo.
Adjusting D elay Tempo (2) - Tap Fun ction p.10
Various func tions can be assig ned to this switch.
Assigning F unctions to PR ESET SELEC T/TAP Switc h p.16
Pressing thi s switch illuminates t he
BPM, mS
, and PS LEDs
sequentially and the display contents change accordingly.
When the
BPM
or mS LED is lit, t he delay tempo is displ ayed.
Setting De lay Unit p.9
When the PS LED is lit, t he number for the sele cted preset is
displayed.
Recalling a Pr eset p.8
Press this sw itch to turn on the
delay effec t. When on, the LE D
above the swi tch illuminates.
Pressing thi s switch illuminates t he
MIX, OUT
, and
DRY
LEDs seq uentially and the dis play contents
change acco rdingly. Press this swi tch when adjusting t he Mix/Out l evel or turning on /off the dry
sound. By pre ssing this switch fo r about 2 seconds, y ou can set the phase of t he delay sound.
Adjusting Delay Volume
p.11
Adjusting Output Volume p.11
Kill Dry Fun ction
p.12
Setting De lay Sound’s Phas e p.12
PAN
Switch
FUNC
Switch
MOD
Switch
PRESET SELECT/TAP
Switch
DISP
Switch & Dis play
ON/OFF
Switch
Pressing thi s switch illuminates t he
TREB, MID
, and
BASS
LEDs sequentially
and the displa y contents change ac cordingly. Press th is switch when
applying th e equalizer to the delay s ound. By pressing t his switch for
about 2 seco nds, you can select e ach frequency poin t for the 3-band
equalizer.
3-Band Eq ualizer Functio n p.14
EQ
Switch
OUTPUT
Switch
DLY
Switch
Pressing thi s switch illuminates th e
D.TIME, FB
, and
TONE
LEDs sequentially
and the displa y contents change ac cordingly. Press th is switch when
adjusting th e delay tempo, feedba ck amount, or delay tim bre.
Adjusting D elay Tempo (1) p.10
Adjusting Feedback Amount p.11
Adjusting D elay Timbre p.11
PARAMETER
Encoder
Turn this knob wh en changing the set ting of each functio n.
Press this k nob when accepting t he change you made.
When the kno b is pressed and turn ed, the change rate in creases in a
block of 10 steps .
A-DLY-B SEL
Switch
Press this sw itch to select the de lay unit (A, B, or A +B) whose s etting is
to be changed. W hen the LED is not li t, you cannot change t he setting
(except for some functions).
SAVE
Switch
Press this sw itch to store the set ting.
Storing Ch anges in a Preset p.7
PRESET
Switch
Press this sw itch to recall a prese t.
Recalling a Pr eset p.8
MODE
Switch
Press this sw itch to select the co nnection mode ( Stereo and Seri es) of
the two dela y effect units ( delays A and B) in the F F-1Y. By pressing the
switch for ab out 2 seconds, the c onnection mode to ggles.
Selecting Delay Connection p.7
MIX/EXT1
Knob
FEEDBACK/EXT2
Knob
Turn this knob wh en adjusting the mix le vel (when in initia l setup
procedure ). You can assign va rious functions o f the FF-1Y to this knob for
direct operation.
Adjusting M ix Level
p.11
Assigning F unctions to MI X/EX T1 or FEEDBAC K/EX T2 Knob p.15
Turn this know wh en adjusting the feed back amount (whe n in initial setup
procedure ). You can assign va rious functions o f the FF-1Y to this knob for
direct operation.
Adjusting Feedback Amount p.11
Assigning F unctions to MI X/EX T1 or FEEDBAC K/EX T2 Knob p.15
STANDBY
Switch
By pressing t his switch, the
DLY A
and
DLY B
LEDs illuminates alternately.
Press this sw itch to turn off eit her of the FF-1Y’s interna l delay units (A
and B) .
Outputt ing Delay Sound In dividually p.7
SOFT CLIPPING LEVEL
&
GAIN
Knobs
Turn these knob s when adjusting the d istortion amou nt and volume of the
delay sound.
Distort ing Delay Sound p.13
SOFT CLIPPING ON
Switch
Press this sw itch when distor ting the delay sound.
Distort ing Delay Sound p.13
A-DLY-B TAP SEL
Switch
TAP TEMPO
LED
Press this sw itch when selectin g the delay unit to which t he Tap tempo is
entered. If t he LED is not lit, you c annot enter the Tap temp o.
Adjusting D elay Tempo (2) - Tap Fun ction p.10
Blinking of t his LED shows the t ap-entered temp o.
Controls and Indicators
Front Panel
6 7
Rear Panel
Side Panel
Basic Operations and How to Use Each Function
Storing Changes in a Preset
1. Press the S AVE switch. The SAVE LED flashes.
2. The display flashes th e number for the preset cu rrently selected.
3. Tu rn the PARA METER enco der until the display sh ows the preset n umber to whic h you want to save your data. (S kip
this step if you s ave the data into th e same prese t number.)
4. Press the SAVE switch to c onfirm. The da ta is saved in the p reset.
NOTE
To cancel the stor ing operation, pr ess any switch other t han SAVE while the di splay is flashing th e preset number. Alter natively, turn the
MIX/EXT1 or FEEDBACK/EX T2 knob. The SAVE LED i s turned off and th e save operation is ca nceled. The stori ng operation is au tomatically
cancel ed by leaving the unit f or about 10 seconds wh en it is flashing its d isplay.
When a para meter in the preset i s changed, the dot be low the first digit of th e preset number ill uminates. The dot tu rns off when the
data is save d to the preset.
Conrming Recalled Preset Number
1. Press the DISP swi tch to turn on the PS LED.
2. The number for the sel ected prese t is shown in the d isplay.
NOTE
When the PRESET sw itch is pressed, the d isplay flashes the c urrently selec ted preset number e ven if it is showing an other parameter. By
pressin g the PRESET switch again, the previous BPM or msec unit display selected by the DISP switch returns. O r, the BPM or mse c unit
display re turns automatica lly after leavin g the unit for about 10 sec onds when its disp lay is flashing.
Selecting Delay Unit Connection
The FF-1Y contains the two d elay effect units (A a nd B) and their conne ction mode can be sele cted internally.
1. Press the MODE switch for more than 2 seconds.
2. When the MODE switch is presse d, the STEREO and SERIES LEDs illuminate alternately.
3. Release the switch w hen the LED for th e desired connecti on method is il luminated.
NOTE
STEREO Illuminated: The delay units are internally connected in parallel.
SERIES Illuminated: The delay units are internally connected in series.
Block Diag ram p.17
Outputting Delay Sound Individually
The two del ay effect units (A and B ) in the FF-1Y c an be setup in dividua lly.
To confirm each de lay sound dur ing sound design proc ess, either delay uni t can be put in S tandby statu s.
1. Press the STANDB Y switch to select the d elay unit to be in S tandby statu s (muted ).
NOTE
Turn on the DLY B LED if y ou want to output the de lay A sound only. Turn on the DLY A LE D if you want to output the d elay B sound only.
If the DLY A and D LY B LEDs are illu minated, the sound is o utput from both the d elay units A and B.
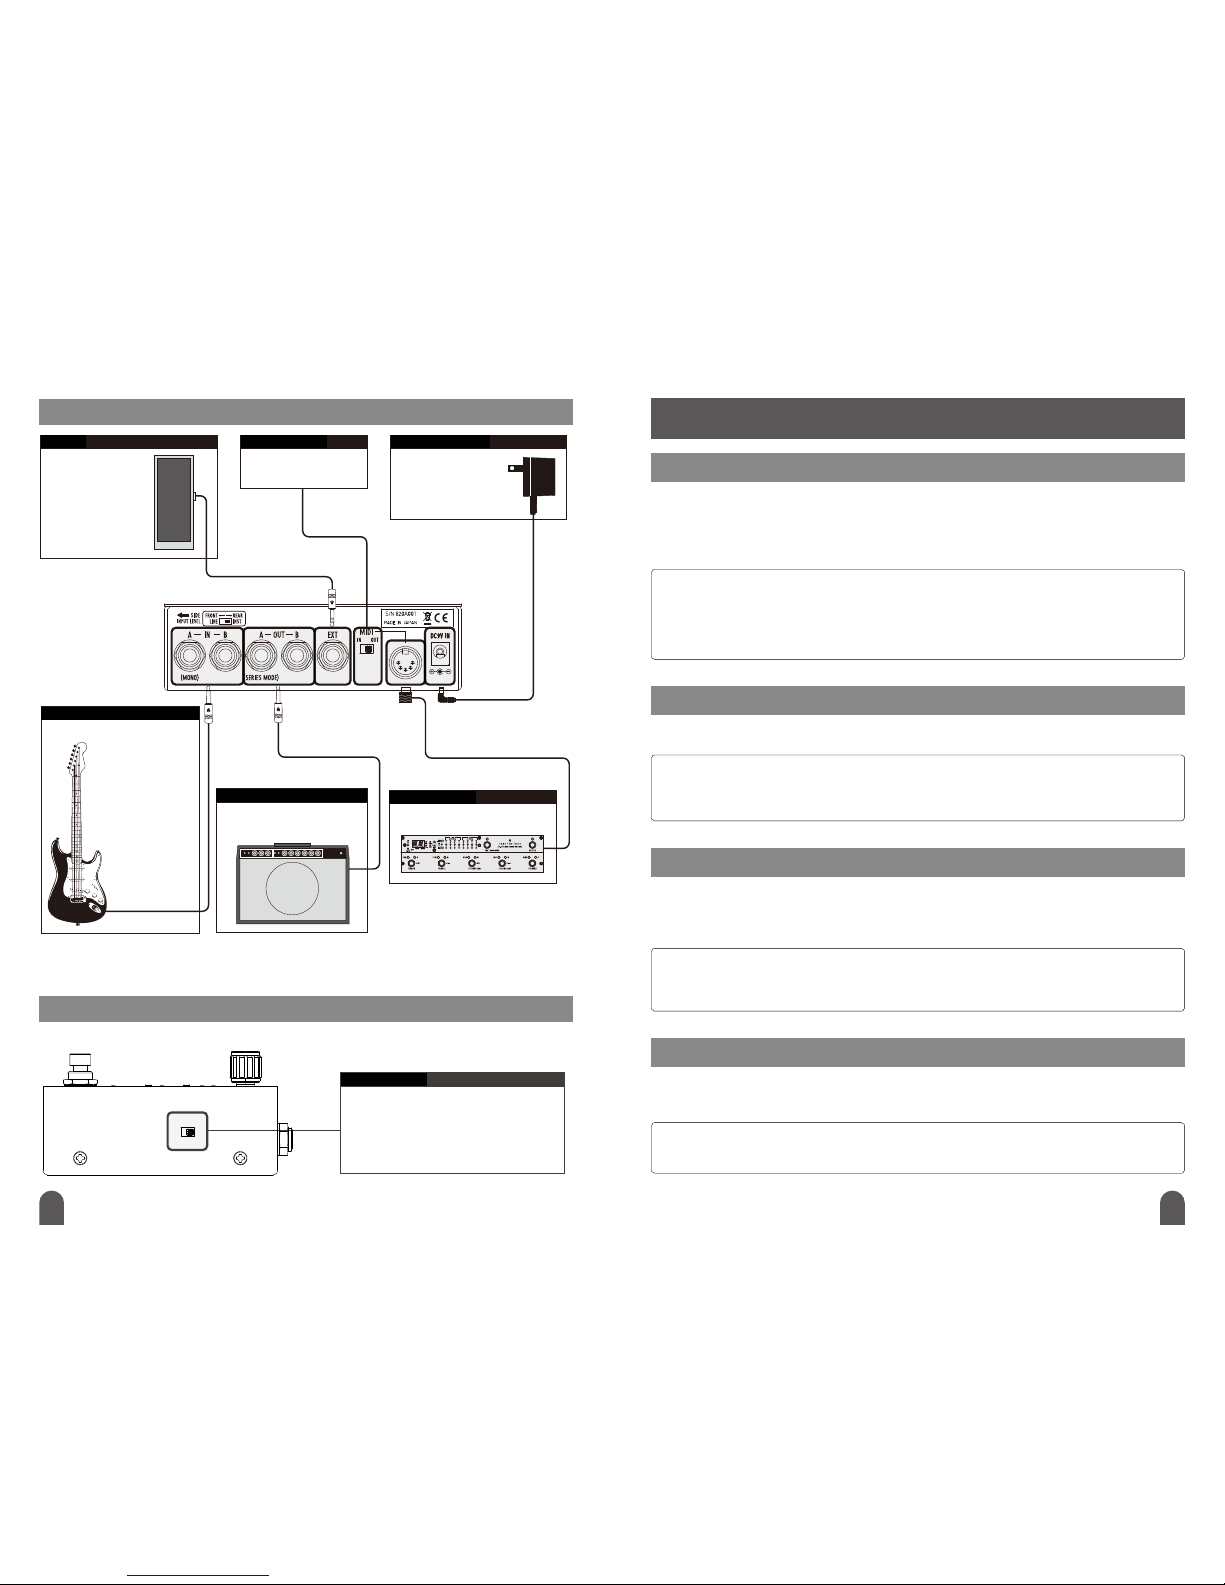
EXT
Terminal
MIDI IN/OUT
Switch
POWER DC9V IN
Terminal
By connect ing an expression
pedal or mome ntary (unlatc h)
type swit ch to this terminal,
you can activ ate the function
assigned to i t.
Assigning F unctions to E XT
Terminal p.15
Selects t he function of the M IDI
terminal.
For connec ting the dedicated A C
adapter supp lied with your FF-1Y.
MIDI
Terminal
INPUT LEVEL
Switch
Output (A (SE RIES)-OUT-B)
Terminal
Input (A (MO NO)-IN-B)
Terminal
I/O ter minal for MIDI si gnal. Its functio n is
selected by t he
MIDI IN/OUT
switch.
This switch i s used to select the F F-1Y’s input level based on t he
output leve l of the device conne cted to the INPUT terminal. To
connect an in strument level dev ice, set the switch to t he rear side
(closer t o the I/O termin als). To connect a l ine level device, set th e
switch to the f ront side. Use a small fl at-blade screwdri ver to slide
the switch.
Used to conn ect to an amplifier, mixer, etc .
To output monau ral signal, connect t o the
OUT A (SER IES) terminal.
For connec ting a guitar, another
musical inst rument, or effec ts
unit.
Connect a de vice with stereo
output to th e IN A (MONO) and IN
B terminals. To use t he unit in
monaural, connect to the IN A
(MONO) terminal only.
By implemen ting Free The
Tone’s original HT S
(Holis tic Tonal Solution )
circuit, sou nd texture is
kept the same whether
the effec t is turn on or off.
 Loading...