

Page 1
816 SHARK TIDE™
INSTRUCTIONS
FEATURES:
•CURRENT TIME (HR., MIN., &
SEC.)
•DAY/DATE/MONTH/YEAR
•INDICATES PRESENT TIME, TIDE
HEIGHT AND DIRECTION
•MOVEABLE CURSOR INDICATES
HOURLY TIDE AND DIRECTION
FOR PRESENT DAY
•FUTURE TIDE MODE INDICA TES
TIDE HEIGHT AND DIRECTION
FOR 15 YEARS
•CHOOSE FROM FIFTEEN PREPROGRAMMED ZONES.
•CHOOSE FROM 128 PREPROGRAMMED BEACHES
WITHIN THE FIFTEEN ZONES
•PROGRAM YOUR LOCAL BEACH
BREAK IF NOT INCLUDED
AMONG THE 128 PREPROGRAMMED BEACHES
•MULTIPLE COUNTDOWN TIMERS
•CHRONOGRAPH WITH SPLIT
TIMES
•FOUR DAILY OR ONE TIME
ALARMS AND HOURLY CHIME
•DUAL TIME AND OPTIONAL 24HR. TIME
•WA TER-RESISTANT TO 300 FEET
•NIGHT VISION™ ELECTROLUMINESCENT BACKLIGHTING
KEY REFERENCES
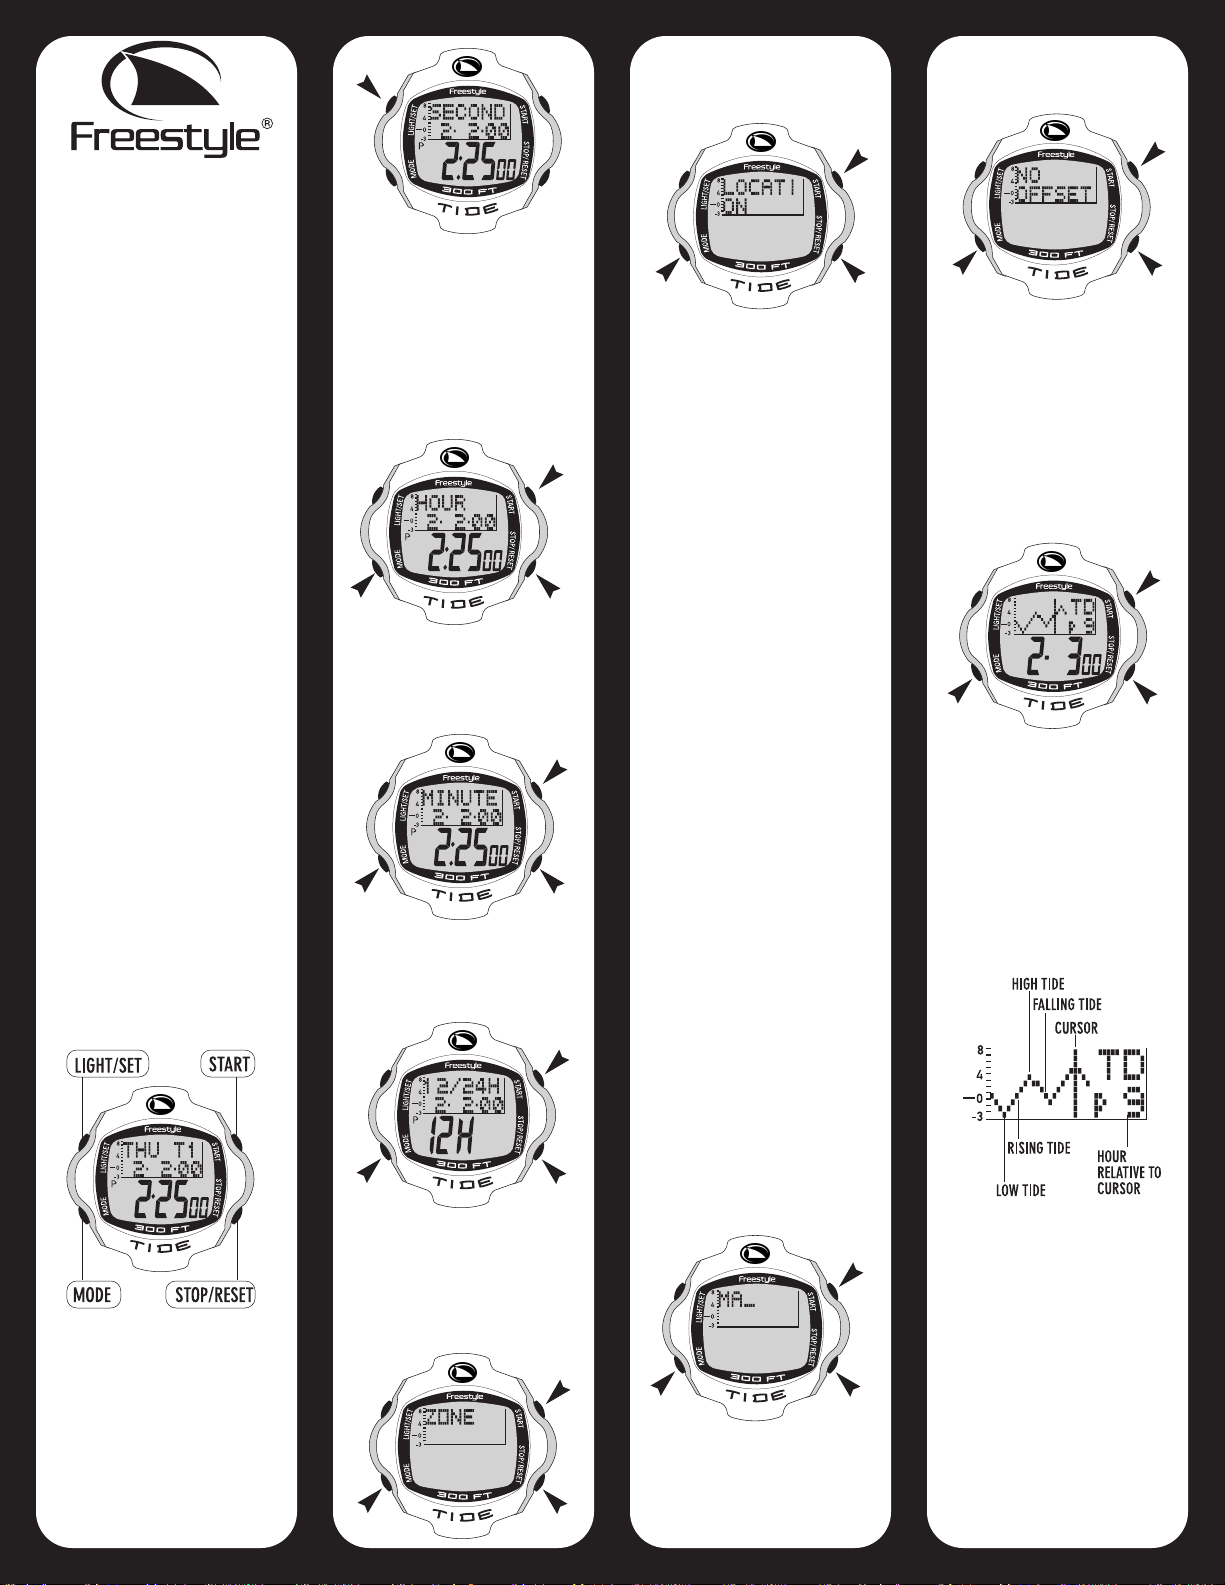
HOW TO SET TIME 1, DATE, 24HOUR FORMAT, AND BEACH
LOCATION
From TIME 1 mode, press and hold
the LIGHT/SET button for
approximately two seconds; the
seconds digits will flash.
Pressing the STAR T button will reset
the seconds digits to 0. If seconds
are 30 or greater, one will be added
to the minutes digits.
To set hours digits, press MODE
button; hours digits will flash. To
advance hours digits, press STAR T
button; to retard hours digits press
STOP/RESET button; hold for
rapid advnce.
To set minutes digits, press MODE
button; minutes digits will flash. To
advance minutes digits, press
START button; to retard minutes
digits, press STOP/RESET button;
hold for rapid advnce.
Continuing through the time and
date setting mode, the setting
sequence is seconds, hours,
minutes, year, month, date, and
12/24- hour mode.
After 12/24-hour mode is selected,
press MODE button; “SET TIDE?”
will appear. Press MODE button,
and one of the six zone options will
appear: Caribbean, East USA,
Hawaii, Japan, Mexico, or West
USA. Press STAR T button to select
your choice of zone.
To set your choice of location or
beach break, press MODE button;
press START button to select
location or beach break of choice.
Press MODE button; if you have
selected the Caribbean, Mexico,
West USA, or East USA, then DST
ON or DST OFF will appear on the
display. DST is an abbreviation for
daylight savings time. Note: All of
the western and eastern coastal
states in USA observe DST,
however, neither Hawaii nor Japan
observe Daylight Savings Time.
Note: The DST feature only needs
to be activated once by pressing
START button; it will adjust
automatically thereafter. However,
you will still need to adjust the time
of day at daylight savings time
changes. The DST flag will appear
on the display when the DST feature
is in the “ON” position.
Press MODE button; “USER OPT”
will appear on the display. If your
favorite location or beach break is
not one of the pre-programmed
locations, you may wish to add it.
To do this, you will need to know
the time difference between the high
tide at your favorite beach and the
high tide (for the same day) at
the closest pre-programmed beach.
This time difference information is
usually illustrated on tide calendars
or local tide charts, and is indicated
for example as (+ or -) 10, 20 or 30
minutes between two beach
locations. For example, suppose
your favorite beach break is Malibu,
which is not pre-programmed in the
watch, and your local tide calendar
indicates that Malibu tides are (+10)
minutes, compared to Los Angeles
tides. After entering Malibu as your
favorite beach, you would enter
(+10) as your offset.
To program your location or beach
break, press START button. Press
START button again to enter the
first letter, then press MODE button
to advance to the second letter. If
you advance any letter too far,
simply press STOP/RESET button
to back up. You may enter a total of
up to twelve letters.
After entering the last letter of the
name of your beach, press MODE
button continuously, until the words
“NO OFFSET” appear. Press
STAR T button to enter your desired
offset. Press LIGHT/SET button to
return to TIME 1 mode.
At any time, while in TIME 1 mode,
press START button; current tide
conditions will appear on the top
half of the display.
HOW TO SET AND OPERATE
CURRENT TIDE
Press MODE button until “TIDE”
appears. Current date will be
displayed on the lower half, current
daily tide will be displayed on the
upper half.
Press STAR T button; and cursor will
scroll across tide graph, indicating
high, low, rising and falling tide
conditions for any hour of the current
day.
Y ou may also set tide zone, location,
DST, or user option from this mode
by pressing and holding LIGHT/SET
button for two seconds. Then follow
the sequence as outlined in “HOW
TO SET TIME 1, DATE, 24-HOUR
FORMAT, AND BEACH
LOCATION.”
The above graph shows how to read
the tide graph.
HOW TO SET AND OPERATE
FUTURE TIDE
In this mode you may enter any
future date for the next 15 years, to
access future tide information for
any selected location or beach
break. If you desire future tide
information for a location other than
your previously selected beach, you
will need to go back to either TIME
1 mode or TIDE mode, and enter
that new location.
Press MODE button until “FUTURE
Page 2
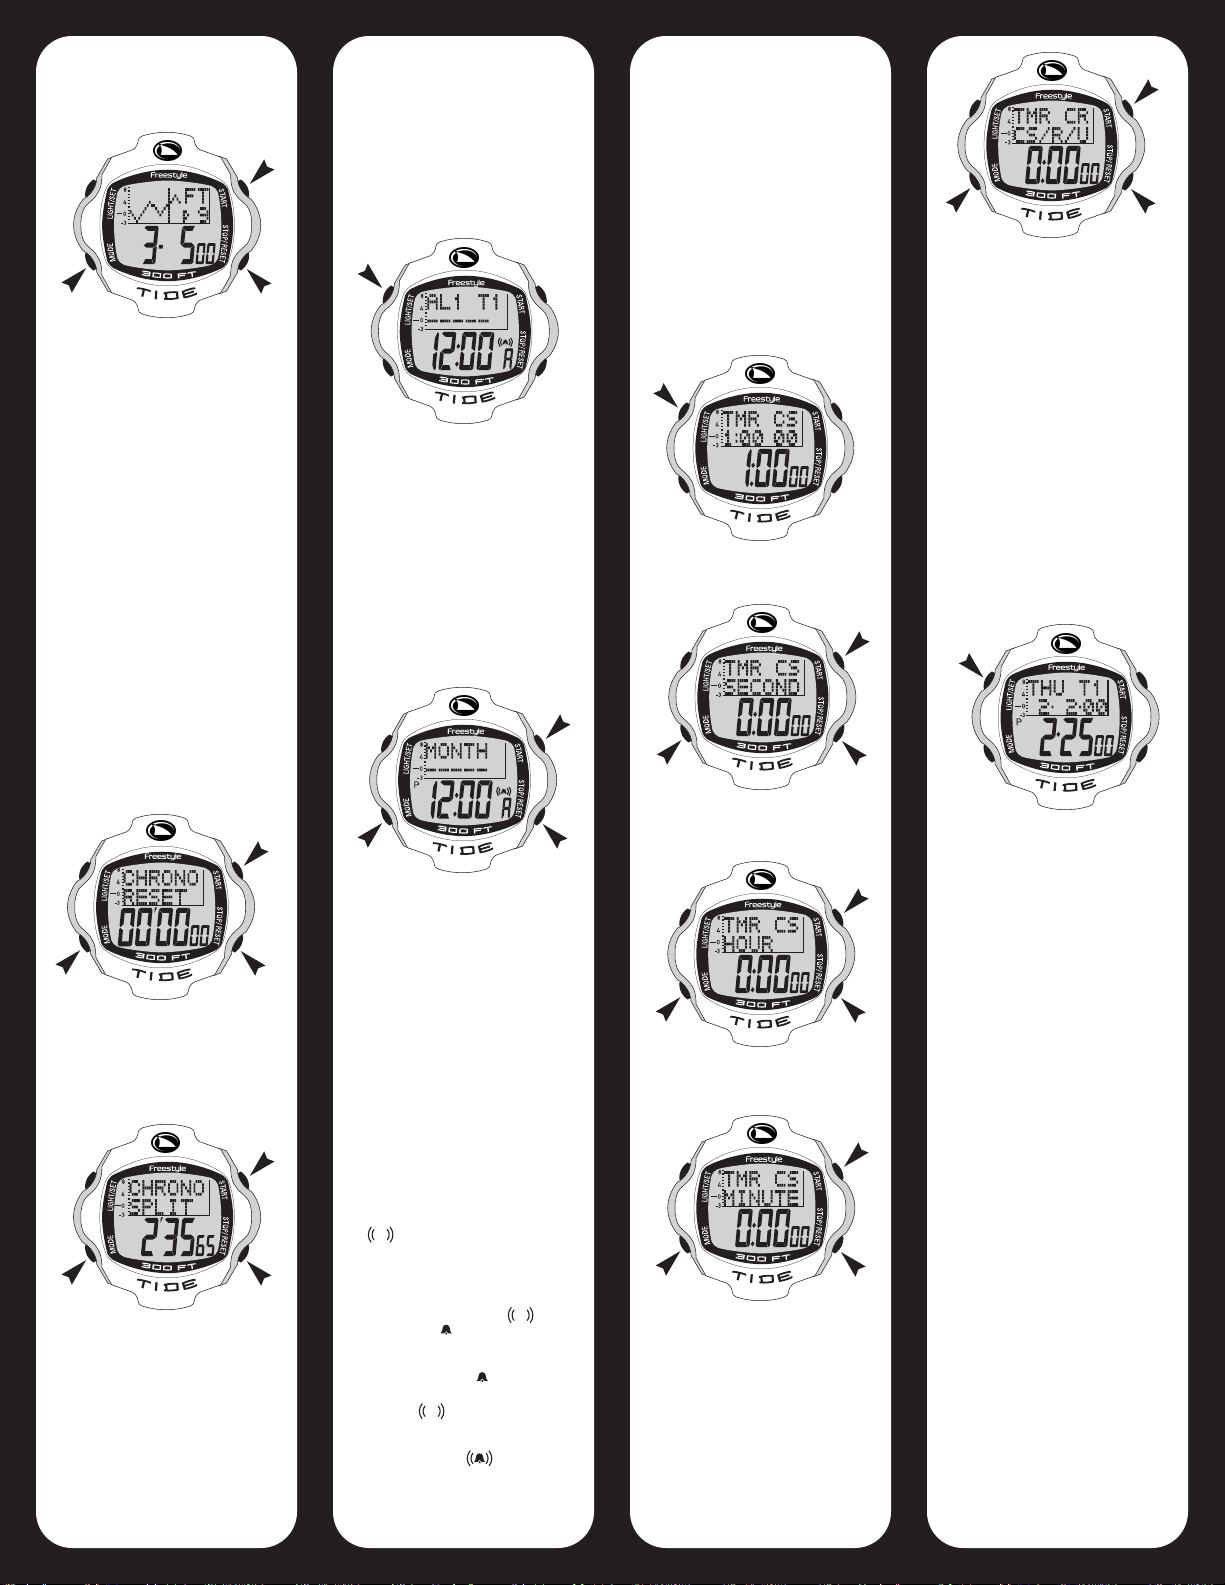
TIDE” appears. Future date will be
displayed on the lower half, future
tide graph and hourly time will be
displayed on the upper half.
Press and hold LIGHT/SET button
for two seconds; year digits will flash.
To advance flashing year digits,
press START button. Press MODE
button; months digits will flash. To
advance months digits, press STAR T
button. Press MODE button; date
digits will flash. To advance date
digits, press START button. When
future date setting is complete, press
LIGHT/SET button. Press START
button; cursor will scroll across tide
graph, indicating tide conditions for
any hour of the day on the future
date selected. Note: Hourly time is
indicated beneath “FT” on the upper
half of display.
HOW TO OPERATE
CHRONOGRAPH/STOPWATCH
Press MODE button until “CHRONO”
appears. “CHRONO RESET” will be
displayed on the upper half;
chronograph time on the lower half.
Reset the chronograph to zero by
pressing STOP/RESET button.
Press START button to start
chronograph.
Press START button to view split
time. Split time is the time elapsed
since the start of the chronograph.
Chronograph will continue to count
while split time is displayed. Each
press of START button will display
a split time.
To stop chronograph, press
STOP/RESET button. Reset the
chronograph to zero by pressing the
STOP/RESET button.
HOW TO SET AND OPERATE THE
ALARMS
Press MODE button until “ALARM”
appears. There are four different
alarms, which can be set as daily
repeating alarms, or one time only
reminder alarms. To set a one time
alarm, you must set a specific date.
To set a daily repeating alarm, date
position must be set to “-----”.
Additionally, the four dif ferent alarms
may be set to reference either
“TIME-1” or dual time “TIME-2.”
Pressing STOP/RESET button will
toggle between the four
different alarms.
Press and hold LIGHT/SET button
to enter alarm setting mode. The
hours digits will flash. Press STAR T
button to advance the flashing hours
digits; hold for rapid advance. Press
MODE button; minutes digits will
flash. Press START button to
advance minutes digits. Press
MODE button; months digits will
flash; to set a one time only reminder
alarm, you must set a date. Press
START button to advance months
digits. To set this alarm as a daily
repeating alarm, enter (--) instead
of specific months digits.
Press MODE button; date digits will
flash. To set a one time only
reminder alarm, press STAR T button
to advance date digits. To set this
alarm as a daily repeating alarm,
enter (--) instead of specific date
digits. Press MODE button; “T1” or
“T2” will flash. Press STOP/RESET
button to indicate if this alarm is in
reference to “TIME-1”, or dual time
“TIME-2”. Press LIGHT/SET button
when alarm 1 setting is complete.
Press STOP/RESET button to
advance to alarm 2, 3 or 4. To set
any of these alarms, follow setting
sequence for alarm 1 as detailed
above.
Once any of the alarm times are
set, the alarm is automatically
activated (armed), and is indicated
as “ ” on the display. To arm or
disarm any of the four alarms while
in alarm mode, press STOP/RESET
button to select alarm. Once
selected, press START button to
arm or disarm the alarm “ ” and/or
hourly chime “ ”. The setting
sequence is:
Hourly chime on: “ ”
Alarm on: “ ”
Both alarm and
hourly chime on: “ ”
Both alarm and
hourly chime off: no symbol
HOW TO OPERATE THE
COUNTDOWN TIMER
Press MODE button until “TIMER”
appears. During the setting process
you can select from three different
countdown timer functions.
Countdown/stop (CS): timer counts
down from a preset time to zero and
stops. Countdown/repeat (CR):
timer counts down from a preset
time to zero, resets and repeats.
Countdown/count up (CU): timer
counts down from a preset time to
zero and begins to count up.
Press and hold LIGHT/SET button
to enter the countdown timer setting
mode.
The seconds digits will flash. Press
START button to advance
seconds digits.
Press MODE button; hours digits
will flash. Press START button to
advance the hour digits.
Press MODE button; minutes digits
will flash; press START button to
advance minutes digits.
Press MODE button; CR, CS or CU
will flash. Press START button to
select which countdown timer you
wish to use.
When countdown time setting is
complete, press LIGHT/SET button
to exit the setting mode. To start
timer, press START button. To stop
timer, press STOP/RESET button.
To reset timer, press LIGHT/SET
button.
HOW TO SET DUAL TIME
Press MODE button until “TIME-2”
appears. To set dual time, press
and hold LIGHT/SET button;
seconds digits will flash. Press
STAR T button to reset the seconds
digits to zero. Continue through the
setting sequence as done in “TIME1”, setting by cycling between
MODE button and START button.
When dual time setting is complete,
press LIGHT/SET button to exit the
setting mode.
CARE AND MAINTENCE
1. Back case cover should only be
removed by an authorized watch
repair specialist.
2. Always rinse your watch in fresh
water after immersion in salt or
chlorinated water.
3. Do not expose watch or band to
chemicals such as gasoline, aerosol
sprays, paint or solvents.
4. Periodically clean with a soft cloth
and fresh water.
NOTE: Extreme electrostatic
discharge can cause the LCD to
‘freeze up’. In this event you could
reset the watch by pressing all 4
buttons together for 5 seconds.
TIDE LOCATIONS
WEST USA
SAN DIEGO,CA
LA JOLLA, CA
SAN CLEMENTE, CA
NEWPORT BAY, CA
CABRILLO BEACH, CA
LOS ANGELES HARBOR, CA
SANTA MONICA, CA
MALIBU, CA
VENTURA, CA
RINCON, CA
SANTA BARBARA, CA
GAVIOTA, CA
POINT ARGUELLO, CA
MORRO BEACH, CA
CARMEL COVE, CA
MONTEREY BAY, CA
MOSS LANDING, CA
SANTA CRUZ, CA
OCEAN BEACH, CA
Page 3

GOLDEN GATE (SF), CA
BOLNAS LAGOON, CA
BODEGA BAY, CA
BIG RIVER, MENDOCINO, CA
CAPE MENDOC, CA
HUMBOLDT BAY, CA
CRESCENT CITY, CA
ABERDEEN, WA
NEWPORT, WA
GULF COAST
CORPUS CHRISTI, TX
NEW ORLEANS, LA
PENSACOLA, FL
EAST COAST
KEY WEST, FL
MIAMI HARBOR, FL
FORT LAUDERDALE, FL
SEBASTIAN INLET, FL
DAYTONA BEACH, FL
SAVANNAH RIVER, GA
FOLLY BEACH, SC
CHARLESTON, SC
MYRTLE BEACH, SC
CAPE FEAR, NC
CAPE HATTERAS, NC
KITTY HAWK, NC
VIRGINIA BEACH, VA
CAPE MAY, NJ
ATLANTIC CITY, NJ
LITTLE EGG HARBOR, NJ
MANASQUAN INLET, NJ
SANDY HOOK, NJ
FIRE ISLAND, NY
BRIDGEPORT, CT
GREAT SALT POND,BLOCK
ISLAND, RI
NEW LONDON,CT
NEWPORT, RI
SAKONNET PNT, RI
GAY HEAD,MARTHAS
VINEYARD,MA
NANTUCKET, MA
CAPE COD, CHATHAM, MA
BOSTON, MA
GLOCHESTER, MA
HAWAII
KAWAIHEE, BIG ISL.
KAILUA KONA, BIG ISLAND
HILO, BIG ISLAND
KAHULULU, MAUI
HANA, MAUI
MAKENA, MAUI
MALAEA, MAUI
LAHINA, MAUI
HALIWAII, OAHU
WIANAE, OAHU
HONOLULU, OAHU
KANEOHE, OAHU
HANAPEPE, KAUAI
NWLILI, KAUAI
HANALILI, KAUAI
JAPAN
MIYAZAKI
MUROTO
ISE
ENOSHIMA
IRAGO
SENDAI
OMAEZAKI
MAIZURU
MEXICO
ENSENADA
SAN CARLOS
PUERTO PNASCO
GUAYMAS, MEX
MAZATLAN
PUERTO VALLARTA
ACAPULCO
SALINA CRUZ
AUSTRALIA
SYDNEY
GOLD COAST
PERTH
PACIFIC
TAVARUA
TEAHUPOO
PAGO PAGO
EASTER ISLAND
DOMINICAL
LA LIBERTAD, EL SALVADOR
GUAM
GALAPAGOS ISLAND
ATLANTIC OCEAN
CANARY ISLAND
FERRY REACH, BERMUDA
NASSAU
EUROPE
EL FERROL DEL CAUDILLO,
SPAIN
LISBON, PORTUGAL
IMHAM, UK
DUBLIN, IRELAND
POINTE DE GRAVE, FRANCE
VENEZA, ITALY
BRAZIL
RIO DE JANEIRO
FERNANDO DE NORONHA
RECIFE
INDIAN OCEAN
REUNION ISLAND
COLOMBO, SRI LANKA
MAALE, MALDIVES
SOUTH AFRICA
DURBAN
JEFFREYS BAY
SOUTH EAST ASIA
PADANG, INDONESIA
BALI, INDONESIA
DISCLAIMER ON TIDE DATA
Not for navigation. This program is
furnished in the hope that it will be
useful, without the implied warranty
of merchantability or fitness for a
particular purpose. Do not use this
program as a basis for any decisions
that could result in harm to people,
other organisms, or property. Check
these predictions against officially
sanctioned tables. Agencies like
NOAA exist because there is a need
for certifiably correct tide predictions.
Do not rely on these predictions if
you need guaranteed results.
Remember that weather conditions
affect tidal ranges and current
speeds, sometimes very strongly.
WARRANTY INFORMATION
Freestyle U.S.A. warrants, to the
original purchaser, that its watches
are free from defects in materials
and workmanship for a period of ten
(10) years under normal use. The
warranty excludes batteries, crystal,
watch case plating, and strap/
bracelet/ band. The warranty
excludes normal wear and tear and
abuse.
Special note: Freestyle® watches
are designed and engineered to be
highly water-resistant, and to
withstand the most active of
lifestyles. The most important
component in keeping your watch
water-resistant is the case back Oring, which prevents water from
entering the watch through the
case back.
Water leakage most often occurs
after improper battery replacement.
We strongly recommend having a
certified jeweler, watch repair
technician or Freestyle's service
center replace your battery. Water
leakage due to improper battery
replacement is not covered under
warranty.
Should your Freestyle® watch
require warranty service, send it
along with the following:
1. A copy of your sales receipt
2. Your printed name and address
3. Your telephone number
4. A brief description of the problem
5. Please include $8.50 for
processing and handling, using
one of the following payment
methods:
-Check
-Money order
-Credit card (be sure to include
card number and expiration date)
REMEMBER: NEVER INCLUDE A
SPECIAL WATCHBAND OR ANY
OTHER PERSONAL ARTICLES
OF VALUE IN YOUR SHIPMENT.
Send to the following address:
Freestyle
Attn: Individual Returns
47-50 33rd Street
Long Island City, NY 11101
(718)-729-8890
Please allow 30 days for return of
your watch.
Neither this warranty, nor any other
warranty expressed, is assumed for
any incidental or consequential
damages, including but not limited
to the mathematical accuracy of the
product. Some states do not allow
limitations on how long an implied
warranty lasts, or the exclusions of
or limitations on consequential
damages, so the above limitations
may not apply to you. This warranty
gives you specific legal rights, and
you may have other rights which
vary from state to state.
This warranty applies to watches
purchased in the United States. For
watches purchased outside the
United States, please contact your
authorized Freestyle® dealer for
warranty information.
If your watch requires servicing not
covered under our warranty (battery,
crystal, strap/bracelet/band, watch
case plating), or refurbishing,
complete the return form (next
column) and return with your watch.
Visit our website at:
www.freestyleusa.com
Page 4

Attn: Individual Returns
47-50 33rd Street
Long Island City, NY 11101
(718)-729-8890
Battery $ 4.00
Case 10.00
Bezel 6.00
Band(Polyurethane) 12.00
Band(Leather) 12.00
Band(Metal) 20.00
Band(Nylon) 7.00
Processing and handling 8.50
________
Total $
Check or Money Order
Master Card
Visa
__________________________________
Account# Expiration Date
__________________________________
Printed Name
__________________________________
Address
__________________________________
__________________________________
__________________________________
Phone Number
__________________________________
Signature
816004-1-4
 Loading...