

Page 1
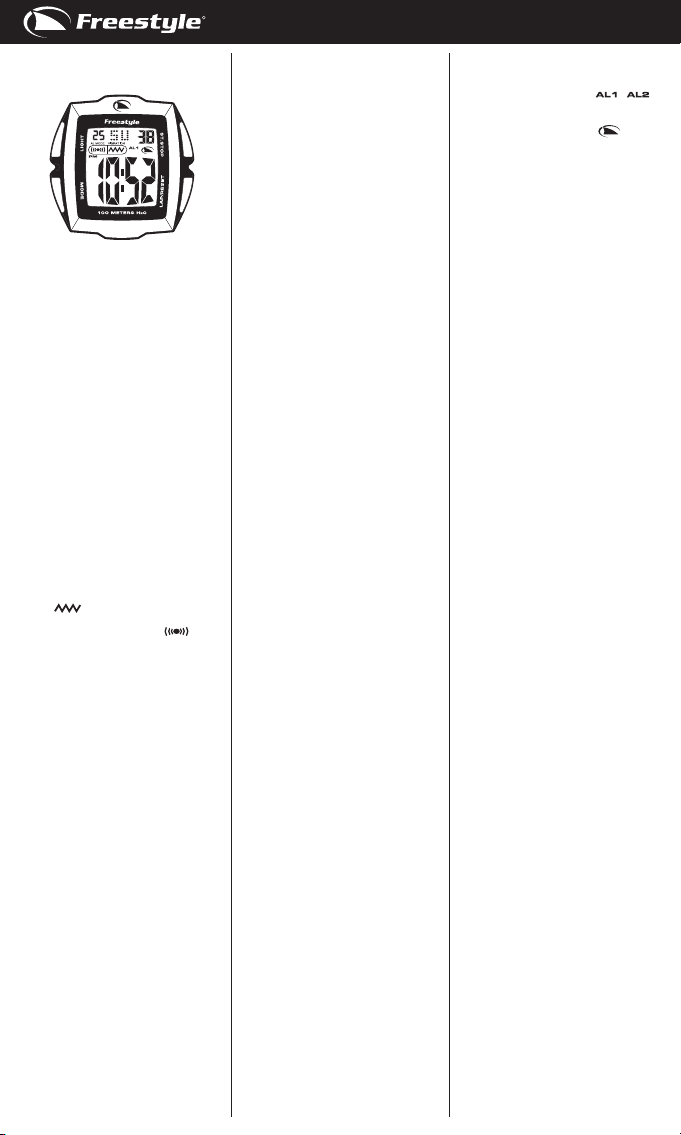
SHARK BUZZ 2.0
S1S4
S2S3
S1. Start/stop button
S2. Lap/reset button
S3. Mode button
S4. Light button
DISPLAY MODES:
The watch has six display modes:
HOME TIME, STOPWATCH, FOREIGN
TIME (T2), HOME TIME ALARM (A1),
FOREIGN TIME ALARM (A2) and TIMER
(TR).
To change from one display mode to
another, press S3 button once.
TO USE THE VIBRATION AND BEEP
FUNCTIONS:
The vibration and beep functions can
be activated individually or simultaneously. When the corresponding function
is activated, the watch will vibrate and
or beep when S1, S2 or S3 button is
pressed or when an alarm goes off.
TO TURN ON/OFF THE VIBRATION
AND BEEP FUNCTIONS:
In HOME TIME mode,
1. Press S1 button once to activate the
vibration function. Vibration indica tor
2. Press again to activate the beep
function. Beep indicator
appear.
3. Press the third time to activate both
functions. Both of the indicators
will appear.
4. Press the fourth time to deactivate
both functions. Both of the indica tors will disappear.
TO SET THE TIME AND CALENDAR:
1. Press S3 button to select HOME
TIME / FOREIGN TIME mode.
2. Press and hold S2 button for
around 2 seconds, the second digits
will blink.
3. Press S1 button to reset the second
digits to zero.
4. Press S3 button, the hour digits will
blink.
5. Press S1 button to set the hour
digits. Holding down the button will
speed up the process.
6. Press S3 button once, the minute
digits will blink.
7. Press S1 button to set the minute
digits. Holding down the button will
speed up the process.
8. Follow the same pattern to set the
hour format, date, month and day
(of the week).
9. To set the hour format, press S1
button to toggle between 12-hour
and 24-hour format. The P.M. indi
cator may be displayed to indicate
the time period 12:00 A.M. – 11:59
P.M. in 12-hour format.
10. After nished making all the set tings, press S2 button to conrm.
will appear.
will
NOTE: In FOREIGN TIME settings, only
the hour digits are open to setting.
All other settings are synchronized
between HOME TIME and FOREIGN
TIME mode.
HOME AND FOREIGN TIME DISPLAY:
To display the foreign time, press S3
button to select FOREIGN TIME mode.
The mode description (T2) will be
displayed.
TO USE THE STOPWATCH:
1. Press S3 button to select STOP WATCH mode.
2. The stopwatch will then be
displayed in its current status –
reset, running or stopped.
3. To resume a counting, press S1
button to resume from where it left
off.
4. To start a new counting, reset the
stopwatch to zero rst.
Press S1 button to stop counting,
then press S2 button to reset.
For the measurement of elapsed time
In STOPWATCH mode,
1. Press S1 button to start counting.
2. To stop counting, press S1 button.
Press S1 button again to resume
from where it left off.
3. To reset to zero, press S1 button to
stop counting and then press S2
button.
For the measurement of split time
In STOPWATCH mode,
1. Press S1 button to start counting.
2. While the stopwatch is running,
press S2 button to register a lap.
The split time will be displayed and
the stopwatch is still running in the
background.
3. To display the currently accumu lated time, press S2 button again.
4. Repeat the last step until all the
laps have been registered.
5. To stop counting, press S1 button.
Press S1 button to resume from
where it left off.
6. To reset to zero, press S1 button to
stop counting and then press S2
button.
NOTE: The stopwatch can count up to a
maximum of 23 hours, 59 minutes and
59.99 seconds.
NOTE: You can leave the stopwatch
running while switching over to other
operating modes.
TO SET THE ALARM:
1. Press S3 button to select HOME
ALARM or FOREIGN TIME to set.
2. Press and hold S2 button for around
2 seconds. The hour digits will
blink.
3. Press S1 button to set the hour
digits. Holding down the button will
speed up the process.
4. Press S3 button, the minute digits
will blink.
5. Press S1 button to set the minute
digits. Holding down the button will
speed up the process.
6. After nished making all the set tings, press S2 button to conrm.
NOTE: The alarm will automatically be
activated after being set.
NOTE: The alarm will work according
to HOME TIME.
TO TURN ON/OFF THE ALARM AND
HOURLY CHIME:
ENGLISH
1. Press S3 button to select HOME
ALARM or FOREIGN ALARM to set.
2. Press S1 button to activate the
alarm. Alarm indicator
will appear.
3. Press again to activate the hourly
chime. Chime indicator will
appear.
4. Press the third time to activate both
functions. Both of the indicators
will appear.
5. Press fourth time to deactivate both
functions. Both indicators will
disappear.
WHEN AN ALARM OR CHIME GOES OFF:
A tune will be emitted by the hour
when the hourly chime function is
activated.
An alarm tune will be emitted at the
designated time for around 20 seconds
when the alarm is activated. To stop
the tune, press any button.
NOTE: The watch will not vibrate and
or beep to signal an hourly chime and
alarm unless the an vibration and or
beep function is activated.
TO SET THE TIMER:
1. Press S3 button to select TIMER
mode.
2. Press and hold S2 button for
around 2 seconds, the hour digits
will blink.
3. Press S1 button to set the hour
digits. Holding down the button will
speed up the process.
4. Press S3 button, the minute digits
will blink.
5. Press S1 button to set the minute
digits. Holding down the button
will speed up the process.
6. After nished making all the set tings, press S2 button to conrm.
TO USE THE TIMER:
1. Press S3 button to select TIMER
mode.
2. The timer will be displayed in its
current state – reset, running, or
stopped.
3. To resume a counting, press S1
button to resume from where it left
off.
4. To start a new counting, re-adjust
the timer rst.
Press S1 button to stop counting,
then set the timer according to the
paragraph “TO SET THE TIMER”.
5. Press S1 button to start counting.
6. To stop counting, press S1 button.
Press S1 button again to resume
from where it left off.
7. After reaching zero in a countdown,
a tune will be emitted for around 20
seconds. To stop the tune, press
any button.
NOTE: You can leave the timer running
while switching over to other operating
modes.
TO USE THE BACKLIGHT:
Press S4 button to turn on the backlight for around 3 seconds.
/
Page 2

ENGLISH
To reduce carbon foot print, these
Freestyle instructions are printed with
soy inks on recycled paper.
FS8128-SHARK BUZZ2.0-1072-MR01
Page 3
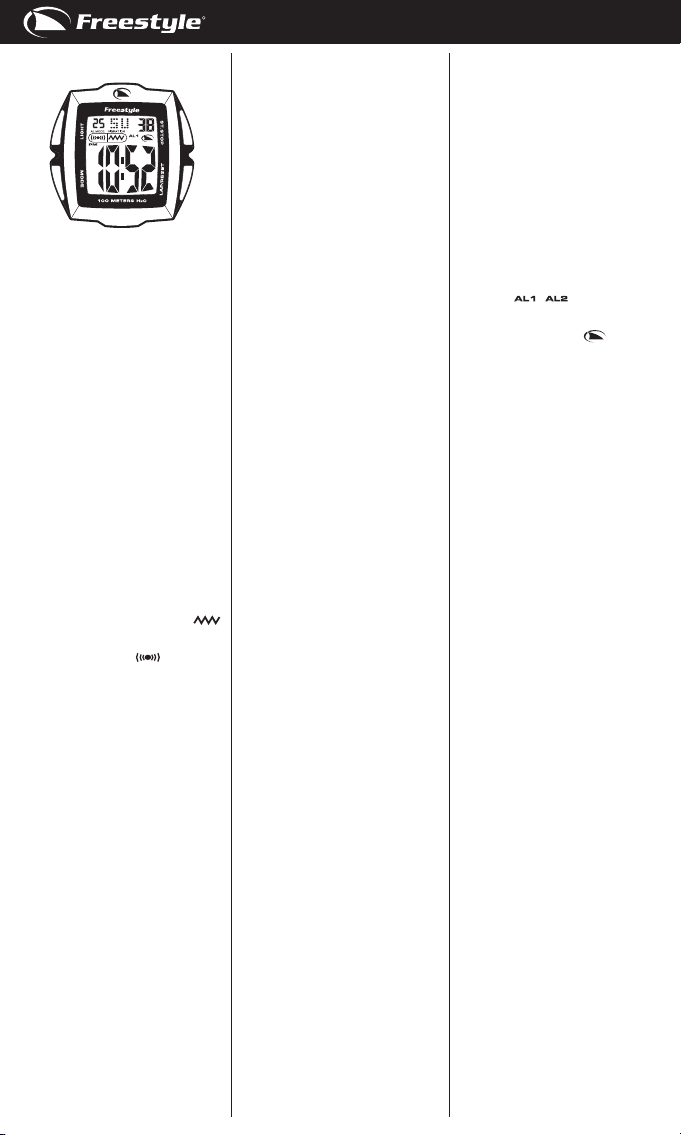
SHARK BUZZ 2.0
S1S4
S2S3
S1. Botón para iniciar/parar
S1. Botón para iniciar/parar
S2. Botón de vuelta/puesta a cero
S3. Botón de modo
S4. Botón de luz
MODOS DE VISUALIZACIÓN:
El reloj tiene seis vistas: HORA EN
CASA, CRONÓMETRO, HORA EN EL
EXTRANJERO (T2), ALARMA 1 (A1),
ALARMA 2 (A2), y TEMPORIZADOR
(TR).
Para cambiar de una vista a otra, pulse
el botón S3 una vez.
CÓMO USAR LAS FUNCIONES DE
VIBRACIÓN Y PITIDO:
Las funciones de vibración y pitido se
activan individual o simultáneamente.
Cuando se active la función correspondiente, el reloj vibrará o emitirá un
pitido al pulsar los botones S1, S2 ó S3
o cuando salte una alarma o el repique
de la hora.
CÓMO APAGAR LAS FUNCIONES DE
VIBRACIÓN Y PITIDO:
En el modo de HORA EN CASA,
1. Pulse el botón S1 una vez para
activar la función de alarma. Apare cerá el indicador de vibración
2. Pulse el botón otra vez para activar
la función de pitido. Aparecerá el
indicador de pitido
3. Pulse una tercera vez para activar
ambas funciones. Aparecerán
ambos indicadores.
4. Pulse una cuarta vez para desacti
var ambas funciones. Desapare
cerán ambos indicadores.
CÓMO AJUSTAR LA HORA Y EL
CALENDARIO:
1. Pulse el botón S3 para seleccionar
el modo de HORA EN CASA / HORA
EN EL EXTRANJERO.
2. Mantenga pulsado el botón S2
durante 2 segundos. Los dígitos de
los segundos parpadearán.
3. Pulse el botón S1 para volver a
poner los dígitos de los segundos a
cero.
4. Pulse el botón S3. Los dígitos de
las horas parpadearán.
5. Pulse el botón S1 para ajustar los
dígitos de la hora. Mantenga pul
sado el botón para acelerar el
proceso.
6. Pulse el botón S3 una vez. Los
dígitos de los minutos parpadearán.
7. Pulse el botón S1 para ajustar los
dígitos de los minutos. Mantenga
pulsado el botón para acelerar el
proceso.
8. Haga lo mismo para congurar el
formato de la hora, la fecha, el mes
y el día de la semana.
9. Para ajustar el formato de la hora,
pulse el botón S1 para cambiar
entre los formatos de 12 horas y de
24 horas. Se mostrará el indicador
de pm para señalar el periodo de
.
tiempo 12:00 am – 11:59 pm en el
formato de 12 horas.
10. Después de hacer todos los ajustes
necesarios, pulse el botón S2 para
conrmarlo.
NOTA: En la conguración de la HORA
EXTRANJERA, sólo podrá ajustar los
dígitos de la hora. El resto de ajustes
está sincronizado entre la HORA EN
CASA y HORA EN EL EXTRANJERO.
PANTALLA PARA CASA Y EL EXTRANJERO:
Pulse el botón S3 para seleccionar el
modo HORA EN EL EXTRANJERO y ver
dicha hora. Aparecerá la descripción
del modo (T2).
CÓMO USAR EL CRONÓMETRO:
1. Pulse el botón S3 para seleccionar
el modo de CRONÓMETRO.
2. Aparecerá el cronómetro en el
estado en que esté: en marcha, a
cero o parado.
3. Pulse el botón S1 para retomar la
cuenta ahí donde se quedó.
4. Para iniciar una cuenta nueva,
primero hay que poner el
cronómetro a cero.
Pulse el botón S1 para interrumpir
la cuenta y después pulse el botón
S2 para volver a cero.
Para medir el tiempo transcurrido,
En modo CRONÓMETRO,
1. Pulse el botón S1 para empezar a
contar.
2. Pulse el botón S1 para interrumpir
la cuenta. Pulse el botón S1 otra
vez para retomar la cuenta ahí
donde se quedó.
3. Pulse el botón S1 para interrumpir
la cuenta y después pulse el botón
S2 para volver a cero.
Para medir el tiempo dividido,
.
En modo CRONÓMETRO,
1. Pulse el botón S1 para empezar a
contar.
2. Mientras el cronómetro está en
marcha, pulse el botón S2 para
registrar una vuelta. Verá el tiempo
dividido mientras que el cronómetro
seguirá contando por detrás.
3. Para mostrar el tiempo acumulado
hasta el momento, pulse S2 otra
vez.
4. Repita el último paso hasta que se
hayan guardado todas las vueltas.
5. Pulse el botón S1 para interrumpir
la cuenta. Pulse el botón S1 para
retomar la cuenta ahí donde se
quedó.
6. Pulse el botón S1 para interrumpir
la cuenta y después pulse el botón
S2 para volver a cero.
NOTA: El cronómetro puede contar
hasta un máximo de 23 horas, 59
minutos y 59 .99 segundos.
NOTA: Puede dejar la CUENTA ATRÁS
en marcha y cambiar a otros modos
operativos.
CÓMO USAR LA ALARMA:
1. Pulse el botón S3 para seleccionar
el modo de ALARMA 1 ó ALARMA 2.
2. Mantenga pulsado el botón S2
durante unos 2 segundos. Los
dígitos de la hora parpadearán.
3. Pulse el botón S1 para ajustar los
dígitos de la hora. Mantenga pul
sado el botón para acelerar el
proceso.
4. Pulse el botón S3. Los dígitos de los
minutos parpadearán.
ESPAÑOL
5. Pulse el botón S1 para ajustar los
dígitos de los minutos. Mantenga
pulsado el botón para acelerar el
proceso.
6. Después de hacer todos los ajustes
necesarios, pulse el botón S2 para
conrmarlo.
NOTA: La alarma se encenderá automáticamente tras su conguración.
NOTA: La alarma funcionará según la
HORA EN CASA.
CÓMO APAGAR Y ENCENDER LA
ALARMA Y EL REPIQUE DE LA HORA:
1. Pulse el botón S3 para seleccionar
el modo de ALARMA 1 ó ALARMA 2.
2. Pulse el botón S1 para activar la
alarma. Aparecerá el indicador de
alarma
3. Pulse el botón otra vez para activar
el repique de la hora. Aparecerá el
indicador de repique .
4. Pulse una tercera vez para activar
ambas funciones. Aparecerán
ambos indicadores.
5. Pulse una cuarta vez para desacti
var ambas funciones. Desapare
cerán ambos indicadores.
CUANDO LA ALARMA O EL REPIQUE
SALTAN:
Cuando se active la función de repique
en cada hora, saltará una melodía.
Con la alarma activada, el sonido de
alarma saltará a la hora jada. Sonará
durante 20 segundos. Para parar el
tono, pulse cualquier botón.
NOTA: El reloj no vibrará ni emitirá
el repique de la hora a no ser que las
respectivas funciones estén activadas.
CÓMO CONFIGURAR EL TEMPORIZADOR:
1. Pulse el botón S3 para seleccionar
el modo de TEMPORIZADOR.
2. Mantenga pulsado el botón S2
durante dos segundos. Los dígitos
de las horas parpadearán.
3. Pulse el botón S1 para ajustar los
dígitos de la hora. Mantenga pul
sado el botón para acelerar el
proceso.
4. Pulse el botón S3. Los dígitos de
los minutos parpadearán.
5. Pulse el botón S1 para ajustar los
dígitos de los minutos. Mantenga
pulsado el botón para acelerar el
proceso.
6. Después de hacer todos los ajustes
necesarios, pulse el botón S2 para
conrmarlo.
CÓMO USAR EL TEMPORIZADOR:
1. Pulse el botón S3 para seleccionar
el modo de TEMPORIZADOR.
2. Aparecerá el temporizador en su
estado actual: reseteado, en mar
cha o parado.
3. Pulse el botón S1 para retomar la
cuenta ahí donde se quedó.
4. Para iniciar una cuenta nueva,
primero hay que reajustar el tem
porizador.
Pulse el botón S1 para interrum
pir la cuenta y después congure
el temporizador según lo indicado
en el párrafo “CÓMO CONFIGURAR
EL TEMPORIZADOR”.
5. Pulse el botón S1 para empezar a
contar.
6. Pulse el botón S1 para interrumpir
la cuenta. Pulse el botón S1 otra
vez para retomar la cuenta ahí
donde se quedó.
.
/
Page 4

7. Después de haber llegado a cero
en la cuenta atrás, sonará un tono
durante 20 segundos. Para parar el
tono, pulse cualquier botón.
NOTA: Puede dejar el TEMPORIZADOR
en marcha y cambiar a otros modos
operativos.
CÓMO USAR LA LUZ DE FONDO:
Pulse el botón S4 para encender la luz
de fondo durante 3 segundos.
ESPAÑOL
Para reducir la huella del carbono,
las instrucciones de Freestyle se han
imprimido con tinta de soja en papel
reciclado.
FS8128-SHARK BUZZ2.0-1072-MR01
Page 5

SHARK BUZZ 2.0
S1S4
S2S3
S1 - Start/Stop-Taste
S2 - Taste Rundenzeit/Rücksetzen
S3 - Taste “Modus”
S4 - Taste für Beleuchtung
ANZEIGEMODI:
Die Armbanduhr hat sechs Anzeigemodi: ORTSZEIT, STOPPUHR,
FREMDZEIT (T2), WECKFUNKTION
1 (A1), WECKFUNKTION 2 (A2), und
TIMER (TMR).
Drücken Sie die Taste S3 einmal um
von einem Modus zum nächsten zu
wechseln.
VIBRATION UND SIGNALFUNKTION:
Die Vibrations- und Signalfunktion
kann jeweils einzeln oder simultan
aktiviert werden. Wenn die entsprechende Funktion aktiviert ist wird die
Armbanduhr vibrieren bzw. piepsen
wenn eine der Tasten S1, S2, oder
S3 gedrückt werden oder wenn das
Stundensignal oder Weckfunktion
aktiviert ist.
VIBRATION UND SIGNALFUNKTION
AN/AUS STELLEN:
Im Modus ORTSZEIT:
1. Drücken Sie Taste S1 einmal um
die Vibrierfunktion zu aktivieren
bzw. zu deaktivieren. Vibrations Symbol
2. Drücken Sie die Taste nochmals
um die Signalfunktion zu aktivieren.
Signal-Symbol
3. Drücken Sie die Taste zum dritten
Mal um beide Funktionen zu
aktivieren. Beide Symbole werden
angezeigt.
4. Drücken Sie die Taste zum
vierten Mal um beide Funktionen
zu deaktivieren. Beide Symbole
werden erlöschen.
ZEIT UND KALENDER EINSTELLEN:
1. Drücken Sie Taste S3 um den Mo
dus ORTSZEIT/FREMDZEIT zu
wählen.
2. Drücken Sie Taste S2 etwa 2
Sekunden lang. Die Sekundenan
zeige wird blinken.
3. Drücken Sie Taste S1 um die
Sekundenanzeige auf “Null”
zurückzusetzen.
4. Drücken Sie Taste S3. Die Stun
denanzeige wird blinken.
5. Drücken Sie Taste S1 um die
Stundenanzeige einzustellen Halten
Sie die Taste gedrückt um die
Anzeige schneller vorzubewegen.
6. Drücken Sie Taste S3 einmal. Die
Minutenanzeige wird blinken.
7. Drücken Sie Taste S1 um die
Minutenanzeige einzustellen Halten
Sie die Taste gedrückt um die
Anzeige schneller vorzubewegen.
8. Folgen Sie den gleichen Schritten
um das Stundenformat, das Datum,
den Monat und (Wochen-) Tag
einzustellen.
9. Drücken Sie Taste S1 um zwischen
wird angezeigt.
wird angezeigt.
12-Stunden und 24-Stundenformat
zu wählen. Die Anzeige „P.M“
erscheint um die Zeit zwischen
Mitternacht und 11:59 Mittags im
12-Stundenformat anzuzeigen.
10. Wenn Sie alle Einstellungen abge
schlossen haben, drücken Sie Taste
S2 zur Bestätigung.
HINWEIS : Im Modi zur Einstellung der
FREMDZEIT können nur die Stunden
eingestellt werden. Die Minuten und
Sekunden für die FREMDZEIT synchronisieren sich mit der ORTSZEIT.
ORTS- UND FREMDZEIT ANZEIGEN:
Drücken Sie Taste S3 um den
Modus FREMDZEIT zu wählen. Die
Beschreibung des Modus (T2) wird
angezeigt.
ZEITMESSUNG MIT DER STOPPUHR:
1. Drücken Sie Taste S3 um den
Modus STOPPUHR zu wählen.
2. Die Stoppuhr wird dann im aktuel
len Status - rücksetzen, zählend,
gestoppt - angezeigt.
3. Drücken Sie Taste S1 um ab der
letzten Messung weiter zu messen.
4. Um eine neue Zeitmessung zu
starten, setzen Sie die Stoppuhr
zuerst wieder auf “Null”.
Drücken Sie Taste S1 um die Zeit
messung zu stoppen und dann
Taste S2 um den Zähler wieder auf
“Null” zurückzusetzen.
Messung der abgelaufenen Zeit:
Im Modus STOPPUHR:
1. Drücken Sie S1 um die Messung zu
starten.
2. Drücken Sie S1 um die Zeitmes
sung zu stoppen. Drücken Sie Taste
S1 um ab der letzten Messung
weiter zu messen.
3. Drücken Sie Taste S1 um die Zeit
messung zu stoppen und dann
Taste S2 um den Zähler wieder auf
“Null” zurückzusetzen.
Messung der Zwischenzeit (Split Time):
Im Modus STOPPUHR:
1. Drücken Sie S1 um die Messung zu
starten.
2. Während die Stoppuhr zählt,
drücken Sie Taste S2 einmal um die
Rundenzeit aufzunehmen. Die
Zwischenzeit wird angezeigt; die
Stoppuhr läuft im Hintergrund
weiter.
3. Drücken Sie S2 um die aktuelle
Gesamtzeit anzuzeigen.
4. Wiederholen Sie den letzten Schritt
bis alle Runden gemessen wurden.
5. Drücken Sie S1 um die Zeitmes
sung zu stoppen. Drücken Sie Taste
S1 um ab der letzten Messung
weiter zu messen.
6. Drücken Sie Taste S1 um die Zeit
messung zu stoppen und dann
Taste S2 um den Zähler wieder auf
“Null” zurückzusetzen.
HINWEIS : Die Stoppuhr wird bis zu
99 Stunden, 59 Minuten und 59.99
Sekunden zählen.
HINWEIS : Sie können die Stoppuhr
laufen lassen während Sie andere Modi
benutzen.
WECKFUNKTION EINSTELLEN:
1. Drücken Sie Taste S3 um zwischen
WECKFUNKTION1 und WECK
FUNKTION2 zu wählen.
2. Halten Sie Taste S2 etwa 2 Sekunde
lang gedrückt. Die Stundenanzeige
wird blinken.
DEUTSCH
3. Drücken Sie Taste S1 um die
Stundenanzeige einzustellen Halten
Sie die Taste gedrückt um die
Anzeige schneller vorzubewegen.
4. Drücken Sie Taste S3. Die Minuten
anzeige wird blinken.
5. Drücken Sie Taste S1 um die
Minutenanzeige einzustellen Halten
Sie die Taste gedrückt um die
Anzeige schneller vorzubewegen.
6. Wenn Sie alle Einstellungen abge
schlossen haben, drücken Sie Taste
S2 zur Bestätigung.
HINWEIS : Der Alarmton wird nach
dem Einstellen automatisch aktiviert.
HINWEIS : Der Alarm richtet sich nach
der ORTSZEIT.
WECKFUNKTION UND STUNDENSIGNAL AN-/AUSSTELLEN:
1. Drücken Sie Taste S3 um zwischen
WECKFUNKTION1 und WECK
FUNKTION2 zu wählen.
2. Drücken Sie Taste S1 um die
Weckfunktion zu aktivieren. Wenn
die Weckfunktion aktiviert ist, wird
die Anzeige Weckfunktion
/ erscheinen.
3. Drücken Sie die Taste nochmals
um die Signalfunktion zu aktivieren.
Signal-Symbol
4. Drücken Sie die Taste zum dritten
Mal um beide Funktionen zu
aktivieren. Beide Symbole werden
angezeigt.
5. Drücken Sie die Taste zum
vierten Mal um beide Funktionen
zu deaktivieren. Beide Symbole
werden erlöschen.
BEIM ERTÖNEN DES WECKSIGNALS
ODER STUNDENSIGNALS:
Ein Signal wird stündlich ertönen
wenn die Stundensignal-Funktion
aktiviert ist.
Wenn die Weckfunktion aktiviert ist
wird zur eingestellten Zeit für etwa 20
Sekunden ein Signal ertönen. Drücken
Sie eine beliebige Taste um das Signal
abzustellen.
HINWEIS : Die Armbanduhr wird nicht
vibrieren bzw. kein Stundensignal
ertönen wenn die Vibrations-/Signalfunktion nicht aktiviert ist.
TIMER EINSTELLEN:
1. Drücken Sie Taste S3 um den
Modus TIMER zu wählen.
2. Drücken Sie Taste S2 etwa 2
Sekunden lang. Die Stundenan
zeige wird blinken.
3. Drücken Sie Taste S1 um die
Stundenanzeige einzustellen Halten
Sie die Taste gedrückt um die
Anzeige schneller vorzubewegen.
4. Drücken Sie Taste S3. Die
Minutenanzeige wird blinken.
Halten Sie die Taste gedrückt um
die Anzeige schneller vorzubewe gen.
5. Drücken Sie Taste S1 um die
Minutenanzeige einzustellen
6. Wenn Sie alle Einstellungen abge
schlossen haben, drücken Sie Taste
S2 zur Bestätigung.
TIMER BENUTZEN:
1. Drücken Sie Taste S3 um den
Modus TIMER zu wählen.
2. Der Timer wird dann im aktuellen
Status - rücksetzen, zählend,
gestoppt - angezeigt.
3. Drücken Sie Taste S1 um ab der
letzten Messung weiter zu messen.
wird angezeigt.
Page 6

4. Um eine neue Zeitmessung zu
starten, setzen Sie den Timer zu erst wieder zurück.
Drücken Sie Taste S1 um die Zeit
messung zu stoppen; stellen Sie
dann den Timer entsprechend des
Kapitels „TIMER EINSTELLEN“ ein.
5. Drücken Sie S1 um die Messung zu
starten.
6. Drücken Sie S1 um die Zeitmes sung zu stoppen. Drücken Sie Taste
S1 um ab der letzten Messung
weiter zu messen.
7. Wenn bei der Zeitmessung Null
erreicht wird, ertönt etwa 20
Sekunden lang ein Signal. Drücken
Sie eine beliebige Taste um das
Signal abzustellen.
HINWEIS : Sie können den Timer
laufen lassen während Sie andere Modi
benutzen.
HINTERGRUNDBELEUCHTUNG
BENUTZEN:
Drücken Sie Taste S4 um die
Hintergrundbeleuchtung für etwa 3
Sekunden anzuschalten.
DEUTSCH
Diese Freestyle-Gebrauchsanweisung
wurde mit Tinte auf Sojabasis auf
Recycling-Papier gedruckt um den
Kohleausstoß zu reduzieren.
FS8128-SHARK BUZZ2.0-1072-MR01
Page 7

SHARK BUZZ 2.0
S1S4
S2S3
S1. Bouton Démarrer / Arrêter
S2. Bouton Temps intermédiaire /
Réinitialiser
S3. Bouton Mode
S4. Bouton d’éclairage
MODES D’AFFICHAGE
La montre offre six modes d’afchage:
HEURE LOCALE, CHRONOMETRE,
HEURE INTERNATIONALE (T2),
ALARME 1 (A1), ALARME 2 (A2) et
MINUTEUR (TR).
Pour changer le mode d’afchage, appuyez une fois sur le bouton S3.
UTILISATION DES FONCTIONS DE
VIBRATION ET BIPS SONORES:
Les fonctions de vibration et bips sonores peuvent être activées individuellement ou simultanément. Lorsque la
fonction correspondante est activée,
la montre vibrera et/ou bipera lorsque
le bouton S1, S2 ou S3 sera pressé
ou lorsqu’un carillon horaire ou une
alarme retentira.
POUR ACTIVER / DESACTIVER LES
FONCTIONS DE VIBRATION ET BIPS
SONORES:
En mode HEURE LOCALE,
1. Appuyez une fois sur le bouton S1
pour active la fonction de vibration.
L’indicateur de Vibration
paraitra.
2. Appuyez de nouveau pour activer la
fonction de bips sonores.
L’indicateur de Bip sonore
apparaitra.
3. Appuyez une troisième fois pour
activer les deux fonctions. Les deux
indicateurs apparaitront.
4. Appuyez une quatrième fois pour
désactiver les deux fonctions. Les
deux indicateurs disparaitront.
REGLAGE DE l’HEURE ET DU CALENDRIER:
1. Appuyez sur le bouton S3 pour
sélectionner le mode HEURE LO
CALE / HEURE INTERNATIONALE.
2. Appuyez et maintenez le bouton S2
durant environ 2 secondes et les
chiffres des secondes clignoteront.
3. Appuyez sur le bouton S1 pour
réinitialiser les chiffres des sec
ondes à zéro.
4. Appuyez sur le bouton S3 et les
chiffres des heures clignoteront.
5. Appuyez sur le bouton S1 pour ré
gler les chiffres des heures. Main
tenez le bouton enfoncé pour ac
célérer la procédure.
6. Appuyez sur le bouton S3 et les
chiffres des minutes clignoteront.
7. Appuyez sur le bouton S1 pour
régler les chiffres des minutes.
Maintenez le bouton enfoncé pour
accélérer la procédure.
8. Suivez la même procédure pour
régler le format horaire, la date, le
mois et le jour (de la semaine).
9. Pour régler le format horaire, ap
ap
puyez sur le bouton S1 pour per
muter le format 12 heures et le
format 24 heures. L’indicateur P.M
s’afchera pour indiquer la période
entre 12:00 A.M. et 11:59 P.M. en
format horaire de 12 heures.
10. Après avoir effectué tous les ré
glages, appuyez sur le bouton S2
pour conrmer.
REMARQUE: En mode de réglage de
l’HEURE INTERNATIONALE, seuls
les chiffres des heures peuvent être
réglés. Tous les autres réglages sont
synchronisés entre l’HEURE LOCALE et
l’HEURE INTERNATIONALE.
AFFICHAGE DE L’HEURE LOCALE ET
DE L’HEURE INTERNATIONALE
Pour afcher l’heure internationale,
appuyez sur le bouton S3 pour sélectionner le mode de l’HEURE INTERNATIONALE. Le code descriptif du mode
(T2) s’afchera.
UTILISATION DU CHRONOMÈTRE
1. Appuyez sur le bouton S3 pour
choisir le mode CHRONOMÈTRE.
2. Le chronomètre s’afche à son état
actuel (réinitialisé, en marche ou à
l’arrêt).
3. Pour reprendre un comptage,
appuyez sur S1. Le chronomètre
reprendra où vous l’avez précédem
ment arrêté.
4. Pour lancer un nouveau comptage,
réinitialisez tout d’abord le chro
nomètre à zéro.
Appuyez sur le bouton S1 pour
arrêter le chronomètre, puis main
tenez appuyé le bouton S2 pour
réinitialiser le chronomètre.
Pour mesurer le temps écoulé,
En mode CHRONOMÈTRE,
1. Appuyez sur le bouton S1 pour
lancer le chronomètre.
2. Pour arrêter le chronomètre, ap
puyez sur le bouton S1. Appuyez sur
le bouton S1 pour reprendre où
vous vous êtes arrêté.
3. Pour réinitialiser à zéro, appuyez
sur le bouton S1 pour arrêter le
compteur puis appuyez sur le bou ton S2.
Pour mesurer un temps intermédiaire,
En mode CHRONOMÈTRE,
1. Appuyez sur le bouton S1 pour
démarrer le compteur.
2. Alors que le chronomètre est
en cours, appuyez une fois sur le
bouton S2 pour enregistrer un
temps intermédiaire. Le temps in
termédiaire s’afchera et le
compteur du chronomètre continu
era à tourner dans le fond.
3. Pour afcher les temps accumulés
en cours, appuyez de nouveau sur
le bouton S2.
4. Répétez la dernière étape jusqu’à
ce que tous les temps intermédi
aires soient sauvegardés.
5. Pour arrêter le compteur, appuyez
sur le bouton S1. Appuyez sur le
bouton S1 pour remettre le compt
eur en marche à partir du point où
il a été arrêté.
6. Pour réinitialiser le compteur à
zéro, appuyez sur le bouton S1 pour
arrêter le compteur puis appuyez
sur le bouton S2
REMARQUE: Le chronographe peut
compter jusqu’à 23 heures, 59 minutes
et 59,99 secondes.
REMARQUE: Vous pouvez laisser
FRANÇAIS
le chronomètre en marche tout en
permutant sur un autre mode.
REGLAGE DE L’ALARME:
1. Appuyez sur le bouton S3 pour
sélectionner le mode ALARME 1 ou
ALARME 2 à régler.
2. Appuyez et maintenez le bouton S2
durant 2 secondes et les chiffres
des heures clignoteront.
3. Appuyez sur le bouton S1 pour ré
gler les chiffres des heures. Main
tenez le bouton enfoncé pour ac
célérer la procédure.
4. Appuyez sur le bouton S3 et les
chiffres des minutes clignoteront.
5. Appuyez sur le bouton S1 pour
régler les chiffres des minutes.
Maintenez le bouton enfoncé pour
accélérer la procédure.
6. Après avoir effectué tous les ré
glages, appuyez sur le bouton S2
pour conrmer.
REMARQUE: L’alarme sera automatiquement active une fois réglée.
REMARQUE: L’alarme fonctionnera
selon l’HEURE LOCALE.
POUR ACTIVER / DESACTIVER
L’ALARME ET LE CARILLON HORAIRE:
1. Appuyez sur le bouton S3 pour
sélectionner le mode ALARME 1 ou
ALARME 2 à régler.
2. Appuyez sur le bouton S1 pour
active l’alarme. L’indicateur de
l’alarme
3. Appuyez de nouveau pour activer le
carillon horaire. L’indicateur du car
illon horaire
4. Appuyez une troisième fois pour
activer les deux fonctions. Les deux
indicateurs apparaitront.
5. Appuyez une quatrième fois pour
désactiver les deux fonctions. Les
deux indicateurs disparaitront.
LORSQUE L’ALARME OU LE CARILLON
HORAIRE RETENTIT:
Un bip sonore sera émis toutes les
heures lorsque la fonction du carillon
horaire est activée.
Une sonnerie d’alarme retentira à
l’heure réglée durant 20 secondes si le
mode d’alarme est activé. Pour arrêter
la sonnerie d’alarme, appuyez sur
n’importe quel bouton.
REMARQUE: La montre ne vibrera pas
et/ou ne bipera pas pour signaler le
carillon horaire et l’alarme sauf si la
fonction vibration et / ou bip sonore
est activée.
REGLAGE DU MINUTEUR:
1. Appuyez sur le bouton S3 pour
sélectionner le mode TIMER
(MINUTEUR).
2. Appuyez et maintenez le bouton S2
et les chiffres des heures clignoter ont.
3. Appuyez sur le bouton S1 pour ré
gler les chiffres des heures. Main
tenez le bouton enfoncé pour ac
célérer la procédure.
4. Appuyez sur le bouton S3 et les
chiffres des minutes clignoteront.
5. Appuyez sur le bouton S1 pour
régler les chiffres des minutes.
Maintenez le bouton enfoncé pour
accélérer la procédure.
6. Après avoir effectué tous les ré
glages, appuyez sur le bouton S2
pour conrmer.
/
apparaîtra.
apparaîtra.
Page 8

UTILISATION DU MINUTEUR:
1. Appuyez sur le bouton S3 pour
sélectionner le mode TIMER
(MINUTEUR).
2. Le minuteur afchera le statut en
cours – réinitialisé, compteur en
cours ou compteur arrêté.
3. Pour réactiver le compteur, ap
puyez sur le bouton S1 et le compt eur se remettra en marche à partir
du point où il a été arrêté.
4. Pour démarrer de nouveau le
compteur, réinitialisez tout d’abord
le minuteur à zéro.
Appuyez sur le bouton S1 pour
arrêter le compteur puis réglez
le minuteur en suivant les étapes
du paragraphe “REGLAGE DU
MINUTEUR”.
5. Appuyez sur le bouton S1 pour
démarrer le minuteur.
6. Appuyez sur le bouton S1 pour ar
rêter le compteur. Appuyez de nou veau sur le bouton S1 et le compt
eur se remettra en marche à partir
du point où il a été arrêté.
7. Lorsque le compte à rebours atteint
zéro, une tonalité sonore sera
émise durant 20 secondes. Pour
arrêter la tonalité sonore, appuyez
sur n’importe quel bouton.
REMARQUE: Vous pouvez laisser
le chronomètre en marche tout en
permutant sur un autre mode.
UTILISATION DU RETRO ECLAIRAGE :
Appuyez sur le bouton S4 pour activer
le rétro éclairage durant 3 secondes.
FRANÇAIS
Pour réduire l’émission de carbone
dans l’atmosphère, ces instructions
Freestyle sont imprimées avec des
encres de soja sur du papier recyclé.
FS8128-SHARK BUZZ2.0-1072-MR01
Page 9

SHARK BUZZ 2.0
S1S4
S2S3
S1. Tasto Start/stop
S2. Tasto Lap/reset
S3. Tasto Mode
S4. Tasto Light
MODALITA’ DI DISPLAY:
L’orologio ha sei modalità di display:
HOME TIME (ORA NAZIONALE), STOPWATCH (CRONOMETRO), FOREIGN
TIME (ORA ESTERA) (T2), ALARM 1
(ALLARME 1) (A1), ALARM 2 (ALLARME
2) (A2) e TIMER (TR).
Per passare da una modalità di display
ad un’altra, premere una volta il tasto
S3.
COME USARE LA VIBRAZIONE E LE
FUNZIONI DI BIP:
La vibrazione e le funzioni di bip possono essere attivate individualmente o
simultaneamente. Quando la funzione
corrispondente viene attivata, l’orologio
vibrerà e/o emetterà un bip quando
il tasto S1, S2 o S3 viene premuto o
quando la suoneria oraria o l’allarme
si disattivano.
COME ATTIVARE/DISATTIVARE LA
VIBRAZIONE O LE FUNZIONI DI BIP:
Nella modalità HOME TIME,
1. Premere una volta il tasto S1 per
attivare la funzione di vibrazione.
L’indicatore di vibrazione
parirà.
2. Premere di nuovo per attivare la
funzione di bip. L’indicatore di bip
apparirà.
3. Premere una terza volta per at tivare entrambe le funzioni. En trambi gli indicatori appariranno.
4. Premere una quarta volta per disat tivare entrambe le funzioni. En
trambi gli indicatori scompariranno.
COME IMPOSTARE ORA E DATA:
1. Premere il tasto S3 per selezionare
la modalità HOME TIME / FOREIGN
TIME.
2. Premere e tenere premuto il tasto
S2 per circa 2 secondi, il numero
dei secondi lampeggerà.
3. Premere il tasto S1 per azzerare la
cifra dei secondi no a 00.
4. Premere il tasto S3, il numero delle
ore lampeggerà.
5. Premere il tasto S1 per impostare
la cifra delle ore. Premere a lungo il
tasto farà avanzare la progressione
più velocemente.
6. Premere una volta il tasto S3, il
numero dei minuti lampeggerà.
7. Premere il tasto S1 per impostare
la cifra dei minuti. Premere a lungo
il tasto farà avanzare la progres sione più velocemente.
8. Seguire lo stesso procedimento
per impostare il formato dell’ora,
data, mese e giorno (della set
timana).
9. Per impostare il formato dell’ora,
premere il tasto S1 per passare
dal formato 12-ore al formato
ap-
24-ore e viceversa. L’ndicatore P.M.
potrebbe essere mostrato per
indicare il periodo di tempo 12:00
A.M. – 11:59 P.M. nel formato
12-ore.
10. Dopo aver impostato, premere il
tasto S2 per confermare.
NOTA: Nelle impostazioni di FOREIGN
TIME, solo la cifra delle ore può essere
impostata. Tutte le altre impostazioni
sono sincronizzate tra la modalità
HOME TIME e FOREIGN TIME.
MOSTRARE HOME E FOREIGN TIME
SUL DISPLAY:
Per mostrare l’ora estera sul display,
premere il tasto S3 per selezionare la
modalità FOREIGN TIME. La descrizione della modalità (T2) sarà mostrata
sul display.
COME USARE IL CRONOMETRO:
1. Premere il tasto S3 per selezionare
la modalità STOPWATCH.
2. Il cronometro verrà mostrato nel
suo stato attuale – azzerato, in
funzione o fermo.
3. Per riprendere un conteggio, pre mere il tasto S1 per riprendere da
dove era stato interrotto.
4. Per iniziare un nuovo conteggio,
bisogna prima azzerare il
cronometro.
Premere il tasto S1 per interromp ere il conteggio, premere quindi il
tasto S2 per azzerare.
Come misurare il tempo trascorso
Nella modalità STOPWATCH,
1. Premere il tasto S1 per iniziare il
conteggio.
2. Per interrompere il conteggio,
premere il tasto S1. Premere di
nuovo il tasto S1 per riprendere da
dove era stato interrotto.
3. Per azzerare, premere il tasto S1
per interrompere il conteggio quindi
premere il tasto S2.
Come misurare il tempo intermedio
Nella modalità STOPWATCH,
1. Premere il tasto S1 per iniziare il
conteggio.
2. Mentre il tempo sul cronometro
scorre, premere il tasto S2 per
registrare un giro. Il tempo inter
medio verrà mostrato sul display
e il tempo continuerà a scorrere
sullo sfondo del cronometro.
3. Per mostrare il tempo attuale ac
cumulato, premere di nuovo il tasto
S2.
4. Ripetere l’ultimo passaggio no a
che tutti i giri non sono stati regis trati.
5. Per interrompere il conteggio,
premere il tasto S1. Premere il
tasto S1 per riprendere da dove è
stato interrotto.
6. Per azzerare, premere il tasto S1
per interrompere il conteggio,
quindi premere il tasto S2.
NOTA: Il cronometro può calcolare no
ad un massimo di 23 ore, 59 minuti e
59.99 secondi.
NOTA: Si può lasciare scorrere il tempo
sul cronometro mentre si passa ad
altre modalità operative.
COME IMPOSTARE L’ALLARME:
1. Premere il tasto S3 per selezionare
l’impostazione ALARM1 o ALARM2
2. Premere e tenere premuto il
tasto S2 per circa 2 secondi. Il
numero dell’ora lampeggerà.
ITALIANO
3. Premere il tasto S1 per impostare
la cifra dell’ora. Premere a lungo il
tasto farà avanzare la progressione
più velocemente.
4. Premere il tasto S3, il numero dei
minuti lampeggerà.
5. Premere il tasto S1 per impostare
la cifra dei minuti.Premere a lungo
il tasto farà avanzare la progres sione più velocemente.
6. Dopo aver impostato, premere il
tasto S2 per confermare.
NOTA: L’allarme si attiverà automaticamente dopo essere stato impostato.
NOTA: L’allarme funzionerà in base all’
HOME TIME.
COME ATTIVARE/DISATTIVARE
L’ALLARME E LA SUONERIA ORARIA:
1. Premere il tasto S3 per selezionare
l’impostazione ALARM 1 o ALARM
2.
2. Premere il tasto S1 per attivare
l’allarme. L’indicatore di allarme
/ apparirà.
3. Premere di nuovo per attivare la
suoneria oraria. L’indicatore di
suoneria oraria
4. Premere una terza volta per at tivare entrambe le funzioni. En
trambi gli indicatori appariranno.
5. Premere una quarta volta per disat tivare entrambe le funzioni. En
trambi gli indicatori scompariranno.
QUANDO LA SUONERIA ORARIA SI
DISATTIVA:
Un suono verrà emesso ogni ora
quando la funzione di suoneria oraria
è attiva.
Una suono di allarme verrà emesso
per circa 20 secondi all’ora prestabilita
quando l’allarme è attivo. Per interrompere il suono, premere un tasto
qualsiasi.
NOTA: L’orologio non vibrerà e/o
emetterà bip per segnalare la suoneria oraria e l’allarme a meno che la
funzione di vibrazione e/o di bip non
sia attiva.
COME IMPOSTARE IL TIMER:
1. Premere il tasto S3 per selezionare
la modalità TIMER.
2. Premere e tenere premuto il tasto
S2 per circa 2 secondi, il numero
delle ore lampeggerà.
3. Premere il tasto S1 per impostare
la cifra delle ore. Premere a lungo il
tasto farà avanzare la progressione
più velocemente.
4. Premere il tasto S3, il numero dei
minuti lampeggerà.
5. Premere il tasto S1 per impostare
la cifra dei minuti. Premere a lungo
il tasto farà avanzare la progres sione più velocemente.
6. Dopo aver impostato, premere il
tasto S2 per confermare.
COME USARE IL TIMER:
1. Premere il tasto S3 per selezionare
la modalità TIMER.
2. Il timer verrà visualizzato nello
stato attuale – azzerato, in funzione
o fermo.
3. Per riprendere un conteggio, pre
mere il tasto S1 per riprendere da
dove era stato interrotto.
4. Per iniziare un nuovo conteggio,
azzerare il timer innanzitutto.
Premere il tasto S1 per interrom
pere il conteggio, quindi impostare
il timer secondo quanto detto nel
apparirà.
Page 10

paragrafo “COME IMPOSTARFE IL
TIMER”.
5. Premere il tasto S1 per iniziare il
conteggio.
6. Per interrompere il conteggio,
premere il tasto S1. Premere di
nuovo il tasto S1 per riprendere da
dove era stato interrotto.
7. Dopo aver raggiunto lo 00 in un
conteggio alla rovescia, un suono
verrà emesso per circa 20 secondi.
Per interrompere il suono, premere
un tasto qualsiasi.
NOTA: Si può lasciare scorrere il tempo
sul timer mentre si passa ad altre
modalità operative.
COME USARE LA RETROILLUMINAZIONE:
Premere il tasto S4 per accendere la
retroilluminazione per circa 3 secondi.
ITALIANO
Per ridurre l’impatto ambientale,
queste istruzioni Freestyle sono
stampate con inchiostri di soia su
carta riciclata .
FS8128-SHARK BUZZ2.0-1072-MR01
Page 11

SHARK BUZZ 2.0
S1S4
S2S3
S1. Botão Iniciar/Parar
S2. Botão de Volta/Reiniciar
S3. Botão Modo
S4. Botão Luz
MODOS DE VISUALIZAÇÃO:
O relógio tem seis modos de visualização: FUSO HORÁRIO DO PAÍS,
CRONÓMETRO, FUSO HORÁRIO
ESTRANGEIRO (T2), ALARME 1 (A1),
ALARME 2 (A2) e TEMPORIZADOR (TR).
Para mudar de um modo de apresentação para outro, prima uma vez o
botão S3.
UTILIZAR AS FUNÇÕES VIBRAÇÃO
E BIP
As funções vibração e bip podem ser
activadas individual ou simultaneamente. Quando a função correspondente é activada, o relógio vibrará e/
ou emitirá um bip quando o botão S1,
S2 ou S3 for premido ou quando um
indicador de sinal sonoro ou alarme
disparar.
LIGAR (ON)/ DESLIGAR (OFF) AS
FUNÇÕES VIBRAÇÃO E BIP:
No modo FUSO HORÁRIO DO PAÍS,
1. Prima o botão S1 uma vez para
activar a função vibração. Será
visualizado o indicador vibração
.
2. Prima de novo para activar a função
bip. Será visualizado o indicador de
bip .
3. Prima uma terceira vez para activar
ambas as funções. Surgirão ambos
os indicadores.
4. Prima uma quarta vez para desacti
var ambas as funções. Desapare cerão ambos os indicadores.
AJUSTAR A HORA E O CALENDÁRIO:
1. Prima o botão S3 para seleccionar
o modo FUSO HORÁRIO DO PAÍS/
ESTRANGEIRO.
2. Prima e mantenha premido o botão
S2 cerca de 2 segundos, os dígitos
dos segundos piscarão.
3. Prima o botão S1 para reajustar os
dígitos dos segundos.
4. Prima o botão S3, os dígitos das
horas piscarão.
5. Prima o botão S1 para acertar os
dígitos da hora. Se mantiver o botão
premido acelerará o processo.
6. Prima uma vez o botão S3, os
dígitos dos minutos piscarão.
7. Prima o botão S1 para acertar os
dígitos dos minutos. Se mantiver o
botão premido acelerará o pro cesso.
8. Siga os mesmos passos para
acertar o formato da hora, data,
mês e dia (da semana).
9. Para acertar o formato da hora,
prima o botão S1 para alternar
entre o formato de 12 ou 24 horas.
O indicador PM. poderá ser vi
sualizado para indicar o período de
tempo12:00 AM.- 11:59 PM. no
formato de 12 horas.
10. Após acabar de efectuar todos os
ajustes, prima o botão S2 para
conrmar.
NOTA: Nas congurações de FUSO
HORÁRIO ESTRANGEIRO, só é possível
acertar os dígitos da hora. Todas as
outras congurações são sincronizadas entre o FUSO HORÁRIO DO PAÍS e
o FUSO HORÁRIO ESTRANGEIRO.
VISUALIZAÇÃO DE FUSO HORÁRIO DO
PAÍS E ESTRANGEIRO:
Para visualizar o fuso horário
estrangeiro, prima o botão S3 para
seleccionar o modo FUSO HORÁRIO
ESTRANGEIRO. Será visualizada a
descrição do modo (T2).
UTILIZAR O CRONÓMETRO:
1. Prima o botão S3 para seleccionar
o modo CRONÓMETRO.
2. O cronómetro será visualizado no
seu estado actual – reajustar, a
funcionar ou parado.
3. Para retomar uma contagem, prima
o botão S1 para retomar a partir de
onde parou.
4. Para iniciar uma nova conta
gem, em primeiro lugar reponha o
cronómetro a zero.
Prima o botão S1 para parar a
contagem e em seguida prima o
botão S2.
Para medir o tempo decorrido:
No modo CRONÓMETRO,
1. Prima o botão S1 para iniciar a
contagem.
2. Para parar a contagem, prima o
botão S1. Prima o botão S1 de novo
para retomar a partir de onde
parou.
3. Para repor a zero, prima o botão S1
para parar a contagem e depois
prima o botão S2.
Para a medição do tempo dividido
No modo CRONÓMETRO,
1. Prima o botão S1 para iniciar a
contagem.
2. Enquanto o cronómetro estiver em
funcionamento, prima o botão S2
uma vez para registar uma volta.
O tempo dividido será visualizado
e o cronómetro continua em funcio
namento em segundo plano.
3. Para visualizar o tempo acumulado
actual, prima o botão S2 de novo.
4. Repita o último passo até que todas
as voltas tenham sido registadas.
5. Para parar a contagem, prima
o botão S1. Prima o botão S1 para
retomar a partir de onde parou.
6. Para repor a zero, prima o botão S1
para parar a contagem e depois
prima o botão S2.
NOTA: O cronómetro pode contar até
um máximo de 23 horas, 59 minutos e
59,99 segundos.
NOTA: Pode deixar o cronómetro em
funcionamento enquanto muda para
outros modos de operação.
AJUSTAR O ALARME
1. Prima o botão S3 para seleccionar
entre as entradas de ALARME 1 ou
ALARME 2 a acertar.
2. Prima e mantenha premido o botão
S2 cerca de 2 segundos. Os dígitos
da hora piscarão.
3. Prima o botão S1 para acertar os
dígitos da hora. Se mantiver o botão
premido acelerará o processo.
4. Prima o botão S3, os dígitos dos
PORTUGUÊS
minutos piscarão.
5. Prima o botão S1 para acertar os
dígitos dos minutos. Se mantiver o
botão premido acelerará o pro cesso.
6. Após acabar de efectuar todos os
ajustes, prima o botão S2 para
conrmar.
NOTA: O alarme será activado automaticamente depois de congurado.
NOTA: O alarme funcionará de acordo
com o FUSO HORÁRIO DO PAÍS.
LIGAR (ON)/ DESLIGAR (OFF)
O ALARME E O SINAL SONORO
HORÁRIO:
1. Prima o botão S3 para seleccionar
o ALARME 1 ou ALARME 2 a acer tar.
2. Prima o botão S1 para activar o
alarme. Será visualizado o indica
dor do alarme
3. Prima de novo para activar a
função de sinal sonoro horário.
Será visualizado o indicador de
sinal sonoro horário .
4. Prima uma terceira vez para activar
ambas as funções. Surgirão ambos
os indicadores.
5. Prima uma quarta vez para des
activar ambas as funções. Ambos
os indicadores desaparecerão.
QUANDO UM ALARME OU SINAL
SONORO HORÁRIO DISPARA:
Será emitida uma melodia à hora
indicada aquando da activação do sinal
sonoro horário.
Será emitida uma melodia de alarme,
cerca de 20 segundos, à hora indicada
aquando da activação do alarme. Para
parar a melodia, prima qualquer botão.
NOTA: O relógio não emitirá o alarme
vibratório / bip para indicar o sinal
sonoro horário e o alarme, excepto se
a função alarme vibratório e/ ou bip
estiver activada.
CONFIGURAR O TEMPORIZADOR:
1. Prima o botão S3 para seleccionar
o modo TEMPORIZADOR.
2. Prima e mantenha premido o botão
S2 cerca de 2 segundos, os dígitos
da hora piscarão.
3. Prima o botão S1 para acertar os
dígitos da hora. Se mantiver o botão
premido acelerará o processo.
4. Prima o botão S3, os dígitos dos
minutos piscarão.
5. Prima o botão S1 para acertar os
dígitos dos minutos. Se mantiver o
botão premido acelerará o pro cesso.
6. Após acabar de efectuar todos os
ajustes, prima o botão S2 para
conrmar.
UTILIZAR O TEMPORIZADOR:
1. Prima o botão S3 para seleccionar
o modo TEMPORIZADOR.
2. O temporizador será visualizado
no seu estado actual – reajustar, a
funcionar ou parado.
3. Para retomar uma contagem,
prima o botão S1 para retomar a
partir de onde parou.
4. Para iniciar uma nova contagem,
volte a acertar primeiro o tempori zador.
Prima o botão S1 para parar a con
tagem, depois acerte o tempo rizador de acordo com o parágrafo
“CONFIGURAR O TEMPORIZADOR”.
5. Prima o botão S1 para iniciar a
.
/
Page 12

contagem.
6. Para parar a contagem, prima o
botão S1. Prima o botão S1 de novo
para retomar a partir de onde
parou.
7. Quando chegar a zero numa con
tagem regressiva, será emitida uma
melodia cerca de 20 segundos.
Para parar a melodia, prima
qualquer botão.
NOTA: Pode deixar o temporizador em
funcionamento enquanto muda para
outros modos de operação.
UTILIZAR A LUZ POSTERIOR:
Prima o botão S4 para ligar a luz
posterior cerca de 3 segundos.
PORTUGUÊS
Para reduzir a emissão de carbono,
estas instruções Freestyle foram
impressas com tinta de soja em papel
reciclado.
FS8128-SHARK BUZZ2.0-1072-MR01
Page 13

SHARK BUZZ 2.0
S1S4
S2S3
S1.スタート/ストップボタン
S2.ラップ/リセットボタン
S3.モードボタン
S4.ライトボタン
表示モード
この時計には次の6つの表示モードがあ
り ま す 。ホ ー ム タ イ ム モ ー ド 、ス ト ッ プ ウ
ォッチモード、海外タイムモード(T2)、ア
ラーム1モード(A1)、アラーム2モード
(A2)、タイマーモード(TR)。
表示モードを変換するには、S3ボタンを
1回押してください。
バイブ・ ビープ機能を使う
バイブ機能とビープ機能は、個別でも同
時でもオンにすることが可能です。各機能
がオンの場合はS1かS2あるいはS3ボタ
ンを押した場合、または時刻お知らせチ
ャイムやアラーム時に時計がバイブする
かまたはビープ音を発します(両機能オン
の場合はその両方)。
バイブ・ビープ機能オン/オフの設定
ホ ームタイム モ ー ド にしま す。
1. S1を1回押すとバイブ機能がオンに
なります。バイブ機能のアイコン
が表 示さ れま す。
2. もう一度ボタンを押すとビープ機能
がオンになります。ビープ機能のアイ
コン
3. もう一度ボタンを押すと両機能がオ
ンになります。両方のアイコンが表示
され ます。
4. もう一度ボタンを押すと両機能がオ
フになります。両方のアイコンが非表
示 になります。
時刻・カレンダーを合わせる
1. S3ボタンを押してホーム/海外タイム
モードを選択します。
2. S2ボタンを約2秒間長押しすると、秒
桁が点滅します。
3. S1ボタンを押して秒刻を0にリセット
します。
4. S3ボタンを押します。時桁が点滅し
ます。
5. S1ボタンを押して時刻を設定しま
す。ボタンを長押しすると早く進みま
す。
6. S3ボタンを1回押すと、分桁が点滅
します。
7. S1ボタンを押して分刻を設定しま
す。ボタンを長押しすると早く進みま
す。
8. 同じ作業を、月・日・曜日・時間フォー
マットについてそれぞれ繰り返して行
ってくださ い 。
9. 時間フォーマットの設定は、S1ボタ
ンを押して12時間表示と24時間
表示を切り替えます。12時間表示で
は、午前12時から午後11時59分の
間にP.M.の文字が表示されます。
10.全ての設定が終わったらS2を押して
設定を終了します。
注: 海外タイムの設定では、時桁のみの
設定が可能です。その他の設定はホーム
タイムと海外タイムモード間で共通です。
が表示されます。
ホーム/海外タイム表示
海外タイムを表示する場合は、S3ボタン
を押して海外タイムモードを選択します。
海外タイムモードを表すT2の文字が表
示さ れます。
ストップ ウォッチを 使 う
1. S3ボタンを押してストップウォッチモ
ードを選択します。
2. その時点でのストップウォッチの状態
(リセット/測定中/停止の状態)が
表示されます。
3. ストップした時点から再びカウントを
開始するにはS1ボタンを押します。
4. 新しく測定しなおす場合は、ストップ
ウォッチをゼロに戻してください 。
S1ボタンを押してカウントをストップ
してからS2ボタンを押してリセットし
ます。
経過タイムの測定
ストップ ウォッチモ ードにします。
1. S1ボタンを押すとカウントが始まり
ます。
2. 測定をストップするにはS1ボタンを
押します。もう一度S1を押すと、スト
ップした時点から再び測定が始まり
ます。
3. ゼロにリセットするには、S1を押して
測定をストップしてからS2を押しま
す。
スプリットタイムの測定
ストップ ウォッチモ ードにします。
1. S1ボタンを押すとカウントが始まり
ま す 。
2. ストップウォッチがカウントしている
間にS2ボタンを押してラップを登録
します。スプリットタイムが表示され
ます。この間 もストップウォッチはカウ
ントを 行 ってい ます。
3. その時点での合計タイムを表示する
場合は、S2をもう一度押します。
4. 全てのラップの登録が終わるまで、最
後のステップを繰り返してください。
5. 測定をストップするにはS1ボタンを
押します。S1ボタンを押すと、ストップ
した時点からカウントを再開します。
6. ゼロにリセットするには、S1を押して
測定をストップしてからS2を押しま
す。
注: ストップウォッチでは最大23時間
59分59.99秒までカウントすることが
できま す。
注: ストップウォッチの使用中に他のモ
ード に切り 替 える ことが で きま す。
アラームを合 わせる
1. S3ボタンを押してアラーム1またはア
ラーム2モードを選択します。
2. S2ボタンを約2秒間長押しします。時
桁が点滅します。
3. S1ボタンを押して時刻を設定します。
ボタンを長押しすると早く進みます。
4. S3ボタンを押します。分桁が点滅し
ます。
5. S1ボタンを押して分刻を設定します。
ボタンを長押しすると早く進みます。
6. 全ての設定が終わったらS2を押して
設定を終了します。
注: 設定後アラームは自動的にオンに
なります。
注: アラームはホームタイムの時間に沿
って機能します。
アラームと時刻お知らせチャイムオン/
オフの設定
1. S3ボタンを押してアラーム1またはア
ラーム2モードを選択します。
2. S1ボタンを押してアラームをオンに
し ま す 。ア ラ ー ム の ア イ コ ン
/ が表示されます。
3. もう一度ボタンを押すと時刻お知ら
せ チ ャ イム が オ ン に なりま す。チ ャイム
日本語
のアイコン
4. もう一度ボタンを押すと両機能がオ
ンになります。両方のアイコンが表示
され ます。
5. もう一度ボタンを押すと両機能がオ
フになります。両方のアイコンが非表
示 になります。
アラーム・チャイムが鳴ったら
時刻お知らせチャイム機能がオンになっ
ている場合は一時間ごとにお知らせ音
がな ります。
アラーム機能をオンにすると、指定の時
間に約20秒間アラーム音が鳴ります。音
を止めたいときは、いずれかのボタンを押
してください 。
注: バイブ機能/ビープ機能がオンにな
っていない場合は、時刻お知らせチャイ
ム/アラームの 時刻に時 計は バイブやビー
プ音 は 発しませ ん。
タイマーを設定する
1. S3ボタンを押してタイマーモードを
選択します。
2. S2ボタンを約2秒間長押しすると、時
桁が点滅します。
3. S1ボタンを押して時刻を設定しま
す。ボタンを長押しすると早く進みま
す。
4. S3ボタンを押します。分桁が点滅し
ます。
5. S1ボタンを押して分刻を設定しま
す。ボタンを長押しすると早く進みま
す。
6. 全ての設定が終わったらS2を押して
設定を終了します。
タイマー を使う
1. S3ボタンを押してタイマーモードを
選択します。
2. その時点でのタイマーの状態(リセッ
ト/カウント中/停止)が表示されま
す。
3. ストップした時点から再びカウントを
開始するにはS1ボタンを押します。
4. 新しくカウントしなおす場合は、タイ
マ ー を ま ず リ セ ッ ト し て く だ さ い 。
S1ボタンを押してカウントをストップ
してから『タイマーを設定する』のセ
クションのとおりタイマーを設定しま
す。
5. S1ボタンを押すとカウントが始まり
ます。
6. 測定をストップするにはS1ボタンを
押します。もう一度S1を押すと、スト
ップした時点から再び測定が始まり
ます。
7. タイマーがゼロになるとお知らせ音
が約20秒間鳴ります。音を止めたい
ときは、いずれかのボタンを押してく
ださい。
注: タイマーのカウント中に他のモード
に切り 替 えることが で きま す。
バック ライト を 使う
S4ボタンを押すとバックライトが約3秒
間点灯します。
が表示されます。
Page 14

日本語
カー ボンフットプリントの減少 を目的 と
してFreestyleの取扱説明書は大豆イ
ンキ とリ サ イクル 紙 を 使 用 して い ま す
FS8128-SHARK BUZZ2.0-1072-MR01
 Loading...