

Page 1
MARINER
S4
S3
S2
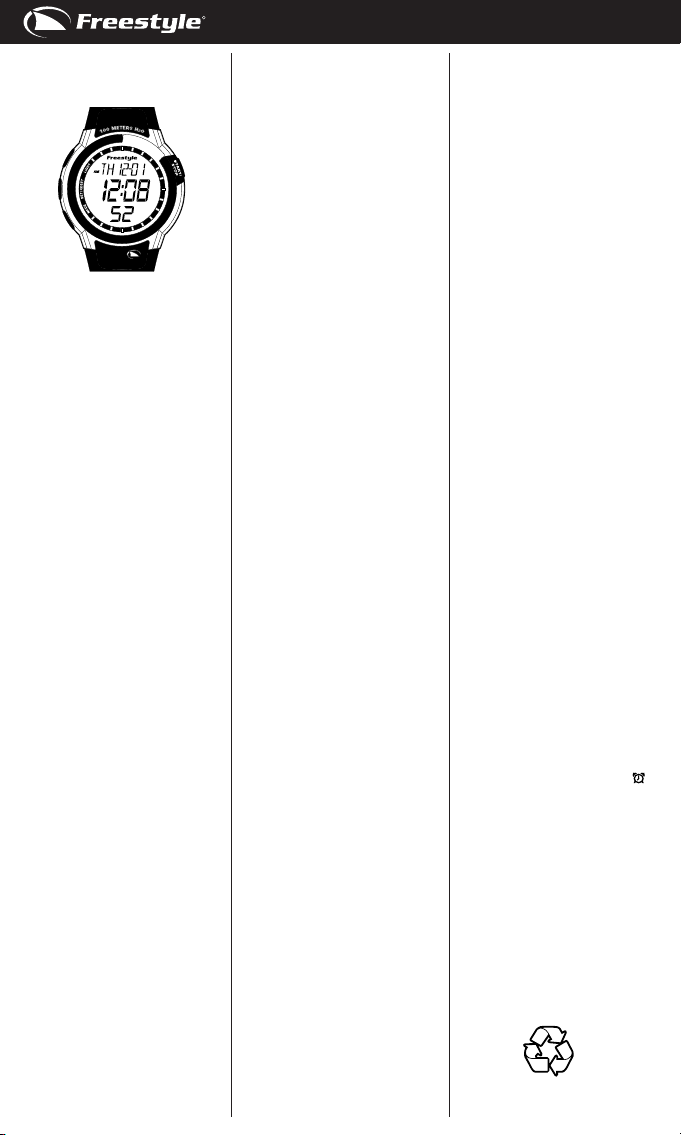
S1. Start/stop button
S2. Mode button
S3. Set/reset button
S4. Light button
SPECIAL FEATURE:
This Freestyle product features unique
Hydro Pushers®: these pushers can be
pressed under water to a dynamic water
pressure (not water depth) of 3 ATM.
DISPLAY MODES:
The watch has four display modes: HOME
TIME (T1)/FOREIGN TIME (T2), CHORONOGRAPH (CHRONO), TIMER and ALARM.
To change from one display mode to
another, press S2 button once.
Note: In any setting mode, if there is no
button pressed for a few minutes, the
watch will automatically save the entered
data and exit the setting procedure.
HOME AND FOREIGN TIME DISPLAY:
To display FOREIGN TIME mode, press
and hold S1 button when HOME TIME
mode is displayed. The mode description (T2) will be displayed and blink for
approximately 5 seconds before switching
to FOREIGN TIME mode. To change back
to HOME TIME mode, press and hold S1
button again.
TO SET THE TIME AND CALENDAR:
1. Press S2 button to select HOME TIME
(T1)/FOREIGN TIME (T2) mode.
2. Press and hold S3 button, the message
“HOLD TO SET” will be displayed for
approximately 3 seconds and the time
zone setting will blink.
3. Press S1 button to toggle between
HOME TIME (T1) and FOREIGN TIME
(T2) to set.
4. Press S2 button, the hour digits will
blink. Press S1 button to set the hour
digits. Holding down the button will
speed up the process.
5. Press S2 button, the minute digits will
blink. Press S1 button to set the minute
digits. Holding down the button will
speed up the process.
6. Press S2 button, the second digits
will blink. Press S1 button to reset the
second digits to zero.
7. Follow the same pattern to set the year,
month and date.
8. Press S2 button, the hour format setting will blink. Press S1 button to toggle
between 12-hour and 24-hour format.
The A.M. or P.M. indicator may be displayed to indicate the time period 12:00
A.M. – 11:59 A.M. or 12:00 P.M. – 11:59
P.M. respectively in 12-hour format.
9. Press S2 button, the hourly chime
S1
(CHIME) setting will blink. Press S1
button to toggle between ON and OFF
for the hourly chime setting.
10. When nished making all the settings,
press S3 button to conrm.
NOTE: The hourly chime setting will apply
to both HOME TIME mode and FOREIGN
TIME mode.
TO USE THE CHRONOGRAPH:
1. Press S2 button to select CHRONOGRAPH mode.
2. The chronograph will then be displayed
in its current state – stopped, running
or reset.
3. To resume a stopped counting, press
S1 button to resume from where it left
off.
4. To start a new counting, reset the
chronograph to zero rst.
Press S1 button to stop counting, then
press S3 button to reset counter to
zero.
For the measurement of elapsed time:
In CHRONOGRAPH mode,
1. Press S1 button to start counting.
2. To stop counting, press S1 button once.
Press S1 button again to resume from
where it left off.
3. To reset to zero, press S1 button to stop
counting and then press S3 button.
For the measurement of split time:
In CHRONOGRAPH mode,
1, Press S1 button to start counting.
2, While the chronograph is running,
press S3 button once to register a lap.
The split time of the registered lap will
be displayed. The chronograph is still
running in the background.
3. To display the current elapsed time,
press S3 button again.
4. Repeat the last step until all the laps
have been registered.
5. To reset to zero, press S1 button to stop
counting and then press S3 button.
For the measurement of two nishes:
In CHRONOGRAPH mode,
1. Press S1 button to start counting.
2. While the chronograph is running,
press S3 button to register and display
the time of the rst runner. The
chronograph is still running in the
background.
3. Press S1 button to stop and register the
time of the second runner.
4. Press S3 button to display the time of
the second runner.
5. To reset to zero, press S3 button again.
NOTE: The chronograph can count up to
a maximum of 23 hours, 59 minutes and
59.99 seconds.
NOTE: You can leave the chronograph
running while switching over to other
operating modes.
TO SET THE TIMER:
1. Press S2 button to select TIMER mode.
2. Press S3 button, the message “HOLD
TO SET” will be displayed for approximately 3 seconds and the hour digits
will blink.
3. Press S1 button to alter the timer setting among 60, 55, 50, 45, 40, 35, 30, 25,
20, 15, 14, 13, 12, 11, 10, 9, 8, 7, 6, 5, 4,
3, 2, and 1 minutes.
4. Press S2 button, the “Action-at-End”
setting will blink. Press S1 button to
select among STOP AT END (STOP),
ENGLISH
REPEAT AT END (REPEAT) and COUNT
UP AT END (UP).
5. When nished making all the settings,
press S3 button to conrm.
NOTE: Denitions of Action-at-End setting
option:
a) STOP AT END – the timer will stop
when the countdown reaches zero.
b) REPEAT AT END – the timer will repeat
the countdown when the countdown
reaches zero.
c) COUNT UP AT END – the timer will
count up to a maximum of 23 hours
59 minutes and 59 seconds when the
countdown reaches zero.
TO USE THE TIMER:
1. Press S3 button to select TIMER mode.
2. The timer will then be displayed in its
current state – stopped, running, or
reset.
3. To resume a stopped counting, press
S1 button to resume from where it left
off.
4. To start a new counting, reload the
timer rst.
Press S1 button to stop counting, then
press S3 button to reload the timer.
5. When reaching zero in a countdown, a
tune will be emitted. To stop the tune,
press any button.
NOTE: You can leave the timer running
while switching to other operating modes.
TO SET THE ALARM TIME:
1. Press S2 button to select ALARM
mode.
2. Press and hold S3 button, the message
“HOLD TO SET” will be displayed and
the hour digits will blink. Press S1 button to set the hour digits. Holding down
the button will speed up the process.
3. Press S2 button, the minute digits will
blink. Press S1 button to set the minute
digits. Holding down the button will
speed up the process.
4. When nished making all the settings,
press S3 button to conrm.
NOTE: The alarm will automatically be
activated after being set.
TO TURN ON/OFF THE ALARM:
In ALARM mode, press S1 button to toggle
between ON and OFF of the alarm. When
the alarm is ON, the alarm indicator
will appear.
WHEN AN ALARM GOES OFF:
A 20-second alarm tune will be emitted
at the designated time when the alarm
is activated. To stop the tune, press any
button.
TO USE THE BACKLIGHT:
Press S4 button to turn on the backlight
for 3 seconds.
To reduce carbon foot print, these
Freestyle instructions are printed with
soy inks on recycled paper.
FS_119 MARINER_AG7502-FS-INST-PKG-R00
Page 2

MARINER
S4
S3
S2
S1. Botón para iniciar/parar
S2. Botón de modo
S3. Botón para congurar/resetear
S4. Botón de luz
CARACTERÍSTICA ESPECIAL:
Este producto de Freestyle tiene una
característica única, Hydro Pushers®: Los pushers se pueden pulsar
bajo agua con una presión de agua
dinámica (no la profundidad) de 3 ATM.
MODOS DE VISUALIZACIÓN:
El reloj tiene cuatro vistas: HORA
NORMAL (T1)/HORA EN EL EXTRANJERO (T2), CRONÓMETRO (CHRONO),
TEMPORIZADOR Y ALARMA.
Para cambiar de una vista a otra, pulse
el botón S2 una vez.
Nota: En cualquier modo de conguración, si no pulsa ningún botón
durante unos minutos, el reloj
guardará automáticamente los datos
introducidos y saldrá del procedimiento
de conguración.
VISUALIZACIÓN DE LA HORA T1 y LA
HORA EN EL EXTRANJERO:
Para ver la HORA EN EL EXTRANJERO,
mantenga pulsado el botón S1 cuando
vea la HORA EN CASA en la pantalla.
La descripción del modo (T2) se visualizará y parpadeará durante unos 5
segundos antes de cambiar a la HORA
EN EL EXTRANJERO. Para volver a la
HORA EN CASA, mantenga pulsado el
botón S1.
CÓMO AJUSTAR LA HORA Y EL
CALENDARIO:
1. Pulse el botón S2 para seleccionar
el modo de HORA EN CASA (T1)/
HORA EN EL EXTRANJERO (T2).
2. Mantenga pulsado el botón S3. Verá
el mensaje “HOLD TO SET” durante
tres segundos, y la zona horaria
parpadeará.
3. Pulse el botón S1 para cambiar
entre los modos de HORA EN CASA
(T1) y HORA EN EL EXTRANJERO
(T2) y congurar.
4. Pulse el botón S2. Los dígitos de
las horas parpadearán. Pulse el
S1
botón S1 para ajustar los dígitos de
la hora. Mantenga pulsado el botón
para acelerar el proceso.
5. Pulse el botón S2. Los dígitos de
los minutos parpadearán. Pulse el
botón S1 para ajustar los dígitos de
los minutos. Mantenga pulsado el
botón para acelerar el proceso.
6. Pulse el botón S2. Los dígitos de
los segundos parpadearán. Pulse
el botón S1 para volver a poner los
dígitos de los segundos a cero.
7. Haga lo mismo para congurar el
año, el mes y la fecha.
8. Pulse el botón S2. El formato de las
horas parpadeará. Para ajustar el
formato de la hora, pulse el botón
S1 para cambiar entre los formatos
de 12 horas y de 24 horas. Se
mostrará el indicador de am ó pm
para señalar el periodo de tiempo
12:00 am. hasta las 11:59 AM ó
12:00 PM – 11:59 pm respectivamente en el formato de 12 horas.
9. Pulse el botón S2. La conguración
del repique de la hora (CHIME)
parpadeará. Pulse el botón S1 para
cambiar entre ON y OFF en la conguración del repique de la hora.
10. Después de hacer todos los ajustes
necesarios, pulse el botón S3 para
conrmarlo.
NOTA: La conguración del repique
de la hora se aplicará tanto a la HORA
EN CASA como a la HORA EN EL
EXTRANJERO.
CÓMO USAR EL CRONÓMETRO:
1. Pulse el botón S2 para seleccionar el
modo de CRONÓMETRO.
2. Aparecerá el cronómetro en el
estado en que esté: en marcha, a
cero o parado.
3. Pulse el botón S1 para retomar la
cuenta ahí donde se quedó.
4. Para iniciar una cuenta nueva, prim-
ero hay que poner el cronómetro
a cero.
Pulse el botón S1 para interrumpir la
cuenta y después pulse el botón S3
para volver a cero.
Para medir el tiempo transcurrido,
En modo CRONÓMETRO,
1. Pulse el botón S1 para empezar a
contar.
2. Pulse el botón S1 una vez para inter-
rumpir la cuenta. Pulse el botón S1
otra vez para retomar la cuenta ahí
donde se quedó.
3. Pulse el botón S1 para interrumpir
la cuenta y después pulse el botón
S3 para volver a cero.
Para medir el tiempo dividido,
En modo CRONÓMETRO,
1. Pulse el botón 1 para empezar a
contar.
2. Mientras el cronómetro está en mar-
cha, pulse el botón S3 una vez para
registrar una vuelta. Se mostrará la
hora dividida de la vuelta registrada.
ESPAÑOL
El cronómetro seguirá contando
por detrás.
3. Para mostrar el tiempo acumulado
hasta el momento, pulse S3 otra vez.
4. Repita el último paso hasta que se
hayan guardado todas las vueltas.
5. Pulse el botón S1 para interrumpir
la cuenta y después pulse el botón
S3 para volver a cero.
Para medir dos metas,
En modo CRONÓMETRO,
1. Pulse el botón S1 para empezar a
contar.
2. Mientras el cronómetro está en marcha, pulse el botón S3 un vez para
registrar y ver el tiempo del primer
corredor. El cronómetro seguirá
contando por detrás.
3. Pulse el botón S1 para parar y registrar el tiempo del segundo corredor.
4. Pulse el botón S3 para ver el tiempo
del segundo corredor.
5. Pulse el botón S3 otra vez para
volver a cero.
NOTA: EL rango de cómputo del
cronómetro son 23 horas, 59 minutos y
59.99 segundos.
NOTA: El cronómetro puede seguir
contando mientras pasa a otros modos
de funcionamiento.
CÓMO CONFIGURAR EL
TEMPORIZADOR:
1. Pulse el botón S2 para seleccionar
el modo de TEMPORIZADOR.
2. Mantenga pulsado el botón S3. Verá
el mensaje “HOLD TO SET” durante
tres segundos, y los dígitos de la
hora parpadearán.
3. Pulse el botón S1 para cambiar la
conguración de la hora entre 60,
55, 50, 45, 40, 35, 30, 25, 20, 15, 14,
13, 12, 11, 10, 9, 8, 7, 6, 5, 4, 3, 2, y
1 minuto.
4. Pulse el botón S2. El formato de
“Action-at-End” parpadeará. Pulse
el botón S1 para seleccionar entre
PARAR AL FINAL (STOP), REPETIR
AL FINAL (REPEAT) Y SEGUIR AL
FINAL (UP).
5. Después de hacer todos los ajustes
necesarios, pulse el botón S3 para
conrmarlo.
NOTA: Deniciones de la opción
Action-at-End:
a) PARA AL FINAL – el temporizador
parará cuando la cuenta atrás llegue
a cero.
b) REPETIR AL FINAL – el temporiza-
dor repetirá la cuenta atrás cuando
llegue a cero.
c) SEGUIR AL FINAL – el temporizador
contará hasta un máximo de 23
horas 59 minutos y 59 segundos
cuando la cuenta atrás llegue a cero.
CÓMO USAR EL TEMPORIZADOR:
1. Pulse el botón S3 para seleccionar
el modo de TEMPORIZADOR.
Page 3

2. Aparecerá el temporizador en el
estado en que esté: en marcha, a
cero o parado.
3. Pulse el botón S1 para retomar la
cuenta ahí donde se quedó.
4. Para iniciar una cuenta nueva,
primero hay que poner el temporizador a cero.
Pulse el botón S1 para interrumpir
la cuenta y después pulse el botón
S3 para recargar el temporizador.
5. Después de haber llegado a cero en
la cuenta atrás, sonará un tono. Para
parar el tono, pulse cualquier botón.
NOTA: El temporizador puede seguir
contando mientras pasa a otros modos
de funcionamiento.
CÓMO CONFIGURAR LA HORA DE LA
ALARMA:
1. Pulse el botón S2 para seleccionar
el modo de ALARMA.
2. Mantenga pulsado el botón S3. Verá
el mensaje “HOLD TO SET” durante
tres segundos, y los dígitos de la
hora parpadearán. Pulse el botón S1
para ajustar los dígitos de la hora.
Mantenga pulsado el botón para
acelerar el proceso.
3. Pulse el botón S2. Los dígitos de los
minutos parpadearán. Pulse el botón
S1 para ajustar los dígitos de los
minutos. Mantenga pulsado el botón
para acelerar el proceso.
4. Después de hacer todos los ajustes
necesarios, pulse el botón S3 para
conrmarlo.
NOTA: La alarma se activará automáticamente después de su conguración.
ENCENDER / APAGAR LA ALARMA:
Pulse el botón S1 para cambiar
entre ON y OFF en la conguración
de la alarma. Cuando la alarma esté
encendida, ON, aparecerá el indicador
de alarma
CUANDO LA ALARMA SALTA:
Con la alarma activada, el sonido de
alarma saltará a la hora jada. Sonará
una melodía durante 20 segundos.
Para parar el tono, pulse cualquier
botón.
CÓMO USAR LA LUZ DE FONDO:
Pulse el botón S4 para encender la luz
de fondo durante 3 segundos.
.
ESPAÑOL
Para reducir la huella del carbono,
las instrucciones de Freestyle se han
imprimido con tinta de soja en papel
reciclado.
FS_119 MARINER_AG7502-FS-INST-PKG-R00
Page 4

MARINER
S4
S3
S2
S1. Start-/Stopp-Taste
S2. Modus-Taste
S3. Taste Einstellen/Rücksetzen
S4. Licht-Taste
BESONDERHEITEN:
Dieses Freestyle-Produkt ist mit einzigartigen Hydro-Pusher® ausgestattet:
Diese Knöpfe können bis zu einem
dynamischen Wasserdruck (nicht
Wassertiefe) von 3 ATM unter Wasser
gedrückt.
ANZEIGEMODI:
Die Uhr hat vier Anzeigenmodi:
ORTSZEIT (T1)/FREMDZEIT (T2),
CHORONOGRAPH (CHRONO), TIMER
und ALARM.
Drücken Sie die Taste S2 einmal um
von einer Anzeige zur nächsten zu
wechseln.
Hinweis: Wenn in einem Einstellmodus einige Minuten lang keine Taste
gedrückt wird, speichert die Uhr die
eingegebenen Daten automatisch und
verlässt das Einstellmenü.
ANZEIGE DER ORTSZEIT UND FREMDZEIT:
Um den FREMDZEIT-Modus anzuzeigen halten Sie Taste S1 wenn
die ORTSZEIT angezeigt wird. Die
Beschreibung des Modus (T2) wird
angezeigt und blinkt etwa 5 Sekunden bevor der FREMDZEIT-Modus
angezeigt wird. Halten Sie die Taste S1
gedrückt um wieder zur ORTSZEIT zu
wechseln.
ZEIT UND KALENDER EINSTELLEN:
1. Drücken Sie Taste S2 um zwischen
ORTSZEIT (T1) oder FREMDZEIT
(T2) zu wählen.
2. Halten Sie Taste S3 gedrückt bis der
Hinweis “HOLD TO SET“ (Drücken
zur Einstellung) etwa drei Sekunden
lang angezeigt wird. Die Einstellung
der Zeitzone wird blinken.
3. Drücken Sie Taste S1 um zwischen
ORTSZEIT (T1) und FREMDZEIT (T2)
zu wechseln.
4. Drücken Sie Taste S2. Die Stun-
S1
denanzeige wird blinken. Drücken
Sie Taste S1 um die Stunden
einzustellen. Halten Sie die Taste
gedrückt um die Anzeige schneller
vorzubewegen.
5. Drücken Sie Taste S2. Die Minutenanzeige wird blinken. Drücken
Sie Taste S1 um die Minuten
einzustellen. Halten Sie die Taste
gedrückt um die Anzeige schneller
vorzubewegen.
6. Drücken Sie Taste S2. Die Sekundenanzeige wird blinken. Drücken
Sie Taste S1 um die Sekundenanzeige auf null zurückzusetzen.
7. Folgen Sie den gleichen Schritten um Jahr, Monat, und Datum
einzustellen.
8. Drücken Sie Taste S2. Das Stundenformat wird blinken. Drücken Sie
Taste S1 um zwischen 12-Stunden
und 24-Stundenformat zu wählen.
Die Anzeige “A.M.“ oder „P.M.“ zeigt
die Uhrzeit zwischen 12 Uhr Mitternacht (A.M) und – 11:59 Mittag
(A.M.) oder 12:00 Mittag (P.M.) 11:59
nachts (P.M) an.
9. Drücken Sie Taste S2. Das Stundensignal (CHIME) wird blinken.
Drücken Sie Taste S1 oder um
zwischen ON (An) und OFF (Aus) für
das Stundensignal zu wechseln.
10. Wenn Sie alle Einstellungen abgeschlossen haben, drücken Sie Taste
S3 zur Bestätigung.
HINWEIS: Das Stundensignal gilt für
ORTSZEIT- als auch FREMDZEITModus.
ZEITMESSUNG MIT DEM CHRONOGRAPHEN:
1. Drücken Sie Taste S2 um den CHRO-
NOGRAPHEN-Modus zu wählen.
2. Der Chronograph wird dann im
aktuellen Status – rücksetzen,
zählend, gestoppt – angezeigt.
3. Drücken Sie Taste S1 um die Zeit-
messung wieder aufzunehmen.
4. Um eine neue Zeitmessung zu
starten, setzen Sie den Chronographen zuerst wieder auf „Null“.
Drücken Sie Taste S1 um die Zeit-
messung zu stoppen und dann Taste
S3 um den Zähler wieder auf „Null“
zurückzusetzen.
Messung der abgelaufenen Zeit:
Im CHRONOGRAPHEN-Modus:
1. Drücken Sie Taste S1 um die Zeit-
messung zu starten.
2. Drücken Sie S1 noch einmal um die
Zeitmessung zu stoppen. Drücken
Sie S1 noch einmal um ab der
letzten Messung weiter zu messen.
3. Um den Chronographen zurück-
zusetzen, drücken Sie Taste S1 um
die Zeitmessung zu stoppen und
drücken anschließend S3.
Messung der Zwischenzeit (Split Time):
Im CHRONOGRAPHEN-Modus:
Drücken Sie Taste 1 um die Zeitmessung zu starten.
DEUTSCH
2. Während der Chronograph zählt,
drücken Sie Taste S3 einmal um
die Rundenzeit aufzunehmen. Die
Zwischenzeit der aktuellen Runde
wird angezeigt. Der Chronograph
läuft im Hintergrund weiter.
3. Drücken Sie nochmals Taste S3 um
die aktuelle Rundenzeit anzuzeigen.
4. Wiederholen Sie den letzten Schritt
bis alle Runden gemessen wurden.
5. Um den Chronographen zurückzusetzen, drücken Sie Taste S1 um
die Zeitmessung zu stoppen und
drücken anschließend S3.
Messung von zwei Läufern:
Im CHRONOGRAPHEN-Modus:
1. Drücken Sie Taste S1 um die Zeitmessung zu starten.
2. Während der Chronograph zählt,
drücken Sie Taste S3 um die
Rundenzeit des ersten Läufers
aufzunehmen und anzuzeigen. Der
Chronograph läuft im Hintergrund
weiter.
3. Drücken Sie Taste S1 um die
Rundenzeit des zweiten Läufers
aufzunehmen.
4. Drücken Sie Taste S3 um die
Rundenzeit des zweiten Läufers
anzuzeigen.
5. Drücken Sie Taste S3 nochmals
um den Zähler auf „Null“ zurückzusetzen.
HINWEIS: Der Chronograph kann bis
zu max. 23 Stunden, 59 Minuten, und
59.99 Sekunden messen.
HINWEIS: Sie können den Chronographen weiter laufen lassen während Sie
in andere Modi umschalten.
TIMER EINSTELLEN:
1. Drücken Sie Taste S2 um den
TIMER-Modus zu wählen
2. Halten Sie Taste S3 gedrückt bis der
Hinweis “HOLD TO SET“ (Drücken
zur Einstellung) etwa drei Sekunden
lang angezeigt wird. Die Stundenanzeige wird blinken.
3. Drücken Sie Taste S1 um den Timer
auf 60, 55, 50, 45, 40, 35, 30, 25, 20,
15, 14, 13, 12, 11, 10, 9, 8, 7, 6, 5, 4,
3, 2, oder 1 Minute zu stellen.
4. Drücken Sie Taste S2. Die Anzeige
„Action at End“ (Funktion bei
Abschluss) wird blinken. Drücken
Sie Taste S1 um unter STOP AT END
(STOP) (am Ende Stoppen), REPEAT
AT END (REPEAT) (Am Ende wiederholen) und COUNT UP AT END (UP)
(Am Ende hochzählen) zu wählen.
5. Wenn Sie alle Einstellungen abgeschlossen haben, drücken Sie Taste
S3 zur Bestätigung.
HINWEIS: Beschreibung der Einstellungsoptionen für Action at End:
a) STOP AT END – Der Timer wird stop-
pen wenn Null erreicht wird.
b) REPEAT AT END – Der Timer wird
die Zählung wiederholen wenn Null
erreicht wird.
Page 5

c) COUNT UP AT END - Der Timer
kann bis zu max. 23 Stunden, 59 Minuten, und 59 Sekunden messen wenn
Null erreicht wird.
TIMER BENUTZEN:
1. Drücken Sie Taste S3 um den
TIMER-Modus zu wählen
2. Der Timer wird dann im aktuellen Status – rücksetzen, zählend,
gestoppt – angezeigt.
3. Drücken Sie Taste S1 um die Zeitmessung wieder aufzunehmen.
4. Um eine neue Zeitmessung zu
starten, laden Sie die Stoppuhr
zuerst wieder.
Drücken Sie Taste S1 um die
Zeitmessung zu stoppen und
anschließend Taste S3.
5. Wenn Null erreicht wird, wird ein
Ton ertönen. Drücken Sie irgendeine
Taste um den Signalton abzustellen.
HINWEIS: Sie können den Timer weiter
laufen lassen während Sie in andere
Modi umschalten.
WECKZEIT EINSTELLEN:
1. Drücken Sie Taste S2 um den
ALARM-Modus zu wählen.
2. Halten Sie Taste S3 gedrückt bis der
Hinweis “HOLD TO SET“ (Drücken
zur Einstellung) angezeigt wird.
Die Stundenanzeige wird blinken.
Drücken Sie Taste S1 um die
Stunden einzustellen. Halten Sie
die Taste gedrückt um die Anzeige
schneller vorzubewegen.
3. Drücken Sie Taste S2. Die Minutenanzeige wird blinken. Drücken Sie
Taste S1 um die Minuten einzustellen. Halten Sie die Taste gedrückt
um die Anzeige schneller vorzubewegen.
4. Wenn Sie alle Einstellungen abgeschlossen haben, drücken Sie Taste
S3 zur Bestätigung.
HINWEIS: Die Weckfunktion wird nach
dem Einstellen automatisch aktiviert.
WECKFUNKTION AN-/AUSSTELLEN:
Im ALARM-Modus drücken Sie Taste
S1 oder um zwischen ON (An) und
OFF (Aus) für die Alarmfunktion zu
wechseln. Wenn die Weckfunktion
aktiviert ist (ON), erscheint die Alarmanzeige
WENN WECKSIGNAL ERTÖNT:
Wenn die Weckfunktion aktiviert ist,
wird zur vorbestimmten Zeit 20 Sekunden lang ein Wecksignal ertönen.
Drücken Sie irgendeine Taste um den
Signalton abzustellen.
HINTERGRUNDBELEUCHTUNG:
Drücken Sie Taste S4 um die Hintergrundbeleuchtung für 3 Sekunden
anzuschalten.
.
DEUTSCH
Diese Freestyle-Gebrauchsanweisung
wurde mit Tinte auf Sojabasis auf
Recycling-Papier gedruckt um den
Kohleausstoß zu reduzieren.
FS_119 MARINER_AG7502-FS-INST-PKG-R00
Page 6

MARINER
S4
S3
S2
S1. Bouton Démarrer / Arrêter
S2. Bouton Mode
S3. Bouton Réglages / Réinitialiser
S4. Bouton d’éclairage
FONCTION SPECIALE:
Ce produit Freestyle unique offre la
fonction unique Hydro Pushers®: ces
boutons peuvent être pressés sous
l’eau à une pression dynamique de
l’eau (ce qui ne correspond pas à la
profondeur) de 3 ATM.
MODES D’AFFICHAGE:
La montre offre quatre modes
d’afchage: HEURE LOCALE (T1)/
HEURE INTERNATIONALE (T2),
CHORONOGRAPHE (CHRONO), MINUTEUR et ALARME.
Pour changer le mode d’afchage, appuyez une fois sur le bouton S2.
Remarque: En mode de réglage, si
aucun bouton n’est pressé durant
quelques minutes, la montre sauvegardera les données entrées et quittera
la procédure de réglage.
AFFICHAGE DE L’HEURE LOCALE ET
DE L’HEURE INTERNATIONALE :
Pour afcher l’HEURE INTERNATIONALE, appuyez et maintenez le bouton
S1 lorsque l’HEURE LOCALE est afchée. Le code descriptif du mode (T2)
s’afchera et clignotera durant environ
5 secondes avant que l’HEURE INTERNATIONALE s’afche. Pour afcher de
nouveau l’HEURE LOCALE, appuyez et
maintenez de nouveau le bouton S1.
REGLAGE DE L’HEURE ET DU CALENDRIER:
1. Appuyez sur le bouton S2 pour sélectionner le mode HEURE LOCALE
(T1) / INTERNATIONALE (T2).
2. Appuyez et maintenez le bouton S3,
le message “HOLD TO SET” (MAINTENIR POUR REGLER) s’afchera
durant environ 3 secondes et la zone
horaire clignotera pour être réglée.
3. Appuyez sur le bouton S1 pour faire
permuter le mode HEURE LOCALE
(T1) et HEURE INTERNATIONALE
(T2) à régler.
S1
4. Appuyez sur le bouton S2, les chiffres des heures clignoteront. Appuyez sur le bouton S1 pour régler
les chiffres des heures. Maintenez
le bouton enfoncé pour accélérer la
procédure.
5. Appuyez sur le bouton S2, les chiffres des minutes clignoteront. Appuyez sur le bouton S1 pour régler
les chiffres des minutes. Maintenez
le bouton enfoncé pour accélérer la
procédure.
6. Appuyez sur le bouton S2, les
chiffres des secondes clignoteront.
Appuyez sur le bouton S1 pour réinitialiser les chiffres des secondes à
zéro.
7. Suivez la même procédure pour
régler l’année, le mois et la date.
8. Appuyez sur le bouton S2, le format
horaire clignotera. Appuyez sur
le bouton S1 pour faire permuter
le mode 12 heures et le mode 24
heures. L’indicateur A.M. (matin) ou
P.M. (après-midi) peut être afché
pour indiquer les périodes de 12h00
à 11h59 du matin ou de 12h00 à
11h59 de l’après-midi en format
horaire de 12 heures.
9. Appuyez sur le bouton S2 le carillon
horaire (CHIME) clignotera. Appuyez
sur le bouton S1 pour activer ou
désactiver le carillon horaire en faisant permuter le mode ON (ACTIVE)
et OFF (DESACTIVE).
10.Après avoir effectué tous les
réglages, appuyez sur le bouton S3
pour conrmer.
REMARQUE: Le réglage du carillon
horaire s’appliquera pour les deux
modes HEURE LOCALE et HEURE
INTERNATIONALE.
UTILISATION DU CHRONOGRAPHE:
1.Appuyez sur le bouton S2 pour sélec-
tionner le mode CHRONOGRAPHE.
2.Le chronographe afchera le statut
en cours – réinitialisé, compteur en
cours ou compteur arrêté.
3.Pour réactiver le compteur, appuyez
sur le bouton S1 et le compteur se
remettra en marche à partir du point
où il a été arrêté.
4.Pour démarrer de nouveau le
compteur, réinitialisez tout d’abord le
chronomètre à zéro. Appuyez sur le
bouton S1 pour arrêter le compteur
puis appuyez sur le bouton S3 pour
réinitialiser le compteur à zéro.
Pour mesurer le temps écoulé :
En mode CHRONOGRAPHE,
1.Appuyez sur le bouton S1 pour
démarrer le compteur.
2.Appuyez une fois sur le bouton S1
pour arrêter le compteur. Appuyez
de nouveau sur le bouton S1 pour
remettre le compteur en marche à
partir du point où il a été arrêté.
3.Pour réinitialiser le compteur à
zéro, appuyez sur le bouton S1 pour
FRANÇAIS
arrêter le compteur puis appuyez sur
le bouton S3.
Pour mesurer un temps intermédiaire,
En mode CHRONOGRAPHE,
1.Appuyez sur le bouton S1 pour
démarrer le compteur.
2.Alors que le chronomètre est en
cours, appuyez une fois sur le
bouton S3 pour enregistrer un
temps intermédiaire. Le temps
intermédiaire du temps de passage
enregistré s’afchera. Le compteur
du chronographe continue à tourner
dans le fond.
3.Pour afcher le temps écoulé en
cours, appuyez de nouveau sur le
bouton S3.
4.Répétez la dernière étape jusqu’à ce
que tous les temps de passage soient
enregistrés.
5.Pour réinitialiser le compteur à
zéro, appuyez sur le bouton S1 pour
arrêter le compteur puis appuyez sur
le bouton S3.
Pour mesurer les temps de deux
coureurs :
En mode CHRONOGRAPHE,
1.Appuyez sur le bouton S1 pour
démarrer le compteur.
2.Alors que le chronomètre est en
cours, appuyez sur le bouton S3
pour enregistrer et afcher le temps
intermédiaire du premier coureur. Le
compteur du chronographe continue
à tourner dans le fond.
3.Appuyez sur le bouton S1 pour
arrêter et enregistrer le temps du
deuxième coureur.
4.Appuyez sur le bouton S3 pour afcher le temps du deuxième coureur.
5.Appuyez de nouveau sur le bouton S3
pour réinitialiser le compteur à zéro.
REMARQUE: Le chronographe peut
compter jusqu’à un maximum de 23
heures, 59 minutes et 59,99 secondes.
REMARQUE: Vous pouvez laisser
le chronomètre en marche tout en
permutant sur un autre mode.
REGLAGE DU MINUTEUR :
1.Appuyez sur le bouton S2 pour sélectionner le mode TIMER (MINUTEUR).
2.Appuyez sur le bouton S3, le message “HOLD TO SET” (MAINTENIR
POUR REGLER) s’afchera durant
environ 3 secondes et les chiffres des
heures clignoteront.
3.Appuyez sur le bouton S1 pour
sélectionner le réglage du minuteur
entre 60, 55, 50, 45, 40, 35, 30, 25, 20,
15, 14, 13, 12, 11, 10, 9, 8, 7, 6, 5, 4, 3,
2, et 1 minute(s).
4.Appuyez sur le bouton S2, le réglage
“Action-at-End” (Action à la n)
clignotera. Appuyez sur le bouton
S1 pour permuter entre STOP AT
END (ARRETER A LA FIN) (ARRET),
REPEAT AT END (REPETER A LA FIN)
Page 7

(REPETITION) et COUNT UP AT END
(RETOUR DE COMPTEUR).
5.Après avoir effectué tous les
réglages, appuyez sur le bouton S3
pour conrmer.
REMARQUE: Dénitions des options de
procédure nale:
a) ARRET A LA FIN – le minuteur
s’arrêtera lorsque le compte à
rebours atteindra zéro.
b) REPETITION A LA FIN – le minuteur
se rechargera et répètera le compte
à rebours lorsque le compte à
rebours aura atteint zéro.
c) RETOUR DE COMPTEUR – Le minu-
teur comptera jusqu’à 23 heures 59
minutes et 59 secondes après avoir
atteint zéro.
UTILISATION DU MINUTEUR:
1.Appuyez sur le bouton S3 pour sélectionner le mode TIMER (MINUTEUR).
2.Le minuteur afchera le statut en
cours – réinitialisé, compteur en
cours ou compteur arrêté.
3.Pour réactiver le compteur, appuyez
sur le bouton S1 et le compteur se
remettra en marche à partir du point
où il a été arrêté.
4.Pour démarrer de nouveau le
compteur, réinitialisez tout d’abord
le minuteur à zéro. Appuyez sur le
bouton S1 pour arrêter le compteur
puis appuyez sur le bouton S3 pour
réinitialiser le minuteur.
5.Lorsque le compte à rebours atteint
zéro, une tonalité sonore sera émise.
Pour arrêter la tonalité sonore, appuyez sur n’importe quel bouton.
REMARQUE: Vous pouvez laisser le
minuteur en marche tout en permutant
sur un autre mode.
REGLAGE DE L’HEURE DE L’ALARME :
1.Appuyez sur le bouton S2 pour sélectionner le mode ALARME.
2.Appuyez et maintenez le bouton S3,
le message “HOLD TO SET” (MAINTENIR POUR REGLER) s’afchera et
les chiffres des heures clignoteront.
Appuyez sur le bouton S1 pour régler
les chiffres des heures. Maintenez
le bouton enfoncé pour accélérer la
procédure.
3.Appuyez sur le bouton S2, les chiffres
des minutes clignoteront. Appuyez
sur le bouton S1 pour régler les
chiffres des minutes. Maintenez le
bouton enfoncé pour accélérer la
procédure.
4.Après avoir effectué tous les
réglages, appuyez sur le bouton S3
pour conrmer.
REMARQUE: L’alarme sera automatiquement activée une fois réglée.
POUR ACTIVER / DESACTIVER
L’ALARME:
En mode ALARME, appuyez sur le
bouton S1 pour activer ou désactiver
l’alarme en faisant permuter le mode
ON (ACTIVE) et OFF (DESACTIVE).
Lorsque l’alarme est activée (ON),
l’indicateur de l’alarme
LORSQUE L’ALARME RETENTIT:
Une sonnerie d’alarme retentira
à l’heure réglée durant environ 20
secondes lorsque l’alarme est activée.
Pour arrêter la sonnerie d’alarme, appuyez sur n’importe quel bouton.
UTILISATION DU RETRO ECLAIRAGE :
Appuyez sur le bouton S4 pour activer
le rétro éclairage durant 3 secondes.
apparaitra.
FRANÇAIS
Pour réduire l’émission de carbone
dans l’atmosphère, ces instructions
Freestyle sont imprimées avec des
encres de soja sur du papier recyclé.
FS_119 MARINER_AG7502-FS-INST-PKG-R00
Page 8

MARINER
S4
S3
S2
S1. Tasto Start/stop (avvio/stop)
S2. Tasto Modalità
S3. Tasto Set/reset (impostazioni/reset-
taggio)
S4. Tasto Luce
FUNZIONE SPECIALE:
Questo prodotto Freestyle garantisce la
caratteristica unica Hydro Pushers®:
questi pulsanti possono essere premuti
sott’acqua ad una pressione dinamica
(non profondità di acqua) di 3 ATM.
MODALITA’ DISPLAY:
L’orologio ha quattro modalità di display:
ORA NAZIONALE (T1)/ ORA ESTERA
(T2), CRONOGRAFO (CHRONO), TIMER
e SVEGLIA.
Per passare tra una modalità display e
un’altra, premere una volta il tasto S2.
Nota: In qualsiasi modalità di impostazione, se nessun tasto viene premuto
per alcuni minuti, l’orologio salverà
automaticamente i dati inseriti e uscirà
dalla procedura di impostazione.
DISPLAY ORA NAZIONALE ED ESTERA:
Per vedere la modalità ORA ESTERA, premere e tenere premuto il tasto S1 quando
si è nella modalità ORA NAZIONALE. La
descrizione della modalità (T2) appare e
lampeggia per circa 5 secondi prima di
passare alla modalità ORA ESTERA. Per
tornare alla modalità ORA NAZIONALE,
premere e tenere premuto di nuovo il
tasto S1.
COME IMPOSTARE L’ORA E IL CALENDARIO:
1. Premere il tasto S2 per selezionare la
modalità ORA NAZIONALE /T1) / ORA
ESTERA (T2).
2. Premere e tenere premuto il tasto S3,
e apparirà per circa 3 secondi il messaggio “HOLD TO SET” (tenere premuto per impostare) e l’impostazione
del fuso orario lampeggerà.
3. Premere il tasto S1 per selezionare la
modalità ORA NAZIONALE (T1) / ORA
ESTERA (T2).
4. Premere il tasto S2, la cifra delle ore
lampeggerà. Premere il tasto S1 per
impostare le cifre dell’ora. Premere
a lungo il tasto farà avanzare la
progressione più velocemente.
S1
5. Premere il tasto S2, le cifre dei minuti
lampeggeranno. Premere il tasto
S1 per impostare le cifre dei minuti.
Premere a lungo il tasto farà avanzare
la progressione più velocemente.
6. Premere il tasto S2, le cifre dei secondi lampeggeranno. Premere il tasto
S1 per azzerare la cifra dei secondi.
7. Seguire lo stesso procedimento per
impostare anno, mese e data.
8. Premere il tasto S2, l’impostazione
del formato dell’ora lampeggerà.
Premere il tasto S1 per passare dal
formato 12 ore a quello 24 ore, e viceversa. L’indicatore A.M. o P.M. sarà
visualizzato per indicare il periodo di
tempo 12:00 A.M. – 11:59 A.M. o 12:00
P.M. – 11:59 P.M. nel formato 12 ore.
9. Premere il tasto S2, l’impostazione
della suoneria oraria (CHIME)
lampeggerà. Premere il tasto S1
per scegliere tra ON e OFF per
l’impostazione della suoneria oraria.
10. Dopo avere terminato le impostazioni,
premere il tasto S3 per confermare.
NOTA: L’impostazione di suoneria oraria
si applica sia alla modalità ORA NAZIONALE che a quella ORA ESTERA.
COME USARE IL CRONOGRAFO:
1. Premere il tasto S2 per selezionare la
modalità CRONOGRAFO.
2. Il cronografo apparirà quindi nel suo
stato attuale - fermo, conteggio o
reset.
3. Per riprendere un conteggio, premere
il tasto S1 per riprendere da dove era
stato interrotto.
4. Per iniziare un nuovo conteggio,
bisogna prima azzerare il cronometro.
Premere il tasto S1 per interrompere
il conteggio, poi premere S3 per resettare a zero il contatore.
Come misurare il tempo trascorso:
Nella modalità CRONOGRAFO,
1. Premere il tasto S1 per iniziare il
conteggio.
2. Per interrompere il conteggio, premere
una volta il tasto S1. Premere di nuovo
S1 per riprendere da dove era stato
interrotto.
3. Per azzerare, premere il tasto S1
per interrompere il conteggio quindi
premere il tasto S3.
Come misurare il tempo intermedio:
Nella modalità CRONOGRAFO,
1, Premere il tasto S1 per iniziare il
conteggio.
2, Mentre il cronografo è in funzione,
premere una volta il tasto S3 per
registrare un giro. Il tempo intermedio
del giro registrato sarà mostrato sul
display. Intanto il cronografo continua
a contare.
3. Per visualizzare il tempo attuale accu-
mulato, premere di nuovo il tasto S3.
4. Ripetere l’ultimo passaggio no a che
tutti i giri non sono stati registrati.
5. Per azzerare, premere il tasto S1
per interrompere il conteggio quindi
premere il tasto S3.
ITALIANO
Per misurare due tempi:
Nella modalità CRONOGRAFO,
1. Premere il tasto S1 per iniziare il
conteggio.
2. Mentre il tempo sul cronometro scorre,
premere il tasto S3 per registrare
e visualizzare il tempo della prima
persona. Intanto il cronografo continua
a contare.
3. Premere il tasto S1 per interrompere
e registrare il tempo della seconda
persona.
4. Premere il tasto S3 per visualizzare il
tempo della seconda persona.
5. Per azzerare, premere di nuovo il
tasto S3.
NOTA: Il cronografo può calcolare no ad
un massimo di 23 ore, 59 minuti e 59,99
secondi.
NOTA: Potete lasciare il cronografo
in funzione mentre passate ad altre
modalità.
COME IMPOSTARE IL TIMER:
1. Premere il tasto S2 per selezionare la
modalità TIMER.
2. Premere e tenere premuto il tasto
S3, e apparirà per circa 3 secondi il
messaggio “HOLD TO SET” (tenere
premuto per impostare) e le cifre
dell’ora lampeggeranno.
3. Premere il tasto S1 per cambiare
l’impostazione del timer tra 60, 55, 50,
45, 40, 35, 30, 25, 20, 15, 14, 13, 12, 11,
10, 9, 8, 7, 6, 5, 4, 3, 2, e 1 minuto.
4. Premere il tasto S2, e l’impostazione
“Action-at-End” (Azione alla ne)
lampeggerà. Premere il tasto S1 per
scegliere tra STOP AT END (STOP) e
REPEAT AT END (REPEAT) e COUNT
UP AT END (UP)
5. Dopo avere terminato le impostazioni,
premere il tasto S3 per confermare.
NOTA: Denizioni dell’opzione di impostazione Action-at-End:
a) STOP AT END – il timer si ferma
quando il conto alla rovescia raggiunge
lo zero.
b) REPEAT AT END – il timer ripeterà il
conto alla rovescia quando il conto alla
rovescia raggiunge lo zero.
c) COUNT UP AT END – il timer può cal-
colare no ad un massimo di 23 ore, 59
minuti e 59 secondi quando il conteggio alla rovescia raggiunge lo zero.
COME UTILIZZARE IL TIMER:
1. Premere il tasto S3 per selezionare la
modalità TIMER.
2. Il timer apparirà quindi nel suo stato
attuale - reset, conteggio o fermo.
3. Per riprendere un conteggio, premere
il tasto S1 per riprendere da dove era
stato interrotto.
4. Per iniziare un nuovo conteggio, ricaricare il timer innanzitutto.
Premere il tasto S1 per interrompere il
conteggio, poi premere il tasto S3 per
ricaricare il timer.
5. Dopo aver raggiunto lo zero in un conto
alla rovescia, un suono verrà emesso.
Page 9

Per interrompere il suono, premere un
tasto qualsiasi.
NOTA: Si può lasciare scorrere il tempo
sul cronometro mentre si passa ad altre
modalità operative.
COME IMPOSTARE L’ORARIO DI
SVEGLIA:
1. Premere il tasto S2 per selezionare la
modalità ALARM.
2. Premere il tasto S3, apparirà il
messaggio “HOLD TO SET” (tenere
premuto per impostare) e le cifre
dell’ora lampeggeranno. Premere il
tasto S1 per impostare le cifre dell’ora.
Premere a lungo il tasto farà avanzare
la progressione più velocemente.
3. Premere il tasto S2, le cifre dei minuti
lampeggeranno. Premere il tasto
S1 per impostare le cifre dei minuti.
Premere a lungo il tasto farà avanzare
la progressione più velocemente.
4. Dopo avere terminato le impostazioni,
premere il tasto S3 per confermare.
NOTA: La sveglia si attiverà automaticamente dopo essere stata impostata.
COME ATTIVARE/DISATTIVARE LA
SVEGLIA:
Nella modalità ALARM, premere il tasto
S1 per scegliere tra ON a OFF della
sveglia. Se la sveglia è su ON, l’indicatore
della sveglia
QUANDO LA SVEGLIA SI ATTIVA:
Quando la sveglia è attivata, viene
emesso un allarme di 20 secondi all’ora
designata. Per interrompere il suono,
premere un tasto qualsiasi.
COME UTILIZZARE LA RETROILLUMINAZIONE:
Premere il tasto S4 per accendere la
retroilluminazione per circa 3 secondi
apparirà.
ITALIANO
Per ridurre l’impatto ambientale,
queste istruzioni Freestyle sono
stampate con inchiostri di soia su
carta riciclata .
FS_119 MARINER_AG7502-FS-INST-PKG-R00
Page 10

MARINER
S4
S3
S2
S1. Botão Iniciar/Parar
S2. Botão Modo
S3. Botão Congurar/Reiniciar
S4. Botão da Luz
CARACTERÍSTICAS ESPECIAIS
Este produto Freestyle apresenta os
únicos Hydro Pushers®: estes botões
de accionamento podem ser premidos
debaixo de água sob uma pressão de
água dinâmica (não profundidade de
água) de 3 ATM.
MODOS DE VISUALIZAÇÃO:
O relógio tem quatro modos de visualização: FUSO DO PAÍS (T1) / FUSO
ESTRANGEIRO (T2), CRONÓGRAFO
(CRONO), TEMPORIZADOR e ALARME.
Para mudar de um modo de apresentação para outro, prima uma vez o
botão S2.
Nota: Em qualquer modo de conguração, se nenhum botão for premido
durante alguns minutos, o relógio
guardará automaticamente os dados
introduzidos e sairá do modo de
conguração.
VISUALIZAÇÃO DE FUSO DO PAÍS E
ESTRANGEIRO:
Para visualizar o modo de FUSO
ESTRANGEIRO, prima e mantenha
premido o botão S1 quando visualizar
o modo FUSO DO PAÍS. A descrição do
modo (T2) será visualizada e piscará
cerca de 5 segundos antes de mudar
para o modo FUSO ESTRANGEIRO.
Para voltar ao modo FUSO DO PAÍS,
prima e mantenha premido o botão S1.
AJUSTAR A HORA E O CALENDÁRIO:
1. Prima o botão S2 para seleccio-
nar o modo FUSO DO PAÍS (T1) /
ESTRANGEIRO (T2).
2. Prima e mantenha premido o
botão S3, a mensagem “MANTER
PREMIDO PARA CONFIGURAR” será
visualizada cerca de 3 segundos e o
fuso horário congurado piscará.
3. Prima o botão S1 para alternar
entre FUSO DO PAÍS (T1) e FUSO
ESTRANGEIRO (T2) para congurar.
S1
4. Prima o botão S2, os dígitos das
horas piscarão. Prima o botão S1
para acertar os dígitos das horas.
Se mantiver o botão premido acelerará o processo.
5. Prima o botão S2, os dígitos dos
minutos piscarão. Prima o botão S1
para acertar os dígitos dos minutos.
Se mantiver o botão premido acelerará o processo.
6. Prima o botão S2, os dígitos dos segundos piscarão. Prima o botão S1
para repor os dígitos dos segundos
a zero.
7. Siga os mesmos passos para acertar o ano, o mês e a data.
8. Prima o botão S2, a conguração do
formato da hora piscará. Prima o
botão S1 para alternar entre o formato de 12 e 24 horas. O indicador
A.M. ou P.M. poderá ser visualizado
para indicar o período de tempo
12:00 A.M. - 11:59 A.M. ou 12:00
P.M. – 11:59 P.M. respectivamente
no formato de 12 horas.
9. Prima o botão S2, a conguração
do sinal sonoro horário (SINAL
SONORO) piscará. Prima o botão
S1 para alternar entre ON (ligado) e
OFF (desligado) para a conguração
do sinal sonoro horário.
10.Após acabar de efectuar todos os
ajustes, prima o botão S3 para
conrmar.
NOTA: A conguração do sinal sonoro
horário será aplicada no modo FUSO
DO PAÍS e FUSO ESTRANGEIRO.
UTILIZAR O CRONÓGRAFO:
1. Prima o botão S2 para seleccionar o
modo CRONÓGRAFO.
2. O cronógrafo será então visualizado
no seu estado actual – parado, a
funcionar ou reajustar.
3. Para retomar uma contagem inter-
rompida, prima o botão S1 para
retomar a partir de onde parou.
4. Para iniciar uma nova contagem, em
primeiro lugar reponha o cronógrafo
a zero.
Prima o botão S1 para parar a conta-
gem e em seguida prima o botão S3
para repor o contador a zero.
Para medir o tempo decorrido:
No modo CRONÓGRAFO,
1. Prima o botão S1 para iniciar a
contagem.
2. Para parar a contagem, prima o
botão S1 uma vez. Prima o botão
S1 de novo para retomar a partir de
onde parou.
3. Para repor a zero, prima o botão
S1 para parar a contagem e depois
prima o botão S3.
Para a medição do tempo total:
No modo CRONÓGRAFO,
1. Prima o botão S1 para iniciar a
contagem.
PORTUGUÊS
Enquanto o cronógrafo estiver em
funcionamento, prima o botão S3
uma vez para registar uma volta.
Será visualizado o tempo parcial da
volta registada. O cronógrafo continua em funcionamento em segundo
plano.
3. Para visualizar o tempo decorrido
actual, prima de novo o botão S3.
4. Repita o último passo até que todas
as voltas tenham sido registadas.
5. Para repor a zero, prima o botão
S1 para parar a contagem e depois
prima o botão S3.
Para a medição de duas chegadas:
No modo CRONÓGRAFO,
1. Prima o botão S1 para iniciar a
contagem.
2. Enquanto o cronógrafo estiver em
funcionamento, prima o botão S3
para registar e visualizar o tempo
do primeiro corredor. O cronógrafo
continua em funcionamento em
segundo plano.
3. Prima o botão S1 para parar e
registar o tempo do segundo
corredor.
4. Prima o botão S3 para visualizar o
tempo do segundo corredor.
5. Para repor a zero, prima o botão S3
novamente.
NOTA: O cronógrafo pode contar até
um máximo de 23 horas, 59 minutos e
59,99 segundos.
NOTA: Pode deixar o cronógrafo em
funcionamento enquanto muda para
outros modos de operação.
UTILIZAR O TEMPORIZADOR:
1. Prima o botão S2 para seleccionar o
modo TEMPORIZADOR.
2. Prima o botão S3, a mensagem
“MANTER PREMIDO PARA CONFIGURAR” será visualizada cerca
de 3 segundos e os dígitos da hora
piscarão.
3. Prima o botão S1 para alterar a
conguração do temporizador entre
60, 55, 50, 45, 40, 35, 30, 25, 20, 15,
14, 13, 12, 11, 10, 9, 8, 7, 6, 5, 4, 3, 2
e 1 minutos.
4. Prima o botão S2, a conguração
de “Acção no nal” piscará. Prima
o botão S1 para seleccionar PARAR
NO FIM (PARAR), REPETIR NO FIM
(REPETIR) e CONTAR ATÉ AO FIM
(CONTAR ATÉ).
5. Após acabar de efectuar todos os
ajustes, prima o botão S3 para
conrmar.
NOTA: Denições da opção conguração Acção no nal:
a) PARAR NO FIM – o temporizador
parará quando a contagem decrescente atingir zero.
b) REPETIR NO FIM – o temporizador
repetirá a contagem regressiva
Page 11

quando esta atingir zero.
c) CONTAR ATÉ AO FIM – o tempori-
zador conta até um máximo de 23
horas, 59 minutos e 59 segundos
quando a contagem regressiva
atingir zero.
UTILIZAR O TEMPORIZADOR:
1. Prima o botão S3 para seleccionar o
modo TEMPORIZADOR.
2. O temporizador será então visualizado no seu estado actual – parado,
a funcionar ou recongurar.
3. Para retomar uma contagem interrompida, prima o botão S1 para
retomar a partir de onde parou.
4. Para iniciar uma nova contagem,
carregue primeiro o temporizador.
Prima o botão S1 para parar a con-
tagem e em seguida prima o botão
S3 para carregar o temporizador.
5. Quando chegar a zero numa
contagem regressiva, será emitida
uma melodia. Para parar a melodia,
prima qualquer botão.
NOTA: Pode deixar o temporizador em
funcionamento enquanto muda para
outros modos de operação.
CONFIGURAR A HORA DO ALARME:
1. Prima o botão S2 para seleccionar o
modo ALARME.
2. Prima o botão S3, a mensagem
“MANTER PREMIDO PARA CONFIGURAR” será visualizada e os
dígitos das horas piscarão. Prima o
botão S1 para acertar os dígitos das
horas. Se mantiver o botão premido
acelerará o processo.
3. Prima o botão S2, os dígitos dos
minutos piscarão. Prima o botão S1
para acertar os dígitos dos minutos.
Se mantiver o botão premido acelerará o processo.
4. Após acabar de efectuar todos os
ajustes, prima o botão S3 para
conrmar.
NOTA: O alarme será activado automaticamente depois de ajustado.
LIGAR (ON) / DESLIGAR (OFF) O
ALARME:
No modo ALARME, prima o botão S1
para alternar entre ON (ligado) e OFF
(desligado). Quando o alarme está
ON (ligado), surgirá o indicador do
alarme
.
QUANDO UM ALARME DISPARA:
Será emitida uma melodia de alarme
durante 20 segundos, na hora indicada
aquando da activação do alarme. Para
parar a melodia, prima qualquer botão.
UTILIZAR A LUZ POSTERIOR:
Prima o botão S4 para ligar a luz
posterior cerca de 3 segundos.
PORTUGUÊS
Para reduzir a emissão de carbono,
estas instruções Freestyle foram
impressas com tinta de soja em papel
reciclado.
FS_119 MARINER_AG7502-FS-INST-PKG-R00
Page 12

MARINER
S4
S3
S2
S1.スタート/ストップボタン
S2.モードボタン
S3 . セット /リセットボ タン
S4 .ライトボタン
特別機能
Freestyleの本製品にはHydro Pusher®が
搭載されています。これらのボタンは動水
圧3ATM(水深ではありません)下で押すこ
とができま す。
表 示モード
この時計には次の4つの表示モー
ドがあります。HOME TIME (ホームタ
イム:T1)/FOREIGN TIME (海外タイ
ム:T2)、 CHORONOGRAPH (クロノグラ
フ:CHRONO)、TIMER (タイマー)、ALARM
(アラーム)。
表示モードを変換するには、S2ボタンを1
回押してください。
注:いずれのモードでも、設定中に数分間
キーの操作が行われなかった場合は自動
的に入力データが保存され設定モードが
終了します。
ホーム/海外タイム表示
FOREIGN TIME モードにするには、HOME
TIME モード時にS1ボタンを長押しします。
海外タイムモードを表すT2の文字が表示
され、約5秒間点滅してからFOREIGN TIME
モードに切り替わります。HOME TIME モ
ードに戻す場合はもう一度S1ボタンを長
押ししま す。
時 刻お よびカレ ンダー を設 定 する
1. S2ボタンを押してHOME TIME (T1)/
FOREIGN TIME (T2) モードを選択しま
す。
2. S3ボタンを長押しすると、 “HOLD TO
SET”の文字が約3秒間表示されて、タイ
ムゾーンの設定が点滅します。
3. S1ボタンを押してHOME TIME (T1)ま
たはFOREIGN TIME (T2)を選択します。
4. S2ボタンを押すと、時桁が点滅しま
す。S1ボタンを押して時刻を設定しま
す。ボタンを 長 押しすると早く進 みま
す。
5. S2ボタンを押すと、分桁が点滅しま
す。S1ボタンを押して分刻を設定しま
す。ボタンを 長 押しすると早く進 みま
す。
6. S2ボタンを押すと、秒桁が点滅しま
す。S1 ボ タンを 押して秒 刻を 0 にリセッ
トしま す 。
7. 同じ作 業を、年・月・日について繰り返し
て行ってください 。
8. S2ボタンを押します。時刻フォーマット
の設定が点滅します。S1ボタンを押す
と12時間表示と24時間表示が切り替わ
ります。12時間表示では、午前0:00 ~
午前11:59にA.M.の文字が表示され、
S1
午後12:00~午後11:59 P.MにP.M.の文
字が表示されます。
9. S2ボタンを押します。毎時お知らせ
チャイム(CHIME) の設定が点滅しま
す。S1ボタンを押すとチャイムのON/
OF F が 切り替 わります。
10. 全ての設定が終わったらS3ボタンを押
して決 定しま す。
注: チャイムの設定はHOME TIME と
FOREIGN TIME モードの両方に適用さ
れます。
クロノグラフを 使う
1. S2ボタンを押してCHRONOGRAPHモー
ドを選択します。
2. その時点でのクロノグラフの状態(停
止/計測中/リセット)が表示されます。
3. 停止したカウントを再開する場合はS1
ボタンを 押しま す。
4. 新しくカウントしなおす場合は、まずクロ
ノグラフを 0 にリセットしてくだ さい 。
S1を押してカウントを停止してからS3ボ
タンを 押して0 にリセットしてください 。
経過タイムの計測
CHRONOGRAPHモードにします。
1. S1ボタンを押してカウントを開始し
ます。
2. カウントを停止するにはS1ボタンを1
回押します。もう一度S1ボタンを押す
と、停止した時点から再びカウントが
始まりま す。
3. 0にリセットするには、S1ボタンを押し
てカウントを停 止してか らS 3ボ タンを
押します。
スプリットタイムの 計 測
CHRONOGRAPHモードにします。
1. S1ボタンを押してカウントを開始し
ます。
2. クロノグラフがカウントしている間にS3
ボタンを 押してラップを 登録し ます。登
録したラップのスプリットタイムが表示
されます。その間もクロノグラフは同時
にカウントを継続しています。
3. その時点での経過タイムを表示する場
合は、S3ボタンをもう一度押します。
4. 上の操作を繰返し、ラップを全て登録
します。
5. 0にリセットするには、S1ボタンを押し
てカウントを停 止してか らS 3ボ タンを
押します。
2つのタイムの測定
CHRONOGRAPHモードにします。
1. S1ボタンを押してカウントを開始し
ます。
2. クロノグラフがカウントしている間にS3
ボタンを押して最初のランナーのタイム
を登録・表示します。その間もクロノグラ
フは同時 にカウントを継続しています。
3. S1ボタンを押して停止し、2人目のラン
ナーのタイムを登録します。
4. S3ボタンを押すと2人目のランナーの
タイムが表示されます。
5. S3ボタンをもう一度押すと0にリセット
されます。
注: クロノグラフでは最大23時間59分
59.99秒までカウントすることができます。
注: クロノグラフのカウント中に他のモー
ドに 切り替 えることも可能 で す。
タイマ ーを 設 定する
1. S2ボタンを押してTIMERモードを選
択します。
2. S3ボタンを長押しすると、 “HOLD TO
SET”の文字が約3秒間表示されて、時桁
が点滅します。
3. S1ボタンを押すと、タイマーの設定時間
を60, 55, 50, 45, 40, 35, 30, 25, 20, 15,
日本語
14, 13, 12, 11, 10, 9, 8, 7, 6, 5, 4, 3, 2, 1
分の中から選択することができます。
4. S2ボタンを押すと、Action-at-End(終了
アクション)の設定が点滅します。S1ボ
タンを押してSTOP AT END (終了後停
止:STOP)、REPEAT AT END (REPEAT:
終了後リピート)、COUNT UP AT END
(UP:終了後カウントアップ)のいずれか
を 選 択 し ま す 。
5. 全ての設定が終わったらS3ボタンを押
して決 定しま す。
注: 終了アクションのオプションについて
a) STOP AT END – タイマーはカウントが0
になった時点で停止します。
b) REPEAT AT END – タイマーはカウント
が0になった時点で再度カウントダウン
をリピートします。
c) COUNT UP AT END – タイマーはカウン
トが0 になったら、そ のまま続け てカウ
ントアップを行 い ます。カ ウントアップは
最大23時間59分59秒までです。
タイマーを使う
1. S3ボタンを押してTIMERモードを選
択します。
2. その時点でのタイマーの状態(停止/計
測中/リセット)が表示されます。
3. 停止したカウントを再開する場合はS1
ボタンを 押しま す。
4. 新しくカウントしなおす場合は、タイマ
ーをリロードしてください。
タイマーのリロードはS1ボタンを押して
カウントを停 止してから S3 ボ タンを 押し
ます。
5. タイマーが0になるとお知らせ音が鳴り
ます。音を止めたいときは、いずれかの
ボタンを 押してください 。
注: タイマー のカウントを継続したまま
他の モ ード に切り替 えることがで きます。
アラー ムを設定 する
1. S2ボタンを押してALARMモードを選
択します。
2. S3ボタンを長押しします。“HOLD TO
SET” の文字が表示されて時桁が点滅し
ます。S1ボタンを押して時刻を設定しま
す。ボタンを長押しすると早く進 みます。
3. S2ボタンを押すと、分桁が点滅しま
す。S1ボタンを押して分刻を設定しま
す。ボタンを長押しすると早く進 みます。
4. 全ての設定が終わったらS3ボタンを押
して決 定しま す。
注: 設定後アラームは自動的にONに
なります。
アラームのON/OFFを設定する
ALARMモードにします。S1ボタンを押して
アラームのON/OFFを切り替えます。アラー
ムがONの時はアラームのアイコン
表示されます。
アラー ムが なったら
アラームがONの場合は、指定の時間に
20秒間アラーム音が鳴ります。音を止め
たいときは、いずれかのボタンを押して
ください。
バックライトを使う
S4ボタンを3秒間押すとバックライトが
点灯 します。
カー ボンフットプリントの減 少 を目的と
してFreestyleの取扱説明書は大豆イ
ンキ とリ サイク ル 紙 を 使 用し てい ま す
が
FS_119 MARINER_AG7502-FS-INST-PKG-R00
 Loading...