

Page 1
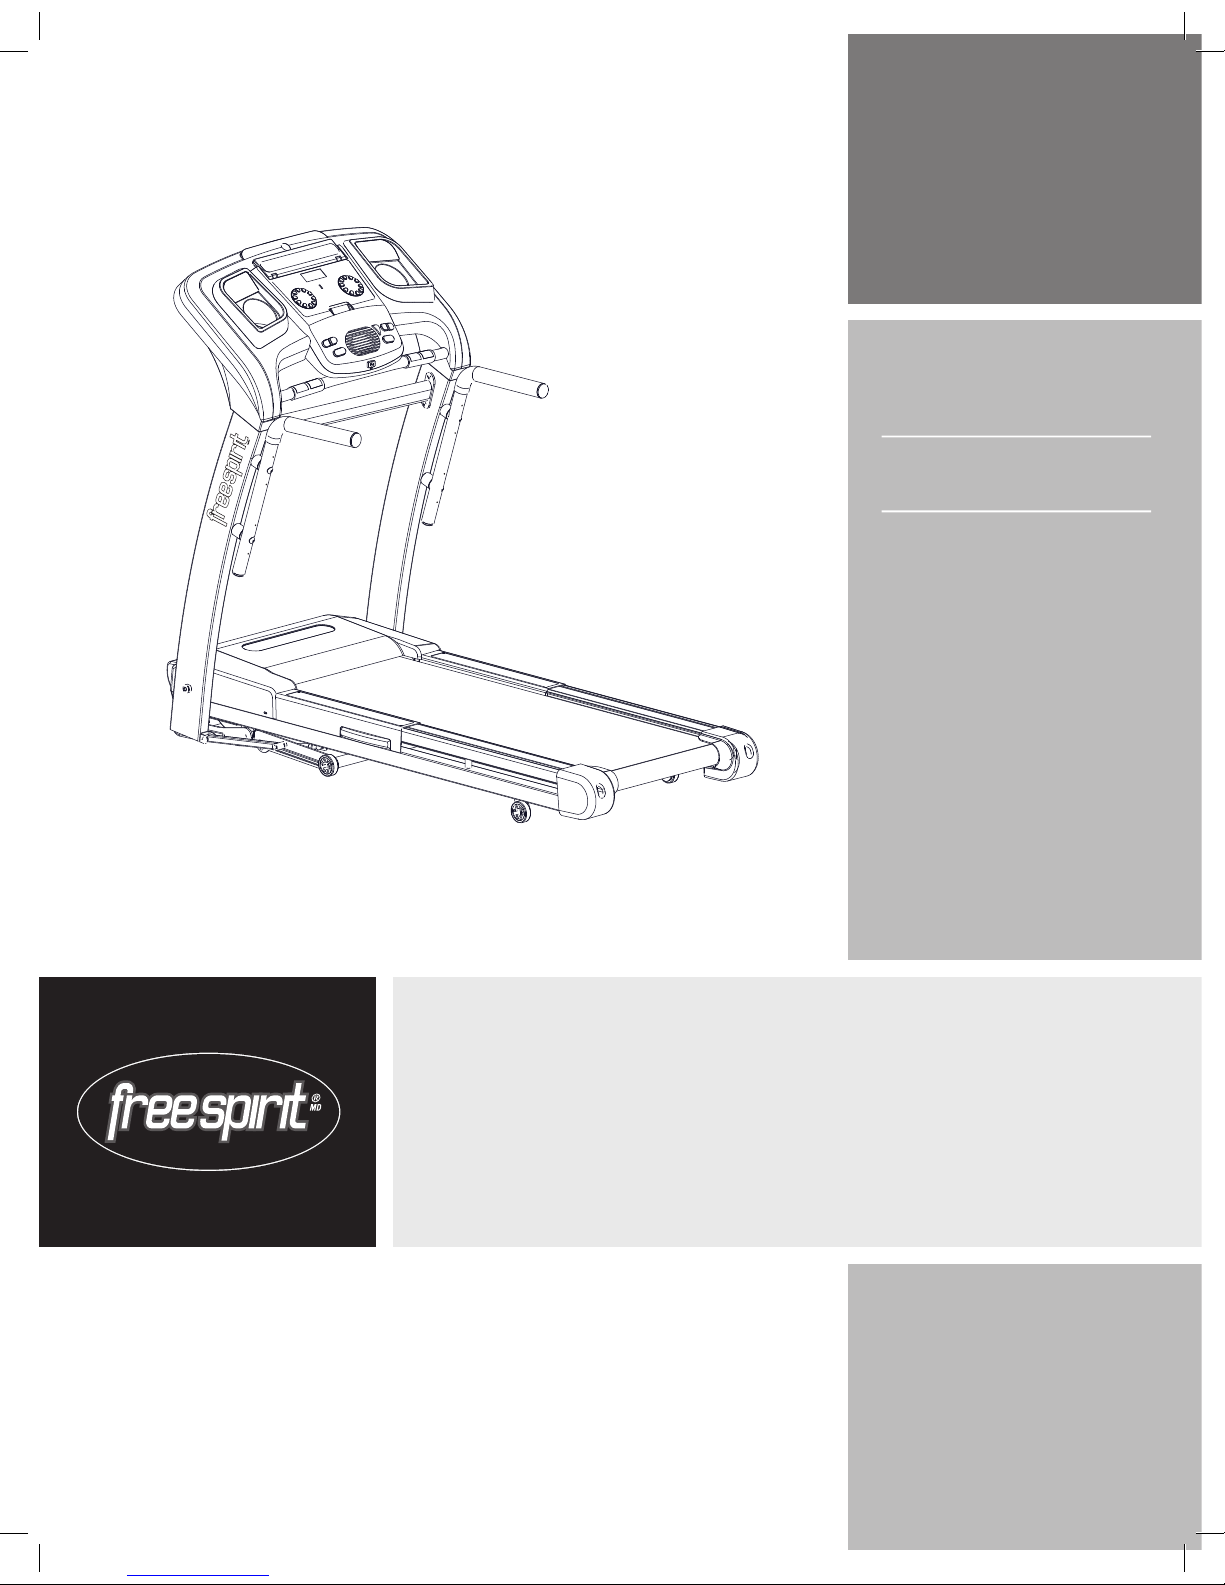
TREADMILL A S S E M B LY
& U S E R ’ S GUIDE
FOR MODEL :
30727
30727_Rev.1.1.indd 1 7/3/07 8:38:07 AM
Page 2
3
INTRODUCTION
IMPORTANT
PRECAUTIONS
ASSEMBLY
BEFORE
YOU BEGIN
TREADMILL
OPERATION
CONDITIONING
GUIDELINES
TROUBLESHOOTING
& MAINTENANCE
LIMITED
WARRANTY
CONGRATULATIONS and THANK YOU for your purchase of this Free Spirit treadmill!
Whether your goal is to win races or simply enjoy a fuller, healthier lifestyle, a Free Spirit treadmill can
help you attain it – adding club-quality performance to your at-home workouts, with the ergonomics
and innovative features you need to get stronger and healthier, faster. Because we're committed to
designing fitness equipment from the inside out, we use only the highest quality components. It's a
commitment we back with one of the strongest frame-to-motor warranty packages in the industry.
You want exercise equipment that offers the most comfort, the best reliability and the highest quality
in its class.
Free Spirit treadmills deliver.
IN T RO D UCT I ON
Importan t Pr ecautio ns
Assembly
Before You Begi n
Trea dmill Ope ration
Conditio ning Guid elines
Trou bleshoo ting & Main tenance
Parts List & Exp loded Dra wing
Limited Warr anty
CONTAC T IN FORMATIO N
4
6
13
16
21
28
31
34
Back Cover
TABLE OF C O N T E N T S
30727_Rev.1.1.indd 2-3 7/3/07 8:38:07 AM
Page 3
4
INTRODUCTION
IMPORTANT
PRECAUTIONS
ASSEMBLY
BEFORE
YOU BEGIN
TREADMILL
OPERATION
LIMITED
WARRANTY
TROUBLESHOOTING
& MAINTENANCE
CONDITIONING
GUIDELINES
5
INTRODUCTION
IMPORTANT
PRECAUTIONS
ASSEMBLY
BEFORE
YOU BEGIN
TREADMILL
OPERATION
CONDITIONING
GUIDELINES
TROUBLESHOOTING
& MAINTENANCE
LIMITED
WARRANTY
TO REDUCE THE RISK OF BURNS, FIRE, ELECTRICAL SHOCK OR INJURY
TO PERSONS:
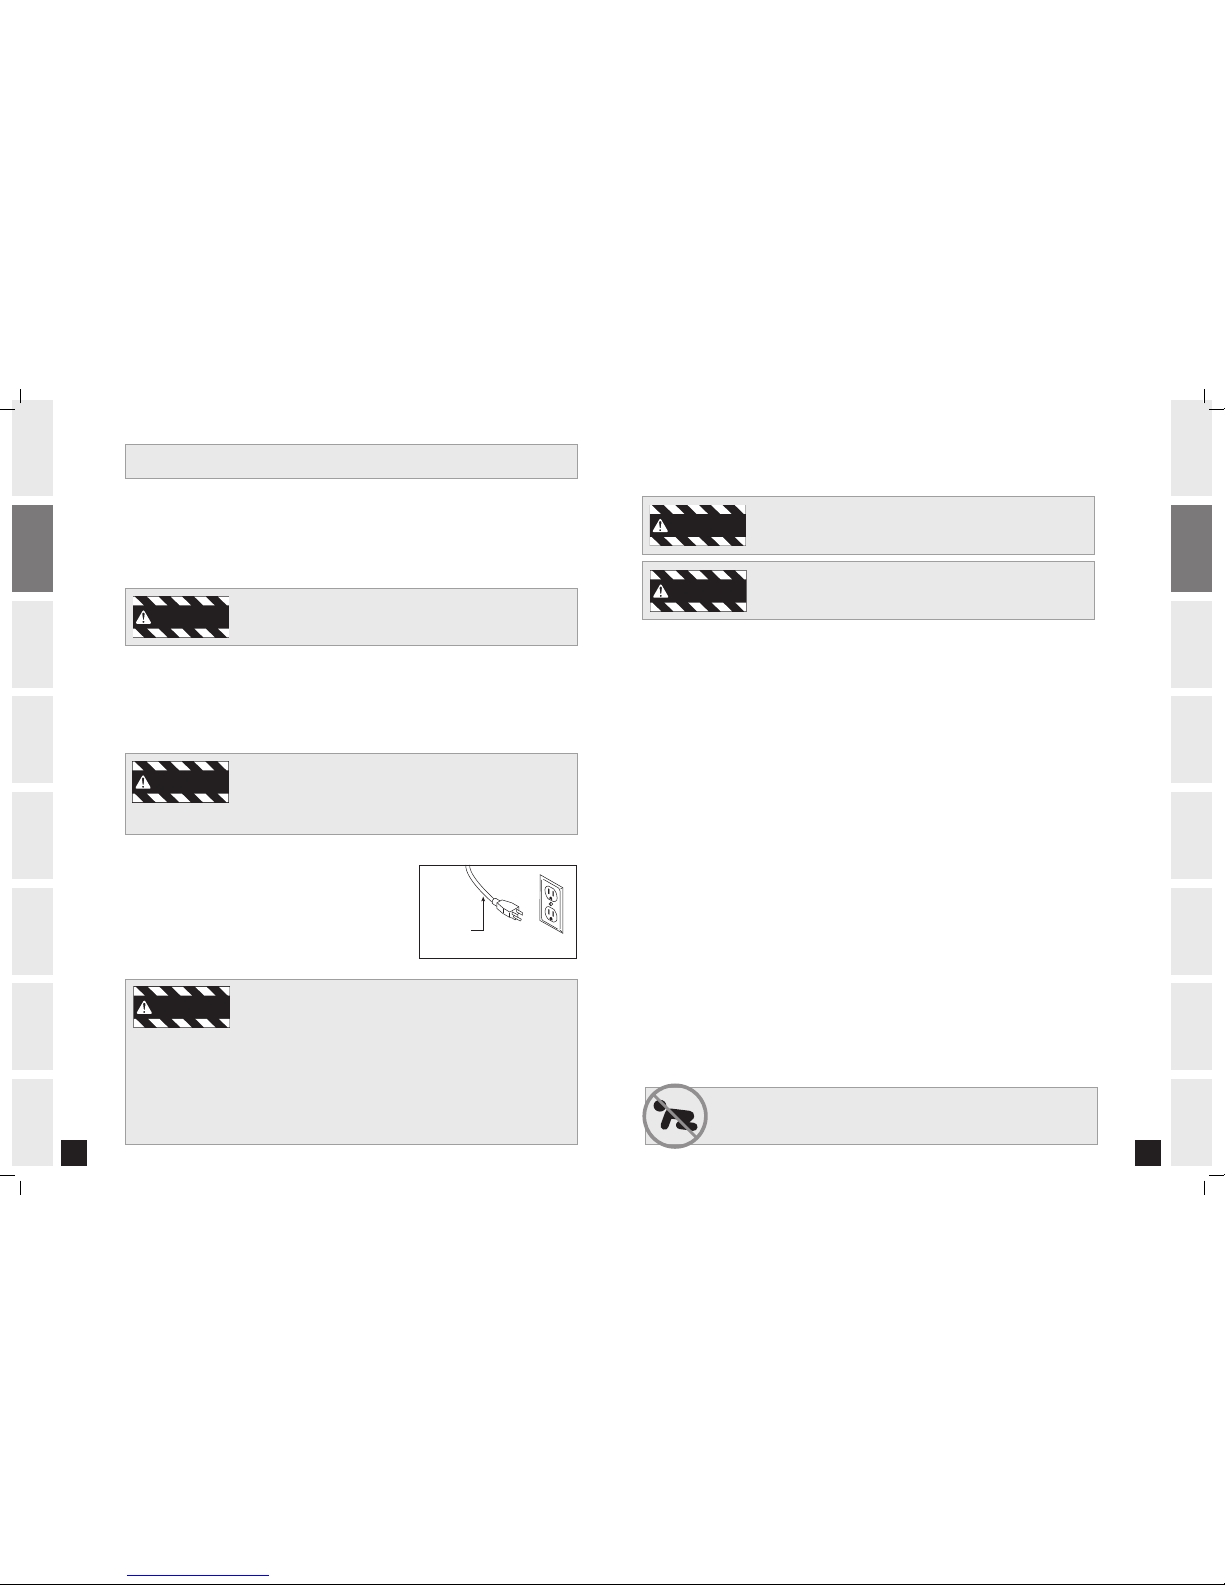
This product is for use on a nominal 110-volt circuit and has a
grounding plug that looks like the illustration to the right. This
product must be used on a dedicated circuit. To determine if you
are on a dedicated circuit, shut off the power to that circuit and
observe if any other devices lose power. If so, move devices to a
different circuit. Note: There are usually multiple outlets on one
circuit. It is recommended that the treadmill be used with a 15
amp circuit for optimal performance.
IM P OR T A NT SA F ETY I N STR UCT I ON S
WARNI NG
WARNI NG
WARNI NG
3-P ole Groun ded Outle t
GROUNDED
TREADMILL
POWER CORD
OPERATION
To reduce the risk of damaging important components on your treadmill, it is
strongly recommended that your treadmill is plugged into a dedicated 15 amp
circuit, without the use of an additional extension cord and/or power strip.
Failure to comply may void the warranty.
IMPORTANT: The treadmill is not compatible with GFCI-equipped outlets.
It is essential that your treadmill is used only indoors, in a climate controlled room. If your treadmill
has been exposed to colder temperatures or high moisture climates, it is strongly recommended that the
treadmill is warmed up to room temperature before first time use. Failure to do so may cause premature
electronic failure.
When using an electrical appliance, basic precautions should always be followed, including the following.
Read all instructions before using this appliance:
SAVE THESE INSTRUCTIONS
SAVE THESE INSTRUCTIONS
Read all instructions before using this treadmill. When using an electrical product, basic precautions
should always be followed, including the following: Read all instructions before using this treadmill. It is the
responsibility of the owner to ensure that all users of this treadmill are adequately informed of all warnings
and precautions. If you have any questions after reading this manual, contact Sears at the number listed on
the back cover of this manual.
Connect this exercise product to a properly grounded outlet only.
See grounding instructions.
GROUNDING INSTRUCTIONS
This product must be grounded. If a treadmill should malfunction or breakdown, grounding provides a path
of least resistance for electrical current to reduce the risk of electrical shock. This product is equipped with
a cord having an equipment-grounding conductor and a grounding plug. The plug must be plugged into an
appropriate outlet that is properly installed and grounded in accordance with local codes and ordinances.
Improper connection of the equipment-grounding conductor can result in a risk of
electric shock. Check with a qualified electrician or serviceman if you are in doubt
as to whether the product is properly grounded. Do not modify the plug provided
with the product. If it will not fit the outlet, have a proper outlet installed by a
qualified electrician.
WARNI NG
At NO time should pets or children under the age of 12 be closer to the treadmill than 10 feet.
At NO time should children under the age of 12 use the treadmill.
Children over the age of 12 should not use the treadmill without adult supervision.
TO REDUCE THE RISK OF ELECTRIC SHOCK:
Always unplug this appliance (or treadmill) from the electrical outlet
immediately after using and before cleaning.
DAN GER
Never use the treadmill before securing the
safety tether clip to your clothing.
If you experience any kind of pain, including
but not limited to chest pains, nausea,
dizziness, or shortness of breath, stop
exercising immediately and consu lt your
physician before continuing.
Do not wear clothes that might catch on any
part of the treadmill.
Always wear athletic shoes while using this
equipment.
Do not jump on the treadmill.
Unplug treadmill before moving or cleaning
it. To clean, wipe surfaces down with soap
and slightly damp cloth only; never use
solvents. (See MAINTENANCE)
At no time should more than one person be
on treadmill while in operation.
The treadmill should not be used by persons
weighing more than 300 pounds. Failure to
comply will void the warranty.
The treadmill is intended for in-home use only.
Do not use this treadmill in any commercial,
rental, school or institutional setting. Failure
to comply will void the warranty.
Do not use the treadmill in any location that
is not temperature controlled, such as but
not limited to garages, porches, pool rooms,
bathrooms, car ports or outdoors. Failure to
comply may void the warranty.
•
•
•
•
•
•
•
•
•
•
An appliance should never be left unattended when plugged in.
Unplug from outlet when not in use, and before putting on or
taking off parts.
Close supervision is necessary when this appliance (or treadmill)
is used by, on, or near children, invalids, or disabled persons.
Use this appliance (or treadmill) only for its intended use
as described in this manual. Do not use attachments not
recommended by the manufacturer.
Never operate this appliance (or treadmill) if it has a damaged
cord or plug, if it is not working properly, if it has been dropped
or damaged, or dropped into water. Return the appliance (or
treadmill) to a service center for examination and repair.
Do not carry this appliance (or treadmill) by supply cord or use
cord as a handle.
Keep the cord away from heated surfaces.
Never operate the appliance (or treadmill) with the air openings
blocked. Keep the air openings free of lint, hair, and the like.
Never drop or insert any object into any opening.
Do not use outdoors.
Do not operate where aerosol (spray) products are being used or
where oxygen is being administered.
To disconnect, turn all controls to the off position, then remove
plug from outlet.
Do not operate under blanket or pillow. Excessive heating can
occur and cause fire, electric shock, or injury to persons.
•
•
•
•
•
•
•
•
•
•
•
•
30727_Rev.1.1.indd 4-5 7/3/07 8:38:09 AM
Page 4
6
INTRODUCTION
IMPORTANT
PRECAUTIONS
ASSEMBLY
BEFORE
YOU BEGIN
TREADMILL
OPERATION
LIMITED
WARRANTY
TROUBLESHOOTING
& MAINTENANCE
CONDITIONING
GUIDELINES
7
INTRODUCTION
IMPORTANT
PRECAUTIONS
ASSEMBLY
BEFORE
YOU BEGIN
TREADMILL
OPERATION
CONDITIONING
GUIDELINES
TROUBLESHOOTING
& MAINTENANCE
LIMITED
WARRANTY
AS S EM B LY
IMPORTANT: READ THESE SAFETY INSTRUCTIONS BEFORE USE!
During the assembly process of the treadmill there are several areas that special attention must be paid.
It is very important to follow the assembly instructions correctly and to make sure all parts are firmly
tightened. If the assembly instructions are not followed correctly, the treadmill could have frame parts that
are not tightened and will seem loose and may cause irritating noises. There should be no side-to-side play
in the console masts or any forward and back play in the console assembly or handlebars. If there is any
play in these areas, the treadmill has not been properly assembled. To prevent damage to the treadmill, the
assembly instructions must be reviewed and corrective actions should be taken.
UNPACKING
Place the treadmill carton on a level flat surface. It is recommended that you place a protective covering on
your floor. Take CAUTION when handling and transporting this unit. Never open box when it is on its side.
Once the banding straps have been removed, do not lift or transport this unit unless it is fully assembled
and in the upright folded position, with the lock latch secure. Unpack the unit where it will be used. Never
grab hold of any portion of the incline frame and attempt to lift or move the treadmill. FAILURE TO FOLLOW
THESE INSTRUCTIONS COULD RESULT IN INJURY!
Before proceeding, find your treadmill’s serial number
and model name located under the deck on the frame
crossbar and enter it in the space provided below.
ENTER YOUR SERIAL NUMBER AND
MODEL NAME IN THE BOXES BELOW:
SERIAL NUMBER :
MODEL NAME:
* Refer to the SERIAL NUMBER and MODEL NAME when calling for service.
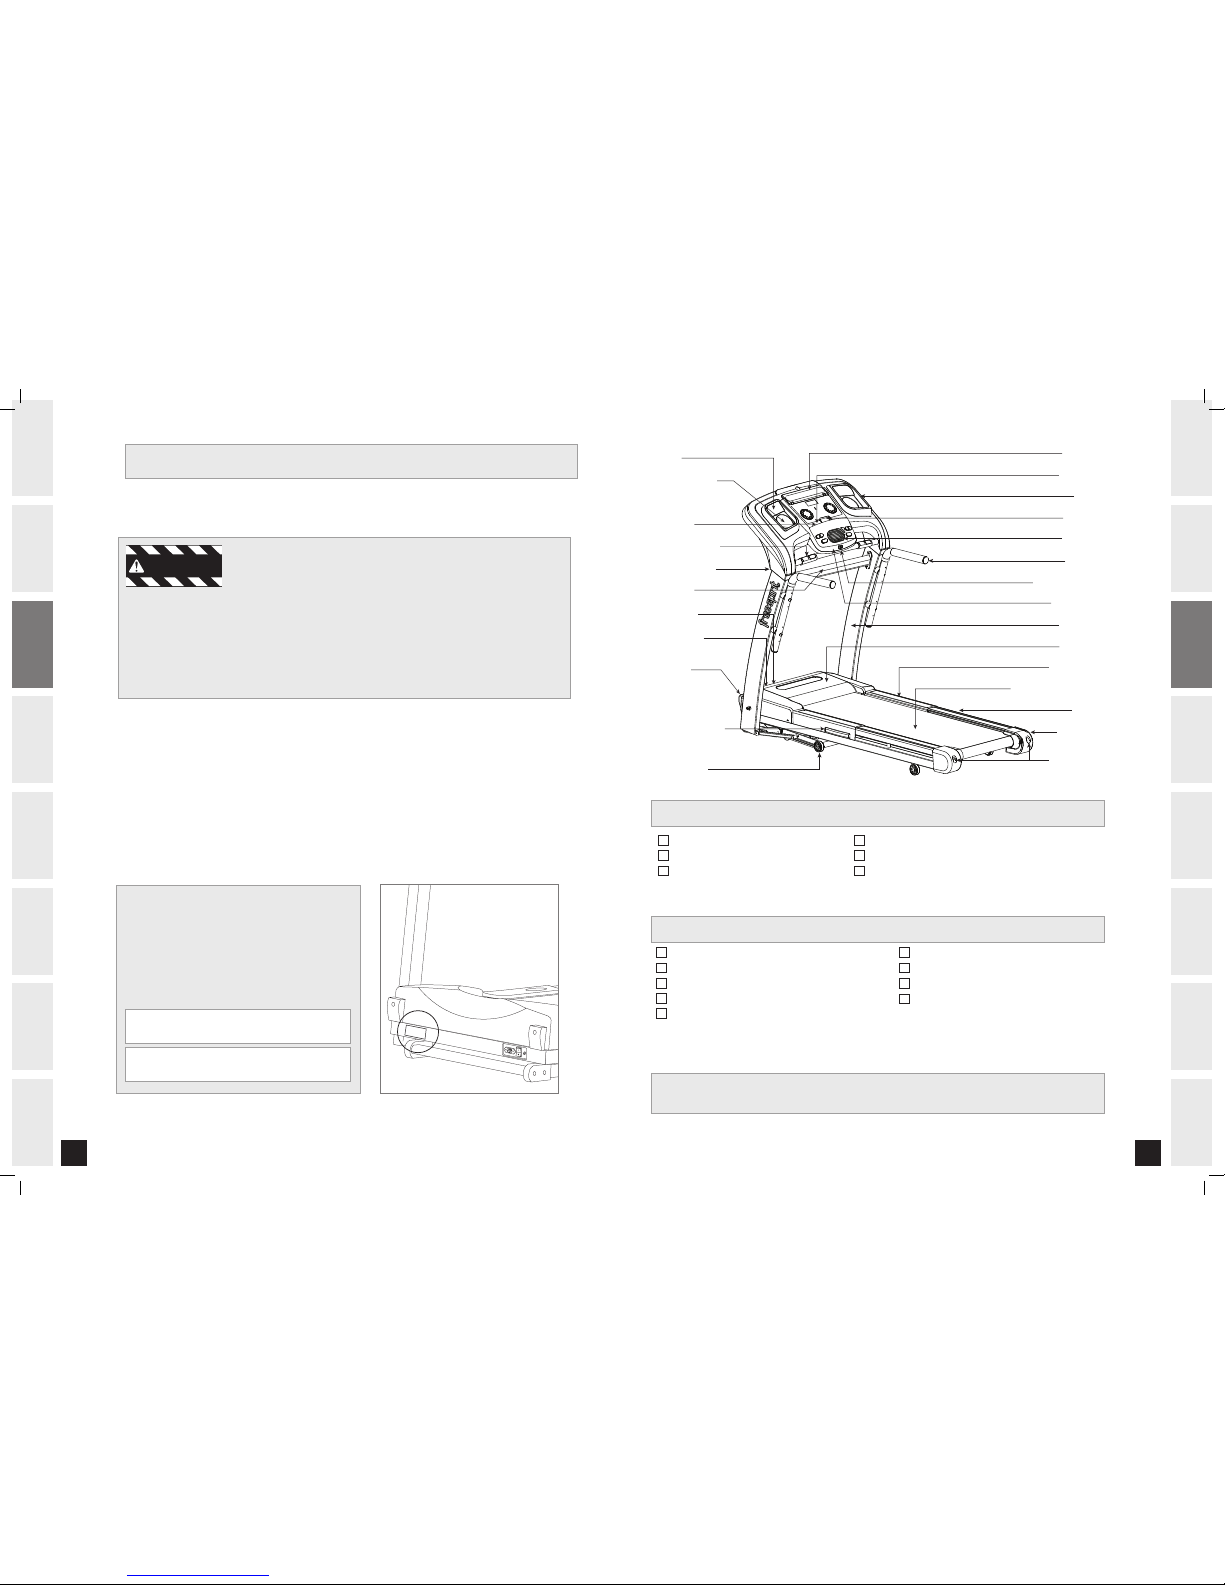
READING RACK
SPEAKERS
WATER BOTTLE HOLDER
GRIP PULSE HANDRAILS
CONSOLE MAST COVER
ON/OFF SWITCH
CIRCUIT BREAKER
ORTHOFLEX GEL CUSHION
TRANSPORT WHEEL
POWER CORD
CONSOLE
LCD DISPLAY
SAFETY KEY PLACEMENT
HEADPHONE JACK
HANDLEBAR
MOTOR COVER
RUNNING BELT / RUNNING DECK
SIDE RAIL
ROLLER END CAP
CONSOLE MAST
REAR ROLLER
ADJUSTMENT BOLTS
FOOT LOCK LATCH
SUPPORT BAR
AUDIO IN JACK
MP3 POCKET
CONSOLE FAN
If you have questions or if there are any missing parts, contact 1-800-4-MY-HOME®.
Further contact information is located on the back cover of this manual.
TOOLS INCLUDED
PARTS INCLUDED
1 Safety Key
1 Console Assembly (located under treadmill deck)
1 Power Cord
4 Hardware Bags
2 Console Masts
Screwdriver
17mm / 19mm Flat Wrench
5 mm T-wrench
2 Console Mast Covers
1 Bottle of Silicone Lubricant
1 Support Bar
1 Audio Adaptor Cable
6 mm T-wrench
10 mm L-wrench
4 mm L-wrench
WARNI NG
30727_Rev.1.1.indd 6-7 7/3/07 8:38:10 AM
Page 5
8
INTRODUCTION
IMPORTANT
PRECAUTIONS
ASSEMBLY
BEFORE
YOU BEGIN
TREADMILL
OPERATION
LIMITED
WARRANTY
TROUBLESHOOTING
& MAINTENANCE
CONDITIONING
GUIDELINES
9
INTRODUCTION
IMPORTANT
PRECAUTIONS
ASSEMBLY
BEFORE
YOU BEGIN
TREADMILL
OPERATION
CONDITIONING
GUIDELINES
TROUBLESHOOTING
& MAINTENANCE
LIMITED
WARRANTY
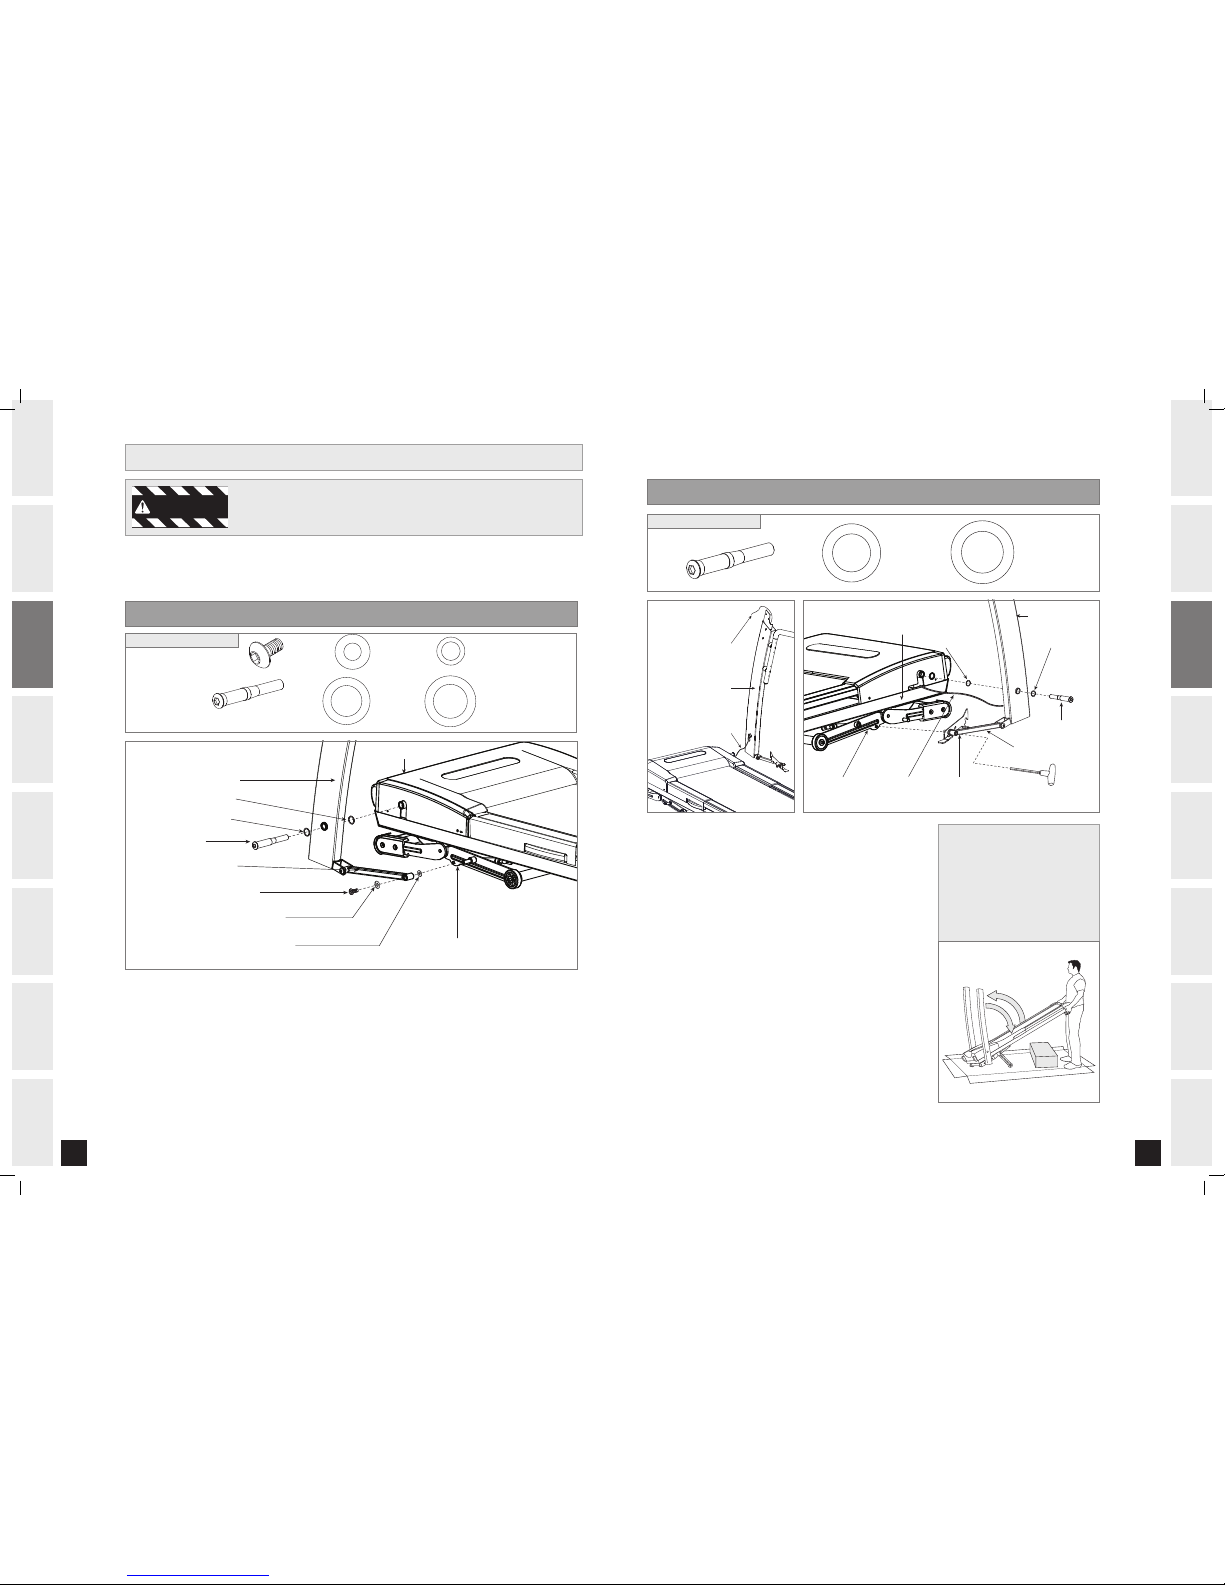
PRE-ASSEMBLY
ASSEMBLY ST E P 1
FLAT WASHER (B)
20 mm
Qty: 1
WAVY WASHER (F)
29 mm
Qty: 1
BOLT (D)
Qty: 1
BOLT (A)
15 mm
Qty: 1
TEFLON WASHER (C)
18 mm
Qty: 1
FLAT WASHER (E)
27 mm
Qty: 1
HARDWARE BAG 1 CONTENTS :
TEFLON WASHER (C) ELEVATION FRAME
FLAT WASHER (B)
BOLT (A)
WAVY WASHER (F)
FLAT WASHER (E)
LEFT CONSOLE MAST
BOLT (D)
MAIN FRAME
LEFT LINKAGE ARM
Open HARDWARE BAG 1.
Cut banding straps. Do not move or lift treadmill from packaging.
Move LEFT LINKAGE ARM into position. Insert 1 BOLT (A) and 1 FLAT WASHER (B) into LEFT
LINKAGE ARM followed by 1 TEFLON WASHER (C) and attach to ELEVATION FRAME.
Lift LEFT CONSOLE MAST into upright position. Be sure to hold the console mast firmly, as
it will not stay in the upright position on its own.
Insert 1 BOLT (D) and 1 FLAT WASHER (E) through LEFT CONSOLE MAST followed by
1 WAVY WASHER (F) and attach to MAIN FRAME.
A
B
C
D
E
ASSEMBLY ST E P 2
ELEVATION FRAME
BOLT (D)
RIGHT LINKAGE ARM
FLAT WASHER (E)
MAIN FRAME
RIGHT CONSOLE MAST
CONSOLE CABLES PRE-ATTACHED BOLT
WAVY WASHER (F)
WAVY WASHER (F)
29 mm
Qty: 1
BOLT (D)
Qty: 1
FLAT WASHER (E)
27 mm
Qty: 1
HARDWARE BAG 2 CONTENTS :
1
3
2
NOTE: If you have attempted to
move the treadmill from the box
and the machine has sprung
open and cannot be assembled,
refer to the troubleshooting
section in order to restore the
treadmill to its proper position.
*
RIGHT CONSOLE MAST
LEAD WIRE
CONSOLE CABLES
Pull LEAD WIRE through RIGHT CONSOLE MAST. After
pulling the LEAD WIRE through the mast, the top of the
CONSOLE CABLE should be located at the top of the
mast. Detach and discard LEAD WIRE.
Open HARDWARE BAG 2.
Move RIGHT LINKAGE ARM into position and attach to
ELEVATION FRAME.
NOTE: While holding RIGHT CONSOLE MAST in the
upright position, tighten PRE-ATTACHED BOLT using
T-wrench to attach RIGHT LINKAGE ARM.
Insert 1 BOLT (D) and 1 FLAT WASHER (E) through
RIGHT CONSOLE MAST followed by 1 WAVY WASHER (F)
and attach to MAIN FRAME.
Lift the RUNNING DECK until lock latch on side of
treadmill is fully engaged.
Remove CONSOLE from box and place out of the way.
Lower the treadmill RUNNING DECK from the folded
position by stepping on LOCK LATCH on lower right side.
A
B
C
D
E
F
G
DO NOT ATTEMPT TO LIFT THE TREADMILL!* Do not move or lift treadmill
from packaging until specified to do so in the assembly instructions. Failure to do
so may result in injury! Remove plastic wrap from console masts.
NOTE: During each assembly step, ensure that ALL nuts and bolts are in place and partially threaded in before
completely tightening any ONE bolt. NOTE: A light application of grease may aid in the installation of hardware.
Any grease, such as lithium bike grease is recommended.
WARNI NG
30727_Rev.1.1.indd 8-9 7/3/07 8:38:14 AM
Page 6
10
INTRODUCTION
IMPORTANT
PRECAUTIONS
ASSEMBLY
BEFORE
YOU BEGIN
TREADMILL
OPERATION
LIMITED
WARRANTY
TROUBLESHOOTING
& MAINTENANCE
CONDITIONING
GUIDELINES
11
INTRODUCTION
IMPORTANT
PRECAUTIONS
ASSEMBLY
BEFORE
YOU BEGIN
TREADMILL
OPERATION
CONDITIONING
GUIDELINES
TROUBLESHOOTING
& MAINTENANCE
LIMITED
WARRANTY
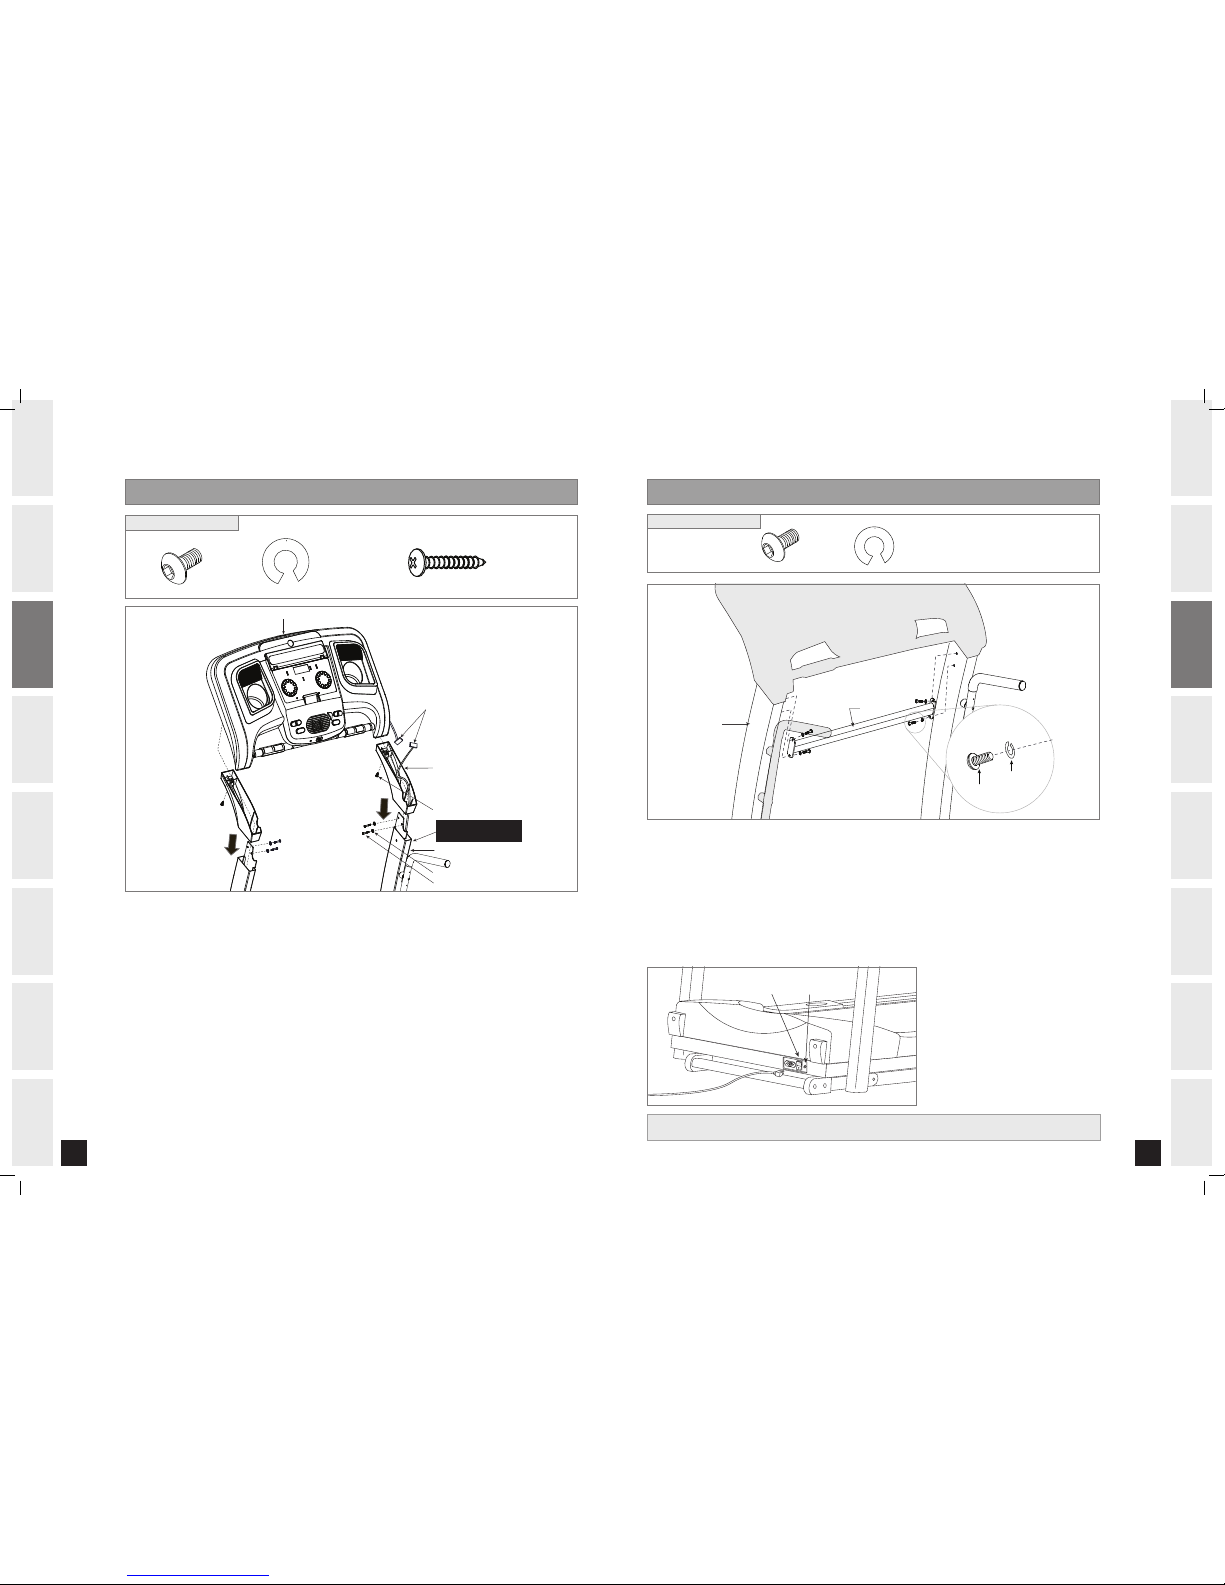
ASSEMBLY ST E P 3
SPRING WASHER (G)
SCREW (H)
CONSOLE MAST COVER
CONSOLE MAST
BOLT (A)
CONSOLE
DO NOT ATTACH
THIS SIDE UNTIL STEP 3-F
CONSOLE CABLES
SCREW (H)
25 mm
Qty: 2
SPRING WASHER (G)
15 mm
Qty: 4
BOLT (A)
15 mm
Qty: 4
HARDWARE BAG 3 CONTENTS :
ASSEMBLY ST E P 4
HARDWARE BAG 4 CONTENTS :
A Open HARDWARE BAG 3.
B Slide CONSOLE MAST COVERS down onto CONSOLE MAST.
C With running deck in lowered position, place CONSOLE on upright masts. Align the brackets
that are underneath the console with the top holes of the upright masts.
D To assemble the LEFT CONSOLE MAST to the CONSOLE, insert 1 BOLT (A) and 1 SPRING
WASHER (G) into each of the 2 holes in the LEFT CONSOLE MAST and lightly tighten.
E Gently lift RIGHT side of the CONSOLE to connect the CONSOLE CABLES. Carefully tuck
wires in mast to avoid damage. NOTE: Do not pinch console cables.
F Repeat STEP D above to assemble the RIGHT CONSOLE MAST to the CONSOLE.
G Tighten all bolts completely.
H Place 1 SCREW (H) through the back of both CONSOLE MAST COVERS and tighten
into the CONSOLE.
SUPPORT BAR
CONSOLE MAST
BOLT (A)
SPRING WASHER (G)
BOLT (A)
15 mm
Qty: 4
SPRING WASHER (G)
15 mm
Qty: 4
A Open HARDWARE BAG 4.
B Align SUPPORT BAR with holes in CONSOLE MAST.
C Insert 2 BOLTS (A) and 2 SPRING WASHERS (G) into the two holes of the SUPPORT BAR. NOTE:
Look into holes in the right mast before inserting bolt to prevent cables from being damaged.
D Repeat on other side.
E Tighten all bolts completely.
YOU’RE FINISHED!
POWER SWITCH
CIRCUIT BREAKER
Connect power plug to the treadmill
and connect the cord to a power
outlet. The on/off switch is located
next to the power cord. Flip this
switch to the 'ON' position, so that
the switch is lit. You will hear a beep
and the console will light up.
30727_Rev.1.1.indd 10-11 7/3/07 8:38:25 AM
Page 7
12
INTRODUCTION
IMPORTANT
PRECAUTIONS
ASSEMBLY
BEFORE
YOU BEGIN
TREADMILL
OPERATION
LIMITED
WARRANTY
TROUBLESHOOTING
& MAINTENANCE
CONDITIONING
GUIDELINES
13
INTRODUCTION
IMPORTANT
PRECAUTIONS
ASSEMBLY
BEFORE
YOU BEGIN
TREADMILL
OPERATION
CONDITIONING
GUIDELINES
TROUBLESHOOTING
& MAINTENANCE
LIMITED
WARRANTY
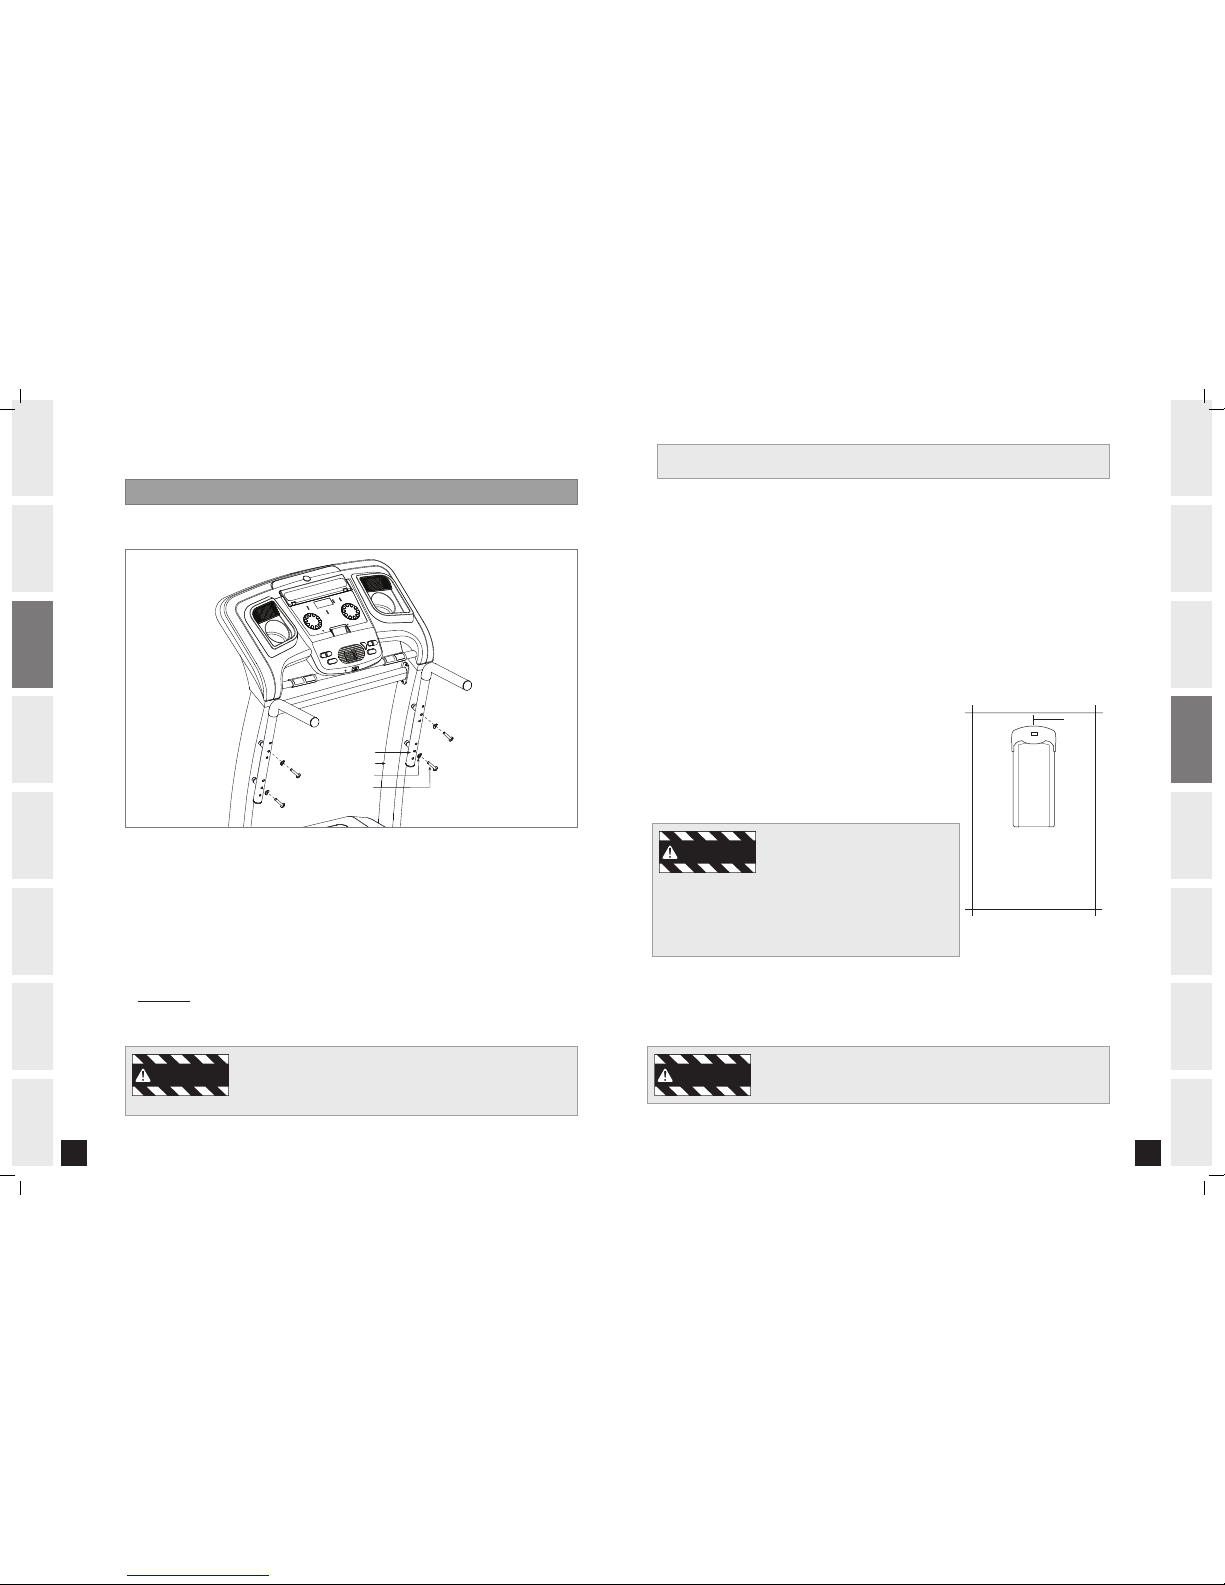
HANDLEBAR ADJUSTMENT (O P T I O N A L )
ARC WASHER
BOLT
CONSOLE MAST
HANDLEBARS
A Detach the HANDLEBAR from the CONSOLE MAST by removing both BOLTS and ARC
WASHERS.
B Position the HANDLEBAR into the desired location (there are three possible heights for the
handlebars).
C Reinsert the BOLTS and ARC WASHERS that were removed in Step A.
D Make sure to repeat Steps A-C on the other HANDLEBAR so that the handlebars are in the
same location.
E Completely tighten all BOLTS in both HANDLEBARS.
BE F OR E Y O U BEG I N
CONGRATULATIONS! on choosing your treadmill. You’ve taken an important step in developing and
sustaining an exercise program! Your treadmill is a tremendously effective tool for achieving your personal
fitness goals. Regular use of your treadmill can improve the quality of your life in so many ways.
HERE ARE JUST A FEW OF THE HEALTH BENEFITS OF EXERCISE:
• Weight Loss
• A Healthier Heart
• Improved Muscle Tone
• Increased Daily Energy Levels
The key to reaping these benefits is to develop an exercise habit. Your new treadmill will help you eliminate
obstacles that prevent you from exercising. Inclement weather and darkness won't interfere with your
workout when you use your treadmill in the comfort of your home. This guide provides you with basic
information for using and enjoying your new machine.
LOCATION OF THE TREADMILL
Place the treadmill on a level surface. There should be 6 feet of clearance
behind the treadmill, 3 feet on each side and one foot in front for folding
and the power cord. Do not place the treadmill in any area that will block
any vent or air openings. The treadmill should not be located in a garage,
covered patio, near water or outdoors.
DO NOT STAND ON THE BELT
While you are preparing to use the treadmill, do not stand on the belt.
Place your feet on the side rails before starting the treadmill. Start
walking on the belt only after the belt has begun to move. Never start the
treadmill at a fast running speed and attempt to jump on!
SAFETY KEY
Your treadmill will not start unless the safety key is placed in position. Attach the clip end securely to your
clothing. This safety key is designed to cut the power to the treadmill if you should fall. Check the operation
of the safety key every 2 weeks.
NEVER USE THE TREADMILL WITHOUT SECURING THE SAFETY KEY CLIP TO YOUR
CLOTHING. PULL ON THE SAFETY KEY CLIP FIRST TO MAKE SURE IT WILL NOT
COME OFF YOUR CLOTHING.
WARNI NG
3 feet
6 feet
3 feet
1 foot
WARNI NG
For a more comfortable workout, the treadmill handlebars are adjustable. The handlebars are pre-installed to
the masts. To adjust the handlebars to a more comfortable position, follow the steps below.
WARNI NG
BOTH HANDLEBARS SHOULD BE REINSERTED IN THE SAME LOCATION AND ALL
HANDLEBAR BOLTS SHOULD BE COMPLETELY TIGHTENED. INJURY MAY RESULT
IF ONE HANDLEBAR IS HIGHER OR LOWER THAN THE OTHER HANDLEBAR AND
IF THE HANDLEBAR BOLTS ARE NOT COMPLETELY TIGHTENED.
30727_Rev.1.1.indd 12-13 7/3/07 8:38:30 AM
Page 8
14
INTRODUCTION
IMPORTANT
PRECAUTIONS
ASSEMBLY
BEFORE
YOU BEGIN
TREADMILL
OPERATION
LIMITED
WARRANTY
TROUBLESHOOTING
& MAINTENANCE
CONDITIONING
GUIDELINES
15
INTRODUCTION
IMPORTANT
PRECAUTIONS
ASSEMBLY
BEFORE
YOU BEGIN
TREADMILL
OPERATION
CONDITIONING
GUIDELINES
TROUBLESHOOTING
& MAINTENANCE
LIMITED
WARRANTY
PROPER USAGE
Your treadmill is capable of reaching high speeds. Always start off using a slower speed and adjust the speed in
small increments to reach a higher speed level. Never leave the treadmill unattended while it is running. When
not in use, remove the safety key, turn the on/off switch to off and unplug the power cord. Make sure to follow
the MAINTENANCE schedule located on page 30 in this manual. Keep your body and head facing forward. Do not
attempt to turn around or look backwards while the treadmill is running. Stop your workout immediately if you
feel pain, faint, dizzy or are short of breath.
Do not operate the treadmill if the power cord or plug is damaged.
If the treadmill appears to not be working properly, do not use the treadmill.
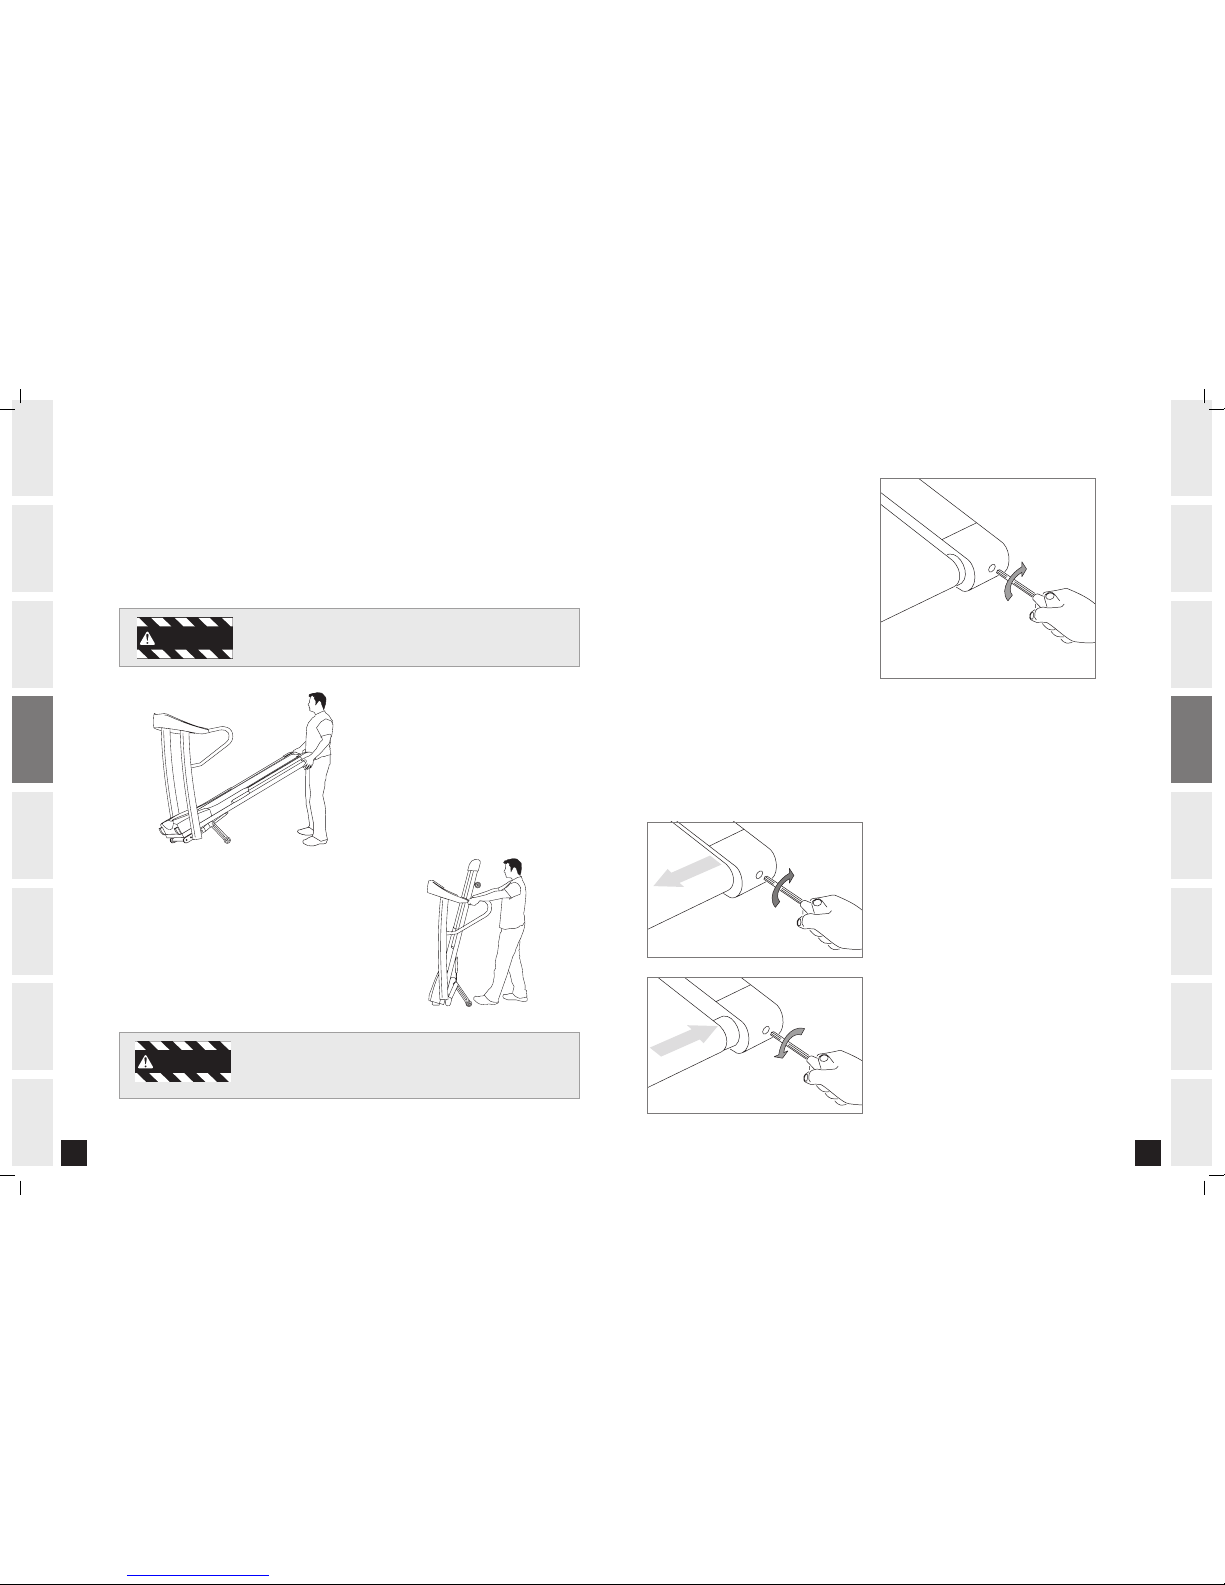
FOLDING
Firmly grasp the back end of the treadmill. Carefully
lift the end of the treadmill deck into the upright
position until the foot lock latch engages and
securely locks the deck into position. Make sure the
deck is securely latched before letting go. To unfold,
firmly grasp the back end of the treadmill. Gently
press down on the foot lock latch with your foot until
the lock latch disengages. Carefully lower the deck
to the ground.
MOVING
Your treadmill has a pair of transport wheels
built into the frame. To move, make sure the
treadmill is folded and securely latched. Then firmly
grasp the handlebars, tilt the treadmill back and
roll. NOTE: Do not attempt to disassemble and
transport treadmill.
Our Treadmills are heavy, use care and additional help if necessary when moving.
Do not attempt to move or transport treadmill unless it is in the upright, folded
position with the lock latch secured. Failure to follow these instructions could
result in injury.
WARNI NG
WARNI NG
CENTERING THE RUNNING BELT
The running belt has been properly adjusted at
the factory before it was shipped. At times the
belt can move off-center during shipment. Before
operating the treadmill, make sure the belt is
centered and remains centered to maintain
smooth operation.
CAUTION: Do not run belt faster than 1/2 mph
while centering. Keep fingers, hair and clothing
away from belt at all times.
If the running belt is too far to the right
side: With the treadmill running at 1/2 mph, turn
the right adjustment bolt clockwise 1/4 TURN at
a time (using the supplied allen wrench). Check
the belt alignment. Allow belt to run a full cycle
to gauge if more adjustment is needed. Repeat if
necessary, until the belt remains centered during
use.
If the running belt is too far to the left
side: With the treadmill running at 1/2 mph, turn
the right adjustment bolt counter-clockwise 1/4
TURN at a time (using the supplied allen wrench).
Check the belt alignment. Allow belt to run a full
cycle to gauge if more adjustment is needed.
Repeat if necessary, until the belt remains centered
during use.
Belt is too far to the right side
Belt is too far to the left side
TENSIONING THE RUNNING BELT
The running belt has been properly adjusted at the
factory before it was shipped. At times the belt can
move off-center during shipment.
CAUTION: Running belt should NOT be moving during
tensioning. Over-tightening the running belt can
cause excessive wear on the treadmill as well as its
components. Never over-tighten the belt.
If you can feel a slipping sensation when running on
the treadmill, the running belt must be tightened. In
most cases, the belt has stretched from use, causing
the belt to slip. This is a normal and common
adjustment. To eliminate this slipping, TURN THE
TREADMILL OFF and tension BOTH THE REAR ROLLER
BOLTS using the supplied allen wrench, turning them
1/4 TURN to the right as shown. Turn the treadmill
on and check for slipping. Repeat if necessary, but
NEVER TURN the roller bolts more than 1/4 turn at
a time. Belt is properly tensioned when the slipping
sensation is gone.
30727_Rev.1.1.indd 14-15 7/3/07 8:38:33 AM
Page 9
16
INTRODUCTION
IMPORTANT
PRECAUTIONS
ASSEMBLY
BEFORE
YOU BEGIN
TREADMILL
OPERATION
LIMITED
WARRANTY
TROUBLESHOOTING
& MAINTENANCE
CONDITIONING
GUIDELINES
17
INTRODUCTION
IMPORTANT
PRECAUTIONS
ASSEMBLY
BEFORE
YOU BEGIN
TREADMILL
OPERATION
CONDITIONING
GUIDELINES
TROUBLESHOOTING
& MAINTENANCE
LIMITED
WARRANTY
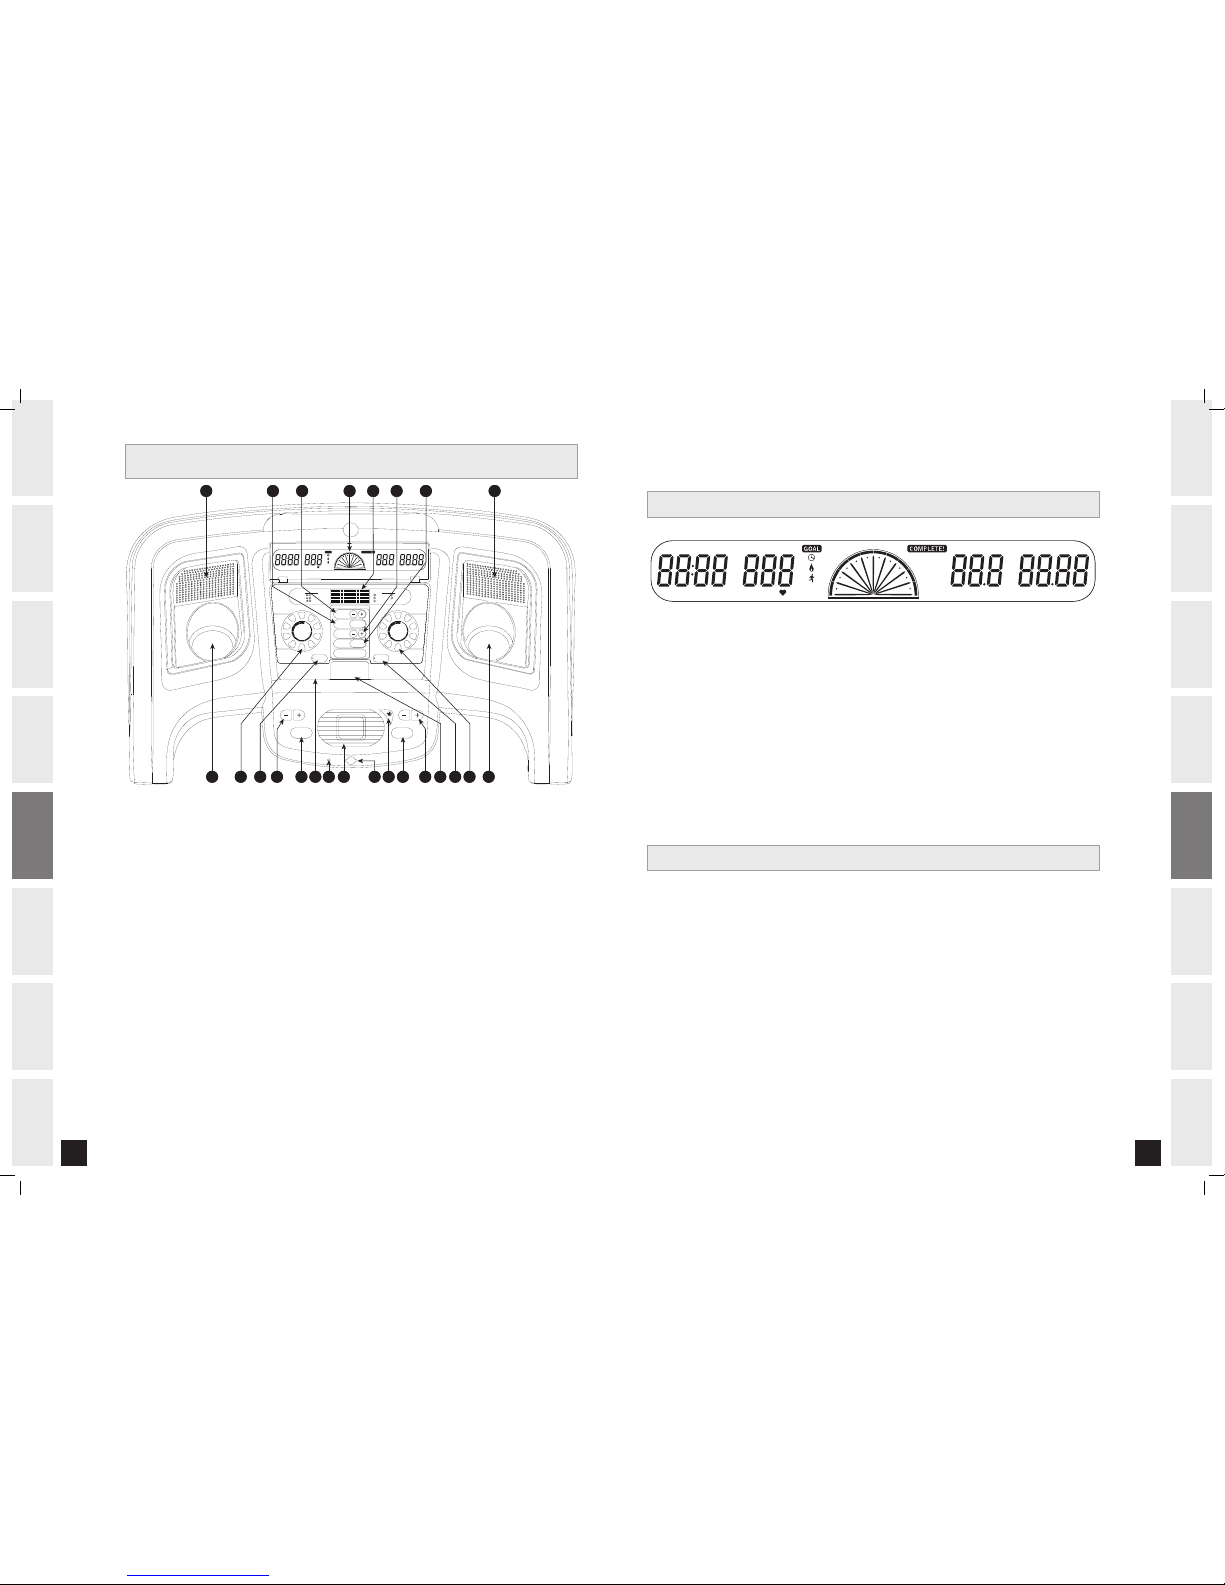
TIME • Shown as Minutes:Seconds. Indicates the time remaining or the time elapsed in your workout.
CALORIES • Indicates total calories burned during your workout.
PULSE • Shown as Beats Per Minute. Indicates your heart rate (displayed when contact is made with both
pulse grips).
GOALtracker™ • Displays progress throughout workout and goal type.
SPEED • Shown as MPH. Indicates the speed of the treadmill belt.
INCLINE • Shown as Percent. Indicates the incline of the treadmill deck surface.
DISTANCE • Shown as Miles. Indicates distance traveled during your workout.
PERFECTview™ A D J U S TABLE M O N I T O R DI S P L AY
TIME DISTANCE
WEIGHT
SPEED
INCLINE
CALORIES
PULSE
0 %
20
40 60
80
100 %
G O A L
T O
PULSE GRIPS
Place the palm of your hands directly on the grip pulse handlebars. Both hands must grip the bars for your heart
rate to register. It takes 5 consecutive heart beats (15-20 seconds) for your heart rate to register. When gripping
the pulse handlebars, do not grip tightly. Holding the grips tightly may elevate your blood pressure. Keep a loose,
cupping hold. You may experience an erratic readout if consistently holding the grip pulse handlebars. Make sure
to clean the pulse sensors to ensure proper contact can be maintained.
HEART R ATE
PERFECTview™: Displays Incline, Time, Pulse, Calories, Speed, Distance and GOALtracker™.
(GOALtracker™ Displays progress throughout workout and goal type.)
WORKOUT PROFILE: Displays workout profiles.
STOP: Press to pause/end your workout. Hold for 3 seconds to reset the treadmill.
START/QUICK START: Press to begin the selected workout goal or simply press to begin a manual program
without setting up a workout goal.
WEIGHT ADJUSTMENT KEYS: Used to adjust weight settings.
SELECT GOAL TYPE KEY: Used to select desired goal.
ADJUST GOAL KEYS: Used to adjust goal settings.
SELECT WORKOUT KEY: Used to select desired workout.
USER FAVORITE KEYS: Retains a user’s favorite program settings in memory.
SPEED +/- KEYS: Press to adjust speed (0.1 MPH increments).
INCLINE +/- KEYS: Press to adjust incline (0.5% increments).
QUICK SPEED KEYS: Press to reach desired speed more quickly.
QUICK INCLINE KEYS: Press to reach desired incline more quickly.
SAFETY KEY POSITION: Enables treadmill when inserted.
BLOWER FAN: Personal workout fan.
FAN BUTTON: Press the fan button once for low speed, twice for medium speed, three times for high speed
and four times to turn the fan off.
WATER BOTTLE HOLDERS: Holds personal workout equipment.
SPEAKERS: Music plays through speakers when your CD / MP3 player is connected to the console.
AUDIO OUT / HEADPHONE JACK: Plug your headphones into this jack to listen to your music through the
headphones. NOTE: When headphones are plugged into the headphone jack the sound will no longer come
out through the speakers.
AUDIO IN: Plug your CD / MP3 player into the console using the included audio adaptor cable.
MP3 PLAYER POCKET: Used to store your MP3 player.
A)
B)
C)
D)
E)
F)
G)
H)
I)
J)
K)
L)
M)
N)
O)
P)
Q)
R)
S)
T)
U)
TR E AD M ILL OP ER AT I ON
SELECT
GOAL TYPE
SELECT
WORKOUT
PRESS START
STEP 2 :
STEP 1 :
STEP 4 :
STEP 5 :
ADJUST
GOAL
ENTER
WEIGHT
STEP 3 :
GET T IN G S TA R T E D
FAVORITE 1 FAVORITE 2
Time
Calories
Distance
GOAL TY PE
P1: Manual
P2: Intervals
P3: Rolling Hills
WORKOUT S
P4: Weight Loss
P5: Peak Intervals
QUICK
SPEED
KEYS
10
5
9
416
2
7
3
8
10
5
9
4
1
6
2
7
3
8
QUICK
INCLINE
KEYS
START
QUICK START
STOP
HOLD TO RESET
SPEED
INCLINE
TIME DISTANCE
WEIGHT
SPEED
INCLINE
CALORIES
PULSE
0%
20
40 60
80
100%
G O A L
T O
AA AAR ARAF AE AG AH
ACAPANAOASATADAI AIAU ALAMAQ AQAJAK
B
30727_Rev.1.1.indd 16-17 7/3/07 8:38:34 AM
Page 10
18
INTRODUCTION
IMPORTANT
PRECAUTIONS
ASSEMBLY
BEFORE
YOU BEGIN
TREADMILL
OPERATION
LIMITED
WARRANTY
TROUBLESHOOTING
& MAINTENANCE
CONDITIONING
GUIDELINES
19
INTRODUCTION
IMPORTANT
PRECAUTIONS
ASSEMBLY
BEFORE
YOU BEGIN
TREADMILL
OPERATION
CONDITIONING
GUIDELINES
TROUBLESHOOTING
& MAINTENANCE
LIMITED
WARRANTY
CONSOLE O P E R ATION
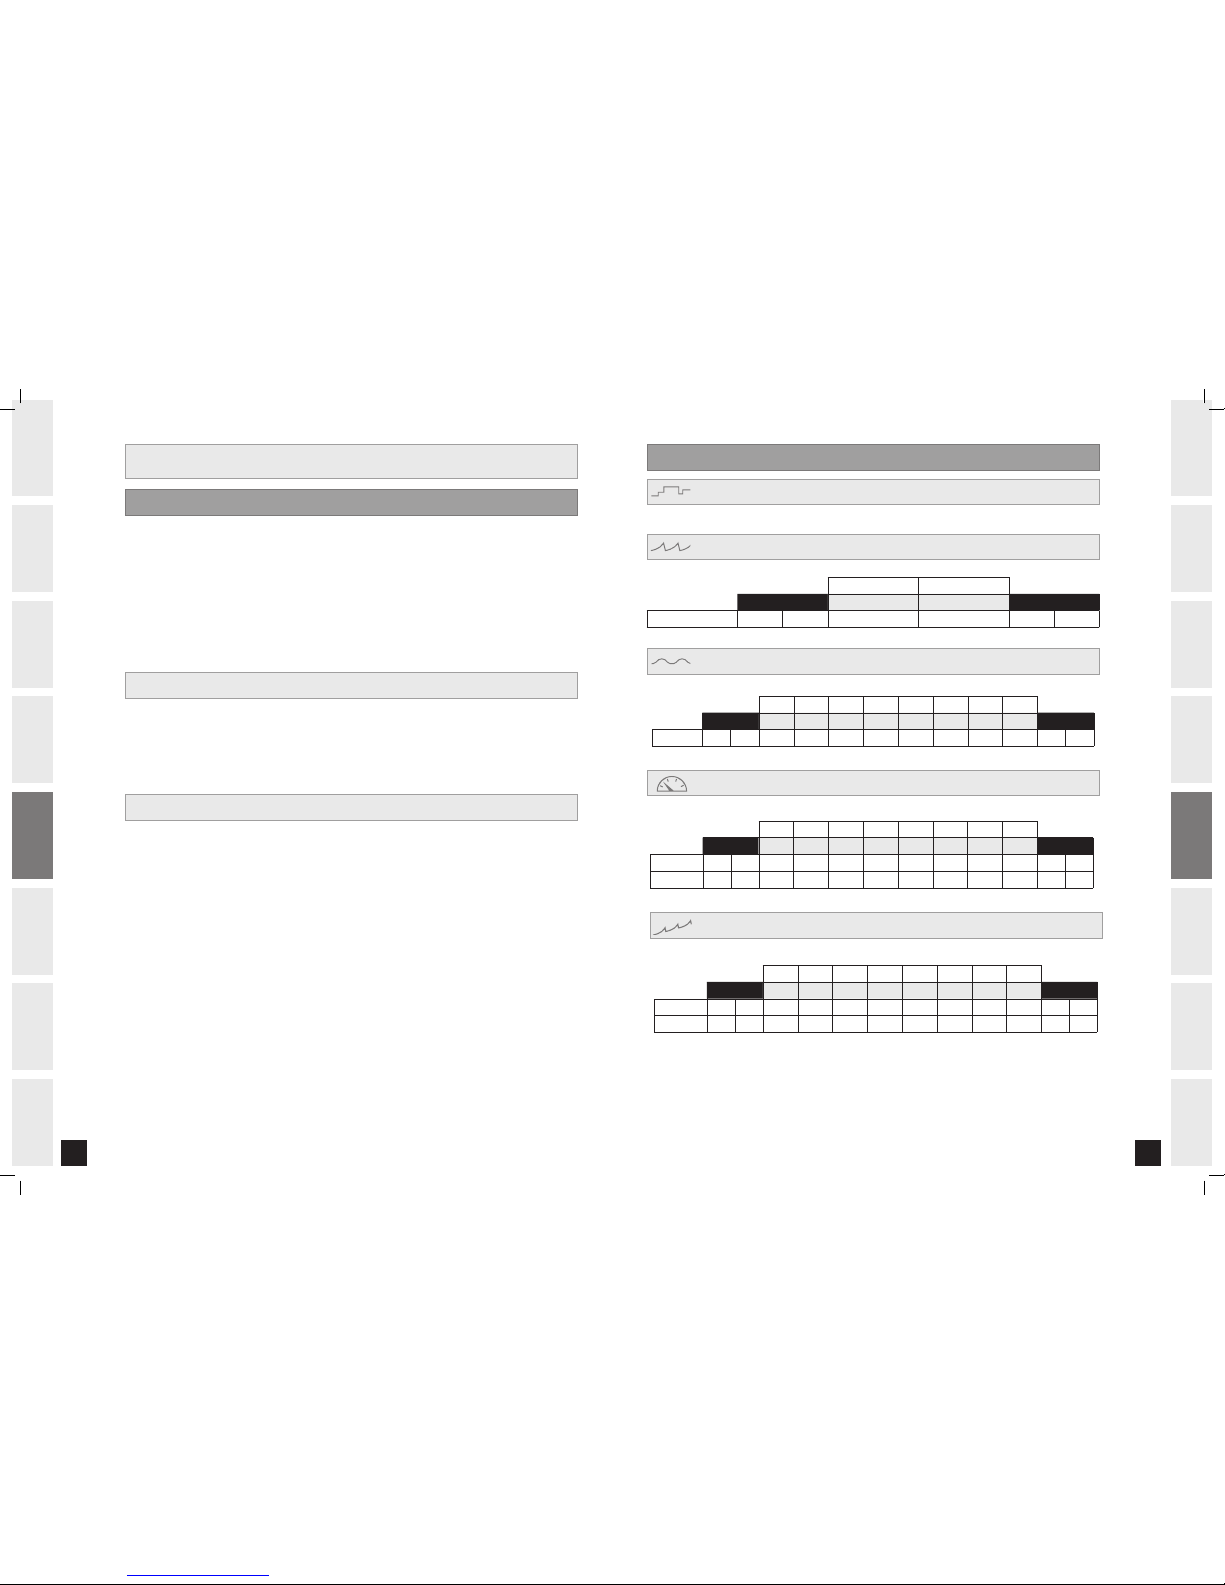
PROGRAM: M A N U A L (P1)
MANUAL
A series of alternating SPEED levels.
1:30 :30
WARM-UP 1 2 COOL-DOWN
SPEED 1.0 1.5 2.0 4.0 1.5 1.0
(Segments repeat and cool-down occurs only during time-based goals.)
PROGRAM: I N T E R VALS (P2)
MANUAL
INTERVALS
Motivates with different combinations of SPEED.
:30 :30 :30 :30 :30 :30 :30 :30
WARM-UP
1 2 3 4 5 6 7 8
COOL-DOWN
SPEED
1.0 1.5 2.0 2.5 3.0 3.5 4.0 3.5 3.0 2.5 2.3 1.5
(Segments repeat and cool-down occurs only during time-based goals.)
PROGRAM: R O L L I N G HI L L S (P3)
MANUAL
INTERVALS
ROLLING
Allows ‘On The Fly’ manual SPEED and INCLINE changes.
Check to make sure nothing is on the treadmill and that nothing will hinder the
movement of the treadmill.
Plug in the power cord and turn the treadmill ON.
Stand on the side rails of the treadmill.
Attach the safety key clip to part of your clothing.
Insert the safety key into the safety key slot located on the console.
BEFORE U S I N G TH E TR E A D M I L L
1)
2)
3)
4)
5)
TR E AD M ILL OP ER AT I ON
Challenges with various combinations of HILLS and VALLEYS. (SPEED and INCLINE changes.)
:30 :30 :30 :30 :30 :30 :30 :30
WARM-UP
1 2 3 4 5 6 7 8
COOL-DOWN
ELEVATION 0.0 0.5 1.5 1.5 1.0 0.5 0.5 0.5 1.0 1.5 0.5 0.0
SPEED 1.0 1.5 2.0 2.5 3.0 3.5 4.0 3.5 3.0 2.5 2.3 1.5
(Segments repeat and cool-down occurs only during time-based goals.)
PROGRAM: W E I G H T LO S S (P4)
MANUAL
INTERVALS
ROLLING
WEIGHT LOSS
1) Press the START button and begin exercising.
2) Program will automatically default to MANUAL. The time will count up from 0:00.
3) Incline and Speed can be adjusted during workout using the SPEED/INCLINE + / - KEYS or
SPEED/INCLINE QUICK keys.
QUICK START
SELECTING WORKOUT GOALS
1) Upon initial console power up the screen will flash and prompt you to enter your weight (this is needed to
accurately calculate calories burned). Use the WEIGHT ADJUSTMENT KEYS to enter your weight.
2) When desired weight is displayed, use the SELECT GOAL TYPE KEY to select among the three different
program goal types.
Time
Calories
Distance
3) When desired goal type is displayed, use the ADJUST GOAL KEYS to increase or decrease the values
of your goal.
4) When desired goal value is displayed, use the SELECT WORKOUT KEY to select one of the five different
program profiles:
P1: Manual
P2: Intervals
P3: Rolling Hills
P4: Weight Loss
P5: Peak Intervals
5) When the desired program profile is displayed, press START to begin workout.
•
•
•
•
•
•
•
•
Challenges with various combinations of HILLS and VALLEYS. (SPEED and INCLINE changes.)
1:30 :30 1:30 :30 1:30 :30 1:30 :30
WARM-UP
1 2 3 4 5 6 7 8
COOL-DOWN
ELEVATION 1.0 1.5 1.0 2.0 1.0 2.0 1.0 2.5 1.0 2.5 1.5 1.0
SPEED 1.0 1.5 2.0 4.0 2.0 4.0 2.0 4.5 2.0 4.5 1.5 1.0
(Segments repeat and cool-down occurs only during time-based goals.)
PROGRAM: P E A K IN T E R VALS (P5)
MANUAL
INTERVALS
ROLLING
WEIGHT LOSS
GOLF COURSE
RACE
CUSTOM 1
CUSTOM 2
THR ZONE 1
THR ZONE 2
VALLEY
TOUR
PEAK
INTERVALS
*NOTE: Warm-up and cool-down times are dependent on Goal Type selected.
Time Goal: 4:00 warm-up and cool-down.
Distance or Calorie Goal: 4:00 warm-up only and the program ends when selected goal is reached.
**NOTE: When in a program, if the user adjusts speed or incline, all of the remaining program segments
will be adjusted as well.
30727_Rev.1.1.indd 18-19 7/3/07 8:38:36 AM
Page 11
20
INTRODUCTION
IMPORTANT
PRECAUTIONS
ASSEMBLY
BEFORE
YOU BEGIN
TREADMILL
OPERATION
LIMITED
WARRANTY
TROUBLESHOOTING
& MAINTENANCE
CONDITIONING
GUIDELINES
21
INTRODUCTION
IMPORTANT
PRECAUTIONS
ASSEMBLY
BEFORE
YOU BEGIN
TREADMILL
OPERATION
CONDITIONING
GUIDELINES
TROUBLESHOOTING
& MAINTENANCE
LIMITED
WARRANTY
USER FAV OR I T E KE Y S
The user favorite keys allow up to two programs and program settings to be saved into memory. Using a
favorite key enables you to begin your favorite program quickly. To set a user FAVORITE KEY, follow the steps
as listed in the “SETTING FAVORITE KEYS” section.
SETTING FAVORITE KEYS:
1) Press and hold the FAVORITE 1 or FAVORITE 2 key for five seconds until you hear three beeps. The
LED inside the FAVORITE KEY will be flashing. *NOTE: The FAVORITE KEYS can not be programmed
if you are already in a program.
2) The screen will flash and prompt you to enter your weight (weight entry is needed to accurately
calculate calories burned). Use the WEIGHT ADJUSTMENT KEYS to enter your weight.
3) When desired weight is displayed, use the SELECT GOAL TYPE KEY to select preferred goal type
(Time, Calories, Distance).
4) When desired goal type is displayed, use the ADJUST GOAL KEYS to increase or decrease the
values of your goal.
5) When desired goal value is displayed, use the SELECT WORKOUT KEY to select one of the five
different program profiles (Manual, Intervals, Rolling Hills, Weight Loss, Peak Intervals).
6) When the desired program profile is displayed, press START to begin workout. The FAVORITE KEY
programming is complete and the LED inside the FAVORITE KEY will no longer flash.
*NOTE: At any time, you may reset a FAVORITE KEY with a new program or different program settings
by following the six steps listed above.
USING FAVORITE KEYS
1) After you have programmed a FAVORITE KEY as listed in the “SETTING FAVORITE KEYS” section,
you may use the FAVORITE KEY. Press the desired FAVORITE 1 or FAVORITE 2 key.
2) Press START to begin the program.
*NOTE: The FAVORITE 1 and FAVORITE 2 keys may only be used before starting a program. The keys
will not function while in a program.
ALWAYS CONSULT YOUR PHYSICIAN BEFORE BEGINNING AN EXERCISE PROGRAM.
HOW OFTEN? (Frequency of Workouts)
The American Heart Association recommends that you exercise at least 3 to 4 days per week to maintain
cardiovascular fitness. If you have other goals such as weight or fat loss, you will achieve your goal faster with
more frequent exercise. Whether it’s 3 days or 6 days, remember that your ultimate goal should be to make
exercise a lifetime habit. Many people are successful staying with a fitness program if they set aside a specific
time of day to exercise. It doesn’t matter whether it’s in the morning before breakfast, during lunch hour or while
watching the evening news. What’s more important is that it’s a time that allows you to keep a schedule, and a
time when you won’t be interrupted. To be successful with your fitness program, you have to make it a priority in
your life. So decide on a time, pull out your day planner and pencil in your exercise times for the next month!
HOW LONG? (Duration of Workouts)
For aerobic exercise benefits, it’s recommended that you exercise from between 24 and 60 minutes per session.
But start slowly and gradually increase your exercise times. If you’ve been sedentary during the past year, it may
be a good idea to keep your exercise times to as little as five minutes initially. Your body will need time to adjust
to the new activity. If your goal is weight loss, a longer exercise session at lower intensities has been found to
be most effective. A workout time of 48 minutes or more is recommended for best weight loss results.
HOW HARD? (Intensity of Workouts)
How hard you workout is also determined by your goals. If you use your treadmill to prepare for a 5K run, you
will probably work out at a higher intensity than if your goal is general fitness. Regardless of your long term
goals, always begin an exercise program at low intensity. Aerobic exercise does not have to be painful to be
beneficial! There are two ways to measure your exercise intensity. The first is by monitoring your heart rate (using
the grip pulse handlebars), and the second is by evaluating your perceived exertion level (this is simpler than
it sounds!).
PERCEIVED EXERTION LEVEL
A simple way to gauge your exercise intensity is to evaluate your perceived exertion level. While exercising, if you
are too winded to maintain a conversation without gasping, you are working out too hard. A good rule of thumb
is to work to the point of exhilaration, not exhaustion. If you cannot catch your breath, it’s time to slow down.
Always be aware of these warning signs of overexertion.
CO N DI T ION I NG GU IDE L IN E S
30727_Rev.1.1.indd 20-21 7/3/07 8:38:36 AM
Page 12
22
INTRODUCTION
IMPORTANT
PRECAUTIONS
ASSEMBLY
BEFORE
YOU BEGIN
TREADMILL
OPERATION
LIMITED
WARRANTY
TROUBLESHOOTING
& MAINTENANCE
CONDITIONING
GUIDELINES
23
INTRODUCTION
IMPORTANT
PRECAUTIONS
ASSEMBLY
BEFORE
YOU BEGIN
TREADMILL
OPERATION
CONDITIONING
GUIDELINES
TROUBLESHOOTING
& MAINTENANCE
LIMITED
WARRANTY
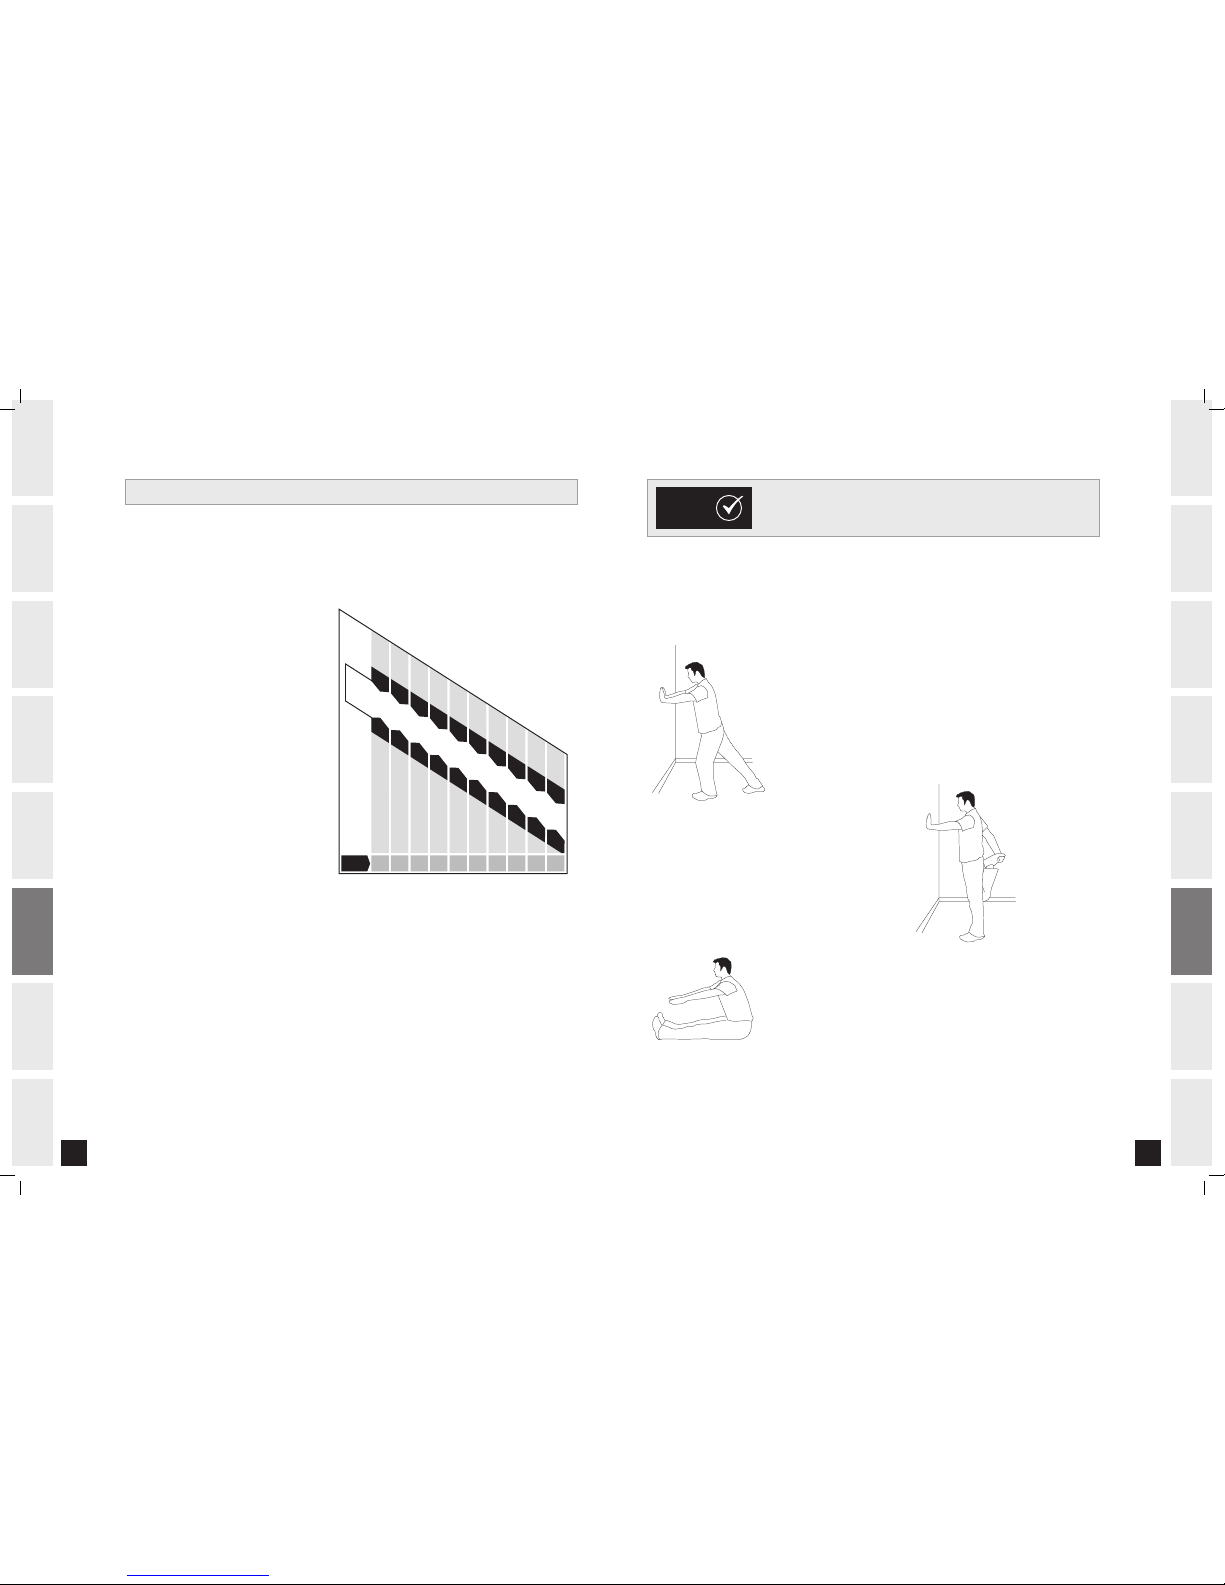
What is Target Heart Rate Zone?
Target Heart Rate Zone tells you
the number of times per minute
your heart needs to beat to
achieve a desired workout effect.
It is represented as a percentage
of the maximum number of times
your heart can beat per minute.
Target Zone will vary for each
individual, depending on age,
current level of conditioning,
and personal fitness goals. The
American Heart Association
recommends working-out at a
Target Heart Rate Zone of between
60% and 75% of your maximum
heart rate. A beginner will want to
workout in the 60% range while
a more experienced exerciser will
want to workout in the 70-75%
range. See chart for reference.
EXAMPLE:
For a 42-year-old user: Find age along the bottom of the chart (round to 40), follow age column up to
the target zone bar. Results: 60% of maximum Heart Rate = 108 Beats Per Minute, 75% of maximum
Heart Rate = 135 Beat Per Minute.
ALWAYS CONSULT YOUR PHYSICIAN BEFORE BEGINNING AN EXERCISE PROGRAM.
TARGET HEART R ATE Z O N E CH A R T
100 %
75%
60%
BE AT S PER M IN UT E
20 25 30 35 40 45 5 0 55 6 0 65
AGE
T
A R G E T Z O N E
120
117
114
111
10
8
10
5
102
99
97
93
150
146
143
13
9
13
5
13
1
128
12
4
12
0
116
STRETCH FIRST
Before using your product, it is best to take a few minutes doing a few gentle stretching exercises.
Stretching prior to exercise will improve flexibility and reduce chances of exercise related injury. Ease into
each of these stretches with a slow gentle motion. Do not stretch to the point of pain. Make sure not to
bounce while doing these stretches.
1. STANDING CALF MUSCLE STRETCH
Stand near a wall with the toes of your left foot about 18" from the wall, and
the right foot about 12" behind the other foot. Lean forward, pushing against
the wall with your palms. Keep your heels flat and hold this position for a
count of 15 seconds. Make sure that you do not bounce while stretching.
Repeat on the other side.
2. STANDING QUADRICEPS STRETCH
Using a wall to provide balance, grasp your right ankle
with your right hand and hold your foot against the back
of your thigh for 15 seconds. Repeat with your left ankle
and hand.
3. SITTING HAMSTRING & LOWER BACK MUSCLE STRETCH
Sit on the floor with your legs together and straight out in front of you. Do
not lock your knees. Extend your fingers towards your toes and hold for a
count of 15 seconds. Make sure that you do not bounce while stretching. Sit
upright again. Repeat one time.
STRETCHING
T I P S
30727_Rev.1.1.indd 22-23 7/3/07 8:38:38 AM
Page 13
24
INTRODUCTION
IMPORTANT
PRECAUTIONS
ASSEMBLY
BEFORE
YOU BEGIN
TREADMILL
OPERATION
LIMITED
WARRANTY
TROUBLESHOOTING
& MAINTENANCE
CONDITIONING
GUIDELINES
25
INTRODUCTION
IMPORTANT
PRECAUTIONS
ASSEMBLY
BEFORE
YOU BEGIN
TREADMILL
OPERATION
CONDITIONING
GUIDELINES
TROUBLESHOOTING
& MAINTENANCE
LIMITED
WARRANTY
WARM UP
The first 2 to 5 minutes of a workout should be devoted to warming up. The warm-up will limber your
muscles and prepare them for more strenuous exercise. Make sure that you warm-up on your product at a
slow pace. The warm up should gradually bring your heart rate into your Target Heart Rate Zone.
COOL DOWN
Never stop exercising suddenly! A cool-down period of 3-5 minutes allows your heart to readjust to the
decreased demand. Make sure that your cool down period consists of a very slow pace to allow your heart
rate to lower. After the cool-down, repeat the stretching exercises listed above to loosen and relax your
muscles.
An important step in developing a long term fitness program is to determine your goals. Is your primary
goal for exercising to lose weight? Improve muscle? Reduce stress? Prepare for the spring racing schedule?
Knowing what your goals are will help you develop a more successful exercise program. Below are some
common exercise goals:
• Weight Loss - lower intensity, longer duration workouts
• Improve Body Shape and Tone - interval workouts, alternate between high and low intensities
• Increased Energy Level - more frequent daily workouts
• Improved Sports Performance - high intensity workouts
• Improved Cardiovascular Endurance - moderate intensity, longer duration workouts
If possible try to define your personal goals in precise, measurable terms, and then put your goals in writing.
The more specific you can be, the easier it will be to track your progress. If your goals are long term, divide
them up into monthly and weekly segments. Longer term goals can lose some of the immediate motivation
benefits. Short term goals are easier to achieve. Your console provides you with several readouts that can
be used to record your progress. You can track Distance, Calories or Time.
KEEPING AN EXERCISE DIARY
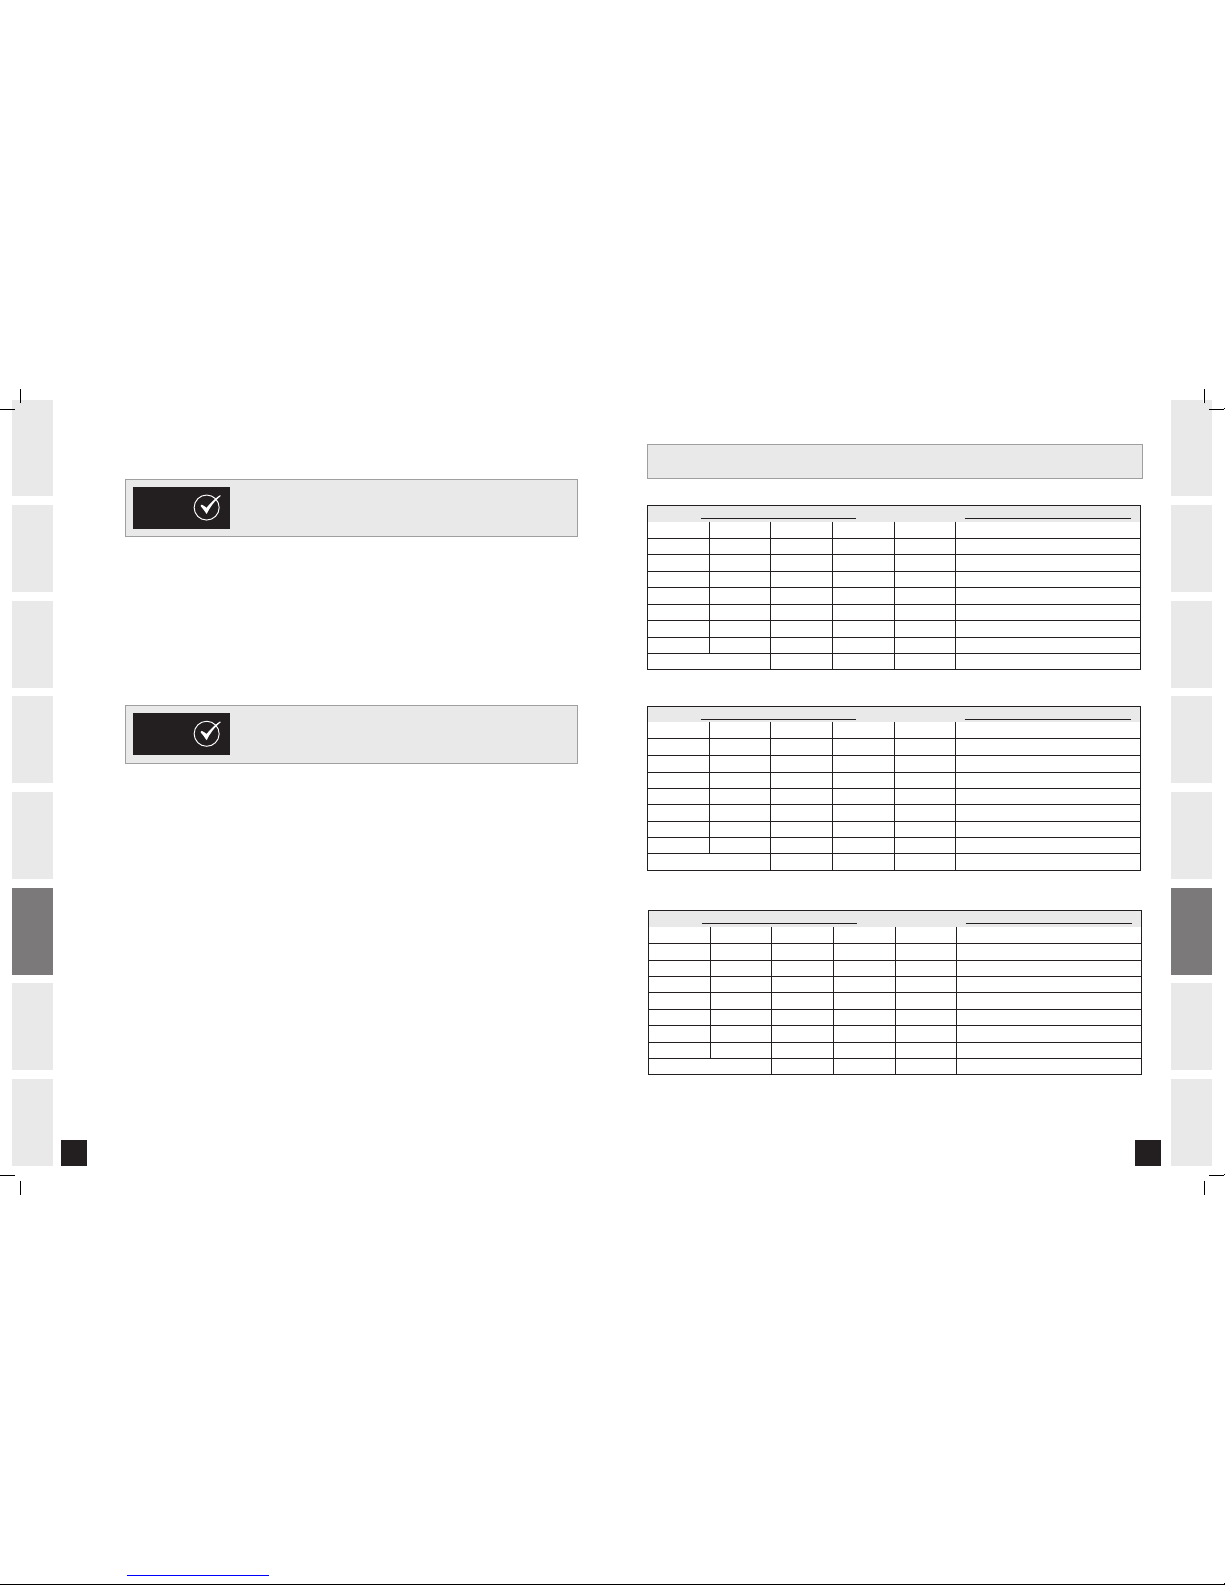
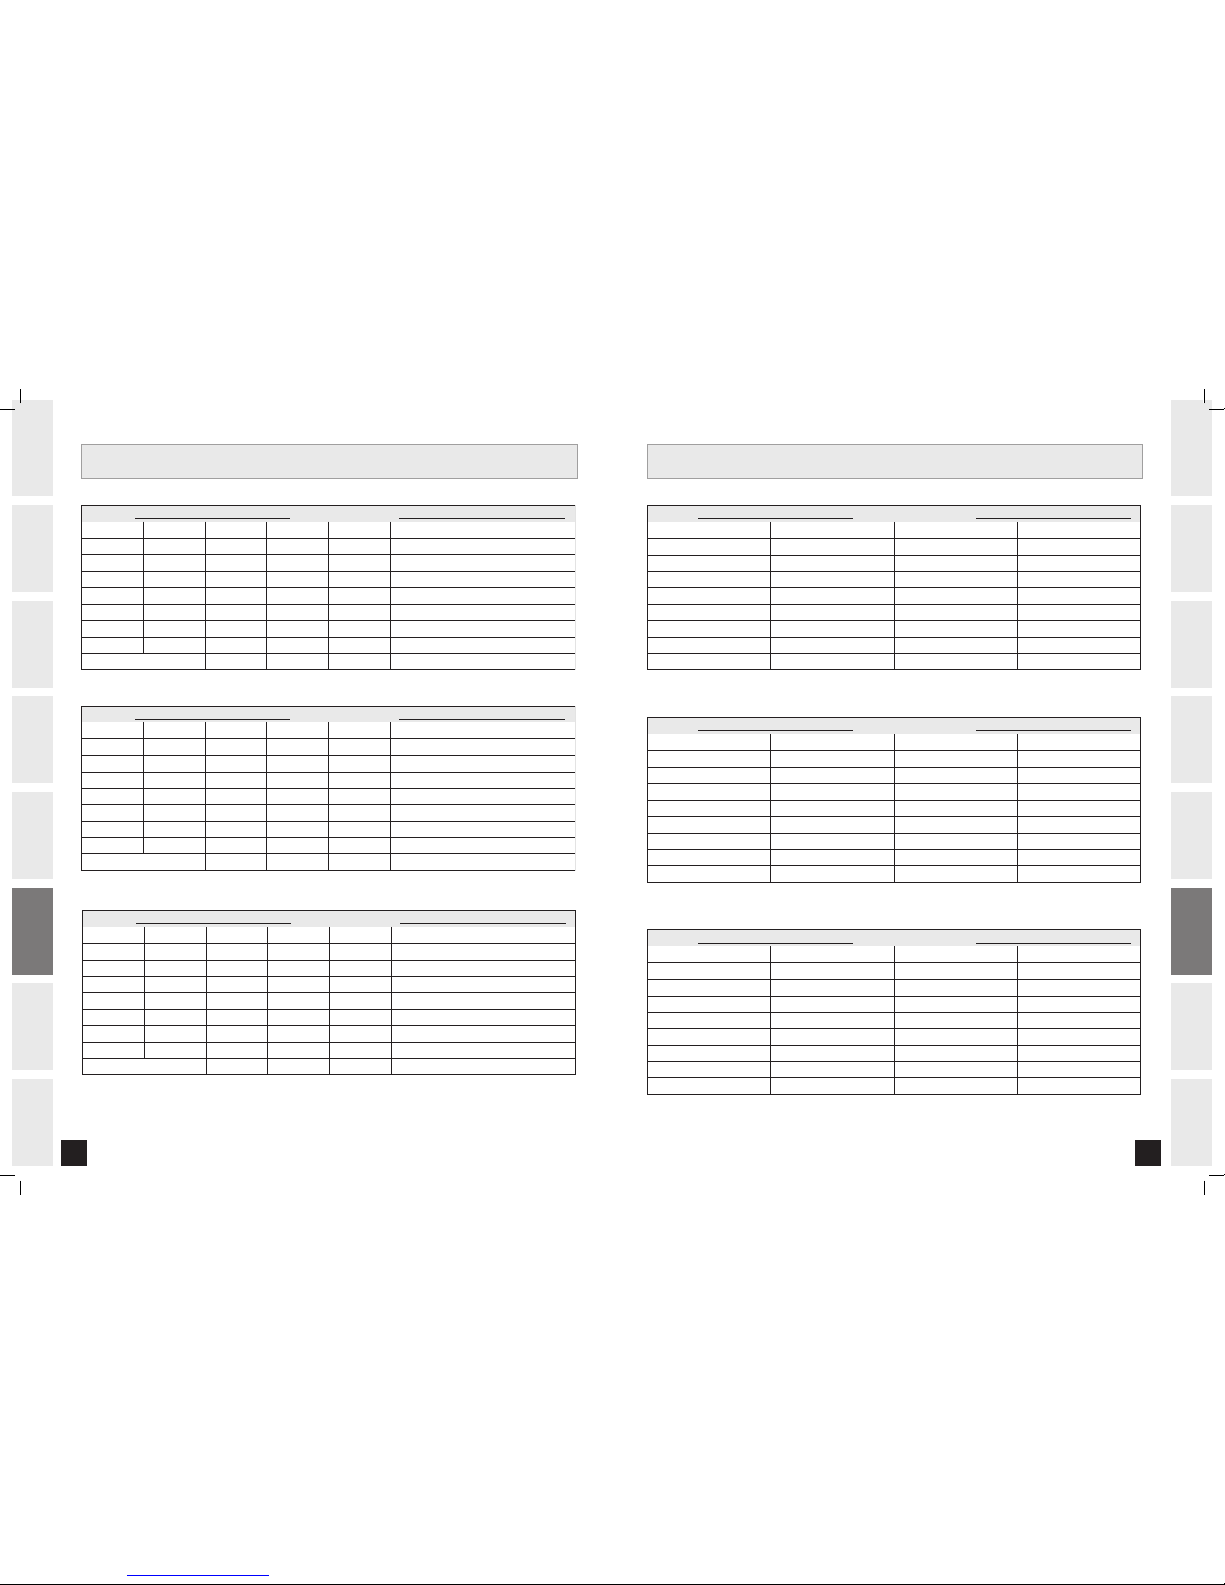
To make your personal exercise log book, photocopy the weekly and monthly log sheets, which are located
on the following pages.
THE IMPORTANCE OF WARM UP & COOL DOWN
ACHIEVING YOUR FITNESS GOALS
T I P S
T I P S
WE E KLY LOG SH EET S
W EE K # W EE KLY G OA L
W EE KLY T OT AL S :
DA Y
SU ND AY
MO ND AY
TU ES DAY
WE DN ES DAY
TH UR SD AY
FR ID AY
SA TUR DA Y
DA TE DI ST ANC E CA LO RI ES T IME COM ME NT S
W EE K # W EE KLY G OA L
W EE KLY T OT AL S :
DA Y
SU ND AY
MO ND AY
TU ES DAY
WE DN ES DAY
TH UR SD AY
FR ID AY
SA TUR DA Y
DA TE DI ST ANC E CA LO RI ES T IME COM ME NT S
W EE K # W EE KLY G OA L
W EE KLY T OT AL S :
DA Y
SU ND AY
MO ND AY
TU ES DAY
WE DN ES DAY
TH UR SD AY
FR ID AY
SA TUR DA Y
DA TE DI ST ANC E CA LO RI ES T IME COM ME NT S
30727_Rev.1.1.indd 24-25 7/3/07 8:38:39 AM
Page 14
26
INTRODUCTION
IMPORTANT
PRECAUTIONS
ASSEMBLY
BEFORE
YOU BEGIN
TREADMILL
OPERATION
LIMITED
WARRANTY
TROUBLESHOOTING
& MAINTENANCE
CONDITIONING
GUIDELINES
27
INTRODUCTION
IMPORTANT
PRECAUTIONS
ASSEMBLY
BEFORE
YOU BEGIN
TREADMILL
OPERATION
CONDITIONING
GUIDELINES
TROUBLESHOOTING
& MAINTENANCE
LIMITED
WARRANTY
MO N TH LY LO G S H EE T S
M ON TH M ON TH LY GO AL
M ON TH LY TO TA LS :
W EE K # D IS TA NC E CA LO RI ES TI ME
M ON TH M ON TH LY GO AL
M ON TH LY TO TA LS :
W EE K # D IS TA NC E CA LO RI ES TI ME
M ON TH M ON TH LY GO AL
M ON TH LY TO TA LS :
W EE K # D IS TA NC E CA LO RI ES TI ME
WE E KLY LOG SH EET S
W EE K # W EE KLY G OA L
W EE KLY T OT AL S :
DA Y
SU ND AY
MO ND AY
TU ES DAY
WE DN ES DAY
TH UR SD AY
FR ID AY
SA TUR DA Y
DA TE DI ST ANC E CA LO RI ES T IME COM ME NT S
W EE K # W EE KLY G OA L
W EE KLY T OT AL S :
DA Y
SU ND AY
MO ND AY
TU ES DAY
WE DN ES DAY
TH UR SD AY
FR ID AY
SA TUR DA Y
DA TE DI ST ANC E CA LO RI ES T IME COM ME NT S
W EE K # W EE KLY G OA L
W EE KLY T OT AL S :
DA Y
SU ND AY
MO ND AY
TU ES DAY
WE DN ES DAY
TH UR SD AY
FR ID AY
SA TUR DA Y
DA TE DI ST ANC E CA LO RI ES T IME COM ME NT S
30727_Rev.1.1.indd 26-27 7/3/07 8:38:39 AM
Page 15
28
INTRODUCTION
IMPORTANT
PRECAUTIONS
ASSEMBLY
BEFORE
YOU BEGIN
TREADMILL
OPERATION
LIMITED
WARRANTY
TROUBLESHOOTING
& MAINTENANCE
CONDITIONING
GUIDELINES
29
INTRODUCTION
IMPORTANT
PRECAUTIONS
ASSEMBLY
BEFORE
YOU BEGIN
TREADMILL
OPERATION
CONDITIONING
GUIDELINES
TROUBLESHOOTING
& MAINTENANCE
LIMITED
WARRANTY
COMMON PRODUCT QUESTIONS
ARE THE SOUNDS MY TREADMILL MAKES NORMAL?
All treadmills make a certain type of thumping noise due to the belt riding over the rollers, especially new
treadmills. This noise will diminish over time, although may not totally go away. Over time, the belt will stretch,
causing the belt to ride smoother over the rollers.
WHY IS THE TREADMILL I PURCHASED LOUDER THAN THE ONE AT THE STORE?
All fitness products seem quieter in a large store showroom because there is generally more background noise
than in your home. Also, there will be less reverberation on a carpeted concrete floor than on a wood overlay floor.
Sometimes a heavy rubber mat will help reduce reverberation through the floor. If a fitness product is placed close
to a wall, there will be more reflected noise.
WHEN SHOULD I BE WORRIED ABOUT A NOISE?
As long as the sounds your treadmill makes are no louder than a normal conversational tone of voice, it is
considered normal noise.
TROUBLESHOOTING - TREADMILL
Your treadmill is designed to be reliable and easy to use. However, if you experience a problem, please reference the
troubleshooting guide listed below.
PROBLEM: If you have attempted to move
the treadmill from the box and the machine
has sprung open and cannot be assembled.
SOLUTION: The air shocks have been engaged prematurely. To correct this, tilt the machine on its nose by lifting the
deck (light end) upwards. Fold down the deck so that it is horizontal. You may now proceed with the assembly.
PROBLEM: The console does not light up and/or the belt does not move.
SOLUTION: Verify the following:
DOES THE RED LIGHT ON THE ON/OFF SWITCH LIGHT UP?
IF YES:
• Double check that all connections are secure, especially the console cable. Unplug and reconnect the console
cable to verify.
• Make sure the console cable is not pinched or damaged in any way.
• Turn the power off, unplug the power cable and wait 60 seconds. Remove motor cover. Wait until all red LED lights
have gone off on the motor control board before proceeding. Next, verify that none of the wires connected to the
lower board are loose or disconnected.
IF NO:
• Verify that the outlet the machine is plugged into is functional. Double check that the breaker has not tripped, it is
on a dedicated 15-amp circuit, it is not on a GFCI equipped outlet, and it is not plugged into a power strip/surge
protector or extension cord.
• The power cord is not pinched or damaged and is properly plugged into the outlet AND the machine.
• The power switch is turned to the ON position.
TR O UB L ESH O OT I NG
PROBLEM: The treadmill circuit breaker trips during a workout.
SOLUTION: Verify the following:
• Make sure the treadmill is plugged into a dedicated 15-amp circuit.
• Verify that you do not have the machine on an extension cord or surge protector.
• Confirm that the machine is not plugged into a GFCI-equipped outlet or on a circuit that has a GFCI-equipped outlet on it.
• Lubricate treadmill deck if necessary.
PROBLEM: The running belt does not stay centered during a workout.
SOLUTION: Verify the following:
• Make sure the treadmill is on a level surface.
• Verify that the belt is properly tightened and centered (Refer to the Adjustment section for detailed directions).
PROBLEM: Operating speed appears inaccurate.
SOLUTION: Auto-calibrate the treadmill:
• Power on the treadmill and have the safety key in position on the
console. Press and hold the elevation “+” and speed “-” buttons for
approximately 5 seconds to enter the Engineering Mode. The console
will beep and “ENG0” appears in the display.
• Press the Speed “+” or “-” button until “ENG2” appears in the display.
• Press, “SELECT WORKOUT” to select. Press, “START” to begin. The
treadmill running belt will begin to move automatically and the autocalibration sequence will properly set and store the speed values.
• Upon successful calibration, the treadmill will beep several times. The
console will automatically exit Engineering Mode and return to the
start-up screen.
TROUBLESHOOTING - HEART RATE
Check your exercise environment for sources of interference such as fluorescent lights, computers, underground fencing, home
security systems or appliances containing large motors. These items may cause erratic heart rate readouts.
You may experience an erratic readout under the following conditions:
• Gripping the heart rate handlebars too tight. Try to maintain moderate pressure while holding onto the heart rate handlebars.
• Constant movement and vibration due to constantly holding the heart rate handlebars while exercising. If you are receiving
erratic heart rate readouts, try to only hold the grips long enough to monitor your heart rate.
• When you are breathing heavily during a workout.
• When your hands are constricted by wearing a ring.
• When your hands are dry or cold. Try to moisten your palms by rubbing them together to warm.
• Anyone with heavy arrhythmia.
• Anyone with arteriosclerosis or peripheral circulation disorder.
• Anyone whose skin on the measuring palm is especially thick.
If the above troubleshooting section does not remedy the problem, discontinue use and turn the power off.
PLEASE CALL SEARS AT THE NUMBER ON THE BACK PANEL.
The following information may be asked of you when you call. Please have these items readily available:
• Model Name
• Serial Number
In order for the technician to service your treadmill they may need to ask detailed questions about the symptoms that are occurring.
Some troubleshooting questions that may be asked are:
• How long has this problem been occurring?
• Does this problem occur with every use? With every user?
• If you are hearing a noise, does it come from the front or the back? What kind of noise is it (thumping, grinding, squeaking,
chirping etc.)?
• Has the machine been lubricated and maintained per the maintenance schedule?
Answering these and other questions will give the technicians the ability to send proper replacement parts and the service necessary
to get you and your Free Spirit treadmill running again!
WARNI NG
DO NOT stand on running belt while
calibrating – stand on the guide
rails. Treadmill will fluctuate between
low and high speeds for several
minutes until calibration is complete.
LIF T
30727_Rev.1.1.indd 28-29 7/3/07 8:38:40 AM
Page 16
30
INTRODUCTION
IMPORTANT
PRECAUTIONS
ASSEMBLY
BEFORE
YOU BEGIN
TREADMILL
OPERATION
LIMITED
WARRANTY
TROUBLESHOOTING
& MAINTENANCE
CONDITIONING
GUIDELINES
31
INTRODUCTION
IMPORTANT
PRECAUTIONS
ASSEMBLY
BEFORE
YOU BEGIN
TREADMILL
OPERATION
CONDITIONING
GUIDELINES
TROUBLESHOOTING
& MAINTENANCE
LIMITED
WARRANTY
MA I NT E NAN C E
Cleanliness of your treadmill and its operation environment will keep maintenance problems and service calls to a
minimum. For this reason, we recommend that the following preventive maintenance schedule be followed.
AFTER EACH USE (DAILY)
Clean and inspect, following these steps:
• Turn off the treadmill with the on/off switch, then unplug the power cord at the wall outlet.
• Wipe down the running belt, deck, motor cover, and console casing with a damp cloth. Never use solvents, as they
can cause damage to the treadmill.
• Inspect the power cord. Replace the power cord if damaged.
• Make sure the power cord is not underneath the treadmill or in any other area where it can become pinched or cut.
• Check the tension and alignment of the running belt. Make sure that the treadmill belt will not damage any other
components on the treadmill by being misaligned.
EVERY WEEK
Clean underneath the treadmill, following these steps:
• Turn off the treadmill with the on/off switch, then unplug the power cord at the wall outlet.
• Fold the treadmill into the upright position, making sure that the lock latch is secure.
• Move the treadmill to a remote location.
• Wipe or vacuum any dust particles or other objects that may have accumulated underneath the treadmill.
• Return the treadmill to its previous position.
EVERY MONTH - IMPORTANT!
• Turn off the treadmill with the on/off switch, then unplug the power cord at the wall outlet.
• Inspect all assembly bolts of the machine for proper tightness.
• Turn off the treadmill and wait 60 seconds.
• Remove the motor cover. Wait until all display lights turn off.
• Clean the motor and lower board area to eliminate any lint or dust particles that may have accumulated. Failure to
do so may result in premature failure of key electrical components.
• Vacuum and wipe down the belt with a damp cloth. Vacuum any black/white particles that may accumulate around
the unit. These particles may accumulate from normal treadmill use.
EVERY 6 MONTHS OR 150 MILES
It is necessary to lubricate your treadmill running deck every six months
or 150 miles to maintain optimal performance of your treadmill. Once the
treadmill reaches 150 miles, the console will prompt you to lubricate the
treadmill. Only use silicone lubricant designated for treadmills; available
by calling Sears at 1-800-4-MY-HOME®.
• TURN OFF THE TREADMILL with the on/off switch, then unplug the
power cord at the wall outlet.
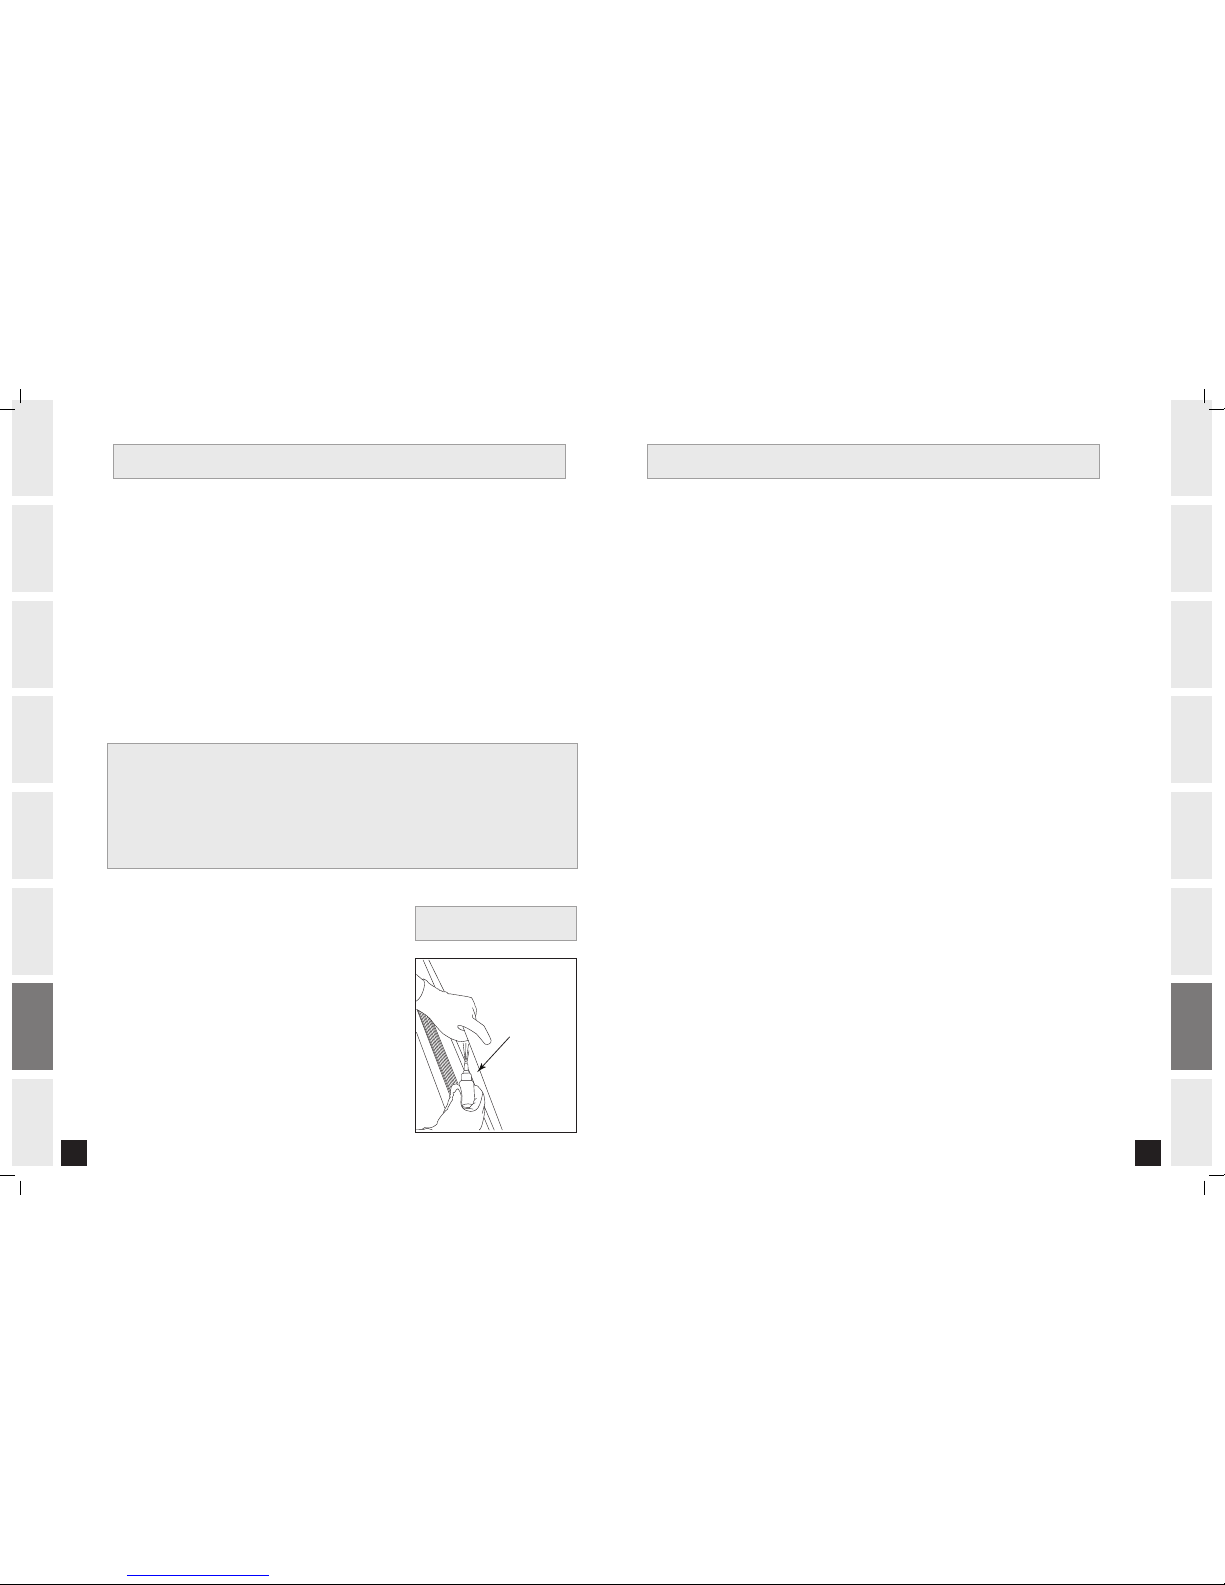
• Loosen both the rear roller bolts. (For best results, place two removable
marks on both sides of the frame and note roller position). Once
the belt is loosened, take the bottle of lubricant and apply it to the
entire top surface of the running deck. Tighten both rear roller bolts
(matching up the marks for proper position) to original position. After
you have applied lubricant, plug in the power cord, insert the safety
key, start the treadmill and walk on the belt for two minutes to spread
the lubricant.
• Lubricate the air shocks with Teflon based spray.
• Once lubrication is complete, reset the console by pressing and holding
‘STOP’ and Speed ‘+’ buttons for 5 seconds.
NOTE: The Treadmill will not operate when the message is showing.
You may hold STOP for 5 seconds to suspend message for 5 miles.
RUNNING BELT
RUNNING DECK
LU B RI C AT ION
PA R TS LI S T
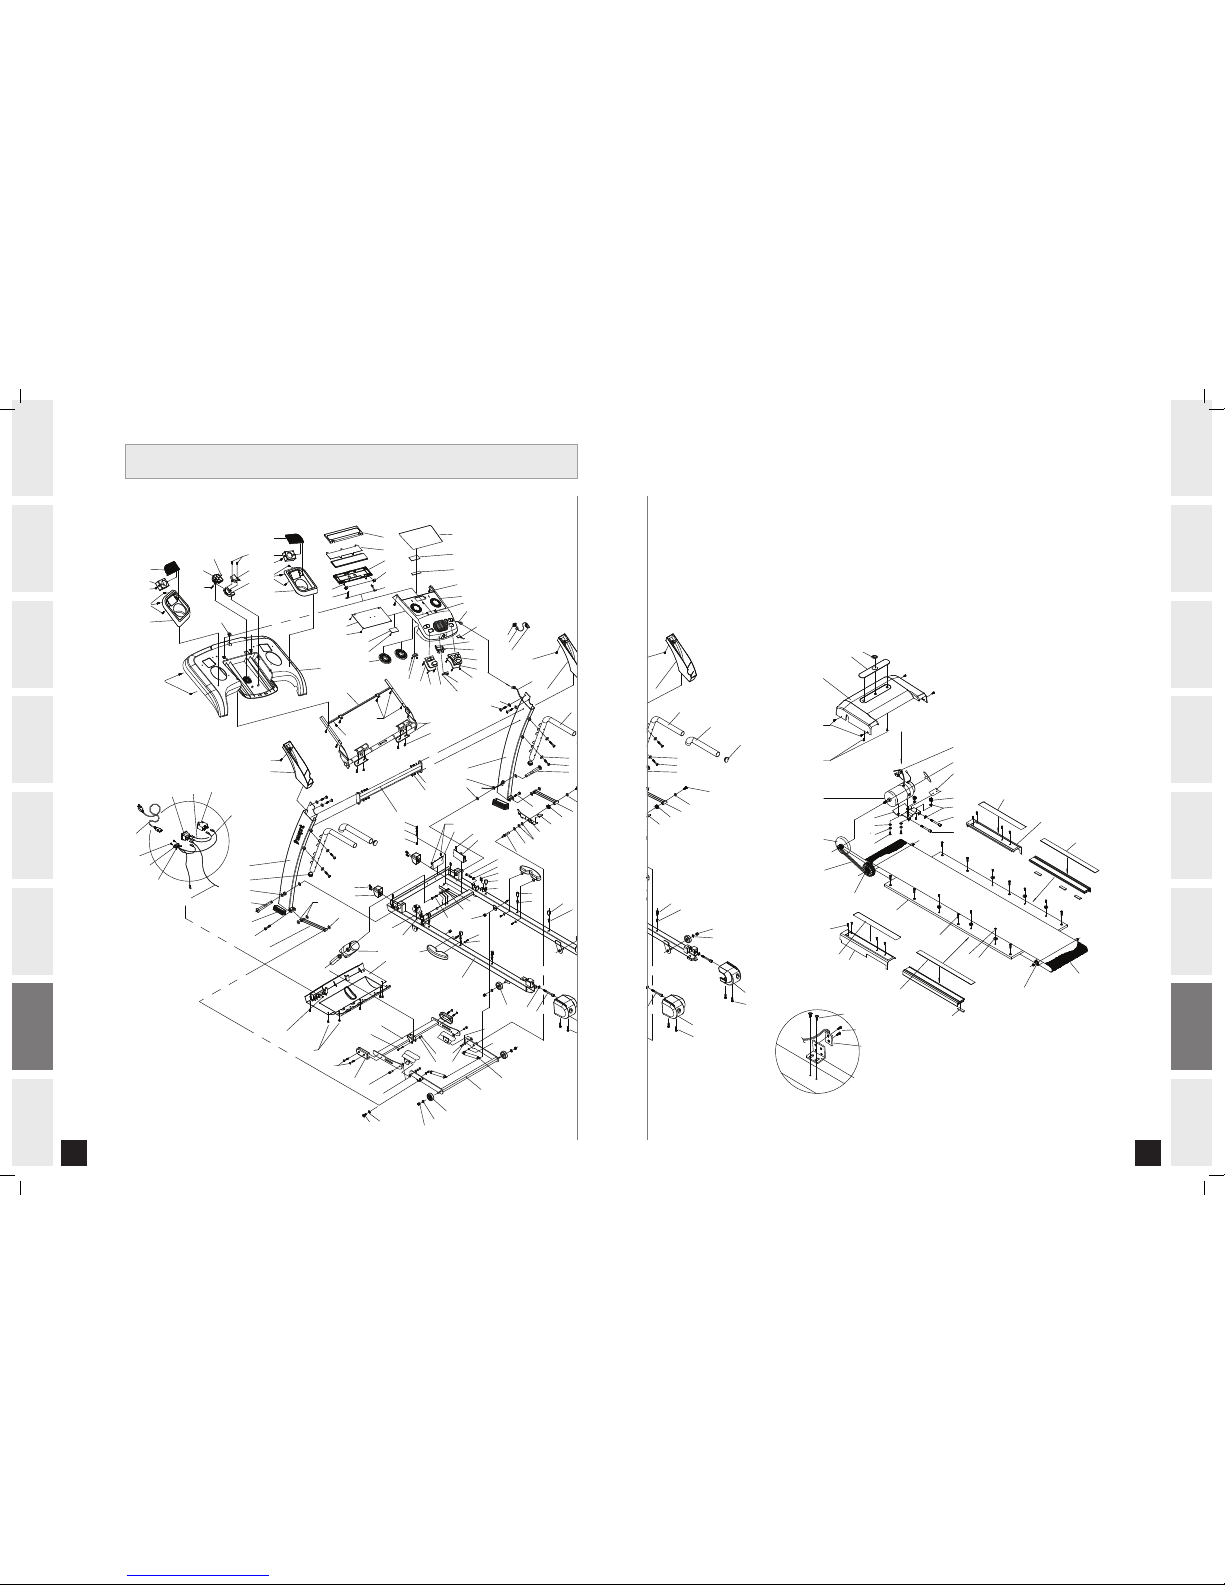
Please refer to EXPLODED DRAWING on next page.
N29
N30
N31
N32
N34
N35
N36
N38
N40
N41
N42
N51
N52
N55
N56
N57
N58
N59
N60
N61
N62
N63
N64
N65
N66
N67
N68
N70
N71
N72
P01
P02
P03
P04
P05
P06
P07
P08
P09
P10
P11
P14
P15
P17
P19
P23
Q01
Q02
Q05
Q06
Q07
Q08
Q09
Q11
Q19
Q21
Q22
Q23
Q30
Q31
Q32
R02
R03
R04
R06
R08
R09
R10
V02
V03
V07
V08
V09
V14
V15
Z01
Z02
Z04
Z06
Z08
Z09
Z10
Z11
Z12
Z13
Z14
Z19
Z21
081366
081368
076675
077344
079713
079714
079716
079717
076663
014669-B
014683-B
019086-DB
020162-A
004310-C
071757
004614-AB
004562-00
004620-00
005091-Z
007490-B
009561-AX
000767-D
000768-D
004975-00
004927-00
076661
056276-CA
056277-CA
001299-B
020162-A
008628-B
071830
008625-C
005229-00
005212-A
020487-ZA
005044-00
004926-00
005196-00
005212-A
005198-00
072019
079715
005222-00
004724-00
005047-00
005062-00
001601-A
004565-00
004941-00
077660
082558
083575
000037-CC
000037-CC
005062-00
004941-00
001251-00
004425-B
016157-Z
039043-00
032669-IF
077362
004502-Z
000877-B
004926-00
005104-00
004595-B
004934-Z
005146-A
003386-A
004590-Z
005005-00
005117-00
004480-Z
004523-00
024275-A
020179-Z
076739
076740
079719
079720
076750
076752
004619-AB
076666
N/A
N/A
N/A
001679-00
076756
076758
073300
004614-AB
N/A
N/A
066650-A
076092
076093
073753
077363
077364
004619-00
020374-AB
040806-00
004864-00
020210-ZAB
071206
075922
076819
076820
074949
056532-A
040613-B
072156
073303
073705
070674
002671-A
075998
074973
074975
003363-00
002124-B
002248-D
003326-00
003346-00
002169-A
070670
001679-00
004415-Z
004880-00
004378-00
004889-Z
001686-C
079722
077449
076737
076738
079984
079985
000955-BC
077830
061532-BA
076743
076745
029150-AA
004864-00
004867-A
004631-00
071888
004158-00
020121-A
005044-00
004454-Z
004525-00
004903-00
077374
061683-AX
079677
081380
081381
077114
077115
005422-00
005393-Z
020668-00
005386-A
010680-00
004724-00
005004-AC
004714-AD
005163-00
004749-00
004631-00
001679-00
066044-A
Support Tube, Left-30727
Support Tube, Right-30727
Crossbar-30727
Handlebar, L/R-30727
Frame, Elevation-30727
Frame, Folding-30727
Connecting Tube,Left-30727
Connecting Tube,Right-30727
Console Frame Set-30727
Roller Set, Front
Roller Set, Rear
Gel Cell-30727
Screw (M10X1.5PX40L)
Running Deck
Axle, Support Tube-GS1035T,T81
Screw (3x10L)
Bolt-Deck-M8x1.25Px35L
Screw(4X12L)
Washer, Flat (4.2x10x1.2T)
Speed Sensor Bracket
Air Shock, 100kg
Elastomer - Orange
Elastomer - Blue
Brass Insert-Guide Rails
Nylon Nut
Cover,Bottom,Support Tube-30727
End Cap,Handlebar
End Cap,Bottom of H-bar
Cover - folding frame
Screw (M10X1.5PX40L)
Bolt - Support tube base
Swivel Axle
Bolt - M8x1.25Px32L
Wave Washer, Nylon-20.5x29x1.5t
Teflon Washer (12.2x18x1.0t)
Washer, Flat (10.5x18x2.5t)
Washer, Flat-8.3x16x1.3t
Nylon Nut (M8x1.25P)
Teflon Washer-(10.5x20x1.0T)
Teflon Washer (12.2x18x1.0T)
Teflon washer-15.9x28.4x1.0t
Spring,Foot Lock Latch
Foot Lock Latch-30727
Wavy Washer (16.7x22.5x0.3T)
Bolt (M8x1.25Px15L)
Washer, Flat -8.2x20x1.8T
Washer, Flat-10.2x19x2.0t
Cover-Foot Lock Latch
Screw-M8x1.25Px12L
Nylon Nut (M10x1.5P)
Hardware Pack-30727
Console Set-30727
Owner’s Manual-30727
Mobile Wheel-30727
Mobile Wheel-30727
Washer, Flat(10.2x19x2.0t)
Nylon Nut (M10x1.5P)
Rail Lock - treads
Screw(5x15L)
Drive Motor Set
Elevation Motor Set
Motor Control Board--2.25, 2.5hp-2nd Gen Digital
Bracket, Drive Motor-30727
Bolt - 5/16: -18UNCx16L TL 14L
Cushion-Drive motor
Nylon Nut (M8x1.25P)
Washer, Flat (8.2x16x0.8t)
Bolt Hex Head 3/8’-16UNC-42L TL14
Nut- 17mm
Washer, Flat-10.5x20x2.0t
Ferrite Core
Bolt-Incline Mtr-bottom
Washer, Spring (8.2x15.4x2t)
Washer, Flat (8.2x16.0x2.0t)
Screw - Round Hex Socket
Screw (M8X1.25PX40L)
Polar Receiver
Screw (4x12L)
Console Shell-30727
Faceplate only-30727
Cup Holder,Left-30727
Cup Holder,Right-30727
Cover, Speaker,Left-30727
Cover, Speaker,Right-30727
Screw (4x8L)
Tray, IPOD-30727
Order Console Set
Order Console Set
Order Console Set
Wire Clip,Console
Overlay, Left-30727
Overlay, Right-30727
Key, Adjustment-30727
Screw (3x10L)
Order Console Set
Order Console Set
Screw;Phillip;Round;M3x0.5Px8L
Cover, Fan FrontCover, Fan RearSafety Key Set-30727
Decal, Console Upper-30727
Decal, Console Upper-30727
Screw, Large Oval Tapping
Nut, Hex(M5x0.8P)
Screw, Phillip,Round(M5x0.8Px40L)(TH20L)
Screw-4X12 - treads
Screw (3x20L)
Upper Board-30727
Keypad-30727
Speaker, Left (400mm wire)
Speaker, Right (680mm wire)
Wire, Sensor-30727
Grip Pulse
Ground Wire
Amplifier Board
Fan
Wire, Connecting, Head Phone (3P-3P;180mm)-30727
Wire, Ground, IPOD, (300mm)-30727
Audio (CD) Wire
Power Wire;Control Board;500;16AWG+150
Connect Wire;Head Phone;2*(2.54-3P);50m
Cable, Speaker-30272
Power Socket, 16AWG-Treads
Connecting Cable-socket/breaker
Speed Sensor, Front Roller-All Treads with 2 prong
Power Switch-All treads
Breaker;Through Electric Current;12A 125
Power Cord-Socket
Board, Lower, Speakers
Wire Clip-Treadmill Consoles
Screw-Power Socket-10mm -Treads
Nut for Zero Switch Cable
Screw
Nut-M5x0.8P-All treads
Wave tube: ConsoleCable
Cover, Motor-30727
Cover, Motor,Bottom
Side Rail, Left Front-30727
Side Rail, Right Front-30727
End Cap, Side Rail,Left-30727
End Cap, Side Rail,Right-30727
End Cap, Front,L/R
Decal, Motor Cover-30727
Foam Grip, Handlebar-RST 5.6
Cover, Support Tube, Left-30727
Cover, Support Tube, Right-30727
Dual Sided Foam Tape
Screw-4X12 - treads
Screw-4x15
Screw - (25mm)
Running Belt
Drive Belt
Bolt (M8x1.25Px70L)
Washer, Flat-8.3x16x1.3t - Treads
Screw-Round Hex SocketScrew-Round Hex Socket
Nut M5x0.8Px4H;
Logo, Motor Cover Decal
Decal, Faceplate-’07 ‘08 consoles
Accent Piece, Side Rail Front L/R
Side Rail Set, w/Accent Piece,Rear,Left
Side Rail Set, w/Accent Piece,Rear,Right
Decal, Audio in
Decal, Audio out
HexWrench, L-Shaped
T-wrench-6mm
Hex Wrench
Hex Wrench
Washer, Spring (M8 Zinc)
Bolt (M8x1.25Px15L)
Washer, Spring (SW6 6.1x12.2x1.5t;Elec Pla)
Bolt (M6x1.0Px15L)
Washer, Arc (8.4×17x1.0t)
Screw, Oval Hex Socket
Screw - (25mm)
Wire Clip, Console
Washer, Flat (20.2x27.0x2.5t)
Part #: Description: Part #: Description:
AC1
AC2
AC3
AG1
AH1
AH2
AH3
AH4
AN2
AR1
AR2
B18
B21
B27
B30
B35
B36
B39
B40
B52
B56
B57
B58
B59
B60
C15
G36
G37
H05
H10
H14
H18
H19
H20
H23
H24
H25
H26
H27
H28
H29
H30
H31
H33
H42
H43
H47
H49
H50
H51
KIT
KIT
KIT
L05
L06
L07
L08
L10
L11
M01
M02
M03
M05
M06
M07
M08
M09
M10
M12
M13
M17
M20
M25
M30
M45
M46
M47
M60
N01
N02
N04
N05
N06
N07
N19
N20
N25
N26
N27
30727_Rev.1.1.indd 30-31 7/3/07 8:38:41 AM
Page 17
32
INTRODUCTION
IMPORTANT
PRECAUTIONS
ASSEMBLY
BEFORE
YOU BEGIN
TREADMILL
OPERATION
LIMITED
WARRANTY
TROUBLESHOOTING
& MAINTENANCE
CONDITIONING
GUIDELINES
33
INTRODUCTION
IMPORTANT
PRECAUTIONS
ASSEMBLY
BEFORE
YOU BEGIN
TREADMILL
OPERATION
CONDITIONING
GUIDELINES
TROUBLESHOOTING
& MAINTENANCE
LIMITED
WARRANTY
EX P LO D ED DR AW I NG
P15
P14
P08
P05
P07
P01
P01
P09
6-N58
Z13
B30
Z09
B35
4-N55
N57
N56
Q31
B35
4-N55
N36
N37
6-N34
2-N38
8-N58
2-N38
4-N34
2-N38
4-N34
N20/(N34)
6-N58
Z11
N59
Z14
2-Q32
2-Q32
R04
4-Q31
9-Q30
Q30
B35
B52
4-Q32
2-Q32
Q05
V08
B27
V07
AR1
AR2
R03
M04
M01
Q01
Q11
V02
3-Q30
L10
6-L11
8-B36
Q21
Q22
Q23
V07
R02
2-M06
M25
H24
H26
2-M25
B56
M05
M30
M45
M46
M08
M09
M07
M17
M47
Q06
V09
N06
N07
N04
N05
N63
N63
N68
V03
N41
N40
N25
N26
N27
N03
N35
N61
N52
N51
N60
N67
2-N32
N60
N60
N30
N31
N60
N60
N21
2-N34
N64
P02
N02
N42
N44
N43
P03
Z10
AG1
Q19
G36
Z12
G37
AC1
N01
AN2
1-N19
N65
B18
R10
Q08
Q07
AH2
M12
H25
M13
M13
M12
M10
M20
AH1
AB1
L06
R06
R09
R06
4-Q17
B59
B58
B57
B59
B59
B58
L08
L07
B40
B39
B60
L05
H47
H51
H27
H19
H05
4-H50
P15
H30
H49
H14
H31
H33
H29
H18
P23
AC2
Z10
Z11
P17
P19
P18
AC3
2-M60
P10
M03
2-M60
Q02
M02
R08
H28
H23
Q09
C15
H14
Z21
B30
H42
H43
P04
H20
Z14
Z08
P06
AH4
AH3
Z13
B30
2-Q32
2-Q32
4-Q31
Q30
B35
B52
4-Q32
Q05
V08
B27
V07
AR1
AR2
R03
M04
M01
Q01
Q11
V02
3-Q30
L10
6-L11
8-B36
Q22
Q23
V07
R02
2-M06
M25
M05
M30
M45
M46
M08
M09
M07
M17
M47
Q06
V09
AG1
Q19
G36
Z12
Q08
Q07
B59
B58
L08
L07
H30
H49
H31
H42
H43
P06
AH4
30727_Rev.1.1.indd 32-33 7/3/07 8:38:59 AM
Page 18
34
INTRODUCTION
IMPORTANT
PRECAUTIONS
ASSEMBLY
BEFORE
YOU BEGIN
TREADMILL
OPERATION
LIMITED
WARRANTY
TROUBLESHOOTING
& MAINTENANCE
CONDITIONING
GUIDELINES
LI M IT E D W A RRA N TY
FRAME • 10 YEARS
Sears warrants the frame against defects in workmanship and materials for a period of ten years from the date of purchase, so long
as the device remains in the possession of the original owner.
DRIVE MOTOR/ELEVATION • 3 YEARS
Sears warrants the drive/elevation motors against defects in workmanship and materials for a period of three years from the date of
purchase, so long as the device remains in the possession of the original owner.
ELECTRONICS & PARTS • 1 YEAR
Sears warrants the electronic components, finish and all original parts for a period of one year from the date of original purchase, so long
as the device remains in the possession of the original owner.
LABOR • 1 YEAR
Sears shall cover the labor cost for the repair of the device for a period of one year from the date of the original purchase, so long as the
device remains in the possession of the original owner.
EXCLUSIONS AND LIMITATIONS
Who IS covered:
• The original owner and is not transferable.
What IS covered:
• Repair or replacement of a defective motor, electronic component, or
defective part and is the sole remedy of the warranty.
What IS NOT covered:
• Normal wear and tear, improper assembly or maintenance, or installation
of parts or accessories not originally intended or compatible with the
equipment as sold.
• Damage or failure due to accident, abuse, corrosion, discoloration of paint
or plastic, neglect, theft, vandalism, fire, flood, wind, lightning, freezing,
or other natural disasters of any kind, power reduction, fluctuation or
failure from whatever cause, unusual atmospheric conditions, collision,
introduction of foreign objects into the covered unit, or modifications that
are unauthorized or not recommended by Sears.
• Incidental or consequential damages. Sears is not responsible or liable for
indirect, special or consequential damages, economic loss, loss of property,
or profits, loss of enjoyment or use, or other consequential damages
of whatsoever nature in connection with the purchase, use, repair or
maintenance of the equipment.
• Equipment used for commercial purposes or any use other than a single
family or Household, unless endorsed by Sears for coverage.
• Equipment owned or operated outside the US and Canada.
• Delivery, assembly, installation, setup for original or replacement units or
labor or other costs associated with removal or replacement of the covered
unit.
• Any attempt to repair this equipment creates a risk of injury. Sears is not
responsible or liable for any damage, loss or liability arising from any
personal injury incurred during the course of, or as a result of any repair
or attempted repair of your fitness equipment by other than an authorized
service technician. All repairs attempted by you on your fitness equipment
are undertaken AT YOUR OWN RISK and Sears shall have no liability for any
injury to the person or property arising from such repairs.
SERVICE/RETURNS
• All returns must be pre-authorized by Sears.
• Sears’ obligation under this warranty is limited
to replacing or repairing, at Sears’ option, the
equipment at one of its authorized service
centers.
• A Sears authorized service center must receive
all equipment for which a warranty claim is
made. This equipment must be received with all
freight and other transportation charges prepaid,
accompanied by sufficient proof of purchase.
• Parts and electronic components reconditioned
to As New Condition by Sears or its vendors may
sometimes be supplied as warranty replacement
parts and constitute fulfillment of warranty
terms.
• This warranty gives you specific legal rights, and
your rights may vary from province to province.
30727_Rev.1.1.indd 34-35 7/3/07 8:39:04 AM
Page 19
30727 Rev. 1.1 | Designed & Engineered in the U.S.A. | Made in China
Get it xed, at your home or ours!
Just Call:
1-800-4-MY-HOME
(1-800-469-4663)
24 hours a day, 7 days a week
For the repair of major brand appliances in your own home...
no matter who made it, no matter who sold it!
For your nearest Sears Parts & Service location,
to bring in products like vacuums, lawn equipment and electronics.
For Sears Parts & Service, to order the replacement parts,
accessories and owner's manuals that you need to do-it-yourself.
www.sears.ca
To purchase or inquire about a Sears Maintenance Agreement, call:
1-800-361-6665
9 a.m.-11 p.m. Mon.-Fri. EST, 9 a.m.-4 p.m. Sat.
Pour service en francais:
1-800-LE-FOYER
(1-800-533-6937)
www.sears.ca
®
MC
HomeCentral
TM
/ Trademarks of Sears, Roebuck and Co. used under license by Sears Canada
Marque deposèe/ Marque de Commerce de Sears, Roebuck and Co. utillisèe en vertu díune licence de Sears Canada
TM
®
MC
®
30727_Rev.1.1.indd 36 7/3/07 8:39:04 AM
 Loading...