

Page 1
Get it fixed, at your home or ours!
Just Call:
1-800-4-MY-HOME
(1-800-469-4663)
24 hours a day, 7 days a week
For the repair of major brand appliances in your own home...
no matter who made it, no matter who sold it!
For your nearest Sears Parts & Service location,
to bring in products like vacuums, lawn equipment and electronics.
For Sears Parts & Service, to order the replacement parts,
accessories and owner's manuals that you need to do-it-yourself.
www.sears.ca
To purchase or inquire about a Sears Maintenance Agreement, call:
1-800-361-6665
9 a.m.-11 p.m. Mon.-Fri. EST, 9 a.m.-4 p.m. Sat.
Pour service en francais:
1-800-LE-FOYER
(1-800-533-6937)
www.sears.ca
®
MC
HomeCentral
TM
/ Trademarks of Sears, Roebuck and Co. used under license by Sears Canada
Marque deposEe/ Marque de Commerce de Sears, Roebuck and Co. utillisEe en vertu d une licence de Sears Canada
TM
®
MC
®
30150
Elliptical User’s Guide
Sears Ca. English. Rev. 1.4
SEARS CANADA, INC. TORONTO, ONTARIO M5B 2B8
freespirit_English_30150v1.4.qxd 7/23/2004 9:02 AM Page 1
Page 2

freespirit_English_30150v1.4.qxd 7/23/2004 9:02 AM Page 2
Page 3
37
Table of Contents
IMPORTANT PRECAUTIONS . . . . . . . . . . . . . . . . . . . . . . . . . . . . . . . . . . . . . . . . . . . . . . . . . . .3
BEFORE YOU BEGIN . . . . . . . . . . . . . . . . . . . . . . . . . . . . . . . . . . . . . . . . . . . . . . . . . . . . . . . .7
ASSEMBLY . . . . . . . . . . . . . . . . . . . . . . . . . . . . . . . . . . . . . . . . . . . . . . . . . . . . . . . . . . . . . . .8
ELLIPTICAL OPERATION & ADJUSTMENT . . . . . . . . . . . . . . . . . . . . . . . . . . . . . . . . . . . . . . . .11
CONSOLE FEATURES & DISPLAY . . . . . . . . . . . . . . . . . . . . . . . . . . . . . . . . . . . . . . . . . . . . . .14
PROGRAM PROFILES . . . . . . . . . . . . . . . . . . . . . . . . . . . . . . . . . . . . . . . . . . . . . . . . . . . . . .18
PROGRAM CHARTS . . . . . . . . . . . . . . . . . . . . . . . . . . . . . . . . . . . . . . . . . . . . . . . . . . . . . . . .19
USING YOUR RACE PROGRAM . . . . . . . . . . . . . . . . . . . . . . . . . . . . . . . . . . . . . . . . . . . . . . . .21
USING YOUR THR ZONE 1 & 2 PROGRAMS . . . . . . . . . . . . . . . . . . . . . . . . . . . . . . . . . . . . . .22
USING YOUR CUSTOM USER 1 & 2 PROGRAMS . . . . . . . . . . . . . . . . . . . . . . . . . . . . . . . . . .23
TROUBLESHOOTING & MAINTENANCE PROCEDURES . . . . . . . . . . . . . . . . . . . . . . . . . . . . . .24
CONDITIONING GUIDELINES . . . . . . . . . . . . . . . . . . . . . . . . . . . . . . . . . . . . . . . . . . . . . . . . .28
MONITORING YOUR HEART RATE . . . . . . . . . . . . . . . . . . . . . . . . . . . . . . . . . . . . . . . . . . . . .29
HEART RATE CHART . . . . . . . . . . . . . . . . . . . . . . . . . . . . . . . . . . . . . . . . . . . . . . . . . . . . . . .30
DEVELOPING A FITNESS PROGRAM & WARM UP/COOL DOWN . . . . . . . . . . . . . . . . . . . . . . . .31
ACHIEVING YOUR FITNESS GOALS . . . . . . . . . . . . . . . . . . . . . . . . . . . . . . . . . . . . . . . . . . . .32
WEEKLY LOG SHEETS . . . . . . . . . . . . . . . . . . . . . . . . . . . . . . . . . . . . . . . . . . . . . . . . . . . . . .33
MONTHLY LG SHEETS . . . . . . . . . . . . . . . . . . . . . . . . . . . . . . . . . . . . . . . . . . . . . . . . . . . . . .34
PARTS LIST . . . . . . . . . . . . . . . . . . . . . . . . . . . . . . . . . . . . . . . . . . . . . . . . . . . . . . . . . . . . . .35
EXPLODED DIAGRAM . . . . . . . . . . . . . . . . . . . . . . . . . . . . . . . . . . . . . . . . . . . . . . . . . . . . . .36
LIMITED WARRANTY . . . . . . . . . . . . . . . . . . . . . . . . . . . . . . . . . . . . . . . . . . . . . . . . . . . . . . .37
2
CAUTION
Read all precautions and instructions in this manual before using this equipment.
Save this manual for future reference.
CAUTION
!
FRAME • LIFETIME
Sears warrants the frame against defects in workmanship and materials for the lifetime of the
original owner.
BRAKE • 10 YEARS
Sears warrants the brake against defects in workmanship and materials for the ten years of the
original owner.
ELECTRONICS & PARTS • 1 YEAR
Sears warrants the electronic components and all original parts for a period of one year from the date
of original purchase, so long as the device remains in the possession of the original owner.
LABOR • 1 YEAR
Sears shall cover the labor cost for the repair of the device for a period of one year from the
date of the original purchase, so long as the device remains in the possession of the original
owner.
EXCLUSIONS AND LIMITATIONS
This warranty applies only to the original owner and is not transferable. This warranty is expressly limited to the repair or replacement of a defective frame, electronic component, or defective part and is
the sole remedy of the warranty. The warranty does not cover normal wear and tear, improper assembly or maintenance, or installation of parts or accessories not originally intended or compatible with
the elliptical trainer as sold. The warranty does not apply to damage or failure due to accident,
abuse, corrosion, discoloration of paint or plastic, or neglect. Sears shall not be responsible for incidental or consequential damages. All returns must be pre-authorized by Sears. Sears’ obligation
under this warranty is limited to replacing or repairing, at Sears’ option, the product at one of its
authorized service centers. An Sears authorized service center must receive all products for which a
warranty claim is made. These products must be received with all freight and other transportation
charges prepaid, accompanied by sufficient proof of purchase. Parts and electronic components
reconditioned to As New Condition by Sears or its vendors may sometimes be supplied as warranty
replacement parts and constitute fulfillment of warranty terms. This warranty gives you specific legal
rights, and your rights may vary from state to state. This warranty is applicable to sales made only by
Sears, its affiliates, subsidiaries and authorized distributors of Sears products within the U.S. and
Canada.
WARRANTY REGISTRATION
Your warranty card must be completed and sent to Sears or register online at www.sears.ca, before a
warranty claim can be processed.
Limited Warranty
freespirit_English_30150v1.4.qxd 7/23/2004 9:02 AM Page 3
Page 4
SAVE THESE INSTRUCTIONS
When using an electrical product, basic precautions should always be followed. Read all instructions
before using this exercise product.
WARNING!
To reduce the risk of burns, fire, electrical shock or injury to persons:
• Use this exercise product for its intended use as described in this owner's
guide. Do not use attachments not recommended by the manufacturer.
• Never drop or insert any object into any opening.
• Do not remove the elliptical trainer's side covers. Service should be performed
only by an authorized Sears service provider.
• Never operate this elliptical trainer if it has a damaged cord or plug, if it is not
working properly, if it has been damaged, or immersed in water.
• Keep the cord away from heated surfaces.
• Do not use outdoors.
• Only use the power cord provided with your elliptical trainer.
• Never place the power cord under carpeting or place any object on top of the
power cord, which may pinch or damage it.
• Unplug your elliptical trainer before moving it.
3
Important Precautions
WARNING
36
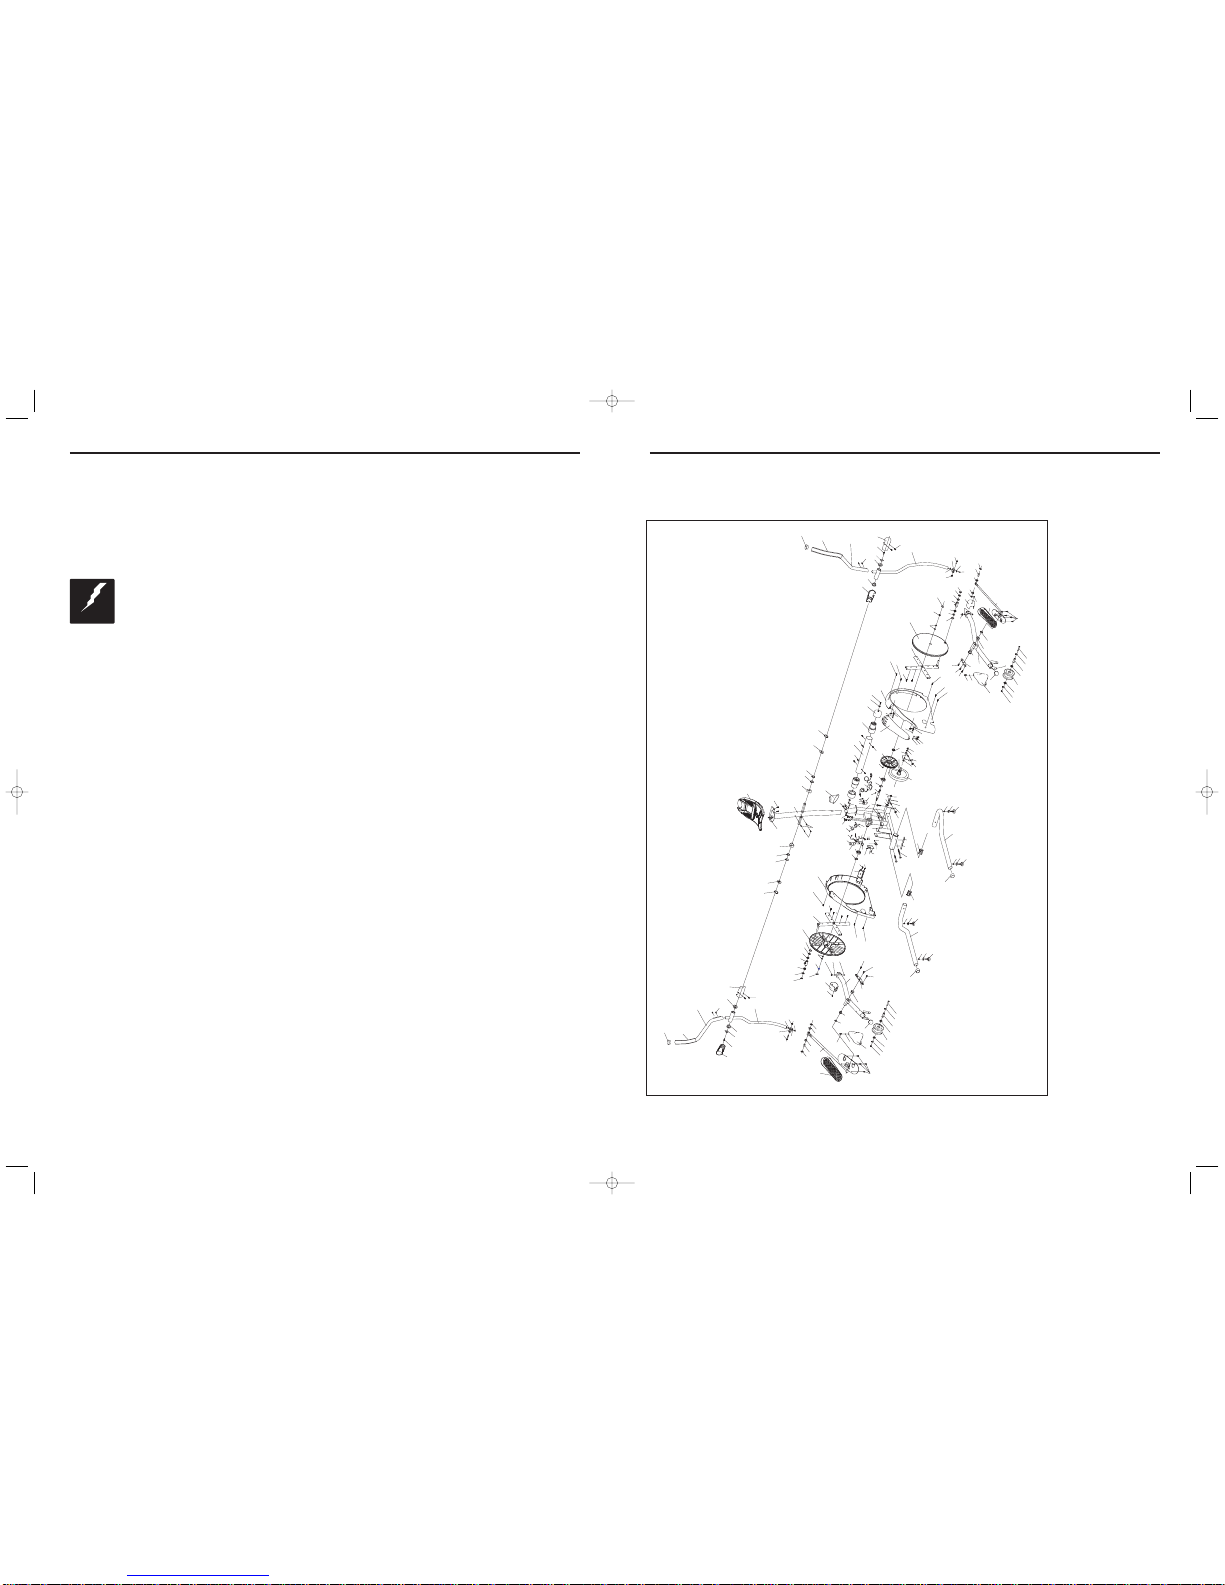
Exploded Diagram
Z01
B26
F05
E25
E54
E22
E03
E21
E04
E25
E54
E02
E53
F09
F05
F08
E53
F09
F08
F02
F18
F05
F08
F09
F09
E62
E53
Z19
E32
AE1
E42
E63
E32
Z18
E64
R17
F01
F08
F05
F18
R15
R18
R14
R03
Q44
Z18
Z18
Q30
Q30
Q43
Q42
Q26
Q41
R16
Q30
AJ1
E60
E55
AH1
G09
H07
Z11
H04
H04
E56
Z06
Z05
G10
E68
H07
G22
AE3
E13
E67
E18
H08
G23
E18
E67
R11
Q17
H10
AG5
R51
Q03
AG3
H04
E25
E21
E54
E03
E25
E04
E60
E22
E54
E62
E53
Z18
Z18
E42
Z18
Q30
E63
E64
E32
Z19
E55
AH1
H04
H07
E32
AE2
Z05
Q30
E57
Z11
Z05
Z06
R11
R51
J06
Q30
AJ1
L03
Q30
P01
S26
R10
R15
B26
R13
R14
R16
R17
R18
S02
S23
S20
S53
S27
S52
Q30
S25
S03
P51
P08
P03
Z13
R20
S54
S55
R37
R08
R01
R34
AB1
P09
Q30
Q25
R12
R13
Q26
Q25
Q44
J06
Q30
L08
Q16
R02
L06
L10
L02
L05
Q01
Z02
P07
S24
S25
R34
Q19
P04
R08
S51
B25
P05
P02
Z01
Z08
Z03
Q02
C11
Q15
L01
L03
G20
G19
G20
G09
H07
H08
G22
G10
G23
AG5
H10
Q17
AE3
E18
E68
E18
E67
E67
Z05
Q03
G19
G46
G10
G1
G12
AG4
Z10
G1
G45
Z09
C10
G15
G15
G44
AC1
G15
G15
G44
P02
N54
AN1
Z10
G1
G46
G45
G10
G12
G1
Z09
AG1
G21
G4
2
G21
AG2
G42
freespirit_English_30150v1.4.qxd 7/23/2004 9:02 AM Page 4
Page 5

OTHER SAFETY TIPS FOR YOUR ELLIPTICAL TRAINER
CAUTION!
• If you experience chest pains, nausea, dizziness or shortness of breath, stop
exercising immediately and consult your physician before continuing.
• Do not turn pedal arms by hand.
• Do not wear clothing that might catch on any part of the elliptical trainer.
• Make sure handlebars are secure before each use.
• Read the owner's guide before operating this elliptical trainer.
• Maintain a comfortable pace. Do not ‘sprint’ above 80 rpms on this machine.
• To maintain balance it is recommended to keep a grip on the
handlebars while exercising, mounting or dismounting the machine.
OPERATION
It is essential that your elliptical trainer is used only indoors, in a climate controlled room. If your
elliptical trainer has been exposed to colder temperatures or high moisture climates, it is strongly recommended that the elliptical trainer is warmed up to room temperature before first time use. Failure
to do so may cause premature electronic failure.
CHILDREN
• Keep children off of your elliptical trainer at all times.
• When the elliptical is in use, young children and pets should be kept at least 10
feet away.
CLEANING
• Clean with soap and slightly damp cloth only. Never use solvents.
WEIGHT CAPACITY
• 275 lbs
35 4
CAUTION
!
Parts List
item NO. JHT Parts No. Description
AB1 SP0301053AC MAIN FRAME
B25 ME0701001 C CLIP
B26 MB0403047A SPACER FOR
SINGLE GLUE
AC1 SP0302083AB CONSOLE MAST
C10 ME0102026 SCREW,OVAL HEAD
AE1 SP0305061AB RIGHT PEDAL ARM
AE2 SP0305062AB LEFT PEDAL ARM
AE3 SW0327006C CRANK PIN HOUS-
ING
E10 MB0649012A SPACER
E13 ME0506005 WAVY WASHER
E18 MD0503004 NEEDLE BEARING
E21 ME0112041 SCREW, OVAL HEX
SOCKET
E22 ME0204005 NYLON NUT
E25 MD0501002 BALL BEARING
E53 MB0609127AA END CAP
E54 ME0902006 C CLIP
E55 MB0691009C PEDAL
E56 MB0622014B RIGHT CRANK
COVER
E57 MB0622015B LEFT CRANK
COVER
E60 ME0102094 SCREW,OVAL HEAD
E61 ME0102042 SCREW,OVAL HEAD
E67 ME0502041 FLAT WAHSER
E68 ME0902007 C CLIP
F01 SP0313028AD RIGHT RAIL
F02 SP0313029AD LEFT RAIL
F08 MB0302002 LEVELER DEVICE
F09 MB0301002 ADJUSTABLE
FOOT PAD
F18 MB0604037A RAIL SLEEVE
AG1 SP0309037AD SWING ARM
ASSY-RH
AG2 SP0308020AD SWING ARM
ASSY-LH
AG3 SP0309038AD LOWER HANDLE-
BAR-RH
AG4 SP0308021AD UPPER HANDLE-
BAR-RH
AG5 SP0340002AF CONNECTING
COVER
G10 ME0112086 SCREW
G11 ML0105017B COPPER BUSHING
G12 ME0502138 FLAT WAHSER
G15 ME0902015 C CLIP
G19 ME0506011 WASHER
G20 ME0502003 FLAT WAHSER
G21 MB0401109A FOAM GRIP
G22 ME0502035 FLAT WAHSER
G23 ME0505042A TEFLON WASHER
G42 MB0609018B END CAP
G43 ME0501007 SPRING WASHER
G44 MB0649010B SPACER FOR
HANDLE
G45 MB0622012C SWIVEL AXLE
FRONT COVER
G46 MB0622013C SWIVEL AXLE
BACK COVER
AH1 SP0318015AD LOW LINK ARM
H04 ML0105003A SECONDARY
ARM COPPER
BUSHING
H07 ME0505038 TEFLON WASHER
H08 ME0204005 SELF LOCKING
NUT
H10 ME0109022 SCREW 3/8"-
16UNCX25L
AJ1 SP0314021AD CRANK SET
item NO. JHT Parts No. Description
J06 ME0121004 LARGE
SCREW,OVAL-TAPPING
L01 SP0312004AD FRONT STABILIZER
SET
L02 MB0667001 MOBILE WHEEL
L05 MB0102003 94 MOBILE WHEEL
L03 ME0301014 THREADED BRASS
INSERT/RIVET
L06 ME0107013 SCREW,OVAL-TAP-
PING
L08 ME0101027AB SCREW, ROUND
HEAD
L10 ME0502063 FLAT WAHSER
AN1 SM0004098AF CONSOLE SET
P01 MC0510005A SPEED SENSOR
WIRE
P02 MC0501092A CONSOLE CABLE
P03 ME0108004 SCREW, ROUND
TAPPING
P04 MJ1040014B SENSOR BRACKET
P05 ME0107057A SCREW, OVAL-TAP-
PING
P07 MC0560001A SWITCH WIRE
P08 ME0104136 SCREW, ROUND
HEX SOCKET
P51 ME0201001 NUT,HEX HEAD
MC0714110A2 ADAPTER
Q01 MB0203041EC RIGHT SIDE COVER
Q02 MB0202054EC LEFT SIDE COVER
Q03 MB06E2002BC DISK
Q15 MB0210024C CONSOLE COVER
Q16 MB0669005AF ADORNMENT
PLATE FOR FRAME
COVER
Q17 MB0678025AC END CAP FOR SIDE
ROUND
Q19 MB0624006C POWER SOKET
Q25 MJ1234001 CONNECTING
PLATE FOR SIDE
COVER
Q26 ME0701001 C-CLIP
Q30 ME0107015 SCREW,OVAL-TAP-
PING
Q41 ME1120016C SPRING
Q42 ME0102013 SCREW,OVAL HEAD
Q43 ME0502098 FLAT WAHSER
Q44 ME0108031A SCREW
R01 MJ3305031A DRIVE AXLE
R02 MD0119001D DRIVE BELT
WHEEL
R03 MD0208025A
R08 MD0501007 BALL BEARING
R10 MD0603013A PULLEY BELT
R11 ME0208006 HEX NUT
R12 MJ3308001 FIXING NUT
R20 ME0401007 2-END ROUND KEY
R34 ME0902011 C CLIP
R37 MC0708001 SENSOR MAGNET
R13 ME0110003 EYE BOLT
R14 MJ1804001 EYE BOLT HOLDER
R15 ME0204010 NYLON NUT
R16 ME0201012 HEX NUT
R17 ME0502053 FLAT WAHSER
R18 ME0201013 HEX NUT
R51 ME0508004 TRAY WASHER
S02 ML0247025A RESISTANCE WIRE
SM0905006A ECB CD MOTOR
SET
S23 MJ1906002B CAM
S27 MJ1908001 IC FIX PLATE
item NO. JHT Parts No. Description
S51 ME0104002 SCREW, ROUND
HEX SOCKET
S52 ME0102003 SCREW,OVAL HEAD
S53 ME0114001 SETTLE BOLT
S54 ME0502104 FLAT WAHSER
S55 ME0102004 SCREW,OVAL HEAD
S03 SP0320010AA FIXED BASE FOR
MOTOR
S04 ME0107014 SCREW, OVAL-TAP-
PING
V06 MG0214095A COVER DECAL
V20 MG0234044A DECAL
V21 MG0311001A DECAL
V30 MH0204325A ASSEMBLY GUIDE
V31 MH0207141A OWNER`S MANUAL
V33 MH0101040A GUARANTEE
CARD(VISION)
X01 MF0101235A OUTER CARTON
X12 MF0701004 CABLE TIE(BLACK)
AZ1 SM0338072A HARDWARE SET
Z01 ME0112101 SCREW, OVAL HEX
SOCKET
Z02 ME0204011 NYLON NUT
Z03 ME0503001 ARC WASHER
Z04 ME0502038 FLAT WAHSER
Z05 ME0506005 WAVY WASHER
Z06 ME0505055B TEFLON WASHER
Z07 ME0204025 NYLON NUT
Z08 ME0502015 FLAT WAHSER
Z09 ME0112086 BOLT,CAP-END
ALLEN
Z10 ME0112034 BOLT,CAP-END
ALLEN
Z11 ME0114034 SETTLE BOLT
Z12 ME0108012 SCREW,ROUND
TAPPING
Z13 ME0107016 SCREW, OVAL TAP-
PING
Z14 ME0112073 BOLT,CAP-END
ALLEN
Z15 ME1007002 WRENCH
Z16 ME1001002 OPEN END
WRENCH
Z17 ME1007001 WRENCH
Z18 ME1001006 OPEN END
WRENCH
Z19 MF0701002 CABLE TIE(BLACK)
AC1 SZEP29HCSM CONSOLE MAST
SET
AN1 SZEP29BCNS CONSOLE SET
AG4 SZEP29HLHB-L UPPER HANDLE-
BAR-LH SET
AG3 SZEP29HLHB-R UPPER HANDLE-
BAR-RH SET
AH1 SZEP29HLLA-2 LOW LINK ARM
SET
F02 SZEP29HRAL-L LEFT RAIL SET
F01 SZEP29HRAL-R RIGHT RAIL SET
Q02 SZEP29HSCV-L LEFT SIDE COVER
SET
Q01 SZEP29HSCV-R RIGHT SIDE COVER
SET
AG2 SZEP29HUHB-L SWING ARM ASSY-
LH SET
AG1 SZEP29HUHB-R SWING ARM ASSY-
RH SET
AE1 SZEP29HPAM-R RIGHT PEDAL ARM
SET
AE2 SZEP29HPAM-L LEFT PEDAL ARM
SET
MODEL: 30150
freespirit_English_30150v1.4.qxd 7/23/2004 9:02 AM Page 5
Page 6
CAUTION:
BEFORE BEGINNING ANY EXERCISE PROGRAM, ALWAYS CONSULT YOUR PHYSICIAN. IF YOU
EXPERIENCE CHEST PAINS, NAUSEA, DIZZINESS OR SHORTNESS OF BREATH, STOP EXERCISING AND CONSULT YOUR PHYSICIAN BEFORE CONTINUING.
IMPORTANT: PLEASE READ BEFORE USE!
ASSEMBLY
CAUTION!
There are several areas during the assembly process of a elliptical trainer that special attention must
be paid. It is very important to follow the assembly instructions correctly and to make sure all parts
are firmly tightened. If the assembly instructions are not followed correctly, the elliptical trainer
could have frame parts that are not tightened and will seem loose and may cause irritating noises. To
prevent damage to the elliptical trainer, the assembly instructions must be reviewed and corrective
actions should be taken.
345
CAUTION
!
CAUTION
!
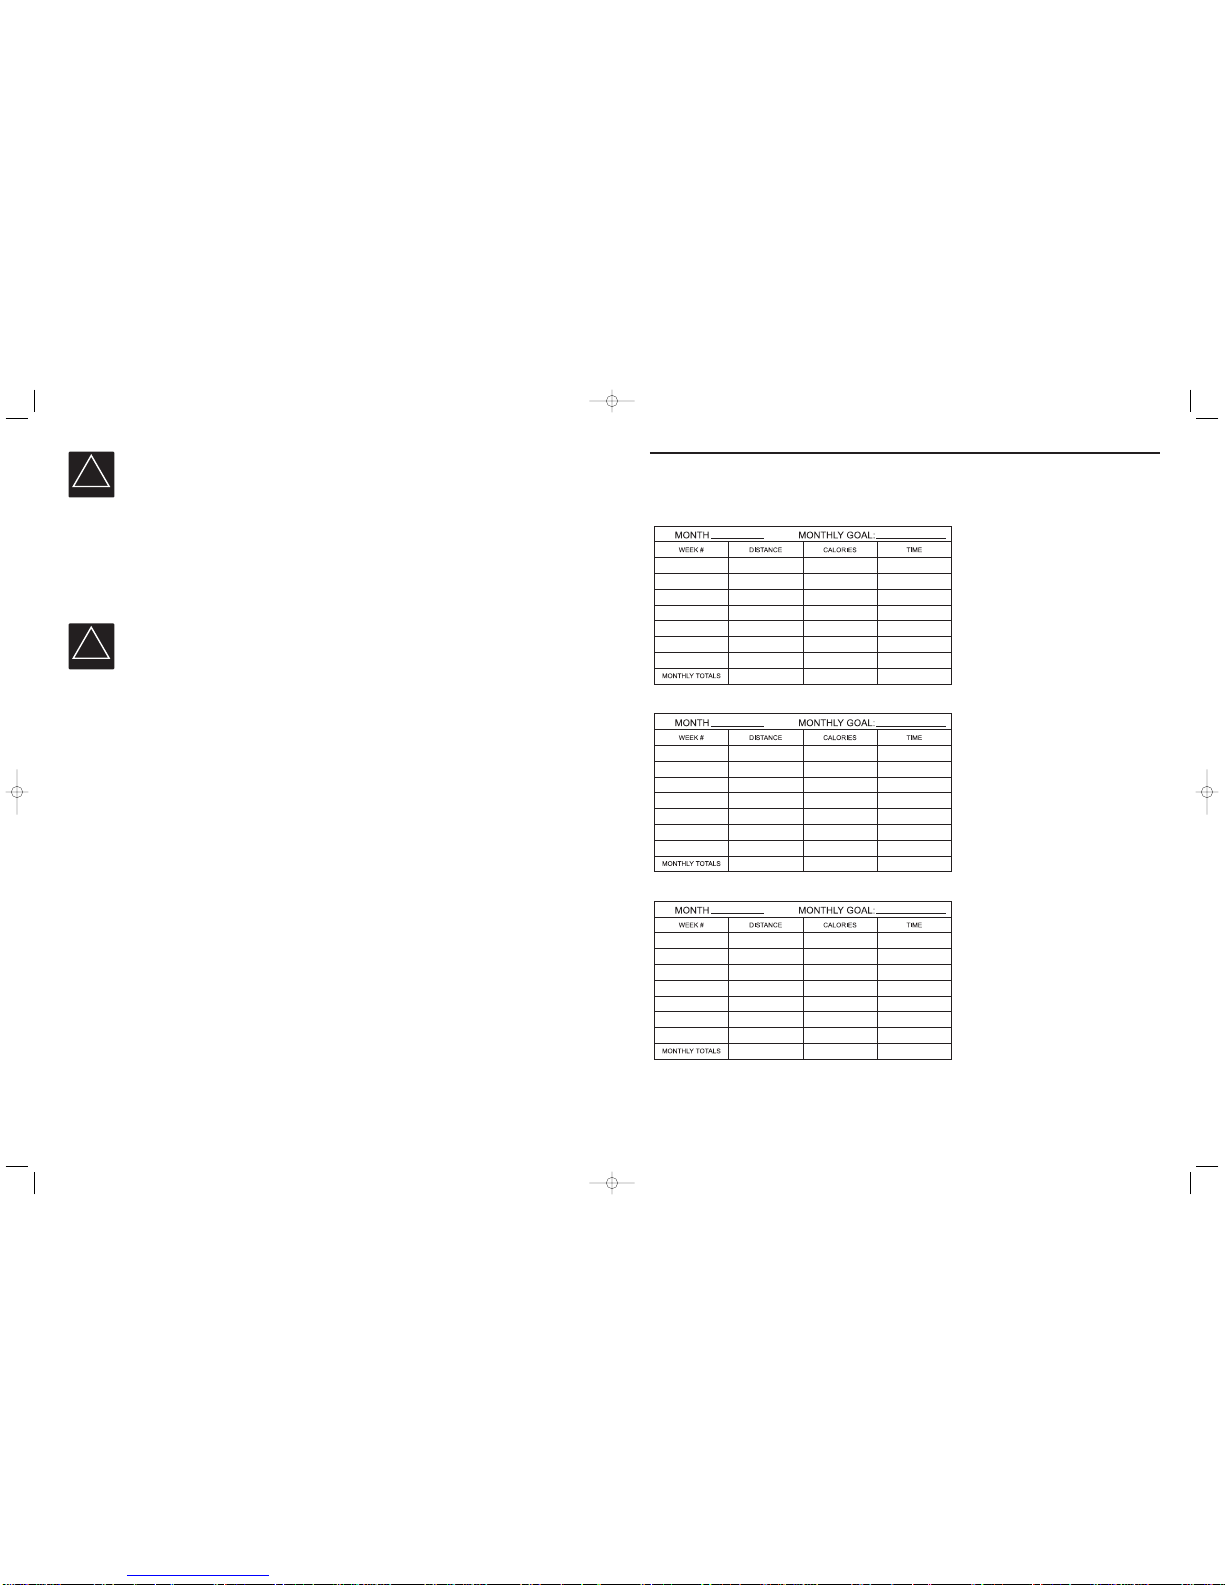
Monthly Log Sheet
freespirit_English_30150v1.4.qxd 7/23/2004 9:02 AM Page 6
Page 7
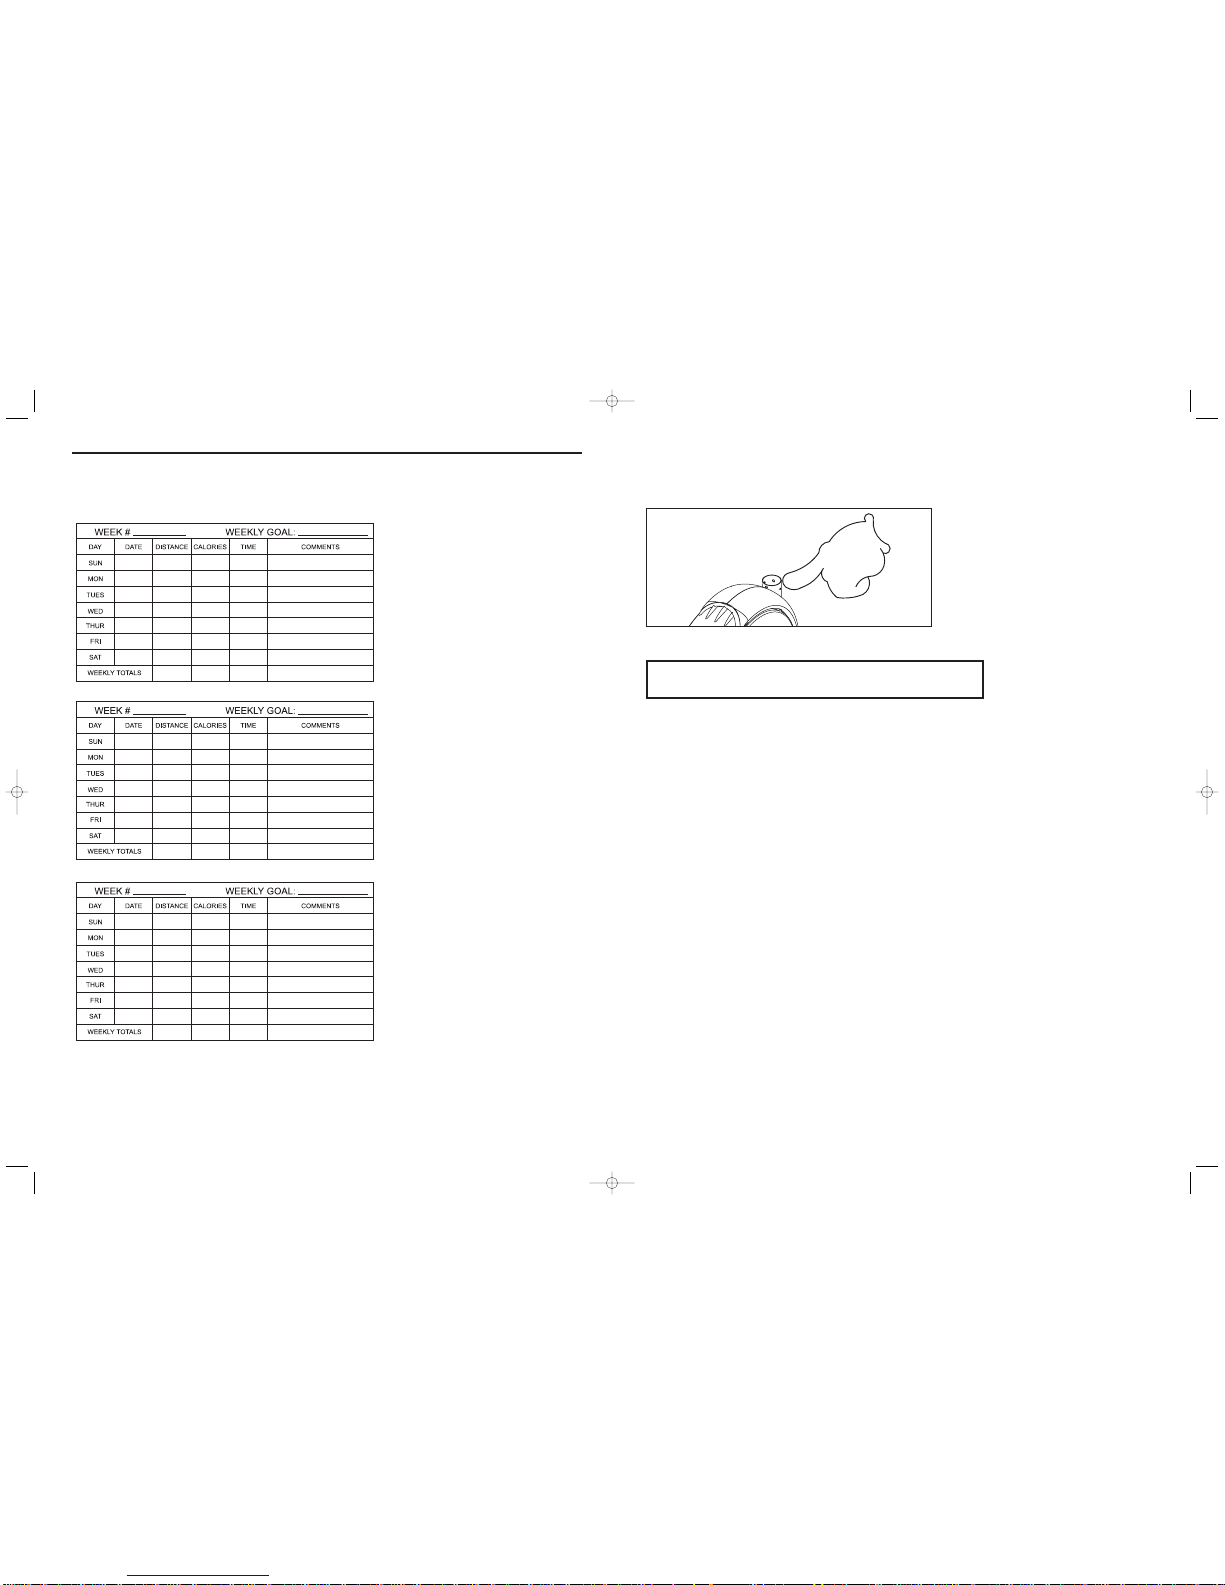
Before proceeding, find your elliptical trainer’s serial number and model name located under the
console mast boot and enter it in the space provided below:
SERIAL NUMBER AND MODEL NAME LOCATION:
ENTER YOUR SERIAL NUMBER IN BOX BELOW:
Refer to this number when calling for service, and also enter this serial number on your
Warranty Card and in your own records. Be sure to read the Safety Instructions and complete
Owner’s Guide before using your new elliptical trainer.
6
33
Weekly Log Sheet
freespirit_English_30150v1.4.qxd 7/23/2004 9:02 AM Page 7
Page 8
CONGRATULATIONS! on choosing your elliptical trainer.
You’ve taken an important step in developing and sustaining an exercise program! Your elliptical
trainer is a tremendously effective tool for achieving your personal fitness goals. Regular use of your
elliptical trainer can improve the quality of your life in so many ways.
Here are just a few of the health benefits of aerobic exercise:
• Weight Loss
• A Healthier Heart
• Improved Muscle Tone
• Increased Daily Energy Levels
• Reduced Stress
• Help In Countering Anxiety and Depression
• An Improved Self Image
The key to reaping these benefits is to develop the exercise habit. Your new elliptical trainer will help
you eliminate the obstacles that prevent you from getting in your exercise time. Inclement weather
and darkness won't interfere with your workout when you use your elliptical trainer in the comfort of
your home. This manual provides you with basic information for using and enjoying your new
machine. A more complete knowledge of your new elliptical trainer will assist you in realizing your
goal of a healthy lifestyle.
327
Before You Begin
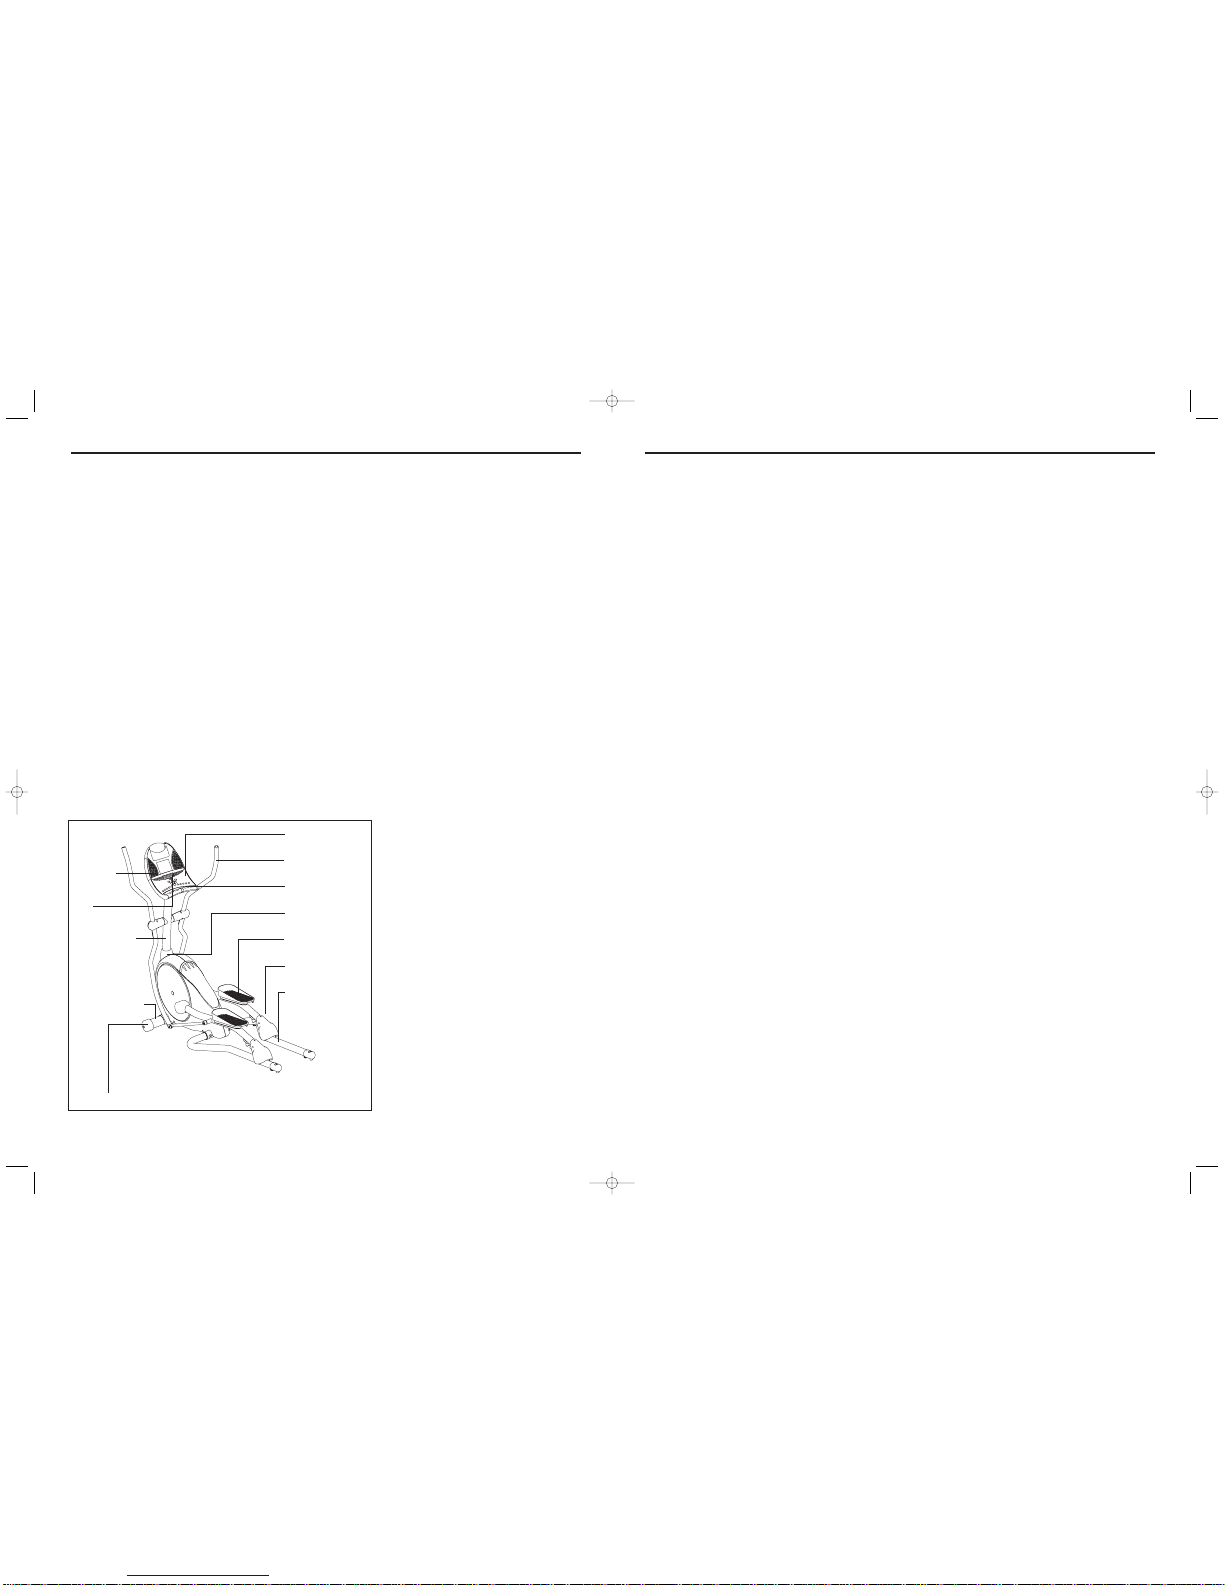
Console
Handle Bar
Grip pulse
Console Mast Boot
Pivoting Footpad
Pedal Arm
Guide Rail
Transport Wheel
Speakers
Fan
Console Mast
Front Foot Tube
An important step in developing a long term fitness program is to determine your goals. Is your primary goal for exercising on your elliptical trainer to lose weight? Improve muscle? Burn Stress?
Prepare for the spring racing schedule? Knowing what your goals are will help you develop a more
successful exercise program. Below are some common exercise goals:
• Weight Loss • Weight Maintenance
• Improve Body Shape and Tone • Strengthen Leg Muscles
• Increased Energy Level • Improved Sleep Patterns
• Improved Sports Performance • Stress Reduction
• Improved Cardiovascular Endurance
If possible try to define your personal goals in precise, measurable terms, and then put your goals in
writing. The more specific you can be, the easier it will be to track your progress. If your goals are
long term, divide them up into monthly and weekly segments. Longer term goals can lose some of the
immediate motivation benefits. Short term goals are easier to achieve. Your elliptical trainer console
provides you with several readouts that can be used to record your progress. You can track Distance,
Calories or Time. Time is the most important and useful of test functions.
KEEPING AN EXERCISE DIARY
Photocopy the weekly and monthly log sheets on the following pages to make your personal exercise
log book. As time goes by you’ll be able to look back with pride at the work you’ve done. As your fitness improves, you can look back and see how far you’ve come.
HOW HARD?
How hard you workout is also determined by your goals. If you use your elliptical trainer to prepare
for a 5K run, you will probably work out at a higher intensity than if your goal is general fitness.
Regardless of your long term goals, always begin an exercise program at low intensity. Aerobic exercise does not have to be painful to be beneficial! There are two ways to measure your exercise intensity. The first is by monitoring your heart rate, and the second is by evaluating your perceived exertion level (this is simpler than it sounds!). Note: Always consult your physician before beginning an
exercise program.
PERCEIVED EXERTION LEVEL
The second and simpler way to gauge your exercise intensity is to evaluate your perceived exertion
level. While exercising if you are too winded to maintain a conversation without gasping, you are
working out too hard. A good rule of thumb is to work to the point of exhilaration, not exhaustion. If
you cannot catch your breath, it’s time to slow down. Always be aware of other warning signs of
overexertion.
Achieving Your Fitness Goals
freespirit_English_30150v1.4.qxd 7/23/2004 9:02 AM Page 8
Page 9
831
Assembly
UNPACKING
Unpack the product where you will be using it. Place the product on a level flat surface. It is recommended that you place a protective covering on your floor. Note: It is recommended that you apply
grease to the threads of each bolt as you assemble the product, to prevent loosening and noise. Also,
during each assembly step, ensure that ALL nuts and bolts are in place and partially threaded in
before completely tightening any ONE bolt.
FAILURE TO FOLLOW THESE INSTRUCTIONS COULD RESULT IN INJURY! Place your Elliptical
trainer on a level flat surface. It is recommended that you place a protective covering on your floor.
Parts
• 1 Front Foot Tube
• 2 Upper Handlebars
• 2 Lower Handlebars/Link Arms
• 2 Pedal arms
• 2 Guide Rails
• 1 Console Mast
• 1 Console Mast Boot
• 1 Power Supply
• 2 Pedal Arm Sleeves
• 2 Crank Boots
• 2 Front Upper
Handlebar Covers
• 2 Back Upper
Handlebar Covers
• 1 Hardware Pack
(contents listed below)
Tools (included)
• 4mm Allen Wrench
• 5mm Allen Wrench/
Phillips Screw Driver
• 13/15mm Flat Wrench
• 17mm Wrench
CONTACT THE SEARS CUSTOMER ASSISTANCE CENTER; TOLL FREE @ 1-800-469-4663
SEARS CANADA, INC. TORONTO, ONTARIO M5B 2B8
STRETCH FIRST
Before using your Sears product, it is best to take a few minutes doing a few gentle stretching exercises. Stretching prior to exercise will improve flexibility and reduce chances of exercise related
injury. Ease into each of these stretches with a slow gentle motion. Do not stretch to the point of
pain. Make sure not to bounce while doing these stretches.
WALL PUSH
Stand near a wall with the toes of one foot about 18" from the wall, and the other foot about 12"
behind the other foot. Lean forward, pushing against the wall with your palms. Keep your heels flat
and hold this position for a count of 15 seconds. Make sure that you do not bounce while stretching.
Alternate positions of your feet and repeat for a total of 8 repetitions.
STANDING QUADRICEPS STRETCH
Using a wall to provide balance, grasp your left ankle with your left hand and hold your foot against
the back of your thigh for a count of 15 seconds. Repeat with your right ankle and hand, and continue
alternating for a total of 8 repetitions.
SEATED TOE TOUCH
Sit on the floor with your legs together and straight out in front of you. Do not lock your knees.
Extend your fingers towards your toes and hold for a count of 15 seconds. Make sure that you do not
bounce while stretching. Sit upright again. Repeat for a total of 8 repetitions.
WARM UP
The first 2 to 5 minutes of a workout should be devoted to warming up. The warm-up will limber your
muscles and prepare them for more strenuous exercise. Make sure that you warm-up on your Sears
product at a slow pace.
COOL DOWN
Never stop exercising suddenly! A cool-down period allows your heart to readjust to the decreased
demand. Make sure that your cool down period consists of a very slow pace to allow your heart rate to
lower. After the cool-down, repeat the stretching exercises listed above to loosen and relax your muscles.
Developing A Fitness Program
Warm Up & Cool Down
A
B
C
C
D
E
F
G
H
I
J
Pre-Attached to Console
K
Console Wire Included
L
K) Note: Black 25mm
Teflon Washer should be
facing down.
K) Note: Black 25mm
Teflon Washer should be
facing up.
Pedal Arm Sleeves
freespirit_English_30150v1.4.qxd 7/23/2004 9:02 AM Page 9
Page 10
9 30
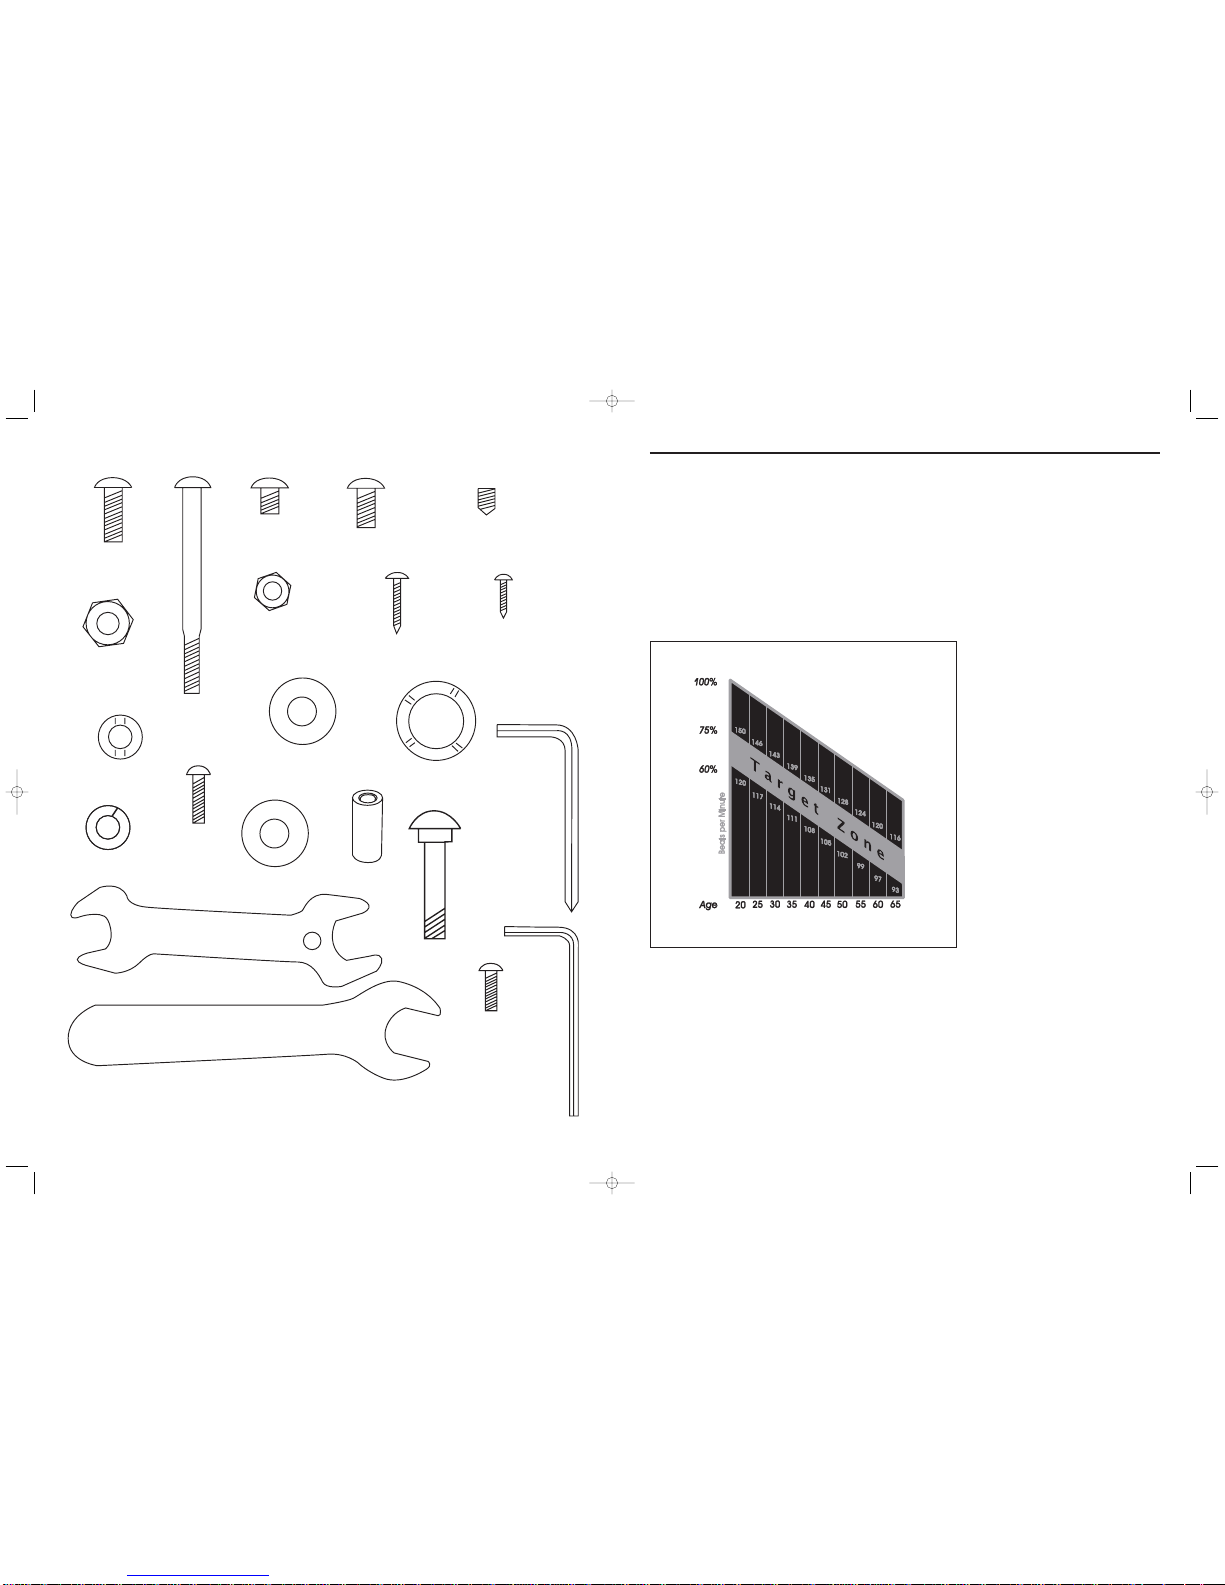
TARGET HEART RATE ZONE
Your ‘Target Heart Rate Zone’ is a percentage of your maximum heart rate. Target Zones will vary for
each individual, depending on age, current level of conditioning, and personal fitness goals. The
American Heart Association recommends working-out at a ‘Target Heart Rate Zone’ of between 60%
and 75% of your maximum heart rate. See the chart below for convenient reference. EXAMPLE for a
42-year old user: find AGE along the bottom of the chart (round to 40), follow AGE column up to the
TARGET ZONE BAR. RESULTS: 60% of maximum Hear Rate = 108 Beats Per Minute, 75% of maximum Heart Rate = 135 Beat Per Minute.
Heart Rate Chart
F) 17mm Nut
Quantity: 2
K) 25mm Teflon Coated
Washer
Quantity: 4
L) Wavy Washer
Quantity: 2
I) 15mm Screw
Quantity: 4
J) Arc Washer
Quantity: 3
H) 20mm Screw
Quantity: 2
G) 13mm Nut
Quantity: 3
E) 8mm Set Screw
Quantity: 4
HARDWARE
B) 70mm Bolt
Quantity: 3
O) 17mm Wrench
Quantity: 1
P) 15/13mm Wrench
Quantity: 1
N) 4mm Allen
Quantity: 1
M) 5mm Screw
Driver
Quantity: 1
A) 20mm Bolt
Quantity: 2
U) Lock Washer
Quantity: 3
D) 15mm Bolt
Quantity: 6
C) 12mm Bolt
Quantity: 3
Q) 25mm Bolt
Quantity: 4
R) White Teflon
Washer
Quantity: 4
T) 40mm Bolt
Quantity: 2
S) 20mm Bolt
Quantity: 4
V) Sleeve
freespirit_English_30150v1.4.qxd 7/23/2004 9:02 AM Page 10
Page 11
29 10
FEEDBACK
Your elliptical trainer offers two heart rate feedback options. You may choose to use the heart rate
handlebars, or the chest transmitter for a hands free workout.
HEART RATE HANDLEBAR
Place the palm of your hands directly on the heart rate handlebars. Both hands must grip the bars for
your heart rate to register. When griping the handlebars, do not grip tightly. Holding the grips tightly
may elevate your blood pressure. Try to maintain moderate pressure while holding onto the heart rate
handlebars. It is recommended that you hold the handlebars only long enough to see your heart rate
readout on the console. You may experience an erratic readout if consistently holding the handlebars.
TELEMETRIC CHEST TRANSMITTER
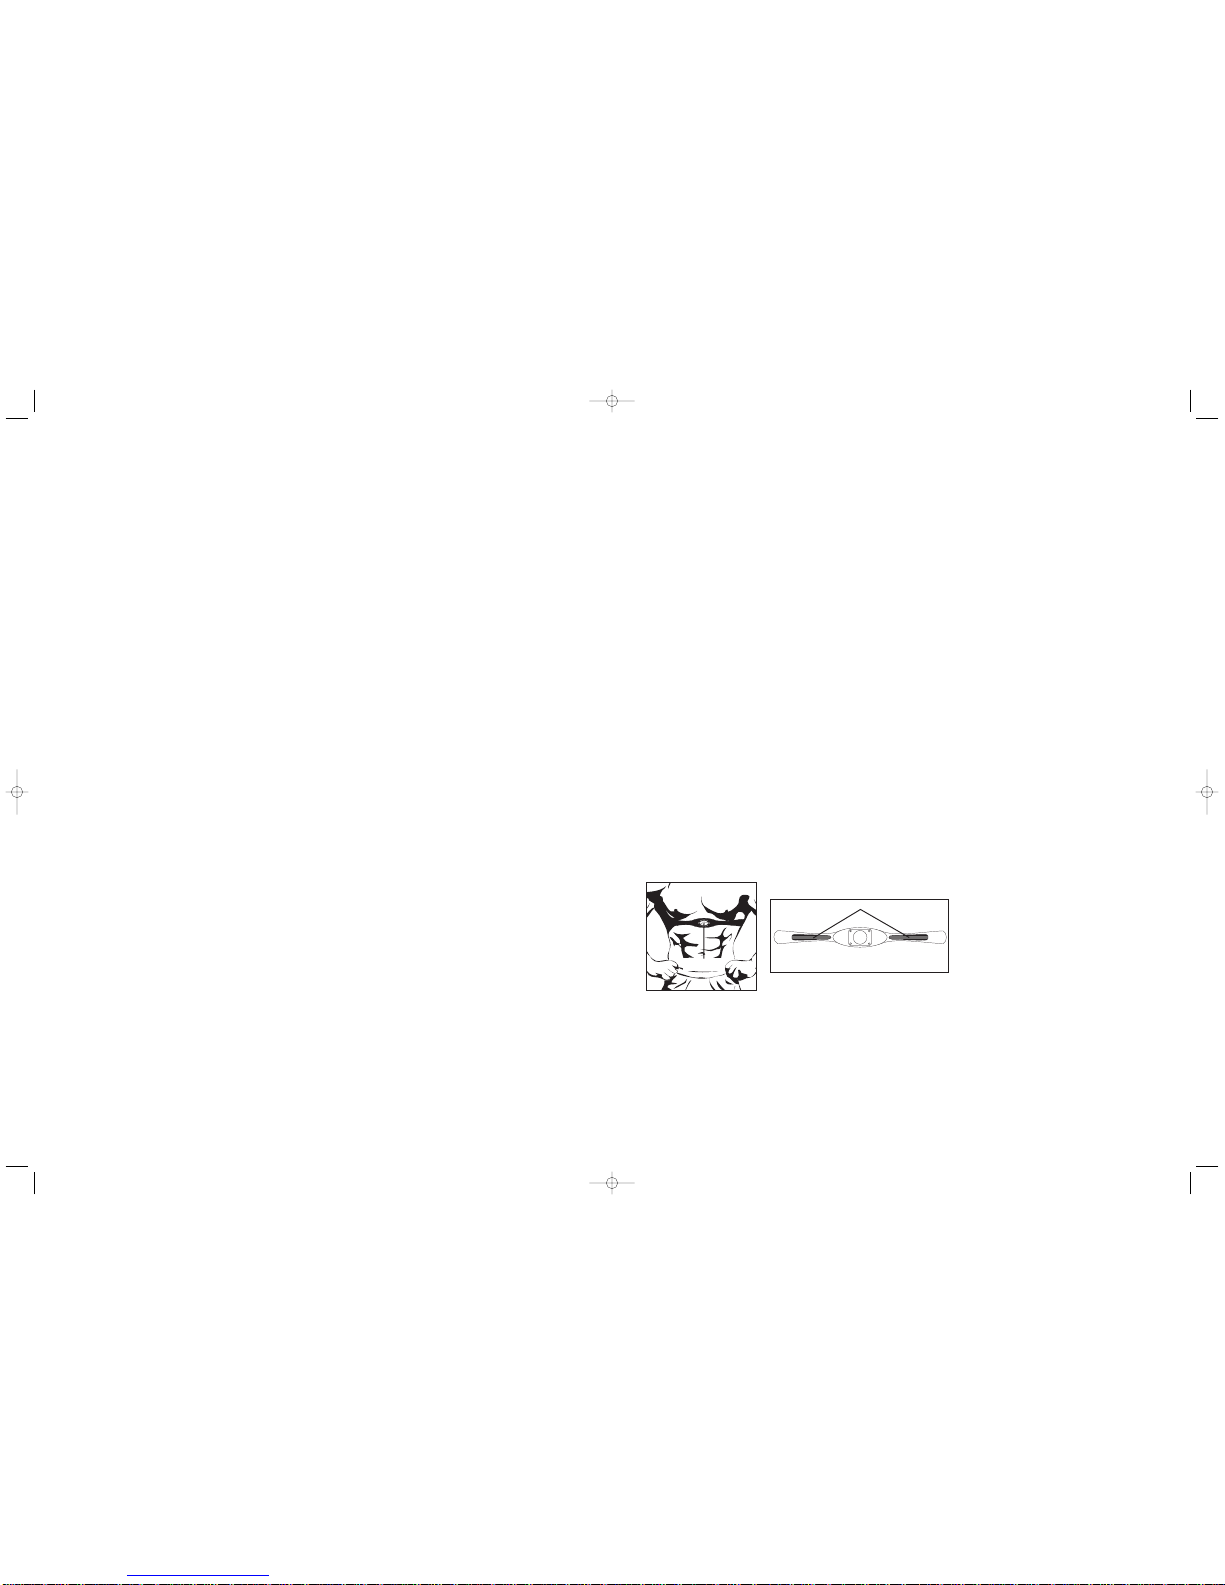
Prior to wearing the chest transmitter on your chest, moisten the two rubber electrodes with water.
Center the chest strap just below the breast or pectoral muscles, directly over your sternum, with the
logo facing out. Note: The chest strap must be tight and properly placed to receive an accurate and
consistent readout. If the chest strap is too loose, or positioned improperly, you may receive an erratic or inconsistent heart rate readout. Note: Chest strap not included, sold separately.
If you have any problems with the heart rate function please refer to the troubleshooting in the table
of contents.
WARNING!
The heart rate function is not a medical device. Various factors may affect the accuracy of your heart
rate reading. The heart rate reading is intended only as an exercise aid
.
Monitoring Your Heart Rate
WARNING
8
1
A
2
B
3
G
J
U
B
C
4
F
K
H
7
G
R
T
V
E
I
5
D
L
S
Q
6
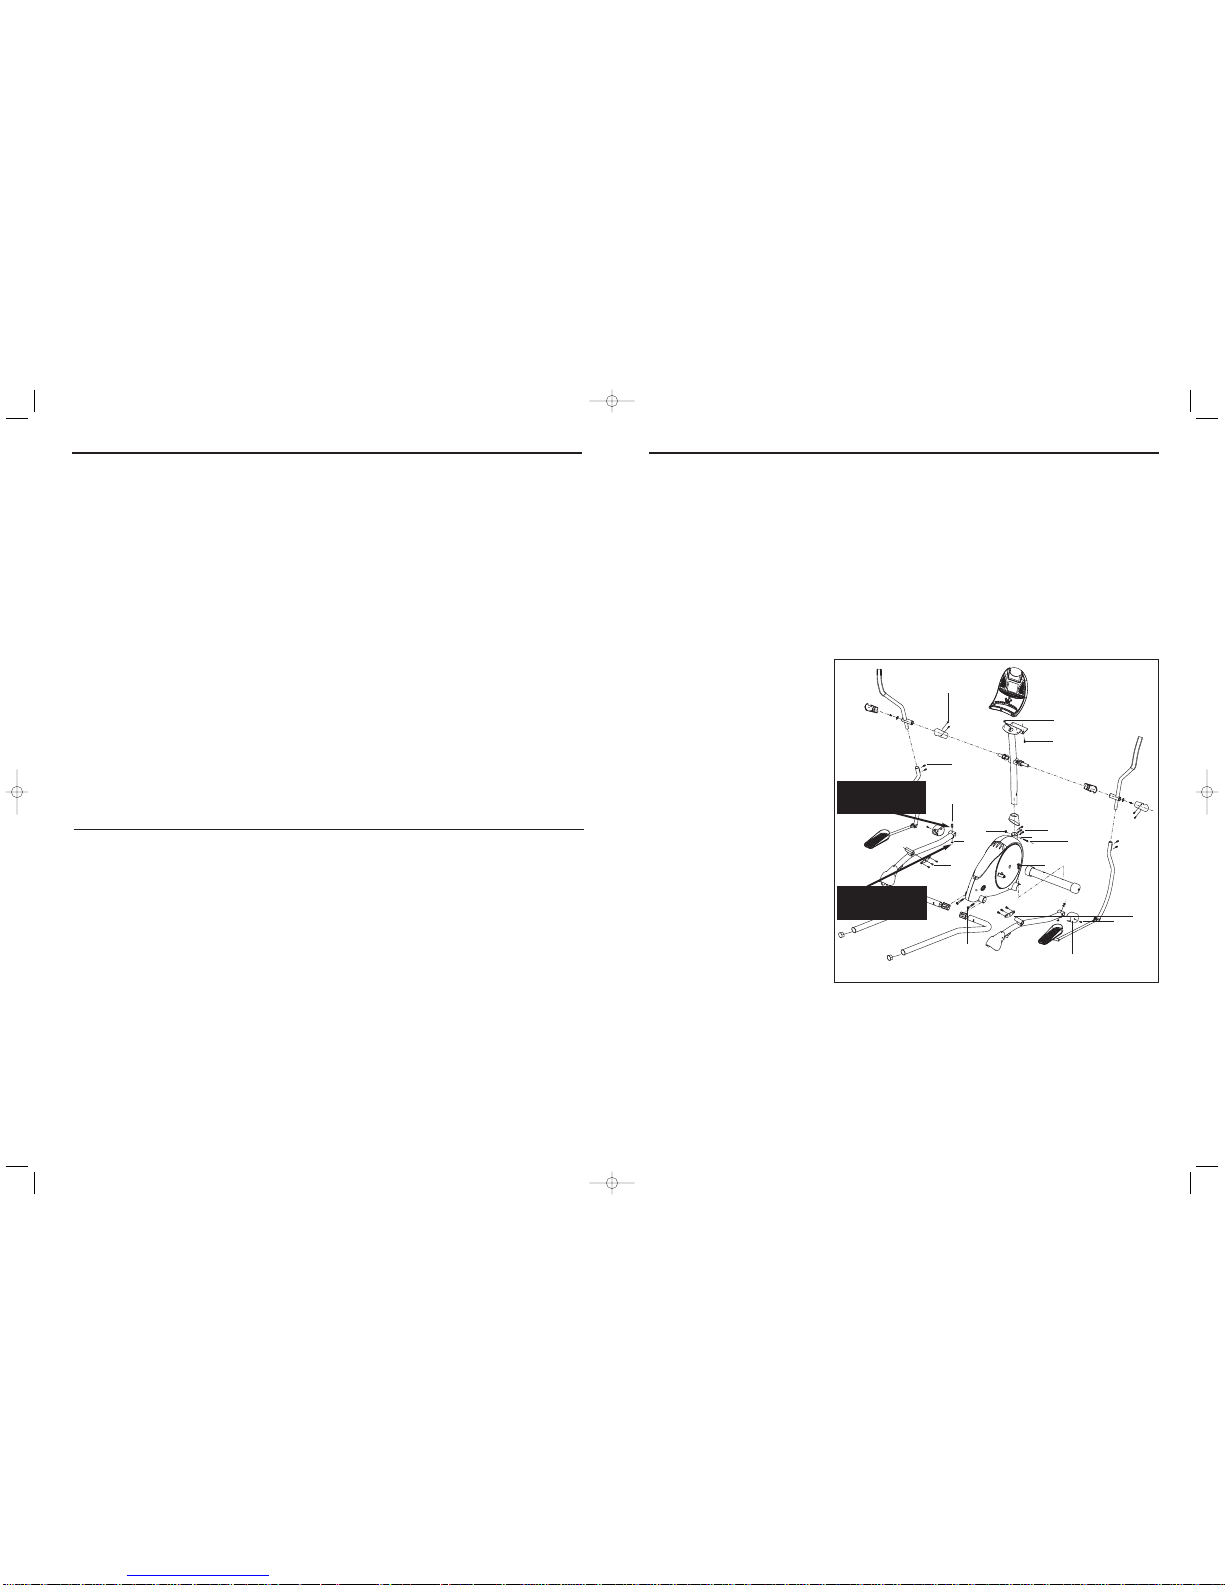
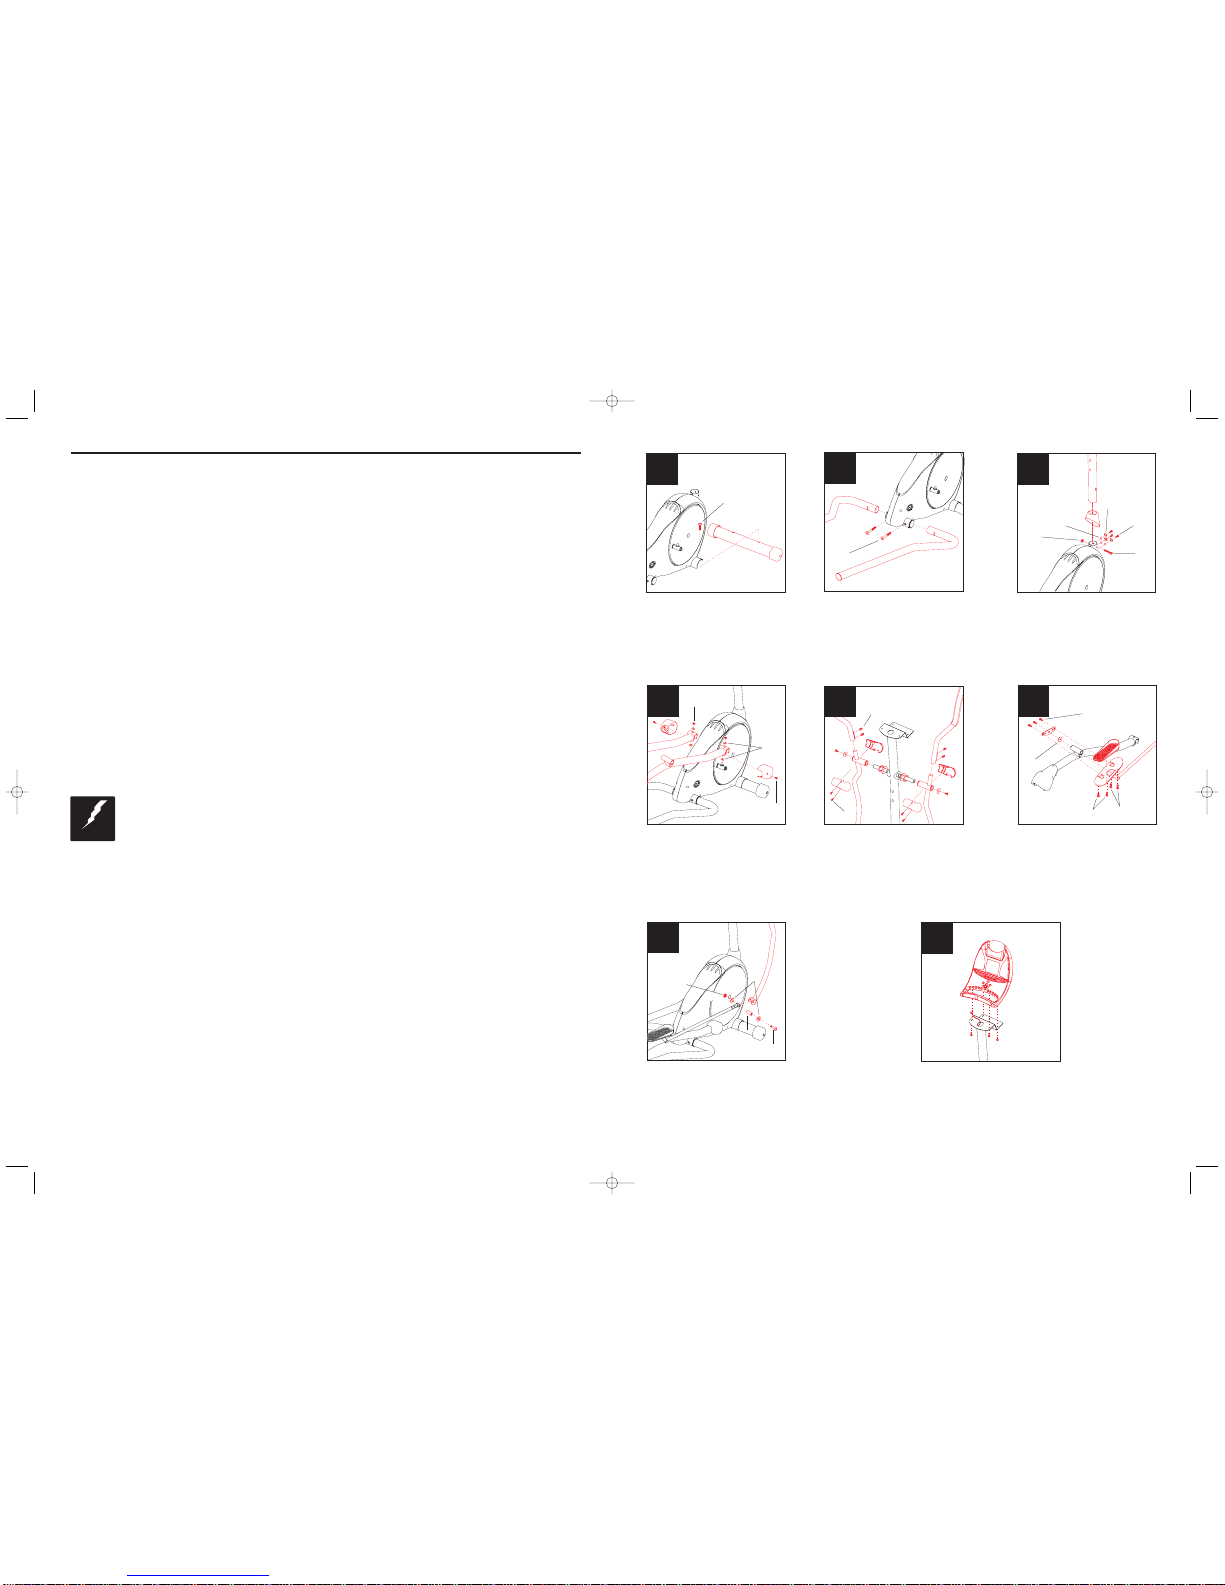
STEP 1:
ATTACH FRONT TUBE.
Note: Make sure not to tighten
bolts until all assembly steps have
been completely assembled and
aligned.
STEP 2:
ATTACH LEFT & RIGHT GUIDE
RAILS.
STEP 3:
ATTACH CONSOLE MAST AND
CONSOLE MAST BOOT.
Note: Make sure to loosen the
water bottle screws in order to fit
the console cable through the
mast. DO NOT PINCH WIRES!
STEP 4:
ATTACH LEFT & RIGHT PEDAL
ARMS AND PEDAL ARM
SLEEVES.
Note: Black ‘Teflon’ surface of K
should be facing the pedal arm.
STEP 5:
ATTACH LEFT & RIGHT LOWER
HANDLE BARS TO CONSOLE
MAST. ATTACH LEFT & RIGHT
UPPER HANDLE BARS. ATTACH
H-BAR COVERS. Note: Bolts and
washers are pre-assembled.
STEP 6:
ATTACH FOOT PAD TO FOOT
PLATE THEN CONNECT THE
PIVOTING FOOT PAD.
STEP 7:
ATTACH LEFT & RIGHT LINK ARMS TO LOWER LEFT
& RIGHT HANDLE BARS.
STEP 8:
ATTACH CONSOLE AND CONNECT ALL WIRES.
Note: DO NOT PINCH WIRES!
Note: Bolts are pre-assembled to console.
freespirit_English_30150v1.4.qxd 7/23/2004 9:03 AM Page 11
Page 12
11 28
POWER
Your programmable elliptical trainer is powered by a power supply. The power supply must be
plugged into the power jack, which is located in the front of the machine near the front foot tube.
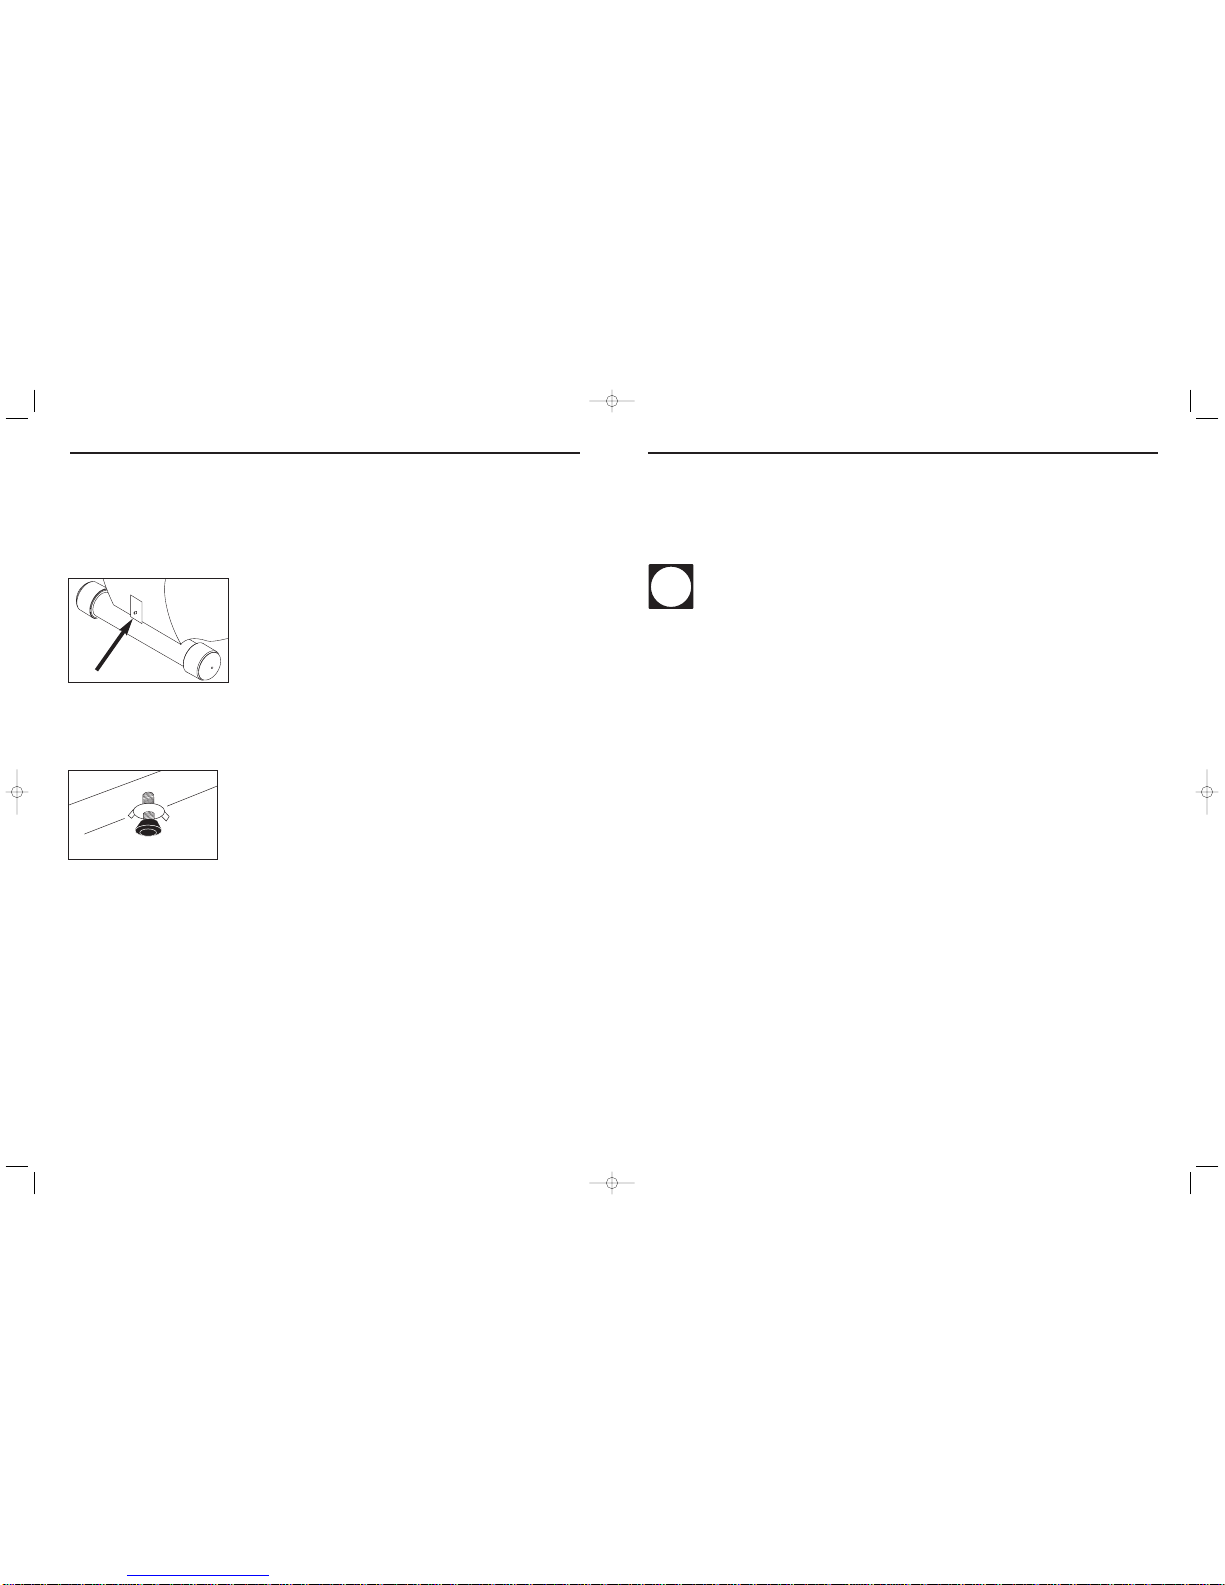
LEVELING
The elliptical trainer should be level for optimum use. Once you have placed the elliptical trainer
where you intend to use it, raise or lower the adjustable levelers located underneath each guiderail.
Once you have leveled the elliptical trainer, lock the levelers in place by tightening the wing nuts
against the frame.
Elliptical Operation & Adjustment
Always consult your physician before beginning an exercise program.
HOW OFTEN?
The American Heart Association recommends that you exercise at least 3 to 4 days per week to maintain cardiovascular fitness. If you have other goals such as weight or fat loss, you will achieve your
goal faster with more frequent exercise. Whether it’s 3 days or 6 days, remember that your ultimate
goal should be to make exercise a lifetime habit. Many people are successful staying with a fitness
program if they set aside a specific time of day to exercise. It doesn’t matter whether it’s in the
morning before your shower, during lunch hour or while watching the evening news. What’s more
important is that it’s a time that allows you to keep a schedule, and a time when you won’t be interrupted. If you are to be successful with your fitness program, you have to make it a priority in your
life. So decide on a time, pull out your day planner and pencil in your exercise times for the next
month!
HOW LONG?
For aerobic exercise benefits, it’s recommended that you exercise from between 24 and 32 minutes
per session. But start slowly and gradually increase your exercise times. If you’ve been sedentary during the past year, it may be a good idea to keep your exercise times to as little as five minutes initially. Your body will need time to adjust to the new activity. If your goal is weight loss, a longer exercise
session at lower intensities has been found to be most effective. A workout time of 48 minutes or
more is recommended for best weight loss results.
Conditioning Guidelines
TIPS
freespirit_English_30150v1.4.qxd 7/23/2004 9:03 AM Page 12
Page 13
27 12
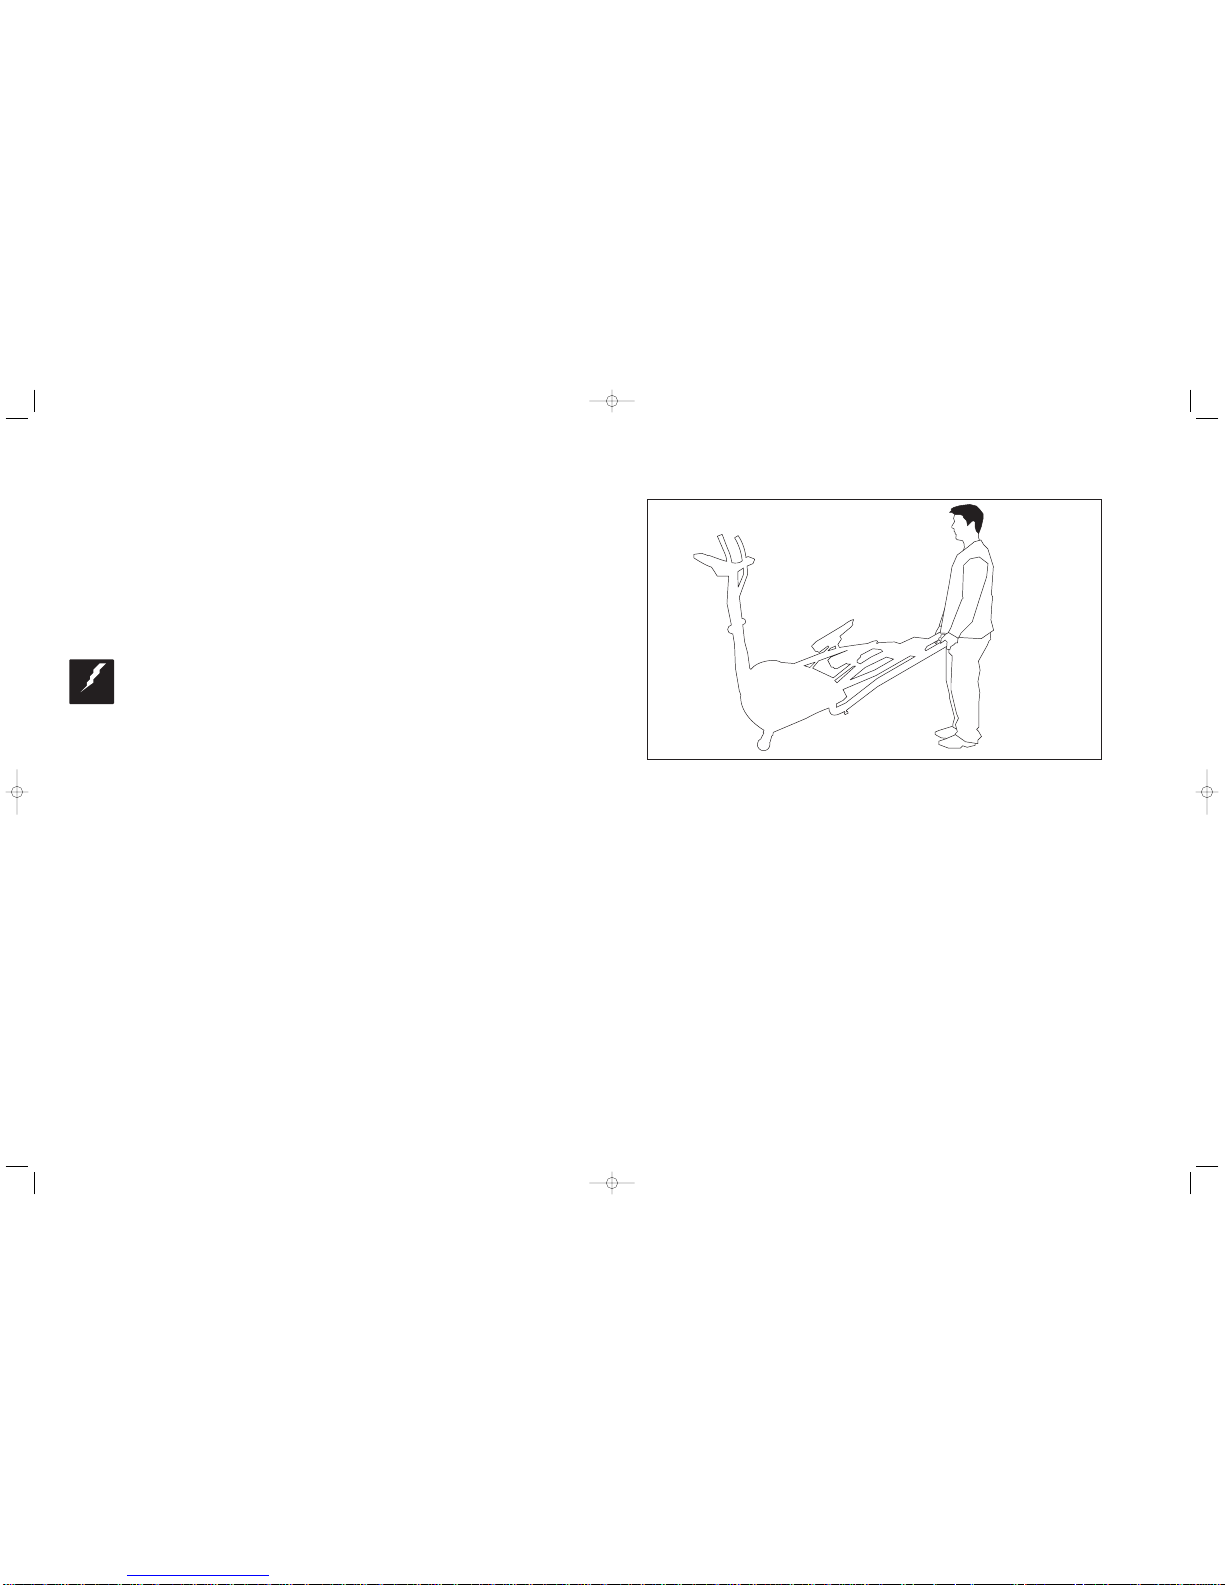
MOVING
Your elliptical trainer has a pair of transport wheels built into the front of the frame. Carefully pick up
the guide rails and roll the elliptical to the desired position.
WHAT KIND OF ROUTINE MAINTENANCE IS REQUIRED?
We use sealed bearings throughout our ellipticals so lubrication is not needed. The most important
maintenance step is to simply wipe your perspiration off the entire trainer and guide rails after each
use.
HOW DO I CLEAN MY SEARS ELLIPTICAL TRAINER?
Clean with soap and water cleaners only. Never use solvents on plastic parts.
Cleanliness of your elliptical trainer and its operating environment will keep maintenance problems
and service calls to a minimum. For this reason, Sears recommends that the following preventive
maintenance schedule be followed:
AFTER EACH USE
Turn off the elliptical trainer with the on/off switch located on the back of the console, and unplug
the power cord from the wall outlet.
WARNING!
To remove power from the elliptical, the power cord must be disconnected from the wall outlet.
• Clean the entire machine and guide rails
• Wipe down the elliptical trainer with a damp cloth. Never use solvents, as they can cause damage
to the elliptical.
• Inspect the power cord. If the power cord is damaged, contact Sears.
• Make sure the power cord is not underneath the elliptical trainer or in any other area where it can
become pinched or cut.
EVERY WEEK
Clean underneath the elliptical, following these steps:
• Turn off the elliptical trainer with the on/off switch.
• Then unplug the power cord at the wall outlet.
• Move the elliptical trainer to a remote location.
• Wipe or vacuum any dust particles or other objects that may have accumulated underneath the
elliptical.
• Return the elliptical trainer to its previous position.
EVERY MONTH
• Inspect all assembly bolts and pedals on the machine for proper tightness.
WARNING
freespirit_English_30150v1.4.qxd 7/23/2004 9:03 AM Page 13
Page 14

13 26
COMMON PRODUCT QUESTIONS
ARE THE SOUNDS MY ELLIPTICAL TRAINER MAKES NORMAL?
Our elliptical trainers are some of the quietest available because they use belt drives and friction free
magnetic resistance. We use the highest grade bearings and belts to minimize noise. However,
because the resistance system itself is so quiet, you will occasionally hear other slight mechanical
noises. Unlike older, louder technologies, there are no fans, friction belts, or alternator noises to
mask these sounds on our elliptical trainers. These mechanical noises, which may or may not be
intermittent, are normal and are caused by the transfer of significant amounts of energy to a rapidly
spinning flywheel. All bearings, belts and other rotating parts will generate some noise which will
transmit through the casing and frame. It is also normal for these sounds to change slightly during a
workout and over time because of thermal expansion of the parts.
WHY IS THE ELLIPTICAL TRAINER I HAD DELIVERED LOUDER THAN THE ONE AT THE STORE?
All fitness products seem quieter in a large store showroom because there is generally more background noise than in your home. Also, there will be less reverberation on a carpeted concrete floor
than on a wood overlay floor. Sometimes a heavy rubber mat will help reduce reverberation through
the floor. If a fitness product is placed close to a wall, there will be more reflected noise.
HOW LONG WILL THE DRIVE BELT LAST?
The computer modeling we have done indicated virtually thousands of maintenance free hours. Belts
are now commonly used in far more demanding applications such as motorcycle drives.
CAN I MOVE THE TRAINER EASILY ONCE IT IS ASSEMBLED?
Your elliptical trainer has a pair of transport wheels built into the front legs. It is easy to move your
Elliptical Trainer by rolling it on the front transport wheels. It is important that you place your elliptical trainer in a comfortable and inviting room. Your Elliptical Trainer is designed to use minimal floor
space. Many people will place their Elliptical Trainers facing the TV or a picture window. If at all possible, avoid putting your Elliptical Trainer in a unfinished basement. To make exercise a desirable
daily activity for you, the Elliptical Trainer should be in a attractive setting.
CAUTION
!
CAUTION! Our elliptical trainers are well built and heavy, weighing up to 200lbs.! Use care and
additional help if necessary when moving.
FOOT POSITIONING
Your elliptical trainer has a variety of foot positions to offer a variance in your workout routine and to
strengthen and train a wider range of leg muscles. Your elliptical trainer also allows you to pedal both
forward and backwards to allow you to focus on other muscle groups such as hamstring and calves.
When using your elliptical trainer, you may notice that your heel raises off of the foot pad. This is a
natural walking or running motion and you should not try to prevent this.
freespirit_English_30150v1.4.qxd 7/23/2004 9:03 AM Page 14
Page 15
25 14
Simply press the 'Start" button to begin exercising. The program will automatically default to the
Manual program unless another program is selected.
RESET
Press and hold the Stop button to reset the elliptical trainer.
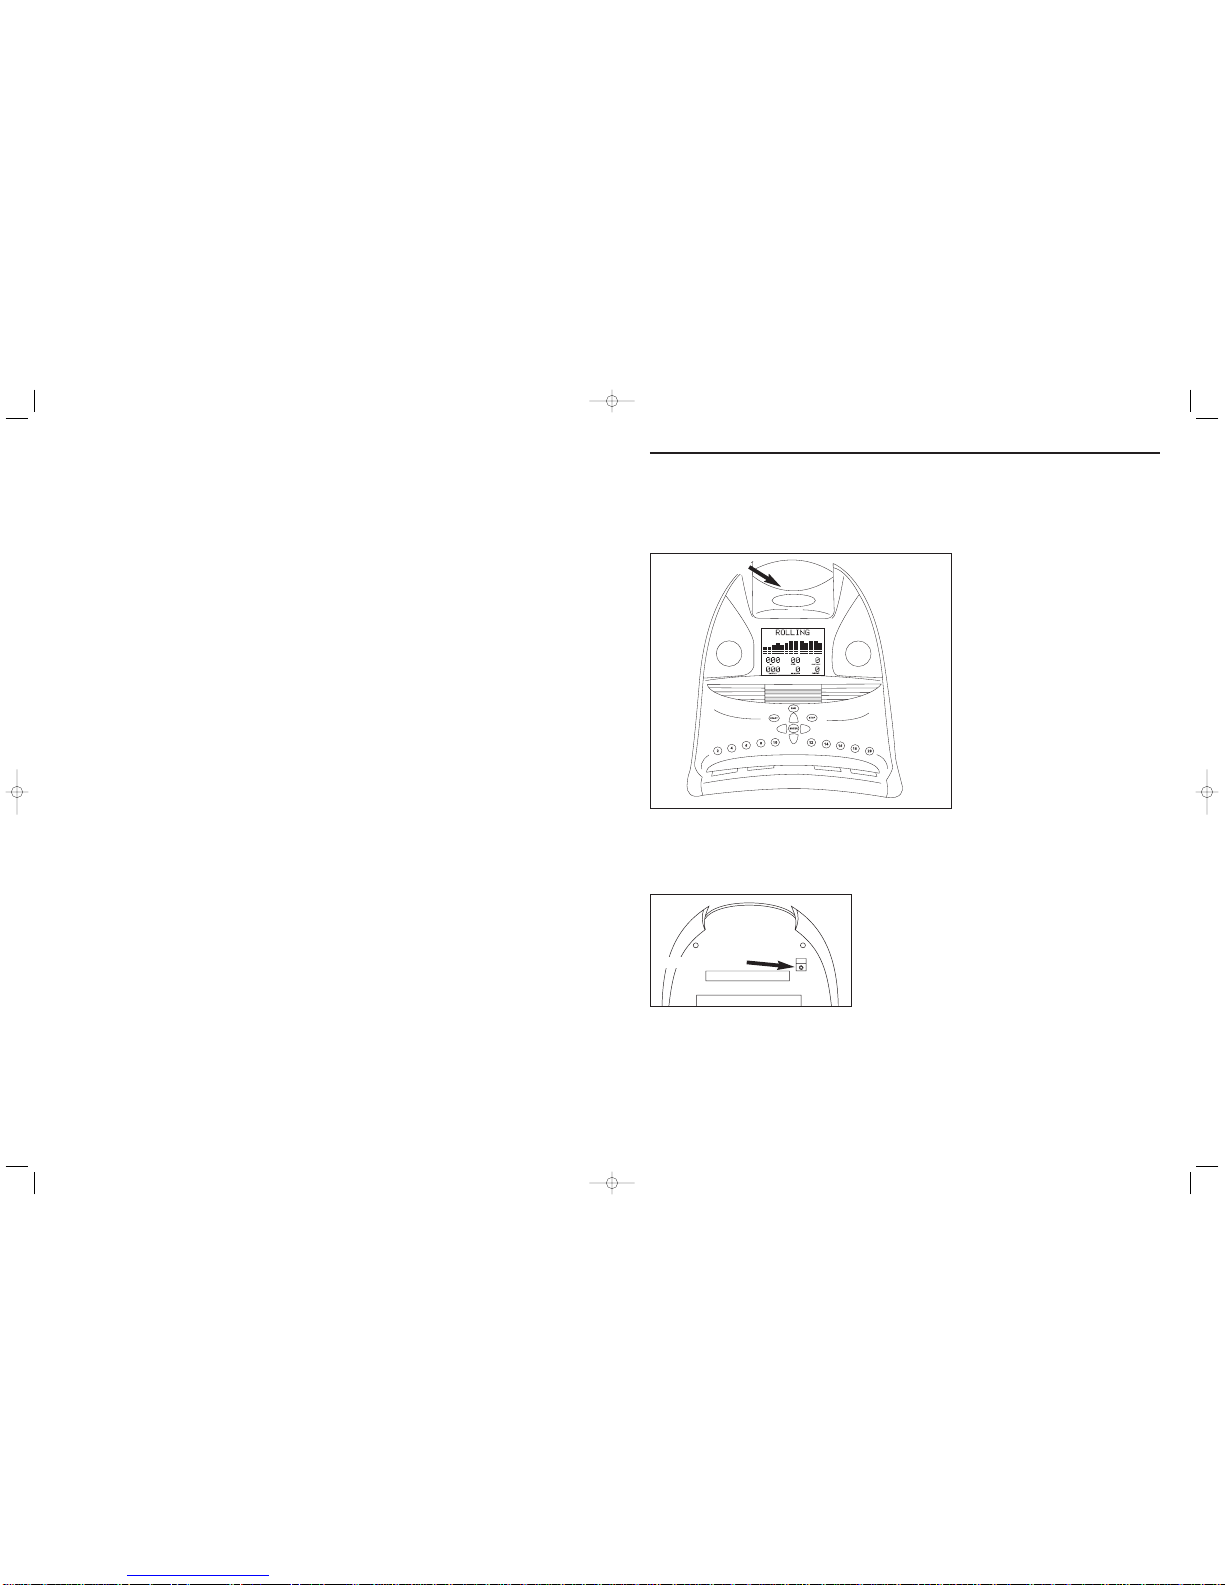
LOCATING THE SPEAKER INPUT JACK
Compatible with AM/FM, CD, MP3, and cassette.
Speaker Input Jack
CD/MP3 Player Holder
Console Features & Display
YOU MAY EXPERIENCE AN ERRATIC READOUT UNDER THE FOLLOWING CONDITIONS:
• Gripping the heart rate handlebars too tight. Try to maintain moderate pressure while holding onto
the heart rate handlebars.
• Constant movement and vibration due to constantly holding the heart rate grips while exercising.
• When you are breathing heavily during a workout.
• When your hands are constricted by wearing a ring.
• When your hands are dry or cold. Try moistening your palms or rubbing them
together to warm.
• Anyone with heavy arrhythmia.
• Anyone with arteriosclerosis or peripheral circulation disorder.
• Anyone whose skin on the measuring palms is especially thick.
Note: Outside interference sources such as computers, motors and fluorescent lights may cause the
heart rate reading to be erratic.
If the above troubleshooting section does not remedy the problem,
discontinue use and turn the power off.
DO NOT RETURN TO THE STORE, PLEASE CONTACT THE
SEARS CUSTOMER ASSISTANCE CENTER
TOLLFREE @ 1-800-469-4663.
www.sears.ca
freespirit_English_30150v1.4.qxd 7/23/2004 9:03 AM Page 15
Page 16
2415
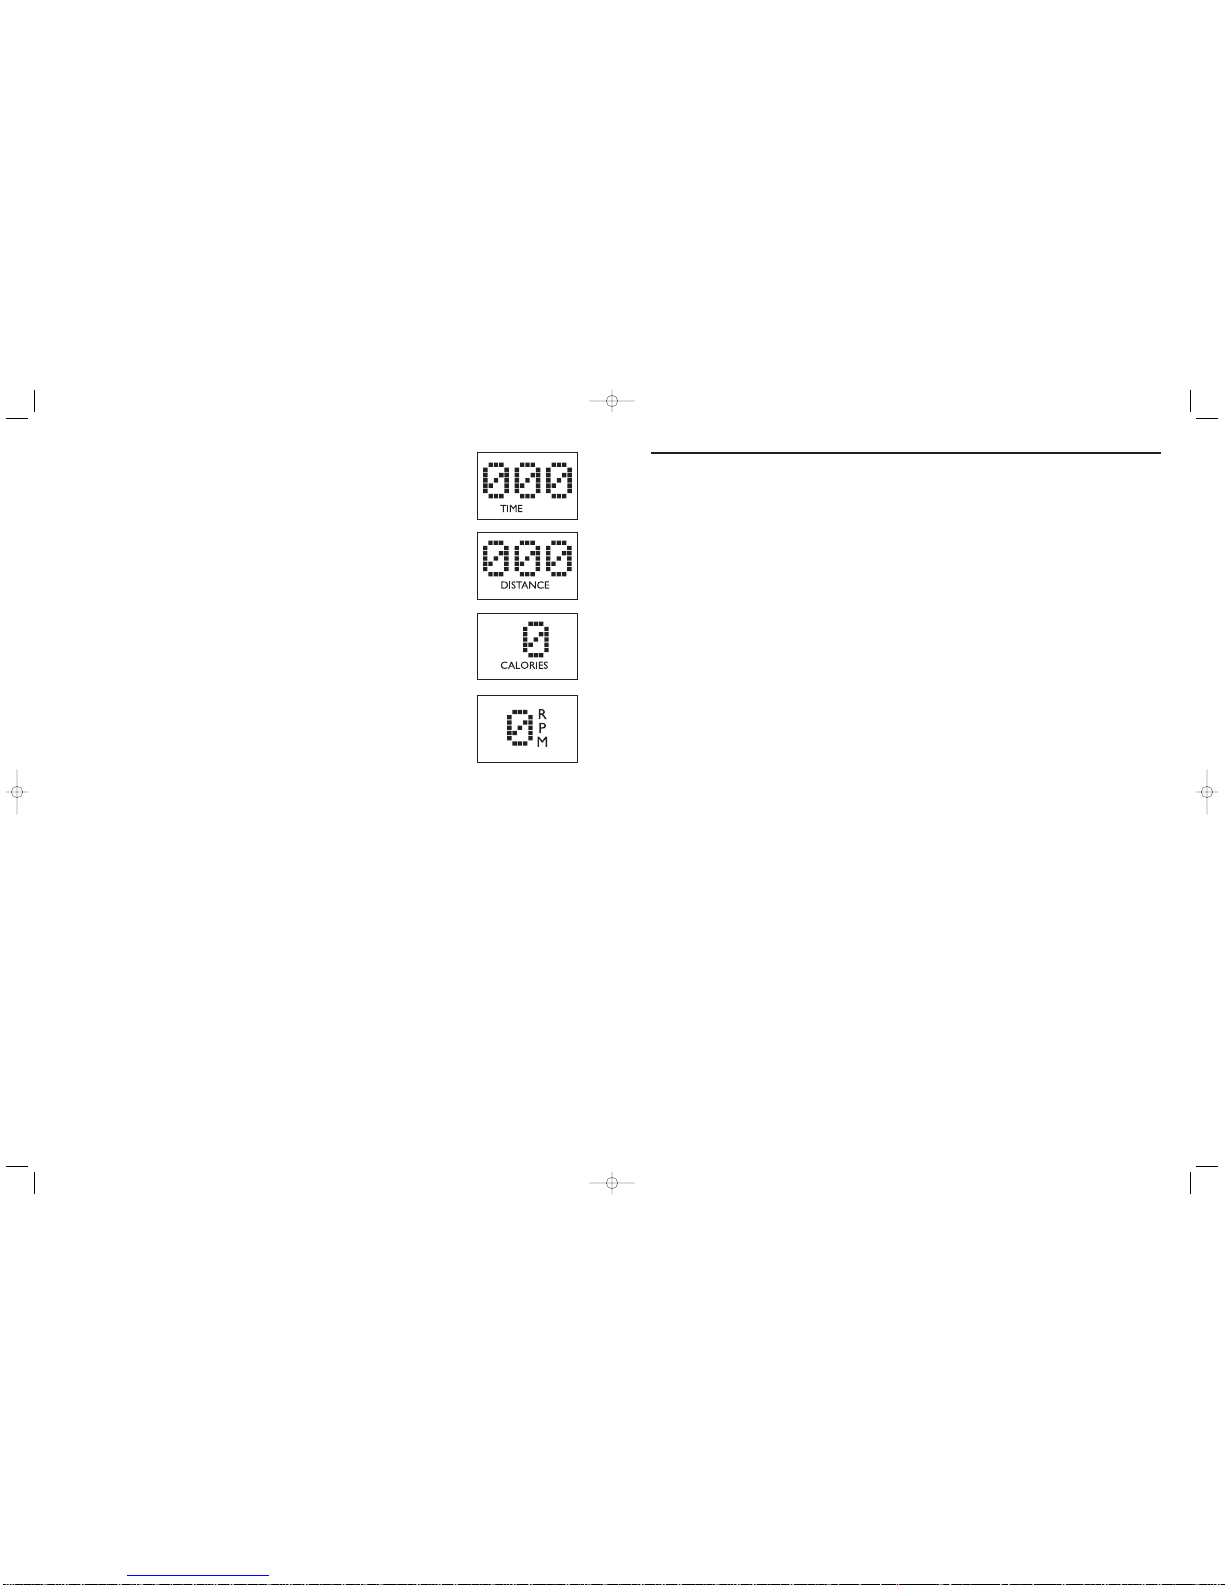
TIME
Shown as Minutes:Seconds. View the time remaining or the time elapsed in
your workout.
DISTANCE
Shown as Miles. View the accumulated distance during your workout.
CALORIES
Shown as total accumulated calories burned during your workout.
RPM
Shown as Revolutions per Minute. Improve striding technique while reducing
leg muscle fatigue by striding between 60 & 70 RPM.
Your elliptical trainer is designed to be reliable and maintenance free. However, if you do experience
problems with your elliptical, please reference the troubleshooting guide listed below.
PROBLEM: There is no display on the console.
SOLUTION: Check all power connections first or remove the console and verify that the console
cable is attached properly, making sure that the cable is securely inserted into the console.
PROBLEM: The elliptical trainer makes a squeaking or chirping noise.
SOLUTION: Loosen all bolts attached during the assembly process, grease the threads and tighten
again.
PROBLEM: The resistance levels seem to be incorrect, seeming too hard or too easy.
SOLUTION: Reset the console and allow the resistance to reset to the default position. Restart the
console and retry the resistance levels.
PROBLEM: Roller wheels appear to be leaving particles on the guiderails.
SOLUTION: This is considered normal wear of the elliptical wheels. To remove, simply wipe off the
roller wheels and guide rails with a damp cloth.
HEART RATE TROUBLESHOOTING
PROBLEM: There is no heart rate reading
SOLUTION: If you are using the chest strap, there may be a poor connection between the electrodes
and the skin. Remoisten the electrodes with water.
SOLUTION: The chest strap may not be positioned properly. Reposition the chest strap. It may be
necessary to experiment with the fit and position of the chest strap.
SOLUTION: Verify that the distance between the chest strap and the console is not beyond the rec-
ommended range of 36 inches.
SOLUTION: The battery in the chest strap may be dead. Take the chest strap to a jewelry store or
return to Sears for a battery replacement.
PROBLEM: Erratic or Inconsistent Readout.
SOLUTION: This is often caused by dry electrodes or a loose chest strap
Moisture on the rubber electrodes is required for proper operation. Try a more generous
coating of water on the electrodes and tightening the chest strap.
Check your exercise environment for sources of interference such as high power lines, large motors,
etc.
Note: Chest strap not included, sold separately.
Troubleshooting & Maintenance Procedures
freespirit_English_30150v1.4.qxd 7/23/2004 9:03 AM Page 16
Page 17
1623
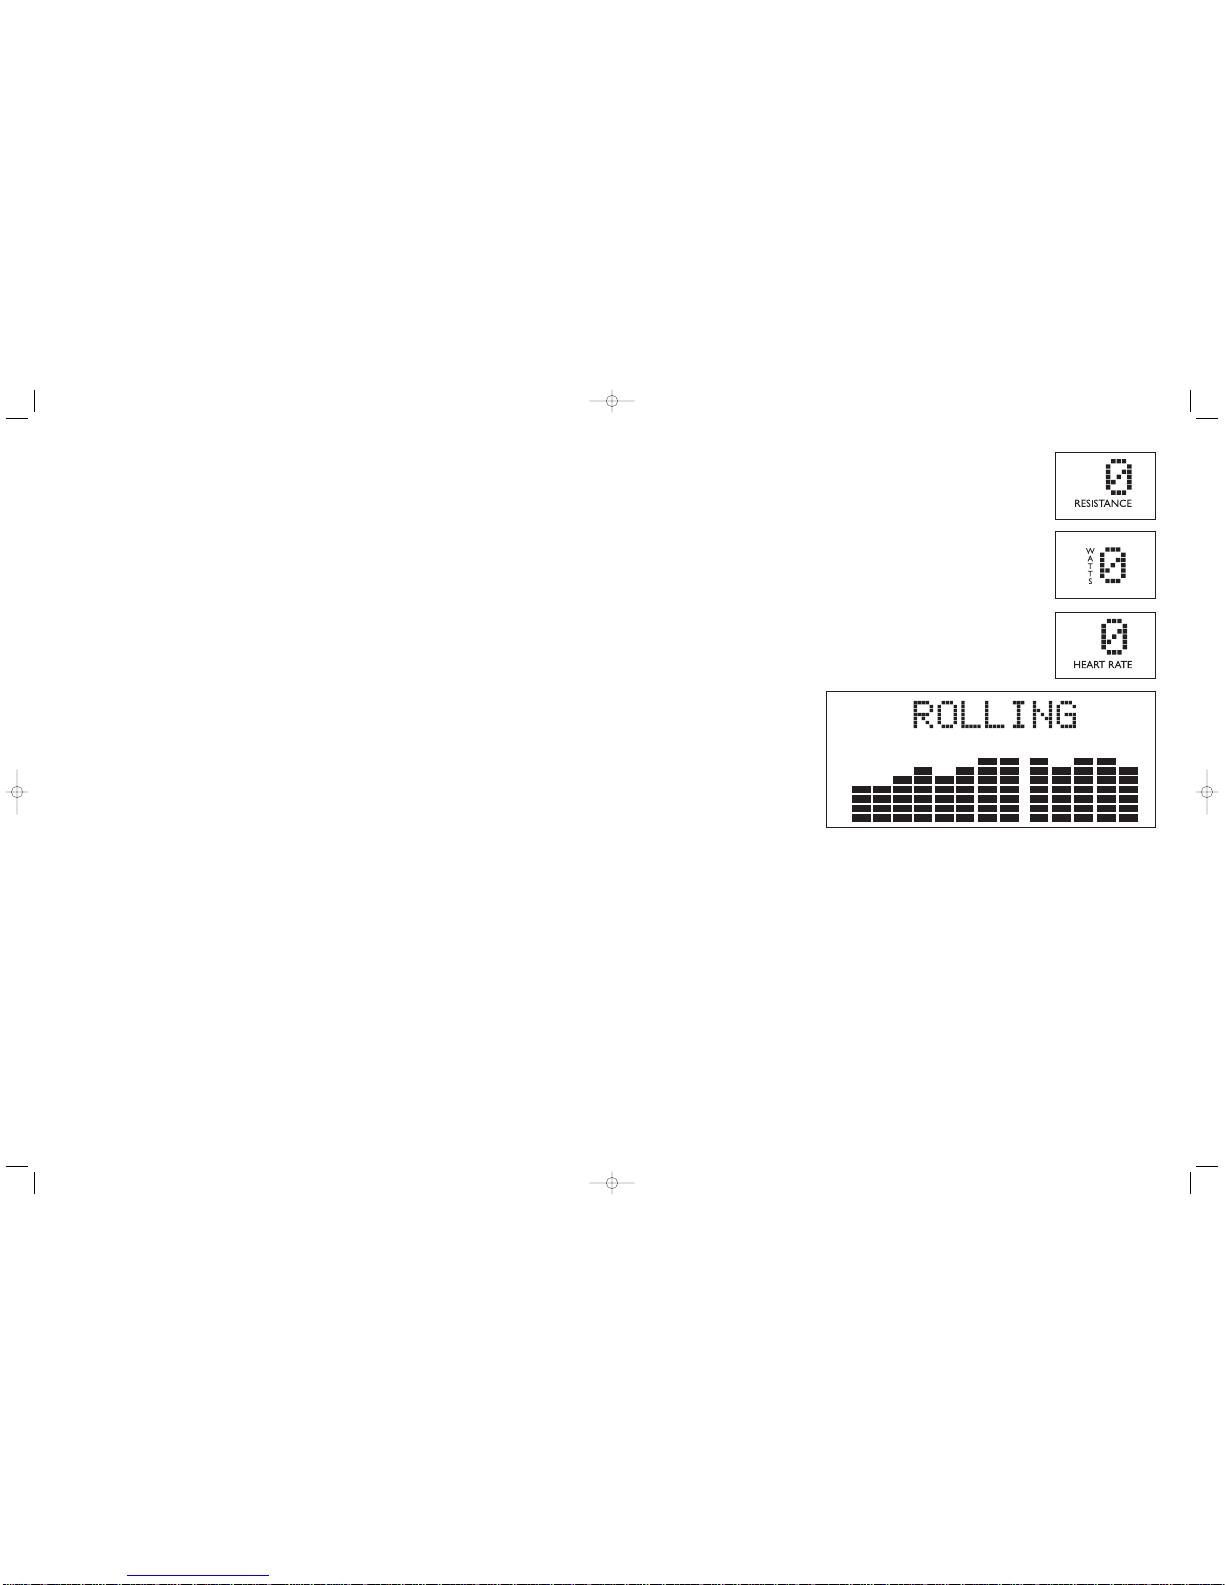
RESISTANCE
During a workout, the amount of resistance can be adjusted by pressing the
plus ‘Up’ or ‘Down’ buttons or the quick resistance keys on the console. The
resistance levels vary from level 1 to 20 quick speed keys (level 1 being the
easiest and level 20 being the most difficult).
WATTS
A measurement of your expending energy. May be used to evaluate and quantify your fitness progress over time.
HEART RATE
Shown as Beats per Minute. You can monitor your heart rate at any time during your workout by holding the heart rate grips or wearing the chest transmitter.
PROFILE
Allows you to view your program
intensity while you exercise. Each
horizontal row of bars represents 2
resistance levels.
USING YOUR CUSTOM USER PROGRAMS 1 & 2
Your Custom User 1 & 2 Programs are designed to allow you to create your own programming, with
the ability to save your program settings for future workouts. To use your Custom User 1 & 2
Programs, follow these instructions:
1. Once the Custom User 1 & 2 Programs has been selected, press ‘Enter’.
2. Choose your desired time using the ‘Up’ or ‘Down’ speed key and press ‘Enter’.
3. Choose your desired resistance using the ‘Up’ or ‘Down’ buttons and press ‘Enter’. You will
need to select a resistance for all 15 segments, pressing ‘Enter’ after each segment.
4. Once you have chosen your desired resistance level for all 15 segments, press ‘Start’ to begin
your program. At this time, your program has been successfully saved into memory, and can be
used for future workouts.
5. To reset your program information and delete it from memory, press and hold the ‘Enter’
button for 5 seconds once you have selected the Custom User 1 & 2 Programs in the start
menu.
6. While using your saved program in the Custom User 1 & 2 Programs, you are able to adjust
the resistance,but any changes will not be saved.
freespirit_English_30150v1.4.qxd 7/23/2004 9:03 AM Page 17
Page 18
2217
CHOOSING A PROGRAM
With the program text scrolling, press the arrow keys to scroll through the different programs. Press
enter to choose your desired program. Once you choose your program, you will see the resistance
level scrolling across the screen.
CHOOSING A RESISTANCE
With the resistance text scrolling, press the arrow keys or quick resistance keys to scroll through the
different resistance levels. Press enter to choose your desired resistance. Once you choose your
resistance, you will see the time scrolling across the screen.
CHOOSING A TIME
With the time text scrolling, press the arrow keys to scroll through the different times. Press enter to
choose your desired time. Once you choose your time, press the ‘Enter’ button and begin your workout.
CHOOSING YOUR WEIGHT
With the weight text scrolling, press the arrow keys to scroll through the different weights. Press enter
to choose your desired weight. Once you choose your weight, press the ‘Start’ button and begin your
workout.
FINISHING YOUR WORKOUT
Press the 'Stop' button to pause your workout, press and hold to reset your workout. Remember to
gradually slow down your pace before stopping or pausing your workout. The machine will not stop
moving if you stop your feet abruptly. After you have finished your workout, the console will retain the
data from your workout for 45 seconds before resetting.
USING YOUR THR ZONE PROGRAMS 1 & 2
The THR zone program is designed to keep the user at an optimum exercise level, while adjusting the
resistance levels to keep the user at a target heart rate. To choose the THR zone program, follow
these instructions.
1. Choose the THR zone program by pressing the ‘Up’ or ‘Down’ buttons. Press ‘Enter’.
2. Determine your target THR zone by using the heart rate chart (reference target heart rate
THR zone chart in table of contents). Choose your target pulse zone by pressing the ‘Up’ or
‘Down’ buttons. Your target pulse zone should be set at a number that you will be able
to exercise throughout the majority of your workout.
3. The THR zone program will have a 5 minute warm-up period before it will start adjusting the
resistance levels to get you to your target THR zone.
4. After the 5 minute warm-up period, the resistance levels will increase gradually to get the user
to the selected target pulse zone. Once the user is at the target pulse zone; plus or minus 5
beats, the resistance level will remain at the current resistance level.
5. If the actual heart rate of the user is above the target pulse zone, the resistance levels will
gradually begin decreasing to keep the user in the target pulse zone. If the user is more than
25 beats above the target pulse zone, the console will shut down for safety purposes.
6. The last 5 minutes of the program will be dedicated to a cool-down period. At this time, the
program will gradually decrease the resistance level to give the user a smooth and easy cool
down.
NOTE: The chest strap (Chest strap not included, sold separately) is required to use the Target THR
zone program.
CHEST STRAP TRANSMITTER PLACEMENT AND MOISTENING THE ELECTRODES
Logo
Apply Moisture Here
Backside of Chest Transmitter
freespirit_English_30150v1.4.qxd 7/23/2004 9:03 AM Page 18
Page 19

1821
P1 MANUAL
Customized workouts, allowing the user to adjust resistance level to the user's preference.
P2 INTERVALS
Improves your strength, speed, and endurance by raising and lowering the resistance levels throughout your workout to involve both your heart and muscles.
P3 ROLLING
Maintains weight by gradually raising and lowering the resistance level to gradually raise and lower
your heart rate.
P4 WEIGHT LOSS
Promotes weight loss by raising and lowering the resistance level, while keeping you in your fat burning zone.
P5 TOUR
Simulates a gradual hill climb to strengthen your leg muscles and improve your cardiovascular health.
P6 RACE
A great motivational program for competitive individuals that allows the user to compete with a computer pacer to the finish line.
P7 THR ZONE PROGRAM 1
Benefits weight loss by maintaining an optimum exercise level to burn fat, while adjusting the resistance to keep you in your target heart rate zone.
P8 THR ZONE PROGRAM 2
Benefits weight loss by maintaining an optimum exercise level to burn fat, while adjusting the resistance to keep you in your target heart rate zone.
P9 CUSTOM USER PROGRAM 1
Customized workout, time defaults to 30 minutes.
P10 CUSTOM USER PROGRAM 2
Customized workout, time defaults to 30 minutes.
Program Profiles
USING YOUR RACE PROGRAM
Your Race Program is designed to add motivation to a workout by allowing you to compete against a
selected pacer. To use your Race Program, follow these instructions:
1. Choose the Race program by either pressing the ‘Up’ or ‘Down’ buttons. Press ‘Enter’.
2. Choose the desired Pace (average speed) using the ‘Up’ or ‘Down’ buttons. There are a total of
17 Pace levels to choose from, ranging from 6 mph to 22 mph in increments of 1.0 mph, with
1.0 mph being the lowest and 22 mph being the highest. Once the desired Pace is selected,
press ‘Enter’.
3. Choose the desired Distance by pressing the ‘Up’ or ‘Down’ buttons. Press ‘Enter’.
4. Choose your weight by pressing the ‘Up’ or ‘Down’ buttons. Press ‘Enter’.
5. Press ‘Start’ and begin your Race Program.
The time of the program will default accordingly to the pace (average speed) and distance that you
entered. After the Race Program has started, press the ‘Up’ or ‘Down’ buttons or the quick resistance
keys to adjust your resistance (levels 1-20). Your goal in this program is to beat the pacer to the finish line by covering an equal distance at a faster pace.
The top row of bars shows the computer pacer position. The bottom row of bars indicates your position. If you trail the pacer, you should pedal at a faster speed to catch and pass the pacer.
If you beat the pacer to the finish line, the screen will flash “Time Over” and the program will end.
Note: If you beat the pacer to the finish line, you will complete the program before the projected finish time. If the pacer beats you to the finish line, the entire program time will elapse.
freespirit_English_30150v1.4.qxd 7/23/2004 9:03 AM Page 19
Page 20
2019
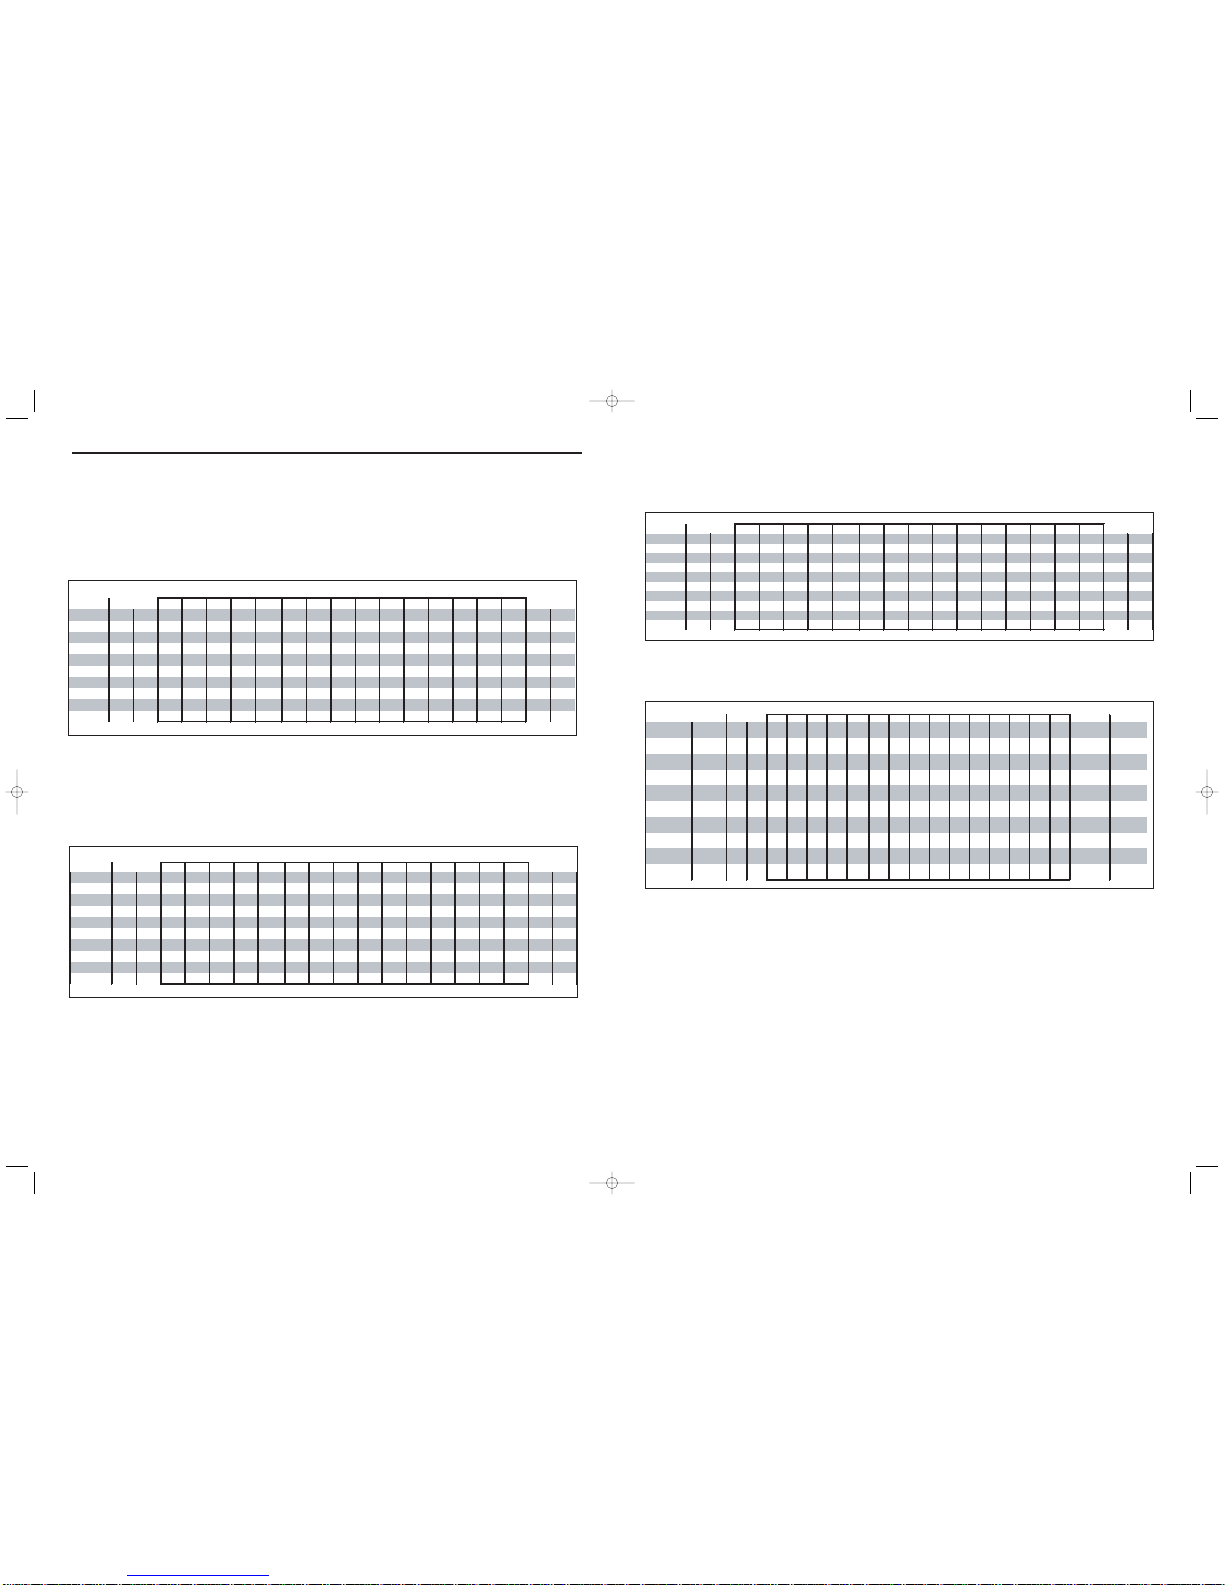
Program Charts
P2 INTERVALS
Time-based goal with 10 difficulty levels to choose from.
Peak segments last 30 seconds, valley segments last 90 seconds.
Warm-up and cool-down last 5:00 minutes each and are included in program times.
P3 ROLLING
Time-based goal with 10 difficulty levels to choose from.
All segments last 10 seconds.
Warm-up and cool-down last 5:00 minutes each and are included in program times.
1 2 3 4 5 6 7 8 9 10 11 12 13 14 15
Level 1
1125252 525252525211
Level 2
1126262 626262626211
Level 3
1237373 737373737321
Level 4
2238383 838383838322
Level 5
2249494 949494949422
Level 6
2 3 410410 4 104104104104104 3 2
Level 7
2 3 511511 5 115115115115115 3 2
Level 8
3 3 512512 5 125125125125125 3 3
Level 9
3 3 613613 6 136136136136136 3 3
Level 10
3 4 614614 6 146146146146146 4 3
Program segments
Warm Up Cool Down
1 2 3 4 5 6 7 8 9 101112131415
Level 1
1112345 654321234543
Level 2
1223456 765432345653
Level 3
2234567 876543456764
Level 4
2345678 987654567874
Level 5
34567891098765678975
Level 6
35678910111098767891085
Level 7
45789101112111098789101186
Level 8
4 6 8 9 10 11 12 13 12 11 10 9 8 9 10 11 12 9 6
Level 9
5 7 9 101112 131413121110 9 1011121310 7
Level 10
5 8 10 11 12 13 14 15 14 13 12 11 10 11 12 13 14 11 7
Warm Up
Program segments
Cool Down
Resistance
Resistance
P4 WEIGHT LOSS
Time-based goal with 10 difficulty levels to choose from.
All segments last 10 seconds.
Warm-up and cool-down last 5:00 minutes each and are included in program times.
12345 6789101112131415
Level 1
3455432 234554322322
Level 2
3566543 345665433432
Level 3
4577654 456776544543
Level 4
4688765 567887655653
Level 5
5799876 678998766754
Level 6
58101098 7 78910109877864
Level 7
6 8 11 11 10 9 8 8 9 10 11 11 10 9 8 8 9 7 5
Level 8
6 9 12 12 11 10 9 9 10 11 12 12 11 10 9 9 10 8 5
Level 9
7 1013131211 10 10111213131211101011 8 6
Level 10
7 1114141312 11 11121314141312111112 9 6
Program segments
Warm Up Cool Down
Resistance
P5 TOUR
Distance-based program with 10 different difficulty levels to choose from.
1 2 3 4 5 6 7 8 9 10 11 12 13 14 15 Total distanc
e
Level 1
Resistance2234353 454535344322
distance 142 212 283 256 113 387 91 351 333 301 301 165 288 434 312 310 150 113 300
Level 2
Resistance2345464 565646455432
distance 165 248 330 295 129 466 97 369 431 407 339 179 368 548 349 376 166 125 332
Level 3
Resistance3456575 676757566543
distance 169 253 337 308 142 484 97 389 441 413 349 187 376 560 373 383 172 129 344
Level 4
Resistance3567686 787868677653
distance 169 254 338 327 187 500 106 416 462 430 373 201 393 572 396 401 178 134 356
Level 5
Resistance4578797 898979788754
distance 170 254 339 256 113 387 91 351 333 433 375 205 405 575 400 410 180 135 360
Level 6
Resistance 4 6 8 9 8 10 8 9 10 430 8 10 8 9 9 8 6 4
distance 170 255 340 295 129 466 97 369 431 435 380 208 410 578 405 415 190 143 380
Level 7
Resistance 5 7 9 10 9 11 9 10 11 431 1 9 11 9 10 10 9 7 5
distance 171 256 341 308 142 484 97 389 441 435 380 210 415 580 410 425 200 150 400
Level 8
Resistance5 8 10111012 1011124322101210111110 8 5
distance 171 257 342 327 187 500 106 416 462 440 385 215 425 585 415 430 205 154 410
Level 9
Resistance6 8 11121113 1112134333111311121211 8 6
distance 172 257 343 327 187 500 106 416 462 450 390 220 460 590 420 435 210 158 420
Level 10
Resistance6 9 12131214 1213144344121412131312 9 6
distance 376 502 374 327 187 500 106 416 462 475 400 225 482 600 425 450 220 180 440
Program segments
6522
7147
5905
6192
5772
6096
6233
6431
4841
5718
Warm Up Cool Down
Resistance
Distance = Yards
freespirit_English_30150v1.4.qxd 7/23/2004 9:03 AM Page 20
 Loading...