

TWR-MPC5125
For high-resolution display applications
TOWER SYSTEM Quick Start Guide for TWR-MPC5125
TOWER SYSTEM
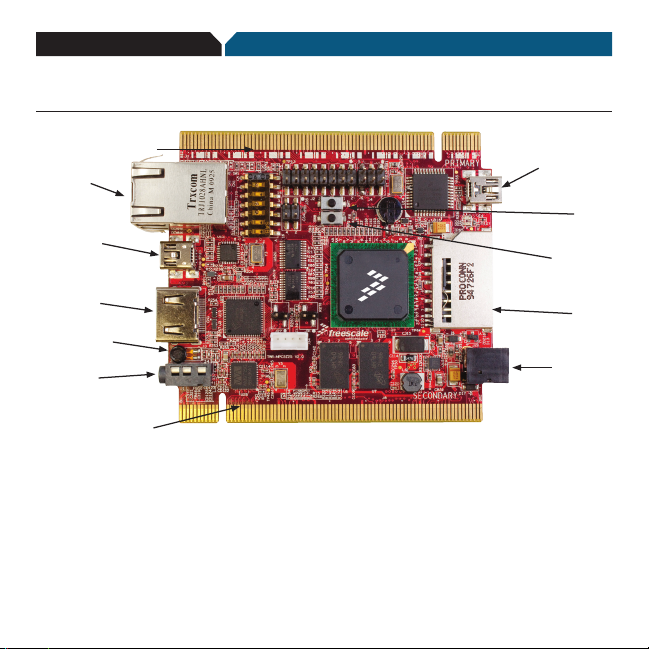
Get to know the TWR-MPC5125
Primary Tower
Elevator Connector
Ethernet
RJ45
Mini-AB USB
Connector
HDMI
Connector
Microphone
Audio Out
Secondary Tower
Elevator Connector
Serial to
USB Bridge
Mini-B USB
Hibernate
SDHC
Connector
5V Power
Connector
Freescale Tower System
The TWR-MPC5125 module is a single board computer as well as a part of the Freescale Tower System,
a modular development platform that enables rapid prototyping and tool re-use through reconfigurable
hardware. Take your design to the next level and begin constructing your Tower System today.
Reset
(SW7)
(SW8)
TOWER SYSTEM Quick Start Guide for TWR-MPC5125
Step-by-Step Installation Instructions
In this Quick Start Guide, you will learn how to set up the TWR-MPC5125
module and run the default demonstration software. The following
instructions are for Windows
®
X P.
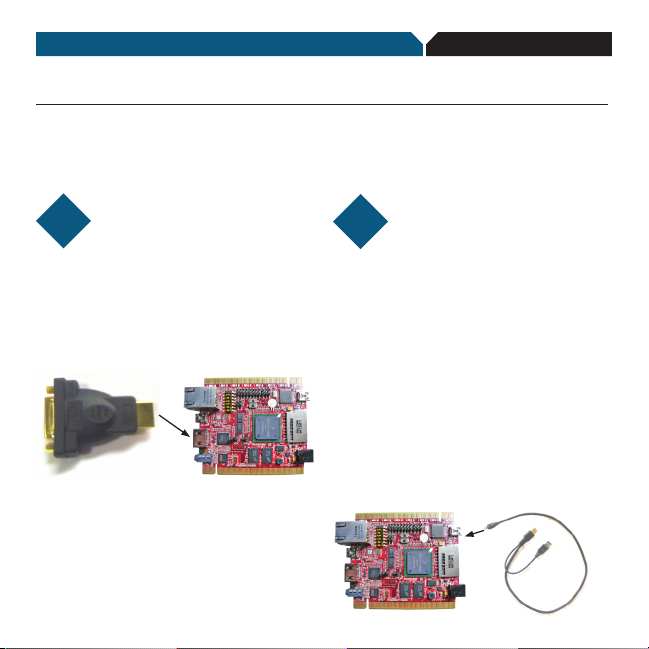
STEP
Connect the HDMI cable
1
provided, connect the HDMI port on the
TWR-MPC5125 to a DVI-D port on a
display monitor. (Alternatively, connect the
HDMI port to an HDMI port on a monitor.
Cable not provided.)
Note: DVI –to–VGA is not supported.
Using the HDMI-to-DVI-D cable
STEP
Connect the USB cable
2
for the Serial-to-USB
bridge to provide power
Power the board from a host computer
by plugging in the dual-port USB cable.
Insert the two Standard-A plugs into two
USB ports a host computer. Then insert
the Mini-B side of the cable into the
Mini-B connector (J19) which is next to
the SDHC card slot.
(Alternatively, the board can be powered
by a 5V barrel jack from a wall supply. The
supply must be a center-hot configuration
2.1 mm jack and the voltage must be 5V.
Cable not provided).

TOWER SYSTEM
View video on
STEP
3
the display
The board comes pre-programmed
to automatically boot the LimePC™
Linux operating system with video
demonstration application. Stop Here or
Continue on to LimeOS™
Linux desktop
STEP
Connect a USB mouse
4
and keyboard
Connect a USB mouse and USB keyboard
to a USB hub and connect the hub to the
Mini-AB connector (DOWN4) which is next
to the RJ45 port.
Press Q on the
STEP
5
keyboard or right-click
on the mouse
The video demonstration application will
close, revealing the LimeOS graphical
desktop. Explore with the USB mouse and
keyboard input.
STEP
Using the Serial-to-
6
USB bridge
The Freescale MC9S08JM60 Serial
to-USB bridge solution provides a RS-232
equivalent connection to the host computer
through the USB communications device
class. When plugged in and powered the
USB connection will enumerate as a COM
port on the PC.
To determine the COM port # for the
connection, right click on the My
Computer icon and select “Manage,” click
Device Manager, find and expand ports
(COM and LPT).

Install software driver
STEP
7
When the cable is plugged
New Hardware Wizard will start. Select
the option Install from a list or specific
location (Advanced), then select “Next.”
Browse for the file Freescale_CDC_Driver.
inf which is available on the DVD. Select
“Next,” then “Finish.”
in the first time, the Found
STEP
Open Microsoft®
8
HyperTerminal or a
terminal program
of your choice
Select File > New Connection. Type a name
for the new connection. Pick the COM port
number for the connection found in step 4.
Choose the following port settings: Bits per
Second: 115200, Data bits: 8, Parity: None,
Stop bit: 1, Flow control: None.
TOWER SYSTEM Quick Start Guide for TWR-MPC5125

TOWER SYSTEM
STEP
Press the reset button
9
on the board
STEP
Find the U-Boot prompt
10
on the terminal
Quickly press a key (on the host computer
keyboard) to stop automatic booting. The
U-Boot bootloader is pre-flashed in the
on-board NAND flash memory. At system
start up, U-Boot initializes the system and
allows the user to choose an operating
system to run.
Note: The default operating system that
automatically boots is LimeOS. To select
another operating system such as MQX,
press a key within three seconds to stop
automatic booting (autoboot).
STEP
Booting Freescale MQX
11
RTOS with digital sign
demo application
At the U-Boot prompt, type “run
mqxboot”. The MQX RTOS with demo
application loads into the SDRAM from
the NAND flash and executes.
STEP
View images on
12
the display
The Freescale MQX RTOS with digital
signage demonstration software is
preloaded on the board. This example
application shows how information,
advertising or other messages can be
displayed on screens in retail stores,
corporate buildings and other
public places.

To make this the auto-boot option,
type “set bootcmd run mqxboot” and
press “Enter.” Then type “save” to save
this change to the U-Boot environment
variables in the nand flash.
To change back to autoboot Linux,
replace “mqxboot” with “nandboot.”
STEP
Booting LimeOS
13
Linux from the U-Boot
terminal
Press the Reset button and type “run
nandboot” at the U-Boot prompt
TOWER SYSTEM Quick Start Guide for TWR-MPC5125
For more information, view the following
documents:
•MQXLab:Howtobuildandload
MQX applications
•LinuxLab:Howtorunpre-loaded
applications in the LimeOS Linux
demonstration software
•TWR-MPC5125User’sManual:
Hardware configuration, U-Boot and
Linux information
•MPC5125ReferenceManualandData
Sheet: MPC5125 information
For more information about other
mobileGT families, visit www.freescale.
com/mobilegt to get the latest lab
tutorials, application notes, other
supporting documents and learn about
other training opportunities.
For more information on Tower System
controllers and peripheral modules, visit
www.freescale.com/tower. To become
a member of the online Tower Geeks
community, visit www.towergeeks.org.

TOWER SYSTEM
Learn more at www.freescale.com/tower.
Freescale, the F reescale logo, mobi leGT and MQX are tra demarks
of Freescale Semiconductor, Inc., Reg. U.S. Pat. & Tm. Off.
All other product or service names are the property of their
respective owners. © 2010 Freescale Semiconductor, Inc.
Doc Number: MPC512CYMNQSG / REV 0
Agile Number: 926-78413 / REV A
 Loading...