

Page 1
Freescale Semiconductor
User’s Guide
KIT34825EPEVME Evaluation Board
Document Number: KT34825UG
Rev. 2.0, 8/2010
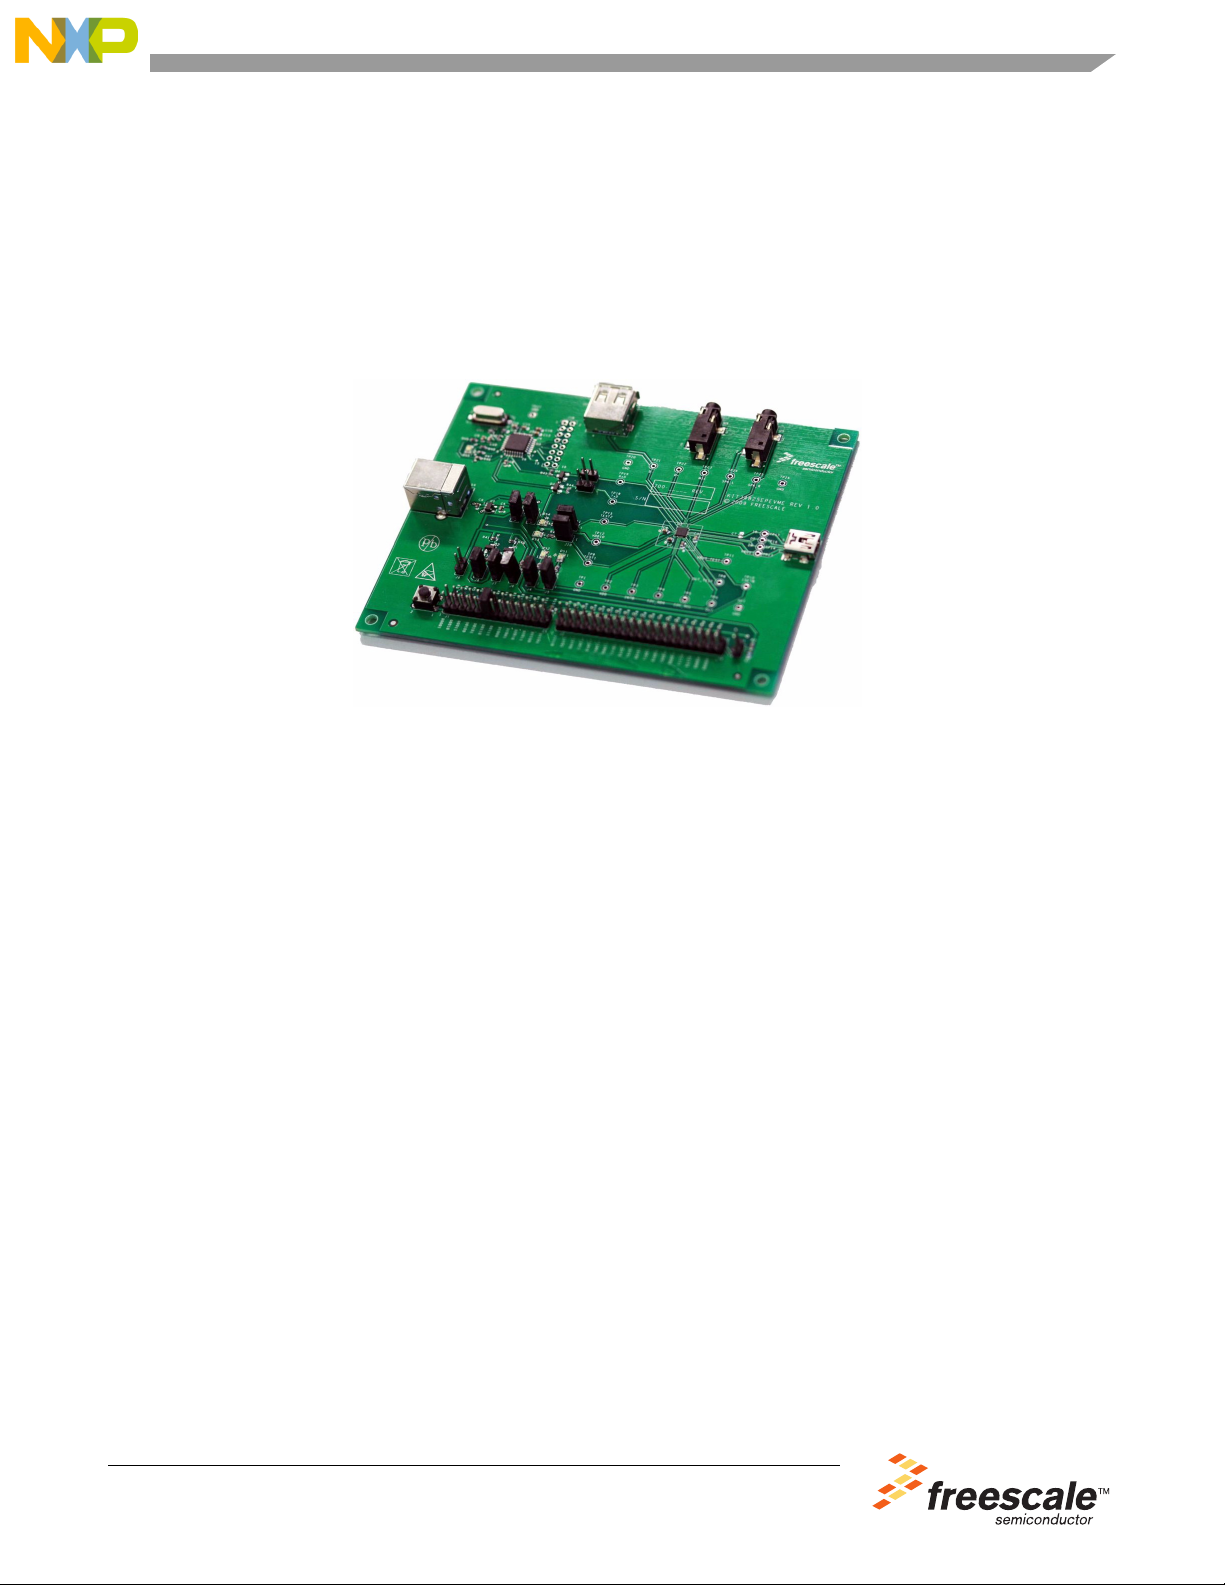
Figure 1. KIT34825EPEVME Evaluation Board
Table of Contents
1 Kit Contents / Packing List . . . . . . . . . . . . . . . . . . . . . . . . . . . . . . . . . . . . . . . . . . . . . . . . . . . . . . . . . . . . . . . . . . . . . . 2
2 Important Notice . . . . . . . . . . . . . . . . . . . . . . . . . . . . . . . . . . . . . . . . . . . . . . . . . . . . . . . . . . . . . . . . . . . . . . . . . . . . . . 3
3 Introduction . . . . . . . . . . . . . . . . . . . . . . . . . . . . . . . . . . . . . . . . . . . . . . . . . . . . . . . . . . . . . . . . . . . . . . . . . . . . . . . . . . 4
4 Hardware Description . . . . . . . . . . . . . . . . . . . . . . . . . . . . . . . . . . . . . . . . . . . . . . . . . . . . . . . . . . . . . . . . . . . . . . . . . . 6
5 Software Description. . . . . . . . . . . . . . . . . . . . . . . . . . . . . . . . . . . . . . . . . . . . . . . . . . . . . . . . . . . . . . . . . . . . . . . . . . 12
6 Using the Evaluation Kit . . . . . . . . . . . . . . . . . . . . . . . . . . . . . . . . . . . . . . . . . . . . . . . . . . . . . . . . . . . . . . . . . . . . . . . 18
7 KIT34825EPEVME Board Layout . . . . . . . . . . . . . . . . . . . . . . . . . . . . . . . . . . . . . . . . . . . . . . . . . . . . . . . . . . . . . . . . 22
8 KIT34825EPEVME Evaluation Board Bill of Material . . . . . . . . . . . . . . . . . . . . . . . . . . . . . . . . . . . . . . . . . . . . . . . . . 24
9 References . . . . . . . . . . . . . . . . . . . . . . . . . . . . . . . . . . . . . . . . . . . . . . . . . . . . . . . . . . . . . . . . . . . . . . . . . . . . . . . . . 26
10 Revision History . . . . . . . . . . . . . . . . . . . . . . . . . . . . . . . . . . . . . . . . . . . . . . . . . . . . . . . . . . . . . . . . . . . . . . . . . . . . 27
© Freescale Semiconductor, Inc., 2009 - 2010. All rights reserved.
Page 2

Kit Contents / Packing List
1 Kit Contents / Packing List
• KIT34825EPEVME Evaluation Board (1)
• Standard USB A-to-B cable (1)
• CD34825 (1)
KIT34825EPEVME Evaluation Board, Rev. 2.0
2 Freescale Semiconductor
Page 3

2 Important Notice
Freescale provides the enclosed product(s) under the following conditions:
This evaluation kit is intended for use of ENGINEERING DEVELOPMENT OR EVALUATION
PURPOSES ONLY. It is provided as a sample IC pre-soldered to a printed circuit board to make
it easier to access inputs, outputs, and supply terminals. This EVB may be used with any
development system or other source of I/O signals by simply connecting it to the host MCU or
computer board via off-the-shelf cables. This EVB is not a Reference Design and is not intended
to represent a final design recommendation for any particular application. Final device in an
application will be heavily dependent on proper printed circuit board layout and heat sinking
design as well as attention to supply filtering, transient suppression, and I/O signal quality.
The goods provided may not be complete in terms of required design, marketing, and or
manufacturing related protective considerations, including product safety measures typically
found in the end product incorporating the goods. Due to the open construction of the product, it
is the user's responsibility to take any and all appropriate precautions with regard to electrostatic
discharge. In order to minimize risks associated with the customers applications, adequate design
and operating safeguards must be provided by the customer to minimize inherent or procedural
hazards. For any safety concerns, contact Freescale sales and technical support services.
Should this evaluation kit not meet the specifications indicated in the kit, it may be returned within
30 days from the date of delivery and will be replaced by a new kit.
Freescale reserves the right to make changes without further notice to any products herein.
Freescale makes no warranty, representation or guarantee regarding the suitability of its products
for any particular purpose, nor does Freescale assume any liability arising out of the application
or use of any product or circuit, and specifically disclaims any and all liability, including without
limitation consequential or incidental damages. “Typical” parameters can and do vary in different
applications and actual performance may vary over time. All operating parameters, including
“Typical”, must be validated for each customer application by customer’s technical experts.
Freescale does not convey any license under its patent rights nor the rights of others. Freescale
products are not designed, intended, or authorized for use as components in systems intended
for surgical implant into the body, or other applications intended to support or sustain life, or for
any other application in which the failure of the Freescale product could create a situation where
personal injury or death may occur.
Should Buyer purchase or use Freescale products for any such unintended or unauthorized
application, Buyer shall indemnify and hold Freescale and its officers, employees, subsidiaries,
affiliates, and distributors harmless against all claims, costs, damages, and expenses, and
reasonable attorney fees arising out of, directly or indirectly, any claim of personal injury or death
associated with such unintended or unauthorized use, even if such claim alleges that Freescale
was negligent regarding the design or manufacture of the part.Freescale™ and the Freescale
logo are trademarks of Freescale Semiconductor, Inc. All other product or service names are the
property of their respective owners.© Freescale Semiconductor, Inc., 2010. All rights reserved.
Important Notice
KIT34825EPEVME Evaluation Board, Rev. 2.0
Freescale Semiconductor 3
Page 4

Introduction
3 Introduction
This KIT34825EPEVME evaluation kit is for demonstrating the capability and features of the 34825 and
is aimed to make it easy for users to evaluate the performance of the 34825. The KIT34825EPEVME
evaluation kit contains an 34825 evaluation board, a graphic user interface (GUI) software for personal
computers (PC), and connection cables.
The 34825 is designed to support the Universal Charging Solution (UCS) recommended by the OMTP
(Open Mobile T
wired accessories. A typical application circuit is shown in Figure 2. The 34825 offers five pins (VBUS,
ID, DP, DM, and GND) to directly interface to the
connected to the evaluation kit (which simulates a cell phone system) through the mini-USB connector.
The 34825 also offers pins to interface to the USB, audio, UART, the I2C bus, and the interrupt (
signals of the baseband in the cell phone system. All these signals are simulated by the evaluation kit so
users do not need to generate them.
erminal Platform) as well as to use the same 5-pin micro or mini-USB connector for other
mini or micro-USB connector. Accessories are
INT)
Baseband
GPIO
I2C
UART
USB XCVR
AUDIO
34825
VDDIO
INT
I2C_SDA
I2C_SCL
RXD
TXD
D+
DSPK_L
SPK_R
MIC
VDD
ISET
OUT
VBUS
DP
DM
GND
LI+
ID
Charger
USB Connector
V
BUS
ID
D+
D-
GND
Figure 2. The Typical Application Circuit of 34825
The evaluation kit is designed to work together with a PC running Microsoft Windows for easy
emonstration or evaluation. All baseband signals in Figure 2 are generated by the evaluation kit with
d
the help from the PC, so the user does not need to provide special equipment. The 34825 evaluation
oard contains an MCU block to generate the I2C signals to control the 34825 and to receive the interrupt
b
signal from the 34825 using a GPIO pin. The MCU block is controlled by the PC with the GUI via a USB
connection. The PC together with the MCU block simulates the host device of the I2C bus and the
interrupt interface of the baseband circuit in a cell phone system. The evaluation kit uses the PC to obtain
the audio signals and a USB flash memory device to generate the D+ and D- signals. The UART signals
can be obtained from the MCU block but is not enabled in this version of the MCU firmware.
The evaluation board offers other features for the simp
lification of the evaluation. A remote control
simulator is offered for simulation the remote control buttons. An accessory simulator allows users to
simulate the attachment or detachment of accessories without connecting a real accessory to the
mini-USB connector. LEDs are used to indicate two logic outputs. Jumpers are offered for configuration
of the evaluation board. The evaluation board offers all test points needed for evaluation of the 34825 or
directly connecting the IC to a real cell phone printed circuit board (PCB) with jumping wires.
KIT34825EPEVME Evaluation Board, Rev. 2.0
4 Freescale Semiconductor
Page 5
Introduction
Standard A
Connector
MCU Block
Standard B
Connector
Jumpers
Remote
Control
Simulator
3.1 EVB Features
• Input supply voltage ranges
• VDD: from 2.7 to 5.5V
• VBUS: from 2.8 to 28V
• VDDIO: from 1.65 to 3.6V
• All baseband signals generated in the evaluation kit with a PC
• An on-board USB-to-I2C interface acting as an I2C host
• Powered and controlled by one USB port
• LEDs status indication of the OUT and the
• On-board accessory and remote control simulators
• Can be directly jump connected to a real cell phone PCB for evaluation
• 5 inch x 4 inch board size
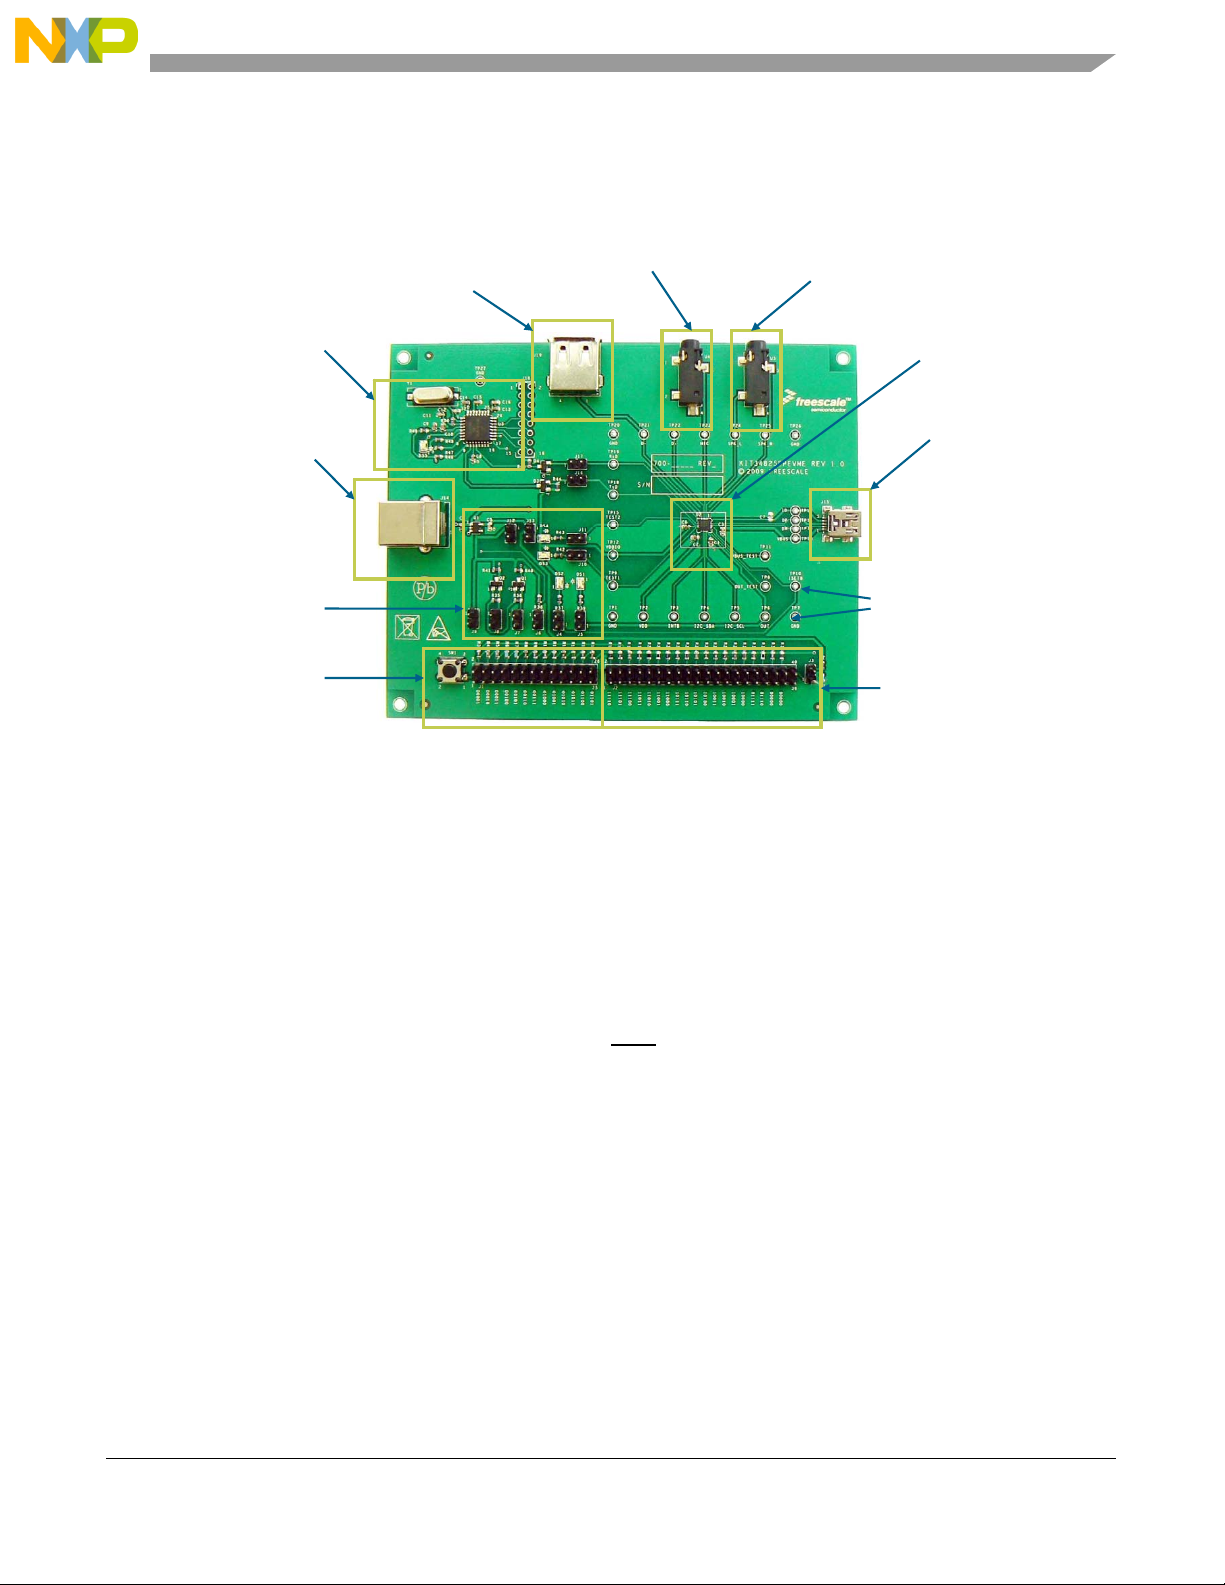
MIC Jack
Figure 3. The 34825 Evaluation Board
ISET
Stereo
Headphone Jack
MC34825
Circuit
Mini-USB
Connector
Test Points
Accessory
Simulator
3.2 Required Equipment
Minimum required equipment:
• USB-enabled computer with Windows 2000 or later operating system
• A standard USB A-to-B cable
KIT34825EPEVME Evaluation Board, Rev. 2.0
Freescale Semiconductor 5
Page 6

Hardware Description
4 Hardware Description
The hardware in the evaluation kit includes an 34825 evaluation board and a standard USB A-to-B cable.
The evaluation board has three major blocks: the circuit related to the 34825, the remote control and
accessory simulator, and the USB-to-I2C interface. This section describes the above three blocks as well
as an example of an audio accessory with remote control.
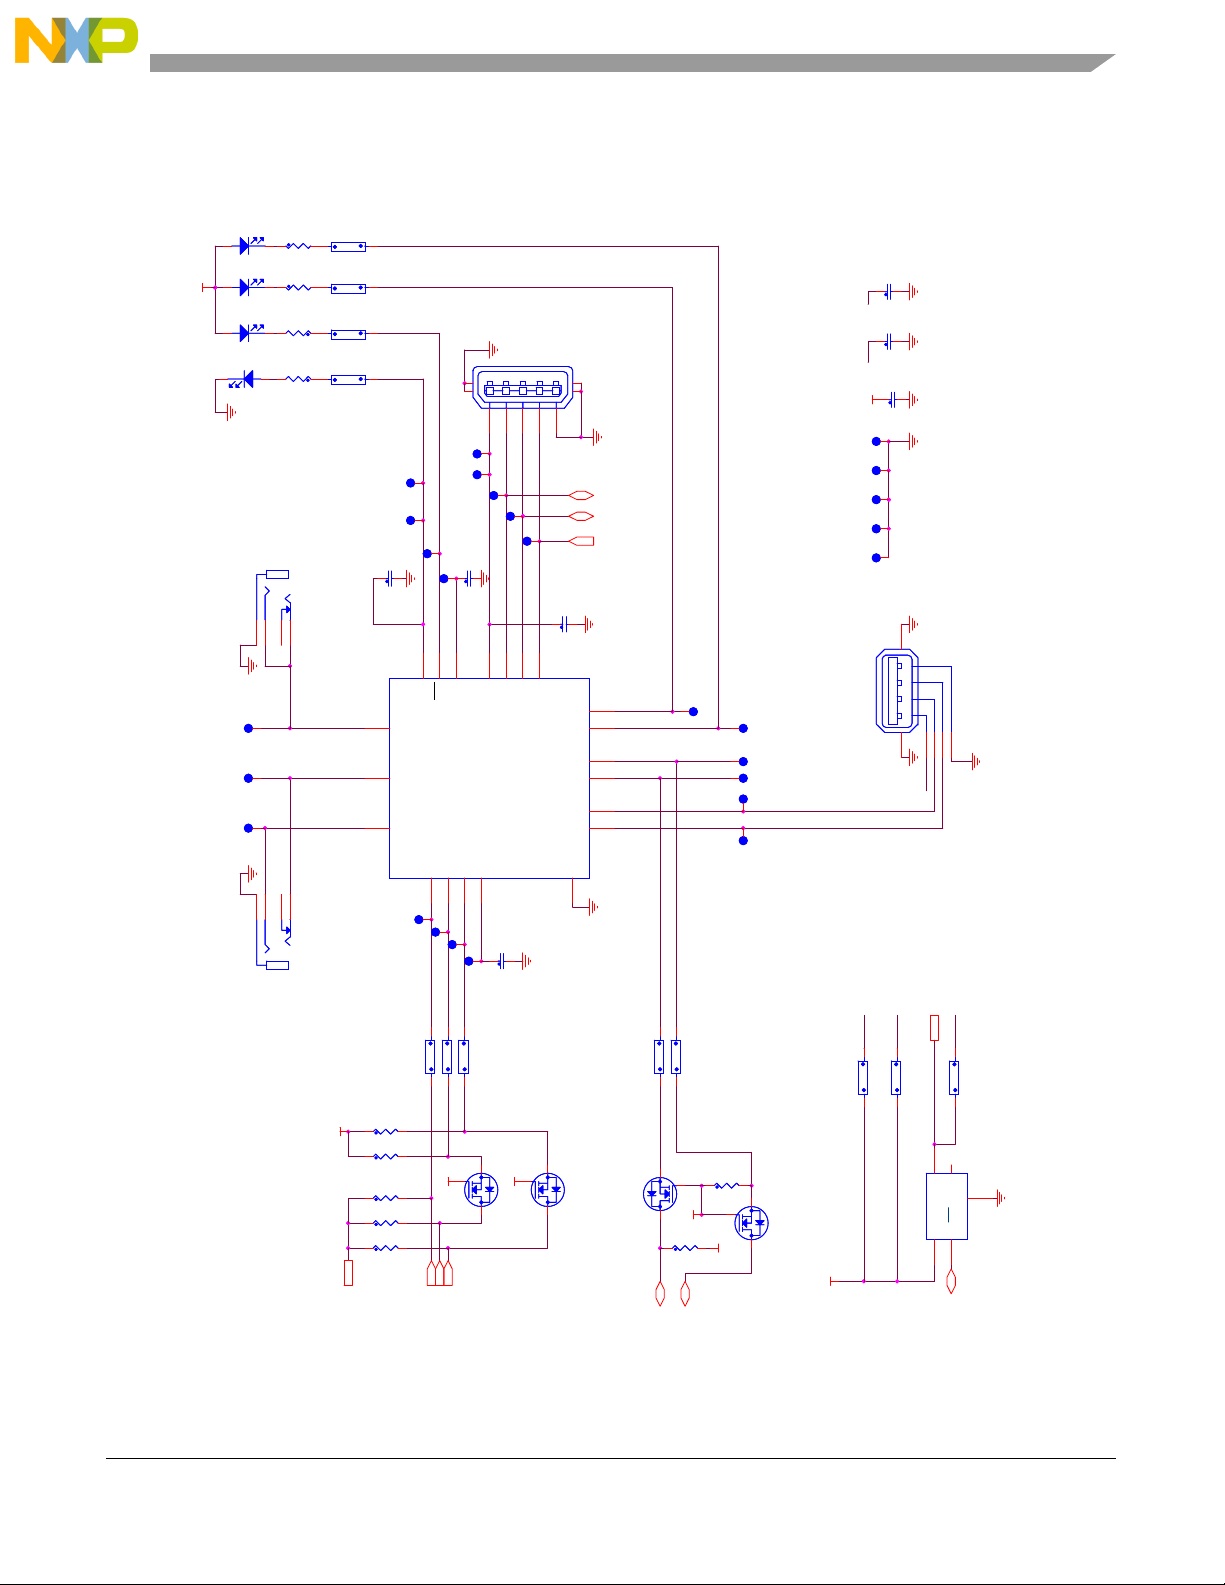
4.1 34825 Circuit
The schematic related to the 34825 is shown in Figure 4. Jumpers are offered to configure the evaluation
board for demonstration or evaluation purposes. When the evaluation board is used to be directly jump
connected to a cell phone PCB, these jumpers should be disconnected to prevent interference between
the signals from the evaluation board and the cell phone board.
4.1.1 I2C and Interrupt Signals
The I2C signals are the interrupt signal are connected to the MCU. The transistors Q1 and Q2 are for
level shifting between the 5V I2C signal for the MCU and the VDDIO from the 34825. The jumpers J6, J7,
and J8 should normally be always connected unless the evaluation board is used to directly jump these
signals to a cell phone PCB, in which case the signals are jumped directly from the corresponding test
points TP3, TP4 and TP5 to the cell phone PCB and the above jumpers should be disconnected.
4.1.2 Audio Signals
The audio signals include the microphone (MIC) signal and the stereo speaker (SPK_L and SPK_R)
signals. These three signals are connected to the microphone and the stereo audio jacks.
4.1.3 UART Signals
The UART signals are connected to the MCU on the evaluation board via jumpers J16 and J17 as well
as transistors Q3 and Q4. The two transistors are for level shifting purpose. Since the UART features are
not enabled, users should keep the JP16 and JP17 open all the time. The UART feature can be evaluated
with the UART signals from a different circuit by jumping the signals to test points TP18 and TP19.
4.1.4 LED Indicators
The evaluation offers two LEDs to indicate the status of the two logic signals ISET and OUT. When a
power supply is attached to the mini-USB connector, depending on the type of the power supply, the
output will indicate either high impedance open-drain output or low impedance to ground. The red LED
DS2 is used to indicate the
datasheet for more details), the voltage at the VBUS pin is switched to the OUT pin. The red LED DS1
will indicate the voltage level at the OUT pin. Jumpers J4 and J5 should always be connected for these
two signals. There are another two LEDs on the Evaluation Board DS3 and DS4. They are reserved for
Freescale internal use only. Please keep the jumpers J10 and J11 open all the time.
ISET
ISET logic level. If the internal power MOSFET is turned on (refer to the
KIT34825EPEVME Evaluation Board, Rev. 2.0
6 Freescale Semiconductor
Page 7
VDDIO
21
21
21
DS1
DS1
U4
U4
123
TP23TP23
TP24TP24
TP25TP25
123
U5
U5
DS4
DS4
DS3
DS3
DS2
DS2
2 1
RED LED
RED LED
R
R
R
R
R431KR43
RED LED
RED LED
R421KR42
RED LED
RED LED
R371KR37
1K
RED LED
RED LED
R391KR39
1K
L
L
4
3.5mm STEREO JACK
3.5mm STEREO JACK
4
L
L
3.5mm STEREO JACK
3.5mm STEREO JACK
Hardware Description
J11J11
1K
1K
1 2
J10J10
1 2
J4J4
1 2
J15
123
TP14TP14
VBUS
17
18
VBUS
C6
0.1UFC60.1UF
J15
USB_5_MINI_AB_SKT
ID
C3
4700 PFC34700 PF
USB_5_MINI_AB_SKT
ID DP DM
TEST1
10
TEST2
8
TxD
7
RxD
6
D-
5
D+
4
EP
21
TP9TP9
TP15TP15
TP18TP18
TP19TP19
TP21TP21
TP22TP22
4S25
TP16TP16
TP17TP17
19
20
DP
DM
J5J5
1 2
TP8TP8
TP6TP6
C1
1.0UFC11.0UF
OUT
15
U2
MIC
3
SPK_L
2
SPK_R
1
TP3TP3
5V D- D+ ID G
5V D- D+ ID G
S1
S3S4
TP13TP13
TP11TP11
TP10TP10
TP2TP2
C2
1.0UFC21.0UF
VDD
11
16
VDD
OUT
ISET
MC34825U2MC34825
VDDIO
INTB12I2C_SDA
I2C_SCL
9
13
14
TP5TP5
VDDIO
TP4TP4
TP12TP12
C7
100PF(optional)
C7
100PF(optional)
ID
C5
2.2uFC52.2uF
VDD_3V3
C4
1.0UFC41.0UF
VDD_5V
TP20TP20
TP27TP27
TP26TP26
TP1TP1
TP7TP7
S2
J19
J19
USB_TYPE_A_FEMALE
USB_TYPE_A_FEMALE
VD-D+G
VD-D+G
S1A1A2A3A4
OUT
VDD_3V3
VDDIO
VDD
VDD_5V
VBUS
1 2
J12J12
J9J9
1 2
VDD_3V3
5
Vout
Vin1ON/OFF
U1
U1
1 2
4
NC
3
V_CON
J13J13
GND
LP2980IM5X-3.3
LP2980IM5X-3.3
2
VDDIO
VDD_5V
J6J6
J7J7
J8J8
1 2
1 2
1 2
R36
4.7k
R36
4.7k
INTB
VDDIO
I2C_SCL
I2C_SDA
23
1
R35
4.7k
R35
4.7k
R38
4.7k
R38
4.7k
R41
4.7k
R41
4.7k
R40
4.7k
R40
4.7k
Q2
FDV303NQ2FDV303N
VDDIO
1
Q1
FDV303NQ1FDV303N
23
Q4
FDV303NQ4FDV303N
J17J17
J16J16
1 2
1 2
23
R44
4.7k
R44
4.7k
1
VDDIO
R45
4.7k
R45
4.7k
TxD
RxD
1
VDD_5V
23
Q3
FDV303NQ3FDV303N
Figure 4. The 34825 Schematic of the KIT34825EPEVME Evaluation Board
KIT34825EPEVME Evaluation Board, Rev. 2.0
Freescale Semiconductor 7
Page 8

Hardware Description
4.1.5 On-Board LDO and VDD_5V
The evaluation board has a 3.3V LDO on the board. This LDO generates the VDDIO voltage as well as
to generate a reference voltage (3.3V) for the USB charger simulator (see section
information). Unless powered by a different source, the JP13 should always be connected for the VDDIO
supply.
The 3.3V LDO is powered by a 5V supply (VDD_5V) from the standard type-B USB connector. The
VDD_5V supply are also used to supply the 34825 via jumper J12 to the VDD pin during the evaluation.
In addition, the VDD_5V can also be used to generate the 5V supply to the VBUS pin in the mini-USB
connector to simulate various power supplies, together with the D+/D- connection and the ID connection.
Jumper J9 is for this purpose. More details are given in the section
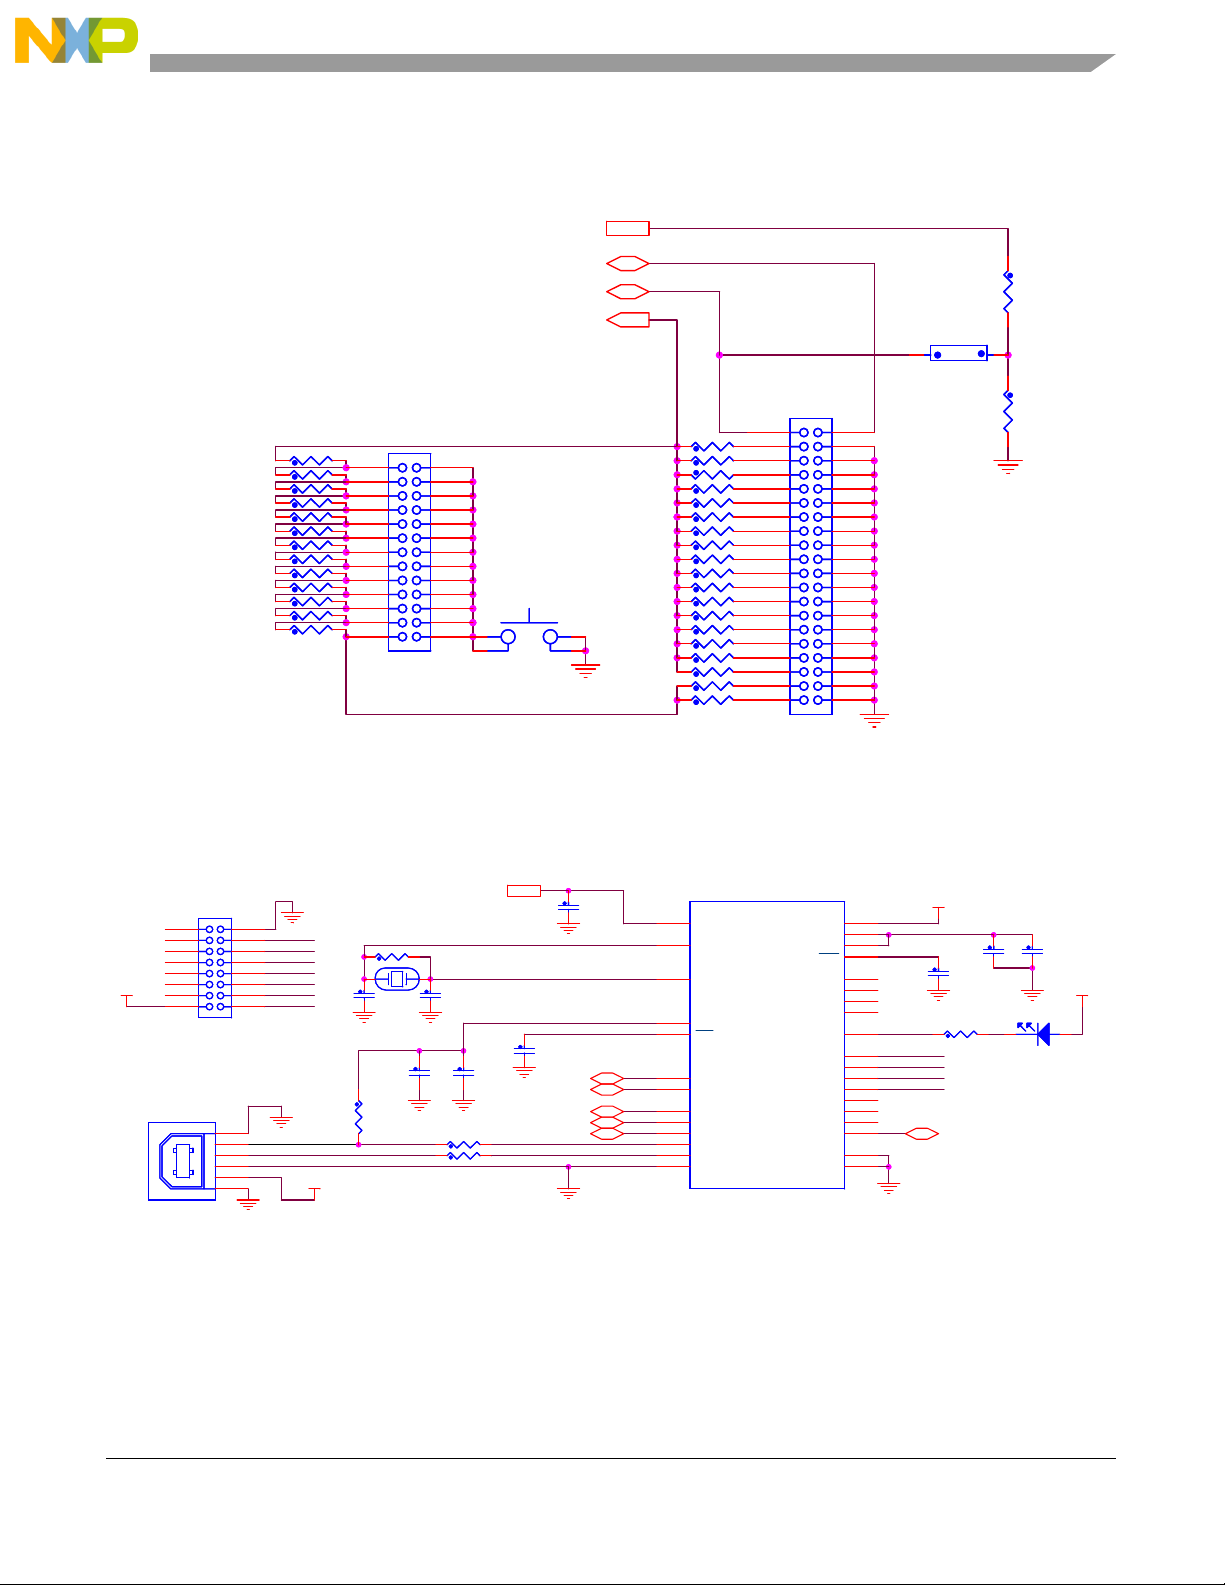
4.2 Remote Control and Accessory Simulator
The remote control simulator contains 13 resistors (R3 to R15) that are corresponding to the 13 supported
keys (see datasheet for more details) and a push button (SW1) to simulate the action of the remote
control. The left side of
to select one ID resistor value by shorting the corresponding jumper in J1 and then to press the push
button SW1. Shorting pin1 and pin2 of the jumper header J1 represents the S0 key. Shorting pin3 and
pin4 of the J1 represents S1 key, and so on.
The right side of Figure 5 shows the schematic of the accessory simulator. Resistor R16 to R34 represent
all supported ID resistors. R16 and R17 are in series with the remote control key resistors to form the
correct ID resistors. Shorting one pair of the headers in J2 is equivalent to connecting one ID resistor to
the ID pin.
The headers of 39 and 40 in J2 are connected to the DP and DM pins of the 34825. Shorting these two
headers is equivalent to short the DP and DM pins. To simulate the attachment of a dedicated charger,
the users can short the 39 and 40 headers first and then short jumper J9 to connect the VDD_5V to the
VBUS pin of the mini-USB connector. Once the J9 are shorted, the 34825 sees a 5V at the VBUS pin and
starts the power supply type identification. The identification result will be a dedicated charger.
Figure 5 shows the detailed schematic. To simulate a key press, the user needs
4.2 for more
4.2.
Resistors R1 and R2 and jumper J3 are for simulating the USB charger. The USB charger requires the
power supply to offer a 0.6V to the DM pin when the DP pin is sourced with a 0.6V. Shorting J3 first and
then J9 creates and equivalent attachment of a USB charger to the mini-USB connector.
The headers in J2 should be left open unless an accessory is being simulated.
4.3 USB-to-I2C Interface
The USB-to-I2C interface consisting of the MCU block and the standard type-B connector enables users
to use the PC as the host controller of the I2C bus. Users can access the I2C register map with the GUI
in the PC and receive the interrupt signal from the 34825. The schematic of the USB-to-I2C interface is
given in
connector is given to connect the evaluation board to the PC. The USB bus voltage is the supply of the
VDD_5V discussed earlier.
8 Freescale Semiconductor
Figure 6. The MCU in the schematic is powered by the USB bus voltage. A standard type-B
KIT34825EPEVME Evaluation Board, Rev. 2.0
Page 9
VDD_3V3
Hardware Description
ڋڋڋڋڌ
ڋڋڋڌڋ
ڋڋڋڌڌ
ڋڋڌڋڋ
ڋڋڌڋڌ
ڋڋڌڌڋ
ڋڋڌڌڌ
ڋڌڋڋڋ
ڋڌڋڋڌ
ڋڌڋڌڋ
ڋڌڋڌڌ
ڋڌڌڋڋ
ڋڌڌڋڌ
DP
DM
ID
3940
3738
3536
3334
3132
2930
2728
2526
2324
2122
1920
1718
1516
1314
1112
910
78
34
12
J2
J2
R3 2.0KR3 2.0K
R4 604R4 604
R5 604R5 604
R6 806.0R6 806.0
R7 806.0R7 806.0
R8 1.21KR8 1.21K
R9 2.0KR9 2.0K
R10 2.0KR10 2.0K
R11 2.0KR11 2.0K
R12 2.43KR12 2.43K
R13 2.8KR13 2.8K
R14 3.24KR14 3.24K
R15 3.57KR15 3.57K
ID
12
6 5
HDR_2X13
HDR_2X13
34
78
910
1112
1314
1516
1718
1920
2122
2324
2526
J1
J1
1
2
SW1
SW1
DTSHW-67N
DTSHW-67N
3
4
R34 10R34 10
R33 75R33 75
R32 28.7KR32 28.7K
R31 34.0KR31 34.0K
R30 40.2KR30 40.2K
R29 49.9KR29 49.9K
R28 64.9KR28 64.9K
R27 80.6KR27 80.6K
R26 102KR26 102K
R25 121KR25 121K
R24 150KR24 150K
R23 200KR23 200K
R22 255KR22 255K
R21 301KR21 301K
R20 365KR20 365K
R19 442KR19 442K
R18 523KR18 523K
R17 590KR17 590K
R16 976KR16 976K
6 5
HDR_2X20
HDR_2X20
Figure 5. The Schematic for the Remote Control and the Accessory Simulator.
J3J3
1 2
ڋڋڋڋڋ
ڋڋڋڋڋ
ڋڌڌڌڋ
ڋڌڌڌڌ
ڌڋڋڋڋ
ڌڋڋڋڌ
ڌڋڋڌڋ
ڌڋڋڌڌ
ڌڋڌڋڋ
ڌڋڌڌڋ
ڌڋڌڌڌ
ڌڌڋڋڋ
ڌڌڋڋڌ
ڌڌڋڌڋ
ڌڌڋڌڌ
ڌڌڌڋڋ
ڌڌڌڋڌ
ڌڋڌڋڌ
ڌڌڌڌڋ
R2
3.57KR23.57K
0.6V
R1
806.0R1806.0
VDD_5V
1 2
3 4
7 8
9 10
11 12
13 14
15 16
2
34
2
34
1
1
USB_TYPE_B
USB_TYPE_B
J18
J18
HDR_2X8
HDR_2X8
J14
J14
S2
2
-D
-D
3
+D
+D
4
G
G
1
V
V
S1
VDD_5V
R50
C12
C12
22PF
22PF
R50
10M
10M
1 2
Y1
12MHzY112MHz
C9
0.1UFC90.1UF
R49
R49
1.5K
1.5K
R46 27R46 27
R47 27R47 27
C11
C11
22PF
22PF
C10
C10
4.7UF
4.7UF
RST
VPP
65
PTE3
PTA0
PTA1
PTA2
PTA3
VDD_5V
VPP
C8
0.1UFC80.1UF
I2C_SCL
INTB
I2C_SDA
PTE3
TxD
RxD
C15
C15
2.2uF
2.2uF
U3
U3
5
VDD
2
OSC1
3
OSC2
4
VREG
11
IRQ
10
PTC0/TxD
12
PTC1/RxD
18
PTE0/TCLK
7
PTE1/T1CH01
17
PTE2/T2CH01
9
PTE4/D-
8
PTE3/D+
1
VSS
MC908JB16FAE
MC908JB16FAE
VDDA
VREFGA0
VREFGA1
RST
CGMOUT1
CGMOUT2
CGMXFC1
CGMXFC2
PTD0
PTA0/KBA0
PTA1/KBA1
PTA2/KBA2
PTA3/KBA3
PTA4/KBA4
PTA5/KBA5
PTA6/KBA6
PTA7/KBA7
VSSA0
VSSA1
PTA0
PTA1
PTA2
PTA3
RST
C14
C14
0.1UF
0.1UF
VDD_5V
R481KR48
1K
C13
C13
0.1UF
0.1UF
V_CON
DS5
DS5
RED LED
RED LED
C16
C16
4.7UF
4.7UF
VDD_5V
21
30
29
25
32
31
23
27
26
6
22
21
20
19
16
15
14
13
28
24
Figure 6. The MCU Block and I/O of the KIT34825EPEVME Schematic
KIT34825EPEVME Evaluation Board, Rev. 2.0
Freescale Semiconductor 9
Page 10

Hardware Description
4.4 Audio Accessory with Remote Control
The user may build an additional audio accessory with remote control to work with the evaluation kit. Here
is an example of the audio accessory with remote control. The picture of the top side and the bottom side
are shown in Figure 7. The schematic is shown in Figure 8.
The top side contains five buttons, representing S0 to S4 re
“play/pause”, “previous”, “next”, “volume up”, and “volume down” respectively in the GUI software comes
with the evaluation kit. The assignments are indicated at the lower-left corner with the silk screen, as
shown in Figure 7.
The bottom side contains two audio jacks for a microphone and a stereo headphone, a mini-USB
connector
, and the ID resistors for the five buttons and the audio accessory. The audio jacks are for
connecting to a regular headphone/microphone combo for computers that is not included in the
evaluation kit but can be easily acquired in any computer accessory store. The mini-USB connector is for
connecting to the mini-USB connector of the evaluation board with a special cable comes with the
evaluation kit.
The board, together with the headphone/microphone
combo and the mini-USB cable form an audio
headset with a microphone and a remote control. Users can use such an accessory to evaluate the
feature of the remote control and the simultaneous stereo and the microphone signals.
spectively. These buttons are assigned to
Top Side of the
Remote Control
Board
The Assignment
of the 5 Buttons
Bottom Side of the
Remote Control
Board
Mini-USB
Connector
Figure 7. The Audio Accessory with Remote Control Buttons
KIT34825EPEVME Evaluation Board, Rev. 2.0
10 Freescale Semiconductor
Page 11

Hardware Description
R1
2.0KR12.0K
ID
1
2
3
4
SW1
SW1
DTSHW-67N
DTSHW-67N
J1
J1
3.5mm STEREO JACK
3.5mm STEREO JACK
R
R
L
L
L
L
R
R
J3
J3
3.5mm STEREO JACK
3.5mm STEREO JACK
R2
604R2604
2
4
SW2
SW2
DTSHW-67N
DTSHW-67N
1
3
4
2
2
4
3
1
1
3
R3
604R3604
SW3
SW3
DTSHW-67N
DTSHW-67N
R4
806.0R4806.0
1
2
3
4
SW4
SW4
DTSHW-67N
DTSHW-67N
ID
R5
806.0R5806.0
1
1
2
3
4
1
2
3
4
5
2
4
SW5
SW5
DTSHW-67N
DTSHW-67N
S1
S3S4
5V D- D+ ID G
5V D- D+ ID G
J2
J2
USB_5_MINI_AB_SKT
USB_5_MINI_AB_SKT
S2
R6
604KR6604K
3
Figure 8. The Schematic for the Audio Accessory with Remote Control Buttons
KIT34825EPEVME Evaluation Board, Rev. 2.0
Freescale Semiconductor 11
Page 12

Software Description
5 Software Description
A GUI software comes with the evaluation kit for the convenience of demonstration and evaluation. This
section introduces how to install the driver of the evaluation kit in a PC, how to start the GUI software, and
how to use the software.
5.1 Installation of the Driver
The evaluation kit is designed as a USB Human Interface Device (HID), similar to a mouse. For Microsoft
Windows 2000 or a later operating system (OS), the driver for the HID class is already built in. The driver
will be loaded automatically when the evaluation kit is connected to a USB port for the first time. The
operating system will indicate the following messages during the first-time connection to the USB port.
• The OS will automatically recognize the board and s
information, as shown in Figure 9.
• The OS will recognize the USB device as a “USB Human Interface
as shown in Figure 10.
• The OS will install the internal driver to make it ready
message is shown in Figure 11.
how the product name “USB Interface Board”
Device” and show the message
for users to use the evaluation kit. The
Figure 9. Windows Finds the New Hardware
Figure 10. Windows Recognizes the Evaluation Board as an HID Device
Figure 11. The Interface Board is Ready to Use
KIT34825EPEVME Evaluation Board, Rev. 2.0
12 Freescale Semiconductor
Page 13

Software Description
After the driver is installed, unless the user uninstalls the driver, the OS will not show any of the above
information again when the evaluation kit is connected to the USB port. When the evaluation kit is
connected, the user can check the board status in the Windows Device Manager. Under the “Human
Interface Device” category, one can double click one USB Human Interface Device and properties.
Figure 12 will show up. Please note that the board name “USB Interface
should also show that the device is working properly.
Board” is shown in Location. It
Figure 12. The Device Status in the Window Device Manager
5.2 Installation and Starting the GUI software
The GUI software is an executable file running in Windows 2000 or a later OS. The file name is
34825Demo.exe. The Windows Media Player is required to be installed to run the GUI software. In order
to demonstrate the remote control feature of the 34825, the software needs four audio files named
“Audio01.wma”, “Audio02.wma”, “Audio03.wma” and “Audio04.wma” in the same application folder. No
installation is needed. The users need only to copy the four mentioned “.wma” files and the
34825Demo.exe file into the same folder, as shown in Figure 13. Doubling clicking the 34825Demo.exe
will start the GUI software.
KIT34825EPEVME Evaluation Board, Rev. 2.0
Freescale Semiconductor 13
Page 14

Software Description
Figure 13. The Files in The GUI Software Folder
5.3 Using the GUI Software
The GUI has two windows. The window on the left side is a cell phone window and the window on the
right side is an information window, as shown in Figure 14. When the software is started, the GUI shows
the cell phone window first. The information displayed in the cell phone window is dependent on the
cessory that is attached to the mini-USB connector of the evaluation board. The information window
ac
contains detailed information about 34825 and the status of the evaluation board.
This section explains each portion of the two
5.3.1 System buttons
At the top of the cell phone window, there are two system buttons, as shown in Figure 14. The one on
the right is the c
button, when clicked, to show or hide the information window.
5.3.2 Status information
The status information is located at the bottom of the information window. This is for indicating the status
of the evaluation board. If the evaluation board is connected and recognized by the OS, a message “The
34825 Evaluation Board Is Connected!” and the version number of the evaluation board firmware will
be shown. The evaluation system is ready to work. If the evaluation board is not connected to the PC
when the software is running, the message shown will be “The 34825 Evaluation Board Is not Found.
Please Check and Connect the Evaluation Board!” Whenever the evaluation board is connected while
the GUI software is running, the PC software will recognize the evaluation board automatically and
display the first message.
lose button to exit the GUI software when clicked. The one on the left side is a Show/Hide
windows in details.
KIT34825EPEVME Evaluation Board, Rev. 2.0
14 Freescale Semiconductor
Page 15

Two System Buttons Register Map
Software Description
Identi fication Resul t
Device Mode
Audio Volume
Record Button
Status Infor mation
5.3.3 The register map
The register map is shown at the top of the information window. Refer to the 34825 datasheet for more
information about the register map. The values of the registers will be automatically updated if an interrupt
is received from the 34825. The user can manually update each register by clicking the “R” command
button next to each register, as shown in Figure 14. For a read-and-write register, a hidden “W” command
button will show up next to the “R” button when the register value is modified. The
the bit value in the register map. After clicking the “W” button, the new value will be written into the 34825
and the “W” button will disappear again. When the value in the register is not changed, the “W” command
button is hidden.
5.3.4 Command buttons
There are three command buttons, “Read All Registers”, “Reset by VDDIO” and “Reset by I2C”, located
at the lower portion of the information window. The functions for them, when clicked, are as following:
Read All Registers:
Reset by VDDIO: to r
to read all internal registers and display the result in the register map.
eset the 34825 by disabling the VDDIO supply to the 34825.
Remote-Control
Key Status
Three Command
Buttons
Figure 14. The 34825 Demo GUI
user can directly modify
KIT34825EPEVME Evaluation Board, Rev. 2.0
Freescale Semiconductor 15
Page 16

Software Description
Reset by I2C: to reset the 34825 by pulling both I2C_SCL and I2C_SDA signals to ground. Refer to the
datasheet of 34825 for more information. The status of the registers after reset will show up in the register
map.
5.3.5 Identification result
The identification result is displayed right under the register map. When the 34825 identifies one
accessory, the accessory name is shown in this window.
5.3.6 Device mode
The device mode is displayed next to the identification result. The 34825 has three operation modes,
Standby, Power Save and Active (refer to the datasheet for more details). The operation mode of device
is shown at this location.
5.3.7 Remote control key status
The 34825 supports up to 13 remote control keys (S0 to S12) when an Audio R/C 1 or an Audio R/C 2
accessory is attached to the mini-USB connector of the evaluation board. With an Audio R/C 1 or an
Audio R/C 2 accessory attached, the cell phone window enters the media-player mode, as shown in
Figure 14. In the media-player mode, the remote control key status will be displayed. When the key is
released before a “short-key” timing length, the corresponding key in the GUI shows green color. When
the key is still pressed when passing the “short-key” timing length, the corresponding key shows red color
until the key is released.
When using the remote control simulator on the evaluation board, the key “S0”, “S1”, “S2”, “S3” and “S4”
are assigned to “Play/Pause”, “Previous”, “Next”, “Volume Up” and “Volume Down” function of the
Windows Media Player. Pressing S0 will start or pause the music. The S1 and S2 switch between the four
songs shown in
the cell phone window of the GUI software.
Figure 13. The S3 and S4 adjust the volume of the music and the volume is displayed
5.3.8 Record button
When the Audio R/C accessory is attached, the GUI software can record the voice input from the
microphone. Click the red “R” button under the Windows Media Player to start the voice recording. At the
same time, the button name is changed to “P”. Click the red “P” button to stop voice recording and
recorded voice will be played back through the headphone.
5.3.9 Version information
There is an “about...” item in the system menu of the software. After running the GUI software, clicking
the right button of the mouse with the cursor pointing at the software icon in the task bar, as shown in
Figure 15, will pop up the system menu that contains the “about...” selection. Clicking the “about...”
selection results in a dialog window showing the version information of the software.
KIT34825EPEVME Evaluation Board, Rev. 2.0
16 Freescale Semiconductor
Page 17

Software Description
.
Figure 15. The About... Menu Selection
KIT34825EPEVME Evaluation Board, Rev. 2.0
Freescale Semiconductor 17
Page 18

Using the Evaluation Kit
6 Using the Evaluation Kit
There are two ways of using the evaluation board. The first one is to directly jump connect the signals of
34825 to the customer’s system board. The evaluation board offers the test points of all pins of the IC for
the convenience of such connection. The second way is to use the evaluation kit and a PC and the GUI
software to evaluate or demonstrate the features and the performance of the 34825. The first way is
straight forward and requires no further explanation once the user understand the 34825. This section
describes the second way with a few real examples of using the evaluation kit.
6.1 Setting up the Evaluation Kit
The 34825 requires the baseband signals for the demonstration or evaluation. Those signals can be
easily created with the evaluation kit.
6.1.1 I2C host signals
The I2C host signals are provided by the MCU in the USB-to-I2C interface. Connect the evaluation board
to the PC that runs the GUI software using a USB A-to-B cable, as shown in Figure 16. The I2C host
command can be sent from the GUI software via the USB34825 can be intercepted by the MCU and forwarded to the GUI software via the USB bus.
to-I2C interface. Any interrupt signal from the
Figure 16. The Setup for the KIT34825EPEVME Kit
6.1.2 Audio signals
The audio signals, namely the microphone and the stereo audio signals, can also be obtained from the
PC. Connect the microphone and stereo speaker jacks between the PC and the evaluation board, as
shown in Figure 16. When evaluating with an audio acces
the PC functions as the baseband system to offer a stereo audio output
the microphone signal. The signals will be passed through the 34825 to the external audio accessory.
KIT34825EPEVME Evaluation Board, Rev. 2.0
18 Freescale Semiconductor
sory, such as the one illustrated in Figure 16,
to the 34825 as well as to receive
Page 19

6.1.3 USB slave device signals
A cell phone is a USB slave device. A PC is a USB host device so cannot be used to offer slave device
signals. The evaluation board offers a female USB type-A connector for a USB flash memory device. The
user can connect any USB2.0 compatible flash memory device to the evaluation board to test the
480Mbps data transfer speed and the performance of the analog switches in the 34825. The connection
of the flash memory is illustrated in Figure 16.
6.1.4 Jumper configuration
The jumpers need be configured properly for the operation. The location of the jumpers are shown in
Figure 17. These jumpers should be removed when using the
signals to the customer system board.
The default configuration for the jumpers is summarized in Table 1. The jumper configuration should stay
in the default connections if the on-board accessory simula
J10 & J11 &
J16 & J17
always open
Using the Evaluation Kit
test points to directly jump the 34825
tor or the on-board remote control is not used.
J17
J16
J4 to J8 &
J12 & J13
always
shorted
J9 shorted to
connect 5V to
VBUS of miniUSB connector
SW1
Tabl e 1. The Default Configuration of the Jumpers
Jumper Default Connection Comments
J4, J5 Shorted LED indications for ISET and OUT signals
J6, J7, J8 Shorted I2C and Interrupt signals
J10, J11 Open Reserved for Freescale internal use only
J12
J13
J1 J2 J3
Figure 17. The Jumper Configurations.
J11
J10
J4 J5J7 J6 J9 J8
Pin 39 &
40 of J2
short
DP/DM of
mini-USB
connector
J3 shorted
for USB
charger
accessory
J12, J13 Shorted To provide VDD and VDDIO supplies to 34825
KIT34825EPEVME Evaluation Board, Rev. 2.0
Freescale Semiconductor 19
Page 20

Using the Evaluation Kit
Jumper Default Connection Comments
J16, J17 Open TxD and RxD signals. Not supported in the current board.
J1 Open or short J1 contains 13 pairs of headers for the 13 remote control keys. They
J2 Open J2 contains 20 pairs of headers for selecting different ID resistors
J3 Open J3 is for simulating the USB charger accessory.
J9 Open J9 shorts the 5V bus voltage from the type-B connector to the
Table 1. The Default Configuration of the Jumpers
are disconnected by the SW1 switch so either short or open does not
affect the operation of the evaluation. When the remote control
keys in an audio accessory is simulated, one pair should be shorted
and then the SW1 push button be pressed to create a key press
event.
for their corresponding accessories. The pair of pin 39 and 40 are
connected to the DP and DM pins of the mini-USB connector on
the evaluation board.
VBUS pin of the mini-USB connector for simulating. Unless using
the on-board simulator for a powered accessory, this jumper should
always be open.
6.2 Evaluation Examples
Once the above connections are made, the evaluation kit is ready to be evaluated or demonstrated. One
can imagine that the PC and the evaluation board form a cell phone system. The only interface of the cell
phone to the external world is the mini-USB connector. External accessories, such as an audio headset,
an ac-dc adapter, or a USB port can be connected to the cell phone system only through the mini-USB
connector.
6.2.1 Dedicated Charger
A dedicated charger is a powered accessory that has a 5V on the VBUS pin and the D+ and the D- pins
are shorted. When such an accessory is attached to the mini-USB connector of the evaluation board, the
34825 will recognize and send an interrupt to the I2C host. The internal power MOSFET is turned on
automatically to switch the 5V VBUS voltage to the OUT output and the I2C host sets the
low. Both LEDs for the OUT and the
displayed in the Identification Result window in the GUI software.
If a dedicated charger is not available, one can simulate such an accessory with the on-board accessory
simulator. The steps are as following:
1. Short pin 39 and pin 40 of J2.
2. Short J9.
Once J9 is shorted, the 5V supply is jumped to the VBUS pin of the mini-USB connector. The 34825 will
see an accessory with D+ and D- shorted and a 5V on the VBUS pin, and hence recognizes it as a
dedicated charger.
ISET output to
ISET indications will be turned on. The dedicated charger is
KIT34825EPEVME Evaluation Board, Rev. 2.0
20 Freescale Semiconductor
Page 21

6.2.2 USB Port
Connect the evaluation kit to a PC using a regular USB A-to-mini-B cable. Since a USB port has a 5V on
the VBUS pin, the D+ and D- not shorted, and the ID pin floating, the 34825 recognizes the accessory as
a USB port. The identification result is displayed in the GUI software. The internal power MOSFET is
turned on automatically to switch the 5V VBUS to the OUT pin. The I2C host leave the
impedance so only the OUT indication LED will be turned on. The PC will recognize the flash memory
connected to the evaluation board and the user can read from or write to the flash memory the same way
as if the flash memory is attached to a USB port of the PC directly. Try to copy a large file to see the data
transfer speed.
If a second PC is not available, the user can use the same PC shown in Figure 16 for the USB port.
6.2.3 USB Charger
A USB charger is a special charger defined in the USB Charging Specification Version 1.0 from the USB
developer’s forum. If such a charger is not available, one can use the on-board accessory simulator with
the following two steps, starting with the default jumper configuration.
1. Short J3.
2. Short J9.
Using the Evaluation Kit
ISET output high
Once J9 is shorted, an accessory recognition flow starts in the 34825 and a USB charger is recognized.
The internal power MOSFET is turned on automatically and
and
ISET LED indications are turned on.
6.2.4 Audio Accessory
If the user has an additional audio accessory (a stereo headphone with a microphone and the 5-button
remote control), as described in section
accessory.
When attached to the mini-USB connector, the audio accessory is recognized by the 34825 and the
Identification Result in the GUI shows “Audio R/C”, representing an audio accessory with remote control.
The signal connections between the accessory and the baseband system (simulated by the PC in this
case) are established. Any music out from the PC will be passed to the stereo headphone while the
microphone signal from the headset will be passed to the PC. The cell phone window in the GUI shows
a volume indication, the playback progress bar, and a red-dot button for recording the voice (refer to
section
The 5 buttons in the remote control are assigned to the play/pause, previous, next, volume up, and
volume down functions in the media player. When the Play/Pause is pressed, the PC starts to play music
to the headphone. One can play with all five buttons to find out the functions. Try to press quickly and
press and hold the key for a few seconds to see the color difference in the key displays of the GUI
software.
The voice recording function is for demonstrating that the headset has independent stereo audio and the
microphone channels. When the record button is clicked, the voice is recorded into the PC through the
microphone in the headset. Clicking the record button again will stop recording and immediately start
playing back recorded voice, while the stereo music continues to play independently.
5.3.8 for more details).
ISET is set to low by the I2C host. Both OUT
4.4. Please refer to Figure 16 for the construction of the audio
The user can also use the J1 to simulate all 13 keys, as described in section 4.2.
KIT34825EPEVME Evaluation Board, Rev. 2.0
Freescale Semiconductor 21
Page 22

KIT34825EPEVME Board Layout
7 KIT34825EPEVME Board Layout
7.1 Overview
Figure 18. The Overview of the KIT34825EPEVME Evaluation Board.
7.2 Top Side Silkscreen Layer
Figure 19. The Top Side Silk Screen Layer of the KIT34825EPEVME Evaluation Board.
KIT34825EPEVME Evaluation Board, Rev. 2.0
22 Freescale Semiconductor
Page 23

7.3 Top Side Layer
KIT34825EPEVME Board Layout
Figure 20. Top Side Layer of the KIT34825EPEVME Evaluation Board.
7.4 Bottom Side Layer
Figure 21. The Bottom Side Layer of the KIT34825EPEVME Evaluation Board.
KIT34825EPEVME Evaluation Board, Rev. 2.0
Freescale Semiconductor 23
Page 24

KIT34825EPEVME Evaluation Board Bill of Material
8 KIT34825EPEVME Evaluation Board Bill of Material
Item Qty Schematic Label Value Description Vender
Capacitors
1 3 C1, C2, C4 1.0μF CAP CER 1.0UF 16V 10% X5R 0603 TDK
MURATA
2 1 C3 4700pF CAP CER 4700PF 50V 5% X7R 0603 TDK
MURATA
3 5 C6, C8, C9, C13, C14 0.1μF CAP CER 0.1UF 50V 10% X7R 0603 TDK
MURATA
4 1 C7 (optional) 100pF CAP CER 100PF 50V 10% X7R 0603 TDK
MURATA
5 2 C10, C16 4.7μF CAP CER 4.7UF 6.3V 20% X5R 0603 TDK
MURATA
6 2 C11, C12 22pF CAP CER 22PF 50V 10% X7R 0603 TDK
MURATA
7 2 C5, C15 2.2μF CAP CER 2.2UF 6.3V 20% X5R 1608 TDK
MURATA
Resistors
8 1 R32 28.7k RES MF 28.7K 1/10W 1% 0603 KOA SPEER
9 4 R3, R9-R11 2.0k RES MF 2.0K 1/10W 1% 0603 KOA SPEER
10 2 R4, R5 604.0 RES MF 604.0 OHM 1/10W 1% 0603 KOA SPEER
11 3 R1, R6, R7 806.0 RES MF 806.0 OHM 1/10W 1% 0603 KOA SPEER
12 1 R8 1.21k RES MF 1.21K 1/10W 1% 0603 KOA SPEER
13 1 R12 2.43k RES MF 2.43k 1/10W 1% 0603 KOA SPEER
14 1 R13 2.8k RES MF 2.8k 1/10W 1% 0603 KOA SPEER
15 1 R14 3.24k RES MF 3.24k 1/10W 1% 0603 KOA SPEER
16 2 R2, R15 3.57k RES MF 3.57k 1/10W 1% 0603 KOA SPEER
17 1 R16 976.0k RES MF 976.0k 1/10W 1% 0603 KOA SPEER
18 1 R17 590.0k RES MF 590.0k 1/10W 1% 0603 KOA SPEER
19 1 R18 523.0k RES MF 523.0k 1/10W 1% 0603 KOA SPEER
20 1 R19 442.0k RES MF 442.0k 1/10W 1% 0603 KOA SPEER
21 1 R20 365.0k RES MF 365.0k 1/10W 1% 0603 KOA SPEER
22 1 R21 301.0k RES MF 301.0k 1/10W 1% 0603 KOA SPEER
23 1 R22 255.0k RES MF 255.0k 1/10W 1% 0603 KOA SPEER
24 1 R23 200.0k RES MF 200.0k 1/10W 1% 0603 KOA SPEER
25 1 R24 150.0k RES MF 150.0k 1/10W 1% 0603 KOA SPEER
26 1 R25 121.0k RES MF 121.0k 1/10W 1% 0603 KOA SPEER
27 1 R26 102.0k RES MF 102.0k 1/10W 1% 0603 KOA SPEER
28 1 R27 80.6k RES MF 80.6k 1/10W 1% 0603 KOA SPEER
29 1 R28 64.9k RES MF 64.9k 1/10W 1% 0603 KOA SPEER
30 1 R29 49.9k RES MF 49.9k 1/10W 1% 0603 KOA SPEER
KIT34825EPEVME Evaluation Board, Rev. 2.0
24 Freescale Semiconductor
Page 25

KIT34825EPEVME Evaluation Board Bill of Material
Item Qty Schematic Label Value Description Vender
31 1 R30 40.2k RES MF 40.2k 1/10W 1% 0603 KOA SPEER
32 1 R31 34.0k RES MF 34.0k 1/10W 1% 0603 KOA SPEER
33 1 R33 75.0 RES MF 75.0 OHM 1/10W 1% 0603 KOA SPEER
34 1 R34 10.0 RES MF 10.0 OHM 1/10W 1% 0603 KOA SPEER
35 7 R35,R36, R38, R40,
R41, R44, R45
36 5 R37, R39, R42, R43,
R48
37 2 R46, R47 27 RES MF 27 OHM 1/10W 5% 0603 KOA SPEER
38 1 R49 1.5k RES MF 1.5k 1/10W 5% 0603 KOA SPEER
39 1 R50 10M RES MF 10M 1/10W 5% 0603 KOA SPEER
LEDs
40 5 DS1-DS5 RED LED LED RED SGL 30MA SMT 0805 LUMEX
FETS and LDOs
41 4 Q1-Q4 FDV303N TRAN NMOS GEN 680MA 25V SOT-23 FAIRCHILD
42 1 U1 FAN2500S33X 3.3V 100 mA CMOS LDO SOT23-5 FAIRCHILD
Push buttons, Jumpers and Connectors
43 1 SW1 DTSHW-67N SW SPST NO PB WSH 12VDC 50MA THDIPTRONICS
4.7k RES MF 4.7k 1/10W 5% 0603 KOA SPEER
1.0k RES MF 1.0k 1/10W 5% 0603 KOA SPEER
44 1 J1 HDR_2x13 HDR 2X13 TH 100MIL CTR 330H AU SAMTEC
45 1 J2 HDR_2x20 HDR 2X20 TH 100MIL CTR 330H AU SAMTEC
46 13 J3-J13, J16, J17 SHORT_100mil CON 2 JUMPER MALE 2.54MM SP
157H AU
47 1 J14 USB_TYPE_B CON 2X2 USB_TYPE_B RA SKT SHLD
TH -- 435H AU
48 1 J15 USB_5_MINI_AB
_SKT
49 1 J19 USB_TYPE_A_F
EMALE
50 2 U4, U5 3.5mm STEREO
JACK
51 27 TP1-TP27 TP-105-01-00 TEST POINT PIN 0.109 x 0.087 TH
Crystal
52 1 Y1 12MHz XTAL 12MHz FIXED PAR--SMT
Freescale IC
53 1 U2 MC34825EP USB INTERFACE IC QFN20 FREESCALE
54 1 U3 MC908JB16FAE 8-bit MCU LQFP32 FREESCALE
CON 5 SKT RA USB MINI AB SMT AU SAMTEC
CON 4 SKT RA TH USB A FEMALE SAMTEC
CON 4 AUD RA SMT KYCON
YELLOW
11.5x4.7MM
PRECI-DIP
CYPRESS
COMPONENTS
CITIZEN
KIT34825EPEVME Evaluation Board, Rev. 2.0
Freescale Semiconductor 25
Page 26

References
9 References
Following are URLs where you can obtain information on other Freescale products and application
solutions:
Description URL
Data Sheet www.freescale.com/files/analog/doc/data_sheet/MC34825.pdf
Freescale’s Web Site www.freescale.com
Freescale’s Analog Web Site www.freescale.com/analog
Freescale’s Power Management Web Site www.freescale.com/powermanagement
Freescale’s Automotive Applications Web Site www.freescale.com/automotive
KIT34825EPEVME Evaluation Board, Rev. 2.0
26 Freescale Semiconductor
Page 27

10 Revision History
REVISION DATE DESCRIPTION OF CHANGES
1.0
8/2010 • Initial Release
Revision History
KIT34825EPEVME Evaluation Board, Rev. 2.0
Freescale Semiconductor 27
Page 28

How to Reach Us:
Home Page:
www.freescale.com
Web Support:
http://www.freescale.com/support
USA/Europe or Locations Not Listed:
Freescale Semiconductor, Inc.
Technical Information Center, EL516
2100 East Elliot Road
Tempe, Arizona 85284
1-800-521-6274 or +1-480-768-2130
www.freescale.com/support
Europe, Middle East, and Africa:
Freescale Halbleiter Deutschland GmbH
Technical Information Center
Schatzbogen 7
81829 Muenchen, Germany
+44 1296 380 456 (English)
+46 8 52200080 (English)
+49 89 92103 559 (German)
+33 1 69 35 48 48 (French)
www.freescale.com/support
Japan:
Freescale Semiconductor Japan Ltd.
Headquarters
ARCO Tower 15F
1-8-1, Shimo-Meguro, Meguro-ku,
Tokyo 153-0064
Japan
0120 191014 or +81 3 5437 9125
support.japan@freescale.com
Asia/Pacific:
Freescale Semiconductor China Ltd.
Exchange Building 23F
No. 118 Jianguo Road
Chaoyang District
Beijing 100022
China
+86 10 5879 8000
support.asia@freescale.com
For Literature Requests Only:
Freescale Semiconductor Literature Distribution Center
P.O. Box 5405
Denver, Colorado 80217
1-800-441-2447 or +1-303-675-2140
Fax: +1-303-675-2150
LDCForFreescaleSemiconductor@hibbertgroup.com
Information in this document is provided solely to enable system and
software implementers to use Freescale Semiconductor products. There are
no express or implied copyright licenses granted hereunder to design or
fabricate any integrated circuits or integrated circuits based on the
information in this document.
Freescale Semiconductor reserves the right to make changes without further
notice to any products herein. Freescale Semiconductor makes no warranty,
representation or guarantee regarding the suitability of its products for any
particular purpose, nor does Freescale Semiconductor assume any liability
arising out of the application or use of any product or circuit, and specifically
disclaims any and all liability, including without limitation consequential or
incidental damages. “Typical” parameters that may be provided in Freescale
Semiconductor data sheets and/or specifications can and do vary in different
applications and actual performance may vary over time. All operating
parameters, including “Typicals”, must be validated for each customer
application by customer’s technical experts. Freescale Semiconductor does
not convey any license under its patent rights nor the rights of others.
Freescale Semiconductor products are not designed, intended, or authorized
for use as components in systems intended for surgical implant into the body,
or other applications intended to support or sustain life, or for any other
application in which the failure of the Freescale Semiconductor product could
create a situation where personal injury or death may occur. Should Buyer
purchase or use Freescale Semiconductor products for any such unintended
or unauthorized application, Buyer shall indemnify and hold Freescale
Semiconductor and its officers, employees, subsidiaries, affiliates, and
distributors harmless against all claims, costs, damages, and expenses, and
reasonable attorney fees arising out of, directly or indirectly, any claim of
personal injury or death associated with such unintended or unauthorized
use, even if such claim alleges that Freescale Semiconductor was negligent
regarding the design or manufacture of the part.
Freescale™ and the Freescale logo are trademarks of
Freescale Semiconductor, Inc. All other product or service names
are the property of their respective owners.
© Freescale Semiconductor, Inc., 2010. All rights reserved.
KT34825UG
Rev. 2.0
8/2010
 Loading...