

Page 1

DSPD56362EVM
Upgrade Manual
Revision 3.1
Motorola, Incorporated
Semiconductor Products Sector
Digital Audio Operations
6501 William Cannon Drive West
Austin, TX 78735-8598
Frees
cale Semiconductor,
I
Freescale Semiconductor, Inc.
For More Information On This Product,
Go to: www.freescale.com
nc...
Page 2
Motorola reserves the right to make changes without further notice to any products herein. Motorola makes no warranty,
representation or guarantee regarding the suitability of its products for any particular purpose, nor does Motorola assume any
liability arising out of the applicatio n or use of any product o r circuit, and specifically disclaims any and all liabil ity, including
without limitation consequen tia l or in ci dental damages. “Typical” parameters whic h m ay be pro vi ded in Mot orola data sheets
and/or specifications can and do vary in different applications and actual performance may vary over time. All operating
parameters, including “Typicals” must be validated for each customer application by customer’s technica l experts. Motorola
does not convey any license under its patent rights nor the rights of others. Motorola pr oducts are not designed, intended, or
authorized for use as components in systems intended for surgical implant into the body, or other applications intended to
support life, or for any other application in which the failure of the Motorola product could create a situation where personal
injury or death may occur. Should Bu yer purchase or use Motorola products for any such unintended or unauthorized
application, Buyer shall indemnify and hold Motorola and its officers, employees, subsidiaries, affiliates, and distributors
harmless against all claims, costs, damages, and expenses, and reasonable attorney fees arising out of, directly or indirectly,
any claim of personal injury or death associated with such unintended or unauthorized use, even if such claim alleges that
Motorola was negligent regarding the design or manufacture of the par t. Motorola and are registered trademarks of
Motorola, Inc. Motorola, Inc. is an Equal Opportunity/Affirmative Action Employer.
How to reach us:
USA/Europe/Locations Not Listed:
Motorola Literature Distribution
P.O. Box 5405
Denver, Colorado 80217
(303) 675-2140
(800) 441-2447
MFAX:
RMFAX0@email.sps.mot.com
TOUCHTONE (602) 244-6609
US & Canada ONLY
(800) 774-1848
Asia/Pacific:
Motorola Semiconductors H.K. Ltd.
8B Tai Ping Industrial Park
51 Ting Kok Road
Tai Po, N.T., Hong Kong
852-26629298
Technical Resource Center:
1 (800) 521-627 4
DSP Helpline
dsphelp@dsp.sps.mot.com
Japan:
Nippon Motorola Ltd.
SPD, Strategic Planning Office
4-32-1, Nishi-Gotanda
Shinagawa-ku, To kyo 141, Japan
81-3-5487-8488
Internet:
http://www.motorola-dsp.com
OnCE is a trademark of Motorola, Inc.
Introduction
This document provides a description of how to upgrade the standard DSP56362EVM
Evaluation Module to the DSPD56362 and related components. After the upgrade is complete
the EVM system will be capable of autodectect/autoswitching of PCM, Dolby DigitalTM,
DTSTM and MPEG bitstreams in addition to various post decoder functions. The user interface
of the upgraded EVM is also described.
Frees
cale Semiconductor,
I
Freescale Semiconductor, Inc.
For More Information On This Product,
Go to: www.freescale.com
nc...
Page 3

MOTOROLA DSPD56362EVM Upgrade Manual iii
TABLE OF CONTENTS
Paragraph Page
Number Title Number
1.1 INTRODUCTION . . . . . . . . . . . . . . . . . . . . . . . . . . . . . . . . . . . . . . . . . . . . . . . 1-1
1.2 UPGRADE KIT CONTENTS . . . . . . . . . . . . . . . . . . . . . . . . . . . . . . . . . . . . . . 1-1
1.3 UPGRADE INSTRUCTIONS . . . . . . . . . . . . . . . . . . . . . . . . . . . . . . . . . . . . . . 1-2
1.3.1 DSP Replacement . . . . . . . . . . . . . . . . . . . . . . . . . . . . . . . . . . . . . . . . . . . . . 1-3
1.3.2 68HC11 Replacement. . . . . . . . . . . . . . . . . . . . . . . . . . . . . . . . . . . . . . . . . . 1-3
1.3.3 EPROM Replacement. . . . . . . . . . . . . . . . . . . . . . . . . . . . . . . . . . . . . . . . . . 1-3
1.3.4 Jumper Settings. . . . . . . . . . . . . . . . . . . . . . . . . . . . . . . . . . . . . . . . . . . . . . . 1-3
2.1 INTRODUCTION . . . . . . . . . . . . . . . . . . . . . . . . . . . . . . . . . . . . . . . . . . . . . . . 2-1
2.2 REQUIRED EQUIPMENT . . . . . . . . . . . . . . . . . . . . . . . . . . . . . . . . . . . . . . . . 2-1
2.3 DEMONSTRATION SETUP. . . . . . . . . . . . . . . . . . . . . . . . . . . . . . . . . . . . . . . 2-1
2.4 USER INTERFACE. . . . . . . . . . . . . . . . . . . . . . . . . . . . . . . . . . . . . . . . . . . . . . 2-4
2.4.1 LCD Screen Description. . . . . . . . . . . . . . . . . . . . . . . . . . . . . . . . . . . . . . . . 2-7
2.4.2 Decoder Activation. . . . . . . . . . . . . . . . . . . . . . . . . . . . . . . . . . . . . . . . . . . . 2-7
2.4.3 Decoder Source Type . . . . . . . . . . . . . . . . . . . . . . . . . . . . . . . . . . . . . . . . . . 2-7
2.4.4 Speaker Configuration . . . . . . . . . . . . . . . . . . . . . . . . . . . . . . . . . . . . . . . . . 2-7
2.4.5 Volume Control . . . . . . . . . . . . . . . . . . . . . . . . . . . . . . . . . . . . . . . . . . . . . . 2-8
2.4.5.1 Master Volume Control . . . . . . . . . . . . . . . . . . . . . . . . . . . . . . . . . . . . . 2-8
2.4.5.2 Individual Volume Control. . . . . . . . . . . . . . . . . . . . . . . . . . . . . . . . . . . 2-8
3.1 INTRODUCTION . . . . . . . . . . . . . . . . . . . . . . . . . . . . . . . . . . . . . . . . . . . . . . . 3-1
3.2 MAIN FUNCTION. . . . . . . . . . . . . . . . . . . . . . . . . . . . . . . . . . . . . . . . . . . . . . . 3-1
3.3 SYSTEM-SPECIFIC CONFIGURATION . . . . . . . . . . . . . . . . . . . . . . . . . . . . 3-2
3.4 MODE SCREENS . . . . . . . . . . . . . . . . . . . . . . . . . . . . . . . . . . . . . . . . . . . . . . . 3-4
3.5 EVENT-HANDLER FUNCTION . . . . . . . . . . . . . . . . . . . . . . . . . . . . . . . . . . . 3-5
3.6 SPI COMMUNICATION. . . . . . . . . . . . . . . . . . . . . . . . . . . . . . . . . . . . . . . . . . 3-5
3.6.1 Receiving Data from the DSP. . . . . . . . . . . . . . . . . . . . . . . . . . . . . . . . . . . . 3-5
3.6.2 Transmitting Data to the DSP. . . . . . . . . . . . . . . . . . . . . . . . . . . . . . . . . . . . 3-6
Frees
cale Semiconductor,
I
Freescale Semiconductor, Inc.
For More Information On This Product,
Go to: www.freescale.com
nc...
Page 4

-iv DSPD56362EVM Upgrade Manual MOTOROLA
Frees
cale Semiconductor,
I
Freescale Semiconductor, Inc.
For More Information On This Product,
Go to: www.freescale.com
nc...
Page 5

MOTOROLA DSPD56362EVM Upgrade Manual iii
LIST OF FIGURES
Figure Page
Number Title Number
Figure 1-1 Upgradeable Devices . . . . . . . . . . . . . . . . . . . . . . . . . . . . . . . . . . . . . . . 1-2
Figure 1-2 Jumper Settings. . . . . . . . . . . . . . . . . . . . . . . . . . . . . . . . . . . . . . . . . . . . 1-4
Figure 2-1 Home Theater Demonstration. . . . . . . . . . . . . . . . . . . . . . . . . . . . . . . . . 2-2
Figure 2-2 Jumper Settings. . . . . . . . . . . . . . . . . . . . . . . . . . . . . . . . . . . . . . . . . . . . 2-3
Figure 2-3 LCD Screens. . . . . . . . . . . . . . . . . . . . . . . . . . . . . . . . . . . . . . . . . . . . . . 2-4
Figure 2-4 LCD Screens (cont.) . . . . . . . . . . . . . . . . . . . . . . . . . . . . . . . . . . . . . . . . 2-7
Frees
cale Semiconductor,
I
Freescale Semiconductor, Inc.
For More Information On This Product,
Go to: www.freescale.com
nc...
Page 6

-vi DSPD56362EVM Upgrade Manual MOTOROLA
Frees
cale Semiconductor,
I
Freescale Semiconductor, Inc.
For More Information On This Product,
Go to: www.freescale.com
nc...
Page 7

MOTOROLA DSPD56362EVM Upgrade Manual 1-1
SECTION 1
UPGRADE INSTRUCTIONS
1.1 INTRODUCTION
This section describes the instructions on how to upgrade the DSP56362EVM to have DSPD56362
decoder functionality. The DSP56362EVM upgrade kit allows user to replace the DSP, 68HC11, and
EPROM to add the following functionalities to the EVM:
• Auto-detection of Dolby DigitalTM, DTSTM, MPEG and PCM source.
• Standalone operation of EVM.
• LCD user interface for control and status operations.
1.2 UPGRADE KIT CONTENTS
The DSP56362EVM upgrade kit contains the following items:
• DSPD56362 Rev. D digital signal processor
• MC68HC711E9 Rev 3.0 microcontroller
• AT27LV010A Rev 1.0 EPROM
• Jumpers
• EVM Supplement Manual (this document)
The DSPD56362 Applications User Manual can be downloaded from Motorola’s website:
http://mot-sps.com/ADC/markets/dspaudio/DSP56362.html
Frees
cale Semiconductor,
I
Freescale Semiconductor, Inc.
For More Information On This Product,
Go to: www.freescale.com
nc...
Page 8
1-2 DSPD56362EVM Upgrade Manual MOTOROLA
UPGRADE INSTRUCTIONS
UPGRADE INSTRUCTIONS
1.3 UPGRADE INSTRUCTIONS
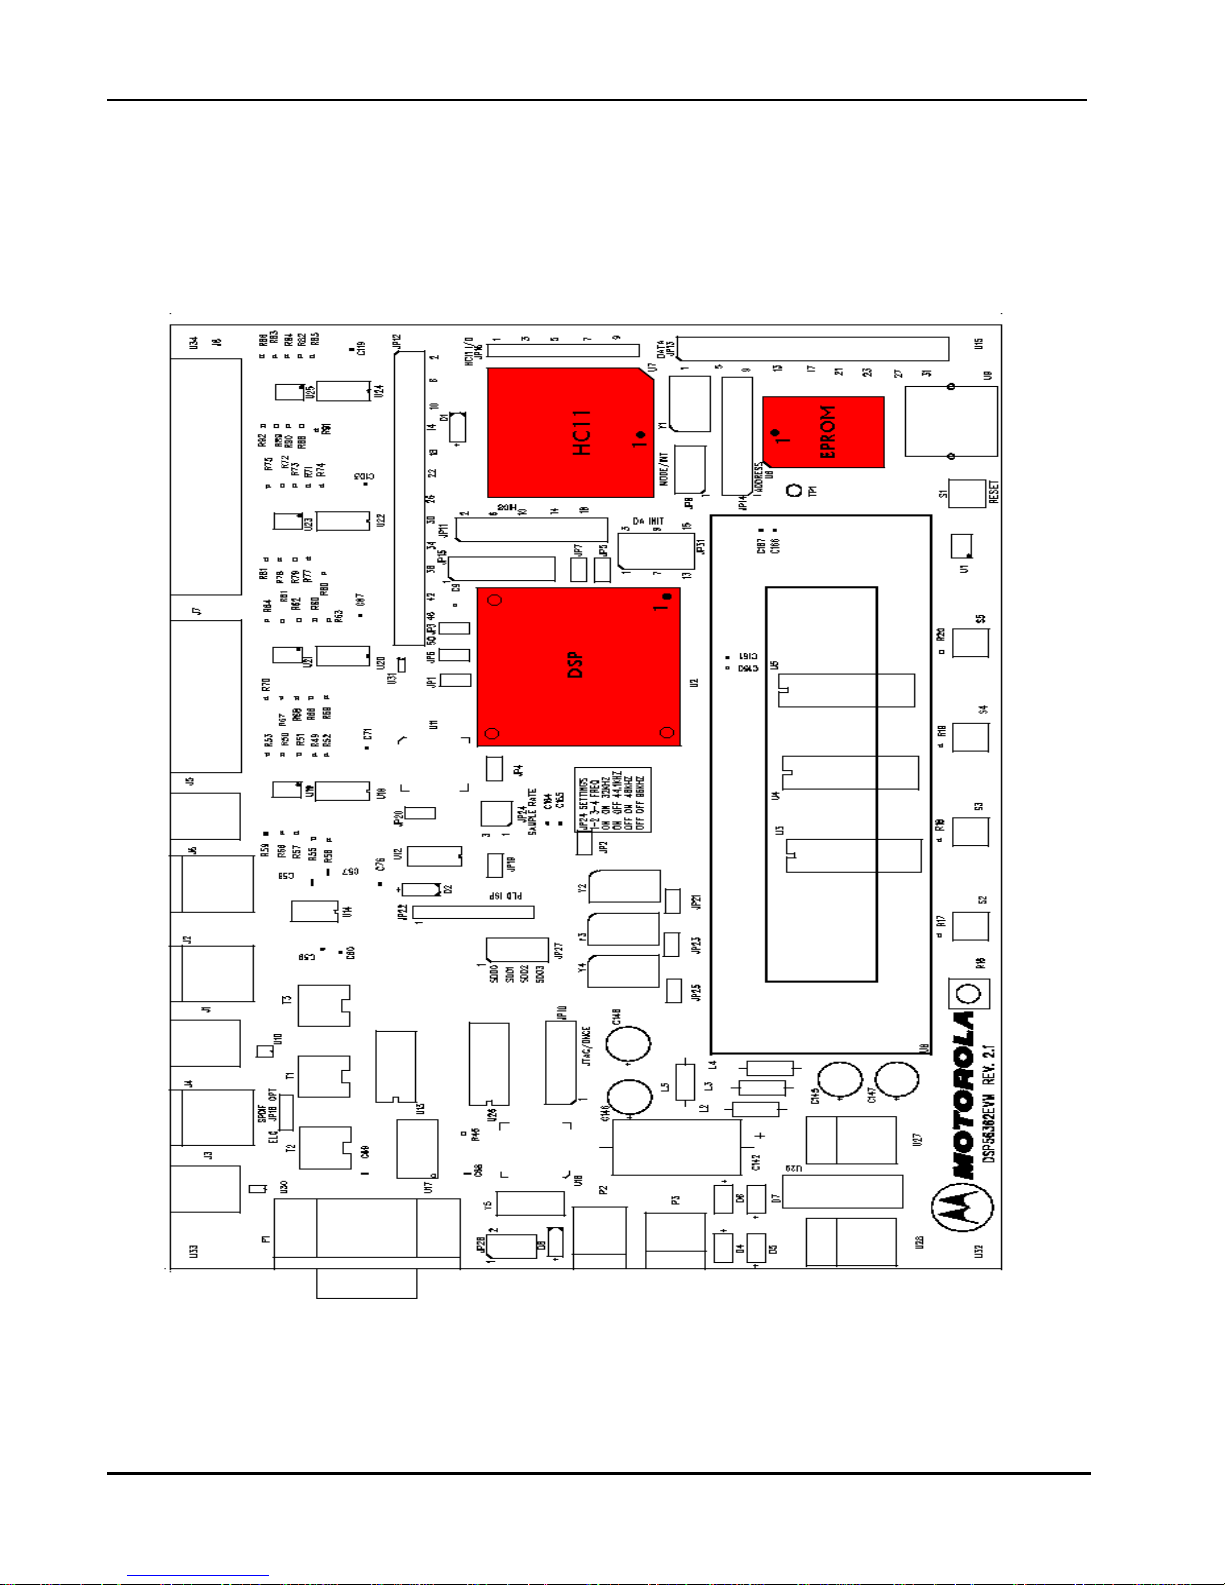
Figure 1-1 shows the location of the DSP, 68HC11, and EPROM. These components need to be
replaced with the components included in the upgrade kit. Pin 1 is indicated by the black dot.
Figure 1-1 Upgradeable Devices
Frees
cale Semiconductor,
I
Freescale Semiconductor, Inc.
For More Information On This Product,
Go to: www.freescale.com
nc...
Page 9

UPGRADE INSTRUCTIONS
UPGRADE INSTRUCTIONS
MOTOROLA DSPD56362EVM Upgrade Manual 1-3
1.3.1 DSP Replacement
To upgrade the DSP:
1. Use a Philips-head screwdriver to remove the 4 screws on the DSP socket U1.
2. Remove the socket top.
3. Remove the generic DSP using a chip suction device and replace it with the DSP included in
the upgrade kit. Verify that the DSP is placed in the socket securely and that the pins make
contact with the socket. Refer to Figure 1-1 for the correct orientation of the DSP.
Caution: To avoid damaging the DSP, use an anti-static wrist band when handling this
device. Using a device other than a chip suction device to lift the DSP may damage the
fine-pitched pins.
4. Replace the socket top and screw the top down.
1.3.2 68HC11 Replacement
To upgrade the 68HC11:
1. Remove the 68HC11 microcontroller from the socket U7 using a PLCC chip extractor device.
2. Replace the component with the 68HC11 included in the upgrade kit. Refer to Figure 1-1 for
the correct orientation of the 68HC11.
1.3.3 EPROM Replacement
To upgrade the EPROM:
1. Remove the EPROM from the socket U6 using a PLCC chip extractor device.
2. Replace the component with the EPROM included in the upgrade kit. Refer to Figure 1-1 for
the correct orientation of the EPROM.
1.3.4 Jumper Settings
Figure 1-2 shows how to modify the jumper settings:
Frees
cale Semiconductor,
I
Freescale Semiconductor, Inc.
For More Information On This Product,
Go to: www.freescale.com
nc...
Page 10

1-4 DSPD56362EVM Upgrade Manual MOTOROLA
UPGRADE INSTRUCTIONS
UPGRADE INSTRUCTIONS
1. Place a jumper from JP11 pin 14 to JP11 pin 17. (PB13 to +3.3V)
2. Place a jumper from JP11 pin 15 to JP11 pin 6. (PB14 to GND)
3. Place jumpers on JP8 pins 1-2, 5-6, and 7-8. (MODE 2)
Figure 1-2 Jumper Settings
Frees
cale Semiconductor,
I
Freescale Semiconductor, Inc.
For More Information On This Product,
Go to: www.freescale.com
nc...
Page 11

MOTOROLA DSPD56362EVM Upgrade Manual 2-1
SECTION 2
DEMONSTRATION INSTRUCTIONS
2.1 INTRODUCTION
This section describes the instructions on how to setup the EVM to demonstrate Dolby
DigitalTM, Dolby Pro LogicTM, DTSTM and MPEG decoding.
2.2 REQUIRED EQUIPMENT
• Dolby DigitalTM, DTSTM, or PCM source, i.e. DVD, Laserdisc, DAT, CD, VHS, etc.
• An audio amplifier driving headphones or speakers as shown on the following page in
Figure 2-1
• 7-9V AC/DC power supply
2.3 DEMONSTRATION SETUP
1. Verify that the DSP, 68HC11, and EPROM have been upgraded as described in
Section 2.3.
2. Verify that the jumper modifications have been made as described in Section 1.3.4.
3. Verify that the jumper settings are correct as shown in Figure 2-2. The default jumper
setting assumes that an optical cable is used to connect the input to the EVM.
However, if using a coaxial cable, move the jumper on JP18 to pins 1-2.
4. Connect the input and output cables to the EVM as shown in Figure 2-1.
5. Apply 7-9V AC/DC to the power connector P2.
Frees
cale Semiconductor,
I
Freescale Semiconductor, Inc.
For More Information On This Product,
Go to: www.freescale.com
nc...
Page 12

2-2 DSPD56362EVM Upgrade Manual MOTOROLA
DEMONSTRATION INSTRUCTIONS
Demonstration Setup
Figure 2-1 Home Theater Demonstration
Power Amp
Laserdisc/DVD Player
Listener
DSP56362EVM
Subwoofer
(unpowered)
Subwoofer
(powered)
DSP56362
68HC11E9
BB1716
BB1716
BB1716
BB1716
ISPLS
12032
DIR1700
CS8414
CS8404
BB1800
P2
P3
P1
JP12
JP16
JP13
JP14
JP8
JP31
JP11
JP15
JP7 JP5
JP4
JP20
JP24
JP19
JP2
JP25JP23JP21
JP22
JP10
JP20
IR Rx
JP18
GS71108J-10
GS71108J-10
GS71108J-10
LR
Rs
Ls
C
Sub
Ra
La
Lin Rin
Elec.
out
Elec.
out
Opt.
in
Elec.
in
Frees
cale Semiconductor,
I
Freescale Semiconductor, Inc.
For More Information On This Product,
Go to: www.freescale.com
nc...
Page 13

DEMONSTRATION INSTRUCTIONS
Demonstration Setup
MOTOROLA DSPD56362EVM Upgrade Manual 2-3
Figure 2-2 Jumper Settings
Frees
cale Semiconductor,
I
Freescale Semiconductor, Inc.
For More Information On This Product,
Go to: www.freescale.com
nc...
Page 14

2-4 DSPD56362EVM Upgrade Manual MOTOROLA
DEMONSTRATION INSTRUCTIONS
User Interface
2.4 USER INTERFACE
Figure 2-3 illustrates the different screens of the LCD panels and the corresponding actions of the
pushbutton switches.
Figure 2-3 LCD Screens
S2 S3 S4 S5
EVM56362 vx.x
Go
S2 S3 S4 S5
Dolby Digital
Spkr Vol
TO VOLUME CONFIGURATION SCREEN
START SCREEN
DECODER STATUS SCREEN
TO SPEAKER CONFIGURATION SCREEN
Frees
cale Semiconductor,
I
Freescale Semiconductor, Inc.
For More Information On This Product,
Go to: www.freescale.com
nc...
Page 15

DEMONSTRATION INSTRUCTIONS
User Interface
MOTOROLA DSPD56362EVM Upgrade Manual 2-5
S2 S3 S4 S5
Left/Right: WIDE
Wide Nrrw Next
S2 S3 S4 S5
Center: WIDE
Wide Nrrw None Next
S2 S3 S4 S5
Surround: WIDE
Wide Nrrw None Next
S2 S3 S4 S5
Subwoofer: WIDE
Wide None Next Home
SPEAKER CONFIGURATION SCREEN
TO DECODER STATUS SCREEN
Frees
cale Semiconductor,
I
Freescale Semiconductor, Inc.
For More Information On This Product,
Go to: www.freescale.com
nc...
Page 16

2-6 DSPD56362EVM Upgrade Manual MOTOROLA
DEMONSTRATION INSTRUCTIONS
User Interface
S2 S3 S4 S5
Volume Setting
Mstr Indv Home
S2 S3 S4 S5
RightSurr + 0 dB
V+ V- Next Home
S2 S3 S4 S5
Left + 0 dB
V+ V- Next Home
VOLUME CONFIGURATION SCREEN
S2 S3 S4 S5
Center + 0 dB
V+ V- Next Home
S2 S3 S4 S5
Right + 0 dB
V+ V- Next Home
S2 S3 S4 S5
LeftSurr + 0 dB
V+ V- Next Home
S2 S3 S4 S5
Subwoofer + 0 dB
V+ V- Next Home
S2 S3 S4 S5
Master + 0 dB
V+ V- Un/Mute Home
S2 S3 S4 S5
Mute: OFF
On Off Home
TO DECODER STATUS SCREEN
Frees
cale Semiconductor,
I
Freescale Semiconductor, Inc.
For More Information On This Product,
Go to: www.freescale.com
nc...
Page 17

DEMONSTRATION INSTRUCTIONS
User Interface
MOTOROLA DSPD56362EVM Upgrade Manual 2-7
Figure 2-4 LCD Screens (cont.)
2.4.1 LCD Screen Description
The EVM’s user interface allows the user to perform the following functions:
• Activate the DSP decoder functionality
• Obtain decoder source type status information
• Select speaker configuration
• Control the master volume
• Control the individual channels volume
• Control mute and unmute
2.4.2 Decoder Activation
Once power is applied to the EVM, the Start Screen will be displayed on the LCD panel. Pre ssing the
S2 button (‘Go’) will activate the decoder and the LCD will display the message ‘Wait...’ until a
software patch is downloaded to the DSP. After several seconds, auto-detection is activated and the
decoder type is shown on the screen.
2.4.3 Decoder Source Type
It is not necessary to reset the EVM when changing the source (AC-3, DTS, MPEG or PCM). Once
the change is made the LCD panel will automatically display the current decoder source type on the
Decoder Status Screen.
2.4.4 Speaker Configuration
Pressing the S2 button (‘Spkr’) while in the Decoder Screen gives the user control of the speaker
configuration. The default configuration for the left, right, center, surround, and subwoofer speakers
are initially set to ‘Wide’ mode. However, the user has the option of changing the left, right, center,
and surround speaker configuration to ‘Narrow’ mode or turning off the center, surround and
subwoofer speakers for a two-speaker configuration. Pressing the ‘Next’ button allows the user to
Frees
cale Semiconductor,
I
Freescale Semiconductor, Inc.
For More Information On This Product,
Go to: www.freescale.com
nc...
Page 18

2-8 DSPD56362EVM Upgrade Manual MOTOROLA
DEMONSTRATION INSTRUCTIONS
User Interface
configure the next speaker. Table 2-1 summarizes the available speaker settings. If the source is
PCM, the DSP assumes the source is surround encoded and decodes the bitstream as Dolby Pro
Logic.
2.4.5 Volume Control
Pressing the S4 button (‘Vol’) while in the Decoder Screen gives the user control of the master and
individual channel volume. The default master and individual channel volume setting is 0 dB.
2.4.5.1 Master Volume Control
Pressing the S2 button (‘Mstr’) while in the Volume Screen gives the user control of the master
volume. In the Master Volume Screen, the master volume may be changed by pressing the S2 button
(‘V+’) to increase the volume or the S3 button (‘V-) to decrease the volume in increments of 1 dB.
The volume range is from -64 dB to +64 dB.
The master volume may be muted and unmuted by pressing the S4 button (‘Un/Mute’) and selecting
‘On’ or ‘Off’.
Pressing the S5 button (‘Home’) changes the display back to the Decoder Screen.
2.4.5.2 Individual Volume Control
Pressing the S3 button (‘Indiv’) while in the Volume Screen gives the user control of the individual
channel volume. In the Individual Channel Volume Screen, the individual channel volume may be
changed by pressing the S2 button (‘V+’) to increase the volume or the S3 button (‘V-) to decrease
Table 2-1 Speaker Configuration
SPEAKER SETTINGS
Left/Right Wide - default
Narrow
Center Wide - default
Narrow
None
Surround Wide - default
Narrow
None
Subwoofer Wide - default
None
Frees
cale Semiconductor,
I
Freescale Semiconductor, Inc.
For More Information On This Product,
Go to: www.freescale.com
nc...
Page 19

DEMONSTRATION INSTRUCTIONS
User Interface
MOTOROLA DSPD56362EVM Upgrade Manual 2-9
the volume in increments of 1 dB. The volume range is from -64 dB to +64 dB. The S4 button
(‘Next’) allows the user to cycle through the different channels.
Pressing the S5 button (‘Home’) changes the display back to the Decoder Screen.
Frees
cale Semiconductor,
I
Freescale Semiconductor, Inc.
For More Information On This Product,
Go to: www.freescale.com
nc...
Page 20

2-10 DSPD56362EVM Upgrade Manual MOTOROLA
DEMONSTRATION INSTRUCTIONS
User Interface
Frees
cale Semiconductor,
I
Freescale Semiconductor, Inc.
For More Information On This Product,
Go to: www.freescale.com
nc...
Page 21

MOTOROLA DSPD56362EVM Upgrade Manual 3-1
SECTION 3
68HC11 SOURCE CODE DESCIPTION
3.1 INTRODUCTION
This section gives a brief description of how the 68HC11 microcontroller code works in case
the user needs to make modifications or additions to the user interface.
3.2 MAIN FUNCTION
The following steps are taken in the main function of the code:
1. InitRegs( )- Initialize 68HC11 control registers:
• Configure Port A pins to be inputs from switches S2, S3, S4, and S5.
• Configure Port B pins to be outputs to LCD and D/A converters control signals.
• Configure Port C pins to be outputs to LCD data lines.
• Configure Port D pins to be input from and outputs to DSP’s SHI port.
2. InitVol( )- Initialize D/A converters:
• Configure D/A converters to operate in software mode.
• Initialize attenuation and input data format for all four D/A converters.
3. InitKey( )- Initialize key input manager:
• Configure keypad action on the EVM.
4. InitLCD( )- Initialize LCD manager:
• Configure to display messages on the LCD.
5. InitParams( )- Initialize parameters:
• Initialize left, right, center, surround, and subwoofer volume at 0 dB.
6. SetMode(BOOT_MODE) - Display initial screen on LCD.
Frees
cale Semiconductor,
I
Freescale Semiconductor, Inc.
For More Information On This Product,
Go to: www.freescale.com
nc...
Page 22

3-2 DSPD56362EVM Upgrade Manual MOTOROLA
68HC11 SOURCE CODE DESCIPTION
SYSTEM-SPECIFIC CONFIGURATION
• Run InitAV2( ) function
• Run RunPatch( ) function.
7. Enable interrupts and wait for keypad inputs.
3.3 SYSTEM-SPECIFIC CONFIGURATION
The InitAV3( ) function configures specific DSP registers for the EVM56362. However, other
systems may require different settings and this function may need to be modified. These system
differences may affect the following:
• Multiplication factor in the PCTL.
• Address attribute AAx signals for selecting external memory devices.
• Number of wait states for each AAx signal in the BCR.
• ESAI receive and transmit configuration.
Table 3-1 shows the default DSP register settings for the EVM56362.
Table 3-1 InitAV2 Default Settings
REGISTER ADDRESS VALUE DESCRIPTION
PLL PCTL 0xFFFFFD 0x0F000B DSP operating frequency of 96Mhz
BUS
INTERFACE
AAR0 0xFFFFF9 0x0C063D Additional address line A18
AAR1 0xFFFFF8 0x080539 Map external EPROM access X/Y/P:$080000
to $0FFFFF
AAR2 0xFFFFF7 0x040639 Map external SRAM access X/Y/P:$040000
to $07FFFF
BCR 0xFFFFFB 0x0005E1 AAR0 1 wait state
AAR1 15 wait staes
AAR2 1 wait state
INTERRUPT
PRIORITY
IPRP 0xFFFFFE 0x000187 ESAI interrupt priority level 2
DAX interrupt priority level 1
Timer, SHI interrupt level 0
Frees
cale Semiconductor,
I
Freescale Semiconductor, Inc.
For More Information On This Product,
Go to: www.freescale.com
nc...
Page 23

68HC11 SOURCE CODE DESCIPTION
SYSTEM-SPECIFIC CONFIGURATION
MOTOROLA DSPD56362EVM Upgrade Manual 3-3
ENHANCED
SERIAL
AUDIO
INTERFACE
SAICR 0xFFFFB4 0x000000 Independent clock and frame sync signals for
Rx and Tx (asynchronous)
RCR 0xFFFFB7 0x714902 RX1 is enabled, shift data in MSB first,
left-aligned data word, network mode, 32-bit
slot length, 16-bit word length, word-lenght
frame sync, frame sync occurs 1 seri al clock
cycle earlier, Rx, Rx exception, and Rx even
data slot interrupts are enabled
RCCR 0xFFFFB8 0x0C0200 Fixed divide by 8 prescaler is operational, 2
words per frame, falling edge of Rx clock is
used to clock data in and frame sync, rising
edge of Rx clock is used to latch data in and
frame sync, frame start indicated by low level
on frame sync pin
TCR 0xFFFFB5 0x717D0F TX0, TX1, TX2 and TX3 are enabled, shift
data out in MSB first, left-a ligned data word,
network mode, 32-bit slot length, 24-bit word
length, word-length frame sync, Tx, Tx
exception, and Tx eve n data slot inter rupts ar e
enabled
TCCR 0xFFFFB6 0x0C0200 Fixed divide by 8 prescaler is operational, 2
words per frame, falling edge of Tx clock is
used to clock data out and frame sync, rising
edge of Rx clock is used to latch the data and
frame sync in, frame start is indicate d by low
level on frame sync pin
RSMA 0xFFFFBB 0x000003 Receive a data word and generate a receive
full condition RDF=1 for slots 1 and 2
RSMB 0xFFFFBC 0x000000 Only slots 1 and 2 are used
TSMA 0xFFFFB9 0x000003 Transmit a data word and generate a transmit
empty condition TDE=1 for slots 1 and 2
TSMB 0xFFFFBA 0x000000 Only slots 1 and 2 are used
Table 3-1 InitAV2 Default Settings (Continued)
REGISTER ADDRESS VALUE DESCRIPTION
Frees
cale Semiconductor,
I
Freescale Semiconductor, Inc.
For More Information On This Product,
Go to: www.freescale.com
nc...
Page 24

3-4 DSPD56362EVM Upgrade Manual MOTOROLA
68HC11 SOURCE CODE DESCIPTION
MODE SCREENS
3.4 MODE SCREENS
Each screen is defined by the current mode as well as the next mode associated with each of the four
switches. These modes are stored in the array tableModes. The example below shows the format
of the mode screen:
tableModes[ ] =
{
{CURRENT_MODE,
{NXT_MODE_S2, NXT_MODE_S3, NXT_MODE_S4, NXT_MODE_S5},
“Text Line” 1,
“Action_S2 Action_S3 Action_S4 Action_S5”},
}
In the example below, BOOT_MODE is the first screen that is displayed when the DSP is reset.
Decoding is started when “Go” is selected by pressing switch S2. When S2 is pressed, the new mode
is DEC_MODE which displays the decoder type. Pressing switch S3, S4, or S5 does not initiate any
action, thus NO_MODE is the next mode.
tableModes[ ] =
{
{BOOT_MODE,
{DEC_MODE, NO_MODE, NO_MODE, NO_MODE},
“EVM56362”,
“Go”},
}
Frees
cale Semiconductor,
I
Freescale Semiconductor, Inc.
For More Information On This Product,
Go to: www.freescale.com
nc...
Page 25

68HC11 SOURCE CODE DESCIPTION
EVENT-HANDLER FUNCTION
MOTOROLA DSPD56362EVM Upgrade Manual 3-5
3.5 EVENT-HANDLER FUNCTION
The ProcessEvent( ) function processes the events according to the current display mode and
keypad action. For example, if the current mode is MUTE_MODE, the ProcessEvent function
sends the mute command to the DSP if switch S2 is pressed, or it sends the unmute command to the
DSP if switch S3 is pressed, or sets the mode to the decoder status mode DEC_MODE if S5 pressed.
ProcessEvent ( )
{
case(MUTE_MODE):
{
send MUTE opcode if S2 is pressed
send UNMUTE opcode if S3 is pressed
return to start screen if S5 is pressed
break;
}
}
3.6 SPI COMMUNICATION
Communication between the 68HC11 host microcontroller and the DSP is via SPI. The host is
configured as the master and the DSP is configured as the slave. The ExchangeSPI_DSP
(rx_addr, tx_addr) function performs the SPI communication by exchanging 3 bytes. Data
at address tx_addr is transmitted to the DSP and data received from the DSP is stored at address
rx_addr.
3.6.1 Receiving Data from the DSP
The 68HC11 can receive a data word from the DSP by using the GetDSP (opcode) function.
This function is used for receiving status information from the DSP. The opcode parameter
specifies the status command. For example, the command
DSP_REPLY = GetDSP (MODE_SOURCE)
prompts the DSP to reply with the decoder type. In this case, the parameter MODE_SOURCE is the
command 0x0A02100. The reply may be Dolby Digital, DTS, MPEG, or PCM. The status
opcodes are listed in the DSP56362 Applications User Manual.
Frees
cale Semiconductor,
I
Freescale Semiconductor, Inc.
For More Information On This Product,
Go to: www.freescale.com
nc...
Page 26

3-6 DSPD56362EVM Upgrade Manual MOTOROLA
68HC11 SOURCE CODE DESCIPTION
SPI COMMUNICATION
3.6.2 Transmitting Data to the DSP
The 68HC11 can transmit a data word to the DSP by using the SendDSP (opcode) function. This
function is used for transmitting control commands to the DSP. The opcode paramet er specifies the
control command. For example, the command
SetDSP (MUTE)
sends the control opcode to mute the outputs of the DSP. In this case the parameter MUTE is the
command 0xE08480. The control opcodes are listed in the DSP56362 Applications User Manual.
The SetDSP function has other variations depending on the number of data words to send. These
variations include:
SetDSP2 (opcode, data)
SetDSP3 (opcode, address, data)
SetDSP4 (opcode, address, data1, data2)
SetDSP5 (opcode, address, data1, data2, data3)
When multiple data words are transmitted, these words are stored in contiguious memory locations.
Forexample, data1 will be stored at address and data2 will be stored at address+1.
Frees
cale Semiconductor,
I
Freescale Semiconductor, Inc.
For More Information On This Product,
Go to: www.freescale.com
nc...
 Loading...