

Page 1
Freescale Semiconductor
123456
7
8 9 10 11 12 13
14
AVDD
GND
DVDD_IO
SCL/SPCCS
INT1/DRDY
INT2
N/C
SDO
SDA/SDI/SDO
N/C
IADDR0
N/C
GND
Technical Data
±2g/±4g/±8g Three Axis Low-g
Document Number: MMA7455L
Rev 4, 08/2008
Digital Output Accelerometer
The MMA7455L is a Digital Output (I2C/SPI), low power, low profile
capacitive micromachined accelerometer featuring signal conditioning, a low
pass filter, temperature compensation, self-test, configurable to detect 0g
through interrupt pins (INT1 or INT2), and pulse detect for quick motion
detection. 0g offset and sensitivity are factory set and require no external
devices. The 0g offset can be customer calibrated using assigned 0g registers
and g-Select which allows for command selection for 3 acceleration ranges
(2g/4g/8g). The MMA7455L includes a Standby Mode that makes it ideal for
handheld battery powered electronics.
Features
2
• Digital Output (I
• 3mm x 5mm x 1mm LGA-14 Package
• Low Current Consumption
• Self-Test for Z-Axis
• Low Voltage Operation: 2.4 V – 3.6 V
• User Assigned Registers for Offset Calibration
• Programmable Threshold Interrupt Output
• Level Detection for Motion Recognition (Shock, Vibration, Freefall)
• Pulse Detection for Single or Double Pulse Recognition
• Sensitivity (64 LSB/g @ 2g and @ 8g in 10-Bit Mode)
• Selectable Sensitivity (±2g, ±4g, ±8g) for 8-bit Mode
• Robust Design, High Shocks Survivability (5,000g)
• RoHS Compliant
• Environmentally Preferred Product
• Low Cost
C/SPI)
MMA7455L
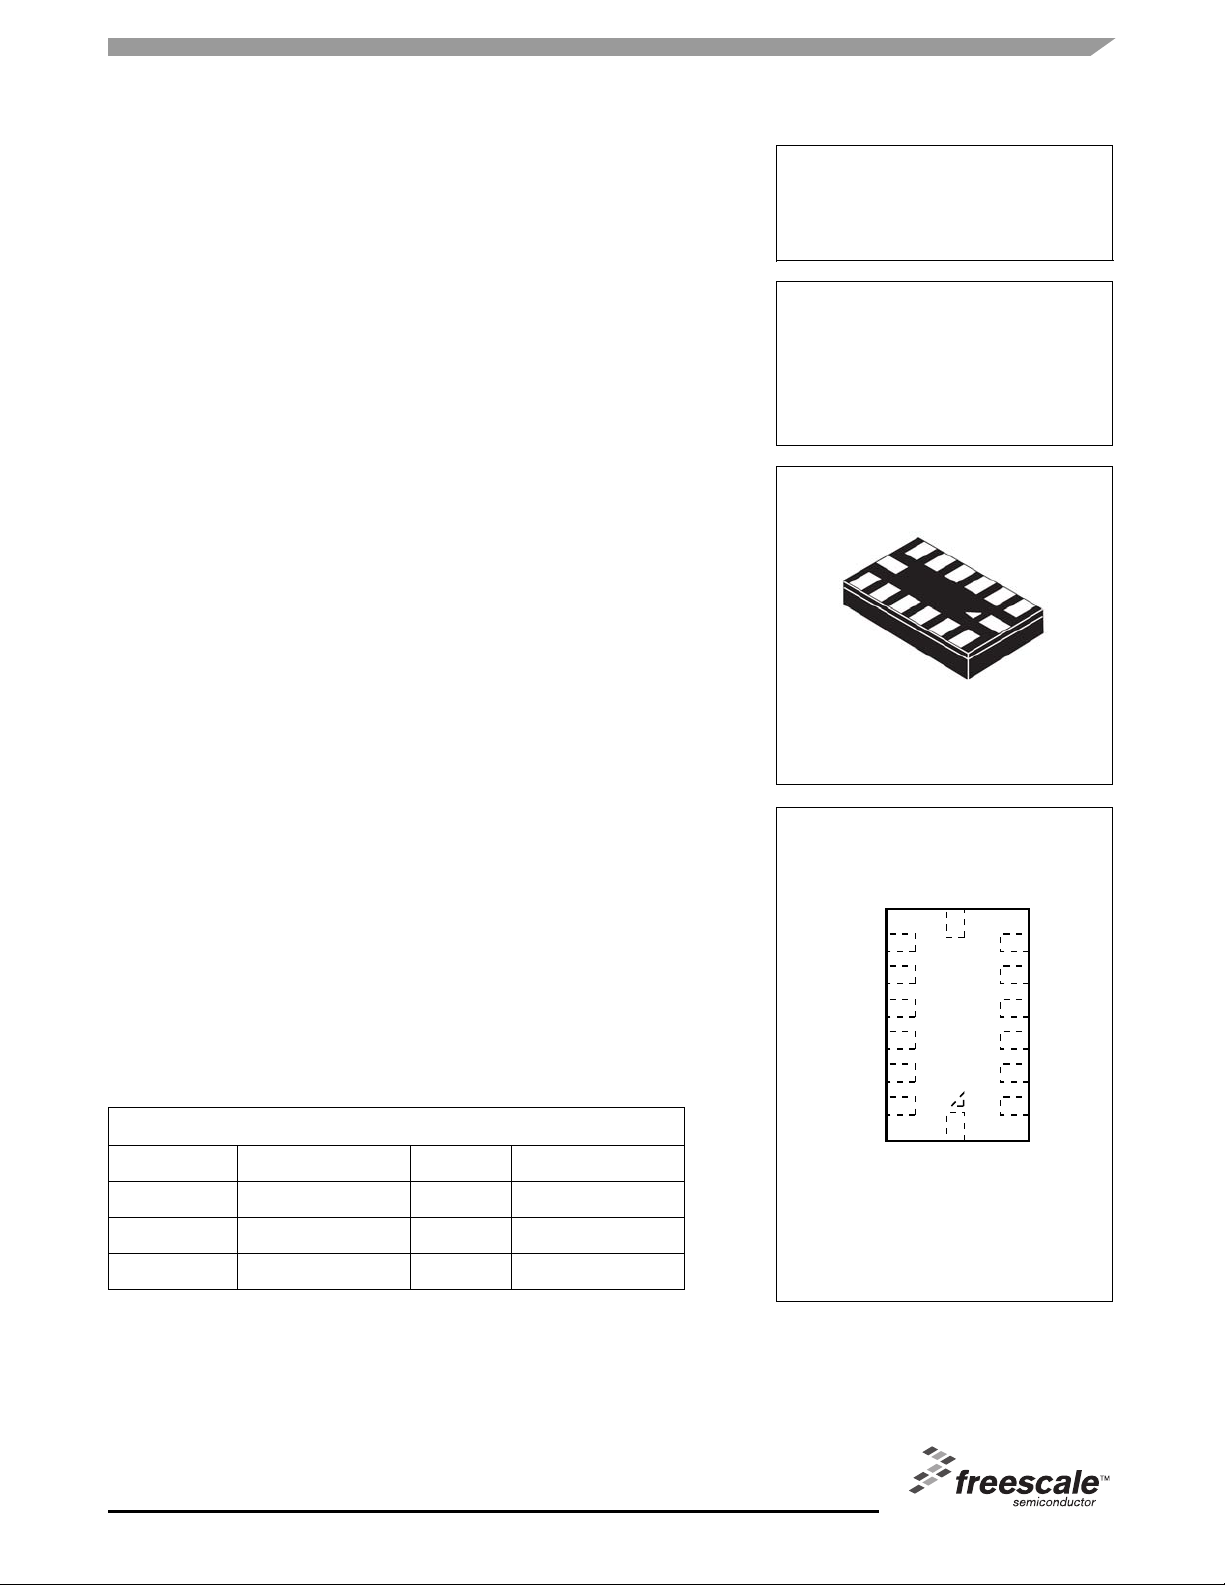
MMA7455L: XYZ-AXIS
ACCELEROMETER
±2G/±4G/±8G
Bottom View
14 LEAD
LGA
CASE 1977-01
Top View
Typical Applications
• Cell Phone/PMP/PDA: Image Stability, Text Scroll, Motion Dialing, Tap to
Mute
• HDD: Freefall Detection
• Laptop PC: Freefall Detection, Anti-Theft
• Pedometer
• Motion Sensing, Event Recorder
ORDERING INFORMATION
Part Number Temperature Range Package Shipping
MMA7455LT
MMA7455LR1
MMA7455LR2
This document contains certain information on a new product.
Specifications and information herein are subject to change without notice.
© Freescale Semiconductor, Inc., 2007, 2008. All rights reserved.
–40 to +85°C LGA-14 Tray
–40 to +85°C LGA-14 7” Tape & Reel
–40 to +85°C LGA-14 13” Tape & Reel
Figure 1. Pin Connections
Page 2

Contents
ELECTRO STATIC DISCHARGE (ESD) . . . . . . . . . . . . . . . . . . . . . . . . . . . . . . . . . . . . . . . . . . . . . . . . . . . . . . . . . . . . . . . . . . .6
PRINCIPLE OF OPERATION . . . . . . . . . . . . . . . . . . . . . . . . . . . . . . . . . . . . . . . . . . . . . . . . . . . . . . . . . . . . . . . . . . . . . . . . . . . .8
FEATURES . . . . . . . . . . . . . . . . . . . . . . . . . . . . . . . . . . . . . . . . . . . . . . . . . . . . . . . . . . . . . . . . . . . . . . . . . . . . . . . . . . . . . . . . . .8
Self-Test . . . . . . . . . . . . . . . . . . . . . . . . . . . . . . . . . . . . . . . . . . . . . . . . . . . . . . . . . . . . . . . . . . . . . . . . . . . . . . . . . . . . .8
g-Select . . . . . . . . . . . . . . . . . . . . . . . . . . . . . . . . . . . . . . . . . . . . . . . . . . . . . . . . . . . . . . . . . . . . . . . . . . . . . . . . . . . . . .9
Standby Mode . . . . . . . . . . . . . . . . . . . . . . . . . . . . . . . . . . . . . . . . . . . . . . . . . . . . . . . . . . . . . . . . . . . . . . . . . . . . . . . . .9
Measurement Mode . . . . . . . . . . . . . . . . . . . . . . . . . . . . . . . . . . . . . . . . . . . . . . . . . . . . . . . . . . . . . . . . . . . . . . . . . . . .9
LEVEL DETECTION . . . . . . . . . . . . . . . . . . . . . . . . . . . . . . . . . . . . . . . . . . . . . . . . . . . . . . . . . . . . . . . . . . . . . . . . . . . . . . . . . .10
$18: Control 1 (Read/Write) Setting the Detection Axes for X, Y and Z . . . . . . . . . . . . . . . . . . . . . . . . . . . . . . . . . . . .10
$19: Control 2 (Read/Write) Motion Detection (OR Condition) or Freefall Detection (AND Condition) . . . . . . . . . . . .10
$18: Control 1 (Read/Write): Setting the threshold to be an integer value or an absolute value . . . . . . . . . . . . . . . . .10
$1A: Level Detection Threshold Limit Value (Read/Write) . . . . . . . . . . . . . . . . . . . . . . . . . . . . . . . . . . . . . . . . . . . . . .10
THRESHOLD DETECTION FOR MOTION AND FREEFALL CONDITIONS . . . . . . . . . . . . . . . . . . . . . . . . . . . . . . . . . . . . . . .11
CASE 1: Motion Detection . . . . . . . . . . . . . . . . . . . . . . . . . . . . . . . . . . . . . . . . . . . . . . . . . . . . . . . . . . . . . . . . . . . . . .11
CASE 2: Motion Detection . . . . . . . . . . . . . . . . . . . . . . . . . . . . . . . . . . . . . . . . . . . . . . . . . . . . . . . . . . . . . . . . . . . . . .11
CASE 3: Freefall Detection . . . . . . . . . . . . . . . . . . . . . . . . . . . . . . . . . . . . . . . . . . . . . . . . . . . . . . . . . . . . . . . . . . . . . .11
CASE 4: Freefall Detection . . . . . . . . . . . . . . . . . . . . . . . . . . . . . . . . . . . . . . . . . . . . . . . . . . . . . . . . . . . . . . . . . . . . . .11
PULSE DETECTION . . . . . . . . . . . . . . . . . . . . . . . . . . . . . . . . . . . . . . . . . . . . . . . . . . . . . . . . . . . . . . . . . . . . . . . . . . . . . . . . . .12
$18: Control 1 (Read/Write): Disable X, Y or Z for pulse detection . . . . . . . . . . . . . . . . . . . . . . . . . . . . . . . . . . . . . . .12
$19: Control 2 (Read/Write): Motion Detection (OR condition) or Freefall Detection (AND condition) . . . . . . . . . . . . .12
CASE 1: Single Pulse Motion Detection: X or Y or Z > Pulse Threshold for Time < Pulse Duration . . . . . . . . . . . . . .12
CASE 2: Freefall Detection: X and Y and Z < Pulse Threshold for Time > Latency Time . . . . . . . . . . . . . . . . . . . . . .13
CASE 3: Double Pulse Detection: X OR Y OR Z > Threshold for Pulse Duration1 < PDTime1, Latency Time, AND .14
ASSIGNING, CLEARING & DETECTING INTERRUPTS . . . . . . . . . . . . . . . . . . . . . . . . . . . . . . . . . . . . . . . . . . . . . . . . . . . . . .15
Clearing the Interrupt Pins: Register $17 . . . . . . . . . . . . . . . . . . . . . . . . . . . . . . . . . . . . . . . . . . . . . . . . . . . . . . . . . . .15
Detecting Interrupts . . . . . . . . . . . . . . . . . . . . . . . . . . . . . . . . . . . . . . . . . . . . . . . . . . . . . . . . . . . . . . . . . . . . . . . . . . .16
DIGITAL INTERFACE . . . . . . . . . . . . . . . . . . . . . . . . . . . . . . . . . . . . . . . . . . . . . . . . . . . . . . . . . . . . . . . . . . . . . . . . . . . . . . . . .16
BASIC CONNECTIONS . . . . . . . . . . . . . . . . . . . . . . . . . . . . . . . . . . . . . . . . . . . . . . . . . . . . . . . . . . . . . . . . . . . . . . . . . . . . . . .19
REGISTER DEFINITIONS . . . . . . . . . . . . . . . . . . . . . . . . . . . . . . . . . . . . . . . . . . . . . . . . . . . . . . . . . . . . . . . . . . . . . . . . . . . . .21
SOLDERING AND MOUNTING GUIDELINES FOR THE LGA ACCELEROMETER SENSOR TO A PC BOARD . . . . . . . . . .29
2
C Slave Interface . . . . . . . . . . . . . . . . . . . . . . . . . . . . . . . . . . . . . . . . . . . . . . . . . . . . . . . . . . . . . . . . . . . . . . . . . . . .16
I
SPI Slave Interface . . . . . . . . . . . . . . . . . . . . . . . . . . . . . . . . . . . . . . . . . . . . . . . . . . . . . . . . . . . . . . . . . . . . . . . . . . . .18
Pin Descriptions . . . . . . . . . . . . . . . . . . . . . . . . . . . . . . . . . . . . . . . . . . . . . . . . . . . . . . . . . . . . . . . . . . . . . . . . . . . . . .19
Recommended PCB Layout for Interfacing Accelerometer to Microcontroller . . . . . . . . . . . . . . . . . . . . . . . . . . . . . . .19
MMA7455L
Sensors
2 Freescale Semiconductor
Page 3

List of Figures
Pin Connections . . . . . . . . . . . . . . . . . . . . . . . . . . . . . . . . . . . . . . . . . . . . . . . . . . . . . . . . . . . . . . . . . . . . . . . . . . . . . . . . . . . . . . 1
Simplified Accelerometer Functional Block Diagram. . . . . . . . . . . . . . . . . . . . . . . . . . . . . . . . . . . . . . . . . . . . . . . . . . . . . . . . . . .5
Simplified Transducer Physical Model. . . . . . . . . . . . . . . . . . . . . . . . . . . . . . . . . . . . . . . . . . . . . . . . . . . . . . . . . . . . . . . . . . . . . . 8
Single Pulse Detection . . . . . . . . . . . . . . . . . . . . . . . . . . . . . . . . . . . . . . . . . . . . . . . . . . . . . . . . . . . . . . . . . . . . . . . . . . . . . . . . 13
Freefall Detection in Pulse Mode. . . . . . . . . . . . . . . . . . . . . . . . . . . . . . . . . . . . . . . . . . . . . . . . . . . . . . . . . . . . . . . . . . . . . . . . . 13
Double Pulse Detection . . . . . . . . . . . . . . . . . . . . . . . . . . . . . . . . . . . . . . . . . . . . . . . . . . . . . . . . . . . . . . . . . . . . . . . . . . . . . . . . 14
Single Byte Read - The Master is reading one address from the MMA7455L . . . . . . . . . . . . . . . . . . . . . . . . . . . . . . . . . . . . . . 17
Multiple Bytes Read - The Master is reading multiple sequential registers from the MMA7455L . . . . . . . . . . . . . . . . . . . . . . . . 17
Single Byte Write - The Master (MCU) is writing to a single register of the MMA7455L . . . . . . . . . . . . . . . . . . . . . . . . . . . . . . . 17
Multiple Byte Writes - The Master (MCU) is writing to multiple sequential registers of the MMA7455L . . . . . . . . . . . . . . . . . . . 17
SPI Timing Diagram for 8-Bit Register Read (4 Wire Mode) . . . . . . . . . . . . . . . . . . . . . . . . . . . . . . . . . . . . . . . . . . . . . . . . . . . . 18
SPI Timing Diagram for 8-Bit Register Read (3 Wire Mode) . . . . . . . . . . . . . . . . . . . . . . . . . . . . . . . . . . . . . . . . . . . . . . . . . . . . 18
SPI timing Diagram for 8-Bit Register Write (3 Wire Mode) . . . . . . . . . . . . . . . . . . . . . . . . . . . . . . . . . . . . . . . . . . . . . . . . . . . . 18
Pinout Description . . . . . . . . . . . . . . . . . . . . . . . . . . . . . . . . . . . . . . . . . . . . . . . . . . . . . . . . . . . . . . . . . . . . . . . . . . . . . . . . . . . . 19
2
C Connection to MCU. . . . . . . . . . . . . . . . . . . . . . . . . . . . . . . . . . . . . . . . . . . . . . . . . . . . . . . . . . . . . . . . . . . . . . . . . . . . . . . . 19
I
SPI Connection to MCU . . . . . . . . . . . . . . . . . . . . . . . . . . . . . . . . . . . . . . . . . . . . . . . . . . . . . . . . . . . . . . . . . . . . . . . . . . . . . . . 20
Sensing Direction and Output Response at 2g Mode . . . . . . . . . . . . . . . . . . . . . . . . . . . . . . . . . . . . . . . . . . . . . . . . . . . . . . . . . 28
Recommended PCB Land Pattern for the 5 x 3 mm LGA Package . . . . . . . . . . . . . . . . . . . . . . . . . . . . . . . . . . . . . . . . . . . . . . 29
Incorrect PCB Top Metal Pattern Under
Package. . . . . . . . . . . . . . . . . . . . . . . . . . . . . . . . . . . . . . . . . . . . . . . . . . . . . . . . . . . . . . . . . . . . . . . . . . . . . . . . . . . . . . . . . . . . 30
Correct PCB Top Metal Pattern Under Package. . . . . . . . . . . . . . . . . . . . . . . . . . . . . . . . . . . . . . . . . . . . . . . . . . . . . . . . . . . . .30
Recommended PCB Land Pad, Solder Mask, and Signal Trace Near Package Design . . . . . . . . . . . . . . . . . . . . . . . . . . . . . .30
Stencil Design Guidelines . . . . . . . . . . . . . . . . . . . . . . . . . . . . . . . . . . . . . . . . . . . . . . . . . . . . . . . . . . . . . . . . . . . . . . . . . . . . . . 31
MMA7455L
Sensors
Freescale Semiconductor 3
Page 4

List of Tables
Pin Descriptions . . . . . . . . . . . . . . . . . . . . . . . . . . . . . . . . . . . . . . . . . . . . . . . . . . . . . . . . . . . . . . . . . . . . . . . . . . . . . . . . . . . . . .5
Maximum Ratings
(Maximum ratings are the limits to which the device can be exposed without causing permanent damage.) . . . . . . . . . . . . . . .6
Operating Characteristics
Unless otherwise noted: –40°C < TA < 85°C, 2.4 V < AVDD < 3.6 V, Acceleration = 0g, Loaded output. . . . . . . . . . . . . . . . . . .7
Function Parameters for Detection
–40°C < TA < 85°C, 2.4 V < AVDD < 3.6 V, unless otherwise specified . . . . . . . . . . . . . . . . . . . . . . . . . . . . . . . . . . . . . . . . . . .8
$16: Mode Control Register (Read/Write) . . . . . . . . . . . . . . . . . . . . . . . . . . . . . . . . . . . . . . . . . . . . . . . . . . . . . . . . . . . . . . . . . . .9
Configuring the g-Select for 8-bit output using Register $16 with GLVL[1:0] bits. . . . . . . . . . . . . . . . . . . . . . . . . . . . . . . . . . . . .9
Configuring the Mode using Register $16 with MODE[1:0] bits. . . . . . . . . . . . . . . . . . . . . . . . . . . . . . . . . . . . . . . . . . . . . . . . . . .9
THOPT = 0 Absolute; THOPT = 1 Positive Negative . . . . . . . . . . . . . . . . . . . . . . . . . . . . . . . . . . . . . . . . . . . . . . . . . . . . . . . . .10
$1B: Pulse Detection Threshold Limit Value (Read/Write) . . . . . . . . . . . . . . . . . . . . . . . . . . . . . . . . . . . . . . . . . . . . . . . . . . . . .12
$1C: Pulse Duration Value (Read/Write) . . . . . . . . . . . . . . . . . . . . . . . . . . . . . . . . . . . . . . . . . . . . . . . . . . . . . . . . . . . . . . . . . .12
$1B: Pulse Detection Threshold Limit Value (Read/Write) . . . . . . . . . . . . . . . . . . . . . . . . . . . . . . . . . . . . . . . . . . . . . . . . . . . . .13
$1D: Latency Time Value (Read/Write) . . . . . . . . . . . . . . . . . . . . . . . . . . . . . . . . . . . . . . . . . . . . . . . . . . . . . . . . . . . . . . . . . . .13
$1B: Pulse Detection Threshold Limit Value (Read/Write) . . . . . . . . . . . . . . . . . . . . . . . . . . . . . . . . . . . . . . . . . . . . . . . . . . . . .14
$1C: Pulse Duration Value (Read/Write) . . . . . . . . . . . . . . . . . . . . . . . . . . . . . . . . . . . . . . . . . . . . . . . . . . . . . . . . . . . . . . . . . .14
$1D: Latency Time Value (Read/Write) . . . . . . . . . . . . . . . . . . . . . . . . . . . . . . . . . . . . . . . . . . . . . . . . . . . . . . . . . . . . . . . . . . .14
$1E: Time Window for 2nd Pulse Value (Read/Write) . . . . . . . . . . . . . . . . . . . . . . . . . . . . . . . . . . . . . . . . . . . . . . . . . . . . . . . .14
$18 Control 1 Register . . . . . . . . . . . . . . . . . . . . . . . . . . . . . . . . . . . . . . . . . . . . . . . . . . . . . . . . . . . . . . . . . . . . . . . . . . . . . . . .15
Configuring the Interrupt settings using Register $18 with INTREG[1:0] bits . . . . . . . . . . . . . . . . . . . . . . . . . . . . . . . . . . . . . . .15
$17: Interrupt Latch Reset (Read/Write) . . . . . . . . . . . . . . . . . . . . . . . . . . . . . . . . . . . . . . . . . . . . . . . . . . . . . . . . . . . . . . . . . . .15
$0A: Detection Source Register (Read only) . . . . . . . . . . . . . . . . . . . . . . . . . . . . . . . . . . . . . . . . . . . . . . . . . . . . . . . . . . . . . . .16
Pin Descriptions . . . . . . . . . . . . . . . . . . . . . . . . . . . . . . . . . . . . . . . . . . . . . . . . . . . . . . . . . . . . . . . . . . . . . . . . . . . . . . . . . . . . .19
User Register Summary . . . . . . . . . . . . . . . . . . . . . . . . . . . . . . . . . . . . . . . . . . . . . . . . . . . . . . . . . . . . . . . . . . . . . . . . . . . . . . .21
$00: 10bits Output Value X LSB (Read only) . . . . . . . . . . . . . . . . . . . . . . . . . . . . . . . . . . . . . . . . . . . . . . . . . . . . . . . . . . . . . . .21
$01: 10bits Output Value X MSB (Read only) . . . . . . . . . . . . . . . . . . . . . . . . . . . . . . . . . . . . . . . . . . . . . . . . . . . . . . . . . . . . . . .22
$02: 10bits Output Value Y LSB (Read only) . . . . . . . . . . . . . . . . . . . . . . . . . . . . . . . . . . . . . . . . . . . . . . . . . . . . . . . . . . . . . . .22
$03: 10bits Output Value Y MSB (Read only) . . . . . . . . . . . . . . . . . . . . . . . . . . . . . . . . . . . . . . . . . . . . . . . . . . . . . . . . . . . . . . .22
$05: 10bits Output Value X MSB (Read only) . . . . . . . . . . . . . . . . . . . . . . . . . . . . . . . . . . . . . . . . . . . . . . . . . . . . . . . . . . . . . . .22
$06: 8bits Output Value X (Read only) . . . . . . . . . . . . . . . . . . . . . . . . . . . . . . . . . . . . . . . . . . . . . . . . . . . . . . . . . . . . . . . . . . . .22
$07: 8bits Output Value Y (Read only) . . . . . . . . . . . . . . . . . . . . . . . . . . . . . . . . . . . . . . . . . . . . . . . . . . . . . . . . . . . . . . . . . . . .22
$08: 8bits Output Value Z (Read only) . . . . . . . . . . . . . . . . . . . . . . . . . . . . . . . . . . . . . . . . . . . . . . . . . . . . . . . . . . . . . . . . . . . .23
$09: Status Register (Read only) . . . . . . . . . . . . . . . . . . . . . . . . . . . . . . . . . . . . . . . . . . . . . . . . . . . . . . . . . . . . . . . . . . . . . . . .23
$0A: Detection Source Register (Read only) . . . . . . . . . . . . . . . . . . . . . . . . . . . . . . . . . . . . . . . . . . . . . . . . . . . . . . . . . . . . . . .23
$0D: I2C Device Address (Bit 6-0: Read only, Bit 7: Read/Write) . . . . . . . . . . . . . . . . . . . . . . . . . . . . . . . . . . . . . . . . . . . . . . . .24
$0E: User Information (Read Only: Optional) . . . . . . . . . . . . . . . . . . . . . . . . . . . . . . . . . . . . . . . . . . . . . . . . . . . . . . . . . . . . . . .24
$0F: “Who Am I” Value (Read only: Optional) . . . . . . . . . . . . . . . . . . . . . . . . . . . . . . . . . . . . . . . . . . . . . . . . . . . . . . . . . . . . . . .24
$10: Offset Drift X LSB (Read/Write) . . . . . . . . . . . . . . . . . . . . . . . . . . . . . . . . . . . . . . . . . . . . . . . . . . . . . . . . . . . . . . . . . . . . .24
$11: Offset Drift X MSB (Read/Write) . . . . . . . . . . . . . . . . . . . . . . . . . . . . . . . . . . . . . . . . . . . . . . . . . . . . . . . . . . . . . . . . . . . . .24
$12: Offset Drift Y LSB (Read/Write) . . . . . . . . . . . . . . . . . . . . . . . . . . . . . . . . . . . . . . . . . . . . . . . . . . . . . . . . . . . . . . . . . . . . .24
$13: Offset Drift Y MSB (Read/Write) . . . . . . . . . . . . . . . . . . . . . . . . . . . . . . . . . . . . . . . . . . . . . . . . . . . . . . . . . . . . . . . . . . . . .25
$14: Offset Drift Z LSB (Read/Write) . . . . . . . . . . . . . . . . . . . . . . . . . . . . . . . . . . . . . . . . . . . . . . . . . . . . . . . . . . . . . . . . . . . . . .25
$15: Offset Drift Z MSB (Read/Write) . . . . . . . . . . . . . . . . . . . . . . . . . . . . . . . . . . . . . . . . . . . . . . . . . . . . . . . . . . . . . . . . . . . . .25
$16: Mode Control Register (Read/Write) . . . . . . . . . . . . . . . . . . . . . . . . . . . . . . . . . . . . . . . . . . . . . . . . . . . . . . . . . . . . . . . . . .25
Configuring the g-Select for 8-bit output using Register $16 with GLVL[1:0] bits. . . . . . . . . . . . . . . . . . . . . . . . . . . . . . . . . . . .25
$17: Interrupt Latch Reset (Read/Write) . . . . . . . . . . . . . . . . . . . . . . . . . . . . . . . . . . . . . . . . . . . . . . . . . . . . . . . . . . . . . . . . . . .26
$18 Control 1 (Read/Write) . . . . . . . . . . . . . . . . . . . . . . . . . . . . . . . . . . . . . . . . . . . . . . . . . . . . . . . . . . . . . . . . . . . . . . . . . . . . .26
Configuring the Interrupt settings using Register $18 with INTREG[1:0] bits . . . . . . . . . . . . . . . . . . . . . . . . . . . . . . . . . . . . . . .26
$1A: Level Detection Threshold Limit Value (Read/Write) . . . . . . . . . . . . . . . . . . . . . . . . . . . . . . . . . . . . . . . . . . . . . . . . . . . . .27
$1B: Pulse Detection Threshold Limit Value (Read/Write) . . . . . . . . . . . . . . . . . . . . . . . . . . . . . . . . . . . . . . . . . . . . . . . . . . . . .27
$1C: Pulse Duration Value (Read/Write) . . . . . . . . . . . . . . . . . . . . . . . . . . . . . . . . . . . . . . . . . . . . . . . . . . . . . . . . . . . . . . . . . .27
$1D: Latency Time Value (Read/Write) . . . . . . . . . . . . . . . . . . . . . . . . . . . . . . . . . . . . . . . . . . . . . . . . . . . . . . . . . . . . . . . . . . .27
$1E: Time Window for 2nd Pulse Value (Read/Write) . . . . . . . . . . . . . . . . . . . . . . . . . . . . . . . . . . . . . . . . . . . . . . . . . . . . . . . .27
Acceleration vs. Output (8-bit data) . . . . . . . . . . . . . . . . . . . . . . . . . . . . . . . . . . . . . . . . . . . . . . . . . . . . . . . . . . . . . . . . . . . . . . .28
MMA7455L
Sensors
4 Freescale Semiconductor
Page 5
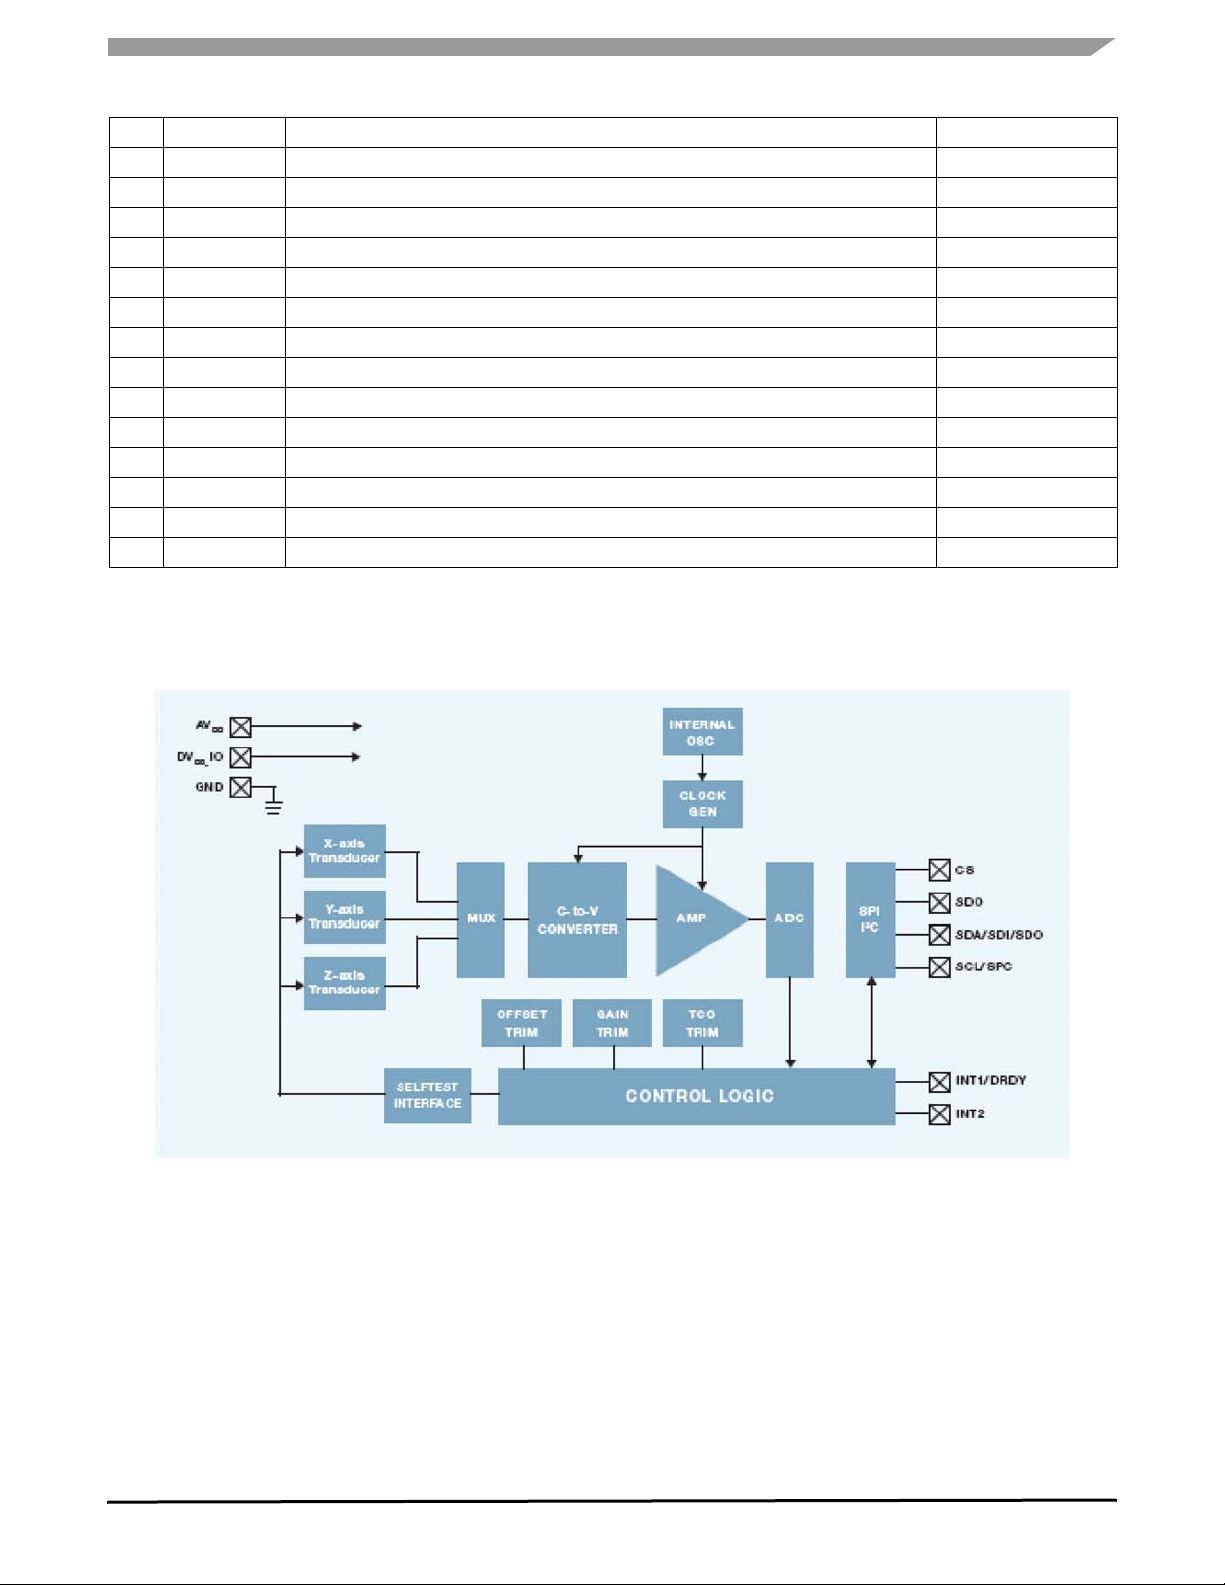
Table 1. Pin Descriptions
Pin # Pin Name Description Pin Status
1 DVDD_IO Digital Power for I/O pads Input
2 GND Ground Input
3 N/C No internal connection. Leave unconnected or connect to Ground. Input
4 IADDR0
2
C Address Bit 0 (optional)*
I
5 GND Ground Input
6 AVDD Analog Power Input
7CS
SPI Enable (0), I
2
C Enable (1)
8 INT1/DRDY Interrupt 1/ Data Ready Output
9 INT2 Interrupt 2 Output
10 N/C No internal connection. Leave unconnected or connect to Ground. Input
11 N/C Leave unconnected or connect to Ground. Input
12 SDO SPI Serial Data Output Output
13 SDA/SDI/SDO
14 SCL/SPC
2
C Serial Data (SDA), SPI Serial Data Input (SDI), 3-wire interface Serial Data Output (SDO)
I
2
C Serial Clock (SCL), SPI Serial Clock (SPC)
I
Open Drain/Input/Output
*This address selection capability is not enabled at the default state. If the user wants to use it, factory programming is required. If activated (pin4
on the device is active).
<$1D= 0001 1101> bit 0 is V
on pin 4
DD
<$1C=0001 1100> bit 0 is GND on pin 4. If the pin is programmed it cannot be left NC.
Input
Input
Input
Figure 1. Simplified Accelerometer Functional Block Diagram
MMA7455L
Sensors
Freescale Semiconductor 5
Page 6

Table 2. Maximum Ratings
(Maximum ratings are the limits to which the device can be exposed without causing permanent damage.)
Rating Symbol Value Unit
Maximum Acceleration (all axes) g
Analog Supply Voltage AV
Digital I/O pins Supply Voltage DV
Drop Test D
Storage Temperature Range T
max
DD
DD_IO
drop
stg
5000 g
-0.3 to +3.6 V
-0.3 to +3.6 V
1.8 m
-40 to +125 °C
ELECTRO STATIC DISCHARGE (ESD)
WARNING: This device is sensitive to electrostatic discharge.
Although the Freescale accelerometer contains internal 2000V ESD protection circuitry, extra precaution must be taken by the
user to protect the chip from ESD. A charge of over 2000 volts can accumulate on the human body or associated test equipment.
A charge of this magnitude can alter the performance or cause failure of the chip. When handling the accelerometer, proper ESD
precautions should be followed to avoid exposing the device to discharges which may be detrimental to its performance.
MMA7455L
Sensors
6 Freescale Semiconductor
Page 7

Table 3. Operating Characteristics
Unless otherwise noted: –40°C <
Analog Supply Voltage
Standby/Operation Mode
Enable Bus Mode
Digital I/O Pins Supply Voltage
Standby/Operation Mode
Enable Bus Mode
Supply Current Drain
Operation Mode
Pulse Detect Function Mode
Standby Mode (except data loading and I
Operating Temperature Range T
0g Output Signal (T
±2g range (25°C) 8bit GLVL[1:0]= 0 1
±4g range (25°C) 8bit GLVL[1:0]= 1 0
±8g range (25°C) 8bit GLVL[1:0]= 0 0
±8g range (25°C) 10bit
Sensitivity (T
±2g range (25°C) 8bit
±4g range (25°C) 8bit
±8g range (25°C) 8bit
±8g range (25°C) 10bit
Self-Test Output Response
Zout ΔST
Input High Voltage
Input Low Voltage
Internal Clock Frequency (T
SPI Frequency
DD_IO
DD_IO
< 2.4 V
> 2.4 V
DV
DV
Bandwidth for Data Measurement (User Selectable)
DFBW 0
DFBW 1
Output Data Rate
Output Data Rate is 125 Hz when 62.5 bandwidth is selected.
Output Data rate is 250 Hz when 125Hz bandwidth is selected.
Control Timing
Wait Time for I
Turn On Response Time (Standby to Normal Mode)
Turn Off Response Time (Normal to Standby Mode)
Self-Test Response Time
Sensing Element Resonant Frequency
XY
Z
Nonlinearity (2 g range) -1 — +1 %FS
Cross Axis Sensitivity -5 — +5 %
=25°C, AVDD = 2.8 V
A
=25°C, AV
A
2
DD
C/SPI ready after power on
TA < 85°C, 2.4 V < AVDD < 3.6 V, Acceleration = 0g, Loaded output.
Characteristic Symbol Min Typ Max Unit
2
C/SPI communication period)
= 2.8 V)
= 25°C, AVDD = 2.8 V) t
A
AV
DD
AV
DD
DV
DD_IO
DV
DD_IO
I
DD
I
DD
I
DD
A
V
IH
V
IL
CLK
t
su
t
ru
t
rd
t
st
f
GCELLXY
f
GCELLZ
Z
2.4
2.8
3.6
0
1.71
1.71
—
—
—
1.8
1.8
400
400
2.5
AV
DD
3.6
490
490
10
-40 25 85 °C
-21
—
—
-21
58
—
—
58
64
32
16
64
0
0
0
0
21
—
—
21
70
—
—
70
+48 +64 +80 count
0.7 x DVDD
—
—
—
—
0.35 x DVDD
140 150 160 kHz
—
—
—
—
—
—
—
—
—
—
—
—
4
8
62.5
125
125
250
1
—
—
—
6.0
3.4
—
—
—
—
—
—
—
20
20
20
—
—
count/g
count/g
count/g
count/g
V
V
V
V
μA
μA
μA
count
count
count
count
V
V
MHz
MHz
Hz
Hz
Hz
Hz
ms
ms
ms
ms
kHz
kHz
MMA7455L
Sensors
Freescale Semiconductor 7
Page 8
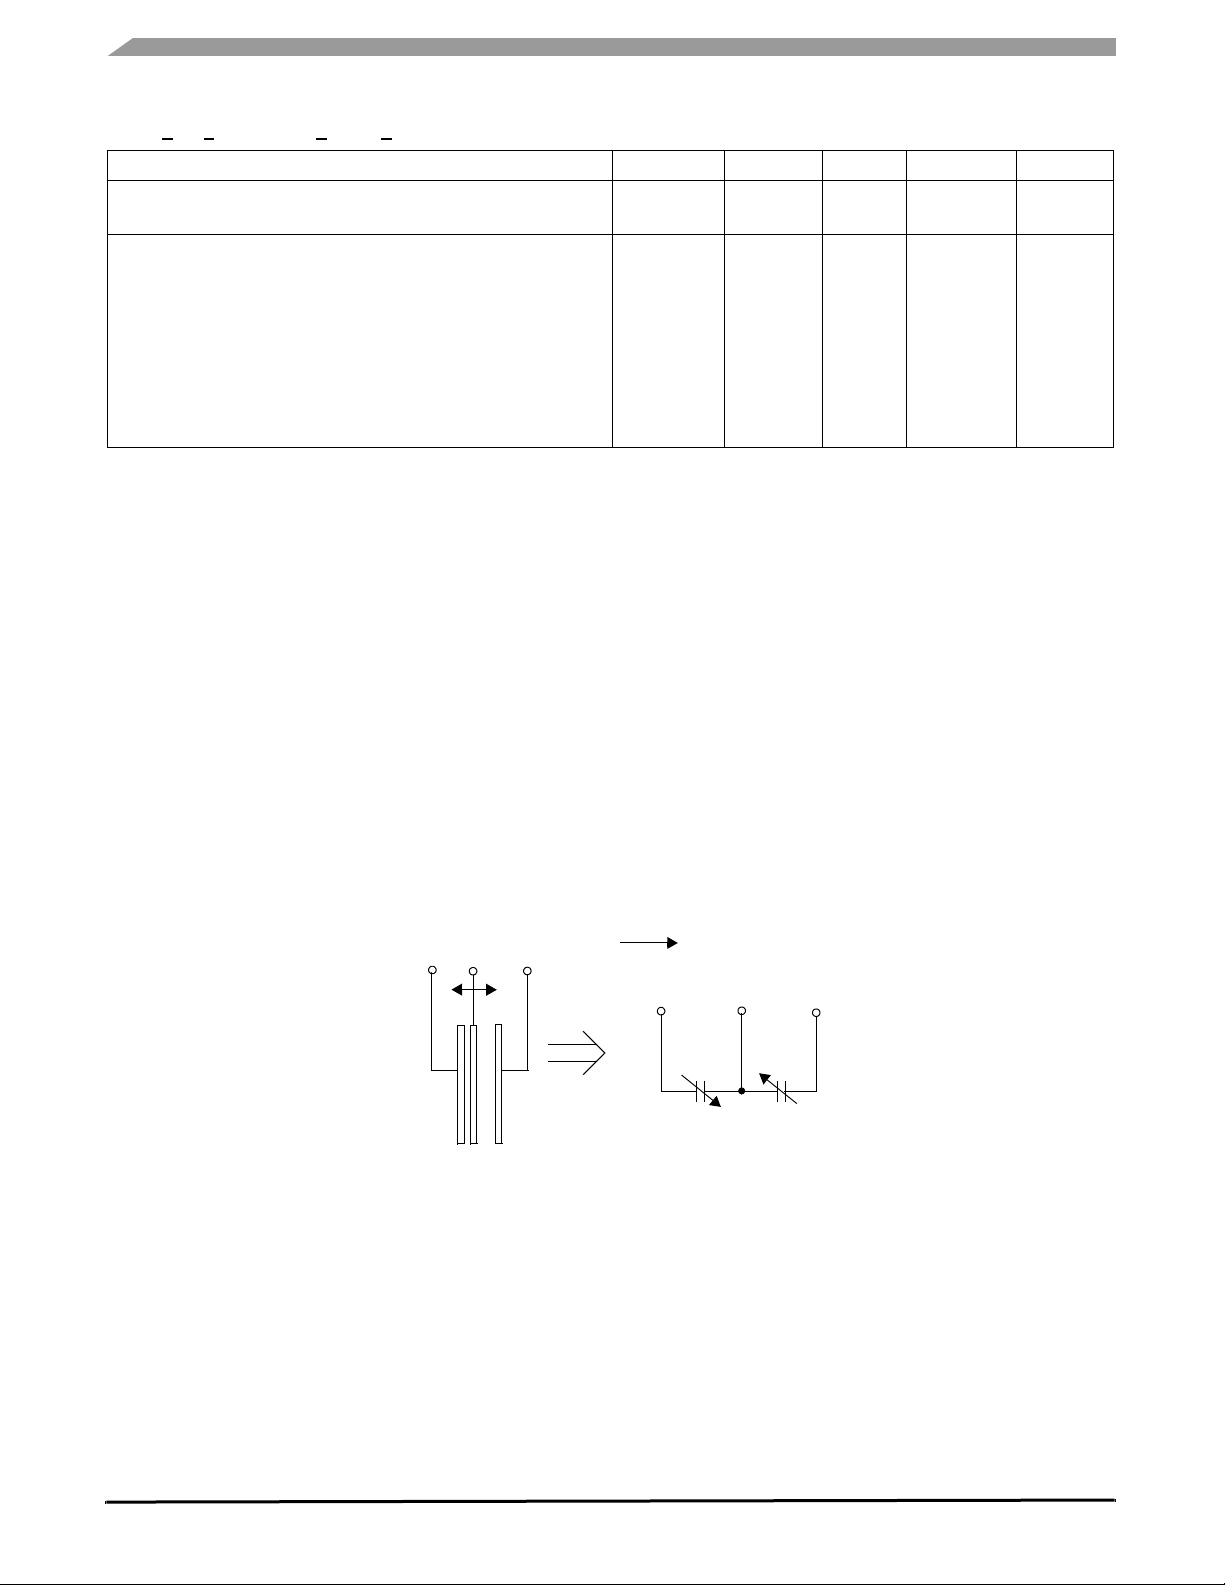
Table 4. Function Parameters for Detection
–40°C <
Note: The response time is between 10% of full scale VDD input voltage and 90% of the final operating output voltage.
*The bandwidth for detecting interrupts in level and pulse is 600Hz which is changed from measurement mode.
TA < 85°C, 2.4 V < AVDD < 3.6 V, unless otherwise specified
Characteristic Symbol Min Typ Max Unit
Level Detection
Detection Threshold Range 0 — FS g
Pulse Detection
Pulse detection range (Adjustable range)
Time step for pulse detection
Threshold range for pulses
Detection levels for threshold
Latency timer (Adjustable range)
Time Window (Adjustable range)
Bandwidth for detecting interrupt*
Time step for latency timer and time window
0.5
—
0
—
1
1
—
—
—
0.5
—
127
—
—
600
1
127
—
FS
—
150
250
—
—
ms
ms
g
Counts
ms
ms
Hz
ms
PRINCIPLE OF OPERATION
The Freescale accelerometer is a surface-micromachined integrated-circuit accelerometer. The device consists of a surface micromachined capacitive sensing cell (g-cell) and a signal conditioning ASIC contained in a single package. The sensing element
is sealed hermetically at the wafer level using a bulk micromachined cap wafer. The g-cell is a mechanical structure formed from
semiconductor materials (polysilicon) using semiconductor processes (masking and etching). It can be modeled as a set of
beams attached to a movable central mass that move between fixed beams. The movable beams can be deflected from their
rest position by subjecting the system to an acceleration (Figure 2).
As the beams attached to the central mass move, the distance from them to the fixed beams on one side will increase by the
same amount that the distance to the fixed beams on the other side decreases. The change in distance is a measure of acceleration. The g-cell beams form two back-to-back capacitors (Figure 2). As the center beam moves with acceleration, the distance
between the beams changes and each capacitor's value will change, (C = A
electric constant, and D is the distance between the beams.
The ASIC uses switched capacitor techniques to measure the g-cell capacitors and extract the acceleration data from the difference between the two capacitors. The ASIC also signal conditions and filters (switched capacitor) the signal, providing a digital
output that is proportional to acceleration.
ε/D). Where A is the area of the beam, ε is the di-
Acceleration
Figure 2. Simplified Transducer Physical Model
FEATURES
Self-Test
The sensor provides a self-test feature that allows the verification of the mechanical and electrical integrity of the accelerometer
at any time before or after installation. This feature is critical in applications such as hard disk drive protection where system integrity must be ensured over the life of the product. When the self-test function is initiated through the mode control register ($16),
accessing the “self-test” bit, an electrostatic force is applied to each axis to cause it to deflect. The Z-axis is trimmed to deflect
1g. This procedure assures that both the mechanical (g-cell) and electronic sections of the accelerometer are functioning.
MMA7455L
Sensors
8 Freescale Semiconductor
Page 9
g-Select
The g-Select feature enables the selection between 3 acceleration ranges for measurement. Depending on the values in the
Mode control register ($16), the MMA7455L’s internal gain will be changed allowing it to function with a 2g, 4g or 8g measurement
sensitivity. This feature is ideal when a product has applications requiring two or more acceleration ranges for optimum performance and for enabling multiple functions. The sensitivity can be changed during the operation by modifying the two GLVL bits
located in the mode control register.
$16: Mode Control Register (Read/Write)
D7 D6 D5 D4 D3 D2 D1 D0 Bit
-- DRPD SPI3W STON GLVL[1] GLVL[0] MODE[1] MODE[0] Function
0 0 0 0 0 0 0 0 Default
Table 5. Configuring the g-Select for 8-bit output using Register $16 with GLVL[1:0] bits.
GLVL [1:0] g-Range Sensitivity
00 8g 16 LSB/g
01 2g 64 LSB/g
10 4g 32 LSB/g
Standby Mode
This digital output 3-axis accelerometer provides a standby mode that is ideal for battery operated products. When standby mode
is active, the device outputs are turned off, providing significant reduction of operating current. When the device is in standby
mode the current will be reduced to 2.5 µA typical. In standby mode the device can read and write to the registers with the I
2
C/
SPI available, but no new measurements can be taken in this mode as all current consuming parts are off. The mode of the device
is controlled through the mode control register by accessing the two mode bits as shown in Table 6.
Table 6. Configuring the Mode using Register $16 with MODE[1:0] bits.
MODE [1:0] Function
00 Standby Mode
01 Measurement Mode
10 Level Detection Mode
11 Pulse Detection Mode
Measurement Mode
During measurement mode, continuous measurements on all three axes enabled. The g-range for 2g, 4g, or 8g are selectable
with 8-bit data and the g-range of 8g is selectable with 10-bit data. The sample rate during measurement mode is 125 Hz with
62.5 BW filter selected. The sample rate is 250 Hz with the 125 Hz filter selected. Therefore, when a conversion is complete
(signaled by the DRDY flag), the next measurement will be ready.
When measurements on all three axes are completed, a logic high level is output to the DRDY pin, indicating “measurement data
is ready.” The DRDY status can be monitored by the DRDY bit in Status Register (Address: $09). The DRDY pin is kept high until
one of the three Output Value Registers are read. If the next measurement data is written before the previous data is read, the
DOVR bit in the Status Register will be set. Also note that in measurement mode, level detection mode and pulse detection mode
are not available.
By default all three axes are enabled. X and/or Y and/or Z can be disabled. There is a choice between detecting an absolute
signal or a positive or negative only signal on the enabled axes. There is also a choice between doing a detection for motion
where X or Y or Z > Threshold vs. doing a detection for freefall where X & Y & Z < Threshold.
MMA7455L
Sensors
Freescale Semiconductor 9
Page 10
LEVEL DETECTION
When in Level or Pulse detection mode, it is not advisable to read the XYZ measurements because this can conflict with timing.
The interrupts for level and pulse detection are at 600 Hz, while measurement mode is at 125 Hz. It is best to exit the pulse/level
mode before taking a measurement on the XYZ.
Both the Level Detection and Pulse Detection modes can trigger an interrupt. Typically one interrupt is assigned to either pulse
detection or level detection. To detect both at the same time 2 interrupts are required. The level detection mechanism has no
timers associated with it. Once a set acceleration level is reached the interrupt pin will go high and remain high until the interrupt
pin is cleared (See Assigning, Clearing & Detecting Interrupts).
By default all three axes are enabled and the detection range is 8g only. X and/or Y and/or Z can be disabled. There is a choice
between detecting an Absolute signal or a Positive or Negative only signal on the enabled axes. There is also a choice between
doing a detection for Motion where X or Y or Z > Threshold vs. doing a detection for Freefall where X& Y & Z < Threshold.
$18: Control 1 (Read/Write) Setting the Detection Axes for X, Y and Z
This allows the user to define how many axes to use for detection. All axes are enabled by default. To disable write 1.
XDA: Disable X
YDA: Disable Y
ZDA: Disable Z
D7 D6 D5 D4 D3 D2 D1 D0 Reg $18
DFBW THOPT ZDA YDA XDA INTREG[1] INTREG[0] INTPIN Function
00000000Default
$19: Control 2 (Read/Write) Motion Detection (OR Condition) or Freefall Detection (AND Condition
)
LDPL = 0: Level detection polarity is positive and detecting condition is OR for all 3 axes.
X or Y or Z > Threshold
||X|| or ||Y|| or ||Z|| > Threshold
LDPL = 1: Level detection polarity is negative detecting condition is AND for all 3 axes.
X and Y and Z < Threshold
||X|| and ||Y|| and ||Z|| < Threshold
D7 D6 D5 D4 D3 D2 D1 D0 Reg $19
-- -- -- -- -- DRVO PDPL LDPL Function
00000000Default
$18: Control 1 (Read/Write): Setting the threshold to be an integer value or an absolute value
This allows the user to set the threshold to be absolute, or to be based on the threshold value as positive or negative.
THOPT = 0 Absolute; THOPT = 1 Positive Negative
D7 D6 D5 D4 D3 D2 D1 D0 Reg $18
DFBW THOPT ZDA YDA XDA INTREG[1] INTREG[0] INTPIN Function
00000000Default
$1A: Level Detection Threshold Limit Value (Read/Write)
When an event is detected the interrupt pin (either INT1 or INT2) will go high. The interrupt pin assignment is set up in Register
$18, discussed in the Assigning, Clearing & Detecting Interrupts section. The detection status is monitored by the Detection
Source Register $0A.
D7 D6 D5 D4 D3 D2 D1 D0 Reg $1A
LDTH[7] LDTH[6] LDTH[5] LDTH[4] LDTH[3] LDTH[2] LDTH[1] LDTH[0] Function
00000000Default
LDTH[7:0]: Level detection threshold value. If THOPT bit in Detection Control Register is “0”, it is unsigned 7 bits value and
LDTH[7] should be “0”. If THOPT bit is “1”, it is signed 8 bits value.
MMA7455L
Sensors
10 Freescale Semiconductor
Page 11
THRESHOLD DETECTION FOR MOTION AND FREEFALL CONDITIONS
CASE 1: Motion Detection
Integer Value: X >Threshold OR Y >Threshold OR Z > Threshold
Reg $18 THOPT=1; Reg 19 LDPL=0, Set Threshold to 3g, which is 47 counts (16 counts/g). Set register $1A LDTH = $2F.
TH = $2F
CASE 2: Motion Detection
Absolute: ||X|| > Threshold OR ||Y|| >Threshold OR ||Z|| > Threshold
Reg $18 THOPT=0; Reg 19 LDPL=0, Set Threshold to 3g, which is 47 counts (16 counts/g). Set register $1A LDTH = $2F.
TH = $2F
TH = $D1
CASE 3: Freefall Detection
Integer Value: X < Threshold AND Y < Threshold AND Z <Threshold
Reg $18 THOPT=1; Reg 19 LDPL=1, Set Threshold to 0.5g, which is 7 counts (16 counts/g). Set register $1A LDTH = $07
TH = $07
CASE 4: Freefall Detection
Absolute: ||X|| <Threshold AND ||Y|| < Threshold AND ||Z||< Threshold
Reg $18 THOPT=0; Reg 19 LDPL=1, Set Threshold to +/-0.5g, which is 7 counts (16 counts/g). Set register $1A LDTH = $07.
TH = $07
TH = $F9
MMA7455L
Sensors
Freescale Semiconductor 11
Page 12

PULSE DETECTION
There are two interrupt pins available for detection of level and pulse conditions. The pulse detection has several timing windows
associated with it. A single pulse and a double pulse can be detected. Also freefall can be detected. The interrupt pins can be
assigned to detect the first pulse on one interrupt and the second pulse on the other interrupt. This is explained on
Page page 15, under the Assigning, Clearing & Detecting Interrupts section.
By default all three axes are enabled and the detection range is 8g only. X and/or Y and/or Z can be disabled. There is a choice
between doing a detection for Motion detection vs. doing a detection for Freefall.
$18: Control 1 (Read/Write): Disable X, Y or Z for pulse detection
This allows the user to define how many axes to use for detection. All axes are enabled by default. To disable write 1
XDA: Disable X
YDA: Disable Y
ZDA: Disable Z.
D7 D6 D5 D4 D3 D2 D1 D0 Reg $18
DFBW THOPT ZDA YDA XDA INTREG[1] INTREG[0] INTPIN Function
00000000Default
$19: Control 2 (Read/Write): Motion Detection (OR condition) or Freefall Detection (AND condition)
PDPL
0: Pulse detection polarity is positive and detecting condition is OR 3 axes.
1: Pulse detection polarity is negative and detecting condition is AND 3 axes.
D7 D6 D5 D4 D3 D2 D1 D0 Reg $19
-- -- -- -- -- DRVO PDPL LDPL Function
00000000Default
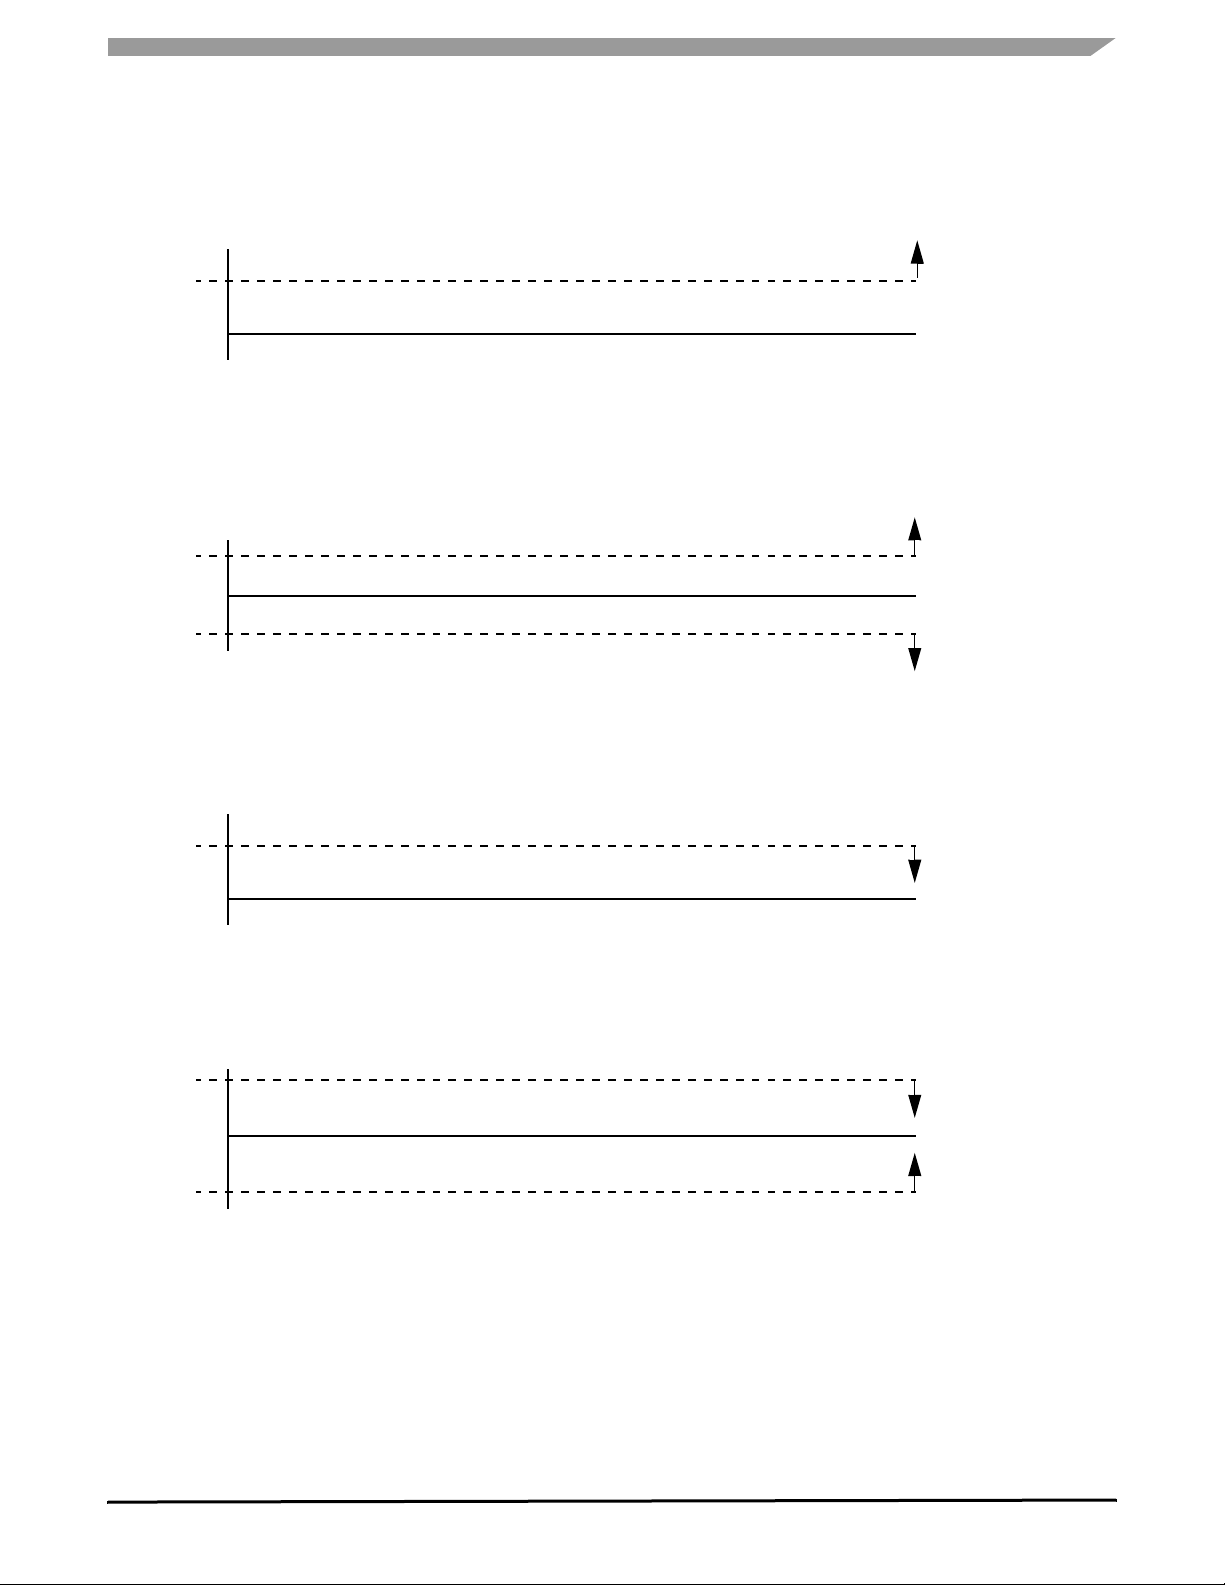
CASE 1: Single Pulse Motion Detection: X or Y or Z > Pulse Threshold for Time < Pulse Duration
For motion detection with single pulse the device must be in pulse mode. PDPL in Register $19 =0 for “OR” motion condition.
The Pulse threshold must be set in Register $1B and the pulse duration time window must also be set using Register $1C. The
pulse must be detected before the time window closes for the interrupt to trigger.
$1B: Pulse Detection Threshold Limit Value (Read/Write)
D7 D6 D5 D4 D3 D2 D1 D0 Reg $1B
PDTH[7] PDTH[6] PDTH[5] PDTH[4] PDTH[3] PDTH[2] PDTH[1] PDTH[0] Function
00000000Default
$1C: Pulse Duration Value (Read/Write)
D7 D6 D5 D4 D3 D2 D1 D0 Reg $1C
PD[7] PD[6] PD[5] PD[4] PD[3] PD[2] PD[1] PD[0] Function
00000001Default
MMA7455L
Sensors
12 Freescale Semiconductor
Page 13

G
G
th
Pulse Detec tion
Time duration
INT pin
*Note there is up to
1.6ms delay on the
interrupt signal
Single Pulse Detection ($19 PDPL=0 indicating motion detection)
Time Window for 2
nd
pulse $1E TW=0 indicating single pulse
Time
Time
Figure 3. Single Pulse Detection
CASE 2: Freefall Detection: X and Y and Z < Pulse Threshold for Time > Latency Time
For freefall detection, set in pulse mode. PDPL in Register $19 =1 for “AND” freefall condition. The Pulse threshold must be set
in Register $1B and the pulse latency time window must also be set using Register $1D. All three axes must remain below the
threshold longer than the time window for the interrupt to trigger.
$1B: Pulse Detection Threshold Limit Value (Read/Write)
D7 D6 D5 D4 D3 D2 D1 D0 Reg $1B
PDTH[7] PDTH[6] PDTH[5] PDTH[4] PDTH[3] PDTH[2] PDTH[1] PDTH[0] Function
00000000Default
$1D: Latency Time Value (Read/Write)
D7 D6 D5 D4 D3 D2 D1 D0 Reg $1D
LT[7] LT[6] LT[5] LT[4] LT[3] LT[2] LT[1] LT[0] Function
00000001Default
Figure 4. Freefall Detection in Pulse Mode
MMA7455L
Sensors
Freescale Semiconductor 13
Page 14

CASE 3: Double Pulse Detection: X OR Y OR Z > Threshold for Pulse Duration1 < PDTime1, Latency Time, AND
X OR Y OR Z > Threshold for Pulse Duration2 < PDTime2
For motion detection with double pulse the device must be in pulse mode. PDPL in Register $19 =0 for “OR” motion condition.
The Pulse Threshold must be set in Register $1B and the Pulse Duration Time Window must also be set using Register $1C.
Then the Latency Time (time between pulses) must be set in Register $1D and then the Second Time Window must be set in
Register $1E for the time window of the second pulse. The pulse must be detected before the time window closes for the interrupt
to trigger.
$1B: Pulse Detection Threshold Limit Value (Read/Write)
D7 D6 D5 D4 D3 D2 D1 D0 Reg $1B
PDTH[7] PDTH[6] PDTH[5] PDTH[4] PDTH[3] PDTH[2] PDTH[1] PDTH[0] Function
00000000Default
$1C: Pulse Duration Value (Read/Write)
D7 D6 D5 D4 D3 D2 D1 D0 Reg $1C
PD[7] PD[6] PD[5] PD[4] PD[3] PD[2] PD[1] PD[0] Function
00000001Default
$1D: Latency Time Value (Read/Write)
D7 D6 D5 D4 D3 D2 D1 D0 Reg $1D
LT[7] LT[6] LT[5] LT[4] LT[3] LT[2] LT[1] LT[0] Function
00000001Default
$1E: Time Window for 2nd Pulse Value (Read/Write)
D7 D6 D5 D4 D3 D2 D1 D0 Reg $1E
TW[7] TW[6] TW[5] TW[4] TW[3] TW[2] TW[1] TW[0] Function
00000000Default
When any of the events are detected, the interrupt pin (either INT1 or INT2) will go high. The interrupt pin assignment is set
up in Register $18, discussed in the Assigning, Clearing & Detecting Interrupts section on page 15. The detection status is
monitored by the detection source register $0A.
G
G
th
INT
Pulse Detection
Time Window
Latency Time Window
nd
(2
pulse ignored here)
Double Pulse Detection ($19 PDPL=0 indicating motion detection)
Time Window for 2
nd
pulse $1E TW>0 indicating double pulse
Pulse Detection Time Window for
nd
pulse
2
Figure 5. Double Pulse Detection
Time
Time Window >0
for 2 pulse detect
*Note there is up to
1.6ms delay on the
interrupt signal
Time
MMA7455L
Sensors
14 Freescale Semiconductor
Page 15

ASSIGNING, CLEARING & DETECTING INTERRUPTS
Assigning the interrupt pins is done in Register $18. There are 3 combinations for the interrupt pins to be assigned which are
outlined below in the table for INTREG[1:0].
$18 Control 1 Register
D7 D6 D5 D4 D3 D2 D1 D0 Reg $18
DFBW THOPT ZDA YDA XDA INTREG[1] INTREG[0] INTPIN Function
00000000Default
Table 7. Configuring the Interrupt settings using Register $18 with INTREG[1:0] bits
INTREG[1:0] “INT1” Register Bit “INT2” Register Bit
00 Level detection Pulse Detection
01 Pulse Detection Level Detection
10 Single Pulse detection Single or Double Pulse Detection
00:
01: INT1 Register is detecting Pulse while INT2 is detecting Level.
10: INT1 Register is detecting a Single Pulse and INT2 is detecting Single Pulse (if 2nd Time Window = 0) or if there is a latency
time window and second time window>0 then INT2 will detect the double pulse only.
INTPIN: INT1 pin is routed to INT1 bit in Detection Source Register ($0A) and INT2 pin is routed to INT2 bit in Detection Source
Register ($0A).
INTPIN: INT2 pin is routed to INT1 bit in Detection Source Register ($0A) and INT1 pin is routed to INT2 bit in Detection Source
Register ($0A).
Note: When INTREG[1:0] =10 for the condition to detect single pulse on INT1 and either single or double pulse on INT2, INT1
register bit can no longer be cleared by setting CLR_INT1 bit. It is cleared by setting CLR_INT2 bit. In this case, setting CLR_INT2
clears both INT1 and INT2 register bits and resets the detection operation. Follow the example given for clearing the interrupts.
Clearing the Interrupt Pins: Register $17
$17: Interrupt Latch Reset (Read/Write)
D7 D6 D5 D4 D3 D2 D1 D0 Reg $17
-- -- -- -- -- -- CLR_INT2 CLR_INT1 Function
00000000Default
CLR_INT1
1: Clear “INT1”
0: Do not clear “INT1”
CLR_INT2
1: Clear “INT2”
0: Do not clear “INT2”
After interrupt has triggered due to a detection, the interrupt pin (INT1 or INT2) need to be cleared by writing a logic 1. Then the
interrupt pin should be enabled to trigger the next detection by setting it to a logic 0.
This example is to show how to reset the interrupt flags
void ClearIntLatch(void)
{
IIC_ByteWrite(INTRST, 0x03);
IIC_ByteWrite(INTRST, 0x00);
}
MMA7455L
Sensors
Freescale Semiconductor 15
Page 16

Detecting Interrupts
$0A: Detection Source Register (Read only)
D7 D6 D5 D4 D3 D2 D1 D0 Reg $0A
LDX LDY LDZ PDX PDY PDZ INT2 INT1 Function
00000000Default
LDX
1: Level detection event is detected on X-axis
0: Level detection event is not detected on X-axis
LDY
1: Level detection event is detected on Y-axis
0: Level detection event is not detected on Y-axis
LDZ
1: Level detection event is detected on Z-axis
0: Level detection event is not detected on Z-axis
PDX
st
pulse is detected on X-axis
1: 1
0: 1st pulse is detected on X-axis
PDZ
st
1: 1
pulse is detected on Z-axis
st
pulse is detected on Z-axis
0: 1
INT1
1: Interrupt assigned by INTRG[1:0] bits in Control 1
Register ($18) and is detected
0: Interrupt assigned by INTRG[1:0] bits in Control 1
Register ($18) and is not detected
INT2
1: Interrupt assigned by INTRG[1:0] bits in Control 1
Register ($18) and is detected
0: Interrupt assigned by INTRG[1:0] bits in Control 1
Register ($18) and is not detected
PDY
1: 1st pulse is detected on Y-axis
st
pulse is detected on Y-axis
0: 1
DIGITAL INTERFACE
The MMA7455L has both an I2C and SPI digital output available for a communication interface. CS pin is used for selecting the
mode of communication. When CS is low, SPI communication is selected. When CS is high, I2C communication is selected.
Note: It is recommended to disable I
2
C during SPI communication to avoid communication errors between devices using a dif-
ferent SPI communication protocol. To disable I2C, set the I2CDIS bit in I2C Device Address register using SPI.
2
I
C Slave Interface
2
C is a synchronous serial communication between a master device and one or more slave devices. The master is typically a
I
microcontroller, which provides the serial clock signal and addresses the slave device(s) on the bus. The MMA7455L communicates only in slave operation where the device address is $1D. Multiple read and write modes are available. The protocol supports
slave only operation. It does not support Hs mode, “10-bit addressing”, “general call” and: ”START byte”.
SINGLE BYTE READ
The MMA7455L has an 10-bit ADC that can sample, convert and return sensor data on request. The transmission of an 8-bit
command begins on the falling edge of SCL. After the eight clock cycles are used to send the command, note that the data returned is sent with the MSB first once the data is received. Figure 6 shows the timing diagram for the accelerometer 8-bit I
2
C
read operation. The Master (or MCU) transmits a start condition (ST) to the MMA7455L, slave address ($1D), with the R/W bit
set to “0” for a write, and the MMA7455L sends an acknowledgement. Then the Master (or MCU) transmits the 10-bit address of
the register to read and the MMA7455L sends an acknowledgement. The Master (or MCU) transmits a repeated start condition
(SR) and then addresses the MMA7455L ($1D) with the R/W bit set to “1” for a read from the previously selected register. The
Slave then acknowledges and transmits the data from the requested register. The Master does not acknowledge (NAK) it received the transmitted data, but transmits a stop condition to end the data transfer.
MULTIPLE BYTES READ
The MMA7455L automatically increments the received register address commands after a read command is received. Therefore,
after following the steps of a single byte read, multiple bytes of data can be read from sequential registers after each MMA7455L
acknowledgment (AK) is received until a NACK is received from the Master followed by a stop condition (SP) signalling an end
of transmission. See Figure 7.
MMA7455L
Sensors
16 Freescale Semiconductor
Page 17

SINGLE BYTE WRITE
To start a write command, the Master transmits a start condition (ST) to the MMA7455L, slave address ($1D) with the R/W bit set
to “0” for a write, the MMA7455L sends an acknowledgement. Then the Master (MCU) transmits the 8-bit address of the register
to write to, and the MMA7455L sends an acknowledgement. Then the Master (or MCU) transmits the 8-bit data to write to the
designated register and the MMA7455L sends an acknowledgement that it has received the data. Since this transmission is complete, the Master transmits a stop condition (SP) to the data transfer. The data sent to the MMA7455L is now stored in the appropriate register. See Figure 8.
Figure 6. Single Byte Read - The Master is reading one address from the MMA7455L
Figure 7. Multiple Bytes Read - The Master is reading multiple sequential registers from the MMA7455L
Figure 8. Single Byte Write - The Master (MCU) is writing to a single register of the MMA7455L
MULTIPLE BYTES WRITE
The MMA7455L automatically increments the received register address commands after a write command is received. Therefore,
after following the steps of a single byte write, multiple bytes of data can be written to sequential registers after each MMA7455L
acknowledgment (ACK) is received. See Figure 9.
Figure 9. Multiple Byte Writes - The Master (MCU) is writing to multiple sequential registers of the MMA7455L
MMA7455L
Sensors
Freescale Semiconductor 17
Page 18

SPI Slave Interface
The MMA7455L also uses serial peripheral interface communication as a digital communication. The SPI communication is primarily used for synchronous serial communication between a master device and one or more slave devices. See Figure 15 for
an example of how to configure one master with one MMA745xL device. The MMA7455L is always operated as a slave device.
Typically, the master device would be a microcontroller which would drive the clock (SPC) and chip select (CS) signals.
The SPI interface consists of two control lines and two data lines: CS, SPC, SDI, and SDO. The CS, also known as Chip Select,
is the slave device enable which is controlled by the SPI master. CS is driven low at the start of a transmission. CS is then driven
high at the end of a transmission. SPC is the Serial Port Clock which is also controlled by the SPI master. SDI and SDO are the
Serial Port Data Input and the Serial Port Data Output. The SDI and SDO data lines are driven at the falling edge of the SPC and
should be captured at the rising edge of the SPC.
Read and write register commands are completed in 16 clock pulses or in multiples of 8, in the case of a multiple byte read/write.
SPI Read Operation
A SPI read transfer consists of a 1-bit Read/Write signal, a 6-bit address, and 1-bit don’t care bit. (1-bit R/W=0 + 6-bits address
+ 1-bit don’t care). The data to read is sent by the SPI interface during the next transfer. See Figure 10 and Figure 11 for the
timing diagram for an 8-bit read in 4 wire and 3 wire modes, respectively.
SPI Write Operation
In order to write to one of the 8-bit registers, an 8-bit write command must be sent to the MMA7455L. The write command consists
of an MSB (0=read, 1=write) to indicate writing to the MMA7455L register, followed by a 6-bit address and 1 don’t care bit.
The command should then be followed the 8-bit data transfer. See Figure 12 for the timing diagram for an 8-bit data write.
Figure 10. SPI Timing Diagram for 8-Bit Register Read (4 Wire Mode)
Figure 11. SPI Timing Diagram for 8-Bit Register Read (3 Wire Mode)
Figure 12. SPI Timing Diagram for 8-Bit Register Write (3 Wire Mode)
MMA7455L
Sensors
18 Freescale Semiconductor
Page 19

BASIC CONNECTIONS
Pin Descriptions
INT1/DRDY
INT2
N/C
N/C
SDO
SDA/SDI/SDO
Figure 13. Pinout Description
8 9 10 11 12 13
Top Vi e w
7
14
SCL/SPCCS
AVDD
GND
IADDR0
N/C
GND
123456
DVDD_IO
Table 8. Pin Descriptions
Pin # Pin Name Description
1 DVDD_IO Digital Power for I/O pads Input
2 GND Ground Input
3 N/C No internal connection. Leave
unconnected or connect to Ground.
4 IADDR0
5 GND Ground Input
6 AVDD Analog Power Input
7CS
8 INT1/DRDY Interrupt 1/ Data Ready Output
9 INT2 Interrupt 2 Output
10 N/C No internal connection. Leave
11 N/C No internal connection. Leave
12 SDO SPI Serial Data Output Output
13 SDA/SDI/SDO
14 SCL/SPC
2
I
C Address Bit 0
2
SPI Enable (0), I
unconnected or connect to Ground.
unconnected or connect to Ground.
2
C Serial Data (SDA), SPI Serial
I
Data Input (SDI), 3-wire interface
Serial Data Output (SDO)
2
I
C Serial Clock (SCL), SPI Serial
Clock (SPC)
C Enable (1)
Status
Drain/
Input/
Output
Pin
Input
Input
Input
Input
Input
Open
Input
Vdd
Vdd
VDD
GND
GND
Recommended PCB Layout for Interfacing Accelerometer to Microcontroller
Address set bit (bit 0)
Address set bit (bit 0)
Vdd_IO
Vdd_IO
10uF
10uF
0.1uF
0.1uF
10uF
10uF
0.1uF
0.1uF
VDD
Vdd
Vdd
VDD
10k?
10k?
R2
VDD
Vdd
Vdd
10k?
10k?
R1
MCU
MCU
SCL
SCL
SDA
SDA
INT2
INT2
INT1/DRDY
INT1/DRDY
2
Figure 14. I
C Connection to MCU
MMA7455L
Sensors
Freescale Semiconductor 19
Page 20

Vdd
1~10uF
Vdd_IO
1~10uF
MCU
SCL/SPC
SDA/SDI/SDO
GND
Figure 15. SPI Connection to MCU
NOTES:
1. Use a 0.1 μF and a 10 μF capacitor on AV
2. Physical coupling distance of the accelerometer to the microcontroller should be minimal.
3. PCB layout of power and ground should not couple power supply noise.
4. Accelerometer and microcontroller should not be a high current path.
5. Any external power supply switching frequency should be selected such that they do not interfere with the internal
accelerometer sampling frequency (sampling frequency). This will prevent aliasing errors.
6. Physical distance of the two GND pins (Pin2 and Pin5) tied together should be at the shortest distance.
to and DVDD_IO to decouple the power source.
DD
SDO
INT2
INT1/DRDY
CS
MMA7455L
Sensors
20 Freescale Semiconductor
Page 21

Table 9. User Register Summary
Address Name Definition Bit 7 Bit 6 Bit 5 Bit 4 Bit 3 Bit 2 Bit 1 Bit 0
$00 XOUTL 10 bits output value X LSB XOUT[7] XOUT[6] XOUT[5] XOUT[4] XOUT[3] XOUT[2] XOUT[1] XOUT[0]
$01 XOUTH 10 bits output value X MSB -- -- -- -- -- -- XOUT[9] XOUT[8]
$02 YOUTL 10 bits output value Y LSB YOUT[7] YOUT[6] YOUT[5] YOUT[4] YOUT[3] YOUT[2] YOUT[1] YOUT[0]
$03 YOUTH 10 bits output value Y MSB -- -- -- -- -- -- YOUT[9] YOUT[8]
$04 ZOUTL 10 bits output value Z LSB ZOUT[7] ZOUT[6] ZOUT[5] ZOUT[4] ZOUT[3] ZOUT[2] ZOUT[1] ZOUT[0]
$05 ZOUTH 10 bits output value Z MSB -- -- -- -- -- -- ZOUT[9] ZOUT[8]
$06 XOUT8 8 bits output value X XOUT[7] XOUT[6] XOUT[5] XOUT[4] XOUT[3] XOUT[2] XOUT[1] XOUT[0]
$07 YOUT8 8 bits output value Y YOUT[7] YOUT[6] YOUT[5] YOUT[4] YOUT[3] YOUT[2] YOUT[1] YOUT[0]
$08 ZOUT8 8 bits output value Z ZOUT[7] ZOUT[6] ZOUT[5] ZOUT[4] ZOUT[3] ZOUT[2] ZOUT[1] ZOUT[0]
$09 STATUS Status registers -- -- -- -- -- PERR DOVR DRDY
$0A DETSRC Detection source registers LDX LDY LDZ PDX PDY PDZ INT2 INT1
$0B TOUT “Temperature output value” (Optional) TMP[7] TMP[6] TMP[5] TMP[4] TMP[3] TMP[2] TMP[1] TMP[0]
$0C (Reserved) -- -- -- -- -- -- -- --
$0D I2CAD I2C device address I2CDIS DAD[6] DAD[5] DAD[4] DAD[3] DAD[2] DAD[1] DAD[0]
$0E USRINF User information (Optional) UI[7] UI[6] UI[5] UI[4] UI[3] UI[2] UI[1] UI[0]
$0F WHOAMI “Who am I” value (Optional) ID[7] ID[6] ID[5] ID[4] ID[3] ID[2] ID[1] ID[0]
$10 XOFFL Offset drift X value (LSB) XOFF[7] XOFF[6] XOFF[5] XOFF[4] XOFF[3] XOFF[2] XOFF[1] XOFF[0]
$11 XOFFH Offset drift X value (MSB) -- -- -- -- -- XOFF[10] XOFF[9] XOFF[8]
$12 YOFFL Offset drift Y value (LSB) YOFF[7] YOFF[6] YOFF[5] YOFF[4] YOFF[3] YOFF[2] YOFF[1] YOFF[0]
$13 YOFFH Offset drift Y value (MSB) -- -- -- -- -- YOFF[10] YOFF[9] YOFF[8]
$14 ZOFFL Offset drift Z value (LSB) ZOFF[7] ZOFF[6] ZOFF[5] ZOFF[4] ZOFF[3] ZOFF[2] ZOFF[1] ZOFF[0]
$15 ZOFFH Offset drift Z value (MSB) -- -- -- -- -- ZOFF[10] ZOFF[9] ZOFF[8]
$16 MCTL Mode control -- DRPD SPI3W STON GLVL[1] GLVL[0] MOD[1] MOD[0]
$17 INTRST Interrupt latch reset -- -- -- -- -- -- CLRINT2 CLRINT1
$18 CTL1 Control 1 DFBW THOPT ZDA YDA XDA INTRG[1] INTRG[0] INTPIN
$19 CTL2 Control 2 -- -- -- -- -- DRVO PDPL LDPL
$1A LDTH Level detection threshold limit value LDTH[7] LDTH[6] LDTH[5] LDTH[4] LDTH[3] LDTH[2] LDTH[1] LDTH[0]
$1B PDTH Pulse detection threshold limit value PDTH[7] PDTH[6] PDTH[5] PDTH[4] PDTH[3] PDTH[2] PDTH[1] PDTH[0]
$1C PW Pulse duration value PD[7] PD[6] PD[5] PD[4] PD[3] PD[2] PD[1] PD[0]
$1D LT Latency time value LT[7] LT[6] LT[5] LT[4] LT[3] LT[2] LT[1] LT[0]
$1E TW Time window for 2nd pulse value TW[7] TW[6] TW[5] TW[4] TW[3] TW[2] TW[1] TW[0]
$1F (Reserved) -- -- -- -- -- -- -- --
REGISTER DEFINITIONS
$00: 10bits Output Value X LSB (Read only)
D7 D6 D5 D4 D3 D2 D1 D0 Bit
XOUT [7] XOUT [6] XOUT [5] XOUT [4] XOUT [3] XOUT [2] XOUT [1] XOUT[0] Function
0 0 0 0 0 0 0 0 Default
Signed byte data (2’s compliment): 0g = 10’h000
Reading low byte XOUTL latches high byte XOUTH to allow 10-bit reads.
XOUTH should be read directly following XOUTL read.
MMA7455L
Sensors
Freescale Semiconductor 21
Page 22

$01: 10bits Output Value X MSB (Read only)
D7 D6 D5 D4 D3 D2 D1 D0 Bit
-- -- -- -- -- -- XOUT [9] XOUT[8] Function
0 0 0 0 0 0 0 0 Default
Signed byte data (2’s compliment): 0g = 10’h000
Reading low byte XOUTL latches high byte XOUTH to allow 10-bit reads.
XOUTH should be read directly following XOUTL read.
$02: 10bits Output Value Y LSB (Read only)
D7 D6 D5 D4 D3 D2 D1 D0 Bit
YOUT [7] YOUT [6] YOUT [5] YOUT [4] YOUT [3] YOUT [2] YOUT [1] YOUT[0] Function
0 0 0 0 0 0 0 0 Default
Signed byte data (2’s compliment): 0g = 10’h000
Reading low byte YOUTL latches high byte YOUTH to allow coherent 10-bit reads.
YOUTH should be read directly following YOUTL.
$03: 10bits Output Value Y MSB (Read only)
D7 D6 D5 D4 D3 D2 D1 D0 Bit
-- -- -- -- -- -- YOUT [9] YOUT[8] Function
0 0 0 0 0 0 0 0 Default
Signed byte data (2’s compliment): 0g = 10’h000
Reading low byte ZOUTL latches high byte ZOUTH to allow coherent 10-bit reads.
ZOUTH should be read directly following ZOUTL.
$04: 10bits Output Value Z LSB (Read only)
D7 D6 D5 D4 D3 D2 D1 D0 Bit
ZOUT [7] ZOUT [6] ZOUT [5] ZOUT [4] ZOUT [3] ZOUT [2] ZOUT [1] ZOUT[0] Function
0 0 0 0 0 0 0 0 Default
Signed byte data (2’s compliment): 0g = 10’h000
Reading low byte ZOUTL latches high byte ZOUTH to allow coherent 10-bit reads.
ZOUTH should be read directly following ZOUTL.
$05: 10bits Output Value X MSB (Read only)
D7 D6 D5 D4 D3 D2 D1 D0 Bit
-- -- -- -- -- -- ZOUT [9] ZOUT[8] Function
0 0 0 0 0 0 0 0 Default
$06: 8bits Output Value X (Read only)
D7 D6 D5 D4 D3 D2 D1 D0 Bit
XOUT[7] XOUT [6] XOUT [5] XOUT [4] XOUT [3] XOUT [2] XOUT [1] XOUT [0] Function
0 0 0 0 0 0 0 0 Default
Signed byte data (2’s compliment): 0g = 8’h00
$07: 8bits Output Value Y (Read only)
D7 D6 D5 D4 D3 D2 D1 D0 Bit
YOUT[7] YOUT [6] YOUT [5] YOUT [4] YOUT [3] YOUT [2] YOUT [1] YOUT [0] Function
0 0 0 0 0 0 0 0 Default
Signed byte data (2’s compliment): 0g = 8’h00
MMA7455L
Sensors
22 Freescale Semiconductor
Page 23

$08: 8bits Output Value Z (Read only)
D7 D6 D5 D4 D3 D2 D1 D0 Bit
ZOUT[7] ZOUT [6] ZOUT [5] ZOUT [4] ZOUT [3] ZOUT [2] ZOUT [1] ZOUT [0] Function
0 0 0 0 0 0 0 0 Default
Signed byte data (2’s compliment): 0g = 8’h00
$09: Status Register (Read only)
D7 D6 D5 D4 D3 D2 D1 D0 Bit
-- -- -- -- -- PERR DOVR DRDY Function
0 0 0 0 0 0 0 0 Default
DRDY
1: Data is ready
0: Data is not ready
DOVR
PERR
1: Parity error is detected in trim data. Then, self-test is disabled
0: Parity error is not detected in trim data
1: Data is over written
0: Data is not over written
$0A: Detection Source Register (Read only)
D7 D6 D5 D4 D3 D2 D1 D0 Bit
LDX LDY LDZ PDX PDY PDZ INT2 INT1 Function
0 0 0 0 0 0 0 0 Default
LDX
1: Level detection detected on X-axis
0: Level detection not detected on X-axis
LDY
1: Level detection detected on Y-axis
0: Level detection not detected on Y-axis
LDZ
1: Level detection detected on Z-axis
0: Level detection not detected on Z-axis
PDX *Note
1: Pulse is detected on X-axis at single pulse detection
0: Pulse is not detected on X-axis at single pulse detection
PDY *Note
1: Pulse is detected on Y-axis at single pulse detection
0: Pulse is not detected on Y-axis at single pulse detection
PDZ *Note
1: Pulse is detected on Z-axis at single pulse detection
0: Pulse is not detected on Z-axis at single pulse detection
Note: This bit value is not valid at double pulse detection
INT1
1: Interrupt assigned by INTRG[1:0] bits in Control 1
Register ($18) and is detected
0: Interrupt assigned by INTRG[1:0] bits in Control 1
Register ($18) and is not detected
INT2
1: Interrupt assigned by INTRG[1:0] bits in Control 1
Register ($18) and is detected
0: Interrupt assigned by INTRG[1:0] bits in Control 1
Register ($18) and is not detected
*Note: Must define DRDY to be an output to either INT1 or
not. This is done through bit DRPD located in Register $16.
MMA7455L
Sensors
Freescale Semiconductor 23
Page 24

$0D: I2C Device Address (Bit 6-0: Read only, Bit 7: Read/Write)
D7 D6 D5 D4 D3 D2 D1 D0 Bit
I2CDIS DVAD[6] DVAD[5] DVAD[4] DVAD[3] DVAD[2] DVAD[1] DVAD[0] Function
0 0 0 1 1 1 0 1 Default
I2CDIS
2
C and SPI are available.
0: I
2
1: I
C is disabled.
DVAD[6:0]: I
2
C device address
$0E: User Information (Read Only: Optional)
D7 D6 D5 D4 D3 D2 D1 D0 Bit
UI[7] UI[6] UI[5] UI[4] UI[3] UI[2] UI[1] UI[0] Function
0/OTP 0/OTP 0/OTP 0/OTP 0/OTP 0/OTP 0/OTP 0/OTP Default
UI2[7:0]: User information
$0F: “Who Am I” Value (Read only: Optional)
D7 D6 D5 D4 D3 D2 D1 D0 Bit
ID[7] ID [6] ID [5] ID [4] ID [3] ID [2] ID [1] ID [0] Function
0/OTP 0/OTP 0/OTP 0/OTP 0/OTP 0/OTP 0/OTP 0/OTP Default
$10: Offset Drift X LSB (Read/Write)
The following Offset Drift Registers are used for setting and storing the offset calibrations to eliminate the 0g offset. Please refer
to Freescale application note AN3745 for detailed instructions on the process to set and store the calibration values.
D7 D6 D5 D4 D3 D2 D1 D0 Bit
XOFF[7] XOFF [6] XOFF [5] XOFF [4] XOFF [3] XOFF [2] XOFF [1] XOFF [0] Function
0 0 0 0 0 0 0 0 Default
Signed byte data (2’s compliment): User level offset trim value for X-axis
Bit XOFF[7] XOFF[6] XOFF[5] XOFF[4] XOFF[3] XOFF[2] XOFF[1] XOFF[0]
Weight* 64 LSB 32 LSB 16 LSB 8 LSB 4 LSB 2 LSB 1 LSB 0.5 LSB
*Bit weight is for 8g 10bit data output. Typical value for reference only. Variation is specified in “Electrical Characteristics” section.
$11: Offset Drift X MSB (Read/Write)
D7 D6 D5 D4 D3 D2 D1 D0 Bit
-- -- -- -- -- XOFF [10] XOFF [9] XOFF [8] Function
0 0 0 0 0 0 0 0 Default
Signed byte data (2’s compliment): User level offset trim value for X-axis
$12: Offset Drift Y LSB (Read/Write)
D7 D6 D5 D4 D3 D2 D1 D0 Bit
YOFF[7] YOFF [6] YOFF [5] YOFF [4] YOFF [3] YOFF [2] YOFF [1] YOFF [0] Function
0 0 0 0 0 0 0 0 Default
Signed byte data (2’s compliment): User level offset trim value for Y-axis
Bit YOFF[7] YOFF[6] YOFF[5] YOFF[4] YOFF[3] YOFF[2] YOFF[1] YOFF[0]
Weight* 64 LSB 32 LSB 16 LSB 8 LSB 4 LSB 2 LSB 1 LSB 0.5 LSB
*Bit weight is for 2g 8bit data output. Typical value for reference only. Variation is specified in “Electrical Characteristics” section.
MMA7455L
Sensors
24 Freescale Semiconductor
Page 25

$13: Offset Drift Y MSB (Read/Write)
D7 D6 D5 D4 D3 D2 D1 D0 Bit
-- -- -- -- -- YOFF [10] YOFF [9] YOFF [8] Function
0 0 0 0 0 0 0 0 Default
Signed byte data (2’s compliment): User level offset trim value for Y-axis
Bit YOFF[10] YOFF[9] YOFF[8]
Weight* Polarity 256 LSB 128 LSB
*Bit weight is for 2g 8bit data output. Typical value for reference only. Variation is specified in “Electrical Characteristics” section.
$14: Offset Drift Z LSB (Read/Write)
D7 D6 D5 D4 D3 D2 D1 D0 Bit
ZOFF[7] ZOFF[6] ZOFF[5] ZOFF[4] ZOFF[3] ZOFF[2] ZOFF[1] ZOFF[0] Function
0 0 0 0 0 0 0 0 Default
Signed byte data (2’s compliment): User level offset trim value for Z-axis
Bit ZOFF[7] ZOFF[6] ZOFF[5] ZOFF[4] ZOFF[3] ZOFF[2] ZOFF[1] ZOFF[0]
Weight* 64 LSB 32 LSB 16 LSB 8 LSB 4 LSB 2 LSB 1 LSB 0.5 LSB
*Bit weight is for 2g 8bit data output. Typical value for reference only. Variation is specified in “Electrical Characteristics” section.
$15: Offset Drift Z MSB (Read/Write)
D7 D6 D5 D4 D3 D2 D1 D0 Bit
-- -- -- -- -- ZOFF[10] ZOFF[9] ZOFF[8] Function
0 0 0 0 0 0 0 0 Default
Signed byte data (2’s compliment): User level offset trim value for Z-axis
Bit ZOFF[10] ZOFF[9] ZOFF[8]
Weight* Polarity 256 LSB 128 LSB
*Bit weight is for 2g 8bit data output. Typical value for reference only. Variation is specified in “Electrical Characteristics” section.
$16: Mode Control Register (Read/Write)
D7 D6 D5 D4 D3 D2 D1 D0 Bit
-- DRPD SPI3W STON GLVL[1] GLVL[0] MODE[1] MODE[0] Function
0 0 0 0 0 0 0 0 Default
Table 10. Configuring the g-Select for 8-bit output using Register $16 with GLVL[1:0] bits.
GLVL [1:0] g-Range Sensitivity
00 8g 16 LSB/g
01 2g 64 LSB/g
10 4g 32 LSB/g
GLVL [1:0]
00: 8g is selected for measurement range.
10: 4g is selected for measurement range.
01: 2g is selected for measurement range.
STON
0: Self-test is not enabled
SPI3W
0: SPI is 4 wire mode
1: SPI is 3 wire mode
DRPD
0: Data ready status is output to INT1/DRDY PIN
1: Data ready status is not output to INT1/DRDY PIN
1: Self-test is enabled
MMA7455L
Sensors
Freescale Semiconductor 25
Page 26

$17: Interrupt Latch Reset (Read/Write)
D7 D6 D5 D4 D3 D2 D1 D0 Bit
-- -- -- -- -- -- CLR_INT2 CLR_INT1 Function
0 0 0 0 0 0 0 0 Default
CLR_INT1
1: Clear “INT1” and LDX/LDY/LDZ or PDX/PDY/PDZ bits in Detection Source Register ($0A) depending on
Control1($18) INTREG[1:0] setting.
0: Do not clear “INT1” LDX/LDY/LDZ or PDX/PDY/PDZ bits in Detection Source Register ($0A)
CLR_INT2
1: Clear “INT2” and LDX/LDY/LDZ or PDX/PDY/PDZ bits in Detection Source Register ($0A) depending on
Control1($18) INTREG[1:0] setting.
0: Do not clear “INT2” and LDX/LDY/LDZ or PDX/PDY/PDZ bits in Detection Source Register ($0A).
$18 Control 1 (Read/Write)
D7 D6 D5 D4 D3 D2 D1 D0 Bit
DFBW THOPT ZDA YDA XDA INTREG[1] INTREG[0] INTPIN Function
00000000Default
Table 11. Configuring the Interrupt settings using Register $18 with INTREG[1:0] bits
INTREG[1:0] “INT1” Register Bit “INT2” Register Bit
00 Level detection Pulse Detection
01 Pulse Detection Level Detection
10 Single Pulse detection Single or Double Pulse Detection
01: INT1 Register is detecting Pulse while INT2 is detecting Level.
nd
10: INT1 Register is detecting a Single Pulse and INT2 is detecting Single Pulse (if 2
Time Window = 0) or if there is a latency
time window and second time window>0 then INT2 will detect the double pulse only.
INTPIN: INT1 pin is routed to INT1 bit in Detection Source Register ($0A) and INT2 pin is routed to INT2 bit in Detection Source
Register ($0A).
INTPIN: INT2 pin is routed to INT1 bit in Detection Source Register ($0A) and INT1 pin is routed to INT2 bit in Detection Source
Register ($0A).
Note: When INTREG[1:0] =10 for the condition to detect single pulse on INT1 and either single or double pulse on INT2, INT1
register bit can no longer be cleared by setting CLR_INT1 bit. It is cleared by setting CLR_INT2 bit. In this case, setting CLR_INT2
clears both INT1 and INT2 register bits and resets the detection operation.
XDA
1: X-axis is disabled for detection.
0: X-axis is enabled for detection.
YDA
1: Y-axis is disabled for detection.
0: Y-axis is enabled for detection.
ZDA
THOPT (This bit is valid for level detection only, not valid
for pulse detection)
0: Threshold value is absolute only
1: Integer value is available.
DFBW
0: Digital filter band width is 62.5 Hz
1: Digital filter band width is 125 Hz
1: Z-axis is disabled for detection.
0: Z-axis is enabled for detection.
$19: Control 2 (Read/Write)
D7 D6 D5 D4 D3 D2 D1 D0 Bit
DRVO PDPL LDPL Function
0 0 0 0 0 0 0 0 Default
LDPL
0: Level detection polarity is positive and detecting condition
is OR 3 axes.
1: Level detection polarity is negative detecting condition is
AND 3 axes.
PDPL
0: Pulse detection polarity is positive and detecting condition
is OR 3 axes.
1: Pulse detection polarity is negative and detecting condition
is AND 3 axes.
MMA7455L
Sensors
26 Freescale Semiconductor
Page 27

DRVO
1: Strong drive strength on SDA/SDO pin
0: Standard drive strength on SDA/SDO pin
$1A: Level Detection Threshold Limit Value (Read/Write)
D7 D6 D5 D4 D3 D2 D1 D0 Bit
LDTH[7] LDTH[6] LDTH[5] LDTH[4] LDTH[3] LDTH[2] LDTH[1] LDTH[0] Function
0 0 0 0 0 0 0 0 Default
LDTH[7:0]: Level detection threshold value. If THOPT bit in Detection Control Register is “0”, it is unsigned 7 bits value and
LDTH[7] should be “0”. If THOPT bit is “1”, it is signed 8 bits value.
$1B: Pulse Detection Threshold Limit Value (Read/Write)
D7 D6 D5 D4 D3 D2 D1 D0 Bit
XPDTH PDTH[6] PDTH[5] PDTH[4] PDTH[3] PDTH[2] PDTH[1] PDTH[0] Function
0 0 0 0 0 0 0 0 Default
PDTH[6:0]: Pulse detection threshold value (unsigned 7 bits).
XPDTH: This bit should be “0”.
$1C: Pulse Duration Value (Read/Write)
D7 D6 D5 D4 D3 D2 D1 D0 Bit
PD[7] PD[6] PD[5] PD[4] PD[3] PD[2] PD[1] PD[0] Function
0 0 0 0 0 0 0 0 Default
Min: PD[7:0] = 4’h01 = 0.5 ms
Max: PD[7:0] = 4’hFF = 127 ms
1 LSB = 0.5 ms
$1D: Latency Time Value (Read/Write)
D7 D6 D5 D4 D3 D2 D1 D0 Bit
LT[7] LT[6] LT[5] LT[4] LT[3] LT[2] LT[1] LT[0] Function
0 0 0 0 0 0 0 0 Default
Min: LT[7:0] = 8’h01 = 1 ms
Max: LT[7:0] = 8’hFF = 255 ms
1 LSB = 1 ms
$1E: Time Window for 2nd Pulse Value (Read/Write)
D7 D6 D5 D4 D3 D2 D1 D0 Bit
TW[7] TW[6] TW[5] TW[4] TW[3] TW[2] TW[1] TW[0] Function
0 0 0 0 0 0 0 0 Default
Min: TW[7:0] = 8’h01 = 1 ms (Single pulse detection)
Max: TW[7:0] = 8’hFF = 255 ms
1 LSB = 1 ms
MMA7455L
Sensors
Freescale Semiconductor 27
Page 28

SENSING DIRECTION AND OUTPUT RESPONSE
The following figure shows sensing direction and the output response for 2g mode.
147
165432
@ +1g = $3F
X
OUT
@0g=$00
Y
OUT
@0g=$00
Z
OUT
Top View
Direction of Earth's gravity field.*
165432
147
1312111098
X
1312111098
14 7
* When positioned as shown, the Earth’s gravity will result in a positive 1g output.
@0g=$00
OUT
@ +1g = $3F
Y
OUT
@0g=$00
Z
OUT
13 12 11 10 9 8
165432
X
@0g=$00
OUT
@ -1g = $C1
Y
OUT
@0g=$00
Z
OUT
X
Y
Z
1312111098
OUT
OUT
OUT
147
@ -1g = $C1
@0g=$00
@ 0g = $00
165432
Side View
Bottom
X
OUT
Y
OUT
@ +1g = $3F
Z
OUT
Bottom
X
OUT
Y
OUT
Z
OUT
Top
@0g=$00
@0g=$00
Top
@0g=$00
@0g=$00
@ -1g = $C1
Figure 16. Sensing Direction and Output Response at 2g Mode
Table 12. Acceleration vs. Output (8-bit data)
FS Mode Acceleration Output
2g Mode -2g $80
-1g $C1
0g $00
+1g $3F
+2g $7F
4g Mode -4g $80
-1g $E1
0g $00
+1g $1F
+4g $7F
8g Mode -8g $80
-1g $F1
0g $00
+1g $0F
+8g $7F
MMA7455L
Sensors
28 Freescale Semiconductor
Page 29

MINIMUM RECOMMENDED FOOTPRINT FOR SURFACE MOUNTED APPLICATIONS
Surface mount board layout is a critical portion of the total design. The footprint for the surface mount packages must be the
correct size to ensure proper solder connection interface between the board and the package.
With the correct footprint, the packages will self-align when subjected to a solder reflow process. It is always recommended to
design boards with a solder mask layer to avoid bridging and shorting between solder pads.
SOLDERING AND MOUNTING GUIDELINES FOR THE LGA ACCELEROMETER SENSOR TO A PC BOARD
These guideline are for soldering and mounting the LGA package inertial sensors to printed circuit boards (PCBs). The purpose
is to minimize the stress on the package after board mounting. The MMA7455L digital output accelerometer uses the Land Grid
Array (LGA) package platform. This section describes suggested methods of soldering these devices to the PC board for consumer applications. Figure 17 shows the recommended PCB land pattern for the package.
Figure 17. Recommended PCB Land Pattern for the 5 x 3 mm LGA Package
MMA7455L
Sensors
Freescale Semiconductor 29
Page 30

OVERVIEW OF SOLDERING CONSIDERATIONS
Information provided here is based on experiments executed on LGA devices. They do not represent exact conditions present
at a customer site. Hence, information herein should be used as a guidance only and process and design optimizations are recommended to develop an application specific solution. It should be noted that with the proper PCB footprint and solder stencil
designs the package will self-align during the solder reflow process.
The following are the recommended guidelines to follow for mounting LGA sensors for consumer applications.
PCB MOUNTING RECOMMENDATIONS
1. The PCB land should be designed with Non Solder Mask Defined (NSMD) as shown in Figure 20.
2. No additional metal pattern underneath package as shown in Figure 19.
3. PCB land pad is 0.9 mm x 0.6 mm which is the size of the package pad plus 0.1 mm as shown in Figure 20.
4. The solder mask opening is equal to the size of the PCB land pad plus an extra 0.1 mm as shown in Figure 20.
5. The stencil aperture size is equal to the PCB land pad – 0.025mm.
LGA package w/ solder
PCB top metal layer
Example of 2 layer PCB
Top metal pattern
Top metal pattern
under package area
Figure 18. Incorrect PCB Top Metal Pattern Under
Via structure under
Via structure under
package area
Package
Figure 19. Correct PCB Top Metal Pattern Under Package
Pad Dimension by Package
0.5 mm
0.8 mm
Figure 20. Recommended PCB Land Pad, Solder Mask, and Signal Trace Near Package Design
PCB land pattern - NSMD
Cu: 0.9 x 0.6 mm sq.
SM opening = PCB land pad + 0.1mm
= 1.0 x 0.7mm sq.
Signal trace near
package: 0.1mm width
and min. 0.5mm length
are recommended.
Wider trace can be
continued after these.
Wider trace
MMA7455L
Sensors
30 Freescale Semiconductor
Page 31

Signal trace near
package
Package
footprint
Stencil opening = PCB landing
pad -0.025mm
= 0.575mmx0,875mm
10x0.8mm
14x0.575mm
14x0.875mm
Figure 21. Stencil Design Guidelines
6. Do not place any components or vias at a distance less than 2 mm from the package land area. This may cause additional
package stress if it is too close to the package land area.
7. Signal traces connected to pads should be as symmetric as possible. Put dummy traces on NC pads in order to have same
length of exposed trace for all pads. Signal traces with 0.1 mm width and min. 0.5 mm length for all PCB land pads near the
package are recommended as shown in Figure 20 and Figure 21. Wider trace can be continued after the 0.5 mm zone.
8. Use a standard pick and place process and equipment. Do not us a hand soldering process.
9. It is recommended to use a cleanable solder paste with an additional cleaning step after SMT mount.
10. Do not use a screw down or stacking to fix the PCB into an enclosure because this could bend the PCB putting stress on
the package.
11. The PCB should be rated for the multiple lead-free reflow condition with max 260°C temperature.
Please cross reference with the device data sheet for mounting guidelines specific to the exact device used.
Freescale LGA sensors are compliant with Restrictions on Hazardous Substances (RoHS), having halide free molding compound
(green) and lead-free terminations. These terminations are compatible with tin-lead (Sn-Pb) as well as tin-silver-copper
(Sn-Ag-Cu) solder paste soldering processes. Reflow profiles applicable to those processes can be used successfully for soldering the devices.
MMA7455L
Sensors
Freescale Semiconductor 31
Page 32

Xoff_mg/degreeC_-40to85
Xsens_%/DegreeC_-40to85
LSL USLTarget
-3 -2 -1 0 1 2 3
Yoff_mg/degree C_-40to85
LSL USLTarget
-3 -2 -1 0 1 2 3
Zoff_mg/degreeC_-40to85
LSL USLTarget
LSL USLTarget
-0.02 -0.01 0 0.01 0.02
Ysens_%/DegreeC_-40to85
LSL USLTarget
-0.02 -0.01 0 0.01 0.02
Zsens_%/DegreeC_-40to85
LSL USLTarget
-3 -2 -1 0 1 2 3
-0.03 -0.02 -0.01 0 0.01 0.02 0.03
Figure 22. MMA7455L Temperature Coefficient of Offset (TCO) and
Temperature Coefficient of Sensitivity (TCS) Distribution Charts
MMA7455L
Sensors
32 Freescale Semiconductor
Page 33

PACKAGE DIMENSIONS
CASE 1977-01
ISSUE A
14-LEAD LGA
MMA7455L
Sensors
Freescale Semiconductor 33
Page 34

PACKAGE DIMENSIONS
CASE 1977-01
ISSUE A
14-LEAD LGA
MMA7455L
Sensors
34 Freescale Semiconductor
Page 35

How to Reach Us:
Home Page:
www.freescale.com
Web Support:
http://www.freescale.com/support
USA/Europe or Locations Not Listed:
Freescale Semiconductor, Inc.
Technical Information Center, EL516
2100 East Elliot Road
Tempe, Arizona 85284
1-800-521-6274 or +1-480-768-2130
www.freescale.com/support
Europe, Middle East, and Africa:
Freescale Halbleiter Deutschland GmbH
Technical Information Center
Schatzbogen 7
81829 Muenchen, Germany
+44 1296 380 456 (English)
+46 8 52200080 (English)
+49 89 92103 559 (German)
+33 1 69 35 48 48 (French)
www.freescale.com/support
Japan:
Freescale Semiconductor Japan Ltd.
Headquarters
ARCO Tower 15F
1-8-1, Shimo-Meguro, Meguro-ku,
Tokyo 153-0064
Japan
0120 191014 or +81 3 5437 9125
support.japan@freescale.com
Asia/Pacific:
Freescale Semiconductor China Ltd.
Exchange Building 23F
No. 118 Jianguo Road
Chaoyang District
Beijing 100022
China
+86 010 5879 8000
support.asia@freescale.com
For Literature Requests Only:
Freescale Semiconductor Literature Distribution Center
P.O. Box 5405
Denver, Colorado 80217
1-800-441-2447 or +1-303-675-2140
Fax: +1-303-675-2150
LDCForFreescaleSemiconductor@hibbertgroup.com
Information in this document is provided solely to enable system and software
implementers to use Freescale Semiconductor products. There are no express or
implied copyright licenses granted hereunder to design or fabricate any integrated
circuits or integrated circuits based on the information in this document.
Freescale Semiconductor reserves the right to make changes without further notice to
any products herein. Freescale Semiconductor makes no warranty, representation or
guarantee regarding the suitability of its products for any particular purpose, nor does
Freescale Semiconductor assume any liability arising out of the application or use of any
product or circuit, and specifically disclaims any and all liability, including without
limitation consequential or incidental damages. “Typical” parameters that may be
provided in Freescale Semiconductor data sheets and/or specifications can and do vary
in different applications and actual performance may vary over time. All operating
parameters, including “Typicals”, must be validated for each customer application by
customer’s technical experts. Freescale Semiconductor does not convey any license
under its patent rights nor the rights of others. Freescale Semiconductor products are
not designed, intended, or authorized for use as components in systems intended for
surgical implant into the body, or other applications intended to support or sustain life,
or for any other application in which the failure of the Freescale Semiconductor product
could create a situation where personal injury or death may occur. Should Buyer
purchase or use Freescale Semiconductor products for any such unintended or
unauthorized application, Buyer shall indemnify and hold Freescale Semiconductor and
its officers, employees, subsidiaries, affiliates, and distributors harmless against all
claims, costs, damages, and expenses, and reasonable attorney fees arising out of,
directly or indirectly, any claim of personal injury or death associated with such
unintended or unauthorized use, even if such claim alleges that Freescale
Semiconductor was negligent regarding the design or manufacture of the part.
Freescale™ and the Freescale logo are trademarks of Freescale Semiconductor, Inc.
All other product or service names are the property of their respective owners.
© Freescale Semiconductor, Inc. 2008. All rights reserved.
MMA7455L
Rev. 4
08/2008
RoHS-compliant and/or Pb-free versions of Freescale products have the functionality and electrical
characteristics of their non-RoHS-compliant and/or non-Pb-free counterparts. For further
information, see http:/www.freescale.com or contact your Freescale sales representative.
For information on Freescale’s Environmental Products program, go to http://www.freescale.com/epp.
 Loading...