

Page 1
reedom
F
eliability
R
nnovation
I
FR1
USERS INSTRUCTION MANUAL
USERS INSTRUCTION MANUAL
Page 2
FOREWORD
Please read and follow all instructions in this Users Instruction Manual before
attempting to operate your Scooter for the first time. If there is anything in this
manual that you do not understand, or if you require additional assistance for setting
it up, contact your Authorized Agent.
Using your product safely depends upon your diligence in following the warnings,
cautions and instructions in this manual.
A full technical specication can be found at the rear of this manual.
Using your Scooter safely also depends upon your good judgment and / or common
sense, as well as that of your Provider, Caregiver or Health Professional.
1
Always think safety!
Page 3

CONTENTS
Introduction ............................................................................................................ 3
Purpose of your Scooter ........................................................................................ 4
Rules for safe use ........................................................................................... 5
Getting to know your Scooter ................................................................................ 7
Operating your Scooter ........................................................................................ 8
Freewheeling your Scooter .............................................................................. 15
Safety instructions and warning ............................................................................ 15
Safety warning & instruction labels ....................................................................... 17
Learning to get about ............................................................................................ 17
Batteries and battery charging .............................................................................. 19
Basic fault nging .................................................................................................. 21
Technical specication .......................................................................................... 24
Classification .......................................................................................... 26
Optional accessories ............................................................................................. 27
Guarantee terms ................................................................................................... 29
Service history ..................................................................................................... 30
2
Page 4
INTRODUCTION
Congratulations on the purchase of your Scooter. Please read this User Instruction
Manual carefully before you attempt to operate your scooter. Your User Instruction
Manual will assist you to get the most from your machine.
This manual contains important information regarding the safe operation and
maintenance of your Scooter.
If you have any queries concerning operation or maintenance, consult your
authorized dealer.
Please keep in mind that the operator of the Scooter is responsible for
hazards occurring to other people or their property.
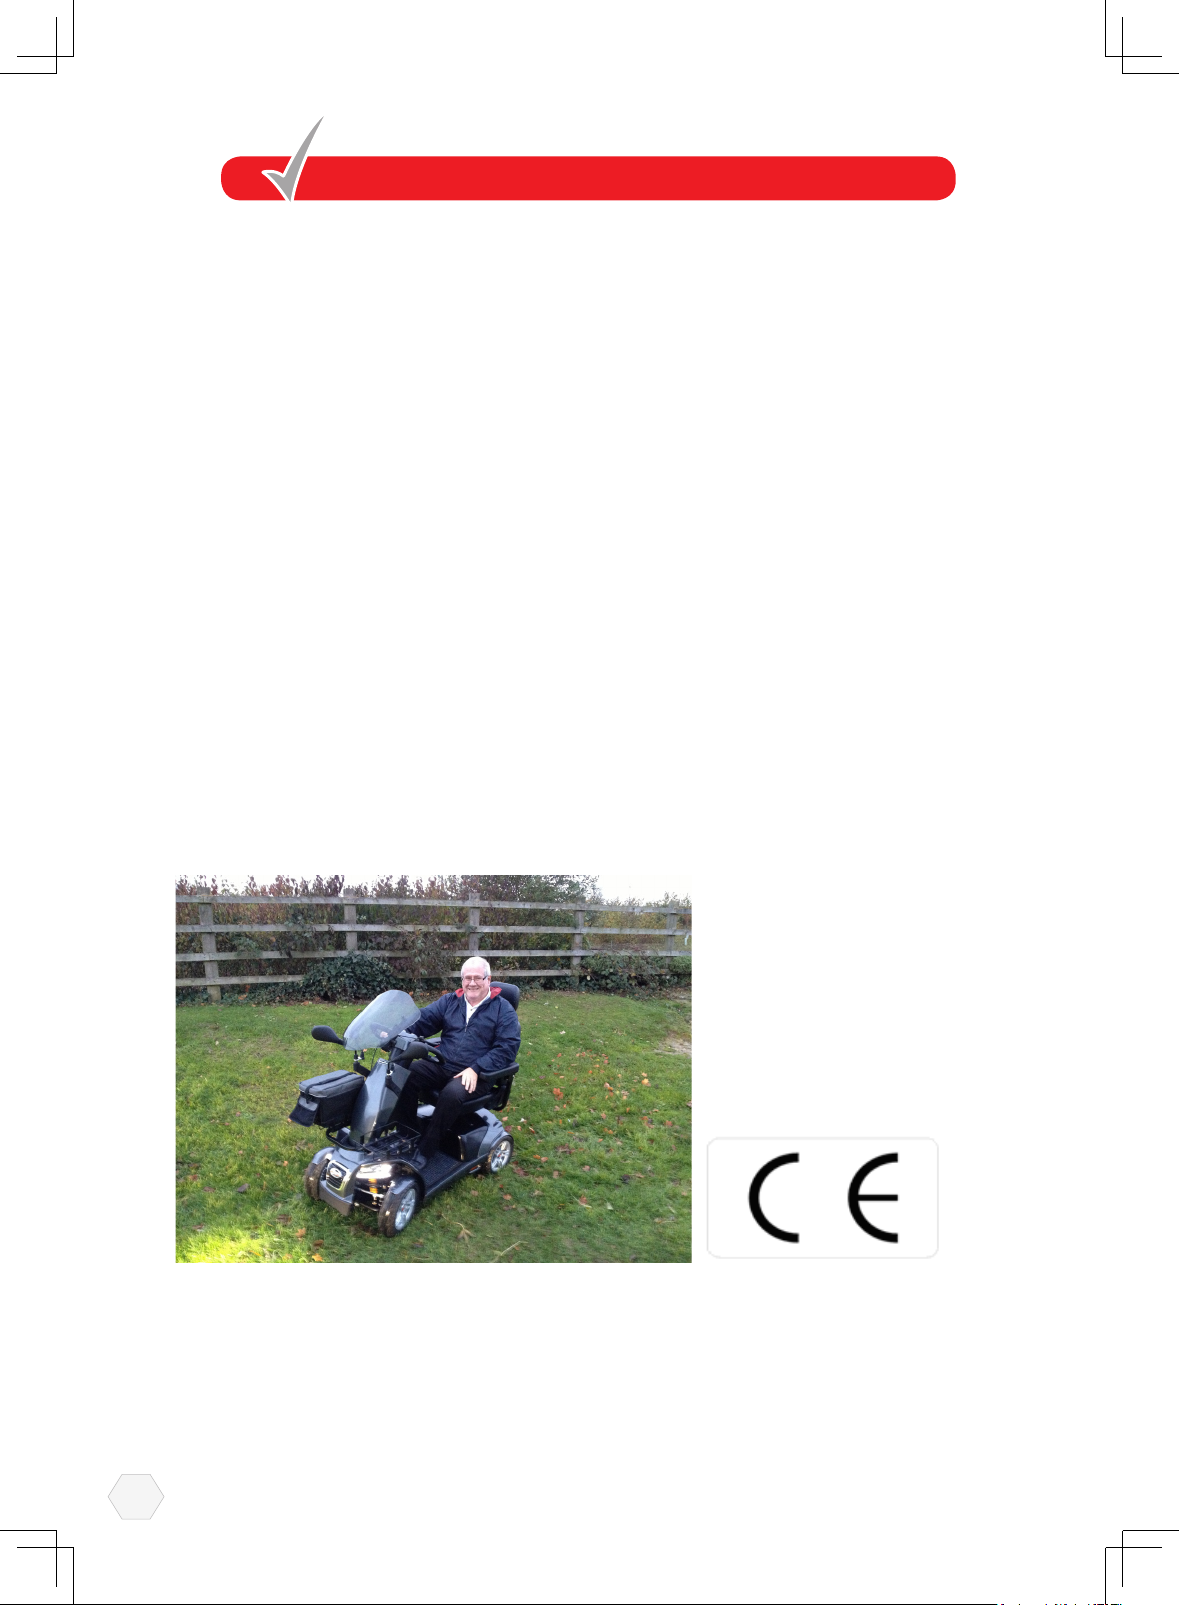
The FR1 provides transportation for an elderly or disabled person. It can be used in a
variety of indoor and outdoor settings.
Your scooter has numerous features not found on other power scooters. With proper
care and maintenance, you will enjoy many years of dependable service.
Please remember that when it comes to service and repairs, your authorized dealer
knows your scooter best.
3
Page 5

PURPOSE OF YOUR SCOOTER
Your Scooter is suitable for persons who require independent mobility combined with
comfort, safety, reliability and a product that needs a minimal amount of maintenance.
The intended user should possess some degree of ability with the use of both arms
and hands, reasonable balance and good eyesight, and a degree of spatial
awareness.
The user should have received training in the use of the product, preferably in their
normal environment.
Your Scooter should not be used in torrential rain or deep snow, on loose slippery
surfaces and slopes or on wet grass etc., which could become a danger to the rider,
or other road users.
Do not drive your scooter if you are under the influence of alcohol, drugs or
medication that may affect your ability. If you are in doubt consult your doctor.
4
Page 6

RULE FOR SAFE USE
These symbols below are used in this Users Instruction manual to identify
warnings and cautions. It is very important for you to read and understand them.
Warning:Failure to note the warnings in this user ’s manual may result in
personal injury.
Your scooter is a powerful machine. Please read all of the instructions in this
manual before operating your Scooter. Follow notes carefully to ensure safety at
all times.
Always make certain your machine is fully charged and in full working order
before starting your journey.
Weight Limitations: Your scooter is rated for a maximum weight capacity of 400
lbs.
1. Do not ride your scooter without reading this instruction manual. Also read all
of the safety instructions and warnings at the start of this manual.
2. Only drive your scooter if your health condition will allow you to be safe.
3. Do not exceed the maximum safe gradient outlined for your vehicle
4. Do not carry passengers or exceed the maximum carrying weight.
5. Do not reverse your scooter onto uneven inclines or surfaces. Be cautious
when traversing slopes.
6. Do not drive your scooter in a confined space unless the speed adjustment
dial is set low.
7. Do not turn suddenly at full speed, especially on uneven or sloping ground.
8. Do not drive your scooter where you cannot safely or legally walk.
9. Do not drive your scooter unless the seat is locked into the driving position.
10.Do not drive your scooter over deep, soft terrain (eg. soft earth, deep grass,
loose gravel, snow).
11.Do not drive when under the influence of alcohol or certain drugs which may
impair your safety.
12.Do not climb or descend Curbs that exceed the maximum dimension detailed
under technical specification of this manual. Do not turn when negotiating
curbs.
13.Always approach obstacles at low speed.
14.Always approach obstacles straight.
15.Always keep your feet on the vehicle when driving.
16.Always proceed carefully while riding, especially as you approach the
downgrade of a ramp.
17.Always reduce speed when descending inclines.
18.Always avoid uneven surfaces.
19.Always consult your physician or a therapist if in doubt about your ability
to operate a Scooter.
5
Page 7

20.Transport - Do not sit on your scooter while it is in a moving vehicle.
Always strap down your scooter then transfer to the vehicle seat.
21.The batteries fitted to your scooter are maintenance free and do not
require topping up with distilled water.
22.Do not drive your scooter through deep water or clean with a high
pressure hose.
23.Do not drive your scooter through sea sand or sea water, this is very
corrosive.
Always wash salt splashing from the metal parts of your Scooter with hot
soapy water as soon as possible.
24. Do not drive on motorways, highways (i.e. those with a speed limit of
over 50mph), cycle lanes or in bus lanes.
25. Always switch your lights on at night or in poor visibility. Wear reflective
clothing.
Please remember you are a motorized pedestrian and must observe all rules
and regulations of other pedestrians wherever possible. Your scooter has been
designed for use on most roads; drive with due care and attention. Read the
‘Safety instructions and warnings’ section of this manual.
Please have a safe journey
6
Page 8
GETTING TO KNOW YOUR SCOOTER
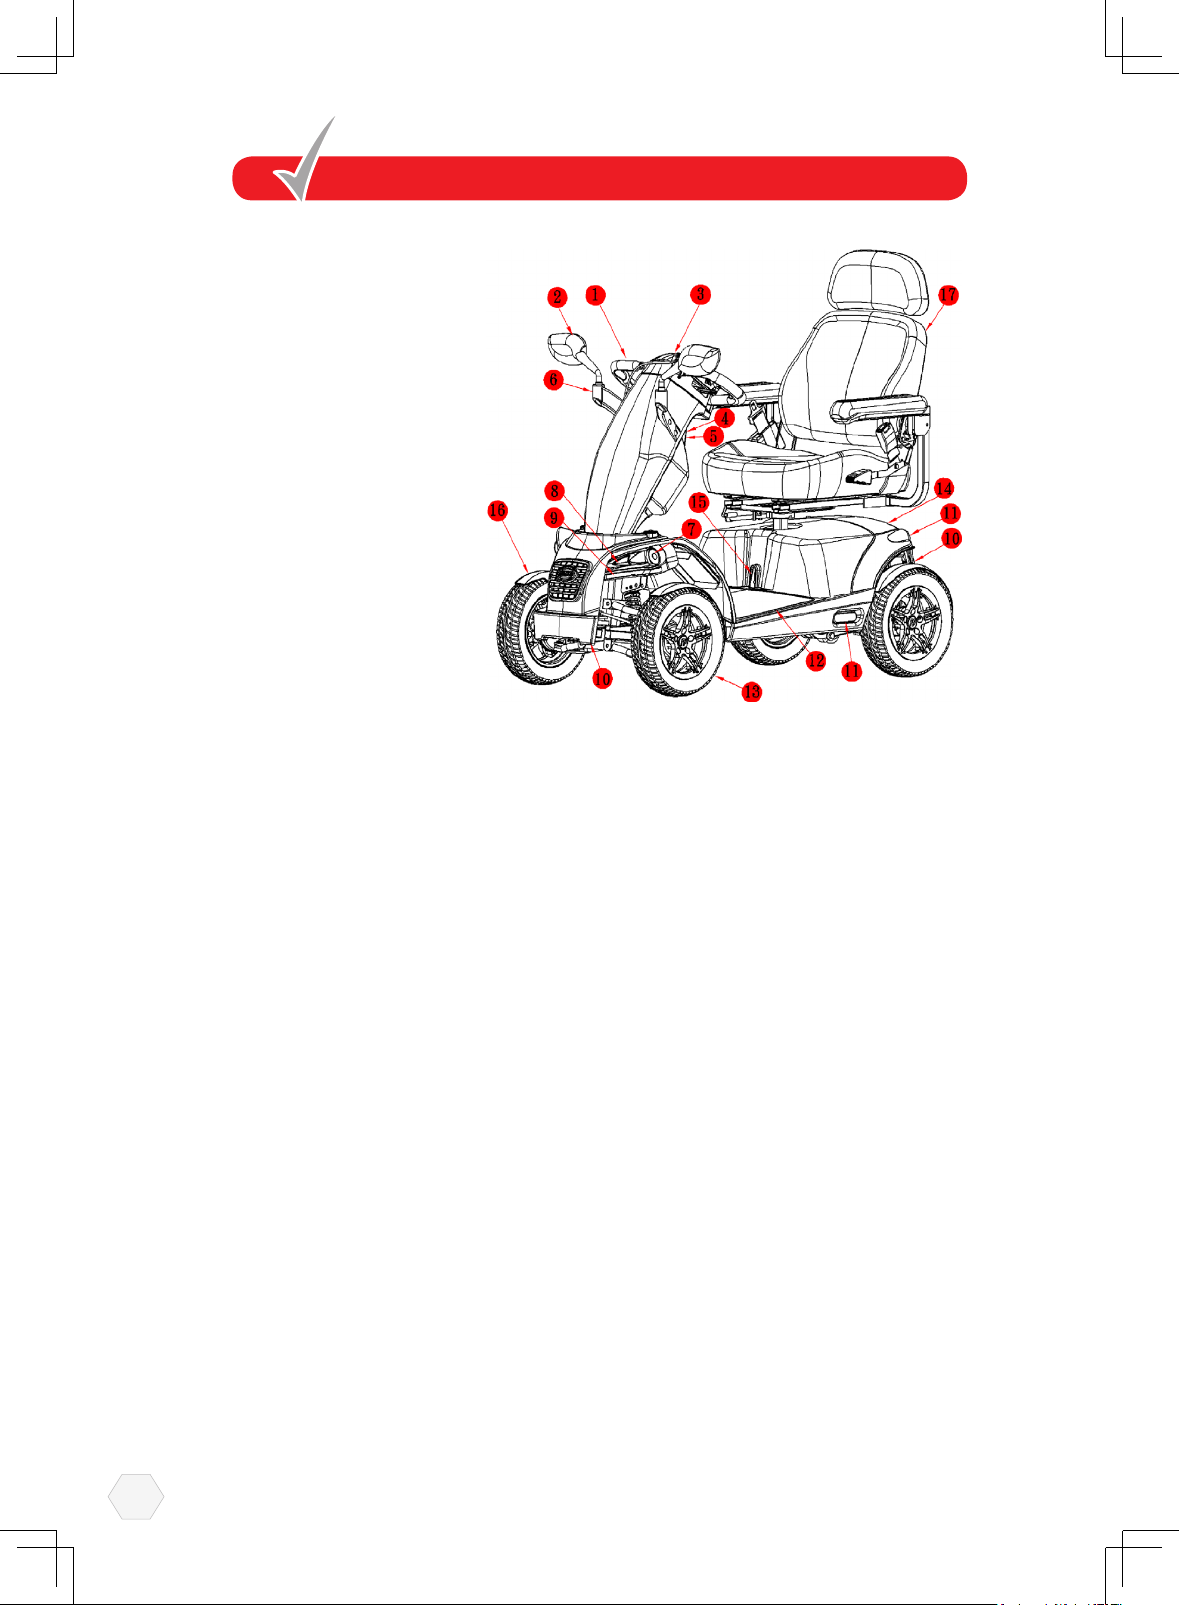
1. Stccring handbars
2. Drining mirror
3. Concole
4. Off-board charger port
5. USB 5V power outlet
6. Injectiion mirror bracket
7.Front lights
8.Direction indicator lights
9.Daytimc running lights
10.Front and rear bumpers
11.Side and rear reectors
12.Floor mat
13.13"aluminum alloy sporty wheels
14.3 functions in one rear lighting
(rear light/indicators/auto brake light)
15.Main circuit braker
16.Mudguards for all wheels
17.Adiustable angle seat with backrest
Your Scooter is delivered fully assembled, fitting the two batteries and the seat
assembly together with some minor adjustments are detailed on the following pages,
under ‘Operating your Scooter’. A full technical specication for your Scooter can be
found at the rear of this manual.
A great deal of thought and consultation has gone into the design of your state-ofthe-art, life-changing scooter. Your Scooter will help to increase your mobility and
therefore give you more time and energy to enjoy your life.
A great deal of thought has gone into the design of your four wheeled vehicle which
will allow you to negotiate obstacles found in confined shopping areas. Also, the
four wheels will give you added stability on uneven surface. This is just one of the
features you will nd on your Scooter.
Others are:
COMFORT - The contoured seat giving you day-long comfort. A fully proportional
speed-controller with a speed restriction facility allows you a smooth, safe jerk-free
ride.
CAUTION -Do not switch 'off' the on/off power key when you are moving; this will
automatically apply the motor parking brake suddenly and could place you in a
dangerous situation. Your scooter is tted with anti-tipping wheels. Do not remove
these anti-tipping wheels, they are an important part of the scooter design provided
specically for your safety.
7
Page 9
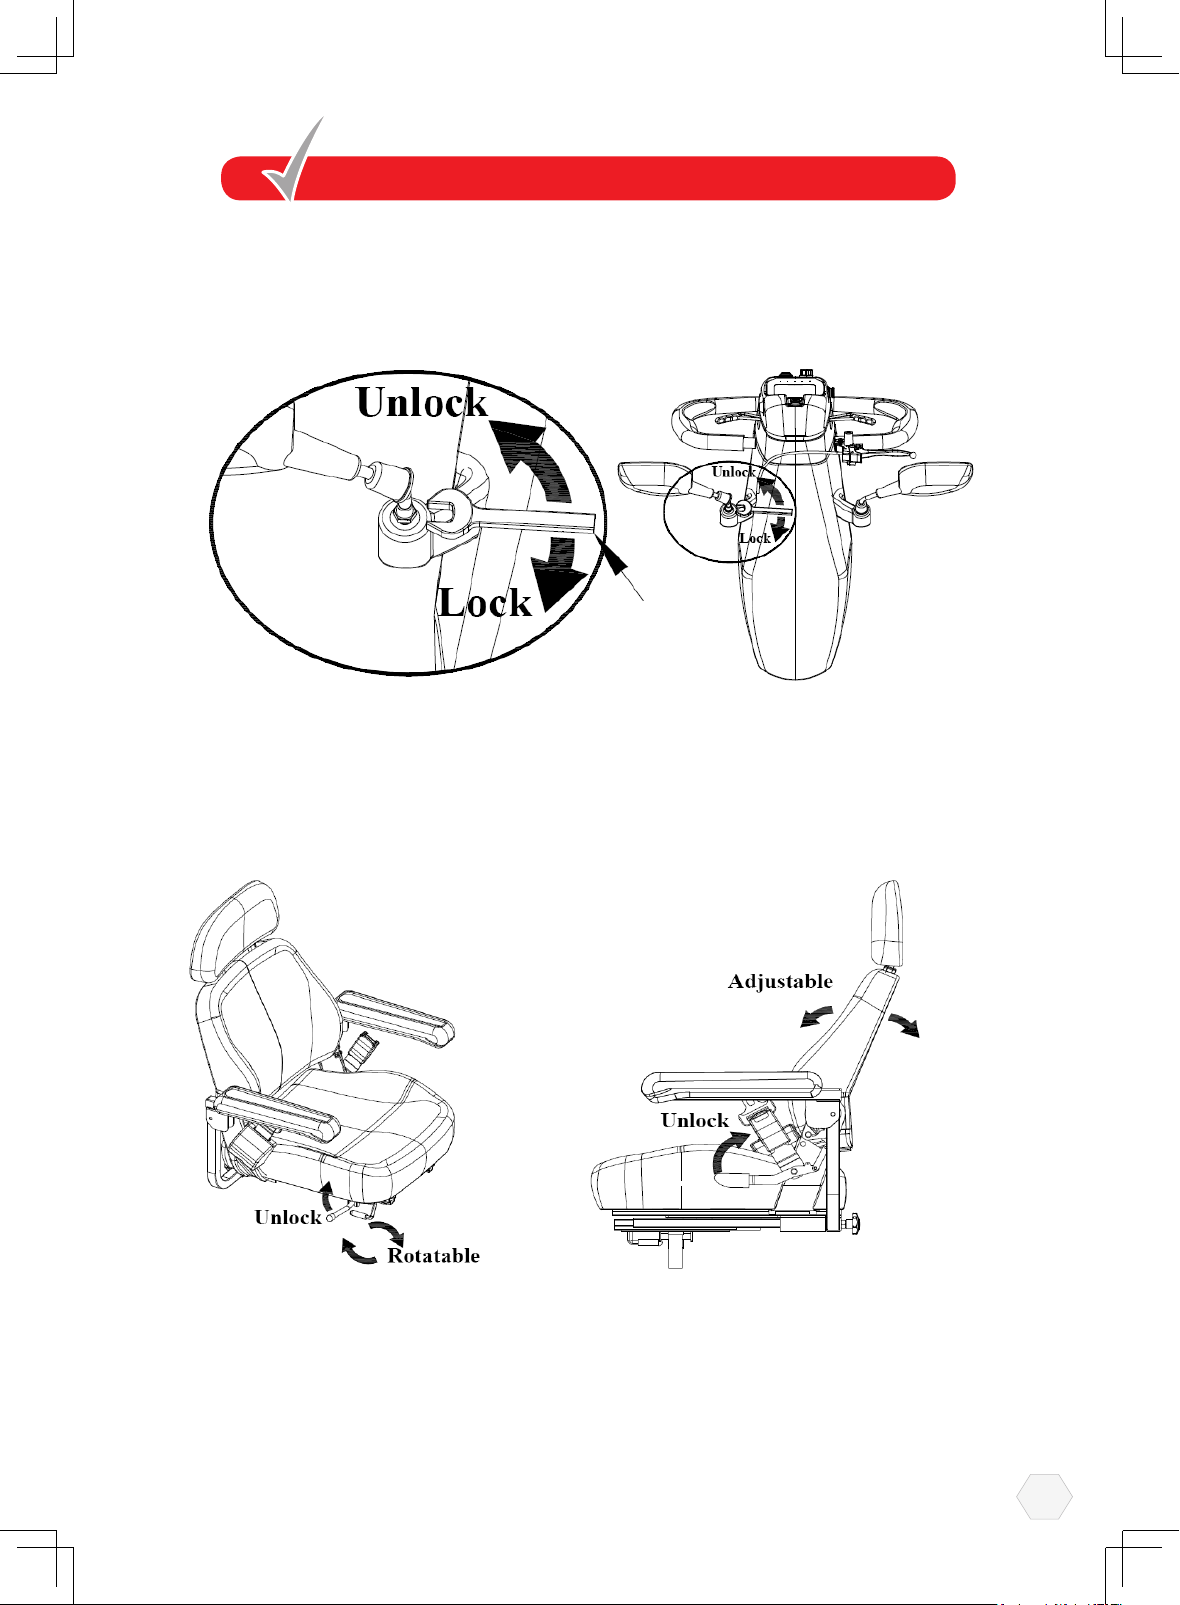
OPERATING YOUR SCOOTER
Before setting out on your scooter you need to make sure that your seat is in the
correct driving position. The seat has three basic adjustments to assist your comfort.
1.Mirror assemble:
14mm
wrench
2.Seat Lock Lever:
This allows the seat to swivel through 360 degree: Pull up fully to release the
seat allowing rotation. Release lever to lock the seat into the desired position. .
Caution:The seat locking lever must be locked in place and be lifted up fully when
rotating the seat, failure to observe this may result in unnecessary wear of the seat
post.
Removing seat from Scooter:
The seat mounting post is designed with a special safety lifting point, this will prevent
the seat from inadvertently coming off, It can only be removed by turning the 90
degree from the forward driving position.
8
Page 10
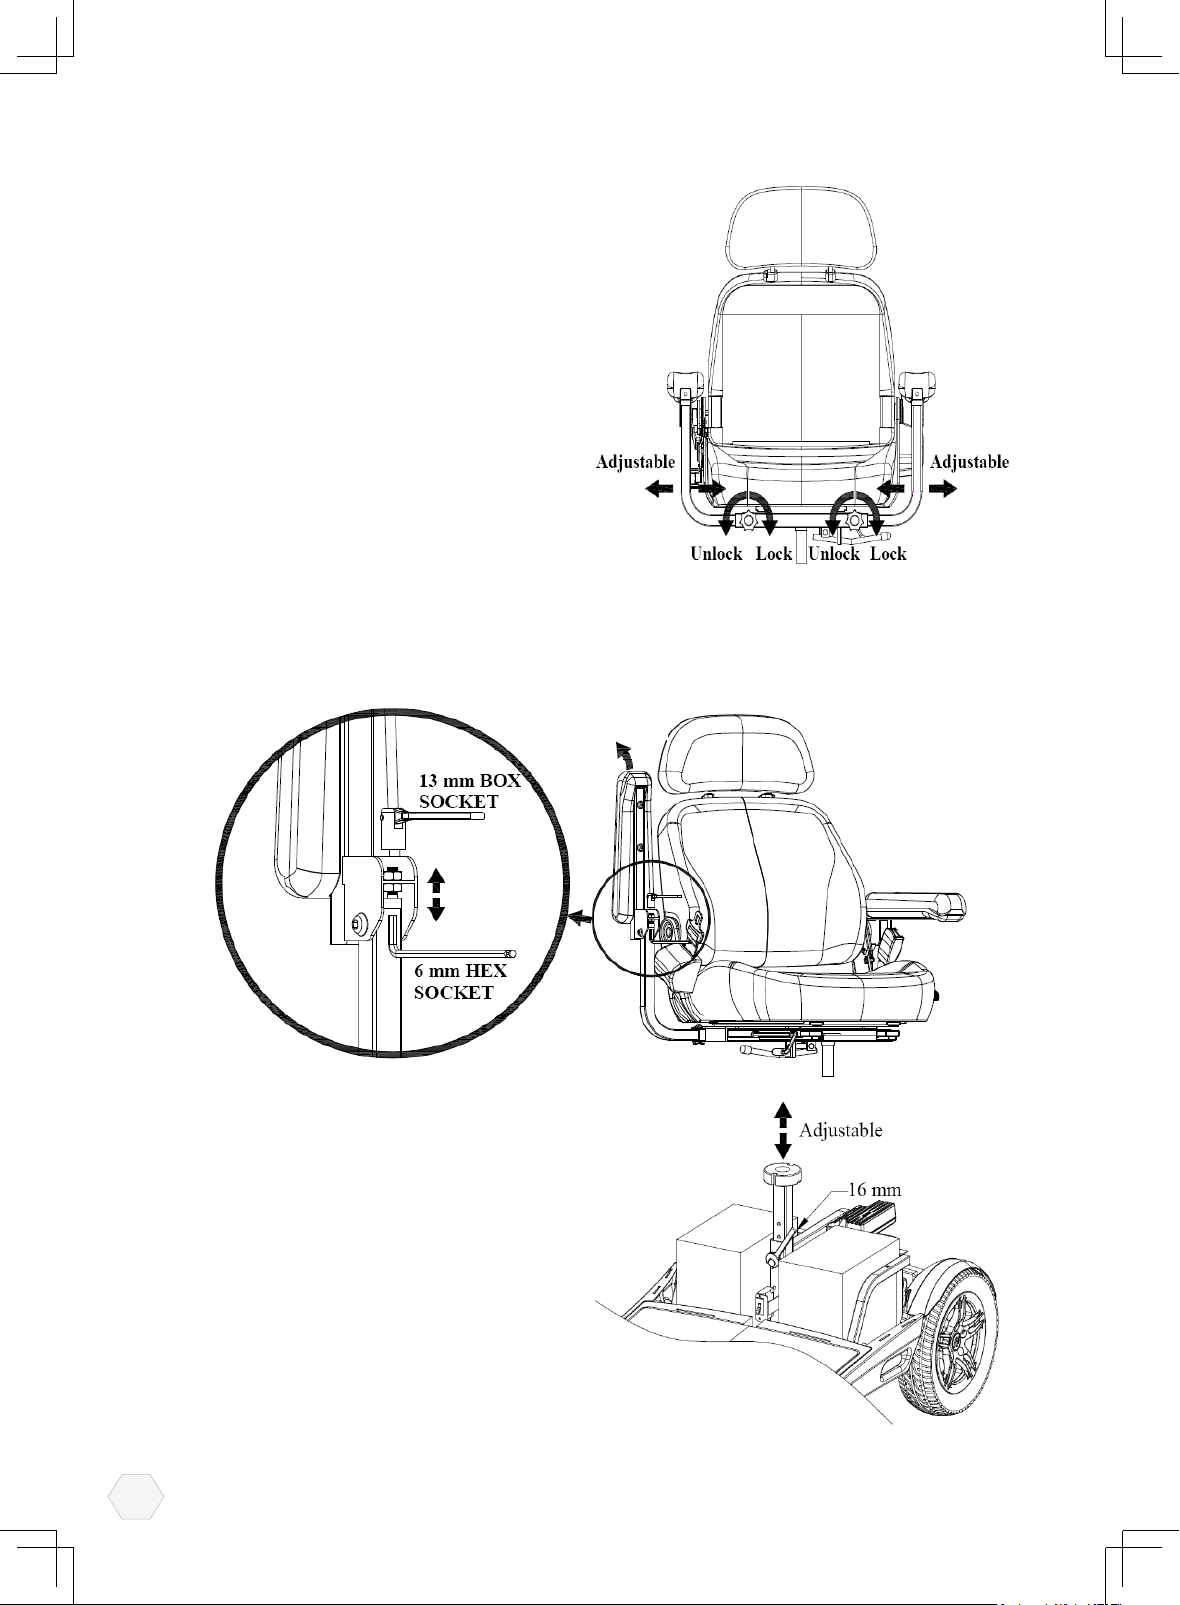
3.Armrest Width Adjustment:On each
side at the rear of the seat you will nd a
large black knob. By simply loosening this
knob you are able to slide the armrests in
or out to whatever width you desire. Re-
tighten the knobs fully.
Warning: Do not drive your scooter with
the arms removed or in the raised position.
4.Armrest Angle Adjustment:he armrest
angle can be adjusted individually to suit
your needs.
To make adjustments to the armrest angle
you will need two 13mm wrenches (not
provided). Lift the arm upwards, you will
note the adjusting bolt. First loosen the locking nut, rotate the bolt in or out until the
required angle is found, lower the arm and check the angle for comfort; re-adjust as
necessary.
Finally the tighten locking nut.
Adjustable
5.Seat Height Adjustment:You may need
to alter the seat height setting at a later
date, please follow these instructions.
(1) Remove your seat from the Scooter by
lifting the seat.
(2) With the aid of a 16mm wrench (not
supplied) loosen the 10mm seat clamp
xing bolt from side of seat post.
Remove the 10mm xing bolt and
reposition the bolt into one of the four
preferred location holes of the seat
mounting tube.
9
wrench
Page 11
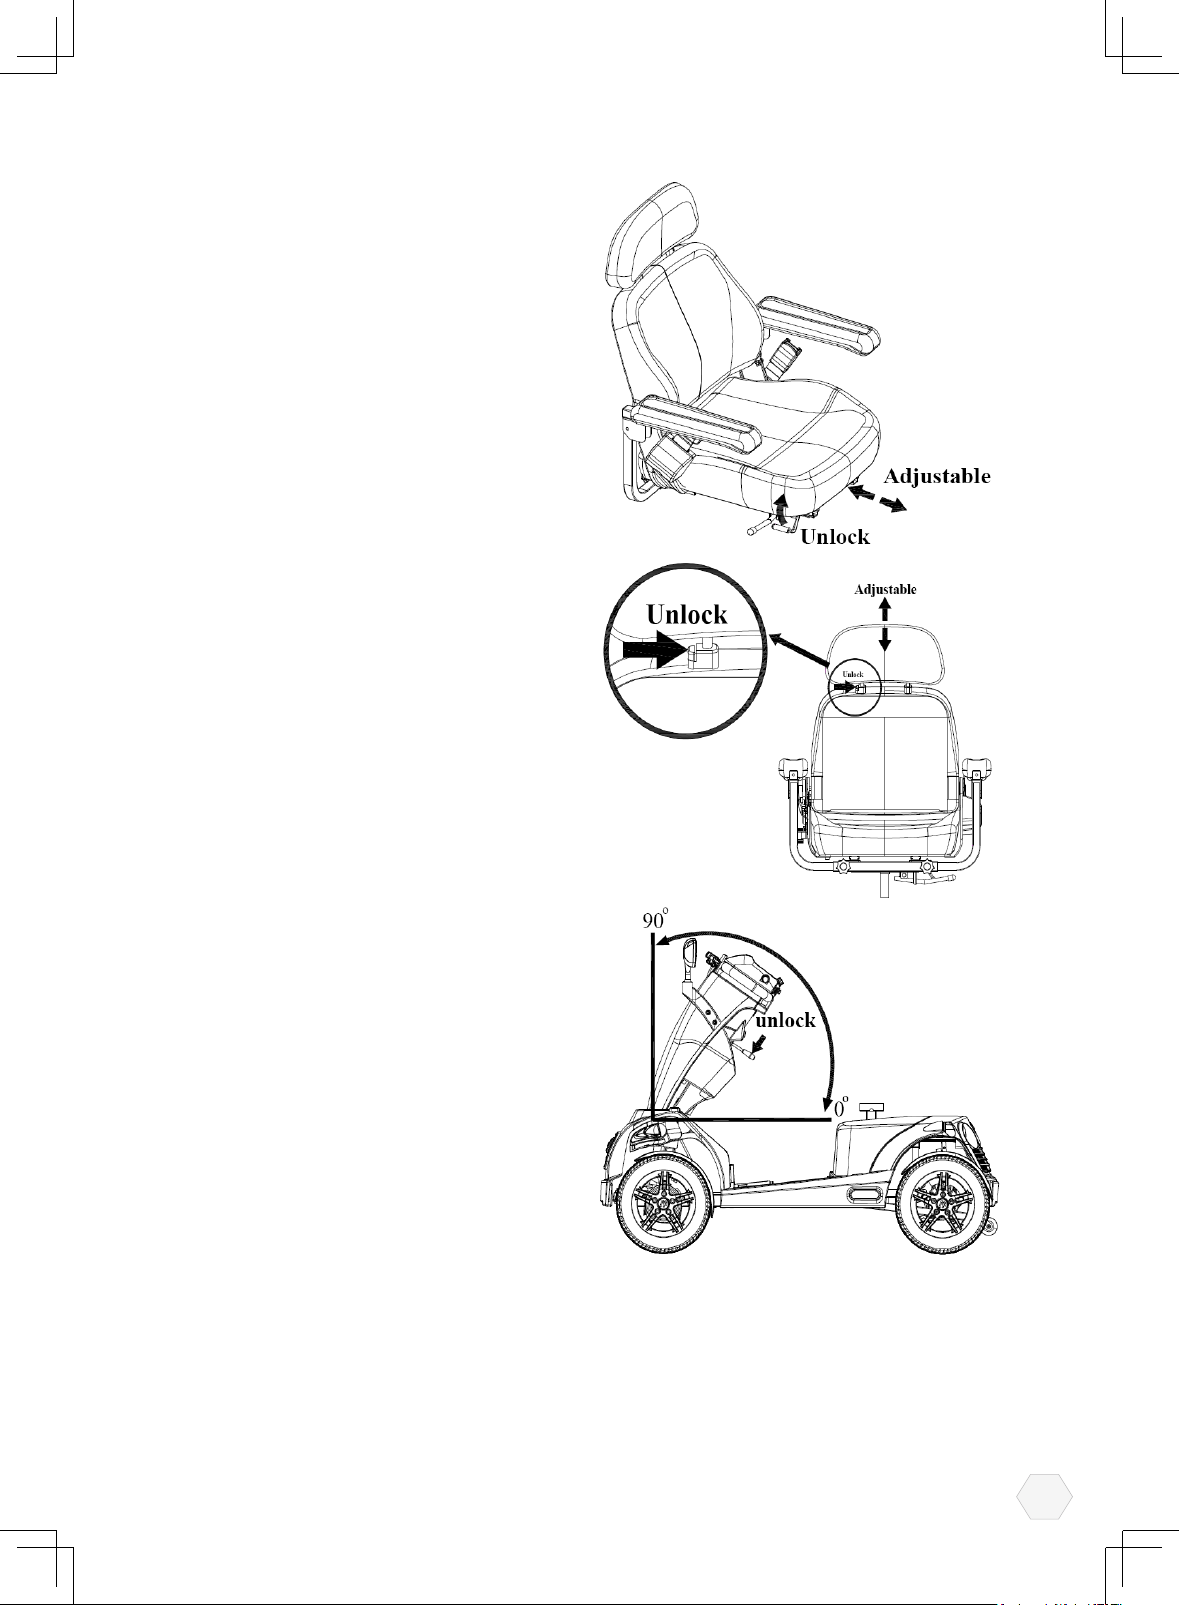
(3).Re-tighten the 10mm xing screw.
(4).Ret the seat onto your Scooter.
6.Seat Slide of the seat:Located on
the right front side of the seat. The lever
allows you to adjust your seat forwards
and backwards when sitting on the seat.
Simply pull up the lever and move in the
desired position backward by pushing or
forward by hitching. As soon as the lever
is released, the seat will lock into the new
position.
Caution: Check the seat has fully locked by
hitching backwards and forwards.
7.Backrest Height Adjustment:he upper
cushion of your backrest can be adjusted
for height, giving you more back support
if you are tall, by operating the small latch
cushion up or push down for the most
comfortable position.
8.Handlebar Adjustment:he handlebar
of your Scooter is designed to allow you
to position it in a comfortable driving
position. It can be locked into numerous
positions or unlocked to move freely for
transportation.
The handlebar lock is operated by a black
lever positioned on the right hand side of
the handlebar.
To release the handlebar from a locked
position pull the black lever upwards, the
handlebar will now move freely, but under
mild tension.
9. Tiller height adjustable:
10
Page 12
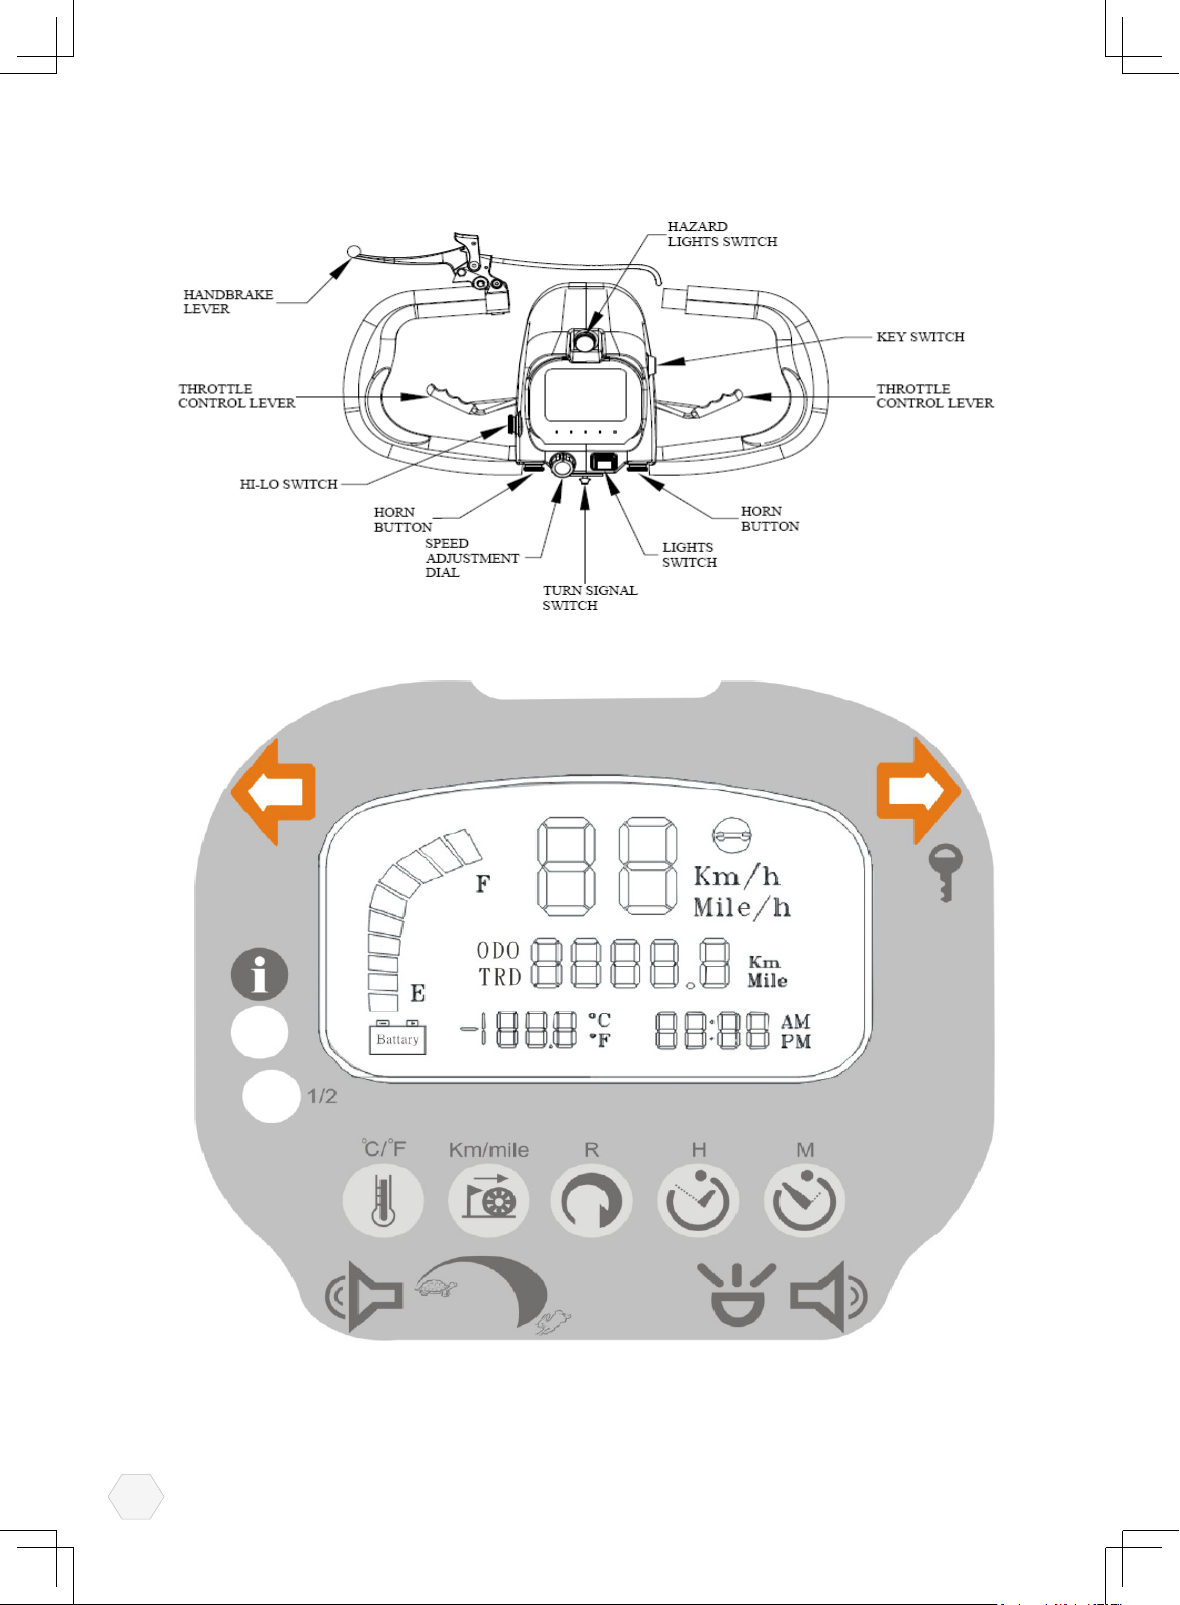
10.Control Features:
HI-LOW
Your controls are located on the handlebar console they are:
11
Page 13
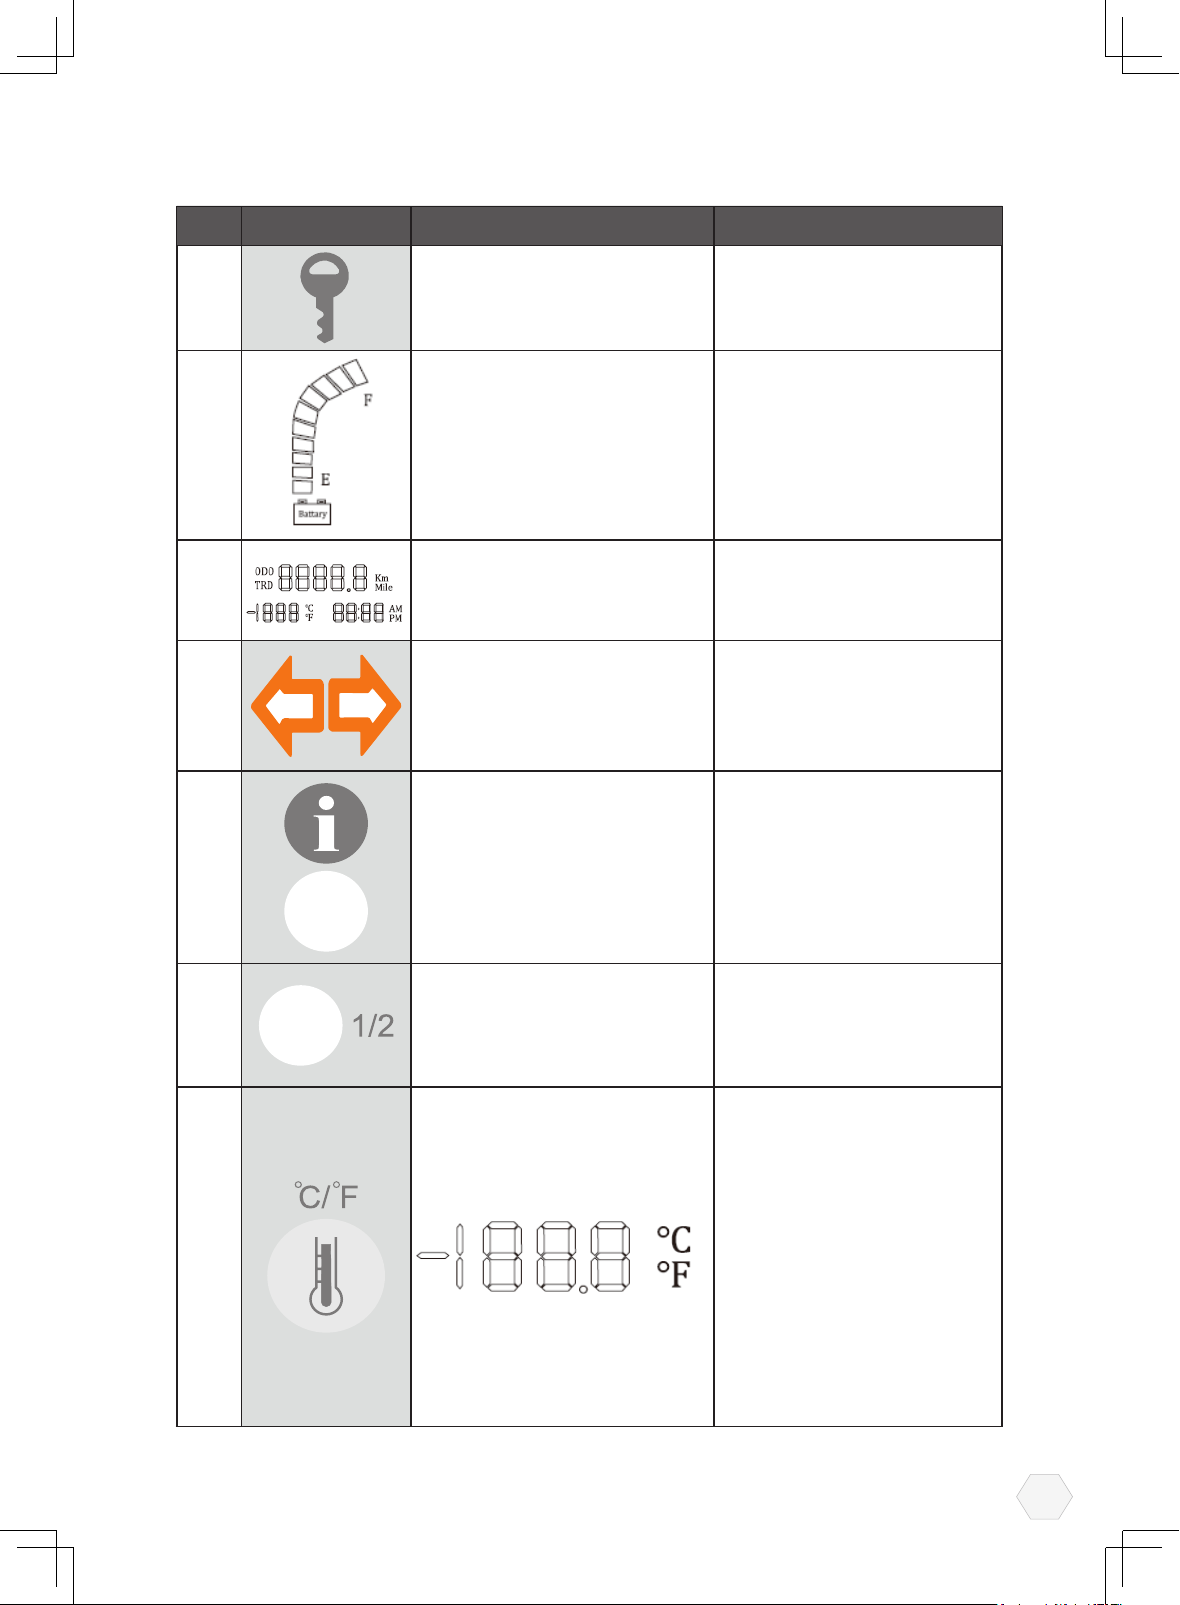
11.LCD Control Console:
Sign Function Description
1 On-Off Power Switch
2 Batteries condition indicator
3
4 Direction indicator
Distance/Temperature
/Time indicator
Will activate controller
system and control panel
Bars will illuminate to show
the level of charge in your
batteries
Will illuminate when power
on and they also exhibit in
different value
Will illuminate when the
direction switch is activated
press to terminate.
5 Status light
6 Half speed indicator
7
The green light will illuminate
at a constant rate when key
switch on and will flash for
identify faults
Will illuminate when the half
switch is activated
Switch between Centigrade
and Fahrenheit
l. Short press for switching
between Centigrade and
Fahrenheit.
12
Page 14
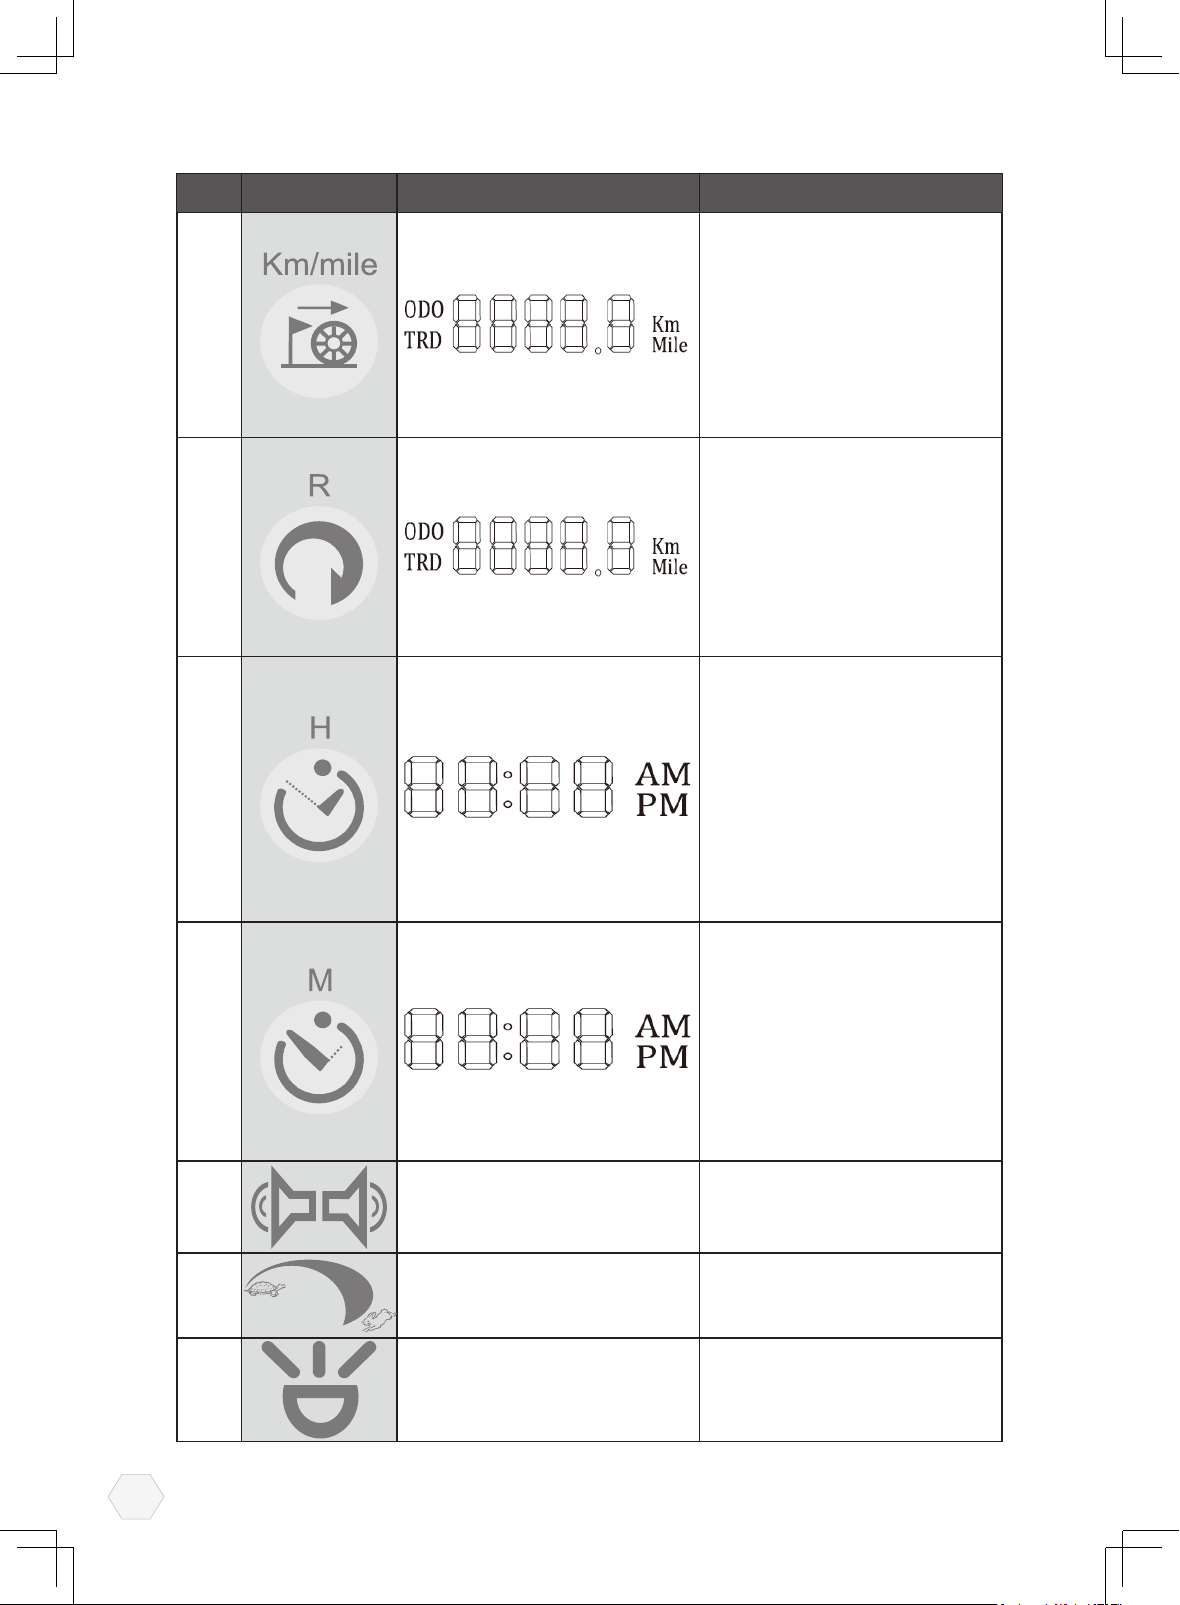
8
9
10
Sign Function Description
Switch between Km and Miles
l. Short press for switching
between kilometer and mile.
2. Program Setting Mode for
Speed and Loadstone
setting, please contact
your authorized dealer for
adjustment.
Reset the distance(range)
1. Short press to switch
between ODO/TRIP.
2. Press sustained to reset
TRIP.
ODO = Odometer
= Total distance
TRD = Trip distance
Hour setting
1.Short press to increase
hours value.
2.Press sustained H to
increase hour value
sustainability.
3. Will return normal (drive)
mode after 3 sec. without
setting.
13
11
12 Left and right horn button
13 Speed Adjustment Dial
14 Front/Rear light switch
Minute setting
1. Short press to decrease
mlnute value.
2. Press sustalned M to
decrease minute value
sustainability.
3. Will return normal (drive)
mode after 3 sec. without
setting.
Press to sound a warning to
other road users.
Allow to pre-select your
desired top speed.
Simply push on and off to
Front and rear light
Page 15
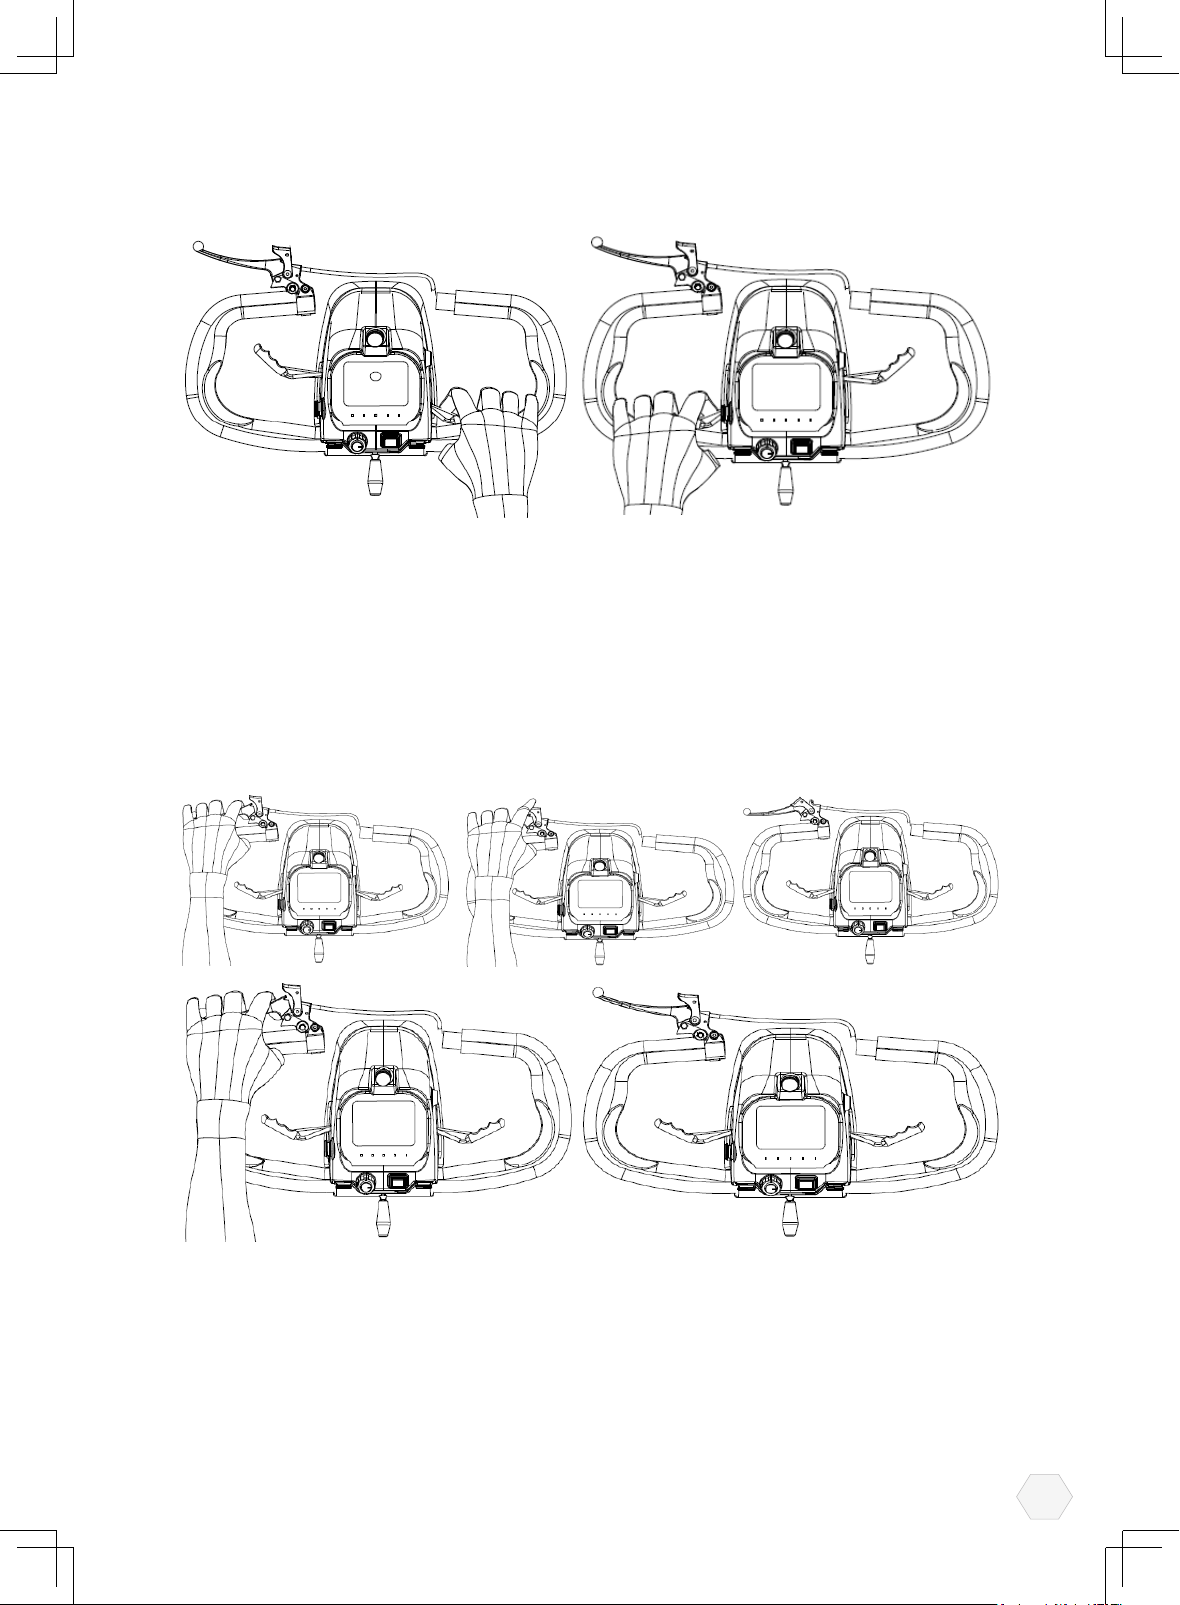
12.Forward, Reverse Control Lever (Wig wag):
Forward Reverse
Your speed for forward and reverse motion and braking is controlled here.
The right thumb lever moves your Scooter in a forwards direction and also
controls the rate of speed by the proportional amount of pressure applied.
The left thumb lever moves the Scooter in a reverse direction and controls the
rate of speed by the pressure applied . The lever when released will return itself
to the neutral position, and you will gently stop. You will note that you can obtain
the reverse of this procedure by pulling the levers backwards with your thumb.
13.Emergency Brake:
Emergency brake lever located on your steering handlebars, It will operate two brake
mechanisms in two front wheels in the meantime when you grab the brake lever.
Brake force can be adjusted by tightening the screw beside brake drums.
14
Page 16
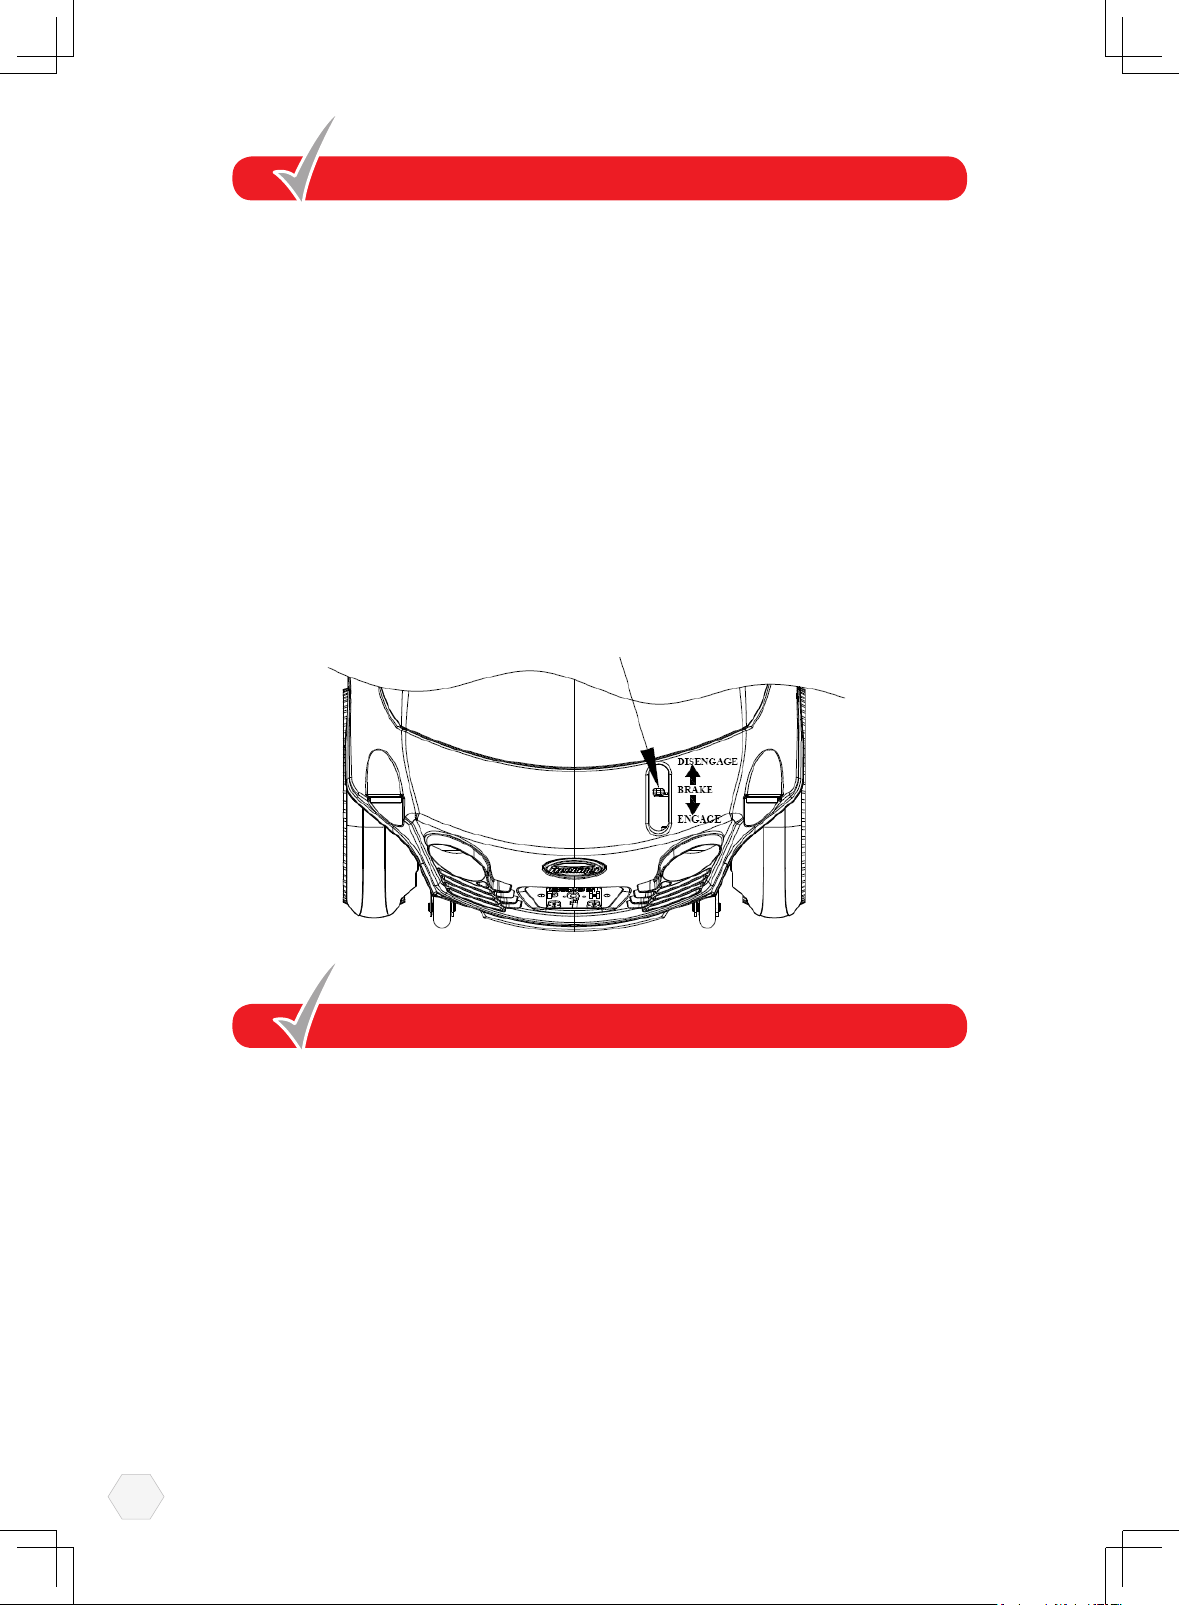
FREEWHEELING YOUR SCOOTER
If for reasons of convenience, or you require to push your Scooter for a short
distance, the drive system can be put into ‘freewheel mode’. This will allow your
Scooter to roll freely.
1.Freewheel Procedure:
The freewheel device is a red lever located at the rear right hand side of your
scooter.
To freewheel your scooter rst switch off the power switch located on the scooter’s
control console.
Pull up the disengage lever until a distinct click is felt. You can now push your scooter
with ease.
Please note, in this mode with the power switch in the off position, the braking safety
system is automatically activated when the Scooter is pushed quicker than walking
speed, this is an automatic ‘run away’ safety checking system, it also reduces the risk
of casual theft. Safety instructions and warnings
SAFETY INSTRUCTIONS & WARNING
ELECTROMAGNETIC AND RADIO FREQUENCY INTERFENCE (EMI/RFI)
Electromagnetic and radio Frequency Interference can come from mobile phone,
radio transmitters etc. In some cases, these waves can cause damage to control
system. Your scooter has an immunity to EMI, the higher the immunity level, the
greater the protection against EMI.
Your scooter has been tested and passed at an immunity level of 20 V/M.
Warning: Additional of accessories or components to your scooter can increase the
susceptibility to EMI. Do cot modify scooter in any way not authorized.
1.Safety Check:
We recommend that you perform a safety check before each use to make certain
your Scooter operates smoothly and safely.
15
Page 17
a. Check type inflation, maintain at 35 p.s.i.
b. Check all battery connections, make certain they are serviceable and not
corroded.
c. Check front basket is fitted correctly.
d. Check batteries have been fully charged.
e. Check operation of brakes.
Warning: Do not carry passengers on your Scooter. Your Scooter is designed for
a single occupant which complies with legal requirements for pavement vehicles.
Carrying passengers on your Scooter may result in personal injury and/or
property damage.
We will not be held responsible for injuries and/or property damage resulting
from failure to observe these weight limitations. Please also remember when
carrying heavy objects that this will increase your total weight and may make
your Scooter unstable.
2.Inclines:
More and more modern buildings are designed with disability access in mind.
Ramps have specified percentage of inclination, designed for easy and safe
access. Some ramps may have turning switchbacks (180 degree turns) that
require you to have good cornering skills on your Scooter.
a. Take a wide arc with your Scooter's front wheel around tight corners, your rear
wheels will follow preventing you from cutting the corner short and bumping or
getting hung up on raised currbs.
b. When descending an incline keep your speed adjustment set to the slowest
speed setting to ensure a safely controlled descent and driving in a forward
direction only. If your Scooter descent is quicker than you anticipated allow
the Scooter to completely stop, then progress at a slower speed setting.
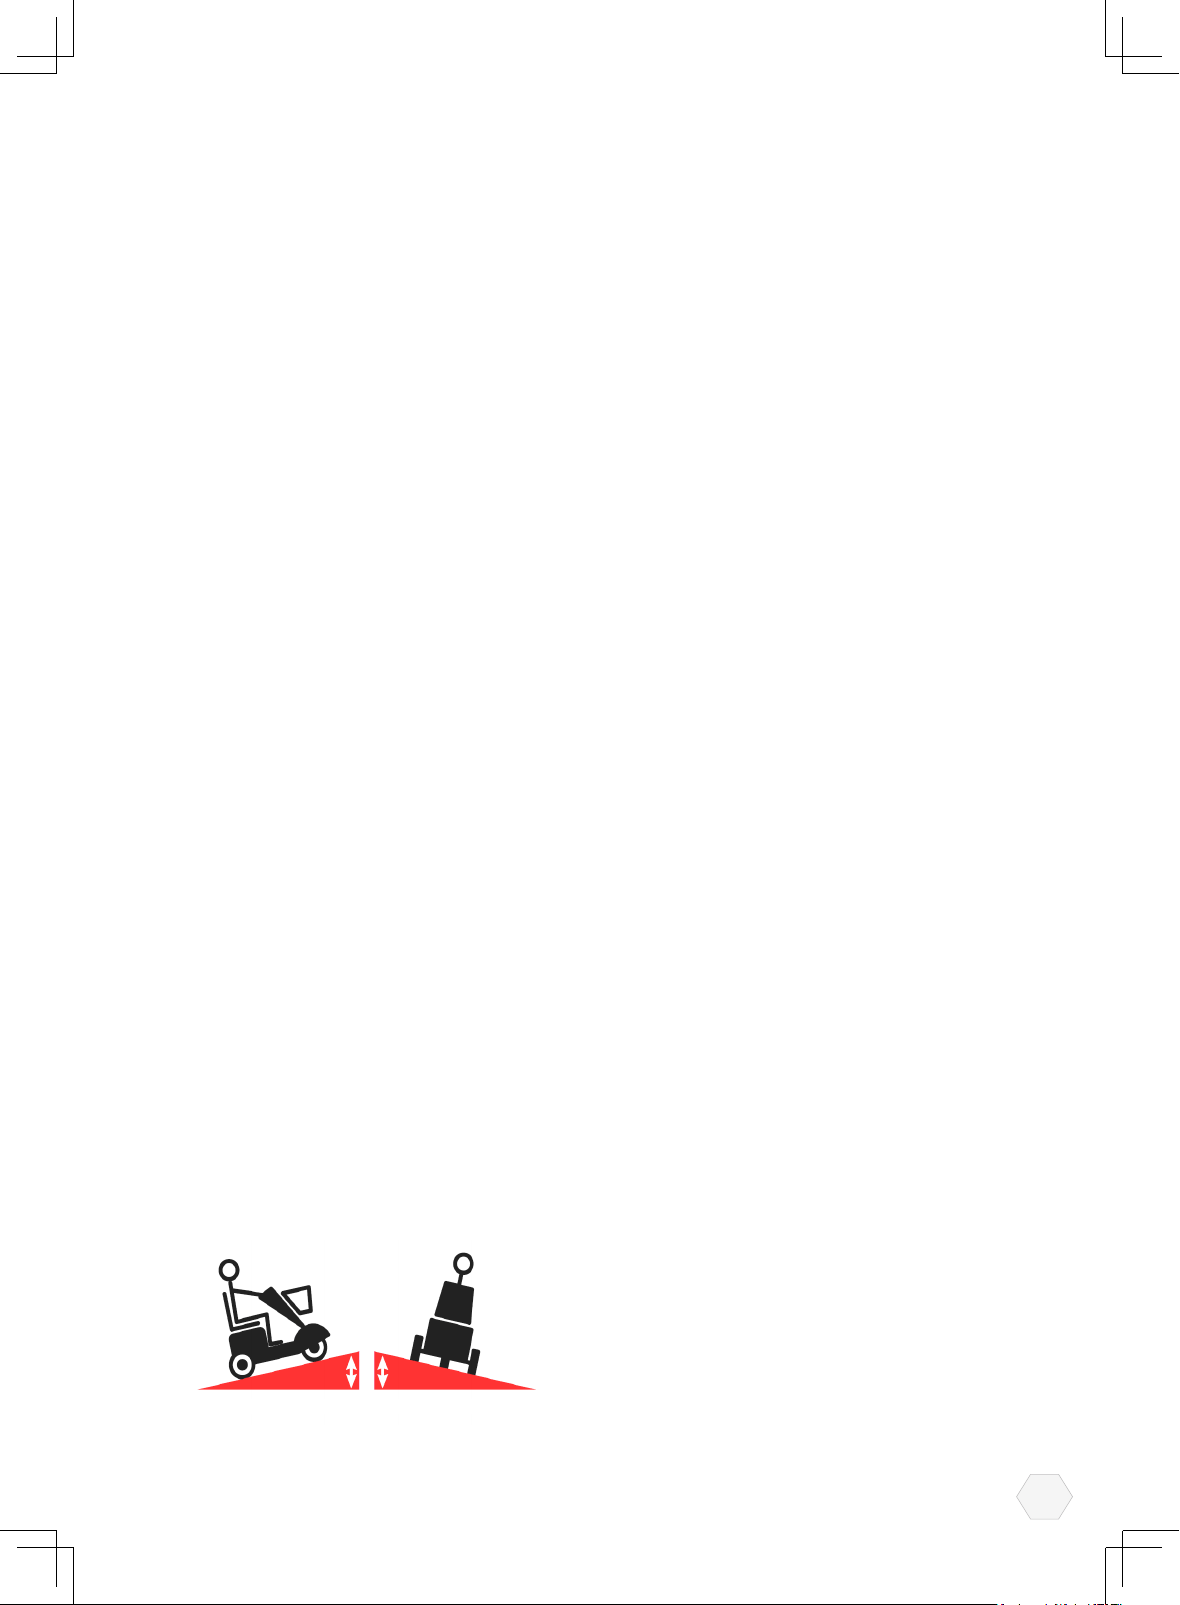
Warning: Never drive down an incline at full speed. When climbing an incline,
try to keep your Scooter moving, if you must stop, start up again slowly and then
accelerate smoothly with caution. Avoid sudden stop starts, lean forward towards
your handlebars to increase stability and prevent rearward tipping.
Warning: When climbing an incline, do not zig-zag or drive at an angle up the
face of the incline. Drive your Scooter smoothly up the incline without stopping,
this greatly reduces the possibility of a tip or fall.
6 degree maximum incline 6 degree maximum incline
16
Page 18
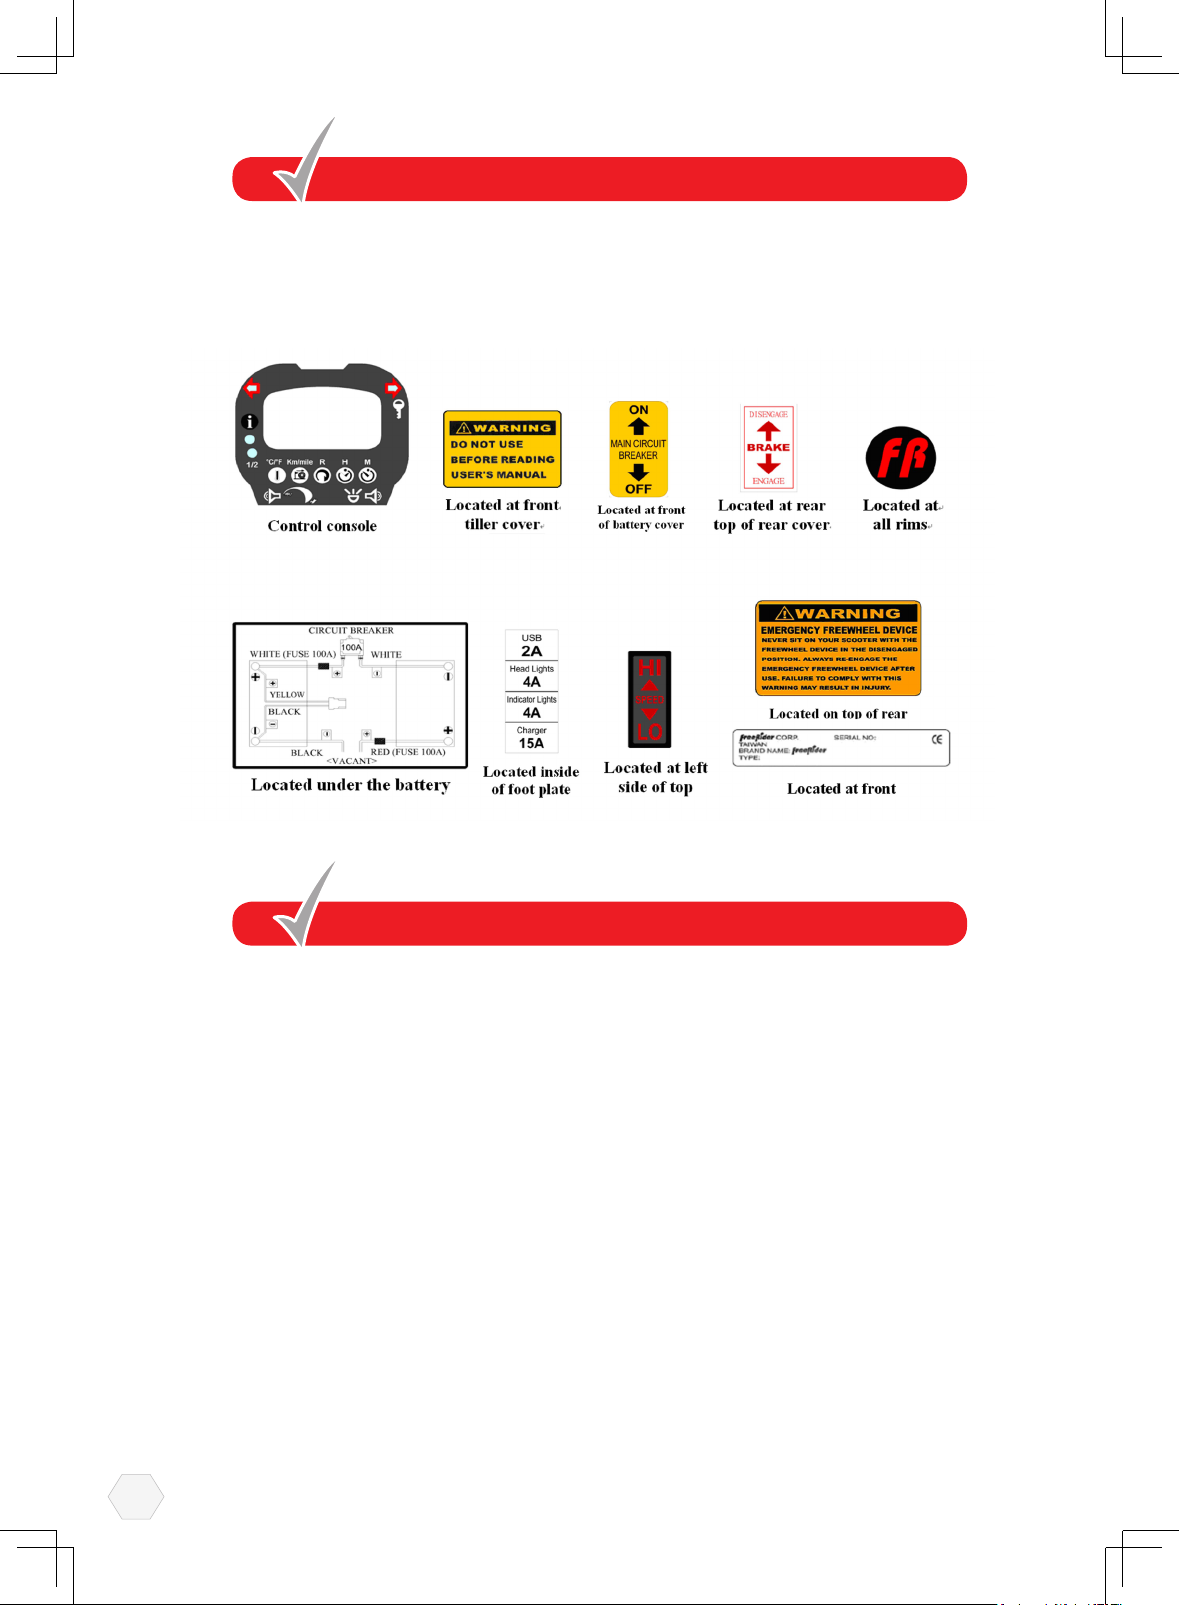
SAFETY WARNING & INSTRUCTION LABELS
The following labels are positioned on your scooter, they communicate important
warnings or instructions regarding the safe operation of your scooter. Please
familiarize yourself with their location.
LEARNING TO GET ABOUT
1. Basic Driving:
Make certain you are comfortably seated on your scooter and both armrests are
down. Ensure that the “Speed Adjustment Dial” is turned to minimum for your rst
drive. When you have become more condent you can increase the setting to a
higher speed. Push the right” Thumb Lever Control” as described earlier. You will
very gently move forwards. Release the lever, and you will gently stop. Practice
these two basic functions until you get used to them. Steering the Scooter is easy
and logical by turning the handle bars in the direction you wish to maneuver.
2. Control On An Incline:
When you approach an incline, it is best to learn forward. This moves the center
of gravity of your scooter towards the front of the scooter for improved stability.
When going down an incline, keep your speed slow. This will keep you in a safely
controlled descent. It is best to learn backwards, this moves the centre of gravity
of your Scooter towards the rear of the scooter for improved stability. If you wish to
stop completely, release the control lever, and you will come to a gentle stop, avoid
sudden stop starts.
17
Page 19

Normal driving position Increased Stability driving position
CONTROL OVER STATIONARY OBSTACLES
Stationery obstacle (steps, curbs etc.) must be avoided where possible. Proceed with
extreme caution when driving near raise surfaces, unprotected ledges and/or drop
offs such as curbs, porches, stairs etc.
Most new pavements have wheelchair access ramps at intersections, use these at
all times. Plan your route where possible to avoid poor and uneven surfaces. Do not
attempt to ride up or down curbs as you may ground your scooter and damage it’s
construction.
Correct Incorrect
18
Page 20
BATTERIES AND BATTERY CHARGING
1.Battery Installation:
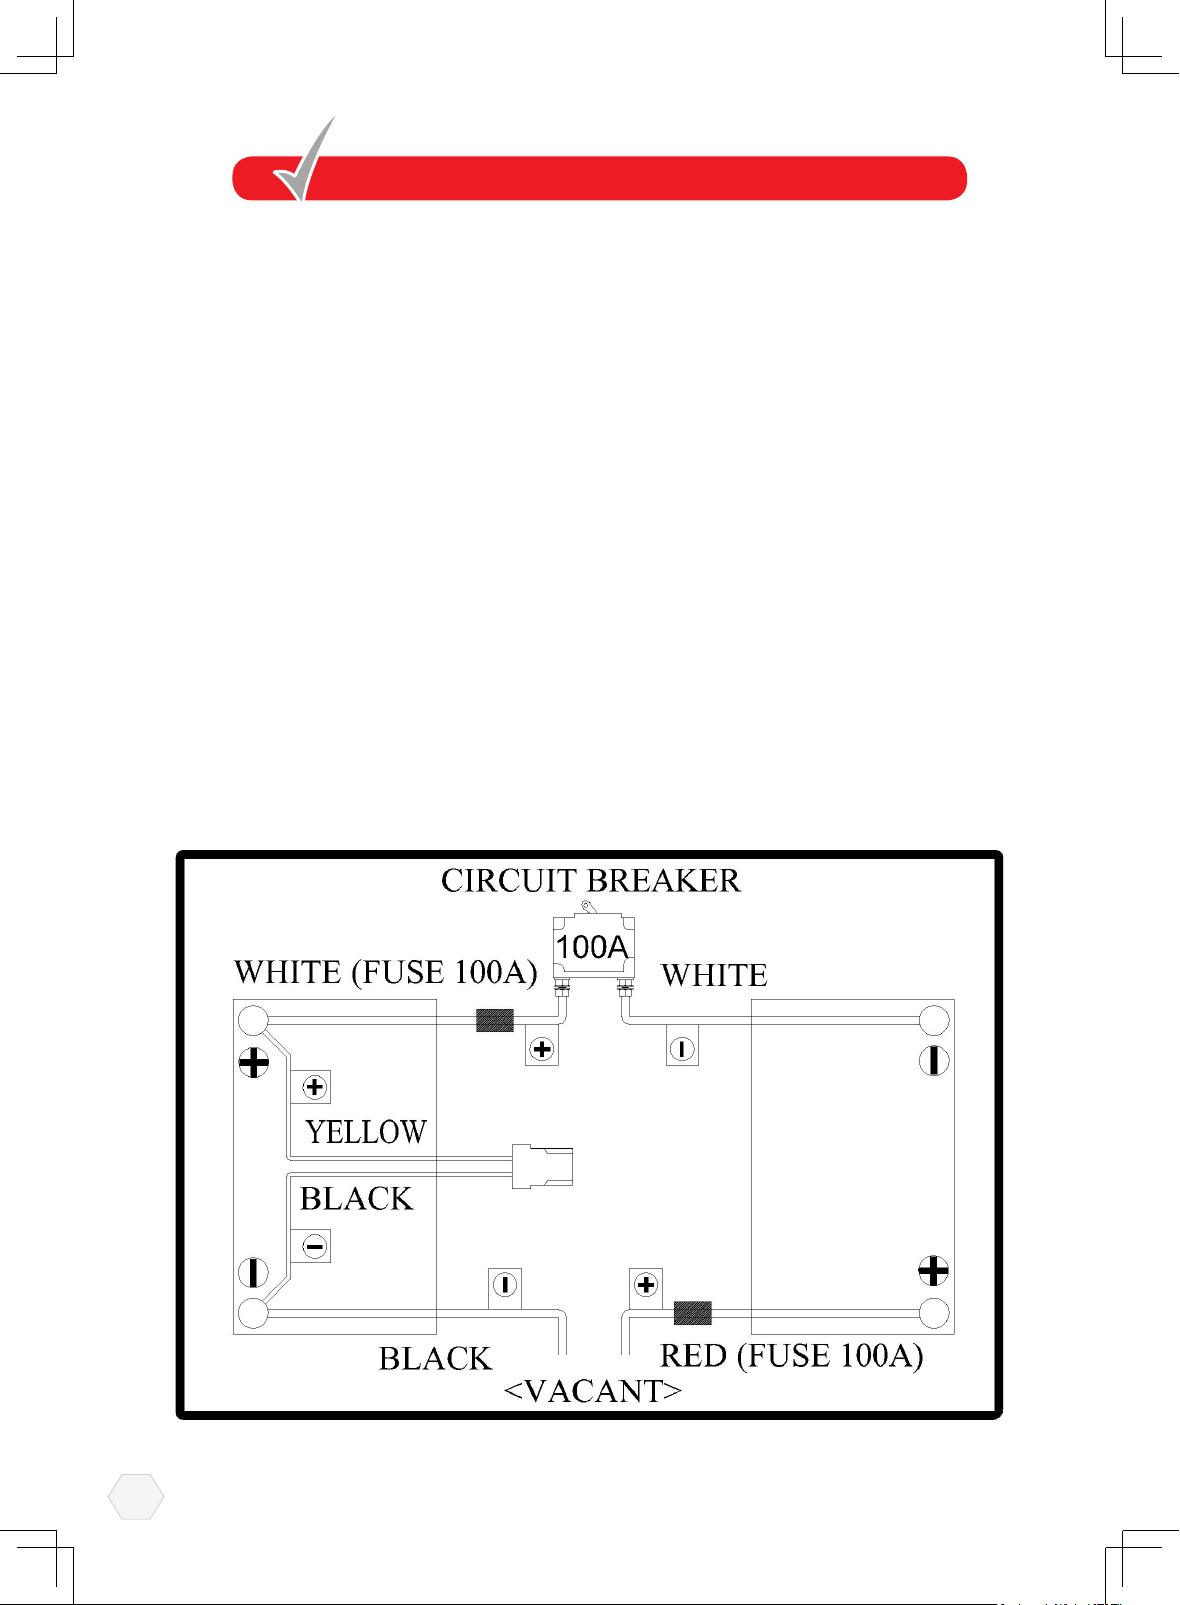
Your Scooter is equipped with two maintenance free 12 volt 75Ah batteries. The
batteries are linked together by wiring cables to supply the electronic system with 24
volts of power.
Warning: IIt is imperative that the two batteries are connected correctly to prevent a
short circuit between the two batteries. When rst installing the batteries follow these
assembly instructions.
(1) Connect the labeled positive (+) wire to the positive (+) terminal of the battery,
with the screw, nut and washer provided.
(2) Connect the labeled negative (-) wire to the negative (-) terminal of the battery,
with the screw, nut and washer provided.
(3) Repeat this procedure on the second battery making certain the plastic red/black
terminal covers are secured over each terminal.
(4) Sit on the seat and switch on your scooter, the battery meter will now move to
show the state of charge in the batteries and your Scooter is ready to drive.
Batteries circuit diagram
19
Page 21
2.Battery Charging:
Your Scooter has a lot of power. To ensure it works to its full potential you must
maintain both batteries on full charge. Nightly recharging, after use, will help you to
give them a longer life and will ensure your Scooter is always ready to go when you
are. Only use the charger supplied with your scooter; other makes of charger may
permanently damage your batteries and would invalidate the Guarantee.
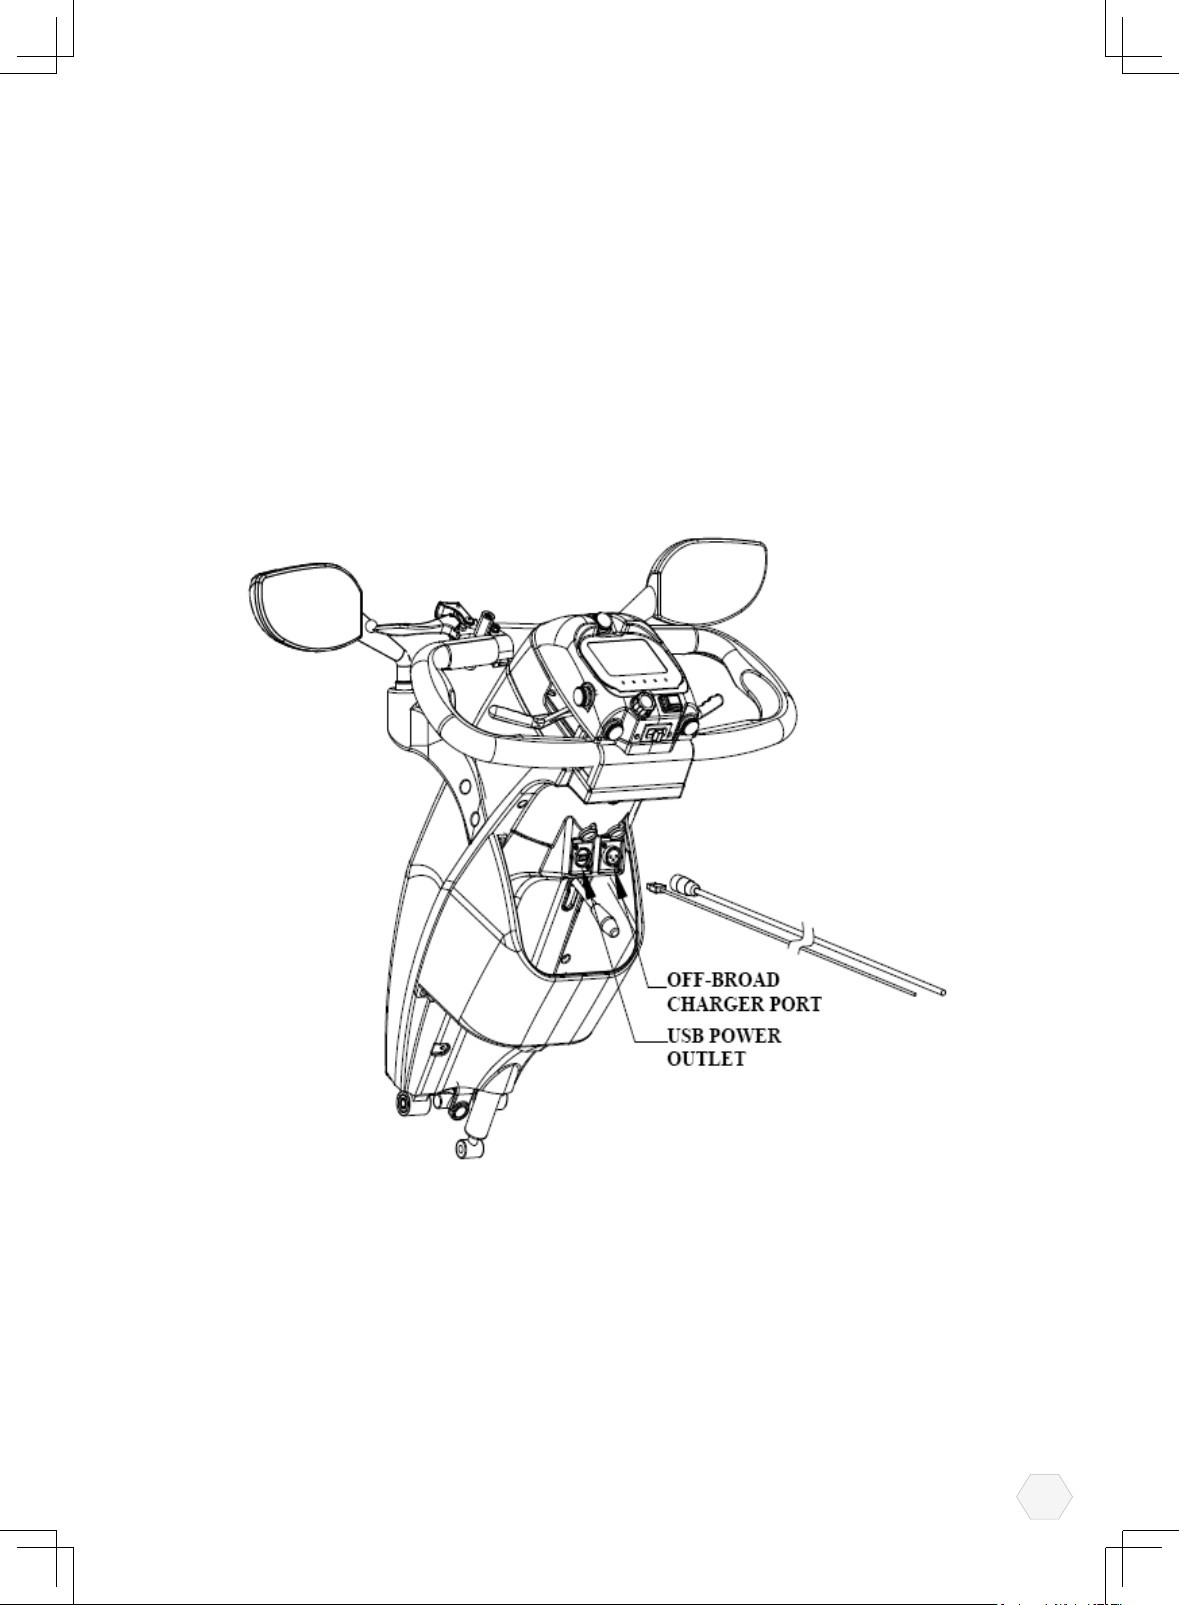
3.USB Power Outlet:
The USB 5V/1A power outlet will allow you to charge you a small electronic
device such as cell phone or any other devices which is suitable for the electric
specications.
20
Page 22
BASIC FAULT FINDING
If your Scooter will not start:
(1) Check the power key switch is turned 'on'. If it is, the battery condition indicator
meter will be operating. If the green status light on your console is ashing once
per second, charge your batteries.
If the battery condition meter and the green status light fail to operate when the key
switch is in the 'on' position, check the following:
(2) Make sure the battery charger is not plugged into the tiller charge socket, this will
prevent drive.
(3) Check both battery connectors. Check battery terminal condition.
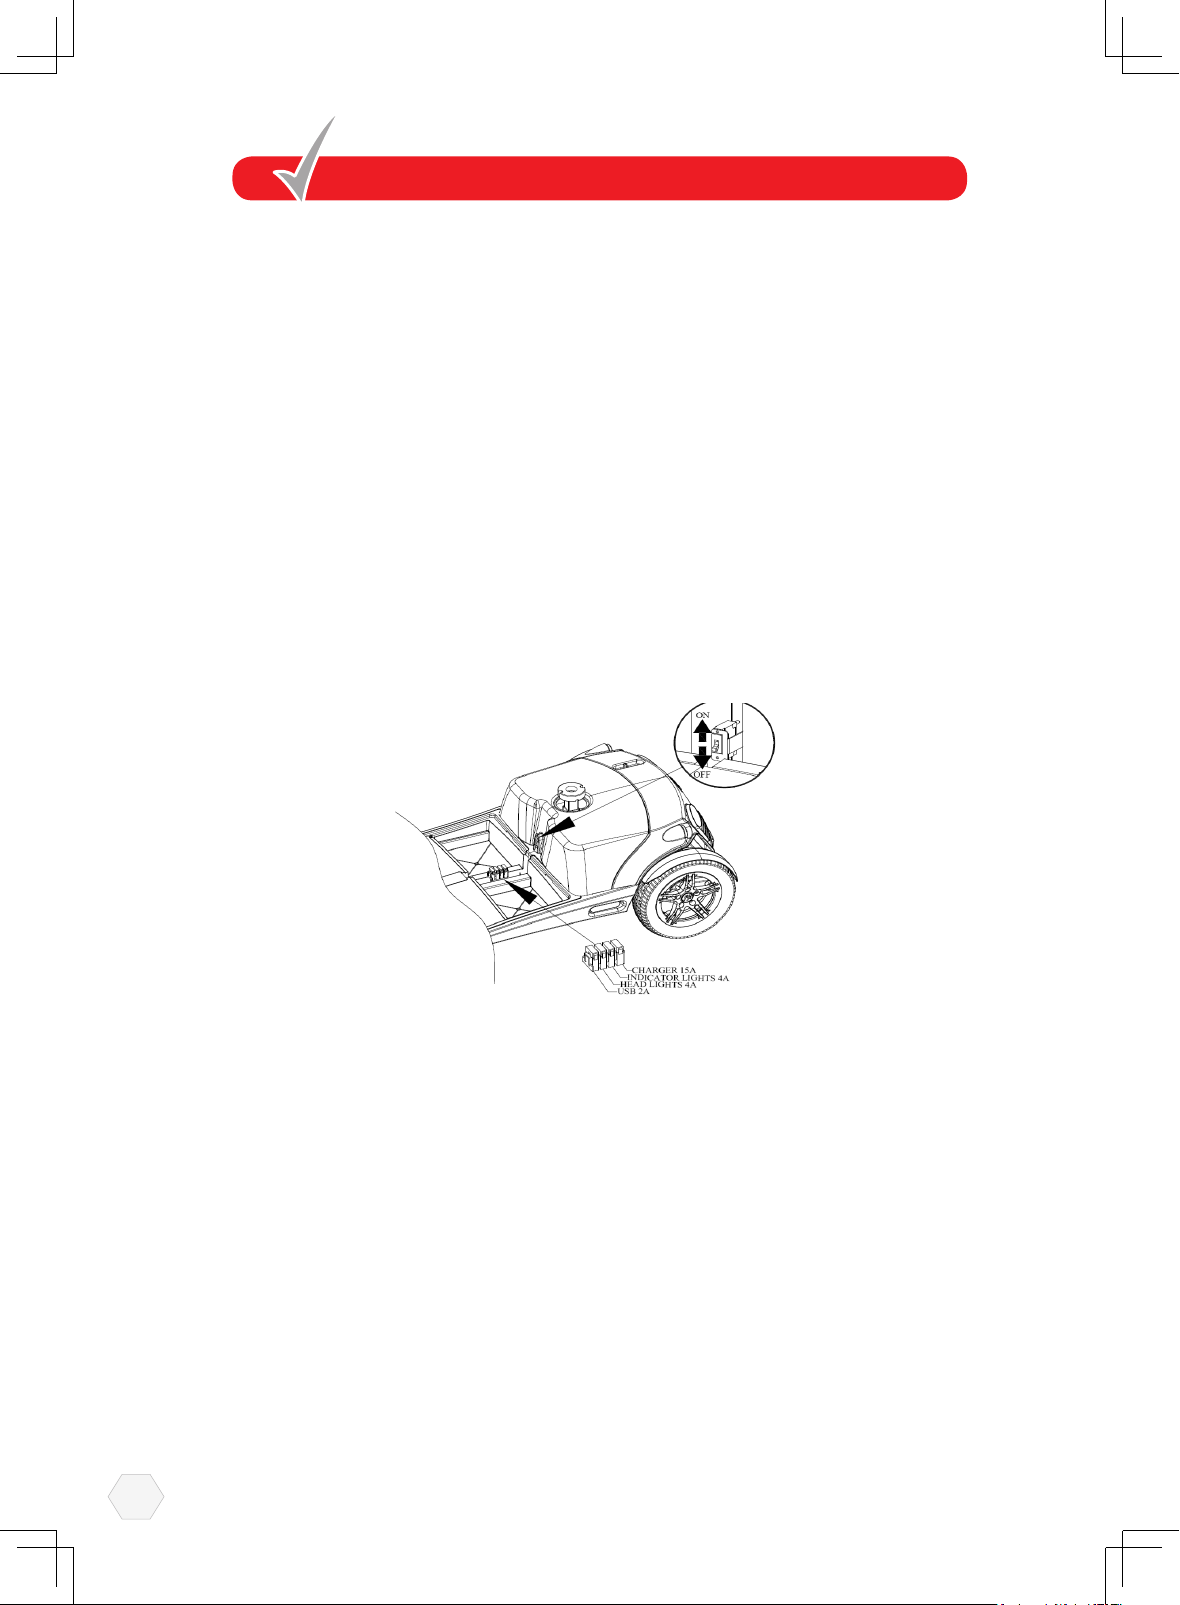
(4) Check the 'circuit breaker'
If your Scooter stops for no apparent reason, it is probably due to the circuit breaker
disconnecting from the speed control electronic box.
On rare occasions, a temporary overload on the electric circuit can occur – for
instance when climbing a steep incline. If this happens, reset the circuit breaker, wait
for two minutes to allow the temperature activated switch to cool down. Locate the
plunger on the circuit breaker through the access hole. Place a nger onto the circuit
breaker and press down on the plunger until it remains down. You are now ready to
drive again. If the circuit breaker trips up again wait for 5 minutes and try again.
1.Fault Diagnosis:
Faults with the main speed controller are rare. Most faults on powered vehicles
are associated with wiring or misconnections due to poor maintenance or incorrect
installation of connectors when assembling the Scooter after transportation in a car.
If your Scooter should fail to operate you will be assisted in diagnosis and locating
the area of the fault by observing the number of flashes emitted from the 'green'
status light on your control console.
21
Page 23

2.Charging Circuit Fuse:
One fuse protects your Scooter charging circuit from receiving an overload of
electrical current. The fuse used in the Scooter is the same type which is found on
automobiles. In the unlikely event that a fuse should 'blow' and needs replacing.
use only a fuse of a 15amp rating. Please note this size of fuse has been selected to
give your Scooter the best protection without premature fusing.
Warning: Do not use fuses with a higher rating than 15amps as this may cause
permanent failure to the wiring and wiring connectors or personal injury. For access
to a fuse remove the four screws located in the rear body cover, lift cover. Locate and
lift the fuse block on it's wire, lift up the fuse
lid and withdraw the 'read' fuse. Replace the blown fuse with recommended 15 amp
(pink) fuse, close fuse lid and replace fuse block.
use only a fuse of a 15amp rating. Please note this size of fuse has been selected
to give your Scooter the best protection without premature fusing.
22
Page 24
3.Status Fault Codes:
Flash Description Meaning
1 Battery Low
2 Low Battery Fault
Note:
The low battery fault ash code,described above, is a requirement of various safety
standards.
The scooter will output a visible and audible low battery warning if the battery
voltage drops below 90% of its cut-off voltage.
The warning will be two short ashes, and will take priority over all other ash codes
in the system.
3 High Battery Fault
Current Limit Time-out or
4
Controller too hot
5 Park Brake Fault
The batteries are running low. Recharge the
batteries
The batteries have run out of charge.
Recharge the batteries. Check the battery and
associated connections and wiring.
Battery voltage is too high. This may occur if
overcharged &/ or travelling down a long slope.
If travelling down a slope, reduce your speed
to mini mize the amount of regenerative
charging.
The motor has been exceeding its maximum
current rating for too long.
The scooter may have stalled. Turn the
controller off, leave for a few minutes and turn
back on again.
The motor may be faulty. Check the motor and
associated connections and wiring.
Either a park brake release switch is active or
the park brake is faulty. Check the park brake
and associated connections and wiring. Ensure
any associated switches are in their correct
positions.
23
6 Drive Inhibit
7 Speed pot Fault
8 Motor Voltage Fault
9 Other error
Either a stop function is active or a charger
Inhitit or OONAPU condition has occurred.
Release the stop condition(seat raised etc.)
Disconnect the battery charger Ensure the
throttle is in neutral when turning the controller
on. The throttle may require re-calibration.
The throttle, speed limit pot, or their associated
wiring may be faulty. Check the throttle and
speed pot and associated connections and
wiring.
The motor or its associated wiring is faulty.
Check the motor and associated connections
and wiring.
The controller may have an internal fault.
Check the motor and associated connections
and wiring.
Page 25

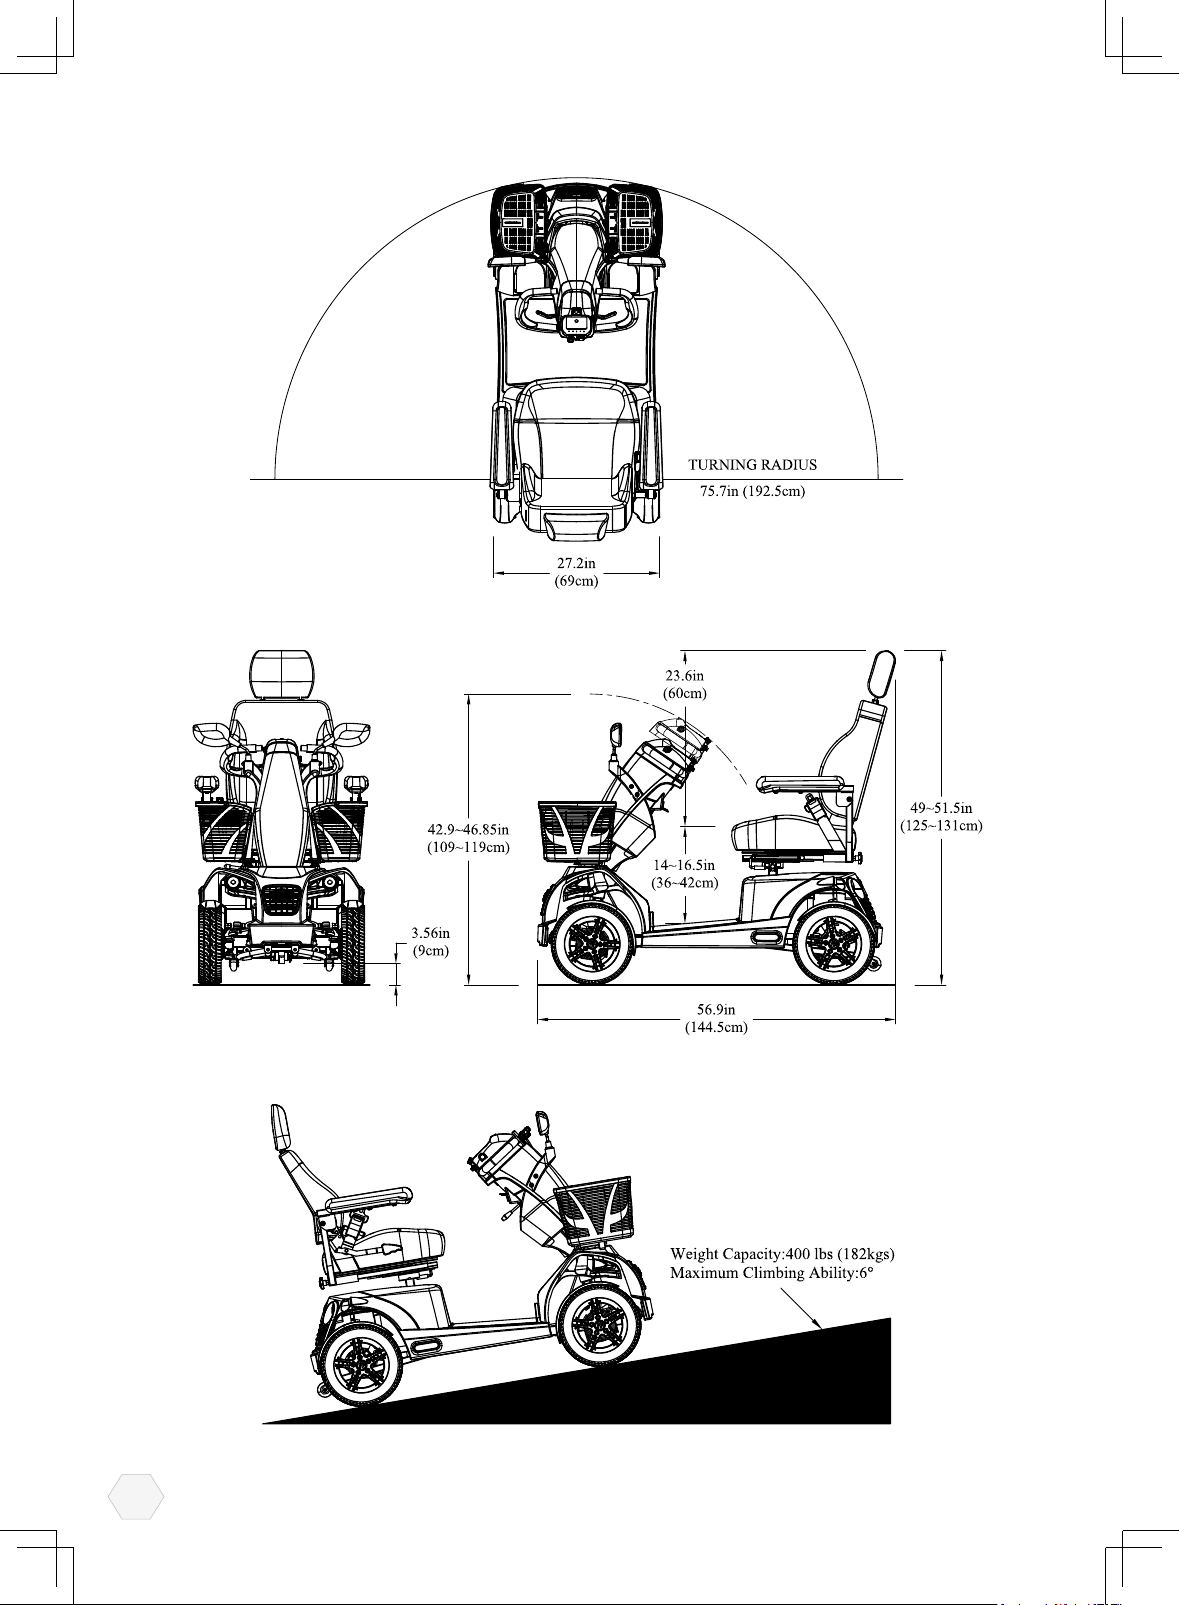
TECHNICAL SPECIFICATION
Model Number FR1
Maximum Safe Slope 6 degree
Maximum Climbing Ability 6 degree
Maximum Obstacle Climbing Ability 2.36 in.(60 mm)
Colors Metallic Gray / Metallic Orange
Overall Length 56.9 in.(144.5 cm)
Overall Width 27.2 in.(69 cm)
Total Weight with Batteries 366 lbs(166.4 kgs)
Front Axle Weight 99.2 lbs(45 kgs)
Rear Axle Weight 150 lbs(68 kgs)
Total Weight Without Batteries 251.6 lbs(114.4 kgs)
Battery Weight 75Ah
Turning Radius 75.5 in.(192 cm)
Reversing width-tiller steering 88.98 in.(226 cm)
Speed (Maximum)
Range Per Charge
26 kgs (57 lbs.) each
8.1mph(13kph)
9.4mph(15kph)
10.6mph(17kph)
36 miles / 58 km( 90 kgs ) ; 30 miles / 48 km( 182 kgs )
41 miles / 65 km( 90 kgs ) ; 36 miles / 58 km( 182 kgs )
38 miles / 61 km( 90 kgs ) ; 32 miles / 51 km( 182 kgs )
Ground Clearance 3.56 in.(9 cm)
Weight Capacity 400 lbs(182 kgs)
Type: Foldable
Standard Seating
Drive System
Suspension front and rear shock absorber
Dual Braking System Electronic, regenerative, and electromechanical
Tyres
Battery Requirements
Battery Charger 8-amp charger
Weight(w/armrests): 37.4 lbs(17 kgs)
Material: Black
Dimensions: 17 in.(43 cm) width & depth
Rear-wheel drive, sealed transaxle,24 volt DC
motor
Type: pneumatic
Front and rear: 13 inches
Type: two 12 volt, deep cycle, AGM or Gel-cell
Size: 75 AH
24
Page 26
25
Page 27

CLASSIFICATION
Type 'B' indoor / with some outdoor capabilities (EN12184:1999) Class 2 (Highway
Regulations 1988).
Maximum safe climbing angle: 6 degrees with 400 lbs weight capacity (182 kg).
Warning: The safe climbing angle is measured with the seat in the highest position,
and a weight capacity of 400lbs (182 kg). The motor on your scooter is powerful
and may be able to climb a steeper incline than the maximum safe climbing angle.
Exceeding the safe climbing angle may put you at risk of injury. On no account must
you attempt to climb an incline of more than 6 degrees. This will exceed the rear
stability of your scooter.
Maximum speed: Up to 8 mph (13 km/h) [+/-10%] dependent on weight and
manufacturing tolerances.
Range: Up to 30 miles (48.2 km) between charges under ideal conditions.
Note: Range varies with weight, terrain, temperature, battery condition etc. and is
subject to manufacturing tolerances. Your battery will require a period of "breaking in"
before they will reach their optimum capacity (up to 20 charge, discharge cycles can
be expected) before full range is experienced. Refer to the battery charging section
of this manual.
Tire Size: Front 13 inch, Rear 13 inch. pneumatic.
Batteries: Lead Acid battery 75AH
Charger: AC input.100-240 volt, 50/60Hz,
DC output 24 volt. 8 Amp for Lead Acid battery
Conforms to: EN60335-2-29 and EN12184
EN12184:1999 (Clause 9.8)
EN55022:2010, Class B
IEC61000-4-2/ IEC61000-4-3
Radiated Radio Frequency Electromagnetic (RS): Field strength tested to 20V/m
compliance.
Electrical System: 24 volt DC
Drive system: Rear wheel, direct drive via sealed drive axle
Motor: 24 volt DC. Permanent magnet totally enclosed for outdoor use. Internal
brushes. 3.0 Amp (no load) 70 W.4100 RPM
26
Page 28
Brake: Automatic dynamic regenerating braking system with spring activated
magnetic solenoid parking brake and freewheel facility.
Tiller: Adjustable locking for driving comfort.
Speed Control: Proportional state of the art design for safety and smooth operation
incorporated with 'Fault' diagnosis.
Seat: Contoured adjustable seat with height adjustment. Armrest with Multiple width
adjustments.
Charge Socket: Located on the rear tiller cover. (Complies with EMC Directive
89/336/EEC and with Medical Devices Directives 93/42/EEC.)
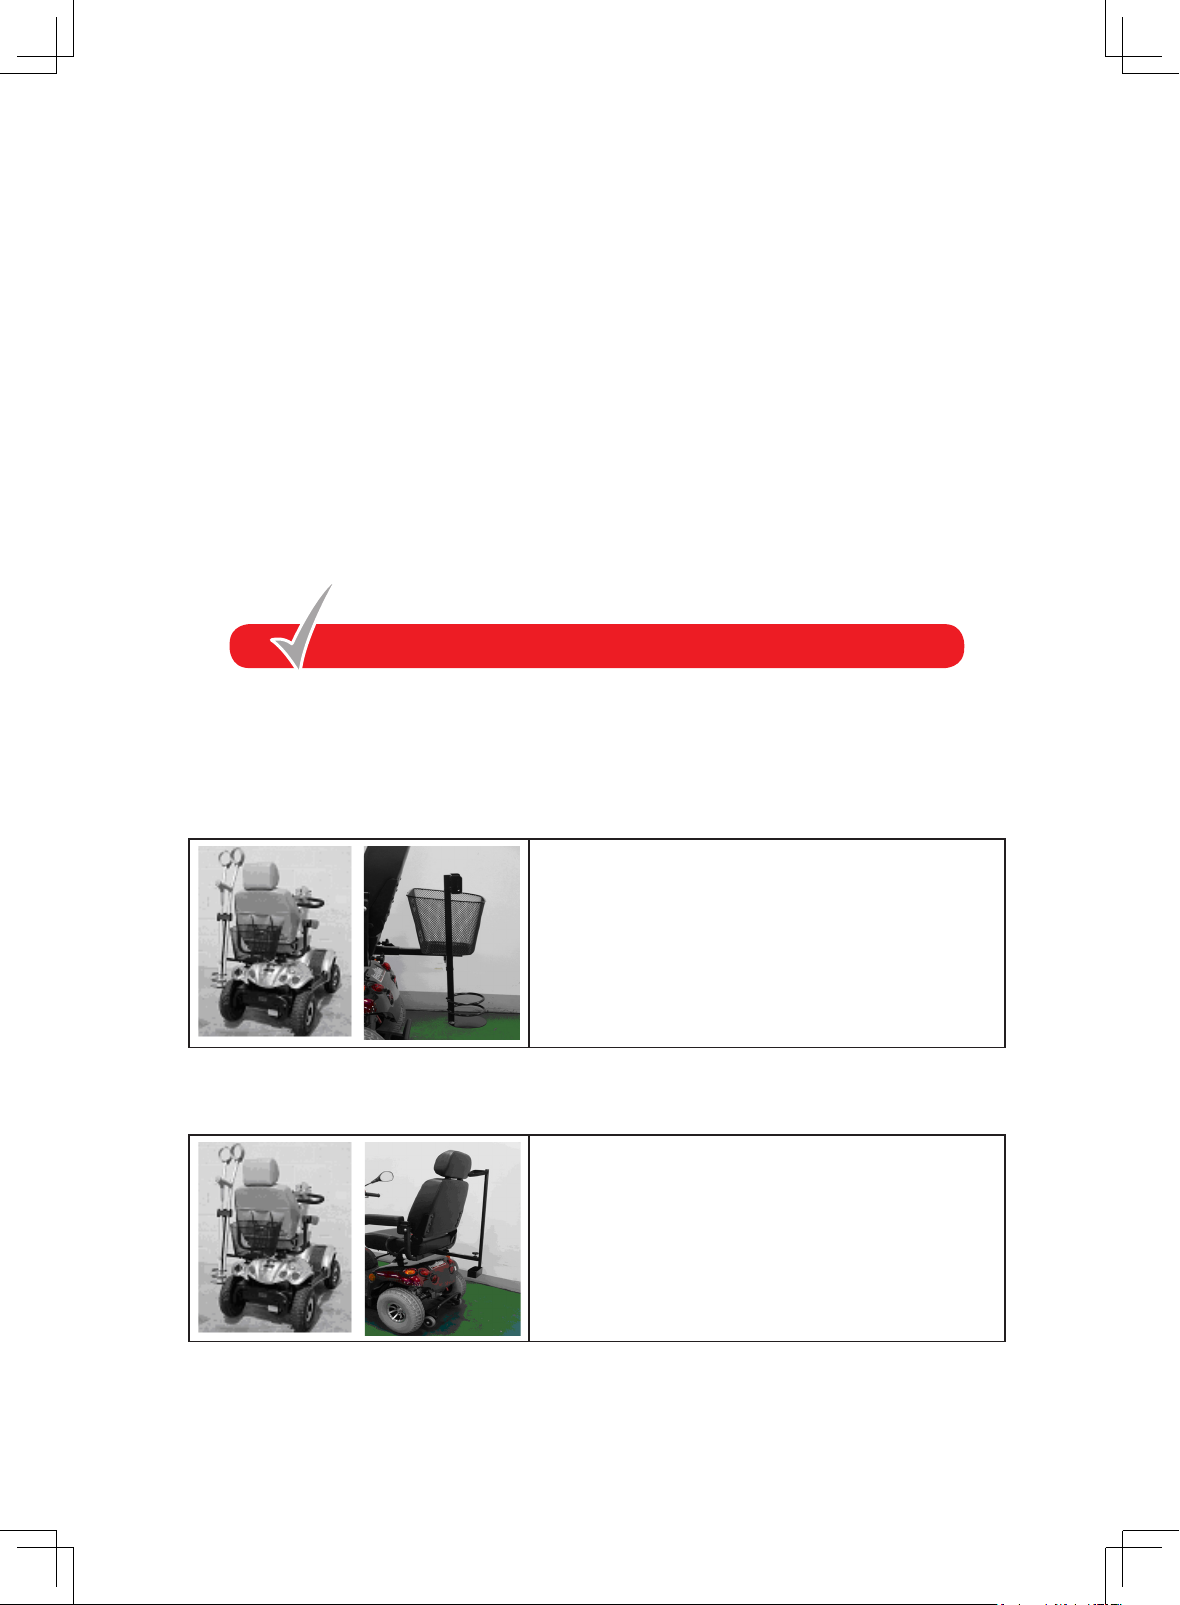
OPTIONAL ACCESSORIES
For information regarding these optional accessories please contact your Authorised
Freerider Agent.
Combined Basket,Stick/Crutch Holder
Stick/Umbrella Holder
Combining the usefulness of the rear basket
and the stick/crutch holder.
Ideal way to carry walking aids.
27
Page 29
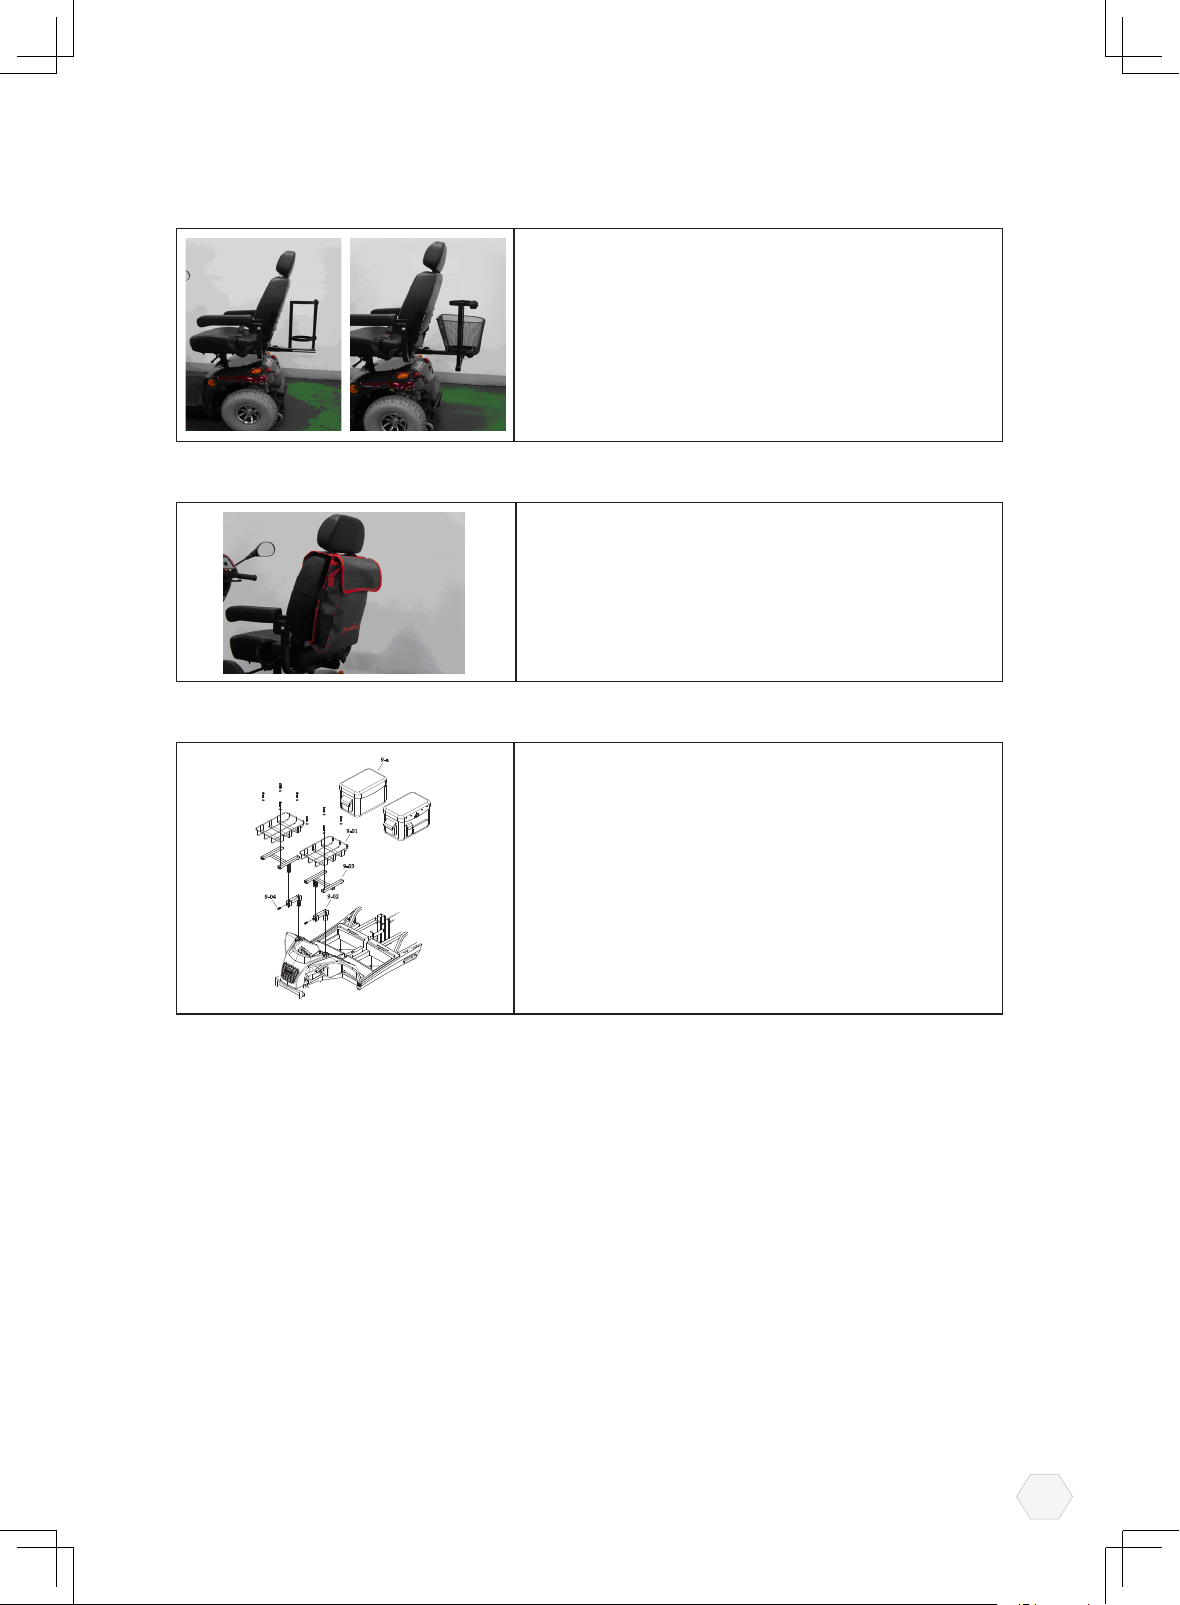
Oxygen Holder
9-02
9-03
9-01
9-a
9-04
Saddle (SEAT) Bag
Accessory Bracket
Conveniently fits over the seat back rest,
designed to accept a standard mobile N.H.S.
issue oxygen bottle.
Looking for somewhere to store rainproof hats,
scarves and gloves, just in case you get caught
out in a shower? Use the saddle storage bag.
1. Bracket:PM90-0104
2. Accessory bracket: PM90-0201
3. Bracket frame:PM90-0203
4. Saddle bag: PP90-1000
28
Page 30
GUARANTEE TERMS
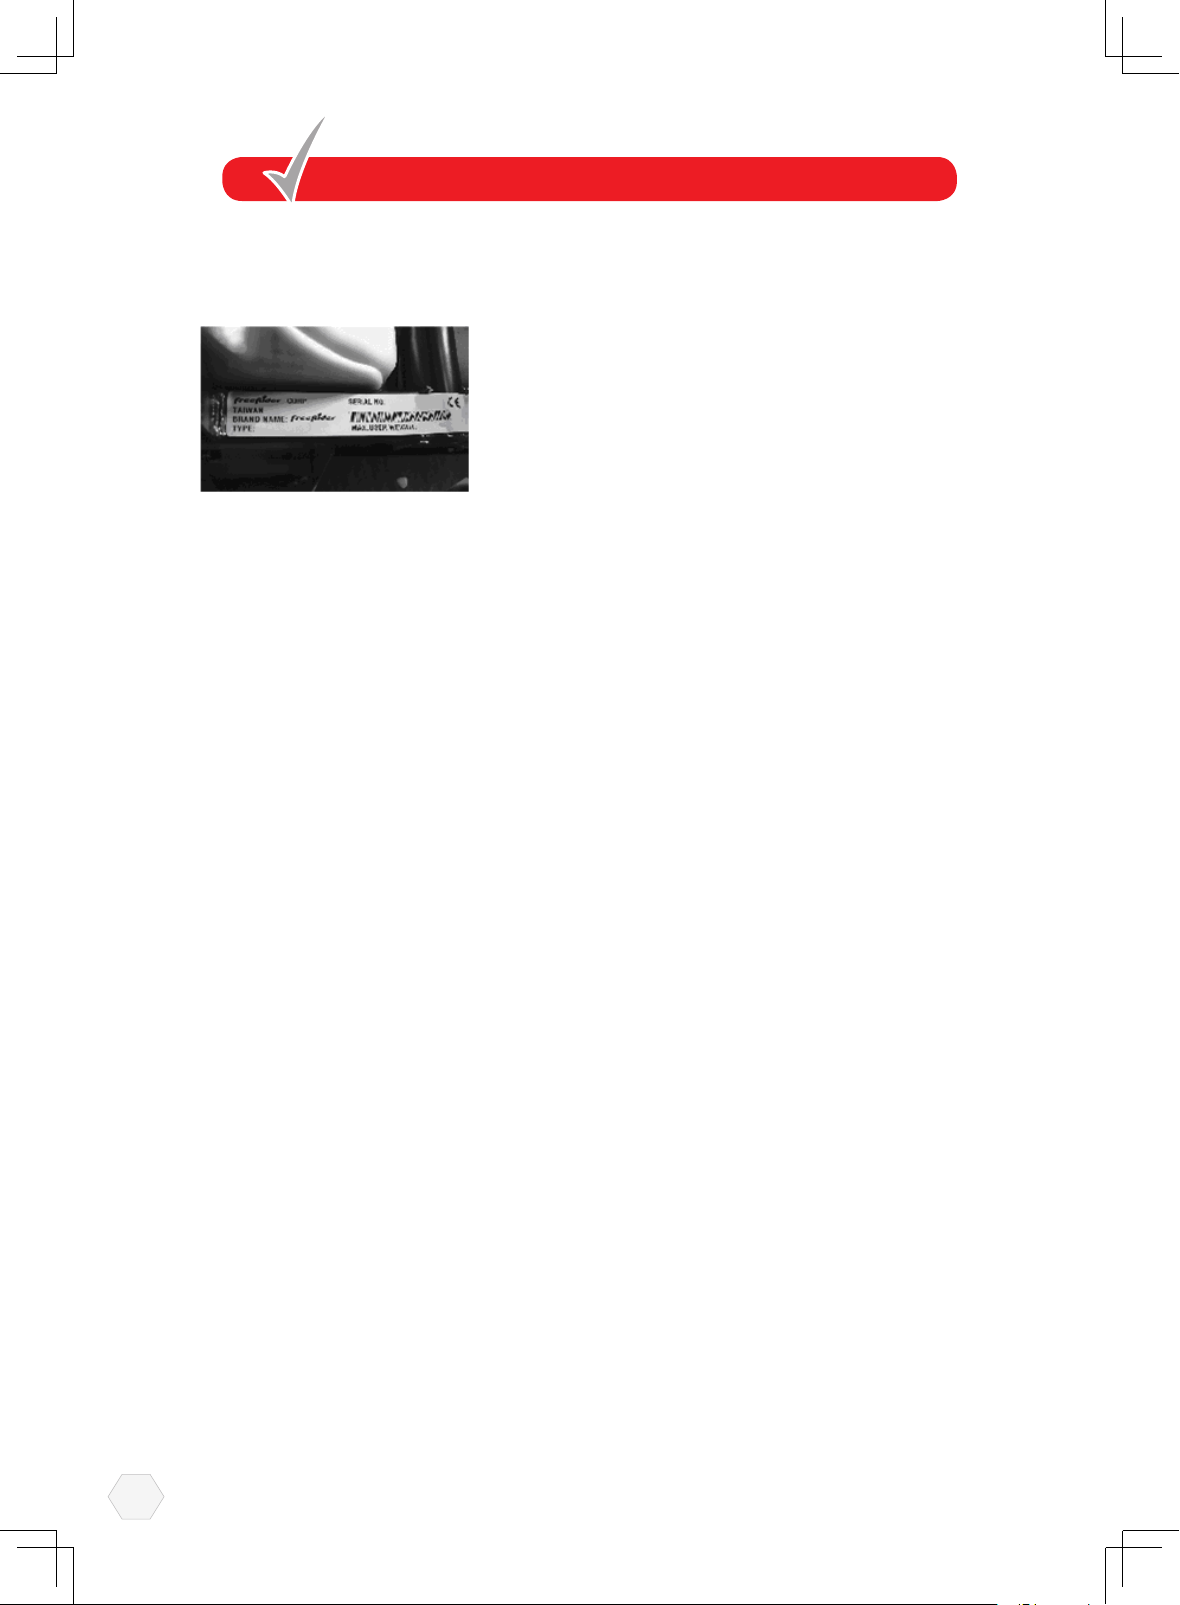
Please keep a note of your serial No….
Your Scooter is guaranteed for 12 months from the date of purchase against faults
arising due to defects in manufacture or materials. This guarantee does not detract
from, but is in addition to your legal rights. Parts replaced or repaired under the terms
of this guarantee will be covered for the balance of the 12 months period.
This guarantee applies only to parts supplied or approved by authorized distributor.
This guarantee is not transferable.
Note: Extended guarantee insurance can be arranged by your Distributor, he will be
able to advise the extra cost of this cover.
METAL WORK: Metal components, such as the framework and bright metal parts
require special attention and may deteriorate in certain conditions. Moisture and salt
may corrode parts left unattended, proprietary auto cleaner polishes should be used
to Prevent long term damage. Failure to clean and protect these components may
void your warranty.
SPEED CONTROLLER:Servicing of the speed controller or battery charger must
only be carried out by your local authorized distributor.
Any attempt to open or dismantle these items render the guarantee void on that item.
BATTERIES:Batteries carry a limited 12 month guarantee from the original
manufacturer which is subject to a stringent wear and tear clause. Any battery faults
due to a defect in the original manufacture will normally become obvious within the
rst two months of use. Any gradual deterioration in the performance after this period
is normal and associated with fair wear and tear, mis-use or accidental damage and
as such is not covered by the manufacturers warranty. (Batteries are guaranteed as
single parts, only the failed part is replaceable).
Warning: Do not attempt to open the battery vent plugs.
29
Page 31
SERVICE HISTORY
This section is designed to assist you in keeping a record of any service and repairs to
your Freerider Scooter.
Should you decide to sell or exchange your Scooter in the future this will prove most
helpful to you.Your Se rvice agent will also benet from a documented record and this
book should accompany the Scooter when service or repair work is carried out. The
service agent will complete this section and return the book to you.
DETAILS OF WORK CARRIED OUT
DATE INITIALS
DETAILS OF WORK CARRIED OUT DEALER STAMP
DATE INITIALS
DETAILS OF WORK CARRIED OUT
DEALER STAMP
DEALER STAMP
DATE INITIALS
DETAILS OF WORK CARRIED OUT DEALER STAMP
DATE INITIALS
30
Page 32
YOUR LOCAL DEALER
PHONE TODAY FOR FREE HOME DEMONSTRATION
FREERIDER CORP
Head Quarter and Kaohsiung Facility:
No.22,Bengong 5th Rd.,Gangshan Dist.,
Kaohsiung City 820,Taiwan(R.O.C)
Tel:886-7-6223093 Fax:886-7-6230373
Email:sales @ freerider.com.tw
http://www.freerider.com.tw
2013.06.17 V2
 Loading...