

Freequency pmr-120tx Instruction Manual

PMR-120TX
PMR 446 TRANSCEIVER
INSTRUCTION MANUAL
www.ttikorea.co.kr
PMR120(E) / 1 of 68
Thank you for purchasing this Freequency radio.
All our products are built to offer excellent value for money
by combining advanced features, great design and
manufacturing quality.
To ensure you are familiar with the operation and features
of your radio and in order to obtain the best performance,
please read this manual carefully before operation.
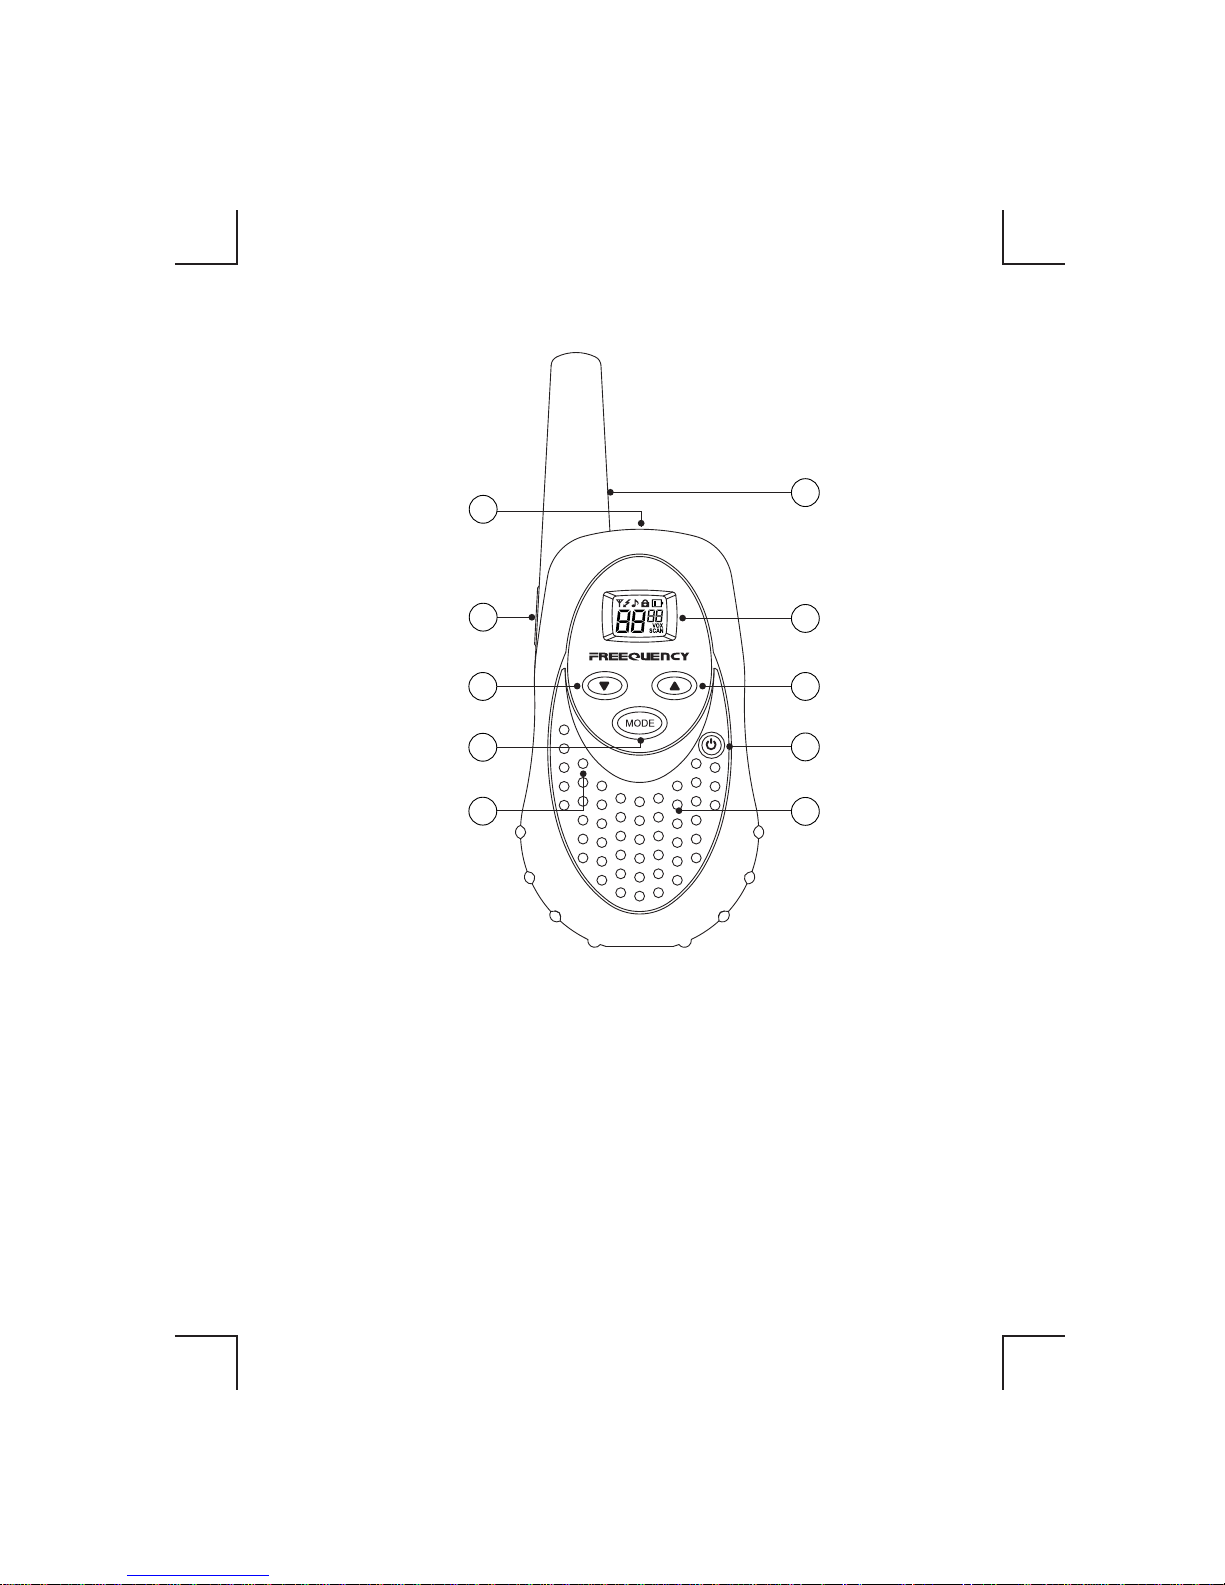
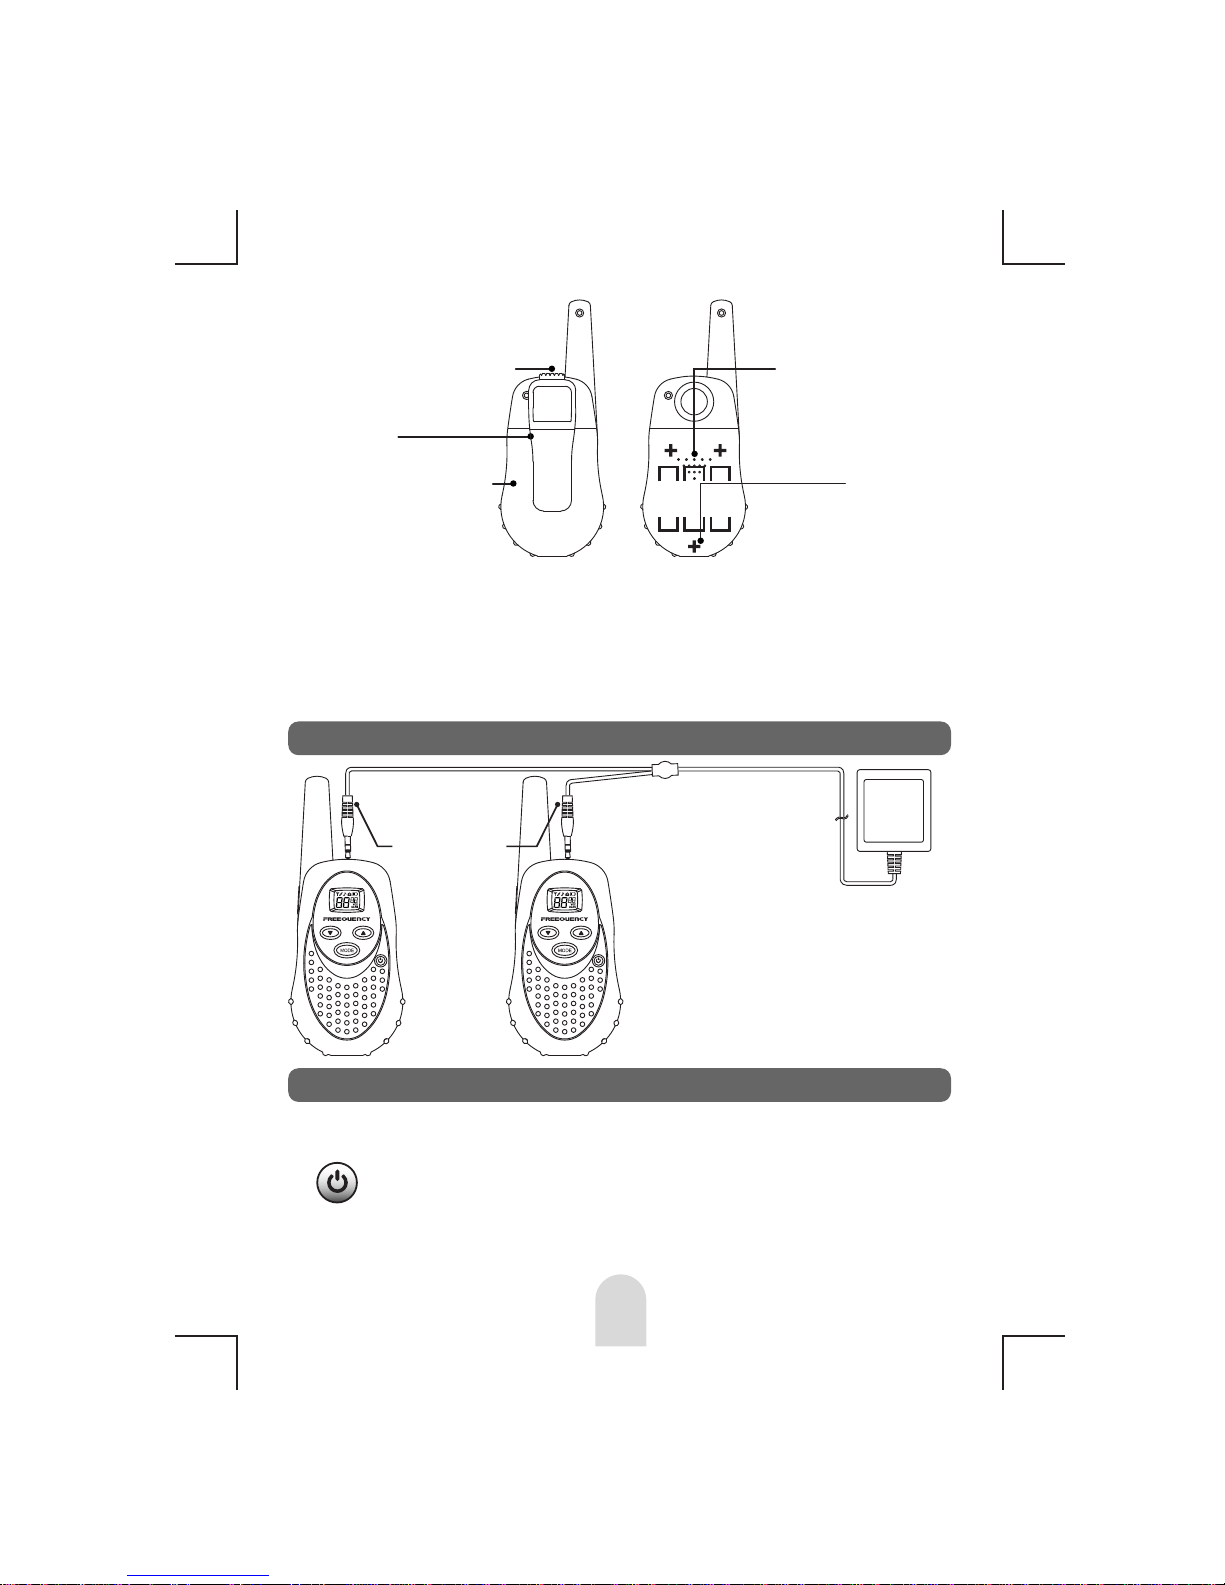
1
2
3
10
PTT Button
Microphone
Down Button
Speaker
Microphone/
Charger Jack
Antenna
Up Button
Speaker
6
8
LCD Display
7
Power/
Scan Button
9
4
Mode/
Lock Button
5
PMR120(E) / 2 of 68

1. Contents
2. CAUTION
3. LCD Display
4. Equipment and Accessories Supplied
5. Powering the transceiver
6. Installing the batteries
7. Charge Information
8. Control Buttons
(1) Power on-off button
(2) Push-To-Talk (PTT) button
(3) Up button
(4) Down button
9. Operating Modes and Features
(1) PMR Operation
(2) Channel Selection
(3) CTCSS Mode Selection
(4) VOX Mode Selection
(5) Roger Beep Tone
(6) Button Beep (Keytone)
(7) Call Ringer
(8) Keypad Lock
(9) Channel Scan Operation
(10) Battery Alert
(11) Backlighting
10. Note for Good Communication
11. Warning
12. Troubleshooting
13. Technical Specifications
14. Main Channel Frequency Table
15. CTCSS Tone Subcode Table
16. CE Declaration
17. Safety Requirement
5
3
6
6
6
7
7
7
7
8
8
8
8
8
9
9
10
10
10
11
11
1. Contents
6
7
8
10
10
11
11
11
11
11
11
3
PMR120(E) / 3 of 68

NEVER ATTEMPT TO CHARGE ALKALINE OR
DRYCELL BATTERIES, AS BATTERIES MAY BURST
CAUSING PERSONAL INJURY AND DAMAGE TO
THE PRODUCT. WHEN RECHARGING NICKEL
METAL HYDRIDE (Ni-MH) BATTERIES WITH THE
SUPPLIED TTI CHARGER AND WALL ADAPTOR,
USE ONLY TTI-APPROVED RECHARGEABLE
BATTERIES. USE OF THE TTI CHARGER WITH
OTHER BRANDS OF BATTERIES IS NOT
RECOMMENDED, AS BATTERY CHARGING TIMES
WILL VARY WITH DIFFERENT BRANDS. AVOID
PLACING THE PMR-120TX RADIO TRANSCEIVER
FOR PROLONGED PERIODS OF TIME IN DIRECT
SUNLIGHT OR TEMPERATURES BELOW -20ºC OR
ABOVE 60ºC.
KEEP THE ANTENNA AT 1 INCH (2.5cm) AWAY
FROM YOUR HEAD AND BODY. DO NOT USE YOUR
PMR-120TX RADIO TRANSCEIVER WITH A
DAMAGED ANTENNA.
PLACE THE RUBBER COVERS ON JACKS WHEN
NOT IN USE.
4
2. CAUTION
1. PMR-120TX
1) Radio (1)
2) Instruction Manual (1)
Optional Accessories : 1) AC Wall Charger
2) Rechargeable Batteries
2. PMR-120TX-2
1) Radio (2)
2) Instruction Manual (1)
Optional Accessories : 1) AC Wall Charger
2) Rechargeable Batteries
3. PMR-120TX-2CH
1) Radio (2)
2) Instruction Manual (1)
3) AC Wall Charger (1)
4) Rechargeable Batteries (2 packs)
4. Equipment and Accessories Supplied
Your PMR-120TX Radio transceiver operates on three
AAA batteries. Alkaline batteries will provide slightly
better performance than rechargeable batteries.
When using rechargeable batteries, battery charging
time is typically 12-15 hours. (You are recommended
to charge two radios at the same time.)
5. Powering the transceiver
5
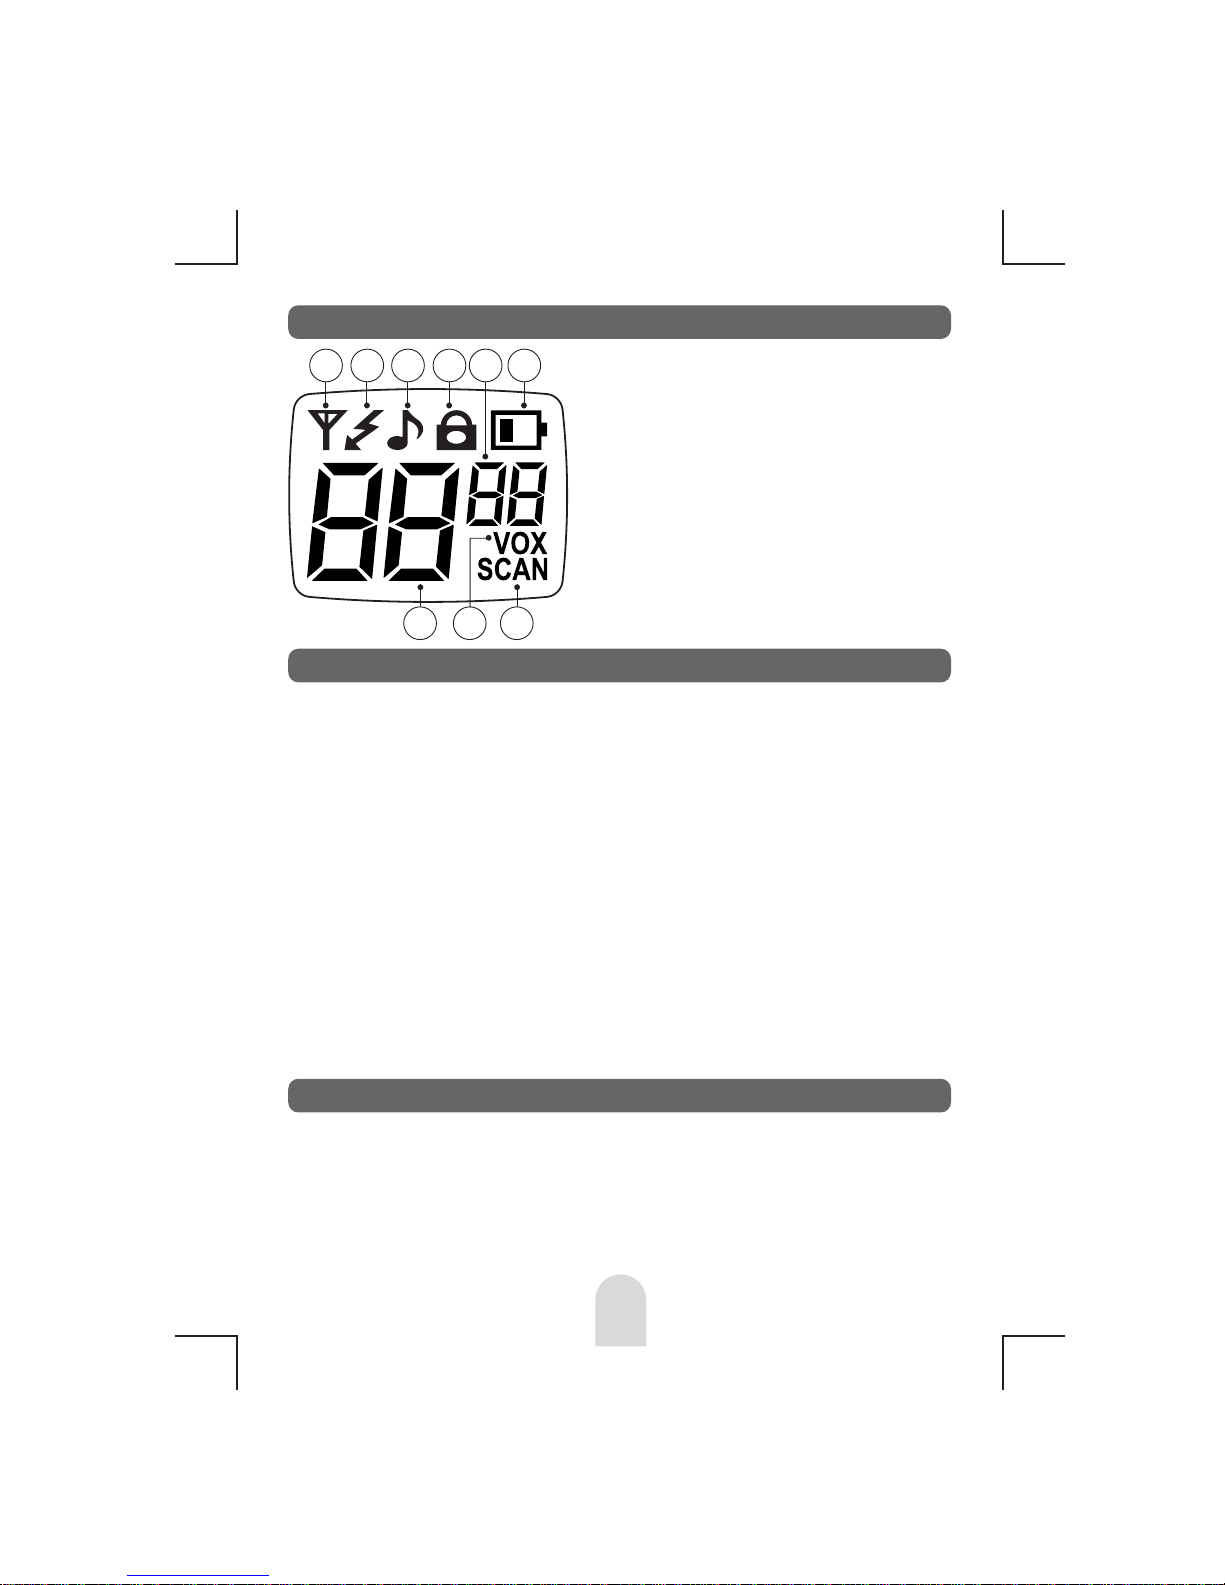
3. LCD Display
Transmit Indicator
Busy Indicator (Upon
receiving a transmission)
Roger Beep Tone Indicator
Lock Indicator
CTCSS Subcode Indicator
Low Battery Level Indicator
Channel Number Display
Voice Activated
Tansmission indicator
Channel Scan
1.
2.
3.
4.
5.
6.
7.
8.
9.
2 31 4 65
987
PMR120(E) / 5 of 68
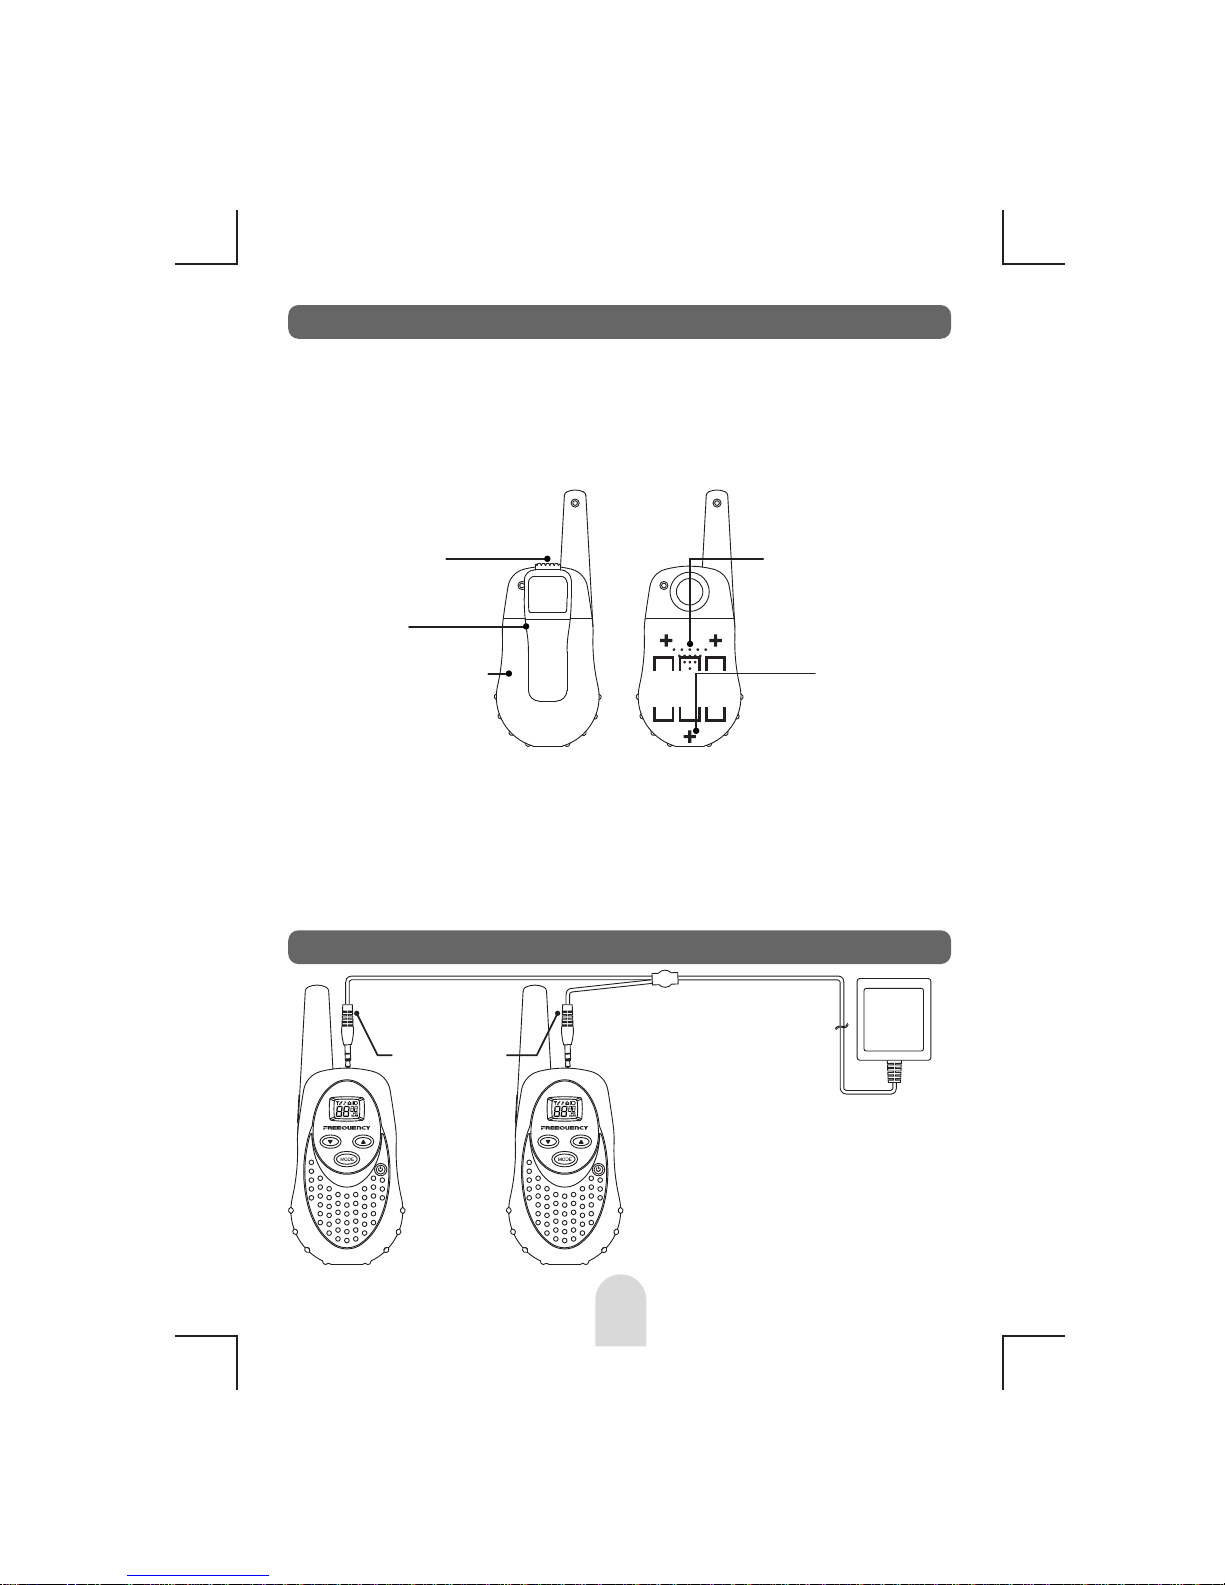
7. Charge Information (For PMR-120TX-2CH)
6
CLIP SPRING
RELEASE TAB
BELT CLIP
BATTERY COVER
COVER ARROW
POSITIVE
TERMINALS
1. Using thumb, press down on battery cover at arrow and slide
cover down.
2. Then lift cover at bottom to open. Remove cover.
3. Insert three AAA batteries (positive (+) end toward the top
begining at left side and alternating positive terminals as
shown).
ADAPTOR
POWER
PLUG
INPUT : 230VAC
OUTPUT : 6VDC
NOTE: Only TTI approved
rechargeable batteries
can be recharged
in the radio transceiver.
Battery installation is made more convenient when the belt clip is
either rotated left or right to the horizontal position, or is removed.
simply rotate the clip in either direction to the horizontal position.
Be careful not to use excessive force. To remove the clip, press
down on the spring release tab and pull the clip straight out from
the radio body.
6. Installing the batteries
PMR120(E) / 6 of 68

(1) Power on-off Button
Press and hold the POWER on/off button for at
least 2 seconds.You will hear a confirming melody
to indicate the unit is on. To turn the unit off, press
and hold the button for at least 2 seconds.
(3) Up Button
In the standby mode, pressing this button will increase
the listening volume. The current volume is indicated
(1-7). When in function edit mode this button will be
used to adjust the unit's settings.
(4) Down Button
In the standby mode, pressing this button will
decrease the listening volume. When in function edit
mode this button will be used to adjust the unit's
settings.
(2) Push-To-Talk (PTT) Button
Pressing and holding this button will allow you to
speak to any transceiver that is set to the same
channel and privacy code setting as yours. Hold the
transceiver approximately 2 to 3 inches from your
mouth as you speak into the built in microphone. After
you have finished speaking, release the PTT Button to
allow reception of incoming signals. Whenever the
button is pressed, the transmit icon ( ) will appear.
When receiving an incoming signal, the BUSY ( )
icon will appear. The PTT button can also be used as
a two-way call ringer. Pressing the button twice
quickly will call another party on the same channel.
7
8. Control Buttons
9. Operating Modes and Features
(1) PMR Operation
- Press and hold the POWER On/Off button for 2 seconds to
turn on power.
- Press the MODE button so the channel number flashes.
- Select the desired channel with the Up and Down Buttons.
PMR120(E) / 7 of 68

8
The BUSY icon ( ) appears to indicate an incoming call.
- Press and hold the PTT button to transmit, then speak into
the microphone clearly and slowly. The transmit icon ( )
appears on the display while the button is pressed.
- Release PTT button to receive.
- Communication can only be accomplished when the channel
and CTCSS tone frequency of at least two parties are the
same .
- The CTCSS subcode (01-38) will be displayed on the LCD
panel if the CTCSS tone frequency function is enabled
(not oF).
(2) Channel Selection
- From standby mode, press the MODE button once;
the channel number flashes.
- Press the Up or down button briefly to move to the desired
channel number.
- Press the PTT button momentarily to confirm selection.
(3) CTCSS Mode (Sub-Channel) Selection
- From standby mode,press the MODE Button twice;
a flashing oF or sub-channel number is displayed.
- Press the Up or Down button to select the desired
sub-channel for use (01-38).
- Press the PTT button to confirm selection.
- The CTCSS mode can be turned off by selecting oF as the
setting.
NOTE : To communicate with other PMR units, they must be
switched to the same channel and CTCSS subcode. To
communicate with other PMR units that do not have subcodes,
switch your unit to the same channel with the subcode set to oF.
The CTCSS subcodes do not prevent others from hearing you
transmisstion.This will only allow you to ignore all traffic on a
given channel not using the same subcode.
(4) VOX Mode Selection
When your voice or signal is detected using the internal
microphone/headset (purchased separately), the radio transmits
automatically without the need to press the PTT button.
PMR120(E) / 8 of 68

9
(7) Call Ringer
The transceiver provides a transmit call ring melody to alert
other users of an incoming call. From standby mode, pressing
the PTT button twice in quick succession will transmit the call
ringer melody.
(6) Button Beep (keytone)
This feature allows the transceiver to sound a confirmation
tone whenever the following keys are pressed: Power On/Off/
Scan Button, Up/Down Buttonsand MODE Button. This feature
is always on.
(5) Rogrer Beep Tone
The Roger Beep is a tone which is automatically transmittied
whenever the PTT button is released.
To enable and disable the Roger Beep tone:
- From standby mode, press the MODE Button 4 times unitil
the flashing Roger Beep icon ( ) appears with on or oF.
- Press the Up or Down Button to select the tone on or off as
desired.
-
Press the PTT button momentarily to confirm selection.
- When enabled, the Roger beep icon ( ) appears.
(8) Keypad Lock
The lock function is to avoid the accidental changes of radio
settings. The POWER On/Off, PTT and Volume Up/Down
button will supercede the lock function.
To set the keypad lock operation :
- From standby mode, press and hold the MODE button for 2
seconds or until the lock icon ( ) appears on the display.
- To disable the lock operation, press and hold the MODE
button for at least 2 seconds ; the lock icon ( ) will disappear.
To enable the VOX operation:
- From standby mode, press the MODE button 3 times
unitil the
blinking VOX icon ( ) appears with on or oF.
- Press the Up or Down button to select the VOX on or oF as
desired.
- Press the PTT button momentarily confirm selection.
- When enabled, the VOX icon ( ) appears.
PMR120(E) / 9 of 68

10
Note: while the SCAN mode is active, the MODE button is
inoperative. In addition, the SCAN mode will reduce the overall
battery life since the battery save function is overridden.
(11) Backlighting
By pressing any buttons, the LCD backlight is turned on.
The LCD backlight will be turned off automatically in about 5
seconds after any final button is pressed.
(10) Battery Alert
When the low battery icon ( ) blinks steadily on the LCD
panel, recharge the unit or install fresh batteries.
To enable the channel scan mode:
- From standby mode,momentarily press the Power On/Off
Button; SCAN will appear on the LCD display.
- The radio will automatically display each channel (1-8) in
ascending order to find an active main channel.
- When the unit doesn't find any signals and you want to
transmit, press the PTT Button to return to primary channel
operation.The transceiver will automatically resume scanning
approximately 15 seconds after the communication is
completed.
- If there is no activity and you want to leave the scan mode,
press the Power On/Off button momentarily and the unit will
return to normal operation; the SCAN icon ( ) will
disappear from the LCD display.
(9) Channel Scan Operation
This feature allows you to monitor all channels automatically
for valid signals. While scanning, you can transmit and receive.
When a signal is received, the scan is interrupted and will
return to scan mode approximately 5 seconds after the
interruption.
PMR120(E) / 10 of 68

11
11. Warning
Remove the batteries from the transceiver if it is not expected
to be used for long periods.This will eliminate the possibility
of chemicals leaking from the batteries and corroding the
transceiver.
Avoid exposing the transceiver to water or extremes of
temperature.
Do not use this device in or near a mining facility, which uses
remotely triggered explosives or in areas labeled "Blasting
Area".
Do not attempt to modify or in any way increase the output of
this transceiver. Its output is designed to meet the legal limits.
Do not use this device or charge its batteries in potentially
explosive atmospheres.
Turn your transceiver off wherever posted notices restrict the
use of radios or cellular telephones.
Facilities such as hospitals may use equipment that is
sensitive to RF energy.
Turn your transceiver off on board aircraft when requested to
do so.
Do not place your radio in front of a vehicle's air-bag. If the
air-bag deploys, it could propel the transceiver like a
projectile causing bodily injury.
1.The PMR-120TX channels are shared on a 'take turns' basis.
This means other groups may be talking on any of the
channels. A common code of courtesy is to switch to another
vacant channel and not to attempt to talk over someone who
is already using the channel you first selected.
2.The PMR-120TX has been designed to maximize
performance and improve transmission range in the field.
To avoid interference, it is recommended that you do not use
the units closer than 5 feet apart.
3.To increase battery life, use the SCAN feature sparingly.
This feature will reduce operating time considerably.
10. Notes for Good Communication
PMR120(E) / 11 of 68

12
14. Main Channel Frequency Table
15. CTCSS Tone Subcode Table
Channel
1
2
3
4
Frequency (MHz)
446.00625
446.01875
446.03125
446.04375
Channel
5
6
7
8
Frequency (MHz)
446.05625
446.06875
446.08125
446.09375
No.
1
2
3
4
5
6
7
8
9
10
Freq.
67.0
71.9
74.4
77.0
79.7
82.5
85.4
88.5
91.5
94.8
No.
11
12
13
14
15
16
17
18
19
20
Freq.
97.4
100.0
103.5
107.2
110.9
114.8
118.8
123.0
127.3
131.8
No.
31
32
33
34
35
36
37
38
OF
Freq.
192.8
203.5
210.7
218.1
225.7
233.6
241.8
250.3
0
No.
21
22
23
24
25
26
27
28
29
30
Freq.
136.5
141.3
146.2
151.4
156.7
162.2
167.9
173.8
179.9
186.2
12. Troubleshooting
13. Technical Specifications
If you have problems with your PMR-120TX, reset your unit by
turning it off and removing the batteries. And re-insert the
batteries and turn the unit on again. Check the battery power
level since in many cases low batteries cause problems such
as no transmission, weak receiving signal and low sound.
Operating frequency
Channel capacity
Channel spacing
Power source
446.00625 to 446.09375 MHz
eight channels
12.5KHz
3 X 1.5 V ' AAA' battery
PMR120(E) / 12 of 68
13
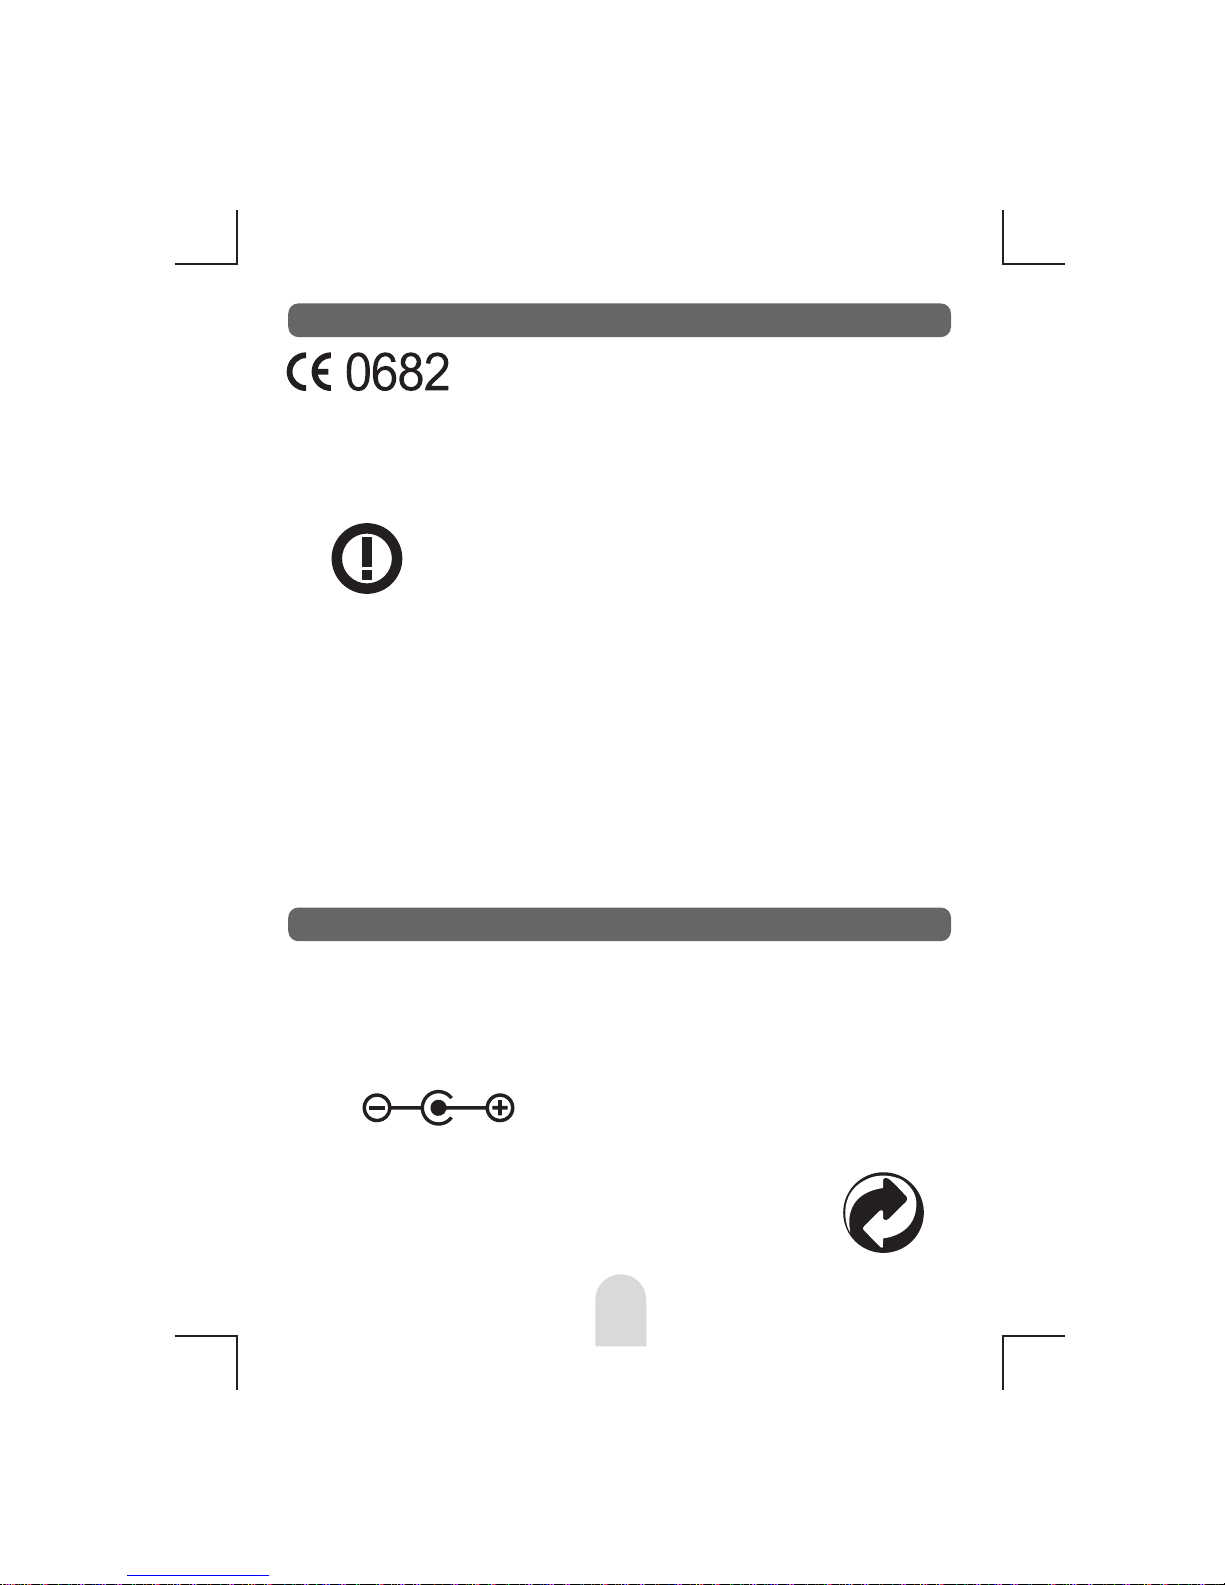
16. CE Declaration
17. Safety Requirement
For charging the rechargeable batteries, only CE-approved AC
adaptor must be used in compliance with the following
specifications:
CE version of the PMR-120TX which
displays the "CE" symbol on the product
label, complies with the essential
requirements of the European Radio and
Telecommunication Terminal Directive
1999/5/CE.
This warning symbol indicates that this
equipment operates in non-harmonised
frequency bands and / or may be subject to
licensing conditions in the country of use.
Be sure to check that you have the correct
version of this radio or the correct
programming of this radio, to comply with
national licensing requirement.
* INPUT : AC 230V 50Hz 30mA
* OUTPUT : DC 6V 300mA
The unit can be used without license and charges in:
Austria, Belgium, Denmark, Finland, France,
Germany, Great Britain, Greece, Italy, Luxemburg,
Netherlands, Portugal, Spain, Sweden, Switzerland
PMR120(E) / 13 of 68

THIS PAGE LEFT BLANK INTENTIONALLY
PMR120 / 14 of 68

PMR-120TX
PMR 446 TRANSCEIVER
Bedienungsanleitung
www.ttikorea.co.kr
PMR120(G) / 15 of 68

1
2
3
10
Push-To-Talk
Taste
Mikrofon
Down Taste
Antenne
Anschlussmöglichkeit
für externes Zubehör
(Headset / Mikrofon)
sowie Buchse für
Ladegerät
Up Taste
Lautsprecher
6
8
LCD
7
Power on/off,
Scan Taste
9
11
Gürtelclip
12
Batteriefachdeckel
4
Menütaste /
Tastatursperre
5
PMR120(G) / 16 of 68

1. Inhalt
2. VORSICHT
3. LCD Display
4. mitgeliefertes Zubehör
5. Stromversorgung des Geräts
6. Einlegen der Batterien
7. Information zum Laden
8. Funktionstasten
(1) Power on-off Taste
(2) Push To Talk (PTT) Taste
(3) UP Taste
(4) DOWN Taste
9. Menüs und Funktionen
(1) PMR Sende-/Empfangsbetrieb
(2) Kanalwahl
(3)
Auswahl der CTCSS Subaudio Codes
(4) VOX Modus aktivieren
(5) Roger Piepton
(6) Tastatur Quittungstöne
(7) Anrufklingelton
(8) Tastatursperre
(9) Suchlauf (SCAN) Funktion
(10) Batteriewarnanzeige
(11) Hintergrundbeleuchtung
10.
Tips für eine störungsfreie Kommunikation
11. SICHERHEITSHINWEISE
12. Fehlerbehebung
13. technische Spezifikationen
14. Frequenzen
15. CTCSS Subaudioton Tabelle
16. Konformitätserklärung
17. Sicherheitshinweis
4
3
4
5
5
6
7
7
7
7
8
8
9
10
10
10
11
11
12
1. Inhalt
5
6
9
10
11
14
14
13
12
13
13
3
PMR120(G) / 17 of 68

4
2. VORSICHT
Laden Sie ausschließlich Akkus (rechargable) im Gerät
auf. Batterien können nicht aufgeladen werden. Beim
Ladevorgang können Batterien explodieren und
schweren Schaden am Gerät verursachen. Wenn Sie
Ni-MH Akkus im Gerät aufladen möchten, achten Sie
darauf nur Original TTI Akkus zu benutzen. Akkus
anderer Marken können erheblich längere Ladezeiten
haben. Setzen Sie das PMR-120TX niemals direkter
Sonneneinstrahlung oder
extremen Temperaturen von
unter -20°C oder über +60°C aus.
Halten Sie die Antenne während des Sendens
mindestens 2,5cm entfernt von Ihrem Kopf. Benutzen
Sie keinesfalls ein PMR-120TX Gerät mit beschädigter
Antenne.
Decken Sie die Anschlussbuchsen mit der Gummikappe
ab wenn kein Headset/Lautsprecher angeschlossen ist.
3. LCD Display
Sendeanzeige
Empfangsanzeige
Anzeige des Rogerpiepton
Anzeige der Tastatursperre
CTCSS Subcode Anzeige
Batteriewarnanzeige
Anzeige der Kanalnummer
Anzeige bei aktivierter
Sprachsteuerung (VOX)
Kanal Scan (Suchlauf)
1.
2.
3.
4.
5.
6.
7.
8.
9.
2 31 4 65
987
PMR120(G) / 18 of 68

5
4. mitgeliefertes Zubehör
Das PMR-120TX Gerät wird mit 3 AAA-Batterien oder Akkus
betrieben. Alkaline Batterien funktionieren teilweise besser als
Akkus. Wenn Sie Akkus benutzen beachten Sie das die
typischen Ladezeiten ca. 12 bis 15 Std. betragen (beide Geräte
sollten gleichzeitig geladen werden).
5. Stromversorgung des Geräts
1. PMR-120TX
1) PMR Funkgerät (1)
2) Bedienungsanleitung (1)
optionales Zubehör : 1) Steckernetzteil-Ladegerät
2) Akkus
2. PMR-120TX-2
1) PMR Funkgerät (2)
2) Bedienungsanleitung (1)
optionales Zubehör : 1) Steckernetzteil-Ladegerät
2) Akkus
3. PMR-120TX-2CH
1) PMR Funkgerät (2)
2) Bedienungsanleitung (1)
3) Steckernetzteil-Ladegerät (2)
4) Akkus
Das Einlegen der Batterien ist am Einfachsten möglich wenn Sie
den Gürtelclip zur Seite drehen oder Ihn ganz von der Rückseite
des Geräts entfernen. Seien Sie beim Entfernen des Gürtelclips
vorsichtig um den Gürtelclip nicht abzubrechen. Den Gürtelclip
können Sie entfernen indem Sie die Taste auf der Oberseite des
Gürtelclips nach unten drücken.
6. Einlegen der Batterien
PMR120(G) / 19 of 68
(1) Power on-off Taste
Halten Sie die Taste POWER On/Off für ca. 2
Sekunden gedrückt. Nun hören Sie eine
Begrüßungsmelodie. Zur Bestätigung das das Gerät
eingeschaltet ist. Um das Gerät wieder auszuschalten
halten Sie erneut für 2 Sekunden die Taste POWER On/Off
gedrückt.
6
8. Control Buttons
7. Information zum Laden des PMR-120TX-2CH
Knopf zum Entfernen
des Gürtelclips
Gürtelclip
1. Drücken Sie mit dem Daumen den Batteriefachdeckel auf der
geriffelten Stelle nach unten.
2. Nehmen Sie den Deckel vom Gerät.
3. Legen Sie drei Batterien oder Akkus from Typ AAA in das
Batteriefach. Achten Sie auf die richtige Polarität (+/-) beim
Einlegen der Batterien.
Stecker des
Ladegeräts
Wichtig: Nur Original TTI
Akkus sollten im Gerät
aufgeladen werden.
Eingangsspannung: 230V AC
Ausgangsspannung: 6V DC
Batteriefachdeckel
Batteriekontakte
Plus Pole
PMR120(G) / 20 of 68

(3) UP Taste
Wenn sich das Gerät im Standby Modus befindet
kann mit dieser Taste die Lautstärke lauter eingestellt
werden. Der aktuelle Lautstärkelevel (1-7) zeigt sich
wenn diese Taste im Standy Modus kurz gerückt wird.
Im Funktionsmodus kann mit dieser Taste die Abstimmung der
einzelnen Funktionen reguliert werden.
(2) Push To Talk (PTT) Taste
Durch das Gedrückthalten dieser Taste können Sie
mit allen PMR Funkteilnehmern in ihrer Reichweite
kommunizieren die auf dem gleichen Kanal (eventuell
auf dem gleichen CTCSS Ton) empfangsbereit sind.
Halten Sie das Gerät während Sie in das eingebaute Mikrofon
sprechen mind. 5 cm von Ihrem Mund entfernt. Nach der
Beendigung Ihrer Nachricht lassen Sie die PTT Taste wieder
los um in Empfangsbereitschaft zu wechseln. Immer wenn
diese Taste gedrückt wird erscheint das Sendesymbol ( ) im
Display. Während Sie ein Signal empfangen erscheint die
Emfpfangsanzeige ( ) im Display. Mit Hilfe der PTT Taste
kann außerdem durch zweimaliges kurzes Drücken ein
Klingelton ausgesendet werden der Ihrem Funkpartner
singnalisiert, das Sie auf diesem Kanal noch aktiv sind oder
vsendeseitig jetzt aktiv werden.
7
(4) DOWN Taste
Wenn sich das Gerät im Standby Modus befindet
(eingeschaltet ist) kann mit dieser Taste die
Lautstärke leiser eingestellt werden. Im
Funktionsmodus kann mit dieser Taste die
Abstimmung der einzelnen Funktionen reguliert werden.
9. Menüs und Funktionen
(1) PMR Sende-/Empfangsbetrieb
- Halten Sie die Taste POWER On/Off für 2 Sekunden
gedrückt um das Gerät einzuschalten.
- Drücken Sie die Taste MODE so daß die Kanalnummer
blinkt.
PMR120(G) / 21 of 68
 Loading...