

Page 1
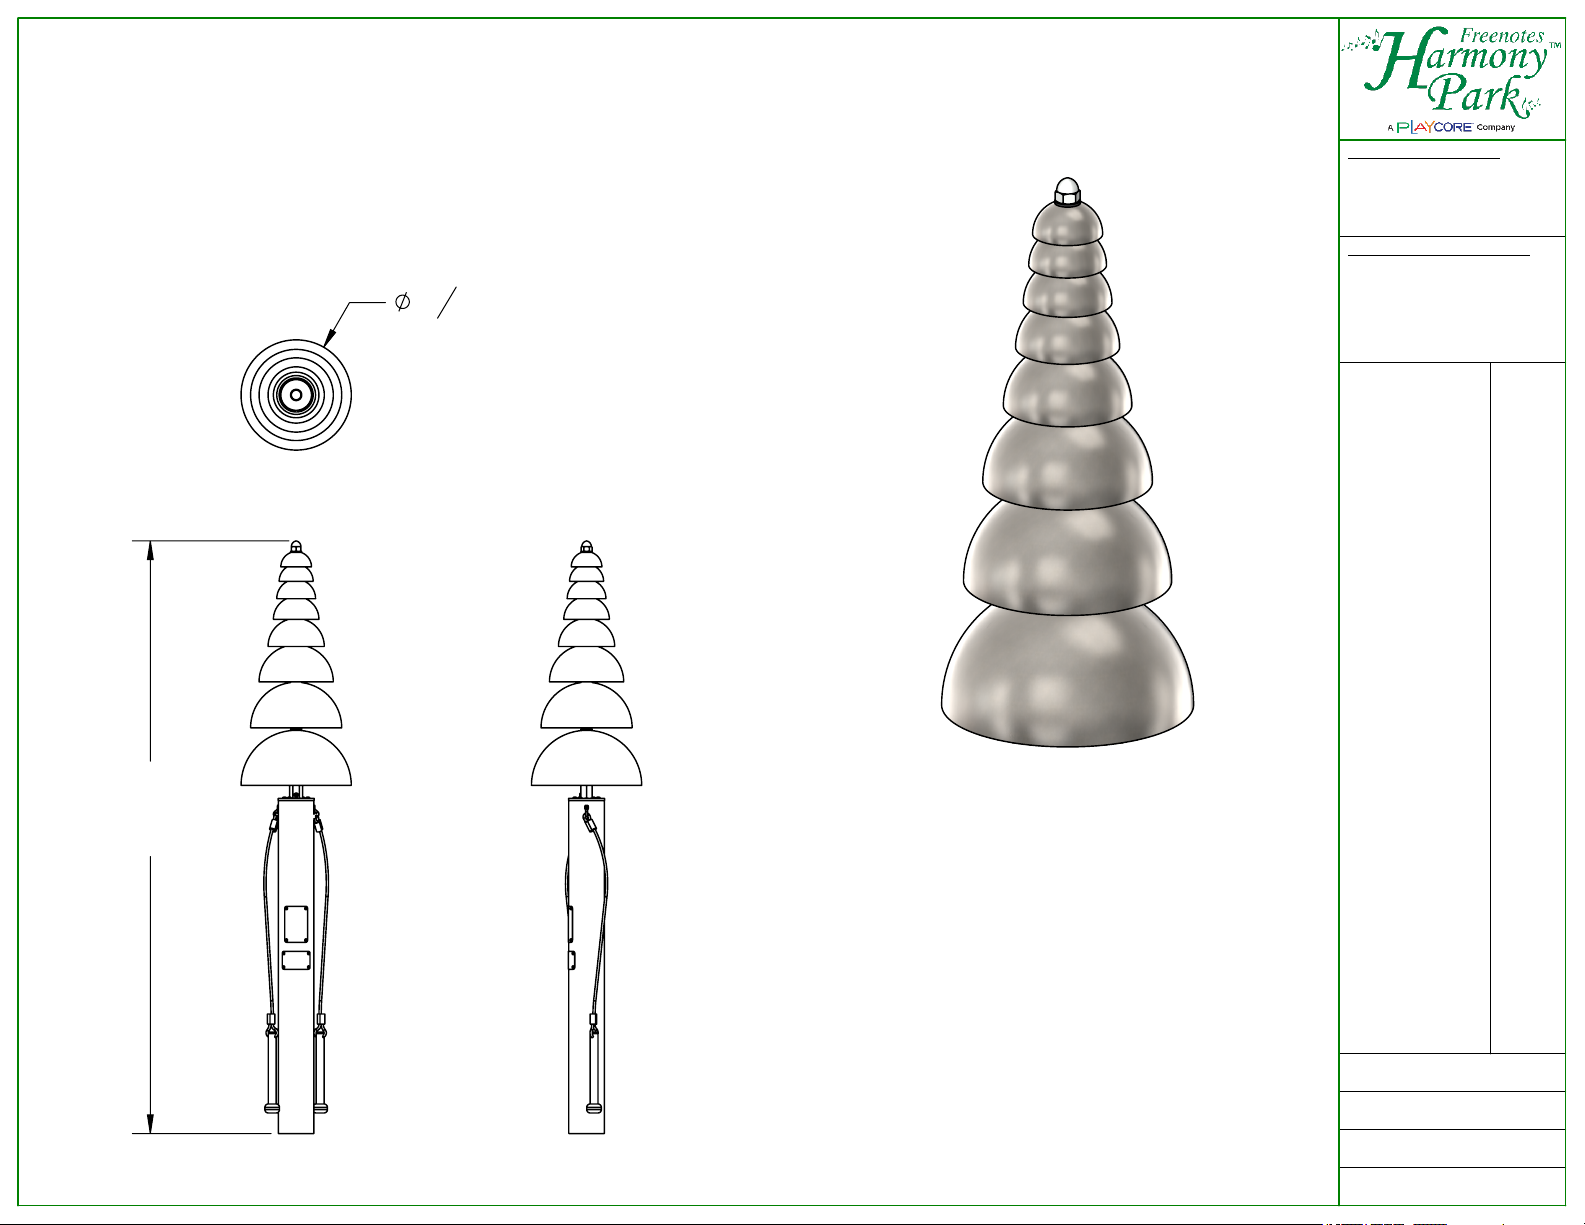
PAGODA BELLS
1
12
"
4
INSTALLATION GUIDE
FREENOTES HARMONY PARK
194 BODO DRIVE, UNIT F
DURANGO CO 81303
TEL: (970) 375-7825
FAX: (970) 247-0856
WWW.FREENOTESHARMONYPARK.COM
PROPRIETARY AND CONFIDENTIAL
THE INFORMATION CONTAINED IN THIS
DRAWING IS THE SOLE PROPERTY OF
FREENOTES HARMONY PARK. ANY
REPRODUCTION IN PART OR AS A
WHOLE WITHOUT THE WRITTEN
PERMISSION OF FREENOTES HARMONY
PARK IS PROHIBITED.
66" Adult
62" Ages 7-11
57" Ages 5-7
52" Ages 3-5
Main Features:
Stainless Steel Bells
•
Stainless Steel Hardware
•
Contents:
SHEET 2 - Parts List and Instrument to Post Installation
•
SHEET 3 - In Ground Installation
•
SHEET 4 - Surface Mount Installation
•
Weights:
Instrument Weight, 20lbs.
•
Boxed Instrument Weight, 27lbs.
•
Boxed Post Weight, 28-38lbs.
•
Pagoda Bells - Installation Guide
TITLE:
REVISION: A
SCALE: 1:16
DATE: 2/9/2018
SHEET 1 OF 4
PBEL-INSTALL
DWG. NO.
Page 2
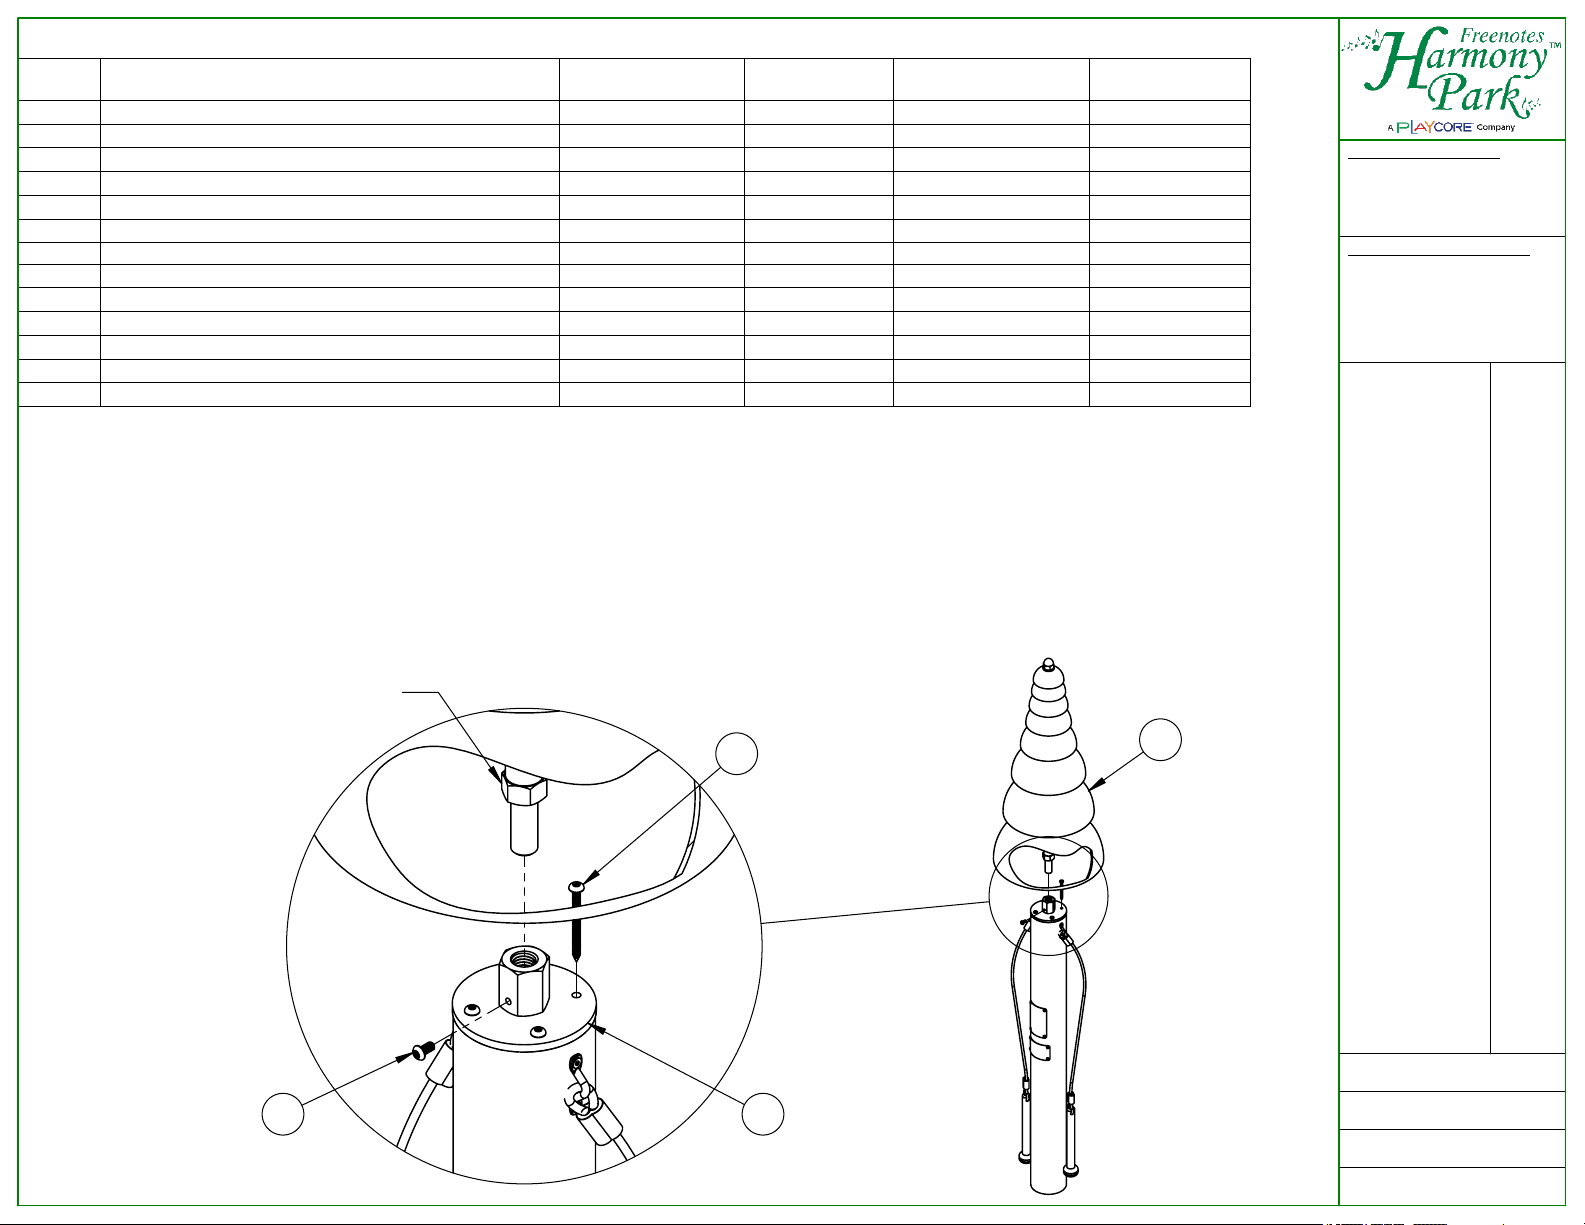
Parts List:
ITEM NO.
1
2
3
4
5
6
7
8
9
10
11
12
13
Pagoda Bells Instrument Assembly
Surface Mount Recycled Post, 37"lg.
#12 Button Head Screw, 2.5"lg. SS, T25 tamp
1/4"-20 Button Head Screw, .5"lg. SS, T27 tamp
3/8"-16 Wedge Expansion Anchor, SS
PART DESCRIPTION
Threaded Rod Support
In Ground Recycled Post, 73"lg.
In Ground Steel Post, 73"lg.
Surface Mount Steel Post, 37"lg.
Surface Mount Base
5/16" Hex Head Lag Bolt, 5"lg. SS
35/64" Hex Nut Cap
Security Driver
Step 1 (Recycled Post Only):
In Ground -
Recycled Post/QTY.
1 1 1 1
1 1 1 1
1
-
- -
- - -
- -
4
1 1 1 1
- -
- -
- -
1 1 1 1
Fasten the Threaded Rod Support to the Recycled Post with the provided #12 Button Head Screws
In Ground -
Steel Post/QTY.
and Security Driver. Make sure that the Threaded Rod Support is centered with the Post.
(The Threaded Rod Support is already preattached to Steel Posts)
Surface Mount -
Recycled Post/QTY.
- - -
1
-
- -
1
1
4
2
4 4
4 4
Surface Mount -
Steel Post/QTY.
FREENOTES HARMONY PARK
194 BODO DRIVE, UNIT F
DURANGO CO 81303
-
1
-
-
-
TEL: (970) 375-7825
FAX: (970) 247-0856
WWW.FREENOTESHARMONYPARK.COM
PROPRIETARY AND CONFIDENTIAL
THE INFORMATION CONTAINED IN THIS
DRAWING IS THE SOLE PROPERTY OF
FREENOTES HARMONY PARK. ANY
REPRODUCTION IN PART OR AS A
WHOLE WITHOUT THE WRITTEN
PERMISSION OF FREENOTES HARMONY
PARK IS PROHIBITED.
Step 2:
Thread the Pagoda Bells Instrument Assembly's Threaded Rod into the Threaded Rod Support on the Instrument Post. Tighten
down until the Stop Nut makes contact with the Threaded Rod Support.
Step 3:
Take the 1/4"-20 Button Head Screw with Security Driver and thread it through the Threaded Rod Support all the way into the
Threaded Rod. This secures the Instrument Assembly so that it can not be backed out.
Threaded Rod w/ Stop Nut
8
DETAIL A
SCALE 1 : 4
1
PBEL-INSTALL
Parts List and Instrument to Post Installation
TITLE:
REVISION: A
DWG. NO.
9 2
SCALE: 1:16
DATE: 2/9/2018
SHEET 2 OF 4
Page 3
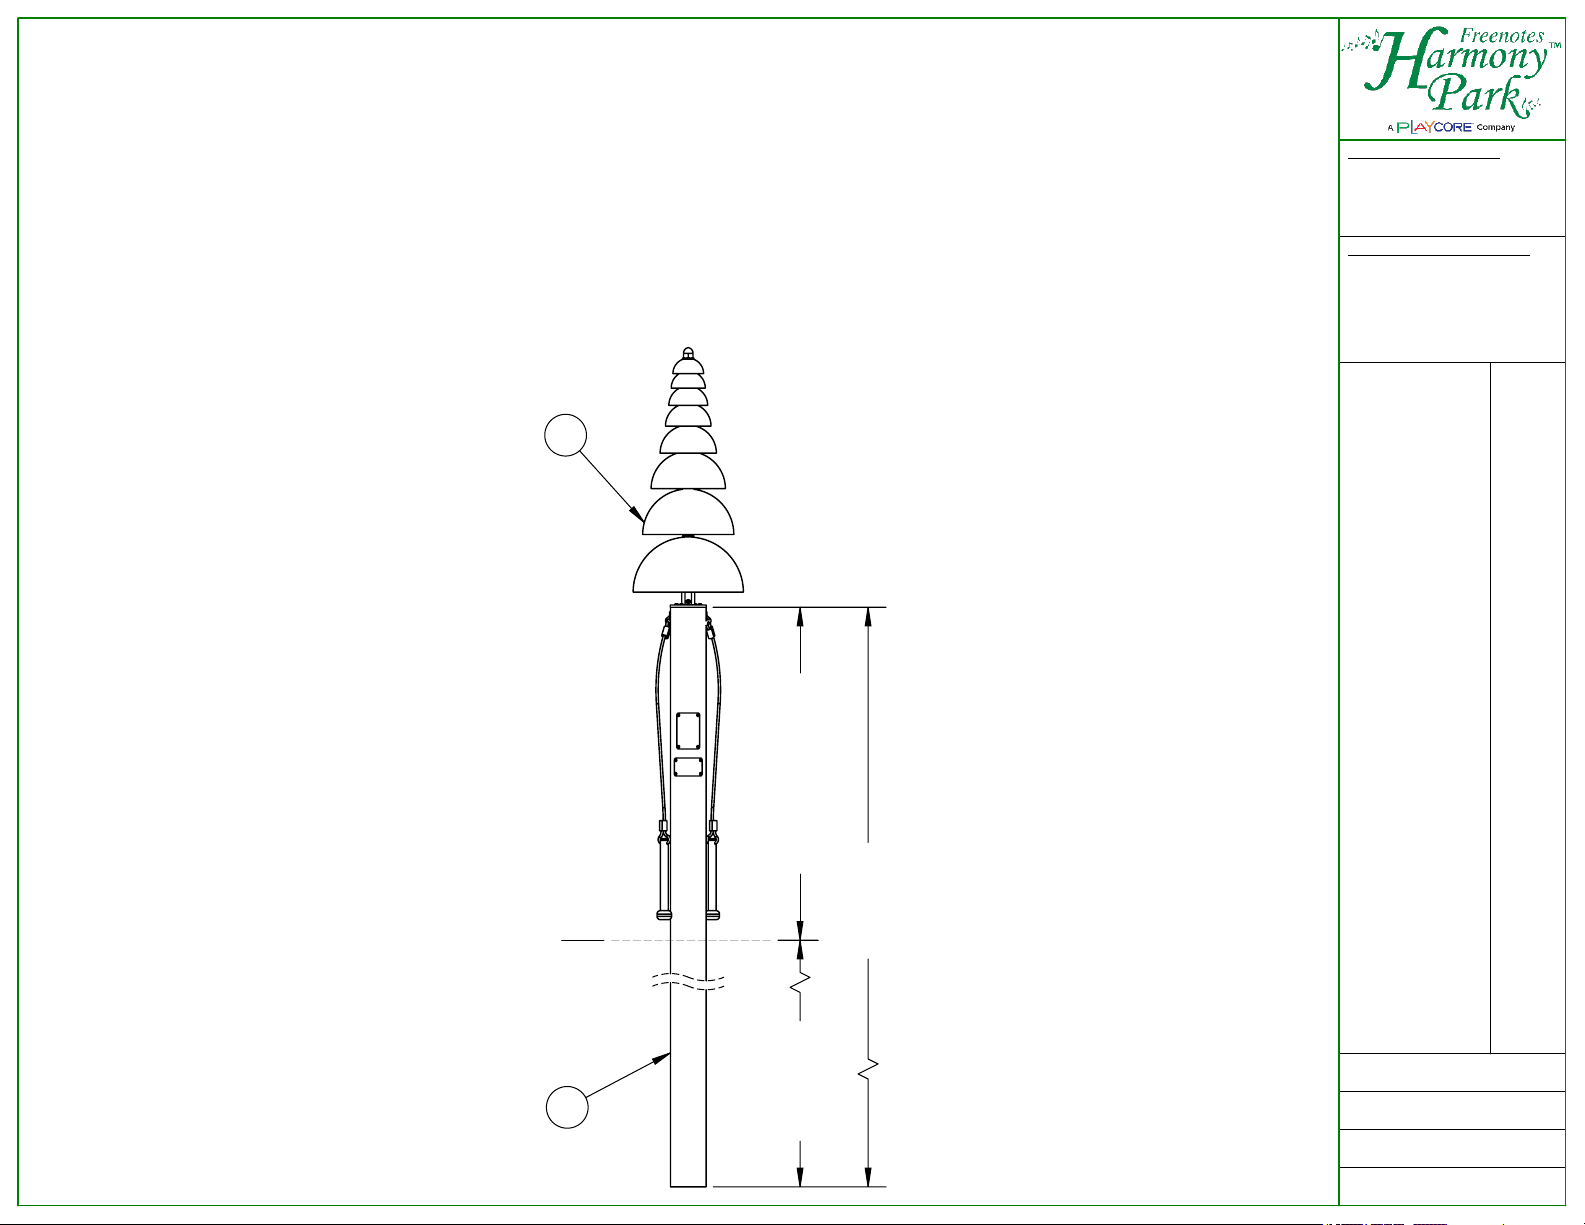
Step 1:
Excavate one 10" diameter hole, 36" deep at the installation location. Contractor can modify post to desired height.
Post Length = Frost Depth (
36" Recommended
) + Finished Height
Finished Height Guideline: (Ages 3-5, 23"
Step 2:
With two people, lower the Post with the Instrument attached into the excavated hole.
) (
Ages 5-7, 28"
) (
Ages 7-11, 33"
) (
Adult, 37"
)
Step 3:
Verify the correct placement, levelness, and finished height of the Instrument. Check for sufficient clearance around the
Instrument, a 36" perimeter around the Instrument is recommended for wheelchair accessibility.
Step 4:
Last pour concrete around the Post. It is recommended to brace the Instrument to hold it rigid while the concrete cures.
Leave to set according to the concrete manufacturers guidelines. Approximately (3) 80lb. bags will be needed.
1
FREENOTES HARMONY PARK
194 BODO DRIVE, UNIT F
DURANGO CO 81303
TEL: (970) 375-7825
FAX: (970) 247-0856
WWW.FREENOTESHARMONYPARK.COM
PROPRIETARY AND CONFIDENTIAL
THE INFORMATION CONTAINED IN THIS
DRAWING IS THE SOLE PROPERTY OF
FREENOTES HARMONY PARK. ANY
REPRODUCTION IN PART OR AS A
WHOLE WITHOUT THE WRITTEN
PERMISSION OF FREENOTES HARMONY
PARK IS PROHIBITED.
Ground Level
3/4
Finished Post Height
Post Depth
Frost Depth
In Ground Installation
TITLE:
REVISION: A
SCALE: 1:16
DATE: 2/9/2018
SHEET 3 OF 4
PBEL-INSTALL
DWG. NO.
Page 4
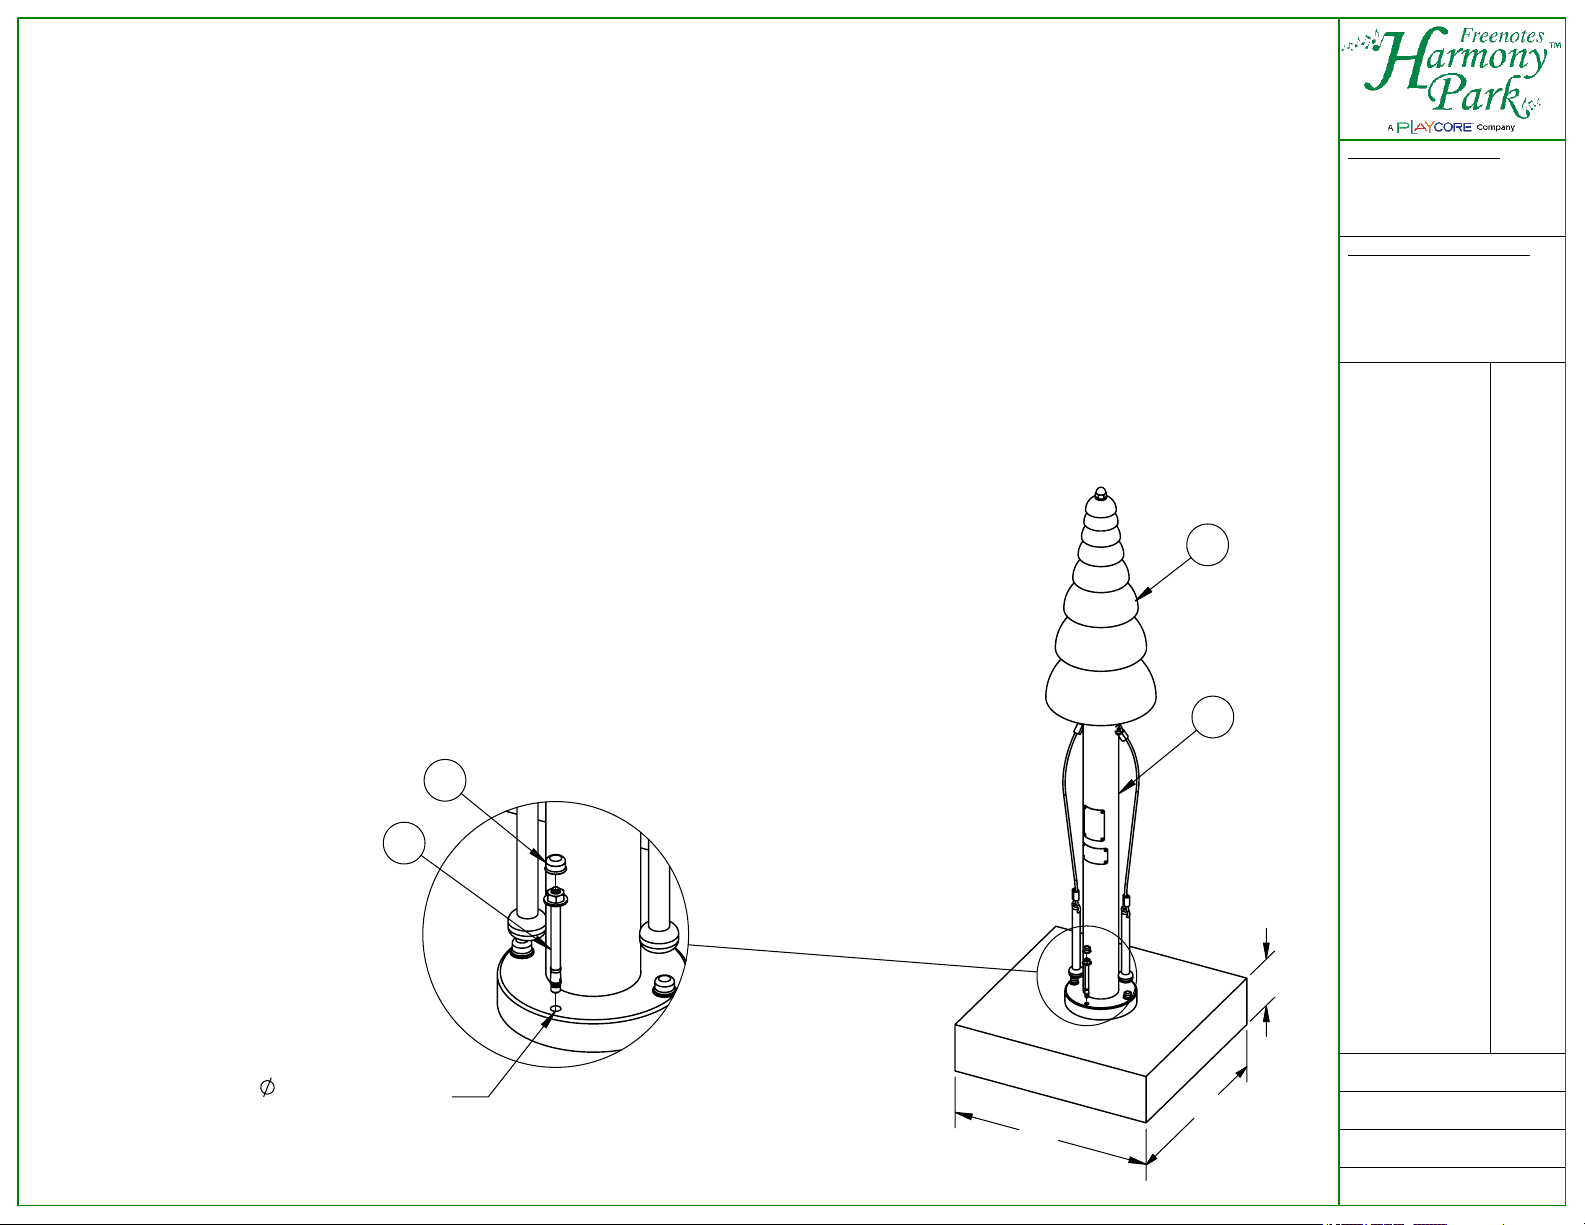
Step 1:
Standard height for Surface Mount Posts are 37". The Recycled Posts may be modified in the field to the following heights:
(
Ages 3-5, 23"
) (
Ages 5-7, 28"
) (
Ages 7-11, 33"
) (
Adult, 37"
The height of Surface Mount Steel Posts can not be adjusted.
)
Step 2:
Determine installation location. Verify concrete footing is a minimum of 24" long x 24" wide x 6" thick. If the concrete pad is at
an angle, steel washers are required to act as shims (Shims not provided). If there is not already an existing pad, approximately
(4) 80lb. bags will be needed. Allow concrete to cure per concrete manufacturers guidelines.
Step 3 (Recycled Post Only):
the Post. The Base should fit snuggly around the Post. Fasten them together with the provided
Step 4:
With two people place the Instrument Assembly with Post attached onto the concrete pad and mark the center of the holes
Install the Surface Mount Base to the bottom of the Post. Align the holes on the Base with the holes on
5/16" Hex Head Lag Bolt
on the Surface Mount Base. After you have made your marks, set aside the Instrument in order to drill for anchor holes. With a
hammer or rotary drill, drill through concrete at marked locations. Drill to a minimum depth of 4". A 3/8" masonry drill bit will be
needed.
Step 5:
Place the Instrument back over the drilled out holes. Insert provided anchor bolts into aligned holes.
Position anchor nut so that it is flush with the top of the bolt. Pound anchor bolts into the hole until
the anchor washer is flush with the Surface Mount Base. Tighten anchor bolts until they are snug.
Cover remaining bolt sections with provided nut caps.
Step 6:
Verify the correct placement, levelness, and finished height of the Instrument. Check for
sufficient clearance around the Instrument, a 36" perimeter around the Instrument is
recommended for wheelchair accessibility.
Step 7:
If installing onto wet concrete, us the wet set anchor manufacturers guidelines for
installation procedures.
s.
1
5/6
FREENOTES HARMONY PARK
194 BODO DRIVE, UNIT F
DURANGO CO 81303
TEL: (970) 375-7825
FAX: (970) 247-0856
WWW.FREENOTESHARMONYPARK.COM
PROPRIETARY AND CONFIDENTIAL
THE INFORMATION CONTAINED IN THIS
DRAWING IS THE SOLE PROPERTY OF
FREENOTES HARMONY PARK. ANY
REPRODUCTION IN PART OR AS A
WHOLE WITHOUT THE WRITTEN
PERMISSION OF FREENOTES HARMONY
PARK IS PROHIBITED.
11
DETAIL B
SCALE 1 : 6
3/8" Drill Diameter
to a Depth of 4"
12
24"
24"
6"
Surface Mount Installation
TITLE:
REVISION: A
SCALE: 1:16
DATE: 2/9/2018
SHEET 4 OF 4
PBELL-INSTALL
DWG. NO.
 Loading...