

Page 1

Model No. FMPW17.0
QUESTIONS?
If you have questions, or if
parts are damaged or missing,
please see HOW TO CONTACT
CUSTOMER CARE on the back
cover of this manual.
USER’S MANUAL
CAUTION
Read all precautions and
instructions in this manual before
using this equipment. Keep this
manual for future reference.
www.freemotionfitness.com
Page 2

TABLE OF CONTENTS
IMPORTANT PRECAUTIONS ..................................................................3
COMPLIANCE INFORMATION. . . . . . . . . . . . . . . . . . . . . . . . . . . . . . . . . . . . . . . . . . . . . . . . . . . . . . . . . . . . . . . . .4
CONSOLE FEATURES . . . . . . . . . . . . . . . . . . . . . . . . . . . . . . . . . . . . . . . . . . . . . . . . . . . . . . . . . . . . . . . . . . . . . . . 5
CONSOLE SPECIFICATIONS .................................................................5
CONSOLE DIAGRAM . . . . . . . . . . . . . . . . . . . . . . . . . . . . . . . . . . . . . . . . . . . . . . . . . . . . . . . . . . . . . . . . . . . . . . . .6
DISPLAY DIAGRAM .........................................................................7
DISPLAY DEFINITIONS ......................................................................8
HOW TO USE THE CONSOLE. . . . . . . . . . . . . . . . . . . . . . . . . . . . . . . . . . . . . . . . . . . . . . . . . . . . . . . . . . . . . . . .10
HOW TO LINK ANT+ COMPATIBLE DEVICES ...................................................16
HOW TO CONFIGURE THE CONSOLE. . . . . . . . . . . . . . . . . . . . . . . . . . . . . . . . . . . . . . . . . . . . . . . . . . . . . . . . .18
MAINTENANCE ...........................................................................26
TROUBLESHOOTING ......................................................................27
HOW TO CONTACT CUSTOMER CARE . . . . . . . . . . . . . . . . . . . . . . . . . . . . . . . . . . . . . . . . . . . . . . . . Back Cover
LIMITED WARRANTY. . . . . . . . . . . . . . . . . . . . . . . . . . . . . . . . . . . . . . . . . . . . . . . . . . . . . . . . . . . . . . . Back Cover
ANT+™ is a trademark of Garmin Ltd. or its subsidiaries.
Polar is a registered trademark of Polar Electro Oy.
FREEMOTION is a registered trademark of ICON Health & Fitness, Inc.
2
Page 3

IMPORTANT PRECAUTIONS
WARNING: To reduce the risk of serious injury, read all important precautions and
instructions in this manual and all warnings on your console before using your console. FreeMotion
Fitness assumes no responsibility for personal injury or property damage sustained by or through
the use of this product.
1. It is the responsibility of the owner to ensure
that all users of the console are adequately
informed of all precautions.
2. Before beginning any exercise program,
consult your physician. This is especially
important for persons over age 35 or persons with pre-existing health problems.
3. If you have an implanted medical device,
such as a pacemaker, consult your physician
before using a heart rate monitor.
4. If you are taking medication regularly,
consult your physician to find out if the medication will affect your exercise heart rate.
5. Use the console only as described in this
manual.
6. Keep the console indoors, away from moisture and dust. Do not put the console in a
garage or covered patio, or near water.
7. Inspect and properly tighten all parts each
time the console is used. Replace any worn
parts immediately.
8. Keep children under age 13 and pets away
from the console at all times.
9. To avoid damage to the console, keep liquids
away from the console and keep the console
out of direct sunlight.
10. Clean the console with a soft, damp cloth
only. Do not use abrasives or solvents to
clean the console.
11. When storing the console, remove the batteries. Store the console in a clean, dry location
away from moisture and dust.
12. Over exercising may result in serious injury
or death. If you feel faint, if you become short
of breath, or if you experience pain while
exercising, stop immediately and cool down.
3
Page 4

COMPLIANCE INFORMATION
UNITED STATES
FCC Statement. This device complies with Part 15 of the FCC Rules. Operation is subject to the following two
conditions: (1) This device may not cause harmful interference, and (2) this device must accept any interference
received, including interference that may cause undesired operation.
FCC Warning: Any changes or modifications not expressly approved by the party responsible for compliance could void the user’s authority to operate this equipment.
Note: This equipment has been tested and found to comply with the limits for a Class B digital device, pursuant to
Part 15 of the FCC Rules. These limits are designed to provide reasonable protection against harmful interference
in a residential installation. This equipment generates, uses, and can radiate radio frequency energy and, if not
installed and used in accordance with the instructions, may cause harmful interference to radio communications.
However, there is no guarantee that interference will not occur in a particular installation. If this equipment does
cause harmful interference to radio or television reception, which can be determined by turning the equipment off
and on, the user is encouraged to try to correct the interference by one of the following measures:
• Reorient or relocate the receiving antenna.
• Increase the separation between the equipment and the receiver.
• Connect the equipment into an outlet on a circuit different from that to which the receiver is connected.
• Consult the dealer or an experienced radio/TV technician for help.
This device meets the FCC and IC requirements for RF exposure in public or uncontrolled environments.
IMPORTANT: To satisfy exposure compliance requirements, the antenna and transmitter in the console
must be at least 8 in. (20 cm) from all persons and must not be near or connected to any other antenna or
transmitter.
Note: The console contains FCC ID: 06R1823.
CANADA
IC Statement. This device complies with Industry Canada (IC) license exempt RSS standard(s). Operation is sub-
ject to the following two conditions: (1) This device may not cause harmful interference, and (2) this device must
accept any interference received, including interference that may cause undesired operation.
This Class B digital apparatus complies with Canadian ICES-003.
Note: The console contains IC ID: 3797A-1823.
4
Page 5

CONSOLE FEATURES
OVERMOLDED CONSOLE COVER
To prevent moisture from entering the console, the
entire upper surface of the console, including the buttons, is overmolded in a thin rubber membrane. This
surface can easily be cleaned with a soft, damp, nonabrasive cloth.
BACKLIT LCD DISPLAY
The console has an LCD display that features a
backlight, fixed displays that provide ride data, and an
active dot matrix message banner. During a ride, the
message banner displays useful text messages relating to the other ride data. The message banner also
functions as a menu in the SETTINGS mode.
CONSOLE SPECIFICATIONS
HEART RATE MONITOR COMPATIBLE
The console is compatible with ANT+™ and non-coded
®
Polar
heart rate monitor models. The console will link
to the strongest heart rate monitor signal in a range of
approximately 2 to 3 meters. Note: A heart rate monitor
is not included with the console.
USB DATA STORAGE
The console has a USB port that can be used with
commercially-available USB drives. The ride data for
each INTERVAL and the TOTAL RIDE can be saved
to a USB drive in a .csv file format that will allow users
to track and analyze their ride data. This file format is
common to standard spreadsheet software programs
and can also be uploaded to many training websites.
Dimensions
Height: 1.6 in. (40 mm)
Length: 6.9 in. (175 mm)
Width: 3.3 in. (85 mm)
Weight with Batteries
1 lb. (2.2 kg)
Batteries Required
Three (3) C batteries (LR14)
5
Page 6
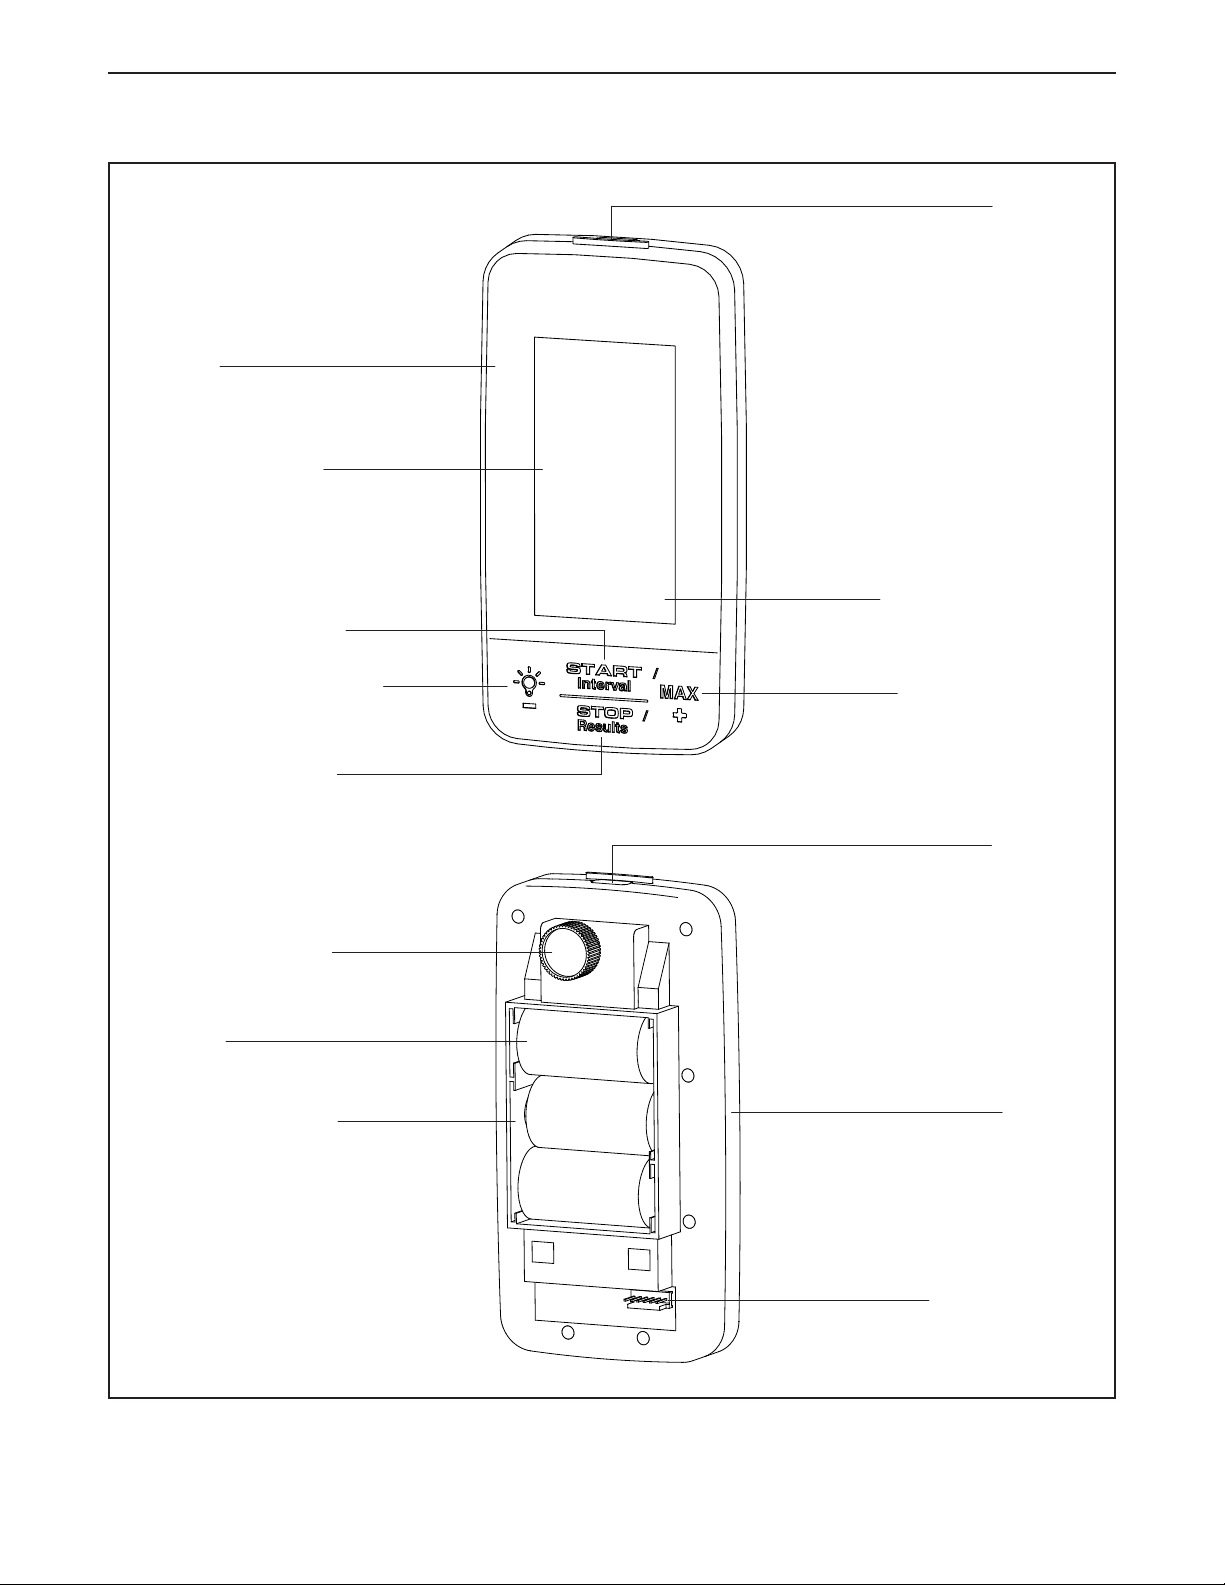
CONSOLE DIAGRAM
FRONT
Console
Backlit LCD Display
START/Interval Button
Backlight / – / Down Button
STOP/Results Button
USB Port
LCD Message Banner
MAX / + / Up Button
REAR
Battery Cover Screw
Batteries
Battery Compartment
USB Port
Console
Wire Receptacle
6
Page 7

DISPLAY DIAGRAM
1
2
3
4
Number Display Description
1 WATTS Displays power output in watts—instantaneous, average, and maximum.
2 RPM Displays pedaling cadence in revolutions per minute (RPM)—instantaneous,
3 TIME In the INTERVAL mode, displays the elapsed time for the interval. In the RIDE
4 DIST In the INTERVAL mode, displays the distance traveled in miles (MI) or kilome-
5
6
7
8 9 12
average, and maximum.
and the TOTAL RIDE mode, displays the elapsed time for the entire ride.
ters (KM) for the interval. In the RIDE and the TOTAL RIDE mode, displays the
distance traveled in miles or kilometers for the entire ride.
10
11
5 BPM If the user wears a compatible heart rate monitor (not included), displays the
heart rate in beats per minute (BPM)—instantaneous, average, and maximum.
6 INTERVAL Displays the number of the current interval.
7 SPEED Displays pedaling speed in miles per hour or kilometers per hour—
instantaneous, average, and maximum.
8 KCAL Displays the cumulative kilocalories (KCAL) value during the ride.
9 KJ Displays the cumulative kilojoules (KJ) value during the ride.
10 AVG Displays the average values for the current interval or the entire ride.
11 MAX In the RIDE mode and the TOTAL RIDE mode, displays the maximum values.
12 Message Banner Displays text messages indicating the current mode or menu option.
Examples: WARM UP, RIDE, TOTAL RIDE, SETTINGS.
7
Page 8

DISPLAY DEFINITIONS
WARM UP
The console has a WARM UP mode designed to allow
a user to adjust the exercise bike, to warm up, and to
prepare for an actual ride. In a studio cycling class,
users can use this mode to warm up before the class
begins.
While the WARM UP mode is selected, the console will
provide instantaneous data in the displays for a user
to reference. However, the console will not record the
elapsed time, will not show average values, and will
not save ride data to a USB drive.
To exit the WARM UP mode, a user will press the
START/Interval button to enter the INTERVAL mode
and begin the ride.
INTERVAL
During the ride, the console will be in the INTERVAL
mode.
The INTERVAL mode can have 1 to 99 numbered
intervals. To enter a new INTERVAL, a user will press
the START/Interval button. The display will show the
INTERVAL number.
For each interval, the console will record the elapsed
time and distance and will show instantaneous data
and average values in the displays.
Ride data for each INTERVAL will also be saved in the
console memory for the TOTAL RIDE mode. If a user
inserts a USB drive into the USB port before entering
the INTERVAL mode, the ride data will also be saved
to the USB drive in the TOTAL RIDE mode.
RIDE
During the ride, a user can press the STOP/Results
button to select the RIDE mode and view data for the
entire ride.
While the RIDE mode is selected, the console will
show the time and distance for the entire ride. The displays will show the maximum values achieved for the
ride so far and the average values for the ride so far.
WATTS
The console will measure and show a user’s power
output in WATTS. A watt is an instantaneous measurement of power and is a product of two factors: force
and movement.
When a user rides an exercise bike, force equates
to how hard the user pushes the pedals. Movement
equates to the user’s pedaling cadence—measured in
revolutions per minute (RPM).
A watt is the international standard unit for power.
However, power output is often expressed in horsepower as well. For reference, 746 watts is equal to 1
horsepower.
8
Page 9

KJ (KILOJOULES)
HEART RATE
The console will measure and show the amount of
work a user has accomplished during a ride in kilojoules (KJ). The console will show the kilojoules value
only in the TOTAL RIDE mode.
The kilojoules value is a direct measurement that can
be converted into a food energy equivalent (kilocalories). However, the formula for this conversion makes
assumptions about the mechanical efficiency of the
human body.
A kilojoule is equal to 1000 joules. In turn, 1 joule is
equal to 1 watt applied for 1 second.
KCAL (KILOCALORIES)
The console will measure and show the approximate
amount of food energy used by a user’s body in
kilocalories (KCAL). Note: Kilocalories are also known
as large calories or Calories. In nutritional contexts,
kilocalories are known as Calories.
A kilocalorie is equal to 1000 small calories. Note:
Small calories are also known as gram calories. Small
calories are very small units and are not used in nutritional contexts.
If a user wears a compatible chest heart rate monitor
(not included), the console will measure and show a
user’s heart rate in beats per minute (BPM).
When the console detects a signal from the user’s
chest heart rate monitor, the heart symbol in the
display will flash and the user’s heart rate will be
shown.
SPEED
The console will measure and show the user’s
pedaling speed in miles per hour or kilometers per
hour. Note: The unit of measurement can be changed
in the SETTINGS mode.
The console will calculate a user’s pedaling speed
based on the user’s power output in watts and the
user’s weight.
DISTANCE
The console will measure and show the distance traveled in miles (MI) or kilometers (KM). Note: The unit
of measurement can be changed in the SETTINGS
mode.
RPM (REVOLUTIONS PER MINUTE)
The console will measure and show the user’s
pedaling cadence in revolutions per minute (RPM).
A user’s pedaling cadence is the number of times the
user’s foot travels a complete pedal stroke (360-degree
circle or revolution) in one minute.
The console will calculate the distance traveled based
on the user’s pedaling speed, which is based on the
user’s power output in watts and the user’s weight.
9
Page 10

HOW TO USE THE CONSOLE
To activate the console, see this page. To turn off
the console, see this page. To use the backlight, see
this page. To set up the console, see page 11. To
use the WARM UP mode, see page 12. To use the
INTERVAL mode, see page 13. To use the RIDE
mode, see page 14. To use the Auto Pause mode,
see page 14. To use the Auto Pause Off mode,
see page 15. To use the TOTAL RIDE mode, see
page 15.
HOW TO ACTIVATE THE CONSOLE
IMPORTANT: If the console has been exposed to
cold temperatures, allow it to warm to room temperature before you install batteries and activate
the console. If you do not do this, you may damage
the console display or other electrical components.
Press any button on the console to activate the console. The display will then light and the console will be
ready for use.
HOW TO TURN OFF THE CONSOLE
To conserve battery power, the console will automatically enter the Sleep Mode in the following conditions:
When the User Setup mode is selected—The console will enter the Sleep Mode after 45 seconds if the
pedals do not move or if no buttons are pressed.
When the WARM UP mode, the Auto Pause mode,
or the TOTAL RIDE mode is selected—The console
will enter the Sleep Mode after 3 minutes if the pedals
do not move.
When the console is in the Sleep Mode, no data will be
shown in the display.
HOW TO USE THE BACKLIGHT
Press the Backlight button repeatedly to turn the backlight on. To change the backlight duration, see step 4
on page 19.
10
Page 11
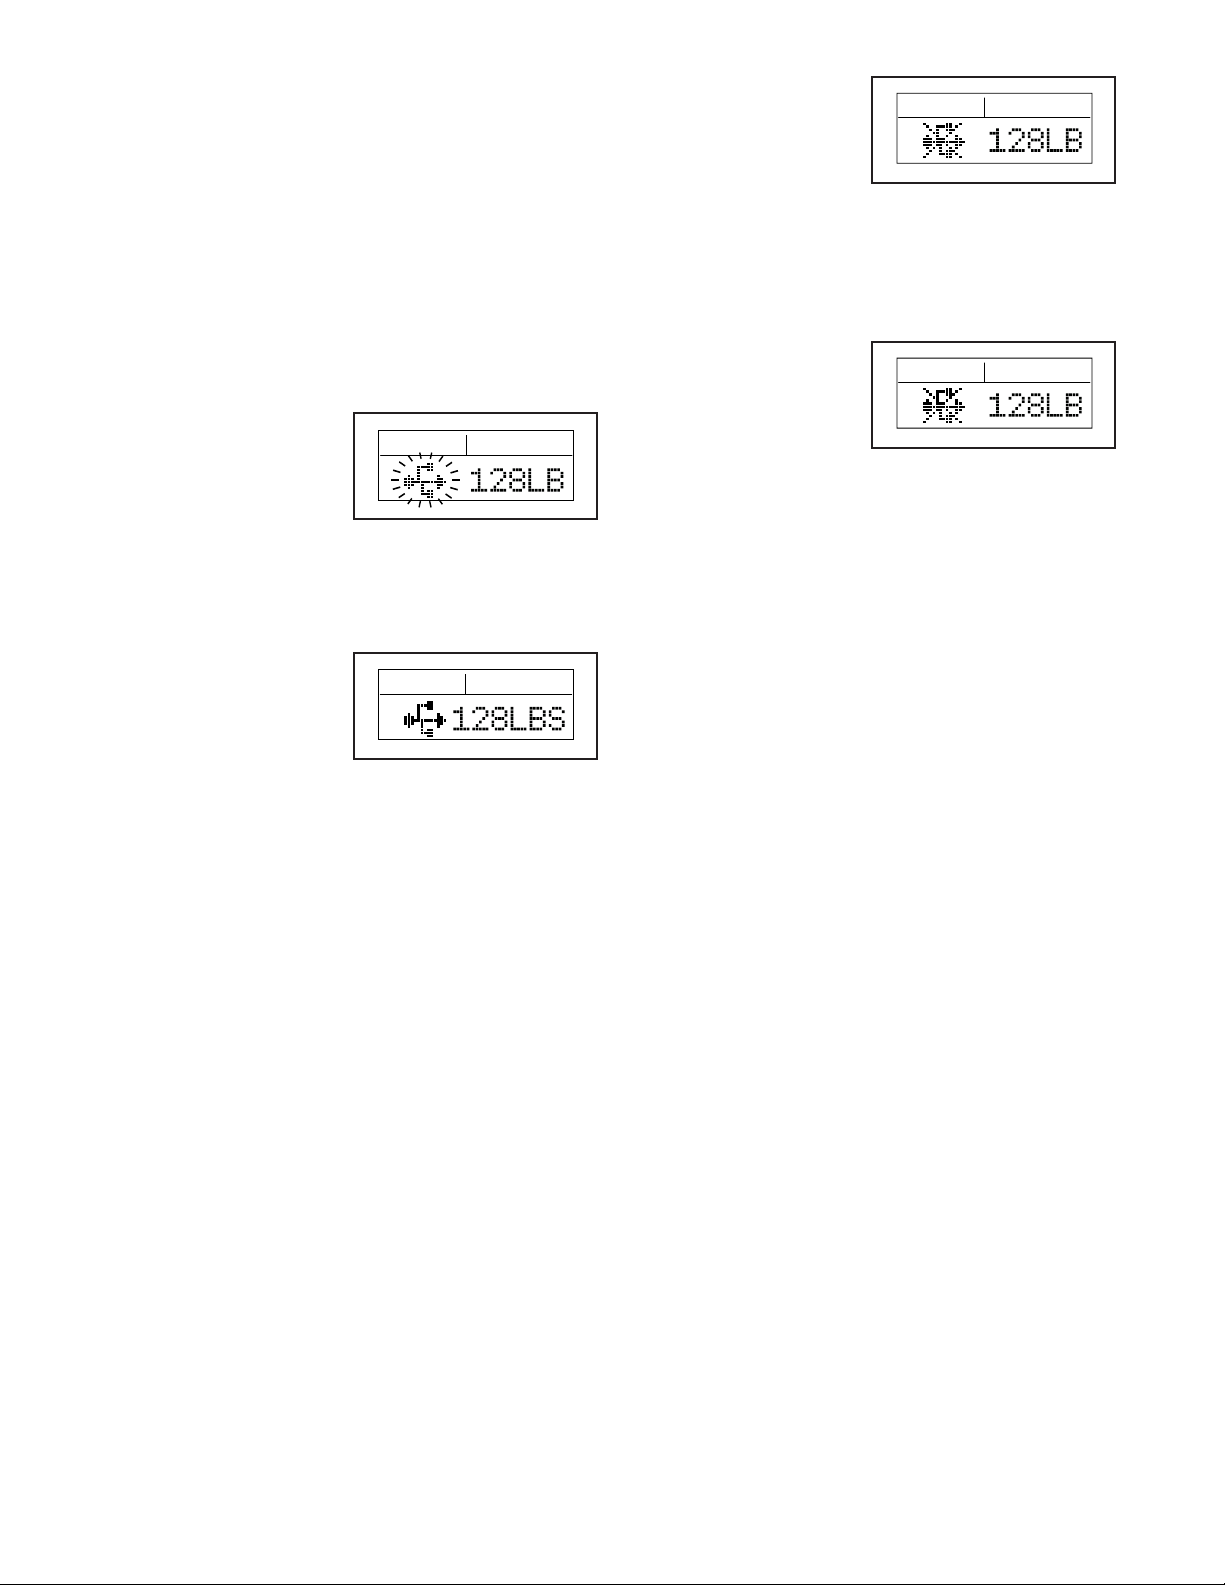
HOW TO SET UP THE CONSOLE
1. Activate the console.
See HOW TO ACTIVATE THE CONSOLE on
page 10.
2. Select the User Setup mode.
If the console does
not detect a USB
drive, the USB
symbol will be
crossed out.
Note: If desired, you can disable the USB port. See
step 4 on page 21.
When you activate the console, the User Setup
mode will be selected automatically.
3. Insert a USB drive into the USB port if desired.
A flashing USB
symbol in the
display will prompt
you to insert a USB
drive into the USB
port on the console. If you insert a USB drive into the USB port,
your ride data will be saved to the USB drive in the
TOTAL RIDE mode.
If the console
detects a USB
drive, the USB
symbol will stop
flashing.
4. Enter your weight.
The console will
prompt you to enter
your weight. Note:
Your weight is used
to calculate KCAL
values.
Press the MAX or Backlight button to increase
or decrease the weight value. Note: If you do not
enter a weight value, the console will use the
default weight value to calculate KCAL values.
5. Exit the User Setup mode.
Press the START/Interval button to exit the User
Setup mode and enter the WARM UP mode.
11
Page 12

HOW TO USE THE WARM UP MODE
4. Follow your progress with the displays.
1. Activate the console.
See HOW TO ACTIVATE THE CONSOLE on
page 10.
2. Set up the console if desired.
When you activate the console, the User Setup
mode will be selected automatically. See steps 2 to
4 on page 11 to set up the console.
3. Select the WARM UP mode.
Press the START/Interval button to exit the User
Setup mode and enter the WARM UP mode.
When the WARM UP mode is selected, the words
WARM UP will appear in the message banner.
The WARM UP mode is designed to allow you
to adjust the exercise bike, to warm up, and to
prepare for an actual ride. In a studio cycling class,
you can use this mode to warm up before the class
begins.
See the DISPLAY
DIAGRAM on
page 7.
When the WARM
UP mode is
selected, the
console will show
instantaneous data
in the displays.
However, the console will not show
the elapsed time,
will not show average values, and will
not save ride data
to a USB drive.
5. Exit the WARM UP mode.
To exit the WARM UP mode, press the START/
Interval button. The console will then enter the
INTERVAL mode and begin the ride.
12
Page 13

HOW TO USE THE INTERVAL MODE
1. Activate the console.
See HOW TO ACTIVATE THE CONSOLE on
page 10.
the high-intensity and low-intensity portions of an
interval ride into separate intervals. You can also
save the data for each interval to a USB drive (see
step 3 on page 11).
6. Follow your progress with the displays.
2. Set up the console if desired.
When you activate the console, the User Setup
mode will be selected automatically. See HOW TO
SET UP THE CONSOLE on page 11.
3. Begin pedaling and warm up if desired.
When you press the START/Interval button or
begin pedaling, the console will enter the WARM
UP mode. See HOW TO USE THE WARM UP
MODE on page 12.
4. Select the INTERVAL mode.
To exit the WARM
UP mode and enter
the INTERVAL
mode, press the
START/Interval button. The INTERVAL
number will appear in the display.
5. Divide your ride into intervals if desired.
The INTERVAL
mode can have 1
to 99 numbered
intervals. To enter
a new INTERVAL,
press the START/
Interval button. The display will show the current
INTERVAL number.
The INTERVAL mode is designed to allow you to
divide your ride into specific elements that can be
tracked and analyzed. For example, you can divide
See the DISPLAY
DIAGRAM
on page 7.
During each inter-
val, the console will
show the elapsed
time and distance.
The displays will
show instantaneous data and
average values.
When you select
a new interval, the
console will reset
the time, distance,
and average values
to zero.
7. Pause the console if desired.
See HOW TO USE THE AUTO PAUSE MODE on
page 14.
8. View the RIDE mode if desired.
See HOW TO USE THE RIDE MODE on
page 14.
9. End the ride.
To end the ride, press and hold the STOP/Results
button for 3 seconds. The console will then enter
the TOTAL RIDE mode. See HOW TO USE THE
TOTAL RIDE MODE on page 15.
13
Page 14
HOW TO USE THE RIDE MODE
HOW TO USE THE AUTO PAUSE MODE
1. Select the INTERVAL mode.
See steps 1 to 4 on page 13 and select the
INTERVAL mode.
2. Select the RIDE mode.
To view the RIDE mode at any time during any
interval, press the STOP/Results button. The word
RIDE will appear in the message banner.
3. View data for the entire ride.
When the RIDE
mode is selected,
the console will
show data for the
entire ride so far.
See the DISPLAY
DIAGRAM on
page 7.
The time and dis-
tance displays will
show the elapsed
time for the entire
ride and the distance for the entire
ride. The displays
will show the
maximum values
achieved for the
ride and the average values for the ride.
The console has an Auto Pause mode that allows you
to stop your ride temporarily and then resume your ride
without affecting the average value data shown and
saved by the console.
The console will enter the Auto Pause mode when you
stop pedaling and the console does not detect a pedaling cadence.
Note: The console will not enter the Auto Pause mode
when the WARM UP mode is selected.
When the console
enters the Auto Pause
mode, a pause symbol
will appear in the message banner. The time
display will pause.
The console will exit the Auto Pause mode and return
to the current interval when you resume pedaling and
the console detects a pedaling cadence.
The console will exit the Auto Pause mode and enter
the Sleep Mode after 3 minutes if the console does not
detect a pedaling cadence.
Note: If desired, you can disable the Auto Pause mode.
See HOW TO USE THE AUTO PAUSE OFF MODE at
the right.
Note: When the RIDE mode is selected, you can
still press the START/Interval button to enter a new
interval.
4. Exit the RIDE mode.
To exit the RIDE mode and view the current
INTERVAL mode, press the START/Interval button.
The console will also exit the RIDE mode automati-
cally after 10 seconds.
14
Page 15
HOW TO USE THE AUTO PAUSE OFF MODE
HOW TO USE THE TOTAL RIDE MODE
The console has an Auto Pause Off mode designed to
be used by studio cycling class instructors.
Since most studio cycling classes must be completed
in a set period of time, instructors may not want the
console to pause the time when they stop pedaling or
get off their exercise bikes for short periods of time.
When the Auto Pause Off mode is selected, a pause
symbol will appear in the message banner when
you stop pedaling and the console does not detect a
pedaling cadence; however, the time display will not
pause.
The console will exit the Auto Pause Off mode and
return to the current interval when you resume pedaling and the console detects a pedaling cadence.
The console will exit the Auto Pause Off mode and
enter the Sleep Mode after 3 minutes if the console
does not detect a pedaling cadence.
To disable or enable the Auto Pause mode, see step 3
on page 20.
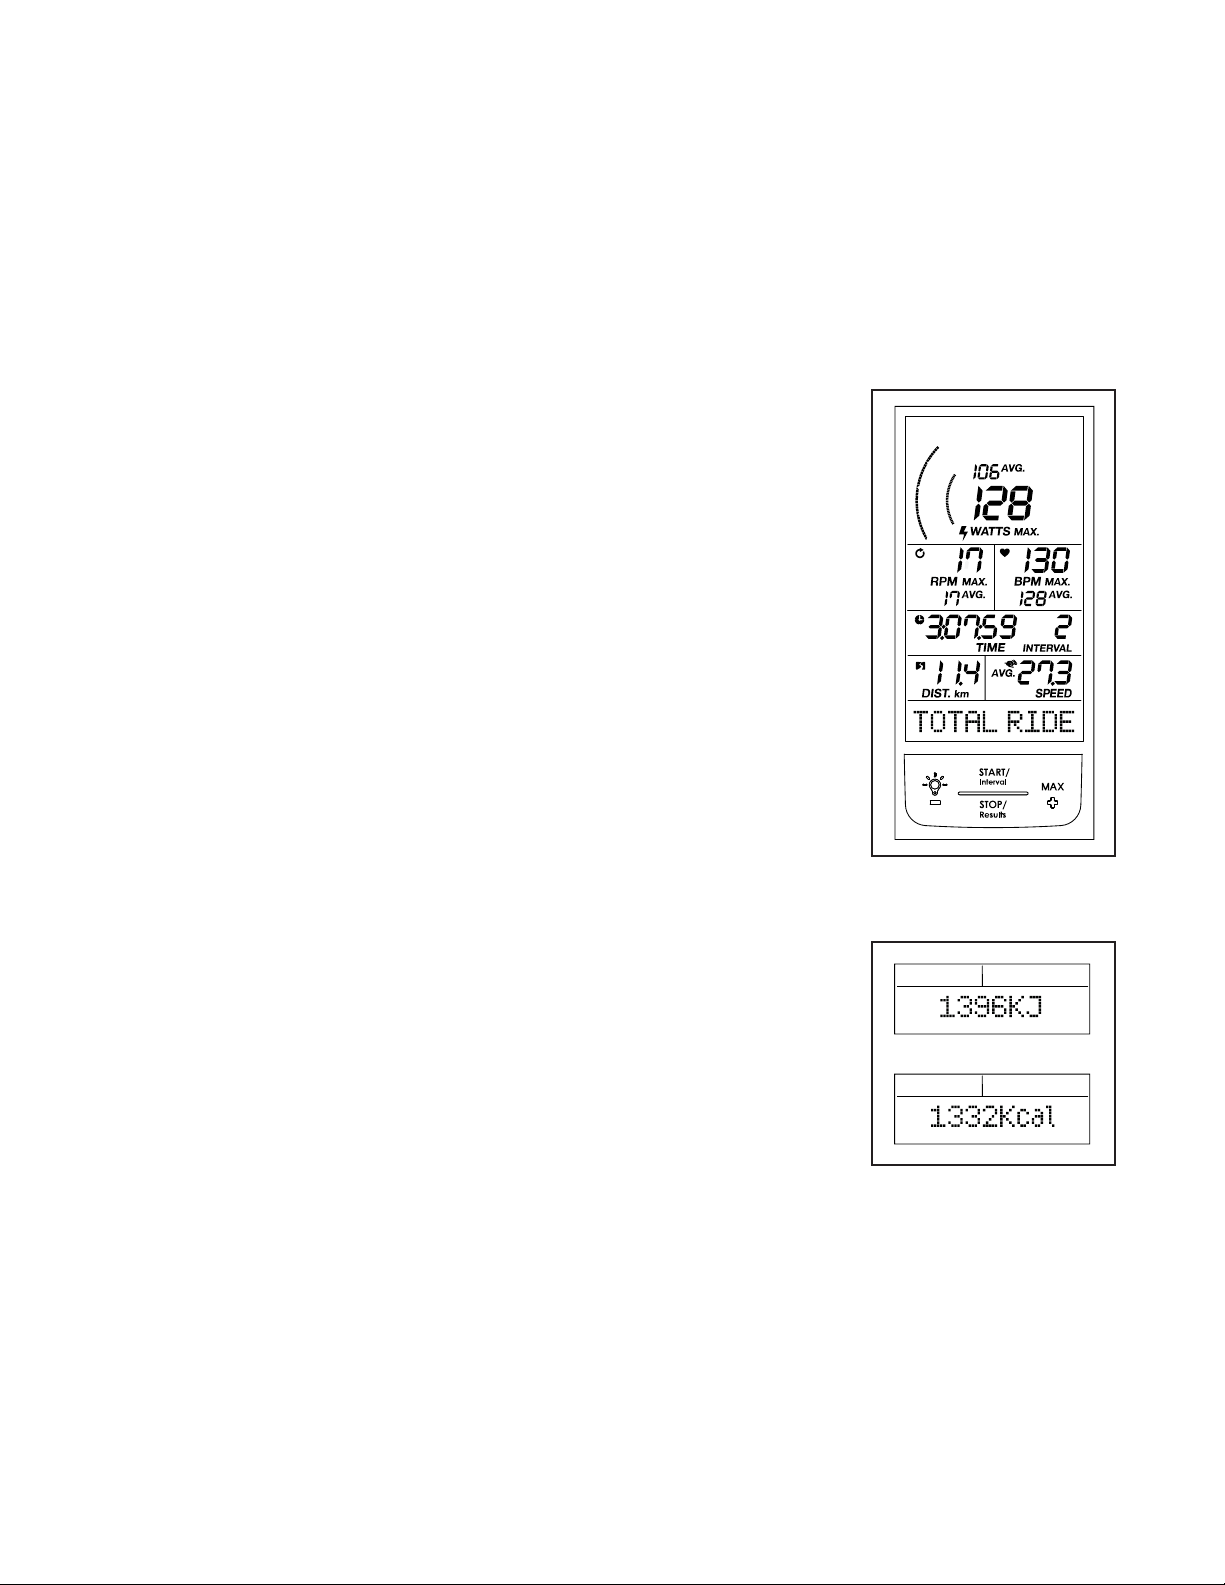
1. Select the TOTAL RIDE mode.
To end a ride and select the TOTAL RIDE mode,
press and hold the STOP/Results button for 3 seconds (see steps 1 to 9 on page 13).
The words TOTAL RIDE will appear in the message
banner.
2. View and save data for the ride.
When the TOTAL
RIDE mode is
selected, the console will show the
data for the ride.
See the DISPLAY
DIAGRAM on
page 7.
The time and
distance displays
will show the time
for the entire ride
and the distance
for the entire ride.
The displays will
show the maximum
values achieved
for the ride and the
average values for
the ride.
The message ban-
ner will also show
the KJ (kilojoules)
and the KCAL (kilocalories) values in
a repeating cycle.
If there is a USB drive inserted into the USB port
(see step 3 on page 11), the data for the ride will
also be saved to the USB drive.
3. Turn off the console.
See HOW TO TURN OFF THE CONSOLE on
page 10.
15
Page 16

HOW TO LINK ANT+ COMPATIBLE DEVICES
THE ANT+ MODULE AND COMPATIBLE DEVICES
The console has a secure, digital ANT+ module that
allows the console to communicate with ANT+ compatible heart rate monitors, fitness watches, and mobile
devices.
There are many brands of ANT+
compatible heart rate monitor
models available. The symbol
shown here indicates that a heart
rate monitor is compatible with the
ANT+ module in the console.
There are also many brands of ANT+ compatible fitness watches and mobile devices available. These
devices can capture your ride data wirelessly, so you
do not have to insert a USB drive into the USB port
on the console to save your ride data. Many of these
devices can also transfer your ride data wirelessly to
training programs on computers, mobile devices, and
websites.
The symbol shown here indicates
that a fitness watch or mobile
device is compatible with the
ANT+ module in the console and
can communicate wirelessly with
other devices.
Before you can use the ANT+ module with a compatible device, you must link (pair) the device to the ANT+
module.
HOW TO LINK A HEART RATE MONITOR
Follow the manufacturer’s instructions to use your
ANT+ compatible heart rate monitor.
1. Put on the heart rate monitor and position
yourself near the console.
You must be within 12 inches (30 centimeters) of
the console to link the heart rate monitor to the
ANT+ module in the console.
2. Activate the console and select the WARM UP
mode.
See HOW TO ACTIVATE THE CONSOLE on page
10. Then, press the START/Interval button to
enter the WARM UP mode.
Note: The console must be in the WARM UP mode
to link to an ANT+ compatible heart rate monitor.
The heart rate monitor cannot link to the ANT+
module when the console is in the INTERVAL
mode.
3. Link the heart rate monitor to the ANT+ module
in the console.
When the WARM UP mode is selected, the ANT+
module will link to the heart rate monitor.
The heart symbol will flash in the heart rate display
and the console will show heart rate data.
See HOW TO LINK A HEART RATE MONITOR at the
right to link your ANT+ compatible heart rate monitor to
the ANT+ module.
See HOW TO LINK A FITNESS WATCH OR MOBILE
DEVICE on page 17 to link your ANT+ compatible
fitness watch or mobile device to the ANT+ module.
Note: After the heart rate monitor is linked to the
ANT+ module in the console, the ANT+ module will
be able to receive heart rate signals within an area
encompassing all the riding positions of the exercise bike.
16
Page 17

HOW TO LINK A FITNESS WATCH OR A MOBILE
DEVICE
Follow the manufacturer’s instructions to use your
ANT+ compatible fitness watch or mobile device.
Note: The console must be in the WARM UP mode
to link to an ANT+ compatible fitness watch or
mobile device. The fitness watch or mobile device
cannot link to the ANT+ module when the console
is in the INTERVAL mode.
1. Make sure that your device is in linking mode
and position the device near the console.
See the manufacturer’s instructions for your fitness
watch or mobile device to select the linking mode.
The fitness watch or mobile device must be within
6 inches (15 centimeters) of the console.
2. Activate the console and select the WARM UP
mode.
See HOW TO ACTIVATE THE CONSOLE on page
10. Then, press the START/Interval button to
enter the WARM UP mode.
3. Link the fitness watch or mobile device to the
ANT+ module in the console.
When the WARM UP mode is selected, the ANT+
module will link to the fitness watch or mobile
device.
The fitness watch or mobile device will indicate a
successful link to the ANT+ module in the console.
Note: After the fitness watch or mobile device is
linked to the ANT+ module in the console, the
ANT+ module will be able to receive signals within
an area encompassing all the riding positions of the
exercise bike.
17
Page 18

HOW TO CONFIGURE THE CONSOLE
To select the settings mode, see this page. To
change display settings, see page 19. To change
system settings, see page 20. To manage
console firmware, see page 22. To use a bike
number, see page 24. To upgrade the console
firmware, see page 25.
HOW TO USE THE SETTINGS MODE
To select the SETTINGS mode, press and hold the
Backlight and MAX buttons until the settings menu
appears in the message banner.
To exit the SETTINGS mode, press the MAX button
repeatedly until the word BACK appears in the message banner. Then, press the START/Interval button.
The console will exit the SETTINGS mode.
You can use the console buttons to navigate through
the menus and change console settings.
The menu options will appear in the message banner.
Press the Backlight button to move to the previous
menu option. Press the MAX button to move to the
next menu option. Press the START/Interval button to
select a menu option or enter a setting.
The settings menu contains the following menu
options:
DISPLAY—Select this menu option to select a unit
of measurement for the console, to select a console
display language, to change the backlight duration, and
to change the contrast level of the display.
SYSTEM—Select this menu option to view the battery
power level, to enable or disable the Auto Pause mode,
to enable or disable the USB port, to view information about console usage, and to manage the console
firmware.
BIKE #—Select this menu option to assign an
identification number to the console.
BACK—Select this menu option to exit the settings
menu.
To exit a menu or to exit the SETTINGS mode, select
the BACK menu option repeatedly.
18
Page 19

HOW TO CHANGE DISPLAY SETTINGS
1. Activate the console and select the DISPLAY
menu option.
See HOW TO ACTIVATE THE CONSOLE on
page 10.
Then, see HOW TO USE THE SETTINGS MODE
on page 18.
The display menu will appear in the message
banner.
2. Select the UNITS menu option and change the
unit of measurement if desired.
The console can
display speed and
distance in miles
(ENGLISH) or kilometers (METRIC).
The currently
selected unit of
measurement will
be displayed with a
dark background.
Select the desired ENGLISH or METRIC unit of
measurement. Then, return to the display menu.
3. Select the LANGUAGE menu option and
change the console display language if desired.
The console may
be able to display text in other
languages.
4. Select the BACKLIGHT menu option and
change the backlight duration if desired.
You can change
the amount of time
the backlight will
stay lit after you
press the Backlight
button. The console
has BK LT TIME
(backlight time), ON, and OFF backlight durations.
The currently
selected backlight
duration will be displayed with a dark
background.
Note: The backlight duration you select will affect
the battery life. To extend the battery life, it is
recommended that you select a short backlight
duration.
When you select
the BK LT TIME
menu option,
you can select a
backlight duration
from the backlight
time menu. Note: The default backlight duration is
5 seconds.
When the ON backlight duration is selected, the
backlight will stay lit the entire time the console
is activated. Note: This backlight duration is not
recommended for high-use environments, such as
fitness clubs.
When the OFF backlight duration is selected, the
backlight will not light.
The currently
selected console
display language
will be displayed
with a dark
background.
Select the desired console display language. Then,
return to the display menu.
Select the desired backlight duration. Then, return
to the display menu.
19
Page 20
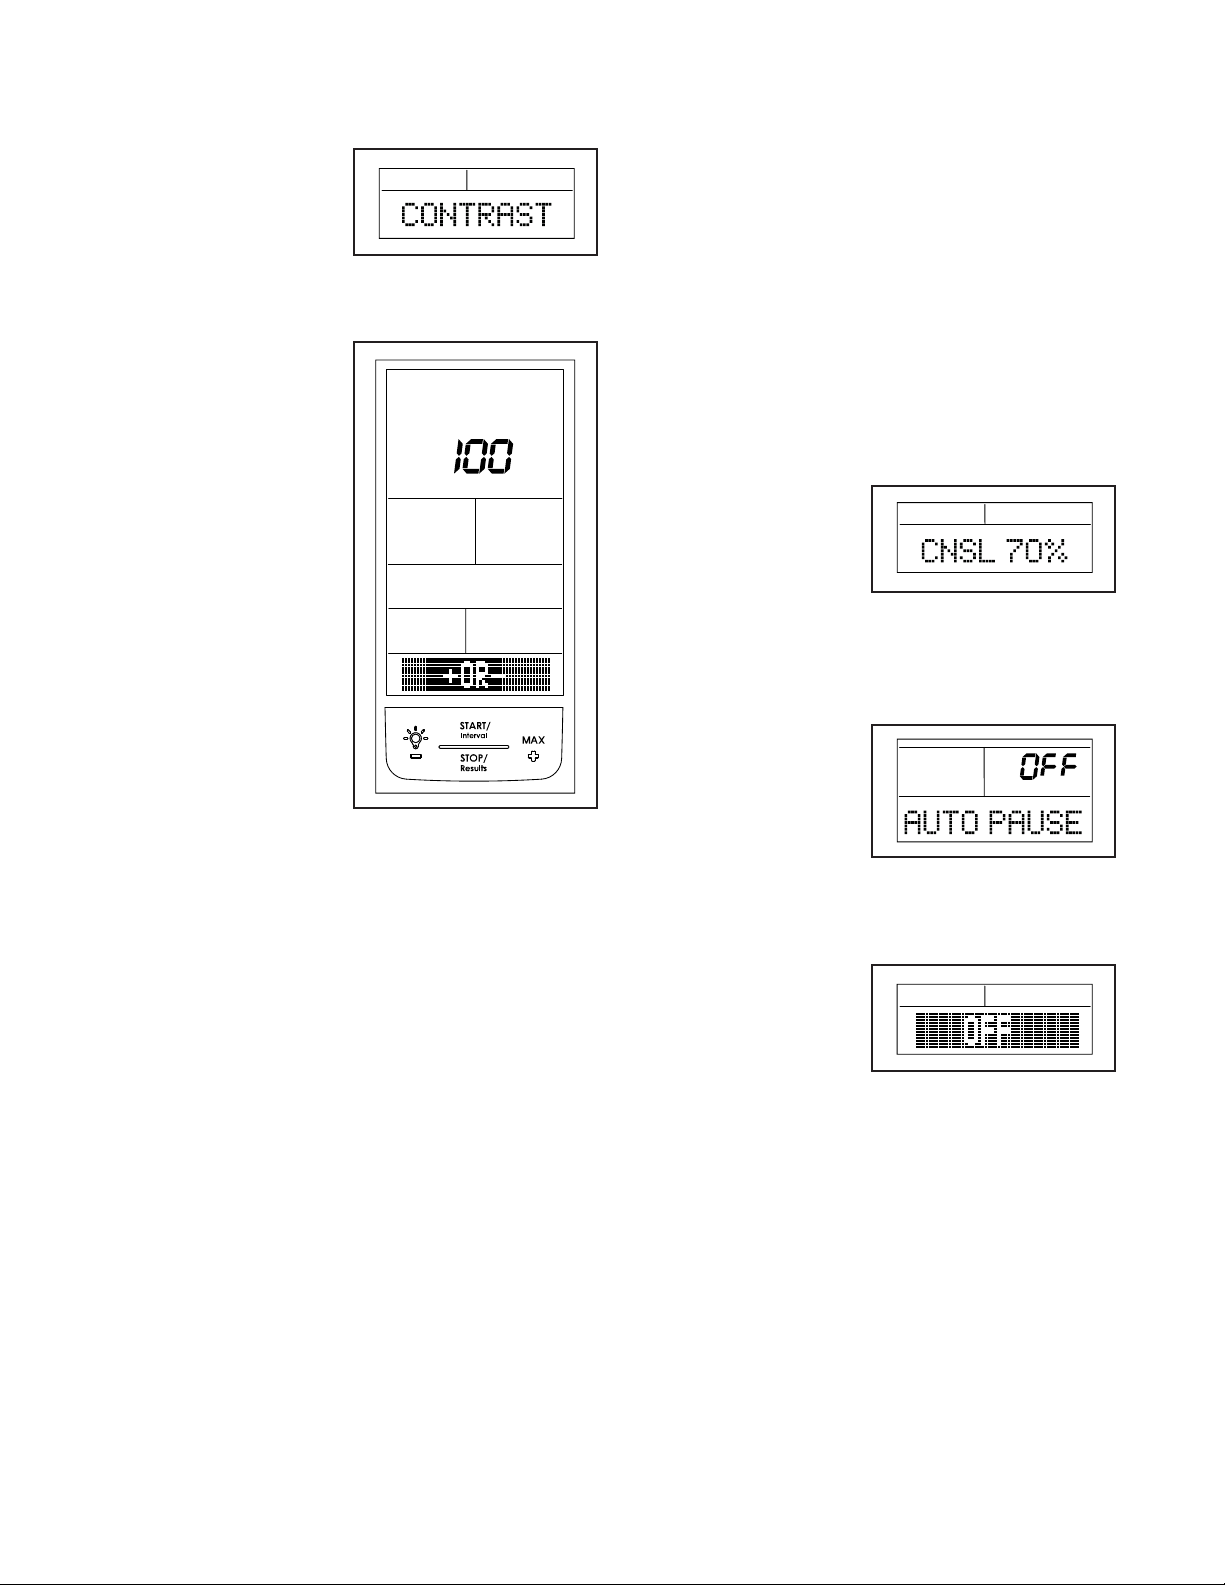
5. Select the CONTRAST menu option and change
the contrast level of the LCD display if desired.
You can adjust the
contrast level of the
LCD display from
0 to 100 percent.
Note: The default
contrast level is
100 percent.
HOW TO CHANGE SYSTEM SETTINGS
1. Activate the console and select the SYSTEM
menu option.
See HOW TO ACTIVATE THE CONSOLE on
page 10.
Then, see HOW TO USE THE SETTINGS MODE
on page 18.
The currently
selected contrast
level will be shown
in the display.
Tip: It is recom-
mended that you
adjust the console
to a high contrast
level in bright or
mixed lighting conditions. However,
adjusting the
console to a lower
contrast level can
improve battery life.
Press the MAX or
Backlight button to increase or
decrease the contrast level. Then, press the START/Interval button
to confirm your selection.
6. Exit the display menu.
The system menu will appear in the message
banner.
2. Select BTT LVL and check the battery power
level if desired.
The current battery
power level of the
console will appear
in the display.
3. Select the AUTO PAUSE menu option and
enable or disable the Auto Pause mode if
desired.
You can enable
(ON) or disable
(OFF) the Auto
Pause mode. See
HOW TO USE
THE AUTO PAUSE
MODE on page
14 for more information about the Auto Pause
mode.
See HOW TO USE THE SETTINGS MODE on
page 18.
The currently
selected option will
be displayed with a
dark background.
Tip: It is recommended that studio cycling class
instructors who manage their classes based on
time select the OFF option for the consoles on their
exercise bikes.
Select the desired ON or OFF option. Then, return
to the system menu.
20
Page 21

4. Select the USB menu option and enable or
disable the USB port if desired.
You can enable
(ON) or disable
(OFF) the USB port
on the console.
Note: The default
option is ON.
The currently
selected USB
option will be displayed with a dark
background.
The stats menu will
appear in the message banner. View
the desired console
usage information.
To save the
console usage
information to a
USB drive, select
the SAVE TO USB
option. The console
will then save the information in a .csv file format.
Return to the system menu.
When the OFF option is selected, the USB port
cannot be used to save ride data (see step 3 on
page 11) and cannot be used to save or import
custom console settings (see page 22).
Select the desired ON or OFF option. Then, return
to the system menu.
5. Select the STATS menu option and view
console usage information if desired.
The console
keeps track of
usage information
(STATS) that can
be viewed and
saved on a USB
drive. Note: The USB port must be enabled to save
console usage information on a USB drive (see
step 4 on this page).
6. Select the FIRMWARE menu option and
manage the console firmware if desired.
The firmware menu
will appear in the
message banner.
See HOW TO MANAGE CONSOLE FIRMWARE
on page 22.
7. Exit the system menu.
See HOW TO USE THE SETTINGS MODE on
page 18.
21
Page 22

HOW TO MANAGE CONSOLE FIRMWARE
How to Save Custom Console Settings
Firmware is the programming that allows the console
to function. Using the firmware menu, you can do the
following:
• View information about the console firmware
• Save and import custom console settings
• Restore console settings to the manufacturer’s
default settings
The firmware menu contains the following menu
options:
SWVER:X.X (console version number)—Select this
menu option to view the current firmware version number for the console.
HWVER:X.X (hardware version number)—Select
this menu option to view the current hardware version
number for the console.
SAVE CFG—Select this menu option to save your
custom console settings to a USB drive. Your custom
console settings can then be used on other consoles.
See HOW TO SAVE CUSTOM CONSOLE SETTINGS
at the right.
IMPORT CFG—Select this menu option to import
saved custom console settings from a USB drive
into the console. See HOW TO IMPORT CUSTOM
CONSOLE SETTINGS on page 23.
RESET TO DEFAULT—Select this menu option to
reset your custom console settings to the manufac-
turer’s default settings. See HOW TO RESTORE
DEFAULT SETTINGS on page 23.
The following custom console settings can be saved to
a USB drive:
• Unit of measurement
• Backlight duration
• Contrast level
• Auto pause setting
• USB port setting
The custom console settings will be saved in an
import.cfg file format.
1. Make sure that the USB port on the console is
enabled (see step 4 on page 21).
2. Insert your USB drive into the USB port on the
console.
3. Select the SAVE
CFG menu option
on the firmware
menu. The console
will begin saving
the custom console
settings to the USB drive.
4. If the custom console settings are saved successfully to the USB drive, the word DONE will appear
in the message banner.
5. If the custom console settings are not saved to
the USB drive, the word FAILED will appear in the
message banner. Go to TROUBLESHOOTING on
page 27.
22
Page 23
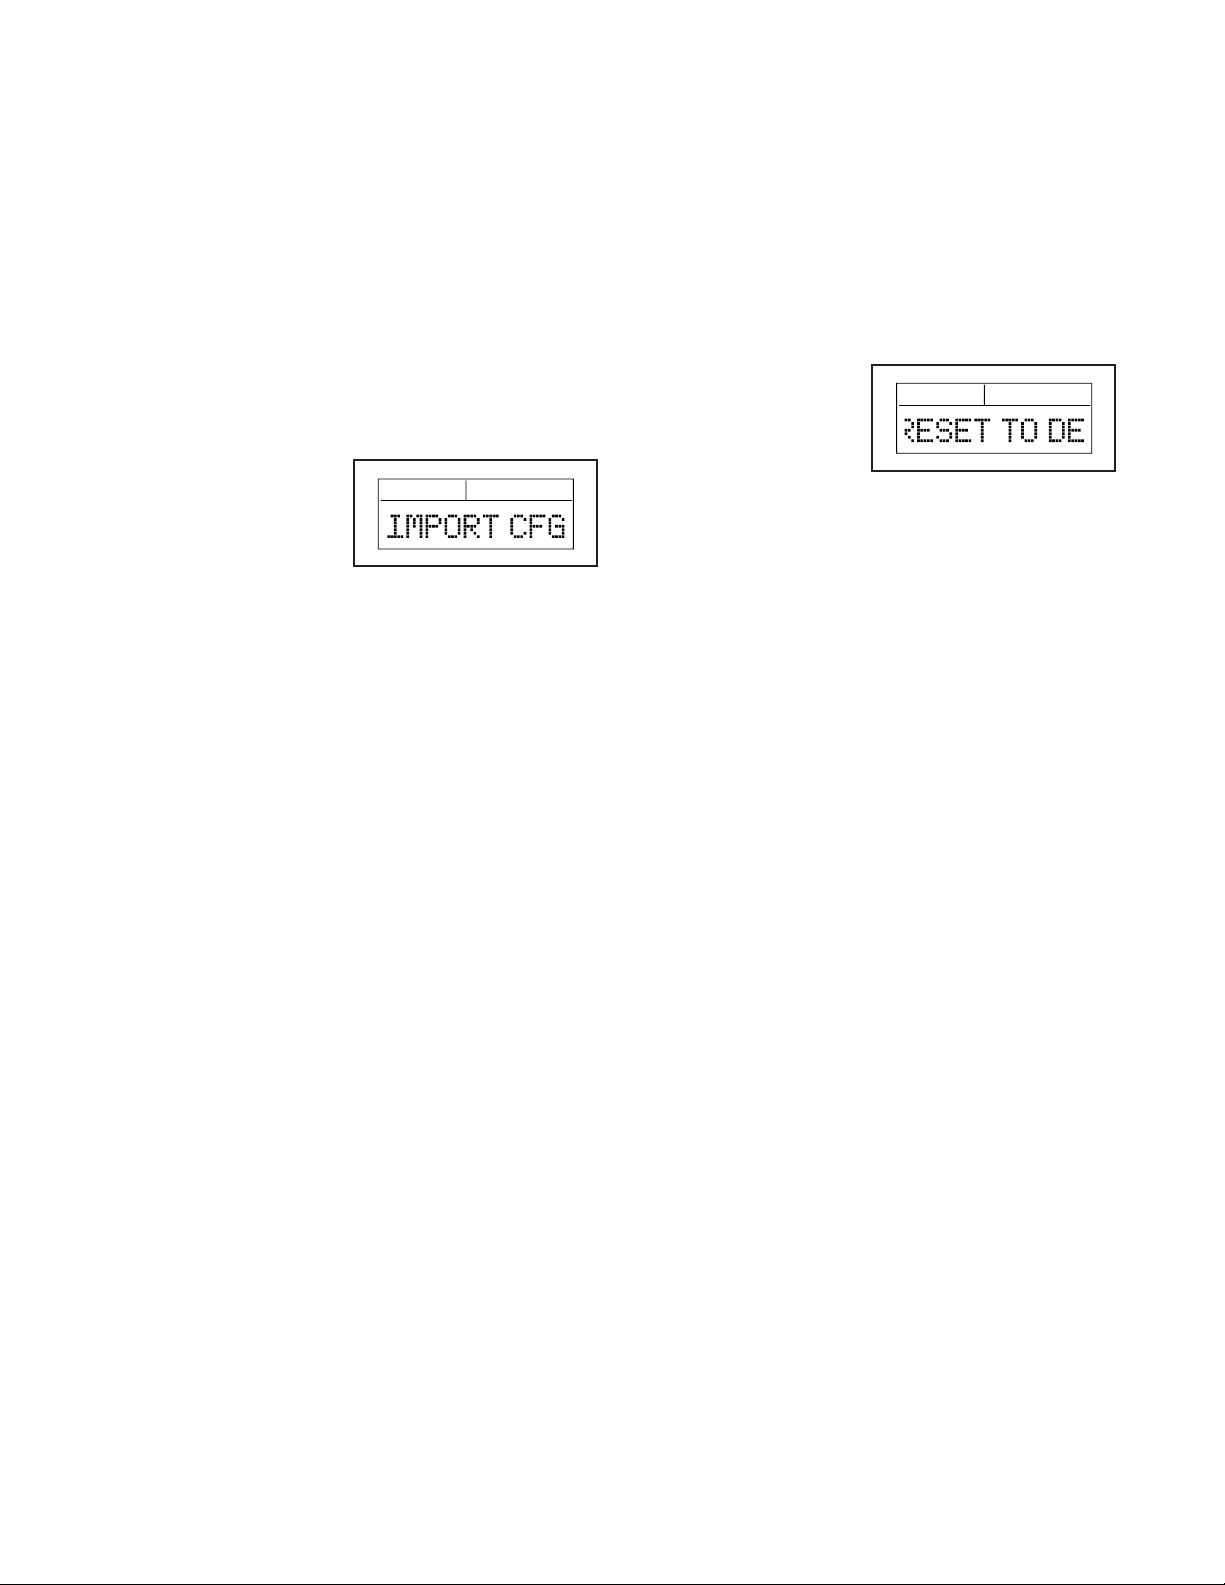
How to Import Custom Console Settings
How to Restore Default Settings
You can import saved custom console settings from a
USB drive to the console.
1. Make sure that the USB port on the console is
enabled (see step 4 on page 21).
2. Make sure that the desired custom console settings
file (import.cfg) is saved on your USB drive (see
HOW TO SAVE CUSTOM CONSOLE SETTINGS
page 22).
3. Insert your USB drive into the USB port on the
console.
4. Select the IMPORT
CFG menu option
on the firmware
menu. The console
will begin importing
the custom console
settings to the console.
5. If the custom console settings are imported
successfully to the console, the word DONE will
appear in the message banner.
You can restore the following console settings to the
manufacturer’s default settings. The default settings
are indicated in parentheses:
• Unit of measurement (ENGLISH)
• Backlight duration (5 SEC)
• Contrast level (100 %)
• Auto pause setting (ON)
• USB port setting (ON)
Select the RESET TO
DEFAULT menu option
on the firmware menu.
The word DONE will
appear in the message
banner to indicate that
the console is restored to the default settings.
6. If the custom console settings are not imported to
the console, the word FAILED will appear in the
message banner. Go to TROUBLESHOOTING on
page 27.
23
Page 24

HOW TO USE A BIKE NUMBER
Tip: It is strongly recommended that each exercise
bike in a fitness club be numbered for easy
identification.
The bike number
will appear in the
message banner.
To make sure that the correct console stays with the
correct exercise bike, you can assign an identification
number to the console that matches the identification
number of the exercise bike.
If there is a communication problem between the
console and the exercise bike, you can view the bike
number and make sure that the console is attached to
the correct exercise bike.
To assign the bike number, see HOW TO ASSIGN
THE BIKE NUMBER below. To view the bike number,
see HOW TO VIEW THE BIKE NUMBER at the right.
How to Assign the Bike Number
1. Activate the console and select the BIKE #
menu option.
See HOW TO ACTIVATE THE CONSOLE on
page 10.
Then, see HOW TO USE THE SETTINGS MODE
on page 18.
2. Assign a bike number to the console.
You can assign a bike number from 1 to 99.
Press the MAX and Backlight buttons to assign
the desired bike number. Then, press the START/
Interval button to confirm your selection.
3. Exit the bike number menu.
See HOW TO USE THE SETTINGS MODE on
page 18.
How to View the Bike Number
Press and hold the START/Interval and MAX buttons at
any time when the console is activated. The bike number assigned to the console will appear in the message
banner for as long as the buttons are held.
24
Page 25

HOW TO UPGRADE THE CONSOLE FIRMWARE
USB DETECT
USB DETECT
USB DETECT
IMPORTANT: Upgrading the console firmware
is an advanced procedure. Make sure to read
all instructions before upgrading the console
firmware.
1. The upgraded firmware file will be provided on a
USB drive in a .HEX file format. There should be
only one file on the USB drive. The file must be in
the top level of the drive directory. The file cannot
be within any other folder.
2. Activate the console and select the SYSTEM menu
option (see step 1 on page 20.)
3. Make sure that the USB port on the console is
enabled (see step 4 on page 21).
4. Select the firmware menu option (see step 6 on
page 21). Then, select the SWVER:X.X menu
option on the firmware menu (see page 22).
View and note the current console version number.
5. Insert the USB drive containing the upgraded
firmware file into the USB port on the console.
If the console does
not detect the USB
drive, the word
TIMEOUT will
appear in the message banner after
approximately 15 seconds. Remove and reinsert
the USB drive into the USB port on the console
and repeat this step.
8. During the firmware upgrade, the
word LOADING
will appear in the
message banner
for approximately
10 seconds.
If the firmware
upgrade is successful, the word
COMPLETE will
appear in the
message banner.
After this occurs, the console is using the upgraded
firmware.
6. Remove the screw from the battery cover, and then
remove the console from the battery cover.
7. Press and hold the START/Interval button. While
you are holding the START/Interval button, remove
one battery from the battery compartment. Then,
reinsert the battery into the battery compartment
and release the START/Interval button.
The words USB
DETECT will
appear in the
message banner.
If a firmware file
is detected on the
USB drive, the firmware upgrade will begin.
9. Reattach the console to the battery cover.
10. Select the firmware menu option (see step 6 on
page 21). Select the SWVER:X.X menu option
on the firmware menu (see page 22). View and
note the upgraded console version number.
11. Restore your custom console settings if desired
(see page 23). During the firmware upgrade,
the console settings may be reset to the manufac-
turer’s default settings.
USB DETECT
25
Page 26

MAINTENANCE
HOW TO CLEAN THE CONSOLE
To clean the console, use a soft, damp, non-abrasive
cloth. Do not use abrasives or solvents to clean the
console. IMPORTANT: To avoid damage to the con-
sole, keep liquids away from the console and keep
the console out of direct sunlight.
HOW TO REPLACE THE CONSOLE BATTERIES
When the batteries for the console need to be replaced
or recharged, a low battery warning will appear in the
display.
IMPORTANT: Replace or recharge the batteries as
soon as possible when the low battery warning
appears. If you do not replace or recharge the batteries, the console may shut down.
The console can use three C standard alkaline batteries. Standard alkaline batteries have an extended shelf
life (low discharge rate) and provide good battery life
when used.
The console can also use three C NiMH (nickel-metal
hydride) rechargeable batteries. These batteries have
longer battery life for each charge compared to standard alkaline batteries and can be charged up to five
hundred times. These rechargeable batteries are a
good option for high-use environments, such as fitness
clubs. Make sure to use low discharge rechargeable
batteries that have at least a 2500mAh capacity.
To replace the console batteries, remove the console
from the battery cover and insert the batteries into the
battery compartment. Make sure to orient the bat-
teries as shown by the diagram inside the battery
compartment. Then, reattach the console to the bat-
tery cover.
26
Page 27

TROUBLESHOOTING
Problem Possible Cause Solution
Console does not activate Console batteries dead or improperly
installed
Make sure fresh batteries are properly installed in console.
Console does not display data Console not connected to wire from
Console does not show heart rate
in display
Console does not display KCAL
value
Backlight does not turn on Backlight duration set to OFF Select SETTINGS mode, select DISPLAY, select BACKLIGHT, and set
Backlight stays on Backlight duration set to ON Select SETTINGS mode, select DISPLAY, select BACKLIGHT, and set
USB drive does not connect to
console
Cannot save or import settings USB port set to OFF Select SETTINGS mode, select SYSTEM, select USB, and set USB port
fitness equipment
Heart rate monitor not in contact with skin Wet contacts on heart rate monitor and make sure that heart rate monitor
Heart rate monitor does not work Make sure that heart rate monitor works. Test heart rate monitor on other
Console not receiving ANT+ signal If using ANT+ heart rate monitor, stand within 12 inches (30 centimeters)
Console not receiving Polar signal Make sure that Polar heart rate monitor is non-coded. Console is not
Console not receiving 5.3kHz signal Electromagnetic interference in area may be disrupting signal. Make sure
User not wearing heart rate monitor KCAL calculations require user to wear heart rate monitor.
USB port set to OFF Select SETTINGS mode, select SYSTEM, select USB, and set USB port
See assembly steps in user’s manual for fitness equipment and make
sure wire from fitness equipment is firmly connected to console.
is in contact with skin.
equipment. Make sure fresh batteries are properly installed in heart rate
monitor.
of console during WARM UP mode and allow console to link to heart rate
monitor.
compatible with coded Polar heart rate monitors.
that no other devices in area are causing interference.
backlight duration.
backlight duration.
to ON.
to ON.
Cannot upgrade firmware USB port set to OFF Select SETTINGS mode, select SYSTEM, select USB, and set USB port
Firmware file error Make sure that only one firmware upgrade file is on USB drive. File must
Time display runs when console
is paused
Auto Pause set to OFF Select SETTINGS mode, select SYSTEM, select AUTO PAUSE, and set
to ON.
be in top drive directory and cannot be in a folder.
Auto Pause to ON.
27
Page 28

HOW TO CONTACT CUSTOMER CARE
If you have questions after reading this manual, or if parts are damaged or missing, please contact Customer
Care at one of the phone numbers or addresses listed below. Please note the model number, serial number,
and name of the product (see the front cover of this manual) before contacting Customer Care.
In the United States
Call: 1-800-201-2109, Mon.–Fri. 6 a.m.–6 p.m. MT
Email: customercare@freemotionfitness.com
Write:
FreeMotion Fitness
1500 South 1000 West
Logan, UT 84321-9813
United States
LIMITED WARRANTY
WARRANTY PERIODS AND COVERAGE
FreeMotion Fitness warrants this product to be free from
defects in workmanship and material under normal use and
service conditions. Parts and labor are warranted for one (1)
year, unless otherwise specified on the invoice.
The warranty period commences on the invoice date of
purchase. Any parts repaired or replaced during this warranty
period will be warranted for the remainder of the original warranty period.
CONDITIONS AND LIMITATIONS
The following will void the warranty on this product:
1. This warranty applies only to the original owner and is
non-transferable.
2. The labor warranty applies only to products sold in the US
and Canada. Contact your authorized FreeMotion Fitness
dealer for details on labor coverage in your country.
3. Any misuse, abuse, or improper service.
4. Users in excess of the maximum user weight listed in this
manual.
5. Damage caused by moving the product or improper storage including moving or storing the product on its side.
6. Use or storage of the product outdoors or in high-humidity
environments including spa and pool areas.
7. Damage caused by improper wiring or insufficient electrical current. Note: This product may not have wiring.
This warranty shall not apply to the following:
1. Cosmetic items including grips, decals, and labels.
Outside the United States
Call: 001-800-527-5417 or 001-435-786-3521,
Mon.–Fri. 6 a.m.–3 p.m. USA Mountain Time
Email: intlcustomercare@freemotionfitness.com
2. Pick-up and delivery or freight charges involved with a
repair.
3. Any problem as a result of improper assembly or delivery.
WHAT TO DO IF SERVICE IS REQUIRED
FreeMotion Fitness warranty service may be obtained by
contacting the authorized dealer from which you purchased
this product. Make sure to retain your original invoice and
serial number information. If this product experiences a failure under the warranty terms set forth, FreeMotion Fitness
shall provide at their option either repair, replacement, or
refund of the purchase price. FreeMotion Fitness compensates service providers for warranty trips within their service
area. You may be charged additionally for service calls
beyond this service area.
FreeMotion Fitness is not responsible or liable for indirect,
special, or consequential damages arising out of or in connection with the use or performance of the product; damages
with respect to any economic loss, loss of property, loss
of revenues or profits, loss of enjoyment or use, or cost of
removal or installation; or other consequential damages.
Some regions do not allow the exclusion or limitation of consequential damages. Accordingly, the above limitation may
not apply to you. This warranty gives you specific rights, and
you may have other rights that vary from region to region.
TO CONTACT FREEMOTION FITNESS
See HOW TO CONTACT CUSTOMER CARE above.
Part No. 384479 R1116A © 2016 ICON Health & Fitness, Inc.
 Loading...