

Page 1

Model No. F202.1
Serial No.
Write the serial number in the space
above for reference.
Serial Number Decal
(on underside of
frame)
QUESTIONS?
If you have questions, or if
parts are damaged or missing,
please see HOW TO CONTACT
CUSTOMER CARE on the back
cover of this manual.
OWNER’S MANUAL
CAUTION
Read all precautions and
instructions in this manual
before using this equipment.
Keep this manual for future
reference.
freemotionfitness.com
Page 2
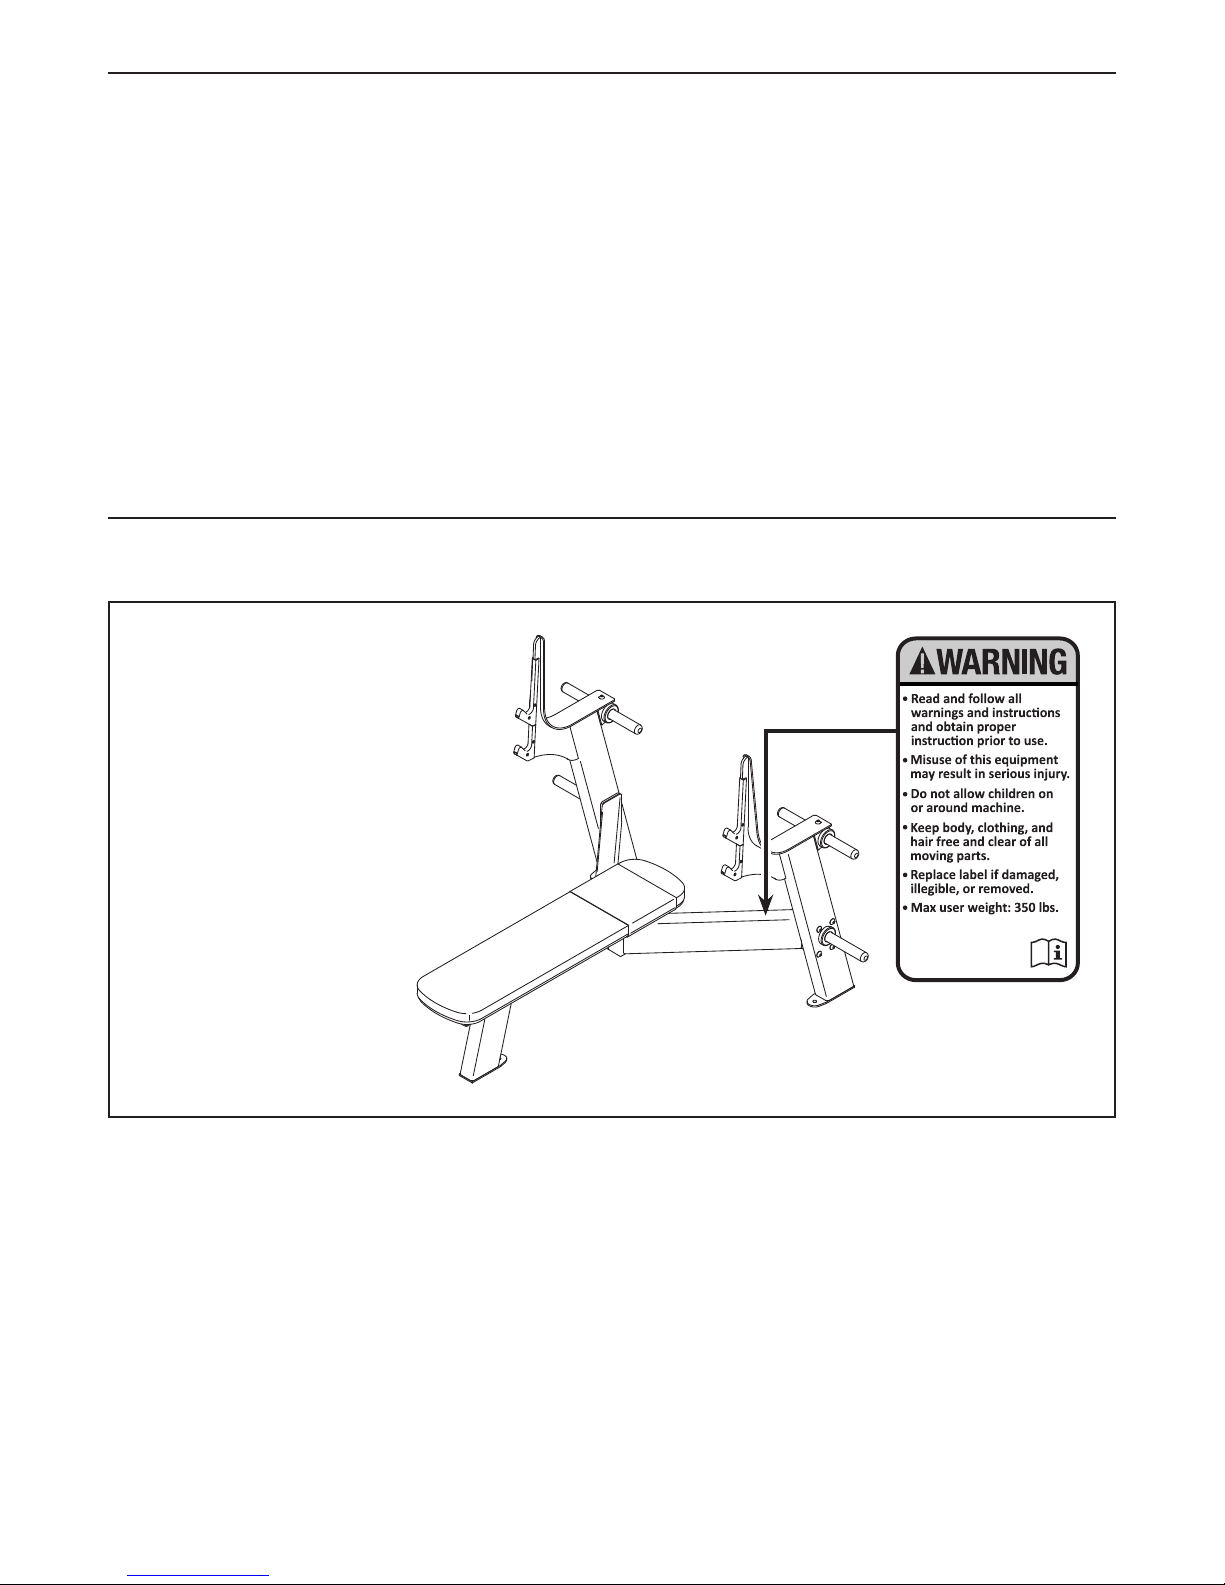
TABLE OF CONTENTS
WARNING DECAL PLACEMENT . . . . . . . . . . . . . . . . . . . . . . . . . . . . . . . . . . . . . . . . . . . . . . . . . . . . . . . . . . . . . . .2
IMPORTANT PRECAUTIONS ..................................................................3
BEFORE YOU BEGIN. . . . . . . . . . . . . . . . . . . . . . . . . . . . . . . . . . . . . . . . . . . . . . . . . . . . . . . . . . . . . . . . . . . . . . . .4
PART IDENTIFICATION CHART. . . . . . . . . . . . . . . . . . . . . . . . . . . . . . . . . . . . . . . . . . . . . . . . . . . . . . . . . . . . . . . .5
ASSEMBLY . . . . . . . . . . . . . . . . . . . . . . . . . . . . . . . . . . . . . . . . . . . . . . . . . . . . . . . . . . . . . . . . . . . . . . . . . . . . . . . .6
WEIGHT STORAGE .........................................................................9
MAINTENANCE AND TROUBLESHOOTING .....................................................10
PART LIST. . . . . . . . . . . . . . . . . . . . . . . . . . . . . . . . . . . . . . . . . . . . . . . . . . . . . . . . . . . . . . . . . . . . . . . . . . . . . . . . 11
EXPLODED DRAWING. . . . . . . . . . . . . . . . . . . . . . . . . . . . . . . . . . . . . . . . . . . . . . . . . . . . . . . . . . . . . . . . . . . . . . 11
HOW TO CONTACT CUSTOMER CARE . . . . . . . . . . . . . . . . . . . . . . . . . . . . . . . . . . . . . . . . . . . . . . . . Back Cover
LIMITED WARRANTY. . . . . . . . . . . . . . . . . . . . . . . . . . . . . . . . . . . . . . . . . . . . . . . . . . . . . . . . . . . . . . . Back Cover
WARNING DECAL PLACEMENT
This drawing shows the location(s)
of the warning decal(s). If a decal
is missing or illegible, see the
back cover of this manual and
request a free replacement decal.
Apply the decal in the location
shown. Note: The decal(s) may not
be shown at actual size.
FREEMOTION is a registered trademark of ICON Health & Fitness, Inc.
FORMULA 409 is a registered trademark of The Clorox Company.
SIMPLE GREEN is a registered trademark of Sunshine Makers, Inc.
2
Page 3

IMPORTANT PRECAUTIONS
WARNING: To reduce the risk of serious injury, read all important precautions and
instructions in this manual and all warnings on your strength equipment before using your strength
equipment. FreeMotion Fitness assumes no responsibility for personal injury or property damage
sustained by or through the use of this product.
1. Before beginning any exercise program,
consult your physician. This is especially
important for persons over age 35 or persons with pre-existing health problems.
2. Use the strength equipment only as
described in this manual.
3. Use the strength equipment only on a level
surface. Cover the floor beneath the strength
equipment to protect the floor.
4. It is the purchaser’s responsibility to
ensure that there is enough space around
the strength equipment for the intended
exercise.
5. Using the three 14 mm anchor holes to
provide maximum stability, the strength
equipment must be anchored to the floor
where required or whenever possible.
6. Make sure that all parts are properly
tightened before each use of the strength
equipment.
8. All users of the strength equipment should
be instructed to report any injury or strength
equipment irregularity to facility staff
immediately.
9. The strength equipment is designed to
support a maximum user weight of 350
pounds (159 kg); a maximum of 600 pounds
(272 kg) of weight, including a barbell; and
a maximum total weight of 950 pounds (431
kg). Note: The strength equipment does not
include weights or a barbell.
10. Keep children under age 13 and pets away
from the strength equipment at all times.
11. Always wear athletic shoes for foot protection while using the strength equipment.
12. Do not lean on or rest your hands on the
strength equipment when it is in use.
13. Always exercise with a partner. Your partner
should be ready to catch the barbell if you
cannot complete a repetition.
7. It is the responsibility of the owner to ensure
that all users of the strength equipment are
adequately informed of all precautions, have
read and understood all warning and caution
decals, and are informed of how to use the
strength equipment properly.
14. Over exercising may result in serious injury
or death. If you feel faint, if you become short
of breath, or if you experience pain while
exercising, stop immediately and cool down.
3
Page 4

BEFORE YOU BEGIN
Thank you for selecting the FREEMOTION® OLYMPIC
FLAT BENCH strength equipment. The OLYMPIC FLAT
BENCH is designed to help you develop the major
muscle groups of your upper body. Whether your goal
is to tone your body or build dramatic muscle size and
strength, the OLYMPIC FLAT BENCH will help you to
achieve the specific results you want.
For your benefit, read this manual carefully before
you use the strength equipment. If you have
Length: 5 ft. 2 in. (157 cm)
Width: 5 ft. 6 in. (168 cm)
Height: 4 ft. 3 in. (130 cm)
Weight: 262 lbs. (119 kg)
Rack
Short Storage Bar
questions after reading this manual, please see the
back cover of this manual. To help us assist you, note
the product model number and serial number before
contacting us. The model number and the location of
the serial number decal are shown on the front cover of
this manual.
Before reading further, please familiarize yourself with
the parts that are labeled in the drawing below.
Long Storage Bars
Anchor Hole
Seat
Anchor Holes
4
Page 5

PART IDENTIFICATION CHART
This chart is provided to help you identify the small parts used in assembly. The number in parentheses below
each part is the key number of the part from the PART LIST near the end of this manual. The number following
the parentheses is the quantity needed for assembly. IMPORTANT: If you cannot find a part in the hardware
kit, check to see if it has been preassembled.
M8 x 90mm Screw (15)–2
M12 Washer (16)–4
M12 x 20mm
Hex Screw (17)–4
M12 x 55mm Button
Screw (13)–2
M12 x 90mm Button Screw (14)–10
5
Page 6

ASSEMBLY
To make assembly easier, carefully read the
following information and instructions:
• Assembly requires two persons.
• Because of its weight and size, the strength
equipment should be assembled in the location
where it will be used. Make sure that there is
enough clearance to walk around the strength
equipment as you assemble it.
• Place all parts in a cleared area and remove the
packing materials. Do not dispose of the packing
materials until assembly is completed.
1. Attach the Left Frame (4) to the Center Frame
(3) with two M12 x 20mm Hex Screws (17) and
two M12 Washers (16).
Attach the Right Frame (5) in the same way.
• For help identifying small parts, use the PART
IDENTIFICATION CHART on page 5.
• Assembly requires the following tools (not
included):
an adjustable wrench
a set of metric hex keys
Assembly may be more convenient if you have
a socket set, a set of open-end or closed-end
wrenches, or a set of ratchet wrenches.
1
5
3
4
17
16
17
6
Page 7

2. Identify the Left Upright (1), which is marked with
an “L” sticker; do not confuse the Left Upright
with the Right Upright (2).
Attach the Left Upright (1) to the Left Frame (4)
with four M12 x 90mm Button Screws (14); do
not tighten the Button Screws yet.
Attach the Right Upright (2) to the Right
Frame (5) in the same way.
Make sure that the racks on the Left and
Right Uprights (1, 2) are aligned, and then
tighten the eight M12 x 90mm Button
Screws (14).
2
2
5
Rack
4
1
14
14
3. Attach a Short Storage Bar (6) to the Left Upright
(1) with an M12 x 90mm Button Screw (14).
Next, slide a Weight Bumper (12) onto the Short
Storage Bar (6).
Repeat this step on the other side of the
strength equipment.
3
1
14
6
12
7
Page 8
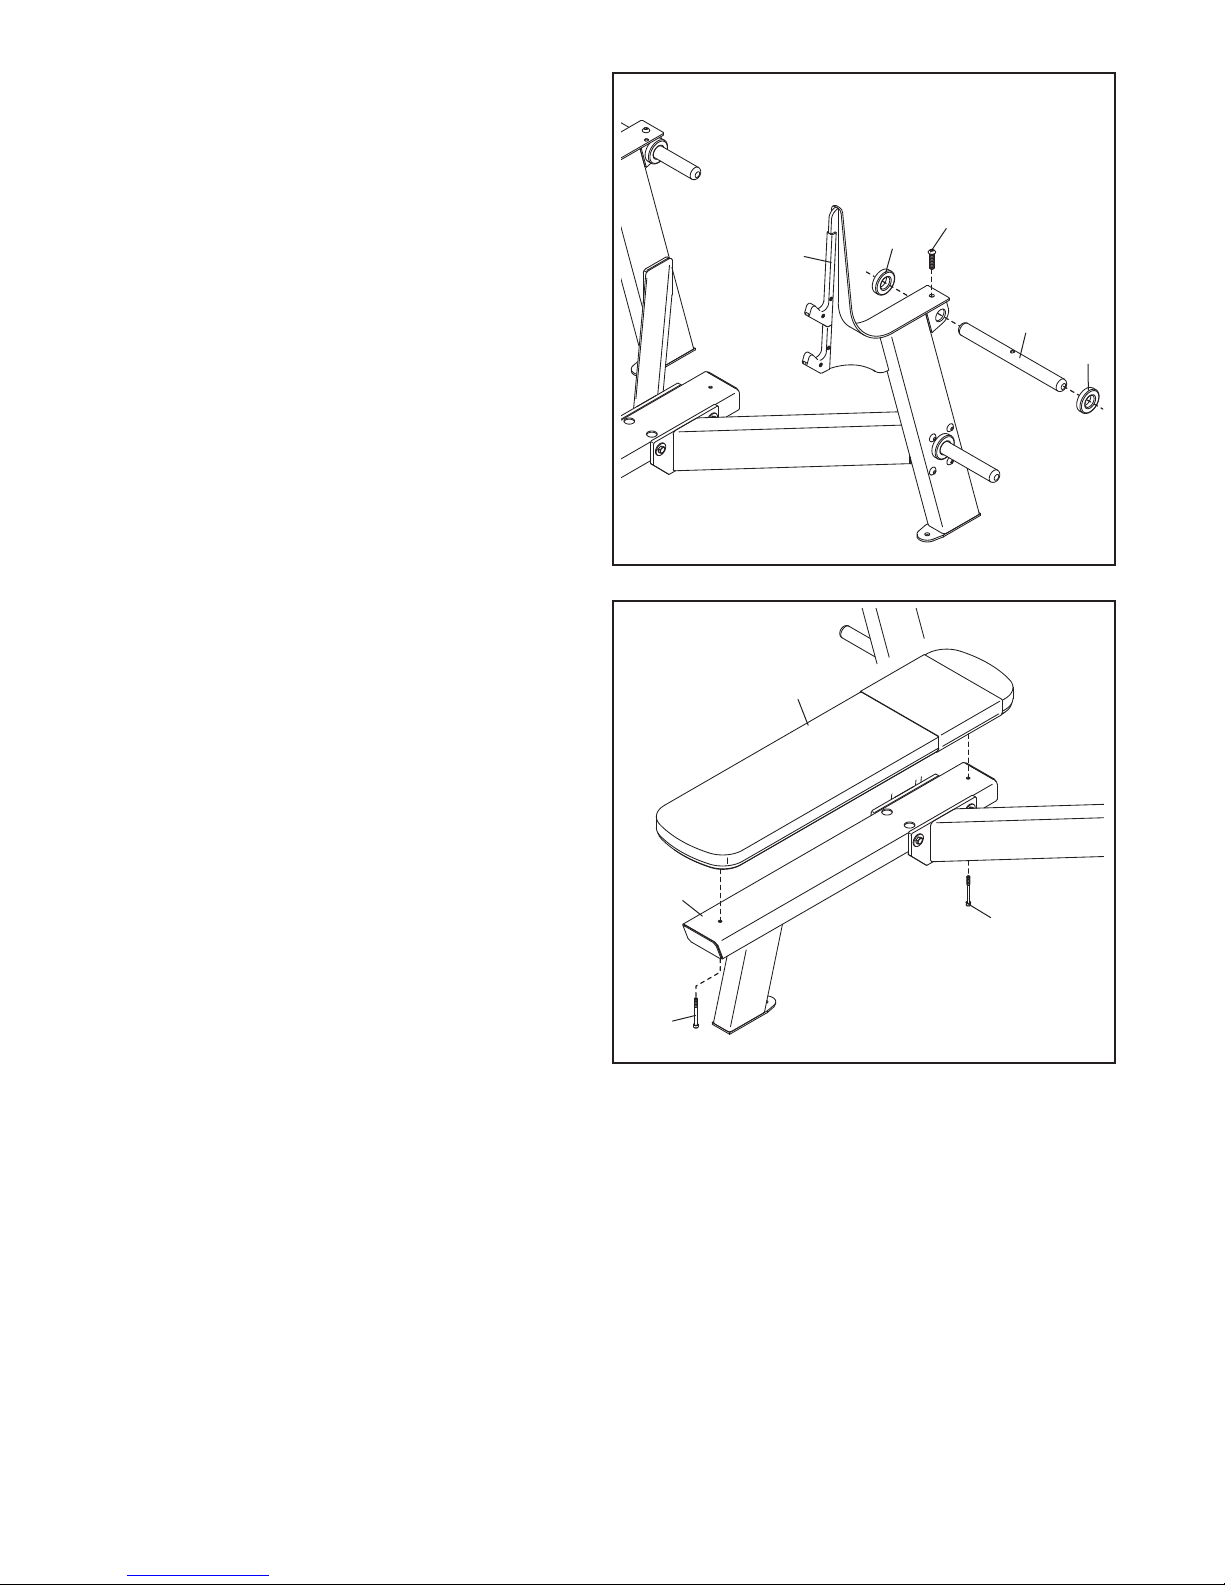
4. Attach a Long Storage Bar (7) to the Left Upright
(1) with an M12 x 55mm Button Screw (13).
Next, slide two Weight Bumpers (12) onto the
Long Storage Bar (7).
4
Repeat this step on the other side of the
strength equipment.
5. Attach the Seat (10) to the Center Frame (3) with
two M8 x 90mm Screws (15); to avoid damag-
ing the Seat, tighten the Screws only until the
Seat does not move or feel loose.
13
12
1
7
12
5
10
3
15
15
6. Make sure that all parts of the strength equipment are properly tightened. To protect the floor or carpet
from damage, place a mat under the strength equipment.
8
Page 9

WEIGHT STORAGE
This section explains how to store weights (not included) on the strength equipment. Make sure that all parts are
properly tightened each time the strength equipment is used; replace any worn parts immediately.
STORING WEIGHTS
Unused weights can be stored on the storage bars
on the strength equipment. Place lighter weights on
the long (upper) storage bars; place heavier weights
on the short (bottom) storage bars.
WARNING: Each long storage
bar can hold up to 225 lbs. (102 kg). Each
short storage bar can hold up to 150 lbs.
(68 kg). Do not place a total of more than
600 lbs. (272 kg), including a barbell (not
included), on the racks and the storage
bars. Always place the same amount of
weight on both sides of your barbell.
Rack
Short
Storage
Bar
Long
Storage
Bar
Long
Storage
Bar
Rack
Short
Storage
Bar
9
Page 10

MAINTENANCE AND TROUBLESHOOTING
For optimal performance of the strength equipment and to reduce the chances of injury to users, you must perform preventive maintenance on a regular basis. Instruct all personnel to perform the procedures described in
this section. Personnel must also record and report any accident. To maintain the strength equipment’s warranty,
use only FREEMOTION parts for repair or replacement. If there are any questions or concerns, see HOW TO
CONTACT CUSTOMER CARE on the back cover of this manual.
DAILY MAINTENANCE
Upholstery and Frame—General Cleaning
1. Clean the strength equipment using a soft cloth
dampened with a light solution of mild soap and
warm water. If necessary, use a soft bristle brush
with the cleaning solution.
2. Rinse the area thoroughly using a soft cloth dampened with clean water. Dry thoroughly.
Upholstery—Difficult Stains
1. Spray the stain with a non-abrasive household
cleaner such as FORMULA 409® cleaner, SIMPLE
GREEN®, or a similar product. Rub the stained
area gently and let the cleaning solution sit for a
few minutes.
2. Rinse the area thoroughly using a soft cloth dampened with clean water. Dry thoroughly.
3. Repeat these steps, if necessary, using a soft-bristle brush.
Optional Method for Difficult Stains
1. Rub the stained area gently using a soft cloth
dampened with rubbing alcohol.
2. Rinse the area thoroughly using a soft cloth dampened with clean water. Dry thoroughly.
CAUTION: When using any cleaning product, try it
first in an unnoticeable place to ensure that there is
no damage to the material. Follow the directions and
the safety precautions of the manufacturer of each
cleaning product used. FreeMotion Fitness and its
vendors cannot be held liable for damage or injuries
resulting from the use or misuse of cleaning products.
IMPORTANT: Do not use abrasive cleaners, which
may scratch the strength equipment. Strong cleaners and abrasives will damage decals; use caution
around decals. Do not use solvents such as lacquer thinner, kerosene, gasoline, or similar liquids.
WEEKLY MAINTENANCE
Hardware
Check all nuts and bolts, and tighten them if necessary. IMPORTANT: All FREEMOTION cushions
have dense plywood supports with tee-nuts that
are used to bolt the cushions to the strength
equipment. Because the tee-nuts are held by the
plywood, they will not withstand the torque that
standard nuts and bolts will. When tightening the
bolts securing a cushion, turn them only until they
are snug and the cushion does not move or feel
loose. Overtightening may strip the tee-nuts from
the plywood and make it impossible to remove the
cushion in the future.
10
Page 11

PART LIST
Key No. Qty. Description Key No. Qty. Description
Model No. F202.1 R0216A
1 1 Left Upright
2 1 Right Upright
3 1 Center Frame
4 1 Left Frame
5 1 Right Frame
6 2 Short Storage Bar
7 2 Long Storage Bar
8 2 Upper Rack Cover
9 2 Lower Rack Cover
10 1 Seat
Note: Specifications are subject to change without notice. For information about ordering replacement parts, see
the back cover of this manual. *These parts are not illustrated.
EXPLODED DRAWING
18
18
18
12
8
18
9
18
6
13
12
7
11 1 Seat Wear Cover
12 6 Weight Bumper
13 2 M12 x 55mm Button Screw
14 10 M12 x 90mm Button Screw
15 2 M8 x 90mm Screw
16 4 M12 Washer
17 4 M12 x 20mm Hex Screw
18 20 M5 x 12mm Screw
* – Owner’s Manual
Model No. F202.1 R0216A
12
7
13
14
11
17
16
15
2
17
14
12
5
10
18
18
18
3
18
8
9
18
18
15
12
1
14
14
14
6
12
4
17
16
17
11
Page 12

HOW TO CONTACT CUSTOMER CARE
If you have questions after reading this manual, or if parts are damaged or missing, please contact Customer
Care at one of the phone numbers or addresses listed below. Please note the model number, serial number,
and name of the product (see the front cover of this manual) before contacting Customer Care. If you are
ordering replacement parts, please also note the key number and description of each part (see the PART
LIST and the EXPLODED DRAWING near the end of this manual).
In the United States
Call: 1-800-201-2109, Mon.–Fri. 6 a.m.–6 p.m. MT
Email: customercare@freemotionfitness.com
Write:
FreeMotion Fitness
1500 South 1000 West
Logan, UT 84321-9813
United States
LIMITED WARRANTY
WARRANTY PERIODS AND COVERAGE
FreeMotion Fitness warrants this product to be free from
defects in workmanship and material under normal use and
service conditions. Parts and labor are warranted for one (1)
year, unless otherwise specified on the invoice.
The warranty period commences on the invoice date of
purchase. Any parts repaired or replaced during this warranty
period will be warranted for the remainder of the original
warranty period.
CONDITIONS AND LIMITATIONS
The following will void the warranty on this product:
1. This warranty applies only to the original owner and is
non-transferable.
2. The labor warranty applies only to products sold in the US
and Canada. Contact your authorized FreeMotion Fitness
dealer for details on labor coverage in your country.
3. Any misuse, abuse, or improper service.
4. Users in excess of the maximum user weight listed in this
manual. Note: This product may not have a maximum user
weight.
5. Damage caused by moving the product or improper storage including moving or storing the product on its side.
6. Use or storage of the product outdoors or in high-humidity
environments including spa and pool areas.
7. Damage caused by improper wiring or insufficient electrical current. Note: This product may not have wiring.
This warranty shall not apply to the following:
1. Cosmetic items including grips, decals, and labels.
Outside the United States
Call: 001-800-527-5417 or 001-435-786-3521,
Mon.–Fri. 6 a.m.–3 p.m. USA Mountain Time
Email: intlcustomercare@freemotionfitness.com
2. Pick-up and delivery or freight charges involved with a
repair.
3. Any problem as a result of improper assembly or delivery.
WHAT TO DO IF SERVICE IS REQUIRED
FreeMotion Fitness warranty service may be obtained by
contacting the authorized dealer from which you purchased
this product. Make sure to retain your original invoice and
serial number information. If this product experiences a failure under the warranty terms set forth, FreeMotion Fitness
shall provide at their option either repair, replacement, or
refund of the purchase price. FreeMotion Fitness compensates service providers for warranty trips within their service
area. You may be charged additionally for service calls
beyond this service area.
FreeMotion Fitness is not responsible or liable for indirect, special, or consequential damages arising out of or
in connection with the use or performance of the product;
damages with respect to any economic loss, loss of property,
loss of revenues or profits, loss of enjoyment or use, or cost
of removal or installation; or other consequential damages.
Some regions do not allow the exclusion or limitation of consequential damages. Accordingly, the above limitation may
not apply to you. This warranty gives you specific rights, and
you may have other rights that vary from region to region.
TO CONTACT FREEMOTION FITNESS
See HOW TO CONTACT CUSTOMER CARE above.
Part No. 309679 R0216A Printed in China © 2011 ICON Health & Fitness, Inc.
 Loading...