

MODEL: PFS16
16 GA FENCING
16 GA FENCING
16 GA FENCING
STAPLER
STAPLER
STAPLER
HTTP://WWW.FREEMANTOOLS.COM
1-888-669-5672
PRIME GLOBAL PRODUCTS, INC.
HTTP://WWW.FREEMANTOOLS.COM
1-888-669-5672
PRIME GLOBAL PRODUCTS, INC.
WARNING:
Failure to follow warnings could result in DEATH OR SERIOUS INJURY.
SAVE THIS MANUAL FOR FUTURE REFERENCE
IMFPFS16-V1 04/18
MODEL: PFS16
MODEL: PFS16
GENERALSAFETYRULES
UNPACKING
FEATURES
P3
P6
P6
OPERATION
ADJUSTING THE EXHAUST
LOADING FASTENERS
UNLOADING FASTENERS
CLEARING JAMS
SETTING THE AIR PRESSURE
DEPTH ADJUSTMENT
FIRING THE TOOL
MAINTENANCE
RECOMMENDED HOOKUP
TROUBLESHOOTING
WEARABLE PARTS
WARRANTIES
P7
P7
P7
P8
P8
P8
P9
P9
P10
P11
P11
P12
WARNING:
The warnings and precautions discussed in this manual cannot cover all possible conditions
and situations that may occur. Please be aware of the potential hazards, and take all
necessary precautions to avoid risk of injuries.
SAVE THIS MANUAL
●
Keep this manual for the safety
war n i n g, p recaut i ons, o perati o ns,
i ns pe c t i o n s a n d m a i n t e na nc e
in formation. Ke ep this ma nua l an d
the receipt in a safe and dry place for
future reference.
!
WARNING:
To avoid serious personal injury,
do n ot atte mpt to use this product
u n t il y o u r e a d t h e m a n u a l
thorou g h l y and u n d e rsta n d i t
completely. Save this manual and
review frequently for continuing
saf e opera tion a nd inst ructi ng
others who may use this tool.
SYMBOLS
●
The following signal words and meanings are intended to explain the levels of risk
associated with this tool, and can be found in the manual, packaging, labeling, and
all other information provided with this tool:
SYMBOLS SIGNAL MEANING
!
!
WARNING:
CAUTION:
CAUTION:
GENERAL SAFETY RULES
SIN S T RUCTIO N S P ERTAIN I N G T O A
RISK OF FIRE, ELECTRIC SHOCK, OR
INJURY TO PERSONS.
!
WARNING:
When using tools, basic precautions
s h o u l d a l w a y s b e f o l l o w e d ,
including the following:
CALIFORNIA PROPOSITION 65
!
WARNING:
This product can expose you to
chemicals including lead, which is
known to the State of California to
cause cancer and birth defects or
other reproductive harm. For more
information, go to
www.P65Warnings.ca.gov.
WORK AREA
Keep the work area clean and wel l
●
lit. Cluttered benches and dark areas
increase the risks of accidents.
Do not operate the tool in explo sive
●
a t m o s ph e r e s , s uc h a s i n t h e
presence of flammable l i q u i d s ,
gases, or dust. The tool creates a
spark which m ay ignit e f lammable
liquids, gases or dust.
Keep byst a n d e rs, childre n , a n d
●
others away while operati ng t he
tool . Distr a ction s could resu l t in
improper use and cause injury.
A v o i d u n in t e n ti o n a l m i sf i r e s .
●
A l w a y s u s e c a u t i o n t o a v o i d
accidentally firing. Do not point at
yourself or anyone else regardless if
it contains fasteners or not.
Indicates a potentially hazardous situation,which, if
not avoided, could result in death or serious injury.
Indicates a potentially hazardous situation, which, if
not avoided, may result in minor or moderate injury.
(Without symbol) Indicates a situation that may result
in property damage.
PERSONAL SAFETY
Do not nail on top of another nail. This nail
can cause the nail to be deflected and hit
someone, or cause the tool to react and
result in a risk of injury to persons.
Remove finger from the trigger when not
driving fasteners. Never carry the tool with
finger on trigger, the tool is able to fire a
fastener.
Always wear eye protection. Operator and
others in the work area should always wear
ANSI-approved safety goggles with side
shields. Eye protection is used to guard
against flying fasteners and debris, which
may cause severe eye injury.
Always wear hearing protection when
using the tool. Prolonged exposure to high
intensity noise may cause hearing loss.
Use safety equipment. A dust mask, nonskid safety shoes and a hard hat must be
used for the applicable conditions. Wear a
full face shield if you are producing metal
filings or wood chips.
Dress properly. Do not wear loose clothing
or jewelry. Contain long hair. Keep your long
hair, clothing, and gloves away from moving
parts. Loose clothes, jewelry, or long hair
can be caught in moving parts.
Stay alert, watch what you are doing and
use common sense when operating a
power tool. Do not use tool while tired or
under the influence of drugs, alcohol, or
medication. A moment of inattention while
operating the tool may cause serious injury.
Avoid unintentional firing. Keep fingers
away from trigger when not driving
fasteners, especially when connecting the
tool to the air supply.
Keep proper footing and balance at all
times. Proper footing and balance enables
better control of the tool in unexpected
situations.
02
HTTP://WWW.FREEMANTOOLS.COM 1-888-669-5672
HTTP://WWW.FREEMANTOOLS.COM 1-888-669-5672
03
MODEL: PFS16 MODEL: PFS16
Do not use on a ladder or unstable
supports. Stable footing on a solid surface
enables better control of the tool in
unexpected situations.
Make sure the hose is f ree o f
obstructions or snags. Entangled or
snarled hoses can cause loss of balance or
footing and may become damaged,
resulting in possible injury.
Do not overreach. Keep proper footing and
balance at all times. Proper footing and
balance enables better control of the tool in
unexpected situations.
Do not attach the hose or tool to your
body.
Attach the hose to the structure to
reduce the risk of loss of balance if the
hose shifts.
Always assume that the tool contains
fasteners. Do not point the tool toward
yourself or anyone whether it contains
fasteners or not.
Wash hands after handling. This product
or its power cord may contain chemicals
known to the State of California to cause
ca nce r and birt h d efects or oth er
reproductive harm.
TOOL USE AND CARE
Know this tool. Read manual carefully,
●
learn its applications and limitations, as
well as the specific potential hazards
related to this tool.
O n l y u s e f a s t e n er s t h a t a r e
●
recommended for your models. Do not
use the wrong fasteners or load the
fasteners incorrectly.
Check for misalignment or binding of
●
moving parts, breakage of parts, and any
other condition that may affect the tool’s
operation. If damaged, have the tool
serviced before using. Many accidents are
caused by poorly maintained tools.
Maintain tools with care. Keep tool clean.
●
A properly maintained tool reduces the risk
of binding and is easier to control.
Store tools out of the reach of children
●
and other untrained people. Tools are
dangerous in the hands of untrained users.
●
Check operation of the tool before use.
Do not use the tool if the workpiece contact
mechanism is not working correctly as
accidental driving of a fastener may occur.
Do not use tool if trigger does not actuate
●
properly. Any tool that cannot be controlled
with the trigger is dangerous and must be
repaired.
Do not force tool. Use the correct tool for
●
your application. The correct tool will do the
job better and safer at the rate for which it
is designed.
Use clamps or another practical way to
●
secure and support the workpiece to a
stable platform. Holding a tool by hand or
against the body is unstable and may lead
to loss of control.
Keep the tool and its handle dry, clean
●
and free from oil and grease. Always use a
clean cloth when cleaning. Never use brake
fluids, gasoline, petroleum-based products,
or any strong solvents to clean your tool.
Do not use the tool as a hammer.
●
●
Never use this tool in a manner that could
cause a fastener to be directed toward
anything other than the workpiece.
●
Never use gasoline or other flammable
liquids to clean the tool. Never use the
tool in the presence of flammable liquids or
gases. Vapors could ignite by a spark and
cause an explosion which will result in
death or serious personal injury.
Do not remove, tamper with, or otherwise
●
cause the trigger lock or trigger to
become inoperable. Do not operate any
tool which has been modified in a like
fashion. Death or serious personal injury
could result.
Do not touch the trigger unless driving
●
fasteners. Never attach air line to tool or
carry tool while touching the trigger. The
tool could eject a fastener which will result
in death or serious personal injury. Also
actuate the trigger lock to the safe position
when not in use.
Always fit tool with a fitting or hose the
●
coupling on or near the tool that in a way
all compressed air in the the remaining
tool is discharged at the time the fitting
or hose coupling is disconnected. Do not
use a check valve or any other fitting which
allows air to remain in the tool. Death or
serious personal injury could occur.
Never place hands or any other body
●
parts in the fastener discharge area of
the tool. The tool might eject a fastener
and could result in death or serious
personal injury.
Never carry the tool by the air hose or
●
pull the hose to move the tool or a
compressor. Keep hoses away from heat,
oil and sharp edges. Replace any hose that
is weak, worn, or otherwise damaged.
Personal injury or tool damage could occur.
Always assume the tool contains
●
fasteners. Respect the tool as a working
implement; no horseplay.
Always keep others at a safe distance
●
from the work area in case of accidental
discharge of fasteners. Do not point the
tool toward yourself or anyone whether it
contains fasteners or not. Accidental
triggering of the tool could result in death or
serious personal injury.
Do not drop or throw the tool. Dropping or
●
throwing the tool can result in damage that
will make the tool unusable or unsafe. If the
tool has been dropped or thrown, examine
the tool closely for an air leak or bent,
cracked or broken parts. STOP and repair
before using, or serious injury could occur.
Avoid using the tool when the magazine
●
is empty. Accelerated wear on the tool may
occur.
Clean and check all air supply hoses and
●
fittings before connecting the tool to an
air supply. Replace any damaged or worn
hoses or fittings. Tool performance or
durability may be reduced.
Do not use the tool if it leaks air or does
●
not function properly.
Do not operate the tool if it does not
●
contain a legible warning label.
Always carry the tool by the handle. Never
●
carry the tool by the air hose.
TOOL SERVICE
Only use accessories that are identified
●
by the manufacturer for the specific tool
model.
Use of unauthorized parts or failure to
●
follow maintenance instructions may
create a risk of injury.
Only use the lubricants supplied with the
●
tool or specified by the manufacturer.
Tool service must be performed only by
●
qualified repair personnel.
OPERATION
Do not drive fasteners near edge of the
●
workpiece. The workpiece may split
causing the fastener or ricochet, potentially
injuring you or people around.
Do not carry the tool from place to place
●
holding the trigger. Accidental discharge
could result. Choice of triggering method is
important. Check manual for triggering
options.
During normal use the tool will recoil
●
immediately after driving a fastener. This
is a
normal function of the tool. Do not attempt
to prevent the recoil by holding the tool
against the workpiece. Restriction to the
recoil can result in a second fastener being
driven from the tool. Grip the handle firmly
and let the tool do the work. Failure to heed
this warning can result in serious personal
injury.
Do not drive fasteners on top of other
●
fasteners or with the tool at an overly
steep angl may cause deflection of e. This
fasteners which could cause injury.
Do not actuate the tool unless you intend
●
to drive a fastener into the workpiece.
Always handle the tool with care:
●
Respect the tool as a working implement.
◆
Never engage in horseplay.
◆
Never pull the trigger unless nose
◆
isdirected toward the workpiece.
Keep others a safe distance from the tool
◆
while tool is in operation as accidental
actuation may occur,possibly causing
injury.
AIR SUPPLY AND CONNECTIONS
The connector on the tool must not hold
●
p r es s u r e w he n a i r s u p p l y i s
disconnected. If an incorrect fitting is used,
the tool can remain charged with air after
disconnecting and thus will be able to drive
a fastener even after the air line is
disconnected, possibly causing injury.
Do not use any type of reactive gases,
●
including, but not limited to, oxygen and
combustible gases, as a power source.
Use filtered, lubricated, and regulated
compressed air only. Use of a reactive gas
instead of compressed air may cause the
tool to explode which will cause death or
serious personal injury.
On l y us e a pres s u r e - r e g u l a t e d
●
compressed air source to limit the air
pressure supplied to the tool. The
regulated pressure must not exceed 100
psi. If the regulator fails, the pressure
delivered to the tool must not exceed 200
psi. The tool could explode which will cause
death or serious personal injury.
Always disconnect the air source:
●
Before unloading or making adjustments.
When maintaining the tool.
When clearing a jam.
When touching the safety yoke.
When tool is not in use.
When moving to a different work area.
HTTP://WWW.FREEMANTOOLS.COM 1-888-669-5672 HTTP://WWW.FREEMANTOOLS.COM 1-888-669-5672
0504
MODEL: PFS16 MODEL: PFS16
Such precautionary measures reduce the risk
of injury to persons.
LOADINGTOOL
Do not load the tool with fasteners when
●
any one of the operating controls is
activated.
Never place a hand or any part of body in
●
fastener discharge area of tool.
Never point the tool at anyone.
●
Do not pull the trigger or depress the
●
wo rkp iece contac t as accidental
actuation may occur, possibly causing
injury.
!
WARNING:
Th e warnin gs and pre cautions
discussed above cannot cover all
possible conditions and situations that
may occur. It must be understood by
the user that common sense and
caution are factors which cannot be
built into this product, but must be
supplied by the user.
UNPACKING
This tool has been shipped completely
●
assembled.
Carefully remove the tool and any
●
accessories from the box.
Inspect the tool carefully to make sure no
●
breakage or damage occurred during
shipping.
Do not discard the packing material until
●
you have carefully inspected and
satisfactorily operated the tool.
If any parts are damaged or missing,
●
please call 1-888-669-5672.
!
WARNING:
If any parts are missing do not operate
this tool until the missing parts are
replaced. Failure to do so could result
in possible serious personal injury.
!
WARNING:
Do not attempt to modify this tool or
create accessories not recommended
for use with this tool. Any such
alteration or modification is misuse
an d cou ld resu lt i n haz ard ous
condition leading to possible serious
personal injury.
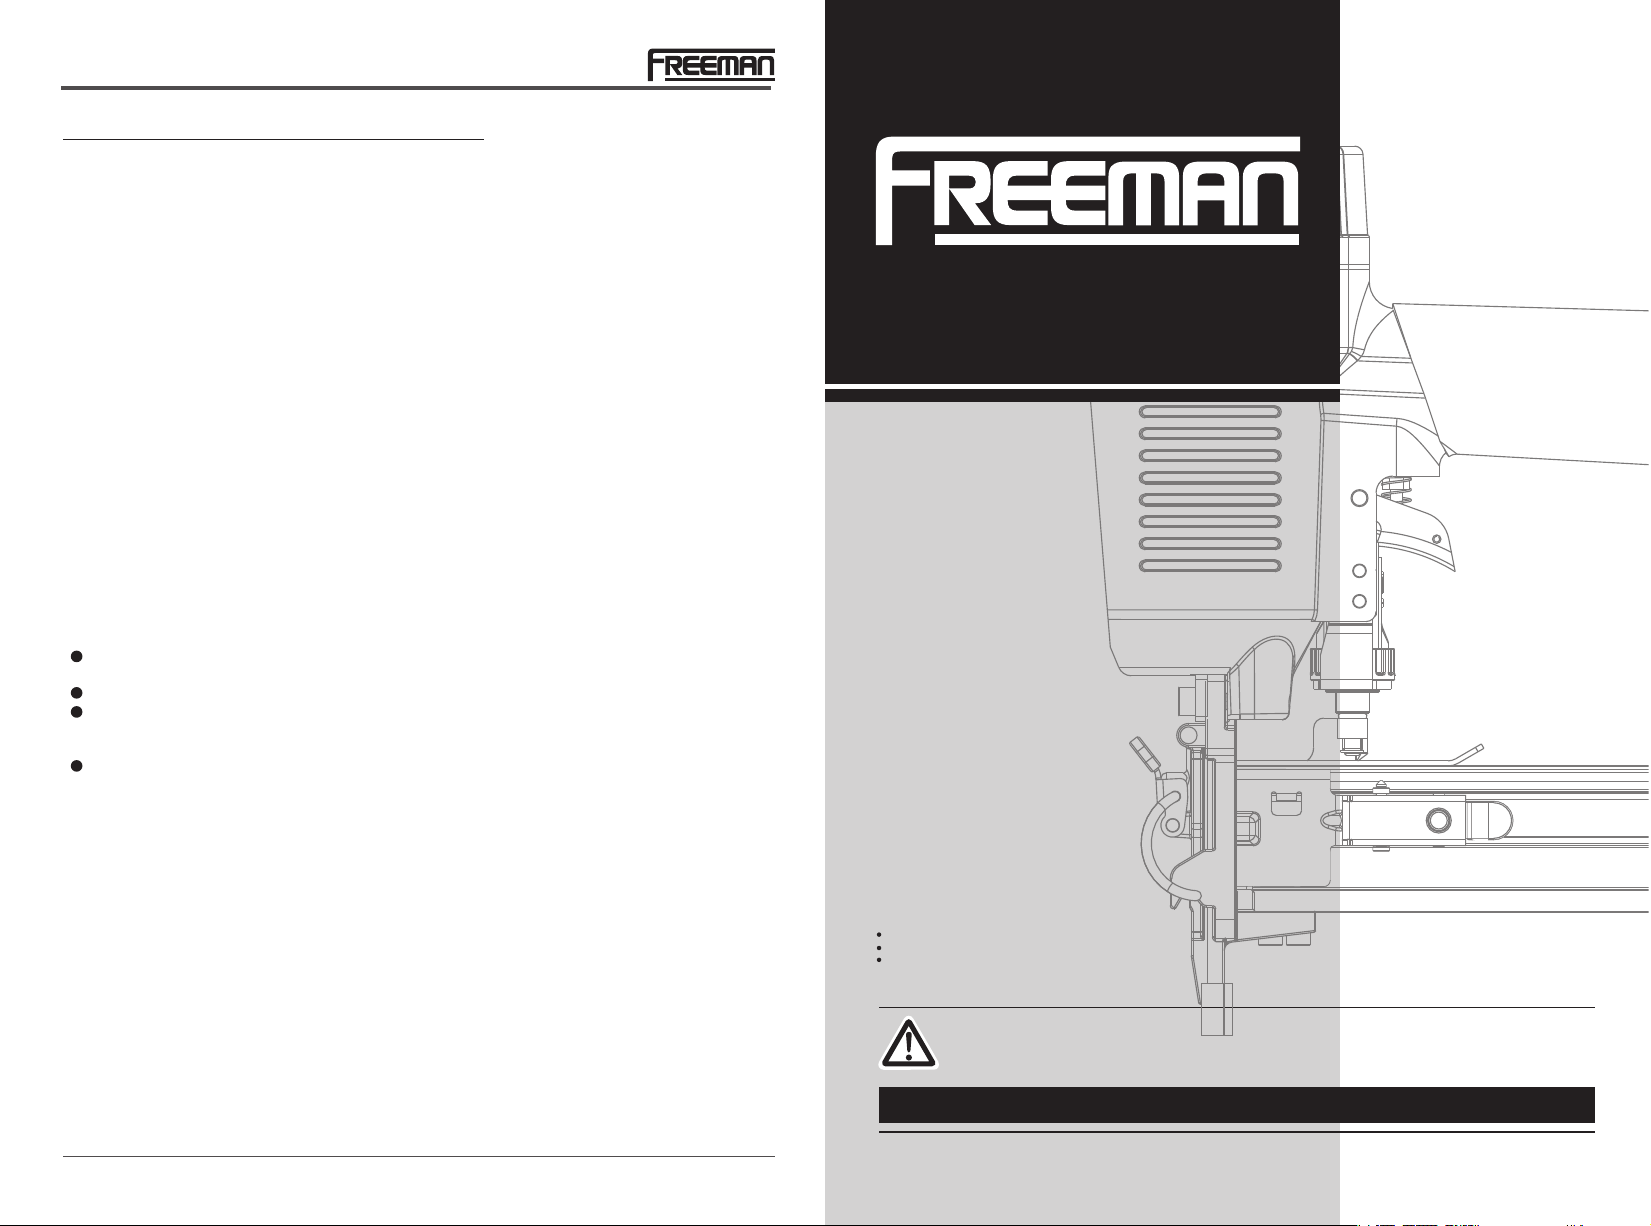
FEATURES
SPECIFICATIONS
AIR CONSUMPTION: 6.35 SCFM with 100
fasteners per minute @ 90 psi
AIR INLET: 1/4 inch NPT
MAGAZINE CAPACITY:
100 fasteners, 16 gauge
WEIGHT: 4.34 lbs
MAXIMUM PRESSURE: 100 psi
PRESSURE RANGE: 60 psi – 100 psi
FASTENER LENGTH RANGE:
3/4 inch to 1 inch
3/4”
7/8”
1”
(16 G a.)
Compatible with generic brands of 16 gauge
fencing staples.
FEATURES
360°ADJUSTABLE EXHAUST
Allows user to direct air away from face.
ONE PIECE DRIVER BLADE
For increased durability.
ANODIZED ALUMINUM CYLINDER AND
MAGAZINE
For long lasting durability.
COMFORT-GRIP HANDLE
For increased comfort and control.
ERGONOMICALLY ENGINEERED BODY
Rugged and Comfortable resulting in a
light-weight tool great for extended use.
ADJUSTABLE DEPTH
Depth is easily adjustable for various
applications.
QUICK-JAM RELEASE
Allows for easy access clearing in the
event of a jam.
18mm
22mm
25mm
OPERATION
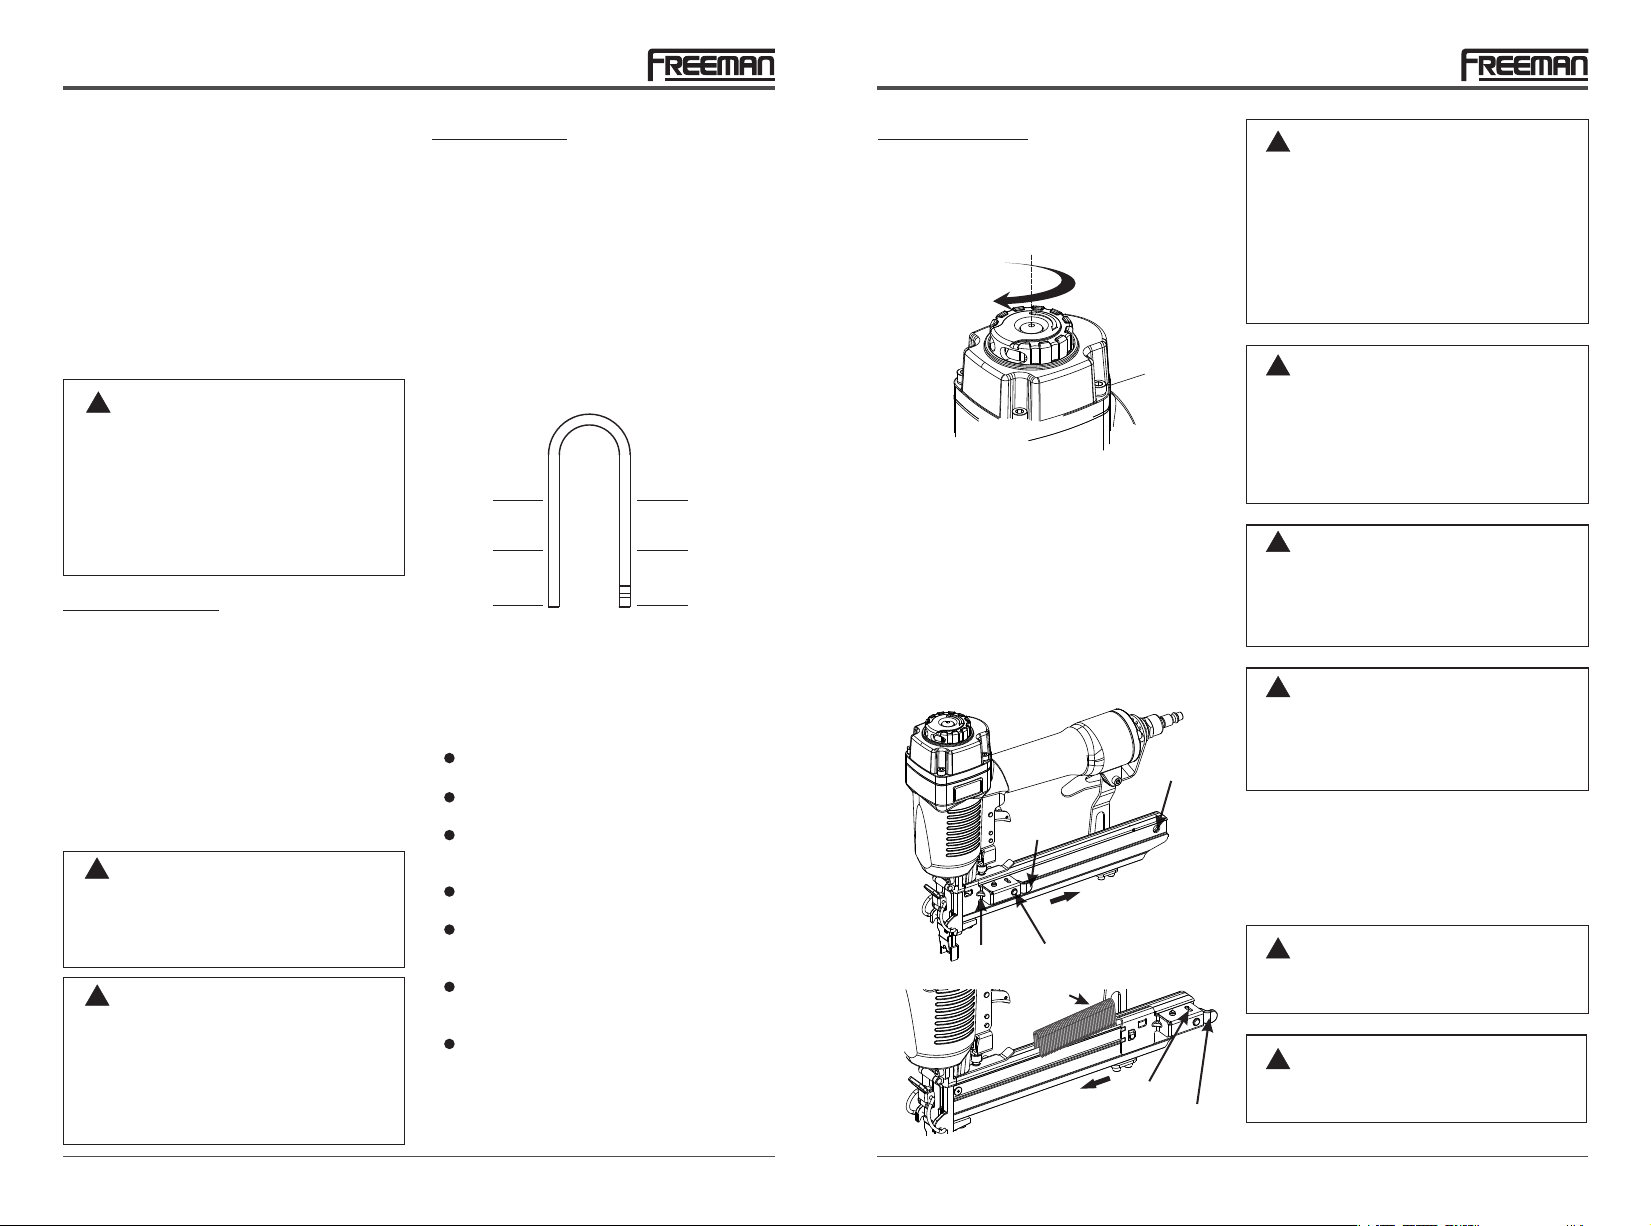
ADJUSTING THE EXHAUST
The adjustable exhaust on the cap of the tool
allows users to direct the exhaust according
to operator preference. To adjust the direction,
turn the exhaust cap in the desired direction.
LOADING FASTENERS
Connect the tool to the air supply.
1.
Pull the Pusher backward until the Pusher
2.
Pin set into the Stop Hole.
Insert appropriate nail strips from the top
3.
of magazine.
Pull the Pusher Handle to get the Pusher
4.
Pin released from the Stop Hole to let the
Pusher go back to move fasteners up to
the driving mechanism. The Pusher will
stop when it rests against the end of the
fastener.
Stop Hole
Pusher handle
Pull backwards
Pusher
Pusher Pin
PULL
Pusher
Handle
us
P
Staples
(16Ga.)
rwar
o
h f
d
Stop Hole
!
WARNING:
The tool may fire when it is first
connected to the air source. Always
connect the tool to the air source
before loading fasteners to prevent
injury from unintended cycling. Always
make sure the tool’s magazine is empty
at the beginning of each work session,
before connecting to an air source.
!
WARNING:
Only use those fasteners recommended
for use with this tool. Fasteners not
identified for use with this tool by the
tool manufacturer can result in a risk of
injury to persons or tool damage when
used in this tool.
!
WARNING:
Keep the tool pointed away from
yourself and others when loading
fasteners. Failure to do so could result
in possible serious personal injury.
!
WARNING:
Neve r l o a d f asteners with t h e
workpiece contact or trigger activated.
Doing so could result in possible
serious personal injury.
UNLOADING FASTENERS
Unloading is the reverse of loading, except
always disconnect the air source before
unloading.
!
WARNING:
Always unload all fasteners before
removing tool from service.
!
!
WARNING:
Always disconnect the air source before
unloading.
06
HTTP://WWW.FREEMANTOOLS.COM 1-888-669-5672 HTTP://WWW.FREEMANTOOLS.COM 1-888-669-5672
07

MODEL: PFS16 MODEL: PFS16
CLEARING JAMS
Occasionally, a fastener may become
jammed in the firing mechanism of the
tool, making the tool inoperable. To
remove a jammed fastener, follow these
steps below:
Disconnect the tool from air source.
1.
2.
Remove fasteners from the tool. Failure to
do so will cause the fasteners to eject
from the front of the tool.
3.
Pull up on the Latch and open the Nose
Cover.
4.
Using caution not to bend or damage the
driver blade, using pliers or a screwdriver
if required to clear the jammed fastener.
5.
Close the jam release and latch.
6.
Reconnect the tool to the air source.
7.
Reload the tool with fasteners.
Latch
Nose Cover
!
WARNING:
Make sure there is no fastener in the
magazine before clearing a jam.
!
WARNING:
Disconnect the tool from the air source
whenever clearing a jam. After
disconnecting the tool from the air
compressor, there should still be
enough air pressure to fire the tool.
After the air hose is disconnected,
always fire the tool into scrap wood
repeatedly to make sure all of the
compressed air is expended.
SETTING THE AIR PRESSURE
The amount of air pressure required depends
on the size of the fasteners and the workpiece
material.
Begin testing the depth of drive by driving a
test nail into the same type of workpiece
material used for the actual job.
Drive a test fastener with the air pressure set
at 90-95 psi. Raise or lower the air pressure to
find the lowest setting that will perform the job
with consistent results.
It may be possible to achieve the desired
depth with air pressure adjustments alone.
DEPTH ADJUSTMENT
The driving depth of the fasteners is
adjustable. To adjust the depth, use the drive
depth adjustment wheel (H) on the tool.
1.
Disconnect the tool from air source.
2.
Turn the depth wheel left or right to
change the driving depth.
3.
Reconnect the tool to the air source.
4.
Drive a test nail after each adjustment until
the desired depth is set.
Adjustment
wheel (H)
Too Deep
Turn the adjustment knob count clockwise
Too Shallow
Turn the adjustment knobclockwise
Flush
Adjustment
wheel (H)
Flush
CAUTION:
It is advisable to test the depth on a
scrap workpiece to determine the
required depth for the application.
To determine depth of drive, first adjust
the air pressure and drive a test
fastener. Never exceed 100 psi.
FIRING THE TOOL
(SINGLE SEQUENTIAL MODE)
The tool is specially designed for single
sequential mode. This mode requires the
trigger to be pulled each time a fastener is
driven. The too l can be actuated by
depressing the work contact element against
the work surface followed by pulling the
trigger. The trigger must be released to reset
the tool before another fastener can be driven.
!
WARNING:
During normal use the tool will recoil
immediately after driving a fastener.
This is a normal function of the tool.
Do not attempt to prevent the recoil
by holding the tool against the work.
Restriction to the recoil can result in
a second fastener being driven from
the tool. Grip the handle firmly and
let the tool do the work. Failure to
heed this warning can result in
serious personal injury.
MAINTENANCE
!
WARNING:
Any time inspection, maintenance, and
cleaning are done:
◆Disconnectthetoolfromtheairsource.
◆Empty the magazine completely.
ANTI-DUST
Each tool is packed with an anti-dustcap on
the air connector.
Keep the anti-dust cap cover the air
connector when the tool is not in use.
LUBRICATION
Frequent, but not excessive, lubrication is
required for best performance. Oil for the tool
is added through the air line connection and
will lubricate the internal parts.
1.
Disconnect the tool from the air source to
add the lubricant.
2.
Turn the tool so the air inlet is facing up.
Place 2 - 3 drops of pneumatic fastening
tool oil into air inlet. Do not use detergent
oils, oil additives, or other air-tool oils as
theselubricantswillcauseaccelerated
weartothesealsandbumpersinthetool,
resultinginpoortoolperformance and
frequenttoolmaintenance.
3.
After adding oil, connect the tool to the
air source, run tool briefly. Wipe off any
excess oil from the cap exhaust.
CAUTION:
Lubricate tool only with specified
lubricants.
HTTP://WWW.FREEMANTOOLS.COM 1-888-669-5672HTTP://WWW.FREEMANTOOLS.COM 1-888-669-5672
0908
MODEL: PFS16 MODEL: PFS16
CLEANING
Avoid using solvents when cleaning plastic
parts. Most plastics are susceptible to
damage from various types of commercial
solvents and maybe damaged by their use.
Use clean cloths to remove dirt, dust, oil,
grease, etc.
!
WARNING:
Do not at any time let brake fluids,
gasoline, petroleum-based products,
penetration oils, ect., come in contact
with plastic parts. Chemicals can
damage, weaken or destroy plastic
which may result in serious personal
injury.
COLD WEATHER OPERATION
For cold weather operation, near and below
freezing, the moisture in the air line may
freeze and prevent tool operation. We
recommend the use of air tool lubricant or
permanent antifreeze (ethylene glycol) as a
cold weather lubricant.
CAUTION:
Do not store tools in a cold weather
environment to prevent frost or ice
formation on the tool's operating valves
and mechanisms that could cause tool
failure.
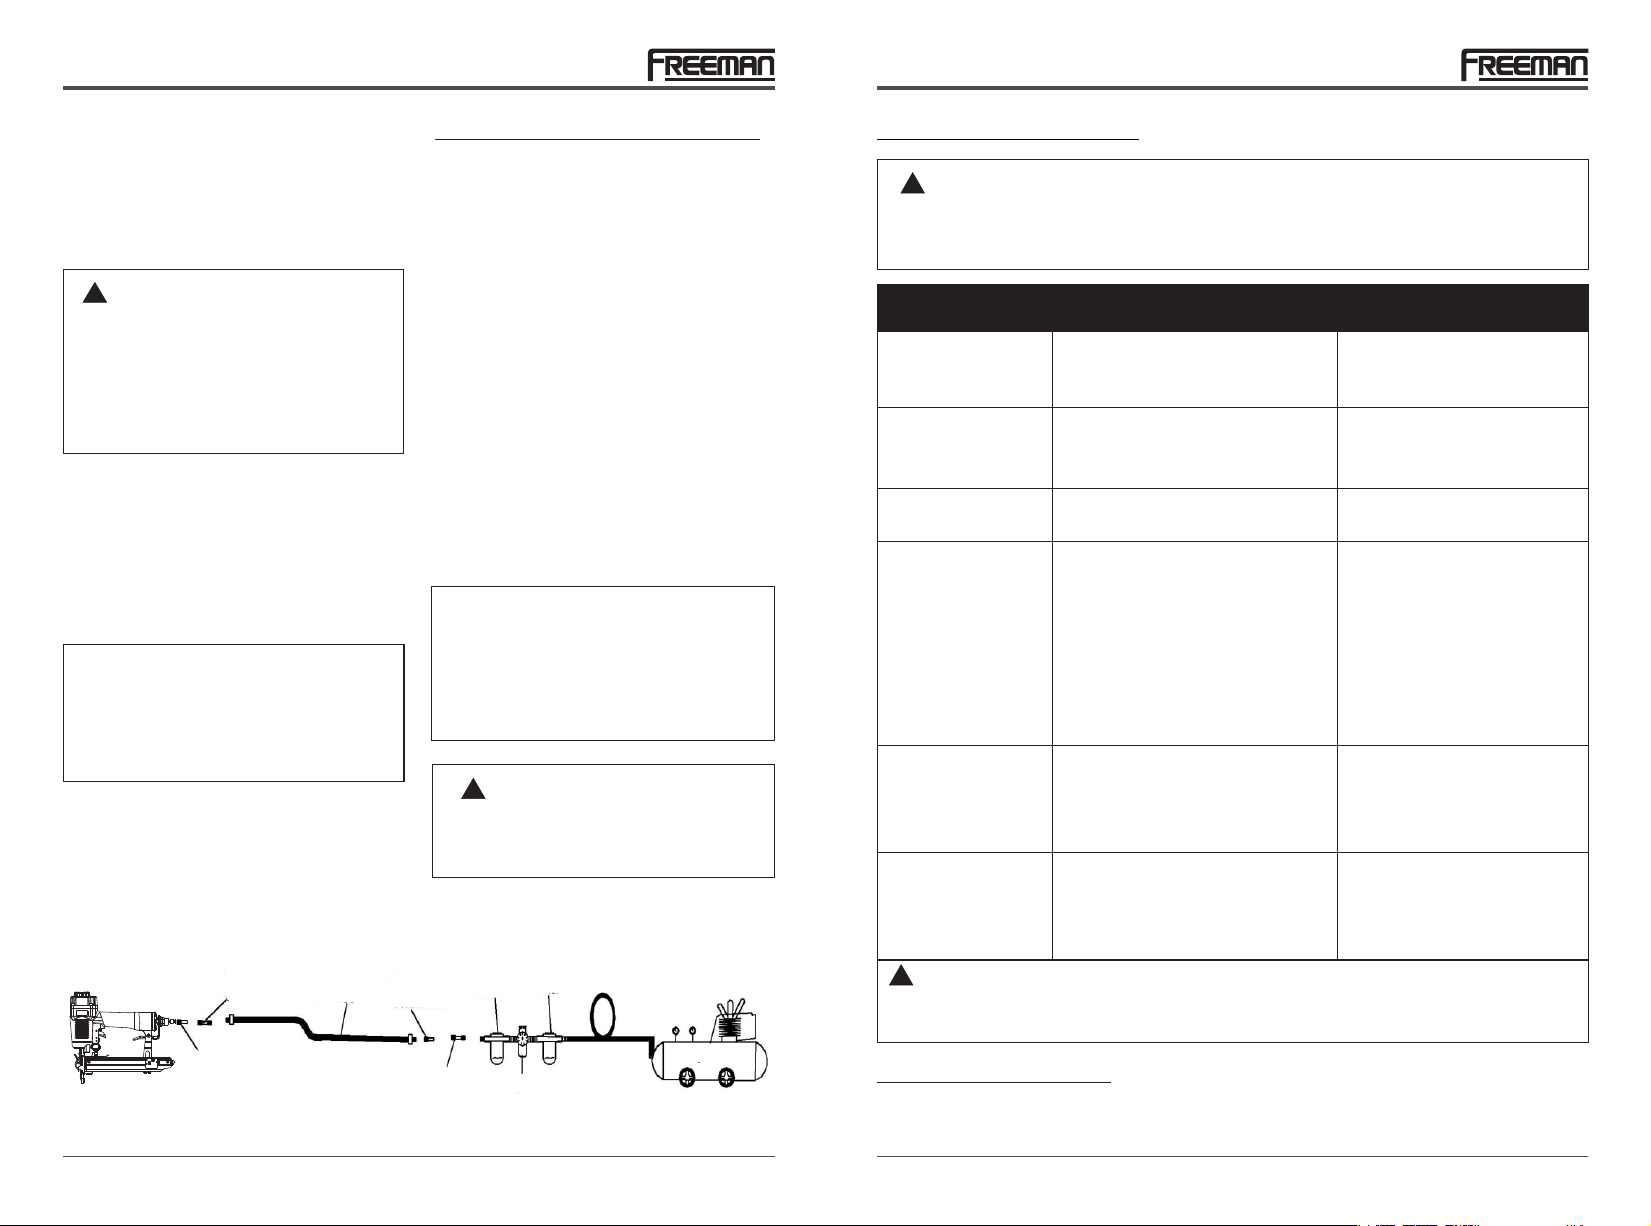
Quick
coupler
Air hose
Quick
connector
RECOMMENDED HOOKUP
1.
The air compressor must be able to
maintain a minimum of 60 psi when the
tool is being used. An inadequate air
supply can cause a loss of power and
inconsistent driving.
2.
An oiler can be used to provide oil
circulation through the tool. A filter can be
used to remove liquid and solid impurities
which can rust or gum up internal parts of
the tool.
3.
Always use air supply hoses with a
minimum working pressure rating equal to
or greater than the pressure from the
power source if a regulator fails, or 150
psi, whichever is greater. Use 3/8" air hose
for runs up to 50' and use a 3/8" quick
coupler on the air hose.
4.
Use a pre ssure re g ulato r on the
compressor, with an operating pressure of
0-125 psi. A pressure regulator is required
to control the operating pressure of the
tool between 60 and 100 psi.
CAUTION:
The air compressor must be able to
maintain a minimum of 60 psi when the
tool is being used. An inadequate air
supply can cause a loss of power and
inconsistent driving.
!
WARNING:
Do not connect with an air compressor
which can potentially exceed 200 psi. As
tool may burst, possibly causing injury.
Filter
Oiler
TROUBLESHOOTING
!
WARNING:
Stop using tool immediately if any of the following problems occur. Serious personal
injury could result. Any repairs or replacements must be done by a qualified service
person or an authorized service center.
PROBLEMS POSSIBLE CAUSE(S) CORRECTIVE ACTION
Air leaking at the
trigger valve area.
Air leaking between
the housing and nose.
Air leaking between
the housing and cap.
Tool cannot work.
The tool has a loss
of power or can not
drive the nail enough.
Fasteners are jammed
in the tool.
!
WARNING:
Only use Freeman authorized repair parts. For questions please call 1-888-669-5672 or
visit our website at http://www.freemantools.com
O-rings in trigger valve housing are
damaged.
1.Loose screws in housing.
2.Damaged O-rings.
3.Damaged to bumper.
1.Loose screws.
2.Damaged gasket.
1.Nail jammed in the nose.
2.Low nails triggering anti-dry-fire
mechanism.
3.Dirt in nose piece.
4.Damaged or jammed magazine
prevents feeding nails.
5.Inadequate air flow.
6.Worn O-ring on piston or lack
of lubrication.
7.Damaged O-ring on trigger valve.
1.Inadequate lubrication.
2.Insufficient air supply.
3.Tool is not set up correctly.
1.Incorrect fasteners.
2.Damaged fasteners.
3.Magazine or nose screws are loose.
4.Driver is damaged.
Replace o-rings on trigger valve.
Check operation of Work Contact
Element (WCE).
1.Tighten screws.
2.Replace O-rings.
3.Replace bumper.
1.Tighten screws.
2.Replace gasket.
1.Clear the jammed nail.
2.Load more nails.
3.Clear drive channel.
4.Replace or clean magazine.
5.Verify adequate air supply.
6.Replace and lubricate o-rings.
7.Replace trigger valve kit.
1.Lubricate the tool.
2.Verify adequate air supply.
3.Adjust the DEPTH ADJUSTMENT
wheel, or remove NON-MARRING
pad.
1.Verify that fasteners are the correct
size.
2.Clean and replace fasteners.
3.Tighten screws.
4.Replace driver.
10
Quick
connector
HTTP://WWW.FREEMANTOOLS.COM 1-888-669-5672 HTTP://WWW.FREEMANTOOLS.COM 1-888-669-5672
Quick
coupler
Regulator
Compressor
WEARABLE PARTS
Repair parts can be ordered from our website: http://www.freemantools.com
11
MODEL: PFS16
PGP INC. PRODUCT WARRANTIES
FREEMAN Pneumatic Nail Guns Warranties
7 Year Professional Tool Warranty
The Freeman Tool limited warranty extends exclusively to the original purchaser of the Freeman
Product, begins on the date of purchase and excludes wearable parts. During the warranty period
Prime Global Products, Inc. (PGP) expressly warrants that the Freeman Product is free from defect
in materials and workmanship subject to the exceptions and limitations contained herein. PGP shall
at its option, repair, replace, or offer a full refund for a Freeman Product that has a defect in
materials or workmanship.
90 Day Wearable Parts Warranty
The Freeman wearable parts limited warranty extends exclusively to the original purchaser of the
Freeman Product and begins on the date of purchase, and includes driver blades, bumpers, O-rings,
pistons, piston rings, and gaskets. During the warranty period PGP expressly warrants that the
Freeman Product is free from defect in materials and workmanship subject to the exceptions and
limitations contained herein. PGP shall at its option, repair, replace, or offer a full refund for a
Freeman Product that has a defect in materials or workmanship.
MODELO: PFS16
A DATED SALES RECEIPT OR PROOF OF PURCHASE FROM THE ORIGINAL RETAIL PURCHASER
IS REQUIRED TO MAKE A WARRANTY CLAIM. Warranty registration is also required and can be
accomplished through On-Line Product Registration at www freemantools com, select SUPPORT, . .
select PRODUCT REGISTRATION. To make a warranty claim, the original purchaser must return the
Freeman Nail Gun, postage prepaid and insured, with proof of purchase to PGP or any of its
authorized service centers. For questions please call 1-888-669-5672. Other than the postage and
insurance requirement, no charge will be made for repairs covered by this warranty.
Warranty Exclusions
These Warranties do not apply where:
Repairs or alterations have been made, or attempted, by others, and/or the unauthorized use of
non-conforming parts or accessories.
Repairs are required due to normal wear and tear.
The Nail Gun has been abused, misused, improperly maintained or operated, including: the
failure to use clean, dry, regulated compressed air at the recommended pressure; accidents
caused by use of the Product after partial failure.Freeman
The Product is used commercially in assembly lines or production lines. The Freeman Freeman
Product is intended for use by individuals and these warranties do not extend to such
commercial uses.
NO WARRANTY, ORAL OR WRITTEN, EXPRESSED OR IMPLIED, OTHER THAN THE ABOVE
WARRANTIES IS MADE WITH REGARD TO THIS FREEMAN PRODUCT. ANY IMPLIED
WARRANTIES WILL BE LIMITED IN DURATION TO THE APPLICABLE WARRANTY PERIOD
SPECIFIED ABOVE. SOME STATES DO NOT ALLOW LIMITATIONS ON HOW LONG AN IMPLIED
WARRANTY LASTS, SO THE ABOVE MAY NOT APPLY TO YOU. YOUR REMEDIES ARE SOLELY
AND EXCLUSIVELY AS STATED ABOVE. PGP SHALL IN NO EVENT BE LIABLE FOR
INCIDENTAL, CONSEQUENTIAL, INDIRECT, OR SPECIAL DAMAGES. SOME STATES DO NOT
ALLOW THE EXCLUSION OR LIMITATION OF INCIDENTAL OR CONSEQUENTIAL DAMAGES, SO
THE ABOVE LIMITATION OR EXCLUSION MAY NOT APPLY TO YOU. IN NO EVENT, WHETHER
AS A RESULT OF A BREACH OF CONTRACT, WARRANTY, TORT (INCLUDING NEGLIGENCE) OR
OTHERWISE, SHALL PGP’S LIABILITY EXCEED THE PRICE OF THE PRODUCT WHICH HAS
GIVEN RISE TO THE CLAIM OR LIABILITY. ANY LIABILITY CONNECTED WITH THE USE OF
THIS PRODUCT SHALL TERMINATE UPON THE EXIRATION OF THE WARRANTY PERIOD
SPECIFIED ABOVE. NO EMPLOYEE OR REPRESENTATION OF PGP, OR ANY DISTRIBUTOR OR
DEALER IS AUTHORIZED TO MAKE ANY CHANGE OR MODIFICATION OF THIS WARRANTY.
These warranties give you specific legal rights. you may also have other rights which vary from state
to state.
THESE WARRANTIES ARE SUBJECT TO CHANGE WITHOUT NOTICE.
ENGRAPADORA DE CERCADO
ENGRAPADORA DE CERCADO
ENGRAPADORA DE CERCADO
DE CALIBRE 16
DE CALIBRE 16
DE CALIBRE 16
HTTP://WWW.FREEMANTOOLS.COM
1-888-669-5672
PRIME GLOBAL PRODUCTS, INC.
ADVERTENCIA:
No seguir las advertencias correctamente puede causar
LA MUERTE O LESIONES GRAVES.
GUARDA ESTE MANUAL PARA CONSULTARLO EN EL FUTURO.
12 HTTP://WWW.FREEMANTOOLS.COM 1-888-669-5672

MODEL: PFS16 MODEL: PFS16
NORMAS GENERALES DE SEGURIDAD
DESEMPACAR
CARACTERÍSTICAS
P15
P19
P19
OPERACIÓN
CÓMO AJUSTAR EL ESCAPE
CÓMO CARGAR LOS SUJETADORES
CÓMO DESCARGAR LOS SUJETADORES
CÓMO RETIRAR SUJETADORES ATASCADOS
CÓMO CONFIGURAR LA PRESIÓN DE AIRE
AJUSTE DE PROFUNDIDAD
CÓMO ACTIVAR LA HERRAMIENTA
MANTENIMIENTO
CONEXIÓN RECOMENDADA
SOLUCIÓN DE PROBLEMAS
PIEZAS DESGASTADAS
GARANTIAS
P20
P20
P20
P21
P21
P21
P22
P22
P24
P25
P26
P26
ADVERTENCIA:
Las advertencias y precauciones mencionadas en este manual no abarcan todas las
condiciones y situaciones posibles. Es perfectamente comprensible que no podemos fabricar
el sentido común y la precaución como partes de ningún producto, el usuario es el
responsable de obrar en consecuencia.
GUARDAR ESTE MANUAL
!
●
Guarda este manual para tener a mano las
advertencias de seguridad,precauciones,
o p e r a c i o n e s , i n s p e c c i o n e s y
mantenimiento. Guarda este manual y
elrecibo en un lugar seguro y seco para
consultarlo en el futuro.
ADVERTENCIA:
Para evitar lesiones personales graves,
no intentes usar este producto hasta
haber leído y comprendido el manual
por completo. Guarda este manual y
consúltalo con frecuencia para un
funcionamiento seguro y para instruir
a otros usuarios de esta herramienta.
SÍMBOLOS
●
Símbolos en este manual, las etiquetas, envases y en toda la información provista con esta
herramienta. Las siguientes palabras de aviso y significados tienen el objetivo de explicar los
niveles de riesgo asociados con esta herramienta.
SÍMBOLOS AVISO SIGNIFICADO
!
!
ADVERTENCIA:
PRECAUCIÓN:
PRECAUCIÓN:
NORMAS GENERALES DE
SEGURIDAD
INSTRUCCIONES EN REFERENCIA AL PELIGRO
DE INCENDIOS, CHOQUE ELECTRICO O
LESIONES PERSONALES.
!
ADVERTENCIA:
Cuando se usen herramientas, siempre
se deberán seguir precauciones
básicas, incluyendo las siguientes:
PROPOSICIÓN 65 DE CALIFORNIA
!
ADVERTENCIA:
Este producto puede exponerlos a
productos químicos incluyendo
plomo, que es conocido por el
Estado de California para causar
cáncer y defectos de nacimiento u
otros daños reproductiveos. Para
obtener más información, visite
www.P65Warnings.ca.gov.
ÁREA DE TRABAJO
Mantenga el área de trabajo limpia y bien
●
iluminada. Los ban cos de trab ajo
desordenados y las áreas oscuras aumentan
el riesgo de accidentes.
No utilice la herramienta en atmósferas en
●
las que exista riesgo de explosión, como
por ejemplo en presencia de líquidos
inflamables, gases o polvo. La herramienta
produce una chispa que podría encender
líquidos inflamables, gases o polvo.
Mantenga a los transeúntes, niños y a otras
●
personas alejadas cuando esté utilizando la
herramienta. Las distracciones podrían
resultar en el uso inapropiado y causar
lesiones.
Evite los disparos accidentales. Siempre
●
tenga precaución para evitar disparos
Indica una situación potencialmente peligrosa que, de no evitarse,
podría causar la muerte o lesiones graves.
Indica una situación potencialmente peligrosa que, de no evitarse,
podría causar la muerte o lesiones graves.
(Sin símbolo) Indica una situación que puede resultar en daños a
la propiedad.
accidentales. No a punte la herramienta hacia
usted u otra persona, aun cuando no
contenga sujetadores.
SEGURIDAD PERSONAL
No clave sobre otro clavo. Esto puede
●
causar que el clavo se desvíe y alcance a
alguien, o que la herramienta reaccione de
alguna manera y lesione a alguien.
Retire el dedo del gatillo cuando no
●
coloca sujetadores. Nunca transporte la
herramienta con el dedo en el gatillo, ya
que la herramienta puede disparar un
sujetador.
Usa siempre protección para los ojos. El
●
operador y las otras personas en el área de
trabajo deben usar siempre gafas de
seguridad con protectores laterales,
aprobadas por ANSI. La protección de los
ojos se utiliza para resguardarlos de los
fijadores y residuos que puedan saltar, los
cuales pueden causar lesiones graves en
los ojos.
Usa siempre protección auditiva cuando
●
utilices la herramienta. La exposición
prolongada a ruidos de alta intensidad
puede causar la pérdida de la audición.
Usa un equipo de seguridad. Se deben
●
usar una máscara antipolvo, calzado de
seguridad antideslizante y un casco rígido
en condiciones donde sean necesarios.
Usa una máscara protectora completa si
estás trabajando con virutas de madera o
limaduras de metales
Usa la vestimenta adecuada. No utilices
●
ropa o joyas sueltas. Recoge el cabello
largo. Mantén el cabello, la ropa y los
guantes alejados de las partes móviles. La
ropa y las joyas sueltas o el cabello largo
pueden quedar atrapados en las partes
móviles.
14-Sp 15-Sp
HTTP://WWW.FREEMANTOOLS.COM 1-888-669-5672 HTTP://WWW.FREEMANTOOLS.COM 1-888-669-5672

MODEL: PFS16 MODEL: PFS16
Cuando utilices una herramienta de
motor mantente alerta, observa lo que
estás haciendo y utiliza el sentido común.
No utilices la herramienta si estás cansado
o bajo el efecto de drogas, alcohol o
medicamentos.Un momento de distracción
durante la operación de la herramienta
puede causar lesiones graves.
Para evitar disparos accidentales
mantenga los dedos alejados del gatillo
cuando no accione los sujetadores,
especialmente cuando conecte la
herramienta al suministro de aire.
Mantén siempre una posición firme y el
equilibrio adecuado. Una posición firme y
el l equilibrio adecuado permiten controlar
mejor la herramienta en situaciones
inesperadas.
No la utilices sobre una escalera de tijera
o soportes inestables. Una posición
estable sobre una superficie sólida permite
un mejor control de la herramienta en
situaciones imprevistas.
Asegúrate de que la manguera esté libre
de o b s truccio n e s o trabas. L a s
mangueras atascadas o enredadas pueden
causar la pérdida del equilibrio o la
estabilidad y pueden dañarse y causar
lesiones.
No se extienda demasiado. Mantenga un
apoyo de pies y un equilibrio adecuados en
todo momento. Un apoyo de pies y
equilibrio adecuados permiten un mejor
control de la herramienta en situaciones
inesperadas.
No fije la manguera o herramienta a su
cuerpo.
Fije la manguera a la estructura para
reducir el riesgo de pérdida de equilibrio
en caso que la manguera se mueva.
Sie m pre d é por s entado q ue la
herramienta contiene sujetadores. No
apunte la herramienta hacia usted u otra
pe rsona, aun cuando no contenga
sujetadores.
Lá v e s e l as m a n o s des p u és d e
manipularlo. Este producto o su cable
eléctrico pueden contener sustancias
químicas reconocidas por el estado de
California como causantes de cáncer,
defectos congénitos y otros daños en el
aparato reproductivo.
USO Y CUIDADO DE LA HERRAMIENTA
Infórmate sobre la herramienta. Lee el
manual con cuidado, aprende sobre sus
aplicaciones y limitaciones, como también
sobre los riesgos específicos y potenciales
relacionados con la herramienta.
U s a ú n i c a m e n te l o s f i j a d o r e s
recomendados para el modelo. No uses
los fijadores incorrectos ni los cargues de
forma inadecuada.
Comprueba que las piezas móviles no
estén desalineadas ni bloqueadas, que
no haya piezas dañadas o cualquier otra
cond i ción q u e pueda a f ectar e l
funcionamiento de la herramienta. Si está
dañada, repara la herramienta antes de
utilizarla. Muchos accidentes se deben al
ma n te ni mi en to i nco r r e ct o d e la
herramienta.
Cuida la herramienta para mantenerla en
buenas condiciones. Mantén limpia la
herramienta. Una herramienta con el
mantenimiento adecuado corre menos
riesgo de bloquearse y es más fácil de
controlar.
Guarda las herramientas fuera del
alcance de los niños y otras personas que
no sepan co m o u t i l i z a r las. L a s
herramientas son peligrosas en manos de
usuarios que no saben como utilizarlas.
Comprueba el funcionamiento de la
herramienta antes de usarla. No uses la
herramienta si el mecanismo de contacto
de la pieza de trabajo no funciona
correctamente para evitar disparar los
fijadores accidentalmente.
No utilice la herramienta si el gatillo no se
acciona correctamente. Toda herramienta
que no pueda controlarse con el gatillo es
peligrosa y debe repararse.
No fuerces la herramienta. Utiliza la
herramienta correcta según la aplicación.
La herramienta correcta realizará el trabajo
mejor y con más seguridad a la velocidad
para la cual está diseñada.
Usa abrazaderas u otra forma práctica
para asegurar y sujetar la pieza de
trabajo a una plataforma estable.
Sostener la herramienta con la mano o
apoyarla contra el cuerpo no ofrece la
estabilidad adecuada y puede causar
pérdida de control.
Mantén la herramienta y el mango secos,
limpios y libres de aceite o grasa. Usa
siempre un paño limpio para la limpieza.
Nunca uses líquido de freno, gasolina,
productos a base de petróleo ni solventes
para limpiar la herramienta.
No utilices la herramienta como martillo.
No utilices esta herramienta de tal
manera que los fijadores se dirijan hacia
cualquier otra cosa que no sea la pieza
de trabajo.
Nunca utilice gasolina ni ningún otro
líquido inflamable para limpiar la
herramienta. Nunca utilice la herramienta
en pre senc ia d e lí quid os o gas es
infl a mables. Lo s vapo res p o d rían
encenderse por una chispa y causar una
explosión que podría provocar lesiones
personales graves o la muerte.
No retire, fuerce ni haga que el gatillo o el
seguro del mismo queden inutilizables.
No haga funcionar ninguna herramienta
que se haya modificado de dicha manera,
en caso contrario podrían ocurrir lesiones
personales graves o la muerte.
No apriete el gatillo a menos que coloque
sujetadores. Nunca fije el conducto de aire
comprimido ni cargue la herramienta
mientras aprieta el gatillo. La herramienta
podría lanzar un sujetador y provocar
lesiones personales graves o la muerte.
Siempre coloque el seguro del gatillo en la
posición de seguridad cuando no use la
herramienta.
Siempre fije la manguera con un
conector o acoplador de manguera sobre
o cerca de la herramienta, de forma tal
que todo el aire comprimido en la
herramienta se descargue al momento
en que el conector o el acoplador de la
manguera estén desconectados. No
utilice una válvula de control ni ningún otro
con ector que per mita que el a i re
permanezca en la herramienta, en caso
contrar io p odrí an o curr ir l esio nes
personales graves o la muerte.
Nunca coloque las manos ni otra parte
del cuerpo en el área de descarga de
sujetadores de la herramienta. La
herramienta podría lanzar un sujetador y
provocar lesiones personales graves o la
muerte.
Nunca transporte la herramienta de la
manguera de aire comprimido ni jale la
manguera para mover la herramienta o
un compresor. Mantenga las mangueras
alejadas del calor, el aceite y los bordes
filosos. Reemplace las mangueras dañadas
o desgastadas, en caso contrario podrían
ocurrir lesiones personales o daños en la
herramienta.
Sie m pre d é por s entado q ue la
herramienta contiene sujetadores.
Considere la herrami enta como un
implemento de trabajo y no juegue con ella.
Siempre mantenga a las demás personas
a una distancia segura del lugar de
trabajo, en caso se produzcan descargas
accidentales de sujetadores. No Apunte la
herramienta hacia usted u otra persona,
aun cuando no contenga sujetadores. La
activación accidental de la herramienta
podría provocar lesiones personales graves
o la muerte.
No deje caer ni lance la herramienta.Ya
que esto podría ocasionar daños en la
herramienta y causar que la misma ya no
sea utilizable o segura. Si la herramienta ha
sufrido caídas o ha sido lanzada, examínela
atentamente y revise si hay piezas
dobladas, rajadas o rotas y si hay fuga de
aire comprimido. NO PROSIGA y repárela
antes de usarla, en caso contrario podrían
ocurrir lesiones graves.
Evite usar la herramienta cuando el
cargador está vacío. Ya que esto puede
prod ucir des gaste acelera do en la
herramienta.
Limpie y revise todas las mangueras y
conectores de suministro de aire
comprimido antes de conectar la
herramienta a un suministro de aire
comprimido. Reemplace las mangueras y
conectores dañados o desgastados, de lo
contrario el rendimiento o la durabilidad de
la herramienta podrían verse reducidos.
No utilices la herramienta si pierde aire o
no funciona correctamente.
No utilices la herramienta si no tiene una
etiqueta de advertencia legible.
Siempre sujeta la herramienta por el
mango. Nunca la sujetes por la manguera
de aire.
REPARACIÓN DE LA HERRAMIENTA
Usa únicamente accesorios identificados
●
por el fabricante para ese modelo
específico de herramienta.
La utilización de piezas no autorizadas o
●
el incumplimiento de las instrucciones de
mantenimiento pueden aumentar el
riesgo de lesiones.
Usa únicamente los lubricantes provistos
●
con la herramienta o especificados por el
fabricante.
La reparación de la herramienta debe ser
●
realizada únicamente por personal
calificado.
16-Sp 17-Sp
HTTP://WWW.FREEMANTOOLS.COM 1-888-669-5672 HTTP://WWW.FREEMANTOOLS.COM 1-888-669-5672

MODEL: PFS16 MODEL: PFS16
FUNCIONAMIENTO
No coloques fijadores cerca del borde del
●
material. La pieza de trabajo puede
partirse y hacer que el fijador rebote y te
dañe a ti o a las personas alrededor.
No traslade la herramienta de un lugar a
otro presionando el gatillo. Esto podría
provocar una descarga accidental. La
opción del método de disparos es
importante. Verifique el manual para las
opciones de disparo.
Durante el uso normal la herramienta se
rebobinará de inmediato luego de
accionar un sujetador. Esta es una función
normal de la herramienta. No intente evitar
la rebobinación sosteniendo la herramienta
en contr a de l fun c ionam iento . La
restricción para rebobinar puede provocar
que se accione un segundo sujetador
desde la herramienta. Sujete la manija
firmemente y permita que la herramienta
re alic e el tra bajo . No se guir est a
advertencia puede provocar graves
lesiones personales.
No coloques fijadores sobre otros
fijadores o con la herramienta a un
ángulo demasiado inclinado ya que esto
puede causar el desvío de los fijadores y
provocar lesiones.
No uses la herramienta a menos que
pretendas colocar un fijador en la pieza
de trabajo.
Opera siempre la herramienta con
cuidado:
Re s pe ta l a he r r ami e n ta c o m o
implemento de trabajo.
Nunca la uses en bromas y juegos.
Nunca jale el gatillo a menos que la
punta esté orientada directamente hacia
el trabajo.
Mantén a los demás a una distancia
segura de la herramienta ya que puede
acc i onarse acc i dental m ente, y
posiblemente causar lesiones.
ENTRADA DE AIRE Y CONEXIONES
El conector de la herramienta no debe
●
estar bajo presión al desconectar la
entrada de aire. Si se utiliza un acoplador
incorrecto, la herramienta puede quedar
cargada de aire luego de la desconexión y
podría disparar fijadores incluso con la
línea de aire desconectada y ello puede
causar lesiones.
No utilice ningún tipo de gases reactivos,
●
lo que incluye pero no se limita al oxígeno
o agases combustibles, como fuente de
alimentación. Use únicamente aire
comprimido filtrado, lubricado y regulado.
El uso de gas reactivo en lugar de aire
co m p r im i do pued e hace r que la
herramienta explote, lo cual produciría
lesiones personales Graves o la muerte.
Use únicamente una fuente de aire
comprimido de presión regulada para
limitar la presión de aire suministrada a la
herramienta. La presión regulada no debe
superar los 6,89 bar. Si el regulador falla, la
presión enviada a la herramienta no debe
superar los 13,79 bar, de lo contrario la
herramienta podría explotar y causar
lesiones personales graves o la muerte.
Desconecta siempre la fuente de aire:
Antes de descargar o realizar ajustes.
Al realizar el mantenimiento de la
herramienta.
Al desatascarla.
Al tocar la horquilla de seguridad.
Cuando la herramienta no está en uso.
Al desplazarse a otra área de trabajo.
Dichas medidas de precaución reducirán el
riesgo de lesiones a personas.
CARGAR LA HERRAMIENTA
No cargues la herramienta con fijadores
●
si alguno de los controles operativos está
activado.
Nunca coloques la mano ni ninguna otra
●
parte del cuerpo en el área de descarga
de los fijadores.
Nunca apuntes la herramienta hacia las
●
personas.
No jale el gatillo ni presione la pieza de
●
trabajo en contacto ya que se podría
a c c i o na r a c c i d en ta lm en te y
posiblemente causar lesiones.
!
ADVERTENCIA:
Las advertencias y precauciones
mencionadas anteriormente no abarcan
todas las condiciones y situaciones
p o s i bl e s . E s p e rf e ct a m en t e
comprensible que no podemos fabricar
el sentido común y la precaución como
partes de ningún producto, el usuario
es e l res pons able d e obra r en
consecuencia.
DESEMPACAR
Es ta h erra mien ta s e ha envi ado
●
completamente ensamblada.
Retira cuidadosamente la herramienta y
●
los accesorios de la caja.
I n s p e c c i o n a l a h e r r a m i e n t a
●
cuidadosamente para asegurarte de que
no haya ocurrido ninguna rotura ni daño
durante el envío.
No deseches el material de empaque
●
hasta qu e h a y as inspeccio n a d o
c u i d a d o s a m e n t e y u t i l i z a d o
satisfactoriamente la herramienta.
●
Si alguna pieza está dañada o falta, llama
al 1-888-669-5672.
!
ADVERTENCIA:
Si falta alguna pieza, no utilices esta
herramienta hasta reemplazarla. De no
seguir esta advertencia, pueden
producirse lesiones graves.
!
ADVERTENCIA:
No intentes modificar esta herramienta
o c o n s t r u i r a c c e s o r i o s n o
recomendados para la misma. Tales
mod ific acio nes o camb ios s on
considerados un mal uso y pueden
resultar en condiciones peligrosas que
a su vez pueden posiblemente causar
lesiones.
CARACTERÍSTICAS
ESPECIFICACIONES
CONSUMO DE AIRE: 6,35 SCFM con 100
sujetadores por minuto a 6,20 bar
ENTRADA DE AIRE: NPT DE 1/4’’
CAPACIDAD DEL CARGADOR:
100 sujetadores de calibre 16
PESO DE LA HERRAMIENTA: 1,97 kgs
PRESIÓN MÁXIMA: 6,89 bar
RANGO DE PRESIÓN: 4,14-6,89 bar
RANGO EN LARGO DE SUJETADORES::
18mm (3/4”) a 25mm (1”)
3/4”
6/7”
1”
(Ca libre 1 6)
Compatible con genérico marca de grapas de
cercado calibre 16 .
CARACTERÍSTICAS
ESCAPE AJUSTABLE EN 360 GRADOS
Permite al usuario controlar el aire lejos de
los cara.
HOJA DE UNA PIEZA
Para mayor durabilidad.
CARGADOR Y CILINDRO DE ALUMINIO
ANODIZADO
Para una mayor durabilidad.
CÓMODA MANIJA DE AGARRE
Para mayor comodidad y control.
ESTRUCTURA DE DISEÑO ERGONÓMICO
Resistente y cómoda, que resulta en una
herramienta liviana ideal para un uso
prolongado.
PROFUNDIDAD AJUSTABLE
La profundidad se ajusta fácilmente para
varias aplicaciones.
LIBERACIÓN RÁPIDA DE ATASCOS
Permite un fácil acceso a la eliminación en
el caso de un atasco.
18mm
22mm
25mm
18-Sp 19-Sp
HTTP://WWW.FREEMANTOOLS.COM 1-888-669-5672 HTTP://WWW.FREEMANTOOLS.COM 1-888-669-5672

MODEL: PFS16 MODEL: PFS16
OPERACIÓN
CÓMO AJUSTAR EL ESCAPE
El escape ajustable en la cubierta de la
herramienta permite a los usuarios controlar
los escapes de acuerdo a las preferencias del
operador. Para ajustar la dirección, gire la
cubierta del tubo de escape a la dirección
deseada.
CÓMO CARGAR LOS SUJETADORES
Conecte la herramienta a la fuente de aire.
1.
Tire del Empujador hacia atrás hasta que el
Clavija de Empujador puesto en la Dejar de
Agujero.
2.
Insertar tiras de clavos adecuados desde la
cima de la revista.
3.
Tire de la Manija de Empujador para
conseguir el Clavija de Empujador liberado
de la parada del agujero para que el
4.
Empujador volver a mover los sujetadores
hasta el mecanismo de accionamiento. El
empujador se detendrá cuando se apoya
contra el extremo del elemento de fijación.
Dejar de
Agujero
Manija de
Empujador
Tire hacia atrás
Clavija de Empujador
Empujador
e
HALAR
Dejar de
Agujero
Manija de
Empujador
E
mpu
Grapas
c
r ha
a
j
lant
ade
a
i
!
ADVERTENCIA:
La herramienta puede dispararse al ser
conectada por primera vez a la fuente de
aire. Conecta siempre la herramienta a
la fuente de aire antes de cargar los
fijadores para evitar lesiones causadas
por ciclos accidentales. Asegúrate
siempre de que el cargador de la
herramienta esté vacío al comienzo de
cada sesión de trabajo, antes de
conectarla a una fuente de aire.
!
ADVERTENCIA:
Use s olame nte l os suje tador es
recomendados para esta herramienta.
Los sujetadores no identificados por el
fabricante de la herramienta para usarse
con la misma pueden causar lesiones a
las personas o daños en la herramienta
cuando se usan con ella.
!
ADVERTENCIA:
Mantenga la herramienta en dirección
opuesta a usted y otras personas al
cargar los sujetadores. No hacerlo
podría provocar lesiones personales
graves.
!
ADVERTENCIA:
Nunca cargue el sujetador con la pieza
de trabajo en contacto o el gatillo
activado. Esto podría provocar lesiones
personales graves.
CÓMO DESCARGAR LOS SUJETADORES
La descarga es lo opuesto a la carga,
(Excepción) siempre desconecte la fuente de
aire antes de realizar la descarga.
!
ADVERTENCIA:
Si e m p r e d e s c a rg u e tod o s lo s
su jeta dores a nte s de retirar la
herramienta del servicio.
!
ADVERTENCIA:
Conecta siempre la herramienta a la
fuente de aire antes de cargar los
fijadores para evitar lesiones causadas
por ciclos accidentales.
CÓMO RETIRAR SUJETADORES
ATASCADOS
En ocasiones, un sujetador puede atascarse
en el mecanismo de disparo, dejando la
herramienta inoperante. Para retirar el
sujetador atascado, siga los siguientes pasos:
Desconecta la herramienta de la fuente de
1.
aire.
Retire los sujetadores de la herramienta. No
2.
hacerlo podría p r o v o c a r que l os
sujetadores se expulsen desde la parte
frontal de la herramienta.
Jale el Pestillo hacia arriba y abra la
3.
Cubierta de la nariz.
Tenga cuidado de no doblar o dañar la hoja,
4.
si e s nec e s a r i o us e pinz a s o u n
destornillador para limpiar el sujetador
atascado.
Cierre la liberación de atascos y el pestillo.
5.
Después reconecta la fuente de aire a la
6.
herramienta.
Vuelve a cargar la herramienta con
7.
fijadores.
Pestillo
Cubierta de la nariz
!
ADVERTENCIA:
Asegúrese de que no haya sujetadores
en el cargador antes de retirar un
sujetador atascado.
!
ADVERTENCIA:
Desconecte la herramienta de la fuente
de aire cada vez que retire un sujetador
atascado. Luego de desconectar la
herramienta del compresor de aire,
debería haber suficiente presión de aire
para disparar. Luego de desconectar la
manguera de aire, siempre dispare la
herramienta varias veces sobre un trozo
de made ra q ue no u tili ce para
asegurarse de que se expenda todo el
aire comprimido.
CÓMO CONFIGURAR LA
PRESIÓN DE AIRE
La cantidad de presión de aire requerida
depende del tamaño de los fijadores y del
material de la pieza de trabajo.
Comienza por comprobar la profundidad de
clavado disparando un clavo de prueba hacia
una pieza de trabajo del mismo material
utilizado para el trabajo real.
Dispara un fijador de prueba con la presión de
aire configurada a 6,20-6,55 bar. Aumenta o
reduce la presión de aire para hallar la
configuración más baja posible para realizar el
trabajo con resultados uniformes.
Es posible que se pueda lograr la profundidad
deseada ajustando únicamente la presión de
aire.
AJUSTE DE PROFUNDIDAD
La profundidad de disparo de los sujetadores
es ajustable. Para ajustar la profundidad, utilice
la rueda de ajuste de profundidad de disparo (F)
en la herramienta.
1.
Desconecta la herramienta de la fuente de
aire.
Gire la rueda de profundidad hacia la
2.
izquierda o hacia la derecha para cambiar
la profundidad de disparo.
3.
Después reconecta la fuente de aire a la
herramienta.
Dispare un clavo de prueba luego de
4.
realizar cada ajuste hasta establecer la
profundidad deseada.
20-Sp 21-Sp
HTTP://WWW.FREEMANTOOLS.COM 1-888-669-5672 HTTP://WWW.FREEMANTOOLS.COM 1-888-669-5672

MODEL: PFS16 MODEL: PFS16
Desconecta la herramienta de la fuente de
Rueda de
Demasiado
profundo
Gire el pomo de ajuste en contrario al de las agujas del
reloj
Demasiado
poco profundo
Gire el pomo de ajuste en el sentido de las agujas del reloj
ajuste (H)
Al ras
Rueda de
ajuste (H)
Al ras
PRECAUCIÓN:
Se recomienda probar la profundidad en
una pieza de trabajo de desecho para
determinar la profundidad requerida
para la aplicación. Para determinar la
profundidad de disparo, primero ajuste
la presión de aire y dispare un sujetador
de prueba. Nunca supere los 6,89 bar.
CÓMO ACTIVAR LA HERRAMIENTA
( MODO DE ACCIÓN SECUENCIAL SIMPLE)
La herramienta está diseñada especialmente
para el modo secuencial simple. Este modo
requiere que se jale el gatillo cada vez que se
dispara un sujetador. Se puede accionar la
herramienta presionando el elemento de
contacto de trabajo contra la superficie de
trabajo seguido de la presión del gatillo.
Se debe liberar el gatillo para reiniciar la
herramienta antes de que se dispare otro
sujetador.
!
ADVERTENCIA:
Durante el uso normal la herramienta se
rebobinará de inmediato luego de
accionar un sujetador. Esta es una
función normal de la herramienta. No
i n t en te ev i ta r l a r e bob i n ac ión
sosteniendo la herramienta en contra del
funcionamiento. La restricción para
rebobinar puede provocar que se
accione un segundo sujetador desde la
herramienta. Sujete la manija firmemente
y permita que la herramienta realice el
trabajo. No seguir esta advertencia
pue de p rovo c ar grave s le s iones
personales.
MANTENIMIENTO
!
ADVERTENCIA:
A n t e s d e i n s p e c c i o n a r, d a r
mantenimiento y limpiar:
◆Desconecta la herramienta de la fuente
de aire.
◆Vacía el cargador por completo.
FUNCIÓN ANTIPOLVO
Todas las herramientas vienen con un tapón
antipolvo en el conector de aire; verifícalo si lo
tienes después de desempacar la herramienta.
Mantén el tapón antipolvo para cubrir el
conector de aire.
LUBRICACIÓN
Frecuente, pero la lubricación es necesaria
para un mejor rendimiento luego de periodos
de uso prolongados. Si se agrega aceite a la
herramienta a través de la conexión de la línea
de aire se lubricarán las piezas internas.
1.
aire, a agre g u e lubricantes para
herramientas.
2. Gire la herramienta de forma tal que la
entrada de aire dé hacia arriba. Coloque 2 a
3 gotas d eac eite neumá tico de la
herramienta de la cerradura en la entrada
de aire. No utilices aceite detergente ni
aditivos puesto que estos Lubricantes
causarán el desgaste acelerado de los
sellos y amortiguadores de la herramienta,
lo que resultará en el mal funcionamiento
de la misma y elevará la frecuencia del
mantenimiento.
3.
Después de agregar el aceite, haga
funcionar la herramienta por un breve
periodo. Limpie el exceso de aceite de la
salida de la cubierta.
PRECAUCIÓN:
Lubrica la herramienta únicamente con
los lubricantes especificados.
LIMPIEZA
Evita el uso de solventes para limpiar las piezas
plásticas.
La mayoría de los plásticos pueden dañarse
con facilidad al usar varios tipos de solventes
comerciales. Usa paños limpios para limpiar la
suciedad, polvo, grasa, etc.
!
ADVERTENCIA:
En ningún momento dejes que líquidos
para freno, gasolina, productos a base de
petróleo, aceites penetrantes, etc. entren
en contacto con las piezas plásticas.
Estos químicos pueden dañar, debilitar o
destruir el plástico, lo que puede provocar
lesiones graves.
OPERACIÓN EN CLIMAS FRÍOS
En caso de operación en climas fríos, cerca o
debajo del punto de congelamiento, la
humedad en la línea de aire puede congelarse
evitando el funcionamiento de la herramienta.
Recomendamos usar lubricantes para
herramientas neumáticas o un anticongelante
permanente (glicol de etileno) como lubricante
para climas fríos.
PRECAUCIÓN:
No almacenes la herramienta en un
ambiente de clima frío para evitar la
formación de escarcha o hielo sobre las
válvulas y mecanismos operativos de la
herramienta, pues la misma podría
dejar de funcionar.
22-Sp 23-Sp
HTTP://WWW.FREEMANTOOLS.COM 1-888-669-5672 HTTP://WWW.FREEMANTOOLS.COM 1-888-669-5672

MODEL: PFS16 MODEL: PFS16
CONEXIÓN RECOMENDADA
El compresor de aire debe ser capaz de
1.
mantener un mínimo de 4,14 bar mientras
la herramienta está en uso. Un suministro
inadecuado de aire puede causar una
pérdida de potencia y un clavado desigual.
.2
Se puede usar un lubricador para
proporcionar circulación de aceite en toda
la herramienta. Se puede usar un filtro
para retirar las impurezas líquidas y
sólidas, las que pueden oxidar piezas
internas de la herramienta o hacer que
éstas se apelmacen.
3.
Siempre u s e mangueras d e a i re
comprimido con una clasificación de
presión de trabajo igual o superior a la
presión de la fuente de alimentación en
caso que el regulador falle, o de bar, 10,34
el que sea mayor. Use mangueras de aire
co mprimido de 3/8” para (9 ,5mm)
distancias de hasta 15,24 m y use un
acoplador de conexión rápida de 3/8”
(9,5 m m ) e n l a man g u era d e a i re
comprimido.
4.
Use un regulador de presión en el
compresor con una presión de trabajo de
0 a 8,62 bar. Se necesita un regulador de
presión que controle la presión de trabajo
de la herramienta entre 4,14 bar y 6,89
bar.
PRECAUCIÓN:
El compresor de aire debe ser capaz de
mantener un mínimo de bar 4,14
mientras la herramienta está en uso. Un
suministro inadecuado de aire puede
causar una pérdida de potencia y un
clavado desigual.
!
ADVERTENCIA:
No conectes la herramienta a un
compresor de aire que pueda exceder
las 13,79 bar, La herramienta podría
explotar y posiblemente provocar
lesiones.
SOLUCIÓN DE PROBLEMAS
!
ADVERTENCIA:
Deje de utilizar inmediatamente la herramienta si se presenta alguno de los problemas
descritos a continuación, de lo contrario podrían ocurrir lesiones personales graves.
Cualquier reparación o reemplazo debe llevarse a cabo por un técnico calificado o un
centro de servicio autorizado.
PROBLEMA CAUSA POSIBLE ACCIONES CORRECTIVAS
Fuga de aire en el
de la válvula del gatillo.
Fuga de aire entre
el armazón y el borde.
Fuga de aire entre el
armazón y la cubierta.
La herramienta no
puede funcionar.
Las juntas tóricas en el armazón de la
válvula del gatillo están dañadas.
1. Hay tornillos flojos en el armazón.
2. Juntas tóricas dañadas.
3. Protector dañado.
1. Tornillos sueltos.
2. Empaquetadura dañada.
1. Nail atascado en la nariz.
2. Bajo las uñas desencadenando
anti-fuego seco mecanismo.
3. La suciedad en la pieza de la nariz.
4. Revista dañada o atascada evita
alimentar las uñas.
5. Flujo de aire inadecuado.
6. Desgaste de la junta tórica en el
pistón o falta de lubricación.
7. Junta tórica dañada en la válvula
de gatillo.
Cambie las juntas tóricas.
1. Apriete los tornillos.
2. Cambie las juntas tóricas.
3. Cambie el protector.
1.Apriete los tornillos.
2. Cambie la empaquetadura.
1. Borrar el clavo atascado.
2. Cargue más clavos.
3. Canal de accionamiento claro.
4. Reemplace o limpie la revista.
5. Verifique el suministro de aire
adecuado.
6. Cambie y lubrique las juntas
tóricas.
7. Reemplace el kit de la válvula
de gatillo.
Acople
rápido
Conector rápido
Manguera
de aire
Conector
rápido
Acople
rápido
Lubricador
Regulador
Filtro
Compresor
La herramienta pierde
velocidad o potencia.
Los sujetadores se
atascan en la
herramienta.
!
ADVERTENCIA:
Use sólo piezas de repuesto autorizadas por Freeman. Si tiene preguntas llame al 1-888-669-
1. lubricación inadecuada.
2. Suministro de aire insuficiente.
3. La herramienta no está configurada
correctamente.
1. sujetadores incorrectos.
2. sujetadores dañados.
3. Los tornillos de la revista o nariz
están sueltos.
4. El conductor está dañado.
5672 o visite nuestro sitio Web en http://www.freemantools.com
1. Lubricar la herramienta.
2. Verificar el suministro de aire
adecuado.
3. Ajuste el AJUSTE DE
PROFUNDIDAD rueda, o quita
NON-MARRING almohadilla.
1. Verifique que los sujetadores
tengan el tamaño correcto.
2. Limpie y reemplace los sujetadores.
3. Apretar los tornillos.
4. Reemplace el controlador.
24-Sp 25-SpHTTP://WWW.FREEMANTOOLS.COM 1-888-669-5672 HTTP://WWW.FREEMANTOOLS.COM 1-888-669-5672

MODEL: PFS16 MODEL: PFS16
PIEZAS DESGASTADAS
Puede pedir piezas de repuesto en nuestro sitio Web: http://www.freemantools.com
GARANTÍAS DE LOS PRODUCTOS PGP INC.
Garantía de pistola neumática para clavos Freeman
Garantía de 7 años para herramientas profesionales
la garantía limitada para herramientas Freeman se extiende en forma exclusiva al comprador
original del producto Freeman, comienza en la fecha de compra y excluye todas las piezas de
desgaste. Durante el período de garantía Prima Global Products, Inc. (PGP) garantiza expresamente
que el producto Freeman está libre de defectos de material y mano de obra con sujeción a las
excepciones y limitaciones contenidas en el presente. A su elección, PGP reparará, remplazará u
ofrecerá un reembolso completo por un producto Freeman que tenga un defecto de material o
mano de obra.
Garantía de 90 días para piezas de desgaste
la garantía limitada para piezas de desgaste se extiende en forma exclusiva al comprador original
del producto Freeman, comienza en la fecha de compra e incluye las hojas guías, los protectores,
juntas tóricas, pistones, aros de pistón y empaquetaduras. Durante el período de garantía PGP
expresamente garantiza que el producto Freeman está libre de defectos de material y mano de
obra con sujeción a las excepciones y limitaciones contenidas en el presente. A su elección, PGP
reparará, remplazará u ofrecerá una reembolso completo por un producto Freeman que tenga un
defecto de material o mano de obra.
PARA HACER UN RECLAMO DE GARANTÍA SE REQUIERE EL ORIGINAL DEL RECIBO O PRUEBA
DE COMPRA QUE EMITIÓ EL VENDEDOR DONDE SE INDIQUE LA FECHA DE COMPRA. También
se necesita registrar la garantía lo que se podrá hacer a través del proceso de registro de producto
en línea en www freemantools com, seleccione SOPORTE, luego REGISTRO DE PRODUCTO. . .
Para hacer un reclamo de garantía, el comprador original deberá enviar a PGP o a uno de sus
centros de servicios autorizados la Pistola para Clavos Freeman, franqueo postal prepagado y
garantizado, incluyendo la prueba de compra. Para cualquier consulta llame al 1-888-669-5672. No
se hará cobro alguno por las reparaciones que estén cubiertas por la presente garantía, con
excepción del costo del franqueo postal y los requisitos de seguro.
EN LA PRESENTE GARANTÍA NO SE DA NINGUNA OTRA GARANTÍA, ORAL O ESCRITA,
EXPRESA O IMPLÍCITA, QUE NO SEA LA QUE SE INDICA LÍNEAS ARRIBA EN RELACIÓN A
ESTE PRODUCTO FREEMAN. TODA GARANTÍA IMPLÍCITA TENDRÁ UNA DURACIÓN
LIMITADA AL PERÍODO DE GARANTÍA APLICABLE QUE SE MENCIONA AQUÍ. ALGUNOS
ESTADOS NO PERMITEN LIMITACIONES SOBRE CUÁNTO TIEMPO DURA UNA GARANTÍA
IMPLÍCITA, POR LO QUE LO AQUÍ CONSIGNADO PODRÍA NO APLICARSE A SU CASO. SUS
RECURSOS LEGALES SE LIMITAN ÚNICA Y EXCLUSIVAMENTE A LO AQUÍ CONSIGNADO.
EN NINGÚN CASO PGP SERÁ RESPONSABLE POR DAÑOS INDIRECTOS, FORTUITOS O
CUANTIFICABLES, POR LO QUE LA LIMITACIÓN O EXCLUSIÓN AQUÍ CONTENIDA PUEDE
NO APLICARSE A SU CASO. EN NINGÚN CASO, SEA COMO RESULTADO DE UN
INCUMPLIMIENTO DE CONTRATO, DE GARANTÍA, AGRAVIO (INCLUYENDO NEGLIGENCIA) U
OTRO, LA RESPONSABILIDAD DE PGP EXCEDERÁ EL PRECIO DEL PRODUCTO QUE DIO
ORIGEN AL RECLAMO DE GARANTÍA O A LA RESPONSABILIDAD. TODA OBLIGACIÓN
RELACIONADA CON EL USO DE ESTE PRODUCTO TERMINARÁ AL VENCIMIENTO DEL
PERÍODO DE GARANTÍA AQUÍ ESPECIFICADO. NINGÚN EMPLEADO O REPRESENTANTE DE
PGP, O CUALQUIER OTRO AGENTE O DISTRIBUIDOR, ESTÁ AUTORIZADO A REALIZAR
CAMBIOS O MODIFICACIONES A ESTA GARANTÍA.
La presente garantía le da al comprador derechos legales específicos. El comprador podría tener
otros derechos que varían de un estado a otro.
ESTAS GARANTíAS ESTÁN SUJETAS A CAMBIO SIN PREVIO AVISO.
Exclusiones de la garantía
Esta garantía no se aplicará en ninguno de los siguientes casos:
Cuando se hayan hecho, o intentado hacer, reparaciones o modificaciones por otros o cuando
se haya usado sin autorización piezas o accesorios no conformes.
Cuando se requiera hacer reparaciones debido al desgaste lógico y normal.
Cuando se haya usado inadecuadamente la pistola para clavos o no se haya operado en forma
apropiada o no se le haya dado el mantenimiento que correspondía, incluyendo: no usar aire
comprimido regulado, seco y limpio a la presión recomendada; accidentes provocados por uso
del producto después de una falla parcial.Freeman
El producto se usa comercialmente en líneas de ensamblaje o de producción. El Freeman
producto está diseñado para ser usado por personas particulares y es por eso que Freeman
esta garantía no se extiende a usos comerciales.
26-Sp 27-SpHTTP://WWW.FREEMANTOOLS.COM 1-888-669-5672 HTTP://WWW.FREEMANTOOLS.COM 1-888-669-5672

MODÈLE: PFS16
MODÈLE: PFS16
CL TURE AGRAFEUSE
Ô
CL TURE AGRAFEUSE
Ô
CL TURE AGRAFEUSE Ô
DE CALIBRE 16
DE CALIBRE 16
DE CALIBRE 16
RÈGLES DE S CURIT G N RALESÉ É É É
D BALLAGEÉ
CARACT RISTIQUESÉ
UTILISATION
RÉGLAGE DE L’ÉVENT
CHARGEMENT DES ATTACHES
DÉCHARGEMENT DES ATTACHES
DÉGAGER LES BLOCAGES
RÉGLAGE DE LA PRESSION D’AIR
RÉGLAGE DE LA PROFONDEUR
DÉCLENCHEMENT DE L’OUTIL
ENTRETIEN
RACCORD RECOMMANDÉ
D PANNAGEÉ
PIÈCES D’USURE
GARANTIES
!
AVERTISSEMENT:
P30
P33
P34
P34
P34
P35
P36
P36
P36
P37
P37
P38
P40
P41
P41
HTTP://WWW.FREEMANTOOLS.COM
1-888-669-5672
PRIME GLOBAL PRODUCTS, INC.
AVERTISSEMENT:
Tout manquement aux mises en garde pourrait se solder par
MORT D’HOMME OU DES BLESSURES GRAVES.
CONSERVEZ CE MANUEL POUR RÉFÉRENCE ULTÉRIEURE.
Les mises en garde et les précautions dont il est question dans le présent manuel ne couvrent
pas toutes les conditions et les situations possibles. L’utilisateur doit comprendre qu’il est
impératif de faire preuve de jugement et de prudence.
CONSERVEZ CE MANUEL
!
●
Gardez ce manuel qui contient les
avertissements de sécurité, les précautions
à prendre, le mode de fonctionnement, les
inspections et l’entretien à effectuer. Gardez
ce manuel et le reçu dans un endroit sec et
sécuritaire pour référence ultérieure.
HTTP://WWW.FREEMANTOOLS.COM 1-888-669-5672
AVERTISSEMENT:
Pour éviter tout risque de blessure
grave, ne tentez pas d’utiliser cet outil
avant d’avoir lu entièrement le manuel
et de l’avoir compris. Conservez ce
manuel et consultez-le fréquemment
pour une utilisation sécuritaire par
toute personne qui utilise cet outil.
29-Fr

MODÈLE: PFS16
MODÈLE: PFS16
SYMBOLES
●
Dans le présent manuel, sur les étiquettes, les emballages et tous les autres documents
d’information fournis avec cet outil, les symboles et leur signification décrivent les niveaux
de risque associés à cet outil :
SYMBOLES
!
!
RÈGLES DE SÉCURITÉ
GÉNÉRALES
INSTRUCTIONS RELATIVES AU RISQUE
D’INCENDIE, À L’ÉLECTROCUTION OU AU
RISQUE DE BLESSURES.
!
AVERTISSEMENT:
Lors de l’utilisation des outils, il est
toujours essentiel de suivre les
mesures de sécurité de base, y compris
celles qui suivent:
PROPOSITION 65 DE LA CALIFORNIE
!
AVERTISSEMENT:
Ce produit peut vous exposer à des
produits chimiques, y compris le
plomb, ce qui est connu de l’État de
Californie pour causer le cancer, des
anomalies congénitales ou d’autres
troubles de la reprocuction. Pour de
plus d’informations, allez à
www.P65Warnings.ca.gov.
ZONE DE TRAVAIL
Garder la zone de travail propre et bien
●
éclairée. Des établis encombrés et des
endroits sombres présentent des risques
d’accidents.
N’utilisez pas l’outil en présence de
●
vapeurs explosives (comme celles
dégagées par des liquides, des gaz ou
des poussières inflammables). Les
étincelles générées par l’outil peuvent
enflammer les liquides, les gaz ou les
poussières inflammables.
Éloignez les curieux, les enfants et les
●
visiteurs de la zone de travail lorsqu’on
utilise l’outil. Une distraction peut entraîner
une utilisation inappropriée et causer des
blessures.
●
Évitez les déclenchements accidentels.
INDICATEUR SIGNIFICATION
AVERTISSEMENT :
ATTENTION :
ATTENTION :
Indique une situation potentiellement dangereuse qui, si elle n’est pas
évitée, pourrait se solder par mort d’homme ou des blessures graves.
Indique une situation potentiellement dangereuse qui, si elle n’est pas
évitée,pourrait se solder par des blessures mineures ou modérées.
(Aucun symbole) Indique une situation qui pourrait poser des risques
de dommages matériels.
Afin d’éviter le déclenchement accidentel,
soyez toujours prudent. Ne pointez jamais
l’outil vers vous ou vers d’autres personnes,
qu’il contienne ou non des attaches.
SÉCURITÉ PERSONNELLE
N’enfoncez pas un clou par-dessus un
●
autre clou. Le clou pourrait dévier et heurter
quelqu’un ou provoquer un mouvement
brusque de l’outil, ce qui peut entraîner des
risques de blessure.
Retirez votre doigt de la gâchette lorsque
●
vous n’êtes pas en train d’enfoncer une
fixation. Ne transportez jamais l’outil en
gardant votre doigt sur la gâchette; l’outil
pourrait projeter une fixation.
Portez toujours des lunettes de sécurité.
●
L’opérateur et les autres personnes se
trouvant dans la zone de travail doivent
toujours porter des lunettes de sécurité avec
des écrans de protection latéraux
conformes aux stipulations de l’ANSI. Les
lunettes de protection assurent une
protection contre les attaches et les débris
pouvant causer des blessures graves aux
yeux.
Po rte z toujours des pro tecterus
●
auriculaires lorsque vous utilisez l’outil.
Une exposition prolongée à des bruits de
grande intensité risque de causer une perte
auditive.
Portez un équipement de protection. Il faut
●
utiliser un masque antipoussières, des
chaussu res d e sécuri té à semell e
antidérapante et un casque, en fonction des
conditions de travail. Portez un masque
complet si vous produisez de la limaille ou
des copeaux de bois.
Portez des vêtements appropriés. Évitez
●
de porter des vêtements amples ou des
bijoux. Attachez les cheveux longs. Gardez
les cheveux, les vêtements et les gants à
l’écart des pièces mobiles. Les vêtements
amples, bijoux ou cheveux longs pourraient
se prendre dans les pièces mobiles.
Demeurez vigilant, faites attention à ce
que vous faites et faites preuve de
jugement lorsque vous utilisez un outil
électrique. N’utilisez pas l’outil si vous êtes
fatigué ou lorsque vous avez pris de la
drogue, de l’alcool ou des médicaments. De
graves blessures peuvent résulter d’un
moment d’inattention lors de l’utilisation de
l’outil.
Évitez les déclenchements accidentels.
Éloignez les doigts de la détente lorsque
vous ne clouez pas, particulièrement
lorsque vous connectez l’outil à la source
d’alimentation en air.
Gardez les pieds au sol et conservez
votre équilibre en tout temps. La stabilité
et un bon équilibre permettent de mieux
contrôler l’outil dans des situations
inattendues. N’utilisez pas l’outil sur une
échelle ou sur une surface instable. La
stabilité sur une surface solide permet de
mieux contrôler l’outil dans des situations
inattendues.
Assurez-vous que le tuyau n’est pas
obstrué ou partiellement bouché. Des
tuyaux emmêlés ou enchevêtrés risquent de
vous faire perdre l’équilibre ou tomber,
d’endommager l’outil et de causer des
blessures.
Ne tendez pas trop les bras. Gardez les
pieds au sol et conservez votre équilibre en
tout temps. La stabilité et un bon équilibre
permettent de mieux contrôler l’outil dans
des situations inattendues.
N’attachez pas le tuyau ou l’outil à votre
corps.
Attachez le tuyau à la structure pour
réduire le risque de perte d’équilibre si le
tuyau bougeait.
Assumez toujours que l’outil contient des
attaches.
Ne pointez jamais l’outil vers vous ou vers
d’autres personnes, qu’il contienne ou non
des attaches.
Lavez vos mains après avoir manipulé
l’o u til. C e t outil ou s o n cord o n
d’alimentation peut contenir des produits
chimiques reconnus par l’État de californie
comme causant descancers et des
malformations congénitales ou comme étant
nocifs au système reproducteur.
UTILISATION ET ENTRETIEN DE L OUTIL’
Apprenez à connaître cet outil. Lisez
●
attentivement le manuel, familiarisez-vous
avec les applications et les limites, ainsi
qu’avec les risques potentiels liés à cet outil.
N’utilisez que les attaches recommandées
●
pour votre modèle. Chargez correctement
les attaches et n’utilisez pas d’attaches
inappropriées.
Vérifiez l’alignement et l’absence de jeu
●
des pièces mobiles, le degré d’usure des
pièces ainsi que tout autre facteur
s u s c e p tib l e d e n u i r e a u b on
fonctionnement de l’outil. S'il est
endommagé, faites réparer l’outil avant de
l’utiliser. Des outils mal entretenus sont la
cause de nombreux accidents.
Prenez soin de vos outils. Gardez vos
●
outils propres. Un outil bien entretenu réduit
le risque de blocage et est plus facile à
contrôler.
Rangez l’outil hors de la portée des
●
enfants et de toute autre personne qui
n’en connaît pas le fonctionnement. Les
outils sont dangereux dans des mains
inexpérimentées.
Vérifiez le fonctionnement de l’outil avant
●
de l’utiliser. N’utilisez pas l’outil si le
mécanisme de contact ne fonctionne pas.
Cela pourrait causer l’éjection accidentelle
d’une attache.
N’utilisez pas l’outil si la détente ne
●
fonctionne pas. Tout outil dont la détente
ne fonctionne pas est dangeruex et doit être
réparé.
Ne forcez pas l’outil. Utilisez le bon outil
●
pour votre application. L’outil approprié fera
mieux le travail et de façon plus sécuritaire à
la vitesse pour laquelle il a été conçu.
Utilisez des pinces ou un autre moyen
●
pratique de tenir en place et de supporter
l’ouvrage sur une plateforme stable.
Maintenir l’outil avec votre main ou contre
votre corps est instable et risque de causer
la perte de contrôle de l’outil.
●
Assurez-vous que les poignées sont
sèches, propres et exemptes d’huile et de
graisse. Utilisez toujours un chiffon propre
pour le nettoyage. N’utilisez pas de liquide
de frein, d’essence, de produits à base de
pétrole ou tout autre diluant puissant pour
nettoyer votre outil.
N’utilisez pas l’outil comme un marteau.
●
N’utilisez jamais cet outil lorsqu’une
●
attache est dirigée vers autre chose
qu’une pièce à travailler.
30-Fr
HTTP://WWW.FREEMANTOOLS.COM 1-888-669-5672
HTTP://WWW.FREEMANTOOLS.COM 1-888-669-5672
31-Fr

MODÈLE: PFS16
MODÈLE: PFS16
N’utilisez jamais d’essence ou d’autres
●
liquides inflammables pour nettoyer l’outil.
N’utilisez jamais l’outil en présence de
liquides ou de gaz inflammables. Une
étincelle pourrait enflammer la vapeur, ce
qui risquerait de causer une explosion qui
pourrait se solder par mort d’homme ou des
blessures graves.
Il ne faut pas retirer, altérer, ou autrement
●
rendre inutilisables le bouton de
verrouillage de la détente ou la
détente.N’utilisez pas un outil qui a été
modifié de quelque façon que ce soit. Cela
pourrait se solder par mort d’homme ou des
blessures graves.
Ne touchez la détente que lorsque vous
●
enfoncez des attaches. Ne fixez pas le
tuyau d’air comprimé à l’outil et ne
transportez jamais l’outil avec votre doigt
sur la détente. L’outil pourrait éjecter une
attache, ce qui pourrait se solder par mort
d’homme ou des blessures graves.
Actionnez également le bouton de
verrouillage lorsque vous n’utilisez pas l’outil.
Attachez toujours à l’outil un raccord de
●
façon à ce que tout l’air comprimé soit
retiré de l’outil lorsque le joint
d’accouplement est déconnecté.N’utilisez
pas de clapet de non-retour ou tout autre
tuyau qui permet à l’air de demeurer dans
l’outil. Cela pourrait se solder par mort
d’homme ou des blessures graves.
Ne placez jamais vos mains ou toute
●
autre partie du corps dans la zone
d’éjection des attaches de l’outil. L’outil
pourrait éjecter une attaché, ce qui pourrait
se solder par mort d’homme ou des
blessures graves.
Ne transportez jamais l’outil en le tenant
●
par le tuyau d’air. Ne tirez jamais sur le
tuyau p our déplacer l’o util ou un
compresseur. Gardez les tuyaux éloignés
des sources de chaleur, de l’huile et des
bords coupants. Remplacez tout tuyau
endommagé, fragile ou usé. Cela pourrait
causer des dommages à l’outil ou des
blessures.
Assumez toujours que l’outil contient des
●
attaches. Votre outil est un instrument de
travail, pas un jouet.
Gardez toujours les autres à une distance
●
sécuritaire de la zone de travail en cas
d’éjection accidentelle d’attaches. Ne
pointez jamais l’outil vers vous ou vers
d’autres personnes, qu’il contienne ou non
des attaches. Le déclenchement accidentel
de l’outil pourrait se solder par mort
d’homme ou des blessures graves.
Ne laissez pas tomber l’outil et ne le
●
lancez pas. Faire tomber ou lancer l’outil
pourrait l’endommager et le rendre
inutilisable ou non sécuritaire. Si l’outil est
tombé ou a été lancé, vérifiez qu’il ne
présente aucune pièce pliée, fissurée ou
brisée et qu’il n’y a pas de fuite d’air. Cessez
d’utiliser l’outil et faites-le réparer afin
d’éviter les blessures graves.
Évitez d’utiliser l’outil lorsque le magasin
●
est vide. Cela entraîne l’usure accélérée de
l’outil.
Nettoyez et vérifiez tous les tuyaux d’air
●
et raccords avant de connecter l’outil à
une source d’alimentation en air.
Remplacez tout tuyau ou raccord
endommagé ou usé. Négliger de le faire
pourrait contribuer à réduire la performance
ou la durabilité de l’outil.
N’utilisez pas l’outil s’il a une fuite d’air ou
●
s’il ne fonctionne pas correctement.
N’utilisez pas l’outil si aucune étiquette
●
d’avertissement lisible n’y est apposée.
Ne portez jamais l’outil par lex tuyays
●
d’air.
ENTRETIEN DE L’OUTIL
N’util i s e z que des a c cessoires
●
recommandés par le fabricant pour votre
modèle d’outil.
L’utilisation de pièces non autorisées ou le
●
non-respect des instructions d’entretien
pourrait causer un risque de blessure.
N’utilisez que les lubrifiants fournis avec
●
l’outil ou précisés par le fabricant.
L’outil ne doit être réparé que par du
●
personnel qualifié.
UTILISATION
N’enfoncez pas d’attaches près du bord
●
de la pièce. La pièce risque de se fendre,
de faire ricocher l’attache et de blesser
l’opérateur ou une autre personne.
Ne déplacez pas l’outil avec le doigt sur la
●
dé ten te. Cel a po urra it caus er un
déclenchement accidentel. Le choix de la
méthode de déclenchement est important.
Consultez le manuel pour connaître les
différentes méthodes de déclenchement.
Dans le cadre d’une utilisation normale,
●
l’outil aura du recul immédiatement après
avoir enfoncé une attache. C’est une
fonction normale de l’outil. Ne tentez pas
d’empêcher le recul en retenant l’outil contre
l’ouvrage. La restriction du recul pourrait
causer l’éjection d’une seconde attache.
Tenez fermement la poignée et laissez l’outil
faire le travail. Ne pas tenir compte de cette
mise en garde pourrait entraîner des
blessures graves.
●
N’enfoncez pas d’attaches sur d’autres
attaches ou avec l’outil à un angle trop
aigu. Ceci pourrait causer le ricochet des
attaches et provoquer des blessures.
●
N’actionnez pas l’outil à moins de vouloir
enfoncer une attache dans la pièce.
●
Utilisez toujours l’outil avec précaution :
Res p e c te z vot re o ut i l en t a nt
qu’instrument de travail.
Évitez de jouer avec.
N’appuyez jamais sur la détente à moins
que l’embout ne soit dirigé vers l’ouvrage.
Gardez les autres à une distance
sécuritaire de l’outil lorsque vous l’utilisez.
Une activation accidentelle pourrait se
produire et entraîner des blessures.
ALIMENTATION EN AIR ET CONNEXIONS
Le connecteur de l’outil ne doit pas
●
retenir la pression lorsque l’alimentation
en air est déconnectée. Si un mauvais
raccord est utilisé, l’outil pourrait demeurer
chargé d’air après avoir été débranché et
être en mesure d’enfoncer une attache
même après le débranchement du tuyau
d’air, pouvant ainsi entraîner des blessures.
N’utilisez aucun type de gaz réactifs,
●
notamment l’oxygène et les gaz
combustibles comme source d’énergie.
N'utilisez que de l’air comprimé filtré,
●
lubrifié et contrôlé. L’utilisation d’un gaz
réactif plutôt que d’air comprimé pourrait
causer l’explosion de l’outil qui pourrait se
solder par mort d’homme ou des blessures
graves.
N’utilisez qu’une source d’alimentation en
●
air comprimé dont la pression est
contrôlée afin de limiter la pression d’air
de l’outil. La pression contrôlée ne doit pas
excéder 689 kPa. Dans l’éventualité d’une
défaillance du régulateur, la pression de
l’outil ne doit pas excéder 1379kPa. L’outil
pourrait exploser, ce qui pourrait entraîner
mort d’homme ou des blessures graves.
Dé connectez to ujours la source
d’alimentation en air :
Avant de procéder au déchargement ou
de faire des ajustements.
Lorsque vous entretenez l’outil.
Lorsque vous libérez des attaches
coincées.
Lorsque vous touchez le palpeur de
sécurité.
Lorsque l’outil n’est pas utilisé.
Lorsque vous transportez l’outil d’une aire
de travail à une autre.
Ces précautions permettent de réduire les
risques de blessure.
CHARGEMENT DE L’OUTIL
Ne chargez pas d’attaches dans l’outil
●
lorsque l’une des commandes est
activée.
Ne placez jamais vos mains ou toute
●
autre partie du corps dans la zone
d’éjection des attaches de l’outil.
Ne p o i n te z ja m a i s l ’ o u t i l v e r s
●
quiconque.
●
N’appuyez pas sur la détente ni sur la
pièce à travailler puisque cela pourrait
causer une activation accidentelle et
causer des blessures.
!
AVERTISSEMENT:
Les mises en garde et les précautions
dont il est question précédemment
dans ce manuel ne couvrent pas toutes
les c onditions et les situatio ns
possibles. L’utilisateur doit comprendre
qu’il est impératif de faire preuve de
jugement et de prudence.
DÉBALLAGE
Cet outil a été expédié entièrement
●
assemblé.
Retirez soigneusement l’outil et les
●
accessoires de la boîte.
Inspectez attentivement l’outil pour
●
vous a s s u r e r q u ’ a u cun b r i s o u
do mma ge n’ est survenu pen dan t
l’expédition.
Ne jetez pas l’emballage tant que vous
●
n’avez pas inspecté attentivement
l’outil et que vous ne l’avez pas utilisé
de façon satisfaisante.
●
En cas de pièces manquantes ou
endommagées, veuillez composer le
1-888-669-5672.
32-Fr
HTTP://WWW.FREEMANTOOLS.COM 1-888-669-5672 HTTP://WWW.FREEMANTOOLS.COM 1-888-669-5672
33-Fr

MODÈLE: PFS16
!
AVERTISSEMENT:
En ca de pièces manquantes, n’utilisez
pas l ’ o u t i l a v ant d e l e s a v oir
remplacées. Tout manquement peut
entraîner des blessures graves .
!
AVERTISSEMENT:
Ne tentez pas de modifier cet outil ou
de crée r des acces soir es d ont
l’utilisation n’est pas recommandée
avec cet outil. Toute altération ou
modification est considérée comme une
utilisation abusive et risque de créer
une situation dangereuse pouvant
entraîner des blessures graves.
CARACTÉRISTIQUES
CONSOMMATION D’AIR : 0.18 m /min avec
100 attaches par minute à 621kPa
ADMISSION D’AIR : 6,3 mm (¼ po) NPT
CAPACITÉ DU MAGASIN :
100 attaches de calibre 16
POIDS : 1,97 kg
PRESSION MAXIMALE : 689 kPa
PLAGE DE PRESSION : 414-689 kPa
TAILLE DE LA ATTACHES:
18 mm (3/4 po) à 25 mm (1 po)
3/4”
7/8”
1”
(16 Calibre)
Compatible avec les clôture agrafes de calibre 16
et génériques
3
18mm
22mm
25mm
CARACTÉRISTIQUES
ÉVENT RÉGLABLE À 360°
Permet à l’utilisateur de diriger l’air
d’échappement loin des visage.
LAME D’ENTRAÎNEMENT UNE PIÈCE
Pour augmenter la durabilité.
CYLINDRE ET MAGASIN EN
ALUMINIUM ANODISÉ
Pour une durabilité supérieure
POIGNÉE À PRISE CONFORTABLE
Pour améliorer le confort et le contrôle.
CORPS CONÇU DE FAÇON
ERGONOMIQUE
Robuste et confortable, ce qui donne un
outil léger, excellent pour une utilisation
prolongée.
PROFONDEUR RÉGLABLE
La profondeur est facilement réglable
pour diverses utilisations.
DÉBLOCAGE RAPIDE
Permet un accès facile à l'occasion d'un
blocage.
UTILISATION
RÉGLAGE DE L’ÉVENT
L’évent réglable sur le couvercle de l’outil
permet de diriger l’évent au besoin. Pour
ajuster la direction, tournez le couvercle de
l’évent dans la direction désirée.
CHARGEMENT DES ATTACHES
1.
R ac co rd e z l ’ o u t i l à l a s ou rc e
d’alimentation en air.
2.
Tirez le Poussoir vers l’arrière jusqu’à ce
que le Broche Poussoir mis dans le Trou
D’arrêt.
3.
Insérez bandes de clous appropriés à
partir du haut de magazine.
MODÈLE: PFS16
4.
Tirez le Poignée Poignée pour obtenir le
Broche Poussoir libéré du Trou D’arrêt
po ur lais ser le Pou sso ir revenir à
déplacer les a t ta c h e s jusqu’à le
mécanisme d’entraînement. Le Poussoir
s’ a r rê te q u an d i l r e p os e c o n tr e
l’extrémité de l’élément de fixation.
Trou Arrêter
Poignée
Poussoir
ri
r
a
l'
rs
e
ez v
r
Ti
Broche Poussoir
Poussoir
Agrafe
(16Ga.)
Trou Arrêter
ant
v
a
l'
s
r
e
v
r
se
Pous
!
AVERTISSEMENT:
L’outil peut se déclencher lorsqu’il est
connecté à la source d’alimentation en
air. Connectez toujours l’outil à la source
d’alimentation en air avant de charger les
attaches afin d’éviter les blessures
pouvant être causées par un cycle
involontaire. Assurez-vous toujours que
le magasin de l’outil est vide au début de
chaque séance de travail et avant de le
connecter à la source d’alimentation en
air.
e
r
è
TIRER
Poignée
Poussoir
!
AVERTISSEMENT:
Ne chargez jamais les attaches lorsque
le contact ou la détente est activé. Cela
pourrait entraîner de graves blessures.
!
AVERTISSEMENT:
N ’ ut i l i s ez q u e l e s f i x a t i o n s
recommandées pour une utilisation avec
cet outil. L’utilisation de fixations qui ne
sont pas conçues expressément pour cet
outil par son fabricant peut entraîner des
risques de blessure ou de dommages à
l’outil.
!
AVERTISSEMENT:
Ne pointez pas l’outil vers vous ou vers
d’autres personnes lorsque vous chargez
les attaches. Tout manquement peut
entraîner des blessures graves.
DÉCHARGEMENT DES ATTACHES
Le déchargement s’effectue à l’inverse du
chargement, à l’exception du fait qu’il faut
déconnecter la source d’alimentation en air
avant de décharger.
!
AVERTISSEMENT:
Déchargez toujours toutes les attaches
avant de le ranger.
!
AVERTISSEMENT:
Déconnectez toujours la source
d’alime n t a t i o n e n a ir avant le
déchargement.
34-Fr
HTTP://WWW.FREEMANTOOLS.COM 1-888-669-5672 HTTP://WWW.FREEMANTOOLS.COM 1-888-669-5672
35-Fr

MODÈLE: PFS16
MODÈLE: PFS16
DÉGAGER LES BLOCAGES
Parfois, une attache se coince dans le
mécanisme de déclenchement de l’outil,
rendant celui-ci inutilisable. Pour retirer une
attache coincée, suivez les étapes ci-dessous :
Déc o nnect e z l ’ outil d e l a sou rce
1.
d’alimentation en air.
Retirez les attaches de l’outil. Négliger de
2.
le faire causera l’éjection d’attaches par
l’avant de l’outil.
Tirez le bouton du Verrou vers le haut et
3.
ouvrez le Recouvrir de nez.
Faites attention de ne pas plier ou
4.
endommager la lame d’entraînement. Au
besoin, utilisez des pinces ou un tournevis
pour dégager l’attache coincée.
Fermez le mécanisme de déblocage et le
5.
verrou.
Reco n n e c t ez l’o u t i l à la s o u r c e
6.
d’alimentation en air.
Remettez les attaches dans l’outil.
7.
Verrou
Recouvrir de nez
!
AVERTISSEMENT:
Assurez-vous que le magasin est vide
avant de décoincer une atache.
!
AVERTISSEMENT:
Déconnectez l’outil de la source
d'alimentation en air chaque fois que
vous décoincez une attache. Après avoir
déconnecté l’outil du compresseur, l’outil
devrait encore contenir suffisamment
d’air pour le déclencher. Après avoir
déconnecté le tuyau d’air, déclenchez
toujours plusieurs fois l’outil dans un
morceau de bois afin de vous assurer
que tout l’air comprimé est expulsé.
RÉGLER LA PRESSION D’AIR
La quantité de pression d’air nécessaire
dépend de la taille des attaches et du
matériau de la pièce.
Testez la profondeur de l’attache éjectée en
enfonçant un clou dans le même type de
matériau que celui utilisé pour le travail.
Enfoncez une attache avec la pression
réglée entre 621 kPa et 655 kPa. Par la suite,
il suffit d’augmenter ou de réduire la
pression d’air pour trouver le réglage le plus
faible qui permettra d’obtenir des résultats
constants.
Il est possible d’obtenir la profondeur voulue
en n’effectuant que des ajustements de la
pression d’air.
RÉGLAGE DE LA PROFONDEUR
La profondeur de clouage des attaches peut
être ajustée. Pour régler la profondeur, utilisez
le bouton de réglage de roue d’ajustement(H)
situé du côté droit de l’outil.
Déconnectez l ’ o u t i l de l a sourc e
1.
d’alimentation en air.
Tournez le bouton de réglage vers la
2.
gauche ou la droite pour modifier la
profondeur de clouage.
Re c o nn ec te z l ’ ou ti l à l a sou r c e
3.
d’alimentation en air.
Éjectez un clou après chaque réglage
4.
jusqu’à l’obtention de la profondeur voulue.
Roue
d ajustement(H)’
Trop profond
Tournez le bouton de réglage de la ajustement dans le
sens contraire des aiguilles d’une montre.
Pas assez
profond
Tournez le bouton de réglage de la ajustement
dans le sens des aiguilles d’une montre.
À ras
Roue
d ajustement’
(H)
À ras
ATTENTION:
Il es t recommandé de tester la
profondeur de clouage sur une pièce
inutili sée afin de dét erminer la
profondeur requise pour l’application.
Pour déterminer la profondeur de
clouage, réglez d’abord la pression d’air,
puis éjectez une attache. Ne dépassez
jamais 689 kPa.
DÉCLENCHEMENT DE L’OUTIL
( MODE DE DÉCLENCHEMENT UNIQUE PAR SÉQUENCE)
L’outil a été spécialement conçu pour un
mode unique par séquence.
Ce mode exige d’appuyer sur la détente
chaque fois pour éjecter une attache. L’outil
peut être activé en appuyant l’élément de
contact contre la surface de travail avant
d’appuyer sur la détente.
La détente doit être r e l â c h é e p o u r
réenclencher l’outil avant de pouvoir éjecter
une autre attache.
!
AVERTISSEMENT:
Durant son utilisation normale,
l’outil subira une force de recul
immédiatement après l’insertion
d'un clou. Il s’agit d’une fonction
normale de l'outil. Ne tentez pas
d’empêcher le recul en retenant
l’outil contre la surface de travail.
Ne pas permettre le recul pourrait
entraîner l’insertion d’un deuxième
clou par l’outil. Tenez fermement la
poignée et laissez l’outil faire le
tr avail. Le non-respect de cet
avertissement pourrait entraîner de
graves blessures.
ENTRETIEN
!
AVERTISSEMENT:
Chaque fois qu’une inspection, qu’un
entretien ou qu’un nettoyage est effectué:
Déconnectez l’outil de la source
d’alimentation en air.
Videz complètement le magasin.
ANTIPOUSSIÈRES
Chaque outil est dote d’un couvercle
antipoussières sur le connecteur à air.
Placez le couvercle antipoussières sur le
connecteur à air lorsque vous n’utilisez pas
l’outil.
LUBRIFICATION
F r éq ue n t, ma i s p a s e x ces s iv e , la
lu brification e st nécessaire pou r une
meilleure performance. Huile pour l’outil
ajouté à travers la connexion add ligne
aérienne va lubrifier les pièces internes.
1.
Débranchez l’alimentation en air de l’outil
afin d’appliquer du lubrifiant.
2.
Tournez l’outil de façon à ce que l’entrée
d’air soit orientée vers le haut. Appliquez 2
ou 3 gouttes d’huile pour outil de fixation
pneumatique dans l’entrée d’air. N’utilisez
pas d’huile détersive, d’additif pour essence
ou d’huile à outil pneumatique. N’ajoutez
pas d’huile détergente ni d’autres additifs :
ces lubrifiants accéléreraient l’usure des
joints et des butoirs de l’outil, ce qui nuirait
à son rendement et augmenterait la
fréquence des entretiens.
36-Fr
HTTP://WWW.FREEMANTOOLS.COM 1-888-669-5672 HTTP://WWW.FREEMANTOOLS.COM 1-888-669-5672
37-Fr

MODÈLE: PFS16
Après avoir ajouté l’huile, raccordez l’outil à
3.
la source d’air et mettez brièvement l’outil
en marche. Essuyez tout excédent d’huile
de la sortie d’air du couvercle.
!
ATTENTION :
Ne lubrifiez l’outil qu’avec les lubrifiants
précisés.
NETTOYAGE
Évitez d’utiliser des solvants pour nettoyer les
pièces de plastique.
La plupart des plastiques risquent d’être
endommagés par l’emploi des différents types
de solvants commerciaux.
Utilisez un chiffon propre pour retirer la saleté,
la poussière, l’huile, la graisse, etc.
!
AVERTISSEMENT:
Le liquide de freins, l’essence, les
produits à base de pétrole, les huiles de
pénétration et autres ne peuvent en
aucun cas entrer en contact avec les
pièces de plastique. Les produits
chimiques peuvent endommager, affaiblir
ou détruire le plastique et ainsi causer
des blessures graves.
!
AVERTISSEMENT:
Ne rangez pas les outils dans un
environnement froid afin d’éviter le
gel ou la formation de glace sur les
v a l v e s d e c om ma nd e e t l e s
méc anis m es d e l’out il, ce q ui
pourrait entraîner une panne.
RACCORD RECOMMANDÉ
Le compresseur doit être en mesure de
1.
maintenir une pression minimale de 414
kPa lorsque l’outil est utilisé. Une
mauvaise alimentation en air pourrait
causer une perte de puissance et un
déclenchement irrégulier.
Un réservoir d’huile peut être utilisé pour
2.
permettre la circulation d’huile dans
l’outil. Un filtre peut être utilisé pour
retirer les impuretés liquides et solides
susceptibles de corroder ou d’encrasser
les pièces internes de l’outil.
U t i l i s e z t o u j ou r s d e s t u y a u x
3.
d’alimentation en air avec une pression
d’air minimale équivalente ou supérieure
à la pression de la source d’alimentation
afi n d ’é v i t er u ne défa i l l a nc e du
régulateur. Ou 10,34 bar, Lequel est plus
élver. Utilisez un tuyau d’air de 9,53 mm
(3/8 po) pouvant aller jusqu’à 15,24 m (50
pi), et utilisez 9,53mm (3/8 po) raccord
rapide sur le tuyau d’air.
Utilisez un régulateur de pression sur le
4.
co m p r es s eu r d ’u n e p re s si o n d e
fonctionnement de 0 à 862 kPa. Un
régulateur de pression est nécessaire
p o ur c o nt r ô l er l a p re s si o n d e
fonctionnement de l’outil entre 414 kPa
et 689 kPa.
MODÈLE: PFS16
ATTENTION:
Le compresseur doit être en mesure
de maintenir une pression minimale
de 414 kPa lorsque l’outil est utilisé.
Une mauvaise alimentation en air
pour r a i t c auser une perte d e
puissance et un déclenchement
irrégulier.
Dispositif
d attache ’
rapide
Raccord à
branchement
rapide
Tuyau
d air’
Raccord à
branchement
rapide
Dispositif
d attache ’
rapide
!
AVERTISSEMENT:
Ne connectez pas l’outil sur un
co mpres seur po uvant d épasser
1379 kPa. L’outil pourrait exploser,
ce qui pou r r ait entr a î ner des
blessures.
Graisseur
Filtre
Compresseur
Régulateur
FONCTIONNEMENT PAR TEMPS FROID
Par gel ou température proche du gel,
l’humidité dans le tuyau d’air peut geler et
nuire au fonctionnement de l’outil. Nous
recommandons d’utiliser un lubrifiant ou un
antigel permanent (éthylèneglycol) pour
outil pneumatique en guise de lubrifiant par
temps froid.
38-Fr
HTTP://WWW.FREEMANTOOLS.COM 1-888-669-5672 HTTP://WWW.FREEMANTOOLS.COM 1-888-669-5672
39-Fr

MODÈLE: PFS16
MODÈLE: PFS16
DÉPANNAGE
!
AVERTISSEMENT:
Cessez immédiatement d’utiliser l’outil si l’un des problèmes suivants survient. Cela
pourrait entraîner des blessures graves. Les réparations et les remplacements doivent
être effectués par du personnel qualifié ou un centre de service autorisé.
PROBLÈME
Fuite d’air au niveau de
la soupape de détente.
Fuite d’air entre le
boîtier et l’embout.
Fuite d’air entre le
boîtier et le couvercle.
L’outil ne peut pas
fonctionner.
L’outil fonctionne au
ralenti ou subit une
perte de puissance.
Des attaches sont
coincées dans l’outil.
!
AVERTISSEMENT:
N’utilisez que des pièces autorisées par Freeman pour la réparation. Si vous avez des
questions, composez le 1-888-669-5672 ou allez sur notre site Web au
http://www.freemantools.com
CAUSE POSSIBLE
Les joints toriques du boîtier de la
soupape de détente sont endommagés.
1.Vis desserrées dans le boîtier.
2.Joints toriques endommagés.
3.Tampons endommagés.
1.Vis desserrées.
2.Garniture endommagée.
1.Nail coincé dans le nez.
2.Low clous déclenchant anti-feu-sec
mécanisme.
3.Dirt dans le morceau de nez.
4.Magazine endommagé ou coincé
Empêche de nourrir les ongles.
5.Débit d'air insuffisant.
6.Joint torique du piston usé ou
lubrification insuffisante.
7.O-ring endommagé sur la valve de
déclenchement.
1.Lubrification inadéquate.
2.Approvisionnement en air insuffisant.
3.L’outil n’est pas configuré
correctement.
1.Les attaches incorrectes.
2.Attaches endommagées.
3.Magazine ou vis de nez sont lâches.
4.Le pilote est endommagé.
MESURES À PRENDRE
Remplacez les joints toriques.
1.Resserrez les vis.
2.Remplacez les joints toriques.
3.Remplacez le tampon.
1.Remplacez les joints toriques.
2.Remplacez le tampon.
1.Effacer le clou coincé.
2.Charger plus de clous.
3.Effacer le canal du lecteur.
4.Remplacer ou nettoyer le magasin.
5.Vérifiez l'approvisionnement en air
adéquat.
6.Remplacez et lubrifiez les joints
toriques.
7.Remplacer le kit de soupape de
détente.
1.Lubrifiez l’outil.
2.Vérifiez l’approvisionnement en air
adéquat.
3.Ajustez l’AJUSTEMENT DE
PROFONDEUR roue, ou enlever
NON-MARRING tampon.
1.Vérifiez que les fixations sont
correctes Taille.
2.Nettoyez et remplacez les fixations.
recommandées.
3.Resserrez les vis.
4.Remplacer le pilote.
PIÈCES D’USURE
Des pièces de rechange peuvent être commandées sur notre site Web :
http://www.freemantools.com
GARANTIES DES PRODUITS PGP INC.
Garantie pour les cloueuses pneumatiques Freeman
Garantie de 7 ans pour outil professionnel
La garantie limitée pour outil Freeman s’applique exclusivement à l’acheteur original du produit
Freeman, commence à la date d’achat et exclut les pièces susceptibles de s’user. Pendant la
période de garantie, Prime Global Products, Inc. (PGP) garantit expressément que le produit
Freeman est exempt de défaut de matériaux et de fabrication, sous réserve des exceptions et
limitations contenues dans les présentes. PGP pourra à son gré, réparer, remplacer, ou offrir un
remboursement complet pour un produit Freeman présentant un défaut de matériaux ou de
fabrication.
Garantie de 90 jours pour les pièces soumises à l’usure
La garantie limitée Freeman pour les pièces susceptibles de s’user étend exclusivement à
l’acheteur original du produit Freeman, commence à la date d’achat, et comprend les lames
d’entraînement, butoirs, joints toriques, pistons, segments de piston et joints. Pendant la période de
garantie PGP garantit expressément que le produit Freeman est exempt de défaut de matériaux et
de fabrication, sous réserve des exceptions et limitations contenues dans les présentes. PGP
pourra à son gré, réparer, remplacer, ou offrir un remboursement complet pour un produit Freeman
présentant un défaut de matériaux ou de fabrication.
UN REÇU D’ACHAT DATÉ OU UNE PREUVE D’ACHAT DE L’ACHETEUR AU DÉTAIL ORIGINAL EST
REQUIS POUR FAIRE UNE RÉCLAMATION DE GARANTIE. L’enregistrement de la garantie est
également nécessaire et peut être fait par notre enregistrement de produits en ligne au
www.freemantools.com. Sélectionnez l’onglet SOUTIEN, sélectionnez l’onglet ENREGISTREMENT
DU PRODUIT. Pour procéder à une réclamation de garantie, l’acheteur original doit retourner la
cloueuse pneumatique Freeman, port payé et assuré, avec preuve d’achat à PGP ou l’un de ses
centres de service autorisés. Pour toute question, veuillez composer le 1-888-669-5672. Aucuns
frais, autres que les frais de poste et d’assurance, ne seront exigés pour les réparations couvertes
par cette garantie.
Exclusions de la garantie
Ces garanties ne sont pas applicables lorsque :
Des réparations ou modifications ont été apportées, ou tentées, par un tiers, et/ou une
utilisation de pièces ou d’accessoires non autorisés ou non conformes a eu lieu.
Des réparations sont nécessaires en raison de l’usure normale.
La cloueuse pneumatique a fait l’objet d’abus, a été utilisée de façon non appropriée,
incorrectement entretenue ou maniée, incluant : l’incapacité à utiliser de l’air comprimé qui
soit propre, sec et régulé à la pression recommandée; les accidents causés par l’utilisation du
produit Freeman après une défaillance partielle.
Le produit Freeman est utilisé à des fins commerciales pour les chaînes de montage ou les
lignes de production. Le produit Freeman est destiné à un usage personnel et ces garanties ne
couvrent pas de telles utilisations commerciales.
40-Fr
HTTP://WWW.FREEMANTOOLS.COM 1-888-669-5672 HTTP://WWW.FREEMANTOOLS.COM 1-888-669-5672
41-Fr

MODÈLE: PFS16
AUCUNE GARANTIE, VERBALE OU ÉCRITE, EXPLICITE OU IMPLICITE, AUTRE QUE LES
GARANTIES INDIQUÉES CI-DESSUS N’EST FAITE EN CE QUI CONCERNE CE PRODUIT
FREEMAN. TOUTE GARANTIE IMPLICITE SERA LIMITÉE À LA PÉRIODE DE GARANTIE
DÉFINIE CI-DESSUS. CERTAINES JURIDICTIONS NE PERMETTENT PAS LA LIMITATION DE
LA DURÉE D'UNE GARANTIE IMPLICITE, AUQUEL CAS LES CLAUSES CI-DESSUS NE VOUS
CONCERNENT PEUT-ÊTRE PAS. VOS RECOURS SONT UNIQUEMENT ET EXCLUSIVEMENT
COMME INDIQUÉS CI-DESSUS. PGP NE SERA EN AUCUN CAS RESPONSABLE DES
DOMMAGES DIRECTS, INDIRECTS, CONSÉCUTIFS OU ACCESSOIRES. CERTAINES
JURIDICTIONS NE PERMETTANT PAS L’EXCLUSION OU LA LIMITATION DES DOMMAGES
DIRECTS OU INDIRECTS, CES LIMITATIONS OU EXCLUSIONS PEUVENT NE PAS
S’APPLIQUER À VOUS. EN AUCUN CAS, QUE CE SOIT EN RAISON D’UNE RUPTURE DE
CONTRAT, LA VIOLATION D’UNE GARANTIE, UN DÉLIT CIVIL (Y COMPRIS LA NÉGLIGENCE)
OU AUTRE, LA RESPONSABILITÉ DE PGP NE DEVRA EXCÉDER LE PRIX DU PRODUIT
CONCERNÉ PAR LA RÉCLAMATION OU LA RESPONSABILITÉ. TOUTE RESPONSABILITÉ
RELIÉE À L’UTILISATION DE CE PRODUIT SE TERMINE À L’EXPIRATION DE LA PÉRIODE DE
GARANTIE SPÉCIFIÉE CI-DESSUS. AUCUN EMPLOYÉ OU REPRÉSENTANT DE PGP, OU
TOUT DISTRIBUTEUR OU REVENDEUR N’EST AUTORISÉ À PROCÉDER À TOUT
CHANGEMENT OU MODIFICATION DE LA PRÉSENTE GARANTIE.
Ces garanties vous accordent des droits légaux spécifiques. Vous pouvez également avoir
d’autres droits qui varient d’une juridiction à l’autre.
CES GARANTIES SONT SUJETTES À DES CHANGEMENTS SANS PRÉAVIS.
NOTE:
MODÈLE: PFS16
42-Fr
HTTP://WWW.FREEMANTOOLS.COM 1-888-669-5672 HTTP://WWW.FREEMANTOOLS.COM 1-888-669-5672
43-Fr
 Loading...