

Freeman PE20V2118G User Manual
MODEL: PE20V2118G
HTTP://WWW.FREEMANTOOLS.COM
1-888-669-5672
PRIME GLOBAL PRODUCTS, INC.
WARNING:
Failure to follow warnings could result in DEATH OR SERIOUS INJURY.
PE2118G-V2 08/18
MODEL: PE20V2118G
MODEL: PE20V2118G
SYMBOLS
GENERAL SAFETY INSTRUCTIONS
UNPACKING
SPECIFICATIONS
FEATURES
OPERATION
USING BELT HOOK
LOADING FASTENERS
UNLOADING FASTENERS
DEPTH OF DRIVE
SETTING TOOL FIRING SETTINGS
WORK CONTACT ELEMENT
NO-MAR PAD
REMOVING BATTERY
CLEARING JAMS
CHARGING BATTERY
CHARGING A HOT BATTERY PACK
BATTERIES
BATTERY PACK REMOVAL AND RECYCLING
MAINTENANCE
TROUBLESHOOTING
WEARABLE PARTS
WARRANTIES
3
3 - 5
6
6
6
6 - 11
6
7
8
8
8 - 9
9
9
9
10
10
11
11
11
11
12 - 13
13
14
WARNING
The warnings and precautions discussed in this manual cannot cover all possible conditions and
situations that may occur. Please be aware of the potential hazards, and take all necessary precautions to avoid risk of injuries.
SAVE THIS MANUAL
To avoid serious personal injury, do not attempt to use this product until you read the manual
thoroughly and understand it completely. Save this manual and review frequently for safe operation
and instructing others who may use this tool. Keep this manual for the safety warnings, precautions,
operations, inspections and maintenance information. Store this manual and the receipt in a safe and
dry place for future reference.
SYMBOLS
In this manual, on the labels, packages and all other information provided with this tool, the following signal
words and meanings are intended to explain the levels of risk associated with this tool.
SYMBOLS
GENERAL SAFETY
INSTRUCTIONS
CALIFORNIA PROPOSITION 65
WARNING:
This product can expose you to chemicals including lead, which is known to
the State of California to cause cancer
and birth defects or other reproductive
harm. For more information go to
www.P65Warnings.ca.gov.
WORK AREA
Keep the work area clean and well lit. Cluttered
benches and dark areas increase the risk of
accidents.
Do not operate the tool in explosive
atmospheres, such as in the presence of
flammable liquids, gases or dust. The tool could
create a spark which may ignite flammable liquids,
gases or dust.
Keep bystanders, children, and others away
while operating the tool. Distractions could result
in improper use and cause injury.
Keep proper footing and balance at all times.
Proper footing and balance enables better control
of the tool in unexpected situations.
Do not use on a ladder or unstable supports.
Stable footing on a solid surface enables better
control of the tool in unexpected situations.
PERSONAL SAFETY
Always wear eye protection. Operator and others
in the work area should always wear ANSI-Z87.1
approved safety goggles with side shields. Eye
protection is used to guard against flying debris,
which may cause severe eye injury.
SIGNAL MEANING
WARNING:
CAUTION:
CAUTION:
Indicates a potentially hazardous situation, which, if not avoided,
could result in death or serious injury.
Indicates a potentially hazardous situation, which, if not avoided,
may result in minor or moderate injury.
(Without symbol) Indicates a situation that may result in
property damage.
Always wear ANSI S3.19 approved hearing
protection when using the tool. Prolonged
exposure to high intensity noise may cause hearing
loss.
Dress properly. Do not wear loose clothing or
jewelry. Keep your hair, clothing, and gloves away
from moving parts. Loose clothes, jewelry, or long
hair can be caught in moving parts.
Stay alert. Do not use tool while tired or under the
influence of drugs, alcohol, or medication. A
moment of inattention while operating the tool may
cause serious injury.
Avoid prolonged use. The tool’s repetitive motion
and vibration can cause harm to your hands or
arms. The user can use gloves for extra cushion,
take frequent breaks and limit daily use to prevent
this issue.
This tool vibrates with use. Continuous
operation can be harmful to your hands and
arms. Stop using the tool if you feel tingling or pain.
Resume work after recovery. Seek medical advice
if serious symptoms occur.
Make sure there are no hidden electrical cables,
gas pipes, etc. while working on the work piece.
These hazards could harm the user if damaged
while using this tool.
Never place hands or any other body parts in
the fastener discharge area of the tool. The tool
might eject a fastener and could result in death
or serious personal injury.
For overhead work, wear a safety helmet.
Wash hands after handling this product or its
power cord. They may contain chemicals
known to the State of California to cause cancer
and birth defects or other reproductive harm.
ELECTRICAL SAFETY
The chargers power plug must match the
outlet. Never modify the plug or plug the tool into
outlets that do not match the plug.
Avoid contact with grounded elements such as
metal tables, pipes, ranges or refrigerators.
Contact with these elements can put you at risk of
electrical shock.
02
HTTP://WWW.FREEMANTOOLS.COM 1-888-669-5672
HTTP://WWW.FREEMANTOOLS.COM 1-888-669-5672
03
MODEL: PE20V2118G MODEL: PE20V2118G
When operating the tool keep tool away from
wet conditions. Wet tools can cause electrical
shock.
Always inspect electrical cord for damage
before and after use. A damaged cord can cause
electrical shock.
If you are operating the tool outside use a
extension cord that is rated for outdoor use.
If the user must use the tool in damp
conditions, use a ground fault circuit interrupter (GFCI).
TOOL USE AND CARE
Know this tool. Read this manual carefully, learn
its applications and limitations, as well as the
specific potential hazards related to this tool.
Only use fasteners that are recommended for
your tool model by the manufacturer. Do not use
the wrong fasteners or load them incorrectly, as this
can cause jams or damage to the tool.
When you are able to, secure work pieces to a
stable platform using clamps or other tools.
Always have a firm footing and grip on the tool
to counteract any force that may be enacted
during the operation of the tool.
Practice safe working practices and ensure all
relevant legal requirements are being followed
when using this tool.
Never point the tool at the user or others in the
work area. This could cause serious injury.
The tool should not be forced, use the correct
tool for your application. The correct tool will do
the job better and safer at the rate for which the tool
is being used.
Before making adjustments, changing
accessories, or storing the tool disconnect the
tool from the battery. This
injury from the power tool.
Remove any adjustment wrenches or keys
before activating the tool. Leaving adjustment
accessories on the moving parts on the tool will
increase the risk of injury.
Check for misalignment or binding of moving
parts, breakage of parts and any other
condition that may affect the tool’s operation. If
damaged, have the tool serviced before using.
Many accidents are caused by poorly maintained
tools.
Maintain tool with care. A properly maintained
tool will function more smoothly and prevent
binding, making it easier to use.
Check operation of the tool before use. Do not
use the tool if the workpiece contact mechanism is
not working correctly as accidental driving of a
fastener may occur.
Never use this tool in a manner that could
cause a fastener to be directed toward anything
other than the workpiece.
will reduce the risk of
Do not remove,tamper with, or otherwise cause
the trigger to lock or trigger to become inoperable. Do not operate any tool which has been
modified in a like fashion. Death or serious personal injury could result.
Always assume the tool contains fasteners.
Respect the tool; no horseplay.
Avoid using the tool when the magazine is
empty. Accelerated wear on the tool may occur.
Store the tool away from children or untrained
persons when not in use. The tool can be
dangerous when used by untrained persons.
Do not use the tool for anything other than its
intended use.
Do not use the tool if
actuate properly. Any tool that cannot be
controlled with the trigger is dangerous and must
be repaired.
Keep the tool and its handle dry, clean and free
of oil and grease. Always use a clean cloth when
cleaning. Never use brake fluids, gasoline,
petroleum-based products, or any strong solvents
to clean your tool.
Never use gasoline or other flammable liquids
to clean the tool. Never use the tool in the
presence of flammable liquids or gases. Vapors
could ignite by a spark and cause an explosion
which will result in death or serious injury.
Do not use the tool as a hammer.
Never press the trigger of the tool when it is not
intended to be used.
Do not drop or throw the tool. Dropping or
throwing the tool can result in damage that will
make the tool unusable or unsafe. If the tool has
been dropped or thrown, examine the tool closely
for bent, cracked or broken parts. STOP and repair
before using or serious injury could occur.
Do not operate the tool if it does not contain a
legible warning label.
the trigger does not
BATTERY AND CHARGER USE AND
CARE
Only use batteries that are recommended for
this tool by the manufacturer. Use of any other
battery may cause risk of injury or fire.
When the battery is not in use, keep it away
from metal objects that could connect one
terminal to another. If the terminals are connect-
ed the battery could cause fire or burns.
Keep the battery free of abusive situations, if a
battery is damaged it can eject battery liquid. If
you come in contact with the battery liquid flush the
contact area with water. If your eye comes in
contact with the battery liquid flush with water and
seek medical help. Battery liquid can cause
irritation or burns.
Do not store batteries in areas that can reach or
exceed 105°F (such as outside sheds or metal
buildings in the summer).
Only charge the battery with a charger recommended by the manufacturer. Use of any other
charger may cause risk of injury or fire.
Do not use chargers for anything other than
charging manufacturer recommended
batteries, otherwise electric shock could occur.
Do not expose the charger to rain or snow.
Make sure the charger’s cord is located in an
area where it will not be damaged.
Extension cords should not be used unless
absolutely necessary. Improper use of an
extension cord can result in electric shock.
Do not place an object on top of the charger.
This could block ventilation slots and cause
excessive internal heat.
Do not use the charger if it has been subjected
to a hard blow, has been dropped, or damaged
otherwise. Take the charger to an authorized
repair center.
Do not disassemble the charger. If the charger
needs to be repaired take it to an authorized repair
center.
Before cleaning the charger make sure to
unplug it from any power source. This will
reduce the risk of an electrical shock.
Never connect two chargers together.
WARNING:
Do not open the battery for any reason. If
the battery is damaged or cracked do not
insert it into the charger. Electric shock
can be caused by a damaged battery. Be
sure to dispose of all batteries at a
service center for recycling.
WARNING:
Do not burn batteries or expose them to
extreme heat. This could cause the
battery to explode.
WARNING:
Do not allow liquid to get into the
charger, electric shock could result.
WARNING:
Electrocution hazard. Do not touch or
allow conductive objects to touch the
charging terminals. Electric shock or
electrocution could occur.
TOOL SERVICE
Only use accessories that are identified by the
manufacturer for the specific tool model.
Use of unauthorized parts or failure to follow
maintenance instructions may create a risk of
injury.
Tool service must only be performed by a
qualified repair personnel.
OPERATION
Do not drive fasteners near the edge of the
material. The workpiece may split causing the
fastener to
work area.
Do not carry the tool from place to place while
holding the trigger. Accidental discharge could
result.
During normal use the tool will recoil immediately
after driving a fastener. This is a normal function of
the tool. Do not attempt to prevent the recoil by
holding the tool against the work. Restriction to the
recoil can result in a second fastener being driven
from the tool. Grip the handle firmly and let the tool
do the work. Failure to heed this warning can result
in serious personal injury.
Do not drive fasteners on top of other fasteners or
with the tool at an overly steep angle as this may
cause deflection of fasteners which could cause
injury.
Do not actuate the tool unless you intend to drive
a fastener into the workpiece.
Always handle the tool with care:
Respect the tool as a working implement.
Never engage in horseplay.
Never pull the trigger unless nose is directed
toward the workpiece.
Keep others at a safe distance from the tool
while tool is in operation as accidental
actuation may occur, possibly causing injury.
ricochet, injuring you or people in the
HTTP://WWW.FREEMANTOOLS.COM 1-888-669-5672 05HTTP://WWW.FREEMANTOOLS.COM 1-888-669-567204
UNPACKING
This tool has been shipped completely assembled.
Carefully remove the tool and any accessories from
the box.
Inspect the tool carefully to make sure no breakage
or damage occurred during shipping.
Do not discard the packing material until you have
carefully inspected and satisfactorily operated the
tool.
If any parts are damaged or missing, please call
1-888-669-5672.
WARNING:
If any parts are missing do not operate
this tool until the missing parts are
replaced. Failure to do so could result in
serious personal injury.
WARNING:
Do not attempt to modify this tool or
create accessories not recommended
for use with this tool. Any such alteration
or modification is misuse and could
result in hazardous conditions leading to
possible serious personal injury.
SPECIFICATIONS
MODEL: PE20V2118G MODEL: PE20V2118G
LED LIGHT INDICATOR
To warn user of nail jams, low battery, and empty
magazine
LED WORKING LIGHT
Helps to illuminate the working surface
EASY ACCESS NOSE
For clearing jams
DEPTH ADJUSTMENT WHEEL
To control driving depth of fastener
SELECT FIRE SWITCH
For quick selection of bump/single firing mode
BELT HOOK
LITHIUM ION BATTERY
OPERATION
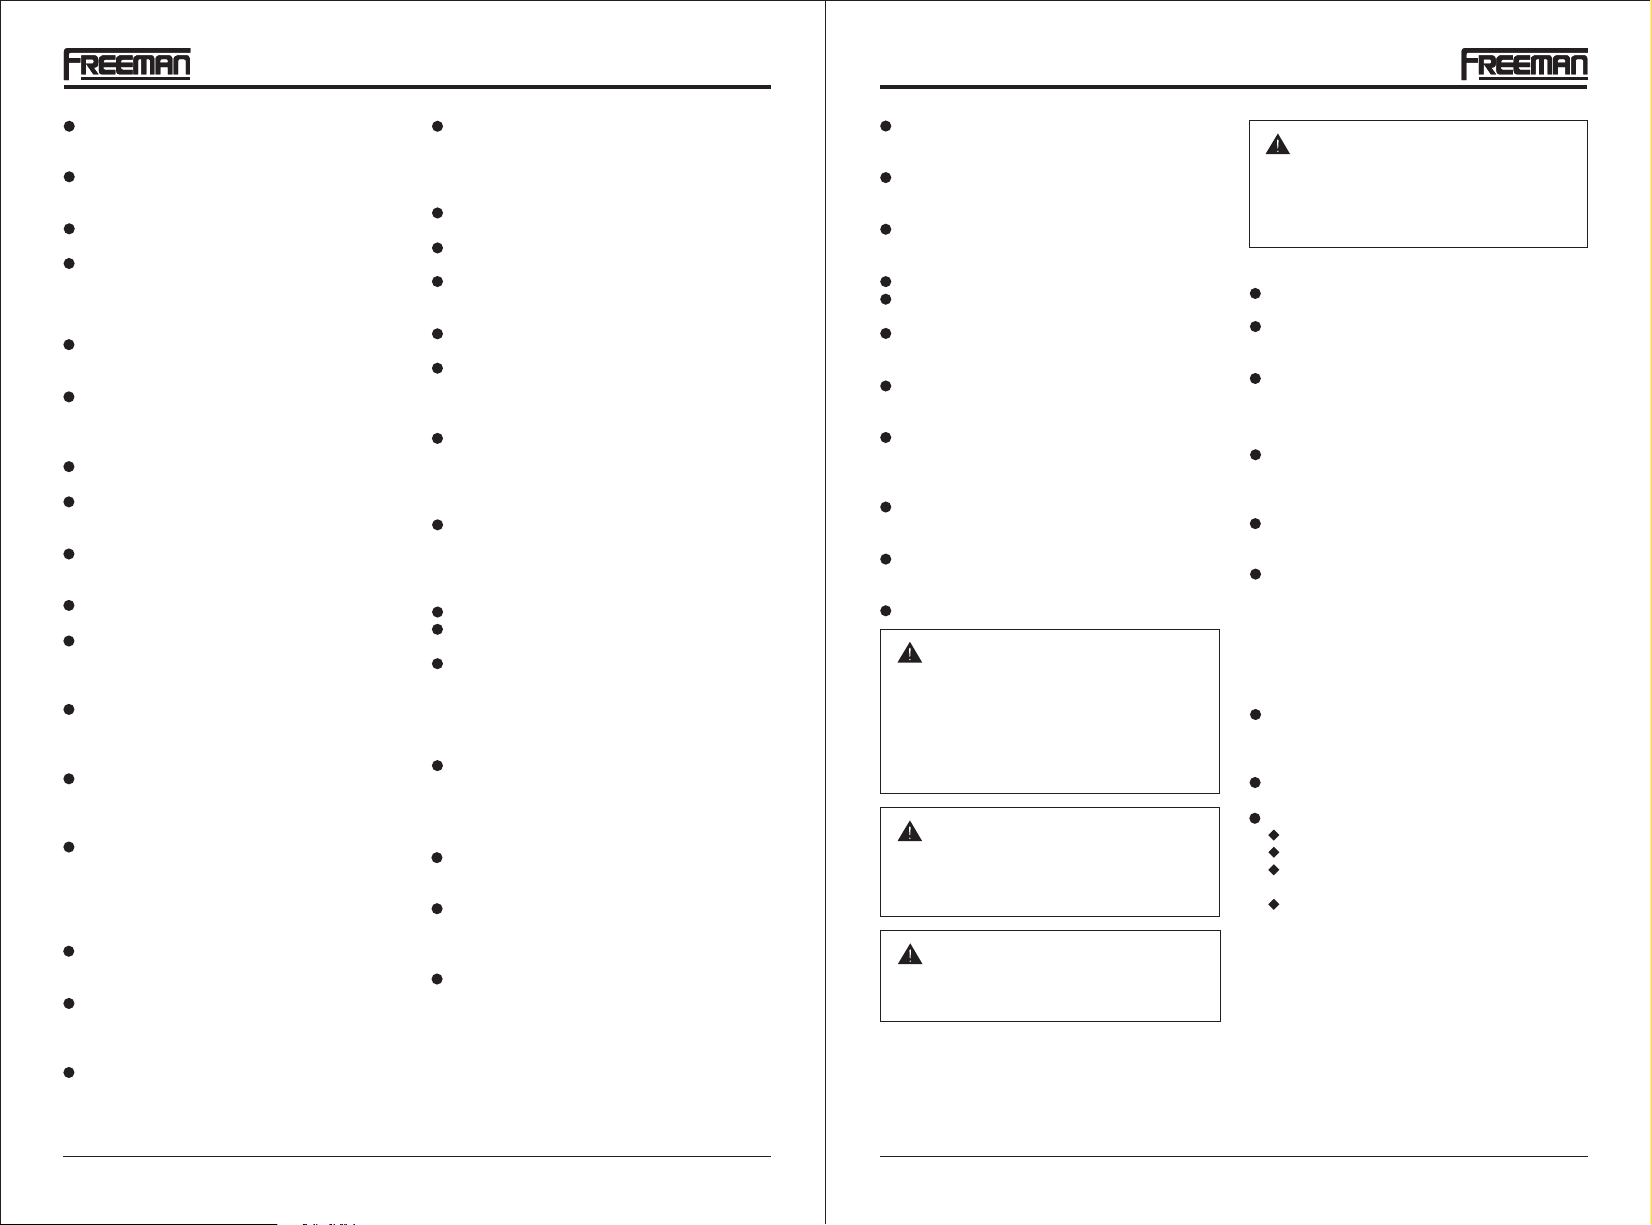
USING BELT HOOK
1.
Use a screw driver to loosen the belt hook bolt by
rotating the bolt in a counter clockwise direction.
2.
Rotate the belt hook to the desired position.
3.
Use the screw driver to tighten the belt hook bolt
and lock the belt hook into position.
LOADING FASTENERS
1.
Push down on the latch button(A). Pull back on the
magazine cover(B).
2.
Insert a stick of fasteners into the magazine rail(C).
For brad nails, the pointed ends of the fasteners
are resting on the bottom edge of the magazine
when loading.
For staples, the head of the staples are resting
on the top of the magazine.
3.
Push the magazine cover(B) forward until the latch
button pops up.
Latch Button(A)
Narrow Crown
Staples(C)
Magazine Rail(C)
Magazine Cover(B)
WARNING:
The tool may fire when it is first connected to the power source. Always disconnect the tool to the power source before
loading fasteners to prevent injury from
unintended cycling. Always make sure
the tool’s magazine is empty at the
beginning of each work session, before
connecting to the power source.
BATTERY CHARGE
INPUT VOLTAGE
FIRING SPEED
MAGAZINE CAPACITY
SHOTS PER CHARGE
CHARGE TIME
WEIGHT
FASTENER TYPE
FASTENER LENGTH
120V, 60Hz
20V Max DC, 36Wh
30 nails/staples per minute
100 nails/staples
400
30 min
6.17 lbs
18 GA Brad Nails & 18 GA
1/4” Narrow Crown Staples
Nails: 3/4” - 2”
Staples: 3/4” - 1 5/8”
FEATURES
HIGH POWER TECHNOLOGY
Provides fast firing speeds
ERGONOMIC HANDLE
For comfortable use and decreased slipping
06
HTTP://WWW.FREEMANTOOLS.COM 1-888-669-5672
Belt Hook
Belt Hook Bolt
Brad Nails(C)
Magazine Rail(C)
WARNING:
Only use fasteners that are recommended for use with this tool by the manufacturer. Fasteners not identified for use
with this tool by the tool’s manufacturer
could result in a risk to persons or tool
damage when used in this tool.
WARNING:
Keep the tool pointed away from
yourself and others when loading fasteners. Failure to do so could result in
serious personal injury.
Magazine Cover(B)
WARNING:
Never load fasteners with the workpiece
contact or trigger activated. Doing so
could result in possible serious personal
injury.
HTTP://WWW.FREEMANTOOLS.COM 1-888-669-5672
07
WARNING:
Never load fasteners with the workpiece
contact or trigger activated. Doing so
could result in possible serious personal
injury.
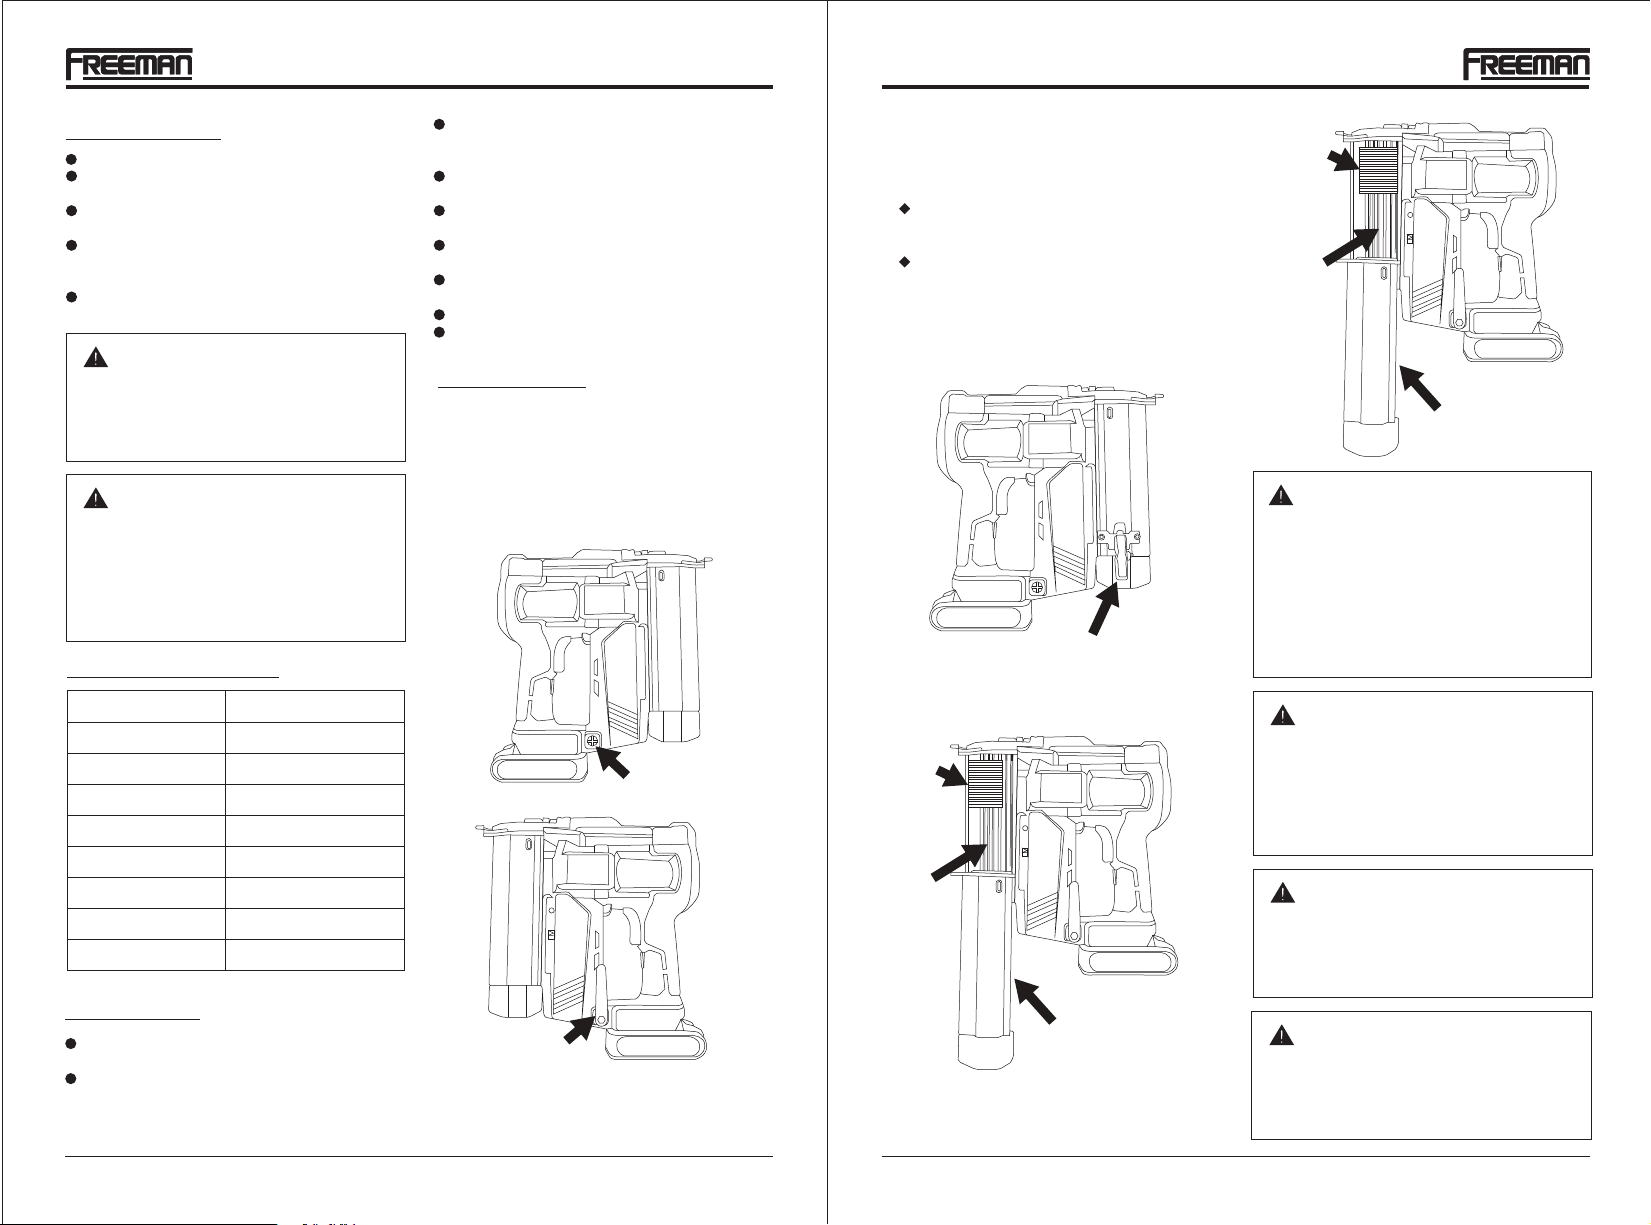
UNLOADING FASTENERS
1.
Remove Battery.
2.
Push down on the latch button(A). Pull back on the
magazine cover(B).
3.
Remove all fasteners from the magazine rail(C).
4.
Push the magazine cover(B) forward until the latch
button pops up.
Battery
Magazine Rail(C)
Latch Button(A)
Battery
Magazine Cover(B)
WARNING:
Always unload all fasteners before
removing the tool from service.
MODEL: PE20V2118G MODEL: PE20V2118G
WARNING:
Always disconnect the power source
before unloading.
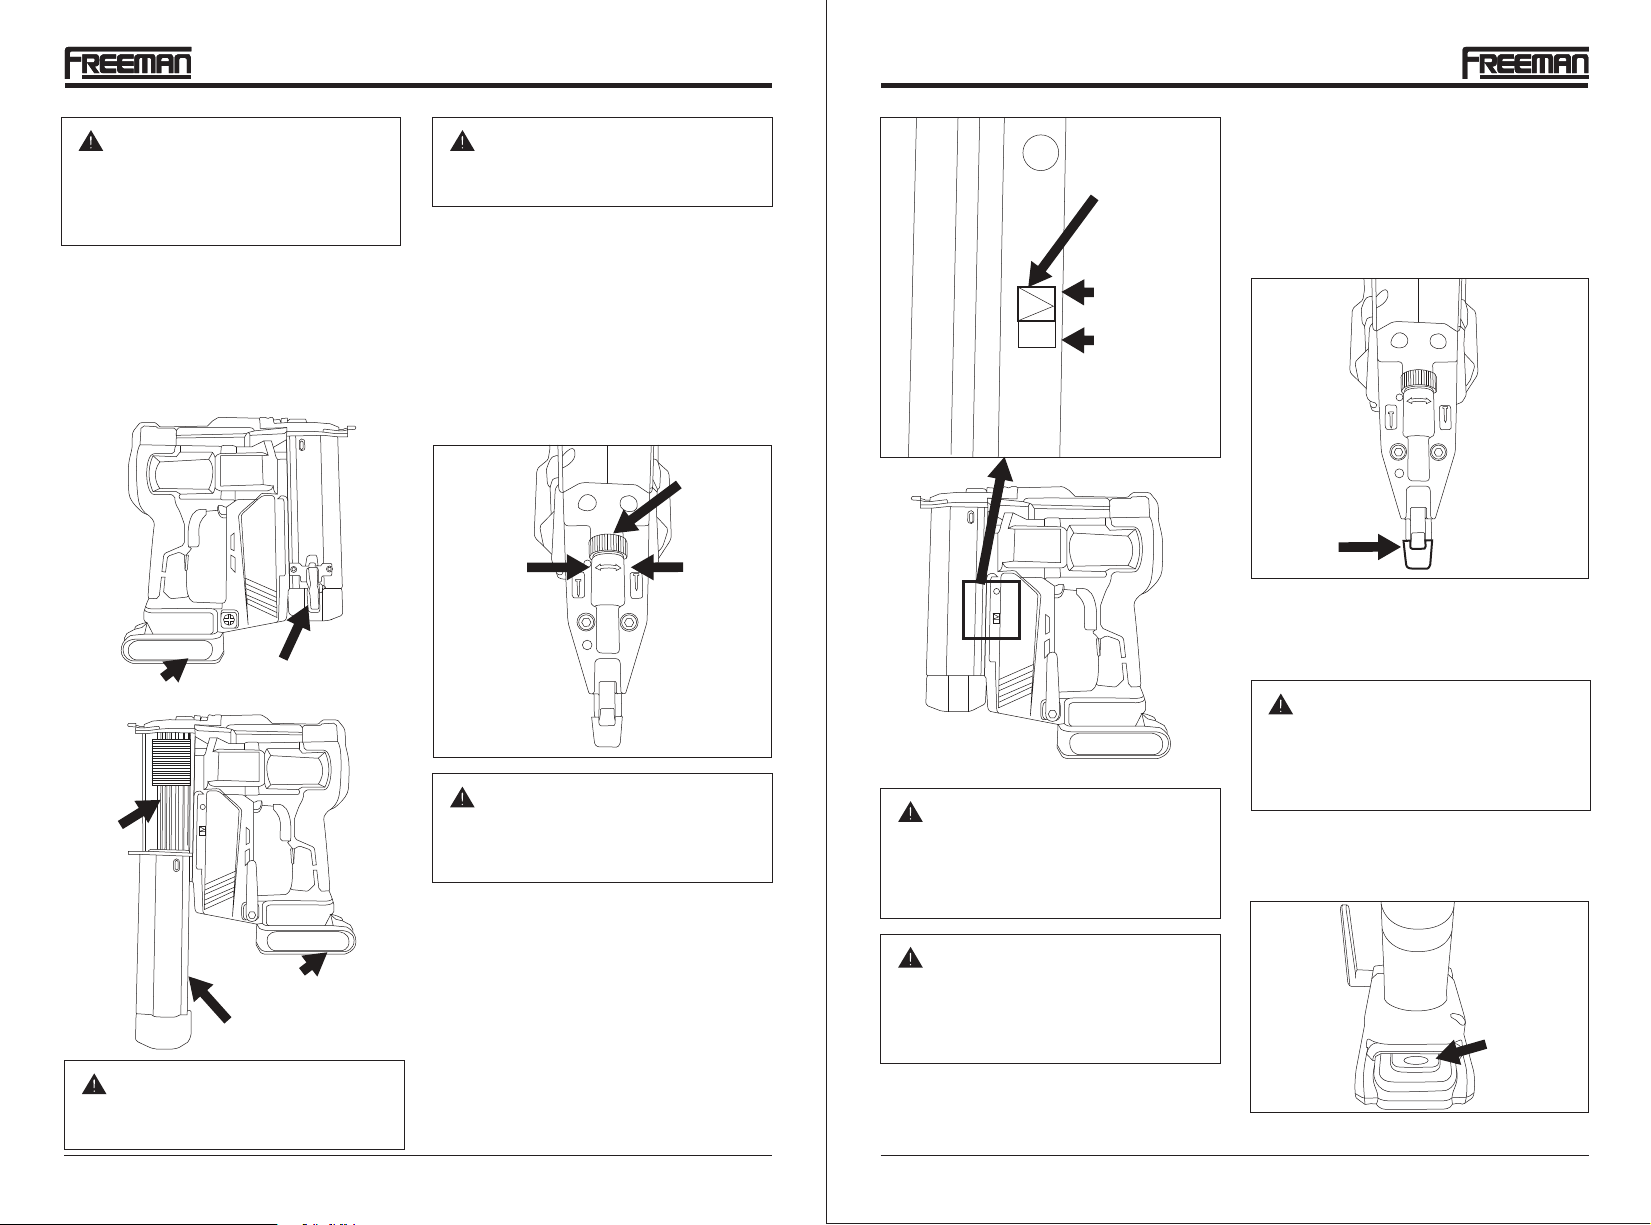
DEPTH OF DRIVE
The driving depth of the fasteners is adjustable. To
adjust the depth, use the drive depth adjustment
wheel(G) on the top of the tools nose.
1.
Rotate the depth adjustment wheel in a clockwise
direction when the nose of the tool is pointed away
from you to increase the fastener depth of drive.
2.
Rotate the depth adjustment wheel in a counterclockwise direction when the nose of the tool is
pointed away from you to decrease the depth of
drive.
Depth
Adjustment
Wheel (G)
Increase
Depth of
Drive
Decrease
Depth of
Drive
CAUTION:
It is advisable to test the depth of drive
on a scrap workpiece to determine the
required depth for the application.
SETTING TOOL FIRING SETTINGS
Push the fire selection switch up to select single
1.
sequential fire. This mode requires the trigger to
be pulled each time a fastener is driven. The tool
can be actuated by depressing the work contact
element against the work surface after pulling the
trigger.
Push the fire selection switch down to select bump
2.
fire. This will enable you to fire a shot by holding
down the trigger and pressing the nose of the gun
down on the work piece as many times as is
necessary.
Fire Selection
Switch
Single Sequential
Firing Position
Bump Fire
Position
WARNING:
Always know the operational mode of
the tool before use. Failure to know the
operational mode could result in death
or serious personal injury.
WARNING:
An improperly functioning tool must not
be used. Do not actuate the tool unless
the tool is placed firmly against the work
place.
WORK CONTACT ELEMENT
Check the operation of the work contact element trip
mechanism before each use. The WCE must move
freely without binding through its entire travel
distance. The WCE spring must return the WCE to its
fully extended position after being depressed. Do not
operate the tool if the WCE trip mechanism is not
operating properly. Personal injury may occur.
Work
Contact
Element
NO-MAR PAD
The no-mar pad attached to the nose of the tool helps
to prevent marring and denting when working with
softer woods.
WARNING:
Disconnect the tool from the battery
before removing or replacing the no-mar
pad. Failure to do so could result in
serious personal injury.
REMOVING BATTERY
1.
Press battery release button.
2.
Pull battery free of the nailer/stapler body.
Battery
Release
Button
HTTP://WWW.FREEMANTOOLS.COM 1-888-669-5672 09HTTP://WWW.FREEMANTOOLS.COM 1-888-669-567208

MODEL: PE20V2118G MODEL: PE20V2118G
CLEARING JAMS
Occasionally, a fastener may become jammed in the
firing mechanism of the tool, making the tool inoperable. To remove a jammed fastener, follow the steps
below:
Disconnect the battery from the tool.
1.
Push down on the latch button(A). Pull back on the
2.
magazine cover(B).
Remove fasteners from the magazine.
3.
Latch
Button(A)
Use wrench to loose four bolts and remove the
4.
nose cover.
Bolt x 4
Magazine
Cover(B)
5.
Use a flat screw driver to remove the jammed
fastener and push the drive blade back into place.
CHARGING BATTERY
To charge the battery line up the slot of the battery
1.
with the slot of the charger and slide into place.
The battery indication light should turn from green
2.
to red when the battery is charging.
When the indication light has turned green the
3.
battery should be fully charged.
CHARGING A HOT BATTERY PACK
After a tool has been used for a prolong amount of
time the batteries in the battery pack will become hot.
This only occurs when the tool has been used
continuously for a extended period of time. When the
battery becomes hot let it cool for 30 minutes before
recharging. Refer to the CHARGING BATTERY
section for normal charging of batteries. If the
charger does not charge your battery under normal
circumstances, contact the authorized dealer.
BATTERIES
These batteries will wear out over time, like all
batteries. If this happens do not disassemble the
battery and attempt to fix it. This could cause serious
burns especially when wearing rings and jewelry. To
have the longest possible battery life, we suggest the
following.
Once a battery pack has been fully charged
remove it from the charger
The battery should be stored in a temperature
that is below 80°F and away from moisture
Batteries should be stored with a 30%-50%
charge
If a battery has been stored for six months or
more charge the battery as normal
BATTERY PACK REMOVAL AND
RECYCLING
Please recycle all worn batteries.
This battery contains lithium-ion
batteries. Local and state
regulations may prohibit disposal
of lithium-ion batteries in
ordinary trash. Consult your local
waste authority for information
regarding available recycling
and/or options.
Remove the tool battery.
Slide magazine cover down to remove nails and
expose the nail channel.
Use a small amount of air tool oil on a clean cloth to
swab and wipe down the nail channel, untill all
traces of glue are removed.
Reinstall nails in the magazine and close the
magazine cover.
COLD WEATHER OPERATION
When you are operating the tool in below freezing
environments:
1.
Before using the tool be sure to keep it as warm as
possible
2.
Fire the tool into a scrap piece of material 5 to 6
times.
CLEANING
Avoid using solvents when cleaning plastic parts.
Most plastics are susceptible to damage from various
types of commercial solvents and maybe damaged
by their use. Use clean cloths to remove dirt, dust , oil,
grease, etc.
MAINTENANCE
WARNING:
Any time inspection, maintenance, and
cleaning are done be sure to remove the
battery from the tool and empty all
fasteners from the magazine.
CLEANING THE NAIL CHANNEL
Problems with driving nails or cycling of nails while
firing may be due to glue residue from the nail strips.
If this is the case clean the area around the driving
mechanism.
HTTP://WWW.FREEMANTOOLS.COM 1-888-669-5672 11HTTP://WWW.FREEMANTOOLS.COM 1-888-669-567210

MODEL: PE20V2118G MODEL: PE20V2118G
TROUBLESHOOTING
WARNING:
Stop using tool immediately if any of the following problems occur. Serious personal
injury could result. Any repairs or replacements must be done by a qualified service
person or an authorized service center.
PROBLEM POSSIBLE CAUSE(S) CORRECTIVE ACTIONS
Tool doesn’t turn on
(LED lights do not
turn on).
Tool doesn’t actuate
(LED lights do turn
on).
Tool does not
actuate (LED light
is red).
Tool operates, but
no fastener is
driven.
Tool operates, but
does not drive the
fastener fully.
The internal electronics of the tool
have not reset.
The battery is low or not charged.
The battery is damaged.
The work contact element is locked
into position.
The battery terminals are dirty.
Damaged internal electronics.
Work contact element is not
depressed.
Work contact element is jammed.
Damaged electronics.
The battery charge is low.
The battery is to hot.
A fastener is jammed in the tool.
No nails in the magazine.
Incorrect fastener has been loaded.
Debris in nose piece.
Debris in magazine.
Worn magazine or drive blade.
The battery has a low charge or is
damaged.
The depth adjust is set too shallow.
Tool is not press firmly against the
workpiece.
Material and fastener length is too
rigorous on the tool.
Remove the battery from the tool, wait 3
seconds and reinsert.
Charge the battery.
Replace the battery.
Unlock the work contact element.
Clean the battery terminals.
See authorized service center.
If the tool is set in the single fire setting,
release the trigger or work contact element
Then try refiring the tool.
Unlock the work contact element.
See authorized service center.
Charge or replace battery.
Let the tool cool down.
Remove the battery from the tool and clear
the jam from the gun. Then push the drive
blade back and reinsert the battery.
Load more fasteners in the magazine.
Insert the fasteners recommended by the
manufacturer.
Clean the nose piece with pneumatic air
tool oil and a clean cloth.
Clean the magazine with pneumatic air tool
oil and a clean cloth.
See authorized service center.
Charge or replace the battery.
Rotate the depth adjust towards the deeper
setting.
Press down more firmly on the workpiece.
Choose a more appropriate material and
fastener for your application.
PROBLEM POSSIBLE CAUSE(S) CORRECTIVE ACTIONS
Load fasteners recommended by the
manufacturer
Charge or replace battery
Clean the nose piece with pneumatic air
tool oil and a clean cloth
Clean the magazine with pneumatic air tool
oil and a clean cloth
See authorized service center
See authorized service center
Jammed fastener
The incorrect fastener is loaded in
the tool
Low battery charge or damaged
battery
Debris is in nose piece
Debris is in magazine
Worn magazine
Worn or damaged pusher spring
WARNING:
Only use Freeman Authorized Repair Parts. For questions please call 1-888-669-5672 or
visit our website at http://www.freemantools.com
WEARABLE PARTS
Repair parts can be ordered from our website: http://www.freemantools.com
HTTP://WWW.FREEMANTOOLS.COM 1-888-669-5672 13HTTP://WWW.FREEMANTOOLS.COM 1-888-669-567212
 Loading...