

Freeman P13INLC User Manual
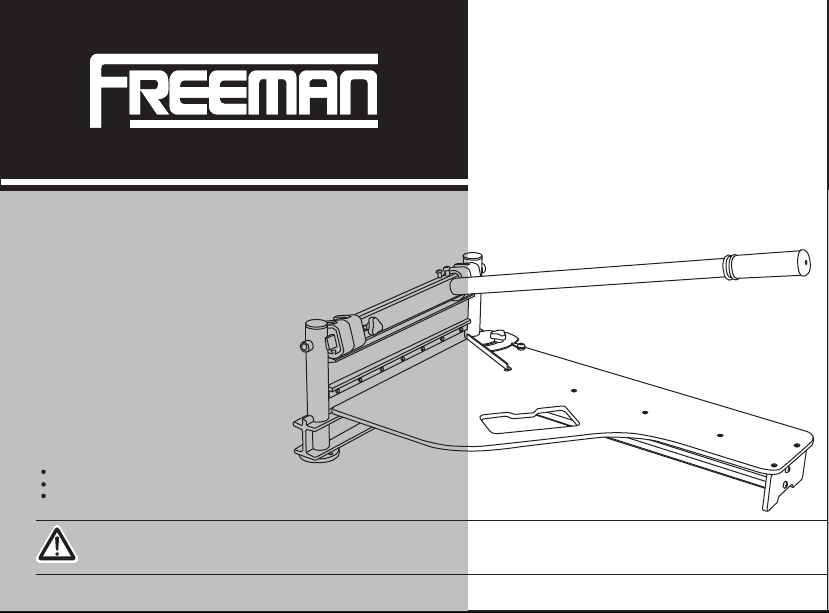
MODEL: P13INLC
13” LAMINATE
FLOORING
CUTTER
HTTP://WWW.FREEMANTOOLS.COM
1-888-669-5672
PRIME GLOBAL PRODUCTS, INC.
WARNING:
Failure to follow warnings could result in
DEATH OR SERIOUS INJURY.
KEEP YOUR DATED PROOF OF PURCHASE FOR WARRENTY PURPOSE
SAVE THE MANUAL FOR FUTURE REFERENCE
P13INLC-V1 11/17
MODEL: P13INLC MODEL: P13INLC
SYMBOLS
GENERAL SAFETY INSTRUCTIONS
UNPACKING
SPECIFICATIONS
FEATURES
3
4 - 5
5
6
6
OPERATION 6 - 11
ASSEMBLY
SETTING UP FOR OPERATION
STRAIGHT CUTTING
0 - 45° CUTTING
ADJUSTING THE BLADE
SHARPENING OR REPLACING BLADE
HONING BLADE
LUBRICATION
WARRANTIES
HTTP://WWW.FREEMANTOOLS.COM 1-888-669-567202
6 - 7
7 - 8
8 - 9
9
9 - 10
10 - 11
11
11
12 - 13
WARNING
The warnings and precautions discussed in this
manual cannot cover all possible conditions and
situations that may occur. Please be aware of
the potential hazards, and take all necessary
precautions to avoid risk of injuries.
SAVE THIS MANUAL
To avoid serious personal injury, do not attempt
to use this product until you read the manual
thoroughly and understand it completely. Save
this manual and review frequently for safe
operation and instructing others who may use
this tool. Keep this manual for the safety
warnings, precautions, operations, inspections
and maintenance information. Store this
manual and the receipt in a safe and dry place
for future reference.
SYMBOLS
In this manual, on the labels, packages and all other information provided with this tool, the following signal
words and meanings are intended to explain the levels of risk associated with this tool.
SYMBOLS
SIGNAL MEANING
WARNING:
CAUTION:
CAUTION:
HTTP://WWW.FREEMANTOOLS.COM 1-888-669-5672
Indicates a potentially hazardous situation, which, if not avoided,
could result in death or serious injury.
Indicates a potentially hazardous situation, which, if not avoided,
may result in minor or moderate injury.
(Without symbol) Indicates a situation that may result in
property damage.
03
GENERAL SAFETY
INSTRUCTIONS
CALIFORNIA PROPOSITION 65
WARNING:
WARNING: This product can expose you
to chemicals including lead, which is
known to the State of California to cause
cancer and birth defects or other reproductive harm. For more information go
to www.P65Warnings.ca.gov.
WARNING:
WARNING: The dust generated by
cutting certain wood, wood fiber and / or
PVC products can be harmful to your
health.
MODEL: P13INLC MODEL: P13INLC
WORK AREA
Keep the work area clean and well lit. Cluttered
benches and dark areas increase the risk of
accidents.
Keep bystanders, children, and others away
while operating the tool. Distractions could result
in improper use of tool and cause injury.
PERSONAL SAFETY
Stay alert. Do not use tool while tired or under the
influence of drugs, alcohol, or medication. A
moment of inattention while operating the tool may
cause serious injury.
Maintain the tool with care. Keep tool clean. A
properly maintained tool, reduces the risk of a tool
malfunction.
Always wear safety approved eye protection
with side shields (ANSI Z87.1).
Wash hands after handling this product or its
power cord. They may contain chemicals known
to the State of California to cause cancer and birth
defects or other reproductive harm.
TOOL USE AND CARE
Know this tool. Read manual carefully, learn its
applications and limitations, as well as the specific
potential hazards related to this tool.
Maintain the 13" Flooring Cutter with care.
Keep blade sharp and clean. Follow instructions
for lubricating and changing accessories.
Do not drop or throw the tool. Dropping or
throwing the tool can result in damage that will
make the tool unusable or unsafe. If the tool has
been droppezd or thrown, examine the tool closely
for bent, cracked or broken parts. If damage has
been done to tool do not use.
Never use this tool for anything other than the
application it was originally designed for.
Keep blade sharp. A dull blade will not perform
properly.
Always keep hands away from blade while
operating or carrying.
Keep children and unauthorized persons away
from the 13" Flooring Cutter and work area.
Make sure tool is secure. Operate only on a firm
substrate or solid stand.
Never modify this tool in any way.
Never leave the 13" Flooring Cutter unattended.
Secure the handle with the lock chain when not in
use.
Store the tool out of reach of children or
untrained people. The tool can be dangerous in
the hands of untrained users.
TOOL SERVICE
Only use accessories that are identified by the
manufacturer for the specific tool model.
Use of unauthorized parts or failure to follow
maintenance instructions may create a risk of
injury.
Tool service must only be performed by a
qualified repair personnel.
UNPACKING
Carefully remove the tool and any accessories
from the box.
Inspect the tool carefully to make sure no breakage
or damage occurred during shipping.
Do not discard the packing material until you have
carefully inspected and satisfactorily operated the
tool.
If any parts are damaged or missing, please call
1-888-669-5672.
HTTP://WWW.FREEMANTOOLS.COM 1-888-669-567204
HTTP://WWW.FREEMANTOOLS.COM 1-888-669-5672
05
WARNING:
Do not attempt to modify this tool or
create accessories not recommended
for use with this tool. Any such alteration
or modification is misuse and could
result in hazardous conditions leading to
possible serious personal injury.
SPECIFICATIONS
DIMENSIONS
WEIGHT
MAXIMUM CUTTING
WIDTH
MAXIMUM CUTTING
THICKNESS
PACKING LIST
13” Laminate Flooring Cutter
Adjustment Tools
Instruction Manual
Philips Head Screws
18.13” X 24.25” X 8”
14.5 lbs
13”
12mm
HTTP://WWW.FREEMANTOOLS.COM 1-888-669-567206 HTTP://WWW.FREEMANTOOLS.COM 1-888-669-5672
MODEL: P13INLC MODEL: P13INLC
FEATURES
13" SHEAR BLADE
Cuts materials up to 13" wide and 12mm thick
without splintering or chipping
SPRING LOADED CUTTING MECHANISM
Provides smooth, consistent pressure for clean
cuts
EXTENDED HANDLE
Extra leverage increases cutting power with
minimal effort
ANGLED MITER GAUGE
Built-in adjustable gauge for angled cuts from 0º to
45º
SAFETY LOCK
Prevents blade from moving when not in use
REPLACEABLE BLADE
Extend the life of the tool by sharpening or
replacing the blade
EXTENDED BASE
Minimizes plank movement while cutting for
maximum accuracy
OPERATION
ASSEMBLY
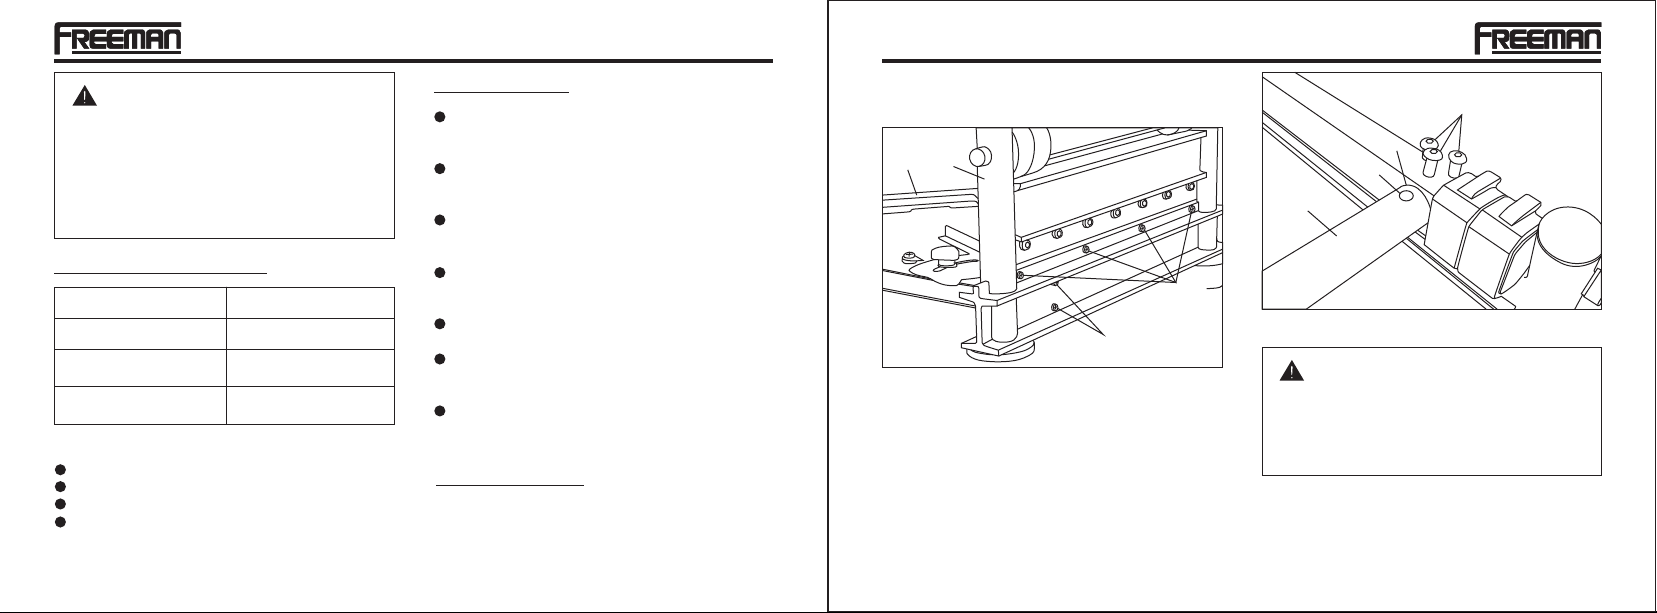
1.
Attach the extended table base (Fig. 1-A) Fig.1 to
the blade assembly (Fig. 1-B) using 4 small Phillips
head screws (Fig. 1-C). Use two larger philips head
screws (Fig.1-D) to secure the table brace.
A
B
C
D
FIGURE 1
2.
Attach the handle (Fig. 2 - A) to the top of the blade
assembly by loosening the three fixing screws (Fig.
2 - B) with a hex key. Insert the handle shaft into
the cylindrical hole (Fig. 2 - C), making sure the
recessed hole in the handle shaft (Fig. 3 - D) lines
up with the center screw on the blade assembly.
Once properly aligned, secure the handle by
tightening the center screw with a hex key. Then,
tighten the remaining two screws.
B
B
C
D
A
FIGURE 2
WARNING:
Secure handle in the down position and
re-engage the safety lock before storing,
carrying or transporting your laminate
flooring cutter.
07

SETTING UP FOR OPERATION
1.
The laminate flooring cutter is shipped with the
blade assembly in the down and locked position.
This safety feature ensures that the cutting edge of
the blade is not exposed during transport or
storage. To unlock the blade assembly, loosen the
safety lock knob (Fig. 3-A), depress the handle
then slide the lock knob to the right to disengage
the lock (Fig. 3-B).
A
B
WARNING:
Do not put your fingers against the sharp
edge of the blade at any time.
STRAIGHT CUTTING
1.
Adjust the angle gauge (Fig. 4 - A) so the red arrow
is pointing at the 0º mark, and tighten the knob
(Fig. 4 - B).
2.
Insert material between the cutting blade and the
base, flush with the angle gauge. Push the handle
down to complete a cut.
MODEL: P13INLCMODEL: P13INLC
WARNING:
Maintain control of the handle. Do not
allow handle to slam back after making
cut.
0 - 45° CUTTING
1.
Adjust the angle attachment to 45º and tighten the
knob. Insert material between the cutting blade and
the base, flush with the angle attachment (Fig. 5).
Push the handle down to complete a cut.
ADJUSTING THE BLADE
1.
Unscrew and remove the adjustment plate screws
(Fig. 6).
FIGURE 3
C
FIGURE 6
B
A
FIGURE 4
HTTP://WWW.FREEMANTOOLS.COM 1-888-669-567208 HTTP://WWW.FREEMANTOOLS.COM 1-888-669-5672 09
FIGURE 5
2.
Tighten both adjustment plates by 1 or 2 holes (Fig.
7). The adjustment on both plates must be the
same.
FIGURE 7
flat edge of the blade must remain flat. We
recommend that this operation be done by a qualified
professional.
WARNING:
Blade is very sharp. Wear gloves when
handling blade.
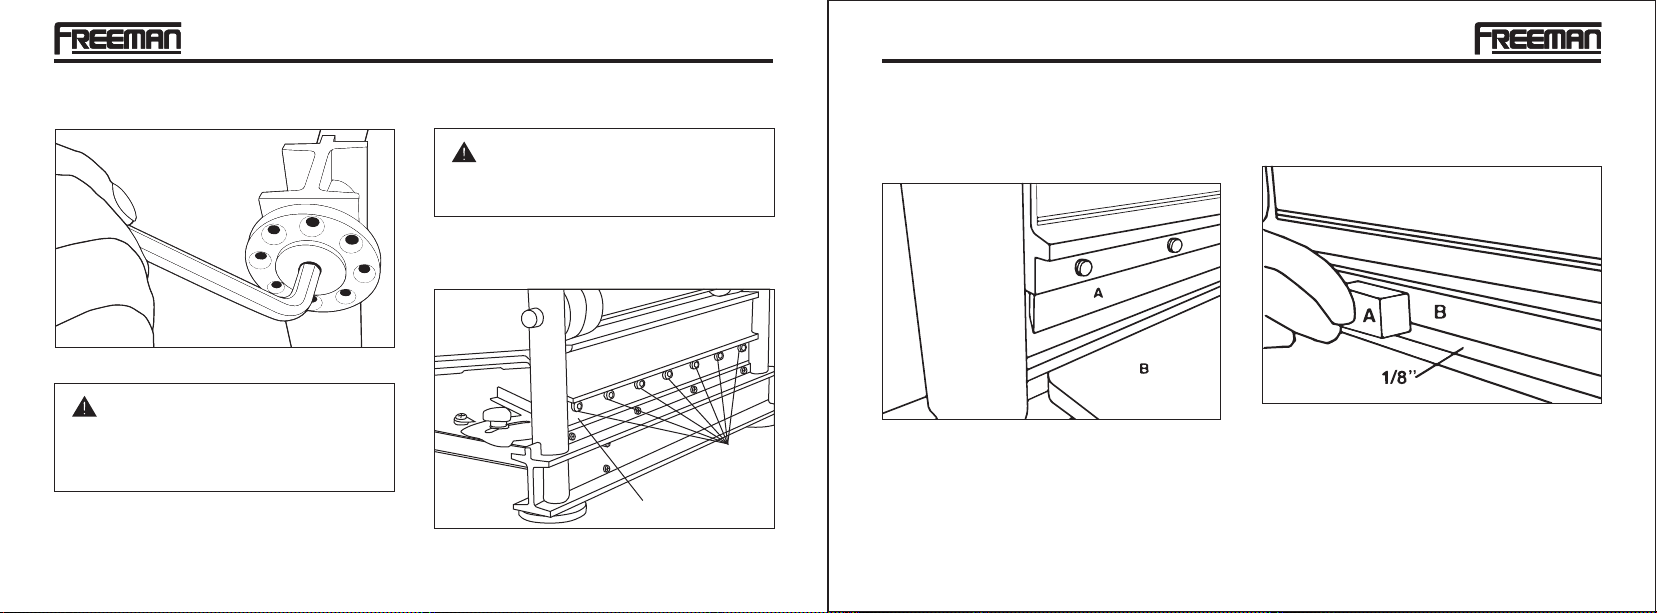
1.
To remove the blade (Fig. 8-A), remove the seven
allen head screws (Fig. 8-B) using the supplied
hex. key. Carefully remove the blade.
MODEL: P13INLCMODEL: P13INLC
2.
Once blade has been sharpened or replaced, it can
be re-installed. Position the blade (Fig. 9-A) with its
flat edge facing the table (Fig. 9-B). Make sure
the mounting surface and blade are clean,
re-install the blade with the seven allen head
screws removed earlier using the supplied hex key.
With the blade (Fig. 10-B) installed and positioned
roughly 1/8” above the table top, lay the flat side of
your honing stone (Fig. 10-A) against the flat side of
the blade. Move the honing stone from one end to the
other a few times until burr has been removed.
WARNING:
Do not completely loosen or remove the
adjustment plates. Adjustment plates are
under high spring tension.
SHARPENING OR REPLACING BLADE
The included blade can be sharpened. Only the
beveled edge of the blade must be sharpened. The
HTTP://WWW.FREEMANTOOLS.COM 1-888-669-567210 HTTP://WWW.FREEMANTOOLS.COM 1-888-669-5672 11
FIGURE 8
FIGURE 9
B
A
HONING BLADE
Removing burrs from the flat edge of the blade is very
important, honing a new blade should be done after
the first 40-100 cuts, after every 100+ cuts and when
the blade has been re-sharpened.
LUBRICATION
To prevent surface corrosion, it is recommended to
apply a small amount of light machine oil on the
sliding parts of the laminate cutter. Lubrication should
be done once every two months or once a month if
working in dirty or dusty conditions.
FIGURE 10

MODEL: P13INLC MODEL: P13INLC
PGP INC. PRODUCT WARRANTIES
Professional 1-Year Limited Warranty
The Freeman Tool limited warranty extends exclusively to the original purchaser of the Freeman Product, begins
on the date of purchase. During the warranty period Prime Global Products, Inc. (PGP) expressly warrants that
the Freeman Product is free from defect in materials and workmanship subject to the exceptions and limitations
contained herein. PGP shall at its option, repair, replace, or offer a full refund for a Freeman Product that has a
defect in materials or workmanship.
A DATED SALES RECEIPT OR PROOF OF PURCHASE FROM THE ORIGINAL RETAIL PURCHASER IS
REQUIRED TO MAKE A WARRANTY CLAIM. Warranty registration is also required and can be accomplished
through On-Line Product Registration at www.primeglobalproducts.com, select SUPPORT, select PRODUCT
REGISTRATION. To make a warranty claim, the original purchaser must return the Freeman Tool, postage
prepaid and insured, with proof of purchase to PGP or any of its authorized service centers. For questions please
call 1-888-669-5672. Other than the postage and insurance requirement, no charge will be made for repairs
covered by this warranty.
HTTP://WWW.FREEMANTOOLS.COM 1-888-669-567212 13
Warranty Exclusions
These Warranties do not apply where:
Repairs or alterations have been made, or attempted, by others, and/or the unauthorized use of non-conforming parts or accessories.
Repairs are required due to normal wear and tear.
The Tool has been abused, misused, improperly maintained or operated, including: the failure to use clean, dry,
regulated compressed air at the recommended pressure; accidents caused by use of the Freeman Product
after partial failure.
The Freeman Product is used commercially in assembly lines or production lines. The Freeman Product is
intended for use by individuals and these warranties do not extend to such commercial uses.
NO WARRANTY, ORAL OR WRITTEN, EXPRESSED OR IMPLIED, OTHER THAN THE ABOVE WARRANTIES
IS MADE WITH REGARD TO THIS FREEMAN PRODUCT. ANY IMPLIED WARRANTIES WILL BE LIMITED IN
DURATION TO THE APPLICABLE WARRANTY PERIOD SPECIFIED ABOVE. SOME STATES DO NOT ALLOW
LIMITATIONS ON HOW LONG AN IMPLIED WARRANTY LASTS, SO THE ABOVE MAY NOT APPLY TO YOU.
YOUR REMEDIES ARE SOLELY AND EXCLUSIVELY AS STATED ABOVE. PGP SHALL IN NO EVENT BE
LIABLE FOR INCIDENTAL, CONSEQUENTIAL, INDIRECT, OR SPECIAL DAMAGES. SOME STATES DO NOT
ALLOW THE EXCLUSION OR LIMITATION OF INCIDENTAL OR CONSEQUENTIAL DAMAGES, SO THE
ABOVE LIMITATION OR EXCLUSION MAY NOT APPLY TO YOU. IN NO EVENT, WHETHER AS A RESULT OF
A BREACH OF CONTRACT, WARRANTY, TORT (INCLUDING NEGLIGENCE) OR OTHERWISE, SHALL PGP’S
LIABILITY EXCEED THE PRICE OF THE PRODUCT WHICH HAS GIVEN RISE TO THE CLAIM OR LIABILITY.
ANY LIABILITY CONNECTED WITH THE USE OF THIS PRODUCT SHALL TERMINATE UPON THE EXPIRATION OF THE WARRANTY PERIOD SPECIFIED ABOVE. NO EMPLOYEE OR REPRESENTATION OF PGP,
OR ANY DISTRIBUTOR OR DEALER IS AUTHORIZED TO MAKE ANY CHANGE OR MODIFICATION OF THIS
WARRANTY.
These warranties give you specific legal rights. You may also have other rights which vary from state to state.
HTTP://WWW.FREEMANTOOLS.COM 1-888-669-5672
 Loading...