

Page 1
1
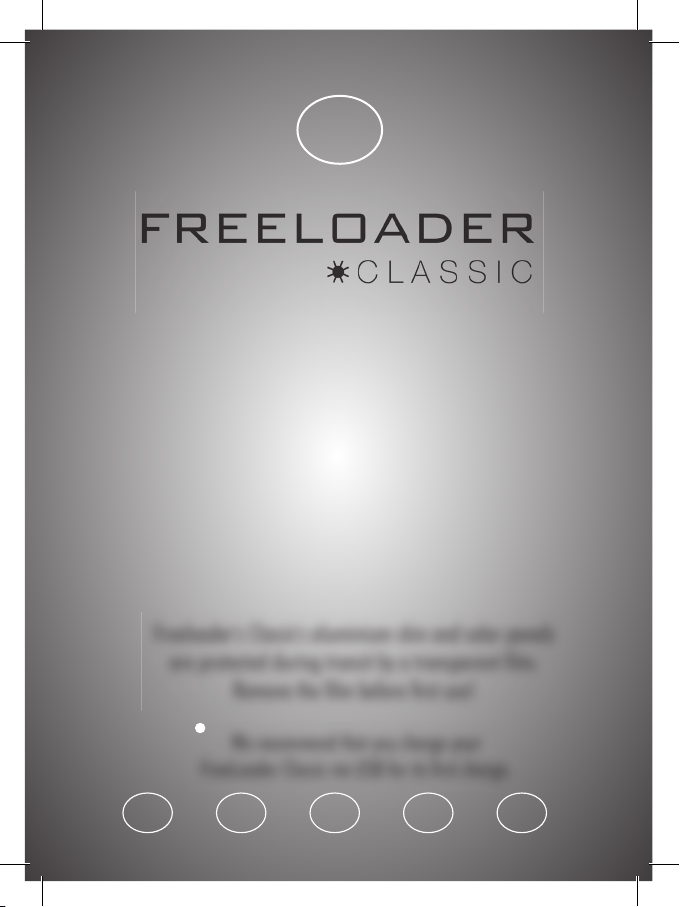
User Manual
Portable Solar Energy
Models:
SC8100 (Grey)
SC8101 (Pink)
We recommend that you charge your
FreeLoader Classic via USB for its fi rst charge.
GB
Freeloader's Classic's aluminium skin and solar panels
are protected during transit by a transparent fi lm.
Remove the fi lm before fi rst use!
GB
D
I
E
F
Page 2
1
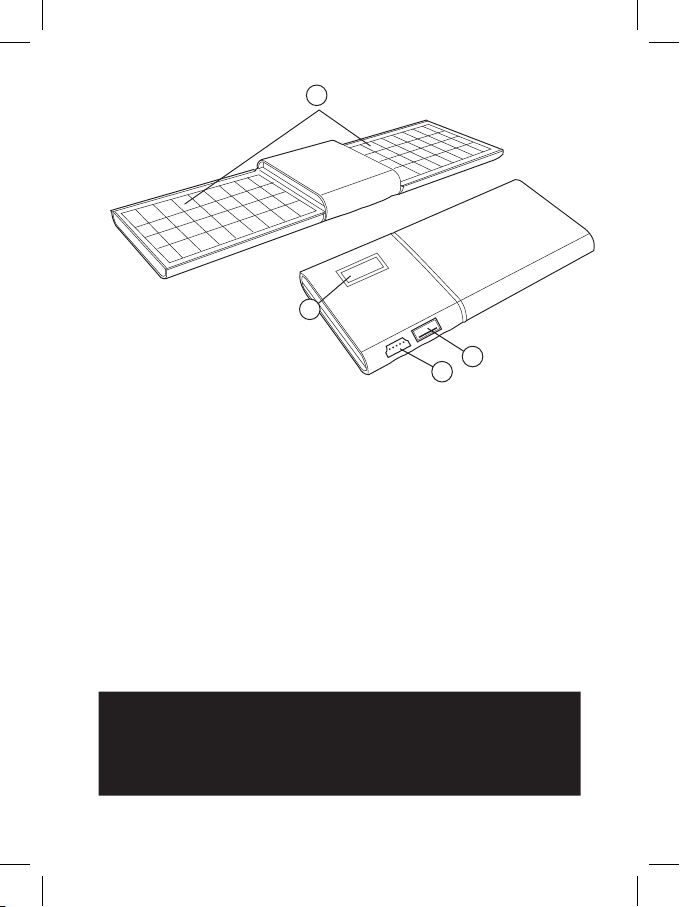
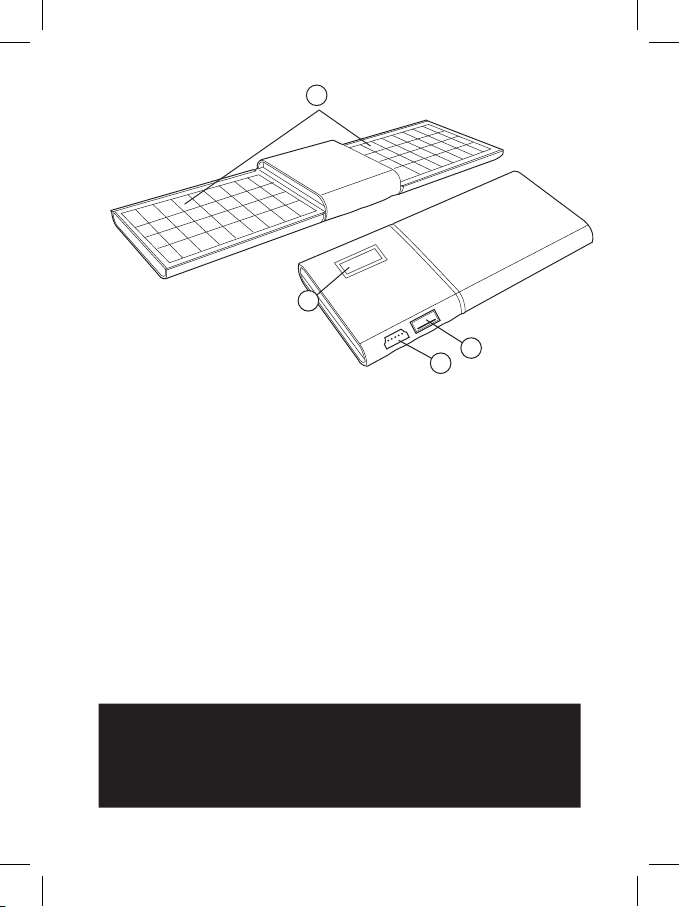
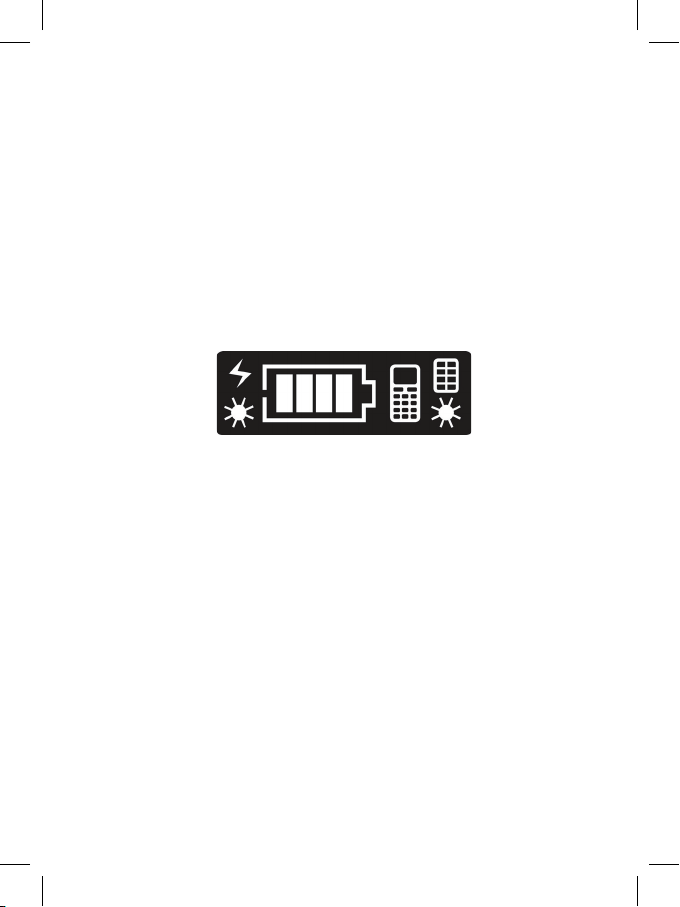
1. Solar Panel
2. Power out (for master cable
and devices' own USB cable)
3. Power in (for USB charge cable)
4. LED – Charge status display
1
2
3
4
IMPORTANT - Due to the ongoing advances in technology we
cannot guarantee compatibility with third party devices and in
all cases would recommend testing the charger with your device
before it is relied upon in the field.
Components Included:
1 x FreeLoader Classic charger
1 x Power Master cable
1 x Adaptor for Nintendo DS Lite
1 x Adaptor for LG Chocolate Series Phones
2 x Adaptors for Nokia mobile phones
1 x Adaptor for Samsung mobile phones
1 x Adaptors for Sony Ericsson mobile phones
1 x 4mm jack plug for PSP, Tom Tom, digital camera etc
1 x Micro USB adaptor for most current phones, Blackberry, Nokia,
Samsung, LG, Sony Ericson etc
1 x Mini USB adaptor for Motorola RAZR, MP3 etc
Page 3

2
Electrical Characteristics / Performance
1. Solar Panel (mono/multi crystalline): 5.5V 150mA
2. Rechargeable Lithium Battery: 3.7V 1200mAh
3. USB charging cable: 5V 500mA
4. DC Output: 5.5V+/– 0.5% 500mA
5. Time required to deliver power from Freeloader Classic:
30 minutes to 2 hours
6. Time required to charge the FreeLoader Classic internal battery using
the USB charge cable: 3 to 4 hours
7. Time required to charge the FreeLoader Classic internal battery in sunny
conditions using the solar panels: 5 to 10 hours
Note - light quality plays a key role in determining the speed of charge.
Cloudy days or the Freeloader Classic being positioned behind a glass
window will all increase the time needed to charge its battery.
Operation Instructions:
1. To charge using the USB charge cable
Insert the Mini USB Tip into the round end of the Master Cable, then
insert the USB plug on the other end of the cable into a PC, laptop or
other suitable device (which is switched ON). Insert the mini USB tip into
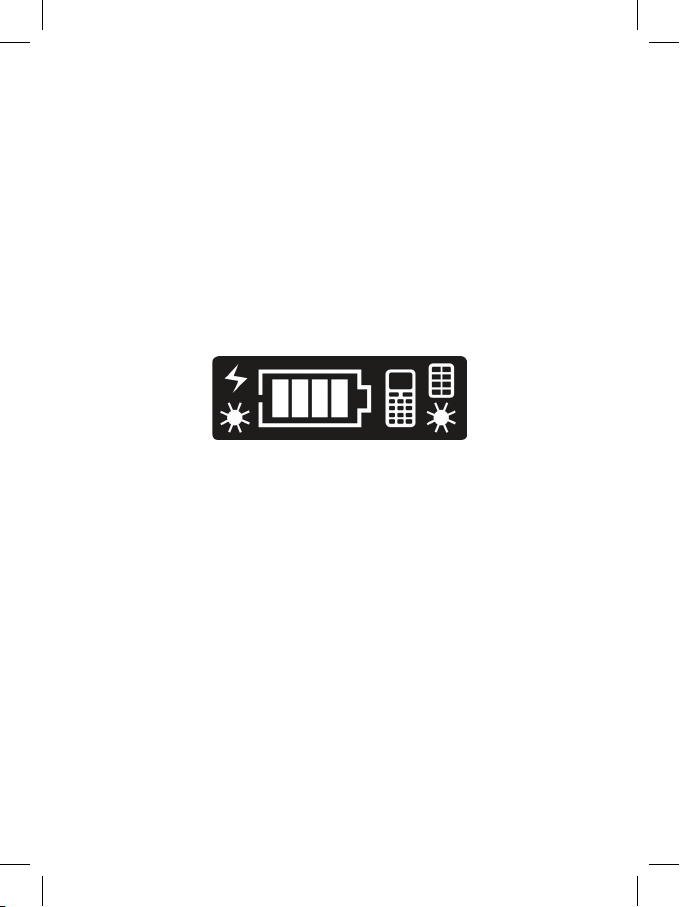
Freeloader Classic’s Power In socket (2). The LCD panel (4) will illuminate
and a “battery” icon will be displayed indicating the current battery level
(1 bar = 10% to 25% charge, 2 bars = up to 50% charge, 3 bars = up
75% charge and 4 bars = from 76% to 100% charge). The “lightning bolt”
icon will also be displayed indicating that Freeloader Classic is accepting a
charge from a USB connected power source.
Note - Please do not leave the USB charge cable plugged in overnight as
damage to the battery may occur.
IMPORTANT - This method of charging is recommended for the
first charge from new and may take up to 8 hours. USB charging
is also a worthwhile practice once or twice a year as this helps to
condition the battery and will result in longer battery life.
Page 4
3
2. To charge from the solar panels
Remove the clear film from both solar panels before first use. Detach the
solar panels from the body of FreeLoader Classic and separate the two halves
exposing the face of each solar panel. The end of the solar panel that has the
two locating lugs should then be inserted into the side of FreeLoader Classic’s
body – one solar panel each side.
When the solar panels are facing the sun, the LCD panel will show
a “battery”
icon indicating the current battery level (see note 1 for more information) and
two flashing “sun” icons (one for each solar panel). Please note – the LCD panel
will not illuminate during solar charging. The brighter the Sun light, the faster
the charge.
Note - be careful not to scratch the surface of the solar
panels and do not clean with strong detergent.
Please note: Prolonged exposure of Freeloader Classic to sun/daylight will not
damage the battery because of its in-built advanced charge control electronics.
3. To charge from the optional Supercharger Accessory
Supercharger is connected to Freeloader Classic via the Power in socket (2)
and will provide all weather, all terrain charging for Freeloader. It also speeds
up charging time to as little as 4 hours. When Supercharger is attached the
LCD panel will show a “battery” icon indicating the current battery level (see
note1 for more information) and a “solar panel” icon. Please note – the LCD
panel will not illuminate during solar charging.
4. To charge hand held electrical devices
Insert the USB end of the Master cable into Freeloader Classic’s Power Out
socket (3). Select the correct adaptor tip, insert into the female end of the
Master cable and connect to your device. Freeloader Classic’s
LCD panel will
illuminate and a “battery” icon will be displayed indicating the current battery
level in Freeloader Classic (see note 1 for more information) and a “mobile
phone” icon will flash icon indicating the Freeloader Classic is delivering
power to a device. The device being charged should also indicate that it is
Page 5

4
receiving a charge. When there is insufficient charge in Freeloader or if the
device battery level and the Freeloader battery level are roughly the same,
Freeloader will not deliver power and the LCD panel will not be illuminated.
NOTE –
where no adaptor tip is supplied for a device, connect the USB sync
cable supplied with a device (such as the white USB cable supplied with iPhone,
iPad, iPod etc) into Output Socket (3) and follow the same steps as above.
Should no such cable exist additional adaptor tips can be purchased form
www.solartechnology.co.uk.
Warning
1. Keep FreeLoader Classic’s body away from fire, water and any form moisture to
ensure damage and injury do not result.
2. Any sever shock or impact may result in damage and will invalidate the warranty.
3. It is forbidden to dismantle FreeLoader Classic except by Solar Technology
personnel or agents appointed by Solar Technology. Any sign of tampering will
result in the warranty being invalidated.
Warranty
FreeLoader Classic is supplied with a 12 month warranty, excluding the battery.
Should a failure occur during this time Solar Technology International Ltd will
repair or replace any faulty part, at its discretion.
Solar Technology International Ltd does not accept liability for any 3rd party
damage how so ever caused or any costs associated with the return of faulty
products.
To make a warranty claim please telephone Solar Technology International Ltd on
+44 (0) 1684 774000
.
These warranty conditions in no way affect your statutory rights. A full set of Solar
Technology International Ltd terms and conditions are available on request.
Optional Accessories
Solar Technology International Ltd provides a comprehensive range of accessories
for Freeloader Classic, which is constantly being updated as new devices come
onto the market.
Our accessory range covers the following: Spare Freeloader battery,
Supercharger – booster panel, CamCaddy – universal camera battery charging
cradle, AA/AAA Battery Charger, In-car charge adaptor, Mains charge adaptor,
Carry pouch for Freeloader plus over 30 additional connection tips. Please
contact your retailer for the full range or go to www.solartechnology.co.uk
Page 6

5
Removing the battery
PLEASE NOTE this will invalidate your warranty.
If for any reason you need to dispose of the Freeloader Classic’s Battery / Hub
you will need to remove the battery first.The battery must then be disposed of
separately. Please contact your local authority for how to dispose of a lithium
ion battery correctly.
To remove the battery you will need to undo the two small screws on one of
the black plastic end caps on the hub unit (the part with the LCD Panel).
Remove the end cap and then slide the internal compartment out of the
aluminium sleeve.
Once removed the battery is the large Blue component, simply cut the
connecting wires (using side cutters or strong scissors) and remove the battery.
The battery is supported by an adhesive pad and might require a strong pull
to remove it.
Please then dispose of the remaining parts in accordance with your local
authorities instructions.
Disposal of used FreeLoader Classic’s battery
Please dispose of FreeLoader Classic’s battery responsibly. Should you be unable
to find a suitable waste disposal unit for the battery, please return this in a sealed
plastic bag, contained in a padded envelope to Solar Technology International Ltd.
Frequently Asked Questions
1. My Freeloader Classic has been outside, in the sun but when I connected it to
my device, it only charged for a short time and did not deliver much power?
• Please ensure the first charge is given by the USB cable connected to a PC or lap
top.
• Please make sure you have removed the protective film from the solar cells as this
will radically reduce the effectiveness of the cells.
• Please ensure Freeloader Classic is given exposure to sunny conditions for
between 5 to 10 hours.
• Ensure the Freeloader Classic is outside, facing south, in an un-shaded position
and ideally tilted at a 45 degree angle.
• If Freeloader Classic is connected to a device that has a near full battery (if for
example you were testing Freeloader Classic from new), Freeloader Classic
would, potentially, not deliver power because if the battery in the device has more
or equal power than the Freeloader Classic, Freeloader Classic will not be able to
deliver power. Wait until the device to be charged is 50% to 60% full (see note 3)
Page 7

6
2. What performance I can expect from Freeloader Classic?
• After 1 day in full sun (9am to 6pm) the Freeloader Classic hub will be pretty much
fully charged. When connected to your device it will deliver power for 30minutes to
2hours depending on the device.
• If Freeloader Classic is positioned behind a window, again facing south in full sun
conditions the time needed to fully charge Freeloader Classic’s battery will be up
to 3 days. The reason for this increase in time is that most glass incorporates UV
filters, which naturally reduce the amount of irradiation needed to enable solar
panels to operate effectively.
• In cloudy conditions, Freeloader Classic may take approximately 1 1/2 times longer
to charge than the above mentioned times, but this is depending on the time of
year, density of cloud etc.
3. Freeloader’s LCD panel shows it has some charge but it wont deliver it to my
device.
• In such circumstances Freeloader’s LCD panel will not be illuminated and it means
the battery level in your device is similar to the battery level in Freeloader. You will
need to either allow Freeloader longer to charge up more fully or allow your device
to discharge further before connecting the two (see note 1).
4. Can I charge my Freeloader Classic hub whilst at the same time powering a
device?
• No. If Freeloader Classic’s hub is empty you will not be able to simultaneously
charge and deliver power. The reason is that Freeloader Classic delivers power to a
device approximately 10 times quicker than its solar cells can charge up its hub.
5. Will charging Freeloader Classic from its solar cells behind glass cause me any
problems?
• Not really a problem but it will increase the time needed to charge the hub
sometimes up to three times longer than if outside.
6. I have Freeloader Classic positioned on a shady windowsill.
Will the Freeloader Classic still charge?
• Yes the Freeloader Classic will still be charged by its solar cells but it will take a lot
longer compared to being outside in full sun - up to 4-5 days longer in fact.
7. Can I leave the Freeloader Classic out in the rain?
• No, we do not recommend getting the Freeloader Classic wet, however, should this
happen accidentally, please dry both hub and cells in a dry airy position away from
children and food stuffs. The solar cells should be fine; however, the hub / battery
may be unsalvageable. A trial will soon tell, however, we would recommend this
trial be done outside by the solar cells only and NOT the USB charge cable. If the
hub will not work a new one can be ordered from www.solartechnology.co.uk
8. How do I connect Freeloader Classic to my device as I don’t seem to have a
connector in the Freeloader Classic pack that fits?
• To connect up a device where no connection tip is supplied please use the original
sync cable (the cable you use for connecting to a PC) and insert the USB end into
Freeloader Classic’s Power Out (3) socket. Then connect to your device in the
normal way.
Page 8

7
9. I have a device that can be charged via my computers USB port can the
Freeloader Classic charge it?
• Yes the Freeloader Classic should be able to charge it.
10. Are there any devices that Freeloader Classic cannot power?
• Freeloader Classic has a voltage range of 3v to 5.5v, so any device that needs
a higher voltage such as a lap top or video camera is outside the scope of
Freeloader Classic.
• If we have no connection tip (see www.solartechnology.co.uk for the list of
accessory tips), there is no USB sync cable supplied with the device or there is no
Freeloader Classic accessory such as CamCaddy or the AA / AAA Battery charger
that suits the device, then Freeloader Classic will not be compatible.
• Digital camera’s where the “block style” battery of the camera needs to be
removed and inserted into a cradle to charge can only be powered by Freeloader
Classic if the optional CamCaddy accessory is purchased. Please Note
– Freeloader Classic will only be able to charge compact
digital camera batteries
(or any camera battery under 5v). For Digital SLR camera battery charging,
Freeloader Pro must be purchased.
WE WANT YOUR PICTURES!
We are seeking images of you and your Freeloader in action in the weirdest
and most wonderful places around the world. For every picture we publish on
our web site you will receive a complimentary Freeloader Battery/Hub worth
£19.99.
Please email your images to sales@solartechnology.co.uk and don't forget to
include your mailing address.
Note: We cannot guarantee to publish every image received - the final decision
to publish or not will be made by Solar Technology International Ltd. By sending
the image the sender automatically grants Solar Technology International
Ltd approval to use the image for any future use in marketing its Freeloader
product.
Solar Technology International Ltd
We are manufacturers of some of the worlds most advanced solar energy
products from solar toys to full scale industrial solar modules. To find out more
please visit www.solartechnology.co.uk.
If you have any questions about this product or regarding these instructions
please contact the Solar Technology International Technical Help Line
on +44 (0) 1684 774000 or alternatively please write to:
Solar Technology International Ltd, Unit 4, Station Drive, Bredon, Nr.
Tewkesbury, Glos. GL20 7HH, UK
Page 9

8
Il vous est recommandé de recharger
votre FreeLoader Classic à l’aide du câble
USB lors de sa première charge.
Durant le transport, le revêtement aluminium et
les panneaux solaires du FreeLoader Classic sont
protégés par un fi lm transparent.
Enlevez le fi lm protecteur avant la première utilisation!
Notice d’utilisation
Énergie solaire portable
Modèles :
SC8100 (Gris)
SC8101 (Rose)
F
Page 10
9
Éléments inclus
1 x chargeur FreeLoader Classic
1 x câble de connexion principal
1x adaptateur pour Nintendo DS Lite
1 x adaptateur pour téléphones LG de la collection Chocolate
2 x adaptateurs pour téléphones portables Nokia
1 x adaptateur pour téléphones portables Samsung
1 x adaptateur pour téléphones portables Sony Ericsson
1 x prise jack 4 mm pour PSP, Tom Tom, appareils photo numériques, etc.
1 x adaptateur micro USB pour la majorité des modèles actuels de téléphones :
Blackberry, Nokia, Samsung, LG, Sony Ericson, etc.
1 x adaptateur mini USB pour Motorola RAZR, MP3, etc.
1
2
3
4
IMPORTANT - Pour cause de changements continus de technologie,
nous ne pouvons garantir la compatibilité avec des appareils de
tierces parties et dans tous les cas nous recommandons le test du
chargeur avec notre appareil avant utilisation sur le terrain.
1. Panneau solaire
2. Sortie de tension (pour le
câble de connexion et le
câble USB fourni avec l’appareil)
3. Entrée d’alimentation (pour le câble de charge USB)
4. LCD - affichage du niveau de charge
Page 11

10
Caractéristiques / performance électriques
1. Panneau solaire (mono/multi cristallin) : 5,5 V 150 mA
2. Batterie rechargeable lithium-ion : 3,7 V 1200 mAh
3. Câble de charge USB : 5 V 500 mA
4. Puissance de sortie DC : 5,5 V+/– 0,5 % 500 mA
5. Temps de charge d’un appareil à l’aide du FreeLoader Classic :
de 30 minutes à 2 heures
6. Temps de charge de la batterie interne du FreeLoader Classic via le câble
de charge USB : 3 à 4 heures
7. Temps de charge de la batterie interne du FreeLoader Classic à l’aide des
panneaux solaires dans des conditions ensoleillées : de 5 à 10 heures.
Remarque - La luminosité joue un rôle important pour déterminer la vitesse
de charge. Par temps nuageux, en hiver ou lorsque le FreeLoader Classic
est placé derrière une fenêtre, le temps de charge de la batterie interne sera
considérablement plus long.
Mode d’emploi
1. Charger à l’aide du câble de charge USB
Insérez l’adaptateur mini USB à l’extrémité ronde du câble de connexion,
puis insérez la prise USB à l’autre extrémité du câble dans le port d’un PC,
d’un ordinateur portable ou de tout autre appareil adapté (l’appareil doit
être allumé). Insérez l’adaptateur mini USB dans la prise d’alimentation
du FreeLoader Classic (2). L’écran LCD (4) s’allume et le symbole d’une
« batterie » s’affiche afin d’indiquer le niveau de charge actuel de la batterie
(1 barre = niveau de charge de 10 à 25 %, 2 barres = jusqu’à 50 %, 3 barres
= jusqu’à 75 % et 4 barres = de 76 à 100 %). Par ailleurs, le symbole d’un
« éclair » indique que le FreeLoader Classic est mis en charge depuis une
source d’alimentation connectée via USB.
Remarque – Veuillez ne pas laisser le câble de charge USB branché toute une
nuit car cela pourrait endommager la batterie.
IMPORTANT - Cette méthode de recharge est recommandée
lors de la première charge de l’appareil neuf et peut requérir
jusqu’à 8 heures. Un chargement par USB est recommandé une
à deux fois par an afin d’allonger la durée de vie de la batterie.
Page 12
11
2. Charger le FreeLoader Classic via les panneaux solaires
Retirez le film transparent des deux panneaux solaires avant la première utilisation.
Détachez les panneaux solaires du FreeLoader Classic et séparez les deux moitiés
de façon à exposer la partie supérieure de chaque panneau solaire. L’extrémité
du panneau solaire qui est dotée de deux pattes de positionnement doit être
insérée sur le côté du corps principal du FreeLoader Classic – un panneau solaire
de chaque côté. Lorsque les panneaux solaires sont exposés au soleil, le symbole
d’une « batterie » s’affiche à l’écran LCD de façon à indiquer le niveau de charge
actuel de la batterie (voir note 1 pour en savoir plus) ainsi que le symbole de deux
« soleils » qui clignotent (un pour chaque panneau solaire). Veuillez noter – l’écran
LCD ne s’allume pas durant le chargement via l’énergie solaire. Plus la lumière du
soleil est intense et plus la vitesse de charge sera rapide.
Remarque – Veillez à ne pas rayer la surface des panneaux solaires et à ne pas
les nettoyer avec un détergeant trop puissant.
Veuillez noter : Une exposition prolongée du FreeLoader Classic au soleil ou à
la lumière du jour n’entraîne aucun dommage à sa batterie grâce à son système
intégré de contrôle électronique avancé.
3. Charger à l’aide du Supercharger (accessoire en option)
Le Supercharger est relié au FreeLoader Classic via la prise d’alimentation
(2) et permet de recharger le FreeLoader quelles que soient les conditions
météorologiques et du terrain. Il permet également de réduire le temps de charge,
jusqu’à 4 heures seulement. Lorsque le Supercharger est connecté, l’écran LCD
affiche le symbole d’une « batterie » de façon à indiquer le niveau de charge
actuel de la batterie (voir note 1 pour en savoir plus) ainsi que le symbole d’un
« panneau solaire ».
Veuillez noter – l’écran LCD ne s’allume pas durant le
chargement via l’énergie solaire.
4. Charger des appareils portables
Insérez la prise USB du câble de connexion dans la prise de sortie du FreeLoader
Classic (3). Sélectionnez l’adaptateur adapté, insérez-le dans la prise femelle du
câble de connexion principal et reliez à votre appareil. L’écran LCD du FreeLoader
Classic s’allume et le symbole d’une « Batterie » s’affiche afin d’indiquer le niveau
de charge actuel de la batterie du FreeLoader Classic (voir note 1 pour en savoir
plus) et le symbole d’un « téléphone portable » clignote pour indiquer que le
FreeLoader Classic recharge un appareil.
L’appareil rechargé devrait également
Page 13

12
indiquer qu’il est en cours de charge. Lorsque le niveau de charge du FreeLoader
est insuffisant ou si les niveaux de charge de la batterie de l’appareil et du
FreeLoader sont équivalents, le FreeLoader ne rechargera pas l’appareil et l’écran
LCD ne s’illuminera pas.
REMARQUE – en l’absence d’adaptateur pour un appareil, veuillez connecter
le câble de synchronisation USB fourni avec cet appareil (p. ex. : le câble USB
blanc fourni avec l’iPhone, l’iPad, l’iPod, etc.) dans la prise de sortie (3) et suivez
les mêmes étapes que celles indiquées ci-dessus. Si vous ne disposez pas de ce
câble, il est possible de commander un adaptateur supplémentaire sur www.
solartechnology.co.uk
.
Avertissement
1. Tenir le FreeLoader Classic à l’écart du feu, de l’eau et de toute humidité afin
d’éviter tout dommage ou blessure.
2. Tout choc ou impact important peut occasionner des dommages et invalide la
garantie.
3. Seuls les membres du personnel de Solar Technology ou les agents nommés
par Solar Technology sont en mesure de démonter le FreeLoader Classic. Tout
signe de manipulation irrégulière entraînera l’invalidité de la garantie.
Garantie
Le FreeLoader Classic est garanti 12 mois, à l’exception de la batterie. En cas de
panne au cours de ces douze mois, Solar Technology International Ltd procédera,
à sa discrétion, à la réparation ou au remplacement de toute pièce défectueuse.
Solar Technology International Ltd ne peut être tenu responsable pour tout
dommage causé à un tiers ou pour les frais associés au renvoi des produits
défectueux. Pour effectuer une demande sous garantie, veuillez contacter Solar
Technology International Ltd par téléphone au
+44 (0) 1684 774000.
Ces conditions de garantie n’affectent aucunement vos droits de consommateur
prévus par la loi. L’ensemble des conditions générales de Solar Technology
International Ltd sont disponibles sur demande.
Accessoires en option
Solar Technology International Ltd offre une gamme complète d’accessoires pour
le FreeLoader Classic. Celle-ci est complétée en permanence à mesure que de
nouveaux produits sortent sur le marché.
Notre gamme d’accessoires comprend notamment : Batterie de rechange pour
le FreeLoader, Supercharger (panneau de charge rapide), CamCaddy (chargeur
universel de batterie pour appareil photo), chargeur de piles AA/AAA, adaptateur
voiture, adaptateur secteur, pochette de transport pour le FreeLoader et plus de
30 adaptateurs supplémentaires. Pour découvrir la gamme complète, veuillez
contacter votre revendeur ou consulter le site www.solartechnology.co.u
k.
Page 14

13
Enlever la batterie
VEUILLEZ NOTER que le fait de retirer la batterie invalide votre garantie.
Si pour quelques raisons que ce soit vous souhaitez jeter la batterie/hub de votre
FreeLoader Classic, vous devrez enlever la batterie au préalable. La batterie doit
être éliminée séparément. Veuillez contacter les autorités locales afin de savoir
comment éliminer correctement une batterie au lithium-ion.
Pour enlever la batterie, vous devez dévisser les deux petites vis situées sur l’un des
capuchons plastiques noirs de l’unité (la partie dotée de l’écran LCD). Enlevez le
capuchon et faites glisser le compartiment interne de façon à le faire sortir de la
coque aluminium.
Une fois retiré, vous apercevrez un gros composant bleu qui est la batterie. Il
vous suffit de couper les câbles de connexion (à l’aide de pinces coupantes ou de
ciseaux résistants) et de retirer la batterie.
La batterie est également fixée par un ruban adhésif, il est donc nécessaire de tirer
fortement sur la batterie pour l’enlever.
Veuillez éliminer les autres composants en conformité avec les dispositions en
vigueur stipulées par les autorités locales.
Élimination de la batterie usagée du FreeLoader Classic
Veuillez éliminer la batterie usagée du FreeLoader Classic de manière
responsable. Si vous ne parvenez pas à trouver une déchetterie en mesure de
collecter la batterie, veuillez la retourner à Solar Technology International Ltd dans
un sac plastique scellé que vous placerez dans une enveloppe rembourrée.
Questions fréquentes
1. Mon FreeLoader Classic a été à l’extérieur au soleil mais quand je l’ai connecté à
mon appareil, il n’a rechargé qu’un court instant et n’a pas d élivré beaucoup de
puissance.
• Veuillez vous assurer que la première charge est effectuée via le câble USB relié à un
PC ou ordinateur portable.
• Assurez-vous d’avoir enlevé le film protecteur des panneaux solaires car il réduit
radicalement l’efficacité de rechargement avec les panneaux solaires.
• Assurez-vous que votre FreeLoader Classic est exposé au soleil entre 5 à 10 heures.
• Veuillez vous assurer que votre FreeLoader Classic est placé à l’extérieur, exposé face
au sud, au soleil et incliné à 45° dans l’idéal.
• Si le FreeLoader Classic est relié à un appareil doté d’une batterie quasiment
rechargée (si, par exemple, vous testez le FreeLoader Classic neuf), il se peut que le
FreeLoader Classic ne délivre aucune puissance car si la batterie de l’appareil est
dotée d’une puissance égale ou supérieure à celle du FreeLoader Classic, celui-ci ne
pourra pas recharger l’appareil. Avant de recharger un appareil, veuillez attendre
que son niveau de charge soit compris entre 50 et 60 % (voir note 3).
Page 15

14
2. Quel niveau de performance puis-je attendre du FreeLoader Classic ?
• Après un jour en plein soleil (de 9 h à 18 h), le FreeLoader Classic sera
complètement chargé. Une fois connecté à votre appareil, il fournira entre 30
minutes et 2 h de charge selon le type d’appareil.
• Si le FreeLoader Classic est placé derrière une vitre, par temps ensoleillé et face au
sud, il vous faudra compter jusqu’à 3 jours pour que sa batterie interne se charge
complètement. Cette augmentation du temps de charge s’explique par le fait que
la majorité des vitres sont dotées de filtres anti UV qui réduisent naturellement la
quantité de radiation qui est nécessaire pour permettre aux panneaux solaires de
fonctionner efficacement.
• Par temps nuageux, le temps de charge du FreeLoader Classic est multiplié par 1,5
par rapport aux temps indiqués ci-dessus. Toutefois, la durée de charge dépend de
la saison, de la densité des nuages, etc.
3. L’écran LCD du FreeLoader indique un certain niveau de charge mais aucune
puissance n’est délivrée à mon appareil.
• Dans un tel cas, l’écran LCD du FreeLoader ne sera pas illuminé. Cela signifie que le
niveau de charge de la batterie de votre appareil est similaire à celui du FreeLoader.
Vous devrez soit charger le FreeLoader pendant plus longtemps ou laisser votre
appareil se décharger davantage avant de pouvoir les relier (voir note 1).
4. Puis-je charger mon FreeLoader Classic tout en rechargeant un appareil en
même temps ?
• Non. Si la batterie du FreeLoader Classic est vide, vous ne pourrez pas la charger
et délivrer de l’énergie simultanément. En effet, le FreeLoader Classic délivre sa
puissance à un appareil approximativement 10 fois plus vite que ses panneaux
solaires ne peuvent recharger sa batterie interne.
5. Recharger le FreeLoader Classic à l’aide de ses panneaux solaires derrière une
vitre peut-il causer des problèmes ?
• Non, pas nécessairement un problème. Il vous faudra seulement plus de temps pour
recharger la batterie, parfois jusqu’à 3 fois plus de temps que s’il était à l’extérieur.
6. Mon FreeLoader Classic est positionné derrière une fenêtre ombragée. Est-ce qu’il
se rechargera quand même ?
• Oui, le FreeLoader Classic se rechargera via ses panneaux solaires mais il faudra
beaucoup plus de temps que s’il était à l’extérieur en plein soleil - jusqu’à 4 à 5 jours
de plus.
7. Puis-je laisser le FreeLoader Classic sous la pluie ?
• Non, il n’est pas recommandé de mouiller le FreeLoader Classic. Toutefois, si ceci
arrive accidentellement, laissez sécher le hub et les panneaux solaires dans un
endroit aéré, tenu hors de portée des enfants et à l’écart de denrées alimentaires.
Les panneaux solaires ne devraient pas être endommagés mais le hub/la batterie
risquent de l’être. Effectuez un test pour déterminer rapidement si le FreeLoader a été
endommagé. Pour le tester, il vous est recommandé d’effectuer le test à l’extérieur en
n’utilisant que les panneaux solaires et NON PAS le câble de charge USB. Si le hub
ne fonctionne pas, il est possible de commander une nouvelle unité sur le site www.
solartechnology.co.uk.
8. Comment puis-je relier le FreeLoader Classic à mon appareil car il semblerait que
le pack du FreeLoader Classic ne contient pas l’adaptateur adapté ?
Page 16

15
• Pour relier un appareil pour lequel aucun adaptateur n’est fourni, veuillez utiliser le
câble de synchronisation d’origine de votre appareil (le câble que vous utilisez pour
le connecter à un PC) et insérez l’embout USB dans la prise de sortie du FreeLoader
Classic (3). Ensuite, il vous suffit de relier l’appareil normalement.
9. Je dispose d’un appareil qui peut être rechargé via le port USB de mon PC. Peut-il
être également rechargé à l’aide du FreeLoader Classic ?
• Oui, le FreeLoader Classic devrait pouvoir le recharger.
10. Existe-t-il certains appareils que le FreeLoader Classic n’est pas en mesure de
recharger ?
• Le FreeLoader Classic est doté d’une plage de tension allant de 3 V à 5,5 V, tout
appareil nécessitant un voltage plus important, tel qu’un ordinateur portable ou un
caméscope, ne pourra pas être rechargé à l’aide du FreeLoader Classic.
• Si nous n’offrons pas d’adaptateur adapté (voir la gamme complète d’accessoires
sur www.solartechnology.co.u
k), si aucun câble de synchronisation USB n’est fourni
avec l’appareil ou si aucun accessoire du FreeLoader Classic (tels que la CamCaddy
ou le chargeur de piles AA/AAA) n’est compatible avec l’appareil, le FreeLoader
Classic ne pourra pas être utilisé.
• Les appareils photo numériques, dotés d’une batterie de style « bloc » qui doit être
insérée sur un socle pour être rechargée, peuvent uniquement être rechargés à l’aide
du FreeLoader Classic si l’accessoire en option CamCaddy est acheté. Veuillez noter
– le FreeLoader Classic permet uniquement de recharger des batteries d’appareils
photo numériques compacts (ou toute batterie d’appareil photo d’une tension
inférieure à 5 V). Pour recharger la batterie d’un appareil photo numérique SLR, il est
nécessaire d’acheter le FreeLoader Pro.
Solar Technology International Ltd
Nous fabriquons certains des produits fonctionnant à l’énergie solaire les plus sophistiqués
du marché mondial, des jouets solaires à des modules solaires industriels de grande
échelle. Pour en savoir plus, veuillez consulter le site : www.solartechnology.co.uk
.
Pour toutes questions concernant ce produit ou ce mode d’emploi, veuillez contacter la
ligne d’assistance de Solar Technology International au +44 (0) 1684 774000,
ou écrire à : Solar Technology International Ltd, Unit 4, Station Drive, Bredon,
Nr. Tewkesbury, Glos. GL20 7HH, Royaume-Uni.
Nous souhaitons recevoir vos photos !
Nous recherchons des photos de vous et de votre FreeLoader en action aux quatre
coins du monde et dans des endroits insolites. Pour toute photo publiée sur notre site
Internet, vous recevrez gratuitement une batterie/hub FreeLoader d’une valeur de
19,99 £.
Veuillez envoyer vos photos à sales@solartechnology.co.uk et n’oubliez pas
d’indiquer votre adresse postale.
Remarque: Nous ne pouvons pas garantir que toutes les photos envoyées seront
publiées. La décision finale revient à Solar Technology International Ltd. En envoyant
votre photo, vous autorisez automatiquement Solar Technology International Ltd à
utiliser votre photo pour toute utilisation marketing concernant les produits FreeLoader.
Page 17

16
D
Wir empfehlen Ihnen, den FreeLoader Classic
bei der ersten Aufl adung über USB-Anschluss zu laden.
Aluminiumgehäuse und Solarpaneele
sind im Auslieferungszustand durch eine
transparente Schutzfolie geschützt.
Folie bitte vor Benutzung entfernen.
Bedienungsanleitung
Tragbare Solarenergie
Modelle:
SC8088 (Grau)
SC8089 (Pink)
Page 18

17
Lieferumfang
1 x FreeLoader Classic Ladegerät
1 x Hauptladekabel
1 x Adapter für Nintendo DS Lite
1 x Adapter für Telefone der LG-Chocolate-Serie
2 x Adapter für Nokia-Mobiltelefone
1 x Adapter für Samsung-Mobiltelefone
1 x Adapter für Sony-Ericsson-Mobiltelefone
1 x 4-mm-Klinkenstecker für PSP, TomTom, Digitalkameras usw.
1 x Micro-USB-Adapter für die meisten aktuellen Telefone,
Blackberry, Nokia, Samsung, LG, Sony Ericsson usw.
1 x Mini-USB-Adapter für Motorola RAZR, MP3-Player usw.
1
2
3
4
WICHTIG - Aufgrund der ständigen technologischen Fortschritte
können wir die Kompatibilität mit Drittanbieter-Geräten nicht
garantieren.Wir empfehlen in jedem Fall, das Ladegerät zusammen
mit Ihrem Gerät zu testen, bevor Sie sich im praktischen Einsatz
darauf verlassen.
1. Solarpaneel
2. Strom-Ausgang
(für Hauptladekabel und
USB-Kabel der Geräte)
3. Strom-Eingang (für USB-Ladekabel)
4. LCD-Anzeige für Ladezustand
Page 19

18
Technische Daten / Leistung
1. Solarpaneel (mono-/multikristallin): 5,5 V 150 mA
2. Aufladbare Lithium-Batterie: 3,7 V 1200 mAh
3. USB-Ladekabel: 5 V 500 mA
4. Ausgangsleistung (DC): 5,5 V +/- 0,5% 500 mA
5. Benötigte Zeit für Stromversorgung mit FreeLoader Classic:
30 Minuten bis zu 2 Stunden
6. Benötigte Zeit für Aufladung des internen Akkus des FreeLoader Classic
mit USB-Ladekabel: 3 bis 4 Stunden
7. Benötigte Zeit für Aufladung des internen Akkus des FreeLoader Classic
unter sonnigen Bedingungen mit Solarpaneelen: 5 bis 10 Stunden
Hinweis: Die Lichtqualität spielt für die benötigte Ladezeit eine wesentliche
Rolle. Bei Bewölkung oder der Positionierung hinter einem Glasfenster
verlängert sich die benötigte Akku-Ladezeit.
Betriebsanleitung
1. Aufladung über USB-Ladekabel
Schließen Sie den Mini-USB-Stecker an das runde Ende des Hauptkabels
an, schließen Sie dann den USB-Stecker am anderen Ende des Kabels an
einen PC, ein Laptop oder ein anderes geeignetes Gerät an (Geräte müssen
eingeschaltet sein). Schließen Sie den Mini-USB-Stecker an den Strom-Eingang
(2) des FreeLoader Classic an. Das LCD-Display (4) leuchtet auf, und ein
„Batterie“-Symbol wird eingeblendet und zeigt den aktuellen Akku-Ladestatus
(1 Balken = 10 % bis 25 % Aufladung, 2 Balken = bis zu 50 % Aufladung, 3
Balken = bis zu 75 % Aufladung und 4 Balken = 76 % bis 100 % Aufladung).
Das „Blitz“-Symbol wird ebenfalls eingeblendet und zeigt an, dass FreeLoader
Classic von einer über USB-Anschluss verbundenen Stromquelle
geladen wird.
Hinweis: Bitte lassen Sie das USB-Ladekabel nicht über Nacht angeschlossen,
da der Akku beschädigt werden könnte.
WICHTIG - Diese Auflademethode wird für die erste Aufladung
des Neugeräts empfohlen und kann bis zu 8 Stunden benötigen.
Die Aufladung über USB-Ladekabel sollte ein- bis zweimal
jährlich durchgeführt werden, da es den Akku konditioniert und
seine Lebensdauer verlängert.
Page 20

19
2. Aufladung über die Solarpaneele
Entfernen Sie vor Gebrauch die Schutzfolie von beiden Solarpaneelen. Lösen
Sie die Solarpaneele vom Gehäuse des FreeLoader Classic und trennen Sie die
beiden Hälften, so dass die Oberseiten der Solarpaneele freiliegen. Die Enden
der Solarpanelle, an denen sich die beiden Aufhängeösen befinden, sollten
dann seitlich in das Gehäuse des FreeLoader Classic eingesteckt werden – ein
Solarpaneel auf jeder Seite.
Wenn die Solarpaneele auf das Sonnenlicht ausgerichtet sind, werden im
LCD-Display ein „Batterie“-Symbol, das den aktuellen Akku-Status anzeigt
(weitere Informationen im Abschnitt 1), sowie zwei blinkende „Sonnen“-Symbole
(eines für jedes Solarpaneel) eingeblendet. Hinweis: Das LCD-Display leuchtet
während der Solar-Aufladung nicht auf. Je intensiver die Sonneneinstrahlung ist,
desto schneller erfolgt die Aufladung.
Hinweis: Bitte achten Sie darauf, die Oberfläche der Solarpaneele nicht zu
verkratzen und keine scharfen Reinigungsmittel zu verwenden.
Hinweis: Auch wenn FreeLoader Classic über längere Zeiträume dem
Sonnen-/Tageslicht ausgesetzt ist, wird der Akku aufgrund des integrierten
Überladungsschutzes nicht beschädigt.
3. Aufladung über den separat erhältlichen Supercharger
Das Zubehörteil Supercharger wird über den Strom-Eingang (2) an
den FreeLoader Classic angeschlossen und bietet eine wetter- und
geländeunabhängige Aufladung für den FreeLoader. Es verringert die
Aufladezeit auf nur 4 Stunden. Wenn der Supercharger angeschlossen ist,
werden im LCD-Display ein „Batterie“-Symbol zur Anzeige des aktuellen
Akku-Status (weitere Informationen in Abschnitt 1) und ein „Solarpaneel“Symbol angezeigt. Hinweis: Das LCD-Display leuchtet während der SolarAufladung nicht auf.
4. Aufladen von tragbaren Elektrogeräten
Schließen Sie den USB-Anschluss des Hauptladekabels an den Strom-Ausgang
(3) des FreeLoader Classic an. Wählen Sie den passenden Adapter-Stecker
aus, schließen Sie ihn am weiblichen Anschluss des Hauptladekabels an und
verbinden Sie ihn mit Ihrem Gerät. Die LCD-Anzeige des FreeLoader Classic
leuchtet auf; und zeigt ein „Batterie“-Symbol an, das den aktuellen Akku-Status
im FreeLoader Classic (weitere Informationen in Abschnitt 1) zeigt, sowie ein
„Handy“-Symbol, das durch Blinken anzeigt, dass der FreeLoader Classic ein
Gerät mit Strom versorgt. Auch das zur Aufladung angeschlossene Gerät sollte
anzeigen, dass es aufgeladen wird. Falls der Ladezustand des FreeLoader nicht
Page 21

20
ausreicht oder falls der Ladezustand des Geräte-Akkus dem des FreeLoaderAkkus ungefähr entspricht, gibt der FreeLoader keinen Strom ab und die LCDAnzeige leuchtet nicht auf.
HINWEIS: Wenn für ein Gerät kein Adapter-Stecker vorhanden ist, verbinden
Sie das mit dem Gerät mitgelieferte USB-Synchronisierungskabel (z.B. das weiße
USB-Kabel, das im Lieferumfang von iPhone, iPad, iPod usw. enthalten ist) mit
dem Strom-Ausgang (3) und führen Sie die oben aufgeführten Schritte durch.
Falls kein derartiges Kabel vorhanden ist, sind zusätzliche Adapterstecker über
www.solartechnology.co.u
k erhältlich.
Achtung
1. Halten Sie den FreeLoader Classic von Feuer, Wasser und sonstiger Feuchtigkeit
fern, um Beschädigungen und Verletzungen zu vermeiden.
2. Starke Erschütterungen oder Stöße können zu Beschädigungen führen und
führen zum Verlust des Garantieanspruchs.
3. Das Öffnen des FreeLoader Classic ist nur Mitarbeitern von Solar Technology
oder von Solar Technology autorisiertem Fachpersonal gestattet. Jedes Anzeichen
von Manipulation führt zum Verlust des Garantieanspruchs.
Garantie
Der FreeLoader Classic wird mit einer Garantie von 12 Monaten geliefert, mit
Ausnahme des Akkus. Im Falle eines Defekts während dieses Zeitraums verpflichtet
sich Solar Technology International Ltd, fehlerhafte Teile nach eigenem Ermessen
auszutauschen oder zu reparieren.
Solar Technology International Ltd übernimmt keine Haftung für Drittschäden,
unabhängig von der Ursache, oder jedwede Kosten für die Rücksendung
fehlerhafter Produkte.
Um einen Garantieanspruch geltend zu machen, setzen Sie sich unter der Nummer
+44 1684 774000 bitte telefonisch mit Solar Technology International Ltd in
Verbindung.
Diese Garantiebedingungen beeinträchtigen Ihre gesetzlich festgelegten Ansprüche
nicht. Die vollständigen Geschäftsbedingungen der Solar Technology International
Ltd sind auf Anfrage erhältlich.
Separat erhältliches Zubehör
Solar Technology International Ltd bietet ein umfassendes Zubehörprogramm für
den FreeLoader Classic, das laufend aktualisiert wird, wenn neue Geräte auf den
Markt kommen.
Unser Zubehörprogramm enthält unter anderem: Ersatz-Akku für den FreeLoader,
Supercharger-Verstärkermodul, CamCaddy - Universal-Ladeschale für
Kamera-Akkus, AA/AAA-Akku-Ladegerät, Kfz-Ladeadapter, Netz-Ladeadapter,
Transporttasche für den FreeLoader sowie mehr als 30 zusätzliche
Verbindungsstecker. Informationen über das vollständige Programm erhalten Sie bei
Ihrem Fachhändler oder unter www.solartechnology.co.uk.
Page 22

21
Entfernen des Akkus
BITTE BEACHTEN SIE, dass Ihr Garantieanspruch hierdurch erlischt.
Falls Sie aus irgendeinem Grund Batterie / Ladeteil des FreeLoader Classic
entsorgen müssen, müssen Sie zunächst den Akku entnehmen.Der Akku muss
dann separat entsorgt werden. Informationen zur ordnungsgemäßen Entsorgung
eines Lithium-Ionen-Akkus erhalten Sie bei den zuständigen Behörden vor Ort.
Zum Entfernen des Akkus müssen Sie die beiden kleinen Schrauben an einer der
schwarzen Kunststoff-Abschlusskappen am Ladeteil (dem mittleren Geräteteil mit
dem LCD-Display) entfernen. Entfernen Sie die Abschlusskappe und lassen Sie den
inneren Teil aus dem Aluminiumgehäuse gleiten.
Beim Akku handelt es sich um das große blaue Element. Durchtrennen Sie einfach
die Anschlusskabel (mit Hilfe eines Seitenschneiders oder einer starken Schere) und
entfernen Sie den Akku.Der Akku wird von einem Klebekissen gehalten, so dass
eventuell kräftiges Ziehen nötig ist.
Bitte entsorgen Sie die übrigen Teile dann gemäß den Anweisungen der
zuständigen Behörden.
Entsorgung von gebrauchten Akkus des FreeLoader Classic
Bitte entsorgen Sie die Akkus des FreeLoader Classic auf verantwortungsvolle Art.
Falls Sie keine geeignete Entsorgungsstelle für den Akku finden, senden Sie ihn
bitte in einem dicht verschlossenen Plastikbeutel in einem Luftpolsterumschlag an
Solar Technology International Ltd zurück.
Häufig gestellte Fragen
1. Mein FreeLoader Classic war draußen, in der Sonne, aber als ich ihn an mein
Gerät angeschlossen habe, hat er nur für kurze Zeit geladen und nur wenig
Aufladung gebracht.
• Bitte achten Sie darauf, dass die erste Aufladung über ein USB-Kabel erfolgt, das an
einen PC oder ein Laptop angeschlossen ist.
• Bitte vergewissern Sie sich, dass Sie den Schutzfilm von den Solarzellen abgezogen
haben, da dieser die Leistungsfähigkeit der Zellen erheblich verringert.
• Bitte achten Sie darauf, dass der FreeLoader Classic zwischen 5 und 10 Stunden lang
dem Sonnenlicht ausgesetzt ist.
• Stellen Sie sicher, dass der FreeLoader Classic sich im Freien befindet, nach Süden
ausgerichtet ist, nicht im Schatten ist und im Idealfall einen Neigungswinkel von 45
Grad hat.
• Falls der FreeLoader Classic mit einem Gerät verbunden ist, dessen Akku fast
vollständig aufgeladen ist (falls Sie den FreeLoader Classic beispielsweise im
Neuzustand testen), liefert der FreeLoader Classic möglicherweise keinen Strom, denn
der FreeLoader Classic kann ein Gerät, dessen Akku-Ladung der des FreeLoader
Classic entspricht oder höher ist, nicht mit Strom versorgen. Warten Sie in diesem Fall,
bis die Aufladung des Gerätes bei 50 % bis 60 % liegt (siehe auch Abschnitt 3).
2. Welche Leistung kann ich vom FreeLoader Classic erwarten?
• Nach einem Tag in direkter Sonne (9 bis 18 Uhr) ist das Ladeteil des FreeLoader
Classic in der Regel vollständig aufgeladen. Beim Anschluss an Ihr Gerät wird er es
30 Minuten bis 2 Stunden lang mit Strom laden, je nach Gerät.
Page 23

22
• Wenn der FreeLoader Classic sich hinter einem Glasfenster befindet und auch hier
bei vollem Sonnenlicht nach Süden ausgerichtet ist, beträgt die benötigte Zeit zur
Aufladung des FreeLoader-Classic-Akkus bis zu 3 Tage. Der Grund für den höheren
Zeitbedarf liegt darin, dass Fensterglas in der Regel UV-Filter enthält, die die für
einen wirkungsvollen Betrieb der Solarpaneele erforderliche Einstrahlung verringern.
• Bei bewölkten Lichtverhältnissen kann der FreeLoader Classic circa das
Eineinhalbfache der oben genannten Zeiten benötigen; dies hängt jedoch von der
Jahreszeit, der Wolkendichte usw. ab.
3. Die LCD-Anzeige des FreeLoader zeigt an, dass Ladung vorhanden ist, sie wird
jedoch nicht an mein Gerät übertragen.
• Unter diesen Umständen leuchtet das LCD-Display des FreeLoader nicht auf;
es bedeutet, dass die Akku-Ladung in Ihrem Gerät in etwa dem Ladestatus des
FreeLoader-Akkus entspricht. Sie müssen entweder den FreeLoader weiter aufladen
lassen oder den Akku in Ihrem Gerät weiter entladen lassen, bevor Sie die beiden
Geräte miteinander verbinden (siehe Abschnitt 1).
4. Kann ich das Ladeteil des FreeLoader Classic aufladen und gleichzeitig ein Gerät
damit mit Strom laden?
• Nein. Wenn das Ladeteil des FreeLoader Classic leer ist, können Sie es nicht
gleichzeitig aufladen und Strom damit liefern. Das liegt daran, dass der FreeLoader
Classic ungefähr zehnmal schneller ein anderes Gerät mit Strom speist als die
Solarzellen das Ladeteil aufladen können.
5. Kann die Aufladung des FreeLoader Classic über die Solarzellen hinter Glas
Probleme verursachen?
• Es führt nicht zu Problemen, erhöht jedoch die für die Aufladung des Ladeteils
benötigte Zeit, im manchen Fällen auf das Dreifache der im Freien benötigten Zeit.
6. Ich habe den FreeLoader Classic auf eine Fensterbank im Schatten gelegt. Lädt
der FreeLoader Classic trotzdem auf?
• Ja, der FreeLoader Classic wird trotzdem über die Solarzellen aufgeladen, es dauert
jedoch erheblich länger als im Freien bei voller Sonneneinstrahlung – tatsächlich
sogar bis zu 4 bis 5 Tage länger.
7. Kann ich den FreeLoader Classic bei Regen draußen lassen?
• Nein, es ist nicht ratsam, den FreeLoader Classic nass werden zu lassen. Sollte
dies jedoch versehentlich geschehen, lassen Sie Ladeteil und Solarzellen außerhalb
der Reichweite von Kindern und außerhalb der Nähe von Lebensmitteln an einem
trockenen, gut gelüfteten Ort gründlich trocknen. Die Solarzellen sollten danach
wieder funktionieren, Ladeteil / Akku sind jedoch möglicherweise nicht mehr zu
retten. Ein Versuch zeigt, ob das der Fall ist. Wir empfehlen jedoch, diesen Versuch
im Freien und ausschließlich über die Solarzellen durchzuführen und NICHT über
das USB-Ladekabel. Sollte das Ladeteil nicht mehr funktionieren, können Sie unter
www.solartechnology.co.uk ein neues bestellen.
8. Wie kann ich den FreeLoader Classic an mein Gerät anschließen, wenn im
Lieferumfang des FreeLoader Classic anscheinend kein passender Stecker zu
finden ist?
• Um ein Gerät anzuschließen, für das kein Stecker mitgeliefert wird, verwenden Sie
bitte das Original-Synchronisierungskabel Ihres Geräts (das Kabel, das Sie für den
Anschluss an einen PC verwenden) und schließen Sie das USB-Ende an den StromAusgang (3) des FreeLoader Classic an. Schließen Sie Ihr Gerät dann wie üblich an.
Page 24

23
9. Ich habe ein Gerät, das über den USB-Anschluss meines Computers aufgeladen
werden kann. Kann ich es auch mit dem FreeLoader Classic aufladen?
• Ja, der FreeLoader Classic sollte es aufladen können.
10. Gibt es Geräte, die der FreeLoader Classic nicht aufladen kann?
• Der FreeLoader Classic hat einen Spannungsbereich von 3 Volt bis 5,5 Volt. Geräte,
die eine höhere Spannung benötigen, wie etwa ein Laptop oder eine Videokamera,
sind außerhalb des Anwendungsbereiches des FreeLoader Classic.
• Wenn kein Adapterstecker angeboten wird (eine Liste der als Zubehör erhältlichen
Stecker ist auf www.solartechnology.co.uk zu finden), kein USB-Synchronisierungskabel
mit dem Gerät mitgeliefert wurde oder es kein für das Gerät passendes Zubehör für
den FreeLoader Classic, wie beispielsweise der CamCaddy oder das AA/AAA-AkkuLadegerät gibt, dann ist der FreeLoader Classic nicht mit dem Gerät kompatibel.
• Digitalkameras, deren „Block“-Akkus aus dem Gerät genommen und in einer
Ladeschale geladen werden müssen, können nur beim Erwerb des separat
erhältlichen Zubehörteils CamCaddy mit dem FreeLoader aufgeladen werden.
Hinweis: FreeLoader Classic kann nur Akkus von Kompakt-Digitalkameras (oder
Kamera-Akkus unter 5 Volt) aufladen. Um Akkus von Digital-Spiegelreflexkameras
aufzuladen, ist der FreeLoader Pro erforderlich.
Solar Technology International Ltd
Wir sind Hersteller einiger der weltweit höchstentwickelten Produkte im Bereich
Solarenergie, von Solarspielzeugen bis hin zu Solarmodulen im industriellen
Maßstab. Weitere Informationen finden Sie unter www.solartechnology.co.uk
.
Sollten Sie Fragen zu diesem Produkt oder zu dieser Anleitung haben, wenden
Sie sich bitte telefonisch unter der Nummer +44 1684 774000 an den
technischen Beratungsdienst von Solar Technology International oder wenden
Sie sich alternativ schriftlich an:Solar Technology International Ltd, Unit 4,
Station Drive, Bredon, Nr. Tewkesbury, Glos. GL20 7HH, UK
WIR WOLLEN IHRE BILDER!
Wir suchen Bilder von Ihnen und Ihrem FreeLoader in Aktion, und zwar an den
ungewöhnlichsten und schönsten Orten der Welt. Für jedes Foto, das wir auf
unserer Website veröffentlichen, erhalten Sie einen FreeLoader-Akku/Ladeteil
im Wert von £ 19,99 gratis.
Bitte senden Sie uns Ihre Bilder an sales@solartechnology.co.u
k und vergessen
Sie nicht, Ihre Postanschrift anzugeben.
Hinweis: Wir können nicht garantieren, dass wir jedes erhaltene Bild
veröffentlichen – die endgültige Entscheidung über die Veröffentlichung liegt bei
Solar Technology International Ltd. Durch die Einsendung des Bildes erklärt sich
der Absender mit der zukünftigen Nutzung des Bildes durch Solar Technology
International Ltd für die Vermarktung der FreeLoader-Produkte einverstanden.
Page 25

24
E
Recomendamos que la primera carga
de FreeLoader Classic se realice mediante USB.
Durante el transporte, los paneles solares y la
piel de aluminio de Freeloader Classic quedan
protegidos por una película transparente.
Quite la película antes de utilizarlo por primera vez.
Manual de Usuario
Energía solar portátil
Modelos:
SC8088 (Gris)
SC8089 (Rosa)
Page 26

25
1. Panel solar
2. Salida de alimentación
(para el cable maestro y el
cable USB de los propios dispositivos)
3. Entrada de alimentación (para el cable de carga USB)
4. LCD – Pantalla de estado de carga
Componentes incluidos:
1 cargador Freeloader Classic
1 cable de alimentación maestro
1 adaptador para Nintendo DS Lite
1 adaptador para los teléfonos de la serie Chocolate de LG
2 adaptadores para teléfonos móviles Nokia
1 adaptador para teléfonos móviles Samsung
1 adaptador para teléfonos móviles Sony Ericsson
1 enchufe macho de 4mm para PSP, Tom Tom, cámaras digitales, etc.
1 adaptador micro USB para la mayoría de los teléfonos,
Blackberry, Nokia, Samsung, LG, Sony Ericsson, etc.
1 adaptador mini USB para Motorola RAZR, reproductores de MP3, etc.
1
2
3
4
IMPORTANTE - Debido a los continuos avances tecnológicos no
podemos garantizar la compatibilidad con dispositivos de terceros,
por lo que recomendamos probar siempre el cargador con su
dispositivo antes de aplicarlo en el campo.
Page 27

26
Características eléctricas/rendimiento
1. Panel solar (mono/multi-cristalino): 5,5 V - 150 mA
2. Batería de litio recargable: 3,7 V 1.200 mAh
3. Cable de carga USB: 5 V – 500 mA
4. Salida de CC: 5,5 V+/– 0,5% 500 mA
5. Tiempo necesario para proporcionar alimentación desde FreeLoader
Classic: de 30 minutos a 2 horas.
6. Tiempo requerido para cargar la batería interna de FreeLoader Classic
mediante el cable de carga USB: de 3 a 4 horas.
7. Tiempo requerido para cargar la batería interna de Freeloader Classic en
condiciones soleadas mediante los paneles solares: de 5 a 10 horas.
Nota: la calidad de la luz juega un papel vital a la hora de determinar el
tiempo de carga. Si el día está nublado o si se coloca el dispositivo Freeloader
Classic tras una ventana, la batería tardará más en cargarse.
Instrucciones de funcionamiento:
1. Carga mediante el cable de carga USB
Inserte el adaptador mini USB en el extremo redondeado del cable maestro y,
a continuación, inserte el enchufe USB en el otro extremo del cable en un PC,
portátil u otro dispositivo adecuado (que esté encendido). Inserte el adaptador
mini USB en el enchufe hembra de entrada de alimentación de Freeloader
Classic. El panel LCD (4) se iluminará y se mostrará un icono de batería para
indicar el nivel actual de la batería (1 barra = carga del 10 al 25%, 2 barras =
carga del 26 al 50%, 3 barras = carga del 51 al 75% y 4 barras = carga del 76
al 100%). El icono de “rayo” también se mostrará para indicar que el dispositivo
Freeloader Classic está aceptando carga desde una fuente de alimentación
conectada mediante USB.
Nota: no deje el cable de carga USB conectado durante la noche, ya que
podrían producirse daños en la batería.
IMPORTANTE - este método de carga se recomienda para la
primera carga y podría durar hasta 8 horas. La carga mediante
USB es una práctica recomendable que se debe realizar una
o dos veces al año, ya que ayuda a condicionar la batería y
aumentará su vida útil.
Page 28

27
2. Carga desde los paneles solares
Quite la película transparente de ambos paneles solares antes de utilizar el
dispositivo por primera vez. Desconecte los paneles solares del cuerpo del
dispositivo Freeloader Classic y separe las dos mitades dejando expuesta la
cara de ambos paneles solares. El extremo del panel solar que tiene los dos
lóbulos de ubicación debería insertarse a continuación en el lado del cuerpo del
dispositivo FreeLoader Classic, con un panel solar a cada lado.
Cuando los paneles solares estén de cara al sol, el panel LCD mostrará un
icono de batería, que indica el nivel de batería actual (consulte la nota 1 para
obtener más información) y dos iconos con forma de sol parpadeantes (uno
para cada panel solar). Tenga en cuenta que el panel LCD no se iluminará
durante la carga solar. Mientras más intensa sea la luz del sol, más rápida se
producirá la carga.
Nota: no permita que se ralle la superficie de los paneles solares y no los limpie
con un detergente fuerte.
Nota: la exposición prolongada del dispositivo FreeLoader Classic a la luz
del sol/día no dañará la batería gracias a la electrónica de control de carga
avanzada de que dispone.
Advertencia
1. Mantenga el cuerpo de FreeLoader Classic alejado del fuego, agua y
humedad con el fin de garantizar que no se produzcan daños ni lesiones.
2. Cualquier golpe o impacto fuerte dañará el dispositivo y anulará la garantía.
3. Únicamente el personal de Solar Technology o los agentes designados por
Solar Technology tienen permiso para desmontar el dispositivo FreeLoader
Classic. Cualquier indicio de manipulación del dispositivo anulará la validez
de la garantía.
Page 29

28
Garantía
FreeLoader Classic dispone de una garantía de 12 meses, excluyendo la batería.
En caso de que se produzca un error durante este periodo, Solar Technology
International Ltd se encargará de reparar o cambiar la pieza defectuosa, según
considere oportuno.
Solar Technology International Ltd no acepta responsabilidad respecto a daños
realizados por terceros, independientemente de cómo se hayan producido, ni de
los costes asociados a la devolución de productos defectuosos.
Para realizar una reclamación de garantía, llame por teléfono a Solar Technology
International Ltd al +44 (0) 1684 774000.
Estas condiciones de garantía no afectan en ningún modo a sus derechos
legales. Hay disponible un conjunto completo de términos y condiciones de Solar
Technology International Ltd bajo petición.
Accesorios opcionales
Solar Technology International Ltd proporciona un amplio rango de accesorios
para Freeloader Classic, que se actualiza constantemente a medida que salen al
mercado nuevos dispositivos.
Nuestro rango de accesorios abarca lo siguiente: Batería de Freeloader de
repuesto, panel acelerador Supercharger, plataforma de carga de baterías de
cámaras universal CamCaddy, cargador de baterías AA/AAA, adaptador de carga
para coches, adaptador de carga para red eléctrica, bolsa de transporte para el
dispositivo Freeloader más 30 adaptadores de conexión adicionales. Póngase en
contacto con un distribuidor para obtener información sobre todos los accesorios
o visite la página web www.solartechnology.co.uk
.
Extracción de la batería
TENGA EN CUENTA que esto anulará la garantía.
Si por cualquier motivo debe tirar el concentrador o la batería del dispositivo
Freeloader Classic, deberá quitar primero la batería. A continuación, debe tirarse
la batería por separado. Póngase en contacto con las autoridades locales para
informarse sobre cómo deshacerse de una batería de iones de litio correctamente.
Para extraer la batería debe quitar los dos tornillos pequeños que hay en uno de los
tapones de extremo de plástico negros que hay en la unidad concentradora (la parte
que tiene el panel LCD).
Quite el tapón del extremo y extraiga el compartimento interno del manguito de
aluminio. Una vez que haya extraído la batería del componente azul grande, corte
los cables de conexión (mediante herramientas de corte lateral o mediante unas
tijeras fuertes) y extraiga la batería. La batería es retenida mediante una almohadilla
adhesiva, por lo que puede que haga falta tirar fuertemente de ella para sacarla.
A continuación, deshágase de las piezas restantes de acuerdo con las
instrucciones de las autoridades locales.
Page 30

29
Cómo deshacerse de una batería usada
de FreeLoader Classic
Deshágase de forma responsable de las baterías usadas de FreeLoader
Classic. Si no fuese capaz de encontrar un lugar adecuado para la retirada
de residuos de baterías, envíela en una bolsa de plástico sellada dentro de un
sobre acolchado a Solar Technology International Ltd.
Preguntas frecuentes
1. Mi dispositivo Freeloader Classic ha estado al sol en el exterior, pero al
conectarlo a mi dispositivo, sólo lo cargó un corto periodo de tiempo y no
suministró mucha energía.
• Asegúrese de que la primera carga se realiza mediante el cable USB conectado
a un ordenador portátil o de sobremesa.
• Asegúrese de haber extraído la película protectora de las celdas solares, ya que,
de lo contrario, la eficacia de las celdas se ve reducida de manera radical.
• Asegúrese de que el dispositivo Freeloader Classic ha estado expuesto en
condiciones de tiempo soleado durante un periodo de entre 5 y 10 horas.
• Asegúrese de que el dispositivo Freeloader Classic esté fuera, de cara al sur, en
un lugar sin sombras y, de forma ideal, en un ángulo de 45 grados.
• Si Freeloader Classic está conectado a un dispositivo que está prácticamente
cargado del todo (si, por ejemplo, está probando por primera vez Freeloader
Classic), es probable que no suministre energía, porque si la batería del
dispositivo tiene una carga igual o superior a la del dispositivo Freeloader
Classic, éste no podrá suministrar energía. Espere hasta que el dispositivo esté
cargado entre el 50 y el 60% (consulte la nota 3)
2. ¿Qué rendimiento puedo esperar de Freeloader Classic?
• Tras una exposición de un día a un sol sin nubes (de 9 AM a 6 PM), el
concentrador Freeloader Classic deberá estar prácticamente cargado del todo.
Cuando esté conectado a su dispositivo, suministrará energía durante un
periodo de 30 minutos a 2 horas en función del dispositivo.
• Si Freeloader Classic está colocado tras una ventana, cara al sur en condiciones
de sol sin nubes, el tiempo necesario para cargar por completo la batería de
Freeloader Classic será de hasta 3 días. El motivo de este aumento de tiempo
es que la mayor parte de los cristales incorporan filtros de rayos ultravioleta, lo
que, como es natural, reduce la cantidad de radiación necesaria para permitir
que los paneles solares funcionen de forma eficaz.
• Si hay nubes, Freeloader Classic puede que tarde 1,5 veces más en cargar que
lo indicado anteriormente, pero esto depende de la época del año, la densidad
de las nubes, etc.
Page 31

30
3. El panel LCD de Freeloader muestra que tiene alguna carga, pero no la
suministra a mi dispositivo
• En estas circunstancias, el panel LCD de Freeloader no se iluminará, lo que
significa que el nivel de batería de su dispositivo es similar al del dispositivo
Freeloader. Deberá permitir que Freeloader se cargue más o que su dispositivo
se descargue más antes de volver a conectar los dos dispositivos (consulte la
nota 1).
4. ¿Puedo cargar mi concentrador Freeloader Classic al mismo tiempo que
alimenta un dispositivo?
• No. Si el concentrador Freeloader Classic está vacío, no podrá cargar y
suministrar energía al mismo tiempo. El motivo es que Freeloader Classic
suministra energía a un dispositivo unas 10 veces más rápido de lo que sus
celdas solares tardan en cargar el concentrador.
5. ¿Supondrá un problema que cargue el dispositivo Freeloader Classic mediante
sus celdas solares tras una ventana?
• Realmente no supondrá ningún problema, pero aumentará hasta tres veces el
tiempo que se necesitaría para cargar el concentrador si estuviese en el exterior.
6. Tengo Freeloader Classic colocado en un alféizar donde hay sombra. ¿Se
cargará el dispositivo Freeloader Classic de todos modos?
• Sí, el dispositivo Freeloader Classic se cargará de todos modos mediante sus
celdas solares, pero la carga requerirá mucho más tiempo (de hecho, hasta 4 ó
5 días más) que si estuviese expuesto al sol directo.
7. ¿Puedo dejar que la lluvia moje el dispositivo Freeloader Classic?
• No, no recomendamos dejar que se moje el dispositivo Freeloader Classic; no
obstante, si esto sucediese de forma accidental, seque el concentrador y las
celdas en un lugar seco y aireado donde no haya niños ni alimentos. Las celdas
solares puede que estén bien, pero puede sea imposible salvar el concentrador
y la batería. Esto se puede comprobar mediante una prueba; no obstante,
recomendamos que esta prueba se realice en el exterior mediante las celdas
solares únicamente y NO mediante el cable de carga USB. Si el concentrador
no funciona, puede pedir uno nuevo en www.solartechnology.co.uk.
8. No parece que haya un conector apto para mi dispositivo en el paquete de
Freeloader Classic, entonces, ¿cómo conecto el dispositivo Freeloader Classic
a mi dispositivo?
• Para conectar un dispositivo en el caso de que no haya un adaptador, deberá
usar el cable de sincronización original (el cable que utiliza para conectarlo a un
PC) e insertar el extremo USB en el enchufe hembra de salida de alimentación
de Freeloader Classic (3). A continuación, conéctelo a su dispositivo de forma
normal.
9. Tengo un dispositivo que se puede cargar mediante el puerto USB de mi
ordenador, ¿puede cargarlo Freeloader Classic?
• Sí, Freeloader Classic debería poder cargarlo.
Page 32

31
10. ¿Existen dispositivos que Freeloader Classic no pueda alimentar?
• Freeloader Classic tiene un rango de voltaje de 3 a 5,5 V, por lo que los
dispositivos que necesiten más voltaje, como ordenadores portátiles o
videocámaras, quedan fuera del alcance de Freeloader Classic.
• Si no tenemos un adaptador (vea la lista de adaptadores en
www.solartechnology.co.uk), no se ha suministrado un cable USB de
sincronización con el dispositivo o no hay un accesorio de Freeloader
Classic como CamCaddy o el cargador de baterías AA/AAA correcto para el
dispositivo, Freeloader Classic no será compatible.
• Freeloader Classic sólo podrá alimentar una cámara digital donde se extrae
la batería de tipo bloque y se inserta en una plataforma para su carga si se
compra el accesorio opcional CamCaddy. Tenga en cuenta que Freeloader
Classic solo podrá cargar baterías de cámaras digitales compactas (o cualquier
batería de cámara con un voltaje inferior a 5 V). Para cargar baterías de
cámaras réflex digitales, se debe comprar
Freeloader Pro.
Solar Technology International Ltd
Somos fabricantes de algunos de los productos de energía solar más avanzados
del mundo, desde juguetes solares a módulos solares industriales de gran escala.
Para obtener más información, visite www.solartechnology.co.uk.
Si tiene alguna pregunta sobre este producto o estas instrucciones, póngase en
contacto con la línea de asistencia técnica de Solar Technology International en el
+44 (0) 1684 774000 o envíe una carta a Solar Technology International Ltd,
Unit 4, Station Drive, Bredon, Nr. Tewkesbury, Glos. GL20 7HH, Reino Unido.
¡QUEREMOS SUS FOTOS!
Queremos fotografías de usted y su dispositivo Freeloader en acción en los
lugares más extraños y maravillosos de todo el mundo. Por cada imagen que
publiquemos en nuestro sitio web, recibirá una batería/concentrador Freeloader
adicional valorado en 19,99£.
Envíe sus imágenes por correo electrónico a sales@solartechnology.co.uk y
no se olvide de incluir su dirección de correo postal.
Nota: no podemos garantizar la publicación de todas las imágenes recibidas.
La decisión final sobre la publicación de cada foto será tomada por Solar
Technology International Ltd. Al enviar la imagen, el remitente autoriza a Solar
Technology International Ltd a utilizar la imagen en el futuro cuando así lo
considere oportuno con el fin de promocionar su producto Freeloader.
Page 33

32
I
Manuale Utente
Energia solare portatile
Modelli:
SC8088 (Grigio)
SC8089 (Rosa)
Si raccomanda di effettuare la prima
carica delFreeloader Classic mediante USB.
I pannelli solari e il rivestimento in alluminio di
Freeloader Classic sono protetti durante il
trasporto da una pellicola trasparente.
Rimuovere la pellicola prima di iniziare a utilizzarlo!
Page 34

33
1. Pannello solare
2. Uscita alimentazione
(per il cavo principale e
cavo USB dei dispositivi)
3. Ingresso alimentazione
(per il cavo di ricarica USB)
4. LCD – Display dello stato di carica
Componenti in dotazione
1 Caricatore Freeloader Classic
1 Cavo di alimentazione principale
1 Adattatore per Nintendo DS Lite
1 Adattatore per telefoni LG serie Chocolate
2 Adattatori per cellulari Nokia
1 Adattatore per cellulari Samsung
1 Adattatore per cellulari Sony Ericsson
1 Spinotto da 4mm per PSP, Tom Tom, fotocamera digitale ecc.
1 Adattatore Micro USB per i telefoni più diffusi, Blackberry, Nokia,
Samsung, LG, Sony Ericsson ecc.
1 Adattatore Mini USB per Motorola RAZR, MP3 ecc.
1
2
3
4
IMPORTANTE - A causa dei progressi tecnologici in corso
non possiamo garantire la compatibilità con dispositivi di altri
produttori e in ogni caso si consiglia sempre di provare il
caricatore con il proprio dispositivo prima di utilizzarlo nel campo.
Page 35

34
Caratteristiche e prestazioni elettriche
1. Pannello solare (mono/multicristallino): 5,5 V, 150 mA
2. Batteria ricaricabile al litio: 3,7 V, 1200 mAh
3. Cavo di ricarica USB: 5V, 500 mA
4. Uscita CC: 5,5 V +/– 0,5% 500 mA
5. Tempo impiegato per la fornitura di energia dal Freeloader Classic:
da 30 minuti a 2 ore
6. Tempo impiegato per caricare la batteria interna del Freeloader Classic con il cavo
di ricarica USB: da 3 a 4 ore
7. Tempo impiegato per caricare la batteria interna del Freeloader Classic in
presenza di sole mediante i pannelli solari: da 5 a 10 ore
Nota – la qualità della luce è determinante per la velocità di carica. Nelle giornate
nuvolose o se Freeloader Classic è posizionato dietro a una vetrata, occorrerà più
tempo per caricare la batteria.
Istruzioni per l’uso
1. Per effettuare la ricarica utilizzando il cavo di ricarica USB
Inserire il connettore Mini USB nel terminale tondo del cavo principale, quindi inserire
il connettore USB sull’altro terminale del cavo in un PC, computer portatile o altro
dispositivo adatto (che deve essere acceso).
Inserire il connettore Mini USB nella presa
di ingresso alimentazione del Freeloader Classic (2). Il pannello LCD (4) si illumina
e compare l’icona di una batteria indicante il livello di carica attuale della batteria (1
tacca = dal 10% al 25% di carica, 2 tacche = fino al 50% di carica, 3 tacche = fino
al 75% di carica e 4 tacche = dal 76% al 100% di carica). Apparirà anche l’icona
di un fulmine, a conferma che Freeloader Classic è in carica da una sorgente di
alimentazione connessa tramite USB.
Nota – Non lasciare il cavo di ricarica USB collegato durante la notte perché ciò
potrebbe danneggiare la batteria
IMPORTANTE – Questo metodo di carica è raccomandato per la prima carica
e può richiedere fino a 8 ore. La ricarica USB è anche una buona prassi da
eseguire una o due volte l’anno per prolungare la durata della batteria.
2. Per effettuare la ricarica utilizzando i pannelli solari
Rimuovere la pellicola trasparente da entrambi i pannelli solari prima di iniziare a
utilizzarli. Staccare i pannelli solari dal corpo del Freeloader Classic e separare le due
metà esponendo il lato frontale di ogni pannello solare. L’estremità del pannello solare
che presenta due alette deve essere inserita nel lato del corpo del Freeloader Classic
– un pannello solare per ogni lato.
Quando i pannelli sono rivolti verso il sole, il pannello LCD mostra l’icona di una
batteria che indica il livello
di carica attuale della batteria (vedere la nota 1 per
maggiori informazioni) e due icone a forma di sole lampeggianti (una per ogni
pannello solare). Tenere presente che il pannello LCD non si illumina durante la
ricarica solare. Più luminosa è la luce solare, più rapida sarà la ricarica.
Page 36

35
Nota: l’esposizione prolungata di Freeloader Classic a sole/luce diurna non danneggia
la batteria grazie all’elettronica di controllo carica avanzata di cui è dotato.
3. Per effettuare la ricarica con l’accessorio opzionale Supercharger
Supercharger si collega al Freeloader Classic mediante la presa di ingresso
alimentazione (2) e consente di caricare il Freeloader in qualsiasi condizione
meteorologica e su qualsiasi terreno. Inoltre velocizza la ricarica fino a 4 ore. Quando
il Supercharger è collegato al pannello LCD mostra un’icona a forma di batteria
indicante il livello di carica attuale della batteria (vedere la nota 1 per maggiori
informazioni) e un’icona a forma di pannello solare.
Tenere presente che il pannello
LCD non si illumina durante la ricarica solare.
4. Per effettuare la ricarica di dispositivi elettrici portatili
Inserire l’estremità USB del cavo principale nella presa di uscita alimentazione del
Freeloader Classic (3). Selezionare l’adattatore corretto, inserirlo nel terminale femmina
del cavo principale e collegarlo al dispositivo. Il pannello LCD di Freeloader Classic
si illumina e appare un’icona a forma di batteria indicando il livello di carica attuale
della batteria in Freeloader Classic (vedere la nota 1 per maggiori informazioni) e
un’icona a forma di telefono cellulare lampeggia a conferma che Freeloader Classic sta
fornendo energia a un dispositivo.
Anche sul dispositivo in carica deve essere presente
un’indicazione di ricezione carica. Se la carica del Freeloader è insufficiente o se il
livello di carica della batteria del dispositivo e del Freeloader sono all’incirca uguali,
Freeloader non fornisce energia e il pannello LCD non si illumina.
NOTA – se non è disponibile l’adattatore per uno specifico dispositivo, collegare il
cavo di sincronizzazione USB in dotazione col dispositivo stesso (ad esempio il cavo
USB bianco in dotazione con iPhone, iPad, iPod ecc.) alla presa di uscita (3) e seguire
la procedura sopraindicata. In mancanza del cavo suddetto è possibile acquistare
adattatori extra dal sito www.solartechnology.co.uk
Avvertenza
1. Tenere Freeloader Classic lontano da fiamme, acqua e qualsiasi forma di umidità
per evitare danni e lesioni.
2. Qualunque urto o forte impatto può provocare danni con conseguente
annullamento della garanzia.
3. È proibito smontare il Freeloader Classic, eccetto per il personale Solar Technology
o gli agenti designati da Solar Technology. Qualsiasi segno di manomissione
comporta l'annullamento della garanzia.
Page 37

36
Garanzia
Freeloader Classic è fornito con garanzia di 12 mesi, esclusa la batteria. Qualora
si verificasse un guasto in tale arco di tempo, Solar Technology International Ltd
provvederà a riparare o a sostituire le parti difettose a sua discrezione.
Solar Technology International Ltd declina ogni responsabilità per danni di qualsiasi
natura imputabili a terzi o per eventuali costi associati alla restituzione di prodotti
difettosi.
Per inoltrare un reclamo sulla garanzia, contattare Solar Technology International Ltd al
+44 (0) 1684 774000
.
Queste condizioni di garanzia non inficiano in alcun modo i diritti legali dell’utente.
Previa richiesta, è disponibile il pacchetto completo dei termini e delle condizioni Solar
Technology International Ltd.
Accessori opzionali
Solar Technology International Ltd fornisce un'ampia gamma di accessori per Freeloader
Classic, costantemente aggiornata in base alle novità del mercato.
La nostra gamma di accessori include: batteria di riserva per Freeloader, Supercharger
– pannello ausiliario, CamCaddy – base di carica universale per batterie di
fotocamera, caricabatterie AA/AAA, adattatore per caricatore auto, adattatore per
caricatore di rete, custodia per Freeloader e oltre 30 connettori aggiuntivi. Contattare
il rivenditore per conoscere la gamma completa o collegarsi al sito
www.solartechnology.co.uk
.
Rimozione della batteria
NOTA questa procedura comporta l'annullamento della garanzia.
Se per qualsiasi motivo occorre smaltire la batteria / l’hub del Freeloader Classic,
rimuovere prima la batteria.
La batteria deve essere smaltita separatamente. Contattare le autorità locali per
ottenere informazioni sul corretto smaltimento di una batteria agli ioni di litio. Per
rimuovere la batteria svitare le due viti su uno dei cappucci terminali in plastica neri
sull’hub (la parte con il pannello LCD). Rimuovere il cappuccio terminale e far scorrere
il vano interno all’esterno del manicotto in alluminio.
Una volta rimosso è visibile la batteria (il componente blu più grande), tagliare i fili di
connessione (con un tronchese diagonale o un paio di grosse forbici) e rimuovere la
batteria.
La batteria è mantenuta da un supporto adesivo e può essere necessario tirare con
decisione per rimuoverla.
Smaltire le parti residue secondo le istruzioni delle
autorità locali.
Smaltimento della batteria del Freeloader Classic. Smaltire la batteria del Freeloader
Classic in modo responsabile. Qualora non fosse possibile smaltire adeguatamente
la batteria, restituirla a Solar Technology International Ltd in un sacchetto di plastica
sigillato contenuto in una busta imbottita.
Page 38

37
Domande frequenti
1. Il mio Freeloader Classic è stato all’aperto esposto al sole ma quando lo collego al
dispositivo la ricarica dura poco e non fornisce energia sufficiente.
• Assicurarsi che la prima carica sia stata effettuata collegando il cavo USB a un PC o
computer portatile.
• Verificare di aver rimosso la pellicola protettiva dalle celle solari, poiché essa riduce
drasticamente la loro efficacia.
• Accertarsi che Freeloader Classic sia stato esposto al sole da 5 a 10 ore.
• Controllare che Freeloader Classic sia posizionato all’aperto rivolto verso sud in una
posizione non ombreggiata e preferibilmente inclinato di 45°.
• Se Freeloader Classic è collegato a un dispositivo la cui batteria è quasi completamente
carica (ad esempio se si vuole effettuare un test iniziale), Freeloader Classic potrebbe non
fornire energia se la batteria del dispositivo ha già un livello di energia uguale o superiore a
quella del Freeloader Classic. Attendere che il livello del dispositivo da caricare sia compreso
tra il 50% e il 60% (vedere la nota 3).
2. Che tipo di prestazioni devo aspettarmi da Freeloader Classic?
• Dopo 1 giorno di massima esposizione al sole (dalle 9 del mattino alle 6 di sera), l’hub
del Freeloader Classic sarà quasi del tutto carico. Una volta collegato al dispositivo fornirà
energia da 30 minuti a 2 ore, a seconda del dispositivo stesso.
• Se Freeloader Classic è posizionato dietro una finestra, rivolto a sud in condizioni di massima
esposizione solare, il tempo impiegato per caricare completamente la sua batteria può
arrivare fino a 3 giorni. Un tale aumento di tempo è dovuto al fatto che la maggior parte dei
vetri contiene filtri UV che riducono l’irraggiamento, indispensabile al buon funzionamento
dei pannelli solari.
• In presenza di nuvole, Freeloader Classic può impiegare circa il doppio del tempo per
caricarsi rispetto ai tempi suddetti, ma ciò dipende dal periodo dell’anno, dalla densità delle
nuvole ecc.
3. Il pannello LCD del Freeloader indica che è presente della carica residua ma non viene
alimentata al dispositivo.
• In questi casi il pannello LCD del Freeloader non si illumina, ciò indica che il livello di carica
della batteria del dispositivo è simile a quello del Freeloader. Lasciar caricare maggiormente
il Freeloader o far scaricare ulteriormente il dispositivo prima di collegarli (vedere la nota 1).
4. Posso caricare l’hub del Freeloader Classic e allo stesso tempo caricare un dispositivo?
• No. Se l’hub del Freeloader Classic è scarico non è possibile caricarlo e fornire energia allo
stesso tempo. Questo perché Freeloader Classic fornisce energia a un dispositivo circa 10
volte più rapidamente rispetto a quanto le sue celle solari caricano l’hub.
5. Caricare il Freeloader Classic posizionando le celle solari dietro a un vetro comporta
qualche problema?
• Nessun problema, ma il tempo impiegato per caricare l’hub aumenta fino a 3 volte rispetto
al posizionamento all’aperto.
6. Ho posizionato il Freeloader Classic su un davanzale ombreggiato. Riuscirà a caricarsi
comunque?
• Sì, Freeloader Classic continua a caricarsi grazie alle celle solari ma impiegherà molto più
tempo rispetto al posizionamento all’aperto in piena esposizione solare, per la precisione
fino a 4-5 giorni in più.
7. Posso lasciare Freeloader Classic sotto la pioggia?
Page 39

38
• No, si sconsiglia di far bagnare il Freeloader Classic, tuttavia se ciò dovesse accadere
asciugare sia l’hub che le celle in un luogo areato asciutto lontano da bambini e alimenti.
Le celle solari non dovrebbero riportare danni; tuttavia, l'hub o la batteria potrebbero essere
irrecuperabili. Un semplice test potrà confermarlo, tuttavia si raccomanda di effettuarlo
all’aperto con le celle solari e NON con il cavo di ricarica USB. Se l’hub non funziona è
possibile ordinarne uno nuovo su www.solartechnology.co.uk
8. Come collego Freeloader Classic al mio dispositivo? Non sembra esserci un connettore
adatto nella confezione di Freeloader Classic
.
• Per collegare un dispositivo per il quale non è fornito un connettore, utilizzare il cavo di
sincronizzazione originale (il cavo usato per il collegamento a un PC) e inserire l’estremità
USB nella presa di uscita di alimentazione (3) del Freeloader Classic. Quindi, collegarlo
normalmente al dispositivo.
9. Ho un dispositivo che può essere caricato mediante la porta USB del mio computer, posso
caricarlo con Freeloader Classic?
• Sì, Freeloader Classic dovrebbe essere in grado di caricarlo.
10. Ci sono dispositivi che non possono essere caricati con Freeloader Classic?
• Freeloader Classic ha una gamma di tensione da 3 V a 5,5 V, pertanto qualsiasi dispositivo
che richiede tensione maggiore, come un computer portatile o una videocamera, non rientra
nel campo d’azione del Freeloader Classic.
• Se non sono disponibili connettori adatti (vedere l'elenco dei connettori ausiliari su www.
solartechnology.co.uk), non è fornito alcun cavo di sincronizzazione USB con il dispositivo o
non è disponibile alcun accessorio Freeloader Classic adatto al dispositivo, come CamCaddy
o il caricabatterie AA / AAA, Freeloader Classic non potrà essere utilizzato.
• Le fotocamere digitali che necessitano la rimozione del blocco batteria e l’inserimento in
una base di carica possono essere caricate con Freeloader Classic solo previo acquisto
dell’accessorio CamCaddy. Attenzione – Freeloader Classic può caricare solo batterie di
fotocamere digitali compatte (o qualsiasi batteria di fotocamera inferiore ai 5 V). Per caricare
batterie di fotocamere digitali reflex occorre acquistare Freeloader Pro.
Solar Technology International Ltd
Produciamo alcuni dei prodotti a energia solare più avanzati al mondo, spaziando dai
giocattoli a energia solare fino ai moduli solari per uso industriale. Per saperne di più,
visitare il sito www.solartechnology.co.uk.
Per qualsiasi domanda su questo prodotto o sulle istruzioni, contattare il Call center Solar
Technology International al +44 (0) 1684 774000 oppure scrivere a: Solar Technology
International Ltd, Unit 4, Station Drive, Bredon, Nr. Tewkesbury, Glos. GL20 7HH, UK.
Vogliamo la tua foto!
Siamo alla ricerca di immagini tue e del tuo Freeloader in azione nei posti più strani e belli
in ogni parte del mondo. Per ogni foto che sarà pubblicata sul nostro sito riceverai una
batteria / hub Freeloader extra del valore di £ 19,99.
Invia le tue immagini a sales@solartechnology.co.uk e ricordati di indicare il tuo
indirizzo postale.
Nota: Non possiamo garantire la pubblicazione di tutte le immagini ricevute. La decisione
finale spetta a Solar Technology International Ltd. Inviando l’immagine l’utente autorizza
Solar Technology International Ltd a utilizzarla per scopi futuri in merito a iniziative di
marketing per il prodotto Freeloader.
Page 40

TECHNOLOGY INTERNATIONAL
Solar
Solar Technology International Ltd.
Units 4-6, Station Drive, Bredon, Nr. Tewkesbury,
Glos. GL20 7HH, United Kingdom
Tel: +44 (0) 1684 774000 Fax: +44 (0) 1684 773974
Email: support@solartechnology.co.uk
 Loading...