

Page 1
MID
User
Manual
Page 2
Page 3
Safe
and
efficient
operation
guide
Fc
a#t
d
fr.flvs
use,
das€
Bad
the follillng
infomation
b€foE
rritg.
'1.
h lhe
pa@$
ot using
T-Flash
card of
fits
,
pl@se
do
not
pull
out mrd
to avoid the
sb'age
erd or
devi@ damage.
2. When
using headphonG,
please
onsure that
headphones
volume
in
the a@eptable
@9e lo
avoid damage
of
your
hearing.
3. Dont
let
your
device
and a@ssories
to
reach liquid
or damp
envircnment_
,i.
Oon't
let
your
devi@ in
the temperature
t@ hot
or t@
@ld.
5. D6't
let
your
device in
the flame,
lit cigars
or cigarottes
beside.
6. Oontgivedevi@ painted.
7,
Do.r't
drcp
or throw
devi@.
6, Do.rl
auempt
to take
apad
the device,
Donl unilateElly
repah
device
and a@essories.
9. Tlis
devics
of cha€ing
volt6ge
is S.O V,
please
conf m b€fore
use.
,0.
Ooo't
@ any non
designated
dErg€r,
or
you
will havg
the
potgntial
risk.
'l
I,
Grly
@
the doth
of a litfle
wel or antistatic
lo
wipe devi@.
Don,t
use th6
cloth oI dry
a
Sdb
Eldicity
to wipe
device.
12,
Be€@
of LCD
etc
unit betongs
to the
ftagile
pads
,
Note
K@ping,
Don,t
make Hit
a
powful
*busion.
13.
Doi't let
y@r
childEn
play
device
or a@esoiles
. Children
are likoty
to hurt
,ErE€fiE
d otleE
,
And
maybe
damage
the device
or ac6sori6.
14. Pl6e
donl optional
unload sysiem
of
appli@tion
,
So
as to avoid
the device
or
part
Chapter
I
Get to
Know
your
Device
1.
Device
Layout
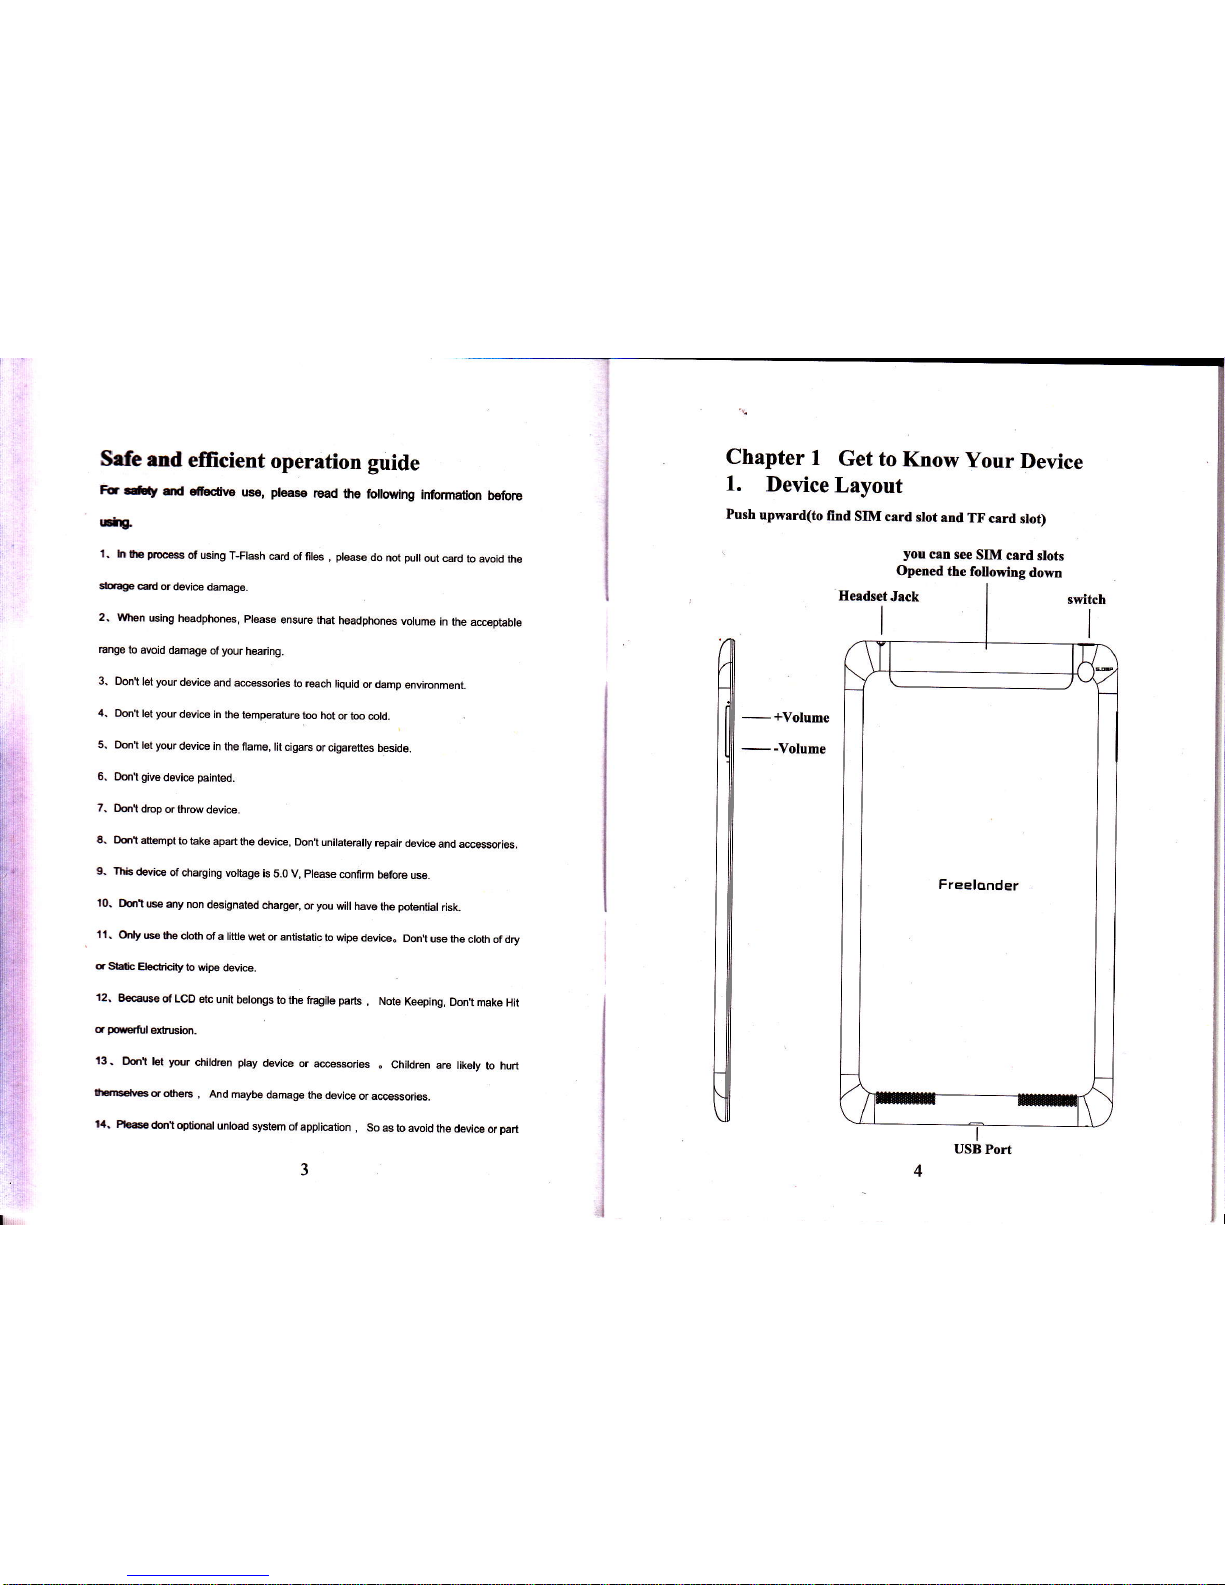
Push
upmrd(to
find
SIM card
stot
and
TF
card
slot)
you
csn see
SIM
card
slots
Opened
the fotlowing
dom
E€adset
Jack
I
switch
I
m---
U
il
iii,*
I
USB Port
Page 4
ffi
m'
Ii
ii,
i'
i
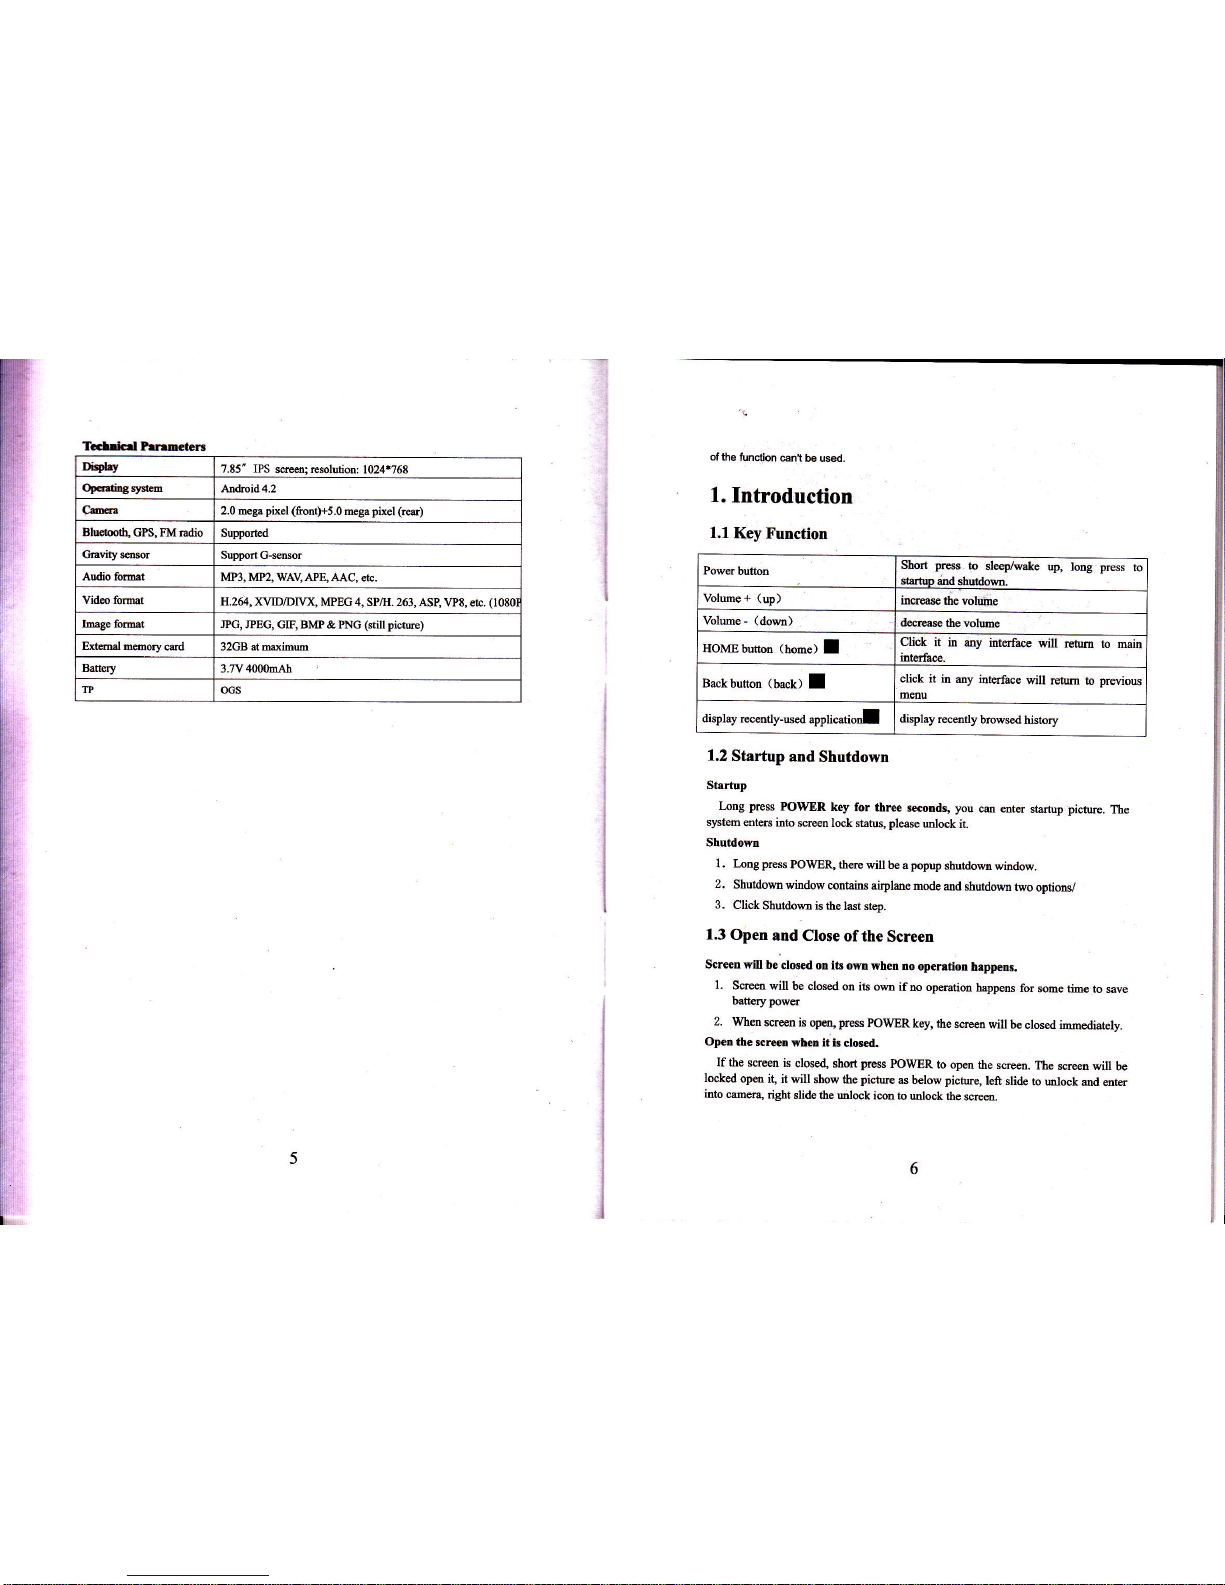
Tc.lricd PrnmcteB
Di+lry
7.E5" IPS
srem: resolutim: 1024*768
Opa.litrgsytu
Andrcid 4.2
Cffi
2.0 mega
pixel (ftontlrs.o
mega
pixel (red)
Blutulh" GPS, FM
Edio Suppo.ted
CEvity s@fi
Suppofr c-ffior
Andio fomt
MP3, MP2, WAV APE,
AAC, Eb.
Vido folmt
I{.264, XVID/DIIX,
MPEG 4, SP/H. 263, ASB
VP8, eh.
(1080
IDage fo@t
JPG,
JPEG, GIF, BMP & PNG
(still picm)
Exhal
@ory card
l2GB at mdimum
Baftry 3_ry40kAh
m oGs
of
the tunclion
@nt
b6 usd.
1.
Introduction
1.1
Key
Function
1.2
Startup
and
Shutdown
Startup
I-ng press
POWER
key for
thre
rcordr,
you
@ mter
startup picture.
The
slEteh
@ters into
screen lek safus, please
ulock it.
Shutdom
l. Ioog press
POWX\ thqe
will be apopup
shurdomwiodow.
2.
Shutdomwindowcontai$
airpldemode
mdshutdomtwooptionv
3.
Click
Shutdom is
the ldt step.
13
Open
and Close
ofthe
Screen
Scren will
be
closd otr lts om
when no
opemtiotr
hrppens
1.
Sm
will be clmd
on its om
if no op@tiotr
happens
for
some time
to save
battery powq
2.
When
sc@n is
open,
press
POWER
key, lhe
s@eo
will
be closed imcdiatelv.
Opetr
the scrceD
whcn lt ir
cl6ed.
If the sc@n
is
closed, short prcss
POWER
to opa
the meen.
The
smm will
be
l@ked
open
it, it will
show the
picrw
6 below picture,
left slide
to utrl@k
ed aEr
hto me.a"
right
slide the Drlock
icotr to
ulock the
scrm.
Power bulbn
Short
prcss
to
sleep/wake
up, lotrg press
to
sh.tuo
dtrd shutdom-
Volme
+
(up)
inwe
the volme
Volme
-
(dom)
de6se
the volwe
HOMEbuttotr
(home)
I
Click
it in dy
itrterf@
will rehm
lo min
intsfre.
Bekbutton
(back)
I
ctick it
itr my ittqface
vill
retM
to
preyioN
Emu
display
ruently-ued
applicadoJ
display
remtty
browsed
hismry
Page 5
l
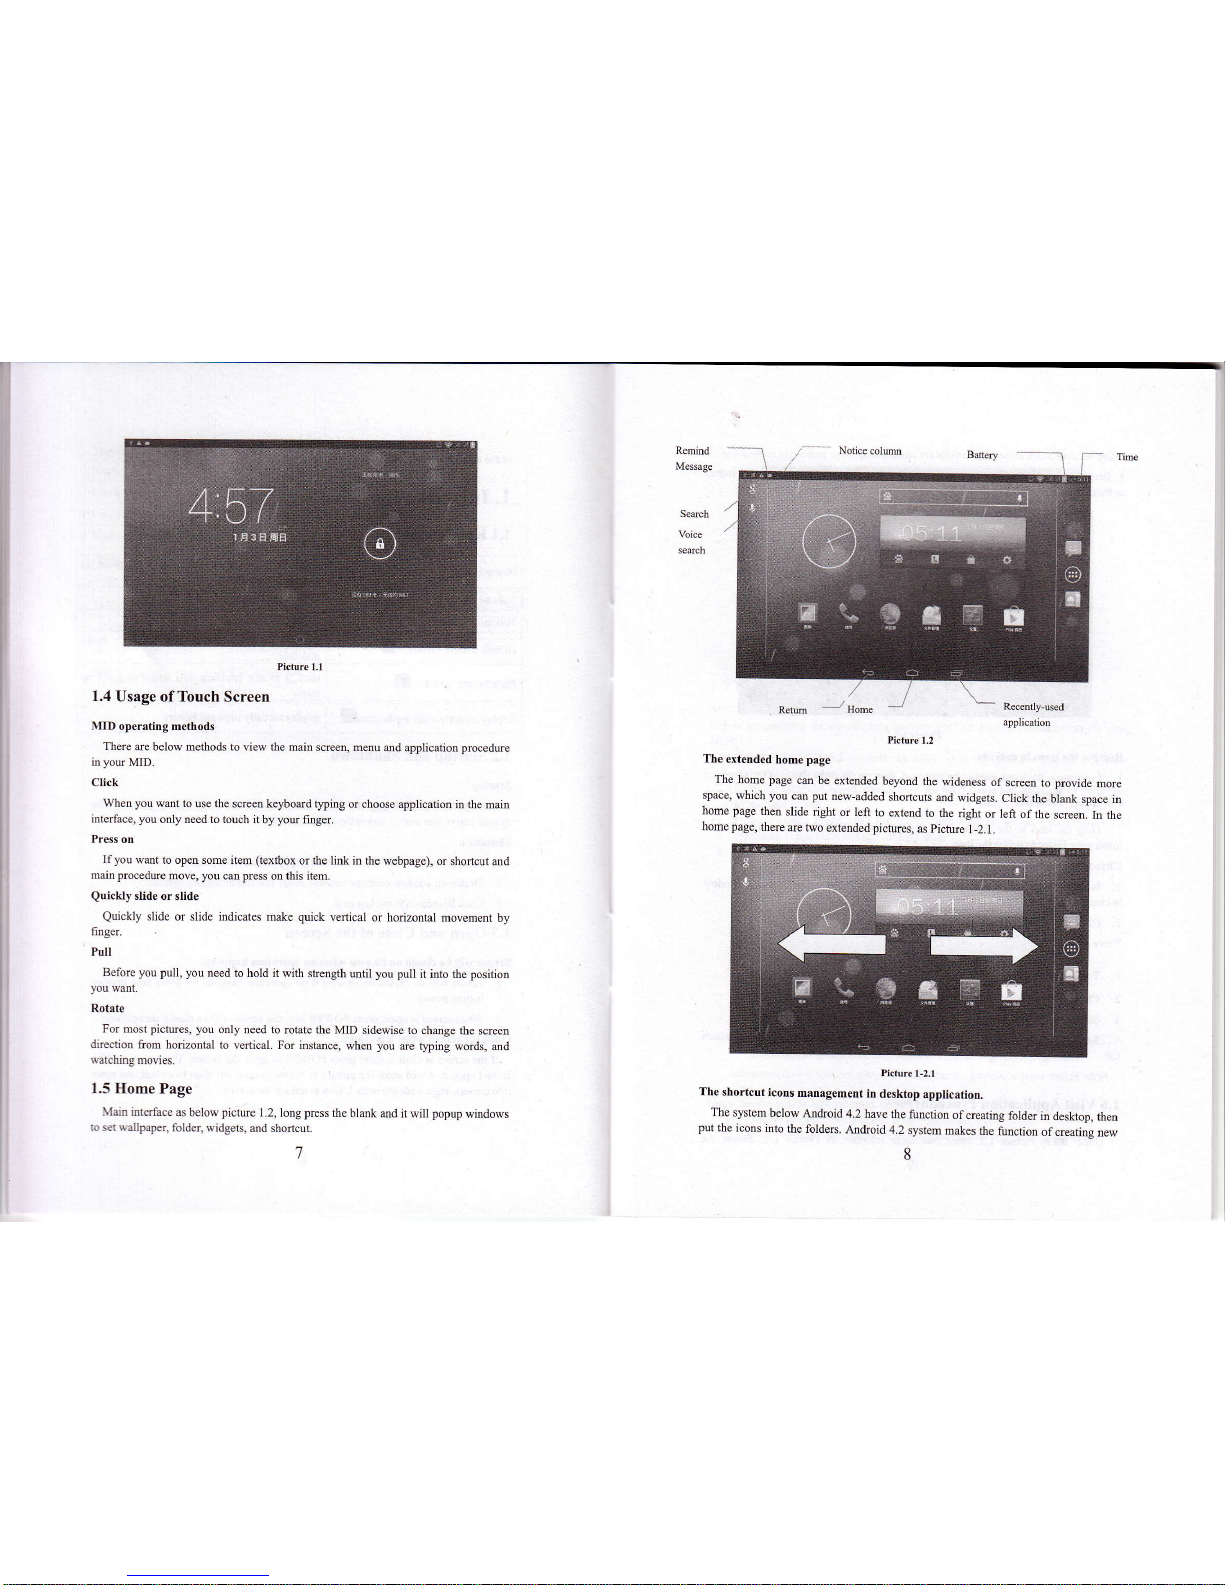
Renind
Message
Search
Hcture
1.1
1.4
Usage ofTouch
Screen
MID
operating methods
There
ae below methods to
view
the
maiD screen, menu
md application
prccedue
in
you
MID.
Click
Whetr
you
wmt to
use
the
scieen keybotrd typing
or choose application
itr
the
maio
intdface,
you
only need to touch it
by
you
fmger.
Ptess on
Ifyou
wmt to open some item
(textbox
or the Iink in the
webpage),
or shoftcut and
main
procedue
move,
you
cm
press
on
this item.
Quickly
slide
or slide
Quickly
slide or slide indicates
make
quick
vefrical
or horizontal
movement by
finger.
Pull
Before you pull, you
need to hold it with
shength util
you pull
it into the
position
you
wmt.
Rotate
For most
pictues,
you
only
need to rohte the
MID sidewise to
change the screeD
direction
Aom horizonhl to
vefrical. For instance. when you
are
tlping words, and
walching
movies.
1.5 Home Page
Maitr
interface as
below
pictue
1.2,
long
Fess
the
blank md it will
popup
wiadows
to set wallpapeq
foldel widgets,
md shofrcut.
picture
1.2
The
extended
home
page
The home page
cm be
extended
beyond the
wideness
of
screen to provide
more
space,
which you
cm put
trew-added
shottcuts
md
widgets.
Click
the blant
space in
home page
then
slide right
or left
to extend
to the
dght
or left of the
sffeen.
Itr the
home
page,
there
are Mo
extended
pict[es,
as
pictue
1-2.1.
.
Pich.e r-2.1
The shortcut
icons
man{gemetrt
in
desktop
applicatioD.
The
slstem
below
Android
4.2 have the
function
of ueating
folder
in
deskop, then
put
the icons
into
the foldere.
Andrcid
4.2
system makes
the
finction
ofcreating
new
8
Page 6
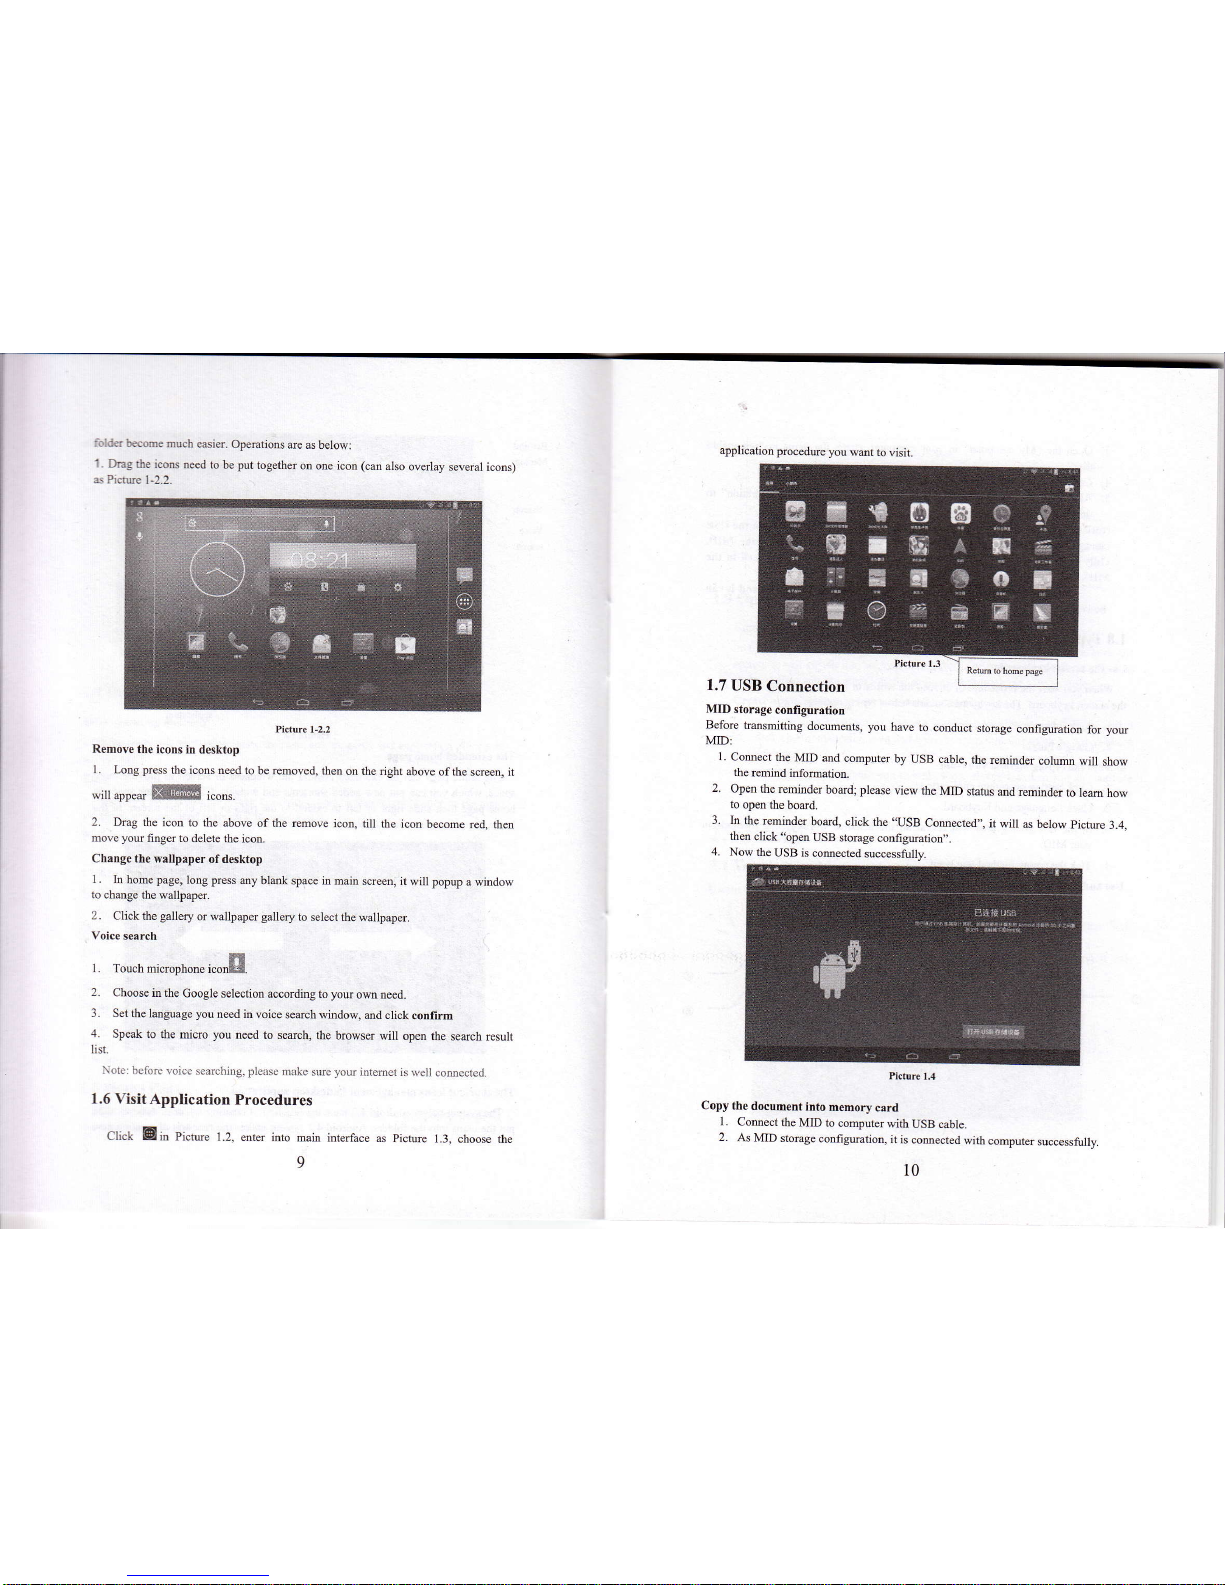
folder
become
much edier.
Opemtions
are as below:
1. Dmg
the icoro
ueed to
be
put
together
on one icon (cm
also
overlay
several icons)
6 Pictue l-2.2
Picture l-2.2
Remov€ the
icons in desktop
l.
Long
press
the icons need to
be lemoved, then
otr the dght
above of the
screen, it
*itt
"ppe*
XIMB
icoo..
2.
Dmg the
icon to the above
of the remove
icon, till the icotr
become red.
thm
move
you
finger to delete
the icon.
Change the
wallpaper ofdesktop
1 . In
home
page,
lotrg
press
any
blank space in main
screen, it
will
popup
a
window
to chmge
the wallpaper.
2.
Click the
gallery
or wallpapo
gallery
to select the
wallpapo.
Voice search
n
r.
l ouctr mrcfophone
rcol]g.
2.
Choose in the
Google selection
according to
you
om need.
3. Set
the lmguage
you
treed in voice
search window,
and click
conlirm
4.
Speak to
the micro
you
need to sedch,
lhe browser
will open the
semch rcsult
list.
Note: bofbr.
lrcice searohitrg. pleas!
mi*e sue
you
internst is
well comectcd.
1.6
Visit Application
Procedures
Ctck
Eitr Pictue
1.2, enter into
maia interface
as
pictue
1.3.
choose th€
9
Before
ftansmitting
documents, you
have to
conduct
stomge
configuation
for
you
MID:
1.
Comect
the
MID and
computer
by
USB cable,
the
reminder
colum
will show
the
remind
infomation.
2.
Open
the rcminder
board; pleoe
view the
MID
status
ed reminder
to
lem how
to
open
the
boad.
3. In
the remindo
board, click
the
.USB
Comected,,,
it will
as below
pictue
3.4,
then
click "opetr
USB
stomge
configuatiotr,'.
4. Now
the
USB is
com€cted
successfiily.
Hctore
t.4
Copy the
document
itrto
memory
card
1. Connect
the MID to
computer
with
USB cable.
2.
As MID
stomge
configuation,
it
is comected
with computer
successfully.
application
procedwe
you
wmt to
visit.
1.7
USB
Connection
MID storage
cotrfi
guratiotr
10
Page 7
i.
Op€n the
"My
computer"
in
you
computer,
check
the items
in,temovable
di*".
.1.
Copy the
docmetrts you
treed into.?emovable
disc,,.
5. After
copying
filishes,
click..shutdoM
the
USB
stomge
configuation,,to
miNull.
\otice:
l
When
the MID
is cotrnectcd
wifh
tiSB €sble,
and you
olen the
llSR
storage
coofiguration,
you
ca*,t view
the
memory
card thrcxgh
ahe
[lID.
Orly after you
detsah
the US$
calrle,
you
aatr
yiew
the
meaory
card ir tha
}IID.
2. Bofore
copying, pl.ss.
corlirm
thrrc is
SD card
itr MID
rnd it'
can
be read.
1.8
Typing
words
Use the scre€n
keyboard
When you
std the procedme
or choose the
words
or numbers
edition, it
will show
the
screetr keybodd.
The
keyboad
conaias below
typing
options:
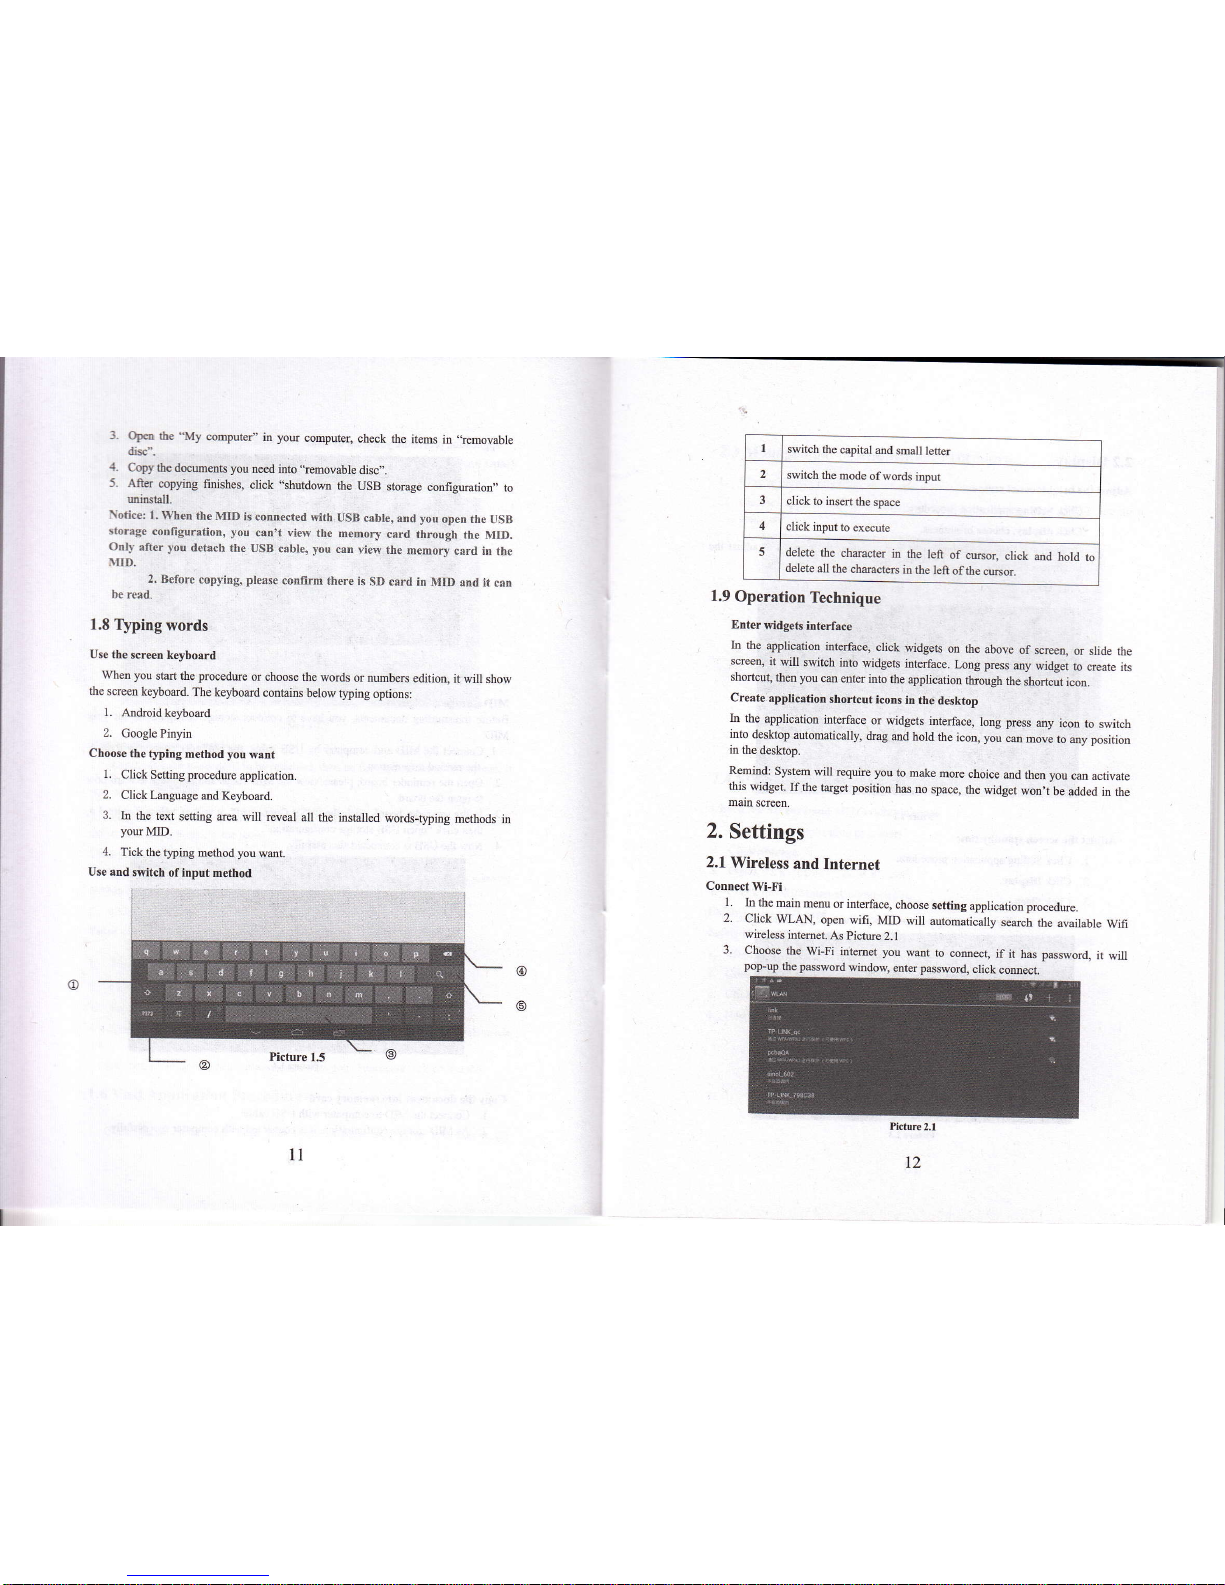
1.
Androidkeybotrd
2.
GooglePinyin
Cboose the
r)?ing
melhod
)ou
watrt
l.
Click
Sening
procedwe
application.
2.
Click Langmge
md Keybotrd.
3. In
the text
setting area
will reveal
all the installed
words-typing
methods in
you
MID.
4.
Tick the
typing method
you
wmt.
Use and
switch
ofinput method
t1
I
switch the
capital
md
small lefter
switch
the
mode
ofwords
input
3
click
to insen
the
space
4
click
input to
execute
5
delete the
checttr
in
the
left
of cmor.
click and
hold to
delete
all the
chmcters
io
the Ieft
of the
cmor.
1.9
Operation
Technique
Enter
widgets
iuterface
In
the
application
interface,
click
widgets
on
the
above
of scree4
or slide
the
screen,
it
will
switch into
widgets
intedace.
Long press
any
widget
to create
its
shofrcut,
then you
ce enter
ifto the
application
through
the
shortcu
icon.
Create
application
shortcut
icons
in the
desktop
In
the
application
iilerface
or widgets
interface,
long press
my icoD
to
switch
into
deskop
automatically,
dmg
and hold
the
icon,
you
cm
move
to
ey
position
in
the
deskop.
Remind:
System
will requirc you
to
make
oore choice
ed thm you
co activate
this
widget.
Ifthe
tmget
position
has no
space,
the wialget
wotr,t
be added
in the
main
screen.
2.
Settings
2.1
Wireless
and Internet
ConnNt
Wi-Fi
l.
In the
main
menu
o interface,
choose
setting
application procedue.
2.
Click
WLAN,
open
wifi,
MID will
automatically
seach
the
available
Wifi
wheless
intemet.
As
pictue
2.1
3.
Choose
the
WiFi intemet you
waDt to
comect,
if
it has password,
it
will
pop-up
the password
window,
enter
password,
olick
comecl
t2
Page 8
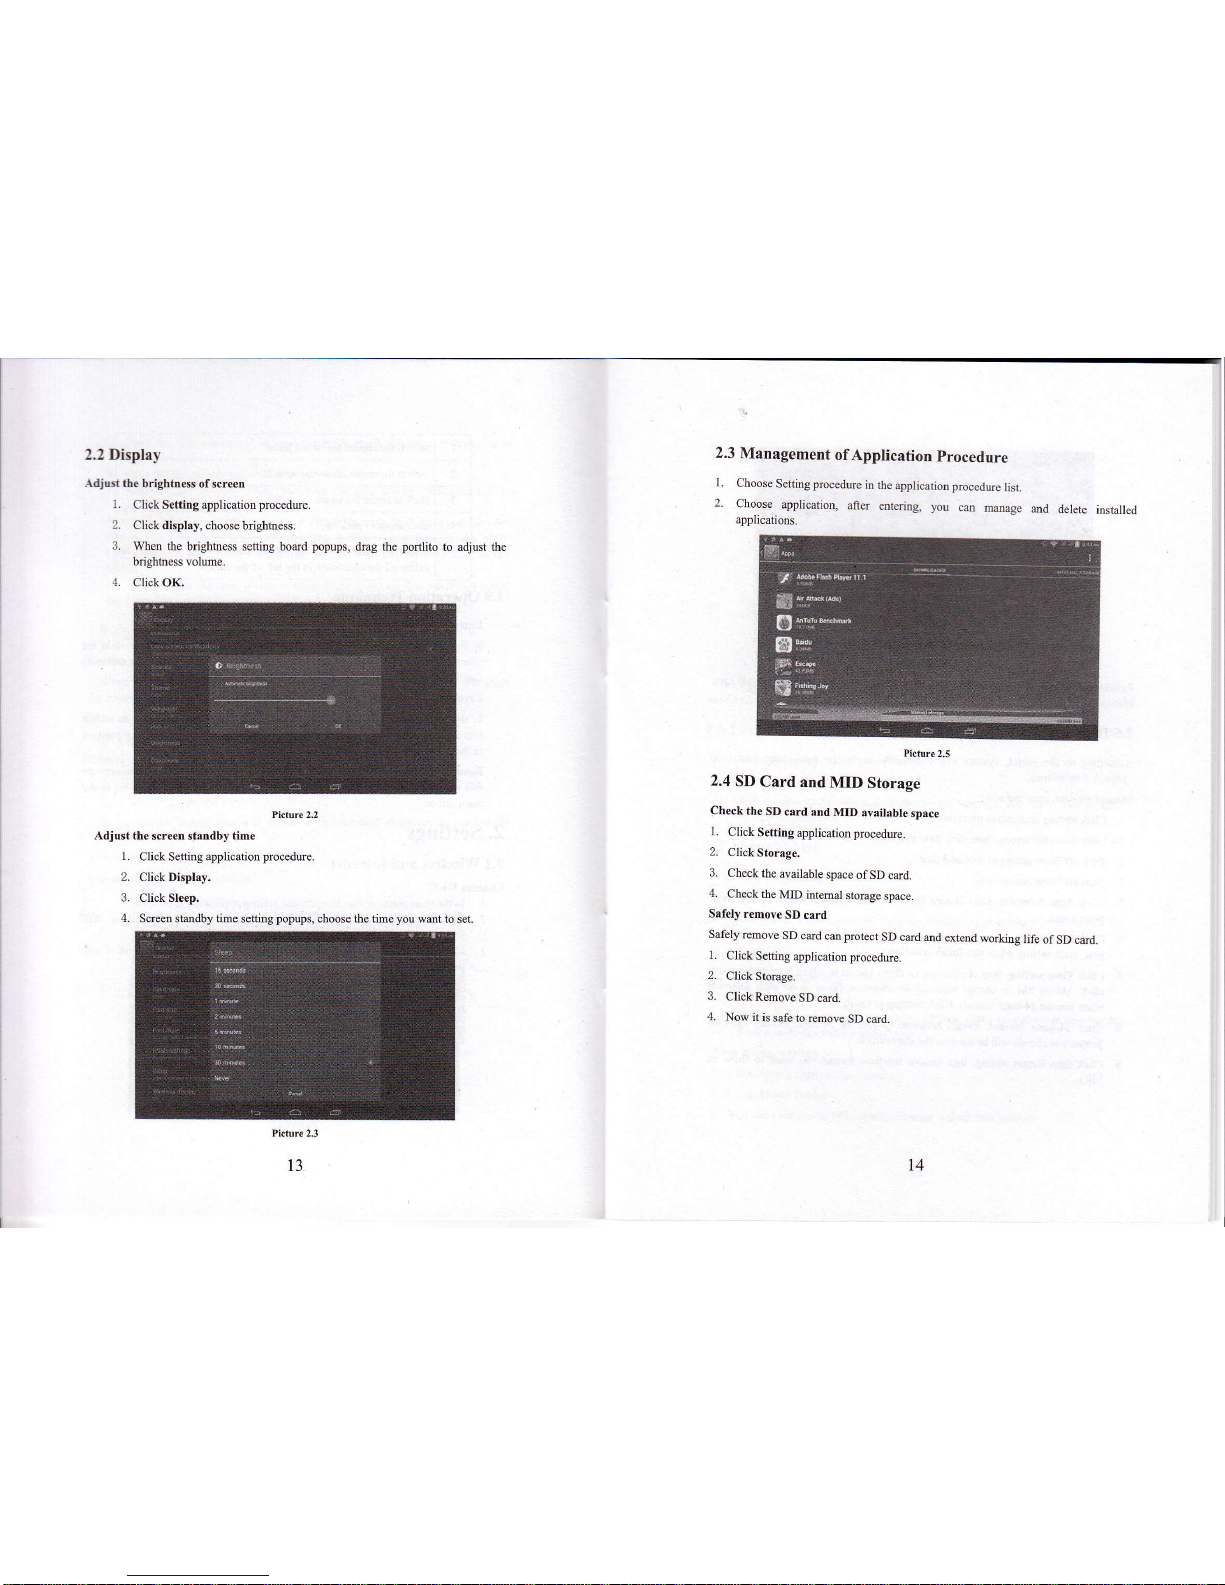
2.2 Display
Adjus the
brightness ofscre€n
l-
Click
Setting applicatiotr
procedue.
2.
Click
display, choose brighhess.
3.
When the brighhess settiDg boud
popups,
drag the portlito
to adjust tbe
brighmess volme.
4. C1ick OK.
Phtwe 2.2
Adjust the
$creen
standby time
1.
Click Seftitrg applicatiotr
procedure.
2.
ClickDisplay.
3. ClickSleep.
4.
Screen standby time seftirg
popups,
choose the time
you
want to set.
2.3
Management
of Application
procedure
1.
Choose
Setting
Focedure
in the
application
procealue
list.
2.
Choose
application,
after
etrtedtrg, you
cm
mmage
ed delete
imtalled
applications.
picture
2.s
2.4
SD
Card
and MID
Storage
Check
the SD
card
and MID
ayailabl€
space
1.
Click
Setting
application procedue.
2.
ClickStorage.
3.
Check
the
available
space
of SD
crd.
4.
Check
the
MID inteaal
storage
space_
Srfely
remoye
SD card
Safely
remove
SD cad cm protect
SD
cdd md
extend
working
life
of
SD cad.
i.
Click
Sefting
application ptocedue.
2.
Click Storage.
3.
ClickRemoveSDcad.
4.
Nowitis
safe
to remove
SD
cdd.
13
t4
Page 9
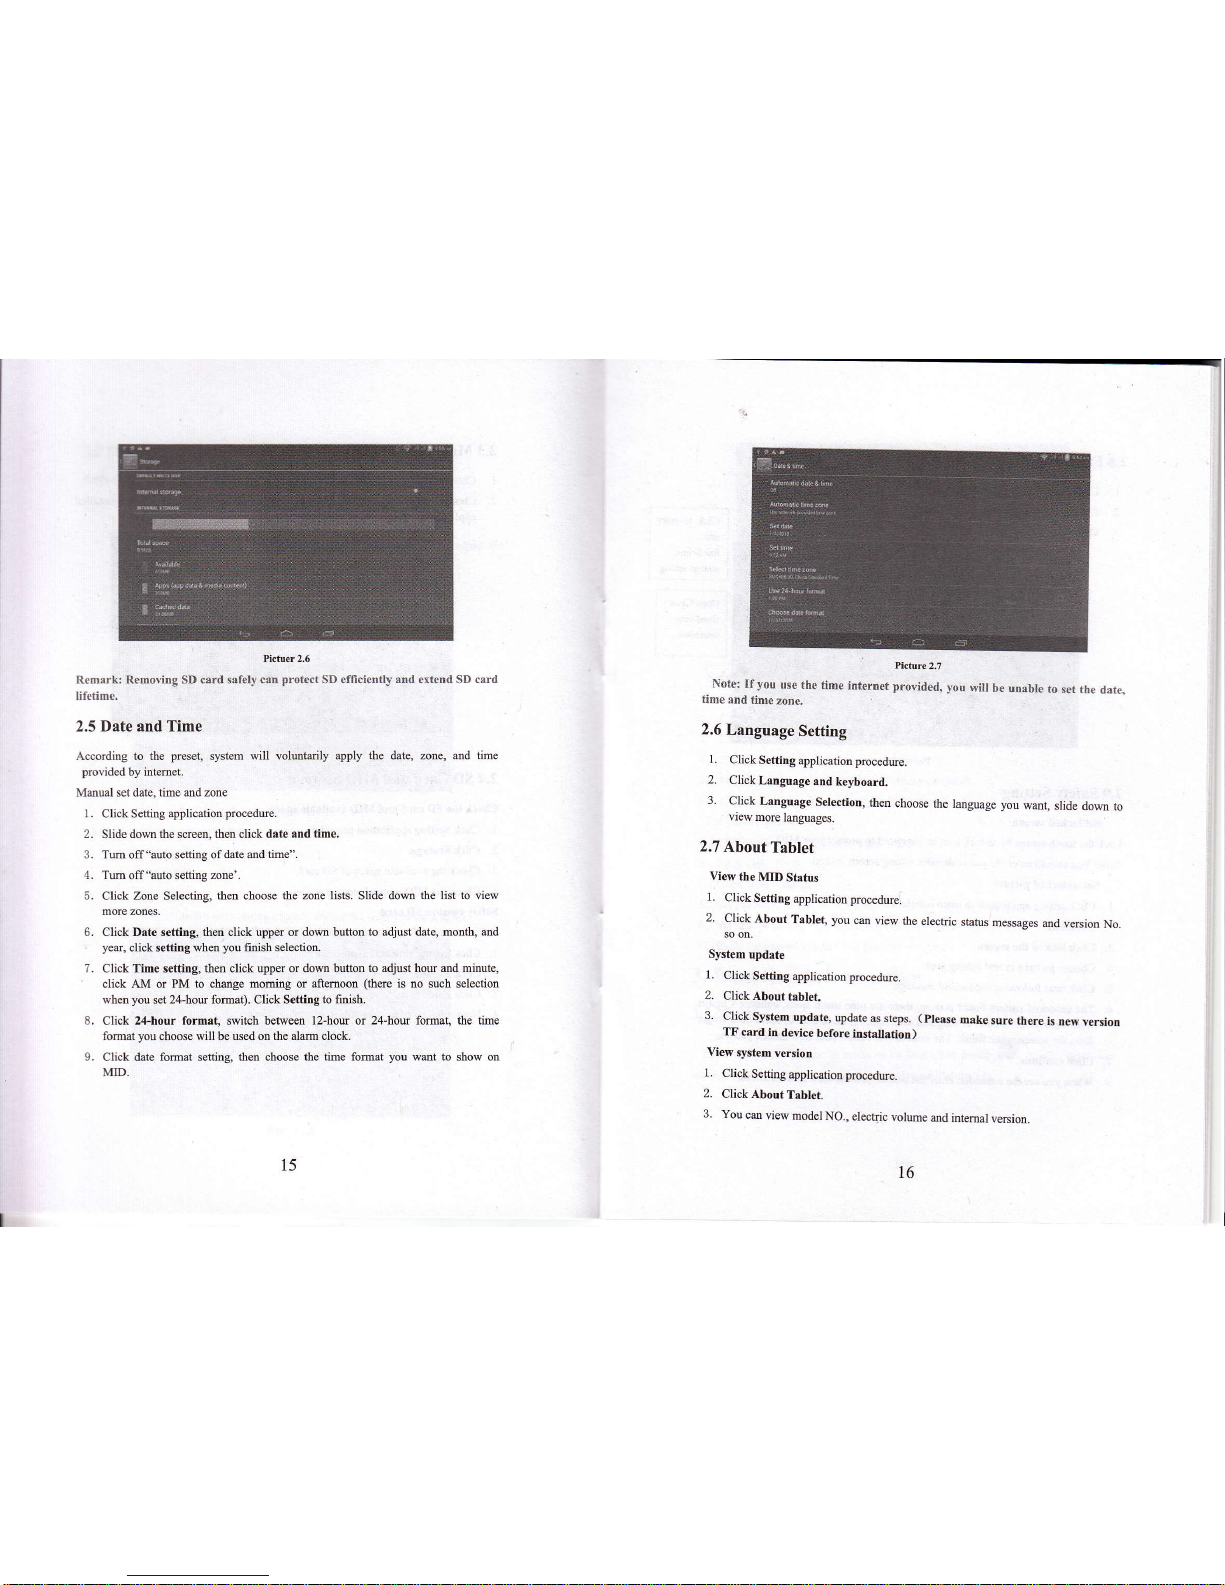
Picher 2.6
Rcmarkr Removing SI) card safely can
protect
SD ef{iciently
and
extend SD crd
lilctime,
2.5 Date and Time
According to the
prese!
s,6tem will
volubrily apply the date, zotre, and
provided
by
intemet.
Mmual set date, time md zotre
I
.
Click Senjng application
procedue.
2. Slide dom the screen, thm click date
and time.
3. Tm off"auto setting of date md
time".
4. T@
off
'?uto
sefting
zone'.
5.
Click
Zone
Selecting,
then choose the zone lists. Slide dom
the list to view
6. Click Date setting, th6 click upper or dom button
to
adjust date,
month, md
yed,
click setting when
you
finish selection.
7. Click Time setting, thetr click upper or dom bufiotr
to adjust hou md mitrute,
click AM or PM to chmge
moming or aftemoon
(there
is no such selectiofl
when
you
set 24-how fomat). Click SettiDg to finish.
8.
Click 2+hour formll, switch betueetr
l2-hou or 24-hou fomat, ihe time
fomat
you
choose will be Ned
oD the alam clock.
9.
Click date fomat setting,
then
choose
the time fomat
you
wmt b show on
MID-
pictor€
2.2
Note:
Ifyou
use the tim€
intertret
provided.
you
will
b€ uDable
to set the
datq
time
and
lime
zone.
2.6
Language
Setting
1.
Click
Setting
application procedue.
2.
CJickLanguage
and
keyboard.
3.
Click
Language
Selection,
then
choose
the language
you
wmt,
slide
doM to
view
more lmgmges.
2.7
About
Tabtet
View
the
MID
Status
1.
Click Setting
application proceduei
2.
Click
About
Tablet,
you
can
view
the electric
status
messages
md
veBion
No.
so
on.
System
update
L
Click
Seftitrg
application
procedue.
2.
ClickAbouttablet.
3.
Click SysteE
update,
update
d sbps.
(
please
make
sure tbere
is
new
versioE
TF
card itr
device
before
instxllatioD
)
View
system
versior
1.
Click
Seftiq
applicatiotr
procedue.
2.
ClickAboutTablet.
3.
You
cm
view
model NO.,
elecsc
volme
ed iilemal
venion.
15
16
Page 10
l-
ClickS€ttirgapplicatiotrprocedue
2-
Click fired-tine
startup and shutdown.
3.
Opemte d below
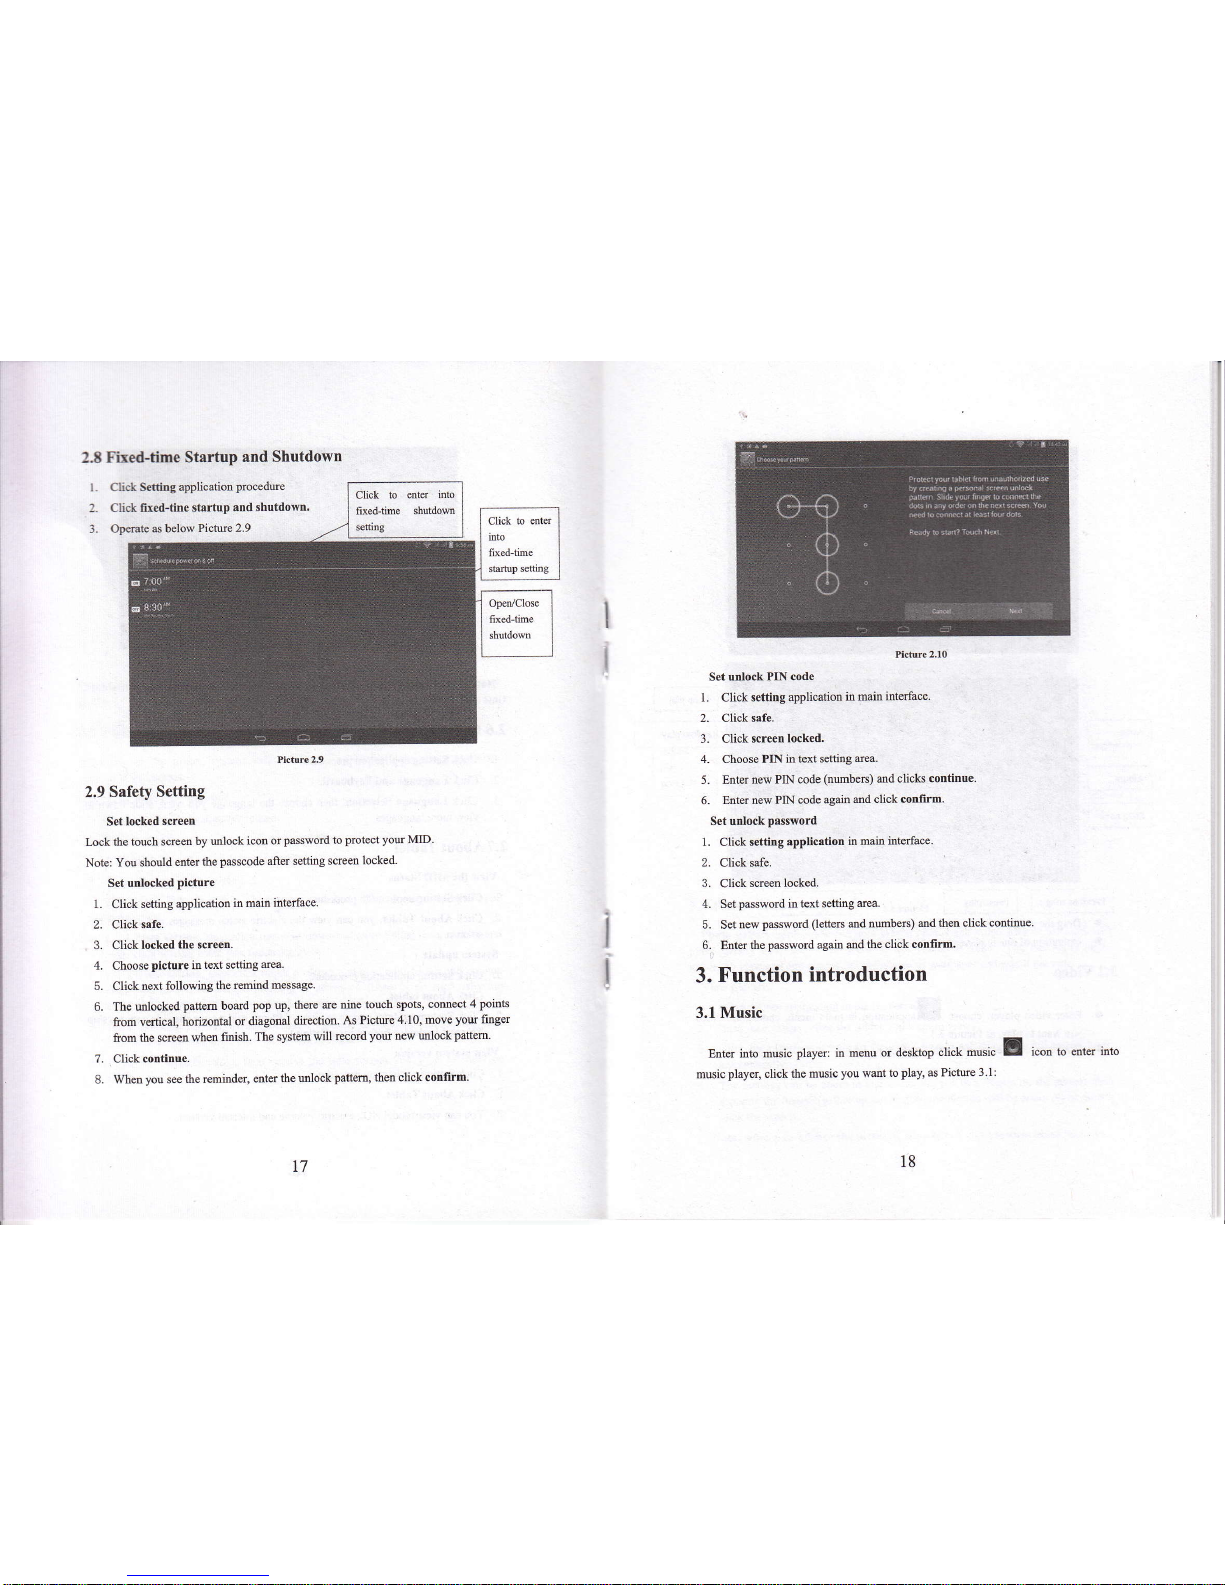
Pictue 2.9
2-t Fxed-time
Startup
and Shutdown
frctur€ 2.9
2.9
Safety Setting
Set lock€d
screen
Lock
the touch scre@
by ulock
icotr or
pdsword to
protect you MID.
Note:
You should
etrtd
the
pffiscode
after setlEg
screen locked.
1.
2.
3.
4.
5.
6.
7.
8.
Set unlocked
picture
Click
sening
applicalioo
in mai,
interface
Click ssfe.
Click locked
the screetr.
Ch@se
picture
io
text setting
rea.
Click next fotlowitrg
the
remind message.
The
ulocked
pattem boad
pop up, there
ue nine touch
spots, comect
4
points
fiom
vertical, hoilzotrtal
or diagoml
direction.
As Picfi[e
4.10, move
yow
fmger
fiom the sqeetr
whetr
fnish. The
systm will
record
you
new
unlock
patt@.
Click cotrtitrue,
When
you
see
the remmder,
dter
the uDlock
paftem, then click conlirm.
Hchre
2 l0
Set
unlock PIN code
1. Click setting application
in maitr interface.
2. Click safe.
3. Cliok
screer locked.
4. Choose PIN intextsettingaea.
5. Enter
new PIN code
(nmbers)
md
clicks continue.
6.
Enter trew PIN code
agaio
md click conlim.
Set utrlock
password
1. Click retting
applicrtion
in main
inttrfee
2.
Clicksafe.
3.
Clickscreenlocked.
4. Set
password in text sefting
rea.
5. Set new
pffsword
(lefters
md nmbeN)
md thetr click
cotrthue.
6.
Enter
the
pdsword again ed
the click
conlirm.
3.
Function
introduction
3.1 Music
Enttr itrto m6ic
player:
in mmu
or desktop
click music !
icon to enter
into
music
plays, click the music
you
wmt
to
play,
as Pictre
3.1:
t'7
l8
Page 11
*m
mlr
le-'
H
l
a
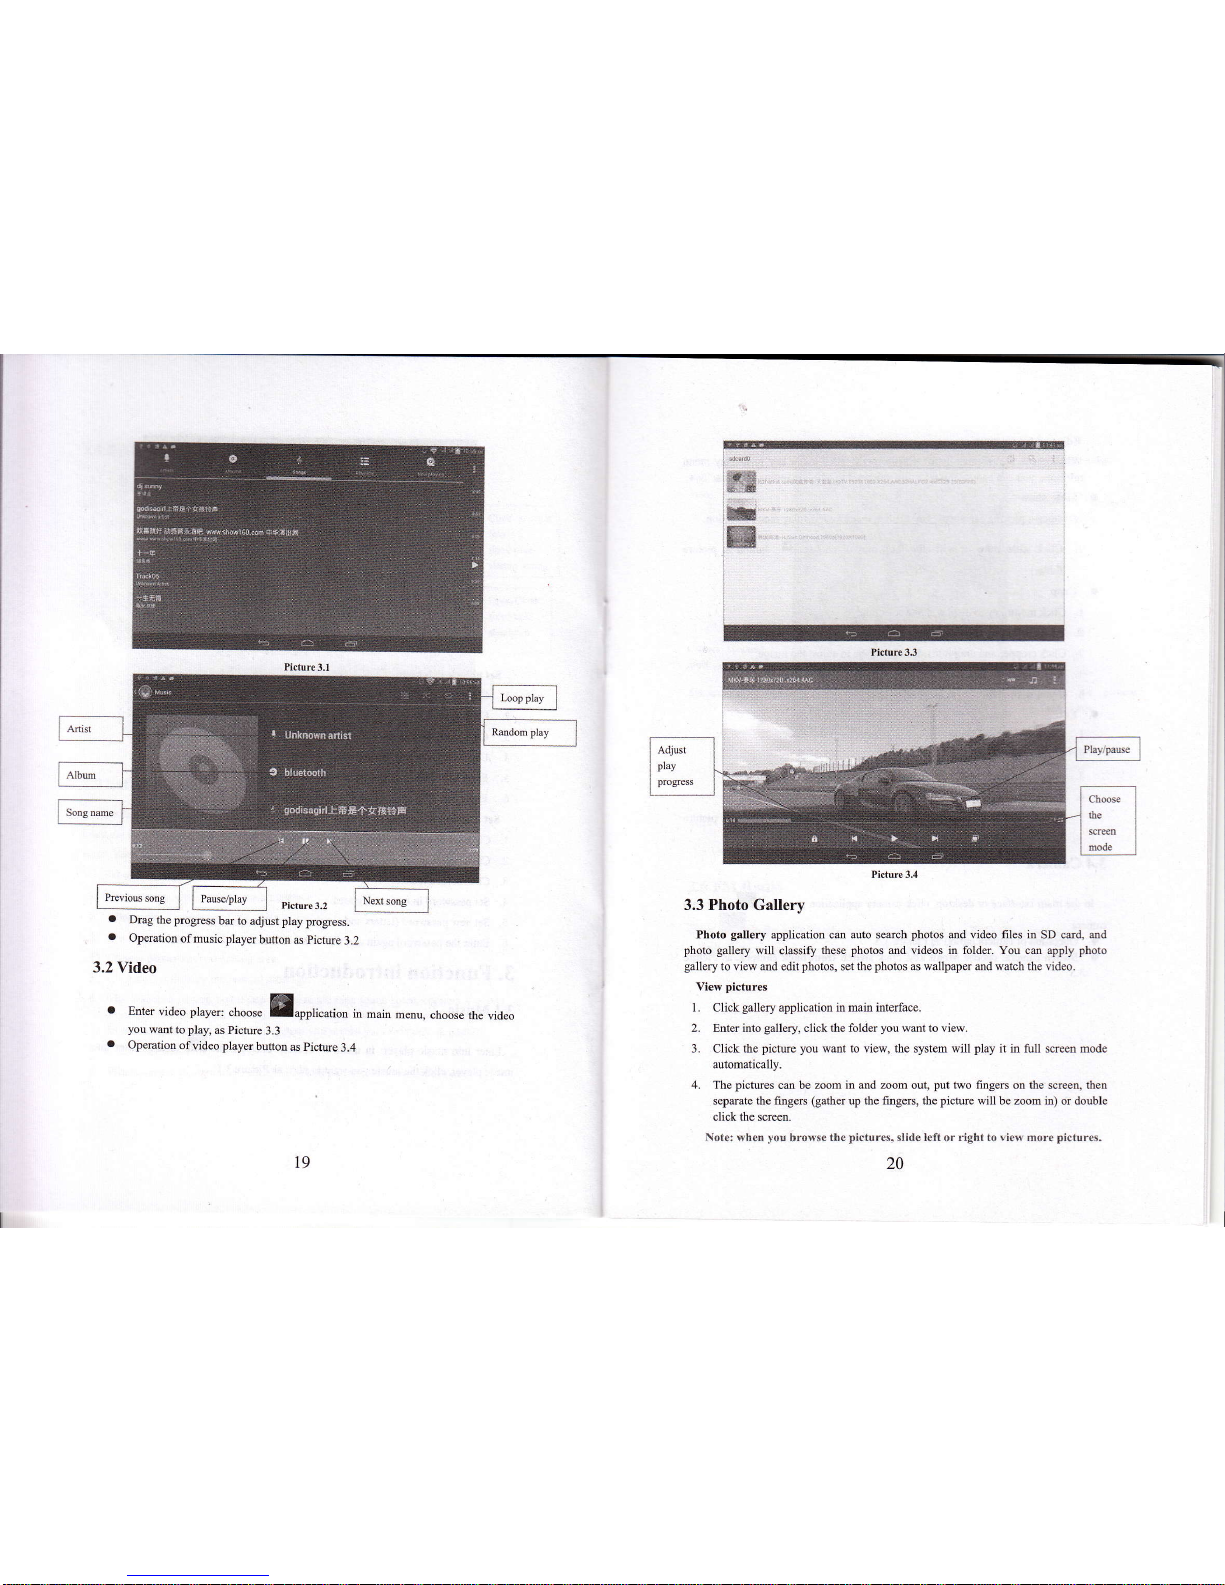
Dmg the progess
bar to
adjust
play
progress.
a
Opemtion
ofmusic player
buton
as
picfure
3.2
3.2
Video
a
Enttr
video
player:
choose
Eapptication
in
main
menu,
choose the
video
you
want
to
play,
as Picture
3.3
o
Opemtion
of
video
player
button
tr
picture
3.4
Picture 3.4
3.3 Photo Gallery
Photo
gallery
application can auto sedch
photos
and video files in SD card, ad
photo gallery
will
cldsiry
these
photos
md videos in folder. You cm apply
photo
gallery
to view and edit
photos,
set the
photos
d wallpaper and watch the video.
View
pictures
l. Click
gallery
application in main interface.
2. Entr into
galloy,
click the folder
you
want to view.
3. Click the
pictue you
want to view, ihe system will
play
it in fuIl screen mode
automatically.
4.
The
pictues
can be zoom
in md zoom
out,
put
two fingers
on the scrcen, then
sepdate the fingers
(gather
up the fmge$, the
pictue
will be zoom itr) or double
click the scree&
\ote:
when
to!
brow$e
the
pictur€s.
slide lefl or dght to riew' more
pictures.
l9
20
Page 12
Edit
atrd set pictures
Waen
check
the
pictues
in
full
screen
mode,
click menu
key
to display
menu
selection, you
c&
choose
the
selection you
need
to
edit md
sefting pictues.
a
Slide
Show
1.
Open a picture,
use
vitual key
to click
menu
key,
display
menu
selection.
2.
Click
slide show,
it will
auto
loop
playtor
choose
Dl
bufton in picture
folder)
a
Crop
1.
Click
menu
key to
display menu
selection.
2.
Then
click crop,
click
aod drag
related
area to
adjust
the oopper.
3.
Click
cropper and
drag it
inside
and outside
to
adjust the
image.
4.
After adjust
the size you
want,
click
crop.
5.
If
you
wish
to
give
up to crop,
click
caDcel
to retum
to
picfure
browse_
a
f,dit
l.
Click
menu key,
display the
menu
selection.
2.
Clickedit.
3. Adjust
the
brighhess,
sryle, colol
mtialid
sefring
in
selection.
4.
CIick
save.
5.
If
you
want to
give
up edit,
click
return
key,
click not
to retum
to
pictue
btowse.
3.4 Camera
In the
main interface
or
cleskop,
click camera
application
procedueEl,
ento into
a
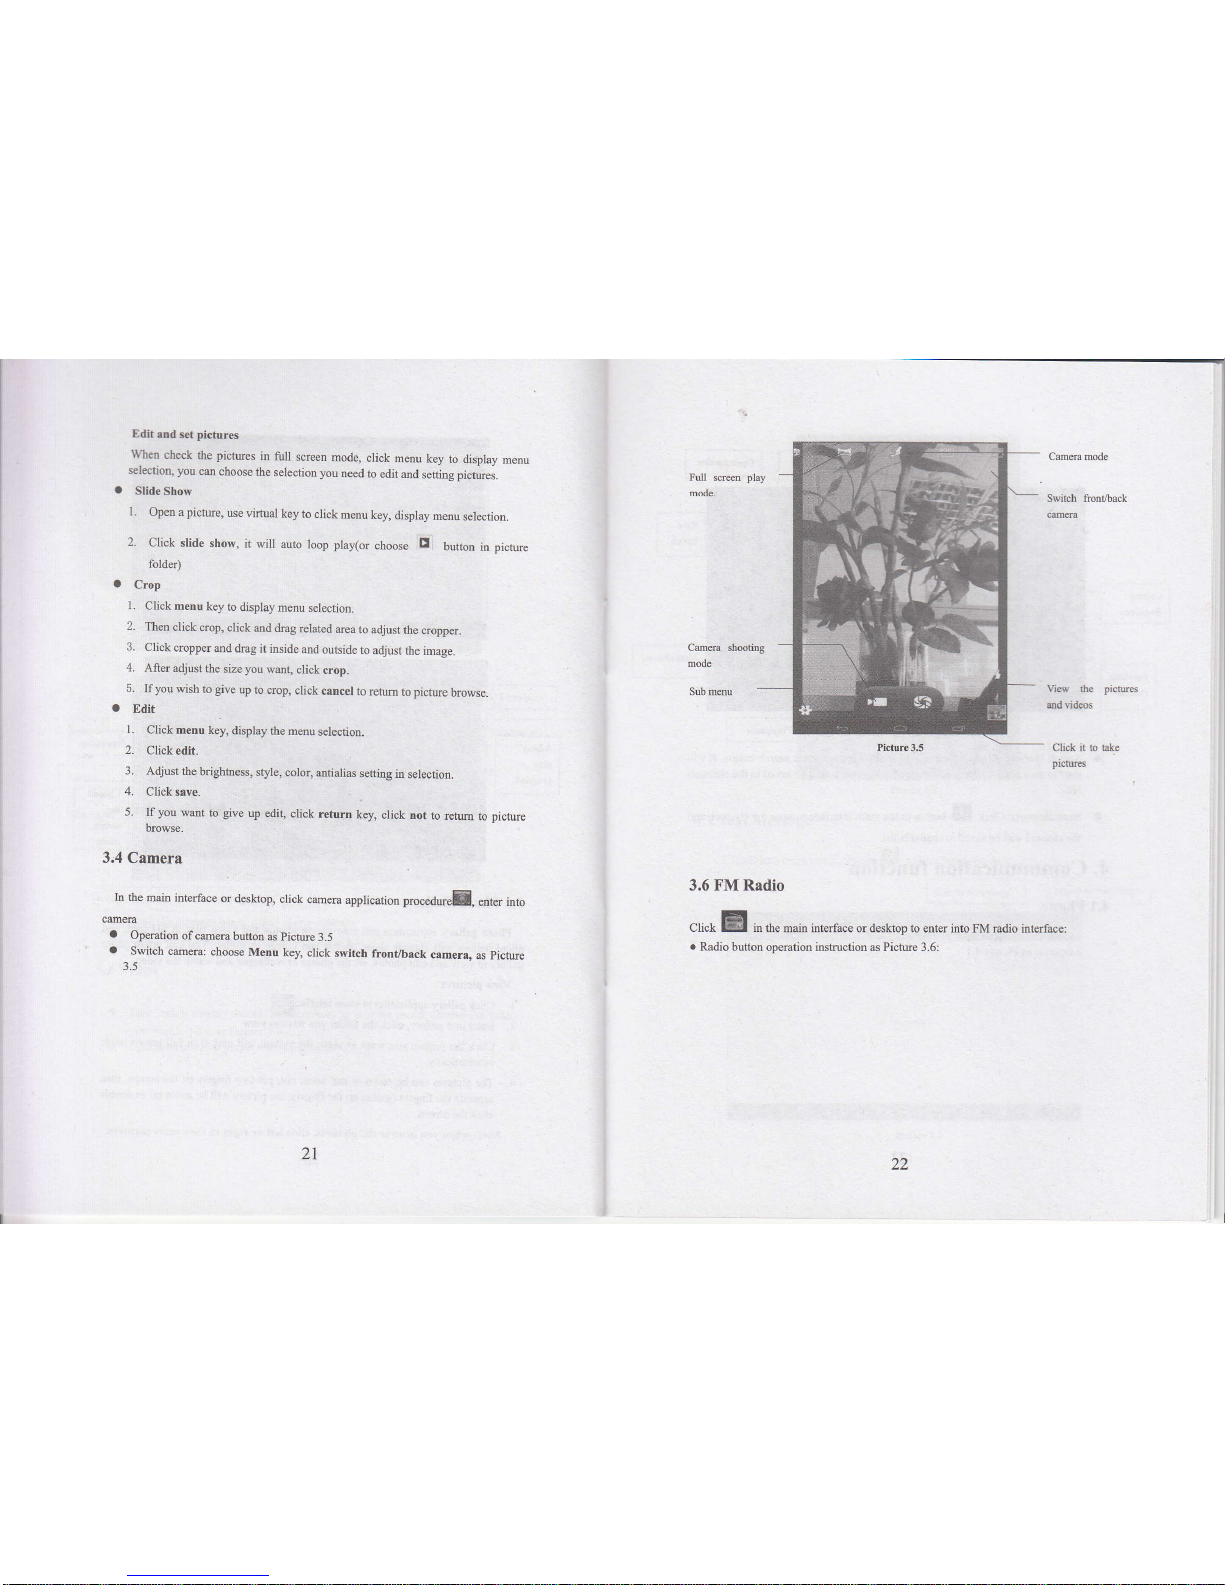
Operation
of cmera
bufton
as Picfure
3 .5
a
Switch
cmera:
choose
Menu
key, click
switch
froni/back
camera,
as
picture
3.5
Full sueen
3.6 FM Radio
Cfi"t M in the
main interface or alesktop to etrter into FM rudio interface:
.
Radio
bufion operation iastuction as Pictue 3-6:
z1
22
Page 13
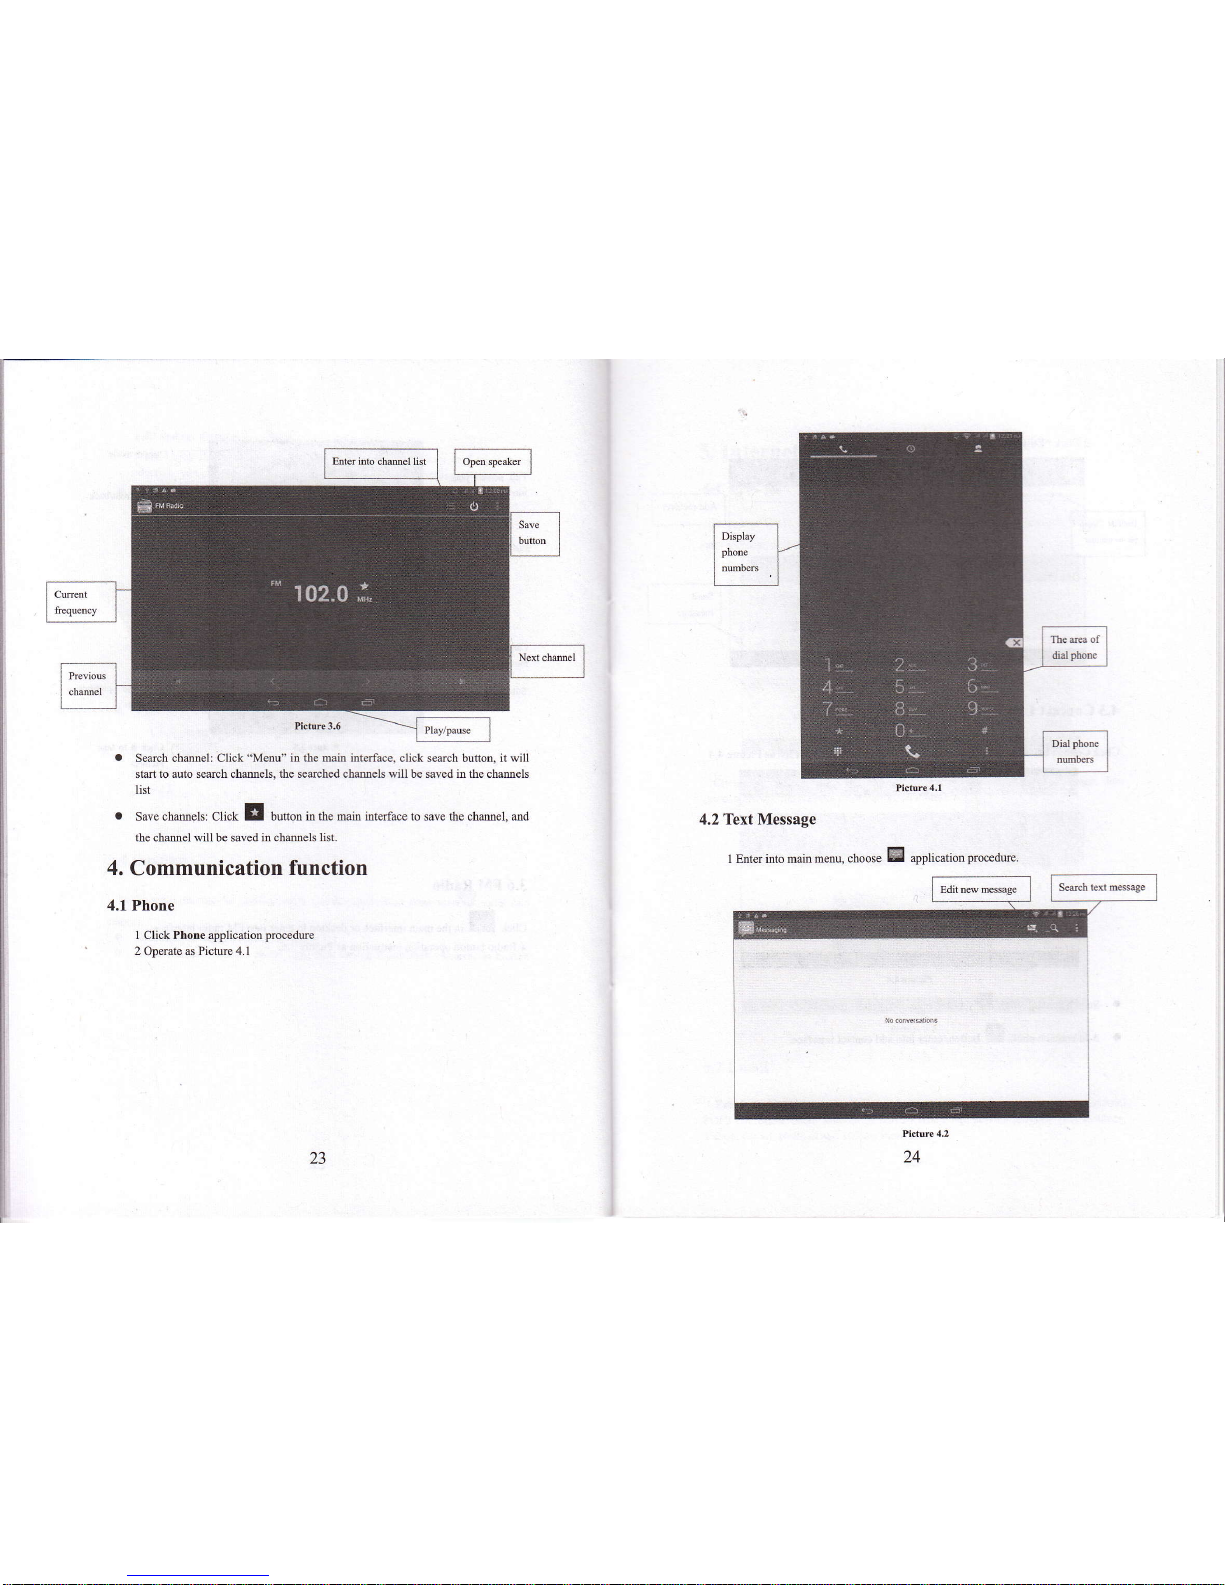
a
Sedch channel: Click
"Menu" itr the min interface,
click search button, it will
std to auto seech chmels, the setched chmels will be saved in the chmels
list
o
Save
chmels: Click E buron in tne mr interface to save the chmel, mal
the chamel will be saved in chmels
list.
4.
Communication
function
4.1 Phone
I Click Photre applicatioD
procedue
2
Operate
as Pictue 4.1
Ptuture4.1
4.2 Text Message
I Enter iilo main
menu,
"hoor"
I application
procedue
23
Page 14
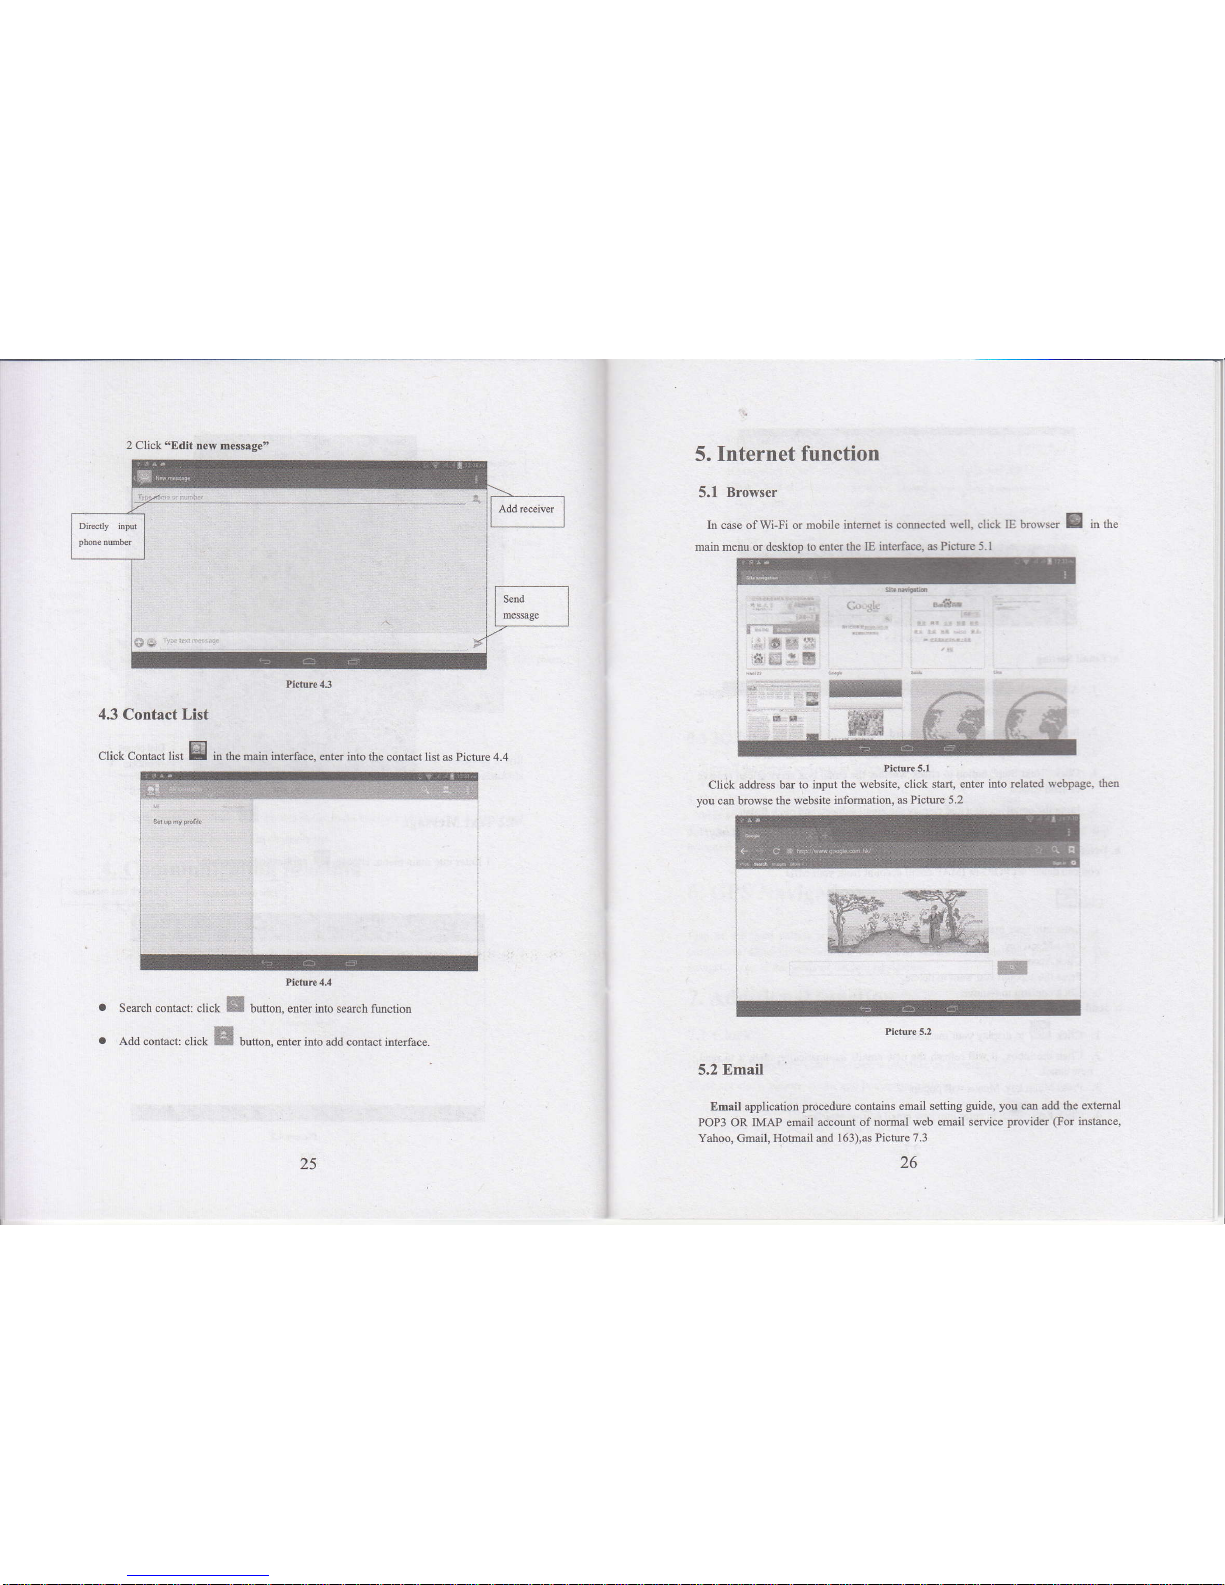
2 Click
"Edit
new message"
5. Internet function
5.1
Browser
In case of Wi-Fi or mobile
intemet is comected
*ell.
click
IE
mainmenu or deskop to
etrterthe IE interface, 6 Pictue
5.I
b.o*.".
B in th.
4.3
Contact
List
Click Conhct list EE in the main interface,
enter into the conhct list
d Pictue 4.4
Pilture4.4
Setrch contrct:
click
W
bunon, enter into
sedch function
Add conEct:
click
El
bunoD. mrer inro add
conucl inlerface.
Click
ad&ess btr to input
the website, click stad, enter
into related webpage,
then
you
cm browse the website
infomation,
as Picture 5.2
Ptcture 5.2
5.2
Email
Email applicatioD
procedue contains email setting
guide, you
cm add the extemal
POP3 OR MAP
email accout of nomal
web email senice
prcvider
(For
instmce,
Yahoo, Gmail, Hotuail and
163),as Pictue 7.3
a
a
25
26
Page 15
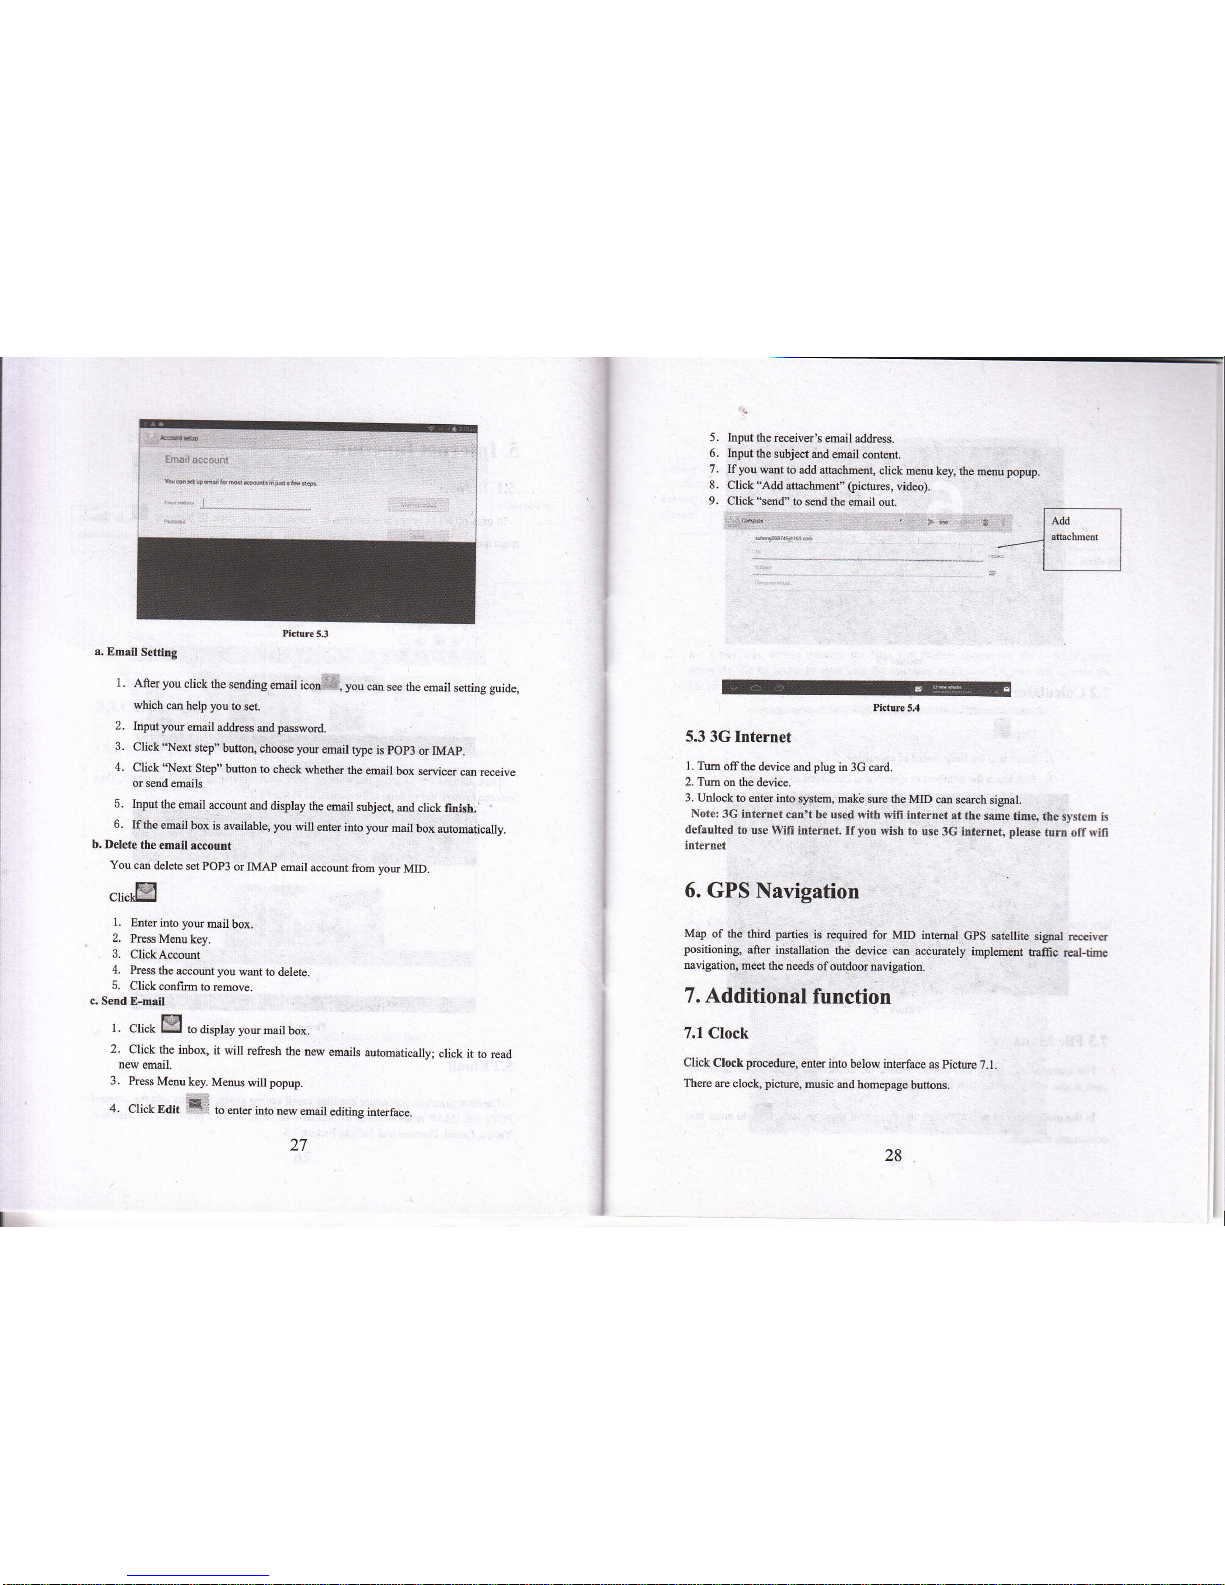
picture
5.3
a.
Email
Setting
l.
After
you
click the
sendiDg
ehail
icotr'
.
you
cm see
tbe email
setting guide,
which
cm help
you
to
set.
2.
Inputyou
email address
ild
pssword.
3.
Click
"Next
step"
buttotr, choose you
emil
type is
pop3
or IMAP.
4.
Click 'Next
Step" bufton
to check
whether
the
email
box seflicer
ce
receive
or send
emails
5.
hput
the email
accoutrt
md
display the
mail
subject,
md
click linish.
6.
If the
email
box is available, you
will
enttr into your
mail
box automatically.
b. Delete
the email
account
You
cil
delete
set POP3
or IMAP
email
accout
from
vour MID_
F:
CliclEJ
1.
Enterintoyou
mailbox.
2.
Press
Mmu
key.
3.
Click Accout
4.
Prcss
the accout you
wmt to
delete.
5.
Clickconflmtoremove.
c. SeDd
E-mail
F:
I
.
Click Lil
ro
display
you
mail
box.
2.
Click the
inbox,
it will
refiesh the
new
emails
automatically;
click
it to read
new
email.
3.
Press
MeDukey.
Menus
willpopup.
4.
Click Edit
i'*ll
to *ter
ioto oew
emat
eatiting
interface.
5.
6,
7.
8.
hput the
receiver'<
email address.
Input
the
subject md
mail cotrtent.
If
you
lmt to add
attehm@t,
click metru
key, the
menu
popup.
Click "Add
athchm@t"
(pictues,
video).
Click
"smd"
to
send the email
oul
-.,;;,...-
Picture5.4
5.3
3G Internet
1. Tm
offthe device
and
plug
in 3G
card.
2. Tm
on the
device.
3. Unlock
to ents into
systeh, maka
sue the MID
cm seach
signal.
Note: 36 intarnet
cen't
tle used *itl Rili
intoinet at
thc sa&e timer
the systom
is
defaulted
to
use ll'ili itrterael.
If
you
wish to trse
3G ilternet, please
turn off *ifi
intrrnet
6. GPS
Navigation
Map
of the
third
pdies
is required for
MID intmal
GpS
satellite sigml
reeiver
positioning,
after
installation the
deyice cm
accwately implement
tlaffic real-tioe
navigatioq
meet
the treeds
ofoutdoor navigatiotr.
7. Additional
function
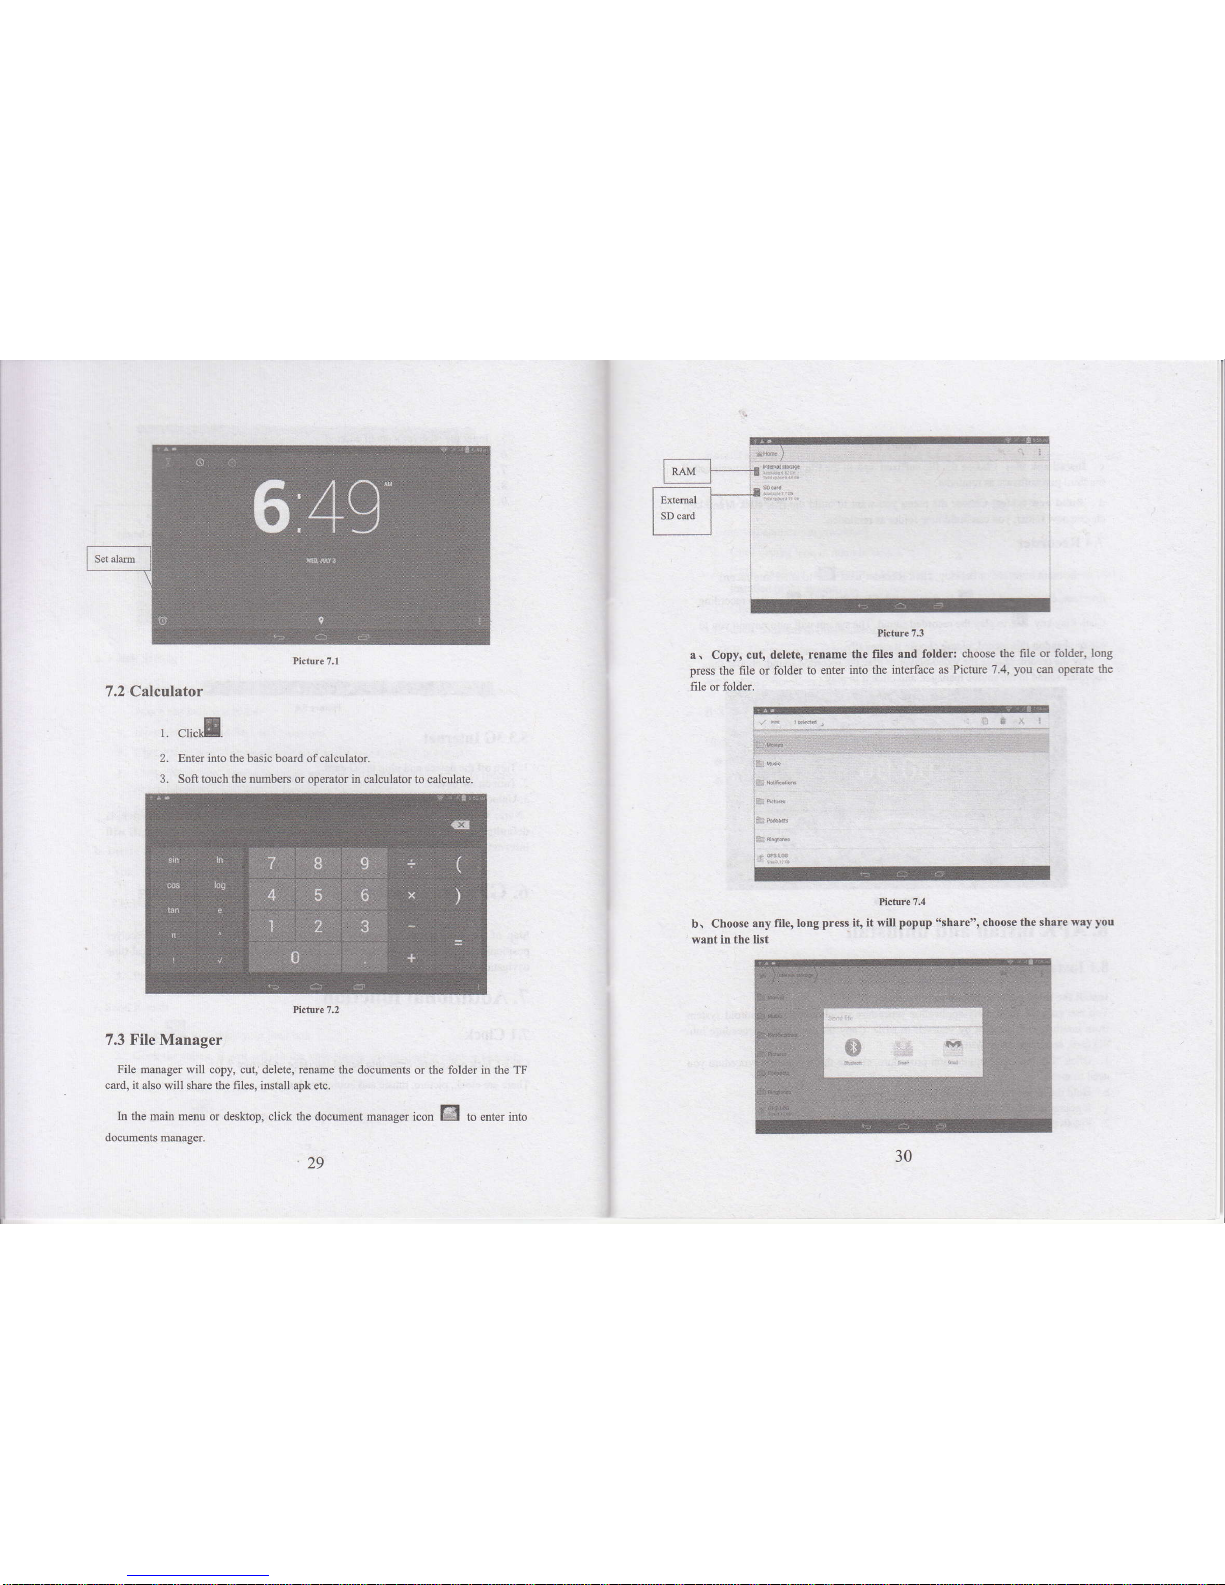
7.1 Clock
Click
Clock
procedure,
etrta into
below iilerface
as
picture
7.1.
There me
clock,
pictue,
music md
homepage
buttons.
27
28
Page 16
@*--.t'*
I
I
li:;,
!
lExtemat I \
"
l.r*,0 I I
tl
i
T.2,Calculator
1.
2.
3.
"r,"f,.
Enter iilo lhe b6ic boild ofcalculator.
Soft touch the nMbeN or optrator itr cal@lator to
calculate
Picture
7.2
7.3 File Manager
File mmager
will copy, cut, delete, renamd the docmmts
or
the
folder in the TF
ctrd, it also will
shtre
the files, hstall
apk €tc.
ln the
main metru or desktop, click the docment mmager
icon @ to entu into
docMeDts mmagtr.
frfirc 73
a, Copy, cut, delete,
rename the fils
and folder: choose
the file or folder, long
press
the
file or folda to entq
hto the interface
as Picm 7.4,
you
cd op@te
the
file ot folda.
Hctore 7.4
b, Choose
any file, lotrg
press it, it will
popup
"share",
choose
the share way
you
wrnt in the iist
29
Page 17
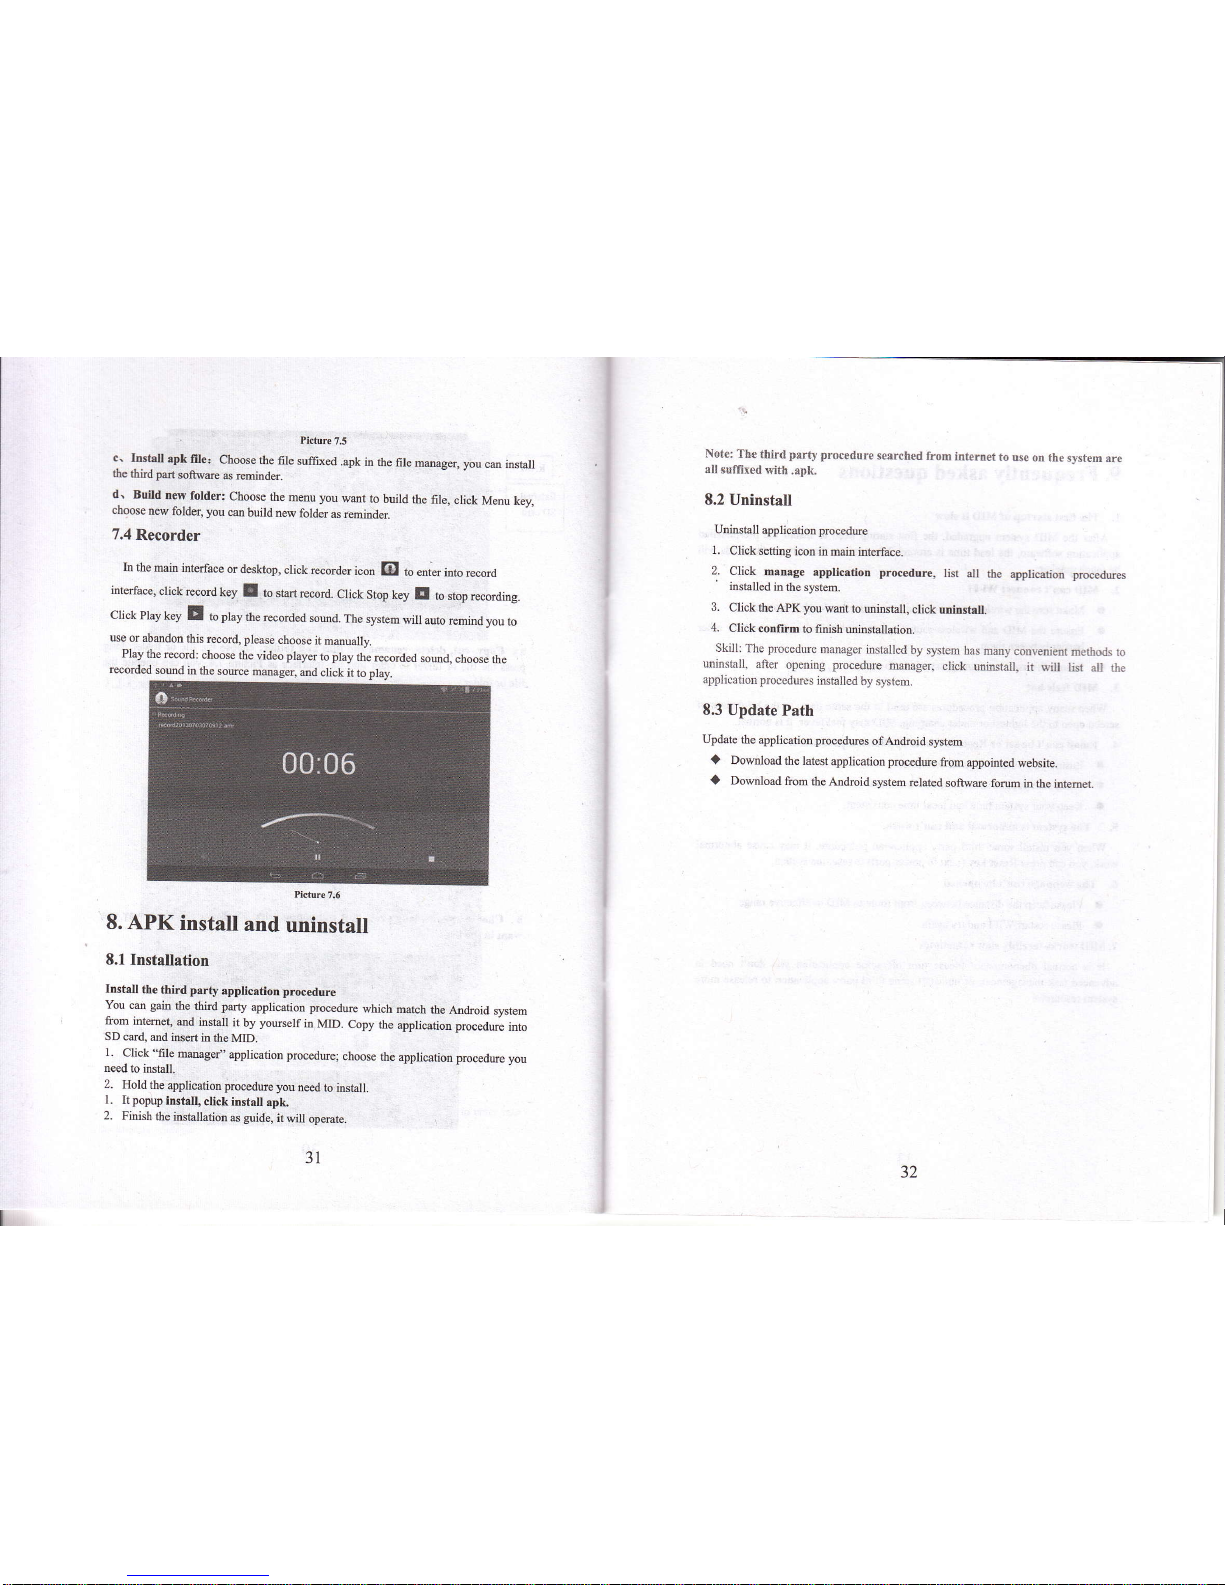
picture
7.s
..
hstall
apk
file.
Choose
the
file
sulfixed
.apk
in the
file
mmager, you
cm install
the
third pm
soliwae
6 minder.
d.
Build
new
folder:
Choose
the
menu
you
wmt
to
build
the file,
click
Menu
key,
choose
new foldet you
cm
build
new
lolder
as remiDder.
7.4
Recorder
In
the
main interface
d desllop,
click recorder
icon
fil to
*r
into record
interface,
click
record
key
! to stan
record.
Click
Stop key
It to
stop
recording.
Click
Play
key
E to
play
the recorded
soud.
The
system
will
auto remind you
to
use
or abandon
this
record, please
choose
it
manually.
8.
APK
install
and
uninstall
8.1
Installation
Install
the third parry
.pplication
procedure
You
m gain
the
third prty
application procedue
which
match
the
Andrcid
system
from
itrtemet,
md
install
it by
yowself
itr MID.
Copy
the
applicatiotr procedure
into
SD
ctrd,
and inseft
in the
MID.
1.
Click
"file
manager,,
application
procedue;
choose
the application
procedue
you
need
to inshll
2.
Hold
the
application procedue
you
need to
install.
1-
It
popup
install,
click install
apk,
2. Finish
the installation
as
guide,
it
will operate.
8.2
Uninstall
Uninshll
application procedue
1.
Click
sefiing
icon in main
iDterface.
2.
Click
matrage
application procedure,
Iist
all the
application procedures
'
installed
in
the system.
3.
Click the
APK
you
want to
wiNtall,
click uninstall.
4.
Click confirm
to
fitrish minstallation.
Skill:
The
proccdurc
manager inslalled
by
s)steil has
manv convenicni
meihods
io
udnstall.
after
opeoing procedure
mamger.
click
uniastail.
it Bill
list all ilrc
.
pnlir:r'i.rr
pruceJur:.
i Frdllcd h\ .)5rcm.
8.3 Update
Path
Update
the application
procedues
ofAndroid
system
a
Download
the latest
application
procedure
from
appoitrted
website.
a Download
flom
the Android
slstem related
sofiware
fo]m
in the intemet.
l\oter
Th€
tirir{t
pard
procadure
searched
fi.om
internet
to use
on thc
srstem are
ill
suffirod
with
.apk,
Play
the record:
choose the
video player
to
play
the
recorded
sound.
choose the
recorded
soud
in the
souce
manager,
and
click it
to
play
31
32
Page 18
9. Frequently
asked
questions
l.
TteErsaltartup of MID ls slow
Aftq the MID s,tsteh upgrad€4 the fist
startup n@d to instatl the
pre-itrtalled
applicatio
softwre, the lead time is mmd 2-3 minutEs, the
startup aftwards witl
be mrch
quicka.
2. MID c.tr't connst Wi-Fi
a
Make sre the wireless routtr of htemet swioe
cm work io nomal.
a
Etrsw the MID md wirelss router itr cqhh dishce,
ed tro wall or othq
bmiq betwea thm.
a
ErsEe
the
user
lrm€
md
password
both cond.
3. MlDfeelihot
Who mmy applietioa
prcoedues
e ued at the sme time, or the brigibess of
scr@
open
to the lightest or md6 chegitrg, MID may feel fwer. It is no@al.
4. Emll cm't
be
st or R€litntion of .pplicatlon
pr@€due.
a
ENre
yow
intmet is well m€cted.
a
Make sue
you
@il stting
my is corect.
a
Keq)
you
sysm
time ed local time coNistetrt.
5. The
sldtem
k rbromrl .trd cu't mrk
Whm
you
istall some thid
party
application
prmedrre,
it my caNe abnonnal
work,
you
cm
press
Reiet key
(rcxt
to
powd port)
to
rcset
the s)atem.
6. Thewebprgec.tr'tbeopered
a
Plse keep the distmce betw@ ftom rcute to MID itr effective tuge.
a
PleNe rest{t WIFI md hy again.
7. MID workr
terribly
slow rometimei
It is notual
phenomdon.
Plede tm off some appli@tion
you
don't need
in
advmced task
lr@g@@t or uiretall some third
pdty
applicatiotr to rel@se more
system resouceg.
33
 Loading...