


SARA™ CE
Scanning and Reading Appliance
Camera Edition
User’s Guide
Freedom Scientific
January 2011

PUBLISHED BY
Freedom Scientific
st
11800 31
Court North
St. Petersburg, Florida 33716-1805
USA
http://www.FreedomScientific.com
Information in this document is subject to change without notice. No part of this
publication may be reproduced or transmitted in any form or any means, electronic or
mechanical, for any purpose, without the express written permission of Freedom
Scientific.
Copyright © 2011 Freedom Scientific, All Rights Reserved.
Federal Communications Commission Notice
This equipment has been tested and found to comply with the limits for a Class B digital
device, pursuant to Part 15 of the FCC Rules. These limits are designed to provide
reasonable protection against harmful interference in a residential installation. This
equipment generates, uses, and can radiate radio frequency energy and, if not installed
and used in accordance with the instructions, may cause harmful interference to radio
communications. However, there is no guarantee that interference will not occur in a
particular installation. If this equipment does cause harmful interference to radio or
television reception, which can be determined by turning the equipment off and on, the
ser is encu ouraged to try to correct the interfere
m
easures:
Reorient or relocate the receiving antenna.
Increase the separation between the equipment and receiver.
Connect the equipment into an outlet on a ci rcuit different from that to which
receiver is connected.
Consult the dealer or an experie
Industry Canada ICES-003 Notice
This Class B digital apparatus complies with Canadian ICES-003.
Cet appareil numérique de
Regulatory Compliance
la classe B est conforme à la norme NMB-003 du Canada.
nced radio or television technician for help.
nce by one or more
of the following
the

Wavelengths: 400 nm to 780 n
Power: 5V 500mA
Safety: UL 60950-1
CAN/CAS-C22.2 No. 60950-1
EMC: 15) Class B
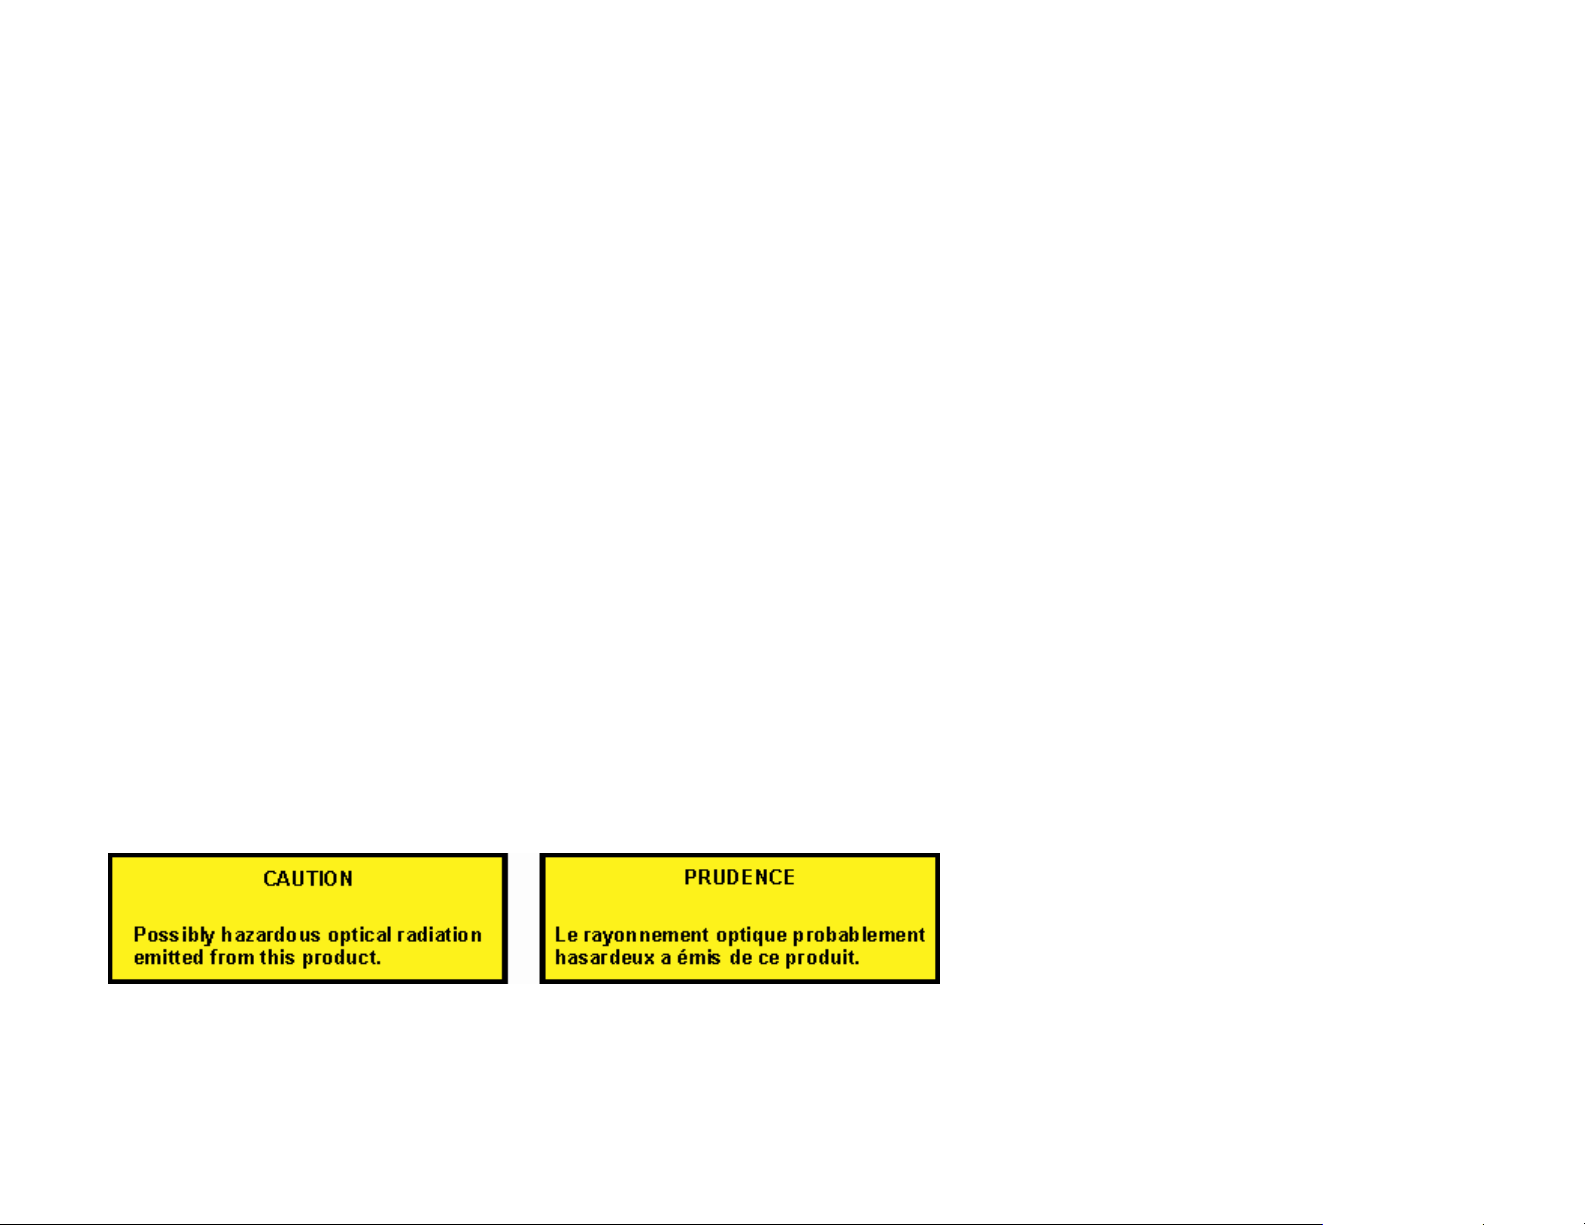
Safety and Maintenance
The LED lamp used in this product is in excess of the Exempt Risk Group defined in
CEI IEC 62471:2006-07. This lamp has been found to be in the Risk Group 2
IEC 60950-1
FCC (CFR-47, part
Industry Ca
EN 55022
EN 55024
nada ICES-003
Class B
m
classification at an exposure distance of 20cm or less from the glass surface of the
lamp. Car th
The specific hazard is retinal blue light. Do not stare at the lamp as it may be
th
e eyes.
T
o keep your SARA CE in good condition, observe the following guidelines:
Read the instructio ns in this user’s guide before attempting to use SARA CE.
e should be taken to avoid exposure when operating and installing is lamp.
harm
ful to

Do not attempt to repair SARA CE or open its case. This product contains no user
serviceable parts.
Keep SARA CE away from wet areas, rain, and other sources of liquids. Do no
submerge SARA CE.
Always operate SARA CE in a place where the temperature is between 10° and 3
C (50° and 95° F).
Do not store in places subje
When cleaning SARA CE, make sure the unit is unplugged from the wall outlet.
Use a lightly dampened, soft, clean cloth with water or mild detergent. Do not use
alcohol, solvents, abrasives, or aerosol sprays.
ct to temperature extremes such as a parked car.
t
5°
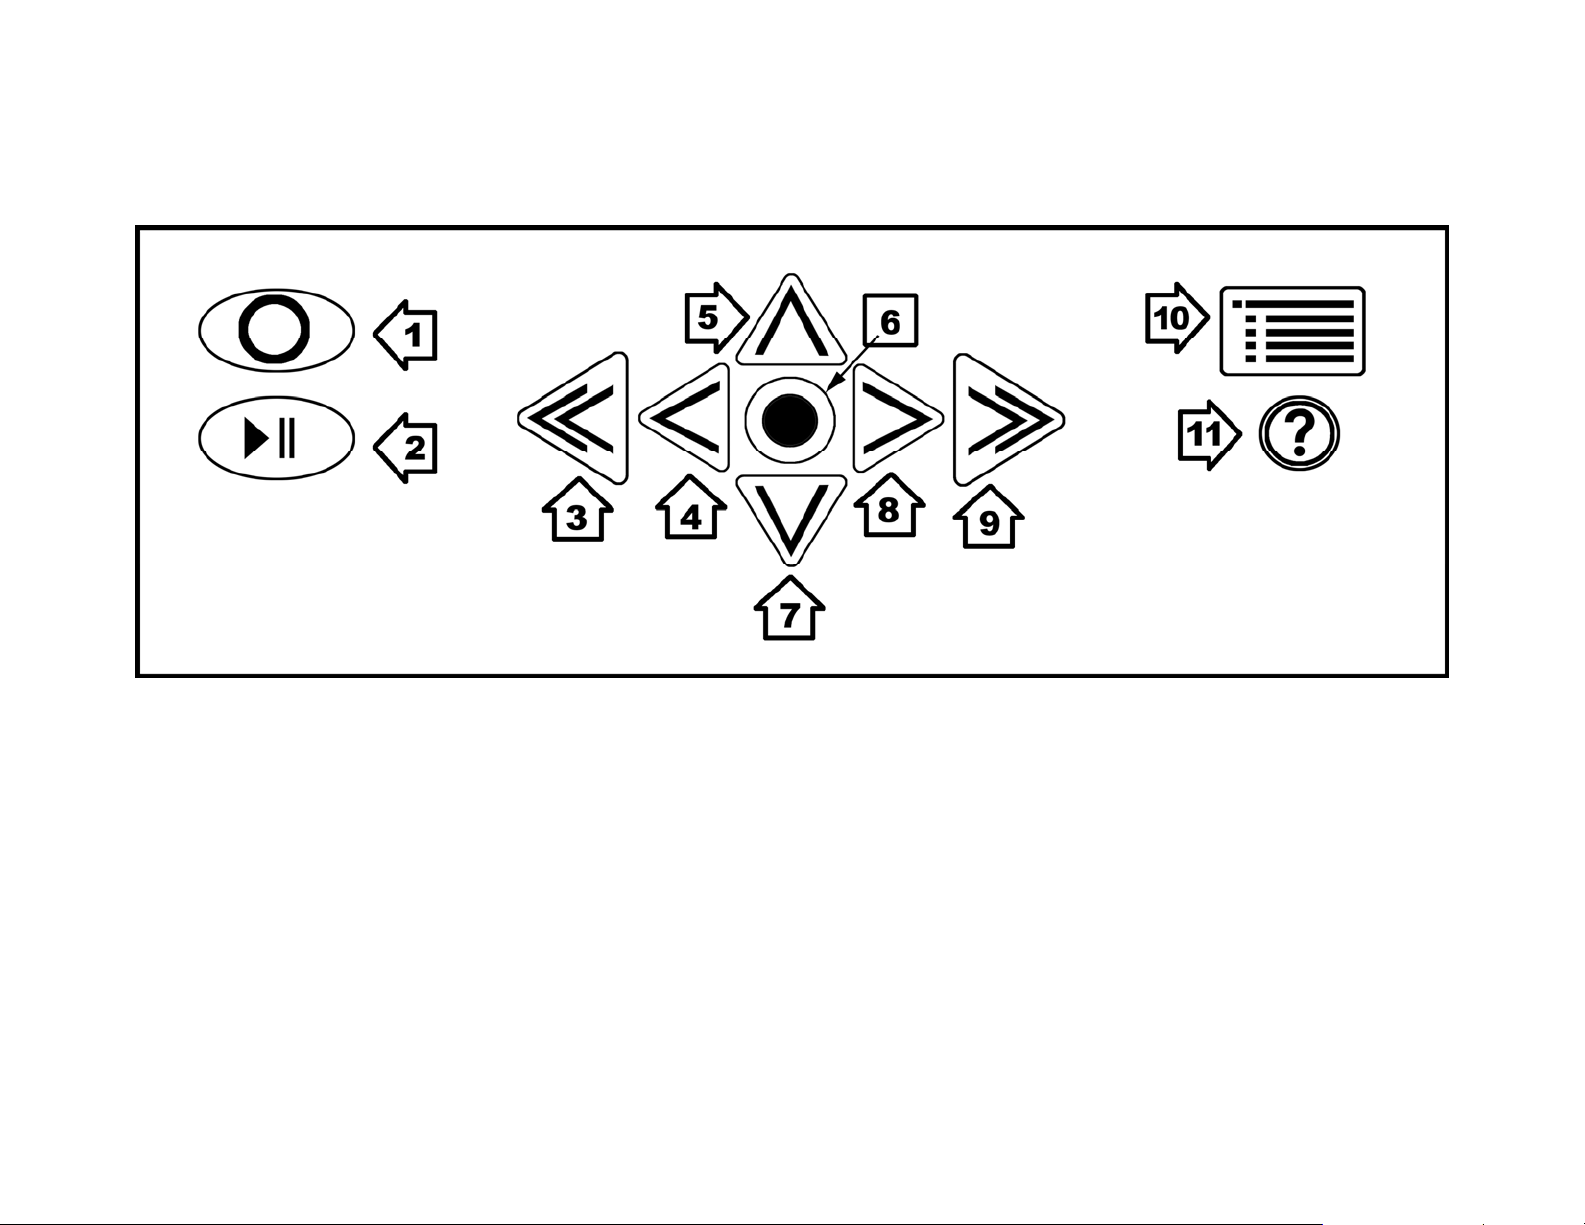
S RA A CE Top Panel
1. Scan/Record Key – Scan a document or record a file name.
2. Play/Pause Key – Start or stop reading.
3. Left Double Arrow – Move back one paragraph.
4. Left Arrow – Move left one word.
5. Top Arrow – Move up one line.

6. Select Key – Read current
7. Down Arrow – Move down one line.
8. Right Arrow – Move right one word.
9. Right Double Arrow – Move forward one paragraph.
10. Menu Button – Opens the menu.
11. Help Key – Press this key followed by any key to learn its function.
word.
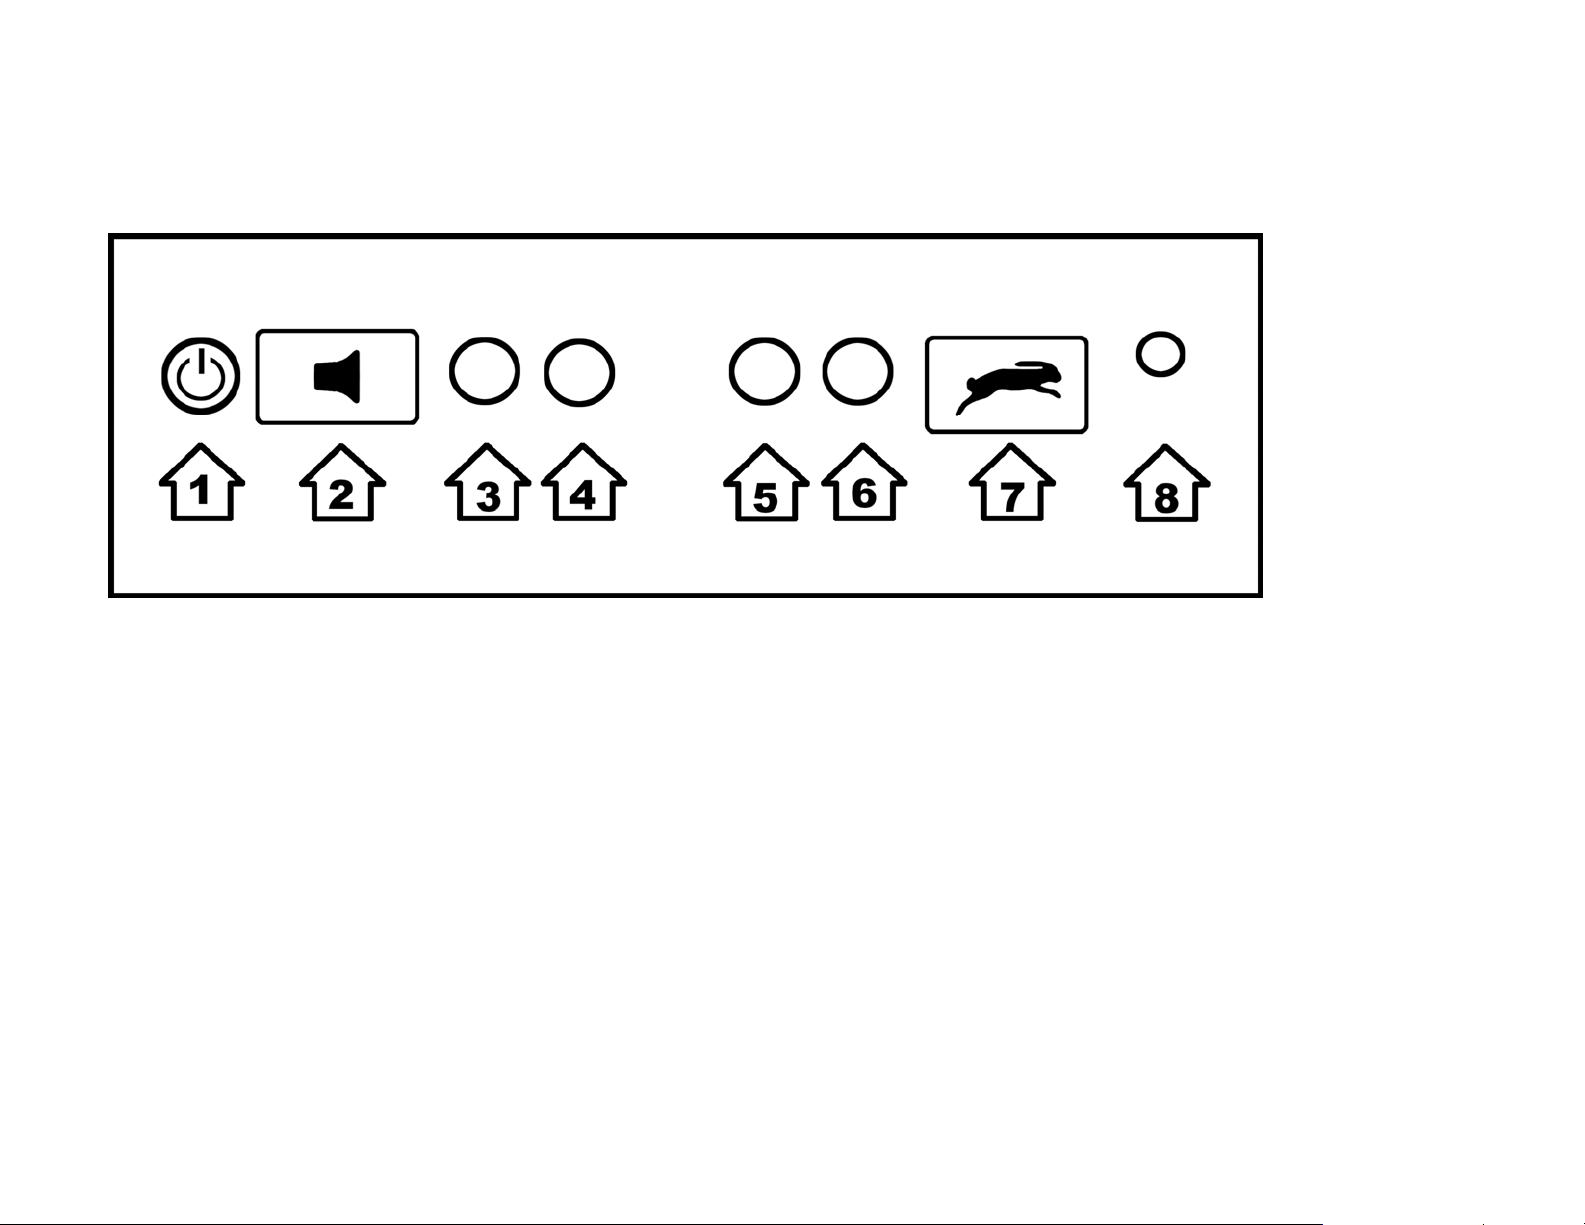
SARA CE Front Panel
1. Power button – Turn SARA CE on or off.
2. Volume Rocker – Raise or lower the volume of the speech.
3. Function Key 1 – Toggle the camera light on or off.
4. Function Key 2 – Erase the current page.
5. Function Key 3 – Cycle through scanning modes.
6. Function Key 4 – Toggle column recognition on or off.

7. Voice Rate Rocker - Increase or decrease the reading speed.
8. Headset Jack – Connect the included headset.

Table of Contents
Introduction _______________________________________________________ 1
Welcome to SARA CE!______________________________________________ 1
Features _________________________________________________________ 2
What’s in the Box? _________________________________________________ 3
What SARA CE Cannot Read ________________________________________ 4
How to Set Up SARA CE ____________________________________________ 4
Scanning and Reading with SARA CE __________________________________ 6
Powering SARA CE On and Off _______________________________________ 6
Scanning and Reading with SARA CE__________________________________ 7
Adjusting Voice Volume _____________________________________________ 8
Adjusting Reading Speeds ___________________________________________ 8
Getting Help ______________________________________________________ 8
Using the Movement Keys ___________________________________________ 9
To Skim through a Document while Reading ____________________________ 10
Cycling through Documents you are Reading ___________________________ 11
Using the Function Keys____________________________________________ 11
Using the Menus___________________________________________________ 13

Using the Settings Wizard
W
orking with Files _________________________________________________ 15
___________________________________________ 14
Opening a New Blank Document _____________________________________ 15
Opening a Saved Document_________________________________________ 16
Opening a Document fro a USB Drive________________________________ 17m
Listening to an Audio File ___________________________________________ 18
Navigating an Audio File__________________________________________ 19
Reading Public Domain Books_______________________________________ 20
Closing a Documen _______________________________________________ 20t
S
aving a Document _______________________________________________ 21
Saving a Document with a Different Name____________________________ 22
Saving a Document on a USB Drive_________________________________ 22
Deleting a Document ______________________________________________ 23
U
sing the Menus for Other Settings___________________________________ 24
Go To Menu _____________________________________________________ 24
V
oice Settings____________________________________________________ 25
Reading Voice and Menu Voice ____________________________________ 25
Enabled Languages _____________________________________________ 26
S
canning Settings_________________________________________________ 27
Scanning Order_________________________________________________ 27

Scanning Mode_________________________________________________ 27
Vi
gsual Settin s ___________________________________________________ 29
Text Font______________________________________________________ 29
Text Size______________________________________________________ 29
Text Color _____________________________________________________ 29
Spotlight Color__________________________________________________ 30
Spacing_______________________________________________________ 30
A
dvanced Settings ________________________________________________ 30
Key Assignments _______________________________________________ 30
Key Announcements_____________________________________________ 32
Save to USB Format_____________________________________________ 34
Contracted Braille _______________________________________________ 34
Restore Factory Settings__________________________________________ 35
Updating SARA CE________________________________________________ 35
A
ttachments for SARA CE___________________________________________ 36
Using a Headset or Speakers with SARA CE____________________________ 36
Using a Monitor with SARA CE ______________________________________ 36
Using a Braille Display with SARA CE _________________________________ 37
Optional Keyboard Covers __________________________________________ 38
Warranty Information_______________________________________________ 39

Technical Support_________________________________________________ 42
Web Site____________________________________________
Keyboard Layout Diagram for C
reating Tactile Images ___________________ 44
____________ 43


n Introductio
We
lcome to SARA CE!
Freedom Scientific’s SARA CE (Scanning and Reading Appliance, Camera Edition) is a
stand-alone device designed to help the blin
materials. You can use SARA CE to read almost anything, including mail, important
documents, hardcover and paperback books, and more. SARA CE uses the latest in
optical character recognition technology to scan pages and then reads the contents of
that page to you with clear, crisp, human-sounding synthesized speech. SARA CE
contains a host of features that let you customize your reading experience. Read books
or play audio files stored on a USB Flash drive. SARA CE even allows you to read
DAISY (Digital Accessible Information System) format digital talking books.
This user’s guide is intended to show you how easy it is to scan and read using SARA
CE. It contains information on the easy automatic use of SARA CE as well as on using
the keypad. Not only can you easily set up SARA CE and attach a headset, but you can
d and those with low vision read printed
a so connect it to a computer
l monitor.
There are menus you can use to set a variety of choices like reading and menu voices,
language, visual settings, and managing files saved to the hard drive or to a USB
memory device.
1

Features
The SARA CE is easy to use. It works right out of the box. Major features of SARA CE
include:
Fast automatic scanning. Just place a page under the camera and hear it read
back to you in seconds.
Reads books, magazines, newspapers, bills, and more.
Reads DAISY audio books.
Reads columns and sidebars as well as text.
Manual and automatic scanning modes.
2
Large buttons perfor
A colorful keypad with tactile symbols and shapes conveys
Press the Help key followed by any of the other keys to learn the key’s function.
sy-to-use menus to control scanning and reading. a
E
ont-mounted stereo speakers make SARA CE easy to hear.
Fr
R
ealSpeak™ Solo voices can be changed to suit your preferences, including
ading speed and volume.
re
Spell words to get a better understanding of what is being spoken.
m all the basic functions any user needs.
each button’s use.

S
ARA CE can remember hundreds of thousands of pages.
Access reading material stored on a USB device, such as a USB thumb drive or
ex
ternal hard drive. You can also save books to a USB drive.
Connect to a computer monitor for colorful , large print to complement the speec
Wh ’
at s in the Box?
S
C
amera
Power cord
Power adapter (110 to 220 V)
La
Braille Quick Start Guide
Headset
Test page for scanning
h.
ARA CE Scanning and Reading Appliance
rge print user’s guide
3

What SARA CE Cannot Read
SARA CE cannot read handw
typewritten letter, SARA CE reads the letter
written over other printed words, for exampl
touc
SARA CE may have trouble reading some printed forms because borders are often
used to surround the text. SARA CE sometimes ignores text that is too close to vertical
or horizontal lines or words surrounded by a box. For example, you will have difficulty
usin
new
dete
How
hed by the signature may not be read correctly.
g SARA CE to read box scores on the sports or stock market pages of a
spaper. Even if SARA CE reads most of the text correctly, it may be hard to
rmine the meaning.
to Set Up SARA CE
1.
Turn SARA CE so that the back of the unit is facing you.
ritten or hand-printed material. If there is a signature on a
but not the signature. If the signature is
e the closing "Sincerely yours," the letters
4
2.
Line up the page guide along the back of the unit so that the two slots on the
bottom of the guide are positioned over the two shoulder screws located to the
left and right of the rear panel connections and toward the bottom of the unit.
Press down firmly until the guide is in place then tighten the thumb screws to the
left and right of the vertical post by turning them clockwise.

3. Press and hold the release button located between the vertical post and the
camera arm, and raise the camera until it locks in place.
4. right of the blue monitor
5. Plug the square end of the AC power cord into the power adapter (the black
7.
Plug the cable into one of the USB ports located to the
port when facing the back of the unit.
rectangular box).
Connect the small, circular end of the power adapter cable to the back of SARA 6.
CE. The correct socket is on the far right side when facing the back of the unit.
Plug the AC power cord into a wall outlet.
If you want to use the headset that comes with SARA CE, plug it into the headse
jack on the lower right of the front panel.
t
5

anning and Reading with SARA CE Sc
Powerin
The
lowe
pow
While SARA CE is warming up, t
When the unit is ready, it says, "
read
key,
start
you will hear a different message spoken. Refer to "Key Announcements" on page
32 for information on customizing this start up message.
War is ning: Do not disconnect the power cord or unplug SARA CE while the unit
g SARA CE On and Off
POWER button is the small, circular green button located on the far left of the
r vertical surface on the front of SARA CE. Press this button once to turn the
er on.
here is an intermittent tone to indicate it is active.
Welcome to SARA. Samantha is the current
ing voice. Press the green Read key to begin reading. Press the yellow help
followed by any other key, to learn what it does." This is SARA CE's default
up message. If you have changed the reading voice or the scanning mode,
powering off.
6
Press the P
pr ou
to ess the POWER button again to power down or any other key to cancel. If y
do not press a button within 30 seconds, SARA CE will automatically cancel the
shut down.
OWER button to turn off your SARA CE unit. SARA CE will prompt you

Note: Any unsaved documents will be discarded when you shut down. To save your
documents, stop SARA CE from shutting down and save your documents. See
S
aving a Document on page 21 for more information.
Scanning and Reading with SARA CE
1. Place your reading material p
camera. Align the top edge of
2. After aligning the page, move your hands out of the way. SARA CE automatically
scans an
To stop reading, press the READ key, which is the green key with a raised play
and pause symbol below the
reading.
If you do not want SARA CE to automatically scan a page when it is placed
under the camera, switch to one of the other scanning modes, such as Scan and
Read, then press the
the upper left of the keypad. For more information, refer to Scanning Mode on
pag
e 27.
d begins reading the recognized text.
SCAN key, which is the red oval key with a raised circle in
rint side up on the scan area directly under the
the page along the page guide.
SCAN key. Press the Read key again to resume
7

Ad ing
just
Voice Volume
To the right of the Power button on the front panel is an orange rocker key with
a
raised loud speaker on it that controls the volume of SARA CE’s speech.
This is called the VOLUME ROCKER. Press on the left side of the bar to lower
the volume and on the right side to raise the volume. SARA CE says “softer” or
“louder” so that you can adjust the volume to your preferred level.
Adjusting Re
SARA
the he
speed.
you hear SARA CE say “slower” each time you press it. Pressing on the right
side of the bar increases the voice rate and you hear SARA CE say “faster.”
ading Speeds
CE has another orange rocker key on the front edge, just to the left of
adset jack on the right. It has a raised rabbit symbol on it to represent
This is the VOICE RATE ROCKER. If you press the left side of the bar
Press the VOICE RATE ROCKER key until you find a comfortable reading
speed.
Getting Help
Press the HELP key followed by one of the other keys for an explanation of
that key’s function.
8

In addition, SARA CE contains the contents of this use
audio book for easy navigation. To open the online use
MENU key, press UP ARROW to move to About SARA, then press the
SELECTOR key to open the submenu. Press the SELECTOR key again to
open Help.
U
sing the Movement Keys
To move around on a page you are reading, use the four blue arrow keys in the cent
of the keypad.
The UP and DOWN ARROWS move one line up or down.
r's guide as a DAISY
r’s guide, press the
er
The LEFT and RIGHT ARROWS move you one word in the direction of the
arrow.
9

Press the blue SELECTOR key, located in the center of the arrow keys, to
read the current word. Press the SELECTOR key a second time to spell th
current word. Press the SELECTOR key a third time to spell the current
word using the phonetic alphabet (where “A” is “Alpha,” “B” is “Bravo,” and
so on).
The factory setting for the blue DOUBLE ARROW keys moves forwa
or backward by paragraphs. You can change the movement unit of
DOUBLE ARROWS by select
Assignments submenu in the Advanced submenu. You can select page
sentence, paragraph, or none. Use the up and down arrow keys to
select an option, and then press the SELECTOR key.
Tip : For more information on using SARA CE’s menus, see Using the Menus on page
ing Double Arrow Movement from the Key
e
rd
the
,
13.
To Skim through a Document while Reading
You can skim read through a document by using the arrows while SARA CE is already
and RIGHT ARROWS move by sentence and the DOUBLE reading. The
ARRO
selected.
10
LEFT
WS move by paragraph. SARA CE continues to read at the next unit you have

Cycling through Documents you are Reading
You can have more than one document open simultaneously. It is possible to cycle
through t SARA
CE. Refe
the Document Toggle function to a key as this option is not assigned by default. Once
assigned
have too
comman
hese documents using one of the four function keys on the front of the
r to Function Keys 1 through 4 on page 31 for more information on assigning
, press the key once to move from one open file to another. If you find you
many documents open, you can close them by using the Close Document
d on the File submenu.
Using the Function Keys
Four small, circular function keys are located in the center of the front panel,
between the VOLUME ROCKER and VOICE RATE ROCKER. FUNCTION Key 1
is the farthest of the four keys on the left. FUNCTION Key 2 is the next key to the
right, and so on. You can assign a variety of different commands to these keys from
the Key Assignments submenu in the Adv
see Function Keys 1 through 4 on page 31.
anced submenu. For more information,
efault, each fuBy d nction key performs the following command:
Function Key 1 – Toggles the camera light on or off. By default, the light is off as
the SARA CE is optimized to work in normal room lighting under most
You should only need to turn on the light if the room is very dark.
conditions.
11
11

Function Key 2 – Erases the current page. When you press this key, SARA CE
asks you to press it again if you wish to del
other key to cancel this command.
Note: When you perform this command while using the default Single Page Automatic
scanning mode, you will receive a message stating that you cannot delete from
the current document as it is receiving scanned data. Press the SELECTOR key
to dismiss this message and return to the document. If you want to delete the
current page, scan a new page, or save the document or change to another
scanning mode, then delete the page.
Function Key 3 – Cycles through the various scanning modes. Refer to Scannin
Mode on page 27 for a description of the different scanning modes available.
Function Key 4 – Allows you to choose whether SARA CE divides columns or
ignores columns when scanning.
Note: Some commands are not available when an audio file is playing.
ete the page. If not, simply press any
g
12

Using the Menus
SARA CE has a menu that allows you to work with files, set voice and
scanning options, choose visual settings, and select languages you want to
use.
Use the MENU key to access the menu. The MENU key is the rectangular
brown key on the upper right of the keyboard. Press the MENU key once to
open the menu. Pressing the MENU
item and returns you to the documen
Once the menu is open:
Use
menu item as you move to it.
Use the SELECTOR key to open submenus and to accept menu choices, similar t
pressing the ENTER key on a computer.
Press the LEFT ARROW to close a submenu if it is open or close a list and return
to the menu.
When you are in a list, the DOUBLE ARROWS move up or down a list by 10 items.
Press the MENU key to close the menus and return to the document.
Tip: Press the HELP key followed by any other key to have its function explained.
the UP and DOWN ARROWS to select menu items. SARA CE reads each
key while in any of the menus closes the
t.
o
13

zard Using the Settings Wi
The Settings Wizard offers a convenient way to configure SARA CE without having to
go th ugh several menus to locate the options you want. To launch the wizard, press
the M
Settin
The w
including the font type and point size; foreground and background color for displayed
text; foreground and background color for the spotlight; the reading voice name and
rate; e used for scanning; how SARA
CE announces keys at startup; and the
Use the UP and DOWN ARROW
ARROW keys to go to the next or previous page. If you are on the last page, pre
RIGHT ARROW will close the wizard and apply your new settings. Press the MENU
from any page in the wizard to cancel and return to the currently open document without
changing settings.
ro
ENU key to open the menu, use the UP or DOWN ARROW keys to navigate to
gs Wizard, then press the SELECTOR key.
izard consists of a series of pages which allow you to change various settings
the menu voice name and rate; the default mod
format used when saving files to a USB drive.
keys to change a setting and the RIGHT and LEFT
ssing
key
14

Working with Files
You can use the File submenu to open documents, close documents, play audio files
(such as DAISY books), read public domain books, save documents, and delete
documents. To access the File submenu, press the MENU key, and then press the
SELECTOR key to choose File. To choose a command, use the UP and DOWN
ARROW keys to select it, and then press the SELECTOR key.
O
pening a New Blank Document
To open a new document, select New Document from the Fi
scan a new page. Using the default Single Page Automatic scanning mode, each new
scanned page replaces the previous page. However, if you change to one of the other
scanning modes, such as Multipage Automatic, SARA CE adds each new page to the
document. You can continue scanning pages to add to this document and then save
them as a single file (see Saving a Document on page 21).
le submenu. You can then
15

Tip: Do not use one document to store all of your scanned pages. Not only will it
become increasingly difficult to locate important information in a timely manner,
but SARA CE will take longer to save or open the file.
The ability to save and manage multiple files is a key function of SARA CE to help
improve organization. Once you have scanned a document, such as a newspaper
article, or a piece of mail, save it with a unique file name related to the information
it contains. When you are ready to scan something different, remember to open a
new document and repeat the process. You will find it much easier to locate
information stored in smaller, well-named files.
pening a Saved Document O
To open a document that you have saved, select Open Document from the File
submenu. SARA CE displays a list of all files in memory. Use the UP and DOWN
ARROWS to move by item and the DOUBLE ARROWS to move through the list by ten
items. SARA CE speaks the names of the files available as you move through them.
After you hear the name of the desired document, press the SELECTOR key to open it.
Note: If you have read the document previously, you are moved to the text location
where you left off.
16

Opening a Document from a USB Drive
If you have reading material on a USB drive, such as a thumb drive or external hard
drive, you can open the file and read it with SARA CE. Connect a USB drive to one of
the USB ports on the back of SARA CE, open the File submenu, and select Open from
Media. The following file formats are supported: OBX, ARK, RTF, TXT, DOC, PDF,
HTML, XML, and DAISY audio files.
If more than one drive is connected, you are first placed in a list of all available drives.
Use the UP and DOWN ARROW keys to select the drive you want to open files from,
and press the SELECTOR key to list the files on that drive.
Note: Files you want to read with SARA CE on a USB drive cannot be stored in folders.
You can also open TIFF, JPEG, and PCX image files. When you open image files,
SARA CE scans and recognizes the text and then inserts it into a new document. You
must save this document if you want to keep it (see Saving a Document on page 21).
17

Listening to an Audio File
To begin playing an audio file, including DAISY books, connect a USB drive containing
audio content to one of the USB ports on the back of the SARA CE. Open the File
submenu and select Play Audio. Just like when opening files from a USB drive, if mor
than one device is available, use the UP and DOWN ARROW keys to select a drive
then press the SELECTOR key to open it. SARA CE places you in a list of the available
audio tracks or DAISY books.
SARA CE only lists audio tracks that are supported. The following file formats are
supported: MP3, WAV, audio MPG, unprotected WMA,
Note: Titles can be the actual book title or a unique, invented title.
If you listened to this book before, you are immediately placed at the spot where you
last stopped listening when you open the book. Press the green READ/PLAY key with
the raised play and pause symbols on it to begin listening to the audio file. Press this
key again to pause.
Tip: Press the HELP button followed by one of the other buttons for an explanation of
that button’s function while accessing an audio file.
and CDA
e
18

Navigating an Audio File
While playing an audio file, you can use the LEFT DOUBLE ARROWS
RIGHT DOUBLE ARROW
or fast forward, SARA CE immediately begin
To increase or decrease the playback speed of the audio file, use the VOICE RATE
ROCKER.
When the file is stopped, you can use the UP and DOWN ARROWS to select the track
you want to listen to. Press the READ/PLAY key to play that track.
When you are finished listening to an audio file, select Close Document from the File
submenu. You can only have one audio file open at a time, but you can freely switch
other documents that are open.
Note: While most audio files simply list the track numbers, DAISY books display topics,
or chapters, in a tree view. You can navigate by using the UP and DOWN
ARROWS. You can also use the RIGHT and LEFT ARROWS to expand and
S to fast forward the audio by five seconds. After you rewind
s playing the audio from the new position.
to rewind or the
to
close the topics.
19

R
eading Public Domain Books
SARA CE includes many classic literary works for your reading enjoyment. To read one
of these books, open the File submenu and select Public Domain Books. If you have
assigned the Public Domain Book function to a Function key, press that function key.
Depending on the enabled languages and available books, another submenu listing the
languages you can choose from may be available. If more than one dialect of a
language is
collection will be the same. For example, the bo
English is the same because both are English dialects.
Note: If there are collections available for other languages that you have enabled,
these also appear on the submenu.
Use the UP and DOWN ARROWS, or the DOUBLE ARROW keys, to select the book
you want to read and press the SELECTOR key. When SARA CE opens the book, it
reads it using the dialect you selected previously from the submenu. You can navigate
these books the same way as documents that you scan.
losing a Documen
C t
To close a document, open the File submenu and select Close Document. If the
document has not been saved prior to closing, SARA CE will ask if you would like to
enabled, and a collection of books for that language is available, the book
ok collection for British English and U.S.
save the document.
20

Upon closing a document, yo
If no other documents are op
S
aving a Document
To save the current document, select Save Document from the File submenu. If the file
has not been saved previously, you are prompted to press the SCAN/RECORD key to
record a file name. To record a name for the do
the microphone located on the right front of the SARA CE next to the speaker. This
process is similar to recording a greeting on an answering machine.
Begin speaking when you hear the tone. Your file name can be 5 seconds long. The
recording ends automatically and is played back.
SARA CE then prompts you to press the SELECTOR key to accept the file name or to
press the SCAN/RECORD key again to redo the recording.
u are returned to another open document if any are open.
en, a new untitled document is created.
cument, speak in the general direction of
You can re-record the file name until you are satisfied. The file is not saved until you
press the SELECTOR key to accept your recorded file name.
By default, documents opened from a USB device are saved to the USB device unless
you save the document using Save As from the File submenu.
21

Saving a Document with a Different Name
You can save a document under a different name. To save the currently open document
with a different name, select Save As from the File submenu. Press the
SCAN/
press the SELECTOR key. A version of the document with the original name is retained
in memory.
RECORD key, and speak a new name for the document. When you are finished,
Saving a Document on a USB Drive
You can save the currently o ocument on an external USB drive, such as a thumb
drive or external hard drive. Conne
SARA CE. Then, select Save to Media from the File submenu.
of
I m ne drive is available, you are first placed in a list of all available drives.
U
and press the SELECTOR key. Press the SCAN/RECORD
th copy
th
ore than o
f
se the UP and DOWN ARROW keys to select the drive you want to save the file to,
e document. When you are finished, press the SELECTOR key. SARA
e file to the USB drive.
pen d
ct a USB drive to one of the USB ports on the back
key, and speak a name for
CE will
By default, SARA CE saves the document as a Rich Text (RTF) document. You can
so choose to save the file as an OpenBook (.OBX) or plain text (.TXT) document
al
ing the Save to USB Format submenu (see page 34) in the Advanced submenu. T
us he
e name is saved as a sound (.WAV) file.
fil
22

De
leting a Document
To delete a docume
submenu. Use the
Press the SELECTOR key to delete the file. SARA CE will ask you if you want to
the file. You can use the LEFT ARROW to go back to the menu without deleting t
or press the SELECTOR key to delete the file.
nt saved in memory, select Delete a Document from the File
UP and DOWN ARROWS to move to the file you want to delete.
delete
he file,
23

To access the submenus described in this section, press the MENU key. Then, use the
Using the Menus for Other Settings
UP and DOWN ARROWS
G
o To Menu
The Go To submenu allows you to quickly move from place to place in the current
document or audio track list.
The available commands include:
Top of Document – Moves you to the beginning of the current document or
track list.
Bottom of Document – Moves you to the end of the current document or audio
track list.
Next Page – Moves you to the next page of the current document.
Previous Page – Moves you to the previous page of the current document.
to make a selection and press the SELECTOR key.
audio
24
Next Paragraph – Moves you to the beginning of the next paragraph.
Previous Paragraph – Moves you to the beginning of the previous paragraph.
Next Sentence – Moves you to the beginning of the next sentence.

Previous Sentence
– Moves you to the beginning of the previous sentence.
Voice Settings
The Vo
settings. You can cha
determines the voices
choosing the Reading Voice command.
Reading Voice and Menu Voice
Open the Voice Settings submenu and select Reading Voice to change the voice SA
CE uses while reading, or select Menu Voice to change the voice SARA C
navigating menus. The following voice options are available:
oice Rate – The voice rate can be set between 100 and 500 words per minute
ice Settings submenu allows you to change your reading and menu voice
nge the speech rate and the voice. The speaking language
that are available. You can also select the reading language by
E uses when
V .
Y is setting using either the VOICE RATE ROCKER bar on the
ou can change th
RA
front right of the
When you go to the menu, SARA CE announces the current rate for either the
reading or menu voice.
Voice Selection – When you select the Voice Selection command, a list of the
voices available for the current language displays. Use the UP and DOWN
ARROW to move through the list of voices. Press the SELECTOR key to choose
the voice you want to use.
unit or the menu. The rate adjusts in units of 20 words per minute.
25

V
Enable
Select E
language
“check
as many of these languages as you like. Once a language is enabled, you can choose it
for the
Tip: You can assign one of the four function keys to cycle through your enabled
oice Language – Changing the voice language automatically changes the
scanning language and the list of available voices. While in the document, you can
retu
rn to the menu to change languages.
d Languages
nabled Languages from the Voice Settings submenu to open a list of the
s installed on SARA CE. If a language is activated, you hear the word
.” Use the SELECTOR key to check or uncheck the language. You can enable ed
reading voice.
languages.
26

Scanning Settin
The Scanning Settings submenu allows you to change the scanning order and scanning
mode.
gs
Scanning Order
Select Scann
CE should divide columns or ignore them. The default setting is Divide Columns. For
example, if you are scanning a newspaper, you would want to have Divide Columns
selec
page. If you
Tip: You can also press FUNCTION Key 4 to toggle between Divide Columns and
ted so SARA CE recognizes the columns instead of reading straight across the
Ignore Columns.
ing Order from the Scanning Settings submenu to choose whether SARA
want to read across columns of text, select Ignore Columns.
Scanning Mode
Select Scanning Mode from the Scanning Settings submenu to choose one of the
following modes:
27

Single Pag
page document and automatically scans a page as soon as it is positioned
under the camera without the need to press the SCAN key. After each s
the current page in the document is replaced with the newly scanned page. If
you choose to save this document while this mode is active, a new blank
document is created the next time a page
cument and a page is scanned, SARA CE switches to a new single page
do
cument.
do
Multipage Automatic – SARA CE automatically scans a page as soon as it i
positioned under the camera and adds it to the current document. This ena
you to quickly scan multiple pages int
SCAN key each
scanning.
Scan and Read – SARA CE stops reading when you press the SCAN key and
e Automatic – Selected by default, SARA CE opens a new single
can,
is scanned. If you are in another
s
bles
o a document without having to press the
time. Press the SCAN key to start and stop multipage
28
begins scanning. When the scan is complete, SARA CE begins reading the
new page.
Scan in Backg
location in a document while SARA CE scans a page.
Scan and Replace – SARA CE replaces the current page with the newly
scanned page. You can use this mode to rescan or replace a page in a multipage document.
round – Allows you to continue reading from the current

V
isual Settings
Use the Visual Settings submenu when SARA CE is attached to a computer monitor to
change the font, size, color, and spacing of displayed text. For instructions on how to
connect a monitor to SARA CE, see Using a Monitor with SARA CE on page 36.
Text Font
Select Text Font from the Visual Settings submenu to change the font of the displayed
text.
Text Size
Select Text Size from the Visual Settings submenu to increase or decrease the size of
the displayed text. The available sizes are expressed in points.
Text Color
Select Text Color from the Visual Settings submenu to choose from seve
foreground/background color combinations for displayed text.
ral different
29

S
potlight Color
S
elect Spotlight Color from the Visual Settings submenu to choose from several
i
rent foreground/d ffe background color combinations for the spotlight, which highlights
ea
ch word as SARA CE reads. Having the spotlight color set differently from the text
color makes it easier to locate the highlighted text.
S
pacing
Select Spacing from the Visual Settings submenu to change the spacing of displayed
e
Six different text spacing ot xt. ptions are available. E
a
mounts of space between words and letters.
ach level provides increasing
Ad
vanced Settings
From the Advanced submen
start up message, set the document format used when saving to a USB drive, and reset
SARA CE to factory defaults.
u, you can change how certain keys behave, change the
Key Assignments
The
keys and the function keys.
30
Key Assignments submenu allows you to change the behavior of the double arrow

D
ouble Arrow Movement
Sele
in th
can be set to move by sentence, paragraph, page, or none. The default setting is
pa
Fun
You can assign different commands to the four function keys located on the front panel
of
submenu, and select one of the four available function keys. A list of possible
co
and to assign to the key,
and then press the key. After you have assigned the command, press
LEFT ARROW key to close the list.
Note:
ct Double Arrow Movement from the Key Assignments submenu to change how far
e document you will move each time you press the double arrow keys. The keys
ragraph.
ction Keys 1 through 4
e SARA CE. To do this, open the Advanced submenu, then the Key Assignments
th
mmands that you can assign to the selected function key is displayed. Use the UP
DOWN ARRO
Some commands are not available when playing an audio book.
W keys to move to the command that you want
SELECTOR the
The available commands include:
Language Toggle – Cycles through your enabled languages.
Divide Columns Toggle – Switches between Divide Columns and Ignore
Columns.
Delete Page – Erases the current page.
31

Document Toggle – C
Go to Top of Document
audio track list.
Go to Bottom of Document – Moves you to the end of the current document or
audio track list.
Scanning Mode Toggle – Switches between Single Page Automatic mode,
Multipage Automatic mode, Scan and Read mode, Scan in Background mode, and
Scan and Replace mode.
Light Toggle – Turns the camera light on or off.
Public Domain Books
language and dialect you have currently selected.
ycles through currently open documents.
– Moves you to the beginning of the current document or
– Opens a list of Public Domain books available for the
Key Announcements
The Key Announcements submenu allows you to change the message that you hear
after SARA CE is powered on. Use the UP and DOWN ARROW keys to move to the
type of message you want to hear and press the
are:
32
SELECTOR key. The available options

Speak Visual Cues - selecte
following message is spoken, "Welcome to SARA. Samantha is the current reading
voice. Press the red Scan key to scan. Press the green Read key to begin r
Press the yellow help key, followed by any other key, to learn what it does."
Speak Orientation cues - When selected, SARA CE speaks the following
message after starting, "Welcome to SARA. Samantha is the current reading voice
Press the Scan key, located at the top left of the keypad, to scan. Press the Read
key, located directly below the Scan key, to begin reading. Press the Help key,
located at the bottom right
None - When selecte
"Welcome to SARA. Samantha is the current reading voice."
Note: If you have selected a different reading voice, you will hear that voice name
spoken instead of Samantha, which is the default reading voice. You can change
d, SARA CE speaks the following message after starting,
d by default. After SARA CE has finished starting, the
eading.
of the keypad, followed by any key to learn what it does."
.
the reading voice by opening the Voice Settings submenu, Reading Voice
submenu, and choosing Voice Selection.
33

Save to USB Format
Use this submenu to specify the format your documents are saved in when you save to
a USB drive using the Save to Media command from the File
documents are saved to USB in Rich Text (RTF) format. You can also choose to save
your
Use
pres
be s
documents in OpenBook (OBX) format, or plain text (TXT) format.
the UP and DOWN ARROW keys to move to the document format you want, and
s the SELECTOR key. Once selected, any documents you save to a USB drive will
aved in the document format you specified.
submenu. By default,
Contracted Braille
If you are using SARA CE with a Freedom Scientific Focus braille display or PAC
Mate™ Portable Braille Display, enable this option to have text sent to your display in
contracted Braille. By default, this setting is off, which means text is displayed in
computer Braille. In computer Braille, each character is represented by a single Braille
cell. In contracted Braille, certain combinations of lett
form, and more information is displayed at one time.
ers are c
ombined into a shorter
Note: Contracted Braille is only available in English document s.
34

R t
es ore Factory Settings
Select this option to reset all of SARA CE's settings to their factory defaults. Any
settings you have modified such as voice settings, function key assignments, file saving
options, as well as scanning and visual settings are reset to the way they were when
you received your SARA CE. When you select this option, you will be asked if you are
u y key to reset or the
s re ou want to reset to factory defaults. Press the SELECTOR
LEFT ARROW key to cancel. You will receive a mes
been reset to factory defaults.
U
pdating SARA CE
This command lets you add updated information from Freedom Scientific for your SA
CE using a USB drive. If you received a thumb drive containing an update, insert the
drive into one of the USB ports on the back of the unit. Press the MENU key, and t
use the arrow keys to move to Update SARA CE, and press the SELECTOR key.
CE will ask you if any files need to be saved and will then perform the update. W
update is complete, the unit will turn itself off and restart on its own. When you h
“Welcome to SARA CE,” the update is complete.
sage confirming that SARA CE has
hen the
ear,
RA
hen
SARA
35

Attachments for SARA CE
U
sing a Headset or Speakers with SARA CE
There is a headset jack on the front panel on the far right. Just plug in the headset
that comes with SARA CE to enjoy listening to
others in the area. While the headset is plugged in, the speakers are turned off.
You can also connect external speakers using the audio out jack on the right of the
back panel of the SARA CE next to the power plug.
SARA CE read without disturbing
Using a Monitor with SARA CE
You can connect a monitor to SARA CE so that you can see the text you are reading.
You can change the font, size, color, and spacing of the displayed text in the Visual
Settings submenu.
To connect a monitor to SARA CE, do the following:
1. Turn off the power for both the monitor and SARA CE.
2. Turn SARA CE so that the back of the unit is facing you.
36

3. In the bottom row of connections, the second connector (square and protruding a
bit) is a blue port for a typical computer monitor.
cable to the blue monitor port.
Tip: If the cable connector does not seem to fit well, turn the cable connector over.
4. Tighten the screws on the connector. The monitor is ready to use.
sing a Braille Display with SARA CE
U
You can connect a Freedom Scientific Focus braille display or PAC Mate Portable
Braille Display to SARA CE so you can receive tactile access to the text you are
reading. Controls on these Braille displays allow you to navigate through documents
and menus.
To connect a Braille display to SARA CE, plug the USB cable that came with your
display into one of the USB ports on the back of the unit next to the blue monitor
connector. It is not necessary to turn off the power before doing this. SARA CE
Connect the monitor display
automatically detects the display and you can immediately begin using Braille.
By default, text is displaye
Advanced submenu and select Contracted Braille.
d in computer Braille. To read in contracted Braille, open the
37

Optional Keyboard Covers
A basic and advanced set of keyboard covers is sold separately. The covers allo
to conceal certain, non-essential SARA CE buttons to help users focus on basic
functionality. To order these keyboard covers, contact Freedom Scientific Sales at (800)
444-4443 or e-mail Info@FreedomScientific.com.
w you
38

ation Warranty Inform
Freedom Scientific, warrants that the magnetic media the software is recorded on, the
product's Documentation, and any hardware provided by Freedom Scientific, are free
from defects in mat
warrants that the product performs substantially in accordance with the specifications
set forth in the Documentation, and processes a specific sample data (the "Recognitio
Test Image") with the specified standard of accuracy. Some documents may be
processed with a high degree of accuracy. However, poor quality documents, certain
typefaces, complex layout, or lower resolutions may make it difficult or impossible for
the product to process pages with satisfactory accuracy. As a result, Freedom Scientific
performance warranty is based on the system's handling of the Recognition Test I
Duration of the Warranty
The warranty described above is made for a period of two (2) years from the date the
products are delivered to you as the first user.
Repair or Replacement
Freedom Scientific will repair or replace any hardware, software, documentation, or
erials and workmanship under normal use. Freedom Scientific
n
mage.
magnetic media that proves defective in materials, workmanship, or must be corrected
to achieve warranted performance, without additional charge, on an exchange basis, as
described below.
39

Final Remedy
If Freedom Scientific is unable to replace defective hardware, documentation, or
defective media, or if Freedom Scientific is unable to make the product perform to its
specifications within a reasonable time, Freedom Scientific will either replace the entire
package with a similar product or refund the purchase price of the package.
Exclusions
Freedom Scientific does not warrant that the product will meet your requirements or tha
its operation will be uninterrupted or error free. The warranty does not cover a
component or part of the
has been altered or chan
responsible for problems caused by changes in the operating characteristics of the
computer hardware or operating system, or any upgrades or modifications to these
items that are made after the delivery of Freedom Scientifics’ product to you.
Warranty Limitations and Freedom Scientific Liability
Any implied warranties, including any warranties of merchantability or fitness for a
particular purpose, are limited to the term of this express warranty.
product that has been subjected to damage or abuse, or that
ged in any way by you or others. Freedom Scientific is not
t
40

FREEDOM
consequent
warranties even if Freedom Scientific or its agent has been advised of the possibility
such damages.
Your Obligations
You may call the Freedom Scientific Technical Supp
authorization to return any defective item to Freedom Scientific during the warranty
period. Technical Support hours are 8:30 A.M. to 7:00 P.M. Eastern Time, Freedom
Scientific holidays excepted and the telephone number is (727) 803-8600. Collect calls
will not be accepted. The Technical Support representative will help you diagnose and
correct any apparent problem. You m
If a Freedom Scientific Technical Support representative is unable to correct your
problem by telephone, you will be given a return authorization number and an address
SCIENTIFIC shall not, in any case, be liable for special, incidental,
ial, indirect or other similar damages arising from any breach of these
of
ort Department for assistance or
ay be asked to run certain diagnostic tests.
for returning the defective item for warranty service or replacement. You must include
proof of your purchase date such as a copy of your receipt or invoice. Also, you are
responsible for any shipping and insurance costs associated with returning the defective
item.
41

Other Warranty Conditions
The
express, or implied, and the remedies set forth above are your sole and exclusive
remedies. Only an authorized officer of Freedom Scientific may make modifications to
this warranty, or make additional warranties binding on Freedom Scientific. Accordingly,
additional statements such as advertising or presentations, whether oral or written, do
not constitute warranties by Freedom Scientific and should not be relied upon as such.
This Warranty gives you specific legal rights, and you may also have other rights that
vary from state to state.
warranties set forth above are in lieu of all other warranties, whether oral, written,
Technical Support
Our Technical Support staff provides assistance for the initial setup of SARA CE and
other Freedom Scientific products. Ongoing Technical Support is available for those
users who purchase and register SARA CE. Before calling Technical Support, please
visit our Web site at http://www.FreedomScientific.com or e-mail us at
Support@FreedomScientific.com. Our Technical Support phone number is (727) 803-
8600. When calling Technical Support, please have your SARA CE serial number
ready.
42

42BWeb Site
Freedom Scientific has an Internet Web site that has additional sources of technical
support and information. You can use your computer to download software programs,
technical bulletins, and product updates from these sources. You can find the Freedom
Scientific Web site at www.FreedomScientific.com.
SARA CE has a 30-day money back guarantee and a standard two year warranty
against manufacturers defect from date of receipt.
Please call Technical Support at (727) 803-8600 and talk to a specialist who will assist
you in troubleshooting any problem.
43

8BKeyboard Layout Diagram for Creating Tactile Images
44
 Loading...