

Page 1
Assembly Instructions
Alfresco Outdoor Kitchen
Before you begin to assemble your new piece of furniture, please check to ensure that all parts have been supplied.
Follow instructions closely as deviation from them may void your warranty and present a possible safety risk.
It is recommended that assembly is done on a soft surface like carpet to avoid any damage.
If you experience any problems with your new purchase please phone our Customer Service Hotline 1800 807 416 (Customers
outside Australia should contact their closest Freedom store.
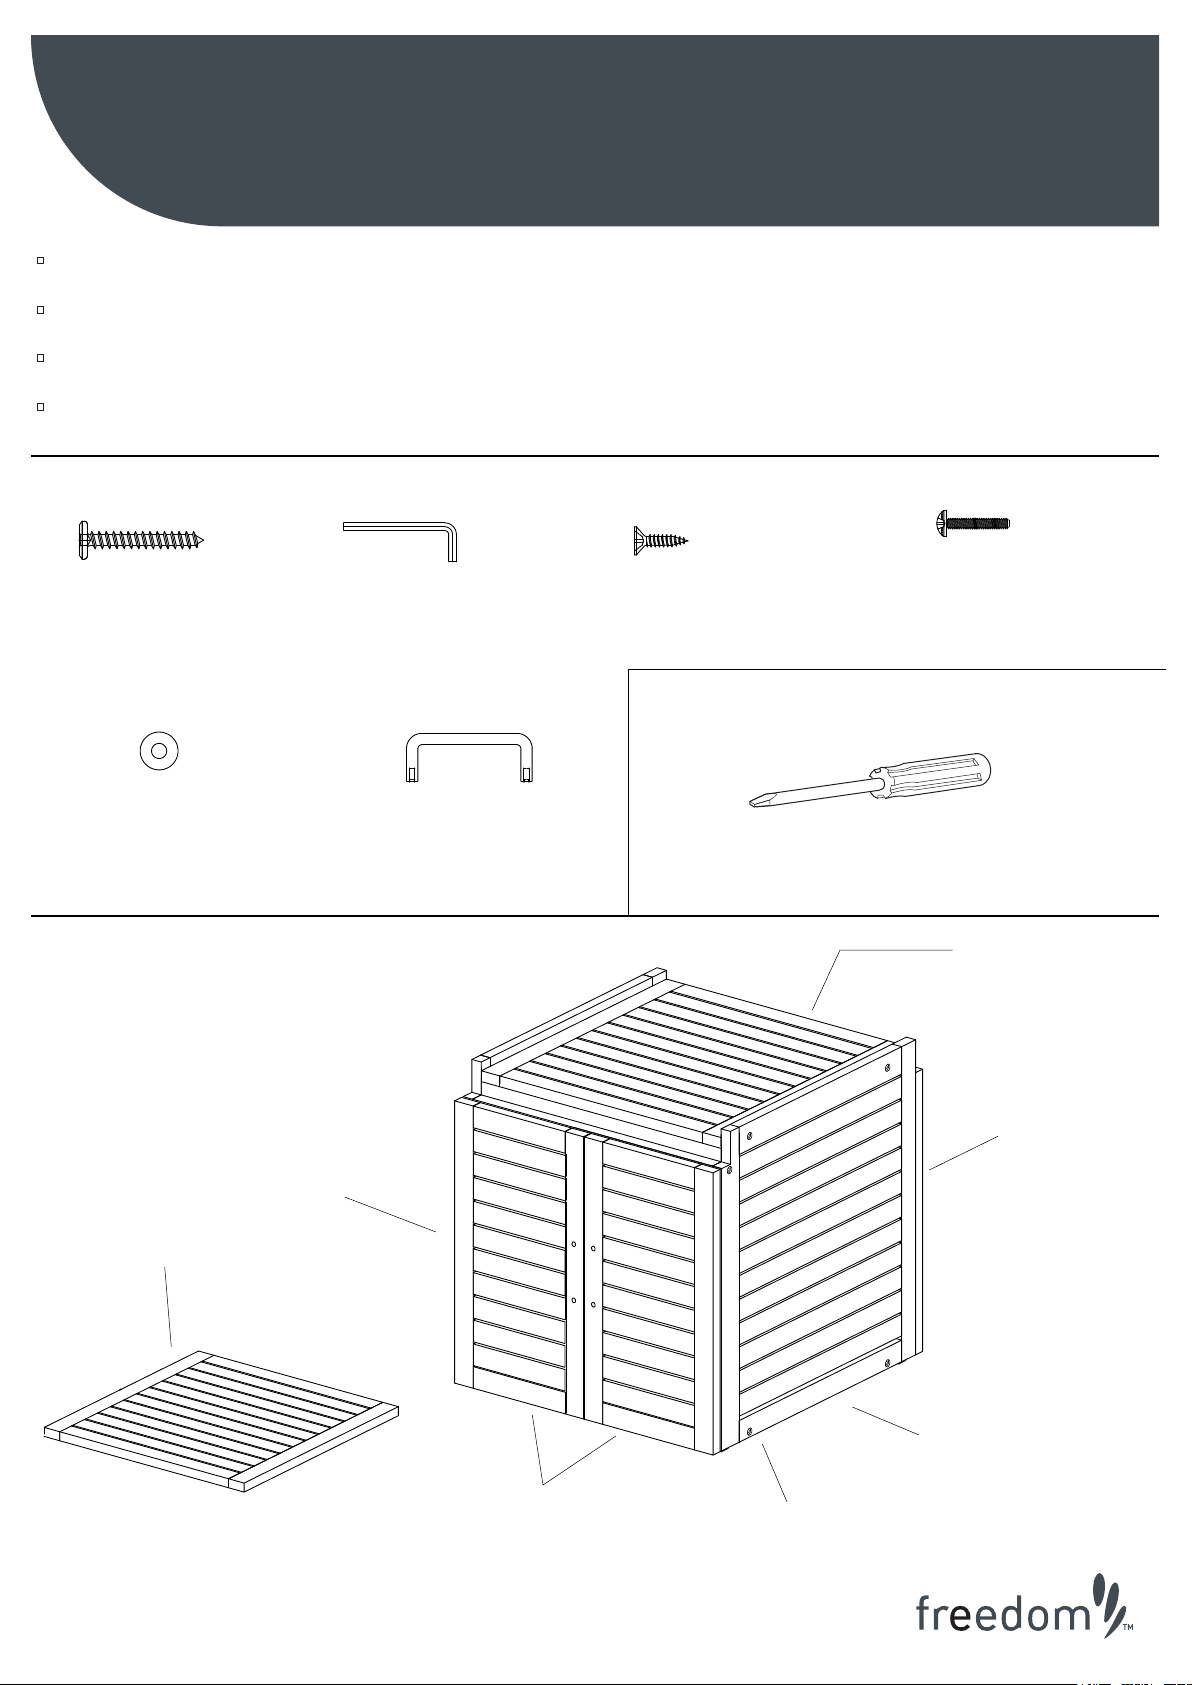
Hardware - Cabinet
14 x Part A
Screw M6 x 40mm
8 x Part E
Washer 10mm Dia
Parts - Cabinet
1 x Part L
LH Side Panel
1 x Part B
Allen Key
2 x Part F
Handle
12 x Part C
Screw M3.5mm x 15mm
Tool Required
(Not Supplied)
4 x Part D
Bolt M4 x 25mm
Screwdriver
1 x Part G
Top Panel
1 x Part H
Back Panel
Page 1
1 x Part M
Shelf
2 x Part K
Door
1 x Part I
RH Side Panel
1 x Part L
Base Panel
Page 2
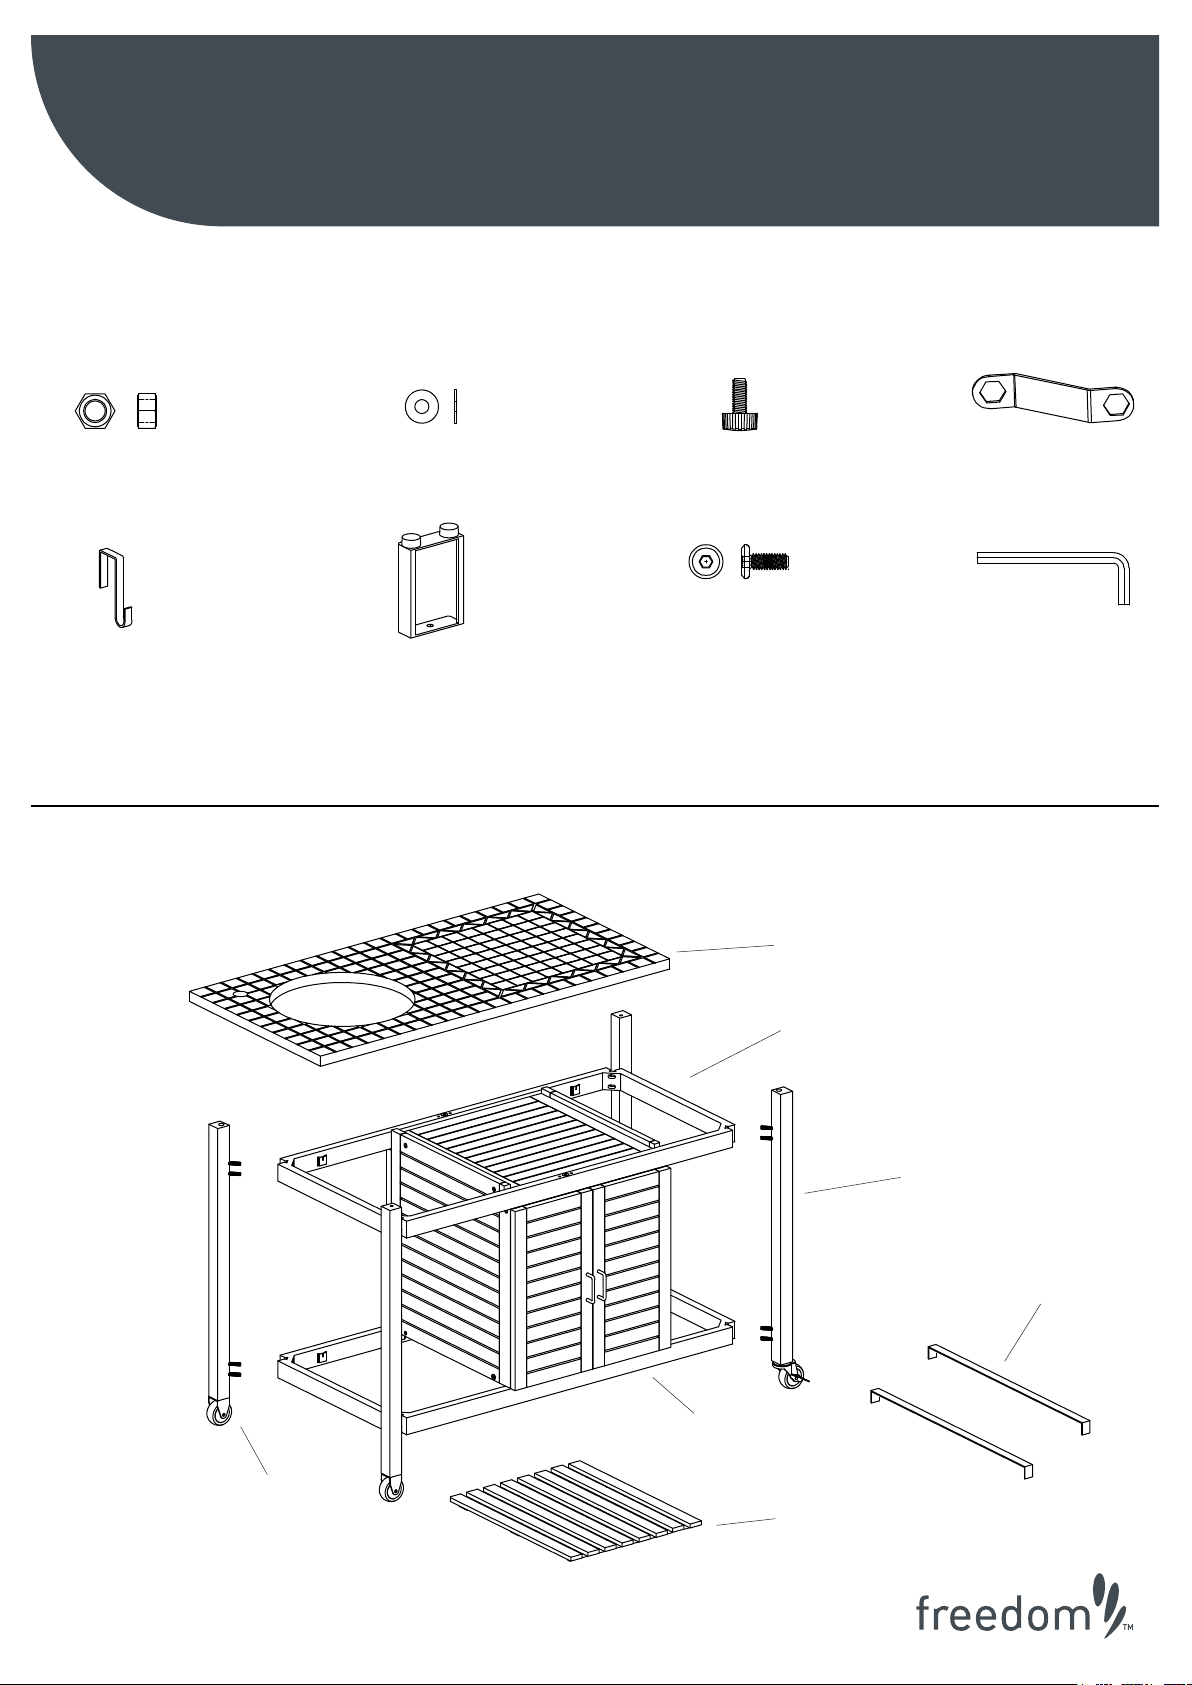
Hardware - Bench
Assembly Instructions
Alfresco Outdoor Kitchen
16 x Part A
Hex Nut M8 x 6.5mm
2 x Part E
Hook
Parts - Bench
16 x Part B
Washer 19mm Dia
2 x Part F
Support / Height Adjuster
4 x Part C
Height Adjuster
2 x Part G
Bolt M6 x 15mm
1 x Part D
Spanner
Part H
Allen Key
1 x Part I
Tiled Top
2 x Part J
Metal Frame
Page 2
2 x Part O
Leg with Fixed
Castor
2 x Part K
Leg w/ Locking
Castor
2 x Part L
Metal Brace
1 x Part M
Assembled Cabinet
1 x Part N
Shelf
Page 3
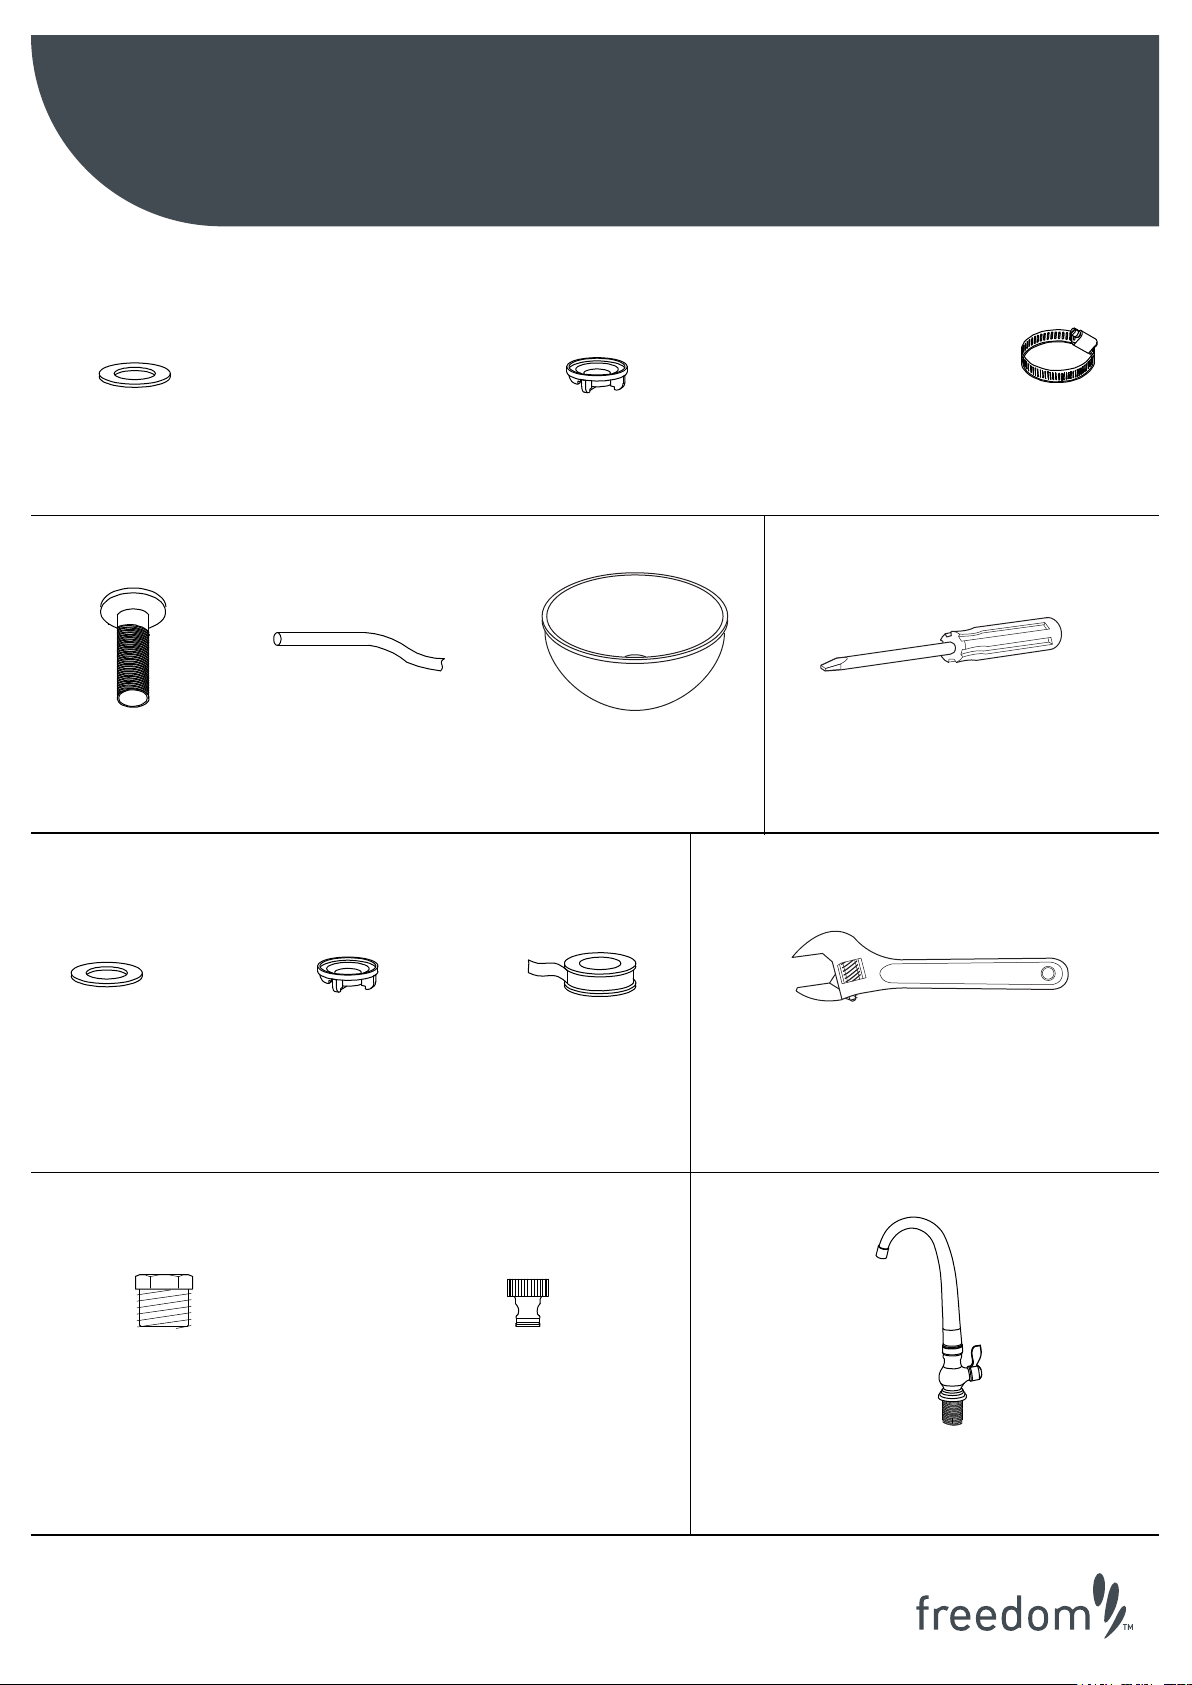
Hardware - Sink
Assembly Instructions
Alfresco Outdoor Kitchen
1 x Part A
Rubber Washer
Parts - Sink
1 x Part D
Stainless Steel Pipe
Hardware - Tap
(Supplied)
1 x Part E
Plastic Drain Hose
1 x Part B
Wing Nut
1 x Part F
Sink
1 x Part C
Hose Clamp
Tool Required
(Not Supplied)
Screwdriver
Tool Required
( Not Supplied)
1 x Part A
Rubber Washer
Hardware - Tap
(Not Supplied)
1 x Part D
Brass Bush Hexagon Reducer
25 x 15mm
(Ryemetal Model No1913 -1)
This Bush can be purchased
from Bunnings Warehouse
Page 3
1 x Part B
Wing Nut
1 x Part C
Plumbing Tape
1 x Part E
Garden Hose Adaptor 25mm
This Adaptor can be
purchased from a hardware store
Large Shifting Spanner
or Similar Tool
Parts - Tap
1 x Part F
Tap
Page 4

Page 5

Bench Assembly
Step 1.
Assembly Instructions
Alfresco Outdoor Kitchen
More than one person is
recommended to complete
!
this Bench assembly.
Part B & A
Part D
Part K
Part J
Part M
Part O
Step 2.
Part C
Part H
Part F
Part L
Part G
Part N
Page 5
Page 6

Step 3.
Assembly Instructions
Alfresco Outdoor Kitchen
Part I
Turn Part C clockwise or
anti - clockwise to ensure
Part C
Part I is level.
Sink Assembly
Step 1.
Part D
Part D
Part F
Part A
Page 6
Part B
Page 7

Step 2.
Place the end of Part E
(Drain Hose) in hot water
!
for 20 seconds to allow it to
fit over PartD (Pipe).
Assembly Instructions
Alfresco Outdoor Kitchen
Part D
Part E
Step 3.
Part C
Page 7
Page 8

Step 4.
Assembly Instructions
Alfresco Outdoor Kitchen
Tap Assembly
Step 1.
Part F
Part A
Page 8
Part B
Page 9

Step 2.
Assembly Instructions
Alfresco Outdoor Kitchen
Wrap Part C (Plumbing Tape)
around Part F (Tap) to stop
water leaks
Part D
Step 3. Step 4.
Part E
Part C
Standard
Garden
Hose
Page 9
Page 10

Care Information
Alfresco Outdoor Kitchen
General Care
Periodically check and retighten all fasteners. Wipe down all surfaces using a clean cloth weekly.
Table Top Care
The mosaic table top is hand made using glazed, clay tiles. The top is finished with a surface
treatment to resist fading, dirt and water, making it weather proof.
Wash down the table top using warm, soapy water.
Never store table top on its side as this will damage the tiles.
Care Information
Alfresco Outdoor Kitchen
Each table top comes with a repair kit to allow you to change or repair a damaged tile.
Contents of Repair Kit
1. Fine grit sandpaper
2. Bag of crushed tile (pink colour
3. Bag of grit mix (grey colour)
4. Replacement tiles
NOTE: Superglue is required to complete repair work.
Changing a Tile
1. Remove the damaged tile.
2. Clean the surface.
3. Following the instructions on the tube, apply super glue to the back of the tile. Press the tile firmly
into position for 5 seconds.
4. Mix the small bag of grit mix (grey) with 1:1 water.
5. Fill up the gap around the tile using the mixture of grit and water.
6. Scrape off any excess grit so that it is level with the tiles.
7. Wipe tile with a damp sponge or cloth, being careful not to disturb the grit.
8. Allow to dry for 12 hours. If the grit appears to be rough, it can be lightly sanded using the
sandpaper supplied.
Repairing a Crack or a Hole in the Tile
1. Clean the area that needs to be repaired.
2. After ensuring that the area is dry, apply super glue to the hole or crack (following the directions on
the tube).
3. Sprinkle the content of the crushed tile bag (pink colour) to fill the hole or crack.
4. Add a little super glue to the surface.
5. Sprinkle a fine layer of crushed tile grit on top.
6. Wait 15 minutes then sand the surface using the sandpaper .
Page 10
 Loading...