

Page 1
MANUAL
STORAGE GATEWAY
NETWORK HARD DRIVE / 3.5" / STORAGE SERVER
BACKUP SERVER / EMAIL SERVER / ROUTER / AND MORE
STORAGE GATEWAY WLAN
NETWORK HARD DRIVE / 3.5" / STORAGE SERVER
BACKUP SERVER / EMAIL SERVER / ROUTER / AND MORE
Rev. 618
Page 2
Freecom Storage Gateway (FSG)
Warning !
All rights reserved. The products named in this manual are only used for identification
purposes and may be trademarks or registered trademarks of the respective companies.
This device was designed for home or office use.
Warning! This device is equipment complying with EN55022 class B.
Freecom Technologies is not liable for any damages that may occur from the use of a
Freecom system. All rights reserved. We reserve the right to upgrade our products in
keeping with technological advances.
GB
Congratulations
Congratulations on your purchase of the Freecom™ Storage Gateway (FSG). The FSG
provides central network storage or Network Attached Storage (NAS) and a secure
connection for multiple personal computers (PCs) to the Internet through an external modem.
If you are unfamiliar with networking and routing basics, refer to Appendix B, "Networks
and Routing Basics", to become more familiar with the terminology and procedures
used in this manual.
Freecom Technologies • Germany
www.freecom.com
To prevent data loss, make a backup copy of your data each time before
reconfiguring the hard drive.
© 2006 Freecom Technologies
2
Page 3

Table of Contents
User manual
General Information .............................................................................................................................. page 4
Safety precautions .................................................................................................................................. page 7
Chapter 1:
Connecting / Installing FSG ................................................................................................................ page 13
Chapter 2:
Get to Know Your FSG .......................................................................................................................... page 15
Chapter 3:
FSG Functions ........................................................................................................................................... page 33
Chapter 4:
The Freecom Storage Gateway Wizard .......................................................................................... page75
Chapter 5:
FSG in everyday use ............................................................................................................................... page 81
GB
Apendix:
Appendix A ................................................................................................................................................ page 112
Appendix B ................................................................................................................................................ page 113
Appendix C ................................................................................................................................................ page 121
3
Page 4

Freecom Storage Gateway (FSG)
GB
General Information
Package contents
Please check the contents of the box to ensure it includes following items:
• Freecom FSG drive
• Power pack
• Network cable (UTP)
• Base
• Wall mounting
• CD-ROM with instruction manual and application software
• Quick installation guide
• Safety guide
Technical Support
For any technical questions, please visit our web site at www.freecom.com or at the site
created specifically of this product, www.openfsg.com. These websites offer a range of
information, answers to frequently asked questions, firmware and product guides
(available for download). You can also use our forum to exchange experience with other
users or discuss any problems or difficulties you may be having. Or else contact Freecom
Support for more in-depth assistance.
Freecom on the net
The FSG and other Freecom products including documentation, drivers, and other
information can be found on a World Wide Web home page that you can access at the
universal resource locator (URL) http://www.freecom.com. A connection to the Internet
and a Web browser such as Internet Explorer or Firefox are required.
4
Page 5

General Information
Related Publications
There is a lot of information available on the internet that can help you achieve what you
want. In this document, you may be directed to various RFC documents for further
information. An RFC is a Request For Comment (RFC) published by the Internet Engineering Task Force (IETF), an open organization that defines the architecture and operation
of the Internet. The RFC documents outline and define the standard protocols and
procedures for the Internet. The documents are listed on the World Wide Web at
www.ietf.org and are mirrored and indexed at many other sites worldwide.
For more information about address assignment, refer to the IETF documents RFC 1597,
Address Allocation for Private Internets, and RFC 1466, Guidelines for Management of IP
Address Space.
For more information about IP address translation, refer to RFC 1631, The IP Network
Address Translator (NAT).
Statement of Conditions
In the interest of improving internal design, operational function, and/or reliability,
Freecom reserves the right to make changes to the products described in this document
without notice. Freecom does not assume any liability that may occur due to the use or
application of the product(s) or circuit layout(s) described herein.
Trademarks
Freecom is a trademark of Freecom Technologies.
Microsoft, Windows, and Windows NT are registered trademarks of Microsoft Corporation.
Other brand and product names are registered trademarks or trademarks of their
respective holders.
GB
5
Page 6

Freecom Storage Gateway (FSG)
GB
System Requirements
The following hardware and software requirements must be fulfilled to ensure troublefree operation.
Hardware Requirements
In order to use the Freecom FSG, following components are needed:
• Intel Pentium II 233MHz or higher
• 64MB RAM or higher
• CD-ROM drive for installing drivers and/or software
• LAN
• Internet connection for online warranty registration and driver/software updates
and downloads
Software Requirements
• Windows 98 SE
• Windows Me
• Windows 2000
• Windows XP
• Windows NT
• MacOS 8.6 or 9.x
• MacOS X
• Linux Kernel 2.2 or higher
6
Page 7

Safety precautions
Precautionary measures
To ensure that your Freecom FSG functions properly, please take note of the following
precautions. If these are not followed, you may void your warranty and damage the FSG.
• Do not drop the Freecom FSG or expose it to other kinds of sudden mechanical
shocks as this may result in data loss and damage to the hard drive.
• Do not use the Freecom FSG when the ambient temperature is below 10°C or above 45°C.
• If the Freecom FSG is moved from a cool environment to a warmer environment,
please allow the drive to acclimatize to the ambient temperature before operating
the device. Failing to do so may lead to condensation within the drive enclosure,
which in turn may cause the drive to malfunction.
• Do not place liquids or drinks on the FSG. When liquids are spilled and get in contact
with the electronics within the drive enclosure, it will damage the drive and will
cause the drive to malfunction.
• Do not use the FSG in a dusty environment. Dust inside the enclosure may damage
the internal electronics and result in drive malfunction.
• Only use the power adapter that was supplied with the FSG.
• Opening the FSG will void the warranty.
GB
7
Page 8

Freecom Storage Gateway (FSG)
GB
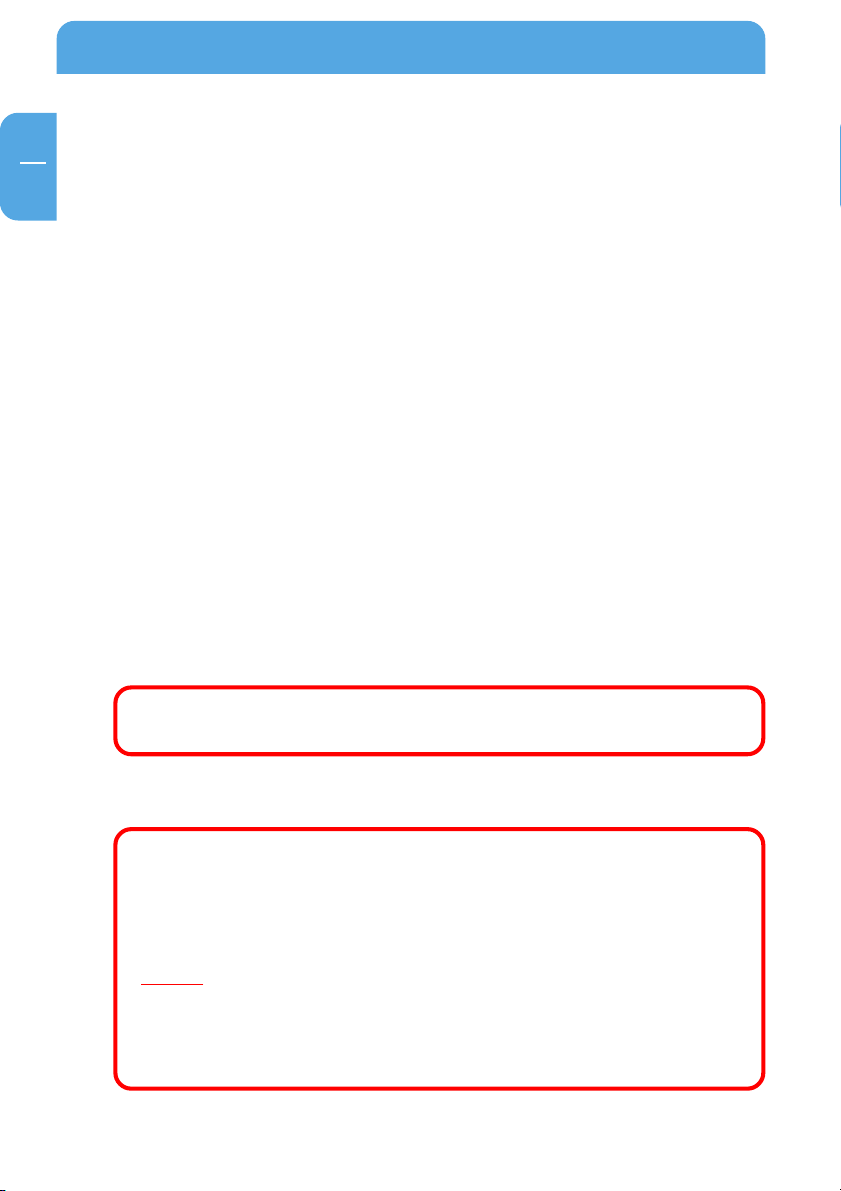
Advantages of the Freecom Storage Gateway FSG
The Freecom Storage Gateway is the perfect solution for home and small business use.
Thanks to its fast and easy installation, you are up and running the FSG in no time at all.
With its integrated router function, secure Internet access is child's play. Simply plug in
a DSL modem on the FSG's WAN port and every computer in the network has access to
the Internet immediately. Plus its integrated firewall protects every PC against hackers.
FSG is a combination hard drive, server (3 x LAN, 1 x WLAN) and USB server (4 x USB 2.0
High Speed). This reduces the number of devices you need. Most of the FSG functions
can be used with little previous knowledge.
File server
Save your data centrally on FSG and make it accessible to all PCs in the network.
Web server
Save your websites on the FSG and put them directly online.
FTP server
The built-in FTP server allows you to access data from any PC over the Internet.
LAN router
Network several PCs over the three available LAN ports and access the Internet from any
computer.
USB server
Increase your storage space by attaching additional devices (e.g., external hard-drives)
and let other network devices use this disk space.
USB printer server
Connect a USB printer and use it as your network printer.
Media server
Play multimedia files (films, music, images) on any attached client (for example, the
network media player).
8
Page 9

Advantages of the Freecom Storage Gateway FSG
Firewall
The integrated firewall protects your data from hackers.
eSATA interface
Connect an external SATA drive such as a hard drive and increase your storage capacity
in the process.
Mail server
Use the mail server to set up an individual e-mail account for each user. Users can get
their e-mails from an e-mail client through the FSG.
PHP & MySQL
Create forums, guestbooks et al. with PHP and MySQL, and add them to your homepage.
Open Source Firmware
You are familiar with Linux and want to add more features to your FSG? No problem.
Firmware is available free of charge and open to modification (The user assumes all risks
relating to any modification he/she may perform.).
GB
9
Page 10
GB
Freecom Storage Gateway (FSG)
10
Page 11

Software features
Software features
Network transport protocols
TCP/IP
Network file protocols
Microsoft Network CIFS
Client support
Microsoft Windows 98/Me/NT 4.0/2000/XP/2003 Server
Apple Macintosh OS 8.x/9.x/10.x
Network settings
DHCP
Manual configuration
System management
Web-based configuration
Configuration wizard
Internet services
HTTP (with PHP)
FTP
SQL
SSH
Mail
UpnP
Dynamic DNS
NTP
GB
Security
Supports user, group and file shares
System configuration
Number of users: unlimited
Number of groups: unlimited
11
Page 12

Freecom Storage Gateway (FSG)
GB
Router
PPPoE
DHCP client
Fixed IP
Firewall
Port forwarding
Hardware features
Processor
Intel XScale IXP422
64 MB RAM
4 MB Flash
Network connection
3x LAN, 1x WAN RJ-45 100 Mbps
USB
4x USB 2.0 480 Mbps for up to four printers or four mass storage devices
S-ATA
1 x eSATA HDD interface
Fan
Temperature-controlled fan
HDD
80/160/250/400/500 GB (depended on model)
HDD sleep mode for lower power consumption and reduced noise
12
Page 13

Connecting / Installing FSG
Electrical requirements
Voltage: 100 - 240 V DC
Frequency: 50 - 60 Hz, single-phase
Environmental requirements
Operating temperature: 10 - 45° C (50 - 122° F)
Storage temperature: -10 - 70° C (-40 - 185° F)
Humidity: 20 - 80 % relative humidity, no condensation
Maximum operating altitude (above sea level): 3000 m (9900 ft)
Dimensions and weight
Dimensions: L x W x H: 17.5 x 14 x 4.4 cm / 6.9 x 5.5 x 1.7 inch
Weight: 950 g
Chapter 1: Connecting / Installing FSG
1.1 Hardware Installation
Setup of the FSG is performed using the following steps:
GB
1
1. Plug the FSG's power cord into a power outlet.
2. Switch on DHCP on the PC, a DHCP server is automatically on on the FSG
3. Connect the included Ethernet Cable into the Ethernet port on the rear of FSG into
one of the LAN ports (1,2 or 3). Connect the other end of the cable directly to the PC.
4. Check the LINK/ACT light on the UTP port you have connected on the FSG-3. If it is
lit, then your FSG is connected properly.
13
Page 14
Freecom Storage Gateway (FSG)
GB
1
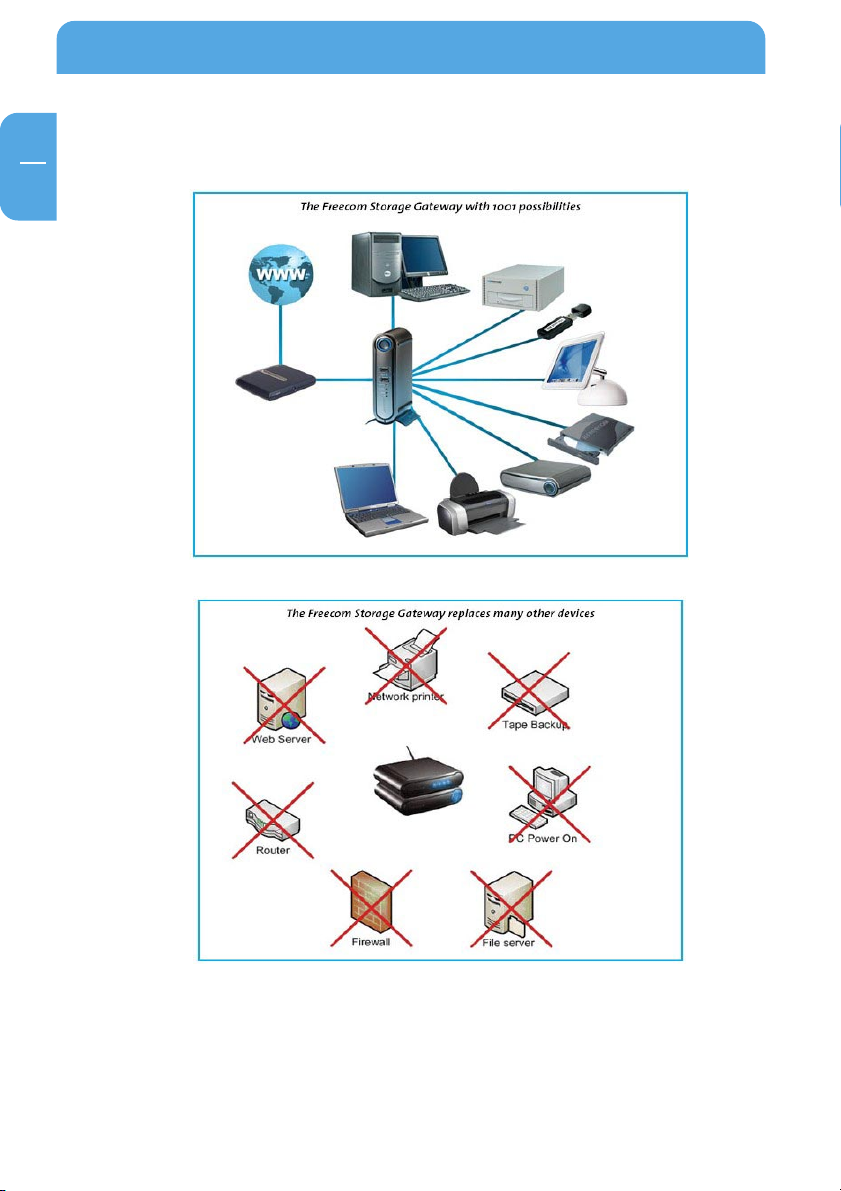
1.2 Software
The Freecom Storage Gateway wizard quickly detects and performs the basic set-up of
your FSG. When you start it, it displays all FSGs available in your network and helps you
configure the FSG as a printer server or create network folders.
1. Install the Freecom Storage Gateway Wizard (FSGW) from the enclosed Manual &
Application CD.
2. Start the Freecom Storage Gateway Wizard.
3. Check the FSGW whether your FSG was detected. This may take some time. If your
FSG is not immediately detected, click "Search again for available Freecom Storage
Gateway devices" to repeat the search.
4. For a detailed functional description on the Freecom Storage Gateway Wizard,
please refer to chapter 11.
14
Page 15
Get to Know Your FSG
Chapter 2: Get to Know Your FSG
This chapter describes the lights and mechanical layout of the FSG.
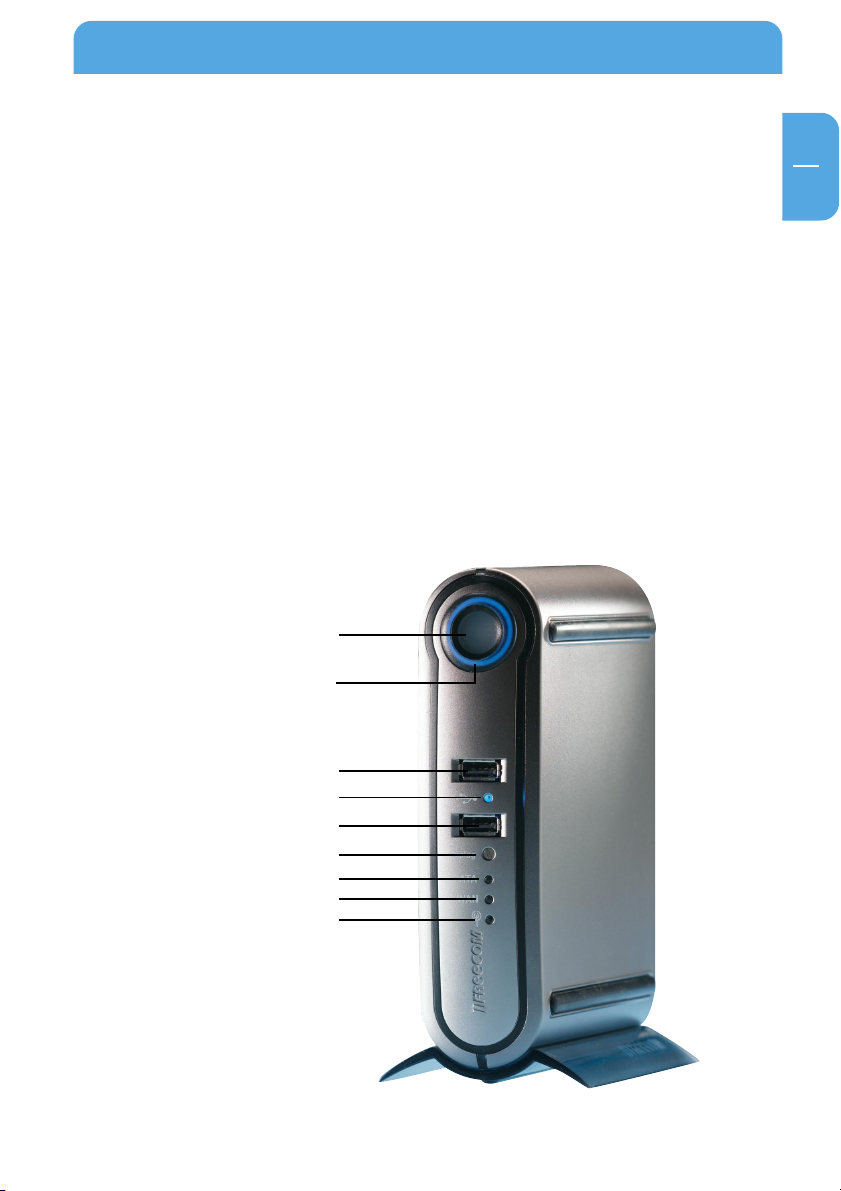
2.1 FSG connectors, LEDs and buttons
The FSG Front panel
The front panel consists of:
1. Power on
2. Power on LED
3. LED ring
4. USB host port type A (front 1)
5. USB LED
6. USB host port type A (front 2)
7. USB unplug button
8. SATA LED
9. WAN LED
10. WLAN LED
1./2.
3.
GB
2
10.
4.
5.
6.
7.
8.
9.
15
Page 16
Freecom Storage Gateway (FSG)
GB
2
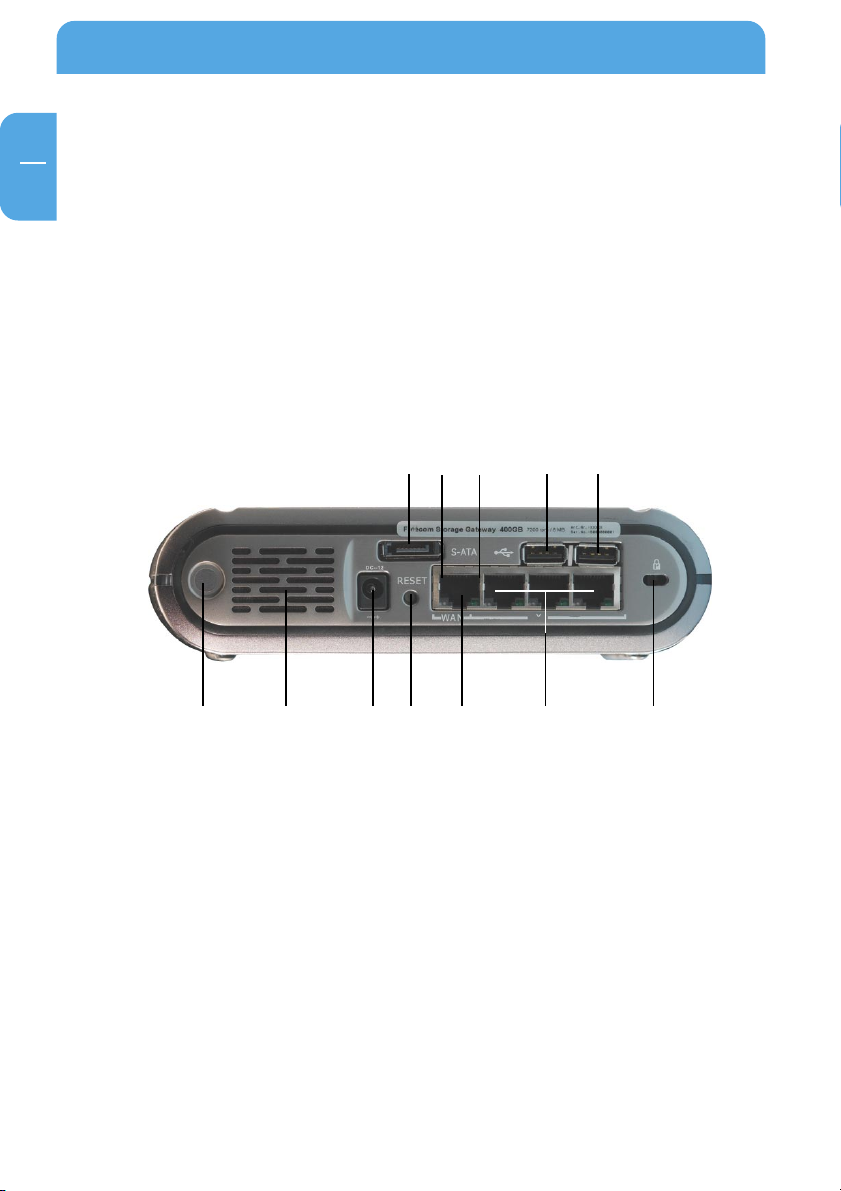
The FSG Back panel
The back panel consists of:
1. WLAN antenna connector
2. Fan inlet
3. 12 V DC power jack
4. eSATA connector
5. Hardware reset button
6. WAN port
7. LAN ports 1, 2 and 3
8. USB host port type A (back 1)
9. USB host port type A (back 2)
10. Kensington lock
4. 11. 8. 9.
16
1. 2. 3. 5. 6. 7. 10.
Page 17
Get to Know Your FSG
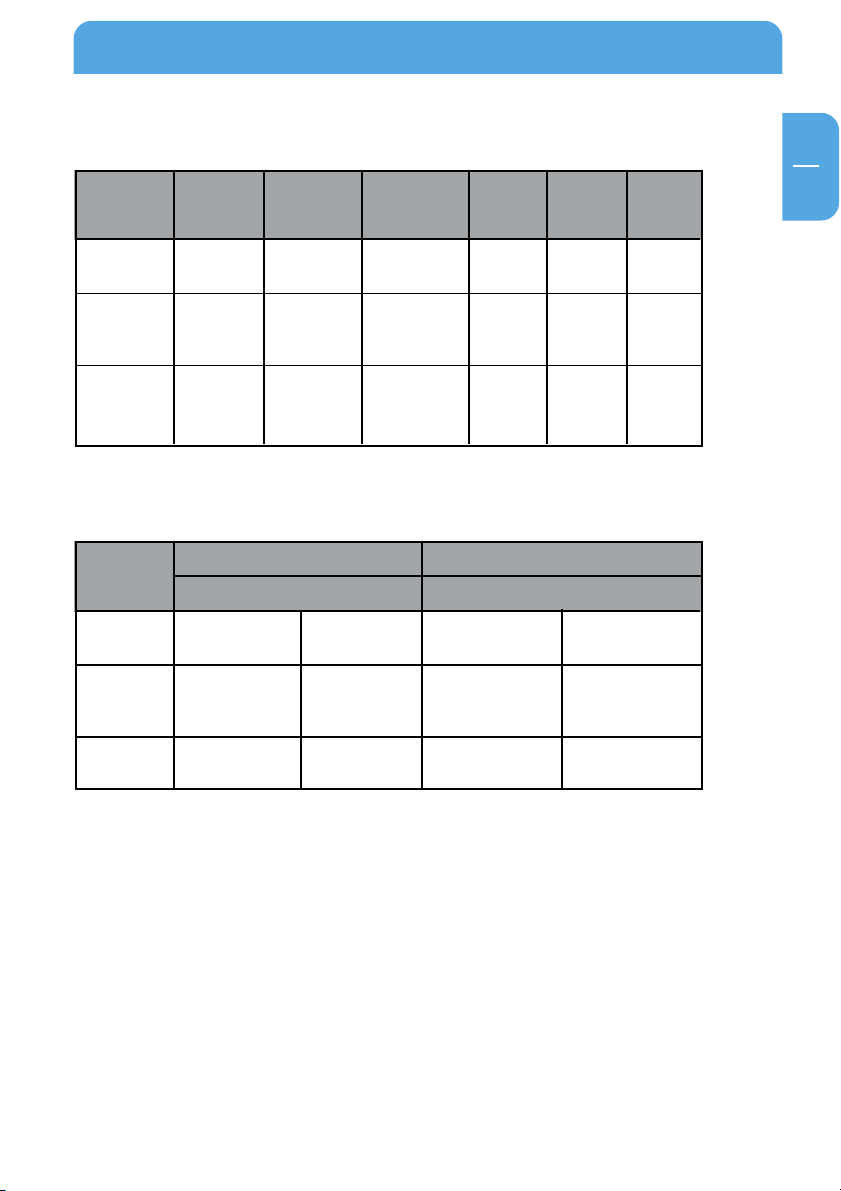
Front
Display
Solid blue
Flash regularly
or intermittently
OFF
Back
Display
Solid blue
Flashes
intermittently
POWER (LED
SYNC Button)
System boots
OK
System boots
System ready
or in Standby
mode
Green
Connection is active
Possible network
collisions
LED ring
Normal mode
HDD activity
No power
supply
LAN LED WAN LED
High-speed Ethernet
Sending or receiving
connected / Error
Yellow
(100 Mbit/s)
data
S-ATA LED
S-ATA device
connected
-
No device
WAN LED
WAN
connected
-
No
connection /
Error
Green
Connection is active
Possible network
collisions
WAN LED
disabled
USB LED
WLAN is
enabled
WLAN is
High-speed Ethernet
Sending or receiving
-
Yellow
(100 Mbit/s)
data
WLAN is
enabled
WLAN is
disabled
GB
2
-
OFF
No connection / Error
10 Mbit/s Ethernet
No connection / Error
10 Mbit/s Ethernet
17
Page 18
Freecom Storage Gateway (FSG)
GB
2
Quick Setup
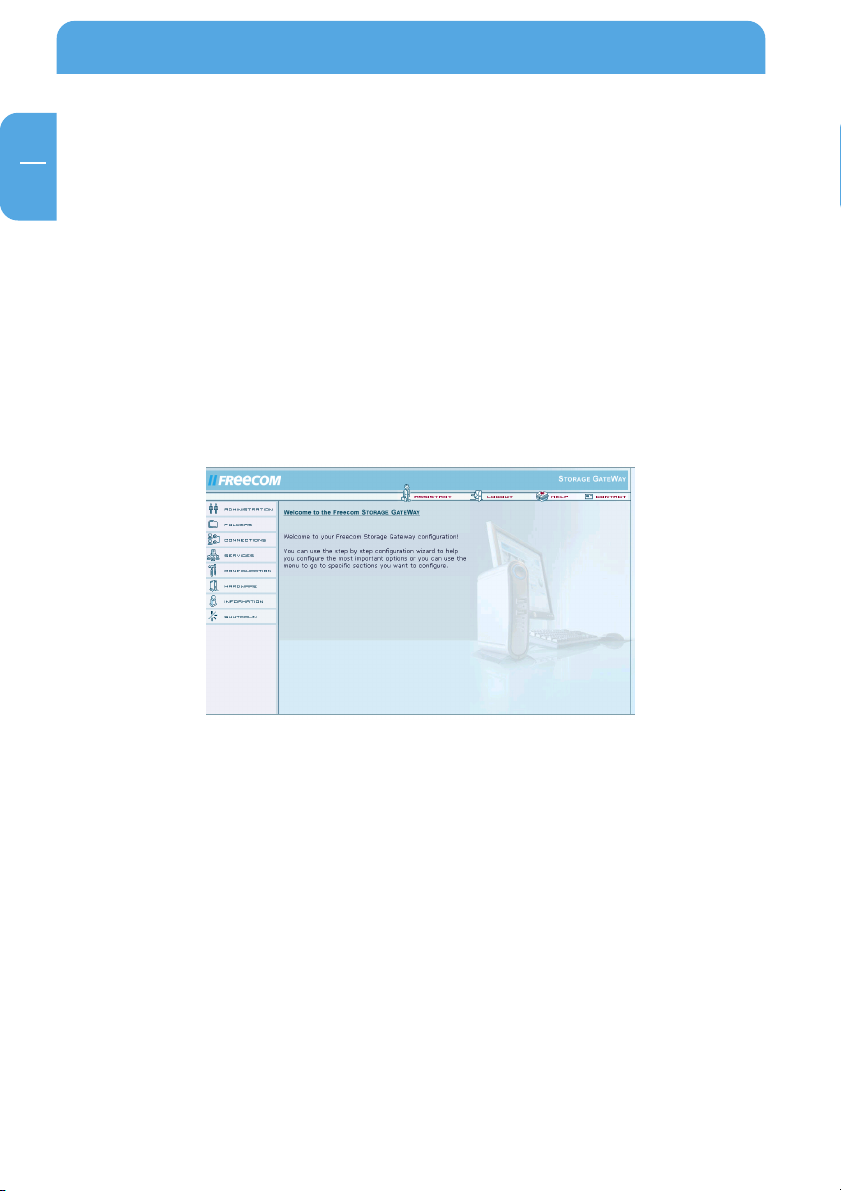
2.2 FSG configuration wizard
The configuration wizard is integrated into the web interface and helps you to configure
the basic settings on your FSG. This in turn ensures you can work with the FSG in the
shortest time possible.
2.2.1 Starting the FSG configuration
To use the wizard, please go to the configuration page of your FSG by starting any web
browser (Internet Explorer, Opera, Firefox etc.) and entering the hostname 'FSG' * or the
IP address '192.168.1.1'* in the address bar. Click 'Enter Configuration' and log on under
the username 'admin' and the password 'admin'*.
* These are the factory defaults. If you have already changed these settings, enter the new
username and password.
18
Page 19
Quick Set-up
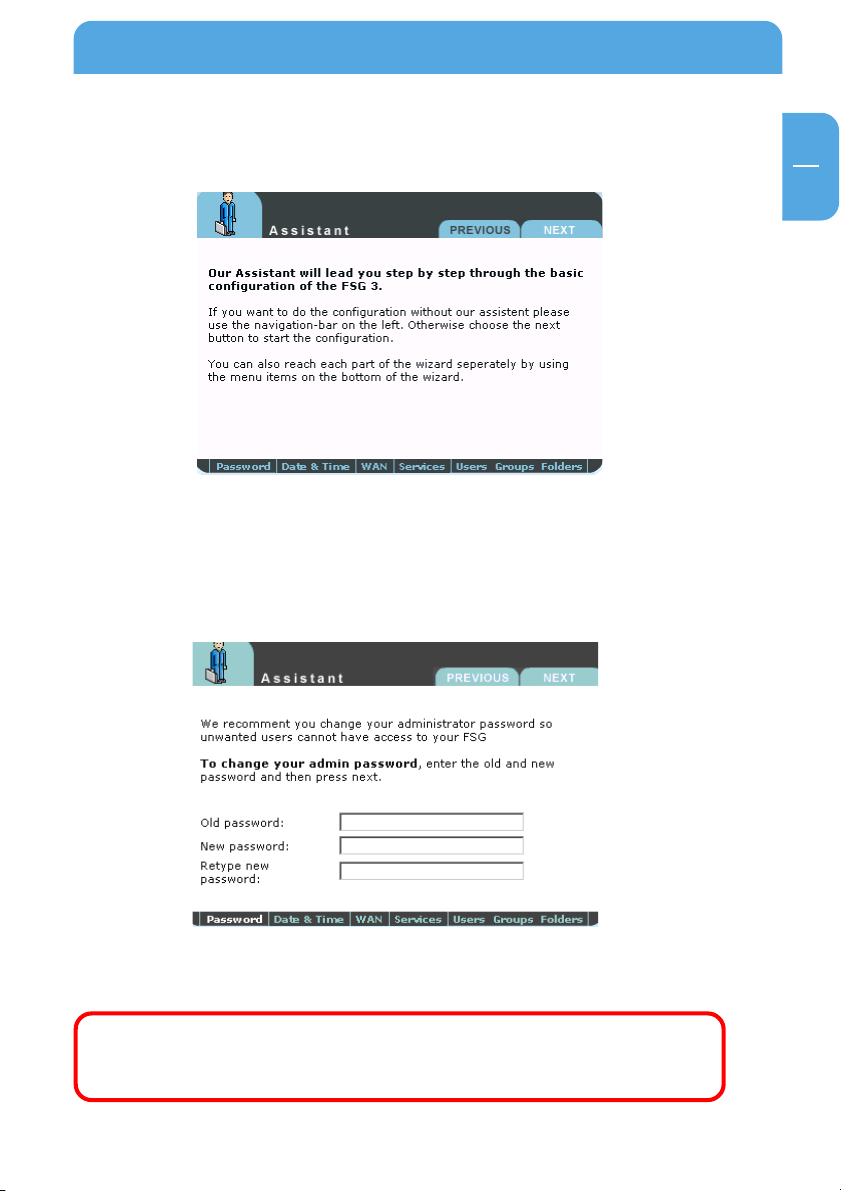
2.2.2 Starting the wizard
Click 'Wizard' in the top menu bar.
2.2.3 Changing the administrator password
Start the wizard and then click 'Next'. You now have the option of changing the
administrator password.
GB
2
First enter the old password (factory default setting: 'admin') and then type in the new
password twice. Now click 'Next'.
Note: We recommend changing the password because every FSG comes
with the administrator password 'admin', in other words any person who
knows your IP address could potentially access your FSG.
19
Page 20

Freecom Storage Gateway (FSG)
GB
2
2.2.4 Changing date and time
You can change the date and time on the FSG in this window by simply entering the new
values and clicking 'Next'.
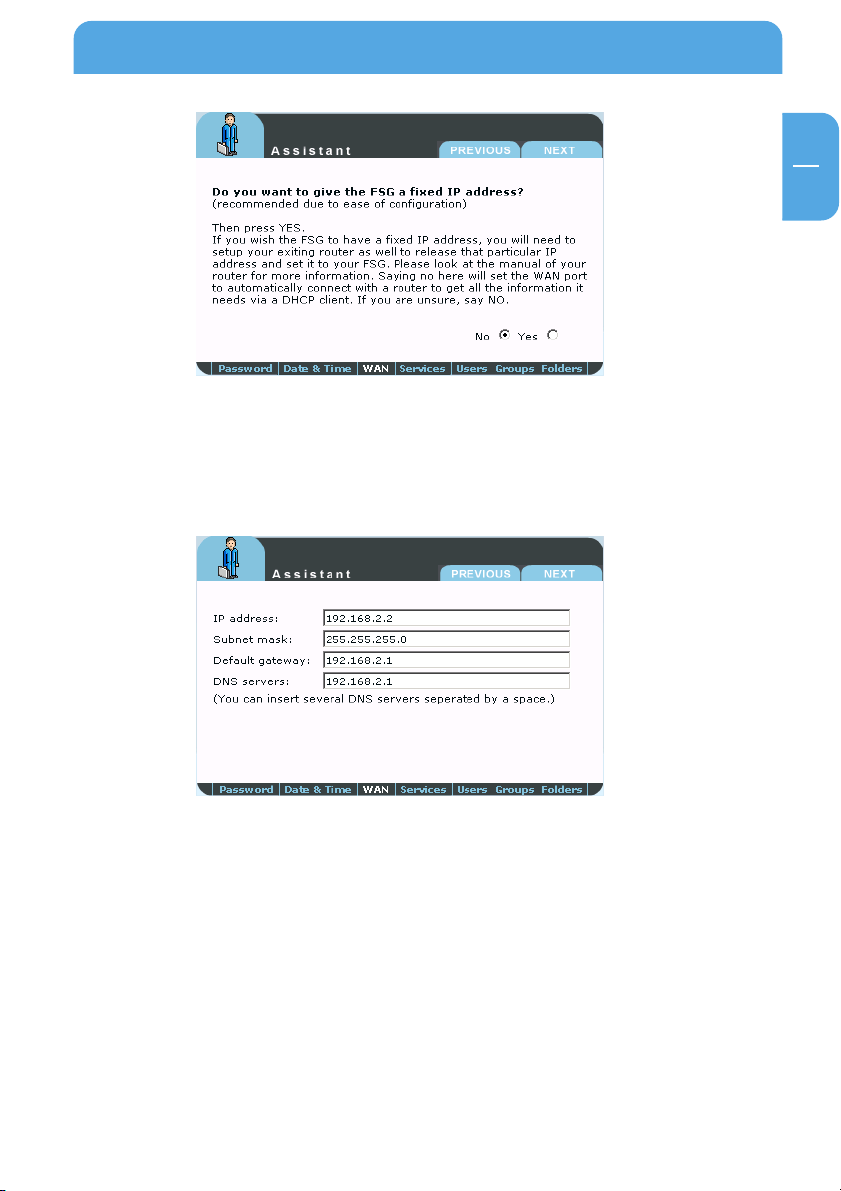
2.2.5 WAN settings
If you are planning to connect the FSG to a router, hit 'Yes' and then 'Next'. If not, press
'No' and then 'Next'.
20
Page 21
Quick Set-up
Do you want your FSG to have a fixed IP address (WAN port)? If yes, select 'Yes' and press
'Next'. If this is not the case, press 'No' and then 'Next'.
Fixed IP address
GB
2
You can enter the IP address, subnet mask, Gateway and (multiple) DNS servers to be
used by the FSG WAN port in this form.
IP address: Enter an IP address that falls within your router's address
range.
This IP address provide you with access to the FSG from
within your local network.
Subnet mask: Enter the subnet mask of your router (example:
255.255.255.0).
Standard Gateway: IP address of your router, e.g., 192.168.2.1.
DNS servers: Enter the IP address of your router here.
21
Page 22

Freecom Storage Gateway (FSG)
GB
2
Without router (when selecting 'No')
If you intend to use your FSG as a router and to access the Internet, click 'Yes' and then
'Next'. If not, press 'No' then 'next'.
DSL
You can enter the DSL login data from your provider here and enable 'Dial on demand'
if you are using a DSL package with restricted minutes. In this case, the Internet
connection is only established when a query is sent to the Internet.
Services
FSG has several useful services which you can configure in the coming sections.
22
Page 23
Quick Set-up
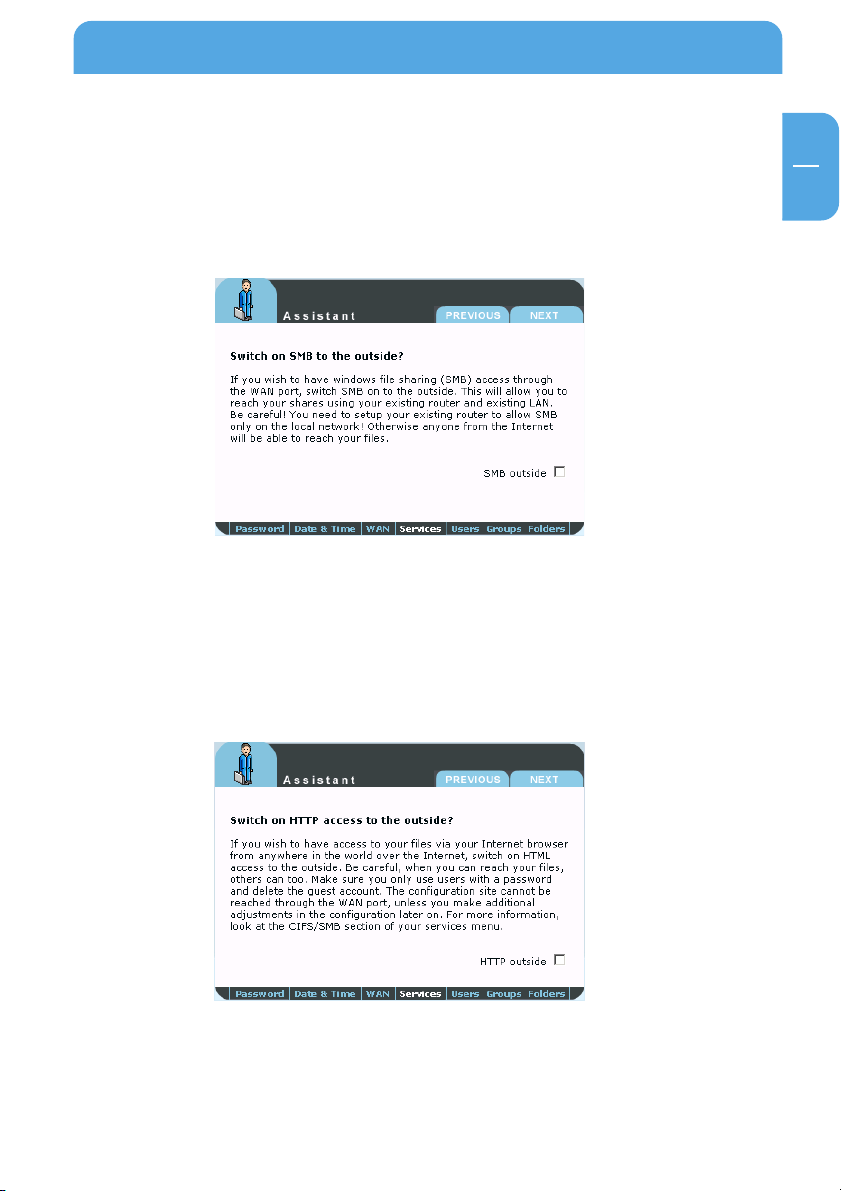
2.2.6 Services
FSG has several useful services which you can configure in the coming sections.
Windows File Sharing (SMB)
SMB is used by Windows to transfer files and for printing services.
It allows you to enable Windows File Sharing service for the WAN port (for example, to
access this via a router).
HTTP server
An HTTP server is a server service that provides information in accordance with the HTTP
protocol. The data is accessed using HTTP URLs.
GB
2
You are given the option here of specifying whether or not the HTTP server can be
accessed from outside the network (Internet).
23
Page 24
Freecom Storage Gateway (FSG)
GB
2
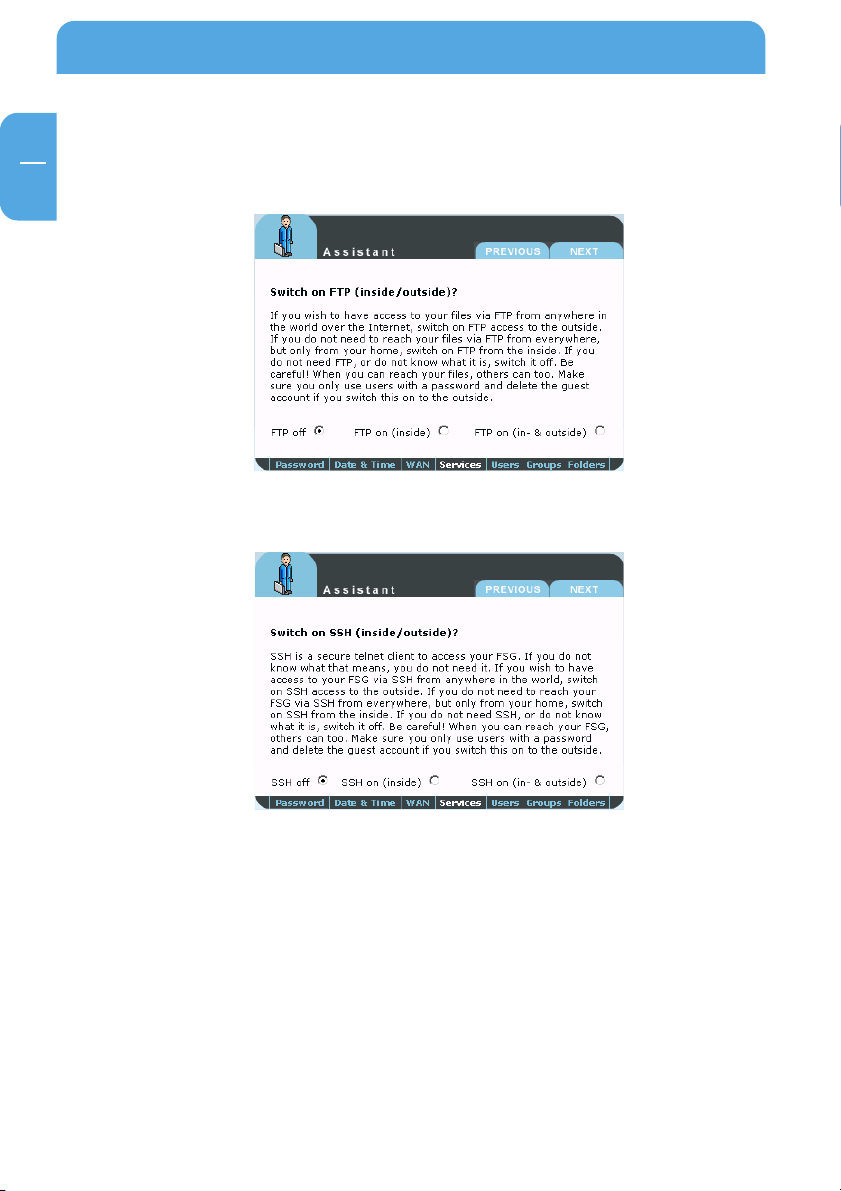
FTP server
You can enable the FTP server and specify whether it can be accessed only internally
(within your network) or also from the outside.
SSH server
On this screen you can enable the SSH server and specify whether it can be accessed only
internally (within your network) or also from outside the network.
24
Page 25
Quick Set-up
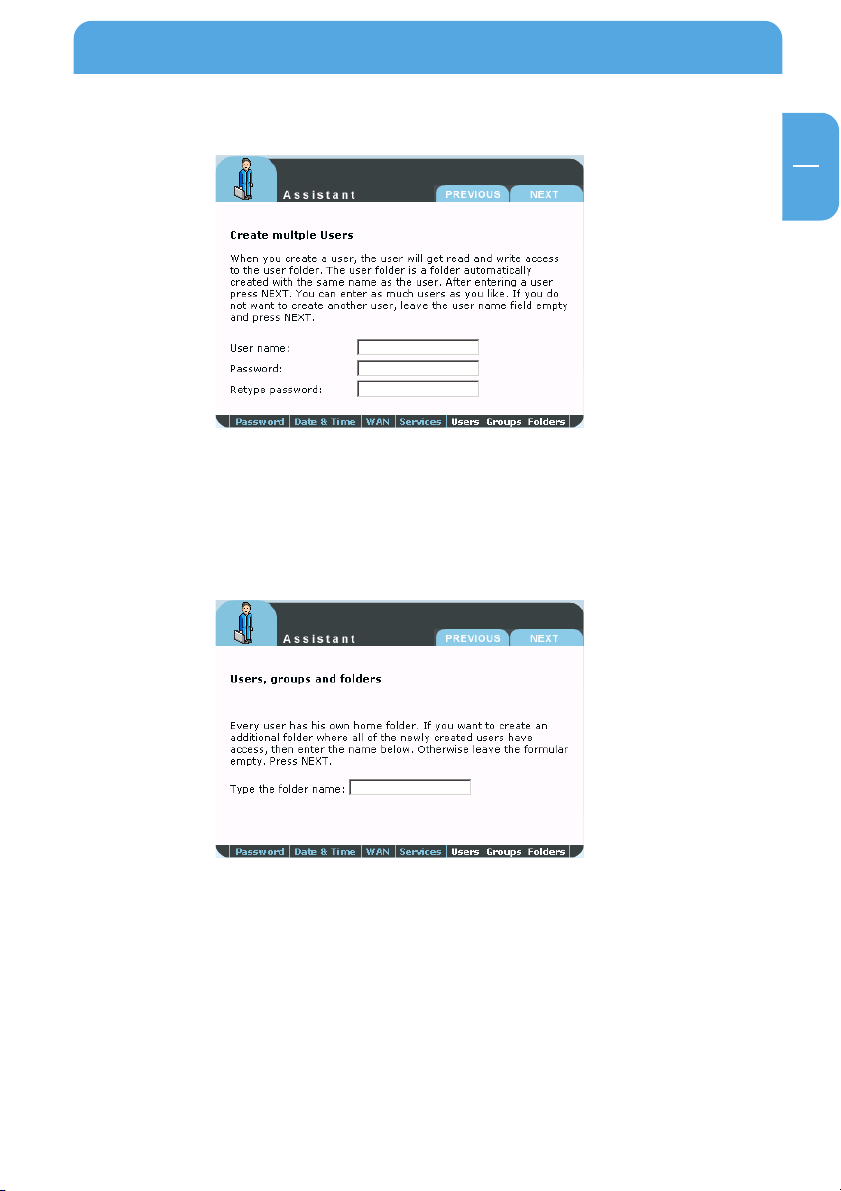
2.2.7 Users
You can enter several users with or without a password in this screen. The added users
are able to access the FSG via SMB, HTTP or FTP if these services are enabled. If you plan
on leaving this area blank, skip to 9.1.9.
2.2.8 Folders
GB
2
This screen allows you to create a folder on the FSG. All users added previously have
access to this folder.
By creating this folder, you only have to copy files that you want to make available to all
users one time to this location. You would otherwise be required to copy these files and
paste them in each of individual user folders.
25
Page 26
Freecom Storage Gateway (FSG)
GB
2
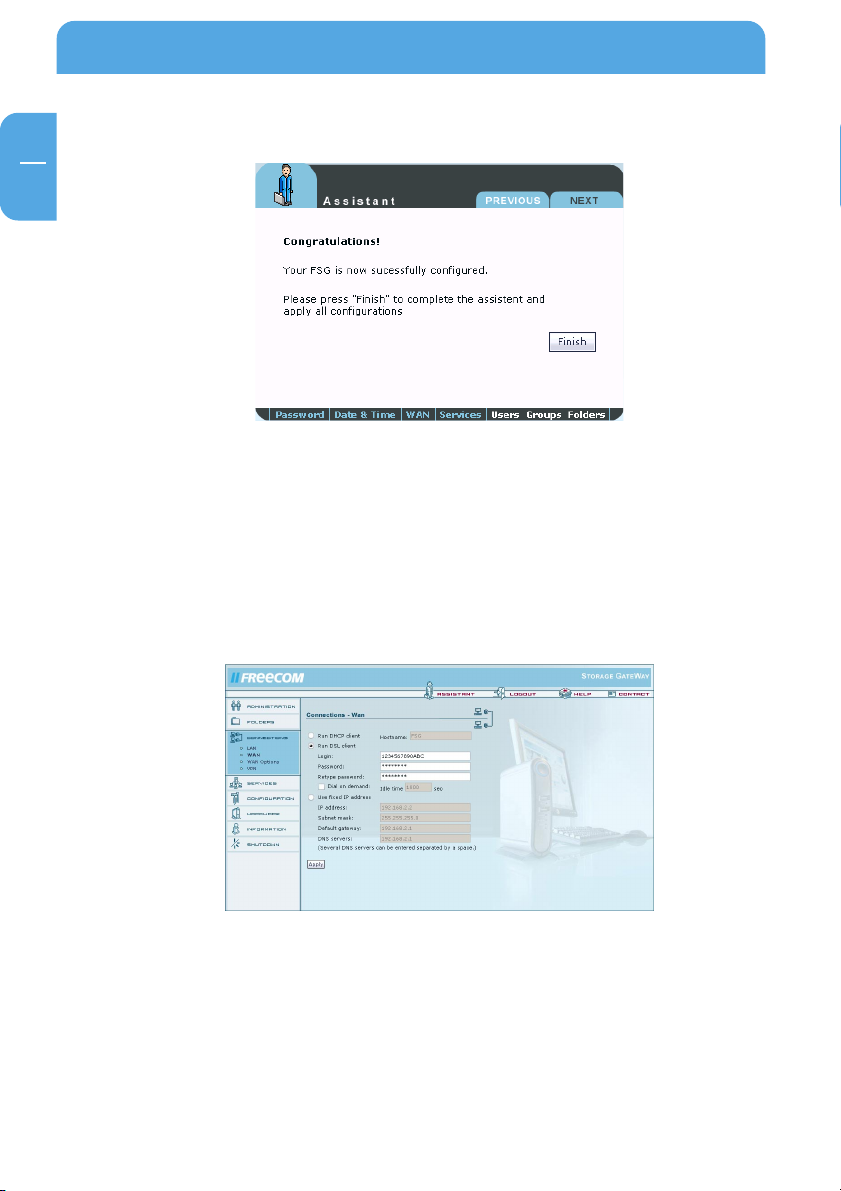
2.2.9 Finish
Click 'Finish' to save your settings.
2.3 Internet access
If you have not already set up your Internet connection in the FSG configuration described
above, you may do so at any other time in the future. This is done by clicking 'Connections"
– 'WAN' in the FSG menu. Enable 'Run DSL Client' and then enter the login data.
26
Page 27

Accessing data via SMB
2.4 Accessing data via SMB
Windows
Open Windows Explorer and enter either
\\fsg* or
\\192.168.1.1 in the address bar.
If you have changed the host name or the IP address, please use the new settings.
Enter your username and password for accessing the FSG. If you are logging on as the
administrator, you will have access to all folders on the FSG.
Linux
Open the file browser (Konqueror, for instance) and enter
smb://fsg* or
smb://192.168.1.1*
Enter your username and password for accessing the FSG. If you are logging on as the
administrator, you will have access to all folders on the FSG.
Mac OS
Mac OS X Vers.10.3 and higher
Select 'Go To' -> 'Connect with Server...'from the menu bar. The FSG address is:
GB
2
smb://192.168.1.1* or else
smb://FSG_NAME (factory default is smb://FSG).
* Factory defaults. If you have changed the host name or the IP address, please use the new
settings.
27
Page 28

Freecom Storage Gateway (FSG)
GB
2
2.5 Accessing data via SMB
Windows
Open Windows Explorer and enter either
\\fsg* or
\\192.168.1.1
in the address bar.
If you have changed the host name or the IP address, please use the new settings.
Enter your username and password for accessing the FSG. If you are logging on as the
administrator, you will have access to all folders on the FSG.
Linux
Open the file browser (Konqueror, for instance) and enter
smb://fsg* or
smb://192.168.1.1*
Enter your username and password for accessing the FSG. If you are logging on as the
administrator, you will have access to all folders on the FSG.
Mac OS
Mac OS X Vers.10.3 and higher
Select 'Go To' -> 'Connect with Server...' from the menu bar. The FSG address is:
smb://192.168.1.1* or else
smb://FSG_NAME (factory default: smb://FSG).
* Factory defaults. If you have changed the host name or the IP address, please use the new
settings.
28
Page 29
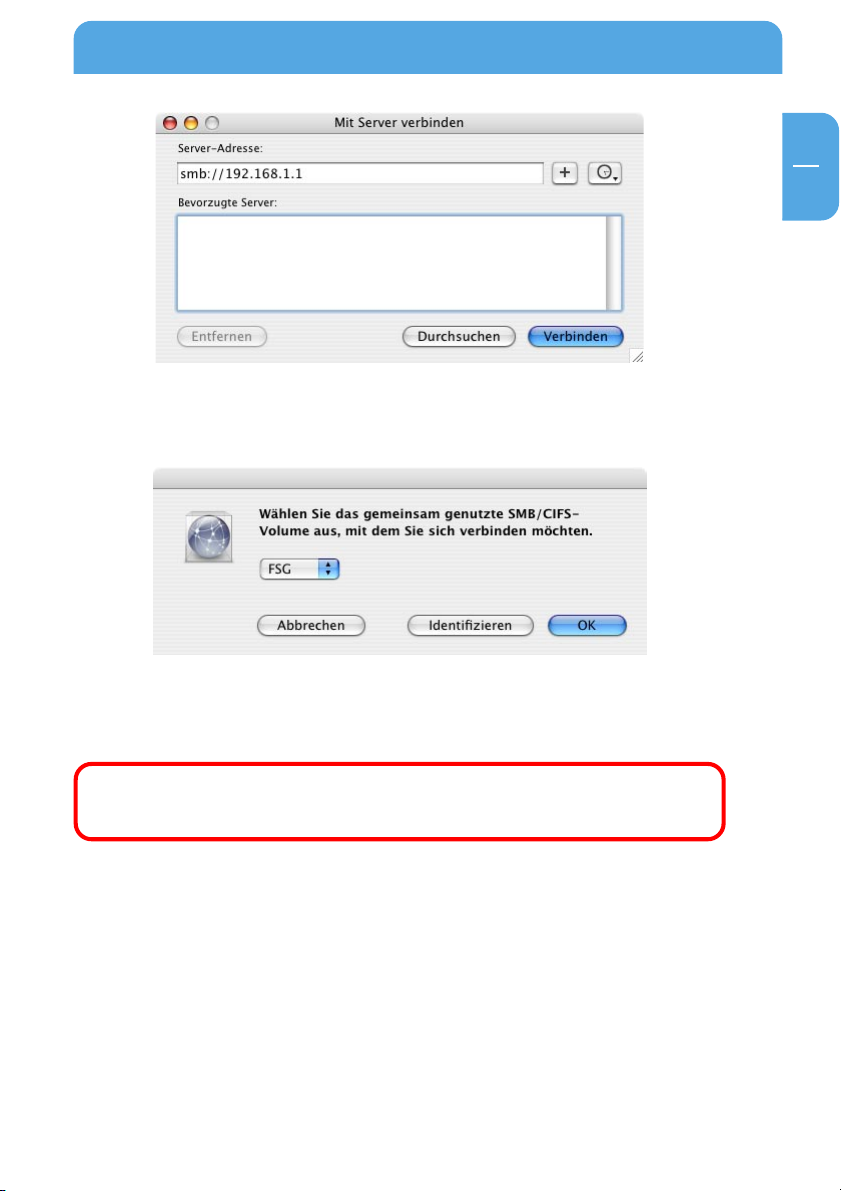
Accessing data via SMB
Click 'Connect'. You now need to select a shared folder on the next screen. Press OK to
continue.
GB
2
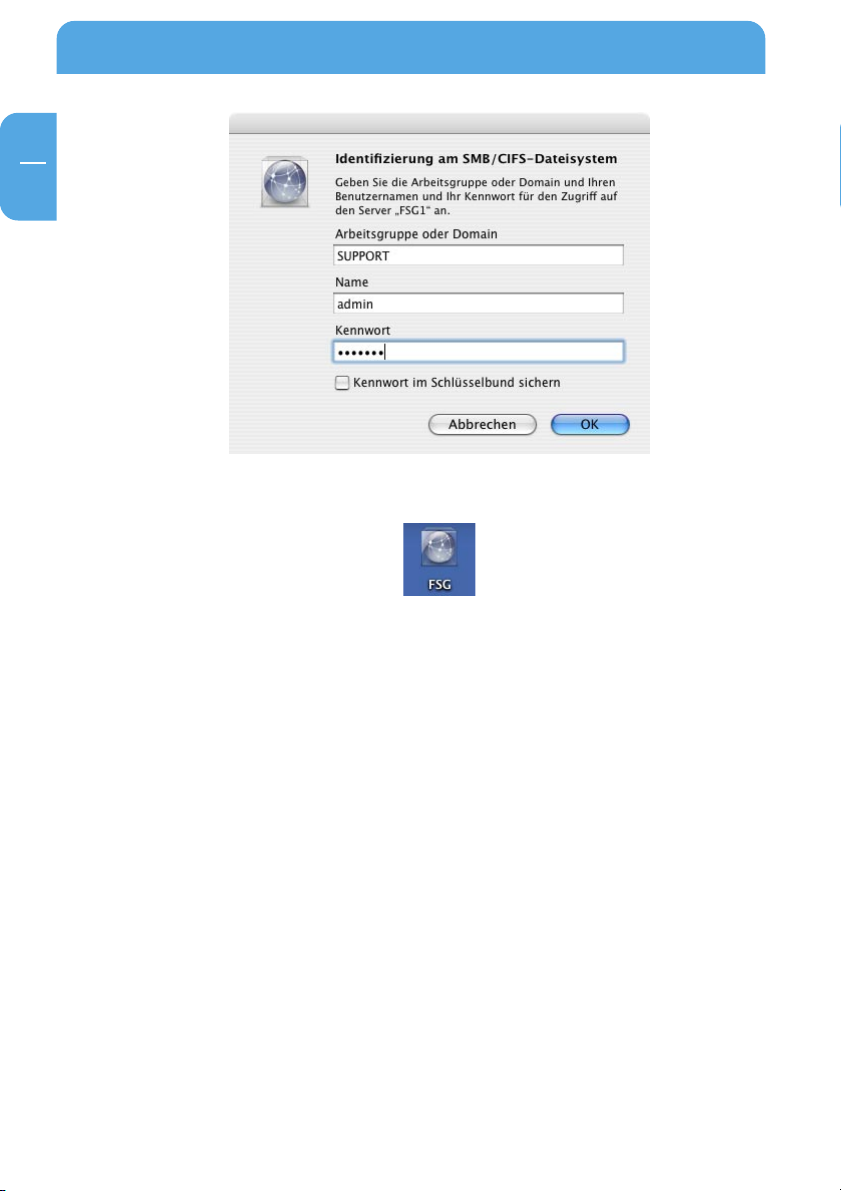
Enter the workgroup, your username and password for accessing the FSG. If you are
logging on as the administrator, you will have access to all folders on the FSG.
Note: You set the workgroup name of the FSG under 'Connection'-& 'LAN'
in FSG Configuration menu.
29
Page 30
GB
2
Freecom Storage Gateway (FSG)
After pressing OK, the FSG is configured and an icon appears on your computer desktop.
To access all the FSG folders that your username has been assigned user privileges,
simply double-click this icon.
30
Page 31

Accessing data via HTTP
2.6 Accessing data via HTTP
Note: You have read but not write access with HTTP.
Local access
Open your browser and enter either
bar. Click 'Enter as User' and log on as Admin or as a user. You may now view or download
any file in your folder (as a user) or anywhere on the FSG (as the administrator).
Accessing over the Internet
To do so, you need to enable the option 'Open HTTP server to the outside' under
'Services' -> 'HTTP Server' in the FSG configuration menu.
Then open your browser and enter your Internet IP address in the address bar. This can
be found in the FSG's configuration menu under 'Information' -> 'Network'-> 'WAN Port'
- 'IP Address' if you have connected your FSG directly to a DSL modem. If your FSG is
connected to a router, please check in your router's configuration menu.
You may likewise use your DynDNS address (for more information, refer to chapter
10.5.2.
Click 'Enter as User' and log on as Admin or as a user. You may now view and download
any file in your folder (as user) or anywhere on the FSG (as administrator).
"http://fsg"* or "http://192.168.1.1"* in the address
GB
2
* If you have changed the hostname or the IP address of the FSG, please use the new settings here.
31
Page 32

Freecom Storage Gateway (FSG)
GB
2
2.7 Accessing data via FTP
Note: Not all browsers can upload data via FTP. Those that can include
Internet Explorer and Konqueror. We recommend using FTP client software such as WS_FTP, SmartFTP or CuteFTP.
Local access
Enable the FTP Server option (Service -> FTP Server - Run FTP server). Use any FTP client
software or open your browser and enter
ftp://USERNAME:USERPASSWORD@192.168.1.1
or
ftp://USERNAME:USERPASSWORD@fsg.
Accessing via the Internet
Enable FTP for the Internet (Service -> FTP Server -> Open FTP server for the outside). Use
any FTP client software or open your browser and enter
ftp://USERNAME:USERPASSWORD@YOUR_INTERNET_IP
or
ftp://USERNAME:USERPASSWORD@YOUR_DYNDNS_HOST.
USERNAME = your username
USERPASSWORD = your user password
YOUR_INTERNET_IP = your WAN IP address
YOUR_DYNDNS_HOST = your Dynamic DNS address
32
Page 33

FSG Functions
a different network
encryption technique
Chapter 3: FSG Functions
3.1 Overview
Administration
Folders Create folders on the FSG-3
Connections
Users
Groups
Administrator
LAN
WAN
WAN Options
VPN
Wireless
Edit user settings
Edit group settings
Change administrator password
Configure your LAN connection
Setup your connection to the internet or
to
Advanced WAN options (expert options)
Setup and edit VPN connections
Switch WLAN on and off, select
GB
3
Wireless ACL
Define WLAN filter rules.
33
Page 34

GB
Configure the web server settings
p
previously saved configuration file.
previously saved configuration file.
server.
Freecom Storage Gateway (FSG)
Services
DHCP Server
Setup DHCP server to automatically
configure clients
3
Configuration
Dynamic DNS
HTTP Server
File Server (CIFS)
FTP Server
SSH Server
Port Forwarding
Save configuration
Restore configuration
Reset configuration
Configure the DynDNS options of the
FSG-3
Configure Windows File Sharing through
the WAN port
Configure the FTP server settings to
upload and download files
Configure the SSH server (secure
terminal server)
Configure ports to be forwarded to
certain PCs in the LAN
Save the current configuration on your
com
uter.
Restore a configuration from a
Restore a configuration from a
Hardware
Date & Time
Set date & time manually or from a time
34
Update Firmware
Harddrive
Fan Control
Update firmware here
Configure hard disk settings
Configure fan settings
Page 35

FSG Functions
Reboot
Reboot the FSG
Shutdown the FSG.
System
eSATA devices.
Information
Shutdown
Copyright
Version
Devices
Network
Wireless Network
Logs
Shut Down
Shows copyright information
Shows system information
Firmware and operating system version
information
Shows status of attached USB and
Display connection setting for WAN and
LAN connection.
Get information about the WLAN Port
and the connected stations.
View log files for several FSG functions.
GB
3
35
Page 36

Freecom Storage Gateway (FSG)
GB
3
3.2 Administration
3.2.1 Users
Go to Administration -> Users.
You can manage access privileges to the FSG by creating new users.
• When you click 'New', a dialog box appears on the screen where you can add new users.
- Enter a username and password.
- Confirm the password.
- In the 'User disk quota' field, you can limit the storage space for each user. For
instance, enter '50' (50 GB) or 50m (50 MB) as the limit. If you enter '0', the user is
given unlimited space on the FSG.
36
Note: The allocated space only includes files personally added by the user
and not those entered by others. If, for instance, the administrator writes
data to the user's folder, this does not count towards the user's total
allotment.
- To grant the user read-only access, click 'User has read-only access onto the FTP
server'. If this field is not enabled, the user has read and write access.
Page 37

Administration
• To edit the user settings at a later time, click the user followed by the 'Properties'
button.
• To remove this user, click this entry followed by the 'Delete' button.
Please confirm that you really want to perform this operation by pressing
'Yes, I want to delete the user and all its data'.
GB
3
37
Page 38

Freecom Storage Gateway (FSG)
GB
3
3.2.2 Groups
Go to Administration -> Groups.
Access control for all file access systems (FTP, HTTP and SMB) is structured around either
group or user access rights (privileges). You can add or remove access rights in this
window. If a group is assigned privileges or has them revoked, these are assigned /
revoked for all users in this group.
• When you click 'New', a dialog box appears on the screen where you can add new
groups.
• You can add new users or edit the group settings by selecting a group and clicking
the 'Properties' button.
• If you select a group and hit the 'Delete' button, the group, but not the users in the
group, is deleted.
3.2.3 Administrator
Go to Administration -> Administrator.
Here you can alter the administrator password. Please enter the old password, the new
password and a retype of the new password.
If you have completely lost your administrator password, please do a reset to default
values as described in Reset.
38
Page 39

Administration
3.3 Folders
Go to 'Folders'.
The access control for all file retrieval systems (FTP, HTTP and SMB) is based on either
group or user access rights. Access permissions can be set or removed using these
menus. Folder permissions can be given either to a group or a user or both.
• Pressing the Add button gives you a dialog to add new folders. These folders will be
created.
• Selecting a folder and pressing the properties button will allow you to edit the folder
settings and add groups or users.
• Selecting a folder and pressing the delete button will delete the folder.
GB
3
39
Page 40

Freecom Storage Gateway (FSG)
GB
3
3.4 Connections
3.4.1 LAN
Go to Connections –> LAN.
Here you can set up your connection to the local area network (LAN).
Options Description
IP address This is the IP address your FSG uses in your LAN
IP subnet mask This is your subnet mask
Workgroup This is the name of the workgroup where your FSG is located.
Router name Name of the FSG in the LAN. This name can be used to access
the web configuration (e.g. http://FSG) instead of using the IP
address. This makes it easier for the user to access the web
interface.
3.4.2 WAN
Go to Connections –> WAN.
You can configure your connection to the Internet or any other network on this screen.
40
Page 41

Administration
Options Description
Run DHCP Client Enables the DHCP Client option. If the WAN port is con-
nected to a DHCP server (e.g., another router), you will
need to set up the WAN connection using this option.
Run DSL Client If the WAN port is connected directly to a DSL or cable
modem, you will need to enter information provided by
your provider in several fields. This option allows you to
set up PPPoE or other types of DSL or cable connections.
Login Username that you received from your ISP.
Password Password that you received from your ISP.
Retype Password Re-enter your password that you received from your ISP.
Dial on Demand A DSL connection is established only when a PC in the
network requests one.
Idle time (in seconds) Use this option if you are only given a limited contingent
of online hours each month. The DSL connection is disconnected if the user does not send or receive data within
a set period of time (in seconds).
Use fixed IP This allows you to manually enter the IP address for
thenetwork connection. This is your fixed IP address;
please ask your ISP or network manager for this information.
Subnet mask Subnet mask; please ask your ISP or network manager for
this information.
Default gateway Your ISP's gateway address; please ask your ISP or net-
work manager for this information. If your FSG is connected to a router, please enter the router's IP address in
this field.
DNS servers Your ISP's DNS server address; please ask your ISP or
network manager for this information. If your FSG is connected behind a router, please enter the router's IP address in this field.
GB
3
41
Page 42

GB
3
Freecom Storage Gateway (FSG)
3.4.3 WAN options
Go to Connections –> WAN Options.
ATTENTION: These options are intended for expert users only. Only change
these settings if you know what you are doing!
Options Description
MTU (for DSL only) MTU settings (MTU = Maximum Transfer Unit)
(In Bytes)
Answer ICMP packets This will allow others to ping the host. It is good for
(ping etc) debugging but it can be asecurity hazard!
Enable exposed host Enabling this will allow one PC on the LAN to act as if it
bypasses the firewall completely and has a direct connection
to the internet (Attention: An exposed host is computer that
virtually has a direct connection to the internet. This is a big
security risk, not only to this computer but to the whole LAN!).
IP address Exposed host IP address.
Enable hardware This will enable you to set the MAC address of the WAN
address cloning connection so it matches the address your ISP authenti-
cates by.
MAC address This is the MAC address your WAN port will be cloned to.
Open SBM/CIFS on This will open SMB/CIFS for the WAN port. Only needs to
WAN port be enabled when the FSG is used behind a router.
42
Page 43

Administration
3.4.4 VPN
Go to Connections –> VPN.
The VPN connections listed here are shown with name, status, operation, Remote Host
and Remote Net.
• If you are adding a new dedicated connection, click 'Add connection'.
• To view and edit the properties of the existing connection, select the connection and
click 'Properties'.
• To remove a connection, click 'Delete connection'.
• To view the status of your connections, click 'Show status'.
GB
3
43
Page 44

Freecom Storage Gateway (FSG)
GB
3
Adding a new connection
To add a new VPN connection, click the 'Add connection' button.
Options Description
Status You can choose to enable or disable the connection.
Name* This is the name which will refer to the VPN connection. It is
used for internal use only.
Remote Host IP* This is the IP address of the remote host you wish to reach. If
you which to allow any IP (Road Warrior) type enter: 0.0.0.0.
Remote Network* This is the remote network you wish to reach. Example:
192.168.20.0/24
ESP encryption ESP encryption options
IKE encryption IKE encryption options
Pre-Shared Key Fill in your pre-shared key here. Please ask your network
administrator for more info
Action You can specify if you want a listening only connection or a
full connection.
Alive ping IP Here you can enter an IP address where a ping is sent every 15
minutes. This maintains a connection whenever the server
times out due to lack of activity on the other side.
Additional subnet If you want to route another subnet via the VPN tunnel, enter
its IP address here (e.g., 192.168.50.0/24).
* Fields with an asterisk (*) need to be filled out. All the rest is for experts and can be left as is.
44
Page 45

Administration
3.4.5 WLAN
Wireless LAN (WLAN) is a network structure that does not utilize any cables. WLAN allows
you to connect your FSG to other WLAN-capable mobile devices.
enable WLAN Enable and disable WLAN.
Network Name (ESSID) The name of the network identified by the FSG (any name
can be entered here).
IP address Shows the LAN IP of your FSG.
without encryption Sets the FSG connection type to no encryption. Using this
type of connection may present a serious security risk
because all WLAN-capable devices in your network are
able to access your shared
connection! Only use this connection type for test purposes and do not use it under any circumstances if your
FSG contains confidential information.
directories, files, and Internet
GB
3
45
Page 46

Freecom Storage Gateway (FSG)
GB
3
enable WEP encryption The Wired Equivalent Privacy, or WEP encryption for short,
enables you to protect your FSG connection against
unintended access. The WEP key has to be either 10 or 26
characters in length and use the hexadecimal format.
Characters permitted: 0123456789ABCDEF. Please write
down the code you have entered. This needs to be entered on all of the devices that access your FSG. An example of a 10-character code: FF37AC99B1
Do not use the code provided above.
You should only use WEP if your terminal device does not
support WPA encryption as the WEP standard is out-ofdate and not secure.
enable WPA encryption Wi-Fi Protected Access (WPA) is an encrypted connection
type that protects your network against unintended access. If you intend to use WAP, you will need to create an
authorization key used by the devices to log on to your
FSG. Please make a note of the key.
We highly recommend using WAP encryption.
WPA-PSK key You need to enter an authorization key in this window if
the 'WAP encryption' option is enabled. This is used by the
devices to log on to your FSG via WLAN. PSF, short for
PreShared Key, is a WEP protocol extension. The key should
contain no less than 8 and no more than 63 characters.
46
Page 47

Administration
encryption You can choose the type of encryption for the selected
key type from this drop down menu.
The following options are available:
WPA (TKIP) TKIP is the most basic method of encryption in WPA. All
devices that support WPA can use this method.
WPA2 CCMP WPA2 is an upgraded version of WPA. The method of
encryption is an enhanced version of WPA. WPA2 is however not supported by all devices.
WPA and WPA2 When this option is selected, your FSG determines which
method to use to connect a device to your FSG.
3.4.6 Wireless ACL
Wireless ALC enables you to filter devices attempting to access your WLANs based on
their MAC address. This method of access filtering is not secure and should only be used
in combination with WPA as many devices allow the user to manually change the MAC
address.
Access list policy This option allows you to set the connection filter for
WLAN access. This option filters the devices according to
their MAC address and is therefore not secure!
GB
3
47
Page 48

Freecom Storage Gateway (FSG)
GB
3
Open to every client When this option is selected, no type of filtering takes
place. All devices can connect to your FSG.
allow all in list All devices in the filter list are granted access.
deny all in list All devices contained in the filter list are denied access.
New Press the 'New' button to add devices to the filter list.
Properties This properties window allows you to edit the settings for
your filter entries.
Delete Press 'Delete' to remove the selected filter entry from the
list.
Status: enabled: activates the filter; disabled: deactivates the
filter
Name: You enter a name for the filter here in this field.
Hardware address The user needs to enter the MAC address for these filter
rules (MAC address) (see example).
48
Page 49

Services
3.5 Services
3.5.1 DHCP server
Go to Services –> DHCP Server.
The DHCP server is responsible for giving dynamic IP addresses to the computers on the
LAN. For more information, please read Networks and Router Basics.
Options Description
Start DHCP server Check this if you want to run the DHCP server. Do not run the
DHCP server if you use fixed IP addresses.
Subnet mask The subnet mask in use for the DHCP server.
Gateway The IP address of the gateway the DHCP clients should be
automatically forwarded to if they want to reach external
sites. This address should usually be the FSG itself, unless a
different gateway is running.
Domain name server The IP address of the DNS server the clients should query. This
should be the FSG IP address or an other DNS system.
IP address range The range of IP addresses the DHCP server can use.
IP release time The time between refreshing IP addresses given to DHCP
clients.
GB
3
49
Page 50

Freecom Storage Gateway (FSG)
GB
3
3.5.2 Dynamic DNS
Go to Services -> Dynamic DNS.
Dynamic Domain Name System gives the ability to provide an official DNS name such as
www.yourname.com to the dynamic IP address you have gotten from your ISP. You will
need to register at one of the listed providers. Please see their websites for further details.
Options Description
Run dynamic DNS client Check this if you want to enable the Dynamic DNS client
Service Several different Service providers are supported. These are
dyndns.org, dtdns.com, no-ip.com. Register at the website of
one of the service providers and fill in the required information
Host This is the domain name you registered at the DDNS service
provider
Username This is the username you registered at the DDNS service
provider
Password This is the password you registered at the DDNS service
provider
Retype password This is the password you registered at the DDNS service
provider again
50
Page 51

Configuration
3.5.3 HTTP Server
Go to Services -> HTTP Server.
Use these settings to configure the web server. The web server in use is a version of
Apache.
Options Description
Open HTTP server to This allows the http server to be reached from IP addresses
the outside whose source address is located somewhere on the
internet (if enabled, it is recommended to use SSL
encryption as well).
Use SSL encryption This will allow SSL encrypted pages (https) This is a security
feature (If enabled, device is reachable via https://ip.address,
otherwise via http://ip.address).
Access for configuration Provides access to the FSG web interface from the outside.
pages from the outside (e.g., Internet)
Configuration You open and configure the existing Web Front Pages here.
GB
3
51
Page 52

Freecom Storage Gateway (FSG)
GB
3
Web Front Pages and Aliases
Go to Services -> HTTP Server -> Configuration -> New.
Options Explanation
Name Enter a name for your homepage here.
DNS Name Enter the DNS name for the homepage that you regis-
tered with a Dynamic DNS provider.
Port Enter the port that you want to use to access your
homepage. (We recommend using port 80. If another port
is selected, you will need to enter the port each time you
access the page. Example: hhtp:ip-address:81 for port 81.)
Folder Select the folder where your homepage is stored.
Enable PHP 4 Enables PHP-4 support for this DNS name.
52
Page 53

Configuration
Web Page Aliases
Options Explanation
Name Enter a name for your alias.
Alias Enter a name used to access your alias (e.g., music) if you
want your alias to be reached at www.yourname.com/music.
Path Enter the folder path on the FSG used to access the alias.
GB
3
53
Page 54

Freecom Storage Gateway (FSG)
GB
3
3.5.4 File Server (CIFS)
Go to Services -> File Server (CIFS).
You can enable Windows File Sharing for the outside via the WAN port on this screen.
This enables you to access your FSG over the Internet using Windows Explorer by
entering your Dynamic DNS hostname. This is done by typing in \\www.yourname.com
in the address bar (type in your Dynamic DNS hostname instead of www.yourname.com).
54
Page 55

Configuration
3.5.5 FTP Server
Go to Services -> FTP Server.
This is a File Transfer Protocol (FTP) based server.
Options Explanation
run FTP server Turn on the FTP server.
open FTP server for The FTP server may now be accessed by Internet users from
the outside the outside (only functions internally, not in the Internet).
Use SSL encryption Activates SSL encryption for FTP. Is not supported by all
browsers.
TCP port Enter a port here if you do not want to use the default
port for FTP (port 21).
GB
3
55
Page 56

Freecom Storage Gateway (FSG)
GB
3
3.5.6 SSH Server
Go to Services -> SSH Server.
The SSH server is a secure terminal client that can be used to perform advanced
configuration settings. Please only use this where required because it may present a
security risk. All users with a user account on the FSG can access the FSG.
Options Explanation
Run SSH server Start/stop server
Open SSH server to the The SSH may now be accessed by outside
outside Internet users through the WAN port.
Attention: Starting the SSH server represents a security risk. Only do this
if you trust the users!
56
Page 57

Configuration
3.5.7 Port forwarding
Go to Services -> Port forwarding.
Port forwarding is a type of NAT (Network Address Translation). It permits certain ports
to access select PCs within the local area network from the Internet. This is a method used
to circumvent the firewall. The list indicates which ports are forwarded to which IP
addresses in the LAN. Click 'New' to create a new port forwarding.
Options Explanation
Name Can be any random name.
Status Shows the status of port forwarding for the requested
port (enabled or disabled).
Port You can enter the port(s) that you want to forward to the
PC with the IP address as indicated below. You can enter
several ports separated by commas (e.g., 21, 23, 80). If you
enter a colon, a range of ports is selected (e.g., 2600:2700).
Protocol Shows the protocol selected for the forwarding port (TCP
or UDP).
IP address Shows the internal IP address of the PC the port is for-
warded to.
GB
3
57
Page 58

Freecom Storage Gateway (FSG)
GB
3
3.5.8 Mail server
Select Services -> Mail Server.
The mail server allows you to set up provider independent e-mail addresses for use by
individuals using your FSG. If you do not have your own domain name, you may also use
a Dynamic DNS address here. Example: Your DynDNS address is test.yourdyndns.org.
The admin e-mail address in the case would be admin@testyourdyndns.org.
Fetchmail allows you to retrieve e-mails from other accounts and manage them centrally
on your FSG.
For more details on using the mail server, please refer to the chapter 'Setting up the FSG
Mail Server'.
Options Explanation
Run Mail Server Enables the mail server.
Open IMAP and POP3 Permits the use of IMAP and POP3
server for the outside via the WAN port.
Open SMTP server for Permits the use of SMTP via the WAN port.
the outside
Run Fetchmail daemon Starts Fetchmail. Fetchmail allows you to get e-mails from
other e-mail accounts and allocate them to specific FSG
users. Fetchmail checks all accounts at preset intervals for
new e-mails.
58
Page 59

Explanation of Configuration Options
To set up Fetchmail, click 'New' in the 'Fetchmail Account Configuration' section. You
need to enter the details required to retrieve e-mails here.
Options Explanation
External / Account Login Enter an e-mail account from which the e-mails are re-
trieved.
External POP/IMAP Server Enter the POP/IMAP server for the e-mail account.
Account password Set the password for the e-mail account.
Retype account password Re-enter the password for the e-mail account.
Forward to local user Enter the name of the user's mail folder where the mail is
forwarded (local FSG user).
Choose protocol Select whether to use POP3 or IMAP for fetching e-mails.
Note: Many freemail providers only support POP3.
Keep mail on remote server Enable this option if you do not want the e-mails to be
after fetching it deleted from the server after retrieval.
GB
3
59
Page 60

Freecom Storage Gateway (FSG)
GB
3
3.5.9 SQL server
Go to Services -> SQL Server.
The SQL server allows you to create and manage databases via SQL. In this case, use a
MySQL client or a PHP script.
Options Explanation
Run SQL server Activates the SQL server.
Open SQL server for Allows you to use the SQL server via the WAN port.
the outside
TCP Port The TCP port used for SQL queries.
Administration page Opens the Configuration window where databases and
users are configured.
SQL Administrator If you are no longer able to access SQL when for instance
the user has been deleted, you can set up a new administrator account.
Password Set the password for the SQL administrator in this field.
Re-type password Re-enter the password for the SQL administrator.
Set Account Click here to set up the SQL administrator account.
60
Page 61

Explanation of Configuration Options
3.5.10 Media server
Open Services -> Media Server.
Options Explanation
Enable Media Server Activate the media server.
Content Folders Display a list of folders on the FSG.
Enable Internet Radio Enables the use of Internet radio through the FSG.
Enable Picture Rescaling Enables you to automatically resize images.
Enable audio format Enables you to resample various audio formats.
resampling
Language Menu language for 'Advanced Options'.
GB
3
61
Page 62

Freecom Storage Gateway (FSG)
GB
3
3.6 Configuration
It is possible to save and restore all FSG user settings.
Note: Please do not save your user settings directly on the FSG.
3.6.1 Save configuration
Open Configuration -> Save Configuration.
In this window, you can save the current configuration file on your computer.
After pressing the button, you are asked where you want to save the back-up copy of the
configuration file. Select a location and click 'Save Configuration'.
62
Page 63

Explanation of Configuration Options
3.6.2 Restore Configuration
Open Configuration -> Restore Configuration.
This window offers you the option of restoring a previously saved configuration file.
Press 'Browse' to select an existing backup copy of your configuration file. Then click the
'Restore' button to start the process.
Do not turn the FSG off while the configuration is being restored. This will corrupt and
destroy the configuration of your FSG.
A button is provided that allows you to delete all users not found in the restored
configuration. All data in these directories is then deleted! If you do not press this button,
the user data and logins are not deleted.
You may also select whether to delete the folders of your FSG that do not exist in the
restored configuration. All data in these folders is then deleted!
GB
3
Attention: Please keep in mind that any changes you may have made to the
configuration after backing up the restored configuration will be deleted.
Attention: If the Restore Configuration option is enabled, all existing
settings will be lost! Please save the current configuration beforehand!
The administrator password remains unchanged.
63
Page 64

Freecom Storage Gateway (FSG)
GB
3
3.6.3 Reset configuration
Open Configuration -> Reset Configuration.
Please click the reset button to reset the factory default configuration. This does not
affect or change the version of firmware. You can delete all users.
You can delete all users and groups with one button. All data is then deleted! If this
option is not selected, the user data and logins are not deleted. You may also choose to
delete all folders on your FSG. All data in these folders is then erased!
Attention: Removing all users and folders also means that this data is lost.
To reset the hardware, press the Reset button located on the back of the FSG. Do this for
instance when you are no longer able to access the web interface. When you press the
Reset button, the administrator password is also reset to 'admin'.
64
Page 65

Explanation of Configuration Options
3.7 Hardware
3.7.1 Date & Time
Open Hardware -> Date & Time.
You may change the date and time on the FSG here. You may change the settings
manually or use the Internet time server.
Options Explanation
Time Zone Select your local time zone.
Use European summer Enable this option if you live in a country that uses time
rule summer time.
Automatically synchronize When using this option, select a time server and update
with an Internet time interval.
server
Set manually date and time If you enable this option, please set the date and time
manually.
GB
3
65
Page 66

Freecom Storage Gateway (FSG)
GB
3
3.7.2 Update firmware
Open Hardware -> Update Firmware.
Here you can update the firmware. New firmware usually fixes bugs and adds additional
features to your FSG. Check on www.freecom.com if new firmware updates are available
for the Freecom Storage Gateway.
Freecom will release new and updated firmware on a regular basis. It is also possible to
obtain the source code and create your own firmware.
Attention: Changing the source code of the firmware is at your own risk!
Download the firmware file and click on "Browse" to select the file. Click on "Update
firmware" to start the update.
Attention: Updating the firmware is at your own risk! Make sure to make
a backup of your current configuration before updating the firmware.
66
Page 67

Explanation of Configuration Options
3.7.3 Hard drive
Open Hardware -> Harddrive.
You can configure any hard drive setting in this window.
Spin-down time
Hard drives are devices with moving part that create noise and heat, and consume
power. If the FSG is not used for an extended period of time, your best option may be to
shut down the hard drive. This reduces power consumption and the amount of noise and
heat generated. It also increases the operational life of the hard drive. When the hard
drive is shutdown, it will take longer to access it initially because the hard drive has to first
start spinning.
You can set the time after which the hard disk shuts down following the last access. If you
do not want to use this option, please enter 0.
Once you have set the time, click 'Apply'.
Formatting the hard drive
Before formatting the internal HD on the FSG, please read the warning notices. All data
is lost during formatting! After reading the warning notices, please press the button to
confirm you want to format the hard drive. Then click the 'Format drive' button.
Attention: When you click the 'Format drive' button, all data on the drive
is lost! Please make a backup copy before formatting the drive.
GB
3
Attention: Stop all operations on the device while the drive is being
formatted!
67
Page 68

GB
3
Freecom Storage Gateway (FSG)
3.7.4 Fan control
Open Hardware -> Fan Control.
This option allows you to adjust the fan speed. Reducing the fan speed means less noise,
but higher temperatures in the device. When operating the device in extremely warm
conditions or whenever the device is in constant use, we recommend that you increase
the fan speed to deliver more cooling capacity.
68
Page 69

Explanation of Configuration Options
3.8 Information
This is the information menu. It contains diagnostics data and general information.
3.8.1 Copyright
Open Information -> Copyright.
This section contains information on copyrights for your FSG.
3.8.2 System
Open Information -> System.
You will find general system information on available disk space and your processor.
GB
3
69
Page 70

Freecom Storage Gateway (FSG)
GB
3
3.8.3 Version
Open Information -> Version.
This window displays information on the operating system and firmware contained on FSG.
70
Page 71

Explanation of Configuration Options
3.8.4 Devices
Open Information -> Devices.
This dialog box displays a list of attached devices. Click 'Refresh' in your browser if one
of the connected devices is not displayed on the screen.
Note: eSATA are only detected by the FSG once it has been restarted after
the device is attached. After restarted the FSG, the eSATA device is detected and is then ready for use.
GB
3
71
Page 72

Freecom Storage Gateway (FSG)
GB
3
3.8.5 Network
Open Information -> Network.
Both LAN and WAN (internet) Network information is found here for the FSG. If you need
the IP address of the FSG, please look for it here.
WAN Port:
Status Shows the active status
Hardware Address Shows the MAC address or physical address of the port
IP Address Your outside FSG (WAN) internet IP address assigned by your ISP
Broadcast Address This address is used to ask all computers on a subnet at once
Subnet Mask This is the subnet mask gotten from your ISP
Cable Attached This shows if the cable is attached or not
LAN Port:
Hardware Address Shows the MAC address or physical address of the port
IP Address Your FSG (LAN) internet IP address
Broadcast Address This address is used to ask all computers on a subnet at once
Subnet Mask This is the subnet mask you setup for your network
DNS servers:
Displays a list of DNS servers assigned to you by your provider.
72
Page 73

Explanation of Configuration Options
3.8.6 Logs
Open Information -> Logs.
If you encounter problems with you FSG, you can use the log file recording option to
locate the issue.
The FSG offers several log files for different software components:
- Kernel
- DSL connection
- DHCP server
- Hotplug
- VPN connections
- Dynamic DNS
- FTP server
- E-mail server
To enable the log function, simply hit the 'Start log file recording' and then press 'Apply'.
Select a function (e.g., DSL connection) from the list and click 'Refresh' to update the
screen display.
GB
3
73
Page 74

Freecom Storage Gateway (FSG)
GB
3
3.9 Shutdown
This screen allows you to reboot or shutdown the FSG. (You can then safely unplug the
device from the power supply.)
Attention: Always shutdown the FSG before unplugging the power supply. If you do not do this, you may damage your drive or corrupt the
system.
3.9.1 Reboot
Open Shutdown -> Reboot.
If you encounter any problems with the FSG, it may help if you restart the unit. Click
'Reboot' and the FSG restarts.
74
Page 75

The Freecom Storage Gateway Wizard
3.9.2 Shut Down
Open Shutdown -> Shut Down.
The FSG shuts down when you press the 'Shutdown' button. When all the lights on the
device are off, you can unplug it from the power outlet. This may take a few seconds.
Press the Power on button to turn the FSG back on.
Note: The LED ring stays on after the FSG has shut down.
Chapter 4: The Freecom Storage Gateway Wizard
GB
4
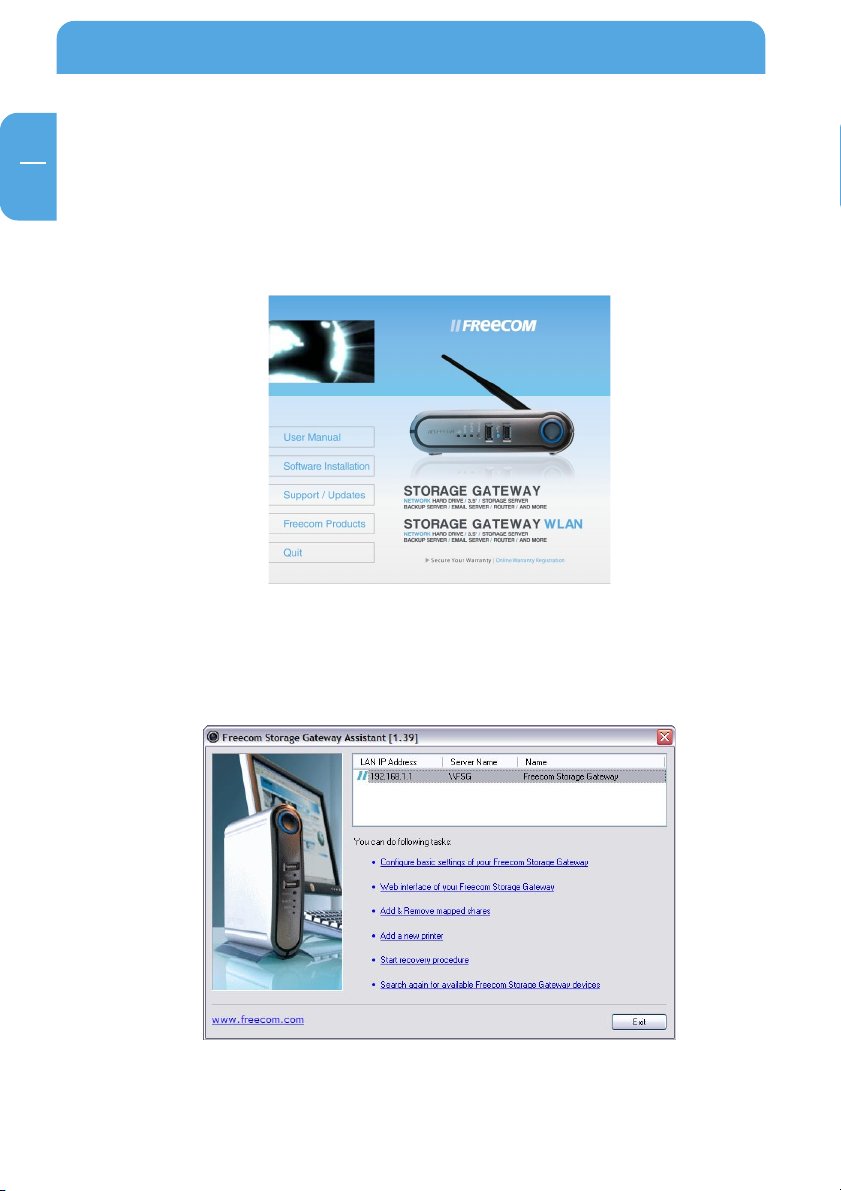
The Freecom Storage Gateway Wizard helps you to locate each FSG in your network.
When started, it displays all FSGs available in your network and helps you configure the
FSG as a printer server or create network folders. You can also configure the basic
settings and quickly find the configuration website using the FSG Wizard. You may also
perform any of the functions of the FSG Wizard manually.
Note: The FSGW software only works with Windows.
75
Page 76

Freecom Storage Gateway (FSG)
GB
4
4.1 Installation
Please place the Manual & Application CD on the tray. It contains user manuals and
software, including the FSG Wizard. Once the CD is inserted, a window should appear
automatically on the screen. If this does not happen, pleases proceed as follows:
1. Open your computer Desktop.
2. Double-click the CD drive containing the CD. The CD window should now open.
3. Click 'Install Software' -> 'FSG Wizard'. Follow the instructions for installing the
software.
4. Start the FSG Wizard.
4.2 Features of the FSG Wizard
The preset password and login name for the FSG are:
Login Name: admin
Password: admin
76
Page 77

The Freecom Storage Gateway Wizard
4.2.1 Configure basic settings of your Freecom Storage Gateway
In this screen, you can set an IP address, subnet mask, device name and workgroup name
for your FSG. With this information, it is easy to locate your FSG in the network without
the wizard. To change the settings, you have to first enter the administrator password.
4.2.2 Accessing your FSG web interface
When you click this menu item, the web interface for your FSG opens in your default
browser.
GB
4
77
Page 78

Freecom Storage Gateway (FSG)
GB
4
4.2.3 Adding and removing network drives
You can assign a drive letter to shared folders on your FSG. This allows you to access to
the files in Windows more quickly.
4.2.4 Add a new printer
This windows allows you to configure any printer connected to your FSG on your local
PC using Windows Printer Wizard.
78
Note: The attached printer has to be set up separately on each computer!
Page 79

The Freecom Storage Gateway Wizard
4.2.5 Start recovery procedure
This procedure can reset and repair an FSG to factory default settings if you cannot
access your FSG anymore. Your user data will not be deleted!
To restore your settings, please proceed as follows:
a) Enable the Recovery mode by clicking 'Start the recovery procedure' in the Freecom
Storage Gateway Wizard.
b) Turn the FSG off using 'Shutdown'.
c) Unplug the FSG's AC power pack.
d) Use a pointed object to carefully press the 'Reset' button. It is located next to the AC
power slot on the back of the FSG.
e) Keep the 'Reset' button pressed down and reattach the AC power supply.
f) Release the 'Reset' button.
g) The LED on the PWR button lights up, indicating that the Recovery mode is enabled.
The device's LED flashes while the recovery process is taking place.
h) Once the LEDs stop flashing and the LED on the PWR button turns off, the recovery
process is complete. A message window appears on screen, telling you that the
recovery is finished.
i) Once it is complete, press OK in the Freecom Storage Gateway Wizard window.
GB
4
79
Page 80

GB
4
Freecom Storage Gateway (FSG)
Note: After recovery, all user data is still available on the FSG. To avoid
problems, the administrator should backup all user data and format the
hard disk. If an old configuration file was saved before, the administrator
should load this configuration and afterwards copy the individual user
data back to its folders.
4.2.6 Repeat search for available Freecom Storage Gateways
Click here to repeat the search for your FSG if it was not detected during the first search.
Please make sure that your network is configured as described above in this manual and
that all cables are properly attached.
80
Page 81

FSG in everyday use
Chapter 5: FSG in everyday use
5.1 WAN or internet connection setup
Next to using the FSG as a standalone router and NAS and connecting computers and
switches and routers to the LAN ports, there is also the option of connecting the FSG
WAN port to an existing router or straight to an internet modem.
5.1.1 Using the FSG behind a router
Note: When initially configuring the FSG, your computer needs to be
connected to one of the LAN ports on this device.
Connecting the hardware
1. Connect a RJ45 cable to a LAN port on your router.
2. Plug the other end of the cable into the WAN port on the Freecom Storage Gateway.
3. Once the FSG is configured, you can connect the network PC to the FSG or your
router.
FSG configuration
Using a fixed IP address Preparation
1. Check the 'DHCP' box under TCI/IP Settings in your computer's network settings. For
more details, refer to Appendix B in this manual.
2. Connect your PC to the FSG.
3. Open the Internet browser and start the Configuration menu for the FSG (factory
defaults: http://fsg or. http://192.168.1.1).
4. Open 'Connections' -> LAN' and select an IP address for the FSG.
GB
5
To prevent conflicting IP addresses in your network, make sure the LAN
IPs for your FSG and router are different.
5. Open 'Connection' -> 'WAN' and select 'Use fixed IP address'.
Use the following settings:
Specify the IP address: Enter an IP address that lies within the your router's
address range; if the router's IP address is 192.168.2.1,
enter 192.168.2.100 for your FSG.
This IP address allows you to access to the FSG from
anywhere in your local network.
81
Page 82

Freecom Storage Gateway (FSG)
GB
5
Subnet mask: Enter the subnet mask of your router (example:
255.255.255.0).
Standard Gateway: IP address of your router, e.g., 192.168.2.1.
Using the FSG behind a router when employing a fixed IP address
1. Open 'Services' -> 'File Server (CIFS)' and enable 'Open Windows File Sharing (CIFS/
SBM) on the WAN port'.
2. If you want to access the FSG from outside the network (e.g., over the Internet) via
HTTP (port 80) and FTP (port 21), you will need to forward these ports on your router
to the IP address assigned by the router to the FSG. In this example, you are required
to forward ports 21 and 80 to the IP address 192.168.2.100. For more details on
forwarding ports, please refer to your router's manual.
3. Please make sure that 'Services' -> 'HTTP Server' -> 'Open HTTP server to the outside'
and 'access for configuration pages from the outside” / 'FTP Server' 'open FTP server
for the outside' are enabled in FSG's Configuration window.
82
Note: The FSG DynDNS options do not function when the FSG is used
behind a router. Please enable the router's DynDNS option.
Page 83

FSG in Everyday Use
Using DHCP
An alterative to using a fixed IP address is assigning your FSG a dynamic IP address through
your router. You will need to enable your router's DHCP server before using the FSG as a
DHCP client behind the router! For further details, please refer to your router's manual.
Before getting start
1. Check the 'DHCP' box under TCI/IP Settings in the network settings of your PC. For
more details, refer to Appendix B in this manual.
2. Connect your PC to the FSG.
3. Open the Internet browser and start the Configuration menu for the FSG (fault
defaults: http://fsg or http://192.168.1.1).
4. Go to 'Connections' -> 'WAN' and choose 'Run DHCP Client'. Click 'Apply'. Your FSG
is now assigned an IP address by your router.
GB
5
5. Enable the DHCP server on your router's Configuration window. For more information on this topic, please refer to your router's manual.
6. Connect the WAN port on your FSG to a LAN port on your router.
Using the FSG behind a router via DHCO
1. Open 'Information' -> 'Network'. You can view the IP address assigned by the router
to your FSG under WAN Port -> IP address. If your router uses the IP address
192.168.2.1, the FSG IP address for example could be 192.168.2.100.
2. If you want to access the FSG from outside the network (e.g., over the Internet) via
HTTP (port 80) and FTP (port 21), you will need to forward these ports on your router
to the IP address assigned by the router to the FSG. In our example, you need to
forward ports 21 and 80 to the IP address 192.168.2.100. For more details on
forwarding ports, please refer to your router's manual.
3. Please make sure that 'Services' -> 'HTTP Server' -> 'Open HTTP server to the outside'
and 'access for configuration pages from the outside” / 'FTP Server' 'open FTP server
for the outside' are enabled in FSG's Configuration window.
83
Page 84

Freecom Storage Gateway (FSG)
GB
5
Note: The FSG DynDNS options do not function when using the FSG
behind a router. Please check your router's DynDNS box.
5.1.2 Using CIFS (Samba) over the Internet (behind a router)
CIFS (Samba) allows you to access the FSG over the Internet without any additional
software. You can also map a folder on the FSG, i.e., add it to Windows. Mapped drives
are network drives that can be used like normal folders.
1. Open Services -> File Server (CIFS).
2. Check the box next to 'Open Windows File Sharing (CIFS/SMB) on the WAN port'.
3. Confirm by pressing 'Apply'.
4. Forward TCP ports 139 and 445 from the router to the LAN IP on your FSG. For more
information on how to forward a port on your router to the FSG, please refer to your
router's manual.
5. Your LAN is now configured for CIFS (Samba).
84
Page 85

FSG in Everyday Use
5.1.3 Connecting the FSG WAN port to a modem
To use the internet through your FSG, you will need to setup the FSG with the configuration information provided by your ISP. This information is described in detail in the
"Getting on the internet" section of the "Before you begin" chapter.
To configure your FSG with this information, you should:
• Open the Web interface window of your FSG.
• Log on under 'admin' and administrator password.
• Click 'Connections' on the left-hand side of the window.
• Click 'WAN' on the left-hand side.
• If the IP data is prepared dynamically, check to make sure that 'Run DHCP Client' is
enabled. The configuration is complete.
• If the IP data is not prepared dynamically, click the 'Run DSL Client' box.
GB
5
• Enter the login data provided by your ISP.
• Click 'Apply'.
• Save your settings.
• To test the connection, start the Internet browser and see if you can access your
Internet Favorites or check the Info window under WAN on the FSG configuration
website to see whether your ISP has assigned you an IP address.
Note: It may take some time to establish the DSL connection to the ISP.
85
Page 86

Freecom Storage Gateway (FSG)
GB
5
5.2 Dynamic DNS
A DynDNS entry allows you to access a computer using a dynamic IP address at any time
under the same domain name. To do so, you first need to register with a DynDNS service.
It updates the modified IP addresses and forwards this to the domain name. This enables
you to be reached at one single domain name at any time even if your IP address changes
ever so often.
Your FSG supports three different DynDNS providers:
- www.dyndns.com
- www.dtdns.com
- www.no-ip.com
Creating a Dynamic DNS account (e.g., no-ip.com) and setting up a host
Note: You will need to register with a Dynamic DNS provider such as www.no-ip.com.
Once you have registered at one of the providers, go to step 1.4.
1.1 To register at No-IP (requires a valid e-mail address), go to http://www.no-ip.com.
86
Page 87

FSG in Everyday Use
1.2 Press 'Sign-up now!' located next to the Login button. Enter the required information
on the next page and click 'Sign-up now!'.
1.3 You will then receive an e-mail from No-IP, where you are asked to activate your
account (This may take a few minutes.). Click the link in the e-mail to activate your
account.
1.4 Log on to your No-IP account and create a host.
1.5 Adding a new host
a. Select 'Host/Redirects -> 'Add' on the left section of the screen.
GB
5
b. Enter the required hostname in the specified box and select a domain name such
as 'zapto.org'. Choose a different host or domain name if the one you have entered
is not available.
c. Click 'Create Host' and the new host has been added.
d. To view your account settings, click 'Host/Redirects' ->'Manage'.
87
Page 88

GB
5
Freecom Storage Gateway (FSG)
Note: To set up a homepage on your FSG, you will require two hosts, one
to access the FSG configuration and the other to access the homepage.
5.3 Setting up your own homepage on the FSG
You can set up one or more homepages on your FSG. They are accessed by entering the
dynamic DNS address. Please follow these steps to set up a homepage on the FSG:
Configuring the FSG
Open 'Services' ->'Dynamic DNS'.
• Select 'no-ip.com' as the service.
• Enter one of the hosts created in chapter 12.2 (e.g., fsg- 3forum.zapto.org).
Note: This host allows you to access your configuration page from the outside via HTTP/
FTP/SSH.
• Username: the e-mail address used to register at no-ip.com.
• Password: Your no-ip password.
• Repeat password: Re-enter your no-ip password.
To access the Configuration pages from the outside, you will first need to enable 'Open
HTTP Server to the outside' and 'Access for Configuration pages from the Outside' under
'Services' - 'HTTP Server'.
88
Page 89

FSG in Everyday Use
Setting up web front pages
• Add a new folder in the FSG configuration window (example: Homepage).
• Select 'New' under 'Services' -> 'HTTP Server'.
• Enter a name such as 'My Homepage'.
• Enter the second host created in step 1 in the field 'DNS Name' (example:
MyFSG.zapto.org).
Note: You may use the same host as in step 2.1. Keep in mind that you can
now only access your FSG configuration by entering the WAN IP address.
• Enter any port in 'Port'. (We recommend that you use port 80. If not, you will have to
enter http://MyFSG.zapto.org:81/, with 81 indicating the port).
• As the 'Folder', select the one you created in step 3.1.
• Click 'Apply'. The HTTP now restarts.
• Create an index.html in the selected folder. This HTML page is opened whenever you
access your host (e.g., http://MyFSG.zapto.org).
Web Front Page Aliases
Once your web front page has been set up, you can set aliases for your folders. Enable the
check box for your web front page and click 'Properties'. Select 'New' on the 'Properties'
screen.
Enter a name for your alias. You may choose any name.
• Please enter an abbreviation as the 'Alias' (e.g., mp3).
• Please enter the folder path in the field labeled 'Path' (e.g., files/test/user10/music/).
You can now access this folder (for instance, files/test/user10/music/) using the alias
(e.g., http:// MyFSG.zapto.org/mp3").
GB
5
Note: If the path you enter ends with a slash ('/') (e.g., files/test/user10/music/), the user
is required to enter the user, username and password whenever he accesses the alias
address (e.g., http:// MyFSG.zapto.org/mp3). If the path does not end with a blank space
(' ') (e.g., files/test/user10/music), the user is not be required to enter the username and
password when accessing the alias address (e.g., http:// MyFSG.zapto.org/mp3).
Note: You can only use hosts from a provider. It is however possible to use
multiple domains from one provider.
89
Page 90

Freecom Storage Gateway (FSG)
GB
5
5.4 Setting up a printer
Windows: Installing a USB printer
To install a USB printer, connect the printer to one of the USB host ports on the FSG.
Check to make sure the FSG is on. Now turn the printer on.
Installing using the Freecom Storage Gateway Wizard
1. Connect a USB printer to the FSG.
2. Open the FSG Configuration page and check whether the printer was detected
under 'Information' -> 'USB'.
3. Start the Freecom Storage Gateway Wizard and click 'Add a new printer'. The FSGW
automatically applies all settings. You only need to select the driver for your printer
model.
Manual installation
1. Connect a USB printer to the FSG.
2. Open the FSG Configuration page and check whether the printer was detected
under 'Information' -> 'USB'.
3. Go to Start -> Settings -> Printer and faxes -> Add printer in Windows.
4. The print wizard starts. Click 'Next'.
5. Select 'Add local printer on this computer' and check the box next to 'Automatically
detect and install my plug&play printer'. Click 'Next'.
6. Select the printer port in the next screen. Open 'Add new port' and select 'Standard
TCP/IP port'. Click 'Next'.
7. The 'Add Standard TCI/IP port wizard' starts. Click 'Next' to continue. The 'Add port'
window opens. Use the following settings: Printer name or IP address: FSG name or
IP address of the FSG port name: 9100. Click 'Next'.
9. Now you need to enter the other port data. Set Device Type to: default (Generic
Network Card) and click 'Next'. An overview of your settings is provided in the next
screen. Click Finish.
10. To complete the installation, you now have to install the printer software. Select the
software for your printer. If your printer is not contained in the list, hit 'Have Disk' and
insert the drivers disk or CD for your printer.
90
Note: You can also use the Freecom Storage Gateway Wizard for quick
installation of your printer in Windows. For detailed instructions on using
the FSGW, please refer to chapter 4, 'The Freecom Storage Gateway Wizard'.
Page 91

Setting up a printer
Mac OS X: Installing a USB printer
To install a USB printer, connect the printer to one of the USB host ports on the FSG.
Check to make sure the FSG is on. Then turn the printer on.
1. Connect a USB printer to the FSG.
2. Open the FSG Configuration page and check whether the printer was detected
under 'Information' -> 'USB'.
3. Open 'System preferences' -> 'Printing & Faxing'.
4. Click '+' to add a new printer.
5. The 'Printer Browser' opens. Select 'IP printer' as the printer type and select the
following settings:
GB
5
Protocol: HP Jet Direct-Socket
Address: 192.168.1.1:9100 (replace 192.168.1.1 with the IP address that
you set for your FSG)
Queue name: You may leave this field blank.
A list of available printer drivers is now compiled.
91
Page 92

GB
5
Freecom Storage Gateway (FSG)
6. You can enter additional information on the printer in the 'Name' and 'Location' fields.
7. Select the model of your printer under 'Print Using'. You may need to install the
printer driver for your printer beforehand.
8. Click 'Add' to finish printer setup.
92
Page 93

SSH Server
5.5 SSH Server
The SSH server is a secure terminal client that can be used to perform advanced
configurations. Please use this only where absolutely necessary because each user with
an account can also connect to the SSH server.
5.5.1 Starting the SSH server
Open 'Services' -> 'SSH Server' and enable 'Run SSH server'. If you also want to use the SSH
server from the outside (Internet, router), enable 'Open SSH to the outside through the
WAN port' and press 'Apply'.
Attention: Using an SSH server presents a security risk. Only do this if you
trust the users!
GB
5
93
Page 94

Freecom Storage Gateway (FSG)
GB
5
5.5.2 Connecting with the SSH server for Windows
Install an SSH client (e.g., PuTTY) and start it. Enter your FSG's IP address/hostname:
With PuTTY, you only need to enter the IP address and hostname, and can leave all other
settings unchanged. To connect, simply press 'Open':
Log on with the username and password.
94
Page 95

SSH Server
Linux/Mac OS X
Open the console window or start 'Terminal' (Mac OS X). You now need to type in:
ssh FSG_IP –l admin
FSG_IP = IP address of your FSG (192.168.1.1, for instance). Now connect with the FSG's
SSH server and sign in as admin. You can use the SSH server once you have entered the
administrator password.
Sample SSH application
SSH allows you to instruct the FSG to download files from an FTP server. The file is then
saved on the FSG without having to turn the PC on. This featureis particularly useful
when downloading large files from slow FTP servers. The syntax for the 'ftpget' function
is: ftpget -u <username> -p <password> <ftp server> local file path and name &
Example:
ftpget -u anonymous -p test@test.de ftp.ftp.com ftp.exe /pub/ test.exe &
User to Connect As: anonymous
Password: test@test.de
FTP server: ftp.opera.com
Local file name: ftp.exe —> name used to save the file on the FSG
Remotefilepathandname: /pub/test.exe —> path and file name on FTP server &
—> Continues download when PuTTY is closed.
GB
5
95
Page 96

Freecom Storage Gateway (FSG)
GB
5
5.6 Connecting External Drivers (USB, SATA)
5.6.1 USB
For more information on attached external USB mass storage devices, please refer to the
section 'Information on the FSG configuration pages'.
Installing USB mass storage devices
To add more disk space to the FSG, plug a USB mass storage device into one of the USB
host ports. Then turn on the external USB device. The disk space on theUSB device should
appear as a shared folder. When using SMB (Windows File Sharing), it may take a few
minutes until the Windows-based computer detects the new folder. If you are using a
browser (HTML) to view your files, you can click Refresh. This shared folder can be
accessed via FTP, HTML and SMB (Window File Sharing). The folder is configured with
read and write privileges for all users located in the master directory (/). Once the device
is attached, you can limit the user privileges. Please read the chapter on adding users and
groups and on setting folder rights.
Attention: Optical drives such as DVD writers can only be used to read
files and data.
Attention: When attaching a card reader, you need to insert the flash disk
before connecting it to the FSG.
Power supply
All host ports can supply the USB-specific 500 mA current. If more power is required,
please use the AC power supply that came with the external USB device.
96
Page 97

Connecting External Drivers (USB, SATA)
File systems
The attached USB device has use in a file system format supported by the FSG. The
supported file systems are:
FAT32
NTFS (read-only access)
ext2
ext3
reiserfs
HFS(+) (read-only access)
Note: To obtain full access to the external drive, we recommend that you
use FAT32 when formatting the drive.
5.6.2 eSATA
Connection
To install a S-ATA external storage device, you must first shutdown the FSG. Go to the
web interface and log in to the administration site. Go to the shutdown item of the
Hardware menu and press shutdown. Wait till the FSG is shutdown and plug in the eSATA connector of the external device into the FSG eS-ATA port. Make sure the eS-ATA
device is powered on and turn the FSG back on. The storage on the eS-ATA device should
show up as a shared folder. This shared folder can be reached via FTP, HTML and SMB
(Windows file sharing). The folder will be mounted with read and write rights for all in the
root folder (/).
GB
5
Filesystems
An attached S-ATA Disk must be formatted in a file system supported by the FSG. The
supported file systems are:
FAT32
NTFS (read-only)
ext2
ext3
reiserfs
HFS(+) (read-only)
Remark: To have read/write access on the external disk, we recommend
formatting the disk in FAT32 format.
97
Page 98

Freecom Storage Gateway (FSG)
GB
5
5.7 Setting up Virtual Private Networks (VPNs)
A Virtual Private Network (VPN) is a computer network that uses a public network such
as the Internet to transfer private data. VPN users can exchange data just like in an
internal LAN. VPN are often used by companies as a way of providing access to the
company network to staff when they are out of the office. The process involves the FSG
establishing a VPN connection to the company's VPN gateway. Using this connection,
the employee is then able to perform his duties as if he/she were working directly in the
company's local area network.
Open Connections -> VPN -> ADD Connection in the main menu.
Status
You can enable or disable the VPN connection at any time here.
Name
Please enter any name of your choosing for the connection here.
Remote Host IP
In this field, please type in the IP address of the VPN routers that you wish to connect to
(you need to have an account on this router).
Remote Network
Enter the IP address and the network mask that you want to access. Example: 192.168.1.0/
24. The '0' at the end of the IP address signifies that you can reach any PC in the network
under the IP addresses 192.168.1.1 – 192.168.1.254. /24 indicates that this is a network
mask 255.255.255.0. If the network you are attempting to access contains several
subnets with the net mask 255.255.252.0, please enter /22 in place of /24.
ESP Encryption
This is where you set the encryption protocols. You can keep the default settings,
although they have to be supported by the remote machine.
ESP Encryption 3Des
Triple DES (3DES) is an advanced version of the Data Encryption Standard (DES). The old
DES only used key lengths of up to 56 bits. 3DES on the other hand uses three encryption
cycles and two or three keys. By using three keys, an actual key length of 112 bits is
provided.
MD5
MD5 sums are used by PGP and other programs to check the integrity of files. This
involves comparing the file's current MD5 sum with an accepted sum from earlier. This
allows the system to determine whether the file has been changed or is corrupt.
98
Page 99

Setting up Virtual Private Networks (VPNs)
SHA1
Secure Hash Algorithm (SHA) is the term used to describe a group of standardized
cryptographic hash functions.
Working together with the National Security Agency, the National Institute of Standards
and Technology (NIST) developed a secure hash function for signing as part of the Digital
Signature Algorithms (DSA) for the Digital Signature Standard (DSS). It was released in
1994. The name given to it was the Secure Hash Standard (SHS). It specifies the Secure
Hash Algorithm (SHA), with a hash value of 160 bits for messages up to 264 bits in size.
The algorithm shares a similar structure with MD4, designed by Ronald L. Rivest. There
are two versions of the Secure Hash Algorithm: SHA0 and SHA1. They differ in the
number of cycles passed through when generating the hash value.
Pre-Shared Key
Similar to a password. Has to be the same on both VPN routers (FSG and remote VPN
router).
Operation
1. Establish connection - Allows you to establish a connection with another VPN router.
2. Listen Only - Allows you to accept a connection from another router.
Alive Ping IP
You can enter the router's IP address used in establishing a connection in this field. This
involves sending a ping at set intervals to ensure that connection is not cut when no
activity is registered over a long period of time.
GB
5
99
Page 100

Freecom Storage Gateway (FSG)
GB
5
5.8 Setting up an FSG Mail Server
An e-mail server, or simply mail server, handles e-mails. It is responsible for receiving,
sending, saving or forwarding e-mails.
Note: In the name of spam protection, some freemail providers refuse to
accept e-mails received from dynamic DNS hostnames. Please keep this in
mind when sending e-mails!
Configuring the FSG
The FSG mail server supports POP3 (Post Office Protocol Version 3) and IMAP (Internet
Message Access Protocol) for retrieving and SMTP (Simple Mail Transfer Protocol) for
sending e-mails.
POP3 Communications protocol for retrieving e-mails using an
e-mail client. POP3 allows the user to retrieve and delete
e-mails on the server. A permanent connection to the
POP3 mail server is not required. The fetched e-mails are
stored locally and available offline.
IMAP The IMAP protocol allows the user to access and manage
e-mails directly on the server using an e-mail client. Unlike the POP3 protocol, the e-mails generally remain on
the server and are only transferred to the client as required. In other words, you need an Internet connection
to read the e-mails. IMAP provides detailed access control
to mailboxes as POP3.
Note: Many freemail providers only support POP3!
SMTP The SMTP protocol is used to exchange e-mails within
computer networks. SMTP is mostly used to send and
forward e-mails.
Set up a Dynamic client under Services -> Dynamic DNS if you have not already done so.
Your e-mail address corresponds to the hostname that you set earlier, e.g.,
xxx@yourhost.no-ip.org (xxx is a user that you previously added on the FSG; yourhost.noip is the hostname that you selected at the Dynamic DNS provider).
100
 Loading...