

Page 1
Freecom Classic SL Network Drive
EXTERNAL HARD DRIVE
Rev.503
Page 2

Freecom Classic SL Network Drive
Warning !
All rights reserved. The products named in this manual are only used for identification purposes and may be trademarks or registered trademarks of the respective
companies. This device was designed for home or office use.
Warning! This device is equipment complying with EN55022 class A. This equipment can cause radio disturbances in a residential area. If this is the case, the user
has to take appropriate measures and assume all responsibility and costs for. It may
not be used near or with any life-sustaing systems.
Freecom cannot be made liable for any damages, loss of data or damage following
thereof -whatsoever (including, without limitation, damages for loss of business
profits, business interruption, loss of business information, or other pecuniary loss)
arising out of the use of or inability to use this Freecom product, even if Freecom
has been advised of the possibility of such damages.
We reserve the right to upgrade our products in keeping with technological
advances.
GB
Dear customer.
Thank you for purchasing the Freecom Classic SL Network Drive -
Network storage via Ethernet made possible through NDAS technology!
This User Manual is intended to help you install the Classic SL Network Drive
quickly and easily onto your Personal Computer or Ethernet Network. Please
read the instructions carefully.
Freecom Technologies • Germany
www.Freecom.com
2
Page 3

Table of Contents
Table of Contents
Chapter 1: Introduction ............................... page 6
1.1 Package Contents ......................................................................... page 6
1.2 System Requirements ................................................................... page 6
1.3 Classic SL Network Drive Setup Overview ................................... page 7
Chapter 2: Cable Installation....................... page 8
2.1 NDAS Mode ..................................................................................page 8
2.2 USB Mode .....................................................................................page 8
Chapter 3: Software Installation ................ page 9
3.1 For Windows XP and Windows 2000 ..........................................page 9
3.2 For Windows 98 SE and Windows ME .........................................page 10
3.3 Classic SL Network Drive Administrator ...................................... page 12
GB
Chapter 4: Drive Registration ..................... page13
4.1 Add / Register a New Classic SL Network Drive .......................... page 13
4.2 Using Classic SL Network Drive .................................................... page 15
4.3 Sharing Classic SL Network Drive ................................................. page 15
Chapter 5: Status and Mode Indicator ....... page17
5.1 Changing from Read / Write Mode to Read Only Mode ........... page 18
5.2 Changing from Read Only mode to Read / Write Mode ............ page 18
3
Page 4

Freecom Classic SL Network Drive
GB
Chapter 6: Introduction to Administrator
Tool Menu ..................................................... page19
Chapter 7: Drive Functions .......................... page20
Chapter 8: Advanced Drive Functions ........ page21
8.1 Introduction to Aggregation ....................................................... page 21
8.2 Introduction to Mirroring ............................................................ page 21
8.3 Requirements for Aggregating / Mirroring ................................ page 21
8.4 Instructions for Aggregating / Mirroring
Two Classic SL Network Drives ..................................................... page 21
8.4.1 Disable Classic SL Network Drive .............................................. page 22
8.4.2 Aggregate / Mirror Classic SL Network Drive ........................... page 22
8.4.3 Enable Classic SL Network Drive ............................................... page 24
8.4.4 Format Classic SL Network Drive .............................................. page 25
8.4.5 Enable Classic SL Network Drive for Other Users .................... page 25
8.4.6 Unbind Classic SL Network Drive .............................................. page 26
Chapter 9: Formatting ................................. page 28
9.1 Initialize Classic SL Network Drive ............................................... page 28
9.2 Partition Classic SL Network Drive ............................................... page 29
Chapter 10: Uninstall ................................... page33
Chapter 11: FAQ ............................................ page35
4
Page 5

Chapter 12: Troubleshooting ...................... page44
Regulatory Statements ................................ page50
GB
© 2005 Freecom Technologies
5
Page 6

Freecom Classic SL Network Drive
GB
1
Chapter 1: Introduction
1.1 Package Contents
The following items are included in the Classic SL Network Drive package:
• Classic SL Network Drive
• Power adapter
• Manual and Software Installation CD
• Ethernet Cable
• USB Cable
• Warranty card
1.2 Minimum System Requirements
Windows® 98SE / Me / 2000 / XP
• 233 MHz Pentium® II or higher
• 64 MB RAM (128 MB recommended)
• USB 1.1 Port (USB 2.0 recommended)
• CD-ROM drive for installation
• 100Base-T full duplex switch for NDAS mode
Mac® OS X
• Mac OS X 10.3 or higher
• 128 MB RAM (256 MB recommended)
• USB 1.1 Port (USB 2.0 recommended)
• CD-ROM drive for installation
• 100Base-T full duplex switch for NDAS mode
• MAC OS X requires the drive formatted in FAT-32
6
Page 7

Introduction
1.3 Classic SL Network Drive Setup Overview
Classic SL Network Drive
NDAS (Ethernet) mode
USB-mode
GB
1
7
Page 8
Freecom Classic SL Network Drive
GB
2
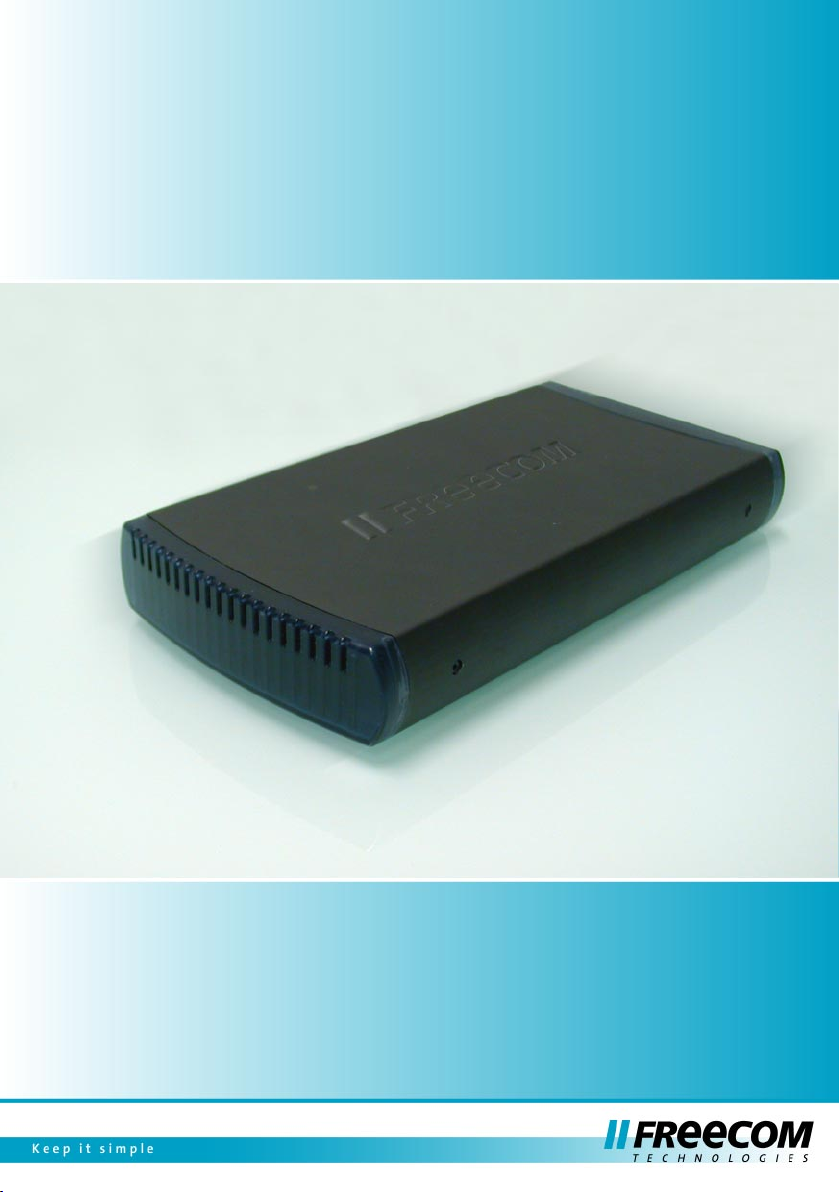
Chapter 2: Cable Installation
Warning: Do not connect USB cable and Ethernet cable at the
same time.
2.1 NDAS (Ethernet) Mode
Classic SL Network Drive
1. Connect the included Ethernet cable from the Ethernet port on the Classic SL
Network Drive to a switch (100 Base-T full duplex).
Wireless users: Connect Classic SL Network Drive to your wireless router or
access point with the included Ethernet cable.
2. Make sure the power connector is firmly attached to the Classic SL Network
Drive and connect the power adapter to a power source.
3. Slide the On/Off Switch to ON position.
2.2 USB Mode
Classic SL Network Drive
1. Connect the included USB cable from the USB port on the Classic SL Network
Drive to your PC’s USB port.
2. Make sure the power connector is connected firmly to the Classic SL Network
Drive and connect the power adaptor to a power source.
3. Slide the On/Off Switch to ON position.
8
Page 9

Software Installation
Chapter 3: Software Installation
3.1 For Windows XP and Windows 2000
Installation of the Classic SL Network Drive software is simple and easy. Insert the
included "Classic SL Network Drive Manual & Software Installation CD" into your
CD-ROM Drive and select the Drive Sharing and Classic SL Network Drive Mode.
You will be guided through the installation.
Network Drive Mode:
NDAS mode: Select NDAS mode to share the Classic SL Network Drive with users
on the network.
Drive Sharing:
Select a Drive Sharing Mode that is best for your environment:
• Multi OS:
- Classic SL Network Drive can be shared within a mixed network of Windows98/Me/2000/XP and Apple Macintosh computers
- Multiple PC’s can have Read Only access simultaneously
- Write access is assigned to one user at a time and is passed from one user
to another.
- Fastest performance
• Multi-Write:
- Windows2000/XP environment
- Multiple PC’s can have Read and Write access simultaneously
GB
3
USB 2.0 Mode: Select USB mode to use the Classic SL Network Drive as a portable
external hard drive for your PC.
9
Page 10
Freecom Classic SL Network Drive
GB
3
3.2 For Windows 98 SE and Windows ME
For the latest software and drivers, visit www.freecom.com
NDAS Mode
Insert the included "Classic SL Network Drive Installation CD" into your CDROM Drive. You will be guided through the installation.
USB 2.0 Mode
Follow the instructions below:
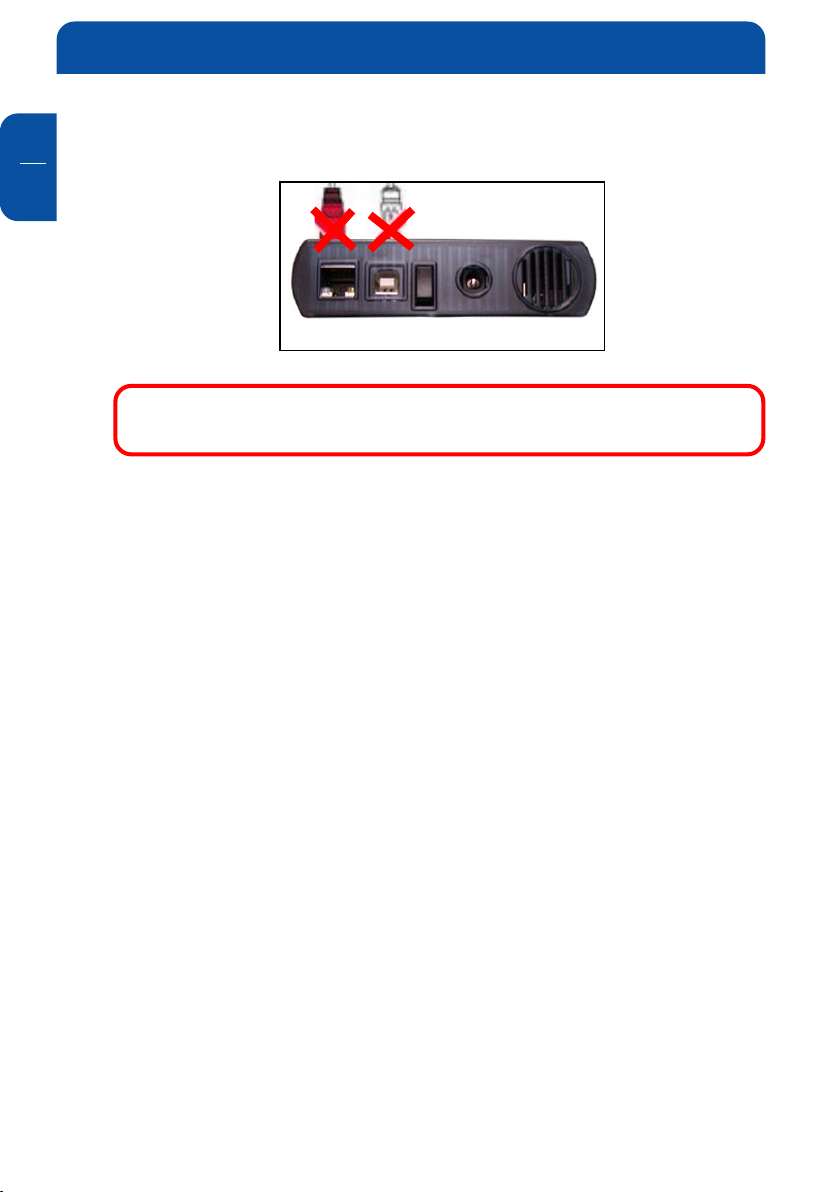
Step 1
If this is your first time installing the Classic SL Network Drive, the "Add New
Hardware Wizard" will appear. Click "Next" and follow the instructions on
your screen.
If you have already previously installed the Classic SL Network Drive, the
Classic SL Network Drive will be listed as a local drive in "My Computer". Drive
letter and name may vary between Personal Computers.
10
Step 2
Select "Search for the best driver for your device".
Click "Next".
Page 11
Software Installation
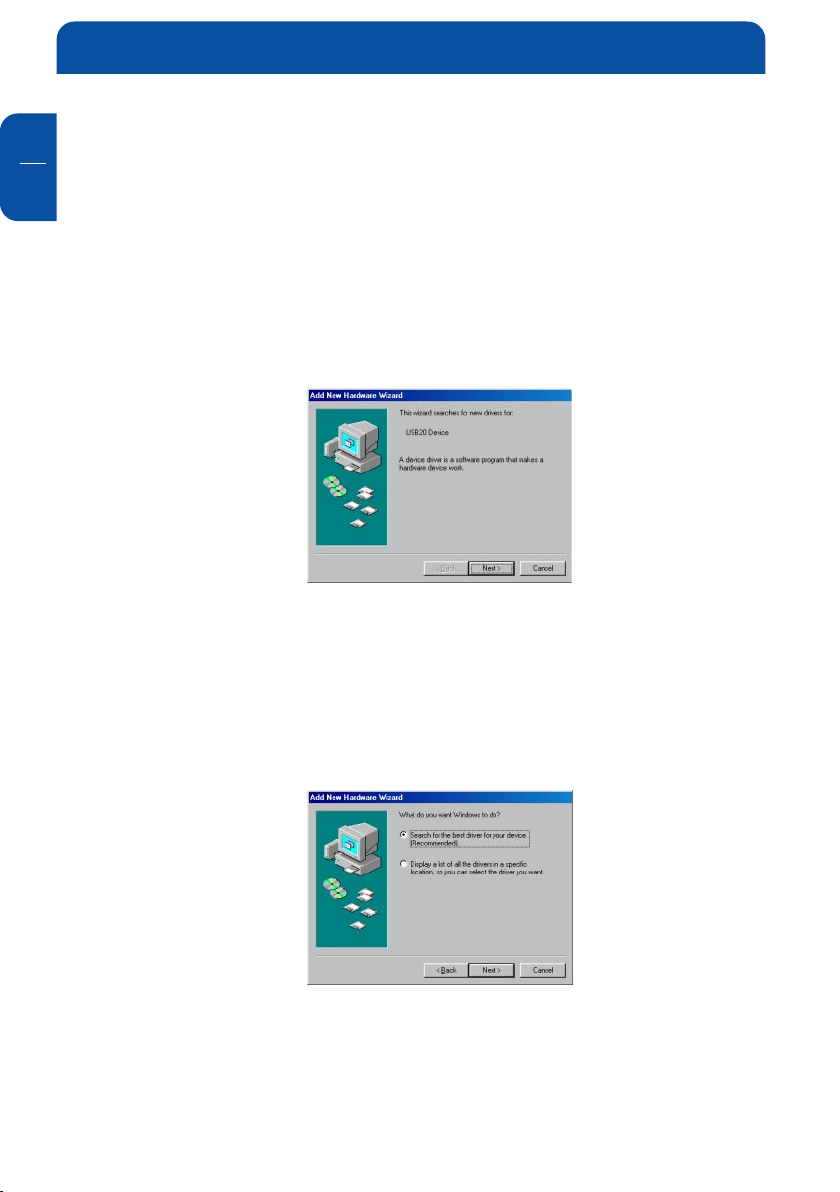
Step 3
Make sure that the checkbox "CD-ROM drive" is activated. Continue by
clicking on "Next".
Step 4
Click "Next".
GB
3
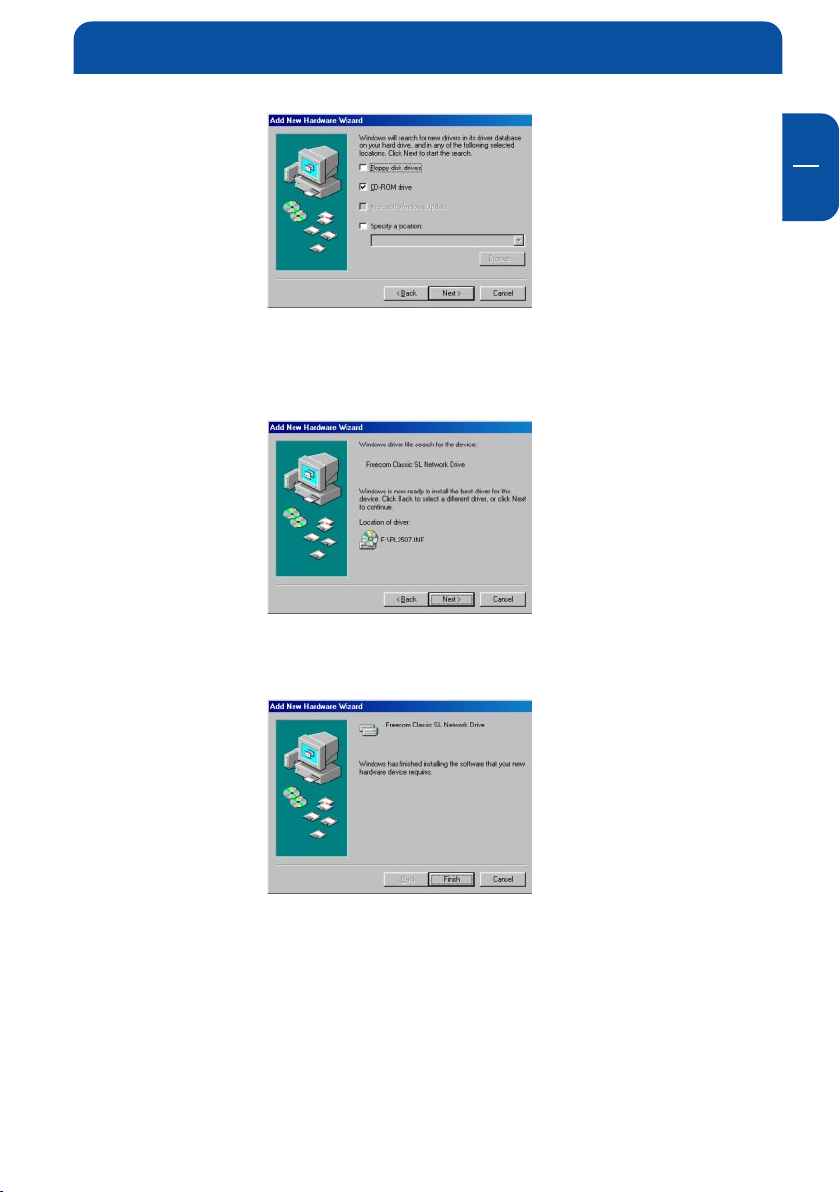
Step 5
Driver has been successfully installed, click "Finish".
11
Page 12

Freecom Classic SL Network Drive
GB
3
3.3 Classic SL Network Drive Administrator
When the software installation is completed, you will find a Classic SL Network
Drive Launcher Icon on your desktop screen and a Classic SL Network Drive
Administrator Tool icon on the system tray.
• Classic SL Network Drive Launcher (desktop icon) activates and loads the
Classic SL Network Drive Administrator Tool onto the system tray.
• Classic SL Network Drive Administrator Tool (system tray icon) performs the
following functions:
- Refresh Classic SL Network Drive Status
- Add a Classic SL Network Drive
- Display Software Version
- Enable Read / Write Access
- Enable Read Only Access
- Disable Classic SL Network Drive
- Edit Classic SL Network Drive Name
- Display Classic SL Network Drive Properties
NOTE: Classic SL Network Drive Launcher is used only on Windows
XP and Windows 2000.
12
Page 13
Drive Registration
Chapter 4: Drive Registration
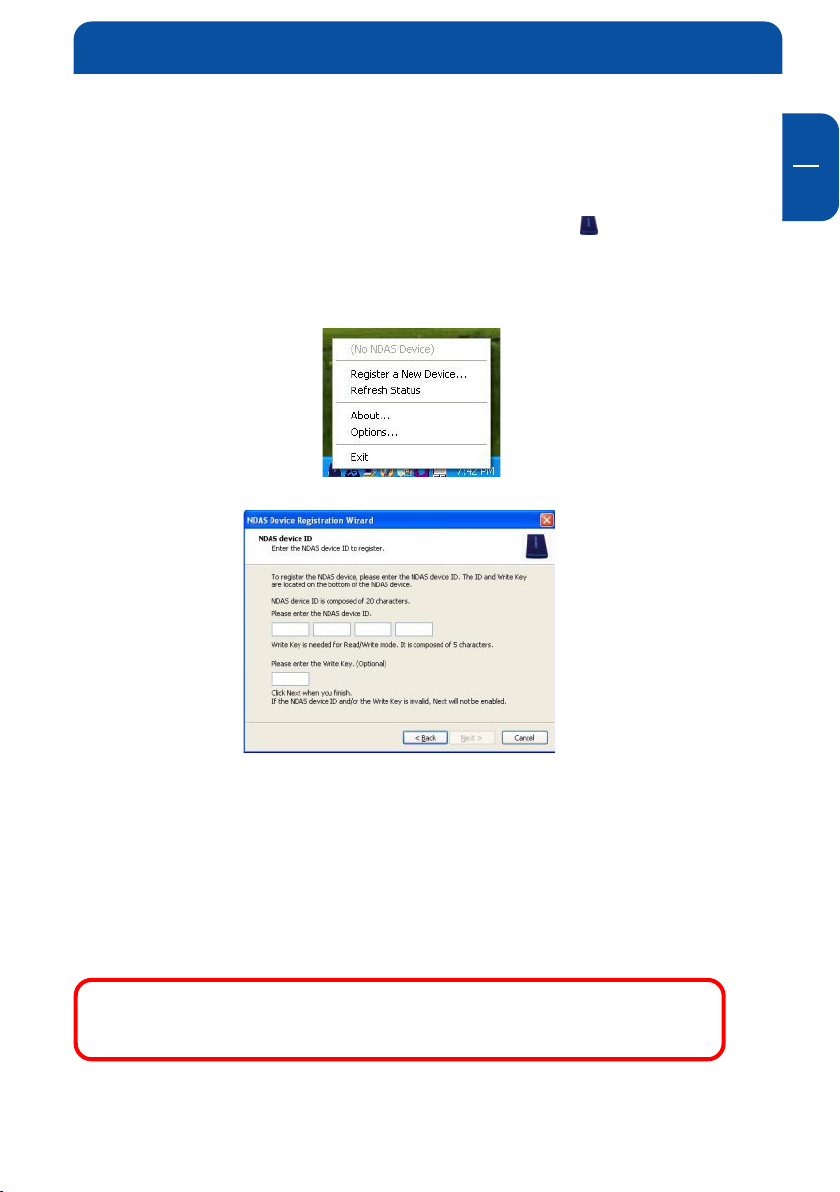
4.1 Add / register a New Classic SL Network Drive
1. Click "Classic SL Network Drive Administrator Tool" Icon located on the
system tray.
2. Select "New Classic SL Network Drive".
3. Register a Classic SL Network Drive.
GB
4
- Classic SL Network Drive Name: (optional) Select a name for your Classic
SL Network Drive
- Classic SL Network Drive ID: Enter the 20-digit Classic SL Network Drive
ID located on the bottom of your Classic SL Network Drive.
- Write Key: (optional) Enter the 5-digit Write Key located on the bottom of
your Classic SL Network Drive.
Write Key must be registered to write to Classic SL Network Drive.
NOTE: Classic SL Network Drive ID and Write Key do not contain
the letter O. Please use the number 0 (zero), for all 0’s.
13
Page 14
Freecom Classic SL Network Drive
GB
4
4. Click "Add".
5. Click "OK" to confirm the Classic SL Network Drive registration.
- If the "Write Key" was entered in the previous step, the Classic SL Network
Drive is registered as "Read / Write Mode".
- If the "Write Key" was not entered in the previous step, the Classic SL
Network Drive is registered as "Read Only Mode".
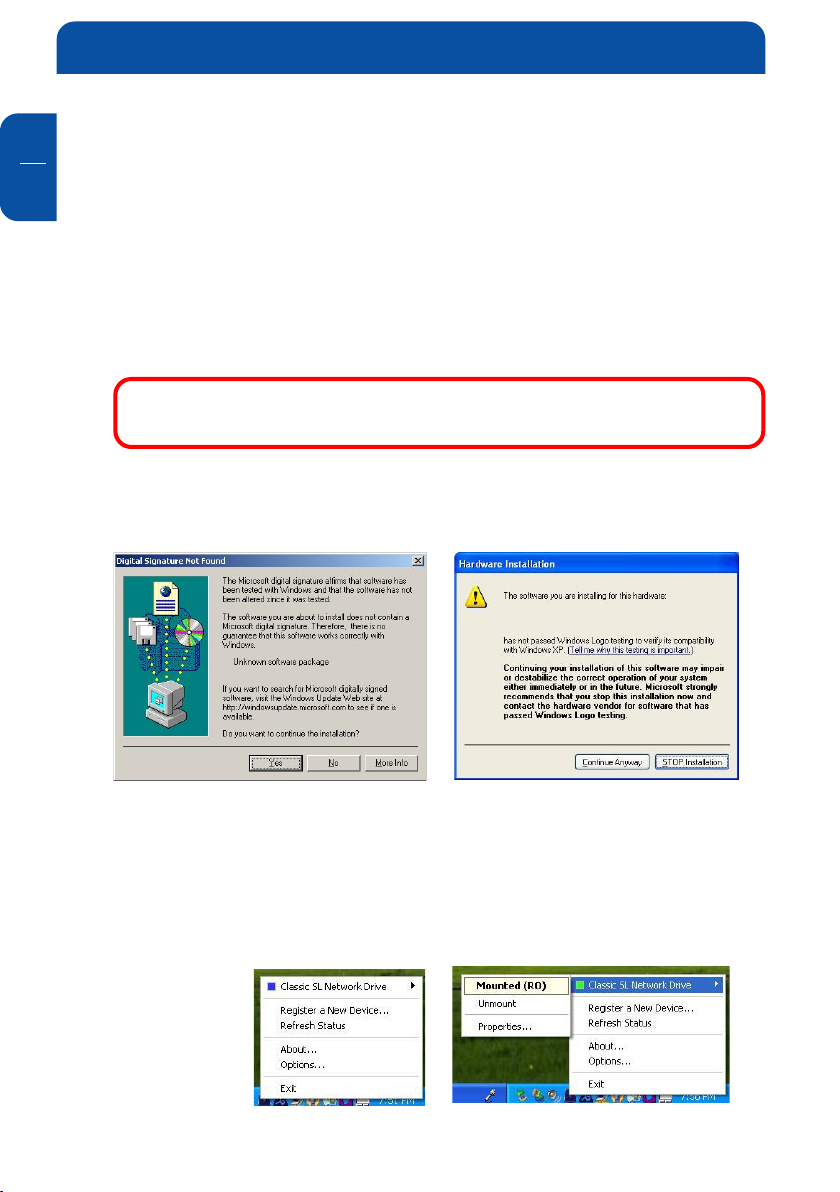
6. "Found New Hardware Wizard"
- This window may or may not appear.
- If the "Found New Hardware" window appears, follow the instructions and
install the new Classic SL Network Drive.
NOTE: For Windows 2000, the "Upgrade Device Driver Wizard" will
appear instead.
7. "Windows Digital Signature" window.
Windows 2000 Windows XP
Freecom Network DriveFreecom Network Drive
Freecom Network Drive
Freecom Network DriveFreecom Network Drive
Click "Yes" Click "Continue Anyway"
8. Registration is completed.
Click "Classic SL Network Drive Administrator Tool" to see the registered
Classic SL Network Drive.
Read/Write Mode Read Only Mode
14
Page 15

Drive Registration
4.2 Using Classic SL Network Drive
Now that you have successfully installed the Freecom Classic SL Network Drive,
please familiarize yourself with using the Classic SL Network Drive. The Classic SL
Network Drive is located in "My Computer" as a local drive. Drive letter and
Classic SL Network Drive name may vary between different Personal Computers.
You can use Classic SL Network Drive like a local drive on your PC.
- Drag and drop files to Classic SL Network Drive.
- Copy and paste data to Classic SL Network Drive.
- Make and delete folders.
- Share files and folders.
- Backup your data.
4.3 Sharing Classic SL Network Drive
When the Classic SL Network Drive is connected to your network, it can be
accessed from any computer on this network. To share the Classic SL Network
Drive, the following must be done:
Windows 2000/XP Environment:
- All computers and Classic SL Network Drive must be on the same LAN.
- Classic SL Network Drive must be connected via Ethernet or Wireless Access
Point.
- To share Read and Write access, all computers on the network using the
Network Disk must have the Classic SL Network Drive driver version 3.x.x
installed.
- Classic SL Network Drive must be registered onto each computer.
GB
4
Mixed Environment with Windows and Mac:
- All computers and Classic SL Network Drive must be on the same LAN.
- Classic SL Network Drive must be connected via Ethernet or Wireless Access Point.
- To share Classic SL Network Drive each computer on the network must install
the corresponding Classic SL Network Drive Driver.
- On Windows XP/2000, install Classic SL Network Drive driver v2.4 (do not use
3.x.x).
- On Windows 98 SE/ME, install Classic SL Network Driver 1.x
- On Mac OSX, install Classic SL Network Drive driver 1.x
- Classic SL Network Drive must be registered onto each computer.
- Write access is assigned to one user at a time and is passed from one
user to another.
15
Page 16

Freecom Classic SL Network Drive
GB
4
NOTE: Classic SL Network Drive is preformatted in NTFS. In order
to use Classic SL Network Drive in mixed environments, Classic SL
Network Drive must be formatted in FAT32. If you use the "Disk
Management" utility in Windows XP or 2000 to format your
Classic SL Network Drive, then your Classic SL Network Drive will
be re-formatted in NTFS. NTFS is not a compatible file system
format with Mac and Windows 98SE / Me, thus your computers on
these OS will not recognize Classic SL Network Drive. You can use
a third party format utility to choose the file format your Classic SL
Network Drive is formatted in.
Warning:
• Do not perform disk operations (format, partition and chkdsk)
when multiple PCs are connected.
• Classic SL Network Drive can be formatted, partitioned, chkdsk,
aggregated or mirrored only when one PC is connected.
• When sharing Classic SL Network Drive between Windows
2000 and Windows XP, perform chkdsk.
16
Page 17

Status and Mode Indicator
Chapter 5: Status and Mode Indicator
Classic SL Network Drive provides users with seven basic modes. Below is a chart
describing each of the Classic SL Network Drive Modes and the icons that
correspond with each mode.
Drive Color Icon Drive Icon Mode / Meaning
Green
Blue
Red
Gray
White
Read Only Mode
- Users can only read from Classic SL Network Drive.
Read / Write Mode
- Users can read and write to Classic SL Network
Drive.
Unrecognized Mode
- Classic SL Network Drive cannot be used.
- You can only remove this Classic SL Network Drive
from your computer or view its property.
Disabled Mode
- Classic SL Network Drive is disabled from your
computer.
- Classic SL Network Drive can be enabled back to
Read Only Mode, Read/Write Mode or removed
from the PC
- Classic SL Network Drive can be Aggregated or
Mirrored.
Busy Mode
- Classic SL Network Drive is busy performing a task
or an application is using Classic SL Network Drive.
GB
5
Black
Yellow
Disconnected Mode
- Classic SL Network Drive is not connected to the
network.
- Power Cord, Ethernet Cord or USB Cord is
unplugged. Once the cord is connected, you can
resume Classic SL Network Drive use.
Bound Mode
- Bound disk used for Aggregation and Mirroring
only.
- You can only remove it from your computer or view
its property.
17
Page 18

Freecom Classic SL Network Drive
GB
5
5.1 Changing from Read / Write Mode to Read Only Mode
- Click "Classic SL Network Drive Administrator Tool" and select the Classic
SL Network Drive you want to change from "Read/Write" to "Read Only".
- Select "Enable Read Only".
The "Blue Circle" will change to a "Green Circle", indicating "Read Only
Mode".
5.2 Changing from Read Only Mode to Read / Write Mode
- Click "Classic SL Network Drive Administrator Tool" and select the Classic
SL Network Drive you want to change from "Read Only" to "Read/Write".
- Select "Enable Read/Write".
The "Green Circle" will change to a "Blue Circle", indicating "Read/Write
Mode".
18
Page 19

Introduction to Administrator Tool Menu
Chapter 6: Introduction to Administrator Tool Menu
Click "Classic SL Network Drive Administrator Tool". All registered Classic SL
Network Drive(s) will be displayed on the Net-Disk Administrator Tool Menu. If
you named your Classic SL Network Drive at the registration step, this name will
be displayed in place of the default name Classic SL Network Drive X.
- Refresh Status - Updates the status of Classic SL Network Drives that are
connected to the network.
- If a Classic SL Network Drive is displayed with a black-coloured circle ,
connection to Classic SL Network Drive is not established.
- New Classic SL Network Drive - Registers a new Classic SL Network Drive
onto your computer.
- Every time a new Classic SL Network Drive is added, it must be registered.
For more information please refer to Chapter 4.1 Add / Register a New
Classic SL Network Drive.
- About - Displays Classic SL Network Drive Administrator version.
- Exit - Exits Classic SL Network Drive Administrator.
Classic SL Network Drive Administrator Tool can be restored by double
clicking the icon
on the Desktop.
GB
6
19
Page 20

Freecom Classic SL Network Drive
GB
7
Chapter 7: Drive Functions
Click "Classic SL Network Drive Administrator Tool" and place the cursor on a
Classic SL Network Drive to view its functions.
- Disable - Disables writing to and reading from the Classic SL Network Drive.
NOTE: If the Classic SL Network Drive is being used by any
application, it will not disable. Wait until all applications using
the Classic SL Network Drive have finished. Then try disabling it
again. If you still cannot disable after several attempts, restart
your computer. This may occur when unknown programs in the
background are still using Classic SL Network Drive.
- Edit Name – Updates/Changes the name of the Classic SL Network Drive.
- Type in the new name for the Classic SL Network Drive on "Edit a Classic SL
Network Drive" window then click "OK". If you do not want to change the
name of the Classic SL Network Drive, click "Cancel".
- Enable Read Only – Enables Read Only Mode.
- Enable Read/Write – Enables Read / Write Mode.
- Property – Displays the properties of the Classic SL Network Drive.
- Refresh – Updates the Network Drive’s data from which you are reading.
- Remove – Removes the Classic SL Network Drive from your computer.
20
Page 21

Advanced Drive Functions
Chapter 8: Advanced Drive Functions
8.1 Introduction to Aggregation
Aggregation allows two Classic SL Network Drive units to be recognized as a
single large disk drive. This feature is extremely useful when a larger storage
device is needed.
8.2 Introduction to Mirroring
The Mirroring function enables a real-time mirrored copy of a Primary Classic SL
Network Drive to a Secondary Classic SL Network Drive, continuously writing a
copy of data on the Primary Classic SL Network Drive to a Secondary Classic SL
Network Drive, whenever changes or edits are made.
8.3 Requirements for Aggregation / Mirroring
- Only two Classic SL Network Drives can be aggregated/mirrored at a time.
- Each Classic SL Network Drive must have a Write Key.
- Do not aggregate/mirror Classic SL Network Drives that are already mirrored
or aggregated.
- Mirroring: The Secondary Classic SL Network Drive must be the same size or
larger than the Primary Classic SL Network Drive.
- Classic SL Network Drives that are being aggregated/mirrored must be
disabled on all PCs, except on the PC that is performing the aggregation/
mirroring.
- Both Classic SL Network Drives must be formatted prior to aggregation/
mirroring.
- Other users can enable aggregated/mirrored Classic SL Network Drives once
aggregation/mirroring is completed.
GB
8
NOTE: Aggregation and mirroring functions can only be performed in Windows XP and Windows 2000.
8.4 Instructions for aggregating / mirroring two Classic SL
Network Drives
Before two Classic SL Network Drives can be Aggregated / Mirrored, they must
be Disabled from all computers that have access to the Classic SL Network Drive.
21
Page 22

Freecom Classic SL Network Drive
GB
8
8.4.1 Disable Classic SL Network Drive
- Go to "Classic SL Network Drive Administrator Tool", choose the Network
Drive you want to disable and select Disable.
- Wait a few seconds for changes to occur. If color of disabled Classic SL
Network Drive has not changed to Grey, click Status.
- Repeat this step for the second Classic SL Network Drive.
- Disable these two Classic SL Network Drives from all other PCs that have
access to them.
8.4.2 Aggregate / Mirror Classic SL Network Drive
1. Go to "Start > Program > Classic SL Network Drive> Classic SL Network Drive
Aggregation & Mirroring".
2. From the "Classic SL Network Drive Aggregation & Mirroring" window,
select one of the two Classic SL Network Drive you just Disabled. Once you
select a Classic SL Network Drive, "Aggr"
enable.
3. a) Click "Aggr" Button for aggregation.
b) Click "Mirror" Button for mirroring.
- Aggregation: The Classic SL Network Drive Bound window displays the
first Classic SL Network Drive you selected to aggregate. The Classic SL
Network Drive Available window lists all the Classic SL Network Drives you
can select from which to aggregate with the first Classic SL Network Drive.
and "Mirror" buttons will
22
Page 23

Advanced Drive Functions
- Mirroring: The Classic SL Network Drive Bound window displays the Classic
SL Network Drive which the data will be mirrored from and the Classic SL
Network Drive Available window lists all the Classic SL Network Drive you
can select from to mirror the data.
4. Select a Classic SL Network Drive from the "Classic SL Network Drive
available" box that you want to aggregate or mirror to. Click button
then click "OK".
If you selected the wrong Classic SL Network Drive to aggregate or mirror,
you can simply select the Classic SL Network Drive from the "Classic SL
Network Drive bound" window and click . This will unbind the Classic SL
Network Drive.
NOTE: Mirroring Only - A Classic SL Network Drive can only be
mirrored to another Classic SL Network Drive with larger or same
size.
GB
8
5. Aggregation/mirror successful
- Once the aggregation/mirroring successfully starts, a "Classic SL Network
Drive Administrator" Window will appear advising you to format / partition
the Primary Classic SL Network Drive.
- Before you can format / partition a Classic SL Network Drive, Classic SL
Network Drive must be enabled first.
- Click "OK".
23
Page 24

Freecom Classic SL Network Drive
GB
8
6. Aggregation or Mirroring is completed.
Aggregation Mirroring
- Aggregation: The Aggregated Classic SL Network Drive is indicated by the
word Aggr Primary: Classic SL Network Drive1. The Classic SL Network Drive
from the bound box becomes the Primary Network Drive, and the Classic SL
Network Drive from the available box becomes the Secondary Network
Drive. The capacity of the Secondary gets added to the Primary Classic SL
Network Drive.
- Mirroring: The Mirrored Classic SL Network Drive is indicated by the word
Mirror Primary: Classic SL Network Drive
1. The Classic SL Network Drive from the bound box becomes the Primary
Network Drive and the Classic SL Network Drive from the available box
becomes the Secondary Network Drive.
The Primary Classic SL Network Drive is mirrored to the Secondary Classic SL
Network Drive.
8.4.3 Enable Classic SL Network Drive
1. Click Classic SL Network Drive Administrator Tool
Note: Classic SL Network Drive 1 is disabled Primary Classic SL
Network Drive and Classic SL Network Drive 2 is the Secondary
Classic SL Network Drive
2. Enable the aggregated / mirrored Classic SL Network Drive by selecting either
Enable Read/Write or Enable Read Only.
Enabled Aggregated / Mirrored Classic SL Network Drive
.
24
Page 25

Advanced Drive Functions
- Enabled Classic SL Network Drive is indicated by either a blue or green circle.
A yellow circle indicates the secondary Classic SL Network Drive.
- Go to Classic SL Network Drive Aggregation & Mirroring window.
Here, enabled Classic SL Network Drive is indicated with blue or green
colored Classic SL Network Drive.
Aggregation Mirroring
8.4.4 Format Classic SL Network Drive
Before you can use the new aggregated / mirrored Classic SL Network Drive,
the Primary Network Drive needs to be formatted. Please refer to Chapter 9
Formatting Classic SL Network Drive.
GB
8
8.4.5 Register Aggregated / Mirrored Classic SL Network Drive for other users
Once the Primary Classic SL Network Drive has been successfully formatted,
enable the Primary Classic SL Network Drive or add both Primary and
Secondary Classic SL Network Drives to all the other PCs that want to use the
Aggregated / Mirrored Classic SL Network Drive.
The Secondary Classic SL Network Drive will automatically be enabled once
Primary Classic SL Network Drive is enabled.
NOTE: The Classic SL Network Drive Administrator will automatically detect the mode of the Primary and Secondary Classic SL
Network Drive when enabled on additional PCs. Only the Primary
Network Drive may be enabled.
25
Page 26

Freecom Classic SL Network Drive
GB
8
8.4.6 Unbind Classic SL Network Drive
1. Before Classic SL Network Drive can be unbound, both Primary and Secondary Classic SL Network Drives must be disabled from all PCs using the
Aggregated / Mirrored Classic SL Network Drive.
NOTE: For more information on disabling Classic SL Network
Drive, please refer to 8.4.1 Disable Classic SL Network Drive.
2. Go to the PC that was used to perform the Aggregation / Mirroring.
3. Go to "Classic SL Network Drive Aggregation & Mirroring" window. The
color of the disabled Master Classic SL Network Drive will be "Grey". If not,
press "Status" button.
Aggregation Mirroring
4. Select the disabled Primary Classic SL Network Drive and click unbind
button.
The Aggregated / Mirrored Classic SL Network Drive will unbind into the two
disabled Classic SL Network Drives.
26
Page 27

Advanced Drive Functions
Two unbound Classic SL Network Drives are also visible from "Classic SL
Network Drive Administrator Tool."
5. Enable the unbound Classic SL Network Drives by selecting either "Enable
Read/Write" or "Enable Read Only".
- Classic SL Network Drive cannot be used until it is enabled.
- Repeat this step for the second unbound Classic SL Network Drive.
6. Format Classic SL Network Drive.
- Before you can use the unbound Classic SL Network Drive, both Classic SL
Network Drives need to be formatted.
Please refer to Chapter 9 Formatting Classic SL Network Drive.
GB
8
27
Page 28

Freecom Classic SL Network Drive
GB
9
Chapter 9: Formatting Classic SL Network Drive
Note: Classic SL Network Drive is preformatted in NTFS. In order
to use Classic SL Network Drive in mixed mode environments with
Mac and Windows, Classic SL Network Drive must be formatted in
FAT32. If you use the following steps to format your Classic SL
Network Drive in Windows XP or 2000, then your Classic SL
Network Drive will be reformatted in NTFS. NTFS is not a compatible file system format with Mac, thus your Mac computers will
not recognize Classic SL Network Drive. You can use a third party
format utility if you need to choose the file format that your
Classic SL Network Drive is formatted in.
9.1 Initialize Classic SL Network Drive
1. Right click "My Computer" and select "Manage".
2. "Computer Management" window will appear. Click "Disk Management"
under "Storage".
3. "Computer Management" window will list all the disks in the computer.
4. Find the Classic SL Network Drive you want to initialize.
- If the Classic SL Network Drive is described as "Basic" or "Healthy", skip to
Chapter 9.2 Partition Classic SL Network Drive. Otherwise, go to next step.
5. Initialize Classic SL Network Drive
28
- Right click and select "Initialize Disk".
- "Initialize Disk" window will appear. Select the Classic SL Network Drive
and click "OK".
Page 29

Formatting Classic SL Network Drive
6. Classic SL Network Drive will be automatically initialized.
- "Unknown" becomes "Basic".
7. Initialization is completed.
- Before Classic SL Network Drive can be used, it must be partitioned. Please
refer to the next section for how to partition it.
9.2 Partition Classic SL Network Drive
1. From the "Computer Management" window, find the Classic SL Network
Drive you want to format.
2. Right click and select "Delete Partition".
GB
9
3. "Delete Primary Partition" will appear.
- When you delete partition, all the data on the disk will be lost.
- Click "Yes", if you want to continue partitioning. Otherwise, click "No".
29
Page 30

Freecom Classic SL Network Drive
GB
9
4. Partition has been deleted and it is indicated by the word Unallocated.
5. Right click and select "New Partition".
6. "New Partition Wizard": Click "Next".
7. "Select Partition Type":
- Select "Primary partition".
30
- Click "Next".
Page 31

Formatting Classic SL Network Drive
8. "Specify Partition Size:
- Click "Next".
NOTE: The partition size is automatically set. Do not change the
size.
9. Assign Drive Letter or Path:
- Select Assign the following driver letter.
- Choose a name for the drive from list.
GB
9
- Click "Next".
31
Page 32

Freecom Classic SL Network Drive
GB
9
10. Format Partition:
- Select "Format this partition with the following Settings"
-
File System: "NTFS"
- Allocation unit size: "Default"
- Select "Perform a quick format (Recommended)".
- Click "Next".
11. Partitioning is finished. Click "Finish".
.
32
- You can see the partitioned disk.
Page 33

Uninstalling Classic SL Network Drive
Chapter 10: Uninstalling Classic SL Network Drive
Before you can uninstall a Classic SL Network Drive, you must first close all
applications that are using the Classic SL Network Drive. Classic SL Network Drive
Administrator, Classic SL Network Drive Aggregation & Mirroring, Windows
Explorer and Internet Explorer must also be closed.
Uninstall
1. Close Classic SL Network Drive Administrator Tool by selecting Exit.
2. Uninstall Classic SL Network Drive
For Windows XP/2000
- Go to "Start > All > Classic SL Network Drive > Uninstall Classic SL Network
Drive".
- "Windows Installer" will appear. Click "Yes" if you want to continue
uninstall. Otherwise click "No".
GB
10
33
Page 34

Freecom Classic SL Network Drive
GB
10
NOTE: A warning window may appear if applications are using the
Classic SL Network Drive. Click Cancel and try removing Classic SL
Network Drive after applications that are using the Classic SL
Network Drive have finished.
For Windows 98 SE / Windows Me
- Go to "Start > Settings < Control Panel > Add or Remove Programs >Install
/ Uninstall" tab
- Select "Classic SL Network Drive Tools for Windows 98 SE / ME" and click
"Add/Remove" button.
NOTE: A warning window may appear if applications are using the
Classic SL Network Drive. Click Abort and try removing Classic SL
Network Drive after applications that are using the Classic SL
Network Drive have finished.
3. Restart the PC once uninstall is finished.
34
Page 35

FAQ
Chapter 11: FAQ
For the most recent list of FAQs, please visit http://www.freecom.com
General
1. What can Classic SL Network Drive be used for?
Classic SL Network Drive can be used with a variety of applications. It is ideal
for all users that cannot afford NAS systems, such as small to medium
businesses, SOHO (Small Office Home Office), workgroups, departments,
schools and public institutions. Classic SL Network Drive technology’s convenience and low cost provides the best storage solution for home / office
networking.
- Use as storage for Personal Computer and Home Networking (storing and
sharing files, backup / archiving, etc.)
- Expanding storage requirements.
- Business primary or secondary network storage.
- Public institution’s storage for data archives, disclosed data, backups, and
data conservation.
- Multimedia storage device (MP3s, Digital Photos, Digital Video).
- Multi-platform networking (Simultaneous use from Macintosh and Windows)
- Non-PC / Non-Computing applications (security, CCTV, technograph recording, MRI, entertainment).
GB
11
2. How is Classic SL Network Drive different from NAS or SAN?
Classic SL Network Drive is a good alternative to NAS or SAN. Classic SL
Network Drive is much more cost-effective, efficient and easy to use. It is for
users looking for lower costs and storage associated with backup / archiving.
Although both Classic SL Network Drive and NAS are storage devices that are
implemented over a network, Classic SL Network Drive takes up less space
than NAS or SAN products. Classic SL Network Drive utilizes NDAS technology - allowing it to connect the hard disk directly to a network without a
server. In NAS, the hard disk must be connected to a storage server, which
must also be connected to the network.
33
3. For NDAS mode, do I need drivers installed on each computer using
33
Classic SL Network Drive?
Yes, the drivers need to be loaded on each computer that want access to
Classic SL Network Drive. However, if you are using Windows Sharing, only
one computer will need the software installed. The other computers will not
need it.
35
Page 36

Freecom Classic SL Network Drive
GB
11
Windows 2000 / XP
1. I am having trouble using Multi-write over wireless connection.
What do you recommend?
Try a wired connection for our 3.x drivers and compare how it works. If you
are using wireless with other computers, we recommend enabling the hardwired computer first, then the wireless computer.
When using wireless, we also recommend 802.11g. When using 802.11b, we
highly recommend hardwiring your computer when doing large file transfers because of the low bandwidth associated with 802.11b.
2. How should I format Classic SL Network Drive?
We recommend formatting Classic SL Network Drive via NDAS (Ethernet)
mode. If using Classic SL Network Drive as a USB device only, then it is OK to
format via USB. It is also recommended that you format Classic SL Network
Drive to NTFS if using Windows 2000/XP. Our 3.x drivers are only supported
on NTFS, while 2.x drivers support FAT32.
3. How do I disconnect Classic SL Network Drive?
We always recommend using the Disable option from your Classic SL
Network Drive Administrator Tool if connected via NDAS (Ethernet). You
can use the "Unplug or Eject Hardware" icon in your System Tray to stop the
Classic SL Network Drive before disconnecting (this applies to either USB or
NDAS mode).
4. When I try to write to Classic SL Network Drive I get a "write
protected" error and cannot write to the disk.
The permissions scheme may need to be reset. Try disabling the Classic SL
Network Drive on all machines first, then re-enable them one by one. If that
doesn’t help, try rebooting the machines and power cycling Classic SL
Network Drive.
5. When I try to write to Classic SL Network Drive, I get the following
error message: "Classic SL Network Drive is being used by noncompatible software on another PC. You can use read-access only
for now." What does this mean?
This means that there is another computer on the network that has a
different version of the Classic SL Network Drive software installed. All
machines must have the exact same version of our software. Please make
sure that all computers have the exact same version of Classic SL Network
Drive software installed. For instance, 3.02 is different from 3.03.
6. Can I set the "My Documents" folder to point to my Classic SL
Network Drive instead of a place on my local hard drive?
We do not recommend doing this, as your computer will be dependent on
this location during software installation and uninstallation. You may
receive Windows Error Messages looking for a nonexisting location.
36
Page 37

FAQ
7. My computer is moving very slowly when my Classic SL Network
Drive is enabled, and the ACT light on my Classic SL Network Drive
is solid yellow. What is going on?
This is a result of a bad connection between the computer and the Classic SL
Network Drive. Please make sure that you are using only network switches
and routers, and that you are not using any network hubs. Also, if you have
any software firewalls installed on your computer (i.e. Norton Internet
Security, McAfee Personal Firewall, etc.), make sure to add Admin.exe and
LDServ.exe into their list of programs to Allow with full access. You can also
try disabling your Antivirus software to see if that makes a difference.
Please also try power cycling your Classic SL Network Drive and switch as well.
8. Sometimes when I transfer files to my Classic SL Network Drive, why
is the speed so slow?
Try updating your Network Card’s drivers to the latest from the manufacturer. If you network card has the option of changing the transmit and
receive buffers to both 128 (in the card’s properties in device manager),
please try doing that. If you have an nForce chipset, try updating your Nvidia
nForce drivers to the latest Unified Drivers from Nvidia’s website. Please also
make sure that you are using 100Mb switch as well.
9. I’ve installed my Classic SL Network Drive and it shows up as a Black
Dot.
Make sure you are using the latest version of Classic SL Network Drive
software. USB does not require Classic SL Network Drive software to work;
so if you are using USB, the software is not needed and this explains why
there is a black dot. Also, double check the following: the power cable is
plugged in tightly, the LED light of the switch port where it is connected is
blinking.
Also, latest versions of antivirus software have a feature called Script
Blocking. Please ensure that this feature is disabled along with any firewall
software before installing Classic SL Network Drive software.
You might also need to enable Classic SL Network Drive protocol and
programs to run alongside your firewall software.
Even after you have done these steps, your firewall/antivirus software may
still block access.
If using Wireless, make sure you are connected to the wireless router and
that the signal is strong.
Try to check for and install the latest firmware from your router’s manufacturer website and for the latest drivers for your wireless card.
You can also try plugging in via Ethernet to see if it works that way.
If using VPN software, try unchecking the box for Deterministic Network
Enhancer or any other VPN protocol in your NIC Properties.
If, after everything, it is still showing as a black dot, please try disabling all
your Startup items and non-Microsoft services from your msconfig utility.
GB
11
37
Page 38

Freecom Classic SL Network Drive
GB
11
Msconfig can be accessed by clicking on Start-> Run-> and typing in
"msconfig" and clicking OK.
For further help, please contact the Freecom Support Center for your
country.
10. When adding Classic SL Network Drive to my computer, why does
the "ADD" button stay gray?
You may not have entered all the alpha-numeric values correctly. There are
no letter "O"s; please verify that you have used the number "0" (zero) for
anything resembling an "O." Also please check by our other letters as well;
two V’s may look like a W. Start by entering only the Classic SL Network Drive
ID. The ADD button should not be greyed out if the correct ID is entered.
Once it is not greyed out, proceed to add the Write Key as well.
Please also make sure that there are 20 characters for the Classic SL Network
Drive ID, not including the Write Key.
11. I installed the Classic SL Network Drive key but cannot see Classic SL
Network Drive in "My Computer." What should I do?
Click on the Classic SL Network Drive Admin Tool in your System tray and
make sure Classic SL Network Drive is enabled. There should be a dot next
to your Classic SL Network Drive, colored either Blue (Read/Write) or Green
(Read Only). If it is a black colored dot, then please go to the FAQ: "I’ve
installed my Classic SL Network Drive and it shows up as a Black Dot."
If Classic SL Network Drive is enabled, open "Computer Management" by
right -clicking on "My Computer." Go to "Manage," then click on "Disk
Management." Check if your Classic SL Network Drive is recognized. It
should show up as Disk 1 or Disk 2 or a different number depending on the
number of drives that you have on your computer. Right -click on the
appropriate "Disk #" and click "Initialize." if that option exists.
Also make sure that the Classic SL Network Drive is partitioned and formatted. If you see something that says "Unallocated," then right-click on the
"Unallocated," create a partition, and then format the drive to your file
system preference.
To use Classic SL Network Drive with other Operating Systems such as
Windows 98SE / ME, and Mac OS X, you will need to format your Classic SL
Network Drive to FAT32 for it to be recognized.
12. Why am I getting a "Data has been corrupted" message when I try
to open or copy a file?
Open up Command Prompt and run "chkdsk" for the Classic SL Network
Drive drive.
Go to Start - Run - type in "cmd" without the quotation marks.
Then type in "chkdsk Classic SL Network Drive DriveLetter: /F"
For example, if your Classic SL Network Drive shows up as drive letter E: in
My Computer, you would type in the following: chkdsk E: /F
38
Page 39

FAQ
13. Why do I keep getting this error message: "The device ‘Generic
volume’ cannot be stopped right now. Try stopping the device again
later." ?
Close any windows that are displaying your Classic SL Network Drive and
retry what you were doing earlier. If you continue to get that error message,
restart your computer. However, if you were copying a large amount of files,
it is possible that it is still being copied in the background from its cache. You
may need to wait until it is finished before continuing. If that does not work,
then try restarting your computer and try again.
14. I just installed Classic SL Network Drive; why is the Classic SL
Network Drive showing up as a red color?
Try unplugging your Classic SL Network Drive’s power cord, wait about 10
seconds, and plug it back in. If this doesn’t work, try restarting your
computer as well. Please try disabling your firewall/antivirus software and
if that works then you may need to configure the software to allow your
Classic SL Network Drive to run.
15. I keep getting "Internal Error; Update Failed." What does this mean?
Try updating to our latest drivers to see if that fixes the problem.
Before installing our Classic SL Network Drive software, please disable any
Firewall/Antivirus software and also make sure that Script Blocking is turned
off for antivirus software. If problems still persist, please try uninstalling the
Firewall/Antivirus software and reinstall Classic SL Network Drive software.
Also try updating your NIC drivers to the latest available.
16. I am getting the message "Connection closed abnormally. Try to
reconnect." What does this mean?
Check to make sure that you are using the latest version of our software. If
Classic SL Network Drive keeps losing its connection to your computer, check
your USB or Ethernet cable connection.
If your Classic SL Network Drive is shared on a network, we also recommend
using NTFS for multi-write software.
This can be verified by right -clicking on your Classic SL Network Drive drive
letter from My Computer and clicking on Properties. Then, under File System
it will indicate the type of file system your Classic SL Network Drive is
formatted to. To format Classic SL Network Drive to NTFS, please right-click
on the Classic SL Network Drive drive letter from My Computer and then click
on Format. There should be a drop down menu that will allow you to select
NTFS. Please also make sure to check the box next to the word Quick Format.
Also, make sure Classic SL Network Drive is plugged into a 100mb/full duplex
capable switch and that you are using a 10/100mb Network Card. Classic SL
Network Drive is not supported on hubs. If you have your switch uplinked
to another one, try putting Classic SL Network Drive and your computer on
the same switch and retry.
GB
11
39
Page 40

Freecom Classic SL Network Drive
GB
11
Try setting your NIC’s speed/duplex settings to 100Mb/full duplex:
Right click on My Network Places - click on Properties - right click on Local
Area Connection and click on Properties. Then click on the Configure button
next to your NIC- and click on the Advanced tab. There, you should be able
to find something related to "Speed & Duplex", "Media Settings", etc .
where, once highlighted, you can click on a drop down menu and select
100Mb/full duplex. You can also try going to your NIC (Ethernet card)
manufacturer and downloading the latest drivers. If using a DSL router,
please try updating the firmware on it as well.
Or, try plugging your PC into a different port on the Classic SL Network Drive
and see if you have different results.
If you are using an Antivirus/Firewall software, please try disabling it and see
if that solves the issue.
The latest versions of antivirus software have Script Blocking. Try disabling
that as well because disabling Antivirus may not necessarily disable that
feature.
17. I keep getting Autoplay when I plug in Classic SL Network Drive.
Create a blank text file in the root directory of your Classic SL Network Drive
and name it "autorun.inf". Place this in the root directory of your Classic SL
Network Drive drive letter in "My Computer." This should stop the Autoplay
prompt.
18. Using Windows file sharing function, after reboot, share gets lost.
Is there any work around?
Create a batch file and place it in your startup folder. To create batch file:?
Open up notepad -? Type in "net share sharename=DriveLetter:path" (For
example net share Classic SL Network Drive =F:)? Save the file as a .bat
extension. (For example, the file name would be called " NetDisk.bat")
19. Why can’t my computer go into hibernation or standby?
If you want to use your computer in hibernation or standby, you must have
Classic SL Network Drive disabled before that can occur. Click on the Classic
SL Network Drive Admin Tool on your system tray - go to your Classic SL
Network Drive and then you should see a menu with Disable as one of the
choices.
20. I have clicked on the Classic SL Network Drive Admin Tool on my
desktop and nothing happens.
The icon on the desktop is only used to launch our icon into the system tray,
if for some reason it is not already there. The icon in the system tray is used
for Enabling/Disabling, Adding/Removing, andswitching modes for Read/
Write on Classic SL Network Drive.
40
Page 41

FAQ
21. When I try to copy something to my Classic SL Network Drive, why
does the following show up: "Cannot copy Classic SL Network Drive
Administrator: The disk is write-protected. Remove the write-protection or use another disk."?
You probably do not have Read/Write access. Click on the Classic SL Network
Drive Icon in your bottom-right system tray. Go to your Classic SL Network
Drive and then click on "Enable Read/Write."
22. Why can’t I format my whole Classic SL Network Drive to FAT32?
Windows 2000/XP comes with a limitation of only 32GB partitions that it can
create. This is a Windows limitation and the only resolution is to use a 3rd
party partitioning software or use a Windows 98SE/ME computer to format
the entire drive to FAT32. With our Multi-Write drivers, NTFS is recommended anyways for stability and performance purposes.
Windows 98SE / Windows Me
1. How do I disconnect Classic SL Network Drive?
We recommend using the Disable option from your Classic SL Network Drive
Administrator Tool if connected via NDAS (Ethernet). You can also use the
"Unplug or Eject Hardware" icon in your System Tray to stop the Classic SL
Network Drive before disconnecting it (this applies to either USB or NDAS
mode).
2. I’ve installed Classic SL Network Drive on my Windows 98SE computer and cannot see Classic SL Network Drive.
Please check to see if Classic SL Network Drive drivers are properly loaded.
If you are using USB, you may need to download the Classic SL Network Drive
USB drivers from our Download Center. Right-click on My Computer - Go to
Properties - then click on Device Manager and look for any yellow exclamation or question marks.
Check if Classic SL Network Drive is formatted to FAT32 as Windows 98SE can
only recognize FAT file systems.
If you can, go to Start - Run - and type in "Command" without quotation marks
and press the Enter key. Next, type in "fdisk" without quotation marks.
If it asks you about Enabling large file support, type in Y and press the Enter key.
If there is an option #5, then Enter in that number.
If that option is not there, then your Classic SL Network Drive is not being
recognized.
If it is, then please check to see that your drive is there.
If your Classic SL Network Drive is still not recognized, make sure that your
Classic SL Network Drive is powered on. Also, try power-cycling your Classic
SL Network Drive and making sure that the software, if any, are loaded
correctly.
GB
11
41
Page 42

Freecom Classic SL Network Drive
GB
11
3. My Classic SL Network Drive shows up as a Black Dot.
Please check the following: power cable is plugged in tightly, there is a
blinking LED where it is connected to (switch), and that any firewall/
antivirus software are disabled before installing. The latest versions of
antivirus software have script blocking.
Please ensure this feature is disabled before continuing.
You might also need to enable Classic SL Network Drive protocol and
programs to run. Even after you have done these steps, it is still possible that
the firewall/antivirus software will block access. If it still does notwork,
uninstall the firewall/antivirus software, reboot, and reinstall our software.
If it succeeds, then you can re-install the antivirus/firewall software afterwards.
If using Wireless connection, please make sure that you are connected to the
wireless router and that you have a strong signal. Try going to your wireless
router’s website to check for the latest firmware and also check for the latest
drivers for your wireless card.
4. I have installed drivers for Windows 98SE and keep getting disconnected when transferring large files.
Windows 98SE can only read FAT32 file systems. Unfortunately, FAT32
comes with a limitation on single large files transfers up to 4GB. This is a file
system limitation. Please also check our website for updates on the Win98SE
drivers.
5. I have just installed Classic SL Network Drive, why does Classic SL
Network Drive show up as a red color?
Try unplugging your Classic SL Network Drive’s power cord, wait about 10
seconds, and plug it back in. If this doesn’t work, try restarting your
computer as well.
6. When adding Classic SL Network Drive to my computer, why does
the "ADD" button stay gray?
You may not have entered all the alpha-numeric values correctly. There are
no letter "O"s; please verify that you have used the number "0" (zero) for
anything resembling an "O." Also, check your other letters as well; two V’s
may look like a W. Start by entering only the Classic SL Network Drive ID. The
ADD button should not be greyed out if the correct ID is entered. Once it is
not grayed out, proceed to add the Write Key as well if you want read-write
access. Also make sure that there are 20 characters for the Classic SL Network
Drive ID, not including the Write Key.
42
Page 43

FAQ
USB
1. I have plugged in Classic SL Network Drive to my USB port and
cannot see Classic SL Network Drive in My Computer.
Try plugging the Classic SL Network Drive into a different USB port on your
PC. Or try using a different USB cable.
With Windows ME/2000/XP and MAC, Classic SL Network Drive uses the
Operating System’s built-in USB drivers, therefore, no software is necessary.
If you are using Windows98SE, please check our website for the latest USB
drivers. www.freecom.com.
If using Windows98SE/ME, and MAC, make sure that Classic SL Network
Drive is formatted to the supported files system. Windows Me requires
FAT32. Mac has its own file system, but also supports FAT32. It is up to you
to choose the appropriate one.
2. My Classic SL Network Drive shows up as a Black dot when used with
USB.
When used with USB mode, the software is not needed, therefore you will
see a black dot (disconnected) in the system tray as that is an indicator for
NDAS (Ethernet) mode.
Aggregation & Mirroring
1. What is the maximum number of NetDisk that support aggregation?
Aggregation can currently be done using two (2) NetDisk units.
GB
11
2. When used with Mirroring, and one NetDisk goes down what
happens?
The kind of mirroring done with NetDisk software is basic. You must format
before mirroring or aggregating NetDisk.
If one NetDisk goes down, data will still be on the other NetDisk and can be
accessed, but if you want to replace the down NetDisk, you must format
both NetDisks again to recreate mirror.
43
Page 44

Freecom Classic SL Network Drive
GB
12
Chapter 12: Troubleshooting
General
For the most recent list of Troubleshooting tips, please visit http://
www.freecom.com
1. How do I install Classic SL Network Drive?
Classic SL Network Drive can be installed using either Ethernet or USB.
Ethernet connection allows Classic SL Network Drive to be used as a Network
Storage Device; USB connection allows Classic SL Network Drive to be used
as a high-speed, external hard drive.
To install in NDAS Mode (requires a 100 Mb / full duplex switch)
• Connect the Power Cable and LAN Cable, from Classic SL Network Drive to
power and switch respectively.
• Install Classic SL Network Drive software from Installation CD or down load
the software from the Freecom website.
To install in Ethernet Mode (requires a cross-over cable which is not supplied)
• Connect the Power Cable and Cross-Over Cable, from Classic SL Network
Drive to power and Ethernet port on computer, respectively.
• Install Classic SL Network Drive software from Installation CD or down load
the software from the Freecom website.
To install in USB 2.0 Mode
• Connect the Power Cable and USB Cable, from Classic SL Network Drive,
to power and USB port on computer,respectively.
• Computer should automatically recognize Classic SL Network Drive. For
Windows 98/Windows Me and Mac, Classic SL Network Drive must me
formatted to FAT32 or recognized file system.
2. When adding Classic SL Network Drive to my computer, why does
the "ADD" button stay gray?
You may not have entered values correctly. The letter "O" is not used; please
verify that you have used the number "0" (zero).
3 I have just installed Classic SL Network Drive; why is the Classic SL
Network Drive showing up as a red color?
Try unplugging your Classic SL Network Drive power cord, wait about 10
seconds, and plug it back in. If this doesn’t work, try restarting your
computer.
44
Page 45

Troubleshooting
4. Why can’t my computer go into hibernation or standby?
If you want to use your computer in hibernation or standby, you must have
Classic SL Network Drive disabled before that can occur. Click on the Classic
SL Network Drive Admin Tool on you system tray- go to your Classic SL
Network Drive and then you should see a menu with Disable as one of the
choices.
5. My Classic SL Network Drive shows up as a Black Dot.
Please check the following: power cable is plugged in tightly, there is a link
light on the switch where it plugged in and please make sure that any
firewall/antivirus software is disabled before installing. The latest versions
of antivirus software have a new feature called script blocking. Please
ensure that this feature is disabled before continuing. You might also need
to enable our protocol and programs to run as well. Even after you have
done these things, it is possible that the firewall/antivirus software will still
block access. If this occurs, try uninstalling the firewall/antivirus software,
reboot, then reinstall our software. If this works, then you may reinstall the
antivirus/firewall software afterwards. If using Wireless, make sure that you
are connected to the wireless router and that your signal is good. Try going
to your wireless router’s website and check for the latest firmware and also
check for the latest drivers for your wireless card as well.
Try plugging in via Ethernet and see if it works that way.
6. I am getting "Classic SL Network Drive unplugged abnormally"?
Check to make sure that you are using the latest version of our software. The
Classic SL Network Drive connection may be unstable. Please check your
connections. Also, please check to see if your Classic SL Network Drive is
formatted to NTFS if you are using only 2000 or XP. This can be checked by
right-clicking on your Classic SL Network Drive drive letter from My Computer and clicking on Properties. Then, under File System it will indicate the
type of file system your Classic SL Network Drive is formatted to. To format
Classic SL Network Drive to NTFS, please right-click on the Classic SL Network
Drive drive letter from My Computer and then click on Format. There should
be a drop down menu that will allow you to select NTFS. Please also make
sure to check the box next to the word Quick Format.
Make sure that Classic SL Network Drive is plugged into a 100Mb/full duplex
capable switch. Classic SL Network Drive is not supported on hubs. If you
have your switches uplinked to another one, try putting Classic SL Network
Drive and your computer on the same switch and retry.
GB
12
45
Page 46

Freecom Classic SL Network Drive
GB
12
Try setting your NIC’s speed/duplex settings to 100Mb/full duplex. Right click
on My Network Places- click on Properties- right click on Local Area
Connection and click on Properties. Then click on the Configure button next
to your NIC- and click on the Advanced tab. There, you should be able to find
something related to "Speed & Duplex", "Media Settings", etc . where, once
highlighted, you can click on a drop down menu and select 100Mb/full
duplex.
You can try going to your NIC (Ethernet card) manufacturer and downloading
the latest drivers.
If using a DSL router, please try updating the firmware on it as well. Also, try
plugging Classic SL Network Drive your PC into a different port on the switch
and see if you have different results.
7. I have installed the Classic SL Network Drive key but cannot see
Classic SL Network Drive in "My Computer." What should I do?
Open up "Computer Management" by right-clicking on "My Computer."
Go to "Manage," then click on "Disk Management." Check to see if your
Classic SL Network Drive is recognized. It should show up as Disk 1 or Disk 2
or a different number depending on the number of drives that you have on
your computer.
Right -click on the appropriate "Disk #" and click "Initialize.". Also, for
Windows 98SE / Windows ME / Mac users, you will need to format disk to
FAT32 for it to be recognized.
8. I’ve just installed Classic SL Network Drive software, and now my
internet does not work.
This can happen when used with McAfee Virus Scan Professional 7.0; you
must disable HAWK Script Stopper in McAfee, before installing our software.
9. I have clicked on the Classic SL Network Drive Administrator Tool on
my desktop and nothing happens.
The icon on the desktop is only used to launch "Classic SL Network Drive
Administrator Tool" into the system tray, if for some reason it is not in there
already. The icon in the system tray is used for enabling, disabling, adding,
removing and switching Read / Write modes on Classic SL Network Drive.
10. I am getting a "Data has been corrupted" message on my computer
when I try to open up or copy a file. What should I do?
Open up Command Prompt and run "chkdsk" for the Classic SL Network
Drive drive. To do this Go to Start -> Run-> type in "cmd" without the
quotation marks. Then type in "chkdsk Classic SL Network Drive Drive Letter:
/F" For example, if your Classic SL Network Drive shows up as drive letter E:
in My Computer, you would type in the following: chkdsk E: /F
46
Page 47

Troubleshooting
11. When I try to copy something to my Classic SL Network Drive, why
does the following show up:
"Cannot copy Classic SL Network Drive Administrator: The disk is writeprotected. Remove the write-protection or use another disk."?
You do not have Read / Write access. Click on the Classic SL Network Drive
Icon in your bottom-right system tray.
Go to your Classic SL Network Drive and then click on "Enable Read/Write."
12. I get this error message: "The device ‘Generic volume’ cannot be
stopped right now. Try stopping the device again later."?
Close any windows that are displaying your Classic SL Network Drive and
retry what you were trying to do. If you continue to get that error message,
logging off then back on or rebooting. After copying a large amount of
data, it may seem as though it has completed, but there might be files still
being copied in the background from memory. Please wait and try later to
ensure that data will not be corrupted.
13. I am using Windows 98SE and the CD software will not load.
Currently, our Windows 98SE / ME drivers are not available on our CD. We
do have drivers* that are available in our Download Center. *The Windows
98SE/ME driver permits Read/Write access to the Classic SL Network Drive for
only one computer at a time. Write access can be passed in token format. Any
computer on the LAN can share Read access.
14. I’ve installed Classic SL Network Drive on my Windows 98SE computer and cannot see Classic SL Network Drive.
Please check to see if Classic SL Network Drive drivers are properly loaded.
If you are using NDAS mode, please check our Download Center for the
latest drivers. If you are using USB, you may need to download the Classic SL
Network Drive USB drivers from our Download Center. Right-click on My
Computer -> Go to Properties -> then click on Device Manager and look for
any yellow exclamation or question marks. Check to see if Classic SL Network
Drive is formatted to FAT32 as Windows 98SE can only recognize FAT file
systems. If you can, go to Start - Run - and type in "Command" without
quotation marks and press the Enter key.
Next, type in "fdisk" without quotation marks.
If you are asked about enabling large file support, type in "Y" and press the
"Enter" key. If you are asked about NTFS partitions, then your Classic SL
Network Drive is not in FAT32. Press "Esc" to exit Fdisk. Please go to
www.freecom.com and download directions for Windows 98SE / Me software drivers. The manual will explain how to FDISK and format your drive
in Windows 98SE/Windows Me. If Classic SL Network Drive is still not
recognized, make sure that Classic SL Network Drive is on. Also, try powercycling your Classic SL Network Drive and make sure that Classic SL Network
Drive software, if needed, is installed correctly.
GB
12
47
Page 48

Freecom Classic SL Network Drive
GB
12
15. I keep getting Autoplay when I plug in Classic SL Network Drive.
Create a blank text file in the root directory of your Classic SL Network Drive
and name it "autorun.inf". Place this in the root directory of your Classic SL
Network Drive drive letter in "My Computer."
16. I installed drivers for Windows 98SE and get disconnected when
transferring large files.
Windows 98SE can only read FAT32 file systems. Unfortunately, FAT32
comes with a limitation on single large files transfers up to 4GB. This is a file
system limitation. Please check our website for updates on the Win98SE
drivers.
17. I click on my files and get "Access Denied." What should I do?
If you are using Windows XP Professional, open My Computer-> go to
Tools-> Folder options-> click on the View tab and at the bottom uncheck
the "Enable Simple File Sharing" box. Then continue to the instructions
below.
If you are using Windows XP Home (plug in via USB): Then restart and hold
F8 during bootup to go into Safe Mode. Once in Safe Mode, please follow
instructions below.
Windows 2000 Computers: Open "My Computer," right click on the Classic
SL Network Drive drive letter and go to Properties.
Click on the Security Tab and then the Advanced button. If the Everyone
group is missing, please add the group and give it Full Control permissions.
Then click on the Owner tab and at the bottom, change the owner to
Administrators. If you are asked to replace permissions on all subdirectories,
say YES. You should now be able to access contents. This is related to the
Operating System’s security features.
18. I keep getting "Internal Error; Update Failed." What does this mean?
Update to Classic SL Network Drive’s latest drivers to see if that fixes the
problem. The Classic SL Network Drive Administrator may have started too
early. Try removing it from your startup folder located at
Start>Programs>Startup.
Then manually run the program to see if it still occurs.
19. Using Windows file sharing function, after reboot, share gets lost.
Is there any work around?
Create a batch file and place it in your startup folder. To create batch file:
Open Notepad application and type in "net share
sharename=DriveLetter:path" (For example net share Classic SL Network
Drive=F:). Save the file as a .bat extension (For example, "Classic SL Network
Drive.bat").
48
Page 49

Troubleshooting
20. I have installed the Mac Drivers but Classic SL Network Drive will not
mount.
Please check the following: Make sure that it is formatted to a file system
that your Mac can recognize.
When plugged in via NDAS (Ethernet), try enabling Read Only mode and
reboot your Mac. If you get a popup after rebooting, click "Initialize." It
should show up on your desktop as a Hard Drive.
You can then change Classic SL Network Drive to Read/Write mode later, if
needed.
• Try plugging it in via USB to see if it is recognized. If it still does not work
try reinstalling the Mac drivers from the Download Center.
• If you are using a Windows computer as well, then connect it to a Windows
computer and run the chkdsk utility.
• To do this: Open up Command Prompt and run "chkdsk" for the Classic SL
Network Drive drive. Go to Start -> Run -> type in "cmd" without the
quotation marks. Then type in "chkdsk Classic SL Network Drive / DriveLetter:
/F" For example, if your Classic SL Network Drive shows up as drive letter
E: in My Computer, you would type in the following: chkdsk E: /F After
running chkdsk and it still does not mount, then try formatting the Classic
SL Network Drive again and retry mounting drive.
USB
1. I have plugged in Classic SL Network Drive to my USB port and
cannot see Classic SL Network Drive in My Computer.
You must power off Classic SL Network Drive completely before doing so. Try
plugging Classic SL Network Drive into a different USB port on your
computer and see if that works. If using Windows 98SE / Windows Me, or
Mac, make sure that Classic SL Network Drive is formatted in a supported file
system. Windows 98SE / Windows Me requires FAT32. Mac has its own file
system, but also supports FAT32. You should choose the appropriate one.
GB
12
2. My Classic SL Network Drive shows up as a Black dot when used with
USB.
When used with USB mode, the Classic SL Network Drive Software is not
needed, therefore you will see a Black Dot (disconnected) in the system tray
since it is an indicator only for NDAS (Ethernet) mode.
Aggregation & Mirroring (PIC)
1. I cannot Aggregate or Mirror NDAS.
Please make sure that your NDAS is disabled before mirroring or aggregating them.
49
Page 50

Freecom Classic SL Network Drive
GB
Regulatory Statements
United States (FCC)
The computer equipment described in this manual generates
and uses radio frequency (RF) energy. If the equipment is not
installed and operated in strict accordance with the manufacturer’s instructions, interference to radio and television reception might result.
This equipment complies with Part 15 of the FCC Rules. Operation is subject to the following conditions:
(1) This device may not cause harmful interference, and (2) this
device must accept any interference received, including interference that may cause undesired operation.
Part 15, Class B, of the FCC Rules, is designed to provide
reasonable protection against radio and television interference
in a residential installation. Although the equipment has been
tested and found to comply with the allowed RF emission limits,
as specified in the above cited Rules, there is no guarantee that
interference will not occur in a particular installation. Interference can be determined by turning the equipment off and on
while monitoring radio or television reception. The user may be
able to eliminate any interference by implementing one or
more of the following measures:
- Reorient the affected device and/or its receiving antenna.
- Increase the distance between the affected device and the
computer equipment.
- Plug the computer and its peripherals into a different branch
circuit from that used by the af fected device.
- If necessary, consult an experienced radio/television technician for additional suggestions.
50
Page 51

WARRANTY (valid in Europe/Turkey only):
We thank you for purchasing this Freecom product and hope you will enjoy using it.
In order to avoid unnecessary inconvenience on your part, we suggest reading the quick install guide,
instruction manual and any additional electronic and or printed manuals. When problems occur we
have a database with Frequently Asked Questions (FAQ) on our Freecom website (www.freecom.com),
please check this site before you contact the helpdesk.
Your Guarantee
All Freecom products come with unlimited technical phone and web support. By this Guarantee, Freecom
warrants their products to be free from defects in material and workmanship for a period listed below
from the date of its original purchase. If during this period of guarantee the product proves defective
due to improper materials or workmanship, Freecom will, without charge for labour or parts, at its
sole discretion, repair or replace the product or its defective parts upon the terms and conditions set
out below.
Conditions
This guarantee will be granted only when the original invoice or sales receipt (indicating the date of
purchase, product and serial number) is presented together with the defective product and a Freecom
RMA number received from the Freecom Website or given by a Freecom Service Center. Freecom
reserves the right to refuse the free-of-charge guarantee services when the date of purchase of the
product cannot be proven. This guarantee will not apply if the RMA number is missing, the serial
number on the product has been altered, removed or made illegible.
This guarantee covers only the hardware components packaged with the product. This guarantee
covers none of the following: (a) any consumable supplied with the product, such as media or batter-
ies; (b) damage to or loss of any software programs, data or removable storage media; (c) any damage
resulting from adaptations, changes or adjustments, which may have been made to the product,
without the prior written consent of Freecom; (d) attempted repair by any party other than autho-
rized by Freecom and (e) accidents, lightning, water, fire or any other such cause beyond the reason-
able control of Freecom.
With respect to all services provided, Freecom is not responsible for any damage to or loss of any
programs, data or other information stored on any media or any part of any product serviced. Freecom
is not liable for the consequence of business loss in case of system failure. Be sure to exclude all parts
not covered by this guarantee prior to returning the product to Freecom. Freecom is not liable for any
loss or damage to these items. If during the repair of the product the contents of the hard drive are
altered, deleted or in any way modified, Freecom is not liable whatsoever.
Repair parts and replacement products will be provided on an exchange basis and will be either new,
equivalent to new or reconditioned. All replaced parts and products become the property of Freecom
The period of guarantee for any product or part repaired or replaced in warranty shall be the balance
of the original guarantee. Repairs or replacements on product or parts out of warranty carry 6 (six)
months guarantee.
All Freecom products come with unlimited free technical phone and web support.
Freecom Product Warranty period
Traveller & Portable 1 year (Two years in Europe)
Classic & Internal Series 1 year (Two years in Europe)
FC, FS & FX Series 1 year (Two years in Europe)
FHD Series & FireWire Harddrive 1 year (Two years in Europe)
USB Floppy Disk Drive 1 year (Two years in Europe)
USBCard 1 year (Two years in Europe)
DAT & LTO Drives (retail) 3 years
DAT-S Kits 2 years
ThinServer* 1 year (Two years in Europe)
Beatman 1 year (Two years in Europe)
Cables 1 year (Two years in Europe)
* Controller inside 3 years after online registration only. (GB)
 Loading...