

Page 1
USER MANUAL
MOBILE DRIVE SECURE
EXTERNAL MOBILE DRIVE / 2.5" / USB 2.0 / RFID
Rev. 912
Page 2
EN
Freecom Mobile Drive Secure
Dear user!
Thank you for selecting the Freecom Mobile Drive Secure as your external hard drive.
The Freecom Mobile Drive Secure provides a new definition of data security. Your data is
protected by using a keycard (in credit card format) to unlock the drive. For optimal use and
performance we advise you to read this manual carefully before using this product.
Freecom Technologies • Germany
www.freecom.com
Contents of the box
Please check the contents of the box; the following items should be included:
• Fr
eecom Mobile Drive Secure (external hard drive)
• Connection cable (USB 2.0)
• 2 keycards (credit card size) using RFID technology
• Manual, safety manual and application software pre-installed on the hard drive
• Quick Install Guide
* When the power provided by the USB port is not sufficient, visit www.freecom.com/support for an optional
AC adapter.
*
Need assistance? Have questions?
In case you have a question about the use of this product, need information about other
Freecom products or need technical assistance, please contact the Freecom Service Center
for your country. See www.freecom.com for details.
Freecom offers free unlimited helpdesk support.
Warning !
All rights reser ved. The products named in this manual are only used for identification
purposes and may be trademarks or registered trademarks of the respective companies.
This device was designed for home or office use.
Warning! This device is equipment complying with EN55022 class A. This equipment
can cause radio disturbances in a residential area. If this is the case, the user has to take
appropriate measures and assume all responsibility and costs for. It may not be used near
or with any life-sustaining systems.
Freecom cannot be made liable for any damages, loss of data or damage following
thereof -whatsoever (including, without limitation, damages for loss of business profits,
business interruption, loss of business information, or other pecuniary loss) arising out
of the use of or inability to use this Freecom product, even if Freecom has been advised
of the possibility of such damages.
We reserve the right to upgrade our products in keeping with technological advances.
2
Page 3

EN
Table of Contents
User manual
General Information ...........................................................................................................page 4
Precautionary measures ....................................................................................................pag
Freecom Mobile Drive Secure ........................................................................................pag
e 5
e 6
Chapter 1:
Hardware Installation .........................................................................................................page 7
Chapter 2:
Driver Installation ................................................................................................................page 10
Chapter 3:
Installation of the application software ...................................................................... page 11
Chapter 4:
Enabling data protection by keycard –
using the Freecom Hard Drive Keycard Protection software tool .....................page 13
Chapter 5:
Using Freecom Turbo USB 2.0 (only PC) .....................................................................page 25
Chapter 6:
Partitioning your Freecom Mobile Drive Secure .....................................................page 26
© 2009 Freecom Technologies
3
Page 4

EN
Freecom Mobile Drive Secure
General Information
The following hardware and software requirements must be fulfilled to ensure troublefree operation.
System requirements
In order to use the Freecom Mobile Drive Secure, following components are needed:
PC:
• Intel Pentium III / AMD Duron 900 MHz or higher
• 256 MB RAM (Vista: 512 MB RAM) or higher
• Available USB 2.0 or USB 1.1 port*
• Internet connection for online warranty registration, software updates and downloads
• Operating system: Windows XP, Windows Vista
Mac:
• Po
werPC G3/G4/G5, Mac Book Pro or Intel Mac
• 256 MB RAM or higher
• Available USB 2.0 or USB 1.1 port*
• Internet connection for online warranty registration, software updates and downloads
• Operating system: Mac OS X v10.4 or higher
* To achieve optimal performance from the Freecom Mobile Drive Secure your computer should be equipped
with an USB 2.0 port.
4
Page 5
EN
General Information
Precautionary measures
To ensure that your Freecom Mobile Drive Secure functions properly, please take note
of the following precautions. If these are not followed, you may void your warranty and
damage the Freecom Mobile Drive Secure.
• Saf
ely remove the Freecom Mobile Drive Secure via your operating system (the "unplug
or eject hardware" option in the Windows taskbar) before disconnecting the USB cable
or power cable and before switching off the device. Failing to do so may result in data
loss.
• Do
not drop the Freecom Mobile Drive Secure or expose it to other kinds of sudden
mechanical shocks as this may result in data loss and damage to the Freecom Mobile
Drive Secure.
not use the Freecom Mobile Drive Secure when the ambient temperature is below
• Do
10°C or above 35°C.
the Freecom Mobile Drive Secure is moved from a cool environment to a warmer
• If
environment, please allow the drive to acclimatize to the ambient temperature
before operating the device. Failing to do so may lead to condensation within the
drive enclosure, which in turn may cause the drive to malfunction.
not place liquids or drinks on the Freecom Mobile Drive Secure. When liquids are
• Do
spilled and get in contact with the electronics within the drive enclosure, it will damage
the drive and will cause the drive to malfunction.
not use the Freecom Mobile Drive Secure in a dusty environment. Dust inside the
• Do
enclosure may damage the internal electronics and result in drive malfunction.
ening the Freecom Mobile Drive Secure will void the warranty.
• Op
• Since USB 2.0 is backwards compatible with USB 1.1, the Freecom Mobile Drive Secure
can be connected to all USB ports. When connected to a USB 1.1 port, however, the
performance (data transfer rate) of the Freecom Mobile Drive Secure will be much
lower than when the drive is connected to a USB 2.0 port.
On some computers it might occur that the USB port does not deliver enough
power to the Mobile Drive Secure. In that case, you need to use an external
power supply.
For safety reasons you must only use Freecom’s Power Supply Part.No. 30003.
Don’t use any other other power supply!
5
Page 6

EN
Freecom Mobile Drive Secure
Freecom Mobile Drive Secure
The hi-speed data transfer through the USB 2.0 interface makes it ideally suitable for
data-storage, file sharing, backup, archiving, audio playback and all applications that
need fast file access.
For your convenience, the Freecom Mobile Drive Secure has been partitioned (1 partition) and
pre-formatted (FAT32 file system). The FAT32 format ensures maximum interchangeability
of the Freecom Mobile Drive Secure between different computers. Should you choose
to format the Freecom Mobile Drive Secure in another file system (e.g. NTFS), please be
aware of possible problems when connecting the Freecom Mobile Drive Secure to another
computer than the one you used for formatting.
6
Page 7
7
EN
1
Hardware Installation
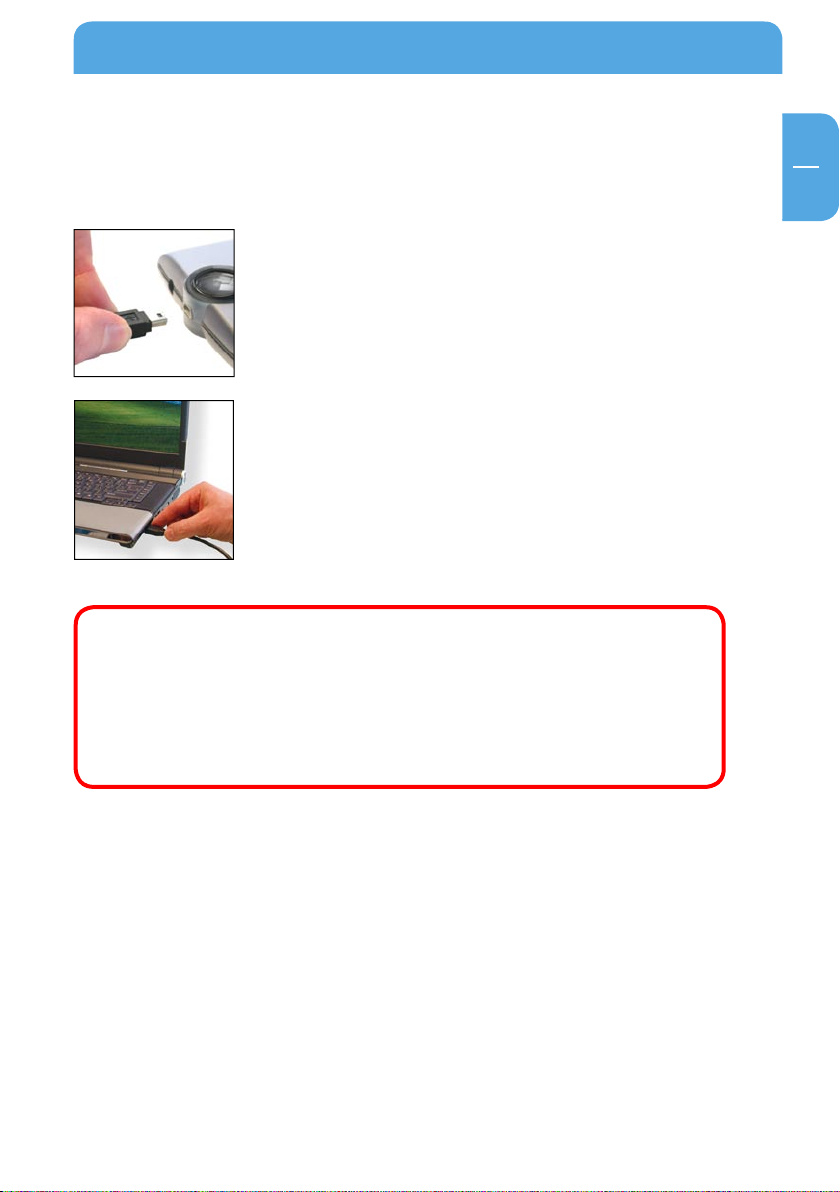
Chapter 1: Hardware Installation
Before connecting the cables make sure the Freecom Mobile Drive Secure is switched
off.
1. Connect the interface cable (USB) to the Freecom Mobile
Drive Secure.
2. Connect the interface cable (USB) to the interface port (USB)
of your computer.
Since USB 2.0 is backwards compatible with USB 1.1, the Freecom Mobile
Drive Secure can be connected to all USB ports. When connected to a USB 1.1
port, however, the performance (data transfer rate) of the Freecom Mobile
Drive Secure will be much lower than when the drive is connected to a USB
2.0 port.
For optimum performance the Freecom Mobile Drive Secure should always
be connected to a USB 2.0 interface.
Page 8

EN
1
Freecom Mobile Drive Secure
1.1 Data protection by keycard (using RFID technology)
The data on the Mobile Drive Secure can be protected from unwanted access by using
a keycard to unlock the drive. This keycard is placed over a sensor inside the Mobile
Drive Secure, when the Mobile Drive Secure recognizes the keycard it will unlock the
drive for use.
The technology inside the keycard and the Mobile Drive Secure is called RFID. RFID stands
for Radio Frequency Identification. The same technology can be found for example in
office buildings, where people need to present a keycard if they want access to the
building or to a certain floor / department / room.
Your Mobile Drive Secure comes with 2 Keycards, in credit card size. This card fits easily
in your wallet so you always will carry it with you. The default setting of the drive is "no
protection". When starting to use the Mobile Drive Secure for the first time, you need to
configure the 2 supplied keycards with the drive. The Mobile Drive Secure can identify
maximum 2 keycards. We suggest that – after configuring – you use one keycard (labeled
"Security Key") and store the other keycard (labeled "Master Key") in a safe place, in case
your Security Key gets lost.
Of course you can also use the drive without the keycards. In that case you do not need
to run the configuration wizard – you can immediately start using your hard drive after
unpacking it from the box. Please note that your data is not protected against unwanted
access then.
You can also decide to use the keycard protection at a later stage, however please note
that the drive needs to be reformatted then and all data on the drive will be lost. See
chapter 4.
How the keycard protection works:
Mobile Drive
Secure locked
To configure the 2 keycards using the "Freecom Hard Drive Keycard Protection" software
assistant, see chapter 4.
unlock Mobile Drive
Secure with keycard
over the sensor
Mobile Drive
Secure
unlocked
Move keycard over
the sensor
Mobile Drive Secure
8
locked
Page 9
9
EN
1
Hardware Installation
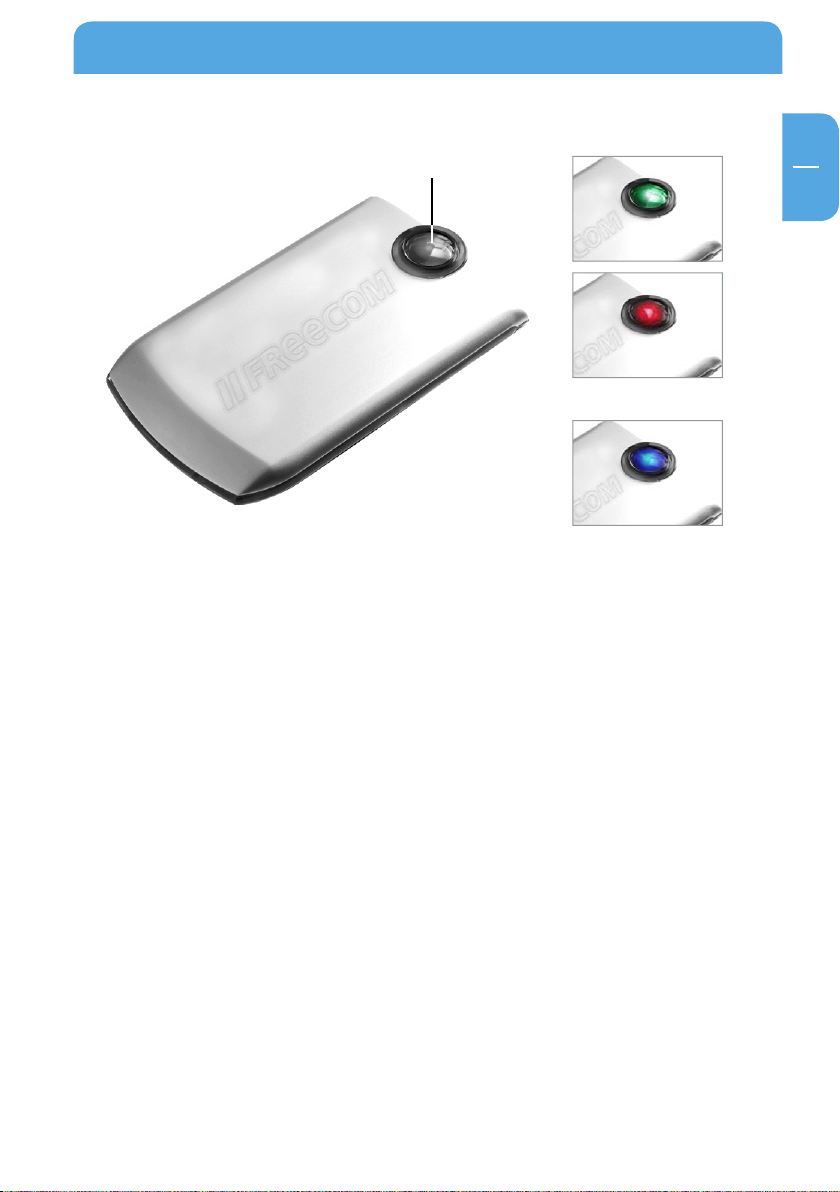
1.2 RFID sensor and LEDs
1. RFID sensor
This is the position where the keycard needs to be held to unlock the drive.
2. LED (green/red)
LED off: keyc
ard protection not configured
LED red, flashing quickly: wai
ting for initial recognition of the first
Keycard
LED green, flashing quickly: waiting for initial recognition of the second
Keycard
LED red, flashing slowly (1 second gap): delay of error detection
LED red, bright: har
d drive locked, can not be accessed
LED green, bright: har
d drive unlocked, ready for use (read data
from / write data to the hard drive)
LED red, flashing quickly: era
sing data on the hard drive
3. LED (blue)
LED blue: dev
ice on
LED blue blinking: dat
a transfer
2. LED (green/red)
3. LED (blue)
1. RFID sensor
Page 10

EN
1
Freecom Mobile Drive Secure
4. Acoustic signals
Red LED: Mobile Drive Secure is locked, one short beep
when drive is connected to PC/Mac
en LED: Mobile Drive Secure is unlocked, two short beeps
Gre
when keycard is moved over sensor to unlock
or to lock the drive
While configuring the keycards:
rd: LED is blinking red, four beeps when ready for
No ca
the first keycard
er first card: LED is blinking green, two short beeps when
Aft
first keycard was accepted
er second card: LED is constantly green, two short beeps when
Aft
second keycard was accepted
Chapter 2: Driver Installation
Under Windows XP / Vista and Mac OS X a separate Freecom driver is not required. The
drivers will be installed automatically by the operating system after plugging in the
Freecom Mobile Drive Secure into the USB port of the computer.
10
Page 11
EN
3
Installation of the application software
Chapter 3: Installation of the application software
3.1 Installation software PC
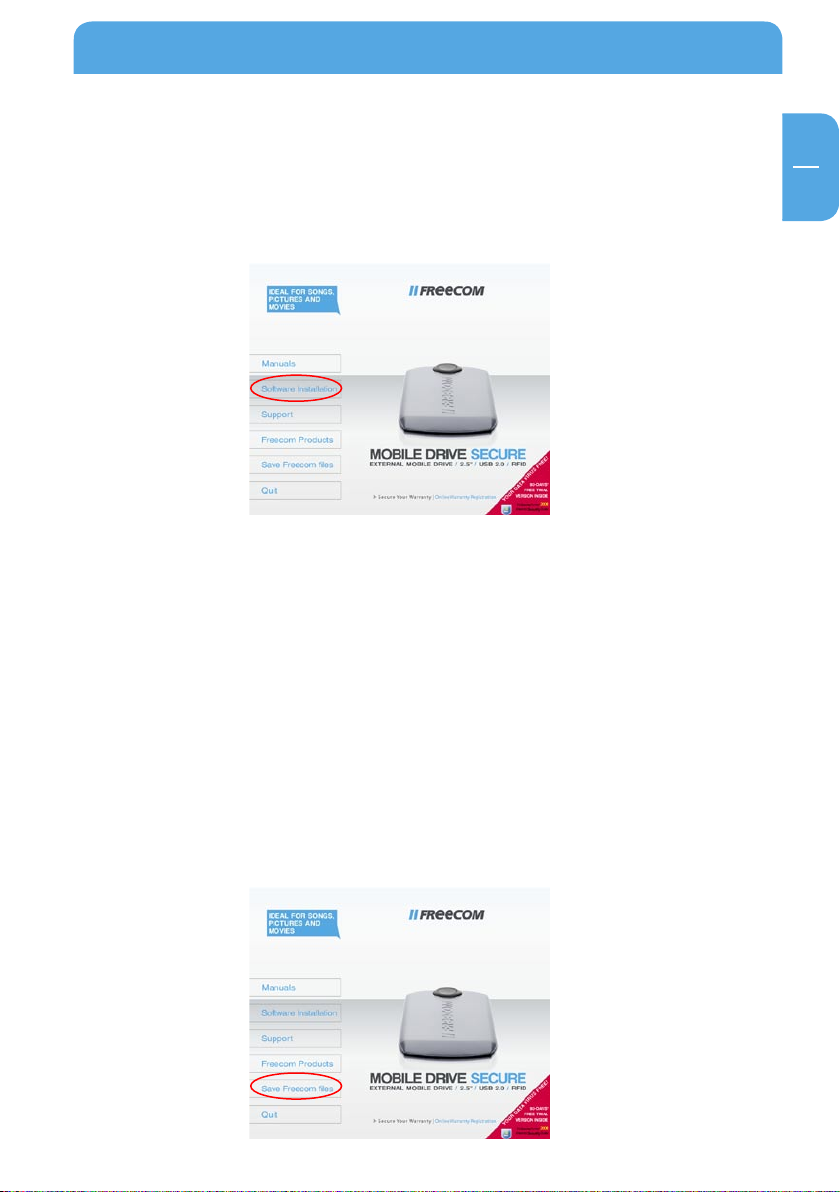
1. Click on "StartPC.exe" in the main directory of the hard drive. The Freecom start menu
opens.
2. Click on "Software Installation" -> "NTI Shadow", "NTI Ripper", "RFID HD Protection"
or other software. The installation starts now. Follow the instructions on the screen,
confirm with "Next" in order to continue with the installation.
1 Saving Freecom data
3.1.
The user manuals and complementary software (when applicable) are pre-loaded
onto the hard drive. We recommend that you save these files to your computer ("My
Documents"/"Freecom"), to always have a backup of these files in case you (accidentally)
reformat the drive or delete these files from the drive.
Saving these files from the external hard drive to your computer is easy:
lick on the button "Save Freecom files".
1. C
2. All provided data on the Freecom hard drive will be saved to the folder "Freecom" in
"My Documents".
11
Page 12

EN
3
Freecom Mobile Drive Secure
3.2 Installation software Mac
1. Click on "Start MAC" in the main directory of the hard drive. The Freecom start menu
opens.
lick on "Software Installation" -> "Install NTI Shadow" or "RFID HD Protection". The
2. C
installation starts now. Follow the instructions on the screen, confirm with "Next" in
order to continue with the installation.
3.2.1 Sa
The user manuals and complementary software (when applicable) are pre-loaded onto
the hard drive. We recommend that you save these files to your computer ("Documents"/
"Freecom"), to always have a backup of these files in case you (accidentally) reformat
the drive or delete these files from the drive.
Saving these files from the external hard drive to your computer is easy:
1. C
2. All provided data on the Freecom hard drive will be saved to the folder "Freecom" in
ving Freecom data
lick on the button "Save Freecom files".
"Documents".
12
Page 13

EN
4
Enabling data protection by keycard
Chapter 4: Enabling data protection by keycard – using the
Freecom Hard Drive Keycard Protection software
tool
4.1 Freecom Hard Drive Keycard Protection (Windows)
You can protect your Mobile Drive Secure from unwanted access by enabling the RFID
protection. RFID stands for Radio Frequency Identification, and this technology is used
in the 2 keycards shipped with the drive and in the drive itself.
When starting to use the Mobile Drive Secure for the first time, you need to configure
the 2 supplied keycards with the drive. The Mobile Drive Secure can identify maximum
2 keycards. We suggest that – after configuring – you use one keycard (labeled "Security
Key") and store the other keycard (labeled "Master Key") in a safe place, in case your
Security Key gets lost.
The use of the RFID protection with the keycards is purely optional. If you don’t want to
use this security option, you can immediately use your Mobile Drive Secure out of the
box, without any configuration steps necessary, just as any standard USB hard drive. You
can also decide to use the keycard protection at a later stage, however please note that
the drive needs to be reformatted then and all data on the drive will be lost.
The default setting of the Mobile Drive Secure is "No Keycard protection".
Attention: When setting up the security option, all data will be deleted
on your hard drive. You have the possibility to backup all Freecom data
(manuals, software etc.) to your local hard drive during the setup. This
option will backup ONLY Freecom data! If you already have some personal
data on the hard drive, this will not be saved.
13
Page 14

EN
4
Freecom Mobile Drive Secure
4.1.1 Initial setup of RFID protection
In MyComputer, select the Freecom Mobile Drive Secure. Click "StartPC.exe".
A menu screen will appear. Select "Software Installation" and then select "RFID HD
Protection".
Please make sure to have the two supplied Keycards (labeled "Security Key" and "Master
Key" at hand, these are required for setup.
Run the Freecom Hard Drive Keycard Protection software.
Confirm that all data on your hard drive will be deleted and click on "Next".
Confirm once again that you really want to format the hard drive.
After that, a window with a progress bar will be shown and the device LED will blink red.
14
Page 15

EN
4
Enabling data protection by keycard
Move the first keycard over the sensor on the drive, which is located at the front of the
drive (see page 9). If it was successfully recognized, the LED will start blinking green.
Move the second keycard over the sensor. If it was successfully recognized, the LED will
be constantly green. RFID protection is now enabled. The next time you connect your
Freecom Mobile Drive Secure, you have to identify with one of the keycard to access
your data.
15
Page 16

EN
4
Freecom Mobile Drive Secure
4.1.2 Using your Freecom Mobile Drive Secure with RFID protection
After configuring the two keycards, every time you connect your Freecom Mobile Drive
Secure to your computer or switch it on, the left LED will be red indicating the drive is
locked and can not be used. The drive will not appear as a drive letter in Windows Explorer.
In order to use the drive, you need to identify yourself by holding one of the keycards in
front of the sensor on the drive. The left LED will change from red to green, indicating
that your Mobile Drive Secure is now unlocked and can be used. You will now also see
the Mobile Drive Secure appear as a drive letter in Windows Explorer.
IMPORTANT: If the Keycard security is enabled, the only way to access the
Mobile Drive Secure is by presenting the keycard to the drive. Without the
keycard there is no possibility to access the data on the drive.
After having configured the two keycards, when running the Freecom RFID protection
tool it will give you three options to choose from:
1. Safely remove hard drive
This option allows you to safely remove the hard drive from your system. After using the drive
we recommend you use this option to remove the drive, in order to prevent data loss.
After use, we recommend you switch off the power of the Mobile Drive Secure. Next
time you switch the drive back on, you will need to present one of the keycards to the
drive in order to use the drive.
16
Page 17

EN
4
Enabling data protection by keycard
2. Add new keycard
In case you have lost one or both of the keycards, you can always configure 2 new keycards
for use with your Mobile Drive Secure.
ATTENTION: You have to configure again with 2 ke
have 2 keycards at hand.
This setup procedure is exactly the same as described in paragraph 4.1.1.
ycards. Make sure to
ove keycard protection
3. Rem
You may always decide to not use the keycard security option anymore. To remove the
keycard protection, select this option. After this procedure, you can use the Mobile Drive
Secure as any other (unprotected) external USB hard drive.
ATTENTION: when removing the RFID protection, the hard drive will be
formatted and all your data will be lost. Make sure you have made a backup
of your important files before using this removal option.
17
Page 18

EN
4
Freecom Mobile Drive Secure
4.1.3 I have lost my keycards – what can I do now?
If you have lost both your keycards, you will not be able to get access to your data on the
Freecom Mobile Drive Secure anymore.
To use your Freecom Mobile Drive Secure again, the RFID protection has to be removed.
When removing the RFID protection, the hard drive will be formatted and all your data
will be lost. Make sure you always regularly make a backup of your important files.
Run the Freecom Hard Drive Keycard Protection software and confirm that all data on
the hard drive will be deleted. Click on "Next" and confirm again that all data will be
deleted.
The RFID protection will now be removed and the hard drive will be formatted. This
might take up to two hours.
After the hard drive has successfully been formatted, you can either use the drive without
keycard protection or set up two new keycards as described in paragraph 4.1.1.
New keycards are available via www.freecom.com or your local Freecom reseller.
If at any point during installing and/or configuring your Mobile Drive
Secure you need assistance or have questions, please contact the Freecom
Support Center for your country. See www.freecom.com for details.
Freecom offers free unlimited helpdesk support.
18
Page 19

EN
4
Enabling data protection by keycard
4.2 Freecom Hard Drive Keycard Protection (Mac)
You can protect your Mobile Drive Secure from unwanted access by enabling the RFID
protection. RFID stands for Radio Frequency Identification, and this technology is used
in the 2 keycards shipped with the drive and in the drive itself.
When starting to use the Mobile Drive Secure for the first time, you need to configure
the 2 supplied keycards with the drive. The Mobile Drive Secure can identify maximum
2 keycards. We suggest that – after configuring – you use one keycard (labeled "Security
Key") and store the other keycard (labeled "Master Key") in a safe place, in case your
Security Key gets lost.
The use of the RFID protection with the keycards is purely optional. If you don’t want to
use this security option, you can immediately use your Mobile Drive Secure out of the
box, without any configuration steps necessary, just as any standard USB hard drive.
The default setting of the Mobile Drive Secure is "No Keycard protection".
Attention: When setting up the security option, all data will be deleted
on your hard drive. You have the possibility to backup all Freecom data
(manuals, software etc.) to your local hard drive during the setup. This
option will backup ONLY Freecom data! If you already have some personal
data on the hard drive, this will not be saved.
19
Page 20

EN
4
Freecom Mobile Drive Secure
4.2.1 Initial setup of RFID protection
Click on "Start MAC" in the main directory of the hard drive. A menu screen will appear.
Select "Software Installation" and then select "RFID HD Protection".
Please make sure to have the two supplied Keycards (labeled "Security Key" and "Master
Key" at hand, these are required for setup.
Run the "Freecom RFID" software. This can be found in "Applications" —> "Utilities".
Confirm that all data on your hard drive will be deleted and click on "OK".
20
Page 21

EN
4
Enabling data protection by keycard
Confirm once again that you really want to format the hard drive.
After that, a window with a progress bar will be shown and the device LED will blink red.
Move the first keycard over the sensor on the drive, which is located at the front of the
drive (see page 9). If it was successfully recognized, the LED will start blinking green.
Move the second keycard over the sensor. If it was successfully recognized, the LED will
be constantly green. RFID protection is now enabled. The next time you connect your
Freecom Mobile Drive Secure, you have to identify with one of the keycards to access
your data.
21
Page 22

EN
4
Freecom Mobile Drive Secure
4.2.2 Using your Freecom Mobile Drive Secure with RFID protection
After configuring the two keycards, every time you connect your Freecom Mobile Drive
Secure to your Mac or switch it on, the left LED will be red indicating the drive is locked
and can not be used. The drive will not appear on your Mac desktop. In order to use the
drive, you need to identify yourself by holding one of the keycards in front of the sensor
on the drive. The left LED will change from red to green, indicating that your Mobile Drive
Secure is now unlocked and can be used. You will now see the Mobile Drive Secure on
your Mac desktop.
IMPORTANT: If the Keycard security is enabled, the only way to access the
Mobile Drive Secure is by presenting the keycard to the drive. Without the
keycard there is no possibility to access the data on the drive.
After having configured the two keycards, when running the Freecom RFID protection
tool it will give you three options to choose from:
1. Eject hard drive
This option allows you to safely remove the hard drive from your system. After using the drive
we recommend you use this option to remove the drive, in order to prevent data loss.
After use, we recommend you switch off the power of the Mobile Drive Secure. Next
time you switch the drive back on, you will need to present one of the keycards to the
drive in order to use the drive.
22
Page 23

EN
4
Enabling data protection by keycard
2. Add a new keycard
In case you have lost one or both of the keycards, you can always configure 2 new keycards
for use with your Mobile Drive Secure.
ATTENTION: You have to configure again with 2 ke
have 2 keycards at hand.
This setup procedure is exactly the same as described in paragraph 4.2.1.
ove keycard protection
3. Rem
You may always decide to not use the keycard security option anymore. To remove the
keycard protection, select this option. After this procedure, you can use the Mobile Drive
Secure as any other (unprotected) external USB hard drive.
ycards. Make sure to
ATTENTION: when removing the RFID protection, the hard drive will be
formatted and all your data will be lost. Make sure you have made a backup
of your important files before using this removal option.
23
Page 24

EN
4
Freecom Mobile Drive Secure
4.2.3 I have lost my keycards – what can I do now?
If you have lost both your keycards, you will not be able to get access to your data on the
Freecom Mobile Drive Secure anymore.
To use your Freecom Mobile Drive Secure again, the RFID protection has to be removed.
When removing the RFID protection, the hard drive will be formatted and all your data
will be lost. Make sure you always regularly make a backup of your important files.
Run the "Freecom RFID" software and confirm that all data on the hard drive will be
deleted. Click on "OK" and confirm again that all data will be deleted.
The RFID protection will now be removed and the hard drive will be formatted. This
might take up to two hours.
After the hard drive has successfully been formatted, you can either use the drive without
keycard protection or set up two new keycards as described in paragraph 4.2.1.
New keycards are available via www.freecom.com or your local Freecom reseller.
If at any point during installing and/or configuring your Mobile Drive
Secure you need assistance or have questions, please contact the Freecom
Support Center for your country. See www.freecom.com for details.
Freecom offers free unlimited helpdesk support.
24
Page 25

EN
5
Using Freecom Turbo USB 2.0 (only PC)
Chapter 5: Using Freecom Turbo USB 2.0 (only PC)
By installing the Turbo USB 2.0 driver for your Mobile Drive Secure, the data transfer rate
can be significantly increased (up to 40% faster transfer speed compared to standard
High-Speed USB).
Enabling the Turbo USB 2.0 driver
1. Connect the Freecom Mobile Drive Secure to your PC.
2. Run "Start.exe" from your Mobile Drive Secure and go to Software Installation ->
Freecom Turbo USB 2.0.
3. T
he Freecom Turbo USB 2.0 Wizard will open.
heck the drive and click on "Configure" to enable the Turbo USB2.0 driver for the
4. C
Freecom Mobile Drive Secure.
Dis
abling the Turbo USB 2.0 driver
1. Connect the Freecom Mobile Drive Secure to your PC.
2. Run "Start.exe" from your Mobile Drive Secure and go to Software Installation ->
Freecom Turbo USB 2.0.
3. T
he Freecom Turbo USB 2.0 Wizard will open. Uncheck the drive and click on "Configure"
to disable the Freecom Turbo USB 2.0 driver for the Freecom Mobile Drive Secure.
25
Page 26

EN
6
Freecom Mobile Drive Secure
Chapter 6: Partitioning your Freecom Mobile Drive Secure
6.1 General information
Your Freecom Mobile Drive Secure was partitioned and formatted to provide you with
the maximum available capacity and compatibility. FAT32 was chosen as file system to
assure that you will be able to read your files on any PC. It is recommended not to change
the current configuration of your Freecom Mobile Drive Secure.
For some users another file system might fit better for their needs. This manual describes
current limitations of most common file systems and Instructions to enable you to adapt
the Freecom Mobile Drive Secure to your needs.
6.2 File System features
Please refer to the tables below for an overview:
File systems supported by different operating systems
Opera ting system
File sys tem
FAT FAT32 NTFS HFS+
Windows XP / Vista yes yes yes no
Mac OS X yes yes yes
Maximum size of a partition
Opera ting system
File sys tem
FAT FAT32 NTFS HFS+
Windows XP / Vista 4 GB* 32 GB 16 TB -
Mac OS X 10.1.x - 128 GB - 2 TB
Mac OS X 10.2.x - 128 GB - 8 TB
Mac OS X 10.3.x - ( -> 128 GB) - 16 TB
Mac OS X 10.4.x - ( -> 128 GB) - 16 TB
Mac OS X 10.5.x - ( -> 128 GB) - 16 TB
* FAT partitions larger than 2 GB can only be administrated by Windows XP / Vista.
26
(only read) yes
Page 27

EN
6
Partitioning your Freecom Mobile Drive Secure
Example for different partitions with different file systems on one Freecom
Mobile Drive Secure
File sys tem
Total
size of Fre ecom
Mobil e Drive Secure
500 GB 470 GB 30 GB
Note: On NTFS formatted hard drives can only be written under Windows
XP / Vista. Under MacOSX data can only be read.
The example above is a good solution for Windows XP / Vista users who sometimes
exchange data with Macs.
For storing the data under Windows XP / Vista both partitions can be used. As the NTFS
file system can only be read by Mac data to be used on these operating systems must
be stored on the FAT32 partition.
Please follow the steps below to adapt the Mobile Drive Secure for your needs.
NTFS FAT32
6.3 Partitioning your Mobile Drive Secure under Windows XP / Vista
6.3.1 Deleting a partition on the Freecom Mobile Drive Secure
1. Click with the right mouse button on the "My Computer" icon on your desktop.
2. Select the option "Manage".
3. Select the option "Storage" -> "Disk Management".
4. Choose your external Mobile Drive Secure and right-click on the partition.
5. Select "Delete Partition" and confirm by clicking on "Yes". The partition will be
deleted now.
6.3.2 Cre
The following steps will guide you through the process of creating partitions on your
Freecom Mobile Drive Secure. After this procedure your Mobile Drive Secure will be ready
for use and it will be allocated a drive letter.
1. C
2. Select the option "Manage".
3. Select the option "Storage" -> "Disk Management".
4. Choose the hard drive, which is "unallocated". Ensure that the entire drive is
ating a partition on the Freecom Mobile Drive Secure
lick with the right mouse button on the "My Computer" icon on your desktop.
"unallocated".
27
Page 28

EN
6
Freecom Mobile Drive Secure
5. Click with the right mouse button on the "unallocated" area and select the option
"New Partition". The "New Partition Wizard" opens. Click on "Next".
28
Page 29

EN
6
Partitioning your Freecom Mobile Drive Secure
6. Select "Primary partition" and click on "Next".
7. Now you can adjust the size of your partition. Click on "Next" if only one partition is to
be created. See next chapter (Creating two or more partitions on the Freecom Mobile
Drive Secure under Windows XP / Vista) how to create more than one partition.
ssign a drive letter to your hard drive. Normally you can use the default options.
8. A
Click on "Next".
29
Page 30

EN
6
Freecom Mobile Drive Secure
9. Select the formatting option "Format this partition with the following settings". Choose
either "FAT32" or "NTFS", the "Allocation unit size" should remain on "Default". Finally
select "Perform a quick format" and click on "Next".
10. Click on "Finish" to complete the partitioning of your Freecom Mobile Drive Secure.
Your Freecom Mobile Drive Secure will be formatted now and is ready-to-use
afterwards.
30
Page 31

EN
6
Partitioning your Freecom Mobile Drive Secure
6.3.3 Creating two or more partitions on the Freecom Mobile Drive Secure under Windows XP / Vista
1. Repeat the steps from the previous chapter (Creating a partition on the Freecom
Mobile Drive Secure under Windows XP / Vista) for creating the first partition.
2. Click with the right mouse button on the "My Computer" icon on your desktop.
3. Select the option "Manage".
4. Select the option "Storage" -> "Disk Management".
5. Right-click on the unallocated space of your Freecom Mobile Drive Secure and select
the option "New partition". The "New Partition Wizard" opens. Click on "Next".
elect "Extended partition" and click on "Next".
6. S
7. Now you can adjust the size of your partition. Enter the size and click on "Next".
31
Page 32

EN
6
Freecom Mobile Drive Secure
8. Click on "Finish" to create the "Extended partition". The unallocated space now
changed to "Free space".
32
Page 33

EN
6
Partitioning your Freecom Mobile Drive Secure
9. Right-click on "Free Space" and select "New Logical Drive". The "New Partition Wizard"
opens. Click on "Next".
10. "Logical drive" is already selected. Click on "Next".
11. Specify the partition size and click on "Next".
12. Assign a drive letter and click on "Next".
13. Select the formatting option "Format this partition with the following settings". Choose
either "FAT32" or "NTFS", the "Allocation unit size" should remain on "Default". Finally
select "Perform a quick format" and click on "Next".
Click on "Finish" to complete partitioning. Your partition will be formatted now and
14.
is ready-to-use.
Note: If you select NTFS as file system, the data of your Mobile Drive Secure
can be read only under Mac OS X. There is no possibility to write data.
33
Page 34

EN
6
Freecom Mobile Drive Secure
6.4 Partitioning your Freecom Mobile Drive Secure under Mac OS X
1. Open the "Disk Utility". This can be found in "Applications" —> "Utilities".
2. Click on the tab "Partition".
Here you can setup the partition settings and partition the drive according to your
settings (e.g. Mac OS Extended). Detailed information how to use the Disk Utility can
be found in the help:
34
Page 35

WARRANTY
(valid in Europe/Turkey only)
We thank you for purchasing this Freecom product and hope you will enjoy using it.
In order to avoid unnecessary inconvenience on your part, we suggest reading the quick
install guide, instruction manual and any additional electronic and or printed manuals. When
problems occur we have a database with Frequently Asked Questions (FAQ) on our Freecom
website (www.freecom.com), please check this site before you contact the helpdesk.
Your Guarantee
All Freecom products come with unlimited technical phone and web support. By this
Guarantee, Freecom warrants their products to be free from defects in material and workmanship for a period listed below from the date of its original purchase. If during this period
of guarantee the product proves defective due to improper materials or workmanship,
Freecom will, without charge for labour or parts, at its sole discretion, repair or replace the
product or its defective parts upon the terms and conditions set out below.
Conditions
This guarantee will be granted only when the original invoice or sales receipt (indicating
the date of purchase, product and serial number) is presented together with the defective
product and a Freecom RMA number received from the Freecom Website or given by a
Freecom Service Center. Freecom reserves the right to refuse the free-of-charge guarantee
services when the date of purchase of the product cannot be proven. This guarantee will
not apply if the RMA number is missing, the serial number on the product has been altered,
removed or made illegible.
This guarantee covers only the hardware components packaged with the product. This
guarantee covers none of the following: (a) any consumable supplied with the product, such
as media or batteries; (b) damage to or loss of any software programs, data or removable
storage media; (c) any damage resulting from adaptations, changes or adjustments, which
may have been made to the product, without the prior written consent of Freecom; (d) attempted repair by any party other than authorized by Freecom and (e) accidents, lightning,
water, re or any other such cause beyond the reasonable control of Freecom.
With respect to all services provided, Freecom is not responsible for any damage to or loss
of any programs, data or other information stored on any media or any part of any product
serviced. Freecom is not liable for the consequence of business loss in case of system failure.
Be sure to exclude all parts not covered by this guarantee prior to returning the product to
Freecom. Freecom is not liable for any loss or damage to these items. If during the repair
of the product the contents of the hard drive are altered, deleted or in any way modied,
Freecom is not liable whatsoever.
Repair parts and replacement products will be provided on an exchange basis and will be
either new, equivalent to new or reconditioned. All replaced parts and products become
the property of Freecom The period of guarantee for any product or part repaired or replaced in warranty shall be the balance of the original guarantee. Repairs or replacements
on product or parts out of warranty carry 6 (six) months guarantee.
2
YEARS
WAR RANTY
 Loading...