

Page 1
USER MANUAL
MEDIA PLAYER II
EXTERNAL MULTIMEDIA HARD DRIVE / 3.5" / LAN / USB 2.0 / AV
Rev. 904
Page 2

Freecom MediaPlayer II
EN
Dear user!
Thank you for buying the Freecom MediaPlayer II, a brand-new digital multimedia
player that supports dual data access mode via 3.5" HDD inside (not supplied with
"Drive In Kit"-model) and 10/100Mbps Network. With this Freecom MediaPlayer II you
can easily enjoy Digital Movies, Digital Music, Digital Photos from a 3.5" HDD (when assembled in the device) and from all PC's in your network, directly on your TV or HiFi set.
For optimal use and performance we advise you to read this manual carefully before
using this product.
Freecom Technologies GmbH • Germany
www.freecom.com
Contents of the box
Please check the contents of the box. At least the following items should be included:
reecom MediaPlayer II
• F
• Power adapter
• Remote control (including batteries)
• Audio/Video cable
• USB cable
• Network cable
• CD with manual, safety manual
• Quick Install Guide
Warning !
All rights reserved. The products named in this manual are only used for identification
purposes and may be trademarks or registered trademarks of the respective companies.
This device was designed for home or office use.
Warning! This device is equipment complying with EN55022 class A. This equipment can
cause radio disturbances in a residential area. If this is the case, the user has to take appropriate measures and assume all responsibility and costs for. It may not be used near
or with any life-sustaining systems.
Freecom cannot be made liable for any damages, loss of data or damage following thereof
-whatsoever (including, without limitation, damages for loss of business profits, business
interruption, loss of business information, or other pecuniary loss) arising out of the use
of or inability to use this Freecom product, even if Freecom has been advised of the possibility of such damages.
We reserve the right to upgrade our products in keeping with technological advances.
2
Page 3

EN
Table of Contents
User manual
General Information ...........................................................................................................page 4
Important note .............................................................................................................. page 4
Specification
Minimum System Requirements ............................................................................page 5
Precautions .....................................................................................................................page 6
Warnings and Safety Instructions ..........................................................................page 8
...................................................................................................................pa
ge 4
Chapter 1:
Product Overview ................................................................................................................page 9
Front View .......................................................................................................................page 9
Back View
Remote control ..............................................................................................................page 11
.........................................................................................................................pa
ge 10
Chapter 2:
Basic operation .....................................................................................................................page 13
First steps ........................................................................................................................ pa
Network Setup under Windows XP and Windows Vista ............................... page 15
ge 13
Chapter 3:
Using the product ................................................................................................................page 20
Browse and play the media files ............................................................................page 20
File Copy ..........................................................................................................................page 22
Setup Menu ...................................................................................................................page 23
Chapter 4:
Install BT_SAMBA .................................................................................................................page 38
Initial installation ..........................................................................................................page 38
Neighbor Web interface ............................................................................................ page 39
BitTorrent Download .................................................................................................. page 39
Add new torrent
Visit neighbor ............................................................................................................... page 42
Account Management ...............................................................................................page 42
© 2009 Freecom Technologies
...........................................................................................................pa
ge 40
3
Page 4

Freecom MediaPlayer II
EN
General Information
Important note:
The Freecom device has not been developed or conceived for use with disregard
to copyrights or other rights to intellectual property. The Freecom device can only
be used with material which is the legal property of the user or where the user
has a legal licence for this purpose so that such use must be permitted because
of these property rights or licenses.
This product is protected by certain intellectual property rights of Microsoft. Use
or distribution of such technology outside of this product is prohibited without
a license from Microsoft.
Specification
USB host Support multiple USB storage
USB port USB 2.0 high speed port
Network connection RJ45 10/100 M connect
Video output Composite video / component video / HDMI
Audio output Stereo / digital HDMI / coaxial
Audio Format: MP3, WMA, WAV, AAC, OGG, AC3
Bit rate: MP3 32 kbps - 320 kbps
WMA 32 kbps - 192 kbps
Video Video codecs: MPEG 1/2/4, DivX, XviD
File types: RM, RMVB, VOB, DAT, AVI, MPG, MPEG, TS
Subtitle SSA, SMI, SRT, SUB
Picture JPG / BMP
Picture play mode Slide show
Power adapter AC input: 100V~240 V, 50/60 Hz
DC output: 12 V, 2 A
Dimension 203 × 164.4 × 51 mm
Weight About 800 g (Without hard drive)
4
Page 5

EN
General Information
Minimum System Requirements
PC:
• Intel Pentium III / AMD Duron 900 MHz or higher
• 256 MB RAM (Vista: 512 MB RAM) or higher
• Available USB 2.0, 1.1 Port (USB 2.0 recommended)*
• Available 10/100 Ethernet LAN Port, RJ45 (100 Mbps recommended) or WLAN
• LAN Cable
• For playback on TV, a TV set with PAL or NTSC system is required.
• Supported HDD: Compatible with standard 3.5" SATA Hard Drive
• Internet connection for online warranty registration, software updates and downloads
• O
perating system: Windows 2000, Windows XP, Windows Vista
Mac:
owerPC G3/G4/G5, Power Book G3/G4 or Intel Mac
• P
• 256 MB RAM or higher
• Available USB 2.0, 1.1 Port (USB 2.0 recommended)*
• Available 10/100 Ethernet LAN Port, RJ45 (100 Mbps recommended) or WLAN
• LAN Cable
• For playback on TV, a TV set with PAL or NTSC system is required.
• Supported HDD: Compatible with standard 3.5" SATA Hard Drive
• Internet connection for online warranty registration, software updates and downloads
• O
perating system: Mac OS X v10.3 or higher
ATTENTION! This device has no built-in WLAN. For WLAN support, you
have to use a WLAN USB dongle which is optionally available on www.
freecom.com.
* USB 2.0 is downwards compatible to USB 1.1. To achieve optimal performance from the Freecom MediaPlayer
II your PC should be equipped with an USB 2.0 port.
5
Page 6

Freecom MediaPlayer II
EN
Precautions
Please read the following in this manual carefully for proper use.
Copyright
• F
reecom can not be held responsible for the use of illegal software, audio sources,
video sources etc. The user and/or owner of the Freecom MediaPlayer II is legally
responsible for the content on the device.
Check supported codec
• T
he Freecom MediaPlayer II may not play back all media files. Please check the codec
type and ensure this is supported by the MediaPlayer II. Please note that possible errors
in the media file or use of unrecognized characters may result in improper playback.
Cautions for USB Device
• C
onnect the power adapter as well when you connect Freecom MediaPlayer II to a
PC.
• D
o not connect the Freecom MediaPlayer II with a USB cable of more than 3 metres
long. Doing so may result in low transfer speeds and/or bad connection.
e recommend you to use the supplied USB cable by our company.
• W
• If you connect this device to USB 1.1 Host Adapter, the speed is USB 1.1 (Max. 12 Mbps),
so we recommend you to connect to USB 2.0 for full speed of max. 480 Mbps.
Cautions for USB Host
ot all USB devices may be supported by the USB Host port. Please check the com-
• N
patibility before use or purchase.
Cautions when inserting a HDD
• O
nly 3.5" SATA type HDD can be used.
• We recommend you to use more than 6 GB HDD. In case you use a harddrive with
less than 6 GB, it may cause data loss.
Cautions when using Network connection
When the Freecom MediaPlayer II is connected to a PC using the Windows file shar-
•
ing option, be sure to use the Windows Network sharing function.
• T
he sharing function may not be functioning properly as a result of errors in Windows
or the user's computer environment. Freecom can not be held responsible for this.
epending on user's network performance and computer environment, data transfer
• D
through network may have intermittent data cut-offs.
epending on user's wireless network performance and computer environment,
• D
data transfer through wireless network may have intermittent data cut-offs.
6
Page 7

EN
General Information
Cautions for possibility of causing Radio Waves to cross
• Freecom MediaPlayer II may cause Radio Waves to cross, so it is recommended to be
alert when you keep devices near the Freecom MediaPlayer II. Especially concerning
your health.
Data Backup
• W
e strongly recommend you to make a data backup to another safe medium. Freecom
can not be held responsible for data damage or data loss on the built-in hard drive.
Cautions for drop, shock
• D
o not drop the device. It may cause critical damage to the hard drive.
Do not insert materials
o not insert any material in the Freecom MediaPlayer II. This may cause a defect or
• D
malfunction of the device.
Do not disassemble or modify
•
o not disassemble or modify the Freecom MediaPlayer II.
D
Do not stack
• D
o not place materials, devices or anything else on the Freecom MediaPlayer II.
Cautions for exposure to water,moisture, etc
• D
on't expose Freecom MediaPlayer II to oil, water, dust, moisture or rain and wind.
Turn off the Freecom MediaPlayer II immediately if exposed to any moist substance
or water.
• D
o not expose the Freecom MediaPlayer II to heat, keep away from heated areas.
Place the Freecom MediaPlayer II in well ventilated places.
Cautions for magnetic materials
• K
eep all magnetic devices away from the Freecom MediaPlayer II. Magnets or magnetic
devices like speakers may erase or cause damage to data stored on the hard disk.
7
Page 8

Freecom MediaPlayer II
EN
Warnings and Safety Instructions
Please read and follow the below mentioned instructions. They should be observed in
order to prevent injury to the user, damage to the device and damage to property, as
well as to ensure safe use of the product. Not following these instructions may cause
the unit to malfunction.
To ensure that your Freecom MediaPlayer II functions properly, please take note of the
following precautions. If these are not followed, you may void your warranty and dam-
age the Freecom MediaPlayer II.
afely remove the Freecom MediaPlayer II via your operating system - the "unplug
• S
or eject hardware" option in the Windows taskbar - before disconnecting the USB
cable or power cable and before switching off the device. Failing to do so may result
in data loss.
• D
o not disconnect the Freecom MediaPlayer II from the PC during file transfer. This
may result in data loss and an error to the Freecom MediaPlayer II. If this occurs, please
run the ScanDisk utility.
o not drop the Freecom MediaPlayer II or expose it to other kinds of sudden me-
• D
chanical shocks as this may result in data loss and damage to the hard drive.
o not use the Freecom MediaPlayer II when the ambient temperature is below 10°C
• D
or above 35°C.
f the Freecom MediaPlayer II is moved from a cool environment to a warmer envi-
• I
ronment, please allow the drive to acclimatize to the ambient temperature before
operating the device. Failing to do so may lead to condensation within the drive
enclosure, which in turn may cause the drive to malfunction.
o not place liquids or drinks on the Freecom MediaPlayer II. When liquids are spilled
• D
and get in contact with the electronics within the drive enclosure, it will damage the
drive and will cause the drive to malfunction.
o not use the Freecom MediaPlayer II in a dusty environment. Dust inside the en-
• D
closure may damage the internal electronics and result in drive malfunction.
o not use the Freecom MediaPlayer II near magnetic fields.
• D
• The Freecom MediaPlayer II may generate heat when used for a longer period of
time.
Furthermore, warranty does not apply to:
amages or problems resulting from misuse, abuse, accident, alteration or incorrect
• D
electrical current or voltage.
• A
ny product tampered with or with a damaged warranty seal
• Any product without a warranty or serial number label.
• Batteries and any consumable items delivered with or in the equipment.
8
Page 9
9
Product Overview
EN
1
Chapter 1: Product Overview
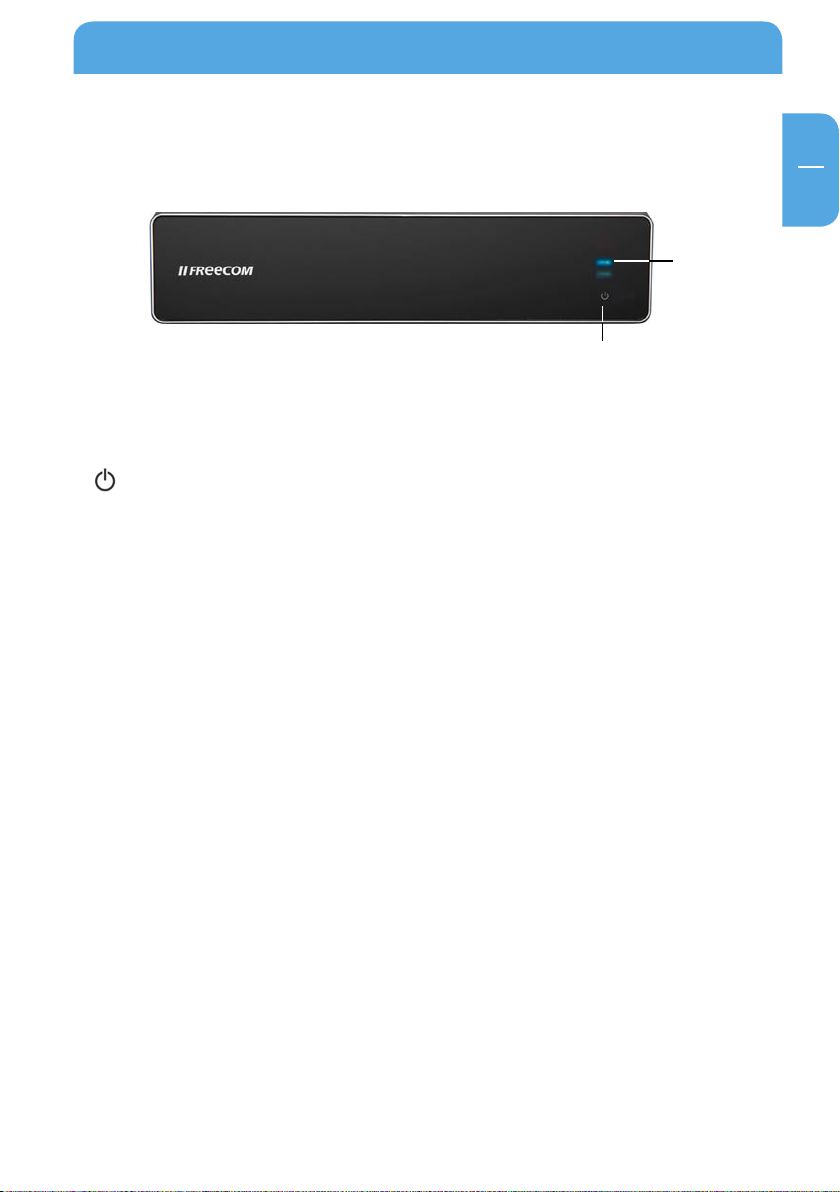
1.1 Front View
Button definition
Button Button definition Description
Power button Press shortly to switch on/off the
power.
Please note: shutting down the device
takes ca. 15 seconds!
LED definition
LED LED definition Description
HDD Read/Write LED LED lights when copy, twinkles when
data is transferred.
Power Power LED Blue light when device is switched on,
red light when device is in standby.
LED
Power
Page 10
10
Freecom MediaPlayer II
EN
1
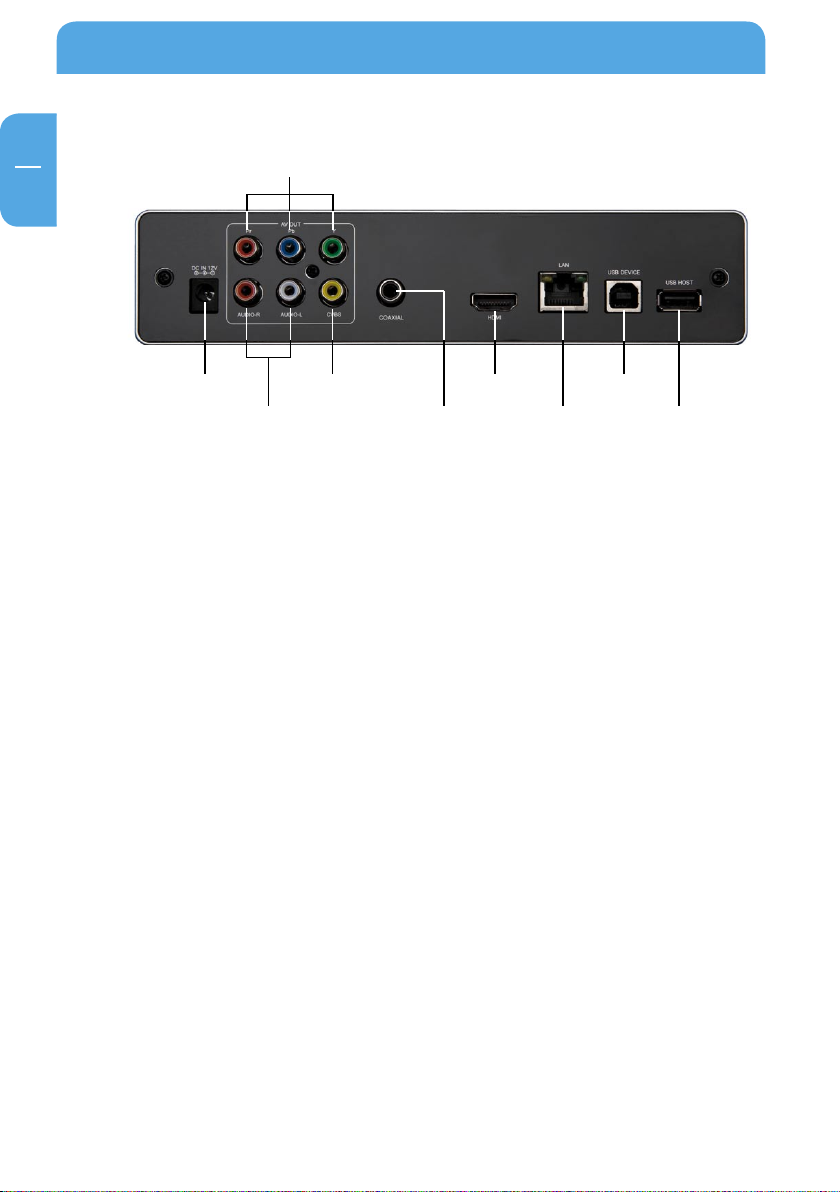
1.2 Back View
Port definition
Port Port definition Description
Power Input Power port Power input (12V, 2A DC)
Component
video output
YPbPr connection Progressive scan component video
output
Composite
audio output
Audio connection Composite audio output
Composite
video output
Video connection Composite video output
Coaxial Audio output port Digital audio signal output
HDMI High definition port Digital audio and video signal output
via HDMI port
LAN Network port Network connection via LAN Port
USB DEVICE USB port USB port for connection with PC
USB HOST USB port USB port for connection of external storage
devices or WLAN USB stick
Power Input
Composite audio output Coaxial
HDMI
LAN USB DEVICE
USB HOST
Component video output
Composite video output
Page 11
11
Product Overview
EN
1
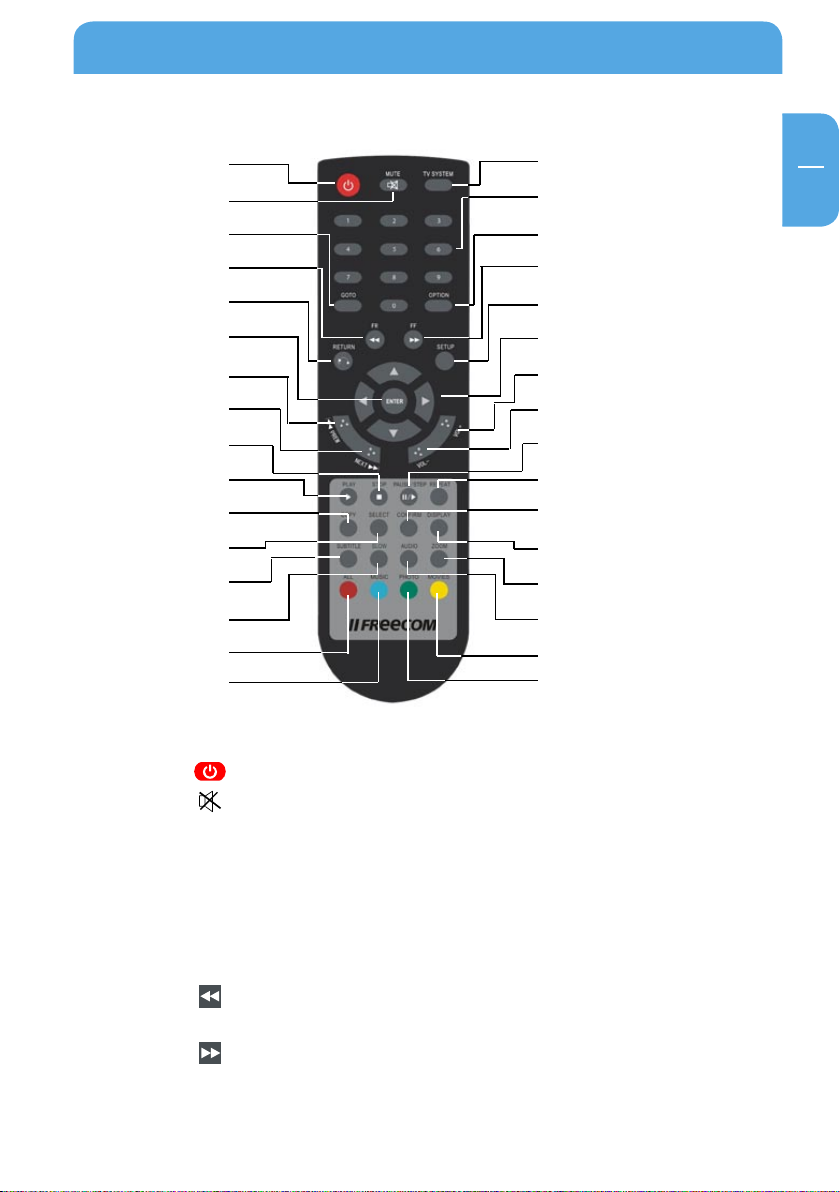
1.3 Remote control
BUTTON FUNCTION
POWER Turn device on and off (standby mode)
MUTE Turn on or off audio output
TV SYSTEM Press to switch between NTSC, PAL, 480p, 576p, 720p 50Hz, 720p
60Hz, 1080i 50Hz and 1080i 60Hz
0-9 Press to input digits
GOTO Press to jump to a title, chapter or a specified time
OPTION Press to select option bar to rename or delete the file
FR Press to fast rewind from current position and press again to
select the speed
FF Press to fast forward from current position and press again to
select the speed
RETURN Return to the previous menu
SETUP Enter the Setup Menu
POWER
MUTE
GOTO
Fast rewind
RETURN
ENTER
PREV
NEXT
STOP
PLAY
COPY
SELECT
SUBTITLE
SLOW
ALL
MUSIC
TV SYSTEM
0-9
OPTION
Fast forward
SETUP
Navigation
VOL+
VOL-
PAUSE/STEP
REPEAT
CONFIRM
DISPLAY
ZOOM
AUDIO
MOVIES
PHOTO
Page 12

Freecom MediaPlayer II
EN
1
Navigation key for up, down, left and right
ENTER Press to confirm selection
PREV Press to return to previous file
NEXT Press to go to next file
VOL- Press to decrease the volume
VOL+ Press to increase the volume
PLAY Press to play file
STOP Press to stop playback
PAUSE/STEP Press to pause playback, press again for step playing
REPEAT Press to set repeat option: chapter, title or off
COPY Enter the copy mode
SELECT Press to select a file or folder and then press "confirm" to add or
delete file or folder in the playlist
CONFIRM Press this key to add or delete files in the playlist
DISPLAY Press to display time, title, information of chapter when playing
video and photo
SUBTITLE Switch subtitle on/off if a subtitle file is available
SLOW Press for slow motion: (3/4, 1/2, 1/4, 1/8, 1/16x)
Press PLAY to resume to regular play mode.
AUDIO Switch audio track
ZOOM Press to zoom when playing back photos or Video:
Photo zoom levels:2x, 4x, 8x, 16x
Video zoom levels:2x, 3x, 4x, 8x
ALL Press this key to show all files
MUSIC Press this key to show all audio files
PHOTO Press this key to show all picture files
MOVIES Press this key to show all video files
12
Page 13
Basic operation
EN
2
Chapter 2: Basic operation
2.1 First steps
1. Power connection
Take out power adapter from the package and connect it to the device.
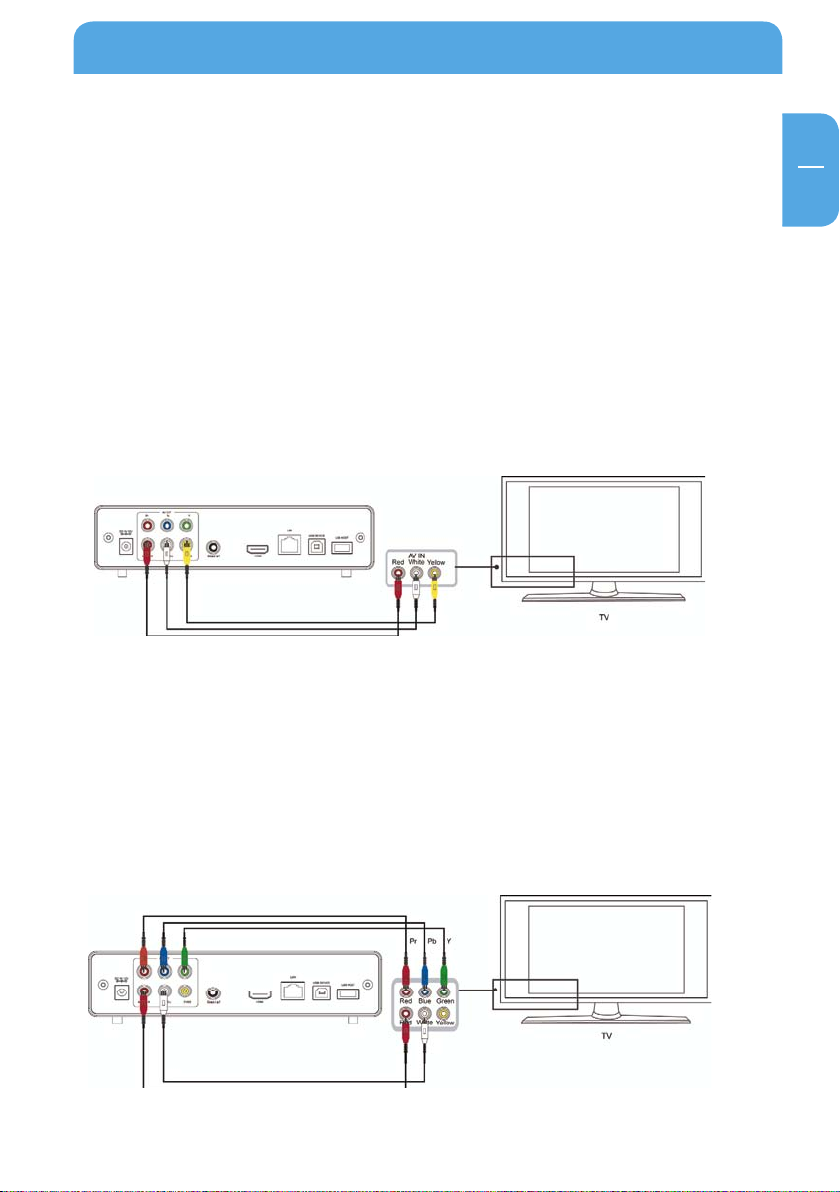
2. Connection of TV audio output
The product is designed with multi-output, including composite (AV), component (YPbPr).
and HDMI. You can select different interfaces according to various needs. The product can
detect video output automatically, making the operation user-friendly and convenient.
Please refer to the following instructions how to connect to avoid any problem.
Composite output connection (AV)
Plug the yellow connector into the AV output of product and AV input of TV, and plug
the red and white connector into the audio input of TV or HIFI. Turn on the TV and select
AV mode. Turn on the product and TV displays the interface of initiation.
Component output connection (YPbPr)
Plug the YPbPr cable into the output of product and input of TV. Because the cable is
only for video signal, another AV cable is necessary. Plug the red and white connector of
AV cable into the audio output of product and audio input of TV or HIFI. Turn on TV and
select YPbPr mode. Turn on the product and TV displays the interface of initiation.
13
Page 14

Freecom MediaPlayer II
EN
2
Coaxial output connection
Coaxial output: Connect the product coaxial connector with the coaxial connector of
your video or audio device by using a coaxial cable. Enter the product's audio setup and
select the Digital Output option "SPDIF LPCM" or "SPDIF RAW". It is possible to enjoy 5.1
high quality sound through a multi channel decoder/amplifier with coaxial input.
HDMI output mode
HDMI is an output with best audio and video quality which outputs digital video and
audio composited at the same time. Connect HDMI cable to output of product and
display device with HDMI input. Select HDMI mode in TV until it displays the interface
of initiation.
3. Connection and setup of network
The product can play files stored on the PC directly through network. Please connect the
RJ45 cable according to the following illustration. The network is connected well when
the LEDs of network status and R/W are blinking (on RJ45 connector).
Connect one end of the RJ45 cable to the product like the PC does and connect the
video output. Press "setup" key or select "setup" menu in the initiation interface. Select
"Network" option in the setup window and press "ENTER" to confirm. It is available for
both automatic and manual IP setup. Press "setup" key again to exist after setup. Before
access the PC through network by the product, the media files must be shared in the
network.
Following is the setup of media file sharing in PC.
14
Page 15

Basic operation
EN
2
2.2 Network Setup under Windows XP and Windows Vista
2.2.1 Windows XP
Two conditions are necessary for a successful setup network connection:
1.
Folder sharing and safety setup.
2. Set the same gateway and subnet address.
Procedure of file sharing under Windows XP:
Select the folder to be shared, right-click mouse and select the option" Sharing and
1.
Security".
Select "Sharing" in the Properties option and select "Share this folder on the network"
2.
and click on "Apply" to confirm.
15
Page 16

Freecom MediaPlayer II
EN
2
3. Open Control Panel -> Administrative Tools -> Computer Management -> Local Users
and Groups" and click "Users" option. Right click "Guest" and select "Properties".
Select 'Users can not change password' and 'Password never expires'. Keep the other
4.
checkboxes unchecked.
16
5.
Open Control Panel -> Network Connections and select "Local Area connection"
Right-click to select "Properties".
Page 17

EN
2
6. Select ‘Internet Protocol (TCP/IP)’ and click on "Properties".
Basic operation
7. Set up the relevant IP address, subnet mask and gateway. This can also be done
automatically (DHCP).
8.
Click on OK to complete the Network Sharing procedure.
17
Page 18

Freecom MediaPlayer II
EN
2
2.2.2 Windows Vista
1. Please make sure that you have administrator rights on your Vista system.
2. Select Control Panel -> User Accounts and Family Safety.
3. Select "User Accounts" -> "Manage another account". Click on the "Guest" account
and select "Turn on" if it is turned off.
4.
Select the folder to share and right-click on it. Then select the "Share" option.
5. Add the "Guest" account to the list.
6. Select "Share" and then the folder will be shared.
Playback function
With this HDD player, you can browse movie, photo and music files stored in HDD, USB
and network. Please enter the file browser to select the media and press "ENTER" button
to play the file. It is possible to preview the selected media and press "ENTER" button
to play.
Connect to the PC
This HDD Player is also a multimedia file storage device and can be used by connecting
to the PC.
1.
Connect to the power supply.
While using the HDD player with PC, power supply is required.
2. Connect to PC with USB cable.
Connect the HDD player to PC with USB cable to copy and transfer data.
18
Page 19

Basic operation
EN
2
Follow the instructions as shown in the above picture and connect the device to PC.
Power on the PC and enter the system. The PC detects the device automatically and then
the device can be used as an external USB storage device. After data transfer is finished,
please remove the USB storage device safely (click the USB device icon to stop the USB
device and then pull out the USB cable).
Notes:
1. Please don’t power off when the device is busy (reading/writing data).
If there is no USB detected after connecting the USB cable to the PC pull
2.
off the USB cable, wait about 10 seconds and then connect it again.
19
Page 20

Freecom MediaPlayer II
EN
3
Chapter 3: Using the product
3.1 Browse and play media files
Power on the HDD Player. The system shows the main menu after a few seconds. Four
options will be available:.
With these functions, you can browse movie, photo and music files stored in HDD, network and USB by pressing the "
device. Press the "ENTER" button to confirm your selection.
To make file browsing and playing easier, there is a function to filter and display all files
into different folders named "All", "Music", "Photo" and "Movies". You can switch to any
folder by pressing the "
" and " " navigation button on the remote control.
" and " " navigation buttons to choose the source
20
Page 21

Using the product
EN
3
File Edit menu
Select a file or folder by pressing the navigation button. Press OPTION button on the
remote control to rename or delete files and press the "ENTER" button to confirm.
Return Select to return to the first menu
Rename Please refer to the following procedure to rename a file:
1
Select Rename.
.
2. The edit window appears after pressing ENTER key.
3. Use the navigation arrows to select letters and numbers. CAPS to
toggle between uppercase and lowercase letters. Press <- to delete,
-> to insert a space, ENTER to confirm.
Once you finished the new name input, select ENTER to confirm.
4.
If you want to cancel the naming during the process, press ENTER
to return.
Delete Please refer to the following procedure to delete a title:
Press
1.
2. Press ENTER to confirm and delete the file.
3. Confirmation message will appear. Press
4. Press ENTER to confirm the delete. Select return to cancel delete.
and to select the Delete tab.
or and select ENTER.
21
Page 22

Freecom MediaPlayer II
EN
3
3.1.1 Network
My shortcut
Select a PC in the menu or add one available IP address to access media files in network
through My_Shortcuts.
3.2 File Copy
The File Copy function allows copying files between HDD, USB or Network. Press the
COPY button on the remote control to copy files from one media to another.
3.2.1 Copy operation
Step 1: Select Source Device
Press
select Destination Device or press
Step 2: Select Destination Device
Press
screen. Then press
Step 3: Select copy files or folders
In the Source sector, press
which you want to copy. "√" appears on the right side of the selected file or folder. Press
and to select the device from where files are to be copied. Then press to
to return.
and to select the destination device after go to the Destination sector on the
for the next step or press to return.
and to select and press PLAY to select files or folders
to next step, and press to return.
ATTENTION! The maximum number of files that can be selected to copy
ime is 8.
at a t
22
Page 23

EN
3
Step 4: Select the destination folder
Using the product
Press
or press
Step 5: Copy Status
In the menu, select ENTER to copy or select NO to cancel. After file copy is finished, the
system will display "File Copy is completed!" or "File Copy failed!". Select "Ok" to return
to the Main menu or select "No" to return to the Copy menu.
or to select a target folder in the destination sector. Press for the next step
to return.
3.3 Setup Menu
Press the "Setup" button on the remote control to enter the Setup menu. It is possible
to configure Photo, Audio, Video, Network and System settings.
Select any option by pressing
firm or press RETURN to exit. Press SETUP button again on remote control to exit from
the setup menu.
Changing Photos Settings
Slide Show Set time interval of slide show.
Tr
ansition Effect Select transition effect between photos in the slide show.
and on the remote control and press ENTER to con-
Background Music The music must be in the same folder the same folder as the
pictures, choose background music position by navigation.
23
Page 24

Freecom MediaPlayer II
EN
3
Changing Audio Settings
Night Mode "On" "Off" and "Comfort mode" are available
In comfort mode, the volume is restricted automatically so that
it would not affect other people from rest or working.
Digital output The following options are available:
- H
DMI LPCM
- HDMI RAW
- SPDIF LPCM
- SPDIF RAW
Changing Video Settings
Screen Ratio - P
Brightness Select to set brightness level.
Contrast Select to set contrast level.
TV System Select to adjust TV system.
an Scan 4:3 Displays a wide picture on the entire screen
and cuts off the redundant portions when a standard 4:3
TV is connected.
- Letter Box 4:3 Displays a wide picture with two black borders
on top and bottom of 4:3 screen when a standard 4:3 TV is
connected.
6:9 Compresses the image to convert the whole image
- 1
when a 16:9 TV is connected.
Changing HDMI settings
Connect the HDMI cable before usage, adjust TV mode to HDMI, then video appears on
TV screen. Please refer to "Changing Audio Settings" and "Changing Video Settings" if
you want to change HDMI settings.
24
Page 25

Using the product
EN
3
Changing Network Settings
Note: A WLAN USB Stick is optionally available on www.freecom.com.
Wired LAN Setup
and
Wireless LAN Setup
Wired LAN Setup
DHCP IP (AUTO) : Set the DNS server IP address automatically.
Wireless LAN Setup:
Check the following items before using this function:
- C
onnection between product and network
- Network protocol is available
- Files are shared
Auto: Automatically set IP address
Manual: Select IP address, subnet address and default gateway.
These can be entered through navigation and numeric key.
Press "ENTER" to confirm.
FIXED IP (MANUAL)
When using Fixed IP, it is required to enter the following:
-
P address
I
- Subnet Mask
- Default Gateway.
If assistance for the above settings is required, please contact your network administrator.
Press
to confirm.
to navigate. Use numeric keys to enter the data and press "ENTER"
25
Page 26

Freecom MediaPlayer II
EN
3
Wireless Setup
Enter the SETUP by pressing the SETUP button on the remote control. Select NET ->
Wireless Setup and press OK to enter.
When using this feature for the first time, select MODIFY and follow the setup step-by-step.
Select INFRASTRUCTURE or PEER TO PEER, according to your needs.
26
Page 27

Using the product
EN
3
Wireless LAN Connection
Freecom MediaPlayer II supports two types of wireless structure modes: Infrastructure
mode & Ad-Hoc mode (Peer-to-peer).
Ad
Ad-Hoc Mode (Peer-to-peer)
1:1 wireless LAN connection type between wireless adapter and Freecom MediaPlayer
II without wireless access point.
Infrastructure Mode (AP)
Wireless LAN connection type with Wireless Access Point.
Wireless AP (Infrastructure Mode) or Wireless Adapter (Ad-Hoc Mode)
is
needed for wireless connection. IEEE 802.11g wireless standard is
recommended for better wireless environment. Freecom MediaPlayer II
is compatible with IEEE 802.11g & b standard.
-Hoc Mode Infrastructure Mode (AP)
27
Page 28

Freecom MediaPlayer II
EN
3
Infrastructure Mode
You can insert a USB wireless network card to the USB HOST interface on startup of the
device or you can insert a USB wireless network card at this time. The screen will show
WIFI PLUG-IN.
"Auto" allows to automatically search for Wireless SSID.
28
Page 29

EN
3
Select the encryption mode of your Access Point:
- Open System
- Shared Key (WEP)
- WPA/WPA2 Key
Using the product
and press ENTER on the remote control. Enter your password, if required.
29
Page 30

Freecom MediaPlayer II
EN
3
You can choose DHCP IP (AUTO) to obtain a dynamic IP or choose FIX IP (MANUAL) to
set a fixed IP.
The parameters are shown in the SETTING LIST as follows :
Press ENTER on the remote control. After the connection was established successfully,
you will see a summary where IP address, subnet mask and default gateway are shown.
Press ENTER again to return to the Network Setup. You will now see the IP address of your
device and an indicator showing the signal strength of your connection.
30
Page 31

Using the product
EN
3
Select "NETWORK" in the main menu. You will see not only "My_Shortcuts" and "My_
Neighbors", but also all shared folders in your network. This indicates the success of your
wireless connection setup.
31
Page 32

Freecom MediaPlayer II
EN
3
Peer-to-peer mode (Ad-hoc mode)
Use "Peer-to-peer" to create a wireless network between your Mediaplayer and another
computer without using a WLAN router. Such networks are sometimes also referred to
as ad-hoc networks.
To establish a peer-to-peer network a USB WLAN stick for the Mediaplayer and a WLANcapable computer/notebook are required.
See the help of your operating system or the manual of your WLAN USB Stick on how to
setup an ad-hoc network on your computer.
Please select "Manual " for setting parameters.
32
Page 33

Using the product
EN
3
Set the name of product in wireless network as wireless SSID. Set the host IP address
and make sure that the IP address does not conflict with the USB wireless network card
IP addresses of your computer.
Save settings and test. After successful test, network information will be shown.
Press ENTER to return to the Network Setup.
33
Page 34

Freecom MediaPlayer II
EN
3
In the main interface of the " NETWORK ", select "MY_SHORTCUTS".
34
Page 35

Using the product
EN
3
Press the "Option" button on the remote control. In the pop-up window select "add" to
add a new shortcut. The user will be GUEST, as IP address the IP address of the computer
in your peer-to-peer network has to be entered.
Save settings and select the shortcut to enter. You will now have access to the IP address
of the host to share the contents of the host.
35
Page 36

Freecom MediaPlayer II
EN
3
Changing System Settings
Menu Language Choose the OSD (On Screen Display) language.
Text Encoding Change character encoding.
Login Control Activate login control (password) for the device web interface.
System Info Start, stop, upgrade or uninstall system services.
36
Page 37

EN
3
System Update Upgrade your system here.
HDD Format Use this option to format the built-in HDD.
ATTENTION! The internal hard disk will be formatted in NTFS
format. Mac users have read-only access when connecting the
device via USB to their Mac. To copy data from Mac to the Mediaplayer, network connection must be used.
Using the product
Restore Default Restore factory settings of your Mediaplayer.
37
Page 38

Freecom MediaPlayer II
EN
4
Chapter 4: Installing BT_SAMBA
BT Player is a system software, it consists of the operating system (Linux+AP) and the
application software (BT_SAMBA).
4.1 Initial installation
When inserting a hard disk to the system for the first time, the system will start with the
hard disk format interface.
You can also press "SETUP" on the remote control to open the Setup menu and select
"HDD Format" to format HDD.
Step 1: Press "
When highlighting the YES button, press "ENTER" to enter the next step. Otherwise,
select "Cancel" to return.
Step 2: Hard disk format
Press "
"Format" button is highlighted, press "ENTER" to start. Otherwise, select "Back" button
to go back.
Step 3: Install BT/Samba Extension
After HDD format is complete, the system will install BT/Samba automatically. Please select
OK for the next step. The system will auto install according the following steps:
Install BT/Samba Extension
1.
2. Install Bit-Torrent Support
3. Install Samba Server Support
4. Install Web Support
When the installation is complete, the system will display a success message at the end
of every step.
" and " " on the remote control to make a selection.
" and " " on the remote control to select "Back" or "Format". When the
38
Page 39

Install BT_SAMBA
EN
4
Step 4: Congratulation page
When formatting is finished, the system will display a congratulation page. Select OK
button and Press "ENTER" to exit. The system will boot up automatically.
4.2 Neighbor Web interface
When the Mediaplayer has a network connection, you can use the player’s IP address to
access the "Neighbor Web" interface of the Mediaplayer.
Open the Internet Explorer and enter the Mediaplayer IP address. The Neighbor Web will
display the Bittorrent and Player Status.
At Home page, the "Neighbor web" will display BT Player’s status and storage device.
4.3 BitTorrent Download
At the home page, select "BitTorrent Download" to open the download interface.
39
Page 40

Freecom MediaPlayer II
EN
4
4.4 Add new torrent
Select to add a new torrent download.
On the "Add new torrent" page, click the "Browse" button to choose a torrent file path
from local PC. When you select a torrent file, press "Open" button to add.
Next , click "Yes" to confirm your selected file and to go back to the BitTorrent download
page, otherwise click "No" to do nothing and to go back to the BitTorrent download
page. When selecting "Yes", you will automatically be redirected to the torrent download page.
40
Page 41

Install BT_SAMBA
EN
4
1. Download Page
When clicking on a torrent file name, at the bottom of the page the torrent file information will be displayed. When the box on the left side of the file name is checked, it
means that the file is selected. You ca now select "Start" ,"Stop" ,"Delete" ,"Refresh" and
sort order "up" and "down".
tTorrent Setting
2. Bi
Press "Setting" to open the BitTorrent setting page.
Set maximum download rate, maximum upload rate and seeding setting in the setting
page.
When setting is completed, click to save, click to return or click to restore default settings.
41
Page 42

Freecom MediaPlayer II
EN
4
4.5 "Visit neighbor" function
On the device home page, select "Visit neighbor" to browse the HDD files.
ATTENTION: This feature is only available when using the Internet Explorer! It will not work with other browsers, e.g. Firefox or Opera.
4.6 Account Management
On the device home page, select "Account Management" to access the Account Management page. When "Account Management" cannot be started, please confirm in the
Mediaplayer Setup that Login control is set to ON.
The user name is Admin and the default password is 123. Please set the password according to your requirements.
Login password can be modified here. Please enter the password twice and click "Enter"
to confirm. When the modification was successful, press "Confirm" and return. Please
note the user name cannot be changed.
42
Page 43

WARRANTY
(valid in Europe/Turkey only)
We thank you for purchasing this Freecom product and hope you will enjoy using it.
In order to avoid unnecessary inconvenience on your part, we suggest reading the quick
install guide, instruction manual and any additional electronic and or printed manuals. When
problems occur we have a database with Frequently Asked Questions (FAQ) on our Freecom
website (www.freecom.com), please check this site before you contact the helpdesk.
Your Guarantee
All Freecom products come with unlimited technical phone and web support. By this
Guarantee, Freecom warrants their products to be free from defects in material and workmanship for a period listed below from the date of its original purchase. If during this period
of guarantee the product proves defective due to improper materials or workmanship,
Freecom will, without charge for labour or parts, at its sole discretion, repair or replace the
product or its defective parts upon the terms and conditions set out below.
Conditions
This guarantee will be granted only when the original invoice or sales receipt (indicating
the date of purchase, product and serial number) is presented together with the defective
product and a Freecom RMA number received from the Freecom Website or given by a
Freecom Service Center. Freecom reserves the right to refuse the free-of-charge guarantee
services when the date of purchase of the product cannot be proven. This guarantee will
not apply if the RMA number is missing, the serial number on the product has been altered,
removed or made illegible.
This guarantee covers only the hardware components packaged with the product. This
guarantee covers none of the following: (a) any consumable supplied with the product, such
as media or batteries; (b) damage to or loss of any software programs, data or removable
storage media; (c) any damage resulting from adaptations, changes or adjustments, which
may have been made to the product, without the prior written consent of Freecom; (d) attempted repair by any party other than authorized by Freecom and (e) accidents, lightning,
water, re or any other such cause beyond the reasonable control of Freecom.
With respect to all services provided, Freecom is not responsible for any damage to or loss
of any programs, data or other information stored on any media or any part of any product
serviced. Freecom is not liable for the consequence of business loss in case of system failure.
Be sure to exclude all parts not covered by this guarantee prior to returning the product to
Freecom. Freecom is not liable for any loss or damage to these items. If during the repair
of the product the contents of the hard drive are altered, deleted or in any way modied,
Freecom is not liable whatsoever.
Repair parts and replacement products will be provided on an exchange basis and will be
either new, equivalent to new or reconditioned. All replaced parts and products become
the property of Freecom The period of guarantee for any product or part repaired or replaced in warranty shall be the balance of the original guarantee. Repairs or replacements
on product or parts out of warranty carry 6 (six) months guarantee.
1
YEAR
WAR RAN TY
 Loading...