

Page 1
GB
USA
Rev. 232
Users Manual
1
Page 2

GB
USA
Dear user!
Thank you for choosing the Freecom Beatman Flash MP3/WMA Digital
Audio Player, the ultra small, skip-free solution for enjoying music every-
where you go, whatever you do. Please read the operating instructions
carefully before starting to use your Freecom Beatman Flash.
Freecom Technologies Germany
www.freecom.com
WARNING!
All rights reserved. The products named in this manual are only used for
identification purposes and may be trademarks or registered trademarks of the
respective companies. This device was designed for home or office use.
We reserve the right to upgrade our products in keeping with technological
advances.
When using headphones
Avoid damaging your hearing: do not play your headset at a high volume.
Hearing experts advise against continuous extended play. If you experience a
ringing in your ears, reduce the volume or discontinue use.
Do not use while operating a motorized vehicle. It may create a traffic hazard
and it is illegal in many areas. You should be extremely cautious or temporarily
discontinue use in potentially hazardous situations. Even if your headphones
are of an "open air" type, do not turn up the volume so high that you cannot
hear what is going on around you.
2
Page 3

Contents
USER MANUAL
Contents of the box .................................................................. page 4
Minimum system requirements ................................................ page 5
Precautionary measures ............................................................ page 5
Device description ..................................................................... page 6
Display panel ............................................................................. page 7
CHAPTER 1:
Start up - Hardware Installation ............................................... page 8
CHAPTER 2:
Installation of the Digital Audio Manager software .............. page 10
CHAPTER 3:
Driver Installation ...................................................................... page 12
GB
USA
CHAPTER 4:
Every day use ............................................................................. page 19
CHAPTER 5:
Troubleshooting ........................................................................ page 29
Freecom Internet Service & Support Hotline ........................... page 30
© 2002 Freecom Technologies
3
Page 4
GB
USA
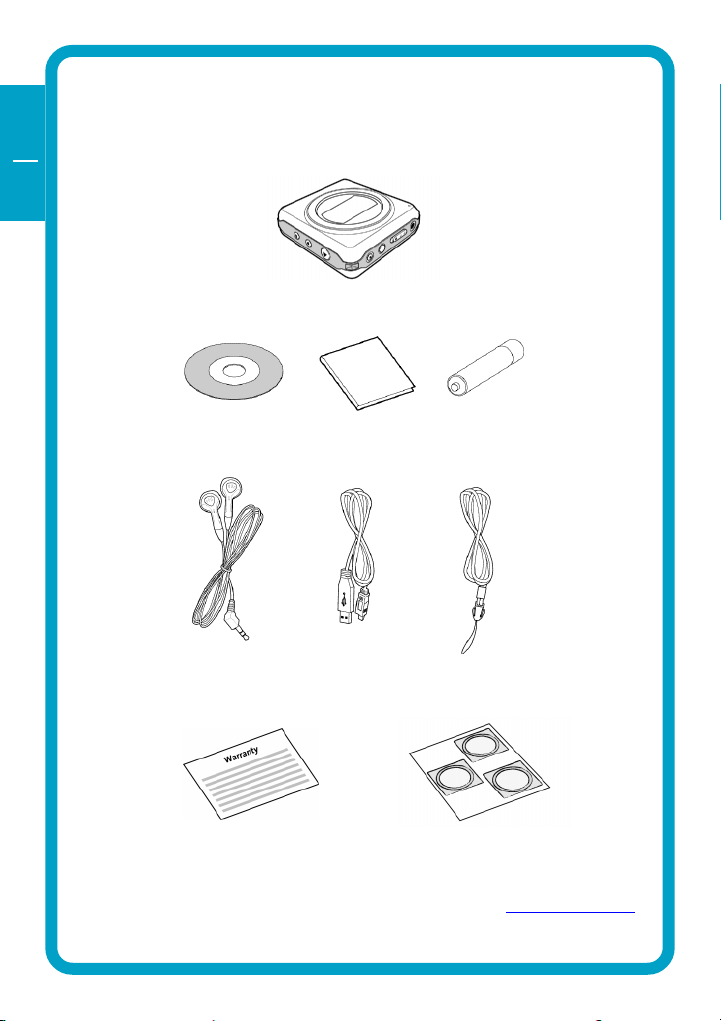
Contents of the box
Before starting to use your Freecom Beatman Flash, please check the box for
the following contents.
Freecom Beatman Flash MP3/WMA player
Software CD Quick Install Guide Duracell Ultra M3
Sennheiser headphones USB cable for Neck-strap
connection to PC
Warranty card Cover labels
Contact your local Freecom dealer/retailer or the Freecom Support Center for
your country (see page 30) if any of the above items are missing from your box.
Do not forget to register your Freecom Beatman Flash by visiting www.freecom.com
or by filling out the warranty card.
AAA size battery
4
Page 5

Precautionary measures
Minimum System Requirements for Digital Audio Manager Software
Intel Pentium 133 MHz
32 MB RAM
40 GB free hard drive space
CD-ROM drive
Windows 98 SE, ME, 2000 or XP
Available USB port
Precautionary measures
To ensure that your Freecom Beatman Flash functions properly, please take
note of the following precautions. If these are not followed, you may void
your warranty and damage the Beatman Flash.
Do not drop the Freecom Beatman Flash or expose it to other kinds of
excessively heavy shocks, as this may result in the unit malfunctioning.
Do not use the Freecom Beatman Flash when the ambient temperature
is below 10°C or above 45°C and in direct sun-light.
If the Freecom Beatman Flash is moved from a cool environment to a
warmer environment, please allow it to acclimatize to the ambient
temperature before operating the device. Failing to do so may lead to
condensation within the enclosure, which in turn may cause it to
malfunction.
Do not place liquids or drinks on the Beatman Flash. When liquids are
spilled and get in contact with the electronics within the device enclo-
sure, it will damage the Beatman Flash and will cause it to malfunction.
Do not use the Beatman Flash in a dusty environment. Dust inside the
enclosure may damage the internal electronics and result in a malfunc-
tion.
Opening the Beatman Flash will void the warranty.
GB
USA
5
Page 6
GB
USA
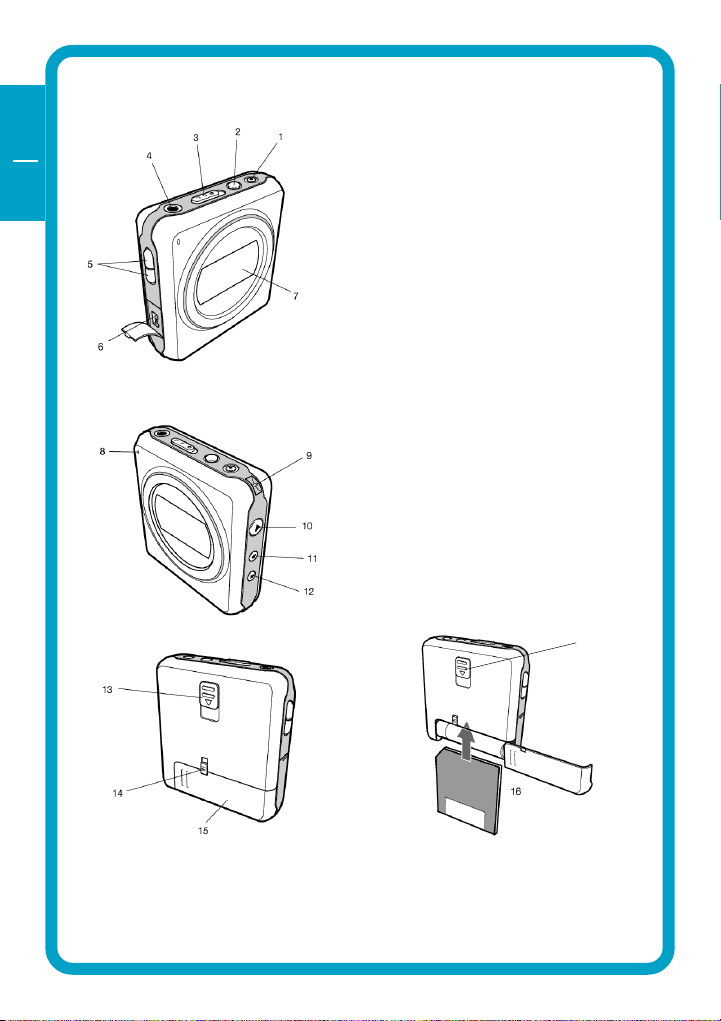
Device description
1 Rec (voice recording) /
Repeat A-B button
2 Mode / Equalizer /
Navigation button
3 Hold switch
4 Headphone connector
5 Volume control (up/down)
6 USB connector
7 LCD Display
8 Microphone
9 Neck strap holder
10 Power On / Play / Pause / Power
Off button
11 Previous / Fast backward
12 Next / Fast forward
17
13 SMC card eject switch 16 Insert SMC card in the correct
14 Battery lock switch direction, as shown.
15 Battery cover 17 To remove SMC card, open the
battery cover, slide the SMC card
eject switch (13) down and remove card.
6
Page 7
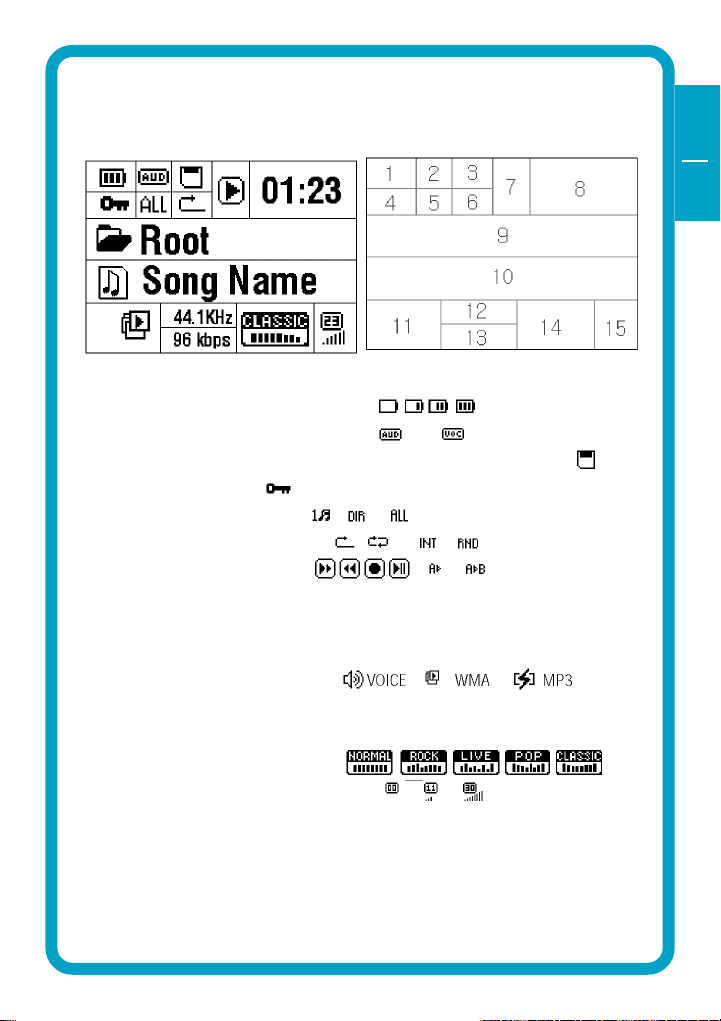
Display panel
1 BATTERY indicator
2 PLAY TYPE (audio/voice) indicator
3 SMC CARD indicator (only appears if SMC card is inserted)
4 HOLD indicator
5 REPEAT MODE indicator
6 REPEAT SETTING indicator
7 PLAY STATUS indicator
8 PLAYING TIME indicator
9 CURRENT FOLDER indicator
10 CURRENT SONG indicator
11 CURRENT FILE TYPE indicator
12 CURRENT SAMPLING FREQUENCY indicator
13 BIT RATE indicator
14 EQUALIZER SETTING indicator
15 VOLUME indicator
Display panel
GB
USA
7
Page 8
GB
USA
1
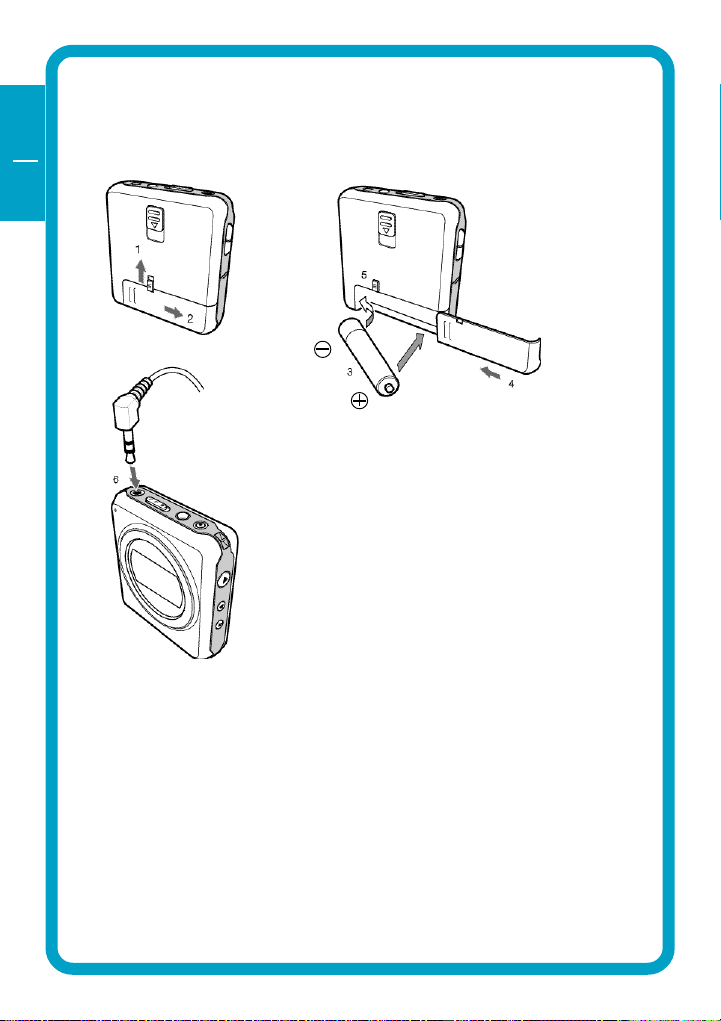
CHAPTER 1: Start up - Hardware Installation
1.1 Inserting battery & connecting headphone
1. Unlock battery cover by sliding the battery hold switch in the direction
shown.
2. Slide the battery cover in the direction shown to open the battery cover.
3. Insert one AAA-size battery as shown, with the side touching the spring
inside the battery cover.
Note: Batteries contain chemical substances. When empty, they
should be properly disposed of.
4. Slide the battery cover back.
5. Lock the battery cover by sliding the lock-switch back.
6. Insert the headphone jack into the headphone connector, as shown.
8
Page 9
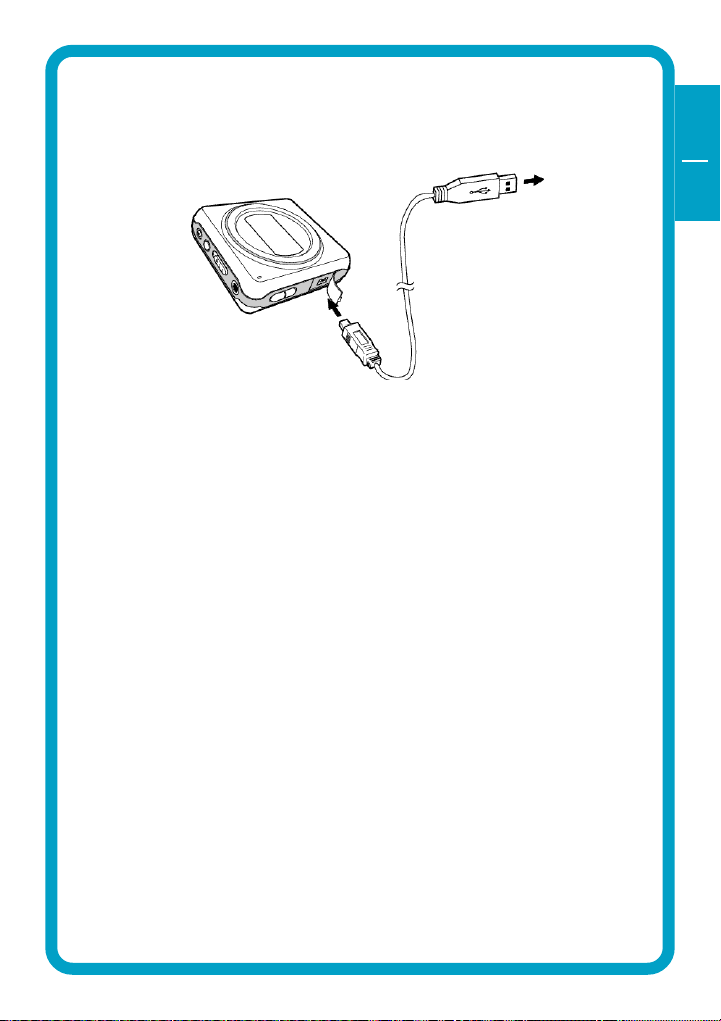
Connect the Beatman Flash to your PC
1.2 Connecting the Beatman Flash to your PC
1. Insert the large USB connector into a USB port (USB 1.1 or 2.0) of your PC
2. Insert the small USB connector into the USB connector of the Beatman
Flash.
Note: If you connect the USB cable when the Beatman Flash is still
playing, it may cause the unit to malfunction. To avoid this, please
only connect the USB cable when the Beatman Flash is in Power Off
or Pause mode.
GB
USA
1
9
Page 10
GB
USA
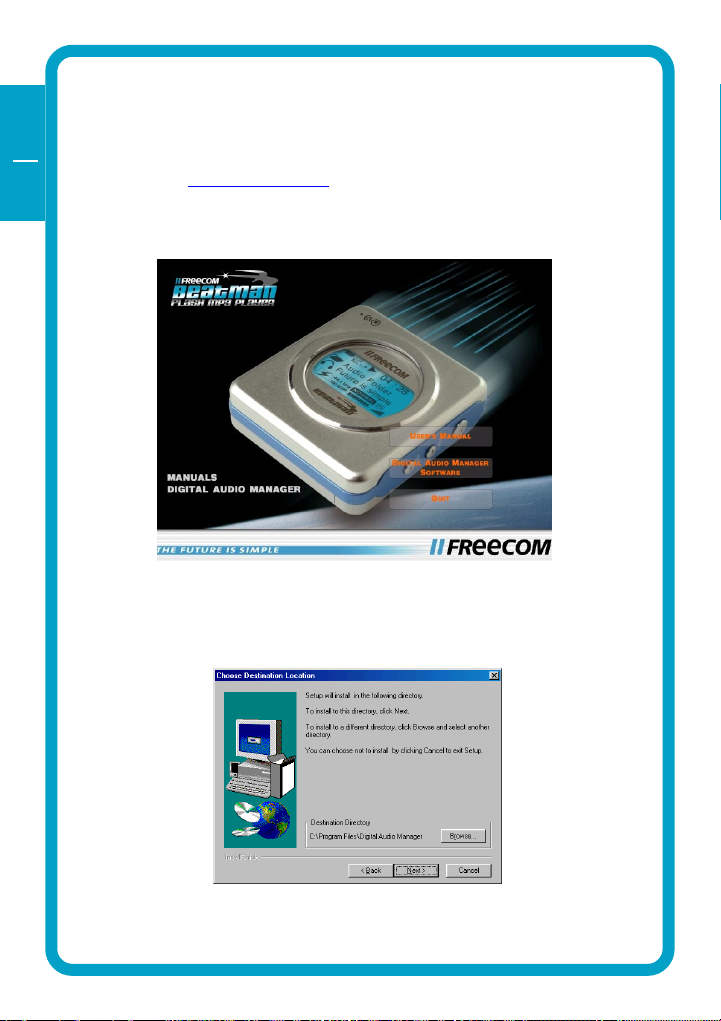
CHAPTER 2: Installing the Digital Audio Manager
software
2
Notes: Check www.freecom.com for the latest software-versions and up-
dates.
1. Insert the software CD ("FC Beatman Flash") into your CD-ROM drive.
Click "Digital Audio Manager Software" to continue.
2. Select destination directory (we advise you to accept the default selec-
tion) and click "Next" to continue
10
Page 11

Installation of the Digital Audio Manager software
3. Cick "Next" to continue
4. Cick "Next" to continue
GB
USA
2
5. Click "Finish" to finish installation. You can access Digital Audio Man-
ager from the Programs menu in the Windows Start menu.
11
Page 12

GB
USA
CHAPTER 3: Driver Installation
3.1 Installing Windows 98 SE USB driver
3
1. Make sure the Freecom Beatman Flash is connected to the PC by using
the supplied USB connection cable.
2. Switch the Freecom Beatman Flash on.
3. The "Add New Hardware Wizard" opens and a "USB Device" is found.
Click on "Next".
4. In the next window select "Search for the best driver for your device.
(Recommended)".
Click on "Next".
12
Page 13

Installing driver Windows 98 SE
5. Click "Browse". Select the CD-ROM drive with the Digital Audio Player
software.
Continue by clicking on "Next".
6. Follow the instructions on screen.The necessary files will be installed.
Click on "Finish" to complete the installation.
GB
USA
3
13
Page 14

GB
USA
3
3.2 Installing Windows Me USB driver
1. Make sure the Freecom Beatman Flash is connected to the PC by using
the supplied USB connection cable.
2. Switch the Freecom Beatman Flash on.
3. The "Add New Hardware Wizard" opens and a "USB Device" is found.
Click on "Next".
4. The necessary files will be installed. Click on "Finish" to complete the
installation.
14
Page 15

Installing driver Windows 2000
3.3 Installing Windows 2000 USB driver
1. Make sure the Freecom Beatman Flash is connected to the PC by using
the supplied USB connection cable.
2. Switch the Freecom Beatman Flash on.
3. The "Add New Hardware Wizard" opens and a "USB Device" is found.
Click on "Next".
4. In the next window select "Search for a suitable driver for my device
(recommended).
GB
USA
3
Click on "Next".
15
Page 16

GB
USA
3
5. Make sure that the checkbox "CD ROM drive" is activated in the next
window.
Continue by clicking on "Next".
6. In the next window a massage is shown, that a driver for an USB device
is found.
Click on "Next".
16
Page 17

Installing USB driver under Windows XP
7. The necessary files will be installed. Click on "Finish" to complete the
installation.
3.4 Installing Windows XP USB driver
1. Make sure the Freecom Beatman Flash is connected to the PC by using
the supplied USB connection cable.
2. Switch the Freecom Beatman Flash on.
3. The "Add New Hardware Wizard" opens and a "USB Device" is found.
GB
USA
3
Click on "Next".
17
Page 18

GB
USA
3
4. Click "Continue Anyway".
5. The necessary files will be installed. Click on "Finish" to complete the
installation.
18
Page 19

CHAPTER 4: Every day use
4.1 Starting the program
Every day use
GB
USA
Please select the "Freecom Digital Audio Manager":
1. Click "Start" - "Programs" - "Freecom Digital Audio Manager" - "Freecom
Digital Audio Manager".
2. Select the music files you want to transfer and "drag and drop" them to
the screen on the right.
4
3. To transfer / change / remove files or to format the memory, please select
the operation menu
19
Page 20

GB
USA
4.2 Description of the menus
MENU SUBMENU DESCRIPTION
4
OPERATION DOWNLOAD SELECTED FILES Download selected data or
FROM PC TO PLAYER files from PC into internal/
external memory (Drag & Drop)
UPLOAD SELECTED FILES FROM Upload selected data or files
PLAYER TO PC *) from internal/external memory
of Player to PC (drag & drop)
REMOVE SELECTED FILES FROM Delete selected data or files from
PLAYER internal/external memory of Player
REMOVE ALL FILES Delete all data or files from
internal and/or external
memory of Player
FORMAT Format all internal/external
memory of Player
FORMAT ALL MEMORIES Format all selected data or files
in internal and/or external
memory of Player
CANCEL OPERATIONS IN QUEUE Cancel operation of selected
DOWNLOAD/UPLOAD/DELETE
in queue
CANCEL ALL OPERATIONS Cancel all operations of
DOWNLOAD/UPLOAD/DELETE
in queue
VIEW MEMORY Option for viewing selected
memory in internal/external
memory. You can select and
view one of [NAME,STORAGE,
SIZE, DATA]
PC Option for viewing data in
PC. You can select and view
one of [BIG ICON, SMALL,
ICON, LIST, REPORT]
ABOUT ABOUT Information on Digital Audio
Manager software
*) Note: When "UPLOAD SELECTED FILES FROM PLAYER TO PC" is
selected:
1. MP3 and WMA files can not be uploaded from Player to PC.
2. Voice files will be converted into .wav and stored on the PC.
20
Page 21

Every day use
4.3 Operating instructions
Power on
1. Press the "4" button to turn the power on.
2. After Power On, music will start immediately (when autoplay is acti-
vated).
Pause / Power off
GB
USA
4
1. Press "4" button during playback to pause the player.
2. To turn the power off, press "4" button for more than 2 seconds when
the player is in pause mode.
21
Page 22

GB
USA
4
Hold On/Off
Hold-On
Hold-Off
The Hold function locks all buttons.
1. Slide the hold switch in the direction of the arrow to activate Hold
function.
2. Slide the hold switch back to de-activate Hold function.
Volume Control
Press Vol. +/- on the left side of the player to adjust the volume. Volume
range is 0 (minimum) to 30 (maximum).
22
Page 23

Every day use
Fast Backward & Fast Forward
Press and hold "7" button during playback to search fast backward within
the song.
Press and hold "8" button during playback to search fast forward within the
song.
Previous / Next Track
1. Press "8" button to move the next song.
2. Press "7" button to move the previous song.
GB
USA
4
23
Page 24

GB
USA
4
Loop repeat
1. Press "Rec/A.B" button shortly during playback to mark the beginning
of the loop. "A 4" will flicker in the display
2. Press "Rec/A.B" button shortly again to mark the end of the loop.
"A4B" will appear in the display and the loop is played repeatedly.
3. Press "Rec/A.B" button shortly again to exit the loop.
Deleting Files
Press "Rec/A.B" button for a few seconds during playback to delete the song
currently playing.
24
Page 25

Every day use
Intro
1. Press "4" button for a few seconds to activate the intro mode: the first
10 seconds of each song will be played in sequence.
2. Press "4" again to exit the intro mode.
MODE Setting
1. Press "4" button to pause music while playing.
2. Press MODE button for a few seconds to enter the MODE menu.
3. Scroll through the menu by pressing VOL +/- buttons.
2. Change the setting by pressing "7" or "8" buttons .
3. Press MODE button for a few seconds to exit mode menu.
GB
USA
4
See table on page 26 for a detailed description of the mode settings.
25
Page 26

GB
USA
4
MODE Setting
MODE ITEMS SETTINGS REMARKS
Type (play mode) <AUDIO> Music (MP3/WMA)
play mode
<VOICE> Voice recording and
playback mode
Repeat <1 song> repeat 1 song
<ALL> repeat all
P-mode <Auto-R>: infinite repeat
<Intro>: play the first
10 seconds of each song
Set EQ <Normal> / <Classic> / <Live> /
<Pop> / <Rock>
ERASE <1File> erase 1 music file when
pressing Rec/A.B
VS SET 8kbps / 16kbps / 32kbps High quality means a
larger file size
AUTO PLAY <On> song starts playing
automatically when power is
turned on
<Off> Auto Play off
RESUME <Off> Playback starts with the
first song in memory
<Song> Playback starts with the
last song that was playing
before power was switched off
<Real> Playback starts from the
exact position in the last song
that was playing before power
was switched off
EL MODE (backlight) backlight is on for 3
seconds
Language <Eng> English
<Kor> Korean
<Chn> Chinese
<Jpn> Japanese
ID3 tag <On> ID3 tag information
(if available) is displayed
<Off> ID3 tag information is
not displayed
Contrast 0 10 0 = no contrast,
10 = high contrast
26
Page 27

Every day use
Equalizer setting and navigation during playback
Equalizer Setting
1. Press MODE button shortly during playback
2. EQ indicator on display will flicker; change EQ setting by pressing "7"
or "8" button.
3. Press MODE button shortly to exit EQ setting menu
Navigation during playback
1. Press MODE button for a few seconds during playback
2. Search for music file by pressing "7" or "8" button
3. Press "4" to play the selected song
GB
USA
4
Voice recording
1. Press "4" button during playback to enter pause mode
2. Press "Rec/A.B" button for more than 2 seconds to start voice recording.
"Recording now..." will appear in the display.
3. Press "Rec/A.B" button shortly to stop voice recording.
Note
- Voice file is created automatically during voice recording
- Voice quality can be changed in "MODE" settings, see page 26
MIC
27
Page 28

GB
USA
4
Playback & Deleting voice files
1. Playback of recorded voice files is the same as playback of music files.
Select a file using "7" or "8" and press "4" to start playback.
2. Press "Rec/A.B" button for more than 2 seconds to delete the voice file
that is currently playing.
Returning to Audio mode
1. Press "4" button shortly to pause mode during playback.
2. Press MODE button for a few seconds to enter mode setting menu.
3. Press VOL +/- buttons until you reach TYPE mode
4. Press "7" or "8" button to change from Voice to Audio mode
5. Press "MODE" for more than 2 seconds to exit Mode setting menu.
28
Page 29

Troubleshooting
CHAPTER 5: Troubleshooting
PROBLEM CAUSE AND ACTION
The power will not turn on Check if the battery is inserted correctly
Check if the battery is empty; if so replace
battery
Check if ambient temperature is too low;
operating temperature is between 10° and 45° C.
Buttons do not work Check if the Hold function is activated:
if so de-activate hold function.
Poor sound quality or no sound Check if headphones are connected correctly
Check if SMC card is inserted correctly
MP3/WMA files cannot be Check if power is turned on.
downloaded Check if USB cable is connected correctly to player
and PC.
Check in Windows Device Manager if the USB
driver is installed correctly.
GB
USA
5
29
Page 30

GB
USA
5
Freecom Internet Service
Freecom Technologies has made the following service available on the
Internet, at www.freecom.com:
Online information about technical information
current product information
Drivers, driver updates and software information
Forum
Support Hotline
The following hotlines are available if you are still unable to get your
Freecom Beatman Flash to work properly after reading the manual and the
suggestions for troubleshooting:
België (NL)* 0 78 25 00 00 supportnl@freecom.com
Belgique (F)* 0 78 25 00 01 supportfr@freecom.com
Belgien (D)* 0 78 25 00 02 supportde@freecom.com
Danmark 33 11 42 00 supportint@freecom.com
Deutschland & Österreich +49 (0) 20 37 68 09 50 supportde@freecom.com
France +33 (0) 1 34 04 72 05 supportfr@freecom.com
Nederland +31 (0) 1 58 88 01 10 supportnl@freecom.com
Norge 62 82 13 67 supportint@freecom.com
Schweiz (D) +41 (0) 8 48 88 99 10 supportde@freecom.com
Suisse (F) +41 (0) 8 48 88 77 10 supportfr@freecom.com
Suomessa 03 - 6 10 13 82 supportint@freecom.com
Sverige 08 - 29 66 00 supportint@freecom.com
United Kingdom & Ireland + 44 (0) 14 23 70 47 15 supportuk@freecom.com
USA +1 501 548 48 49 support.usa@freecom.com
other countries +31 (0) 1 58 88 01 10 supportint@freecom.com
Hotline Email
* (alléén in België/seulement pour la Belgique/nur in Belgien)
30
Page 31

Technical Specifications
Technical Specifications
Supported file formats MP3 (MPEG 1/2/2.5 layer 3) playback
WMA
Supported MP3 bitrates 32Kbps ~ 320Kbps CBR and VBR
Supported MP3 sampling frequencies 16/22.05/24/32/44.1/48 kHz
Supported WMA bitrates 64Kbps ~ 128Kbps
Internal memory see product label on retail box
Voice recording user selectable (8/16/32Kbps)
recording time: max. 17 hours at
8Kbps when internal memory is 64MB
LCD Multi Line Graphic LCD, 128*64 dots
and 4 lines
EL backlight
Memory expansion SMC expansion slot, for 32MB / 64MB/
128MB SMC cards
ID3 tag support Yes
Equalizer Normal / Classic / Pop / Rock / Live
Supported languages English, Korean, Chinese, Japanese
PC interface USB
Power requirement 1x AAA size, alkaline battery or
rechargeable battery
Operation time up to 9 hours on 1 AAA size alkaline
battery
Dimensions size: 52.6 x 56.7 x 17.5 mm / 2.07 x 2.23
x 0.68 inch
weight (without battery): 44 gr / 1.55
ounce
Headphone Output specifications Frequency response 20Hz 20kHz
Signal to noise ratio: > 85dB
Total Harmonic Distortion: < 0.1%
GB
USA
5
31
Page 32

GB
USA
WARRANTY (valid in Europe/Turkey only):
Warranty: two years manufacturers warranty. Opening the Freecom
Beatman Flash voids warranty.
For service contact your local Freecom dealer or the Freecom Service
Center in your country.
Freecom and Beatman are trademarks of Freecom Technologies BV, Delft, The
Netherlands (freecom.com). All other brands/marks are trademarks of their
respective companies.
Errors and omissions excepted.
32
FEDERAL COMMUNICATIONS COMMISSION - DECLARATION OF CONFORMITY
This equipment has been tested and found to comply with the limits for a Class B digital
device, pursuant to part 15 of the FCC Rules, and RS 210 Regulations (Canada). These
limits are designed to provide reasonable protection against harmful interference in a
residential area. This equipment generates, uses, and can radiate radio frequency
energy and if, not installed and used in accordance with the instructions, may cause
harmful interference to radio communications. However, there is no guarantee that
interference will not occur in a particular installation. If this equipment does cause
harmful interference to radio or television reception, which can be determined by
running the equipment off and on, the user is encouraged to try to correct the
interference by one or more of the following measures:
Reorient or relocate the receiving antenna.
Increase separation between the equipment and receiver.
Connect the equipment to an outlet on a circuit different from that
to which the receiver is connected.
Consult the dealer or an experienced radio technician for help.
 Loading...