

Page 1
maximum music
maximum power
maximum fun
Page 2
GB
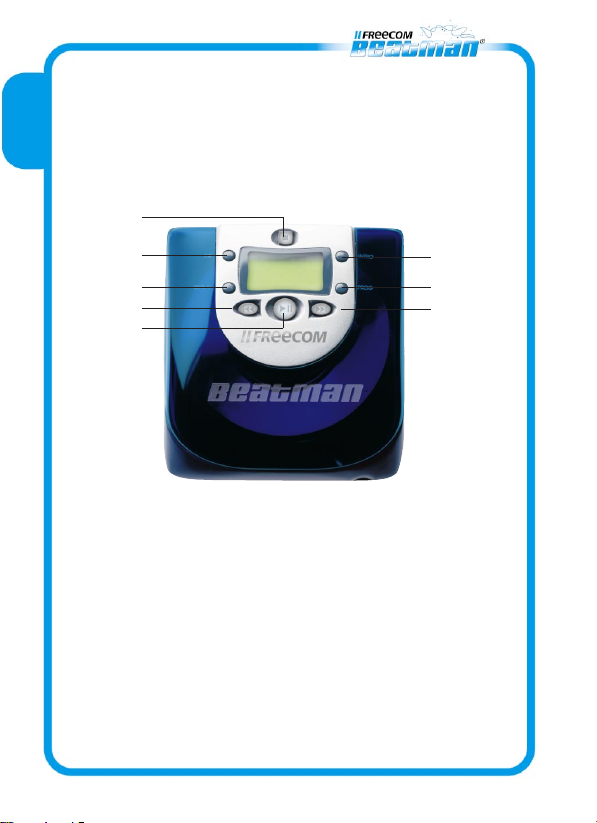
FREECOM Beatman Mini CD I
1
5
6
2
3
1 Stop/Off (<)
2 Previous (9)
3 Play/On/Pause (4;)
4 Next (:)
5 Equalizer
6 Repeat
7 Intro
8 Program
7
8
4
2
Page 3

GB
9
10
11
9 Power supply in
10 Headphone in +
Line out
12
13
14
11 Open player
cover
14 Volume control
12 Hold
13 Bass boost
LCD display
3
Page 4

GB
1. General
Thank you for buying the FREECOM Beatman MiniCD
I, the new standard in portable compressed audio
players! Please read the operating instructions care-
fully before starting to use your FREECOM Beatman.
Please note that the FREECOM Beatman plays MiniCDs
only (MiniCDs have a diameter of 8cm, in comparison
with the regular CDs which have a diameter of 12cm).
We recommend that you use FREECOM MiniCD-R discs
with your Beatman.
FREECOM CDR-discs are 100% compliant with
the Orange Book Part II volume 2 standard.
Before using your FREECOM Beatman, please check
the box for the contents:
FREECOM Beatman MiniCD I MiniCD/MP3 player
AC power adapter (please check if the voltage
complies with your country)
2x Duracell UltraM3 AA-size alkaline batteries
User manual
1x FREECOM Mini CD-R (blank)
1x FREECOM pre-recorded Mini CD
1x FREECOM/Sennheiser headphones
1x Warranty card
4
Page 5
Contact your local FREECOM dealer / retailer or the
FREECOM Support Centre for your country (see
page17) if one of the above items is missing from your
retail-package. Dont forget to register your Beatman
by visiting www.freecom.com or by filling out the
warranty card.
Visit www.freecom.com for free music down-
loads, cool Beatman accessories, CD-R(W) me-
dia, free tools and players!
Win a CD-RW Recorder on www.freecom.com.
No purchase necessary to play!!
2. Operating Instructions
Please note that the numbers in brackets refer to the
pictures of the player on page 2and 3.
Power
The FREECOM Beatman
can be powered either by
2 AA-size alkaline batter-
ies or by the AC adapter.
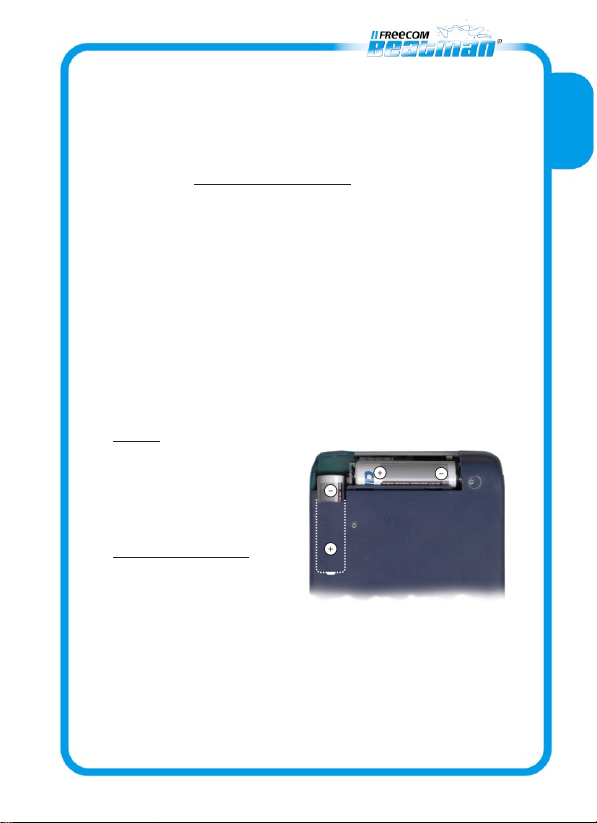
Inserting batteries
Remove the battery cover
on the back of the player
by sliding it in the direction indicated by the arrows on
the battery-cover.
Insert 2AA-size alkaline batteries according to the
drawing. Please make sure that the batteries are
properly inserted, with + and side according to the
Picture.
GB
5
Page 6

GB
Batteries contain chemical substances, when
empty, they should be properly disposed of.
Connecting the power supply
Insert the AC adapter into the appropriate socket (9).
Insert the power plug into the mains outlet. When
using the power supply, remove the batteries.
Getting started
Open the cover by sliding the "Open" switch (11).
Insert a MiniCD into the Beatman, with the label
facing up. Never touch the lens of the player.
Close the cover.
Press "Play" (3) to turn on the power.
The player will start initializing the
CD. When initializing, the LCD dis-
play shows "READ".
If a MP3 CD is inserted, the display
will show the total number of titles
and tracks.
If a Audio CD is inserted, the display
will show the total tracks and playing
time.
If no CD is inserted or the disc cannot
be initialized, the LCD display will
show "NO DISC".
6
Page 7

Only when power comes from the batteries, will the
battery-status indicator appear on the display.
battery full battery empty
When the batteries are running low, the battery-
indicator will start flashing.
Play/Pause/Resume
Press Play "4;" (3) to start playing music. If this
button is pressed during playing, the player will go
into "Pause" mode. To resume play, press "4;" (3)
once again.
play mode pause mode
Please note that when playing a MP3 CD, the songs
will be played in the filenames alphabetical order,
unless the user has changed the playing-order by
adding a "tag" to the filename.
Stop/Off
Press Stop "<" (1) to stop the player and enter idle
status (the motor does not run but the power is on).
When the player is in idle status, pressing the "<" (1)
button will turn off the player.
GB
7
Page 8

GB
Next
Press Next ":" (4) to skip to the beginning of the next
track. Continuous pressing of Next ":" (4) during play
will fast-search forward through the track.
Previous
Press Previous "9" (2) to skip to the beginning of the
previous track. Continuous pressing of Previous dur-
ing play will fast-search backwards through the track.
Program
The FREECOM Beatman has a memory for program-
ming up to 20 songs.
To start the "program" function, press the Program
button (8). The memory-ID starts from "01". The song
ID starts from title 1 and track 00 if the memory is
empty. If the memory is not empty, the last memorized
song will be displayed.
Press Next or Previous to select the song you want to
program. Press Program to store the selected song in
the memory. Repeat this process until you have pro-
grammed the songs that you want. Press play "4;"
(3) to start playing the programmed songs.
The program-memory will be erased when the power
is switched off.
8
Page 9

Intro
Press Intro (7) to start playing the
intro (the first 10 seconds) of every
song. If the player is in Program mode,
only the intro of the memorized songs will be played.
To stop the intro function, press the Intro button(7)
once again or press the Play button (3).
Repeat
The repeat function has 5 modes:
Off/Repeat song/repeat title/repeat
all/random play.
Press Repeat button (6) to change the repeat mode;
the default setting is "repeat off". Repeat Off is not
displayed on the LCD-display.
If the player is in Program mode, the Repeat function
will only repeat the memorized songs.
Equalizer
The Beatman has 4 equalizer modes:
Normal/Jazz/Rock/Classic. Press the
EQ button (5) to change the EQ mode;
default setting by power on is "normal".
Normal mode is not displayed on the LCD-display.
Please note that the EQ function only works when
playing MP3 CDs.
Bass Boost (13)
Turn on the switch to enable the
Bass Boost function.
GB
9
Page 10

GB
Hold (12)
Turn on the switch to hold all panel
buttons.
Open (11)
Slide the switch to open the player
cover.
Opening the cover will stop any ac-
tion, but the power will remain on. The LCD-display
shows "OPEN".
Volume (14)
The FREECOM Beatman has a rotary volume control-
ler; turning the volume-wheel clockwise will increase
the volume; turning the wheel anti-clockwise will
decrease the volume.
Earphone and AC Power Adapter connections
DC jack (9), for connecting the AC power adapter
Stereo earphone jack (10), for connecting the
headphone or the optional cable to connect the
Beatman to your HiFi-system.
ESP and mechanical anti-shock
The FREECOM Beatman is equipped with a Electronic
Shock Protection feature for MP3 CD, and with a
mechanical anti shock feature, which ensures continu-
ous play whilst playing AudioCDs. Both ESP and Anti-
Shock features are always enabled.
10
Page 11

WARNING!
When using headphones
Avoid damaging your hearing: do not play your
headset at a high volume. Hearing experts ad-
vise against continuous extended play. If you
experience a ringing in your ears, reduce the
volume or discontinue use.
Do not use while operating a motorized vehicle.
It may create a traffic hazard and it is illegal in
many areas. You should be extremely cautious
or temporarily discontinue use in potentially
hazardous situations. Even if your headphones
are of an "open air" type, do not turn up the
volume so high that you cannot hear what is
going on around you.
GB
11
Page 12

GB
3. Troubleshooting
When your player does not operate properly, please
check the following points. If you are unable to solve
the problem, please contact your dealer or the
FREECOM support centre.
Power can not be turned on
Check if the batteries are inserted correctly, see
page 5
Replace batteries if they become discharged
Check if the mains-adapter is connected properly
to the player, see page 3
Check if the connection of the adapter to the
player is loose
Playback is not possible or player stops during
playback
Make sure the disc cover is closed properly
Deactivate the HOLD mode
When there is condensation on the lens, wait until
the lens has cleared
Check if the CD is inserted properly, it should be
placed with the label side up
Check if the CD is scratched or damaged. If so, use
another CD
12
Page 13

Playback does not start from the first track
Check if the program or the resume function is
activated, if so clear program or switch off resume.
No sound or sound quality is poor
Check if headphones are connected properly, see
page 3
Check the volume level, adjust if necessary
Check if the headphone plug is dirty, if so clean the
headphone plug
Check if the player is located near strong magnetic
fields, if so move the set away.
GB
13
Page 14

GB
4. Technical specifications:
Dimensions: 103mm (L) x 95mm (W) x 28.5mm (H)
Weight: 158 g.
Disc: disc size: 8cm MiniCD
capacity: 185MB = 3 to 4 hours of
MP3 music on 1 MiniCD, 21min Audio
(CD-DA) on 1 MiniCD
FREECOM recommends the use of FREECOM MiniCDs. Most
CD(R)(W) drives support reading and writing this media.
However, check our website www.freecom.com for a list of
compatible drives.
8cm CD-media can not be used in a "slot-in" drive and in a car-
hifi set, unless a CD-adapter is used.
Supported CD format: CD-DA and MP3
(MPEG-1 Audio ISO/IEC
11172-3) including
.MP3 or .MPx
Supported CD media: CD-ROM, CD-R, CD-RW
Supported CD mode: CD Digital Audio, CD ROM
mode 1 or mode 2, CD EXTRA
(multi session)
14
Page 15

Power supply: 1.5V AA alkaline battery x 2
FREECOM recommends Duracell UltraM3 AA alkaline batte-
ries for optimal performance.
4.5V/1A Linear Power Adapter
Operation Time: up to 7 hours on 2 AA-size
alkaline batteries
Anti-shock: 40secs mechanical anti-shock
for CD-DA
8secs ESP for MP3
Supported bitrate: 32Kbps ~ 320Kbps
(MPEG-1 layer 3)
Supported
sampling rate: max. 44.1KHz
Temperature and humidity
Storage: temp. -20° C to 60° C /
hum. 10% to 90%
RH non-condensing
Operating: temp. 0° C to 45° C /
hum. 10% to 80%
RH non-condensing
GB
15
Page 16

GB
Headphone output specifications
Output: 0.75Vrms (load=32 Ω)
Frequency Response: 100Hz-20KHz
Signal to noise ratio: >80dB
Distortion (thd): 1% max at 1KHz
Channel separation: >65dB
MTBF: minimum 20000 POH
Headphone specification
Type: Sennheiser MX 300
Frequency response: 18 20000Hz
Impedance: 32 Ω
Max. SPL: 116dB (at 1kHz, 0.5Vrms)
Cable length: approx. 1 m.
Warranty: One year. Opening the FREECOM
Beatman voids warranty.
For service contact your local FREECOM dealer or
the FREECOM Service Center in your country.
16
Page 17

5. FREECOM Internet Service
Visit www.freecom.com for free music down-
loads, cool Beatman accessories, CD-R(W) me-
dia, free tools and players!
Win a CD-RW Recorder on www.freecom.com.
No purchase necessary to play!!
Support Hotline
The following hotlines are available if you still are
unable to get your FREECOM device to work properly
after reading the manual and the suggestions for
correcting errors:
United Kingdom & Ireland
+44 (0) 1423 704 715 supportuk@freecom.com
Deutschland & Österreich
+49 (0) 203 768 0950 supportde@freecom.com
France & Belgique (F)
+33 (0) 1 34 04 72 05 supportfr@freecom.com
Nederland & België (NL)
+31 (0) 15 888 0110 supportnl@freecom.com
Schweiz (D)
+41 (0) 848 88 99 10 supportde@freecom.com
Suisse (F)
+41 (0) 848 88 77 10 supportfr@freecom.com
All other countries:
Please apply to your local FREECOM Reseller or email
to: supportint@freecom.com
GB
17
Page 18

FEDERAL COMMUNICATIONS COMMISSION - DECLARATION OF
CONFORMITY
This equiqment has been tested and found to comply with the limits for
a Class B digital device, pursuant to part 15 of the FCC Rules, and RS 210
Regulations (Canada). These limits are designed to provide reasonable
protection against harmful interference in a residential area. This
equiqment generates, uses, and can radiate radio frequency energy
and if, not installed and used in accordance with the instructions, may
cause harmful interference to radio communications. However, there
is no guarantee that interference will not occur in a particular installation.
If this equipment does cause harmful interference to radio or television
reception, which can be determined by running the equipment off and
on, the user is encouraged to try to correct the interference by one or
more of the following measures:
Reorient or relocate the receiving antenna.
Increase separation between the equipment and receiver.
Connect the equipment to an outlet on a circuit different from that
to which the receiver is connected.
Consult the dealer or an experienced radio technician for help.
Page 19

FREECOM and Beatman are trademarks of FREECOM
Technologies BV, Delft, The Netherlands (FREECOM.com).
All other brands/marks are trademarks of their respective
companies.
Errors and omissions excepted.
WWW.FREECOM.COM
© FREECOM Technologies . Printed in Germany
Art. No. 16431 / Rev. 129
 Loading...