

Page 1
USER MANUAL
SILVER STORE 2-DRIVE NAS
NETWORK ATTACHED HARD DRIVE / 3.5" / RAID / GIGABIT LAN / USB 3.0 HOST
Rev. 120
Page 2
EN
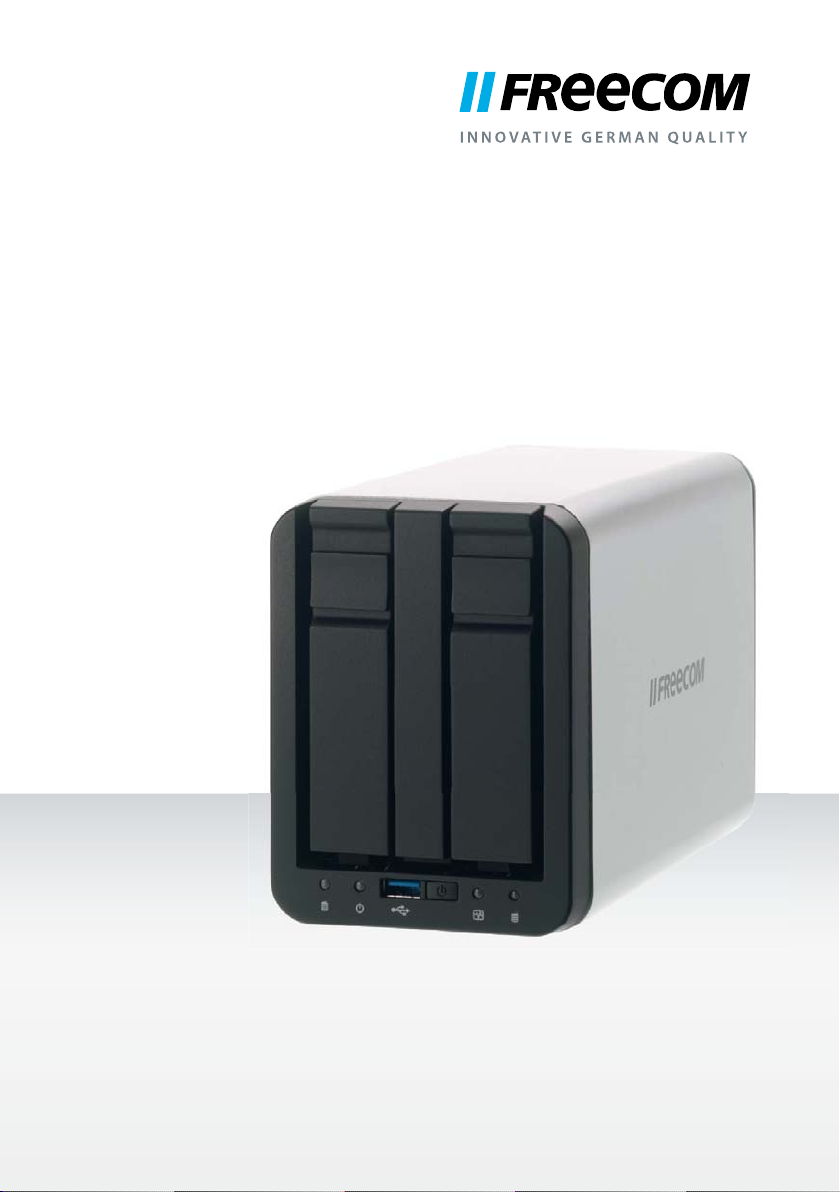
FREECOM SILVER STORE 2-DRIVE NAS
Dear user!
Thank you very much for choosing the SilverStore 2-Drive NAS. The SilverStore 2-Drive
NAS offers you easy-to-use network storage possibilities and the facility of using the device
as a DLNA/UPnP media server and as a torrent download client.
Freecom Technologies • Germany
www.freecom.com
Contents of the box
Please check the contents of the box. All articles included in this box are listed on the back
side of the packaging.
Need assistance? Have questions?
In case you have a question about the use of this product, need information about
other Freecom products or need technical assistance, please contact the Freecom
Service Center for your country. See www.freecom.com for details.
Freecom offers free unlimited helpdesk support.
Warning !
All rights reserved. The products named in this manual are only used for identification
purposes and may be trademarks or registered trademarks of the respective
companies. This device was designed for home or office use.
This device is equipment complying with EN55022 class B.
Freecom cannot be made liable for any damages, loss of data or damage following
thereof -whatsoever (including, without limitation, damages for loss of business
profits, business interruption, loss of business information, or other pecuniary loss)
arising out of the use of or inability to use this Freecom product, even if Freecom has
been advised of the possibility of such damages.
We reserve the right to upgrade our products in keeping with technological advances.
2
Page 3

EN
FREECOM SILVER STORE 2-DRIVE NAS
Table of Contents
General Information
System requirements.................................................................................................................... Page 4
Precautionary measures ..............................................................................................................Page 5
Introduction .....................................................................................................................................Page 6
Chapter
Hardware Installation ...................................................................................................................Page 8
Chapter
Installation of the application software (FNSA) .................................................................. Page 11
Chapter
Getting Started ............................................................................................................................... Page 18
Chapter
Navigating the SilverStore Web-based Utility .................................................................... Page 21
Chapter
Tonido Remote Access .................................................................................................................Page 68
Chapter
Troubleshooting.. ...........................................................................................................................Page 82
Appendix A: CE, FCC and other certifications.. ..................................................................Page 82
Appendix B: Preparing LAN for use with the SilverStore.. ..............................................Page 83
Appendix C: Network Basics.. ....................................................................................................Page 85
© 2011 Freecom Technologies
3
Page 4
EN
FREECOM SILVER STORE 2-DRIVE NAS
General Information
Your system needs to meet the following hardware and software requirements for the
device to function properly.
System requirements
To use the SilverStore 2-Drive NAS, you will require the following components:
PC:
• Intel Pentium III / AMD Duron 900 MHz or higher
• 256 MB RAM (Vista / 7: 512 MB RAM) or higher
• LAN (1000Base-T full duplex connection recommended)
• CD-ROM drive
• Internet connection for online warranty registration, software updates and downloads
• Operating system: Windows XP, Windows Vista, Windows 7
Mac:
• PowerPC G4/G5 or Intel Mac
• 256 MB RAM or higher
• LAN (1000Base-T full duplex connection recommended)
• CD-ROM drive
• Internet connection for online warranty registration, software updates and downloads
• Operating system: Mac OS X v10.4 or higher
If you have bought the SilverStore 2-Drive NAS as a kit (no HDD delivered) we advise you to
use 2 Disks. In order to enable immediate use, your SilverStore 2-Drive NAS is pre-formatted
and configured as RAID 0. You therefore have the maximum storage space available. If you
value maximum data security, we recommend the configuration as RAID 1. In the "RAID 1"
mode, your hard disks will be mirrored, so that only half the maximum storage space will
be available. If one hard disk fails, your data can then be restored from the second hard
disk. Further information on hard disk configuration can be found in the "Storage" section
of this manual.
4
Page 5
EN
FREECOM SILVER STORE 2-DRIVE NAS
Precautionary measures
To ensure that your SilverStore 2-Drive NAS functions properly, please take note of the
following precautions. If these are not followed, you may void your warranty and damage
the SilverStore 2-Drive NAS.
• Do not drop the SilverStore 2-Drive NAS or expose it to other kinds of sudden mechanical
shocks as this may result in data loss and damage to the SilverStore 2-Drive NAS.
• Do not use the SilverStore 2-Drive NAS when the ambient temperature is below 10°C
or above 35°C.
• If the SilverStore 2-Drive NAS is moved from a cool environment to a warmer environment,
please allow the drive to acclimatize to the ambient temperature before operating the
device. Failing to do so may lead to condensation within the drive enclosure, which in
turn may cause the drive to malfunction.
• Do not place liquids or drinks on the SilverStore 2-Drive NAS. When liquids are spilled
and get in contact with the electronics within the drive enclosure, it will damage the
drive and will cause the drive to malfunction.
• Do not use the SilverStore 2-Drive NAS in a dusty environment. Dust inside the enclosure
may damage the internal electronics and result in drive malfunction.
• Only use the power adapter that was supplied with the SilverStore 2-Drive NAS.
• Opening the SilverStore 2-Drive NAS will void the warranty.
If at any point during installing and/or configuring your SilverStore
2-Drive NAS you need assistance or have questions, please contact
the Freecom Support Center for your country. See www.freecom.com
for details.
Freecom offers free unlimited helpdesk support.
5
Page 6

EN
FREECOM SILVER STORE 2-DRIVE NAS
Introduction
The SilverStore storage appliance includes a web-based utility that can be accessed through
a web browser from any computer on your network. Administrators can efficiently manage
and monitor the SilverStore’s hardware components, health and performance.
SilverStore 2-Drive NAS – Setup overview
6
Page 7

EN
FREECOM SILVER STORE 2-DRIVE NAS
Features
• Remote access
SilverStore supports remote access via a web-based utility, enabling management from
anywhere in the network.
• Secured access
SilverStore can be accessed with password protected, SSL (SSL - Secure Socket Layer)
encrypted web utility.
• Email notification
Administrators are automatically alerted by email, in the event of warnings or errors
related to temperatures, fan speeds, hard drive, network, USB occurred in the SilverStore.
• Multiple management levels
Users can be assigned different access permissions. SilverStore supports two levels: full
access and read only.
• Update via web
Administrators can run remote firmware updates on the SilverStore.
• Disk management
Administrators can use the web-based utility to monitor internal and external USB hard
drives.
• SMART support
Includes SMART (Smart Monitoring Analysis and Reporting Technology)
feature for monitoring SATA hard drive health status.
• USB storage support
Supports data backup to an external USB hard drive.
• Support for volume sharing
Allows file sharing (such as documents, photos, music, or videos) with other computers
on a network.
7
Page 8
EN
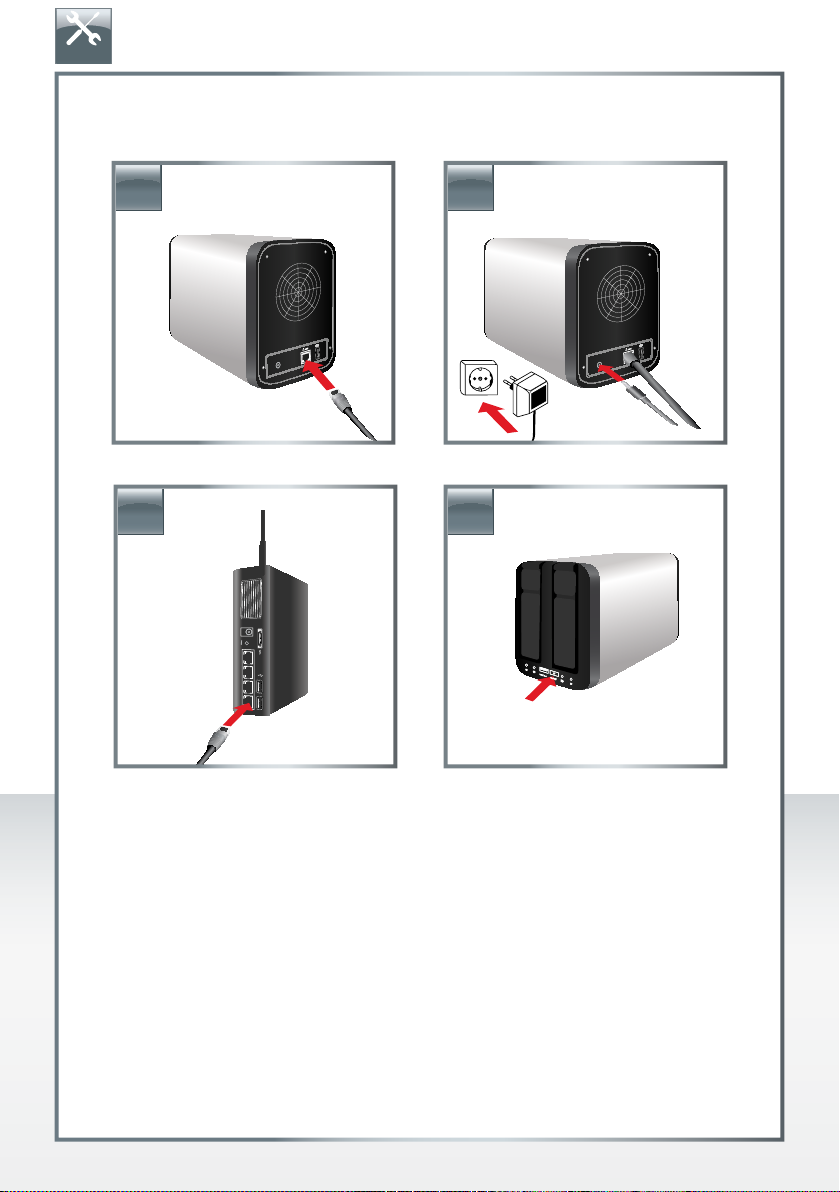
Chapter: Hardware Installation
1. 2.
3. 4.
FREECOM SILVER STORE 2-DRIVE NAS
1. Plug the LAN cable into the SilverStore 2-Drive NAS.
2. Insert the power cord into the SilverStore 2-Drive NAS and plug the power supply into
the socket.
3. Connect the other end of the LAN cable to a network router.
Please note: Your router must be configured as a DHCP server. Further information on
setting up the DHCP server function of your router can be found in the manual of your
router.
4. Switch on the SilverStore 2-Drive NAS before using it.
8
Page 9

EN
Tray remove / insertion
1. 2.
3. 4.
FREECOM SILVER STORE 2-DRIVE NAS
1. Push down Eject button and open tray handle max. 45°!
2. Encompass the tray handle! Fix device location by other hand and pull out the tray!
3. Insert tray with open tray handle into the slot! Push tray with thumb totally into the
device!
4. Close tray handle!
Handle with care!
9
Page 10
EN
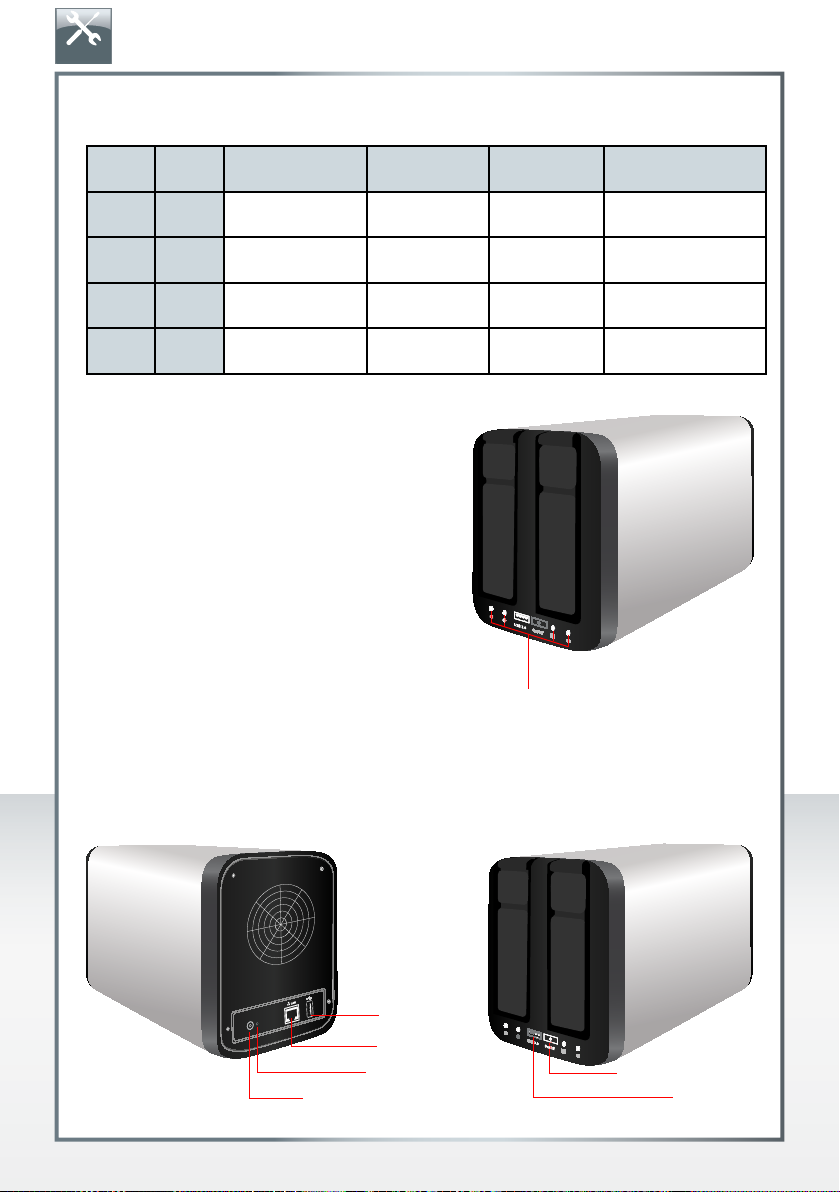
LED Description
FREECOM SILVER STORE 2-DRIVE NAS
LED
1 HDD 1
2 Power
3 Activity
4
HDD 2
Power switch
On Flashing Red Off
HDD formatted Data access HDD
Device on x x Device off
x e.g. Upgrade/
boot/shut down
HDD formatted Data access HDD
unformatted
System fault Normal mode
unformatted
LEDs
x
x
The SilverStore is designed to work 24/7 but to conserve electricity and extend the life of
the device we advise to turn the SilverStore 2-Drive NAS off when it will not be used for a
longer time period.
USB
LAN
Reset
Power supply
On/off switch
USB 3.0
10
Page 11

EN
FREECOM SILVER STORE 2-DRIVE NAS
Chapter: Installation of the application software (FNSA)
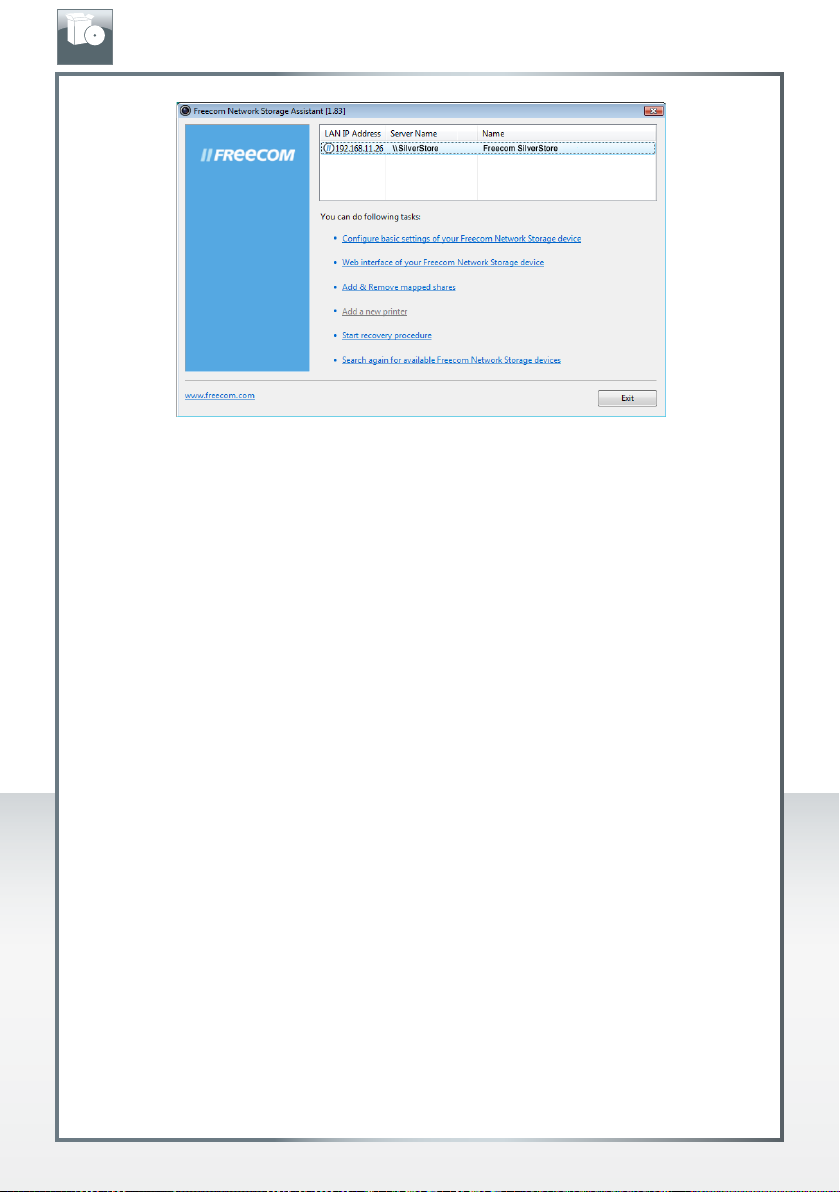
Installation of the Freecom Network Storage Assistant Software (PC)
The Freecom Network Storage Assistant quickly detects and performs the basic setup of
your SilverStore 2-Drive NAS. When you start it, it displays all Freecom Network devices
available in your network and helps you creating network folders.
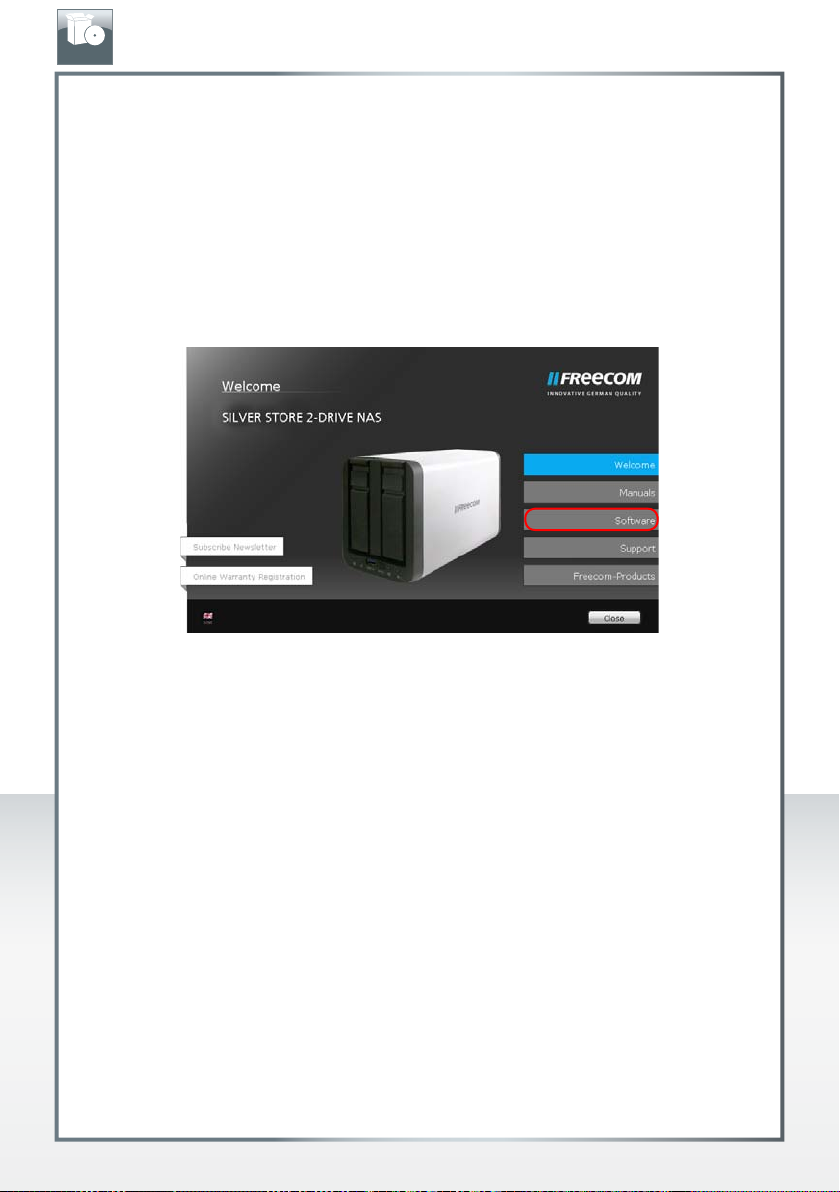
1. Please insert the Manual & Application CD into your CD/DVD drive. It contains user
manuals and software, including the Freecom Network Storage Assistant. Once the
CD is inserted, a window should appear automatically on the screen. If this does not
happen, please proceed as follows:
2. Open "My Computer".
3. Double-click the CD drive containing the CD. The CD window should now open.
4. Click on "Software Installation" -> "FNS Assistant". The installation starts now. Follow the
instructions on the screen, confirm with "Next" in order to continue with the installation.
After installation has finished, press "Quit" to exit the menu screen.
5. Start the Freecom Network Storage Assistant by clicking on the "FNSA" icon on your
desktop or via "Start" -> "Program files".
6. Check the Freecom Network Storage Assistant whether your SilverStore 2-Drive NAS was
detected. This may take some time. If your SilverStore 2-Drive NAS is not immediately
detected, click "Search again for available Freecom Network Storage devices" to repeat
the search.
11
Page 12
EN
7. For a detailed functional description on the Freecom Network Storage Assistant, please
refer to chapter "Features of the Freecom Network Storage Assistant (PC)".
FREECOM SILVER STORE 2-DRIVE NAS
12
Page 13
EN
FREECOM SILVER STORE 2-DRIVE NAS
Installation of the Freecom Network Storage Assistant Software (Mac)
The Freecom Network Storage Assistant quickly detects and performs the basic setup of
your SilverStore 2-Drive NAS. When you start it, it displays all Freecom Network devices
available in your network and helps you creating network folders.
1. Please insert the Manual & Application CD into your CD/DVD drive. It contains user
manuals and software, including the Freecom Network Storage Assistant.
2. You will now see CD icon on your Mac desktop.
3. Double-click on the CD icon. Click "Start". The CD window should now open.
4. Click on "Software Installation" -> "FNS Assistant". The installation starts now. Follow the
instructions on the screen, confirm with "Next" in order to continue with the installation.
After installation has finished, press "Quit" to exit the menu screen.
5. Start the Freecom Network Storage Assistant. This can be found in "Applications" ->
"Utilities".
6. Check the Freecom Network Storage Assistant whether your SilverStore 2-Drive NAS was
detected. This may take some time. If your SilverStore 2-Drive NAS is not immediately
detected, click "Search again for available Freecom Network Storage devices" to repeat
the search.
7. For a detailed functional description on the Freecom Network Storage Assistant, please
refer to chapter "Features of the Freecom Network Storage Assistant (Mac)"
13
Page 14

EN
FREECOM SILVER STORE 2-DRIVE NAS
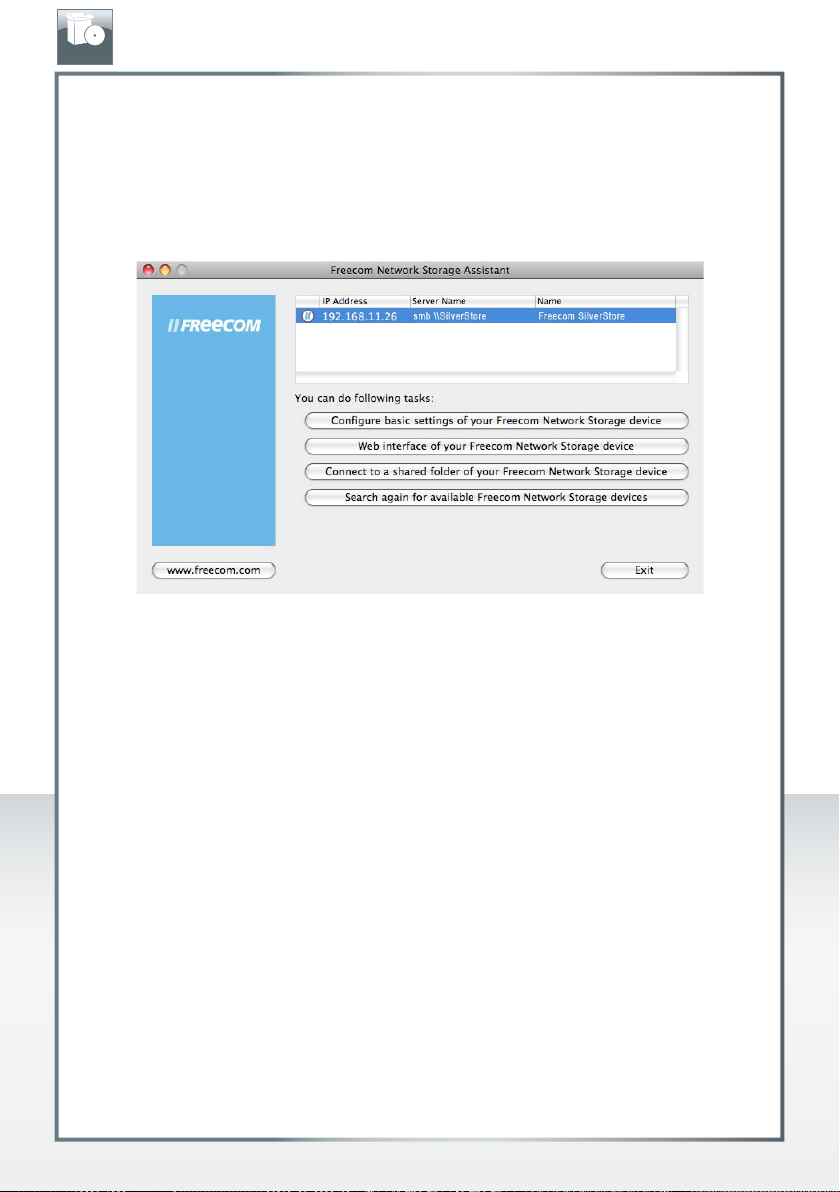
Features of the Freecom Network Storage Assistant (PC)
The Freecom Network Storage Assistant helps you to locate each SilverStore 2-Drive NAS in
your network. When started, it displays all SilverStore 2-Drive NAS available in your network
and helps you to create network folders. You may also perform any of the functions of the
Freecom Network Storage Assistant manually.
The preset password and login name for the SilverStore 2-Drive NAS are:
Login Name: admin
Password: admin
Configure basic settings of your Freecom Network Storage Device
In this screen, you can set an IP address, subnet mask, device name and workgroup name
for your SilverStore 2-Drive NAS. With this information, it is easy to locate your SilverStore
2-Drive NAS in the network without the FNSA. To change the settings, you have to enter
the administrator password.
Web interface of your Freecom Network Storage Device
When you click this menu item, the web interface for your SilverStore 2-Drive NAS opens
in your default browser.
14
Page 15
EN
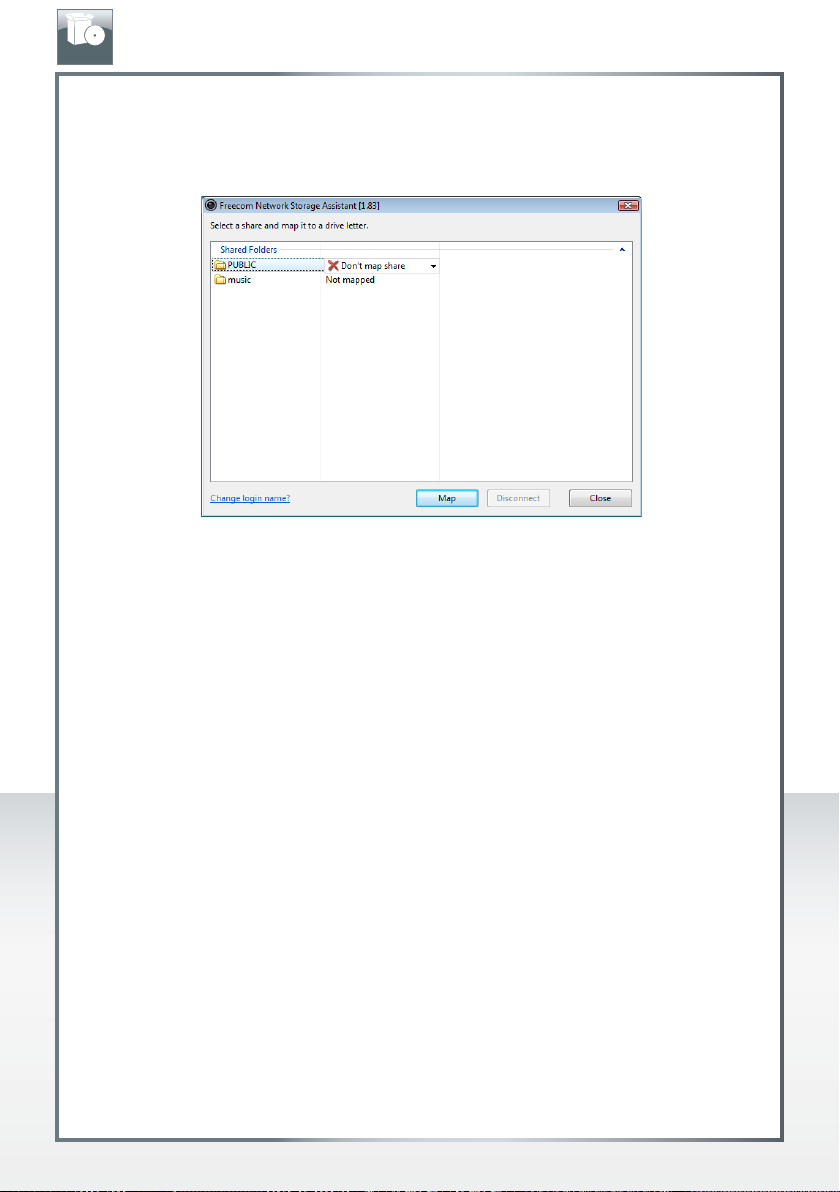
Add and remove mapped shares
You can assign a drive letter to shared folders on your SilverStore 2-Drive NAS. This allows
you to access files in Windows more quickly.
Start recovery procedure
This procedure can reset and repair a SilverStore 2-Drive NAS to factory default settings if
you cannot access your SilverStore 2-Drive NAS anymore.
FREECOM SILVER STORE 2-DRIVE NAS
To restore your settings, please proceed as follows:
a) Enable the Recovery mode by clicking 'Start the recovery procedure' in the Freecom
Network Storage Assistant.
b) Turn the SilverStore 2-Drive NAS off.
c) Use a pointed object to carefully press the 'Reset' button. It is located next to the AC
power slot on the back of the SilverStore 2-Drive NAS.
d) Keep the 'Reset' button pressed down and turn device on again.
e) Wait until white LED goes off (ca. 1 second), then release the 'Reset' button.
Search again for available Freecom Network devices
Click here to repeat the search for your SilverStore 2-Drive NAS if it was not detected during
the first search. Please make sure that your network is configured as described above in
this manual and that all cables are properly attached.
15
Page 16
EN
FREECOM SILVER STORE 2-DRIVE NAS
Features of the Freecom Network Storage Assistant (Mac)
The Freecom Network Storage Assistant helps you to locate each SilverStore 2-Drive NAS in
your network. When started, it displays all SilverStore 2-Drive NAS available in your network
and helps you configure the SilverStore 2-Drive NAS and that create network folders. You
may also perform any of the functions of the Freecom Network Storage Assistant manually.
The preset password and login name for the SilverStore 2-Drive NAS are:
Login Name: admin
Password: admin
16
Page 17
EN
Configure basic settings of your Freecom Network Storage device
In this screen, you can set an IP address, subnet mask, device name and workgroup name
for your SilverStore 2-Drive NAS. With this information, it is easy to locate your SilverStore
2-Drive NAS in the network without the wizard. To change the settings, you have to enter
the administrator password.
Web interface of your Freecom Network Storage device
When you click this menu item, the web interface for your SilverStore 2-Drive NAS opens
in your default browser.
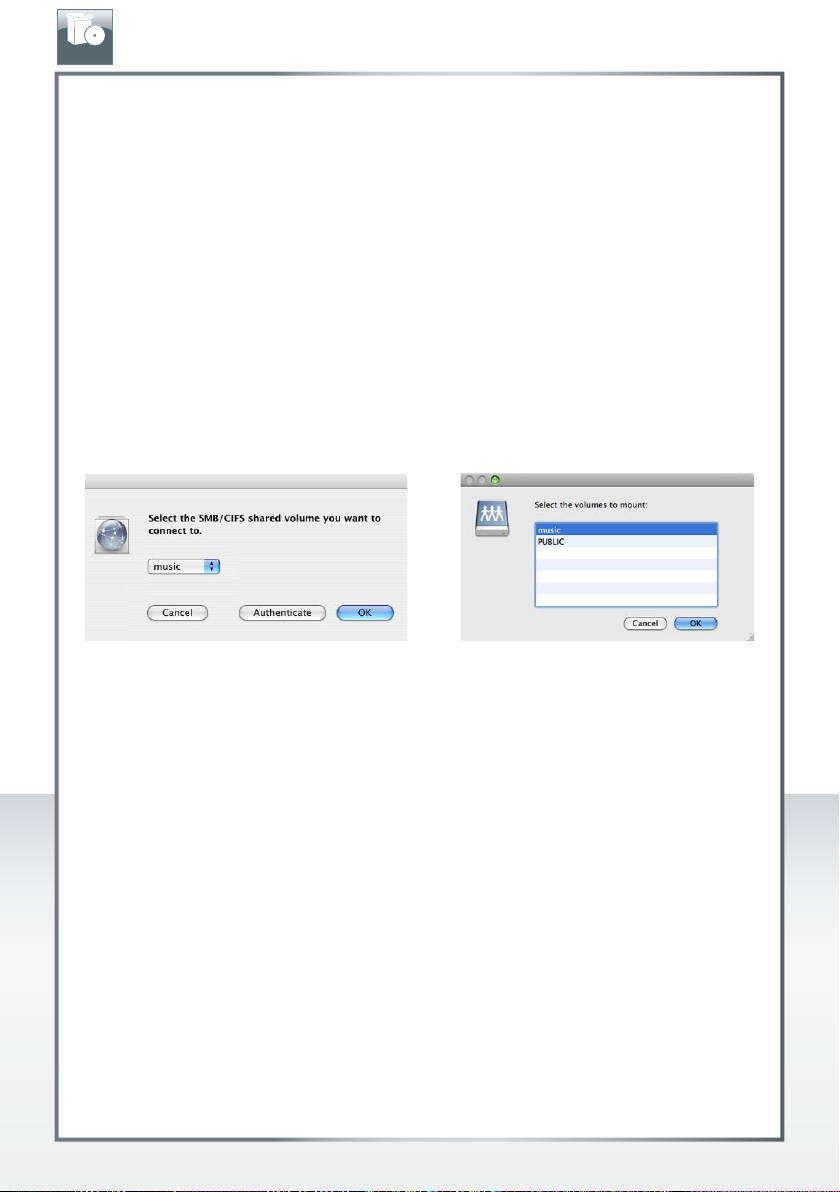
Connect to a shared folder of your Freecom Network Storage device
This window allows you to mount any folder of your SilverStore 2-Drive NAS on your Mac.
This allows fast access to this folder.
FREECOM SILVER STORE 2-DRIVE NAS
Mac OS X 10.4 Mac OS X 10.5/10.6
Search again for available Freecom Network Storage devices
Click here to repeat the search for your SilverStore 2-Drive NAS if it was not detected during
the first search. Please make sure that your network is configured as described above in
this manual and that all cables are properly attached.
17
Page 18
EN
FREECOM SILVER STORE 2-DRIVE NAS
Chapter: Getting Started
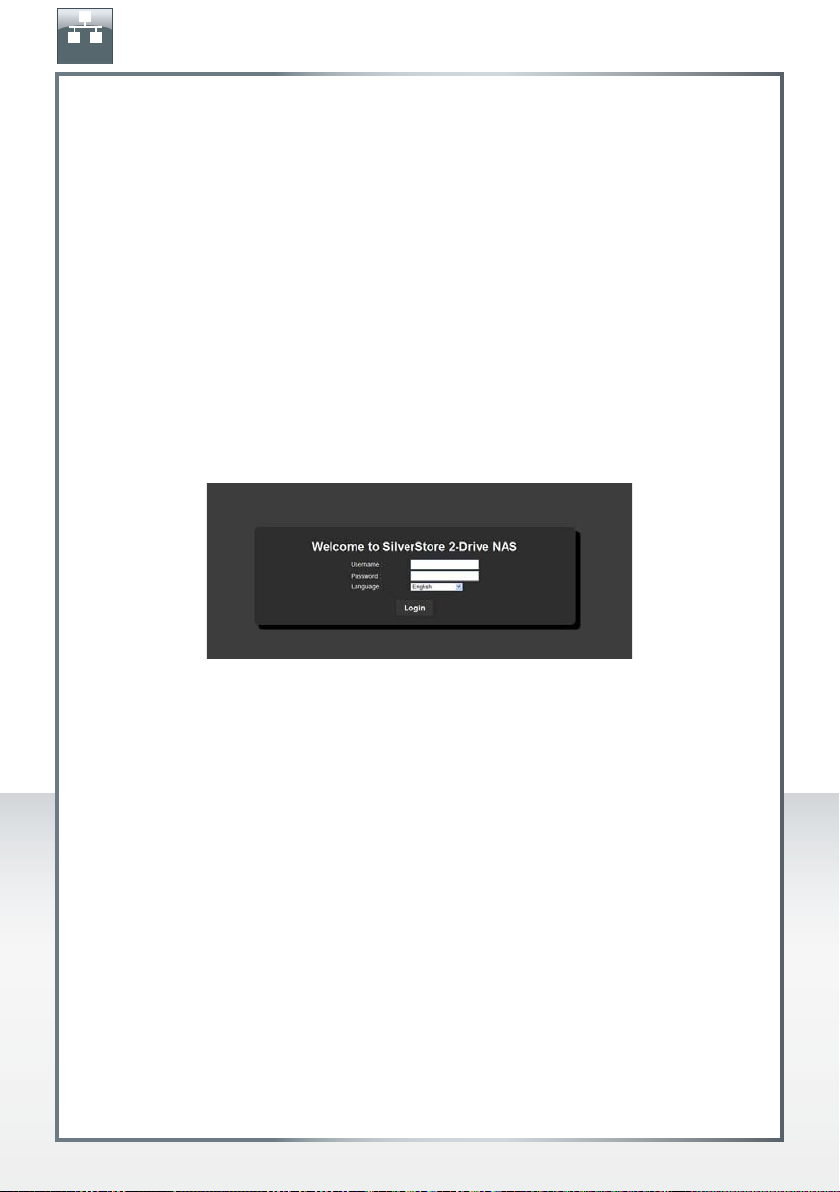
Below include instructions for launching the web-based utility’s login page using Windows,
Mac, or Linux.
Accessing the Web-based Utility Using Windows
You have two options to launch the login page - using an internet browser or the Windows
taskbar. The Web-based utility allows administrators to remotely configure related hardware,
network, storage, access control, and status settings for the SilverStore storage appliance.
To access the web-based utility:
1. Ensure that the SilverStore is powered on and connected to your network.
2. Open your Internet browser (e.g. Explorer, Firefox)
3. In the Address bar, type the SilverStore’s IP address, then press Enter.
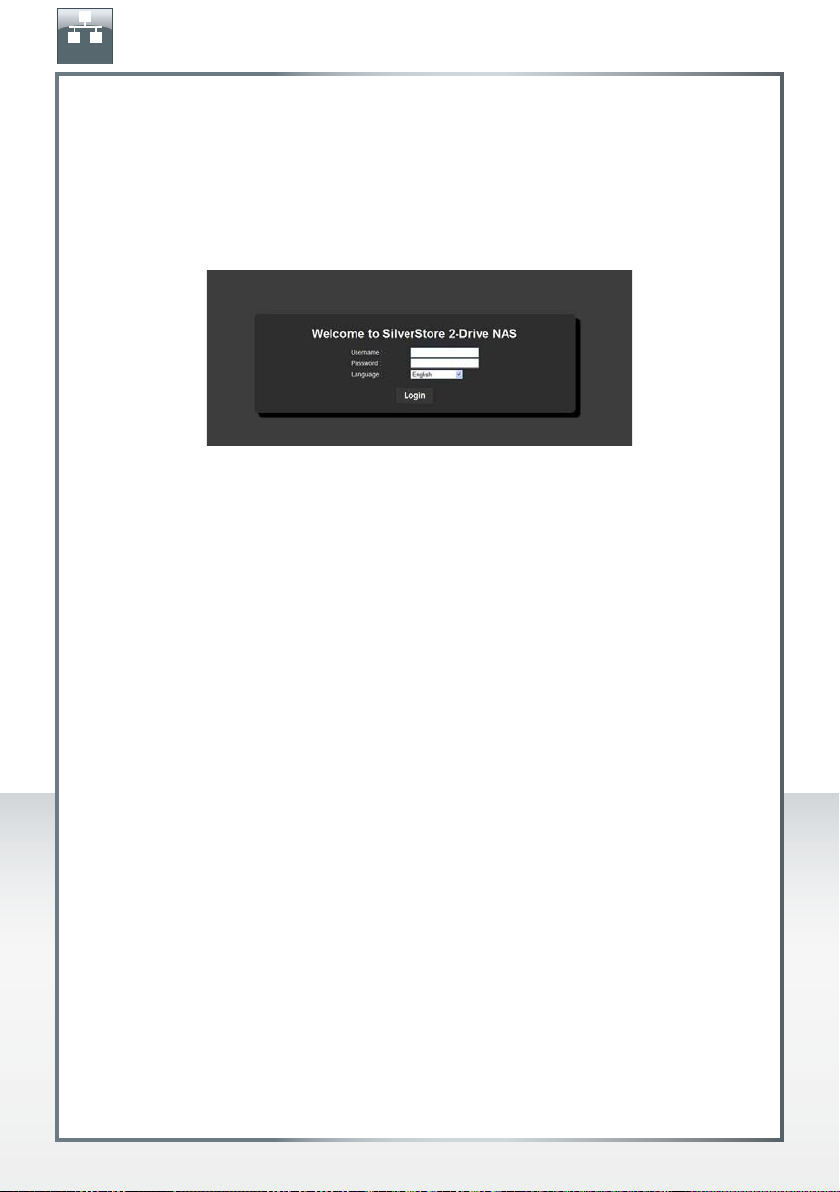
4. Type in the default user name and password.
NOTE: The default user name and password is admin. Both user name and password
are case sensitive and should be entered exactly in the same way each time.
5. Click Login.
18
Page 19
EN
FREECOM SILVER STORE 2-DRIVE NAS
Accessing the Web-based Utility Using Mac OS X
To access the web-based utility:
1. Ensure that the SilverStore is powered on and connected to your network.
2. Launch the Internet Web browser.
3. In the Address box, type the SilverStore’s IP address, then press Enter.
4. Type in the default user name and password.
NOTE: The default user name and password is admin. Both user name and password
are case sensitive and should be entered exactly in the same way each time.
5. Click Login.
Accessing the Web-based Utility Using Linux
To access the web-based utility:
1. Ensure that the SilverStore is powered on and connected to your network.
2. Launch the internet web browser.
3. In the Address box, type the SilverStore’s IP address, then press Enter.
4. Type in the default user name and password.
NOTE: The default user name and password is admin.
5. Click Login.
19
Page 20
EN
FREECOM SILVER STORE 2-DRIVE NAS
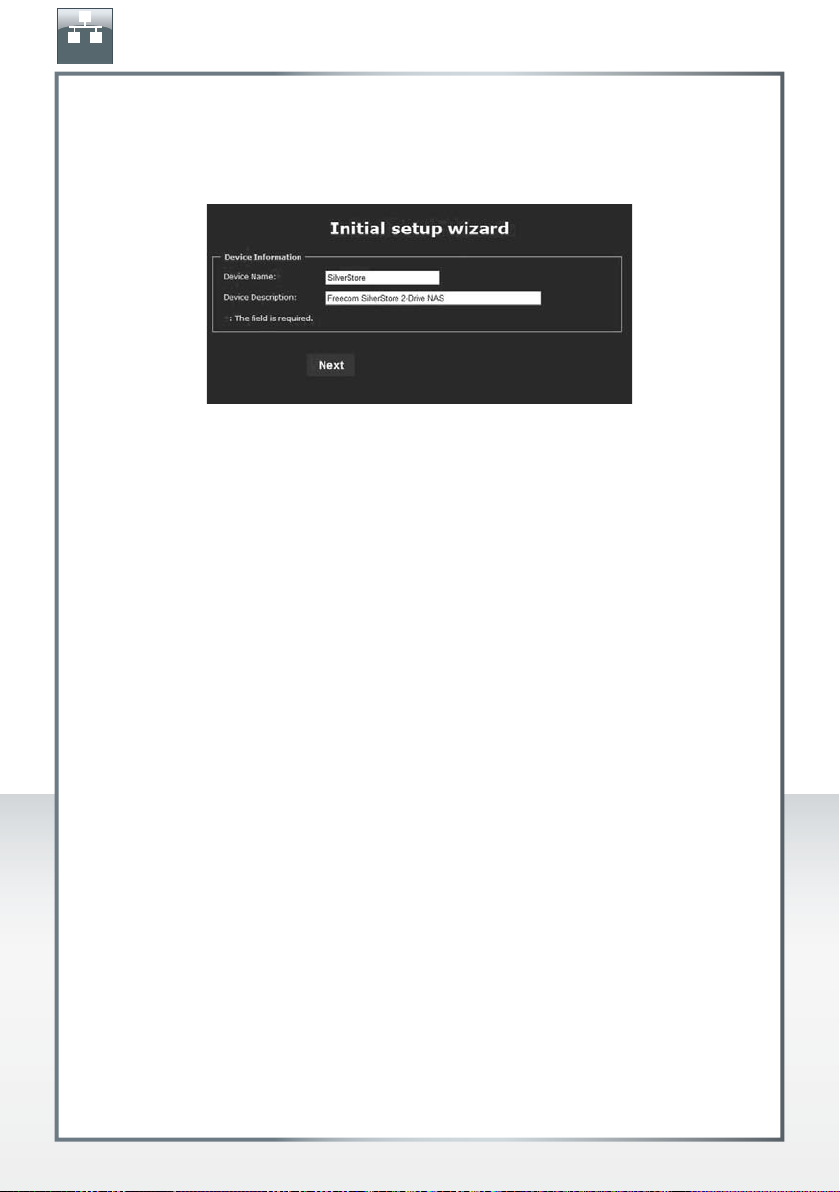
SilverStore - Initial setup wizard
After logging in to the SilverStore web interface for the first time, the “Initial setup wizard”
will open:
The „Initial setup wizard“ offers the configuration of the basic settings required for the
operation of your Freecom SilverStore. These are:
Device Information:
Change name and description of your SilverStore.
Network:
IP Address (Obtain IP address automatically)
Your Freecom SilverStore will get an IP address automatically assigned from your router.
IP Address (manual configuration)
When unchecking the box “Obtain IP address automatically”, you will be able to manually
configure the network settings of your Freecom SilverStore.
Time Zone (automatic)
Select your time zone and the option if you want to use an NTP time server for automatic
configuration of date and time or if you want to use manual date and time setting.
Admin Password
For security reasons, change your admin password here. We recommend using a password
with minimum 8 characters length.
After finishing the “Initial setup wizard”, you can login again to your Freecom SilverStore.
20
Page 21
EN
FREECOM SILVER STORE 2-DRIVE NAS
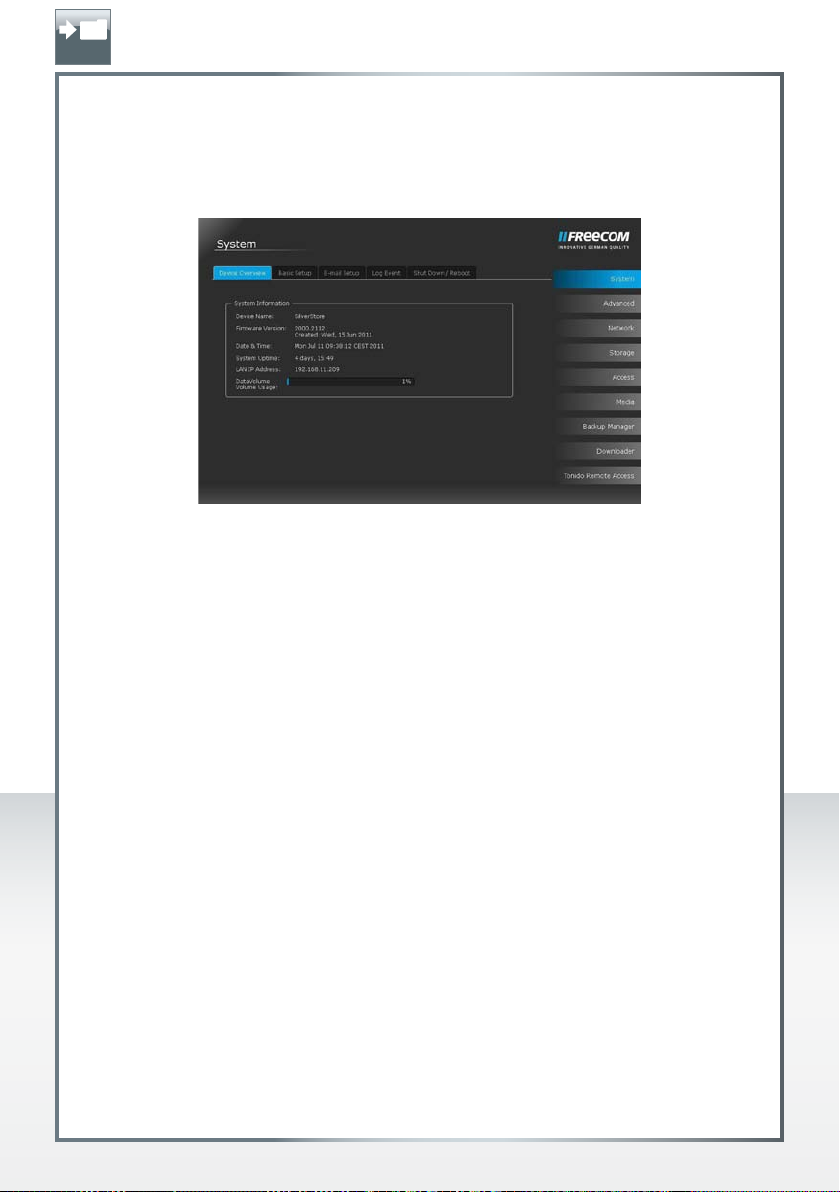
Chapter: Navigating the SilverStore Web-based Utility
The web-based utility is designed to logically access and manage the features of the
SilverStore. After logging onto the web-based utility, the System Information page appears.
The web GUI (graphical user interface) is divided into two areas. On the left is the information
pane, which displays list of information, commands or configuration options that are
associated with the category selected from the navigation menu bar. On the right is a
multi-level navigation menu bar, which is divided into nine categories and each category
is subdivided into several submenus which will appear as tabs on the information pane
(For example, on the screen above the Network menu includes five tabs: Device Overview,
Basic Setup, E-mail Setup, Log Event and Shut Down/Reboot.).
The navigation menu bar includes the following menus:
• System - The System menu contains basic system information. It also provides options
for setting the device name, time zone, date and time, email notifications, and performing
remote system shutdown or reboot. For more details, see “Using the System Menu”.
• Advanced - The Advanced menu allows you to change the login password, upgrade
the SilverStore firmware, backup the SilverStore system configuration information,
restore system to factory defaults, enable the file system checking features, check the
hard drives for bad blocks. For more details, see “Using the Advanced Menu” .
• Network - The Network menu has access to all network configuration options, such as
setting up DHCP / Static IP address, network services (i.e., SMB, FTP, NFS, Apple network),
and configuring membership in a domain or workgroup. For more details, see “Using
the Network Menu”.
21
Page 22

EN
• Storage - The Storage menu displays the number of hard drives installed on the
SilverStore and basic hard drive(s) information (such as model name, size, and status). It
also includes services for volume management, iSCSI device management, and shared
folder management, and allows you to view detailed USB storage device information
and hard disk drive quota settings. For more details, see “Using the Storage Menu”.
• Access - The Access menu allows you to add, modify or remove users and groups, set
user or group permissions (read/write, read only, no access) on a shared folder or USB
storage devices. For more details, see “Using the Access Menu”.
• Media - The Media menu allows you to enable Media Server function to make media
contents (such as digital photos, videos and music) stored on the SilverStore available
for shared access and enable streaming service into iTunes. For more details, see “Using
the Media Menu”.
• Backup Manager - The Backup Manager menu allows you to back up data from a USB
storage device to the SilverStore, back up data saved on the SilverStore to a USB storage
device, back up data from one SilverStore to another, or back up data volume on the
SilverStore. For more details, see “Using the Backup Manager Menu”.
• Downloader - The Downloader menu allows you to view, manage, boost download
speed, and organize file downloads. For more details, see “Using the Downloader Menu”.
Tonido Remote Access
Tonido Remote Access offers the possibility of sharing files via the internet. It is possible to
allow access for defined users to selected files and folders by using an URL like http://xxx.
freecomnas.com (where xxx is the name you defined while configuring Tonido Remote
Access). User can access either via PC/Mac or by using a Mobile Phone. Mobile Phone
applications are available for iPhone/iPad, Android, Windows Phone and Blackberry.
The Tonido service to access your NAS remotely 24/7 is provided free of charge. No
subscriptions are necessary to enable this feature.
FREECOM SILVER STORE 2-DRIVE NAS
22
Page 23
EN
FREECOM SILVER STORE 2-DRIVE NAS
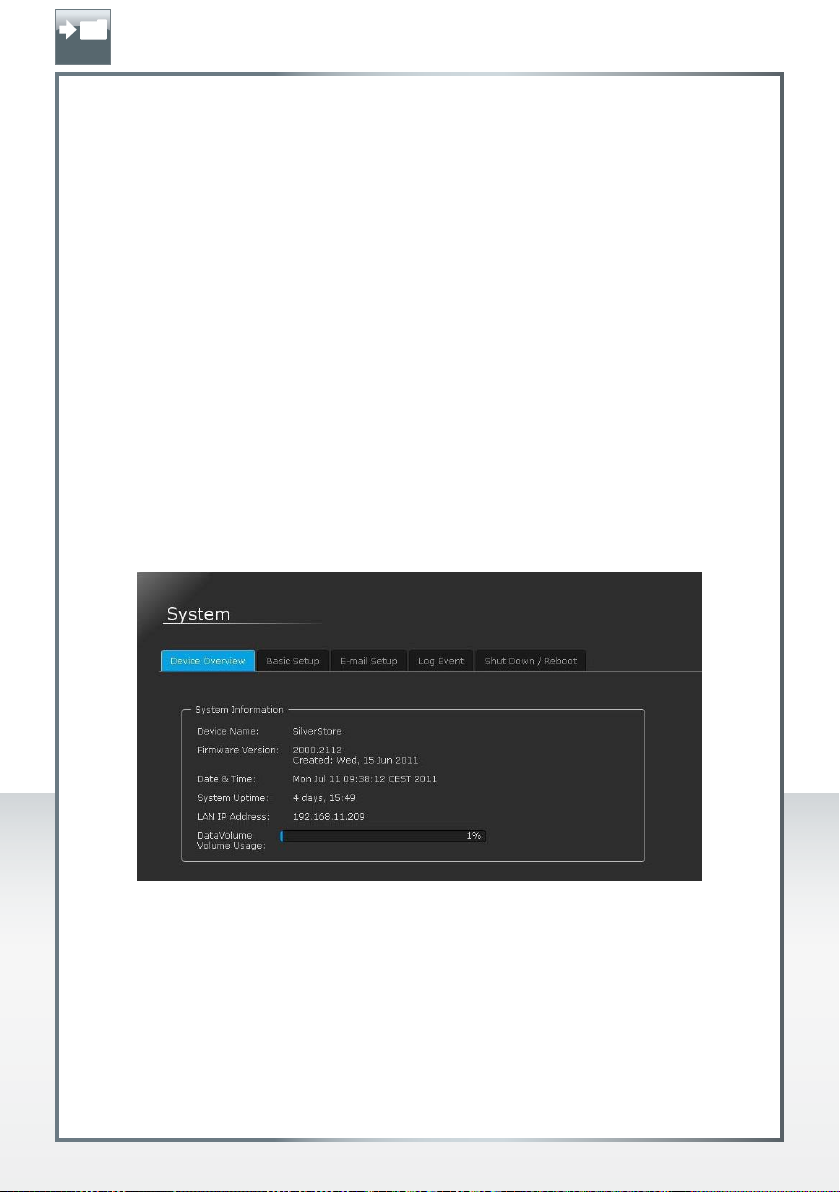
Using the System Menu
The System menu contains basic information for the SilverStore. Use this menu to
set the device name, time zone, date and time, email notifications, and remote
shutdown or remote reboot the SilverStore.
The System menu provides access to the following configuration options:
• Device Overview
• Basic Setup
• E-mail Setup
• Log Event
• Shut Down/Reboot
Device Overview
Use the Device Overview tab to view basic system information, such as device
name, firmware version, current system date/time, system uptime, and LAN IP
address.
23
Page 24
EN
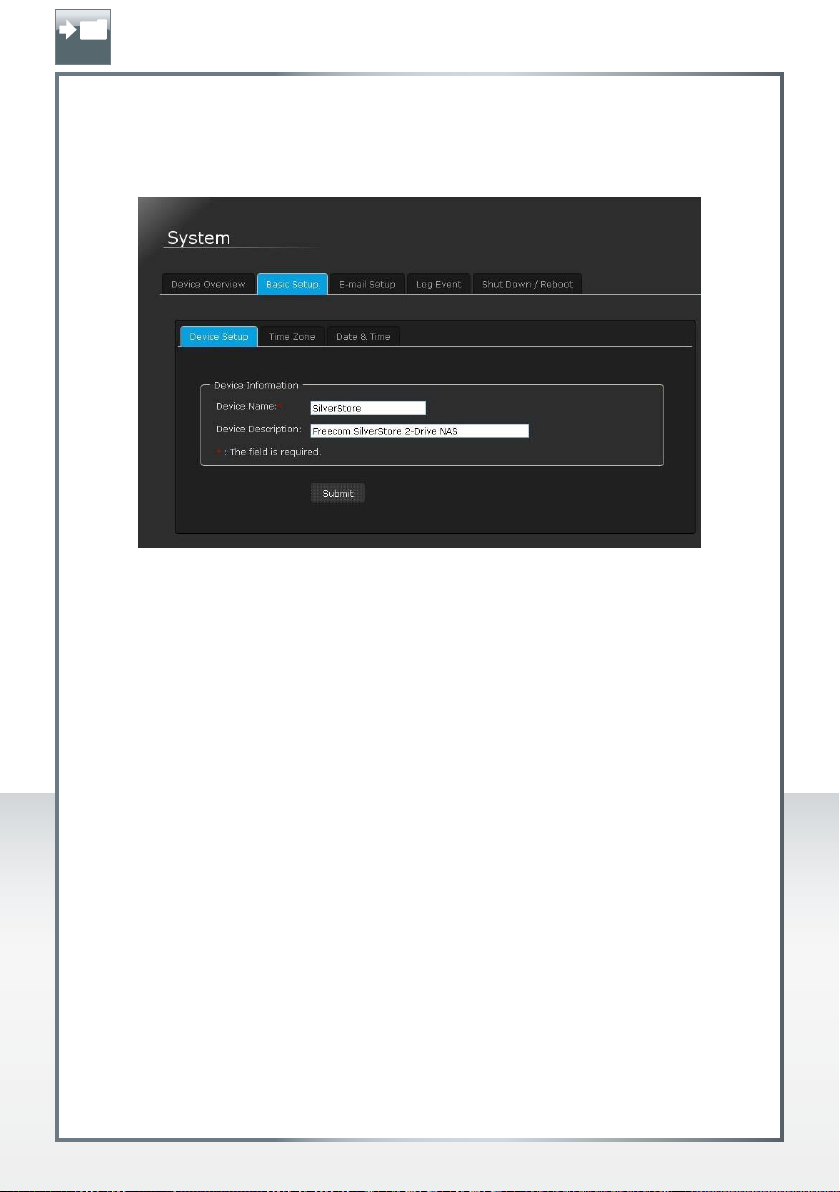
Basic Setup
Use the Basic Setup tab to configure basic device settings, such as set the device name, enter
a device description, configure the time zone, and set date and time for the SilverStore.
To configure the SilverStore settings:
1. Click the Device Setup tab.
2. In the Device Name field, enter a name for the SilverStore. The name can contain up
to 15 characters, including alphabetic, numeric, underscore, space, and most special
characters.
FREECOM SILVER STORE 2-DRIVE NAS
NOTE: The default device name is: SilverStore. The device name is used to
identify the SilverStore storage appliance connected to the network. After
setting the device name, it will appear in the My Network Places on your
computer (My Network Places/Entire Network/Microsoft Windows Network/
[Workgroup Name]/[Device Name], where [Device Name] is the name of the
SilverStore storage appliance).
To connect to multiple SilverStore on the same network, make sure to specify
a unique device name for each system. Renaming a SilverStore will force all
your network computers to remap their shared network resources. Change
name only when necessary.
24
Page 25
EN
3. In the Device Description box, enter a brief device description. The maximum length
of the description must not be more than 256 alphanumeric characters.
4. Click the Time Zone tab, then set the time zone for your location.
5. Click the Date & Time tab, then set the system date and time. To make the SilverStore
synchronize with an NTP (Network Time Protocol) server, select the Enable check box
in NTP Service, then enter the network time server’s IP address.
6. Click Submit.
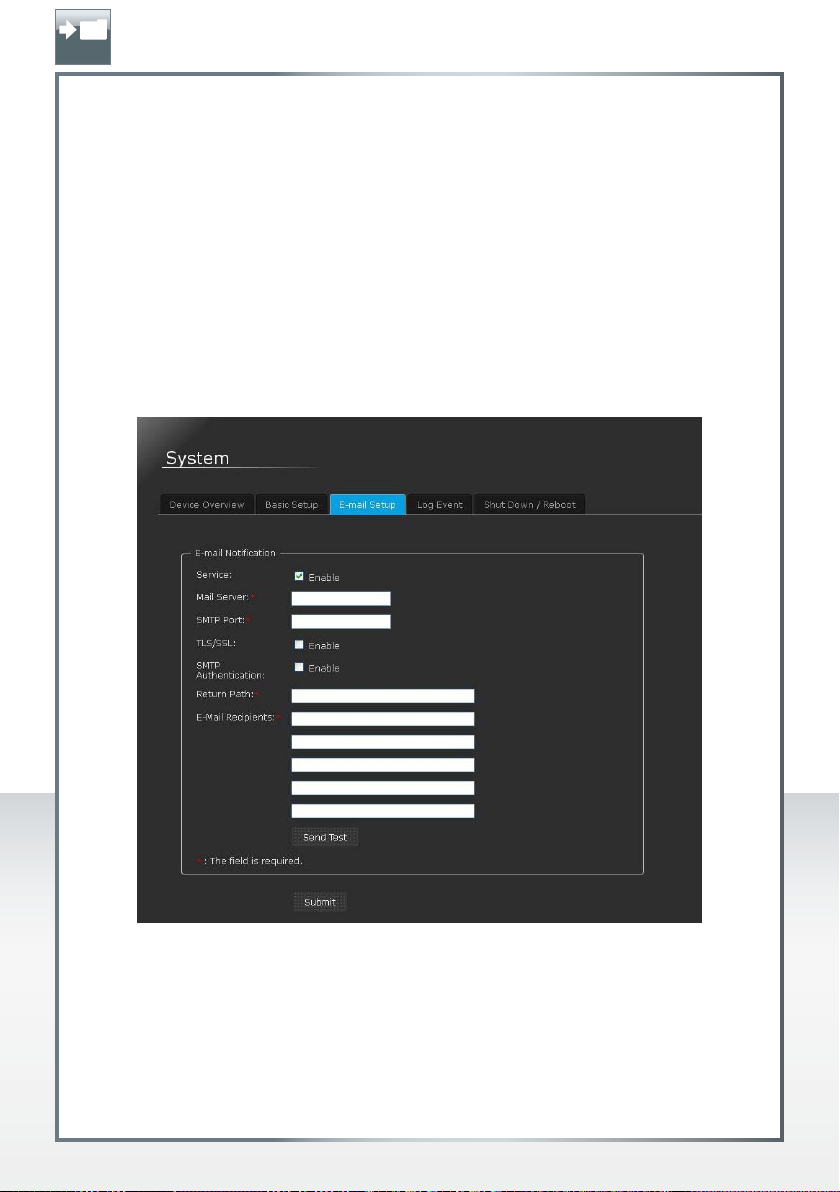
E-mail Setup
Use the E-mail Setup tab to configure the SilverStore utility to send email notifications in
the event of warning or errors related to the fan, temperature, hard drive, volume, network,
USB, user and group occurred on the SilverStore.
FREECOM SILVER STORE 2-DRIVE NAS
To setup email notifications:
1. Click the E-mail Setup tab.
2. Click the Enable check box next to the Service menu items.
25
Page 26
EN
EN
3. In the Mail Server box, enter the SMTP server name or an IP address to be used for
sending email.
4. In the SMTP port box, enter the SMTP port number for outgoing mail.
5. If TLS/SSL is required on email clients, select the Enable check box.
6. If SMTP authentication is required, click the Enable check box, then enter the user name
and password.
7. In the Email Recipients box, enter the email address for the notification recipient. Up
to five email addresses can be added at a time.
8. Click Send Test Mail to send a test alert and confirm your settings are correct.
9. Click Submit.
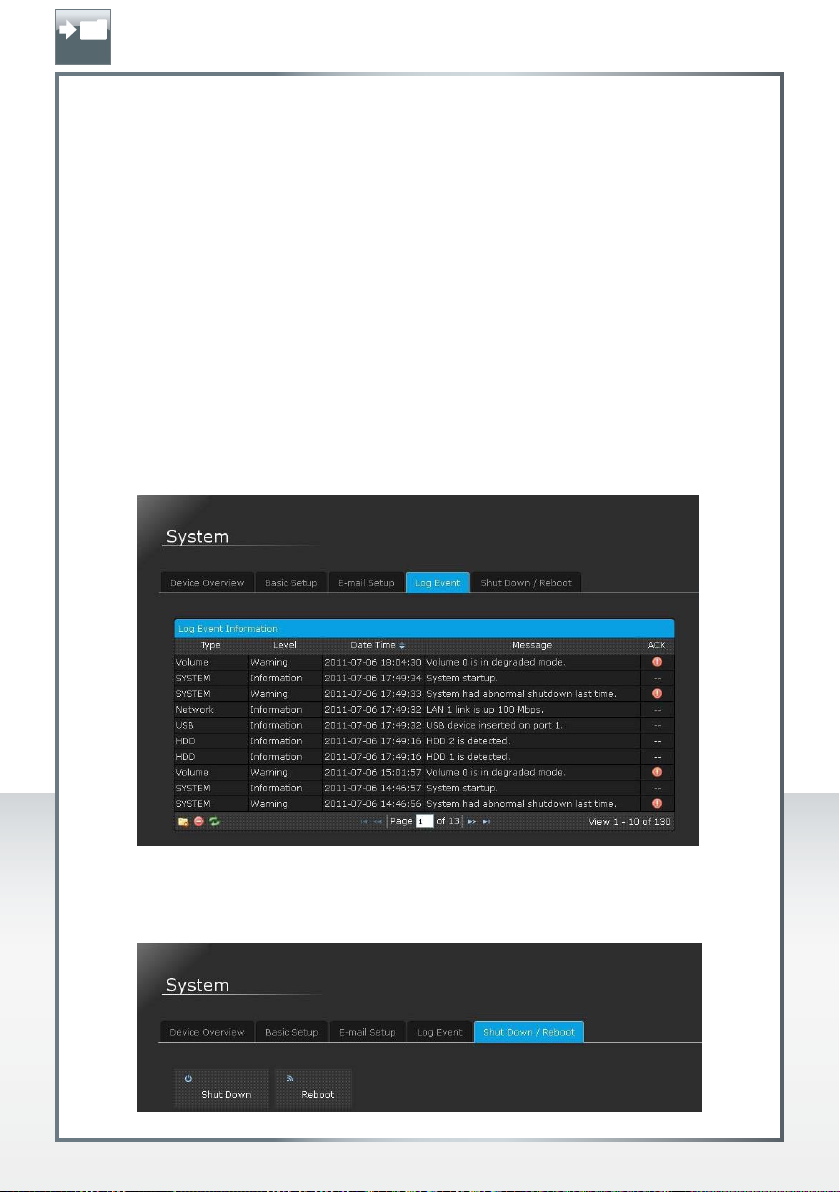
Log Event
Use the Log Event tab to get an overview of all events that were logged by the system.
In the lower left corner, you have the options to delete all log files older than 7 days, to
delete all log files and to refresh the view.
FREECOM SILVER STORE 2-DRIVE NAS
Shut Down/Reboot
Use the Shut Down/Reboot tab to remotely shut down or reboot the SilverStore.
26
Page 27

EN
To remotely shutdown or reboot the system:
• Click Shutdown to turn off SilverStore.
• Click Reboot to restart SilverStore.
Using the Advanced Menu
The Advanced menu allows administrators to change the login password, upgrade the
SilverStore firmware, backup the SilverStore system configuration information, restore
system to factory defaults, enable the file system checking features and check the hard
drives for bad blocks.
The Advanced menu provides access to the following configuration options:
• Admin Password
• Firmware Upgrade
• System Configuration Backup/Restore
• Advanced Setup
Admin Password
Use the Admin Password tab to change the login password.
FREECOM SILVER STORE 2-DRIVE NAS
To change the administrator login password:
1. Click the Admin Password tab.
2. In the Old Password box, enter the old password.
3. In the New Password box, enter the new password. The maximum length of the password
must not be more than 15 alphanumeric characters. Password is case sensitive and
should be entered exactly in the same way each time.
4. In the New Password confirmed box, re-enter the new password.
5. Click Submit.
27
Page 28
EN
Firmware Upgrade
Use the Firmware Upgrade tab to check the firmware version or upgrade the SilverStore
firmware.
New firmware usually fixes bugs and adds additional features to your SilverStore. Check
on www.freecom.com if new firmware updates are available for the Freecom SilverStore.
Freecom will release new and updated firmware on a regular basis.
To upgrade the SilverStore firmware:
1. Download a copy of the new firmware from our Website to your computer. The firmware
image filename should have the following format:
<firmware version>.img; for example fc2000.0091.img.
When you download the firmware file make sure that the filename is correct.
FREECOM SILVER STORE 2-DRIVE NAS
IMPORTANT: Do not rename the firmware file. The SilverStore storage appliance
requires installation file with this filename — <firmware version>.img.
2. Click the Firmware Upgrade tab.
3. Click Choose File.
4. Select the appropriate uncompressed firmware file (the img file; e.g. fc2000.0091.img)
on your computer.
5. Click Submit. A progress bar appears indicating the firmware is being upgraded.
The update process may take a few minutes to complete.
WARNING: Do not interrupt a firmware upgrade in progress, doing
so may cause system to malfunction or unable to boot.
28
Page 29
EN
After the firmware is finished updating the SilverStore reboots automatically to initialize
the new firmware. The web GUI redirects to the System Information page after the update
is completed.
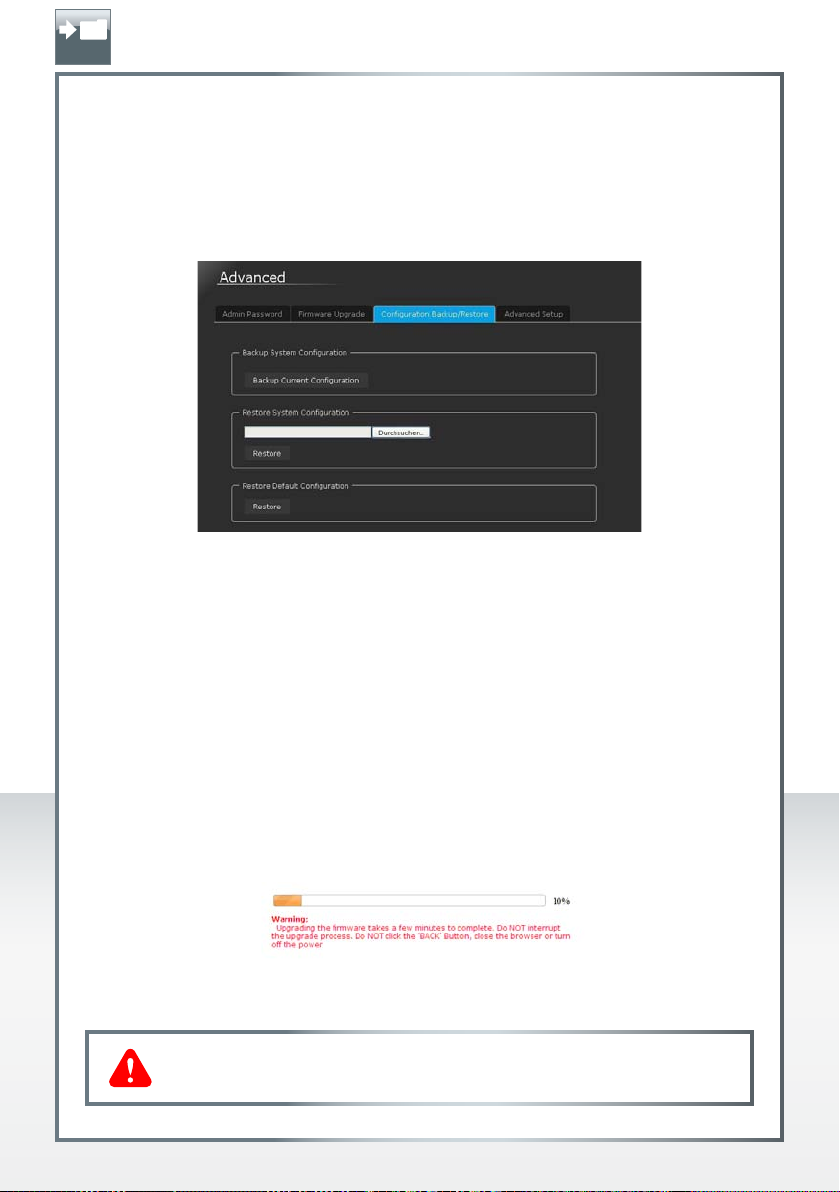
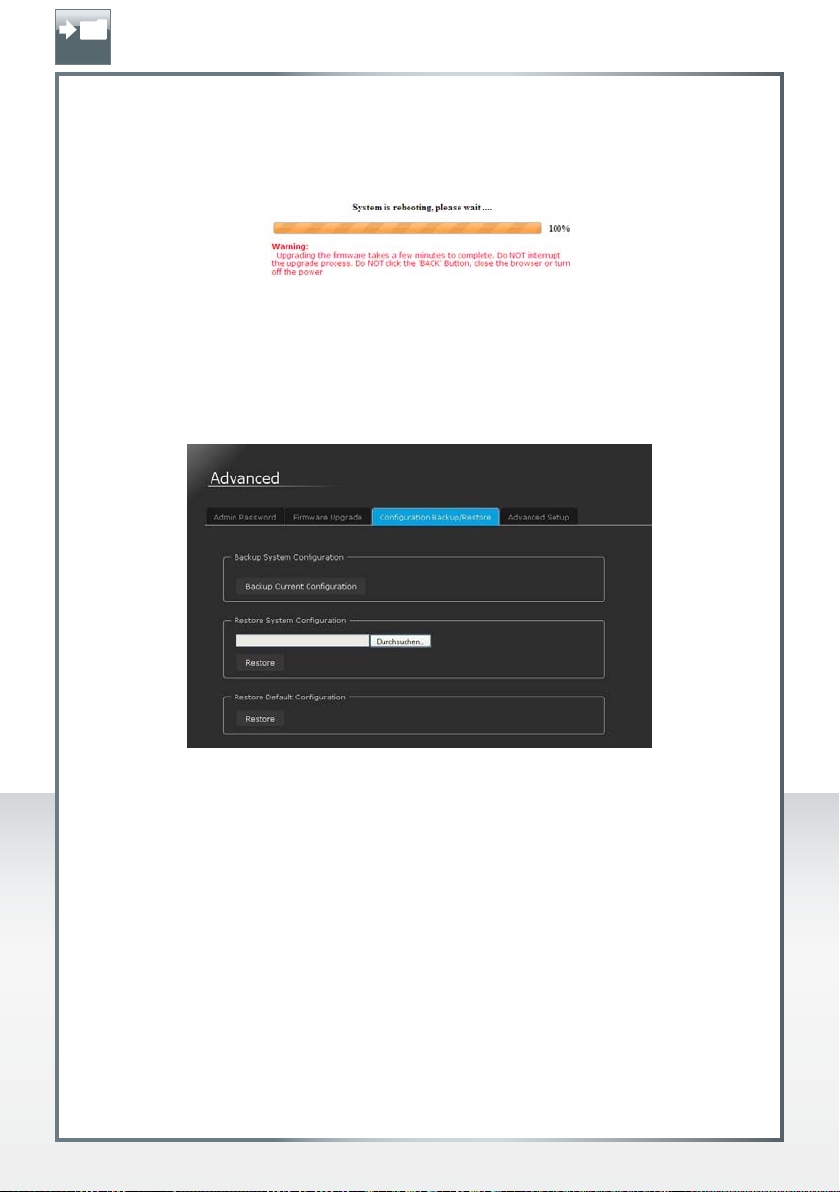
System Configuration Backup/Restore
Use the System Configuration Backup/Restore tab to create a backup copy of the current
system configuration or restore system to factory default settings.
FREECOM SILVER STORE 2-DRIVE NAS
To backup your current configuration settings:
1. Click the System Configuration Backup/Restore tab.
2. In the Backup System Configuration section, click Backup Current Configuration.
To restore a saved configuration:
1. Click the System Configuration Backup/Restore tab.
2. In the Backup System Configuration section, click Choose File.
3. Select a saved configuration file.
4. Click Restore.
29
Page 30

EN
To restore SilverStore to factory settings:
IMPORTANT: Create a backup file of your current system configuration before
restoring the system to its factory default settings. If you have made several
changes to the system configuration file (i.e. adding multiple users) you can easily
restore to the old system configuration file. When you restore to factory settings,
all system settings such as the IP address, device name, admin user name and
password, RAID configuration information, media files will be erased.
1. Click the System Configuration Backup/Restore tab.
2. In the Restore Default Configuration section, click Restore.
Advanced Setup
Use the Advanced Setup tab to enable the file system checking features, turn on scanning
device for bad blocks and enable hard disk standby mode.
FREECOM SILVER STORE 2-DRIVE NAS
To enable file system check on reboot:
1. Click the Advanced Setup tab.
2. Click the Advanced HDD Setup subtab.
3. Click the Perform Filesystem Check at Next Boot Up check box.
4. Click Submit.
30
Page 31

EN
To enable bad block scan on reboot:
1. Click the Advanced Setup tab.
2. Click the Advanced HDD Setup subtab.
3. Click the Perform Bad Block Scan at Next Boot Up check box.
4. Click Submit.
To enable hard disk standby mode:
1. Click the Advanced Setup tab.
2. Click the Advanced HDD Setup subtab.
3. Click the Hard Disk Standby check box.
4. Click Submit.
FREECOM SILVER STORE 2-DRIVE NAS
Using the Network Menu
The Network menu allows administrators access to all network configuration options, such
as setting up a DHCP/static IP address, network services (i.e., protocol, FTP, NFS, Apple
network), and configuring membership in a domain or workgroup.
The Network menu provides access to the following configuration options:
• LAN
• Service
• Workgroup
• Dynamic DNS
LAN
Use the LAN tab to configure your network connection settings. You can either use DHCP or
manually assign a new IP address. The SilverStore is set to automatically obtain IP addresses
from a DHCP server. To assign a static IP address to the SilverStore, disable DHCP. A jumbo
frame size support is also included for switch or routers that supports jumbo frame.
SilverStore supports jumbo Ethernet frames to enhance Ethernet networking performance.
Jumbo frames are frames that are bigger than the standard MTU (Maximum Transmission
Unit), which is 1500 bytes. When SilverStore gets a frame size larger than its MTU, the data
is broken into smaller frames or dropped. By default, the jumbo frame option is disabled
in SilverStore.
31
Page 32

EN
To manually configure the IP settings:
NOTE: If you are connected to a home network, contact your Internet Service
Provider (ISP) to obtain the static IP address.
1. Click the LAN tab.
2. Clear the Obtain IP address automatically check box next to Network.
FREECOM SILVER STORE 2-DRIVE NAS
3. In the IP address box, enter a valid IP address.
4. In the Subnet Mask drop-down menu, select a subnet mask.
5. In the Default Gateway box, enter the IP address of the gateway or router.
6. Clear the Obtain DNS server address automatically check box.
7. In the Preferred DNS box, enter the IP address of the DNS server.
8. In the Alternate DNS box, enter the second DNS address.
9. Click Submit.
10. You must restart SilverStore for the system to change to static IP address.
32
Page 33

EN
Service
Use the Service tab to configure the web and file services on the SilverStore. You can
specify a network option, FTP, NFS or AFP to allow clients on different platforms (such as
Mac, Windows, Linux, Unix) to access files and shared folders on the SilverStore, without
requiring special software on the client’s computer. File Transfer Protocol (FTP) service allows
you to share files securely between the SilverStore and other computers over the Internet.
The Network File System (NFS) service allows you to share files with Linux or UNIX clients
or clients with the NFS client software. The Apple Filing Protocol (AFP) service allows you
to share files with users on Mac systems.
FREECOM SILVER STORE 2-DRIVE NAS
To configure the SilverStore for Web access:
1. Click the Protocol tab.
2. To enable HTTP access to the utility, click the HTTP Service Enable check box.
3. To enable WebDAV or HTTP access to the utility, click the WebDAV Enable check box.
4. Click Submit.
33
Page 34

EN
To enable FTP file service on the SilverStore:
1. Click the FTP tab.
2. Click the FTP Service Enable check box.
3. To enable anonymous access to the FTP server, click the Anonymous Enable check box.
Public file sharing is easily accessed by enabling anonymous.
Anonymous FTP
Anonymous users log in with the user name “anonymous” and use an e-mail address as
password. Anonymous users will have read-only access to the PUBLIC folder.
FREECOM SILVER STORE 2-DRIVE NAS
4. To change the default TCP port for the FTP connection, enter the port number in the
Port box.
5. To enable SSL/TLS protocols, click the SSL/TLS Enable check box.
6. Click Submit.
To use FTP to access the SilverStore:
You can connect to the SilverStore via any FTP client. For example if your SilverStore’s IP
address is set to 10.34.45.59 entering ftp://10.34.45.59 in the Internet Explorer address bar
will access the SilverStore’s contents.
For accessing the SilverStore from the internet, your router have to be configured so that
port 21 will be forwarded to the SilverStore IP adress.
DynDNS
Dynamic Domain Name System gives the ability to provide an official DNS name such as
www.yourname.com to the dynamic IP address you have gotten from your ISP.
To do so, you first need to register with a DynDNS service. It updates the modified IP
addresses and forwards this to the domain name. This enables you to be reached at one
single domain name at any time even if your IP address changes.
34
Page 35

EN
We recommend using this feature, otherwise you always need to know the WAN IP of your
router to access the SilverStore via FTP from the internet.
Use any FTP client software or open your browser and enter
ftp://USERNAME:USERPASSWORD@YOUR_INTERNET_IP
or
ftp://USERNAME:USERPASSWORD@YOUR_DYNDNS_HOST.
USERNAME = your username
USERPASSWORD = your user password
YOUR_INTERNET_IP = your WAN IP address
YOUR_DYNDNS_HOST = your Dynamic DNS address
To enable the NFS file service on the SilverStore:
1. Click the Linux Network (NFS) tab.
FREECOM SILVER STORE 2-DRIVE NAS
2. Click the Linux Network Service Enable check box. The IP Allowed box appears.
3. Enter the IP filters that are allowed for NFS service, then click Add to add a new IP filter.
4. Click Submit.
To use NFS to access the SilverStore:
The mount point for NFS share is: /nfs/SHARENAME,
For example: /nfs/Public.
35
Page 36

EN
To access SilverStore through AFP:
The Apple Filing Protocol (AFP) is a network protocol that offers file services for Mac OS X.
1. Click the Apple Network tab.
2. Click the Apple Network Service Enable check box.
3. Click Submit.
Workgroup
Use the Workgroup tab to set the SilverStore to join a workgroup or domain. Both workgroup
and domain are ways of grouping computers on the network.
FREECOM SILVER STORE 2-DRIVE NAS
Workgroup Mode
By default, the SilverStore is joined to a Workgroup. Unlike workgroups, domains are
controlled from a central location (domain controller) and require central authentication
before you can join them. Workgroups, in contrast, are much simpler to control. As long as
you know the workgroup name, you can add any computer to a workgroup.
36
Page 37

EN
To change the SilverStore’s workgroup name:
1. Click the Workgroup tab.
2. Click the Workgroup radio button.
3. In the Workgroup Name box, enter the workgroup name.
4. Click Submit.
Domain Mode
If your network uses a domain (i.e., has Windows Automated Deployment Services), you
may wish to connect the SilverStore as a domain member. When configured as a domain
member, the SilverStore requests ADS (Automated Deployment Services) to authenticate
users. Domain mode has a more restrictive security level, network users must enter
appropriate passwords before gaining access to SilverStore.
When joining a domain, SilverStore needs the authorization of the domain’s administrator.
You must enter the Domain Name, Administrator and Administrator Password for the
authorization.
NOTE: The local user and domain user share same access control if both their
usernames are similar (not applicable in FTP service).
To join the SilverStore to a domain:
1. Click the Workgroup tab.
2. Click the Domain Membership radio button.
FREECOM SILVER STORE 2-DRIVE NAS
3. In the Domain NetBIOS name box, enter the domain netbios name.
4. In the AD Server name box, enter the server name.
5. In the Domain box, enter a fully qualified AD domain name, for example, swlab-test.
com.
6. To obtain a domain server IP address automatically, click the "Obtain domain server
address automatically" check box. Or, clear this check box to manually enter the domain
IP address.
37
Page 38

EN
7. In the Administrator box, enter the administrator’s user name.
8. In the Password box, enter the administrator’s password.
NOTE: The administrator user name and password can contain up to 15
characters, including alphabetic, numeric, underscore, space, and most special
characters. Both the administrator user name and password are case sensitive
and should be entered exactly in the same way each time.
9. Click Submit.
Dynamic DNS
To set up Dynamic DNS:
1. Click the Dynamic DNS tab.
2. Next to Service activate the Enable check box.
Please check in your router configuration that the ports for the required services (e.g.
port 21 for FTP) are forwarded to the IP address of your SilverStore.
3. Select your Dynamic DNS service provider from the drop-down menu.
4. Enter the domain name (URL), for example mydomain.dynalias.com; you registered
with your DDNS (Dynamic DNS) service provider.
5. Enter the user name and password you used to set up your Dynamic DNS account.
6. Click Submit. You can now log in to the SilverStore via a Web browser using the domain
name.
FREECOM SILVER STORE 2-DRIVE NAS
NOTE: When connecting to the SilverStore using a Web browser, make sure
to include "https://" if you originally set the Web Access Protocol to HTTPS.
Otherwise, only the name is required in the browser's address bar.
38
Page 39

EN
FREECOM SILVER STORE 2-DRIVE NAS
Using the Storage Menu
The Storage menu includes options for individual storage disk configuration and
maintenance. It also includes services for volume management, iSCSI device management,
external USB storage device management, shared folder management, and it allows you to
perform remote RAID configuration options, view detailed USB storage device information
and hard disk drive quota settings.
The Storage menu provides access to the following configuration options:
• Disk
• Volume
• iSCSI
• Shares
• USB Disk
• Quota
• Quota Usage
Disk
Use the Disk tab to view detailed information about the hard drives installed on the SilverStore.
You can view hard drive information such as the manufacturer or model name, size of the
drive, and the status of the drive. Knowing the drive status allows you to monitor hard drive
fault conditions and activity. The drive status that appears in the Status column includes
the following status values:
• Good - Indicates the hard drive is accessible and functioning normally.
• Failed - Indicates a fatal error has occurred, such as the hard drive partition has been
deleted, corrupted, or damaged caused by virus; or data loss.
• Foreign - Indicates SilverStore has detected an old hard drive or a hard drive containing
personal data has been installed. A Clean disk icon appears on disks that display the
Foreign status. Unless the perform a clean disk operation, the files in the hard drive
cannot be accessed. After performing Clean disk, the hard drive appears on the Disk
Management table.
39
Page 40

EN
Volume
Use the Volume tab to manage storage volumes on the SilverStore. You can use modify,
extend, and recover options to manage the storage volumes. This tab displays all the
volumes currently defined on the SilverStore hard drive and provides access to configuration
details relating to how disks are partitioned and how RAID volumes are created on these
disk partitions. You can use these volumes to create shares at a later time.
The Volume tab includes a table that shows the current volumes available on the SilverStore.
This table provides detailed summary of the current volume configuration, such as the
name of the volume, description, RAID type (i.e. Stripe, Mirror, or Span), total drive capacity
and volume status. A volume is a portion of one or more hard disks that are configured
to store data.
The volume status that appears in the Status column includes the following values:
FREECOM SILVER STORE 2-DRIVE NAS
• Good - Indicates the volume is accessible and hard drive is functioning normally.
• Failed - Indicates a volume cannot be started automatically, the disk is damaged or the
file system is corrupt.
• Resyncing - Occurs when creating a mirror or when a mirrored volume is being
resynchronized so both mirrors contain identical data.
• Formatting - Indicates volume is being formatted or system is creating an ext3 (third
extended) file system for a Linux operating system
• Degraded - A drive is missing while setting up a mirror configuration.
• Recovering - Occurs when the system detects a spare drive.
You can also use the Volume tab to configure the SATA hard drives into different software
RAID types. RAID (Redundant Array of Independent Disk Drives) refers to an array of multiple
independent hard drives that provide high performance and reliability. RAID function
depends on the number of drives present and the RAID level you selected.
40
Page 41

EN
SilverStore supports the following RAID levels:
• Stripe (RAID 0) - All data are distributed evenly to all existing drives. The two drives
work in unison to maximize system performance. However, RAID 0 has high risks of
data security. If one drive fails then all data in both drives are lost.
• Mirror (RAID 1) - Two hard drives are required. Data written to one hard drive is
simultaneously duplicated to another hard drive. If one drive fails, the other drive
continues to function as single drive until the failed drive is replaced. To create a mirror
you must select unallocated space on another hard drive and the unallocated space
must be the same size or larger than the source drive you want to mirror. Data on a
mirrored drive is secured, if one hard drive fails, SilverStore administers a warning and
the failed drive must be replaced immediately.
• Span - Also known as JBOD (Just a Bunch of Drives). Two hard drives are required. Several
hard drives are configured as a single hard disk expanding the capacity of the hard
drive and results in a useable total capacity. However, span does not increase system
performance or data security.
FREECOM SILVER STORE 2-DRIVE NAS
41
Page 42

EN
Default RAID configuration
The default RAID configuration for each hard drive installed on the SilverStore is as follows:
• If only one drive is installed in an empty drive bay, the default RAID configuration is span.
• If two hard drives are installed in the SilverStore, the default RAID configuration is mirror.
To create a volume:
1. Click the Volume tab.
2. Click the Create Volume icon.
FREECOM SILVER STORE 2-DRIVE NAS
3. In RAID configuration, select a hard drive configuration. The default logical volume
name for SilverStore is DataVolume.
NOTE: Selecting RAID configuration erases all the disk contents including logical
volumes and all shared folders and their subfolders and files. Be sure to backup
all data before configuring SilverStore’s hard drives for RAID.
4. Click Submit.
42
Page 43

EN
iSCSI
Use the iSCSI tab to enable the iSCSI (Internet Small Computer System Interface) or iSNS
(Internet Storage Name Service) service, create an iSCSI device, set up an iSCSI target, and
create an iSCSi initiator.
iSCSI is an IP-based standard for linking data storage devices over a network and transferring
data by carrying SCSI commands over IP networks.
To configure the iSCSI service
1. Click the iSCSI tab.
2. Click the Service subtab.
FREECOM SILVER STORE 2-DRIVE NAS
3. In the iSCSI Device section, click the Enable check box.
4. In the Port box, enter port number used for the iSCSI service.
5. In the iSNS section, click the Enable check box to enable automated discovery,
management and configuration of iSCSI devices.
6. In the IP Address box, enter the IP address of the iSNS server.
7. Click Submit.
43
Page 44

EN
To create an iSCSI device:
NOTE: Before you start to create an iSCSI device, make sure you have enabled
the iSCSI service. See previous section for detailed instructions.
1. Click the iSCSI tab.
2. Click the iSCSI Device subtab.
3. Click the Add icon located on the lower left corner of the Storage page.
4. In the Device Name box, enter a name for the device.
FREECOM SILVER STORE 2-DRIVE NAS
5. In the Size box, enter the amount of storage space to allocate for this device.
6. In the Location box, select the volume in which the device will reside.
7. Click Submit.
44
Page 45

EN
To create an iSCSI target:
NOTE: Before you start to create an iSCSI target, make sure you have enabled
the iSCSI service. See “To configure the iSCSI service” for detailed instructions.
1. Click the iSCSI tab.
2. Click the iSCSI Target subtab.
3. Click the Add icon located on the lower left corner of the Storage page.
4. In the IQN (iSCSI Qualified Name) box, enter a name for the iSCSI target. This will be
name that appears in the Microsoft iSCSI initiator.
5. Click the optional Enable Header and/or Data Digest option to verify the iSCSI initiator
when it attempts to connect to the target .
6. Enable the One-way and Mutual CHAP feature to use CHAP (Challenge Handshake
Authentication Protocol) to authenticate connection between the iSCSI initiator and
the iSCSI target. When enabled, only the iSCSI target authenticates the initiator. Enable
this feature only if you want the client to perform an additional check to ensure that it
is accessing the correct target.
7. If One-way and Mutual CHAP is enabled, you must enter a CHAP user name and password.
8. Click Next.
9. Review your settings and then click Back to make any changes or click Submit to complete
iSCSI setup.
FREECOM SILVER STORE 2-DRIVE NAS
NOTE: Not only Windows computers can use iSCSI, there are more OS systems.
Also for instance: VMWARE appliances.
45
Page 46

EN
To configure the iSCSI Target
Once the Target is set up, you can make the following changes:
1. Change the iSCSI Target Settings. See “To create an iSCSI target”.
2. Change the logical unit number (LUN) and permissions. By default, the LUN ID for a
target is set to 0 and full access is granted. Follow these steps to make changes.
(a) Click the iSCSI Target subtab.
(b) Click the iSCSI device mapping icon next to the target that you want to modify and
then click the Add icon.
(c) In the LUN ID box, specify the LUN ID number. You can have as many as 256 LUN IDs.
(d) Specify the access permission — Read Only or Full Access, for the iSCSI initiators that
attempt to access the target.
(e) In the iSCSI Device list, select an additional device to map to.
(f) Click Submit.
3. Create an iSCSI initiator mask. You can set up initiator masking to restrict target access
only to the initiator name entered. An iSCSI target must exist before entering an initiator
name.
(a) Click the iSCSI Target subtab.
(b) Click the iSCSI initiator mapping icon next to the target that you want to modify
and then click the Add icon.
(c) In the Initiator Name box, enter the full initiator IQN from the iSCSI Initiator tool (for
example, iqn.1992-09.com.seagate:initiatorname).
(d) Click Submit.
FREECOM SILVER STORE 2-DRIVE NAS
46
Page 47

EN
Shares
Use the Shares tab to manage shares in the SilverStore. This tab includes a table that displays
a list of all the shares, logical volumes, and protocols currently defined on the SilverStore
hard drive. SilverStore comes preconfigured with two shared folders: Public and Download.
When a FAT32/NTFS/HFS+/EXT2/EXT3/EXT4 formatted USB hard drive is connected to the
system, the USB device displays as USB share.
To create a new share on a logical volume:
1. Click the Shares tab.
2. Click the Create icon located on the lower left corner of the Storage page.
FREECOM SILVER STORE 2-DRIVE NAS
3. In the Share Name box, enter a name for the share. The share name can contain up to
32 characters, including alphabetic, numeric, or underscore.
4. In the Description box, enter a brief description.
5. In the Volume drop down menu, select a volume name.
47
Page 48

EN
6. Select a file sharing protocol. SilverStore supports the following file sharing protocols:
• Windows File Sharing/Common Internet File System (CIFS) - A standard way that
clients share files across intranets. CIFS allows Windows, Mac, or Linux clients to
access folders and files stored on your SilverStore. The access control for CIFS is set
as a share folder. Share folder defines access rights for each user/group, the user
needs to enter his/her password for accessing the share. When the client browses
the shares via Windows Explorer, he can only see the shares which he granted access
right (Read Only or Full Access) to them.
• FTP (File Transfer Protocol) - Allows access to files on the SilverStore within your
network and on computers outside your network.
• NFS (Network File System) - Allows Linux clients or clients who have TCP/IP installed
to remotely access folders and files on the SilverStore. Using NFS protocol, the client
can access all or a portion of the shared file directory on the network. The portion
of the file directory can be accessed with the privileges (read only or full access)
designated to each file.
• Apple Network - Allows Mac users to access files on the SilverStore.
• WebDAV - Allows access to folders or files on the SilverStore using a Web browser.
• Tonido Remote Access - Allows access to files and folders from remote PCs and
mobile devices by using Tonido Remote Access.
7. Click Submit.
To modify the share properties:
FREECOM SILVER STORE 2-DRIVE NAS
1. Click the Modify icon.
2. In the Share Name box, enter a new share name. The share name can contain up to 32
characters, including alphabetic, numeric, or underscore.
3. In the Description box, enter a brief description.
4. In the Volume drop down menu, select a volume name.
5. Select a file sharing protocol.
6. Click Submit.
To delete existing shares:
1. Select the share you want to delete.
2. Click the Delete icon.
48
Page 49

EN
USB Disk
The USB Disk tab provides configuration options for a USB hard drive connected to the
SilverStore. Use this tab to remotely format a USB hard drive, safely disconnect a USB hard
drive from the SilverStore, and backup data from a USB drive to the SilverStore.
To format a USB hard drive:
1. Connect a USB hard drive to the SilverStore.
NOTE: SilverStore supports USB flash disk and external USB hard drives; USB
optical drives (CD/DVD combo or DVD dual/multi) are not supported.
2. Select the USB hard drive you want to format, then click the Format icon. A dialog box
appears warning that all data are erased.
FREECOM SILVER STORE 2-DRIVE NAS
WARNING: Formatting hard drives erases all the disk contents,
including partition tables, logical volumes, and all shared folders
and subfolders and files. Perform this procedure only when you know
that it is safe to proceed. When formatting a USB drive, only one
partition is created and your partition is formatted as FAT32/NTFS/
HFS+/EXT2/EXT3/EXT4 (Format can be selected in pull-down menu).
3. Click OK.
4. Disconnect the USB hard drive from the SilverStore.
49
Page 50

EN
To safely disconnect a USB hard drive from the SilverStore:
FREECOM SILVER STORE 2-DRIVE NAS
IMPORTANT: Unplugging a USB hard drive from the SilverStore without any
precautions or safely disconnecting it may cause damage or problems to occur
on SilverStore or data loss or damage to the USB hard drive.
1. On the USB Disk tab, select the device you wish to remove.
2. Click the Safely Remove Disk icon .
3. Click OK.
NOTE: When the USB hard drive is unplugged from the system, the USB shares
that you have previously set on the USB device are also removed from the system.
Quota
Use the Quota tab to control disk space usage on the SilverStore.
To set grace period for a disk quota
You can limit the amount of disk space used for a volume by setting a disk quota. If the disk
quota is reached, you can temporarily allow an additional 100 megabytes (MB) of storage
space by setting a grace period. When the grace period limit has been reached, no files
can be added to the volume until disk space is made available.
1. Click the Quota tab.
2. Select a Volume name, then click the Modify icon located on the lower left corner of
the Storage page.
3. Select Enable next to Quota Service.
4. Next to Grace Time, enter the number of days that the storage space can be exceeded.
50
Page 51

EN
CAUTION: The setting will apply to all saved or backed up files on
that volume. Ensure that you will not accidentally lose important
files on any of the volume's shares before you continue.
5. Click Submit.
To clear the grace period limit for a volume:
1. Click the Quota tab.
2. Select a Volume name, then click the Edit Quota icon.
3. Next to Quota Service, clear the Enable option.
4. Click Submit.
To enable disk quota service:
By default, the SilverStore imposes no limits on a user's storage space (except for the
maximum size of the volume itself). However, you can set quota limits to any user account.
Before you begin, ensure that the Quota Service is enabled for the volume that contains
the shares the user will be accessing.
To enable the Quota Service:
1. Click the Quota tab.
2. Select a Volume name, then click the Edit Quota icon.
3. Next to Quota Service, select Enable.
4. Click Submit.
FREECOM SILVER STORE 2-DRIVE NAS
To allocate disk space to a user (and optionally impose a time limit on stored files):
1. Click the Quota tab.
2. Select a Volume name.
3. Click the Modify icon, then click on "View available users".
4. In the User Quota box, enter the disk space limit (in GB) for the user.
5. Click Submit.
To remove storage space limititations for a user:
1. Click the Quota tab.
2. Select a Volume name (for example Data Volume User Quota). A list of all user accounts
appears.
3. Click the Modify icon, then click on "View available users".
4. In the User Quota box, enter 0.
5. Click Submit.
51
Page 52

EN
Quota Usage
Use the Quota Usage tab to see how much quota every user has and how much of it is used.
You can configure the user size for the Quota Usage.
FREECOM SILVER STORE 2-DRIVE NAS
52
Page 53

EN
FREECOM SILVER STORE 2-DRIVE NAS
Using the Access Menu
The Access menu allows you to configure access control to files and folders in the SilverStore.
The Access menu provides access to the following configuration options:
• Users
• Groups
• Share Permission
• USB Share Permission
Users
Use the Users tab to create, edit, and delete user accounts on the system. SilverStore comes
preset with an administrator user name and password. The administrator account cannot
be deleted.
To create a user account:
Administrators can create user accounts and further customize these accounts with access
permissions.
1. Click the Users tab.
2. Click the Add User icon located on the lower left corner of the Access page.
NOTE: The user name and password can contain up to 15 characters, including
alphabetic, numeric, underscore, space, and most special characters. Both user
name and password are case sensitive and should be entered exactly in the same
way each time.
53
Page 54

EN
3. In the Username box, enter the user name.
4. In the Full Name box, enter the user’s full name.
5. To secure the shared folder so that users must use a password to access it, enter a
password in the Password box.
6. In the Confirm Password box, re-enter the password for confirmation.
7. In the Group List select a previously created Group for the user to join in.
8. In the E-mail box, enter the user’s email address.
9. Click the Admin Rights check box, if the user shell have administrator rights .
10. In the Group Member box, select a group you want the user added to. When a user is
created the Web UI provides a shortcut to create a default share at the same time, the
new user is granted Full Access to its default share, the default share name is similar to
the user name.
FREECOM SILVER STORE 2-DRIVE NAS
NOTE: Make sure the status of system volume is good/degraded.
To modify a user account:
1. Select the user account you want to modify.
2. Click the Edit user icon.
3. Make the changes you want, then click Submit.
To delete a user account:
1. Select the user account you want to delete.
2. Click the Delete user icon.
54
Page 55

EN
Groups
Use the Groups tab to create, edit, and delete a group on the SilverStore.
To create a new local group:
1. Click the Groups tab.
2. Click the Add Group icon located on the lower left corner of the Access page.
FREECOM SILVER STORE 2-DRIVE NAS
3. In the Group Name box, enter the group name. The group name can contain up to 32
characters, including alphabetic, numeric or underscore.
4. In the Description box, enter a description for the new group.
5. In the User Members, specify which users should be members of the group.
6. Click Submit.
To modify a local group:
1. Click the Groups tab.
2. Select the group you want to modify, then click the Add Group icon.
3. Make the changes you want, then click Submit.
To delete a local group:
1. Click the Groups tab.
2. Select the group you want to delete, then click the Delete Group icon.
55
Page 56

EN
Share Permission
Use the Share Permission tab to specify the user or group’s share access permission. Each
user or group must have access permission to access shared resource on the SilverStore.
There are three privilege levels an administrator can assign to a user or group.
• Full Access
• Read Only
• No Access
When there is a conflict in the access rights of a user or group, SilverStore will use the
following rule to handle the conflict:
• No Access has the highest priority.
• Read Write + Read Only = Full Access.
If access permission is assigned to a user or group, the full access, read only, and no access
icons appear on the Share Permission page.
FREECOM SILVER STORE 2-DRIVE NAS
To assign privilege levels for users or groups:
1. Click the Share Permission tab.
2. Select a share name, then click the Modify Permission icon located on the lower left
corner of the Access page.
56
Page 57

EN
3. Click the General subtab.
4. In the Enable Public Share section, click the Enabled check box to enable a public access
to the logical volume.
NOTE: This will deactivate the users and groups subtabs. Do not enable the checkbox
if you want to define specific privilege levels for users and for groups.
FREECOM SILVER STORE 2-DRIVE NAS
5. In the File sharing through NFS section, specify access permission when using a NFS
protocol.
6. Click the Users subtab.
7. Select a user, then specify a privilege level for the user.
8. Click the Groups subtab.
9. Select a group, then specify a privilege level for the group.
10. Click Submit.
57
Page 58

EN
USB Share Permission
Use the USB Share Permission tab to set the access permission for the USB ports of the
SilverStore. There are three privilege levels an administrator can assign to a user or group:
• Full Access
• Read Only
• No Access
When there is a conflict in the access rights of a user or group, SilverStore will use the
following rule to handle the conflict:
• No Access has the highest priority.
• Read Write + Read Only = Full Access.
If access permission is assigned to a user or group, the full access, read only, and no access
icons appear on the USB Share Permission page. You can move your mouse over the icon
to view the user or group list.
To configure the privilege levels for a USB share:
1. Click the USB Permission tab.
FREECOM SILVER STORE 2-DRIVE NAS
2. Select a USB share name, then click the Modify Permission icon located on the lower
left corner of the Access page.
3. Make the changes you want, then click Submit.
58
Page 59

EN
FREECOM SILVER STORE 2-DRIVE NAS
Using the Media Menu
The Media menu allows administrators to set up the SilverStore as a media server, enable
iTunes service on the SilverStore, and configure how files and folders will appear when
accessed by control points and renderers based on UPnP structure. Why, you may wonder,
can UPnP structure based devices access media files in the SilverStore? This is attributed
to WiDMS, an embedded software resolution in SilverStore, providing you with content
directory service that allows you to control the UPnP structure based renderers to play media
files in SilverStore in a wireless manner. The application auto starts once the SilverStore is
powered on. With its configuration mechanism , WiDMS makes it possible for you to manage
its configuration without extra tools.
The Media menu provides access to the following configuration options:
• Media Server Setup
• iTunes Setup
Media Services
Use the Media Services tab to enable the digital media service, sorting method for media
files on the SilverStore, enable compatibility with an Xbox 360 machine, and enable iTunes
service.
To set up SilverStore as a media server:
You can use the SilverStore to share digital photos, videos and music on your local network.
1. Click the Media tab.
2. Click the Media Server Setup subtab.
3. Next to Media Server Service, click the Enable check box.
59
Page 60

EN
4. Specify a sorting method for media files on the SilverStore.
You can choose from the following media file sorting method:
• By name - Files and folders are arranged according to their original organization.
• By date - WiDMS auto checks the latest modification dates of files and accordingly
creates folders named by year and subfolders by month.
FREECOM SILVER STORE 2-DRIVE NAS
NOTE: You should access the media library with control points and renderers
based on UPnP structure such as TV sets or other network media players.
5. Next to Xbox Compatibility, click the Enable check box if you want to enable compatibility
with an Xbox 360. You may need to disable this feature if other digital media players
are unable to find content on the SilverStore.
6. Click Submit.
To set up iTunes Music Server on the SilverStore:
1. Click the Media Services tab.
2. Click the iTunes Setup subtab.
3. Next to iTunes Service, click the Enable check box.
4. Specify the time when the server should check for new music.
5. Click Submit.
The media service is enabled. Media files have to be stored in the “Public” share.
Note: Please use the “Public” share to store media files for using the Media
service.
60
Page 61

EN
FREECOM SILVER STORE 2-DRIVE NAS
Using the Backup Manager Menu
The Backup Manager menu allows administrators to schedule and monitor file backup
tasks from the SilverStore to a USB storage device or vice versa. The Backup Manager menu
provides access to the following configuration options:
• User Backup
• Backup Server
User Backup
Use the User Backup tab to perform the following file backup tasks:
• Backup data from one SilverStore to another NAS device
• Backup data from SilverStore to a USB storage device
• Backup data from a USB storage device to the SilverStore
To schedule recurring file backup tasks:
1. Click the User Backup tab.
2. Select the type of recurring backup task you want to schedule:
• USB to NAS Backup - File(s) from a USB storage device will be backed up to a share
on the SilverStore.
• NAS to USB Backup - Folder from the SilverStore will be backed up to a USB storage
device.
• NAS to NAS Backup - All shares on the SilverStore will be backed up to another
SilverStore or server on your network.
61
Page 62

EN
3. Select the backup source and destination folder, then click Add.
4. Click Next.
5. Enter a description of the backup file that will be easy to identify and remember, then
click Next.
6. Specify the days of the week on which you want the recurring backup task to run, then
click Next.
7. Set a time for the recurring backup task to occur.
8. Click Schedule.
To monitor file backup tasks:
You can quickly check the progress of backup tasks in progress.
1. Click the User Backup tab. A list of running backup tasks appears.
To cancel file backup tasks:
1. Click the User Backup tab.
2. Select a backup task, then click Cancel.
To start file backup from a USB storage device to the SilverStore:
1. Click the User Backup tab.
2. Click the USB to NAS Backup button.
FREECOM SILVER STORE 2-DRIVE NAS
3. Click Add, then select the source folder for backup.
4. Click Start.
The backup task begins. You can check the progress of backup tasks in progress at any
time (see Monitoring File Backup Tasks).
62
Page 63

EN
To start file backup from the SilverStore to a USB Storage Device:
1. Click the User Backup tab.
2. Click the NAS to USB Backup button.
3. Click Add, then select the source folder for backup.
4. Click Start.
The backup task begins. You can check the progress of backup tasks in progress at any time.
FREECOM SILVER STORE 2-DRIVE NAS
To start a file backup from the SilverStore to another SilverStore or backup server on your
network:
1. Click the User Backup tab.
2. Click the NAS to USB Backup button (You need only the IP-adress from the other device).
3. Select the folder you want to back up, then click Next.
63
Page 64

EN
4. Click Detect IP Address to find other backup servers on your network, then from the
drop-down list, select the server where the backup share will be saved.
The other backup server's name appears automatically in the Alias name box.
5. Enter the required information, including authentication name and password for the
destination backup server, then click Test Connection to ensure that the connection
works.
6. Click Start.
The backup task begins. You can check the progress of backup tasks in progress at any
time.
Note: For a NAS-to-NAS backup, the contents of a backup are hidden and cannot
be seen via SMB. To see the contents of a backup, you have to select NAS-toNAS Restore and open a backup.
To restore a backed up file:
By default, SilverStore retains all files that are stored or backed up on it indefinitely.
1. Click the User Backup tab.
2. Click Restore.
Previously backed up content displays in the Executed Schedule list. The details of the
backup are shown below when you select an item.
3. Select a backed up item from the list.
4. Navigate to the Restore destination on the right side of the window.
5. Click Restore Now.
FREECOM SILVER STORE 2-DRIVE NAS
Backup Server
Use the Backup Server tab to select a volume as backup server. Click on Submit to apply
the change.
64
Page 65

EN
FREECOM SILVER STORE 2-DRIVE NAS
Configuring a Time Machine Backup on the SilverStore (Mac OS X)
1. Open your browser and login to the web GUI.
2. Go to “Access” - “Users” and select the “timemachineuser”.
3. Click on the lower left button to configure the password for the “timemachineuser”.
Select a password, retype it and click on OK.
4. Open the “Time Machine Preferences”
5. Switch on the Time Machine Backup. A window will open where to select the backup
destination.
6. Select “Timemachine Backup” on “SilverStore-Backup”. You will be prompted to enter
user name and password.
7. Enter “timemachineuser” as user name and the password you defined before in the
web GUI.
8. You will be logged in and the Time Machine Backup will be started.
65
Page 66

EN
FREECOM SILVER STORE 2-DRIVE NAS
Using the Downloader Menu
The Downloader menu allows administrators to view, manage, boost download speed,
and organize file downloads.
The Downloader menu provides access to the following configuration options:
• Download Task
• Download Preference
• Bittorrent
Download Task
Use the Download Task tab to manage file download task.
Download Preference
Use the Download Preference tab to customize the file download speed.
If you are using a Proxy, you can also add the IP address here.
66
Page 67

EN
Bittorrent
Use the Bittorrent tab to manage torrent files and customize the BT task priority.
Tonido Remote Access
See "Chapter: Tonido Remote Access" for a detailed description how to setup and use
Tonido Remote Access.
FREECOM SILVER STORE 2-DRIVE NAS
67
Page 68

EN
FREECOM SILVER STORE 2-DRIVE NAS
Chapter: Tonido Remote Access
Access to the SilverStore from the outside
Sharing folders for Tonido Remote Access
Before starting with Tonido Remote Access, folders have to be shared for Tonido Remote
Access.
Login to the SilverStore web interface and go to Storage - Shares. Select a folder and click
on “Modify Share” and choose “Tonido Remote Access”.
Tonido Remote Access Configuration
Login to the SilverStore web interface and click on the menu item “Tonido Remote Access”.
68
Page 69

EN
Account Creation
Select an account name, enter password and mail address and accept the Terms of Use. Your
device will be available from the outside under the web address http://test.freecomnas.com
(where “test” stands for the name you selected).
Adding users
In the Tonido GUI, go to “Guest Users”. Click on “Add Guest User” to add users that are
allowed to access your device.
FREECOM SILVER STORE 2-DRIVE NAS
69
Page 70

EN
User Permissions
Define user access limitations for every shared folder (“Allow Access” and/or “Allow Upload”).
Accessing from the outside
To access the SilverStore from the outside via Tonido Remote Access, use the following
information:
URL: http://test.freecomnas.com (where “test” stands for the name you selected)
FREECOM SILVER STORE 2-DRIVE NAS
Login with any user name and password you defined for guest users.
Share guest user accounts with your friends and family to give them access to your multimedia
files. You can login from any PC and even with your iPhone, Android and Windows Mobile
smartphones.
70
Page 71

EN
On logging in to Tonido, the main Tonido Home page is displayed as below. Two menus
are presented prominently on the home page:
• Right Hand menu: Provides easy access to your files, favorites, guest user access,
applications and settings
• Main Menu: Provides quick access to your main applications within Tonido that allow
you to access your files, photos and other media and share them
On the bottom right of the Home page is the option to logout of your Tonido account. Also,
there is the URL you can use to access Tonido from anywhere.
Now, let us explore each of these options on the home page.
FREECOM SILVER STORE 2-DRIVE NAS
71
Page 72

EN
FREECOM SILVER STORE 2-DRIVE NAS
Main Menu
Files:
Explore:
Clicking on “Explore” provides access to your files on your SilverStore via a list view
by default, with an additional gallery view and music tab view that allows for playing
music files.
In the list view, the following user actions are possible:
• Uploading files
• Creating new directories/folders
• Searching for a file
72
Page 73

EN
Additionally, on each folder or file, the following actions are possible:
• Download
• Copy
• Rename
• Delete
• Add to Favorites
• Share
Media:
FREECOM SILVER STORE 2-DRIVE NAS
Listen to Music:
Selecting this option provides quick access to play music from your SilverStore via the
Music tab view.
73
Page 74

EN
Browse Photos:
Selecting this option provides quick access to wath photos from your SilverStore via the
gallery view.
Share:
Files / Music / Photos:
Selecting the option to share files, music or photos, allows you to add a new folder to
share, and specify access permissions for the folder.
Select “Share Files” or “Share Photos” to start adding a share:
FREECOM SILVER STORE 2-DRIVE NAS
The screenshot below shows a folder that has been shared.
74
Page 75

EN
Access History: Provides information on when your shared files were last accessed/
viewed.
FREECOM SILVER STORE 2-DRIVE NAS
Settings (Advanced): Allows you to configure some settings for sharing. You can configure
same settings for the shared files like the personal header and clear the access history
image from cache.
75
Page 76

EN
Active Downloads: Allows you to view the downloads that are active.
FREECOM SILVER STORE 2-DRIVE NAS
76
Page 77

EN
FREECOM SILVER STORE 2-DRIVE NAS
Right Hand Menu
My Files:
Select this to allow easy access to your files within your computer. Your files are displayed in
a list view by default, with an additional gallery view available. In addition to this, music files
can be accessed in a music tab view that features an embedded player to play music files.
My Favorites:
Select this will display the list of files or folders marked as “Favorites”. This allows easy and
quick access to your favorite folders or files. You can favorite a folder or file under the Actions
menu in the Explorer list view under My Files.
77
Page 78

EN
My Shared Files:
Selecting this provides quick access to the files or folders you have shared with other users.
Guest Users:
Selecting this option provides quick access to manage the guest users you have set up for
your account. That is, it allows you to add a guest user, edit or delete them.
FREECOM SILVER STORE 2-DRIVE NAS
78
Page 79

EN
Applications:
Selecting this provides a view of the applications installed with your account. This allows you
to launch an application, suspend, uninstall an application or check for application updates.
Settings:
Selecting this option provides you with access to various settings that you can configure
for your account.
FREECOM SILVER STORE 2-DRIVE NAS
General
79
Page 80

EN
Account
Network
FREECOM SILVER STORE 2-DRIVE NAS
80
Page 81

EN
Miscellaneous
Log
FREECOM SILVER STORE 2-DRIVE NAS
About
81
Page 82

EN
FREECOM SILVER STORE 2-DRIVE NAS
Chapter: Troubleshooting
This chapter helps you identify and solve problems that might occur while you are using
SilverStore.
For any issue, first ensure that you are using the latest firmware for SilverStore. The latest
firmware encloses the latest network and SATA disk drivers.
If you are unable to resolve your server problems on your own, contact your dealer or
Freecom Technologies for assistance.
Appendix A: CE, FCC and other certifications
CE
EN 55022 Declaration of Conformance. This is to certify that the Freecom SilverStore is
shielded against the generation of radio interference in accordance with the application
of Council Directive 89/336/EEC, Article 4a. Conformity is declared by the application of
EN 55022 Class B (CISPR 22).
FCC
This device complies with part 15 of the FCC Rules. Operation is subject to the following
two conditions:
1. This device may not cause harmful interference, and
2. This device must accept any interference received, including interference that may cause
undesired operation.
Federal Communications Commission (FCC) Compliance Notice
Radio Frequency Notice
This equipment has been tested and found to comply with the limits for a Class B digital
device, pursuant to part 15 of the FCC Rules. These limits are designed to provide reasonable
protection against harmful interference in a residential installation. This equipment generates,
uses, and can radiate radio frequency energy and, if not installed and used in accordance
with the instructions, may cause harmful interference to radio communications. However,
there is no guarantee that interference will not occur in a particular installation. If this
equipment does cause harmful interference to radio or television reception, which can be
determined by turning the equipment off and on, the user is encouraged to try to correct
the interference by one or more of the following measures:
• Reorient or relocate the receiving antenna.
• Increase the separation between the equipment and receiver.
• Connect the equipment into an outlet on a circuit different from that to which the
receiver is connected.
• Consult the dealer or an experienced radio/TV technician for help.
82
Page 83

EN
FREECOM SILVER STORE 2-DRIVE NAS
Appendix B: Preparing LAN for use with the SilverStore
This appendix provides a description of how to prepare your computer network for
connecting with the SilverStore and the Internet.
Preparing the computer for connection to the SilverStore
To connect to the SilverStore, you have to install TCP/IP (Transmission Control Protocol/
Internet Protocol) on each of your network computers and select the required network
protocol. If a network interface card (NIC) is already installed on your PC, then TCP/IP is
probably also already installed.
Configuring Windows XP, Vista/7 to work with the SilverStore
To use your network and SilverStore, you may need to manually install TCP/IP and configure
it on every computer in the network. Have your Windows CD at hand before you begin as
you may need it when installing TCP/IP.
Installing or scanning Windows
Network components
You need to make sure that an Ethernet adapter (NIC), the TCP/IP protocol and the Client for
Microsoft Networks are installed. You do not need to remove any of the other components
displayed in the Network Components window. If you need to install the adapter, please
refer to the instruction manual that came with the adapter on how to install the device. To
install or scan for the other components:
1. Click the 'Start' button on the Windows taskbar, go to 'Settings' and then click 'Control
Panel'.
2. Double-click the Network icon and Dial-up Connection (these may also be called
Network Connections or Connect Using on the Mac).
3. If your computer has an Ethernet adapter, you should see an entry for a Local Area
Connection. Double-click this entry and open the 'Properties' tab.
4. Open the 'General' tab.
5. Check to make sure that 'Client for Microsoft ´Networks' and 'Internet Protocol (TCP/IP)'
are displayed on this screen. If they are not, go to 'Install' and add them.
6. Select 'Internet Protocol (TCP/IP), click 'Properties' and check to make sure that 'Obtain
an IP address automatically' is enabled.
7. Click 'OK' and close all windows for network and dial-up connections.
8. Make sure that the computer is connected to the SilverStore and check the TCP/IP
properties (see below). If you notice any problems, you can restart the computer.
83
Page 84

EN
Check the TCP/IP properties
To check the computer's TCP/IP configuration:
1. Click 'Start' in the Windows taskbar and then press 'Run'. The 'Run' screen opens.
2. Enter 'cmd' and then click 'OK'. A command window appears on the screen.
3. Type in ipconfig /all. Your configuration details are displayed and should be as follows
if you are using the default settings for TCP/IP recommended by Freecom:
4. The IP is between 192.168.1.2 and 192.168.1.254
5. The subnet mask is 255.255.255.0
6. The standard Gateway is 192.168.1.1
7. Type in exit.
MacOS X
With Macintosh OS 7 and higher, TCP/IP comes preinstalled on the Macintosh. To use DHCP,
you need to configure TCP/IP on each Macintosh in the network.
1. Open 'System Preferences' and then 'Network'.
2. If it has not already been selected, click 'Built-in Ethernet' from the configuration list.
3. If this has not been selected, click 'Use DHCP' on the TCP/IP tab.
4. Hit 'Save'.
FREECOM SILVER STORE 2-DRIVE NAS
Check the TCP/IP properties (Macintosh)
Once your Macintosh has been configured and restarted, you can check the TCP/IP
configuration by once again opening TCP/IP System Preferences. Open Apple's 'System
Preferences' and hit 'TCP/IP'.
The overview is refreshed and shows your settings. These should look like this if you are
using the default settings for TCP/IP recommended by Freecom:
1. The IP is between 192.168.1.2 and 192.168.1.254
2. The subnet mask is 255.255.255.0
3. The router address is 192.168.1.1
If different values are displayed, restart your Mac. It may be the case that you need to enable
another option in the 'Configuration' settings and then return to 'Use a DHCP server'.
84
Page 85

EN
FREECOM SILVER STORE 2-DRIVE NAS
Appendix C: Network Basics
This chapter provides an overview of IP networks, routing, and firewalls. This is by no means a
complete overview! If you are looking for more information, you can use your favorite search
engine to find information on the internet about the internet. Suffice to say, there is plenty.
Basic Router Concepts
Even though the amount of bandwidth in your local area network (LAN) can be provided easily
and relatively inexpensively, the price of the connection to the internet is much higher. Because
of this expense, Internet access is usually provided by a slower-speed wide-area network (WAN)
link such as a cable or DSL modem. To use this WAN link efficiently, a mechanism must be in place
for selecting and transmitting only the data traffic meant for the Internet. The function of selecting
and forwarding this data is performed by a router.
What is a Router?
A router splits the information meant for your network and meant for other networks, so
the available bandwidth is used efficiently. The router sends data based on network layer
information in the data and on routing tables maintained by the router. The routing tables
are built by gathering and exchanging information with other routers in the network. The
router builds up a logical picture of the overall network. Using this information, the router
chooses the best path for forwarding network traffic. Routers vary in performance and scale,
number of routing protocols supported, and types of physical WAN connection they support.
Routing Information Protocol
One of the protocols used by a router to build and maintain a picture of the network is the
Routing Information Protocol (RIP). Using RIP, routers periodically update one another and
check for changes to add to the routing table.
IP Addresses and the Internet
For a computer to communicate with other computers and Web servers on the Internet,
it must have a unique IP address. An IP address (IP stands for Internet Protocol) is a unique
number that identifies the location of your computer on a network.
Basically, it works like your street address — as a way to find out exactly where you are
and deliver information to you. The IP address is written as 4 numbers between 0 and 255,
such as "192.168.0.12".
This serves the same basic function as a street address. It helps you find out where you
currently are, while also providing other information. The IP address consists of four numbers
between 0 and 255 (e.g., 192.168.0.12).
85
Page 86

EN
Domain Name Server
The computer address is difficult to read, which is why a second system is used in the Internet
by the name of DNS (Domain Name Server). This translates human-readable names such
as www.sharemydisk.com into computer readable names like 82.161.11.206. Each Internet
user must have an IP address. You do not need the human-readable name, but it is quite
useful if you want other users to find you. A few examples of this include: if you operate
a web server or if you want to show your friends images stored on your computer. Many
large companies such as ISPs maintain their own DNS server and let their customers use
the server to search for addresses.
Internet address classes
The Internet Assigned Numbers Authority (IANA) allocates certain blocks of addresses to
organizations. Individual users or small organizations can obtain their addresses either
from the IANA or from an Internet service provider (ISP). You can visit the IANA homepage
at www.iana.org. The IANA issues different class of IP addresses. There are five standard
classes of IP addresses. They are:
Class A
Class A addresses can have up to 16,777,214 hosts on a single network. They use an eight-bit network
number and a 24-bit node number. Class A addresses are in this range: 1.x.x.x to 126.x.x.x.
Class B
FREECOM SILVER STORE 2-DRIVE NAS
Class B addresses can have up to 65,354 hosts on a network. A Class B address uses a 16-bit
network number and a 16-bit node number. Class B addresses are in this range: 128.1.x.x
to 191.254.x.x.
Class C
Class C addresses may have up to 254 hosts in one network. Class C addresses use 24 bits
for network addresses and eight bits for nodes. They range from 192.0.1x to 223.255.254.x.
Class D
Class D addresses are used for multicasts, in other word messages sent to multiple hosts.
Class D addresses range from 224.0.0.0 to 239.255.255.255.
Class E
Class E addresses are for experimental purposes. For each unique value in the network portion
of the address, the range base address (the host address contains only zeroes) is known as
the network address and is not usually assigned to a host. The top address of the range (host
address contains only ones) is unassigned. It is instead used as the broadcast address for
sending a data packet to all hosts with the same network address simultaneously.
86
Page 87

EN
Netmask
The partition scheme that separates the different address classes is used to identify a netmask
attached to the IP address. A netmask is a 32-bit quantity that, in logical combination (using
an AND operator) with an IP address, forms the network address. The netmasks for Class A,
B and C are for instance 255.0.0.0, 255.255.0.0 and 255.255.255.0.
The address 192.168.170.237 is a Class C IP address; its network portion is 192.168.170.
Combining it with the Class C netmask using an AND operator as shown in this example
leaves only the network portion of the address:
11000000 10101000 10101010.11101101 (192.168.170.237)
combined with:
11111111.11111111.11111111.00000000 (255.255.255.0)
resulting in:
11000000 10101000 10101010.00000000 (192.168.170.0)
An alternative to dotted decimal representation is to express the netmask as the quantity of
ones from left to right. This number is added to the IP address after a slash (/) as '/n'. In this
example, the address 192.168.170.237/24 could be written. This indicates that the netmask
is 24 ones followed by eight zeroes.
Subnet Addressing
FREECOM SILVER STORE 2-DRIVE NAS
You can see that even with a Class C address, there are a large number of hosts per network.
It would be a very inefficient use of the amount of IP addresses to supply every LAN with so
many IP addresses. A smaller office LANs does not have that many devices. A more efficient
technique is known as subnet addressing.
Subnet addressing allows us to split one IP network address into smaller multiple physical
networks known as subnetworks. Some of the node numbers are used as a subnet number
instead. A Class B address gives us 16 bits of node numbers translating to 64,000 nodes.
Most organizations do not use 64,000 nodes, so there are free bits that can be reassigned.
Subnet addressing makes use of those bits that are free.
A Class B address can be effectively translated into multiple Class C addresses. For example,
the IP address of 172.16.97.235 would be interpreted as IP network address 172.16, subnet
number 97, and node number 235. In addition to extending the number of addresses
available, subnet addressing provides other benefits. Subnet addressing allows a network
manager to construct an address scheme for the network by using different subnets for
other geographical locations in the network or for other departments in the organization.
87
Page 88

EN
Although the preceding example uses the entire third octet for a subnet address, note
that you are not restricted to octet boundaries in subnetting. To create more network
numbers, you only need to shift some bits from the host address to the network address.
For instance, to partition a Class C network number (192.68.135.0) into two, you shift one
bit from the host address to the network address. The new netmask (or subnet mask) is
255.255.255.128. The first subnet has network number 192.68.135.0 with hosts 192.68.135.1
to 129.68.135.126, and the second subnet has network number 192.68.135.128.with hosts
192.68.135.129 to 192.68.135.254.
Attention: The number 192.68.135.127 is not assigned because it is the
broadcast address of the first subnet. The number 192.68.135.128 is
not assigned because it is the network address of the second subnet.
Freecom strongly recommends that you configure all hosts on a LAN segment to use the
same netmask for the following reasons:
• So that hosts recognize local IP broadcast packets
• When a device broadcasts to its segment neighbors, it uses a destination address of
the local network address with all ones for the host address. In order for this scheme to
work, all devices on the segment must agree on which bits comprise the host address.
• So that a local router or bridge recognizes which addresses are local and which are
remote Private IP Addresses
If your local network is not connected to the Internet (for example, when using NAT), you
can assign any IP addresses to your computers without problems. But to prevent problems
and ease configuration, the IANA has reserved the following three blocks of IP addresses
specifically for private networks:
FREECOM SILVER STORE 2-DRIVE NAS
10.0.0.0 - 10.255.255.255
172.16.0.0 - 172.31.255.255
192.168.0.0 - 192.168.255.255
We recommend that you choose your private network number from this range. The DHCP
server of the SilverStore is preconfigured to automatically assign private addresses.
For more information about address assignment, refer to RFC 1597, Address Allocation for
Private Internets, and RFC 1466, Guidelines for Management of IP Address Space. The Internet
Engineering Task Force (IETF) publishes RFCs on its Web site at www.ietf.org.
88
Page 89

EN
The IP address shortage
The Internet has grown larger than anyone ever imagined it could be. Although the exact
size is unknown, the current estimate is that there are about 100 million hosts and more
than 350 million users actively on the Internet. In fact, the rate of growth has been such
that the Internet is effectively doubling in size each year.
When IP addressing first came out, everyone thought that there were plenty of addresses
to cover any need. Theoretically, you could have 4,294,967,296 unique addresses. The actual
number of available addresses is smaller (somewhere between 3.2 and 3.3 billion) because
of the way that the addresses are separated into classes, and because some addresses are
set aside for multicasting, testing or other special uses.
With the explosion of the Internet and the increase in home networks and business networks,
the number of available IP addresses is simply not enough. The obvious solution is to
redesign the address format to allow for more possible addresses. This is being developed
(called IPv6), but will take many years to implement because it requires modification of the
entire infrastructure of the Internet.
There are 2 systems in place now to help bring down the shortage of IP addresses.
DHCP
First, most users today have a dynamically given IP address or DHCP address from their
provider. This means that the IP address given to you can change over time. This allows the
provider to use the IP address for more then one person or device, since people are often
online at different times. Optimal usage of IP addresses is guaranteed.
FREECOM SILVER STORE 2-DRIVE NAS
89
Page 90

EN
Multiple internal but only one external IP address
A second way to overcome this is to have a single device act on behalf of several other
devices. Routers are typical examples. You have several PCs connect to the router, but
only the router to the Internet. From an internet perspective, there is only one address.
This scheme offers the additional benefit of simple firewall-like protection because the
internal LAN addresses are not available to the Internet through the translated connection.
All incoming inquiries are filtered out by the router. This filtering can prevent intruders from
probing your system. However, using port forwarding, you can allow one PC (for example,
a Web server) on your local network to be accessible to outside users.
This works like a receptionist at a large office. Nobody knows your number; they all call the
main number of the office and are then forwarded by the receptionist to you.
So how does the receptionist know what number to forward the call too? The caller tells the
receptionist what name to look for and the receptionist has a listof names and numbers at
her disposal so she can translate the name to the phone extension she needs.
On the Internet, it works exactly the same. NAT (RFC 1631) or Network Address Translation
allows a single device, such as a router, to act as an agent between the Internet (or "public
network") and a local (or "private") network. This means that only a single, unique IP address
is required to represent an entire group of computers.
Network Address Translation
When you visit a website via your computer, your router, or more specifically your NAT,
remembers which computer on the internal network asked for the information. When the
information (in this case the website you asked for) comes back, the router knows which
computer on the internal network to send the information to. This is Network Address
Translation or NAT.
Developed by Cisco, Network Address Translation is used by a device (firewall, router
or computer) that sits between an internal network and the rest of the world. For more
information about IP address translation, refer to RFC 1631, The IP Network Address
Translator (NAT).
FREECOM SILVER STORE 2-DRIVE NAS
Hosting a server
What If I want to host a server?
For others to be able to view your pictures on your computer, you need to run some type
of service or server. A web server such as apache will allow others to securely watch the
pictures or files on your site. But how does the NAT of your router know this time to which
computer to forward the information?
Since the request comes from the internet, most routers are setup to disallow any traffic
going into the internal network. (Firewall protection) In this case, since we want people
to be able to see our pictures, we want the router to forward this information. We have to
tell the router to do this.
90
Page 91

EN
Someone calling from the internet asks your router for a certain "port". This is the same
as someone calling the receptionist and requesting a certain person by name. Ports are
displayed as numbers but invariably map to pre described services. For instance, when
someone requests a web page, they always ask for the service on port 80, the web server.
Through NAT, it is possible to "map" a certain request for a service (a request for a port) to
a certain PC on the internal network.
MAC Addresses and Address Resolution Protocol
An IP address alone cannot be used to deliver data from one LAN device to another. To send
data between LAN devices, you must convert the IP address of the destination device to
its media access control (MAC) address. Each device on an Ethernet network has a unique
MAC address, which is a 48-bit number assigned to each device by the manufacturer. The
technique that associates the IP address with a MAC address is known as address resolution.
Internet Protocol uses the Address Resolution Protocol (ARP) to resolve MAC addresses. If a
device sends data to another station on the network and the destination MAC address is not
yet recorded, ARP is used. An ARP request is broadcast onto the network. All stations on the
network receive and read the request. The destination IP address for the chosen station is
included as part of the message so that only the station with this IP address responds to the
ARP request. All other stations discard the request.
The station with the correct IP address responds with its own MAC address directly to the
sending device. The receiving station provides the transmitting station with the required
destination MAC address. The IP address data and MAC address data for each station are
held in an ARP table. The next time data is sent, the address can be obtained from the
address information in the table.
FREECOM SILVER STORE 2-DRIVE NAS
Ethernet Cabling
There are two different types of cabling for Ethernet networks. Originally they used thick or
thin coaxial cable, but most installations currently use unshielded twisted pair (UTP) cabling.
The UTP cable contains eight conductors, arranged in four twisted pairs, and terminated
with an RJ45 type connector. There are 2 types of RJ-45 cables available today, the Media
Dependent Interface (MDI) cable and the Media Dependent Interface - Crossover (MDI-X)
cable. The first cable is used to connect routers to PCs and the second to connect PCs directly
to PCs. The sent and receive wires are switched from beginning to end in the crossover cables.
Some Ethernet switch products, such as the SilverStore, are able to sense the polarity of a
connection and automatically adapt to the proper cabling type.
Cable Quality
A twisted pair Ethernet network operating at 10 Mbits/second (10BASE-T) will often tolerate
low quality cables, but at 100 Mbits/second (10BASE-Tx) the cable must be rated as Category
5, or "Cat 5", by the Electronic Industry Association (EIA). This rating will be printed on
the cable jacket. A Category 5 cable will meet specified requirements regarding loss and
crosstalk. In addition, there are restrictions on maximum cable length for both 10 and 100
Mbits/second networks.
91
Page 92

2
YE ARS
WAR RA NT Y
WARRANTY
(VALID IN EUROPE/TURKEY ONLY)
We thank you for purchasing this Freecom product and hope you will enjoy using it.
In order to avoid unnecessary inconvenience on your part, we suggest reading the
quick install guide, instruction manual and any additional electronic and or printed
manuals. When problems occur we have a database with Frequently Asked Questions
(FAQ) on our Freecom website (www.freecom.com), please check this site before you
contact the helpdesk.
Your Guarantee
All Freecom products come with unlimited technical phone and web support. By this
Guarantee, Freecom warrants their products to be free from defects in material and
workmanship for a period listed below from the date of its original purchase. If during
this period of guarantee the product proves defective due to improper materials or
workmanship, Freecom will, without charge for labour or parts, at its sole discretion,
repair or replace the product or its defective parts upon the terms and conditions set
out below.
Conditions
This guarantee will be granted only when the original invoice or sales receipt (indicating the date of purchase, product and serial number) is presented together with the
defective product and a Freecom RMA number received from the Freecom Website or
given by a Freecom Service Center. Freecom reserves the right to refuse the free-ofcharge guarantee services when the date of purchase of the product cannot be proven.
This guarantee will not apply if the RMA number is missing, the serial number on the
product has been altered, removed or made illegible.
This guarantee covers only the hardware components packaged with the product.
This guarantee covers none of the following: (a) any consumable supplied with the
product, such as media or batteries; (b) damage to or loss of any software programs,
data or removable storage media; (c) any damage resulting from adaptations, changes
or adjustments, which may have been made to the product, without the prior written consent of Freecom; (d) attempted repair by any party other than authorized by
Freecom and (e) accidents, lightning, water, re or any other such cause beyond the
reasonable control of Freecom.
With respect to all services provided, Freecom is not responsible for any damage to
or loss of any programs, data or other information stored on any media or any part
of any product serviced. Freecom is not liable for the consequence of business loss in
case of system failure. Be sure to exclude all parts not covered by this guarantee prior
to returning the product to Freecom. Freecom is not liable for any loss or damage to
these items. If during the repair of the product the contents of the hard drive are altered,
deleted or in any way modied, Freecom is not liable whatsoever.
Repair parts and replacement products will be provided on an exchange basis and will
be either new, equivalent to new or reconditioned. All replaced parts and products
become the property of Freecom The period of guarantee for any product or part repaired or replaced in warranty shall be the balance of the original guarantee. Repairs
or replacements on product or parts out of warranty carry 6 (six) months guarantee.
Page 93

Licensing Information
This Freecom product SilverStore includes copyrighted third-party software licensed
under the terms of the GNU General Public License. Please see The GNU General Public
License for the exact terms and conditions of this license.
Package Version License (LicenseVersion)
acl 2.2.47 GPL
attr 2.4.43 GPL
bar
bash 3.2.48 GPL
busybox 1.17.2 GPL
codex 0.1 public domain
cryptsetup 1.1.3 GPL v2
curl 7.17.1 libcurl 4.0.1 MIT License
db 4.6.21 Open Source License for Oracle Berkeley DB
dirvish 1.2.1 Open Software License version 2.0
dosfstools 3.0.10 GPL
e2fsprogs 1.41.12 GPL, GPL v2, BSD
ethtool 6 GPL v2
expat 1.95.8 Thai Open Source Software Center
findutils 4.4.2 GPL
flex 2.5.35 BSD
freetype 2.4.3 BSD/GPL dual license
gdb 7.2 GPL v2, GPL v3
gdbm 1.8.3 GPL v2
glib 2.24.2 GPL v2
hdparm 9.30 BSD
heimdal 1.4 3-clause BSD license
howl 1.0.0 BSD
iscsi-scst 2.0.1 GPL v2
ifplugd 0.28 GPL v2
inadyn 1.96.2 GPL
inotify-tools 3.13 GPL v2
jpeg 8b Public domain
jQuery 1.4.2 GPL, MIT
jQueryUI 1.8.4 GPL
libdaemon 0.14 GPL v2.1
libevent 1.4.13 3-clause BSD license
libgcrypt 1.4.6 GPL v2, GPL v2.1
libgpg-error 1.10 GPL v2, GPL v2.1
libiconv 1.13 GPL v2, GPL v3
libid3tag 0.15.1b GPL v2
libnfsidmap 0.8 GPL v2
libpng 1.4.4 Libpng license
1.11.0
GPL v2
Page 94

libsigc++ 2.2.8 LGPL
libtorrent 0.12.6 GPL
libusb 0.1.12 LGPL v2.1
libxml2 2.7.7 MIT License
libzdb 2,7 GPL v3
lighttpd 1.4.28 BSD
Linux kernel
2.6.31.8 / with
Marvell LSP 5.1.3
GPL
Linux-PAM 1.1.2 GPL
logrotate 3.7.9 GPL
mdadm 3.1.4 GPL v2
mt-daapd 0.2.4.2 GPL v2
ncurses 5,6 GPL v2
netatalk 2.1.5 GPL
nfs-utils 1.2.3 GPL v2
ntfs-3g 2011.04.12 GPL v2
ntp 4.2.6p3 Public domain
openldap 2.4.23 The OpenLDAP Public License
openssh 5.6p1 BSD
openssl 1.0.0d BSD
parted 2.3 GPL v3
pcre 8.10 BSD
perl 5.12.2 GPL
php 5.3.2
PHP License v3.01, copyright (c) the PHP Group
BSD-style license
popt 1.16 GPL
portmap 6.0 BCD, UCB
proftpd 1.3.3d GPL v2
quota 3.17 BSD
readline 6,1 GPL v3
rsync 3.0.7 GPL v3
rTorrent 0.8.6 GPL
samba 3.5.6 GPL
screen 4.0.3 GPL v2
scst 2.0.0.1 GPL v2
scstadmin 2.0.0 GPL v2
shadow 4.1.1 BSD
smartmontool
s
5.38 GPL v2
sqlite 3.7.2 Public Domain
tcp_wrappers 7.6 BSD
u-boot 3.5.9 in LSP 5.1.3 GPL v2
udev 125 GPL v2
usbutils 0.82 GPL v2
util-linux 2.12r GPL v2, UCB
Page 95

wget 1.12 GPL v3
xfsprogs 3.1.3 GPL
xmlrpc-c 1.06.42 BSD
zlib 1.2.5 BSD
C library
gcc
Use cs2009q3-67
default: 2.10.1
Use cs2009q3-67
default: 4.4.1
GPL
GPL
All listed software packages are copyright by their respective authors. Please see the
source code for detailed information.
Source code and tool chain can be found at http://gpl.freecom.com
Availability of source code
Freecom has exposed the full source code of the GPL licensed software, including any
scripts to control compilation and installation of the object code. All future firmware
updates will also be accompanied with their respective source code. For more information
on how you can obtain our open source code, please visit our web site.
License texts
GPLv2 License text
GPLv3 License text
The LGPLv2.1 License text
GNU Library GPLv2
The MIT license text
OpenSSL License
Intel Copyright
BSD licenses
The OpenLDAP Public License
Thai Open Source Software Center
Open Source License for Oracle Berkeley DB
The PHP License, version 3.01
Open Source License V2.0
SQLite copy right
Libpng license
Page 96

GNU GENERAL PUBLIC LICENSE
Version 2, June 1991
Copyright (C) 1989, 1991 Free Software Foundation, Inc. Temple Place, Suite 330,
Boston, MA 02111-1307 USA
Everyone is permitted to copy and distribute verbatim copies of this license document,
but changing it is not allowed.
Preamble
The licenses for most software are designed to take away your freedom to share and
change it. By contrast, the GNU General Public License is intended to guarantee your
freedom to share and change free software to make sure the software is free for all its
users. This General Public License applies to most of the Free Software Foundation‘s
software and to any other program whose authors commit to using it. (Some other Free
Software Foundation software is covered by the GNU Library General Public License
instead.) You can apply it to your programs, too. When we speak of free software, we are
referring to freedom, not price. Our General Public Licenses are designed to make sure
that you have the freedom to distribute copies of free software (and charge for this
service if you wish), that you receive source code or can get it if you want it, that you
can change the software or use pieces of it in new free programs; and that you know you
can do these things.
To protect your rights, we need to make restrictions that forbid anyone to deny you
these rights or to ask you to surrender the rights. These restrictions translate to certain
responsibilities for you if you distribute copies of the software, or if you modify it. For
example, if you distribute copies of such a program, whether gratis or for a fee, you must
give the recipients all the rights that you have. You must make sure that they, too,
receive or can get the source code. And you must show them these terms so they know
their rights.
We protect your rights with two steps: (1) copyright the software, and (2) offer you this
license which gives you legal permission to copy, distribute and/or modify the software.
Also, for each author‘s protection and ours, we want to make certain that everyone
understands that there is no warranty for this free software. If the software is modified
by someone else and passed on, we want its recipients to know that what they have is
not the original, so that any problems introduced by others will n o t reflect on the original
authors‘ reputations.
Finally, any free program is threatened constantly by software patents. We wish to avoid
the danger that redistributors of a free program will individually obtain patent licenses, in
effect making the program proprietary. To prevent this, we have made it clear that any
patent must be licensed for everyone‘s free use or not licensed at all.
The precise terms and conditions for copying, distribution and modification follow.
GNU GENERAL PUBLIC LICENSE TERMS AND CONDITIONS FOR COPYING,
DISTRIBUTION AND MODIFICATION
0. This License applies to any program or other work which contains a notice placed by
the copyright holder saying it may be distributed under the terms of this General Public
License. The „Program“, below, refers to any such program or work, and a „work based
on the Program“ means either the Program or any derivative work under copyright law:
that is to say, a work containing the Program or a portion of it, either verbatim or with
modifications and/or translated into another language. (Hereinafter, translation is
included without limitation in th e term „modification“.) Each licensee is addressed as
„you“. Activities other than copying, distribution and modification are not cov ered by th is
License; they are outside its scope. The act of running the Program is not restricted, and
the output from the Program is covered only if its contents constitute a work based on
the Program (independent of having been made by running the Program). Whether that
is true depends on what the Program does.
Page 97

1. You may copy and distribute verbatim copies of the Program‘s source code as you
receive it, in any medium, provided that you conspicuously and appropriately publish on
each copy an appropriate copyright notice and disclaimer of warranty; keep intact all the
notices that refer to this License and to the absence of any warranty; and give any other
recipients of the Program a copy of this License along with the Program. You may charge
a fee for the physical act of transferring a copy, and you may at your option offer
warranty protection in exchange for a fee.
2. You may modify your copy or copies of the Program or any portion of it, thus forming
a work based on the Program, and copy and distribute such modifications or work under
the terms of Section 1 above, provided that you also meet all of these con d itions:
a) You must cause the modified files to carry prominent notices stating that you changed
the files and the date of any change.
b) You must cause any work that you distribute or publish, that in whole or in part
contains or is derived from the Program or any part thereof, to be licensed as a whole at
no charge to all third parties under the terms of this License. c) If the modified program
normally reads commands interactively when run, you must cause it, when started
running for such interactive use in the most ordinary way, to print or display an
announcement including an appropriate copyright notice and a notice that there is no
warranty (or else, saying that you provide a warranty) and that users may redistribute
the program under these conditions, and telling the user how to view a copy of this
License. (Exception: if the Program itself is interactive but does not normally print such
an announcement, your work based on the Program is not required to print an
announcement.) These requirements apply to the modified work as a whole. If
identifiable sections of that work are not derived from the Program, and can be
reasonably considered independent and separate works in themselves, then this License,
and its terms, do not apply to those sections when you distribute them as separate
works. But when you distribute the same sections as part of a whole which is a work
based on the Program, the distribution of the whole must be on the terms of this License,
whose permissions for other licensees extend to the entire whole, and thus to each and
every part regardless of who wrote it. Thus, it is not the in tent of this section to claim
rights or contest your rights to work written entirely by you; rather, the intent is to
exercise the right to control the distribution of derivative or collective works based on the
Program. In addition, mere aggregation of another work not based on the Program with
the Program (or with a work based on the Program) on a volume of a storage or
distribution medium does not bring the other work under the scope of this License.
3. You may copy and distribute the Program (or a work based on it, under Section 2) in
object code or executable form under the terms of Sections 1 and 2 above provided that
you also do one of the following: a) Accompany it with the complete corresponding
machine-readable source code, which must be distributed under the terms of Sections 1
and 2 above on a medium customarily used for software interchange; or, b) Accompany
it with a written offer, valid for at least three years, to give any third party, for a charge
no more than your cost of physically performing source distribution, a complete machinereadable copy of the corresponding source code, to be distributed under the terms of
Sections 1 and 2 above on a medium customarily used for software interchange; or, c)
Accompany it with the information you received as to the offer to distribute
corresponding source code. (This alternative is allowed only for non commercial
distribution and only if you received the program in object code or executable form with
such an offer, in accord with Subsection b above.) The source code for a work means the
preferred form of the work for making modifications to it. For an executable work,
complete source code means all the source code f
or all modules it cont
ains, plus any
associated interface definition files, plus the scripts used to control compilation and
installation of the executable. However, as a special ex ception, the source code
distributed need not include anything that is normally distributed (in either source or
binary form) with the major components (compiler, kernel, and so on) of the operating
system on which the executable runs, unless that component itself accompanies the
executable. If distribution of executable or object code is made by offering access to copy
from a designated place, then offering equivalent access to copy the source code from
Page 98

the same place counts as distribution of the source code, even though third parties are
not compelled to copy the source along with the object code.
4. You may not copy, modify, sublicense, or distribute the Program except as expressly
provided under this License. Any attempt otherwise to copy, modify, sublicense or
distribute the Program is void, and will automatically terminate your rights under this
License. However, parties who have received copies, or rights, from you under this
License will not have their licenses terminated so long as such parties remain in full
compliance.
5. You are not required to accept this License, since you have not signed it. However,
nothing else grants you permission to modify or distribute the Program or its derivative
works. These actions are prohibited by law if you do not accept this License. Therefore,
by modifying or distributing the Program (or any work based on the Program), you
indicate your acceptance of this License to do so, and all its terms and conditions for
copying, distributing or modifying the Program or works based on it.
6. Each time you redistribute the Program (or any work based on the Program), the
recipient automatically receives a license from the original licensor to copy, distribute or
modify the Program subject to these terms and conditions. You may not impose any
further restrictions on the recipients‘ exercise of the rights granted herein. You are not
responsible for enforcing compliance by third parties to this License.
7. If, as a consequence of a court judgment or allegation of patent infringement or for
any other reason (not limited to patent issues), conditions are imposed on you (whether
by court order, agreement or otherwise) that contradict the conditions of this License,
they do not excuse you from the conditions of this License. If you cannot distribute so as
to satisfy simultaneously your obligations under this License and any other pertinent
obligations, then as a consequence you may not distribute the Program at all. For
example, if a patent license would not permit royalty-free redistribution of the Program
by all those who receive copies directly or indirectly through y ou, then the only way you
could satisfy both it and this License would be to refrain entirely from distribution of the
Program. If any portion of this section is held invalid or unenforceable under an y
particular circumstance, the balance of the section is intended to apply and the section as
a whole is intended to apply in other circumstances. It is not the purpose of this section
to induce you to infringe any patents or other property right claims o r to contest validity
of any such claims; this section has the sole purpose of protecting the integrity of the
free software distribution system, which is implemented by public license practices. Many
people have made generous contributions to the wide range of software distributed
through that system in reliance on consistent application of that system; it is up to the
author/donor to decide if he or she is willing to distribute software through any other
system and a licensee cannot impose that choice. This section is intended to make
thoroughly clear what is believed to be a consequence of the rest of this License.
8. If the distribution and/or use of the Program is restricted in certain countries either by
patents or by copyrighted interfaces, the original copyright holder who places the
Program under this License may add an explicit geographical distribution limitation
excluding those countries, so that distribution is permitted only in or among countries not
thus excluded. In such case, this License incorporates the limitation as if written in the
body of this License.
9. The Free Software Foundation may publish revised and/or new versions of the General
Public License from time to time. Such new versions will be similar in spirit to the present
version, but may differ in detail to address new problems or concerns. Each version is
given a distinguishing version number. If the Program specifies a version number of this
License which applies to it and „any later version“, you have th e option of following the
terms and conditions either of that version or of any later version published by the Free
Software Foundation. If the Program does not specify a version number of this License,
you may choose any version ever published by the Free Software Foundation.
10. If you wish to incorporate parts of the Program into other free programs whose
distribution conditions are di
fferent, write to th
e author to ask for permission. For
software which is copyrighted by the Free Software Foundation, write to the Free
Software Foundation; we sometimes make exceptions for this. Our decision will be
Page 99

guided by the two goals of preserving the free status of all derivatives of our free
software and of promoting the sharing and reuse of software generally.
NO WARRANTY
11. BECAUSE THE PROGRAM IS LICENSED FREE OF CHARGE, THERE IS NO WARRANTY
FOR THE PROGRAM, TO THE EXTENT PERMITTED BY APPLICABLE LAW. EXCEPT WHEN
OTHERWISE STATED IN WRITING THE COPYRIGHT HOLDERS AND/OR OTHER PARTIES
PROVIDE THE PROGRAM „AS IS“ WITHOUT WARRANTY OF ANY KIND, EITHER
EXPRESSED OR IMPLIED, INCLUDING, BUT NOT LIMITED TO, THE IMPLIED WARRANTIES
OF MERCHANTABILITY AND FITNESS FOR A PARTICULAR PURPOSE. THE ENTIRE RISK AS
TO THE QUALITY AND PERFORMANCE OF THE PROGRAM IS WITH YOU. SHOULD THE
PROGRAM PROVE DEFECTIVE, YOU ASSUME THE COST OF ALL NECESSARY SERVICING,
REPAIR OR CORRECTION.
12. IN NO EVENT UNLESS REQUIRED BY APPLICABLE LAW OR AGREED TO IN WRITING
WILL ANY COPYRIGHT HOLDER, OR ANY OTHER PARTY WHO MAY MODIFY AND/OR
REDISTRIBUTE THE PROGRAM AS PERMITTED ABOVE, BE LIABLE TO YOU FOR
DAMAGES, INCLUDING ANY GENERAL, SPECIAL, INCIDENTAL OR CONSEQUENTIAL
DAMAGES ARISING OUT OF THE USE OR INABILITY TO USE THE PROGRAM (INCLUDING
BUT NOT LIMITED TO LOSS OF DATA OR DATA BEING RENDERED INACCURATE OR
LOSSES SUSTAINED BY YOU OR THIRD PARTIES OR A FAILURE OF THE PROGRAM TO
OPERATE WITH ANY OTHER PROGRAMS), EVEN IF SUCH HOLDER OR OTHER PARTY HAS
BEEN ADVISED OF THE POSSIBILITY OF SUCH DAMAGES.
END OF TERMS AND CONDITIONS
How to Apply These Terms to Your New Programs
If you develop a new program, and you want it to be of the greatest possible use to the
public, the best way to achieve this is to make it free software which everyone can
redistribute and change under these terms. To do so, attach the following notices to the
program. It is safest to attach them to the start of each source file to most effectively
convey the exclusion of warranty; and each file should have at least th e „copyright“ line
and a pointer to where the full notice is found.
1. April 1989
Ty Coon, President of Vice
This General Public License does not permit incorporating your program into proprietary
programs. If your program is a subroutine library, you may consider it more useful to
permit linking proprietary applications with the library. If this is what you want to do, use
the GNU Library General Public License instead of this License.
Page 100

GNU GENERAL PUBLIC LICENSE
Version 3, 29 June 2007
Copyright © 2007 Free Software Foundation, Inc. <http://fsf.org/
>
Everyone is permitted to copy and distribute verbatim copies of this license document,
but changing it is not allowed.
Preamble
The GNU G
eneral Public License is a free, copyle
ft license for software and other kinds of
works.
The licenses for most software and other practical works are designed to take away your
freedom to share and change the works. By contrast, the GNU General Public License is
intended to guarantee your freedom to share and change all versions of a program--to
make sure it remains free software for all its users. We, the Free Software Foundation,
use the GNU General Public License for most of our software; it applies also to any other
work released this way by its authors. You can apply it to your programs, too.
When we speak of free software, we are referring to freedom, not price. Our General
Public Licenses are designed to make sure that you have the freedom to distribute copies
of free software (and charge for them if you wish), that you receive source code or can
get it if you want it, that you can change the software or use pieces of it in new free
programs, and that you know you can do these things.
To protect your rights, we need to prevent others from denying you these rights or
asking you to surrender the rights. Therefore, you have certain responsibilities if you
distribute copies of the software, or if you modify it: responsibilities to respect the
freedom of others.
For example, if you distribute copies of such a program, whether gratis or for a fee, you
must pass on to the recipients the same freedoms that you received. You must make
sure that they, too, receive or can get the source code. And you must show them these
terms so they know their rights.
Developers that use the GNU GPL protect your rights with two steps: (1) assert copyright
on the software, and (2) offer you this License giving you legal permission to copy,
distribute and/or modify it.
For the developers' and authors' protection, the GPL clearly explains that there is no
warranty for this free software. For both users' and authors' sake, the GPL requires that
modified versions be marked as changed, so that their problems will not be attributed
erroneously to authors of previous versions.
Some devices are designed to deny users access to install or run modified versions of the
software inside them, although the manufacturer can do so. This is fundamentally
incompatible with the aim of protecting users' freedom to change the software. The
systematic pattern of such abuse occurs in the area of products for individuals to use,
which is precisely where it is most unacceptable. Therefore, we have designed this
version of the GPL to prohibit the practice for those products. If such problems arise
substantially in other domains, we stand ready to extend this provision to those domains
in future versions of the GPL, as needed to protect the freedom of users.
 Loading...