

Page 1

USER MANUAL
NETWORK DRIVE PRO
EXTERNAL NETWORK HARD DRIVE / 3.5" / GIGABIT LAN
WIN & MAC
Rev. 722
Page 2

Freecom Network Drive Pro
GB
Congratulations
Congratulations on your purchase of the Freecom Network Drive Pro. The Network
Drive Pro provides central network storage or Network Attached Storage (NAS). If you are
unfamiliar with networking and routing basics, refer to Appendix C, "Network Basics", to
become more familiar with the terminology and procedures used in this manual.
Freecom Technologies • Germany
www.freecom.com
To prevent data loss, make a backup copy of your data each time before
reconfiguring the hard drive.
Attention!
All rights reserved. The product names contained in this user's guide only are only used
for identification purposes and may be trademarks or registered trademarks of those
companies. This device is designed for office and home use.
Caution! This is an EN 55022 Class B device.
Freecom shall assume no liability for damages of any kind, for loss of data or any consequential
claims resulting therefrom (including, and without restriction, claims relating to the business
losses, business interruptions, loss of business data or other financial claims) that result from
the use of this Freecom product or improper operation of this Freecom product. This shall
also apply in cases where Freecom has been notified that such claims may exist.
Subject to change as technical advances dictate.
2
Page 3

GB
Table of Contents
User manual
General Information ...........................................................................................................page 4
Safety precautions ...............................................................................................................pa
Chapter 1:
Connecting / Installing Network Drive Pro ................................................................ page 10
Chapter 2:
Get to know your Network Drive Pro ...........................................................................page 13
Chapter 3:
Network Drive Pro Functions ..........................................................................................page 23
Chapter 4:
The Freecom Network Storage Assistant ....................................................................page 51
ge 6
Chapter 5:
Network Drive Pro in everyday use ............................................................................... page 58
Apendix:
Appendix A .............................................................................................................................page 71
Appendix B .............................................................................................................................pa
Appendix C ............................................................................................................................. pa
© 2007 Freecom Technologies
ge 72
ge 77
3
Page 4

Freecom Network Drive Pro
GB
General Information
Package contents
Please check the contents of the box to ensure it includes following items:
• F
reecom Network Drive Pro drive
• P
ower pack
• Network cable (UTP)
• CD-ROM with instruction manual, Safety guide and application software
• Quick installation guide
Technical Support
For any technical questions, please visit our web site at www.freecom.com or at the site
created specifically of this product, www.openfsg.com. These websites offer a range
of information, answers to frequently asked questions, firmware and product guides
(available for download). You can also use our forum to exchange experience with other
users or discuss any problems or difficulties you may be having. Or else contact Freecom
Support for more in-depth assistance.
Freecom on the net
The Network Drive Pro and other Freecom products including documentation, drivers,
and other information can be found on a World Wide Web home page that you can
access at the universal resource locator (URL) http://www.freecom.com or http://www.
openfsg.com. A connection to the Internet and a Web browser such as Internet Explorer,
Opera or Firefox are required.
Related Publications
There is a lot of information available on the internet that can help you achieve what you
want. In this document, you may be directed to various RFC documents for further information. An RFC is a Request For Comment (RFC) published by the Internet Engineering
Task Force (IETF), an open organization that defines the architecture and operation of the
Internet. The RFC documents outline and define the standard protocols and procedures
for the Internet. The documents are listed on the World Wide Web at www.ietf.org and
are mirrored and indexed at many other sites worldwide.
For more information about address assignment, refer to the IETF documents RFC 1597,
Address Allocation for Private Internets, and RFC 1466, Guidelines for Management of
IP Address Space.
For more information about IP address translation, refer to RFC 1631, The IP Network
Address Translator (NAT).
4
Page 5

GB
General Information
Statement of Conditions
In the interest of improving internal design, operational function, and/or reliability,
Freecom reserves the right to make changes to the products described in this document
without notice. Freecom does not assume any liability that may occur due to the use or
application of the product(s) or circuit layout(s) described herein.
Trademarks
Freecom is a trademark of Freecom Technologies.
Microsoft, Windows, and Windows NT are registered trademarks of Microsoft Corporation.
Other brand and product names are registered trademarks or trademarks of their respective holders.
System Requirements
The following hardware and software requirements must be fulfilled to ensure troublefree operation.
Hardware Requirements
In order to use the Freecom Network Drive Pro, following components are needed:
• P
C: Intel Pentium III / AMD Duron 900 MHz or higher
• Mac: PowerPC G3/G4/G5, Power Book G3/G4 or Intel Mac
• 256 MB RAM (Vista: 512 MB RAM) or higher
• CD-ROM drive for installing drivers and/or software
• LAN
• Internet connection for online warranty registration and driver/software updates
and downloads
Software Requirements
• W
indows 2000
• Windows XP
• Windows Vista
• MacOS X 10.3 or higher
• Linux Kernel 2.2 or higher
5
Page 6

Freecom Network Drive Pro
GB
Precautionary measures
To ensure that your Freecom Network Drive Pro functions properly, please take note of
the following precautions. If these are not followed, you may void your warranty and
damage the Network Drive Pro.
• Do not drop the Freecom Network Drive Pro or expose it to other kinds of sudden
mechanical shocks as this may result in data loss and damage to the hard drive.
not use the Freecom Network Drive Pro when the ambient temperature is below
• Do
10°C or above 35°C.
f the Freecom Network Drive Pro is moved from a cool environment to a warmer
• I
environment, please allow the drive to acclimatize to the ambient temperature
before operating the device. Failing to do so may lead to condensation within the
drive enclosure, which in turn may cause the drive to malfunction.
o not place liquids or drinks on the Network Drive Pro. When liquids are spilled and
• D
get in contact with the electronics within the drive enclosure, it will damage the drive
and will cause the drive to malfunction.
o not use the Network Drive Pro in a dusty environment. Dust inside the enclosure
• D
may damage the internal electronics and result in drive malfunction.
nly use the power adapter that was supplied with the Network Drive Pro.
• O
• Opening the Network Drive Pro will void the warranty.
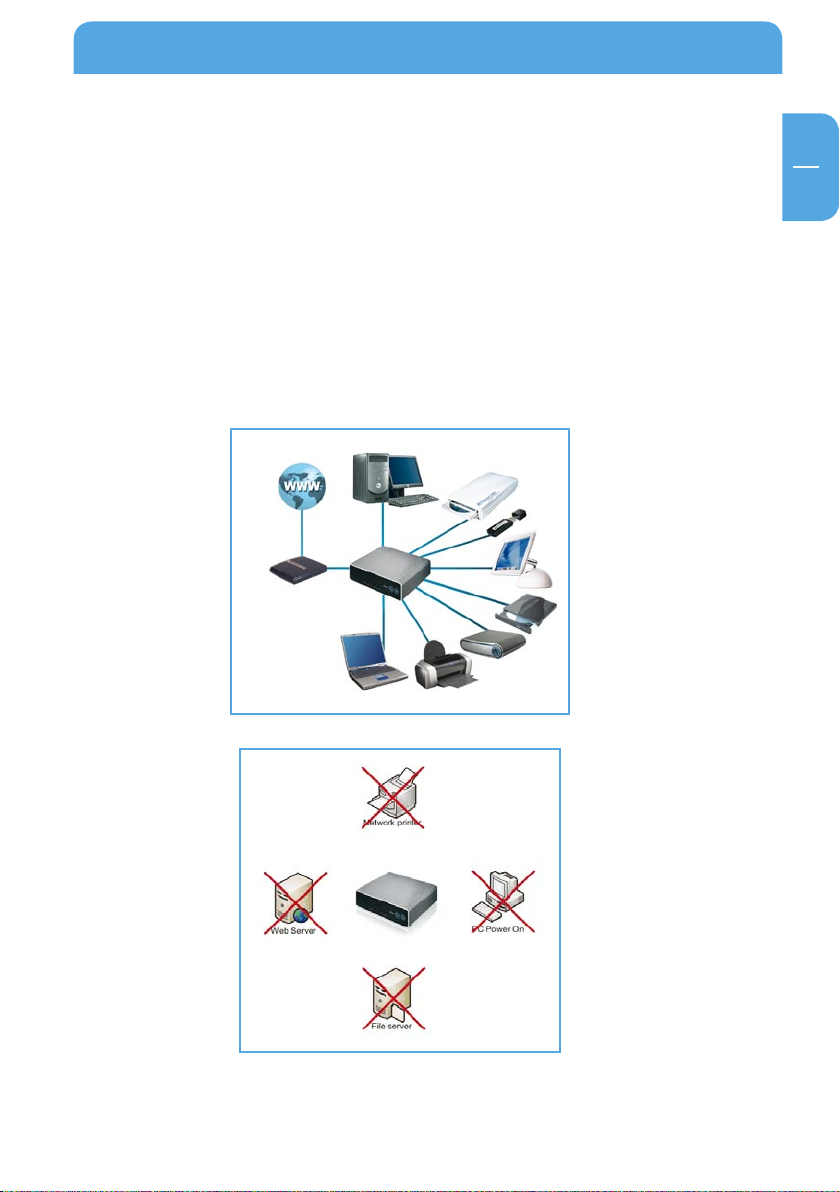
Advantages of the Freecom Network Drive Pro
The Freecom Network Drive Pro is the perfect solution for home and small business use.
Thanks to its fast and easy installation, you are up and running the Network Drive Pro
in no time at all.
Network Drive Pro is a combination hard drive, server (1 x LAN) and USB server (2 x USB
2.0 High Speed). This reduces the number of devices you need. Most of the Network
Drive Pro functions can be used with little previous knowledge.
File server
Save your data centrally on Network Drive Pro and make it accessible to all PCs in the
network.
Web server
Save your websites on the Network Drive Pro and put them directly online.
FTP server
The built-in FTP server allows you to access data from any PC.
6
Page 7
GB
Advantages of the Freecom Network Drive Pro
USB server
Increase your storage space by attaching additional devices (e.g., external hard-drives)
and let other network devices use this disk space.
USB printer server
Connect a USB printer and use it as your network printer.
Open Source Firmware
You are familiar with Linux and want to add more features to your Network Drive Pro?
No problem. Firmware is available free of charge and open to modification (The user
assumes all risks relating to any modification he/she may perform.).
7
Page 8

Freecom Network Drive Pro
GB
Software features
Network transport protocols
TCP/IP
Network file protocols
Microsoft Network CIFS
Client support
Microsoft Windows 98/Me/NT 4.0/2000/XP/2003 Server/Vista
Apple Macintosh OS 8.x/9.x/10.x
Network settings
DHCP
Manual configuration
System management
Web-based configuration
Configuration wizard
Services
HTTP (with PHP)
FTP
SSH
NTP
Security
Supports user, group and file shares
System configuration
Number of users: unlimited
Number of groups: unlimited
8
Page 9

GB
Software features & Hardware features
Hardware features
Processor
StorLink SL3516
64 MB RAM
512 KB Flash
Network connection
1x GBit LAN
USB
2x USB 2.0 480 Mbps for up to two printers or mass storage devices
Fan
Temperature-controlled fan
HDD
HDD sleep mode for lower power consumption and reduced noise
Electrical requirements
Voltage: 100 - 240 V DC
Frequency: 50 - 60 Hz, single-phase
Environmental requirements
Operating temperature: 10 - 35° C (50 - 95° F)
Storage temperature: -10 - 70° C (-40 - 185° F)
Humidity: 20 - 80 % relative humidity, no condensation
Maximum operating altitude (above sea level): 3000 m (9900 ft)
Dimensions and weight
Dimensions: L x B x H 15 x 18 x 5 cm / 5.9 x 7.1 x 2 inch
Weight: approx. 1400 g / 49 ounce
9
Page 10
GB
1
Freecom Network Drive Pro
Chapter 1: Connecting / Installing Network Drive Pro
1.1 Hardware Installation
Setup of the Network Drive Pro is performed using the following steps:
1. Plug the Network Drive Pro's power cord into a power outlet.
2. Switch on DHCP on the PC in the TCP/IP-configuration. (For more information see
Appendix B)
Connect the included Ethernet Cable into the Ethernet port on the rear of Network
3.
Drive Pro into one of the LAN ports. Connect the other end of the cable directly to
the PC.
Check the LINK/ACT light on the UTP port you have connected on the Network Drive
4.
Pro. If it is lit, then your Network Drive Pro is connected properly.
1.2 Installation of the Freecom Network Storage Assistant Software (PC)
The Freecom Network Storage Assistant quickly detects and performs the basic set-up
of your Network Drive Pro. When you start it, it displays all Network Drives Pro available
in your network and helps you configure the Network Drive Pro as a printer server or
create network folders.
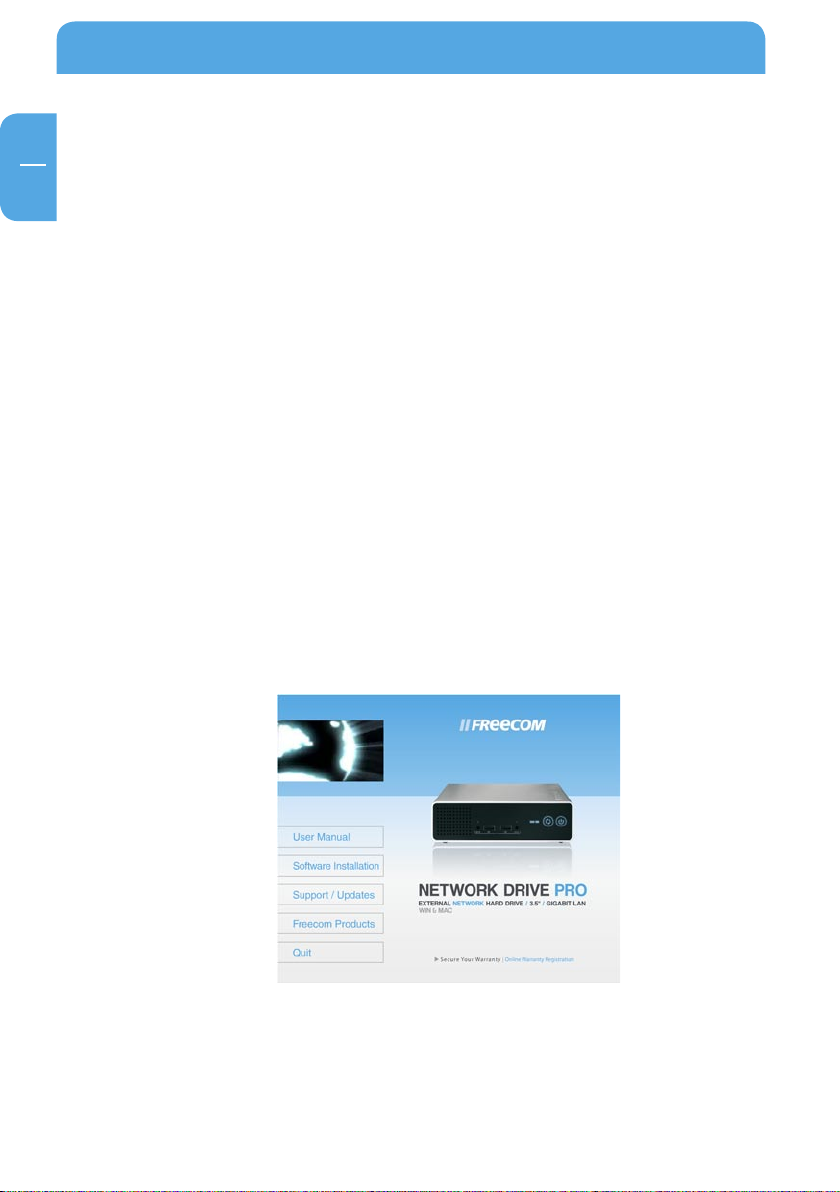
1. Insert the Freecom Network Drive Pro software & Manual CD into your CD drive. The
Freecom start menu opens:
10
In
case the software does not open automatically, please click on "Start.exe" in the
main directory of the CD.
2.
Click on "Software Installation" -> "FNS Assistant". The installation starts now. Follow
the instructions on the screen.
Page 11
GB
1
Connecting / Installing Network Drive Pro
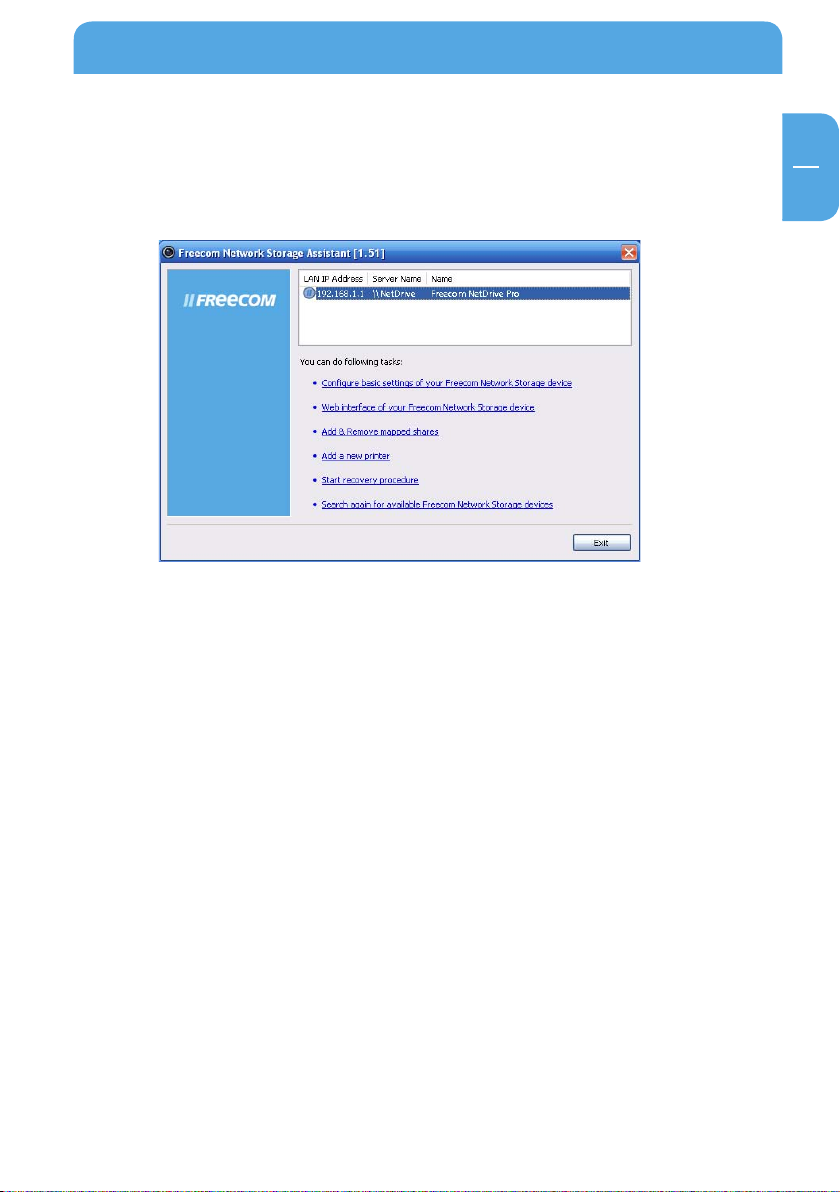
3. Start the Freecom Network Storage Assistant.
4. Check the Freecom Network Storage Assistant whether your Network Drive Pro was
detected. This may take some time. If your Network Drive Pro is not immediately
detected, click "Search again for available Freecom Network Storage devices" to
repeat the search.
For a detailed functional description on the Freecom Network Storage Assistant,
5.
please refer to chapter 4.
1.3 Installation of the Freecom Network Storage Assistant Software (Mac)
The Freecom Network Storage Assistant quickly detects and performs the basic set-up
of your Network Drive Pro. When you start it, it displays all Network Drives Pro available
in your network and helps you configure the Network Drive Pro and the create network
folders.
1. Insert the Freecom Network Drive Pro software & Manual CD into your CD drive.
Please click on "Start" in the main directory of the CD.
2.
Click on "Software Installation" -> "FNS Assistant". The installation starts now. Follow
the instructions on the screen.
Start the Freecom Network Storage Assistant.
3.
Check the Freecom Network Storage Assistant whether your Network Drive Pro was
4.
detected. This may take some time. If your Network Drive Pro is not immediately
detected, click "Search again for available Freecom Network Storage devices" to
repeat the search.
For a detailed functional description on the Freecom Network Storage Assistant,
5.
please refer to chapter 4.
11
Page 12

GB
1
Freecom Network Drive Pro
1.4 Installation of the NTI Software (PC / Mac)
1. Insert the Freecom Network Drive Pro software & Manual CD into your CD drive. The
Freecom start menu opens:
PC
2a. In case the software does not open automatically, please click on "Start.exe" in the
main directory of the CD. Click on "Software Installation -> NTI Shadow" or "NTI Ripper". The installation starts now. Follow the instructions on the screen.
Mac
2b. Please click on "Start" in the main directory of the CD. Click on "Software Installation
-> NTI Shadow" The installation starts now. Follow the instructions on the screen.
12
Page 13
13
GB
2
Get to know your Network Drive Pro
Chapter 2: Get to know your Network Drive Pro
This chapter describes the lights and mechanical layout of the Network Drive Pro.
2.1 Network Drive Pro connectors, LEDs and buttons
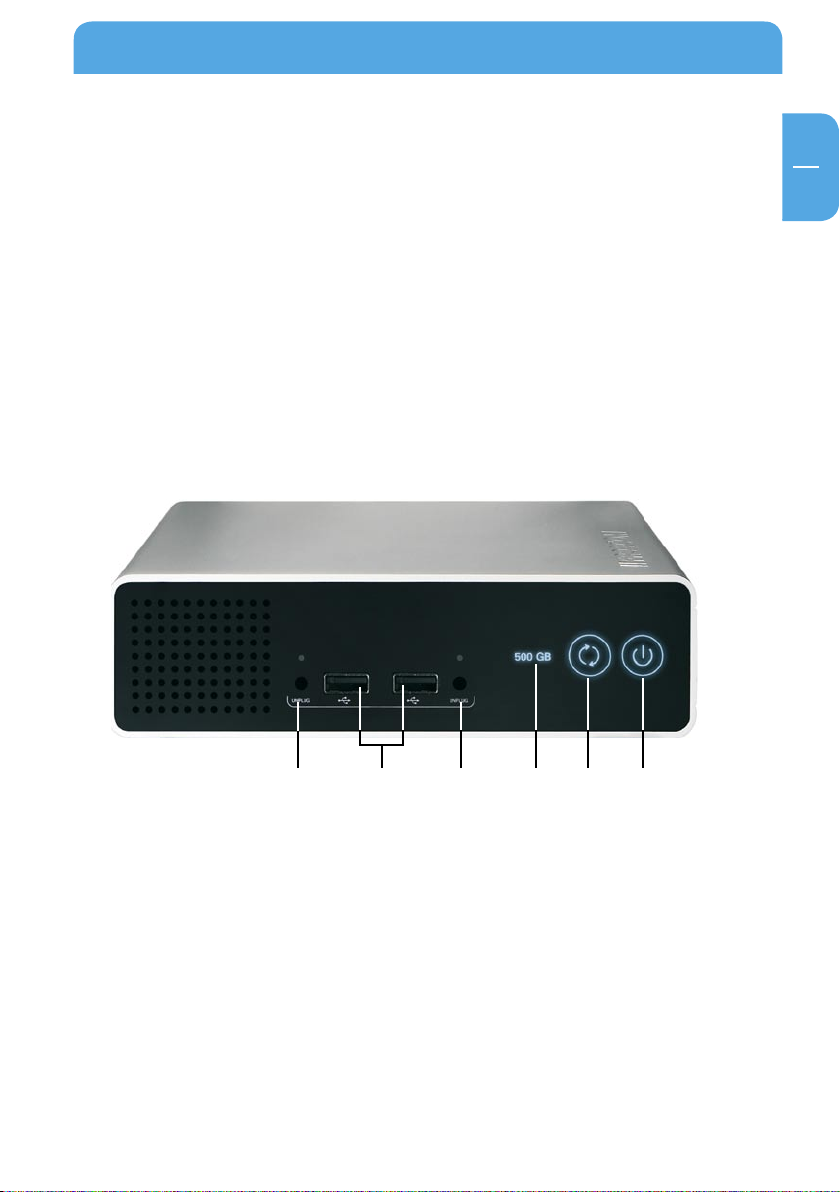
Front of the Network Drive Pro
The front consists of:
1. On/off switch
*
2. Backup switch: immediate start of selected backup tasks
3. LED with drive space capacity indicator
4. USB Unplug switch (2x)
5. USB Host Port Type A (2 x)
* Press up to 5 seconds to switch off device.
3. 1.2.5. 4.4.
Page 14
14
GB
2
Freecom Network Drive Pro
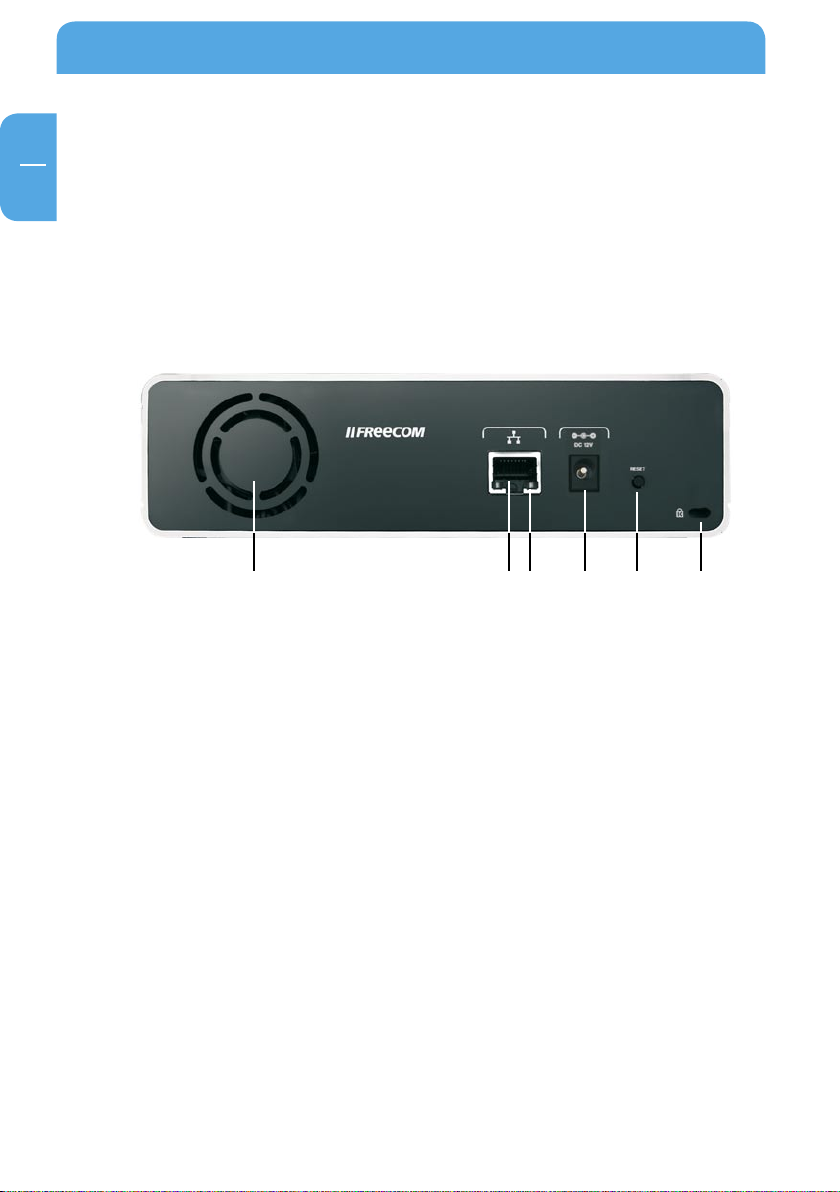
Back of the Network Drive Pro
The back consists of:
1. Ventilator opening
2. LAN Port
3. Status LED (LAN)
4. 12 V direct current connecting socket
5. Reset-Button
6. Kensington lock
4.3. 6.5.2.1.
Page 15

GB
2
Front
Get to know your Network Drive Pro
Display Capacity LED
Solid blue Normal mode Normal mode USB device is logged on.
Regular:
There was an error
Regular or intermittent
flashing
OFF
mounting the data
partition
Intermittent:
Hard drive activity
Hard-Disk error or
no power supply
Shutd own
Button
Device is started USB device is logged off.
Device
power is of f
No device connected.
Back
Display
Solid Connection is active
Intermitent flashing
Possible network
Green Yellow Orange
collisions
LAN LED
High-speed Ethernet
(100 Mbit/s)
Sending or receiving
data
Sending or receiving
USB LED
Gigabit
Ethernet
(1000 Mbit/s)
data
OFF
No
connection / Error
10 Mbit/s Ethernet 10 Mbit/s Ethernet
15
Page 16
16
GB
2
Freecom Network Drive Pro
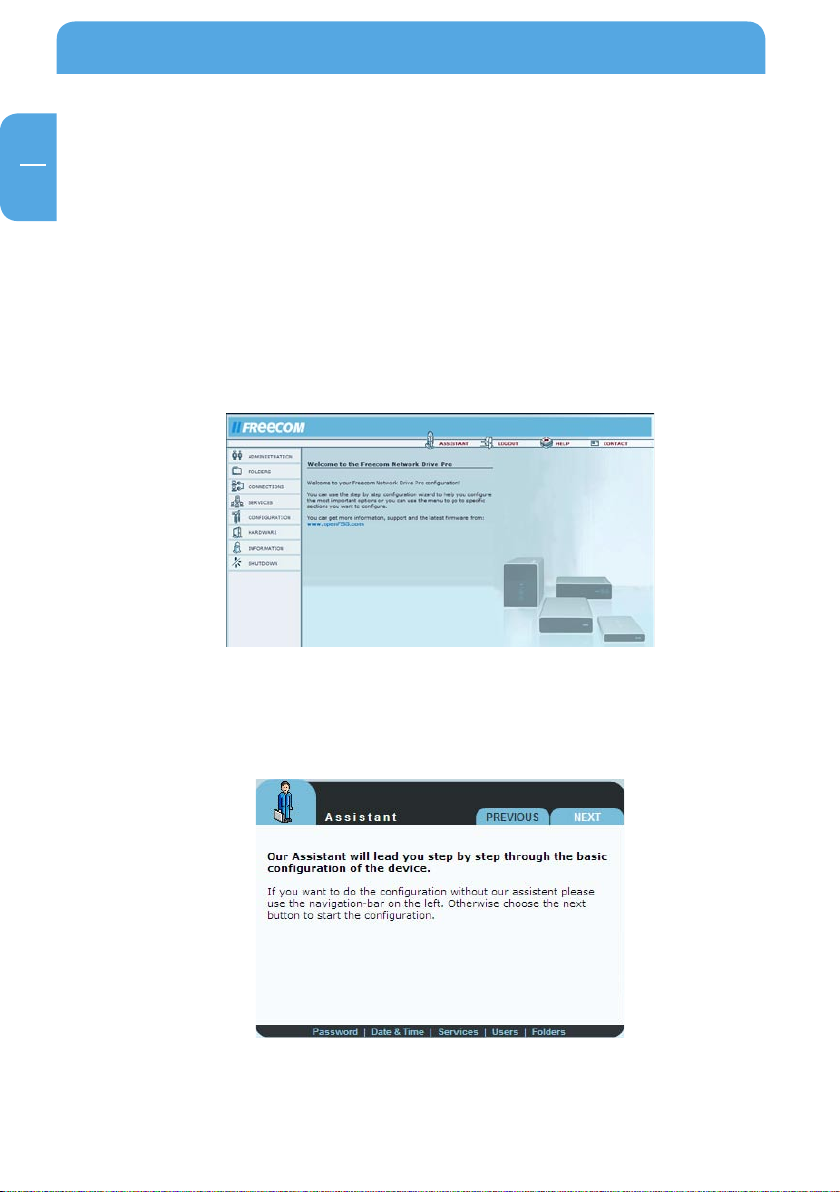
2.2 Network Drive Pro configuration wizard
The configuration wizard is integrated into the web interface and helps you to configure
the basic settings on your Network Drive Pro. This in turn ensures you can work with the
Network Drive Pro in the shortest time possible.
2.2.1 Starting the Network Drive Pro configuration
To use the wizard, please go to the configuration page of your Network Drive Pro by starting any web browser (Internet Explorer, Opera, Firefox etc.) and entering the hostname
'NetDrive' * or the IP address '192.168.1.1'* in the address bar. Click 'Enter Configuration'
and log on under the username 'admin' and the password 'admin'*.
2.2.2 Starting the wizard
Click 'Wizard' in the top menu bar.
* These are the factory defaults. If you have already changed these settings, enter the new username
and password.
Page 17
GB
2
Get to know your Network Drive Pro
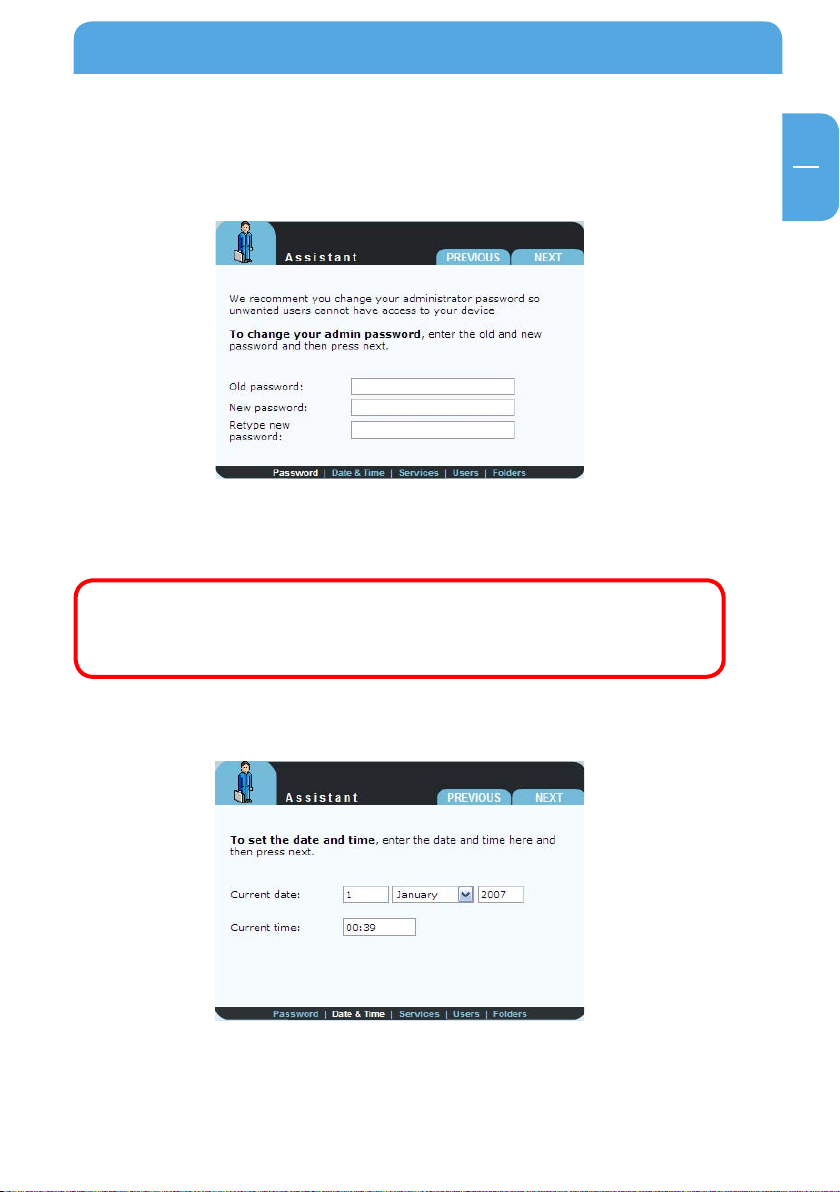
2.2.3 Changing the administrator password
Start the wizard and then click 'Next'. You now have the option of changing the administrator password.
First enter the old password (factory default setting: 'admin') and then type in the new
password twice. Now click 'Next'.
Note: We recommend changing the password because every Network
Drive Pro comes with the administrator password 'admin', in other words
any person who knows your IP address could potentially access your
Network Drive Pro.
2.2.4 C
You can change the date and time on the Network Drive Pro in this window by simply
entering the new values and clicking 'Next'.
hanging date and time
17
Page 18
GB
2
Freecom Network Drive Pro
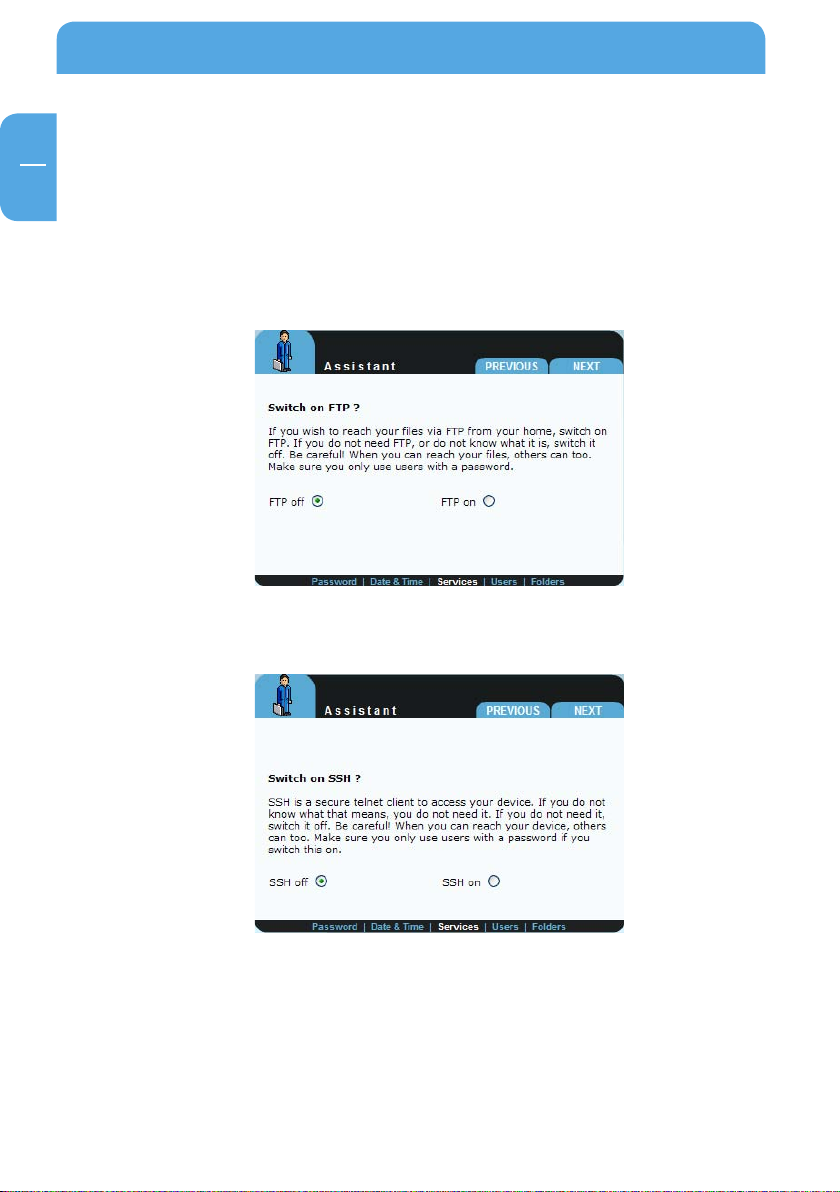
2.2.5 Services
Network Drive Pro has several useful services which you can configure in the coming
sections.
FTP server
You can enable the FTP server and specify whether it can be accessed only internally
(within your network) or also from the outside.
SSH server
On this screen you can enable the SSH server and specify.
18
Page 19
GB
2
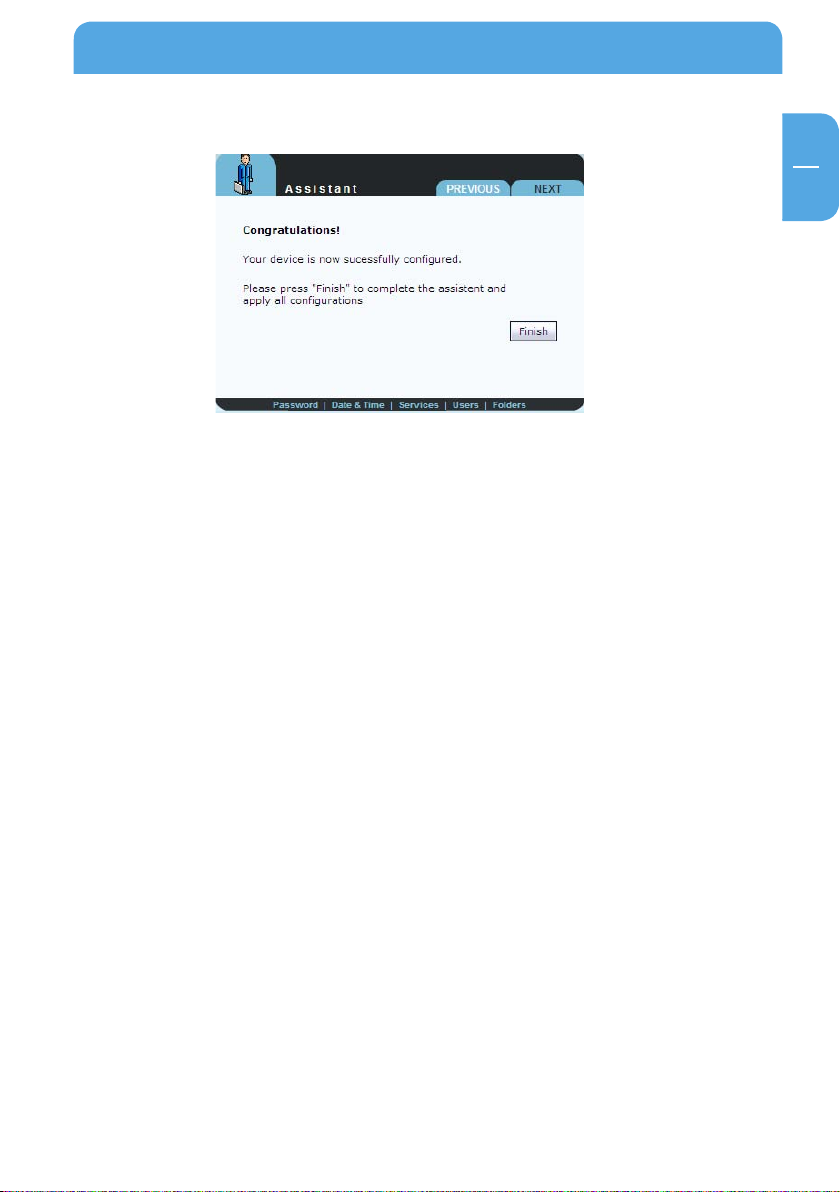
2.2.6 Finish
Click 'Finish' to save your settings.
Get to know your Network Drive Pro
19
Page 20
20
GB
2
Freecom Network Drive Pro
2.3 Accessing data via SMB
Windows
Open Windows Explorer and enter either
\\NetDrive* or
\\192.168.1.1 in the address bar.
If you have changed the host name or the IP address, please use the new settings.
Enter your username and password for accessing the Network Drive Pro. If you are logging
on as the administrator, you will have access to all folders on the Network Drive Pro.
Linux
Open the file browser (Konqueror, for instance) and enter
smb://NetDrive* or
smb://192.168.1.1*
Enter your username and password for accessing the Network Drive Pro. If you are logging
on as the administrator, you will have access to all folders on the Network Drive Pro.
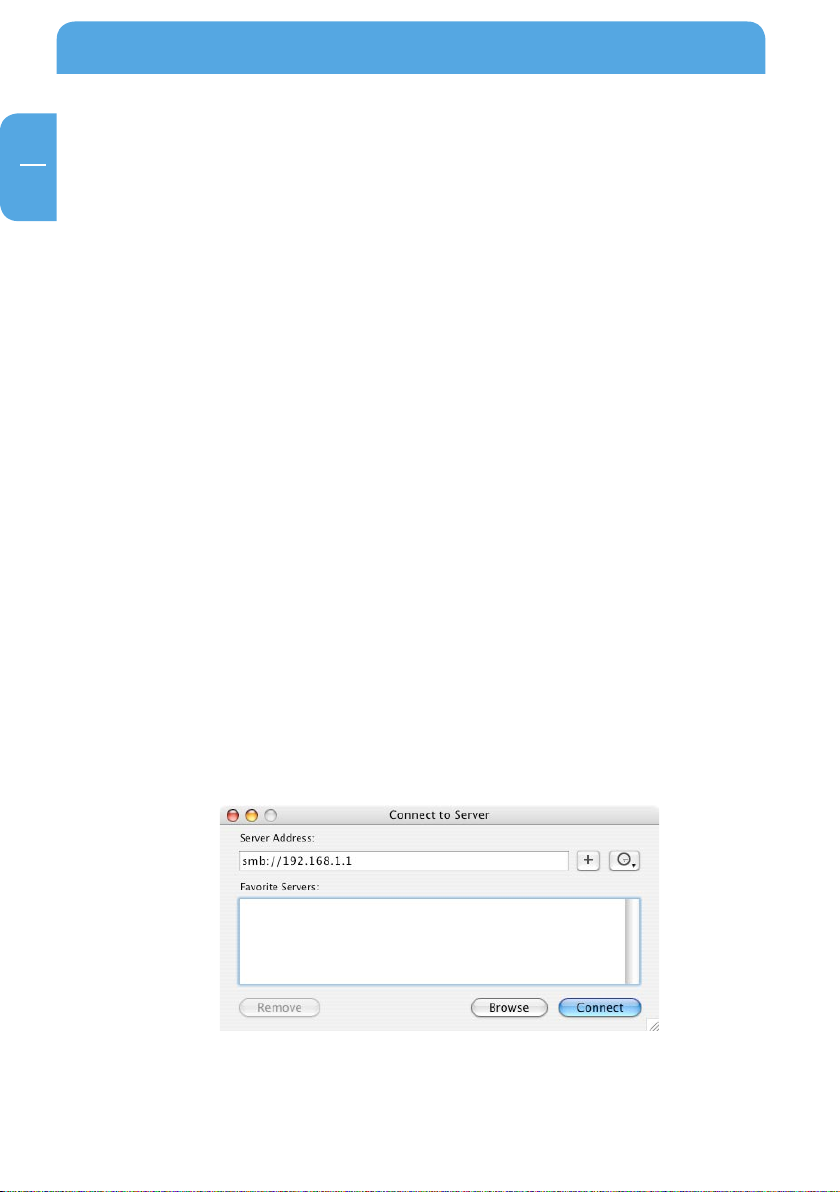
Mac OS
Mac OS X Vers.10.3 and higher
Select 'Go To' -> 'Connect with Server...'from the menu bar. The Network Drive Pro address is:
smb://192.168.1.1* or else
smb://NetDrive_NAME (factory default is smb://NetDrive).
* Factory defaults. If you have changed the host name or the IP address, please use the new settings.
Page 21
21
GB
2
Get to know your Network Drive Pro
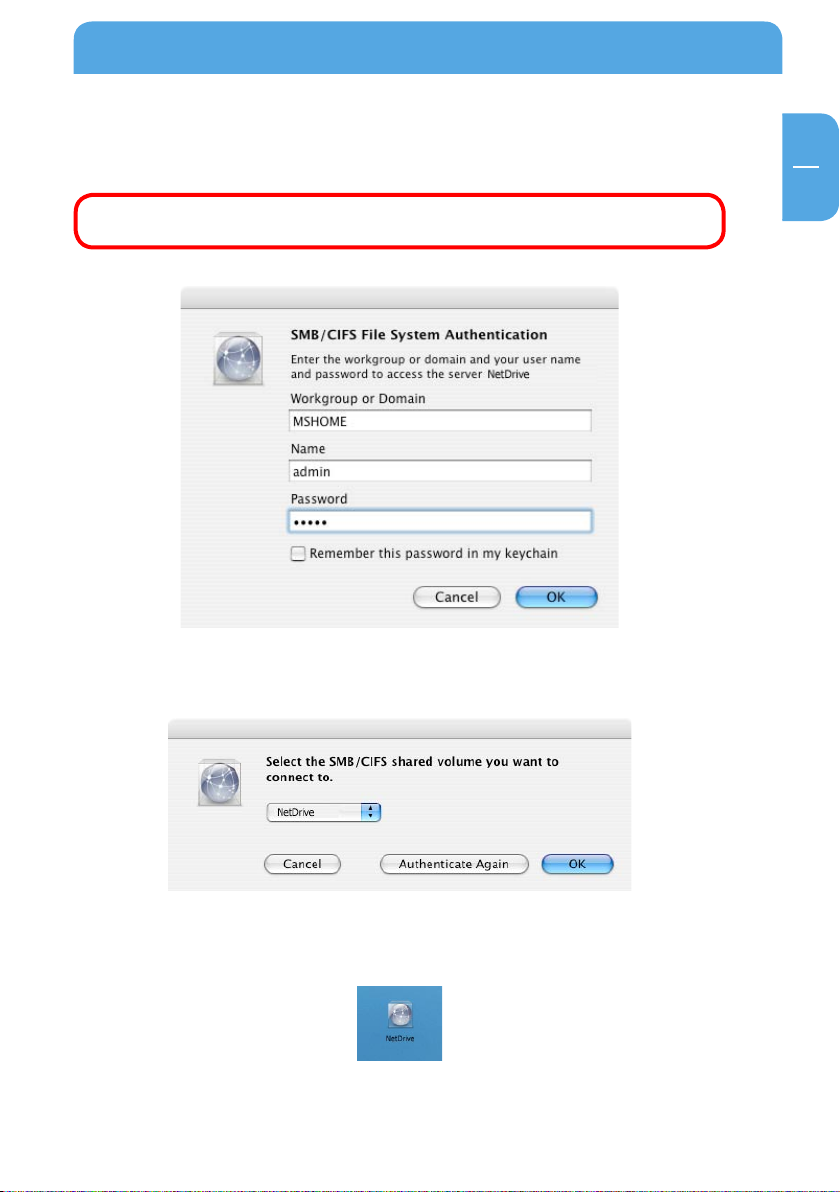
Click 'Connect'. Enter the workgroup, your username and password for accessing the
Network Drive Pro. If you are logging on as the administrator, you will have access to all
folders on the Network Drive Pro.
Note: You set the workgroup name of the Network Drive Pro under 'Connection'-& 'LAN' in Network Drive Pro Configuration menu.
You now need to select a shared folder on the next screen. Press OK to continue.
After pressing OK, the Network Drive Pro is configured and an icon appears on your
computer desktop.
To access all the Network Drive Pro folders that your username has been assigned user
privileges, simply double-click this icon.
Page 22

GB
2
Freecom Network Drive Pro
2.4 Accessing data via HTTP
Note: You have read but not write access with HTTP.
Local access
Open your browser and enter either "http://NetDrive"* or "http://192.168.1.1"* in the
address bar. Click 'Enter as User' and log on as Admin or as a user. You may now view or
download any file in your folder (as a user) or anywhere on the Network Drive Pro (as
the administrator).
2.5 Accessing data via FTP
Note: Not all browsers can upload data via FTP. Those that can include Internet Explorer
and Konqueror. We recommend using FTP client software such as WS_FTP, SmartFTP
or CuteFTP.
Local access
Enable the FTP Server option (Service -> FTP Server - Run FTP server). Use any FTP client
software or open your browser and enter
ftp://USERNAME:USERPASSWORD@192.168.1.1
or
ftp://USERNAME:USERPASSWORD@NetDrive
* If you have changed the hostname or the IP address of the Network Drive Pro, please use the new
settings here.
22
Page 23
GB
3
Network Drive Pro Functions
Chapter 3: Network Drive Pro Functions
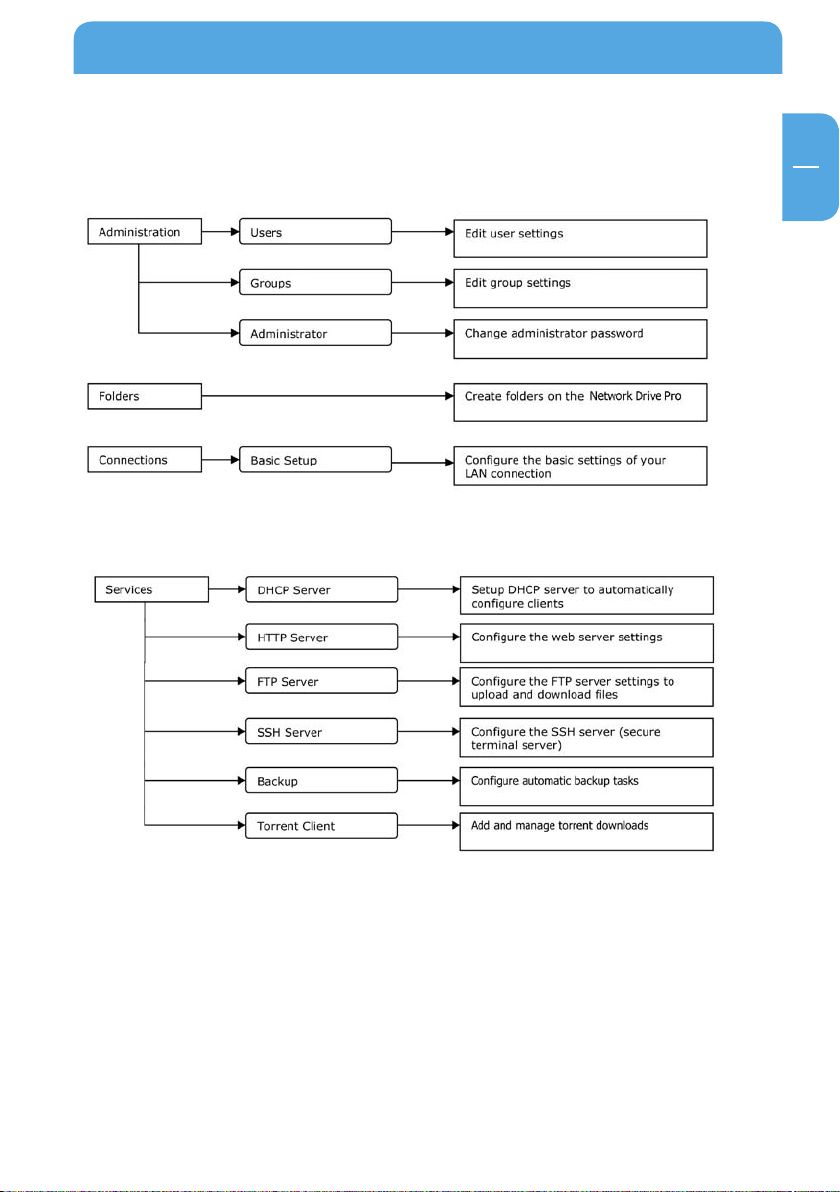
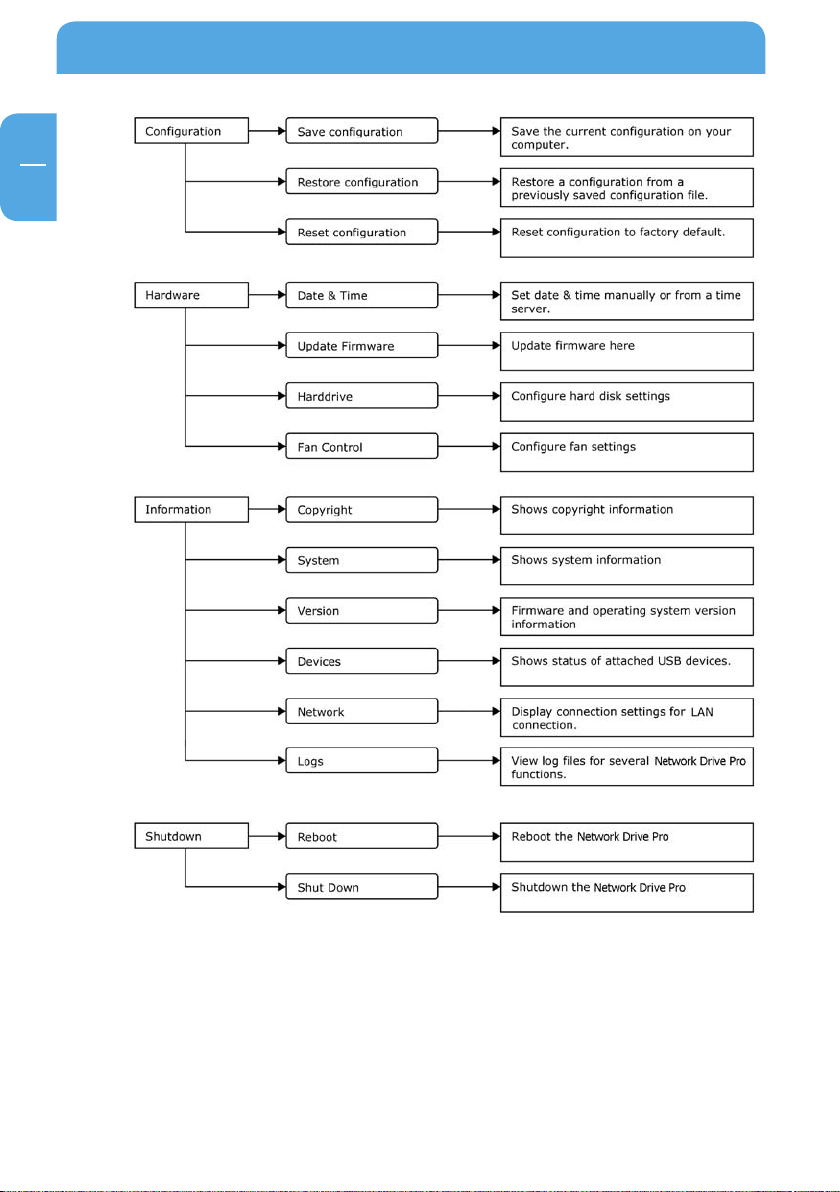
3.1 Overview
23
Page 24
GB
3
Freecom Network Drive Pro
24
Page 25
GB
3
Network Drive Pro Functions
3.2 Administration
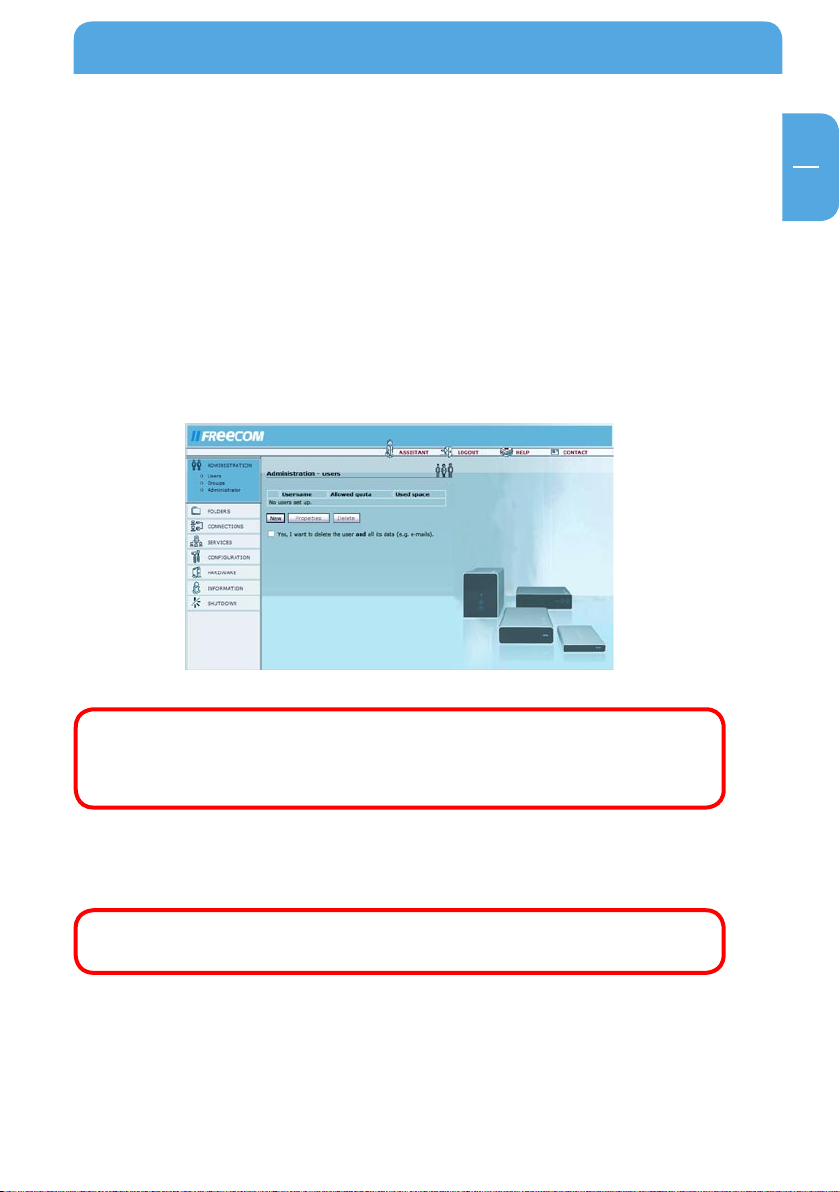
3.2.1 Users
Go to Administration -> Users.
You can manage access privileges to the Network Drive Pro by creating new users.
• Wh
en you click 'New', a dialog box appears on the screen where you can add new users.
• Enter a username and password.
• Confirm the password.
• In the 'User disk quota' field, you can limit the storage space for each user. For instance, enter '50' (50 GB) or 50m (50 MB) as the limit. If you enter '0', the user is given
unlimited space on the Network Drive Pro.
Note: The allocated space only includes files personally added by the
user and not those entered by others. If, for instance, the administrator
writes data to the user's folder, this does not count towards the user's
total allotment.
• To edit the user settings at a later time, click the user followed by the 'Properties'
b
utton.
• To remove this user, click this entry followed by the 'Delete' button.
Please confirm that you really want to perform this operation by pressing
'Yes, I want to delete the user and all its data'.
25
Page 26
GB
3
Freecom Network Drive Pro
To be able to access folders of the Network Drive Pro, you have to issue access rights for
the folders the user is meant to access. The access rights are set in the segment „Folders“ (Page 28).
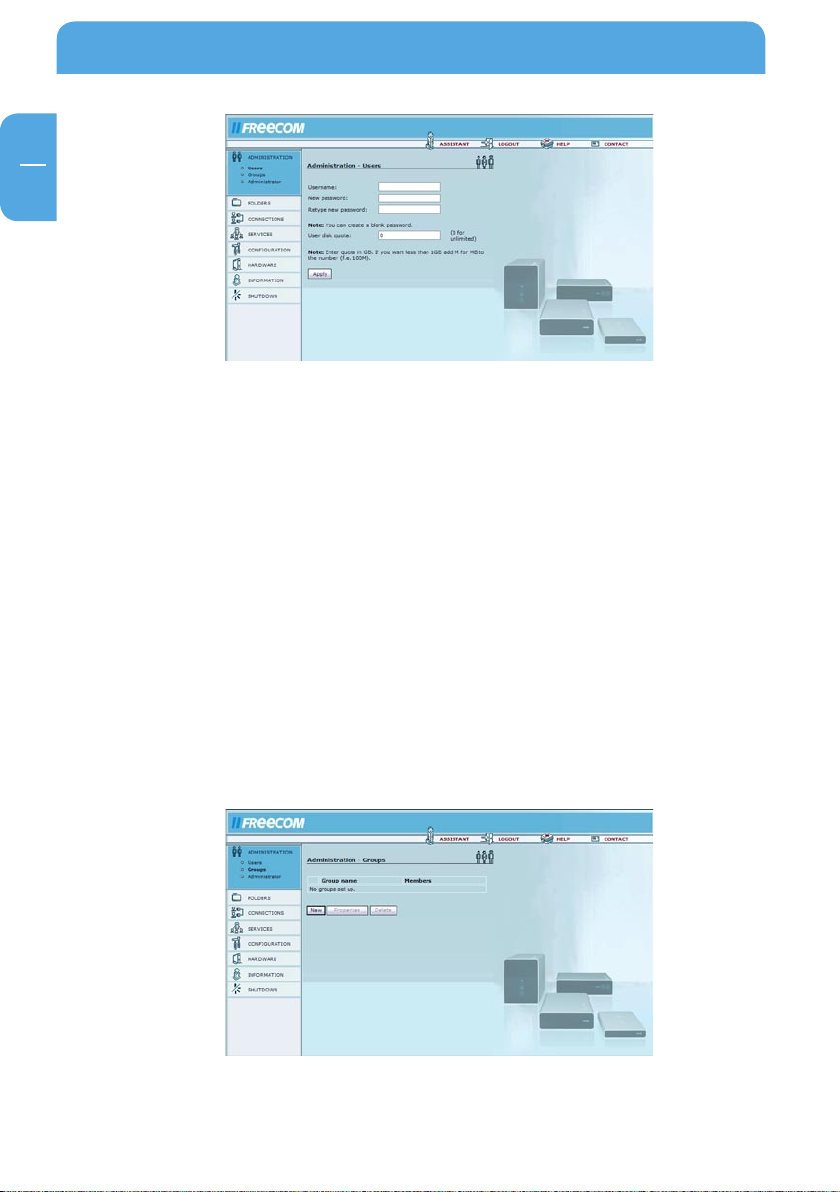
3.2.2 Gr
Go to Administration -> Groups.
Access control for all file access systems (FTP, HTTP and SMB) is structured around either
group or user access rights (privileges). You can add or remove access rights in this window. If a group is assigned privileges or has them revoked, these are assigned / revoked
for all users in this group.
• W
• Y
• I
oups
hen you click 'New', a dialog box appears on the screen where you can add new
groups.
ou can add new users or edit the group settings by selecting a group and clicking
the 'Properties' button.
f you select a group and hit the 'Delete' button, the group, but not the users in the
group, is deleted.
26
Page 27

GB
3
Network Drive Pro Functions
3.2.3 Administrator
Go to Administration -> Administrator.
Here you can alter the administrator password. Please enter the old password, the new
password and a retype of the new password.
If you have completely lost your administrator password, please do a reset to default
values as described in Reset.
27
Page 28

GB
3
Freecom Network Drive Pro
3.3 Folders
Go to 'Folders'.
The access control for all file retrieval systems (FTP, HTTP and SMB) is based on either
group or user access rights. Access permissions can be set or removed using these menus.
Folder permissions can be given either to a group or a user or both.
ressing the Add button gives you a dialog to add new folders. These folders will be
• P
created.
electing a folder and clicking on "Delete" will delete the selected folder.
• S
• You can add and delete new users and groups or edit the folder settings by selecting
a folder and clicking the „Properties“ button. Additionally you can select the access
rights individually for every group and every user (reading and writing access or
reading access only).
28
Page 29

GB
3
Network Drive Pro Functions
3.4 Connections
3.4.1 Basic Setup
Go to Connections -> Basic Setup.
Please select if you want to use a set IP address for the Network Drive Pro or if you want
the DHCP Client of the Network Drive Pro to automatically receive an IP address (e.g.,
from a different router).
ATTENTION: Before changing the settings, please consider if you will
still be able to access the Network Drive Pro after the changes have been
made! As an example, the access to the Network Drive Pro without an
DHCP-Server is not possible if you select DHCP Client.
Options Description
Device Name Name of the Network Drive Pro in the LAN.
Workgroup This is the name of the workgroup where your Network
Drive Pro is located.
29
Page 30

GB
3
Freecom Network Drive Pro
Options Description
IP address This allows you to manually enter the IP address for thenet-
work connection. This is your fixed IP address; please ask
your network manager for this information.
Subnet mask Subnet mask; please ask your network manager for this
information.
Default gateway Your ISP's gateway address; please ask your ISP or network
manager for this information. If your Network Drive Pro is
connected to a router, please enter the router's IP address
in this field.
DNS Servers Your ISP's DNS server address; please ask your ISP or net-
work manager for this information. If your Network Drive
Pro is connected behind a router, please enter the router's
IP address in this field.
DHCP Client
Enables the DHCP Client option, if the LAN port is connected to a DHCP server (e.g.
another router).
30
Page 31

GB
3
Network Drive Pro Functions
3.5 Services
3.5.1 DHCP server
Go to Services –> DHCP Server.
The DHCP server is responsible for giving dynamic IP addresses to the computers on the
LAN. For more information, please read Network Basics.
Options Description
Start DHCP server Check this if you want to run the DHCP server. Do not run
the DHCP server if you use fixed IP addresses.
Subnet mask The subnet mask in use for the DHCP server.
Gateway The IP address of the gateway the DHCP clients should be
automatically forwarded to if they want to reach external
sites.
Domain name server The IP address of the DNS server the clients should
query.
IP address range The range of IP addresses the DHCP server can use.
IP release time The time between refreshing IP addresses given to DHCP
clients.
31
Page 32

GB
3
Freecom Network Drive Pro
3.5.2 HTTP Server
Go to Services -> HT TP Server.
Use these settings to configure the web server. The web server in use is a version of
Apache.
Options Description
Use SSL encryption This will allow SSL encrypted pages (https) This is a se-
curity feature (If enabled, device is reachable via https://
ip.address, otherwise via http://ip.address).
Configuration You open and configure the existing Web Front Pages
here.
32
Page 33

GB
3
Network Drive Pro Functions
Web Front Pages and Aliases
Go to Services -> HT TP Server -> Configuration -> New.
Options Explanation
Name Enter a name for your homepage here.
Port Enter the port that you want to use to access your homepage.
(We recommend using port 80. If another port is selected, you
will need to enter the port each time you access the page.
Example: http://ip-address:81 for port 81.)
Folder Select the folder where your homepage is stored.
Enable PHP 4 Enables PHP 4 support for this DNS name.
33
Page 34

GB
3
Freecom Network Drive Pro
Web Page Aliases
Options Explanation
Name Enter a name for your alias.
Alias Enter a name used to access your alias (e.g., music) if you want
your alias to be reached at www.yourname.com/music.
Path Enter the folder path on the Network Drive Pro used to
access the alias.
34
Page 35

GB
3
Network Drive Pro Functions
3.5.3 FTP Server
Go to Services -> FTP Server.
This is a File Transfer Protocol (FTP) based server.
Options Explanation
Run FTP server Turn on the FTP server.
Use SSL encryption Activates SSL encryption for FTP. Is not supported
by all browsers.
TCP port Enter a port here if you do not want to use the default
port for FTP (port 21).
35
Page 36

GB
3
Freecom Network Drive Pro
3.5.4 SSH Server
Go to Services -> SSH Server.
The SSH server is a secure terminal client that can be used to perform advanced configuration settings. Please only use this where required because it may present a security risk. All users with a user account on the Network Drive Pro can access the Network
Drive Pro.
Options Explanation
Run SSH server Start/stop server
Allow admin login only If this function is activated, only the administrator can
access the Network Drive Pro over the SSH.
Attention: Starting the SSH server represents a security risk. Only do this
if you trust the users!
36
Page 37

GB
3
Network Drive Pro Functions
3.5.5 Backup
Go to Services -> Backup.
A detailed description on how to set up a backup can be found in chapter 5.6 Click „New“
to create a new backup task.
Options Explanation
Status Displays if the task is enabled or disabled
Name Any name for the backup task that may be chosen
Source Source directory (local folder or shared network folder)
Destination Destination directory (local or network)
Schedule Time plan of the backup (hourly, daily, weekly, monthly)
Day Date when the backup should be started
Time Time when the backup should be started
Username User name if a backup of a shared network folder should
be created
Password Password if a backup of a shared network folder should
be created.
37
Page 38

GB
3
Freecom Network Drive Pro
3.5.6 Torrent Client
Go to Services -> Torrent client.
With support from the torrent client you can download files over the bittorrent network.
Enter the URL of a torrent file and click „Start Download“. The folder „torrent“ is automatically saved on the Network Drive Pro where all files are saved.
The download status can be seen at the bottom.
Options Explanation
Refresh Refreshes the view
Terminate Terminates the current download
ATTENTION: Please respect the law and only download legally! Freecom
cannot be held responsible for the content of your downloads!
38
Page 39

GB
3
Network Drive Pro Functions
3.6 Configuration
It is possible to save and restore all Network Drive Pro user settings.
Note: Please do not save your user settings directly on the Network Drive
Pro.
1 S
3.6.
Open Configuration -> Save Configuration.
In this window, you can save the current configuration file on your computer.
ave configuration
After pressing the button, you are asked where you want to save the back-up copy of
the configuration file. Select a location and click 'Save Configuration'.
39
Page 40

GB
3
Freecom Network Drive Pro
3.6.2 Restore Configuration
Open Configuration -> Restore Configuration.
This window offers you the option of restoring a previously saved configuration file.
Press 'Browse' to select an existing backup copy of your configuration file. Then click the
'Restore' button to start the process.
Do not turn the Network Drive Pro off while the configuration is being restored. This will
corrupt and destroy the configuration of your Network Drive Pro.
A button is provided that allows you to delete all users not found in the restored configuration. If you do not press this button, the user data and logins are not deleted.
You may also select whether to delete the folders of your Network Drive Pro that do not
exist in the restored configuration. All data in these folders is then deleted!
Attention: Please keep in mind that any changes you may have made to the
configuration after backing up the restored configuration will be deleted.
Attention: If the Restore Configuration option is enabled, all existing
settings will be lost! Please save the current configuration beforehand!
The administrator password remains unchanged.
40
Page 41

GB
3
Network Drive Pro Functions
3.6.3 Reset configuration
Open Configuration -> Reset Configuration.
Please click the reset button to reset the factory default configuration. This does not
affect or change the version of firmware. You can delete all users.
You can delete all users and groups with one button. All data is then deleted! If this option
is not selected, the user data and logins are not deleted. You may also choose to delete
all folders on your Network Drive Pro. All data in these folders is then erased!
Attention: Removing all users and folders also means that this data is lost.
To reset the hardware, press the Reset button located on the back of the Network Drive
Pro. Do this for instance when you are no longer able to access the web interface. When
you press the Reset button, the administrator password is also reset to 'admin'.
41
Page 42

GB
3
Freecom Network Drive Pro
3.7 Hardware
3.7.1 Date & Time
Open Hardware -> Date & Time.
You may change the date and time on the Network Drive Pro here. You may change the
settings manually or use the Internet time server.
Options Explanation
Time Zone Select your local time zone.
Use European summer
time rule
Automatically synchronize
with an Internet time server
Set manually date and time If you enable this option, please set the date and time
Enable this option if you live in a country that uses
summer time.
When using this option, select a time server and update
interval.
manually.
42
Page 43

GB
3
Network Drive Pro Functions
3.7.2 Update Firmware
Open Hardware -> Update Firmware.
Here you can update the firmware. New firmware usually fixes bugs and adds additional
features to your Network Drive Pro. Check on www.freecom.com if new firmware updates
are available for the Freecom Network Drive Pro.
Freecom will release new and updated firmware on a regular basis. It is also possible to
obtain the source code and create your own firmware.
Attention: Changing the source code of the firmware is at your own
risk!
Download the firmware file and click on "Browse" to select the file. Click on "Update
firmware" to start the update.
Attention: Updating the firmware is at your own risk! Make sure to make
a backup of your current configuration before updating the firmware.
3.7.3 H
O
You can configure any hard drive setting in this window.
arddrive
pen Hardware -> Harddrive.
43
Page 44

GB
3
Freecom Network Drive Pro
Spin-down time
If the Network Drive Pro is not used for an extended period of time, your best option
may be to shut down the hard drive. This reduces power consumption and the amount
of noise and heat generated. It also increases the operational life of the hard drive. When
the hard drive is shutdown, it will take longer to access it initially because the hard drive
has to first start spinning.
You can set the time after which the hard disk shuts down following the last access.
Once you have set the time, click 'Apply'.
Formatting the hard drive
Before formatting the internal HD on the Network Drive Pro, please read the warning
notices. All data is lost during formatting! After reading the warning notices, please
press the button to confirm you want to format the hard drive. Then click the 'Format
drive' button.
Attention: When you click the 'Format drive' button, all data on the drive
is lost! Please make a backup copy before formatting the drive.
Attention: Stop all operations on the device while the drive is being
formatted!
44
Page 45

GB
3
Network Drive Pro Functions
3.7.4 Fan control
Open Hardware -> Fan Control.
This option allows you to adjust the fan speed. Reducing the fan speed means less noise,
but higher temperatures in the device. When operating the device in extremely warm
conditions or whenever the device is in constant use, we recommend that you increase
the fan speed to deliver more cooling capacity.
45
Page 46

GB
3
Freecom Network Drive Pro
3.8 Information
This is the information menu. It contains diagnostics data and general information.
3.8.1 Copyright
Open Information -> Copyright.
This section contains information on copyrights for your Network Drive Pro.
3.8.2 Sy
Open Information -> System.
You will find general system information on available disk space and your processor.
stem
46
Page 47

GB
3
Network Drive Pro Functions
3.8.3 Version
Open Information -> Version.
This window displays information on the operating system and firmware contained on
Network Drive Pro.
3.8.4
Devices
Open Information -> Devices.
This dialog box displays a list of attached devices. Click 'Refresh' in your browser if one
of the connected devices is not displayed on the screen.
47
Page 48

GB
3
Freecom Network Drive Pro
3.8.5 Network
Open Information -> Network.
Both LAN Network information is found here for the Network Drive Pro. If you need the
IP address of the Network Drive Pro, please look for it here.
LAN Port:
Options Explanation
Hardware Address Shows the MAC address or physical address of the port
IP address Your Network Drive Pro (LAN) internet IP address
Broadcast Address This address is used to ask all computers on a subnet at
once
Subnet mask This is the subnet mask you setup for your network
48
Page 49

GB
3
Network Drive Pro Functions
3.8.6 Logs
Open Information -> Logs.
If you encounter problems with you Network Drive Pro, you can use the log file recording
option to locate the issue.
The Network Drive Pro offers several log files for different software components:
- Kernel
- DHCP-server
- Hotplug
- Netbios
- SMB server
- HTTP server
- FTP server
- Backup
- Torrent client
- Configuration errors
To enable the log function, simply hit the 'Start log file recording' and then press 'Apply'. Select a function (e.g. DHCP-server) from the list and click 'Refresh' to update the
screen display.
49
Page 50

GB
3
Freecom Network Drive Pro
3.9 Shutdown
This screen allows you to reboot or shutdown the Network Drive Pro. (You can then safely
unplug the device from the power supply.)
Attention: Always shutdown the Network Drive Pro before unplugging
the power supply. If you do not do this, you may damage your drive or
corrupt the system.
1 Reboot
3.9.
O
pen Shutdown -> Reboot.
If you encounter any problems with the Network Drive Pro, it may help if you restart the
unit. Click 'Reboot' and the Network Drive Pro restarts.
3.9.2 S
hut Down
Open Shutdown -> Shut Down.
The Network Drive Pro shuts down when you press the 'Shutdown' button. When all the
lights on the device are off, you can unplug it from the power outlet. This may take a few
seconds. Press the Power on button to turn the Network Drive Pro back on.
50
Page 51

GB
4
The Freecom Network Storage Assistant
Chapter 4: The Freecom Network Storage Assistant
4.1 Features of the Freecom Network Storage Assistant (PC)
The Freecom Network Storage Assistant helps you to locate each Network Drive Pro in
your network. When started, it displays all Network Drives Pro available in your network
and helps you configure the Network Drive Pro as a printer server or create network folders. You can also configure the basic settings and quickly find the configuration website
using the Freecom Network Storage Assistant. You may also perform any of the functions
of the Freecom Network Storage Assistant manually.
The preset password and login name for the Network Drive Pro are:
Login Name: admin
Password: admin
51
Page 52

52
GB
4
Freecom Network Drive Pro
4.1.1 Configure basic settings of your Freecom Network Drive Pro
In this screen, you can set an IP address, subnet mask, device name and workgroup name
for your Network Drive Pro. With this information, it is easy to locate your Network Drive
Pro in the network without the wizard. To change the settings, you have to first enter
the administrator password.
4.1.2 Accessing your Network Drive Pro web interface
When you click this menu item, the web interface for your Network Drive Pro opens in
your default browser.
Page 53

GB
4
The Freecom Network Storage Assistant
4.1.3 Adding and removing network drives
You can assign a drive letter to shared folders on your Network Drive Pro. This allows you
to access to the files in Windows more quickly.
4.1.4 Add a new printer
This windows allows you to configure any printer connected to your Network Drive Pro
on your local PC using Windows Printer Wizard.
Note: The attached printer has to be set up separately on each computer!
53
Page 54

GB
4
Freecom Network Drive Pro
4.1.5 Start recovery procedure
This procedure can reset and repair an Network Drive Pro to factory default settings if you
cannot access your Network Drive Pro anymore. Your user data will not be deleted!
To restore your settings, please proceed as follows:
a
Enable the Recovery mode by clicking 'Start the recovery procedure' in the Freecom
)
Network Storage Assistant.
Turn the Network Drive Pro off using 'Shutdown'.
b)
c) Unplug the Network Drive Pro's AC power pack.
d) Use a pointed object to carefully press the 'Reset' button. It is located next to the AC
power slot on the back of the Network Drive Pro.
Keep the 'Reset' button pressed down and reattach the AC power supply.
e)
f) Release the 'Reset' button after 5 seconds.
g) The LED on the PWR button lights up, indicating that the Recovery mode is enabled.
The device's LED flashes while the recovery process is taking place.
Once the LEDs stop flashing and the LED on the PWR button turns off, the recovery
h)
process is complete. A message window appears on screen, telling you that the
recovery is finished.
Once it is complete, press OK in the Freecom Network Storage Assistant window.
i)
54
Page 55

GB
4
The Freecom Network Storage Assistant
Note: After recovery, all user data is still available on the Network Drive
Pro. To avoid problems, the administrator should backup all user data
and format the hard disk. If an old configuration file was saved before,
the administrator should load this configuration and afterwards copy
the individual user data back to its folders.
4.1.6 Repeat search for available Freecom Network Drive Pro
lick here to repeat the search for your Network Drive Pro if it was not detected during
C
the first search. Please make sure that your network is configured as described above in
this manual and that all cables are properly attached.
55
Page 56

56
GB
5
Freecom Network Drive Pro
4.2 Features of the Freecom Network Storage Assistant (Mac)
The Freecom Network Storage Assistant helps you to locate each Network Drive Pro in
your network. When started, it displays all Network Drives Pro available in your network
and helps you configure the Network Drive Pro and that create network folders. You can
also configure the basic settings and quickly find the configuration website using the
Freecom Network Storage Assistant. You may also perform any of the functions of the
Freecom Network Storage Assistant manually.
The preset password and login name for the Network Drive Pro are:
Login Name: admin
Password: admin
Page 57

57
GB
5
Network Drive Pro in everyday use
4.2.1 Configure basic settings of your Freecom Network Storage device
In this screen, you can set an IP address, subnet mask, device name and workgroup name
for your Network Drive Pro. With this information, it is easy to locate your Network Drive
Pro in the network without the wizard. To change the settings, you have to first enter
the administrator password.
4.2.2 Web interface of your Freecom Network Storage device
When you click this menu item, the web interface for your Network Drive Pro opens in
your default browser.
4.2.3 Connect to a shared folder of your Freecom Network Storage device
This window allows you to mount any folder of your Network Drive Pro on your Mac. This
allows fast accesses to this folders.
4.2.4 Search again for available Freecom Network Storage device
Click here to repeat the search for your Network Drive Pro if it was not detected during
the first search. Please make sure that your network is configured as described above in
this manual and that all cables are properly attached.
Page 58

GB
5
Freecom Network Drive Pro
Chapter 5: Network Drive Pro in everyday use
5.1. Using the Network Drive Pro behind a router
5.1.1 Connecting the hardware
1. Connect a RJ45 cable to a LAN port on your router.
2. Plug the other end of the cable into the LAN port on the Freecom Network Drive Pro.
3. Once the Network Drive Pro is configured, you can connect the network PC to the
Network Drive Pro or your router.
5.
1.2 Using a fixed IP address
Preparation
1.
Check the 'DHCP' box under TCI/IP Settings in your computer's network settings. For
more details, refer to Appendix B in this manual.
2.
Connect your PC to the Network Drive Pro.
3. Open the Internet browser and start the Configuration menu for the Network Drive
Pro (factory defaults: http://NetDrive or. http://192.168.1.1).
Open 'Connection' -> 'Basic Setup' and select 'Use fixed IP address'.
4.
5. Open 'Connections' -> 'Basic Setup' and select an IP address for the Network Drive Pro.
To prevent conflicting IP addresses in your network, make sure the LAN
IPs for your Network Drive Pro and router are different.
Use the following settings:
IP address Enter an IP address that lies within the your router's ad-
dress range; if the router's IP address is 192.168.2.1, enter
192.168.2.100 for your Network Drive Pro.
This IP address allows you to access to the Network Drive
Pro from anywhere in your local network.
58
Page 59

GB
5
Network Drive Pro in everyday use
Subnet mask Enter the sub net m as k of your router (e xampl e:
255.255.255.0).
Default gateway IP address of your router, e.g., 192.168.2.1.
59
Page 60

GB
5
Freecom Network Drive Pro
5.1.3 Using DHCP
An alternative to using a fixed IP address is assigning your Network Drive Pro a dynamic IP address
through your router. You will need to enable your router's DHCP server before using the Network Drive
Pro as a DHCP client behind the router! For further details, please refer to your router's manual.
Before getting start
1.
Check the 'DHCP' box under TCP/IP Settings in the network settings of your PC. For
more details, refer to Appendix B in this manual.
2.
Connect your PC to the Network Drive Pro.
3. Open the Internet browser and start the Configuration menu for the Network Drive
Pro (default: http://NetDrive or http://192.168.1.1).
Go to 'Connections' -> 'Basic Setup' and choose 'Run DHCP Client'. Click 'Apply'. Your
4.
Network Drive Pro is now assigned an IP address by your router.
60
Enable the DHCP server on your router's Configuration window. For more information
5.
on this topic, please refer to your router's manual.
6.
Connect your Network Drive Pro to a LAN port on your router.
Page 61

GB
5
Network Drive Pro in everyday use
5.2 Setting up your own homepage on the Network Drive Pro
Setting up web front pages
• Add a new folder in the Network Drive Pro configuration window (example:
Homepage).
• S
elect 'New' under 'Services' -> 'HTTP Server'.
• Enter a name such as 'My Homepage'.
• Enter the second host created in step 1 in the field 'DNS Name' (example: MyNetDrive.
zapto.org).
nter any port in 'Port'. (We recommend that you use port 80).
• E
• As the 'Folder', select the one you created.
• Click 'Apply'. The HTTP now restarts.
• Create an index.html in the selected folder. This HTML page is opened whenever you
access your host (e.g., http://MyNetDrive.zapto.org).
Web Front Page Aliases
Once your web front page has been set up, you can set aliases for your folders. Enable
the check box for your web front page and click 'Properties'. Select 'New' on the 'Properties' screen.
Enter a name for your alias. You may choose any name.
• P
lease enter an abbreviation as the 'Alias' (e.g., mp3).
• Please enter the folder path in the field labeled 'Path' (e.g., files/test/user10/music/).
You can now access this folder (for instance, files/test/user10/music/) using the alias
(e.g., http:// MyNetDrive.zapto.org/mp3").
Note: You can only use hosts from a provider. It is however possible to
use multiple domains from one provider.
61
Page 62

GB
5
Freecom Network Drive Pro
5.3 Setting up a printer
Windows: Installing a USB printer
To install a USB printer, connect the printer to one of the USB host ports on the Network
Drive Pro. Check to make sure the Network Drive Pro is on. Now turn the printer on.
Installing using the Freecom Network Storage Assistant
1.
Connect a USB printer to the Network Drive Pro.
2. Open the Network Drive Pro Configuration page and check whether the printer was
detected under 'Information' -> 'Devices'.
3.
Start the Freecom Network Storage Assistant and click 'Add a new printer'. The Free-
com Network Storage Assistant automatically applies all settings. You only need to
select the driver for your printer model.
Manual installation
Connect a USB printer to the Network Drive Pro.
1.
2. Open the Network Drive Pro Configuration page and check whether the printer was
detected under 'Information' -> 'Devices'.
3.
Go to Start -> Settings -> Printer and faxes -> Add printer in Windows.
4. The print wizard starts. Click 'Next'.
5. Select 'Add local printer on this computer' and check the box next to 'Automatically
detect and install my plug&play printer'. Click 'Next'.
Select the printer port in the next screen. Open 'Add new port' and select 'Standard
6.
TCP/IP port'. Click 'Next'.
The 'Add Standard TCI/IP port wizard' starts. Click 'Next' to continue. The 'Add port'
7.
window opens. Use the following settings: Printer name or IP address: Network Drive
Pro name or IP address of the Network Drive Pro port name: 9100. Click 'Next'.
Now you need to enter the other port data. Set Device Type to: default (Generic
9.
Network Card) and click 'Next'. An overview of your settings is provided in the next
screen. Click Finish.
To complete the installation, you now have to install the printer software. Select the
10.
software for your printer. If your printer is not contained in the list, hit 'Have Disk'
and insert the drivers disk or CD for your printer.
62
Page 63

63
GB
5
Network Drive Pro in everyday use
Note: You can also use the Freecom Network Storage Assistant for quick
installation of your printer in Windows. For detailed instructions on
usingthe FNSA, please refer to chapter 4, 'The Freecom Network Storage
Assistant'.
Mac OS X: Installing a USB printer
To install a USB printer, connect the printer to one of the USB host ports on the Network
Drive Pro. Check to make sure the Network Drive Pro is on. Then turn the printer on.
1. Connect a USB printer to the Network Drive Pro.
2. Open the Network Drive Pro Configuration page and check whether the printer was
detected under 'Information' -> 'Devices'.
3. Open 'System preferences' -> 'Printing & Faxing'.
4. Click '+' to add a new printer.
5. The 'Printer Browser' opens. Select 'IP printer' as the printer type and select the following settings:
A list of available printer drivers is now compiled.
Protocol: HP Jet Direct-Socket
Address: 192.168.1.1:9100 (replace 192.168.1.1 with the IP address
that you set for your Network Drive Pro)
Queue name: You may leave this field blank.
Page 64

64
GB
5
Freecom Network Drive Pro
6. You can enter additional information on the printer in the 'Name' and 'Location'
fields.
7. Select the model of your printer under 'Print Using'. You may need to install the printer
driver for your printer beforehand.
8. Click 'Add' to finish printer setup.
Page 65

GB
5
Network Drive Pro in everyday use
5.4 SSH Server
The SSH server is a secure terminal client that can be used to perform advanced configurations. Please use this only where absolutely necessary because each user with an
account can also connect to the SSH server.
5.4.1 Starting the SSH server
Open 'Services' -> 'SSH Server' and enable 'Run SSH server'.
Attention: Using an SSH server presents a security risk. Only do this if
you trust the users!
65
Page 66

GB
5
Freecom Network Drive Pro
5.4.2 Connecting with the SSH server for Windows
Install an SSH client (e.g., PuTTY) and start it. Enter your Network Drive Pro's IP address/
hostname:
With PuTTY, you only need to enter the IP address and hostname, and can leave all other
settings unchanged. To connect, simply press 'Open':
Log on with the username and password.
66
Page 67

GB
5
Network Drive Pro in everyday use
5.4.3 Linux/Mac OS X
Open the console window or start 'Terminal' (Mac OS X). You now need to type in:
ssh Network Drive Pro_IP –l admin
Network Drive Pro_IP = IP address of your Network Drive Pro (192.168.1.1, for instance).
Now connect with the Network Drive Pro's SSH server and sign in as admin. You can use
the SSH server once you have entered the administrator password.
5.4.4 Sample SSH application
SSH allows you to instruct the Network Drive Pro to download files from an FTP server.
The file is then saved on the Network Drive Pro without having to turn the PC on. This
featureis particularly useful when downloading large files from slow FTP servers. The
syntax for the 'ftpget' function is: ftpget -u <username> -p <password> <ftp server>
local file path and name & Remotefilepathandname
Example:
ftpget -u anonymous -p test@test.de ftp.ftp.com ftp.exe /pub/ test.exe &
Options Explanation
User to Connect As: anonymous
Password: test@test.de
FTP server: ftp.ftp.com
Local file name: ftp.exe —> name used to save the file on the Network
Drive Pro
Remote file path and name: & /pub/test.exe —> path and file name on FTP server
—> Continues download when PuTTY is closed.
67
Page 68

GB
5
Freecom Network Drive Pro
5.5 Connecting External Drivers (USB)
For more information on attached external USB mass storage devices, please refer to the
section 'Information on the Network Drive Pro configuration pages'.
Installing USB mass storage devices
To add more disk space to the Network Drive Pro, plug a USB mass storage device into one
of the USB host ports. Then turn on the external USB device. The disk space on theUSB
device should appear as a shared folder. When using SMB (Windows File Sharing), it may
take a few minutes until the Windows-based computer detects the new folder. If you
are using a browser (HTML) to view your files, you can click Refresh. This shared folder
can be accessed via FTP, HTML and SMB (Window File Sharing). The folder is configured
with read and write privileges for all users located in the master directory (/). Once the
device is attached, you can limit the user privileges. Please read the chapter on adding
users and groups and on setting folder rights.
Attention: Optical drives such as DVD writers can only be used to read
files and data.
Attention: When attaching a card reader, you need to insert the flash disk
before connecting it to the Network Drive Pro.
68
Page 69

GB
5
Network Drive Pro in everyday use
Power supply
All host ports can supply the USB-specific 500 mA current. If more power is required,
please use the AC power supply that came with the external USB device.
File systems
The attached USB device has use in a file system format supported by the Network Drive
Pro. The supported file systems are:
-
AT32
F
- NTFS (read-only access)
- ext2
- ext3
- reiserfs
- HFS(+) (read-only access)
Note: To obtain full access to the external drive, we recommend that you
us
e FAT32 when formatting the drive.
5.6 Creating automatic backups
With the Network Drive Pro you can create backups of folders on your Network Drive Pro
as well as from shared folders of computers connected to your Network Drive Pro.
To create a backup plan please proceed as follows:
- Go to Services --> Backup on the Web interface of the Network Drive Pro.
- Click „New“. The input screen to create backups opens.
- Please fill in the blanks as follows:
Status
Select „Enabled“ to activate the backup or „Disable“ to deactivate the backup.
Name
Please insert a name for the backup here. You may choose any name.
69
Page 70

GB
5
Freecom Network Drive Pro
Source
Please insert the network path and the shared folder here, e.g.
\\192.168.1.200\1
In this example a backup of the folder „1“ is created from the computer with the IP address 192.168.1.200. Please ensure that the folder „1“ is shared and can be accessed from
the network.
Destination
Please insert the destination folder for the backup here. This can be a folder on the Network
Drive Pro, a folder on a different computer in the network or a external hard drive.
Schedule
Please select from the pulldown-menu, how often the backup should be created. You
can select if the backup should be created hourly, daily, weekly or monthly.
Day
Please insert the date when the backup should be started. If the previous selection was
„hourly“ or „daily“ an entry is not necessary here.
Time
Please insert the time when the backup should be started.
Username
User name for the backup of the shared network drive
Password
Password for the backup of the shared network drive
Click „Apply“ to save the settings.
During every backup the data of the destination drive is overwritten by the data of the
source drive. Data that already exists in the backup that is non-existent on the source
drive is preserved.
70
Page 71

GB
Appendix
Appendix A: CE, FCC and other certifications
CE
EN 55 022 Declaration of Conformance. This is to certify that the Freecom Network Drive
Pro is shielded against the generation of radio interference in accordance with the
application of Council Directive 89/336/EEC, Article 4a. Conformity is declared by the
application of EN 55 022 Class B (CISPR 22).
FCC
This device complies with part 15 of the FCC Rules. Operation is subject to the following
two conditions:
1. This device may not cause harmful interference, and
2. this device must accept any interference received, including interference that may
cause undesired operation.
Federal Communications Commission (FCC) Compliance Notice
Radio Frequency Notice
This equipment has been tested and found to comply with the limits for a Class B digital
device, pursuant to part 15 of the FCC Rules. These limits are designed to provide reasonable protection against harmful interference in a residential installation. This equipment
generates, uses, and can radiate radio frequency energy and, if not installed and used in
accordance with the instructions, may cause harmful interference to radio communications.
However, there is no guarantee that interference will not occur in a particular installation.
If this equipment does cause harmful interference to radio or television reception, which
can be determined by turning the equipment off and on, the user is encouraged to try
to correct the interference by one or more of the following measures:
•
eorient or relocate the receiving antenna.
R
• Increase the separation between the equipment and receiver.
• Connect the equipment into an outlet on a circuit different from that to which the
receiver is connected.
• C
onsult the dealer or an experienced radio/TV technician for help.
71
Page 72

GB
Freecom Network Drive Pro
Appendix B: Preparing LAN for use with the Network Drive Pro
This appendix provides a description of how to prepare your computer network for connecting with the Network Drive Pro and the Internet.
Preparing the computer for connection to the Network Drive Pro
To connect to the Network Drive Pro, you have to install TCP/IP (Transmission Control
Protocol/Internet Protocol) on each of your network computers and select the required
network protocol. If a network interface card (NIC) is already installed on your PC, then
TCP/IP is probably also already installed.
Co
nfiguring Windows 98 SE and Windows Me to work with the Network Drive Pro
To use your network and Network Drive Pro, you will need to manually install TCP/IP and
configure it on each computer in the network. Have your Windows CD handy before you
begin as you may need it when installing TCP/IP.
Installing the required network components
To install or scan for the components required for IP network operation:
1
Click 'Start' - 'Settings' - 'Control Panel' on your Windows taskbar.
.
2. Double-click the Network icon. The Network form contains a list of installed components.
You need to make sure that an Ethernet adapter (NIC), the TCP/IP protocol and the Client for Microsoft Networks are installed. You do not need to remove any of the other
components displayed in the Network Components window.
Installing an Ethernet adapters (NIC)
Click the 'Add' button.
a.
b. Select an adapter and click 'Add'.
c. Select the manufacturer and model of the Ethernet adapter and then click 'OK'.
Installing TCP/IP:
a.
Click the 'Add' button.
b. Select Protocol and click 'Add'.
c. Select Microsoft.
d. Select TCP/IP and then click 'OK'.
72
Page 73

GB
Appendix
Installing Client for Microsoft Networks:
a. Click the 'Add' button.
b. Select Client and click 'Add'.
c. Select Microsoft.
d. Select Client for Microsoft Networks and then click 'OK'. Please restart your PC in
order to have any changes take effect.
Obtain your TCI/IP configuration via DHCP
Once the TCP/IP protocol has been installed, you need to add certain information on each
computer to ensure that other network devices can be accessed. The Network Drive Pro
is preconfigured to automatically forward this information to all computers connected
to its LAN ports. The computers can obtain this information from Network Drive Pro's
internal DHCP server. To use DHCP with the recommended default addresses, please
follow the instructions step by step:
1
Start the Network Drive Pro and wait until it boots. The LED ring lights up once the
.
boot process is complete. (This may take up to 30 seconds.) Connect all computers
to the LAN port on the Network Drive Pro.
2.
Open the Network Control Panel on each of the attached computers and go to the
'Configuration' tab.
Select TCT/IP->(your Ethernet adapter) from the list of network components and click
3.
'Properties'.
Go to 'Obtain an IP address automatically' on the IP Address tab.
4.
5. Open the 'Gateway' tab.
6. If any Gateways are listed, delete them.
7. Click 'OK'.
8. Restart your computer. Repeat steps 2 - 8 on each computer in your network.
Selecting the type of Internet access
Click the 'Start' button on the Windows taskbar, go to 'Settings' and then click 'Control
1.
Panel'.
2.
Double-click the 'Internet Options' icon.
3. Select 'I want to set up my Internet connection manually' or 'I want to connect through
a Local Area Network' and click 'Next' to continue.
Select 'I want to connect through a Local Area Network' and then click 'Next' to
4.
continue.
Uncheck all boxes on the LAN Internet Configuration screen and then click 'Next'.
5.
6. Follow all the instructions provided by the Wizard.
73
Page 74

GB
Freecom Network Drive Pro
Check the TCP/IP properties
Once your PC has been configured and restarted, you can check the TCP/IP configuration
using the utility program winipcfg.exe:
1.
Click 'Start' in the Windows taskbar and then press 'Run'.
2. Enter 'winipcfg' and then click 'OK'. The program winipcfg lists among other things
your IP address, subnet mask and standard Gateway.
3.
Choose your Ethernet adapter from the drop-down menu. The window is refreshed
and shows your settings. These should look like this if you are using the default settings for TCP/IP recommended by Freecom:
The IP is between 192.168.1.2 and 192.168.1.254.
4.
5. The subnet mask is 255.255.255.0.
6. The standard Gateway is 192.168.1.1.
Configuring Windows XP, Vista, NT or 2000 to work with the Network Drive Pro
To use your network and Network Drive Pro, you may need to manually install TCP/IP and
configure it on every computer in the network. Have your Windows CD at hand before
you begin as you may need it when installing TCP/IP.
Installing or scanning Windows
Network components
You need to make sure that an Ethernet adapter (NIC), the TCP/IP protocol and the Client for Microsoft Networks are installed. You do not need to remove any of the other
components displayed in the Network Components window. If you need to install the
adapter, please refer to the instruction manual that came with the adapter on how to
install the device. To install or scan for the other components:
1.
Click the 'Start' button on the Windows taskbar, go to 'Settings' and then click 'Control
Panel'.
2.
Double-click the Network icon and Dial-up Connection (these may also be called
Network Connections or Connect Using on the Mac).
If your computer has an Ethernet adapter, you should see an entry for a Local Area
3.
Connection. Double-click this entry and open the 'Properties' tab.
Open the 'General' tab.
4.
5. Check to make sure that 'Client for Microsoft ´Networks' and 'Internet Protocol (TCP/IP)'
are displayed on this screen. If they are not, go to 'Install' and add them.
Select 'Internet Protocol (TCP/IP), click 'Properties' and check to make sure that 'Obtain
6.
an IP address automatically' is enabled.
Click 'OK' and close all windows for network and dial-up connections.
7.
8. Make sure that the computer is connected to the Network Drive Pro and check the
TCP/IP properties (see below). If you notice any problems, you can restart the computer.
74
Page 75

GB
Appendix
Check the TCP/IP properties
To check the computer's TCP/IP configuration:
1.
Click 'Start' in the Windows taskbar and then press 'Run'. The 'Run' screen opens.
2. Enter 'cmd' and then click 'OK'. A command window appears on the screen.
3. Type in ipconfig /all. Your configuration details are displayed and should be as follows
if you are using the default settings for TCP/IP recommended by Freecom:
4.
The IP is between 192.168.1.2 and 192.168.1.254.
5. The subnet mask is 255.255.255.0.
6. The standard Gateway is 192.168.1.1.
7. Type in exit.
MacOS 8.6 or 9.x
With Macintosh OS 7 and higher, TCP/IP comes preinstalled on the Macintosh. To use
DHCP, you need to configure TCP/IP on each Macintosh in the network.
1. Open Apple's 'System Preferences' and hit 'TCP/IP'. System Preferences TCP/IP opens:
2.
In the 'Connect via' field, select the Macintosh Ethernet interface.
3. Select 'Use a DHCP server' in the 'Configure' field. You may leave the DHCPClient ID
field blank.
Close System Preferences-TCP/IP.
4.
5. Repeat these steps on each Macintosh in your network.
75
Page 76

GB
Freecom Network Drive Pro
MacOS X
With Macintosh OS 7 and higher, TCP/IP comes preinstalled on the Macintosh. To use
DHCP, you need to configure TCP/IP on each Macintosh in the network.
1.
Open 'System Preferences' and then 'Network'.
2. If it has not already been selected, click 'Built-in Ethernet' from the configuration
list.
3.
If this has not been selected, click 'Use DHCP' on the TCP/IP tab.
4. Hit 'Save'.
Check the TCP/IP properties (Macintosh)
Once your Macintosh has been configured and restarted, you can check the TCP/IP
configuration by once again opening TCP/IP System Preferences. Open Apple's 'System
Preferences' and hit 'TCP/IP'.
The overview is refreshed and shows your settings. These should look like this if you are
using the default settings for TCP/IP recommended by Freecom:
1.
The IP is between 192.168.1.2 and 192.168.1.254.
2. The subnet mask is 255.255.255.0.
3. The router address is 192.168.1.1.
If different values are displayed, restart your Mac. It may be the case that you need to
enable another option in the 'Configuration' settings and then return to 'Use a DHCP
server'.
76
Page 77

GB
Appendix
Appendix C: Network Basics
This chapter provides an overview of IP networks, routing, and firewalls. This is by no
means a complete overview! If you are looking for more information, you can use your
favorite search engine to find information on the internet about the internet. Suffice to
say, there is plenty.
Basic Router Concepts
Even though the amount of bandwidth in your local area network (LAN) can be provided easily
and relatively inexpensively, the price of the connection to the internet is much higher. Because
of this expense, Internet access is usually provided by a slower-speed wide-area network (WAN)
link such as a cable or DSL modem. To use this WAN link efficiently, a mechanism must be in
place for selecting and transmitting only the data traffic meant for the Internet. The function of
selecting and forwarding this data is performed by a router.
What is a Router?
A router splits the information meant for your network and meant for other networks,
so the available bandwidth is used efficiently. The router sends data based on network
layer information in the data and on routing tables maintained by the router. The routing tables are built by gathering and exchanging information with other routers in the
network. The router builds up a logical picture of the overall network. Using this information, the router chooses the best path for forwarding network traffic. Routers vary in
performance and scale, number of routing protocols supported, and types of physical
WAN connection they support.
Routing Information Protocol
One of the protocols used by a router to build and maintain a picture of the network is
the Routing Information Protocol (RIP). Using RIP, routers periodically update one another
and check for changes to add to the routing table.
IP Addresses and the Internet
For a computer to communicate with other computers and Web servers on the Internet, it
must have a unique IP address. An IP address (IP stands for Internet Protocol) is a unique
number that identifies the location of your computer on a network.
Basically, it works like your street address — as a way to find out exactly where you are
and deliver information to you. The IP address is written as 4 numbers between 0 and
255, such as "192.168.0.12".
This serves the same basic function as a street address. It helps you find out where you
currently are, while also providing other information. The IP address consists of four
numbers between 0 and 255 (e.g., 192.168.0.12).
77
Page 78

GB
Freecom Network Drive Pro
Domain Name Server
The computer address is difficult to read, which is why a second system is used in the
Internet by the name of DNS (Domain Name Server). This translates human-readable
names such as www.sharemydisk.com into computer readable names like 82.161.11.206.
Each Internet user must have an IP address. You do not need the human-readable name,
but it is quite useful if you want other users to find you. A few examples of this include:
if you operate a web server or if you want to show your friends images stored on your
computer. Many large companies such as ISPs maintain their own DNS server and let
their customers use the server to search for addresses.
Internet address classes
The Internet Assigned Numbers Authority (IANA) allocates certain blocks of addresses to
organizations. Individual users or small organizations can obtain their addresses either
from the IANA or from an Internet service provider (ISP). You can visit the IANA homepage
at www.iana.org. The IANA issues different class of IP addresses. There are five standard
classes of IP addresses. They are:
Class A
Class A addresses can have up to 16,777,214 hosts on a single network. They use an eight-bit network
number and a 24-bit node number. Class A addresses are in this range: 1.x.x.x to 126.x.x.x.
Class B
Class B addresses can have up to 65,354 hosts on a network. A Class B address uses a
16-bit network number and a 16-bit node number. Class B addresses are in this range:
128.1.x.x to 191.254.x.x.
Class C
Class C addresses may have up to 254 hosts in one network. Class C addresses use 24 bits for
network addresses and eight bits for nodes. They range from 192.0.1x to 223.255.254.x.
Class D
Class D addresses are used for multicasts, in other word messages sent to multiple hosts.
Class D addresses range from 224.0.0.0 to 239.255.255.255.
Class E
Class E addresses are for experimental purposes. For each unique value in the network portion of the address, the range base address (the host address contains only zeroes) is known
as the network address and is not usually assigned to a host. The top address of the range
(host address contains only ones) is unassigned. It is instead used as the broadcast address
for sending a data packet to all hosts with the same network address simultaneously.
78
Page 79

GB
Appendix
Netmask
The partition scheme that separates the different address classes is used to identify a
netmask attached to the IP address. A netmask is a 32-bit quantity that, in logical combination (using an AND operator) with an IP address, forms the network address. The
netmasks for Class A, B and C are for instance 255.0.0.0, 255.255.0.0 and 255.255.255.0.
The address 192.168.170.237 is a Class C IP address; its network portion is 192.168.170.
Combining it with the Class C netmask using an AND operator as shown in this example
leaves only the network portion of the address:
11000000 10101000 10101010 11101101 (192.168.170.237)
combined with:
11111111 11111111 11111111 00000000 (255.255.255.0)
resulting in:
11000000 10101000 10101010 00000000 (192.168.170.0)
An alternative to dotted decimal representation is to express the netmask as the quantity
of ones from left to right. This number is added to the IP address after a slash (/) as '/n'.
In this example, the address 192.168.170.237/24 could be written. This indicates that the
netmask is 24 ones followed by eight zeroes.
Subnet Addressing
You can see that even with a Class C address, there are a large number of hosts per network. It would be a very inefficient use of the amount of IP addresses to supply every
LAN with so many IP addresses. A smaller office LANs does not have that many devices.
A more efficient technique is known as subnet addressing.
Subnet addressing allows us to split one IP network address into smaller multiple physical networks known as subnetworks. Some of the node numbers are used as a subnet
number instead. A Class B address gives us 16 bits of node numbers translating to 64,000
nodes. Most organizations do not use 64,000 nodes, so there are free bits that can be
reassigned. Subnet addressing makes use of those bits that are free.
A Class B address can be effectively translated into multiple Class C addresses. For
example, the IP address of 172.16.97.235 would be interpreted as IP network address
172.16, subnet number 97, and node number 235. In addition to extending the number
of addresses available, subnet addressing provides other benefits. Subnet addressing
allows a network manager to construct an address scheme for the network by using
different subnets for other geographical locations in the network or for other departments in the organization.
79
Page 80

GB
Freecom Network Drive Pro
Although the preceding example uses the entire third octet for a subnet address, note
that you are not restricted to octet boundaries in subnetting. To create more network
numbers, you only need to shift some bits from the host address to the network address.
For instance, to partition a Class C network number (192.68.135.0) into two, you shift one
bit from the host address to the network address. The new netmask (or subnet mask) is
255.255.255.128. The first subnet has network number 192.68.135.0 with hosts 192.68.135.1
to 129.68.135.126, and the second subnet has network number 192.68.135.128 with hosts
192.68.135.129 to 192.68.135.254.
Attention: The number 192.6
broadcast address of the first subnet. The number 192.68.135.128 is not
assigned because it is the network address of the second subnet.
Freecom strongly recommends that you configure all hosts on a LAN segment to use
the same netmask for the following reasons:
o that hosts recognize local IP broadcast packets
• S
• When a device broadcasts to its segment neighbors, it uses a destination address of
the local network address with all ones for the host address. In order for this scheme
to work, all devices on the segment must agree on which bits comprise the host address.
• S
o that a local router or bridge recognizes which addresses are local and which are
remote Private IP Addresses
If your local network is not connected to the Internet (for example, when using NAT),
you can assign any IP addresses to your computers without problems. But to prevent
problems and ease configuration, the IANA has reserved the following three blocks of
IP addresses specifically for private networks:
10.0.0.0 - 10.255.255.255
172.16.0.0 - 172.31.255.255
192.168.0.0 - 192.168.255.255
We recommend that you choose your private network number from this range. The
DHCP server of the Network Drive Pro is preconfigured to automatically assign private
addresses.
For more information about address assignment, refer to RFC 1597, Address Allocation
for Private Internets, and RFC 1466, Guidelines for Management of IP Address Space. The
Internet Engineering Task Force (IETF) publishes RFCs on its Web site at www.ietf.org.
8.135.127 is not assigned because it is the
80
Page 81

GB
Appendix
The IP address shortage
The Internet has grown larger than anyone ever imagined it could be. Although the exact
size is unknown, the current estimate is that there are about 100 million hosts and more
than 350 million users actively on the Internet. In fact, the rate of growth has been such
that the Internet is effectively doubling in size each year.
When IP addressing first came out, everyone thought that there were plenty of addresses
to cover any need. Theoretically, you could have 4,294,967,296 unique addresses. The
actual number of available addresses is smaller (somewhere between 3.2 and 3.3 billion)
because of the way that the addresses are separated into classes, and because some addresses are set aside for multicasting, testing or other special uses.
With the explosion of the Internet and the increase in home networks and business
networks, the number of available IP addresses is simply not enough. The obvious
solution is to redesign the address format to allow for more possible addresses. This is
being developed (called IPv6), but will take many years to implement because it requires
modification of the entire infrastructure of the Internet.
There are 2 systems in place now to help bring down the shortage of IP addresses.
DHCP
First, most users today have a dynamically given IP address or DHCP address from their
provider. This means that the IP address given to you can change over time. This allows
the provider to use the IP address for more then one person or device, since people are
often online at different times. Optimal usage of IP addresses is guaranteed.
Your Network Drive Pro gives its internal addresses to your computers in the same way.
For the DNS (Domain Name System) it is difficult to translate your domain name "www.
yourname.sharemydisk.com" to your IP address if your IP address keeps changing.
The system needs to be updated each time your IP address changes. Hence Dynamic
DNS (DDNS) programs. These programs check the latest IP address and update the DNS
system accordingly.
81
Page 82

GB
Freecom Network Drive Pro
Multiple internal but only one external IP address
A second way to overcome this is to have a single device act on behalf of several other
devices. Routers are typical examples. You have several PCs connect to the router, but
only the router to the Internet. From an internet perspective, there is only one address.
This scheme offers the additional benefit of simple firewall-like protection because the
internal LAN addresses are not available to the Internet through the translated connection.
All incoming inquiries are filtered out by the router. This filtering can prevent intruders
from probing your system. However, using port forwarding, you can allow one PC (for
example, a Web server) on your local network to be accessible to outside users.
This works like a receptionist at a large office. Nobody knows your number; they all call
the main number of the office and are then forwarded by the receptionist to you.
So how does the receptionist know what number to forward the call too? The caller tells
the receptionist what name to look for and the receptionist has a listof names and numbers
at her disposal so she can translate the name to the phone extension she needs.
On the Internet, it works exactly the same. NAT (RFC 1631) or Network Address Translation allows a single device, such as a router, to act as an agent between the Internet (or
"public network") and a local (or "private") network. This means that only a single, unique
IP address is required to represent an entire group of computers.
Network Address Translation
When you visit a website via your computer, your router, or more specifically your NAT,
remembers which computer on the internal network asked for the information. When
the information (in this case the website you asked for) comes back, the router knows
which computer on the internal network to send the information to. This is Network
Address Translation or NAT.
Developed by Cisco, Network Address Translation is used by a device (firewall, router
or computer) that sits between an internal network and the rest of the world. For more
information about IP address translation, refer to RFC 1631, The IP Network Address
Translator (NAT).
Hosting a server
What If I want to host a server?
For others to be able to view your pictures on your computer, you need to run some
type of service or server. A web server such as apache will allow others to securely watch
the pictures or files on your site. But how does the NAT of your router know this time to
which computer to forward the information?
Since the request comes from the internet, most routers are setup to disallow any traffic
going into the internal network. (Firewall protection) In this case, since we want people
to be able to see our pictures, we want the router to forward this information. We have
to tell the router to do this.
82
Page 83

GB
Appendix
Someone calling from the internet asks your router for a certain "port". This is the same
as someone calling the receptionist and requesting a certain person by name. Ports are
displayed as numbers but invariably map to pre described services. For instance, when
someone requests a web page, they always ask for the service on port 80, the web server.
Through NAT, it is possible to "map" a certain request for a service (a request for a port)
to a certain PC on the internal network.
MAC Addresses and Address Resolution Protocol
An IP address alone cannot be used to deliver data from one LAN device to another. To send
data between LAN devices, you must convert the IP address of the destination device to
its media access control (MAC) address. Each device on an Ethernet network has a unique
MAC address, which is a 48-bit number assigned to each device by the manufacturer. The
technique that associates the IP address with a MAC address is known as address resolution.
Internet Protocol uses the Address Resolution Protocol (ARP) to resolve MAC addresses. If
a device sends data to another station on the network and the destination MAC address is
not yet recorded, ARP is used. An ARP request is broadcast onto the network. All stations on
the network receive and read the request. The destination IP address for the chosen station
is included as part of the message so that only the station with this IP address responds to
the ARP request. All other stations discard the request.
The station with the correct IP address responds with its own MAC address directly to
the sending device. The receiving station provides the transmitting station with the
required destination MAC address. The IP address data and MAC address data for each
station are held in an ARP table. The next time data is sent, the address can be obtained
from the address information in the table.
Ethernet Cabling
There are two different types of cabling for Ethernet networks. Originally they used thick or
thin coaxial cable, but most installations currently use unshielded twisted pair (UTP) cabling.
The UTP cable contains eight conductors, arranged in four twisted pairs, and terminated
with an RJ45 type connector. There are 2 types of RJ-45 cables available today, the Media
Dependent Interface (MDI) cable and the Media Dependent Interface - Crossover (MDI-X)
cable. The first cable is used to connect routers to PCs and the second to connect PCs directly
to PCs. The sent and receive wires are switched from beginning to end in the crossover
cables. Some Ethernet switch products, such as the Network Drive Pro, are able to sense
the polarity of a connection and automatically adapt to the proper cabling type.
Cable Quality
A twisted pair Ethernet network operating at 10 Mbits/second (10BASE-T) will often
tolerate low quality cables, but at 100 Mbits/second (10BASE-Tx) the cable must be rated
as Category 5, or "Cat 5", by the Electronic Industry Association (EIA). This rating will be
printed on the cable jacket. A Category 5 cable will meet specified requirements regarding loss and crosstalk. In addition, there are restrictions on maximum cable length for
both 10 and 100 Mbits/second networks.
83
Page 84

WARRANTY
(valid in Europe/Turkey only)
We thank you for purchasing this Freecom product and hope you will enjoy using it.
In order to avoid unnecessary inconvenience on your part, we suggest reading the quick
install guide, instruction manual and any additional electronic and or printed manuals.
When problems occur we have a database with Frequently Asked Questions (FAQ) on
our Freecom website (www.freecom.com), please check this site before you contact the
helpdesk.
Your Guarantee
All Freecom products come with unlimited technical phone and web support. By this
Guarantee, Freecom warrants their products to be free from defects in material and workmanship for a period listed below from the date of its original purchase. If during this period
of guarantee the product proves defective due to improper materials or workmanship,
Freecom will, without charge for labour or parts, at its sole discretion, repair or replace the
product or its defective parts upon the terms and conditions set out below.
Conditions
This guarantee will be granted only when the original invoice or sales receipt (indicating
the date of purchase, product and serial number) is presented together with the defective
product and a Freecom RMA number received from the Freecom Website or given by a
Freecom Service Center. Freecom reserves the right to refuse the free-of-charge guarantee services when the date of purchase of the product cannot be proven. This guarantee
will not apply if the RMA number is missing, the serial number on the product has been
altered, removed or made illegible.
This guarantee covers only the hardware components packaged with the product. This
guarantee covers none of the following: (a) any consumable supplied with the product,
such as media or batteries; (b) damage to or loss of any software programs, data or removable storage media; (c) any damage resulting from adaptations, changes or adjustments,
which may have been made to the product, without the prior written consent of Freecom;
(d) attempted repair by any party other than authorized by Freecom and (e) accidents,
lightning, water, re or any other such cause beyond the reasonable control of Freecom.
With respect to all services provided, Freecom is not responsible for any damage to or loss
of any programs, data or other information stored on any media or any part of any product
serviced. Freecom is not liable for the consequence of business loss in case of system
failure. Be sure to exclude all parts not covered by this guarantee prior to returning the
product to Freecom. Freecom is not liable for any loss or damage to these items. If during
the repair of the product the contents of the hard drive are altered, deleted or in any way
modied, Freecom is not liable whatsoever.
Repair parts and replacement products will be provided on an exchange basis and will be
either new, equivalent to new or reconditioned. All replaced parts and products become
the property of Freecom The period of guarantee for any product or part repaired or replaced in warranty shall be the balance of the original guarantee. Repairs or replacements
on product or parts out of warranty carry 6 (six) months guarantee.
 Loading...