

Page 1
NETWORK DRIVE
EXTERNAL NETWORK HARD DRIVE / 3.5" / LAN / USB 2.0
WIN
Rev. 707
USER'S GUIDE
Page 2

2
Freecom Network Drive
EN
Dear user,
Thank you for choosing the Freecom Network Drive. To ensure you get the best perform-
ance and ease of operation, please read this manual carefully before using the Freecom
Network Drive with your Personal Computer or Ethernet Network.
Freecom Technologies GmbH • Germany
www.freecom.com
Package Contents
Please check the contents of the box to ensure it contains the following items:
• Freecom Network Drive
• Power adapter
• LAN connection cable
• USB connection cable
• CD with manual and application software
• Quick Install Guide
Attention!
All rights reserved. The product names contained in this user's guide only are only used
for identification purposes and may be trademarks or registered trademarks of those
companies. This device is designed for office and home use.
Caution! This is an EN 55022 Class B device.
Freecom shall assume no liability for damages of any kind, for loss of data or any consequential
claims resulting therefrom (including, and without restriction, claims relating to the business
losses, business interruptions, loss of business data or other financial claims) that result from
the use of this Freecom product or improper operation of this Freecom product. This shall
also apply in cases where Freecom has been notified that such claims may exist.
Subject to change as technical advances dictate.
© 2007 Freecom Technologies
Page 3

3
EN
Table of Contents
User's Guide
General Information
System requirements .................................................................................................. Page 4
Precautionary measures ............................................................................................ Page 5
Freecom Network Drive ............................................................................................. Page 6
Software Installation (LAN) ....................................................................................... Page 6
Chapter 1:
Hardware Installation ......................................................................................................... Page 7
LED Description
............................................................................................................. Page 8
Power switch .................................................................................................................. Page 8
Chapter 2:
Using the LAN Mode ........................................................................................................... Page 9
Check TCP/IP Settings in Windows 2000/XP ...................................................... Page 9
Chapter 3:
Configuration of the Freecom Network Drive .......................................................... Page 11
The Freecom Network Storage Assistant ............................................................ Page 11
Using the Freecom Network Drive web interface ............................................ Page 12
Basic Settings (Status) of the Freecom Network Drive ................................... Page 14
IP Config ........................................................................................................................... Page 17
Maintenance................................................................................................................... Page 17
Windows File Sharing Configuration (SMB Server) .........................................Page 18
FTP Server Configuration .......................................................................................... Page 21
Disk Utility ....................................................................................................................... Page 25
Chapter 4:
LAN Connection Types of the Freecom Network Drive ............................................. Page 26
Direct connection to a PC .........................................................................................Page 26
Connection to an existing network .......................................................................Page 26
Page 4

4
Freecom Network Drive
EN
* USB 2.0 is backwards compatible with USB 1.1.
General Information
Your system needs to meet the following hardware and software requirements for the
device to function properly.
System requirements
To use the Freecom Network Drive, you will require the following components:
• Intel/AMD CPU 700 MHz or faster
• 256 MB RAM or higher
• CD ROM drive for installing the software
• Free USB 2.0 or USB 1.1. port* or
• 100Base-T full duplex connection for Ethernet mode
• Internet connection for registering warranty online and downloading software
updates.
• Operating system: Windows 2000, Windows XP
Page 5

5
EN
General Information
Precautionary measures
To ensure that your Freecom Network Drive functions properly, please take note of the
following precautions. If these are not followed, you may void your warranty and damage the Freecom Network Drive.
• Safely remove the Freecom Network Drive via your operating system (the "unplug or
eject hardware" option in the Windows taskbar) before disconnecting the USB cable
or power cable and before switching off the device. Failing to do so may result in
data loss.
• Do not drop the Freecom Network Drive or expose it to other kinds of sudden me
-
chanical shocks as this may result in data loss and damage to the Network Drive.
• Do not use the Freecom Network Drive when the ambient temperature is below 10°C
or above 35°C.
• If the Freecom Network Drive is moved from a cool environment to a warmer envi
ronment, please allow the drive to acclimatize to the ambient temperature before
operating the device. Failing to do so may lead to condensation within the drive
enclosure, which in turn may cause the drive to malfunction.
• Do not place liquids or drinks on the Freecom Network Drive. When liquids are spilled
and get in contact with the electronics within the drive enclosure, it will damage the
drive and will cause the drive to malfunction.
• Do not use the Freecom Network Drive in a dusty environment. Dust inside the
enclosure may damage the internal electronics and result in drive malfunction.
• Only use the power adapter that was supplied with the Freecom Network Drive.
• Opening the Freecom Network Drive will void the warranty.
• Since USB 2.0 is backwards compatible with USB 1.1, the Freecom Network Drive
can be connected to all USB ports. When connected to a USB 1.1 port, however, the
performance (data transfer rate) of the Freecom Network Drive will be much lower
than when the drive is connected to a USB 2.0 port.
Page 6
6
Freecom Network Drive
EN
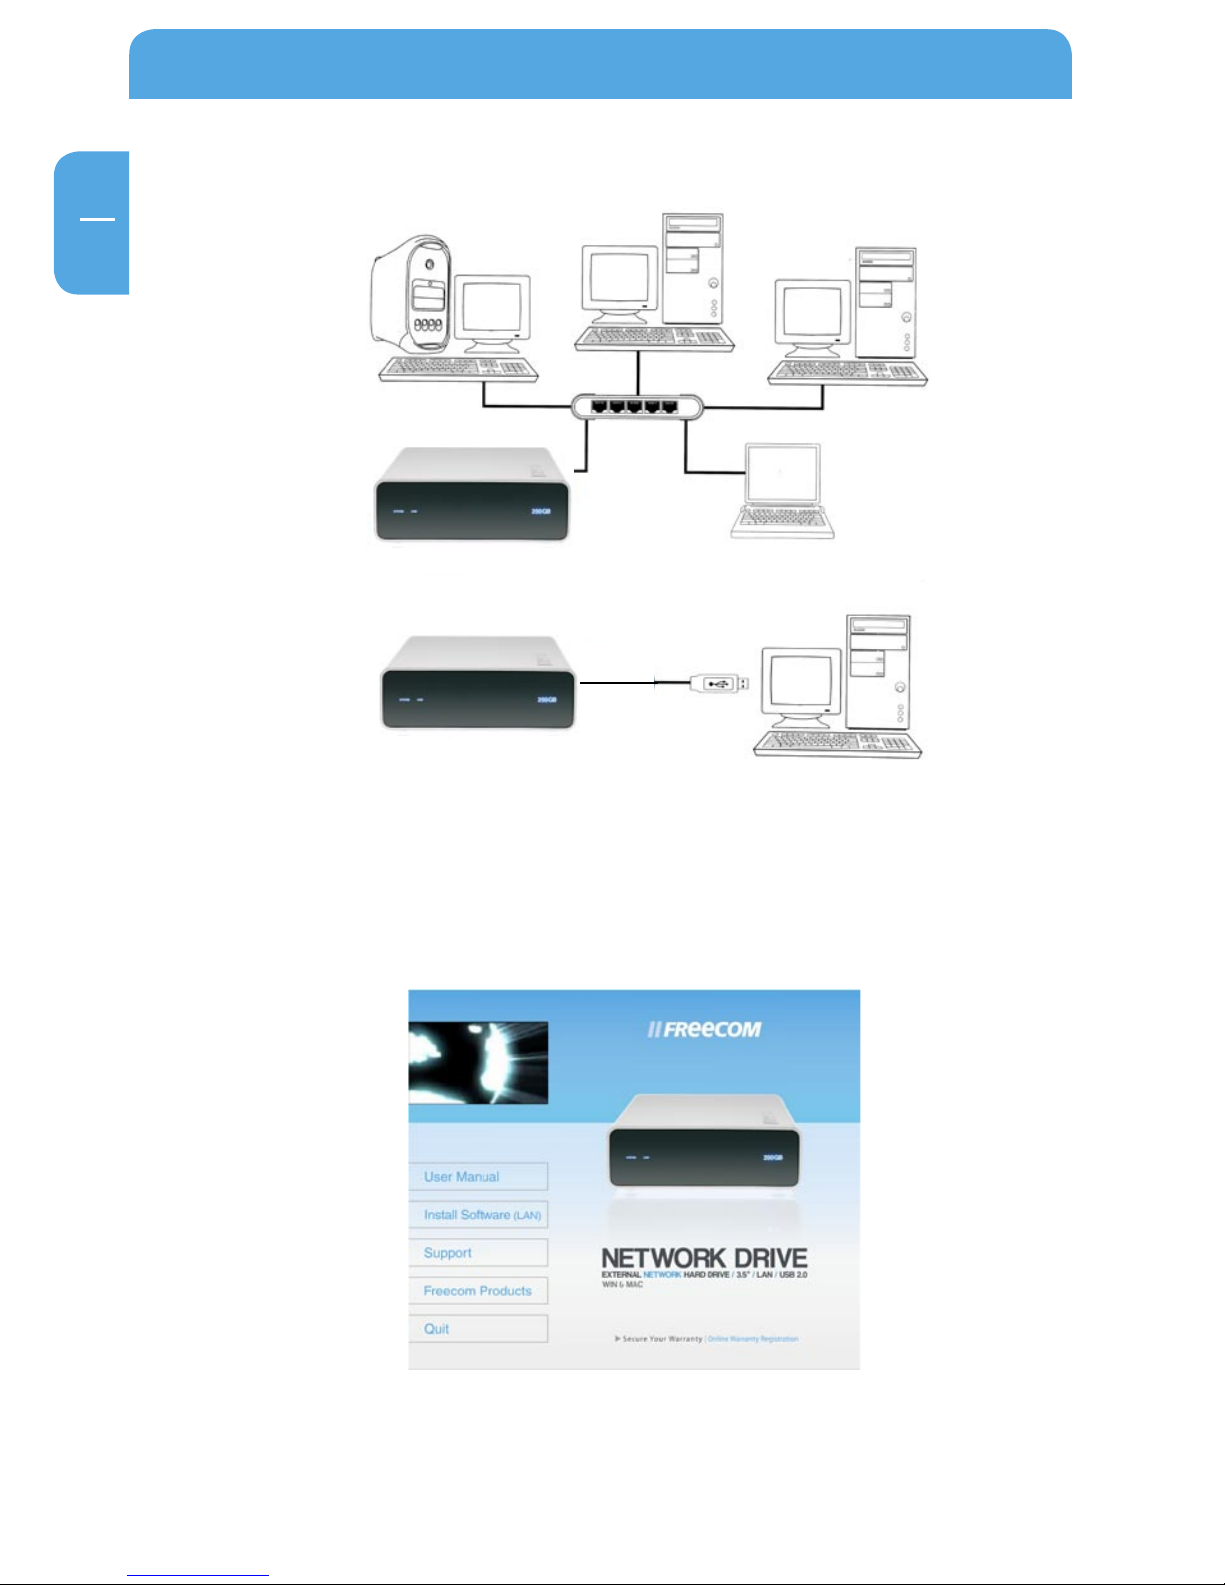
Freecom Network Drive Setup Overview
Software Installation (LAN)
1. Insert the Freecom Network Drive Software & Manual CD into your CD drive. The
Freecom start menu opens:
In case the software does not open automatically, please double click "Start.exe" in
the root directory of the CD.
2. Now click "Install software (LAN)". The installation of the software now begins.
LAN (Ethernet) mode
USB-mode
Page 7
7
EN
1
Hardware Installation
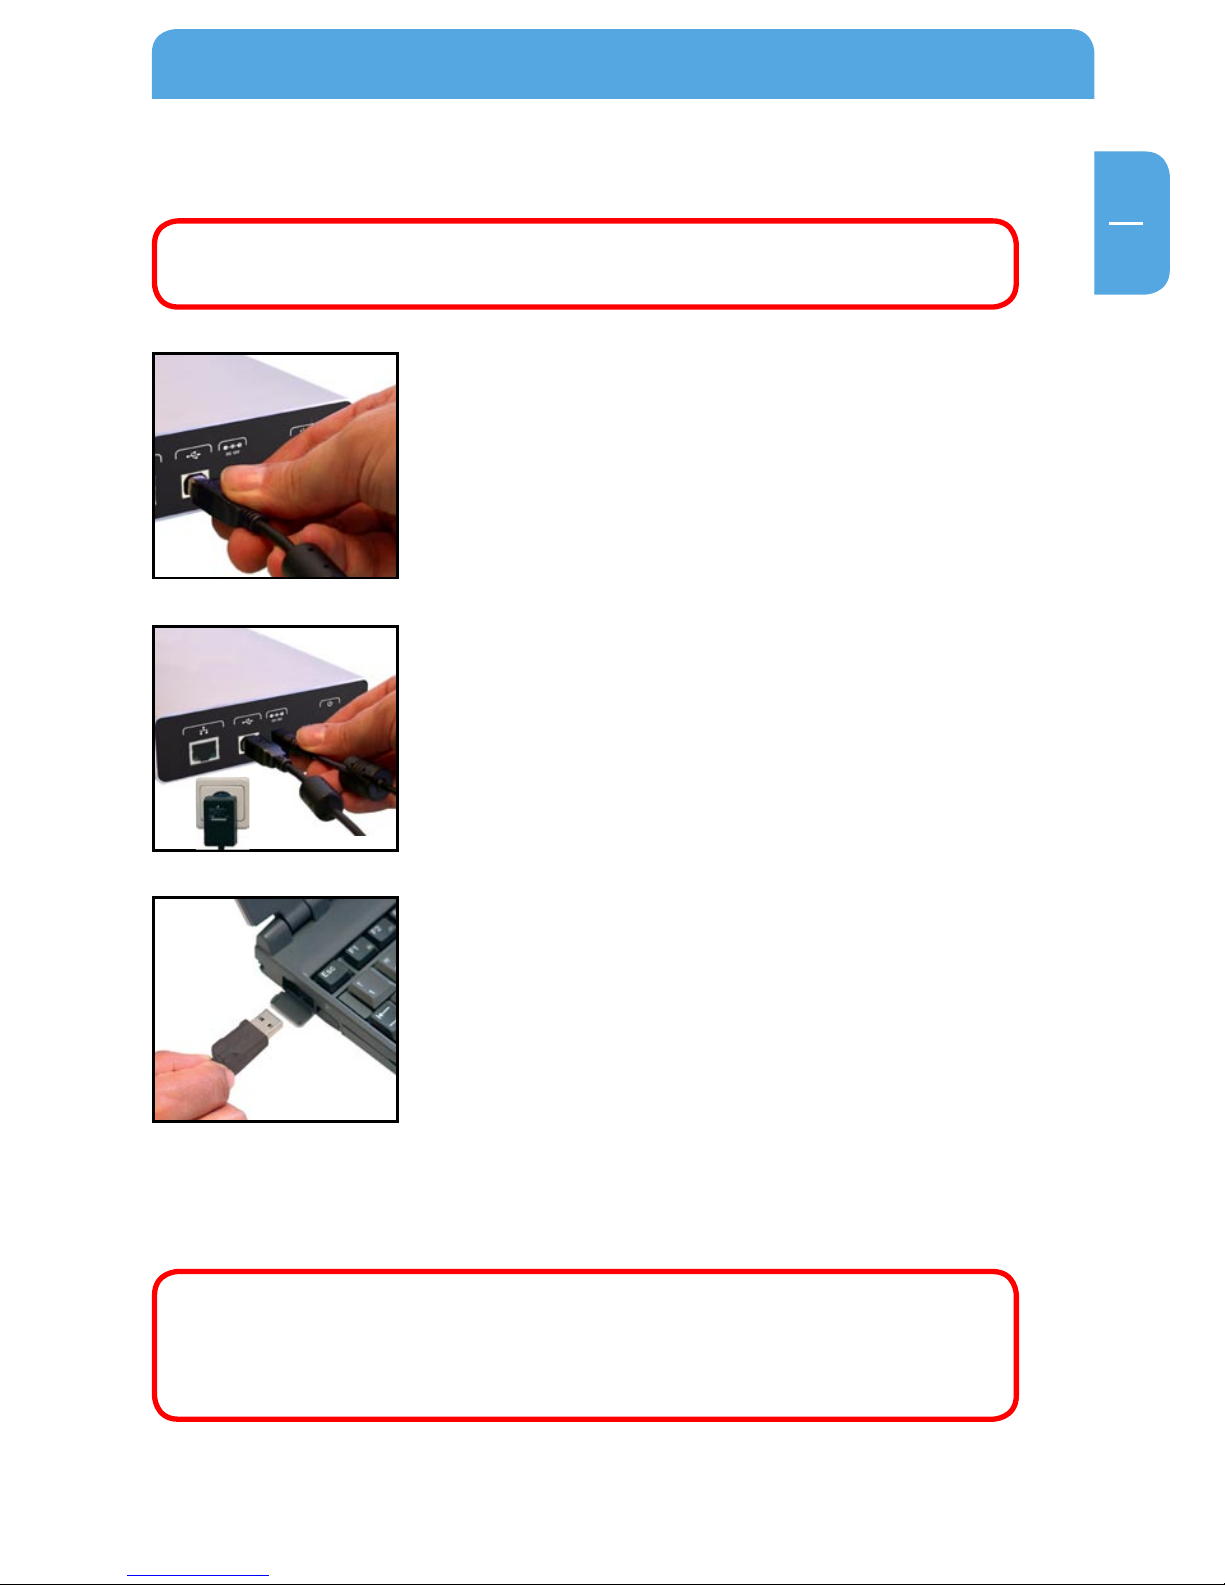
Chapter 1: Hardware Installation
WARNING! Only connect the Network Drive via the USB or LAN Port. Never
use both ports at the same time!
1. Plug the cable (USB or LAN) into the Freecom Network
Drive.
2. Insert the power cord into the Freecom Network Drive and
plug the power supply into the socket.
3. Plug the cable into the port (USB or LAN) on your compu
-
ter.
Because USB 2.0 is backwards compatible with USB 1.1, you can connect the Freecom
Network Drive to any USB port. Please note however that USB 2.0 ports support significantly higher data transfer speeds than USB 1.1.
Driver Installation: Your computer will not require a special Freecom
driver if you are using Windows 2000 / XP. The required driver is automatically installed by the operating system when the cable is plugged
into your computer.
Page 8
8
Freecom Network Drive
EN
1
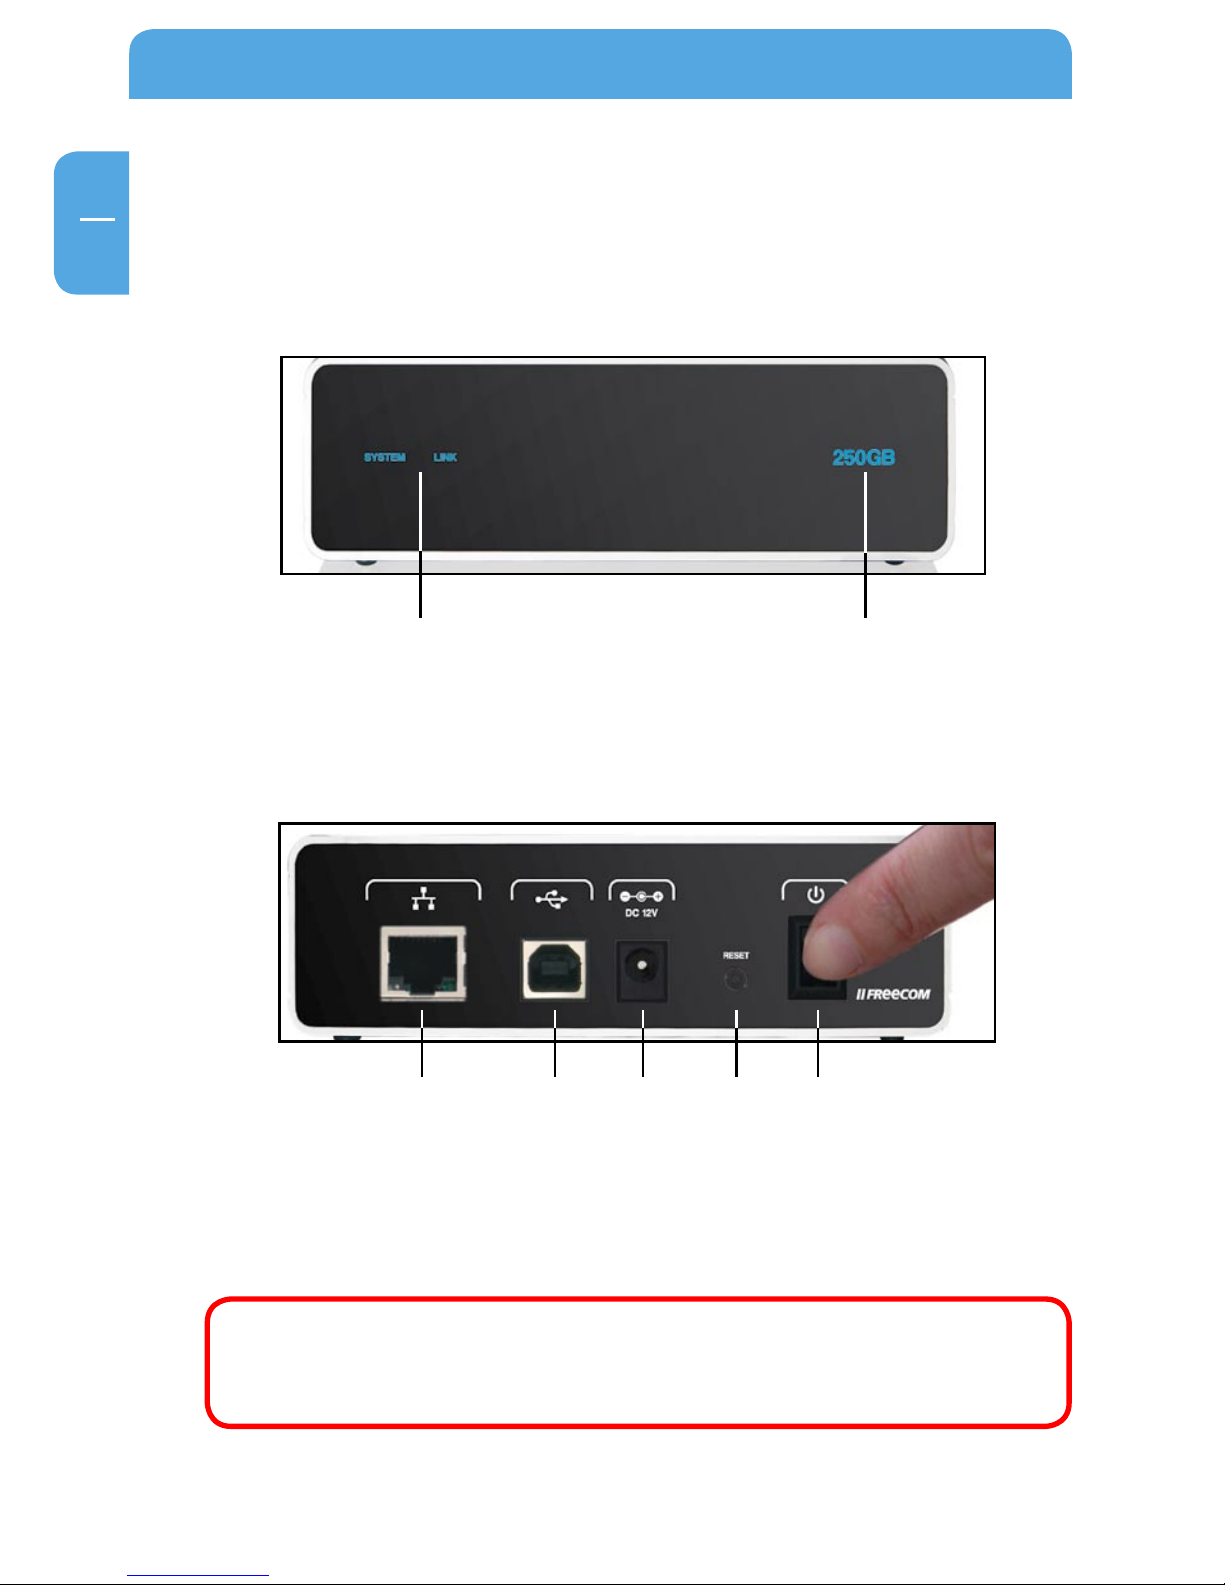
1.1 LED Description
SYSTEM: SYSTEM LED is on when the system is ready
LINK: LINK LED is on when a LAN connection is available
Capacity LED: The Capacity LED is a power and activity display. The LED is always
on when the drive is powered and flickers during drive activity.
1.2 Power switch
Please turn the Freecom Network Drive off when it is not in use. This conserves electricity and extends the life of the hard drive. The power switch is located on the rear of the
Freecom Network Drive.
1.3 Reset button
Press the „Reset“ button and power on device while pressing the „Reset“ button. Keep
„Reset“ button pressed for 15 seconds to restore factory defaults.
WARNING! Before turning off the Freecom Network Drive manually, please
make sure to first "unplug or eject hardware". This option is found in the
Windows taskbar. Failure to do so may result in the loss of data.
Capacity LED
SYSTEM / LINK
LAN USB Power Reset on/off
Page 9
9
EN
2
Chapter 2: Using the LAN Mode
Note: For initial configuration, always connect your Freecom Network
Drive to a PC first! Do not connect the Freecom Network Drive to an existing network when using it for the first time!
2.1 Check TCP/IP Settings in Windows 2000/XP
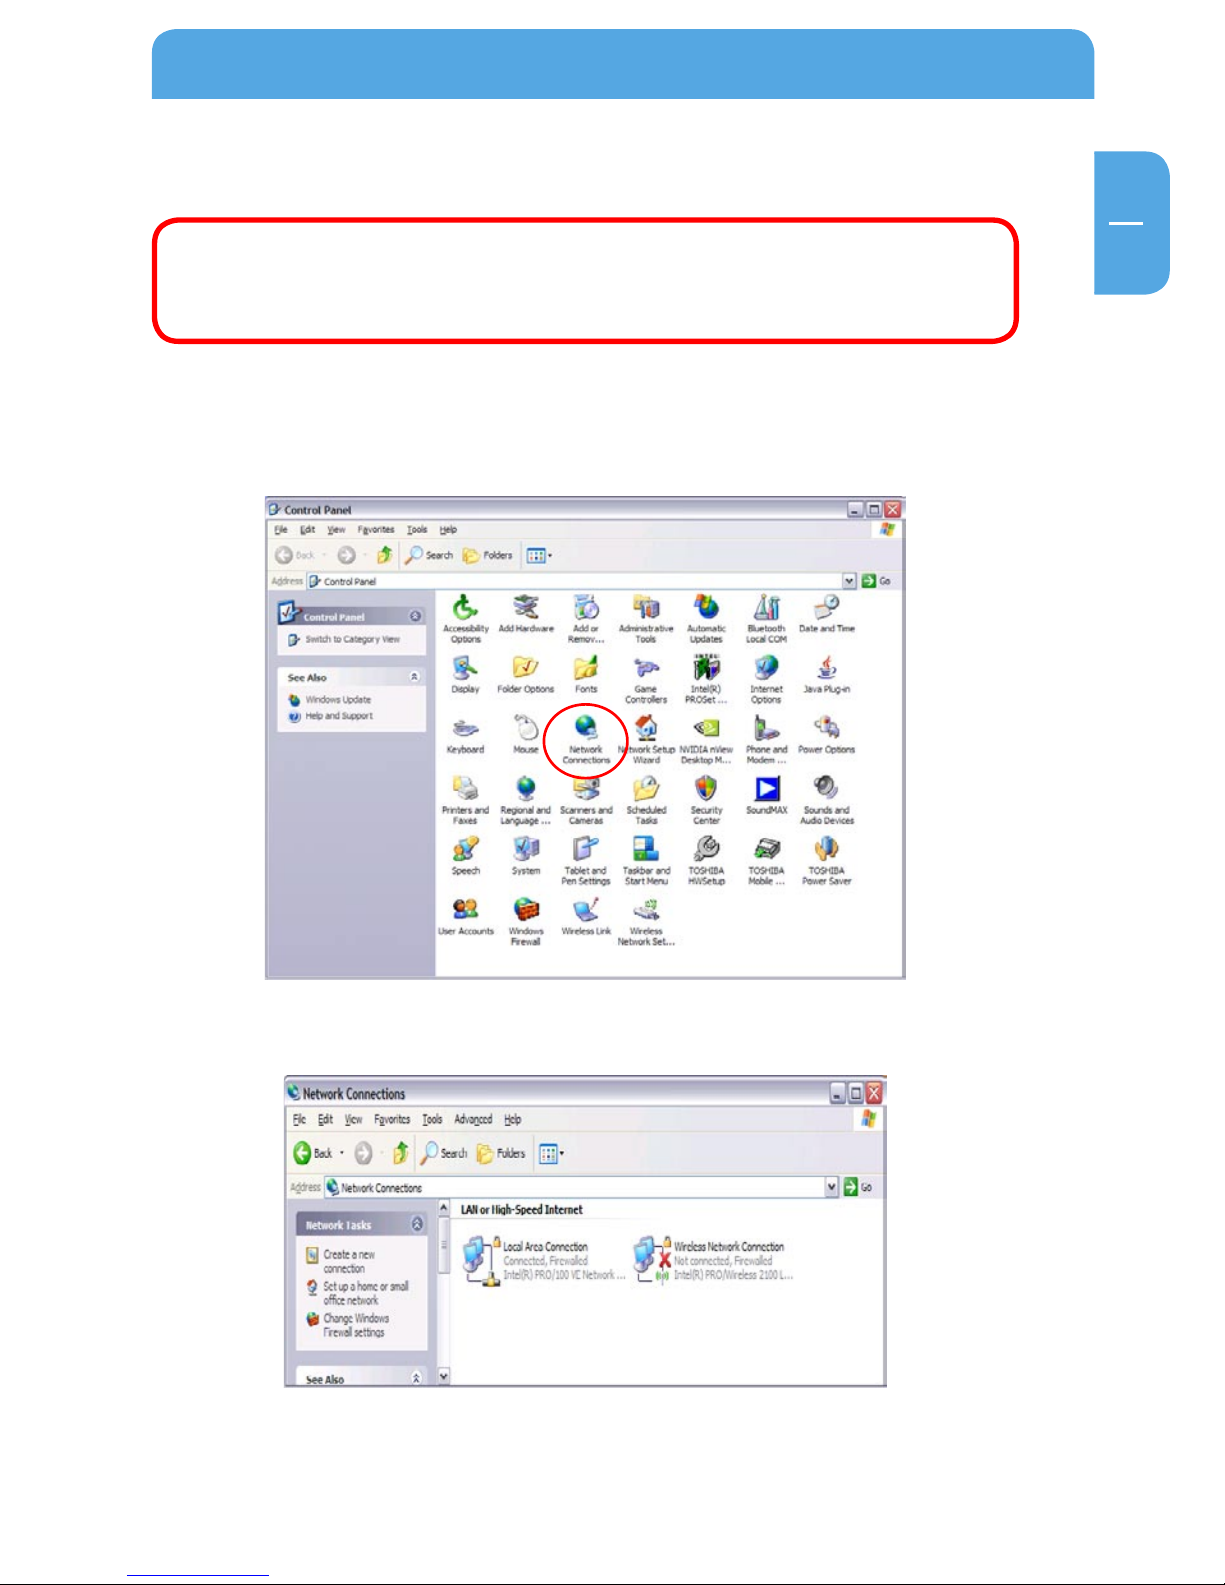
1. Open “Start” -> “Settings” -> “Control Panel”.
2. Double-click on “Network Connections”.
3. Right-click on your “Local Area Connection” and select “Properties”.
4. The following screen will appear. Select “Internet Protocol (TCP/IP)” and click on
the “Properties” button.
Using the LAN Mode
Page 10

10
Freecom Network Drive
EN
2
5. In the “General” tab, select “Obtain an IP address automatically” and “Obtain DNS
server address automatically”.
Page 11

11
EN
3
Configuration of the Freecom Network Drive
Chapter 3: Configuration of the Freecom Network Drive
For easier access we recommend using the PC configured as DHCP Client as described
in the previous chapter.
As default, the DHCP Server of the Freecom Network Drive is switched on. This can be
changed in the “Status” section of the web configuration.
3.1 The Freecom Network Storage Assistant
Windows users can use the “Freecom Network Storage Assistant” to configure the Freecom Network Drive. This tool offers the following functions:
Accessing your Network Drive web interface
When you click this menu item, the web interface for your Freecom Network Drive opens
in your default browser.
Adding and removing shared folders
You can assign a drive letter to shared folders on your Freecom Network Drive. This allows
you to access to the files in Windows more quickly.
Page 12

12
Freecom Network Drive
EN
3
Repeat search for available Freecom Network Drives
Click here to repeat the search for your Freecom Network Drive if it was not detected
during the first search. Please make sure that your network is configured as described
in this manual and that all cables are properly attached.
3.2 Using the Freecom Network Drive web interface
1. Open your web browser, type “type “http://FND” into the URL address box and
press “Enter”.
2. The login dialog box will appear. Please use the following username and password
for the initial login:
Username: admin Password: admin
Page 13

13
EN
3
Configuration of the Freecom Network Drive
3. The start screen of the Freecom Network Drive web interface will open. Now you
can continue configuring your Freecom Network Drive.
Page 14

14
Freecom Network Drive
EN
3
3.3 Basic Settings (Status) of the Freecom Network Drive
In the web interface, click on “Status” to change the basic settings of the Freecom Network Drive:
3.3.1 Status – System Information
Setting up host and group name
Click on the “Change” button next to the “Host Name” field.
Enter the desired host and group names and click on “OK” to apply your settings.
Setting up the administrator password
Click on the “Change” button next to the “Administrator” field.
Page 15

15
EN
3
Configuration of the Freecom Network Drive
Enter your new administrator password and repeat entry in the second field for verification. Click on “OK” to apply your new password.
Configuring the time settings
You can setup date and time of your Freecom Network Drive either manually or automatically.
Manual Configuration
Enter date and time and select the “Disable” button in the “SNTP” section to disable the
usage of a time server.
Select your “Time Zone” and choose whether to use “Daylight Saving Time” or not.
Click on “Apply” to save your settings.
Automatic Configuration
Select the “Auto” button in the SNTP” section to enable using a time server for your
time settings.
In the “Time Server” section, you can either select a time server from the pull-down list
or you can use a time server that is not listed in the pull-down list by manually adding
the NTP address in the field below the pull-down list.
Select your “Time Zone” and choose whether to use “Daylight Saving Time” or not.
Click on “Apply” to save your settings.
Page 16

16
Freecom Network Drive
EN
3
Setting up the language
If the web interface is not displayed correctly, you can select the correct region code
page here. Select the correct code page from the pull-down list and click on “Change”
to apply your setting.
Note: You have to restart your PC to apply the settings! The web interface
language will always be English, this cannot be changed!
Firmware Version
In the “Firmware Version” section you can find information which firmware version is
used in your device. Please have this information available for the Freecom Support if
you have problems with your Freecom Network Drive.
3.3.2 Status – Network Information
DHCP Server Configuration
In this section you can select whether to use the Freecom Network Drive as DHCP Server or not.
To enable the DHCP Server, select the “Enable” button and click on “Apply”. If the DHCP
Server is already enabled and you want to disable it, select the “Disable” button and
click on “Apply”.
Note: The current status of the DHCP Server is displayed to the left of the
“Enable” button.
3.3.3 Status – Disk Information
In this section, the status of the hard disk is displayed. You can find the following information:
Disk ID: Displays information about the hard disk
Free Size: Shows the available free space of the hard disk
Total Size: Shows the total size of the hard disk
Page 17

17
EN
3
Configuration of the Freecom Network Drive
3.4 IP Config
In the “IP Config” section of the web interface it can be configured whether the Freecom
Network Drive has a static IP address or gets an automatic IP address assigned by another
DHCP Server in the network.
ATTENTION: Do not use “Automatic IP” if the DHCP Server is already
switched on on the “Status” page!
“Automatic IP” is not available when the DHCP Server of the Freecom Network Drive is
already running.
3.5 Maintenance
In this section you can
- update the firmware of your Freecom Network Drive. New firmware usually fixes
bugs or adds new features to your Freecom Network Drive.
- make a system reboot or
- reset the Freecom Network Drive settings to factory default.
Page 18

18
Freecom Network Drive
EN
3
3.6 Windows File Sharing Configuration (SMB Server)
Click on “SMB Server” in the web interface to open the SMB server configuration:
3.6.1 Administration of shared folders
In the left section (“Folder List”), shared folders can be administrated. In this list, all available folders on the Freecom Network Drive will be listed:
Create
Opens the menu to create a new shared folder
Page 19

19
EN
3
Configuration of the Freecom Network Drive
Rename
Opens the menu to rename an existing shared folder
Delete
Opens the menu to delete an existing shared folder
Note: for all changes you have to login with your administrator password!
Page 20

20
Freecom Network Drive
EN
3
3.6.2 Sharing folders
Adding a shared folder
To add a folder to the Sharing List, select a folder in the “Folder List” and click on the “->”
button. The folder will now appear in the “Sharing List”.
Password protection
To protect a shared folder with a password, select the folder in the “Sharing List” and
click on the “Password” button.
Enter a new password and repeat entry in the second filed for verification. Click on “OK”
to apply your new password.
Page 21

21
EN
3
Configuration of the Freecom Network Drive
3.6.3 Mounting shared folders
Windows users can use the Freecom Network Storage Assistant to map shared folders
with a drive letter.
- Start the Freecom Network Storage Assistant
- Click on “Add&Remove mapped shares”
- Select a shared folder and map it to a drive letter.
3.7 FTP Server Configuration
In this section you can set FTP functions, status and FTP user administration:
Page 22

22
Freecom Network Drive
EN
3
FTP Status
Enable/disable FTP function and port setting for FTP. The standard port for FTP is 21.
After making your changes, click on “Apply”.
NOTE: If you are using the Freecom Network Drive in a network and you
want to have FTP access on the Freecom Network Drive from the outside
(Internet), you have to forward the selected FTP port (e.g. 21) to the IP
address of your Freecom Network Drive!
Please consult the user manual of your router for further information
how to setup port forwardings!
Allow anonymous
Anonymous login allows the user to login as
User: anonymous Password: user’s e-mail address
Anonymous users will have access to only one folder on the Freecom Network Drive.
Enable/Disable Enable/disable anonymous user access.
Read only / Read/Write Specify if anonymous user has read-only or
read/write access.
Home Directory Specify the folder for the anonymous user, this
folder will be accessed by anonymous login.
Please click on “Apply” to save your settings.
User Account List
In the “Account List”, you can add or delete users and modify their access rights.
Add
Click on “Add” to add a new user. Enter a user name and a password and click on “Apply”.
Page 23

23
EN
3
Configuration of the Freecom Network Drive
Modify
Click on “Modify” to change the user access rights. You can
- set or change the user password
- give the user read-only or read/write access
- select folder the user is allowed to access
After changing the settings, click on “Modify” to apply settings.
En/Disable
Click on “En/Disable” to enable or disable the user access for the selected user.
Delete
Click on “Delete” to delete a user from the list. Confirm with “OK” to delete the user.
Page 24

24
Freecom Network Drive
EN
3
3.7.1 Internal FTP access
Use any FTP client software (e.g. WS_FTP, SmartFTP or CuteFTP) or open your browser
and enter
ftp://USERNAME:USERPASSWORD@<IP ADDRESS> or
ftp://USERNAME:USERPASSWORD@<HOST NAME>
<USERNAME> = user name
<USERPASSWORD> = password of user
<IP ADDRESS> = IP address of your Freecom Network Drive
<HOST NAME> = Host name of the Freecom Network Drive as specified in the settings
3.7.2 External FTP access (via Internet)
To access the Freecom Network Drive via FTP from the Internet, make sure that the FTP
port specified in the Network Drive settings is forwarded to the Network Drive IP address
in the port forwarding settings of your router!
Please consult the user manual of your router for further information
how to setup port forwardings!
Use any FTP client software (e.g. WS_FTP, SmartFTP or CuteFTP) or open your browser
and enter
ftp://USERNAME:USERPASSWORD@YOUR_INTERNET_IP
or
ftp://USERNAME:USERPASSWORD@YOUR_DYNDNS_HOST
<USERNAME> = user name
<USERPASSWORD> = password of user
< YOUR_INTERNET_IP > = your WAN IP address
< YOUR_DYNDNS_HOST > = your Dynamic DNS host name (if supported by your router)
Note: Not all browsers can upload data via FTP. Those that can are e.g.
Internet Explorer and Konqueror. We recommend using FTP client software such as WS_FTP, SmartFTP or CuteFTP.
Page 25

25
EN
3
Configuration of the Freecom Network Drive
3.8 Disk Utility
In this section you can
- choose to format the hard disk,
- specify after how many minutes of inactivity the hard disk will go to sleep mode and
- perform a Scan Disk on the hard disk
Page 26

26
Freecom Network Drive
EN
4
Chapter 4: LAN Connection Types of the Freecom Network Drive
4.1 Direct connection to a PC
Once the PC is setup as DHCP client as described in the chapter “Check TCP/IP Settings on
PC” the user has to configure SMB Server and/or the FTP Server to work with the device
via network connection.
We recommend using the USB connection when connecting the Freecom Network Drive
to a single PC as the USB connection offers faster data transfer rates and easier access
to the Freecom Network Drive.
4.2 Connection to an existing network
Make sure the DHCP Server of your router is enabled. For more information on this topic, please refer to your router's manual.
1. Connect the Freecom Network Drive directly to a PC and open the web configuration.
2. Open the “Status” page.
3. Disable the DHCP Server. Click on “Apply” to save your changes.
4. Open the “IP Config” page.
Page 27

27
EN
4
LAN Connection Types of the Freecom Network Drive
5. Select “Automatic IP” and click on “Apply” to save your changes.
6. Disconnect the Freecom Network Drive from your PC and connect it to your
router.
7. Your Freecom Network Drive will now get an IP address assigned by the DHCP
Server of your router. Every PC connected to your network can now access your
Freecom Network Drive.
You can now use the Freecom Network Storage Assistant for an easy access to your
Freecom Network Drive. This tool helps you to access the web interface or to map shared
folders with a drive letter.
Page 28

WARRANTY
(valid in Europe/Turkey only)
We thank you for purchasing this Freecom product and hope you will enjoy using it.
In order to avoid unnecessary inconvenience on your part, we suggest reading the quick
install guide, instruction manual and any additional electronic and or printed manuals.
When problems occur we have a database with Frequently Asked Questions (FAQ) on
our Freecom website (www.freecom.com), please check this site before you contact the
helpdesk.
Your Guarantee
All Freecom products come with unlimited technical phone and web support. By this
Guarantee, Freecom warrants their products to be free from defects in material and workmanship for a period listed below from the date of its original purchase. If during this period
of guarantee the product proves defective due to improper materials or workmanship,
Freecom will, without charge for labour or parts, at its sole discretion, repair or replace the
product or its defective parts upon the terms and conditions set out below.
Conditions
This guarantee will be granted only when the original invoice or sales receipt (indicating
the date of purchase, product and serial number) is presented together with the defective
product and a Freecom RMA number received from the Freecom Website or given by a
Freecom Service Center. Freecom reserves the right to refuse the free-of-charge guarantee services when the date of purchase of the product cannot be proven. This guarantee
will not apply if the RMA number is missing, the serial number on the product has been
altered, removed or made illegible.
This guarantee covers only the hardware components packaged with the product. This
guarantee covers none of the following: (a) any consumable supplied with the product,
such as media or batteries; (b) damage to or loss of any software programs, data or removable storage media; (c) any damage resulting from adaptations, changes or adjustments,
which may have been made to the product, without the prior written consent of Freecom;
(d) attempted repair by any party other than authorized by Freecom and (e) accidents,
lightning, water, re or any other such cause beyond the reasonable control of Freecom.
With respect to all services provided, Freecom is not responsible for any damage to or loss
of any programs, data or other information stored on any media or any part of any product
serviced. Freecom is not liable for the consequence of business loss in case of system
failure. Be sure to exclude all parts not covered by this guarantee prior to returning the
product to Freecom. Freecom is not liable for any loss or damage to these items. If during
the repair of the product the contents of the hard drive are altered, deleted or in any way
modied, Freecom is not liable whatsoever.
Repair parts and replacement products will be provided on an exchange basis and will be
either new, equivalent to new or reconditioned. All replaced parts and products become
the property of Freecom The period of guarantee for any product or part repaired or replaced in warranty shall be the balance of the original guarantee. Repairs or replacements
on product or parts out of warranty carry 6 (six) months guarantee.
 Loading...