

Page 1
USER MANUAL
NETWORK MEDIAPLAYER 450 WLAN
EXTERNAL MULTIMEDIA HARD DRIVE / 3.5" / USB 2.0 / (W)LAN / AV
WIN & MAc
Rev. 750
Page 2

Freecom MediaPlayer
EN
Dear customer,
Thank you for buying the Freecom MediaPlayer 450, a brand-new digital multimedia
player that supports dual data access mode via 3.5" HDD inside (not supplied with "Drive
In Kit"-model) and 10/100Mbps Network. With this Freecom MediaPlayer you can easily
enjoy Digital Movies, Digital Music, Digital Photos from a 3.5" HDD (when assembled in
the device) and from all PC's in your network, directly on your TV or HiFi set.
Freecom Technologies • Germany
www.freecom.com
Warning !
All rights reserved. The products named in this manual are only used for identification
purposes and may be trademarks or registered trademarks of the respective companies.
This device was designed for home or office use.
Warning! This device is equipment complying with EN55022 class A. This equipment can
cause radio disturbances in a residential area. If this is the case, the user has to take appropriate measures and assume all responsibility and costs for. It may not be used near
or with any life-sustaining systems.
Freecom Technologies is not liable for any damages that may occur from the use of a
Freecom system. All rights reserved. We reserve the right to upgrade our products in
keeping with technological advances.
2
Page 3

EN
Table of Contents
User manual
General Information ...........................................................................................................page 5
Warnings and Safety Instructions .................................................................................pag
Product Overview ................................................................................................................pag
e 9
e 10
Chapter 1:
Use as External USB HDD ..................................................................................................page 12
Insert the Hard Disk (only Drive-In Kit) ................................................................page 12
Connect the Freecom MediaPlayer to the PC ...................................................page 13
Format Built-in HDD via USB ..................................................................................page 13
Copy Data via USB ......................................................................................................page 20
Chapter 2:
Access PC via Network .......................................................................................................page 23
Connect LAN Cable .................................................................................................... page 23
Set Network Configurations ...................................................................................page 24
Wireless LAN Connection ........................................................................................page 24
Chapter 3:
Shared File Playback (Stream) .........................................................................................page 29
Windows 2000 .............................................................................................................page 29
Windows XP ...................................................................................................................page 34
Windows Vista ............................................................................................................. page 40
© 2007 Freecom Technologies
3
Page 4

Freecom MediaPlayer
EN
Chapter 4:
Freecom Network MediaPlayer for Mac ......................................................................page 45
USB 2.0 Mode ................................................................................................................page 45
Partitioning your Freecom MediaPlayer under Mac OS X ............................page 45
FAQ Mac .........................................................................................................................page 46
Chapter 5:
Connect to External AV Device .......................................................................................page 48
Connect Video Cable ................................................................................................page 48
Connect Audio Cable .................................................................................................page 49
Basic Setup ....................................................................................................................page 50
How to Play (Remote Control) ...............................................................................page 71
Chapter 6:
Technical Specifications ....................................................................................................page 89
4
Page 5

EN
General Information
General Information
The Freecom MediaPlayer WLAN fully supports HD (High Definition) files for a really clear
and sharp picture on LCD TV (HDTV support required) and can stream the contents from
a PC/Network through Wireless LAN (802.11g) or Wired LAN. It also features a USB Host
port for attaching external USB Storage.
• Wireless High Definition Multimedia Player
• The latest and powerful media decoding chip -Sigma Design EM8621 Chip
• Full HD file playback up to 1920 x 1080i
• IEEE 802.11g (54Mbps), 802.11b (11Mbps) wireless standard / 10/100Mbs wired LAN
• Wireless security - WEP (Wired Equivalent Privacy)
• Wireless Infrastructure and Ad-Hoc Mode
• Can also be used as external USB 2.0 hard drive
• Read from external USB Storage devices via USB Host port.
• DVD Manager - Playback of DVD File same as Original DVD title
• Video output - HDMI, Component, S-Video and Composite
• Audio output – Stereo, Digital Coaxial & Optical 5.1 ch. Sound, DTS down mix to
stereo
sy Firmware Upgrade
• Ea
Package Content
• Freecom MediaPlayer
• Wireless Antenna
• Footstand
• Remote controller, pilas
• AV cable (composite + stereo cable)
• USB cable (for connecting to PC)
• Power adapter
• CD with user and safety manual
• Quick Install Guide
5
Page 6

Freecom MediaPlayer
EN
Minimum System Requirements
PC:
• Intel Pentium III / AMD Duron 900 MHz or higher
• 256 MB RAM (Vista: 512 MB RAM) or higher
• Available USB 2.0, 1.1 Port (USB 2.0 recommended)*
• Available 10/100 Ethernet LAN Port, RJ-45 (100Mbps recommended) or WLAN
• LAN Cable (cross-wired or standard - see "2.1 Connect LAN Cable")
• For playback on TV, a TV with PAL or NTSC system is required.
• Support HDD: Compatible with a standard 3.5" SATA Hard Drive
• Internet connection for online warranty registration, software updates and downloads
• Op
erating system: Windows 2000, Windows XP, Windows Vista
Mac:
werPC G3/G4/G5, Power Book G3/G4 or Intel Mac
• Po
• 256 MB RAM or higher
• Available USB 2.0, 1.1 Port (USB 2.0 recommended)*
• Available 10/100 Ethernet LAN Port, RJ-45 (100Mbps recommended) or WLAN
• LAN Cable (cross-wired or standard - see "2.1 Connect LAN Cable")
• For playback on TV, a TV with PAL or NTSC system is required.
• Support HDD: Compatible with a standard 3.5" SATA Hard Drive
• Internet connection for online warranty registration, software updates and downloads
• Op
erating system: Mac OS X v10.3 or higher
* USB 2.0 is downwards compatible to USB 1.1. To achieve optimal performance from the Freecom
MediaPlayer your PC should be equipped with an USB 2.0 port.
6
Page 7

EN
General Information
Precautions
Please read the following in this manual carefully for proper use.
Copyright
• Fr
eecom can not be held responsible for the use of illegal software, audio sources,
video sources etc. The user and/or owner of the Freecom MediaPlayer is legally
responsible for the content on the device.
Check supported codec
• Th
e Freecom MediaPlayer may not play back all media files. Please check the codec
type and ensure this is supported by the MediaPlayer. Please note that possible errors
in the media file or use of unrecognized characters may result in improper playback.
Cautions for USB Device
• Co
nnect the power adapter as well when you connect Freecom MediaPlayer to a PC.
• Do not connect the Freecom MediaPlayer with a USB cable of more than 3 metres
long. Doing so may result in low transfer speeds and/or bad connection.
• We r
• If you connect this device to USB 1.1 Host Adapter, the speed is USB 1.1 (Max. 12 Mbps),
Cautions for USB Host
ecommend you to use the supplied USB cable by our company.
so we recommend you to connect to USB 2.0 for full speed of max. 480 Mbps.
t all USB devices may be supported by the USB Host port. Please check the com-
• No
patibility before use or purchase.
Cautions when inserting a HDD
• On
ly 3.5" SATA type HDD can be used.
• We recommend you to use more than 6 GB HDD. In case you use a harddrive with
less than 6 GB, it may cause data loss.
Cautions when using Network connection
hen the Freecom MediaPlayer is connected to a PC using the Windows file sharing
• W
option, be sure to use the Windows Network sharing function.
• Th
e sharing function may not be functioning properly as a result of errors in Windows
or the user's computer environment. Freecom can not be held responsible for this.
pending on user's network performance and computer environment, data transfer
• De
through network may have intermittent data cut-offs.
pending on user's wireless network performance and computer environment,
• De
data transfer through wireless network may have intermittent data cut-offs.
7
Page 8

Freecom MediaPlayer
EN
Cautions for possibility of causing Radio Waves to cross
• Freecom MediaPlayer may cause Radio Waves to cross, so it is recommended to be
alert when you keep devices near the Freecom MediaPlayer. Especially concerning
your health.
Data Backup
• We
strongly recommend you to make a data backup to another safe medium. Freecom
can not be held responsible for data damage or data loss on the built-in hard drive.
Cautions for drop, shock
• Do n
Do not insert materials
• Do
Do not disassemble or modify
•
Do not stack
• Do n
Cautions for exposure to water,moisture, etc
• Do
• Do
Cautions for magnetic materials
• Ke
ot drop the device. It may cause critical damage to the hard drive.
not insert any material in the Freecom MediaPlayer. This may cause a defect or
malfunction of the device.
ot disassemble or modify the Freecom MediaPlayer.
Do n
ot place materials, devices or anything else on the Freecom MediaPlayer.
n't expose Freecom MediaPlayer to oil, water, dust, moisture or rain and wind.
Turn off the Freecom MediaPlayer immediately if exposed to any moist substance
or water.
not expose the Freecom MediaPlayer to heat, keep away from heated areas. Place
the Freecom MediaPlayer in well ventilated places.
ep all magnetic devices away from the Freecom MediaPlayer. Magnets or magnetic
devices like speakers may erase or cause damage to data stored on the hard disk.
8
Page 9

EN
Warnings and Safety Instructions
Warnings and Safety Instructions
Please read and follow the below mentioned instructions. They should be observed in
order to prevent injury to the user, damage to the device and damage to property, as
well as to ensure safe use of the product. Not following these instructions may cause
the unit to malfunction.
To ensure that your Freecom MediaPlayer functions properly, please take note of the following precautions. If these are not followed, you may void your warranty and damage
the Freecom MediaPlayer.
fely remove the Freecom MediaPlayer via your operating system - the "unplug or
• Sa
eject hardware" option in the Windows taskbar - before disconnecting the USB cable
or power cable and before switching off the device. Failing to do so may result in
data loss.
• Do
not disconnect the Freecom MediaPlayer from the PC during file transfer. This
may result in data loss and an error to the Freecom MediaPlayer. If this occurs, please
run the ScanDisk utility.
not drop the Freecom MediaPlayer or expose it to other kinds of sudden mechani-
• Do
cal shocks as this may result in data loss and damage to the hard drive.
not use the Freecom MediaPlayer when the ambient temperature is below 10°C
• Do
or above 35°C.
the Freecom MediaPlayer is moved from a cool environment to a warmer envi-
• If
ronment, please allow the drive to acclimatize to the ambient temperature before
operating the device. Failing to do so may lead to condensation within the drive
enclosure, which in turn may cause the drive to malfunction.
not place liquids or drinks on the Freecom MediaPlayer. When liquids are spilled
• Do
and get in contact with the electronics within the drive enclosure, it will damage the
drive and will cause the drive to malfunction.
not use the Freecom MediaPlayer in a dusty environment. Dust inside the enclosure
• Do
may damage the internal electronics and result in drive malfunction.
• Do n
• The Freecom MediaPlayer may generate heat when used for a longer period of
ot use the Freecom MediaPlayer near magnetic fields.
time.
Furthermore, warranty does not apply to:
mages or problems resulting from misuse, abuse, accident, alteration or incorrect
• Da
electrical current or voltage.
• An
y product tampered with or with a damaged warranty seal
• Any product without a warranty or serial number label.
• Batteries and any consumable items delivered with or in the equipment.
9
Page 10
Freecom MediaPlayer
EN
Product Overview
1. Front View
All basic operation functions can be done with the buttons on the device without use
of the remote control.
1. Enter
3. Power
4. Play / Pause
1. E
NTER Select or play a file
2. NAVIGATION KEY Up
, Down, Left, Right
2. Navigati on key
5. Stop / Init
6. IR
7. PWR
8. NET
9. HDD
3. POWER Power On, Off
4. PLAY / PAUSE Play all files from selected file / Pause
5. STOP / INIT Stop / Return to Mode Selection Screen
6. IR IR receiving area for remote signals
7. PWR Power LED
8. NET Network LED
9. HDD HDD LED
10
Page 11
EN
2. Rear View
9. ANT
Product Overview
1. USB DEVICE
2. USB HOST
10. OPTICAL
11. CVBS
12. STEREO L-R
3. HDMI
4. S-VIDE O
5. COAXIAL
6. Y, PB, PR
7. LAN
8. PWR
1. USB DEVICE Connect to a computer with USB cable
2. USB HOST Connect to an external USB device with USB cable
3. HDMI Connect HDMI cable for digital audio- and video output
4. S-VIDEO Connect S-Video cable for video output
5. COAXIAL Connect Coaxial cable for 5.1 ch. Digital audio output
6. Y, PB, PR Connect component Y, Pb, Pr cable for video output
7. LAN Connect LAN cable for wired networking
8. PWR Connect power adapter
9. ANT Connect wireless antenna for wireless networking
10. OPTICAL Connect Optical cable for 5.1 ch. Digital audio output
11. CVBS Connect Composite cable for video output
12. STEREO L-R Connect Stereo cable for audio output
11
Page 12
Freecom MediaPlayer
EN
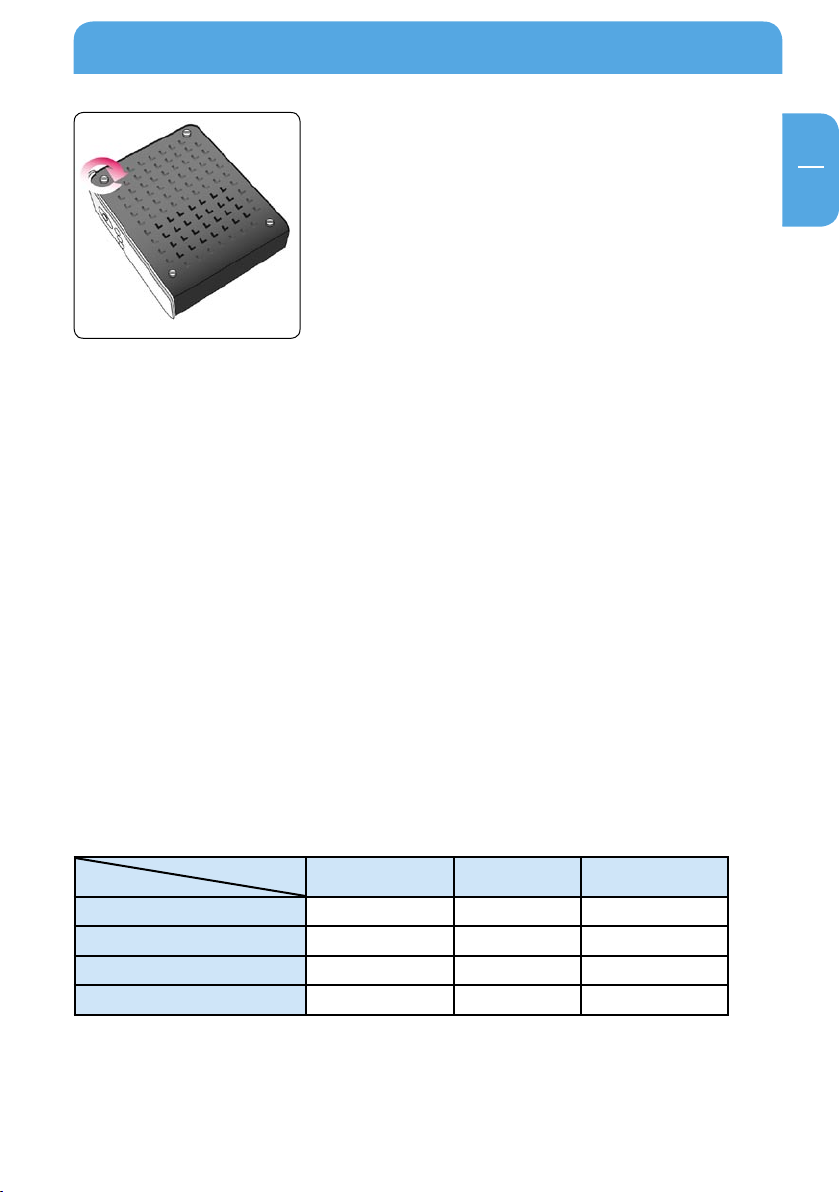
1
Chapter 1: Use as External USB HDD
1.1 Insert the Hard Disk (only Drive-In Kit)
• Only use a 3.5" SATA Hard Disk.
1. Unscrew the 4 screws and open the cover by sliding it in the direction of the arrow.
2. Connect Power and SATA connector to Hard
Disk.
12
lose the cover by sliding it in the direction of the
3. C
arrow.
Page 13
Use as External USB HDD
EN
1
4. Put the 4 screws back.
1.2 Connect the Freecom MediaPlayer to the PC
1. Connect the USB cable to the Freecom MediaPlayer and connect the power adapter
to the DC jack on the Freecom MediaPlayer.
2. Connect the adapter into an AC outlet.
3. Connect the Freecom MediaPlayer to the PC's USB port.
4. Switch the power on by pressing the power on-off button on the Freecom MediaPlayer.
indows 2000, Windows XP and Windows Vista will recognize the Freecom Me-
5. W
diaPlayer as a USB drive; you can use the Freecom MediaPlayer without installing a
driver. If the Freecom MediaPlayer is not recognized or detected, please check that
the USB connector is properly connected to the device and the PC.
1.3 Format Built-in HDD via USB
File System features
Please refer to the tables below for an overview:
File systems supported by different operating systems
Operat ing system
Windows 98SE yes yes not supported
Windows ME yes yes not supported
Windows 2000 yes yes yes
Windows XP / Vista yes yes yes
File sys tem
FAT FAT32 NTFS
13
Page 14

Freecom MediaPlayer
EN
1
Maximum size of a partition
Operat ing system
File sys tem
Windows 98SE 2 GB 60 GB
Windows ME 2 GB 2 TB
Windows 2000 4 GB
Windows XP / Vista 4 GB
FAT FAT32 NTFS
*1, 2
*2
*3
*3
32 GB 16 TB
32 GB 16 TB
n.a.
n.a.
Example for different partitions with different file systems on one Freecom
MediaPlayer
File sys tem
Operat ing system
NTFS FAT32
120 GB 90 GB 30 GB
The example above is a good solution for Windows 2000/XP/Vista users who sometimes
exchange data with Windows 98SE/ME PCs.
For storing the data under Windows 2000/XP/Vista both partitions can be used. As the
NTFS file system is not recognized by Windows 98SE/ME data to be used on these operating systems must be stored on the FAT32 partition.
Please follow the steps below to adapt the Freecom MediaPlayer for your needs.
If the built-in HDD is not formatted, the PC can not detect the hard disk drive. If so, format the hard disk first referring to the following guide. If the hard disk drive is already
formatted, see "Copy Data via USB".
14
*1
: A patch for Windows 98SE is required for hard disk larger than 60 GB. Further information and an update to
fix this problem can be found in article 263044 of the "Microsoft Knowledge Base"on the Microsof t Website
under http://support.microsoft.com.
*2
: Hard disk capacity will not be displayed correctly by fdisk!
*3
: FAT partitions larger than 2 GB can only be administrated by Windows 2000/XP/Vista.
Page 15
Use as External USB HDD
EN
1
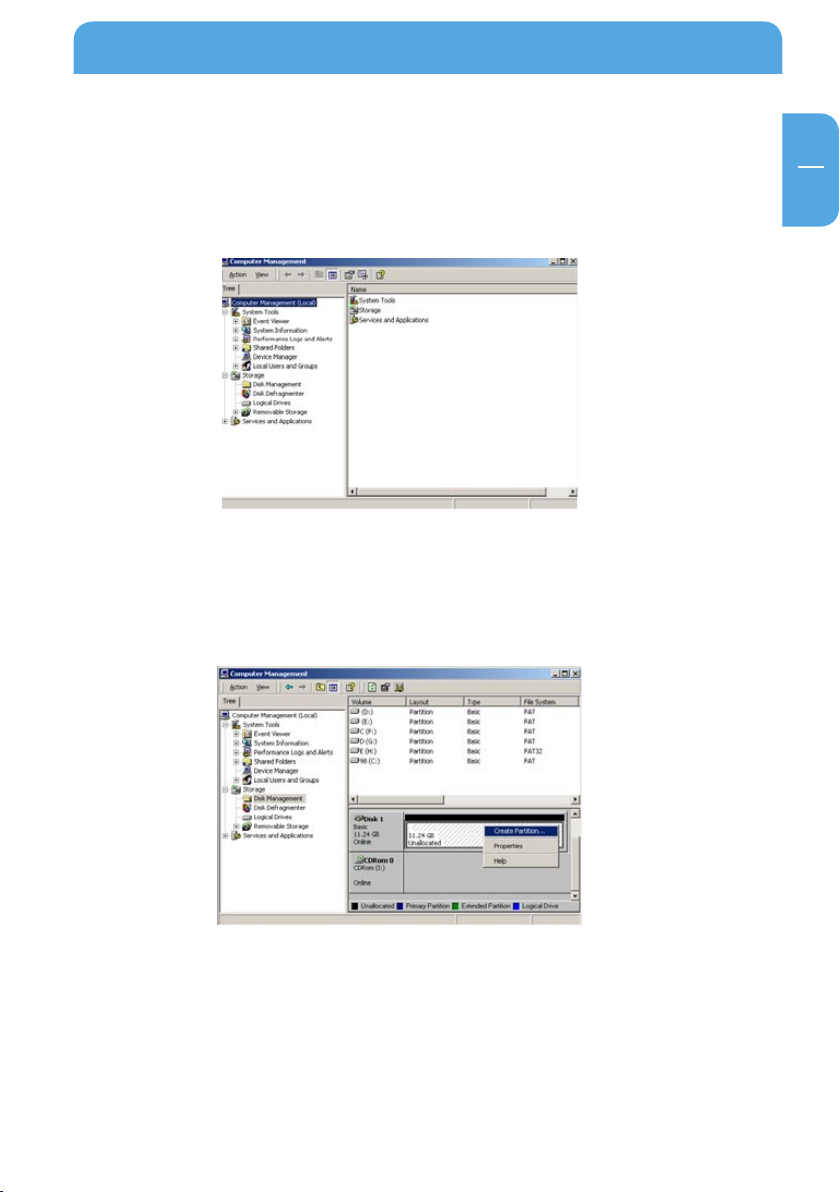
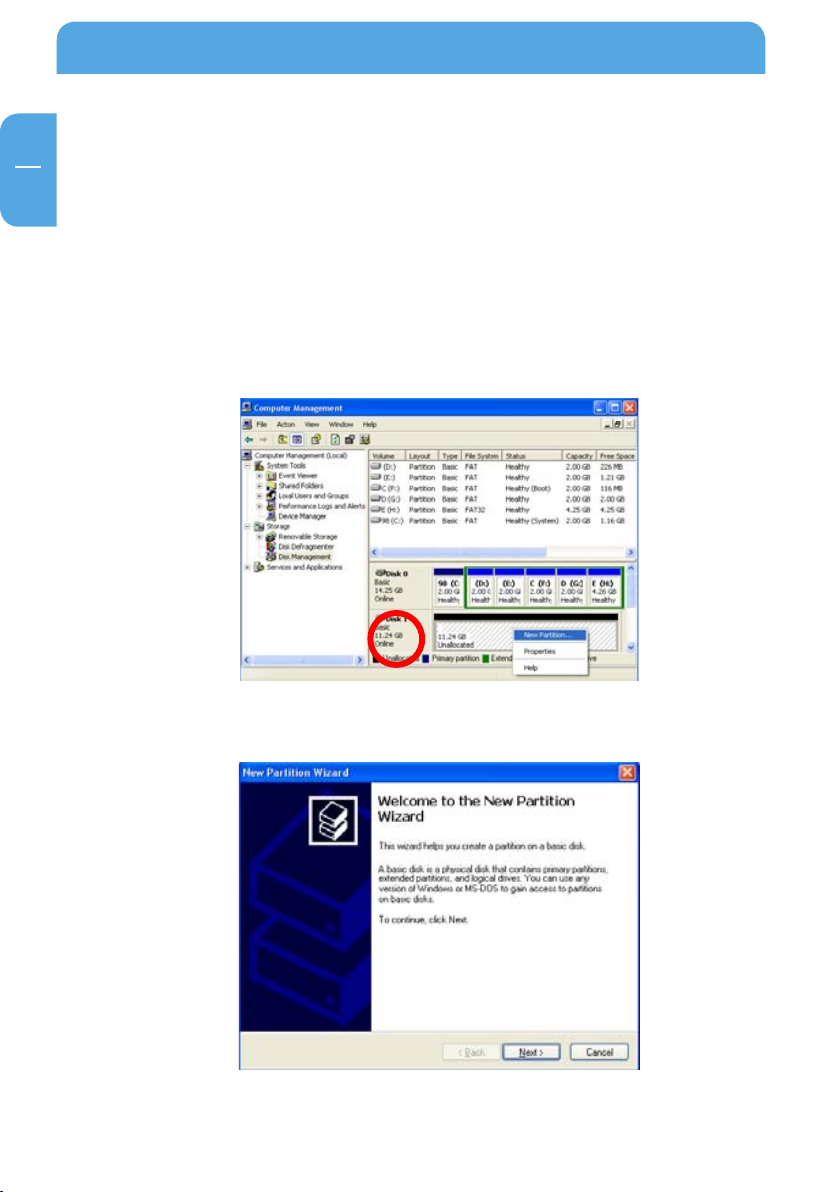
1.3.1 Windows 2000
1. Connect Freecom MediaPlayer to PC via USB cable, and plug power cable of Freecom
MediaPlayer.
2. S
elect "Start > Settings > Control Panel > Administrative Tools > Computer Manage-
ment > Disk Management" in Windows.
f the "Disk Signature and Upgrade Disk Wizard" is started, click Next to progress for
3. I
finishing the wizard. If this wizard does not start, right click the left area of unallocated
drive and start the wizard.
4. A
fter finishing the "Disk Signature and Upgrade Disk Wizard", right-click the Unal-
located Drive and then, click "Create Partition".
15
Page 16
Freecom MediaPlayer
EN
1
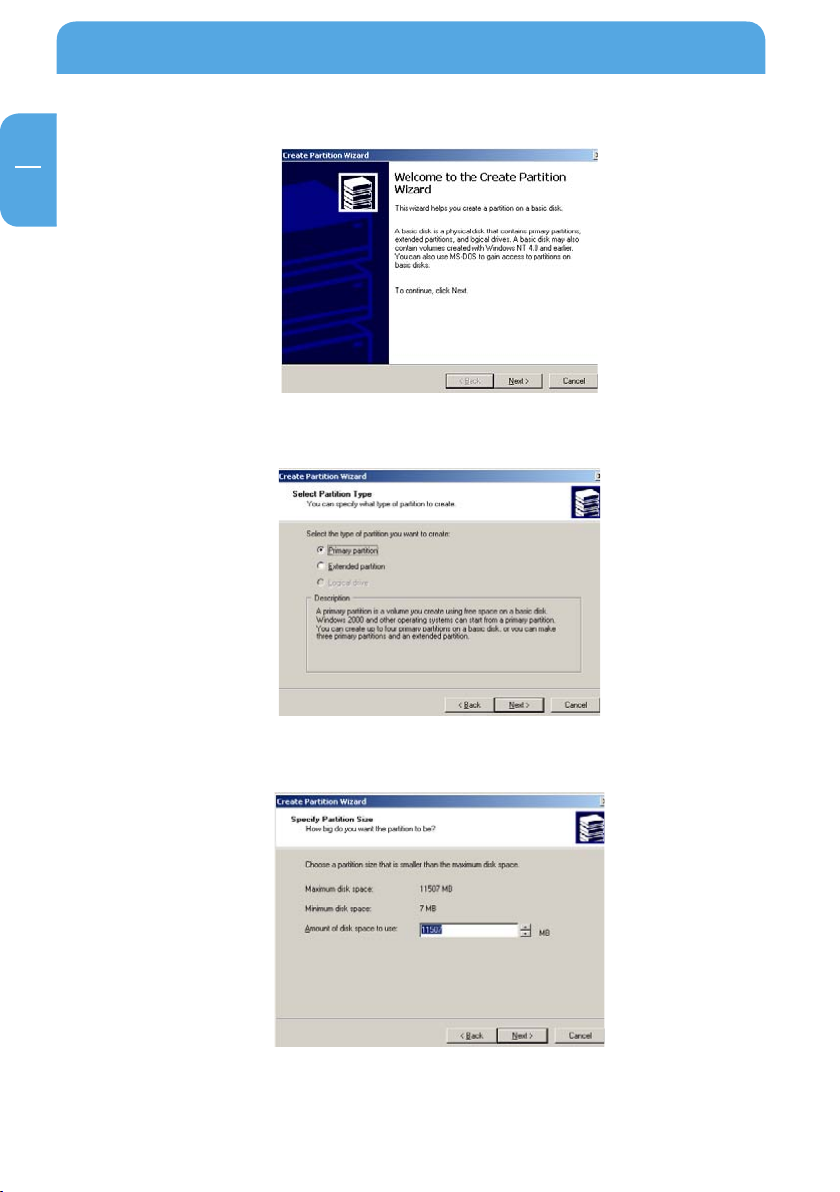
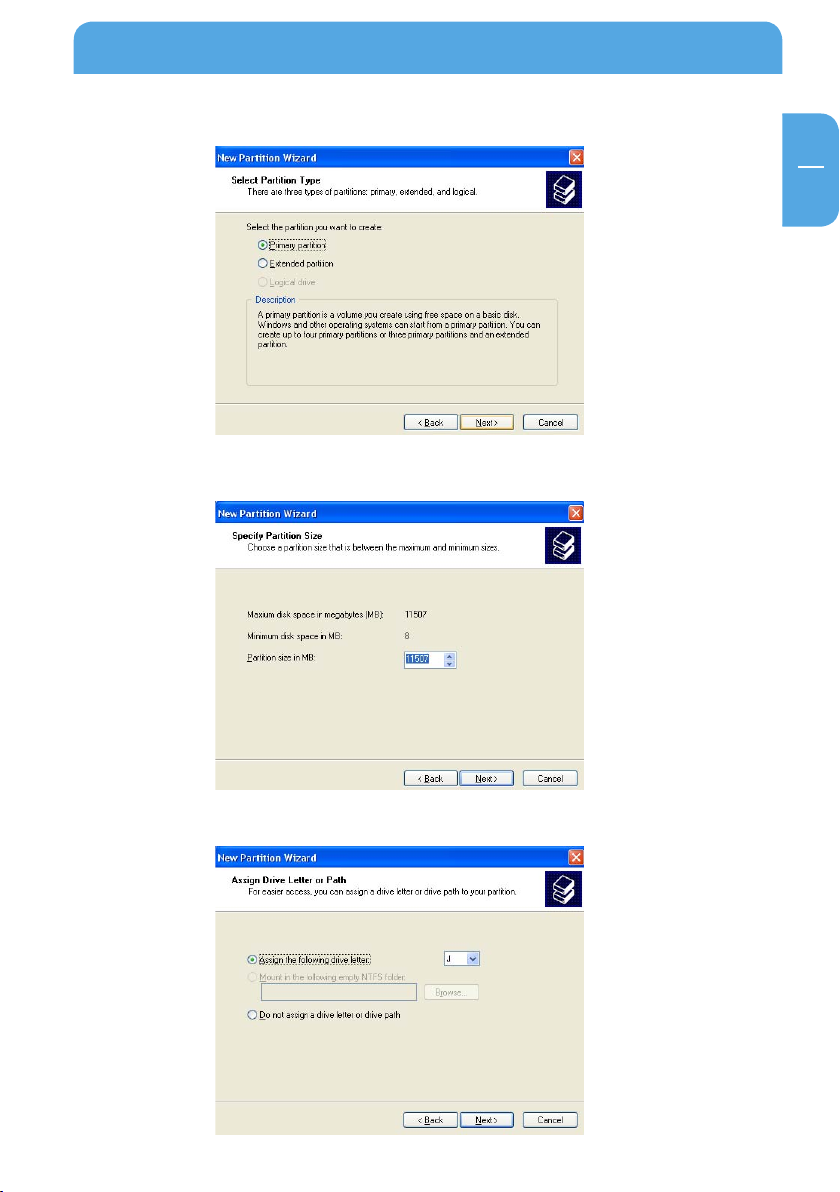
5. Click "Next" at the Windows Create Partition Wizard.
6. Check "Primary Partition" and click "Next".
7. Type the size that you want to use and click "Next".
16
Page 17
Use as External USB HDD
EN
1
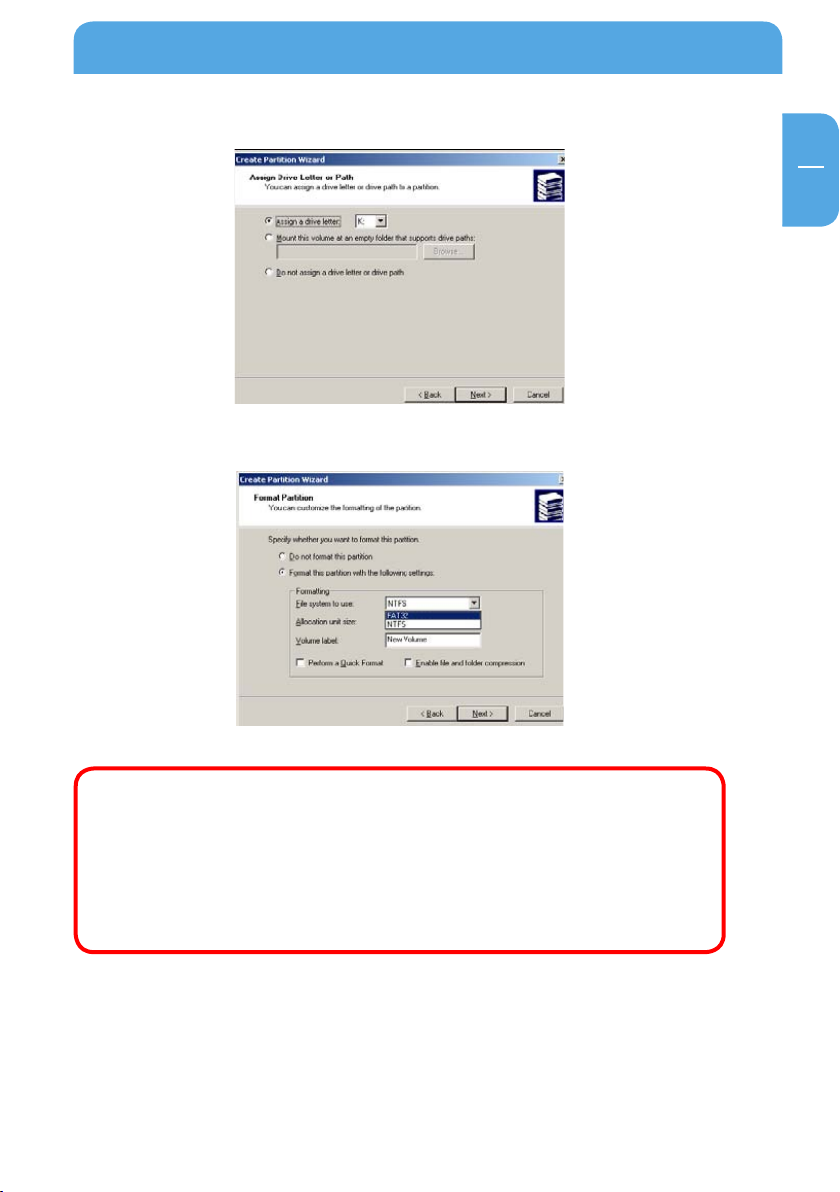
8. Assign a drive letter and click "Next".
9. Choose FAT32 or NTFS at File system to use and click "Next".
FAT 32 system is available on Windows 9
but NTFS system is available on Windows 2000/XP/Vista only.
If you choose FAT32 system on Windows 2000/XP/Vista, one drive letter's
maximum size will be limited to 32GB. If you want to use one drive letter
of 32GB more, you have to format on Windows 98SE/ME.
If you want to create two or more partitions with one disk drive, it will be
recommended "Primary Partition".
10. After finishing Wizard setup, formatting will be progressed automatically.
8/ME and Windows 2000/XP/Vista,
17
Page 18
Freecom MediaPlayer
EN
1
1.3.2 Windows XP / Vista
1. Connect Freecom MediaPlayer to PC via USB cable, and plug power cable of Freecom
MediaPlayer.
2. C
lick "Settings > Control Panel > Administrative Tools > Computer Management>
Disk Management" in Windows. If you can not find Administrative Tools at Control
Panel, click "switch to classic view" in the upper left corner on the screen.
f the "Disk Signature and Upgrade Disk Wizard" starts, click "Next" to progress for
3. I
finishing the wizard. If this wizard does not start, right click the marked left area of
unallocated drive and start the wizard.
fter finishing the "Disk Signature and Upgrade Disk Wizard", Right-click the 'Unal-
4. A
located' Drive. And then, click "New Partition".
18
lick "Next" at the New Partition Wizard.
5. C
Page 19
EN
1
6. Check "Primary partition" and click "Next".
7. Type number size you want to use and click "Next".
Use as External USB HDD
8. Assign a drive letter and click "Next".
19
Page 20

Freecom MediaPlayer
EN
1
9. Choose FAT32 or NTFS at File system to use and click "Next".
FAT 32 system is available on Windows 9
but NTFS system is available on Windows 2000/XP/Vista only.
If you choose FAT32 system on Windows 2000/XP/Vista, one drive letter's
maximum size will be limited to 32GB. If you want to use one drive letter
of 32GB more, you have to format on Windows 98SE/ME.
If you want to create two or more partitions with one disk drive, it will be
recommended "Primary Partition".
fter finishing Wizard setup, formatting will be progressed automatically.
10. A
8/ME and Windows 2000/XP/Vista,
1.4 Copy Data via USB
It is possible to use the Freecom MediaPlayer as an external USB hard disk drive. You can
copy data from your PC to built-in HDD of Freecom MediaPlayer via USB. It is possible to
play media files at the hard disk on TV set.
When connecting to a PC, you have to connect power cable of Freecom
MediaPlayer.
20
Page 21
Use as External USB HDD
EN
1
1.4.1 Windows 2000/XP/Vista
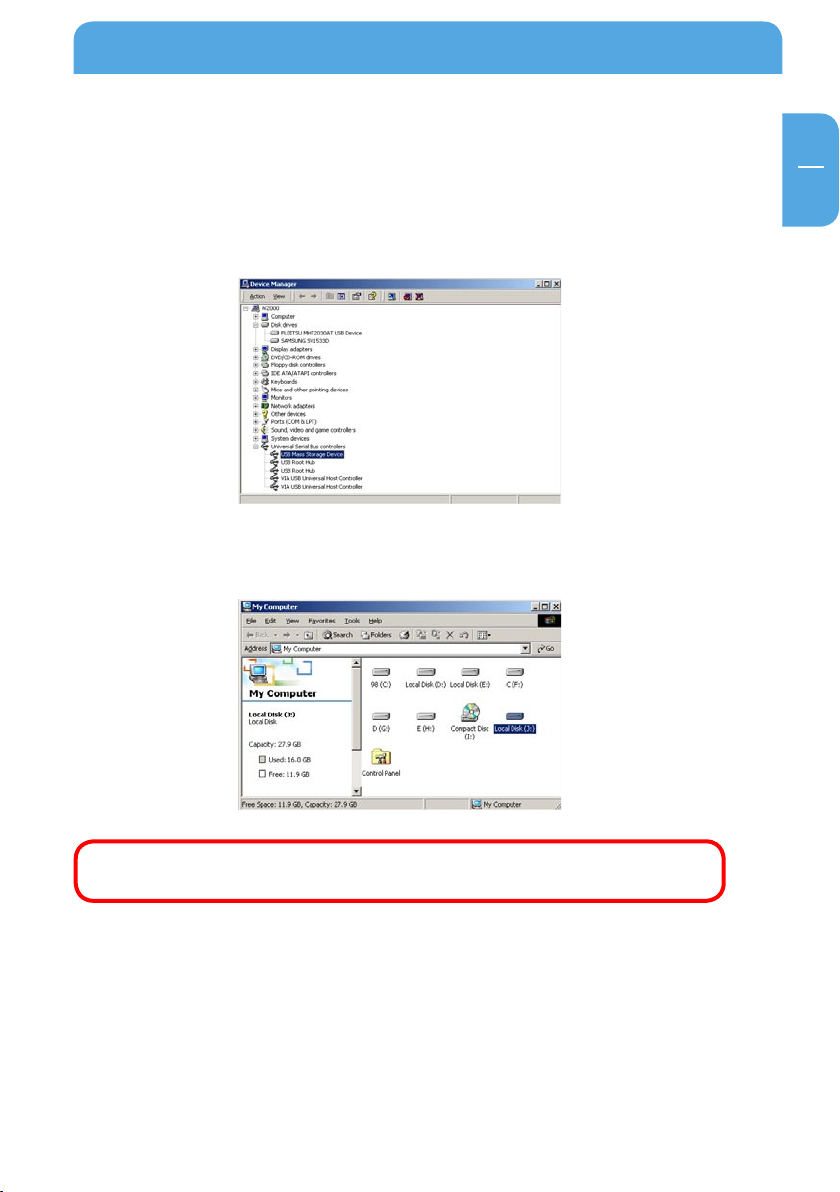
1. After connecting Freecom MediaPlayer and plug power cable, Windows itself will
install driver automatically. And then, check the driver installation at Windows "Start
> Settings > Control panel > (switch to classic View on Windows XP/Vista) > System
> Hardware > Device manager > Universal Serial Bus controllers > USB Mass Storage
Device".
2. C
heck 'My Computer' or 'Explorer', there should be a new volume. You can copy any
data to this volume.
If new volume does not appear, check if HDD is formatted. Windows
/XP/Vista can detect both FAT32 and NTFS file system.
2000
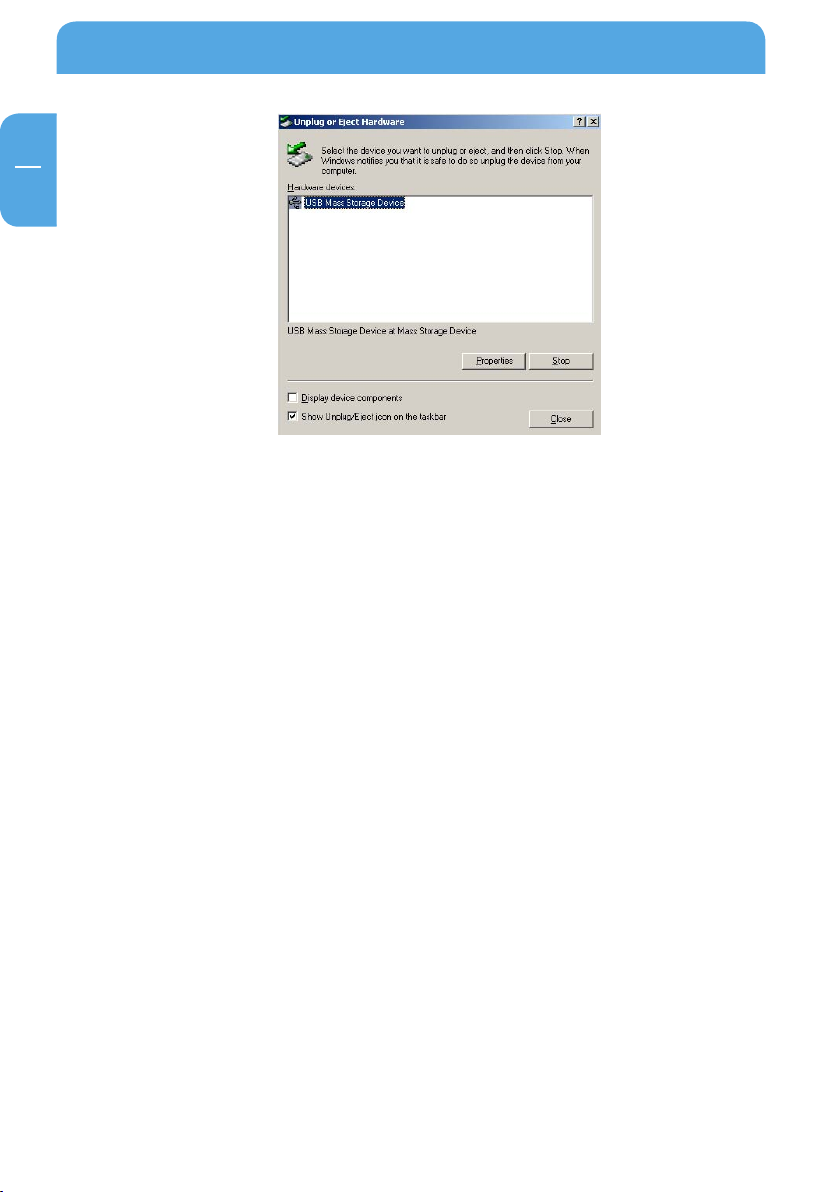
3. After copying data, remove the Freecom MediaPlayer by using the "safely remove
rdware" option in the Windows task bar. If you don't follow this procedure, data
ha
and Freecom MediaPlayer may get damaged.
21
Page 22
Freecom MediaPlayer
EN
1
When you see 'Non High-Speed USB Hub Message'
The message will be displayed on Windows 2000/XP/Vista when you plug Freecom
MediaPlayer into USB 1.1 spec. Host adapter.
1.4
.2 Mac
It can be available on Mac OS X v10.3 or higher.
There is no need to install the installation driver at Mac OS X 10.3 version. The Freecom
MediaPlayer will be detected automatically. If the Freecom MediaPlayer is detected correctly, an icon appeers on the desktop.
To remove the Freecom MediaPlayer safely, drag the icon to the trash and unplug the
Freecom MediaPlayer.
22
Page 23
Access PC via Network
EN
2
Chapter 2: Access PC via Network
Use the FTP Server (see page 70) to copy data to the Mediaplayer via
network.
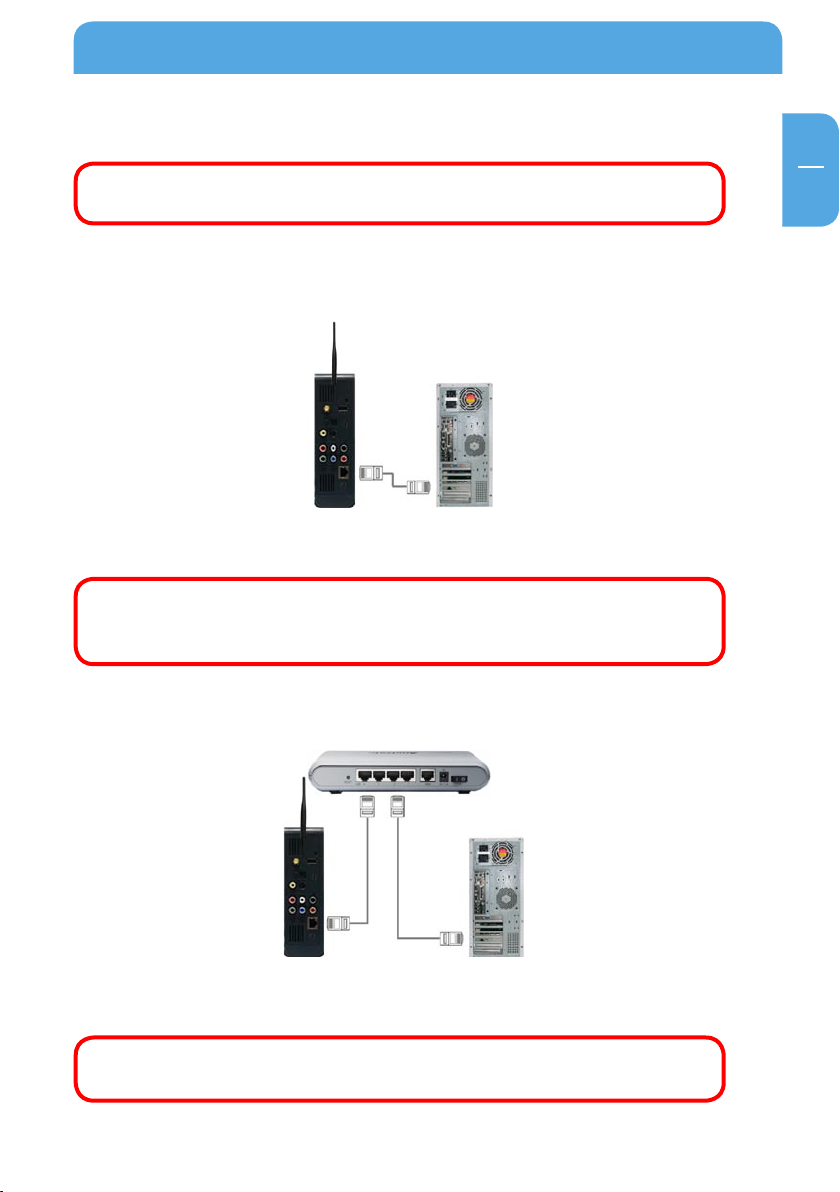
2.1 Connect LAN Cable
When connecting Computer to the Freecom MediaPlayer directly
Connect LAN cable to LAN port between Freecom MediaPlayer and PC. In this case, you
have to use a Cross-wired LAN cable.
If your computer's LAN card is already used for connection to Internet
line, you can install an additional LAN card to your PC and connect that
additional LAN card to the Freecom MediaPlayer.
When connecting with IP Router or Hub
Connect LAN cable to LAN port between IP Router or Hub. In this case, you have to use
Direct LAN Cable type generally.
When you want to play shared multimedia files on network, refer to
ha
pter 3. "Shared File Playback (Stream)".
C
23
Page 24
Freecom MediaPlayer
EN
2
2.2 Set Network Configurations
After connecting the LAN cable, you have to set network configurations of Computer and
Freecom MediaPlayer. You need to share a folder on Windows computer and use same
'IP address range' and same 'Subnet Mask' between Windows computer and Freecom
MediaPlayer.
For example:
Computer Network Freecom MediaPlayer
IP address 192.168.1.2 192.168.1.3
Subnet Mask 255.255.255.0 255.255.255.0
It is possible to assign IP address and Subnet Mask of the Freecom MediaPlayer as Dynamic or Static.
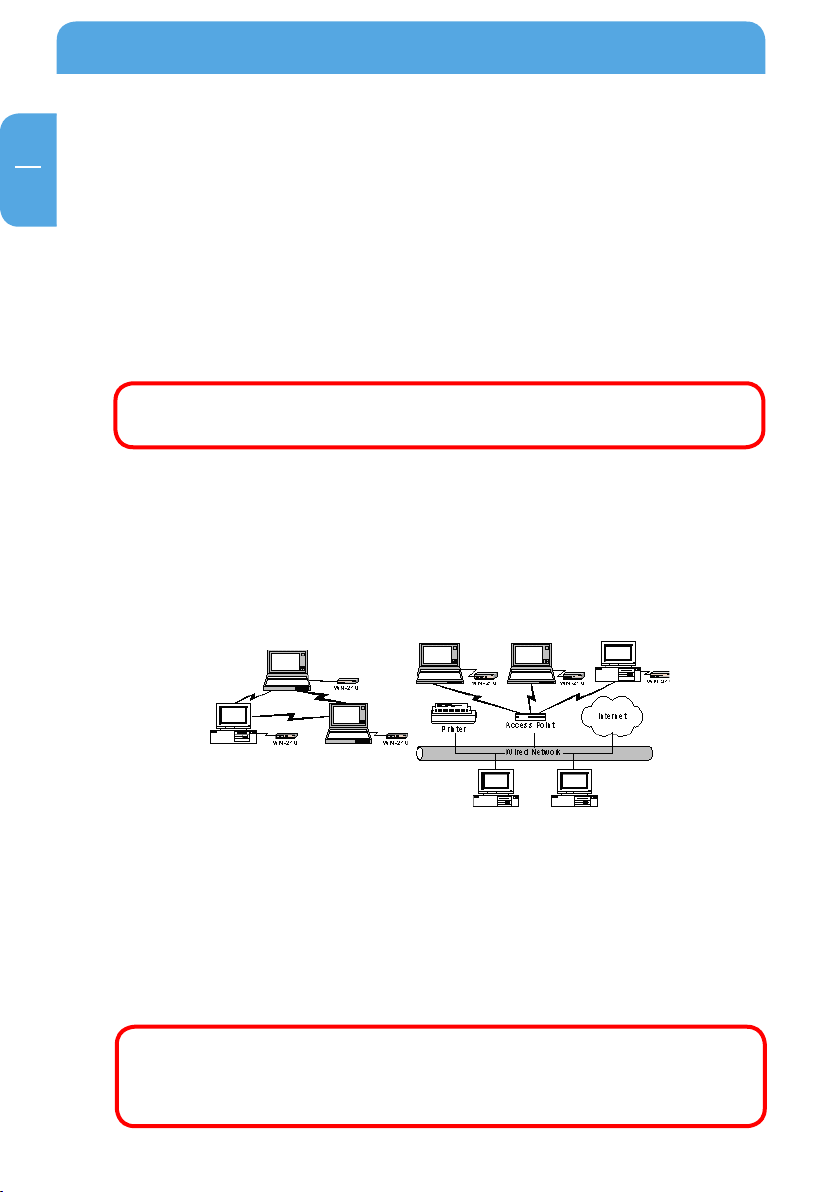
2.3 Wireless LAN Connection
Freecom MediaPlayer supports two types of wireless structure modes: Infrastructure
mode & Ad-Hoc mode.
Ad-Hoc Mode Infrastructure Mode (AP)
Ad-Hoc Mode
1:1 wireless LAN connection type between wireless adapter and Freecom MediaPlayer
without wireless access point.
Infrastructure Mode (AP)
Wireless LAN connection type with Wireless Access Point.
Wireless AP (Infrastructure Mode) or Wireless Adapter (Ad-Hoc Mode)
is n
eeded for wireless connection. IEEE 802.11g wireless standard is
recommended for better wireless environment. Freecom MediaPlayer
is compatible with IEEE 802.11g & b standard.
24
Page 25
Access PC via Network
EN
2
Wireless LAN Connection Setup
You have to connect the Freecom MediaPlayer to a TV set for this setup.
5.2 Connect Video Cable".
See "
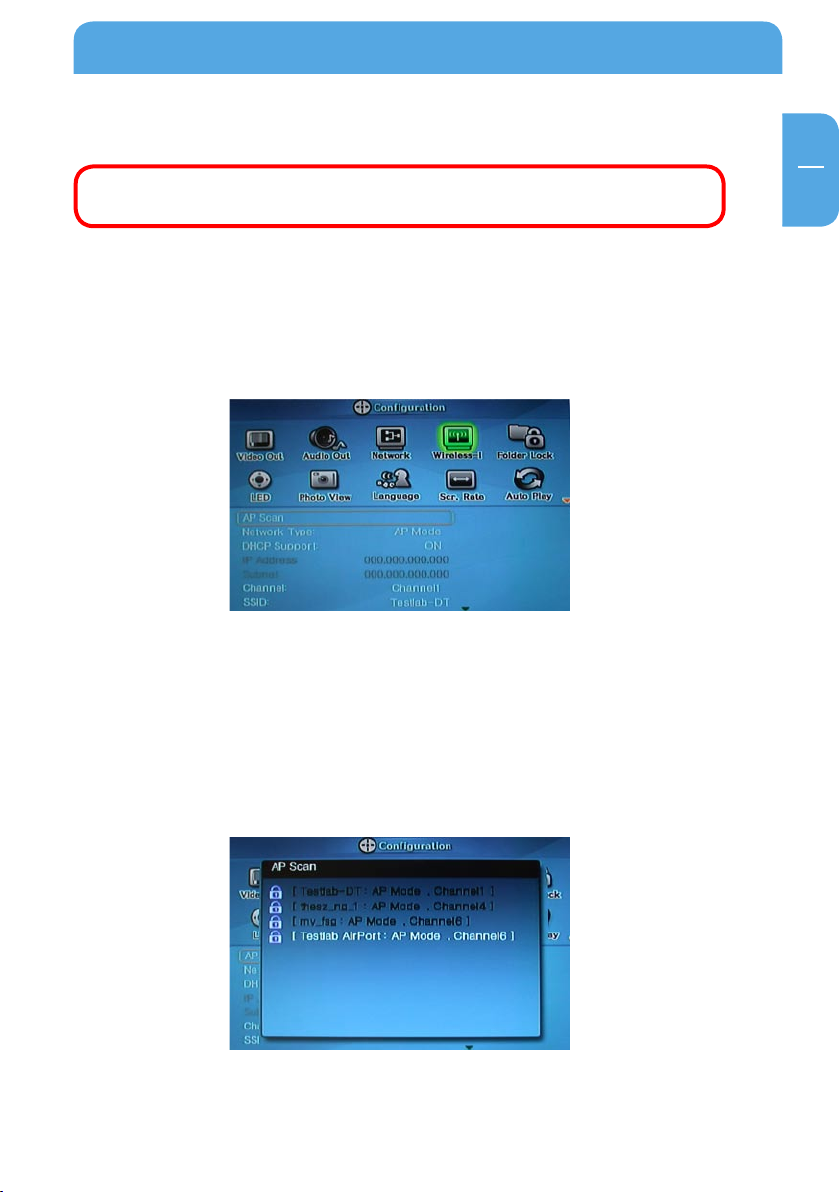
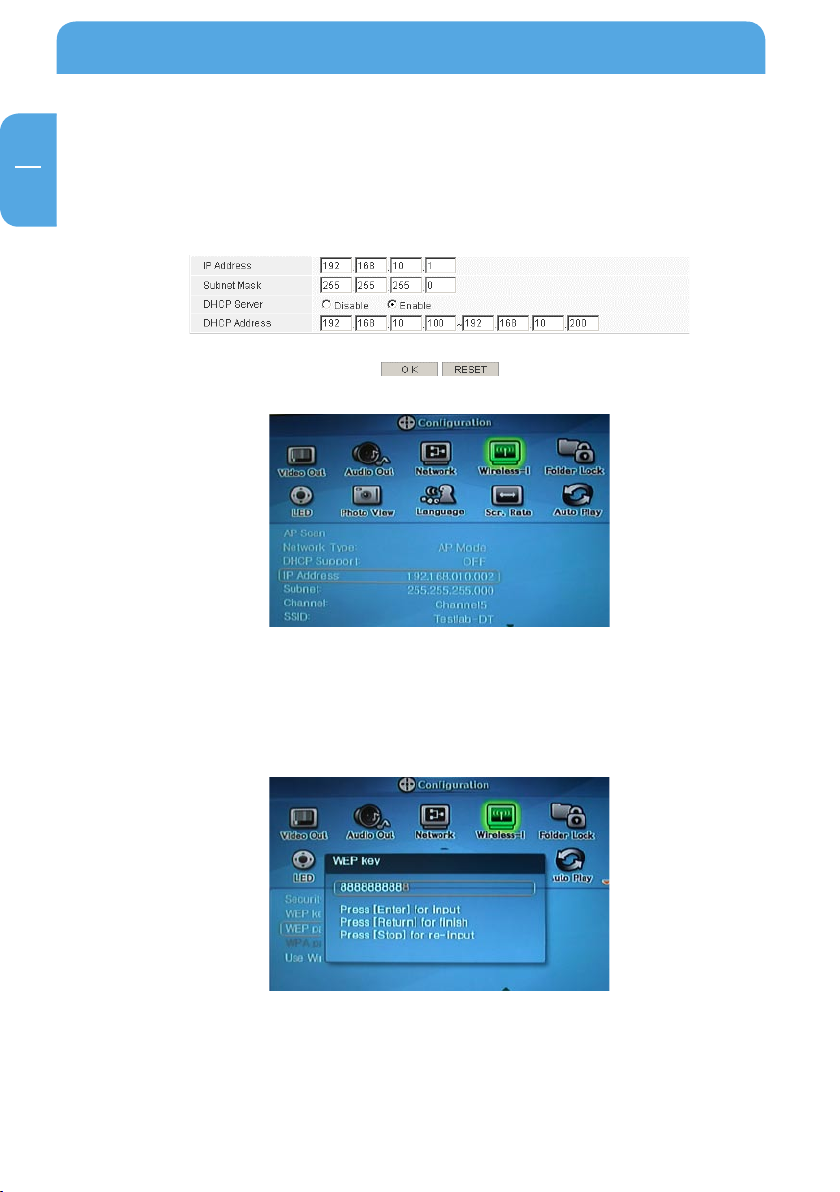
1. Move to Setup screen by pressing "SETUP" button on remote control.
ove to "Wireless-I" Icon and press "OK" button. Setup box will be displayed under
2. M
icon menu.
ove to 'AP Scan' and press "OK" button. Surrounded wireless stations are detected
3. M
and displayed.
elect the preferred station out of the scanned wireless stations.
4. S
Wireless station information is displayed.
ID: Name of Wireless Station
- SS
- Connection Mode: AP Mode (to connect an AP) / Ad-hoc Mode (to connect wireless
adapter)
- Ch
annel: Wireless channel used by wireless station
25
Page 26
Freecom MediaPlayer
EN
2
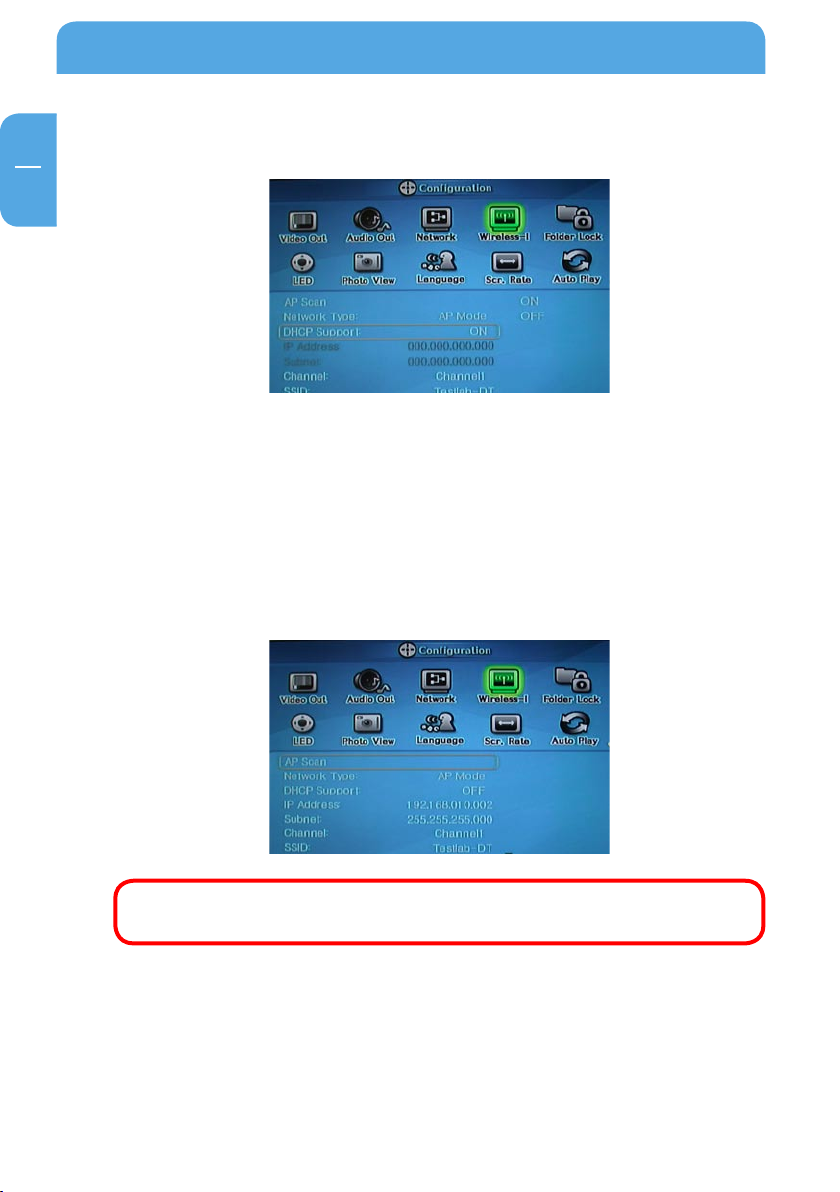
5. Information about wireless station will be displayed. Press "SETUP" for saving configurations.
When connecting Ad-Hoc Mode, manual settings of IP address and Subnet
mask will be needed.
Manual settings of IP address and Subnet mask of wireless adapter and Freecom MediaPlayer will be needed. Disable DHCP and enter "IP address" and "Subnet mask". IP
address must be different between Freecom MediaPlayer and wireless adapter but the
Subnet mask is to be same.
Freecom MediaPlayer: IP address(192.168.10.2); Subnet (255.255.255.0) => Wireless adapter:
IP address (192.168.10.3). Subnet mask (255.255.255.0)
Note: You have to choose a channel on your own if you want to connect
to an other WLAN device.
26
Page 27
Access PC via Network
EN
2
6. "WIRELESS" icon is activated. Run the icon, and the PC list on the network is displayed.
Access to the preferable PC you want.
When wireless icon is not activated or not connected to wireless station.
Waiting or Rebooting" It might take some time to assign IP address from AP in case
1. "
of AP Mode. So, wait for a while. Otherwise, reboot AP and Freecom MediaPlayer
together.
27
Page 28
Freecom MediaPlayer
EN
2
2. "Manual Setting of IP address and Subnet mask" In case of AP Mode, disable DHCP
support and do manual setting of IP address and subnet mask. At the time, each IP
address is to be different and subnet mask is to be same.
AP: IP address(192.168.10.1. Subnet mask (255.255.255.0) => Freecom MediaPlayer: IP
address(192.168.10.2. Subnet mask(255.255.255.0)
When connecting to AP with WEP/WPA wireless security
If a wireless station like AP or Adapter has WEP or WPA wireless security, you have to
enter WEP/WPA key same as AP or wireless adapter.
It is possible to enter WEP/WPA key at "Wireless-I". Enable Security Mode and then enter
WEP/WPA Key of AP or wireless adapter.
To enter use direction key "UP" or "DOWN", or "Number". After finishing that, finally press
"SETUP" for saving configurations.
28
Page 29

Shared File Playback (Stream)
EN
3
Chapter 3: Shared File Playback (Stream)
After connecting LAN cable, you have to set network configurations of both Computer
and Freecom MediaPlayer.
It is possible to assign IP address and Subnet Mask of Freecom MediaPlayer as dynamic
or static.
3.1 Windows 2000
1. Select the folder which you want to share. Right-click the folder and click "Sharing"
in pop menu.
2. Check "Share this folder" and write "Share name". For example, "My Movie":
"Share name": maximum length is 12 ch
aracters.
29
Page 30

Freecom MediaPlayer
EN
3
3. Click "Share Permissions" and check whether "Everyone" account is present or not.
If not, add "Everyone" account.
It is recommended only to use 'Read' at Permissions.
4. After that, the shared folder will be displayed as following picture.
ove to "Settings > Control Panel > Administrative Tools > Computer management
5. M
> Local Users and Groups > Users", and double click "Guest".
30
Page 31

Shared File Playback (Stream)
EN
3
6. Check "User cannot change password" and "Password never expires".
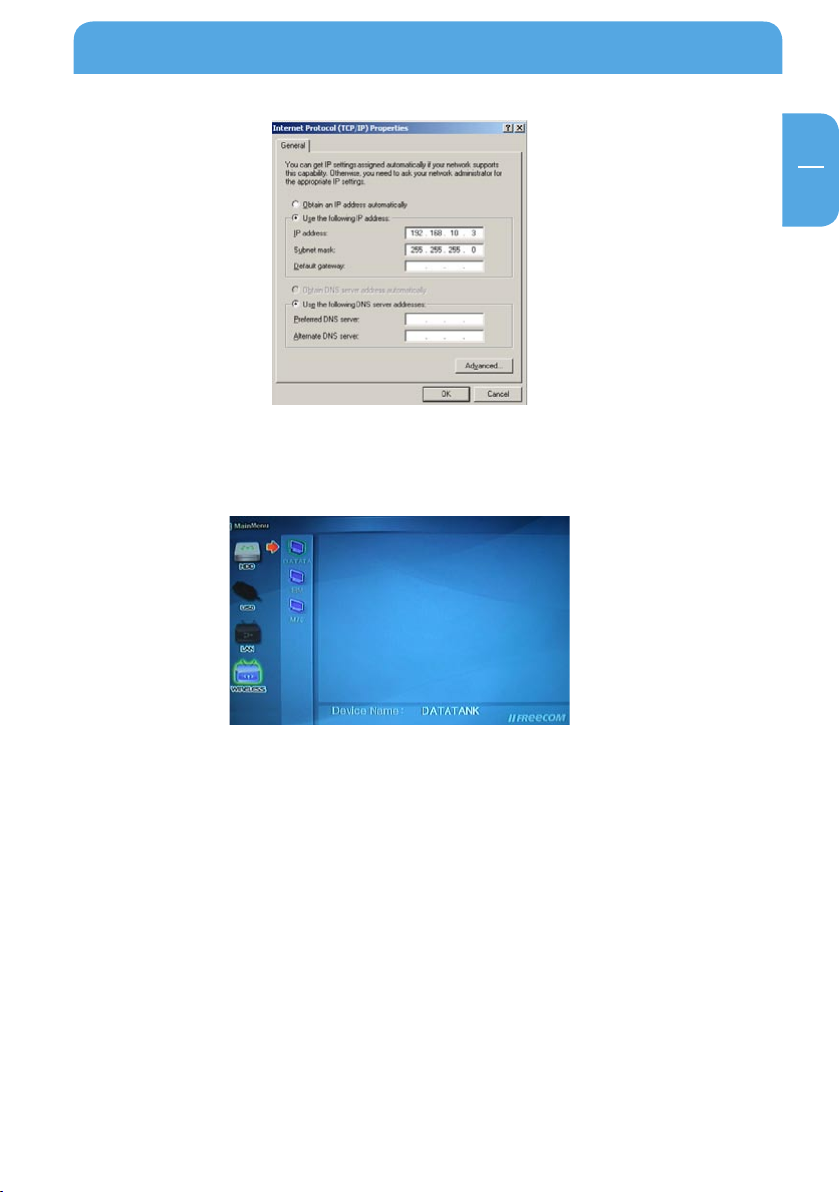
7. Move to "Control Panel > Network and Dial-up Connections", and select Properties
"Local Area Connections" by right click of mouse.
If you see two or more 'Local Area Connections', select one that you will
use for connecting to the Freecom MediaPlayer.
8. Double click 'Internet Protocol (TCP/IP)' that you want to use on your computer.
31
Page 32

Freecom MediaPlayer
EN
3
9. Check 'Use the following IP address', and write 'IP address' & 'Subnet mask' that you
want to use.
For example:
IP address: 192.168.1.3
Subnet mask: 255.255.255.0
If you have already been 'obtained an IP address automatically' from DHCP
Server or IP Router on your local area network, you don't need to write
specific IP address absolutely. Use 'Obtain an IP address automatically' or
write IP address & Subnet mask that DHCP Server or IP Router provide.
32
Page 33

Shared File Playback (Stream)
EN
3
10. Set the network configurations of the Freecom MediaPlayer.
You have to connect the Freecom MediaPlayer to a TV set for this setup.
See "5.1 Connect Video Cable".
ress "SETUP" on remote control for moving to setup screen. Go to "Network". On
P
th
at screen, select 'DHCP Support Off' and write IP address & Subnet mask.
For example:
IP ad
dress: 192.168.1.2
Subnet mask: 255.255.255.0
After writing, press "SETUP" again for saving configurations.
If you have already been provided dynamic IP address from DHCP Server
or IP Router on your local area network, you don't need to write static IP
address absolutely. Use 'DHCP on' or write IP address & Subnet mask that
DHCP Server or IP Router provide.
Check 'IP address obtained automatically'.
When you use 'DHCP On', you can see the IP address on information screen
with pressing "INFO" button.
33
Page 34

Freecom MediaPlayer
EN
3
3.2 Windows XP
1. Select a folder which you want to share. Right-click the folder and click 'Sharing and
Security' in pop menu.
2. Check 'Share this folder on the network' and write 'Share name'. For example, "My
Movie".
"Share name": maximum length is 12 characters.
34
Page 35

Shared File Playback (Stream)
EN
3
3. After that, the shared folder will be displayed as following picture.
4. Move to "Settings > Control Panel > Administrative Tools > Computer management
> Local Users and Groups > Users", and double click 'Guest'.
This is for Windows XP Professional. Windows XP Home users can't see
this figure. Go to next number 6.
If you can't find 'Administrative' at Control Panel, click "Switch to classic
view" in upper left corner on screen.
5. Check 'User cannot change password' and 'Password never expires'.
35
Page 36

Freecom MediaPlayer
EN
3
6. Move to "Control Panel > Network connections", and select "Local Area Connections"
> "Properties" by right click of mouse.
If you can't find 'Administrative Tools' at Control Panel, click "Switch to
classic view" in upper left corner on screen.
If you see two or more 'Local Area Connections', select one that you will
use for connecting to the Freecom MediaPlayer.
7. Double click 'Internet Protocol(TCP/IP)' that you want to use on your computer.
36
Page 37

Shared File Playback (Stream)
EN
3
8. Check "Use the following IP address" and write "IP address" and "Subnet mask" that
you want to use.
For example:
IP address: 192.168.1.3
Subnet mask: 255.255.255.0
If you have already been provided dynamic IP address from DHCP Server
or IP Router on your local area network, you don't need to write static IP
address absolutely. Use 'Obtain an IP address automatically on' or write
IP address & Subnet mask that DHCP Server or IP Router provide.
9. At above number 7. figure, click "Advanced" Tab. Disable "Internet Connection Fire-
ll".
wa
37
Page 38

Freecom MediaPlayer
EN
3
If you use Service Pack 2, refer to the following figures. Click 'Settings'
at 'Windows Firewall'.
Check "OFF" and click 'OK'.
38
Set the network configurations of the Freecom MediaPlayer.
10.
You have to connect the Freecom MediaPlayer to a TV set for this setup.
See "5.1 Connect Video Cable".
Page 39

Shared File Playback (Stream)
EN
3
Press "SETUP" on the remote control for moving to setup screen. Go to "Network".
Select 'DHCP off' and write IP address & Subnet mask.
For example:
IP address: 192.168.1.2
Subnet mask: 255.255.255.0
After writing, press "SETUP" again for saving configurations.
If you have already been provided dynamic IP address from DHCP Server
or IP Router on your local area network, you don't need to write static IP
address absolutely. Use 'DHCP on' or write IP address & Subnet mask that
DHCP Server or IP Router provide.
Check 'IP address obtained automatically'.
When you use 'DHCP On', you can see the IP address on information screen
with pressing "INFO" button.
39
Page 40

40
Freecom MediaPlayer
EN
3
3.3 Windows Vista
Before you do "folder sharing", you need to set up 3 things for Network sharing.
1. Setup of User Accounts and Family safety
a) Click Start > Settings > Control Panel > Users Accounts and Family Safety.
b) Make sure the account is "Guest".
Page 41

41
Shared File Playback (Stream)
EN
3
c) If the "Guest" account is off, then switch it to "On".
2. Disable "Firewall"
a) Click Start > Setting > Control Panel > Security > Windows Firewall on / off.
b) Click at "Off" (not recommended).
Page 42

42
Freecom MediaPlayer
EN
3
3. Setup of Network and Sharing Center
a) Click Start > Setting > Control Panel > Network and Internet > Network and Shar-
ing Center.
b) Select "Password protected sharing" and select "Turn off password protected
sharing".
Page 43

43
Shared File Playback (Stream)
EN
3
c) Make a folder you want to share.
d) You will get a popup "Choose people to share with" then select "Everyone (All
users in this list)" and press "Add" button.
Page 44

44
Freecom MediaPlayer
EN
3
e) After you register the user account, then click "Share" button.
Page 45

Freecom MediaPlayer for Mac
EN
4
Chapter 4: Freecom MediaPlayer for Mac
4.1 USB 2.0 Mode
In USB 2.0 Mode Freecom MediaPlayer is directly attached to a computer's USB Port.
Freecom MediaPlayer via USB
4.2 Partitioning your Freecom MediaPlayer under Mac OS X
1. Open the "Disk Utility". This can be found in "Applications" —> "Utilities".
2. Click on the tab "Partition".
45
Page 46

46
Freecom MediaPlayer
EN
4
Here you can setup the partition settings and partition the drive according to your settings (e.g. Mac OS Extended). Detailed information how to use the Disk Utility can be
found in the help:
4.3 FAQ Mac
1. How do I Disconnect Freecom MediaPlayer?
To disconnect Freecom MediaPlayer, we always recommend using the Eject option. You
may also drag the Freecom MediaPlayer into your Trash. If you are using USB, then Ejecting the Freecom MediaPlayer is all that is needed.
2. How should I format Freecom MediaPlayer?
It is recommended to format Freecom MediaPlayer to Mac OS Extended format using the
Disk Utility (Applications > Utilities > Disk Utility). If you also have a Windows computer
as well, and would like to use it between the two, then you must format it to FAT32 for
it to be recognized on both computers. You may use the "MS-DOS File System" option
to format the disk in FAT32 (Mac OS 10.3 only). A 3rd party partitioning utility to format
the entire drive to FAT32 may be needed if you have Mac OS 10.2.
Page 47

Freecom MediaPlayer for Mac
EN
4
3. The Freecom MediaPlayer mounts up fine and I can see it on my desktop,
but it disappears randomly and reappears. What is going on?
This problem can occur if the connection between your computer and the Freecom
MediaPlayer are a little unstable. Make sure that you are not using any Hubs, and that
only Switches are being used to connect your computers and the MediaPlayer to each
other. If you are using a wireless connection, make sure your signal strength is strong. Try
to connect the Freecom MediaPlayer directly to your ethernet port on your Mac to see if
the connection is stable. This will ensure that the Freecom MediaPlayer's ethernet port
is fine. If your connection stabilizes, then try replacing your ethernet switch or router. If
the problem persists with any switch or router, a newer software version may fix your
issue. Check the Download Center for possible updates.
an the Freecom MediaPlayer be left on over night?
4. C
Yes your Freecom MediaPlayer can be turned on 24 / 7. Before you turn off your computer
we do recommend that you unmount the Freecom MediaPlayer to limit future problems
with your Freecom MediaPlayer.
t takes over a minute for the Freecom MediaPlayer to show up on my
5. I
desktop after enabling.
If you are running your Mac on a wireless connection, this may happen. A wireless connection may take some time to properly obtain a stable connection with the Freecom
MediaPlayer. If your Freecom MediaPlayer is formatted in FAT32, this may also cause
the mount to take long. If you wish to improve the speed, try reformatting the Freecom
MediaPlayer in Mac OS Extended (only if you have a Mac ONLY environment).
47
Page 48

Freecom MediaPlayer
EN
5
Chapter 5: Connect to External AV Device
5.1 Connect Video Cable
Freecom MediaPlayer supports 4 types of video output; "Composite, S-video, Component,
HDMI". Use the video connection that your TV supports. Normally, TV supports composite
video connection, and this package includes composite video cable.
1. Composite: Yellow RCA cable. (Supplied)
Yellow
•
(CVBS)
2. S-Video: Black rounded cable (not supplied)
S-VIDEO
•
3. Component: Y, Pb, Pr component cable (not supplied)
Red
•
(Pr)
Blue
•
(Pb)
Green
•
(Y)
4. HDMI : HDM I Cable (not supplied)
HDMI
•
•
Yellow
(CVBS)
Red
(Pr)
Blue
(Pb)
Green
(Y)
Connect a t digital audio - and
video dev ices
Connect t o Composite
•
(CVBS) Jac k of TV
Connect S -Video Jack of T V
•
•
•
•
Connect P r Jack of TV
Connect P b Jack of TV
Connect Y J ack of TV
When you can not see normal screen after connecting video cable, check
following:
TV "– Switch to Video Input Mode: Turn on TV, and switch to video input mode same
1. "
as video connection. See TV user manual.
2. "
Freecom MediaPlayer" – Switch to Video Output Mode: Press "TV OUT" button
repeatedly. Whenever "TV OUT" is pressed, the video output signal changes.
hen a normal screen appears, save the configurations of the Freecom MediaPlayer.
3. W
See "5.3.1 Video Setup".
48
Page 49

Connect to External AV Device
EN
5
5.2 Connect Audio Cable
Freecom MediaPlayer supports 3 types of audio output; "Stereo, Coaxial, Optical". Use
the audio connection that your TV or Audio set supports. Normally, TV supports stereo
audio connection, and this package includes stereo audio cable.
1. Stereo: Red & White RCA Cable (supplied)
Red
(STEREO -R)
•
(STEREO -L)
•
White
2.Optical: Optical Cable for Digital 5.1 ch. (not supplied)
Red
(STEREO -R)
(STEREO -L)
White
•
•
Connect St ereo-R
Jack of TV.
Connect St ereo-L
Jack of TV.
OPTICA L
•
3. Coaxial: Coaxial cable for Digital 5.1 ch. (not supplied)
COAXIAL
•
Connect O ptical Jack of
Amplif ier or Receiver
Connect C oaxial jack of
Amplif ier or Receiver.
Don't connect optical and coaxial cable together at the same time!
When you do not hear any sound after connecting Optical or Coaxial Cable,
you have to change audio setup of the Freecom MediaPlayer as Encoded
ital. See "5.3.2 Audio Setup".
Dig
49
Page 50

Freecom MediaPlayer
EN
5
5.3 Basic Setup
5.3.1 Video Setup
This is a guide for setting video output of Freecom MediaPlayer. You have to setup Freecom MediaPlayer's video output mode same as TV set's video input mode.
When you can not see normal screen after connecting video cable, check
the followings:
TV "– Switch to Video Input Mode: Turn on TV, and switch to video
1. "
input mode same as video connection. See TV user manual.
reecom MediaPlayer" – Switch to Video Output Mode: Press "TV
2. "F
OUT" button repeatedly. Whenever "TV OUT" is pressed, the video
output signal changes.
en a normal screen appears, save the video configurations of the
3. Wh
Freecom MediaPlayer.
50
Page 51

Connect to External AV Device
EN
5
TV Video
Input Mode
Normal Video
S-Video S-Video Jack
Component 480i "TV Output" = Composite Mode
Component
p
480
720p
1080i
HDMI
480p
720p
1080i
1080p
640x480
800x600
1024x768
1280x1024
1600x1200
D-Sub
480p
720p
1080i
1080p
Player Video
Output Mode
"TV Output"= Composite Mode
"Composite Mode" = C/S-Video
"Composite Mode" = C/ YPbPr
"TV Output" = Component Mode
"Component Mode" = Select one
among 480p, 720p, and 1080i same
as TV input mode
"TV Output" = HD-HDMI Mode
"HD- HDMI Mode" = Selec t one
among 480p, 720p, 1080i,1080p,
640x480, 800x600, 1024x768,
and 1280x1024, 1600x1200 same
as TV input mode.
"TV Output" = HD-HDMI RGB Mode
"HD-HDMI RGB" = Select one among
480p, 720p, 1080i , and 1080psame as
TV input mode
Connection Jack
of TV, Player
CVBS or Composite Jack
(Generally Yellow Jack)
Component 3 Jack
* Y(Gre en), Pb( Blu e),
Red)
Pr(
HDMI Jack HDMI Cable
HDMI jack of Player to DSub jack of T V(Monitor)
Video Cable
Type
Yellow RCA Cable
(Supplied)
S -Vid eo Cable *
Black rounded
Component Cable
* Y(Green),
Pb(Blue), Pr(Re d)
HDMI to D-Sub gender
NTSC / PAL : Standard TV Output. Select the correct one for use in your
country.
51
Page 52

Freecom MediaPlayer
EN
5
Setup Procedure
1. Turn on the Freecom MediaPlayer and press "SETUP" on Mode Selection screen.
2. Move to the 'Video Out' icon and press "OK". The setup box will be displayed under
the icon menu.
elect a TV Out Mode and a detailed video output mode in accordance with the
3. S
selected TV Out Mode and then press "OK".
ress "SETUP" to save configurations.
4. P
52
Page 53

Connect to External AV Device
EN
5
5.3.2 Audio Setup
This is a guide for setting audio output of the Freecom MediaPlayer. You can use Stereo
or Digital 5.1 ch.
Analogue/DCPM: If you connect the supplied audio cables (Red / White)
to TV or Audio set directly.
Encoded Digital: If you want to listen to 5.1 ch / DTS Dolby by connecting
receiver (or amplifier) with the Optical or Coaxial cable.
Setup Procedure
. T
urn on the Freecom MediaPlayer and press "SETUP" on the Mode Selection
1
screen.
2. M
ove to the 'Audio Out' icon and press "OK". The setup box will be displayed under
the icon menu.
3. S
elect Audio Out Mode, choose "Stereo" or 'Encoded Digital' and press "OK".
4. Press "SETUP" to save configurations.
53
Page 54

Freecom MediaPlayer
EN
5
5.3.3 Network Setup
It is possible to obtain an IP address automatically from DHCP Server or IP Router, or to
set the specific IP address. Check your network environments.
DHCP On: You can use this option when it is possible to obtain IP address
automatically from DHCP Server or IP Router.
DHCP Off: You have to use this option if it is not possible to obtain IP
address automatically or you connect to your PC directly without DHCP
Server or IP Router, you have to use this option. Just enter the IP address
and Subnet mask.
"DHCP Support On" Setup Procedure
. T
urn on the Freecom Media Player and press "SETUP" on the Mode Selection screen.
1
2. Move to the 'Network' icon and press "OK". The setup box will be displayed under
the icon menu.
3. S
elect "DHCP Support-ON" and press "OK".
4. Press "SETUP" to save configurations.
54
Page 55

Connect to External AV Device
EN
5
Check the obtained IP address
Press "INFO" on the Mode Selection screen, you will see the current obtained IP address
from the DHCP server.
"DHCP Support Off" Setup Procedure
1. T
urn on the Freecom MediaPlayer and press "SETUP" on the Mode Selection
screen.
2. M
ove to the 'Network' icon and press "OK". The setup box will be displayed under
the icon menu.
3. S
elect 'DHCP Support-OFF' and press "OK".
55
Page 56

Freecom MediaPlayer
EN
5
4. Move to 'IP address', 'Subnet' and press "OK". The input box will be displayed and you
can enter the number with the "Direction" or "Number" button. Finally, press "ENTER"
for saving configurations.
5. Press "ENTER" to save configurations.
Check the obtained IP address
Press "INFO" on the Mode Selection screen and you can see the current obtained IP address from DHCP server.
5.3.4 W
Refer to "2. Connect to PC via Network > 2.3 Wireless LAN Connection".
5.3.5 W
Refer to "2. Connect to PC via Network -> 2.3 Wireless LAN Connection".
ireless Setup
ireless Security Setup
56
Page 57

Connect to External AV Device
EN
5
5.3.6 Folder Lock
In this option you can select a private password – protected folder. Create a folder named
“Private“ on the HDD. Go to “Folder Lock” and select “Private" Folder on. To change the
password, select “Change Password”.
57
Page 58

Freecom MediaPlayer
EN
5
5.3.7 LED Setup
It is possible to turn on or off a backlight LED of the arrow button on the front side. When
the LED disturbs you in night, turn off the LED.
1. T
urn on the Freecom MediaPlayer and press "SETUP" on the Mode Selection
screen.
2. M
ove to the "LED" icon and press "OK". The setup box will be displayed under the
icon menu.
elect "ON" or "OFF" and press "OK".
3. S
4. Press "SETUP" to save configurations.
5.3.8 Photo View Setup
When viewing a photo file, it is possible to enable or disable BGM (Background Music)
and set the playback interval time of each photo file.
58
Page 59

Connect to External AV Device
EN
5
BGM, Music Slide Show
Make a 'music' folder (in a small letter, not in a capital letter) at the root directory of the
built-in HDD and save the MP3 files in the folder. If the HDD is divided into two or more
partitions, make a ‚music' folder in the first partition.
Now you can view photo files and listen to MP3's at the same time. This feature is only
available if you have a Freecom MediaPlayer with a HDD built-in.
Setup Procedure
1. T
urn on the Freecom MediaPlayer and press "SETUP" on the Mode Selection
screen.
2. M
ove to the "Photo View" icon and press "OK". The setup box will be displayed under
the icon menu.
elect "ON" or "OFF" and press "OK".
3. S
4. It is also possible to set the slide show interval time here. Select an interval time and
press "OK".
ou can also select “Effects” here. Select an effect an press “OK”.
5. Y
6. Press "SETUP" to save configurations.
59
Page 60

Freecom MediaPlayer
EN
5
5.3.9 Language Setup
It is possible to set a preferred language. This language will only be applied to OSD, not
to subtitles.
5.3.1
0 Screen Ratio Setup
This is a guide for setting the TV type. There are three options: 4:3 Letter Box, 4:3 Pan
Scan or 16:9.
Setup Procedure
urn on the Freecom MediaPlayer and press "SETUP" on the Mode Selection
1. T
screen.
2. M
ove to the "Scr. Rate" icon and press "OK". The setup box will be displayed under
the icon menu.
3. S
elect "4:3 Letter Box", "4:3 Pan Scan" or "16:9" and press "OK".
4. Press "SETUP" to save configurations.
60
Page 61

Connect to External AV Device
EN
5
5.3.11 Auto Play Setup
Auto Play means that the Freecom MediaPlayer plays the files continuously until it's
stopped manually. This function can be turned on and off.
Setup Procedure
1. T
urn on the Freecom MediaPlayer and press "SETUP" on the Mode Selection
screen.
2. M
ove to the "Auto Play" icon and press "OK". The setup box will be displayed under
the icon menu.
elect "ON" or "OFF" and press "OK".
3. S
4. Press "SETUP" to save configurations.
61
Page 62

Freecom MediaPlayer
EN
5
5.3.12 Internet (How to setup the Internet)
This is for how to connect Freecom MediaPlayer to the Internet.
1. A
fter turn Freecom MediaPlayer on, press "SETUP" button and go to "SETUP" page.
2. Go to the 2nd page and select "Internet" icon and press "ENTER" button then you
will get the above page.
3. B
y using arrow buttons, go to the bottom setup.
By using arrow & number keys, set the configuration and press "ENTER" for saving of
the configuration.
4. P
ress "SETUP" button for the saving of the configuration.
62
Page 63

Connect to External AV Device
EN
5
Check the Internet connection
Go to “Connection test” to check your internet connection.
5.3.13
i-RADIO
Refer to the below how to set up the "i-RADIO" on Freecom MediaPlayer.
Note: You can use shoutcast, and your own playlists (.pls, .m3u).
ists must be located in a folder called “i-RADIO” in the root directory of
the HDD.
How to setup
fter turn Freecom MediaPlayer on, press "SETUP" button and go to "SETUP" page.
1. A
Playl-
63
Page 64

Freecom MediaPlayer
EN
5
2. Select "i-RADIO" icon and press "ENTER" button then you will get the above page.
3. By using arrow buttons, go to the bottom setup. By using arrow & number keys, set
the configuration and press "ENTER" for saving of the configuration.
ress "SETUP" button for the saving of the configuration
4. P
Number of Server
Shoutcast has plenty of server lists, so you can limit the server number list with this
function.
In case, select "Off" at the server list
64
Note: After you made "i-RADIO" folder at the root directory in the HDD of
ecom MediaPlayer, it shows playlists saved in pls, m3u format.
Fre
1. Press
key at the main page, select "i-RADIO" icon and press "ENTER" button.
Page 65

Connect to External AV Device
EN
5
2. It shows server lists saved in the "i-RADIO" folder at the root directory. Select a list
and press "ENTER" button then it plays.
In case, select "Shoutcast" at the server list
t shows the live broadcasting server list.
1. I
2. After select a server, it shows the broadcasting lists and press "ENTER" button then
it plays.
65
Page 66

Freecom MediaPlayer
EN
5
5.3.14 Skin
With skin function, you can make your own GUI (graphical user interface) of Freecom
MediaPlayer.
Note: Save your own GUI or icon images in "skin1" folder at the root directory of Freecom MediaPlayer.
How to setup
fter turn Freecom MediaPlayer on, press "SETUP" button and go to "SETUP" page.
1. A
2. Select "Skin" icon and press "ENTER" button then you will get the page below.
3. By using arrow buttons, go to the bottom setup. By using arrow & number keys, set
the configuration and press "ENTER" for saving of the configuration.
ress "SETUP" button for the saving of the configuration.
4. P
• Skin Folder: You can make up to 10 (skin1,skin2…,skin10).
• User Color File: If "color.txt" file is in the skin folder, it is showed as the user wants. If
there is no color.txt file, then the default color is showed.
• Fo
nt color: Select the font color on the GUI (default : black)
• Font color selected: Font color when it is selected (Default : White)
66
Page 67

Connect to External AV Device
EN
5
How to setup
1. Make "skin1" folder and save "GUI" or "Images" in the folder at the root directory in
a HDD of Freecom MediaPlayer.
2. A
t Setup page of skin, select "ON" of "Skin Support" and select "Skin folder". Press
"SETUP" button for saving the configuration.
3. N
ow, you see the changed GUI. If you can not see the font, then change the font
color. (Setup Page > Skin > Change Font Color).
67
Page 68

Freecom MediaPlayer
EN
5
4. As the above, it supports several font colors.
5.3.15 Others
You can set up for sound effect and screensaver.
How to setup
fter turn Freecom MediaPlayer on, press "SETUP" button and go to "SETUP" page.
1. A
2. Select "etc." icon and press "ENTER" button then you will get the following page.
68
Page 69

Connect to External AV Device
EN
5
3. By using arrow buttons, go to the bottom setup. By using arrow & number keys, set
the configuration and press "ENTER" for saving of the configuration.
4. Press "SETUP" button for the saving of the configuration.
5.3.16 Protocol
1. Turn Freecom Media Player on an press the “SETUP” button.
2. Move to the “Protocol” icon an press “OK”.
3. By using the arrow keys you can set the configuration. Press “SETUP” to save the
configuration.
You can select between the protocols SAMBA, UPNP, NFS and FTP.
When selecting a protocol, specific options for the selected protocol will be available
in the menu.
69
Page 70

Freecom MediaPlayer
EN
5
5.3.17 FTP
This option allows to run an FTP server on the Freecom Media Player.
Use the FTP Server to copy data to the Mediaplayer via network.
1. T
urn the Freecom Media Player on an press the “SETUP” button.
2. Move to the “FTP” icon and press “OK”.
3. By using the arrows key you can set the configuration. Press “SETUP” to save the
configuration.
Rem
Options Explanation
Use FTP Server Turn on the FTP server.
FTP Server Save-To Path Select a destination
Server ID FTP Username
Server Password FTP Password
Server Port Enter a port here if you do not want to use the default
port for FTP (port 21).
ark: The FTP server settings can only be changed when the FTP server is off.
Not all browsers can upload data via FTP. Those that can include Internet
Explorer and Konqueror. We recommend using FTP client software such
as WS_FTP, SmartFTP or CuteFTP.
Enable the FTP Server option ("Setup" -> "FTP" -> "Use FTP Server" -> „ON“). Use any FTP
client software or open your browser and enter
ftp://USERNAME:USERPASSWORD@ MEDIAPLAYER_IP.
USERNAME = Server ID
USERPASSWORD = Server Password
MEDIAPLAYER_IP = Mediaplayer IP-Address
70
Page 71

Connect to External AV Device
EN
5
5.4 How to Play (Remote Control)
5.4.1 Basic Screen Menu
Mode Selection
The Mode Selection screen is the first screen that appears when the Freecom MediaPlayer
is switched on. In this screen, you can select HDD (built-in), USB (external USB device),
LAN (wired network), WIRELESS (wireless network). You can select one out of them.
HDD: Built-in HDD, USB: external USB device, LAN: wired network, WIRELESS: wireless network.
Each Mode icon is activated when connecting to an external device the
right Mode is automatically selected.
Built-in HDD or external USB device
Following example is in case of a built-in HDD and the external USB device.
1. In the Mode Selection screen select the 'HDD' or 'USB' icon and press "OK".
2. The HDD or the USB data is displayed. Select a file and press "OK" to play that file.
71
Page 72

Freecom MediaPlayer
EN
5
Wired & Wireless Network
Following example is in case of a wired network or a wireless network.
1. I
n the Mode Selection screen select the 'LAN' or 'WIRELESS' icon and press "OK".
2. A list of all the PC's on the network is displayed. To access a PC on the network select
that PC and press "OK"
he shared folder of the PC is displayed. Select a file and press "OK" to play that file.
3. T
Refresh Network PC
To refresh the Network's PC list press "STOP".
72
Page 73

EN
5
File Selection
To play a file, select it and press "OK".
Remote Control Function Descriptions
MENU Menu Icon
PREV Move by page
NEXT Move by page
SLOW ( )
DEVICE Mode Selection
OK Playback Play a file.
SELECT
(Number 1.)
SELECT ALL
ber 2.)
um
(N
MOVIE Movie Mode Only Movie files are displayed.
MUSIC Music Mode Only Movie files are displayed.
PHOTO Photo Mode
Connect to External AV Device
Function and Button Descriptions
Menu Icon is displayed including 'Play one,
Play all and Play-list'. Press again for returning
file selection screen.
Navigation Key Navigation key
In case of two or more file list page, move to
previous page.
In case of two or more file list page, move
to next page.
Up directory
Register a file at
Play-List
Register all files
at Play-List
Return to up directory.
Return to HDD, USB, LAN, WIRELESS selection screen.
Use when registering a file at Play-List. After
selecting a file, move to "MENU > Play-List"
Use when registering all files at Play-List. After
selecting files, move to "MENU > Play-List"
Only Photo files are displayed. After pressing
"PHOTO", you can use photo slide show.
73
Page 74

Freecom MediaPlayer
EN
5
ALL MEDIA All Media Mode
INFO -
TV OUT Video Out Signal
Control
Brt.CONT
SETUP - Go to setup screen.
Play All Files or Play One File
There are two Play modes:
Play All Files: Plays a selected file and continues to play all files in the directory and
subdirectory.
Play One File: Plays the selected file and stops.
To switch Play modes press "MENU" and move to the 'Play mode' icon. Change the mode
in 'Play all' or 'Play One' and press "OK". Press "MENU" to save configurations.
Refresh Network
luminosity,
color depth,
brightness
All media files are displayed including
movie, music and photo.
Current informati on of Player is displayed.
When pressing this button, video output
signal is changed repeatedly.(If you can not
see normal screen, press this button repeatedly until returningnormal screen.
When pressing this button, 3 modes switch.
After selecting a mode, change settings
with
arrow buttons.
To refresh the Network's PC list press "STOP".
Jump to first or last page
There might to be two or more list pages in case of many files at directory. At the time,
conveniently jump to first or last page.
Jump to last page from first page: Move to "Up Directory" on the top of first page and
press " " or "Previous".
Jump to first page from last page: Move to the last file on last page and press " " or
"Next".
Full directory path
To make a directory path fully visible, press "Scr. Size".
74
Page 75

Connect to External AV Device
EN
5
5.4.2 Play Video Files
Select a file and press "OK".
While viewing a file, you can press "MENU" to enter the 'Tool Box Menu'. This 'Tool Box'
has a detailed play back function.
75
Page 76

Freecom MediaPlayer
EN
5
Function and Button Descriptions
Remote
Control
MENU Tool Box
OK
NEXT
PREV
Direction
Direction
SLOW Playback Slow
SEARCH
VOLUME +
Direction
VOLUME -
Direction
MUTE Sound Off
Function Descriptions
Playback Play file.
Playback
Next File
Playback
Previous File
Fast Forward
Rewind
Jump to
Preferable
Playback Time
Volume Up Volume up.
Volume Down Volume down.
Pause
Tool Box is displayed. For returning to playback,
press again.
When pressing while playing a file, pause the
playback. For returning to playback, press
again.
Play next file after a current playback file.
Play mode must be "Play all" in order to use this
function.
Play the previous file after a current playback
file.
Play mode must be "Play all" in order to use this
function.
Whenever pressing this button, play speed is
changed with 2x, 4x 8x, 16x, 32x in forward.
Whenever pressing this button, play speed is
changed with 8x, 16x, 32x in backward.
Play slowly 1/2x, 1/4x, and 1/8x whenever pressing this button.
Move to a selected time of a file.Enter your preferable playback time with "Number" and press
"OK", or use timesearching bar)
Mute the sound. In order to hear sound, press
this button again.
76
Page 77

Connect to External AV Device
EN
5
Subtitle
Move & Size
Subtitle Sync
SUBTITLE
BOOMARK
AUDIO Dual Audio
INFO
Brt. CONT
Subtitle
Select or Hide
Subtitle
Language Select
Specific Playback-
Time Memory
Show File
Information
Control
luminosity, color
depth, brightness
It is possible to change subtitle size and location.
arrow button changes location. After doing,
press "OK".
It is possible to set the subtitle sync. With
(one second) (60 second) when motion and
subtitle sync is not matched.
The subtitle name same as video file is displayed
on screen automatically. However, it is possible to
open the other preferable subtitle files or hide.
It is possible to switch each subtitle language
when the subtitle is dual language format,
for example, including a local language and
English. When selecting "Discriminating subtitle language", first subtitle language will be
displayed.
Save specific playback time when pressing this
button. If you want to see bookmark list, press
"BOOKMARK" on file selection screen.
It is possible to switch each audio language when
the audio format is dual-audio, for example,
including a local language and English.
Show the file information which is being played.
In order to hide the information, press this button again.
When pressing this button, 3 modes switch.
After selecting a mode, change settings with
arrow button changes size and
arrow buttons.
5.4.3 Play DVD Files
The DVD manager function supports playing original DVD's and Ripped DVD files.
Make a folder and save all the ripped files in this folder, connect to the TV or Monitor and
select the 'VIDEO_TS.IFO' file in this folder.
Make sure that all the ripped files including VIDEO_TS.IFO from one DVD title are located
in one folder.
77
Page 78

Freecom MediaPlayer
EN
5
The DVD Manager function will not work if you can not find the 'VIDEO_TS.IFO' file among the ripped files from an original DVD title, DVD
manager function will not work.
Move to the folder with the ripped DVD files.
Select the 'VIDEO_TS.IFO' file and press "OK".
78
Function and Button Descriptions
Remote Control Function Descriptions
It is possible to switch each audio language
AUDIO Dual Audio
SUBTITLE
Scr. SIZE Screen Size
Select
Subtitle Type
when the audio format is dual-audio, for example, including a local language and English.
Subtitle type will be changed whenever pressing this button.
Screen size will be changed when pressing
the button.
Page 79

Connect to External AV Device
EN
5
MENU Go to Menu Move to main menu while playing DVD.
SLOW Playback Slow
REPEAT
A-B REPEAT A-B repeat Set the A-B repeat.
TITLE Go to Title Menu Move to title menu while playing DVD.
ANGLE Angle Apply angle function.
INFO
SEARCH
Brt. CONT
NEXT
PREV
Fast Forward
Rewind
OK
VOLUME +
Direction
VOLUME -
Direction
MUTE Sound Off
Chapter, Title
Repeat
Show File
Information
Jump to Preferable
Playback Time
Control
luminosity, color
depth,brightness
Playback
Next Chapter
Playback
Previous Chapter
Playback Play 'Video_ts.ifo' file.
Pause
Volume Up Volume Up.
Volume Down Volume Down.
Play slowly 1/2x, 1/4x, and 1/8x whenever
pressing this button.
Set chapter, title repeat.
Show the file information which is being
played. In order tohide the information, press
this button again.
Move to a selected time of a file. (It is not possible to use time searching bar.)
When pressing this button, 3 modes switch.
After selecting a mode, change settings with
arrow buttons.
Play next chapter.
Play previous chapter.
Whenever pressing this button, play speed is
changed with 8x, 16x, 32x, 48x in forward.
Whenever pressing this button, play speed is
changed with 8x, 16x, 32x, 48x in backward.
Pause playback, if pressing this button when
a file is being played. In order to play again,
press this button again.
Mute the sound. In order to hear sound, press
this button again.
79
Page 80

Freecom MediaPlayer
EN
5
5.4.4 Play Audio Files
Select a file and press "OK".
While viewing a file, you can press "MENU" to enter the 'Tool Box Menu'. This 'Tool Box'
has a detailed play back function.
80
Page 81

Connect to External AV Device
EN
5
Function and Button Descriptions
Remote
Control
MENU Tool Box
OK
NEXT
PREV
Fast Forward
SEARCH
VOLUME +
Direction
VOLUME -
Direction
MUTE Sound Off
INFO
Brt. CONT
Function
Playback Play file.
Pause
Playback
Next File
Playback
Previous File
Rewind
Jump to
Preferable
Playback Time
Volume Up
Volume Down
Show File
Information
Control luminosity, color depth,
brightness
Descriptions
Tool Box is displayed. For returning to playback,
press again.
When pressing while playing a file, pause the playback. For returning to playback, press again.
Play a next file after a current playback file. Play
mode must be in Play all in order to use this
function.
Play a previous file after a current playback file.
Play mode must be in Play all in order to use this
function.
Whenever pressing this button, play speed is
changed with 2x, 4x 8x, 16x, 32x in forward.
Whenever pressing this button, play speed is
changed with 8x, 16x, 32x in backward.
Move to a selected time of a file.
Enter your prefe rable playback tim e with
"Number" and press "OK".
Volume Up.
It is not possible to use this button when manual
subtitle is displayed while playing audio file.
Volume Down.
It is not possible to use this button when manual
subtitle is displayed while playing audio file.
Mute the sound. In order to hear sound, press
this button again.
Show the file information which is being played.
In order to hide the information, press this button again.
When pressing this button, 3 modes switch. After
selecting a mode, change settings with
arrow buttons.
81
Page 82

Freecom MediaPlayer
EN
5
MP3 Subtitle
It is possible to show MP3 subtitles if the MP3 file supports this feature.
The MP3 file which supports subtitles is made in the 'driver caption editor' program, it
doesn't support the LDB program.
While viewing a file, you can press "MENU" to enter the 'Tool Box Menu'. This 'Tool Box'
has a detailed play back function.
5.4.5 Play Photo Files
Select a file and press "OK".
When pressing "MENU" while playing a file, "Tool Box Menu" is displayed. Tool Box allows
using detailed playback function.
82
Page 83

Connect to External AV Device
EN
5
Function and Button Descriptions
Remote Control Function Descriptions
MENU Tool Box
OK
NEXT
PREV
INFO
Brt. CONT
Playback
Pause
Playback
Next File
Playback
Previous File
Show File
Information
Control
luminosity,
color depth,
brightness
Tool Box is displayed. For returning to playback,
press again.
Play file.
When pressing while playing a file, pause the playback. For returning to playback, press again.
Play a next file after a current playback file. Play
mode must be in Play all in order to use this
function.
Play a previous file after a current playback file.
Play mode must be in Play all in order to use
this function.
Show the file information which is being played.
In order tohide the information, press this button again.
When pressing this button, 3 modes switch.
After selecting a mode, change settings with
arrow buttons.
Photo Slide Show
You can use the 'Play All' mode as a photo slide show.
Music Slide Show
Make a 'music' folder (in a small letter not a capital letter at root directory) of built-in
HDD and save MP3 files at the folder. If the HDD is divided into two or more partitions,
make a 'music' folder at first partition.
When you play one or all photo files, you can listen MP3 and see photo slide show
together.
However, if there is just networking computer (not built-in HDD), you cannot listen MP3.
Freecom MediaPlayer just detect MP3 files at built-in HDD's music folder. At that time,
before playing photo files, set the Photo mode with pressing "PHOTO" button.
Set the playback interval time
To set the play back interval time for the slide show press "SETUP" and choose an interval
time.
83
Page 84

Freecom MediaPlayer
EN
5
5.4.6 Make a Play List
You can create a preferred play list.
The preferred play list will be erased after rebooting the Freecom MediaPlayer.
elect your preferred files with "SELECT" or "SELECT ALL".
1. S
2
Press "MENU" and select 'Play list'.
.
84
Page 85

Connect to External AV Device
EN
5
3. The play list screen appears and displays the following:
- Play: play the preferred files
- Cancel: close the play list
- Move up, down: change to another file
- Shuffle: play files randomly
- Delete: delete the selected file
- Delete all: delete all files in the play list
85
Page 86

Freecom MediaPlayer
EN
5
5.4.7 Remote Control
In this chapter the basic use of the remote control is described. For a more detailed description we refer to chapters '5.4.1 Basic Screen Menu', '5.4.2 Play Video files', '5.4.3 Play
DVD files', '5.4.4 Play Audio files', '5.4.5 Play Photo files' and '5.4.6 Make a Play List'.
POWER: Turn On / Of f
TITLE: Go to Title Menu
SUBTITLE: Select Subtitle Type
Scr. SIZE: Screen Size
ANGLE: Angle
REPEAT: Chapter, Title Repeat
A-B REPEAT: A-B repeat
Brt. CONT: Control luminosity,
color depth, brightness
DEVICE: Mode Selection
MENU: Tool Box
SETUP: Go to setup screen.
INFO: Show file information
SEARCH: Jump to Preferable / Playback
Time
AUDIO: Dual Audio
TV OUT: Video Out Signal
M
IE: Movie Mode
OV
MUSIC: Music Mode
PHOTO: Photo Mode
ALL MEDIA: All Media Mode
SLOW : Playback Slow
Navigation key
STOP: Stop
OK : Playback / Pause
: Fast Forward
: Rewind
PREV : Move by page
NEXT : Move by page
SELECT: Register a file at Play-List
SELECT ALL: Register all files at Play-List
MUTE: Sound Off
VOLUME (+): Volume up
VOLUME (-): Volume down
BOOKMARK: Specific Playback
Time Memory
86
Page 87

Connect to External AV Device
EN
5
Insert/Change Battery
1. Open the battery cover of the remote control.
2. Put the enclosed pilas on the tray.
3. Insert the cover into the remote control.
5.4.8 USB Host
How to eject the tray of external USB ODD (Optical Disk Drive)?
p playback and press number "3" button in order to eject the tray of
Sto
external USB ODD. In addition, original DVD title with CSS Lock should
not be played when connecting with USB host, but it is possible to play
other format like XviD.
The Freecom MediaPlayer might not be compatible with some external
USB devices. There are so many external USB devices, and specific products might not be compatible. We do not guarantee compatibility with
all kinds of external USB devices.
Connect your external USB device to USB host port of Player. USB icon shall be activated on
file selection screen. Selecting USB icon, and the files in USB device shall be displayed.
87
Page 88

Freecom MediaPlayer
EN
5
Firmware Upgrade
Download an upgrade file from a local distributor in your country or visit:
www.freecom.com/support.
Connect the Freecom MediaPlayer to a TV set and turn it on, select the upgrade file and
press "OK". The upgrade will progress automatically.
To check the firmware, press "SETUP" in the setup screen.
Select the file and press the "INFO" button to display the current firmware version.
88
Page 89

Technical Specifications
EN
6
Chapter 6: Technical Specifications
Product Name Freecom MediaPlayer
Power 12 V , 3 A
Weight 450 g (without HDD & wireless antenna)
Dimension 57 x 150 x 185 mm (without wireless antenna)
Available OS
USB Device Device Port x 1ea, 480Mbps USB 2.0 (USB 1.1 compatible)
USB Host
Wired LAN
Wireless LAN
HDD Type 3.5" SATA HDD
HDD File System NTFS / FAT32
TV Type NTSC / PAL
Video Format
Audio Format MP3, OGG, WAV, WMA
Photo Format JPG/JPEG
Video Output
USB Device Compatible: Windows 2000/XP/Vista, Mac OS X v10.3
higher
Host Port x 1ea, 480Mbps USB 2.0 (USB 1.1 compatible)Supporting
to read USB devices like External USB HDD, ODD, Flash Drive, Card
Reader
10/100 Mbps LAN (RJ-45. x 1ea, 100BaseTx: UTP/STP Category 5
LAN cable compatible
54 Mbps IEEE802.11g, 5dBi detachable antenna x 1ea, SMA type
connector
AVI : MS-MPEG4v3/XviD/WMV9 (Not support XviD which has GMC
option applied)
WMV : WMV9
ASF : WMV9
MP4 : MPEG4 Video
DAT : MPEG1
VOB : MPEG2
MPG/MPEG : MPEG1/MPEG2
TP/TS/TRP : HD-MPEG2/SD-MPEG2
COMPOSITE
S-VIDEO
HD COMPONENT Y, Pb, Pr (480p, 720p, 1080i)
HD HDMI (480p, 720p, 1080i, 1080p
89
Page 90

Freecom MediaPlayer
EN
6
Audio Output
Working Temperature 10˚C ~ 35˚C
Working Humidity 10% ~ 50%
STEREO L-R
S/PDIF Digital Output (Coaxial/Optical )
90
Page 91

WARRANTY
(valid in Europe/Turkey only)
We thank you for purchasing this Freecom product and hope you will enjoy using it.
In order to avoid unnecessary inconvenience on your part, we suggest reading the quick
install guide, instruction manual and any additional electronic and or printed manuals. When
problems occur we have a database with Frequently Asked Questions (FAQ) on our Freecom
website (www.freecom.com), please check this site before you contact the helpdesk.
Your Guarantee
All Freecom products come with unlimited technical phone and web support. By this
Guarantee, Freecom warrants their products to be free from defects in material and workmanship for a period listed below from the date of its original purchase. If during this period
of guarantee the product proves defective due to improper materials or workmanship,
Freecom will, without charge for labour or parts, at its sole discretion, repair or replace the
product or its defective parts upon the terms and conditions set out below.
Conditions
This guarantee will be granted only when the original invoice or sales receipt (indicating
the date of purchase, product and serial number) is presented together with the defective
product and a Freecom RMA number received from the Freecom Website or given by a
Freecom Service Center. Freecom reserves the right to refuse the free-of-charge guarantee
services when the date of purchase of the product cannot be proven. This guarantee will
not apply if the RMA number is missing, the serial number on the product has been altered,
removed or made illegible.
This guarantee covers only the hardware components packaged with the product. This
guarantee covers none of the following: (a) any consumable supplied with the product, such
as media or batteries; (b) damage to or loss of any software programs, data or removable
storage media; (c) any damage resulting from adaptations, changes or adjustments, which
may have been made to the product, without the prior written consent of Freecom; (d) attempted repair by any party other than authorized by Freecom and (e) accidents, lightning,
water, re or any other such cause beyond the reasonable control of Freecom.
With respect to all services provided, Freecom is not responsible for any damage to or loss
of any programs, data or other information stored on any media or any part of any product
serviced. Freecom is not liable for the consequence of business loss in case of system failure.
Be sure to exclude all parts not covered by this guarantee prior to returning the product to
Freecom. Freecom is not liable for any loss or damage to these items. If during the repair
of the product the contents of the hard drive are altered, deleted or in any way modied,
Freecom is not liable whatsoever.
Repair parts and replacement products will be provided on an exchange basis and will be
either new, equivalent to new or reconditioned. All replaced parts and products become
the property of Freecom The period of guarantee for any product or part repaired or replaced in warranty shall be the balance of the original guarantee. Repairs or replacements
on product or parts out of warranty carry 6 (six) months guarantee.
1
YEAR
WAR RANT Y
 Loading...