

Page 1

USER MANUAL
Datalogic Memor™
FRED NUHQ MOBILITY
August 2013
Page 2

Contact Fred IT Group Head Office — 03 9418 1800
Copyright Notice COPYRIGHT © 2012 FRED IT GROUP
Trademark Notices Fred Pharmacy, Fred Retail, and Fred Services are registered trademarks of Fred IT Group
Other Trademarks Microsoft, Microsoft .NET Framework, Microsoft Internet Information Services (IIS), Windows, Windows Vista, Windows 7, Windows Server
Version: 0.01
Website — www.fred.com.au
Fred Help Centre — https://help.fred.com.au
PTY LTD
UTILISED IN ANY FORM OR BY ANY MEANS, ELECTRONIC OR MECHANICAL, INCLUDING PHOTOCOPYING, RECORDING, OR BY
INFORMATION STORAGE AND RETRIEVAL SYSTEM, WITHOUT THE PRIOR WRITTEN PERMISSION OF FRED IT GROUP
The following logos and products are trademarks of Fred IT Group
Fred Dispense, Fred Pak, Fred Connect, Fred POS, Fred NUHQ, Fred NUHQ, Fred Satscan, Fred Help, Fred Backup, Fred Server, Fred Shop,
Fred Net, Fred Phone, Fred EFTPOS.
2003, and Windows XP are either registered trademarks or trademarks of Microsoft Corporation in the United States and/or other countries.
Dual Core, Quad Core Xeon, Core 2 Duo and Pentium 4 are trademarks of Intel Corporation in the United States and/or other countries.
Modified: 7 October 2013
PRINTED IN AUSTRALIA. NO PART OF THIS PUBLICATION MAY BE REPRODUCED OR
PTY LTD
PTY LTD
:
PTY LTD:
Page 3

Contents
NUHQ MOBILITY HANDHELD SCANNER 1
Main features .......................................................................................................................... 1
Logging into Fred Mobility .................................................................................................... 1
Scanning items ..................................................................................................................... 2
Using the Stylus ................................................................................................................... 2
Fred Mobility Main Options .................................................................................................. 3
Numeric keypad function keys ............................................................................................. 4
ORDERING 5
Working with orders ............................................................................................................... 5
Creating New Orders ........................................................................................................... 5
Editing Existing Orders ......................................................................................................... 7
Receiving an order ............................................................................................................... 8
GENERAL OPTIONS 11
Search and Lookup .............................................................................................................. 11
General options configuration ............................................................................................ 12
Scan ....................................................................................................................................... 13
Changing Item Cost ........................................................................................................... 13
Changing Retail Prices ....................................................................................................... 13
Creating Alias ..................................................................................................................... 14
Updating Quantity on Hand ................................................................................................ 15
Updating Committed Quantities ......................................................................................... 16
Updating Quantity Available ............................................................................................... 17
Setting Restock and Reorder Points .................................................................................. 17
Printing Labels .................................................................................................................... 18
CONTENTS
i
Page 4

STOCKTAKING 20
Stocktake Options ................................................................................................................ 20
Using Rolling Stocktake ..................................................................................................... 20
Performing a Batch Stocktake ............................................................................................ 21
TROUBLESHOOTING FRED MOBILITY 23
Device Troubleshooting ....................................................................................................... 23
STEP 1: Reset Fred Mobility .............................................................................................. 23
STEP 2: Check the wireless network connection .............................................................. 23
STEP 3: Restart the NU Mobile Service ............................................................................ 24
STEP 4: Check Fred Mobility Connection .......................................................................... 24
Items Not Scanning .............................................................................................................. 25
Item does not have a barcode to scan ....................................................................................... 25
Item is listed in an invoice to be received but now has new Alias/Barcode ............................... 25
No existing item stockcard in NUHQ .......................................................................................... 25
Wrong item has been delivered in the order .............................................................................. 25
Item was not found ..................................................................................................................... 25
Letters typing instead of numbers .............................................................................................. 26
UPDATING FRED MOBILITY 27
Updating Fred Mobility ......................................................................................................... 27
CONTENTS
ii
Page 5
SECTION 1
NUHQ MOBILITY
HANDHELD SCANNER
NUHQ Mobility Overview
Fred Mobility is a wireless laser terminal that communicates directly with your computer from wherever you
are. Any tasks that you perform at the shelf face go directly into your point of sale system — fast and
accurately, every time.
NUHQ Mobility allows existing stores to purchase and use Mobility devices with NUHQ as a back office
application.
MAIN FEATURES
Logging into Fred Mobility
To log into Fred Mobility:
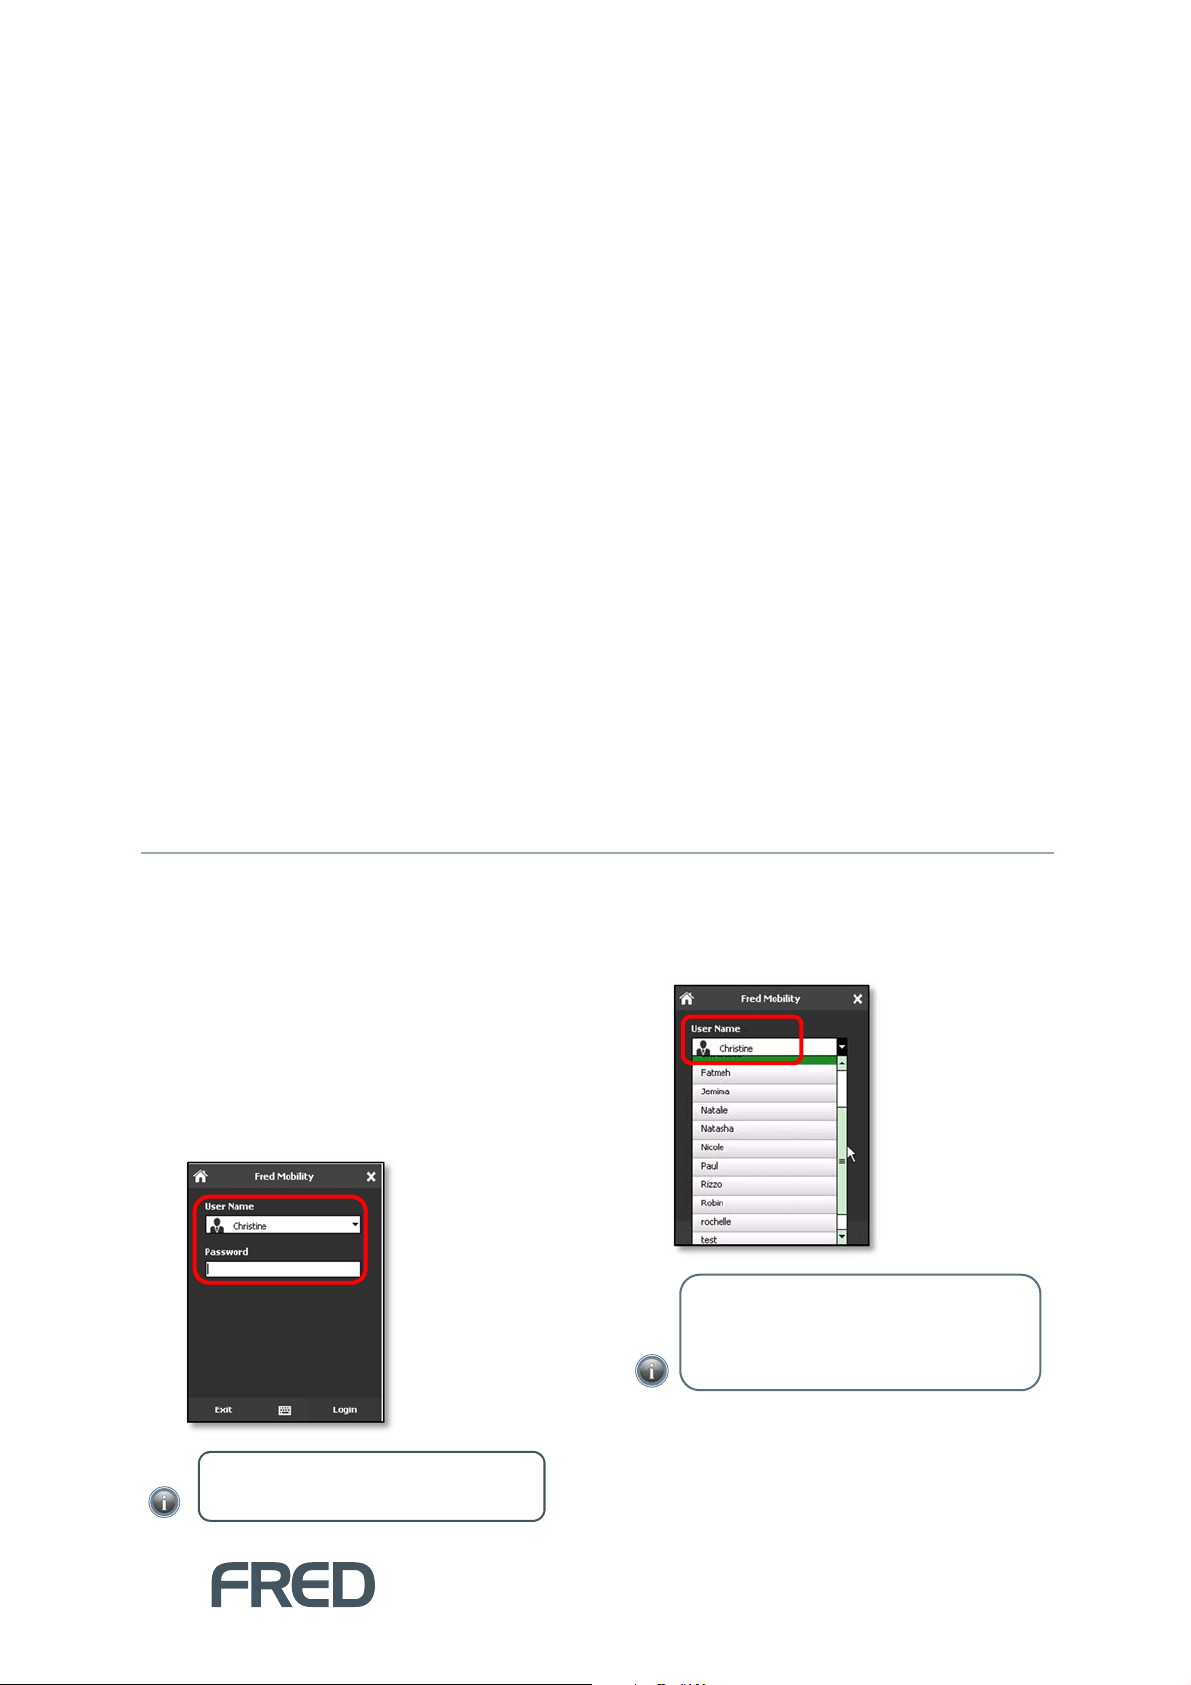
1. Press [F2] to open Fred Mobility.
The Login menu is displayed.
2. Select your user name from the User Name
drop-down.
NOTE: There is no default user for
NUHQ Mobility.
The user name selected on the device is
added to history records to allow actions to
be easily audited.
TIP: To exclude us ers from this list, go
to the Store Operation Manager
menu, and select Cashiers. Prefix user
names to be excluded with “zz”.
3. Enter your password.
Fred Mobility accepts blank passwords if the
cashier has been set up without a password
in Store Operations or Fred POS. If the
CONTENTS
1
Page 6
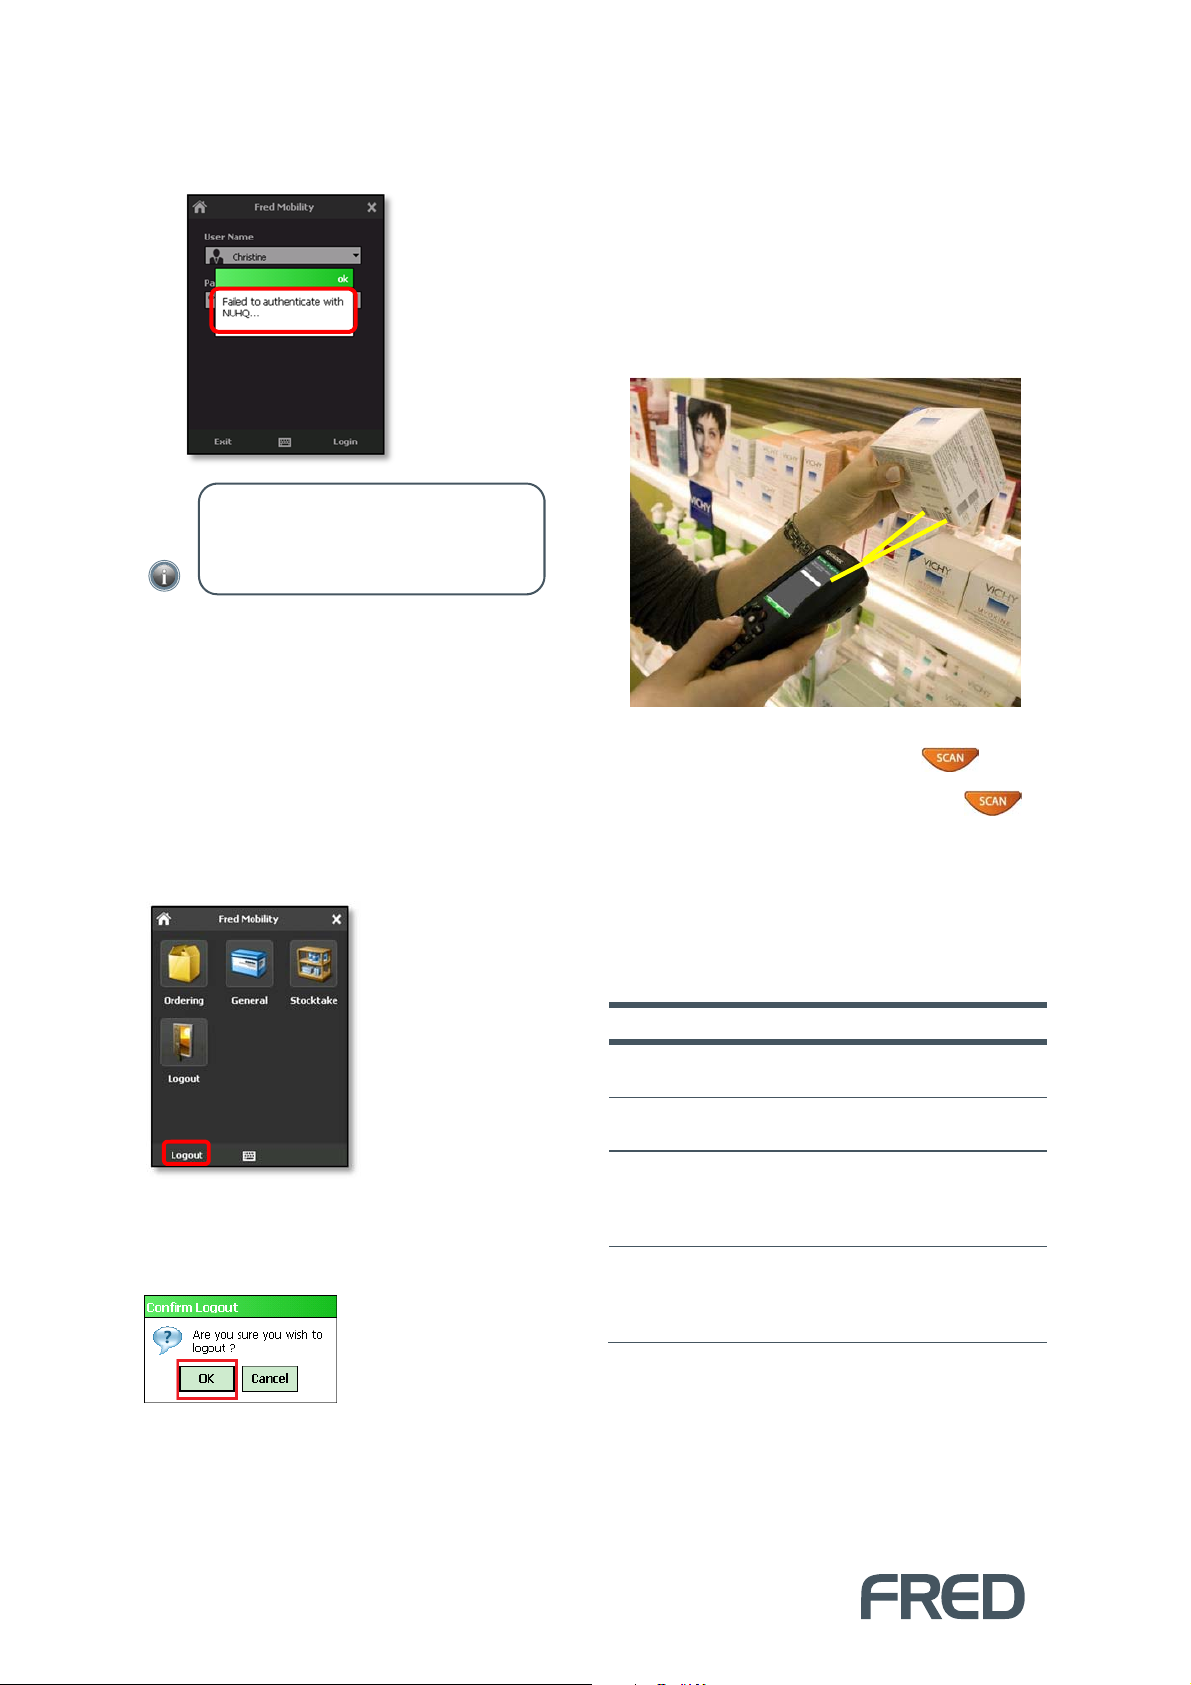
password is incorrect or missing, Fred
Mobility displays an error message.
NOTE: After a short period of
inactivity (usually 5 mins), the screen
locks and returns to the login screen.
Logging out of Fred Mobility
The easiest way to logout of Fred Mobility is by
SC
using the [E
] key on the device or tapping the
[Back] button from any screen you are in until
you return to the Fred Mobility main screen.
Scanning items
The Fred Mobility device captures a picture of
the entire bar code.
To scan items using the handheld scanner:
1. Point the Fred Mobility device to the barcode
of the product approximately 10cm from the
barcode.
2. Point the red laser on the barcode and then
press + hold the Fred Mobility button.
To logout of your Fred Mobility device:
1. Navigate to Fred Mobility main options
screen, and then tap [Logout].
Fred Mobility displays a confirmation
message.
4. Tap [OK] to confirm logout.
5. Return your Fred Mobility device to the
charger.
3. Once you hear a beep, release the
button.
Using the Stylus
The stylus selects items and enters information.
The stylus functions like a mouse.
Tap Function
Tap
Double Tap Touch the screen twice with the stylus to
Drag
Tap-and-hold Tap and hold the stylus on an item to
TABLE 1: STYLUS FUNCTIONS
Touch the screen once with the stylus to
open items and select.
open items and select options.
Hold the stylus on the screen and drag
across the screen to select text and
images. Drag in a list to select multiple
items.
see a list of actions available for that
item. On the pop-up menu that appears,
tap the action you want to perform.
MAIN FEATURES
2
Page 7
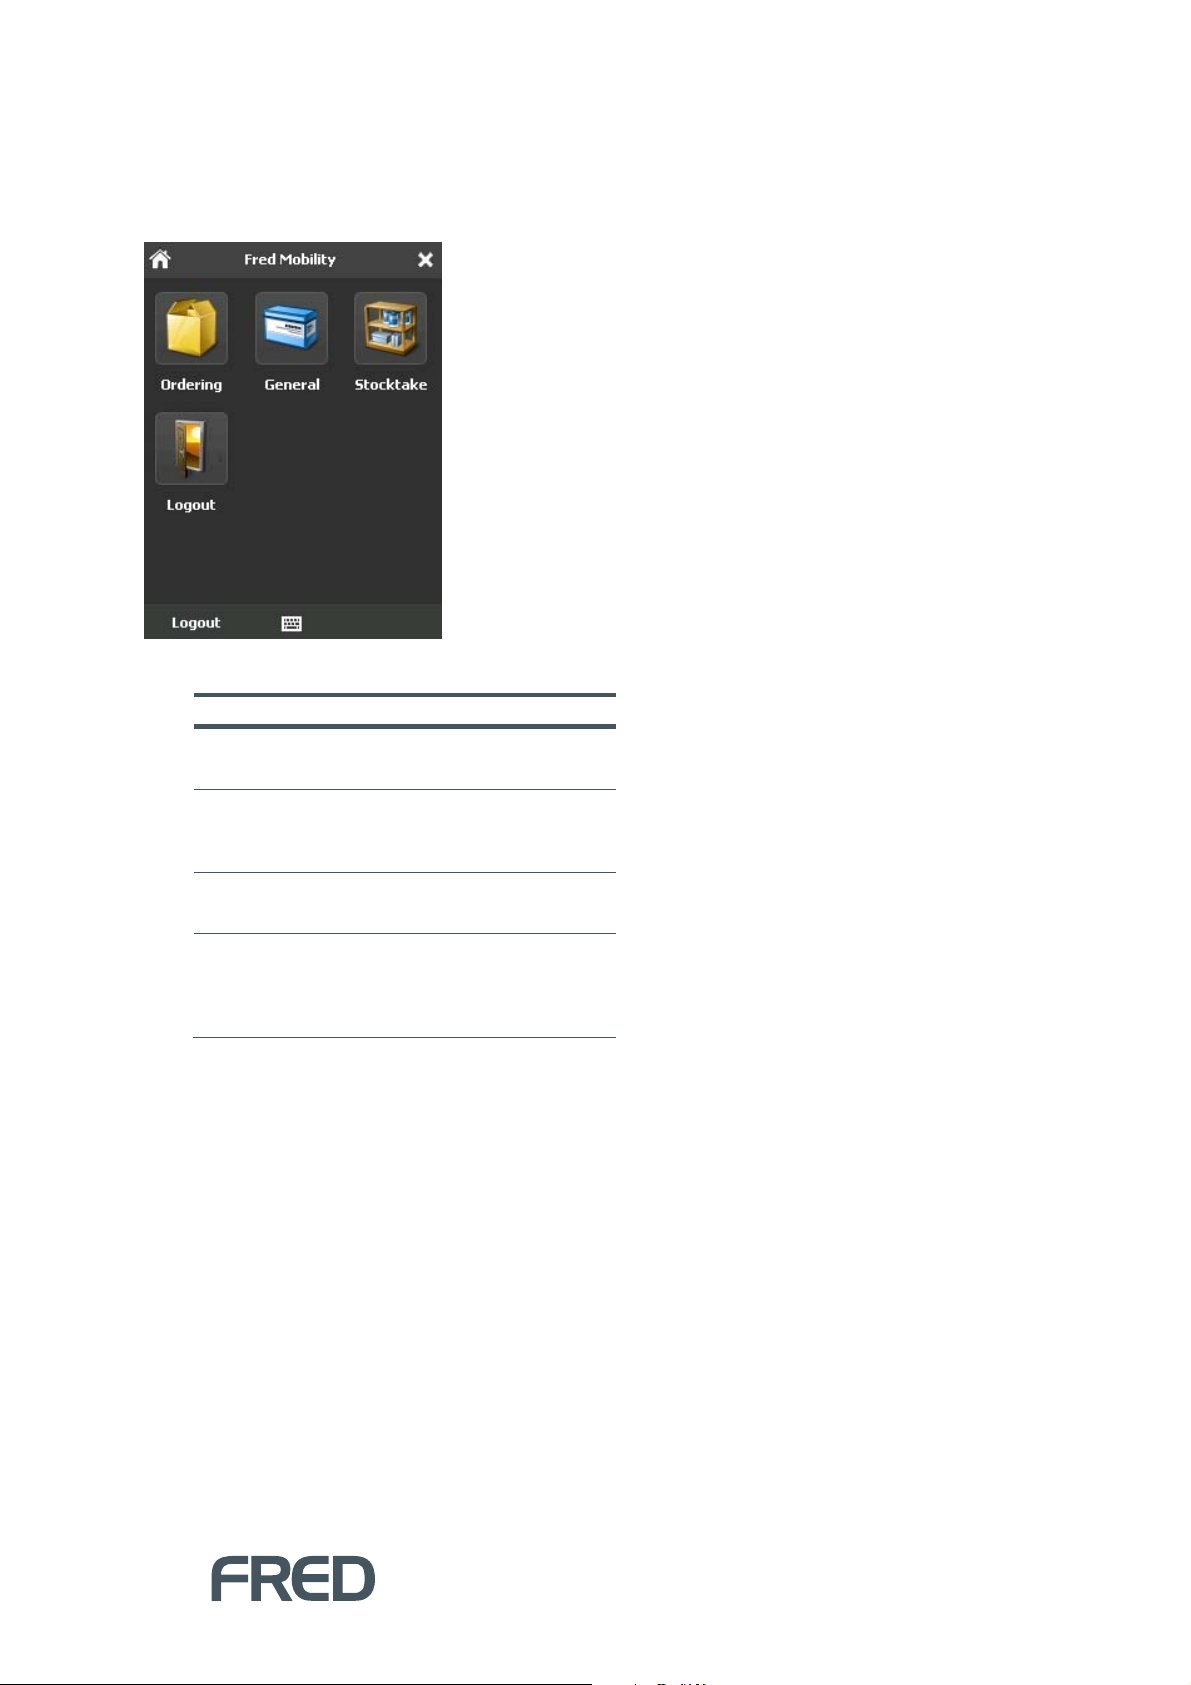
Fred Mobility Main Options
Once you log into Fred Mobility using your Store Operations or Fred POS username and password, the
Main Options screen appears.
FIGURE 1: FRED MOBILITY OPTIONS ON THE MAIN SCREEN
OPTION DESCRIPTION PAGE
Ordering Allows you to create, edit and
receive orders.
General Allows you to configure various
stock card options, update item
information and print labels.
Stocktake Allows you to perform Rolling
Stocktakes or Batch Stocktakes.
Logout Logs the current user out of
Fred Mobility. Once you have
logged out return the device to
the charger.
TABLE 2: FRED MOBILITY OPTIONS QUICK REFERENCE TABLE
5
11
20
2
CONTENTS
3
Page 8
Numeric keypad function keys
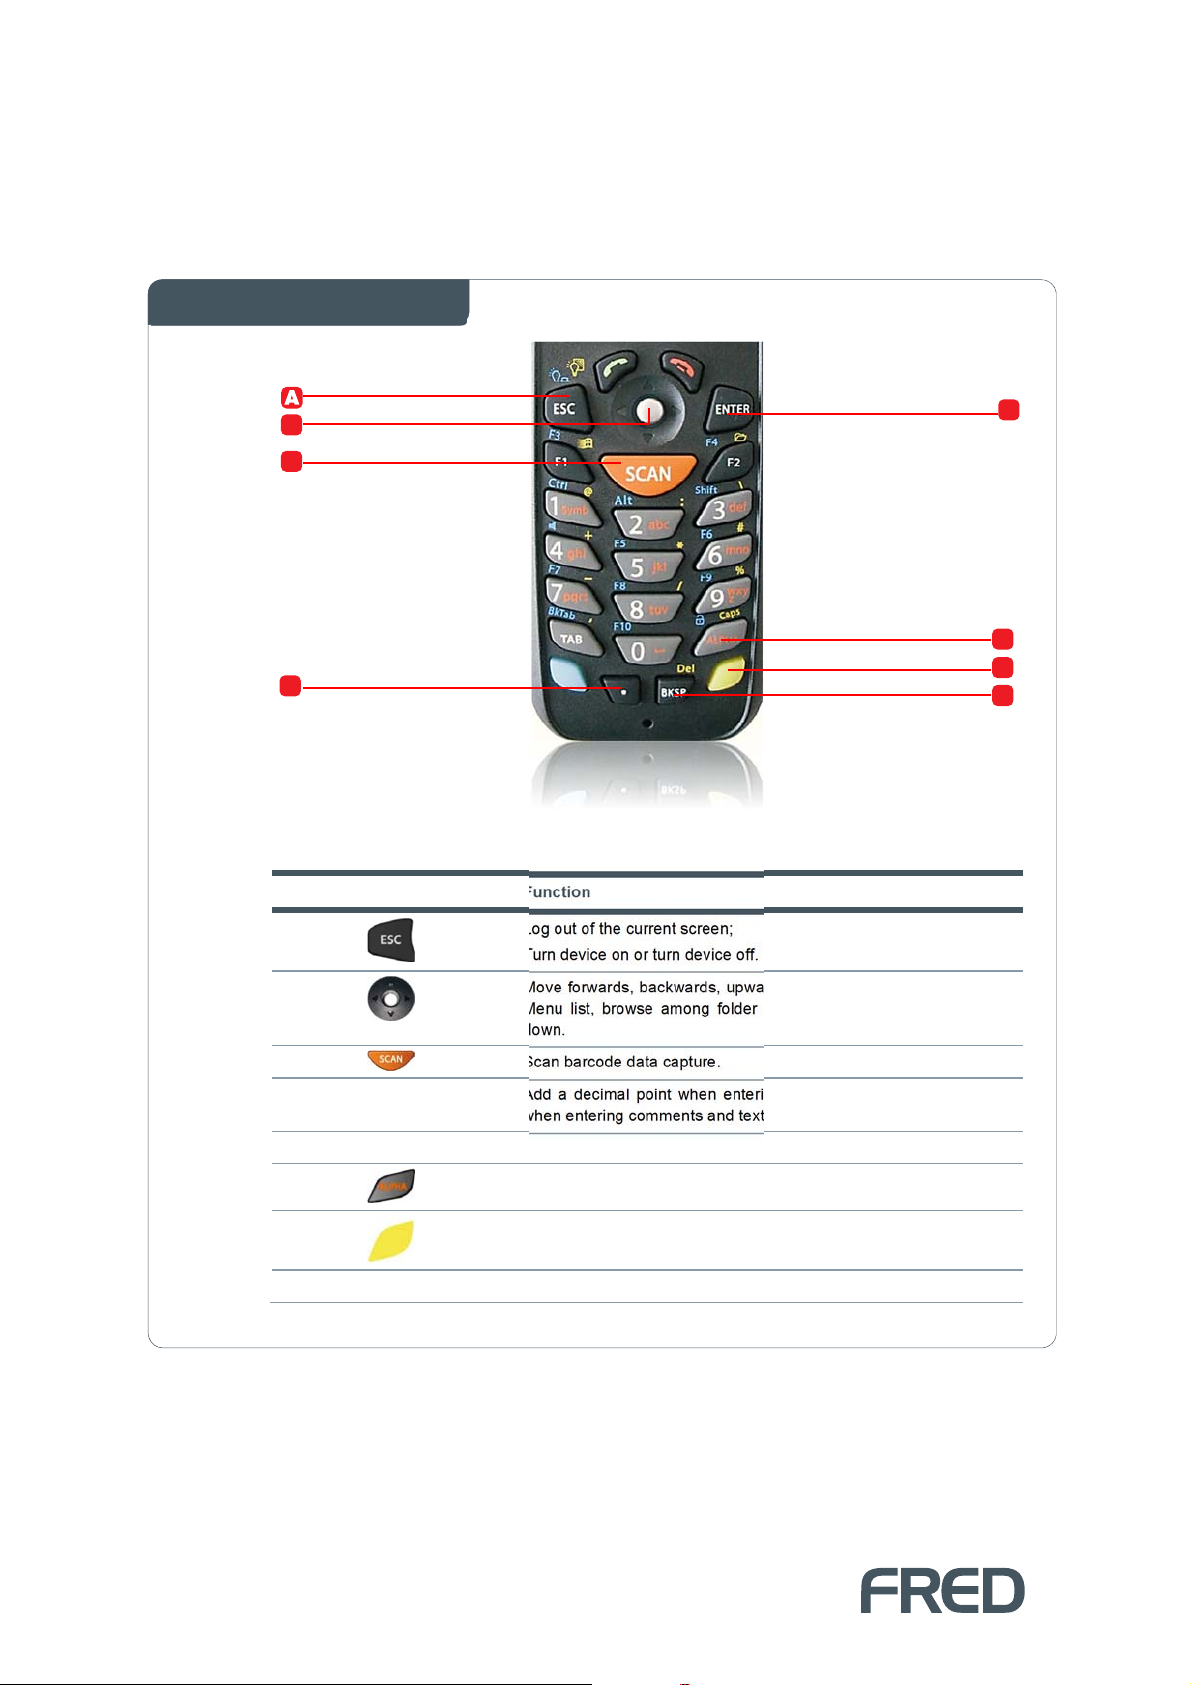
The section below outlines the most important function keys to become familiar with in order to effectively
use your new Fred Mobility Device. The keypad is located on the front of the device below the screen. The
numeric keypad appears as shown below including a list of functions of main keys.
NUMERIC KEYPAD
B
E
C
F
G
D
FIGURE 2: NUMBERIC KEYPAD
H
Label Button(s) Function
A.
B.
C.
D. Decimal point key
E. [ENTER]
F.
G.
H. [BKSP]
Log out of the current screen;
Turn device on or turn device off.
Move forwards, backwards, upwards or downwards, scroll through a
Menu list, browse among folder files or select functions if pressed
down.
Scan barcode data capture.
Add a decimal point when entering values. Use also as a full stop
when entering comments and text.
Confirm an action.
Alternate numeric and alphanumeric use of the 10 numeric keys.
Yellow modifier: Press before a standard key to enable the character
or function printed in yellow above the key.
Delete a single character entered.
TABLE 3: MAIN NUMERIC KEYPAD FUNCTION KEYS ON THE FRED MOBILITY DEVICE
MAIN FEATURES
4
Page 9
SECTION 2
ORDERING
WORKING WITH ORDERS
Ordering allows you to receive orders, create new orders, and edit existing orders that are still open. You
can also check and update the stock on hand before ordering items.
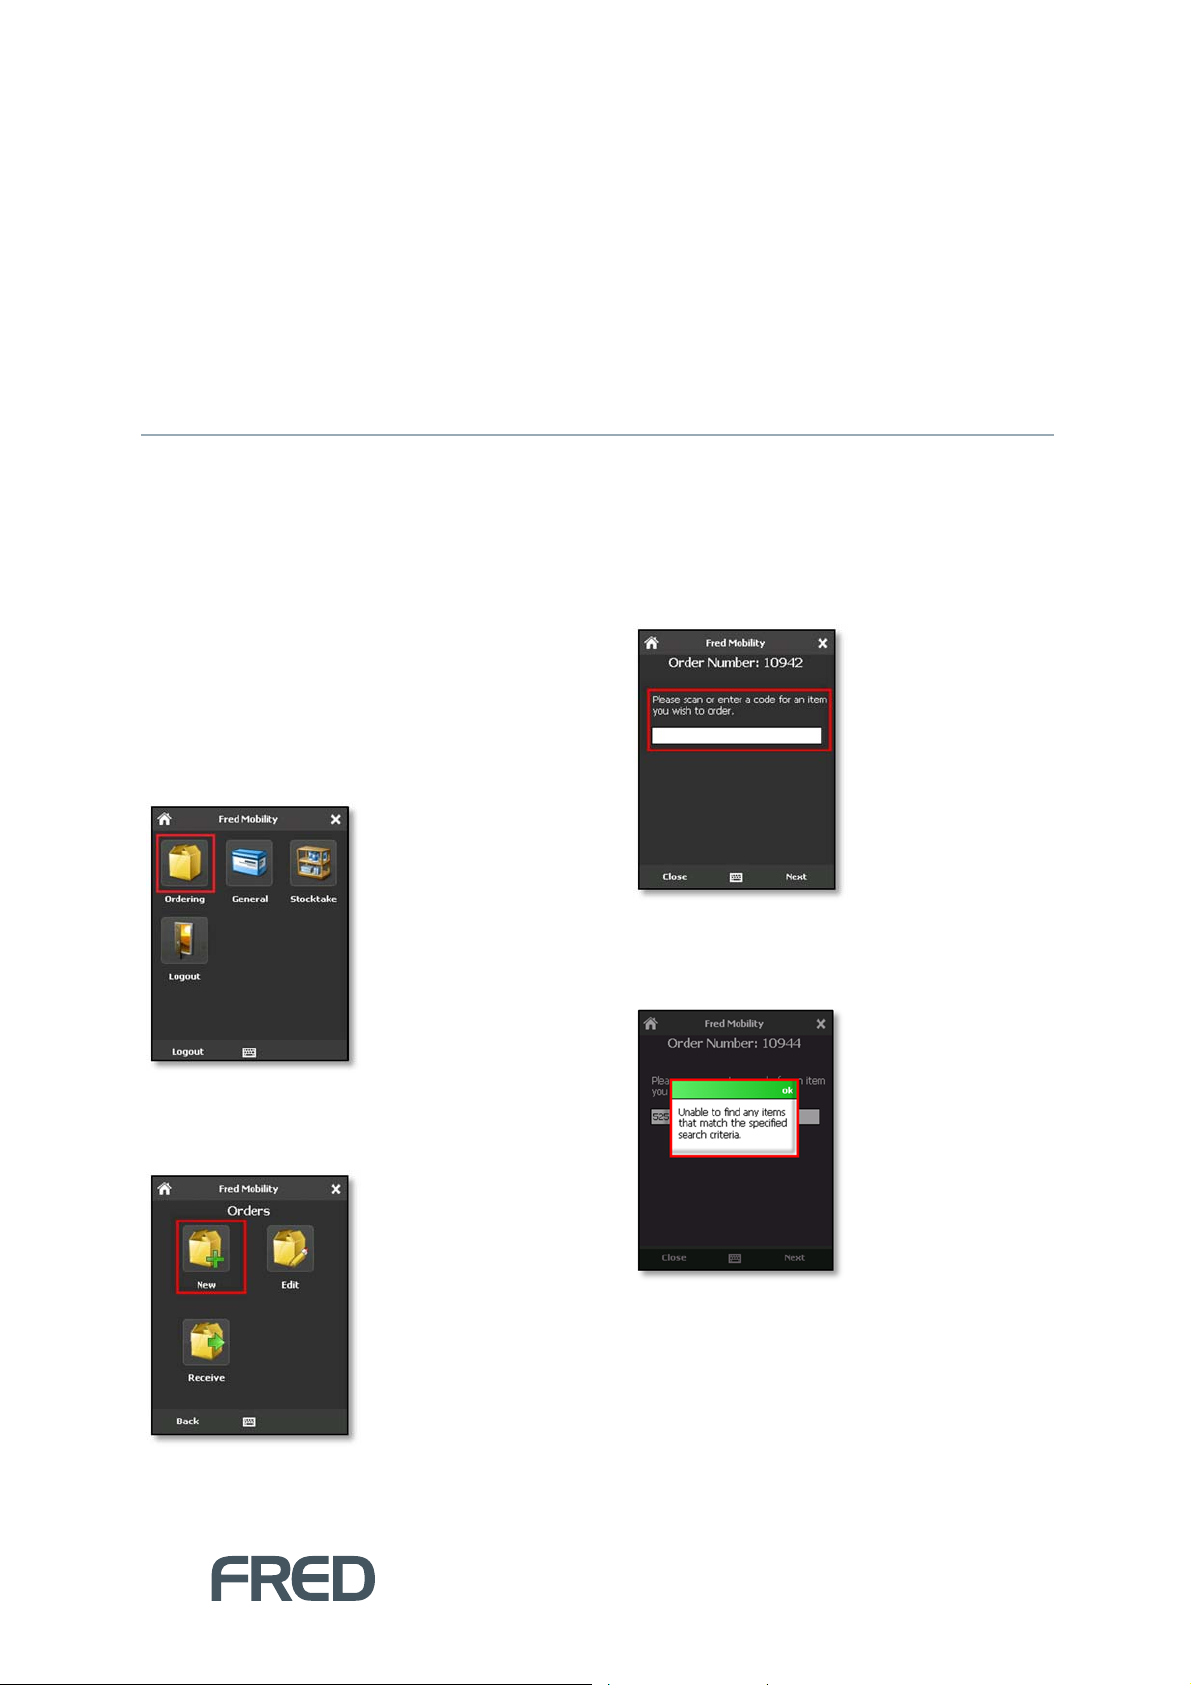
4. In the Search screen, scan the item or enter
Creating New Orders
To create new orders:
1. Login to Fred Mobility using your Fred POS
username and password.
a code to search for an item you wish to
order.
The Fred Mobility main screen appears.
2. Tap [Ordering].
The Orders screen appears.
3. Tap [New].
If the code scanned or input is not found in
the database, Fred Mobility displays an
Error message.
ORDERING
5
Page 10
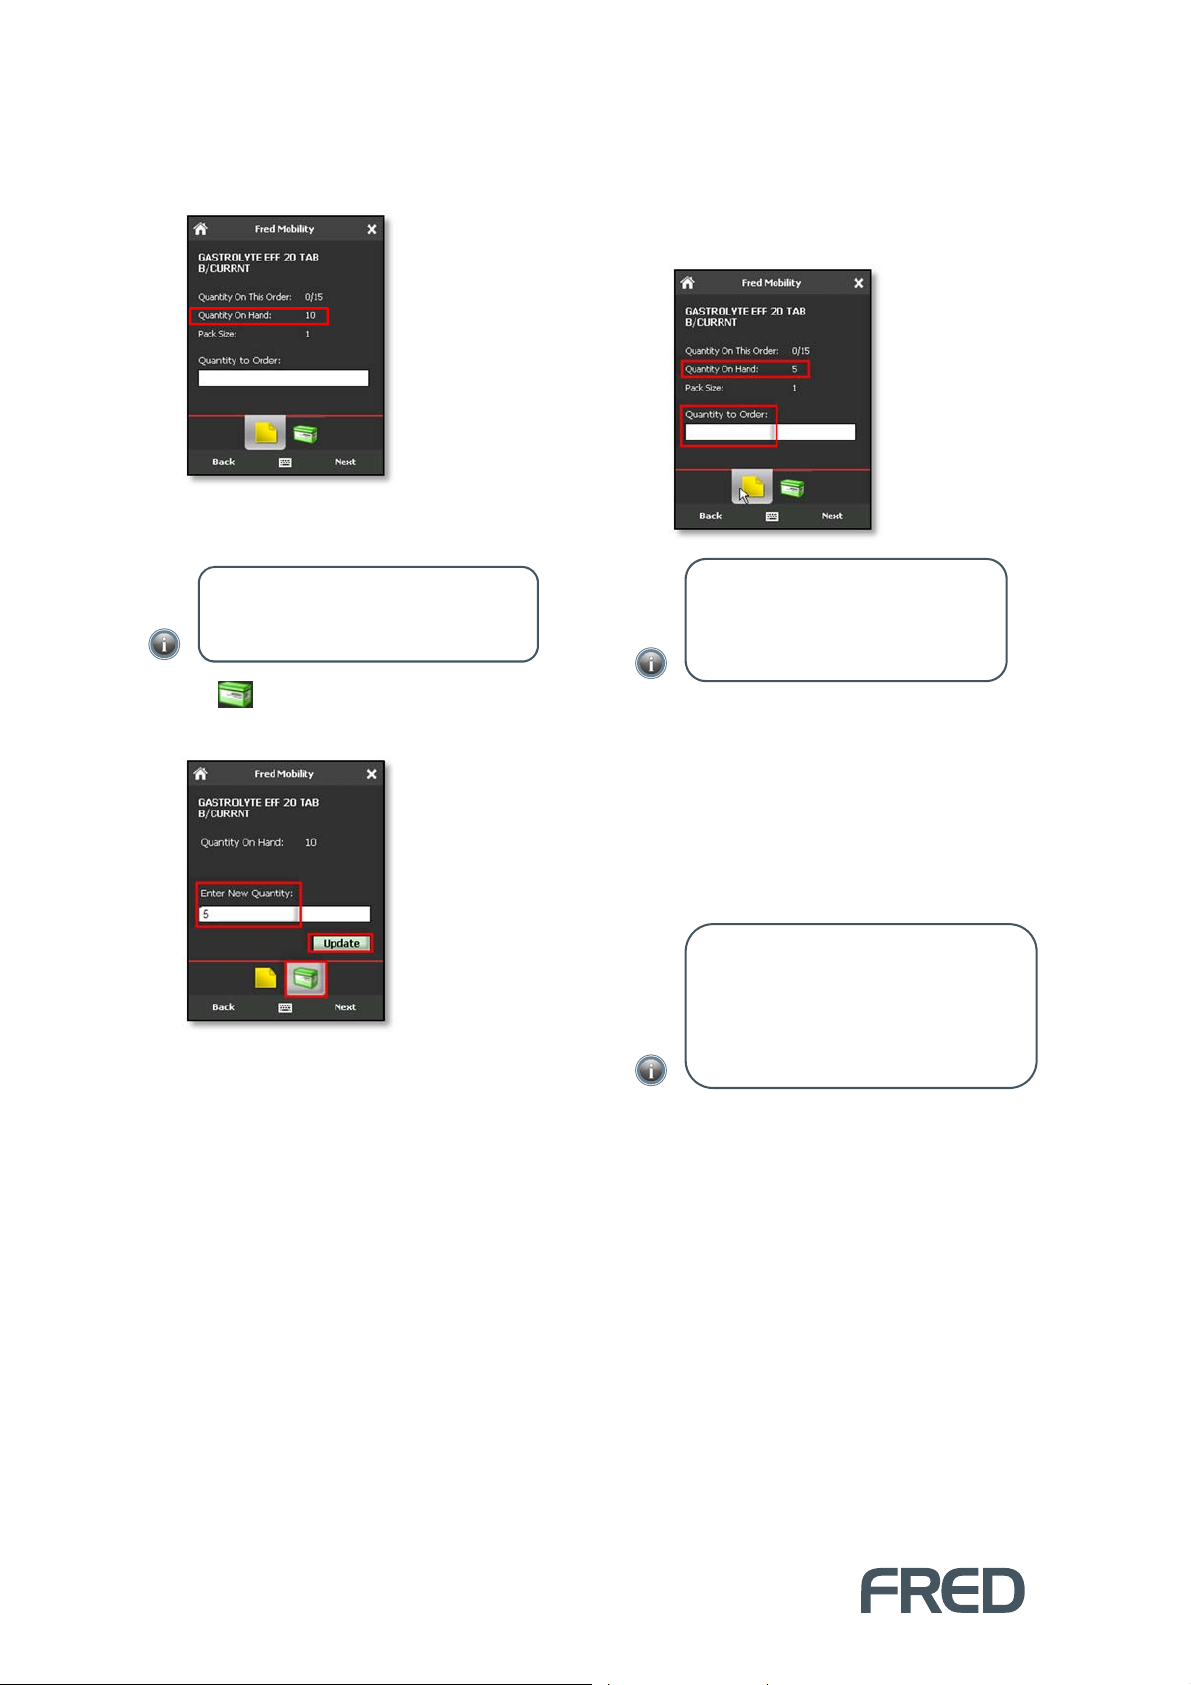
If the code is found, the Orders screen
displays basic ordering information about
the item.
Before ordering, you can also update the
Quantity on Hand.
NOTE: The second value in Quantity
on This Order represents the quantity on
order in ALL orders.
5. Tap to open the Quantity on Hand
screen.
6. Enter the New Quantity on Hand and tap
[Update] (or press the [E
NTER
] key on your
Fred Mobility device) to update the Quantity
on Hand and return to the Quantity to
Order screen.
NOTE: The Quantity on Hand has
been updated. If you close the
Quantity on Hand screen without
updating, the value is discarded.
7. Enter the Quantity to Order and press the
NTER
] key on your Fred Mobility device.
[E
A new line is saved your new Order.
8. Repeat the process for all items to be added
to the new Order.
9. Once complete logout of Fred Mobility and
return your device to the charger.
NOTE: If you scan or input a code that is
already on the order, the screen displays
the Quantity on This Order. When you
input a Quantity to Order, the system
overrides the previous Quantity on this
Order. It does not append it to the existing
WORKING WITH ORDERS
6
Page 11
Editing Existing Orders
The Edit function allows users to modify Orders
with an Open status.
To edit existing orders:
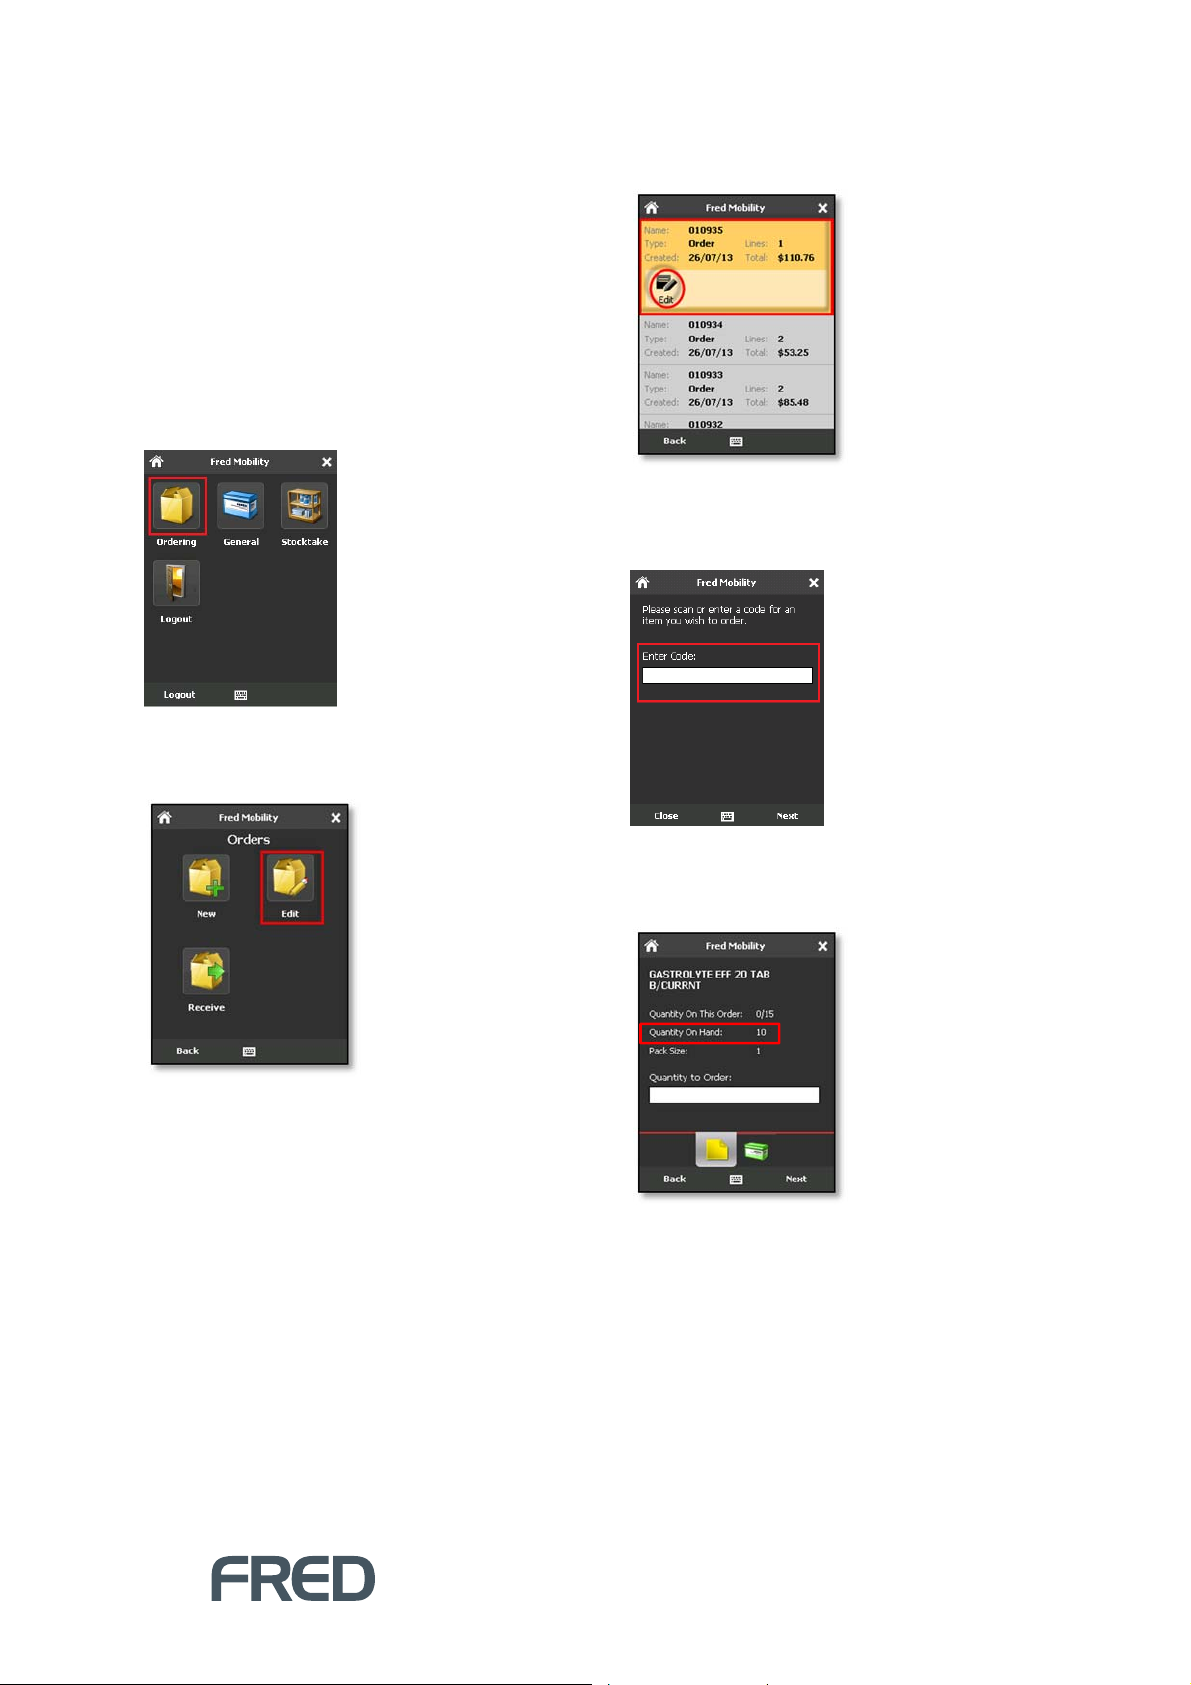
1. Login to Fred Mobility using your Fred
POS username and password.
The Fred Mobility main screen appears.
10. Tap [Ordering].
12. Scroll to locate the required order and tap
[Edit].
13. In the Search screen, scan the item or enter
a code for an item you wish to order or
adjust.
The Orders screen appears.
11. Tap [Edit].
Fred Mobility displays the most recent ten
open orders.
If the code already exists in this order,
Fred Mobility displays basic ordering
information about the item.
Before ordering, you can also update the
Quantity on Hand.
ORDERING
7
Page 12
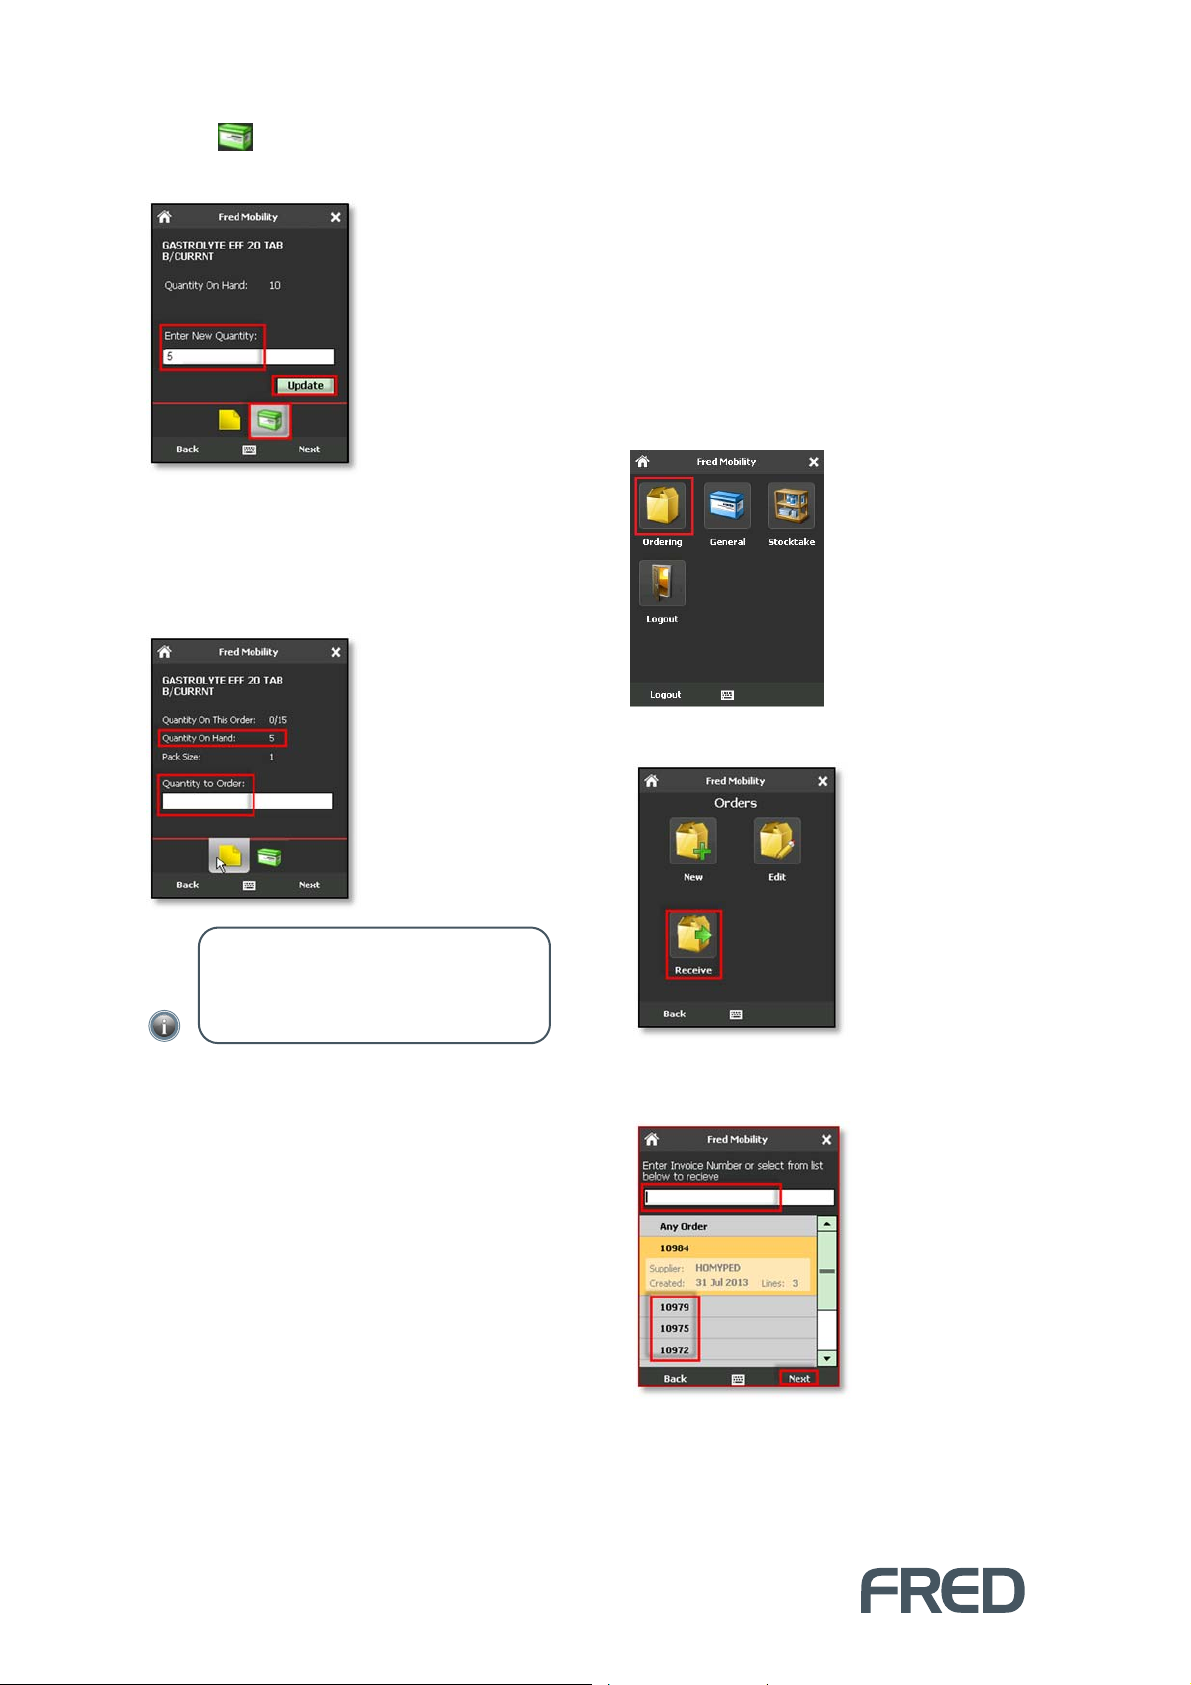
14. Tap to open the Quantity on Hand
screen.
15. Enter the New Quantity on Hand and tap
[Update] (or press the [E
Fred Mobility device) to update the Quantity
on Hand and return to the Quantity to
Order screen.
NTER
] key on your
Receiving an order
This section describes how to receive Orders
from suppliers or from other stores.
To receive orders:
1. Login to Fred Mobility using your Fred
POS username and password.
The Fred Mobility main screen appears.
20. Tap [Ordering].
NOTE: The Quantity on Hand has been
updated. If you close the Quantity on
Hand screen without updating, the value is
discarded.
16. Enter the quantity to add to the order and
press the [E
NTER
] key on your Fred Mobility
device.
If you input a zero Quantity to Order, the
line is removed from this order.
If the code is new to this order, the
Quantity on This Order is displayed as
zero (as it was not on the original order).
21. Tap [Receive].
22. In the Receive screen, do one of the
following:
17. Repeat the process for all items to be added
to the order.
18. Once complete logout of Fred Mobility and
return your device to the charger.
19. To complete your order, log into Fred NUHQ.
WORKING WITH ORDERS
8
Page 13
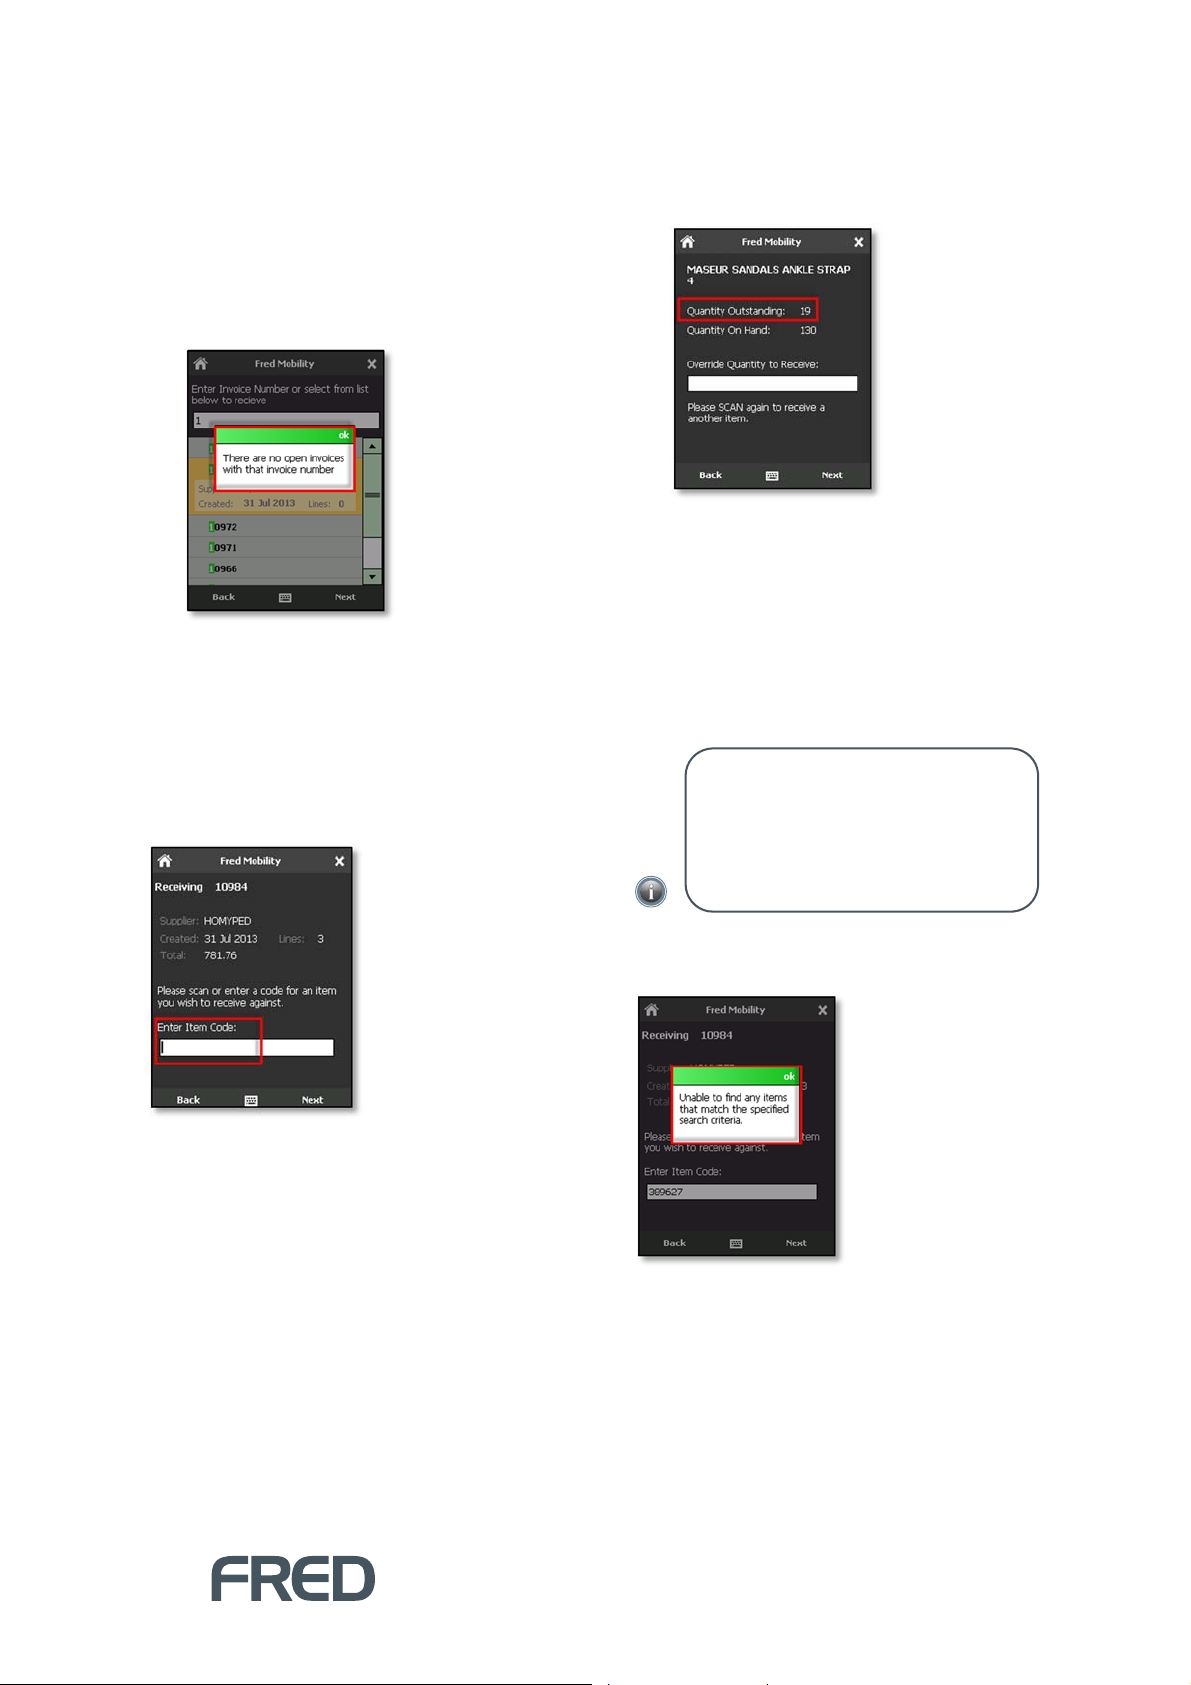
Enter the invoice number.
-or-
Select from the list of displayed invoices
and press the [E
Mobility device.
NTER
] key on your Fred
If no matching invoice number is found, Fred
Mobility displays an Error message.
If a matching invoice number is found or
selected in the Receive screen, Fred
Mobility displays basic information about the
selected invoice.
24. Do one of the following:
To receive items individually, scan each
product barcode.
Fred Mobility automatically receives “1” and
displays another Search screen.
-or-
To receive multiples of an items scan the
next product barcode and enter the
quantity to receive.
Press the [E
Mobility device.
NTER
] key on your Fred
23. In the Search screen, scan the item you
wish to receive or enter a code, then tap
[Next].
NOTE: The quantity entered reduces the
Quantity Outstanding figure — it does not
overwrite. If an error is made and too many
items received, log in to Fred NUHQ and
manually adjust the quantity received (this
cannot be done in Fred Mobility).
If an Item Code cannot be found, Fred
Mobility displays an Error message.
ORDERING
9
Page 14
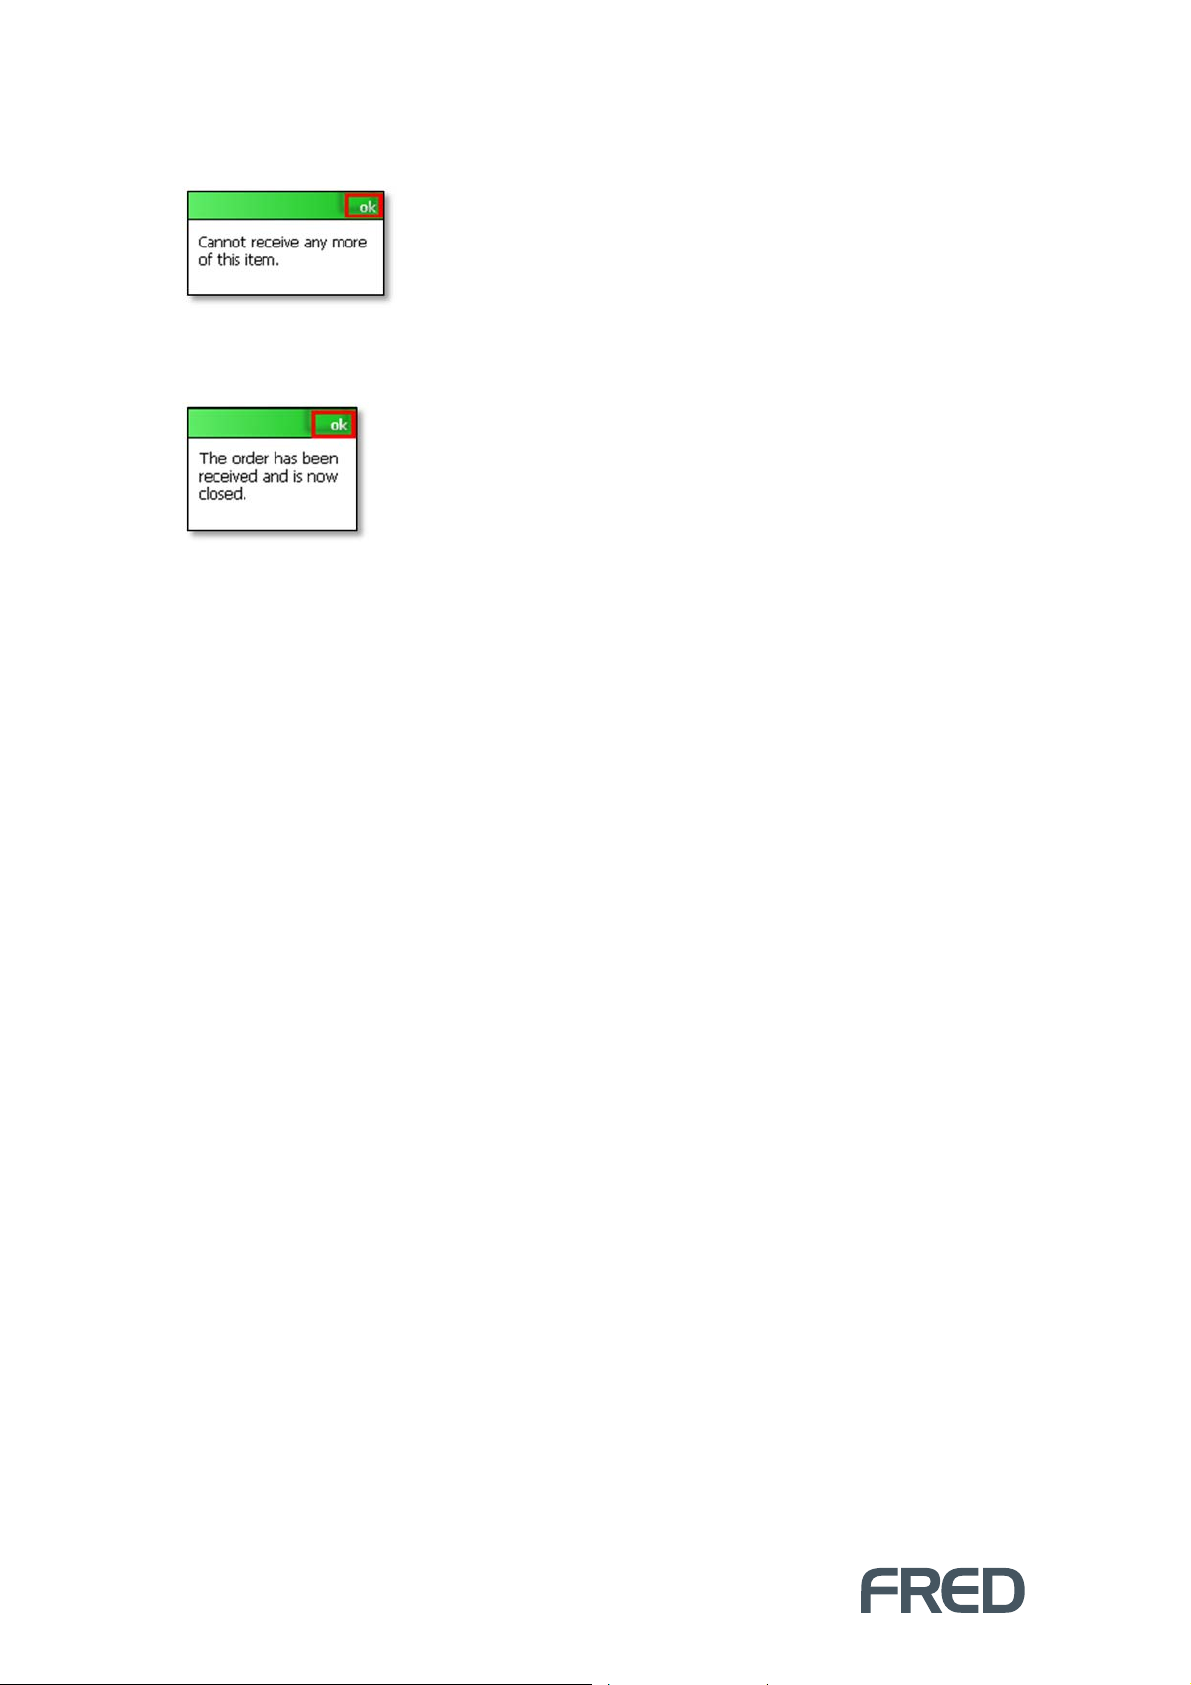
If the number of scans or the quantity entered in exceeds the quantity on the order, Fred Mobility
displays a Warning message.
25. Continue scanning items until all items are received.
Once all items have been received Fred Mobility displays an information message.
26. To finish, tap [OK] then logout of Fred Mobility.
You may also close the order by logging into Fred NUHQ.
WORKING WITH ORDERS
10
Page 15
SECTION 3
GENERAL OPTIONS
SEARCH AND LOOKUP
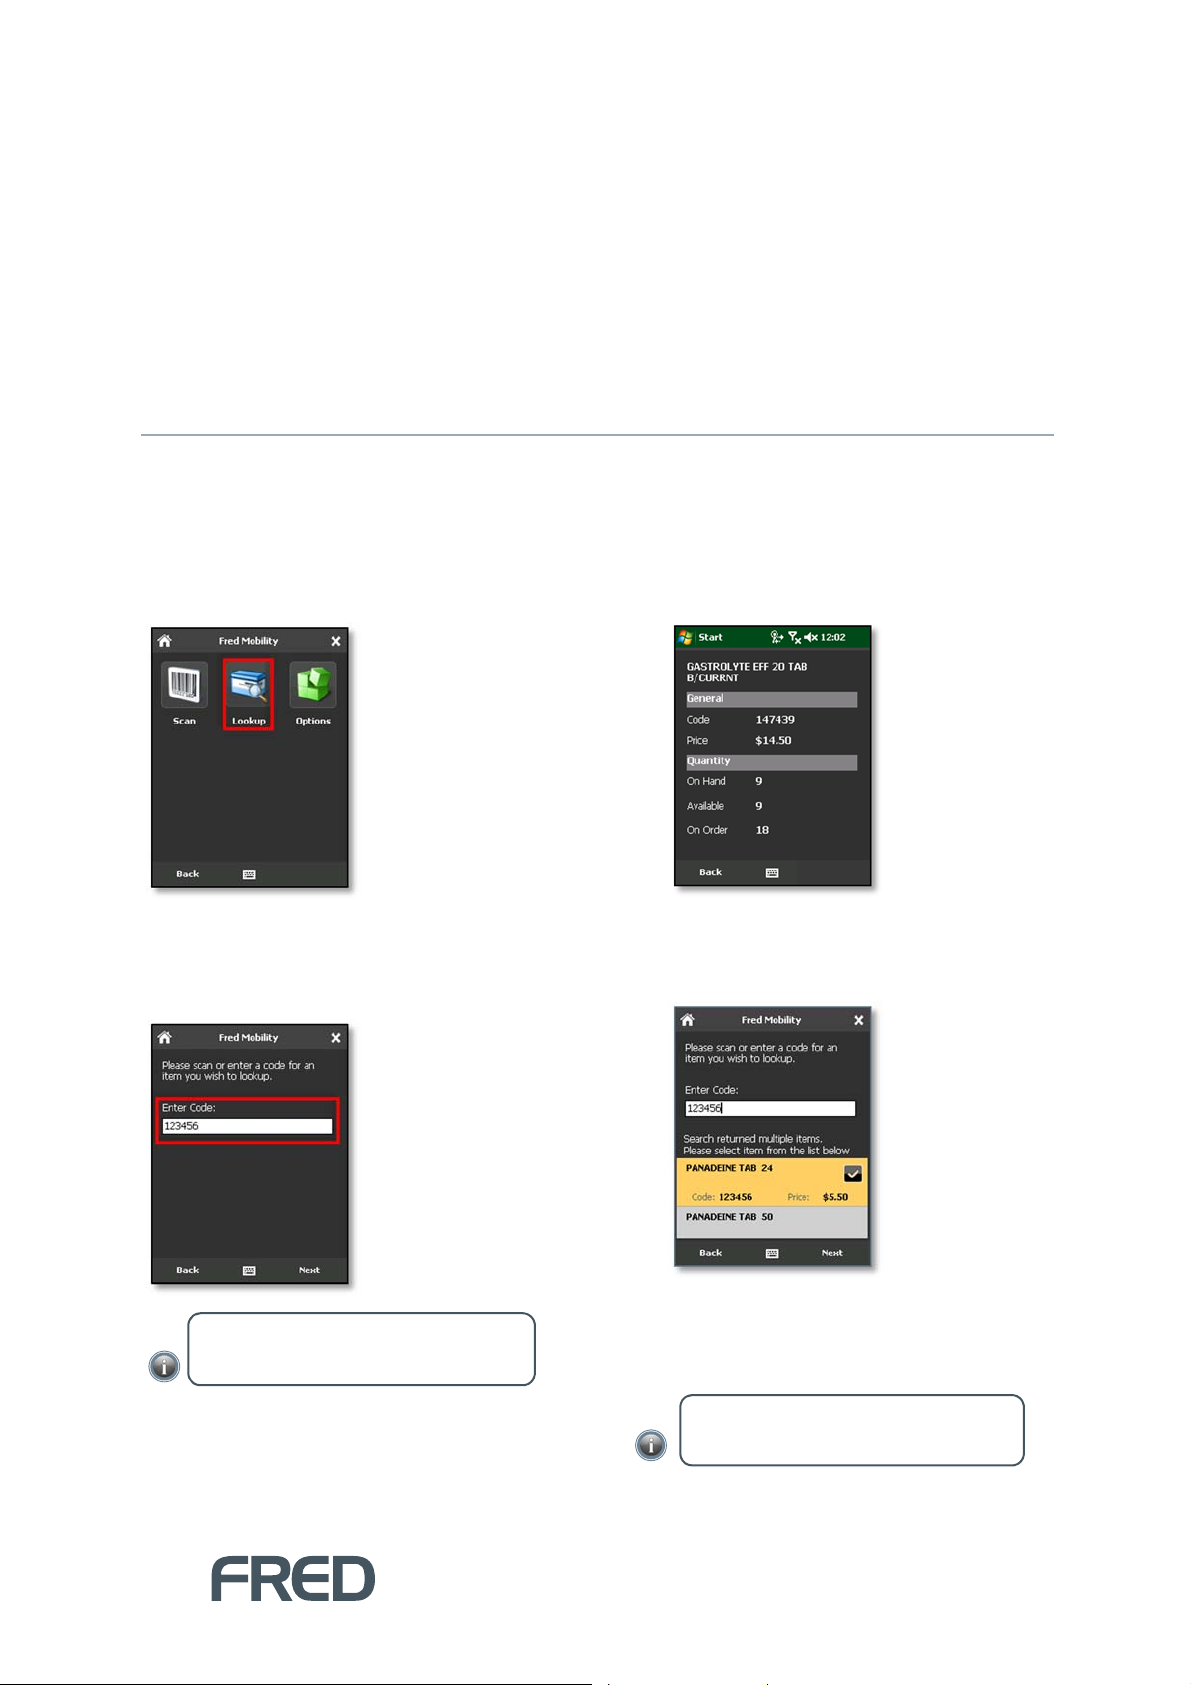
The Lookup option in the General screen allows you to search for items by Code and view their
properties. These properties an read-only and cannot be edited.
To search an item:
1. Tap [Lookup].
If the search retrieves a single item for the
search criteria, the Item Lookup screen
displays basic information about the item.
The Item Search screen is displayed.
2. Enter or scan the Code of the item you wish
to lookup.
NOTE: Items can be searched by Code or
Alias.
If the search retrieves more than one
match for the search criteria, Fred Mobility
displays a list of all matching results.
3. Select one item from the list to display Item
Lookup screen.
4. Tap [Back] to return to the Search screen.
NOTE: Click [Back] to return to the
General screen.
GENERAL OPTIONS
11
Page 16
GENERAL OPTIONS CONFIGURATION
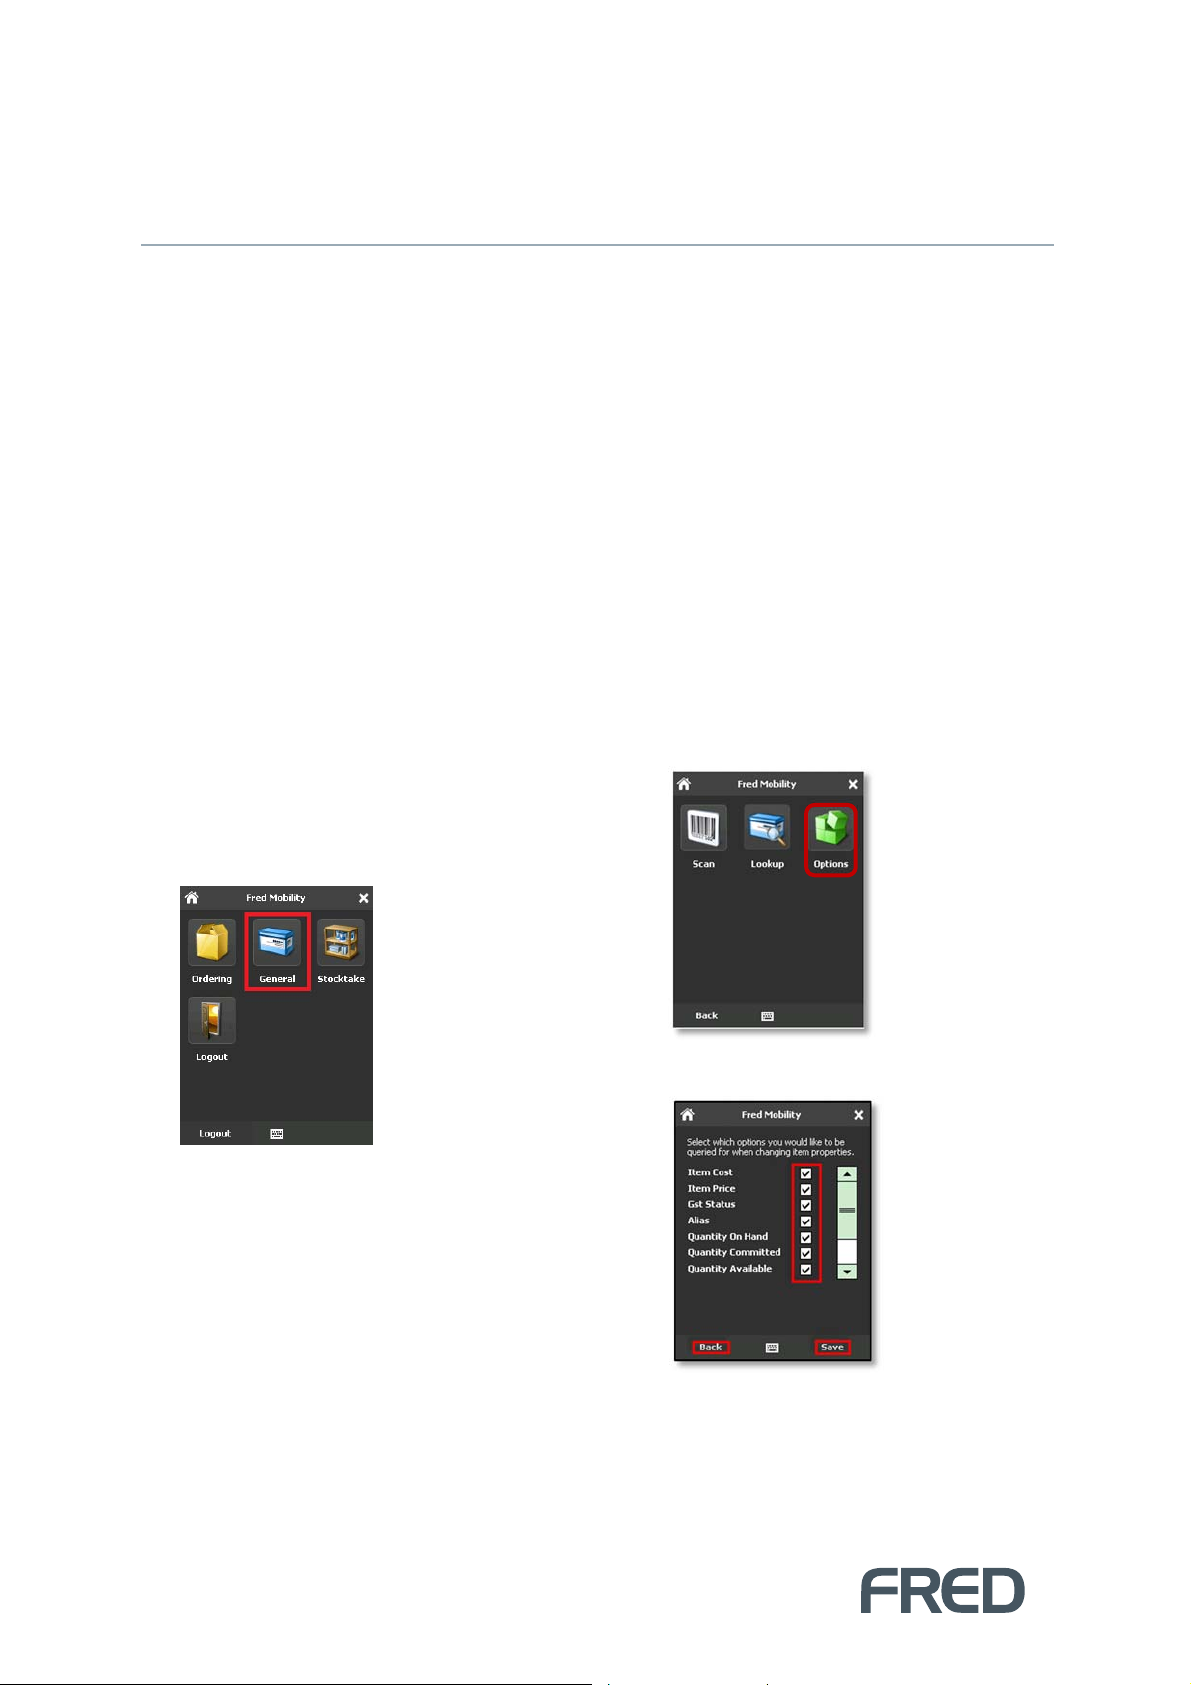
Options allows you to select which items properties you want to edit when scanning. Scan allows you to
view and edit the following properties:
Item Cost
Item Price
GST Status
Alias
Quantity on Hand
Quantity Committed
Quantity Available
Restock Level
Reorder Point
Print Labels
To configure General options:
1. Login to Fred Mobility using your Fred
POS username and password.
The Fred Mobility main screen appears.
5. Tap [General].
6. Tap [Options] to open the scanning
Options screen.
7. Select the required prompt options.
GENERAL OPTIONS CONFIGURATION
12
8. Tap [Save] for changes to take effect.
These options are saved in Fred Mobility as
system settings and set for all devices used
in the store.
Page 17
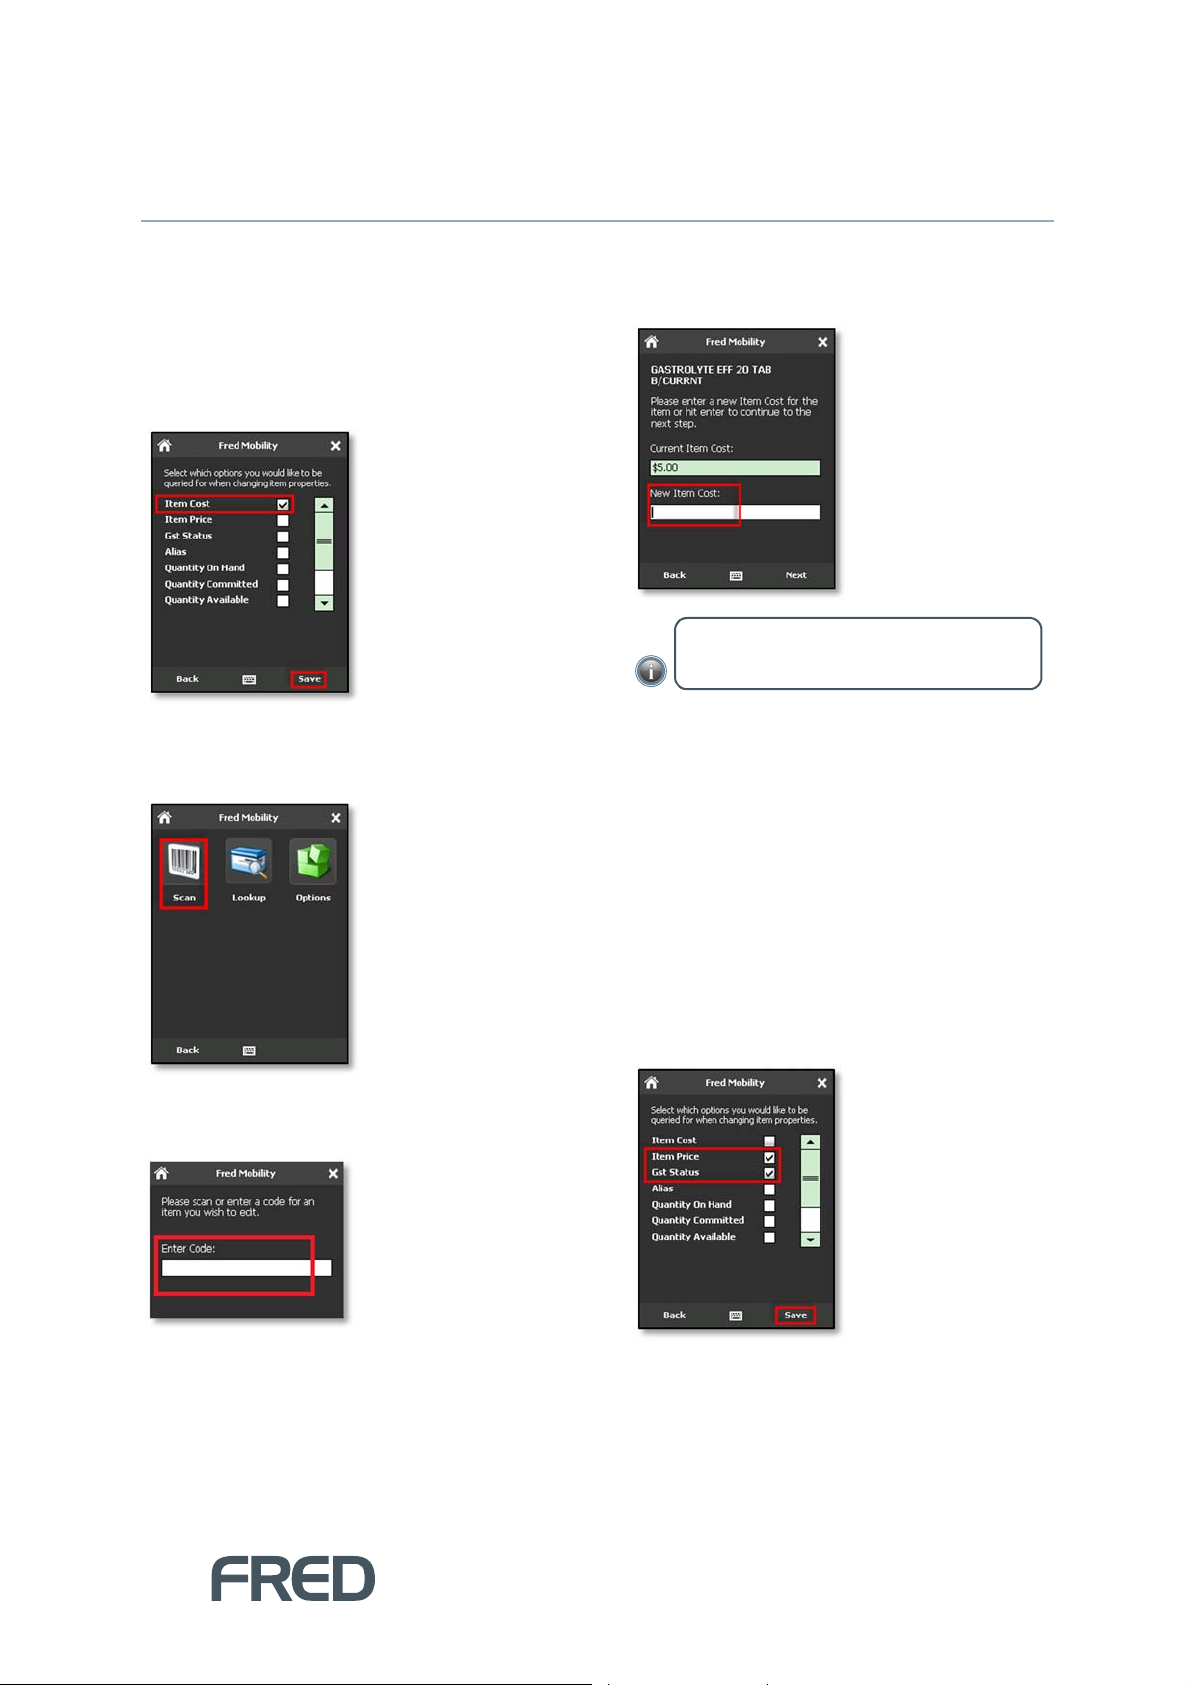
SCAN
Changing Item Cost
To update the cost of an Item:
1. Ensure that Item Cost is selected in the
[Options] menu.
2. To finish tap [Save].
3. Tap [Scan].
5. Enter the New Item Price and press the
[E
NTER
] key on your Fred Mobility device.
NOTE: If no figure is entered, the Current
Item Cost is maintained.
6. Tap [Next] and repeat the process for all
items to be updated.
7. Once complete logout of Fred Mobility and
return your device to the charger.
4. In the Search screen, scan the item or enter
a code for an item you wish to scan.
Changing Retail Prices
To update the price of an Item:
1. Ensure that Item Price is selected in the
[Options] menu.
2. You may want to update the GST Status of
this item at the same time.
3. To finish, tap [Save].
GENERAL OPTIONS
13
Page 18
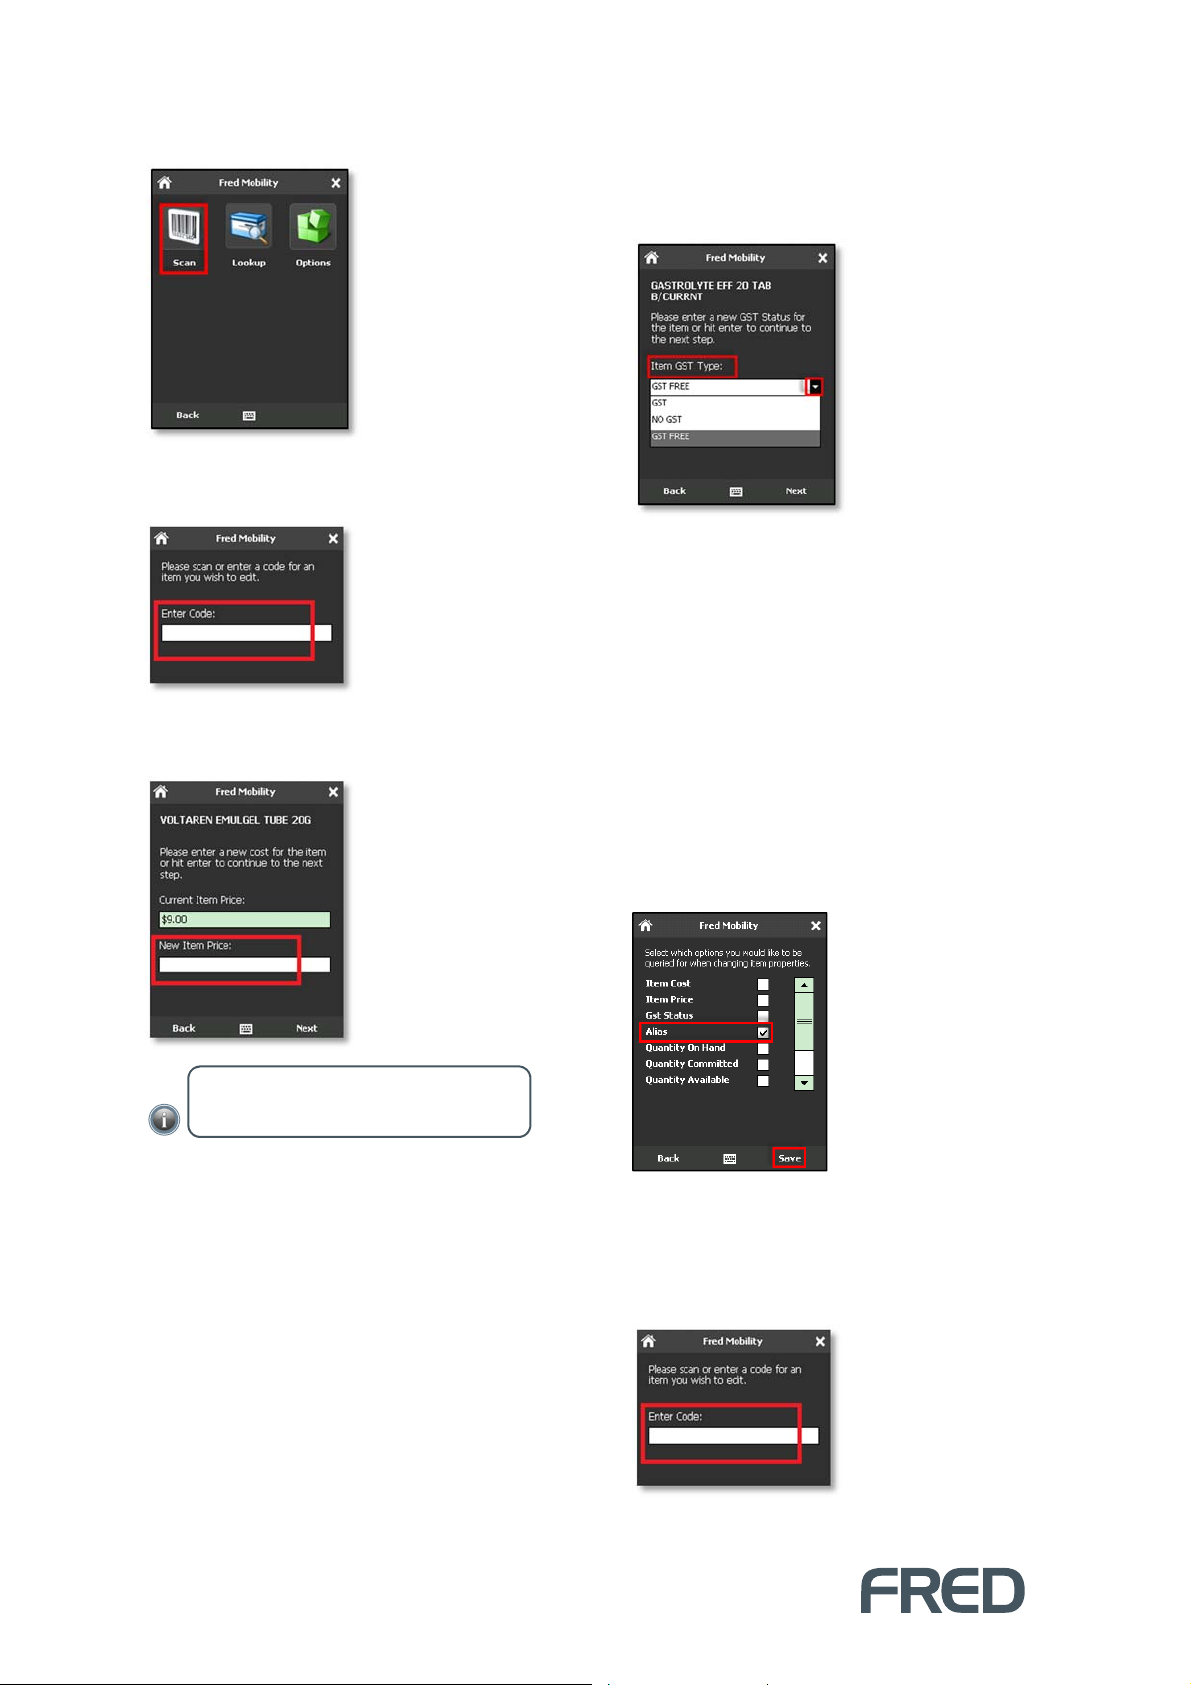
4. Tap [Scan].
5. In the Search screen, scan the item or enter
a code for an item you wish to scan.
6. Enter the New Item Price and press the
[E
NTER
] key on your Fred Mobility device.
7. Tap [Next] to display the next screen. If GST
Status was selected in the Options screen,
Fred Mobility displays the GST Status
screen.
8. Select the appropriate Item GST Type from
the drop-down list.
9. Tap [Next] and repeat the process for all
items to be updated.
10. Once complete logout of Fred Mobility and
return your device to the charger.
Creating Alias
To create a new Alias for an item:
1. Ensure that Alias is selected in the
[Options] menu.
NOTE: If no figure is entered, the Current
Item Price is maintained.
2. To finish, tap [Save].
3. Tap [Scan].
4. In the Search screen, scan the item or enter
a code for an item you wish to scan.
SCAN
14
5. Enter a new Alias for the item.
Page 19
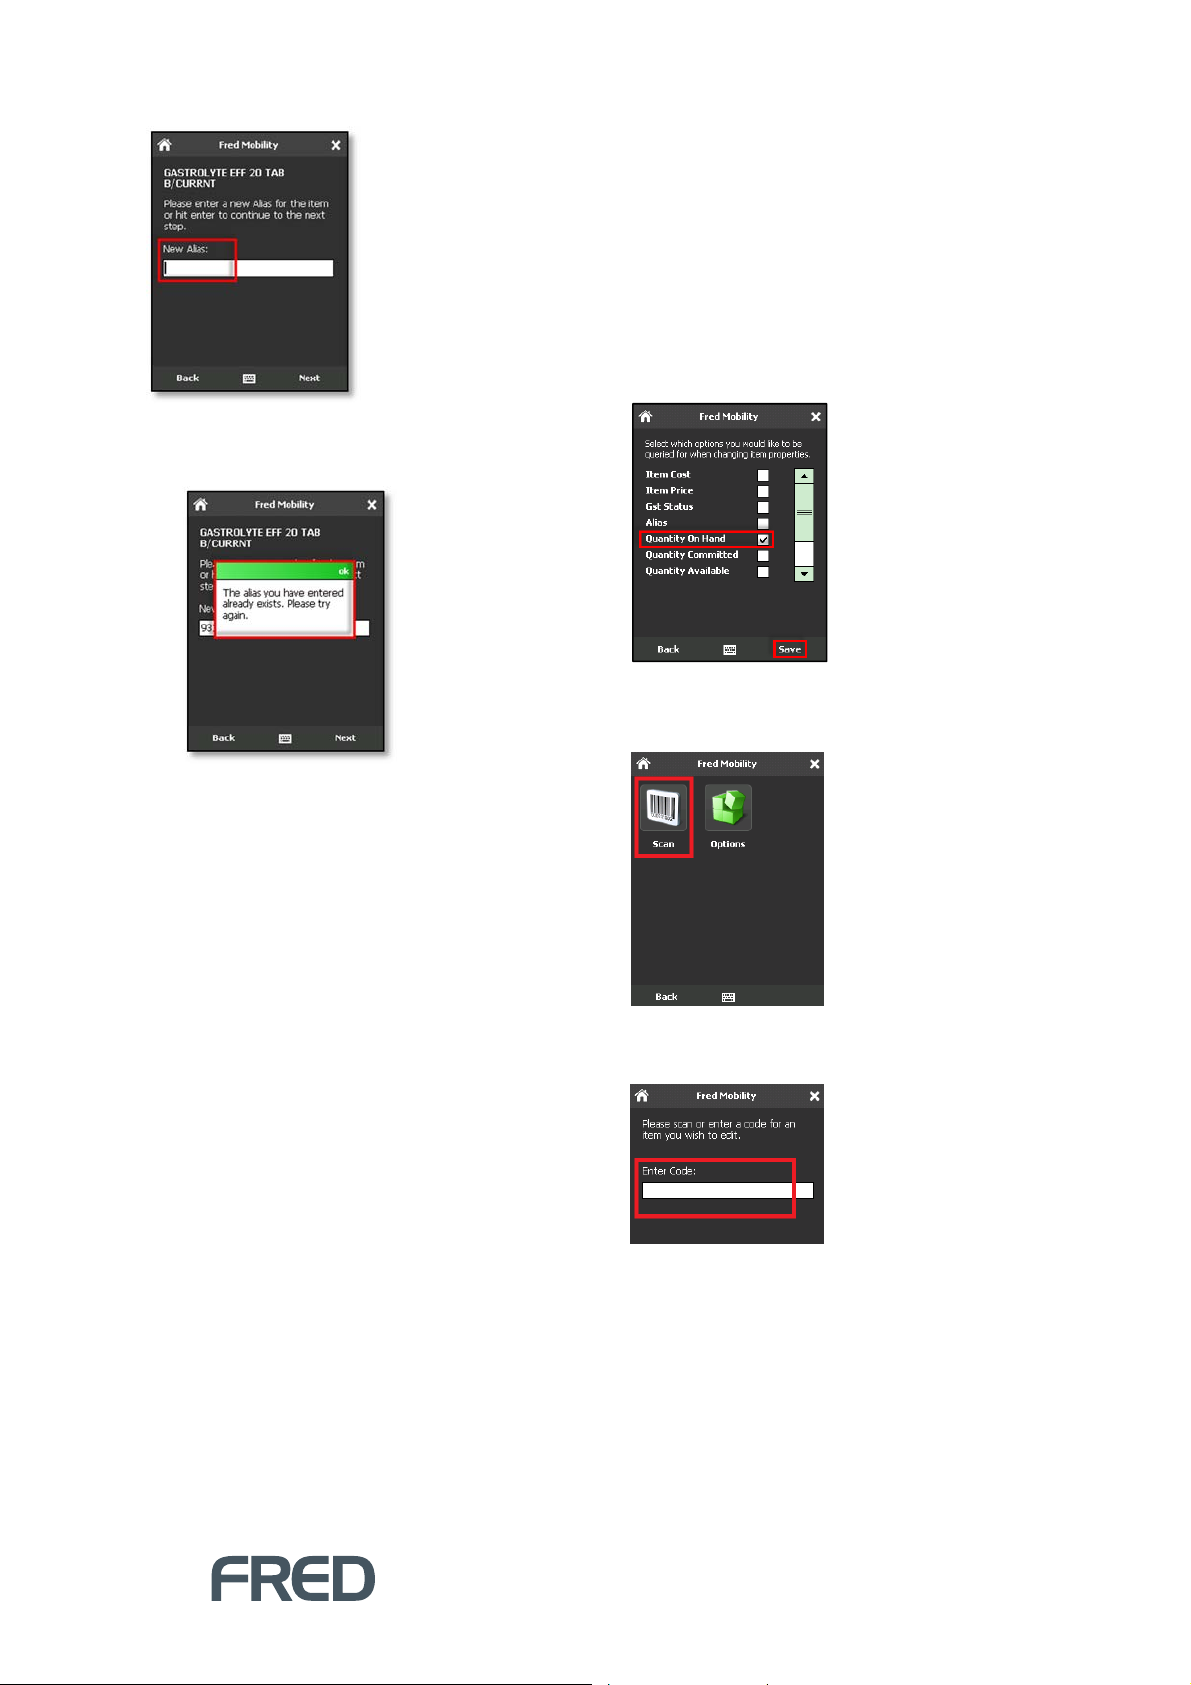
If the Alias already exists, NUHQ Mobility
displays an Error message.
Updating Quantity on Hand
Quantity on Hand refers to all stock of an item,
including committed quantities.
To update Quantity on Hand:
1. Ensure that Quantity on Hand is selected in
the [Options] menu. [change screenshot to
show only one ticked option]
2. To finish, tap [Save].
6. Click [OK] to close the message and return
to the Alias screen.
7. Enter a new Alias for the item.
8. Tap [Next] and repeat the process for all
items to be updated.
9. Once complete logout of Fred Mobility and
return your device to the charger.
3. Tap [Scan].
4. Scan the item or enter a code for an item
you wish to scan.
GENERAL OPTIONS
15
Page 20
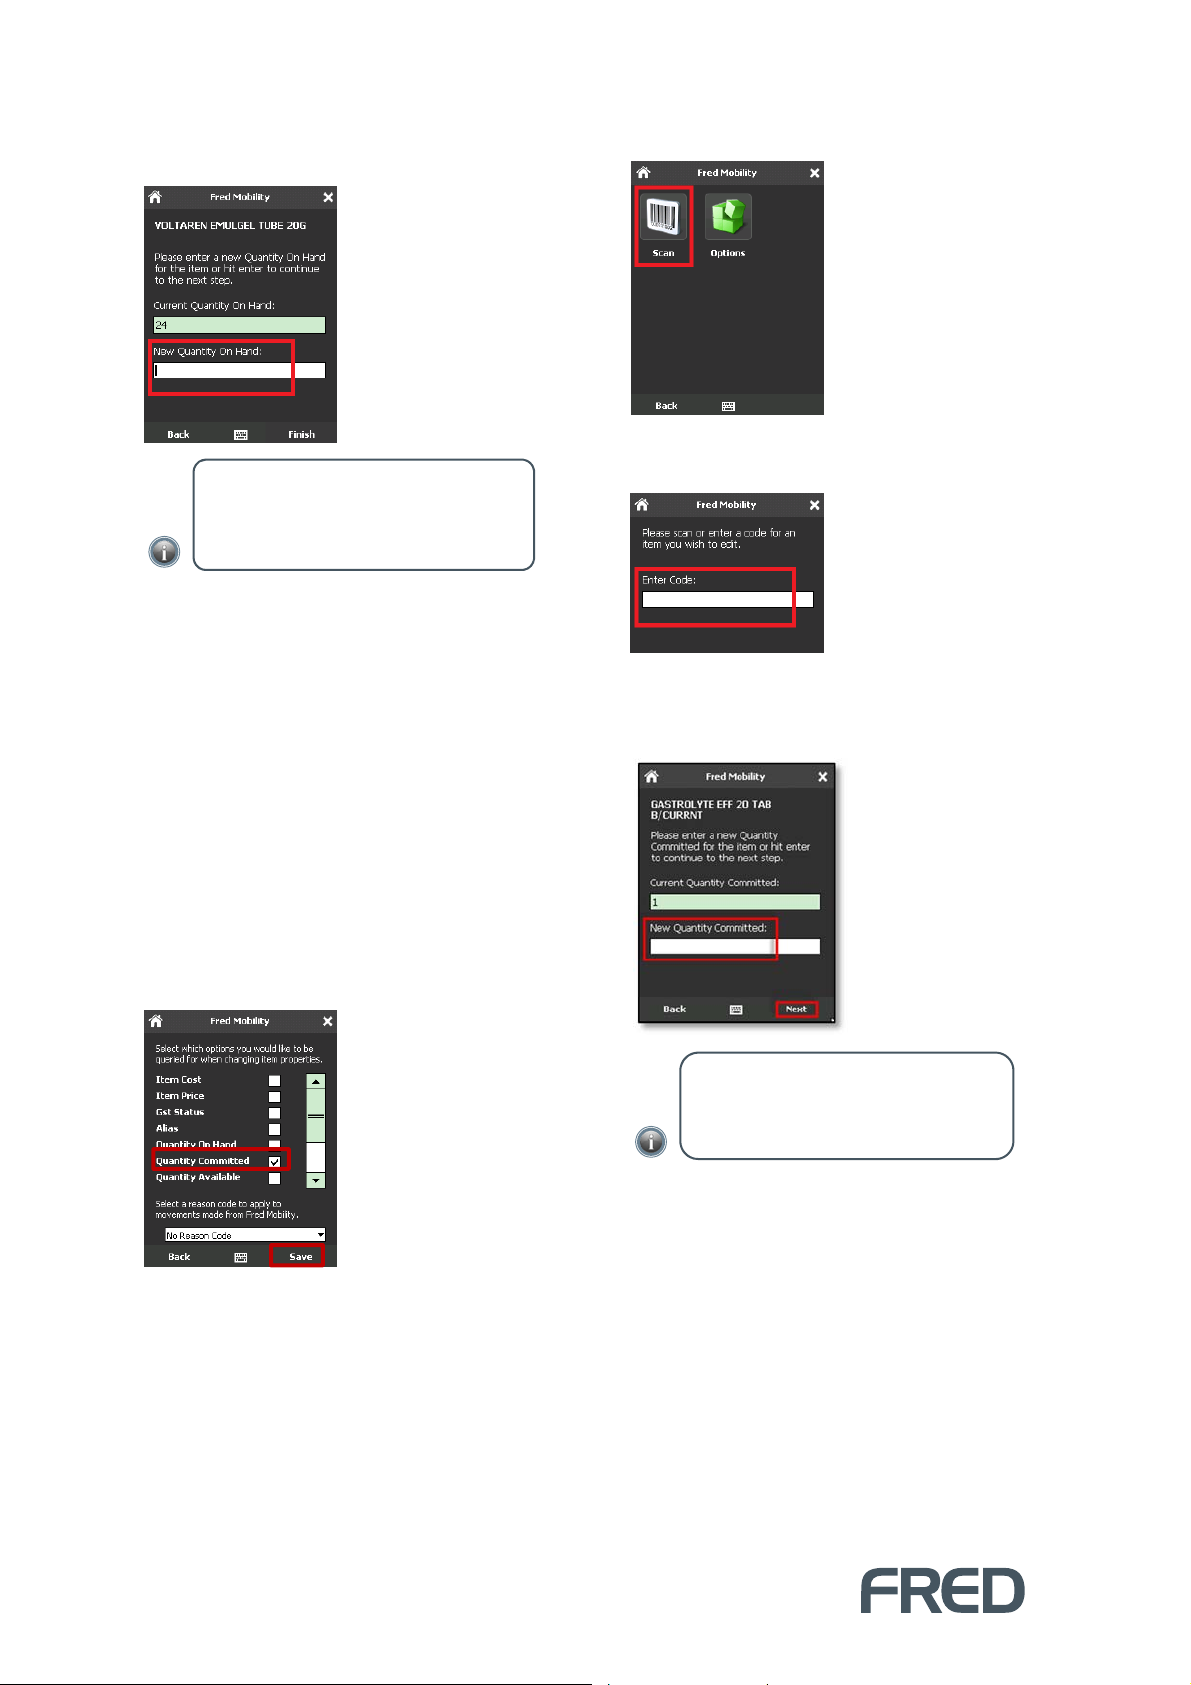
5. Enter the New Quantity on Hand and then
press [E
NTER
] on your Fred Mobility device.
NOTE: The figure entered overwrites the
Current Quantity On Hand. If no figure is
entered, the Current Quantity On Hand
will be maintained.
6. Repeat the process for all items to be
updated.
7. Once complete logout of Fred Mobility and
return your device to the charger.
Updating Committed
3. Tap [Scan].
4. In the Search screen, scan the item or enter
a code for an item you wish to scan.
5. Enter the New Committed Quantity and
NTER
then press the [E
] on your Fred Mobility
device.
Quantities
Quantity Committed refers to stock that has
been reserved. It is not counted in the Quantity
Available tally.
To update Committed Quantities:
1. Ensure that Quantity Committed is selected
in the [Options] menu.
2. To finish, tap [Save].
NOTE: The quantity entered overwrites the
Current Quantity Committed. If no figure is
entered, the Current Quantity Committed will
be maintained.
6. Tap [Next] to repeat the process for all items
to be updated.
7. Once complete logout of Fred Mobility and
return your device to the charger.
SCAN
16
Page 21
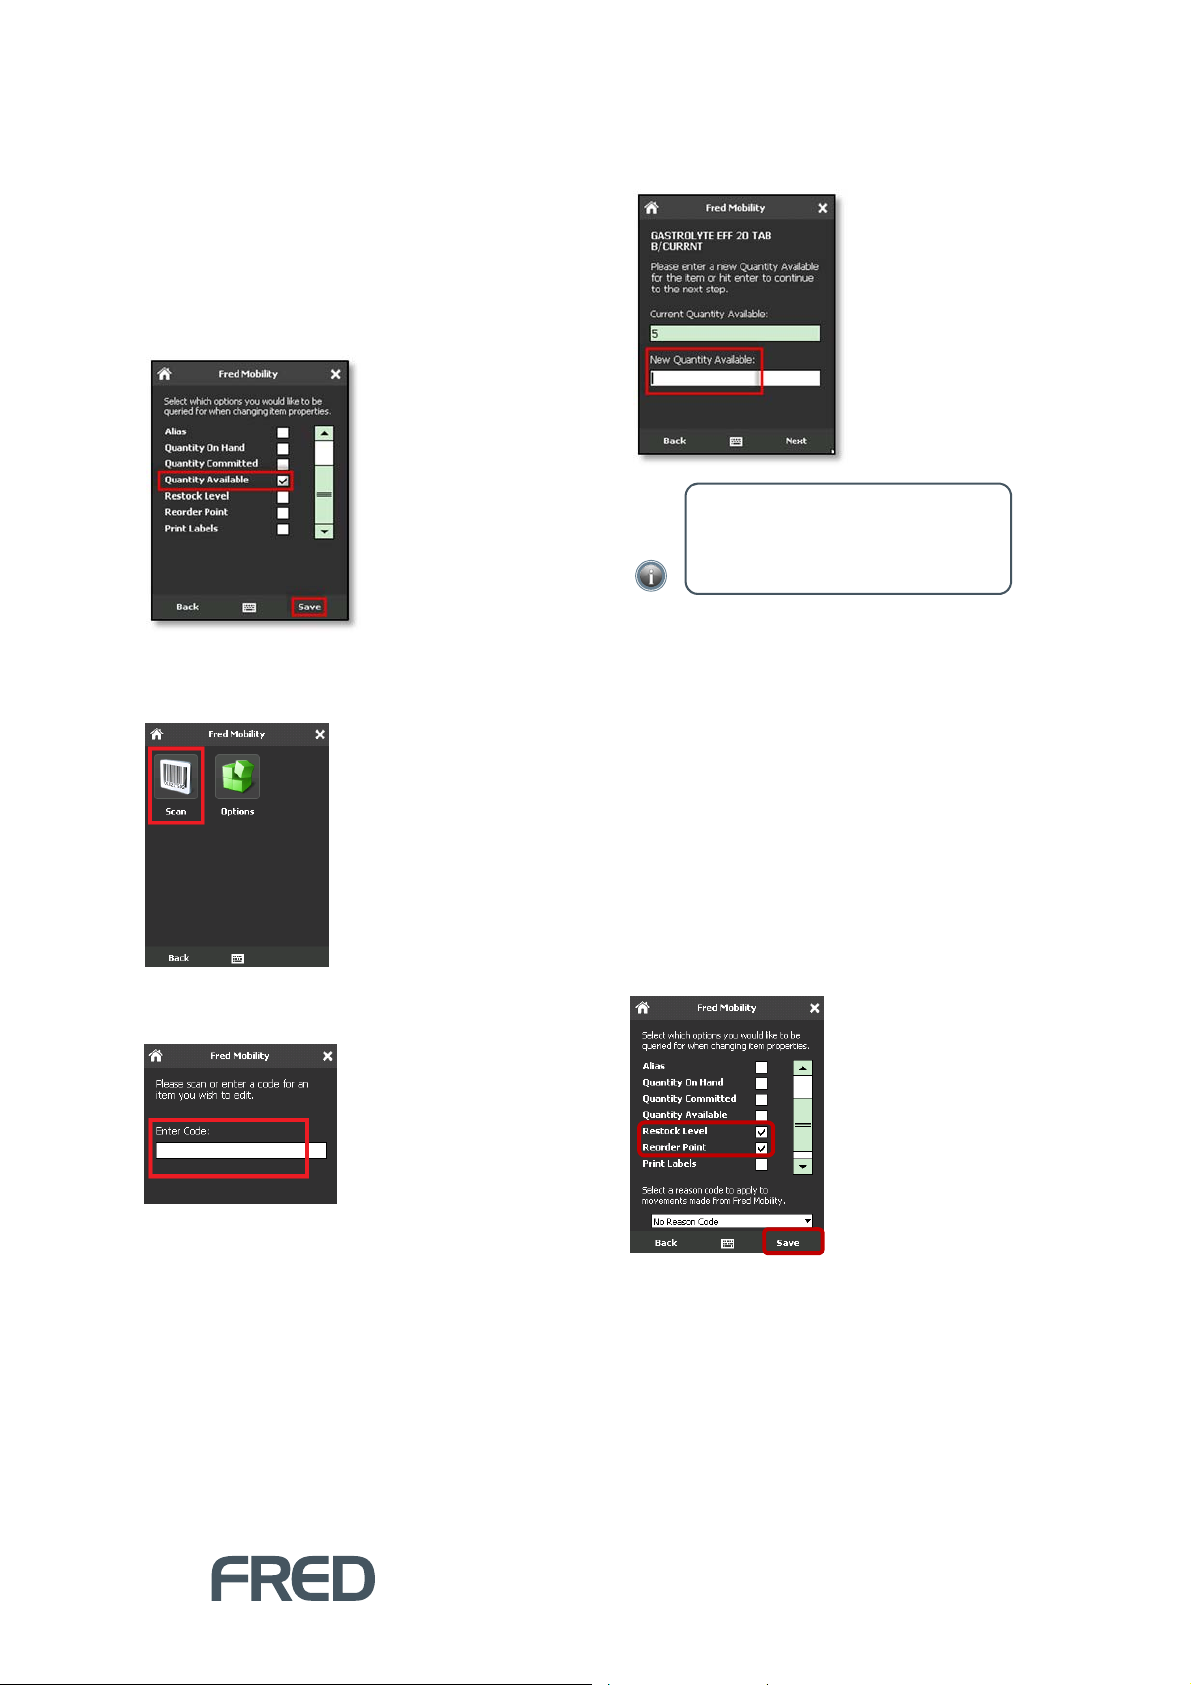
Updating Quantity Available
Stock on Hand tallies all stock, including
committed quantities.
To update Quantity Available:
1. Ensure that Quantity Available is selected
in the [Options] menu.
2. To finish, tap [Save].
3. Tap [Scan].
5. Enter the New Quantity Available and then
NTER
press [E
NOTE: The figure entered overwrites
the Current Quantity On Hand. If no
figure is entered, the Current Quantity
On Hand will be maintained.
6. Repeat the process for all items to be
updated.
7. Once complete logout of Fred Mobility and
return your device to the charger.
] on your Fred Mobility device.
4. Scan the item or enter a code for an item
you wish to scan.
Setting Restock and Reorder
Points
To set Restock and Reorder Points:
1. Ensure that Restock Level (and Reorder
Point, if required) is selected in the
[Options] menu.
2. To finish, tap [Save].
GENERAL OPTIONS
17
Page 22
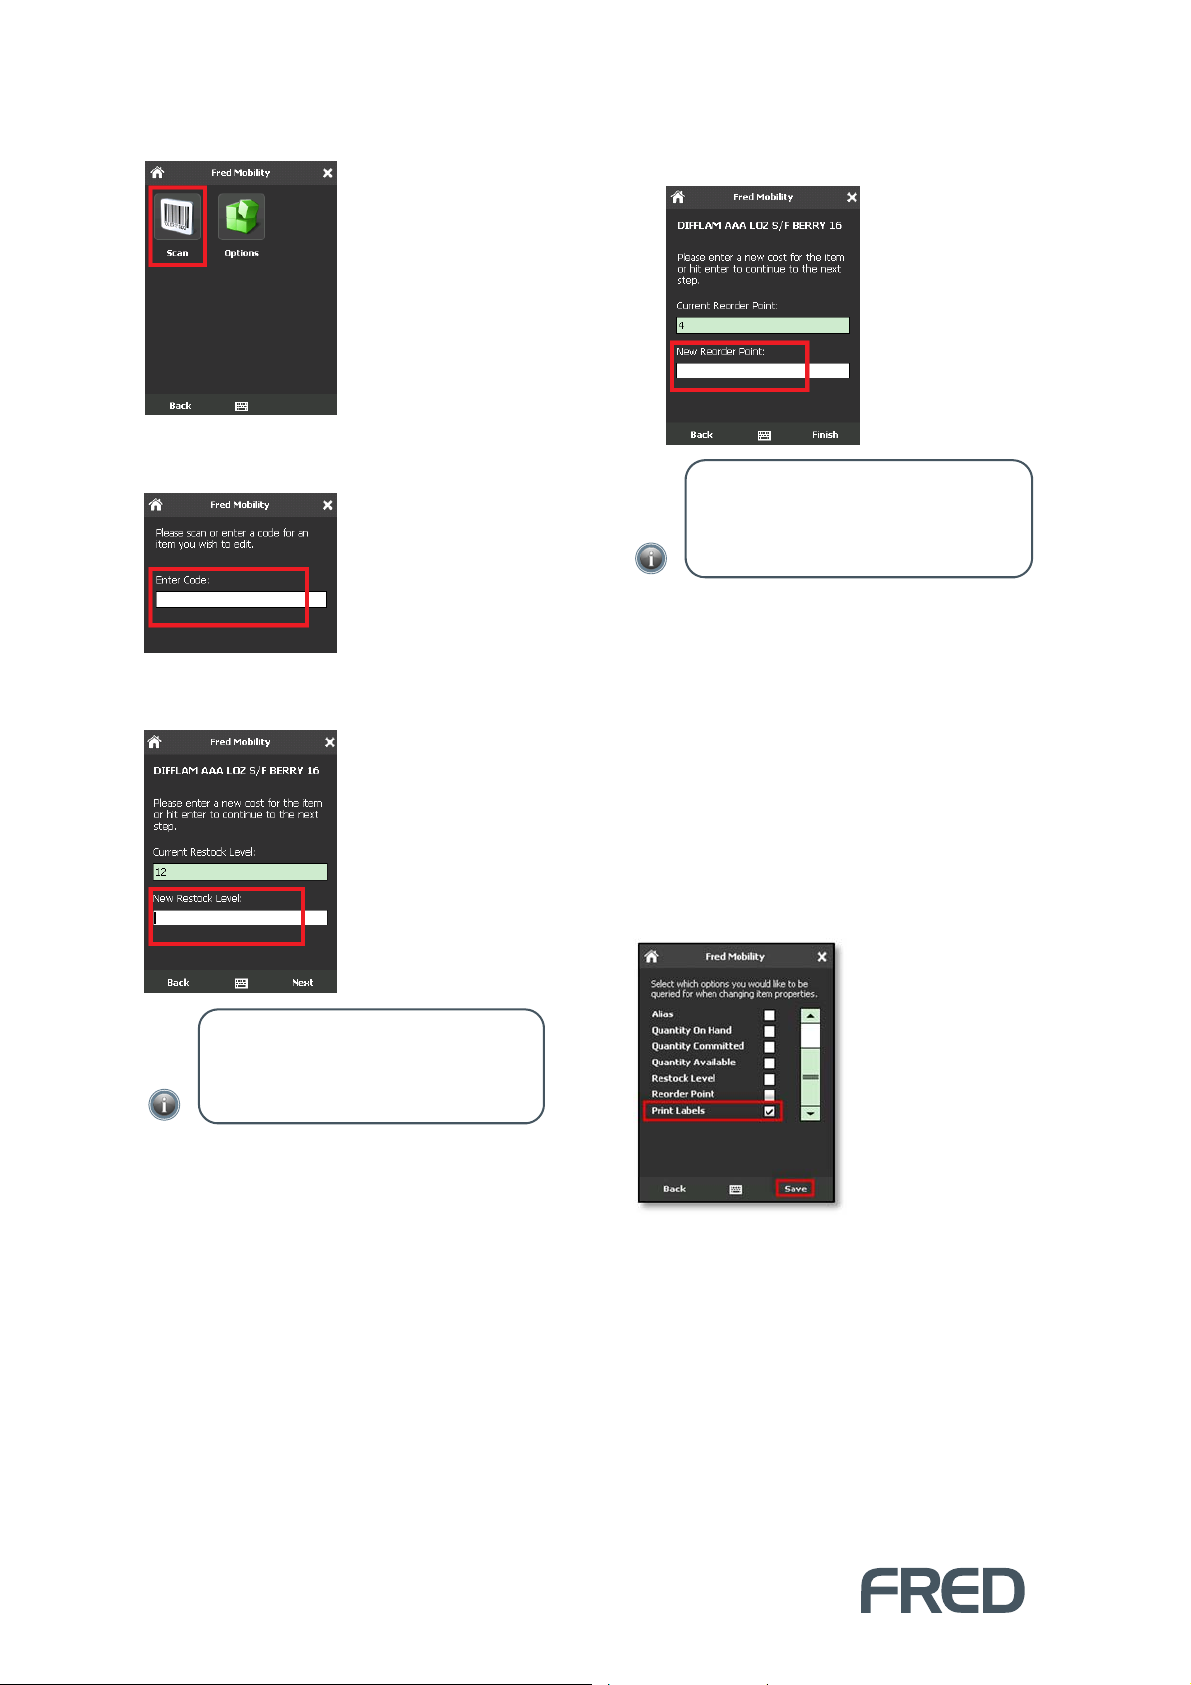
3. Tap [Scan].
4. In the Search screen, scan the item or enter
a code for an item you wish to scan.
5. Enter the New Restock Level and then
press [Next] on your Fred Mobility device.
6. Enter the New Reorder Point and then
NTER
press [E
] on your Fred Mobility device.
NOTE: The figure entered will overwrite
the Current Reorder Point. If no figure is
entered, the Current Reorder Point will be
maintained.
7. Repeat the process for all items to be
updated.
8. Once complete logout of Fred Mobility and
return your device to the charger
NOTE: The figure entered will overwrite
the Current Restock Level. If no figure is
entered, the Current Restock Level will
be maintained.
Printing Labels
To print labels:
1. Ensure that Print Labels is selected in the
[Options] menu. [change screenshot to
show only one ticked option]
2. To finish, tap [Save].
SCAN
18
Page 23
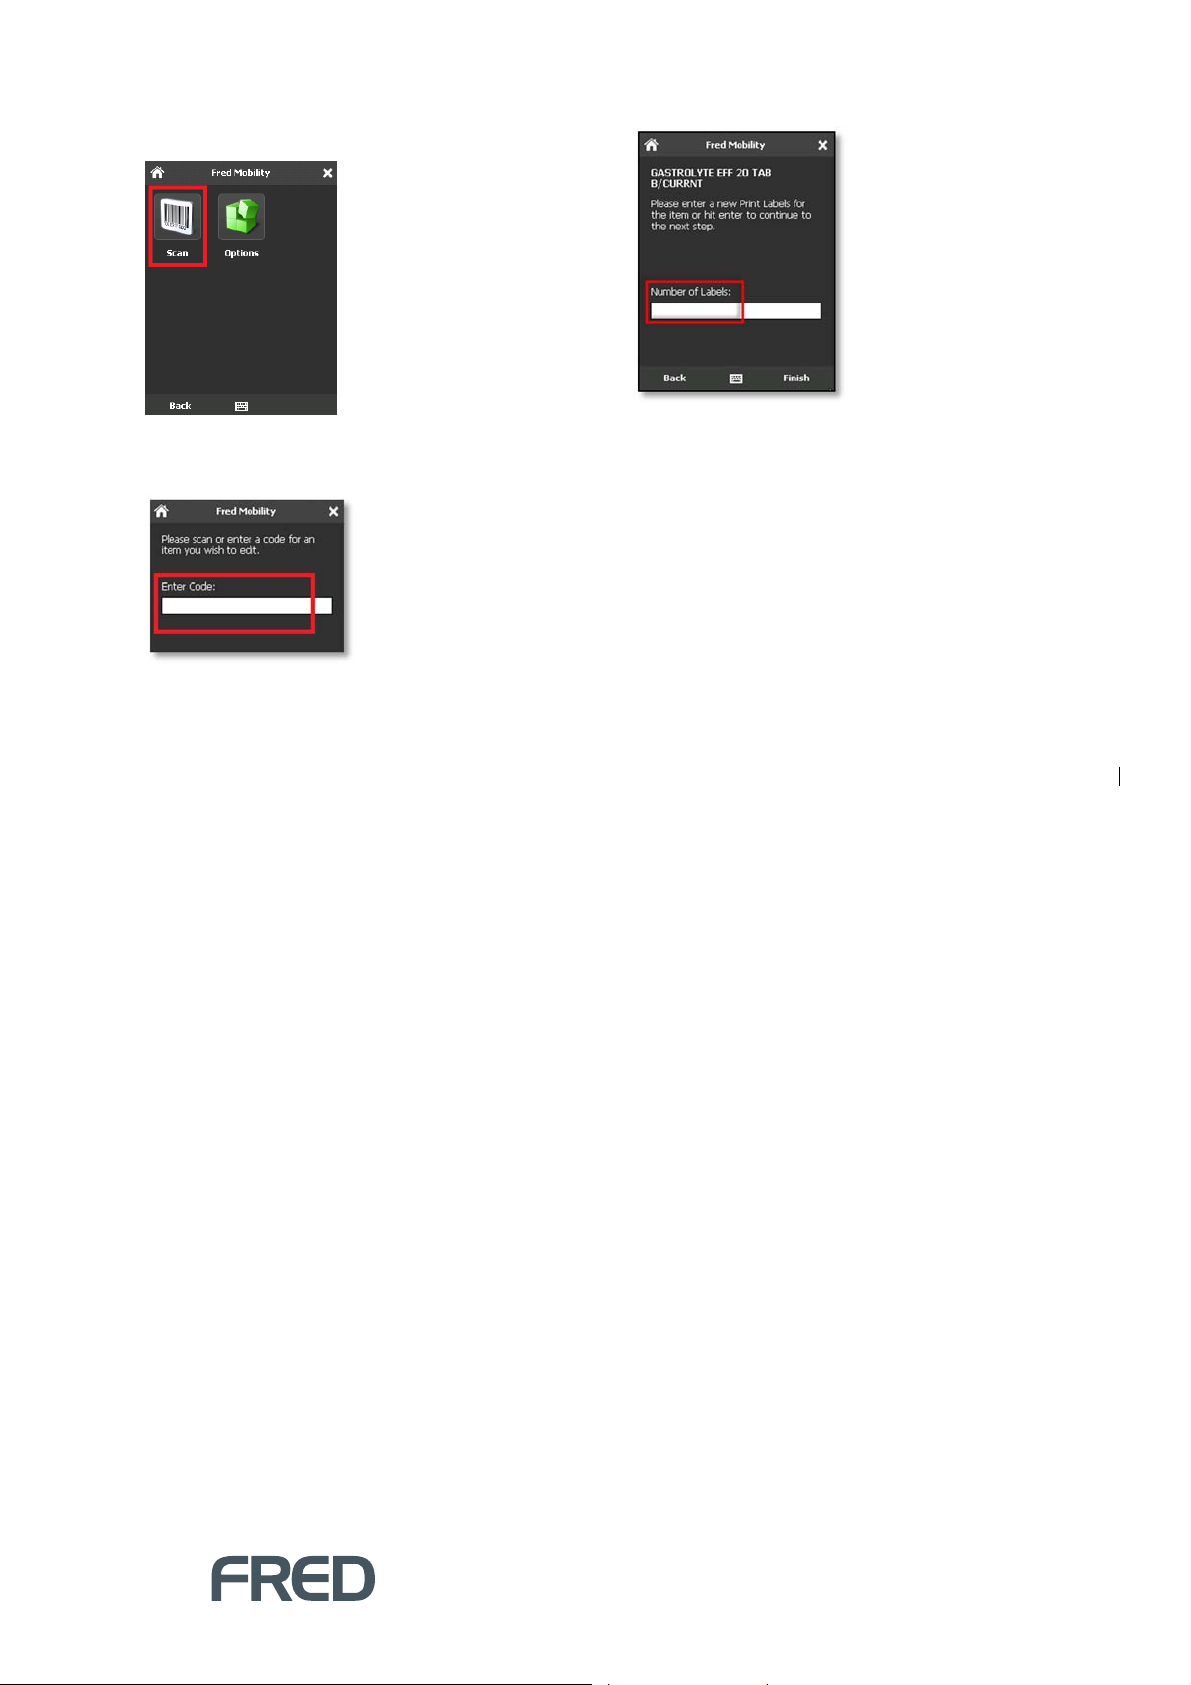
3. Tap [Scan].
4. In the Search screen, scan the item or enter
a code for an item you wish to scan.
5. Enter the Number of Labels you want to
print for this item and then press the [E
NTER
key on your Fred Mobility device.
6. Tap [Finish] to return to the Search screen
and scan another item.
7. Repeat the process for all items you wish to
print labels for.
8. Once complete logout of Fred Mobility and
return your device to the charger.
]
GENERAL OPTIONS
19
Page 24
SECTION 4
STOCKTAKING
STOCKTAKE OPTIONS
The Stocktaking option on your Fred Mobility device allows you to perform either a:
Rolling Stocktake This option allows you to perform an ad-hoc stocktake. This feature is not
recommended if you wish to perform Stocktake Reporting.
Batch Stocktake. This option allows for detailed reporting. If you wish to perform Stocktake
reporting after your stocktake, use the Batch stocktake feature as it provides the most detailed
analysis and reporting via Fred NUHQ.
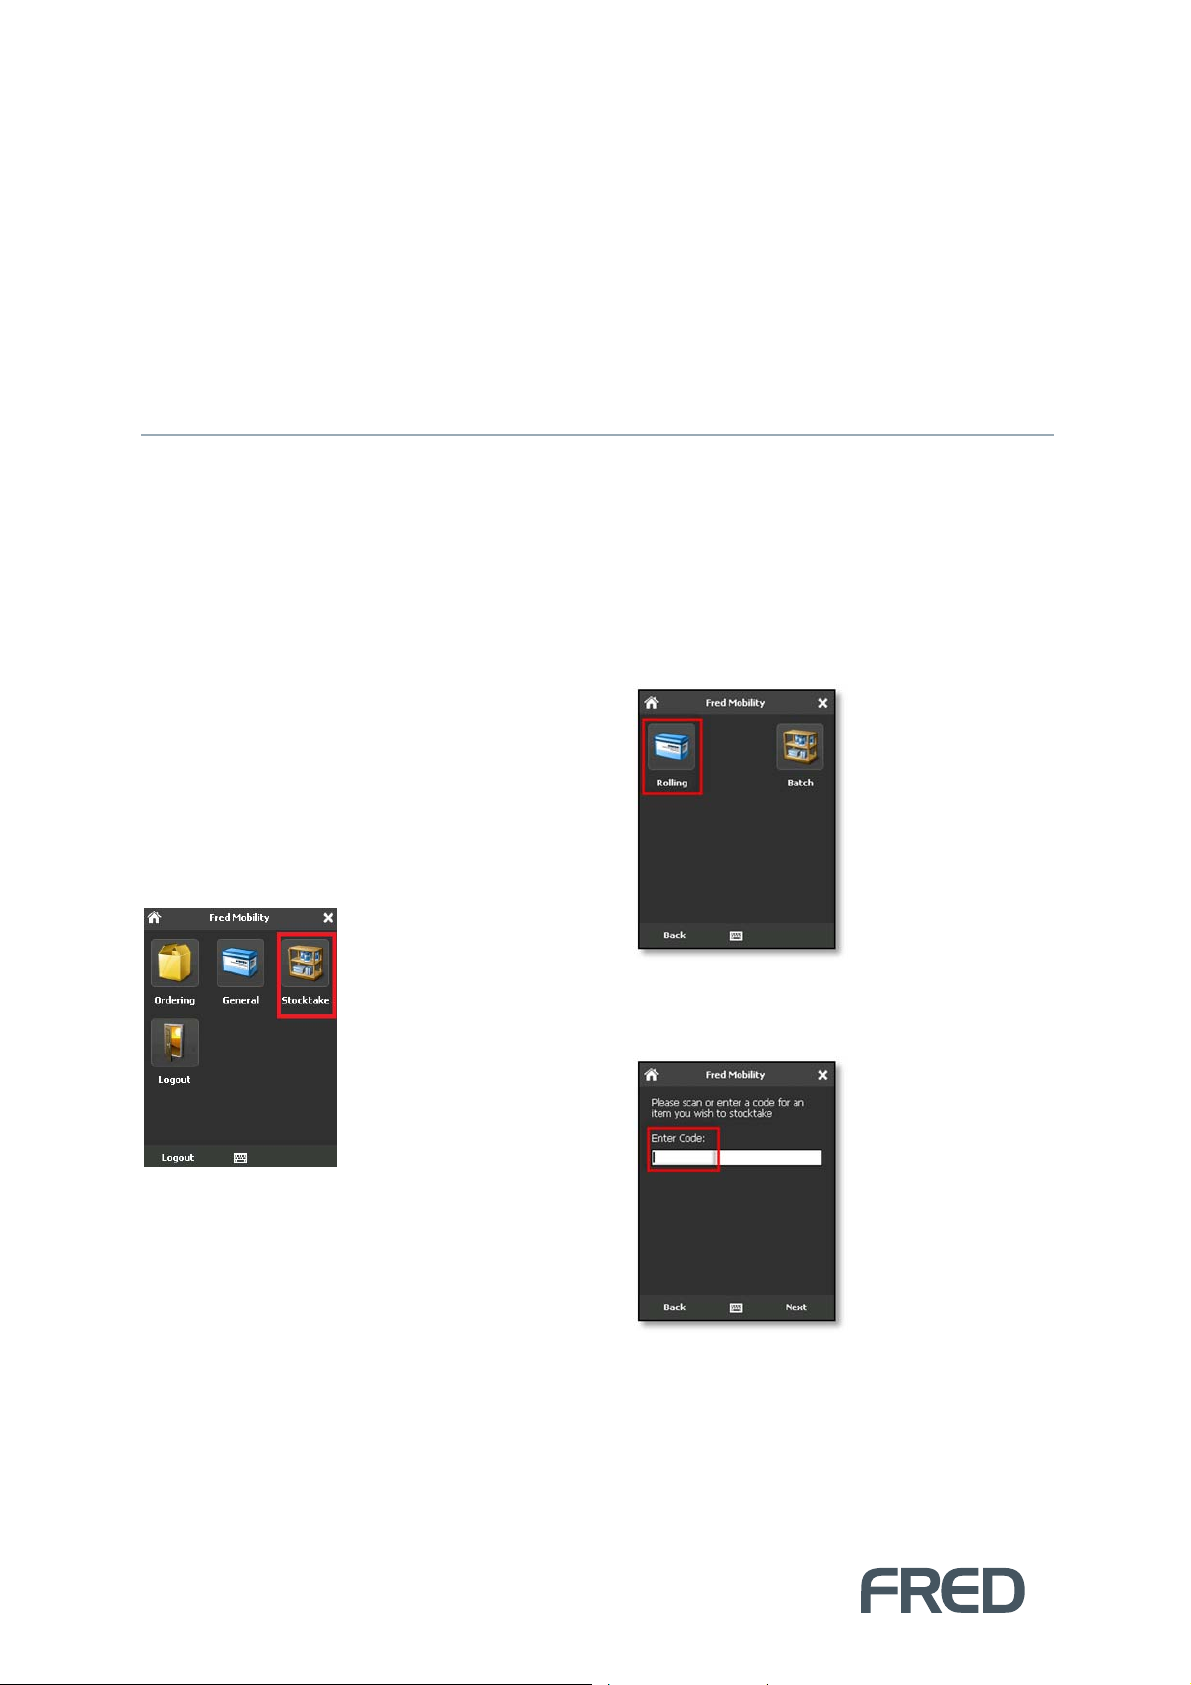
10. Tap [Rolling].
Using Rolling Stocktake
To use Rolling Stocktake:
1. Login to Fred Mobility using your Fred
POS username and password.
The Fred Mobility main screen appears.
9. Tap [Stocktake].
The Item Search screen is displayed.
11. Scan or enter an Item Code (or Alias).
STOCKTAKE OPTIONS
20
Page 25
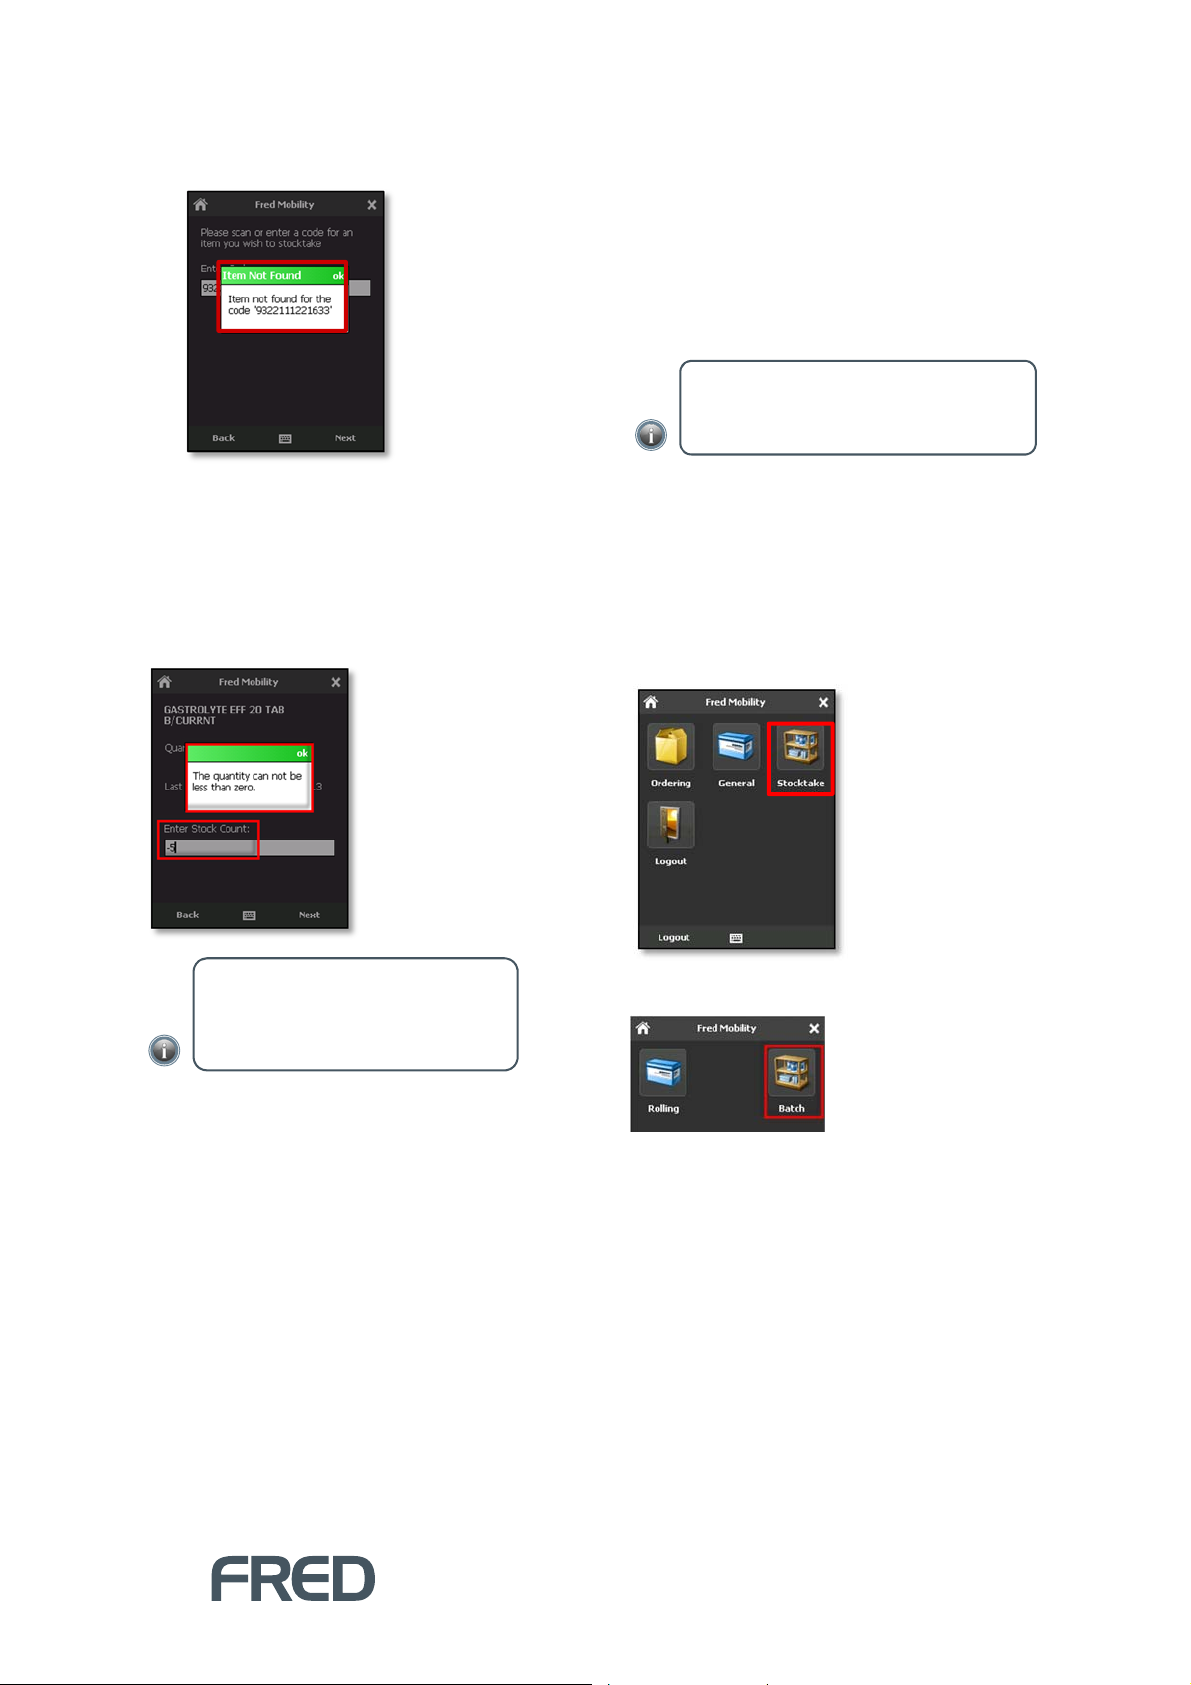
If no suitable match is found, Fred Mobility
displays an Error message.
If a suitable match is found, the Item
information at the last stocktake is
displayed.
If multiple items are found, Fred Mobility
selects the first found item.
12. Enter a new Stock Count.
Performing a Batch
Stocktake
The Batch Stocktake feature is recommended if
you wish to perform Stocktake Reporting. It
provides the most detailed analysis and reporting
via Fred NUHQ.
NOTE: The following procedure presumes
you have already created the Batch within
Store Operations Manager.
To perform a Batch Stocktake:
1. Login to Fred Mobility using your Store
Operations or Fred POS username and
password.
The Fred Mobility main screen appears.
2. Tap [Stocktake].
NOTE: Stock Count accepts decimal
values. Negative values are not allowed.
The new value overwites the previous
number.
13. Tap [Next] to update the Stock Count for
the Rolling stocktake.
14. Repeat the process for all items to be
updated.
15. Once complete logout of Fred Mobility and
return your device to the charger.
3. In the Stocktake screen, tap [Batch].
The Stocktake Selection menu displays a
list stocktakes with an Open status.
STOCKTAKING
21
Page 26
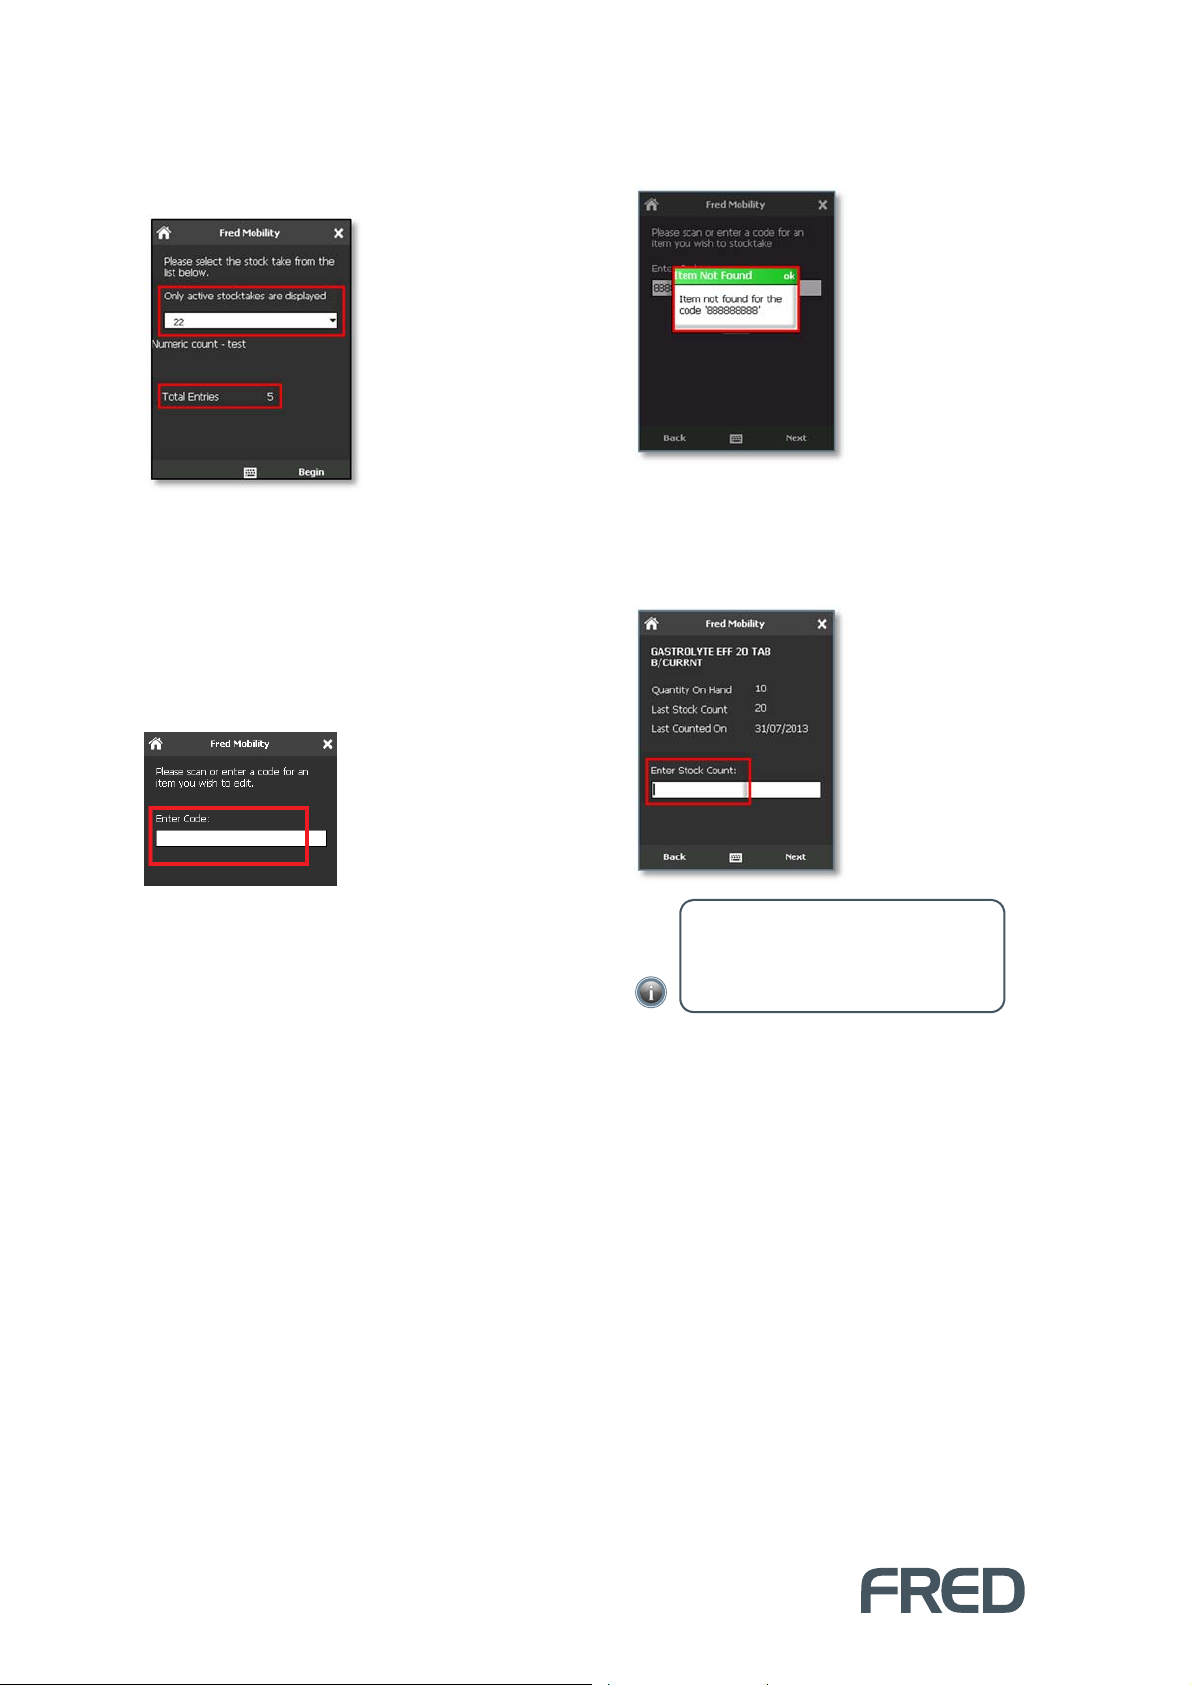
4. Tap the drop-down menu and select the
Stocktake Batch previously created in the
Store Operations Manager.
Each stockake entry is displayed with a tally
of entries.
5. Once you have located the desired
stocktake, tap [Begin].
The Search screen is displayed.
6. In the Search screen, scan the item or enter
a code for an item you wish to scan.
If the Code cannot be found, an Error
message is displayed.
If the code is found, the items details are
displayed.
7. Enter the Stock Count and then press
[Enter] or [Next] to capture the count.
NOTE: Stock Count accepts decimal
values. Negative values are allowed and
the new value is appended to the
previous number.
8. Repeat the process for all items to be
updated.
9. Once complete logout of Fred Mobility and
return your device to the charger.
Quantities are updated when the batch is
closed in the Store Operations Manager.
STOCKTAKE OPTIONS
22
Page 27
SECTION 5
TROUBLESHOOTING FRED
MOBILITY
This section provides troubleshooting information for Fred Mobility users who are having issues with the
handheld device.
DEVICE TROUBLESHOOTING
STEP 1: Reset Fred Mobility
If your Fred Mobility device is “
responding, try the following:
A Warm Boot terminates an unresponsive
application and clears the working RAM,
preserving both the file system and the registry
hanging
” or not
STEP 2: Check the wireless
network connection
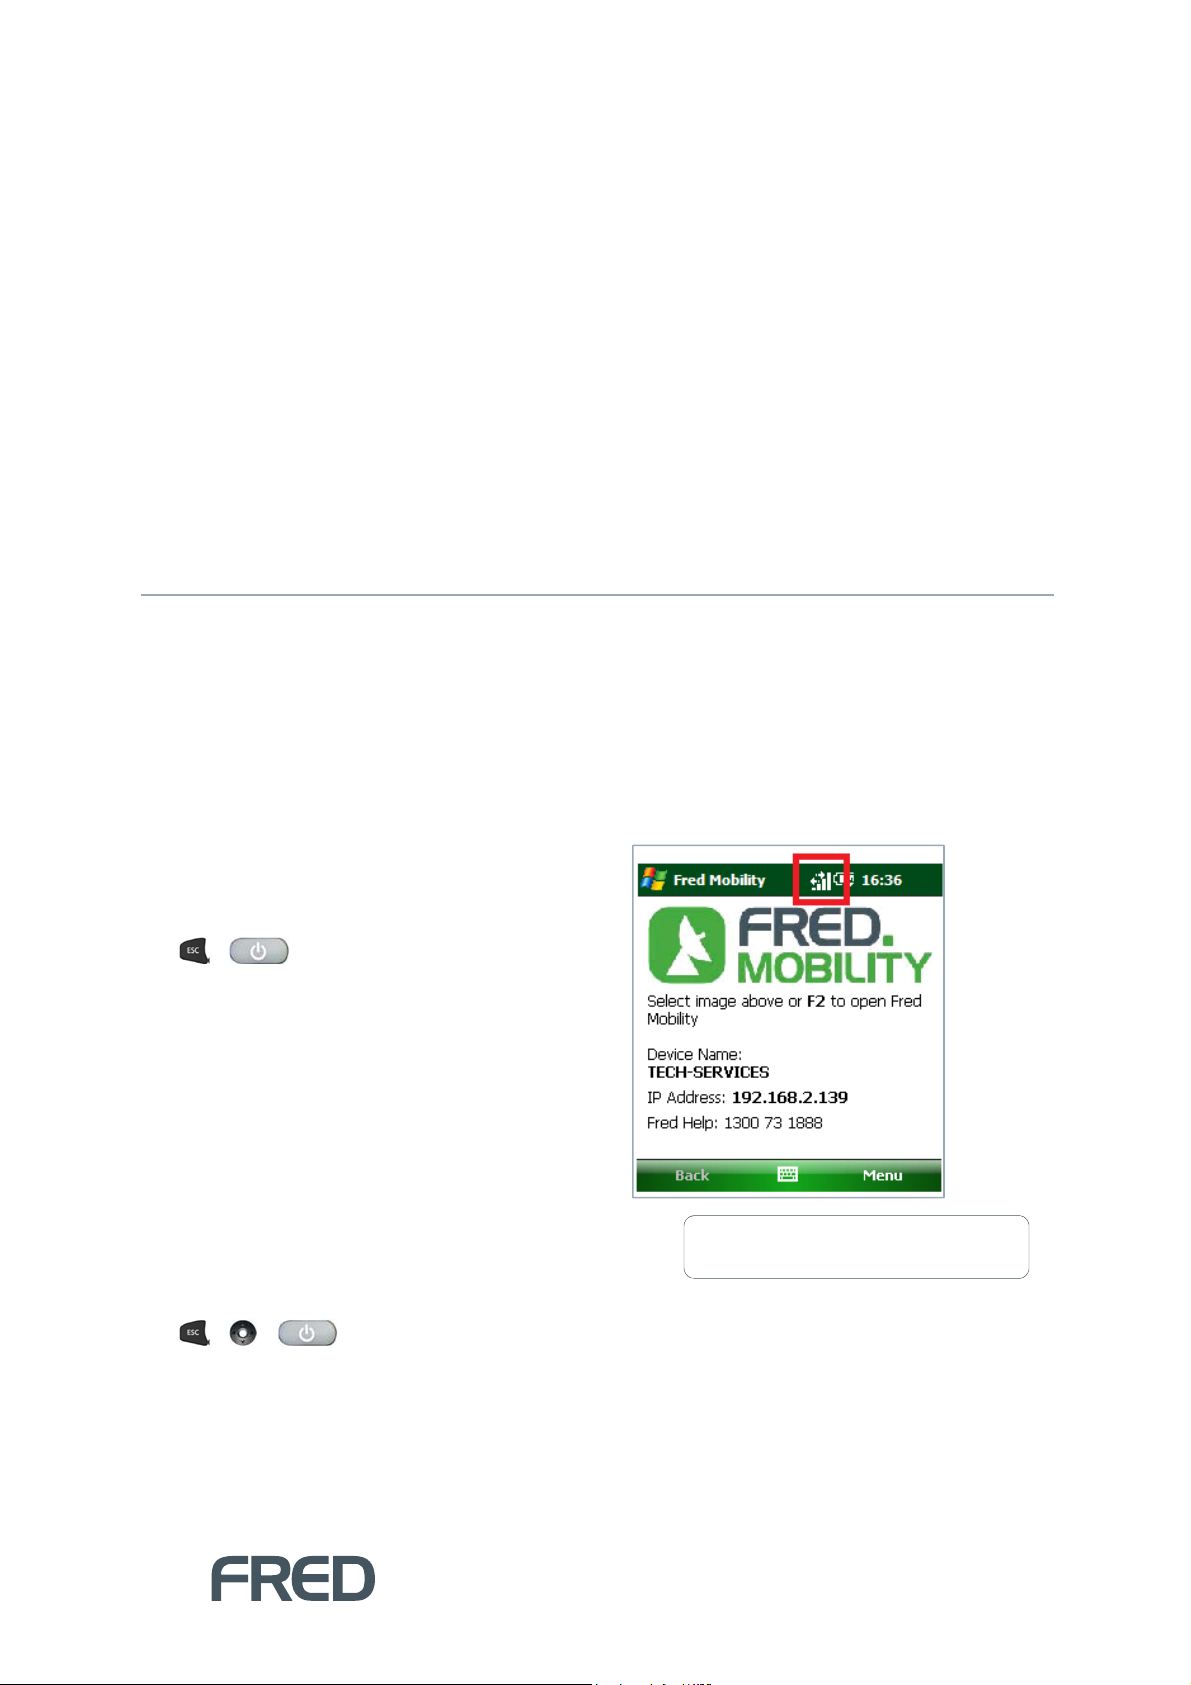
1. From the Fred Mobility welcome screen,
confirm the wireless signal strength (it should
appear as shown in the following image).
To perform a warm boot:
1. On your Fred Mobility device, press the
+ keys simultaneously. All
applications on Memor (including NUHQ) will
close and the device resets.
2. Check if your Fred Mobility device is now
working as expected. If your device is still
not working, Please proceed to Cold Boot
A Cold Boot forces all applications to close and
clears working RAM and files not resident on the
persistent flash memory.
To perform a cold boot:
1. On your Fred Mobility device, press the
+ + keys simultaneously. All
applications on Memor (including NUHQ)
forcibly close and the device resets.
2. Check if your Fred Mobility device is now
working as expected. If your device is still
Step 2
not working, please proceed to
.
If there is a strong signal indicator, please
contact Fred Help on 1300 731 888
TROUBLESHOOTING FRED MOBILITY
23
Page 28
p
STEP 3: Restart the NU
Mobile Service
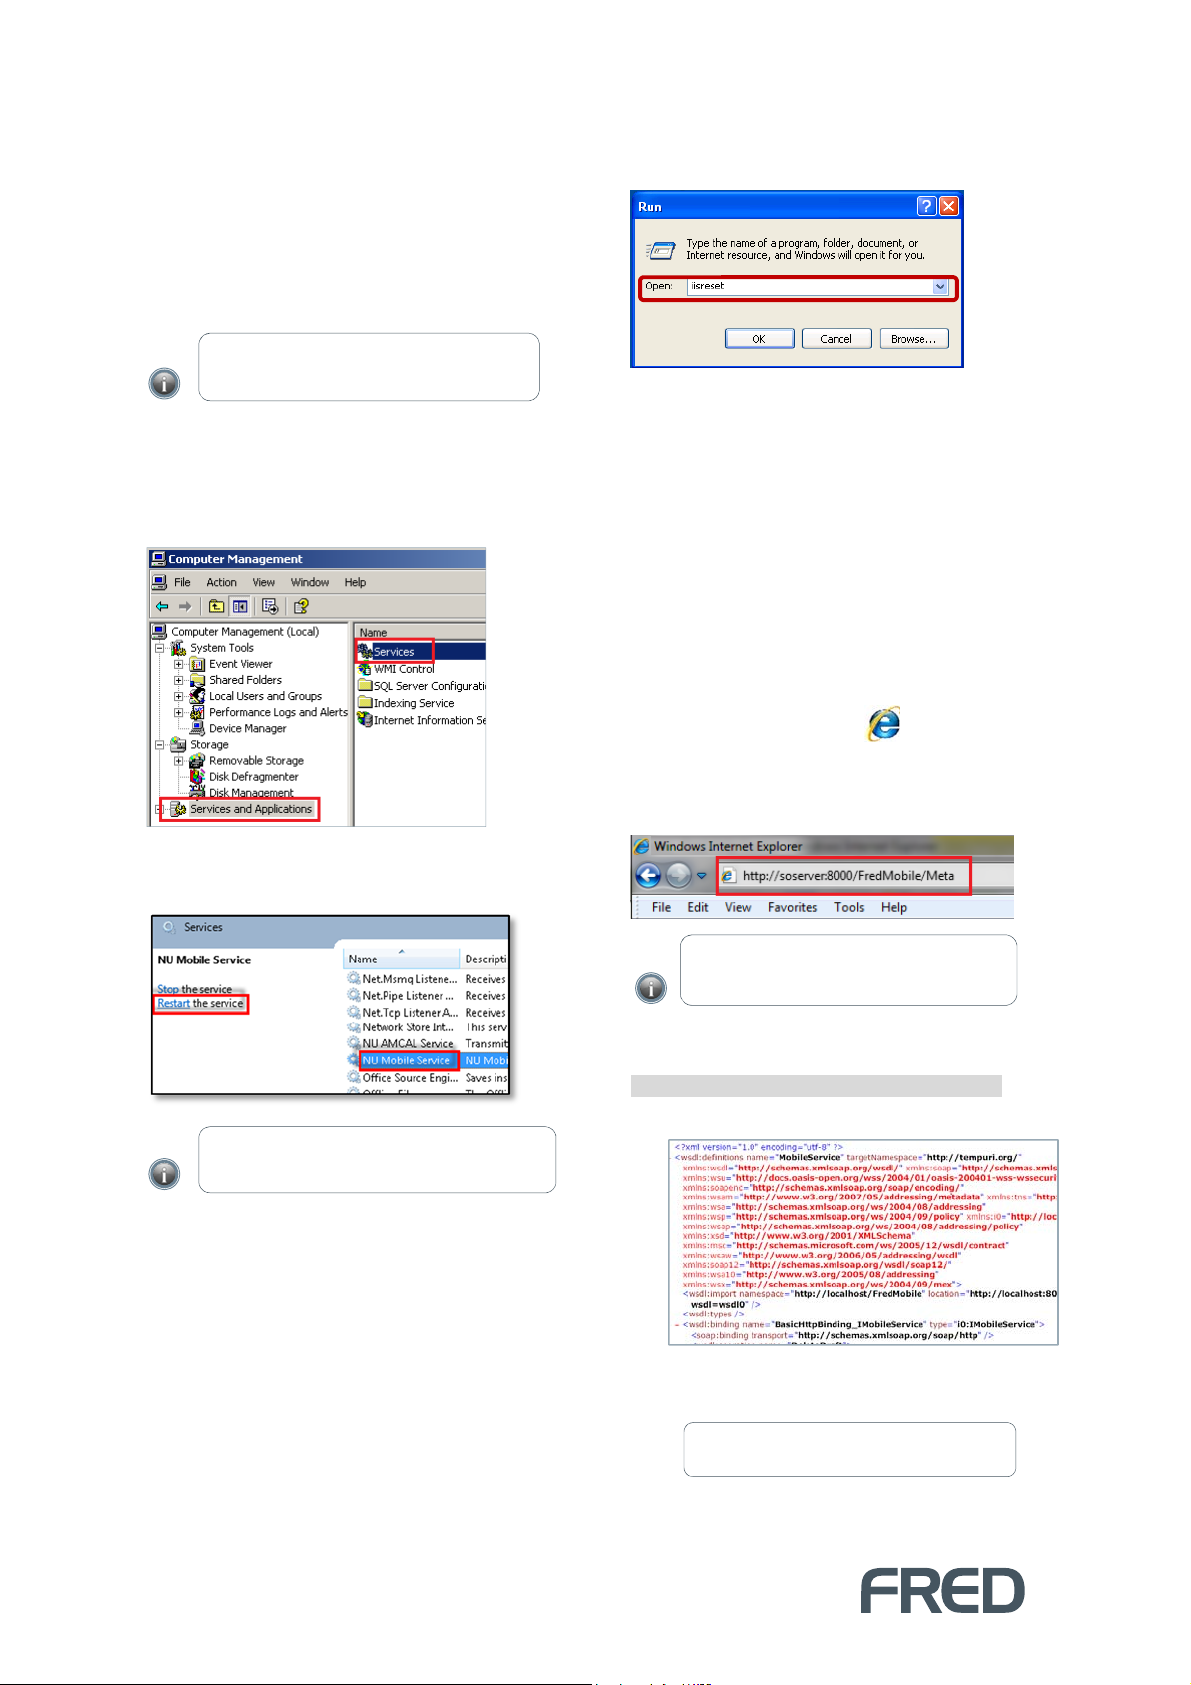
To Restart the NU Mobile Service:
1. Go to your server computer.
6. In the Run dialog, enter ‘iisreset’ and then
click [OK].
If you have an SBS (Small Business Server) y ou
will need to call Fred Help on 1300 73 1888.
2. Right-click on My Computer and then select
Manage.
3. Click Services and Applications, and then
double-click Services.
4. Select NU Mobile Service and then select
Restart.
A black window appears to indicate services
are being restarted.
7. Wait for this window to close.
8. If your device is still not working, please
proceed to
Step 4
(below).
STEP 4: Check Fred Mobility
Connection
1. Go to a store computer.
2.
Open Internet Explorer and in the
Address bar, enter and go to the following
web address:
name>:8000/FredMobile/Meta
http://<server
NOTE: Wait until the “Status” column displays
“Started”.
5. From the desktop, click Start and select
“Run...”.
The Run dialog appears.
NOTE: Replace <server name> with your
server name (e.g. fileserver or SOServer).
If the connection works, your browser will display
an XML page which begins with the following
<?xml version="1.0" encoding="utf-8" ?>
(shown below).
Check if your Fred Mobility device is now
working as expected.
If your device is still not working, contact Fred
Hel
on 1300 731 888.
DEVICE TROUBLESHOOTING
24
Page 29

ITEMS NOT SCANNING
Problems with scanning maybe caused by some of the following issues:
The item does not have a barcode to scan.
The item is listed in an invoice to be received but now has new Alias/Barcode.
There is no existing item stockcard in NUHQ.
(i.e. item is new and was ordered over the phone).
The item was not found.
Item does not have a barcode to scan
To print a label:
1. Login to NUHQ.
2. Search for the item via Inventory > Items.
3. Open the Item Stockcard.
4. Print a Label via the Item Stockcard toolbar.
Item is listed in an invoice to be
received but now has new
Alias/Barcode
To add an Alias/Barcode:
1. Login to NUHQ.
2. Search for the item via Inventory > Items.
3. Open the Item Stockcard.
4. Add the new Alias (barcode) to the item
stockcard.
5. Click [Save and Close].
No existing item stockcard in NUHQ
To create a stockcard:
1. Login to NUHQ.
2. Create an Item Stockcard from:
Inventory > Create Item Wizard
-or-
Ordering
Wrong item has been delivered in the
order
N/A – based on your store procedure.
Item was not found
Some barcodes may not read correctly due to
zeros at the start or end of the barcode.
To search for items:
In NUHQ, go to Inventory and then search items
based on item description.
If item is found, open the
and add the new
- or -
If the item is not found, create a new item
via Create Item Wizard.
TIP! Make sure you are searching "All" items
not only active items.
item barcode
item stockcard
.
TROUBLESHOOTING FRED MOBILITY
25
Page 30
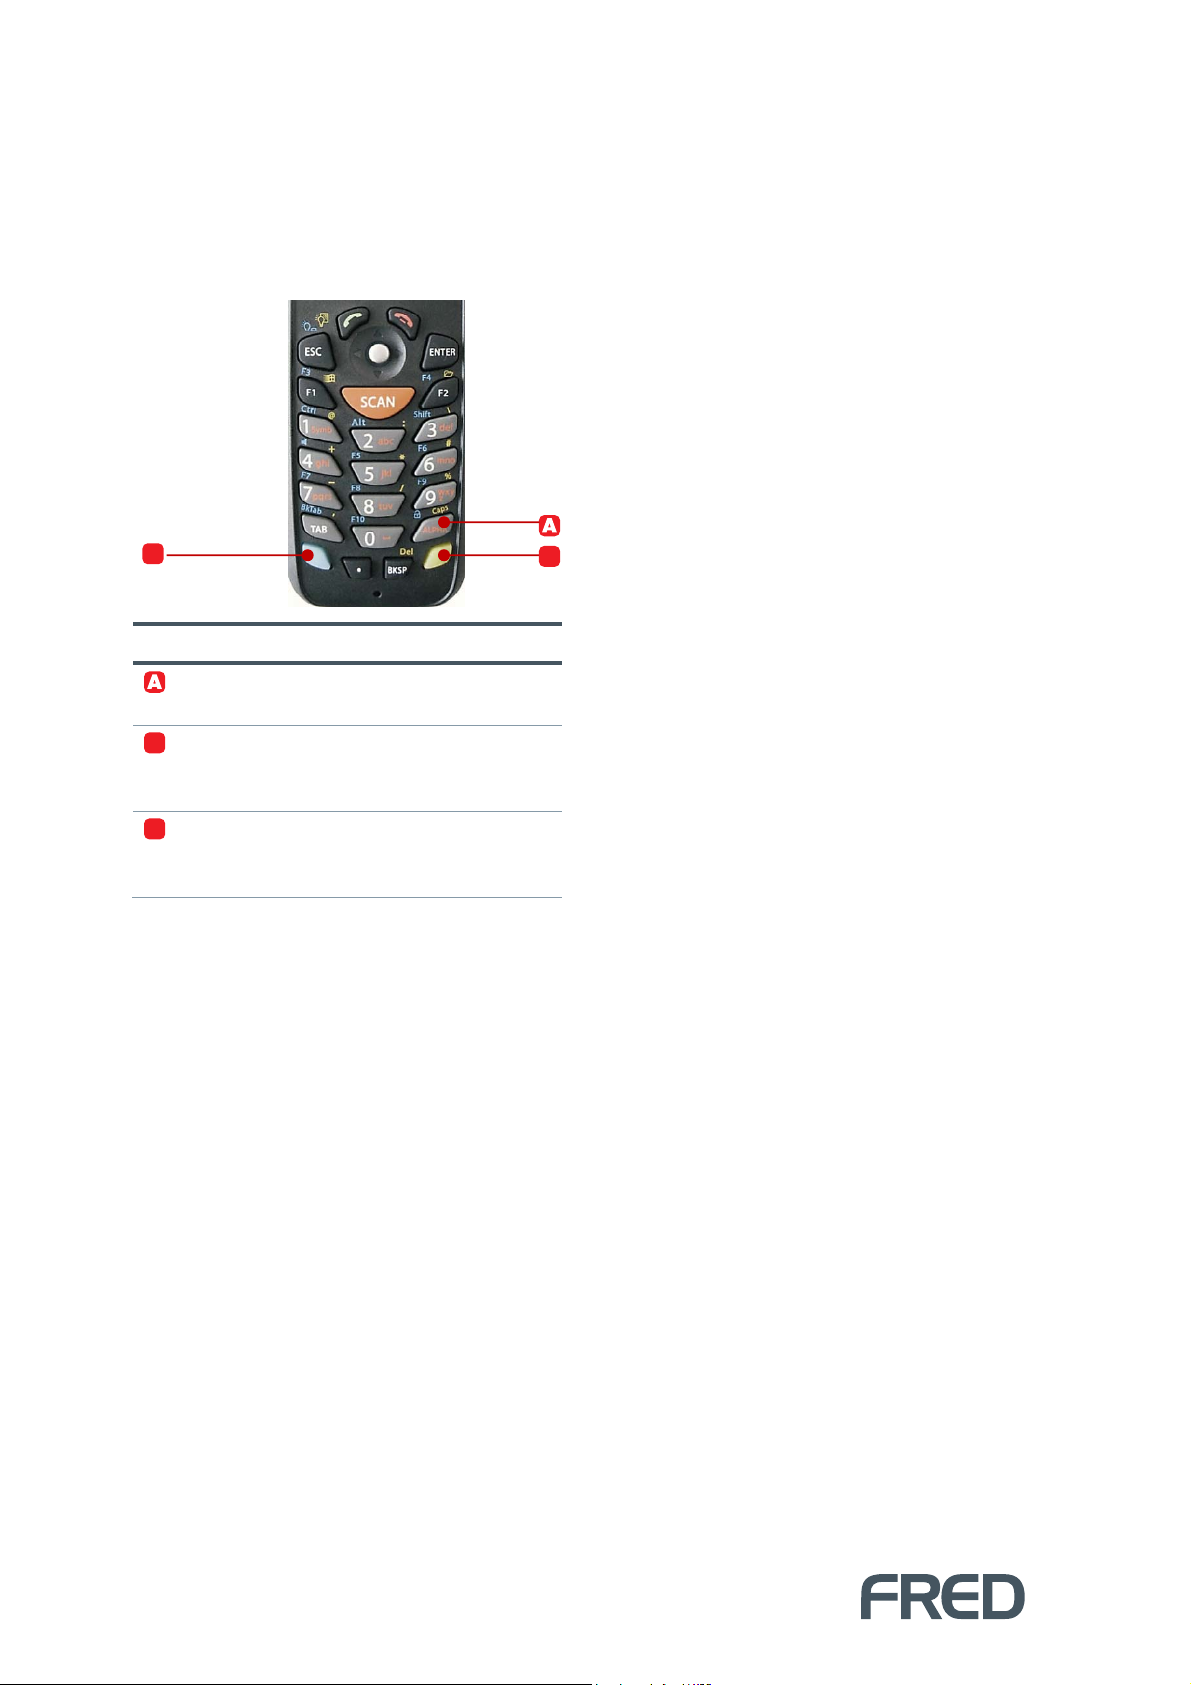
Letters typing instead of numbers
To fix this issue:
Press either the [Alpha] key, Yellow function key or Blue Modifier to toggle “off” the setting and go back
to numbers.
C
Key Description
Alpha key
Alternate between numeric
and alphanumeric characters.
B
Yellow
function key
Press before a standard key
to enable the character
printed yellow above the key.
C
Blue
modifier
Press before a standard key
to enable the character
printed blue above the key.
B
ITEMS NOT SCANNING
26
Page 31
SECTION 6
UPDATING FRED MOBILITY
UPDATING FRED MOBILITY
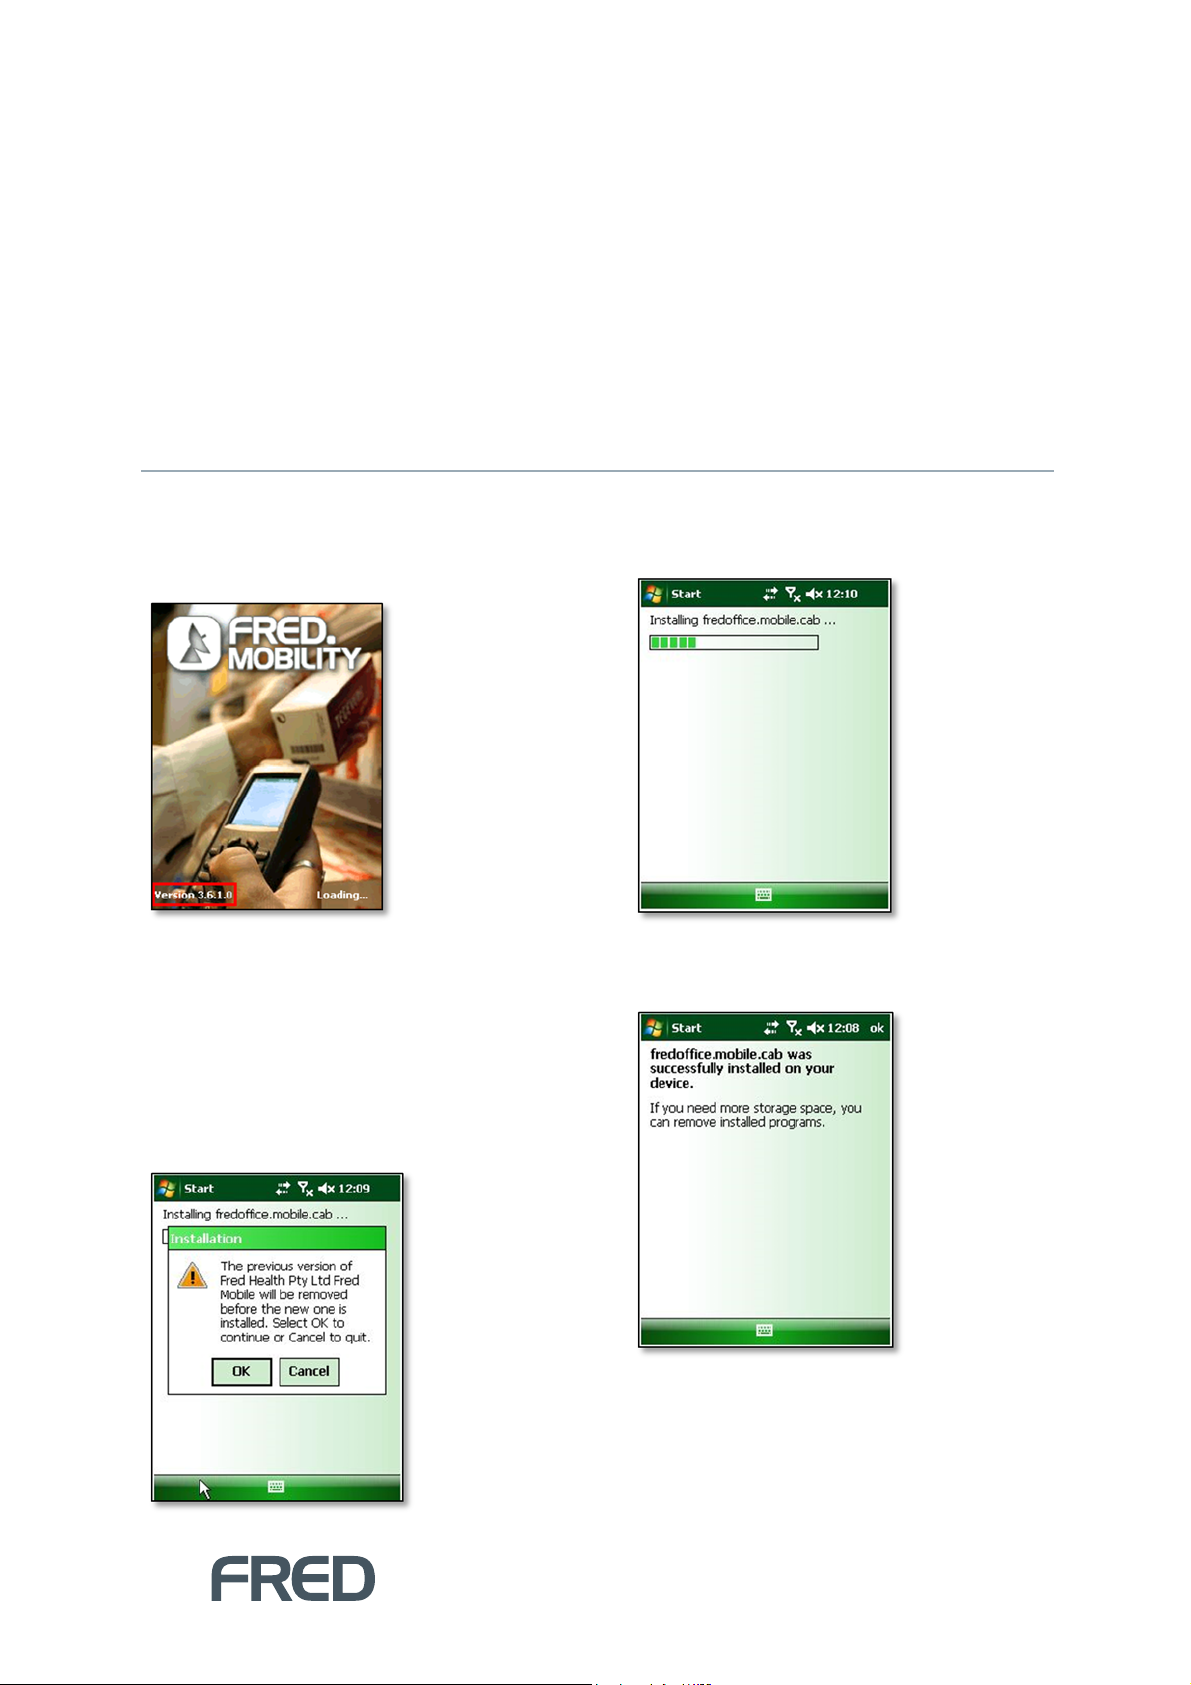
Before troubleshooting Fred Mobility, ensure that
the current Fred Mobility software version
matches the current software version of NUHQ.
Fred Mobility will begin installing the new
software.
Fred Mobility updates are released generally at
the same time as NUHQ updates become
available. When a Fred Mobility update is
available, the device prompts you to update and
install the latest software version.
To update the Fred Mobility software version:
Click [OK] at the Installation prompt.
Once complete, Fred Mobility displays a
confirmation message.
UPDATING FRED MOBILITY
27
Page 32

Page left intentionally blank
Page 33

1300 731 888 (Local Call Cost)
Fred Help Centre: http://help.fred.com.au
Email: [email protected]
8.30am - 9.00pm (EST) Mon – Fri
8.30am - 5.00pm (EST) Sat, Sun & Public Holidays
Fred IT Group Pty Ltd
20 Trenerry Crescent Abbotsford VIC 3067 T 03 9418 1800 F 1300 730 888
www.fred.com.au
COPYRIGHT © 2012 FRED IT GROUP
MECHANICAL, INCLUDING PHOTOCOPYING, RECORDING, OR BY INFORMATION STORAGE AND RETRIEVAL SYSTEM, WITHOUT THE PRIOR WRITTEN PERMISSION OF FRED IT GROUP
PTY LTD
PRINTED IN AUSTRALIA. NO PART OF THIS PUBLICATION MAY BE REPRODUCED OR UTILISED IN ANY FORM OR BY ANY MEANS, ELECTRONIC OR
PTY LTD
 Loading...