

Page 1

A s s e m b l y H I N T S
● Pay a bike shop to do it for you !
● If you’re not a great handyperson, get a friend who is to help you.
● Read and Re Read the instructions before you start.
● Lay everything out and make sure you have everything you need.
● If you get stuck, call us on 07 5539 5803.
ASSEMBLY
INSTRUCTIONS
Page 2

Page 2
Table of Contents
Introduction Page 3
Unpacking Instructions Page 4
Unpacking Instructions & Tools Needed Page 5
Fitting Derailleur and Rear wheels Page 6
Fitting Rear Axle to Frame Page 7
Fitting Front Wheel and Handle Bars Page 8
Fitting Seat and Chain Page 9
Fitting Chain and Gear Cable Page10
Routing and Connecting Gear Cable Page11
Fitting Chainguard Pedals and Front Brake Cable Page12
Adjusting Front Brake and Installing Rear Brake Cable Page13
Adjusting Rear Brakes and Fitting Front Guard Page14
Mounting Rear Fenders Page15
Fitting Reflector, Bell and Wheel caps Page16
Installing Rear Basket and Removing Packing Stickers Page17
Fitting Cable Ends Page18
IMPORTANT Riding and Safety Hints Page19
Warranty Information Page20
Page 3
Page 3
Congratulations on the purchase of
your Fraser Trike.
Your trike has been delivered to you approximately 60% to
70% assembled. Trikes are delivered this way as the freight
costs on assembled trikes is very expensive and it works out
much cheaper to send them this way and to have you or your
local bike shop complete the assembly.
Bike Shop assembly or Do it Yourself ?
B I K E S H O P
For the best and safest result, we
strongly recommend that you have
your local bike shop or someone
with mechanical experience put the
trike together for you. Purely from a
safety perspective , it is imperative
that everything is correctly assembled, aligned and tightened.
S E L F A S S E MB L Y
This trike has been designed to be
safe and stable, but only if it is assembled correctly. Please follow all instructions carefully and if you are
unsure of any particular part of the
assembly—
CALL US ON 07 5539 5803
Page 4
Page 4
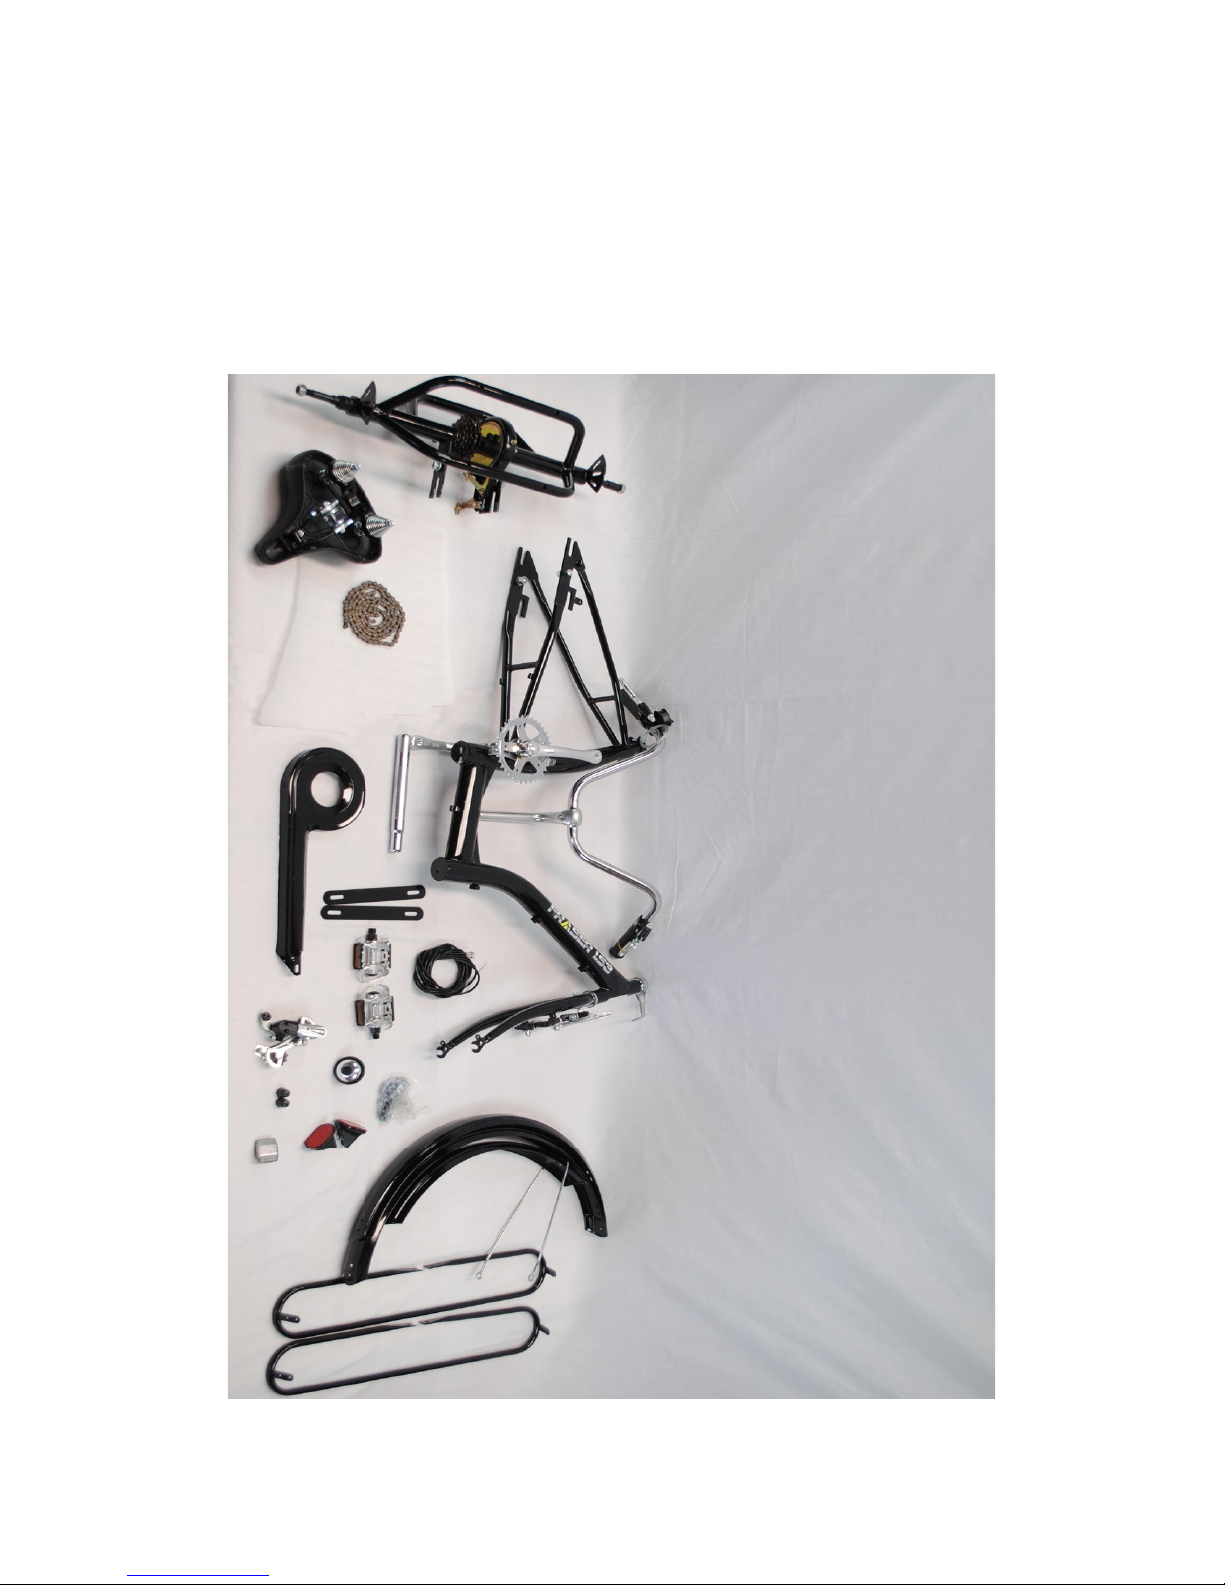
MISSING PARTS
If for any reason a part is missing, please call us on 07 5539 5803 and we will
express post one to you immediately.
1
2
3
4
5
6
7
8
9
10
1. Rear Axle
2. Seat
3. Chain
4. Frame & Forks
5. Handle Bars
6. Seat Post
7. Chain Guard
8. Basket Brackets
9. Pedals
10. Cables
11. Gears
12. Bell
13. Nuts & Bolts
14. Front Wheel Caps
15. Front Reflector
16. Rear Reflectors
17. 2 Rear 1 Front
Fenders
18. Fender Brackets
11
12
13
14
15
16
17
18
Box 1
Unpack both boxes and lay everything out.
CHECK THAT ALL PARTS ARE INCLUDED
BEFORE YOU START.
Page 5
Page 5
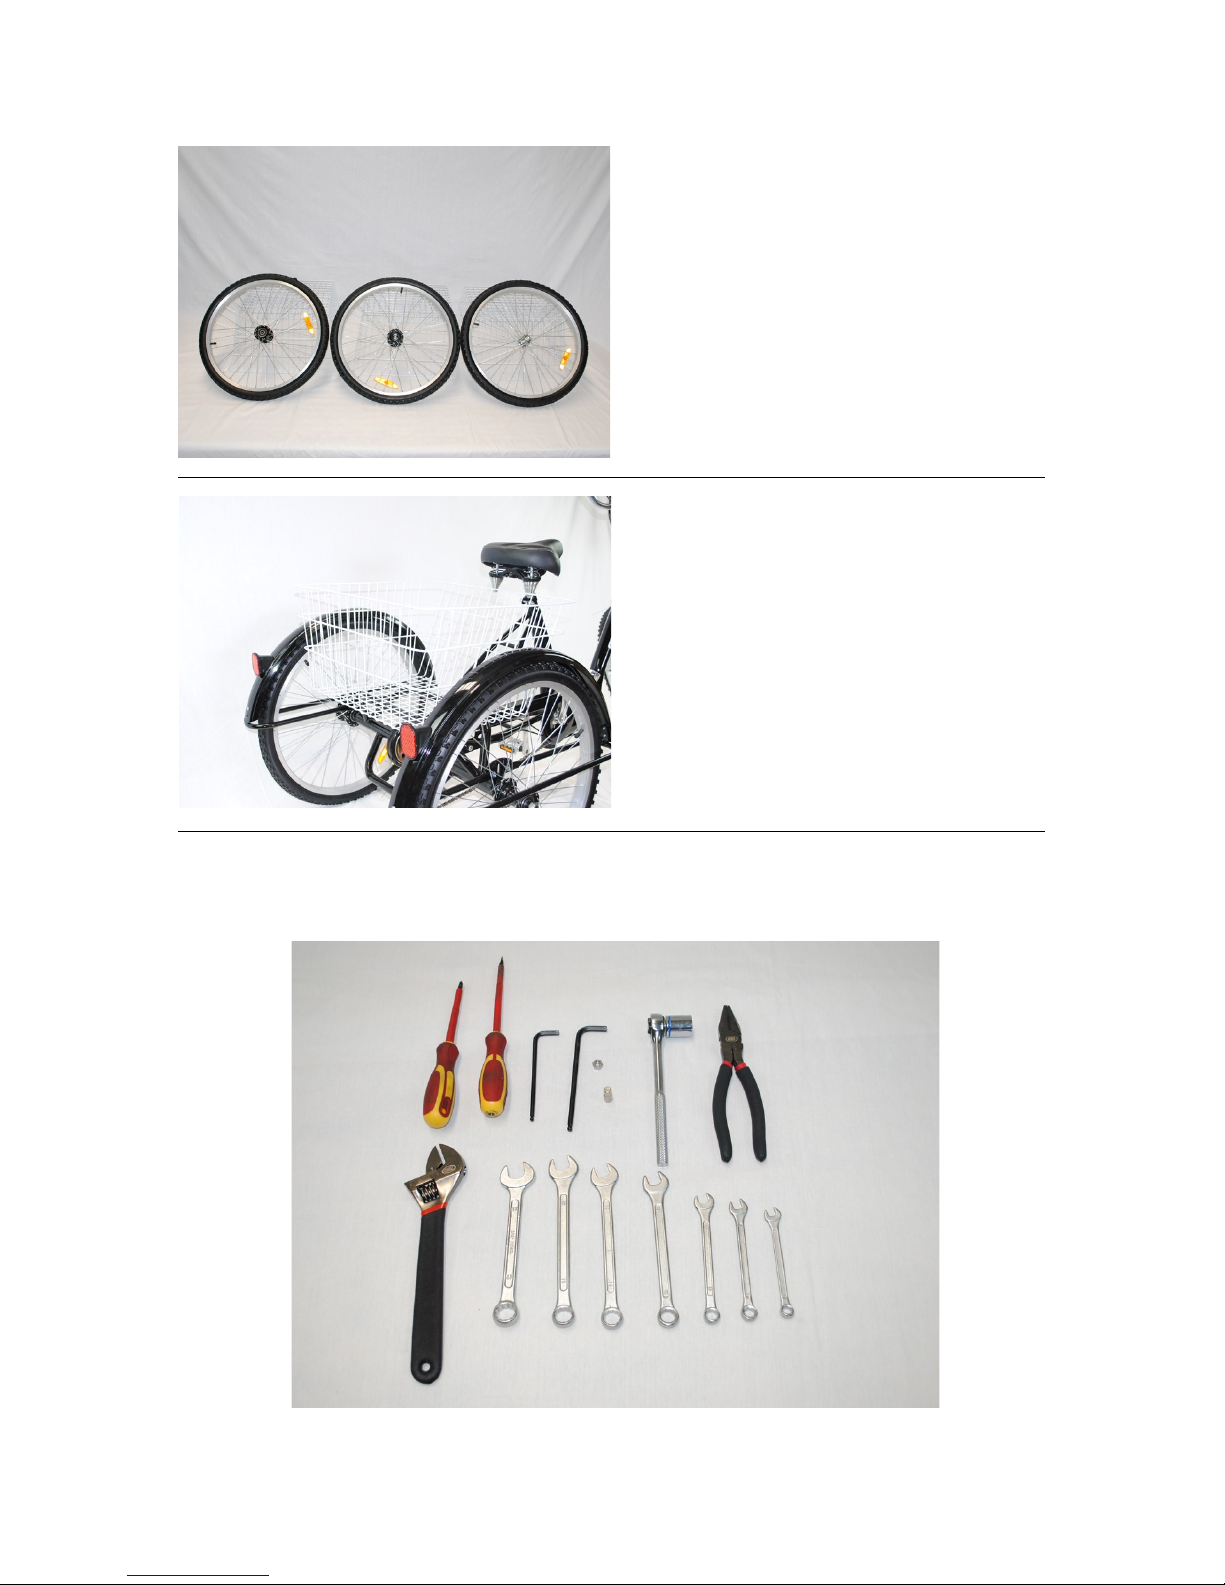
Box 1
Box 2
1. Rear Wire Basket
2. These Instructions
1. Front Wheel
2. Rear Drive Wheel
3. Rear Free Wheel
Tools Needed
Page 6
Page 6
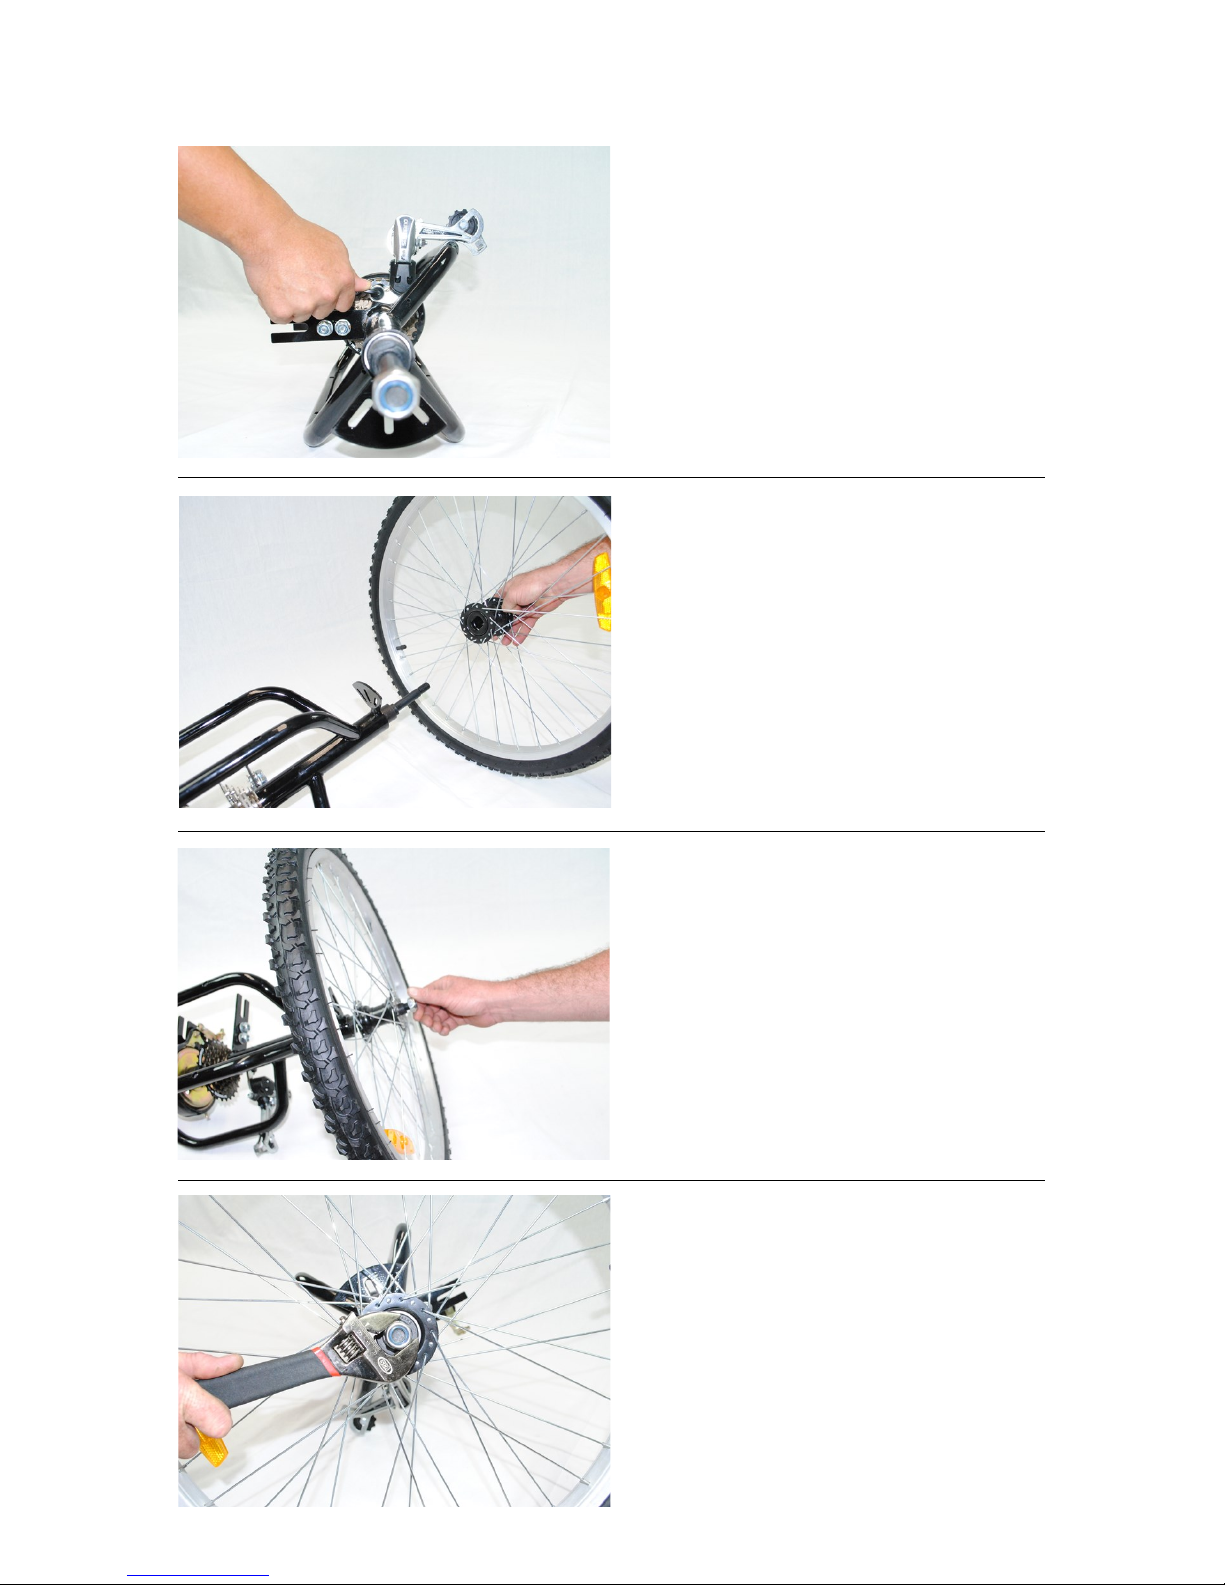
Assembly of rear end of trike
Attach the Shimano derailleur
(gear changer) to the rear axle
assembly using a size 5 Allen key.
Make sure the sprung sprocket
arm is opened so that it sits on the
outside of the crossbar as shown
in the picture.
Attach right side drive wheel
The right side drive wheel is different to the left one in that it has
a rectangular keyway. With the
keyway facing inwards side it
onto the axle.
Attach spacer and wheel nut
The small spacer goes on the outside of the wheel and then the nut.
Using the shifter tighten till firm.
Page 7

Page 7
Fitting the left wheel
The left wheel can go on either
way so it is important you find the
arrow on the tyres and make sure
the arrow is facing forward. The
large spacer goes on the inside of
the wheel and the small spacer
and nut go on the outside.
Using the shifter tighten till firm.
Attach Rear Axle to Trike Frame
Remove nuts and washers from
frame mounting bolts but leave
the bolts where they are.
Slide Axle and Frame together.
The rear axle arms slide inside
the main frame arms. They are
normally quite tight so this job
often requires 2 people. Once in
position check that rear axle is
square, replace nuts and washers
and tighten with a 17m spanner.
Page 8
Page 8
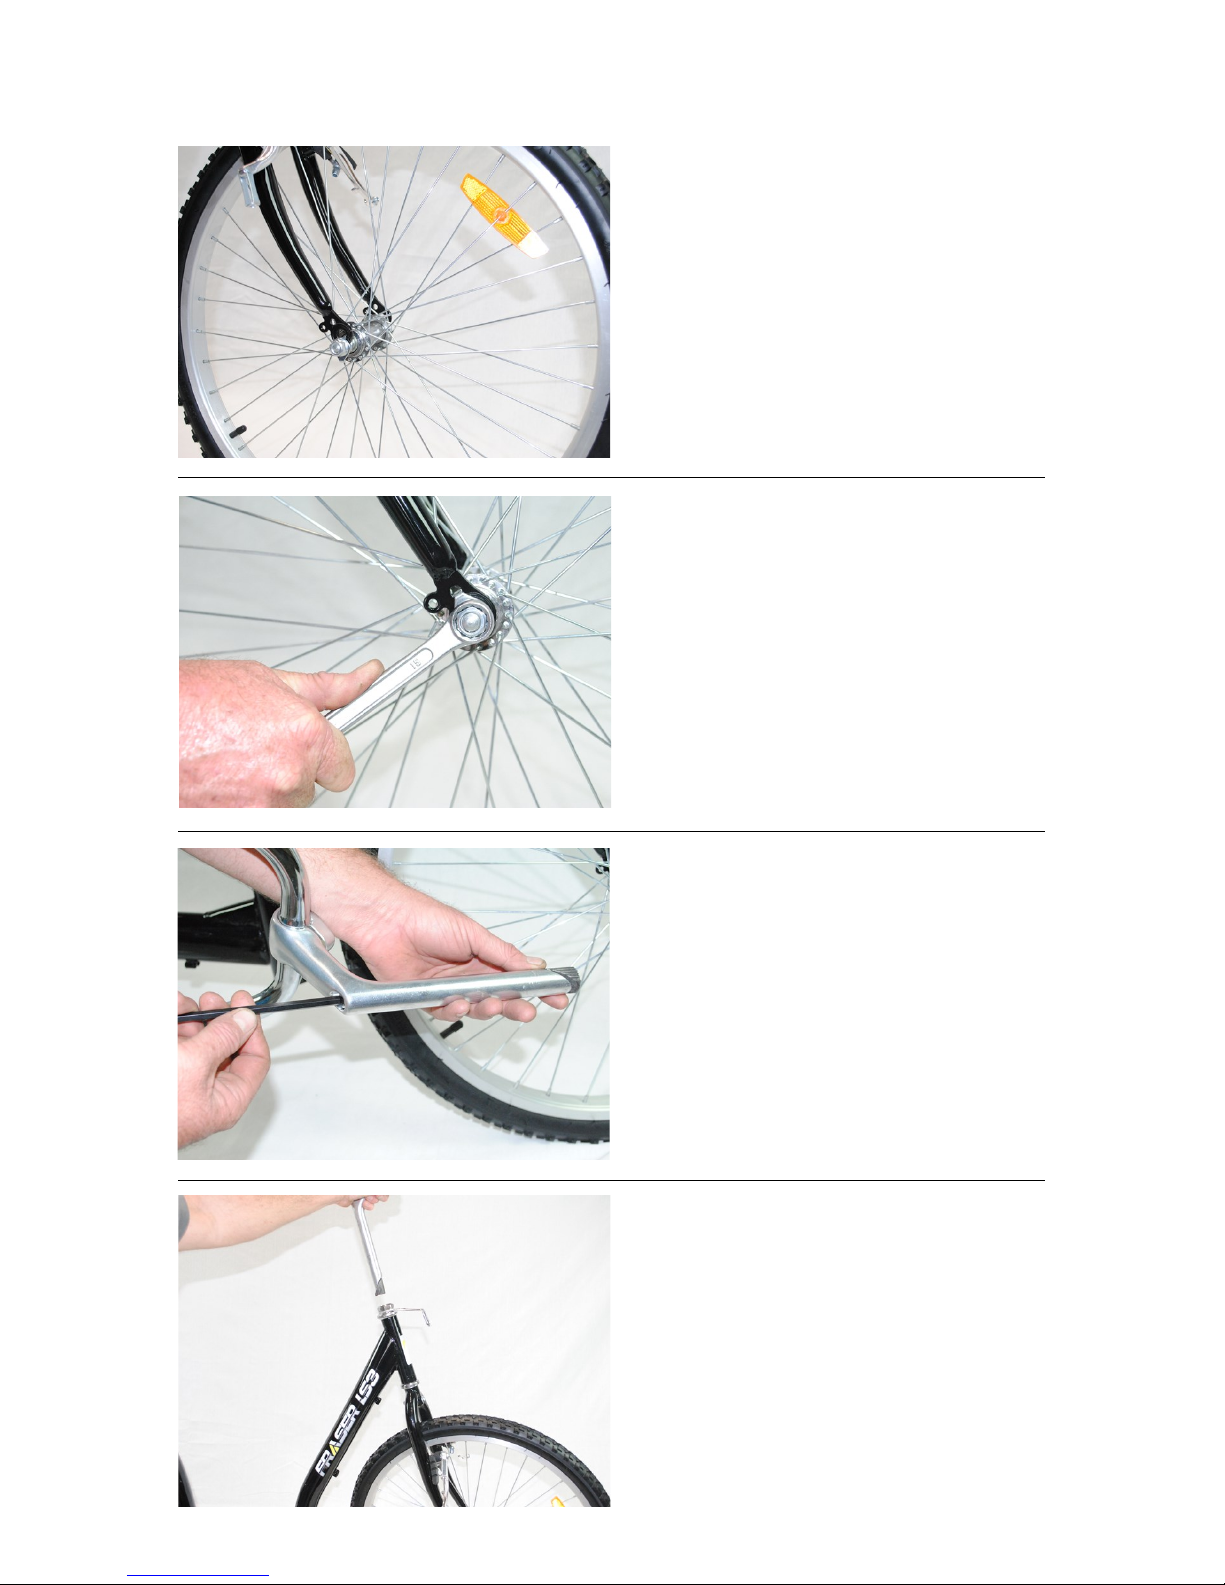
Mount front wheel.
The front wheel has directional
tyres so make sure the arrows
face forward. Using a 15mm
spanner loosen the nuts and slide
the front wheel into the frame
forks. Make sure the locking
washer’s end point is located in
the whole on the forks.
Tighten each of the locking nuts.
Fitting the Handle Bars
Using a size 6 Allen key, loosen
so that the grooved bottom locking nut is as loose as you can
make it without removing it.
Slide into Frame Neck
Slide the handle bar post into the
frame neck. This can sometimes
be a very tight fit and you may
need to force it or work it from
side to side.
Page 9
Page 9
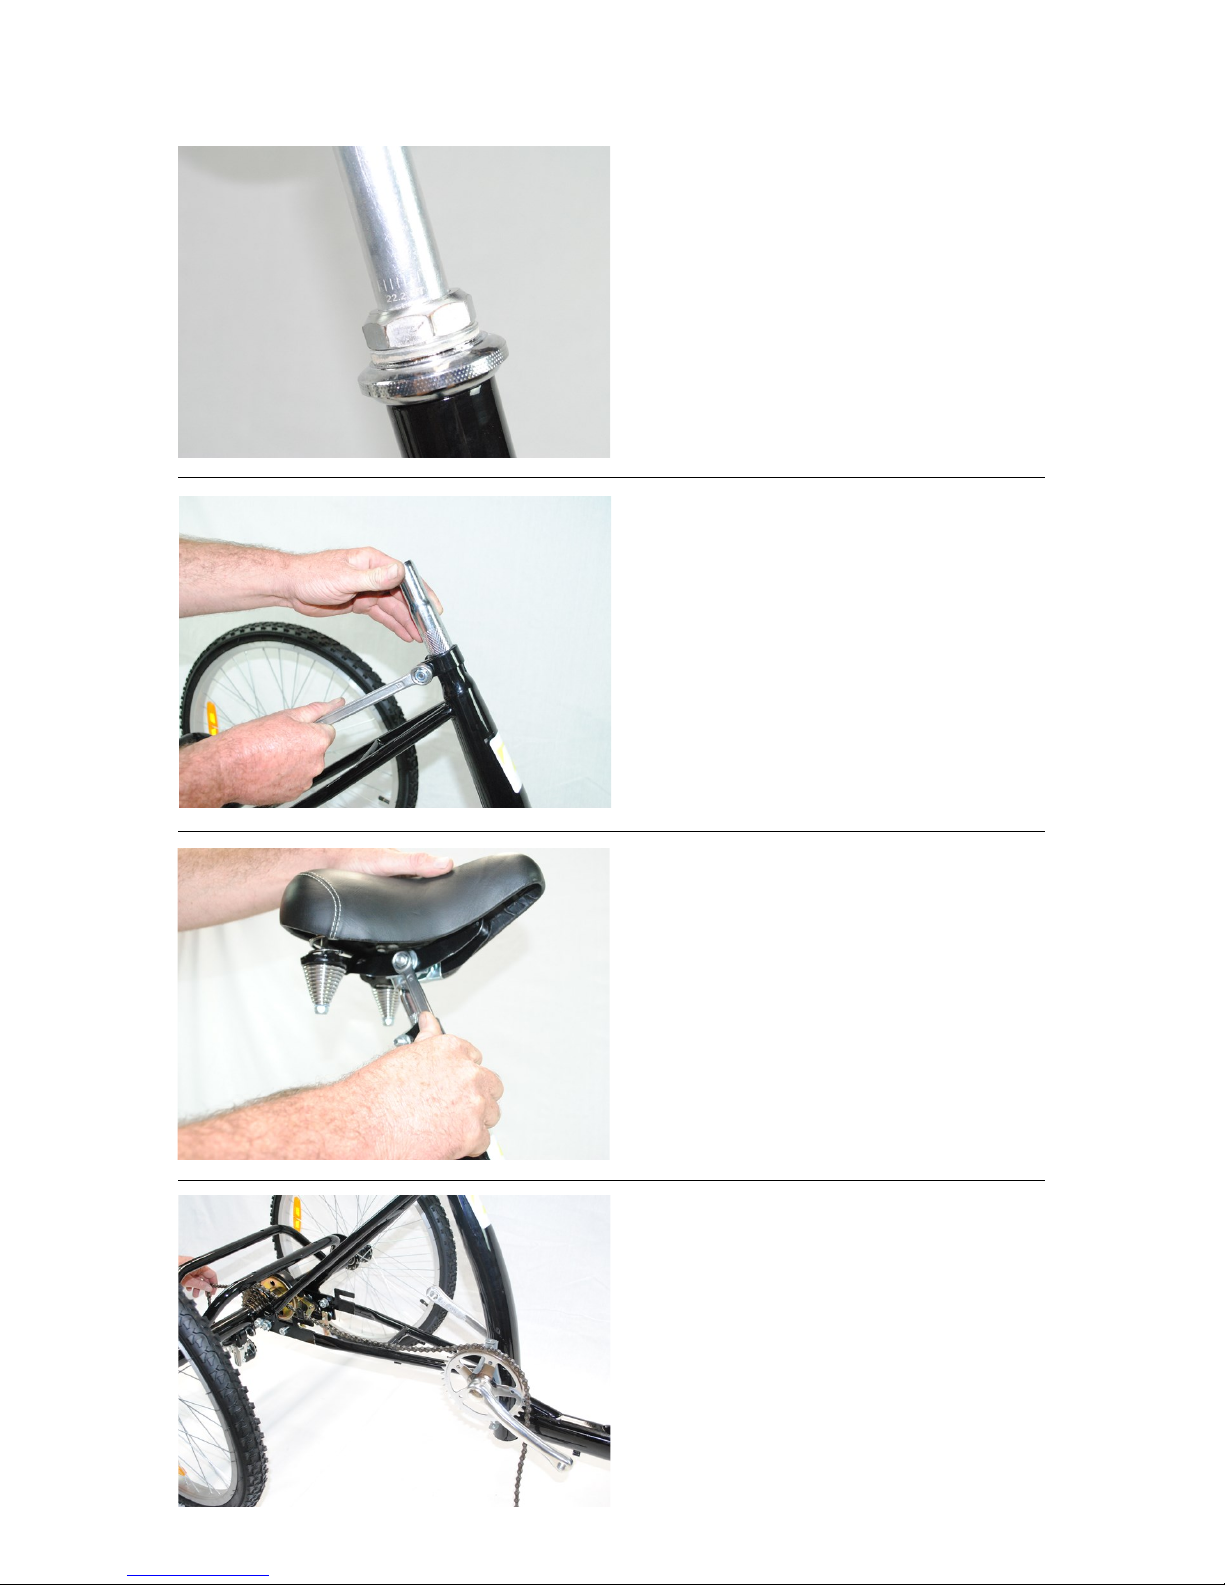
Make sure it is inserted past the
minimum insertion mark
Adjust the height to your
preferred level and make sure the
bars are straight and aligned with
the front wheel. Tighten with a
size 6 Allen key.
Mounting the Seat Post
Slide the seat post into the seat
upright and tighten with a 13m
spanner. Make sure the post is
inserted past the minimum insertion mark. When the trike is assembled both the seat height and
handle bar height can be adjusted to suit the rider.
Lower Seat onto Mounting Pole
Manually adjust seat so that it
looks flat or horizontal and tighten on both sides with a 13m spanner.
Installing the chain
Lay the chain over the front pedal
sprocket and on top of the largest
sprocket on the rear axle.
Page 10
Page 10
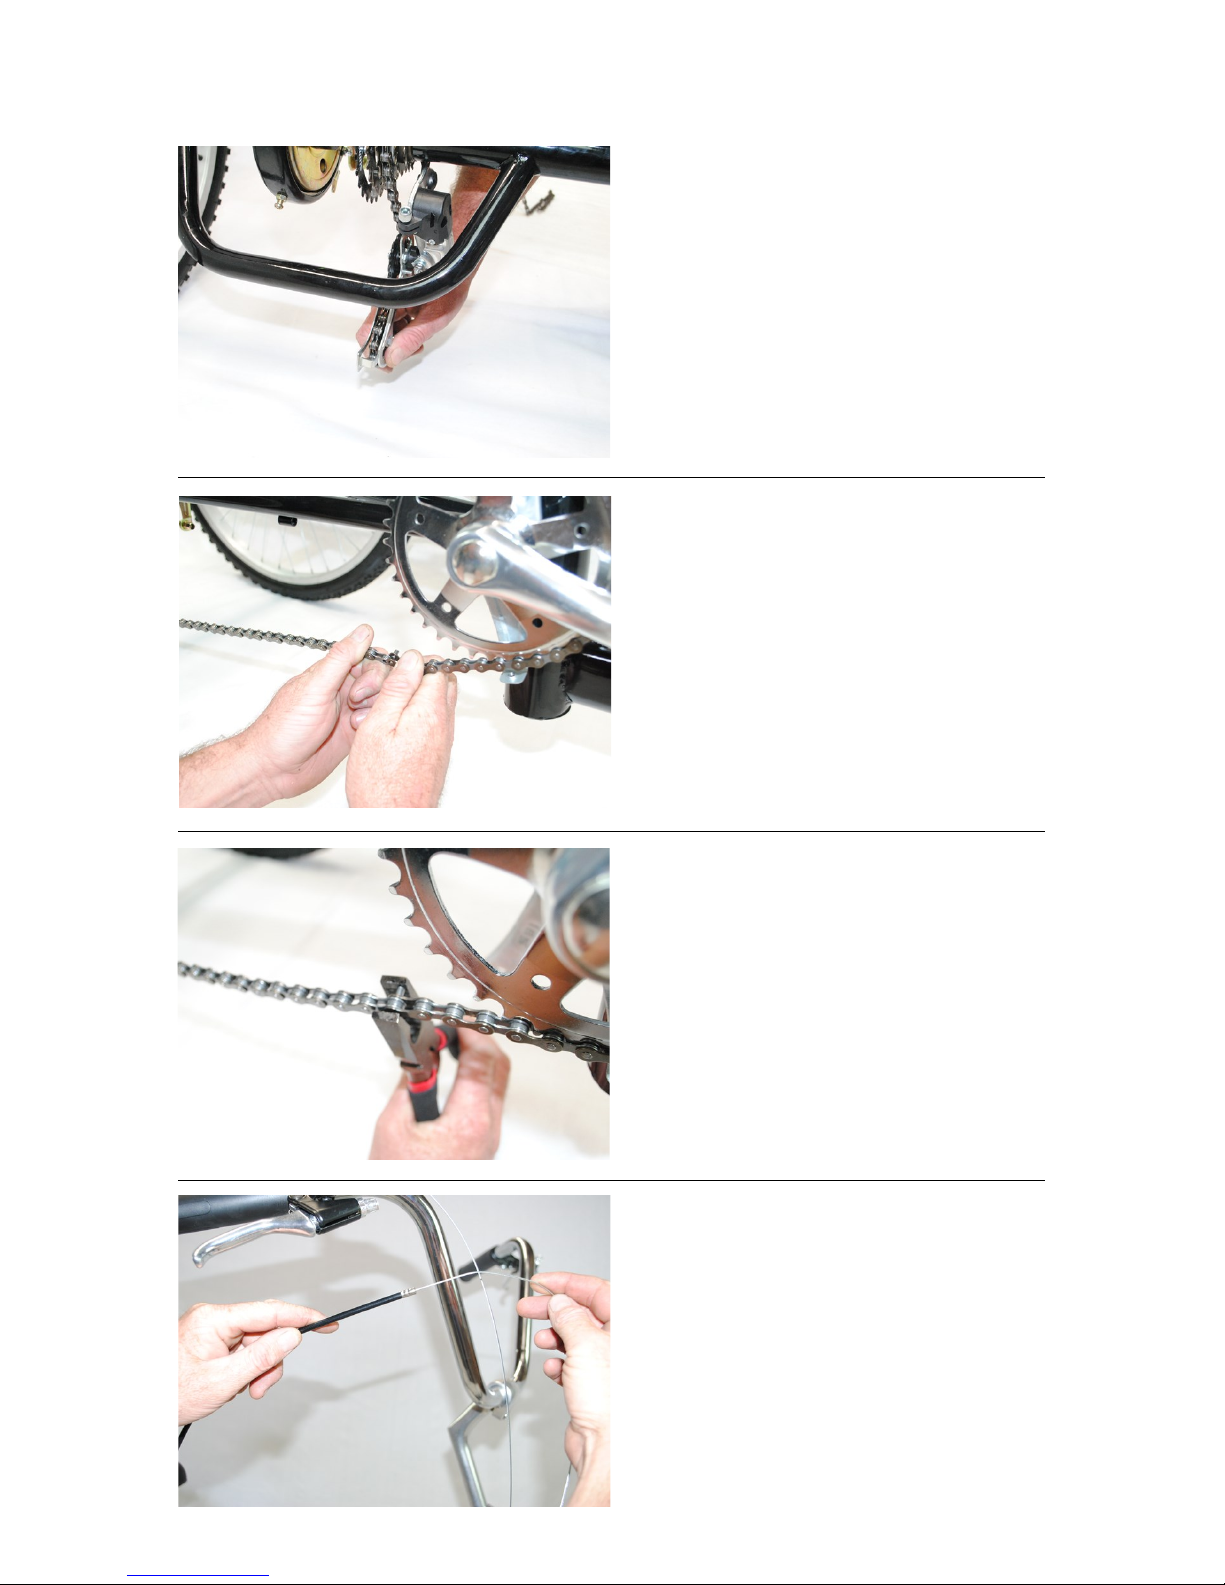
Feeding the Chain through the
Derailleur
Looking from the rear of the
trike feed the chain over the top
of the first small black sprockets
on the Shimano derailleur around
it then over the top of the bottom
sprocket and the forward so that
it can join the other end.
Join chain ends together.
Push the pin in using pliers
Fitting the Gear Cable
Unravel the gear cable from the
handle bar gear changer and feed
it through the empty outer black
cable sleeve.
Page 11
Page 11
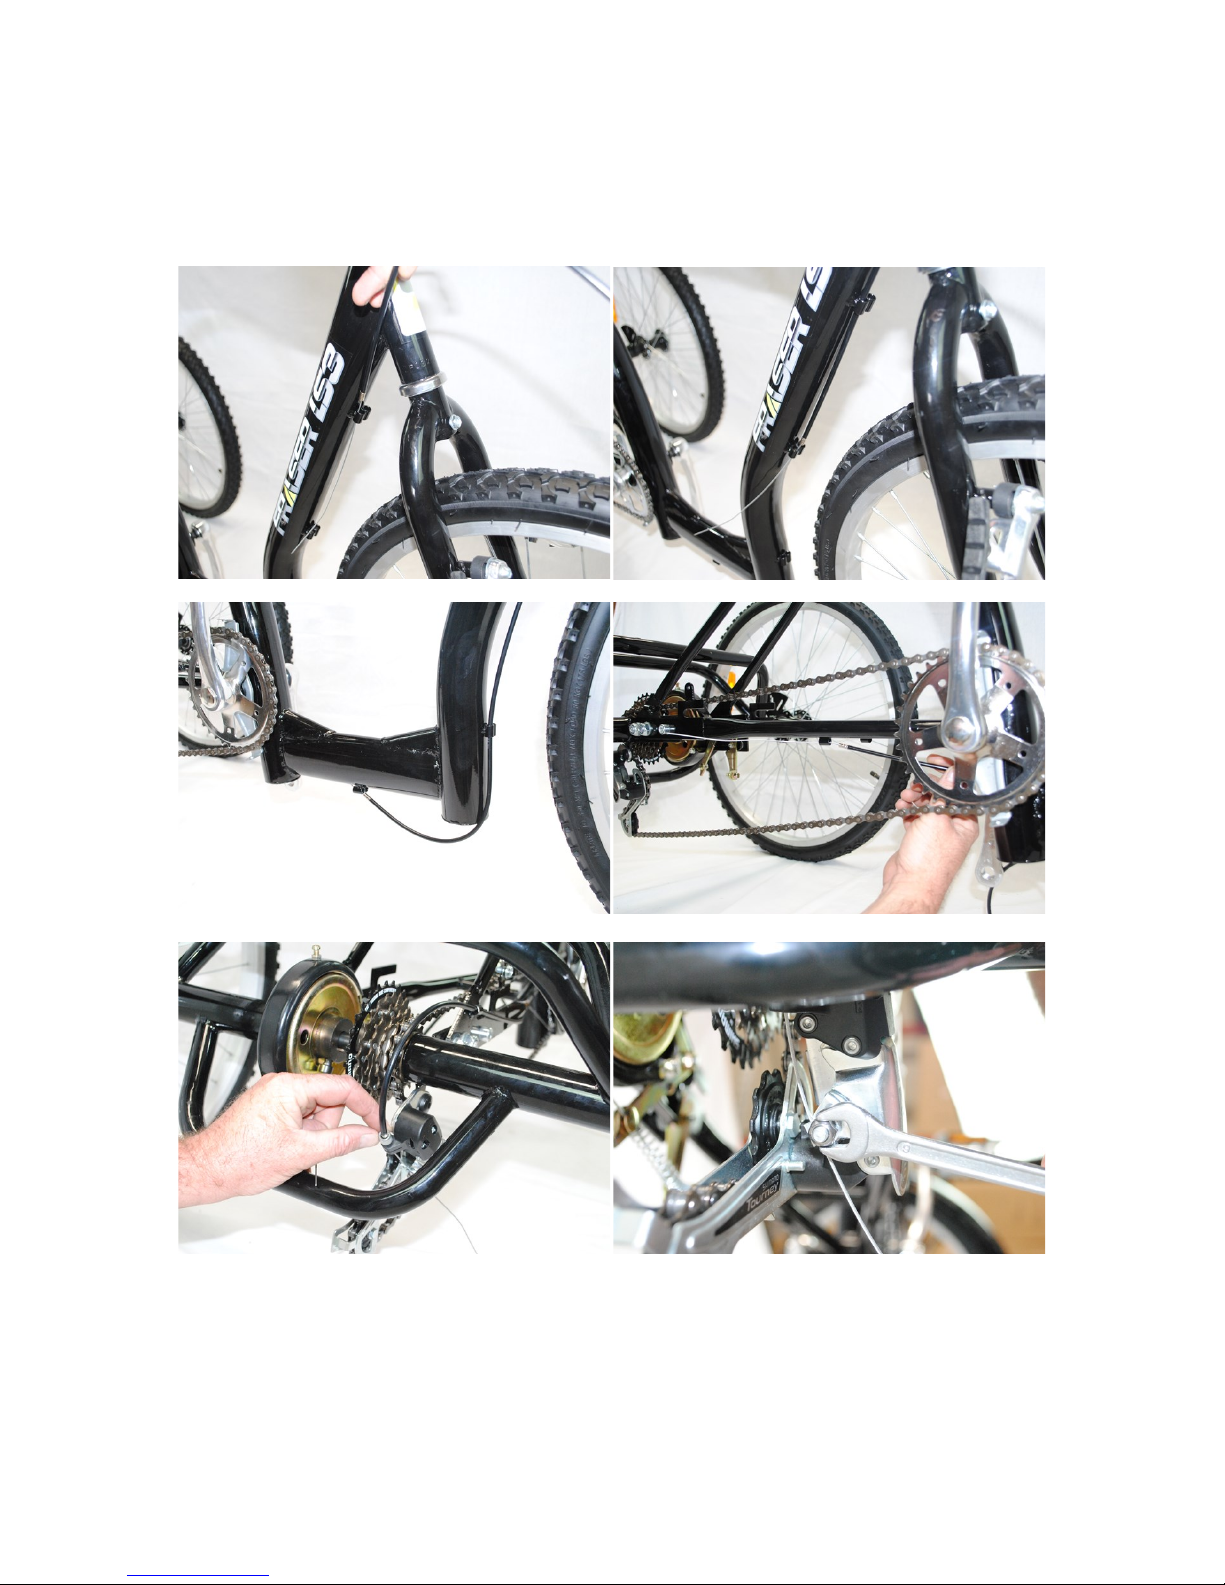
Thread the cable through all the
mounting points back to the rear
Attach the cable to the Derailleur
We strongly suggest you search YouTube for instruction videos on how to
best adjust the Shimano Gears. It is very straight forward but much easier
to understand by watching a video rather than an instruction book. There
are several very good videos on there that are very helpful.
Page 12
Page 12
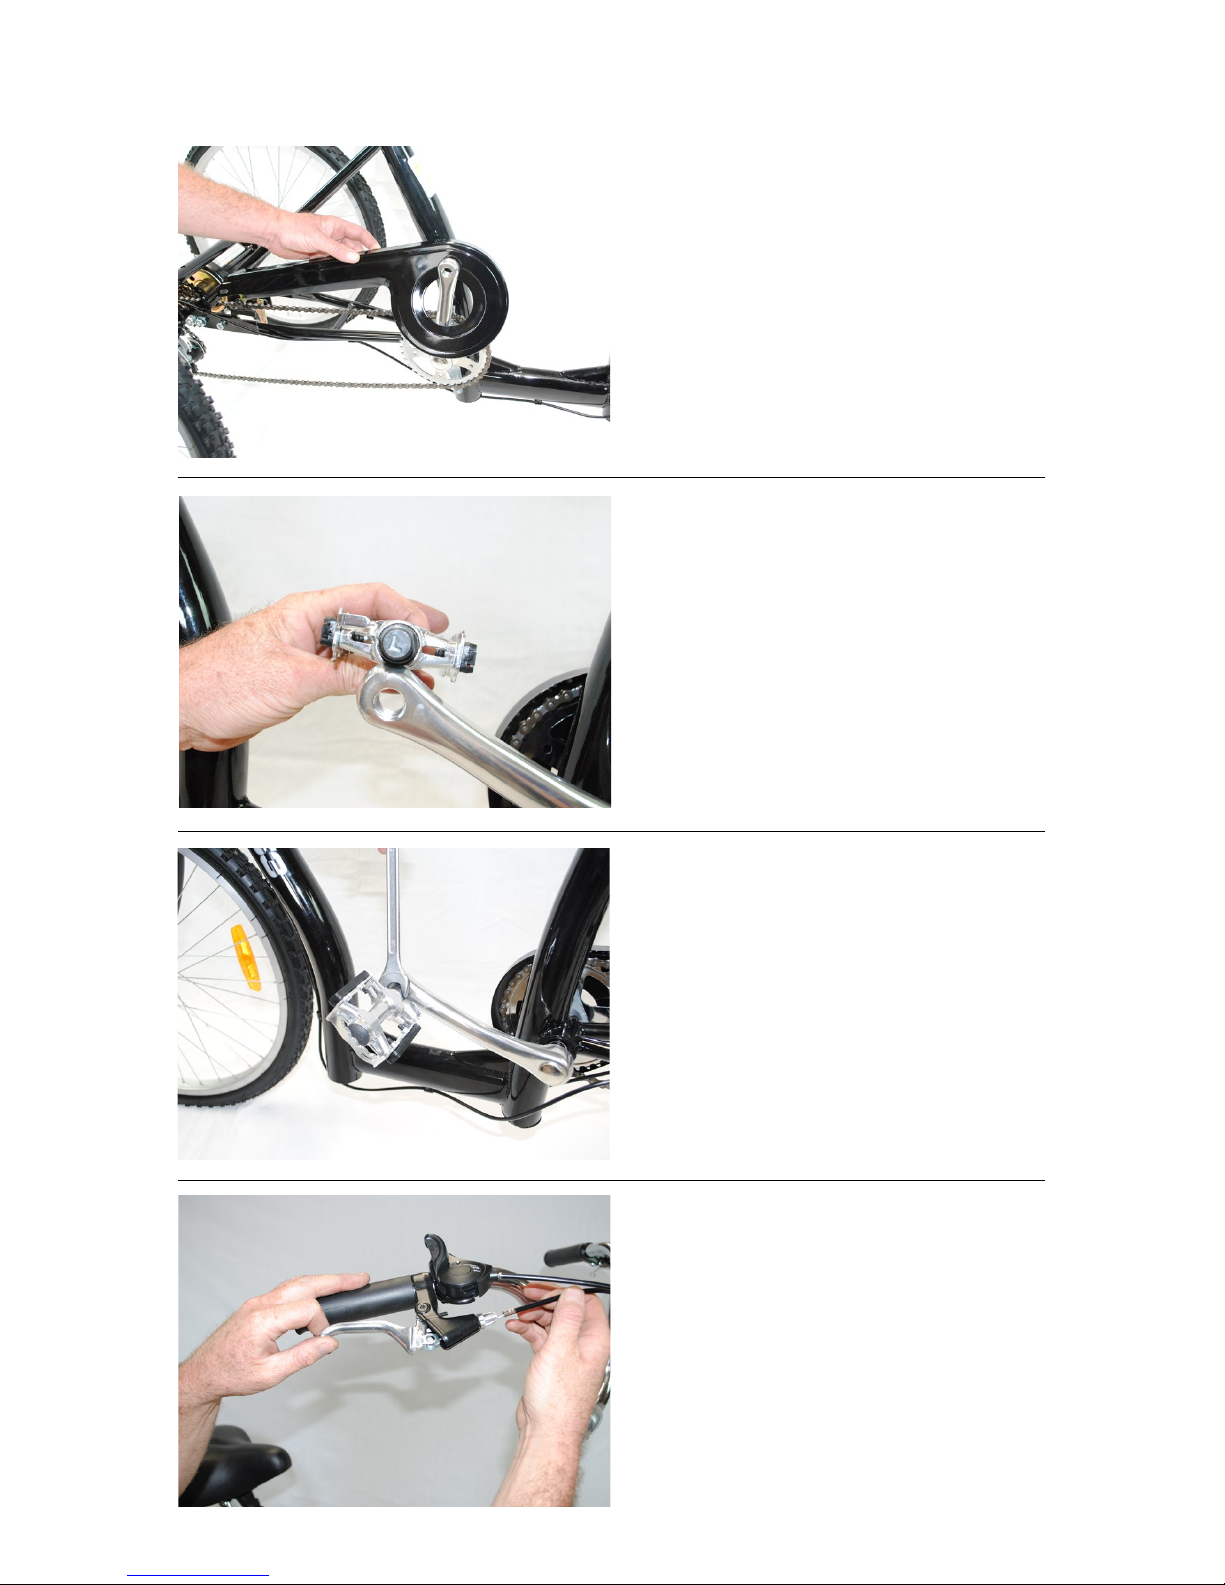
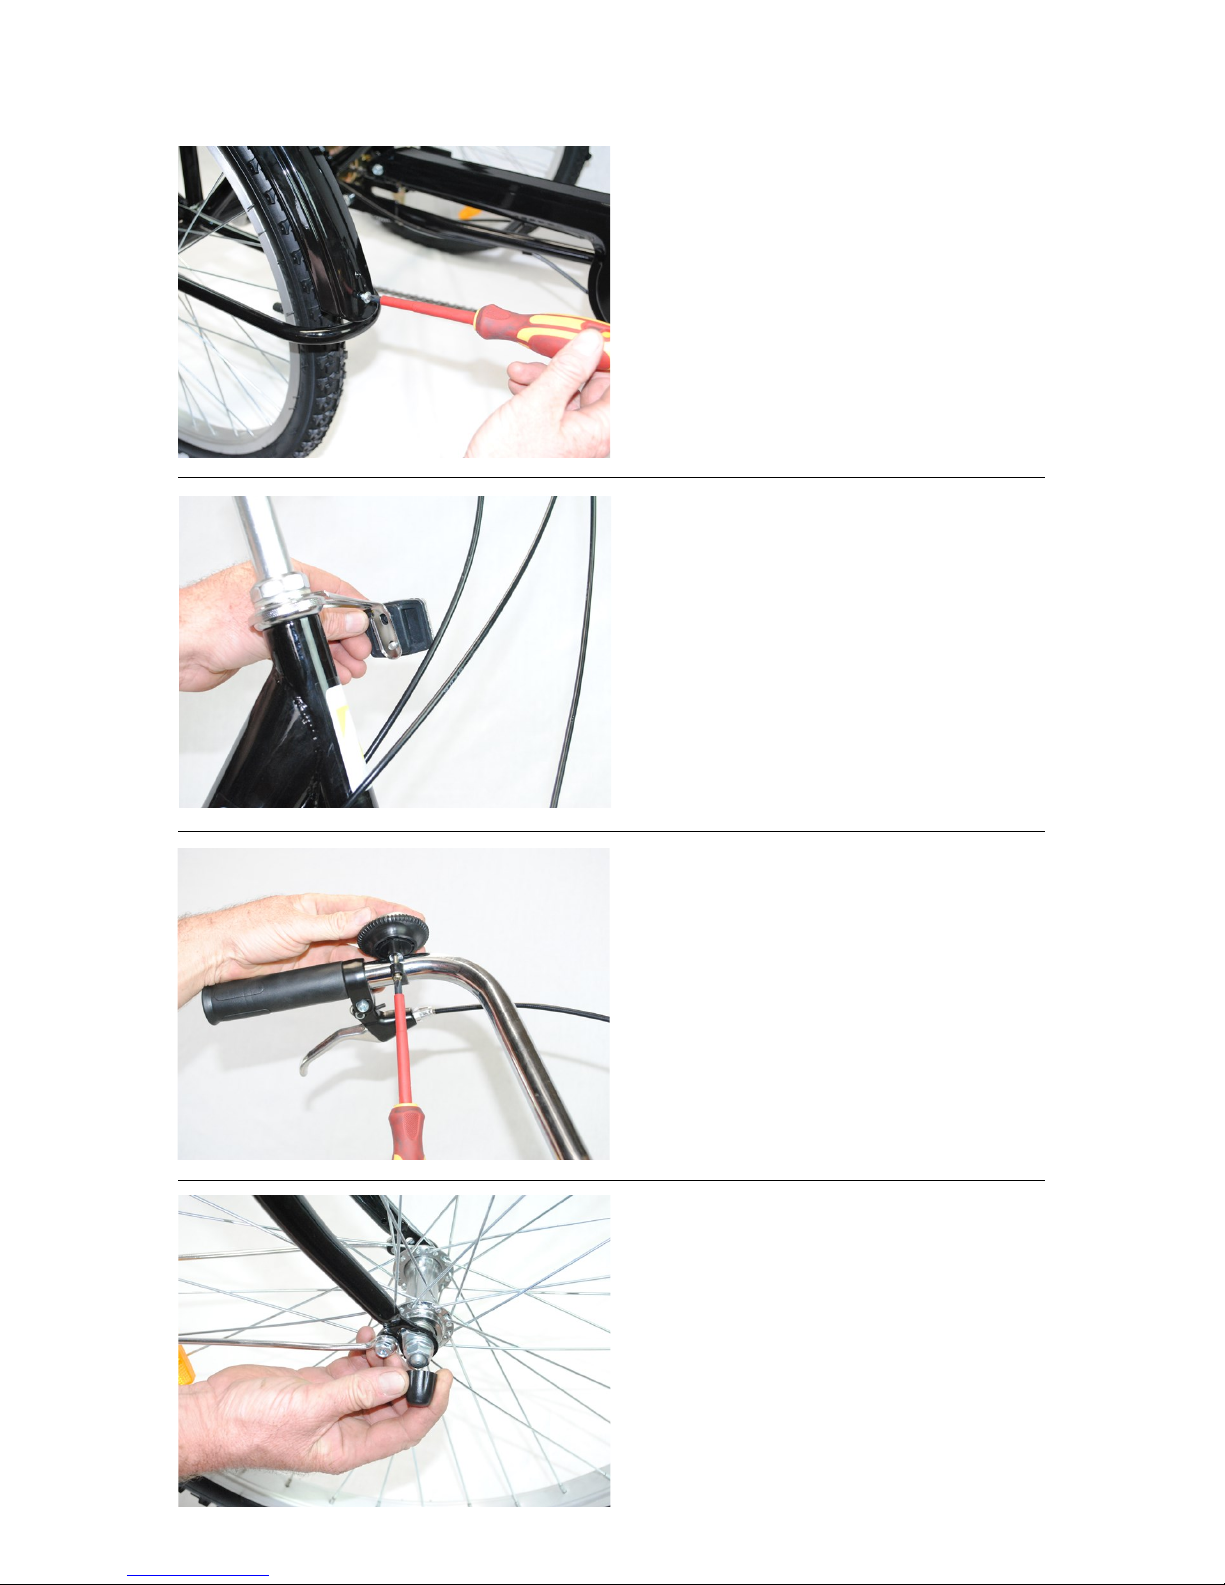
Mount the Chain Guard
Slide the chainguard over the
right pedal crank and fasten with
the screws provided.
Fit Left and Right Pedals
The pedal bolts are marker L for
left and R for right.
Tighten with a 15m spanner.
Install Front Brake Cable
Feed cable into Brake Lever by
turning the silver adjuster so that
the cable can slot in.
Page 13
Page 13
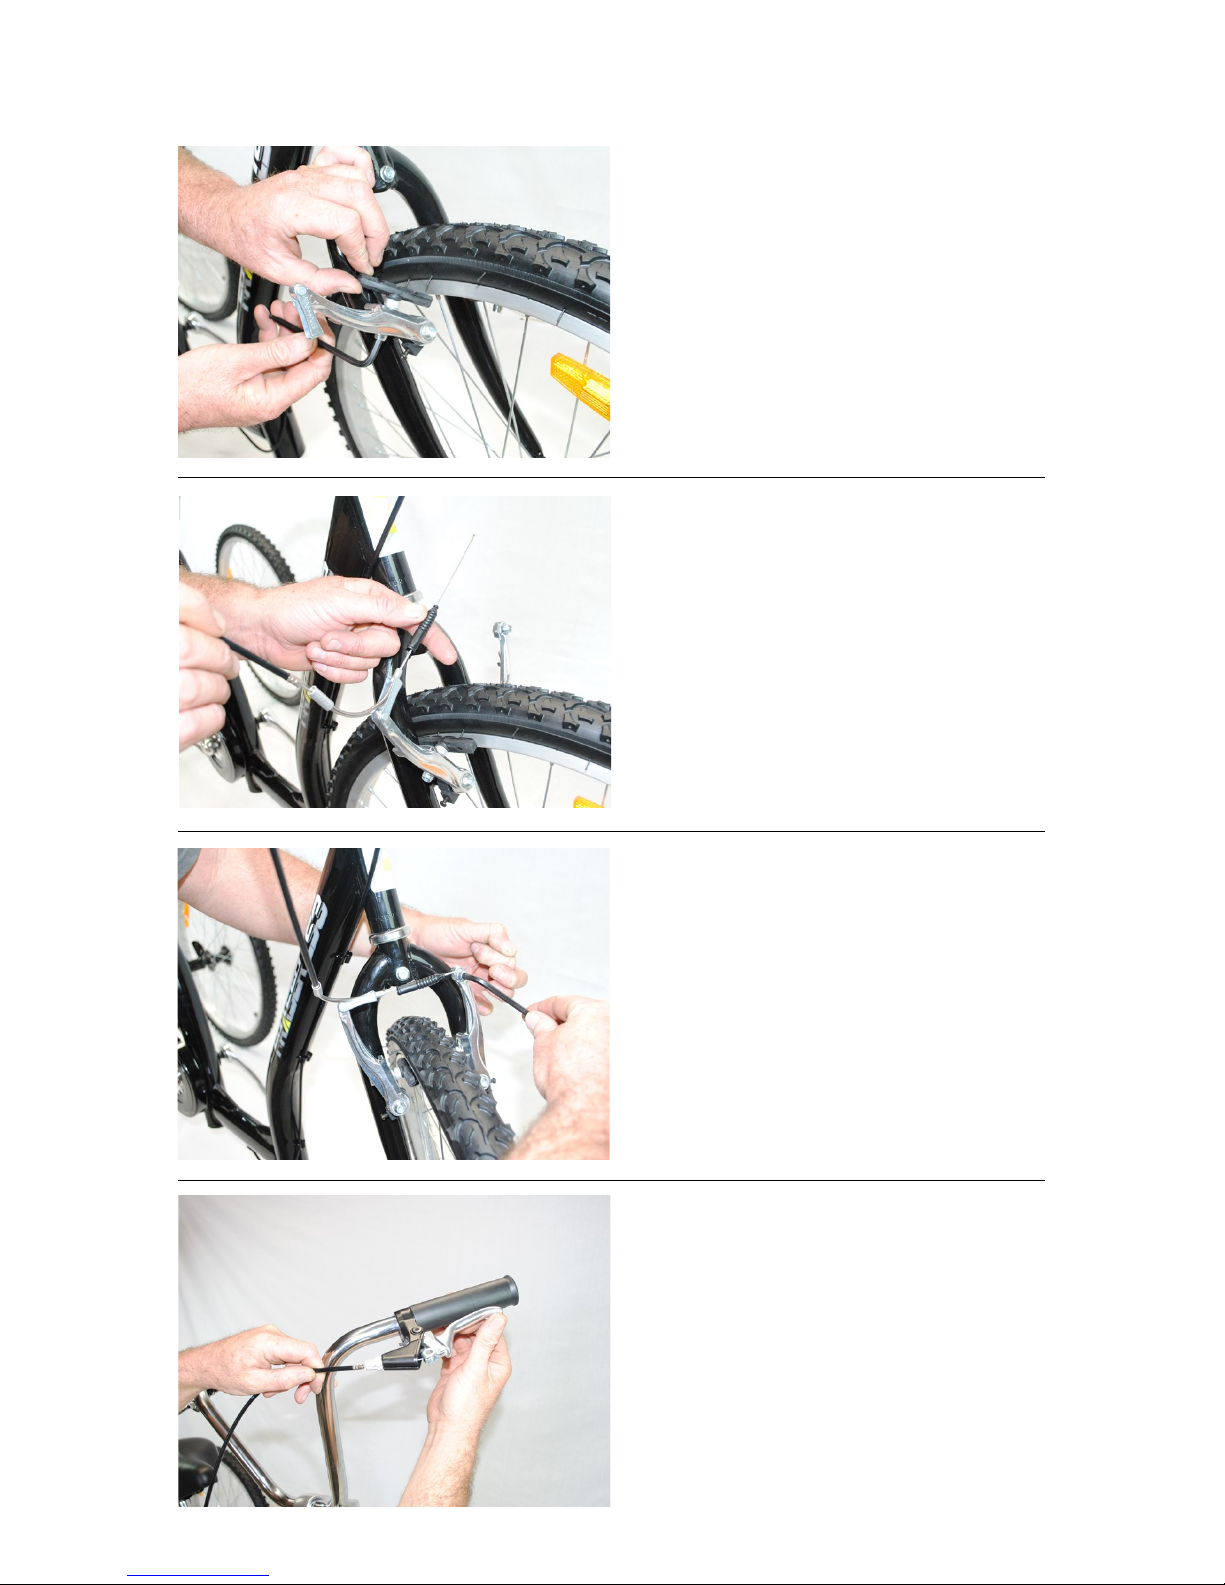
Adjusting Brake Pads
Loosen front brake pads with a 5
Allen key, allowing pads to line
up with the rim when pushed
close. Lock brake pads into place
with the 5 Allen key.
Joining the 2 pads
Feed brake cable through the
angled brake sleeve and then
through the rubber cable protector.
Fixing and Adjusting Cable.
Loosen brake cable clamp on the
opposing side, feed cable through
and tighten making sure brake
pads are as close as possible to
the rim without actually touching.
Installing Back Brake Cable
Fit back brake cable into left
hand brake lever in the same
manner as the front was fitted.
Page 14
Page 14
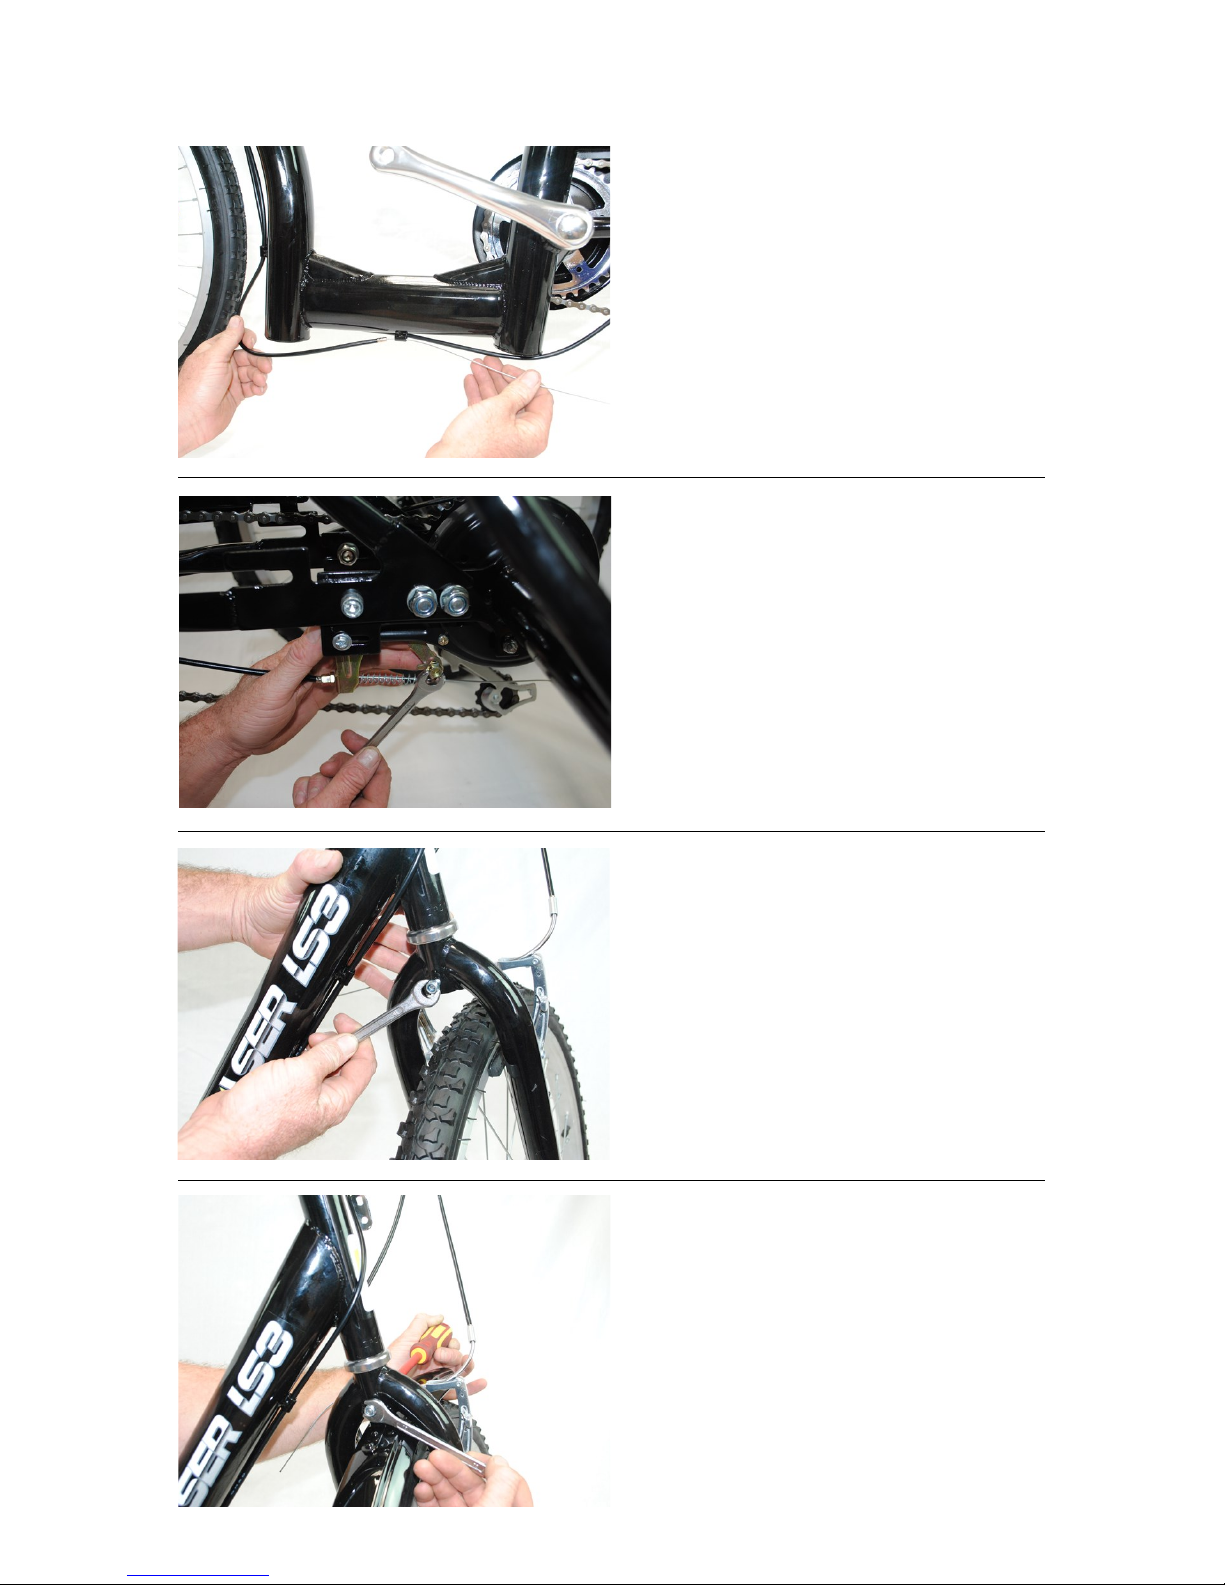
Thread Brake Cable through all
mounting points back towards
the rear.
Fitting cable to Rear Brake
Loosen off nut on rear brake with
10m spanner. Fit spring as per
picture and thread cable through
bolt and tighten bolt. The rear
brake is only for slowing down it
is not a stopping brake. It can be
adjusted with the cable here or
also by screwing the screws
around the outer rim of the rear
brake.
Mounting Front Guard
Remove nut off guard mounting
bolt.
Fit guard onto bolt and tighten
using a 10m spanner.
Page 15
Page 15
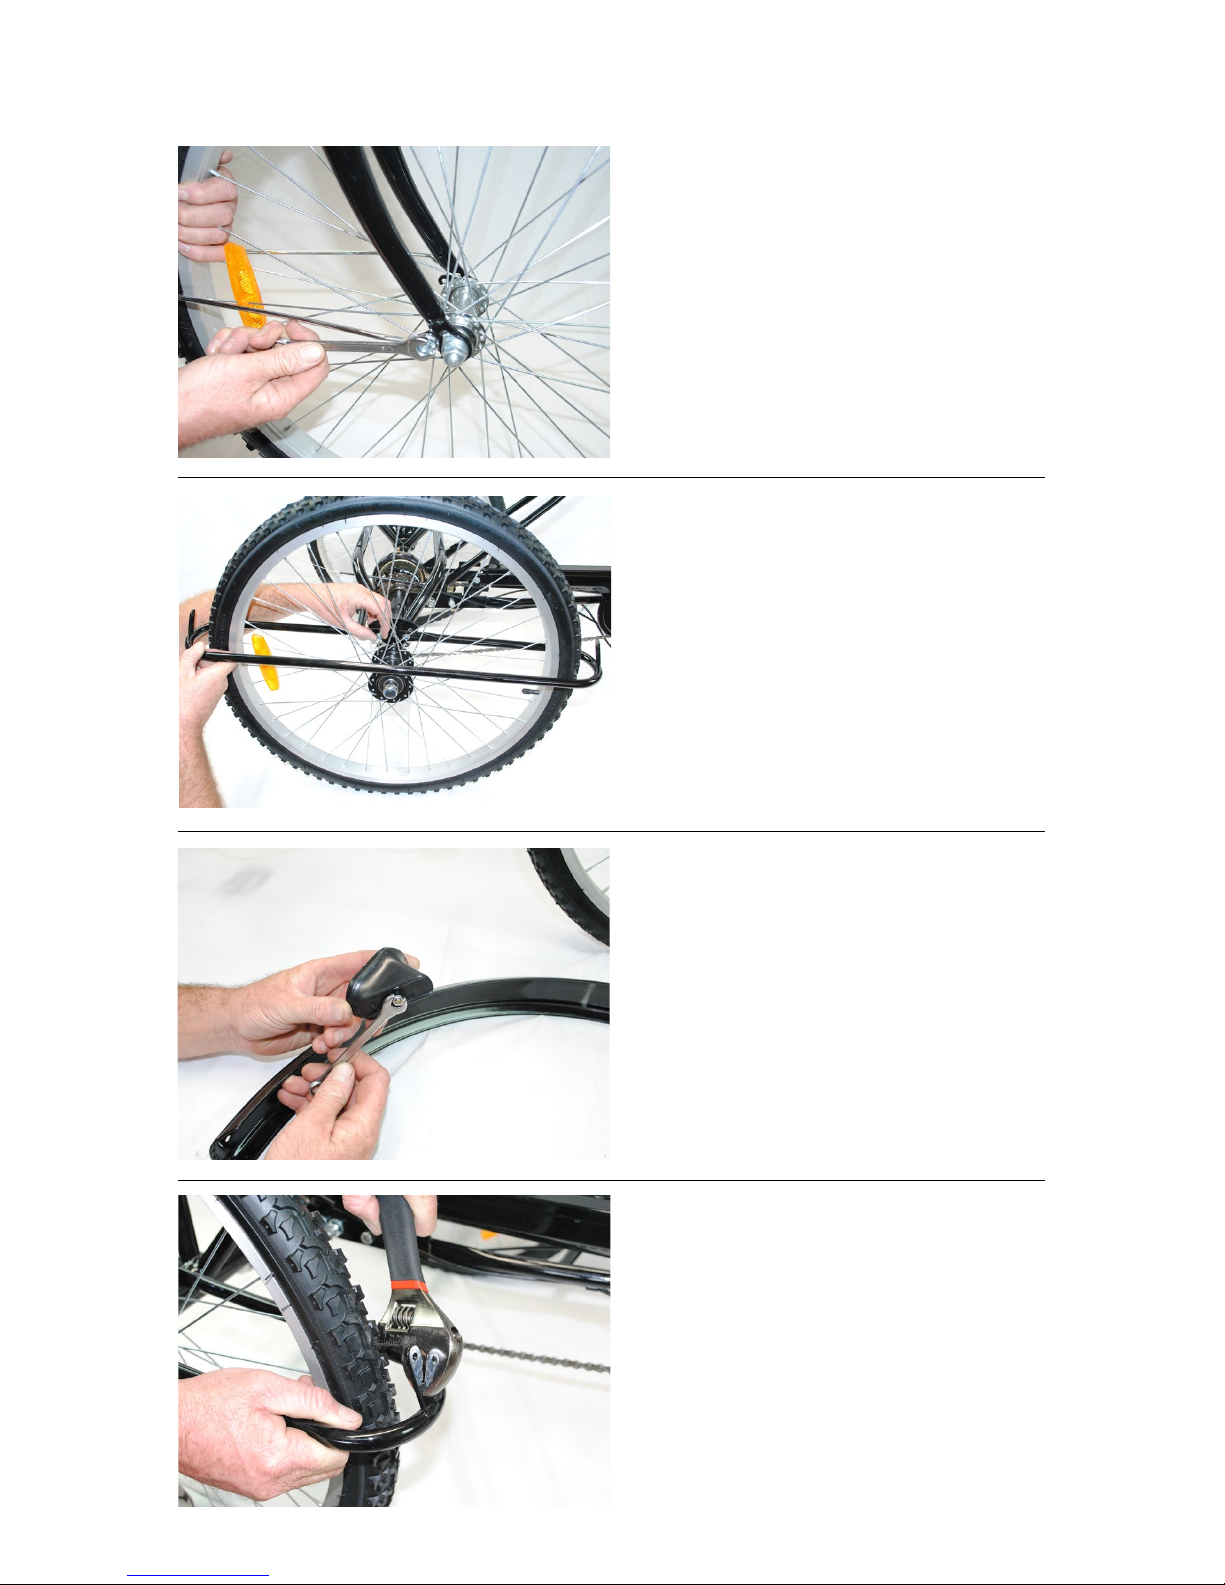
Fasten Support Brackets
Use the 10m bolts provided to
fasten the support brackets to the
lower forks where there are
threaded holes provided.
Mounting Rear Guard Supports
Slide guard brackets over wheel
and fasten with nuts and bolts
provided and tighten with 10m
spanner or screw driver. Once
tightened, manually twist the
bracket so that it is centered on
the wheel and horizontal to the
ground.
Attach red rear reflectors to
guard using an 8m spanner.
Adjust bracket to receive fender
Lay the fender on top of the
bracket to check fit. On some occasions it may be necessary to
lightly bend the bracket inwards
for a better fit of the fender
Page 16
Page 16
Mount fenders using the 4 small
screws provided.
Once the fenders are tight and
mounted, flex and bend the fenders
and brackets so that they are
centered to the wheels.
Mount Front Clear Reflector
Using a 8m spanner, mount the
front reflector.
Mount Bell
Remove screw from bell, open up
fitting and fit the bell on the left
handle bar. Replace screw and
tighten.
Fit front wheel bolt caps.
Page 17
Page 17
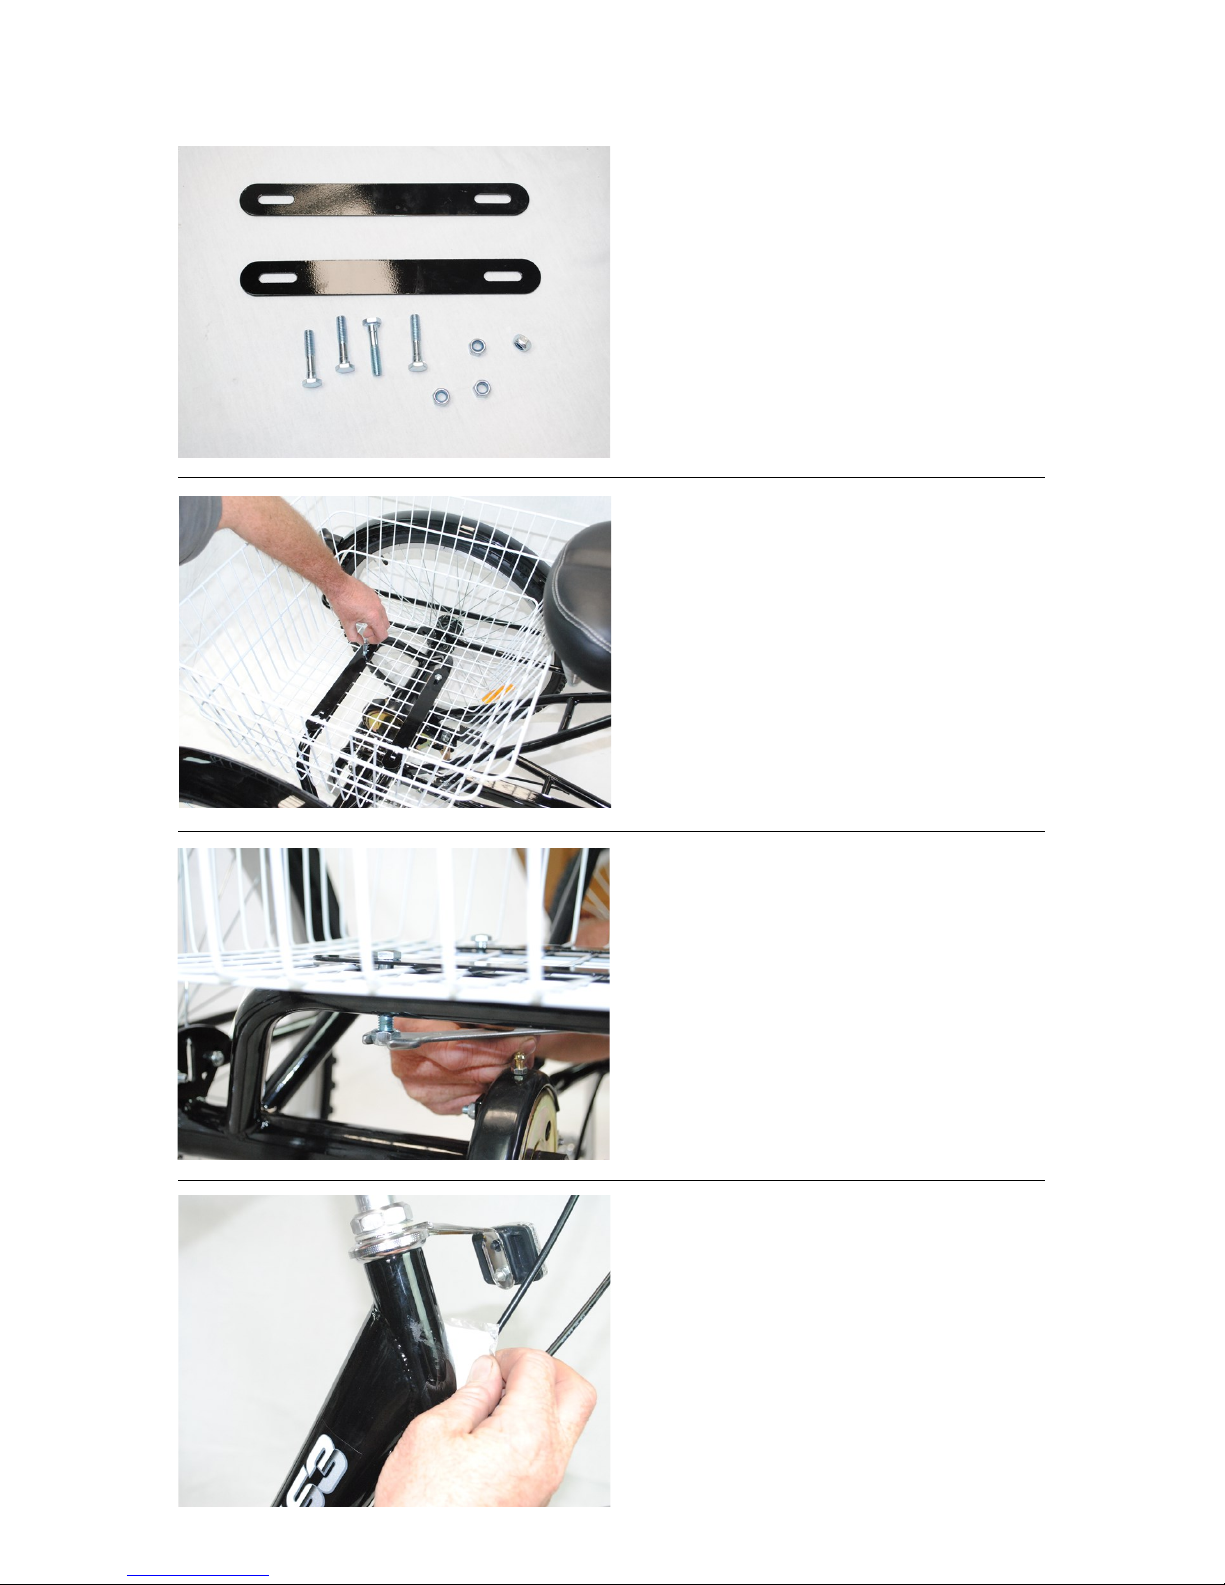
Locate the 2 Basket Brackets and
the 4 bolts and nuts needed to
secure them.
Fitting the Basket
Place the basket on top of the
rear axle assembly and lay the
basket brackets longways inline
with the axle support. Place the 4
bolts through the brackets, the
basket and then the axle.
Tighten the nuts using a 13m
spanner.
Remove packing stickers
The stickers on the seat upright
and neck stem can be left on but
they are only production stickers
for the factory. If you want to remove them they can be easily
peeled off and the sticky residue
removed with a normal household
cleaner.
Page 18
Page 18
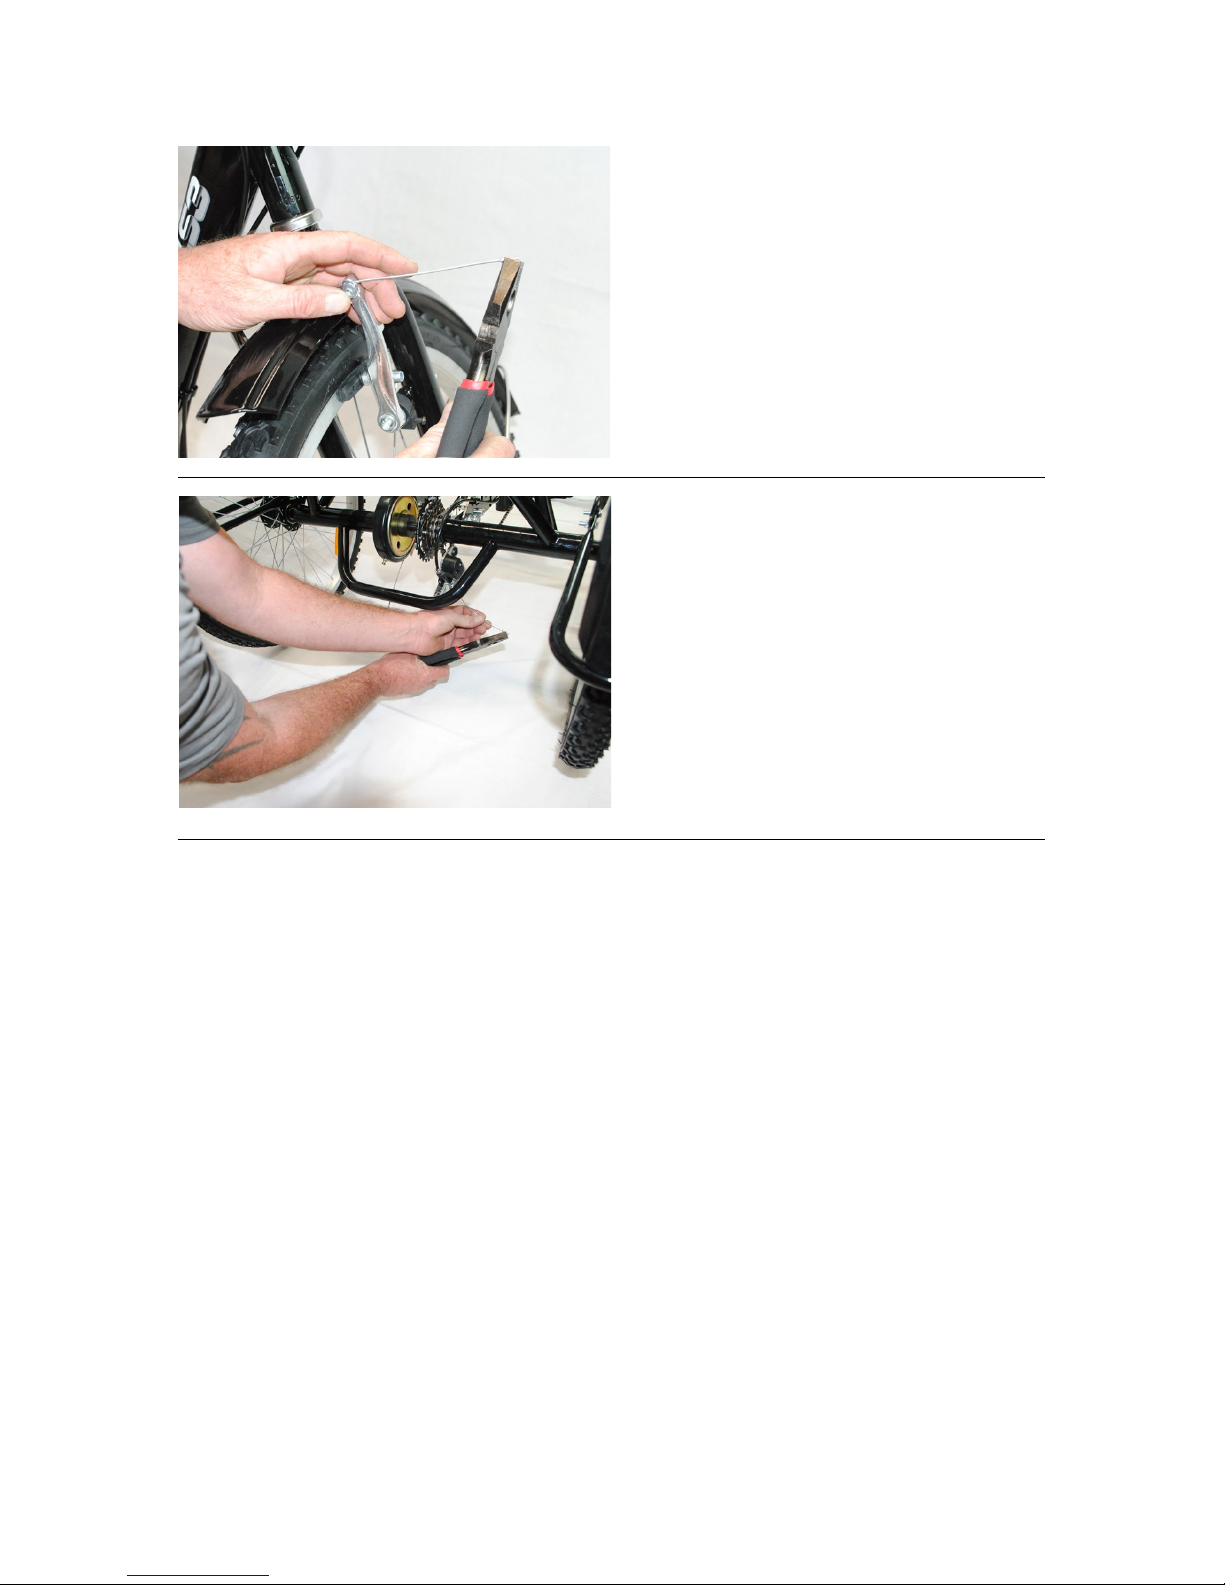
Cable Cap
Clamp the cable ends on by
squeezing with pliers.
Repeat the same on the gear cable and rear brake cable.
Page 19

Page 19
IMPORTANT FACTS ABOUT RIDING A TRIKE
There may be several reasons why you have chosen a trike over a normal bike.
They offer a stable riding platform and loads of storage space.
They do however have some differences you need to be aware of before you
ride.
Because trikes do not lean like normal bikes, the first time you ride one they
may feel quite strange. When you turn a corner on a trike it stays flat and stable
in line with the ground and you may feel your weight being pushed in the oppo-
site direction of the turn. On a normal bike you would lean into a turn, you
must do the same on a trike. Trikes are designed not to tip over if used correctly, but humans aren’t so your body needs to move to keep balance, particularly
if you try a fast, sharp turn.
We strongly recommend the first time you ride a trike that you take it slow and
easy. Try slow not so sharp turns, lean slightly into the turn and before long it
will all feel very natural to you.
The same applies if you are riding on uneven or sloping ground. Even though
the trike will travel in line with the slope, you need to lean slightly into the
slope, just like a normal bike.
VERY IMPORTANT SAFETY FACTS
A trike can and will tip over if you push it too far. If you take fast and sharp
turns without counterbalancing your weight the trike can lift up onto two
wheels and may tip over. These trikes have been designed for leisurely riding
and if used correctly are very safe and stable.
Because a trike has 3 wheels, you must always try and be aware of any obsta-
cles that any of the wheels may encounter, particularly the rear 2 wheels. Trikes
are much wider than bikes so remember when you are passing parked cars or
other obstacles that the rear wheels protrude wider than your body so make sure
you leave plenty of clearance.
The last thing is the difference between the front and rear brakes. The rear
brake is designed as a slowdown brake and not a stopping brake. Only one of
the rear wheels is braked on a trike which means if that one wheel was braked
hard it would make the trike turn in the direction of the stopped wheel. It is for
this reason that the rear brake is only for slowing down and it will not bring you
to an abrupt stop. The front brake is the brake to use for stopping, or use both
brakes together but do not rely on the rear brake alone to stop the trike.
ENJOY YOUR NEW FRASER TRIKE !
Page 20

LIMITED WARRANTY AND POLICY ON REPLACEMENT
PROCEDURES & RESPONSIBILITIES
Your purchase includes the following warranty which is in lieu of all other
express warranties. This warranty is extended only to the initial consumer purchaser. No warranty registration is required. This warranty gives
you specific legal rights and you may have other rights which vary from
state to state.
FRAME
Steel frames are guaranteed against faulty materials and workmanship
for as long as the initial consumer purchaser has the trike, subject to the
condition of the warranty listed below. If frame failure should occur due
to faulty materials or workmanship during the guarantee period, the
frame will be replaced. For frame replacement under this Fraser Trikes
Warranty, contact us, stating the nature of the failure, model number,
date received and the name of the store from which the bike was received, at the address given on the back cover.
Frame must be returned for inspection at customer’s expense. Please
note: the fork is not part of the frame. A lifetime warranty on your frame
does not guarantee that the product will last forever. The length of the
useful life cycle will vary depending on the type of trike, riding conditions
and care the trike receives. Competition, jumping, downhill racing, trick
riding, trial riding, riding in severe conditions or climates, riding with
heavy loads or any other non-standard use can substantially shorten the
useful product life cycle. Any one or a combination of these conditions
may result in an unpredictable failure that is not covered by this warranty. All trikes and frame sets should be periodically checked by a bicycle
mechanic for indications of potential problems, inappropriate use or
abuse. These are important safety checks and are very important to help
prevent accidents, bodily injury to the rider and shortened useful product
life cycle.
PARTS
All other parts of the unit except Normal Wear Parts are warranted
against defective materials and workmanship for a period of 1 year from
the date of purchase by the initial consumer purchaser, subject to the
Terms and Conditions of the warranty listed below. If failure of any part
should occur due to faulty materials or workmanship during the warranty
period, the part will be replaced.
Page 21

All warranty claims must be submitted to the address located on the
back cover, and must be shipped prepaid and accompanied by proof of
purchase. Any other warranty claims not included in this statement are
void. This especially includes installation, assembly, and disassembly
costs. This warranty does not cover paint damage, rust, or any modifications made to the bicycle. Normal Wear Parts are defined as grips,
tires, tubes, cables, brake shoes and saddle covering. These parts are
warranted to be free from defects in material and workmanship as delivered with the product. Any claim for repair or replacement of Normal
Wear Parts (grips, tubes, tires, cables, brake shoes and saddle cover-
ing) and missing parts must be made within thirty (30) days of the date
of purchase. The warranty does not cover normal wear and tear, improper assembly or maintenance, or installation of parts or accessories
not originally intended or compatible with the bicycle as sold. The warranty does not apply to damage or failure due to accident, abuse, misuse, neglect, or theft. Claims involving these issues will not be honoured.
CONDITIONS OF WARRANTY
1.Your trike has been designed for general transportation and recre-
ational use, but has not been designed to withstand abuse associat-
ed with stunting and jumping. This warranty ceases when you rent,
sell, give away the trike, ride with more than one person, or use the
trike for stunting or jumping.
2.This warranty does not cover ordinary wear and tear or anything
you break accidentally or deliberately.
3.It is the responsibility of the individual consumer purchaser to as-
sure that all parts included in the factory-sealed carton are properly
installed, all functional parts are initially adjusted properly, and subsequent normal maintenance services and adjustments necessary to
keep the trike in good operating condition are properly made. This
warranty does not apply to damage due to improper installation of
parts installation or any kind of power plant or internal combustion
engine, modification or alteration of the brakes, drive train or frame
in any way or failure to properly maintain or adjust the trike.
Page 22

Telephone: 07 5539 5803 Facsimile: 07 5597 5090
WEB: http://www.fraser tr ikes.com.au Email: sales@fr aser tr ikes.com.au
Mail: P.O. Box 2951, Southpor t BC, Queensland 4215
 Loading...