

Franklin Chef FIM12, FIM12SS User Manual
®
Countertop Ice Maker
Máquina de hielo de mostrador
User’s Guide
Guía del usuario
FRANKLIN INDUSTRIES, L.L.C.
4100 First Avenue
Brooklyn NY 11232-3321
Tel.: 1-888-424-8278 Models/Modelos FIM12
Website: www.franklinchef.com FIM12SS

Table of Contents
Important Safeguards · · · · · · · · · · · · · · · · · · · · · · · 1 - 3
Parts Diagram · · · · · · · · · · · · · · · · · · · · · · · · · · · · 4
Technical Information · · · · · · · · · · · · · · · · · · · · · · · · 5
Before Your First Use · · · · · · · · · · · · · · · · · · · · · · · · 5
Operating Instructions · · · · · · · · · · · · · · · · · · · · · · 6 - 7
Cleaning and Maintenance · · · · · · · · · · · · · · · · · · · · · · 8
Troubleshooting · · · · · · · · · · · · · · · · · · · · · · · · · · · 9
Limited Warranty · · · · · · · · · · · · · · · · · · · · · · · · · · 10
Spanish Version of this Manual · · · · · · · · · · · · · · · · 11 - 21

IMPORTANT SAFEGUARDS
Before the ice maker is used, it must be properly positioned and installed as
described in this manual, so read the manual carefully. The warranty may be
affected or voided by an incorrect installation. To reduce the risk of fire,
electrical shock or injury when using the ice maker, follow basic precautions,
including the following:
• Plug into a grounded 3-prong outlet; do not remove grounding prong,
and do not use an adapter. The use of an extension cord is not
recommended..
It is recommended that a separate circuit, serving only your ice maker,
•
be provided. Use receptacles that cannot be turned off by a switch or
pull chain.
• Do not connect or disconnect the electric plug when your hands are wet.
• Never unplug the ice maker by pulling on the power cord. Always grip
the plug firmly and pull straight out from the outlet.
• Never clean ice maker parts with flammable fluids. Do not store or use
gasoline or other flammable vapors and liquids in the vicinity of this or
any other appliance. The fumes can create a fire hazard or explosion.
• Before proceeding with cleaning and maintenance operations, make
sure the power line of the unit is disconnected.
• Before operating, put all panels back into place.
• Never allow children to operate or play with the ice maker.
Do not touch the evaporator with your hand when the machine is
•
operating.
Unplug the ice maker or disconnect power before cleaning or servicing.
•
Failure to do so can result in electrical shock or death.
• Do not attempt to repair or replace any part of your ice maker unless it
is specifically recommended in this manual. All other servicing should
be referred to a qualified technician.
1

• To ensure proper ventilation for your ice maker, the front of the unit
must be completely unobstructed. Choose a well-ventilated area with
temperatures above 50ºF (10ºC) and below 100ºF (38ºC). This unit is
suitable for both indoor and outdoor operation.
•
The ice maker should not be located next to ovens, grills or other
sources of high heat.
• The ice maker must be installed with all electrical connections in
accordance with state and local codes. A standard electrical supply
(120 VAC only, 60 Hz, 15 A), properly grounded in accordance with the
National Electrical Code and local codes and ordinances is required.
• Do not kink or pinch the power supply cord between the ice maker and
its enclosure.
•
The fuse (or circuit breaker) size should be 15 amperes.
It is important for the ice maker to be leveled in order to work properly.
•
You may need to make several adjustments to level it.
• Check for leaks after connection.
• Although the unit has been tested at the factory, due to long-term
transit and storage, the first batch of cubes must be discarded.
• Remove the packing materials and clean the ice maker before using.
• Except to take ice from the unit, keep the door closed in order to
reduce ice melting and to promote proper ice formation.
•
If the ice maker will not be used for a long time, before the next use it
must be thoroughly cleaned. Follow carefully any cleaning instructions
provided. Do not leave any solution inside the ice maker after cleaning.
• DO NOT use solvent-based cleaning agents or abrasives on the
interior. These cleaners may transmit taste to the ice cubes, or damage
or discolor the interior.
• Do not use this apparatus for other than its intended purpose.
SAVE THESE INSTRUCTIONS
2

Electrical Connection
Do not, under any circumstances, cut or remove the third (ground) prong from
the power cord. For personal safety, this appliance must be properly
grounded. The power cord of this appliance is equipped with a 3-prong
grounding plug that mates with a standard 3-prong grounding wall outlet to
minimize the possibility of electric shock hazard from the appliance. Have the
wall outlet and circuit checked by a qualified electrician to make sure the outlet
is properly grounded. When a standard 2-prong wall outlet is encountered, it is
your responsibility and obligation to have it replaced with a properly grounded
3-prong wall outlet. The ice maker should always be plugged into its own
individual electrical outlet which has a voltage rating that matches the rating
label on the appliance. This provides the best performance and also prevents
overloading house wiring circuits which could cause a fire hazard from
overheated wires. Never unplug your ice maker by pulling on the power cord.
Always grip the plug firmly and pull straight out from the outlet. Repair or
replace immediately all power cords that have become frayed or otherwise
damaged. Do not use a cord that shows cracks or abrasion damage along its
length or at either end. When moving the ice maker, be careful not to damage
the power cord.
Extension Cord
Because of potential safety hazards under certain conditions, it is strongly
recommended that you do not use an extension cord with this ice maker
because the cord may overheat and cause a risk of fire. However, if you must
use an extension cord, the cord should be No. 16 AWG minimum size and
rated no less than 1800W.
3
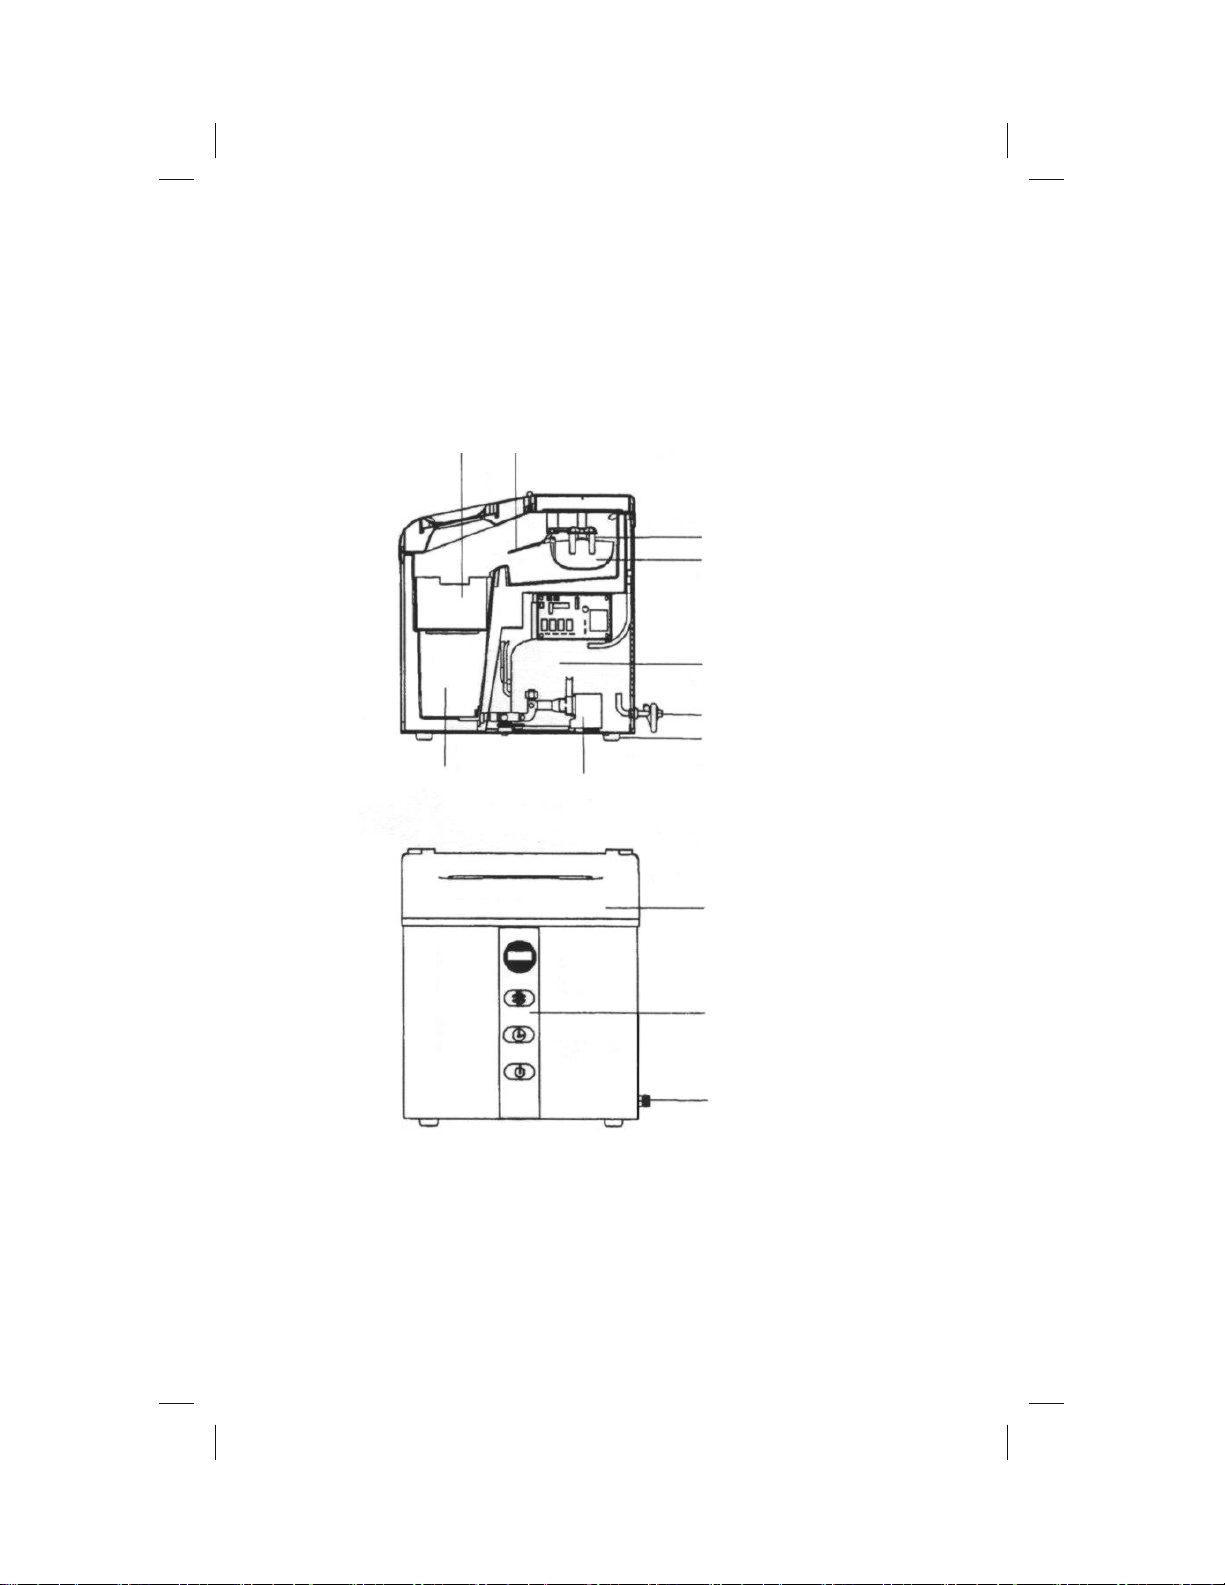
Parts Diagram
Ice collecting
bin
Water storage
tank
Ice
pusher
Evaporator rods
Water box
Compressor
Power cord
Rubber foot
Water pump
Lid
Control panel
Water outlet
stopper
4

Technical Specifications
Model No.: FIM12 (white)
FIM12SS (stainless steel)
Power Input: 120V AC ~ 60Hz ~ 2.3A
Output: 12 cubes in as little as 7 minutes
Capacity: 2.64 lbs of ice
Unit Dimensions: 15.7”W x 14.2”D x 16.0”H
Unit Weight: 42.9 lbs.
Refrigerant: R134a
Before Your First Use
1. When moving the unit, never tilt it more than 45º. Never turn it upside
down. This could cause improper operation of the compressor or
refrigeration system.
2. The ice maker should be placed on a level, stable surface away from any
heat source or corrosive gas. If the ice maker is not level, turn each foot
clockwise to raise the foot, or counter-clockwise to lower it. Continue this
with all feet until the unit is level and stable. At least six inches of
clearance should be left around the ice maker to ensure proper ventilation.
3. Before using the ice maker for the first time, wait about 12 hours after
positioning it in its final location.
4. Clean the inside of the ice maker thoroughly. Wipe the inner surfaces, ice
collecting bin, water box, ice pusher and evaporator rods.
5
Operating Instructions
NOTE: This unit is suitable for both indoor and outdoor use.
1. Raise the lid and fill the water storage tank with drinkable (i.e., tap, purified
or bottled) water. Make sure the water level is not higher than the bottom
of the ice collecting bin.
2. Plug the unit into a grounded electrical outlet.
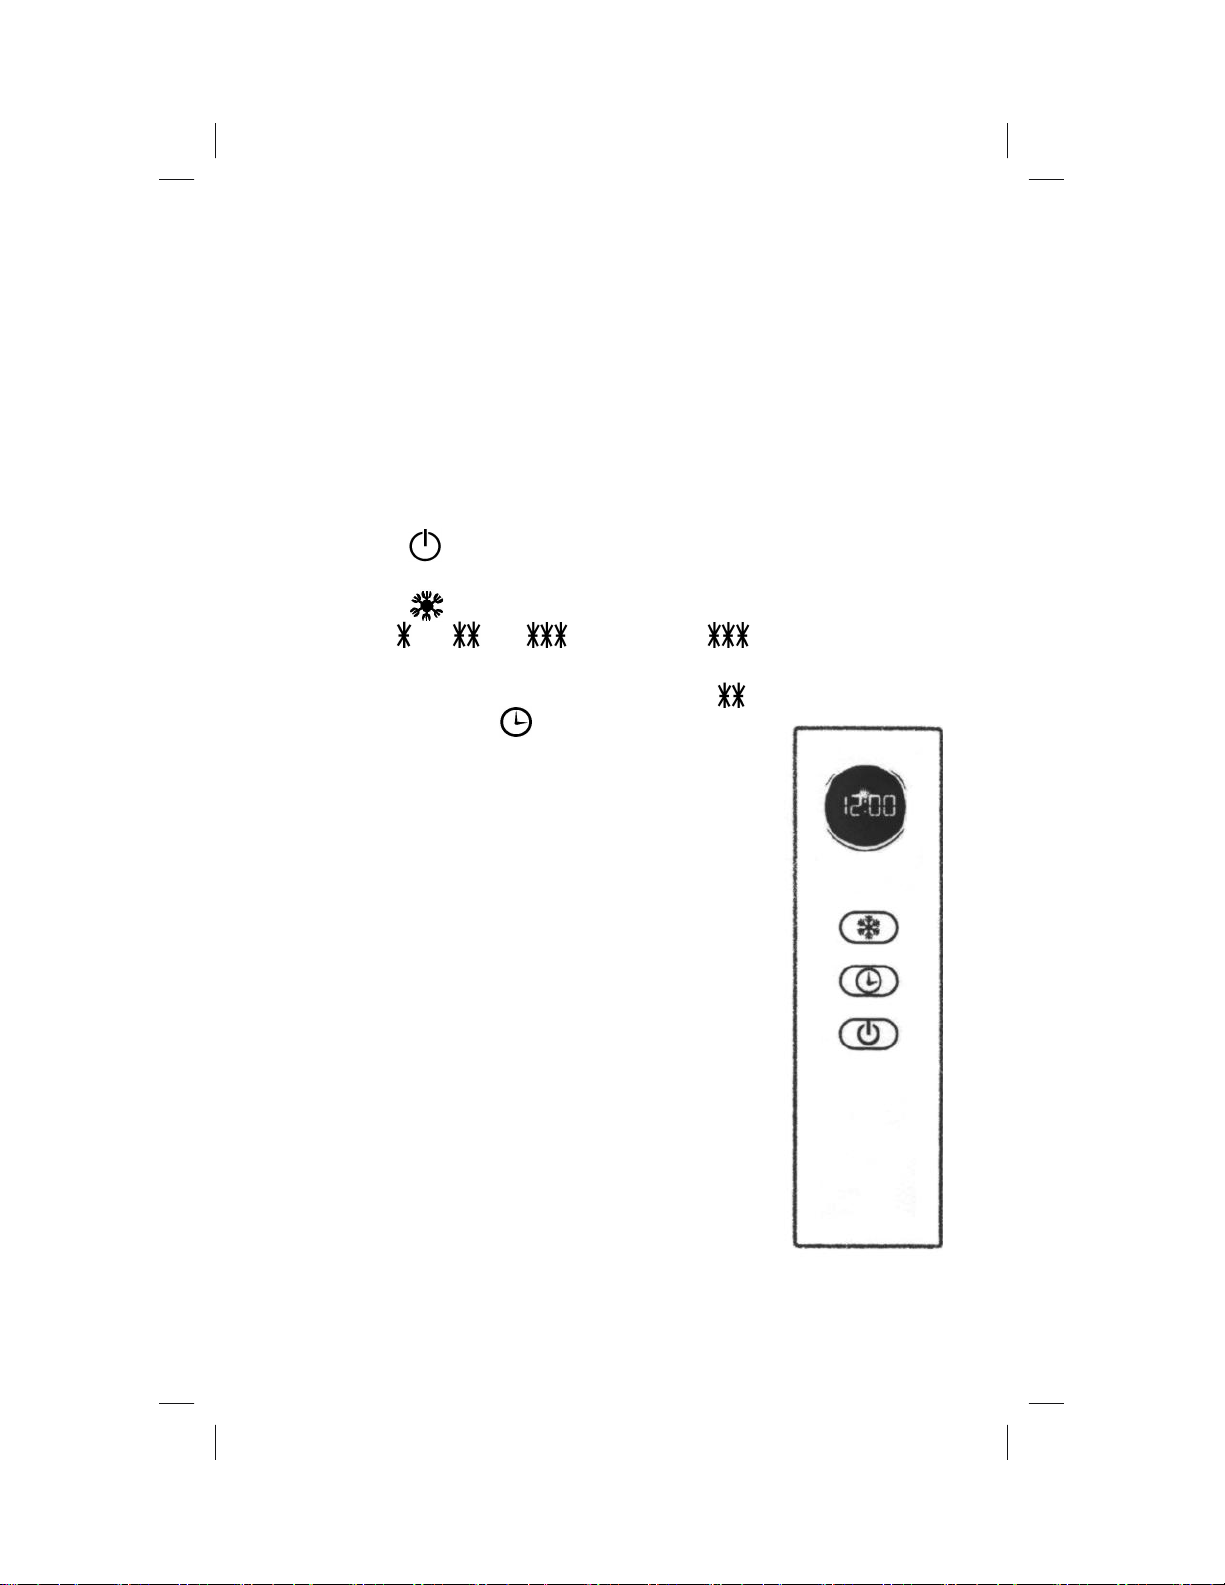
a. Press the button on the control panel to start the machine. Pressing
this button a second time will stop operation.
b. Press the button to select the desired thickness with the LED
display: or or . The setting indicates the thickest
ice cubes and each ice-making cycle will take up to 9 minutes. If a
thickness is not selected, the default setting is used.
c. If desired, press the button to set a delayed
start time. (See next page.)
3. The ice-making process is as follows:
a. Water is pumped into the water box from the
water storage tank. This can take up to 45
seconds.
b. The ice-making cycle begins when the
evaporator rods are dipped into the water box
to start making ice.
c. It takes 7 to 9 minutes to complete the ice making cycle depending on the cube thickness
selected. When the cycle is finished, the water
box tilts backward and the remaining water flows
back to the water storage tank through the water
leakage grooves. The evaporator rods release
the ice cubes.
d. Approximately 60 seconds later, the ice pusher
pushes the ice into the ice storage bin. After the
water box flips back to its level position, the next
ice-making cycle will begin.
6
 Loading...