

Page 1
www.franklin.com
USB Dictionary
& Thesaurus
MWD-170
User’s Guide
Page 2

License Agreement
READ THIS LICENSE AGREEMENT BEFORE USING THE ELECTRONIC REFERENCE. YOUR
USE OF THE ELECTRONIC REFERENCE DEEMS THAT YOU ACCEPT THE TERMS OF THIS
LICENSE. IF YOU DO NOT AGREE WITH THESE TERMS, YOU MAY RETURN THIS PACKAGE
WITH PURCHASE RECEIPT TO THE DEALER FROM WHICH YOU PURCHASED THE
ELECTRONIC REFERENCE AND YOUR PURCHASE PRICE WILLBE REFUNDED.
ELECTRONIC REFERENCE means the software product and documentation found in this package
and FRANKLIN means Franklin Electronic Publishers, Inc.
Limited Use License
All rights in the ELECTRONIC REFERENCE remain the property of FRANKLIN. Through your
purchase, FRANKLIN grants you a personal and nonexclusive license to use this ELECTRONIC
REFERENCE. You may not make any copies of the ELECTRONIC REFERENCE or of the data
stored therein at the time of purchase, whether in electronic or print format. Such copying would be
in violation of applicable copyright laws. Further, you may not modify, adapt, disassemble,
decompile, translate, create derivative works of, or in any way reverse engineer the ELECTRONIC
REFERENCE. You may not export or reexport, directly or indirectly, the ELECTRONIC REFERENCE
without compliance with appropriate governmental regulations. The ELECTRONIC REFERENCE
contains Franklin’s confidential and proprietary information which you agree to take adequate steps
to protect from unauthorized disclosure or use. This license is effective until terminated by Franklin.
This license terminates immediately without notice from FRANKLIN if you fail to comply with any
provision of this license.
Page 3

Getting Started
Congratulations on your purchase of the USB Dictionary & Thesaurus! This dictionary provides
access to definitions, thesaurus entries, a guide to English grammar and more. Take this convenient
USB flash drive with you so you can access your dictionary anywhere you’ll have access to a PC
with a USB 2.0 port. Use Mobipocket Reader Desktop to use the dictionary on your PC. Then use
the Mobipocket Reader Desktop to download additional eBooks and eNews at any time.
System Requirements
To use this dictionary on your PC, your computer must meet the following minimum system
requirements.
• Pentium PC or compatible with available USB support
• Processor speed 500 mHz or better
• 128 MB RAM
• Mouse or other pointing device
• Windows
• Available USB port, 2.0 or higher
• Internet access
®
2000 (Service Pack 4 or higher) XP (Service Pack 2 or higher)
Page 4
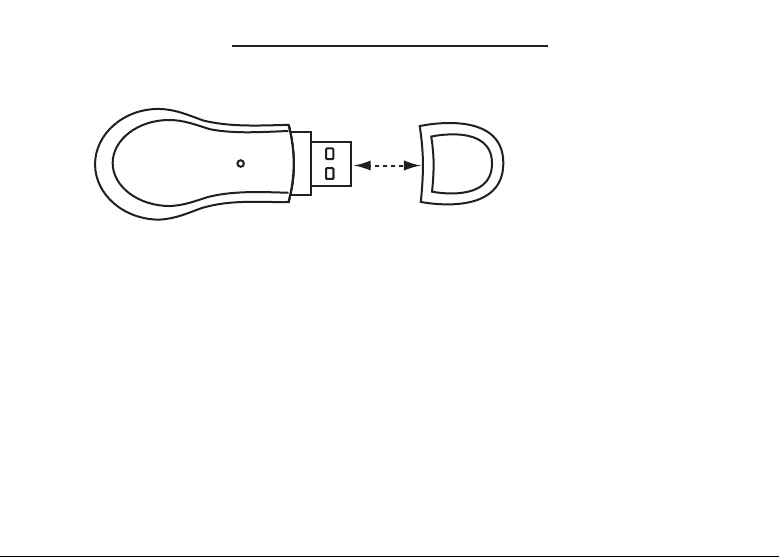
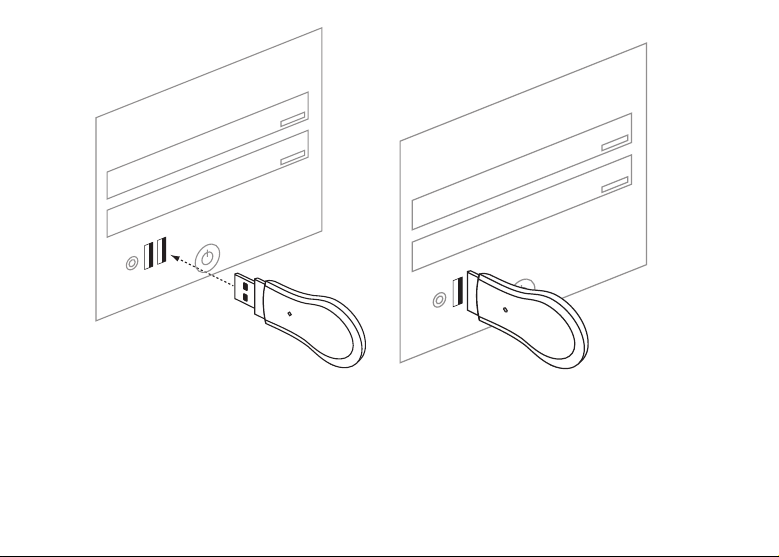
Plugging In Your Dictionary
To open the dictionary on your PC, follow the following instructions:
1. Take off the USB cover on your dictionary.
2. Find an open USB port on your computer.
3. Insert the dictionary into the USB port.
Page 5
The Mobipocket Reader Desktop initializes and then launches on your PC.
Page 6
Note: You may be prompted to restart your computer during the initialization. You do not
have to restart to use your device. Click No to continue.
Page 7

✓ Mapping Disk Drives
If your dictionary does not automatically launch, it may be because it could not establish all the
necessary drives on your computer. Double-click My Computer. All the drives your computer
currently registers are listed in various categories: Hard Disk Drives, Devices with Removable
Storage, Network Drives, etc. The drives for your dictionary are listed under Devices with
Removable Storage. Your dictionary requires two drives in order to automatically install. If it finds
the second drive already occupied by a mapped network drive, the dictionary will not
automatically install. Please re-map the network drive, then unplug and re-plug in your dictionary.
To re-map a drive, in My Computer, click the drive you want to re-map, click Tools | Disconnect
Network Drive to disconnect the drive, then click Tools | Map Network Drive to re-map it.
✓ About Screen Illustrations
Some screen illustrations in this User’s Guide are cropped, resized, or may differ slightly from what
you see on your PC. This does not mean that your dictionary is malfunctioning.
Page 8
Finding Definitions
It’s easy to look up a word in this dictionary. Simply type it in at the word entry screen. This is the
first screen you see on your PC.
Note: All instructions in this User ’s Guide refer to your typing or pressing buttons on your PC
keyboard, or using your mouse or other pointing device.
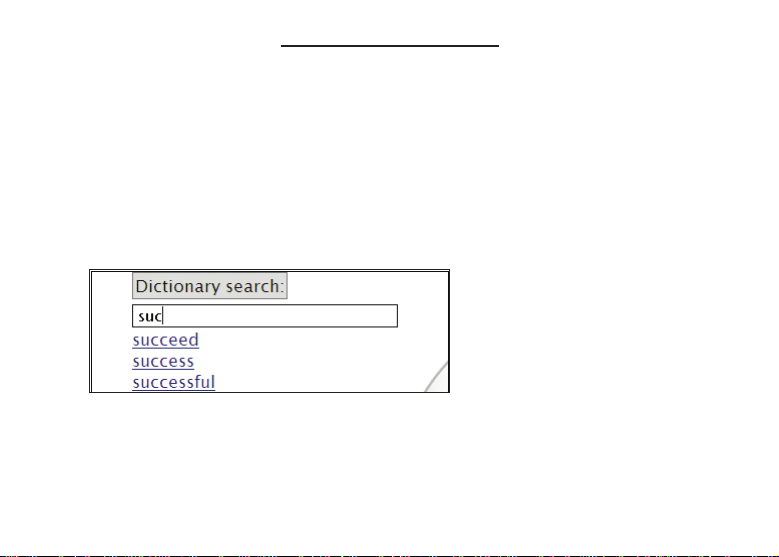
1. Type a word (for example, success).
To erase a letter, press Backspace.
To type a capital, hold Shift and press a letter key.
As you type letters, the first word in the dictionary that matches the letters you type will move
to the top of the word list. You may not have to type the entire word in order to find the one
you want. In this example, note that “success” appears on the screen after you type “suc”
but does not get highlighted until you type “success”.
2. When the word you want is on the screen, press the down arrow until the word you want is
highlighted.
Or you can continue typing letters until the word is complete and the matching word in the
list is automatically highlighted.
Page 9
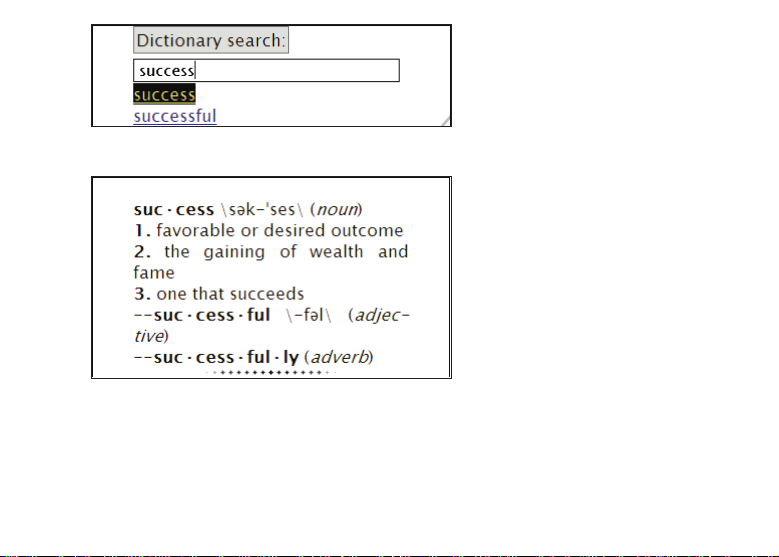
3. Press Enter to view the definition.
Or you can use the mouse and click the word you want.
Page 10
4. Press the right and left arrows to scroll through and read the definition, if necessary.
You can also click and to scroll.
Note: If you press the up and down arrows, you will jump to the previous or next links in the
text. With a link highlighted, press Enter to go to that location in the eBook.
Click to view a grammar topic about the headword’s part of speech.
If a word has a thesaurus entry, is displayed at the bottom of the screen.
Click it to view the entry.
If a word has Confusables, is displayed at the bottom of the screen. Click it to view
the Confusables.
5. Click and then Search to return to the word entry screen.
Page 11
Finding Thesaurus Entries
Thesaurus entries consist of synonyms, antonyms, classmates and other information about a word.
Synonyms are words with the same or similar meaning. Antonyms are words with the opposite
meaning. Classmates are words related in some way to the word you are looking up. They are often
words from a class of similar things, such as being a member of the same class of animals (for
example, giraffe). If a word has a thesaurus entry, will be displayed at the bottom of the
window.
1. Click and then Search to return to the word entry screen.
2. Click .
3. Type a word (for example, complete).
To erase a letter, press Backspace.
To type a capital, hold Shift and press a letter key.
As you type letters, the first word in the dictionary that matches the letters you type will move
to the top of the word list. You may not have to type the entire word in order to find the one
you want. In this example, note that “complete” appears on the screen after you type “compl”
but does not get highlighted until you type “complete”.
4. When the word you want is on the screen, press the down arrow until the word you want is
highlighted.
Or you can continue typing letters until the word is complete and the matching word in the
list is automatically highlighted.
5. Press Enter to view the thesaurus entry.
Or you can use the mouse and click the word you want.
Page 12

Note: If the word you selected does not have a thesaurus entry, the thesaurus entry for the
first word on the word list will be displayed.
6. Press the right and left arrows to scroll through and read the entry, if necessary.
You can also click and to scroll.
Note: If you press the up and down arrows, you will jump to the previous or next links in the
text. With a link highlighted, press Enter to go to that location in the eBook.
Click to view a grammar topic about the headword’s part of speech.
If a word has a dictionary entry, is displayed at the bottom of the screen.
Click it to view the definition.
If a word has Confusables, is displayed at the bottom of the screen. Click it to view
the Confusables.
7. Click and then Search to return to the dictionary word entry screen.
Page 13

Correcting Misspellings
If you misspell a word, don’t worry. It will be corrected automatically. You can even spell it
phonetically.
1. Click and then Search to return to the word entry screen.
2. Type a misspelled word (for example, chear).
To erase a letter, press Backspace. Note: If the word you type does not match any word in
the dictionary, nothing in the word list is highlighted.
3. Press Enter.
The spell correction list is displayed.
Page 14

4. Press the down or up arrows to highlight a correction.
5. Press Enter to view its dictionary entry.
To go back to the correction list and select another word, press Backspace.
Finding Confusables
Confusables are homonyms and spelling variants that are easy to confuse. If a word has
Confusables, is displayed at the bottom of the screen.
1. Click and then Search to return to the word entry screen.
2. Type a word (for example, rain) and press Enter.
3. Click .
Confusables are displayed with identifying words.
4. Click and then Search to return to the word entry screen.
®
Page 15

Finding a Letter in a Word
If you are uncertain about how to spell a word, type a question mark (?) in place of each unknown
letter.
1. Click and then Search to return to the word entry screen.
2. Type a word with ?s (for example, st??y).
3. Press Enter.
The MatchMaker list is displayed.
4. Press the down or up arrows to move the highlight to the word you want.
5. Press Enter to view its dictionary entry.
To go back to the correction list and select another word, press Backspace.
✓ Word Finding Tips
You can also use ?s to help solve crossword puzzles. For example, you can search for a fiveletter word in which its second letter is h and its last letter is w. Enter ?h??w to see possible
answers.
Page 16

Finding a Series of Letters
To find prefixes, suffixes, and other parts of words, type an asterisk (✽) in a word. Each asterisk
stands for a series of letters. Note: If you type an asterisk at the beginning of a word, it may take a
little while to find the matching words.
1. Click and then Search to return to the word entry screen.
2. Type a word with an asterisk (for example, intra
To type an asterisk, hold Shift and press 8.
3. Press Enter.
The MatchMaker list is displayed.
4. Press the down or up arrows to move the highlight to the word you want.
5. Press Enter to view its dictionary entry.
To go back to the correction list and select another word, press Backspace.
✽
).
Page 17

Using the Grammar Guide
Your dictionary includes a helpful guide to English grammar that describes parts of speech and other
grammar topics. Read the grammar guide and test your comprehension by answering quizzes at the
end of most sections.
1. Click and then Search to return to the word entry screen.
2. Click .
Note: If you click from an entry, you will go directly to a topic relating to the
headword’s part of speech.
3. Press the up and down arrows to highlight the topic you want and then press Enter.
Or you can click the topic you want.
Continue selecting subsections, if necessary, until you reach the text of the grammar guide.
Page 18

Press to see a menu of all the topics available in the grammar guide and then use
the same procedure to select the topic you want.
4. Press the left and right arrows to scroll through the text.
Press or to go to the next or previous topic, if available.
5. Press to return to the main menu.
To return to the dictionary, click Removable Storage in the left pane of the Mobipocket
Reader, click Merriam-Webster Dictionary and Thesaurus, and then click . If
at any time, you return to the dictionary and see only the Merriam-Webster logo on the page,
click and then Search to return to the word entry screen.
Page 19

Grammar Quizzes
Y our grammar guide contains many quizzes to help you learn and understand the rules of grammar you are
reading about. Note: Quizzes are not available for every topic. To take a quiz, click
. During a quiz, to move to the next question, click . Click to exit the quiz and
return to the grammar topic. Click to go to the main menu of the grammar guide.
✓ Select the Solution Quizzes
This type of quiz provides you with options. Instructions are displayed at the top of the screen
indicating what the quiz expects you to choose. At each question, press the up or down arrows to
begin and move the highlight. Highlight the option you want and then press Enter to see if you
are correct. Or you can click the option you want.
✓ Type the Answer Quizzes
This type of quiz asks you to fill in the blank. Instructions are displayed at the top of the screen
indicating what the quiz expects you to type. Type your answer. To see the expected answer,
press .
✓ On Your Honor Quizzes
This type of quiz asks you to say a solution to yourself. Instructions are displayed at the top of the
screen indicating what the quiz expects you to know. Press the down arrow to see the answer.
Page 20

Highlighting Words
Another way to look up words is by highlighting them in text. Then you can find their definition, copy
the word to the clipboard, highlight the word in the entry, add a note, or edit the word.
1. At any text, press click a word to highlight it.
If you want to highlight more than one word, click and hold the left mouse button at the
beginning of the text, then move the mouse until all the text you want is highlighted before
letting go.
A pop-up menu is displayed.
2. Click the option you want and then press Enter.
Click Lookup to search for the highlighted text in any available dictionary. Alist of possible
entries is displayed. Click the entry you want to view.
Click Copy to copy the highlighted text to the clipboard.
Click Highlight to save a shading over the highlighted text.
Page 21

To delete the shading at a later time, highlight any portion of the highlighted text, then select
Delete Highlight from the pop-up menu.
Click Add note to add an explanatory note regarding the highlighted text. A pop-up bubble is
displayed where you can type your note. Begin typing your note. To erase a letter, press
Backspace. To type a capital, hold Shift and press a letter key. When you are finished
typing, click Close to save the note or click Delete to exit without saving the note. is
added to the page where you added the note, and the highlighted text is shaded.
Click at any time to view, edit, or delete the note. You can also add a note to a entry
without highlighting any text. Click in the tool bar and then add the note as
described above.
Click Modify to replace the highlighted text with your own preference. A pop-up bubble is
displayed where you can type your changes. The highlighted text is included in the bubble.
Begin typing your changes. To erase a letter, press Backspace. To type a capital, hold Shift
and press a letter key. When you are finished typing, click Close to save the changes or
click Delete to exit without saving your changes. is added to the page where you added
the changes, and the highlighted text is shaded and crossed out in the entry, so that it is
easily identified as a modification.
Page 22

Click at any time to view, edit, or delete the changes.
Click Add link to add a hyperlink from the highlighted text to a page within this dictionary or
another location. An instructional note is displayed. Click anywhere on the screen to close
the instructions. Go to the entry you want to link to and highlight any word on the page. The
pop-up menu is displayed. Click Set link target. You return to your previous location. is
displayed and the highlighted text is underlined so you know it is a link.
Click at any time to edit or delete the hyperlink.
Click anywhere in the screen to close the pop-up menu and remove the highlight.
✓ Adding a Bookmark
If you are viewing an entry that you want to mark for easy access, or just to remember where you
were, you can add a bookmark to that page. Simply click and you a bookmark will
be saved. If you revisit a page that has a bookmark, and want to remove it, you see
in the tool bar. Click it to remove the bookmark.
✓ Viewing the Annotations Pane
Any time you add a bookmark, highlight, note, modification, or link a record of these is kept in the
“Annotations pane” of the Mobipocket Reader. When you add an item, this pane is displayed
automatically. But you can choose to view or close it anytime. Click View | Annotations pane. If
there is a check mark next to Annotations pane, it is already displayed, and you will be closing
it. Another way to view the pane is by clicking then Show Annotation Pane.
Page 23

For example, an Annotations pane that looks like this is displayed on the right side of the screen:
When viewing the Annotations pane, you can easily access any item you have added. Click the item
in the pane to go to that location. Then click the icon, if necessary, to view your note or changes. The
following icons indicate the different kinds of items you can add:
Bookmark, Highlight, Note, Modification, and Link
Page 24

Understanding the Mobipocket Reader
Read the following to help you understand the layout and additional functions of the Mobipocket
Reader. For information about the Annotations pane, please refer to “Viewing the Annotations Pane”
in the “Highlighting Words” section.
Menu bar
Search
Input Box
Tool bar
Left pane
Annotations
Pane
Left Pane
The left pane contains a basic source of links for the places you may visit frequently while using the
Mobipocket Reader.
Now Reading Displays the current eBook or other document you are viewing.
Page 25

My Library View all the eBooks, eNews and eDocs you have on your PC.
My Device List Displays the list of external devices Mobipocket Reader has communicated
with on your PC.
Online Account Logs you into your account at www.mobipocket.com. Internet access is
required. If you don’t already have an account set up, you can create one
when you purchase eBooks.
eBookstore Opens a store of eBooks that you can purchase and download to read on
your PC.
eNewsstand Opens a store of eNewspapers that you can subscribe to and read on your
PC.
Removable Storage This is the name of your USB Dictionary & Thesaurus. Click this at any time
to return to the dictionary.
Tool Bar
The Tool Bar is a list of buttons you can access while reading a document. Note: These options
change depending on where you are in the Mobipocket Reader.
Click... To...
go to a document’s table of contents, if available.
go to the previous page.
go to the next page.
go back to a previous location.
go forward to a previous location.
increase the font size.
decrease the font size.
Page 26

add a bookmark at your current location in the text.
delete a bookmark previously added at your location in the text.
add a note.
change the layout of the Mobipocket Reader.
toggle the Mobipocket Reader to and from full screen view.
access the Mobipocket Reader options.
copy a selected document to an attached device.
begin reading the selected document.
go to the store of eNewspapers that you can subscribe to and read on your PC.
go to the store of eBooks that you can purchase and download to read on your
PC.
get the latest updates to your eNews subscriptions.
stop an update to your eNews subscriptions, once it has begun.
return to the home page of the eBookstore or eNewstand.
logout of your Mobipocket Reader account.
create a new folder to help you organize your Mobipocket files.
download again a file you may have accidentally deleted from your PC.
install a new device to use with the Mobipocket Reader.
convert a file on your PC to a Mobipocket readable format.
Page 27

Menu Bar
The Menu Bar provides you with an alternative method of performing the same functions you may
find on the Tool Bar or the Left pane.
File The File menu provides you with options to open new files, add files to your Library, create
a New Reading List, see a file’s properties, send a file to an attached handheld device,
convert a file to Mobipocket format, update your eNews subscriptions and exit the
Mobipocket Reader.
Edit The Edit menu allows you to undo your last action or cut, copy and paste text.
View The View menu allows you to display the Left pane, the preview pane (if available) and the
Annotations pane. You can view the current document, My Library, the eNewsstand, an
eBookstore, your device list, or your online account. You can adjust the font size or the
layout of the pages of a document. You can refresh the display, turn on or off autoscrolling,
view the document at full screen and adjust the orientation (if available).
Go to The Go to menu allows you to go to the first or last page of a document, or go to the next
or previous page. You can also input a specific page number to go directly to a particular
page. You can move forward, back or go to a Table of Contents (if available).
Tools The Tools menu allows you to add or remove a bookmark, add a note, install a new
device, get information about your books, login or logout of your online account,
redownload a previously downloaded file, or change your settings.
Help The Help menu provides a list of links where you can find help, customer service and
other helpful tips. you can also check for updates to the software and provide feedback
about the application.
Search Input Box
Type a word in the Search Input Box and press Enter repeatedly to search for it throughout the
current document.
Page 28

Getting eBooks
The Mobipocket Reader provides you with easy access to purchasing and downloading eBooks in
categories ranging from Science Fiction to History and many more. Note: Before you purchase and
download eBooks, be sure you are connected to the Internet. The following example, leads you
through the purchase of an eBook on the www.mobipocket.com Web site.
1. Click eBookstore in the Left pane.
The Home page of the eBookstore is opened within the Mobipocket Reader.
2. Browse to find the eBook you want.
Categories are listed down the left side of the page.
At any time, click to return to the Home page of the eBookstore.
3. When you see a title you want to purchase, click it, so you are viewing that eBook’s page.
If you are not sure if you want to make the purchase, you can download a free sample of the
eBook. Click FREE SAMPLE to download and read a sample of the book. Then return to the
eBookstore to purchase the eBook.
4. Click ADD TO CART.
You then have the option to continue shopping, or to proceed to checkout.
Click View Shopping Cart to view the contents of your cart at any time. If you wish to
remove a selection, click Delete.
5. Click Proceed to checkout.
You will be prompted to re-enter your username and password. If you have not already
created an account, you can do so now. Click Create an account and follow the steps on
the screen.
6. Type your username and password and click OK.
You are asked to review your order.
7. Click Confirm order to place your order.
Page 29

8. Enter your payment information and click Submit.
When the order has been completed, a page is presented where you can download the eBook.
9. Click DOWNLOAD.
After the book has been downloaded, you will be asked to activate the book.
Note: Please save all your eBooks in My Documents | My eBooks so that the Mobipocket
Reader can see them.
10. Type your username and password and click Logon.
The eBook you purchased is displayed.
✓ Other Bookstores
Other bookstores are available for you to browse. Click eBookstore in the Left pane. Then click
View | eBookstore from the Menu Bar. A sub-menu of additional Web sites is listed where you
can browse for other eBooks. Click the one you want and that page will be loaded into the
Mobipocket Reader. Note: Checkout and purchase procedures may differ depending on what
Web site you download from.
✓ Saving Additional Files to the USB Drive
Your USB flash drive contains additional memory which you can use to save downloaded eBooks
and eNews so you can take them with you.
1. Open My Computer.
There are two drives associated with the USB Dictioanry: Auto_Run and Removable Disk.
Anything you save must be saved into the Removable Disk drive.
You may have additional memory available to use. To see how much space you have, right-
click the Removabal Disk drive, and click Properties. A graph is displayed indicating how
much memory is currently being used and how much is available.
2. Find the file you want to copy, and then copy it to your “Removable Storage” drive, as
indicated in your My Computer folder.
Page 30

Getting eNews
The Mobipocket Reader also provides you with easy access to subscribing to eNewspapers. Note:
Before you subscribe, be sure you are connected to the Internet.
1. Click eNewsstand in the Left pane.
The Home page of the eNewsstand is opened within the Mobipocket Reader.
2. Browse to find the eNewspaper you want.
Categories are listed down the left side of the page.
At any time, click to return to the Home page of the eBookstore.
3. When you see a newspaper you want to subscribe to, click it, so you are viewing that
eNewspaper’s page.
4. Click SUBSCRIBE.
The eNews section of My Library is displayed, the eNewspaper subscription is activated, and
the most recent update is downloaded to your PC.
Note: There is no charge to subscribe to an eNewspaper.
5. Click to begin reading the eNews.
At any time, click an eNews subscription, click to check if there are any updates
to the file.
You can also adjust the times when your eNews subscriptions are updated. Click Tools |
Settings ... to open the Settings screen. Click the eNews tab, then adjust the days when
you want to update your eNews.
Page 31

Recovering Your Dictionary
Your dictionary can be accidentally deleted from your device. If this happens, you can restore the
dictionary by following the steps below.
1. Unplug the device and plug it back in.
When the device is plugged into your computer it checks to make sure that it contains all the
proper files. If it does not, the files will be restored automatically.
If the dictionary still will not run, try steps 2-6.
2. Open My Computer, then open the “Auto_Run” drive.
3. Right-click restore.exe, then click Copy.
4. Open the “Removable disk” drive.
Note: You may need to “view hidden files” in order to see files in the “Removable disk”
folder. To do this, open Control Panel. Select Appearance and Themes, then Folder
Options. Select the View tab, then click the check box next to “Show hidden files and
folders”.
5. Right-click anywhere inside the folder, then click Paste.
6. Double-click restore.exe to run the restoration program.
Page 32

Specifications
Model: MWD-170 USB Dictionary & Thesaurus
• Size: 3 x 1.25 x 0.25 in • Weight: 0.4 oz.
ISBN 1-59074-356-3
Please have your product number (MWD-170) and date of purchase handy when you call to register. For
customer service and technical support call 609-386-8997.
Do not use or store this product in extreme or prolonged heat, cold, humidity, or other adverse conditions. If
you have a problem with this product, refer to the warranty.
Copyrights, Patents, and Trademarks
© 1995-2006 Franklin Electronic Publishers, Inc., Burlington, N.J. 08016-4907 USA. All rights reserved.
© 1997 Merriam-Webster, Incorporated. All rights reserved.
“A MERRIAM-WEBSTER” and “WREATH & MONOGRAM” are registered trademarks of Merriam-Webster,
Incorporated and are used herein pursuant to License.
© 2005 Mobipocket.com S.A. Paris, France. All rights reserved.
Note: This device should be disposed through your local electronic product recycling system - do not throw
into the trash bin.
Contacts
Storage or Problems
Page 33

FCC Notice
This device complies with Part 15 of the FCC Rules. Operation is subject to the following two conditions: (1) This device may not
cause harmful interference, and (2) This device must accept any interference received, including interference that may cause
undesired operation.
Warning: Changes or modifications to this unit not expressly approved by the party responsible for compliance could void the user’s
authority to operate the equipment.
NOTE: This equipment has been tested and found to comply with the limits for a Class B digital device, pursuant to Part 15 of the
FCC Rules. These limits are designed to provide reasonable protection against harmful interference in a residential installation. This
equipment generates, uses and can radiate radio frequency energy and, if not installed and used in accordance with the instructions,
may cause harmful interference to radio communications. However, there is no guarantee that interference will not occur in a
particular installation. If this equipment does cause harmful interference to radio or television reception, which can be determined by
turning the equipment off and on, the user is encouraged to try to correct the interference by one or more of the following measures:
–Reorient or relocate the receiving antenna.
–Increase the separation between the equipment and receiver.
–Connect the equipment into an outlet on a circuit different from that to which the receiver is connected.
–Consult the dealer or an experienced radio/TV technician for help.
NOTE: The manufacturer is not responsible for any radio or TV interference caused by unauthorized modifications to this equipment.
Such modifications could void the user’s authority to operate the equipment.
Disclaimer of Warranties
Except as specifically provided herein, Franklin makes no warranty of any kind, express or implied, with respect to this product.
Limited Warranty (U.S. only)
LIMITED WARRANTY, DISCLAIMER OF WARRANTIES, AND LIMITED REMEDY
FRANKLIN WARRANTS TO THE ORIGINALPURCHASER THATTHIS PRODUCT WILL BE FREE FROM DEFECTS IN MATERIALS
AND WORKMANSHIP FOR APERIOD OF ONE (1) YEAR FROM THE ORIGINAL DATE OF PURCHASE AS EVIDENCED BY A
COPY OF THE SALES RECEIPT. THIS LIMITED WARRANTY DOES NOT COVER DAMAGE DUE TO ACTS OF GOD, ACCIDENT,
MISUSE, ABUSE, NEGLIGENCE, MODIFICATION, UNSUITABLE ENVIRONMENT, OR IMPROPER MAINTENANCE. THE SOLE
OBLIGATION AND LIABILITY OF FRANKLIN, AND THE EXCLUSIVE REMEDY UNDER THIS LIMITED WARRANTY, IS REPAIR OR
REPLACEMENT AT THE SOLE OPTION OF FRANKLIN AND THIS REMEDYAPPLIES ONLYIN THE CASE IN WHICH FRANKLIN
DETERMINES THATTHE PRODUCT WAS DEFECTIVE AND THAT THE DEFECT AROSE WITHIN THE DURATION OF THE
Page 34

LIMITED WARRANTY. THIS REMEDY IS THE EXCLUSIVE REMEDY FOR BREACH OF THIS WARRANTY. THIS WARRANTY GIVES
YOU CERTAIN RIGHTS; YOU MAYALSO HAVE OTHER RIGHTS THAT MAY VARY FROM JURISDICTION TO JURISDICTION.
EXCEPT FOR THE LIMITED WARRANTYEXPRESSLY RECITED ABOVE, THIS FRANKLIN PRODUCT IS PROVIDED ON AN “AS IS”
BASIS, WITHOUTANY OTHER WARRANTIES, EXPRESS OR IMPLIED, INCLUDING, BUT NOT LIMITED TO, WARRANTIES OF
MERCHANTABLE QUALITY, MERCHANTABILITY, OR FITNESS FOR APARTICULAR PURPOSE, OR THOSE ARISING BYLAW,
STATUTE, USAGE OF TRADE, OR COURSE OF DEALING. THIS WARRANTYAPPLIES ONLYTO PRODUCTS MANUFACTURED BYOR
FOR FRANKLIN AND SPECIFICALLY DOES NOT INCLUDE BATTERIES, CORROSION OF BATTERYCONTACTS OR ANYOTHER
DAMAGE CAUSED BY BATTERIES. FRANKLIN SHALLNOT HAVE ANY LIABILITY TO THE PURCHASER OR ANY OTHER PERSON OR
ENTITY FOR ANYINDIRECT, INCIDENTAL, SPECIAL, OR CONSEQUENTIAL DAMAGES WHATSOEVER, INCLUDING, BUT NOT
LIMITED TO, LOSS OF REVENUE OR PROFIT, LOST OR CORRUPTED DATA, OR OTHER COMMERCIALOR ECONOMIC LOSS, EVEN
IF FRANKLIN HAS BEEN ADVISED OF THE POSSIBILITYOF SUCH DAMAGES, OR EVEN IF OTHERWISE FORESEEABLE. FRANKLIN
IS NOT RESPONSIBLE FOR CLAIMS BYA THIRD PARTY. FRANKLIN’S MAXIMUM AGGREGATE LIABILITY SHALL NOT EXCEED THE
AMOUNT PAID FOR THE PRODUCT AS EVIDENCED BY THE SALES RECEIPT. SOME STATES/JURISDICTIONS DO NOTALLOW THE
EXCLUSION OR LIMITATION OF LIABILITY FOR CONSEQUENTIALOR INCIDENTAL DAMAGES, SO THE ABOVE LIMITATION MAY
NOTAPPLY TO YOU. IF THE LAWS OF THE RELEVANTJURISDICTION DO NOT PERMIT FULL WAIVER OF IMPLIED WARRANTIES,
THEN THE DURATION OF IMPLIED WARRANTIES AND CONDITIONS ARE LIMITED TO THE DURATION OF THE EXPRESS
WARRANTY GRANTED HEREIN.
Warranty Service: If you think your product is defective, call Franklin’s Customer Service Desk, 1-800-266-5626, to request a return
merchandise authorization (“RMA”) number, before returning the product (transportation charges prepaid) to:
Franklin Electronic Publishers, Inc.
Attn: Service Department
One Franklin Plaza
Burlington, NJ 08016-4907
If you return a Franklin product, please include your name, address, telephone number, a brief description of the defect and a copy of
your sales receipt as proof of your original date of purchase. You must also write the RMAprominently on the package if you return
the product; otherwise there may be a lengthy delay in the processing of your return. Franklin strongly recommends using a trackable
form of deliver to Franklin for your return.
Page 35

Limited Warranty (EU and Switzerland)
Notwithstanding the disclaimer of warranties above, this product, excluding batteries and liquid crystal display (LCD), is guaranteed by
Franklin to be free of defects in materials or workmanship for a period of two years from the date of purchase. It will be repaired or
replaced with an equivalent product (at Franklin’s option) free of charge for any defect in workmanship or materials during that time.
This warranty explicitly excludes defects due to misuse, accidental damage, or wear and tear. This warranty does not affect the
consumer’s statutory rights.
Limited Warranty (outside U.S., EU and Switzerland)
Notwithstanding the disclaimer of warranties above, this product, excluding batteries and liquid crystal display (LCD), is guaranteed by
Franklin to be free of defects in materials or workmanship for a period of one year from the date of purchase. It will be repaired or
replaced with an equivalent product (at Franklin’s option) free of charge for any defect in workmanship or materials during that time.
Products purchased outside the United States, the European Union and Switzerland that are returned under warranty should be
returned to the original vendor with proof of purchase and description of fault. Charges will be made for all repairs unless valid proof of
purchase is provided.
This warranty explicitly excludes defects due to misuse, accidental damage, or wear and tear. This warranty does not affect the
consumer’s statutory rights.
EVP-28003-00
Rev. A
 Loading...