

Page 1
LDS-1990
Language Studio
Spanish
German
Translate - Listen - Speak
Page 2

License Agreement (U.S. only)
READ THIS LICENSE AGREEMENT BEFORE USING THE ELECTRONIC REFERENCE.
YOUR USE OF THE ELECTRONIC REFERENCE DEEMS THAT YOU ACCEPT THE
TERMS OF THIS LICENSE. IF YOU DO NOT AGREE WITH THESE TERMS, YOU MAY
RETURN THIS PACKAGE WITH PURCHASE RECEIPT TO THE DEALER FROM WHICH
YOU PURCHASED THE ELECTRONIC REFERENCE AND YOUR PURCHASE PRICE
WILL BE REFUNDED. ELECTRONIC REFERENCE means the software product and
documentation found in this package and FRANKLIN means Franklin Electronic
Publishers, Inc.
Limited Use License
All rights in the ELECTRONIC REFERENCE remain the property of FRANKLIN.
Through your purchase, FRANKLIN grants you a personal and nonexclusive
license to use this ELECTRONIC REFERENCE. You may not make any copies of the
ELECTRONIC REFERENCE or of the data stored therein at the time of purchase,
whether in electronic or print format. Such copying would be in violation of
applicable copyright laws. Further, you may not modify, adapt, disassemble,
decompile, translate, create derivative works of, or in any way reverse engineer the
ELECTRONIC REFERENCE. You may not export or reexport, directly or indirectly,
the ELECTRONIC REFERENCE without compliance with appropriate governmental
regulations. The ELECTRONIC REFERENCE contains Franklin’s con dential and
proprietary information which you agree to take adequate steps to protect from
unauthorized disclosure or use. This license is e ective until terminated by Franklin.
This license terminates immediately without notice from FRANKLIN if you fail to
comply with any provision of this license.
Please read the following safety
warnings and precautions before
using your device. Note: If this
device is to be used by young
children, this User’s Guide should
be read to them by an adult and
their use of the device should be
monitored. Failure to do so may
cause injury.
1
Page 3

Table of Contents
Introduction ........................................3
Battery Information ...........................5
Understanding Your Device ...............7
Key Guide ............................................9
Product Care .................................... 11
Resetting Your Device ..................... 12
Getting Started ................................ 13
Using the Library ............................. 14
Changing the Settings .................... 15
Selecting a Book .............................. 17
Looking Up a Word .......................... 18
Finding Idioms ................................. 21
Highlighting Words ......................... 22
Viewing Your Search History........... 38
Using the Menus .............................. 38
Using the Audio Player .................... 40
Using Record and Playback ............ 42
Playing the Games ........................... 43
Using the Clock ................................ 46
Using the Calculator ........................ 47
Using the Phone Book ..................... 49
Using the Converter ........................ 52
Installing the
Franklin PC Desktop ........................ 54
Connecting Your Device .................. 55
Using the Franklin PC Desktop ....... 56
Using Annotations, Modi cations
and Highlights ................................. 23
Viewing the Annotations List ......... 25
Viewing In ections by Franklin ...... 26
Viewing
Supplemental Information ............. 27
Using the Phrase Books................... 29
Using the Grammar Guide .............. 31
Using My Vocabulary List ................. 33
Using My Dictionary ......................... 36
Using the
Franklin PC View™ Feature .............. 61
Speci cations ................................... 66
Recycling and Disposal ................... 67
FCC Notice ........................................ 67
Disclaimer of Warranties ................. 68
Limited Warranty
(EU and Switzerland) ....................... 68
Limited Warranty (Outside U.S.,
EU and Switzerland) ........................ 68
Limited Warranty (U.S. only) ........... 69
2
Page 4

Introduction
Introduction
Congratulations on your purchase
of the LDS-1990, Language Studio
Spanish - German! The LDS-1990 is an
educational, informational, and versatile
handheld computing device. Your
package includes:
• your LDS-1990 device
• Franklin PC Desktop installation CDROM
• earphones
• USB cable
Your LDS-1990 has the ability to store
eBooks, RSS eNews, audio les and
other documents. It has a built-in
organiser, with a clock, calculator,
converter and phone book.
To install the Franklin PC Desktop
on your PC, your computer must
meet the following minimum system
requirements:
• IBM-compatible Pentium class PC or
higher
• 256 color VGA monitor
Your LDS-1990 contains the following
reference books:
• Langenscheidt Handwörterbuch
Spanisch-Deutsch
• Langenscheidt Handwörterbuch
Deutsch-Spanisch
• Sätze für die Reise (S-D)
• Sätze für die Reise (D-S)
• Spanische Grammatik
• Guía de gramática de la lengua
española
• Deutsche Grammatik
• Guía de gramática de la lengua
alemana
Expand your vocabulary by looking
up translations of words using the
Spanish-German and German-Spanish
dictionaries. Find everyday and travel
phrases using the phrase books.
Learn grammar using the Spanish and
German grammar guides. For additional
help in using this device, read the
Spanish or German Tutorial.
• Mouse or other pointing device
• Windows® XP or Windows Vista®
• 20 MB free disk space
• 32 MB RAM
• Available USB port
• CD-ROM Drive
3
Page 5

Introduction Introduction
Save a list of German and Spanish
vocabulary that you want to learn,
study and remember. Add a list of
words and de nitions not found in the
dictionaries in this device.
Most of these books include a word
search feature that helps you nd words
just by typing the rst few letters. If you
can’t nd the words you want, phonetic
spell correction is available to show you
other possibilities. In addition, a word
search feature is included which allows
you to type a “?” in place of any single
letter and a “✽” in place of zero, one or
more letters in a word so that you can
search based on the letters you are sure
of. Verbs are conjugated in all tenses
to make learning and comprehension
easier.
your pronunciation, then play them
both back to see how you compare.
In addition, use the audio player that
comes with your LDS-1990 to listen to
audio books and music.
Purchase titles and expand your
content by loading it from MMC/SD
(MultiMediaCard/Secure Digital). These
convenient cards (sold separately) slip
easily into the side of your LDS-1990.
Transfer les directly from your PC to an
MMC/SD and you can carry more books,
music, and other documents around
with you.
Use the Franklin PC View™ feature of the
Franklin PC Desktop to view content
from the LDS-1990 on a personal
computer. Just connect your device to
a PC and you can use the dictionary
Hear Spanish and German words
and Spanish and German phrases
pronounced in high-quality speech so
you can practice saying them correctly.
Use the listen, record and playback
feature to practice pronouncing words.
Listen to a word or phrase, record
features on a PC screen.
4
Page 6
Battery Information
Your LDS-1990 uses a rechargeable 3.7 volt lithium polymer battery.
The rst time you use your device, it requires approximately 4 to 6 hours of
charging before use. Thereafter, your device can take up to 6 hours for a full charge.
Battery power lasts for about 1 week of normal dictionary use or 14 hours of
continuous dictionary use (and around half that with continuous audio). When you
see the low battery warning, please recharge your battery.
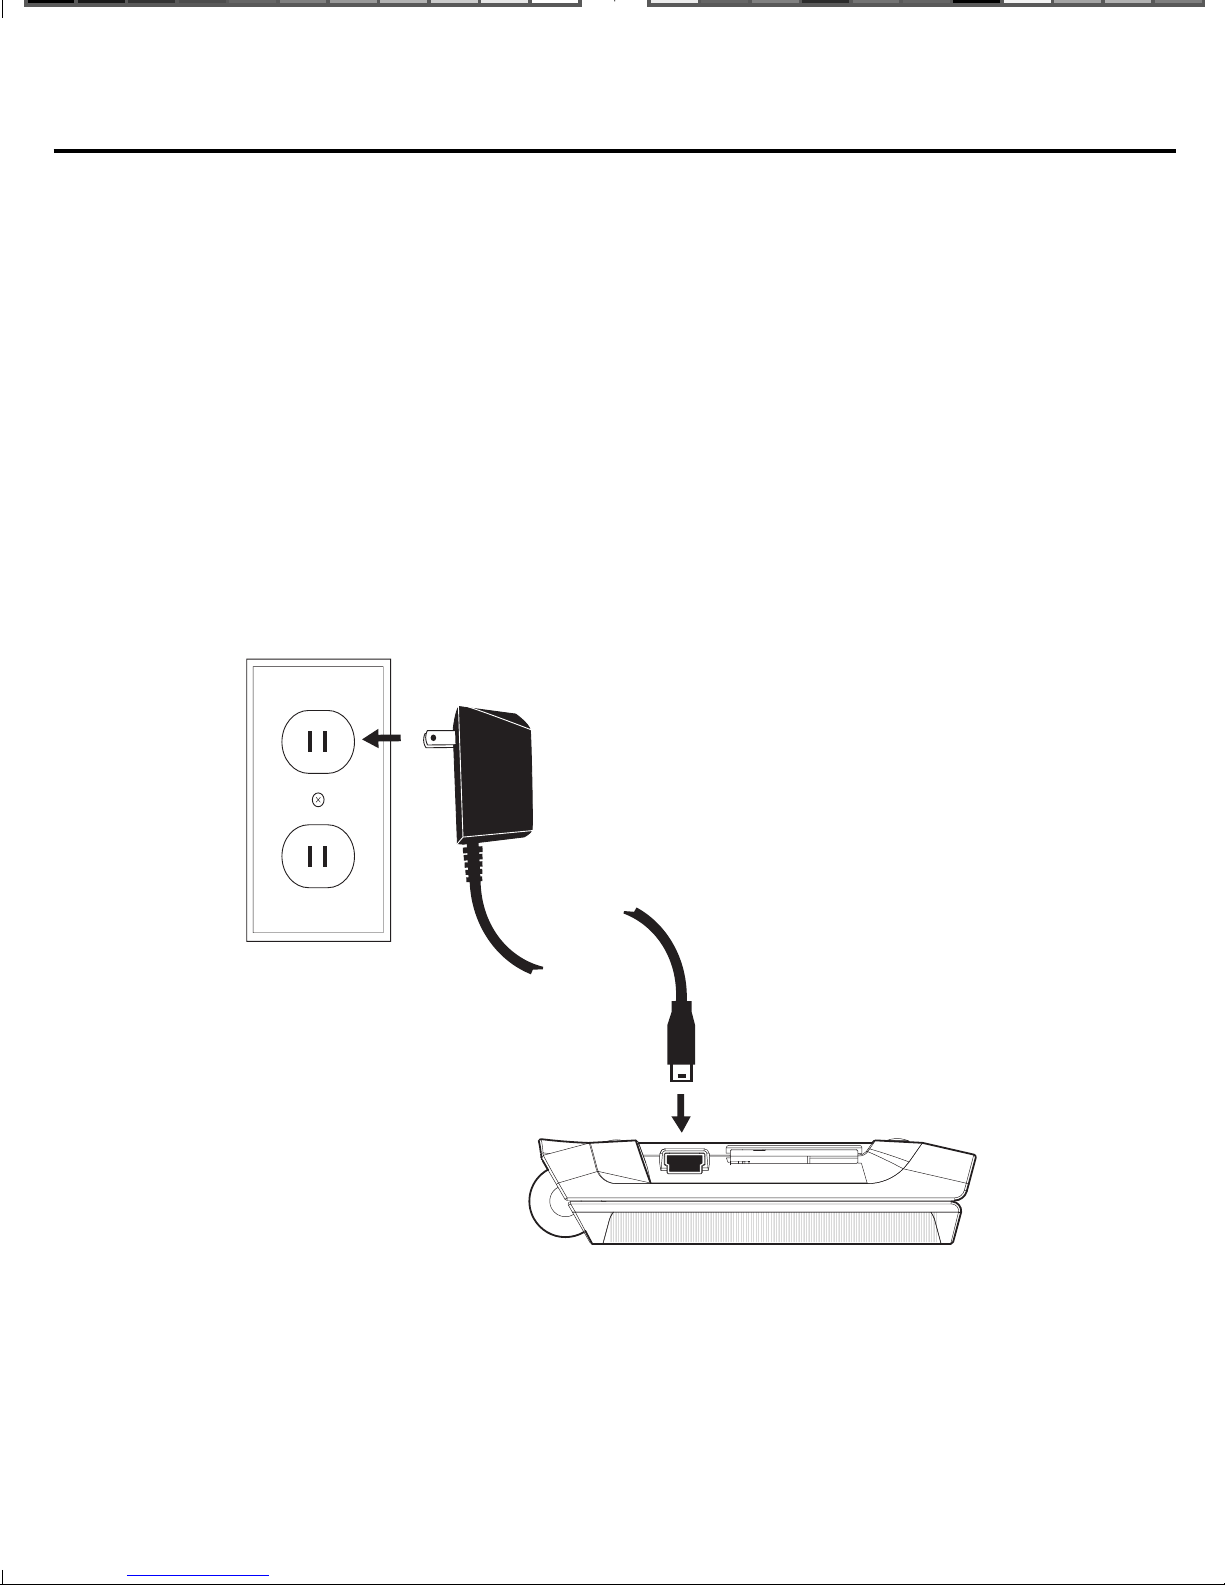
Recharging the Battery
Follow these instructions to recharge the battery.
1. Find the USB charger cable included with your device.
2. Make sure your device is turned o .
3. Plug the small end into your device and the other end into a power source.
Continue charging your device until the battery is fully charged.
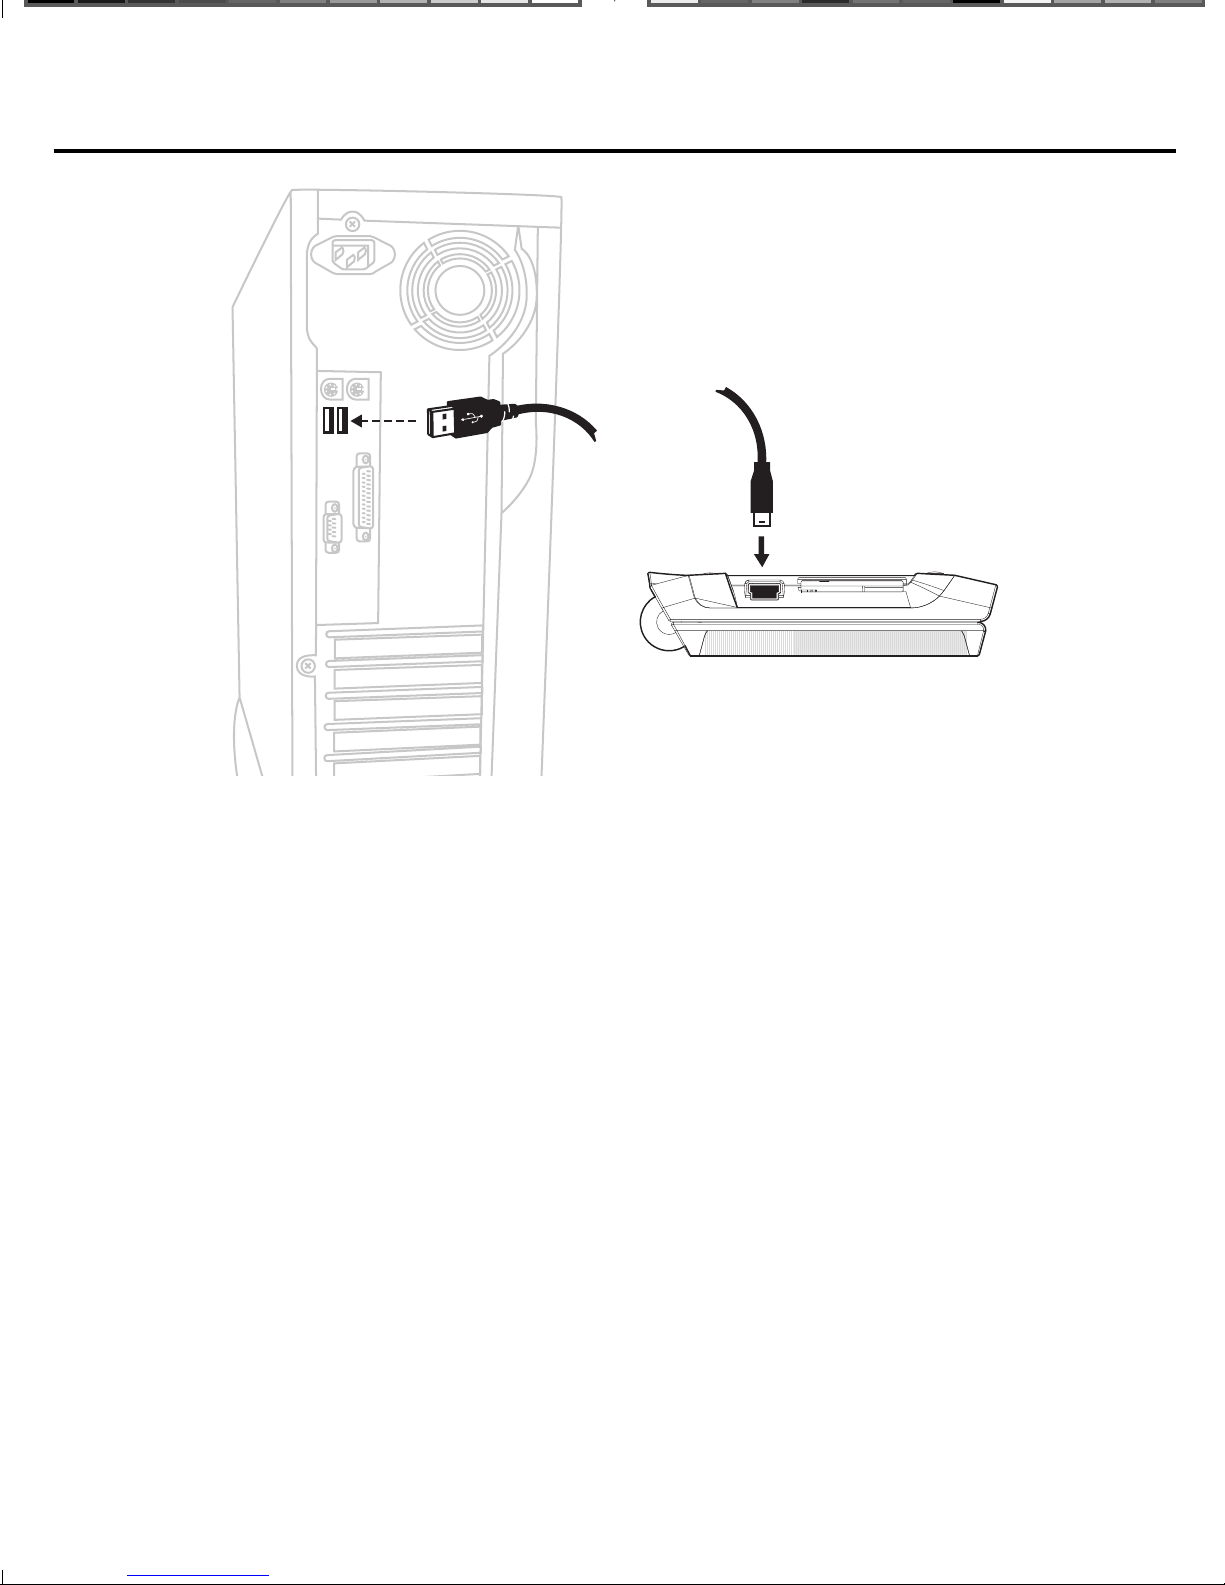
You can also charge your battery by plugging it into your PC using the included
USB cable. Plug the wide end of the USB cable into a USB port on your PC and
the smaller end of the USB cable into the USB port on your device.
5
Page 7
Battery Information
Note: To use your device while it is plugged into your PC, use the Franklin PC
View™ feature on your PC to access the dictionaries. For more information,
please see “Using the Franklin PC View™ Feature” on page 61.
Battery Precautions
• If the device is left unused for a long period of time, the battery may lose its
charge. Please recharge the battery following the steps described above in order
to use your device.
• Rechargeable batteries are only to be charged under adult supervision.
• Use the supplied charger to recharge the battery. Improperly charging a battery
may damage the battery.
• You may not open this device. All changes to this device are strictly prohibited
and will invalidate the guarantee.
• Leaving the device in hot or cold places, such as in a closed car in summer or
winter conditions, will reduce the capacity and lifetime of the battery. Always try
to keep the device between 15ºC and 25ºC (59ºF and 77ºF). A device with a hot
or cold battery may not work temporarily, even when the battery is fully charged.
6
Page 8
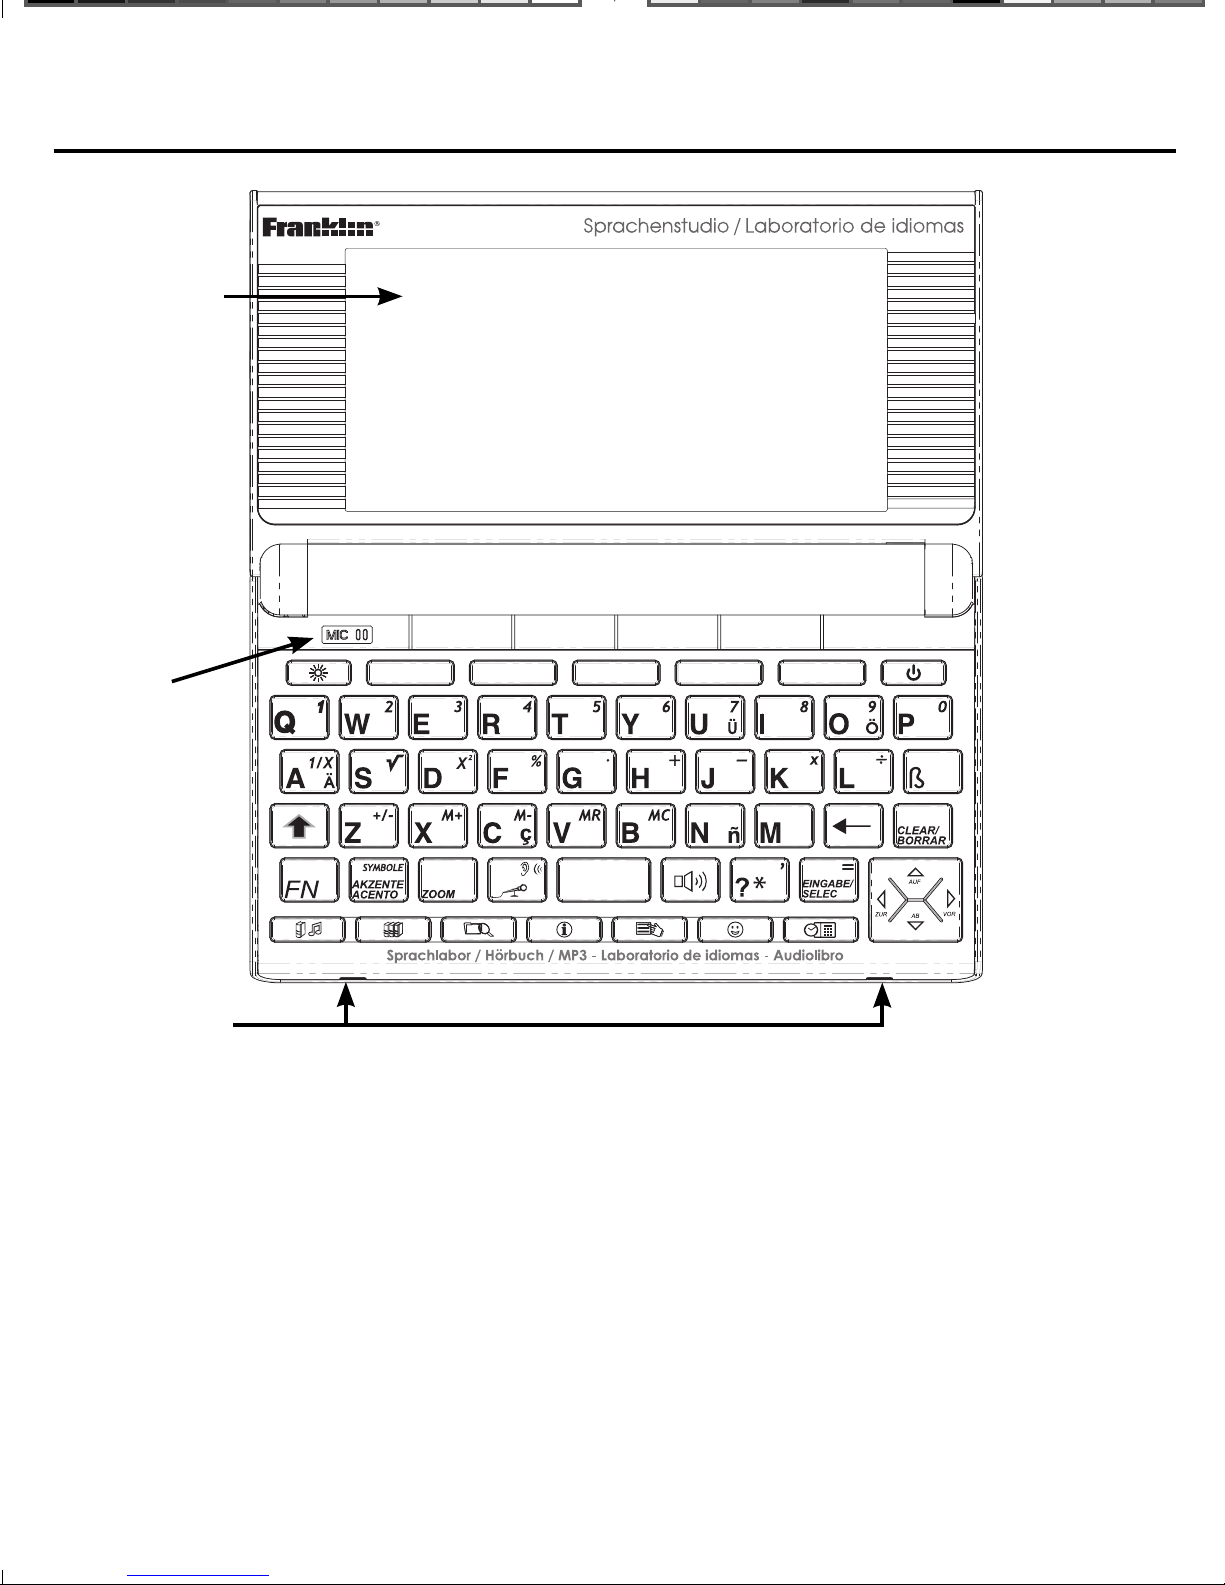
Screen in
Lid
Understanding Your Device
Microphone
Speakers
Screen in Lid: The screen of the LDS-1990 is contained in the lid, so you can tilt the
screen for optimum viewing.
Microphone: The microphone is located in the upper left corner, just above the
keyboard on the front of your device. Speak into this when recording.
Speakers: The two speakers are located on the front edge of the device.
7
Page 9
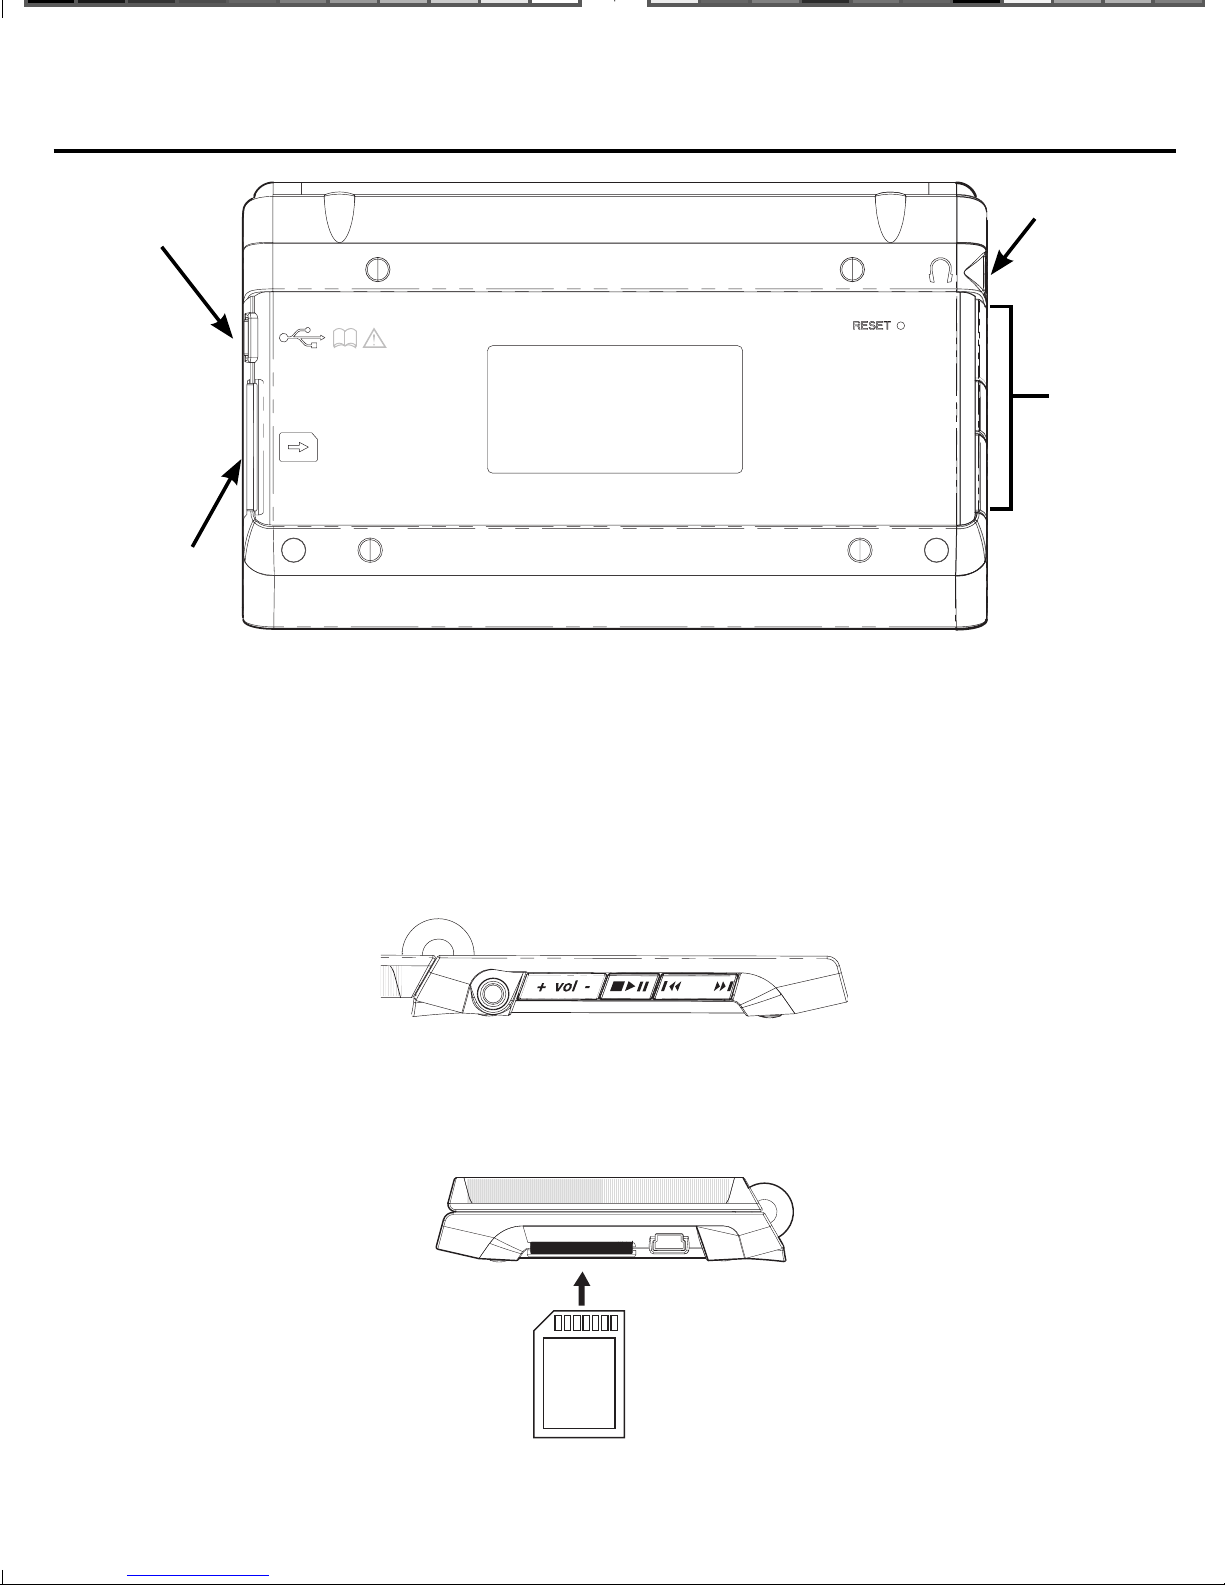
Understanding Your Device
USB Port
Headphone
Jack
Audio
Player
Buttons
MMC/SD
Slot
USB Port: Plug the cable into this port to connect your device to your PC and to
recharge your device using an external power source.
Headphone Jack: The headphone jack is designed for 3.5 mm, 35 ohm impedance
stereo headphones. Caution: Monophonic headphones will not work with this unit.
Audio Player Buttons: The buttons, located on the left side of the device, control
the audio les stored on your device, as well as the volume of the speaker or
headphones.
MMC/SD Slot: Insert MMC/SD here. Slide the MMC/SD into the slot with the
contacts facing the back of the device. Push gently until it clicks into place. To
remove an MMC/SD from the slot, put your thumb on the MMC/SD and push it in
slightly. You hear a click and the MMC/SD pops out. Slide it out of the slot.
8
Page 10
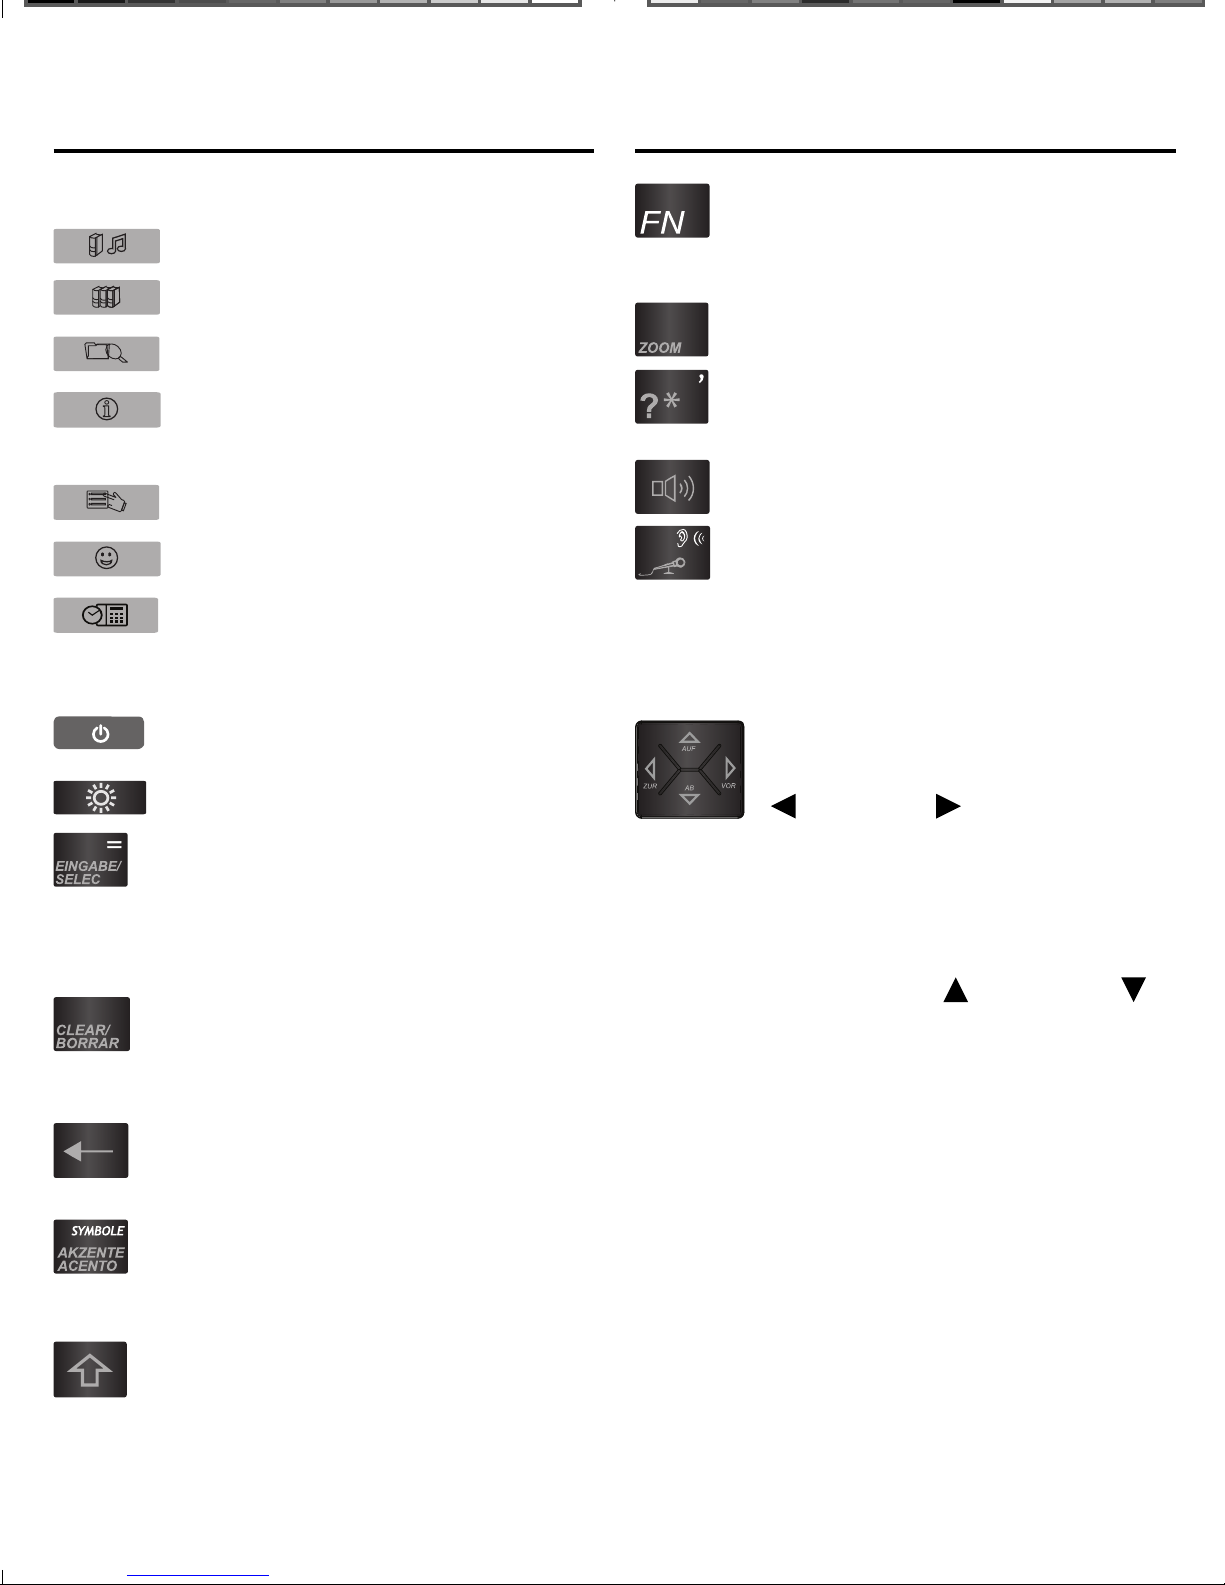
Key Guide
Key Guide
Picture Keys
Opens the Audio Player.
Goes to the Library.
Displays your search history.
Displays information about
your current screen.
Opens a menu, if available.
Goes to the Games Menu.
Goes to the Organiser.
Function Keys
Turns the product on or o .
Turns the backlight on or o .
Shifts to type numbers,
punctuation marks and other
symbols.
Adjusts the font size.
At an input box, types a ? to
stand for a letter in a word.
Pronounces a word or phrase.
Begins and stops recording.
With FN, plays a recorded
message.
Navigation Button
Moves in the indicated
direction. In text, press the left
(
) or right ( ) part of the
Selects an item. In the
calculator, performs a
calculation. In text, highlights
a word.
Clears an input box. From text,
goes to the main screen of a
book.
Backs up, erases a letter, or
turns o the highlight in text.
Cycles through the accents
for the last typed letter, if
available.
Shifts to type capital letters
and punctuation marks.
button to highlight the next or
previous link, when available.
When no links are available,
pages up or down. In text,
press the up (
part of the button to highlight
the previous or next link, when
available. When no links are
available, scrolls up or down
one line at a time.
) or down ( )
About Screen Illustrations ✓
Some screen illustrations and Soft
Key labels in this User’s Guide may
di er slightly from what you see on
screen. This does not mean that your
unit is malfunctioning.
9
Page 11

Key Guide Key Guide
Combination Keys*
+ At an input box, types an
asterisk (✽) to stand for zero,
one or more letters in a word.
+ Types an apostrophe.
+ At an input box or other
entry eld, cycles through the
available symbols, including @
/ _ ~ : ; , and #.
+ Plays a recorded message.
* Hold the rst key while pressing the second.
Audio Keys
†
Calculator Keys
A(1/x) Calculates a reciprocal.
S(√x) Calculates a square root.
2
D(x
F(%) Calculates a percentage.
G(.) Inserts a decimal point.
H(+),J(-) Adds, subtracts, multiplies or
K(x),L(÷)
Z(+/-) Changes the number on the
X(M+) Adds the number to the
C(
) Squares a number.
divides numbers.
screen to a negative or positive
number.
number stored in memory.
M-) Subtracts the number from the
Increases (+) or decreases (-)
the volume.
Plays a stopped or paused le.
Pauses a playing le. Press
and hold to stop a playing or
paused le.
Press the right side ( ) of this
key to go to the next le. Hold
it in to fast-forward through a
le. Press the left side (
) of
this key to go to the previous
le. Hold it in to rewind
through a le.
† The keys for controlling the audio are located
on the side of your device.
number stored in memory.
V(
MR) Recalls the number stored in
memory.
B(
MC) Clears the memory.
10
Page 12
Key Guide
Product Care
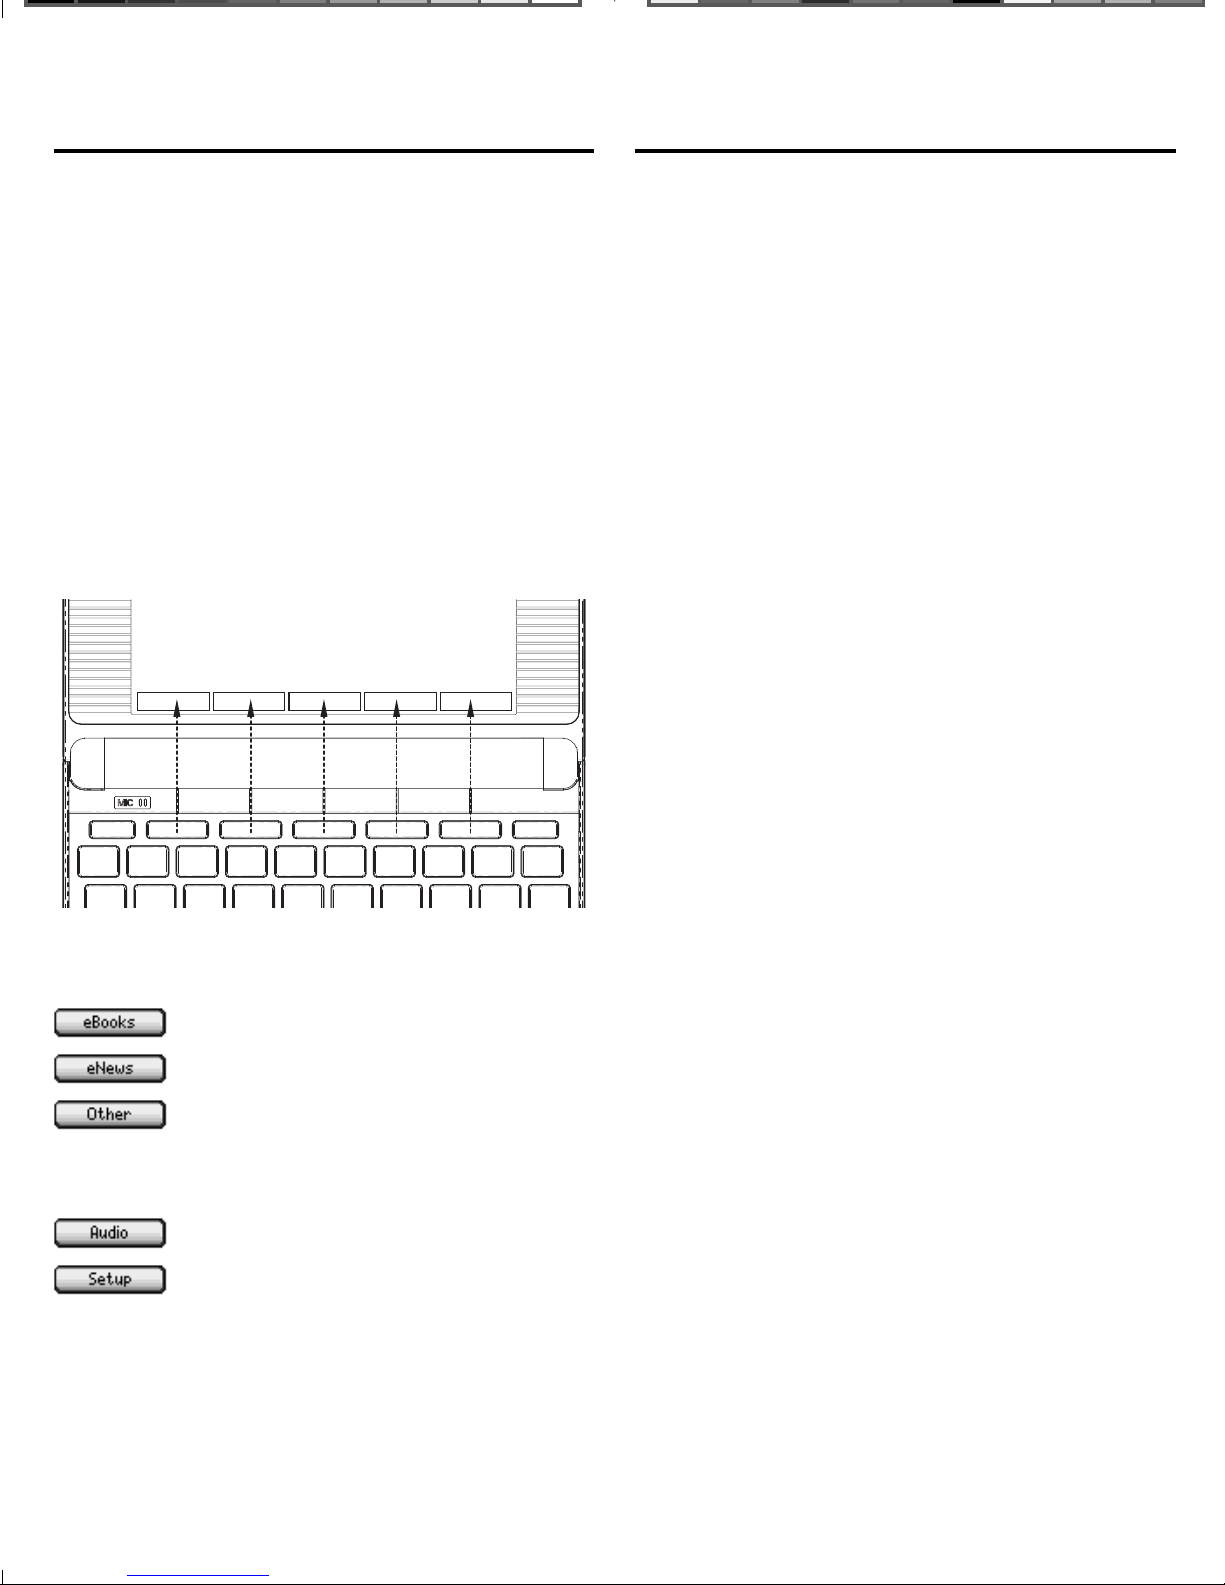
Soft Keys
In this device, up to ve extra functions
are available depending on what you
are doing and what you are reading.
They are indicated by “tabs” or “labels”
across the bottom of the screen.
Because they can change from location
to location, they are called “soft”. To
use a Soft Key, press the unlabeled
key at the top of the keyboard that
corresponds to the label you want.
Your LDS-1990 is designed to be light,
compact and durable. However, it is an
electronic device and must be treated
carefully. Putting unnecessary pressure
on it or striking the device against other
objects can cause damage.
In order to avoid damage to your LDS1990, please:
• Keep the lid closed when you are not
using it. This will protect the screen
from being broken, scratched or
marred in any way.
• Do not drop, crush, bend, or apply
excessive force to the device.
• Do not expose your LDS-1990 to
moisture, extreme temperatures
For example, at the Library, the
following Soft Keys are available:
Opens the list of eBooks.
Opens the list of eNews.
Opens the list of My Vocabulary
List, My Dictionary and any
miscellaneous text les.
Opens the list of audio les.
Displays the Settings List.
Please read each individual section
for information on what Soft Keys are
or other adverse conditions. Avoid
storing it in damp, humid or wet
places. It is not waterproof.
• Clean the device by wiping with
a soft, dry cloth. Do not use harsh
chemicals.
• Should the device’s glass break,
properly dispose of the product
avoiding contact with your skin, then
wash your hands immediately.
• Please keep screen protectors and
plastic bags away from babies
and children to avoid danger of
su ocation.
available.
11
Page 13
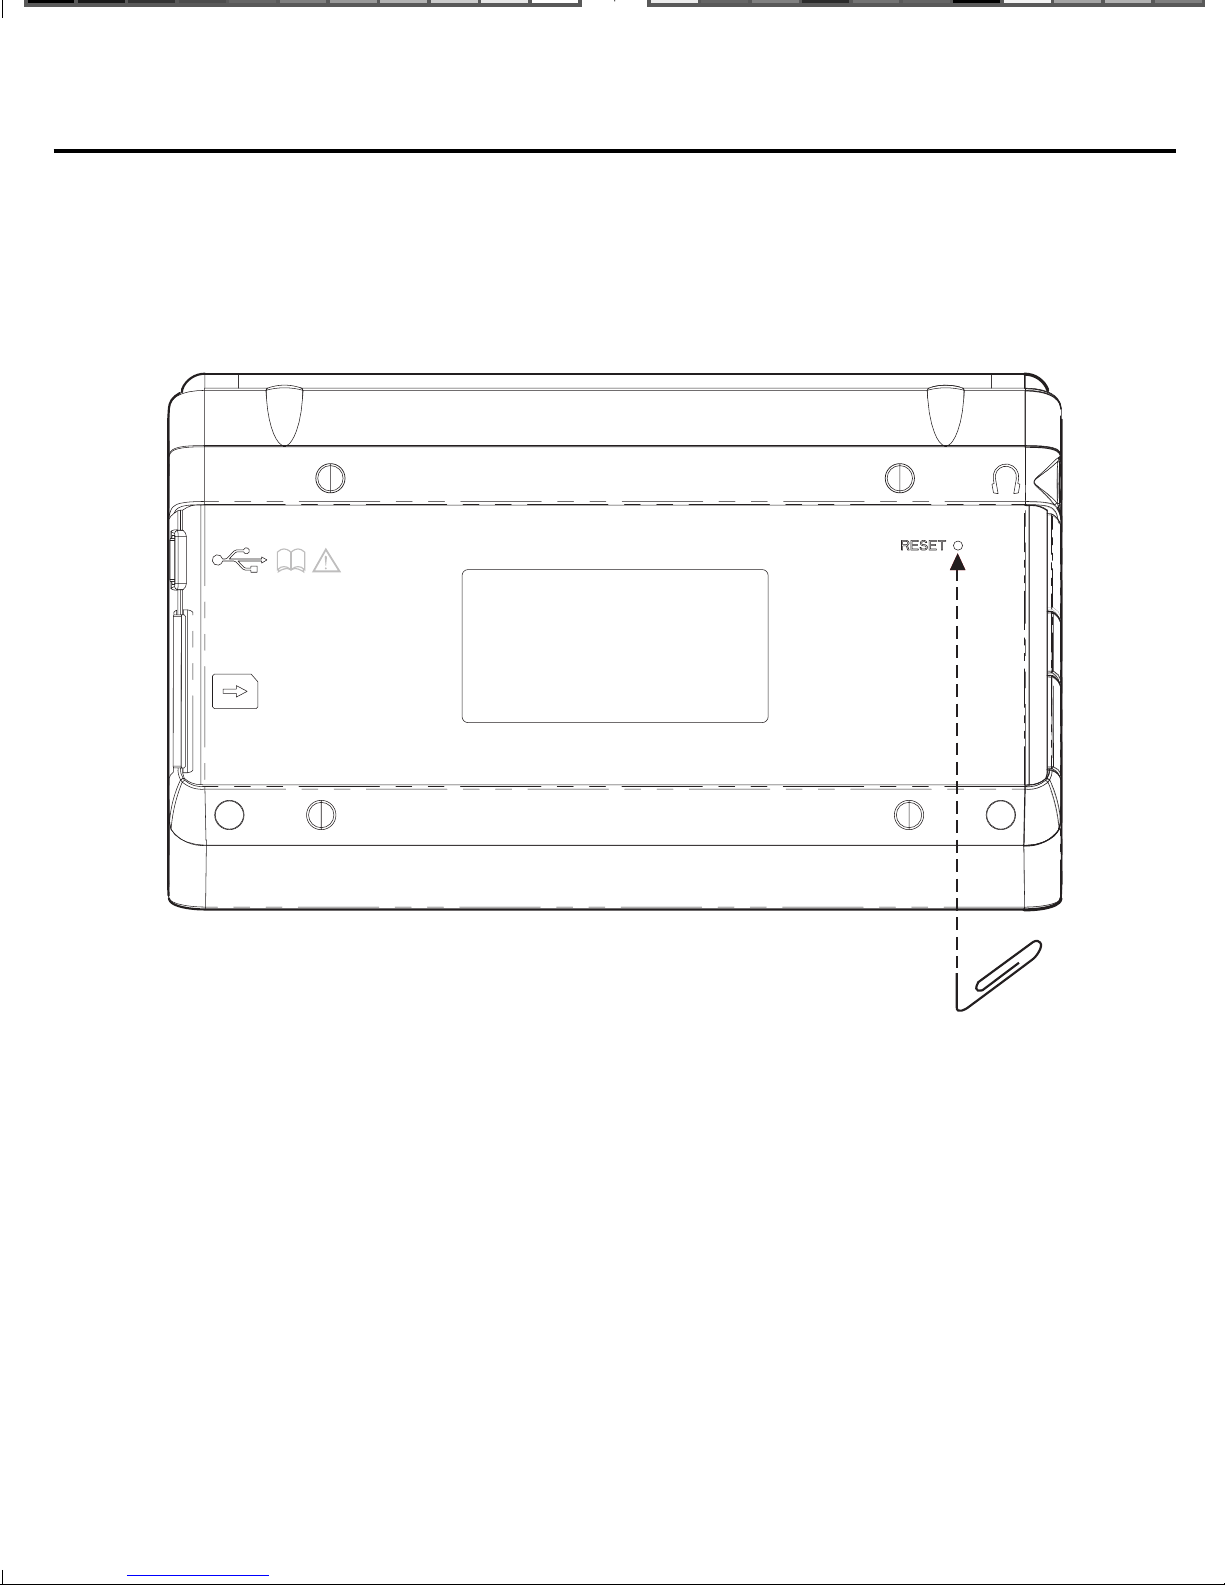
Resetting Your Device
If the keyboard fails to respond, or if the screen performs erratically, perform a
system reset by following the steps below.
1. Use a paper clip to gently press the reset button on your unit.
If nothing happens, try step 2.
The reset button is recessed in a pin-sized hole on the back of the unit.
Warning! Pressing the reset button with more than light pressure may
permanently disable your product. In addition, resetting the product resets the
volume, contrast, date and time settings to their defaults and may erase any
recently entered information.
2. Hold CLEAR and press the reset button.
Warning! This restores factory defaults, so all saved information and settings will
be erased.
12
Page 14
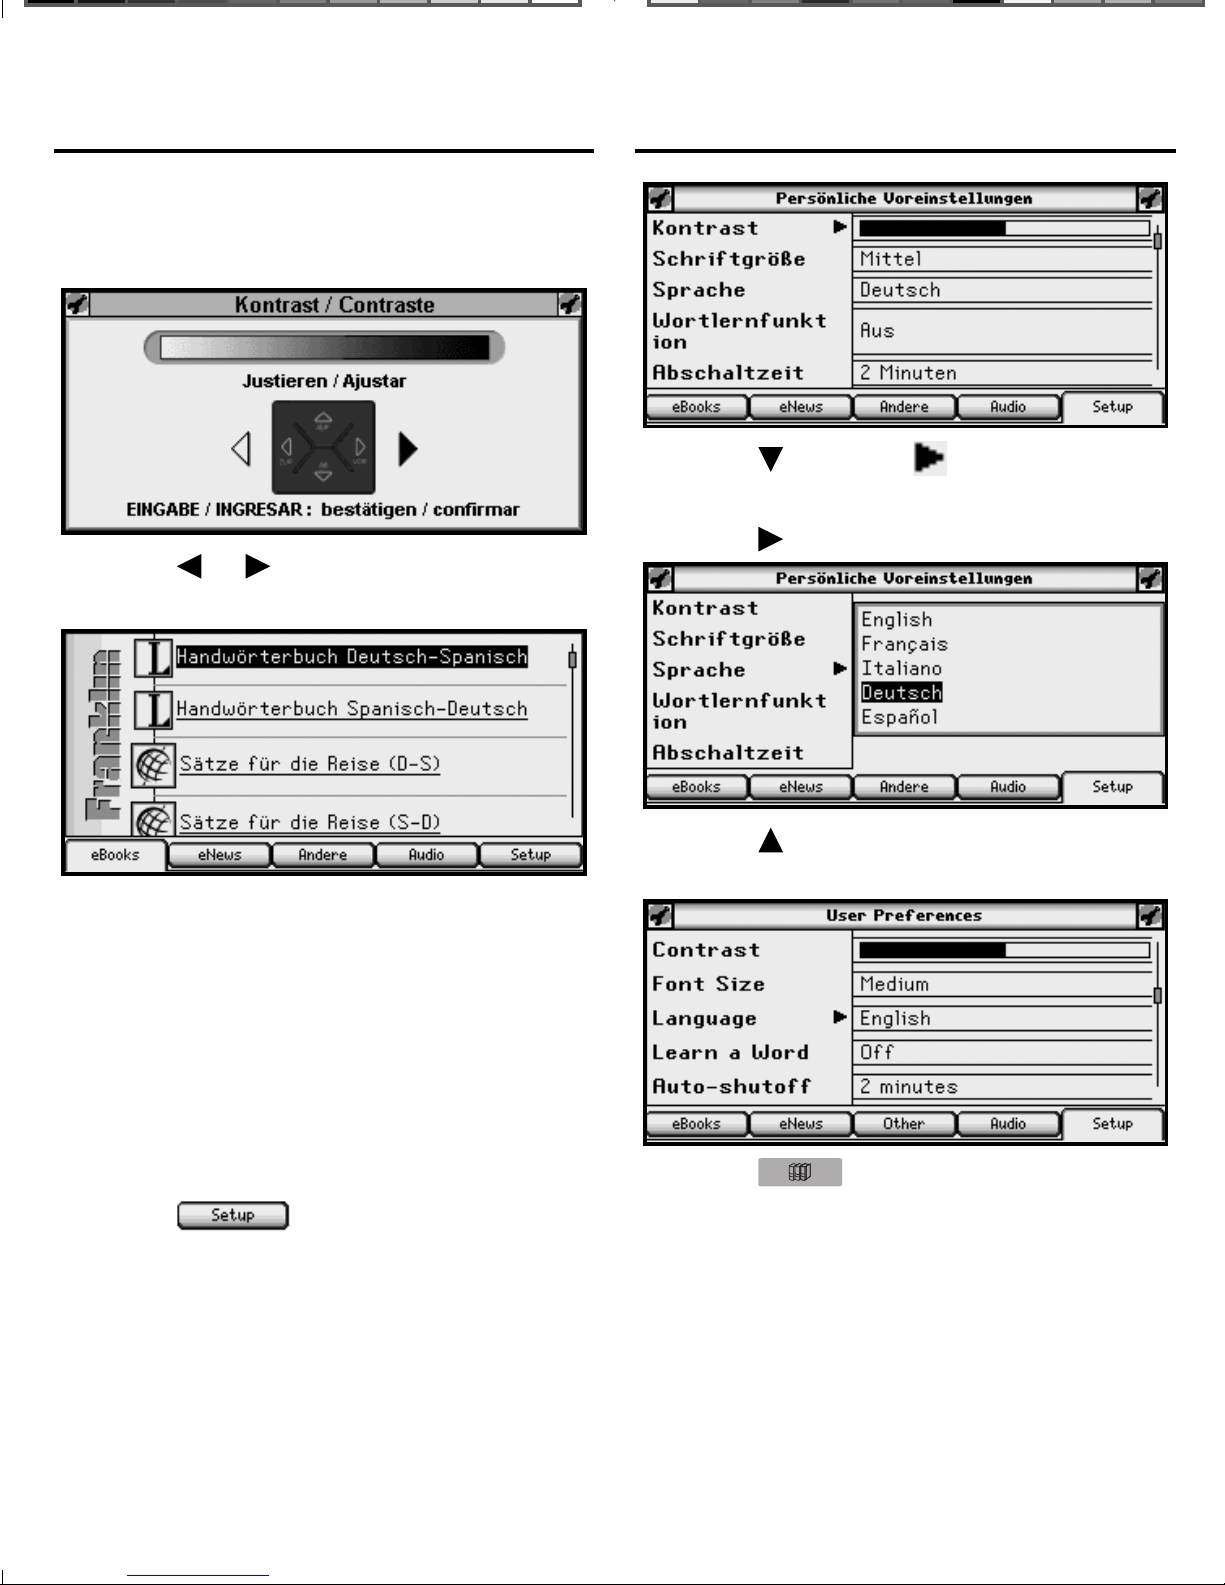
Getting Started
The rst time you turn on your device,
a contrast bar is displayed. The contrast
indicates how dark or light the screen is.
Getting Started
3. Press to move to Sprache
(Language).
1. Press or to adjust the contrast.
2. Press EINGABE when done.
The eBooks tab of the Library is
displayed.
Changing the Language
Initially, the language of the LDS-1990
is set to German. You can change the
4. Press
5. Press to highlight English and
then press EINGABE.
.
message language to English, French,
Spanish, or Italian.
1. Press
2. Press EINGABE to select
Persönliche Voreinstellungen (User
Preferences).
.
6. Press .
The Library is displayed.
13
Page 15

Using the Library
Using the Library
The Library is your home screen.
This is the hub of the LDS-1990 and the
place to start in order to access all of the
dictionaries and other books stored in
your device.* At any time, and from any
location, press
to return to this
location.
The Library consists of ve tabs: eBooks,
eNews, Other, Audio and Setup. The
Utilities
From anywhere within the Library, press
to open the Utilities Menu. From
this menu, you can reset your device to
its factory defaults or format an MMC/
SD. Warning! Resetting to the factory
defaults returns the device to its initial
settings, as it was when you purchased
it, and erases any saved information.
Formatting an MMC/SD enables you to
erase an MMC/SD without connecting
to your PC.
1. Press
2. Press
.
.
rst four of these tabs keep track of
the di erent kinds of les that you can
store on your device, and the Setup tab
opens the Settings List. To select a tab,
simply press the Soft Key that refers to
that tab, that is, the blank key at the top
of the keyboard that lines up with the
name of the tab where it is displayed on
the screen.
Try it now by pressing the ve Soft Keys
at the top of the keyboard to see what
happens. Then press
to return
to the list of books.
3. Press or to highlight the one
you want and then press EINGABE.
Format MMC/SD Card erases all
information from an installed
MMC/SD.
Restore Factory Default Settings resets
all settings to what they were the
rst time you turned on your device.
You are asked to con rm the
selected action.
*This includes any titles available on
MMC/SD cards inserted into your device.
4. Press
14
to con rm or
to cancel.
Page 16
Changing the Settings
Changing the Settings
At the Library, press to display
the Settings List. From the Settings List,
you can change your user preferences,
game settings, date and time settings,
and view the version and identi cation
information. For information regarding
your game settings, please see “Game
Settings” on page 43. For information
regarding your date and time settings,
please see “Setting the Date and Time”
on page 46. Press
the menu item you want and then press
EINGABE to select it.
or to highlight
User Preferences
1. Press
2. Press .
3. Press
Preferences and then press
or to highlight User
.
Font Size determines how large or
small the text is in this device.
Language determines the language
used for helptext, menu items and
pop-up messages.
Learn a Word determines whether or
not you see a word every time you
turn on your device.
Auto-shuto determines how long
your device stays on if you forget to
turn it o .
Justi cation determines whether or
not the text of your books is fully
justi ed.
Margins determines whether or not
books have margins.
5. Press
options.
Note: For Contrast, there is no menu
to open the menu of
EINGABE.
4. Press or to move to
Contrast, Font Size, Language,
Learn a Word, Auto-shuto ,
Justi cation, or Margins.
Contrast determines how dark or
light the screen is.
6. Press
7. Press
8. Press
15
of options;
the screen contrast when the pointer
is there.
or to move the highlight
to your choice.
or EINGABE to accept the
setting.
Press
changing the setting.
the Settings List.
and simply adjust
to exit the menu without
or EINGABE to return to
Page 17
Changing the Settings Changing the Settings
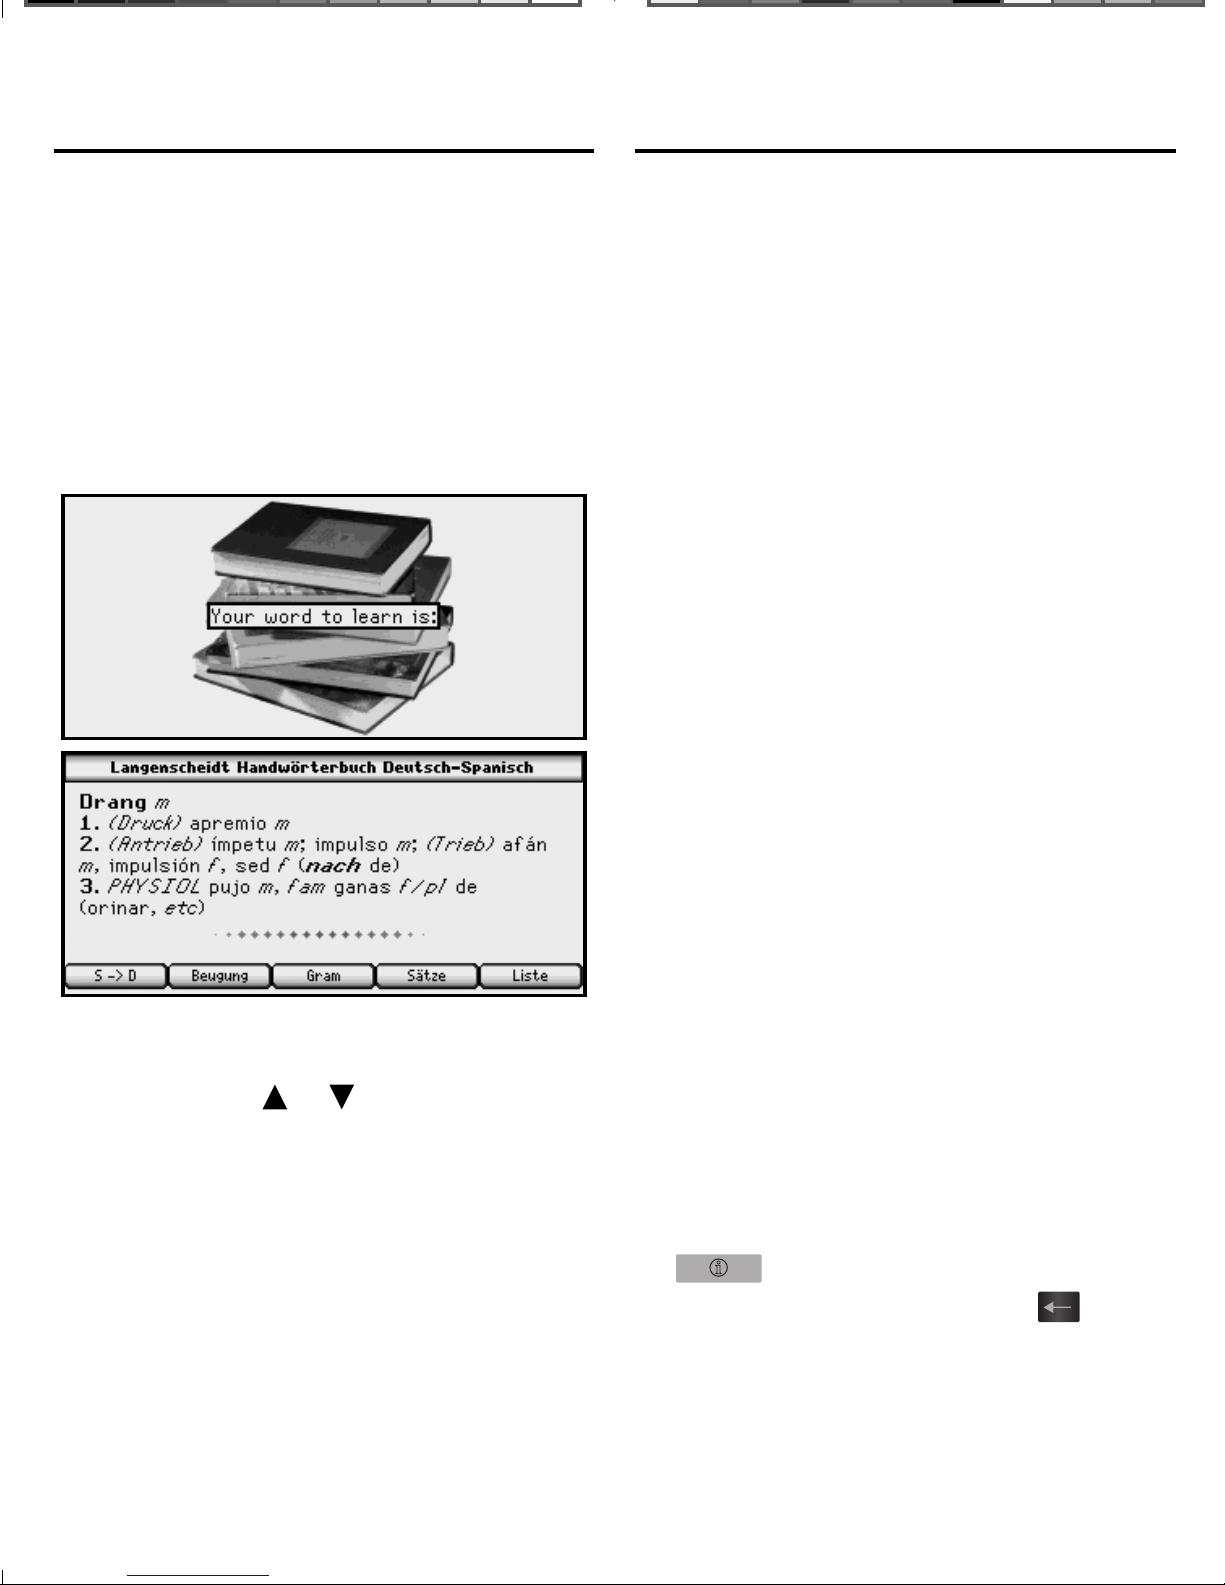
Learn a Word ✓
Your LDS-1990 comes with a Learn
a Word feature to help you increase
your Spanish or German vocabulary.
Each time you turn on your device,
you can see a di erent word taken
from one of the dictionaries in your
device.
You can learn Spanish words from
the Langenscheidt Handwörterbuch
Spanisch-Deutsch or you can
learn German words from the
Langenscheidt Handwörterbuch
Deutsch-Spanisch.
Information
The information screen displays version
and identi cation information about
your LDS-1990 as well as your Personal
ID number (PID). You may be asked for
your PID when you register your device
or purchase books and other content
from Franklin or Mobipocket.
From the User Preferences menu,
open the Learn a Word options
menu. Press
book you want to use and then press
EINGABE.
or to highlight the
16
Help is Always at Hand ✓
For additional assistance while you
use your device, a help message is
available at any screen by pressing
. Use the navigation button
to read the message. Press
exit help. This information is also
available by selecting Tutorial in the
Library.
to
Page 18
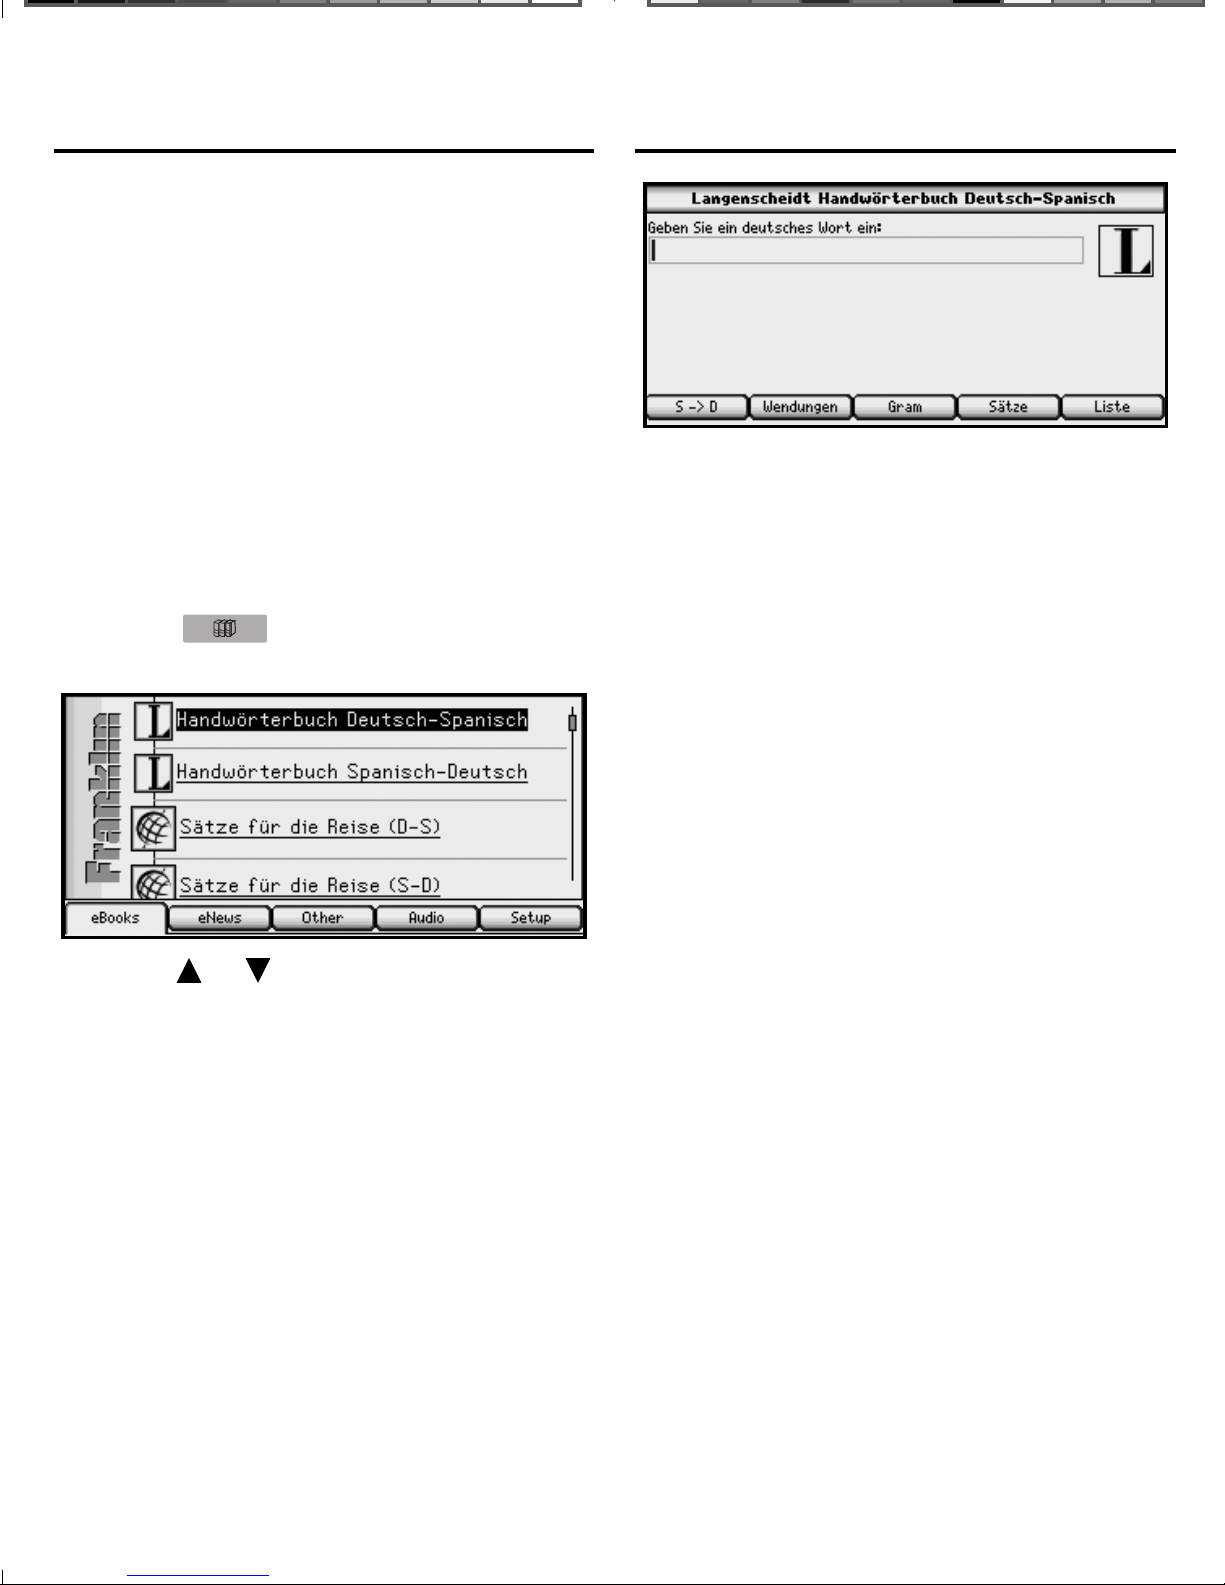
Selecting a Book
In your LDS-1990, you can select
from a variety of reference material
that comes with your device. You can
look up Spanish translations using
the Langenscheidt Handwörterbuch
Spanisch-Deutsch, German
translations using the Langenscheidt
Selecting a Book
Handwörterbuch Deutsch-Spanisch,
and everyday and travel phrases in the
Spanish and German phrase books. You
can learn German and Spanish grammar
rules and topics.
1. Press
.
The eBooks tab is displayed.
2. Press or to move the highlight
to Handwörterbuch Deutsch-
Note: This is the method to select
any book or le in any of the tabs.
That is, use the navigation button
to scroll through your list of les,
and press EINGABE to open the
highlighted le.
Note: eNews is only available
through the Mobipocket Reader for
Franklin, made available through
the Franklin PC Desktop. For more
information on using your device
on your PC, please see “Using the
Franklin PC Desktop” on page 56.
Spanisch and then press EINGABE
to select it.
17
Page 19
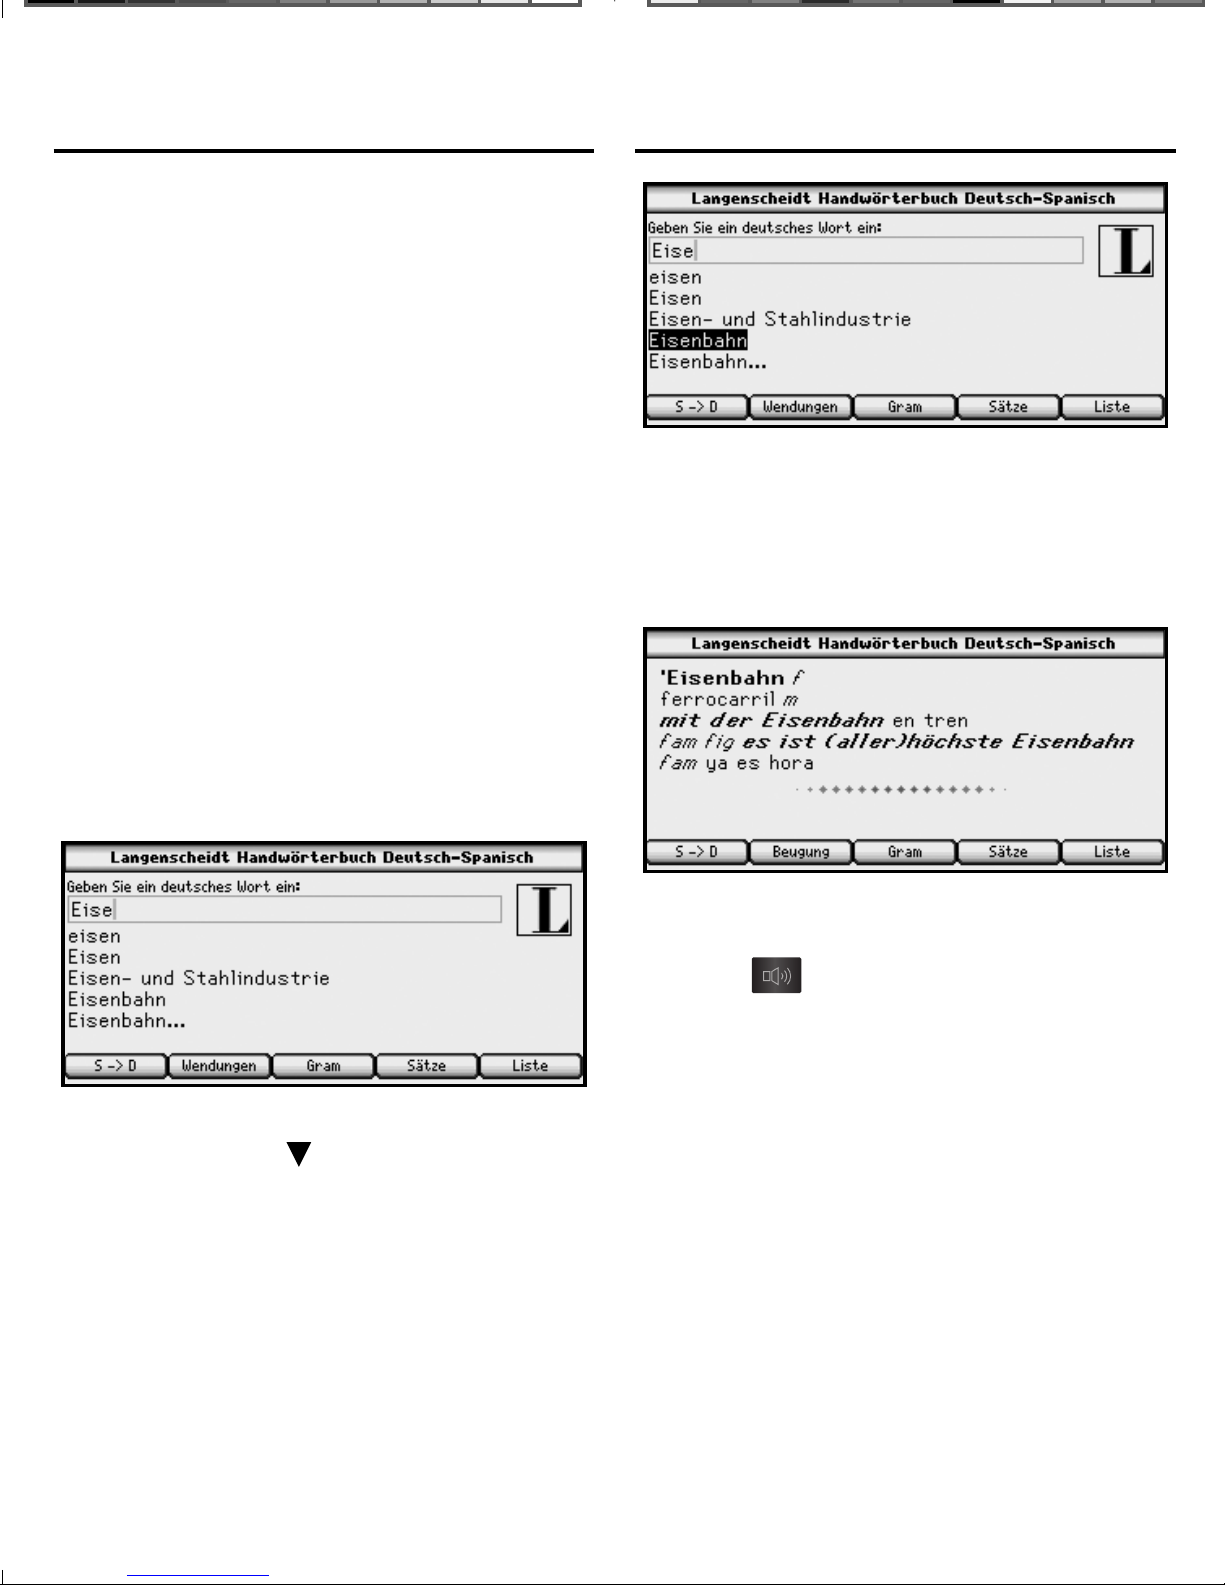
Looking Up a Word
After selecting Langenscheidt
Handwörterbuch Deutsch-Spanisch, you
see a word search screen. Type words at
this screen for instant access to all the
translations in this book.
Note: You can type and search for
words in all of the dictionaries in your
Looking Up a Word
LDS-1990.
1. Begin to type a German word, for
example Eisenbahn.
As you type letters, the rst word in
the book that matches the letters
you type will move to the top of the
word list. You may not have to type
the entire word in order to nd the
one you want. In this example, note
that “Eisenbahn” appears on the
screen after you type “Eise”.
Or you can continue typing letters
until the word is complete and
the matching word in the list is
automatically highlighted.
3. Press EINGABE to look it up.
4. Use the navigation button to read
the entire de nition.
Press
to hear the word.
5. Press CLEAR when done.
2. When the word you want is on the
screen, press
until the word you
want is highlighted.
18
Page 20
Looking Up a Word Looking Up a Word
Soft Keys in the ✓ Langenscheidt
Handwörterbuch SpanischDeutsch or Langenscheidt
Handwörterbuch DeutschSpanisch
While using the Langenscheidt
Spanish-German and GermanSpanish dictionaries, at any given
moment, up to ve extra functions
are available. For example, in the
entry for “Eisenbahn”, you see the
following Soft Keys:
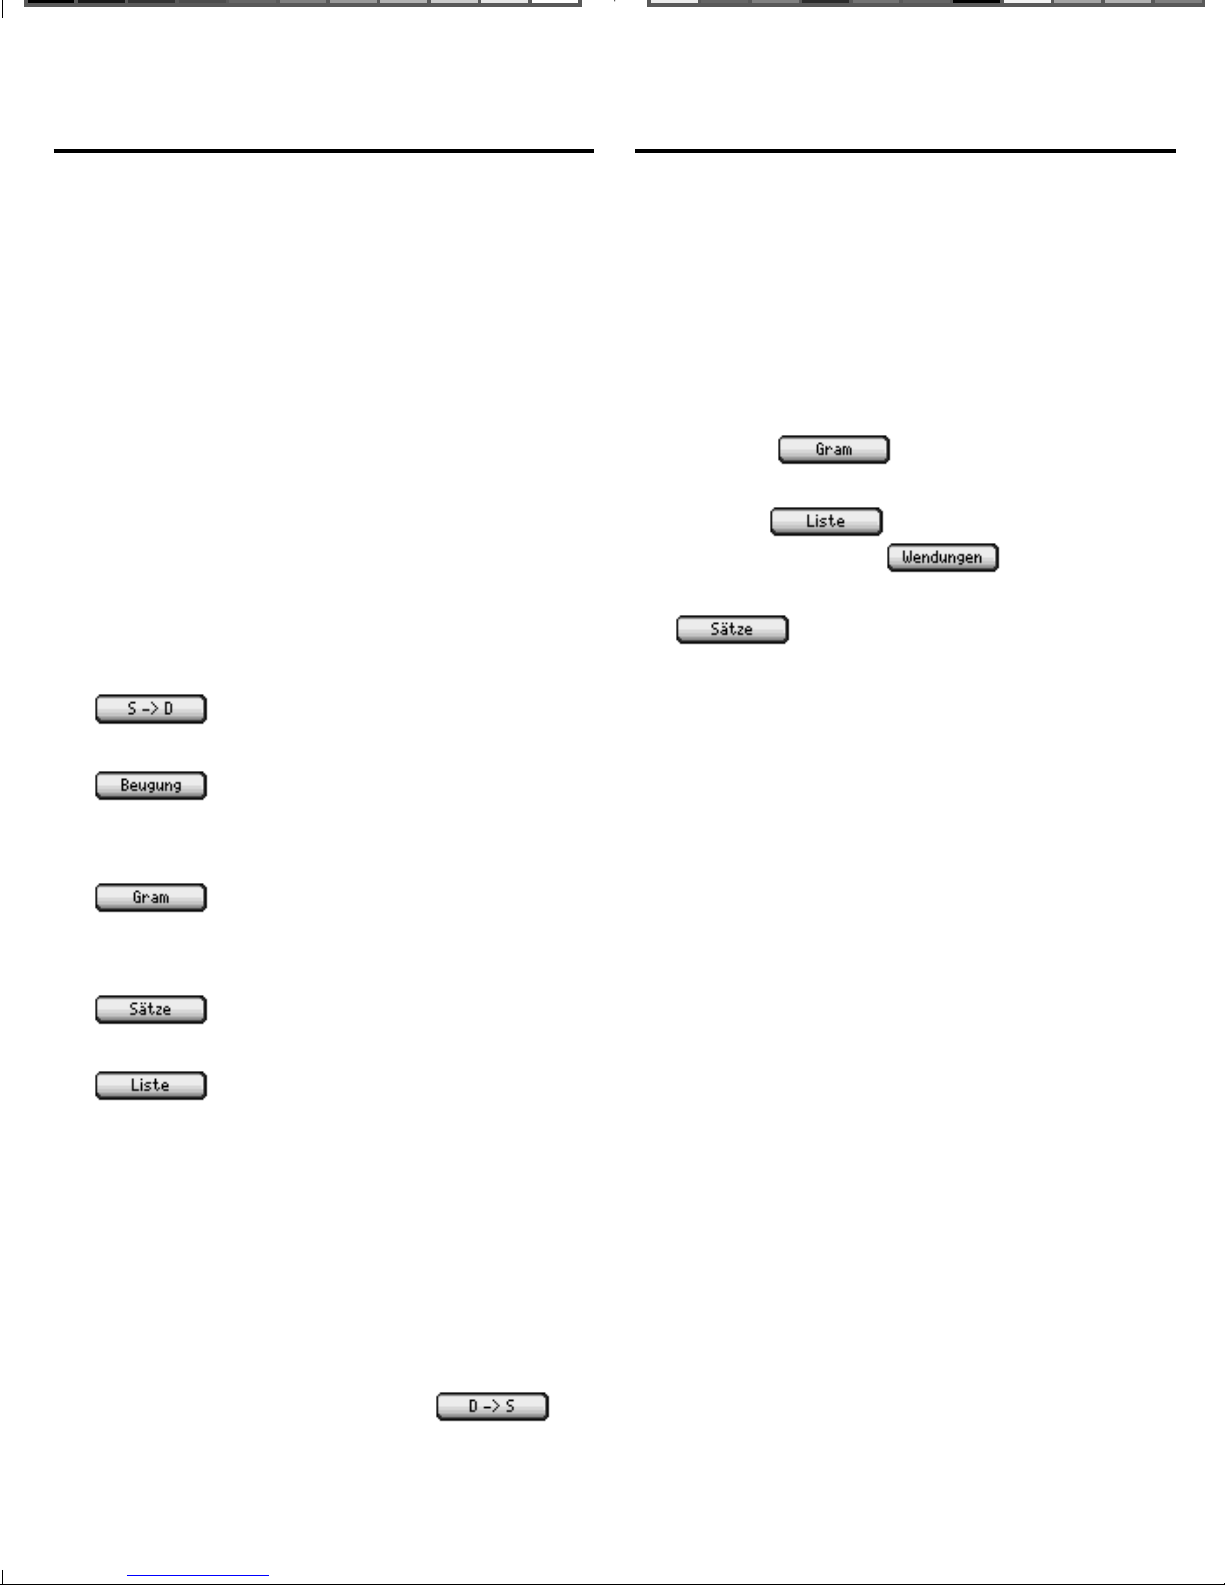
Press… To…
* go to the empty Spanish
word search screen.
(Conj) look up
Please remember, the Soft Keys
vary based on the book you are in.
These are the Soft Keys while in
the Langenscheidt Handwörterbuch
Deutsch-Spanisch.
Note: When there is no active word,
for example at an empty word search
screen,
(Grammar) goes
to the main menu of the Grammar
Guide,
Vocabulary List,
(List) displays My
(Idioms)
goes to the idiom search screen, and
(Phrases) goes to the empty
word search screen of the phrase
book.
Spell Correction ✓
any in ections for
“Eisenbahn”.
(Grammar) go to
a grammar topic
describing nouns.
(Phrases) nd phrases
containing “Eisenbahn”.
(List) add “Eisenbahn” to
My German Vocabulary
List.
* In the Langenscheidt Handwörterbuch
Spanisch-Deutsch, this item reads
goes to the empty German word search screen.
If you type a misspelled word,
in ected form, or a word not in a
book, nothing in the word list will
be highlighted as a match. Press
EINGABE to view a list of possible
spelling corrections for the word as
you typed it.
and
19
Page 21
Looking Up a Word Looking Up a Word
Press or to highlight the word
you want, then press EINGABE to
look it up.
MatchMaker ✓
If you are uncertain about how to
spell a word, type a question mark
(?) in place of each unknown letter.
To nd pre xes, su xes, and other
parts of words, type an asterisk (✽) in
a word. Each asterisk stands for zero,
one or more letters.
Note: If you type an asterisk at the
beginning of a word, it may take
a little while to nd the matching
words.
Press + ? to type an asterisk.
4. Press EINGABE.
A list of matches is displayed with
the rst word highlighted.
5. Press
or to highlight the
word you were looking for and
then press EINGABE to look it
up.
1. Press
2. Press
or to highlight
.
Handwörterbuch DeutschSpanisch and then press
EINGABE.
3. Type tr??er✽.
6. Press CLEAR when done.
20
Page 22
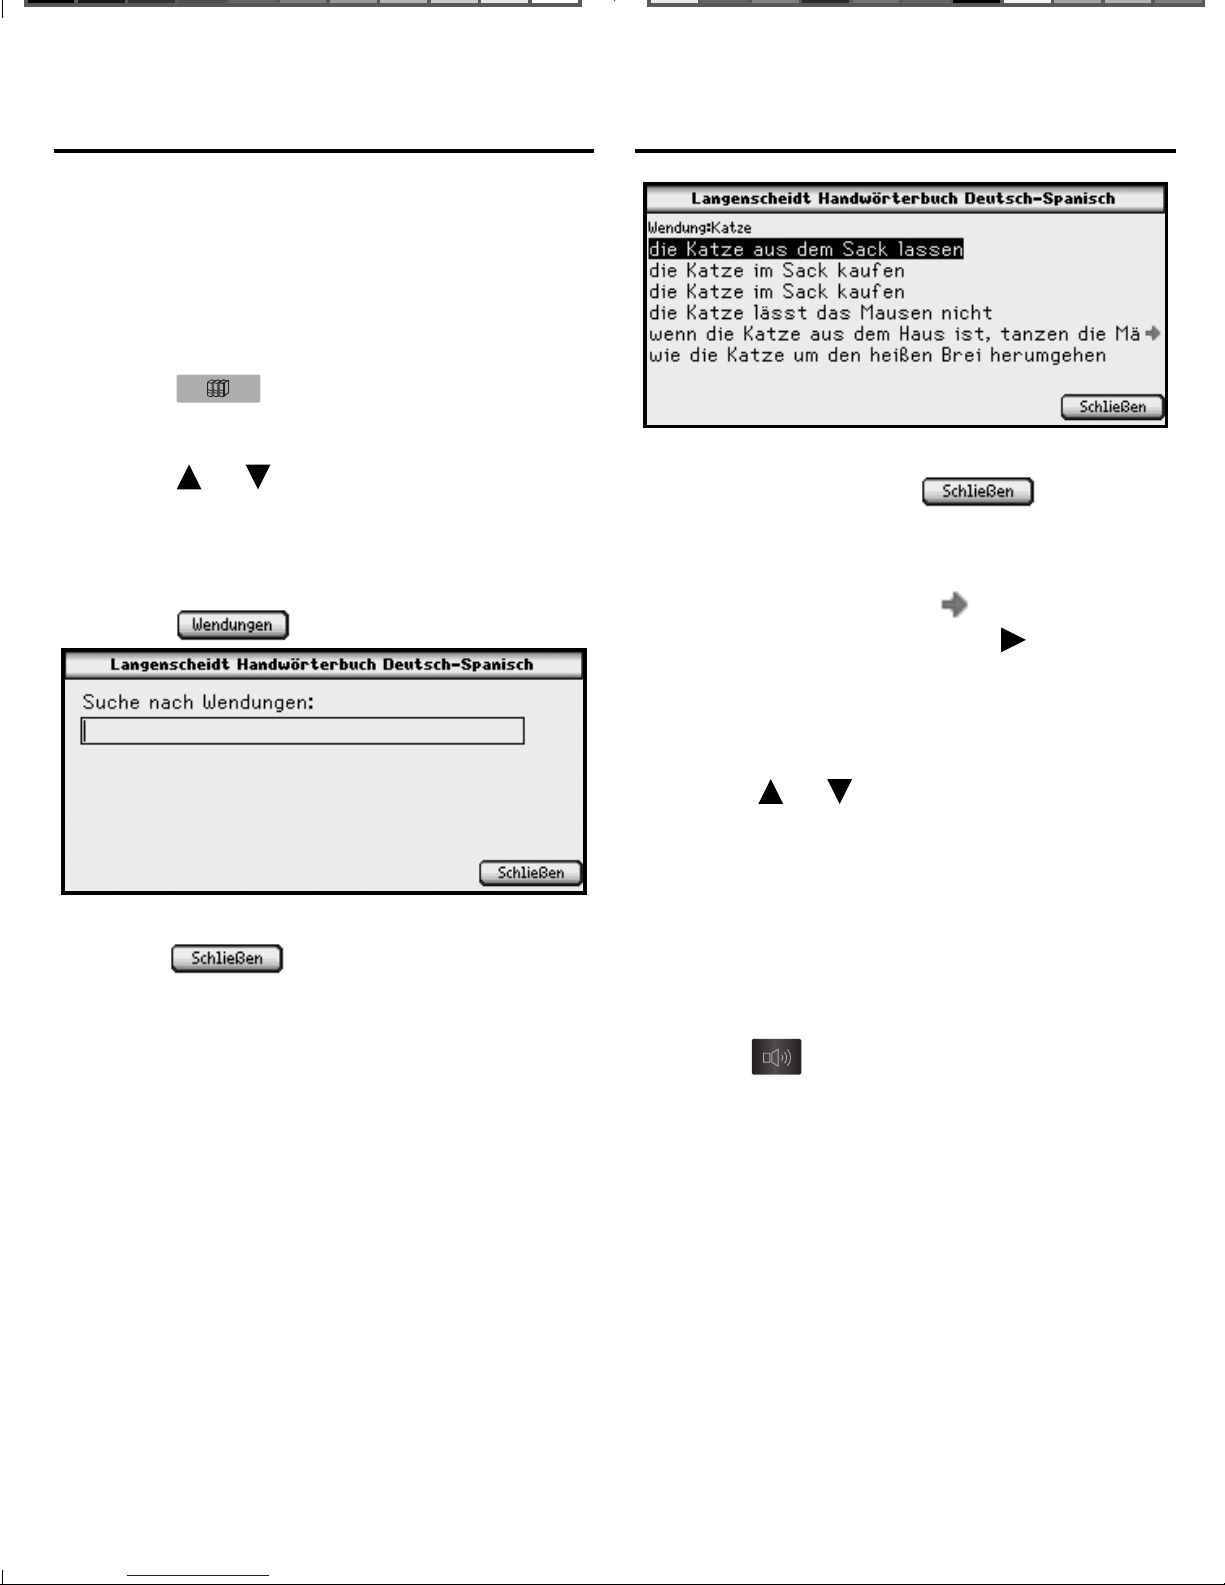
Finding Idioms
The two dictionaries in your device
include idioms in addition to their basic
dictionary entries.
From the Word Entry Screen
1. Press .
The eBooks tab is displayed.
2. Press
Handwörterbuch Deutsch-Spanisch
and then press EINGABE to select
it.
3. Press
or to highlight
(Idioms).
Finding Idioms
The list of idioms that contain “Katze”
is displayed. Press
return to the idiom search screen.
If an idiom is too long to t on the
screen, you will see
side of the screen. Press
on the right
(Close) to
to display
The idiom entry screen is displayed.
Press
the word entry screen.
4. Type a word, for example Katze
and then press EINGABE.
(Close) to return to
the entire idiom on the screen. Press
EINGABE to remove the pop-up
window.
5. Press
to the idiom you want to view and
then press EINGABE to select it.
The entry is displayed that contains
the idiom you selected.
6. Use the navigation button to read
the entire de nition.
Press
pronounced.
7. Press CLEAR when done.
or to move the highlight
to hear the word
21
Page 23

Highlighting Words
Highlighting Words
Another way to look up words is by
highlighting them in text. You can then
nd their de nition or translation, copy
the word to the clipboard, highlight the
word in the entry, add a note, or edit
the word.
1. At any text, press EINGABE to start
the highlight.
To turn the highlight o , press .
3. Press EINGABE.
A menu is displayed at the location
of the highlight.
Lookup searches for your word in
any available dictionary of the same
language as the highlighted word.
Translate searches for your word
in any available dictionary that
translates from the language of
2. Use the navigation button to move
the highlight to the word you
want.
Note: If you want to highlight more
than one word, move the highlight
to the rst word you want to
highlight, then hold
and press
the navigation button to move the
highlight to the last word.
the highlighted word to another
language.
Copy copies your word to the
clipboard.
Highlight saves a highlight over your
word or words in the text.
Add note allows you to add an
explanatory note regarding your
word.
Modify allows you to replace the
selected word or words with your
own preference.
4. Press
or to highlight the
option you want and then press
ENTER.
5. Press CLEAR when done.
22
Page 24

Using Annotations,
Using Annotations,
Modi cations and Highlights
Your device contains three special
features that help you to customize
your books. The Highlight, Modify and
Add note menu items allow you to
mark, edit and expand the text of any
of the books in this device. To review
how to highlight a word or words in
text, please see “Highlighting Words”
on page 22.
Annotations
Customize your learning by entering
annotations that explain, in your own
words, the meaning and usage of the
words you selected. Write examples
you can apply in your job or in any
other of your daily routines.
When you select Add note from the
menu, a note screen is displayed
prompting you to add a note to the
text.
Modi cations and Highlights
symbols. Press CLEAR to clear the
screen. When you are nished typing,
press
press
Your selected word or words are shaded
so that you can remember you added a
note regarding that section of text.
To edit an annotation, highlight the
shaded section of text and press
EINGABE. Then select Edit annotation
from the menu to see and edit your
note. Press
annotation, press
changes to the note, or press
to exit without accepting any changes.
to add the annotation or
to exit without adding it.
to delete the
to accept any
Begin typing your note. Use the
navigation button to move the cursor.
Press
and press a letter, or press AKZENTE,
to type punctuation marks and other
to delete letters. Hold FN
Modi cations
When you select Modify from the menu,
a note screen is displayed containing
the highlighted word or words.
23
Page 25

Using Annotations,
Using Annotations,
Modi cations and Highlights
Begin typing your modi cation to this
text. Use the navigation button to move
the cursor. Press
Hold FN and press a letter, or press
AKZENTE, to type punctuation marks
and other symbols. Press CLEAR to
clear the screen. When you are nished
typing, press
modi cation or press
without adding it.
to delete letters.
to add the
to exit
Modi cations and Highlights
To edit a modi cation at a later time,
highlight the crossed out section of text
and press EINGABE. Then select Edit
modi cation from the menu to edit your
modi cations. Press
the modi cation, press
accept any changes to the modi cation,
or press
accepting any changes.
to exit without
to delete
to
Highlights
When you select Highlight from the
menu, your selected word or words are
shaded in the text (a little darker than
the shading for annotations) so they
stand out and are easy to spot.
Your selected word or words are crossed
out in the text, so they stand out as a
modi cation.
To delete your highlight at a later time,
highlight the highlighted section of text
and press EINGABE. Then select Delete
highlight from the menu to erase the
highlight.
24
Page 26

Viewing the
Annotations List
Viewing the Annotations List
At any time, you can see a list of all the
bookmarks, annotations, highlights and
modi cations you have saved within a
particular eBook.
1. Enter a book where you have
saved a bookmark, annotation,
highlight and/or modi cation.
2. Press
3. Press
the eBook menu.
4. Press
Annotations and then press
EINGABE.
The Annotations list is displayed,
sorted in alphabetical order by the
headword of the entries in which the
notes are saved.
.
or , if necessary, to view
, if necessary, to highlight
The following icons indicate the type
of notation:
5. Use the navigation button to view
the list.
6. Press
particular notation.
Press
highlighted notation. Press
to con rm the deletion or press
7. Press EINGABE to go to the
location of that notation in the
eBook.
Annotation
Bookmark
Highlight
Modi cation
or to highlight a
to cancel.
to delete the
The entire text of the note you
added is displayed for annotations
and modi cations. The entire
text you highlighted is displayed
for highlights. The headword is
displayed for bookmarks.
View the entire text of your notation
as described in “Using Annotations,
Modi cations, and Highlights” on
page 23.
8. Press
Annotations list.
9. Press to close the
Annotations List.
Press
notes from this eBook. Press
to con rm the deletion or press
to return to the
to delete the list of
to cancel.
25
Page 27

Viewing In ections
by Franklin
Viewing In ections by Franklin
In ections show changes in a word’s
gender, tense, and form. When you
see a
that the dictionary includes extensive
in ections (provided by Franklin) of
nouns, verbs, modi ers and other
words. In this device, in ections
are available in the Langenscheidt
Spanish-German and German-Spanish
dictionaries.
Note: Bilingual dictionaries may include
translations of each in ected form.
1. Press
2. Press
Handwörterbuch Deutsch-Spanisch
and then press EINGABE.
(Conj) Soft Key, it means
.
or to highlight
4. When the word you want is on the
screen, press
want is highlighted.
Or you can continue typing letters
until the word is complete and
the matching word in the list is
automatically highlighted.
5. Press EINGABE to look it up.
The dictionary entry for “spielen” is
until the word you
3. Begin to type a German word, for
example, spielen.
As you type letters, the rst word in
the book that matches the letters you
type will move to the top of the word
list. You may not have to type the
entire word in order to nd the one
you want. In this example, note that
“spielen” appears on the screen after
you type “spiele”.
displayed.
6. Press
If needed, use the navigation button
to highlight the part of speech you
want and then press EINGABE.
The principal forms of the German
verb “spielen” are displayed.
7. Use the navigation button to read
the text.
(Conj).
26
Page 28

Viewing In ections by Franklin
Viewing Supplemental
Information
8. Press (Tenses) to see a
menu of available tenses.
9. Press or to highlight the tense
you want and then press EINGABE.
10. Press
(Previous) to view the next or
previous tense.
Press
to the overview. Press
(Next) or
(Overview) to return
In the Langenscheidt German-Spanish
and Spanish-German dictionaries,
you can review nine sections of
supplemental information, provided by
Langenscheidt, to help you understand
your dictionary.
Note: This information is available in
German only.
1. Press
2. Press or to highlight
Handwörterbuch Deutsch-Spanisch
or Handwörterbuch SpanischDeutsch and then press EINGABE.
3. Press
4. Press
to view the Go to menu.
.
.
(Close) to return to the previous
screen.
11. Press CLEAR when done.
27
Page 29

Viewing Supplemental
Viewing Supplemental
Information
5. Press to highlight Apéndice/
Anhänge and then press EINGABE.
The list of topics is displayed.
6. Press or to highlight the one
you want to review and then press
EINGABE.
Information
Die Aussprache des Spanischen
displays a displays a guide to
pronouncing the Spanish language.
Das spanische Alphabet displays the
Spanish alphabet, including the
phonetic pronunciation of each
letter.
Die Silbentrennung im Spanischen
displays some rules of hyphenating
Spanish words.
Die Groß- und Kleinschreibung im
Spanischen displays the rules of
capitalization in Spanish.
Spanischsprachige Länder:
Impressum displays the imprint from
the dictionary.
Vorwort displays the foreword of the
dictionary.
Hinweise für die Benutzer displays
some helpful tips of how to use this
dictionary.
Im Wörterbuch verwendete
Abkürzungen und Zeichen displays
the abbreviations used in this
Hauptstädte, Vorwahlen und
Währungen displays a list of Spanish
speaking countries and the regions
of Spain.
Zahlwörter - Numerales displays a list
of cardinal, ordinal and fractional
numbers.
7. Use the navigation button to read
the entire topic.
8. Press CLEAR when done.
dictionary.
28
Page 30

Using the Phrase Books
There are two ways in which you can
translate helpful phrases in categories
ranging from Emergencies to Business
Communication to Time & Dates.
Browsing Through Phrases
1. Press .
2. Press
für die Reise (D-S) and then press
EINGABE.
or to highlight Sätze
Using the Phrase Books
You can also begin typing a category
name to go directly to that section
of the list.
Note: If a phrase or phrase category
is too long to t on the screen, you
If you want to search the Spanish
phrases, press
3. Press
4. Press or to highlight the
category you want and then press
EINGABE.
(Topics).
.
will see
screen. Press
phrase or category on the screen.
Press EINGABE to remove the popup window.
5. Press
phrase you want and then press
EINGABE.
You can also begin typing a phrase
to go directly to that section of the
list.
on the right side of the
to display the entire
or to highlight the
29
Page 31

Using the Phrase Books Using the Phrase Books
Use the navigation button to read
the text, if necessary. Press
hear the target phrase, that is, the
phrase on the second line. To hear
the Spanish phrase at any time,
press
hear the German phrase at any time,
press
(Liste) to add the phrase to
My Vocabulary List.
6. Press CLEAR when done.
(Speak Spanish). To
(Speak German). Press
Searching for a Speci c
Phrase
1. Press .
to
4. Press EINGABE.
A list of phrases matching your
keyword is displayed. Press
(More) to see phrases using words
similar to your keyword.
5. Press
phrase you want and then press
EINGABE.
or to highlight the
2. Press
für die Reise (D-S) and then press
EINGABE.
If you want to search the Spanish
phrases, press
3. Type one or more keywords for
which you want to nd a phrase.
For example, type gestohlen.
or to highlight Sätze
.
Use the navigation button to read
the text, if necessary. Press
hear the target phrase, that is, the
phrase on the second line. To hear
the Spanish phrase at any time,
press
hear the German phrase at any time,
press
(Liste) to add the phrase to
My Vocabulary List.
(Speak Spanish). To
(Speak German). Press
to
6. Press CLEAR when done.
30
Page 32

Using the Grammar Guide
Using the Grammar Guide
Your LDS-1990 includes Grammar
Guides in German and Spanish that
describe parts of speech and other
grammar topics for both Spanish and
German.
Read the Grammar Guides and test your
comprehension by answering quizzes at
the end of most sections. Your LDS-1990
will tell you if you answer correctly.
Note: Quizzes are only available in the
Spanische Grammatik/Guía de gramática
de la lengua española (Guide to Spanish
Grammar).
1. Press
2. Press
or to highlight Deutsche
.
Grammatik or Guía de gramática
If you want to read about Spanish
grammar in German or Spanish,
highlight Spanische Grammatik
or Guía de gramática de la lengua
española, respectively.
3. Press
or to highlight the topic
you want and then press EINGABE.
or
de la lengua alemana (Guide to
German Grammar) and then press
EINGABE.
or
Continue selecting subsections, if
necessary, until you reach the text of
the Grammar Guide.
Press
(Topics), if available, to
see a menu of all the topics available
in the Guide to Spanish Grammar
and then use the same procedure to
select the topic you want.
31
Page 33

Using the Grammar Guide
Using the Grammar Guide
4. Use the navigation button to read
the text.
Press
/
view the next or previous topic, if
available. Press
(Contents) to return to the main
menu of the Grammar Guide. In the
Guide to German Grammar, press
/
top of the current topic. In the Guide
to Spanish Grammar, press
(Quiz), if available, to take a
quiz about the current topic.
5. Press CLEAR when done.
/
(Previous) to
(Start) to go to the
(Next) or
/
Grammar Quizzes ✓
Select the Solution Quizzes
This type of quiz provides you with
options. Instructions are displayed at
the top of the screen indicating what
the quiz expects you to choose. At
each question, press
and move the highlight. Highlight
the option you want and press
EINGABE to see if you are correct.
or to begin
Type the Answer Quizzes
/
This type of quiz asks you to ll in the
blank. Instructions are displayed at
the top of the screen indicating what
the quiz expects you to type. Type
your answer. To see the answer, press
(Solution).
The Guide to Spanish Grammar
contains many quizzes to help you
learn and understand the rules of
grammar you are reading about.
Note: Quizzes are not available for
every topic.
To take a quiz, press
(Quiz). During a quiz, to
move to the next question, press
/
/
the quiz and return to the grammar
topic. Press
(Contents) to go to the main menu of
the Grammar Guide.
(Quiz). Press
(Close) to exit
/
/
On Your Honor Quizzes
This type of quiz asks you to say a
solution to yourself. Instructions are
displayed at the top of the screen
indicating what the quiz expects you
to know. To see the answer, press
/
(Solution).
32
Page 34

Using My Vocabulary List
Using My Vocabulary List
You can save up to 100 total words and
phrases, in both Spanish and German,
in My Vocabulary List for personal study
or review. My Vocabulary List is saved
between sessions.
Note: Spanish and German words are
stored in separate lists. As you add
dictionaries for other languages, for
example, English, French, or Italian,
you can keep separate lists for those
languages, too. To view My Vocabulary
List for another language, press
The list you open depends on the
language of the word you are trying
to add or the entry language of the
book you are in. For example, from
3. Press or to highlight My
Spanish Vocabulary List or My
German Vocabulary List and then
press EINGABE.
.
My Vocabulary List is displayed for
the selected language. If there are
no items in your list, you see the
message “this list is empty”. To add
a word in the other language, press
Langenscheidt Handwörterbuch
Deutsch-Spanisch you open My German
Vocabulary List and from Langenscheidt
Handwörterbuch Spanisch-Deutsch you
open My Spanish Vocabulary List.
Adding Words
1. Press .
2. Press
.
.
Note:
displayed when you have previously
added words in the other language.
If you have not already done so,
return to Step 1 and select another
language from the Other tab of the
Library.
4. Press
may only be
.
33
Page 35

Using My Vocabulary List
Using My Vocabulary List
Press to close the word
entry screen without adding a word.
5. Type a word and then press
.
If there are multiple books or entries
to which to link, a menu is displayed
indicating the entries (and books, if
necessary) corresponding to your
word.
Adding Words Not in Any ✓
Dictionary
If you type a word that is misspelled
or not found in any book, you are
noti ed and asked if you want to add
it anyway. Press
word or press
your list without adding the word.
to add the
to return to
Adding Words From an Entry ✓
If you are viewing a de nition or
phrase, press
item to My Vocabulary List. You are
asked to con rm the addition.
to add the
6. Press
or entry you want and then press
EINGABE.
The word you typed is added to My
Vocabulary List.
7. Press
or to highlight the book
when done.
Press to add the word or
press
without adding the word.
to return to your list
34
Page 36

Using My Vocabulary List
Using My Vocabulary List
Viewing My Vocabulary List
1. Press .
2. Press .
3. Press
Spanish Vocabulary List or My
German Vocabulary List and then
press EINGABE.
My Vocabulary List is displayed for
the selected language. The book
linked to the word is indicated,
followed by a priority marker and
then the word.
The following icons refer to the
indicated dictionary:
or to highlight My
Langenscheidt
Handwörterbuch Spanisch-
Press to cycle through the
priority settings. The following icons
refer to the indicated priority:
No special status.
You have learned the word.
You need to learn the word.
To see My Vocabulary List for another
language, press
4. Press
di erent item in your list.
5. Press EINGABE to look it up.
6. Press
previous location.
or to highlight a
to return to your
, if available.
Deleting Items from ✓ My
Vocabulary List
Deutsch
Langenscheidt
Handwörterbuch DeutschSpanisch
Sätze für die Reise (S-D)
Sätze für die Reise (D-S)
While viewing your list, press and
to highlight the item you want
to delete and then press
to delete it. Press
the word or
deletion.
Caution: The item may be deleted
without asking for con rmation.
to cancel the
to delete
35
Page 37

Using My Dictionary
Using My Dictionary
Your LDS-1990 contains a personal
dictionary where you can add 500 of
your own words and de nitions. You
can enter words in any language, but
there is only one list.
Adding Entries
1. Press .
2. Press
.
4. Press or to highlight Add an
Entry and then press EINGABE.
5. Type the word you want to add.
6. Press EINGABE to go to the
de nition eld.
Press EINGABE to return to a
previous eld. Press
character. To type a number, hold FN
and press the key. Hold FN and press
to erase a
3. Press or to highlight My
Dictionary and then press
EINGABE to select it.
G to type a period. Hold FN and
press ? to type an apostrophe. Hold
FN and press AKZENTE repeatedly
to cycle through the available
symbols, including @ / _ ~ : ; , and #.
7. Press
Press
the entry.
to save the entry.
to exit without saving
Viewing or Editing Entries
1. Press .
2. Press
.
36
Page 38

Using My Dictionary
Using My Dictionary
3. Press or to highlight My
Dictionary and then press
EINGABE to select it.
4. Press
… and then press EINGABE.
5. Press or to highlight an entry.
Or you can begin typing a speci c
word you want to view to go directly
to that part of the list.
or to highlight Entries:
Deleting Entries
1. Press .
2. Press .
3. Press
Dictionary and then press
EINGABE to select it.
4. Press
Entry and then press EINGABE.
5. Press
you want to delete and then press
EINGABE.
or to highlight My
or to highlight Delete an
or to highlight the entry
6. Press
Type your changes. Use
move the cursor; use
Use EINGABE to move between
elds.
7. Press
changes.
Press
any changes.
to edit the entry.
to save your
to exit without saving
or to
to delete.
Press to delete the entry or
to cancel the deletion.
To delete all of the entries in My
Dictionary, at the My Dictionary
menu, highlight Erase the List and
then press EINGABE.
Press to erase the list or
to cancel the deletion.
37
Page 39

Viewing Your Search History
Using the Menus
Your LDS-1990 remembers and keeps
track of the last 100 entries you have
viewed. This search history includes
both Spanish and German words and
phrases. Any time you want to view this
list, press
The most recently viewed entry is at
the top of the list. The book where you
looked up the word is indicated. Press
.
Each book included in your LDS-1990
has access to two menus of additional
options, eBook and Go to. Press
to open the menus. Press
move between the eBook and Go to
menus. Press
menu item you want and then press
ENTER to select it.
Note: The available menu items di er
from book to book.
or to highlight the
or to
eBook Menu
or to move the highlight to an
entry you want to revisit and then press
EINGABE to look it up. Press
erase the search history. Press
to return to your previous location.
to
Add bookmark adds a bookmark at your
current location.
Note: This menu item is displayed only
while in text.
Remove bookmark removes the
bookmark from your current location.
Note: This menu item is displayed only
when a bookmark exists at your current
location in text.
38
Page 40

Using the Menus
Using the Menus
Annotations displays your list of
bookmarks, annotations, highlights and
modi cations. For more information,
please see “Viewing the Annotations
List”, on page 25. For more information
on Annotations, Highlights and
Modi cations please see page 23.
Paste pastes any information copied to
the clipboard at your current location.
Note: This menu item is displayed only
when you have previously highlighted
text and selected Copy from the popup menu.
Find opens a search input box. Type a
word and then press
for that word in the current eBook. Press
to cancel the search at any
time.
Note: This menu item is displayed only
within the text of an eBook.
Settings goes to the Settings List. For
information on the Settings List, please
see page 15.
to search
Go to Menu
Go to rst page goes to the rst page of
the current book.
Buscar/Suchen goes to the word search
screen for the current book.
Apéndice/Anhänge displays a list of
supplemental information for the
Langenscheidt Spanish-German and
German-Spanish dictionaries. This
information includes the Imprint and
Foreword and other topics ranging
from tips for using the dictionary to
information about the organization of
dictionary entries.
Note: This information is in German
only. For more information, please see
“Viewing Supplemental Information” on
page 27.
Inicio/Überblick goes to the main menu
of the respective grammar guide.
Temas/Themen goes to the list of topics
in the Spanische Grammatik/Guía de
gramática de la lengua española (Guide
to Spanish Grammar).
Copyright/Pie de Imprenta/Impressum
displays copyright information for the
current book.
39
Page 41

Using the Audio Player
Using the Audio Player
The audio player in your LDS-1990 is a
versatile jukebox that you can use to
play many kinds of audio les, including
mp3 and Audible™ format audio books.
Music and audio books will keep
playing, even if you leave the audio
player to look up a word. And if you
want to pause, stop, or even advance to
the next le, just press the audio keys,
located on the side of the device. You
do not have to open the audio player
rst.
Note: If a le is playing, and you want to
listen to a word or phrase from a book,
rst pause or stop the le, then press
.
The audio player opens and begins
playing the selected le.
The name of the selected le is listed
at the top of the screen. Beneath the
title is a progress bar indicating the
progress of the track and how much
time has elapsed.
Another way to open the audio
player is by pressing
at any
Selecting a File
1. Press .
2. Press
Any available audio les are
displayed.
3. Press
you want and then press EINGABE.
or to highlight the le
.
time and from any location.
Your list of audio les is displayed
below the progress bar. Press
to highlight a di erent le and press
EINGABE to hear it.
or
40
Page 42

Using the Audio Player Using the Audio Player
Other Keys in the Audio Player ✓
Press… To…
increase (+) or decrease
(-) the volume.
Display a menu of
go to the next (right
side:
side:
) or previous (left
) le. Press and
hold the right side of the
button to fast-forward
through a le. Press
and hold the left side
of the button to rewind
through a le.
pause a playing le
or play a paused or
stopped le. Press and
hold to stop playing a
le.
Display format, title and
available les. Press
or
to highlight a le and
then press EINGABE or
to hear it.
Using the Audio Player Menu ✓
Press
Player Menu.
Note: The available menu items are
di erent depending on what type of
le you are listening to.
to open the Audio
author/artist information
about the highlighted
le.
41
Page 43

Using the Audio Player
Using Record and Playback
If you are listening to an Audible™
audio book, the following menu
items are available to help you
navigate your audio book: Forward
10 seconds, Forward 1 minute,
Forward 10 minutes, Forward 1 hour,
Backward 10 seconds, Backward
1 minute, Backward 10 minutes,
Backward 1 hour, Skip to the previous
section, and Skip to the next section.
The record and playback feature is a
great tool to help you test and improve
your pronunciation.
1. Go to a word or phrase that you
want to practice pronouncing.
2. Press
to hear the word or
phrase.
Depending on your location, you
may need to press
German) or
(Speak Spanish)
(Speak
to hear the pronunciation you want.
3. Press
to begin recording.
If you are listening to a music le, the
following menu items are available
to help you organize your music les:
Play single, Play all, Repeat single,
Repeat all and Shu e play.
appears at the top right of the
screen when the microphone is
recording.
42
Page 44

Using Record and Playback
Playing the Games
4. Try to repeat what you just heard.
Be sure to not speak too far away
from the microphone, which is
located at the upper left corner of
the keyboard.
5. Press
6. Hold FN and then press to hear
your pronunciation.
7. Press
pronunciation and see how close
you were.
Or press
pronunciation you want.
8. Repeat steps 3 to 7 to continue
again to stop recording.
to hear the device’s
(Speak German) or
(Speak Spanish) to hear the
Game Settings
Before you play, you can choose the skill
level, the game book, the word list, and
whether or not graphics will be used.
1. Press
2. Press
3. Press or to highlight Game
Settings and then press EINGABE.
The Game Settings menu is
displayed.
.
.
recording and comparing your
pronunciation against the device’s.
4. Press or to move to Skill
Level, Game Book, Word List, or
Graphics.
Skill Level determines how easy or
di cult a game is.
Game Book determines which
installed book will be the source of
the words.
Note: Some games cannot be played
with certain books. For example,
Speaking Spelling Bee cannot be
played using the Langenscheidt
Handwörterbuch Deutsch-Spanisch.
Word List determines which subset of
words from that book will be used.
43
Page 45

Playing the GamesPlaying the Games
Graphics lets you turn on or o
images between rounds.
5. Press
options.
6. Press or to move the highlight
to your choice.
7. Press
setting.
Press
changing the setting.
8. Press
Menu.
to open the menu of
or EINGABE to accept the
to exit the menu without
to return to the Games
Selecting a Game ✓
Press
Menu.
to display the Games
Conjumania™
Conjumania teaches verb conjugations.
It shows you an in nitive verb and
asks you to enter a conjugation. Your
conjugation must be spelled correctly,
including accents. Type your guess and
then press EINGABE. To look up the
word, press
to the game. To try a new verb, press
. Press
to return
Press or to move the highlight
to the game of your choice and then
press EINGABE.
Getting Help in the Games ✓
During any game, you can read
instructions by pressing
You can get a hint, when available,
by pressing
pressing
Note: If you reveal the game word,
or give up by
.
.
.
Flashcards
Flashcards displays a word and
challenges you to guess its de nition.
Try to think of the de nition and then
press
Press
to view a new word.
to see if you were right.
to return to the game. Press
you lose the round.
44
Page 46

Playing the Games Playing the Games
Gender Tutor
Gender Tutor asks you to guess the
gender of German or Spanish nouns.
M for masculine is automatically
highlighted. Press
F for feminine, M for masculine or N
for neuter and then press EINGABE
to select your answer. To look up the
word, press
to the game. To try a new word, press
.
or to highlight
. Press
to return
Type letters that you think are in
the mystery word. If you are correct,
the letter appears in place of the
corresponding question mark(s). Press
to ll in a letter. To look up the
word, press
to the game. To try a new word, press
.
. Press
to return
Letris
In Letris, try to form words from the
letters that fall down the screen. The
Hangman
Hangman selects a mystery word
and challenges you to guess it letter
by letter. The letters of the mystery
word are hidden by question marks.
The number of guesses remaining is
indicated by #s and is also displayed at
the bottom of the screen.
moment letters are put together
to form a valid word, those letters
disappear and the remaining letters
shift and fall into the opening created
by the disappearing letters. Words
can be formed both horizontally and
vertically. You earn points for each
word you make. The longer the word,
the better your score. As you advance
rounds, the letters fall more rapidly. If
the pile of letters reaches the top of the
screen, the game is over.
45
Page 47

Playing the Games
Using the Clock
Use the navigation button to move the
letters as they fall. Hold FN and press
or
left as possible. Press
Press
any time, then press
playing again. To try another round,
press
to move the letters as far right or
to drop a letter.
to pause the game at
to start
.
Speaking Spelling Bee
The clock is automatically displayed
every time you access the organiser. The
clock displays the current time, date and
a home city. You can toggle to the world
time by pressing
.
Setting the Date and Time
1. Press
2. Press
3. Press
Time and then press EINGABE.
.
.
or to highlight Date and
Speaking Spelling Bee pronounces a
Spanish word and challenges you to
spell it. Press
again. Press
on the screen. Type your guess and
press EINGABE. To look up the word,
press
the game. To try a new word, press
.
to hear the word
to ash the word
. Press
to return to
The Date and Time Menu is
displayed.
4. Press
Format, Local Time, Local DST, Set
Time, World Time, World DST, Date
Format, or Set Date.
Time Format determines whether
you use a 12 hour or 24 hour clock.
Local Time determines your home
city.
Local DST sets whether or not you are
currently in daylight savings time.
Set Time allows you to set the hour
and minutes according to the
selected clock format.
or to move to Time
46
Page 48

Using the Clock
Using the Calculator
World Time determines your world
city.
World DST sets whether or not your
world city is in daylight savings time.
Date Format determines how you
display the date.
Set Date allows you to set the day,
month and year according to the
selected date format.
5. Press
to open the menu of
options.
For the Set Time and Set Date
settings, press
to highlight the rst
eld.
6. Press
or to move the highlight
to your choice.
1. Press .
2. Press
.
3. Perform your calculation.
You can type up to 10 digits.
Press… To…
G(.) type a decimal point
Z(+/-) use negative numbers
A(1/x) calculate reciprocals
For the Set Time and Set Date
settings, press
again to move to
the next eld. Repeat step 6 for each
eld in the setting, then proceed to
step 7.
7. Press
or EINGABE to accept the
settings.
Press
to exit the menu without
changing the setting.
8. Press to return to the
organiser.
S(√x) calculate square roots
2
D(x
) calculate squares
F(%) calculate percentages
Memory Keys ✓
Press… To…
M+) add the number on the
X(
screen to the number
stored in memory
C(
M-) subtract the number
on the screen from
the number stored in
memory
V(
MR) recall the number from
memory
47
B(
MC) clear memory
Page 49

Using the Calculator Using the Calculator
Practice with the following equations.
a. (32 x 12) – (8 x 8) = 320
• Press B(
MC).
• Type 32.
• Press K(x).
• Type 12.
• Press EINGABE.
• Press X(
M+).
• Type 8.
• Press K(x).
• Type 8.
• Press EINGABE.
• Press C(
M-).
c. 320 x 7 = 2240
• Press V(
MR).
• Press K(x).
• Type 7.
• Press EINGABE.
d. (-39) ÷ (-5) = 7.8
• Type 39.
• Press Z(+/-).
• Press L(÷).
• Type 5.
• Press Z(+/-).
• Press EINGABE.
e. 1.07
3
= 1.225043
• Press V(MR).
b. 320 ÷ 16 = 20
• Press V(MR).
• Press L(÷).
• Type 16.
• Press EINGABE.
• Type 1.
• Press G(.).
• Type 07.
• Press K(x).
• Type 1.
• Press G(.).
• Type 07.
• Press EINGABE.
• Press EINGABE again.
48
Page 50

Using the Calculator
Using the Phone Book
f. √19 = 4.35889894354
• Type 19.
• Press S(√x).
g. 18% of 478 = 86.04
• Type 478.
• Press K(x).
• Type 18.
• Press F(%).
Adding Entries
You can store up to 100 entries in
the phone book. The total number of
entries you can add depends on the size
of each entry.
1. Press
2. Press
3. Press or to highlight Add an
Entry and then press EINGABE.
.
.
4. Type a name.
5. Press to go to the next eld.
49
Page 51

Using the Phone Book Using the Phone Book
6. Continue lling in the elds until
all the information for that contact
has been added.
Press
Press
to return to a previous eld.
to erase a character. To
type a number, hold FN and press
the key. Numbers are automatically
active in any of the phone number
elds. Hold FN and press G to type
a period. Hold FN and press ? to
type an apostrophe. Hold FN and
press AKZENTE repeatedly to cycle
through the available symbols,
including @ / _ ~ : ; , and #.
7. Press EINGABE to save the entry.
4. Press or to highlight the entry
you want to view and then press
EINGABE.
5. Press EINGABE again to edit the
entry.
Viewing or Editing Entries
1. Press .
2. Press
3. Press
or to highlight View: …
and then press EINGABE.
.
Type your changes. Use or to
move the cursor; use
Use
or to move between elds.
to delete.
6. Press EINGABE to save your
changes.
Press
to exit without saving any
changes.
50
Page 52

Using the Phone Book Using the Phone Book
Deleting Entries
1. Press .
2. Press
3. Press
Entry and then press EINGABE.
4. Press or to highlight the entry
you want to delete and then press
EINGABE.
or to highlight Delete an
.
Using a Password
You can use a password to prevent
unauthorized access to the phone book.
Warning! Always write the password
in a safe, separate location. If you lose
or forget the password, you will be able
to use the phone book again only by
restoring the factory defaults of your
LDS-1990, which will permanently erase
all the information stored in the phone
book.
1. Press
2. Press
3. Press
password and then press EINGABE.
.
.
or to highlight Set your
Press to delete the entry or
to cancel the deletion.
To delete all of the entries in the
phone book, at the Phone Book
menu, highlight Erase the List and
then press EINGABE.
Press to erase the list or
to cancel the deletion.
4. Type a password of four to 15
characters and press EINGABE.
Use
to delete.
5. Re-type the password and then
press EINGABE to con rm it.
to move the cursor; use
51
Page 53

Using the Phone Book
Using the Converter
The converter allows you to convert
values of measurement and currency.
Making Metric Conversions
1. Press .
The password you set will be
requested the rst time that the
phone book is used during a session.
Type the password and then press
EINGABE.
6. To change the password, repeat
steps 1-5.
To disable a password, press
2. Press
3. Press or to highlight the
conversion category you want and
then press EINGABE.
Note: If you select Temperatures you
go directly to the entry screen.
4. Press
you want to convert between and
then press EINGABE.
or to highlight the units
.
EINGABE at an empty Set your
password screen.
52
Page 54

Using the Converter Using the Converter
5. Type a number after one of the
units.
Press or to move between the
lines. Press
6. Press EINGABE to convert the
units.
to delete a number.
Making Currency
Conversions
The exchange rate should be in units
of the other currency per one unit of
the home currency (n other/1 home).
For example, to convert between U.S.
Dollars and Euros, enter an exchange
rate of 1.35219. This means that
1.35219 U.S. Dollars is the equivalent
of 1 Euro.
5. Type an amount for the home or
other currency.
1. Press .
2. Press
3. Press
Converter and then press EINGABE.
4. Type an exchange rate and press
EINGABE.
or to highlight Currency
.
Press
lines. Press
6. Press EINGABE to convert the
amount.
or to move between the
to delete a number.
53
Page 55

Installing the
Installing the
Franklin PC Desktop
To install the Franklin PC Desktop from
the installation CD-ROM, follow these
steps.
Warning: You must install the software
on your PC before you connect your
device to your computer, so that your
computer can properly install the
drivers necessary to communicate with
your LDS-1990.
1. Insert the installation CD-ROM
into the CD-ROM drive on your PC.
The installation screen appears.
If this screen DOES NOT launch
automatically, follow these steps.
Franklin PC Desktop
Note: You may be prompted to
restart your computer.
4. Follow the instructions on the
screen to install the program.
When the installation is complete,
the AudibleManager® is launched.
Note: To continue learning about the
Franklin PC Desktop and the Franklin
PC View™ feature, please minimize
the AudibleManager® at this time.
Special note for users of the
Windows Vista® operating system:
Before you continue, please visit
www.franklin-de.com/BM_SD_Vista
• From your PC desktop, double-
click My Computer.
• Double-click the CD-ROM drive.
2. Follow the instructions on the
screen to install the program.
The Franklin PC Desktop and the
Mobipocket Reader for Franklin with
the Franklin PC View™ feature are
installed.
Note: The installation language of
the Franklin PC Desktop and the
Mobipocket Reader for Franklin are
matched to the language of your
Windows® operating system.
3. Once installation is nished, click
the Finish button to close the
installation screen.
for downloads and instructions for
establishing compatibility between
this software, your device, and
Windows Vista®. Your PC will not
be able to recognize your device
without this update.
5. Connect your device to your PC.
Please see page 55 for details.
Opening your Software ✓
You can access the Franklin PC
Desktop, the Mobipocket Reader for
Franklin, and the AudibleManager®
at any time by double-clicking their
respective icons on your PC desktop
or Start | Programs and then the
application you want to open.
The Franklin PC Desktop launches
and you are prompted to begin the
installation of the AudibleManager®.
54
Page 56

Connecting Your Device
Connecting Your Device
Your LDS-1990 has a built-in USB port
and comes with a cable to connect it to
your desktop or laptop computer.
1. Turn on your device.
2. Connect the wide end of the
included USB cable to a USB port
on your PC and the smaller end to
the USB port on your device.
The keyboard on your device is
now disabled. You must use the PC
keyboard and mouse when your
device is connected to the PC. On
your PC, the image of your device on
the Franklin PC Desktop changes to
indicate that your device is properly
connected.
3. Close any pop-up windows that
may open, such as “My Stu ”, “My
Handheld” or “Removable Disk”.
4. Click
to open the Mobipocket
Reader for Franklin.
This screen is displayed on your
device indicating when it is properly
connected to your PC.
The “New Handheld Detected” dialog
box is displayed.
5. Click Next to add your Franklin
device to your list of recognized
devices.
6. Close the Mobipocket Reader for
Franklin and return to the Franklin
PC Desktop.
55
Page 57

Using the Franklin PC Desktop
The Franklin PC Desktop is a PC application that enables you to read and use
the content of your LDS-1990 on your PC using the Franklin PC View™ feature of
the Mobipocket Reader for Franklin. You can also use the Franklin PC Desktop to
purchase more content, register your device, and backup or restore your device
data.
Before you can use the Franklin PC Desktop, make sure you have completed the
instructions in the “Installing the Franklin PC Desktop” and “Connecting Your
Device” sections on pages 54 and 55.
Note: Some features of Franklin PC Desktop require an Internet connection and the
use of Internet Explorer 5.0 or higher.
56
Page 58

Using the Franklin PC Desktop Using the Franklin PC Desktop
Franklin PC Desktop
Functions
1. Double-click on your PC
desktop.
The Franklin PC Desktop opens.
2. Click the link you want.
Registration opens the product
registration Web page.
eBookStore opens a Web page where
you can shop for additional eBooks
to read on your device or PC.
Backup saves to your PC a copy of all
saved data from your device.
Restore restores to your device the
most recent backup of all saved data
from your PC.
Support opens a product support
Web page.
Help opens a help le about
the Franklin PC Desktop in the
Mobipocket Reader for Franklin.
In addition to the links listed above,
the following icons provide you with
quick access to the other software
on your PC.
Click... To...
open Mobipocket
Reader for Franklin and
use the Franklin PC
View™ feature. Please
see “Using the Franklin
PC View™ Feature”
on page 61 for more
information.
open AudibleManager®.
open Windows Explorer
to your “My Music” folder
on your PC. When your
device is connected, the
“Audio” folder opens. If
an MMC/SD is installed
in your device, the card’s
“Audio” folder is also
opened.
57
Page 59

Using the Franklin PC Desktop Using the Franklin PC Desktop
Copying Files to Your Device
Your device is not limited to the books
it comes with. You can copy eBooks, RSS
eNews, mp3 music les and other les
to expand and personalize your device.
Note: Once you have begun using
your Mobipocket Reader for Franklin
to download and install RSS eNews
subscriptions, any updates to these les
will automatically update to your device
when you connect it to your PC.
Try copying an mp3 le to your device:
1. Double-click
desktop.
The Franklin PC Desktop opens.
2. Make sure your device is
connected to your PC.
See “Connecting Your Device” on
page 55 for more information.
on your PC
4. Starting in your “My Music” folder,
nd an mp3 le you want to copy
to your device.
5. Right-click an mp3 le you want to
copy to your device and then click
“Copy” from the pop-up menu.
6. Look for the additional windows
that opened when you clicked
.
Franklin Flash refers to a drive
that stores general purpose les,
including your phone book les and
My Vocabulary List. You can write to
this drive, but available memory is
limited. This may appear labelled as
My Stu .
Franklin SD/MMC refers to the drive
of any removable MMC/SD installed
in your device. Available memory is
determined by the size of the card.
If you have formatted the card using
the Utilities in your device, this will
3. Click
to open Windows
Explorer.
Note: Your “My Music” folder is
automatically opened as well as your
device’s “Audio” folder and the MMC/
SD’s “Audio” folder, if one is installed
in your device.
Note: In order for your device to see
mp3 les, they need to be copied
into the “Audio” folder on your device
or MMC/SD card.
appear as My Card. This may appear
labelled as Removable Disk.
Note: When you open My
Computer, you also see the drive
labelled My Handheld. This refers to
a drive that contains your device’s
primary content. This drive is readonly.
58
Page 60

Using the Franklin PC Desktop Using the Franklin PC Desktop
7. Right-click in the window where
you want to copy the mp3 le and
then click “Paste” from the pop-up
menu.
Warning: It is highly recommended
that in order to use as many les as
you can on your device, you save
them to a MMC/SD. This protects the
books that come with your device
and any user-entered information
from being overwritten or erased
accidentally.
8. When you are nished copying
les to your device, unplug the
USB cable.
9. On your device, press
.
Backup Your Data
The Franklin PC Desktop enables you
to backup all user-entered information
that is saved on your device. While your
device is connected to your PC, click the
Backup link of the Franklin PC Desktop
to save your data. A con rmation dialog
is shown when the backup is complete.
Restore Your Data
If you lose data because you needed
to reset your device to factory defaults,
you can restore your data to the point
when you last saved a backup le.
While your device is connected to
The mp3 le you copied to your
handheld will be displayed in the
track list.
10. Press
you want to play and then press
Note: If you are copying eBook les,
follow the steps above, but open the
eBooks folder on your MMC/SD and
paste your les there. Repeat these
steps to copy as many les to your
device as you want.
or to highlight the track
.
your PC, click the Restore link of the
Franklin PC Desktop. A con rmation
dialog is shown when the restoration is
complete.
Note: If you have made changes to
the data saved on your device, those
changes will be overwritten if you
perform a restoration. There is no
synchronization between the PC and
your device during a Backup or Restore.
59
Page 61

Using the Franklin PC Desktop Using the Franklin PC Desktop
Using the AudibleManager®
Use the AudibleManager® to access
any Audible™ format audio books on
your PC and to purchase and download
additional audio books.
Any Audible™ format audio books
you have stored on your PC are
displayed in the top center pane of the
AudibleManager®. The bottom right
pane displays information about your
device. When your device is connected
to your PC, any Audible™ format audio
books are displayed in bottom center
pane.
Note: for additional information about
how the AudibleManager® works,
please read its helptext by clicking Help
| Help in the tool bar.
To move an audio le to your device,
3. Click
AudibleManager®.
4. Click the check box in the
bottom right pane of the
AudibleManager® of the drive
where you want to save les.
Note: External Drive saves to the
MMC/SD you have installed in your
device. If you do not have an MMC/
SD installed, you may not have
enough memory in your Internal
Drive to copy audio les to your
device.
5. Click the audio book you want in
the top center pane and drag it to
the bottom center pane.
A status bar is displayed indicating
the progress of the transfer.
to open the
follow these steps.
1. Double-click
desktop.
The Franklin PC Desktop opens.
2. Make sure your device is
connected to your PC.
See “Connecting Your Device” on
page 55 for more information.
on your PC
Listening to audio books on ✓
your PC
To listen to an audio book on your
PC, double-click the le and it will
open in your PC’s default media
player.
60
Page 62

Using the Franklin PC View™ Feature
The Franklin PC View™ feature allows you to read the eBooks stored on your device
on your PC.
1. Double-click
on your PC desktop.
The Franklin PC Desktop opens.
2. Make sure your device is connected to your PC.
See “Connecting Your Device” on page 55 for more information.
3. Click
to open the Mobipocket Reader for Franklin.
Note: If you are prompted to install the latest version of Mobipocket Reader,
please click No and continue with the instructions below.*
* After your initial installation of the Franklin PC Desktop, you can get the latest Mobipocket Reader update
by selecting Help from the toolbar. Then select Check for Mobi Reader Update and follow the instructions
on your PC screen.
61
Page 63

Using the Franklin PC View™ Feature
The My Library pane of the Mobipocket Reader for Franklin is displayed.
The rst time you open the desktop Reader, this pane will most likely be empty.
in the tool bar indicates that the desktop Reader sees your Franklin
device. You may be asked to visit the eBookstore. Click the Close button at this
time. Click eBook store to shop for eBooks at a later time.
4. Click Franklin PC View in the left pane of the desktop Reader.
The list of eBooks stored on your device is displayed in the main pane of the
desktop Reader.
5. Click the eBook you want to read and then click
.
6. Use your keyboard and mouse to read the eBook just as you would on your
device.
62
Page 64

Using the
Using the
Franklin PC View™ Feature
Note: Click Franklin PC View in the
left pane of the Reader at any time to
return to the Library of your device.
7. Try the following examples to
get familiar with the Franklin PC
View™ feature.
Looking Up Words
1. Click Franklin PC View.
2. Click Langenscheidt
Handwörterbuch Deutsch-Spanisch
and then click
3. Type entdecken and press ENTER
on your PC keyboard.
The dictionary entry is displayed.
4. Press the right or left arrow keys
to page up or down and read the
.
Franklin PC View™ Feature
Please remember, the Soft Keys
vary based on the book you are in.
These are the Soft Keys while in
the Langenscheidt Handwörterbuch
Deutsch-Spanisch.
5. Press Backspace to return to the
word search screen and search for
another word.
6. Click Franklin PC View to return to
the list of eBooks stored on your
device.
Note: Music les, your search history,
most games and organiser functions
cannot be used from the Franklin PC
View feature. To access any Audible™
format audio books on your PC,
open the AudibleManager®.
text.
Note: Any available Soft Keys are
displayed across the bottom of the
window.
Click... To...
go to the empty English
word search screen.
look up any in ections
for “entdecken”.
look up a grammar topic
describing verbs.
look for phrases
containing “entdecken”.
add “entdecken” to My
German Vocabulary List.
Finding In ections
1. From within the entry for
entdecken, click
If needed, click the part of speech or
translation you want.
The principal forms of the German
verb “entdecken” are displayed. The
root word is displayed at the top of
the screen.
2. Press the right or left arrow keys
to page up or down and read the
text.
.
63
Page 65

Using the
Using the
Franklin PC View™ Feature
3. Click to see a menu of
available tenses.
4. Click the tense you want and then
press ENTER.
5. Click
bottom of the page to view the
next or previous tense.
Click
overview. Click
the previous screen.
6. Click Franklin PC View to return to
the list of eBooks stored on your
device.
or at the
to return to the
to return to
Franklin PC View™ Feature
Finding Phrases
1. Click Franklin PC View.
2. Click Sätze für die Reise (D-S) and
then click
3. Type gestohlen and then press
ENTER.
4. Click the phrase you want to see
translated.
5. Click Franklin PC View to return to
the list of eBooks stored on your
device.
Additional Functions ✓
.
Reading a Grammar Topic
1. Click Franklin PC View.
2. Click Deutsch Grammatik or
Gramática de la lengua alemana
and then click
German grammar in German or
Spanish, respectively.
Select Spanische Grammatik or
Gramática de la lengua española
to read about Spanish grammar in
German or Spanish, respectively.
3. Click on any topic you want to
read.
4. Press the right or left arrow keys
to page up or down and read the
. to read about
The following functions are also
accessible while you read an eBook.
Note: for additional information
about how the Mobipocket Reader
for Franklin works, please read its
helptext by clicking Help | Mobi
Reader Help in the tool bar.
Click... To...
copy the eBook to
your device.
go to the table of
contents, if available.
text.
5. Click Franklin PC View to return to
the list of eBooks stored on your
device.
64
Page 66

Using the
Using the
Franklin PC View™ Feature
go to the previous
page.
go to the next page.
go to your previous
location.
increase the font
size.
decrease the font
size.
add a bookmark or
annotation at your
current location
in the eBook or
display your list of
previously added
bookmarks, notes,
highlights and
modi cations.
change the display
of the eBook in the
desktop Reader.
Franklin PC View™ Feature
Highlighting Text in the ✓
Franklin PC View function
Another way to look up words is
by highlighting them in text. You
can then nd their de nition or
translation, or copy the word to the
clipboard. Highlighting words in the
Franklin PC View™ feature di ers
from the method in your device.
1. Click and drag the mouse across
the text you want to highlight.
A pop-up menu is displayed.
2. Use the up or down arrow keys to
highlight the menu item you want
and then press ENTER to select it.
Note: For a description of available
menu items, please see “Highlighting
Words” on page 22. Add link is a
menu item, unavailable on your
device. This item adds an hyperlink
from this section of text to a
destination of your choosing, so
toggle the desktop
Reader to and from
full screen view.
you can create your own cross
references. Once selected, go to your
target position, highlight the desired
section of text, then select Set link
target from the pop-up menu.
65
Page 67

Speci cations
Speci cations
Model: LDS-1990 Language Studio
Spanish
German
• Battery: rechargeable 3.7 volt lithium
polymer
• Size: 146 x 87.3 x 20.7 mm
© 2006-2009 Franklin Electronic
Publishers, Inc., Burlington, NJ 08016-
4907. U.S.A. All rights reserved.
Content:
© 2006 Langenscheidt KG, Berlin und
München. All rights reserved. Used
by Franklin Electronic Publishers,
Inc., Burlington, pursuant to License
Agreement with Langenscheidt KG,
Berlin und München.
© 2005 Acapela Group S.A. All rights
reserved.
© 2005 Mobipocket.com S.A. Paris,
France. All rights reserved.
Licensed under Audible Patent Nos.
5,926,624, 6,170,060, 6,253,237,
6,560,651, 5,872,712 and 6,158,005.
Audible and AudibleReady are
trademarks of Audible, Inc.
© 2005 Audible, Inc. All rights reserved.
software must conform strictly to the
license agreement between Franklin
and Audible, Inc., and possession
does not convey any right to disclose,
reproduce, or permit others to use the
software without the speci c written
authorization of Audible, Inc.
MPEG Layer-3 audio decoding
technology licensed from Fraunhofer IIS
and Thomson.
Windows is a registered trademark of
Microsoft Corporation in the United
States and other countries. Windows
Vista is either a registered trademark
or trademark of Microsoft Corporation
in the United States and/or other
countries.
Imported to the European Community
by:
Franklin Electronic Publishers GmbH
Kapellenstr. 13
85622 Feldkirchen, Germany
U.S. Patents: 5,113,340; 5,203,705;
5,218,536; 5,229,936; 5,295,070
ISBN: 978-1-59074-471-0
This software is the property of
Audible, Inc. Possession and use of this
66
Page 68

Recycling and Disposal
Device Disposal ✓
This device should be disposed
through your local electronic
product recycling system – do not
throw into the trash bin.
Packaging Disposal ✓
Please save this User’s Guide and all
packing materials, as they contain
important information. In case of
disposal, please refer to your local
recycling system.
This unit may change operating
modes, lose information stored in
memory, or fail to respond due to
electrostatic discharge or electrical
fast transients. Normal operation of
this unit may be re-established by
pressing the reset key, by pressing
, or by removing and replacing
the batteries.
FCC Notice
This device complies with Part 15 of the FCC
Rules. Operation is subject to the following two
conditions: (1) This device may not cause harmful
interference, and (2) This device must accept any
interference received, including interference that
may cause undesired operation.
Warning: Changes or modi cations to this unit
not expressly approved by the party responsible
for compliance could void the user’s authority to
operate the equipment.
NOTE: This equipment has been tested and found
to comply with the limits for a Class B digital
device, pursuant to Part 15 of the FCC Rules.
These limits are designed to provide reasonable
protection against harmful interference in a
residential installation. This equipment generates,
uses and can radiate radio frequency energy
and, if not installed and used in accordance with
the instructions, may cause harmful interference
to radio communications. However, there is no
guarantee that interference will not occur in a
particular installation. If this equipment does
cause harmful interference to radio or television
reception, which can be determined by turning the
equipment o and on, the user is encouraged to try
to correct the interference by one or more of the
following measures:
–Reorient or relocate the receiving antenna.
–Increase the separation between the equipment
and receiver.
–Connect the equipment into an outlet on a
circuit di erent from that to which the receiver is
connected.
–Consult the dealer or an experienced radio/TV
technician for help.
NOTE: This unit was tested with shielded cables on
the peripheral devices. Shielded cables must be
used with the unit to insure compliance.
NOTE: The manufacturer is not responsible
for any radio or TV interference caused by
unauthorized modi cations to this equipment.
Such modi cations could void the user’s authority
to operate the equipment.
67
Page 69

Disclaimer of Warranties
Except as speci cally provided herein, Franklin makes no warranty of any kind,
express or implied, with respect to this product.
Limited Warranty (EU and Switzerland)
Notwithstanding the disclaimer of warranties above, this product, excluding
batteries and liquid crystal display (LCD), is guaranteed by Franklin to be free of
defects in materials or workmanship for a period of two years from the date of
purchase. It will be repaired or replaced with an equivalent product (at Franklin’s
option) free of charge for any defect in workmanship or materials during that time.
This warranty explicitly excludes defects due to misuse, accidental damage, or wear
and tear. This warranty does not a ect the consumer’s statutory rights.
Limited Warranty (Outside U.S., EU and Switzerland)
Notwithstanding the disclaimer of warranties above, this product, excluding
batteries and liquid crystal display (LCD), is guaranteed by Franklin to be free of
defects in materials or workmanship for a period of one year from the date of
purchase. It will be repaired or replaced with an equivalent product (at Franklin’s
option) free of charge for any defect in workmanship or materials during that time.
Products purchased outside the United States, the European Union and Switzerland
that are returned under warranty should be returned to the original vendor with
proof of purchase and description of fault. Charges will be made for all repairs
unless valid proof of purchase is provided.
This warranty explicitly excludes defects due to misuse, accidental damage, or wear
and tear. This warranty does not a ect the consumer’s statutory rights.
68
Page 70

Limited Warranty (U.S. only)
LIMITED WARRANTY, DISCLAIMER OF WARRANTIES, AND LIMITED REMEDY
FRANKLIN WARRANTS TO THE ORIGINAL PURCHASER THAT THIS PRODUCT WILL
BE FREE FROM DEFECTS IN MATERIALS AND WORKMANSHIP FOR A PERIOD OF
ONE (1) YEAR FROM THE ORIGINAL DATE OF PURCHASE AS EVIDENCED BY A COPY
OF THE SALES RECEIPT. THIS LIMITED WARRANTY DOES NOT COVER DAMAGE
DUE TO ACTS OF GOD, ACCIDENT, MISUSE, ABUSE, NEGLIGENCE, MODIFICATION,
UNSUITABLE ENVIRONMENT, OR IMPROPER MAINTENANCE. THE SOLE OBLIGATION
AND LIABILITY OF FRANKLIN, AND THE EXCLUSIVE REMEDY UNDER THIS LIMITED
WARRANTY, IS REPAIR OR REPLACEMENT AT THE SOLE OPTION OF FRANKLIN
AND THIS REMEDY APPLIES ONLY IN THE CASE IN WHICH FRANKLIN DETERMINES
THAT THE PRODUCT WAS DEFECTIVE AND THAT THE DEFECT AROSE WITHIN THE
DURATION OF THE LIMITED WARRANTY. THIS REMEDY IS THE EXCLUSIVE REMEDY
FOR BREACH OF THIS WARRANTY. THIS WARRANTY GIVES YOU CERTAIN RIGHTS;
YOU MAY ALSO HAVE OTHER RIGHTS THAT MAY VARY FROM JURISDICTION TO
JURISDICTION.
EXCEPT FOR THE LIMITED WARRANTY EXPRESSLY RECITED ABOVE, THIS FRANKLIN
PRODUCT IS PROVIDED ON AN “AS IS” BASIS, WITHOUT ANY OTHER WARRANTIES,
EXPRESS OR IMPLIED, INCLUDING, BUT NOT LIMITED TO, WARRANTIES OF
MERCHANTABLE QUALITY, MERCHANTABILITY, OR FITNESS FOR A PARTICULAR
PURPOSE, OR THOSE ARISING BY LAW, STATUTE, USAGE OF TRADE, OR COURSE OF
DEALING. THIS WARRANTY APPLIES ONLY TO PRODUCTS MANUFACTURED BY OR
FOR FRANKLIN AND SPECIFICALLY DOES NOT INCLUDE BATTERIES, CORROSION OF
BATTERY CONTACTS OR ANY OTHER DAMAGE CAUSED BY BATTERIES. FRANKLIN
SHALL NOT HAVE ANY LIABILITY TO THE PURCHASER OR ANY OTHER PERSON OR
ENTITY FOR ANY INDIRECT, INCIDENTAL, SPECIAL, OR CONSEQUENTIAL DAMAGES
WHATSOEVER, INCLUDING, BUT NOT LIMITED TO, LOSS OF REVENUE OR PROFIT,
LOST OR CORRUPTED DATA, OR OTHER COMMERCIAL OR ECONOMIC LOSS, EVEN IF
69
Page 71

Limited Warranty (U.S. only)
FRANKLIN HAS BEEN ADVISED OF THE POSSIBILITY OF SUCH DAMAGES, OR EVEN
IF OTHERWISE FORESEEABLE. FRANKLIN IS NOT RESPONSIBLE FOR CLAIMS BY A
THIRD PARTY. FRANKLIN’S MAXIMUM AGGREGATE LIABILITY SHALL NOT EXCEED
THE AMOUNT PAID FOR THE PRODUCT AS EVIDENCED BY THE SALES RECEIPT.
SOME STATES/JURISDICTIONS DO NOT ALLOW THE EXCLUSION OR LIMITATION
OF LIABILITY FOR CONSEQUENTIAL OR INCIDENTAL DAMAGES, SO THE ABOVE
LIMITATION MAY NOT APPLY TO YOU. IF THE LAWS OF THE RELEVANT JURISDICTION
DO NOT PERMIT FULL WAIVER OF IMPLIED WARRANTIES, THEN THE DURATION OF
IMPLIED WARRANTIES AND CONDITIONS ARE LIMITED TO THE DURATION OF THE
EXPRESS WARRANTY GRANTED HEREIN.
Warranty Service: If you think your product is defective, call Franklin’s Customer
Service Desk, 1-800-266-5626, to request a return merchandise authorization
(“RMA”) number, before returning the product (transportation charges prepaid) to:
Franklin Electronic Publishers, Inc.
Attn: Service Department
One Franklin Plaza
Burlington, NJ 08016-4907
If you return a Franklin product, please include your name, address, telephone
number, a brief description of the defect and a copy of your sales receipt as proof
of your original date of purchase. You must also write the RMA prominently on the
package if you return the product; otherwise there may be a lengthy delay in the
processing of your return. Franklin strongly recommends using a trackable form of
deliver to Franklin for your return.
GBD-28010-00
Rev. A
70
 Loading...