

Page 1

The 32K Electronic
Rolodex File
Operating Manual For:
BRAND
Keep It Simple
R
Page 2

INTRODUCTION
More than 50 years ago, Rolodex revolutionized information management with a unique
card file system that organized names,
addresses, and phone numbers. That single
innovative idea has changed the way that
people work. Rolodex continues the tradition
of innovative excellence with the 32K
Electronic Rolodex File.
The 32K Electronic Rolodex File is a programmable electronic card file and organizer.
It is a simple, yet sophisticated instrument
for storing, maintaining and retrieving vital
information. Its powerful 32K memory can
store hundreds of individual names, phone
numbers, addresses, and miscellaneous
information that can be viewed instantly.
Page 3

FEATURES
The 32K Electronic Rolodex File includes a
Card File with Duplicate File Detection, a To
Do List and Schedule with the ability to set
reminder alarms, a Confidential File, a
Monthly Calendar with Schedule indicators
(Schedule files can be recalled directly from
the Calendar screen.), multiple Daily Alarms,
a Calculator with memory functions and
Infra-red File Transfer.
A large, Supertwist LCD screen features
clearly defined characters and accurate viewing from multiple angles. On-screen indicators show you which mode you are in.
Page 4

TABLE OF CONTENTS
NOTICE .......................................................................1
GETTING FAMILIAR..................................................2
PRODUCT CARE..........................................................2
WALL BRACKET..........................................................2
MODE KEYS...............................................................3
POWER ON................................................................4
AUTO RETURN TO DATE/TIME.....................................4
THE DISPLAY SCREEN.................................................4
MEMORY MANAGEMENT.............................................5
KEYPAD TOUCHTONE ON/OFF....................................5
KEYPAD FEATURES .................................................35
CARD FILE...................................................................6
TO ENTER A CARD FILE...............................................6
TO RECALL A CARD FILE .............................................8
Rotary Search......................................................8
Direct Search .......................................................9
Numeric-Alpha Search........................................10
TO VIEW A CARD FILE WHICH EXCEEDS SIX LINES IN
LENGTH .............................................................11
TO EDIT A CARD FILE................................................11
To Erase Information from a Card File.................12
To Insert Information into a Card File..................13
To Insert a Line Between Two Existing Lines.........14
Page 5

To Insert a Line at the End of a Card File.............15
To Delete an Empty Line.....................................15
TO DELETE AN ENTIRE CARD FILE..............................16
MONTHLY CALENDAR............................................17
TO RECALL THE MONTHLY CALENDAR........................17
TO MOVE THE FLASHING DATE..................................17
TO CHANGE THE MONTH AND YEAR..........................18
TO DO LIST & SCHEDULE.......................................19
TO BEGIN SCHEDULE ENTRY FROM THE CALENDAR....19
TO ENTER A SCHEDULE FILE......................................20
TO RECORD A SCHEDULE ALARM ..............................22
TO RECALL A SCHEDULE FILE FROM THE CALENDAR...24
TO RECALL A SCHEDULE FILE FROM SCHEDULE INDEX ..25
Direct Search .....................................................25
Numeric-Alpha Search........................................26
TO EDIT A TO DO LIST & SCHEDULE FILE ...................27
To Edit the Schedule Date/Time..........................27
To Erase Information from a To Do List/Schedule.28
To Insert Information into a To Do List/Schedule..29
To Insert a Line Between Two Existing Lines.........30
To Insert a Line at the End of a File.....................31
To Delete an Empty Line.....................................31
TO DELETE AN ENTIRE TO DO LIST/SCHEDULE FILE ....32
Page 6

CONFIDENTIAL FILE ................................................33
TO ENTER A PASSWORD ...........................................33
TO CHANGE THE PASSWORD.....................................34
If Password was Forgotten..................................37
TO ENTER A CONFIDENTIAL FILE ...............................38
TO RECALL A CONFIDENTIAL FILE..............................39
Direct Search .....................................................40
Numeric-Alpha Search........................................41
TO EDIT A CONFIDENTIAL FILE..................................42
To Erase Information from a Confidential File......42
To Insert Information into a Confidential File.......43
To Insert a Line Between Two Existing Lines.........44
To Insert a Line at the End of a File.....................45
To Delete an Empty Line.....................................46
TO DELETE AN ENTIRE CONFIDENTIAL FILE ................46
DATE/TIME...............................................................48
TO ENTER THE DATE/TIME........................................48
TO RECALL THE DATE/TIME.......................................49
TO EDIT THE DATE/TIME...........................................50
DAILY ALARMS........................................................52
TO ENTER A DAILY ALARM ........................................52
TO STOP THE ALARM SIGNAL....................................53
TO RECALL THE DAILY ALARM INDEX.........................54
Direct Search .....................................................55
Page 7

Numeric-Alpha Search........................................56
TO EDIT A DAILY ALARM...........................................57
TO DELETE A DAILY ALARM.......................................58
CALCULATOR............................................................59
TO RECALL THE CALCULATOR....................................59
TO USE THE CALCULATOR.........................................60
INFRA-RED TRANSFER ..........................................61
BETWEEN TWO 32K ELECTRONIC ROLODEX FILES ......62
Aligning the Units ..............................................62
Transferring a Single Card File............................62
Transferring Multiple Card Files...........................64
TO/FROM A PERSONAL COMPUTER...........................67
Sending a Single Card File..................................67
Sending Multiple Card Files.................................67
To Receive Files via PC Link................................68
TO/FROM A COMPATIBLE ROLODEX PRODUCT...........69
TROUBLESHOOTING...............................................70
BATTERY REPLACEMENT............................................70
RESETTING THE UNIT................................................71
WARRANTY..............................................................72
OUT OF WARRANTY SERVICE.....................................74
FCC STATEMENT.......................................................75
Page 8

NOTICE
Rolodex strongly recommends that users
maintain separate and permanent written
records for all data stored in the 32K
Electronic Rolodex File. All memory products, computers included, can experience,
under certain conditions, loss or alteration of
data.
Rolodex assumes no responsibility or liability
for any alteration or loss of data, whether due
to the changing of batteries, use beyond battery life, repairs, defects, or misuse. Rolodex
further assumes no responsibility or liability
for any direct or indirect financial losses
claimed by third parties as a result of the use
or loss of this product, regardless of the circumstances under which such losses
occurred.
1
Page 9

GETTING FAMILIAR
PRODUCT CARE
Avoid excessive shock. Try not to drop the
unit.
Avoid exposing the 32K Electronic Rolodex
File to extreme temperature changes, humidity and dust.
Avoid rough handling when using the keyboard. Moderate keystroke pressure is all
that is required.
Do not use solvents or cleaners on the 32K
Electronic Rolodex File. Clean your unit with
a soft, dry cloth.
WALL BRACKET
Your 32K Electronic Rolodex file is equipped
with a wall mount bracket so that it can be
mounted to a wall by using a standard telephone wall mount plate or by inserting
screws into the wall. To mount the unit on
the wall using the telephone wall plate, position the holes in the bracket over the screws
on the plate and slide the unit downward. To
mount the unit by using screws, remove the
wall mount bracket and screw it to the wall.
Reattach the unit to the wall mount bracket.
2
Page 10
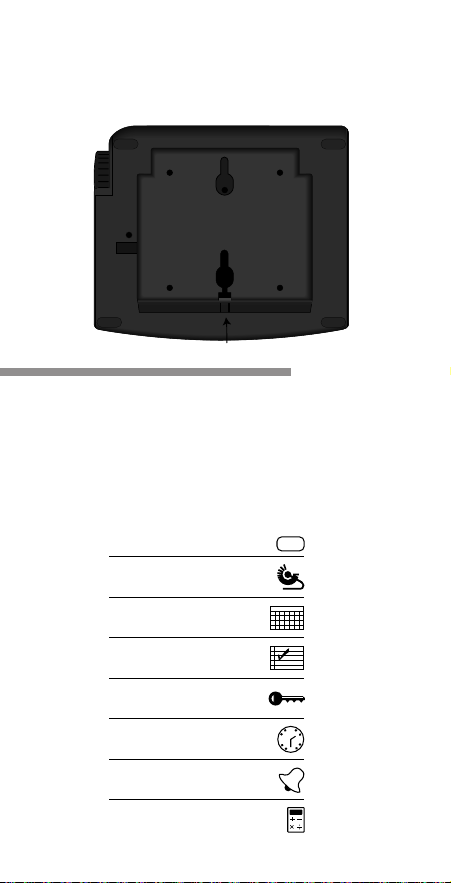
To remove the wall mount bracket, press in
on the latch at the bottom center of the
bracket (see diagram) and lift upward.
MODE KEYS
Mode keys are often referred to in this manual. A Mode key is any key which accesses
one of the 32K Electronic Rolodex File's features. The following illustration displays and
describes each mode key.
3
ENTER
CARD
FILE
MONTHLY
CALENDAR
TO DO LIST &
SCHEDULE
CONFIDENTIAL
FILE
DATE/TIME
DAILY ALARMS
CALC/CE
ENTER
SMTWTFS
12
6
3
9
RESET
RESET
RESET
LATCH
Page 11
POWER ON
To turn the unit on, press any Mode key.
AUTO RETURN TO DATE/TIME
The Date/Time display is the resting state of
the 32K Electronic Rolodex file. The unit is
designed to automatically return to the
Date/Time display if no key is pressed for 3
minutes. It does not turn off.
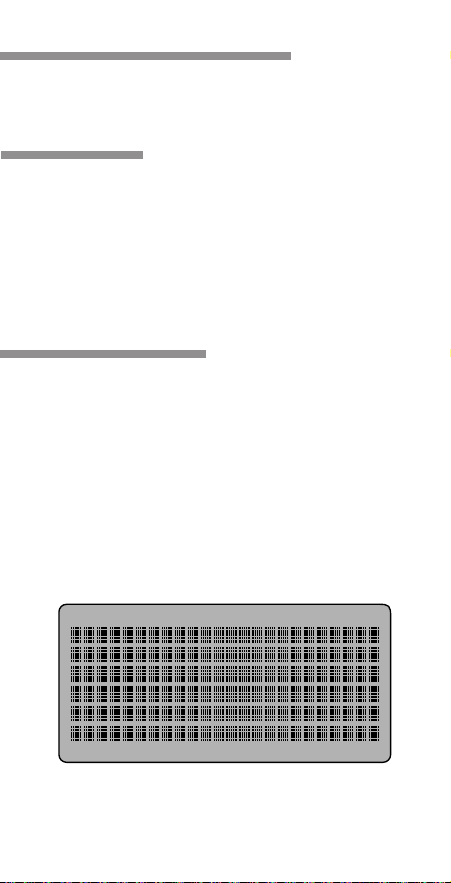
THE DISPLAY SCREEN
The 32K Electronic Rolodex File features a 6
line by 24 character SuperTwist dotmatrix
display screen. This type of display screen
produces clearly defined characters and
allows for viewing from multiple angles.
On screen indicators appear to show you
which mode you are in. For Example:
4
CARD FILE DUPLICATE TO DO LIST/SCHEDULE CONFIDENTIAL FILE DATE/TIME ALARM
SUN MON TUE WED THU FRI SAT
ENTER RECALL
Page 12

MEMORY MANAGEMENT
The amount of memory used and the amount
of memory remaining in the unit is displayed
at the bottom of the Card File recall screen.
As the amount of memory available decreases, it will take longer for files to store. Once
the memory is filled, files can no longer be
stored until some are deleted.
Review your data often. Delete any unnecessary files so that new information can be
stored.
KEYPAD TOUCHTONE ON/OFF
The keypad touchtone can be toggled On/Off
by pressing and holding the SPACE key while
pressing “K”.
5
RECALL
CARD FILE
TYPE IN NAME OF PERSON
OR COMPANY
MEMORY USED 18000
MEMORY AVAILABLE 14000
Page 13
CARD FILE
The Card File is an electronic directory for
storing business and personal information
such as names, telephone numbers and
addresses.
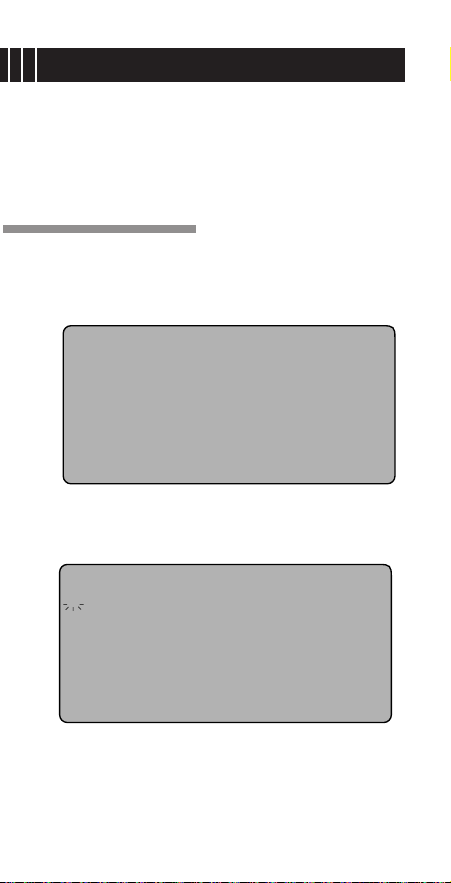
TO ENTER A CARD FILE
1. Press ENTER. The following screen
appears:
2. Press CARD FILE. The following screen
appears:
6
* CARD FILE
* TO DO LIST/SCHEDULE
* CONFIDENTIAL FILE
* DATE/TIME
* DAILY ALARMS
PRESS CORRESPONDING KEY
ENTER
ENTER
CARD FILE
TYPE LAST-FIRST NAME
COMPANY NAME
TEL#
FAX#
ADDRESS-CITY-STATE-ZIP
AND ADDITIONAL INFO.
_
Page 14

3. Type a Card File. The number of characters available in each field are as follows:
Name: 24 characters
Company: 24 characters
Telephone Number: 19 characters
Fax Number: 19 characters
Address/Additional: 24 characters x
58 Lines
4. Press RETURN to go to the next line.
5. To make a correction, press the
EDIT/BACKSPACE key. Or, see the section titled "To Edit a Card File" for more
detailed editing options.
6. To store the file and continue entering
Card Files, press ENTER. Or, press any
mode key to store the file and initiate
another mode.
7. If you attempt to enter a duplicate file,
you will be prompted to confirm the
entry. To accept the file as a duplicate,
type "Y". To reject the duplicate entry,
press "N".
7
Page 15

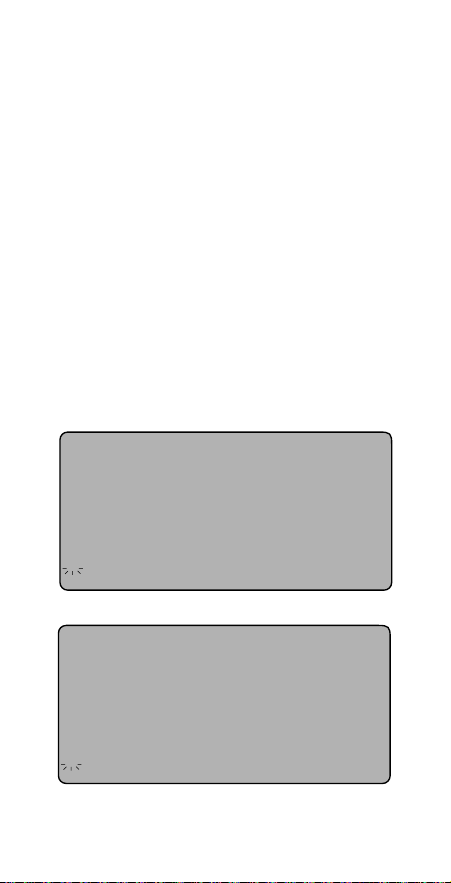
TO RECALL A CARD FILE
1. Press CARD FILE. The following screen
appears:
Note: The amount of memory used and the
amount of memory remaining in the unit is
displayed at the bottom of the display
screen.
2. There are three methods that can be
used to recall a Card File from this point.
They are: Rotary Search, Direct Search
and Numeric-Alpha Search. See the corresponding sections that follow for
instructions.
Rotary Search
1. Turn the Rotary Dial away from you and
hold it there to fast-forward through the
Name and Company Name portion of
your files in numeric-alphabetical order.
(To view your files in reverse numericalphabetical order, turn the Rotary Dial
towards you and hold it there instead.)
8
RECALL
CARD FILE
TYPE IN NAME OF PERSON
OR COMPANY
MEMORY USED 18000
MEMORY AVAILABLE 14000
Page 16

2. Release the rotary dial when the desired
file's Name or Company Name appears
on the top line of the display screen.
3. The entire file appears as shown below.
4. Turn the Rotary dial away from you
repeatedly to view file by file in numericalphabetical order. (Turn the dial
towards you repeatedly to view file by file
in reverse numeric-alphabetical order.)
Direct Search
1. Type 1 to 24 characters of the file name
that you want to recall.
2. Pause for 2.5 seconds.
Note: You will not encounter the 2.5
second pause if only one file contains
the specified characters. To avoid the
2.5 second pause in applicable files,
press the FORWARD ARROW key after
typing the first few characters.
9
RECALL
CARD FILE
ROLODEX CORP.
DOE JOHN
TEL# 1-212-555-1515
FAX# 1-212-555-8484
245 SECAUCUS RD.
SECAUCUS, NJ 07094
Page 17

3.
The first file containing the specified characters appears on the display screen.
4. If more than one file contains the specified characters, the first file in numericalphabetical order will appear. Press
FORWARD ARROW to view the additional files.
5. To search for a different file, follow steps
1 through 4 in this section at any time
while viewing a previously recalled file.
Numeric-Alpha Search
1. Press and hold down the FORWARD
ARROW key to fast-forward through the
Name and Company Name portion of
your files in numeric-alphabetical order.
(To view your files in reverse numericalphabetical order, press and hold the
REVERSE ARROW key instead.)
2. Release the key when the desired file's
Name or Company Name appears on the
top line of the display screen.
3. The entire file appears.
10
Page 18

4. Press the FORWARD ARROW key
repeatedly to view file by file in numericalphabetical order. (Press the REVERSE
ARROW key to view file by file in reverse
numeric-alphabetical order.)
TO VIEW A CARD FILE WHICH
EXCEEDS SIX LINES IN LENGTH
1. Recall a file which contains seven or
more lines.
2. Press the DOWN and UP ARROW keys to
view the file line by line.
Note: The name under which the file
was recalled will remain on the top line
of the display screen.
3. Press the NEXT and LAST keys to view
the file page by page.
TO EDIT A CARD FILE
You can edit the contents of an existing Card
File at any time. An edited file replaces the
original file, so before using the edit function,
read this section carefully. There are various
editing options available.
11
Page 19

To Erase Information from a Card File
1. Recall the Card File that you want to edit.
2. Press the EDIT/BACKSPACE key to enter
the editing mode. A flashing cursor
appears on or after the last character on
the top line of the display screen as illustrated below.
3. Press the EDIT/BACKSPACE key to delete
the character to the left of the flashing
cursor. You can continue to press the
EDIT/BACKSPACE key to erase unwanted
characters to the left of the cursor.
4. To selectively erase characters, use the
FORWARD and REVERSE ARROW keys
to move the cursor to the position of the
unwanted character.
5. Press the DELETE key to erase the character that appears on top of the flashing
cursor. Press the EDIT/BACKSPACE key
to erase the character to the left of the
flashing cursor.
12
RECALL
CARD FILE
DOE JOHN_
ROLODEX CORP.
TEL# 1-212-555-1515
FAX# 1-212-555-8484
245 SECAUCUS RD.
SECAUCUS, NJ 07094
Page 20

6. To move the flashing cursor to another
line, press the UP and DOWN ARROW
keys. The cursor will appear on or after
the last character of each line.
To Insert Information into a Card File
Note: You can insert information into a file
at the same time that you erase information. To do so, start with step number 3
below.
1. Recall the Card File that you want to edit.
2. Press the EDIT/BACKSPACE key to enter
the editing mode. A flashing cursor
appears on or after the last character on
the top line of the display screen.
3. Using the FORWARD, REVERSE, UP and
DOWN ARROW keys, move the flashing
cursor to the insertion point for the new
information.
4. Type the new information using spaces
where required. The existing information
will shift to the right as new characters
are typed.
13
Page 21
To Insert a Line Between Two
Existing Lines
Note: This feature only applies to the
Address and Additional Information field.
1. Recall the file that you want to edit.
2. Press the EDIT/BACKSPACE key to enter
the editing mode.
3. Using the FORWARD, REVERSE, UP and
DOWN ARROW keys, position the flashing cursor underneath the first character
of the line which will follow the blank
line.
4. Press RETURN. A blank line is inserted.
5. Move the cursor to the blank line and
type the new information.
14
RECALL
CARD FILE
ROLODEX CORP.
TEL# 1-212-555-1515
FAX# 1-212-555-8484
245 SECAUCUS RD.
SECAUCUS, NJ 07094
_
RECALL
CARD FILE
DOE JOHN_
ROLODEX CORP.
TEL# 1-212-555-1515
FAX# 1-212-555-8484
245 SECAUCUS RD.
SECAUCUS, NJ 07094
_
Page 22

To Insert a Line at the End of a Card File
Note: This feature only applies to the
Address and Additional Information field.
1. Recall the file that you want to edit.
2. Press the EDIT/BACKSPACE key to enter
the editing mode.
3. Using the FORWARD, REVERSE, UP and
DOWN ARROW keys, position the flashing cursor to the right of the last character in the file.
4. Press RETURN.
5. Type new information.
To Delete an Empty Line
1. Recall the file that you want to edit.
2. Press the EDIT/BACKSPACE key to enter
the editing mode.
3. Using the FORWARD, REVERSE, UP and
DOWN ARROW keys, position the flashing cursor on the empty line that you
want to delete.
4. Press DELETE.
15
Page 23

5. The empty line is deleted and all lines
which followed it are moved up.
TO DELETE AN ENTIRE CARD FILE
Note: If you delete a Card File it is permanently removed from the unit's memory.
Proceed with caution!
1. Recall the Card File to be deleted.
2. Press DELETE. The following screen
appears:
3. Press "Y" for yes, if you want to delete
the file.
4. Press "N" for no, if you want to cancel the
deletion process and keep the file.
16
CARD FILE
DELETE FILE?
Y/N
RECALL
Page 24
17
SUN MON TUE WED THU FRI SAT
1
2 3 4 5 6 7 8
9 10 11 12 13 14 15
16 17 18 19 20 21 22
23 24 25 26 27 28 29
30 31
JAN 1994
*
*
*
*
MONTHLY CALENDAR
The Monthly Calendar is not only a Calendar
reference, it is also a link to the your
Schedule information. Any date which has a
Schedule file associated with it appears with
a dot to its right-hand side. The current date
flashes when the Calendar is recalled.
TO RECALL THE MONTHLY CALENDAR
1. Press MONTHLY CALENDAR.
2. The current date flashes.
TO MOVE THE FLASHING DATE
1. Press FORWARD to move the flashing
date to the right.
2. Press REVERSE to move the flashing
date to the left.
3. Press UP to move the flashing date up
one row.
Page 25

4. Press DOWN to move the flashing date
down one row.
Note: If you move the flashing date into the
blank area at the beginning of the Calendar,
the previous month will appear. If you
move the flashing date into the blank area
at the end of the Calendar, the next month
will appear.
TO CHANGE THE MONTH AND YEAR
1. Press NEXT to display the next month in
chronological order.
2. Press LAST to display the previous
month in chronological order.
3. Press “+” to advance the year.
4. Press “-” to return to the previous year.
5. The Month/Year can also be changed by
moving the flashing date to a vacant
space before the first day of the month,
or after the last day of the month. For
example, while viewing January 1994, if
“1” is flashing, and REVERSE is pressed,
the Calendar for December 1993 will
appear. If “31” is flashing and FORWARD is pressed, the Calendar for
February 1994 will appear.
18
Page 26

TO DO LIST & SCHEDULE
The To Do List & Schedule is used to record
meetings and special events. An alarm can
be set to sound at the time of each Schedule
event as a reminder.
TO BEGIN SCHEDULE ENTRY
FROM THE CALENDAR SCREEN
1. Recall the Monthly Calendar.
2. Display the Month and Year in which the
appointment occurs.
3. Using the FORWARD, REVERSE, UP and
DOWN ARROW keys, move the flashing
date to the date of the appointment.
4. Press ENTER. The To Do List &
Schedule Enter screen appears with the
selected date filled in.
5. Press RETURN. Skip to step number 4
in the next section.
19
DATE: 02-14-1994
TIME: HH:MM A/P
MEMO:
PRESS RETURN TO SCHEDULE
AN UNTIMED EVENT
ENTER
TO DO LIST/SCHEDULE
_
Page 27

TO ENTER A SCHEDULE FILE
1. Press ENTER.
2. Press TO DO LIST & SCHEDULE. The
following screen appears:
3. Type the date of the appointment, then
press RETURN. Or, to enter a daily
Schedule file, just press RETURN. A
daily Schedule file will notify you of an
event which occurs daily. For example:
a lunch reminder. To enter an
Anniversary Schedule, type the Month
and Date of the event, and type “0000”
(four zeros) for the year. An Anniversary
Schedule will notify you of a yearly event.
For example: a birthday.
4. Type the hour of the appointment, using
four digits. (For example: Type "0100"
to indicate one o'clock.) Or, to record an
untimed Schedule file, just press RETURN.
An untimed Schedule could be used as a
reminder to do something on a particular
day. For example: Call John Doe.
20
DATE: MM-DD-YYYY
TIME: HH:MM A/P
MEMO:
TO BYPASS DATE,PRESS RTN
TO CREATE AN ANNIVERSARY
TYPE "0000" FOR "YYYY"
ENTER
TO DO LIST/SCHEDULE
_
Page 28

5. Type "A" or "P" to designate AM or PM,
then press RETURN.
Note: If you want to enter a general To
Do List file, press RETURN in both the
Date and Time fields. To Do List files
will appear first on the To Do List &
Schedule Index with the words “To Do
List” in place of the Date/Time.
6.
To continue, press RETURN. Or, to enter a corresponding Schedule Alarm, press DAILY ALARMS and follow the instructions in the section titled “To Record a Schedule Alarm” which follows.
7. Type your Schedule information into the
Memo field.
Note: The To Do List & Schedule
“Memo” field can accommodate 18
characters on the first line and 24 characters on the following 59 lines.
8. To make a correction, press the
EDIT/BACKSPACE key. Or, see the section titled "To Edit a To Do List &
Schedule File" for more detailed editing
options.
9. To store the file and continue entering
Schedule files, press ENTER. Or, press
any mode key to store the file and initiate
another mode.
21
Page 29

TO RECORD A SCHEDULE ALARM
Note: A Schedule Alarm is indicated by a
bell icon which appears to the right-hand
side when the To Do List & Schedule Index
or an associated Schedule file is recalled.
It also appears in chronological order on
the Daily Alarm index.
1. Follow steps 1 through 5 in the previous
section.
2. Press DAILY ALARMS.
3. The Daily Alarm enter screen appears
with the current Schedule Date/Time displayed as the default. You are prompted
to accept or reject the default Date/Time.
4. Press “Y” for Yes to accept the default
Date/Time.
5. Press “N” for No to reject the default
Date/Time. If you choose “N”, the following screen appears:
22
ALARM DATE: 02-14-1994
ALARM TIME: 07:00 P
SETTINGS CORRECT? Y/N
ENTER
TO DO LIST/SCHEDULE ALARM
Page 30

6. Type an 8 digit Alarm Date, then press
RETURN.
7. Type a 4 digit Alarm Time.
8. Type "A" or "P" to designate AM or PM,
then press RETURN to continue with the
Schedule entry process.
Note: If you are setting an alarm to
remind yourself of an appointment, you
may want to enter an alarm time which
is earlier than the actual event.
9. Type your Schedule information into the
Memo field.
Note: If you choose to enter an Alarm
reminder with your Schedule file, the corresponding Schedule file will appear on the
display screen and the alarm will sound for
one minute at the designated time. To
make the alarm stop sounding before one
minute is reached, press any key.
23
ALARM DATE: MM-DD-YYYY
ALARM TIME: HH:MM A
/
P
ENTER
TO DO LIST/SCHEDULE ALARM
_
Page 31

TO RECALL A SCHEDULE FILE
FROM THE CALENDAR SCREEN
1. Recall the Monthly Calendar.
2. Display the Month and Year of the
desired Schedule file.
Note: A dot appears to the right-hand
side of any date that has a Schedule
file associated with it.
3. Using the FORWARD, REVERSE, UP and
DOWN ARROW keys, move the flashing
date to the date of the desired Schedule
file.
4. Press TO DO LIST & SCHEDULE. The
corresponding Schedule file appears.
5. If more than one Schedule file exists for
the chosen day, an arrow appears to the
right-hand side of the Schedule Time.
Press FORWARD to view additional
Schedule files for the chosen date.
24
RECALL
TO DO LIST/SCHEDULE
DATE: 1-19-1994
TIME: 3:30 P
MEMO: STAFF MEETING
TO DISCUSS NEW COMPANY
POLICIES.
Page 32

TO RECALL A SCHEDULE
FILE FROM THE SCHEDULE INDEX
1. Press TO DO LIST & SCHEDULE. The
following screen appears:
2. There are two methods that can be used
to recall a To Do List & Schedule File
from this point. They are: Direct Search
and Numeric-Alpha Search. See the corresponding sections that follow for
instructions.
Direct Search
Note: The Direct Search method can only
be used to recall a dated Schedule file. To
recall an undated Schedule file or a To Do
List file, follow the instructions for
“Numeric-Alpha Search” that follow.
1. To recall a dated Schedule file, Type the
entire Schedule date that you want to
recall. For example, to recall a file for
September 12, 1994, type “09121994”.
25
RECALL
TO DO LIST/SCHEDULE
TO DO LIST
CHECK FOR MESSAGES
1-19-1994 3:30P
STAFF MEETING
2-14
VALENTINE’S DAY
<
Page 33

2.
The first file containing the specified characters appears on the top line of the To
Do List & Schedule Index.
3. If more than one file contains the specified characters, the first file in chronological order will appear on the top line.
4. To search for a different file, follow steps
1 through 3 in this section at any time
while viewing a previously recalled file.
5. Press the DOWN/UP ARROW keys to
move the desired To Do List & Schedule
file to the right of the selection arrow.
6. Press RETURN.
7. The entire file appears.
Numeric-Alpha Search
1. Press the DOWN/UP ARROW keys to
move the desired To Do List & Schedule
file to the right of the selection arrow.
2. Press RETURN.
3. The entire file appears.
26
Page 34

TO EDIT A
TO DO LIST & SCHEDULE FILE
You can edit the contents of an existing To
Do List & Schedule file at any time. An edited file replaces the original file, so before
using the edit function, read this section
carefully. There are various editing options
available.
To Edit the Schedule Date/Time
1. Recall the To Do List & Schedule file that
you want to edit.
2. Press EDIT/BACKSPACE to enter the
editing mode. A flashing cursor appears
underneath the first digit of the date.
3.
Move the cursor underneath the character
to be changed and type the new character.
4.
Press RETURN to go to the Time field.
Repeat step #3 to edit the Time.
5. After you have changed the Date and/or
Time, press RETURN until the flashing
cursor reaches the Memo field. Press
any mode key to store.
Note: The flashing cursor must
appear
in the Memo field in order for the
changes to be stored.
27
Page 35

To Erase Information from a To Do List
& Schedule File
1. Recall the To Do List & Schedule file that
you want to edit.
2. Press the EDIT/BACKSPACE key to enter
the editing mode. A flashing cursor
appears underneath the first digit of the
date.
3. Press DELETE to erase the character that
appears on top of the flashing cursor or
press EDIT/BACKSPACE to delete the
character to the left of the flashing cursor.
4. Press RETURN to move between fields.
5. To selectively erase characters, use the
FORWARD and REVERSE ARROW keys
to move the cursor to the position of the
unwanted character.
6. To move the flashing cursor to another
line in the Memo field, press the UP and
DOWN ARROW keys. The cursor will
appear on or after the last character of
each line.
28
Page 36

To Insert Information into a To Do List &
Schedule File
Note: You can insert information into a file
at the same time that you erase information. To do so, start with step number 3
below.
Note: Insertion only applies to the Memo
field.
1. Recall the file that you want to edit.
2. Press the EDIT/BACKSPACE key to enter
the editing mode.
3. Press RETURN until the cursor reaches
the Memo field.
4. Using the FORWARD, REVERSE, UP and
DOWN ARROW keys, move the flashing
cursor to the insertion point for the new
information.
5. Type the new information using spaces
where required. The existing information
will shift to the right as new characters
are typed.
29
Page 37

To Insert a Line Between Two
Existing Lines
Note: This feature only applies to the
Memo field.
1. Recall the file that you want to edit.
2. Press the EDIT/BACKSPACE key to enter
the editing mode.
3. Press RETURN until the cursor reaches
the Memo field.
4. Using the FORWARD, REVERSE, UP and
DOWN ARROW keys, position the flashing cursor underneath the first character
of the line which will follow the blank line.
5. Press RETURN. A blank line is inserted.
30
RECALL
TO DO LIST/SCHEDULE
DATE: 01-19-1994
TIME: 03:30 P
MEMO: STAFF MEETING
TO DISCUSS NEW COMPANY
POLICIES.
_
RECALL
TO DO LIST/SCHEDULE
DATE: 01-19-1994
TIME: 03:30 P
MEMO: STAFF MEETING
TO DISCUSS NEW COMPANY
POLICIES.
_
Page 38

6. Move the cursor to the blank line and
type the new information.
To Insert a Line at the End of a File
Note: This feature only applies to the
Memo field.
1. Recall the file that you want to edit.
2. Press the EDIT/BACKSPACE key to enter
the editing mode.
3. Press RETURN until the cursor reaches
the Memo field.
4. Using the FORWARD, REVERSE, UP and
DOWN ARROW keys, position the flashing cursor to the right of the last character in the file.
5.
Press RETURN and type new information.
To Delete an Empty Line
1. Recall the file that you want to edit.
2. Press the EDIT/BACKSPACE key to enter
the editing mode.
3. Press RETURN until the cursor reaches
the Memo field.
31
Page 39

4. Using the FORWARD, REVERSE, UP and
DOWN ARROW keys, position the flashing cursor on the empty line that you
want to delete.
5. Press DELETE. The empty line is deleted
and all lines which followed it are moved
up.
TO DELETE AN ENTIRE
TO DO LIST & SCHEDULE FILE
Note: If you delete a To Do List & Schedule
File it is permanently removed from the
unit's memory. Proceed with caution!
1. Position the To Do List & Schedule file
that you want to delete on the top line of
the To Do List & Schedule Index.
Or
1. Recall the To Do List & Schedule file that
you want to delete.
2. Press DELETE. The display screen reads
DELETE FILE? Y/N.
3. Press "Y" for yes, if you want to delete
the file.
4. Press "N" for no, if you want to cancel the
deletion process and keep the file.
32
Page 40

CONFIDENTIAL FILE
The Confidential File is a password protected
area of the 32K Electronic Rolodex File. It is
divided into 4 sections which contain various
private information.
Before you can store information into the
Confidential File area, a password must be
recorded. After you have recorded a password, make a note of it and store it in a safe
place.
TO ENTER A PASSWORD
1. Press ENTER.
2. Press CONFIDENTIAL FILE. The following screen appears.
3. Type 5 letters and/or numbers as a password. Any combination besides “00000”
(five zeros) can be used.
33
ENTER A PASSWORD
THEN PRESS "RETURN"
-----
ENTER
CONFIDENTIAL FILE
Page 41

4. Press RETURN to store. You can begin
entering Confidential Files at this point.
To do so, start with step number 4 in the
section titled “To Enter a Confidential
File.”
TO CHANGE THE PASSWORD
1. Press CONFIDENTIAL FILE.
2. Type your current password.
3. The Confidential Files menu appears.
4. Pr
ess and Hold the DELETE key. The fol-
lowing screen appears:
5. You will be prompted to enter a new
password.
6. Type 5 letters and/or numbers as a password. Any combination besides “00000”
(five zeros) can be used.
34
CONFIDENTIAL FILE
YOUR PASSWORD
HAS BEEN DELETED
RECALL
Page 42

KEYPAD F
35
MONTHLY
CALENDAR
CARD
FILE
TO DO LIS
& SCHEDU
REVERSERECEIVE SEND VIEW BY PAGE
DELETE
E
R
T
Y
U
A
S
D
F
G
H
J
Z
X
C
V
B
N
W
LAST NEXT
ENTER
,
#
$
/
&
(
)
SMTWTFS
SPACE
32K
TheElectronic File
®
Q
• Press ENTER to
begin the data entry
process, or to confirm
that entry is complete.
• To RECEIVE and SEND
Card Files from another
32K Electronic Rolodex File, a
compatible Rolodex product or
a personal computer via
infra-red beam.
• NEXT and LAST are used to
scroll page by page in Card File,
To Do List/Schedule,
Confidential File and
Daily Alarms
Also, used to change the
Calendar month.
• TO
is use
and s
can b
time
remin
• Large 6 line x 24
character SUPERTWIST
LCD display
• The keypad touchtone
can be toggled On/Off
by pressing and holding
SPACE while pressing "K"
• FORWARD and REVERSE a
used to view file by file in Ca
To Do List/Schedule, Confid
File and Daily Alarms recall m
They are also used to move
flashing date when viewing t
Monthly Calendar, and to mo
cursor when editing or enter
• CARD FILE is a directory for storing
Names, Addresses, Telephone numbers
and Miscellanous information. Files are
automatically cross-referenced and can
be recalled by either the person's name
or company name.
• Recalls the MONTHLY
CALENDAR screen. The
current date flashes. A dot
appears to the right side of
any date which contains a
corresponding To Do List/
Schedule file.
• To insert a SPACE
between characters
during data entry.
• To DELETE an entire file
or to erase one character
at a time when entering
or editing a file.
Page 43

CONFIDENTIAL
FILE
LE
VIEW BY LINE
EDIT/BKS
FORWARD
RETURN
CALC
CE
DAILY
ALARMS
DATE
TIME
L
I
O
P
K
M
,
0
789
4
5
6
1
23
M+ M-
MR/C
:
?
.
12
6
3
9
DO LIST/SCHEDULE
ed to record meetings
of each event as a
• Displays the current
DATE/TIME.
• Convenient Post-It
®
pad holder.
• Recalls 10-digit, full
function CALCULATOR.
Accommodates equations
up to 120 lines in length.
• Turn the ROTARY DIAL
away from you to scroll
through Card Files in
numeric-alphabetical order.
Turn it towards you to
scroll in reverse numericalphabetical order.
• A DAILY ALARM can
be used as a daily wake
up alarm or as a daily
reminder alarm.
• CONFIDENTIAL FILE is a
password protected
area that is divided into
four sections containing
various private information.
• UP and DOWN are used to
view a file line by line.
They are also used to scroll the
To Do List/Schedule and Daily
Alarm indexes and to move the
cursor up and down when editing
or entering a file.
ential
the
ove the
• Standard CALCULATOR
keypad. Function keys
produce their respective
symbols when typed in
databank area.
Also, the PLUS key
increases the Calendar year
by one. The MINUS key
decreases the Calendar year
by one.
• To RETURN between
lines during data entry.
• Press EDIT/BACKSPACE to
begin the editing process.
Also, used to delete the
character to the left of the
flashing cursor in the Enter
and Edit modes.
36
Page 44

Note: If you do not enter a new password within 3 minutes, the unit will
revert back to the previous password.
7. Press RETURN to store.
If Password was Forgotten
If you have forgotten your password you can
use the following steps to gain access to the
Confidential File mode. However, all information which was previously stored in the
Confidential File mode will be deleted.
1. Press CONFIDENTIAL FILE. The password entry screen appears.
2. Type “00000” (five zeros) as the password. The following screen appears:
3. Type “Y” to confirm the deletion process.
Or, type “N” to cancel the deletion
process.
37
RECALL
CONFIDENTIAL FILE
WARNING!!!
YOUR CONFIDENTIAL FILES
WILL BE DELETED!
ARE YOU SURE THAT YOU
WANT TO CONTINUE? Y/N
Page 45

TO ENTER A CONFIDENTIAL FILE
1. Press ENTER.
2. Press CONFIDENTIAL FILE.
3. Enter a password if you have not already
done so. The following screen appears:
4. Type 1-4 to choose the section under
which your Confidential File will be
stored. The following screen appears:
5. Type a Confidential file.
Note: The first line of a Confidential
File can contain 24 characters. The
second through 62nd lines will indent
by one space. Therefore, they can only
contain 23 characters each.
38
CONFIDENTIAL FILES
1. BANK ACCT INFORMATION
2. CREDIT CARD NUMBERS
3. DRIVER’S LIC/TAX NOS.
4. MISCELLANEOUS
TO CHOOSE, TYPE: 1-4
ENTER
CONFIDENTIAL FILE
ENTER
CONFIDENTIAL FILE
TYPE IN CONFIDENTIAL
INFORMATION
_
Page 46

6. If you make a mistake press EDIT/BACKSPACE or see the section titled “To Edit a
Confidential File” that follows for more
detailed editing options.
TO RECALL A CONFIDENTIAL FILE
1. Press CONFIDENTIAL FILE. The following screen appears:
2. Type your password, then press
RETURN. The Confidential File Menu
appears:
3. Type 1-4 to recall the section under
which the Confidential File was stored.
4. A list of all Confidential Files in the chosen section appears. For example:
39
RECALL
CONFIDENTIAL FILE
TYPE IN YOUR PASSWORD
THEN PRESS "RETURN"
_____
CONFIDENTIAL FILES
1. BANK ACCT INFORMATION
2. CREDIT CARD NUMBERS
3. DRIVER’S LIC/TAX NOS.
4. MISCELLANEOUS
TO CHOOSE, TYPE: 1-4
CONFIDENTIAL FILE
RECALL
Page 47

5. There are two methods that can be used
to recall a particular Confidential File
from this point. They are: Direct Search
and Numeric-Alpha Search. See the corresponding sections that follow for
instructions.
Direct Search
1. Type 1 to 24 characters of the
Confidential File that you want to recall.
2. Pause for 2.5 seconds.
Note: You will not encounter the 2.5
second pause if only one file contains
the specified characters. To avoid the
2.5 second pause in applicable files,
press the FORWARD ARROW key after
typing the first few characters.
40
RECALL
CONFIDENTIAL FILE
*BANK ACCT INFORMATION*
ATM PIN NUMBER 8888
CHECKING ACCT. NUMBER
8765-2584
SAVINGS ACCT. NUMBER
8766-5815
Page 48

3.
The first file containing the specified characters appears on the top line of the display screen. All files which follow the current file in numeric-alphabetical order will
appear after the current file on the
Confidential File list.
4. If more than one file contains the specified characters, the first file in numericalphabetical order will appear on the top
line of the display.
5. To search for a different file, follow steps
1 through 4 in this section at any time
while viewing a previously recalled file.
Numeric-Alpha Search
1. Press the FORWARD ARROW key
repeatedly to view file by file in numericalphabetical order. Press REVERSE
ARROW to view files in reverse numericalphabetical order.
2. Press UP/DOWN to view line by line in
the Confidential File list.
3. Press NEXT/LAST to view page by page
in the Confidential File list.
41
Page 49

TO EDIT A CONFIDENTIAL FILE
You can edit the contents of an existing file at
any time. An edited file replaces the original
file, so before using the edit function, read
this section carefully. There are various editing options available.
To Erase Information from a
Confidential File
1. Place the file that you want to edit on the
top line of the Confidential File list.
2. Press the EDIT/BACKSPACE key to enter
the editing mode. A flashing cursor
appears on or after the last character on
the top line of the display screen as illustrated below.
3. Press the EDIT/BACKSPACE key to delete
the character to the left of the flashing
cursor. You can continue to press the
EDIT/BACKSPACE key to erase unwanted
characters to the left of the cursor.
42
RECALL
CONFIDENTIAL FILE
ATM PIN NUMBER 8888
_
Page 50

4. To selectively erase characters, use the
FORWARD and REVERSE ARROW keys
to move the cursor to the position of the
unwanted character.
5. Press the DELETE key to erase the character that appears on top of the flashing
cursor. Press the EDIT/BACKSPACE key
to erase the character to the left of the
flashing cursor.
6. To move the flashing cursor to another
line, press the UP and DOWN ARROW
keys. The cursor will appear on or after
the last character of each line.
To Insert Information into a
Confidential File
Note: You can insert information into a file
at the same time that you erase information. To do so, start with step number 3 in
this section.
1. Place the file that you want to edit on the
top line of the display screen.
2. Press the EDIT/BACKSPACE key to enter
the editing mode. A flashing cursor
appears on or after the last character on
the top line of the display screen.
43
Page 51

3. Using the FORWARD, REVERSE, UP and
DOWN ARROW keys, move the flashing
cursor to the insertion point for the new
information.
4. Type the new information using spaces
where required. The existing information
will shift to the right as new characters
are typed.
To Insert a Line Between Two
Existing Lines
1. Place the file that you want to edit on the
top line of the display screen.
2. Press the EDIT/BACKSPACE key to enter
the editing mode.
3. Using the FORWARD, REVERSE, UP and
DOWN ARROW keys, position the flashing cursor underneath the first character
of the line which will follow the blank
line.
44
RECALL
CONFIDENTIAL FILE
FEDERAL TAX I.D. NUMBER
9854-65214
_
Page 52

4. Press RETURN. A blank line is inserted.
5. Move the cursor to the blank line and
type the new information.
To Insert a Line at the End of a File
1. Place the file that you want to edit on the
top line of the display screen.
2. Press the EDIT/BACKSPACE key to enter
the editing mode.
3. Using the FORWARD, REVERSE, UP and
DOWN ARROW keys, position the flashing cursor to the right of the last character in the file.
4. Press RETURN.
5. Type new information.
45
RECALL
CONFIDENTIAL FILE
FEDERAL TAX I.D. NUMBER
9854-65214
_
Page 53

To Delete an Empty Line
1. Place the file that you want to edit on the
top line of the display screen.
2. Press the EDIT/BACKSPACE key to enter
the editing mode.
3. Using the FORWARD, REVERSE, UP and
DOWN ARROW keys, position the flashing cursor on the line that you want to
delete.
4. Press DELETE.
5. The empty line is deleted and all lines
which followed it are moved up.
TO DELETE AN
ENTIRE CONFIDENTIAL FILE
Note: If you delete a Confidential File it is
permanently removed from the unit's memory. Proceed with caution!
1. Place the file that you want to delete on
the top line of the display screen.
2. Press DELETE. The following screen
appears:
46
Page 54

3. Press "Y" for yes, if you want to delete
the file.
4. Press "N" for no, if you want to cancel the
deletion process and keep the file.
47
RECALL
CONFIDENTIAL FILE
DELETE FILE?
Y/N
Page 55

DATE/TIME
TO ENTER THE DATE/TIME
1. Press ENTER.
2. Press DATE/TIME. The following screen
appears:
3. Type the numeric equivalent of the current month. For example: Type “08” to
indicate August.
4. Type the numeric equivalent of the current day of month. For example: Type
“02” to indicate the second day of the
month.
5. Type the current year using 4 digits, then
press RETURN.
6. Type the current time using four digits.
7. Type “A” for AM or “P” for PM.
48
ENTER
DATE/TIME
DATE: MM-DD-YYYY
TIME: HH:MM A
/
P
_
Page 56

8. If you make a mistake, press EDIT/BACKSPACE or see the section titled “To Edit the Date/Time” that follows for more detailed editing options.
9. Press RETURN to store.
TO RECALL THE DATE/TIME
The current Date/Time is automatically displayed if the 32K Electronic Rolodex File is
not used for 3 minutes. To display the Date
Time before the 3 minute time out is reached
follow the steps below.
1. Press DATE/TIME. The following screen
appears:
2. If a Daily Alarm has sounded since the
unit was last used the display screen will
appear as follows:
49
WEDNESDAY
JANUARY 5, 1994
10:42 A
DATE/TIME
Page 57

The “CHECK YOUR DAILY ALARMS” prompt
appears to signal you that your alarm has
sounded. This way, if you are away from
your unit when the alarm sounds, you know
that you should check your Daily Alarms the
next time that you use the unit.
3. To clear the “CHECK YOUR DAILY
ALARMS” prompt, press ANY KEY.
TO EDIT THE DATE/TIME
1. Press DATE/TIME.
2. Press EDIT/BACKSPACE. A flashing cursor appears underneath the first digit of
the month.
3. Type a new date over the previous date.
Or, to selectively erase characters, use
the FORWARD and REVERSE ARROW
keys to move the cursor to the position
of the unwanted character.
50
DATE/TIME
WEDNESDAY
JANUARY 5, 1994
10:42 A
CHECK YOUR DAILY ALARMS
Page 58

4. Press the DELETE key to erase the character that appears on top of the flashing
cursor.
5. Press RETURN to move the flashing cursor to the Time field.
6. To edit the Time, follow the same procedures used to edit the Date
7. Press RETURN to store.
51
Page 59

52
DAILY ALARMS
A Daily Alarm can be used as a daily wake up
alarm or as a daily reminder alarm. Alarms
can also be set to sound only on a particular
day.
TO ENTER A DAILY ALARM
1. Press ENTER.
2. Press DAILY ALARMS. The following
screen appears:
3. To enter an alarm for a particular date,
type the date using 8 digits, then press
RETURN. To enter a daily alarm, just
press RETURN.
4. Type the 4 digit alarm time.
5. Type “A” for AM or “P” for PM.
6. If you make a mistake press EDIT/BACKSPACE or see the section titled “To Edit a
Daily Alarm” that follows for more
detailed editing options.
ENTER
ALARM
ALARM DATE: MM-DD-YYYY
ALARM TIME: HH:MM A
/
P
TO ENTER A DAILY ALARM
PRESS RETURN
_
Page 60

7. Press RETURN to store.
TO STOP THE ALARM SIGNAL
After a Daily Alarm has been entered, it will
sound for one minute at the specified Date
and/or Time and the Alarm Index will appear.
If there is a Schedule file associated with the
alarm, that file will appear on the display
screen. To stop the Alarm from sounding, follow the steps below.
1. Press ANY KEY. The alarm will cease
and the associated file will remain.
2. If no key is pressed to stop the alarm
from sounding, the following screen will
appear at the unit’s resting state.
The “CHECK YOUR DAILY ALARMS” prompt
appears to signal you that your alarm has
sounded. This way, if you are away from
your unit when the alarm sounds, you know
that you should check your Daily Alarms the
next time that you use the unit.
53
DATE/TIME
WEDNESDAY
JANUARY 5, 1994
10:42 A
CHECK YOUR DAILY ALARMS
Page 61

3. To clear the “CHECK YOUR DAILY
ALARMS” prompt, press ANY KEY again.
TO RECALL THE DAILY ALARM INDEX
Note: If an Alarm was entered to correspond with a Schedule file, the Schedule
Alarm will appear on the Daily Alarm Index
along with any alarms entered directly into
the Daily Alarm mode.
1. Press DAILY ALARMS. The following
screen appears:
2. There are two methods that can be used
to recall a Daily Alarm File from this
point. They are: Direct Search and
Numeric-Alpha Search. See the corresponding sections that follow for instructions.
54
RECALL
ALARM
DAILY ALARM INDEX
12:00 P
1-17-1994 10:00 A
1-18-1994 3:30 P
2- 9 8:00 A
2-14-1994 6:45 P
<
Page 62

Direct Search
Note: The Direct Search Method can only
be used to recall a dated alarm. To recall a
daily (undated) alarm, follow the instructions for “Numeric-Alpha Search” that follow.
1. To recall a dated Daily Alarm file, Type
the entire date that you want to recall.
For example, to recall a file for
September 12, 1994, type “09121994”.
2.
The first file containing the specified characters appears on the top line of the Daily
Alarm Index.
3. If more than one file contains the specified characters, the first file in chronological order will appear on the top line.
4. To search for a different file, follow steps
1 through 3 in this section at any time
while viewing a previously recalled file.
5. Press the DOWN/UP ARROW keys to
move the desired Daily Alarm file the
right of the selection arrow.
55
Page 63

6. Press RETURN. The entire file appears.
7. If there is a Schedule file associated with
the recalled Daily Alarm file, the screen
will appear as follows:
8. Press TO DO LIST & SCHEDULE to view
the associated Schedule file.
Numeric-Alpha Search
1. Press the DOWN/UP ARROW keys to
move the desired Daily Alarm file to the
right of the selection arrow.
2. Press RETURN.
3. The entire file appears.
56
RECALL
ALARM DATE: 11-23-1994
ALARM TIME: 12:30 P
ALARM
RECALL
ALARM DATE: 1-18-1994
ALARM TIME: 3:30 P
PRESS "SCHEDULE" TO VIEW
ASSOCIATED FILE
ALARM
Page 64

TO EDIT A DAILY ALARM
1. Recall the Daily Alarm to be edited.
2. Press EDIT/BACKSPACE. A flashing cursor appears underneath the first digit of
the date.
3. Type a new date over the previous date.
Or, to selectively erase characters, use
the FORWARD and REVERSE ARROW
keys to move the cursor to the position
of the unwanted character.
4. Press the DELETE key to erase the character that appears on top of the flashing
cursor.
5. To move the flashing cursor to the Time
field, Press RETURN.
6. To edit the Time, follow the same procedures used to edit the Date.
7. Press RETURN to store.
Note: You can also use the above procedure to edit a To Do List/Schedule associated Daily Alarm when it is recalled from
within the To Do List/Schedule file.
57
Page 65

TO DELETE A DAILY ALARM
1. Position the Daily Alarm file that you
want to delete on the top line of the Daily
Alarm Index.
Or
1. Recall the Daily Alarm to be deleted.
2. Press DELETE. The following screen
appears:
3. Press "Y" for yes, if you want to delete
the file.
4. Press "N" for no, if you want to cancel the
deletion process and keep the file.
Note: You can also use the above procedure to delete a To Do List/Schedule associated Daily Alarm when it is recalled from
within the To Do List/Schedule file.
58
RECALL
ALARM
DELETE FILE?
Y/N
Page 66

CALCULATOR
The 32K Electronic Rolodex File is equipped
with a full-function calculator which uses a
standard numerical keypad. The 10 digit calculator can accommodate equations up to
120 lines in length.
The Calculator is capable of performing calculations using addition, subtraction, multiplication and division. It also supports memory and percentage calculations. Only the
number keys, decimal key, memory keys and
math function keys will operate in this mode.
RECALL THE CALCULATOR SCREEN
1. Press CALCULATOR. The following
screen appears:
59
0.
Page 67

TO USE THE CALCULATOR
1. Recall the Calculator screen.
2. Enter an equation up to 120 lines in
length.
3. To scroll through the equation line by
line, press the UP/DOWN ARROW keys.
4. To scroll through the equation page by
page, press the NEXT/LAST keys.
5. To clear the last entry, press the
CALCULATOR/CE key one time.
6. To clear the entire equation, press the
CALCULATOR/CE two times.
60
Page 68

INFRA-RED TRANSFER
The Infra-red transfer feature allows you to
transfer your Card Files to/from another 32K
Electronic Rolodex File, or to/from an IBM
®
or
compatible computer. You can also transfer
Card Files to and from a compatible Rolodex
product. These instructions only describe the
32K Electronic Rolodex File's portion of the
transfer. For further instructions, please refer
to your PC Link manual or to the instruction
manual for a compatible Rolodex product.
Before you begin an Infra-red transfer, check
the amount of memory remaining in the
Receiving unit. The amount of memory available in the receiving unit needs to be about
2K more than the amount of memory being
transferred. If there is not enough memory
in the Receiving unit to store the transferred
files, some of the files will not be stored.
(The files are stored in alphabetical order.
So, if there is not enough memory in the
receiving unit to store all of the transferred
files, those at the end of the alphabet will not
be stored.)
Note: A transferred file is not erased from
the sending unit. It is only copied to the
receiving unit.
61
Page 69

Please read the entire Infra-red Transfer
section before attempting to perform an
infra-red transfer.
TRANSFERRING BETWEEN TWO
32K ELECTRONIC ROLODEX FILES
Aligning the Units
1. Place the two 32K Electronic Rolodex File
units side by side with the Receiving unit
on the left-hand side and the Sending
unit on the right-hand side as shown
below:
Transferring a Single Card File
1. Align the two units as shown above.
2. Recall the Card File that you want to
transfer on the sending unit.
3. Press CARD FILE, then RECEIVE on the
receiving unit.
4. Press SEND on the sending unit. The
following screen appears:
62
CONFIDENTIAL
FILE
MONTHLY
CALENDAR
CARD
FILE
TO DO LIST
& SCHEDULE
VIEW BY LINE
EDIT/BKS
REVERSE FORWARDRESUMERECEIVE SEND VIEW BY PAGE
DELETE RETURN
CALCCEDAILY
ALARMS
DATE
TIME
L
E
R
T
Y
U
I
O
P
A
S
D
F
G
H
J
K
Z
X
C
V
B
N
M
,
W
LAST NEXT
M-
ENTER
SMTWTFS
SPACE
0
789
4
5
6
1
23
M+
MR/C
.
12
6
3
9
,
#
$
/
&
(
)
:
?
32K
The
Electronic File
®
Q
SENDRECEIVE
Page 70

5. Choose #1 SEND TO ANOTHER 32K
ELECTRONIC ROLODEX. The Card File
that was recalled is transferred via infrared beam to the receiving 32K Electronic
Rolodex File.
The screen prompt will instruct you that
the file is being transferred. When the
transfer is complete, the display screen
on the sending unit will read:
6. Look at the Receiving unit. If the transfer was successful, the screen on the
Receiving unit should briefly read "Files
are Being Sorted", followed by the
appearance of the transferred file. If this
happens, answer “Y” for yes. The transfer is complete.
63
RECALL
CARD FILE
TRANSFER SUCCESSFUL?
Y/N
RECALL
CARD FILE
1. SEND TO ANOTHER 32K
ELECTRONIC ROLODEX
2.;SEND TO A COMPATIBLE
ROLODEX PRODUCT
TO CHOOSE TYPE 1-2
Page 71

7. If an error occurred during infra-red
transfer, the display screen on the receiving unit will read:
8. Therefore, answer “N” for no and
attempt the infra-red transfer again.
Transferring Multiple Card Files
1. Align the two units.
2. Press CARD FILE on the sending unit.
The following screen appears:
3. Press CARD FILE, then RECEIVE on the
receiving unit.
4. Press SEND on the sending unit. The
following screen appears:
64
RECALL
CARD FILE
FILES DID NOT TRANSFER
SUCCESSFULLY
PLEASE TRY AGAIN
RECALL
CARD FILE
TYPE IN NAME OF PERSON
OR COMPANY
MEMORY USED 18000
MEMORY AVAILABLE 14000
Page 72

5. Choose #1 SEND TO ANOTHER 32K
ELECTRONIC ROLODEX. The following
screen appears:
6. Type “A” to transfer all of the Card File’s
in the Sending unit to the Receiving unit.
7. Type “N” to transfer only the files which
have been added to the Sending unit or
edited since the last infra-red transfer.
8. Files are transferred via infra-red beam to
the receiving 32K Electronic Rolodex File.
The screen prompts will instruct you that
the files are being transferred. When the
transfer is complete, the display screen
on the sending unit will read TRANSFER
SUCCESSFUL? Y/N.
65
RECALL
CARD FILE
TYPE "A" TO TRANSFER
ALL OF YOUR FILES
OR
TYPE "N" TO TRANSFER
YOUR NEW FILES ONLY
RECALL
CARD FILE
1. SEND TO ANOTHER 32K
ELECTRONIC ROLODEX
2.;SEND TO A COMPATIBLE
ROLODEX PRODUCT
TO CHOOSE TYPE 1-2
Page 73

9. Look at the Receiving unit. If the transfer was successful, the screen on the
Receiving unit should read "Files are
Being Sorted", followed by the appearance of the last Card File which was
added to the databank. If this happens,
answer “Y” for yes. The transfer is complete.
10. If an error occurred during infra-red
transfer, the display screen on the receiving unit will read:
11. Therefore, answer “N” for no and
attempt the infra-red transfer again.
66
RECALL
CARD FILE
FILES DID NOT TRANSFER
SUCCESSFULLY
PLEASE TRY AGAIN
Page 74

TRANSFERRING TO/FROM
A PERSONAL COMPUTER
A PC Link is required in order to transfer files
to/from a Personal computer. This optional
product can be purchased from Rolodex by
calling (201) 348-3939 ext. 555 from 8:30am
to 5:00pm, Monday through Friday.
Note: These instructions only describe the
32K Electronic Rolodex File's portion of the
transfer. For further instructions, please
refer to your PC Link manual.
Sending a Single Card File
1. Following the instructions provided with
the PC Link, place the PC Link to the left
of the 32K Electronic Rolodex File.
2. Follow the instructions for transferring a
single Card File to another 32K Electronic
Rolodex File. However, when you reach
step #5, choose #2 SEND TO A COMPATIBLE ROLODEX PRODUCT.
Sending Multiple Card Files
1. Following the instructions provided with
the PC Link, place the PC Link to the left
of the 32K Electronic Rolodex File.
67
Page 75

2. Follow the instructions for transferring
multiple Card Files to another 32K
Electronic Rolodex File. However, when
you reach step #5, choose #2 SEND TO
A COMPATIBLE ROLODEX PRODUCT.
To Receive Files via PC Link
1. Following the instructions provided with
the PC Link, place the PC Link to the
right of the 32K Electronic Rolodex File.
2. Press CARD FILE, then RECEIVE on the
32K Electronic Rolodex File.
3. Begin sending files from your computer.
4. If an error occurs during Infra-red transfer, the 32K Electronic Rolodex File's display screen will read:
Realign the PC Link with the 32K
Electronic Rolodex File and reattempt the
transfer.
68
RECALL
CARD FILE
FILES DID NOT TRANSFER
SUCCESSFULLY
PLEASE TRY AGAIN
Page 76

INFRA-RED TRANSFER TO/FROM
A COMPATIBLE ROLODEX PRODUCT
Several of the products in the Rolodex line
are compatible with the 32K Electronic
Rolodex File. However, not all products are
compatible for both sending and receiving
files. The following chart details each product’s compatibility with the 32K Electronic
Rolodex File.
Send Receive
EL128K
••
EL3100
••
EL3200
••
EL3300
••
EL2128 •
EL64KPL
•
EL64K
•
EL32K
•
The same procedures that are used for transferring files between two 32K Electronic
Rolodex Files are used for transferring files
to/from a 32K Electronic Rolodex File to/from
a compatible Rolodex product. However,
when you reach step #5, choose #2 SEND TO
A COMPATIBLE ROLODEX PRODUCT.
These instructions only describe the 32K
Electronic Rolodex File’s portion of the transfer. Please refer to the operation manual for
the compatible Rolodex product for further
instructions.
69
Page 77

TROUBLESHOOTING
Troubleshooting is limited to changing the
batteries, and resetting the unit. For other
problems, please contact a Rolodex dealer or
call (201) 348-3939 ext. 555. Customer support hours are Monday through Friday from
8:30 am to 5:00 pm Eastern Standard time.
BATTERY REPLACEMENT
Battery life varies with use. If the low battery
warning screen appears or the display screen
begins to lose contrast you should replace
the primary batteries.
Warning! Do not remove the old batteries
until new ones have been purchased.
The 32K Electronic Rolodex File uses four AA
batteries. Replace the old batteries promptly
to prevent memory loss.
1. Remove the battery cover located on the
bottom of the unit by pushing in on the
latch and pulling upward.
2. Remove the old batteries.
3. Install the new batteries in the direction
indicated on the inside of the battery
compartment.
70
Page 78

4. Replace the battery cover.
Note: The 32K Electronic Rolodex File is
equipped with a lithium backup battery to
prevent memory loss during battery
replacement. However, do not rely upon
the lithium backup battery for power, as
memory loss may occur.
RESETTING THE UNIT
If you encounter a problem with the screen
freezing or the keypad locking up, you should
reset your unit.
1. Locate the Reset Hole on the bottom of
the unit.
2. Insert the end of a paper clip or simular
object into the reset hole.
3. The unit will initialize.
71
Page 79

WARRANTY
Rolodex Corporation, 245 Secaucus Road,
Secaucus, New Jersey 07094-2196, Warrants
that your new Rolodex Electronic Product is
free from defects of workmanship and materials. If there is a defect or malfunction of
this product, Rolodex will repair or replace it
free of charge with proof of purchase for one
year from the date of original purchase.
This warranty does not apply to persons who
purchased this product second hand or used.
This warranty does not include adjustments,
parts, and repair by circumstances beyond
the control of Rolodex including, but not limited to fire or other casualty, accident,
neglect, abuse, abnormal use, or battery leakage damage.
There are no other expressed warranties
except as stated herein. After the period of
the expressed warranty set forth herein, there
are no expressed or implied warranties and
those excluded include those of merchantability and fitness for a particular purpose. In no event will Rolodex be liable for
direct, indirect, special, incidental, or consequential damages resulting from any defect
in the product, even if advised of the possibility of such damages. In particular, Rolodex
72
Page 80

shall have no liability for any programs or
data stored in or used with Rolodex
Electronic products and other computer
products, including the costs of recovering
such programs or data.
The warranty and remedies set forth above
are exclusive and in lieu of all others, oral or
written, expressed or implied. No Rolodex
dealer, agent or employee is authorized to
make any modification, extension, or addition
to this warranty. Some states do not allow
limitations on how long an implied warranty
lasts and some states do not allow the exclusion or limitation of incidental or consequential damages, so the above limitations may
not apply to you. To obtain service under the
terms of this warranty:
• Pack the product in the original carton or
equivalent.
• Enclose a copy of the bill of sale or other
document showing original purchase
date.
• Enclose a card or note describing the dif-
ficulty you have had with the product.
Be sure to include your complete name,
address, day and evening phone numbers.
73
Page 81

• Enclose a $5.00 check or money order to
cover shipping and handling.
• Mail the product postage prepaid and
insured to:
Rolodex Corporation
245 Secaucus Road
Secaucus, New Jersey 07094-2196
Attn: Rolodex Service Center
The Rolodex Corporation cannot be held
responsible for any loss or damage caused in
transit. Please retain proof of purchase to
establish date of original purchase. Your
warranty starts with the date of original purchase. This warranty gives you specific legal
rights, and you may also have other rights
which vary from state to state.
OUT OF WARRANTY SERVICE
A flat-rate charge, by model, is made for out
of warranty service. To obtain the service
charge for a particular model, mail your
request to Rolodex Service Center at the
above address.
74
Page 82

FCC STATEMENT
This equipment generates and uses radio frequency energy and if not installed and used
properly, that is, in strict accordance with the
manufacturer's instructions, may cause interference to radio and television reception. It
has been tested and found to comply with the
limits for a class B computing device in
accordance with the specifications in Subpart
3 of Part 15 of FCC Rules, which are
designed to provide reasonable protection
against such interference in a residential
installation. However, there is no guarantee
that interference will not occur in a particular
installation. If this equipment does cause
interference to radio or television reception,
which can be determined by turning the
equipment on and off, the user is encouraged
to try to correct the interference by one or
more of the following measures:
• Reorient the receiving antenna.
• Relocate the computer with respect to
the receiver.
• Move the computer away from the
receiver.
• Plug the computer into a different outlet
so that computer and receiver are on different branch circuits.
75
Page 83

If necessary, the user should consult the
dealer or an experienced radio/television
technician for additional suggestions. The
user may find the following booklet prepared
by the Federal Communications Commission
helpful: "How to Identify and Resolve RadioTV Interference Problems."
This booklet is available from:
The U. S. Government Printing Office
Washington, DC 20402
Stock Number 004-000-00345-4
76
 Loading...