

Page 1

User’s Guide
DMQ-450
Dictionary
Page 2

License Agreement
READ THIS LICENSE AGREEMENT BEFORE USING THE ELECTRONIC REFERENCE. YOUR USE OF THE ELECTRONIC REFERENCE DEEMS THAT YOU
ACCEPT THE TERMS OF THIS LICENSE. IF YOU DO NOT AGREE WITH
THESE TERMS, YOU MAY RETURN THIS PACKAGE WITH PURCHASE
RECEIPT TO THE DEALER FROM WHICH YOU PURCHASED THE ELECTRONIC REFERENCE AND YOUR PURCHASE PRICE WILL BE REFUNDED. ELECTRONIC REFERENCE means the software product and documentation found in
this package and FRANKLIN means Franklin Electronic Publishers, Inc.
Limited Use License
All rights in the ELECTRONIC REFERENCE remain the property of FRANKLIN.
Through your purchase, FRANKLIN grants you a personal and nonexclusive
licensed to use this ELECTRONIC REFERENCE. You may not make any copies of
the ELECTRONIC REFERENCE or of the data stored therein, whether in electronic
or print format. Such copying would be in violation of applicable copyright laws.
Further, you may not modify, adapt, disassemble, decompile, translate, create
derivative works of, or in any way reverse engineer the ELECTRONIC REFERENCE. You may not export or reexport, directly or indirectly, the ELECTRONIC
REFERENCE without compliance with appropriate governmental regulations. The
ELECTRONIC REFERENCE contains Franklin’s confidential and proprietary information which you agree to take adequate steps to protect from unauthorized disclosure or use. This license is effective until terminated. This license terminates
immediately without notice from FRANKLIN if you fail to comply with any provision
of this license.
1
Page 3

Introduction
Welcome to the world of Franklin. Thank you for purchasing the
DMQ-450 which is a powerful, portable, electronic reference book.
With this electronic Collins Dictionary, you can look up over 250,000
words, phrases & definitions, and over 800,000 synonyms plus
antonyms, definitions & ClassmatesTM. You can view Confusables®,
save words to My Word List, sharpen your spelling with Spelling Bee
and use Flashcards to improve your vocabulary. You can also save
names and phone numbers to the databank and play seven fun and
educational games.
To stay informed about new and exciting products from Franklin,
please log on to www.franklin.com/uk and sign up for Wordbug, our
email newsletter.
Enjoy!
To get started, gently pull the battery
insulation sheet to remove it. Use a thin
pointed object to press the reset button on the
back of the device.
2
Page 4

Contents
Key Guide . . . . . . . . . . . . . . . . . . . . . . . . . . . . . . . . . . . . . . . . . . . . . . . . . . . . . . . . . . . . .4
Battery Information . . . . . . . . . . . . . . . . . . . . . . . . . . . . . . . . . . . . . . . . . . . . . . . . . . . . . . .6
Installing Batteries . . . . . . . . . . . . . . . . . . . . . . . . . . . . . . . . . . . . . . . . . . . . . . . . . . . . . . .6
Setting the Clock . . . . . . . . . . . . . . . . . . . . . . . . . . . . . . . . . . . . . . . . . . . . . . . . . . . . . . . .7
Viewing a Demonstration or Tutorial . . . . . . . . . . . . . . . . . . . . . . . . . . . . . . . . . . . . . . . . . .9
Changing the Settings . . . . . . . . . . . . . . . . . . . . . . . . . . . . . . . . . . . . . . . . . . . . . . . . . . . .9
Finding Definitions . . . . . . . . . . . . . . . . . . . . . . . . . . . . . . . . . . . . . . . . . . . . . . . . . . . . . .10
Finding a Letter . . . . . . . . . . . . . . . . . . . . . . . . . . . . . . . . . . . . . . . . . . . . . . . . . . . . . . . .11
Correcting Misspellings . . . . . . . . . . . . . . . . . . . . . . . . . . . . . . . . . . . . . . . . . . . . . . . . . . .11
Viewing Thesaurus Entries . . . . . . . . . . . . . . . . . . . . . . . . . . . . . . . . . . . . . . . . . . . . . . . .12
Finding a Series of Letters . . . . . . . . . . . . . . . . . . . . . . . . . . . . . . . . . . . . . . . . . . . . . . . .12
Highlighting Words . . . . . . . . . . . . . . . . . . . . . . . . . . . . . . . . . . . . . . . . . . . . . . . . . . . . . .13
Finding Confusables . . . . . . . . . . . . . . . . . . . . . . . . . . . . . . . . . . . . . . . . . . . . . . . . . . . . .13
Using My Word List . . . . . . . . . . . . . . . . . . . . . . . . . . . . . . . . . . . . . . . . . . . . . . . . . . . . .14
Using Learning Exercises . . . . . . . . . . . . . . . . . . . . . . . . . . . . . . . . . . . . . . . . . . . . . . . . .16
Playing the Games . . . . . . . . . . . . . . . . . . . . . . . . . . . . . . . . . . . . . . . . . . . . . . . . . . . . . .17
Storing Names & Phone Numbers . . . . . . . . . . . . . . . . . . . . . . . . . . . . . . . . . . . . . . . . . .21
Using a Password . . . . . . . . . . . . . . . . . . . . . . . . . . . . . . . . . . . . . . . . . . . . . . . . . . . . . .23
Using the Calculator . . . . . . . . . . . . . . . . . . . . . . . . . . . . . . . . . . . . . . . . . . . . . . . . . . . . .24
Using the Converter . . . . . . . . . . . . . . . . . . . . . . . . . . . . . . . . . . . . . . . . . . . . . . . . . . . . .25
Resetting the DMQ-450 . . . . . . . . . . . . . . . . . . . . . . . . . . . . . . . . . . . . . . . . . . . . . . . . . .26
Specifications . . . . . . . . . . . . . . . . . . . . . . . . . . . . . . . . . . . . . . . . . . . . . . . . . . . . . . . . . .27
Limited Warranty (outside U.S., EU and Switzerland) . . . . . . . . . . . . . . . . . . . . . . . . . . . .28
Limited Warranty (EU and Switzerland) . . . . . . . . . . . . . . . . . . . . . . . . . . . . . . . . . . . . . . .28
3
Page 5
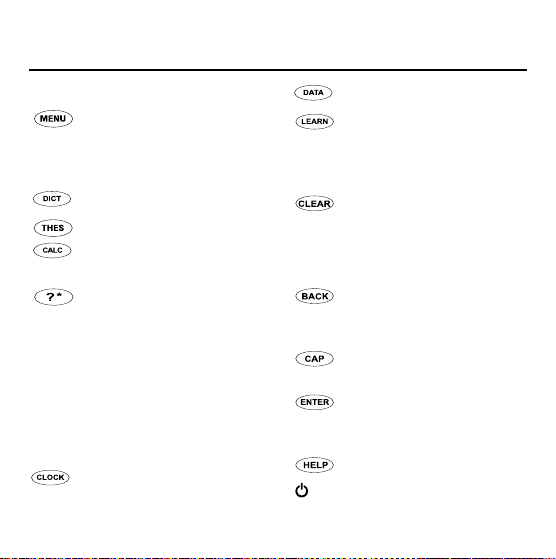
Key Guide
Main Keys
Shows the Main Menu:
Settings, Games, Game
Setup, Tutorialand View
Demo.
Goes to the dictionary.
Goes to the thesaurus.
Goes to the calculator. Press
Pfor the converter.
Goes to the Confusables
list. At the Word Entry
screen, types a ?to stand
for a letter in a word. At a
menu, displays a menu item.
At a dictionary entry, displays
the headword. In games,
reveals the word and forfeits
the game.
T oggles between the Home
and World Clock.
®
Goes to the Databank menu.
Goes to the Learning
Exercises menu.
Function Keys
In the dictionary, goes to the
Word Entry screen. In the
calculator, clears all entries.
In the converter and databank, goes to its main menu.
Backs up, erases a letter, or
turns off the highlight at an
entry.
Shifts to type capital letters
and punctuation marks.
Enters a word, selects an
item, or begins a highlight in
an entry.
Displays a help message.
Turns the unit on or off.
4
Page 6
Key Guide
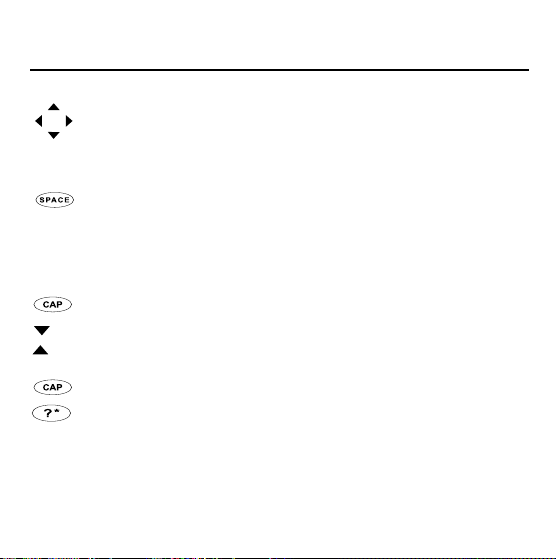
Direction Keys
Moves in the indicated
direction.
NEXT Goes to the next entry.
PREV Goes to the previous entry.
At menus and dictionary
entries, pages down. At the
Word Entry screen, types a
space.
Key Combinations*
+ At a dictionary entry, goes to
the top or bottom of an entry.
or
At menus, goes to the top or
bottom of a list.
+ At the Entry screen, types an
asterisk to stand for a series
of letters in a word. In
games, gives a hint or shuffles the letters.
*Hold down the first key while pressing the
second.
Calculator Keys
L(1/x) Calculates a reciprocal.
J(√x) Calculates a square root.
2
K(x
) Squares a number.
M(%) Calculates a percentage.
B(+), H(-) Adds, subtracts, multiplies,
U(x), I(÷) or divides numbers.
N(+/-) Changes the number on the
screen to a negative or positive number.
S(
M+) Adds the number on the
screen to the number stored
in the memory.
W(
M–) Subtracts the number on the
screen from the number
stored in the memory.
A(
MR) Recalls the number stored in
the memory.
Q(
MC) Clears the memory.
5
Page 7

Installing Batteries Battery Information
Your DMQ-450 is powered by
two CR2032, 3-volt batteries.
Follow these instructions to
install or replace them.
Warning!! If the batteries wear out
completely, any user-entered information will be erased.When changing the batteries, please remove and
replace one battery at a time. If you
remove both batteries at once, you
may lose any information you
entered. You should always keep
written copies of your important information.
1. Turn the unit over.
2. Lift the battery cover on the
back of your DMQ-450 by
pushing it in the direction of
the arrow.
3. Install the batteries positive
side facing up.
4. Replace the battery cover.
• Different types of batteries
or new and used batteries
are not to be mixed.
• Only batteries of the same or
equivalent type as recommended are to be used.
• Batteries are to be inserted
with the correct polarity.
• Exhausted batteries should
be removed.
• Supply terminals are not to
be short-circuited.
➤ Help is Always at Hand
You can view a help message
at any screen by pressing
HELP. Use the direction keys
to read the message. To exit
help, press BACK. To read a
tutorial describing how to use
the product, select Tutorial
from the Main Menu.
6
Page 8
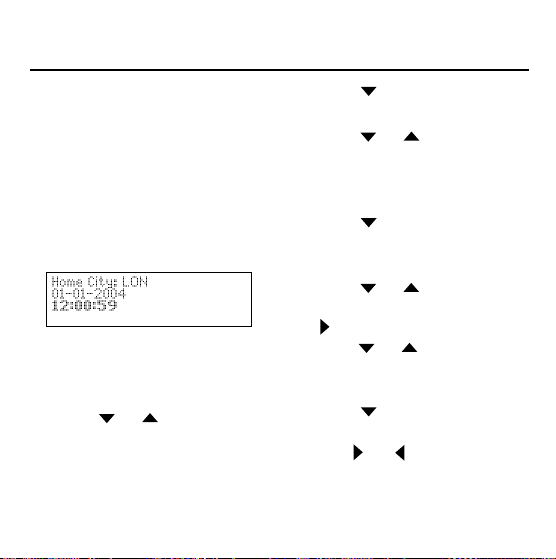
Setting the Clock
The clock lets you set a Home
Time and view local times around
the world. You must set the Home
Time before viewing World Time
because World Time is based on
Home Time.
➤ Setting Home Time
1. Press CLOCK.
Y ou see the Home Time mode.
2. Press S to enter the Setting
mode.
3. Press ENTER to select Set
Time Format.
Press or to cycle
through the 12- and 24-hour
Day/Month/Year formats.
Press ENTER to save your
selection.
4. Press to highlight Set DST
and press ENTER to select it.
Press or to cycle
between DST On or DST Off.
Press ENTER to select your
choice.
5. Press to highlight Set
Time and press ENTER to
select it.
Press or until the current hour is displayed. Press
to move to minutes, then
press or until the current minute is displayed.
Press ENTER to set the time.
6. Press to highlight Set Date
and press ENTER to select it.
Use or to move to the
next or previous field.
7
Page 9
Setting the Clock
Use or to scroll to the
current day/month/year.
Press ENTER to set it.
7. Press to highlight Set
Home City and press ENTER
to select it.
Press or until your local
city is displayed. Press ENTER
to select it.
8. Press CLOCK to exit setting
mode.
➤ Setting World Time
1. Press CLOCK until you see
World City.
2. Press S to enter the Setting
mode.
3. Press ENTER to select Set DST.
Press or to cycle
between DST On or DST Off.
Press ENTER to select your
choice.
4. Press to highlight Set
World City and press ENTER
to select it.
Press or until the city
you want is displayed. Press
ENTER to select it.
5. Press CLOCK to exit Setting
Mode and see the World City
time.
➤ Follow the Arrows
The flashing arrows to the
right of the screen show
which arrow keys you can
press to move around menus
or view more text.
8
Page 10

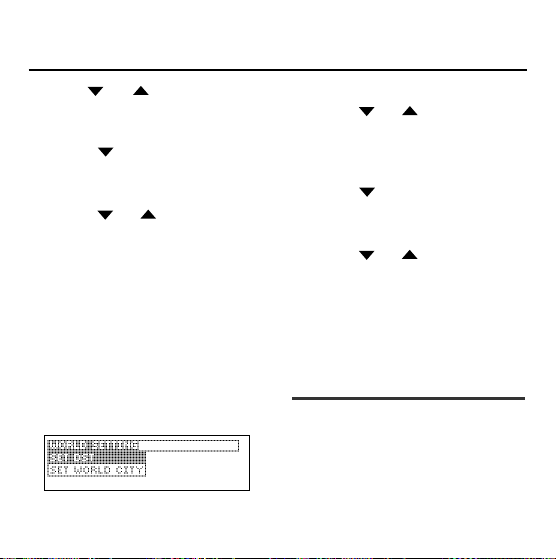
Changing the Settings
Viewing a Demonstration
or Tutorial
When using this dictionary, you
can adjust the screen contrast,
the shutoff time, and the type
size. The shutoff time is how
long your DMQ-450 stays on if
you forget to turn it off.
1. Press MENU.
2. Press ENTER to select
Settings.
3. Press or to highlight
Contrast, Shutoff, or Type
Size.
4. Press ENTER to select the
one you want.
5. Press or to highlight
a new setting and press
ENTER to select it.
Press BACK to leave the setting unchanged.
6. Press CLEAR to return to the
Word Entry screen.
You can view a tutorial or a
demonstration of this dictionary
at any time.
1. Press MENU.
2. Press or to highlight
either Tutorial or View Demo.
3. Press ENTER.
To stop the demonstration or
exit from the Tutorial and go
to the Word Entry screen,
press CLEAR.
➤ About Screen Illustrations
Some screen illustrations in
this User’s Guide may differ
slightly from what you see on
screen. This does not mean
that your DMQ-450 is malfunctioning.
9
Page 11

Finding Definitions
You can find definitions by
typing a word at the Word
Entry screen and then pressing ENTER. Try this example.
1. Press DICT.
4. Press or SPACE to scroll
down through the definition.
5. Press CLEAR to return to the
Word Entry screen.
This is the Word Entry
screen.
2. Type a word (e.g., garner).
To erase a letter, press
BACK.
To type a capital, hold CAP
and press a letter key.
To look up a hyphenated
word, type a space in place
of the hyphen.
3. Press ENTER to view the
definition.
➤ Browsing the Dictionary
While in a definition, press
NEXT or PREV to view the
next or previous definition.
10
Page 12

Correcting Misspellings Finding a Letter
If you misspell a word, don’t
worry. It will be corrected automatically. You can even spell it
phonetically.
1. Type a misspelled word at
the Word Entry screen (e.g.,
chear).
T o erase a letter, press BACK.
2. Press ENTER.
3. Press or to highlight
a correction.
4. Press ENTER to view its dictionary entry.
To go back to the correction
list, press BACK.
5. Press CLEAR when
finished.
If you are uncertain about a letter
in a word, type a question mark in
place of each unknown letter.
1. Type a word with ?s at the
Word Entry screen (e.g.,
conc??ve).
2. Press ENTER.
3. Press or to highlight
a match.
4. Press ENTER to view the
definition.
5. Press CLEAR when finished.
➤ Crossword Solver
Y ou can also use ?s to help
solve crossword puzzles. For
example, if the second letter of
a five-letter word is h and its
last letter is w, type ?h??w to
see possible answers.
11
Page 13

Finding a Series of
Letters
Viewing Thesaurus
Entries
To find prefixes, suffixes, and
other parts of words, type an
asterisk in a word. Asterisks
stand for a series of letters.
Note: If you type an asterisk at
the beginning of a word, it may
take a while to find the matching
words.
1. Type a word with an ✱ at the
Word Entry screen.
To type an asterisk, hold CAP
and press ?.
2. Press ENTER.
3. Press or to highlight
a match.
4. Press ENTER to view the
definition.
5. Press CLEAR when finished.
1. Press DICT.
2. T ype a word and press ENTER.
When you see THES flash
once to the upper right of the
screen, that word has a thesaurus entry.
3. Press THES.
In a thesaurus entry, a brief
definition of the word is followed by a list of synonyms
and antonyms.
4. Press or SPACE to move
down.
To look up the definition of a
synonym or antonym, press
ENTER to start a highlight,
use to move it to the
word you want, and press
ENTER.
5. Press CLEAR when finished.
12
Page 14

Finding Confusables Highlighting Words
Confusables are homonyms and
spelling variants that are easy to
confuse. If a word has Confusables,
CONF will flash once in the upper
right of the screen.
1. Press DICT.
2. Type a word (e.g., rein).
3. Press ENTER.
4. Press ?.
Confusables come with identifying words.
5. Press ENTER again and then
use the arrow keys to highlight a word.
6. Press ENTER to define it, or
press THES to view its synonym list(s).
7. Press CLEAR when finished.
Another way to look up words is
by highlighting them in dictionary definitions, synonym or correction lists.
1. At any text or list, press
ENTER to start the highlight.
To turn the highlight off, press
BACK.
2. Use the arrow keys to highlight a word.
3. Do one of the following:
To… Press…
define the word ENTER
view synonyms THES
view Confusables ?
add the word to LEARN
My Word List
4. Press CLEAR to return to the
Word Entry screen.
13
Page 15

Using My Word List
You can save up to 40 words in
My Word List for personal study or
review. Warning:All the words in
My Word List will be erased if your
batteries run out of power or your
DMQ-450 is reset.
➤ Adding Words
1. Press LEARN.
2. Press ENTER to select My
Word List.
If you haven’t added words to
your word list, View List:
Empty appears.
3. Highlight Add a Word and
press ENTER.
4. Type a word and then press
ENTER to add it.
➤ Adding Highlighted Words
At any text, you can highlight a
word and add it to My Word List.
1. At text, press ENTER to start
the highlight.
2. Use the arrow keys to highlight the word you want.
3. Press LEARN.
Add “your word” appears in
the menu.
4. Press ENTER to add the
word.
➤ Viewing My Word List
1. Press LEARN and select My
Word List.
2. Highlight View List: x
word(s) and press ENTER.
You see the word or words
you added.
14
Page 16

Using My Word List
➤ Deleting One Word from
My Word List
1. Press LEARN, highlight My
Word List and press ENTER.
2. Press or to highlight
Delete a Word and press
ENTER.
3. Press or to highlight
to the word you want to
remove and press ENTER.
The message “Word deleted”
appears on the screen and
the word is removed from My
Word List.
➤ Erasing My Word List
1. Press LEARN, highlight My
Word List and press ENTER.
2. Press or to highlight
Erase the List.
3. Press ENTER.
4. Press Y to erase the entire list.
Press N to return to the My
Word List menu without eras-
ing the list.
➤Adding Words Not
Found in This Dictionary
When you add a word not in
this dictionary, you’re given
two options: Cancel and Add
Anyway. Select an option.
Caution!! Adding words to
My Word List not found in this
dictionary uses considerably
more memory than words
that are. If you add only
words that are not in the dictionary, My Word List may
only hold as few as 10 words.
15
Page 17

Using Learning Exercises
You can test your spelling skills
and improve your vocabulary
with Learning Exercises.
➤ Spelling Bee
1. Press LEARN.
2. Press or to highlight
Spelling Bee and press
ENTER.
Spelling Bee selects words at
random from the dictionary.
My Spelling Bee displays
words from My Word List.
Note: Accented words from
My Word List will not be used
in My Spelling Bee.
3. Select the one you want and
press ENTER.
A word will flash on the
screen for you to spell.
4. Type in the word you just
saw and press ENTER to see
if you spelled it correctly.
5. Press ENTER to see the definition of the word or press
SPACE for a new word.
6. Press CLEAR when finished.
➤ Flashcards
1. Press LEARN.
2. Press or to highlight
Flashcards and press ENTER.
Flashcards selects words at
random from the dictionary.
My Flashcards displays
words from My Word List.
3. Select the one you want and
press ENTER.
A word will be displayed on
the screen for you to study or
define.
4. Press CLEAR when finished.
16
Page 18

Playing the Games
➤ Selecting a Game
1. Press MENU.
2. Press to highlight Games
and press ENTER to select it.
3. Press or to move the
highlight to the game you
want and press ENTER to
select it.
➤ Changing Game Settings
You can choose the skill level,
the word list and the word length
for a game.
1. Press MENU.
2. Press to highlight Game
Setup and press ENTER to
select it.
3. Press or to highlight
a new setting and press
ENTER to select it.
4. Press or to change
the setting and press ENTER
when finished to save the
new setting.
5. Press BACK to return to the
Main Menu.
➤ Getting Help in the Games
During any game you can read
instructions by pressing HELP.
In any game, except Noughts &
Crosses, you can get a hint by
holding CAP and pressing ? or
reveal the game word or words
by pressing ?.
Note: If you reveal the word or
words, you lose the round.
17
Page 19

Playing the Games
Anagram Solver
Anagram Solver finds all the
words that can be made from a
word or letters that you type in.
The words found may not use
all the letters, but a letter will be
used only as many times as it
has been entered.
The number of possible anagrams is displayed to the right of
the screen. Use or to see
the anagrams. To look up a word,
use the arrow keys to move the
highlight to the word you want,
and press DICT to see the definition or press THES to see its the-
saurus entry.
Press BACK to return to the
game.
Hangman
Hangman selects a mystery
word and challenges you to
guess it letter by letter. The letters of the mystery word are hidden by question marks. The
number of guesses remaining is
indicated by #’s.
Type letters that you think are in
the mystery word. If you are correct, the letter appears in place
of the corresponding question
mark or marks.
18
Page 20

Playing the Games
Anagrams
Anagrams challenges you to
find all of the words that can
occur within a selected word.
Each letter can only be used as
many times as it appears in the
selected word. Each anagram
must be a specified minimum
length. This will flash on the
screen before each game. The
number of possible anagrams is
shown on the right side of the
screen.
Type an anagram and then
press ENTER. Use the arrow
keys to view anagrams you’ve
already entered. Press DICT to
see the definition of the word.
Press BACK to return to
Anagrams.
Word Train
In Word Train, you and the train
take turns typing letters to forma
word. Whoever types the last
letter of the word, wins. Press ?
to end the round and reveal the
word. Press DICT to see the
definition of the word.
Press BACK to return to Word
Train.
Jumble
19
Page 21

Playing the Games
Jumble tests your ability to
unscramble letters and form
words. Jumble shows a series of
letters. Type words made from
these letters and then press
ENTER.
Hold CAP and press ? to shuffle
the letters in the root word. To
see the definition of a particular
word, use or to move
the highlight to the word you
want and press DICT. Press
BACK to return to Jumble.
Noughts & Crosses
In Noughts & Crosses, your
challenge is to get three Xs in a
row before your opponent can
get three O’s in a row. Use the
arrow keys to move your X to
the spot you want and press
ENTER.
You can choose to play Noughts
& Crosses 1 Player in which you
play against the DMQ-450 or
Noughts & Crosses 2 Player in
which you play against a friend.
20
Page 22

Storing Names & Phone Numbers
This product has a databank
that can save as many as 100
names and phone numbers. The
total amount of names and numbers that you can save depends
upon the number of characters
in each entry.
➤ To Add an Entry to the
Phone List
1. Press DATA.
2. Use to highlight New
Entry and press ENTER.
3. Type a name and then press
ENTER.
Each name can contain up to
30 characters, including
spaces, with letters appearing
as capitals.
Note: Accented characters
are not supported in the
phone list.
To delete a character, press
BACK. To edit, press .
To Type… Press…
a space SPACE
a hyphen CAP+
a period .’
an apostrophe CAP + .’
4. Use the numbered keys to
type a phone number and
then press ENTER.
Note: You cannot type letters
in a phone number.
➤ To View the Phone List
1. Press DATA.
2. Press or , if needed,
to see View: xx entries (xx%
free) and then press ENTER.
21
Page 23

Storing Names & Phone Numbers
3. To view a name, type it or
use or to see the
name you want.
➤ To Edit Phone List Entries
1. Press DATA.
2. Press or , if needed,
to see Edit Entry, then press
ENTER.
3. Type the name you want to
edit, or use or to
highlight it, then press
ENTER.
Edit the name field. You can
use BACK to delete characters. Press ENTER to move
to the number field. Edit the
number field and press
ENTER to save all changes.
To cancel the edit and return
to the Databank menu without saving changes, press
DATA.
Keep Copies of Important Data
Warning! Your phone list infor-
mation is safely stored in memory as long as the battery supplies power. However, if the battery loses all power, this information will be permanently lost.
Always keep written copies of
your important information.
➤ To Delete an Entry From
the Phone List
1. Press DATA.
2. Press or to highlight
Delete Entry and then press
ENTER.
22
Page 24

Storing Names & Phone
Numbers
Using a Password
3. Press or to highlight
the entry you want to delete.
4. Press ENTER.
5. Press Y to delete the entry or
N to cancel the deletion.
➤ To Erase All the Phone
List Entries
Warning! This procedure per-
manently erases all the names
and numbers in your phone list.
1. Press DATA.
2. Press or to highlight
Erase all data and then press
ENTER.
3. Press Y to erase all the
entries or N to cancel the
operation.
Y ou can use a password to keep
the information in the phone list
private. The password is requested when the unit is turned on and
the phone list is accessed.
Password Warnings
Warning!After you set the pass-
word, you must enter the password to access the phone list for
the first time during a session.
Always record your password and
keep it in a separate place.
If you forget the password, you
must reset the unit to access the
phone list. Warning! Resetting the
unit erases all user-entered information. Always keep written
copies of your data.
If you have a reset button, use the
end of a straightened paper clip to
gently press the reset button.
23
Page 25

Using a Password
Using the Calculator
If you do not have a reset button
located on the back of your unit,
remove the batteries, wait at least
two minutes, and then re-install
them. For battery instructions, see
“Installing the Battery” on page 6.
➤ Password Setup
1. Press DATA.
2. Press or to see Set
Password and press ENTER.
3. Type a password and then
press ENTER.
Your password can have up
to 8 characters. You are
prompted to retype your
password, and press ENTER
to confirm.
4. To disable the password,
repeat Steps 1 and 2 above,
and press ENTER when
Enter Password displays.
➤ Making Calculations
1. Press CALC.
2. Use the numbered keys to
type a number.
To make a number negative
or positive, press N(+/-).
3. Press B(+), H(-), U(x) or I(÷)
to add, subtract, multiply or
divide.
To find a square root, press
J(√x).
4. Type another number.
5. Press enter for the calculation.
To clear the calculator, press
CLEAR.
24
Page 26

Using the Calculator
Using the Converter
➤ Using the Calculator
Memory
1. In the Calculator, make a calculation or type a number.
2. To add the number on the
screen to the number stored
in memory, press S(
subtract the number on the
screen from the number
stored in memory, press
W(
M-).
M indicates the number is
stored in memory.
3. To retrieve the number from
memory, press A(
4. To clear the memory, press
Q(
MC).
M+). To
).
MR
The converter allows you to
easily convert measurements
and currency.
➤ Making Metric Conversions
1. Press CALC and press P.
2. Press to select a conversion category and press
ENTER.
3. Press to select a subcategory and press ENTER.
4. Type a number after one of
the units.
Press or to move
between the lines. Press
BACK to delete a number.
5. Press ENTER to convert it.
6. Press CLEAR when finished.
25
Page 27

Using the Converter
Resetting the DMQ-450
➤ Making Currency
Conversions
1. Press CALC and then press P .
2. Press CAP and then to
highlight Currency and then
press ENTER.
3. Enter a conversion rate and
press ENTER.
The rate should be in units of
the other currency per one
unit of the home currency (n
other/1 home).
4. Enter an amount for the
home or other currency.
Press or to move
between the lines. Press
BACK to erase a number.
5. Press ENTER to convert it.
6. Press CLEAR when finished.
If the keyboard fails to respond,
or if the screen performs erratically, perform a system reset by
following the steps below.
1. Hold CLEAR and press .
If nothing happens, try Step 2.
2. Use a paper clip to gently
press the reset button located on the back of the unit.
Warning! Pressing the reset
button with more than light
pressure may permanently
disable your DMQ-450. In
addition, resetting the DMQ450 erases settings and userentered information.
This unit may change operating
modes due to Electrostatic
Discharge. Normal operation of this
unit can be reestablished by pressing
the reset key, , or by removing/
replacing batteries.
26
Page 28

Specifications
Model: DMQ-450 Collins
Dictionary
• Batteries: Two CR-2032 lithium
• Size: 12.66 x 7.8 x 1.65 cm.
ISBN 1-59074-259-1
Cleaning, Storage, Problems
To clean, spray a mild glass cleaner
onto a cloth and wipe its surface. Do
not spray liquids directly on this product. Do not use or store this product
in extreme or prolonged heat, cold,
humidity, or other adverse conditions.
If you have a problem with this product, refer to the warranty.
FCC NOTICE
This device complies with Part 15 of
the FCC Rules. Operation is subject
to the following two conditions: (1)
This device may not cause harmful
interference, and (2) This device
must accept any interference
received, including interference that
may cause undesired operation.
Warning! Changes or modifications
to this unit not expressly approved by
the party responsible for compliance
could void the user’s authority to
operate the equipment.
Copyrights, Patents, and
Trademarks
© 2004 Franklin Electronic
Publishers, Inc., Burlington, N.J.
08016-4907 USA. All rights reserved.
© Collins Paperback English
Dictionary 5th Edition published 2002
© HarperCollins 1986, 1990, 1995,
1999, 2002.
U.S. Patents: 4,830,618; 4,891,775;
5,113,340; 5,203,705.
27
Page 29

Limited Warranty (EU and
Switzerland)
Limited Warranty (outside
U.S., EU and Switzerland)
This product, excluding batteries and
liquid crystal display (LCD), is guaranteed by Franklin for a period of two
years from the date of purchase. It will
be repaired or replaced with an equivalent product (at Franklin’s option)
free of charge for any defect due to
faulty workmanship or materials.
Products purchased outside the
European Union and Switzerland that
are returned under warranty should
be returned to the original vendor
with proof of purchase and description of fault. Charges will be made
for all repairs unless valid proof of
purchase is provided.
This warranty explicitly excludes
defects due to misuse, accidental
damage, or wear and tear. This guarantee does not affect the consumer’s
statutory rights.
MPD-28002-00 A
Rev. A
This product, excluding batteries and
liquid crystal display (LCD), is guaranteed by Franklin for a period of one
year from the date of purchase. It will
be repaired or replaced with an equivalent product (at Franklin’s option) free
of charge for any defect due to faulty
workmanship or materials.
Products purchased outside the
United States, the European Union
and Switzerland that are returned
under warranty should be returned to
the original vendor with proof of purchase and description of fault.
Charges will be made for all repairs
unless valid proof of purchase is provided.
This warranty explicitly excludes
defects due to misuse, accidental
damage, or wear and tear. This guarantee does not affect the consumer’s
statutory rights.
28
Page 30

www.franklin.com
 Loading...