

Operating instructions
for
motorhomes
from model year 2014
FRANKIA GP GmbH
Bernecker Strasse 12
D-95509 Marktschorgast
Phone: 09227 / 738-0 e-mail: info@frankia.de
Fax: 09227 / 738-33 Internet: www.frankia.de
Edition I
1
Dear FRANKIA customer,
Congratulations on your new FRANKIA motorhome.
It was a good decision to buy a new motorhome. Your new vehicle is a nice FRANKIA
motorhome with great technology, comfort and equipment. Soon you will see how much joy
it is to travel with a FRANKIA. You will be independent and free. Every day you can choose
your destination and stay. We thank you for the confidence that you put in our company.
Your FRANKIA is built on an IVECO, FIAT or MERCEDES chassis. For detailed technical
information you have received the separate operating instructions for the following
appliances: Chassis, refrigerator, hob, heating, current supply panel, radio, TV, telephone,
alarm system, generator, etc.
Before starting your journey we ask you kindly to read these operating instructions. You will
get important information for your motorhome operation so that you can use all technical
advantages of your FRANKIA. Furthermore, you will find helpful information for service and
care of your FRANKIA for its roadworthiness and operational safety. To make reading easier
we have used the following symbols:
Warning
!
Here you will find safety regulations
that will help avoid injury to persons.
Attention
Here you will find safety regulations
that will help avoid material damage.
Info
Here you will find general information and references.
This operating manual is subject to changes due to technical progress or to modified
regulations. This operating manual has been carefully put together. Nevertheless all
information is supplied without liability.
On behalf of all the FRANKIA-staff we wish you nice journeys and restful holidays.
Your FRANKIA-Team

Contents
2
CONTENTS
1. BEGINNING OF THE JOURNEY AND THE JOURNEY
1.1 Payload 4
1.2 Before the journey 5
1.3 Driving 6
1.4 Parking 8
1.5 Spending the night in your motorhome 9
1.6 Sleeping 10
2. AIRING
2.1 Roof lids 17
2.2 Midi-Heki, Heki III 18
2.3 Windows 18
2.4 Body door 19
3. GAS SYSTEM
3.1 General 20
3.2 Gas bottles 20
3.3 Gas hob 22
3.4 Heating - warm water 22
3.5 Gas supply 23
3.6 Refrigerator 26
4. ELECTRIC SYSTEM
4.1 General 29
4.2 Current supply panel 35
4.3 Fuses 12 Volt 37
4.4 Inverter 39
4.5 Generator 40
5. SANITATION FACILITIES
5.1 Central services unit 41
5.2 Fresh water and sewage 43
5.3 Washing room 45
5.4 Thetford toilet 46
5.5 Dejection tank 46
6. DIVERSE
6.1 Electric step 48
6.2 Electric mirrors 49
6.3 Heating 50
6.4 Tables 52
6.5 TV-cupboard 54
6.6 Sun blinds 57
6.7 Electric beds 60

Contents
3
6.8 Rear garages 62
6.9 1 person safety belt system 64
6.10 Back-up aid 64
6.11 Diverse 65
7. SERVICE AND CARE 67
8. WINTER
8.1 Winter holiday 71
8.2 Living in your motorhome in the winter 72
8.3 Immobilization 73
8.4 Antifreeze 74
9. FAULTS
9.1 Electric system 75
9.2 Gas system 77
9.3 Fresh water system 77
9.4 Sewage 78
9.5 Toilet tank 78
9.6 Heating 79
9.7 Electric front bed 80
9.8 Height adjustable bed above seating group 80
9.9 Vehicle 80
10. IMPORTANT TO KNOW 86
11. FRANKIA-DEALERS 87
11.1 Germany
11.2 Europe
11.3 Service partners

Chapter 1 – Beginning of the journey and the journey
4
1. BEGINNING OF THE JOURNEY AND THE
JOURNEY
1.1 The payload
Your motorhome has plenty of loading space. Therefore, please pay attention to the
positioning of your things in your motorhome so that it will have good roadholding.
The FRANKIA double floor offers an additional loading space. Some of this loading space is
accessible from the inside and the outside.
Do not forget to take some tools, reserve lamps, fuses and wheel chocks with you. These
things can be very helpful during your journey.
Loading of the motorhome
Your motorhome has plenty of loading space with outside lockers (depending on the model).
Please note that you can divide your loading space in the double floor with wood partition
walls if you wish.
Please note the following points:
!
!
Heavy objects should be loaded near to the bottom
and directly beside one
of, or better between, the axles. If you have heavy loads try to distribute them
equally to the left and the right side of the motorhome. This will stabilize the
vehicle handling, and loading near the axles will reduce rolling and pitching
of the vehicle body.
Please only put light objects into the upper storage spaces.
Warning
!
!
!
Because of the high centre of gravity a heavy roof load can have an
unfavourable effect on the vehicle handling. Make sure to secure the roof load
with straps.
Wedge tight your luggage so that nothing can move. Loose objects could
damage the motorhome body. Please make sure that nothing can clatter or
slide in the lockers.
!
!
Please do not put heavy objects in lockers that open in or against the driving
direction. The locker doors must be locked during the journey.
Make sure that everything is put away in lockers, drawers and other storage
spaces. In case of a full braking or an accident loose objects can become
dangerous missiles and seriously injure the passengers.
-
The maximum authorized weight and the maximum authorized axle weight (weight of
front axle and rear axle) should not be exceeded.
-
Please note that the installation of additional special equipment will reduce the standard
payload.

Chapter 1 – Beginning of the journey and the journey
5
- Before using your motorhome for the first time we recommend to weigh your motorhome
with full tanks on a calibrated vehicle scale so that you can establish your personal
payload for your motorhome.
this means maximum authorized weight
./. empty weight of your motorhome
./. weight of all passengers
____________________________________
= payload for your luggage
Info
If you overload your motorhome, it is possible that you may have
to pay a fine and overloading can damage the axles and wheels.
Please note the following points for the loading:
-
The inside of your motorhome should be in good order and safely packed so that you will
not encounter a problem if you have to brake suddenly.
-
Please pay attention to the following points:
∗ sliding doors
∗ contents in the cupboards
∗ working board on the kitchen sink unit
∗ loose objects on tables and shelves
∗ travel utensils in the bathroom
∗ table / table top
∗ TV-cupboard
-
Secure loose objects e.g. with towels. This also prevents rattling noise.
1.2 Before the journey
∗ Adjust the exterior mirrors
∗ Open the blackout roller blinds (for the front windscreen and the driver and passenger
windows) completely and attach them
∗ Check if the outside locker doors, especially the rear locker door are really interlocked and
not only ajar. If the large lateral locker doors of the rear garage are not closed correctly, a
warning light on the dashboard will light up.
∗ Lock the body door
∗ Manually retract the steps, if they do not retract automatically and the warning light on the
dashboard lights up.
∗ Put the refrigerator on 12 V position (only works when the engine is running - depending
on the refrigerator model)
∗ Remove the 230 V cable from the exterior socket
∗ Close all doors and lockers and fasten the refrigerator door
∗ Turn off all gas appliances, as gas hob, refrigerator, boiler and close the gas bottles
(except in Germany)
Chapter 1 – Beginning of the journey and the journey
6
∗ Lock the TV cupboard
∗ Fasten the table / table top
∗ Wind up the rear supports
∗ Put the soap dispenser and the toothmugs into the bathroom cupboard
Please check all of these things thoroughly before starting your journey so that you will have
a good and safe trip.
1.3 Driving
You need to drive a motorhome as all other cars with caution and appropriate speed. Please
always pay attention to the dimensions of your vehicle.
ALWAYS PAY ATTENTION TO THE DIMENSIONS
(LENGTH - WIDTH - HEIGHT) OF YOUR MOTORHOME!
Warning
!
!! Attention: Look out for service station roofs, rocks, branches, etc.
Further, please pay attention to the special regulations in foreign countries (for example to
carry along the safety vest or the rear warning signal in Italy for a projecting bike rack).
With a loaded motorhome you need to drive differently as you would with an empty
motorhome.
Please note the following points:
∗ longer braking distance
∗ different handling on gradients and slopes
∗ headwinds can have an influence on the speed
∗ higher crosswind-sensitivity on bridges, when leaving a tunnel and when overtaking a
truck
∗ different vehicle handling in bends due to the height and weight
∗ larger vehicle-dimensions: length, width, height (approx. 3 m)
∗ small bridges, narrow streets, low passages, low service station roofs, etc.
∗ limited visibility when you are reversing
∗ correct adjustment of the mirrors
Chapter 1 – Beginning of the journey and the journey
7
Warning
!
!!! Attention:
The driver is responsible for all passengers using the available seat belts.
When driving, the pilot seats in the living room (option) may only be used
in driving direction.
All seats without seat belts are not allowed to be used during driving.
It is forbidden that people are in the alcove during the journey.
It is best to pack all loose things safely in your motorhome because they can
become dangerous missiles in the case of an impact or when making an
emergency stop.
Warning
!
Attention
You have the possibility to turn the driver seats in the direction of the living area.
You may only turn the seats when the motorhome is not driven and in a secured
position.
With motorhomes on IVECO chassis, the driver seats have to be locked in driving
direction before starting your journey. Otherwise, a red warning light will flash on
the dashboard.
Please turn off all gas appliances at the service station.
Attention
-
Please adapt your speed when driving on bad roads.
-
Compared to a car your vehicle has a long rear overhang (= the distance
between the rear axle and the rear end), which can swing out in narrow
curves and touch the road when the road condition is bad (e.g. deep
bumps). Therefore please drive with caution in narrow curves (for example
when entering or leaving a parking space) or on rough roads.
-
Because of its height a motorhome is very sensitive to cross wind. Please
drive with caution when there is cross wind.
Attention
Too low tyre pressure can cause excessive tyre wear or can lead to bursting of
the tyre when driving a fully loaded motorhome.
Therefore, please check the tyre pressure regularly.
For Fiat motorhomes the correct tyre pressure is indicated in the enclosed ALKO
manual and for Iveco and Mercedes motorhomes in the respective manual.
Chapter 1 – Beginning of the journey and the journey
8
1.4 Parking
Select a gear (if you have an automatic transmission, please put the gear shift in "P" position)
and put the hand brake on. Please don't forget to change your refrigerator to gas or 240 V
because the 12 V supply will be automatically switched off.
You should park your motorhome horizontally so that sewage can flow unhindered out of the
shower or sink unit. Wheel chocks can be very helpful.
When you are using the awning of your motorhome, you should secure it to the ground with
an additional fastener because a gust of wind can make your awning go up and cause
expensive damage to your vehicle.
Your motorhome has rear supports but do not use them for wheel changes.
Attention
For motorhomes with rear axle air suspension:
Always lower the motorhome completely with the air suspension before using the
rear supports.
Otherwise the supports and the motorhome bottom can be damaged.
Please find more information about the air suspension in the operating instructions
of the respective manufacturer.
Please note the following advice:
When your rear supports are down we suggest to put the hand crank to your
steering wheel because then you will be reminded of it before starting your
journey.
In summer please park your motorhome so that the sun cannot blaze down onto
the ventilation slots of your refrigerator. This will make your refrigerator work
better.
When parking your motorhome on a public road in built-up areas at night, please
remember to use the "red/white night park signs" which must be on your
motorhome (only for motorhomes over 3,5 tons).
Before leaving a campsite please check that you have not caused any damage and
left no refuse. The important characteristics of a camper are discretion and
environmental awareness.
Info
Chapter 1 – Beginning of the journey and the journey
9
1.5 Spending the night in your motorhome
In the following table please find the regulations of some European countries:
(subject to change)
Country
Belgium
Camp sites in all regions, especially near the coast, few motorhome parking
spaces, outside of campsites and motorhome parking spaces only at motorway
rest areas (max. one night).
Denmark
Dense network of campsites, not motorhome parking space, Quick-Stop spaces in
front of many campsites, overnight stay prohibited outside campsites
Germany
Dense network of campsites and motorhome parking spaces, One overnight stay
outside of campsites and motorhome parking spaces is permitted in order to
recreate driving fitness, pay attention to regional and local restrictions.
France
Dense network of campsites and motorhome parking spaces, pay attention to
local restrictions regarding overnight stay outside of campsites and motorhome
parking spaces.
Greece
Numerous campsites, especially near the coast, very few motorhome parking
spaces. Overnight stay prohibited outside campsites.
GB
Dense network of campsites, no motorhome parking spaces. Pay attention to local
restrictions regarding overnight stay outside of campsites.
Italy
Dense network of campsites and motorhome parking spaces, especially in the
north and centre of Italy. One overnight stay outside of campsites and motorhome
parking spaces is permitted, pay attention to regional and local restrictions.
Croatia
Dense network of campsites near the coast, few motorhome parking spaces,
Overnight stay outside of campsites and motorhome parking spaces prohibited,
also on private property.
Luxemburg
Dense network of campsites, no motorhome parking spaces, overnight stay
outside of campsites and motorhome parking spaces prohibited.
Netherlands
Dense network of campsites, many camping possibilities on farms, few
motorhome parking spaces. Overnight stay outside of campsites and motorhome
parking spaces prohibited.
Norway
Dense network of campsites, especially in the south, very few motorhome parking
spaces, pay attention to local restrictions regarding overnight stay outside of
campsites and motorhome parking spaces.
Austria
Widespread network of campsites in all regions, overnight stay outside of
campsites and motorhome parking spaces prohibited.
Sweden
Dense network of campsites in the south and centre, very few motorhome parking
spaces, pay attention to local restrictions regarding overnight stay outside of
campsites and motorhome parking spaces.
Switzerland
Widespread network of campsites, motorhome parking spaces in all regions,
overnight stay outside of campsites and motorhome parking spaces prohibited.
Spain
Dense network of campsites, few motorhome parking spaces, b pay attention to
local restrictions regarding overnight stay outside of campsites and motorhome
parking spaces.
On private property please always ask for the permission of the landlord.
Source: Promobil
from May 2012
Chapter 1 – Beginning of the journey and the journey
10
1.6 Sleeping
You can use your alcove bed
immediately. You can fold up your alcove bed so that you have
easier access to the driver’s cab and have better visibility. Please note that you can leave the
alcove bed folded up during the journey too.
The front bed in A-class models
can be folded down. Put your seat backrests to the front to
get the maximum height on your lifting bed. Please swivel the driver’s seat slightly to the
outside so that the backrest does not touch the steering wheel.
Please note that you can keep your bed linen in the bed, but do not forget to secure the bed
with the belt when it is folded up!!!
Attention
Do not use the folded up front bed to store things.
Only the bed linens for two persons may remain on the bed.
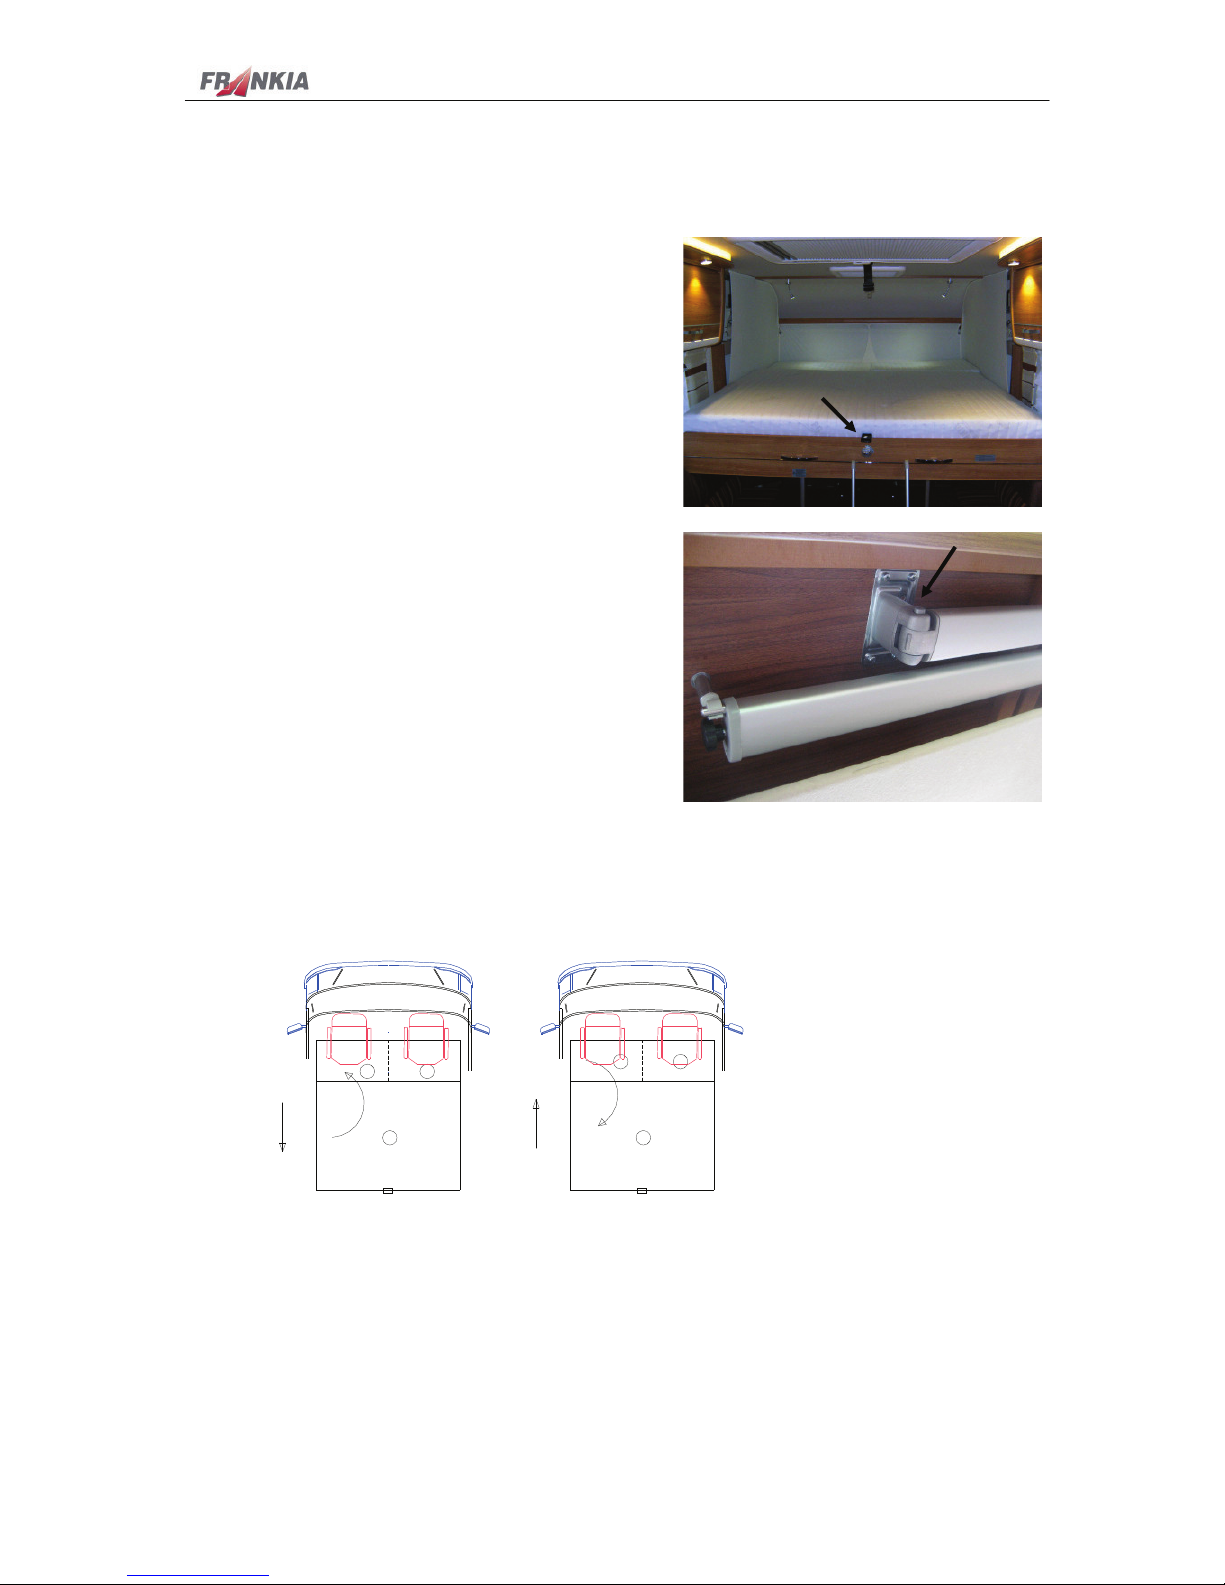
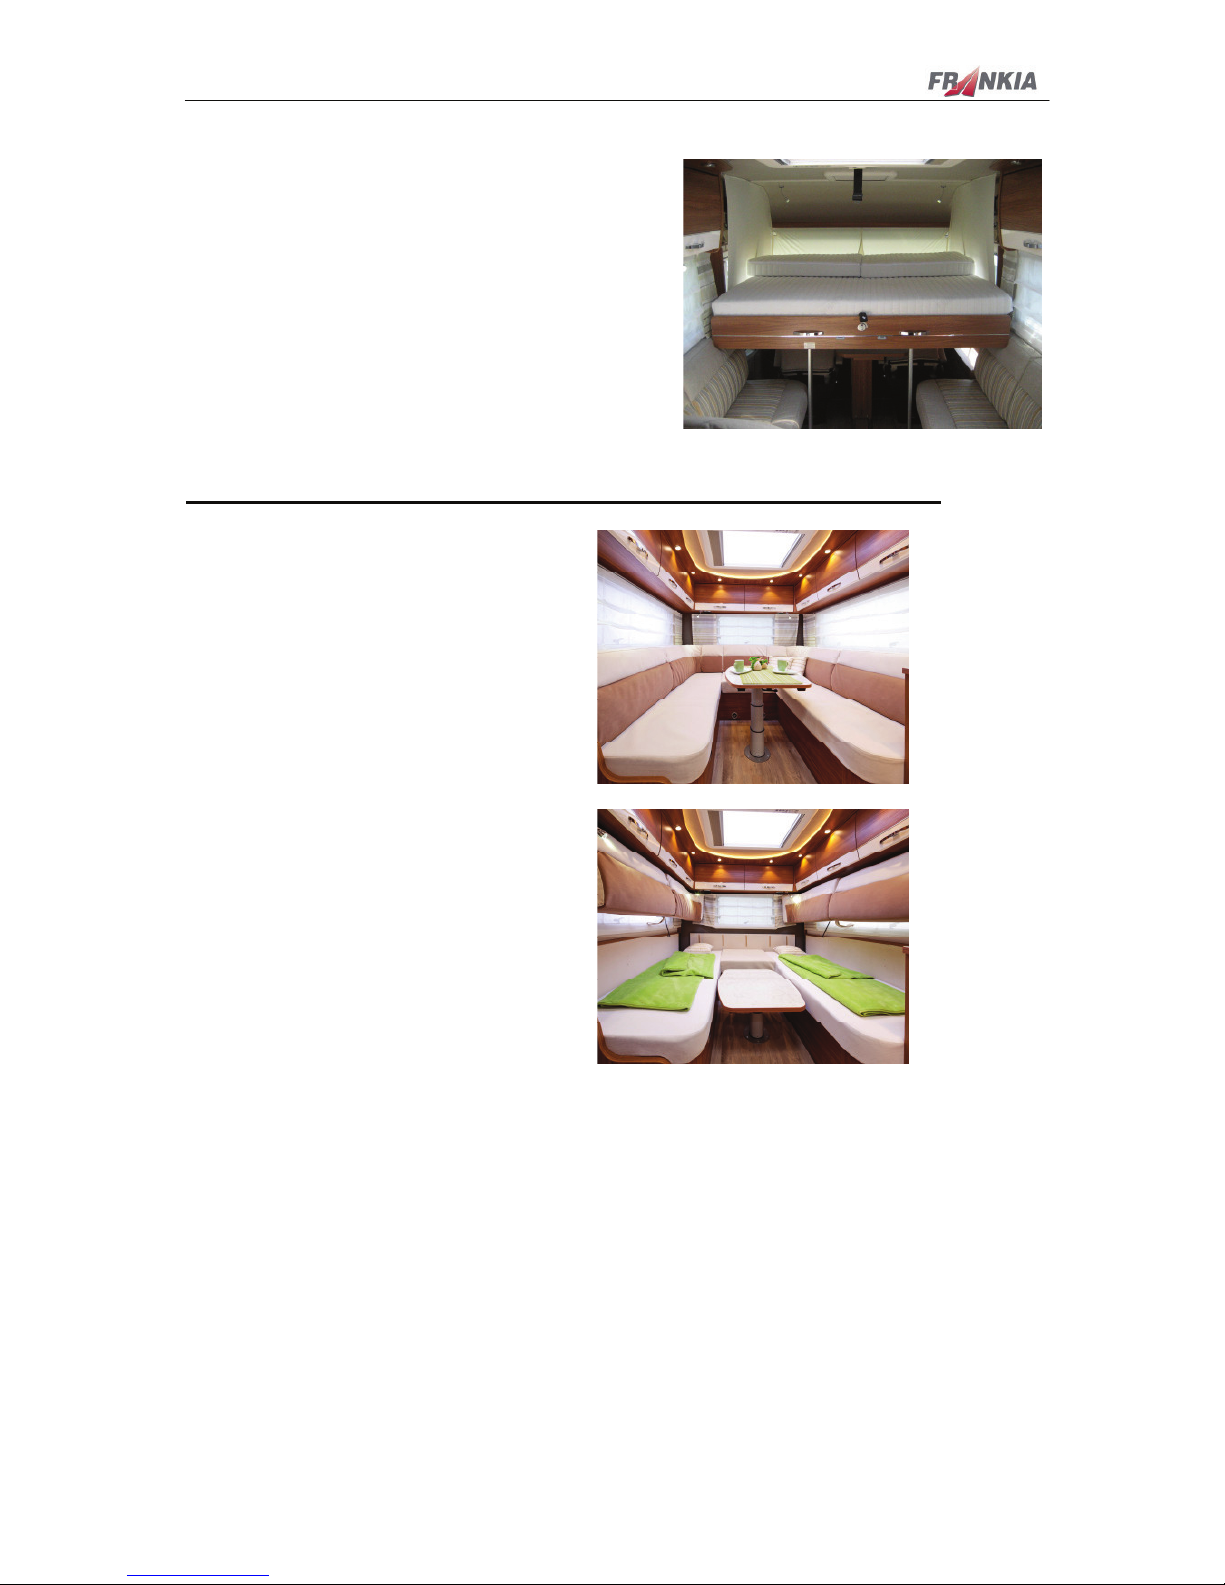
The Duo Beds (= option)
The Frankia Duo Beds for Coachbuilt or A-Class motorhomes have a double use: They can be
used either longways or as a big crosswise double bed of approx. 2 m x 2 m.
Attention
The pulled out duo bed may only be used when the support feet are hinged
down.
Chapter 1 – Beginning of the journey and the journey
11
A-class motorhomes:
•
Move the table into the driver’s cab (see chapter
“table”).
• Release the bed extension by turning the rotary
knob A.
• Lower the electric bed. The switch can be found
next to the panel above the body door.
• Hold the grips on the bed foot and pull out the
bed as far as possible. Lock the bed by turning
the rotary knob A.
• Press strong on the release button B of the
articulation before pivoting down the support
feet.
• You can adjust the height of the support feet
by turning the milled screw
• Do the same manipulation for the second
foot.
• Afterwards you can lower the bed
completely.
• Put the additional mattresses 1a and 1b onto the pulled-out
slatted frame according to the drawing:
I
II
IH
HH
H
'LORM$
'LORM$'LORM$
'LORM$
'LORM$
'LORM$'LORM$
'LORM$
I
II
I
H
HH
H
•
WƵůůŽƵƚƚŚĞďĞĚ
WƵƐŚŝŶƚŚĞďĞĚ
ZŽƚĂƌLJŬŶŽď
ZŽƚĂƌLJŬŶŽď
Chapter 1 – Beginning of the journey and the journey
12
• Hang in the ladder between the two beds.
• For the re-conversion follow the reversed
order.
• Push the additional mattress as far as possible
to the front so that the bed can completely swung
up.
• After lifting the bed please always lock the
bed extension.
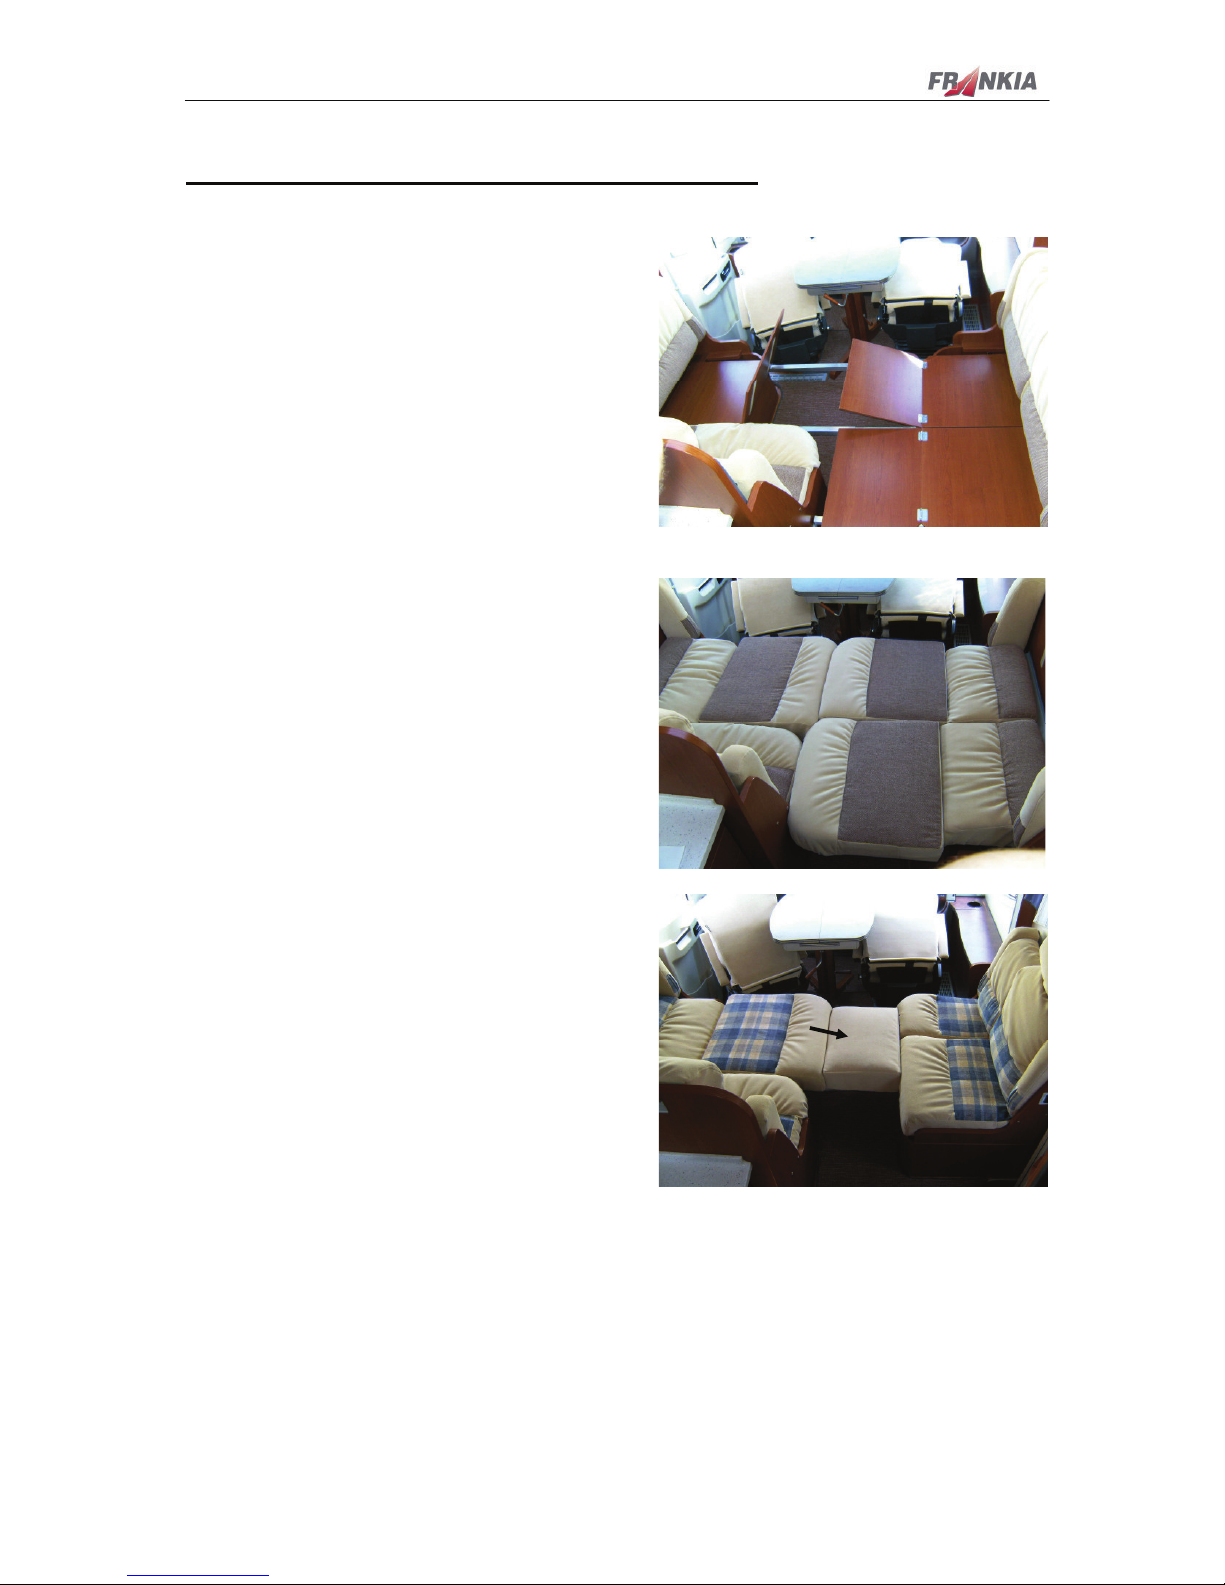
Conversion of the FF2, FF2G, FF4 and A 50 Plus round seating group to a bed
In the FF2 and FF2G models
the round seating group can
easily be turned into two
single beds. With the help of
a strap (installed in the
middle) the backrests can be
moved up so that the
complete seating bench can
be used to lie on.
In addition, the gap between
the two single beds can be
closed by lowering the table
and folding out of the seating
bench tops. After putting on
the rear backrest upholstery
and the auxiliary upholstery,
you have a large bed surface
over almost the total
motorhome width
In the models FF4 and A 50 Plus, the 4 backrest upholstery cushions are used for this
conversion.
Chapter 1 – Beginning of the journey and the journey
13
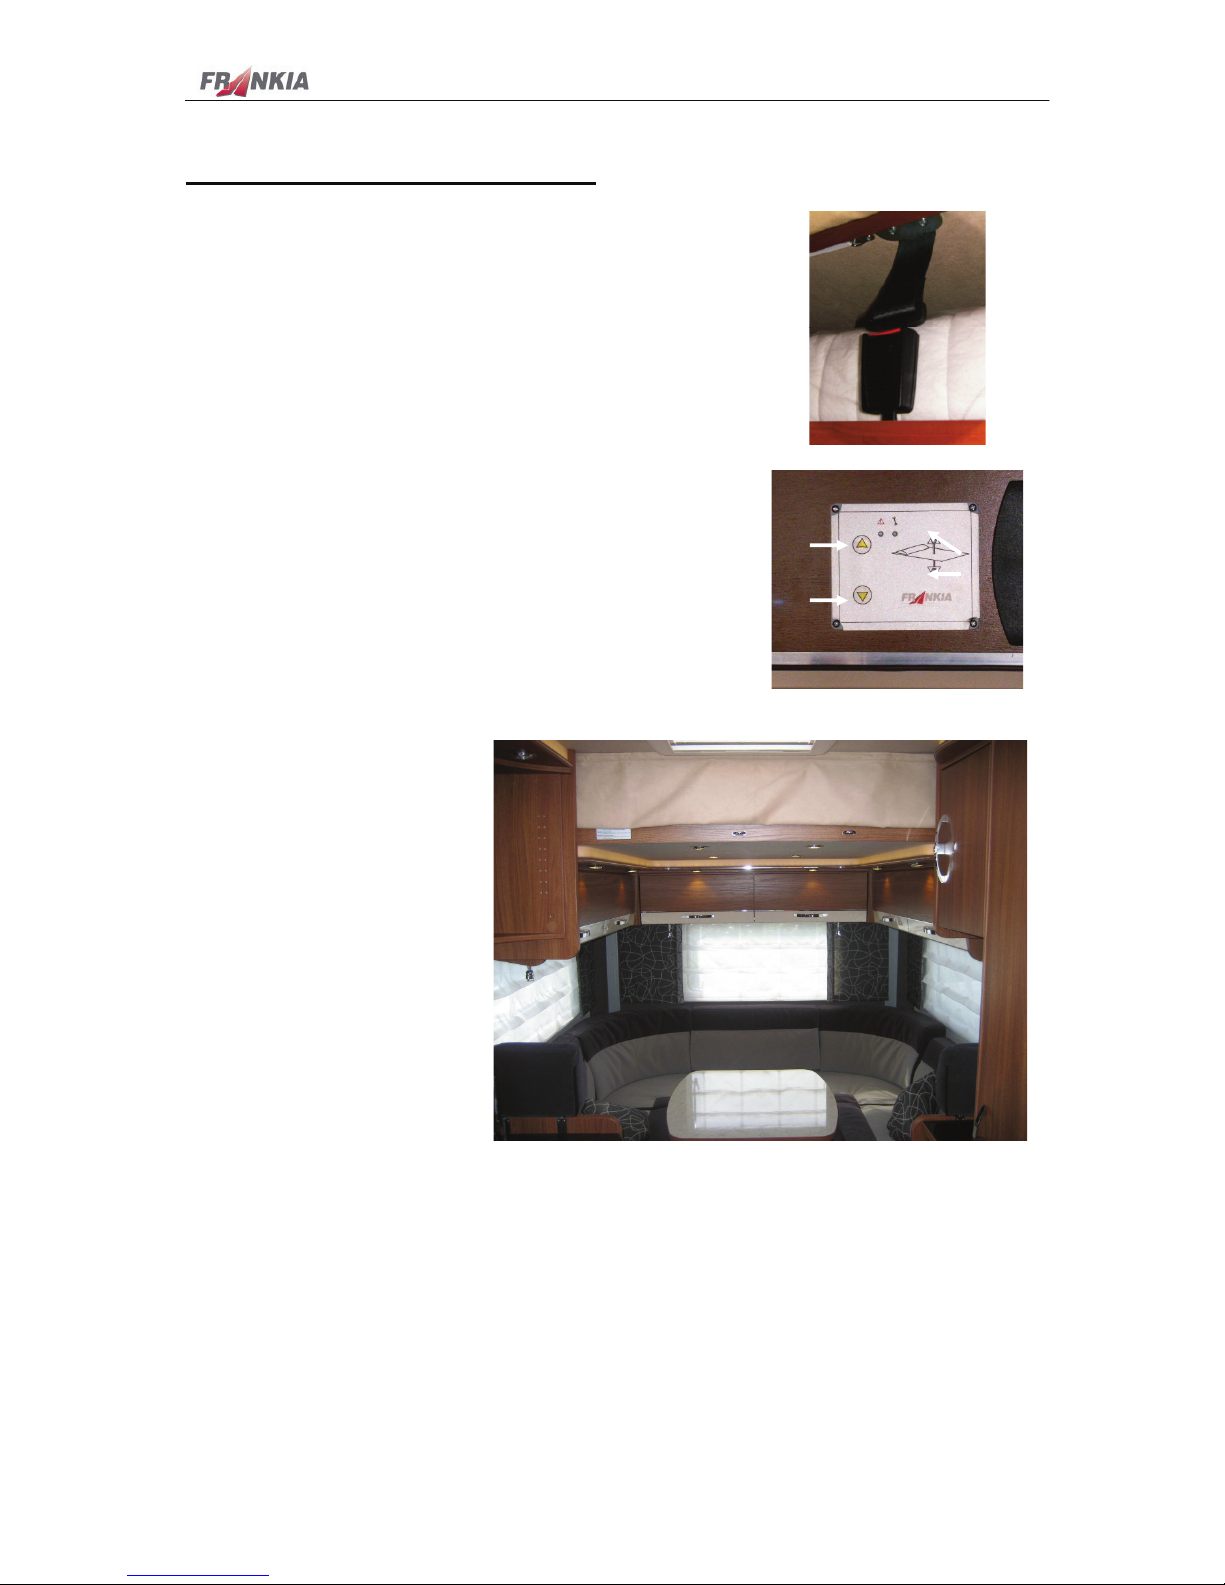
Height adjustable bed above seating group
With some floor plans, there is an electrically adjustable bed
above the seating group.
The bed is secured with a strap. When the security strap is
locked in, there is no electricity in the operating panel. By
pressing the red button on the security strap the lock is
unlocked.
The operating panel is installed in the locker above the body
door.
The operating panel is in energy saving mode. To activate,
press the upper button „A“ for approx 6 seconds. The
directional arrows „C“ light up. By pressing and keeping
pressed of the respective button you can move the bed up and
down respectively.
To lower the bed, press the lower directional arrow „B“. The
bed will move downwards as long as the button is pressed or
until a pre-set position is reached.
Strap
Panel
4 positions of the bed are
programmed by the
manufacturer:
1) In the topmost position, the
mattress is only a few
centimers below the ceiling.
2) If you would like to leave
your bedding on the bed
during the day, only move
the bed up to the 2
nd
position.
Position 1
Chapter 1 – Beginning of the journey and the journey
14
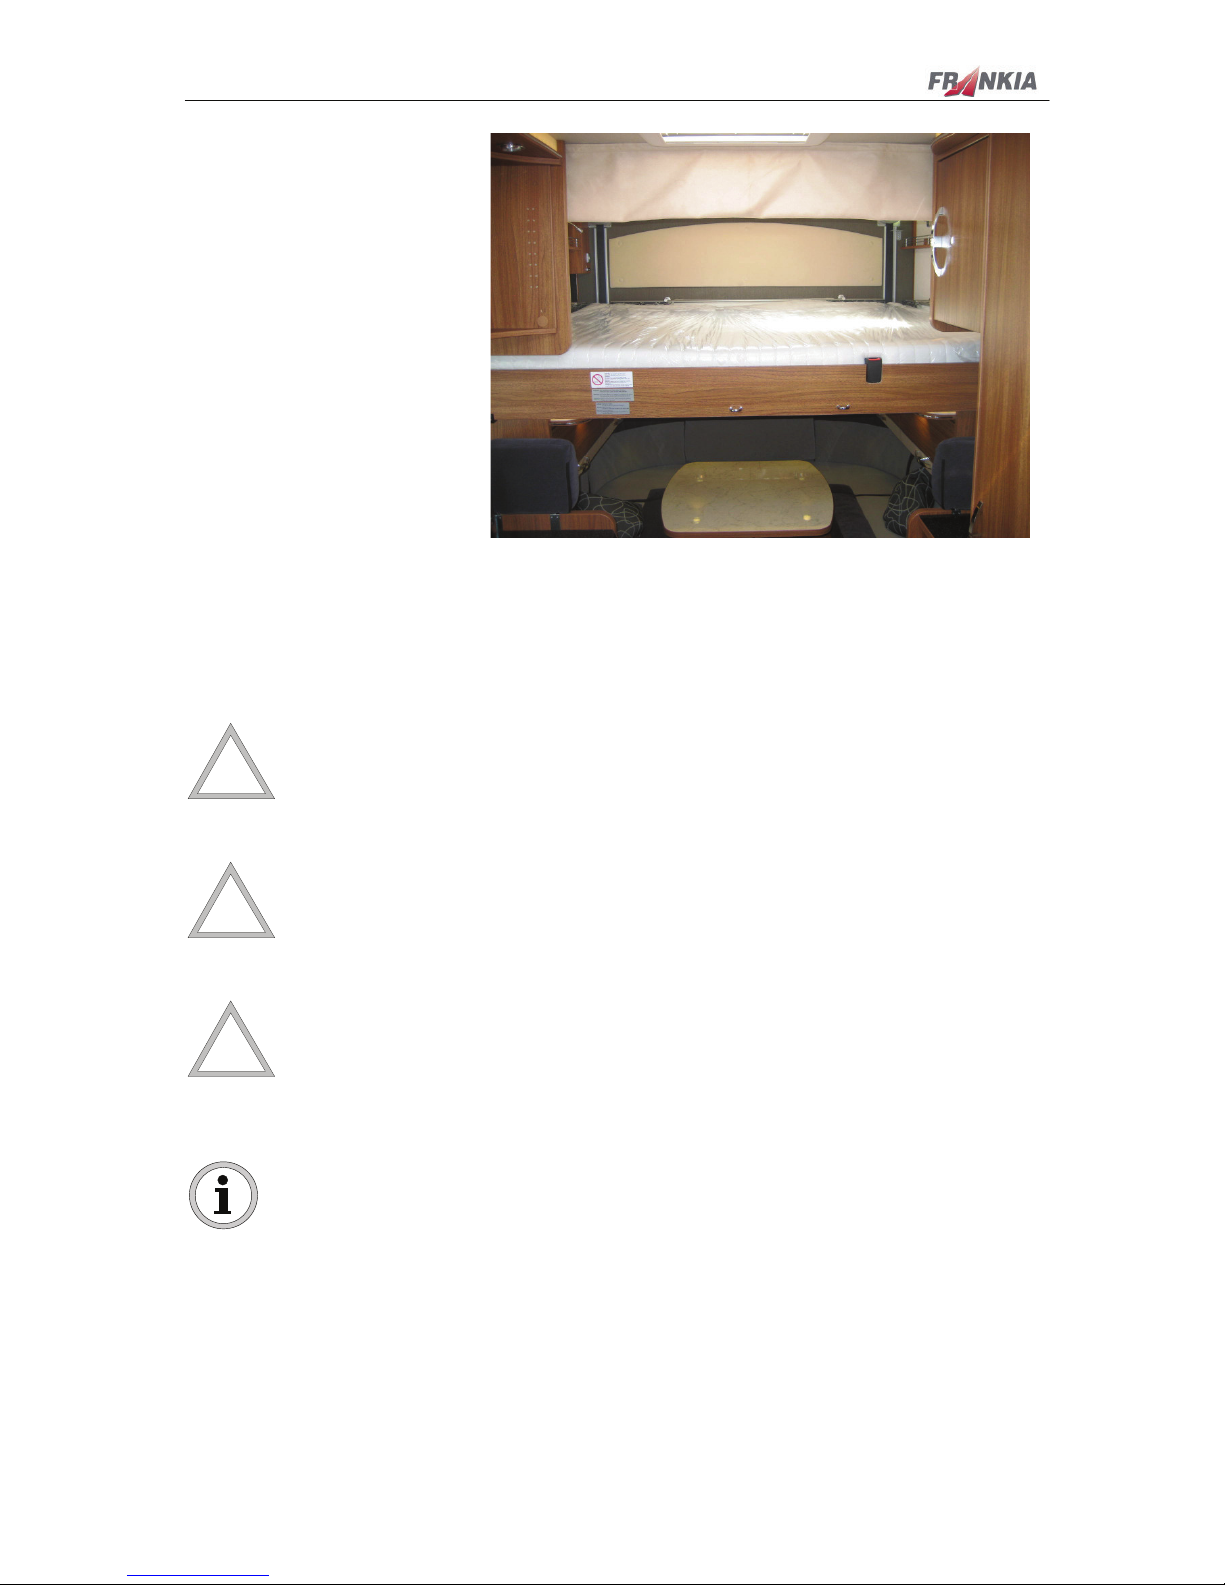
3) In position 3, sleeping is
possible on the upper bed as
well as on the seating group
converted to a bed.
4) If you would only like to
sleep on the height
adjustable bed and not on
the lower bed/seating
group, you can lower the
bed even further. In order to
reach this position, you
have to fold down the
backrest upholstery.
Position 3
To move the bed up, push the upper directional arrow button.
Approx 20 sec. after the last push of a button on the panel, the control switches off.
For detailed information, please see the provided instruction manual from the manufacturer.
Attention
Make sure that no one is on or under the bed when moving it up or down.
Attention
When driving, the bed must be in the upper position and be secured with the
security strap!
The bed is only to be used when parked not when driven!
Attention
The max. combined load in all the upper cupboards below the bed may not
exceed 30 kg.
Info
The control of the bed is fused via circuit 1, while there is a separate 30 A fuse
for the motors in the additional distribution board near the electric block. (see
also chapter 4)
Chapter 1 – Beginning of the journey and the journey
15
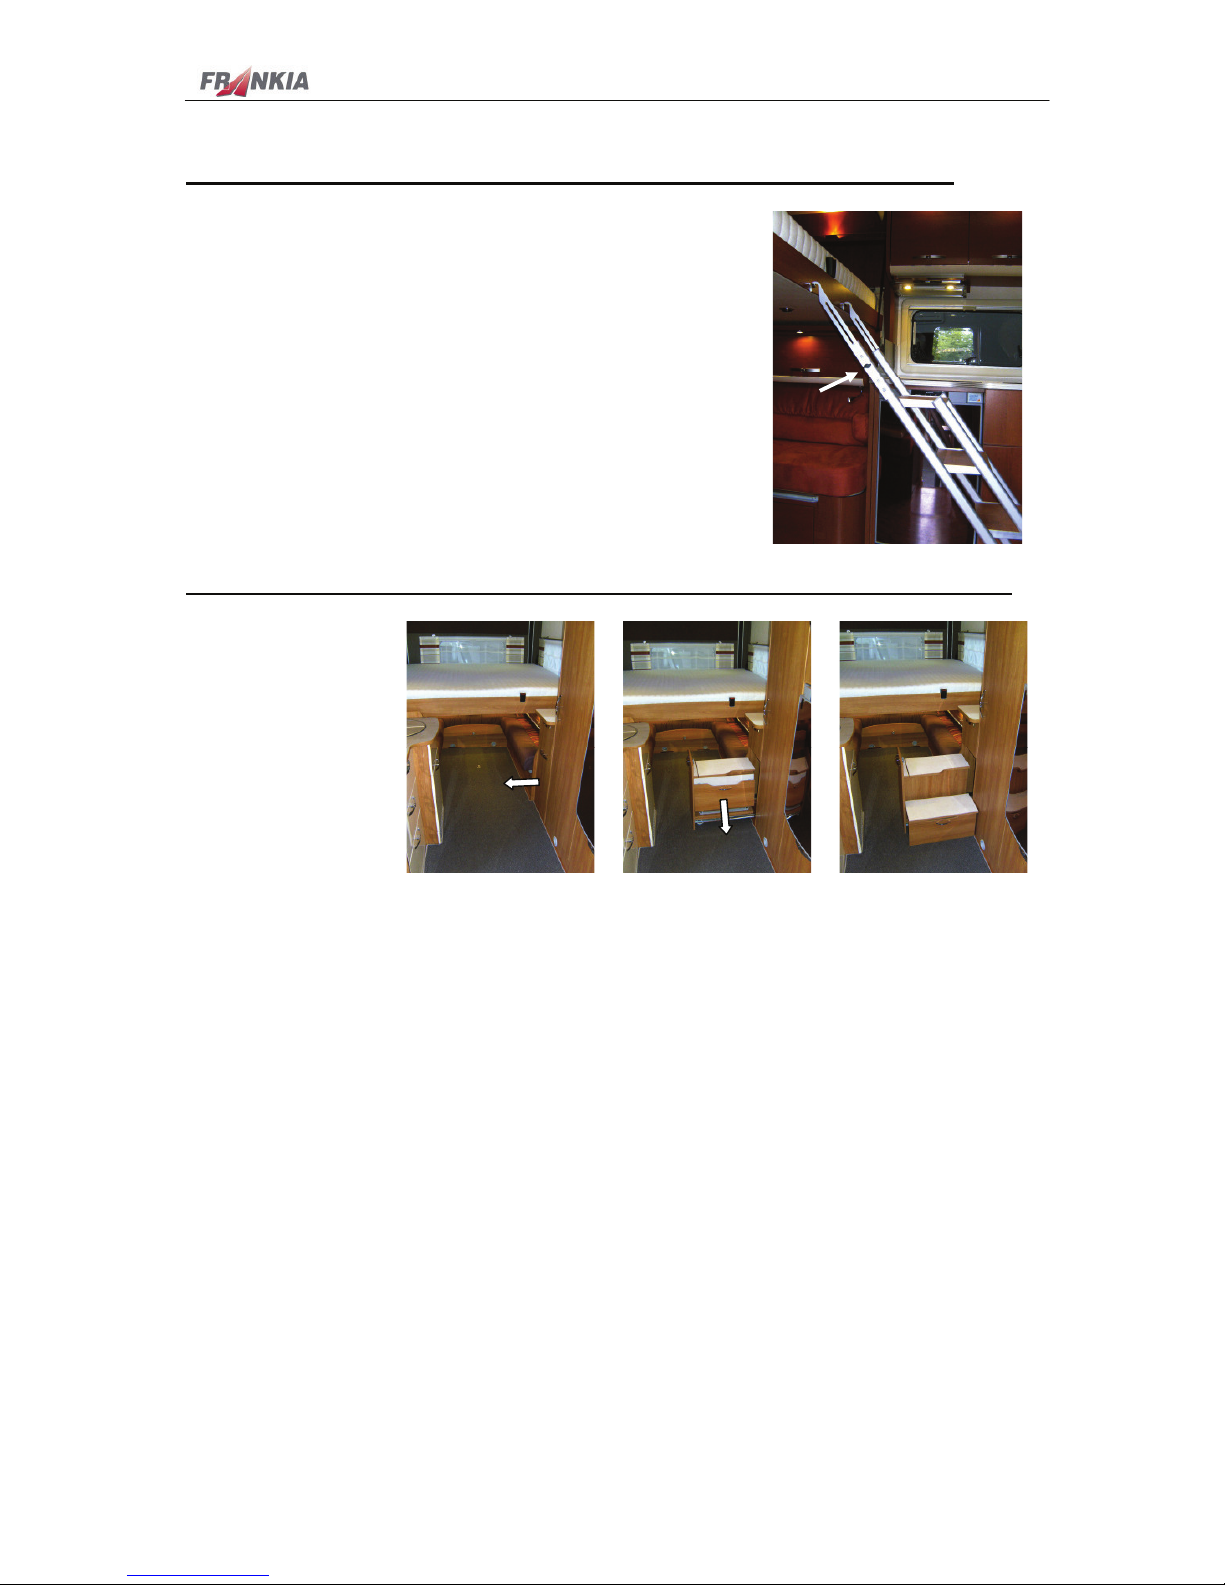
Ladder for height adjustable bed above seating group (depending on floor plan)
The ladder for the height adjustable bed above the seating
group in the FF4 is stored on the rear cab wall behind the
driver’s seat. The bed (no matter in which position) can be
reached comfortably due to the extendable ladder beams. For
this loosen the butterfly handles on the sides, extend as
required equally on both sides and tighten the butterfly
handles.
Fold-up steps for height adjustable bed above seating group (depending on floor plan)
If the height
adjustable bed above
seating group is in
the lowest position, it
can easily be reached
via the fold-up steps.
Pull out the respective cupboard and fold out the lower step.
For the re-conversion follow the reversed order. Please make sure that the lower step is
completely folded up in order to avoid damage to the furniture.
There is storage space underneath the upper step.
Chapter 1 – Beginning of the journey and the journey
16
Conversion of the seating group to a makeshift bed (option)
Makeshift bed
• Move the table to the driver’s cab / or lower the
table top respectively.
• Pull out the aluminium profiles to the right
length and hang them into the supports on the
front of the seat bench.
• Fold the seat bench lids on both sides onto the
aluminium profiles.
• Place the upholstery onto the bed surface.
With A-class motorhomes you need to swivel the
driver’s seat slightly outwards so that the backrest
does not touch the steering wheel.
Like that you can move even big tabletops
completely into the driver’s cab and you can make
your bed without any difficulties.
For motorhomes with a safety belt on the side
seating bench, an additional upholstery piece is
included which can be put on the aluminium
profiles instead of the backrest upholstery which is
not detachable in this case.
Chapter 2 - Airing
17
2. AIRING
2.1 Roof lids
Your motorhome has roof lids which can be used for airing and darkening. Please press the
release button and move the bow up for opening the roof lid. You can lock your roof lid into
different positions.
If the motorhome is exposed to intense sunlight, it is not recommended to close the black out
blinds and plissé-curtains completely, but only to 2 thirds.
The glass has to be put in the position “continuous aeration” to avoid overheating damages.
You can open your roof lid completely or partly as you wish.
The roof lids have a flow-through ventilation, as it is
stipulated by law.
During the journey the roof lids must be closed.
You will get the optimum airing when you open the roof
lid in the kitchen together with your kitchen window.
By opening the roof lid in the washing room you can avoid
your mirrors getting steamed up.
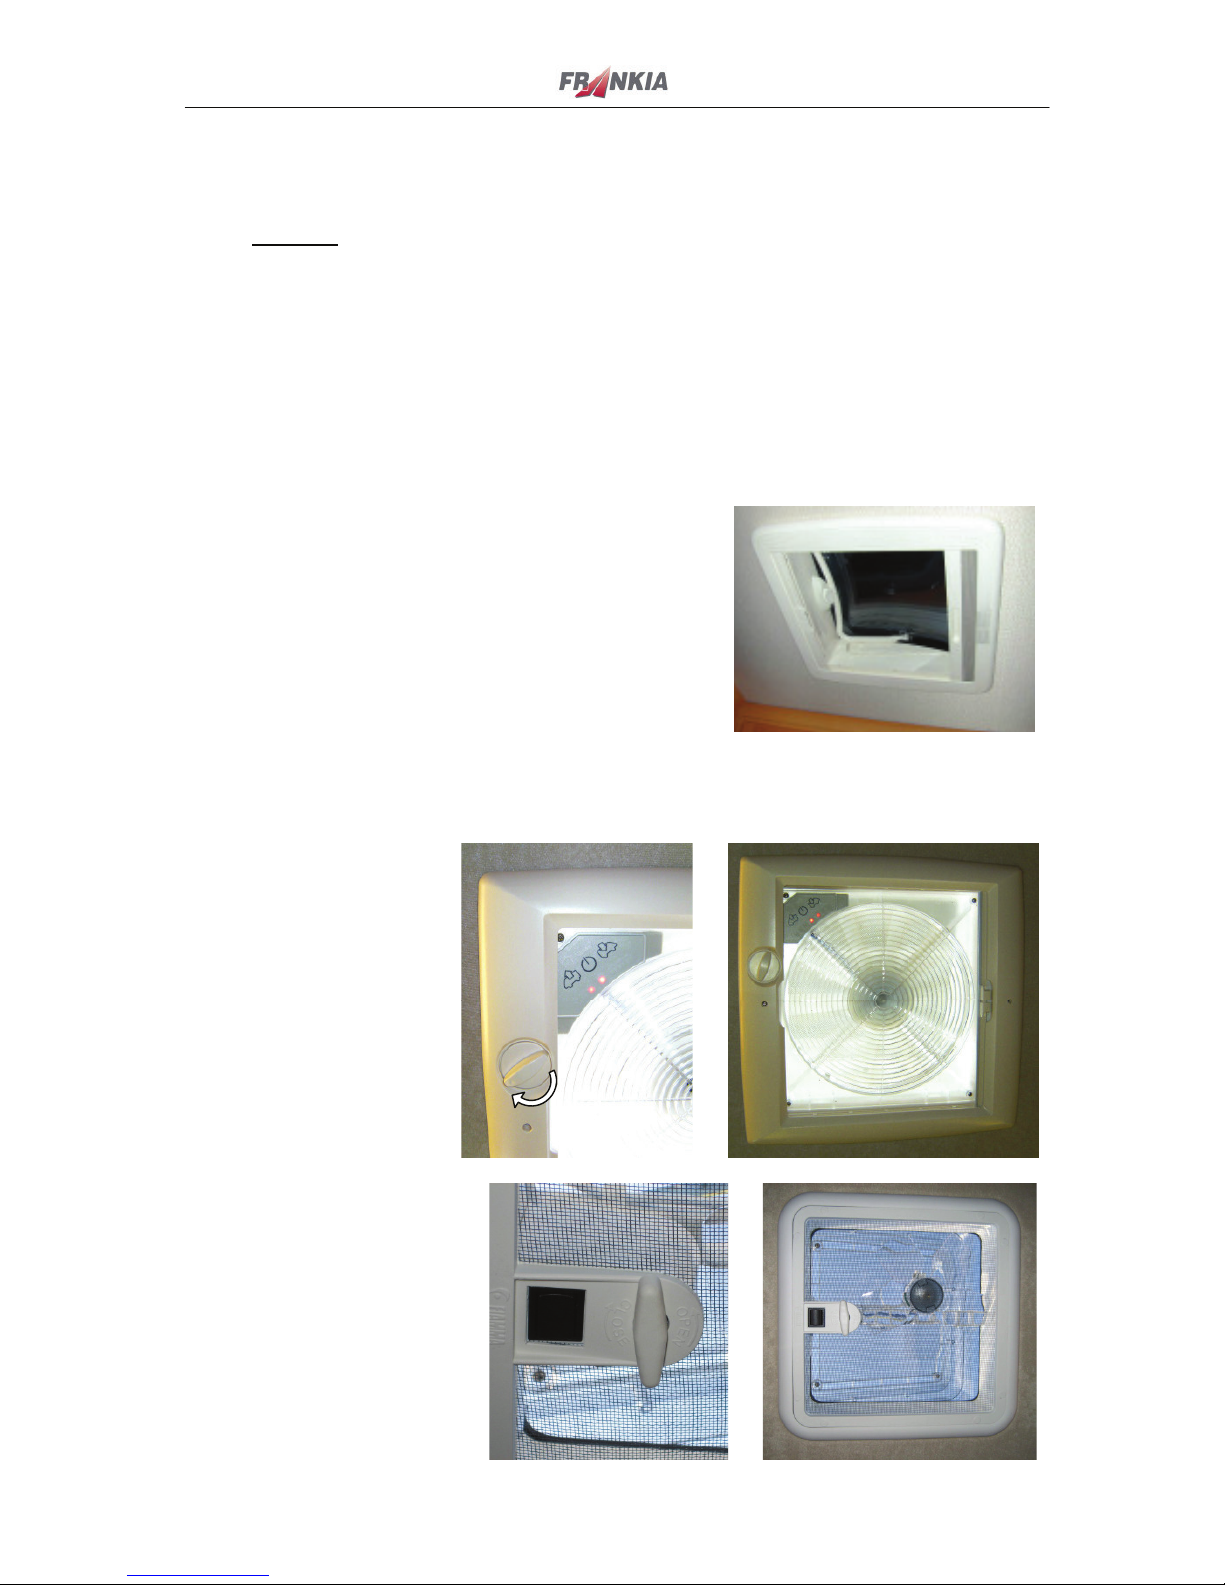
Roof lid with ventilator
„Omnivent“ roof lids with
ventilator can be opened
by turning the knob „A“
in the shown direction.
Via the control panel „B“
you can switch on/off the
ventialtor and choose if
the air shall be blown in
or out. Red LEDs indicate
the current mode.
The „Fiamma“ roof lids with
ventilator can also be opened
by turning the knob.
With the rocker switch the
turning direction of the
ventilator is controlled.
A
B
Chapter 2 - Airing
18
2.2 Midi-Heki, Heki III
You will find all important information in the operating instructions from Seitz.
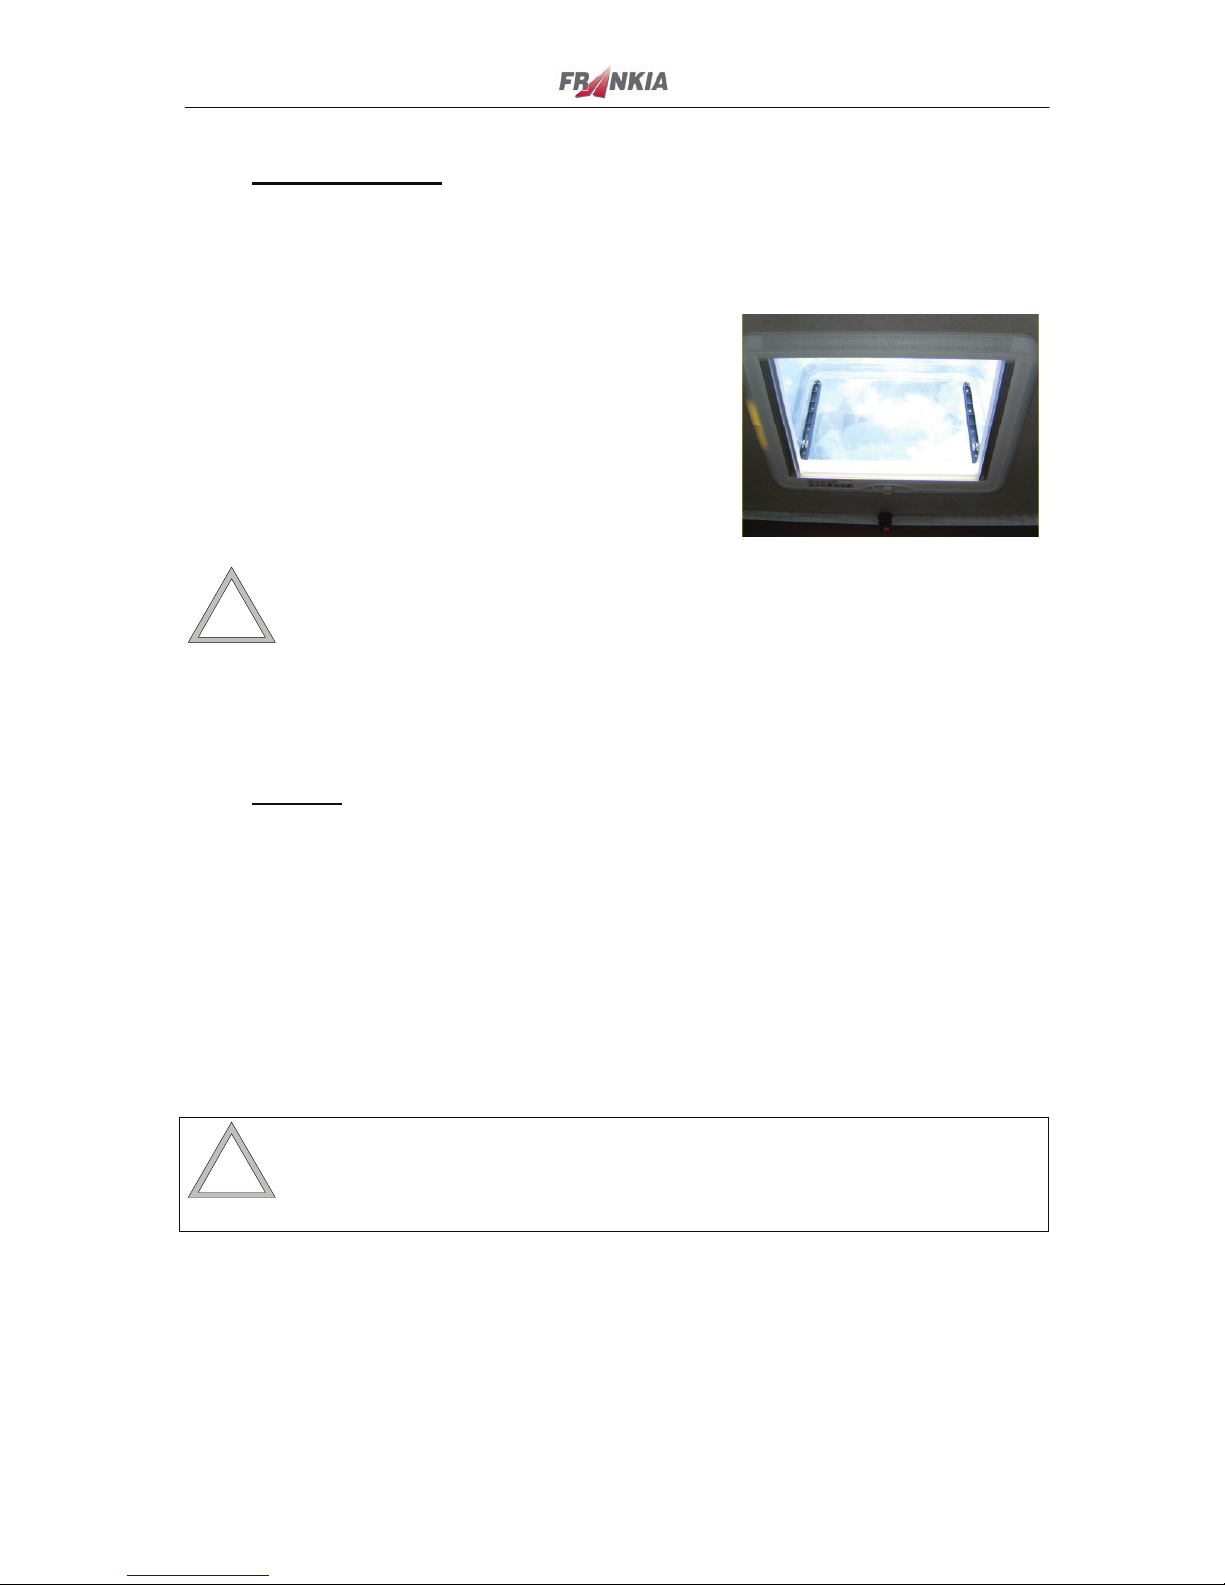
Heki III rooflight
The Heki 3 can be opened with a crank handle up to
an angle of 70°.
To fully close it, make 2 -3 extra turns after the glass
touches the roof.
The lights can be operated by a switch at the entrance.
Attention
During the journey the Heki III rooflight has to be kept closed.
For further information about the Heki III please refer to the Seitz operating instructions.
2.3 Windows
Your FRANKIA motorhome has combined roller blinds. This means that you have darkening
roller blinds for the night and aeration with or without insect meshes.
Please note that your darkening roller blind is not a sun protection roller blind. When the
motorhome is exposed to intense sunlight, it is not recommended to have the black out blinds
closed over a long period, because the material of the blinds could be damaged.
For opening the window please press the safety button and turn the locks to the side. You can
connect the insect meshes with the darkening roller blind and move them up or down
together.
Attention
Do not drive with opened hinged windows!
Chapter 2 - Airing
19
2.4 Body door
You can open the body door by turning the key to the left until it stops. Then pull on the door
handle and the door will open. Before removing the key, turn the key cylinder upright. To
close the door from the inside press down the locking lever.
It is recommended for your safety to lock the body door during the journey when people are
inside the living area.
Attention
Please watch out that the way to the door is not blocked when you are inside your
motorhome, especially at night (escape route).
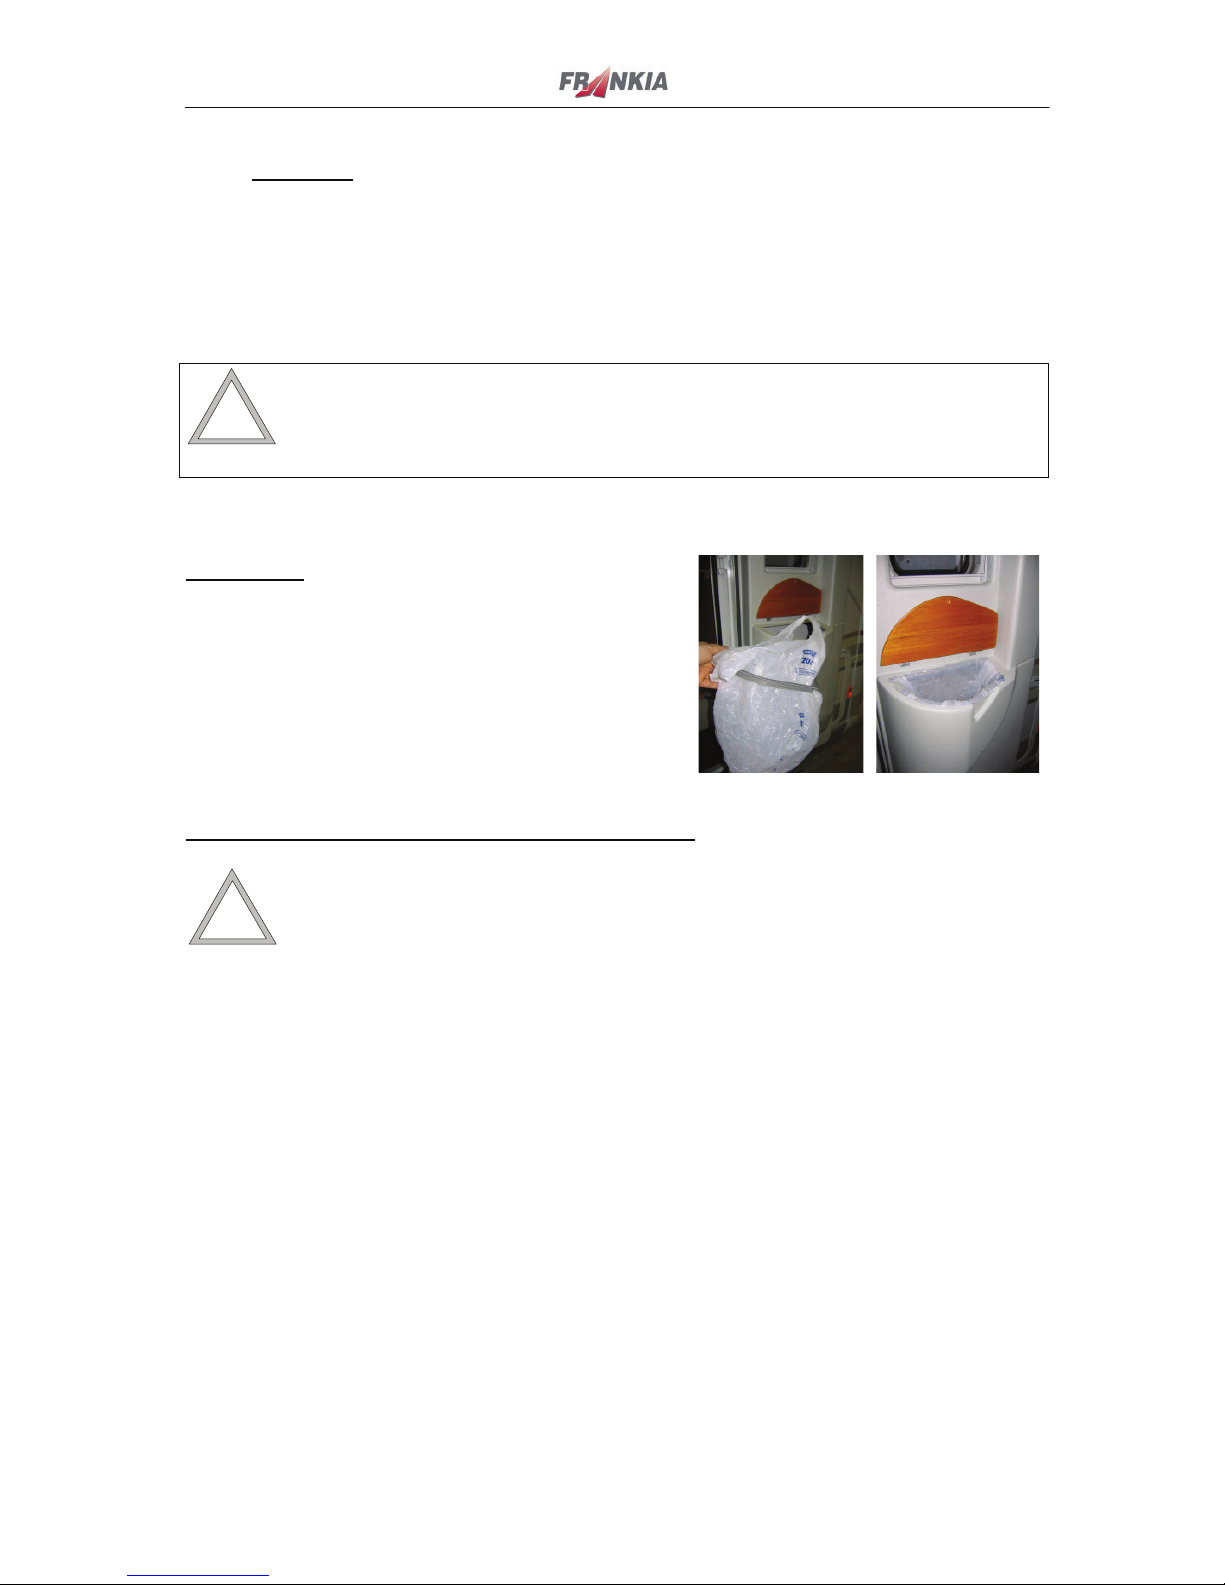
Rubbish bin
The rubbish bin is integrated in the body door.
-
Open up the wooden lid.
-
Put the rubbish bag onto the frame
-
Put the frame with the rubbish bag back into the
rubbish bin.
Please note the following points regarding the airing:
Warning
!
A motorhome contains only a few cubic metres of air, isolated from the outside by
the isolated walls and the rubber seals of the windows.
The air exchange through the flow-through ventilations of roof lids and windows
is not enough to cover the passengers’ need for oxygene.
If the gas hob is also in use, the oxygene will become short very soon and there is
danger of suffocation!
If you do not let enough fresh air into your motorhome, you risk other problems: high
humidity and condensation caused by body transpiration, wet clothes and condensed air from
showering or cooking. To avoid these problems please pay attention to the following points:
-
While you live in the motorhome and the outside temperature is agreeable: Make sure
there is permanent exchange of air by airing the motorhome (opened windows and/or roof
lids).
-
In the winter you should let fresh air into the motorhome several times a day.
-
Keep clear the ventilation slots of the storage spaces.
-
Make sure there is sufficient air exchange also during the night (for example open a roof
lid). The more persons are sleeping in the motorhome, the more airing is needed.
-
An immobilized motorhome also needs airing from time to time to avoid condensation.
Please note that the surplus of humidity will condense on cold things first in your motorhome.
Therefore, please remove the condensation from the windows and if you have a coachbuilt
model then remove the condensation from the front and the corners of the alcove too.
Chapter 3 – Gas system
20
3. GAS SYSTEM
3.1 General
The gas system in your motorhome supplies your refrigerator, your heating with the boiler
and the cooker. These three appliances are connected with the gas bottles.
You can fill your gas system with propane gas and butane gas. Please note that you can use
butane gas only when the temperature is above + 2° C. The operating pressure is 30 mbar.
Before driving to a foreign country please always check if you can use your gas supply there.
In some countries you cannot change your gas bottles when they are empty. You have to refill
them. Therefore, remember that you need an adapter for this.
Further, before driving to a foreign country please check if you can drive with an opened gas
bottle because in some countries it is allowed, for example in Germany, and in other countries
it is not allowed, for example in France.
In Germany a recognized expert must check your gas system every two years.
If the optionally available gas tank is installed in your motorhome, please adhere to the
operating instructions of the respective manufacturer.
3.2 Gas bottles
Please always secure your gas bottles well in your loading space with a strap.
You change a gas bottle as follows:
1. Switch off all gas appliances
2. Close the gas bottle valve
3. Remove the union nut from the pressure reducing valve
ATTENTION ==> left-handed thread
4. Replace the empty gas bottle with the full gas bottle
5. Connect the gas system with the gas bottle
6. Screw on the union nut of the pressure regulator by hand
Please note that the valve always has to be secured with the protecting cap when your gas
bottle isn't connected. Always keep clear the ventilation slots in the bottom of the gas bottle
locker.
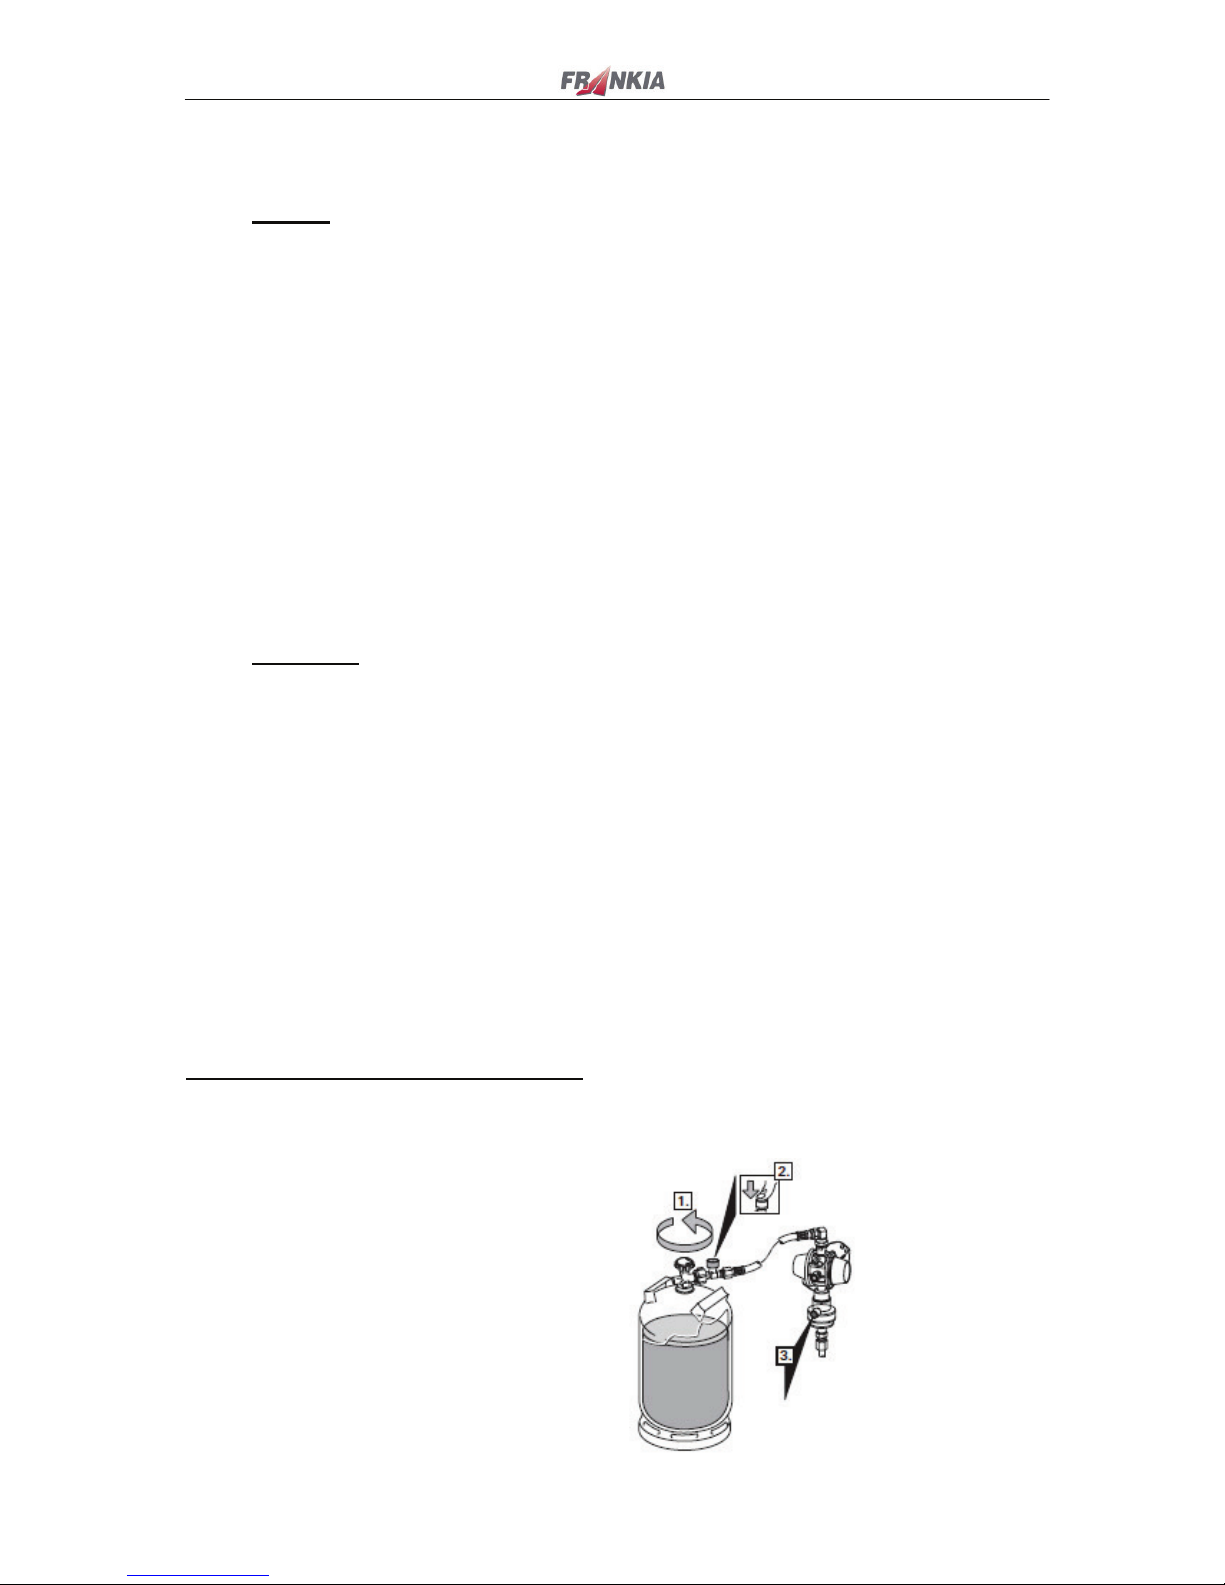
Placing into operation of a new gas bottle
If necessary, please open the remote switch of the gas bottle
1) Open the valve of the bottle
2) Strongly push the hose burst safety
valve (green button) on the high
pressure hose.
3) After an accident or faulty activation,
push the green reset button on the
MonoControl CS (in order to reset the
crash sensor trigger element)
Chapter 3 – Gas system
21
Opening and closing of the gas system
Opening of the gas system
1. Open the connected gas bottle
2. Open the shutoff valve in the lower kitchen cupboard
3. Switch on the appliance
Do not open the shutoff valve of an appliance when you aren't using it.
If an appliance should not work, start the process again in the above-mentioned order.
Closing of the gas system
Please shut off all appliances, the shutoff valve and your gas bottles.
Warning
!
-
The gas bottle space is to be used only for the gas bottles. Please do not use it
as additional storage space for other objects.
-
Always keep clear the flow-through ventilation in the bottom!
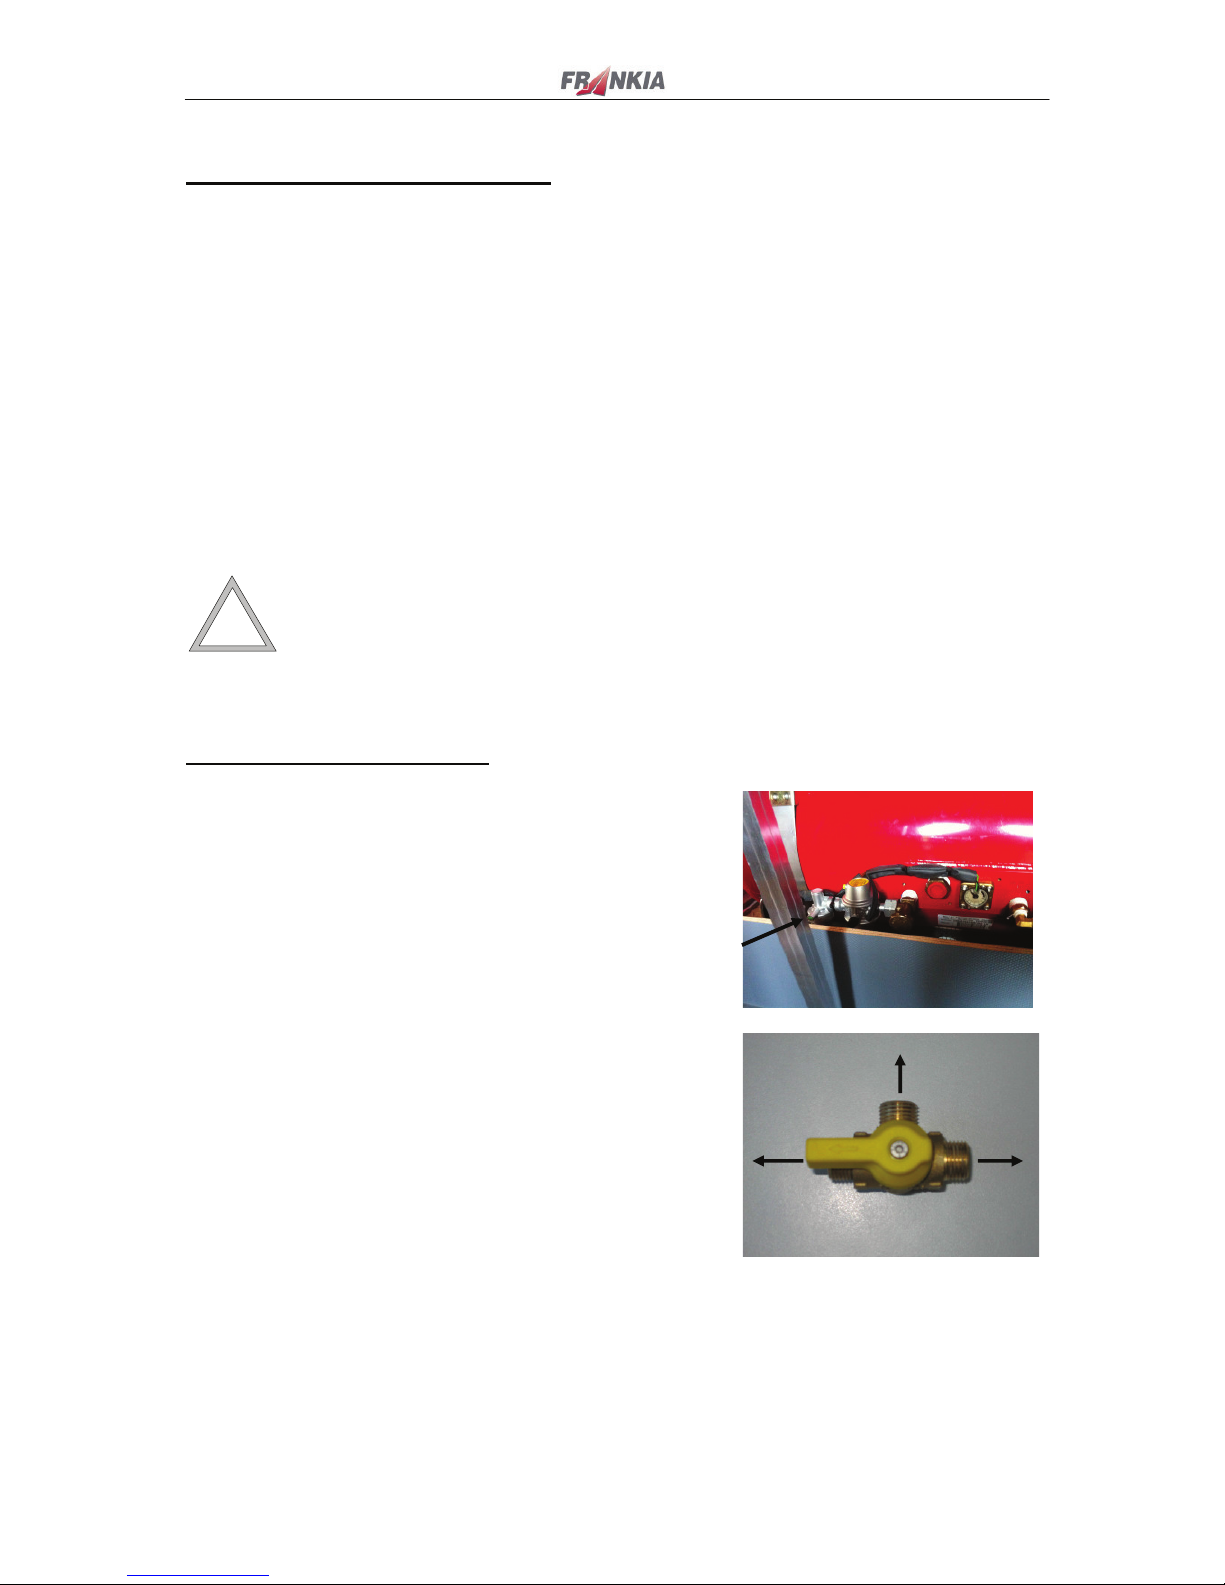
Operating the gas tank (option)
1. Open the tank valve.
2. Strongly push the hose burst safety valve (green
button)
3. After an accident or faulty activation, push the green
reset button on the MonoControl CS (in order to reset
the crash sensor trigger element).
If there are gas bottles installed in addition to the gas tank,
choose the gas source with the 3-way valve.
The 3-way valve is installed nearby the gas distributor in
the kitchen.
Distributor
Gas bottles Gas tank
Chapter 3 – Gas system
22
3.3 Gas hob
Move the gas-valve to the left side and press the button. Hold the button pressed until the gas
ignites. After 10 seconds you can let go of the button.
When you are cooking, please switch your extractor hood ventilator on. Your opened roof lid
in the kitchen and your slightly opened kitchen window will give you optimum airing.
Attention
Do not use your gas hob as heating.
If you are using pots and pans with long handles, please ensure that they do not
get in your way.
Attention
Absolutely make sure to use pots of suitable size. In case of too small pots, flames
can come up from the side of the pots. In no case pots or pans should reach onto
the working surface. This way the heat would spread onto the working surface and
damage it.
3.4 Heating - warm water
Your liquid gas heating is equipped with an electronically controlled blower and an integrated
warm water boiler. This same appliance enables warm air to spread in your complete
motorhome-body while always having 12 l warm water. You only have one appliance for
heating and warm water.
For further information about heating and warm water please refer to chapter 6.
Please thoroughly read the operating instructions from TRUMA before use or maintenance.

Chapter 3 – Gas system
23
3.5 Gas supply
Here you can find information about gas supply in some European countries (without
liability):
Country
Propane Butane BP Gas light Autogas
Belgium Belgian gas bottles are the
same as German bottles.
Bottles can be refilled or
exchanged. No adapter
required.
Campingaz in
bottles is
available in
specialist
shops.
Gas bottle
change at BP
service stations.
Country-wide
service with 397
LPG filling stations
(at service stations),
Europe-adapter
(bayonet fitting)
required.
Denmark The exchange of German
5 kg and 11 kg gas bottles
is possible at many
camping sites. Gas bottles
can be refilled at Kosan
Gas As in Norresundborg
near Alborg, Koge and
Nekso. Sometimes
German bottles are
available from BP Gas.
Campingaz in
bottles is
available in
specialist
shops.
Gas bottle
exchange at BP
service stations,
adapter required.
13 Bilgas filling
stations at
service stations,
Europe,-adapter
(Italien system)
required.
France Only French gas bottles
can be refilled and
exchanged. At service
stations and camping sites
it is possible to lend
French gas bottles (mostly
13 kg) against a deposit
(approx. 35 €), which can
be connected with a EuroSet adapter. Golden
bottles should fit without
an adapter.
Campingaz in
bottles is
available in
specialist
shops.
Country-wide
service with LPG
filling stations at
more than 1800
service stations,
Europe-adapter
(Italian system)
required.
Greece Exchange and refilling of
gas bottles mostly only in
big cities as Athens,
Thessaloniki, Patras and
Monernvassia. It is
recommended to take a
Euro filling set.
Information in Greece
from the ADAC (German
automobile club) hotline
(01) 960 1266.
No refilling of gas
tanks of tourist
vehicles at the 34
LPG gas service
stations.
Connection: Italian
system.

Chapter 3 – Gas system
24
Great Britain British Calorgas bottles
can be connected with an
adapter (Europe set). For
German bottles you can
find filling stations at
Bury St.
Edmunds/Suffolk,
Ellesmere Port/Chesire,
Grangemouth/
Stirlingshire,
Ivybridge/Devon,
Liverpool/Merseyside,
Middlesbrough/Cleveland,
Neath/West Glamorgan,
Southampton/Hamsphire,
Stanford-le-Hope/Essex,
Stoney
Stanton/Leicestershire. In
Scotland: Gleaner Oils in
Milnfield, Elgin.
Campingaz in
bottles is
available in
specialist
shops.
Country-wide
service with LPG
filling stations at
more than 1000
service stations,
especially in urban
agglomerations,
adapter (bayonet)
required.
Italy It is possible to exchange
German bottles on some
Northern Italian camping
sites. Refilling of German
bottles is possible with an
adapter, country-wide net
of exchange and refilling
stations.
Campingaz in
bottles is
available in
specialist
shops.
Country-wide
service of
LPG/autogas
stations at 350
service stations,
especially in
Northern Italy,
adapter (Italian
system) required.
Luxembourg Bottles are the same as
German bottles. Refilling
and exchange possible, no
adapter required.
Campingaz in
bottles is
available in
specialist
shops.
5 LPG filling
stations at service
stations in Southern
Luxembourg.
Netherlands Bottles are the same as
German bottles. Refilling
and exchange possible all
over the country.
Campingaz in
bottles is
available in
specialist
shops.
Exchange of gas
bottles at BP
service stations.
Country-wide
service of LPG
stations at service
stations, adapter
(Spanish system)
required.
Norway It is not possible to refill
foreign gas bottles. At 900
AGA branches you can
lend gas bottles against a
deposit (5 and 11 kg).
These bottles are
compatible with Swedish
and Finnish bottles and
have to be returned within
6 months. AGA adapter
required. Information:
www.aga.no.
Exchange of gas
bottles at BP
service stations,
adapter required.
Country-wide
service of LPG
stations at 39
service stations,
especially in the
South, adapter
(Italian system)
required.

Chapter 3 – Gas system
25
Country
Propane Butane BP Gas light Autogas
Austria Exchange and refilling of
German gas bottles
possible (Austrian bottles
are the same as German
bottles).
Campingaz in
bottles is
available in
specialist
shops.
Exchange of gas
bottles at BP
service stations.
10 autogas filling
stations at service
stations on
motorways, adapter
(Italian system)
required.
Sweden Refilling foreign gas
bottles is not possible. It is
possible to lend gas
bottles from AGA against
a deposit (5 and 11 kg).
These bottles are
compatible with
Norwegian and Finnish
bottles. AGA adapter
required. Information:
www.aga.se.
Exchange of gas
bottles at BP
service stations,
adapter required.
10 LPG filling
stations at service
stations, adapter
(Italian system)
required.
Switzerland Exchange of gas bottles is
not possible, refilling of
German bottles only
exceptionally, adapter
required. It is possible to
lend Swiss bottles with
pressure regulator.
Information: Shell Gas,
phone: 0041/327/587555.
Campingaz in
bottles is
available in
specialist
shops.
7 autogas filling
stations at service
stations, adapter
(Italian system)
could be required.
Spain Sale of liquid gas only in
gas tanks, no refilling of
gas bottles. Possibility to
lend 6 and 12,5 kg gas
bottles against a deposit
from Repsol. List of gas
stations under www.
cepsa.es.
Campingaz in
bottles is
available in
specialist
shops.
Country-wide net is
being set up, with
33 LPG filling
stations at service
stations especially
in Western Spain.
Adapter (Spanish
system) required.
Source: Promobil from January 2007

Chapter 3 – Gas system
26
3.6 Refrigerator
General
Your FRANKIA motorhome has a Dometic refrigerator, which operates with gas, 240 V or
12 V battery. The supply of your refrigerator with 12 V is only possible when you are driving.
You will use the supply with 240 V or gas when you have parked your vehicle. AES
refrigerators choose the energy source automatically.
Attention
The 15 A fuse in the electric block EBL must be used only for a compressor
refrigerator, or for an AES refrigerator, if you wish to operate it with
12 V when the engine is not running.
Please note that you will have air in your gas pipe after long time non-use or after a gas-bottle
change. You can ventilate the pipe by switching your gas hob on for a short time and putting
your thermostat to the highest position. After this your refrigerator should ignite without a
long delay.
Your appliance has all classic functions of a refrigerator:
* conserving foodstuff
* producing ice cubes
* conserving frozen foodstuff
The Dometic operating instruction includes all information and recommendations for your
appliance. Please study and adhere to these instructions carefully.
Some advice for the optimum use of your refrigerator:
Info
* Ice cubes:
* Defrosting:
The best time to make ice cubes is at night because then you will
have ice cubes during the day, even if the refrigerator is working
only with 12 V.
When the cooling element is iced, your refrigerator works less
efficiently. Therefore, we recommend you to defrost your
refrigerator regularly.

Chapter 3 – Gas system
27
Security advice
Warning
!
•
Only authorized experts should carry out changes and repairs of the gas
system! If there are any changes carried out, the test certificate will lose its
validity!
• The gas appliances are designed only for the use with propane, butane or a
mixture of these two gases.
• While you are working with gas (for example filling the tank or changing the
gas bottles) make sure there is no fire or open flame near your motorhome.
Danger of explosion!
• If you have parked your motorhome in a garage, make sure there is no fire or
open flame near the motorhome, because leaking gas can enrich to a
combustible mixture in a closed space!
• The operating pressure of the gas system is 30 mbar. If you use a pressure
regulator with a higher operating pressure, the conical valves will be damaged.
• Each gas appliance has its own shut-off valve (quick fastening valve). Please
always keep this valve closed when the appliance is not used.
• If none of the gas appliances is in use, please shut all the shut-off valves, the
gas bottle remote-control switch and the gas bottle valves (in case you do not
use the gas appliances for a long time).
• Never use the gas hob as heating!
• Carefully read and adhere to the operating instructions of the gas appliances.
Keep these operating instructions in your motorhome so that you can look
something up when you are in doubt.
• Please check regularly if the ventilation and exhaust gas vents of your gas
appliances (heating, refrigerator) are clear of dirt, leaves and snow.
Properties of the used gases:
• They are heavier than the air: leaking gas will sink down to the bottom.
• Under pressure they can be liquefied relatively easily, like this it is possible to increase the
amount of energy stored. One litre of liquid gas makes more than 200 litres of gaseous
“fuel”.
• Mixtures of gas and air are explosive when the gas percentage is approx. 2-10 %.
• A gas leak can be recognized by its smell reminding of garlic.
• If you get liquid gas onto your skin, it can cause frostbite because of the cooling effect.
• They have different boiling points:
• - Propane - 42° Celsius
• - Butane + 1° Celsius
• The boiling point is the temperature at which the liquid “gas” changes to its gaseous
condition. If the ambient temperature is below this point, there will be no more
vaporization.
• This means: If it is cold outside you should use propane because it can vaporize at
temperatures up to approx. - 42° C.

Chapter 3 – Gas system
28
What should you do if there is gas smell?
1. No fire, do not smoke
2. Do not use any electric switches
3. Shut the gas bottle valves
4. Let fresh air into your motorhome
5. Have the gas system checked by a specialist

Chapter 4 – Electric System
29
4. ELECTRIC SYSTEM
4.1 General
Your motorhome has a 240 V alternating current system and a 12 V direct current system.
For FF2 and FF4 motorhomes the connection to the 240 V mains is made with the plug in the
central services compartment, and for all other motorhomes with the cable reel in the central
services compartment, and the plug with the vehicle connecting cable.
Depending on floorplan, you will find the 240 V electric cutout as well as the residual current
protective device either in der wardrobe or in the seating group.
The 12 V supply operates with two batteries - the vehicle battery and the body battery.
All electric appliances which are part of the chassis are supplied from the vehicle battery. The
electric appliances in the living area are supplied from the body battery.
If you are parked and have no possibility to use your 240 V supply, please do not use the
vehicle battery to make sure that it remains charged and that you have no problem starting
your motorhome.
Attention
For your own safety, we recommend to have the 240/12V system checked
regularly by a trained electrician.
Warning
!
On ferries never connect your motorhome to the 240 V mains because an overload
caused by the voltage fluctuations on the ship could damage the electric system.
Central Electrics Unit
The central electrics unit is located in the service compartment.
All electric circuits relevant to the motorhome body are fused here.
A) Additional distrubution device for
chassis (mirror heating, window lift,
rear view camera etc.)
B) Additional distribution device for
body (radio, SAT, central locking
etc.)
C) Circuit amplifier AD 01
(only with Fiat)
D) charger EBL 220-4 with overvoltage
protection
F) Solar charger LR1218 (option)
D
E
C
B
A

Chapter 4 – Electric System
30
Electric cutout:
The electric cutout protects the 240 V connection against overload and short-circuit
(Depending on floorplan, it is located either in the wardrobe or in the seating group).
Residual Current Protective Device (RCD)
The residual current protective device protects you against excessive contact voltage and
furthermore serves to prevent fire in case of a technical defect.
In order to make sure that the RCD functions properly, it has to be checked every month as
well as when changing location. (Press the check key which simulates an error case in order to
ensure proper functioning – see page 35).
Control of the electric cutout:
Switch off the electric cutout
- Switch the rocker switch to „0“
Switch on the electric cutout
- Switch the rocker switch to "1"
Warning
!
-
If the electric cutout is set off, this is in most cases due to a defective
electrical appliance. If necessary please have a specialist check and repair the
appliance.
-
Never use force to hold the rocker switch in position "1"!
Checking the Residual Current Protective Device (RCD)
Checking the RCD
• Press check key
• Rocker switch must jump to "0"
Switch on the RCD
• Switch the rocker switch to "1"

Chapter 4 – Electric System
31
Warning
!
• In most cases, the RCD is activated by faulty insulation or a faulty device.
Should this situation arise, have the system / device checked and repaired by an
expert.
• Never use force to hold the rocker switch in position "1"!
Vehicle electric system 12 V:
If your motorhome is disconnected of the 240 V mains, at least one body battery will ensure
the energy supply of all electric consumers in the living space.
The chassis has its own starter battery which is NOT discharged by the electric consumers of
the living space.
Both batteries are charged automatically
1. by the integrated battery charger when the vehicle is connected to the 240 V mains
2. by the dynamo when the motor is running
3. by the solar module when there is enough sunlight (option)
Protection of the electric system
The main fuses (MIDI fuses) are on the batteries. Please see chapter 4.3 for the position and
function of the additional fuses.
Moreover the electric consumers of the body are protected by fuses in the battery charger.
As leisure battery in FRANKIA motorhomes a battery of the type series MOLL solar is used.
This is a lead-acid battery which is specifically designed for use in hobby and leisure. (see
MOLL technical data sheet)
The main handling/maintenance information can be found herein and in the operating
instructions of the electric block and the Schaudt control and display panel.
Additional information for the proper care and maintenance of the MOLL solar
battery:
How do I know the charge status of the battery?
The easiest way to determine the battery charge status is via the so-called open-circuit
voltage
. The open circuit voltage is the battery voltage in an unoperated state.
Please wait at least 5 hrs after charging before measuring.
In the meantime, the battery should not have been drained considerably.
The measurement of the open circuit voltage can be made either via the control and display
panel, or a separate voltmeter.
open-circuit voltage Charge status Action
12,6 V and higher Fully charged O.K.
12,4 V 75% Recharge
12,2 V 50%
12,0 V 25%
Recharge immediately!
11,8 V 0%

Chapter 4 – Electric System
32
Lower than 11,8V Deeply discharged
The charge status can also be determined via the acid density:
Acid density Charge status
1,26 kg/l and higher Fully charged
>1,22 kg/l Still O.K.
1,22 kg/l and lower Recharge
1,18 kg/l and lower Recharge immediately!
The measurements refer to a temperature of 25° Celsius (as indicated by Moll)
How long can a certain current flow - and how can you calculate this?
First, some basic physical principles:
Electric current is measured in A (Ampere). The voltage in V (volts).
The mathematical product of the two is the electric power W (Watts) = V x A
The nominal voltage of our battery is 12V. On the battery, the capacity is indicated in socalled ampere hours (Ah). In the case of MOLL solar this is the so-called 100-hour capacity.
Example: If a 100 Ah battery is discharged with 1A current, the current can flow 100 hours.
The battery was therefore discharged 100Ah.
At higher load currents, the available capacity decreases. In our example, the 100Ah battery
with a 20A discharge, only about 75 Ah can be drawn.
This corresponds to 3.75 hours.
If we are now connecting a lamp with a rated power of 12W, the discharge current is
calculated as follows: 12W / 12V = 1A.
This means that a current of about 1 A flows. A fully charged battery would last
approximately 100 hours.
What damages the battery?
• Deep discharging below a voltage of 11,8V
• Long idle times in a discharged or partially discharged state.
• Long operating times in very high temperatures
• Fluid level below the lower limit.
• Refilling with unsuitable liquids– only pure distilled water (deionized) may be used.
When operated, the battery should be recharged as soon as possible. The battery should be
fully charged regularly so that the open circuit voltage is 12.6 V and higher.
Care and maintenance of the batteries:
- You should control the battery charge condition regularly, if necessary recharge the
batteries.
- Control the battery-terminal clips: They should be tight and have clean, greased contacts.
- If the motorhome is immobilized for a long time, you should disconnect the batteries from
the earth connection (take off the negative terminal cable). Please make sure that the solar
modules do not supply any current in order to protect the solar regulator from being

Chapter 4 – Electric System
33
damaged. In this case too we recommend to control the battery condition regularly. The
best frost-protection for a battery is a good charge condition.
- During your journeys you should use every possibility to recharge the batteries over the
240 V exterior connection.
Self-discharge of the batteries
Every battery will lose its stocked energy, even without any consumers connected.
This self-discharge shows the age of the battery, old batteries or batteries often discharged and
recharged will discharge faster than new batteries.
Deeply discharged batteries:
If the open circuit voltage falls below 11.8 V, we speak of a deeply discharged battery. When
correctly operated, this condition should actually not occur because a deep discharge
protection is installed in the electrical block. It might not be possible to charge deeply
discharged batteries with the on board charger.
In case the battery is deeply discharged nonetheless, proceed as follows:
1 Charge the battery via the electric block
If this fails:
2 Disconnect battery on both sides and remove
3 Load with suitable external charger
a. either one hour with approx 2A
b. or one hour with approx. 16V
4 Install and connect the battery again
5 Then fully charge the battery via the electrical block
If this measure does not lead to success, there is probably a permanent damage and the battery
must be replaced.
More information can be found in the warning notices and safety regulations for leadacid batteries.
Attention
-
Please avoid discharge voltages of under 11 Volt. Such exhaustive discharges
will considerably shorten the service life of your batteries. If the charge is not
sufficient this can also cause sulphation of the battery, which is difficult to
remove.
-
A fully charged battery is more cold-resistant than an empty battery.
Therefore it is useful to always keep the battery charged in order to prevent it
from freezing.
-
Charge the batteries for at least 12 hours before and after each journey.
-
Before connecting or disconnecting the auxiliary battery, all electrical devices
and lights have to be switched off.
-
The auxiliary battery has to be replaced with the same type, with the same
specification as the originally installed auxiliary battery or as indicated by the
manufacturer.

Chapter 4 – Electric System
34
Solar module (= option)
The solar panel on the vehicle roof transforms light into electric energy. It is made of solar
cells with a high efficiency.
The energy produced by the solar cells is directly entered into the 12 V vehicle electric
system, if there is any energy excess it is used to load the body battery. The solar regulator
distributes the solar energy.
Maintenance and care:
-
The solar cells are behind a hardened glass sheet; the panel is water-tight and
weatherproof. The solar cells should always be clean in order to preserve their
performance. We recommend to clean the glass sheet every four weeks with a damp cloth
and some washing-up liquid.
-
When there is a lot of dust around, the solar panel should be cleaned more often.
-
In the winter please keep the panel free from snow. If the solar cells are covered with
snow, they cannot supply any current.
Instructions for the power supply as per DIN VDE 0100-721:2010-02 directive
When connecting
a) Before connecting the motorhome system with the power supply, please check the
following points:
1) The power supply available at the camp site must be suitable for the elec. system and
devices of the motorhome regarding the measurements of voltage, frequency and
current.
2) The cable and connections must be suitable.
3) The main circuit breaker of the motorhome must be switched off.
A
ttention
The flexible feed line of the motorhome should be unwound completely in
order to avoid damage due to overheating
b) Check cables / pipes, plugs and connections for damage.
c) Plug the flexible feed line into the power socket of the power supply unit provided at the
motorhome pitch.
d) Switch on the main circuit breaker of the motorhome.
e) Check the functioning of the installed Residual Current Protective Device (RCD) by
pressing the check key and switch it back on again.
A
ttention
In cases of doubt or if the power supply is unavailable or faulty after
performing the above procedure, contact the campsite owner.

Chapter 4 – Electric System
35
Disconnecting current supply
Switch off the main circuit breaker of the motorhome and remove the cable from the
power supply unit of the motorhome pitch.
Periodic inspection and testing
The electrical system of the motorhome should be inspected and checked by a competent
electrician at least every three years, and if the motorhome is used frequently, every year.
The electrician shall issue a report on the condition of the system.
Source: DIN VDE 0100-721 Attachment A (normative)
4.2 Current-supply panel
The current supply panel is a real board control. You can read on the instrument panel how
much fresh water and sewage you have as well as your battery charge condition.
All motorhomes are equipped with the DT 220 digital panel
with 12 V main switch. The water pump can be activated on
the basic menu. For this, please press the fresh water tank
button and then turn the pump on or off via the OK button.
The indication „CHARGE!“ shows that you have to charge
the body battery urgently.
Please look at the operating instructions from SCHAUDT if you need further information
about the current-supply panel.
Water pump
Info
The switch for the water pump should only be on when you are living in your
motorhome and the water supply is full. This way you will avoid the pump
running dry or water coming into your loading space or your double floor if
you have a leak anywhere.
The water pump is on but you have no water consumption, this means all valves are closed. If
the pump now goes on and off, this is a sign that you have a leak somewhere. Please switch
the pump off immediately and check all pipes in order to prevent “flooding” of the storage
spaces.
In most models you can find the water distributor next to the fresh water tank. This water
distributor is a direct connection between the pump and the valve. In case of a leak you can
put a dummy plug into the damaged pipe so that you can use all other valves.
We recommend you to check especially the warm water supply every 6 months and to tighten
up the hose clamps.

Chapter 4 – Electric System
36
Display for the fresh water and sewage
Display
100 %
75 %
50 %
25 %
0 %
The digital panel DT 220 shows the fresh water level in steps of 25 %.
The display shows the following:
Display
Fiat / Mercedes
Fresh water tank capacity (l) Sewage tank capacity (l)
100 % approx. 150 approx. 120
75 % approx. 115 approx. 100
50% approx. 75 approx. 60
25% approx. 40 approx. 30
0% 0 0
Display
Iveco
Fresh water tank capacity (l) Sewage tank capacity (l)
100 % approx 300 approx. 260
75 % approx 225 approx. 195
50% approx 150 approx. 130
25% approx 75 approx. 65
0% 0 0
For further information about the control panel please refer to the Schaudt operating manual.

Chapter 4 – Electric System
37
4.3 12 Volt Fuses
12 V fuses on the vehicle battery
(additional distribution of chassis)
The following fuses can be found in the fuse holder (6
circuits) of the Central Electrics Unit (also see pos. A in
photo of chapter 4.1):
A) 20A exterior mirror (A-Class models only)
B) 15A trailer coupling (option)
C) 10A fog lamps (A-Class models only)
D) 5A rear view camera (option)
E) 5A daytime running light (A-Class models only)
F) 2A outside locker door (option)
With Fiat (for line protection) there are fuses for the
additional distribution of the chassis (40A) as well as the
refrigerator (20A). These fuses are located in the battery
compartment below the footwell of the driver’s cab.
With Mercedes, these fuses can be found at the bottom
of the driver’s seat.
With Iveco, these fuses are situated behind the cover on
the left side below the steering wheel.
A
B
D
F
C
E
A B C D E F
A
B
C
D
E
F

Chapter 4 – Electric System
38
Fuses for full air suspension with Iveco
(Option)
As an option, the motorhomes of Premium
Classs are equipped with a 4 chanel full air
suspension.
The fuses for this system are situated in the
engine room on the driver’s side:
A) 2x40 A (with red feed cable)
B) 1x7,5 A (with yellow feed cable)
12 Volt fuses
(additional distribution of body)
The main fuse for the 12 V current supply
of the body (1x60A) and for the additional
distribution of the body (1x100A) as well
as the fuse for the battery sensor line (2A)
are situated next to the body battery.
Summary of fuse circuits on EBL
The fuses for the interior lights are on the electric block EBL 220.
The fuse circuits 1 to 5 are as per the following chart:
Circuit 1
• Consumer load inside of vehicle, passenger side
Circuit 2
• Consumer load inside of vehicle, driver side
Circuit 3
• Not allocated respectively for options
Circuit 4
• Complete lights in ceiling, except for spot between shower and wash room
Circuit 5
• Indirect lights respectively options
B
A

Chapter 4 – Electric System
39
For more detailed information regarding the consumer loads and fuses, please refer to the
operating instructions by Schaudt.
The following fuses are located in the fuse holder
of the central electrics unit (see also item A in
photo chapter 4.1)
A) 10A radio/navigation (option)
B) 10A Sat receiver (option)
C) 10A Dolby Subwoofer (option)
D) 20A heating (option)
E) 15A central locking of body door
F) 30A Drop-down bed (A-Class only)
Attention
A defect fuse will show you a fault in your circuit.
Please have the respective appliances checked.
4.4 Inverter (Option)
• Push the ON button (1) of the inverter.
• The inverter carries out a system check and gives a beep signal when ready for
operation.
• The Automatic (2) LED blinks, this indicates that the inverter is in stand-by mode.
When a load is connected, the inverter switches automatically to operation mode.
• Connect a 240 Volt appliance ( >
25 W e.g. hair dryer etc.) to the 240 Volt socket. The
Automatic (2) and Inverter (3) LED are lighted.
• If the motorhome is connected to 240 Volt, the inverter carries out an automatic power
supply switch and forwards the impressed voltage to the sockets. The Line (4) LED is
lighted.
A B C D E F
A
B
C
D
E
F

Chapter 4 – Electric System
40
(4)LINE-LED
(2)Automatic-LED
(1)ON-OFF button
3) Inverter-LED
4.5 Generator (Option)
The generator creates alternating voltage of 240 Volt and 50 Hz, which can supply the power
requirement of various applications. The max. continuous power output is approx. 2600 Watt.
It is not a problem to connect susceptible appliances like eg. TFT screen or PC because a
inverter unit is making sure that there is a stable frequency.
The generator can be operated very easily via the installed on-board vehicle computer with
lighted display.
For more detailed information, please refer to the provided operating instructions by Dometic.
Regarding TEC29LPG generator (gas operation):
During operation of this generator, make sure to not exceed the statutory maximum flow rate
(1,500 g/h) of the gas system.
The maximum gas demand of the generator at full load is ~ 1,200 g / h. If there is also an
increased gas demand for other areas (e.g. boiler, heating), malfunctions of the operated
devices might occur due to the low operating pressure. In this case, we recommend to reduce
the number of consumers.
Attention
Before switching on the generator, make sure that all consumer loads are switched
off. Otherwise, the voltage peak during the switching on could damage the
connected appliances.

Chapter 5 – Sanitation Facilities
41
5. SANITATION FACILITIES
5.1 Central services unit (option for 640/6400)
Your motorhome has a central services unit. All elements are located together in one storage
compartment (see photo).
-
Open the flap of the central services unit, unroll the fresh water hose.
-
When the fresh water tank is full, the water will run out through the ventilation hose. Roll
up the fresh water hose.
-
In order to avoid return flow from the rolled up hose after filling, put on the supplied
nozzle.
-
Switch on the water pump on the control panel.
-
Turn on one water tap in the warm water position and open it completely to fill the boiler.
-
As soon as the water runs out without bubbles, shut the water tap.
-
Do the same with all other water taps.
-
Open the water taps in the cold water position until the water runs out without bubbles then shut all water taps.
In the winter please do not forget to unroll the water hose completely and let run out all of the
water.
When you do not use your motorhome for some time, especially in the winter months, you
can also uninstall the fresh water hose drum and let the water run out from the hose
completely.
Uninstall the fresh water hose drum:
- Unscrew the screw A
- Tip over the hose drum and take it out
- Take off the adapter on the side
Screw A
Install the fresh water hose drum:
Please perform the above-mentioned steps in reverse order and
do not forget that the holder must be engaged.

Chapter 5 – Sanitation Facilities
42
Warning
!
If you do not use the water pump, please always switch it off with the switch
on the control panel; especially if you leave your motorhome!
Moreover you can fill the fresh water tank with water cans from
the water inlet connection (see photo). For this please take out
the hose from its mountings, take off the plug and fill the water
in.
Draining off the sewage tank:
- Open the flap.
- Take off the lid from the floor passage.
- Carry the grey drain hose to the outside through the floor passage.
- Open the drain slide:
Turn the handle to the back until it shows in the direction of the flow.
- Drain off the tank.
- Shut the drain slide:
Turn back the handle to its initial position.
- Pull the hose inside.
- Close the floor passage with its lid and put the sewage hose into the hole in the lid.
- Close the flap.
Floor passage
Summer lid winter lid
230V - connection through the central service
unit:
- Open the flap.
Roll off the cable from the cable reel and carry it
through the floor passage.
- Close the floor passage with the appropriate lid
(depending on the season: summer/winter).
- Connect the cable to a 240V/50Hz socket.
- On the control panel above the entrance the
indicator lamp for the 240V-charge is lighting.
Warning
!
-
Please always roll off the cable reel completely
- danger of ov
erheating!
- When disconnecting the mains connection, please start with the mains socket in
order to avoid handling a live cable.
- If your mains cable should get caught please do not use force to release it.

Chapter 5 – Sanitation Facilities
43
5.2 Fresh water and sewage
Your motorhome has two tanks and you can check the fluid level on the current-supply panel.
Your fresh water tank of approx. 150 liters is filled from the outside. It is in the heated double
floor and therefore safe from freezing (until approx. - 15° C).
∗ Please always use clean drinking water.
∗ You can put an antiseptic preparation such as Micropur, Certisil or Reomin into your
fresh water tank. In order to avoid corrosion of the filter and the chain in the tank,
please make sure that the used additives are compatible with stainless steel.
∗ Please heat your motorhome well when it is freezing or drain your tanks off.
∗ If you do not use your motorhome for some time (more than 3 days), drain the water
off from the water tank and the hose.
∗ Clean your water hose, fresh water tank and sewage tank regularly.
∗ Your sink unit, shower, washbasin and toilet will be supplied with cold water and
warm water out of the fresh water tank through a pressure pump.
(Max. uninterrupted running time of the pressure pump is approx. 15 minutes).
∗ Your fresh water tank has a drain plug on the bottom.
∗
With motorhomes which have a
reduced fresh water volume, there is a
screw cap in the tank. Turn the cap ¾
counterclockwise – like this the tank
has a volume of approx. 50 liters. If
you keep on turning beyond a
noticeable resistance, the tank will be
emptied. In order to be able to fill the
tank completely with approx. 150
liters, turn the cap clockwise until the
limit stop.
∗ Please only switch your pressure water pump on when your water tank is filled.
Dry-running will destroy the pump.
∗ You will find the two drain valves for the water pipe on the water distributor.
∗ With Truma heatings, the boiler has an automatic anti-freeze valve, which opens when
it is freezing or when you clamp off your body battery. Your water pump will then
start and pump your tank empty through the boiler, but the pump will not stop.
Therefore, please always switch the 12V current supply off when you are not living in
your motorhome.
To drain your boiler manually, first switch off the
switch of the water pump.
Turn the blue switch „A“ by 90° into the shown
position.
To close the valve, turn the switch „A“ again and then
press the button „B“ at the bottom of the freezing
protection.
If the valve is automatically activated due to danger of
freezing, the button “B” comes out.
The temperature inside your motorhome should be at least + 6° C because the valve
will not close when it is colder. If necessary, switch on the heating.
A
B

Chapter 5 – Sanitation Facilities
44
The water will not empty completely through the drain pipe. Therefore, you will find a
drain plug on the bottom of the sewage tank. For emptying the boiler of the Alde
heating, open the yellow discharge valve manually.
Remaining water
If you do not use your motorhome for a long time, we recommend you put it in a
horizontal position.
The sewage tank has a drain plug on the bottom so that you can completely drain off the
water. We recommend to clean the fresh water tank and sewage tank regularly in order to
avoid foul smells.
The sewage tank is frost-protected as long as the double-floor is heated. If you want to
clean the sewage tank, you can reach it through a lid in the floor.
Empty your tanks only at a waste management station.
The warm and cold fresh water is led to the different consuming points through a water
distributor. Each consuming point is supplied directly through the water distributor without
any intermediate connection. In case of a leak in the water system please always control the
consuming point and the water distributor.
The connection points are:
• Water distributor for warm and cold water
• Water pump
• Mains water connection
• Outside shower
• Non-return valves
• Toilet
• Water taps
Drain pipe
Drain plug

Chapter 5 – Sanitation Facilities
45
Drinking water tank FFS – Frankia Fresh water System (option)
As an option your motorhomes is equipped
with a separate closed drinking water
system which consists of a movable 20 ltr
tank, an immersion pump and a separate
water tap installed in the kitchen.
This system is in accordance with the
current (German) drinking water
regulations.
The tank and the hose pipes can easily be taken out for filling and cleaning.
Security advice
Warning
!
Please only use drinking water and no water of poor quality (for example spring
water or water from rivers), like this you can avoid getting germs in your fresh
water tank.
Warning
!
The quality of the water in the fresh water tank depends on the quality of the water
you fill in, where you fill the tank, how you treat the tank, how long the water
stays in the tank, etc.
Germs can develop in the water tank and the water is not suitable for drinking,
preparing meals, etc. any more.
Attention
-
Your motorhome is only frost-protected when the heating is running.
-
Before immobilizing your motorhome please completely drain off your fresh
water system.
-
The fittings in kitchen and bathroom have wear-resistant ceramic inserts. If the
temperature inside the motorhome is below 0° C, the water remaining in the
inserts will freeze. In this case please do not move the water taps until the
fittings have thawed.
-
In order to avoid frost damage both the fresh water and the motorhome must
be warmer than 4° C when you want to fill the fresh water tank. If the ambient
temperature is below 4° C, the motorhome must first be heated.
-
If you have a motorhome with water filler neck (option):
Please do not use a rigid filling tube because it could damage the flexible
connecting line between water filler neck and water tank.
5.3 Wash room
The water can only run off unhindered when the motorhome is parked horizontally.
Please put the plug into the shower floor when you are ready. This way you will avoid getting
unpleasant smells in your motorhome.

Chapter 5 – Sanitation Facilities
46
5.4 Thetford-toilet
The THETFORD-cassette is made out of a high-quality synthetic material. The cassette is
ecologically friendly and easy to use.
The water for your toilet comes from your fresh water tank. You can take the cassette out
through an exterior flap.
We kindly ask you to read the operating instructions for the THETFORD-cassette beforehand.
Attention
It is absolutely necessary to use a sanitary additive.
We recommend „Aqua-Chem blue/ green“ by THETFORD.
5.5 Dejection tank with Thetford C-250 Pump-Out Toilet (= Option)
Motorhomes with dejection tank provide the possibility of pumping
the content of the THETFORD cassette to the 80 l dejection tank.
This tank can be emptied with valve A via flex tube. After each
emptying of the tank, a water hose should be connected to the
tank’s adaptor Gardena B and the inside of the tank should be
flushed thoroughly by means of the installed flushing pipe.
Emptying of dejection tank
•
The drain hose of the dejection tank is led through the under
floor and ends in a pipe which is situated horizontally under
the motorhome floor between two fixtures.
• By flapping down, open the lid A on the fixture at the end of
the pipe
• Hold the pipe B in one hand and turn the swivel element C on
the fixture anticlockwise with the other hand.
• Lower the pipe carefully and pull out the drain hose up to the
disposal station
• Open the valve of the dejection tank
• Empty the dejection tank completely
• Connect the flushing pipe to exterior water supply and
dejection tank
• Turn on the water tap
• Flush for about 2 – 4 minutes
• Turn off the water tap
• Close the valve of the dejection tank
• Disconnect the flushing pipe from exterior water supply and
dejection tank

Chapter 5 – Sanitation Facilities
47
• Lead the drain hose back through the pipe and turn it
upwards.
• Turn the swivel element downward up to the limit stop and
lock with fastening
The dejection tank should be emptied and flushed thoroughly after each trip. It should be
made sure that the tank is completely empty especially if the motorhome is not used during
the winter months.
The rubber seals of the entire system need to be maintained regularly. We recommend to treat
them with THETFORD maintenance spray.
Function chart of dejection tank
For further information please see the included operating manual from THETFORD.
Please only empty at disposal stations.
Att
ention
It is absolutely necessary to use a sanitary additive.
We recommend „Aqua-Chem blue/ green“ by THETFORD.
Attention
Please only use easily decomposable toilet paper.
Regular domestic toilet paper is not suitable.
We recommend „Aqua-Soft“ by THETFORD.

Chapter 6 – Diverse
48
6. DIVERSE
6.1 Electric step
Your motorhome has an electric step at the body door. A-Class motorhomes can be equipped
with an optionally available electric step at the driver’s cab door (standard with Luxury
equipment). The switch is on the inside near the entrance.
In your instrument panel you will see a red control lamp for this step. If you start your engine
and your step is out, it will retract automatically and the red control lamp will go out. If it still
lights red, please have a look to see if your step is out or in.
If your step is in but the red lamp is still lighting, there is a defect in your limit switch. You
can carry on driving but you should visit your FRANKIA dealer as soon as possible.
Attention
It is absolutely necessary to move the step out completely before stepping on it.
Otherwise the mechanics can be damaged!
Maintenance of the electric step
- The step plate should be cleaned regularly in order to preserve the antiskid characteristics
of its surface.
- Please lubricate the joints of your step with oil spray or grease every three months.
Fuse for the electric step
The EBL has an internal fuse for the electric step at the body door which switches off in case
there is an overload, and switches on again after a short time, when it has cooled down.
The fuse for the electric step at the driver’s cab door is located on the starting battery.

Chapter 6 – Diverse
49
6.2 Electric adjustable and heated exterior mirrors
(for A-class motorhomes only)
Adjusting the mirrors:
-
Turn on the ignition / turn the starter key to “Start”
-
Choose the mirror: turn the regulating button to the
left/to the right - the white flash indicates the chosen
side
-
Adjust the mirror with the regulating button;
possible directions: up/down and left/right
-
Manually adjust the additional wide angle mirror.
Heating the mirrors:
Switching on the heating
Start the engine - press the switch - the green indicator
lamp in the switch is lighting
Switching off the heating
Return the switch to its initial position - the indicator
lamp goes out
Info
-
The mirrors can also be adjusted by hand.
-
The mirror heating has a high energy consumption. Therefore it should only be
switched on when needed.
Exterior light
Your motorhome has an exterior light.

Chapter 6 – Diverse
50
6.3 Heating
Heating in the driver’s cab (for A-class models only)
The driver’s cab of your A-class motorhome is heated through
heat-diffusers. You will find on the passenger side a heat-diffuser
and a slide valve.
Position of the slide valve "downwards" or "blue"
= The warm air comes only through the heat diffuser.
Position of the slide valve "upwards" or "red"
= The warm air comes through the heat-diffuser and
through the slots on the instrument panel.
- Like this you will avoid the cold air coming
through the windshield.
The slide valve of the chassis regulating the fresh air supply should be closed, otherwise the warm air
will get outside through the ventilation hose of the
chassis.
Info
- During the journey the slide valve should be in position “downwards” or “blue”,
otherwise the warm air coming from the engine will come out of all heatdiffusers of the motorhome and the windshield will get steamed up because there
is not enough warm air.
During the stay the slide valve should be in position “upwards” or “red” so that
the warm air from the Truma heating can come through the slots on the
instrument panel. Still you should put the slide valve of the chassis on the
instrument panel to interior air circulation, otherwise the warm air from the
Truma heating will get outside.

Chapter 6 – Diverse
51
Warm water heating (standard with Luxury equipment)
Your motorhome has a ALDE warm water heating combined with a engine heat exchanger..
Function of the warm water heating
The control panel is situated below the top storage
lockers in the kitchen. There is a main switch and a
menu button. In standby mode, the temperature, time
etc are indicated. In the settings menu, the temperature
“A”, warm water “B”, electric heating “C” and heating
with gas “D” are regulated. There is also access to the
tool menu. All the functions are explained in the
supplied Alde operating instructions.
The motorhome is equipped with a temperature sensor
near the entrance.
In the wardrobe you can find the water container for the heating.
During operation, the water level should always be between the two
markings (Min., Max.). If necessary fill in some antifreeze into the
water container. In order to avoid overfilling, you should only refill
when the heating is in operation.
A
ttention
Only use antifreeze which is approved for aluminium.
There is a water heater installed in the heating
with a liquid capacity of approx. 8.5 liters fresh
water.
Air can accumulate in the pipes of the water
heating. Please use the bleeding screws on the
radiators in the seating areas, in the kitchen and
in the sleeping area to let off the air.
An automatic bleeding valve “A” is installed
directly on the flow.
The convectors in the rear bed area (depending on floor plan) are
connected with the heating circuit by a so-called bypass and can therefore
be regulated separately with a valve on the convector.
B
A
E
A
A
B
C
D

Chapter 6 – Diverse
52
Info
When you are not using your motorhome, we recommend to
fully remove the water from the boiler.
Turn the switch „A“ by 90° into the shown position.
To close the valve, turn the switch „A“ again and then press
the button „B“ on the bottom of the freeze protection.
If the valve is automatically activated due to danger of
freezing, the button “B” comes out.
6.4 Tables
Table extension
• Lift up the lever on the underside of the table.
• Hold the lever and pull the tabletop to the side until the
stop. The center part of the table now automatically lifts
up until it reaches the level of the tabletop.
• Push the tabletop back until it engages on the center part.
•
For the re-conversion lift up the lever, pull the tabletop back and push it carefully to the
second part of the tabletop. The center part is lowering automatically.
A
B

Chapter 6 – Diverse
53
Moving the table (table on running rail)
•
Pull up the locking lever on the table foot.
• Move the table in the running rail.
• At the requested position, push down the locking lever
on the table foot.
Parking the table in the driver’s cab
•
Release the table from the fastening in the floor.
• Move out the rolls from the table feet.
• With A-class motorhomes you need to swivel the
driver’s seat slightly to the outside so that the backrest
does not touch the steering wheel.
• Move the table to the driver’s cab.
Before driving, the table has to be fixed again in the floor
in order to avoid acceleration of the table in case of an
emergency stop
Fixed table foot, lowerable
The table consists of a fixed lowerable table foot and a continuously movable table top.
By releasing the locks „A“ under the
table, the table top can be moved freely,
e.g. make the access to the cab wider.
When the table top is in the requested
position, fix it by tightening the locks.
Before starting your journey, the table top has to be fixed in order to prevent it from moving
when negotiating bends or full breaking.
A
B

Chapter 6 – Diverse
54
Lower the table by turning
the lever „B“ and pushing
down the table until the
limit stop. Afterwards turn
the lever back to the initial
position in order to fix the
table in the lowered
position.
With floorplans with round seating group, the table has to be lowered first in order to get a
large bed surface or makeshift bed.
6.5 TV cupboard
Pre-wiring
Sat system
Your motorhome is already pre-wired for the connection of a sat system. There are two
cables (1x1,5², white (D+) and 3x0,75², black (reserve)) from the battery charger to a
compartment above the refrigerator or the top locker next to the TV cupboard. Furthermore,
a blue and a brown 1x6² cable have also been installed from the body battery to this
distribution box.
Pre-wiring at battery
charger
Pre-wiring at body battery
Distribution box near TV
cupboard
Solar system
For the connection of a solar
system, the pre-wiring
(2x2,5², black) is made from
the battery charger up to the
back of the operating panel.
Pre-wiring at battery
charger
Pre-wiring at operating
panel

Chapter 6 – Diverse
55
TV cupboard for TFT flatscreen TV
The cabinet at the entrance of your motorhome offers enough
space for a FRANKIA flatscreen TV of up to 22“. Press
down the lever “A” behind the TV in order to move out the
TV. This unlocks the pivot arm.
After use, move the flatscreen TV back to the initial position.
Carefully push the TV until you can hear that the pivot arm is
engaged..
TV cupboard for TFT flatscreen TV
The TV cupboard is designed for the Frankia flatscreen TV 17” and 19”.
•
Before starting your journey please make
sure that the TV cupboard is latched.
• Release the locking lever A by pulling.
• Move the cupboard slowly down and
support it.
• The TV can be adjusted in tilt and angle.
Before storing, make sure that the TV is
back in the original position!
• After use, move the lowered TV cupboard
back up until you can hear it locking back
in place.
Warning
!
- Never pull the locking lever A without holding the cupboard - danger of injury!
- Before starting your journey please always move up the TV cupboard.
- The TV must not be used during the journey.
A
A

Chapter 6 – Diverse
56
TV Cupboard for TFT flat screen TV at the front of the motorhome (=Option)
The TV cupboard is designed for the Frankia flatscreen TVs up to 24”.
• Before starting your journey please make sure that the TV cupboard is latched.
• Release the locking lever at the bottom of the TV-cupboard by pulling
• Move the cupboard slowly down and support it.
Warning
!
• Never pull the locking lever without holding the cupboard - danger of
injury!
• Before starting your journey please always move up the TV cupboard.
• The TV must not be used during the journey.
TV Compartment for TFT flat screen TV in bar seating group (option)
The TV compartment is designed for the Frankia flatscreen TV 17” and 19”.
• Before starting your journey, please make sure that the TV compartment is in the lowest
position.
• Pull up the TV by using the grip hole A.
• By pulling on the sides the TV can be swivelled
• For storing, carefully push down the upper cover until the final position is reached.

Chapter 6 – Diverse
57
6.6 Sun blinds
Sun blind for the windshield and the side-windows (A-class models)
Closing the sun blind: Close the sunblind by pulling down the handle A in the middle
until it has reached the position you wish.
Opening the sun blind: Slowly move the blind upwards
Blackout roller blind for the windshield and the side-windows
A-class models
Attention
The blackout roller blind must not be used as a sunblind when you are driving!
The blind must be attached with the two straps in the upper position before
starting your journey.
Closing the blind:
Release the locks and close the blinds for the side windows until they are attached to the
magnetic rail. Make sure that the blind does not get stuck in the upper guide rail.
Release the locks of the windshield blind and pull the blind down to the instrument panel.
A
A

Chapter 6 – Diverse
58
Spring-loaded latches on the sides lock the blind after approx. 20 cm. This function has been
built in for security reasons, to avoid that the blind comes down during driving, in case you
forgot to attach it. This locking mechanism can be overcome by pressing the actutation A in
the middle of the lower ledge of the blind.
Attention
For security reasons this function must always stay active!
The blind for the front screen can also be used for glare and privacy protection. The blind is
not fixed at the top. Therefore you can e.g. only position it in the lower part of the front screen
to keep people from looking in.
Opening the blind:
Release the counter-lock and draw the blind back / up (for the windscreen blind). Lock the
blind with the closing strap.
Attention
Before driving always completely open the blackout roller blinds for the
windscreen and the side windows, and attach them with the straps.
Electrically operated blackout roller blind for A-Class models (standard with Luxury
equipment)
Attention
The blackout roller blind must not be used as a sunblind when you are driving!
The blind must be in the top position before your start your journey.
Closing:
Hold button A until the blackout blind has reached the dashboard.
A

Chapter 6 – Diverse
59
Opening:
• Hold button B until the blackout blind has reached the top position.
Attention
The blackout blind has to be opened completely before starting your journey.
Blackout roller blind for coachbuilt and low-profile models
Closing the blinds:
Windscreen:
The blackout roller blinds can be found behind the A-pillar
covering. Push up the little slide above the handle. Now you
can close the blinds from the left and the right in the middle of
the windscreen.
Side windows:
The blackout roller blinds for the side windows can be found
behind the covering between the two side windows. Tip the
handle slightly in the direction of the window and then draw the
blinds to the front / to the back until they reach the magnetic
strips.
Opening the blinds:
Windscreen:
Draw back the blinds until they reach the A-pillars. Push the little slide back to the down
position in order to avoid the blinds to close inadvertently when you are driving.
Side windows:
Draw back the blinds until the handle engages on the covering.
A B

Chapter 6 – Diverse
60
Warning
!
- During the journey the blackout roller blinds must always be completely
folded up and locked.
- Never use the blackout roller blinds during the journey.
Attention
If you have a coachbuilt or low-profile model, please first turn the cab seats to the
living area before closing the roller blinds, otherwise the roller blinds could be
damaged.
Exterior insulation mat (= option)
1. Place the insulation mat on the windscreen
and align it with the bottom edge of the
windscreen.
2. Put the sewn-in pocket over the edge of
the opened cab door , afterwards close the
door.
3. Use the Tenax buttons to fix the insulation
mat on the driver and passenger side.
4. By opening the front flap, you can let
light in your motorhome without having
to remove the insulation mat completely.
6.7 Electrically adjustable beds
Electric front bed for A-class models (Standard for HolidayClass, ComfortClass,
ExclusivClass, LuxuryClass and PremiumClass)
If you have ordered an electric front bed, you can lift and lower it with the rocker switch.
•
To lower your electric front bed press the rocker switch
down.
• When the lowest position is reached the engines stop
automatically.
• To lift your electric front bed press the rocker switch up.
• When the highest position is reached the engines stop
automatically.
• If your front bed is in the upper position, please secure it
with the belt.
ATTENTION:
During the adjusting process, lowering and lifting the bed on both sides happens at
different speeds. Therefore, there is no constant velocity and so your bed may go in an

Chapter 6 – Diverse
61
inclined position when you lift or lower it. This has no influence on the operational
safety of your bed. Please always hold the switch pressed until both engines have
reached the top resp. bottom end position and have stopped automatically.
Emergency operation - manual procedure for the front bed is explained in chapter 9.8
Electrically height-adjustable bunk bed (option)
Warning
!
With the switch next to the locker door, the bed height
can be adjusted continuously.
During the adjusting process there may never be a
person on the bed!
With floor plans with bunk beds, the height of the lower bed
can be electrically adjusted.
The bed is secured with a strap. When the belt buckle is
engaged, the operating panel is without current. Press the red
key to open the belt buckle.
The operating panel is in energy saving mode. To activate it,
keep the upper arrow key “A” pressed for approx. 3 seconds.
The direction arrows “C” will light up. You can move the
bed up and down by pressing and keeping pressed the
respective button. To lower the bed, press the lower arrow
key “B”. The bed will move downwards as long as you keep
the key pressed or the lower limit position is reached.
Strap
Panel
Lowering the bed:
• Make sure that no persons are on the bed.
• Open the exterior flaps of your rear garage and make sure that nothing can hinder the bed
to sink to the height that you wish.
• Now you can lower the bed with the switch in the garage to the position that you wish.
Height adjustable bed above seating group
See chapter 1

Chapter 6 – Diverse
62
6.8 Rear garages
Motorbike fixing with sliding ramp for rear garage (= option)
The motorbike holder makes it easier to bring the motorbike into the rear garage but it takes
two people to do this.
Attention
Before you use the motorbike fixing please park your motorhome
horizontally, on dry, flat ground!
Loading of the motorbike:
• If your motorhome is equipped with air-suspension, we
advise to lower the motorhome so that it is easier to
push the motorbike into the rear garage.
• Loosen the hand knob A. The ramp can now be pulled
out of the holding rail.
• Put the lip B at the end of ramp into the receptacle C in
front of the rail on the floor.
• Remove the rearmost holding wedge. For this remove
the securing splint and take out the bolt on the side.
• Swing up the fastening for the handle bar.
• Pull the motorbike into the rear garage via the ramp
until the front wheel lies in the respective support
bracket.
• Swing down the fastening for the handle bar. The claw
can be opened by loosening the knurled screw.
• Put the handle bar in the claw and fasten the knurled
screw.
• For the first use, it might be necessary to displace the
claw by loosening the screws and refastening them in
one of the other holes.
• Put the rear holding wedge again under the rear wheel
of your motorhome and fasten it with bolt and securing
splint.
• In order to securely fasten the motorbike, only use the
lashing rail with the adjustable lashing eyes. Tighten the
included load-securing straps until the motorbike cannot
be moved anymore.
Attention
• Always fasten the motorbike with all 4 load-securing straps in order to secure a
safe transport.
A
B
C

Chapter 6 – Diverse
63
Quad garage (= option)
The quad garage allows you to always take your quad with you in the rear garage.
Attention
Before using the quad garage please park your motorhome horizontally, on
dry, flat ground.
Loading of a quad:
In the rear garage of your motorhome there are aluminium rails which can be used as access
ramps.
* Release the screwing of the two middle rails and pull them out of the garage.
* Put them to the ends of the two fixed outer rails.
* Drive your quad (front wheels) to the access ramps. Press up the switch of the remote
control („OUT“), pull the rope out of the winch and fix it to a sufficiently stable element
(frame) of your quad. Make sure that the rope cannot damage the frame of the exterior
flap or other parts of your motorhome or quad.
* Push the button on the remote control down („IN“) to activate the winch so that the quad
is pulled into the garage until the front wheels touch the installed wheel chocks. Then put
the two rear wheel chocks under the wheels and fasten the quad with the four loadsecuring straps. Push back the two ramps to their initial position and fix them with the
screws.
Attention
Only pull the rope out of the winch as much as necessary.
If the vehicle is pulled in and the rope is fully unwound, this could damage
the winch.
Unloading of a quad:
* Before unloading the quad, take off the
load-securing straps and the rear wheel
chocks.
* Pull out the two middle rails and put
them to the ends of the outer rails.
* Push the button of the remote control
up („OUT“), the rope is rolled off the
winch. The quad is rolling out of the
garage because of the inclination of the
access ramps.
Please make sure that the rope is always taut. If the rope should sag, stop the winch
and push the quad until the rope is taut again.
Warning
!
Please always make sure that there are no persons in the danger zone.
You will find further information about the winch in its operation manual.

Chapter 6 – Diverse
64
6.9 1 Person safety belt system for the side seating
bench (= option)
The 1 person safety belt system from FRANKIA gives
you the possibility to wear a safety belt on the side
seating bench in the driving direction.
• With wider side seating benches, first remove the
front upholstery for the back and seat. (Pic. 2)
• To unlock the rotary seat pull the recessed grip A
located in the side of the bench.
• Pull the seat to the middle of the vehicle up to the
limit stop until you can hear the locking mechanism
clicking into place.
• For the re-conversion, first unlock the seat via the
lateral grip A and then follow the reversed order.
Pic 1: Side seating bench
Pic 2 upholstery removed
Pic 3: Seat with belt
6.10 Back-up aid (option)
Your motorhome is equipped with back-up aid sensor. When you go into reverse, a beep
indicates that the sensor is active. If an obstacle is detected, this is indicated by an acoustic
signal. The frequency of this signal increases the closer you approach the obstacle and turns
into a continuous tone at a distance of approx. 30 cm.

Chapter 6 – Diverse
65
Because a loaded lifting bike carrier would
be viewed as a constant obstacle, the upper
back-up aid sensors can be switched off via
disconnecting switch. This switch is located
in one of the high cupboards in the rear.
(upper back-up aid sensor on / off)
6.11 Diverse
Swivel washroom door
If you have ordered a Frankia motorhome with swivel washroom door, you can join the
washroom with the shower room with some simple movements.
- Turn the rotary lock on the inside of the washroom door.
- You can now swing up the door in the direction of the shower room.
- Turn the rotary lock again so that the door is locked in this position.
You now have a spacious washroom over the complete motorhome width.
For the re-conversion follow the reversed order.
Lowering washbasin
For the Frankia models with lowering washbasin,
the hand washbasin is situated over the toilets.
• Before the use of the toilets, push the washing
stand to the top until the side lockings engage
themselves.
• To lower the washstand, support it and activate
the screw cap A on the bottom side.
• Lower the washstand slowly as far as possible.
You can only open the mirrored cabinet when the washbasin is lowered.
Warning
!
• Only push up the washstand when the washbasin is completely empty.
• During the journey, the washbasin has to be in the lowered position.
Ventilator for refrigerator (Option)
As an option, two ventilators are installed on the backside of the refrigerator. These are
switched on via a thermo switch and help to discharge the warm air.
The switch in the EBL cupboard above the body door deactivates the ventilators.

Chapter 6 – Diverse
66
Outside lockers
• Especially after cleaning with car shampoo or degreaser and also in the wintertime it is
recommended to treat the rubber seals of your outside lockers with a rubber care product,
for example silicone spray, grease pen or anything else similar because like this the rubber
seals will stay supple.
• To open and close the outside lockers first press the flap slightly to the vehicle, hold it
pressed and turn the toggle closure. This will compress the seals, so that they can be
opened or closed more easily.
Spare tyre set
With the spare tyre set you can repair tyre punctures without having to change the tyre.
-
Fill in the tyre sealing gel.
-
Inflate the tyre with the compressor.
You can now drive to the next garage (max. 80 km/h!).
For further information please refer to the enclosed user’s manual.
Chopping boards
The covers for the sink serve multi purposes. When washing up, you can hang one of the sink
covers into the cutout above the sink. This will give you an additional surface to put on your
dishes for drying.

Chapter 7 – Service and Care
67
7. SERVICE AND CARE
Vehicle care:
If your FRANKIA motorhome is taken good care of, it will guarantee a particularly high
comfort of living during your journeys for many years. Therefore we would like to give you
some advice to make sure that your FRANKIA will be a reliable companion for you.
Base vehicle
Info
For the chassis the manufacturer’s operating instructions are authoritative.
Engine-oil filler neck (Fiat and Mercedes)
* In order to refill engine oil, please open the
bonnet.
* On the passenger’s side, yellow stickers with
the inscription „OIL“ mark the positions of the
dipstick and the filler neck.
* For A-class motorhomes a filling aid is
included.
* Screw on the filler neck in the engine
compartment.
* Put in the filling aid.
* Pour suitable engine-oil into the funnel.
Washer fluid filling hose
* In order to refill washer fluid, please open the bonnet.
* The filling hose for the washer fluid can be found on the
passenger’s side, next to the fastening of the bonnet
hinge.
* Take off the blue covering and refill the water.
Interior
Generally the interior of your Frankia does not need any other care than your home.
In general, all synthetic surfaces can be treated with washing-up liquid and water.
Cockpit sprays also give good results. Abrasive or aggressive cleaning agents may not be
used. Any special cleaning agent should be tested first.
Please do not expose the door covering to rain or strong sunlight for a long time, better close
the door under such conditions.
Please note that stones, scouring agents or strong cleansing agents can damage the shower
tray.

Chapter 7 – Service and Care
68
The acrylic glass windows are nearly indestructible - but not completely. Aggressive,
scouring or even caustic cleaning methods will dull your view in the true sense of the word.
Usually mild suds or glass cleaner are sufficient for cleaning the windows.
Exterior
For the exterior washing we recommend clear water, stubborn dirt can usually be removed
with an appropriate shampoo. We recommend special caravan shampoos.
Moreover a number of care products for the long-term conservation of the gelcoat surface are
available (example: „YC Boat Wax“ from „Yachtcare“). Leading GRP manufacturers
recommend to seal all GRP elements with „Yachtcare Boat Wax“ at the beginning of the
season. Put on the wax with a soft cloth and then polish the surface with a clean soft cloth. By
repeating this a second time during the season, you will get the best protection for your GRP
surface. For further information please refer to the user’s manual of the care product.
Please avoid at any rate the use of hard methods, as scouring sponges or rim cleaning agents.
Because of the height of a motorhome, the cleaning of its roof is often neglected. Please keep
in mind that the performance of solar modules is considerably reduced when they are dirty.
Moreover it is of no use to clean your motorhome thoroughly when the first rain rinses the dirt
from the roof and leaves ugly traces on the walls.
There is no problem to walk on the roof with non-slip soft shoes. (Attention: Do not kneel on
the roof, this will leave dents. To avoid dents you can stick aluminium strips onto the roof.)
Please direct your attention also under your motorhome!
Movable add-on parts, for example step, rear supports, retractable bike holders, etc. should be
cleaned and greased about every six months. Under bad conditions (salt, dust, sand) those
parts could possibly need some care more often.
Info
Salt water, from thawing salt, can cause white rust on the galvanized chassis. The
so-called white rust does not present any fault in the quality of the galvanizing. Most
of the time it is only a visual problem. (see also the AL-KO chassis manual)
In order to avoid or remove white rust, AL-KO recommends:
∗ After driving in the winter clean the galvanized surfaces with clear water from
thawing salt (for example with a steam cleaner).
∗ The white rust can be cleaned away from galvanized parts with zinc cleaner.
We recommend cleaning the water hose, the fresh water tank and sewage tank regularly.
The company Certisil offers the product “Certibox” for cleaning, disinfecting and
decalcifying.
We recommend to check especially the warm water supply every 6 months and to tighten up
the hose clamps (red and blue hoses). (see chapter 5.2 Fresh water and sewage).
Especially in the warm season please have a look at the acid level and the water level of your
battery.
In Germany a recognized expert has to check the gas system every two years.

Chapter 7 – Service and Care
69
Every year it is necessary to have a tightness test carried out by your FRANKIA dealer.
Plastic windows / acrylic glass
∗ Clean them with plenty of water, mild soap suds, a soft cloth or a soft sponge.
∗ Please do not use glass cleaner with chemicals, scourers, alcohol and glycerin
additives.
∗ Pay attention to the directions for use on the packing.
∗ Pay attention at car washing installations.
∗ Do not stick stickers on.
The manufacturer SEITZ recommends to use the original Seitz glass cleaner or the acrylic
glass cleaner from the company Frankana.
For the maintenance of the rubber seals Seitz recommends to use talc or petroleum jelly
without additives.
Locker grips of the furniture flaps
∗ To open the flap, hold the locker grip, press the locking button and at the same time open
the flap.
∗ Close the flap and press softly on the grip until you can hear that the lock is engaged.
Metal fittings on furniture doors and lockers
Should the furniture fronts get misaligned over longer time of use, the metal fittings allow to
re-adjust them.
The concealed hinges can be adjusted in three
directions.
• A: O
verlay adjustment to correct the gap.
Turn the screw to the right for a smaller and
to the left for a bigger door overlay.
• B: Depth adjustment. Direct, continuous
depth adjustment via eccentric adjustment.
• C: Height adjustment. With height
adjustable mounting plates it is possible to
adjust the doors to the exact required height.
• D: Direct, continuous height adjustment via
eccentric adjustment.
A
B
D
C

Chapter 7 – Service and Care
70
•
To unhinge the doors or lockers, simply
press the hidden unlocking key E.
Kitchen top and wash basin with marble effect (mineral material)
(= standard for Luxury equipment)
∗ Cleaning every day with a scouring sponge and water will remove even resistant dirt.
∗ Introducing heat, for example hot water or cigarette ashes, will not damage the mineral
material. Simple scouring will remove every trace.
∗ The mineral material is food-safe.
Syphons
The syphons of all drains should be cleaned
from time to time. The syphon under the
kitchen sink is accessible from outside
through the heating compartment. For sinks
out of mineral material (marble effect) a pipe
syphon is installed.
If you notice that water is draining off
slower, dismount the syphon and remove
accumulation.
Screwed syphon of
sink
Pipe syphon for sinks
out of mineral
material
To clean the syphon under the shower,
depending on the floor plan, a panel in the
rear garage or double floor has to be
unscrewed first. Then you can reach the
syphon and unscrew it.
Heating
For the maintenance of the warm air heating, we recommend using the Truma care products.
E

Chapter 8 - Winter
71
8. WINTER
8.1 Winter holiday
Please note the following points for a winter holiday:
-
Please protect the journal bearing of your entrance step with lubricating grease.
-
Please use only propane gas. Down to - 42° C propane gas changes from a liquid
condition into a gaseous condition.
-
The pressure reducer on your gas bottle should be equipped with a TRUMA-Triomatic
system with "Eis-Ex heating" (= option).
-
If the outside temperature is below + 5° C please use the "Eis-Ex heating" to avoid that the
pressure reducer freezes.
-
Please treat your door locks with silicone.
-
Always keep the bottom ventilation of the gas bottle space free. If necessary remove the
snow.
-
Please heat your motorhome well when you leave it so that the water pipes and the sewage
cannot freeze.
-
Do not allow antifreeze into the sewage tank as well as into the system of pipes.
Poisoning risk!!! Antifreeze can attack the pipes and is harmful to the environment.
-
Please protect the ventilation grille of your refrigerator with the winter covering when the
temperature is below 0° C. You will find the installation instructions on the inside of the
covering.
-
If the temperature is above 5° C the covering has to be removed.
-
Depending on use, amount of persons, location, humidity and inside/outside temperature,
make sure to aerate and heat your motorhome sufficiently.
-
The inside of you motorhome is vapour-proof, i.e. the humiditiy created by cooking,
showering and drying wet clothes cannot escape. Therefore, please aerate and heat your
motorhome well at the same time.
-
The surplus of humidity condenses on cold things first in your motorhome. Therefore,
please remove the condensation from the windows and if you have a coachbuilt model,
remove the condensation from the front wall and the corners of the alcove too.
-
You can use your motorhome down to approx. - 15° C when you heat it well.
-
Do not forget the usual winter utensils as snow-shovel, ice scraper, broom, gloves and
defrosting agent.
-
Before starting your journey make sure that the motorhome roof is free from snow and
ice. Large ice plates or amounts of snow sliding down from the roof can endanger other
traffic participants.
Preparation of the living area
Attention
When the fresh water system is filled or when there is any water left in the sewage
tank or in the cesspit tank, the motorhome has to be heated permanently.
As long as the outside temperature does not drop extremely, the water system is
frost-protected.
-
If necessary, especially at night, put the insulation mats on the side windows and the
windscreen.
-
Check the charge condition of the body battery.

Chapter 8 - Winter
72
-
Use the winter coverings for the refrigerator.
-
Close all water drains, water taps and the boiler drain valve.
-
Close all gas shutoff valves.
-
Check the heating and the water system before starting your journey.
-
The first time you let fresh air into your motorhome ensure that you open your cupboards
and loading space too. Like this you will prevent mould.
-
For technical reasons the driver’s cab is not as well insulated as the living area.
-
In the winter months we recommend to have the following things in your motorhome:
shovel and broom to remove snow from the step, the roof and the windows, as well as
snow chains and starting-traction wheel attachments.
-
You need to drive your motorhome differently in snow and ice.
-
Please read the operating instructions of your basic chassis under the chapter "Winter".
Please pay attention to the following points in the winter months:
∗ Conversion of fuel, motor oil, gear oil, antifreeze for the engine water etc.
∗ Tyres / air pressure
∗ Hand brake
∗ Spark plugs
∗ Battery
∗ Door locks
∗ Air entrance slots
8.2 Living in your motorhome in the winter
Attention
-
Do not lay the electric cable on the ground, it could freeze.
-
Please use defrosting agents on alcohol basis for thawing frozen locks. Do not
thaw frozen locks with heated objects or open flames.
-
Do not use defrosting sprays or ice scrapers on the acrylic glass windows!
-
You can thaw frozen drain slides with defrosting spray.
-
Keep the roof free from snow.
-
Always keep the ventilation and exhaust gas vents of the heating, the boiler
and the refrigerator free from snow and ice.
-
Keep the roof lids free from snow and ice.
-
For parking the motorhome please engage the first gear or the reverse gear - for
motorhomes with automatic transmission put the selector lever to "P"; for vehicles with
Sprintshift gear put the lever to "A" or "R".
-
Use wheel chocks to prevent the motorhome from rolling.
-
Keep the solar panel free from snow and ice.
-
In the winter please avoid long cooking because of the condensation.
-
Keep the heating running permanently.
-
If it gets too warm in the motorhome, let fresh air in more often.
-
If necessary switch on the additional heating.
-
Hang wet clothes into the shower.

Chapter 8 - Winter
73
8.3 Immobilization
Your motorhome needs no special care if you do not use it for a long time.
With the following advice you will avoid getting unpleasant smells, mould and frost damage
in your motorhome:
∗ Clean the outside of your motorhome, the fenders and the underbody.
∗
Empty the fresh water tank, the sewage tank and the toilette
tank completely as well as all pipes. For this process please
switch the fuse of the water pump off and open all water valves
and the shower (in the middle position). Remove the drain plug
in the bottom of the fresh water tank and open both the drain
valves of the water pipe. These are situated between the water
tanks.
•
In order to avoid freezing of the pump, it can be dismounted
During winter time, the pump can be removed from the water
circuit via the quick-release fasteners (see photo on the right).
To catch any residual water, use a small bowl.
∗
For motorhomes with washstand plate with marble effect
(standard for Luxury equipment), screw off the siphon and empty
it.
Remount it after that.
∗ Empty and rinse out the sewage tank and the dejection tank (option). Leave open the lids
of the freshwater and sewage tanks so that they can dry completely. This can prevent the
build up of odours.
∗ Uninstall the fresh water hose drum.
∗ Empty the boiler. For this open the antifreeze valve.
∗ Open both drain valves. For this put the levers in vertical position.
∗ To empty the water pump completely let it run dry for a short time.
∗ When your water tank is empty press the toilette flush several times so that the pipe
becomes empty.

Chapter 8 - Winter
74
∗ Rinse your sewage tank and, if you have, the outside shower and the mains water
connection with water.
∗ Blow compressed air through the fresh water hose so that the remaining water will come
out or uninstall the fresh water hose.
∗ Bring your engine to service temperature before immobilizing your motorhome to avoid
damage through condensation in the engine.
∗ Leave the refrigerator slightly open.
∗ Clamp the batteries off.
∗ Leave the cupboards and storage spaces opened.
∗ Put up the upholstery and mattresses.
∗ If you park your motorhome in a garage, leave the roof lids and windows open.
∗ Increase the tyre pressure by 0,5 bar.
∗ Let air into your motorhome and heat it, discharge the batteries and charge them again
every two months.
8.4 Antifreeze
If you do not use your motorhome for a short time especially in the winter or in the
intermediate season, please do not forget that a water pipe break
could occur. A water pipe
break can happen already after two hours depending on the temperature.
If the outside temperature is about 0° C, the water in the pipes can freeze and this can cause a
water pipe break.
Please note the following points:
∗ The heating should always be on
.
∗ Put the thermostat on 5° to 10° C.
∗ Or if you would like to save energy because your motorhome will be parked over a longer
period of time, you can empty your fresh water and sewage tanks and all pipes, the toilet
and the boiler (see 8.3).

Chapter 9 – Faults
75
9. FAULTS
It is not always necessary to contact our after-sales service if you have a problem with your
motorhome. Sometimes you can take remedial action yourself.
If you are unsure, especially with electricity or gas, you should visit our service workshop. It
is for your own security.
Please do not carry out repairs to the electric and gas system yourself.
CAUTION: DANGER!
9.1 Electric system
* 230 V-control light and sockets without energy:
-
Check the electric cutout in the wardrobe
-
Check the fuse of the campsite
* 12 V-interior lighting does not work:
-
Switch on the main switch of the instrument panel
-
Check the charge condition of your body battery
-
Check the 12 V fuses of the battery charger
Lamps Illuminant
Recessed spot light LED – Frankia Article no. 0604210
Recessed spot light, slewable LED – Frankia Article no. 0606320
Spot light Halogen light bulp G4, bright, 10 W
Light in the rear garage T 15 pillar light, 18 W
Reading lamp
LED – Frankia Article no. 0606350
Indirect lighting
LED – Frankia Article no. 0802700/730
Light of the step LED – Frankia Article no. 0802710
Light of the wash room mirror LED – Frankia Article no. 0802720
Light for the glass cabinet LED – Frankia Article no. 0606130/140
Lights of the storage space LED – Frankia Article no. 0606130/140
Lights in shower canopy LED – Frankia Article no. 0802820
Lights in shower friezes LED – Frankia Article no.: 0802730
Illuminants which have blown have to be replaced by the same type of illuminant which have
the same power.
Halogen lamps should only be touched with a cloth. The touching of the glass plunger with
the fingers reduces the delivered brightness and can shorten the length of life of the lamp too.

Chapter 9 – Faults
76
Faulty recessed LED spot light
•
Carefully remove the cover and glass plate
by turning
• Pull out the faulty illuminant
• Insert the new illuminant
• Refix the cover.
Faulty recessed LED spotlight (slewable)
•
Remove the retainer ring and carefully take
off the glass cover
• Pull out the faulty illuminant
• Insert the new illuminant
• Secure the glass cover again with the
retainer ring
Faulty spot light
•
Remove carefully the cover with a screw
driver
• Pull out the faulty illuminant
• Insert the new illuminant
• Plug in the cover
Rear garage lights
•
Remove the frosted glass cover
• Pull out the faulty illuminant of the base
• Insert the new illuminant
• Reclipse the cover
Faulty reading lamp
•
The reading lamp is equipped with LEDs as
illuminant.
• These have an extremely long operating
life. Should there nevertheless be a defect,
the complete lamp has to be exchanged.
Indirect light, lights of step, washroom mirror, glass cabinet, storage space, shower
The indirect lights as well as the lights of step, washroom mirror, shower, glass cabinet and
storage space are equipped with LEDs as illuminant. These have an extremely long operating
life. Should there nevertheless be a defect, the complete lamp has to be exchanged.

Chapter 9 – Faults
77
9.2 Gas system
* A gas appliance does not work:
-
Open the shutoff valve on the gas bottle
-
Open the shutoff valve on the consumption places
-
Fill your gas bottle
-
During frost use propane gas only
-
Check if the pressure reducer works well (frost risk)
-
Use the "Eis-Ex heating" (= option) if the outside temperature is below 5° C
-
If one single appliance does not work please look up the operation process in the
respective chapter
9.3 Fresh water system
* Water comes out from under the motorhome when you fill the fresh water tank:
- When you boiler is heating a little water can come out of the pressure relief valve because
of the water extension.
- Close the antifreeze valve. The temperature in your motorhome has to be above + 6° C,
otherwise the valve will not close.
- Put the drain plug into the fresh water tank
- Check if the hose clamps are properly fixed
- Check the fresh water tank and sewage tank to see if they are over filled
* Taking water out of the tap - only a little water or no water at all comes out:
-
Check the 12 V supply and switch it on
-
Switch the fuse of the water pump on
-
Check the fresh water display
-
Open the drain valve briefly for ventilating the pump when you have refilled the empty
tank
-
If you have taken water from the boiler it will take some minutes until the boiler is filled
again and warm water comes out again
-
If your water tap is opened but the pump does not run, this is probably caused by faults in
the electrics or on the pump
-
The water pump must not run dry, except for a short time
* Leak in your motorhome:
-
First switch the fresh water pump on the current-supply panel off and then search for the
leak
* The water has an aftertaste:
-
Sterilize the fresh water tank and pipe system (takes effect after 6 hours)
-
The water is sterile after you have boiled it for over 10 minutes
-
Drain off your unused water after three days, then clean the tank and refill it
* Faults with the warm water:
-
Check if your heating is on
-
Activate the 12 V supply and the fresh water pump on the current-supply panel
-
Your warm water boiler needs approx. 30 minutes until it is heated up
-
Fill your warm water boiler or ventilate it by opening the warm water tap

Chapter 9 – Faults
78
* If you clamp off the body battery, the antifreeze valve of the boiler will open
inevitably.
9.4 Sewage
* The water does not drain off:
-
Check the filling of your sewage tank on the control panel
-
Search for a possible blockage in the sewage pipe
-
Clean the siphons of the sink unit, the washbasin and the shower
-
The sewage tank is in the double floor and therefore the sewage pipes haven't much
incline, so please check that you have parked your motorhome horizontally.
* Smells in the motorhome:
-
Check if the siphons of the sink unit and the washbasin have a full water-level.
Please put the plugs into the shower floor and into the sink unit when you do not use it.
This way you will avoid getting unpleasant smells in your motorhome.
9.5 Toilet tank
* The toilet tank is too full:
- Make an emergency drain:
Inside - Open the slider of the toilet bottom
Outside - Open the toilet tank door
Now hold the drain plug and open it carefully. Then let it run out into a container.
When the WC is empty close the toilet slider and drain plug and take out the toilet tank.
* Annoying smells:
-
The toilet tank is full, therefore please empty your tank at a waste management station.
The fluid-level indicator shows when you should empty your tank (red area).
-
If it is very hot outside, please use a higher dose of the sanitary concentrate
-
Always close your toilet slider after use
* The toilet flush does not work:
-
Check the filling of your fresh water tank
-
Check the 12 V supply
-
Check the toilet flush fuse in the toilet tank drain
-
If necessary clean your toilet basin manually with a little water
* The toilet slider cannot be opened, you cannot empty the toilet basin:
-
Please open the toilet tank drain door and move the drain plug to the outside. Then you
can level out the excess pressure by slowly opening the lock of the drain plug.
-
Put silicone spray on the seal of the toilet slider
* You cannot take out the toilet tank:
-
Close the slider of the toilet bottom
-
Check if you can freely move the holding bow below the toilet tank
-
Do not take out the toilet tank with force. Come to the service workshop

Chapter 9 – Faults
79
9.6 Heating
* The heating does not ignite:
-
Switch on the 12 V supply on the current-supply panel
-
Open the gas shutoff valve on the consumption place
-
Check your gas supply
-
Check the fuse and electric connections on the heating unit
-
Switch the room thermostat on
-
The red light emitting diode of the reset-key on the control panel of the heating must be
off. If not press the reset-key for a few seconds
-
Repeat the ignition process according to the instructions
* The burner runs but does not warm:
- Set your room thermostat to a sufficient temperature
* The heating goes out while it is running:
- Check your gas supply resp. tank level and your gas bottle
- Check the 12 V supply
- Has there been a deflagration?
In this case please visit your service workshop and have your heating checked before
using it again!
- Wait 3 minutes before you start a new ignition process
- Check your chimney extraction for blockages
9.7 Kitchen appliances
* The refrigerator does not work:
-
Check the operating mode of your refrigerator
-
The refrigerator works without any noise
-
It takes one hour until you can feel if your refrigerator has cooled
-
If you use gas, open the shutoff valve of the consumption place
-
Choose the right operating mode
-
Park your motorhome horizontally
-
The air-extractor vents must be free
-
Take off the air-extractor vent completely when the temperature is above 35° C
-
When the temperature is below 0° C put the winter covering in front of the air-extractor
vent
* The gas hob does not ignite (see also 3.2: gas system)
-
Turn the gas system on and check it
-
Fill or exchange the gas bottle
-
Open the shutoff valve of the consumption place

Chapter 9 – Faults
80
9.8 Electric front bed
In case the motor is defect:
• Turn off the 12 V main switch on the
current-supply panel over the entrance.
• Remove the front bed curtain.
• Release both the fastening screws from
the lifting cylinders and unhinge them.
• Swing up the bed carefully and secure it
with the strap.
• Please visit your FRANKIA dealer
urgently so that he can repair the fault.
9.9 height adjustable bed above seating group
In case the motors are defect:
• Open the upper lateral cupboards in the
rear.
• Remove the metal covers on the driver
and passenger side. At the back of them
the crank handles are attached.
• Put this crank handle into the hexagonal
holes of the motors and wind the bed up
or down synchronously on both sides.
A
ttention
This manual emergency operation has to be carried out by 2 persons!
The winding up or down has to be carried out synchronously in order to avoid
inclination of the bed!
9.10 Vehicle
* The straight-running stability is not good and the motorhome is difficult to steer:
-
Check the tyre inflation pressure
-
Check if the front axle is overloaded
* The engine power is not satisfactory:
-
Carry out the same checks as for the straight-running stability
-
Check if the fuel filter is dirty
-
With a loaded motorhome you need to drive differently as you would drive with a car

Chapter 9 – Faults
81
-
Gradients and strong headwinds reduce the driving performance
* Defect headlight:
- If a headlight does not work, before changing the bulb please check that the contacts are
not oxidised and that the corresponding fuse is working
- Burnt bulbs have to be replaced by bulbs of the same type and the same performance.
- Please only touch the metal part of halogen lamps. Touching the glass part will reduce the
the luminosity and can even reduce the service-life of the lamp.
Outside lighting Illuminant Wattage
Front
Dim light DE-H7 12V 55 W
Long distance light
With position light (with
coachbuilt and low-profile)
FF-H7 12V
T4W 12V
55 W
4 W
Direction indicator light PY21W 12V 21 W
Fog lights H7 12V (coachbuilt, low-profile);
H3 12V (A-Class)
55 W
Position light for A-Class LED – Frankia Article n°.: 0605830
Position light for coachbuilt LED – Frankia Article n°.: 0605760
Rear
Rear end light / brake light P21 12V 5 W
Rear end light R5W 12V 5 W
Back up light P21W 12V 21 W
Direction indicator light PY21W 12V 21 W
Rear fog lam P21W 12V 21 W
Third brake light LED – Frankia Article n°.: 0605750
Side
Side lights LED – Frankia Article n°: 0605820
* Defect headlight (A-class models):
Main and dipped beam headlight
- Take off the rubber cap on the rear end of the headlight
- Push the wire bow down, press it together and lift it up again
- Pull out the bulb and take off the electric plug connector
- Put in a new bulb
- Follow the reverse order for the installation
Parking light
- Take off the rubber cap on the rear end of the headlight
- Take off the electric plug connector
- Turn the socket with the bulb to the left and pull it out
- Turn the bulb to the left and take it out from the socket
- Put in a new bulb
- Follow the reverse order for the installation
Direction indicator lamp
- Take off the electric plug connector
- Turn the socket with the bulb to the left and pull it out
- Turn the bulb to the left and take it out from the socket
- Put in a new bulb
- Follow the reverse order for the installation

Chapter 9 – Faults
82
Daytime running light / position light (with A-Class)
• Maintenance-free lights
• If these do not function, check the 5A fuse in the additional distribution of chassis (at
EBL)
Fog lamps (with A-Class)
• Remove the rubber cap at the rear of the headlight
• Disconnect the electrical connector
• Remove bulp from socket
• Insert new bulp
• If the fog lamps still do not function, check the 10A fuse in the additional distribution
of chassis (at EBL)
* Defect rear light:
- With a screwdriver push up the clamping bow (below the lights)
- Pull out the rear light from its housing and open the lock on the back
- You can now take out the socket with the bulb
- Turn the bulb to the left and take it out from the socket
- Put in a new bulb and close the lock
- When putting the rear light into the bumper, the writing „TOP“ has to be on top and
the clamping bow on the bottom

Chapter 9 – Faults
83
Side positioning lights, third brake lamp, position lights
The side positioning lights, the third brake lamp and the position lights of A-class and
coachbuilt models are equipped with LEDs as illuminant. These have an extremely long
operating life. Should there nevertheless be a defect, the complete lamp has to be exchanged.
Towing
If your motorhome has to be towed and you have an Aclass model on Mercedes chassis, it is absolutely
necessary to use the provided extension piece.
• Turn the original towing lug into the extension piece
as far as possible.
• Open the lid on the front bumper.
Pull the right side of the lid forward until the lock is
released. Then remove the cover to the right
•
With Mercedes turn the extended towing lug / with
Fiat the original towing lug into the respective
threaded hole as far as possible.
1
2

Chapter 9 – Faults
84
Back-up aid
If your motorhome is equipped with back-up aid
sensors and lifting bike carrier, the bikes could be
detected as a constant obstacle. In order to avoid a
continuous tone when reversing, the upper back-up aid
sensors can be switched off. This switch is located in
one of the high cupboards in the rear.
(upper back-up aid sensor on / off)
* Tyre change:
If your motorhome has got a spare wheel (option), please follow these instructions in case of a
flat tyre:
• Engage the first gear or the reverse gear, or in case of automatic transmission choose the
“P” position. Secure the opposite tyre with a choc.
• Taking out the spare tyre.
You can use the jack instead of the wheel spanner in order to lower and lift the wheel
support with the spare wheel more easily (see photo).
• Put the jack to the position intended for the wheel spanner, on the left side of the
spare wheel.
• Uncouple the wheel support and lower it slowly to the ground with the jack
• Follow the reverse order for lifting the wheel support
• Loosen the wheel bolts.
• Position the jack at the respective locating points.
• Lift the motorhome and remove the defective wheel.
• Mount the spare wheel, make sure to tighten the wheel bolts in a criss-cross pattern.
• Store the removed tyre in the spare wheel support.

Chapter 9 – Faults
85
Mounting / replacing aluminium rims
For the mounting of aluminium rims on motorhomes built on IVECO chassis, please proceed
as follows:
•
Dismount the existing outer wheels of the rear axle.
• Mount the tyres from steel rims to 6 hole or 9 hole
aluminium rims. Only use steel valves for the 6 hole or 9
hole aluminium rims.
• Mount a transition adapter ring.
Bolt circle 205/6 on 130/9
Tightening torque of spherical bolts M18x1,5 wheel
nuts : 290-350Nm
•
Remount 6 hole or 9 hole aluminium rims.
6,5 J 16H2 ET 42mm
Sleeves D 28,5mm, height 20mm
Tightening torque of the M14x1,5 screws: 150-160Nm
Warning
!
The inner screws (steel rims plus adapter ring) have to be retightened after
50km.
After another 50km the wheel screws (outer) have to be retightened.
Attention
The German traffic regulations stipulate that an expert has to check the correct
mounting and the vehicle documents have to be adjusted.

Chapter 10 – Important to know
86
10. IMPORTANT TO KNOW
Chassis number, type plate
Body number:
On the type plate on the cross rail in the
engine compartment
Motorhomes on Mercedes chassis
Chassis number in the engine compartment,
in the middle below the front windscreen.
Motorhomes on Fiat chassis
Chassis number inside near the passenger
entrance step under the plastic lid.
For Fiat A-class models the chassis number
can be seen only from the outside, through
the outside locker behind the front axle on the
passenger side.
For Fiat coachbuilt and low-profile models
the chassis number can also be seen on the
lower edge of the front windscreen, from the
outside.
Motorhomes on Iveco chassis
Chassis number on Iveco type plate on the
traverse member in the engine compartment
and behind the front wheel (right side)
stamped on the side member
The points
1 - 6
are the seating positions authorized during the
journey (no. 3 – 6 depending on floor plan).
1 2
3
4
5
6

Chapter 11 – FRANKIA Dealers
87
11. FRANKIA DEALERS
11.1 Germany
Postleitzone 1
Berger Reisemobile
Wolfgang Berger
Lahnstr. 6
12055 Berlin
Tel.: 0 30 / 6 86 42 70
Fax: 0 30 / 6 86 47 66
www.rv-berger.de
info@rv-berger.de
Postleitzone 2
Reisemobile
Jörg Lundberg
Ohechaussee 214
22848 Norderstedt
Tel.: 0 40 / 5 23 23 34
Fax: 0 40 / 5 23 23 47
info@lundberg.de
www.lundberg.de
Tank Reisemobile
Stiller Winkel 2
24229 Dänischenhagen
Tel.: 0 43 49 / 91 94 10
Fax: 0 43 49 / 91 94 11
rene.tank@tank-reisemobile.de
www.tank-reisemobile.de
Reicartech Reisemobil- und
Caravan-Technik Zeven GmbH
Kivinanstr. 40-44
27404 Zeven
Tel.: 0 42 81 / 95 42 37
Fax: 0 42 81 / 95 42 38
ulrich.goetsche@reicartech.de
www.reicartech.de
Autohaus Puhl
Inh. Hans-Joachim Puhl
Alter Weg 35
27478 Cuxhaven
Tel.: 0 47 22 / 6 84
Fax: 0 47 22 / 23 74
info@autohaus-puhl.de
www.autohaus-puhl.de
Postleitzone 3
MPG Mobilpartner Gütersloh oHG
Carl-Zeiss-Str. 36
33334 Gütersloh
Tel.: 0 52 41 / 7 32 63
Fax: 0 52 41 / 68 77 52
info@mpg-mobilpartner.de
www.mpg-mobilpartner.de
Kuno’s Mobile Freizeit
GmbH & Co. KG
Frankfurter Str. 6 A
34295 Edermünde
Tel.: 0 56 65 / 4 06 48 30
Fax: 0 56 65 / 4 06 48 39
info@kuno-mobil.de
www.kuno-mobil.de
Brock Reisemobile UG
Inh. Viola Lehmann
Weddeler Str. 7
38104 Braunschweig
Tel.: 0 53 1 / 36 01 38
Fax: 0 53 1 / 36 01 91
info@brock-reisemobile.de
www.brock-reisemobile.de

Chapter 11 – FRANKIA Dealers
88
Postleitzone 4
Caravan Center Bocholt
Harderhook 29
46395 Bocholt/ Industriepark
Tel.: 0 28 71 / 26 00 00
Fax: 0 28 71 / 26 00 02
c.thielkes@caravan-center-bocholt.de
www.caravan-center-bocholt.de
Postleitzone 5
Reisemobile Jumpertz
Gewerbegebiet Süd-Ost
Rudolf-Diesel-Str. 8
52428 Jülich
Tel.: 0 24 61 / 5 20 21
Fax: 0 24 61 / 42 34
jumpertz.reisemobile@t-online.de
www.reisemobile-jumpertz.de
Postleitzone 6
Reisemobile Euch e.K.
Ludwigshafener Str. 22
67126 Hochdorf-Assenheim
Tel.: 0 62 31 / 75 79
Fax: 0 62 31 / 32 27
info@euch.de
www.euch.de
Postleitzone 7
MyCaravan GmbH
In der Röte 10
71120 Grafenau
Tel.: 0 70 33 / 69 98 93
Fax: 0 70 33 / 53 45 21
info@mycaravan.de
www.mycaravan.de
Postleitzone 8
Reiseservice Nothaft
Inh. Simone Schönfeld
Moosfeldstr. 2a
82275 Emmering
Tel.: 0 81 41 / 52 49 69
Fax: 0 81 41 / 4 16 03
info@reiseservice-nothaft.de
www.reiseservice-nothaft.de
Caravan Company Wolfrum
Inh. Jörg Wolfrum
Kapellenweg 31
83064 Raubling
Tel.: 0 80 35 / 9 67 96 36
Fax: 0 80 35 / 9 67 96 37
info@caravan-company.com
www.caravan-company.com
Wohnmobile-Wohnwagen
Wiedemann GmbH
Dieselstr. 1
Gewerbegebiet Lanzen
87448 Waltenhofen/Kempten
Tel.: 0 83 03 / 92 36 23
Fax: 0 83 03 / 92 34 74
wiedemann.waltenhofen@t-online.de
www.frankia-wiedemann.de

Chapter 11 – FRANKIA Dealers
89
Postleitzone 9
Berger Fahrzeuge Neumarkt GmbH
Fritz-Berger-Str. 1
92318 Neumarkt
Tel.: 0 91 81 / 33 04 60
Fax: 0 91 81 / 33 04 65
info@berger-fahrzeuge.de
www.berger-fahrzeuge.de
Caravaning & Fahrzeugcenter Coburg
Inh. Daniel Gebhardt
Industrie Str. 3
96487 Dörfles-Esbach
Tel.: 0 95 61 / 85 37 887
Fax: 0 95 61 / 85 37 847
info@reisemobile-coburg.de
www.reisemobile-coburg.de
Autohaus Imhof GmbH
Wohnwagen-Reisemobile
Schwarze Brücke 2
97737 Gemünden-Wernfeld
Tel.: 0 93 51 / 36 62
Fax: 0 93 51 / 44 97
info@autohaus-imhof.de
www.autohaus-imhof.de
As of: 08.07.2013

Chapter 11 – FRANKIA Dealers
90
11.2 Europe
Belgium
Caravanes A.J.D.
Ateliers J. Delbrouck S.A.
Route du Condroz, 205
B – 4120 Rotheux (Liége)
Tel.: 00 32 – 43 71 32 37
Fax: 00 32 – 43 71 20 46
info@ajd.be
www.ajd.be
Bronn Technics bvba
Kapelanielaan 18 c
B – 9140 Temse
Tel.: 00 32 – 37 71 29 36
Fax: 00 32 – 37 11 26 84
info@bronntechnics.com
www.bronntechnics.com
Denmark
Niels Braendekilde APS
Jels-Krydset
Haderslevvej 59
DK – 6630 Rodding
Tel.: 00 45 – 74 55 21 01
Fax: 00 45 – 74 55 21 59
mail@nbc-jels.dk
www.nbc-jels.dk
France
Thellier Camping Cars
1 Avenue de l’Avenir
F - 14650 Carpiquet
Tel.: 00 33 – 2 31 80 06 00
Fax: 00 33 – 2 31 80 06 00
Toulouse espace Loisirs – Loisireo
36 Poute de Paris
F – 31130 Fenouillet
Tel. : 00 33 – 5 62 10 76 65
Fax : 00 33 – 5 61 70 94 85
Bordeaux Camping-Cars - Loisireo
RN 10 - Sortie 32.1
106 Avenue de l'Aquitaine
F - 33560 Ste Eulalie
Tel.: 00 33 – 5 56 38 12 22
Fax: 00 33 – 5 56 38 03 71
Bonjour Caravaning
ZA de l'Hermitière
F - 35230 Orgeres
Tel.: 00 33 – 2 99 42 39 39
Fax: 00 33 – 2 99 42 35 79
Sud Loire Caravanes 37
ZI de Martigny
F - 37210 Parcay Meslay
Tel.: 00 33 – 2 47 29 01 11
Fax: 00 33 – 2 47 29 13 89
Socodim
90 Route des Sorinières
F – 44400 Reze
Tel.: 00 33 – 2 51 70 27 87
Fax: 00 33 – 2 51 70 11 39
Sud Loire Caravanes
Route d'Angers - Cholet
F – 49750 Beaulieu sur Layon
Tel.: 00 33 – 2 41 78 31 66
Fax: 00 33 – 2 41 78 63 12
Caravan’or
104 avenue de la République - BP 70143
F – 59471 Seclin
Tel.: 00 33 – 3 20 90 24 84
Fax: 00 33 – 3 20 90 36 84
Eurocar 69
251-255 Route de Grenoble
F – 69800 St Priest
Tel.: 00 33 – 4 78 90 37 72
Fax: 00 33 – 4 78 90 37 05

Chapter 11 – FRANKIA Dealers
91
Alpes Evasion
RN 201 - 244 Rue de la Dent-du-Chat
F – 73420 Voglans-Chambery
Tel.: 00 33 – 4 79 61 23 83
Niort Evasion
BP 1092 - Souche
F – 79010 Niort Cedex
Tel.: 00 33 – 5 49 33 41 76
Fax: 00 33 – 5 49 33 45 69
Great Britain
SMC Motorhomes
Northern Road
NG24 ET Notts Newark
Tel.: 00 44 – 13 36 67 07 60
Fax: 00 44 – 13 36 67 07 67
alistair@smcsales.co.uk
www.smcmotorhomes.co.uk
Ireland
Pat Horan Motors Ltd
The Camper Centre of Ireland
Aglish, Borrisokane,
Co. Tipperary
Tel.: 00 353 – 6 72 11 23
Fax: 00 353 – 6 72 11 88
pathoranmotors@gmail.com
www.pathoranmotors.com
Italy
Ottocaravan Rho s.n.c.
Via Lainate, 94
I-20017 Rho (MI)
Tel.: 00 39 – 02 930 67 97
Fax: 00 39 – 02 935 03 511
info@ottocaravan.it
www.ottocaravan.it
Punto Camper
di Giorgio De Tisi
Via Nazionale 6
I-38060 Besenello (TN)
Tel.: 00 39 – 04 64 82 00 44
Fax: 00 39 – 04 64 82 11 70
info@puntocamper.it
www.puntocamper.it
Netherlands
Rossèl Recreatie BV
Industrieweg 8 a
Ind. Terr. De Wiers / Straat 72
NL – 3433 NL Nieuwegein
Tel.: 00 31 – 30 – 6 06 13 14
Fax: 00 31 – 30 – 6 06 53 34
rossel@rosselrecreatie.nl
www.rosselrecreatie.nl
Norway
Bobil Hansen
Røaveien 63
N-2160 Vormsund
Tel.: 00 47 – 63 90 17 90
Fax: 00 47 – 63 90 17 91
post@bobilhansen.no
www.bobilhansen.no
OK Caravan
Rødmyrlia 1
N-3740 Skien
Tel.: 00 47 – 35 53 85 55
Fax: 00 47 – 35 53 85 56
odd@okcaravan.no
www.okcaravan.no
Bobil Vest AS
Brynalii 74
N-5700 Voss
Tel.: 00 47 – 95 96 30 04
post@bobilvest.com
www.bobilvest.com

Chapter 11 – FRANKIA Dealers
92
BobilSenteret Namsos AS
Axel Sellægs veg 2
N-7805 Namsos
Tel.: 00 47 – 74 20 91 00
Fax: 00 47 – 74 20 91 01
kveli@pilote.no
www.bobilnamsos.no
Austria
Gebetsroither Unternehmensgruppe
Gebetsroitherweg 1
A – 8940 Weißenbach/Liezen
Tel.: 00 43 – 36 12 – 26 30 00
Fax: 00 43 – 36 12 – 26 30 04
office@gebetsroither.com
www.gebetsroither.com
bei Wien
Franz GmbH
F.N. der Fa. Gebetsroither Handels-GmbH
Industriestr. 15
A-2201 Hagenbrunn
Tel:. 00 43 – 22 – 46 47 11
Fax: 00 43 – 22 – 46 47 11 15
in Timelkam
Straß 22
A-4850 Timelkam-Vöcklabruck
Tel:. 00 43 – 76 72 – 7 77 98
Fax: 00 43 – 76 72 – 7 77 98
gebetsroither-moser@aon.at
www.gebetsroither.com
WOMO Jandl GmbH
Betriebsgebiet Nord 1
A-3300 Stift Ardagger
Tel.: 00 43 – 74 79 200 02
Fax: 00 43 – 74 79 200 02
office@wo-mo.at
www.wo-mo.at
Sweden
Forsbergs
Fritidscenter AB
Bjuv
Gnejsgatan 10
SE – 267 90 Bjuv
Tel.: 00 46 – 42 83 08 0
Fax: 00 46 – 42 83 08 8
infobjuv@forsbergsfritidscenter.se
www.forsbergsfritidscenter.se
Forsbergs
Fritidscenter AB
Solbacken
SE – 51198 Hyssna
Tel.: 00 46 – 3 20 – 3 05 50
Fax: 00 46 – 3 20 – 3 05 55
info@forsbergsfritidscenter.se
www.forsbergsfritidscenter.se
Stockholms Husbil &Husvagnscenter AB
Saluvagen 3 – Box 7014
SE – 187 11 Taby
Tel.: 00 46 – 87 56 67 60
Fax: 00 46 – 87 56 44 64
info@shhc.se
www.shhc.se
Switzerland
Garage du Château SA
Serge & Michel Richard
Route du Château 37-39
CH-2520 La Neuville
Tel: 00 41 – 32 751 21 90
serge@garagechateau.ch
www.garagechateau.ch

Chapter 11 – FRANKIA Dealers
93
Spain
M3 Caravaning S.A.
Ctra. N-340 (Vilafranca-Barcelona)
Km 1214,8
E-08720 Vilafranca – Barcelona
Tel.: 00 34 – 9 38 18 25 00
Fax: 00 34 – 9 38 18 13 31
Camping Center Madrid
CtraN-I (de Burgos) km 24
E-28700 San Sebastian de los Reyes
Tel.: 00 34 / 9 38 18 25 00
Fax: 00 34 / 9 38 18 13 31
Czech Republic /Slovakia
Toptrade
Palackého 500
CZ – 76901 Holesov
Tel.: 00 42 – 07 77 – 77 74 00
Fax: 00 42 – 05 73 – 39 40 92
vavra@toptrade.cz
holesov@toptrade.cz
As of: 08.07.2013
 Loading...