

Page 1
Installation and operating instructions Montage- en bedrijfsinstructies
Notice de montage et de mise en service MontaĪ i instrukcja obsáugi
Istruzioni per il montaggio e l’uso
EA-Nr.: 7612982151170
FAR-Best.-Nr.: 5207 10 00
ZAQUA091
Franke Aquarotter GmbH
18-15.100b-Exp.fm/14.11.11
Page 2

................................................................ 3
Please refer to the graphics in the German
Installation and Operating Instructions.
................................................................ 14
Les graphiques sont disponibles dans la notice
de montage et de mise en service allemande.
................................................................ 25
Per le grafiche fare riferimento alle Istruzioni
per il montaggio e l’uso in tedesco.
................................................................ 36
De tekeningen kunt u in de Duitse montage- en
bedrijfsinstructies vinden.
................................................................ 47
Prosimy przyjąü grafikĊ z niemieckiej instrukcji
montaĪu i obsáugi.
Inhaltsverzeichnis03.fm
2
Page 3

0English
Remote Control
Please refer to the graphics in the German Installation and Operating Instructions.
0 Table of Contents
1. Warranty . . . . . . . . . . . . . . . . . . . . . . . . . . . . . . . . . . . . . . . . . . . . 3
2. Important Notes . . . . . . . . . . . . . . . . . . . . . . . . . . . . . . . . . . . . . . 3
Description of Product
3. Application . . . . . . . . . . . . . . . . . . . . . . . . . . . . . . . . . . . . . . . . . . 3
4. Dimensions. . . . . . . . . . . . . . . . . . . . . . . . . . . . . . . . . . . . . . . . . . 3
5. User Interface . . . . . . . . . . . . . . . . . . . . . . . . . . . . . . . . . . . . . . . . 4
Installation, Function and Commissioning
6. Switching the Mode . . . . . . . . . . . . . . . . . . . . . . . . . . . . . . . . . . . 4
7. Activating the Fitting for Remote Control . . . . . . . . . . . . . . . . . . . 4
8. Functions . . . . . . . . . . . . . . . . . . . . . . . . . . . . . . . . . . . . . . . . . . . 5
9. Wash Fitting Settings . . . . . . . . . . . . . . . . . . . . . . . . . . . . . . . . . . 6
10. Urinal Settings . . . . . . . . . . . . . . . . . . . . . . . . . . . . . . . . . . . . . . . 11
11. Additional Settings for the Urinal . . . . . . . . . . . . . . . . . . . . . . . . . 12
Maintenance
12. Changing the Battery . . . . . . . . . . . . . . . . . . . . . . . . . . . . . . . . . . 13
1. Warranty
Liability is accepted according to the General Terms and Conditions of Business and
Supply.
2. Important Notes
Give these instructions to the operator.
All rights reserved to make technical alterations.
3. Application
Remote control for wash fittings and flush valves from the PROTRONIC,
PROTRONIC-C and PROTRONIC-S series for setting the function parameters.
4. Dimensions
18-15.100b-GB.fm
3
Page 4

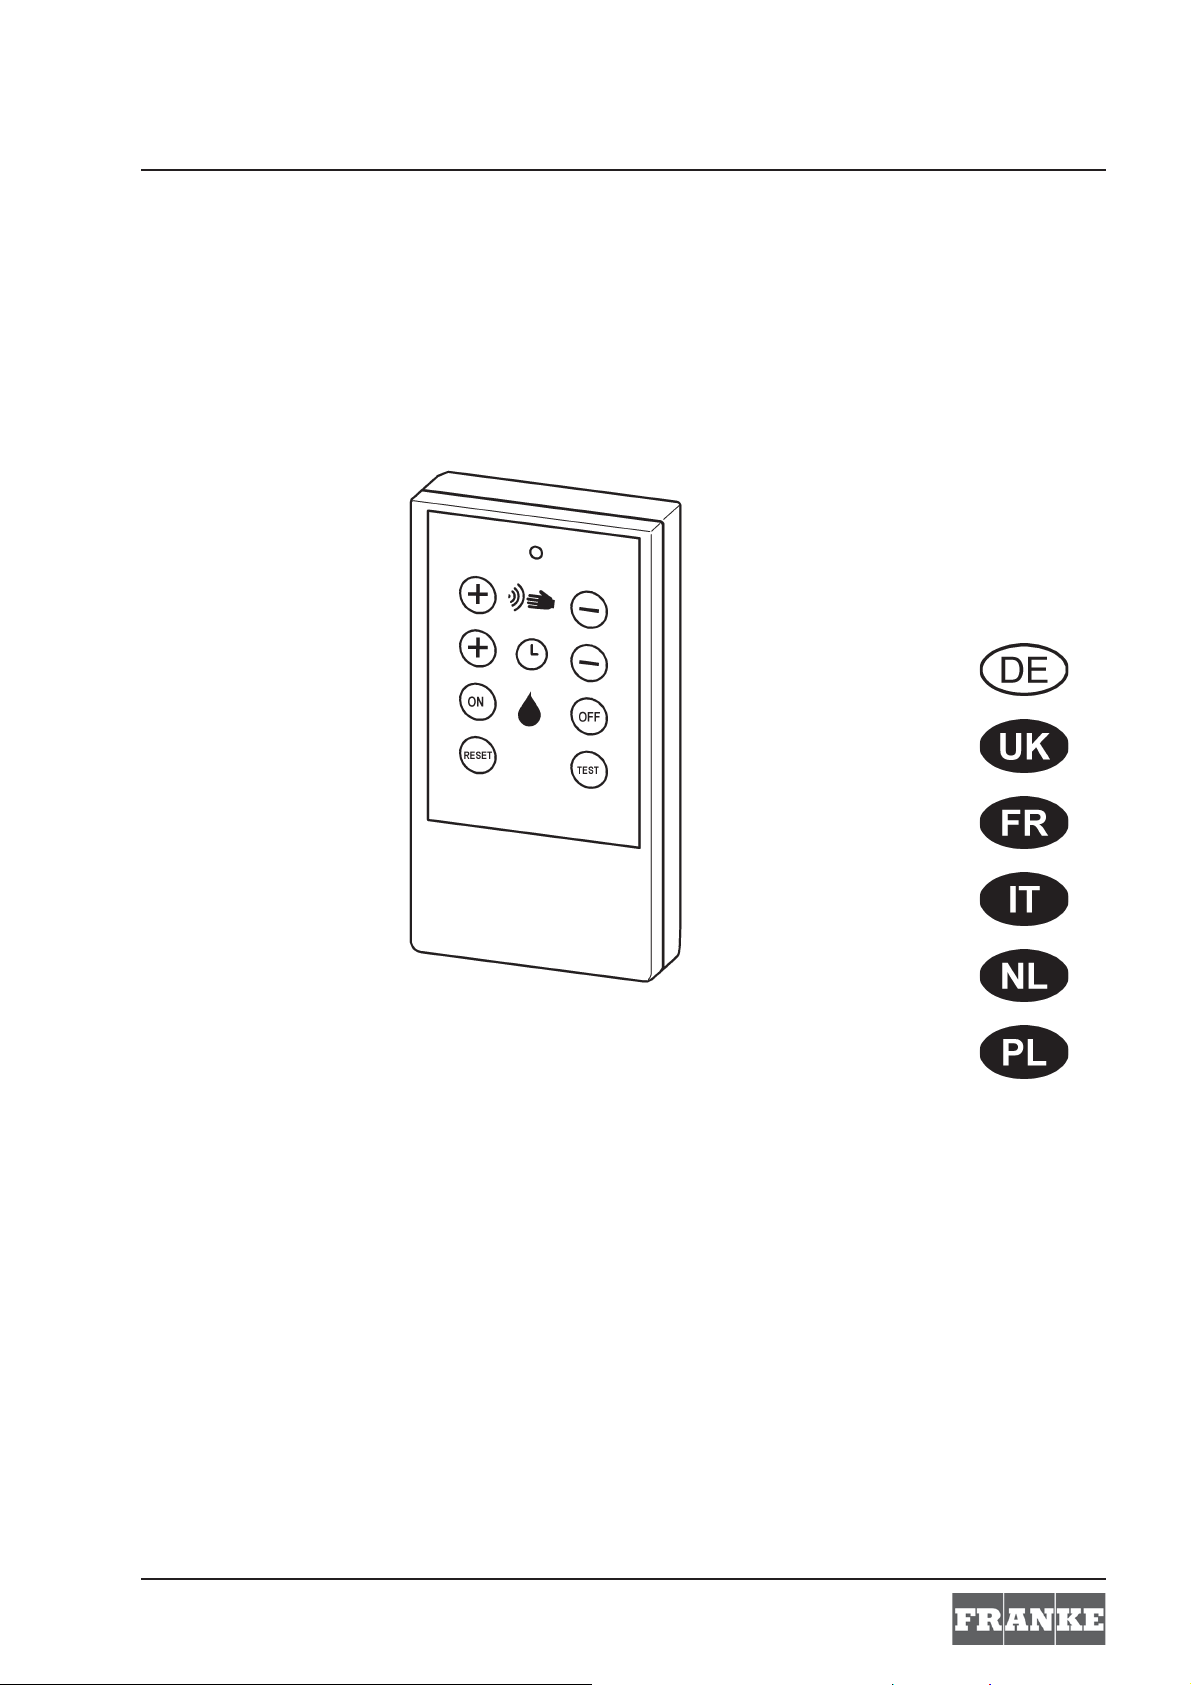
5. User Interface
A: Range
B: Time
C: Functions:
On: Continuous operation mode
Off: Cleaning mode
D: Additional combination keys
E: LED
"Auto repeat" function
When the keys for setting the range and the extension of flow duration are
continually pressed, the command is sent again at regular intervals.
6. Switching the Mode
Both fittings operate with different baud rates. The remote control must be set on the
fitting before activation.
6.1
Press and hold the "Reset" key.
6.2
Press the "–" ( ) key.
•Protronic-C
The LED in the remote control flashes twice slowly.
•Protronic-S
The LED in the remote control flashes 4 times slowly.
7. Activating the Fitting for Remote Control
☞ Perform the following with the remote activation before each adjustment:
• Washbasin fittings: Start the flow of water by approaching the sensor of the fitting.
• Urinal fittings: Place an object at the sensor for at least 5 s.
7.1
Direct the remote control (b) vertically towards the sensor (d) of the fitting at the
specified distance (a) and press a key.
☞ When the key is pressed properly, the LED (c) in the remote control flashes 2 times.
If the LED does not flash, this means either that the keys were not pressed properly
or that the battery in the remote control is empty (see Chapter 12.).
4
18-15.100b-GB.fm
Page 5

7.2
When a remote command is accepted, the LED in the sensor (d) of the fitting
flashes. The flashing intervals are described in the relevant functional description.
• Each time that a remote command is accepted, the fitting remains in remote
control mode for a further 60 s.
• This does not apply for cleaning switch-off.
☞ A flashing LED in the sensor (d) of the fitting is only visible at sensor height for the
Protronic-S series of products.
8. Functions
Test mode = Simulation without water
The sensor range can be tested and adjusted without flowing water in test mode.
8.1
Press the TEST key.
• Test mode is activated.
• The LED in the sensor of the fitting flashes:
– 4 × short, break, 4 × short
• The LED in the sensor of the fitting lights up when a hand or object is detected.
8.2
Set the sensor range.
8.3
Exit the adjustment mode.
• Press the TEST key.
or wait
•60s.
• The LED in the sensor of the fitting flashes:
– 4 × short, break, 4 × short
• The LED in the sensor of the fitting is off.
Setting the sensor range
8.4
Use the + and – ( ) keys to adjust the sensor range in individual steps.
• The LED in the sensor of the fitting flashes:
– 4 × short for each adjustment by one step
– 2 x long when the respective end setting is reached
18-15.100b-GB.fm
5
Page 6

Adjusting the extension of the flow duration/flushing time
8.5
Use the + and – ( ) keys to adjust the extension of the flow duration in individual
steps.
• The LED in the sensor of the fitting flashes:
– 4 × short for each adjustment by one step
– 2 x long when the respective end setting is reached
Switching off the fitting
8.6
Press the OFF key.
• The fitting is now permanently closed.
• The LED in the sensor of the fitting flashes:
– 3 × short, break, 3 × short, break, ...
8.7
Press the OFF key again.
• The fitting is ready for operation.
9. Wash Fitting Settings
Setting for continual flow
A time of 3.5 min or 11 min can be set for continual flow (preset; 3.5 min).
9.1
Press the TEST key.
9.2
Press the OFF key repeatedly until the required mode has been set.
• The time for the continual flow is set.
• The LED in the sensor of the fitting flashes:
– 2 × long = 11 min continual flow time
– 4 × short = 3.5 min continual flow time
9.3
Exit the adjustment mode.
• Press the TEST key.
or wait
•60s.
☞ This function is not available for products manufactured before 01/06/2003. Press
the corresponding keys to switch the fitting off.
18-15.100b-GB.fm
6
Page 7

Activating continual flow (thermal disinfection)
9.4
Turn the mixing lever of the fitting to the hot water limit stop (see instructions for the
fitting).
9.5
Press the ON key.
• Continual flow is started (solenoid valve opens).
☞ Continuous flow can be prematurely terminated by pressing the ON key again.
Setting the automatic safety shut-off.
When an object is continually detected for 60 s, the water flow stops automatically.
9.6
Press and hold the RESET key.
9.7
Press the OFF key within 2 s.
• The LED in the sensor of the fitting flashes.
9.8
Use the + and – ( ) keys to adjust the switch-off time in individual steps.
• The LED in the sensor of the fitting flashes:
– 4 × short for each adjustment up to 60 s by one step (5 s)
– 8 × short for each adjustment from 60 s by one step (60 s)
– 2 x long when the respective end setting is reached
9.9
Wait 10 s.
• The system exits from the setting mode.
Activating/deactivating Hygiene flushing
The "Hygiene flushing" function ensures water hygiene when the fitting is not used
for a prolonged period. The water flow is activated for 1-10 minutes after 1 or 3 days
of non-use.
Caution!
• When the “Hygiene Flushing” function is used, it must be ensured that the water
can flow away properly.
• When the "Hygiene flushing" function is to be used for both the hot and cold water
lines, the mixer lever of the fitting should be in the mixed-water position.
☞ This function is not available for products manufactured before 1 May, 2002. When
the respective keys are pressed, the LED in the sensor of the fitting does not flash.
☞ Important!
Protronic-C: When the "Hygiene flushing" function is active, this state is indicated by
an LED within 3 minutes after the voltage supply is interrupted and reconnected for
object detection.
☞ The factory default setting for "Hygiene Flushing" is deactivated.
18-15.100b-GB.fm
7
Page 8

9.10
Press and hold the RESET key.
9.11
Press the OFF key within 2 s.
• The LED in the sensor of the fitting flashes:
9.12
Press the OFF key within 10 s.
• The LED in the sensor of the fitting flashes:
– 4 x short: The "Hygiene flushing" function is switched on.
– 2 × long: The "Hygiene flushing" function is switched off.
9.13
Wait 10 s.
• The system exits from the setting mode.
Setting the Flushing Interval
9.14
Press the TEST key.
9.15
Press the ON key repeatedly until the required mode has been set.
• The LED in the sensor of the fitting flashes:
Protronic-C Protronic-S
– 2 × long = 1 day – 1 × short = 8 h
– 4 × short = 3 days – 2 × short = 24 h
– 3 × short = 36 h
– 4 × short = 72 h
☞ The flushing interval is
factory-set to 3 days.
9.16
Exit the adjustment mode.
• Press the TEST key.
or wait
•60s.
Setting the flushing duration – Protronic-C
The flushing duration can be set at one minute intervals from 1 to 10 minutes.
☞ The flushing interval is
factory-set to 24 h.
☞ The flushing duration is factory-set to 5 minutes.
9.17
Press the TEST key.
9.18
Use the + and – ( ) keys to adjust the flushing duration in individual steps.
• The LED in the sensor of the fitting flashes:
– 4 × short = adjustment by one stage (approx. 1 minute).
– 2 × long = end setting reached
9.19
Exit the adjustment mode.
• Press the TEST key.
or wait
•60s.
8
18-15.100b-GB.fm
Page 9

Setting the flushing duration – Protronic-S
The flushing duration can be set as follows:
–10 sec
–30 sec
–60 sec
–2 min
–3 min
–5 min
–7 min
–10 min
☞ The flushing duration is factory-set to 10 seconds.
9.20
Press the TEST key.
9.21
Use the + and – ( ) keys to adjust the flushing duration in individual steps.
• The LED in the sensor of the fitting flashes:
– 4 × short = Adjust by one step.
– 2 × long = End setting reached.
9.22
Exit the adjustment mode.
• Press the TEST key.
or wait
•60s.
Resetting default factory settings (Reset)
9.23
Press the RESET key for at least 3 s.
• The system now has the factory settings again.
• The LED in the sensor of the fitting flashes:
– 4 × short, 3 × short, 3 x short
18-15.100b-GB.fm
9
Page 10

Changing the type of detection (only for on-wall washbasin battery installation)
Water flow should start/stop when a hand approaches/moves away from the
sensor (3-7 cm).
9.24
Press the " –" key repeatedly until the minimum sensor range is reached.
• The LED in the sensor of the fitting flashes:
– 2 × long
9.25
Press the " –" key again.
• The type of detection has been changed. The sensor only responds when a hand
approaches/moves away. The sensor range can be adjusted (see Chapter 8.).
• The LED in the sensor of the fitting flashes:
– 5 × long, 3 × short
The water flow should start/stop when a person approaches/moves away from
the sensor (>35 cm).
9.26
Press the " +" key repeatedly until the maximum sensor range is reached.
• The LED in the sensor of the fitting flashes:
– 2 × long
9.27
Press the " +" key again.
• The type of detection has been changed. The sensor only responds when a
person approaches/moves away. The sensor range can be adjusted
(see Chapter 8.).
• The LED in the sensor of the fitting flashes:
– 5 × long, 3 × short
Resetting the type of detection to the default factory setting
9.28
Press the RESET key.
10
18-15.100b-GB.fm
Page 11

10. Urinal Settings
Triggering flushing
10.1
Press the ON key.
• Water flows for the set flushing duration.
Switching 24 hour flushing on/off
☞ Flushing is factory-set to 24 hours.
10.2
Press and hold the RESET key.
10.3
Press the OFF key within 2 s.
• The LED in the sensor of the fitting flashes:
– 4 x short: 24 hour flushing is switched on.
– 2 × long: 24 hour flushing is switched off.
10.4
Wait 10 s.
• The system exits from the setting mode.
Resetting default factory settings (Reset)
10.5
Press the RESET key for at least 3 s.
• The system now has the factory settings again.
• The LED in the sensor of the fitting flashes:
– 4 × short, 1 × long, 3 × short, 1 × long, 3 × short
• The fitting is in Power-Up mode:
– Any detected objects are displayed by the LED in the sensor of the fitting.
– There is no minimum pause time, i.e. flushing always occurs after the end of
detection independent of the time spent in the detection area.
☞ Power-Up mode is stopped automatically after 3 minutes. The fitting is now in
normal operation.
18-15.100b-GB.fm
11
Page 12

11. Additional Settings for the Urinal
☞
These additional settings only apply for concealed urinal fittings operating on the mains.
Switching preliminary flushing on/off
☞ The preliminary flushing is switched off at the factory.
11.1
Press and hold the TEST key.
11.2
Press the ON key within 2 s.
• The LED in the sensor of the fitting flashes:
– 4 x short: Preliminary flushing is switched on.
– 2 × long: Preliminary flushing is switched off.
11.3
Exit the adjustment mode.
• Press the TEST key.
or wait
•60s.
Switching intermediate flushing on/off
☞ Intermediate flushing is factory-set to ON.
11.4
Press and hold the TEST key.
11.5
Press the OFF key within 2 s.
• The LED in the sensor of the fitting flashes:
– 4 x short: Intermediate flushing is switched on.
– 2 × long: Intermediate flushing is switched off.
11.6
Exit the adjustment mode.
• Press the TEST key.
or wait
•60s.
Setting the minimum retention time
☞ The minimum retention time is factory-set to 7 s.
11.7
Press and hold the TEST key.
11.8
Use the + and – ( ) keys to adjust the minimum retention time in individual steps.
• The LED in the sensor of the fitting flashes:
– 4 × short for each adjustment by one step (approx. 1 s)
– 2 x long when the respective end setting is reached
11.9
Exit the adjustment mode.
• Press the TEST key.
or wait
•60s.
12
18-15.100b-GB.fm
Page 13

12. Changing the Battery
12.1
Unscrew the screw (a) on the rear side of the remote control.
12.2
Remove the cover (b).
12.3
Remove the batteries (c).
12.4
Check and clean the contacts. Replace the batteries if required.
☞ Use Micro 1.5V (AAA, LR03) type batteries and ensure correct polarity.
12.5
Reassemble in the reverse order.
☞ Disposal information:
Batteries must be disposed of in a proper manner!
18-15.100b-GB.fm
13
 Loading...