

Page 1
Istruzioni per l’uso e l’installazione
Forno da incasso multifunzione con 6 programmi 1
Instructions for use and installation
Built-in multi-function oven with 6 cooking modes 11
Mode d'emploi et installation
Four à encastrer multifonction 6 programmes 21
Gebrauchs- und Installationsanweisungen
Einbau-Multifunktionsofen mit 6 Programmen 31
Instrucciones para el uso y la instalación
Horno empotrable multifunción con 6 programas 43
Instruções para o uso e a instalação
Forno de encaixar multifuncional com 6 programas 53
Οδηγίες χρήσης και εγκατάστασης
Πολυλειτουργικός εντοιχιζόμενος φούρνος με 6 προγράμματα 63
Kullanım ve montaj talimatları
6 programlı çok fonksiyonlu ankastre fırın 73
Руководство по установке и эксплуатации
Встраиваемая многофункциональная духовка с 6 программами 83
Instrukcje obsługi i instalacji
Wielofunkcyjny piekarnik do zabudowy z 6 programami 93
Instruciuni de utilizare i instalare
Cuptor încorporabil multifuncional cu 6 programe 103
CM 65 M
CR 66 M
CS 66 M
SG 62 M
SM 62 M
SM 66 M
TL 62 M
TL 65 M
IT
GB
FR
DE
ES
PT
GR
TR
RU
RU
RO
Page 2
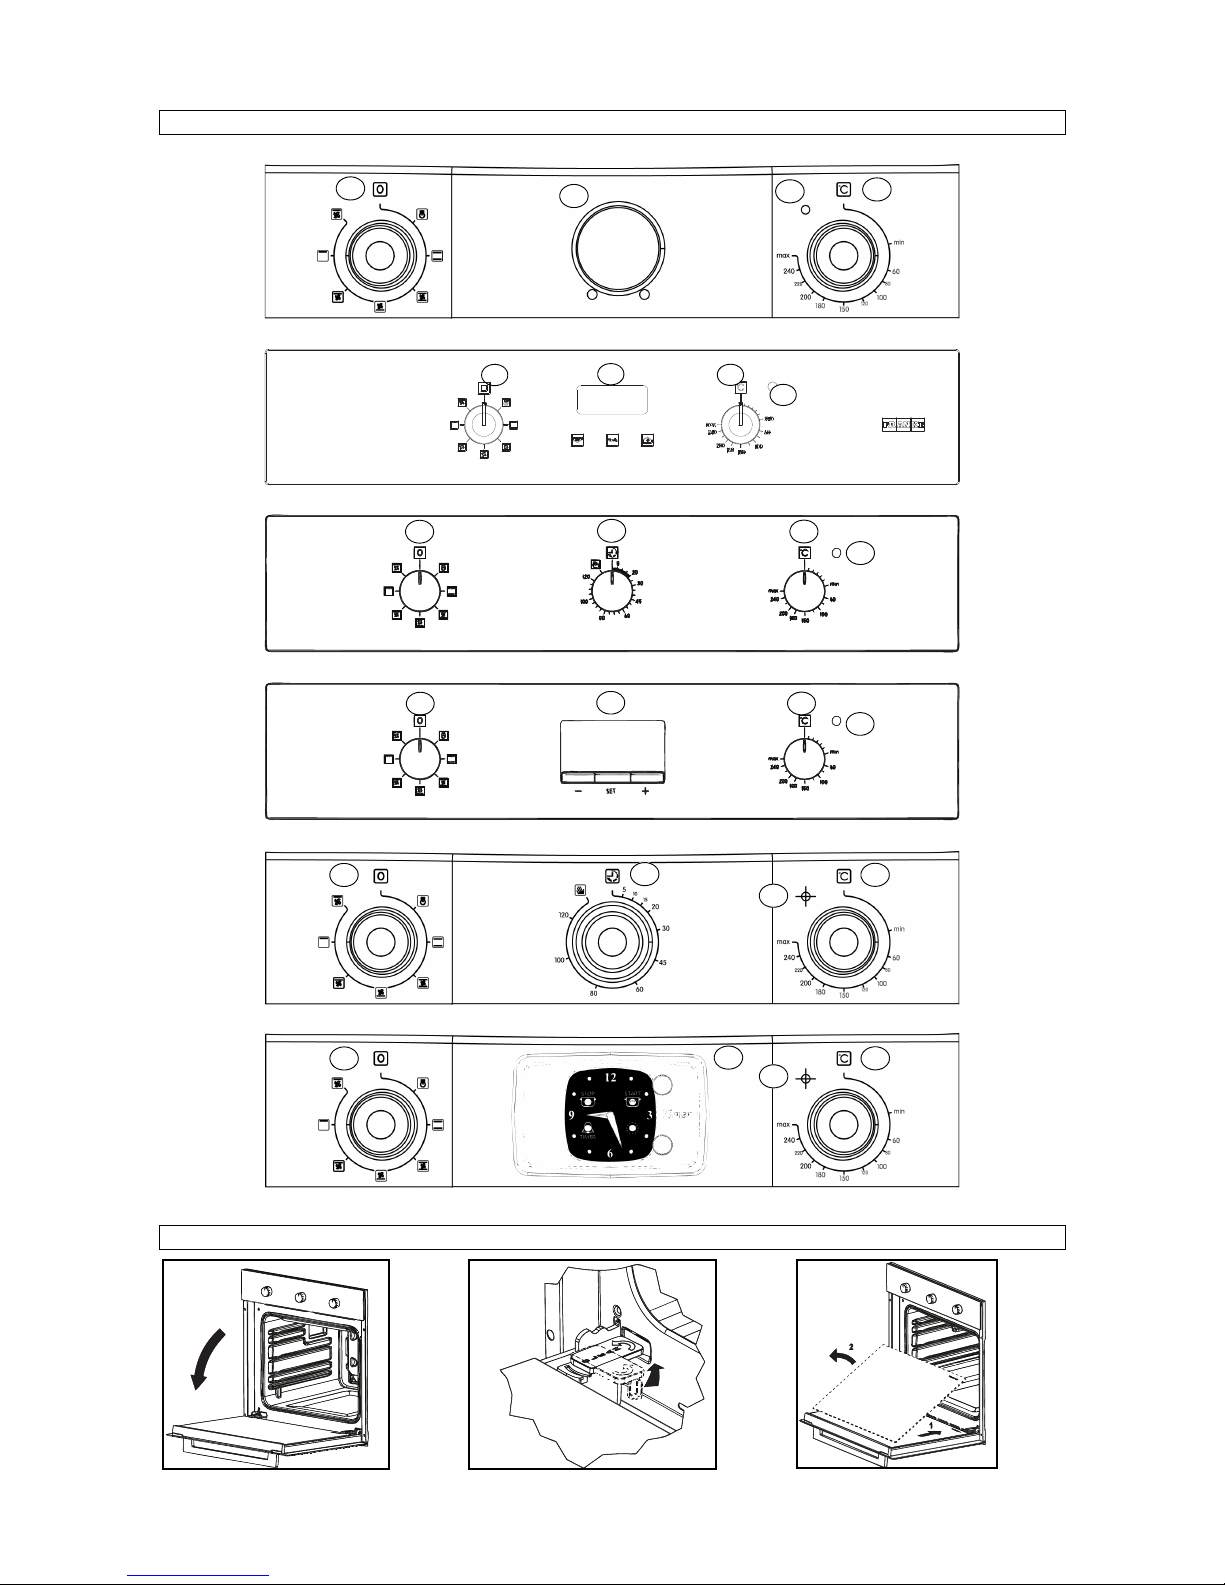
Fig. 1
Fig. 2a/2b/2c
CR/CS 66 M
Fig. 1
SM/SG 62 M
SM 66 M
A D
C
B
A D
C
B
A D
C
B
TL 62 M
TL 65 M
A D
C
B
A D
C
B
CM 65 M
A
D
C
B
A
B
Fig. 2a
Fig. 2b Fig. 2c
Page 3
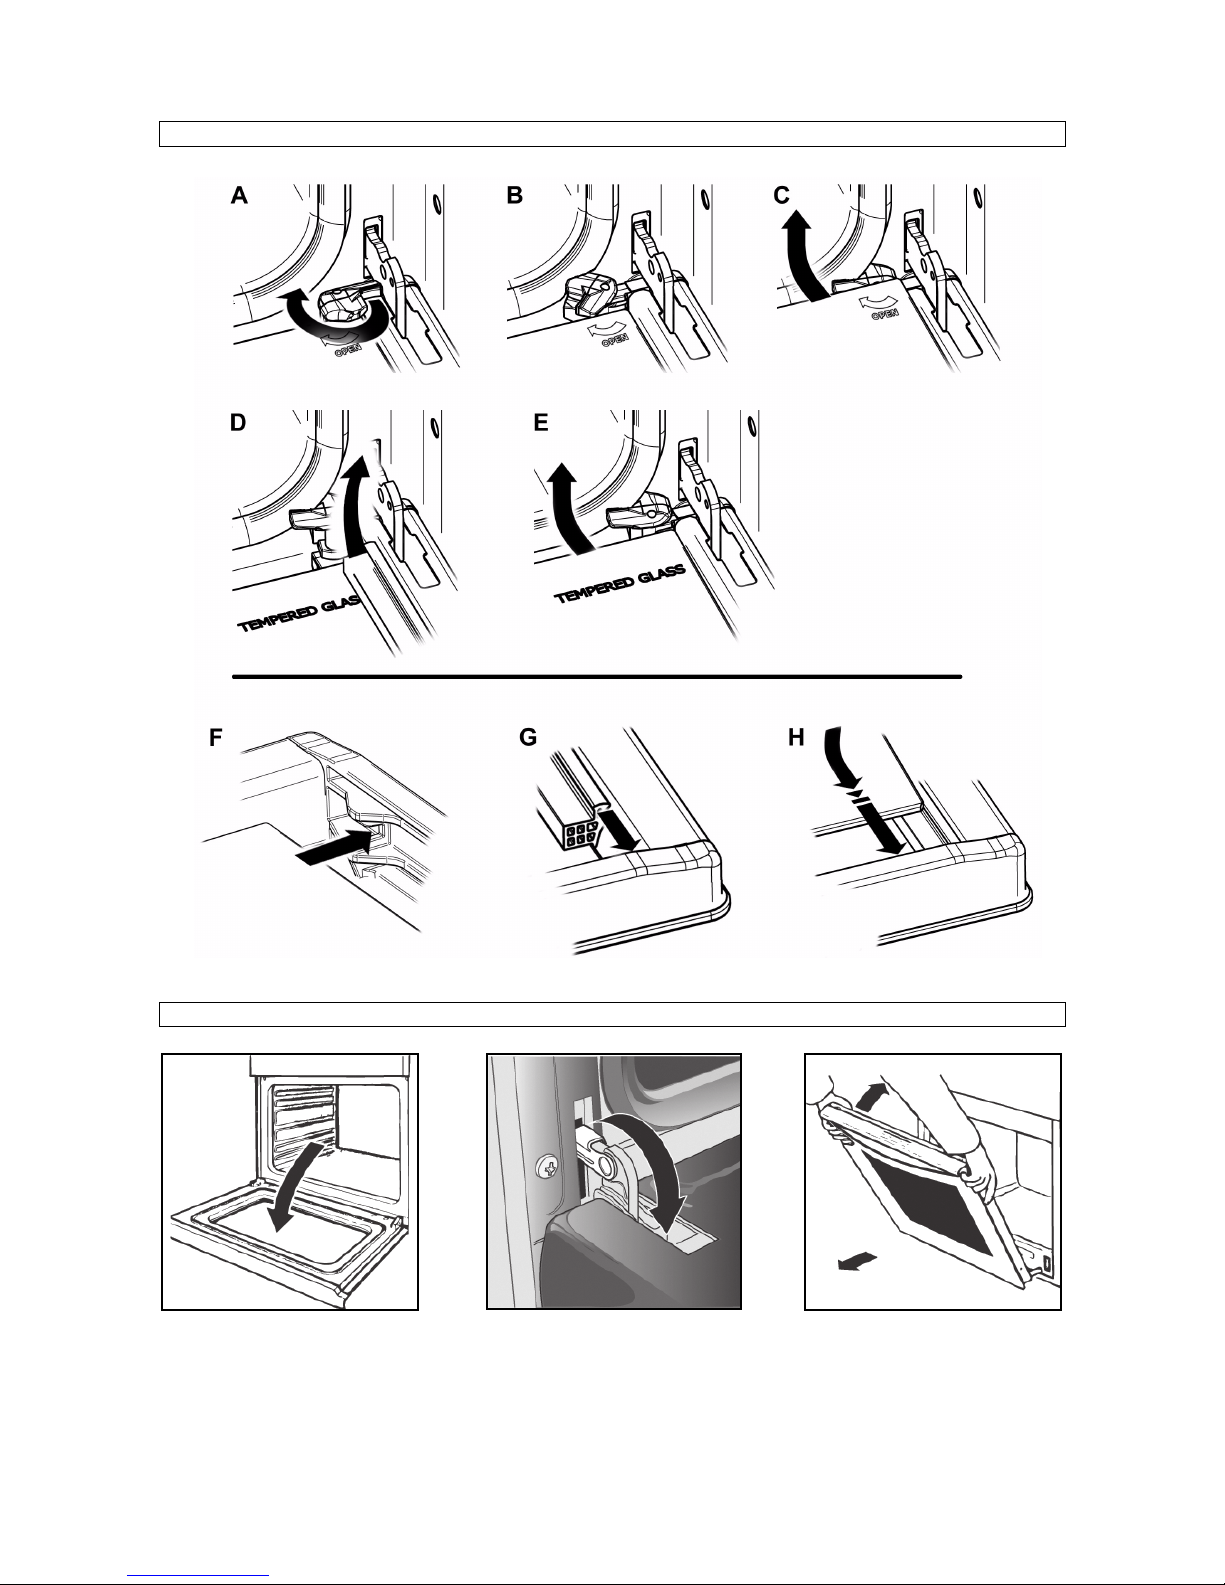
Fig. 3a/3b/3c/3d/3e/3f/3g/3h
Fig. 4a/4b/4c
Fig. 3
Fig. 4a Fig. 4b Fig. 4c
Page 4
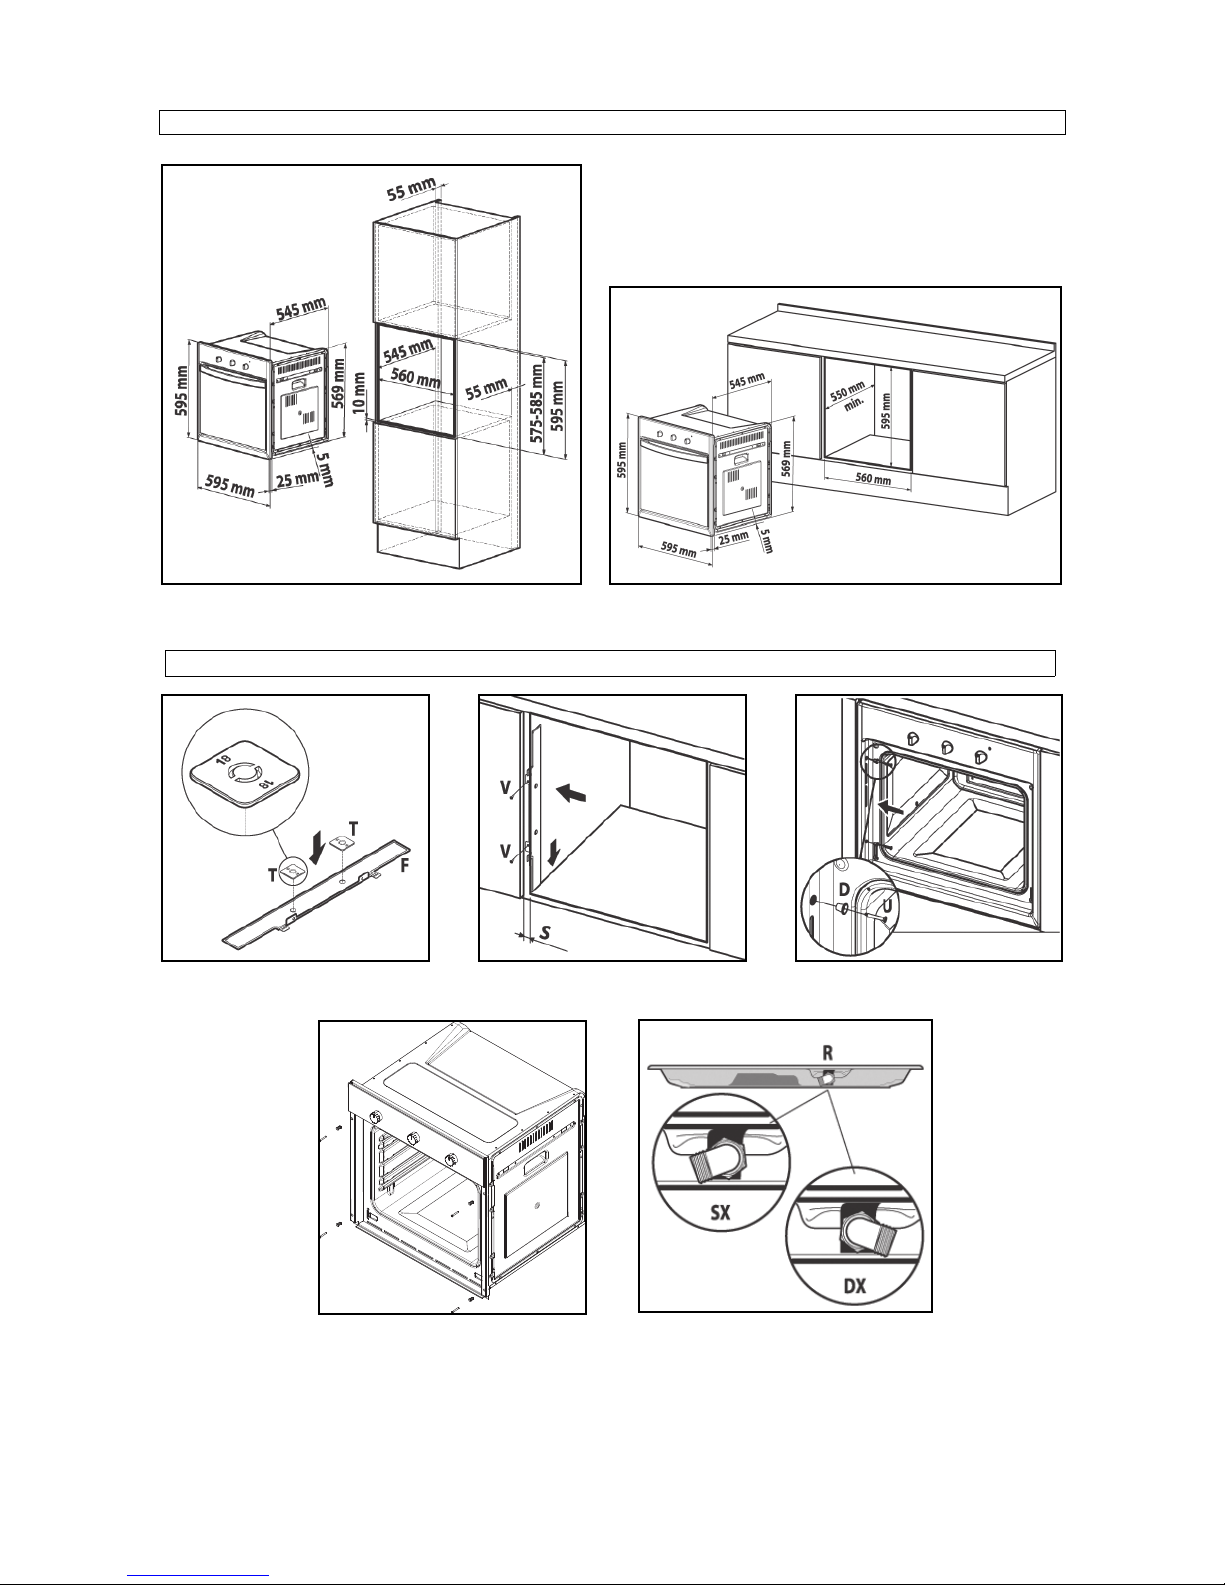
Fig. 5a/5b
Fig. 5a Fig. 5b
Fig. 6a/6b/6c/6d/6e
Fig. 6a Fig. 6b
Fig. 6c
Fig. 6d Fig. 6e
Page 5

Page 6
1
IT
Sommario
Introduzione ....................................................................................................................................... 1
Visto da vicino..................................................................................................................................... 1
Prima accensione................................................................................................................................ 2
Suggerimenti....................................................................................................................................... 2
Come utilizzarlo ................................................................................................................................. 2
Tabella indicativa di cottura ................................................................................................................ 6
Pulizia e manutenzione del forno ....................................................................................................... 7
Assistenza ........................................................................................................................................... 8
Avvertenze per la sicurezza................................................................................................................ 8
Installazione (Fig. 5) ............................................................................................................................ 9
Istruzioni di montaggio ....................................................................................................................... 9
Collegamento alla rete elettrica ....................................................................................................... 10
Dati tecnici........................................................................................................................................ 10
Introduzione
La ringraziamo per aver scelto un prodotto Franke.
Prima di utilizzare l’apparecchio Le consigliamo di leggere attentamente le avvertenze ed i consigli contenuti nel presente
manuale. Sarà così più facile utilizzarlo e mantenerlo efficiente più a lungo. Conservare con cura questo libretto per ogni
ulteriore consultazione.
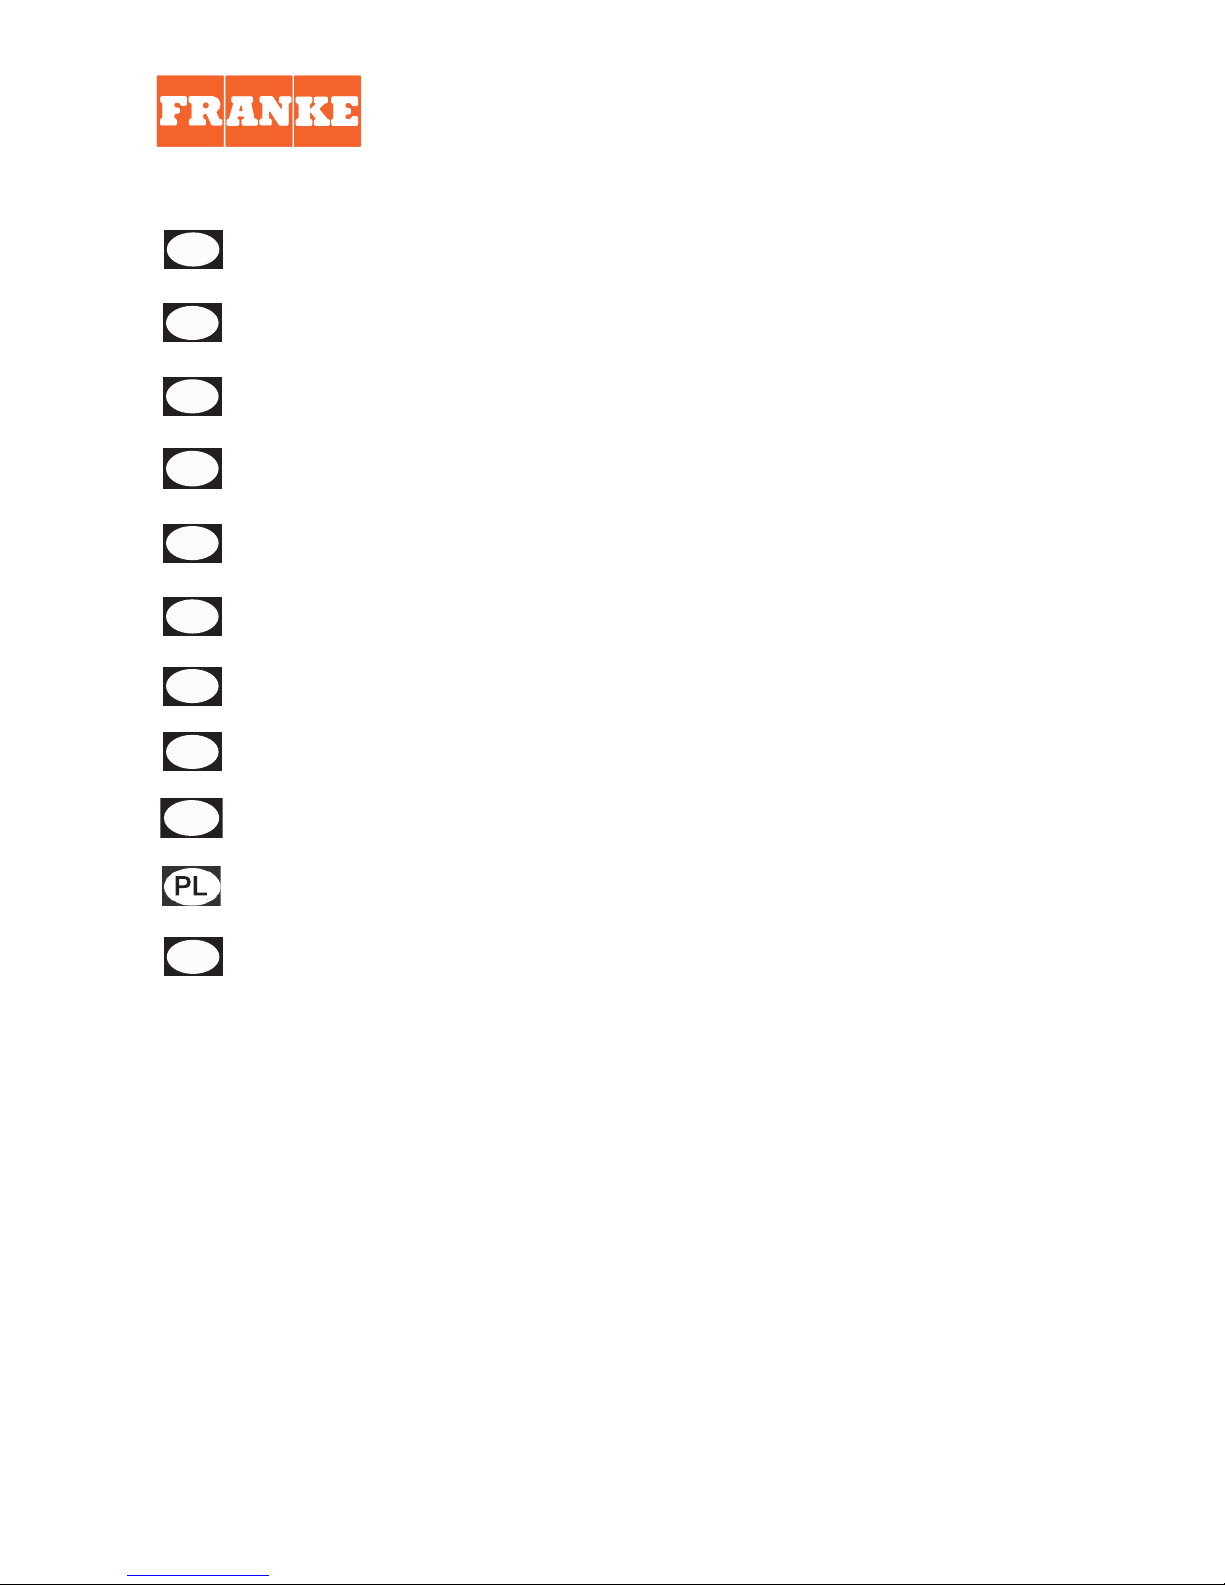
Visto da vicino
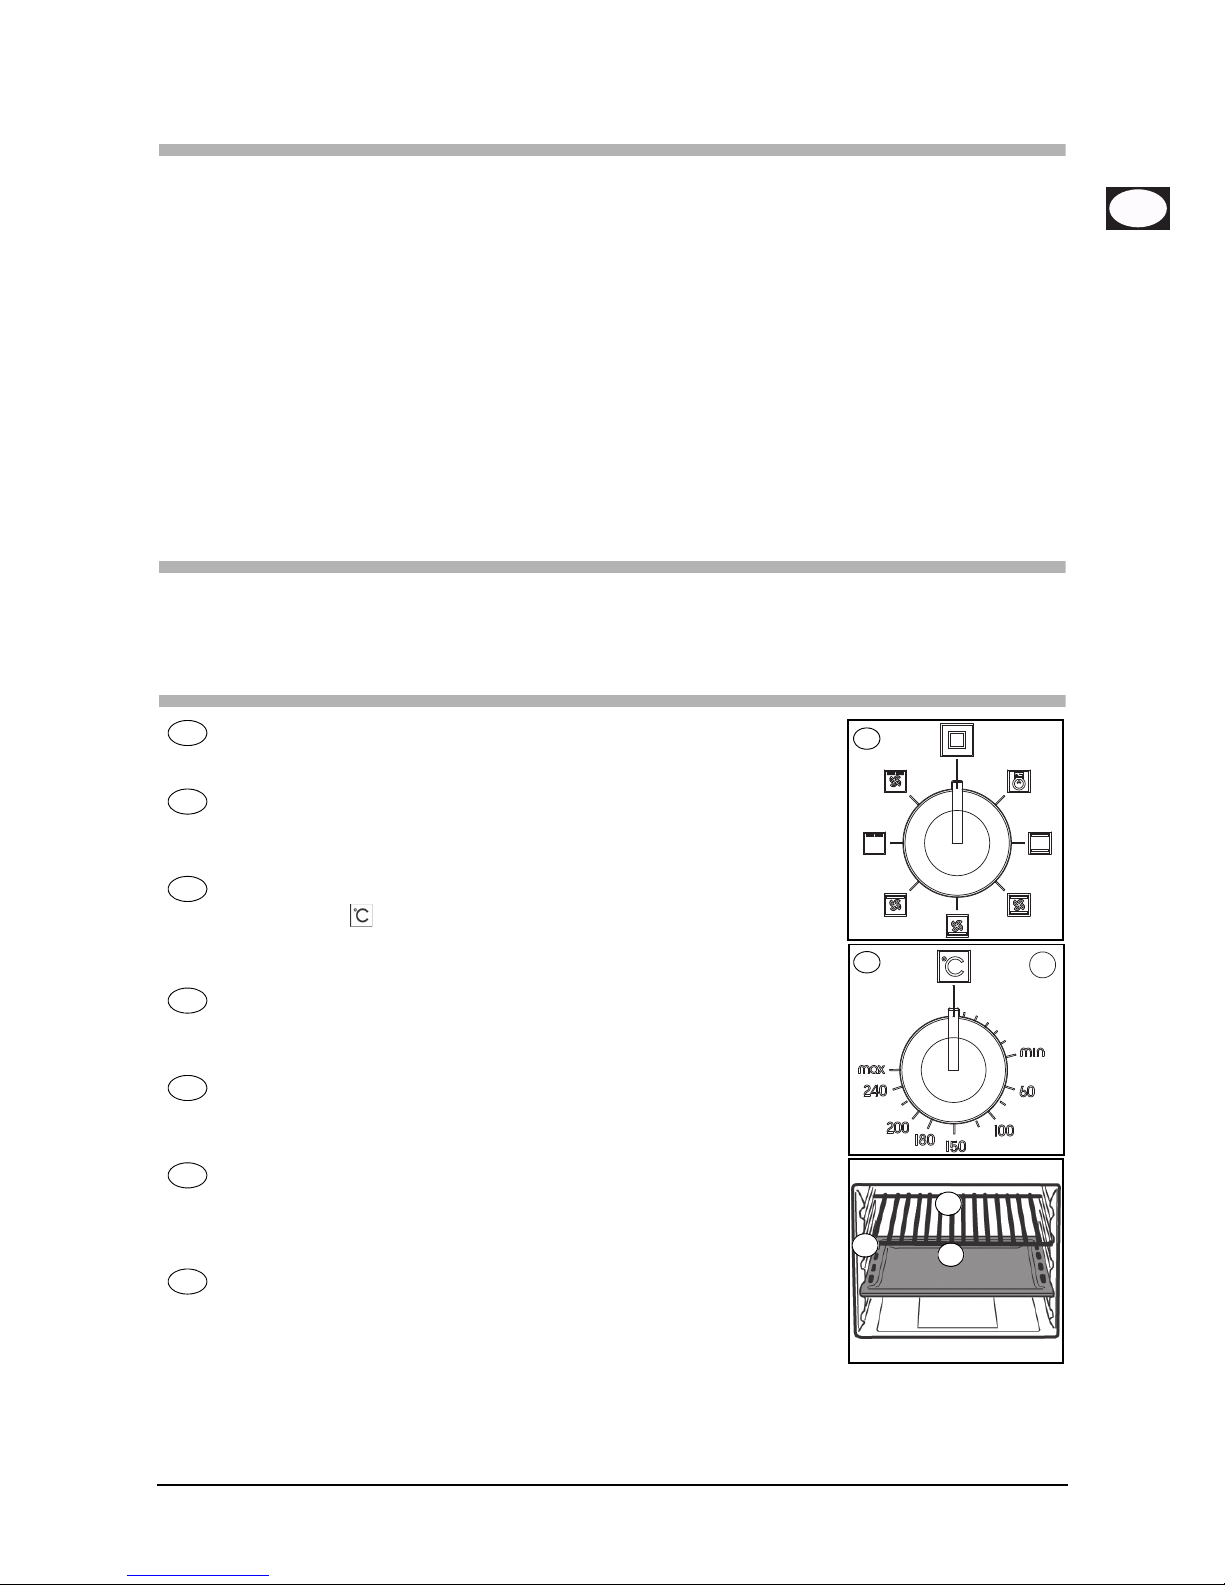
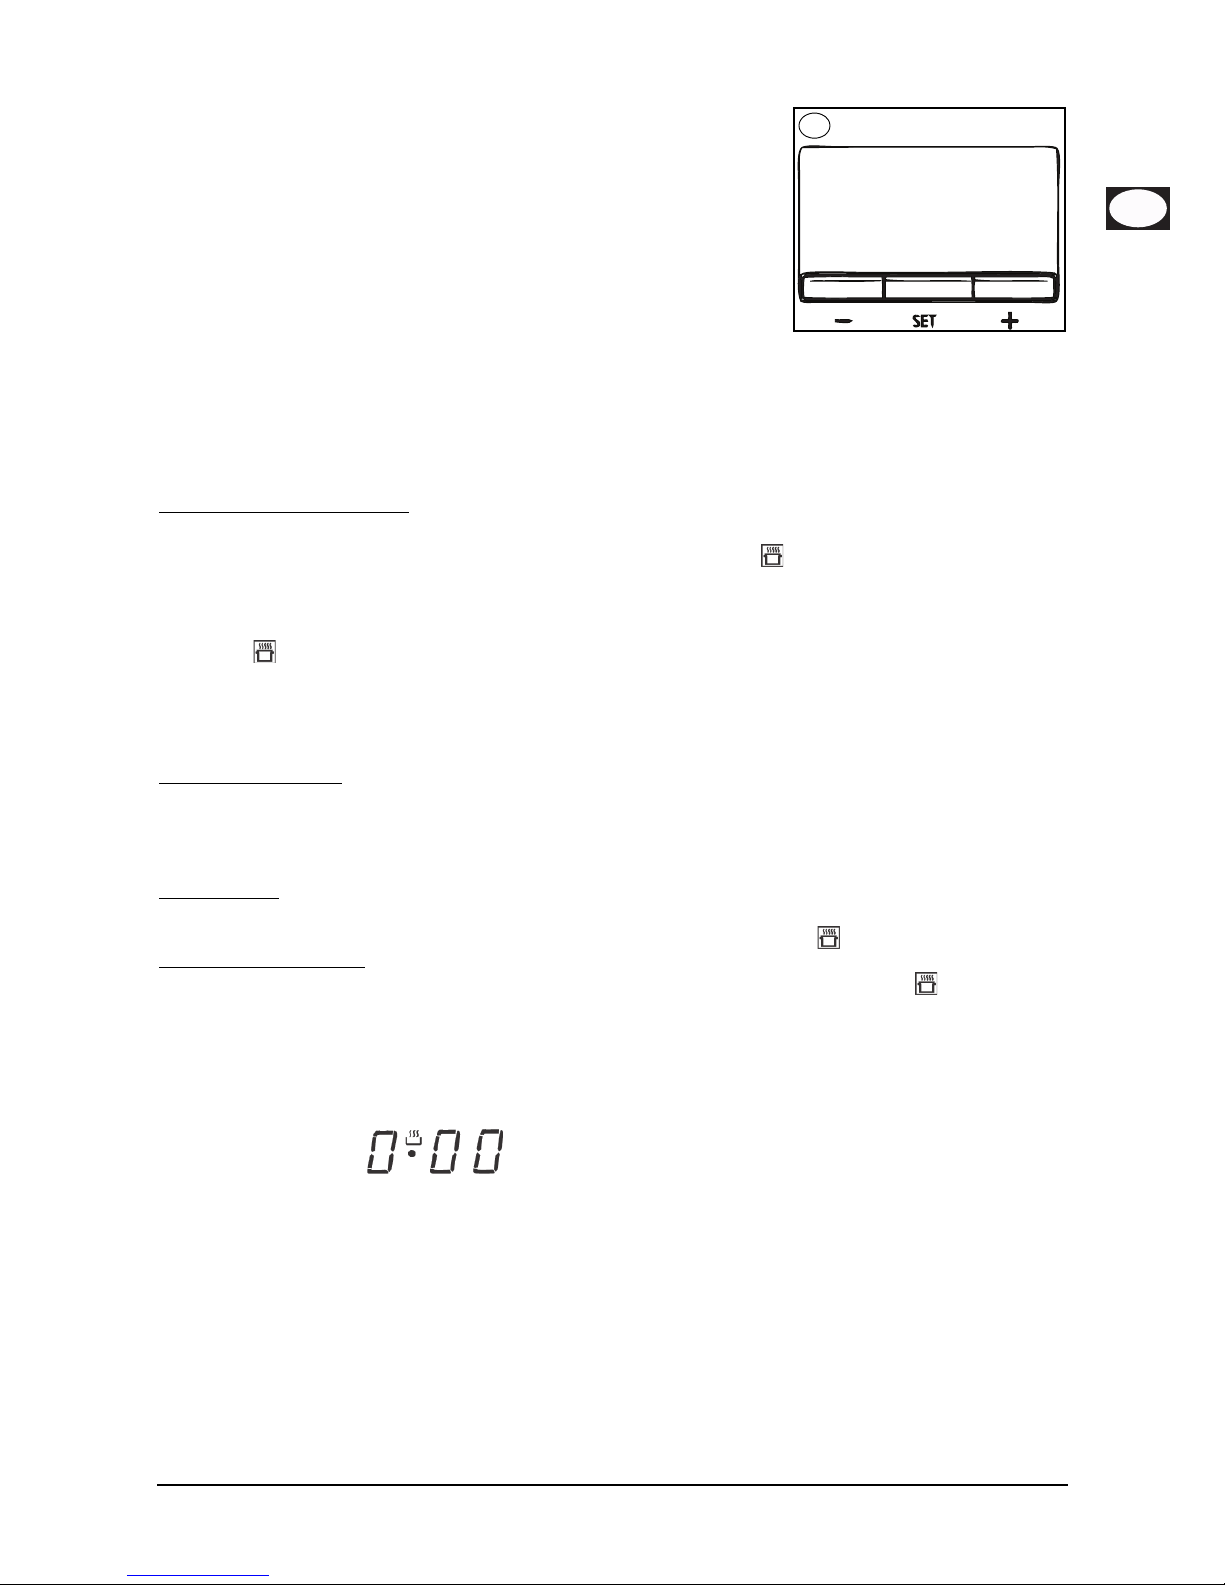
Manopola selezione programmi
Serve a selezionare il modo di funzionamento del forno a seconda del tipo di cottura da
effettuare. Posizionando la manopola su qualsiasi programma, si accende l’illuminazione
interna del forno, indice che il forno è acceso.
Programmatore
Nella gamma dei forni Franke sono previsti diversi sistemi di controllo e gestione del
tempo di cottura, a pag. 3 potrà trovare le istruzioni dettagliate di ciascuno; sarà sufficiente
individuare il tipo di controllo di cui il suo forno dispone per essere guidata ad un corretto
utilizzo della funzione.
Luce spia termostato
Evidenziata dal simbolo avverte che gli elementi riscaldanti del forno sono in funzione.
Essa si spegne quando la temperatura impostata è stata raggiunta, riaccendendosi ogni
qualvolta il forno ritorna in fase di riscaldamento. È utile per verificare il raggiungimento
della temperatura prima di infornare gli alimenti.
Manopola regolazione temperatura (Termostato)
Permette di selezionare la temperatura idonea al tipo di pietanza prescelta, mantenendola
costante per tutta la durata della cottura. Per selezionare la temperatura desiderata,
si deve ruotare la manopola in senso orario, portando l’indice di riferimento al numero
corrispondente. La temperatura massima è di circa 260 °C.
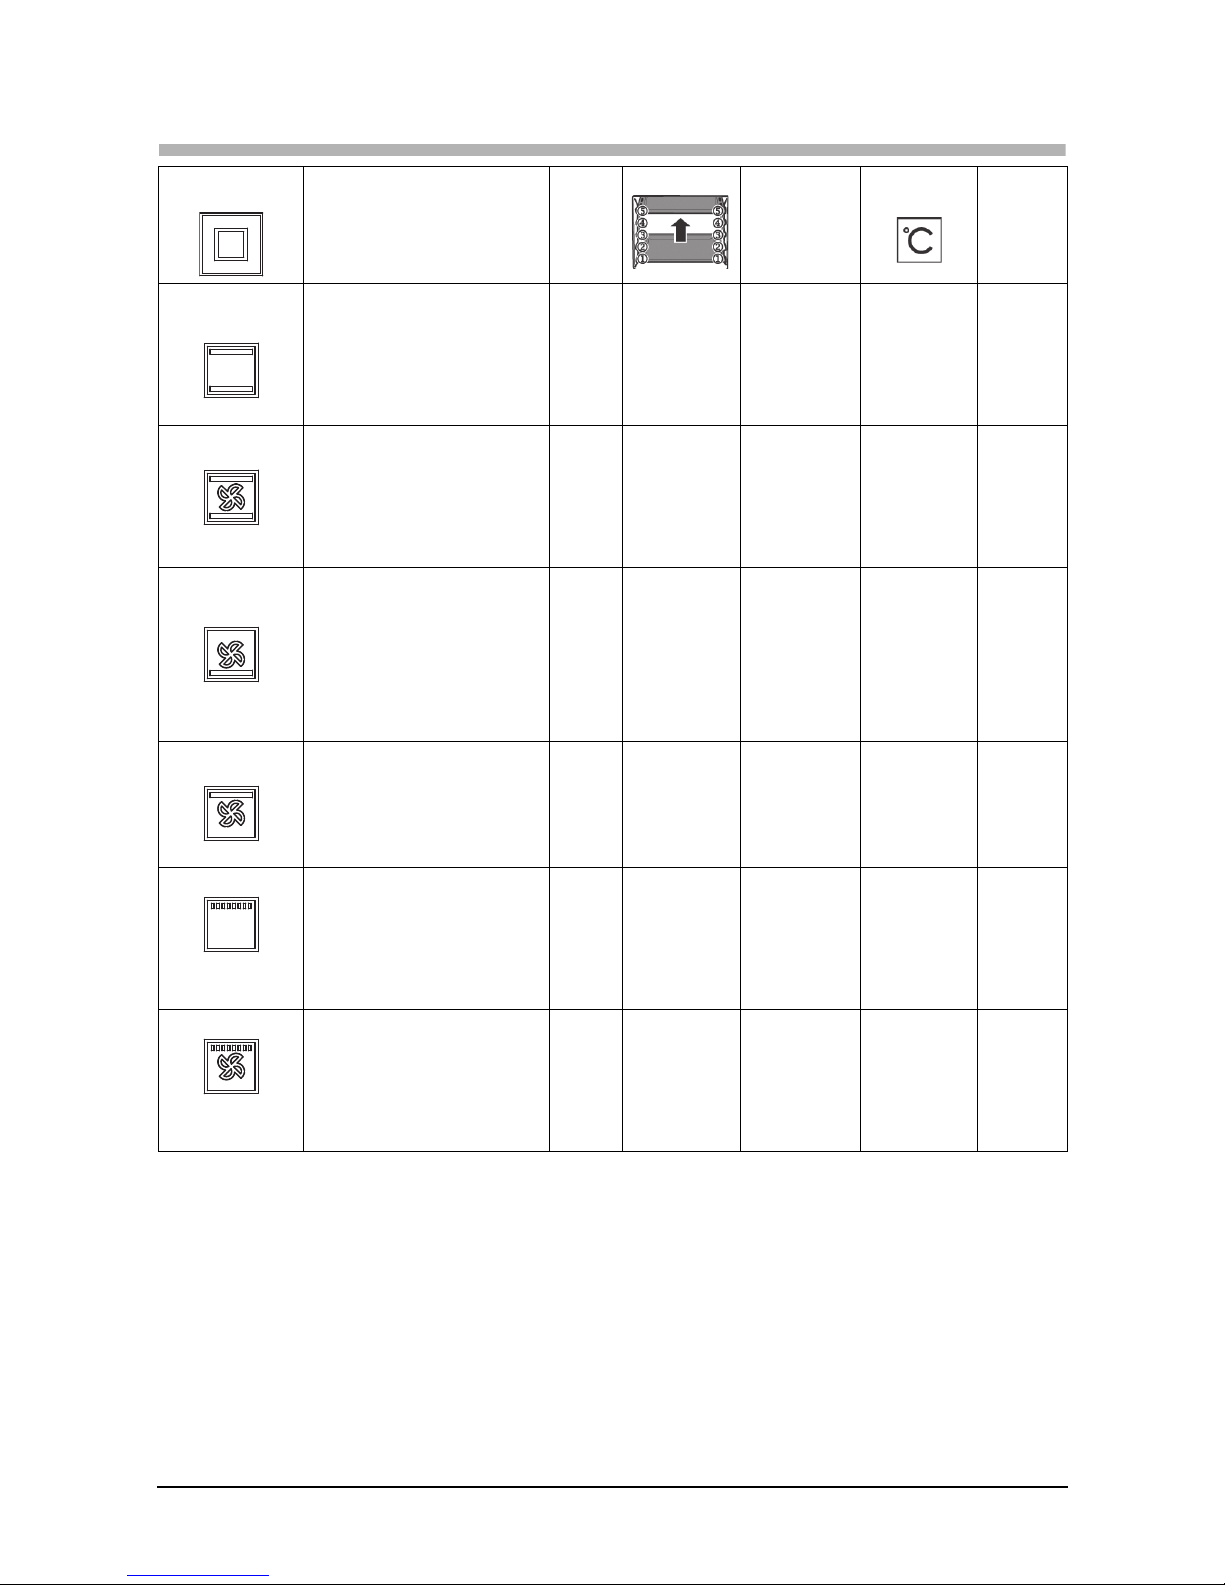
Guide di scorrimento di leccarde e griglie
Servono a posizionare correttamente le griglie e le leccarde in 5 posizioni prestabilite
(da 1 a 5 partendo dal basso); nella tabella indicativa di cottura (pag. 6) troverete
l’indicazione della posizione ideale per ciascun utilizzo del forno.
Leccarda
Viene normalmente usata per raccogliere i sughi delle grigliate o per cuocere direttamente
i cibi; se non utilizzata, durante la cottura la leccarda deve essere tolta dal forno.
La leccarda è in acciaio smaltato di tipo “AA” per uso alimentare. N.B. Per ottenere
migliori risultati di cottura si consiglia di inserire la leccarda con la parte inclinata verso
la parete posteriore della cavità del forno.
Griglia
Viene usata come supporto alle vostre teglie, agli stampini da pasticceria, ed a tutti i
contenitori diversi dalle leccarde in dotazione, o per cuocere prevalentemente nelle
funzioni grill e grill ventilato carne e pesce da grigliare, pane da tostare, ecc. Non è
consigliato un contatto diretto della griglia con i cibi.
ABCDE
F
G
D
A
F
G
E
Page 7
2
Prima accensione
Quando si usa il forno per la prima volta, è necessario far funzionare l’apparecchio a vuoto con la manopola regolazione
temperatura posizionata al massimo per almeno 40 minuti tenendo la porta completamente aperta ed aerando bene il
locale.
L’odore che si avverte durante questa operazione è dovuto all’evaporazione delle sostanze utilizzate per proteggere
il forno durante l’intervallo di tempo che intercorre tra la produzione e l’installazione del prodotto. Trascorso questo
tempo il forno è pronto per l’uso.
Suggerimenti
È buona norma, per la riuscita dei vostri piatti, non introdurre mai le vostre pietanze nel forno freddo, bensì attendere
che esso abbia raggiunto la temperatura da voi prescelta.
Durante la cottura, non appoggiare mai direttamente sul fondo del forno, pentole o contenitori che vanno sempre
posizionati sopra le griglie o le leccarde in dotazione in uno dei 5 ripiani disponibili; la mancata osservanza di questa
indicazione provocherebbe il danneggiamento dello smalto del forno.
Non rivestire mai le pareti del forno con fogli di alluminio, soprattutto la parte inferiore del vano di cottura.
Eventuali riparazioni devono essere effettuate dal personale specializzato e patentato.
Contattare il nostro centro di assistenza più vicino e richiedere solo ricambi originali.
Il vostro forno Franke utilizza smalto speciale, facile da pulire, comunque è buona norma pulirlo spesso evitando di
cuocere più volte lo sporco ed i residui delle cotture precedenti.
Eventuali pannelli autopulenti (qualora il forno ne fosse provvisto) devono essere puliti con acqua e sapone
(vedi istruzioni per la pulizia).
N.B: prima di procedere all’accensione del forno, leggere le istruzioni relative l’uso del timer (vedi pag. 4).
– Se il forno è equipaggiato con un programmatore automatico di cottura o di spegnimento, per utilizzare il forno in
modo manuale è necessario selezionare l’opzione “manuale” contraddistinta dal simbolo .
Come utilizzarlo
In questo forno sono riuniti i pregi dei tradizionali forni a convezione naturale “statici” con quelli dei moderni forni a
convezione forzata “ventilati”. È un apparecchio molto versatile che, in modo facile e sicuro, permette di scegliere fra
6 diversi metodi di cottura. Agendo sulle manopole (A) ed (D) presenti sul cruscotto, si ottiene la selezione dei diversi
programmi e la temperatura desiderata. Per utilizzare al meglio il vostro forno Franke, consultare la tabella indicativa di
cottura a pag. 6.
Ventilazione di raffreddamento
Al fine di ottenere una riduzione delle temperature di porta, cruscotto e fianchi, il forno Franke è dotato di una ventola
di raffreddamento che si attiva automaticamente a forno caldo. Quando la ventola è in funzione è possibile avvertire un
getto d’aria che esce tra frontalino e porta forno, una particolare attenzione è stata posta affinché la velocità dell’aria
in uscita non disturbi l’ambiente cucina e i rumori siano abbattuti al massimo.
A completa salvaguardia dei mobili, a fine cottura la ventilazione rimane attiva finchè il forno non sarà
sufficientemente freddo.
La luce forno
A questo simbolo corrisponde l’accensione dell’illuminazione interna del forno senza inserire nessun tipo di
riscaldamento. Tale funzione è utile per facilitare le operazioni di pulizia a forno spento visualizzando il vano
cottura.
Programmi di cottura
Cottura statica naturale
La manopola del termostato (D) deve essere posizionata tra 50 °C e Max (260 °C).
Il riscaldamento avviene sia dall’alto (resistenza cielo) sia dal basso (resistenza suola). Questa è la funzione di
cottura tradizionale che permette di cuocere uniformemente le vostre pietanze, utilizzando un solo ripiano.
Cottura assistita
La manopola del termostato (D) deve essere posizionata tra 50 °C e Max (260 °C).
Si inseriscono la resistenza superiore (cielo), la resistenza inferiore (suola) e la ventola interna al forno.
Il calore costante ed uniforme cuoce e rosola il cibo in tutti i punti. Si possono cuocere anche pietanze diverse
tra loro utilizzando un massimo di 2 ripiani contemporaneamente.
Page 8
3
IT
Cottura ventilata inferiore
La manopola del termostato (D) deve essere posizionata tra 50 °C e Max (260 °C).
Si inserisce la resistenza inferiore (suola) e la ventola. Ideale per cuocere pesce e in generale prodotti surgelati
e precotti. Molto efficace l'impiego in prodotti da pasticceria.
Cottura ventilata superiore
La manopola del termostato (D) deve essere posizionata tra 50 °C e Max (260 °C).
Si inserisce la resistenza superiore (cielo) e la ventola. La bassa potenza e l'azione della ventola permettono
una cottura molto delicata ed uniforme. Ideale per pasticceria secca e alcuni tipi di pasta al forno.
Cottura grill
La manopola del termostato (D) deve normalmente trovarsi alla posizione Max (260 °C), è tuttavia
possibile scegliere una temperatura inferiore, in questo caso la grigliatura sarà più lenta.
Si inserisce la resistenza grill posta nella parte superiore del forno. In questo caso la veloce cottura superficiale
a raggi infrarossi mantiene morbida la parte interna delle carni; è anche possibile utilizzare la cottura al grill per
tostare velocemente fino a 9 fette di pane. Il forno Franke, è studiato per grigliare con la porta del forno
completamente chiusa.
Avvertenza: la resistenza del grill, durante il funzionamento è molto calda; evitare di toccarla accidentalmente
durante le manipolazioni degli alimenti da grigliare; comunque Franke ha studiato una forma della bocca del
forno che protegge il più possibile le mani di chi lo usa.
Cottura grill ventilata
La manopola del termostato (D) deve normalmente trovarsi alla posizione Max (260 °C), è tuttavia
possibile scegliere una temperatura inferiore, in questo caso la grigliatura sarà più lenta.
Si inserisce la resistenza grill posta nella parte superiore del forno e si mette in funzione la ventola.
Unisce all’irradiazione termica unidirezionale la circolazione forzata dell’aria all’interno del forno.
Ciò impedisce la bruciatura superficiale degli alimenti aumentando il potere di penetrazione del calore.
Risultati eccellenti si ottengono utilizzando il grill ventilato per spiedini misti di carne e verdura, salsicce,
costine di maiale, costolette di agnello, pollo alla diavola, quaglie alla salvia, filetto di maiale, etc.
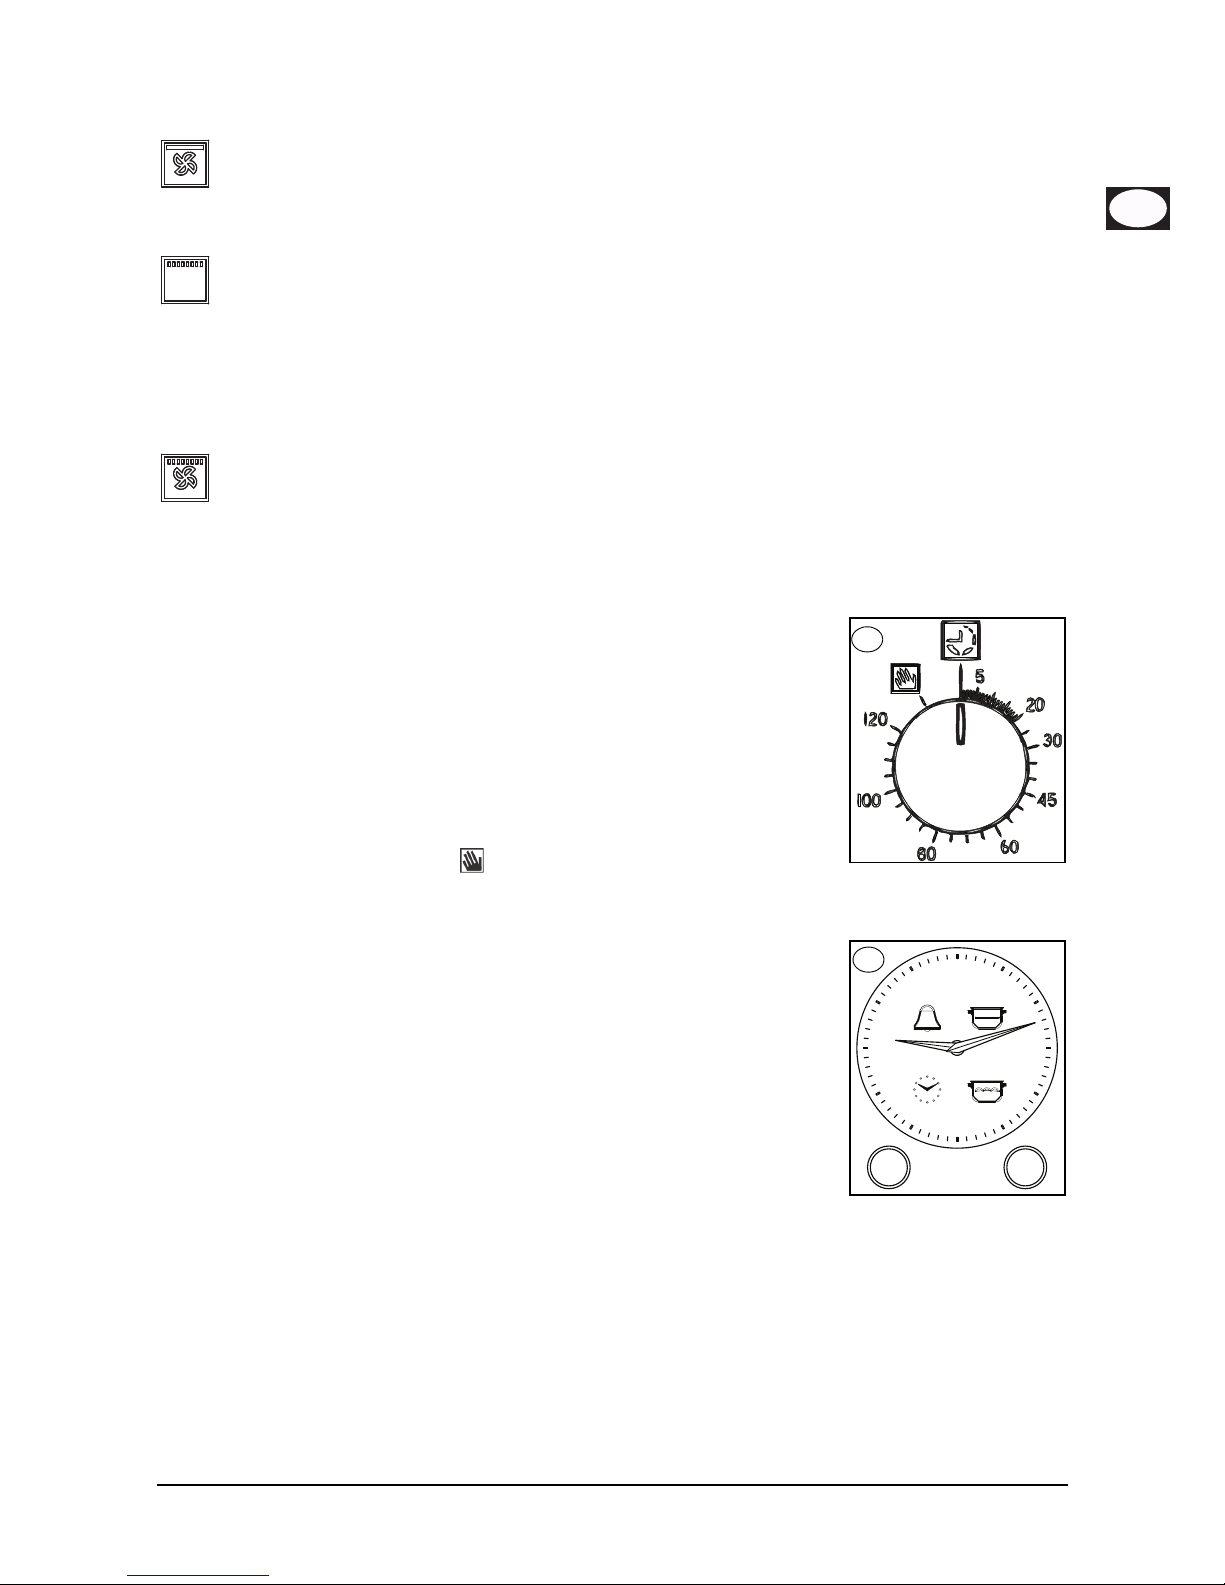
La manopola del contaminuti di fine cottura
Il contaminuti di fine cottura è un utile dispositivo che spegne automaticamente il forno al
raggiungimento del tempo prescelto in un intervallo tra uno e 120 minuti. Per utilizzare il
contaminuti di fine cottura occorre caricare la suoneria ruotando la manopola (B) di un
giro quasi completo in senso orario; quindi, tornando indietro, impostare il tempo
desiderato facendo coincidere con il riferimento fisso del frontalino il numero
corrispondente ai minuti prefissati. Al termine del tempo impostato, oltre all'intervento
della suoneria, si ha lo spegnimento automatico del forno.
N.B. Subito dopo lo spegnimento e per lungo tempo, l'interno del forno mantiene una
temperatura vicina a quella impostata per la cottura; quindi per evitare sovracotture o
bruciature degli alimenti, è opportuno rimuoverli dal forno.
Attenzione: per utilizzare il forno in funzionamento manuale, escludendo cioè il
programmatore di fine cottura, occorre far coincidere l'indice della manopola con il
simbolo fisso sul frontalino. Quando il forno è spento, il programmatore di fine cottura può essere usato come un
normale contaminuti.
L'orologio di fine cottura
Questo orologio è già impostato per l'utilizzo manuale del forno, pertanto la cottura può
essere eseguita anche senza alcun intervento sull'orologio stesso
Manopola destra
Premendo la manopola dx si scelgono in sequenza le funzioni da attivare (timer, fine
cottura, Inizio cottura, impostazione ora), segnalate dal rispettivo led lampeggiante.
Inoltre premendo brevemente questa manopola si possono rivedere le impostazioni già
programmate (Interrogazione) mentre con una pressione più lunga (circa due secondi)
le impostazioni vengono cancellate (Reset).
Manopola sinistra
Ruotando la manopola sx si impostano le lancette dell'orologio tempo relativamente alla
funzione attivata (led lampeggiante).
B
IVI
I
V
I
I
IX
V
V
I
VI
III
I
X
X
III
IXI
TIMER
START
STOP
B
Page 9

4
Leds
– lampeggianti: pronto all'impostazione o avviso di fine funzione
(assieme alla suoneria)
– accesi: funzione in corso
Timer ( )
Per impostare il timer premere una sola volta la manopola dx (il relativo
led inizia a lampeggiare); quindi, ruotando la manopola sx, spostare le
lancette per impostare il tempo di durata del timer. Premendo
nuovamente la manopola dx si conferma l'impostazione data ed il
relativo led da lampeggiante diventa fisso. Le lancette ritornano quindi
alla posizione originale per segnalare l'ora corrente: al raggiungimento
del tempo impostato si attiva la suoneria che può essere arrestata premendo la manopola dx.
Il timer non gestisce il riscaldamento del forno.
Fine cottura ( )
Per impostare la fine della cottura premere la manopola dx per due volte (il led del simbolo inizia a lampeggiare);
quindi, ruotando la manopola sx, spostare le lancette per impostare l'orario di fine cottura.
Il led lampeggerà per i successivi 10 secondi (per eventuali correzioni), trascorsi i quali l'impostazione verrà acquisita ed
il led diverrà fisso.
Lo stesso effetto si ottiene premendo due volte la manopola dx durante il lampeggio.
Al termine della cottura verrà disattivato il riscaldamento del forno e si attiverà la suoneria per 1 minuto; questa può
essere arrestata premendo la manopola dx.
N.B. Alla fine della cottura il forno mantiene per parecchi minuti una temperatura vicina a quella impostata in precedenza;
quindi per evitare sovra cotture degli alimenti, è opportuno estrarli dal forno.
Fine cottura ( ) con inizio ritardato ( )
L'inizio ritardato della cottura è attivabile solo conseguentemente alla fine cottura, impostata la quale, premendo
sulla manopola dx si convaliderà lo “stop”, attivando contemporaneamente il led lampeggiante del simbolo .
Ruotare la manopola sx per imporre anche l'ora di avvio della cottura (chiaramente sarà precedente alla fine, quindi con
le lancette si potrà andare solo all'indietro). Adesso si può confermare definitivamente tramite un'ulteriore pressione
della manopola dx. Anche lasciando scorrere i 10 secondi di lampeggio, il dato verrà automaticamente acquisito. I led dei
simboli e rimangono accesi ed il forno si accenderà all'ora impostata, in quel momento resterà acceso solo
il led del simbolo .
Al termine della cottura si attiverà la suoneria per 1 minuto; questa può essere arrestata premendo la manopola dx.
Impostazione dell'ora del giorno ( )
Per impostare l'ora corretta semplicemente premere la manopola dx per tre volte (il led del simbolo orologio inizia a
lampeggiare) e quindi ruotare la manopola sx. Una volta impostato il giusto orario, confermare premendo la manopola dx.
Il programmatore di cottura elettronico
Consente di programmare il forno nei funzionamenti:
• inizio cottura ritardato con durata stabilita;
• inizio immediato con durata stabilita;
• contaminuti.
Come impostare l’orologio digitale
Dopo l’allacciamento alla rete o dopo una mancanza di corrente il display
lampeggia su: “0.00”.
Premere simultaneamente i tasti + e – per alcuni secondi. L'ora del giorno è
regolabile utilizzando i tasti + e – , mentre il punto tra le ore e i minuti lampeggia.
Se si seleziona la modalità di impostazione dell'ora quando è attivo un programma
automatico, il programma automatico è cancellato.
Eventuali aggiornamenti dell’ora possono essere effettuati ripetendo la fase sopra descritta.
B
B
Page 10

5
IT
Modifica della frequenza segnale acustico
La frequenza del segnale acustico può essere cambiata se non si è programmata
una cottura (e quindi il display mostra l'ora del giorno). Premere simultaneamente
i tasti + e – (dal menu di modifica dell'ora), quindi premere Mode o Set per
selezionare il menu da cui modificare la frequenza del segnale acustico. È possibile
modificare la frequenza del segnale acustico toccando ripetutamente il tasto Mode
o Set; sul display apparirà “ton1”, “ton2”, “ton3”.
Funzionamento manuale del forno
Dopo aver impostato l’ora, il programmatore va automaticamente in posizione
manuale.
Inizio cottura ritardato con durata stabilita
Quando sul display compare l'ora del giorno, premere due volte il tasto Mode o Set per impostare la durata,
quindi premerlo di nuovo per impostare l'ora finale di cottura. Impostare l'ora desiderata con i tasti + e –.
Durante la selezione della modalità di regolazione dell'ora finale o della durata, il simbolo Auto rimane acceso.
Una volta impostata la durata di un programma, l'ora finale non può essere ridotta. Allo stesso modo, la durata di un
programma non può essere prolungata una volta impostata l'ora finale.
Le impostazioni di ora finale e durata definiscono l'ora di inizio programma come segue:
ora di inizio = ora finale - durata
.
Dopo l'impostazione della durata e dell'ora finale, il display continua a mostrare l'ora finale. Il programma si avvia quando
l'ora del giorno coincide con l'ora di inizio: il simbolo Auto si accende fisso e il simbolo si accende lampeggiando.
Dopo l'inizio della cottura, il display mostra il conteggio a ritroso del tempo. Se è selezionata solo l'ora finale di cottura
(la durata è = 0), la cottura si avvia e il display mostra il conteggio a ritroso del tempo.
Il simbolo Auto rimane acceso durante l'attesa per l'inizio cottura ritardato e per tutta la durata della cottura.
Il simbolo lampeggia durante l'attesa per l'inizio cottura ritardato e rimane acceso fisso quando inizia la cottura.
A fine cottura viene emesso un segnale acustico; per interromperlo premere un tasto qualsiasi o lasciar
trascorrere il tempo di durata del segnale.
Programma semi-automatico con durata o con ora finale
Impostazione oraria del programma
Per selezionare la durata o l'ora finale del programma premere due volte il tasto Mode o Set e impostare l'ora desiderata
con i tasti + e –. Durante la selezione della modalità di regolazione dell'ora finale o della durata, il simbolo Auto
corrispondente lampeggia.
Una volta impostata la durata di un programma, l'ora finale non può essere ridotta. Allo stesso modo, la durata di un
programma non può essere prolungata una volta impostata l'ora finale.
Esecuzione del programma di cottura
Quando è in corso il programma automatico, e quindi la cottura è attiva, il simbolo Auto rimane illuminato e sul display
compare il tempo di cottura rimanente (conto alla rovescia). Anche il simbolo rimane illuminato.
Fine del programma automatico
Allo scadere della durata del programma o al raggiungimento dell'ora finale del programma, il corrispondente
simbolo si spegne. Al termine del programma automatico, il simbolo “Auto” lampeggia, il display mostra “End” e
viene emesso un segnale acustico intermittente che può essere arrestato premendo un tasto qualsiasi.
Funzione contaminuti
Nel funzionamento contaminuti viene impostato un tempo dal quale comincia un conto alla rovescia. Questa funzione
non controlla l’accensione e lo spegnimento del forno ma emette solamente un allarme acustico a tempo scaduto.
Premere il tasto Mode o Set una sola volta; sul display compare:
Il simbolo della campana lampeggia , e a questo punto è possibile impostare la durata dell'allarme con i tasti + e –
Quando questa funzione è attiva il simbolo della campana rimane illuminato ed il display mostra il tempo rimanente
(conto alla rovescia).
A fine tempo viene emesso un segnale acustico che può essere arrestato premendo un tasto qualsiasi.
Correzione/cancellazione dei dati
• I dati impostati possono essere cambiati in qualsiasi momento, premendo simultaneamente i tasti + e –.
• Cancellando la durata di cottura si ha la cancellazione automatica anche della fine del funzionamento e viceversa.
• Nel caso di funzionamento programmato, l’apparecchio non accetta tempi di fine cottura antecedenti a quelli di inizio
cottura proposti dall’apparecchio stesso.
N.B. Subito dopo lo spegnimento e per lungo tempo l’interno del forno mantiene una temperatura vicina a quella
impostata per la cottura; quindi per evitare sovracotture o bruciature degli alimenti, è opportuno rimuoverli dal forno.
B
Page 11
6
Tabella indicativa di cottura
N.B: le indicazioni riportate in tabella sono il risultato di prove di cottura eseguite da un team di cuochi professionisti. In ogni caso esse
sono indicative e possono essere modificate in base ai propri gusti personali.
Impostazione
manopola di
selezione
Tipo di cibo Peso
(Kg)
Posizione
ripiani
Te m po d i
preriscalda-
mento (min.)
Impostazione
manopola del
termostato
Durata
della
cottura
(min.)
Cottura statica
naturale
Arrosti di Maiale
Frittate
Merluzzo-Orata-Rombo
Pane Comune
Pasticci
Pesce acqua dolce
Polenta Condita
Torte alla Ricotta
1
1,5
1
1
1
1,5
0,5
1,5
3
2
3
2-4 cont.
2
3
2
2
9,5
10,5
9,5
9,5
10,5
10,5
9,5
9,5
180 °C
200 °C
180 °C
175 °C
200 °C
200 °C
180 °C
180 °C
65-75
25-30
15
25-30
40-45
35-40
25-30
25-30
Cottura assistita Arista di Maiale
Coniglio al forno
Crescia Marchigiana
Gamberi al Forno
Merluzzo-Orata-Rombo
Pane Comune
Torte alla Frutta
Torte Salate
1
1
1
0,5
2
2
1,5
2
3
2
2
3
2-4 cont.
2-4 cont.
2
3-5 cont.
9
9,5
10
10
7,5
9
9
9
180 °C
190 °C
200 °C
200 °C
150 °C
180 °C
175 °C
180 °C
60-70
55-65
25-30
30-40
25-30
25-30
30-35
40-45
Cottura ventilata
inferiore
Petto di Pollo
Tagliata di Vitello
Roast-Beef
To nn o in t ra nc i
Medaglioni Pesce Spada
Gamberoni
Meringhe
Biscotti al burro
Torta Lievitata
Tortini di Mandorle
1
1
1
1
1
1
0,8
1
0,8
1
2 oppure 3
2
3
2
3
2
2
2
2
2 oppure 3
Per velocizzare
il tempo di
preriscaldo,
utilizzare la
funzione
Cottura Assistita.
170 °C
180 °C
170 °C
160 °C
160 °C
180 °C
90 °C
160 °C
170 °C
160 °C
20
20
60
20
20
30
120
30
40
35
Cottura ventilata
superiore
Tortellini Gratinati
Gnocchi di Patate
Pesce Spada
Cozze
Capesante
Patate al Forno
Cannelloni
0,5
0,5
0,5
1
1
0,5
1
3
3
5
4
4
4
3
Per velocizzare
il tempo di
preriscaldo,
utilizzare la
funzione
Cottura Assistita.
Max
Max
200 °C
Max
200 °C
200 °C
Max
25-30
25-30
12-15
10-12
10-12
18-20
25-30
Cottura grill Alette di Pollo
Braciole
Capesante
Patate al Forno
Pesce acqua dolce
Pomodori Gratinati
Spiedini di Anguilla
Spiedini di Tacchino
1
0,8
0,5
1
1
0,4
0,5
0,5
4 oppure 5
3
3 oppure 4
3
3 oppure 4
2 oppure 3
3
4
7
7
7
7
7
7
7
7
Max
Max
Max
Max
Max
Max
Max
Max
25-30
25-30
14-16
25-30
25-30
25-30
25-30
25-30
Cottura grill
ventilata
Coscette di Pollo
Costine di Maiale
Faraona (a pezzi)
Orata al Cartoccio
Pollo (a pezzi)
Quaglie
Salamelle
Verdure
1
0,5
1,2
1
1,5
0,8
1
1
4 oppure 5
4
4
3
3
4
4
4 oppure 5
9,5
14
14
8
14
14
14
14
220 °C
Max
Max
200 °C
Max
Max
Max
Max
25-30
40-45
30-35
20-25
35-40
30-35
20-25
10-15
Page 12
7
IT
Pulizia e manutenzione del forno
Importante
Prima di procedere alla manutenzione del forno occorre staccare sempre la spina dalla presa di corrente o togliere la
corrente dalla linea di alimentazione a mezzo dell’interruttore generale dell’impianto elettrico.
– Le parti in acciaio inox e smaltate rimarranno sempre nuove, se si avrà cura di pulirle con acqua o usando prodotti
specifici, asciugandole accuratamente.
– Bisogna evitare nel modo più assoluto l’uso della paglietta o lana d’acciaio, acido muriatico o altro che possa graffiare
o smerigliare. Evitare l’uso di pulitori a vapore e getti d’acqua diretti.
– Macchie che possono comparire sul fondo del forno, di composizione varia (sughi, zuccheri, albumine e grassi) hanno
sempre origine da schizzi o da traboccamenti di cibi. Gli schizzi si determinano durante la cottura e sono dovuti
all’uso di una temperatura troppo elevata, mentre i traboccamenti sono dovuti all’uso di recipienti troppo piccoli o a
una valutazione errata degli aumenti di volume durante la cottura. Questi due inconvenienti possono essere ovviati
con l’utilizzo di recipienti con bordo alto o utilizzando la leccarda in dotazione al forno. Per quanto riguarda la pulizia
della parte inferiore del forno vi consigliamo di pulire le eventuali macchie presenti a forno tiepido; più si attende per
la pulizia, più sarà difficile togliere le macchie.
Pulizia della porta forno
– La pulizia della porta, sia interna che esterna, deve essere effettuata a forno completamente
raffreddato con acqua calda evitando l’uso di panni ruvidi. Pulire i vetri con appositi detergenti.
– Per le parti smaltate, così come per l’interno del forno, usate acqua calda e detergenti non
abrasivi.
(Solo modelli CR 66 e CS 66)
– Per una pulizia più profonda è possibile smontare la mascherina estetica in plastica della
porta forno. A porta aperta, premere ai lati ed estrarre la mascherina, come indicato in
figura. Per reinserire la mascherina nella porta forno è sufficiente farla scorrere nella sua
sede ed esercitare una lieve pressione fino a far scattare gli agganci laterali.
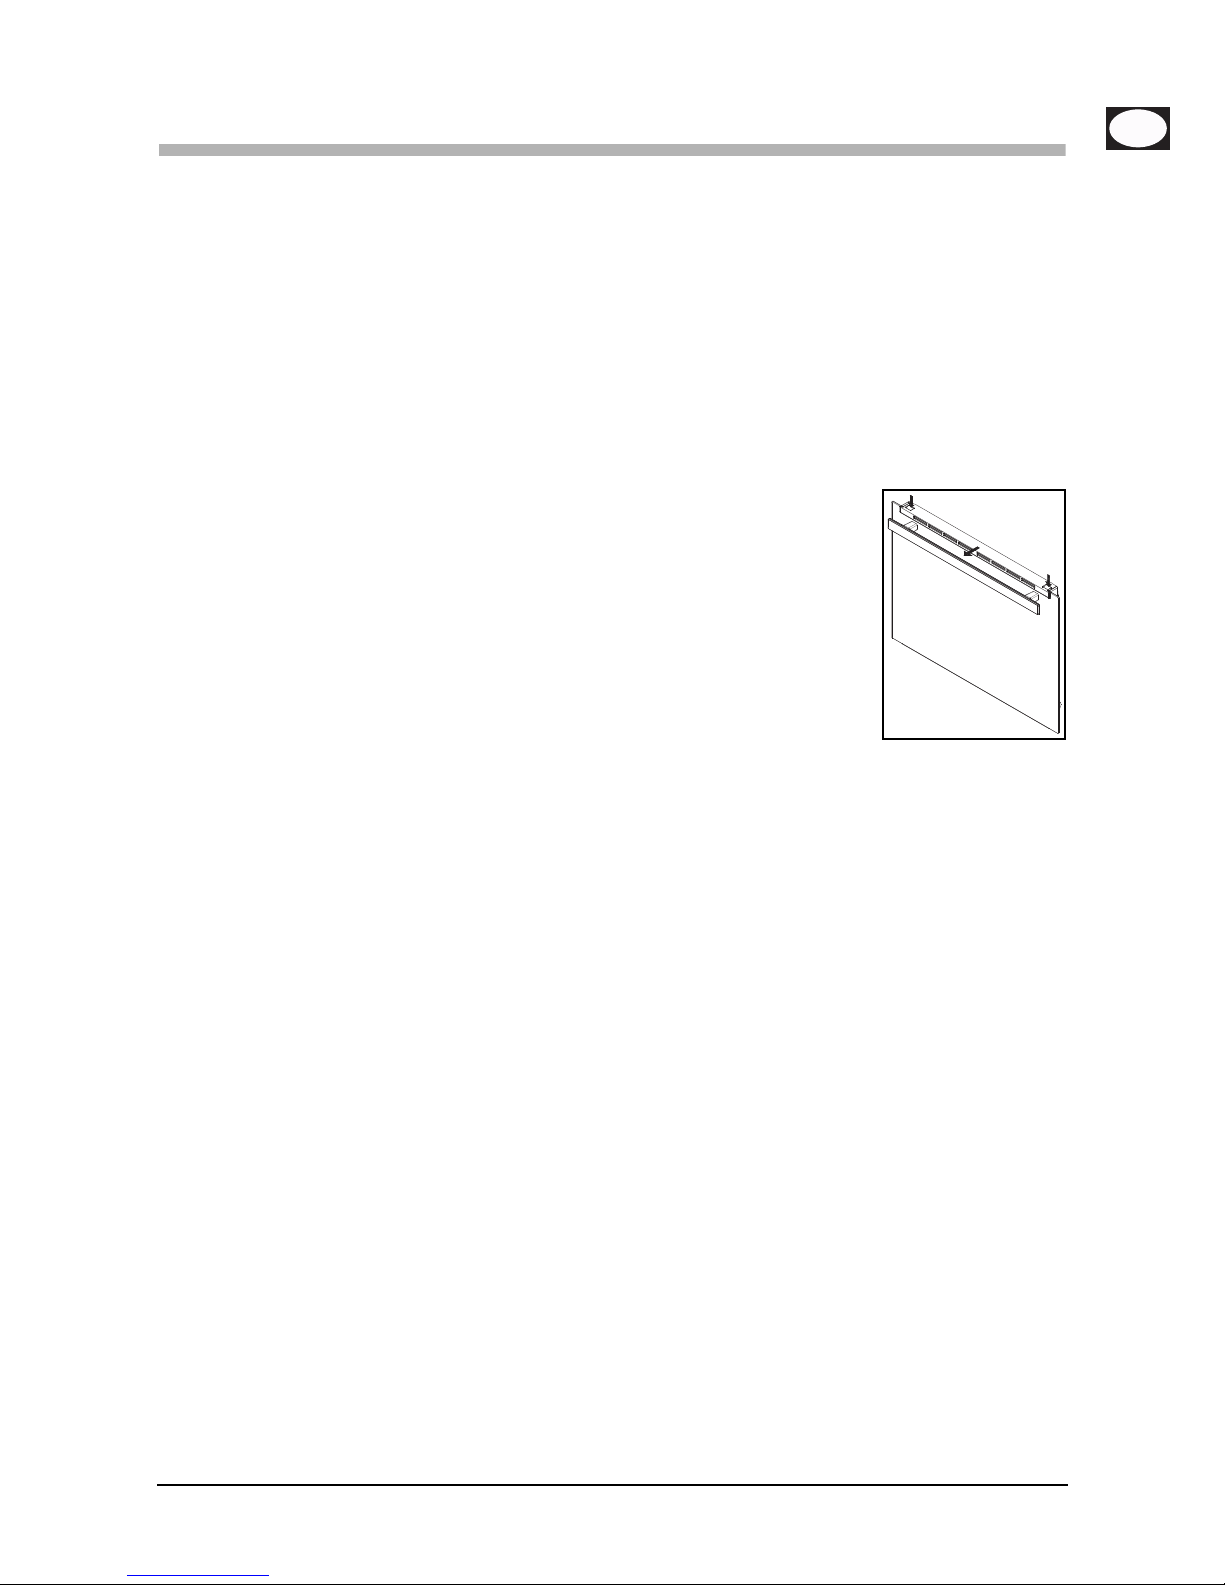
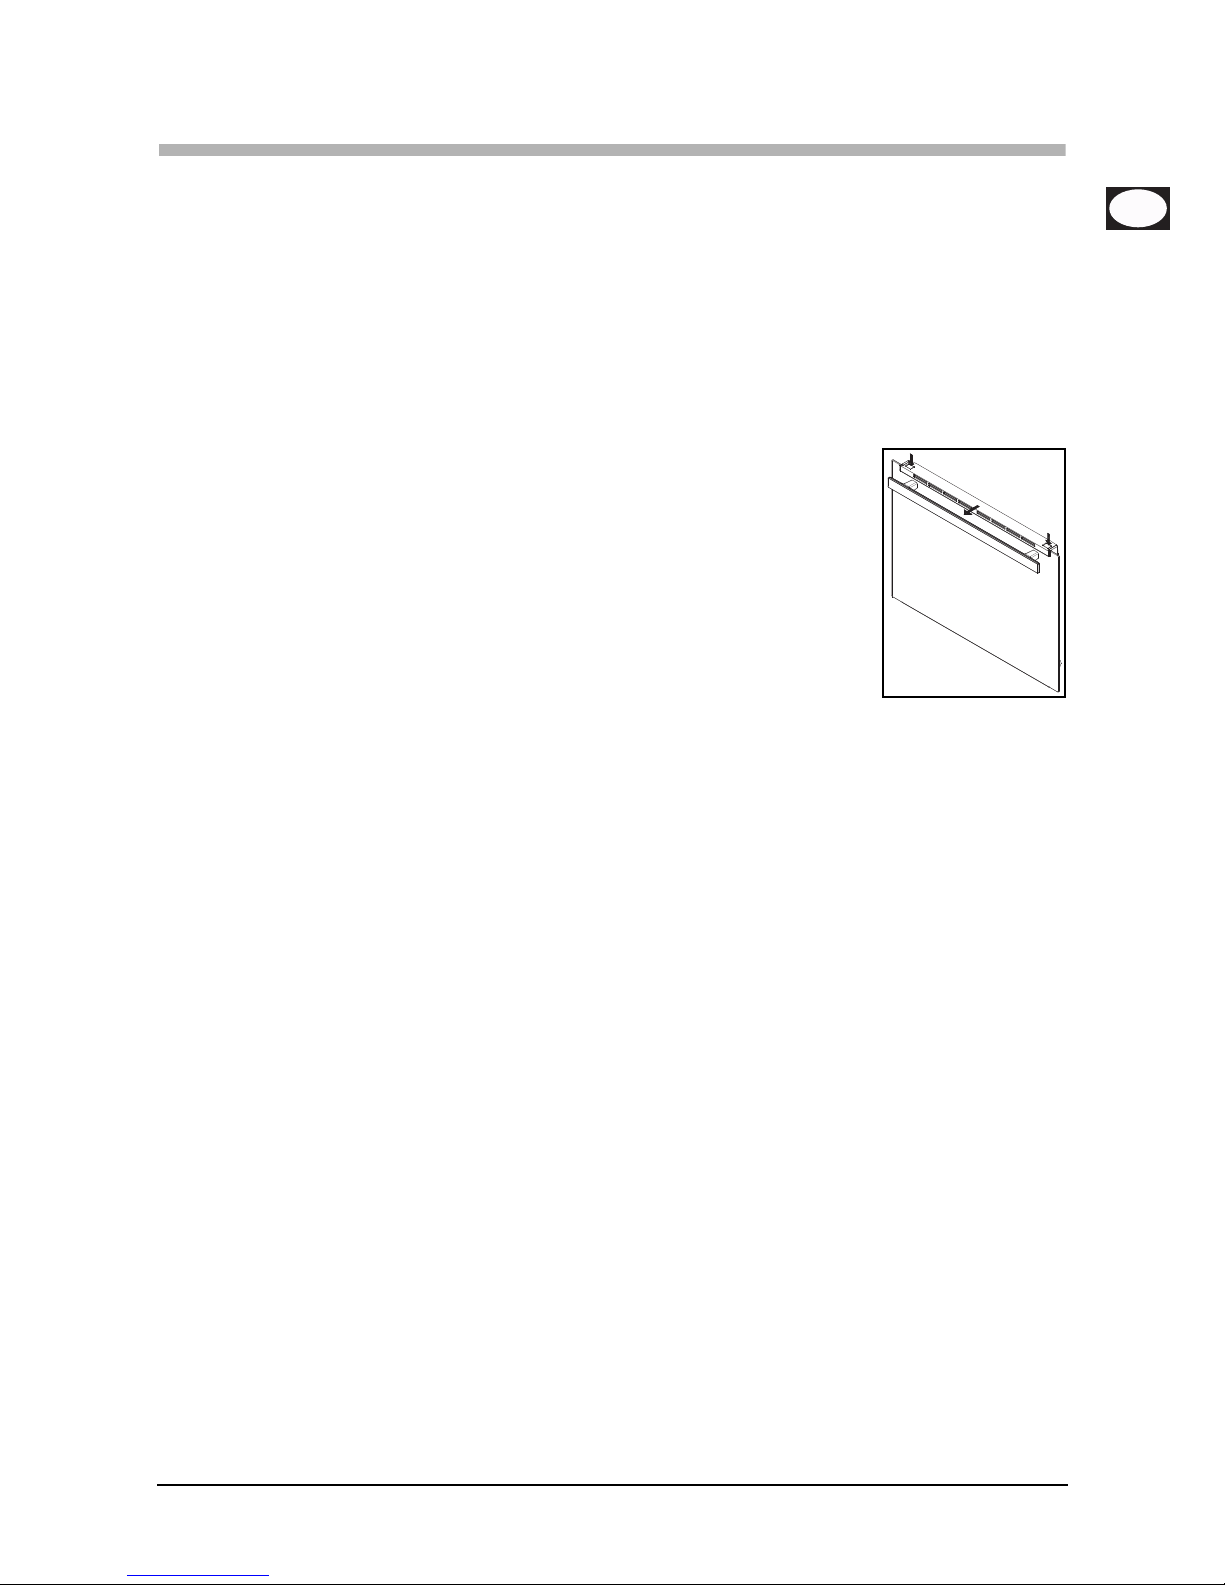
Smontaggio vetro interno porta forno (solo modelli CR, CS e SM) (Fig. 2)
Per una completa pulizia del vetro interno del forno è possibile rimuoverlo totalmente dalla porta operando in maniera
semplice come segue:
• a porta completamente aperta ruotare di 180° i due blocchetti neri (che riportano la dicitura “CLEAN”) all’estremità
inferiore della porta in modo tale che vadano ad inserirsi nelle sedi presenti nella struttura del forno.
NB: Assicurarsi che la rotazione sia completa (in tale posizione il blocchetto effettuerà un piccolo scatto);
• sollevare con cura il vetro interno: i due blocchetti impediranno alla porta di richiudersi (se i blocchetti non venissero
ruotati completamente la rimozione del vetro causerebbe la chiusura immediata della porta stessa).
Dopo aver compiuto le operazioni di pulizia, riposizionare il vetro interno (il verso corretto di montaggio del vetro è
identificato dalla scritta “TEMPERED GLASS” che deve risultare correttamente leggibile) e rigirare nuovamente i due
blocchetti di fissaggio vetro in posizione originale.
ATTENZIONE: non tentare mai la chiusura della porta quando uno solo o entrambi i blocchetti hanno
parzialmente o totalmente svincolato il vetro interno. A pulizia ultimata ricordarsi sempre di rigirare
entrambi i blocchetti prima di richiudere la porta.
Smontaggio vetro interno porta forno (solo modelli TL e CM) (Fig. 3)
Per una completa pulizia del vetro interno del forno è possibile rimuoverlo totalmente dalla porta operando in maniera
semplice come segue:
• a porta completamente aperta ruotare di 180° i due blocchetti neri all’estremità inferiore della porta (fig. 3a e 3b).
NB: Assicurarsi che la rotazione sia completa (in tale posizione il blocchetto effettuerà un piccolo scatto);
• sollevare con cura il vetro interno (fig. 3c): i due blocchetti impediranno alla porta di richiudersi (se i blocchetti non
venissero ruotati completamente la rimozione del vetro causerebbe la chiusura immediata della porta stessa);
• per rimuovere anche il vetro intermedio, sfilare le due guarnizioni laterali (fig. 3d) e quindi sollevare il vetro (fig. 3e);
• dopo aver compiuto le operazioni di pulizia, riposizionare prma il vetro intermedio (fig. 3f) (il verso corretto di
montaggio del vetro è identificato dalla scritta “TEMPERED GLASS” che deve risultare correttamente leggibile)
inserendolo con attenzione nelle gole appropriate situate nella parte superiore della porta e spingendolo in battuta
fino alla fine della gola stessa;
• quindi riposizionare entrambe le guarnizioni (fig. 3g) facendo particolare attenzione al fatto che queste vadano in
battuta contro il profilo superiore della porta.
• infine, riposizionare anche il vetro interno (fig. 3h) e rigirare nuovamente i due blocchetti di fissaggio vetro in
posizione di chiusura originale.
ATTENZIONE: non tentare mai la chiusura della porta quando uno solo o entrambi i blocchetti hanno
parzialmente o totalmente svincolato il vetro interno. A pulizia ultimata ricordarsi sempre di rigirare
entrambi i blocchetti prima di richiudere la porta.
Page 13

8
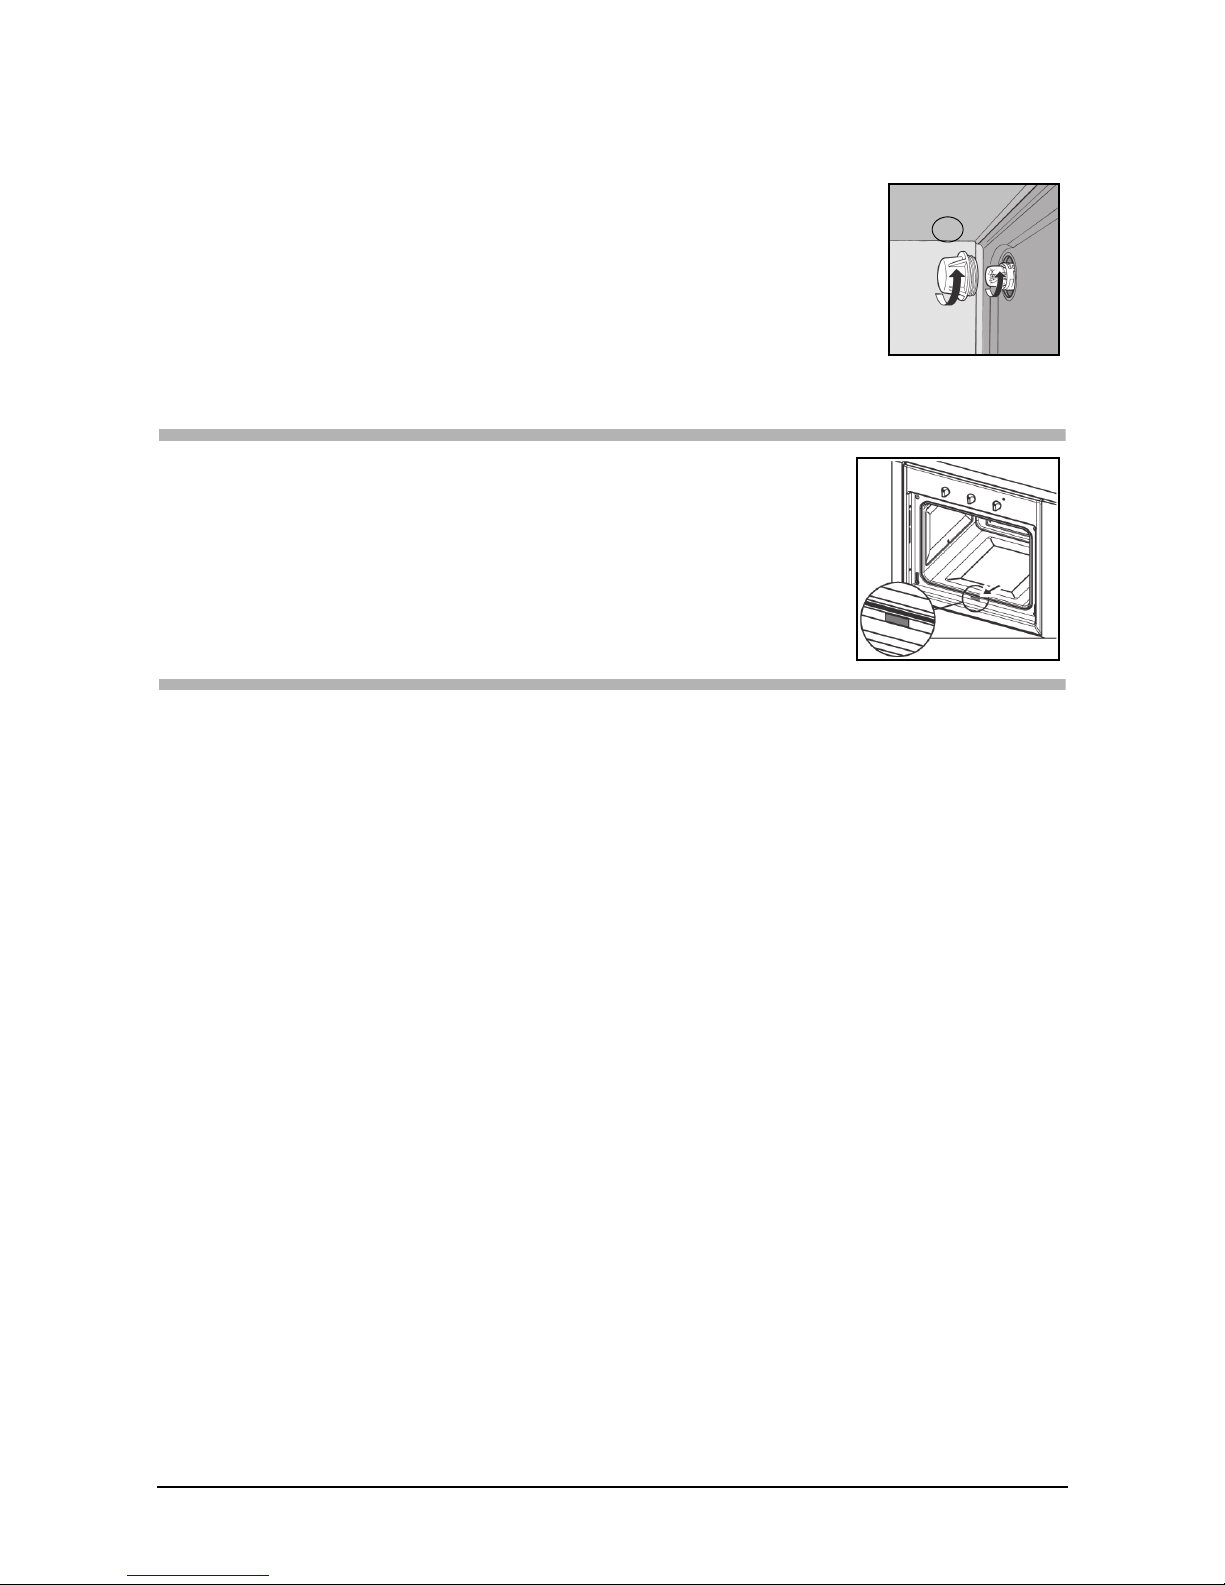
Smontaggio della porta forno (Fig. 4)
Per facilitare la pulizia del forno è possibile smontare la porta, agendo sulle cerniere come segue:
– Le cerniere (A) sono provviste di due cavallotti mobili (B). Sollevando il cavallotto (B) la cerniera si sblocca dalla sua sede.
– Fatto questo bisogna sollevare la porta verso l’alto ed estrarla verso l’esterno; per compiere queste operazioni fare
presa sui fianchi della porta in prossimità delle cerniere.
– Per rimontare la porta infilare prima di tutto le cerniere nelle apposite scanalature.
– Infine, prima di chiudere la porta, non bisogna dimenticare di far ruotare i due cavallotti mobili (B) che sono serviti
per agganciare le due cerniere.
Sostituzione della lampada forno
I Forni Franke sono equipaggiati da una lampada circolare posizionata nella parte posteriore della cavità in alto a sx.
Nel caso si renda necessaria la sostituzione della lampada interna del forno, si deve operare come segue:
– togliere l’alimentazione all’apparecchio tramite l’interruttore omnipolare utilizzato per il
collegamento dell’apparecchio all’impianto elettrico, o scollegare la spina, se accessibile;
– svitare la calottina di protezione di vetro (A);
– svitare la lampada e sostituirla con una resistente ad alta temperatura (300 °C) con le
seguenti caratteristiche:
Tensione: 220-240 V ~ 50-60 Hz
Potenza: 15W
Attacco: (E14) mignon.
– Rimontare la calottina di protezione di vetro (A) e ridate alimentazione all’apparecchio.
Assistenza
Nel caso si verifichino eventuali problemi di funzionamento, contattare il Centro di
Assistenza Tecnica come da elenco allegato.
Non ricorrere mai a tecnici non autorizzati.
Comunicare:
– il tipo di anomalia;
– il modello dell’apparecchio (Art.);
– il numero di serie (S.N.).
Queste ultime informazioni si trovano sulla targhetta caratteristiche riportata sul
certificato di garanzia.
Avvertenze per la sicurezza
• Questo apparecchio non è destinato all'uso da parte di persone con ridotte capacità psichiche o motorie (inclusi i
bambini) o con mancanza di esperienza e conoscenza, a meno che non ci sia una supervisione o istruzione sull'uso
dell'apparecchio da parte di una persona responsabile per la loro sicurezza.
• I bambini devono essere sorvegliati per assicurarsi che non giochino con l'apparecchio.
• Il costruttore non può essere considerato responsabile per eventuali danni derivanti da: errata installazione,
usi impropri, erronei ed irragionevoli.
Rivolgersi assolutamente a personale qualificato nei seguenti casi:
Per garantire l’efficienza e la sicurezza di questo elettrodomestico:
– rivolgetevi esclusivamente a centri di assistenza tecnica autorizzati;
– richiedete sempre l’utilizzo di parti di ricambio originali;
– l’apparecchio è concepito per uso non professionale in abitazioni; non modificatene le caratteristiche;
– sulla targa matricola figurano i simboli dei paesi di destinazione per cui le istruzioni sono valide;
– soltanto quando l’apparecchio è correttamente collegato ad un efficiente impianto di messa a terra, come previsto
dalle norme vigenti, viene garantita la sicurezza elettrica;
– fare attenzione a non toccare gli elementi riscaldanti e alcune parti della porta forno durante l’uso,
in quanto diventano molto calde, ed in particolar modo tenere i bambini a distanza.
Evitate che i bambini abbiano contatti con:
– i comandi e l’apparecchio in genere;
– i componenti dell’imballo (sacchetti, polistirolo, punti metallici, ecc.);
– l’apparecchio, durante e subito dopo il funzionamento del forno, visto il surriscaldamento;
– l’apparecchio inutilizzato (in tal caso vanno rese inoffensive le parti che potrebbero risultare pericolose).
Evitate le seguenti operazioni:
– toccare l’apparecchio con parti del corpo umide;
– usare l’apparecchio quando si è a piedi nudi;
A
Page 14

9
IT
– tirare l’apparecchio o il cavo di alimentazione per staccarli dalla presa di corrente;
– operazioni improprie e pericolose;
– ostruire le aperture di ventilazione o smaltimento calore;
– lasciare il cavo di alimentazione di altri elettrodomestici su parti calde dell’apparecchio;
– l’esposizione ad agenti atmosferici (pioggia, sole);
– l’utilizzo del forno come ripostiglio di oggetti vari;
– l’utilizzo di liquidi infiammabili in prossimità dell’apparecchio;
– l’impiego di adattatori, prese multiple e/o prolunghe;
– installazione o riparazione senza l’intervento di personale qualificato.
Rivolgersi assolutamente a personale qualificato nei seguenti casi:
– installazione (secondo le istruzioni del costruttore);
– nel caso di dubbi sul funzionamento;
– sostituzione della presa in caso di incompatibilità con la spina dell’apparecchio.
Rivolgersi a centri di assistenza autorizzati dal costruttore nei seguenti casi:
– subito dopo aver tolto l’imballaggio, in caso di dubbio sull’integrità dell’apparecchio;
– sostituzione o danneggiamento del cavo di alimentazione;
– guasto o cattivo funzionamento, richiedendo i ricambi originali.
È opportuno effettuare le seguenti operazioni:
– la sola cottura dei cibi evitando altre operazioni;
– prima di qualsiasi operazione di pulizia e manutenzione o in caso di cattivo funzionamento, disconnettere
l’apparecchio dalla rete di alimentazione elettrica;
– per inserire o estrarre recipienti utilizzare guanti da forno;
– dato che all’estremità potrebbe essere più calda a causa di eventuali uscite d’aria, impugnare sempre la maniglia della
porta al centro;
– controllare sempre che le manopole siano nella posizione di arresto quando l’apparecchio non è utilizzato;
– quando si decide di non utilizzare più l’apparecchio, disconnetterlo dalla rete elettrica;
Installazione (Fig. 5)
Importante: l’installazione deve avvenire in conformità alle norme e in accordo alle prescrizioni in vigore. Deve essere
eseguita esclusivamente da personale specializzato e patentato.
Note caratteristiche del mobile
Nei mobili da incasso i componenti (materiali plastici e legno impiallacciato) devono essere tenuti insieme da collanti
resistenti al calore (max 100 °C): materiali e collanti non adatti possono causare deformazioni e scollature. Il mobile deve
consentire il libero passaggio dei collegamenti elettrici. Il mobile in cui viene inserito il forno deve essere sufficientemente
robusto da sopportare il peso dell’apparecchiatura.
Il forno deve essere montato in maniera sicura nella nicchia prevista. Il forno può essere inserito dentro un mobile a
colonna o sotto il piano di un mobile componibile, garantendo comunque una sufficiente aerazione.
Istruzioni di montaggio
Modelli CM e TL (Fig. 6a/6b/6c)
Misurare la larghezza della spalla (S) del mobile che normalmente può essere 16, 18 o 20 mm.
Spalla da 16: posizionare su ciascuna staffa di fissaggio (F) 2 tacchetti (T) con indicato il numero 16.
Spalla da 18: posizionare su ciascuna staffa di fissaggio (F) 2 tacchetti (T) con indicato il numero 18.
Spalla da 20: per la spalla da 20 mm non è necessario inserire alcun tacchetto.
Posizionare le staffe (F) appoggiandole alla spalla del mobile e in basso sul piano di sostegno del forno.
Fissare le staffe (F) mediante le viti (V). Inserire il forno nel mobile, aprire completamente la porta e fissarlo alle staffe (F)
utilizzando le 4 viti (V) ed i 4 distanziali in plastica (D).
Modelli CR, CS, SG e SM (Fig. 6d)
Inserire l’apparecchio nel vano; fissare il corpo al mobile con le 4 viti e le 4 boccole in dotazione utilizzando i fori realizzati
sui fianchi laterali (Fig. 6d).
Nota: Per tutti i modelli, nel caso di inserimento sotto un piano di cottura ruotare preventivamente verso
Dx o verso Sx il raccordo del piano (R) per consentire il corretto inserimento del forno (Fig. 6e).
Page 15
10
IT
Collegamento alla rete elettrica
Il forno FRANKE è fornito di un cavo di alimentazione tripolare con terminali liberi.
Se il forno viene connesso permanentemente alla rete di alimentazione, predisporre un
dispositivo che assicuri la disconnessione dalla rete, con una distanza di apertura dei contatti
(di almeno 3 mm) che consenta la disconnessione completa nelle condizioni della categoria di
sovratensione III. Accertarsi che:
a) la spina e la presa siano adatte per una corrente di 16 A;
b) entrambe siano facilmente raggiungibili e poste in modo che nessuna parte in tensione possa
essere accessibile durante l’introduzione o rimozione della spina stessa;
c) la spina possa essere introdotta senza difficoltà;
d) una volta introdotta la spina, il forno non si appoggi su di essa quando viene installato nel mobile;
e) non siano collegati i terminali di due apparecchi alla stessa spina;
f) nel caso si sostituisca il cavo di alimentazione ne venga utilizzato uno con specifiche 3 x 1,5 mm
2
di tipo H05VV-F;
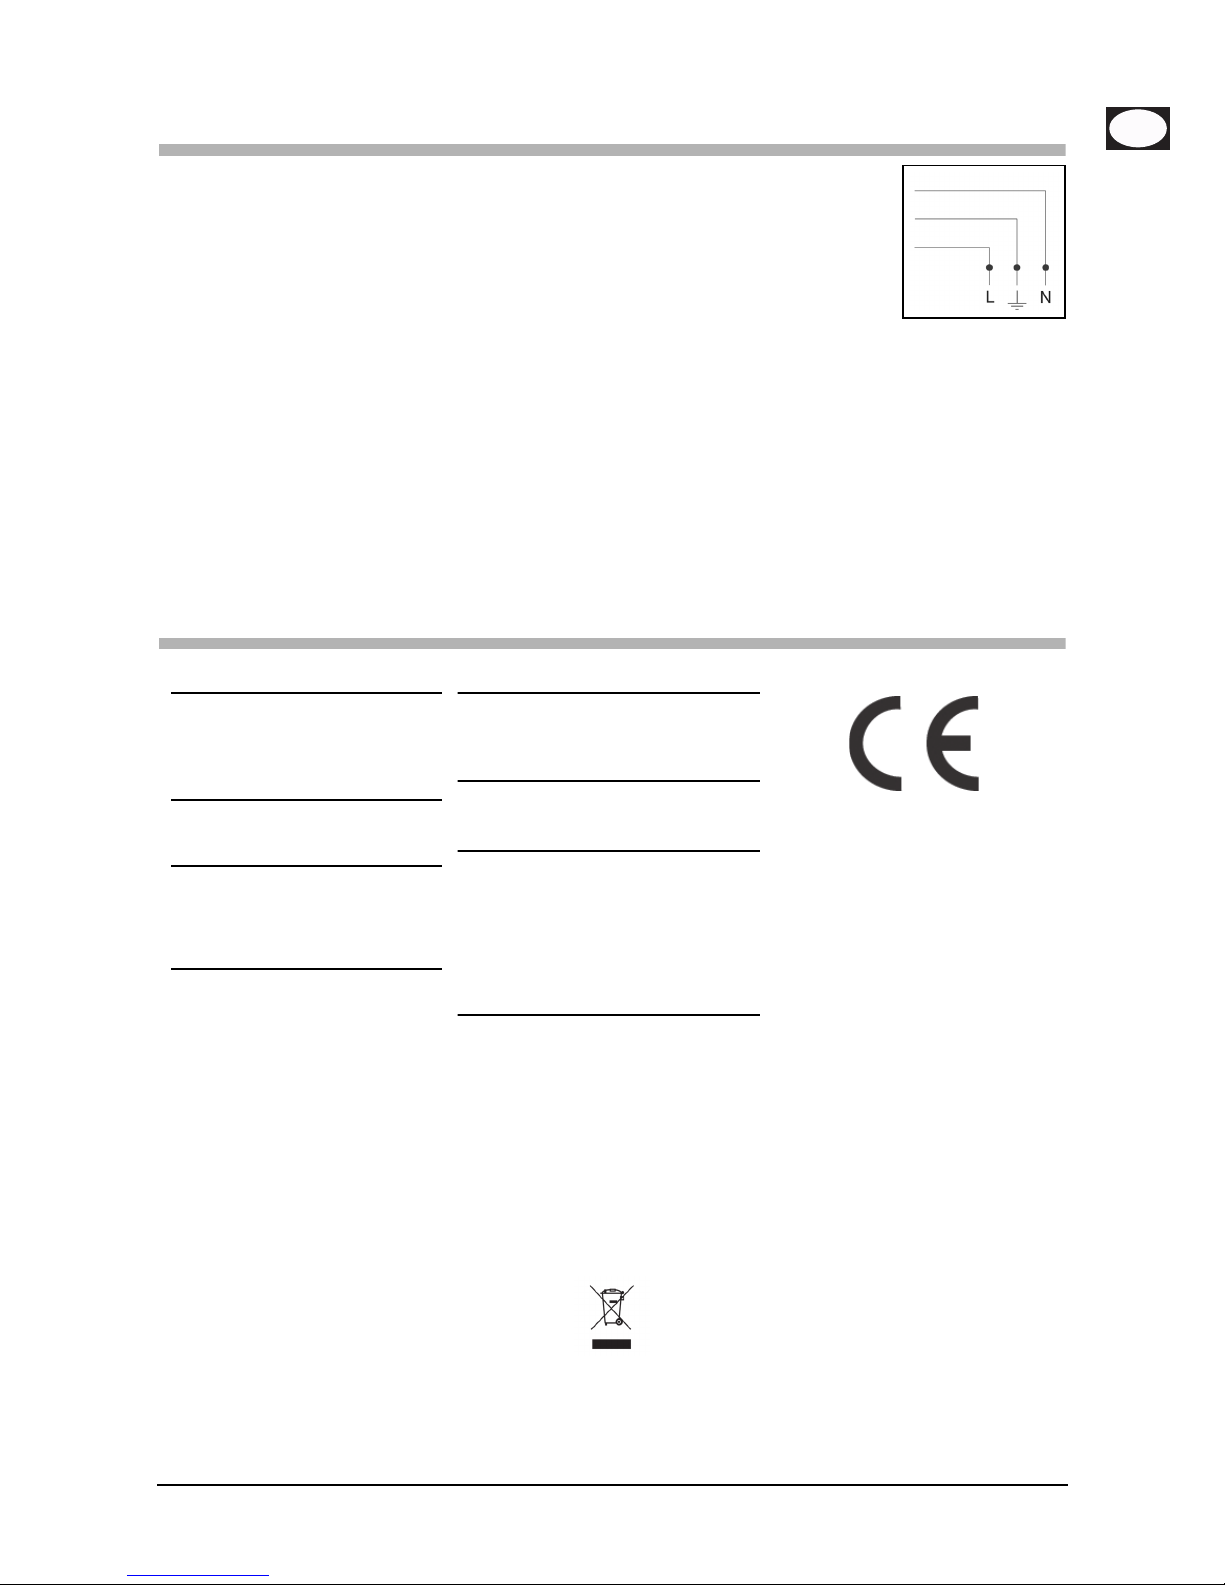
g) è fondamentale che vengano rispettate le polarità di aggancio dei terminali liberi
(Marrone=Fase – Blu=Neutro – GialloVerde=Terra).
N.B: assicuratevi che le caratteristiche della vostra linea elettrica domestica (tensione, potenza massima e corrente),
siano compatibili con quelle del vostro forno FRANKE.
Nota: all'accensione è determinata la frequenza di rete. Quando il timer è collegato a 60 Hz, all'avviamento lampeggia il
simbolo P.
Dati tecnici
INFORMAZIONE AGLI UTENTI
ai sensi dell’articolo del decreto legislativo 25 luglio, n. 15 “Attuazione delle Direttive 2002/95/CE, 2002/96/CE
e 2003/108/CE, relative alla riduzione dell’uso di sostanze pericolose nelle apparecchiature elettriche ed
elettroniche, nonché allo smaltimento dei rifiuti”.
Il simbolo del cassonetto barrato riportato sull’apparecchio indica che il prodotto, alla fine della propria vita utile deve
essere raccolto separatamente dagli altri rifiuti.
L’utente dovrà, pertanto, conferire l’apparecchiatura giunta a fine vita agli idonei centri di raccolta differenziata dei rifiuti
elettronici ed elettrotecnici, oppure riconsegnarla al rivenditore al momento dell’acquisto di una nuova apparecchiatura
di tipo equivalente, in ragione di uno a uno.
L’adeguata raccolta differenziata per l’avvio successivo dell’apparecchiatura dismessa al riciclaggio, al trattamento e allo
smaltimento ambientale compatibile contribuisce ad evitare possibili effetti negativi sull’ambiente e sulla salute e favorisce
il riciclo dei materiali di cui è composta l’apparecchiatura.
Lo smaltimento abusivo da parte dell’utente comporta l’applicazione delle sanzioni amministrative di cui al dlgs. n. 22/1997
(articolo 50 e seguenti del dlgs. n. 22/1997).
Dimensioni utili del forno:
larghezza: 440 mm
profondità: 415 mm
altezza: 312 mm
Volume utile del forno:
57 litri
Consumi (funzione statica):
per raggiungere i 175 °C: 0,32 kWh
per mantenere i 175 °C: 0,62 kWh
consumo totale: 0,94 kWh
Consumi (funzione ventilata):
per raggiungere i 200 °C: 0,42 kWh
per mantenere i 200 °C: 0,77 kWh
consumo totale: 1,19 kWh
Tensione e frequenza di
alimentazione:
220-240 V ~ 50-60 Hz
Potenza totale e portata fusibile:
2300 W - 16 A
Potenza resistenza:
cielo 1000 W
suola 1250 W
grill 2250 W
motoventilatore 30 W
lampada illuminazione forno 15 x 1 W
ventilatore tangenziale 15 W
Questa apparecchiatura è conforme
alle seguenti Direttive Comunitarie:
– 2006/95/EC (Bassa Tensione);
– 2004/108 CEE (Compatibilità
Elettromagnetica).
BLU
GIALLO-VERDE
MARRONE
Page 16
11
GB
Contents
Introduction...................................................................................................................................... 11
A close view...................................................................................................................................... 11
Switching on the first time................................................................................................................ 12
Suggestions ....................................................................................................................................... 12
Operation ......................................................................................................................................... 12
Cooking table ................................................................................................................................... 16
Oven cleaning and maintenance....................................................................................................... 17
Support............................................................................................................................................. 18
Safety instructions............................................................................................................................. 18
Installation (Fig. 5)............................................................................................................................. 19
Installation instructions ..................................................................................................................... 19
Electrical connection ........................................................................................................................ 20
Technical data ................................................................................................................................... 20
Introduction
Thank you for choosing a Franke product.
Before using the appliance, please carefully read the instructions and advice contained in this manual. In this way you will
be able to make best use of the appliance and also ensure its lasting efficiency. Keep this booklet for further reference.
A close view
Programme selector knob
For selecting the oven mode according to the type of cooking required. When the knob is
set to any programme, the oven light comes on indicating that the oven is switched on.
Programmer
Franke ovens have various cooking time management and control systems; refer to
page 13 for specific detailed instructions. Just identify the type of control your oven is
equipped with, to be guided in correct use of the function.
Thermostat indicator
Indicated by the symbol , it signals that the oven heating elements are on. It goes off
when the set temperature has been reached, and comes on again whenever oven heating
is reactivated. It is useful for checking if the temperature has been reached, before
introducing the food.
Temperature control knob (Thermostat)
Used to set the temperature required for the type of food being cooked, keeping it
constant during cooking. To select the required temperature, turn the knob clockwise,
bringing the pointer to the corresponding number. Max. temperature is approx. 260 °C.
Rack and drip-tray runners
Used for correctly positioning the racks and drip-trays in 5 predetermined positions (1 to
5 starting from the bottom); the cooking table (page 16) indicates the best position for
each type of cooking.
Drip-tray
Normally used for collecting juices from grilled food or for cooking food directly;
the drip-tray must be removed from the oven if not used. The drip-tray is in “AA”
food-grade enamelled steel. N.B.: To achieve optimal cooking results it is advisable to
insert the drip-tray with the inclined part towards the rear wall of the oven compartment.
Rack
Used for supporting pans, pastry moulds and any containers other than the drip-trays
provided, or for cooking meat and fish mainly with the grill and turbo grill functions,
toasting bread, etc. Direct contact of the rack with food is not recommended.
ABC
D
E
F
G
D
A
F
G
E
Page 17

12
Switching on the first time
When using the oven for the first time, operate it empty with the temperature knob set to maximum for at least
40 minutes, keeping the door completely open and airing the room.
The odour noticed during this operation is due to the evaporation of substances used to protect the oven during the
period between manufacture and installation. After the 40 minutes, the oven will be ready to use.
Suggestions
For successful cooking, never place your dishes in the oven when it is cold; wait until it has reached the set temperature.
During cooking, never place pots or containers directly on the oven floor; place them above the racks or drip-trays
provided, on one of the five shelves available; failure to do so could damage the oven enamel.
Never cover the walls of the oven with aluminium foil, especially in the lower part of the cooking compartment.
Any repairs must be carried out by specialised, licensed personnel.
Contact our nearest service centre and demand only original spare parts.
Your Franke oven uses a special enamel which is easy to keep clean, however it is advisable to clean it frequently to avoid
baking on grime and previous cooking residues.
Any self-cleaning panels (if provided) can be cleaned with soap and water (see cleaning instructions).
N.B.: Before switching the oven on, read the timer instructions (see page 14).
– If the oven has an automatic cooking or switching off programmer, select the “manual” option indicated by the
symbol to use the oven in manual mode.
Operation
This oven combines the advantages of “static” natural convection ovens with those of modern “fan” ovens. It is a very
versatile appliance which enables safe and easy selection of 6 different cooking methods. Use knobs (A) and (D) on the
control panel to select the required programmes and temperature. For best use of your Franke oven, consult the
cooking table on page 16.
Cooling fan
In order to reduce the temperature at the door, control panel and sides, the Franke oven is equipped with a cooling fan
which is automatically activated when the oven is hot. When the fan is on, air blows from the front of the oven between
the front panel and oven door; special attention has been paid to ensure that the exiting air does not disturb the kitchen
environment and that noise is kept to a minimum.
To protect kitchen units, the fan keeps running after cooking until the oven has cooled down sufficiently.
Oven light
This symbol corresponds to switching on of the oven light without activation of any type of heating.
This option is useful for cleaning the oven when it is switched off, to see the cooking compartment.
Cooking programmes
Natural conventional cooking
Set the thermostat knob (D) between 50 °C and Max. (260 °C).
The heat source is from above (roof heating element) and below (floor heating element). This is the
conventional cooking function which ensures even cooking using a single shelf.
Fan-Assisted cooking
Set the thermostat knob (D) between 50 °C and Max. (260 °C).
The top (roof) heating element, bottom (floor) heating element and fan inside the oven are activated.
The constant and uniform heat cooks and browns the food evenly. Various dishes can be cooked at the same
time, using a maximum of 2 shelves.
Bottom fan-assisted cooking
Set the thermostat knob (D) between 50 °C and Max. (260 °C).
The bottom (floor) heating element and fan are activated. Ideal for cooking fish and frozen and precooked
products in general. Its use with patisserie products is very effective.
Page 18
13
GB
Top fan-assisted cooking
Set the thermostat knob (D) between 50 °C and Max. (260 °C).
The top (roof) heating element and the fan are activated. The low power and the fan allow very gentle and
even cooking. Ideal for dry pastry and certain types of baked pasta.
Grilling
The thermostat knob (D) should normally be set to Max. (260 °C), however a lower temperature
can be set, in which case grilling will be slower.
The grill heating element at the top of the oven switches on. In this case the fast infrared surface cooking
keeps the meat tender on the inside; the grill can also be used to quickly toast up to 9 slices of bread.
The Franke oven is designed to grill food with the oven door completely closed.
N.B.: The grill heating element is very hot when in use; be careful not to touch it accidentally when handling
food to be grilled. In any case, Franke has designed the oven opening to protect hands as much as possible.
Turbo grill cooking
The thermostat knob (D) should normally be set to Max. (260 °C), however a lower temperature
can be set, in which case grilling will be slower.
The grill heating element at the top of the oven and the fan are activated. It combines one-way heat radiation
with forced air circulation inside the oven. This prevents the surface of the food from burning and increases
heat penetration. Excellent results are obtained using the turbogrill for mixed meat and vegetable kebabs,
sausages, spare-ribs and lamb chops, broiled chicken, quail with sage, pork fillets, etc.
End of cooking timer knob
The end of cooking timer is a practical device that turns the oven off automatically at a set
time in an interval of 1 to 120 minutes. To use the end of cooking timer, the ringer must be
wound up by turning the knob (B) almost one full turn clockwise; then, turning back, set
the required time by aligning the number corresponding to the minutes with the fixed
reference on the front panel. At the end of the set time, the ringer sounds and the oven is
automatically switched off.
N.B.: The oven stays hot at around the set cooking temperature for a long time after it
has been switched off; therefore to avoid overcooking or burning the food, it is advisable
to remove it from the oven.
N.B.: To use the oven in manual mode, i.e. without using the end of cooking timer, align
the knob pointer with the fixed symbol on the front panel. When the oven is turned
off, the end of cooking programmer can be used as a normal timer.
End of cooking clock
This clock is already set for manual oven use, therefore cooking is possible even without
adjusting it.
Right knob
Press the right knob to select in sequence the functions to be activated (timer, end of
cooking, cooking start, time setting), signalled by the respective LED blinking.
Press this knob briefly to check already programmed settings (Query), or press it for
about 2 seconds to cancel settings (Reset).
Left knob
Turn the left knob to set the hands of the time clock relevant to the activated function
(LED blinking).
B
IVI
I
V
I
I
IX
V
V
I
VI
III
I
X
X
III
IXI
TIMER
START
STOP
B
Page 19

14
LEDs
– blinking: ready for setting or signalling end of function (together
with the ringer)
– lit: function running
Timer ( )
To set the timer, press the knob on the right once (the corresponding
LED begins to blink); then turn the knob on the left to move the hands
in order to set the timer duration. Press the right knob again to
confirm the setting; the corresponding LED changes from blinking to
steady. The hands will then return to their original position to indicate
the current time: when the set time is reached, the ringer sounds. This
sound can be stopped by pressing the right knob.
The timer does not control oven heating.
End of cooking ( )
To set the end of cooking time, press the right knob twice (the LED for the symbol begins to flash); then turn the
knob on the left to move the hands in order to set the end of cooking time.
The LED will blink for the next 10 seconds (for possible adjustments), after which the setting will be acquired and the
LED becomes steady.
The same effect is obtained by pressing the right knob twice during blinking.
At the end of cooking, oven heating will be deactivated and the ringer will sound for 1 minute; this sound can be stopped
by pressing the right knob.
N.B.: At the end of cooking, the oven remains at a temperature close to the previously set value for several minutes; it is
therefore wise to remove the food from inside so as to avoid overcooking it.
End of cooking ( ) with delayed start ( )
Delayed start of cooking can only be activated following the end of a cooking process; when set, pressing the right knob
confirms the “stop”, and at the same time activates the blinking LED for the symbol . Turn the left knob to also set
the start of cooking time (naturally this will be before the end, therefore the hands can only be moved back). Confirm by
pressing the right knob again. The data can also be automatically acquired by allowing the blinking to continue for
10 seconds. The LEDs for symbols and remain lit and the oven will switch on at the set time, when only the
LED for the symbol will remain lit.
At the end of cooking, the ringer will sound for 1 minute; this sound can be stopped by pressing the right knob.
Setting the time of day ( )
To set the correct time, just press the right knob three times (the LED for the clock symbol starts blinking), then turn the
left knob. After setting the right time, press the right knob to confirm.
Electronic cooking programmer
It enables oven programming in the following modes:
• delayed start of cooking with set duration;
• immediate start of cooking with set duration;
•timer.
Setting the digital clock
When the appliance has been connected to the mains or after a power failure the
display will flash on: “0.00”.
Press the + and – buttons together for a few seconds. The time of day can be
adjusted with the + and – buttons, while the dot between the hours and minutes
flashes. If the time setting mode is selected when an automatic programme is
active, the automatic programme is cancelled.
Possible time adjustments can be made by repeating the steps described above.
B
B
Page 20
15
GB
Acoustic signal frequency modification
The frequency of the acoustic signal can be changed if a cooking cycle is not
programmed (therefore the display shows the time of day). Press the + and –
buttons (from the time modification menu) together, then press Mode or Set to
select the menu for modifying the acoustic signal frequency. The acoustic signal
frequency can be modified by repeatedly pressing the Mode or Set button; “ton1”,
“ton2”, “ton3” will appear on the display.
Manual oven operation
Once the time has been set, the programmer automatically switches to manual
mode.
Starting delayed cooking with set duration
When the time of the day is displayed, press the Mode or Set button twice to set the duration, then press it again to set
the end of cooking time. Set the required time with the + and – buttons. During duration or end time adjustment mode
selection, the Auto symbol remains lit.
Once a programme duration is set, the end time cannot be decreased. Likewise, the duration of a programme cannot be
prolonged once the end time is set.
The end time and duration settings define programme start time as follows:
start time = end time - duration.
After setting the duration and end time, the display still shows the end time. The programme starts when the time of day
coincides with the start time: the Auto symbol lights up steadily and the symbol starts flashing. After the start of
cooking, the display shows the countdown. If only the end of cooking time is selected (the duration is = 0), cooking starts
and the display shows the countdown.
The Auto symbol remains lit during the wait for delayed start and for the entire duration of cooking.
The symbol flashes during the wait for delayed start and remains fixed when cooking starts.
An acoustic signal sounds at the end of cooking; to silence it, press any button or allow the signal to continue
for its duration.
Semiautomatic programme with duration or end time
Programme time setting
To select the programme duration or end time press the Mode or Set button twice and set the required time with the +
and – buttons. During duration or end time adjustment mode selection, the corresponding Auto symbol flashes.
Once a programme duration is set, the end time cannot be decreased. Likewise, the duration of a programme cannot be
prolonged once the end time is set.
Programme run
When the automatic programme is in progress (and therefore the cooking function is active), the Auto symbol remains lit
and the remaining cooking time appears on the display in countdown form. The symbol also remains lit.
Automatic programme end
At the end of the programme duration or when the end time is reached, the corresponding symbol goes off. At the
end of the automatic programme, the “Auto” symbol flashes, the display shows “End” and an intermittent acoustic signal
(which can be stopped by pressing any button) sounds.
Timer function
The timer allows the setting of a time from which a countdown begins. This function does not turn the oven on or off,
but only sounds an audible alarm when the time has elapsed.
Press the Mode or Set button once; the display shows:
The bell symbol flashes, then the alarm duration can be set with the + and – buttons. When this function is active,
the bell symbol remains lit and the display shows the remaining time (countdown).
At the end of the time an acoustic signal (which can be stopped by pressing any button) sounds.
Modifying/deleting data
• The set data can be changed at any time by pressing the + and – buttons together.
• Cancelling the cooking duration automatically ends the function, and vice versa.
• In case of programmed operation, the appliance will not accept end of cooking times prior to those of start of
cooking proposed by the appliance itself.
N.B.: The oven stays hot at around the set cooking temperature for a long time after it has been switched off;
therefore to avoid overcooking or burning the food, it is advisable to remove it from the oven.
B
Page 21
16
Cooking table
N.B.: The indications given in the table are the result of cooking tests carried out by a team of professional chefs. They are provided
as a guide only, and can be changed according to personal tastes.
Selection knob
setting
Type of food Weight
(kg)
Shelf position Preheating
time (min.)
Thermostat
knob setting
Duration
(min.)
Natural
conventional
cooking
Roast pork
Omelettes
Cod-gilthead-turbot
Bread rolls
Pies
Freshwater fish
Polenta with sauce
Cheesecakes
1
1.5
1
1
1
1.5
0.5
1.5
3
2
3
2-4 cont.
2
3
2
2
9.5
10.5
9.5
9.5
10.5
10.5
9.5
9.5
180 °C
200 °C
180 °C
175 °C
200 °C
200 °C
180 °C
180 °C
65-75
25-30
15
25-30
40-45
35-40
25-30
25-30
Fan-Assisted
cooking
Roast pork
Baked rabbit
Crescia Marchigiana (quick flat bread)
Baked crayfish
Cod-gilthead-turbot
Bread rolls
Fruit tarts
Meat & veg pies
1
1
1
0.5
2
2
1.5
2
3
2
2
3
2-4 cont.
2-4 cont.
2
3-5 cont.
9
9.5
10
10
7.5
9
9
9
180 °C
190 °C
200 °C
200 °C
150 °C
180 °C
175 °C
180 °C
60-70
55-65
25-30
30-40
25-30
25-30
30-35
40-45
Bottom
fan-assisted
cooking
Chicken breast
Veal slices
Roast beef
Tu na ste ak s
Swordfish fillets
Crayfish
Meringues
Butter biscuits
Raised cakes
Almond pies
1
1
1
1
1
1
0.8
1
0.8
1
2 or 3
2
3
2
3
2
2
2
2
2 or 3
To speed up
preheating time,
use the
Fan-Assisted
Cooking
function.
170 °C
180 °C
170 °C
160 °C
160 °C
180 °C
90 °C
160 °C
170 °C
160 °C
20
20
60
20
20
30
120
30
40
35
Top fan-assisted
cooking
Tortellini au gratin
Potato dumplings
Swordfish
Mussels
Scallops
Roast potatoes
Cannelloni
0.5
0.5
0.5
1
1
0.5
1
3
3
5
4
4
4
3
To speed up
preheating time,
use the
Fan-Assisted
Cooking
function.
Max
Max
200 °C
Max
200 °C
200 °C
Max
25-30
25-30
12-15
10-12
10-12
18-20
25-30
Grilling Chicken wings
Chops
Scallops
Roast potatoes
Freshwater fish
Tomatoes au gratin
Eel kebabs
Turkey kebabs
1
0.8
0.5
1
1
0.4
0.5
0.5
4 or 5
3
3 or 4
3
3 or 4
2 or 3
3
4
7
7
7
7
7
7
7
7
Max
Max
Max
Max
Max
Max
Max
Max
25-30
25-30
14-16
25-30
25-30
25-30
25-30
25-30
Turbo grill cooking Chicken legs
Spare-ribs
Guinea fowl (pieces)
Gilthead en papillote
Chicken (pieces)
Quails
Sausages
Veg eta bles
1
0.5
1.2
1
1.5
0.8
1
1
4 or 5
4
4
3
3
4
4
4 or 5
9.5
14
14
8
14
14
14
14
220 °C
Max
Max
200 °C
Max
Max
Max
Max
25-30
40-45
30-35
20-25
35-40
30-35
20-25
10-15
Page 22
17
GB
Oven cleaning and maintenance
Important
Before servicing the oven, always unplug it or disconnect the power at the main electrical system switch.
– The stainless steel and enamelled parts of the oven will stay as good as new if regularly cleaned with water or special
detergents. Take care to dry them thoroughly after cleaning.
– Never use scouring pads, steel wool, muriatic acid or other products which could scratch or mark the surface.
Do not use steam cleaners or direct jets of water.
– Stains on the base of the oven, due to various cooking products (sauces, sugar, egg white and fat) are always produced
by spills and splashes. Splashes occur during cooking and are the result of cooking at too high a temperature, while
spills are due to the use of cooking dishes which are too small, or an incorrect estimate of increases in volume during
cooking. These two problems can be solved by using cooking pots with high rims or using the drip-tray supplied
with the oven. To clean the lower part of the oven, it is advisable to remove any stains while the oven is still warm;
stains are easy to deal with when fresh.
Cleaning the oven door
– The oven door must be cleaned (internally and externally) when the oven is completely cold,
using hot water. Do not use abrasive cloths. Clean the glass using special detergents.
– Clean the enamelled surfaces with hot water and non-abrasive detergent, just as for the
oven interior itself.
(Models CR 66 and CS 66 only)
– The oven door decorative plastic panel can be removed for more thorough cleaning. With
the door open, press at the sides and remove the panel, as shown in the figure. To refit the
panel in the oven door, just slide it in place and press lightly to engage the side fastenings.
Removing the oven door internal glass
(models CR, CS and SM only) (Fig. 2)
The oven door can be removed to enable thorough cleaning of the internal glass, by proceeding as follows:
• with the door completely open, turn the two black blocks (with the word “CLEAN”) at the bottom of the door 180°
so that they fit into the seats in the oven structure.
N.B.: Make sure you turn them fully (the blocks will click into this position).
• Carefully lift the internal glass: the two blocks will prevent the door from closing (if the blocks are not turned fully,
removing the glass will cause immediate closing of the door).
After carrying out the cleaning operations, refit the internal glass (the correct position is indicated by the wording
“TEMPERED GLASS”, which must be perfectly legible) and turn the two glass retaining blocks back to their original
position.
CAUTION: Never try closing the door when only one or both blocks have partially or completely freed the
internal glass. After cleaning, always remember to turn both blocks before closing the door.
Removing the oven door internal glass (models TL and CM only) (Fig. 3)
The oven door can be removed to enable thorough cleaning of the internal glass, by proceeding as follows:
• with the door completely open, turn the two black blocks at the bottom of the door 180° (fig. 3a and 3b).
N.B.: Make sure you turn them fully (the blocks will click into this position);
• carefully lift the internal glass (fig. 3c): the two blocks will prevent the door from closing (if the blocks are not turned
fully, removing the glass will cause immediate closing of the door);
• to remove the glass in between, slide out the two side gaskets (fig. 3d) and then lift out the glass (fig. 3e);
• after carrying out the cleaning operations, refit the intermediate glass (fig. 3f) (the correct position is indicated by the
wording “TEMPERED GLASS”, which must be perfectly legible) by inserting it carefully into the relevant grooves
located at the top of the door and pushing it all the way to the end of the groove;
• then replace both gaskets (fig. 3g), taking extra care to ensure they are inserted as far as possible, until they come
into contact with the upper edge of the door;
• finally, refit the internal glass (fig. 3h) and turn the two glass retaining blocks back to their original locking position.
CAUTION: Never try closing the door when only one or both blocks have partially or completely freed the
internal glass. After cleaning, always remember to turn both blocks before closing the door.
Removing the oven door (Fig. 4)
To facilitate oven cleaning, the oven door can be removed by operating on the hinges as follows:
– The hinges (A) are equipped with two moveable locks (B). Lift the lock (B) to release the hinge.
– Then lift the door up and pull it outwards; to do this, hold the door at the sides near the hinges.
– To refit the door, first slide the hinges into their grooves.
– Before closing the door, remember to turn the two locks (B) used as hinge attachments.
Page 23
18
Replacing the oven lamp
Franke ovens are equipped with a circular lamp positioned in the top left area at the back of the compartment.
To replace the oven lamp, proceed as follows:
– turn off the power to the appliance by means of the omnipolar switch used for connecting it
to the electrical system, or disconnect the plug if accessible;
– unscrew the glass cover (A);
– unscrew the lamp and replace it with one resistant to high temperatures (300 °C), with the
following characteristics:
Voltage: 220-240 V ~ 50-60 Hz
Power: 15 W
Connection: (E14) small.
– Refit the glass cover (A) and reconnect the power supply.
Support
In the event of any operation problems, contact a Franke Technical Service Centre
(refer to the attached list).
Never use the services of unauthorised technicians.
Specify:
– type of fault;
– appliance model (Art.);
– serial number (S.N.).
This information is given on the appliance data plate, on the warranty certificate.
Safety instructions
• This appliance is not intended for use by persons (including children) with limited mental or motor abilities or
without experience and knowledge of it, unless supervised or instructed in its use by someone responsible for their
safety.
• Children must be supervised to ensure that they do not play with the appliance.
• The Manufacturer declines any liability for damage due to: incorrect installation, improper, incorrect or unreasonable
use.
Always contact qualified personnel in the following cases:
To ensure safe and efficient operation of this electrical appliance:
– only contact authorised service centres;
– always demand the use of original spare parts;
– the appliance is designed for non-professional household use; do not modify its features;
– the data plate lists the symbols indicating the countries to which the instructions apply;
– appliance electrical safety is guaranteed only when it is connected to an earthing system in compliance with current
regulations;
– do not touch the heating elements or any parts of the oven door during use, since they become very hot,
and in particular keep children away.
Do not allow children to touch:
– the controls and the appliance in general;
– the packing elements (bags, polystyrene, staples, etc.);
– the appliance during and immediately after oven use, since it becomes very hot;
– the appliance when not used (make any potentially hazardous parts safe).
Do not:
– touch the appliance with wet parts of the body;
– use the appliance when barefoot;
– pull the appliance or power cable to unplug it from the socket;
– carry out improper or hazardous operations;
– block the ventilation and cooling openings;
– leave the power cables of other electric appliances on hot parts of the appliance;
– expose the oven to atmospheric agents (rain, sun);
– use the oven to store various objects;
– use flammable liquids near the appliance;
– use adapters, multi-sockets and/or extension leads;
– allow anyone except qualified personnel to install or repair the appliance.
A
Page 24
19
GB
Always contact qualified personnel in the following cases:
– installation (according to the manufacturer's instructions);
– doubts regarding appliance operation;
– replacing the socket if incompatible with the appliance plug.
Contact service centres authorised by the manufacturer in the following cases:
– immediately after unpacking, in case of doubts about appliance integrity;
– replacing or damage to the power cable;
– malfunction or poor operation; always demand original spare parts.
Important:
– only use the appliance to cook food;
– before cleaning or maintenance or in case of malfunction, disconnect the appliance from the power supply;
– use oven gloves when placing containers in the oven or removing them;
– since the end of the door handle may be hotter due to exiting hot air, always grip it in the middle;
– always make sure the control knobs are in the off position when the oven is not in use;
– if the oven is no longer to be used, disconnect it from the power supply.
Installation (Fig. 5)
Important: Installation must be carried out in compliance with current standards and regulations. It must be only be
carried out by specialised and licensed personnel.
Cabinet requirements
For fitted units, the components (plastic materials and veneered wood) must be assembled with heat-resistant adhesives
(max. 100°C): unsuitable materials and adhesives can result in warping and ungluing. The cabinet must allow sufficient
room for the electrical connections. The cabinet in which the oven is fitted must be strong enough to take the weight of
the equipment.
The oven must be securely installed in the recess. The oven can be installed in a column cabinet or under the top of a
modular unit, provided sufficient ventilation is guaranteed.
Installation instructions
Models CM and TL (Fig. 6a/6b/6c)
Measure the width of the cabinet shoulder (S), which normally can be 16, 18 or 20 mm.
16 mm shoulder: on each fixing bracket (F) position 2 lugs (T) marked with the number 16.
18 mm shoulder: on each fixing bracket (F) position 2 lugs (T) marked with the number 18.
20 mm shoulder: the 20 mm shoulder does not require the use of lugs.
Position the brackets (F) against the cabinet shoulder and at the bottom on the oven support top.
Secure the brackets (F) with the screws (V). Position the oven inside the cabinet, open the door fully and fix it to the
brackets (F) using the 4 screws (V) and the 4 plastic spacers (D).
Models CR, CS, SG and SM (Fig. 6d)
Fit the appliance in the compartment; fix the oven to the cabinet with the 4 screws and the 4 bushings provided, using
the holes prepared in the side panels (Fig. 6d).
Note: (applies to all models) If the oven is to be fitted under a cooktop, firstly turn the top connection (R)
to the right or left so that the oven fits properly (Fig. 6e).
Page 25
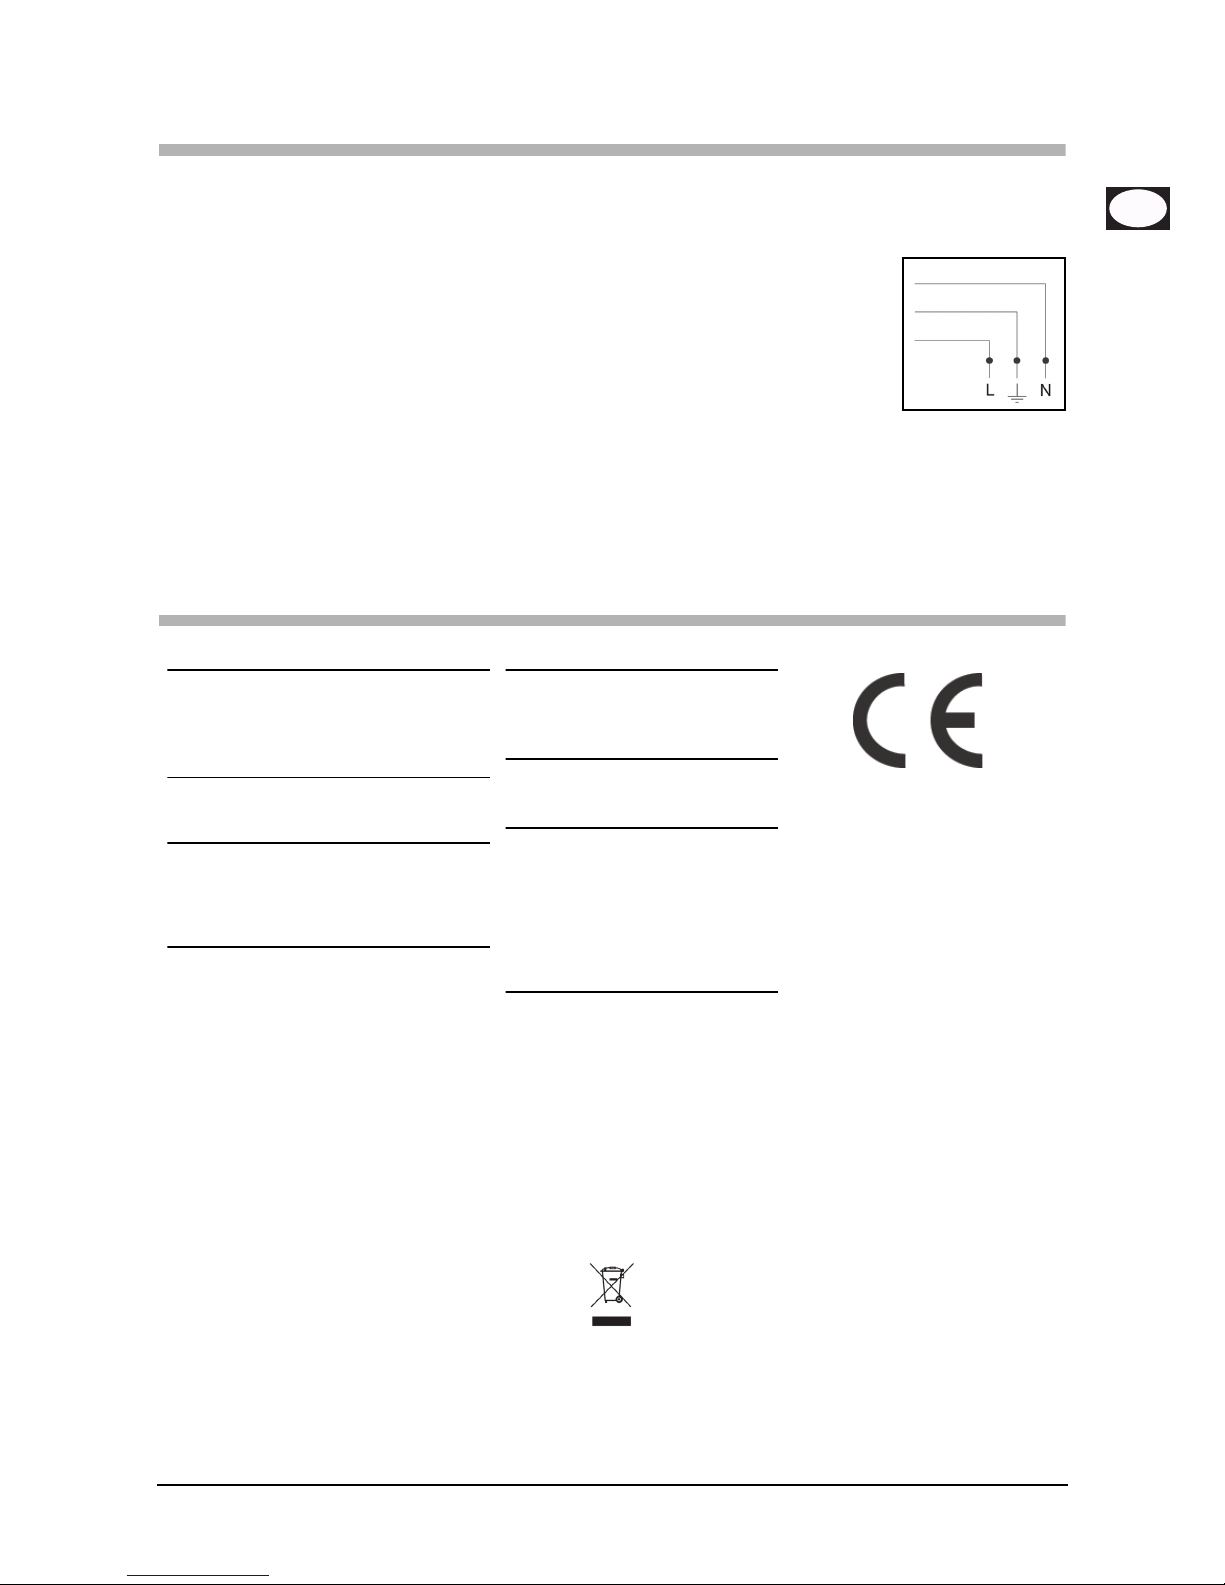
20
GB
Electrical connection
FRANKE ovens are supplied with a three-pole power cable with free terminals.
If the oven is permanently connected to the power supply, install a device that ensures disconnection from the power
supply, with a contact opening distance (at least 3 mm) enabling complete disconnection in category III overvoltage
conditions. Make sure:
a) the plug and socket are suitable for a 16 A current;
b) both can be easily reached and are positioned so that no live part is accessible when inserting
or removing the plug;
c) the plug can be easily inserted;
d) the oven does not rest against the plug when installed in the cabinet;
e) the terminals of two appliances are not connected to the same plug;
f) a 3 x 1.5 mm
2
cable type H05VV-F is used when replacing the power cable;
g) make sure you observe the polarities of the free terminals
(Brown = Live – Blue = Neutral – Yellow Green = Earth).
N.B.: Make sure the characteristics of the household electrical system (voltage, maximum power and current) are
compatible with those of your FRANKE oven.
Note: The mains frequency is established at switching on. When the timer is connected at 60 Hz, the symbol P flashes
during startup.
Technical data
INFORMATION FOR USERS
in accordance with the article of Legislative Decree no. 15 of July 25 “Implementation of Directives
2002/95/EC, 2002/96/EC and 2003/108/EC, regarding reduction of the use of hazardous substances in
electrical and electronic appliances, and waste disposal.
The barred dustbin symbol given on the appliance indicates that at the end of its useful life the product must be collected
separately from other waste.
Therefore, when the appliance has reached the end of its working life the user must take it to an appropriate
differentiated collection centre for electronic and electrotechnical waste, or return it to the dealer when purchasing a
new appliance of equivalent type.
Adequate differentiated collection of the scrapped appliance for subsequent recycling, treatment and
environmentally-friendly disposal will help prevent potential negative effects for the environment and health and
encourages recycling of the materials used in appliance construction.
Improper disposal by the user will lead to the application of administrative penalties under Leg. Decree no. 22/1997
(art. 50 et seq. of Leg. Decree no. 22/1997).
Useful oven dimensions:
width: 440 mm
depth: 415 mm
height: 312 mm
Useful oven volume:
57 litres
Consumption (conventional function):
to reach 175 °C: 0.32 kWh
to maintain 175 °C: 0.62 kWh
total consumption: 0.94 kWh
Consumption (fan function):
to reach 200 °C: 0.42 kWh
to maintain 200 °C: 0.77 kWh
total consumption: 1.19 kWh
Power supply voltage and
frequency:
220-240 V ~ 50-60 Hz
Total power and fuse rating:
2300 W - 16 A
Heating element power:
roof 1000 W
floor 1250 W
grill 2250 W
fan 30 W
oven light 1 x 15 W
tangential fan 15 W
This appliance complies with the
following EC Directives:
– 2006/95/EC (Low Voltage);
– 2004/108 EEC (Electromagnetic
Compatibility).
BLUE
YELLOW-GREEN
BROWN
Page 26
21
FR
Sommaire
Introduction...................................................................................................................................... 21
Vue détaillée ..................................................................................................................................... 21
Première mise en service ................................................................................................................. 22
Conseils ............................................................................................................................................ 22
Mode d'emploi.................................................................................................................................. 22
Tableau indicatif de cuisson .............................................................................................................. 26
Nettoyage et entretien du four ........................................................................................................ 27
Service après-vente .......................................................................................................................... 28
Consignes de sécurité....................................................................................................................... 28
Installation (Fig. 5)............................................................................................................................. 29
Instructions de montage ................................................................................................................... 29
Branchement au secteur................................................................................................................... 30
Données techniques ......................................................................................................................... 30
Introduction
Nous vous remercions d'avoir choisi un produit Franke.
Avant d'utiliser cet appareil, nous vous conseillons de lire attentivement les précautions d'emploi et les conseils donnés
dans ce manuel. Vous pourrez ainsi l'utiliser et le conserver en parfait état plus longtemps. Conservez soigneusement ce
manuel pour pouvoir le consulter ultérieurement.
Vue détaillée
Sélecteur de programmes
Sélection du mode de fonctionnement du four en fonction du type de cuisson. Lorsque le
sélecteur est placé sur un programme, l'éclairage intérieur indique que le four est allumé.
Programmateur
La gamme des fours Franke dispose de plusieurs systèmes de commande et de gestion de
la durée de cuisson. Vous trouverez des conseils d'utilisation détaillés pour chacun d'entre
eux page 23 ; il vous suffit de déterminer le type de contrôle correspondant à votre four
et de vous laisser guider par le manuel pour utiliser correctement cette fonction.
Voyant lumineux du thermostat
Signalé par le symbole , il indique que les résistances du four sont en marche. Il s'éteint
quand la température sélectionnée est atteinte et se rallume quand le four recommence à
chauffer. C'est très utile pour vérifier si la température est atteinte avant d'enfourner les
aliments.
Bouton de réglage de la température (Thermostat)
Il permet de sélectionner la température qui correspond au type de plat choisi et de la
maintenir à un niveau constant pendant toute la durée de la cuisson. Pour sélectionner la
température désirée, tournez le sélecteur dans le sens des aiguilles d'une montre jusqu'à
ce que le repère soit en face du chiffre correspondant. La température maximum est
d’environ 260 °C.
Glissières des lèchefrites et grilles
Elles servent à installer les grilles et les lèchefrites sur les 5 positions préétablies (de 1 à 5
en partant du bas) ; le tableau indicatif de cuisson (page 26) vous indiquera la position
idéale pour chaque utilisation du four.
Lèchefrite
Elle sert habituellement à recueillir le jus des grillades mais peut-être utilisée pour cuisiner
directement certains aliments ; si vous ne l'utilisez pas, sortez-la du four pendant la cuisson.
La lèchefrite est en acier émaillé de type « AA » pour usage alimentaire. Remarque :
Pour obtenir les meilleurs résultats de cuisson, nous vous conseillons d'introduire la
lèchefrite avec la partie inclinée tournée vers la paroi arrière de la cavité du four.
Grille
Elle sert de support à vos plats, aux moules à pâtisserie et aux récipients divers autres que
les lèchefrites fournies avec le four. Elle est utilisée pour cuire, surtout avec les fonctions
Grill et Grill à air pulsé, la viande et le poisson, le pain grillé etc. Nous déconseillons le
contact direct de la grille avec les aliments.
ABCDE
F
G
D
A
F
G
E
Page 27
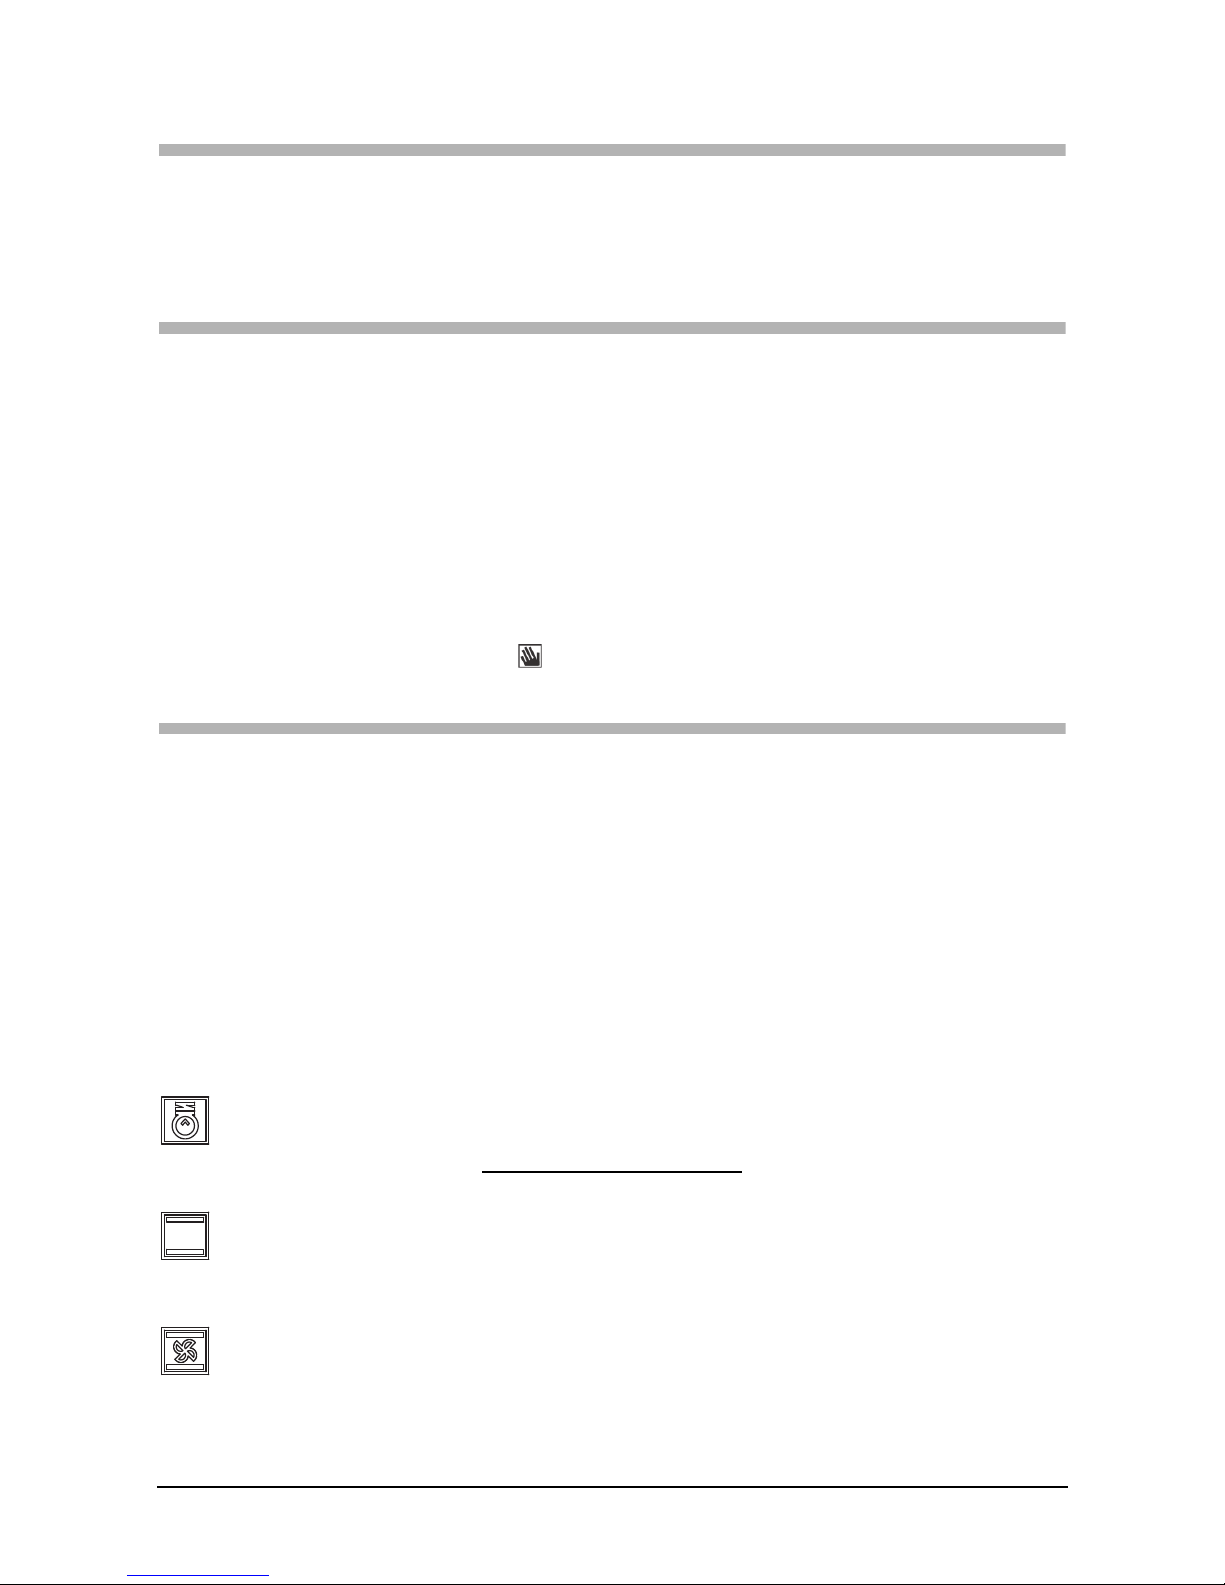
22
Première mise en service
Si vous utilisez votre four pour la première fois, faites fonctionner l'appareil à vide en positionnant le sélecteur de
température au maximum pendant au moins 40 minutes. Laissez la porte complètement ouverte et aérez bien la pièce.
L'odeur dégagée pendant cette opération est due à l'évaporation des substances utilisées pour protéger le four jusqu'au
moment de son installation. Le four est maintenant prêt à être utilisé.
Conseils
Nous vous conseillons, pour bien réussir vos plats, de ne pas les mettre dans le four froid mais d'attendre qu'il ait atteint
la température sélectionnée.
Pendant la cuisson, ne posez pas directement les casseroles ou les récipients sur le fond du four. Placez-les sur les grilles
ou sur les lèchefrites fournies avec l'appareil, à l'un des 5 niveaux possibles ; le non respect de ces consignes est susceptible
de provoquer des dommages à l'émail du four.
Ne recouvrez jamais les parois du four avec des feuilles d'aluminium, surtout la partie inférieure du compartiment interne.
Les réparations éventuelles doivent être effectuées par un professionnel qualifié et habilité à réaliser ces interventions.
Contactez notre service après-vente le plus proche et exigez des pièces détachées d'origine.
Votre four Franke est revêtu d'un émail spécial, facile à entretenir. Toutefois, nous vous conseillons de le nettoyer
régulièrement de façon à éviter de brûler les traces et les résidus des cuissons précédentes.
Les parois autonettoyantes (s'il y en a) doivent être lavées avec de l'eau et du savon (suivre les conseils pour le nettoyage).
Remarque : avant d'allumer le four, lisez les conseils d'utilisation du minuteur (voir page 24).
– Pour utiliser le four équipé d'un programmateur automatique de cuisson et d'arrêt en mode manuel, sélectionnez
l'option « manuel » indiquée par le symbole .
Mode d'emploi
Ce four cumule les avantages des fours traditionnels à convection naturelle « statiques » et ceux des fours modernes à air
pulsé « ventilés ». C'est un appareil très performant qui vous permet de choisir très facilement sans vous tromper entre
6 différents modes de cuisson. Vous pouvez sélectionner les programmes et la température à l'aide des sélecteurs (A)
et (D) situés sur le bandeau de commande. Pour que votre four Franke soit le plus performant possible, consultez le
tableau indicatif des cuissons page page 26.
Ventilation de refroidissement
Pour réduire les températures de la façade, du panneau de commande et des côtés, le four Franke est équipé d'une
ventilation de refroidissement qui se met en marche automatiquement lorsque le four est chaud. Pendant son
fonctionnement, le ventilateur envoie de l'air à l'extérieur par une fente située entre le bandeau et la porte du four.
On a tout particulièrement veillé à ce que la vitesse de l'air pulsé ne gène pas et à ce que les bruits soient réduits au
maximum.
Pour une meilleure protection des meubles, le ventilateur continue à tourner après l'arrêt jusqu'à que le
four ait suffisamment refroidi.
Éclairage du four
Ce symbole indique que l'éclairage intérieur est allumé, mais que le four ne chauffe pas. Cette fonction facilite
les opérations de nettoyage four éteint, en permettant une bonne visibilité du compartiment de cuisson.
Programmes de cuisson
Convection naturelle
Le sélecteur de température (D) doit être positionné entre 50 °C et Max (260 °C).
La chaleur vient à la fois d'en haut (résistance voûte) et d'en bas (résistance sole). C'est la fonction de cuisson
traditionnelle pour une cuisson uniforme de vos plats sur un seul niveau.
Chaleur Tournante
Le sélecteur de température (D) doit être positionné entre 50 °C et Max (260 °C).
La résistance supérieure (voûte), la résistance inférieure (sole) et la turbine interne du four fonctionnent en
même temps.
La chaleur constante et uniforme permet de cuire et dorer parfaitement les aliments. Vous pouvez cuire en
même temps des plats différents en enfournant simultanément sur deux niveaux maximum.
Page 28
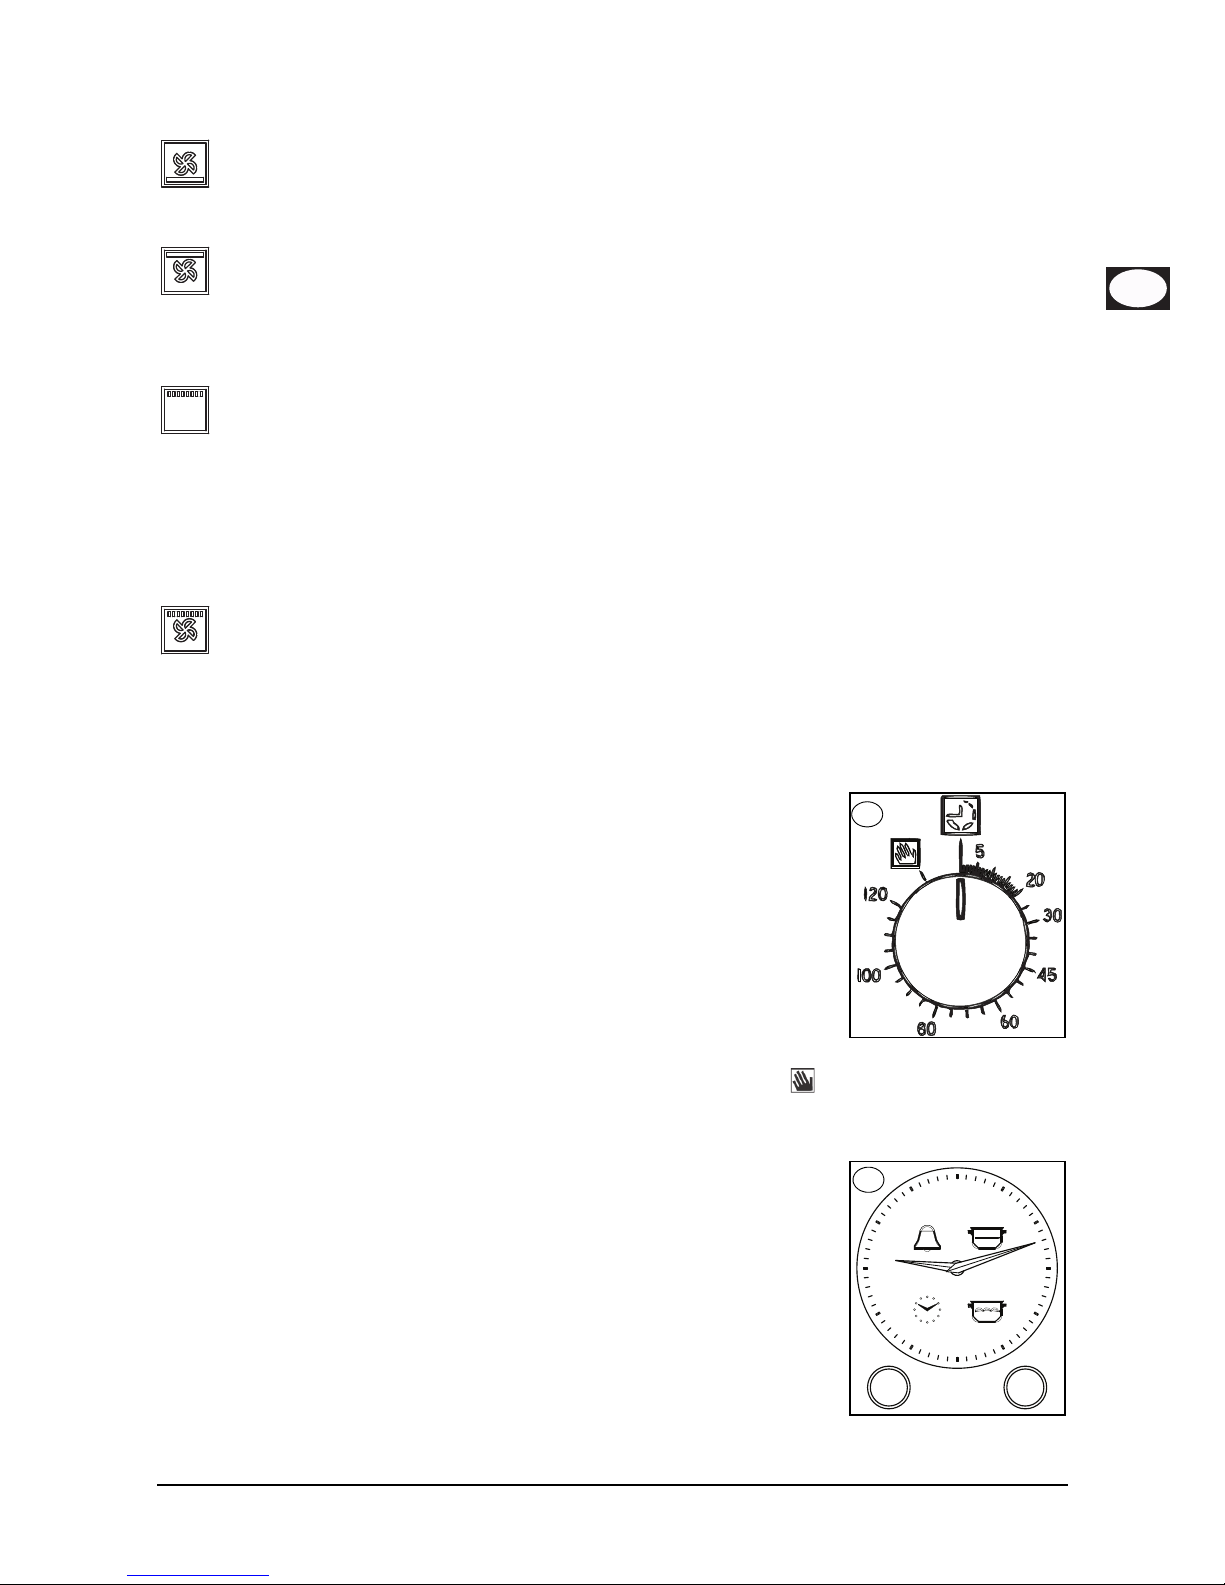
23
FR
Cuisson ventilée inférieure
Le sélecteur de température (D) doit être positionné entre 50 °C et Max (260 °C).
La résistance inférieure (sole) et la turbine fonctionnent simultanément. L'idéal pour cuire du poisson et en
général des produits surgelés et précuits. Très efficace si employé avec des produits de pâtisserie.
Cuisson ventilée supérieure
Le sélecteur de température (D) doit être positionné entre 50 °C et Max (260 °C).
La résistance circulaire (voûte) et la turbine fonctionnent simultanément. La puissance modérée et la
ventilation permettent d'obtenir une cuisson délicate et uniforme. C'est la cuisson idéale pour les gâteaux secs
et certaines recettes de pâtes au four.
Cuisson au gril
Le sélecteur du thermostat (D) doit se trouver sur Max (260 °C). Il est possible de choisir une
température inférieure : la cuisson au grill sera plus lente.
La résistance grill supérieure du four se met en marche. La cuisson rapide aux rayons infrarouges saisit les
viandes en surface et leur permet de rester tendres à l'intérieur ; votre grill vous permet aussi de faire griller
rapidement jusqu'à 9 tranches de pain. Le four Franke est conçu pour griller avec la porte complètement fermée.
Avertissement : la résistance du grill est très chaude pendant le fonctionnement ; évitez de la toucher
accidentellement en manipulant les aliments à griller. Cependant Franke a étudié la forme du four pour
protéger vos mains au maximum.
Cuisson Turbogril
Le sélecteur du thermostat (D) doit se trouver sur Max (260 °C). Il est possible de choisir une
température inférieure : la cuisson au grill sera plus lente.
La résistance grill supérieure et la turbine du four fonctionnent simultanément. L'irradiation thermique
unidirectionnelle s'ajoute au brassage de l'air pour répartir uniformément la chaleur dans le four. Le pouvoir
de pénétration de la chaleur augmente et vos aliments ne brûlent plus en surface. On obtient d'excellents
résultats avec le grill ventilé pour les brochettes de viande et de légumes, les saucisses, les côtelettes de porc
et d'agneau, le poulet en crapaudine, les cailles à la sauge, le filet de porc etc.
Sélecteur du programmateur de fin de cuisson
La minuterie de fin de cuisson est un dispositif très utile qui éteint automatiquement
le four dès que le temps de cuisson préétabli est atteint dans une plage comprise entre
une et 120 minutes. Pour utiliser la minuterie de fin de cuisson, remontez la sonnerie en
tournant la manette (B) d'un tour presque complet dans le sens des aiguilles d'une
montre ; puis, en revenant en arrière, programmez le temps de cuisson désiré en plaçant
le chiffre correspondant au nombre de minutes sélectionné en face du repère fixe de la
façade. À la fin du temps sélectionné, une sonnerie retentit et le four s'éteint
automatiquement.
Remarque : Après l'arrêt et pendant un laps de temps assez long, l'enceinte du four
conserve une température proche de celle de la cuisson ; pour éviter de trop cuire ou de
brûler des aliments, il est préférable de les sortir du four.
Attention : pour utiliser le four en fonctionnement manuel, c'est-à-dire sans le
programmateur de fin de cuisson, amenez le repère du bouton en face du symbole fixe du bandeau. Quand le four
est éteint, le programmateur de fin de cuisson peut être utilisé comme une simple minuterie.
L'horloge de fin de cuisson
Cette horloge est réglée pour permettre l'utilisation du four en mode manuel, et donc la
cuisson peut se produire sans devoir intervenir sur l'horloge en question
Bouton de droite
En appuyant sur le bouton de droite, vous pouvez choisir, l'une après l'autre, les fonctions
à activer (minuteur, fin de cuisson, début de cuisson, réglage de l'heure), indiquées par le
voyant clignotant correspondant.
De plus, en appuyant brièvement sur ce bouton, vous pouvez revoir les réglages
déjà programmés (interrogation) alors que si vous appuyez plus longuement
(environ 2 secondes), ces réglages seront effacés (Reset).
Bouton de gauche
Tournez le bouton de gauche pour régler les aiguilles de l'horloge du temps pour la
fonction activée (voyant clignotant).
B
IVI
I
V
I
I
IX
V
V
I
VI
III
I
X
X
III
IXI
TIMER
START
STOP
B
Page 29
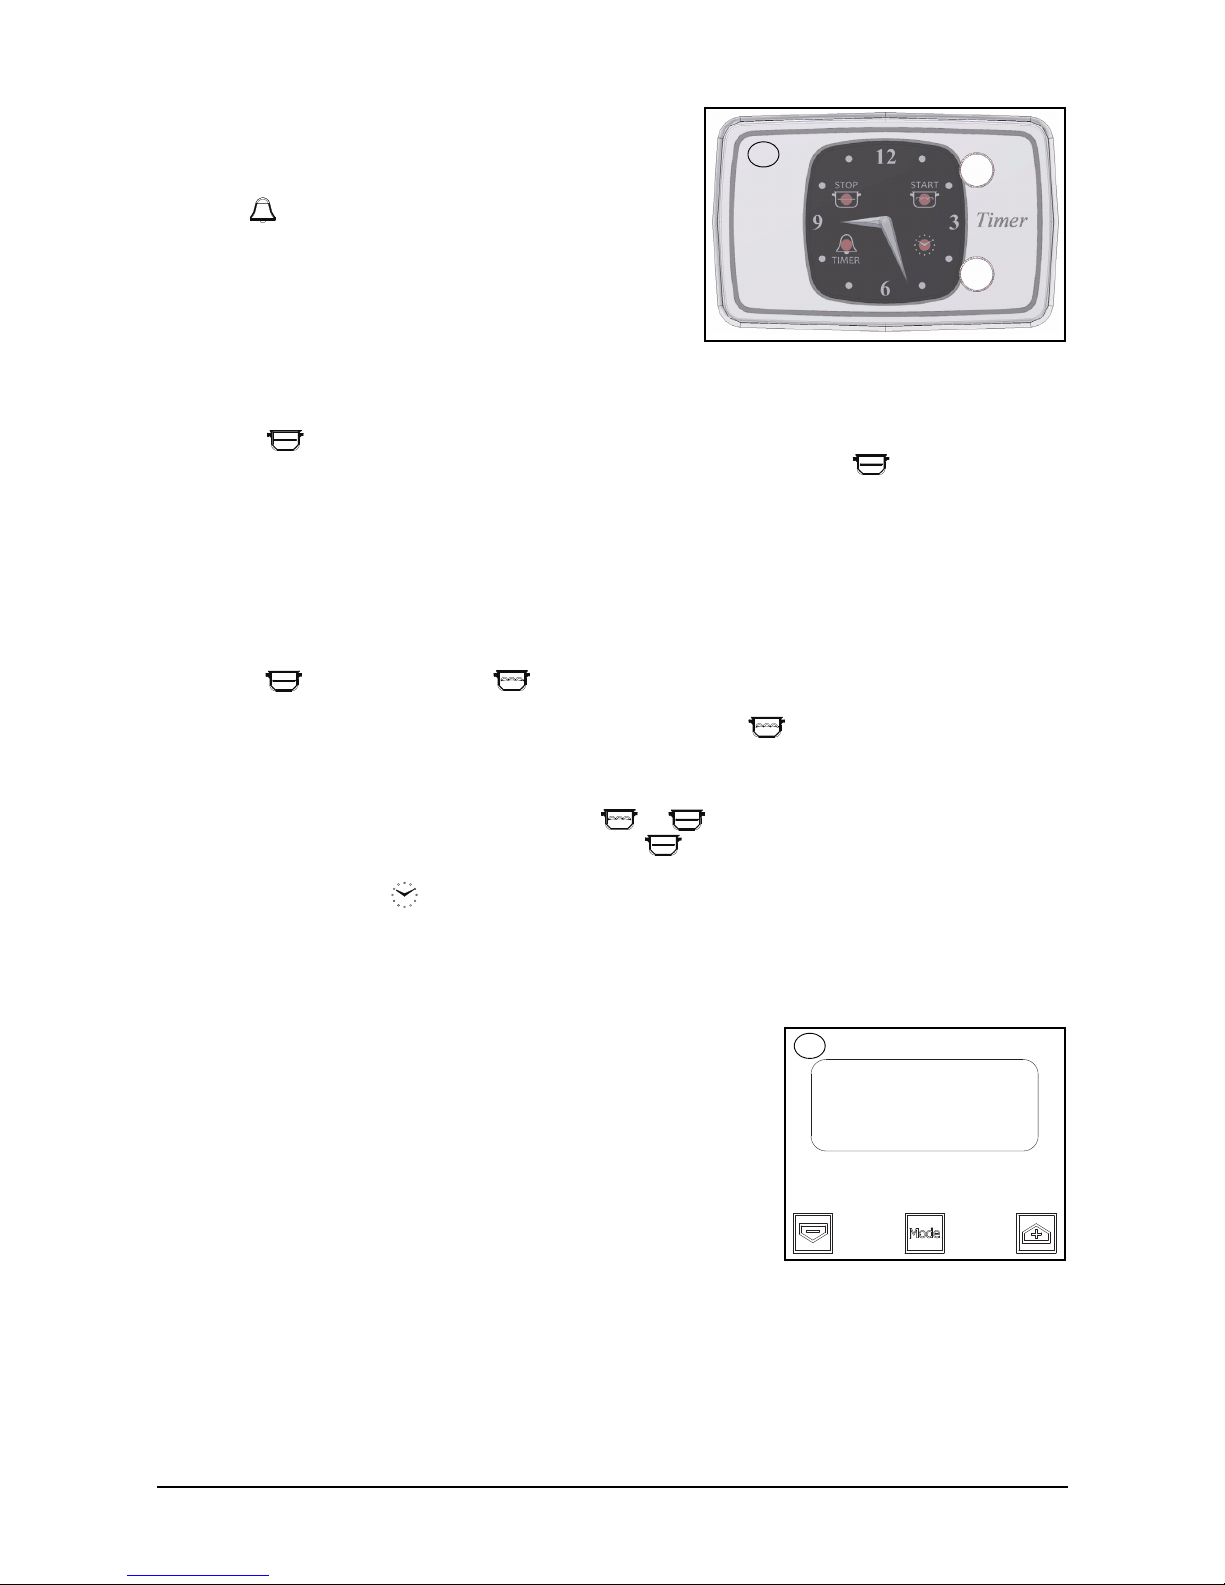
24
Voyants
– clignotants : prêt pour la programmation ou avis de fin de fonction
(en même temps que la sonnerie)
– allumés : fonction en cours
Minuteur ( )
Pour régler la minuterie, appuyez une seule fois sur le bouton droit
(le voyant commence à clignoter) ; tournez ensuite le bouton gauche
pour déplacer les aiguilles et régler ainsi le temps de la minuterie.
Appuyez de nouveau sur le bouton de droite pour confirmer le réglage
de la date ; le voyant correspondant s'arrête de clignoter et reste
allumé. Les aiguilles se remettent ensuite dans leur position d'origine
pour indiquer l'heure actuelle. À la fin du temps de cuisson, la sonnerie se déclenche ; il suffit d'enfoncer le bouton droit
pour l'arrêter.
La minuterie ne gère pas le chauffage du four.
Fin Cuisson ( )
Pour régler la fin de la cuisson, appuyez deux fois sur le bouton droit (le voyant du symbole commence à
clignoter) ; tournez ensuite le bouton gauche pour déplacer les aiguilles et les régler sur l'heure de fin de cuisson.
Le voyant clignotera pendant les 10 secondes suivantes (pour permettre d'éventuelles correction) ; passé ce délai,
la programmation est acquise et le voyant restera allumé.
Vous pouvez obtenir le même effet en appuyant deux fois sur le bouton de droite alors que le voyant clignote.
À la fin de la cuisson, le chauffage du four sera désactivé et la sonnerie retentira pendant 1 minute ; appuyez sur le
bouton de droite pour l'arrêter.
Remarque : à la fin du temps de cuisson, le four reste pendant plusieurs minutes à une température proche de celle de
réglage. Aussi, nous vous conseillons de sortir les aliments du four pour éviter qu'ils soient trop cuits.
Fin cuisson ( ) avec début retardé ( )
Le début retardé de la cuisson ne peut être activé qu'après avoir programmé la fin de la cuisson ; appuyez alors sur
le bouton de droite pour valider l'arrêt ; le voyant correspondant au symbole se mettra à clignoter. Tournez le
bouton de gauche pour programmer également l'heure de début de la cuisson (naturellement, elle doit être inférieur à
l'heure de la fin et donc les aiguilles ne pourront qu'aller en arrière). Vous pouvez maintenant confirmer définitivement
en appuyant de nouveau sur le bouton de droit. Même si vous laissez passer les 10 secondes de clignotement, la donnée
sera acquise automatiquement. Les voyants des symboles et restent allumés et le four s'allumera à l'heure
programmée ; à partir de cet instant, seul le voyant du symbole restera allumé.
À la fin de la cuisson, la sonnerie retentira pendant 1 minute ; appuyez sur le bouton droit pour l'arrêter.
Réglage de l'heure du jour ( )
Pour régler l'heure correcte, appuyez simplement sur le bouton de droite trois fois (le voyant du symbole de l'horloge se
met à clignoter) ; tournez ensuite le bouton de gauche. Une fois que l'heure correcte a été réglée, confirmez en
appuyant sur le bouton de droite.
Le programmateur de cuisson électronique
Il permet de programmer le four comme suit :
• début de cuisson différée avec durée prédéfinie;
• début immédiat avec durée prédéfinie;
• minuterie.
Réglage de l'horloge numérique
Après la mise sous tension ou après une coupure d'électricité, l'afficheur clignote
sur “0.00”.
Appuyez en même temps sur les touches + et – pendant quelques secondes.
L'heure du jour se règle avec les touches + et –, pendant que le point entre les
heures et les minutes clignote. Si vous avez sélectionné le mode de réglage de
l'heure alors qu'un programme automatique était en cours, celui-ci sera annulé.
Pour les réglages ultérieurs de l'heure, répétez la phase ci-dessus.
B
B
Page 30
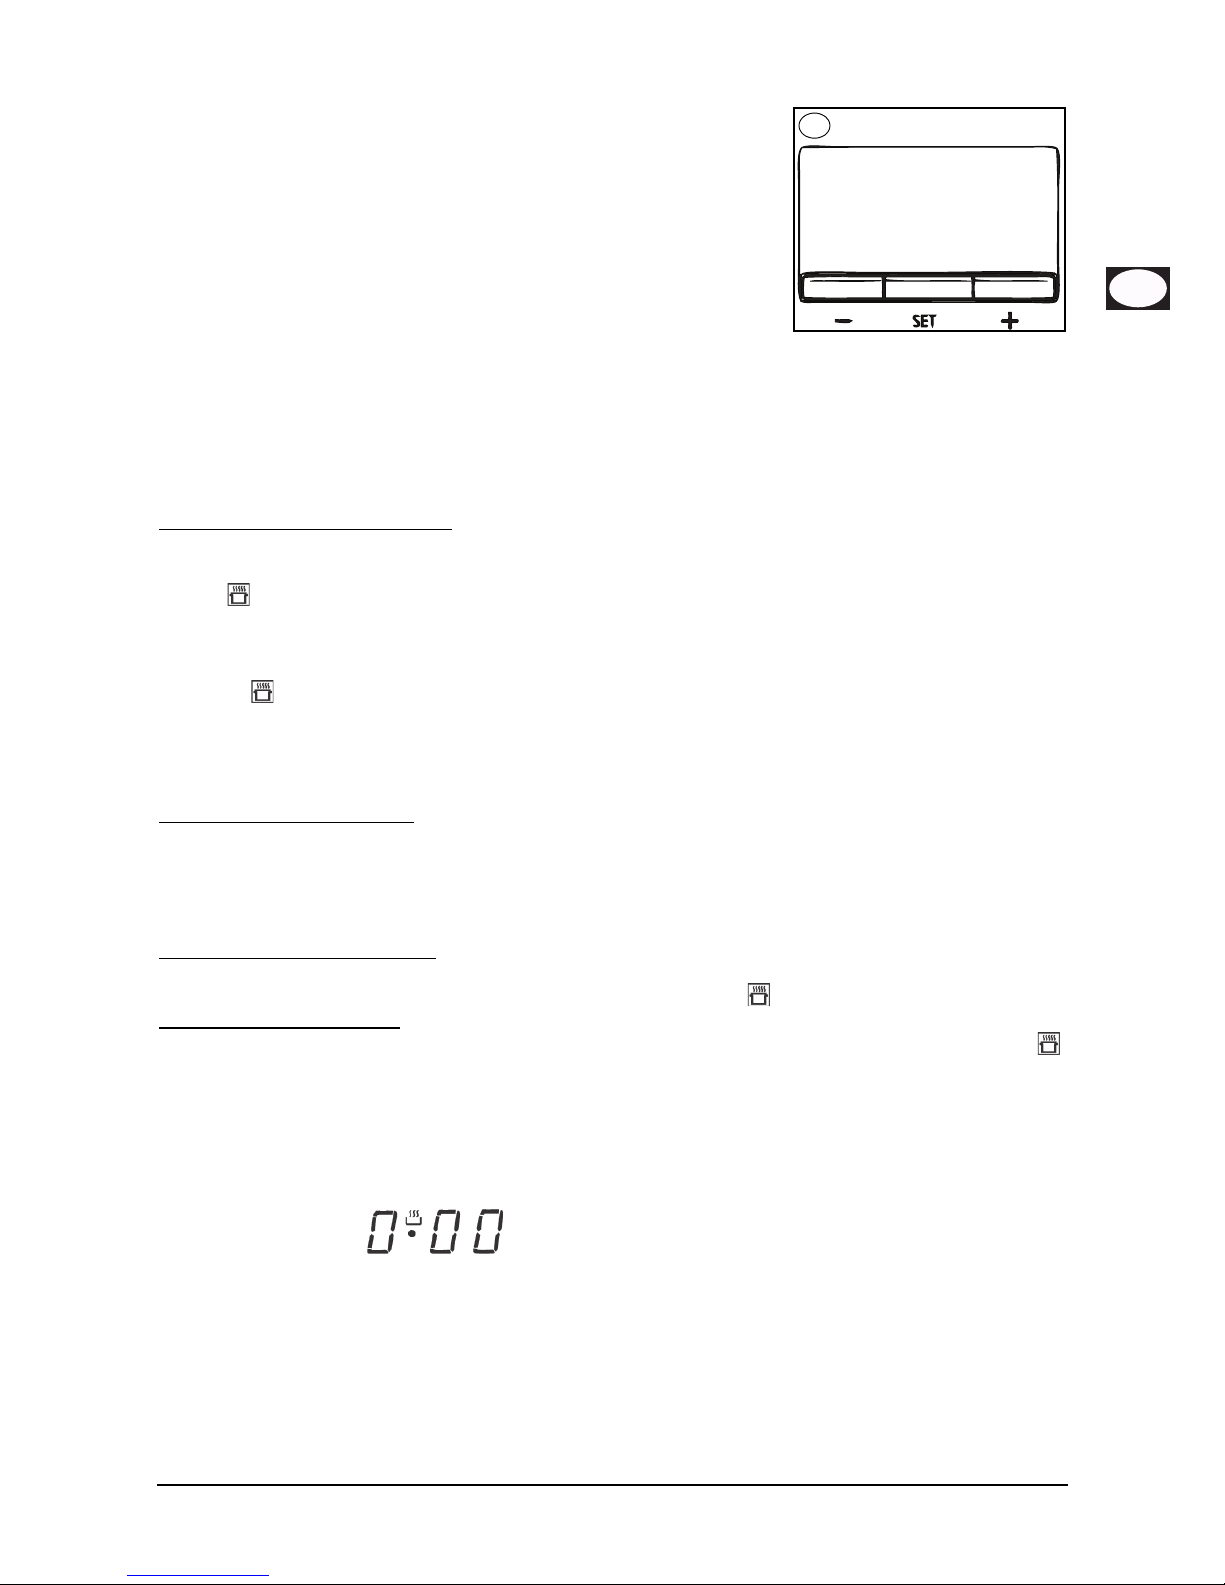
25
FR
Modification de la fréquence du signal sonore
Vous pouvez modifier la fréquence du signal sonore si vous n’avez programmé
aucune cuisson (l’heure du jour est par conséquent affichée). Appuyez en même
temps sur les touches + et – (à partir du menu de modification de l’heure),
appuyez ensuite sur Mode ou Set pour sélectionner le menu d’où vous pourrez
modifier la fréquence du signal sonore. Vous pouvez modifier la fréquence du
signal sonore en appuyant à plusieurs reprises sur la touche Mode ou Set ;
les inscriptions “ton1”, “ton2” et “ton3” apparaissent alors sur l’afficheur.
Fonctionnement manuel du four
Après la sélection de l'heure, le programmateur se place automatiquement en
position manuelle.
Début de cuisson différé avec durée prédéfinie
Quand l’heure du jour apparaît sur l’afficheur, appuyez deux fois sur la touche Mode ou Set pour programmer la durée
et une nouvelle fois pour programmer l’heure de fin de cuisson. Programmez l’heure désirée avec les touches + et –.
Durant la sélection du mode de réglage de l'heure de fin ou de la durée, le symbole Auto correspondant clignote.
Une fois que la durée d'un programme a été saisie, l'heure de fin ne peut plus être diminuée. De la même manière,
la durée d'un programme ne peut être prolongée une fois que l'heure de fin a été programmée.
Les valeurs de l’heure de fin et de la durée définissent l’heure de début du programme comme suit :
heure de début = heure de fin - durée
.
Après avoir programmé la durée et l’heure de fin, cette dernière continue à apparaître sur l’afficheur. Le programme
démarre lorsque l'heure du jour coïncide avec l'heure de début : le symbole Auto s'allume et reste fixe tandis que le
symbole clignote. Après le début de la cuisson, le compte à rebours du temps restant apparaît sur l’afficheur. Si vous
n’avez sélectionné que l’heure de fin de cuisson (la durée est = 0), la cuisson démarre et le comptage à rebours du
temps restant apparaît sur l’afficheur.
Le symbole Auto reste allumé durant l’attente pour le début de cuisson différée et pendant toute la durée de la cuisson.
Le symbole clignote durant l’attente pour le début de la cuisson différée et reste allumé fixement quand la cuisson
commence.
En fin de cuisson, un signal sonore retentit ; pour l'interrompre, appuyez sur une touche quelconque ou
attendez la fin du signal.
Programme semi-automatique avec durée ou heure de fin
Réglage de l'heure du programme
Pour sélectionner la durée ou l’heure de fin du programme, appuyez deux fois sur la touche Mode ou Set et programmez
l’heure désirée avec les touches + et –. Durant la sélection du mode de réglage de l'heure de fin ou de la durée,
le symbole Auto correspondant clignote.
Une fois que la durée d'un programme a été saisie, l'heure de fin ne peut plus être diminuée. De la même manière,
la durée d'un programme ne peut être prolongée une fois que l'heure de fin a été programmée.
Exécution du programme de cuisson
Lorsqu'un programme automatique est en phase d'exécution, donc que la cuisson est en cours, le symbole Auto reste
allumé et l'afficheur montre le temps restant (compte à rebours). Le symbole reste également allumé.
Fin du programme automatique
À la fin de la durée du programme ou lorsque l'heure de fin du programme s’est écoulée, le symbole correspondant
s'éteint. À la fin du programme automatique, le symbole “Auto” clignote, l’inscription “End” apparaît sur l’afficheur et le
four émet un signal sonore intermittent que vous pouvez arrêter en appuyant sur une touche quelconque.
Fonction minuterie
La fonction minuterie permet de programmer le temps à partir duquel commence le compte à rebours. Cette fonction
ne contrôle ni la mise en marche, ni l'extinction du four. Elle émet seulement un signal sonore lorsque le temps
programmé est écoulé.
N’appuyez qu’une seule fois sur la touche Mode ou Set ; l'afficheur indique :
Le symbole de la cloche clignote ; vous pouvez alors programmer la durée de l'alarme avec les touches + et –. Quand
cette fonction est activée, le symbole de la cloche reste allumé et l’afficheur indique le temps restant (compte à rebours).
Une fois le temps écoulé, un signal sonore retentit. Pour l'arrêter, appuyez sur une touche quelconque.
Correction et annulation des données
• Les données programmées peuvent être modifiées à tout moment en appuyant simultanément sur les touches + e –.
• L'annulation de la durée de cuisson entraîne l'annulation automatique de la fin du fonctionnement et vice versa.
• En cas de fonctionnement programmé, l'appareil n'accepte pas les temps de cuisson antérieurs à ceux du départ de
cuisson proposés par l'appareil.
Remarque : Après l'arrêt et pendant un laps de temps assez long, l'enceinte du four conserve une température proche
de celle de la cuisson ; pour éviter de trop cuire ou de brûler des aliments, il est préférable de les sortir du four.
B
Page 31

26
Tableau indicatif de cuisson
Remarque : Les indications figurant dans le tableau correspondent à des essais de cuisson effectués par une équipe de cuisiniers
professionnels. Elles sont données à titre indicatif et peuvent être modifiées selon vos goûts.
Position de la
commande de
sélection
Catégories d'aliments Poids
(kg)
Position des
niveaux
Te m ps d e
préchauffage
(min.)
Programmation
du bouton du
thermostat
Te m p s
de
cuisson
(min.)
Convection naturelle Rôti de porc
Omelette
Colin-Dorade-Turbot
Pain
To u r t e
Poisson d’eau douce
Polenta
Tarte à la ricotta
1
1,5
1
1
1
1,5
0,5
1,5
3
2
3
2 et 4
2
3
2
2
9,5
10,5
9,5
9,5
10,5
10,5
9,5
9,5
180 °C
200 °C
180 °C
175 °C
200 °C
200 °C
180 °C
180 °C
65-75
25-30
15
25-30
40-45
35-40
25-30
25-30
Chaleur Tournante Rôti de Porc
Lapin au four
Fougasse
Gambas au four
Colin-Dorade-Turbot
Pain
Tarte aux fruits
To u r t e s
1
1
1
0,5
2
2
1,5
2
3
2
2
3
2 et 4
2 et 4
2
3 et 5 simult.
9
9,5
10
10
7,5
9
9
9
180 °C
190 °C
200 °C
200 °C
150 °C
180 °C
175 °C
180 °C
60-70
55-65
25-30
30-40
25-30
25-30
30-35
40-45
Cuisson ventilée
inférieure
Poitrine de poulet
Tagliata de veau
Roast-beef
Tr an c h es d e t h on
Médaillons d'espadon
Gambas
Meringues
Biscuits au beurre
Gâteau à la levure
Tartelettes aux amandes
1
1
1
1
1
1
0,8
1
0,8
1
2 ou 3
2
3
2
3
2
2
2
2
2 ou 3
Pour accélérer le
préchauffage,
utilisez la
fonction
«Chaleur
Tournante ».
170 °C
180 °C
170 °C
160 °C
160 °C
180 °C
90 °C
160 °C
170 °C
160 °C
20
20
60
20
20
30
120
30
40
35
Cuisson ventilée
supérieure
Tortellini gratinés
Gnocchi de pommes de terre
Espadon
Moules
Coquilles Saint-Jacques
Pommes de terre rôties
Cannellonis
0,5
0,5
0,5
1
1
0,5
1
3
3
5
4
4
4
3
Pour accélérer le
préchauffage,
utilisez la
fonction
«Chaleur
Tournante ».
Maximum
Maximum
200 °C
Maximum
200 °C
200 °C
Maximum
25-30
25-30
12-15
10-12
10-12
18-20
25-30
Cuisson au gril Ailes de poulet
Côtelettes
Coquilles Saint-Jacques
Pommes de terre rôties
Poisson d’eau douce
Tomates gratinées
Brochettes d'anguille
Brochettes de dinde
1
0,8
0,5
1
1
0,4
0,5
0,5
4 ou 5
3
3 ou 4
3
3 ou 4
2 ou 3
3
4
7
7
7
7
7
7
7
7
Maximum
Maximum
Maximum
Maximum
Maximum
Maximum
Maximum
Maximum
25-30
25-30
14-16
25-30
25-30
25-30
25-30
25-30
Cuisson Turbogril Cuisses de poulet
Travers de porc
Pintade (en morceaux)
Dorade en paquet
Poulet (en morceaux)
Cailles
Saucisses
Légumes
1
0,5
1,2
1
1,5
0,8
1
1
4 ou 5
4
4
3
3
4
4
4 ou 5
9,5
14
14
8
14
14
14
14
220 °C
Maximum
Maximum
200 °C
Maximum
Maximum
Maximum
Maximum
25-30
40-45
30-35
20-25
35-40
30-35
20-25
10-15
Page 32

27
FR
Nettoyage et entretien du four
Important
Avant toute opération d'entretien du four, débranchez le cordon d'alimentation de la prise de courant ou coupez
l'alimentation électrique en agissant sur l'interrupteur général.
– Les pièces en inox ou émaillées conserveront leur aspect d'origine si elles sont nettoyées avec de l'eau ou des
produits spéciaux et soigneusement séchées.
– Évitez absolument d'utiliser une paille de fer ou un tampon métallique, de l'acide chlorhydrique ou tout autre substance
susceptible de rayer ou de ternir votre four. Évitez d'utiliser un nettoyeur à vapeur ou un jet d'eau direct.
– Les tâches qui apparaissent sur le fond du four, d'origines diverses (sauces, sucres, blancs d'œufs et graisses)
proviennent toujours de projections ou de débordements d'aliments. Ces projections se produisent pendant la cuisson
quand la température est trop élevée ; les débordements surviennent quand on utilise des récipients trop petits ou
si on évalue mal les augmentations de volume que subissent les aliments en cours de cuisson. Ces deux problèmes
peuvent être évités grâce à l'utilisation de récipients à bords hauts et de la lèchefrite du four. En ce qui concerne le
nettoyage de la sole du four, nous vous conseillons de nettoyer les tâches éventuelles quand le four est encore tiède.
Nettoyage de la porte du four
– Le nettoyage interne et externe de la porte doit être effectué quand le four est
complètement froid, avec de l'eau chaude et sans chiffon rugueux. Nettoyez les vitres avec
des détergents spéciaux.
– Pour les parties émaillées comme pour l'enceinte du four, utilisez de l'eau chaude et des
détergents non abrasifs.
(Modèles CR 66 et CS 66 uniquement)
– Pour faciliter le nettoyage du four, vous pouvez démonter le cache en plastique de la porte.
Ouvrez la porte et appuyez sur les côtés pour extraire le cache comme le montre la figure.
Pour remettre le cache de la porte, faites-le coulisser dans son siège et exercez une légère
pression pour enclencher les crochets latéraux.
Démontage de la vitre intérieure de la porte du four
(modèles CR, CS et SM uniquement) (Fig. 2)
Pour bien nettoyer la vitre intérieure du four, vous pouvez enlever entièrement la porte en procédant comme suit :
• lorsque la porte est complètement ouverte, tournez les deux blocs noirs (portant l’inscription « CLEAN ») à l’extrémité
inférieure de la porte de 180°, de façon à ce qu’ils s’insèrent dans les logements prévus dans la structure du four ;
Remarque : Veillez à ce que la rotation soit complète (dans cette position, le bloc fait un léger déclic) ;
• les deux blocs empêchent à la porte du four de se refermer (si les blocs ne sont pas entièrement tournés, le fait
d’enlever la vitre provoque la fermeture immédiate de la porte).
Après avoir nettoyé la vitre intérieure, remettez-la en place (l’inscription « TEMPERED GLASS », verre trempé, qui doit
être bien lisible indique le sens de montage correct de la vitre) et remettez les deux blocs de fixation de la vitre dans leur
position d’origine.
ATTENTION : n’essayez jamais de refermer la porte si la vitre intérieure n’est pas entièrement ou
partiellement maintenue par les deux blocs ou par au moins un des deux. Quand le nettoyage est terminé,
n’oubliez pas de tourner les deux blocs avant de refermer la porte.
Démontage de la vitre intérieure de la porte du four
(modèles TL et CM uniquement) (Fig. 3)
Pour bien nettoyer la vitre intérieure du four, vous pouvez enlever entièrement la porte en procédant comme suit :
• la porte étant grande ouverte, tournez de 180° les deux blocs noirs situés à l'extrémité inférieure de la porte (fig. 3a et 3b).
Remarque : Veillez à ce que la rotation soit complète (dans cette position, le bloc fait un léger déclic) ;
• soulevez précautionneusement la vitre intérieure (fig 3c) : les deux blocs empêchent la porte du four de se refermer
(si les blocs ne sont pas entièrement tournés, le fait d’enlever la vitre provoque la fermeture immédiate de la porte) ;
• pour enlever également la vitre intermédiaire, extrayez les deux joints latéraux (fig. 3d) puis soulevez la vitre (fig. 3e) ;
• à la fin des opérations de nettoyage, remettez d'abord la vitre intermédiaire à sa place (fig. 3f) (pour vérifier si le sens
de montage de la vitre est correct, sachez qu'il faut que l'inscription “TEMPERED GLASS” soit lisible) en l'insérant
précautionneusement dans les gorges appropriées situées sur la partie supérieure de la porte et en la poussant à fond
dans la gorge ;
• remettez ensuite les deux joints (fig. 3g) en veillant à ce qu'ils soient en butée contre le profil supérieur de la porte.
• Enfin, remettez également la vitre intérieure à sa place (fig. 3h) et tournez de nouveau les deux blocs de fixation de la
vitre pour les remettre dans leur position de fermeture d'origine.
ATTENTION : n’essayez jamais de refermer la porte si la vitre intérieure n’est pas entièrement ou
partiellement maintenue par les deux blocs ou par au moins un des deux. Quand le nettoyage est terminé,
n’oubliez pas de tourner les deux blocs avant de refermer la porte.
Page 33

28
Démontage de la porte du four (Fig. 4)
Pour faciliter le nettoyage du four, il est possible de démonter la porte en agissant sur les charnières de la façon suivante :
– Les charnières (A) sont munies de deux pontets mobiles (B). Soulevez le pontet (B) pour bloquer la charnière dans
son siège.
– Soulevez ensuite la porte et sortez-la en la tirant vers l'extérieur ; pour réaliser cette opération, saisissez la porte par
les côtés, près des charnières.
– Pour remonter la porte, enfilez d'abord les charnières dans les rainures prévues à cet effet.
– Enfin, avant de fermer la porte, n'oubliez pas de faire tourner les deux pontets mobiles (B) qui ont servi à accrocher
les deux charnières.
Remplacement de l'ampoule du four
Les fours Franke sont munis d'une ampoule ronde placée à l'arrière, en haut et à gauche de l'enceinte.
S'il est nécessaire de remplacer l'ampoule interne du four, procédez comme suit :
– mettez l'appareil hors tension avec l'interrupteur omnipolaire qui le connecte au circuit
électrique ou débranchez la prise si elle accessible ;
– dévissez la calotte de protection en verre (A) ;
– dévissez l'ampoule et remplacez-la par un modèle résistant aux hautes températures (300 °C)
et possédant les caractéristiques ci-dessous :
Te n s i o n : 220-240 V ~ 50-60 Hz
Puissance : 15W
Douille : (E14) miniature.
– Replacez le couvercle de protection en verre (A) et rebranchez l'appareil.
Service après-vente
En cas de problèmes de fonctionnement, contactez le service après-vente indiqué dans la
liste jointe.
Ne faites jamais intervenir un technicien non agréé.
Indiquez :
– le type d'anomalie ;
– le modèle de l'appareil (Art.) ;
– le numéro de série (S.N.).
Ces informations figurent sur la plaque signalétique reproduite sur le certificat de garantie.
Consignes de sécurité
• Cet appareil ne doit pas être utilisé par des porteurs de handicap psychique ou moteur, ni par des enfants ou des
personnes inexpérimentées, sans la surveillance ou les instructions d'un responsable chargé de leur sécurité.
• Ne pas laisser les enfants sans surveillance jouer avec l'appareil.
• Le fabricant décline toute responsabilité en cas de dommages découlant des situations suivantes : mauvaise installation,
usages impropres, erronés ou déraisonnables.
Adressez-vous impérativement à des professionnels qualifiés dans les cas suivants :
Pour garantir l'efficacité et la sécurité de cet appareil électroménager :
– adressez-vous exclusivement à un service après-vente agréé ;
– exigez toujours des pièces détachées d'origine ;
– l'appareil est conçu pour un usage domestique non professionnel ; n'en modifiez pas les caractéristiques ;
– la plaquette signalétique indique le symbole du pays de destination auquel se réfèrent les instructions ;
– la sécurité électrique ne peut être garantie que si l'appareil est relié à une prise de terre efficace et conforme aux
normes en vigueur ;
– ne touchez pas les éléments chauffants ni aucune partie de la porte du four pendant le fonctionnement
car ils atteignent des températures élevées. Tenez les enfants à l'écart.
Évitez que les enfants puissent accéder :
– aux commandes et à l'appareil en général ;
– aux composants de l'emballage (sachets, polystyrène, clous, etc.) ;
– à l'appareil pendant le fonctionnement et tout de suite après l'arrêt du four qui est encore très chaud ;
– à l'appareil inutilisé (dans ce cas, rendez inoffensives les parties susceptibles de présenter un danger).
Évitez les opérations suivantes :
– toucher l'appareil avec une partie humide du corps ;
– utiliser l'appareil pieds nus ;
– tirer sur l'appareil ou sur le cordon d'alimentation pour le débrancher ;
A
Page 34

29
FR
– les opérations impropres ou dangereuses ;
– obstruer les bouches d'aération ou d'évacuation de la chaleur ;
– laisser le cordon d'alimentation d'autres appareils électroménagers sur les parties chaudes du four ;
– l'exposition aux agents atmosphériques (pluie, soleil) ;
– l'utilisation du four comme « vide-poches » ;
– l'utilisation de liquides inflammables à proximité de l'appareil ;
– l'utilisation d'adaptateurs, de prises multiples et/ou de rallonges ;
– l'installation ou la réparation effectuée par des personnes non qualifiées.
Adressez-vous impérativement à des professionnels qualifiés dans les cas suivants :
– installation (suivez les instructions du fabricant) ;
– doute sur le fonctionnement ;
– remplacement de la prise pour incompatibilité avec la fiche de l'appareil.
Adressez-vous à un service après-vente agréé par le fabricant dans les cas suivants :
– tout de suite après avoir déballé l'appareil, si vous avez un doute sur son état ;
– remplacement ou détérioration du cordon d'alimentation ;
– panne ou dysfonctionnement exigeant des pièces détachées d'origine.
Il est conseillé d'effectuer les opérations suivantes :
– cuisez uniquement des aliments et n'effectuez aucune autre opération ;
– avant toute opération de nettoyage ou d'entretien ou en cas de dysfonctionnement, débranchez l'appareil du réseau
électrique ;
– utilisez des maniques pour introduire les récipients dans le four ou les en sortir ;
– la sortie d'air peut rendre l'extrémité de la poignée de la porte plus chaude : saisissez-la toujours par le milieu ;
– contrôlez toujours que le sélecteur est en position d'arrêt quand l'appareil n'est pas utilisé ;
– si vous décidez de ne plus utiliser l'appareil, déconnectez-le du réseau électrique.
Installation (Fig. 5)
Important : l'installation doit être réalisée conformément aux normes et aux règlements en vigueur. Elle doit être
effectuée exclusivement par un professionnel qualifié et agréé.
Remarques sur les caractéristiques du meuble
Pour les meubles à éléments encastrés (matières plastiques et bois plaqué), les composants doivent être assemblés avec
des colles résistant à la chaleur (max. 100 °C) : dans le cas contraire, la chaleur risque de déformer ou de décoller les
matériaux. Le meuble doit permettre le passage des connexions électriques. Le meuble dans lequel le four est placé doit
pouvoir supporter le poids de l'appareil.
Le montage du four dans l'emplacement prévu doit être sûr. Il peut être placé dans un meuble colonne ou sous le plan
d'un meuble composable à condition que l'aération soit suffisante.
Instructions de montage
Modèles CM et TL (Fig. 6a/6b/6c)
Mesurez la largeur du montant (S) du meuble, normalement 16, 18 ou 20 mm.
Épaulement de 16 : positionnez sur chaque patte ou bride de fixation (F) 2 cales (T) portant le numéro 16.
Épaulement de 18 : positionnez sur chaque patte ou bride de fixation (F) 2 cales (T) portant le numéro 18.
Épaulement de 20 : pour le montant de 20 mm, il n'est pas nécessaire d'interposer une cale.
Positionnez les pattes de fixation (F) en les appuyant contre l'épaulement du meuble et en bas, sur le plan d'appui du four.
Fixez les pattes de fixation (F) avec les vis (V). Introduisez le four dans le meuble, ouvrez complètement la porte et
fixez-le avec les pattes de fixation (F) en utilisant les 4 vis (V) et les 4 entretoises en plastique (D).
Modèles CR, CS, SG et SM (Fig. 6d)
Introduisez l'appareil dans le compartiment ; fixez le corps de l'appareil au meuble avec les 4 vis et les 4 bagues de
fixation fournies avec le four en utilisant les trous percés sur les côtés (Fig. 6d).
Remarque : (pour tous les modèles) en cas d'installation de l'appareil sous un plan de cuisson, tournez d'abord
vers la droite ou vers la gauche le raccord du plan (R) afin de permettre une bonne insertion du four (Fig. 6e).
Page 35

30
FR
Branchement au secteur
Le four FRANKE est équipé d'un câble d'alimentation tripolaire à terminaux libres.
Si le four doit rester connecté en permanence au réseau d'alimentation, installez un dispositif de
protection ayant une ouverture des contacts adéquate (minimum 3 mm), qui assure la
déconnexion complète de l'appareil en cas de surtension de catégorie III. Assurez-vous que :
a) la fiche et la prise sont adaptées pour un courant de 16 A ;
b) l'une et l'autre sont facilement accessibles et placées de façon à ce qu'aucune partie sous
tension ne puisse être atteinte lors de l'insertion ou du retrait de la fiche ;
c) la fiche peut être introduite sans difficulté ;
d) une fois la fiche insérée, le four ne repose pas sur celle-ci lorsque vous l'installez dans le meuble ;
e) les terminaux de deux appareils différents ne sont pas connectés à la même fiche ;
f) le cordon d'alimentation est remplacé, en cas de besoin, par un modèle de 3 x 1,5 mm
2
de type H05VV-F ;
g) les polarités de connexion des terminaux libres doivent absolument être respectées
(Marron=Phase – Bleu=Neutre – Jaune Vert=Terre).
Remarque : assurez-vous que les caractéristiques de votre ligne domestique (tension, intensité maximale et courant)
sont compatibles avec celles de votre four FRANKE.
Remarque : la fréquence du réseau est déterminée lors de l'allumage du four. Lorsque la minuterie est reliée à 60 Hz,
le symbole P clignote lors de l'allumage.
Données techniques
INFORMATIONS DESTINÉES AUX UTILISATEURS
conformément au décret loi du 25 juillet, n° 15 « Application des directives 2002/95/CE, 2002/96/CE et
2003/108/CE, relatives à la réduction et à l'utilisation de substances dangereuses dans les appareils
électriques et électroniques et à la mise au rebut des déchets ».
Le symbole apposé sur l'appareil qui représente un conteneur barré indique que l'appareil, en fin de vie, doit faire l'objet
d'une collecte séparée des autres déchets.
Par conséquent, l'utilisateur devra remettre l'appareil arrivé en fin de vie à un centre approprié, chargé de la collecte des
déchets électriques et électroniques, ou le remettre à son revendeur lors de l'achat d'un nouvel appareil de même type,
à raison d'un pour un.
Le tri sélectif réalisé de manière appropriée en vue du recyclage, du traitement et la mise au rebut de manière
compatible avec l'environnement, contribue à éviter toute conséquence négative pour l'environnement et la santé, et
favorise en outre le recyclage du matériel dont se compose l'appareil.
L'élimination abusive de la part de l'utilisateur entraîne l'application des sanctions administratives relatives au décret-loi n°
22/1997 (article 50 et suivants du décret-loi n° 22/1997).
Dimensions utiles du four :
largeur : 440 mm
profondeur : 415 mm
hauteur : 312 mm
Volume utile du four :
57 litres
Consommation (fonction statique) :
montée à 175 °C : 0,32 kWh
maintien à 175 °C : 0,62 kWh
Consommation totale : 0,94 kWh
Consommation (fonction ventilée) :
montée à 200 °C : 0,42 kWh
maintien à 200 °C : 0,77 kWh
Consommation totale : 1,19 kWh
Tension et fréquence d'alimentation :
220-240 V ~ 50-60 Hz
Puissance totale et capacité des
fusibles :
2300 W - 16 A
Puissance résistance :
voûte 1000 W
sole 1250 W
gril 2250 W
ventilateur électrique 30 W
ampoule d'éclairage du four 15 x 1 W
Ventilateur tangentiel 15 W
Cet appareil est conforme aux
directives communautaires
suivantes :
– 2006/95/EC (Basse Tension) ;
– 2004/108 CEE (Compatibilité
électromagnétique).
BLEU
JAUNE-VERT
MARRON
Page 36

31
DE
Inhaltsverzeichnis
Einleitung .......................................................................................................................................... 31
Aus der Nähe betrachtet.................................................................................................................. 31
Erste Inbetriebnahme ....................................................................................................................... 32
Tipps................................................................................................................................................. 32
Wie benutze ich meinen Ofen.......................................................................................................... 32
Garzeittabelle mit Richtwerten ........................................................................................................ 37
Reinigung und Pflege des Backofens................................................................................................. 38
Kundendienst.................................................................................................................................... 39
Sicherheitshinweise .......................................................................................................................... 39
Installation (Abb. 5)........................................................................................................................... 40
Montageanleitung ............................................................................................................................. 40
Elektrischer Anschluss ...................................................................................................................... 41
Technische Daten ............................................................................................................................. 42
Einleitung
Vielen Dank, dass Sie ein Produkt von Franke gewählt haben.
Bevor Sie Ihr Gerät in Betrieb nehmen, bitten wir Sie, die Hinweise und Ratschläge in diesen Gebrauchsanleitungen
sorgfältig zu lesen. Das wird Ihnen den Gebrauch erleichtern und den effizienten Betriebszustand des Gerätes verlängern.
Bewahren Sie diese Gebrauchsanleitungen sorgfältig auf, damit Sie auch zu einem späteren Zeitpunkt darauf zurückgreifen
können.
Aus der Nähe betrachtet
Programmwahlschalter
Der Programmwahlschalter dient zur Wahl der Betriebsart Ihres Backofens, je nach
gewünschter Garart. Sobald der Drehknopf auf eines der vorhandenen Programme gedreht
wird, schaltet sich die Innenbeleuchtung ein und zeigt damit an, dass der Backofen in Betrieb ist.
Programmschalter
Franke-Backöfen sind mit unterschiedlichen Systemen für die Garzeitkontrolle und
-verwaltung ausgestattet. Auf Seite 33 finden Sie ausführliche Informationen zu jedem
einzelnen System. Stellen Sie fest, über welches System Ihr Ofen verfügt und lesen Sie die
entsprechenden Anleitungen zum korrekten Gebrauch aufmerksam durch.
Thermostat-Kontrollleuchte
Zeigt mit dem Symbol an, dass die elektrischen Heizelemente in Betrieb sind.
Sie erlischt, sobald die eingestellte Temperatur erreicht ist, und leuchtet wieder auf, wenn
der Ofen nachheizt. Anhand dieser Kontrollleuchte können Sie jederzeit sofort feststellen,
ob die zum Einschieben des Gargutes erforderliche Temperatur erreicht ist.
Knopf des Temperaturreglers (Thermostat)
Mit diesem Drehknopf lässt sich die für das Rezept geeignete Temperatur wählen. Diese
bleibt während des gesamten Garvorgangs konstant. Um die gewünschte Temperatur
einzustellen, drehen Sie den Drehknopf nach rechts, bis er auf die entsprechende Zahl zeigt.
Die Höchsttemperatur beträgt ca. 260 °C.
Einschubschienen für Fettpfannen und Roste
Mit Hilfe der Einschubebenen können Sie die Roste und Fettpfannen in 5 vorgegebenen
Höhen (von 1 bis 5, von unten nach oben) korrekt positionieren. In der Garzeittabelle mit
Richtwerten (Seite 37) finden Sie Angaben zur idealen Einschubhöhe für die diversen
Speisen.
Fettpfanne
Die Fettpfanne dient normalerweise zum Auffangen von Bratensaft oder direkt zum Garen
von Speisen. Falls Sie die Fettpfanne nicht benötigen, sollten Sie sie aus dem Backofen
nehmen. Sie besteht aus emailliertem Stahl vom Typ „AA“ und ist für Lebensmittelzwecke
geeignet. Hinweis: Für optimale Garergebnisse sollten Sie die Fettpfanne mit dem
schrägen Rand zur hinteren Backofenwand hin einschieben.
Grill
Auf den Rost können Sie Ihre Auflaufformen, Backformen und andere Behälter stellen.
Ebenso können Sie auf dem Rost mit den Funktionen Grill und Turbogrill Fleisch und Fisch
grillen, Brot rösten usw. Vermeiden Sie den direkten Kontakt des Rosts mit den Speisen.
A
BCDEF
G
D
A
F
G
E
Page 37

32
Erste Inbetriebnahme
Bevor Sie den Backofen zum ersten Mal benutzen, müssen Sie das leere Gerät bei komplett geöffneter Tür und auf
Höchsttemperatur eingestelltem Temperaturregler mindestens 40 Minuten lang aufheizen. Sorgen Sie dabei für eine gute
Raumbelüftung.
Der Geruch, der während dieses Vorgangs wahrzunehmen ist, entsteht durch das Verdampfen der zum Schutz des
Gerätes für den Zeitraum zwischen Herstellung und Installation verwendeten Substanzen. Nach diesem ersten
Aufheizen können Sie Ihren Backofen benutzen.
Tipps
Damit Ihre Rezepte optimal gelingen, sollten Sie die Speisen nie in den kalten Ofen stellen, sondern warten, bis dieser
die eingestellte Temperatur erreicht hat.
Stellen Sie Auflauf- oder Backformen nie direkt auf den Boden des Ofens, sondern immer auf einen/s der mitgelieferten
Roste bzw. Backbleche (Fettpfannen), die in eine der fünf verfügbaren Einschubleisten eingesetzt werden müssen, damit
die Emaillebeschichtung des Ofeninneren nicht zerkratzt wird.
Kleiden Sie die Ofenwände nie mit Alufolie aus und decken Sie vor allem den Boden nicht mit Alufolie ab.
Lassen Sie eventuell erforderliche Reparaturen ausschließlich von einem Fachmann ausführen.
Wenden Sie sich an die nächste Franke-Kundendienststelle. Verlangen Sie immer die Verwendung von
Original-Ersatzteilen.
Obwohl Ihr Franke-Backofen mit einer leicht zu reinigenden Spezial-Emaillebeschichtung ausgekleidet ist, sollten Sie ihn
stets sauber halten und vermeiden, dass Rückstände bzw. Verschmutzungen anbacken und sich einbrennen.
Sollte der Backofen mit selbstreinigenden Paneelen ausgestattet sein, so müssen diese mit Wasser und Seife gereinigt
werden (siehe Reinigungsanleitung).
HINWEIS: Lesen Sie vor dem Einschalten des Backofens die Hinweise zur Benutzung der Zeitschaltuhr durch
(siehe Seite 35).
– Ist der Backofen mit einer Gar- oder Abschaltautomatik ausgestattet, müssen Sie zur Aktivierung der manuellen
Bedienung zuerst die Option „manuell“ wählen. Sie erkennen diese Option am Symbol .
Wie benutze ich meinen Ofen
Dieser Backofen vereint alle Vorzüge der konventionellen Heißluftöfen mit „statischer“ Hitze mit denen der modernen
„gebläseunterstützten“ Umluftöfen. Es handelt sich um ein extrem vielseitiges, sicheres und einfach zu bedienendes
Gerät mit 6 verschiedenen Garmethoden. Die Garprogramme und die gewünschte Temperatur werden mit den
Drehknöpfen (A) und (D) auf dem Bedienfeld eingestellt. Damit Sie Ihren Franke-Backofen auch optimal nutzen können,
lesen Sie bitte unbedingt die Tabelle mit den Garzeit-Richtwerten auf Seite 37.
Luftkühlung
Zum Senken der Temperatur von Tür, Bedienfeld und Gerätewänden ist der Backofen mit einem Gebläse ausgestattet,
das sich automatisch einschaltet, wenn der Ofen heiß wird. Bei eingeschaltetem Gebläse können Sie die zwischen
Bedienblende und Backofentür austretende Luft deutlich spüren. Selbstverständlich wurde bei der Planung darauf geachtet,
dass sich das Betriebsgeräusch und der Luftstrom des Gebläses nicht störend auf die die Küchenumgebung auswirken.
Zum wirksamen Schutz der Küchenmöbel bleibt das Gebläse so lange eingeschaltet, bis der Backofen
ausreichend abgekühlt ist.
Backofeninnenbeleuchtung
Auf dieser Position schaltet sich nur die Backofeninnenbeleuchtung ein, der Backofen heizt sich nicht auf.
Die Innenbeleuchtung erleichtert das Reinigen des Garraums des ausgeschalteten Backofens.
Garprogramme
Normale Ober-/Unterhitze
Der Temperaturregler (D) muss zwischen 50 °C und Max (260 °C) stehen.
Die Beheizung erfolgt sowohl von oben (oberes Heizelement) als auch von unten (unteres Heizelement).
Das herkömmliche Garen mit Ober- und Unterhitze ermöglicht ein gleichmäßiges Garen der Speisen,
allerdings kann nur eine Einschubebene genutzt werden.
Page 38

33
DE
Garen mit Gebläse
Der Temperaturregler (D) muss zwischen 50 °C und Max (260 °C) stehen.
Mit dieser Funktion schalten Sie zusätzlich zum oberen und unteren Heizelement auch das Gebläse im Ofen ein.
Durch die gleichmäßige Temperaturverteilung werden die Speisen rundum gegart und gebräunt. Sie können
auch unterschiedliche Speisen zusammen garen, dabei können allerdings nur 2 Einschubebenen gleichzeitig
benutzt werden.
Heißluft Unterhitze
Der Temperaturregler (D) muss zwischen 50 °C und Max (260 °C) stehen.
Mit dieser Funktion schalten Sie das untere Heizelement (Unterhitze) und das Gebläse ein. Ideal zum
Zubereiten von Fisch sowie Tiefkühlwaren und Fertigprodukten im Allgemeinen. Diese Funktion lässt sich
sehr wirkungsvoll für Backwaren verwenden.
Heißluft Oberhitze
Der Temperaturregler (D) muss zwischen 50 °C und Max (260 °C) stehen.
Mit dieser Funktion schalten Sie das obere Heizelement (Oberhitze) und das Gebläse ein. Durch die
Kombination von geringer Leistung und Gebläse wird ein sehr schonendes und gleichmäßiges Garen erzielt.
Daher ist diese Funktion ideal zum Garen von trockenen Süßspeisen und überbackenen Teigwaren.
Grillen
Der Temperaturregler (D) muss normalerweise auf Max (260 °C) stehen; für langsameres Grillen
können Sie aber auch eine niedrigere Temperatur einstellen.
Das Grillelement an der Oberseite des Backofens schaltet sich ein. Das schnelle Garen der Oberfläche durch
Infrarotstrahlen sorgt dafür, dass das Innere des Grillgutes zart bleibt, mit dem Grill können Sie auch in ganz
kurzer Zeit bis zu 9 Brotscheiben rösten. Mit dem Backofen von Franke ist das Grillen nur bei komplett
geschlossener Backofentür möglich.
Hinweis: Das Grillelement wird während des Betriebs sehr heiß. Achten Sie daher darauf, dass Sie es beim
Hantieren mit dem Grillgut nicht versehentlich berühren. Die Öffnung des Backofen ist so gebaut, dass die
Hände des Benutzers weitestgehend geschützt sind.
Umluftgrill
Der Temperaturregler (D) muss normalerweise auf Max (260 °C) stehen; für langsameres Grillen
können Sie aber auch eine niedrigere Temperatur einstellen.
Mit dieser Funktion schalten Sie das Grillelement an der Oberseite des Backofens und das Gebläse ein.
Die einseitige Wärmestrahlung des Grillelementes wird durch die Heißluftumwälzung im Ofeninneren ergänzt.
Dadurch wird die Oberfläche des Grillgutes vor dem Verbrennen geschützt, und die Hitze kann besser in das
Grillgut eindringen. Die Funktion Umluftgrill eignet sich hervorragend zum Grillen von Fleisch-Gemüse-Spießen,
Würstchen, Schweinerippchen, Lammkoteletts, plattgedrücktem Huhn, Wachteln mit Salbei, Schweinefilets usw.
Drehknopf des Kurzzeitweckers mit Abschaltautomatik
Der Kurzzeitwecker ist eine nützliche Einrichtung, die den Backofen nach einer
bestimmten im Bereich von einer bis 120 Minuten einstellbaren Zeitspanne automatisch
abschaltet. Zum Gebrauch des Kurzzeitweckers ziehen Sie die Klingel durch eine fast
vollständige Drehung des Drehknopfes (B) nach rechts auf. Drehen Sie anschließend den
Drehknopf zurück, bis die Markierung der Frontblende den gewünschten Minuten
entspricht. Nach Ablauf der eingestellten Zeit ertönt die Klingel und der Backofen schaltet
sich automatisch ab.
Hinweis: Nach dem Ausschalten behält der Backofen noch längere Zeit eine Temperatur,
die nur knapp unter der eingestellten Gartemperatur liegt. Um ein übermäßiges Garen
oder Verbrennen der Speisen zu vermeiden, sollten Sie diese deshalb aus dem Backofen
nehmen.
Achtung: Soll der Backofen im Handbetrieb ohne Abschaltautomatik benutzt werden,
die Markierung auf dem Drehknopf auf das entsprechende Symbol auf der Frontblende drehen. Wenn der Backofen
abgeschaltet ist, kann der Programmschalter der Garzeit wie ein normaler Kurzzeitwecker verwendet werden.
B
Page 39

34
Uhr der Abschaltautomatik
Diese Uhr ist bereits für den manuellen Betrieb des Backofens eingestellt. Das Garen kann
daher auch ganz ohne Einstellen der Uhr erfolgen.
Rechter Drehknopf
Durch Drücken des rechten Drehknopfes lassen sich nacheinander die einstellbaren
Funktionen (Timer, Garzeitende, Garbeginn, Uhrzeiteinstellung) wählen, die durch
Blinken der jeweiligen LED angezeigt werden.
Außerdem lassen sich durch kurzes Drücken dieses Drehknopfes die bereits
programmierten Einstellungen noch einmal anzeigen (Abfrage), während die Einstellungen
durch längeres Drücken (etwa zwei Sekunden) gelöscht werden (Reset).
Linker Drehknopf
Durch Drehen des linken Drehknopfes werden die Zeiger der Uhr für die entsprechende
aktivierte Funktion eingestellt (LED blinkt).
LEDs
– Blinkend: bereit für die Einstellung oder Anzeige Funktionsende
(zusammen mit der Klingel)
– Dauerlicht: Funktion aktiv
Timer ( )
Zum Einschalten des Timers drücken Sie den rechten Drehknopf nur
einmal (die entsprechende LED beginnt zu blinken). Stellen Sie dann
die Laufzeit des Timers ein, indem Sie durch Drehen des linken
Drehknopfes die Zeiger verstellen. Durch nochmaliges Drücken des
rechten Drehknopfes bestätigen Sie die vorgenommene Einstellung
und die entsprechende LED leuchtet, anstatt zu blinken. Die Zeiger
kehren in ihre ursprüngliche Stellung zurück und zeigen die aktuelle Uhrzeit an: Bei Erreichen der eingestellten Zeit
ertönt die Klingel. Sie lässt sich durch Drücken des rechten Drehknopfes ausschalten.
Der Timer hat keinen Einfluss auf das Aufheizen des Backofens.
Garzeitende ( )
Zum Einstellen des Garzeitendes drücken Sie den rechten Drehknopf zwei Mal (die LED für das Symbol beginnt zu
blinken). Drehen Sie deshalb den linken Drehknopf und verstellen Sie die Zeiger, um das Garzeitende einzustellen.
Die LED blinkt für die nächsten 10 Sekunden (für eventuelle Korrekturen). Nach Ablauf dieser Zeit wird die Einstellung
übernommen und die LED schaltet auf Dauerlicht.
Den selben Effekt erzielen Sie durch zweimaliges Drücken des rechten Drehknopfes während die LED blinkt.
Am Garzeitende wird das Heizelement des Backofens ausgeschaltet und die Klingel ertönt 1 Minute lang. Sie lässt sich
durch Drücken des rechten Drehknopfes ausschalten.
Hinweis: Am Garzeitende behält der Backofen noch längere Zeit eine Temperatur, die nur knapp unter der eingestellten
Gartemperatur liegt. Um ein übermäßiges Garen der Speisen zu vermeiden, sollten Sie diese deshalb aus dem Backofen
nehmen.
Garzeitende ( ) mit zeitversetztem Start ( )
Der verzögerte Start des Garvorgangs lässt sich erst nach dem Garzeitende einstellen. Nach dem Einstellen des
Garzeitendes wird durch Drücken des rechten Drehknopfes der „Stop“ bestätigt und zugleich die blinkende LED für das
Symbol aktiviert. Drehen Sie den rechten Drehknopf zum Einstellen des Garzeitbeginns (die selbstverständlich vor
dem Garzeitende liegen muss, deshalb lassen sich die Zeiger nur zurück drehen). Jetzt können Sie die Einstellungen
durch ein weiteres Drücken des rechten Drehknopfes endgültig bestätigen. Falls Sie die 10 Sekunden Blinken
verstreichen lassen, werden die Einstellungen automatisch übernommen. Die LED für die Symbole und
leuchten weiter und der Backofen schaltet sich zum eingestellten Zeitpunkt ein. Dann leuchtet nur noch die LED für das
Symbol .
Am Garzeitende ertönt die Klingel 1 Minute lang. Sie lässt sich durch Drücken des rechten Drehknopfes ausschalten.
Einstellen der Tagesuhrzeit ( )
Zum Einstellen der aktuellen Uhrzeit drücken Sie einfach drei Mal den rechten Drehknopf (die LED für das Uhrsymbol
beginnt zu blinken) und drehen dann den linken Drehknopf. Nach dem Einstellen der korrekten Uhrzeit bestätigen Sie
durch Drücken des rechten Drehknopfes.
IVI
I
V
I
I
IX
V
V
I
VI
III
I
X
X
III
IXI
TIMER
START
STOP
B
B
Page 40

35
DE
Elektronischer Garzeitprogrammierer
Er erlaubt die folgenden Programmierungen:
• Zeitversetzter Start mit vorgegebener Garzeitdauer;
• Sofortiger Start mit vorgegebener Garzeitdauer;
•Uhr.
Einstellen der Digitaluhr
Nach dem Anschluss an das Stromnetz oder nach einem Stromausfall blinkt am
Display die Anzeige: „0.00“.
Halten Sie die Tasten + und – gleichzeitig einige Sekunden lang gedrückt.
Die Uhrzeit lässt sich anhand der Tasten + und – einstellen, während der Punkt
zwischen der Stunden- und der Minutenanzeige blinkt. Wählt man den Modus
Einstellung der Uhrzeit bei laufendem automatischem Programm, so wird das
automatische Programm gelöscht.
Für eventuelle Neueinstellungen der Uhrzeit gehen Sie ebenso vor.
Ändern der Signaltonfrequenz
Die Signaltonfrequenz lässt sich ändern, wenn gerade kein Garvorgang
programmiert ist (das Display also die aktuelle Uhrzeit anzeigt). Drücken Sie
gleichzeitig die Tasten + und – (im Menü Uhrzeit ändern) und drücken Sie dann
Mode oder Set, um das Menü anzuwählen, in dem sich die Signaltonfrequenz
ändern lässt. Die Signaltonfrequenz lässt sich ändern, indem man wiederholt die
Taste Mode oder Set drückt. Auf dem Display erscheint „Ton1“, „Ton2“, „Ton3“.
Manueller Betrieb
Nach der Einstellung der Uhrzeit schaltet sich die Digitaluhr automatisch auf
Handbetrieb.
Zeitversetzter Beginn des Garvorgangs mit vorgegebener Garzeitdauer
Wenn auf dem Display die aktuelle Uhrzeit erscheint, drücken Sie zweimal die Taste Mode oder Set, um die Dauer
einzustellen. Drücken Sie die Taste dann erneut, um das Garzeitende einzustellen. Stellen Sie die gewünschte Zeit
anhand der Tasten + und – ein. Während der Auswahl des Einstellungsmodus für das Garzeitende oder die Garzeitdauer
blinkt das entsprechende Symbol Auto.
Sobald die Garzeitdauer eingestellt ist, lässt sich das Garzeitende nicht mehr reduzieren. Auch die Garzeitdauer lässt sich
nicht mehr verlängern, wenn das Garzeitende eingestellt wurde.
Die Einstellungen Garzeitendes und Garzeitdauer definieren die Uhrzeit für den Garbeginn folgendermaßen:
Garbeginn = Garzeitende - Garzeitdauer.
Nach dem Einstellen der Garzeitdauer und des Garzeitendes zeigt das Display weiterhin das Garzeitende an. Das Programm
startet, wenn die aktuelle Uhrzeit und der Garbeginn übereinstimmen: Das Symbol Auto leuchtet und das Symbol blinkt.
Nach dem Garbeginn zeigt das Display den Countdown. Wurde nur das Garzeitende gewählt (die Dauer ist = 0), so startet
das Programm und das Display zeigt den Countdown an.
Das Symbol Auto leuchtet während des Wartens auf den zeitverzögerten Garbeginn und während der gesamten Garzeit.
Das Symbol blinkt während des Wartens auf den zeitverzögerten Garbeginn und leuchtet nach dem Garbeginn.
Am Ende der Garzeit ertönt ein akustisches Signal. Zum Abschalten des Signals drücken Sie eine beliebige
Taste oder lassen Sie die Alarmzeit verstreichen.
Halbautomatisches Programm mit Garzeitdauer oder Garzeitende
Zeiteinstellung des Programms
Um die Garzeitdauer oder das Garzeitende zu wählen, drücken Sie zweimal die Taste Mode oder Set und stellen die
gewünschte Uhrzeit anhand der Tasten + und – ein. Während der Auswahl des Einstellungsmodus für das Garzeitende
oder die Garzeitdauer blinkt das entsprechende Symbol Auto.
Sobald die Garzeitdauer eingestellt ist, lässt sich das Garzeitende nicht mehr reduzieren. Auch die Garzeitdauer lässt sich
nicht mehr verlängern, wenn das Garzeitende eingestellt wurde.
Ausführung des Garprogramms
Während das automatische Programm läuft, also der Garvorgang aktiv ist, leuchtet das Symbol Auto und auf dem
Display wird die verbleibende Zeit angezeigt (Countdown). Auch das Symbol leuchtet.
Ende des automatischen Programms
Nach Ablauf des Programms oder nach Erreichen des Garzeitendes erlischt das entsprechende Symbol . Nach Ablauf
des automatischen Programms blinkt das Symbol „Auto“, auf dem Display erscheint „End“ und es ertönt ein
unterbrochenes akustisches Signal, das sich durch Drücken einer beliebigen Taste abstellen lässt.
B
B
Page 41

36
Kurzzeitwecker
Bei Verwendung als Kurzzeitwecker wird eine Zeit eingestellt, ab der der Countdown einsetzt. Die Funktion schaltet
den Ofen weder ein noch aus, nach Ablauf der eingestellten Zeit ertönt jedoch ein akustisches Signal.
Drücken Sie die Taste Mode oder Set nur einmal. Auf dem Display erscheint:
Das Glockensymbol blinkt. Jetzt lässt sich die Dauer des Alarms mit den Tasten + und – einstellen. Wenn diese Funktion
aktiviert ist, leuchtet das Glockensymbol und auf dem Display wird die verbleibende Zeit angezeigt (Countdown).
Nach Ablauf der Zeit ertönt ein akustisches Signal, das sich durch Drücken einer beliebigen Taste abstellen lässt.
Ändern oder Löschen von Daten
• Die eingestellten Daten lassen sich jederzeit ändern. Drücken Sie dazu gleichzeitig die Tasten + und –.
• Durch Löschen der Gardauer wird automatisch auch das Garzeitende gelöscht und umgekehrt.
• Beim programmierten Backofenbetrieb akzeptiert das Gerät kein Garzeitende, das vor dem vom Gerät
vorgeschlagenen Garzeitbeginn liegt.
Hinweis: Nach dem Ausschalten behält der Backofen noch längere Zeit eine Temperatur, die nur knapp unter der
eingestellten Gartemperatur liegt. Um ein übermäßiges Garen oder Verbrennen der Speisen zu vermeiden, sollten Sie
diese deshalb aus dem Backofen nehmen.
Page 42

37
DE
Garzeittabelle mit Richtwerten
Hinweis: Die Angaben in der Tabelle sind das Ergebnis von Garproben, die von einem Profi-Küchenteam durchgeführt wurden.
Dabei handelt es sich um Richtwerte, die sich je nach Geschmack verändern lassen.
Einstellen der
Wahlschalter
Art der Speisen Gewicht
(kg)
Einschubebene Vorwärmzeit
(Minuten)
Einstellung
des
Te m p e r a t u r -
reglers
Garzeit
(in
Minuten)
Normale
Ober-/Unterhitze
Schweinebraten
Omelett
Seehecht, Meerbrasse, Steinbutt
Brot
Auflauf
Süßwasserfische
Überbackene Polenta
Käsekuchen
1
1,5
1
1
1
1,5
0,5
1,5
3
2
3
2-4 gleichz.
2
3
2
2
9,5
10,5
9,5
9,5
10,5
10,5
9,5
9,5
180 °C
200 °C
180 °C
175 °C
200 °C
200 °C
180 °C
180 °C
65-75
25-30
15
25-30
40-45
35-40
25-30
25-30
Garen mit Gebläse Schweinerücken
Ofengebackenes Kaninchen
Fladenbrot
Überbackene Garnelen
Seehecht, Meerbrasse, Steinbutt
Brot
Obstkuchen
Quiche
1
1
1
0,5
2
2
1,5
2
3
2
2
3
2-4 gleichz.
2-4 gleichz.
2
3-5 gleichz.
9
9,5
10
10
7,5
9
9
9
180 °C
190 °C
200 °C
200 °C
150 °C
180 °C
175 °C
180 °C
60-70
55-65
25-30
30-40
25-30
25-30
30-35
40-45
Heißluft Unterhitze Hähnchenbrust
Kalbsgeschnetzeltes
Roastbeef
Tunfischschnitten
Schwertfischmedaillons
Riesengarnelen
Baiser
Butterkekse
Hefekuchen
Mandeltörtchen
1
1
1
1
1
1
0,8
1
0,8
1
2 oder 3
2
3
2
3
2
2
2
2
2 oder 3
Zum
schnelleren
Vor hei zen
verwenden Sie
die Funktion
Ober-/
Unterhitze mit
Gebläse
170 °C
180 °C
170 °C
160 °C
160 °C
180 °C
90 °C
160 °C
170 °C
160 °C
20
20
60
20
20
30
120
30
40
35
Heißluft Oberhitze Überbackene Tortellini
Kartoffelklößchen
Schwertfisch
Miesmuscheln
Jakobsmuscheln
Bratkartoffeln
Cannelloni
0,5
0,5
0,5
1
1
0,5
1
3
3
5
4
4
4
3
Zum
schnelleren
Vor hei zen
verwenden Sie
die Funktion
Ober-/
Unterhitze mit
Gebläse
Max
Max
200 °C
Max
200 °C
200 °C
Max
25-30
25-30
12-15
10-12
10-12
18-20
25-30
Grillen Hähnchenflügel
Koteletts
Jakobsmuscheln
Bratkartoffeln
Süßwasserfische
Überbackene Tomaten
Aalspießchen
Putenspießchen
1
0,8
0,5
1
1
0,4
0,5
0,5
4 oder 5
3
3 oder 4
3
3 oder 4
2 oder 3
3
4
7
7
7
7
7
7
7
7
Max
Max
Max
Max
Max
Max
Max
Max
25-30
25-30
14-16
25-30
25-30
25-30
25-30
25-30
Umluftgrill Hähnchenschlegel
Schweinerippchen
Perlhuhn (in Stücken)
Meerbrasse in der Folie
Hähnchen (in Stücken)
Wachte ln
Bratwurst
Gemüse
1
0,5
1,2
1
1,5
0,8
1
1
4 oder 5
4
4
3
3
4
4
4 oder 5
9,5
14
14
8
14
14
14
14
220 °C
Max
Max
200 °C
Max
Max
Max
Max
25-30
40-45
30-35
20-25
35-40
30-35
20-25
10-15
Page 43

38
Reinigung und Pflege des Backofens
Wichtig
Ziehen Sie vor dem Durchführen von Wartungsarbeiten am Backofen immer den Netzstecker oder schalten Sie den
Strom am Hauptschalter des Stromnetzes ab.
– Die emaillierten Teile und die Edelstahlflächen bleiben wie neu, wenn Sie dieselben sorgfältig mit Wasser oder
Spezialreinigungsmitteln säubern und sorgfältig abtrocknen.
– Vermeiden Sie unbedingt Metallschwämme oder Stahlwolle, Chlorwasserstoffsäure oder andere Produkte/Utensilien,
die Kratzer oder matte Stellen hinterlassen können. Verwenden Sie keine Dampfreiniger und keinen direkten
Wasserstrahl.
– Flecken unterschiedlicher Zusammensetzung (Soßen, Zucker, Eiweiß und Fett), die sich am Backofenboden bilden
können, stammen immer von spritzenden oder überlaufenden Speisen. Spritzer bilden sich während des
Garvorgangs aufgrund zu hoher Temperaturen, während die Speisen überlaufen, wenn zu kleine Formen gewählt
oder das Aufgehen der Speisen während des Garens falsch berechnet wurde. Beide Unannehmlichkeiten lassen sich
durch den Gebrauch von hochwandigem Geschirr oder den Einsatz der mitgelieferten Fettpfanne vermeiden. Für die
Reinigung des Backofenbodens empfehlen wir Ihnen, eventuelle Flecken bei lauwarmer Backofentemperatur zu
entfernen. Je länger Sie mit dem Reinigen warten, desto schwieriger gestaltet sich das Entfernen der Flecken.
Reinigung der Backofentür
– Reinigen Sie die Backofentür von innen und außen, wenn der Backofen vollständig abgekühlt
ist. Verwenden Sie dazu warmes Wasser und weiche Reinigungstücher. Säubern Sie die
Glasscheiben mit Spezialreinigern.
– Verwenden Sie für die emaillierten Teile und den Garraum nur warmes Wasser und meiden
Sie Scheuermittel.
(Nur Modelle CR 66 und CS 66)
– Für eine gründlichere Reinigung lässt sich die Kunststoffverkleidung der Backofentür
abnehmen. Drücken Sie bei offener Backofentür die Entriegelungstasten an den Seiten und
ziehen Sie die Verkleidung wie abgebildet ab. Um die Verkleidung wieder an der
Backofentür anzubringen, setzen Sie diese an ihrem Platz ein und drücken sie leicht an, bis
die seitlichen Verriegelungen hörbar einrasten.
Ausbau der inneren Glasscheibe der Backofentür (nur Modelle CR, CS und SM)
(Abb. 2)
Für eine gründlichere Reinigung lässt sich die Innenscheibe der Backofentür ganz einfach abnehmen. Gehen Sie dazu wie
folgt vor:
• Drehen Sie die beiden schwarzen Verriegelungen (mit der Aufschrift „CLEAN“) am unteren Ende der Tür bei ganz
geöffneter Backofentür um 180°, so dass sie in den Aussparungen im Backofenrahmen verschwinden.
Hinweis: Vergewissern Sie sich, dass die Verriegelungen vollständig gedreht sind (in dieser Position rastet die
Verriegelung hörbar ein).
• Heben Sie die Innenscheibe vorsichtig an. Die Verriegelungen verhindern, dass sich die Backofentür schließt (werden die
Verriegelungen nicht vollständig gedreht, so schließt sich die Backofentür nach dem Entfernen der Innenscheibe sofort).
Setzen Sie die Innenscheibe nach dem Reinigen wieder ein (die Scheibe sitzt richtig, wenn der Schriftzug „TEMPERED
GLASS“ korrekt lesbar ist). Drehen Sie die beiden Verriegelungen der Innenscheibe wieder in ihre Ausgangsposition.
ACHTUNG: Versuchen Sie nie, die Backofentür zu schließen, wenn eine oder beide Verriegelungen der
Innenscheibe teilweise oder ganz entriegelt sind. Denken Sie nach der Reinigung stets daran, beide
Verriegelungen wieder zurück zu drehen, bevor Sie die Backofentür schließen.
Ausbau der inneren Glasscheibe der Backofentür (nur Modelle TL und CM) (Abb. 3)
Für eine gründlichere Reinigung lässt sich die Innenscheibe der Backofentür ganz einfach abnehmen. Gehen Sie dazu wie
folgt vor:
• Drehen Sie die beiden schwarzen Verriegelungen am unteren Ende der Tür bei ganz geöffneter Backofentür um 180°
(Abb. 3a und 3b).
Hinweis: Vergewissern Sie sich, dass die Verriegelungen vollständig gedreht sind (in dieser Position rastet die
Verriegelung hörbar ein).
• Heben Sie die Innenscheibe vorsichtig an (Abb. 3c). Die Verriegelungen verhindern, dass sich die Backofentür
schließt (werden die Verriegelungen nicht vollständig gedreht, so schließt sich die Backofentür nach dem Entfernen
der Innenscheibe sofort).
• Zum Entfernen auch der mittleren Glasscheibe die zwei seitlichen Dichtungen herausziehen (Abb. 3d) und dann das
Glas anheben (Abb. 3e).
• Nach Durchführung der Reinigungsarbeiten zuerst die mittlere Glasscheibe (Abb. 3f) wieder anbringen (die korrekte
Einbaurichtung des Glases ist an der Aufschrift „TEMPERED GLASS“ erkenntlich, die korrekt lesbar sein muss):
Vorsichtig in die Rillen an der Oberseite der Tür einsetzen und bis zum Anschlag am Ende der Rille einschieben.
Page 44

39
DE
• Anschließend beide Dichtungen wieder einsetzen (Abb. 3g). Dabei darauf achten, dass diese bündig am oberen
Türprofil abschließen müssen.
• Zuletzt auch die Innenscheibe wieder anbringen (Abb. 3h) und ihre zwei Verriegelungen in die ursprüngliche
Schließposition bringen.
ACHTUNG: Versuchen Sie nie, die Backofentür zu schließen, wenn eine oder beide Verriegelungen der
Innenscheibe teilweise oder ganz entriegelt sind. Denken Sie nach der Reinigung stets daran, beide
Verriegelungen wieder zurück zu drehen, bevor Sie die Backofentür schließen.
Ausbauen der Backofentür (Abb. 4)
Um die Reinigung des Backofens zu erleichtern, können Sie die Backofentür ausbauen. Gehen Sie dazu wie folgt vor:
– Die Scharniere (A) verfügen über zwei bewegliche Klappen (B). Nach dem Anheben der Klappen (B) lassen sich die
Scharniere aus ihrem Sitz ziehen.
– Heben Sie jetzt die Tür nach oben an und ziehen Sie sie nach vorne heraus. Halten Sie dazu die Backofentür seitlich
neben den Scharnieren.
– Um die Backofentür wieder einzusetzen, schieben Sie zuerst die Scharniere in die vorgesehenen Schlitze.
– Vergessen Sie nicht, die beweglichen Klappen (B), die die beiden Scharniere blockieren, wieder anzulegen, bevor Sie
die Backofentür schließen.
Auswechseln der Backofenlampe
Franke-Öfen sind mit einer runden Lampe ausgestattet, die links oben an der Rückwand des Garraums angebracht ist.
Falls eine der Lampen ausgewechselt werden muss, gehen Sie wie folgt vor:
– Schalten Sie das Gerät mit dem allpoligen Schalter für den elektrischen Anschluss an das
Stromnetz aus oder ziehen Sie den Netzstecker, falls dieser zugänglich ist.
– Schrauben Sie die Schutzabdeckung aus Glas (A) ab.
– Schrauben Sie die Lampe heraus und ersetzen Sie sie durch eine hitzebeständige Lampe
(300 °C) mit folgenden Leistungsdaten:
Spannung: 220-240 V ~ 50-60 Hz
Leistung: 15 W
Sockel: (E14) Mignon.
– Schrauben Sie die Schutzabdeckung aus Glas (A) wieder ein und schließen Sie den Backofen
wieder an das Stromnetz an.
Kundendienst
Sollte es einmal zu Betriebsstörungen an Ihrem Gerät kommen, wenden Sie sich an den
Technischen Kundendienst. Die Adressen finden Sie in der mitgelieferten Liste.
Wenden Sie sich auf keinen Fall an nicht autorisierte Techniker.
Ihre Kundendienststelle benötigt folgende Angaben:
– Art der Störung;
– Gerätemodell (Art.);
– Seriennummer (S.N.).
Diese Angaben können Sie dem Typenschild auf dem Garantieschein entnehmen.
Sicherheitshinweise
• Dieses Gerät ist nicht für die Benutzung durch Personen mit eingeschränkten psychischen oder motorischen
Fähigkeiten (einschließlich Kinder) oder ohne ausreichende Erfahrung und Kenntnisse bestimmt, es sei denn, eine für
die Sicherheit der Benutzer verantwortliche Person erläutert und beaufsichtigt den korrekten Gebrauch des Gerätes.
• Kinder sind zu beaufsichtigen, um sicherzugehen, dass sie nicht mit dem Gerät spielen.
• Der Hersteller haftet nicht für eventuelle Schäden durch falsche Installation, unsachgemäße, fehlerhafte und
unvernünftige Anwendung.
Wenden Sie sich in folgenden Fällen unbedingt an qualifiziertes Fachpersonal:
Um einen sicheren und störungsfreien Betrieb dieses Gerätes zu garantieren:
– Wenden Sie sich ausschließlich an autorisierte Kundendienststellen;
– Verlangen Sie immer den Einbau von Original-Ersatzteilen;
– Das Gerät ist für den Hausgebrauch in Wohnungen bestimmt, nehmen Sie keine Änderungen am Gerät vor;
– Auf dem Typenschild stehen die Kennzeichen der Bestimmungsländer, für die diese Anleitungen gültig sind;
– Die elektrische Sicherheit des Gerätes ist nur dann gewährleistet, wenn das Gerät korrekt an eine funktionstüchtige
und den gesetzlichen Bestimmungen entsprechende Erdung angeschlossen ist;
– Achten Sie darauf, die Heizelemente und die Backofentür während des Betriebs nicht zu berühren,
da diese Teile sehr heiß werden. Halten Sie vor allem Kinder vom Backofen fern.
A
Page 45

40
Verhindern Sie, dass Kinder mit folgenden Teilen in Berührung kommen:
– den Bedienschaltern sowie dem Gerät im Allgemeinen;
– Teilen der Verpackung (Plastiktüten, Styropor, Klammern usw.);
– dem heißen Gerät, besonders während und unmittelbar nach dem Betrieb des Backofens;
– dem ausgesonderten Gerät (in diesem Fall sind eventuell gefährliche Teile unschädlich zu machen).
Vermeiden Sie:
– das Gerät mit feuchten Körperteilen zu berühren;
– das Gerät barfuß zu bedienen;
– am Gerät oder am Netzkabel zu zerren, um den Netzstecker aus der Steckdose zu ziehen;
– unsachgemäße und gefährliche Aktionen;
– die Ventilations- oder Lüftungsschlitze zu verstopfen;
– Netzkabel anderer Elektrogeräte mit heißen Geräteteilen in Berührung kommen zu lassen;
– das Gerät Umwelteinflüssen wie Regen, direktem Sonnenlicht usw. auszusetzen;
– den Backofen zur Aufbewahrung von Gegenständen zu benutzen;
– brennbare Flüssigkeiten in der Nähe des Backofens zu verwenden;
– Adapter, Mehrfachstecker und/oder Verlängerungen zu verwenden;
– das Gerät ohne qualifiziertes Fachpersonal einzubauen oder zu reparieren.
Wenden Sie sich in folgenden Fällen unbedingt an qualifiziertes Fachpersonal:
– zur Installation (nach Anweisungen des Herstellers);
– falls Zweifel bezüglich des Gerätebetriebs bestehen;
– zum Auswechseln der Steckdose, falls die vorhandene nicht zum Gerätestecker passen sollte.
Wenden Sie sich in folgenden Fällen an ein vom Hersteller autorisiertes
Kundendienstzentrum:
– falls unmittelbar nach dem Auspacken Zweifel an der Unversehrtheit des Gerätes bestehen;
– zum Auswechseln oder bei Beschädigung des Netzkabels;
– bei Geräteschäden oder -störungen. Verlangen Sie den Einbau von Original-Ersatzteilen.
Bitte beherzigen Sie folgende Ratschläge:
– Führen Sie während der Zubereitung der Gerichte keine anderen Arbeiten aus;
– Trennen Sie das Gerät vor Reinigungs- und Wartungsarbeiten oder im Störungsfall vom Stromnetz;
– Benutzen Sie Backhandschuhe beim Hineinschieben und Herausnehmen von Formen;
– Fassen Sie den Griff der Backofentür immer in der Mitte an, da er aufgrund von austretender Heißluft zum Rand hin
heißer sein könnte;
– Vergewissern Sie sich stets, dass alle Drehknöpfe ausgeschaltet sind, wenn das Gerät nicht benutzt wird;
– Trennen Sie das Gerät vom Stromnetz, wenn Sie es nicht mehr benutzen;
Installation (Abb. 5)
Wichtig: Die Installation muss unter Beachtung der geltenden Richtlinien und Vorschriften erfolgen. Sie darf
ausschließlich durch geprüftes Fachpersonal erfolgen.
Voraussetzungen für den Einbau des Backofens
Bei Einbaumöbeln müssen die Komponenten (Kunststoff und furniertes Holz) durch hitzebeständige Kleber (max. 100 °C)
zusammengehalten werden. Ungeeignete Materialien und Kleber können Verformungen oder Ablösungen zur Folge haben.
Das Möbel muss so beschaffen sein, dass genug Platz für die Kabel bleibt. Das Möbel, in das der Backofen eingebaut wird,
muss das Gewicht des Gerätes tragen können.
Der Backofen muss sicher in der Einbaunische befestigt werden Der Backofen kann in einen Hochschrank eingebaut
oder unter der Platte eines Einbaumöbels installiert werden, sofern eine ausreichende Belüftung gewährleistet ist.
Montageanleitung
Modelle CM und TL (Abb. 6a/6b/6c)
Messen Sie die Seitenstärke (S) des Schrankes. Im Normalfall beträgt sie 16, 18 oder 20 mm.
Stärke 16: Bringen Sie an jedem Haltebügel (F) 2 mit der Zahl 16 bezeichnete Nocken (T) an.
Stärke 18: Bringen Sie an jedem Haltebügel (F) 2 mit der Zahl 18 bezeichnete Nocken (T) an.
Stärke 20: bei einer Seitenstärke von 20 mm sind keine Nocken erforderlich.
Positionieren Sie die Haltebügel (F) so an den Seiten des Schrankes, dass sie unten auf dem Backofensockel aufsitzen.
Page 46

41
DE
Fixieren Sie die Haltebügel (F) mit Hilfe der Schrauben (V). Schieben Sie den Backofen in den Schrank hinein, öffnen Sie
die Tür ganz und fixieren Sie ihn mit Hilfe der 4 Schrauben (V) und unter Verwendung der 4 Abstandhalter aus Plastik (D)
an den Haltebügeln (F).
Modelle CR, CS, SG und SM (Abb. 6d)
Schieben Sie das Gerät in den Schrank hinein. Fixieren Sie den Gerätekörper mit den mitgelieferten 4 Schrauben und
4 Hülsen am Möbel. Benutzen Sie dazu die seitlich vorgearbeiteten Löcher (Abb. 6d).
Hinweis: Für alle Modelle: Falls das Gerät unter einer Kochfläche installiert werden soll, drehen Sie den
Gasanschluss des Kochfeldes (R) vorsorglich nach rechts oder links, damit der Backofen sich korrekt
einpassen lässt (Abb. 6e).
Elektrischer Anschluss
Ihr FRANKE-Ofen ist mit einem dreipoligen Netzkabel mit freien Kabelenden ausgestattet.
Wird der Ofen dauerhaft an das Stromnetz angeschlossen, so ist eine Trennvorrichtung mit einer
Kontaktöffnungsweite von mindestens 3 mm vorzusehen, die das vollständige Trennen entsprechend
den Bedingungen der Überspannungskategorie III erlaubt. Vergewissern Sie sich, dass:
a) Stecker und Steckdose für 16 A Strom ausgelegt sind;
b) beide leicht zugänglich und so angeordnet sind, dass während des Ein- oder Aussteckens des
Steckers kein Spannung leitendes Teil zugänglich ist;
c) sich der Stecker ohne Widerstand einstecken lässt;
d) der Ofen bei Einbau in das Möbel nicht auf den eingesteckten Stecker zum Aufliegen kommt;
e) die Kabelenden zweier Geräte nicht an denselben Stecker angeschlossen sind;
f) bei Ersatz des Netzkabels das neue Kabel den Spezifikationen 3 x 1,5 mm
2
Typ H05VV-F entspricht;
g) immer die Polung der freien Kabelenden beachten
(Braun=Phase – Blau=Mittelleiter – GelbGrün=Erde).
Hinweis: Stellen Sie sicher, dass die Stromanlage in Ihrer Wohnung in Bezug auf Spannung, Höchstleistung und Stromart
mit Ihrem FRANKE-Ofen kompatibel ist.
Hinweis: Beim Einschalten wird die Netzfrequenz festgestellt. Wird der Timer an 60 Hz angeschlossen, so blinkt beim
Einschalten das Symbol P.
BLAU
GELB-GRÜN
BRAUN
Page 47

42
Te c h n i s c h e D a t e n
ANWENDERINFORMATIONEN
gemäß dem Artikel des gesetzesvertretenden Dekrets Nr. 15 vom 25. Juli „Umsetzung der Richtlinien
2002/95/EG, 2002/96/EG und 2003/108/EG in Bezug auf die Beschränkung der Verwendung gefährlicher
Stoffe in Elektro- und Elektronikgeräten sowie auf die Abfallentsorgung“.
Das Symbol der durchgestrichenen Mülltonne am Gerät weist daraufhin, dass das Altgerät getrennt vom normalen
Haushaltsmüll zu sammeln ist.
Der Anwender ist somit verpflichtet, sein Altgerät bei den getrennten Sammelstellen für Elektro- oder
Elektronikaltgeräte abzugeben oder es dem Händler beim Kauf eines neuen Geräts vom gleichen Typ zurückzugeben.
Die getrennte Sammlung zwecks anschließender Zuführung des Altgeräts zum Recycling, zur Aufbereitung und
umweltgerechten Entsorgung trägt dazu bei, mögliche umwelt- und gesundheitsbelastende Folgen zu vermeiden, und
fördert die Wiederverwertung der im Gerät enthaltenen Rohstoffe.
Die vorschriftswidrige Entsorgung durch den Verbraucher wird mit den im gesetzesvertretenden Dekret Nr. 22/1997
vorgesehenen Verwaltungsstrafen geahndet (Art. 50 ff. des gesetzesvertr. Dekrets Nr. 22/1997).
Nutzmaße des Backofens:
Breite: 440 mm
Tiefe: 415 mm
Höhe: 312 mm
Nutzvolumen des Backofens:
57 Liter
Verbrauch (mit statischer Funktion):
zum Aufheizen auf 175 °C: 0,32 kWh
zum Halten der 175 °C: 0,62 kWh
Gesamtverbrauch: 0,94 kWh
Verbrauch (mit Gebläse):
zum Aufheizen auf 200 °C: 0,42 kWh
zum Halten der 200 °C: 0,77 kWh
Gesamtverbrauch: 1,19 kWh
Netzspannung und -frequenz:
220-240 V ~ 50-60 Hz
Gesamtleistung und
Bemessungsstrom der
Schmelzsicherung:
2300 W - 16 A
Heizleistung:
Oberhitze 1000 W
Unterhitze 1250 W
Grill 2250 W
Gebläse 30 W
Backofeninnenbeleuchtung 15 x 1 W
Tangentialgebläse 15 W
Dieses Gerät erfüllt folgende
EU-Richtlinien:
– 2006/95/EG (Niederspannung);
– 2004/108 EWG
(Elektromagnetische
Verträglichkeit).
Page 48

43
ES
Índice
Introducción ..................................................................................................................................... 43
Visto de cerca................................................................................................................................... 43
Primer uso ........................................................................................................................................ 44
Sugerencias....................................................................................................................................... 44
Modo de empleo .............................................................................................................................. 44
Tabla de cocción............................................................................................................................... 48
Limpieza y mantenimiento del horno............................................................................................... 49
Asistencia.......................................................................................................................................... 50
Instrucciones de seguridad importantes........................................................................................... 50
Instalación (Fig. 5)............................................................................................................................. 51
Instrucciones de instalación .............................................................................................................. 51
Conexión a la red eléctrica............................................................................................................... 52
Datos técnicos .................................................................................................................................. 52
Introducción
Gracias por haber elegido un producto Franke.
Antes de utilizar el aparato, lea atentamente las advertencias y los consejos de este manual. De este modo, le será más
fácil utilizar el aparato y mantenerlo en perfectas condiciones durante más tiempo. Conserve cuidadosamente este
manual para poderlo consultar en cualquier momento.
Visto de cerca
Selector de programas
Sirve para seleccionar el modo de funcionamiento del horno según el tipo de cocción que
se va a efectuar. Al seleccionar un programa, la luz interior del horno se enciende para
indicar que el horno está funcionando.
Programador
En la gama de hornos Franke se incluyen distintos sistemas de control y gestión del tiempo
de cocción; en la pág. 45 se proporcionan instrucciones detalladas; para utilizar
correctamente esta función sólo tiene que localizar el tipo de control de su horno.
Luz del termostato
Identificado con el símbolo , señala que los elementos calentadores del horno están
funcionando. Se apaga cuando el horno alcanza la temperatura seleccionada y se vuelve a
encender al activarse la fase de calentamiento. Es útil para controlar que se haya alcanzado
la temperatura deseada antes de introducir los alimentos en el horno.
Selector de temperatura (Termostato)
Permite seleccionar la temperatura adecuada para cada alimento y mantenerla constante
durante toda la cocción. Para seleccionar la temperatura deseada, gire el selector a la
derecha para situar el índice de referencia en el número correspondiente. La temperatura
máxima es aproximadamente de 260 ºC.
Guías de deslizamiento de las graseras y las parrillas
Sirven para colocar correctamente las parrillas y las graseras en las 5 posiciones
preestablecidas (de1 a 5 comenzando desde abajo); en la tabla de cocción (pág. 48)
encontrará la posición ideal para cada uso del horno.
Grasera
Se utiliza normalmente para recoger los jugos de la carne asada y para cocinar
directamente los alimentos; si no la utiliza durante la cocción, extráigala del horno.
La grasera es de acero esmaltado de tipo “AA” para uso alimentario. Nota: Para obtener
mejores resultados de cocción se recomienda introducir la grasera con la parte inclinada
hacia la pared posterior de la cavidad del horno.
Grill
Se utiliza para apoyar las bandejas para horno, los moldes de pastelería y cualquier otro
recipiente diferente a la grasera suministrada con el aparato; también se usa para asar
carne y pescado, tostar pan, etc., con las funciones de grill y grill ventilado. No se
recomienda el contacto directo de la parrilla con los alimentos.
ABCDEFG
D
A
F
G
E
Page 49

44
Primer uso
Cuando se usa el horno por primera vez, es necesario hacerlo funcionar en vacío durante al menos 40 minutos, con el
selector de regulación de temperatura al máximo, la puerta completamente abierta y ventilando bien el ambiente.
El olor que se advierte durante esta operación se debe a la evaporación de las sustancias empleadas para proteger el horno
desde el momento de su fabricación hasta su instalación. Transcurrido este tiempo, el horno está listo para ser usado.
Sugerencias
Para obtener buenos resultados es importante no introducir los alimentos en el horno cuando está frío, espere a que
alcance la temperatura programada.
Durante la cocción, no apoye ollas ni otros recipientes directamente sobre el fondo; colóquelos sobre las parrillas o las
graseras incluidas en la dotación, eligiendo uno de los 5 niveles disponibles. De lo contrario, podría dañar el esmalte del
horno.
No cubra las paredes ni el fondo del horno con papel de aluminio.
Las reparaciones deberán ser realizadas por personal especializado y autorizado.
Llame a nuestro centro de asistencia más cercano y solicite repuestos originales.
Aunque el horno Franke esté pintado con un esmalte especial, fácil de limpiar, límpielo con frecuencia para que la
suciedad y los residuos de cocciones anteriores no se requemen.
Los paneles autolimpiantes (si el horno está equipado con los mismos) se deben limpiar con agua y jabón (consulte las
instrucciones para la limpieza).
Nota: antes de encender el horno, lea las instrucciones relativas al uso del temporizador (ver pág. 46).
– Si el horno está equipado con un programador automático de cocción o de apagado, para utilizar el horno de forma
manual es necesario seleccionar la opción “manual” señalada con el símbolo .
Modo de empleo
Este horno reúne las ventajas de los hornos tradicionales por convección natural “estáticos” con las de los hornos
modernos por convección forzada “ventilados”. Se trata de un aparato sumamente versátil, que permite elegir, de modo
fácil y seguro, entre 6 métodos de cocción. Pulsando los selectores (A) y (D) del cuadro, se seleccionan el programa y la
temperatura deseados. Para utilizar lo mejor posible su horno Franke, consulte la tabla de cocción, pág. 48.
Ventilación de enfriamiento
Para lograr disminuir la temperatura de la puerta, el panel de mandos y los costados, el horno Franke posee un
ventilador de enfriamiento que se activa automáticamente cuando el horno está caliente. Cuando el ventilador está
funcionando, el horno expulsa el aire entre el frontal y la puerta sin que la velocidad del aire expulsado ni los ruidos
afecten al ambiente de la cocina.
Para proteger los muebles, al final de la cocción el ventilador permanece encendido hasta que el horno se
enfría.
Luz del horno
Sitúe el selector en este símbolo para encender la luz interior del horno sin poner en marcha el horno.
Esta función es útil para limpiar el interior del horno sin tener que encenderlo para iluminarlo.
Programas de cocción
Cocción estática natural
El selector de temperatura (D) debe situarse entre 50 °C y Max (260 °C).
El calentamiento se produce desde arriba (resistencia superior) y desde abajo (resistencia de la solera). Ésta es
la función de cocción tradicional que permite cocinar uniformemente los alimentos, utilizando un sólo nivel.
Cocción asistida
El selector de temperatura (D) debe situarse entre 50 °C y Max (260 °C).
Se activan las resistencias superior (techo) e inferior (solera) y el ventilador interior.
El calor constante y uniforme cocina y dora los alimentos en todos sus puntos. También se pueden cocinar
alimentos diferentes sobre un máximo de 2 niveles al mismo tiempo.
Page 50

45
ES
Cocción ventilada inferior
El selector de temperatura (D) debe situarse entre 50 °C y Max (260 °C).
Se activa la resistencia inferior (suela) y el ventilador. Ideal para cocinar pescado y en general productos
congelados y precocidos. Muy eficaz para la repostería.
Cocción ventilada superior
El selector de temperatura (D) debe situarse entre 50 °C y Max (260 °C).
Se activan la resistencia superior y el ventilador. La baja potencia y la acción del ventilador permiten una
cocción muy delicada y uniforme. Es ideal para pastelería seca y algunos tipos de pasta al horno.
Cocción al grill
El selector de temperatura (D) normalmente ha de estar en la posición Máx. (260 °C); sin embargo,
es posible elegir una temperatura inferior, en cuyo caso, el asado será más lento.
Se activan la resistencia del grill, ubicada en la parte superior del horno. En ese caso, la rápida cocción
superficial, debida a los rayos infrarrojos, mantiene tierna la parte interna de las carnes; también es posible
tostar rápidamente hasta 9 rebanadas de pan. La puerta del horno Franke ha de estar cerrada cuando se
utiliza la función grill.
Advertencia: en cualquier caso, la resistencia del grill está muy caliente durante el funcionamiento; evite
tocarla durante la manipulación de los alimentos que se deban cocinar. En cualquier caso, Franke ha estudiado
una boca de horno que protege al máximo las manos de quien lo usa.
Cocción al grill ventilada
El selector de temperatura (D) normalmente ha de estar en la posición Máx. (260 ºC); sin embargo,
es posible elegir una temperatura inferior, en cuyo caso, el asado será más lento.
Se activa la resistencia del grill, ubicada en la parte superior del horno, y el ventilador. A la irradiación térmica
unidireccional, se añade la circulación forzada del aire en el interior del horno. Esto impide que los alimentos
se quemen superficialmente y hace aumentar el poder de penetración del calor. Utilizando el grill ventilado se
obtienen resultados excelentes en brochetas mixtas de carne y verdura, salchichas, costillas de cerdo,
chuletas de cordero, pollo a la diabla, codorniz a la salvia, solomillo de cerdo, etc.
Selector del minutero de fin de cocción
El minutero de fin de cocción es un dispositivo útil que apaga el horno de forma
automática al alcanzar el tiempo seleccionado (de 1 a 120 minutos). Para utilizarlo, active
el timbre girando el selector (B) una vuelta completa hacia la derecha; a continuación,
gírelo a la izquierda para programar el tiempo haciendo coincidir el número de minutos
con la referencia fija del selector. Al cumplirse el tiempo programado, el timbre suena y
el horno se apaga.
Nota: El horno se mantiene a la temperatura de cocción programada durante algún
tiempo incluso después de apagarlo; extraiga los alimentos del horno para evitar que se
quemen o se pasen de cocción.
Atención: para utilizar el horno de forma manual y desactivar el programador de fin de
cocción, deberá hacer coincidir el índice del selector con el símbolo fijo del frente.
Cuando el horno está apagado, el programador de fin de cocción se puede utilizar como minutero.
El reloj de fin de cocción
Este reloj ya está programado para el uso manual del horno. Por lo tanto, la cocción se
puede realizar sin la intervención del reloj.
Selector derecho
Con el selector derecho se eligen en secuencia las funciones de temporizador, fin de
cocción, inicio de cocción, ajuste de la hora, indicadas por sus respectivos leds.
Además, al pulsarlo brevemente, se ven los valores programados (interrogación), mientras
que si se pulsa de manera prolongada (aproximadamente dos segundos) los valores
programados se borran (Reset).
Selector izquierdo
Al girar el selector izquierdo, las agujas del reloj se mueven de acuerdo con la función
activada (led intermitente).
B
IVI
I
V
I
I
IX
V
V
I
VI
III
I
X
X
III
IXI
TIMER
START
STOP
B
Page 51

46
Leds
– intermitentes: listo para la programación o aviso de fin de la función
(con timbre)
– encendidos: función en curso
Temporizador ( )
Para programar el temporizador, pulse una vez el selector derecho
(el led parpadea) y gire el selector izquierdo para mover las agujas y
seleccionar el tiempo de temporización. Pulsando nuevamente el
selector derecho, se confirma la programación y el led pasa de
intermitente a fijo. Las agujas regresan a su posición original para
indicar la hora actual. Al cumplirse el tiempo programado, se activa un
timbre que puede silenciar pulsando el selector derecho.
El temporizador no gestiona el calentamiento del horno.
Fin de cocción ( )
Para programar el fin de cocción, pulse el selector derecho dos veces (el led del símbolo parpadea) y gire el
selector izquierdo para mover las agujas y seleccionar la hora final de cocción.
El led parpadea 10 segundos (para eventuales correcciones), luego la programación es adquirida y el led queda fijo.
El mismo efecto se obtiene pulsando dos veces el selector derecho durante el parpadeo.
Al finalizar la cocción, el calentamiento del horno se desactiva y el timbre suena durante 1 minuto. Para silenciarlo,
pulse el selector derecho.
Nota: Al cumplirse el tiempo final de cocción, el horno mantiene una temperatura próxima a la programada durante
algunos minutos; se recomienda extraer los alimentos del horno lo antes posible para evitar que se pase el punto de
cocción.
Fin de cocción ( ) con inicio diferido ( )
El inicio diferido de la cocción se activa después de programar el fin de la cocción; pulse el selector derecho para
convalidar el “stop”; simultáneamente se activa el led intermitente del símbolo . Girar el selector izquierdo para
programar la hora de inicio de la cocción (en este caso con las agujas sólo es posible retroceder, no avanzar). Ahora se
puede confirmar la programación definitivamente con el selector derecho. Si se dejan pasar 10 segundos de parpadeo,
el dato es adquirido automáticamente. Los leds de los símbolos y permanecen encendidos y el horno se
enciende a la hora programada. En ese momento sólo el led del símbolo quedará encendido.
Al finalizar la cocción, el calentamiento del horno se desactiva y el timbre suena durante 1 minuto. Para silenciarlo, pulse
el selector derecho.
Ajuste de la hora del día ( )
Para ajustar la hora, pulsar el selector derecho tres veces (el led del símbolo reloj comienza a parpadear) y girar el
selector izquierdo. Una vez ajustada la hora, confirmar con el selector derecho.
Programador de cocción electrónica
Permite programar las siguientes funciones del horno:
• inicio retardado de la cocción con duración programada;
• inicio inmediato de la cocción con duración establecida;
•minutero.
Cómo programar el reloj digital
Después de la conexión a la red o después de un corte de corriente, el visor
parpadea y muestra: “0.00”.
Pulse simultáneamente las teclas + y – unos segundos. La hora del día se ajusta
con las teclas + y –; el punto entre las horas y los minutos parpadea. Si se
selecciona la modalidad de ajuste de la hora cuando hay un programa automático
activo, el programa automático se borra.
Para ajustar la hora, repita la secuencia descrita arriba.
B
B
Page 52

47
ES
Modificación de la frecuencia de la señal acústica
La frecuencia de la señal acústica se puede cambiar si no se ha programado una
cocción (el display muestra la hora del día). Pulsar simultáneamente las teclas + y –
(desde el menú de ajuste de la hora) y pulsar Mode o Set para seleccionar el menú
donde modificar la frecuencia de la señal acústica. Es posible modificar la frecuencia
de la señal acústica pulsando varias veces la tecla Mode o Set; en el display aparece
“ton1”, “ton2”, “ton3”.
Funcionamiento manual del horno
Tras programar la hora, el programador pasará a manual de forma automática.
Inicio retardado de la cocción con duración programada
Cuando el display muestre la hora del día, pulsar dos veces la tecla Mode o Set
para programar la duración; pulsar nuevamente para programar la hora final de cocción. Programar la hora deseada con
las teclas + y –. Durante la selección de la modalidad de regulación de la hora final o de la duración, el símbolo Auto
permanece encendido.
Una vez programada la duración de un programa, la hora final no se puede reducir. De la misma manera, la duración de
un programa no se puede prolongar una vez programada la hora final.
La hora final y la duración definen la hora de inicio del programa, a saber:
hora de inicio = hora final - duración.
Una vez programada la duración y la hora final, el display sigue mostrando la hora final. El programa se inicia cuando
la hora del día coincide con la hora de inicio: el símbolo Auto permanece encendido y el símbolo parpadea.
Después del inicio de la cocción, el display muestra la cuenta regresiva del tiempo. Si está seleccionada sólo la hora final
de cocción (la duración es = 0), la cocción se inicia y el display muestra la cuenta regresiva del tiempo.
El símbolo Auto permanece encendido durante la espera hasta el comienzo de la cocción retardado y durante toda la
cocción.
El símbolo parpadea durante la espera hasta el comienzo de la cocción retardado y permanece encendido cuando
la cocción comienza.
Al finalizar la cocción se emite una señal acústica; para interrumpirla pulse cualquier tecla, o bien espere
que la señal termine.
Programa semiautomático con duración o con hora final
Programación horaria
Para seleccionar la duración o la hora final del programa, pulsar dos veces la tecla Mode o Set y programar la hora con las
teclas + y –. Durante la selección de la modalidad de regulación de la hora final o de la duración, parpadea el símbolo
Auto correspondiente.
Una vez programada la duración de un programa, la hora final no se puede reducir. De la misma manera, la duración de
un programa no se puede prolongar una vez programada la hora final.
Ejecución del programa de cocción
Cuando está en curso el programa automático de cocción, el símbolo Auto permanece encendido y en el display
aparece el tiempo de cocción restante (cuenta regresiva). El símbolo permanece encendido.
Fin del programa automático
Al terminar la duración del programa o al alcanzar la hora final del programa, el símbolo se apaga. Al terminar el
programa automático, el símbolo “Auto” parpadea, el display muestra “End”, y se emite una señal acústica intermitente
que se puede interrumpir pulsando cualquier tecla.
Función minutero
Esta función permite programar el tiempo a partir del cual comienza la cuenta regresiva. No sirve para encender ni
apagar el horno de forma automática. Al finalizar la cuenta regresiva, se activa la alarma acústica.
Pulse la tecla Mode o Set una sola vez; en el display aparece:
El símbolo de la campana parpadea y es posible programar la duración de la alarma con las teclas + y –. Cuando esta función
está activa, el símbolo de la campana permanece encendido y el display muestra el tiempo restante (cuenta regresiva).
Al terminar el tiempo, se emite una señal acústica que se puede detener pulsando cualquier tecla.
Corrección o eliminación de los datos
• Los datos seleccionados se pueden cambiar en cualquier momento pulsando simultáneamente las teclas + y –.
• Al cancelar el tiempo de cocción, se borra de forma automática la hora final de funcionamiento y viceversa.
• En caso de funcionamiento programado, el horno no acepta tiempos de fin de cocción anteriores a los de inicio de
cocción.
Nota: El horno se mantiene a la temperatura de cocción programada durante algún tiempo incluso después de apagarlo;
extraiga los alimentos del horno para evitar que se quemen o se pasen de cocción.
B
Page 53

48
Ta b l a d e c o c c i ó n
Nota: los datos incluidos en la tabla son el resultado de pruebas de cocción realizadas por un equipo de cocineros profesionales.
En cualquier caso, son sólo orientativos y pueden modificarse según los gustos personales de cada uno.
Ubicación del
mando de
selección
Tipo de alimento Peso
(kg)
Posición en
niveles
Tiempo de
precalenta-
miento (min.)
Posición del
selector de
temperatura
Duración
de la
cocción
(min.)
Cocción estática
natural
Asados de cerdo
Tortilla
Merluza-Dorada-Rodaballo
Pan común
Lasaña
Pescado de agua dulce
Polenta condimentada
Tartas de requesón
1
1,5
1
1
1
1,5
0,5
1,5
3
2
3
2-4 cont.
2
3
2
2
9,5
10,5
9,5
9,5
10,5
10,5
9,5
9,5
180 °C
200 °C
180 °C
175 °C
200 °C
200 °C
180 °C
180 °C
65-75
25-30
15
25-30
40-45
35-40
25-30
25-30
Cocción asistida Rustido de cerdo
Conejo al horno
Tarta salada italiana
Gambas al horno
Merluza-Dorada-Rodaballo
Pan común
Tartas de frutas
Tartas saladas
1
1
1
0,5
2
2
1,5
2
3
2
2
3
2-4 cont.
2-4 cont.
2
3-5 cont.
9
9,5
10
10
7,5
9
9
9
180 °C
190 °C
200 °C
200 °C
150 °C
180 °C
175 °C
180 °C
60-70
55-65
25-30
30-40
25-30
25-30
30-35
40-45
Cocción ventilada
inferior
Pechuga de pollo
Lonchas de ternera
Rosbif
Rodajas de atún
Medallones de pez espada
Langostinos
Merengues
Galletas de manteca
Torta fermentada
Pasteles de almendra
1
1
1
1
1
1
0,8
1
0,8
1
2 ó 3
2
3
2
3
2
2
2
2
2 ó 3
Para acortar el
tiempo de
precalentamiento,
utilice la función
de Cocción
Asistida.
170 °C
180 °C
170 °C
160 °C
160 °C
180 °C
90 °C
160 °C
170 °C
160 °C
20
20
60
20
20
30
120
30
40
35
Cocción ventilada
superior
Tortellini gratinados
Ñoquis de patatas
Pez espada
Mejillones
Vieiras
Patatas al horno
Canelones
0,5
0,5
0,5
1
1
0,5
1
3
3
5
4
4
4
3
Para acortar el
tiempo de
precalentamiento,
utilice la función
de Cocción
Asistida.
Máx
Máx
200 °C
Máx
200 °C
200 °C
Máx
25-30
25-30
12-15
10-12
10-12
18-20
25-30
Cocción al grill Alas de pollo
Chuletas
Vieiras
Patatas al horno
Pescado de agua dulce
Tomates gratinados
Brochetas de anguila
Brochetas de pavo
1
0,8
0,5
1
1
0,4
0,5
0,5
4 ó 5
3
3 ó 4
3
3 ó 4
2 ó 3
3
4
7
7
7
7
7
7
7
7
Máx
Máx
Máx
Máx
Máx
Máx
Máx
Máx
25-30
25-30
14-16
25-30
25-30
25-30
25-30
25-30
Cocción al grill
ventilada
Muslos de pollo
Costillas de cerdo
Pintada (troceada)
Dorada en papillote
Pollo (troceado)
Codornices
Salchichas
Verduras
1
0,5
1,2
1
1,5
0,8
1
1
4 ó 5
4
4
3
3
4
4
4 ó 5
9,5
14
14
8
14
14
14
14
220 °C
Máx
Máx
200 °C
Máx
Máx
Máx
Máx
25-30
40-45
30-35
20-25
35-40
30-35
20-25
10-15
Page 54

49
ES
Limpieza y mantenimiento del horno
¡Atención!
Antes de proceder al mantenimiento del horno, desconéctelo de la toma de corriente o corte la corriente de la línea de
alimentación eléctrica por medio del interruptor general de la instalacin.
– Las partes de acero inoxidable y esmaltadas permanecerán nuevas si las limpia con agua o productos específicos y
las seca con cuidado.
– No utilice estropajos de acero, ácido muriático ni ningún otro producto que pueda rayar o dañar las superficies.
Evite el uso de limpiadores de vapor y chorros de agua directos.
– Las manchas que pueden aparecer en el fondo del horno son de variada composición (jugos, azúcares, albúminas y
grasas) y se producen por salpicaduras o derrame de los alimentos. Las salpicaduras se producen durante la cocción
y se deben al uso de una temperatura demasiado elevada, mientras los desbordes se deben al uso de recipientes
demasiado pequeños o a una valoracin incorrecta de los aumentos de volumen durante la cocción. Para solucionar
estos dos inconvenientes, utilice recipientes altos o la grasera suministrada con el horno. Con respecto a la limpieza
de la parte inferior del horno, le aconsejamos limpiar las manchas con el horno tibio; cuanto más espere a limpiarlas,
más difícil será eliminarlas.
Limpieza de la puerta del horno
– Limpie la superficie externa e interna de la puerta cuando el horno esté frío, con agua
caliente y paños suaves. Limpie el cristal con productos especialmente indicados para este
tipo de superficies.
– Limpie las partes esmaltadas y el interior del horno con agua caliente y detergentes no
abrasivos.
(Sólo en los modelos CR 66 y CS 66)
– Para una limpieza más exhaustiva, es posible desmontar la máscara de plástico de la puerta
del horno. Con la puerta abierta, presionar a los costados y extraer la máscara como indica
la figura. Para volver a poner la máscara en la puerta del horno es suficiente desplazarla en su
alojamiento y ejercer una leve presión hasta encastrar los enganches laterales.
Desmontaje del cristal interno de la puerta del horno
(sólo en los modelos CR, CS y SM) (Fig. 2)
Para una limpieza completa del cristal interno del horno, es posible desmontarlo totalmente de la puerta de la siguiente
manera:
• con la puerta abierta del todo, gire 180° los dos topes negros (identificados por la inscripción “CLEAN”) situados en
el extremo inferior de la puerta, de modo que se introduzcan en los alojamientos de la estructura del horno.
Nota: Asegúrese de que la rotación sea completa (en esta posición, el tope se encastra);
• levante con cuidado el cristal interno: los dos topes impiden que la puerta se cierre (si los topes no se giraran,
el desmontaje del cristal causaría el cierre inmediato de la puerta).
Después de la limpieza, monte el cristal interno (el lado correcto de montaje del cristal se distingue por la inscripción
“TEMPERED GLASS”, que debe quedar visible) y gire los dos topes de fijación del cristal a su posición original.
ATENCIÓN: no intente cerrar la puerta con uno o ambos topes total o parcialmente desvinculados del
cristal interno. Después de la limpieza, gire nuevamente ambos topes antes de cerrar la puerta.
Desmontaje del cristal interno de la puerta del horno (sólo en los modelos TL y CM)
(Fig. 3)
Para una limpieza completa del cristal interno del horno, es posible desmontarlo totalmente de la puerta de la siguiente
manera:
• con la puerta completamente abierta, gire 180° los dos topes negros situados en el extremo inferior de la puerta
(figs. 3a y 3b).
Nota: Asegúrese de que la rotación sea completa (en esta posición, el tope se encastra);
• levante con cuidado el cristal interno (fig, 3c): los dos topes impiden que la puerta se cierre (si los topes no se giraran,
el desmontaje del cristal causaría el cierre inmediato de la puerta);
• para desmontar el cristal intermedio, extraiga las dos juntas laterales (fig. 3d) y levante el cristal (fig. 3e);
• al terminar las operaciones de limpieza, coloque el cristal intermedio en primer lugar (fig. 3f) (el mensaje “TEMPERED
GLASS” indica el sentido de montaje correcto y se debe poder leer por entero). Introduzca el cristal intermedio en los
alojamientos de la parte superior de la puerta con cuidado y presiónelo a fondo;
• a continuación, coloque las dos juntas (fig. 3g) de modo que hagan tope contra el perfil superior de la puerta;
• por último, coloque el cristal interno (fig. 3h) y gire los dos topes de fijación hacia la posición de cierre original.
ATENCIÓN: no intente cerrar la puerta con uno o ambos topes total o parcialmente desvinculados del
cristal interno. Después de la limpieza, gire nuevamente ambos topes antes de cerrar la puerta.
Page 55

50
Desmontaje de la puerta del horno (Fig. 4)
Para facilitar la limpieza del horno, desmonte la puerta actuando sobre las bisagras del siguiente modo:
– Las bisagras (A) poseen dos pernos en U móviles (B). Levante el perno en U (B) para desbloquear la bisagra.
– A continuación, levante la puerta y extráigala hacia fuera; para realizar estas operaciones, sujete firmemente la puerta
por los costados cerca de las bisagras.
– Para volver a colocar la puerta, introduzca las bisagras en las ranuras correspondientes.
– A continuación, antes de cerrar la puerta, no se olvide de girar los dos pernos en U móviles (B) que sirven para
enganchar las dos bisagras.
Sustitución de la lámpara del horno
Los hornos Franke incluyen una bombilla circular, que está situada en la parte posterior superior izquierda de la cavidad.
Para sustituir la lámpara del horno:
– desconecte la alimentación del aparato mediante el interruptor omnipolar de conexión a la
instalación eléctrica, o desconecte la clavija, si está accesible;
– desenrosque la protección de cristal (A);
– desenrosque la bombilla y sustitúyala con otra resistente a altas temperaturas (300 °C)
con las siguientes características:
Tensión: 220-240 V ~ 50-60 Hz
Potencia: 15 W
Casquillo: (E14) estrecho.
– Vuelva a colocar la tapa de protección de vidrio (A) y conecte nuevamente el aparato.
Asistencia
En caso de problemas de funcionamiento, llame al Centro de Asistencia Técnica
consultando la lista adjunta.
No recurra nunca a técnicos no autorizados.
Comunique:
– el tipo de anomalía;
– el modelo de aparato (Art.);
– el número de serie (S.N.).
Esta información se encuentra en la placa de características reproducida en el certificado
de garantía.
Instrucciones de seguridad importantes
• Este aparato no está destinado al uso por parte de niños o de personas con capacidades psíquicas o motoras
reducidas o carentes de experiencia y conocimiento, salvo bajo la supervisión o las instrucciones de una persona
responsable de su seguridad.
• Los niños deben estar vigilados para asegurarse de que no jueguen con el aparato.
• El fabricante no es responsable de los daños causados por: errores de instalación, usos indebidos, incorrectos o
irracionales.
Póngase en contacto con personal cualificado en los siguientes casos:
Para garantizar la eficacia y la seguridad de este electrodoméstico:
– diríjase exclusivamente a centros de asistencia técnica autorizados;
– solicite repuestos originales;
– el aparato está destinado al uso doméstico;
– en la placa de características figuran los símbolos de los países de destino para los que son válidas las instrucciones;
– se garantiza la seguridad eléctrica, solamente cuando el aparato está correctamente conectado a tierra, de acuerdo
con lo previsto por las normas vigentes;
– no toque los elementos que generan calor, ni las partes de la puerta del horno que se calientan durante
el uso. Mantenga a los niños alejados de ellas.
Evite que los niños toquen:
– los mandos y el aparato en general;
– los componentes del embalaje (bolsas, poliestireno, puntos metálicos, etc.);
– el horno mientras está funcionando y una vez apagado mientras está caliente;
– el horno inutilizado (en este caso, proteja las partes que puedan ser peligrosas).
Evite:
– tocar el aparato con partes del cuerpo húmedas;
– utilizar el aparato con los pies descalzos;
– arrastrar el aparato o tirar del cable de alimentación eléctrica para desconectarlo;
A
Page 56

51
ES
– operaciones inadecuadas y peligrosas;
– obstruir los orificios de ventilación o salida del calor;
– dejar el cable de alimentación de otros electrodomésticos en contacto con las partes calientes del aparato;
– la exposición a agentes atmosféricos (lluvia, sol);
– el uso del horno para guardar cualquier tipo de objetos;
– el uso de líquidos inflamables cerca del aparato;
– el uso de adaptadores, tomas múltiples y/o alargadores;
– instalaciones o reparaciones efectuadas por personal no cualificado.
Póngase en contacto con personal cualificado en los siguientes casos:
– instalación (según las instrucciones del fabricante);
– dudas sobre el funcionamiento;
– sustitución de la toma si es incompatible con el enchufe del aparato.
Póngase en contacto con un centro autorizado por el fabricante en caso de:
– duda sobre la integridad del aparato, nada más quitar el embalaje;
– sustitución o daño del cable de alimentación;
– avería o funcionamiento incorrecto, solicitando el uso de repuestos originales.
Es conveniente efectuar las siguientes operaciones:
– sólo la cocción de alimentos evitando otras operaciones;
– antes de realizar cualquier operación de limpieza y mantenimiento o en caso de funcionamiento incorrecto,
desconecte el aparato de la red de alimentación eléctrica;
– para introducir o extraer recipientes, utilice guantes para horno;
– sujete el tirador de la puerta por el centro, los extremos podrían estar más calientes debido a la posible salida del aire;
– controle siempre que los selectores estén en la posición de apagado cuando no se utiliza el aparato;
– cuando decida no utilizar más el aparato, desconéctelo de la red eléctrica;
Instalación (Fig. 5)
Importante: la instalación debe cumplir los requisitos impuestos por las normas en vigor. Debe ser realizada por
personal especializado y autorizado.
Notas características del mueble
En los muebles empotrables, los componentes (materiales plásticos y madera contrachapada) se deben mantener unidos
con colas resistentes al calor (máx. 100 °C): materiales y colas no adecuados pueden producir deformaciones y
desencoladuras. El mueble debe permitir el acceso a las conexiones eléctricas. El mueble en el cual se introduce el horno
debe ser lo suficientemente fuerte para soportar el peso del aparato.
El horno se debe instalar de manera segura en el lugar previsto. El horno se puede introducir dentro de un mueble en
columna o debajo de la superficie de un mueble modular, garantizando siempre una aireación suficiente.
Instrucciones de instalación
Modelos CM y TL (Fig. 6a/6b/6c)
Mida el ancho del costado (S) del mueble, que normalmente puede ser de 16, 18 ó 20 mm.
Costado de 16: coloque en cada escuadra de fijación (F) 2 tacos (T) marcados con el número 16.
Costado de 18: coloque en cada escuadra de fijación (F) 2 tacos (T) marcados con el número 18.
Costado de 20: no es necesario introducir tacos.
Coloque las escuadras (F) sobre el costado del mueble y sobre la superficie inferior de soporte del horno.
Fije los soportes (F) con los tornillos (V). Introduzca el horno en el mueble, abra completamente la puerta y fíjelo a los
soportes (F) con los 4 tornillos (V) y los 4 distanciadores de plástico (D).
Modelos CR, CS, SG y SM (Fig. 6d)
Introduzca el aparato en el compartimiento; fije el cuerpo del horno al mueble, introduciendo los 4 tornillos y los
4 casquillos que se suministran de serie en los orificios de los costados (fig. 6d).
Nota: Para instalar el horno debajo de un plano de cocción, gire el empalme del plano (R) a la derecha o a
la izquierda para que el horno entre en el compartimiento correctamente (Fig. 6e).
Page 57

52
Conexión a la red eléctrica
El horno FRANKE está equipado con un cable tripolar con terminales libres.
Si el horno posee una conexión permanente a la red, coloque un dispositivo de desconexión,
con una distancia de apertura entre los contactos de al menos 3 mm, que permita desconectarlo
completamente en caso de sobretensión de categoría III. Compruebe lo siguiente:
a) la clavija y el enchufe deben ser adecuados para una corriente de 16 A;
b) ambos deben ser accesibles y estar colocados de forma que no se pueda acceder a ninguna
parte en tensión durante la conexión o desconexión de la clavija;
c) la clavija se debe enchufar sin dificultad;
d) una vez conectada la clavija, el horno no debe quedar apoyado sobre ella tras su instalación en el mueble;
e) los terminales de dos aparatos no deben estar conectados al mismo enchufe;
f) en caso de sustitución del cable de alimentación, utilice uno con las siguientes especificaciones: 3 x 1,5 mm
2
de tipo
H05VV-F;
g) es muy importante que se respeten las polaridades de los terminales libres
(Marrón = Fase – Azul = Neutro – Amarillo-Verde = Tierra).
Nota: asegúrese de que las características de la instalación eléctrica de su vivienda (tensión, potencia máxima y
corriente) sean compatibles con las de su horno FRANKE.
Nota: al encendido se determina la frecuencia de red. Cuando el timer está conectado a 60 Hz, al arranque parpadea el
símbolo P.
Datos técnicos
INFORMACIÓN PARA LOS USUARIOS
de conformidad con el artículo del decreto legislativo de 25 de julio, n. 15 “Aplicación de las Directivas
2002/95/CE, 2002/96/CE y 2003/108/CE, sobre la reducción del uso de sustancias peligrosas en los aparatos
eléctricos y electrónicos y la eliminación de desechos”.
El símbolo del contenedor de basura tachado en el aparato indica que, al finalizar su vida útil, el mismo no se puede
eliminar con los demás desechos.
El usuario ha de llevarlo a un punto de recogida selectiva para aparatos eléctricos y electrónicos o entregarlo al vendedor
en el momento de la compra de un aparato equivalente.
La recogida selectiva para la reutilización, tratamiento y eliminación respetuosa con el medio ambiente del aparato ayuda
a evitar los efectos negativos sobre el medio ambiente y la salud, y favorece el reciclaje de los materiales que componen
el producto.
En caso de eliminación no conforme del aparato por parte del usuario, se aplicarán las sanciones administrativas previstas
en el decreto legislativo n.22/1997 (artículo 50 y siguientes del decreto legislativo n. 22/1997).
Dimensiones útiles del horno:
ancho: 440 mm
profundidad: 415 mm
altura: 312 mm
Volumen útil del horno:
57 litros
Consumos (función estática):
para alcanzar los 175 °C: 0,32 kWh
para mantener los 175 °C: 0,62 kWh
consumo total: 0,94 kWh
Consumos (función ventilada):
para alcanzar los 200 °C: 0,42 kWh
para mantener los 200 °C: 0,77 kWh
consumo total: 1,19 kWh
Tensión y frecuencia de alimentación:
220-240 V ~ 50-60 Hz
Potencia total y capacidad del fusible:
2300 W - 16 A
Potencia de las resistencias:
superior 1000 W
inferior 1250 W
grill 2250 W
motoventilador 30 W
bombilla de iluminación del horno
15 x 1 W
ventilador tangencial 15 W
Este aparato es conforme con las
siguientes Directivas Comunitarias:
– 2006/95/EC (Baja Tensión);
– 2004/108 CEE (Compatibilidad
Electromagnética).
AZUL
AMARILLO-VERDE
MARRÓN
Page 58

53
PT
Índice
Introdução ........................................................................................................................................ 53
Visto de perto................................................................................................................................... 53
Primeira ligação ................................................................................................................................ 54
Conselhos......................................................................................................................................... 54
Como utilizar o aparelho.................................................................................................................. 54
Tabela indicativa da cozedura........................................................................................................... 58
Limpeza e manutenção do forno...................................................................................................... 59
Assistência técnica ............................................................................................................................ 60
Advertências de segurança ............................................................................................................... 60
Instalação (Fig. 5) .............................................................................................................................. 61
Instruções de montagem .................................................................................................................. 61
Ligação à rede eléctrica .................................................................................................................... 62
Dados técnicos ................................................................................................................................. 62
Introdução
Obrigado por ter escolhido um produto Franke.
Antes de utilizar o aparelho, leia atentamente as advertências e os conselhos presentes neste manual. Desta forma, será
mais fácil utilizá-lo e mantê-lo eficiente por mais tempo. Guarde este manual para poder consultá-lo sempre que necessário.
Visto de perto
Botão de selecção dos programas
Selecciona o modo de funcionamento do forno de acordo com o tipo de cozedura
desejado. Posicionando o botão em qualquer um dos programas, acende-se a iluminação
interna do forno que indica que o forno está aceso.
Programador
Na gama de fornos Franke estão previstos diversos sistemas de controlo e gestão do
tempo de cozedura; na pagina 55 poderá encontrar as instruções detalhadas de cada um;
basta identificar o tipo de controlo do seu forno para ter acesso ao procedimento correcto
de utilização da função.
Indicador luminoso do termóstato
Evidenciado com o símbolo , adverte que os elementos de aquecimento do forno estão
a funcionar. O indicador luminoso apaga-se quando o forno atinge a temperatura máxima
e acende-se de novo para indicar que o forno regressou à fase de aquecimento. É útil para
verificar se a temperatura de cozedura é ideal.
Botão de regulação da temperatura (Termóstato)
Selecciona a temperatura ideal de acordo com o tipo de alimento e mantém-na constante
durante todo o tempo de cozedura. Para seleccionar a temperatura que desejar, rode o
botão na direcção dos ponteiros do relógio até alinhar o indicador com o número
correspondente. A temperatura máxima é de aproximadamente 260 °C.
Guias corrediças das pingadeiras e das grelhas
Servem para posicionar correctamente as grelhas e as pingadeiras numa das 5 posições
predefinidas (de 1 a 5 de baixo para cima); na tabela indicativa de cozedura (na pagina 58)
encontra-se a indicação da posição ideal para cada utilização do forno.
Pingadeira
É normalmente usada para recolher o molho ou a gordura dos alimentos ou então para
cozer directamente os alimentos; se não for utilizada durante a cozedura, retire-a do forno.
A pingadeira é de aço esmaltado do tipo “AA” para uso alimentar. NOTA: Para obter
melhores resultados de cozedura, sugere-se inserir a pingadeira com a parte inclinada na
direcção da parede posterior da cavidade do forno.
Grelha
É utilizada como suporte para formas, forminhas de pastéis e para todos os recipientes
diferentes das pingadeiras fornecidas, ou então para cozer, principalmente com as funções
Grill ou Grill Ventilado, carne e peixe grelhados, para torrar pão, etc. Não é aconselhável
que haja um contacto directo entre a grelha e os alimentos.
ABCDEFG
D
A
F
G
E
Page 59

54
Primeira ligação
Quando se utiliza o forno pela primeira vez, é necessário ligar o aparelho vazio à temperatura máxima durante
40 minutos com a porta totalmente aberta e arejar convenientemente o local de instalação.
O cheiro sentido durante esta operação resulta da evaporação das substâncias utilizadas para proteger o forno no
período que decorre entre a produção e a instalação do aparelho. Passado este tempo, o forno está pronto para ser
utilizado.
Conselhos
Para obter os melhores resultados, não introduza os alimentos com o forno frio; aguarde até atingir a temperatura
programada.
Durante a cozedura, nunca apoie directamente assadeiras ou recipientes no fundo do forno; disponha-os nas grelhas ou
nas pingadeiras fornecidas, numa das 5 prateleiras disponíveis; a não observncia desta indicação pode danificar o esmalte
de acabamento do forno.
Nunca forre as paredes do forno com papel de alumínio, principalmente a parte inferior do vão de cozedura.
Eventuais reparações devem ser efectuadas por pessoal técnico especializado e autorizado.
Contacte o centro de assistência mais próximo e utilize sempre peças de substituição originais.
O forno está revestido com um esmalte especial, fácil de limpar; de qualquer forma, a Franke recomenda que o limpe
regularmente para não continuar a cozer a sujidade e os resíduos acumulados.
Limpe os eventuais painéis de auto-limpeza (se presentes) com água e sabão (consulte as instruções de limpeza).
Nota: antes de ligar o forno, leia atentamente as instruções relativas à utilização do temporizador (videpagina 56).
– Se o forno estiver equipado com um programador automático de cozedura/desactivação, para utilizar o forno no
modo manual, seleccione a opção “manual” assinalada com o símbolo .
Como utilizar o aparelho
Este forno reúne as qualidades dos fornos tradicionais “estáticos” e as dos fornos modernos “ventilados”. Trata-se de um
aparelho extremamente versátil que permite escolher de modo fácil e seguro entre 6 métodos de cozedura diferentes.
Através dos botões (A) e (D) do painel, é possível seleccionar os vários programas, bem como a temperatura desejada.
Para obter o máximo rendimento do seu forno Franke, consulte a tabela indicativa de cozedura na pagina 58.
Ventilação de arrefecimento
Para baixar a temperatura da porta, do painel e dos painéis laterais, o forno Franke está equipado com um ventilador que
se activa automaticamente quando o forno estiver quente. Quando o ventilador estiver a funcionar, é possível sentir um
jacto de ar entre o painel frontal e a porta do forno. Foi dedicada uma atenção especial para que a velocidade de saída do
ar não perturbe o ambiente da cozinha, tendo-se reduzido ao máximo o ruído.
Para não danificar os móveis, a ventilação permanece activa no final da cozedura o tempo necessário para
o arrefecimento do forno.
A luz do forno
Este símbolo indica a iluminação da luz interna do forno sem iniciar qualquer tipo de aquecimento. Esta função
é útil para facilitar as operações de limpeza com o forno desligado, visualizando o vão de cozedura.
Programas de cozedura
Cozedura estática natural
Posicione o botão do termóstato (D) entre 50 °C e Máx. (260 °C).
O calor é gerado tanto na resistência superior como na resistência inferior do forno. Esta é a função de
cozedura tradicional que permite cozer uniformemente os alimentos utilizando uma única prateleira.
Cozedura assistida
Posicione o botão do termóstato (D) entre 50 °C e Máx. (260 °C).
Activam-se a resistência superior, a resistência inferior e o ventilador interno do forno.
O calor constante e uniforme coze e doura o alimento em todos os pontos. É possível cozer simultaneamente
pratos diferentes utilizando até 2 prateleiras.
Page 60

55
PT
Cozedura ventilada inferior
Posicione o botão do termóstato (D) entre 50 °C e Máx. (260 °C).
Activa-se a resistência inferior (parte de baixo) e a ventoinha. Ideal para cozinhar peixe e produtos congelados
e pré-cozinhados em geral. A sua utilização é muito eficaz com produtos de pastelaria.
Cozedura ventilada superior
Posicione o botão do termóstato (D) entre 50 °C e Máx. (260 °C).
Activam-se a resistência superior e o ventilador. A baixa potência e a acção do ventilador permitem obter uma
cozedura muito delicada e uniforme. Ideal para pastelaria seca e alguns tipos de massa especiais para forno.
Cozedura grill
Normalmente, o botão do termóstato (D) deve ser posicionado em Máx. (260 °C); todavia,
é possível escolher uma temperatura inferior, embora neste caso a cozedura seja mais lenta.
A resistência do grill situada na parte superior do forno acende-se. Neste caso, a cozedura superficial rápida
com raios infravermelhos mantém o interior da carne húmido; é também possível torrar rapidamente até
9 fatias de pão. O forno Franke foi estudado para grelhar com a porta do forno completamente fechada.
Porém, a resistência do grill fica muito quente durante o funcionamento; evite tocar-lhe acidentalmente ao
manusear os alimentos que vai grelhar; por isso, a Franke estudou uma forma da boca do forno que protege o
mais possível as mãos do utilizador.
Cozedura grill ventilada
Normalmente, o botão do termóstato (D) deve ser posicionado em Máx. (260 °C); todavia,
é possível escolher uma temperatura inferior, embora neste caso a cozedura seja mais lenta.
Activam-se a resistência do grill situada na parte superior do forno e o ventilador. A irradiação térmica
unidireccional funciona juntamente com a circulação forçada do ar dentro do forno. Esta função impede que a
superfície dos alimentos queime, aumentando o poder de penetração do calor. Obtêm-se resultados
excelentes utilizando o grill ventilado para espetadas mistas de carne e legumes, salsichas, costeletas de
porco, costeletas de borrego, frango, codornizes com salva, lombo de porco, etc.
O botão do contador de minutos de final de cozedura
O contador de minutos de final de cozedura é um dispositivo útil que desliga
automaticamente o forno quando tiver passado o tempo seleccionado num intervalo de 1
até 120 minutos. Para utilizar o contador de minutos de final de cozedura é necessário
dar corda à campainha rodando o botão (B) uma volta quase completa para a direita;
em seguida, voltando atrás, posicione o indicador no número de minutos desejado.
No final do tempo seleccionado, além de tocar a campainha, o forno desliga
automaticamente.
NOTA: Lembre-se que depois de desligar o forno e durante um longo período, o forno
mantém uma temperatura próxima da que foi programada para a cozedura; portanto,
para não cozer demasiado ou queimar os alimentos, retire-os do forno.
Para utilizar o forno com funcionamento manual, ou seja com o programador de fim
de cozedura desactivado, é necessário alinhar o indicador do botão com o símbolo
fixo no painel. Com o forno desligado, o programador de fim cozedura pode ser utilizado como um contador de
minutos normal.
O relógio de final de cozedura
Este relógio já foi programado para a utilização manual do forno, como tal, a cozedura
pode ser realizada sem regular o relógio.
Botão direito
Premir o botão direito permite escolher em sequência as funções a activar (temporizador,
final da cozedura, início da cozedura, programação da hora), indicadas pelo respectivo led
intermitente.
Além disso, ao premir brevemente este botão é possível ver as programações já realizadas
(interrogação), enquanto com uma pressão mais longa (cerca de dois segundos), as
programações são canceladas (Reset).
Botão esquerdo
Premir o botão esquerdo permite programar os ponteiros do relógio relativamente à
função activada (led intermitente).
B
IVI
I
V
I
I
IX
V
V
I
VI
III
I
X
X
III
IXI
TIMER
START
STOP
B
Page 61

56
Leds
– Intermitentes: logo após a programação ou aviso de fim da função
(em conjunto com o sinal sonoro).
– Acessos: função a decorrer.
Temporizador ( )
Para programar o temporizador premir uma única vez o botão direito
(o led respectivo começa a piscar) e, rodando o botão esquerdo,
posicionar os ponteiros para programar o tempo de duração do
temporizador. Se premir novamente o botão direito confirmará a
programação da data e o respectivo led intermitente fica fixo. Os
ponteiros regressam à posição original para indicar a hora actual: ao
alcançar o tempo programado, activa-se o sinal sonoro que pode ser interrompido premindo o botão direito.
O temporizador não gere o aquecimento do forno.
Final Cozedura ( )
Para programar o final de cozedura, prima o botão direito duas vezes (o led do símbolo começa a piscar);
e, rodando o botão esquerdo, mova os ponteiros para programar a hora do final da cozedura.
O led fica intermitente por 10 segundos (para eventuais correcções) e após este período a programação é aceite e o led
fica fixo.
Obterá o mesmo efeito se premir duas vezes o botão direito enquanto está intermitente.
No final da cozedura o aquecimento do forno é desactivado e o sinal sonoro activa-se por 1 minuto; este pode ser
interrompido premindo o botão direito.
NOTA: No final da cozedura o forno mantém, por alguns minutos, uma temperatura próxima da temperatura
programada anteriormente; deste modo, para evitar cozinhar demasiado os alimentos, extraia-os do forno.
Final cozedura ( ) com início retardado ( )
O início atrasado da cozedura activa-se apenas no final da cozedura. Após a sua programação, se premir o botão direito
valida o “stop”, activando simultaneamente o led intermitente do símbolo . Rode o botão esquerdo para
programar também a hora de início da cozedura (como será anterior ao final só poderá retroceder com os ponteiros).
Neste momento, poderá confirmar definitivamente premindo novamente no botão direito. Também poderá aguardar
10 segundos para que os dados sejam automaticamente aceites. Os leds dos símbolos e permanecem
acesos e o forno acede-se à hora programada. Nesse momento, permanecerá aceso apenas o led do símbolo .
No final da cozedura o sinal sonoro activa-se por 1 minuto; este pode ser interrompido premindo o botão direito.
Programar a hora do dia ( )
Para programar a horra correcta, prima o botão direito três vezes (o led do símbolo do relógio começa a piscar) e rode
o botão esquerdo. Após introduzir a hora correcta, confirme premindo o botão direito.
Programador de cozedura electrónico
Possibilita programar o forno nos seguintes modos de funcionamento:
• início retardado da cozedura com duração preestabelecida;
• início imediato com duração estabelecida;
• temporizador.
Como programar o relógio digital
Após a ligação do aparelho à rede ou após um corte de energia, o visor começa a
piscar: “0.00”.
Prima simultaneamente as teclas + e – durante alguns segundos. A hora do dia
pode ser regulada utilizando as teclas + e –, enquanto o ponto entre as horas e
os minutos estiver a piscar. Se seleccionar o modo de regulação da hora enquanto
estiver activo um programa automático, o programa automático é cancelado.
Se for necessário corrigir a hora, repita a operação acima.
B
B
Page 62

57
PT
Alteração da frequência do sinal sonoro
A frequência do sinal sonoro pode ser alterada caso não se tenha programado uma
cozedura (o visor apresenta a hora do dia). Prima simultaneamente as teclas + e –
(no menu de alteração da hora) e, de seguida, prima Mode ou Set para seleccionar o
menu a partir do qual pode modificar a frequência do sinal sonoro. Pode modificar a
frequência do sinal sonoro premindo repetidamente a tecla Mode ou Set; no visor
surgirá “ton1”, “ton2”, “ton3”.
Funcionamento manual do forno
Após programar a hora, o programador retorna automaticamente à posição manual.
Início da cozedura retardada com duração preestabelecida
Quando no visor surgir a hora do dia, prima duas vezes a tecla Mode ou Set para
definir a duração e, em seguida, prima-a novamente para definir a hora final de cozedura. Defina a hora desejada com as
teclas + e –. Durante a selecção do modo de regulação da hora final ou da duração, o símbolo Auto permanece aceso.
Uma vez definida a duração de um programa, a hora final não pode ser reduzida. Da mesma forma, a duração de um
programa não pode ser prolongada uma vez programada a hora final.
A hora final e a duração definem a hora de inicio do programa como se segue:
hora de início = hora final - duração.
Após a definição da duração e da hora final, o visor continua a exibir a hora final. O programa inicia quando a hora do dia
coincidir com a hora de início: o símbolo Auto surge fixo e o símbolo surge a piscar. Após o início da cozedura, o
visor mostra a contagem decrescente do tempo. Se for seleccionada apenas a hora final da cozedura (a duração é = 0),
a cozedura inicia-se e o visor exibe a contagem decrescente do tempo.
O símbolo Auto permanece aceso durante a espera pelo início retardado da cozedura e durante todo o tempo da cozedura.
O símbolo pisca durante a espera pelo início retardado e permanece fixo quando inicia a cozedura.
No final da cozedura é emitido um sinal sonoro; para o interromper, prima uma tecla qualquer ou deixe
passar o tempo de duração do sinal.
Programa semi-automático com duração ou com hora final
Programação horária do programa
Para seleccionar a duração ou a hora final do programa, prima duas vezes a tecla Mode ou Set e defina a hora desejada com
as teclas + e – . Durante a selecção do modo de regulação da hora final ou da duração, o símbolo Auto correspondente
pisca.
Uma vez definida a duração de um programa, a hora final não pode ser reduzida. Da mesma forma, a duração de um
programa não pode ser prolongada uma vez programada a hora final.
Execução do programa de cozedura
Quando o programa automático está em curso, ou seja, a cozedura está activada, o símbolo Auto permanece aceso e
no visor surge o tempo de cozedura remanescente (contagem decrescente). O símbolo também permanece aceso.
O símbolo também permanece aceso.
No fim da duração do programa ou quando se atinge a hora final do programa, o símbolo correspondente apaga-se.
No fim do programa automático, o símbolo “Auto” pisca, o visor exibe “End” e é emitido um sinal sonoro que pode ser
desligado premindo uma tecla qualquer.
Função do contador de minutos
O contador de minutos efectua a contagem ao contrário do tempo programado. Esta função não controla a activação e
a desactivação do forno; emite apenas um sinal sonoro quando o tempo termina.
Prima a tecla Mode ou Set apenas uma vez; aparece no visor:
O símbolo da campainha pisca, e neste momento pode definir-se a duração do alarme com as teclas + e –. Quando esta
função se encontra activa, o símbolo da campainha permanece aceso e o visor exibe o tempo remanescente (contagem
decrescente).
No fim do tempo é emitido um sinal sonoro que pode ser interrompido premindo uma tecla qualquer.
Correcção/cancelamento dos dados
• É possível mudar os dados programados a qualquer momento, premindo simultaneamente as teclas + e – .
• Ao cancelar a duração de cozedura, cancela-se automaticamente também o tempo programado no temporizador e
vice-versa.
• No caso de funcionamento programado, o aparelho não aceita um tempo do final de cozedura anterior ao do início
proposto pelo próprio aparelho.
NOTA: Lembre-se que depois de desligar o forno e durante um longo período, o forno mantém uma temperatura
próxima da que foi programada para a cozedura; portanto, para não cozer demasiado ou queimar os alimentos, retire-os
do forno.
B
Page 63

58
Tabela indicativa da cozedura
NOTA: as indicações fornecidas na tabela são o resultado de testes de cozedura feitos por uma equipa de cozinheiros profissionais.
São, em todo o caso, indicativas e podem ser modificadas com base nos respectivos gostos pessoais.
Regulação do
botão de selecção
Tipo de alimentos Peso
(Kg)
Posição das
prateleiras
Te m po d i
pré-aqueci-
mento (min.)
Regulação do
botão do
termóstato
Duração
da
cozedura
(min.)
Cozedura estática
natural
Porco assado
Omeletas
Pescada-Dourada-Pregado
Pão comum
Pastéis
Peixe de água doce
Polenta com molho
Bolos de requeijão
1
1,5
1
1
1
1,5
0,5
1,5
3
2
3
2-4 cont.
2
3
2
2
9,5
10,5
9,5
9,5
10,5
10,5
9,5
9,5
180 °C
200 °C
180 °C
175 °C
200 °C
200 °C
180 °C
180 °C
65-75
25-30
15
25-30
40-45
35-40
25-30
25-30
Cozedura assistida Porco assado
Coelho assado
Tarte salgada
Camarões no forno
Pescada-Dourada-Pregado
Pão comum
Tartes de fruta
Tartes salgadas
1
1
1
0,5
2
2
1,5
2
3
2
2
3
2-4 cont.
2-4 cont.
2
3-5 cont.
9
9,5
10
10
7,5
9
9
9
180 °C
190 °C
200 °C
200 °C
150 °C
180 °C
175 °C
180 °C
60-70
55-65
25-30
30-40
25-30
25-30
30-35
40-45
Cozedura ventilada
inferior
Peito de frango
Posta de vitela
Rosbife
Atum às postas
Medalhões de peixe-espada
Gambas
Merengue
Biscoitos de manteiga
Bolo levedado
Bolinhos de amêndoa
1
1
1
1
1
1
0,8
1
0,8
1
2 ou 3
2
3
2
3
2
2
2
2
2 ou 3
Para abreviar o
tempo de
pré-aquecimento,
utilize a função de
Cozedura
Assistida.
170 °C
180 °C
170 °C
160 °C
160 °C
180 °C
90 °C
160 °C
170 °C
160 °C
20
20
60
20
20
30
120
30
40
35
Cozedura ventilada
superior
Tortellini gratinados
Gnocchi de batatas
Peixe-espada
Mexilhões
Vieiras
Batatas assadas
Canelones
0,5
0,5
0,5
1
1
0,5
1
3
3
5
4
4
4
3
Para abreviar o
tempo de
pré-aquecimento,
utilize a função de
Cozedura
Assistida.
Máx.
Máx.
200 °C
Máx.
200 °C
200 °C
Máx.
25-30
25-30
12-15
10-12
10-12
18-20
25-30
Cozedura grill Asas de frango
Costeletas
Vieiras
Batatas assadas
Peixe de água doce
Tomates gratinados
Espetadas de enguia
Espetadas de peru
1
0,8
0,5
1
1
0,4
0,5
0,5
4 ou 5
3
3 ou 4
3
3 ou 4
2 ou 3
3
4
7
7
7
7
7
7
7
7
Máx.
Máx.
Máx.
Máx.
Máx.
Máx.
Máx.
Máx.
25-30
25-30
14-16
25-30
25-30
25-30
25-30
25-30
Cozedura grill
ventilada
Coxas de frango
Entrecosto de porco
Pintada (aos pedaços)
Dourada em papelote
Frango (aos pedaços)
Codornizes
Salame
Legumes
1
0,5
1,2
1
1,5
0,8
1
1
4 ou 5
4
4
3
3
4
4
4 ou 5
9,5
14
14
8
14
14
14
14
220 °C
Máx.
Máx.
200 °C
Máx.
Máx.
Máx.
Máx.
25-30
40-45
30-35
20-25
35-40
30-35
20-25
10-15
Page 64

59
PT
Limpeza e manutenção do forno
Atenção
Antes de iniciar as operações de manutenção, retire sempre a ficha da tomada ou desligue o interruptor geral do sistema
eléctrico.
– As peças em aço inox e esmaltadas permanecerão sempre novas, se tiver o cuidado de as limpar com água ou com
produtos específicos e as secar com cuidado.
– Evite absolutamente o uso de palha de aço ou lã de aço, ácido clorídrico ou outros produtos que possam riscar ou
manchar. Evite o uso de dispositivos de limpeza a vapor e jactos de água directos.
– As manchas que aparecem no fundo do forno, de diferente composição (molhos, açúcar, gema de ovo e gordura),
são sempre provocadas por salpicos ou derrames de alimentos. Os salpicos originados durante a cozedura resultam
da utilização de uma temperatura muito alta, enquanto que os derramamentos são causados pelo uso de recipientes
impróprios ou pelo aumento do volume de alguns alimentos durante a cozedura. Estes dois problemas podem ser
solucionados utilizando recipientes com as bordas altas ou a pingadeira fornecida com o forno. Para limpar a parte
inferior do forno, aconselha-se que as eventuais manchas sejam limpas com o forno morno; quanto mais se adiar a
limpeza, mais difícil será retirar as manchas.
Limpeza da porta do forno
– A limpeza da porta, por dentro e por fora, deve ser efectuada com o forno frio com água
quente e sem usar esfregões. Limpe os vidros com os detergentes adequados.
– Para limpar as partes esmaltadas e o interior do forno, utilize água quente e detergentes não
abrasivos.
(Apenas modelos CR 66 e CS 66)
– Para facilitar a limpeza do forno, é possível desmontar a tampa estética de plástico da porta
do forno. Com a porta aberta, prima os lados e extraia a tampa, como indicado na figura.
Para voltar a inserir a tampa na porta do forno, é suficiente deslocá-la para a sua posição
original e exercer uma leve pressão até os ganchos laterais se soltarem.
Desmontagem do vidro interno da porta do forno
(apenas modelos CR, CS e SM) (Fig. 2)
Para uma limpeza completa do vidro interior do forno, é possível retirá-lo totalmente da porta de forma fácil,
procedendo como se segue:
• com a porta totalmente aberta gire a 180° as duas pequenas peças pretas (com a indicação “CLEAN”) na extremidade
interior da porta para que entrem nos locais presentes na estrutura do forno.
NOTA: certifique-se da rotação completa da peça (ouve-se um pequeno estalido quando a peça estiver na posição
correcta);
• levante o vidro interior com cuidado: as duas peças impedirão que a porta volte a fechar-se (caso não gire totalmente
as peças, a remoção do vidro poderia causar o fecho imediato da porta).
Após efectuadas as operações de limpeza, volte a colocar o vidro interior (o lado correcto de montagem do vidro tem a
indicação “TEMPERED GLASS” que deverá ser legível) e volte a girar novamente as duas peças de fixação nas posições
originais.
ATENÇÃO: nunca tente fechar a porta com uma ou ambas as peças parcialmente ou totalmente desencaixadas
do vidro interior. Após a limpeza certifique-se de girar ambas as peças de fixação antes de fechar a porta.
Desmontagem do vidro interior da porta do forno (apenas modelos TL e CM) (Fig. 3)
Para uma limpeza completa do vidro interior do forno, é possível retirá-lo totalmente da porta de forma fácil,
procedendo como se segue:
• com a porta totalmente aberta gire a 180° as duas pequenas peças pretas na extremidade inferior da porta (fig. 3a e 3b).
NOTA: certifique-se da rotação completa da peça (ouve-se um pequeno estalido quando a peça estiver na posição
correcta);
• levante o vidro interior com cuidado (fig. 3c): as duas peças impedirão que a porta volte a fechar-se (caso não gire
totalmente as peças, a remoção do vidro poderia causar o fecho imediato da porta);
• para remover também o vidro do meio, deslizar os vedantes laterais (fig. 3d) e levantar o vidro (fig. 3e);
• após efectuadas as operações de limpeza, volte a colocar o vidro do meio (fig. 3f) (o lado correcto de montagem do
vidro tem a indicação “TEMPERED GLASS” que deverá ser legível) introduzindo-o com cuidado nas aberturas que
se encontram na parte superior da porta e empurrando-o totalmente até ao fim da abertura;
• volte a colocar os vedantes (fig. 3g) de forma que estes coincidam com o perfil superior da porta;
• por fim, volte a colocar o vidro interior (fig. 3h) e gire novamente as duas peças de fixação do vidro nas posições
originais.
ATENÇÃO: nunca tente fechar a porta com uma ou ambas as peças parcialmente ou totalmente
desencaixadas do vidro interior. Após a limpeza certifique-se de girar ambas as peças de fixação antes de
fechar a porta.
Page 65

60
Desmontagem da porta do forno (Fig. 4)
Para facilitar a limpeza do forno, é possível desmontar a porta tirando as dobradiças, da seguinte forma:
– As dobradiças (A) possuem dois suportes móveis (B). Levantando o suporte (B), a dobradiça solta-se.
– Levante a porta e retire-a. Para retirar a porta, segure-a junto das dobradiças.
– Para remontar a porta, enfie primeiro as dobradiças nas respectivas ranhuras.
– Antes de fechar a porta, não se esqueça de rodar os dois suportes móveis (B) que servem para prender as duas dobradiças.
Substituição da lâmpada do forno
Os fornos Franke estão equipados com uma lâmpada circular posicionada na parte posterior da cavidade, em cima à
esquerda.
Se for necessário substituir a lâmpada interna do forno, proceda da seguinte forma:
– desligue a corrente do aparelho através do interruptor omnipolar utilizado para a ligação do
aparelho à rede eléctrica ou, então, retire a ficha da tomada, se esta estiver num local de
fácil acesso;
– desaparafuse a tampa de vidro (A);
– desaperte a lâmpada e substitua-a por uma resistente à alta temperatura (300 °C) com as
seguintes características:
Te n s ã o : 220-240 V ~ 50-60 Hz
Potência: 15 W
Casquilho: (E14) pequeno.
– Monte a tampa de vidro (A) e ligue novamente o aparelho à rede eléctrica.
Assistência técnica
Em caso de eventuais problemas de funcionamento, contacte um dos Centros de
Assistência Técnica indicados.
Nunca recorra a pessoal técnico não autorizado.
Indique:
– o tipo de anomalia;
– o modelo do aparelho (Art.);
– o número de série (S.N.).
Estas últimas informações estão indicadas na placa de características presente no
certificado de garantia.
Advertências de segurança
• Este aparelho não se destina a ser utilizado por pessoas de capacidades psíquicas ou motoras reduzidas, incluindo
crianças, ou sem experiência ou com falta de conhecimentos, salvo se supervisionadas ou instruídas por uma pessoa
responsável pela segurança dos mesmos.
• As crianças devem ser vigiadas para garantir que não mexem no aparelho.
• O fabricante não pode ser considerado responsável por eventuais danos provocados por: instalação errada,
utilização imprópria, incorrecta ou irracional.
Contacte unicamente pessoal qualificado nos seguintes casos:
Para garantir a eficiência e a segurança deste electrodoméstico:
– recorra exclusivamente a centros de assistência técnica autorizados;
– solicite sempre a utilização de peças originais;
– o aparelho foi concebido para utilização doméstica e não profissional; não modifique as suas características;
– na placa de características estão indicados os símbolos dos países nos quais estas instruções são válidas;
– a segurança eléctrica do aparelho só é garantida com um sistema eficiente de ligação à terra, de acordo com as
normas vigentes;
– não toque nos elementos de aquecimento e noutras partes da porta que, durante o funcionamento do
forno, ficam muito quentes; mantenha as crianças afastadas.
Evite que as crianças toquem:
– nos comandos e no aparelho em geral;
– nos componentes da embalagem (sacos, poliestireno, pregos, etc.);
– no aparelho, durante e imediatamente após a sua utilização, já que está quente;
– no aparelho inutilizado (neste caso, proteja as partes que constituem uma potencial fonte de perigo).
Evite as seguintes operações:
– tocar no aparelho com partes do corpo húmidas;
– usar o aparelho descalço;
– puxar o aparelho ou o cabo de alimentação para tirar a ficha da tomada de corrente;
A
Page 66

61
PT
– operações impróprias e perigosas;
– tapar as aberturas de ventilação ou de eliminação do calor;
– apoiar o cabo de alimentação de outros electrodomésticos nas partes quentes do aparelho;
– expor o aparelho aos agentes atmosféricos (chuva, sol);
– utilizar o forno para guardar objectos;
– utilizar líquidos inflamáveis perto do aparelho;
– utilizar adaptadores, tomadas múltiplas e/ou extensões;
– instalar ou reparar o aparelho sem a intervenção de pessoal qualificado.
Contacte unicamente pessoal qualificado nos seguintes casos:
– instalação (segundo as instruções do fabricante);
– no caso de dúvidas sobre o funcionamento do aparelho;
– substituição da tomada em caso de incompatibilidade com a ficha do aparelho.
Contacte centros de assistência técnica autorizados pelo fabricante nos seguintes
casos:
– dúvidas acerca do bom estado do aparelho, depois de retirar da embalagem;
– substituição ou danos no cabo de alimentação;
– avaria ou mau funcionamento; utilize apenas peças de substituição originais.
Convém efectuar as seguintes operações:
– cozer apenas alimentos evitando outras operações;
– antes de efectuar qualquer operação de limpeza e manutenção ou em caso de mau funcionamento, desligue o
aparelho da rede de alimentação eléctrica;
– para inserir ou retirar os recipientes, calce luvas especiais para forno;
– como a extremidade pode estar mais quente por causa de eventuais saídas de ar, segure sempre o puxador da porta
pela parte central;
– verifique sempre se os botões estão desligados quando o aparelho não estiver a ser utilizado;
– quando decidir não utilizar mais o aparelho, desligue-o da rede eléctrica;
Instalação (Fig. 5)
Atenção: a instalação deve ser feita em conformidade com as normas e prescrições vigentes no país de instalação.
Deve ser efectuada exclusivamente por pessoal técnico autorizado.
Notas sobre as características do móvel
A cola dos componentes dos móveis embutidos (materiais plásticos, madeira folheada) deve ser resistente ao calor
(máximo: 100 °C): materiais e colas não próprios podem deformar e soltar. O móvel deve permitir a passagem das
ligações eléctricas. O móvel no qual o forno será embutido deve suportar o peso do aparelho.
O forno deve ser montado de uma forma segura no espaço previsto. O forno pode ser inserido dentro um móvel tipo
coluna ou debaixo de um móvel modular, desde que suficientemente arejados.
Instruções de montagem
Modelos CM e TL (Fig. 6a/6b/6c)
Meça a largura da parede lateral (S) do móvel que normalmente é de 16, 18 ou 20 mm.
Parede lateral de 16: posicione em cada suporte de fixação (F) 2 calços (T) com indicação do número 16.
Parede lateral de 18: posicione em cada suporte de fixação (F) 2 calços (T) com indicação do número 18.
Parede lateral de 20: para a parede lateral de 20 mm não é necessário introduzir nenhum calço.
Fixe os suportes (F) nas paredes do móvel e no plano de suporte do forno.
Fixe os suportes (F) com os parafusos (V). Insira o forno no móvel, abra completamente a porta e fixe-o aos suportes (F)
utilizando os 4 parafusos (V) e os 4 separadores em plástico (D).
Modelos CR, CS, SG e SM (Fig. 6d)
Introduza o aparelho no vão; fixe o corpo ao móvel com os 4 parafusos e os 4 mancais fornecidos utilizando os orifícios
dos painéis laterais (Fig. 6d).
Nota: Para todos os modelos: se colocar o forno por baixo de uma placa de cozinha, rode primeiro a união
do plano (R) para a direita ou para a esquerda, para permitir a introdução correcta do forno (Fig. 6e).
Page 67

62
Ligação à rede eléctrica
O forno FRANKE é fornecido com um cabo de alimentação tripolar com terminais livres.
Se o forno for ligado permanentemente à rede de alimentação, prepare um dispositivo que
assegure a desconexão da rede, com uma distância de abertura dos contactos (de pelo menos
3 mm) que permita a desconexão completa nas condições da categoria de sobretensão III.
Certifique-se de que:
a) a ficha e a tomada são adequadas a uma corrente de 16 A;
b) ambas estão facilmente acessíveis e colocadas de modo que nenhuma parte sob tensão possa
estar acessível durante a introdução ou remoção da ficha;
c) a ficha pode ser inserida sem dificuldade;
d) uma vez inserida a ficha, o forno não está apoiado na mesma quando é instalado no móvel;
e) não estão ligados os terminais de dois aparelhos à mesma ficha;
f) no caso em que se substitua o cabo de alimentação, este deve ter as características 3 x 1,5 mm
2
e ser do tipo H05VV-F;
g) é fundamental respeitar as polaridades dos terminais livres
(Castanho = Fase - Azul = Neutro - Amarelo-Verde = Terra).
Nota: certifique-se de que as características da sua linha eléctrica doméstica (tensão, potência máxima e corrente),
são compatíveis com as do seu forno FRANKE.
Nota: a frequência de rede é determinada aquando da ligação. Quando o temporizador é ligado a 60 Hz, o símbolo P
pisca aquando do arranque.
Dados técnicos
INFORMAÇÃO AOS UTILIZADORES
nos termos do artigo do decreto legislativo de 25 de Julho, nº 15 “Actuação das Directivas 2002/95/CE,
2002/96/CE e 2003/108/CE, relativas à redução do uso de substâncias perigosas nos equipamentos eléctricos
e electrónicos, bem como à eliminação dos resíduos”.
O símbolo do caixote de lixo com uma cruz contido no aparelho indica que o produto, no final da sua vida útil, deve ser
recolhido separadamente dos outros resíduos.
O utilizador deverá, portanto, depositar o aparelho em fim de vida nos devidos centros de recolha selectiva de resíduos
electrónicos e electrotécnicos, ou devolvê-lo ao revendedor aquando da aquisição de um novo aparelho de tipo
equivalente, na razão de um para um.
Uma recolha diferenciada adequada tendo em vista a posterior reciclagem, tratamento e eliminação ambientalmente
compatível do aparelho em fim de vida contribui para evitar possíveis efeitos negativos no ambiente e na saúde pública e
favorece a reciclagem dos materiais de que o equipamento é composto.
A eliminação abusiva do produto por parte do utilizador comporta a aplicação das sanções administrativas referidas no
D. L. nº 22/1997 (artigo 50 e seguintes do D. L. nº 22/1997).
Dimensões úteis do forno:
largura: 440 mm
profundidade: 415 mm
altura: 312 mm
Volume útil do forno:
57 litros
Consumos (função estática):
para alcançar 175 °C: 0,32 kWh
para manter 175 C: 0,62 kWh
consumo total: 0,94 kWh
Consumos (função ventilada):
para alcançar 200 °C: 0,42 kWh
para manter 200 C: 0,77 kWh
consumo total: 1,19 kWh
Tensão e frequência de alimentação:
220-240 V ~ 50-60 Hz
Potência total e amperagem do fusível:
2300 W - 16 A
Potência da resistência:
parte superior do forno 1000 W
parte inferior 1250 W
grill 2250 W
ventilador eléctrico 30 W
lâmpada de iluminação do forno 15 x 1 W
ventilador tangencial 15 W
Este aparelho está em
conformidade com as seguintes
Directivas Comunitárias:
– 2006/95/EC (Baixa tensão);
– 2004/108 CEE
(Compatibilidade
electromagnética).
AZUL
AMARELO-VERDE
CASTANHO
Page 68

63
GR
Περιεχόμενα
Εισαγωγή ........................................................................................................................................ 63
Λεπτομερής περιγραφή .................................................................................................................. 63
Πρώτη χρήση.................................................................................................................................. 64
Συμβουλές....................................................................................................................................... 64
Οδηγίες χρήσης .............................................................................................................................. 64
Ενδεικτικός πίνακας ψησίματος ...................................................................................................... 68
Καθαρισμός και συντήρηση του φούρνου....................................................................................... 69
Τεχν ική υποστήριξη......................................................................................................................... 70
Προειδοποιήσεις για την ασφάλεια ................................................................................................. 70
Εγκατάσταση (εικ. 5)....................................................................................................................... 71
Οδηγίες τοποθέτησης ..................................................................................................................... 71
Σύνδεση στο ηλεκτρικό δίκτυο ........................................................................................................ 72
Τεχν ικά στοιχεία .............................................................................................................................. 72
Εισαγωγή
Σας ευχαριστούμε που επιλέξατε ένα προϊόν της Franke.
Πριν χρησιμοποιήσετε τη συσκευή, συνιστάται να διαβάσετε προσεκτικά τις οδηγίες και τις συμβουλές του παρντος
εγχειριδίου. Με τον τρόπο αυτό, θα χρησιμοποιήσετε πιο εύκολα τη συσκευή και θα τη διατηρήσετε σε καλή
κατάσταση για μεγλύτερο χρονικό διάστημα. Φυλάξτε προσεκτικά το παρόν εγχειρίδιο για μελλοντική
αναφορά.
Λεπτομερής περιγραφή
∆ιακόπτης επιλογής προγραμμάτων
Χρησιμοποιείται για την επιλογή της λειτουργίας του φούρνου ανάλογα με τον επιθυμητό
τρόπο ψησίματος. Γυρίζοντας το διακόπτη σε ένα οποιοδήποτε πρόγραμμα, ανάβει ο
εσωτερικός λαμπτήρας του φούρνου και υποδεινύει ότι ο φούρνος είναι αναμμένος.
Προγραμματιστής
Οι φούρνοι Franke διαθέτουν διάφορα συστήματα ελέγχου και διαχείρισης του χρόνου
ψησίματος. Στη οελίδα 65 θα βρείτε λεπτομερείς οδηγίες για κάθε σύστημα. Θα πρέπει
να εντοπίσετε τον τύπο του συστήματος ελέγχου που διαθέτει ο φούρνος σας, για να
διασφαλιστεί η σωστή χρήση του.
Ενδεικτική λυχνία θερμοστάτη
Επισημαίνεται από το σύμβολο και υποδεικνύει τη λειτουργία των θερμαινόμενων
στοιχείων του φούρνου. Η λυχνία σβήνει όταν επιτευχθεί η θερμοκρασία που έχει
ρυθμιστεί και ανάβει κάθε φορά που ο φούρνος πρέπει να ζεσταθεί ξανά. Χρησιμοποιείται
για τον έλεγχο της επίτευξης της θερμοκρασίας πριν βάλετε το φαγητό στο φούρνο.
∆ιακόπτης ρύθμισης θερμοκρασίας (Θερμοστάτης)
Παρέχει τη δυνατότητα επιλογής της κατάλληλης θερμοκρασίας για το συγκεκριμένο
τύπο φαγητού και διατήρησς της θερμοκρασίας σταθερής για όλη τη διάρκεια του
ψησίματος. Για να επιλέξετε την επιθυμητή θερμοκρασία, πρέπει να γυρίσετε το
διακόπτη δεξιόστροφα, μετακινώντας την ένδειξη του διακόπτη στην αντίστοιχη
θερμοκρασία. Η μέγιστη θερμοκρασία είναι περίπου 260 °C.
Οδηγοί για δίσκους συλλογής λίπους και σχάρες
Χρησιμοποιούνται για τη σωστή τοποθέτηση των σχαρών και των δίσκων
συλλογής λίπους σε 5 προκαθορισμένες θέσεις (από 1 έως 5 ξεκινώντας από κάτω).
Στον ενδεικτικό πίνακα ψησίματος (οελίδα 68) παρέχεται η ιδανική θέση για κάθε
χρήση του φούρνου.
∆ίσκος συλλογής λίπους
Χρησιμοποιείται συνήθως για τη συλλογή των υγρών από το ψήσιμο στο γκριλ ή για το
ψήσιμο φαγητών. Εάν ο δίσκος δεν χρησιμοποιείται, πρέπει να αφαιρείται από το
φούρνο κατά τη διάρκεια του ψησίματος. Ο δίσκος κατασκευάζεται από εμαγιέ χάλυβα
τύπου «AA» για χρήση με τρόφιμα. ΣΗΜ. Για την επίτευξη καλύτερων αποτελεσμάτων
ψησίματος, συνιστάται να τοποθετήσετε το δίσκο συλλογής λίπους με το κεκλιμένο
τμήμα προς την πίσω πλευρά του θαλάμου του φούρνου.
Σχάρα
Χρησιμοποιείται ως βάση για τα ταψιά σας, τις φόρμες ζαχαροπλαστικής και όλα τα
σκεύη εκτός των δίσκων συλλογής λίπους που διαθέτει ο φούρνος ή για ψήσιμο στο
γκριλ ή στο γκριλ με αέρα για κρέας και ψάρια, ψωμί για φυγάνισμα κ.λπ. ∆εν
συνιστάται η απευθείας επαφή της σχάρας με το
φαγητό.
A
BCD?F
G
D
A
F
G
?
Page 69

64
Πρώτη χρήση
Πριν χρησιμοποιήσετε το φούρνο για πρώτη φορά, πρέπει να τον ανάψετε χωρίς να έχετε τοποθετήσει φαγητό,
ρυθμίζοντας το διακόπτη θερμοκρασίας στο μέγιστο για τουλάχιστον 40 λεπτά, με την πόρτα πλήρως ανοικτή και
αερζοντας καλά το χώρο.
Οι οσμές που αναδύονται κατά τη διάρκεια αυτής της διαδικασίας οφείλονται στην εξάτμιση των προϊόντων που
χρησιμοποιούνται για την προστασία του φούρνου κατά το διάστημα από την παραγωγή έως την εγκατάσταση της
συσκευής. Μετά από αυτήν τη διαδικασία, ο φούρνος είναι έτοιμος για χρήση.
Συμβουλές
Για καλύτερα αποτελέσματα, μην τοποθετείτε ποτέ το φαγητό στο φούρνο όταν είναι κρύος, αλλά περιμένετε να
ζεσταθεί έως τη θερμοκρασία που έχετε επιλέξει.
Κατά τη διάρκεια του ψησίματος, μην τοποθετείτε ποτέ απευθείας στο κάτω μέρος του φούρνου σκεύη που πρέπει
να τοποθετούνται πάντα πάνω στις παρεχόμενες σχάρες ή τους δίσκους συλλογής
λίπους σε μία από τις 5
διαθέσιμες θέσεις. Σε αντίθετη περίπτωση, μπορεί να προκληθεί ζημιά στο σμάλτο του φούρνου.
Μην καλύπτετε ποτέ τα τοιχώματα του φούρνου με αλουμινόχαρτο και κυρίως το κάτω μέρος του θαλάμου.
Τυχόν επισκευές πρέπει να εκτελούνται από εξειδικευμένο και εξουσιοδοτημένο προσωπικό.
Απευθυνθείτε στο πλησιέστερο κέντρο υποστήριξης της
εταιρείας και ζητήστε μόνο γνήσια ανταλλακτικά.
Ο φούρνος Franke είναι κατασκευασμένος από ειδικό σμάλτο που καθαρίζει εύκολα. Ωστόσο, πρέπει να τον
καθαρίζεε συχνά, ώστε να αποφεύγεται το επανειλημμένο ψήσιμο των υπολειμμάτων από προηγούμενες χρήσεις
του φούρνου.
Πρέπει να καθαρίζετε τυχόν αυτοκαθαριζόμενα τοιχώματα (εάν διαθέτει ο φούρνος) με νερό και σαπούνι (βλ. οδηίες
καθαρισμού).
ΣΗΜ.: πριν ανάψετε το φούρνο, διαβάστε τις οδηγίες χρήσης για το χρονοδιακόπτη (βλ. οελίδα 66).
– Εάν ο φούρνος διαθέτει αυτόματο προγραμματιστή ψησίματος ή σβησίματος, για να χρησιμοποιήσετε το φούρνο
ση χειροκίνητη λειτουργία πρέπει να επιλέξετε τη ρύθμιση «χειροκίνητη λειτουργία» που υποδεικνύεται από το
σύμβολο .
Οδηγίες χρήσης
Ο φούρνος αυτός συνδυάζει τα πλεονεκτήματα των κλασικών φούρνων με «πάνω/κάτω αντίσταση» φυσικής
μεταγωγής θερμότητας με εκείνα των σύγχρονων φούρνων «αέρα» εξαναγκασμένης μεταγωγής. Πρόκειται για μια
πολύ ευέλικτη συσκευή που παρέχει τη δυνατότητα επιλογής με ευκολία και ασφάλεια 6 διαφοετικών τρόπων
ψησίματος. Με τους διακόπτες (Α) και (D) του πίνακα, μπορείτε να
επιλέξετε τα διάφορα προγράμματα και την
επιθυμητή θερμκρασία. Για να χρησιμοποιήσετε με τον καλύτερο δυνατό τρόπο το φούρνο Franke, συμβουλευτείτε
τον ενδεικτικό πίνακα ψησίματος στη οελίδα 68.
Ανεμιστήρας ψύξης
Για να μειωθεί η θερμοκρασία στην πόρτα, στον πίνακα και στα πλαϊνά τμήματα, ο φούρνος Franke διαθέτει
ανεμιστρα ψύξης που ενεργοποιείται αυτόματα όταν ζεσταθεί ο φούρνος. Όταν ο ανεμιστήρας λειτουργεί, μπορεί να
αντιληφθείτε ένα ρεύμα αέρα μεταξύ της πρόσοψης και της πόρτας το φούρνου. Έχει δοθεί ιδιαίτερη προσοχή ώστε
ο θόρυβος και
η ταχύτητα του εξερχόμενου αέρα να μην επηρεάζου το περιβάλλον της κουζίνας.
Για την προστασία των επίπλων, μετά τη λήξη του ψησίματος ο ανεμιστήρας παραμένει
ενεργοποιημένος έως ότου κρυώσει επαρκώς ο φούρνος.
Φως φούρνου
Το σύμβολο αυτό υποδεικνύει την ενεργοποίηση του εσωτερικού φωτισμού του φούρνου χωρίς άναμμα
του φούρνου. Η λειτουργία αυτή είναι χρήσιμη για διευκόλυνση του καθαρισμού με σβηστό φούρνο και
καλύτερη ορατότητα το θαλάμου του φούρνου.
Προγράμματα ψησίματος
Ψήσιμο με πάνω/κάτω αντίσταση
Ο διακόπτης του θερμοστάτη (D) πρέπει να βρίσκεται μεταξύ των ενδείξεων 50 °C και Max (Μέγ.)
(260 °C).
Η θέρμανση προέρχεται από το πάνω (πάνω αντίσταση) και το κάτω μέρος (κάτω αντίσταση). Πρόκειται
για την παραδοσιακή λειτουργία ψησίματος που παρέχει ομοιόμορφο ψήσιμο των φαγητών
χρησιμοποιώντας μία μόνο θέση τοποθέτησης του σκεύους.
Ψήσιμο με πάνω/κάτω αντίσταση και αέρα
Ο διακόπτης του θερμοστάτη (D) πρέπει να βρίσκεται μεταξύ των ενδείξεων 50 °C και Max (Μέγ.)
(260 °C).
Ανάβουν η πάνω και η κάτω αντίσταση και ο εσωτερικός ανεμιστήρας του φούρνου.
Χάρη στη σταθερή και ομοιόμορφη θερμότητα, το φαγητό ροδίζει και ψήνεται συνολικά. Μπορείτε να ψήσετε
και διαφορετικά μεταξύ τους φαγητά, χρησιμοποιώντας ταυτόχρονα έως 2 θέσεις τοποθέτηση
σκευών.
Page 70

65
GR
Ψήσιμο με κάτω αντίσταση και αέρα
Ο διακόπτης του θερμοστάτη (D) πρέπει να βρίσκεται μεταξύ των ενδείξεων 50 °C και Max (Μέγ.)
(260 °C).
Ανάβει η κάτω αντίσταση και ο ανεμιστήρας. Κατάλληλη λειτουργία για το ψήσιμο ψαριών και γενικά
κατεψυγμένων και προμαγειρεμένων προϊόντων. Ιδιαίτερα αποτελεσματική για γλυκά.
Ψήσιμο με πάνω αντίσταση και αέρα
Ο διακόπτης του θερμοστάτη (D) πρέπει να βρίσκεται μεταξύ των ενδείξεων 50 °C και Max (Μέγ.)
(260 °C).
Ανάβει η πάνω αντίσταση και ο ανεμιστήρας. Η χαμηλή ισχύς και η λειτουργία του ανεμιστήρα παρέχουν
εξαιρετικά ήπιο και ομοιόμορφο ψήσιμο. Ιδανική λειτουργία για στεγνά γλυκά και ορισμένους τύπους
ζυμαρικών φούρνου.
Ψήσιμο στο γκριλ
Ο διακόπτης του θερμοστάτη (D) πρέπει κανονικά να βρίσκεται στη θέση Max (Μέγ.) (260 °C).
Μπορείτε, ωστόσο, να επιλέξετε χαμηλότερη θερμοκρασία με πιο αργό ψήσιμο στο γκριλ.
Ανάβει η αντίσταση του γκριλ που βρίσκεται στο πάνω μέρος του φούρνου. Με τη λειτουργία αυτή, το
γρήγορο επιφανειακό ψήσιμο με υπέρυθρες διατηρεί μαλακό το εσωτερικό των κρεάτων
. Μπορείτε επίσης
να χρησιμοποιήσετε το ψήσιμο στο γκριλ, για να φρυγανίσετε γρήγορα έως 9 φέτες ψωμί. Ο φούρνος
Franke προορίζεται για ψήσιμο στο γκριλ με την πόρτα του φούρνου πλήρως κλειστή.
Προειδοποίηση: Όταν είναι αναμμένη, η αντίσταση του γκριλ έχει πολύ υψηλή θερμοκρασία. Προσέξτε να
μην έρθετε σε επαφή με την αντίσταση
καθώς γυρίζετε τα τρόφιμα που ψήνετε. Για το λόγο αυτό, η Franke
διαμόρφωσε ειδικά το άνοιγμα του φούρνου, ώστε τα χέρια του χρήστη να προστατεύονται όσο το δυνατόν
περισσότερο.
Ψήσιμο στο γκριλ με αέρα
Ο διακόπτης του θερμοστάτη (D) πρέπει κανονικά να βρίσκεται στη θέση Max (Μέγ.) (260 °C).
Μπορείτε, ωστόσο, να επιλέξετε χαμηλότερη θερμοκρασία με πιο αργό ψήσιμο στο γκριλ.
Ανάβει η αντίσταση του γκριλ στο πάνω μέρος του φούρνου και ενεργοποιείται ο ανεμιστήρας. Συνδυάζει
τη μονοκατευθυντική θερμική ακτινοβολία με την εξαναγκασμένη κυκλοφορία του αέρα στο εσωτερικό του
φούρνου. Με τον τρόπο αυτό, αποφεύγεται το επιφανειακό κάψιμο του φαγητού και αυξάνεται η ικανότητα
διείσδυσης της ερμότητας. Εξαιρετικά αποτελέσματα επιτυγχάνονται χρησιμοποιώντας το γκριλ με αέρα
για σουβλάκια με κρέας και λαχανκά, λουκάνικα, παντσέτες, παϊδάκια, κοτόπουλο στη σχάρα, ορτύκια,
χοιρινό φιλέτο κ.λπ.
∆ιακόπτης χρονόμετρου λήξης ψησίματος
Το χρονόμετρο λήξης ψησίματος είναι ένας χρήσιμος διακόπτης που σβήνει αυτόματα
το φούρνο, όταν συμπληρωθί ο επιλεγμένος χρόνος, και μπορεί να ρυθμιστεί από 1
έως 120 λεπτά. Για να χρησιμοποιήσετε το χρονόμετρο λήξης ψησίματος, πρέπει να
κουρδίσετε το ρολόι περιστρέφοντας δεξιόστροφα το διακόπτη (Β) σχεδόν κατά μία
πλήρη στροφή. Στη συνέχεια, γυρίστε τον
αριστερόστροφα και επιλέξτε τον επιθυμητό
χρόνο ευθυγραμμίζοντας την επιθυμητή χρονική ένδειξη με το σταθερό δείκτη της
πρόσοψης. Στο τέλος του ρυθμισμένου διαστήματος, εκτός από την ενεργοποίηση του
ηχητικού σήματος σβήνει αυτόματα κα ο φούρνος.
ΣΗΜ. Αμέσως μετά το σβήσιμο και για μεγάλο χρονικό διάστημα, η θερμοκρασία του
θαλάμου του φούρνου
παραμένει στ ίδια περίπου επίπεδα με τη θερμοκρασία
ψησίματος. Συνεπώς, για να μην ψηθούν υπερβολικά ή καούν τα φαγητά, πρέπει να
τα βγάζετε από το φούρνο.
Προσοχή: Για να χρησιμοποιήσετε το φούρνο στη χειροκίνητη λειτουργία,
απενεργοποιώντας δηλαδή τον προγραμματιστή λήξης ψησίματος, ο δείκτης του διακόπτη πρέπει να
ευθυγραμμιστεί με το
σταθερό σύμβολο στην πρόσοψη. Όταν ο φούρνος είναι σβηστός, ο προγραμματιστής
λήξης ψησίματος μπορεί να χρησιμοποιηθεί σαν ένα κοινό χρονόμετρο.
Ρολόι λήξης ψησίματος
Το ρολόι αυτό είναι ήδη ρυθμισμένο για χειροκίνητη χρήση του φούρνου και, συνεπώς,
μπορείτε να ψήσετε φαγητά χωρίς να το ρυθμίσετε
∆εξιός διακόπτης
Πατώντας το δεξιό διακόπτη, μπορείτε να επιλέξετε διαδοχικά τις λειτουργίες για
ενεργοποίηση (χρονοδιακόπτης, λήξη ψησίματος, έναρξη ψησίματος, ρύθμιση ώρας),
οι οποίες υποδεικνύονται από την αντίστοιχη λυχνία led ου αναβοσβήνει.
Επίσης
, πατώντας στιγμιαία το διακόπτη αυτό, μπορείτε να επανεμφανίσετε τις ήδη
προγραμματισμένες ρυθμίσεις (ερώτημα), ενώ πατώντας τον παρατεταμένα (περίπου
δύο δευτερόλεπτα), οι ρυθμίσεις ακυρώνονται (επαναρρύθιση).
Αριστερός διακόπτης
Περιστρέφοντας τον αριστερό διακόπτη, οι δείκτες του ρολογιού ρυθμίζονται ανάλογα
με την ενεργοποιημένη λειτουργία (λυχνία led που αναβοσβήνει).
B
IVI
I
V
I
I
IX
V
V
I
VI
III
I
X
X
III
IXI
TIMER
START
STOP
B
Page 71

66
Λυχνίες Led
– αναβοσβήνουν: ο φούρνος είναι έτοιμος για ρύθμιση ή η
λειτουργία έχει ολοκληρωθεί (σε συνδυασμό με ένα ηχητικό σήμα)
– αναμμένες: η λειτουργία βρίσκεται σε εξέλιξη
Χρονοδιακόπτης ()
Για να ρυθμίσετε το χρονοδιακόπτη, πατήστε μία μόνο φορά
το δεξιό διακόπτη (η σχετική λυχνία led αρχίζει να ααβοσβήνει).
Στη συνέχεια, περιστρέφοντας τον αριστερό διακόπτη, μετακινήστε
τους
δείκτες, για να ρυθμίσετε τη διάρκεια του χρονοδιακόπτη.
Πατώντας ξανά το δεξιό διακόπτη, η ρύθμιση επιβεβαιώνεται και η
σχετική λυχνία led σταματά να αναβοσβήνει και ανάβει σταθερά.
Στη συνέχεια, οι δείκτες επιστρέφουν στην αρχική θέση και
υποδεικνύουν την τρέχουσα ώρα: όταν συμπληρωθεί ο χρονικό διάστημα που ρυθμίστηκε, ενεργοποιείται ένα
ηχητικό σήμα, το
οποίο μπορεί να απενεργοποιηθεί παώντας το δεξιό διακόπτη.
Η θέρμανση του φούρνου δεν ελέγχεται από το χρονοδιακόπτη.
Λήξη ψησίματος ()
Για να ρυθμίσετε τη λήξη του ψησίματος, πατήστε το δεξί διακόπτη δύο φορές (η λυχνία led του συμβόλου
αρχίζει να αναβοσβήνει). Στη συνέχεια, περιστρέφοντας τον αριστερό διακόπτη, μετακινήστε τους δείκτες, για να
ρυθμίσετε την ώρα λήξης ψησίματος.
Η λυχνία led αναβοσβήνει διαρκώς για 10 δευτερόλεπτα (για τυχόν διόρθωση) και, στη συνέχεια, η ρύθμιση
αποθηκεεται και η λυχνία led ανάβει σταθερά.
Το ίδιο αποτέλεσμα επιτυγχάνεται πατώντας δύο φορές το δεξιό διακόπτη όταν αναβοσβήνει.
Όταν ολοκληρωθεί το ψήσιμο, η θέρμανση του φούρνου απενεργοποιείται και ενεργοποιείται ένα ηχητικό σήμα
γα 1
λεπτό. Μπορείτε να το απενεργοποιήσετε πατώντας το δεξιό διακόπτη.
ΣΗΜ. Μετά τη λήξη του ψησίματος, η θερμοκρασία του φούρνου παραμένει για αρκετά λεπτά στα ίδια περίπου
επίπεδα με τη θερμοκρασία που είχε ρυθμιστεί. Συνεπώς, για να μην ψηθούν υπερβολικά τα φαγητά, πρέπει να τα
βγάζετε αό το φούρνο.
Λήξη
ψησίματος () με καθυστερημένη έναρξη ()
Η καθυστερημένη έναρξη ψησίματος μπορεί να ενεργοποιηθεί μόνο μετά τη λήξη ψησίματος, η οποία όταν ρυθμιστεί,
πατώντας το δεξιό διακόπτη, επιβεβαιώνεται η «λήξη» και ενεργοποιείται ταυτόχρονα η λυχνία led του συμβόλου
που αναβοσβήνει. Περιστρέψτε τον αριστερό διακόπτη, για να ρυθμίσετε την ώρα έναρξης του ψησίματος
(πρέπει
να προηγείται τη ώρας λήξης του ψησίματος και, συνεπώς, με τους δείκτες μπορείτε να μετακινηθείτε μόνο
προς τα πίσω). Στη συνέχεια, μπορείτε να επιβεβαιώσετε οριστικά τη ρύθμιση πατώντας ξανά το δεξιό διακόπτη.
Ηλυχνία αναβοσβήνει για διάστημα 10 δευτερολέπτων και, στη συνέχεια, η ρύθμιση αποθηκεύεται αυτόματα.
Οι λυχνίες led των συμβόλων και παραμένουν αναμμένες και
ο φούρνος θα ανάψει την ώρα που έχει
ρυθμιστεί. Στη συνέχεια, θα παραμείνει αναμμνη μόνο η λυχνία led του συμβόλου .
Όταν ολοκληρωθεί το ψήσιμο, ενεργοποιείται ένα ηχητικό σήμα για 1 λεπτό. Μπορείτε να το απενεργοποιήσετε
πατώντας το δεξιό διακόπτη.
Ρύθμιση ώρας ημέρας ()
Για να ρυθμίσετε τη σωστή ώρα, πατήστε απλά το δεξί
διακόπτη τρεις φορές (η λυχνία led του συμβόλου του
ρολογιού αρχίζει να αναβοσβήνει) και, στη συνέχεια, περιστρέψτε τον αριστερό διακόπτη. Όταν ρυθμιστεί η σωστή
ώρα, επιβεβαιώστε τη ρύθμιση πατώντας το δεξιό διακόπτη.
Ηλεκτρονικός προγραμματιστής ψησίματος
Παρέχει τη δυνατότητα προγραμματισμού των ακόλουθων λειτουργιών του
φούρνου:
• καθυστερημένη έναρξη ψησίματος με καθορισμένη διάρκεια μετά από ένα
διάστημα,
• άμεση έναρξη λειτουργίας με καθορισμένη διάρκεια,
• χρονόμετρο.
Ρύθμιση ψηφιακού ρολογιού
Μετά τη σύνδεση στο δίκτυο ή μετά από διακοπή ρεύματος στην οθόνη
αναβοσβήνει η ένδειξη: «0.00».
Πατήστε ταυτόχρονα τα πλήκτρα + και - για μερικά δευτερόλεπτα. Η ώρα της
ημέρας ρυθμίζεται χρησιμοποιώντας τα πλήκτρα + και -, ενώ αναβοσβήνει η
κουκκίδα ανάμεσα στις ώρες και τα λεπτά. Εάν επιλέξετε τη λειτουργία ρύθμισης της ώρας όταν είναι
ενεργοποιημένο ένα αυτόματο πρόγραμμα, το πρόγραμα αυτό θα ακυρωθεί.
Τυχόν αλλαγές της ώρας μπορούν να γίνουν επαναλαμβάνοντας την παραπάνω διαδικασία.
B
B
Page 72

67
GR
Τροποποίηση της συχνότητας του ηχητικού σήματος
Η συχνότητα του ηχητικού σήματος μπορεί να μεταβληθεί, εάν δεν έχετε
προγραμματίσει το ψήσιμο ενός φαγητού (συνεπώς, στην οθόνη εμφανίζεται η
ώρα της ημέρας). Πατήστε ταυτόχρονα τα πλήκτρα + και - (από το μενού
τροποποίησης ώρας) και, στη συνέχεια, πατήστε το Mode (Λειτοργία) ή το Set
(Ρύθμιση), για να
επιλέξετε το μενού από το οποίο θα τροποποιηθεί η
συχνότητα του ηχητικού σήμαος. Μπορείτε να αλλάξετε τη συχνότητα του
ηχητικού σήματος πατώντας επανειλημμένα το πλήκτρο Mode (Λειτουργία) ή
Set (Ρύθμιση). Στην οθόνη εμφανίζονται οι ενδείξεις «ton1» (τόνος 1), «ton2»
(τόνος 2), «ton3» (τόνος 3).
Χειροκίνητη λειτουργία του φούρνου
Μετά τη ρύθμιση της ώρας, ο προγραμματιστής μετακινείται αυτόματα στη
θέση χειροκίνητης λειτουργίας.
Καθυστερημένη έναρξη ψησίματος με καθορισμένη διάρκεια
Όταν στην οθόνη εμφανιστεί η ώρα της ημέρας, πατήστε δύο φορές το πλήκτρο Mode (Λειτουργία) ή Set (Ρύθμιση)
για ν ρυθμίσετε τη διάρκεια και, στη συνέχεια, πατήστε το ξανά για να ρυθμίσετε την ώρα λήξης ψησίματος.
Ρυθμίστε την επιθυμητή ώρα με τα πλήκτρα + και
–. Κατά την επιλογή της λειτουργίας ρύθμισης της ώρας λήξης ή
της διάρκειας, το σύμβολο Auto (Αυτόματο) παραμένει αναμμένο.
Όταν ρυθμιστεί η διάρκεια ενός προγράμματος, η ώρα λήξης δεν μπορεί να μειωθεί. Επίσης, η διάρκεια ενός
προγράμματος δεν μπορεί να αυξηθεί όταν έχει ήδη ρυθμιστεί η ώρα λήξης.
Οι ρυθμίσεις ώρας
λήξης και διάρκειας καθορίζουν την ώρα έναρξης του προγράμματος ως εξής:
ώρα έναρξης = ώρα λήξης - διάρκεια
.
Μετά τη ρύθμιση της διάρκειας και της ώρας λήξης, στην οθόνη συνεχίζει να εμφανίζεται η ώρα λήξης. Το
πρόγραμμα ξεκινά όταν η ώρα της ημέρας συμπίπτει με την ώρα έναρξης: το σύμβολο Auto (Αυτόματο) ανάβει
σταθερά και το σύμβολο αναβοσβήνει. Μετά την έναρξη του ψησίματος, στην οθόνη εμφανίζεται η μέτρηση
δίπλα στο χρόνο. Εάν είναι επιλεγμένη μόνο η ώρα λήξης ψησίματος (διάρκεια = 0), το ψήσιμο ξεκινά και στην
οθόνη εμφανίζεται η μέτρηση πίσω από το χρόνο.
Το σύμβολο Auto (Αυτόματο) παραμένει αναμμένο κατά το διάστημα αναμονής για έναρξη του ψησίματος με
καθυστέρηση και για όλη τη διάρκεια του ψησίματος.
Το σύμβολο αναβοσβήνει
κατά το διάστημα αναμονής για έναρξη του ψησίματος με καθυστέρηση και ανάβει
σταθερά όταν ξεκινήσει το ψήσιμο.
Στο τέλος του ψησίματος, ενεργοποιείται ένα ηχητικό σήμα. Για να απενεργοποιήσετε το σήμα, πατήστε
ένα οποιοδήποτε πλήκτρο ή περιμένετε μέχρι να ολοκληρωθεί το διάστημα ενεργοποίησης του σήματος.
Ημιαυτόματο πρόγραμμα με ρύθμιση διάρκειας ή ώρας
λήξης
Ρύθμιση διάρκειας προγράμματος
Για να επιλέξετε τη διάρκεια ή την ώρα λήξης του προγράμματος, πατήστε δύο φορές το πλήκτρο Mode (Λειτουργία)
Set (Ρύθμιση) και ρυθμίστε την επιθυμητή ώρα με τα πλήκτρα + και – . Κατά την επιλογή της λειτουργίας ρύθμισης
της ώρας λήξης ή της διάρκειας, αναβοσβήνει το σχετικό σύμβολο Auto (Αυτόματο).
Όταν ρυθμιστεί η διάρκεια ενός
προγράμματος, η ώρα λήξης δεν μπορεί να μειωθεί. Επίσης, η διάρκεια ενός
προγράμματος δεν μπορεί να αυξηθεί όταν έχει ήδη ρυθμιστεί η ώρα λήξης.
Εκτέλεση προγράμματος
Όταν βρίσκεται σε εξέλιξη ένα αυτόματο πρόγραμμα και, συνεπώς, είναι ενεργοποιημένη η λειτουργία ψησίματο,
το σύμβολο Auto (Αυτόματο) παραμένει αναμμένο και στην οθόνη εμφανίζεται ο υπολειπόμενος χρόνος ψησίματος
(αντίστροφη μέτρηση). Το σύμβολο παραμένει επίσης αναμμένο.
Λήξη αυτόματου προγράμματος
Όταν λήξει η διάρκεια του προγράμματος ή συμπληρωθεί η ώρα λήξης του προγράμματος, το σχετικό σύμβολο
σβήνει. Όταν ολοκληρωθεί το αυτόματο πρόγραμμα, το σύμβολο Auto (Αυτόματο) αναβοσβήνει, στην οθόνη
εμφανίζεται η ένδειξη «End» (Λήξη) και ενεργοποιείται ένα διακοπτόμενο ηχητικό σήμα που μπορείτε να
απενεργοποιήσετε πατώντας ένα οποιοδήποτε πλήκτρο.
Λειτουργία του χρονόμετρου
Στη λειτουργία
χρονομέτρου, ρυθμίζεται ένα χρονικό διάστημα μετά από το οποίο ξεκινά η αντίστροφη μέτρηση.
Η λειτουργία αυτή δεν ελέγχει το άναμμα και το σβήσιμο του φούρνου. Ενεργοποιεί μόνο μια ηχητική ειδοποίησ
όταν λήξει ο χρόνος.
Πατήστε το πλήκτρο Mode (Λειτουργία) ή Set (Ρύθμιση) μία μόνο φορά. Στην οθόνη εμφανίζεται η ένδειξη:
Το σύμβολο καμπάνας αναβοσβήνει
και, στο σημείο αυτό, μπορείτε να ρυθμίσετε τη διάρκεια του συναγερμού με τα
πλήκτρα + και –. Όταν είναι ενεργοποιημένη αυτή η λειτουργία, το σύμβολο καμπάνας παραμένει αναμμένο και την
οθόνη εμφανίζεται ο υπολειπόμενος χρόνος (αντίστροφη μέτρηση).
Όταν συμπληρωθεί το χρονικό διάστημα, ενεργοποιείται ένα ηχητικό σήμα, το οποίο μπορείτε να απενεργοποιήστε
πατώντας
ένα οποιοδήποτε πλήκτρο.
B
Page 73

68
∆ιόρθωση/ακύρωση ρυθμίσεων
• Μπορείτε να αλλάξετε τις ρυθμίσεις οποιαδήποτε στιγμή, πατώντας ταυτόχρονα τα πλήκτρα + και -.
• Ακυρώνοντας τη διάρκεια του ψησίματος, ακυρώνεται αυτόματα και η ρύθμιση λήξης της λειτουργίας και αντίστοφα.
• Σε περίπτωση προγραμματισμένης λειτουργίας, ο χρόνος λήξης ψησίματος δεν μπορεί να προηγείται του
χρόνου ναρξης ψησίματος που προτείνει η ίδια
η συσκευή.
ΣΗΜ. Αμέσως μετά το σβήσιμο και για μεγάλο χρονικό διάστημα, η θερμοκρασία του θαλάμου του φούρνου παραμένει
στ ίδια περίπου επίπεδα με τη θερμοκρασία ψησίματος. Συνεπώς, για να μην ψηθούν υπερβολικά ή καούν τα φαγητά,
πρέπει να τα βγάζετε από το φούρνο.
Ενδεικτικός πίνακας ψησίματος
ΣΗΜ.: οι οδηγίες του πίνακα είναι αποτέλεσμα δοκιμών ψησίματος από ομάδα επαγγελματιών μαγείρων. Σε κάθε
περίπτωση, είναι ενδεικτικές και μπορούν να τροποποιηθούν ανάλογα με τις προσωπικές σας προτιμήσες.
Ρύθμιση
διακόπτη
επιλογής
Τύπος φαγητού Βάρος
(Kg)
Θέση
τοποθέτησης
σκεύους
Χρόνος
προθέρ-
μανσης
(λεπτά)
Ρύθμιση
διακόπτη
θερμοστάτ
η
∆ιάρκεια
μαγειρέ-
ματος
(λεπτά)
Ψήσιμο με
πάνω/κάτω
αντίσταση
Ψητό χοιρινό
Ομελέτες
Μπακαλιάρος-Τσι π ούρα-Ρόμβος
Ψωμί
Παστίτσιο
Ψάρι γλυκού νερού
Πολέντα με γέμιση
Γλυκά με τυρί ricotta
1
1,5
1
1
1
1,5
0,5
1,5
3
2
3
2-4 ταυτόχρονα
2
3
2
2
9,5
10,5
9,5
9,5
10,5
10,5
9,5
9,5
180 °C
200 °C
180 °C
175 °C
200 °C
200 °C
180 °C
180 °C
65-75
25-30
15
25-30
40-45
35-40
25-30
25-30
Ψήσιμο με
πάνω/κάτω
αντίσταση και αέρα
Ψητό χοιρινό (πλάτη)
Κουνέλι στο φούρνο
Πίτα
Γαρίδες φούρνου
Μπακαλιάρος-Τσι π ούρα-Ρόμβος
Ψωμί
Γλυκά με φρούτα
Αλμυρές πίτες
1
1
1
0,5
2
2
1,5
2
3
2
2
3
2-4 ταυτόχρονα
2-4 ταυτόχρονα
2
3-5 ταυτόχρονα
9
9,5
10
10
7,5
9
9
9
180 °C
190 °C
200 °C
200 °C
150 °C
180 °C
175 °C
180 °C
60-70
55-65
25-30
30-40
25-30
25-30
30-35
40-45
Ψήσιμο με κάτω
αντίσταση και αέρα
Στήθος κοτόπουλου
Μοσχαράκι γάλακτος
Ψητό μοσχάρι (Ροστ μπιφ)
Τόνος σε φέτες
Φέτες ξιφία
Καραβίδες
Μαρέγκες
Μπισκότα βουτύρου
Κέικ
Κεκάκια αμυγδάλου
1
1
1
1
1
1
0,8
1
0,8
1
2 ή 3
2
3
2
3
2
2
2
2
2 ή 3
Για να
επιταχύνετε την
προθέρμανση,
χρησιμοποιήστε
τη λειτουργία
ψησίματος με
πάνω/κάτω
αντίσταση και
αέρ.
170 °C
180 °C
170 °C
160 °C
160 °C
180 °C
90 °C
160 °C
170 °C
160 °C
20
20
60
20
20
30
120
30
40
35
Ψήσιμο με πάνω
αντίσταση και αέρα
Τορτελίνια ογκρατέν
Νιόκι πατάτας
Ξιφίας
Μύδια
Χτένια
Πατάτες φούρνου
Κανελόνια
0,5
0,5
0,5
1
1
0,5
1
3
3
5
4
4
4
3
Για να
επιταχύνετε την
προθέρμανση,
χρησιμοποιήστε
τη λειτουργία
ψησίματος με
πάνω/κάτω
αντίσταση και
αέρ.
Μέγ.
Μέγ.
200 °C
Μέγ.
200 °C
200 °C
Μέγ.
25-30
25-30
12-15
10-12
10-12
18-20
25-30
Ψήσιμο στο γκριλ Φτερούγες κοτόπουλου
Μπριζόλες
Χτένια
Πατάτες φούρνου
Ψάρι γλυκού νερού
Ντομάτες ογκρατέν
Σουβλάκια χελιού
Σουβλάκια γαλοπούλας
1
0,8
0,5
1
1
0,4
0,5
0,5
4 ή 5
3
3 ή 4
3
3 ή 4
2 ή 3
3
4
7
7
7
7
7
7
7
7
Μέγ.
Μέγ.
Μέγ.
Μέγ.
Μέγ.
Μέγ.
Μέγ.
Μέγ.
25-30
25-30
14-16
25-30
25-30
25-30
25-30
25-30
Ψήσιμο στο γκριλ
με αέρα
Μπούτια κοτόπουλου
Χοιρινά παϊδάκια
Φραγκόκοτα (τεμαχισμένη)
Τσιπο ύ ρ α σε λαδόκολλα
Κοτόπουλο (σε τεμάχια)
Ορτύκια
Λουκάνικα
Λαχανικά
1
0,5
1,2
1
1,5
0,8
1
1
4 ή 5
4
4
3
3
4
4
4 ή 5
9,5
14
14
8
14
14
14
14
220 °C
Μέγ.
Μέγ.
200 °C
Μέγ.
Μέγ.
Μέγ.
Μέγ.
25-30
40-45
30-35
20-25
35-40
30-35
20-25
10-15
Page 74

69
GR
Καθαρισμός και συντήρηση του φούρνου
Σημαντικό
Πριν από τη συντήρηση του φούρνου, πρέπει να αποσυνδέετε το φις από την πρίζα του ρεύματος ή να διακόπτετε
το ρεύμα από τη γραμμή τροφοδοσίας χρησιμοποιώντας το γενικό διακόπτη της ηλεκτρικής εγκατάστασης.
– Οι επιφάνειες από ανοξείδωτο ατσάλι και σμάλτο διατηρούνται πάντα σαν καινούριες, εάν τις καθαρίζετε με νερό
ή ειδικά
προϊόντα και τις σκουπίζετε προσεκτικά.
– Μη χρησιμοποιείτε σε καμία περίπτωση συρμάτινα σφουγγάρια ή σύρμα, υδροχλωρικό οξύ ή άλλα προϊόντα
που μπορεί να χαράξουν ή να φθείρουν τις επιφάνειες. Μη χρησιμοποιείτε ατμοκαθαριστές και απευθείας
τρεχούμενο νερό.
– Οι διάφοροι λεκέδες (από σάλτσες, σάκχαρα, λευκωματίνη και λίπη), που μπορούν να σχηματιστούν στο κάτω
μέρος του φούρνου, οφείλονται πάντα σε πιτσίλισμα ή υπερχείλιση. Τα πιτσιλίσματα προκαλούνται κατά το
ψήσιμο και οφείλονται στη χρήση πολύ υψηλής θερμοκρασίας, ενώ η υπερχείλιση οφείλεται στη χρήση πολύ
μικρών σκευών ή σε λανθασμένη εκτίμηση της αύξησης του όγκου κατά το ψήσιμ. Τα προβλήματα αυτά
μπορούν να αντιμετωπιστούν χρησιμοποιώντας βαθύτερα
σκεύη ή το ταψί του φούρνου. Όσον αφορά τον
καθαρισμό του κάτω μέρους του φούρνου, συνιστάται να καθαρίζετε τυχόν λεκέδες με το φούρνο χλιαρό. Όσο
περισσότερο καθυστερήσετε να τους καθαρίσετε, τόσο πιο δύσκολα αφαιρούνται.
Καθαρισμός της πόρτας του φούρνου
– Ο καθαρισμός της πόρτας, τόσο εσωτερικά όσο και εξωτερικά, πρέπει να γίνεται με το
φούρνο εντελώς κρύο, χρησιμοποιώντας ζεστό νερό και μαλακό πανί. Καθαρίζετε τα
κρύσταλλα με ειδικά απορρυπαντικά.
– Για τις εμαγιέ επιφάνειες, όπως και για το εσωτερικό του φούρνου, χρησιμοποιείτε ζεστό
νερό και μη αποξεστικά απορρυπαντικά.
(Μόνο για τα μοντέλα CR 66 και CS 66)
– Για καλύτερο καθαρισμό, μπορείτε να αφαιρέσετε το πλαστικό διακοσμητικό κάλυμμα της
πόρτας του φούρνου. Ανοίξτε την πόρτα, πατήστε τα πλαϊνά τμήματα και αφαιρέστε το
κάλυμμα, όπως φαίνεται στην εικόνα. Για να εγκαταστήσετε ξανά το κάλυμμα στην πόρτα
του φούρνου, τοποθετήστε το στη θέση του και πιέστε ελαφρώς μέχρι να συνδεθούν
τα
πλαϊνά άγκιστρα.
Αφαίρεση εσωτερικού τζαμιού πόρτας φούρνου (μόνο για μοντέλα CR, CS και SM) (Εικ.2)
Για σωστό καθαρισμό του εσωτερικού τζαμιού του φούρνου, μπορείτε να αφαιρέσετε πλήρως το τζάμι από την
πόρα με εύκολο τρόπο όπως περιγράφεται παρακάτω:
• με την πόρτα τέρμα ανοικτή, περιστρέψτε κατά 180° τις δύο ασφάλειες μαύρου χρώματος (με την ένδειξη «CLEAN»
(Καθαρισμός)) στο κάτω άκρο της πόρτας, ώστε να τοποθετηθούν στις υποδοχές που
υπάρχουν στο φούρνο.
ΣΗΜ.: Βεβαιωθείτε ότι οι ασφάλειες έχουν περιστραφεί πλήρως (θα ακουστεί ένας χαρακτηριστικός ήχος).
• Ανασηκώστε προσεκτικά το εσωτερικό τζάμι: οι δύο ασφάλειες διατηρούν την πόρτα ανοικτή (εάν οι ασφάλειες
δν περιστραφούν πλήρως, η πόρτα θα κλείσει αμέσως μόλις αφαιρεθεί το τζάμι).
Όταν ολοκληρωθεί η διαδικασία καθαρισμού, τοποθετήστε
ξανά το εσωτερικό τζάμι (η σωστή κατεύθυνση
τοποθέτσης του τζαμιού υποδεικνύεται από την ένδειξη «TEMPERED GLASS» (Ενισχυμένο γυαλί), η οποία πρέπει
να διαβάζεται σστά) και περιστρέψτε ξανά τις δύο ασφάλειες στερέωσης του τζαμιού στην αρχική θέση.
ΠΡΟΣΟΧΗ: μην επιχειρήσετε ποτέ να κλείσετε την πόρτα, όταν το εσωτερικό τζάμι δεν συγκρατείται, εν
μέρει ή
πλήρως, από μία ασφάλεια ή και από τις δύο. Μετά τον καθαρισμό, μην ξεχνάτε ότι πρέπει να
περιστρέφετε πάντα και τις δύο ασφάλειες πριν κλείσετε την πόρτα.
Αφαίρεση εσωτερικού τζαμιού πόρτας φούρνου (μόνο για μοντέλα TL και CM) (Εικ.3)
Για σωστό καθαρισμό του εσωτερικού τζαμιού του φούρνου, μπορείτε να αφαιρέσετε πλήρως το τζάμι από την
πόρα με εύκολο τρόπο όπως περιγράφεται παρακάτω:
• με την πόρτα τέρμα ανοικτή, περιστρέψτε κατά 180° τις δύο ασφάλειες μαύρου χρώματος στο κάτω άκρο της
πόρτας (εικ. 3a και 3b).
ΣΗΜ.: Βεβαιωθείτε ότι οι ασφάλειες έχουν περιστραφεί πλήρως
(θα ακουστεί ένας χαρακτηριστικός ήχος).
• Ανασηκώστε προσεκτικά το εσωτερικό τζάμι (εικ.3c): οι δύο ασφάλειες διατηρούν την πόρτα ανοικτή (εάν οι
ασφάλειες δεν περιστραφούν πλήρως, η πόρτα θα κλείσει αμέσως μόλις αφαιρεθεί το τζάμι).
• Για να αφαιρέσετε και το ενδιάμεσο τζάμι, βγάλτε τα δύο πλευρικά λάστιχα (εικ. 3d) και, στη συνέχεια,
ανασηκώστε το τζάμι (εικ. 3e).
• Όταν ολοκληρωθεί η διαδικασία καθαρισμού, τοποθετήστε ξανά πρώτα το ενδιάμεσο τζάμι (εικ.3f) (η σωστή
κατεθυνση τοποθέτησης του τζαμιού υποδεικνύεται από την ένδειξη «TEMPERED GLASS» (Ενισχυμένο γυαλί),
η οποία πρέπει να διαβάζεται σωστά) εισάγοντάς το προσεκτικά στις κατάλληλες εγκοπές που υπάρχουν στο
πάνω τμήμα της πόρτας και πιέζοντάς το
μέχρι τέρμα.
• Στη συνέχεια, τοποθετήστε ξανά και τα δύο λάστιχα (εικ. 3g) με ιδιαίτερη προσοχή ώστε να έρθουν σε επαφή με
το πάνω προφίλ της πόρτας.
• Τέλ ο ς , τοποθετήστε ξανά και το εσωτερικό τζάμι (εικ. 3h) και περιστρέψτε ξανά τις δύο ασφάλειες στερέωσης το
τζαμιού στην αρχική θέση κλεισίματος.
ΠΡΟΣΟΧΗ: μην επιχειρήσετε ποτέ
να κλείσετε την πόρτα, όταν το εσωτερικό τζάμι δεν συγκρατείται, εν
μέρει ή πλήρως, από μία ασφάλεια ή και από τις δύο. Μετά τον καθαρισμό, μην ξεχνάτε ότι πρέπει να
περιστρέφετε πάντα και τις δύο ασφάλειες πριν κλείσετε την πόρτα.
Page 75

70
Αφαίρεση πόρτας φούρνου (εικ.4)
Για να διευκολυνθεί ο καθαρισμός του φούρνου, μπορείτε να αφαιρέσετε την πόρτα ως εξής:
– Οι μεντεσέδες (A) διαθέτουν δύο κινητά άγκιστρα (B). Ανασηκώνοντας το άγκιστρο (B), ο μεντεσές
απασφαλίζεται από την υποδοχή του.
– Στη συνέχεια, ανασηκώστε την πόρτα και αφαιρέστε την. Για να αφαιρέσετε την πόρτα, πιάστε την από τα πλαϊνά
μήματα κοντά
στους μεντεσέδες.
– Για να τοποθετήσετε ξανά την πόρτα, περάστε αρχικά τους μεντεσέδες στις ειδικές αυλακώσεις.
– Τέ λ ο ς , πριν κλείσετε την πόρτα, μην ξεχάσετε να περιστρέψετε τα δύο κινητά άγκιστρα (B) που χρησιμοποιήθηκαν
για τη σύνδεση των δύο μεντεσέδων.
Αντικατάσταση λαμπτήρα φούρνου
Οι φούρνοι Franke διαθέτουν κυκλικό λαμπτήρα που βρίσκεται στο πίσω πάνω αριστερό μέρος του θαλάμου.
Σε περίπτωση που απαιτείται αντικατάσταση του εσωτερικού λαμπτήρα του φούρνου, ακολουθήστε την παρακάτω
διαδικασία:
– ∆ιακόψτε την τροφοδοσία της συσκευής χρησιμοποιώντας τον πολυπολικό διακόπτη
σύνδεσης της συσκευής με τη ηλεκτρική εγκατάσταση ή αποσυνδέστε το φις εάν
βρίσκεται
σε προσιτή θέση.
– Ξεβιδώστε το γυάλινο προστατευτικό κάλυμμα (A).
– Ξεβιδώστε το λαμπτήρα και αντικαταστήστε τον με λαμπτήρα ανθεκτικό στις υψηλές
θερμοκρασίες (300 °C) με τα ακόλουθα χαρακτηριστικά:
Τάση: 220-240 V ~ 50-60 Hz
Ισχύς: 15W
Βάση: (E14) μινιόν.
– Τοποθετήστε το γυάλινο κάλυμμα προστασίας (A) και συνδέστε ξανά την τροφοδοσία της συσκευής.
Τεχνική υποστήριξη
Σε περίπτωση που παρουσιαστούν προβλήματα λειτουργίας, απευθυνθείτε σε ένα
από τα Κέντρα Τεχνικής Υποστήριξης που αναφέρονται στο συνημμένο κατάλογο.
Μην απευθύνεστε ποτέ σε μη εξουσιοδοτημένους τεχνικούς.
∆ηλώστε:
– τον τύπο του προβλήματος,
– το μοντέλο της συσκευής (Art.),
– τον αριθμό σειράς (S.N.).
Οι πληροφορίες αυτές αναγράφονται στην πινακίδα χαρακτηριστικών στο
πιστοποιητικό εγγύησης.
Προειδοποιήσεις για την ασφάλεια
• Η συσκευή αυτή δεν προορίζεται για χρήση από άτομα με μειωμένες σωματικές ή κινητικές ικανότητες
(συμπεριλαμβανομένων παιδιών) ή χωρίς την κατάλληλη εμπειρία και γνώσεις, εκτός εάν επιτηρούνται ή έχουν
λάβει οδηγες σχετικά με τη χρήση της συσκευής από άτομο υπεύθυνο για την ασφάλειά τους.
• Τα παιδιά πρέπει να βρίσκονται
υπό επιτήρηση, ώστε να μην παίζουν με τη συσκευή.
• Ο κατασκευαστής δεν μπορεί να θεωρηθεί υπεύθυνος για ενδεχόμενες βλάβες που οφείλονται σε: λανθασμένη
εγκτάσταση, ακατάλληλη, εσφαλμένη και αλόγιστη χρήση.
Απευθυνθείτε σε εξειδικευμένο προσωπικό στις ακόλουθες περιπτώσεις:
Για να διασφαλιστεί η σωστή λειτουργία και η ασφάλεια της συσκευής:
– απευθύνεστε μόνο στα εξουσιοδοτημένα κέντρα τεχνικής υποστήριξης,
– ζητάτε πάντα τη χρήση γνήσιων ανταλλακτικών,
– η συσκευή προορίζεται για μη επαγγελματική οικιακή χρήση - μην τροποποιείτε τα χαρακτηριστικά της,
– στην πινακίδα με τον αριθμό σειράς αναγράφονται τα σύμβολα των χωρών προορισμού
για τις οποίες ισχύουν οι
δηγίες,
– η ηλεκτρική ασφάλεια μπορεί να διασφαλιστεί μόνο όταν η συσκευή είναι σωστά συνδεδεμένη σε
αποτελεσματική εγκατάσταση γείωσης σύμφωνα με τους ισχύοντες κανονισμούς.
– Αποφεύγετε την επαφή με τα θερμαινόμενα στοιχεία και με ορισμένες επιφάνειες της πόρτας του
φούρνου και κρατάτε τα παιδιά σε απόσταση
ασφαλείας όταν είναι αναμμένος, καθώς τα σημεία αυτά
αποκτούν πολύ υψηλή θερμορασία.
Τα παιδιά δεν πρέπει να έρχονται σε επαφή με:
– τους διακόπτες και τη συσκευή γενικότερα,
– τα στοιχεία της συσκευασίας (σακούλες, πολυστερίνη, μεταλλικά στοιχεία κ.λπ.),
– τη συσκευή όταν είναι αναμμένη και αμέσως μετά τη χρήση του φούρνου, καθώς υπερθερμαίνεται,
– τη συσκευή όταν δεν χρησιμοποιείται (στην περίπτωση αυτή, πρέπει να λάβετε τις απαιτούμενες προφυλάξεις).
Αποφεύγετε τις ακόλουθες ενέργειες:
– μην αγγίζετε τη συσκευή με βρεγμένα μέρη του σώματος,
– μη χρησιμοποιείτε τη συσκευή με γυμνά πόδια,
A
Page 76

71
GR
– μην τραβάτε τη συσκευή ή το ηλεκτρικό καλώδιο για να τα αποσυνδέσετε από την πρίζα,
– αποφεύγετε εσφαλμένες και επικίνδυνες ενέργειες,
– μην καλύπτετε τα ανοίγματα αερισμού ή διάχυσης της θερμότητας,
– μην αφήνετε το ηλεκτρικό καλώδιο άλλων συσκευών πάνω σε θερμές επιφάνειες της συσκευής,
– μην αφήνετε τη συσκευή εκτεθειμένη σε
ατμοσφαιρικούς παράγοντες (βροχή, ήλιο),
– μη χρησιμοποιείτε το φούρνο ως αποθηκευτικό χώρο για διάφορα αντικείμενα,
– μη χρησιμοποιείτε εύφλεκτα υγρά κοντά στη συσκευή,
– μη χρησιμοποιείτε αντάπτορες, πολύπριζα ή/και προεκτάσεις,
– μην επιχειρήσετε να εγκαταστήσετε ή να επισκευάσετε τη συσκευή χωρίς τη βοήθεια εξειδικευμένου προσωπικο.
Απευθυνθείτε σε εξειδικευμένο προσωπικό στις ακόλουθες περιπτώσεις:
– εγκατάσταση (σύμφωνα με τις οδηγίες του κατασκευαστή),
– σε περίπτωση αμφιβολιών σχετικά με τη λειτουργία,
– αντικατάσταση της πρίζας σε περίπτωση ασυμβατότητας με το φις της συσκευής.
Απευθυνθείτε στα εξουσιοδοτημένα κέντρα τεχνικής υποστήριξης του κατασκευαστή στις
ακόλουθες περιπτώσεις:
– σε περίπτωση αμφιβολιών σχετικά με την ακεραιότητα της συσκευής μόλις αφαιρέσετε τη συσκευασία,
– αντικατάσταση ή φθορά του καλωδίου τροφοδοσίας,
– βλάβη ή εσφαλμένη λειτουργία. Ζητήστε γνήσια ανταλλακτικά.
Συνιστάται η εκτέλεση των ακόλουθων ενεργειών:
– μόνο ψήσιμο φαγητών αποφεύγοντας άλλες χρήσεις,
– πριν από οποιαδήποτε εργασία καθαρισμού ή συντήρησης ή σε περίπτωση εσφαλμένης λειτουργίας,
αποσυνδέστε τη συσκευή από το ηλεκτρικό δίκτυο,
– για την τοποθέτηση και την αφαίρεση των σκευών χρησιμοποιείτε γάντια φούρνου,
– πιάνετε τη χειρολαβή της πόρτας πάντα από το κεντρικό τμήμα, καθώς τα άκρα
μπορεί να είναι πιο ζεστά λόγω
ενδεχόμενης εξόδου αέρα,
– ελέγχετε πάντα εάν οι διακόπτες βρίσκονται στη θέση απενεργοποίησης, όταν δεν χρησιμοποιείτε τη συσκευή,
– εάν αποφασίσετε να μη χρησιμοποιήσετε τη συσκευή, αποσυνδέστε την από το ηλεκτρικό δίκτυο,
Εγκατάσταση (εικ.5)
Σημαντικό: Η εγκατάσταση πρέπει να εκτελείται σύμφωνα με τους ισχύοντες κανονισμούς και διατάξεις.
Η εγκατάσταση πρέπει να ανατίθεται μόνο σε εξειδικευμένο και εξουσιοδοτημένο προσωπικό.
Χαρακτηριστικά επίπλου
Οι επιφάνειες των επίπλων εντοιχισμού (πλαστικά υλικά και καπλαμάς ξύλου) πρέπει να συγκολλώνται με
ανθεκτικές στη θερμότητα κόλλες (έως 100 °C): εάν χρησιμοποιηθούν ακατάλληλα υλικά και κόλλες, μπορεί να
προκληθεί παραμόρφωση και αποκόλληση. Το έπιπλο δεν πρέπει να παρεμποδίζει την ελεύθερη διέλευση των
ηλεκτρικών καλωδίων. Το έπιπλο στο οποίο τοποθετείται ο φούρνος πρέπει
να είναι αρκετά ανθεκτικό για
υποστήριξη του βάρους της υσκευής.
Ο φούρνος πρέπει να τοποθετηθεί με ασφαλή τρόπο στην προβλεπόμενη εσοχή. Ο φούρνος μπορεί να
εγκατασταθεί σε στήλη ή κάτω από την επιφάνεια συναρμολογούμενου επίπλου, διασφαλίζονας σε κάθε
περίπτωση επαρκή αερισμό.
Οδηγίες τοποθέτησης
Μοντέλα CM και TL (Εικ. 6a/6b/6c)
Μετρήστε το πλάτος της πατούρας (S) του επίπλου, το οποίο είναι συνήθως 16, 18 ή 20 mm.
Πατούρα 16: τοποθετήστε σε κάθε στήριγμα (F) 2 τάκους (T) με την ένδειξη 16.
Πατούρα 18: τοποθετήστε σε κάθε στήριγμα (F) 2 τάκους (T) με την ένδειξη 18.
Πατούρα 20: για την πατούρα 20 mm, δεν απαιτείται τοποθέτηση τάκων.
Τοποθετήστε τα στηρίγματα (F) στην πατούρα του επίπλου και, συγκεκριμένα,
στο κάτω μέρος της επιφάνειας
στήριξης του φούρνου.
Στερεώστε τα στηρίγματα (F) με τις βίδες (V). Τοποθετήστε το φούρνο στο έπιπλο, ανοίξτε τέρμα την πόρτα και
στερεώστε τον στα στηρίγματα (F) χρησιμοποιώντας τις 4 βίδες (V) και τους 4 πλαστικούς αποστάτες (D).
Μοντέλα CR, CS, SG και SM (Εικ.6d)
Τοποθετήστε τη συσκευή στην υποδοχή. Στερεώστε το σώμα στο έπιπλο με τις 4 βίδες και τους 4 δακτυλίους που
παρέχονται χρησιμοποιώντας τις οπές που ανοίξατε στα πλαϊνά τμήματα (εικ. 6d).
Σημείωση: Για όλα τα μοντέλα, σε περίπτωση τοποθέτησης κάτω από μονάδα εστιών, γυρίστε πρώτα προς
τα δεξιά ή προς τα αιστερά το ρακόρ της
μονάδας (R), για να είναι δυνατή η σωστή τοποθέτηση του
φούρνου (Εικ. 6e).
Page 77

72
Σύνδεση στο ηλεκτρικό δίκτυο
Ο φούρνος FRANKE διαθέτει τριπολικό καλώδιο τροφοδοσίας με ελεύθερους αγωγούς.
Εάν ο φούρνος συνδεθεί μόνιμα στο ηλεκτρικό δίκτυο, εγκαταστήστε μια διάταξη που εξασφαλίζει την αποσύνδεη
από το δίκτυο με απόσταση ανοίγματος των επαφών (τουλάχιστον 3 mm), ώστε να είναι δυνατή η πλήρης
αποσύνδεση στις συνθήκες της κατηγορίας ηλεκτρικής υπέρτασης III. Βεβαιωθείτε ότι:
α) το φις
και η πρίζα είναι κατάλληλα για ρεύμα 16 A,
β) βρίσκονται σε θέση με εύκολη πρόσβαση και είναι τοποθετημένα με τέτοιο τρόπο, ώστε κανένα
σημείο υπό τάση να μην είναι προσβάσιμο κατά τη σύνδεση ή την αποσύνδεση του φις,
γ) το φις μπορεί να συνδεθεί χωρίς δυσκολία,
δ) μετά τη σύνδεση, το
φις δεν βρίσκεται κάτω από το φούρνο κατά την τοποθέτηση σε έπιπλο,
ε) δεν συνδέονται οι ακροδέκτες δύο συσκευών στην ίδια πρίζα,
στ) σε περίπτωση αντικατάστασης του ηλεκτρικού καλωδίου, χρησιμοποιήστε καλώδιο με
διατομή 3x1,5mm
2
τύπου H05VV-F,
ζ) πρέπει να τηρείται οπωσδήποτε η πολικότητα σύνδεσης των ελεύθερων ακροδεκτών
(Καφέ=Φάση – Μπλε=Ουδέτερο – Κίτρινο/Πράσινο=Γείωση).
ΣΗΜ.: βεβαιωθείτε ότι τα χαρακτηριστικά της οικιακής ηλεκτρικής γραμμής (τάση, μέγιστη ισχύς και ένταση) είναι
συμβατά με τα χαρακτηριστικά του φούρνου FRANKE.
Σημείωση: κατά την ενεργοποίηση προσδιορίζεται η συχνότητα του δικτύου.
Όταν ο χρονοδιακόπτης είναι
συνδεδεμένος σε δίκτυο 60 Hz, κατά την ενεργοποίηση αναβοσβήνει το σύμβολο P.
Τεχνικά στοιχεία
ΠΛΗΡΟΦΟΡΙΕΣ ΓΙΑ ΤΟΥΣ ΧΡΗΣΤΕΣ
Σύμφωνα με το άρθρο15 του Ν.∆. της 25ης Ιουλίου «Εφαρμογή των οδηγιών 2002/95/ΕΚ, 2002/96/ΕΚ και
2003/108/ΕΚ σχετικά με τη είωση της χρήσης επικίνδυνων ουσιών στις ηλεκτρικές και ηλεκτρονικές
συσκευές, καθώς και τη διάθεση των αοβλήτων».
Το σύμβολο του διαγραμμένου κάδου απορριμμάτων πάνω στη συσκευή υποδηλώνει ότι
στη λήξη της ωφέλιμης
ζωής του το προϊόν πρέπει να συλλέγεται χωριστά από τα υπόλοιπα απόβλητα.
Ο χρήστης πρέπει κατά συνέπεια να παραδίδει τη συσκευή στο τέλος της ωφέλιμης ζωής της στα κατάλληλα κέντρ
χωριστής συλλογής αποβλήτων ηλεκτρονικών και ηλεκτροτεχνικών ειδών ή στο κατάστημα πώλησης κατά την αγοά
μιας νέας παρόμοιας συσκευής
.
Η κατάλληλη χωριστή συλλογή και παράδοση της συσκευής για ανακύκλωση, επεξεργασία και απόρριψη με τρόπο
φιλικό προς το περιβάλλον συμβάλλει στην αποφυγή πιθανών αρνητικών επιπτώσεων για το περιβάλλον και την
υγεα, καθώς και στην ανακύκλωση των υλικών από τα οποία αποτελείται η συσκευή.
Η ακατάλληλη απόρριψη εκ μέρους του χρήστη επιφέρει
την επιβολή των διοικητικών κυρώσεων που ορίζει το Ν.∆.
22/1997 (άρθρο 50 και επόμενα του Ν.∆. 22/1997).
Ωφέλιμες διαστάσεις φούρνου:
πλάτος: 440 mm
βάθος: 415 mm
ύψος: 312 mm
Ωφέλιμος όγκος φούρνου:
57 λίτρα
Κατανάλωση (λειτουργία με πάνω/κάτω
αντίσταση):
για επίτευξη θερμοκρασίας 175 °C: 0,32 kWh
για διατήρηση θερμοκρασίας 175 °C:
0,62 kWh
συνολική κατανάλωση: 0,94 kWh
Κατανάλωση (λειτουργία με αέρα):
για επίτευξη θερμοκρασίας 200 °C: 0,42 kWh
για διατήρηση θερμοκρασίας 200 °C:
0,77 kWh
συνολική κατανάλωση: 1,19 kWh
Τάση και συχνότητα τροφοδοσίας:
220-240 V ~ 50-60 Hz
Συνολική ισχύς και ασφάλεια:
2300 W - 16 A
Ισχύς αντίστασης:
πάνω: 1000 W
κάτω: 1250 W
γκριλ: 2250 W
μηχανοκίνητος ανεμιστήρας: 30 W
εσωτερικός λαμπτήρας φούρνου:
15 x 1W
ανεμιστήρας εγκάρσιας ροής: 15 W
Η συσκευή συμμορφώνεται
με τις ακόλουθες κοινοτικές
οδηγίες:
– 2006/95/ΕΚ (Χαμηλή τάση),
– 2004/108 ΕΟΚ
(Ηλεκτρομαγνητική
συμβατότητα).
ΜΠΛΕ
ΚΙΤΡΙΝΟ-ΠΡΑΣΙΝΟ
ΚΑΦΕ
Page 78

73
TR
Özet
Giriş................................................................................................................................................. 73
Yakından görünüm.......................................................................................................................... 73
İlk çalıştırma.................................................................................................................................... 74
Öneriler ........................................................................................................................................... 74
Kullanım şekli.................................................................................................................................. 74
Örnek pişirme tablosu..................................................................................................................... 78
Fırının temizliği ve bakımı ............................................................................................................... 79
Yard ım............................................................................................................................................. 80
Güvenlik uyarıları ............................................................................................................................ 80
Montaj (Şek. 5)................................................................................................................................ 81
Montaj talimatları............................................................................................................................. 81
Elektrik şebekesine bağlantı ........................................................................................................... 82
Teknik veriler................................................................................................................................... 82
Giriş
Bir Franke ürününü seçtiğiniz için teşekkürler.
Cihazı kullanmadan önce, kullanma kılavuzunda yer alan uyarı ve tavsiyeleri dikkatlice okumanızı tavsiye ederiz.
Böylelikle cihazı daha uzun süre verimli bir şekilde kullanabilir ve muhafaza edebilirsiniz. Bu kullanma kılavuzunu
gerektiğinde kullanmak üzere özenle saklayınız.
Yakından görünüm
Program seçme düğmesi
Yapılacak pişirme türüne göre fırının çalışma şeklini seçmeye yarar. Bu düğme,
herhangi bir program üzerine getirildiğinde, fırının çalışmakta olduğunu belirten fırın
dahili lambası yanar.
Programlayıcı
Franke fırınları ürün yelpazesinde, her birisinin detaylı talimatları bkz. 75'te
verilmiş olan çeşitli pişirme süresi kontrol ve yönetim sistemleri mevcuttur; fırın
fonksiyonlarından doğru şekilde yararlanabilmek için fırınınızda bulunan kontrol
tipini belirlemek yeterli olacaktır.
Termostat ikaz lambası
simgesi ile işaret edilir, fırın rezistanslarının çalışmakta olduğunu gösterir. Bu
lamba, ayarlanan sıcaklığa ulaşıldığında söner ve fırın yeniden ısınmaya
başladığında tekrar yanar. Yiyecekleri fırına koymadan önce, fırının gerekli
sıcaklığa ulaşıp ulaşmadığını kontrol ediniz.
Sıcaklık ayar düğmesi (Termostat)
Yapmak istediğiniz yemek cinsine göre en uygun sıcaklığın seçilmesini ve pişirme
süresince sıcaklığın sabit kalmasını sağlar. İstenilen sıcaklığı seçmek için,
düğmedeki ok işaretini istediğiniz rakama gelinceye kadar saat yönüne çeviriniz.
Maksimum sıcaklık yaklaşık 260°C'dir.
Tepsi ve ızgara kılavuzları
Bunlar, ızgara ve tepsileri 5 değişik pozisyonda (alttan başlayarak 1'den 5'e kadar)
doğru şekilde yerleştirmeye yarar; örnek pişirme tablosunda (bkz. 78), fırının her
kullanım şekline göre ideal pozisyonla ilgili bilgileri bulabilirsiniz.
Tepsi
Normalde ızgara pişirim sırasında akan yağ ve sosları toplamaya veya üzerinde
doğrudan pişirme yapmaya yarar; tepsi, pişirme sırasında kullanılmayacaksa
fırından çıkarılmalıdır. Tepsi, gıda amaçlı kullanıma uygun “AA” tipi emaye
çeliktendir. Not Mükemmel pişirme sonuçları elde etmek için, tepsiyi eğik kısmı
fırın boşluğunun arka duvarına doğru olacak şekilde yerleştirmeniz önerilmektedir.
Izgara
Yemeklerinizin bulunduğu sahanların, hamur işi kalıplarının ve fırınla beraber
verilmiş tepsiden farklı diğer tüm kapların üzerine konulduğu taşıyıcılar olarak, ya
da et-balık, fanlı ızgara ve ekmek kızartma gibi fonksiyonlarda kullanılır. Izgaranın
yiyeceklerle direk olarak temas ettirilmesi önerilmemektedir.
ABCDEFG
D
A
F
G
E
Page 79

74
İlk çalıştırma
Fırını ilk kez kullanmadan önce, içi boş olacak şekilde sıcaklık ayar düğmesini maksimuma getirerek en az
40 dakika süreyle, kapısı tamamen açık olarak ve bulunduğu mekan iyi havalandırılacak şekilde çalıştırınız.
Bu işlem esnasında çıkacak koku, fırının üretim ile kurulum aşamaları arasındaki süreçte fırını koruma amacıyla
kullanılan maddelerin buharlaşması nedeniyle ortaya çıkan kokudur. Bu işlem tamamlandığında fırın kullanıma
hazırdır.
Öneriler
Pişireceğiniz yemeği fırın soğukken değil, seçmiş olduğunuz sıcaklığa eriştikten sonra fırına koymak daha iyi sonuç
verecektir, böylece yemekleriniz daha lezzetli olacaktır.
Pişirme sırasında, kapları ve tencereleri asla doğrudan fırın tabanına koymayınız, bunlar fırındaki 5 kattan birinde
bulunan ızgaraların veya tepsilerin üzerine yerleştirilmelidir; bu talimata uyulmaması fırın emayesinin zarar
görmesine yol açabilir.
Fırın panellerini, özellikle de iç pişirme bölmesinin panellerini, asla alüminyum folyo ile kaplamayınız.
Gerekli onarımlar, kalifiye personel tarafından yapılmalıdır.
Bu gibi durumlarda en yakın yardım merkezimizi arayın
ız ve sadece orijinal yedek parça kullanılmasını talep ediniz.
Franke marka fırınınızda kolay temizlenen özel emaye kullanılmıştır, bununla birlikte fırını sıkça temizleyerek kalan
yemek artıklarının tekrar pişirilmesini önlemek oldukça yararlıdır.
Otomatik temizlemeli paneller (eğer fırında mevcutsa) su ve süngerle temizlenmelidir (temizlik talimatlarına
bakınız).
Not: Fırını yakmadan önce zamanlayıcı saatinin kullanımına ilişkin talimatları okuyunuz (bkz. 76).
–Eğer fırın otomatik pişirme veya kapatma programlayıcısı ile donatılmışsa, fır
ını manuel olarak kullanmak için
simgesiyle belirtilen 'manuel' seçeneğini seçmek gereklidir.
Kullanım şekli
Bu fırında, geleneksel fırınlardaki doğal “statik” konvansiyonel pişirme avantajlarıyla modern fırınlardaki
güçlendirilmiş “fanlı” pişirme avantajları bir araya getirilmiş bulunmaktadır. Son derece kullanışlı bir fırın olup,
6farklı pişirme yöntemi arasından kolay ve güvenli bir şekilde seçim yapmanıza imkan tanır. Kumanda paneli
üzerindeki (A) ve (D) düğmeleri vasıtasıyla istenilen sıcaklıklar ve farklı programlar seçilebilir. Franke fırınınızı en iyi
şekilde kullanabilmek için bkz. 78'daki örnek pişirme tablosunu inceleyiniz.
Soğutma fanı
Franke fırınları; fırın kapağı, kontrol paneli ve yan panellerin maruz kaldığı sıcaklığı azaltmak amacıyla fırın
sıcakken otomatik olarak devreye giren bir soğutma fanı ile donatılmıştır. Bu fan çalışırken, fırının ön kısmından ve
kapağından dışarı doğru üflenen bir hava hissedilebilir; bu havanın fırın ortamında rahatsızlık yaratmamasına ve
gürültü seviyesinin mümkün olduğunca düşük tutulmasına özen gösterilmiştir.
Fırına yakın olan eşyaların da korunması amacıyla fırın yeterince soğuyana kadar bu fan çalışmaya
devam edecektir.
Fırın lambası
Bu simge, fırın dahili lambasının fırının hiç bir ısıtma fonksiyonu devrede olmaksızın yandığını belirtir. Bu
fonksiyon, fırın kullanımda olmadı zaman yapılan temizlik işlemleri sırasında içini daha iyi görebilmek için
faydalıdır.
Pişirme programları
Doğal statik pişirme
Termostat düğmesi (D), 50 °C ile Maks. (260 °C) sıcaklıkları arasında ayarlanmalıdır.
Isıtma işlemi hem yukarıdan (üst rezistans), hem de aşağıdan (alt rezistans) yapılır. Bu geleneksel
pişirme fonksiyonudur ve sadece tek raf üzerinde yemeklerinizin homojen olarak pişirilmesini sağlar.
Fan yardımıyla pişirme
Termostat düğmesi (D), 50 °C ile Maks. (260 °C) sıcaklıkları arasında ayarlanmalıdır.
Üst rezistans (tavan), alt rezistans (taban) ve fırın iç fanı devreye girer.
Sabit ve eşit dağılımlı sıcaklık, yemeği her noktadan pişirir ve kızartır. Maksimum 2 katı kullanmak
suretiyle, aynı anda birbirinden farklı yemekler pişirmek de mümkündür.
Alttan fanlı pişirme
Termostat düğmesi (D), 50 °C ile Maks. (260 °C) sıcaklıkları arasında ayarlanmalıdır.
Alt rezistans (taban) ve fan devreye girer. Balık ve genel olarak dondurulmuş ve önceden pişirilmiş
ürünleri pişirmek için idealdir. Hamur işlerinde kullanım için çok uygundur.
Page 80

75
TR
Üstten fanlı pişirme
Termostat düğmesi (D), 50 °C ile Maks. (260 °C) sıcaklıkları arasında ayarlanmalıdır.
Üst rezistans (tavan) ve fan devreye girer. Düşük güç ve fanın etkisi, hassas ve eşit dağılımlı bir pişirme
yapılmasını sağlar. Kuru pastalar ve fırında yapılan bazı hamur işleri için idealdir.
Izgarada pişirme
Termostat düğmesi (D) normalde Maks. pozisyonunda (260 °C) bulunmalıdır, ancak bunun altında
bir sıcaklığı seçmek de mümkündür; bu durumda ızgara işlemi daha yavaş gerçekleşecektir.
Fırının üst tarafında yer alan ızgara rezistansı devreye girer. Bu şekilde, kızıl ötesi ışınlarla yemeğin
yüzeyi hızlı bir şekilde pişerken, etlerin iç kısımlarının yumuşak kalması sağlanır; ızgara pişirme
fonksiyonunu aynı anda 9 dilime kadar ekmeği hızlı şekilde kızartmak için kullanmak da mümkündür.
Franke fırını, sadece fırı
n kapağı komple kapalı durumdayken ızgara yapmaya izin verecek şekilde
tasarlanmıştır.
Dikkat: Izgara rezistansı çalışırken çok sıcaktır; yemekleri koyarken ve çıkartırken bunlara kazara
temastan kaçınınız. Bununla birlikte, Franke fırının ağız kısmı, kullanan kişinin ellerini mümkün olduğunca
koruyacak şekilde tasarlamıştır.
Fanlı ızgara pişirme
Termostat düğmesi (D) normalde Maks. pozisyonunda (260 °C) bulunmalıdır, ancak bunun altında
bir sıcaklığı seçmek de mümkündür; bu durumda ızgara işlemi daha yavaş gerçekleşecektir.
Fırının üst tarafındaki ızgara rezistansı devreye girer ve fan çalışmaya başlar. Tek yönlü ısı yayılımına,
fırın içindeki havanın fanla sağlanan sirkülasyonu da eklenir. Bu durum, ısının derine işleme gücünü
arttırarak yemeklerin yüzey kısımlarının yanmasını önler. Et ve sebzelerle yapılan şişlerde, sosis-sucuk
türlerinde, kuzu pirzolalarında, bazı tavuk ve bıldırcın yemeklerinde vs. fanl
ı ızgara fonksiyonu ile çok iyi
neticeler alınabilir.
Pişirme sonu dakika sayacı düğmesi
Pişirme sonu dakika sayacı, 1 ile 120 dakika arasında önceden belirlenmiş bir zaman
dilimi içinde seçilen süre dolduğunda fırını otomatik olarak kapatan yararlı bir
tertibattır. Pişirme sonu dakika sayacının ve ikaz sinyalinin ayarlanması için,
düğmenin (B) saat yönünde bir tur döndürülmesi gerekmektedir; daha sonra geri
dönerek, ön paneldeki işaret ile dakikaları belirten sayılardan birisine denk getirerek
istemiş olduğunuz süreyi ayarlayabilirsiniz. Ayarlanan sürenin sonunda, uyarı zilinin
çalmasının yanı sıra fırın da otomatik olarak kapanacaktır.
Not Fırın kapandıktan hemen sonra ve fırının içinde uzun bir süreyle, ayarlanan
pişirme sıcaklığına yakın bir sıcaklık olacaktır; dolayısıyla yemeklerin fazla pişmesini
yada yanmas
ını önlemek için piştikten sonra fırından çıkarılmaları uygun olacaktır.
Dikkat: Fırını manuel fonksiyonda, yani pişirme sonu programlayıcısını devre dışı
bırakarak kullanmak için, düğme üzerindeki oku ön paneldeki simgesi üzerine
getirmek gerekir. Fırın kapalı olduğu zaman, pişirme sonu programlayıcısını normal
bir dakika sayacı (saati) gibi kullanabilirsiniz.
Pişirme sonu saati
Bu saat halihazırda fırının manuel kullanımı için ayarlanmıştır, dolayısı ile pişirme
işlemi saate müdahale edilmeksizin de yürütülebilir.
Sağ düğme
Sağdaki düğmeye basıldığında sırasıyla aktive edilecek fonksiyonlar seçilir
(zamanlayıcı, pişirme sonu, Pişirmeye başlama, Saat ayarı), bunlar yanıp sönen ilgili
led ile belirtilir.
Ayrıca, bu düğmeye kısa süreli olarak basıldığında, halihazırda programlanmış ayarlar
görüntülenebilir (Sorgu), uzun süreli basıldığında ise, (yaklaşık iki saniye) ayarlar iptal
edilir (Reset).
Sol düğme
Soldaki düğme döndürüldüğünde, saatin ibreleri aktive edilen fonksiyona karşı
lık gelen
süreye ayarlanır (led yanıp söner).
B
IVI
I
V
I
I
IX
V
V
I
VI
III
I
X
X
III
IXI
TIMER
START
STOP
B
Page 81

76
Ledler
–yanıp söner halde: ayarlanmaya hazır veya fonksiyon sonu
uyarısı (zil ile birlikte)
–yanık halde: fonksiyon işlemde
Zamanlayıcı ()
Zamanlayıcıyı ayarlamak için sağdaki düğmeye sadece bir kez
basınız (ilgili led yanıp sönmeye başlar); ardından, zamanlayıcının
süresini ayarlamak için soldaki düğmeyi çevirerek ibreleri ilerletiniz.
Sağdaki düğmeye tekrar basıldığında, tarih ayarı teyit edilir ve yanıp
söner haldeki ilgili led sabit şekilde yanar. İbreler günün saatini
göstermek üzere eski konumlarına döner: ayarlı süreye
ulaşıldığında uyarı zili çalar; zil sağdaki düğmeye basılarak
durdurulabilir.
Zamanlayıcı fır
ının ısıtılması işlemine etki etmez.
Pişirme sonu ( )
Pişirme sonunu ayarlamak için sağdaki düğmeye iki kez basınız ( simgesinin ledi yanıp sönmeye başlar);
ardından, pişirme sonu zamanını ayarlamak için soldaki düğmeyi çevirerek ibreleri ilerletiniz.
Sonraki 10 saniye süresince led yanıp söner (olası düzeltmeler için), bu süre sona erdikten sonra ayar kabul
edilecek ve led sabit halde yanacaktır.
Ledin yanıp sönmesi esnasında sağdaki düğmeye iki kez basmak suretiyle de aynı sonuca ulaşılabilir.
Pişirme işlemi sona erdiğinde, fırın ısıtma devre dışı bırakılır ve uyarı zili 1 dakika süreyle aktive edilir; zil sağdaki
düğmeye basılarak durdurulabilir.
Not Pi
şirme sonunda, fırın uzun dakikalar boyunca ayarlanan sıcaklığa yakın bir sıcaklıkta kalır; dolayısıyla
yemeklerin fazla pişmesini önlemek için fırından çıkarılmaları uygun olacaktır.
Gecikmeli başlatmalı () pişirme sonu ( )
Pişirmeyi gecikmeli başlatma sadece sağdaki düğmeye basılarak “stop/durdurma” işleminin onaylanması ve aynı
anda yanıp söner haldeki simgesi ledinin aktive edilmesi suretiyle ayarlanmış pişirme sonuna göre aktive
edilebilir. Pişirme başlatma saatini de girmek için sol düğmeyi çeviriniz (doğal olarak pişirme sonundan önce
olacaktır, bu nedenle ibreler sadece geriye doğru hareket edebilecektir). Şimdi soldaki düğmeye son bir kez daha
basarak kesin şekilde teyit edebilirsiniz. 10 saniyelik yanıp sönme süresinin geçirilmesi durumunda da değer
otomatik olarak kabul edilecektir. ve simgelerinin ledleri yanık halde kalı
r ve fırın ayarlı saatte çalışır, o
anda sadece simgesi ledi yanık halde kalır.
Pişirme işlemi sona erdiğinde, uyarı zili 1 dakika süreyle aktive edilir; zil sağdaki düğmeye basılarak durdurulabilir.
Günün saatinin ayarlanması ()
Günün saatini doğru olarak ayarlamak için sağdaki düğmeye üç kez basınız (saat simgesinin ledi yanıp sönmeye
başlar) ve sonra sağdaki düğmeyi çeviriniz. Saat doğru şekilde ayarlandığında, sağdaki düğmeye basarak teyit
ediniz.
Elektronik pişirme programlayıcısı
Fırını aşağıdaki fonksiyonlarda programlamanızı sağlar:
• süresi belirlenmiş olarak gecikmeli pişirmeye başlama;
• süresi belirlenmiş olarak pişirmeye derhal başlama;
• zaman ölçer.
Dijital saatin ayarlanması
Şebekeye bağlandıktan, ya da elektrik kesintisinden sonra gösterge üzerinde
şu işaret yanıp sönmeye başlar: “0.00”.
Birkaç saniye süreyle + ve – tuşlarına aynı anda basınız. Günün saati + ve –
tuşları kullanılarak ayarlanabilir, bu esnada saat ve dakikanın arasındaki
nokta yanıp söner. Otomatik bir program çalışmakta iken saat ayarlama modu
seçilirse, otomatik program iptal edilir.
Daha sonra saat ayarı yapmak istendiğinde, yukarıdaki aşamalar tekrar edilir.
B
B
Page 82

77
TR
Sesli sinyalin verilme frekansını değiştirme
Sesli sinyalin verilme frekansı bir pişirme işleminin programlanmamış olması
halinde değiştirilebilir (bu durumda, gösterge günün saatini görüntüler).
Aynı anda + ve – tuşlarına (saati değiştirme menüsünden) basınız, daha sonra
sesli sinyalin verilme frekansının değiştirileceği menüyü seçmek için Mode
veya Set tuşuna basınz. Mode veya Set tuşuna art arda dokunmak suretiyle
sesli sinyalin verilme frekansını değiştirmek mümkündür; göstergede “ton1”,
“ton2”, “ton3” görünür.
Fırının manuel olarak çalıştırılması
Saat ayarı yapıldıktan sonra, programlayıcı otomatik olarak manuel pozisyona
geçer.
Süresi belirlenmiş olarak gecikmeli pişirmeye ba
şlama
Göstergede günün saati göründüğünde, süreyi ayarlamak için Mode veya Set tuşuna iki kez basınız, daha
sonra pişirme bitiş saatini ayarlamak için yeniden basınız. + ve – tuşlarını kullanarak istenilen saati ayarlayınız.
Bitiş saatini veya süreyi ayarlama modunun seçimi esnasında, Auto simgesi yanık halde kalır.
Bir programın süresi ayarlandığında, bitiş saati geriye alınamaz. Aynı şekilde, bitiş saati ayarlanan bir programın
süresi uzatılamaz.
Bitiş saati ve süresi program başlangıç saatini su şekilde tanımlarlar:
başlangıç saati = bitiş saati - süre
.
Bitiş saati ayarlaması yapıldıktan sonra, gösterge bitiş saatini göstermeye devam eder. Günün saati ile başlangıç
saati aynı zamana denk geldiğinde program başlar: Auto simgesi sabit halde yanar ve simgesi yanıp söner
halde yanar. Pişirme işlemi başladıktan sonra, gösterge süre geri sayımını gösterir. Sadece bitiş saatinin seçili
olması halinde (süre = 0), pişirme işlemi başlar ve gösterge süre geri sayımını gösterir.
Auto simgesi, pişirmeye başlama beklenirken ve tüm pişirme süresi boyunca yanık halde kalır.
simgesi, gecikmeli pişirmeye başlama beklenirken yanıp söner ve pişirme başladığında sabit halde yanık kalır.
Pişirme süresinin sonunda sesli bir sinyal duyulur; durdurmak için herhangi bir tuşa basınız veya sinyal
süresinin geçmesini bekleyiniz.
Süreli veya biti
ş saatli yarı-otomatik program
Program zamanlamasının ayarlanması
Programın süresini veya bitiş saatini seçmek için, Mode veya Set tuşuna iki kez basınız ve + ve – tuşlarını
kullanarak istenilen saati ayarlayınız. Bitiş saatini veya süreyi ayarlama modunun seçimi esnasında, ilgili Auto
simgesi yanıp söner.
Bir programın süresi ayarlandığında, bitiş saati geriye alınamaz. Aynı şekilde, bitiş saati ayarlanan bir programın
süresi uzatılamaz.
Pişirme programının uygulanması
Otomatik program çalışıyorken, yani pişirme aktif iken, Auto simgesi yanık kalır ve göstergede kalan pişirme süresi
görüntülenir (geri sayım). simgesi de yanık kalır.
Otomatik program sonu
Program süresi sona erdiğinde veya programın bitiş saatine ulaşıldığında ilgili simgesi söner. Otomatik programın
sonunda, “Auto” (otomatik) simgesi yanıp söner, gösterge “End görüntüler ve aralıklarla bir sesli sinyal verilir, bu sesli
ikaz sinyalini herhangi bir tuşa basarak devre dışı bırakabilirsiniz.
Dakika sayacı fonksiyonu
Dakika sayacının çalıştırılmasında ayarlanan bir zamandan itibaren sürenin geriye doğru işlemesi söz konusudur.
Bu fonksiyon fırının yakılması veya söndürülmesini kontrol etmez sadece süre dolduğunda sesli bir sinyal verir.
Mode veya Set tuşuna bir kez basınız; göstergede su görünür:
Zil simgesi yanıp söner ve bu durumda + ve – tuşlarını kullanarak alarm süresini ayarlamak mümkündür. Bu fonksiyon
aktif iken, zil simgesi yanık kalır ve gösterge kalan süreyi gösterir (geri sayım).
Süre sonunda herhangi bir tuşa basmak suretiyle durdurulabilecek sesli bir sinyal verilir.
Verilerin düzeltilmesi/silinmesi
• Ayarlanan veriler + ve – tuşlarına basmak suretiyle herhangi bir anda değiştirilebilir.
•Pi
şirme süresi silindiğinde otomatikman çalışma süresi sonu da silinmiş olur, tersine bu sürenin silinmiş olması
da pişirme süresini otomatikman siler.
• Programlanmış çalışma durumunda fırın kendisi tarafından önerilmiş (ayarlanmış) olan pişirmeye başlama
sürelerinden önceki pişirme sonu sürelerini kabul etmez.
Not Fırın kapandıktan hemen sonra ve fırının içinde uzun bir süreyle, ayarlanan pişirme sıcaklığına yakın bir
sıcaklık olacaktır; dolayısıyla yemeklerin fazla pişmesini yada yanmasını önlemek için piştikten sonra fırından
çıkarılmaları uygun olacaktır.
B
Page 83

78
Örnek pişirme tablosu
NOT: Tabloda verilmiş olan örnekler, profesyonel aşçılardan oluşan bir takım tarafından yapılan pişirme testlerinin
sonucudur. Her halükarda, bunlar örnek olarak verilmiştir ve kişisel zevklerinize göre değiştirilebilir.
Seçim
düğmesinin
ayarlanması
Yemek tipleri Ağırlık
(Kg)
Kat
pozisyonuÖnısıtma süresi
(dak.)
Ter mos tat
düğmesinin
ayarlanması
Pişirme
süresi
(dak.)
Doğal statik
pişirme
Domuz Rosto
Omletler
Teps i d e Balık
Tava E k m eği
Börekler
Ta tl ı Su Balığı
Mısır Unu Tatlısı
Te re ya ğlı Kekler
1
1,5
1
1
1
1,5
0,5
1,5
3
2
3
2-4 arası
2
3
2
2
9.5
10.5
9.5
9.5
10.5
10.5
9.5
9.5
180 °C
200 °C
180 °C
175 °C
200 °C
200 °C
180 °C
180 °C
65-75
25-30
15
25-30
40-45
35-40
25-30
25-30
Fan yardımıyla
pişirme
Domuz Filota
Fırında Tavşan
Pizza
Fırında Istakoz
Teps i d e Balık
Tava E k m eği
Meyveli Kekler
Tuzlu Tartlar
1
1
1
0,5
2
2
1,5
2
3
2
2
3
2-4 arası
2-4 arası
2
3-5 arası
9
9.5
10
10
7.5
9
9
9
180 °C
190 °C
200 °C
200 °C
150 °C
180 °C
175 °C
180 °C
60-70
55-65
25-30
30-40
25-30
25-30
30-35
40-45
Alttan fanlı pişirme Tavuk g ö ğsü
İnce Dilimlenmiş Dana Eti
Rosto-Biftek
Ton Balığı Dilimleri
Kılıçbalığı Fileto
Jumbo Karides
Beze
Te re ya ğlı bisküvi
Kabarık Kekler
Bademli Kekler
1
1
1
1
1
1
0,8
1
0,8
1
2 veya 3
2
3
2
3
2
2
2
2
2 veya 3
Ön-ısıtma
süresini
hızlandırmak
için Fan
Yar dımıyla
Pişirme
fonksiyonunu
kullanınız.
170 °C
180 °C
170 °C
160 °C
160 °C
180 °C
90 °C
160 °C
170 °C
160 °C
20
20
60
20
20
30
120
30
40
35
Üstten fanlı pişirme Domuz Budu
Unlu Patates Kızartma
Kılıçbalığı
Midye Dolma
Midye
Fırında Patates
Kaneloni (Uzun boru makarna)
0,5
0,5
0,5
1
1
0,5
1
3
3
5
4
4
4
3
Ön-ısıtma
süresini
hızlandırmak
için Fan
Yar dımıyla
Pişirme
fonksiyonunu
kullanınız.
Maks
Maks
200 °C
Maks
200 °C
200 °C
Maks
25-30
25-30
12-15
10-12
10-12
18-20
25-30
Izgarada pişirme Tavuk Kanat
Pirzola
Midye
Fırında Patates
Ta tl ı Su Balığı
Izgara Domates
Yılan Balığı Şiş
Hindi Şiş
1
0,8
0,5
1
1
0,4
0,5
0,5
4 veya 5
3
3 veya 4
3
3 veya 4
2 veya 3
3
4
7
7
7
7
7
7
7
7
Maks
Maks
Maks
Maks
Maks
Maks
Maks
Maks
25-30
25-30
14-16
25-30
25-30
25-30
25-30
25-30
Fanlı ızgara pişirme Tav u k But
Domuz Pirzola
Gine Tavuğu (parça)
Çipura Balığı
Tavuk (parça)
Bıldırcınlar
Sosis-salamlar
Sebzeler
1
0,5
1,2
1
1,5
0,8
1
1
4 veya 5
4
4
3
3
4
4
4 veya 5
9.5
14
14
8
14
14
14
14
220 °C
Maks
Maks
200 °C
Maks
Maks
Maks
Maks
25-30
40-45
30-35
20-25
35-40
30-35
20-25
10-15
Page 84

79
TR
Fırının temizliği ve bakımı
Önemli
Fırının bakımını yapmadan önce, daima fişini prizden çekiniz ya da elektrik tesisatındaki ana elektrik şalteri
vasıtasıyla ana hat elektriğini kesiniz.
– Özel temizlik ürünleri ve su kullanılarak temizlenmeleri ve iyi bir şekilde kurutulmaları halinde, paslanmaz
çelik ve emaye aksamlar daima ilk günkü gibi yeni kalacaktır.
– Çizilmeleri ve zımparalamayı önlemek için kesinlikle tel bez veya çelik yün, muriatik asit kullanmayın.
Buharlı temizleme cihazlarını ve direk su jetlerini kullanmayınız.
–Fırın tabanında ortaya çıkabilecek muhtelif lekeler (soslar, şekerler, yumurta lekeleri ve yağlar) daima
yemeklerin taşmasından yada sıçramasından kaynaklanan lekelerdir. Yemek sıçramaları, pişirme esnasında
gerçekleşir ve çok yüksek sıcaklıklarda pişirme işleminden kaynaklanabilir, taşmalar ise gereğinden küçük
kaplardan yada piş
irme esnasında yemeğin hacminin ne kadar artabileceğinin yanlış hesaplanmasından
kaynaklanır. Bu iki sorun, yüksek kenarlı kaplar veya fırın ekipman kitinde bulunan tepsi kullanılarak çözülebilir.
Fırının taban kısmının temizlenmesi ile ilgili olarak, buradaki olası lekeleri fırın henüz ılıkken temizlemenizi
öneririz; temizlik işi ne kadar ertelenirse, lekelerin çıkarılmas o kadar zorlaşır.
Fırın kapağının temizlenmesi
–Fırın kapağı, gerek iç gerekse dış tarafından tamamen soğukken ve sıcak su kullanarak
temizlenmeli, çizici özellikte bezler kullanmaktan kaçınılmalıdır. Cam kısımları birlikte
verilen deterjanlarla temizleyiniz.
– Emayeli kısımlar ve fırını n iç bölümleri için sıcak su ve çizmeyen deterjanlar kullanınız.
(Sadece CR 66 ve CS 66 modelleri)
– Daha detaylı bir temizlik için, estetik plastik şablonu fırın kapağından çıkartmak
mümkündür. Kapak açıkken, şekilde gösterildiği gibi yanlardan bastırıp şablonu çıkartın.
Şablonu fırın kapağına tekrar takmak için, ortalı bir şekilde yerine kaymasını sağlamak
ve yan montaj yerlerine oturuncaya kadar hafifçe bastırmak yeterlidir.
Fırın kapağı iç camının sökülmesi (sadece CR, CS ve SM modelleri)
(Şek. 2)
Fırının iç camını tam anlamıyla temizlemek için, aşağıdaki işlemleri uygulayarak camı tamamen çıkarmak
mümkündür:
• Kapak tamamen açık halde iken kapağın alt ucundaki iki siyah kilidi (üzerinde “CLEAN/TEMİZ” yazısı olan)
fırının gövdesinde bulunan yuvalara girecek şekilde 180° döndürünüz.
NOT: Döndürme işleminin tam olarak yapıldığından emin olunuz (bu konumda kilit hafif bir tık sesi çıkaracaktır);
• iç camı dikkatlice çıkarınız; bu iki kilit kapağın kapanmasını önleyecektir (kilitlerin tamamen döndürülmemesi
halinde, camın çıkarılması kapağın aniden kapanmasına neden olabilir).
Temizlik işlemlerini tamamladıktan sonra, iç camı geri takın
ız (camın montaj için doğru yüzünde okunaklı şekilde
yazılmış “TEMPERED GLASS/TAVLANMIŞ CAM” yazısı bulunmaktadır) ve iki sabitleme kilidini tekrar eski
konumlarına çeviriniz.
DİKKAT: kilitlerden birinin veya her ikisinin iç camı kısmen veya tamamen serbest bırakmış olması halinde
asla kapağı kapatmaya çalışmayınız. Temizlik işlemi sona erdiğinde, kapağı kapatmadan önce her iki kilidi
de tekrar çevirmeyi unutmayınız.
Fırın kapağı iç camının sökülmesi (sadece TL ve CM modelleri) (Şek. 3)
Fırının iç camını tam anlamıyla temizlemek için, aşağıdaki işlemleri uygulayarak camı tamamen çıkarmak
mümkündür:
• kapak tamamen açık halde iken, kapağın alt ucundaki iki siyah kilidi 180° döndürünüz (şek. 3a ve 3b).
NOT: Döndürme işleminin tam olarak yapıldığından emin olunuz (bu konumda kilit hafif bir tık sesi çıkaracaktır);
• İç camı dikkatlice çıkarınız (şek. 3c); bu iki kilit kapağın kapanmasını önleyecektir (kilitlerin tamamen
döndürülmemesi halinde, camın çıkarılması kapağın aniden kapanmasına neden olabilir);
• ortadaki camı da çıkarmak için, iki yan contayı söküp (şek. 3d) camı çıkarınız (ş
ek. 3e);
• temizlik işlemlerini gerçekleştirdikten sonra, önce orta camı geri takınız (şek. 3f) (camın montaj için doğru
yüzünde okunaklı şekilde yazılmış “TEMPERED GLASS/TAVLANMIŞ CAM” yazısı bulunmaktadır); camı
kapağın üst kısmında yer alan uygun yivlere dikkatlice geçiriniz ve yivin sonuna değinceye kadar itiniz;
• her iki contayı da geri takınız (şek. 3g); kapağın üst profiline değme durumuna özellikle dikkat ediniz.
• son olarak, iç camı da geri takınız (şek. 3h) ve iki cam sabitleme kilidini yeniden eski kapama konumlarına
getiriniz.
DİKKAT: kilitlerden birinin veya her ikisinin iç camı kısmen veya tamamen serbest bırakmış olması halinde
asla kapağı kapatmaya çalışmayınız. Temizlik işlemi sona erdi
ğinde, kapağı kapatmadan önce her iki kilidi
de tekrar çevirmeyi unutmayınız.
Page 85

80
Fırın kapağının sökülmesi (Şek. 4)
Fırının temizliğini kolaylaştırmak için, menteşelerine aşağıdaki şekilde müdahale ederek fırın kapağı sökülebilir:
– Menteşeler (A) iki hareketli köprü bağlantısına (B) sahiptir. Köprü (B) yukarı doğru kaldırıldığında menteşe
yuvasından çıkar.
–Bu işlem yapıldıktan sonra, kapak yukarı doğru kaldırılmalı ve dışarıya doğru çekilmelidir; bu işlemleri yaparken
kapağın menteşelere yakın olan kısımlarından tutunuz.
–Kapağı tekrar takmak için önce mente
şeleri yuvalarına geçiriniz.
– Son olarak kapağı kapamadan önce, menteşeleri tutan iki hareketli köprüyü (B) döndürmeyi unutmayınız.
Fırın lambasının değiştirilmesi
Franke fırınlarında, arka sol üst tarafta yuvarlak bir lamba bulunmaktadır.
Fırının içindeki lambayı değiştirmeniz gerekirse, aşağıdaki işlemleri takip ediniz:
– cihazın elektrik tesisatı bağlantısında kullanılan çok kutuplu anahtar vasıtasıyla elektrik
bağlantısını kesiniz ya da erişilebilir noktada ise fişi çekiniz;
– Koruyucu cam kapağı (A) sökünüz;
– lambayı çevirerek sökünüz ve aşağıda belirtilen özelliklere sahip yüksek ısıya (300 °C)
dayanıklı bir yenisiyle değiştiriniz:
Gerilim: 220-240 V ~ 50-60 Hz
Güç: 15 W
Bağlantı: (E14) minyon.
– Koruyucu cam kapağı (A) geri takın
ız ve cihazın elektrik beslemesini yeniden açınız.
Yardım
Olası çalışma sorunları ortaya çıkması halinde, ekteki listede yer alan bir Franke
Teknik Yardım Merkezi ile temasa geçiniz.
Yetkili olmayan servislere asla başvurmayınız.
Aşağıdaki hususları belirtiniz:
– sorunun tipi;
– cihazın modeli (Art.);
– seri numarası (S.N.).
Bu bilgileri ocakla birlikte verilen garanti belgesinde bulunan etiketin üzerinde
bulabilirsiniz.
Güvenlik uyarıları
• Bu cihaz, cihazın güvenli kullanımını sağlayacak sorumlu bir kişinin denetimi veya bilgilendirmesi olmaksızın
fiziksel, hissi veya akli kapasiteleri ya da tecrübeleri veya bilgileri cihazı güvenli şekilde kullanmaya elverişli
olmayan kişiler tarafından (çocuklar da dahil) kullanılmak üzere tasarlanmamıştır.
• Çocuklar, cihazla oynamamaları için denetim altında tutulmalıdır.
• Şu durumlardan dolayı doğabilecek olası hasarlardan imalatçı firma sorumlu değildir; hatalı montaj, amaç dışı,
hatalı ve uygun olmayan kullanım şekli.
Aşağıdaki durumlarda kesinlikle kalifiye kişilere başvurunuz:
Bu elektrikli ev-içi kullanım cihazının verimli ve güvenli olmasını temin için:
– sadece yetkili teknik yardım merkezlerine başvurunuz;
– daima orijinal yedek parça kullanılmasını talep ediniz;
– cihaz, evlerde kullanım için tasarlanmış olup profesyonel kullanım amaçlı değildir; özelliklerini değiştirmeye
çalışmayınız;
– cihazın veri etiketinde, ürünlerin gideceği ve kullanım talimatlarının geçerli olduğu ülkelerin simgeleri
bulunmaktadır;
– cihazın elektrik sistemi, sadece ürünün yasalarca öngörülen bir toprak bağlantısının yapılması halinde garanti
kapsamına girmektedir;
– kullanım sırasında fırının ısıtıc
ı rezistanslarına ve kapağın bazı noktalarına değmemeye dikkat ediniz,
zira çok sıcak olabilirler, özellikle de çocukları uzak tutmaya özen gösteriniz.
Çocukların dokunmaması gereken aksamlar:
– genel anlamda cihazın tamamı ve kumandaları;
– ambalaj malzemeleri (plastik torbalar, polistiren köpük, metal kısımlar, vs.);
– kullanım sırasında ve kullanımdan hemen sonra çok sıcak olabileceğinden cihazın kendisi;
– kullanım dışı bırakılmış cihaz (böyle bir durumda, tehlike yaratabilecek aksamlara karşı önlem alınmalıdır).
Aşağıdaki hareketlerden kaçınınız:
– cihaza vücudunuzun nemli noktalarıyla dokunmak;
– cihazı yalın ayak haldeyken kullanmak;
– cihazın prizle bağlantısını kesmek için fırının kendisini yada kabloyu tutarak çekmek;
A
Page 86

81
TR
– uygun olmayan ve tehlikeli işlemler yapmak;
– havalandırma ya da dış tahliye kanallarını tıkamak;
–diğer elektrikli cihazlara ait kabloları cihazın sıcak kısımlarıyla temas halinde bırakmak;
– cihazı atmosferik etkenlere maruz bırakmak (yağmur, güneş);
–fırını muhtelif eşyaların konulduğu bir saklama yeri gibi kullanmak;
– cihaz yakınında alev alıcı sıvılar kullanmak;
– adaptörler, çoklu prizler ve/veya uzatma kabloları kullanmak;
– kalifiye olmayan kişilere montaj ve onarımını yaptırmak.
Aşağıdaki durumlarda kesinlikle kalifiye kişilere başvurunuz:
– montaj (imalatçı talimatlarına göre);
–çalışma şekli hakkında emin olunmaması halinde;
– cihazın fişine uymaması halinde prizin değiştirilmesi.
Aşağıdaki durumlarda, imalatçı firma tarafından onaylanmış teknik yardım merkezine
başvurunuz:
– ambalajı açtıktan hemen sonra, cihazın eksiksiz olduğundan şüphe edilmesi halinde;
– elektrik kablosunun değiştirilmesi ya da hasar görmesi halinde;
–arıza ya da iyi çalışmaması halinde (böyle durumlarda orijinal yedek parça talep ediniz).
Aşağıdaki işlemlerin yapılması uygundur:
– sadece yemek pişirmek amaçlı kullanınız, farklı bir amaç için kullanmayınız;
– herhangi bir temizlik ve bakım işleminden önce ya da sorunlu çalışması halinde cihazın elektrik bağlantısını
kesiniz;
– kaplar fırına sürülürken ve çıkarılırken fırın eldiveni kullanınız;
– hava çıkışları nedeniyle uç noktaları sıcak olabileceğinden, kapak tutma kulpunun daima tam merkezinden
tutunuz;
– cihazın kullanılmadığı zamanlar, düğmelerin stop pozisyonunda olduklarını kontrol ediniz;
– cihazı kullanım dışı bırakmaya karar verdiğinizde elektrik şebekesi ile bağ
lantısını kesiniz;
Montaj (Şek. 5)
Önemli: Cihazın kurulumu (montajı) yürürlükteki yönetmeliklere ve normlara uygun olarak yapılmalıdır. Sadece
uzman ve kalifiye kişiler tarafından yapılmalıdır.
Cihaz kasasının özellikleriyle ilgili bilgiler
Ankastre (gömme) mobilyalarda kullanılan aksam (plastik malzemeler ve sunta türü ahşap malzeme) ısıya
dayanıklı tutkallarla yapıştırılmış olmalıdır (maksimum 100 °C). Mobilya, elektrik bağlantılarının serbestçe geçişini
sağlayacak şekilde olmalıdır. Fırının içine yerleştirildiği mobilya, cihazın ağırlığını rahatça taşıyabilecek sağlamlıkta
olmalıdır.
Fırın, yuvasına güvenli şekilde monte edilmelidir. Fırın, sütun şeklinde bir mobilya içine ya da modüler bir mobilya
yüzeyi altına yerleştirilebilir; her iki durumda da yeterli havalandı
rma sağlanmalıdır.
Montaj talimatları
CM ve TL modelleri (Şek. 6a/6b/6c)
Kasanın yan yüzeyinin sac kalınlığını (S) ölçünüz; bu normalde 16, 18 ya da 20 mm olabilir.
16'lık sac kalınlığı: sabitleme braketi (F) üzerine 16 sayısı ile gösterilmiş 2 takozu (T) yerleştiriniz.
18'lık sac kalınlığı: sabitleme braketi (F) üzerine 18 sayısı ile gösterilmiş 2 takozu (T) yerleştiriniz.
20'lik sac kalınlığı: 20 mm'lik sac kalınlığında, herhangi bir takoz yerleştirmeye gerek yoktur.
Braketleri (F) kasanın köşebent bölümüne dayayarak yerleştiriniz, alt tarafta ise fırın destek yüzeyi üzerine
yerleştiriniz.
Braketleri (F) vidalarla (V) sabitleyiniz. Fırını mobilyanın içine yerleştiriniz, kapağı tamamen açınız ve 4 vidayı (V)
ve4plastik ayırıcıyı (D) kullanarak braketlere (F) sabitleyiniz.
CR, CS, SG ve SM modelleri (Şek. 6d)
Cihazı boşluğa yerleştiriniz; fırının gövdesini ekipman kitindeki 4 vida ve 4 halkayı kullanarak yanlardaki deliklerden
kasaya sabitleyiniz (Şek. 6d).
Not: Tüm modeller ile ilgili olarak, fırınınızı bir set üstü ocak altına yerleştirecekseniz, fırının düzgün
oturması için yerleştirme öncesinde ocak (R) rakorunu sağa veya sola hareket ettirerek yerleştiriniz
(Şek. 6e).
Page 87

82
Elektrik şebekesine bağlantı
FRANKE fırınınız, üç kutuplu serbest terminalli bir besleme kablosuyla donatılmıştır.
Eğer fırın besleme şebekesine devamlı bağlantılı şekildeyse, aşırı-gerilim III kategorisi
durumunda kontakları arasındaki açıklık mesafesi akımı komple kesecek şekilde tasarlanmış
(en az 3 mm) bir akım kesme cihazı (akım şalteri) monte ediniz. Aşağıdakileri kontrol ediniz:
a) fiş ve prizin 16 A akım için uygun olmalıdır;
b) hem kolay erişilebilir olmalı hem de aynı fişin çıkarılması veya takılması esnası
nda
elektrikli hiçbir aksama erişmek mümkün olmayacak şekilde yerleştirilmiş olmalı;
c) fiş, bir zorluk olmadan çıkarılabilmelidir;
d) eğer fırın bir mobilya içine ankastre monteli ise, fişi takıldığında üzerine baskı yapmamalıdır;
e) aynı prize iki elektrikli cihaz birden bağlanmamalıdır;
f) eğer elektrik besleme kablosu değiştirilecekse, H05VV-F tipi 3 x 1,5 mm
2
ölçülerinde yenisi ile değiştirilmelidir;
g) Temel olarak boş terminallerin destek kutuplarına dikkat etmeniz gerekmektedir
(Kahverengi=Faz – Mavi=Nötr – Sarı-Yeşil=Toprak).
NOT: Evinizdeki elektrik bağlantısının özellikleri (gerilim, maksimum güç ve akım) FRANKE fırınınızın özellikleri ile
uyumlu olmalıdır.
Not: cihaz çalıştırıldığında şebeke frekansı tespit edilir. Zamanlayıcı 60 Hz ile bağlandığında, cihaz başlatıldığında
P simgesi yanıp söner.
Teknik veriler
KULLANICILARA YÖNELİK BİLGİLER
25 Temmuz tarihli kanun kararnamesinin 15 sayılı maddesi “Elektrikli ve elektronik cihazlarda tehlikeli
madde kullanımının azaltılmasıyla ve ayrıca bunların imhası ile ilgili 2002/95/CE, 2002/96/CE ve
2003/108/CE direktiflerinin uygulanması” uyarınca.
Ürünün üzerindeki üzeri çarpı işaretli çöp kutusu simgesi, ürünün kullanım ömrü sona erdiği zaman diğer
atıklardan/çöplerden ayrılması gerektiğini belirtir.
Dolayısı ile ürünün kullanıcısının, cihazı uygun elektronik ve elektroteknik atık toplama merkezlerine teslim
etmesi veya eşdeğer tipte bir cihazla bire bir değişim yapması için rünü satın aldığı satıcıya geri götürmesi
gerekecektir.
Ürünün, geri dönüşüm amacıyla tahsis edilmiş toplama tesislerine teslim edilmesi, çevreyle dost bir ş
ekilde
muameleye tabi tutulması ve elden çıkarılması, çevre ve insan sağlığına gelebilecek olumsuz etkilerin
önlenmesine yardımcı olmakla birlikte, cihazın yapımında kullanılan malzemelerin geri dönüştürülebilmesini
sağlayacaktır.
Ürünün kullanıcı tarafından kanunlara uygun olmayan bir şekilde imhası/atılması 22/1997 sayılı kanunun
(22/1997 sayılı kanunun 50. maddesi ve müteakip hükümleri) uygulanmasını gerektirir.
Kullanılabilir fırının boyutları:
genişlik: 440 mm
derinlik: 415 mm
yükseklik: 312 mm
Kullanılabilir fırın hacmi:
57 litre
Sarfiyat (statik fonksiyonlu):
175°C'ye ulaşmak için: 0,32 kWs
175°C'yi muhafaza etmek için: 0,62 kWs
Toplam sarfiyat: 0,94 kWs
Sarfiyat (fan fonksiyonlu):
200°C'ye ulaşmak için: 0,42 kWs
200°C'yi muhafaza etmek için: 0,77 kWs
Toplam sarfiyat: 1,19 kWs
Besleme gerilimi ve frekansı:
220-240 V ~ 50-60 Hz
Toplam güç ve sigorta:
2300 W - 16 A
Rezistans gücü:
üst 1000 W
alt 1250 W
ızgara 2250 W
fan motoru 30 W
fırın aydınlatma lambası 15 W x 1
teğet fan 15 W
Bu cihaz, aşağıdaki Avrupa
Birliği direktifleri ile uyumludur:
– 2006/95/EC (Alçak Gerilim);
– 2004/108 EEC
(Elektromanyetik Uygunluk).
MAVİ
SARI-YEŞİL
KAHVERENGİ
Page 88

83
RU
Оглавление
Введение............................................................................................................................................... 83
Прибор крупным планом...................................................................................................................... 83
Первое включение................................................................................................................................84
Рекомендации....................................................................................................................................... 84
Как пользоваться варочной панелью.................................................................................................. 84
Ориентировочная таблица режимов приготовления......................................................................... 88
Чистка и уход за духовкой ................................................................................................................... 89
Сервисное обслуживание.................................................................................................................... 90
Указания по безопасности ................................................................................................................... 90
Установка (Рис. 5) ................................................................................................................................ 91
Указания по монтажу ........................................................................................................................... 91
Подключение к электрической сети.................................................................................................... 92
Технические данные ............................................................................................................................ 92
Введение
Благодарим вас за выбор продукции компании Franke.
Советуем вам перед использованием изделия внимательно ознакомиться с правилами безопасности и
рекомендаиями, приведенными в настоящем руководстве. Это поможет освоить работу с духовкой и позволит
увеличить срок ее службы. Бережно сохраняйте настоящее руководство для последующих консультаций.
Прибор крупным планом
Ручка выбора программ
Эта ручка служит для выбора режима работы духовки в соответствии с нужным
способом приготовления. При установке ручки на любую программу включается
внутреннее освещение духовки, что указывает на то, что дховка включена.
Электронное устройство программирования
В модельном ряду духовок Franke предусмотрены различные системы управления и
регулировки времени приготовления, на стр. 85 приведены подробные указания по
каждой из них; достаточно определить, какая система использована в вашей уховке,
после чего обратиться к соответствующим указаниям по ее применению.
Индикатор термостата
Горящий индикатор с символом указывает на то, что нагревательные элементы
духовки включены. Индикатор гаснет при достижении заданной температуры и
загорается всякий раз снова, когда возобновляется нагрев духовки. Этот индикатор
позволяет убедиться в том, что достигнута нужная температура, после чего можно
помещать продукты в духовку.
Ручка регулировки температуры (термостат)
Эта ручка позволяет выбирать оптимальную для приготовления данного блюда
температуру и поддерживать ее пстоянной в течение всего процесса приготовления.
Для выбора нужной температуры следует повернуть ручку по часовой стрелке,
устанавливая указатель на соответствующую цифру. Максимальная температура
составляет около 260 °C.
Направляющие для противней и решеток
Эти направляющие служат для правильного размещения решеток и противней на
5 предусмотренных уровнях (от 1 до 5, считая снизу); в ориентировочной таблице
режимов приготовления (стр.88) указаны оптимальные положения для каждого
варианта использования духовки.
Противень
Противень обычно используется для сбора соков, образующихся при жарке, или же
для непосредственного пригоовления пищи; если противень не используется, то на
время работы духовки его следует вынуть. Противень выполнен из стали с
эмалированным покрытием типа AA, допускающим использование при приготовлени
пищи. Примечание: Для достижения наилучших результатов приготовления
рекомендуется устанавливать противень так,
чтобы его наклонная сторона была
обращена к задней стенке камеры духовки.
Решетка
Решетка используется в качестве подставки для сковород, кондитерских форм и
любой другой посуды, отличной от входящих в комплект поставки противней, а также
для непосредственного приготовления мяса, рыбы, поджаривания хлеба и т.п.,
преимущественно в режимах гриля и гриля с конвекцией. Следует избегать
непосредственного контакта продуктов с решеткой.
ABC
D
E
F
G
D
A
F
G
E
Page 89

84
Первое включение
При первом включении необходимо дать пустой духовке прогреться в течение не менее 40 минут, установив ручку
регулировки температуры на максимальное значение; при этом следует держать дверцу духовки полностью
открытой и хорошо проветривать помещение.
Запах, ощущаемый при этой операции, вызван испарением материалов, применяемых для защиты духовки в
течение периода между выпуском изделия и
его установкой у пользователя. По истечении этого времени духовка
готова к работе.
Рекомендации
Для получения хороших результатов приготовления блюд никогда не помещайте продукты в холодную духовку.
Следует подождать, пока в духовке не будет достигнута выбранная вами температура.
Во время приготовления не ставьте кастрюли или другую посуду непосредственно на дно духовки; их следует всегда
ставить на входящие в комплект поставки решетки или противни, устанавливаемые на
один из 5 предусмотрнных
уровней; несоблюдение этого правила приводит к повреждению эмалированного покрытия духовки.
Никогда не покрывайте стенки камеры духовки, особенно ее нижнюю часть, алюминиевой фольгой.
В случае необходимости ремонта он должен осуществляться уполномоченными специалистами.
Обращайтесь в наш ближайший сервисный центр и обязательно требуйте использовать оригинальные запчасти.
В приобретенной вами духовке Franke
использована специальная, легко чистящаяся эмаль; рекомендуется часто
чистить ее во избежание повторного теплового воздействия на загрязнения, оставшиеся после предшествующего
ользования духовкой.
Самоочищающиеся панели (если они предусмотрены) следует мыть водой с мылом (см. указания по чистке).
Примечание: перед тем как приступать к эксплуатации духовки, прочтите указания по пользованию таймером
(см.стр
.86).
– Если духовка оборудована автоматическим программатором приготовления пищи или отключения, то для
пользования ею в ручном режиме необходимо выбрать функцию, обозначенную символом .
Как пользоваться варочной панелью
Данная духовка соединяет в себе преимущества традиционных «статических» духовок с естественной конвекцие
и современных «вентилируемых» духовок, использующих режим принудительной конвекции. Духовка отличается
универсальностью, простотой и безопасностью использования и позволяет выбирать 6 разлчных режимов
приготовления. С помощью ручек (А) и (D) на панели управления выполняется задание различных программ и
нужной температуры. Для достижения оптимальных
результатов при пользовании духовкой Franke сверяйтесь с
ориентировочной таблицй режимов приготовления на стр.88.
Охлаждающая вентиляция
В целях снижения температуры дверцы, панели управления и боковых панелей духовка Franke оборудована
охлаждающим вентилятором, который включается автоматически при нагретой духовке. Во время работы
вентилятора можно заметить струю воздуха, выходящую наружу между панелью управления и двецей духовки.
Следует отметить, что компания-изготовитель приложила особые усилия с целью обеспечения такой скорости
выходящего воздуха
, которая не создавала бы неудобств, а также максимального снижения уровня шума.
Для надежного обеспечения сохранности кухонной мебели по окончании приготовления вентилятор
продолжает аботать до тех пор, пока температура духовки не снизится до определенной величины.
Освещение духовки
Этому символу соответствует включение внутреннего освещения духовки без включения системы
нагрева. Эта функция удобна тем, что включение освещения внутри выключенной духовки облегчает ее
чистку.
Программы приготовления
Статический режим (с естественной конвекцией)
Ручка термостата (D) должна быть установлена в положение между 50 °C и Max (260 °C).
Нагрев осуществляется как сверху (верхним нагревательным элементом), так и снизу (нижним
нагревательным элементом). Это традиционный режим приготовления (в меню на дисплее:
стандартный), обеспечивающий равномерное приготоление продуктов с использованием одного уровня.
Режим с принудительной конвекцией (для 2 уровней)
Ручка термостата (D) должна быть установлена в положение между 50 °C и Max (260 °C).
В этом режиме включаются нагревательные элементы потолка (верхний) и дна (нижний), а также
внутренний вентиятор духовки.
Постоянное и равномерное тепло обеспечивает приготовление и подрумянивание блюда со всех сторон.
Допускается приготовление различных блюд с одновременным использованием не более 2 уровней.
Page 90

85
RU
Режим конвекции с нижним нагревом
Ручка термостата (D) должна быть установлена в положение между 50 °C и Max (260 °C).
В этом режиме включаются нижний нагревательный элемент и вентилятор. Этот режим идеален для
приготовления рыбы и других продуктов глубокой заморозки, а также полуфабрикатов. Он очень
эффективен и при выпечке кондитерских изделий.
Режим конвекции с верхним нагревом
Ручка термостата (D) должна быть установлена в положение между 50 °C и Max (260 °C).
В этом режиме (в меню на дисплее: Верхнее с конвекцией) включаются верхний нагревательный
элемент (потолка) и вентилятор. Малая мощность и работа вентилятора обеспечивают очень
равномерные и мягкие условия приготовления Это оптимальный режим для приготовления сухой
выпечки и некоторых типов макаронных изделий.
Режим гриля
Ручка термостата (D) должна обычно находиться в положении Max (260 °C), тем не менее, можно
выбрать и более низкую температуру, но в этом случае приготовление на гриле будет боее
медленным.
Включается нагревательный элемент гриля, находящийся в верхней части духовки. В этом случае
поверхностный слой мяса быстро прожаривается инфракрасными лучами, а его внутренняя часть
отается мягкой
. Режим гриля также можно использовать для быстрого поджаривания тостов (до 9
кусочков хлеба дновременно). В духовке Franke приготовление в режиме гриля должно проводиться при
полностью закрытой дверце.
Предупреждение: Тем не менее, нагревательный элемент гриля во время работы очень сильно
нагревается; следите за тем, чтобы не коснуться его случайно при обращении с приготавливаемыми
на
гриле продуктами. В любом сучае, компанией Franke разработана такая форма отверстия духовки,
которая обеспечивает максимальную защиту ля рук.
Режим гриля с конвекцией
Ручка термостата (D) должна обычно находиться в положении Max (260 °C), тем не менее, можно
выбрать и более низкую температуру, но в этом случае приготовление на гриле будет боее
медленным.
В этом режиме включается нагревательный элемент гриля, расположенный в верхней части духовки, и
одновремено приводится в действие вентилятор. Он добавляет к одностороннему тепловому излучению
принудительную
циркуляцию воздуха внутри духовки. Это препятствует подгоранию поверхности
приготовляемых продуктов за счет увеличения проникающей способности тепла. В режиме гриля с
принудительной конвекцией достигаются отличные результаты при приготовлении мяса с овощми на
шпажках, колбасок, бараньих и свиных ребрышек, цыпленка табака, перепелов с шалфеем, свиного
филе и т. д.
Ручка таймера окончания приготовления
Таймер окончания приготовления (программатор) представляет собой удобное
устройство, автоматически выключающее духовку по истечении заданного времени,
которое может составлять от 1 до 120 минут. Для использования таймера окончания
приготовления необходимо завести устройство подачи звукового сигнала, повернув
ручку (В) почти на полный оборот по часовой стрелке; затем, поворачивая ее в
обратном направлени, задать необходимый отрезок
времени, совместив цифру
количества задаваемых минут на ручке с отметкой на передней панели. По истечении
заданного времени подается звуковой сигнал, а духовка автоматически выключается.
Примечание: В течение длительного периода сразу после выключения духовки
внутри камеры сохраняется температура, близая к заданной температуре
приготовления; поэтому, чтобы продукты не разварились или не подгорели, их
следует вынимать из духовки.
Внимание! Для использования духовки в ручном режиме, т.е. без программатора,
необходимо совместить указатель ручки символом на передней панели духовки. Когда духовка выключена,
программатор времени окончания приготовления может использоваться как обычный таймер.
Часы для задания времени окончания приготовления
Данные часы уже запрограммированы на ручной режим использования духовки,
поэтому приготовление может осуествляться без какого-либо воздействия на сами часы.
Правая ручка управления
При нажатии на правую ручку осуществляется последовательный выбор
активируемых функций (таймер, окончани приготовления, настройка часов),
на которые указывает мигание соответствующего светодиодного индикатора.
Помимо этого, при кратковременном нажатии данной ручки
можно пересмотреть
ранее заданные значения (режим проса), в то время как при долговременном ее
нажатии (около двух секунд) заданные значения обнуляются (выпоняется сброс).
Левая ручка управления
При повороте левой ручки осуществляется установка стрелок часов отсчета времени
в соответствии с активирванной функцией (мигающий светодиодный индикатор).
B
IVI
I
V
I
I
IX
V
V
I
VI
III
I
X
X
III
IXI
TIMER
START
STOP
B
Page 91

86
Светодиодные индикаторы
– мигающие: готовность к выполнению настройки или
предупреждение об окончании действия функции (вместе со
зуковым сигналом)
– горящие постоянным светом: выполнение функции
Таймер ()
Для установки таймера нажмите один раз правую ручку (при этом
начнет мигать соответствующий светодиод); заем, поворачивая
левую ручку, сдвиньте стрелки, чтобы задать нужное время.
Повторным нажатием на правую
ручку управления производится
подтверждение настройки; ранее мигавший светодиод станет
гореть постоянным светом. При этом стрелки вернутся в
первоначальное положение, соответствующее текущему времени: по истечении заданного времени будет
подаваться звуковой сигнал, который можно отключить, нажав правую ручку.
Таймер не управляет нагревом духовки.
Окончание приготовления ()
Для задания времени окончания приготовления два раза
нажмите правую ручку (при этом светодиод символа
начнет мигать); затем, поворачивая левую ручку, сдвиньте стрелки, чтобы задать нужное время окончания
пригтовления.
Светодиод продолжит мигать в течение последующих 10 секунд (для выполнения возможных корректировок),
по истечении которых настройка будет сохранена, а светодиод станет гореть постоянным светом.
Тот же результат может быть получен при
двукратном нажатии правой ручки управления во время мигания.
По окончании приготовления нагрев духовки будет отключен, и в течение 1 минуты будет подаваться звуковой
сгнал, который можно отключить, нажав правую ручку.
Примечание: В течение нескольких минут после окончания приготовления будет сохраняться температура
духовки, близкая заданной, поэтому во избежание пережаривания блюда его следует
вынуть из духовки
Окончание приготовления () с началом приготовления с задержкой ()
Начало приготовления с задержкой может быть активировано только после задания времени окончания
приготовления; при нажатии правой ручки, подтверждается «стоп», и одновременно начинает мигать светодиод,
соответствующий символу . Поверните левую ручку для установки времени начала приготовления (очевидно,
оно должно предшествовать времени его окончания,
а следовательно перемещение стрелок возможно только в
обратном направлении). На этом этапе можно окончательно подтвердить настройку еще одним нажатием правой
ручки. По истечении 10 секунд мигания светодиода настройка будет автоматически сохранена. Светодиоды
символов и будут гореть постоянным светом, и духовка включится в заданное время. Втот момент
будет гореть только свеодиод символа .
По
окончании приготовления в течение 1 минуты будет подаваться звуковой сигнал, который можно отключить,
нжав правую ручку.
Уст ановк а текущего времени ()
Для установки текущего времени дня достаточно три раза нажать правую ручку (светодиод символа часов начне
мигать), а затем поворачивать левую ручку. После установки текущего времени дня подтвердите настройку
нажатием на правую ручку.
Электронное программирующее устройство работы духовки
Это устройство позволяет программировать следующие режимы работы
духовки:
• начало приготовления с задержкой при заданной продолжительности
приготовления;
• Немедленное начало приготовления с заданной продолжительностью
приготовления;
• приготовление с помощью таймера.
Установка времени на цифровых часах
После подключения духовки к сети или после временного перерыва в
электропитании на дисплее мигают цифры: «0.00».
Одновременно нажмите кнопки + и - держите их нажатыми несколько секунд.
Текущее время суток можно регулировать с помощью кнопок + и - в то время,
когда мигает точка между значениям часов и минут. В случае выбора режима установки времени в
момент
выполнения какой-либо автоматической программы, эта автматическая программа отменяется.
Возможные изменения времени можно произвести, повторив вышеописанную процедуру.
B
B
Page 92

87
RU
Изменение тональности звукового сигнала
Тональность звукового сигнала можно изменить, если в данный момент не
запрограммировано приготовление тоо или иного блюда (и, следовательно,
дисплей показывает текущее время). Одновременно нажмите кнопки + и -
(находясь в меню изменения текущего времени), затем нажмите кнопку
«Режим» ли «Настройка» для выбора меню изменения тональности звукового
сигнала. Тональность
звукового сигнала можно изменить, нажимая несколько
раз кнопку «Режим» или «Настройка»; при это на дисплее поочередно будут
появляться надписи «ton1», «ton2», «ton3».
Работа духовки в ручном режиме
После задания времени программирующее устройство автоматически
переключается в ручной режим.
Начало приготовления с задержкой при заданной продолжительности приготовления
Когда на дисплее высветится текущее время, два раза нажмите кнопку
«Режим» или «Настройка» для задания
продолжительности приготовления, затем снова нажмите эту же кнопку для задания времени окончания
приготовлени. Задайте нужное время с помощью кнопок + и –. При выборе режима задания времени окончании
приготовления или продолжительности приготовления на диспле продолжает высвечиваться символ Auto.
После задания продолжительности программы время ее окончания уже не может
быть уменьшено. Аналогично,
после задания времени окончания приготовления продолжительность программы уже не может быть величена.
Заданные значения времени окончания и продолжительности приготовления следующим образом определяют
время начала приготовления:
время начала приготовления = время окончания риготовления - продолжительность приготовления.
После задания времени окончания и продолжительности приготовления дисплей продолжает показывать время
оончания приготовления. Выполнение
программы начинается при совпадении текущего времени с временем
начала приготовления: при это на дисплее высвечиваются символ Auto и мигающий символ . После начала
приготовления дисплей показывает время, остающееся до его окончания. В случае выбора только времени
окончания приготовления (продолжительность приготовления = 0), начинается вполнение программы, а на
дисплее высвечивается время, остающееся до окончания приготовления
.
Символ Auto продолжает гореть в течение ожидания начала приготовления и в течение всего времени
приготовления.
Символ мигает в течение ожидания начала приготовления и затем загорается постоянным светом в момент
начала пригтовления.
По окончании приготовления подается звуковой сигнал; для его отключения достаточно нажать любую
кнопку или дождаться истечения заданного времени подачи
такого сигнала.
Полуавтоматическая программа с заданной продолжительностью или временем окончания
приготовления
Задание времени окончания или продолжительности программы
Для выбора продолжительности иди времени окончания приготовления два раза нажмите кнопку «Режим» или
«Настройка» и задайте нужное время с помощью кнопок + и –. При выборе режима задания времени окончании
приготовления или его продолжительности мигает символ Auto.
После задания продолжительности программы время ее окончания уже не может быть уменьшено. Аналогично,
после задания
времени окончания приготовления продолжительность программы уже не может быть величена.
Выполнение программы
В процессе выполнения автоматической программы символ Auto продолжает высвечиваться на дисплее;
одновременно на нем отображается время, оставшееся до конца программы (выполняется обратный отсчет).
Продолжает высвечиваться также символ .
Окончание автоматической программы
По истечении времени продолжительности программы или по достижении времени ее окончания
соответствующий символ гаснет. По окончании автоматической программы мигает символ Auto, на дисплее
высвечивается сообщение End («Конец») и подается прерывистый звуковой сигнал, который можно отключить
нажатием любой кнопки.
Приготовление с помощью таймера
В режиме с использованием таймера задается время, с которого начинается обратный
отсчет. В этом режиме
управление включением и выключением духовки отсутствует, а по истечении заданного времени лшь подается
звуковой сигнал.
Нажмите один раз кнопку «Режим» или «Настройка»; на дисплее появится следующее:
мигающий символ колокольчика, и после этого можно задать продолжительность подачи звукового сигнала с
помощью кнопок + и – Кода этот режим активен, символ
колокольчика продолжает гореть, а дисплей показывает
остющееся время (выполняет обратный отсчет).
По окончании заданного интервала времени подается звуковой сигнал, который можно отключить нажатием любо
кнопки.
B
Page 93

88
Коррекция/отмена данных
• Введенные данные можно изменить в любой момент, одновременно нажав кнопки + и –.
• При отмене продолжительности приготовления происходит и автоматическая отмена времени окончания
приготовления и наоборот.
• При работе духовки в программируемом режиме невозможно вводить значения времени окончания
приготовления, предшествующего времени начала приготовления, которое определяется самим прибором.
Примечание: В
течение длительного периода сразу после выключения духовки внутри камеры сохраняется
температура, близая к заданной температуре приготовления; поэтому, чтобы продукты не разварились или не
подгорели, их следует вынимать из духовки.
Ориентировочная таблица режимов приготовления
Примечание: Приведенные в таблице значения получены в результате испытаний, проведенных группой профессиональных
поваров. Тем не менее, они являются ориентировочными и могут быть изменены в соответствии с индивидуальным вкусом.
Положение
ручки выбора
программ
Тип блюда Вес
(кг)
Положение
полок
Время
предвари-
тельного
нагрева
(мин.)
Положе-
ние ручки
термостата
Продол-
жите-
льность
пригот-
овления
(
мин)
Статический
режим (с
естественной
конвекцией)
Жаркое из свинины
Яичница
Треска, ората (дорада), палтус
Обычный хлеб
Запеканки
Пресноводная рыба
Полента с приправой
Пироги с творогом
1
1,5
1
1
1
1,5
0,5
1,5
3
2
3
2-4 одновр.
2
3
2
2
9,5
10,5
9,5
9,5
10,5
10,5
9,5
9,5
180 °C
200 °C
180 °C
175 °C
200 °C
200 °C
180 °C
180 °C
65-75
25-30
15
25-30
40-45
35-40
25-30
25-30
Режим с
принудительной
конвекцией (для
2 уровней)
Жареная свиная спинка
Запеченный
кролик
Тон кие лепешки
Креветки, запеченные в духовке
Треска, ората (дорада), палтус
Обычный хлеб
Фруктовые пироги
Пироги с несладкой начинкой
1
1
1
0,5
2
2
1,5
2
3
2
2
3
2-4 одновр.
2-4 одновр.
2
3-5 одновр.
9
9,5
10
10
7,5
9
9
9
180 °C
190 °C
200 °C
200 °C
150 °C
180 °C
175 °C
180 °C
60-70
55-65
25-30
30-40
25-30
25-30
30-35
40-45
Режим конвекции
с нижним
нагревом
Куриная грудка
Антрекот из телятины
Ростбиф
Тунец, нарезанный кусочками
Медальоны из рыбы-меч
Креветки
Безе
Бисквитные
печенья
Торт из дрожжевого теста
Миндальное печенье
1
1
1
1
1
1
0,8
1
0,8
1
2 или 3
2
3
2
3
2
2
2
2
2 или 3
Для сокращения
времени
предварительного
разогрева
используйте
режим конвекции
с двусторонним
нагревом.
170 °C
180 °C
170 °C
160 °C
160 °C
180 °C
90 °C
160 °C
170 °C
160 °C
20
20
60
20
20
30
120
30
40
35
Режим конвекции
с верхним
нагревом
Тортелл ини, приготовленные в
духовке
Картофельные ньокки
Рыба-меч
Мидии
Гребешки
Печеный картофель
Каннеллони (толстые
макароны-трубочки)
0,5
0,5
0,5
1
1
0,5
1
3
3
5
4
4
4
3
Для сокращения
времени
предварительного
разогрева
используйте
режим конвекции
с двусторонним
нагревом.
Макс.
Макс.
200 °C
Макс.
200 °C
200 °C
Макс.
25-30
25-30
12-15
10-12
10-12
18-20
25-30
Режим гриля Куриные крылышки
Жареное мясо
Гребешки
Печеный картофель
Пресноводная рыба
Помидоры, запеченные с сыром и
сухарями
Угорь на шпажках
Индейка на шпажках
1
0,8
0,5
1
1
0,4
0,5
0,5
4 или 5
3
3 или 4
3
3 или 4
2 или 3
3
4
7
7
7
7
7
7
7
7
Макс.
Макс.
Макс.
Макс.
Макс.
Макс.
Макс.
Макс.
25-30
25-30
14-16
25-30
25-30
25-30
25-30
25-30
Режим гриля с
конвекцией
Куриные окорочка
Свиные ребрышки
Цесарка (нарезанная кусками)
Ората в фольге
Курица (нарезанная кусками)
Перепела
Свиные колбаски
Овощи
1
0,5
1,2
1
1,5
0,8
1
1
4 или 5
4
4
3
3
4
4
4 или 5
9,5
14
14
8
14
14
14
14
220 °C
Макс.
Макс.
200 °C
Макс.
Макс.
Макс.
Макс.
25-30
40-45
30-35
20-25
35-40
30-35
20-25
10-15
Page 94

89
RU
Чистка и уход за духовкой
Важное примечание
Перед выполнением любой операции по уходу за духовкой вилку шнура электропитания следует вынуть из
соответствующей розетки или обесточить линию электропитания, выключив рубильник в помещении.
– Детали из нержавеющей стали всегда будут выглядеть как новые, если промывать их водой или чистить
специальными средствами с последующим протиранием насухо.
– Категорически запрещается использовать металлические мочалки
, соляную кислоту или другие средства,
которые могут поцарапать или повредить поверхность. Категорически запрещается пользоваться
пароочистителями и направлять струи воды непосредственно на духовку.
– Пятна различного происхождения (сок, сахар, белок, жиры), которые могут появляться на дне духовки,
вызваны, как правило, брызгами продуктов или их переливанием в процессе приготовления. Брызги могут
быть вызваны чрезмерно
высокой температурой во время приготовления, а переливание возможно при
использовании посуды слишком малого размера или неверной оценки увеличения объема продукта при
приготвлении. Таких неприятных явлений можно избежать, используя посуду с высокими краями или
противень, входящий в комплект поставки. Для удаления пятен с поверхностей в нижней части камеры
рекомендуется выполнять очистку
при еще теплой дуовке; чем больше времени проходит после выключения
духовки, тем труднее удаляются пятна.
Чистка дверцы духовки
– Мойку дверцы, как с внутренней, так и с внешней стороны, следует выполнять горячей
водой после полного охладения духовки, используемая при этом салфетка для мойки
не должна быть грубой. Для мытья стекол пользуйтесь специальными моющими
средствами.
– Для чистки эмалированных деталей, так же как и внутренних поверхностей духовки
следует пользоваться теплой водой и
неабразивными моющими средствами.
(Только для моделей CR 66 и CS 66)
– Для более тщательной чистки можно также снять декоративную пластиковую накладку
дверцы духовки. Открыв дверцу, нажмите с боков и снимите накладку, как показано на
рисунке. Для установки накладки обратно на свое место достаточно вдвинуть ее в свое
гнездо и слегка нажать до щелчк боковых фиксаторов.
Демонтаж внутреннего стекла дверцы духовки (только для моделей CR, CS и SM) (Рис.2)
Можно снять внутреннее стекло дверцы духовки для выполнения его полной чистки; для этого следует выполнит
следующие действия:
• при полностью открытой дверце поверните на 180° две расположенные на нижнем краю дверцы черные
планки (с надписью «CLEAN») так, чтобы они вошли в соответствующие гнезда в корпусе духовки.
Примечание: Убедитесь, что планки развернуты до упора (
при их установке в такое положение раздается
слабый щелчок).
• Осторожно приподнимите внутреннее стекло: две вышеуказанные планки не позволят дверце закрыться
(если планки не будут повернуты до упора, снятие стекла приведет к немедленному закрыванию дверцы).
После выполнения чистки установите внутреннее стекло на место (правильное направление установки
определяется надписью «TEMPERED GLASS», которая должна быть полностью читаемой) и верните обе
крепежные планки в исходное положение.
ВНИМАНИЕ! Ни в коем случае не пытайтесь закрывать дверцу, когда одна или обе планки полностью или
частично ысвободили внутреннее стекло. По окончании чистки всегда помните о необходимости
повернуть в исходное положение обе планки перед тем, как закрывать дверцу.
Демонтаж внутреннего стекла дверцы духовки (только для моделей TL и CM) (Рис.3)
Можно снять внутреннее стекло дверцы духовки для выполнения его полной чистки; для этого следует выполнит
следующие простые операции:
• при полностью открытой дверце поверните на 180° две расположенные на нижнем краю дверцы черные
планки (рис.3a и 3b).
Примечание: Убедитесь, что планки развернуты до упора (при их установке в такое положение раздается
слабый щелчок);
• осторожно приподнимите внутреннее стекло (рис.3c): две вышеуказанные планки не позволят дверце закрыться
(если планки не будут повернуты до упора, снятие стекла приведет к немедленному закрыванию дверцы);
• чтобы снять также промежуточное стекло, снимите две боковые прокладки (рис. 3d) и затем поднимите стекло
(рис.3e);
• после чистки вначале установите на место промежуточное стекло (рис.3f) (правильное направление установки
определяется надписью «TEMPERED GLASS», которая должна быть полностью читаемой), осторожно вставив
его в пазы в верхней части дверцы и надавив на него до упора;
• затем установите обе прокладки (рис.3g), обращая особое внимание на то, чтобы они уперлись в верхний
профиль дверцы;
• в заключение установите внутреннее стекло (рис
.3h) и вновь поверните обе крепежные планки в
первоначальное положение.
ВНИМАНИЕ! Ни в коем случае не пытайтесь закрывать дверцу, когда одна или обе планки полностью или
частично ысвободили внутреннее стекло. По окончании чистки всегда помните о необходимости
повернуть в исходное положение обе планки перед тем, как закрывать дверцу.
Page 95

90
Снятие дверцы духовки (Рис.4)
Для обеспечения более удобной чистки духовки дверцу можно снять с петель описанным ниже способом:
– Петли (А) оснащены двумя подвижными скобами (В). При подъеме скобы (B) петля высвобождается из своего
гнезда.
– После этого, поднимая дверцу вверх, выньте ее наружу; для этого возьмитесь за дверцу по бокам вблизи
петель.
– Чтобы установить дверцу
на место, необходимо сначала вставить петли в соответствующие пазы.
– После этого, перед закрыванием дверцы, следует повернуть две подвижные скобы (В), которые служат для
захват обеих петель.
Замена лампочки духовки
Духовки Franke оснащены кольцевой лампочкой, расположенной в задней части камеры слева вверху.
При необходимости, замена лампочки внутреннего освещения духовки выполняется следующим образом:
– отключите электропитание духовки с помощью многополюсного размыкателя, через
который она подключается к ети, или вынув вилку сетевого шнура духовки из розетки,
если к ней имеется доступ;
– открутите защитный стеклянный
колпачок (A);
– открутите лампочку и замените ее лампочкой, устойчивой к высокой температуре
(300 °C), имеющей следующие характеристики:
напряжение питания: 220-240 В ~ 50-60Гц
Мощность: 15 Вт
Цоколь: (E14) миньон.
– установите на место защитный стеклянный колпачок (A) и снова подайте питание на
духовку.
Сервисное обслуживание
В случае выявления каких-либо неисправностей в процессе работы духовки
обращайтесь в центр сервисного обслуживания. Адреса центров сервисного
обслуживания приведены в прилагаемом списке.
Никогда не обращайтесь к неуполномоченным специалистам.
Укажите:
– вид неисправности;
– модель изделия (Art.);
– серийный номер (S.N.).
Эта информация приведена на паспортной табличке и в гарантийном талоне.
Указания по безопасности
• Данный прибор не предназначен для использования лицами с ограниченными психическими или
двигательными возможностями (включая детей), или с отсутствием надлежащих навыков и знаний,
за исключением случая, когда он находятся под наблюдением или прошли инструктаж по использованию
прибора со стороны лица, ответственног за их безопасность.
• Необходимо следить за тем, чтобы дети не играли
с прибором.
• Изготовитель снимает с себя всякую ответственность за ущерб, который может иметь место вследствие:
невернй установки и ненадлежащей, ошибочной и противоречащей разумным требованиям эксплуатации.
Необходимо обращаться к квалифицированным специалистам в указанных ниже случаях:
Для обеспечения эффективной и безопасной работы данного бытового электроприбора соблюдайте следующие
првила и условия:
– обращайтесь только в авторизованные сервисные центры;
– всегда требуйте использования фирменных запчастей;
– данное изделие предназначено для непрофессионального бытового применения; не изменяйте его
характеристии;
– на паспортной табличке приведены символы стран, для которых действительны настоящие инструкции;
– электрическая
безопасность прибора обеспечивается только при условии его подключения к эффективной
систме заземления, выполненной в соответствии с действующими нормами;
– будьте внимательны, чтобы не касаться нагревательных элементов и некоторых частей дверцы
духовки во время ее работы, т.к. они сильно нагреваются; в частности, ни в коем случае не разрешайте
детям приближаться к
духвке.
Не позволяйте детям прикасаться к:
– органам управления и прибору в целом;
– упаковочным материалам (пакетам, полистироловым деталям, гвоздям и т.д.);
– духовке во время ее работы и сразу после выключения из-за ее сильного нагрева;
– выведенному из эксплуатации изделию (в этом случае следует сделать безопасными узлы/детали,
представляющие потенциальную опасность).
A
Page 96

91
RU
Категорически запрещается:
– прикасаться к духовке влажными частями тела;
– использовать духовку, стоя на полу босыми ногами;
– тянуть за корпус духовки или за сетевой шнур для вынимания его от розетки;
– выполнять непредусмотренные и опасные операции;
– перегораживать отверстия для вентиляции или отвода тепла;
– оставлять сетевые шнуры других электробытовых приборов на горячих частях духовки
;
– подвергать прибор воздействию атмосферных агентов (дождя, солнечных лучей);
– использовать духовку для хранения различных предметов;
– использовать огнеопасные жидкости вблизи духовки;
– использовать переходники, тройники, удлинители и т.д;
– выполнять установку или ремонт духовки без участия квалифицированных специалистов.
Необходимо обращаться к квалифицированным специалистам в указанных ниже случаях:
– для установки духовки (с соблюдением указаний изготовителя);
– при появлении сомнений в правильности работы духовки;
– для замены сетевой розетки в случае ее несовместимости с вилкой сетевого шнура духовки.
Обращайтесь в авторизованные изготовителем центры сервисного обслуживания в
следующих случаях:
– сразу же после распаковки изделия в случае сомнений относительно его целостности;
– для замены или при повреждении сетевого шнура;
– при неисправности или плохой работе духовки, требуя использования оригинальных запчастей.
Рекомендуется придерживаться следующих правил:
– использовать духовку исключительно для приготовления продуктов питания, избегая прочих видов
использоваия;
– перед выполнением любой операции по чистке и уходу или в случае неисправности отключать духовку от сети
электропитания;
– пользоваться специальными рукавицами для того, чтобы ставить или вынимать посуду из духовки;
– всегда браться за ручку дверцы по центру, так как
по краям она может нагреваться сильнее из-за выходящего
грячего воздуха;
– всегда проверять, чтобы при неиспользуемой духовке ручки управления находились в выключенном
положении;
– в случае принятия решения о прекращении эксплуатации изделия отсоединить его от сети электропитания;
Установка (Рис.5)
Внимание: Важное примечание: установку прибора следует выполнять в соответствии с действующими нормами
и правилами. Установка должна выполняться только уполномоченными и квалифицированными специалистами.
Некоторые требования к кухонной мебели
Компоненты материала мебели, в которую встраивается духовка (пластмасса и ДСП), должны быть склеены
связкаи, устойчивыми к высокой температуре (макс. 100 °C): использование неподходящих материалов и клеев
может привести к деформациям и расклеиванию мебели. Мебель должна обеспечивать свободное прохождение
соединительных электрических кабелей. Мебель, в которую встраивается духовка, должна быть достаточно
прочной для того, чтобы
выдерживать ее вес.
Духовка должна быть надежно закреплена в предусмотренной для этого нише. Духовка может встраиваться в
стойку или под столешницу сборной кухонной мебели при условии обеспечения необходимой вентиляции.
Указания по монтажу
Модели CM и TL (Рис. 6a/6b/6c)
Измерьте толщину стенки (S) мебели, обычно равную 16, 18 или 20 мм.
Стенка толщиной 16 мм: установите на каждой крепежной скобе (F) 2 накладки (T) с номером 16.
Стенка толщиной 18 мм: установите на каждой крепежной скобе (F) 2 накладки (T) с номером 18.
Стенка толщиной 20 мм: для 20-мм стенки установки накладок не требуется.
Установите скобы (F), приложив их к стенке мебели, а снизу
- к панели, на которой будет стоять духовка.
Закрепите скобы (F) с помощью винтов (V). Вставьте духовку в мебель, полностью откройте дверцу и прикрепите
духовку к скобам (F) с помощью 4 винтов (V) и 4 пластиковых бобышек (D).
Модели CR, CS, SG и SM (Рис.6d)
Вставьте духовку в нишу для встраивания; прикрепите корпус духовки с помощью 4 винтов и 4 втулок, входящих в
комплект поставки, к стенкам мебели, используя боковые отверстия (Рис. 6d).
Примечание: В случае установки духовки под варочной панелью предварительно разверните вправо или
влево патрубок этой панели (R), чтобы обеспечить правильную установку духовки (Рис. 6е).
Page 97

92
Подключение к электрической сети
Духовка FRANKE поставляется в комплекте с трехполюсным кабелем питания, провода
которого имеют свободные концы.
В случае стационарного соединения, на участке между духовкой и сетью электропитания
должен быть установлен выключатель с расстоянием между разомкнутыми контактами не
менее 3 мм, обеспечивающий полное отключение прибора в условиях перенапряжения
категории III. Убедитесь в соблюдении следующих условий:
a) что
вилка и розетка рассчитаны на ток 16 A;
b) как вилка, так и розетка должны быть легко доступны и установлены так, чтобы
исключить возможность прикоснвения к находящимся под напряжением частям при
введении или отсоединении штепсельной вилки;
c) вилка должна вставляться без приложения усилия;
d) что при встраивании в мебель духовка не опирается на вилку, вставленную в розетку;
e) что к одной розетке не подключены кабели питания двух приборов;
f) в случае замены кабеля питания необходимо использовать кабель 3 x 1,5 мм
2
типа H05VV-F;
g) при подключении свободных концов жил должна быть обязательно соблюдена правильная полярность
(Коричневый=Фаза – Синий=Нейтраль – Желто-зеленый=Заземление).
Примечание: убедитесь, что характеристики домашней электрической сети (напряжение, максимальная
мощность и сила тока) соответствуют номинальным характеристикам приобретенной вами духовки FRANKE.
Примечание: частота сети определяется при включении. Когда таймер подключается к сети
частотой 60 Гц, при
запуске мигает символ P.
Технические данные
ИНФОРМАЦИЯ ДЛЯ ПОЛЬЗОВАТЕЛЕЙ
в соответствии со статьей 15 законодательного акта от 25 июля «Применение Директив 2002/95/CE,
2002/96/CE и 2003/108/CE, касающихся сокращения использования опасных веществ в электрических и
электронных приборах и утилизации отходов».
Имеющийся на приборе символ перечеркнутого контейнера для мусора указывает на то, что по завершении срока
службы данное изделие должно утилизироваться отдельно от обычных бытовых отходов.
Поэтому пользователь обязан сдать изделие с истекшим сроком службы в соответствующий центр сбора
электроных и электрических отходов или же вернуть его в магазин в момент приобретения нового изделия
аналогичного типа, из расчета один к одному.
Надлежащая утилизация прибора обеспечивает правильность его дальнейшей переработки с соблюдением норм
п охране окружающей среды, что позволяет исключить возможное отрицательное воздействие на окружающую
среду и на здоровье людей, а также благоприятствует вторичному использованию материалов, применяемых в
оборудвании.
Утилизация прибора, выполненная пользователем с нарушением действующих правил, влечет за собой
применени административных санкций согласно закону №22/1997 (ст. 50 и последующие Закона № 22/1997).
Полезные размеры духовки:
ширина: 440 мм
глубина: 415 мм
высота: 312 мм
Полезный объем духовки:
57 литров
Потребляемая мощность (в статическом
режиме):
для достижения температуры 175 °C: 0,32 кВтч
для поддержания температуры 175 °C: 0,62 кВтч
общая потребляемая мощность: 0,94 кВтч
Потребляемая мощность (в режиме
принудительной конвекции):
для достижения температуры 200 °C: 0,42 кВтч
для поддержания температуры 200 °C: 0,77 кВтч
общая потребляемая мощность: 1,19 кВтч
Напряжение и частота
электрической сети:
220-240 В ~ 50-60Гц
Общая мощность и
характеристики плавкого
предохранителя:
2300 Вт - 16 A
Мощность нагревательных
элементов:
верхнего 1000 Вт
нижнего 1250 Вт
гриля 2250 Вт
электровентилятор 30 Вт
лампочка для освещения духовки
15 Вт x 1
тангенциальный вентилятор 15 Вт
Данное изделие
соответствует
следующим Директивам
Европейского Союза:
– 2006/95/EC
(по низковольтному
оборудованию);
– 2004/108 CEE
(по электромагнитной
совместимости).
СИНИЙ
ЖЕЛТО-ЗЕЛЕНЫ
КОРИЧНЕВЫЙ
Page 98

93
Spis treści
Wstęp.............................................................................................................................................. 93
Widok z bliska................................................................................................................................. 93
Przed pierwszym uruchomieniem...................................................................................................94
Rady................................................................................................................................................ 94
Sposób eksploatacji ........................................................................................................................ 94
Informacyjna tabela pieczenia ........................................................................................................ 98
Czyszczenie i konserwacja piekarnika............................................................................................99
Serwis ........................................................................................................................................... 100
Ostrzeżenia bezpieczeństwa ........................................................................................................ 100
Instalacja (Rys. 5) ......................................................................................................................... 101
Instrukcje montażu........................................................................................................................ 101
Podłączenie do sieci elektrycznej ................................................................................................. 102
Dane techniczne ........................................................................................................................... 102
Wstęp
Dziękujemy za wybranie produktu Franke.
Przed rozpoczęciem użytkowania urządzenia należy uważnie zapoznać się z ostrzeżeniami i radami zawartymi w
niniejszej instrukcji obsługi. W ten sposób obsługa urządzenia będzie łatwiejsza, a prawidłowa konserwacja
przedłuży jego żywotność. Prosimy o zachowanie niniejszej instrukcji obsługi na przyszłość.
Widok z bliska
Pokrętło wyboru programów
Służy do wyboru trybu pracy piekarnika w zależności od rodzaju pieczenia. Po
ustawieniu dowolnego programu włącza się oświetlenie wewnętrzne piekarnika, co
wskazuje, że piekarnik jest włączony.
Programator
W gamie piekarników Franke przewidziano różne systemy sterowania i regulacji czasu
pieczenia, na str. 95 podano dokładne instrukcje dotyczące każdego z nich; wystarczy
sprawdzić, w jaki rodzaj sterowania wyposażony jest dany piekarnik, aby odnaleźć
instrukcje prawidłowej obsługi danej funkcji.
Kontrolka termostatu
Oznaczona symbolem ostrzega, że pracują nagrzewające się elementy
piekarnika. Wyłącza się, gdy osiągnięta zostanie ustawiona temperatura, a ponownie
włącza, gdy piekarnik powraca do fazy nagrzewania. Zaleca się sprawdzanie przed
włożeniem potrawy do piekarnika, czy osiągnął on ustawioną temperaturę.
Pokrętło regulacji temperatury (Termostat)
Pozwala na wybranie najodpowiedniejszej temperatury do przygotowywanej potrawy
oraz na utrzymanie jej na stałym poziomie przez cały czas pieczenia. Aby wybrać
żądaną temperaturę, należy obrócić pokrętło zgodnie z ruchem wskazówek zegara tak,
aby wskaźnik zatrzymał się przy odpowiednim numerze. Maksymalna temperatura
wynosi ok. 260 °C.
Prowadnice ociekacza oraz rusztu
Służą do zapewnienia prawidłowego rozłożenia rusztu oraz ociekacza na jednym z
5 fabrycznie przewidzianych poziomów (od pozycji 1 na dole do 5 na samej górze);
w informacyjnej tabeli pieczenia (str. 98) znajdują się informacje na temat poziomu
optymalnego dla danego zastosowania piekarnika.
Taca do ociekania
Służy do zbierania soków wydzielających się podczas pieczenia oraz do
bezpośredniego pieczenia potraw; jeśli nie są używane, należy je wyjąć z piekarnika.
Taca do ociekania wykonana jest ze stali typu AA pokrytej emalią i jest przeznaczona
do kontaktów z artykułami spożywczymi. Uwaga: Aby uzyskać lepsze efekty pieczenia,
zaleca się wstawienie ociekacza skierowanego pochyłą częścią w stronę tylnej ściany
komory piekarnika.
Ruszt
Służy do podtrzymywania blach do pieczenia, form do ciast oraz różnych pojemników
za wyjątkiem ociekacza dołączonego w komplecie, lecz przede wszystkim do pieczenia
mięsa, ryb oraz chleba z funkcjami Grill i Grill+termoobieg. Należy unikać
bezpośredniego kontaktu rusztu z potrawą.
A
BCDEF
G
D
A
F
G
E
Page 99

94
Przed pierwszym uruchomieniem
Przed pierwszym użyciem piekarnika należy uruchomić puste urządzenie ustawiając pokrętło regulacji temperatury
na pozycji maksymalnej i rozgrzewać w ten sposób piekarnik przez co najmniej 40 minut. Drzwiczki piekarnika
powinny w tym czasie być całkowicie otwarte. Należy również zapewnić dobrą wentylację pomieszczenia.
Zapach, który powstanie podczas tej czynności, spowodowany jest parowaniem substancji zastosowanych w celu
zabezpieczenia piekarnika w okresie pomiędzy jego produkcją a instalacją. Po upływie tego czasu piekarnik jest
gotowy do użytku.
Rady
Aby zapewnić optymalne wyniki pieczenia, zaleca się, aby nie wkładać potraw do zimnego piekarnika, lecz do
nagrzanego do odpowiedniej temperatury.
Podczas pieczenia nie kłaść naczyń, blach itp. bezpośrednio na dnie piekarnika, lecz na rusztach lub ociekaczach
dostarczanych w komplecie, które można włożyć na jeden z 5 poziomów; nieprzestrzeganie tego zalecenia może
spowodować uszkodzenie emalii piekarnika.
Nie przykrywać ścianek piekarnika, a w szczególności dolnej części komory pieczenia, folią aluminiową.
Ewentualne naprawy należy zlecić do specjalistycznego serwisu.
Skontaktować się z najbliższym naszym centrum serwisowym i żądać zastosowania wyłącznie oryginalnych części
zamiennych.
Państwa piekarnik Franke jest pokryty specjalną, łatwą w czyszczeniu emalią, dzięki czemu nie dochodzi do
wielokrotnego przypiekania pozostałości z poprzedniego pieczenia.
Ewentualne panele samoczyszczące (jeśli piekarnik jest w nie wyposażony) należy czyścić wodą z mydłem
(patrz instrukcje czyszczenia).
Uwaga: Przed uruchomieniem piekarnika zapoznać się z instrukcjami dotyczącymi stosowania timera (patrz str. 96).
– Jeśli piekarnik jest wyposażony w automatyczny programator pieczenia lub wyłączenia, aby można przejść do
obsługi piekarnika w trybie ręcznym należy wybrać opcję “Tryb ręczny” oznaczoną symbolem .
Sposób eksploatacji
W Państwa piekarniku połączono najlepsze cechy tradycyjnych piekarników o naturalnej “statycznej” konwekcji z
nowoczesnymi piekarnikami z konwekcją wymuszoną - “z termoobiegiem”. Jest to urządzenie wszechstronne, które
pozwala na łatwe i bezpieczne wybranie jednego z 6 różnych sposobów pieczenia. Przy pomocy pokręteł (A) oraz
(D) na panelu można ustawić różne programy oraz żądaną temperaturę. Aby zapewnić optymalne wykorzystanie
zalet Państwa piekarnika Franke, prosimy o częste korzystanie z informacyjnej tabeli pieczenia na stronie str. 98.
Wentylacja chłodząca
Aby zapewnić obniżenie temperatury drzwi, panelu oraz boków, piekarnik Franke jest wyposażony w wentylator
chłodzący, który uruchamia się automatycznie, gdy piekarnik jest gorący. Gdy wentylator pracuje, można odczuć
strumień powietrza wychodzący pomiędzy frontem a drzwiczkami piekarnika. Szczególną uwagę przyłożono do
faktu, aby zapewnić, że prędkość wychodzącego nie przeszkadzała w kuchni oraz aby maksymalnie obniżyć
poziom wytwarzanego hałasu.
W celu zapewnienia pełnej ochrony mebli, po zakończeniu pieczenia wentylacja działa do momentu, gdy
piekarnik nie będzie wystarczająco chłodny.
Oświetlenie piekarnika
Ten symbol odpowiada zapaleniu oświetlenia wewnętrznego piekarnika bez ustawienia nagrzewania.
Funkcja taka jest przydatna podczas czyszczenia wyłączonego piekarnika, ponieważ dzięki niej widać
wnętrze komory piekarnika.
Programy pieczenia
Pieczenie statyczne naturalne
Pokrętło termostatu (D) powinno być ustawione na pozycji pomiędzy 50 °C a Max (260 °C).
Piekarnik jest nagrzewany od góry (grzałka górna) oraz od dołu (grzałka dolna). Jest to funkcja pieczenia
tradycyjnego, co pozwala na jednolite upieczenie Państwa potraw przy wykorzystaniu tylko jednej półki.
Termoob.GrzanieGóraDół
Pokrętło termostatu (D) powinno być ustawione na pozycji pomiędzy 50 °C a Max (260 °C).
Włącza się grzałka górna oraz grzałka dolna, a także wentylator wewnątrz piekarnika.
Stałe i jednolite ciepło pozwala na upieczenie oraz na przyrumienienie potrawy w każdym miejscu.
Można piec również różne potrawy, wykorzystując maksymalnie 2 półki równocześnie.
Page 100

95
Pieczenie z termoobiegiem - dół
Pokrętło termostatu (D) powinno być ustawione na pozycji pomiędzy 50 °C a Max (260 °C).
Włącza się grzałka dolna oraz wentylator. Stosować do pieczenia ryb oraz wszelkich produktów
mrożonych i dań gotowych. Wyjątkowo nadaje się do produktów cukierniczych.
Pieczenie z termoobiegiem - góra
Pokrętło termostatu (D) powinno być ustawione na pozycji pomiędzy 50 °C a Max (260 °C).
Włącza się grzałka górna i wentylator. Niska moc oraz działanie wentylatora umożliwiają równomierne
i bardzo delikatne pieczenie. Idealnie nadaje się do suchych ciast i niektórych typów zapiekanek
makaronowych.
Grill
Pokrętło termostatu (D) powinno standardowo znajdować się na pozycji Max (260 °C), lecz można
również wybrać niższą temperaturę, jeśli potrawa będzie wolniej grillowana.
Włącza się grzałka grill znajdująca się w górnej części piekarnika. W takim przypadku szybkie upieczenie
powierzchni promieniami podczerwonymi sprawia, że mięso wewnątrz jest bardzo miękkie; funkcję tę
można również wykorzystać do szybkiego przygotowania tostów z nawet 9 kromek chleba. Piekarnik
Franke został opracowany w taki sposób, aby grillowanie odbywało się przy całkowicie zamkniętych
drzwiczkach.
Ostrzeżenie: Grzałka grilla bardzo się nagrzewa podczas pracy; unikać dotykania jej, nawet
przypadkiem, podczas obracania i wyjmowania grillowanych potraw. Firma Franke zaprojektowała
piekarnik w taki sposób, aby w maksymalny sposób chronić ręce użytkowników podczas wkładania i
wyjmowania potraw z gorącego piekarnika.
Grill+termoobieg
Pokrętło termostatu (D) powinno standardowo znajdować się na pozycji Max (260 °C), lecz można
również wybrać niższą temperaturę, jeśli potrawa będzie wolniej grillowana.
Włącza się grzałka grilla znajdująca się w górnej części piekarnika oraz wentylator. Dzięki temu oprócz
jednokierunkowego nagrzewania wewnątrz piekarnika dochodzi do wymuszonego obiegu powietrza.
W ten sposób zapobiega się przypaleniu powierzchni potraw i zwiększa przenikanie ciepła. Dzięki
zastosowaniu grilla z wentylatorem uzyskuje się doskonały efekt przy przygotowywaniu szaszłyków
mieszanych (z mięsem i warzywami), kiełbasek, kotletów wieprzowych, kotletów jagnięcych, piersi z
kurczaka, przepiórek w szałwii, filetów wieprzowych, itp.
Pokrętło timera czasu zakończenia pieczenia
Timer czasu zakończenia pieczenia jest urządzeniem, które automatycznie wyłącza
piekarnik po upływie ustawionego czasu (w zakresie od 1 do 120 minut). Aby ustawić
timer zakończenia pieczenia, należy wykonać jeden prawie pełny obrót pokrętłem (B)
w kierunku zgodnym z ruchem wskazówek zegara. Następnie, obracając w kierunku
przeciwnym, ustawić żądany czas w taki sposób, aby numer oznaczający określoną
liczbę minut znalazł się przy stałym znaczniku na piekarniku. Po upływie ustawionego
czasu piekarnik się automatycznie wyłącza i uruchamia się sygnał dźwiękowy.
Uwaga: Natychmiast po wyłączeniu i przez dłuższy czas wewnątrz piekarnika
utrzymuje się temperatura bliska ustawionej temperaturze pieczenia.W związku z tym,
aby uniknąć przegotowania lub przypalenia potraw zaleca się wyjąć je z piekarnika.
Uwaga: aby ustawić ręczny tryb pracy piekarnika, tj. bez programatora końca
pieczenia, należy ustawić wskaź
nik na pokrętle na odpowiednim stałym symbolu
na piekarniku. Gdy piekarnik jest wyłączony, programator końca pieczenia może być
używany jako zwykły minutnik.
Zegar czasu zakończenia pieczenia
Ten zegar jest już ustawiony na ręczną obsługę piekarnika, dlatego pieczenie można
prowadzić nawet nie przestawiając samego zegara
Pokrętło prawe
Pokrętłem prawym można wybrać kolejno uruchamiane funkcje (timer, koniec
pieczenia, Początek pieczenia, ustawianie godziny), co jest sygnalizowane przez
miganie odpowiedniej diody.
Ponadto, krótkie wciśnięcie pokrętła umożliwia przejrzenie zaprogramowanych
ustawień (Pytanie), natomiast dłuższe wciśnięcie (przez około dwie sekundy)
powoduje skasowanie ustawień (Reset).
Pokrętło lewe
Obracając pokrętło lewe ustawia się wskazówki zegara odpowiednio do załączonej
funkcji (migająca dioda led).
B
IVI
I
V
I
I
IX
V
V
I
VI
III
I
X
X
III
IXI
TIMER
START
STOP
B
 Loading...