

Page 1
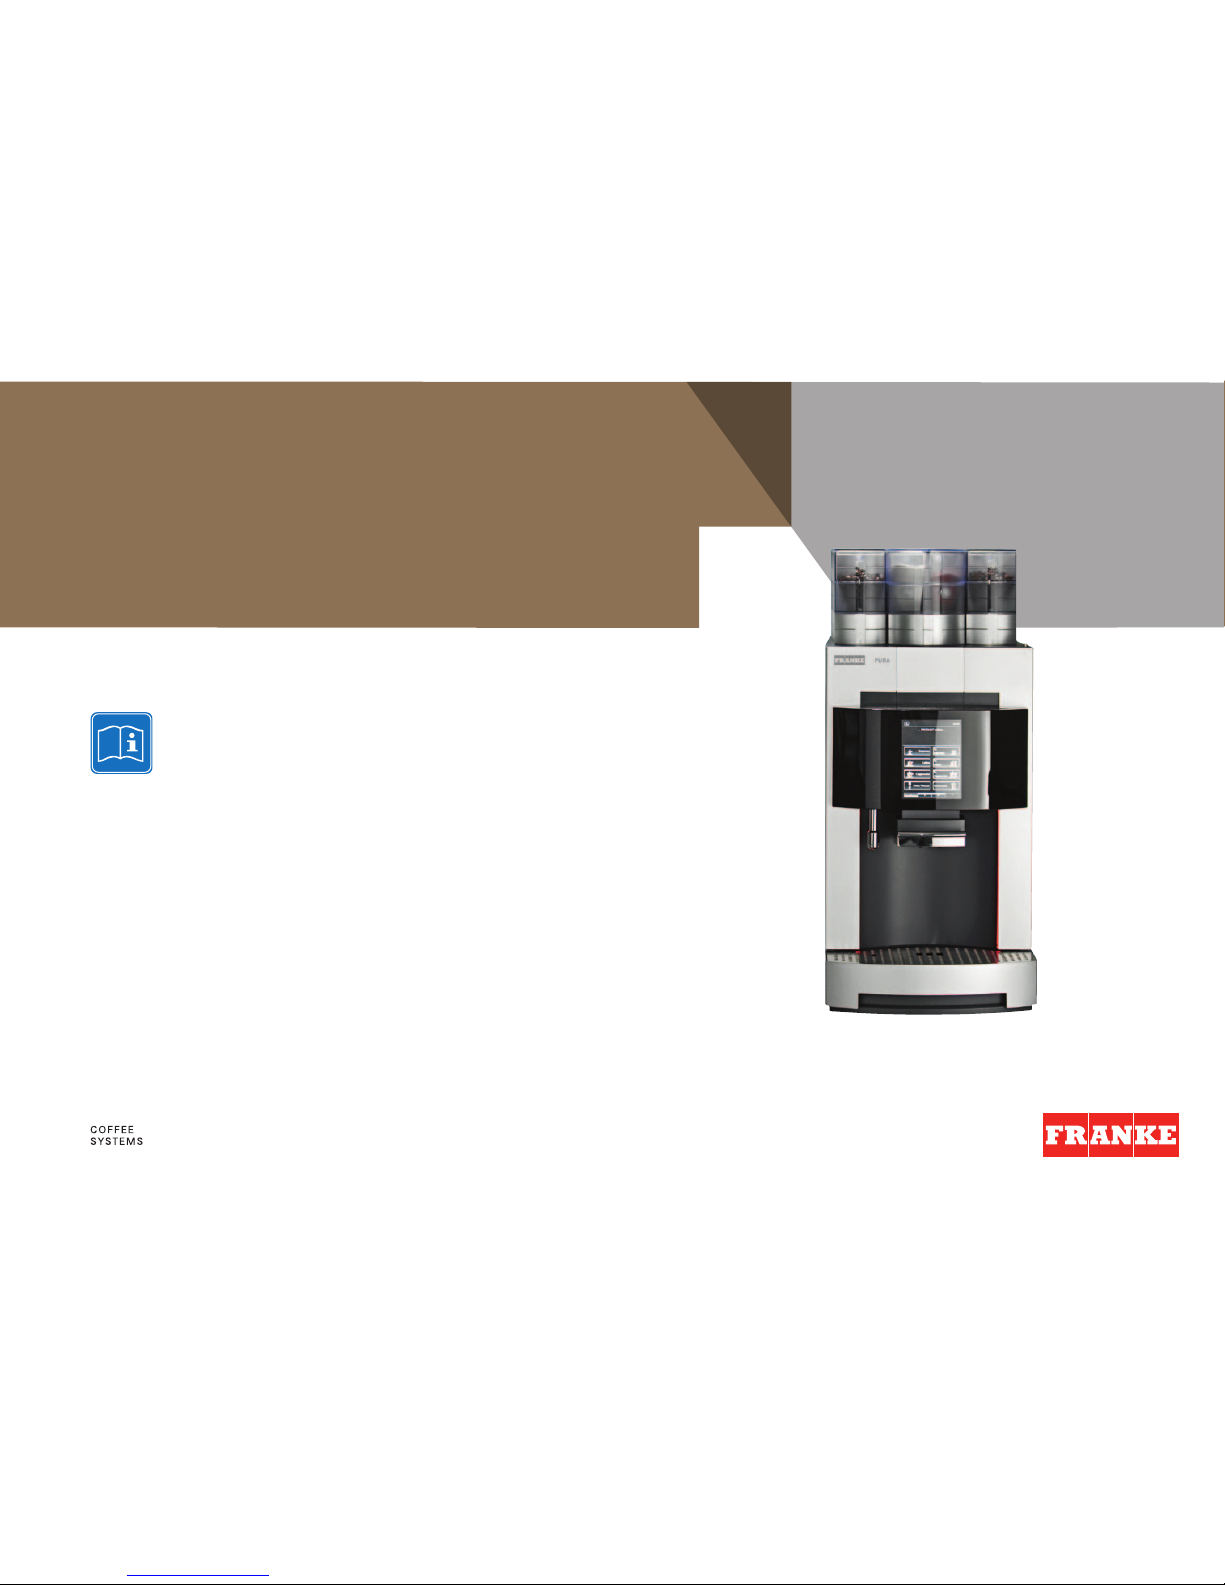
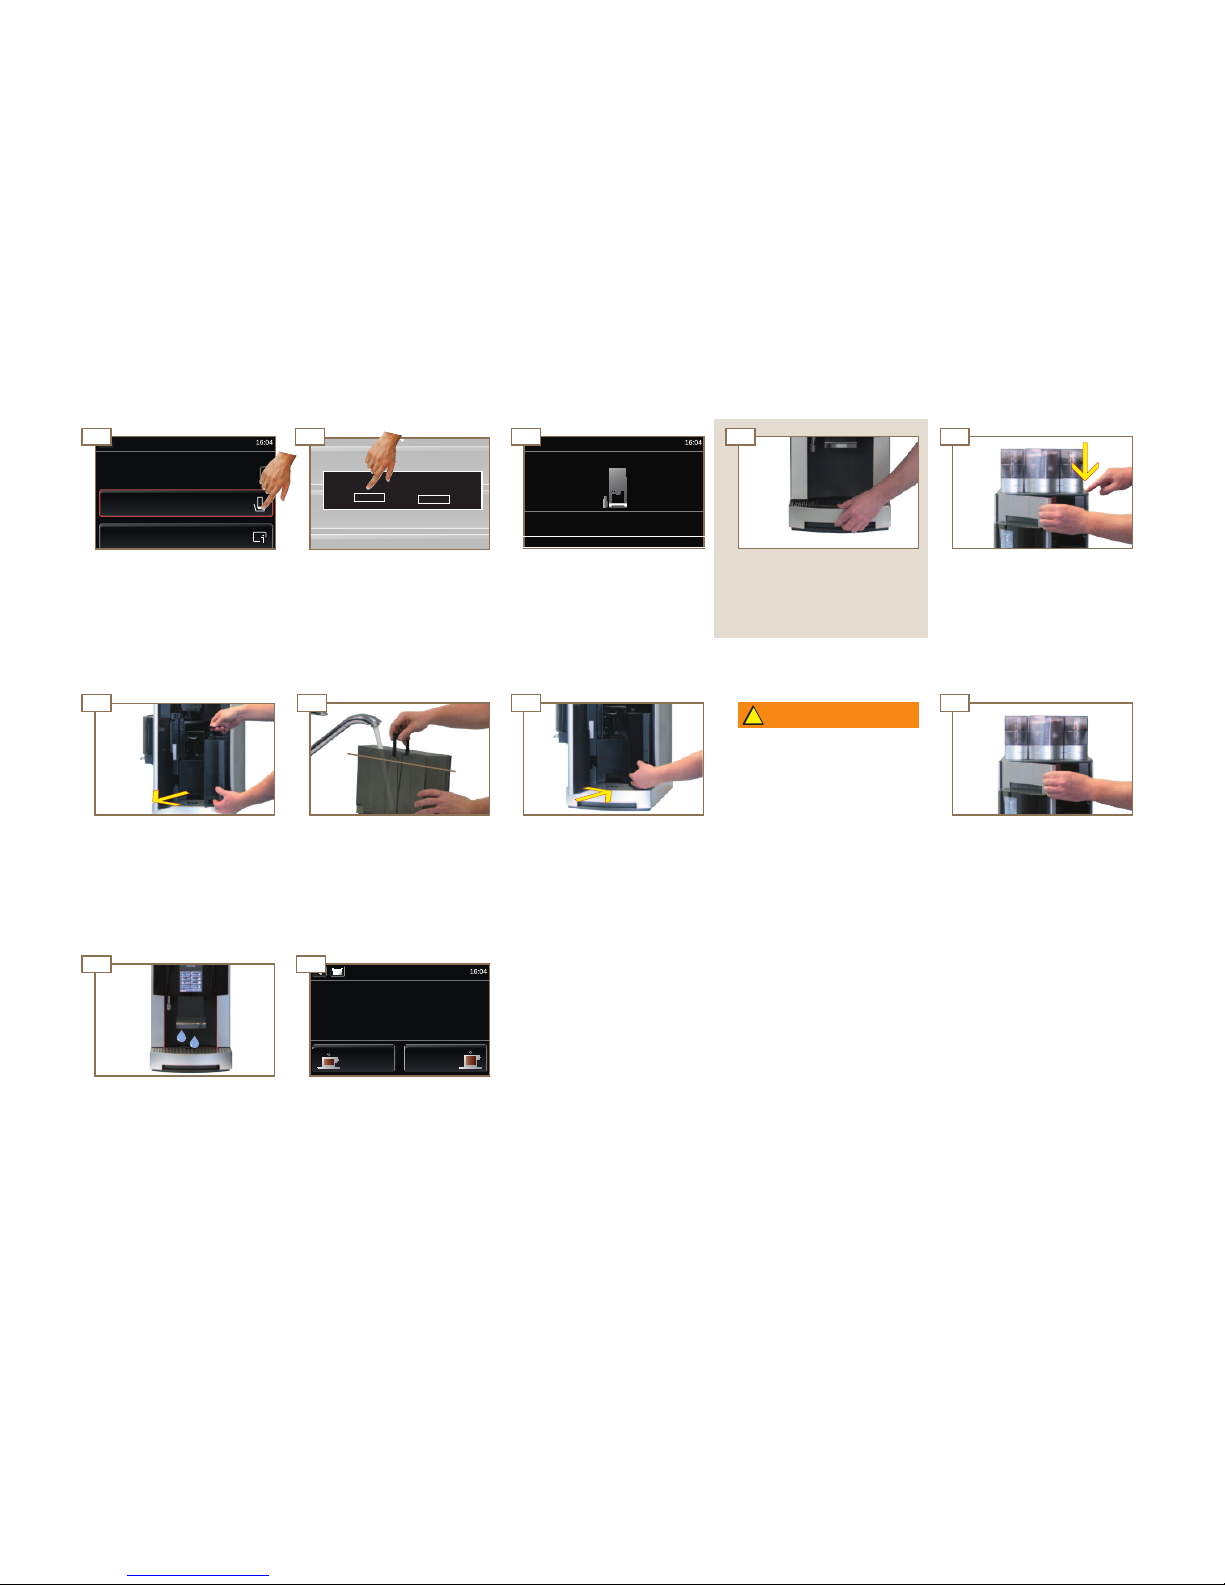
PURA PRONTO & FRESCO
Original Operating Instructions
Read the operating instructions and the chapter
on safety information before operating the machine. Keep
the operating instructions near the machine.
Page 2

Page 3

Dear customer,
Page 1
Congratulations on your purchase of a Pura coffee machine.
Thank you for your confidence in us.
Pura is a powerful and space-saving coffee machine. It adapts
to your needs perfectly.
Your customers will be impressed as you quickly prepare highquality, customized coffee specialties.
We hope you enjoy your coffee machine and that it will bring
you consistently happy customers.
Sincerely, FRANKE Kaffeemaschinen AG
Dear customer,
Page 4
Table of contents
Page 2
Cleaning, rinsing and serviCing
. . . . . . . . . . . . . . . . . . . . . . . . . . 33
Cleaning the water tank
. . . . . . . . . . . . . . . . . . . . . . . . . . . . . 34
Clean the brewing unit .
. . . . . . . . . . . . . . . . . . . . . . . . . . . . . 35
Pura fresCo - Clean the mixing Chamber .
. . . . . . . . . . . . . . . . . 36
aCtivate wiPe ProteCtion
. . . . . . . . . . . . . . . . . . . . . . . . . . . . . 38
rinsing the Coffee and Powder system manually
. . . . . . . . . . . . 38
water filter
. . . . . . . . . . . . . . . . . . . . . . . . . . . . . . . . . . . . . . 39
maintenanCe Plan
. . . . . . . . . . . . . . . . . . . . . . . . . . . . . . . . . . 43
Configuration
. . . . . . . . . . . . . . . . . . . . . . . . . . . . . . . . . . . . . . . 44
introduCtion to Programming
. . . . . . . . . . . . . . . . . . . . . . . . . 44
1 ProduCts
. . . . . . . . . . . . . . . . . . . . . . . . . . . . . . . . . . . . . . 45
2 CloCk
. . . . . . . . . . . . . . . . . . . . . . . . . . . . . . . . . . . . . . . . . 48
3 temPeratures
. . . . . . . . . . . . . . . . . . . . . . . . . . . . . . . . . . . 49
4 oPerating mode
. . . . . . . . . . . . . . . . . . . . . . . . . . . . . . . . . . 49
5 Counters
. . . . . . . . . . . . . . . . . . . . . . . . . . . . . . . . . . . . . . 50
8 Control Panel
. . . . . . . . . . . . . . . . . . . . . . . . . . . . . . . . . . . 51
9 Pins
. . . . . . . . . . . . . . . . . . . . . . . . . . . . . . . . . . . . . . . . . . 54
shut down and disPosal
. . . . . . . . . . . . . . . . . . . . . . . . . . . . . . . 55
shut-down for longer Periods and storage
. . . . . . . . . . . . . . . 55
disPosal
. . . . . . . . . . . . . . . . . . . . . . . . . . . . . . . . . . . . . . . . 55
troubleshooting
. . . . . . . . . . . . . . . . . . . . . . . . . . . . . . . . . . . . . 56
in the event of maChine errors
. . . . . . . . . . . . . . . . . . . . . . . . 56
helP with maChine errors
. . . . . . . . . . . . . . . . . . . . . . . . . . . . 57
helP with Problems ConCerning ProduCt quality
. . . . . . . . . . . . 58
index
. . . . . . . . . . . . . . . . . . . . . . . . . . . . . . . . . . . . . . . . . . . . . 59
exPlanation of symbols
. . . . . . . . . . . . . . . . . . . . . . . . . . . . . . . . . 3
symbols from the oPerating instruCtions
. . . . . . . . . . . . . . . . . . 3
symbols used in the software
. . . . . . . . . . . . . . . . . . . . . . . . . . 4
for your safety
. . . . . . . . . . . . . . . . . . . . . . . . . . . . . . . . . . . . . . 6
general safety ConCerns when using the Pura
. . . . . . . . . . . . . . 7
sCoPe of delivery and identifiCation
. . . . . . . . . . . . . . . . . . . . . . . . 9
sCoPe of delivery
. . . . . . . . . . . . . . . . . . . . . . . . . . . . . . . . . . . 9
identifiCation
. . . . . . . . . . . . . . . . . . . . . . . . . . . . . . . . . . . . . 11
desCriPtion of the maChine
. . . . . . . . . . . . . . . . . . . . . . . . . . . . . 12
Pura maChine
. . . . . . . . . . . . . . . . . . . . . . . . . . . . . . . . . . . . . 12
Pura ComPonents
. . . . . . . . . . . . . . . . . . . . . . . . . . . . . . . . . . 13
touCh disPlay
. . . . . . . . . . . . . . . . . . . . . . . . . . . . . . . . . . . . . 14
add-on units
. . . . . . . . . . . . . . . . . . . . . . . . . . . . . . . . . . . . . 15
installation and teChniCal data
. . . . . . . . . . . . . . . . . . . . . . . . . . 16
start-uP, filling and emPtying
. . . . . . . . . . . . . . . . . . . . . . . . . . . 19
daily start-uP of Pura
. . . . . . . . . . . . . . . . . . . . . . . . . . . . . . 19
filling the Pura
. . . . . . . . . . . . . . . . . . . . . . . . . . . . . . . . . . . 20
emPtying the Pura
. . . . . . . . . . . . . . . . . . . . . . . . . . . . . . . . . . 22
PreParing drinks
. . . . . . . . . . . . . . . . . . . . . . . . . . . . . . . . . . . . . 28
PreParing a standard drink
. . . . . . . . . . . . . . . . . . . . . . . . . . . 28
PreParing two drinks at onCe
. . . . . . . . . . . . . . . . . . . . . . . . . 29
drink PreParation using the queue funCtion (if enabled)
. . . . . . 30
drink PreParation with PreseleCtion (if enabled)
. . . . . . . . . . . . 31
hot water disPenser
. . . . . . . . . . . . . . . . . . . . . . . . . . . . . . . . 32
Table of contents
Page 5
!
!
!
01
4
4
01
i
Explanation of symbols
Page 3
Explanation of symbols
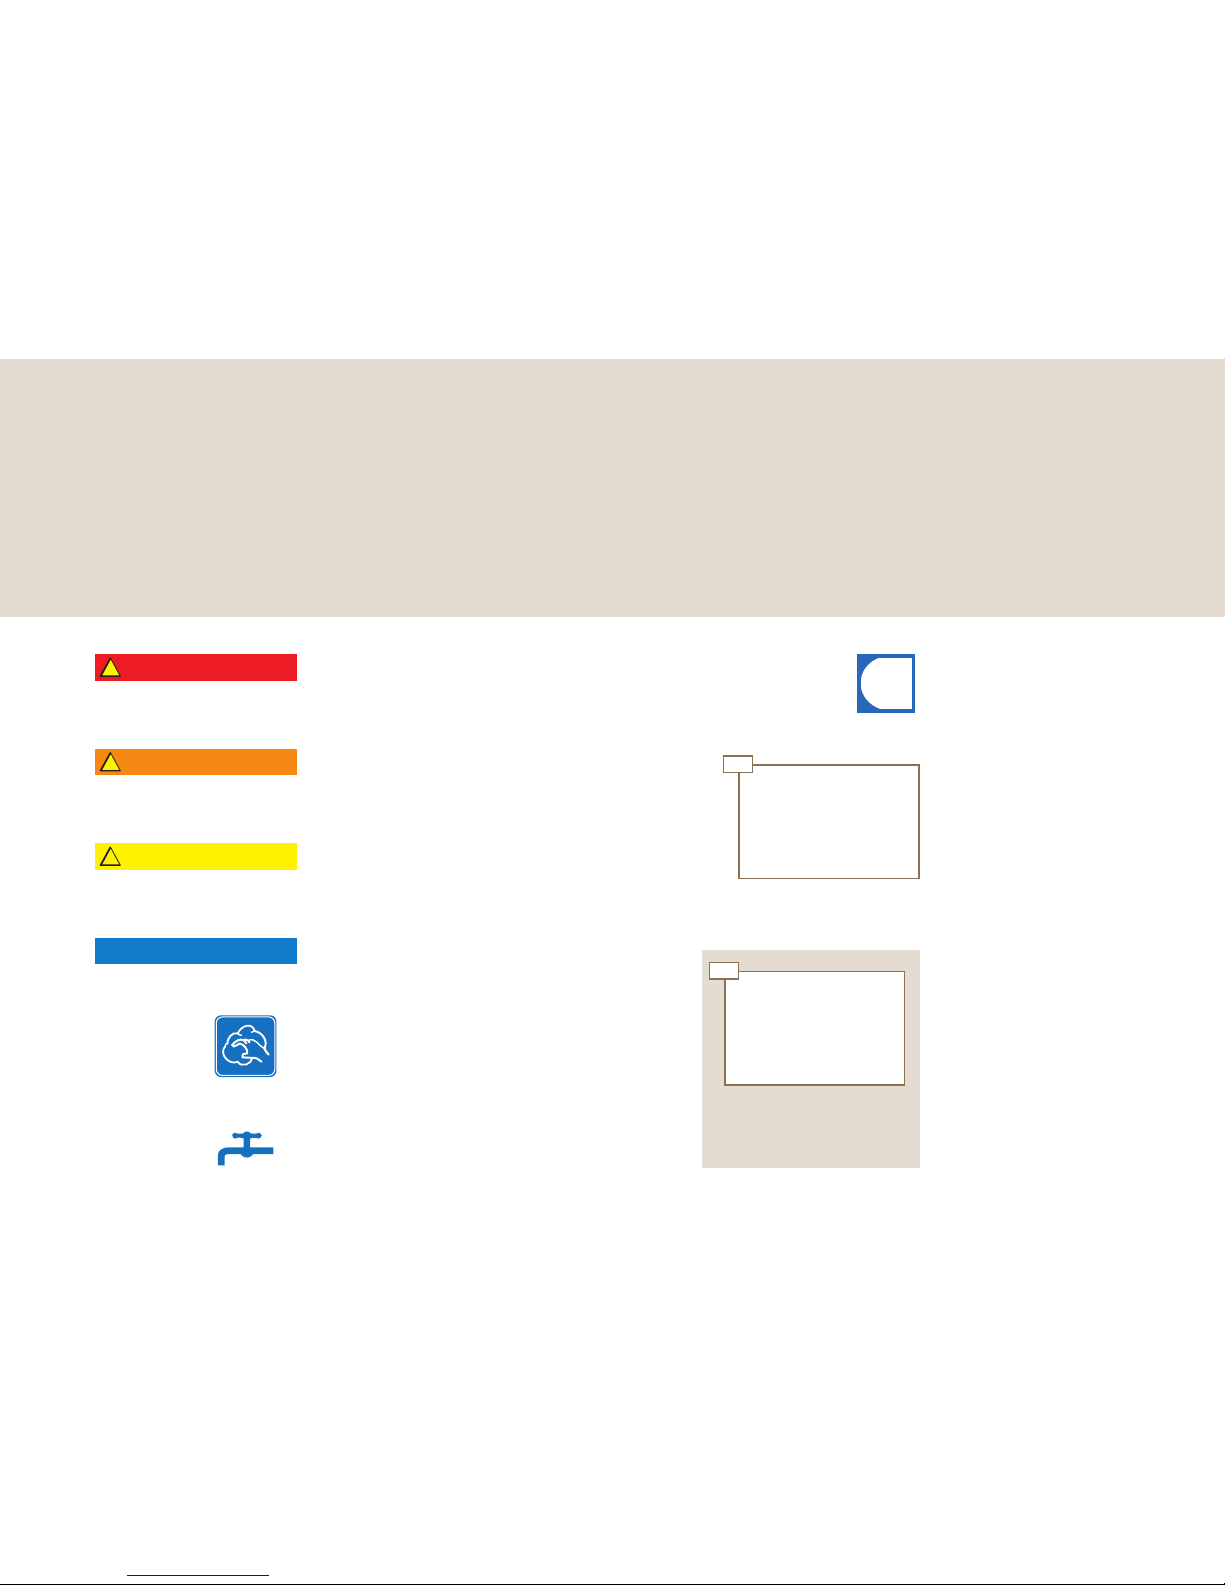
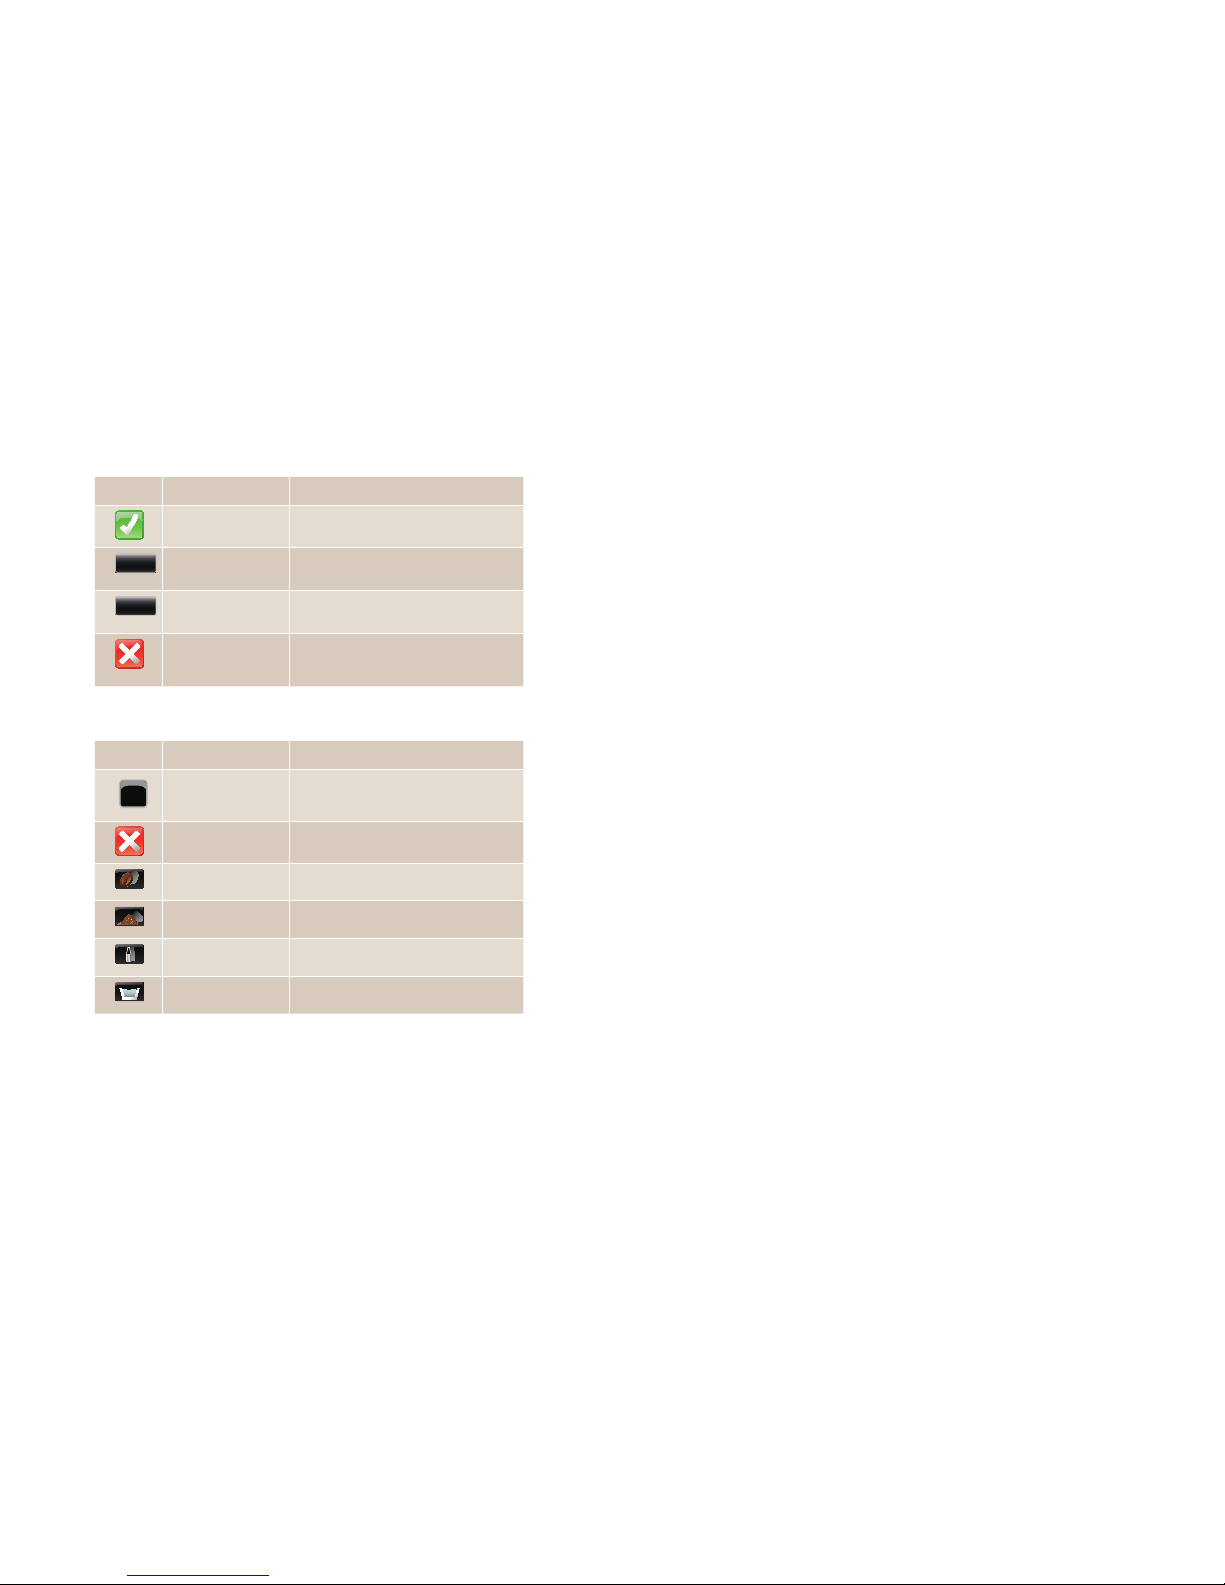
So that you can get the most out of your Pura, we would like to familiarize you with the symbols used
in the operating instructions and the software. For us, thorough information and open communication go without saying.
Symbols from the Operating instructions
This symbol indicates tips, shortcuts
and additional information.
Steps on a background are optional. They must be performed
depending on the model of your
machine.
Thorough "rinsing" of removable
parts.
"Cleaning" the add-on unit or
individual components.
Describes in text and pictures a
step that you must perform.
DANGER
NOTICE
WARNING
CAUTION
NOTICE indicates possibility of damage to the machine.
DANGER indicates potentially lifethreatening danger or grave injury.
CAUTION indicates risk of minor
injury.
WARNING indicates risk of injury.
Page 6
Explanation of symbols
Page 4
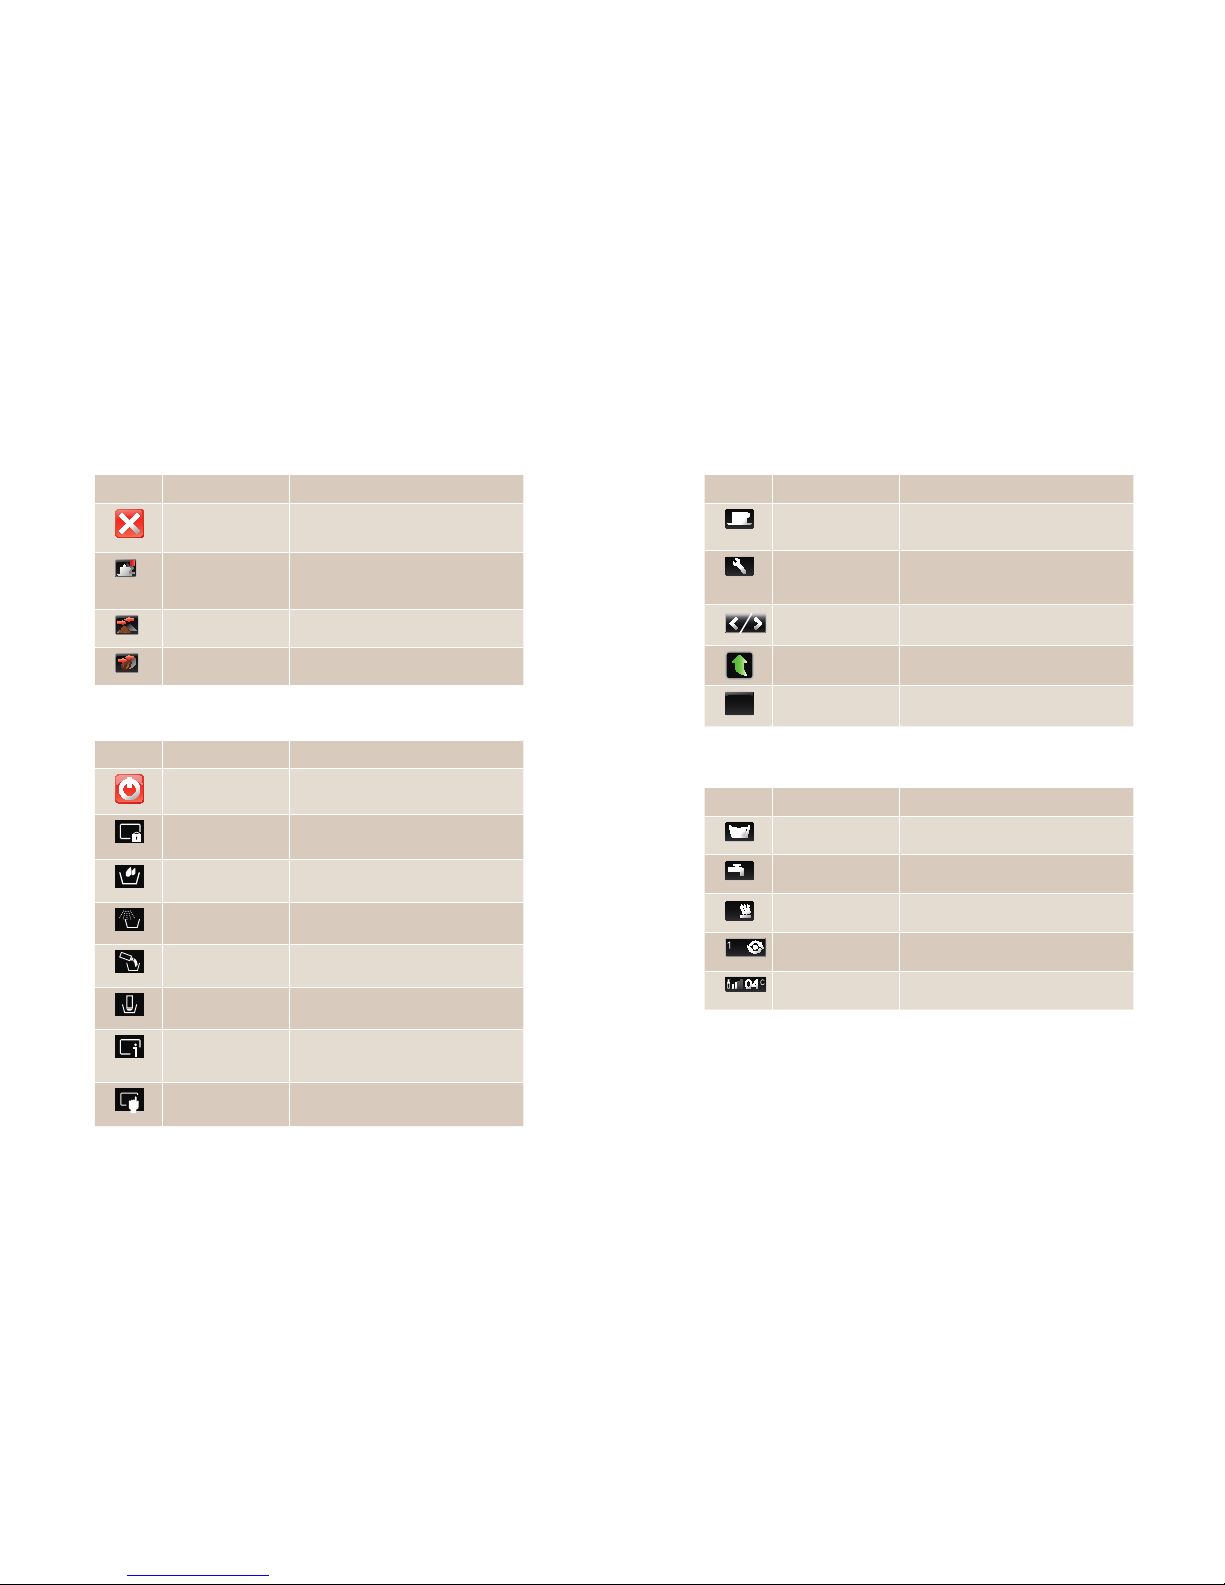
Status
Symbol Designation Description
Water tank
Operation with a water tank
Water connection
Operation with a water connection
1
Heating
Boiler 1 is heating.
Pump
Pump 1 is pumping water.
Fresh milk
Fill level and temperature of fresh milk (Pura
fresco only)
Navigation
Symbol Designation Description
Product level
Press to switch to the Product level to prepare
drinks.
Maintenance level
Press to switch to Maintenance level to
perform maintenance tasks or adjust the
configuration.
Next page/Previous
page
Press to scroll through menus with multiple
pages.
Up one level
Press this button to move up one level in the
menu.
DE
Language selection
Press to change the language (if programmed).
Caring for the machine
Symbol Designation Description
Standby
Press to put the machine in standby mode.
Activate wipe protection
Deactivates the display for 20 seconds. For
non-hazardous wiping of the control panel.
Rinse
Press to start the rinsing process.
Clean
Press to start the cleaning process.
Descale
Press to start the descaling process.
Rinse water filter
Press to rinse the water filter.
Info
Press for machine information (software version, machine type, serial number, installation
number).
Program
Press to access the Programming menu.
Products
Symbol Designation Description
Cancel
Press to cancel a product or setting.
2
Product repetition
Press to prepare two of the same product at
the press of a button. The products are prepared one after another.
Powder type
Press to select the desired powder type.
Coffee type
Press to select the desired coffee type.
Symbols used in the software
Page 7
Explanation of symbols
Page 5
Events
Configuration
Symbol Designation Description
i
Information
Press to display information and help in the
event of machine errors.
Close
Press to exit the Information level.
Coffee beans
Add beans.
Powder
Add powder.
Fresh milk
Add fresh milk.
Water tank
Add water.
Symbol Designation Description
OK
Press to confirm values or input.
DEL
Press to delete individual characters in the
input field.
CLEAR
Press to clear all information in the input field.
EXIT
Press to cancel input and exit the menu. Values
that have been changed will not be saved.
DEL
CLEAR
Page 8
i
For your safety
Page 6
For your safety
If you need more information or
if specific problems occur that
cannot be resolved using these
instructions, contact your local
customer service representative for the required information
or contact FRANKE Kaffeemaschinen AG in Aarburg,
Switzerland, directly.
Important
• Do not operate the coffee machine or add-on units until you have
completely read and understood these instructions.
• Keep these instructions near your coffee machine.
• Your Pura coffee machine is intended for use by trained personnel. Each operator of the Pura must have read and understood
the instructions. This does not apply to self-service customers.
Self-service machines must always be monitored to protect the
users.
• Children or physically or mentally challenged persons must never
approach the device alone and must always be supervised.
• Have the machine serviced at regular intervals. Regular maintenance will ensure the safe operation and high performance of
your Pura.
• If the machines are sold or transferred to a third party, give the
operating instructions to the next user.
• The configuration of your coffee machine may differ from that
shown in the instructions. Please refer to your purchase agreement.
• You will find statements regarding the conformity of your coffee machine in the accompanying Declaration of conformity
(1N 330 084).
• Additional accessories may be obtained directly from your retailer
or from FRANKE Kaffeemaschinen AG in Aarburg, Switzerland.
Pura
The Pura is a coffee machine for use in food service, offices and
similar environments. It is designed to process whole coffee beans,
powder and fresh milk.
Your coffee machine is designed exclusively for preparing coffee
drinks, powdered drinks and hot water in accordance with these
instructions and the technical data.
Refrigeration unit/Milk systems (optional)
Milk systems are optional add-on units for Pura coffee machines.
They are to be used only to cool milk in conjunction with preparing
coffee drinks with a Pura coffee machine.
Only use pre-cooled milk (2 - 5 °C or 36 - 41°F). Only use FRANKE
cleaning solution. Other cleaning agents may leave residue in the
milk system.
Cup warmer (optional)
The cup warmer is an optional add-on unit for Pura coffee machines.
It is intended only for warming coffee cups and glasses used when
preparing drinks.
The cup warmer is not designed to dry dish towels or other cloths. It
is not necessary to cover the cups to warm them.
Both you and the coffee machine are important to us. Therefore, we would like to provide you with detailed safety information. For us, a high degree of safety goes without saying. Protect yourself against
remaining risks from use of the machine.
Proper use and foreseeable improper use
Page 9

! !
!
!
!
For your safety
Page 7
Risk of scalding!
During cleaning, hot water and steam are released repeatedly.
• Keep hands away from the outlets and nozzles during cleaning!
When drinks are dispensed, the products themselves pose a risk of
scalding.
• Always be careful with hot drinks!
WARNING
Risk of burns!
The coffee and milk dispensers and the hot water nozzle are hot.
• Do not touch the outlets or nozzles.
The surfaces of the cup warmer are hot.
• Do not touch these surfaces.
WARNING
Risk of injury!
Reaching into the machine may result in abrasions or crushing injuries from interior components.
• Only open the machine when daily work requires it (e.g. to clean
the powder system or empty the grounds container or fill/
empty the water tank).
• Exercise care and caution when working in an open machine.
• Only service personnel should open the machine for any other
reason.
WARNING
Risk of injury, eye injury and damage to the machine!
Objects in the bean hopper, powder container or grinder may splinter
and be ejected, leading to damage to the machine or injury.
• Never put anything into the bean hopper, powder container or
grinder.
• Never poke any object around in the bean hopper, powder
container or grinder.
WARNINGDANGER
Risk of death by electrocution!
• Never operate a machine that has been damaged or has a damaged power supply cable.
• If you suspect damage to the machine (for instance, a hot or
burning odor), immediately unplug the machine from the outlet
and contact your service technician.
If the power supply cable to this machine is damaged, it must be
replaced by a special power cord.
• Only a qualified service technician should replace the power
supply cable.
• Ensure that the machine and power supply cable are not near
any hot surfaces such as gas or electric stoves or ovens.
• Ensure that the power supply cable is not pinched and does
not rub against sharp edges. The machine contains electrically
conductive parts. Opening the machines can pose risk of death.
• Never open or attempt to repair the machine yourself.
• Do not make any modifications to the machine that are not
described in the operating instructions.
• Repairs should only be made by a service technician using original replacement and accessory parts.
General safety concerns when using the Pura
Page 10

!
!
!
For your safety
Page 8
Illness due to bacteria build-up!
Using a water filter for too long can lead to build-up of algae.
• Replace the water filter as per the maintenance instructions.
CAUTION
Damage from foreign objects!
Putting foreign objects into the brewing unit can cause damage to the machine.
• Never insert any object except cleaning tablets.
NOTICE
Risk of contamination!
When the machine is not in use for extended periods, residue may
accumulate.
• Rinse the coffee machine and add-on units before initial use,
when not in use for extended periods (more than 2 days) as well
as after each cleaning and descaling operation.
Risk of spoiled food residue!
If the machine is not cleaned regularly, milk and coffee residue may
accumulate in the machine, clog the outlets or find its way into
drinks.
• Clean the coffee machine and add-on units at least once a day.
• Read the chapter "Cleaning and Rinsing."
CAUTION
CAUTION
Damage to the machine!
• Set the machine up out of the reach of children.
• Do not expose the machine to the elements, such as rain, frost
or direct sunlight.
The power supply cable can pose a risk of tripping or be damaged.
• Never let the power supply cable hang loose.
A leaking water connection could lead to a machine defect.
• Use a water connection with a shut-off tap and a check valve!
NOTICE
Damage from water jets!
The coffee machine is not protected from water jets.
• Do not use water jets or high-pressure cleaners to clean the
machine.
• Read the chapter "Cleaning and Rinsing."
NOTICE
Page 11
Scope of delivery and identification
Page 9
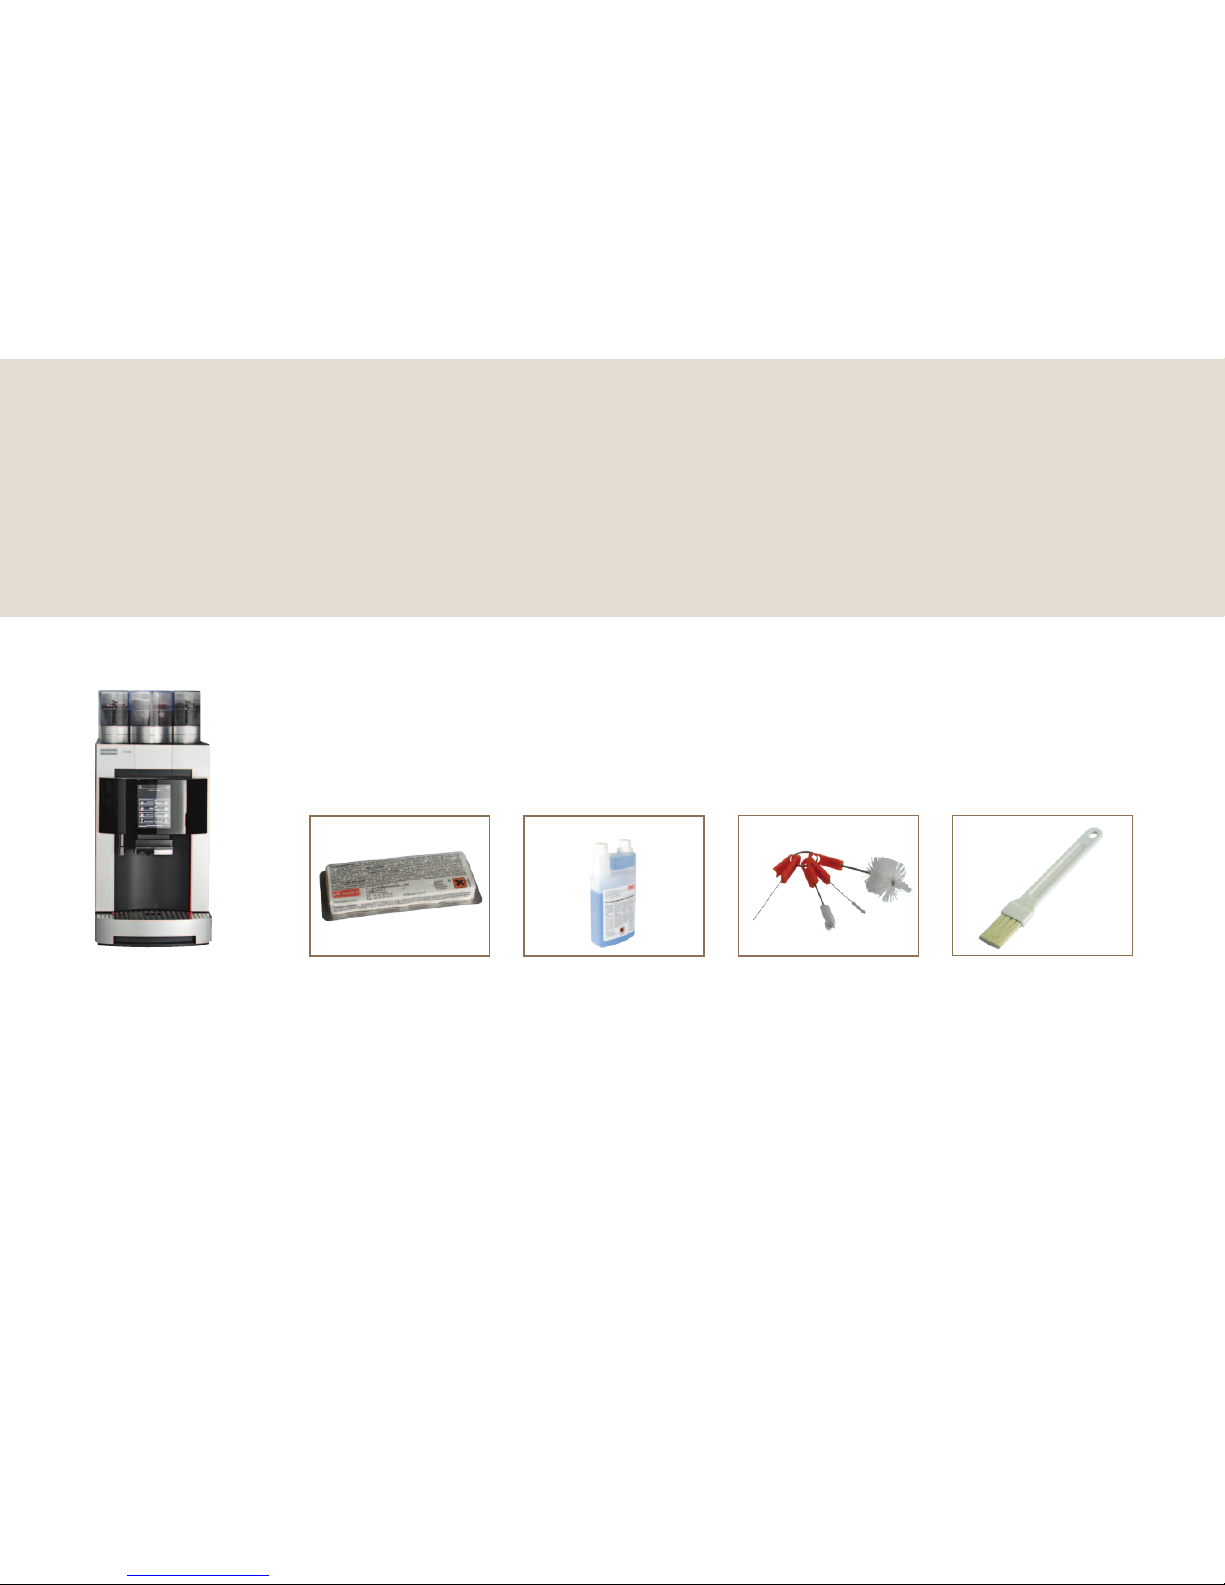
Brush
For cleaning the powder
drawer.
Item no.: H
Pura
Basic model.
Cleaning brushes
To clean the dispenser system.
Item no.: L
Cleaning tablets
To clean and protect your coffee system.
Item no.: P
Cleaning solution
(Pura fresco only)
To keep your milk system clean
and hygienic.
Item no.: BK
Scope of delivery
Scope of delivery and identification
The Pura is a powerful coffee machine. Its modern operating concept will help you keep your
cool in any situation. Listed below are ways to identify your machine and what is included in
the standard delivery.
Page 12
Lesen Sie die Bedienungsanleitung und das Kapitel
Sicherheitshinweise, bevor Sie an der Maschine arbeiten.
Bewahren Sie die Bedienungsanleitung beim Gerät auf.
PURA P RONTO & FRESC O
Originalbetriebsanleitung
i
Scope of delivery and identification
Page 10
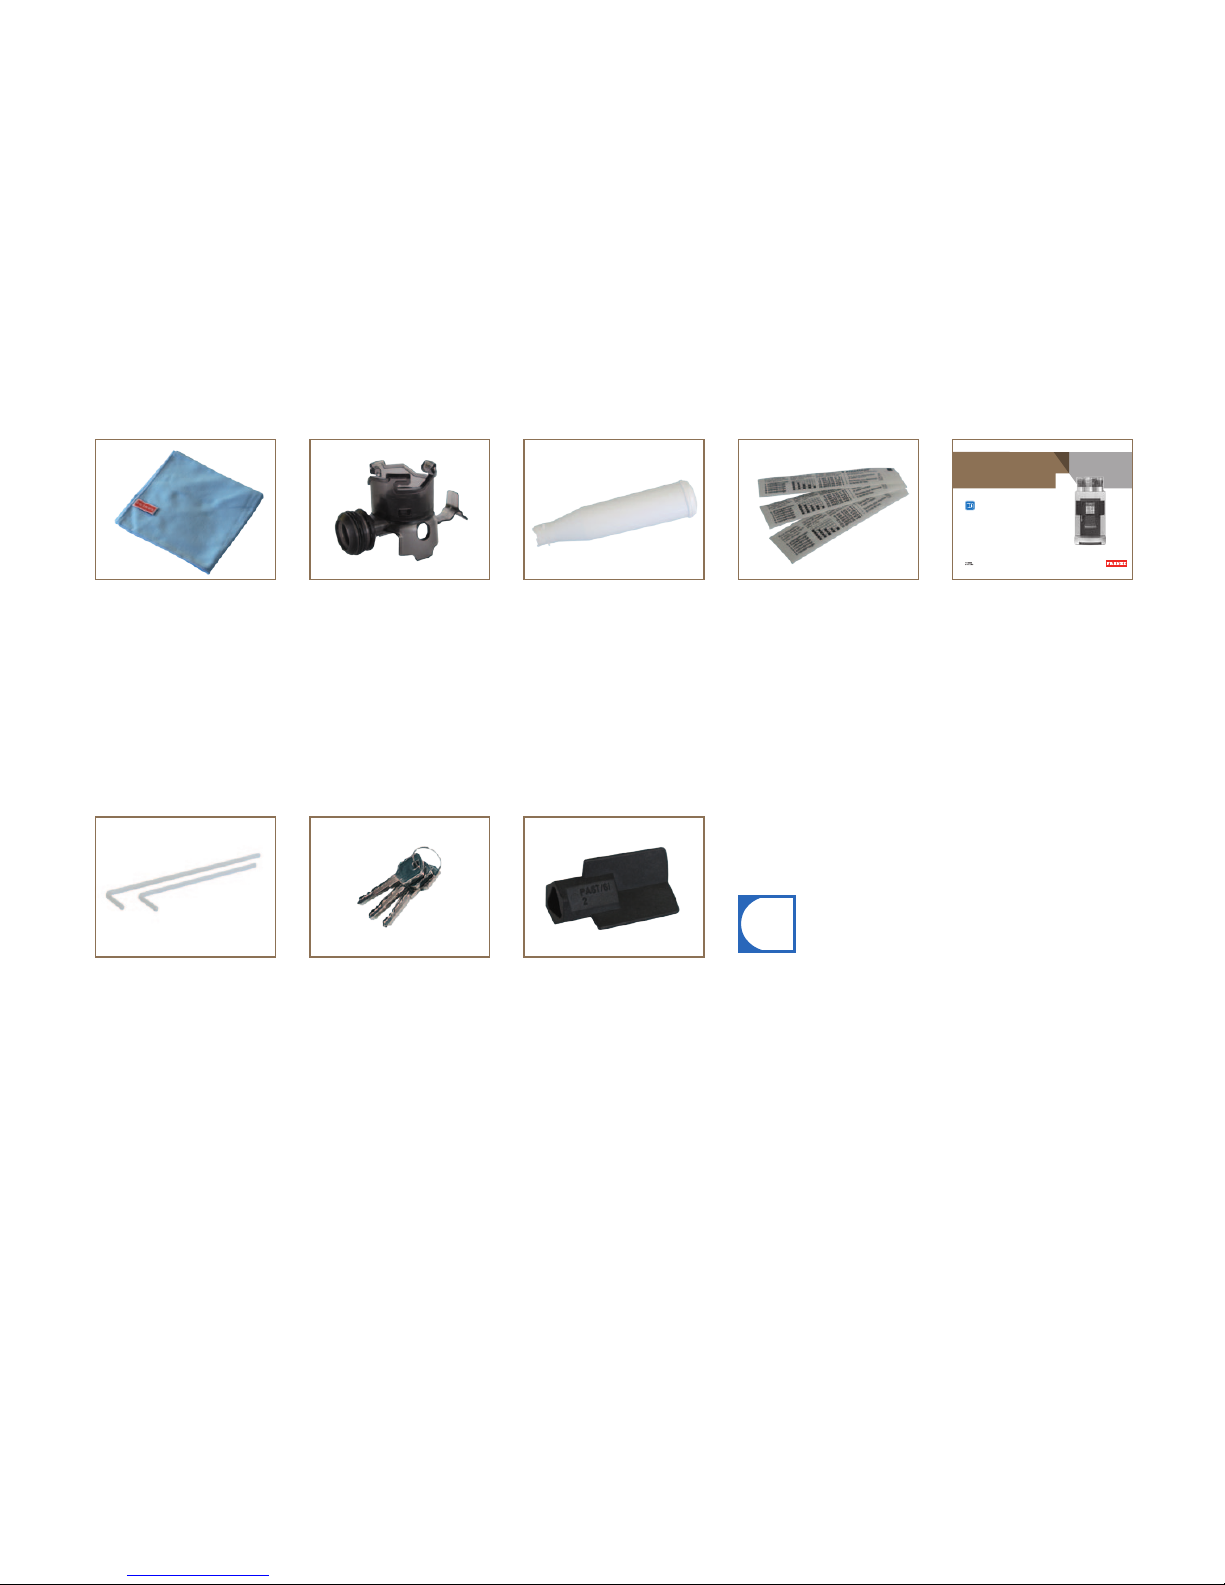
CLARIS water filter
(for water tank operation)
For consistently optimum water
quality.
Item no.: P
Grinder adjustment
tool
For setting the degree of grinding
(Grind coarseness may only be ad-
justed by a service technician.)
Milk lance tube (2 pcs.)
For conveying milk.
Key
To lock the door.
Microfiber cloth
To clean and protect the external parts of the machine.
Item no.: H
Adapter
(for CLARIS water filter)
For using the CLARIS water filter
in the water tank.
Item no.: N
The configuration of your coffee machine may differ from that shown
in the instructions. Please refer to your purchase agreement.
Additional accessories may be obtained directly from your retailer or
from FRANKE Kaffeemaschinen AG in Aarburg, Switzerland.
Operating Instructions
Operating Instructions
Item no.: N (Pura fresco)
Item no.: N (Pura pronto)
Item no.: N (Pura fresco)
Also refer to the chapter "Cleaning and Rinsing."
Other manuals can be downloaded via the Internet.
www.franke.com
Measuring strip
For determining the water
hardness.
Item no.: N
1
for USA and Canada.
Page 13
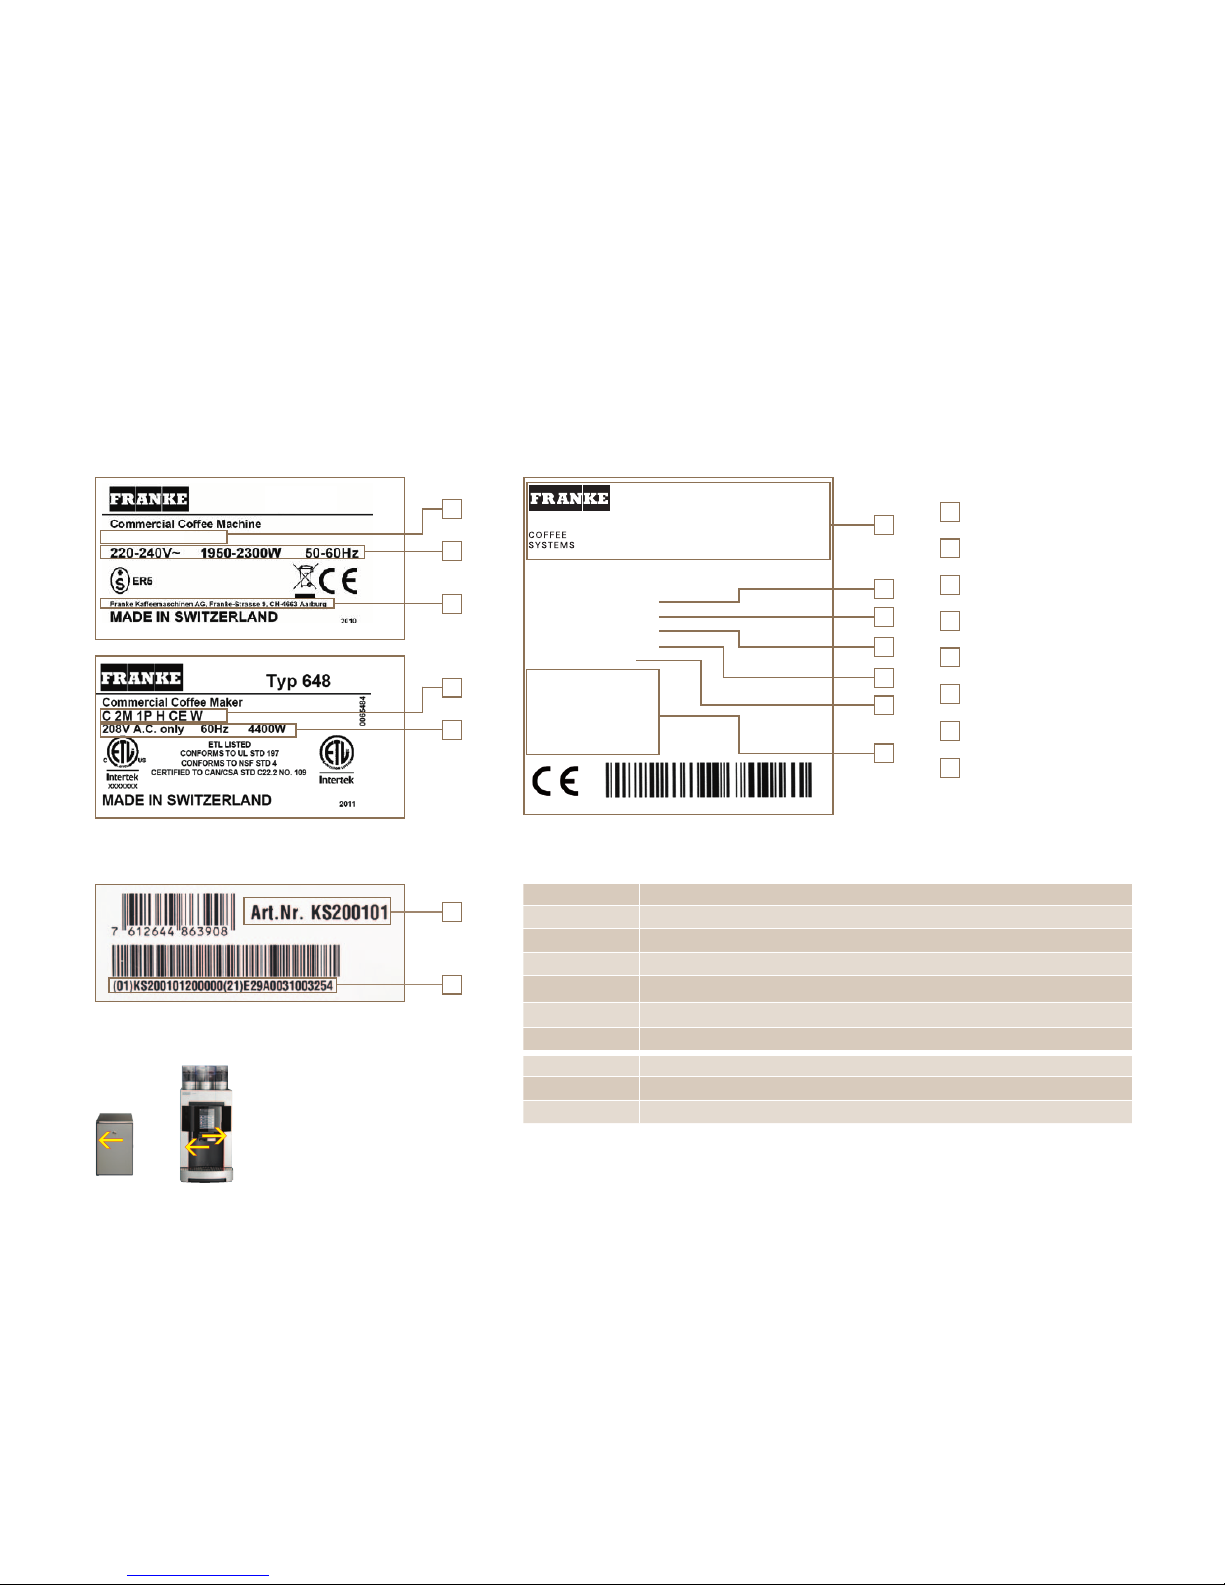
Typ 648
C 2M 1P H CE W
Franke Kaffeemaschinen AG
Franke-Strasse 9
CH-4663 Aarburg
Switzerland
Name Chill&Cup
(to Commercial Coffee Machine)
Serial-No. 00000429
Install-No. 469182
ID-No. 40.000.001
Type: CC 1 CE C
Class: N
Voltage: 220-240V
Frequency: 50/60Hz
Power: 150W
Input current 1.0A
Refrigerant R134a
Charge 50g
Scope of delivery and identification
Page 11
9
3
8
2
2
2
9
6
1
5
9
8
6
5
4
3
2
1
4
3
1
1
Technical data
Model (for model codes, see below)
Machine number
Item number
Climate zone
Apparatus number
Identification code
Manufacturer
Model code Component
C Pura (Model 647/648)
2M Number of grinders
2P Number of double powder containers
H Hot water
W Water connection (optional)
CE Milk foam, warm and cold milk (Pura fresco only)
KE Refrigeration unit (optional)
TW Cup warmer (optional)
CC Chill & Cup, refrigeration unit with cup warmer (optional)
Model code
Position of type plate
Item and serial numbers
Chill & Cup type plate (as an example for add-on units)Type plate (Pura fresco as an example)
Identification
Page 14
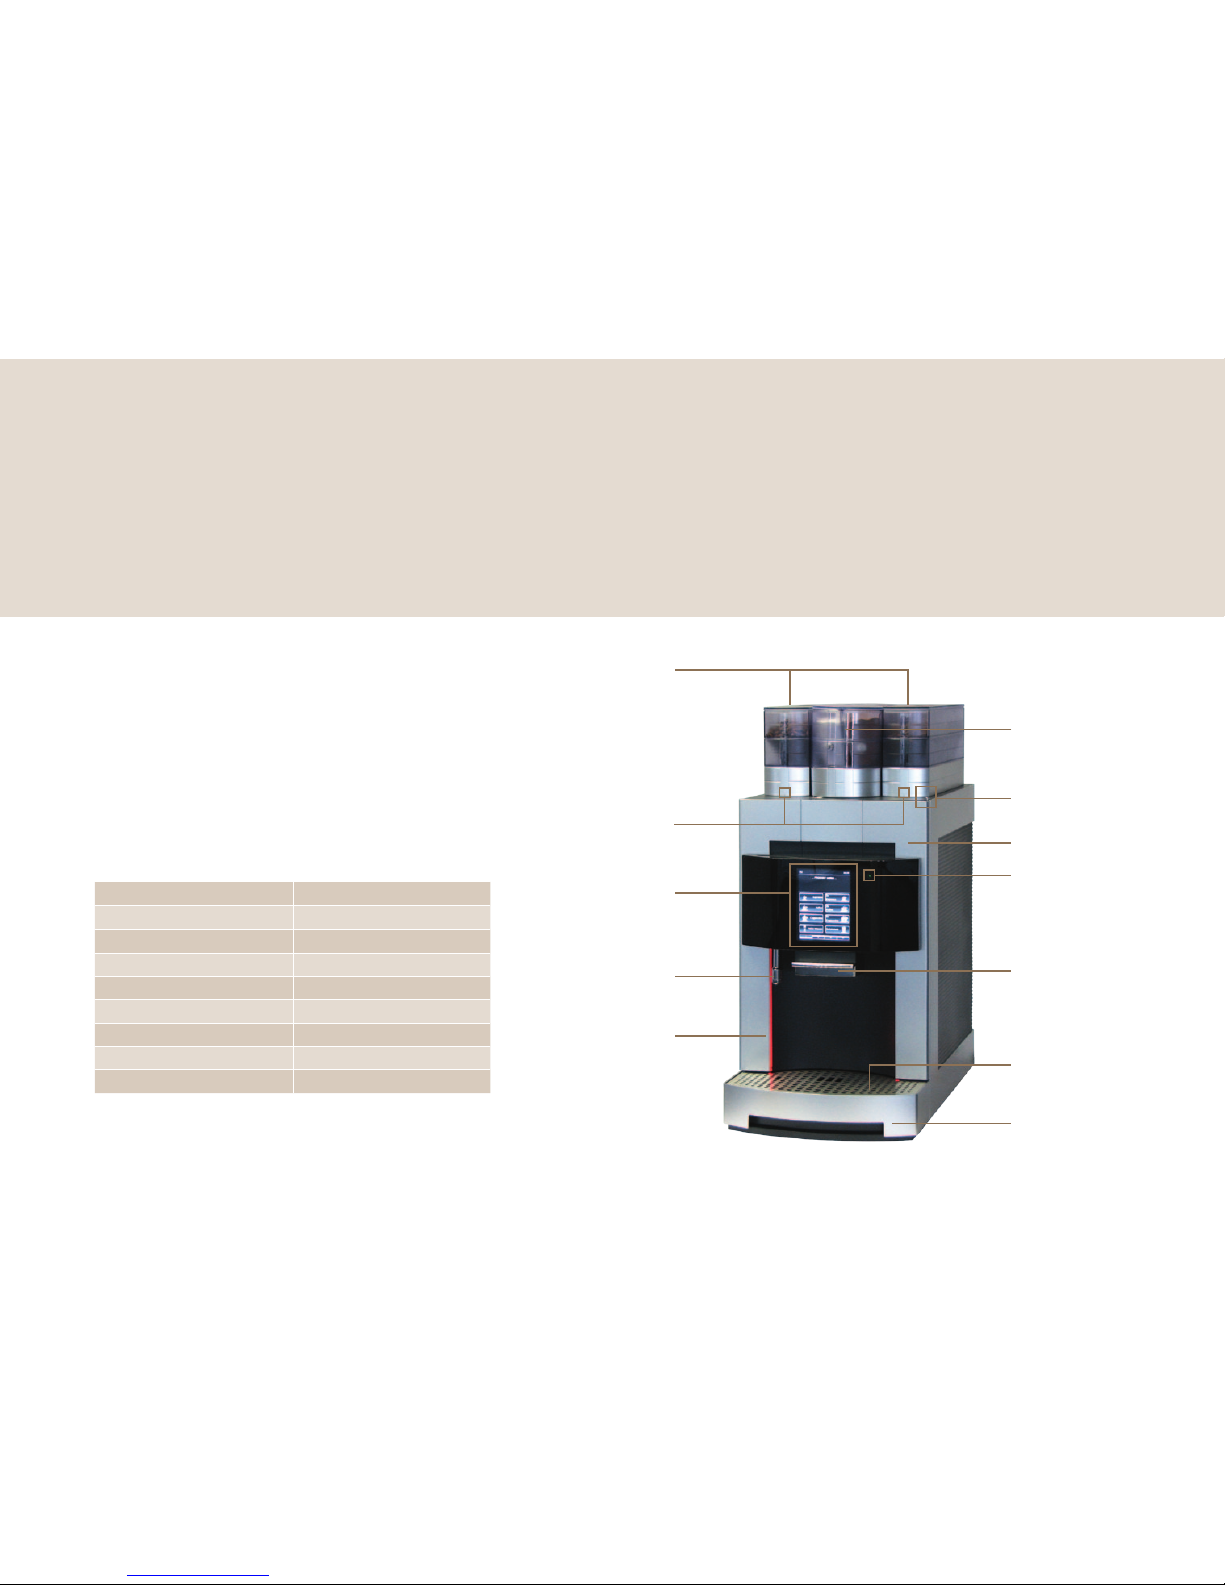
Description of the machine
Page 12
Status display for
standby operation
Door
Locking mechanism
and door lock
Drip tray
Drip grid
Height-adjustable
outlet
(coffee, powder and milk
specialties)
LED lights
(left and right)
Hot water outlet
Marking
(coffee bean hopper only)
Control panel
(with touch display)
Double powder container
(milk powder left,
chocolate powder right)
Coffee bean hopper
Introduction
Capacities
Specialty Hourly capacity
Espresso 120 cups/h
Café crème 120 cups/h
Cappuccino 120 cups/h
Latte 120 cups/h
Latte macchiato 80 cups/h
Chocolate 80 cups/h
Hot milk 80 cups/h
Hot water 20 liters/h
The Pura is available in two models. The coffee machine can be
configured to use a water tank or a water connection. In order for you
to obtain an overview of your machine, we are presenting here the
standard version.
Please note that your coffee machine may look different from the
configuration shown here.
Pura machine
You have chosen enjoyment of every single coffee with the Pura. In this section you will
learn more about the functions and options of your coffee machine and where the controls are located.
Description of the machine
Page 15
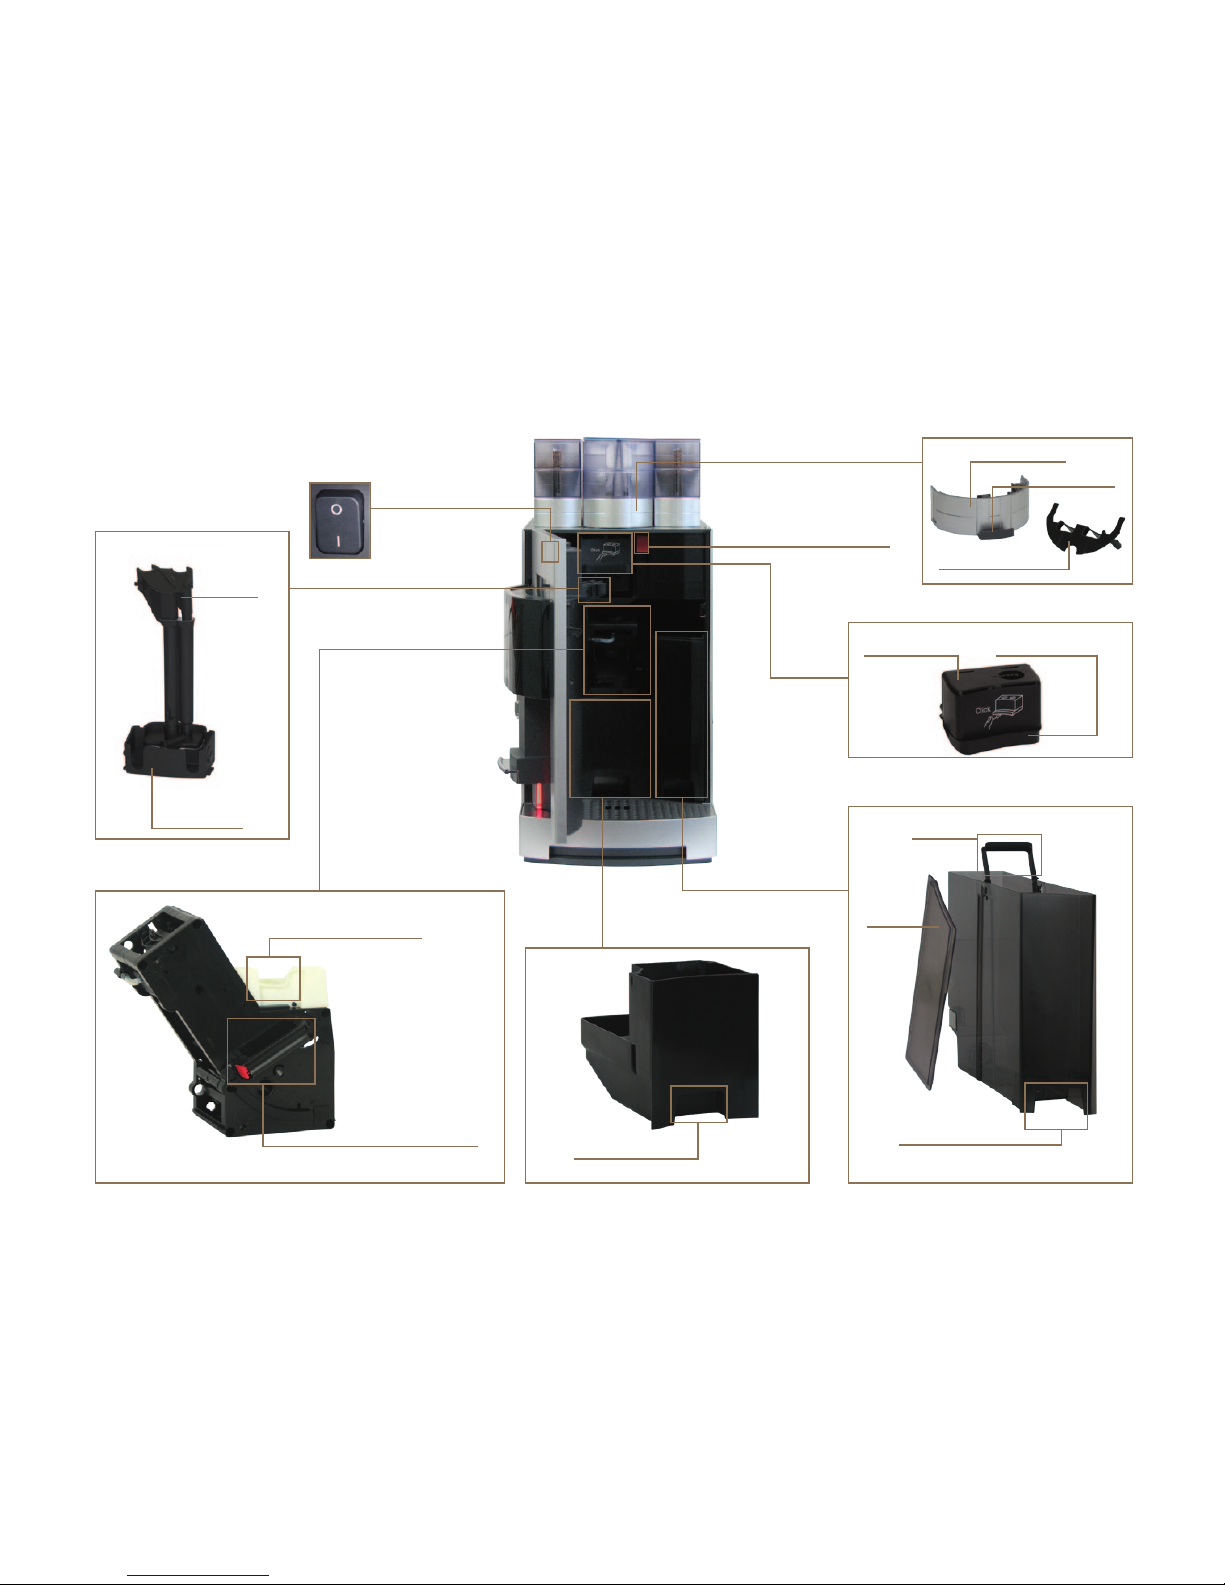
Description of the machine
Page 13
Telescopic outlet
Lever with red head
(unlocked position)
Tablet insert
Brewing unit
Cover
Water tank
Unlocking lever
(coffee bean and powder container)
On/Off switch (behind door)
Powder drawer
Mixing chamber
Handle
Water tank grip
Housing baseHousing cover
Powder chute
Outlet
insert
Dispenser head
Powder
drawer grip
Powder drawer
Grounds container grip
Grounds container
Pura components
Page 16
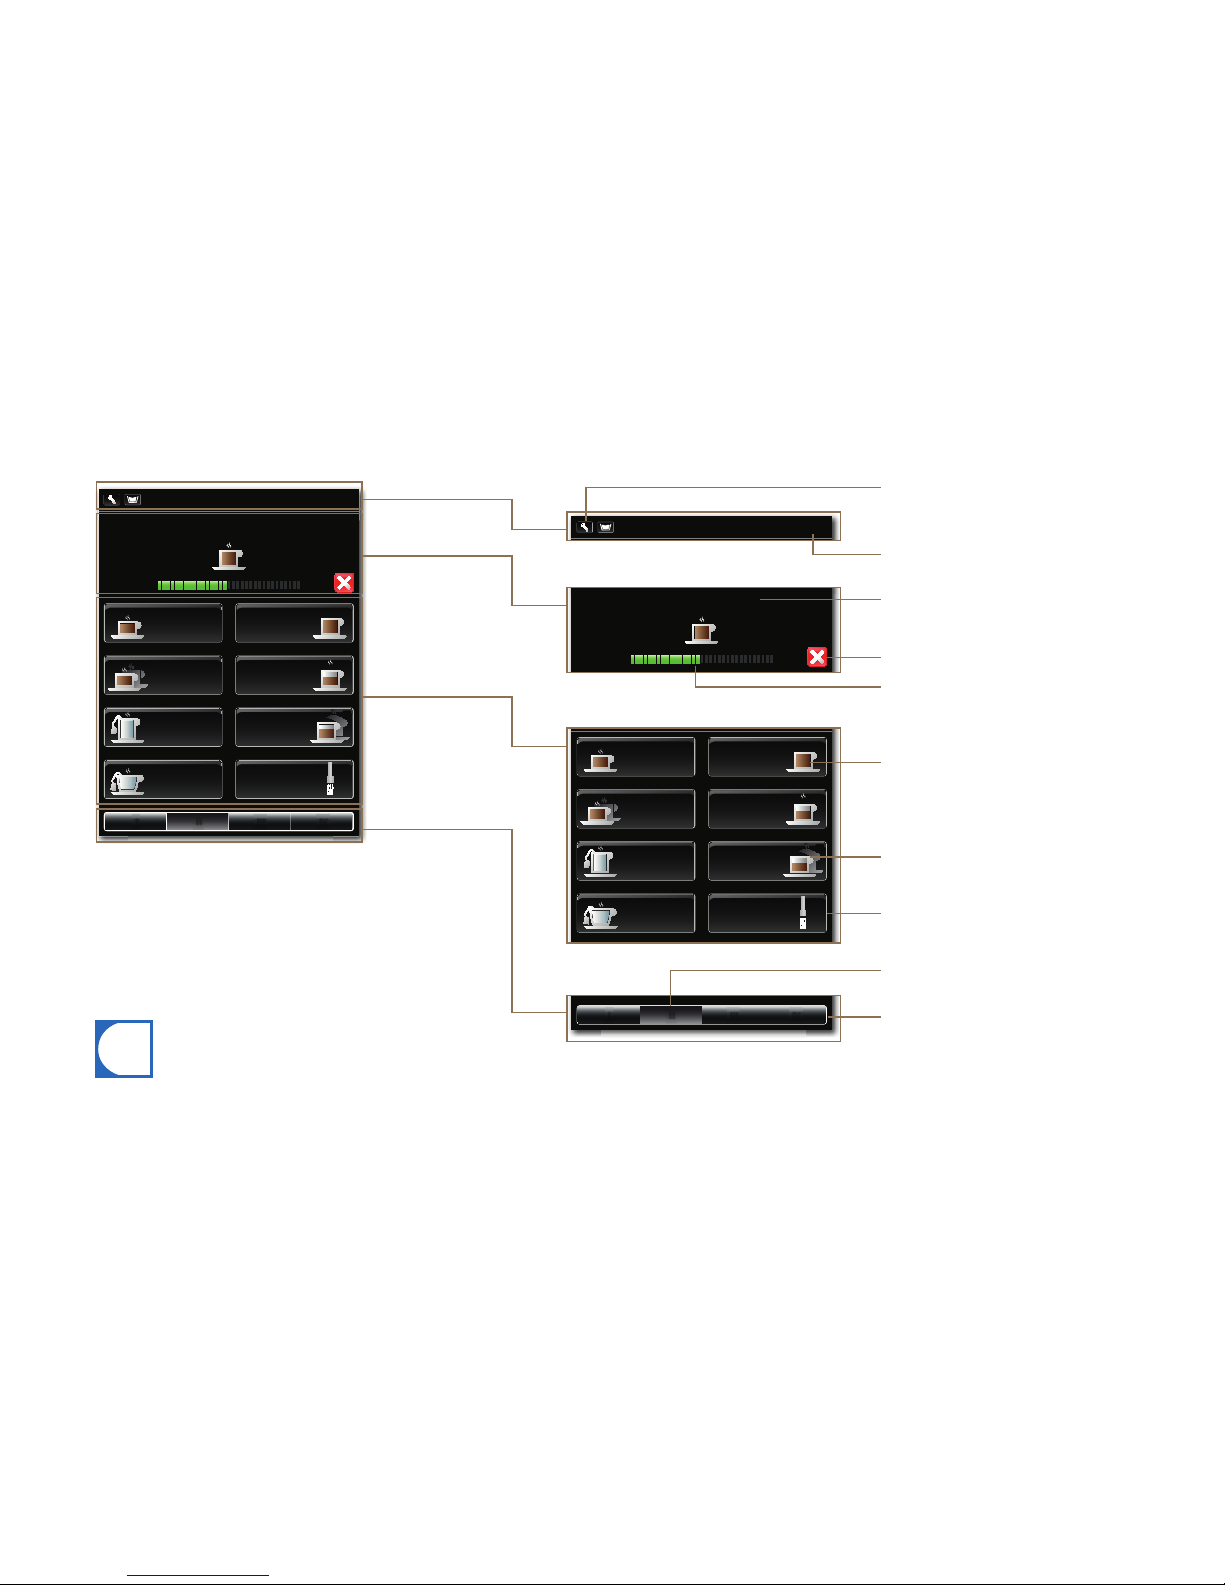
16:04
VIIIII II
16:04
I
III IV
II
16:04
16:04
16:04
16:04
16:04
16:04
16:04
VIIIII II
16:04
I
III IV
II
i
Description of the machine
Page 14
Teacup
Teacup
Hot water
Hot water
Tea mug
Tea mug
Coffee
Coffee
Latte
Latte
2 Latte
2 Latte
Coffee
small
Coffee
small
2 Coffee
small
2 Coffee
small
Coffee
Coffee
Detailed information on the
operation and functions of the
touch display can be found in
the chapter „Configuration“.
Navigation toolbar
Selection area
Information area
Information/prompts
Individual product
Active level
Available levels
(4 levels)
Double product
Product keys
Status display, drink preparation
Product cancel
Change to Maintenance level
See page 44.
Time
Status display
Product preparation display (as an example)Display structure
Touch display
Page 17
Description of the machine
Page 15
On/Off switch
On/Off switch (located on the rear of the machine)
On/Off switch (behind door)
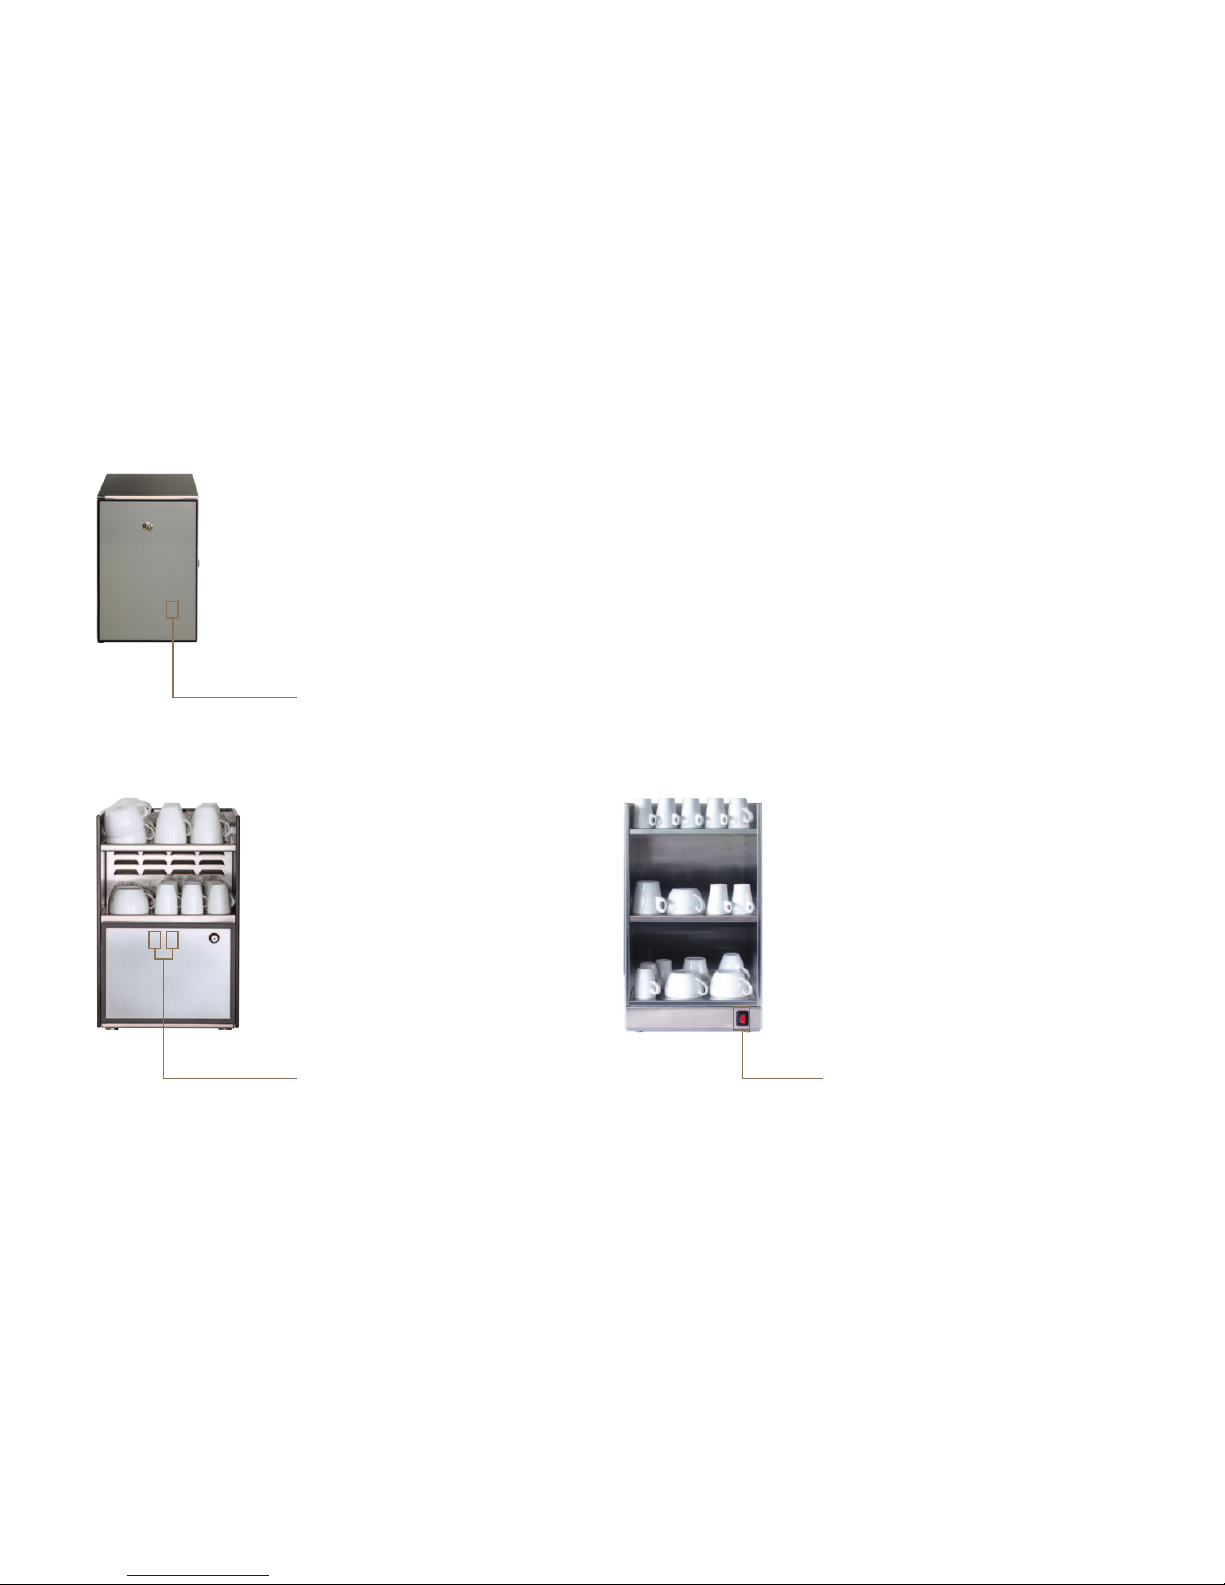
• Refrigeration unit (left switch).
• Cup warmer (right switch).
Cup warmer (optional)
To enjoy coffee at its best, you need
pre-heated cups. The cup warmer fits
perfectly on your Pura.
Chill & Cup (optional)
In many regions, milk is part of a
good cup of coffee.
Chill&Cup is a combination refrigeration unit and cup warmer. You can
connect the Chill&Cup directly to
your Pura so the milk doesn't spoil
and you have pre-warmed cups for
coffee at its best.
Refrigeration unit (optional)
In many regions, milk is part of a
good cup of coffee.
You can connect the milk cooler
directly to the Pura to make sure the
milk doesn't spoil.
Add-on units
Page 18

Installation and technical data
Page 16
1
Height without adjustable feet.
Pura Technical Data
Coffee bean hopper 0.65 kg per hopper (optional: lockable)
Powder container 0.55 kg milk powder, 0.75 kg cocoa powder (optional: lockable)
Water tank 4.5 liters
Grounds container 45 cakes (optional: grounds ejection)
Drip tray (monitored) 1.8 liters
Boiler volume 0.6 liters (coffee)
0.9 liters (hot water, steam)
Electrical connection 220 - 240 V1L N PE1.95 - 2.3 kW50/60 HzFuse: 16 A
208 V1L N PE4.4 kW60 HzFuse: 30 A
Electric cable l = 2000 mm
Supply line (optional) Metal hose with union nut G 3/8", l = 1500 mm
Waste-water hose (optional) d = 16 mm, l = 2000 mm
not permanently attached to the drain (vented)
Noise emission < 70 dB (A)
Weight approx. 30 kg
Width 320 mm
Depth 590 mm
Height
1
691 mm
Water connection (optional) G 3/8" outside thread
Water pressure 80 - 800 kPa (0.8 - 8.0 bar)
Water shut-off with check valve and filter
Water hardness max. 70 mg CaO/1 l water (7 dH, 13 °fH)
Chlorine content max. 0.1 mg/lWorld Health Organization: max. 0.5 mg/l
Ideal pH value 7
Funnel d = 50 mm with siphon
Drain pipe dmin = 1"
Ambient conditions Humidity: max. 80%
Ambient temperature: 10 - 35 °C
Preparations
• The power connection for the coffee machine must be protected
by a ground fault circuit interrupter (GFCI).
• Each terminal of the power supply must be able to be interrupted
by a switch.
• The water connection must have a shut-off with a check valve and
filter and must meet the requirements of the technical data and of
local regulations. (Only when being used with a water connection)
• The water for coffee preparation should always be fresh, oxygenated and rich in minerals.
• If your coffee machine has an electrical connection other than
the one described in the table opposite, you will have received
additional information regarding the installation with your order
confirmation.
Installation
You must have completed these preparations before one of our service technicians can install the coffee machines for you.
One of our service technicians will install your coffee machines and
put them into operation for the first time. The technician will walk you
through the basic functions.
Your Pura must be properly installed so that you can operate it correctly—one of our service technicians will do
that for you. You'll have to take care of a few things first. You'll find the preparations for problem-free enjoyment
of your coffee machine here.
Installation and technical data
Installation
Page 19
h1 = 7
h2 = 53
h3 = 109-118
min 50/75
min 200
Ø100
78
590
590
541 150
320
590
320
320
85
45230
375
35 291
150
320
35250
160
691
175
70
Installation and technical data
Page 17
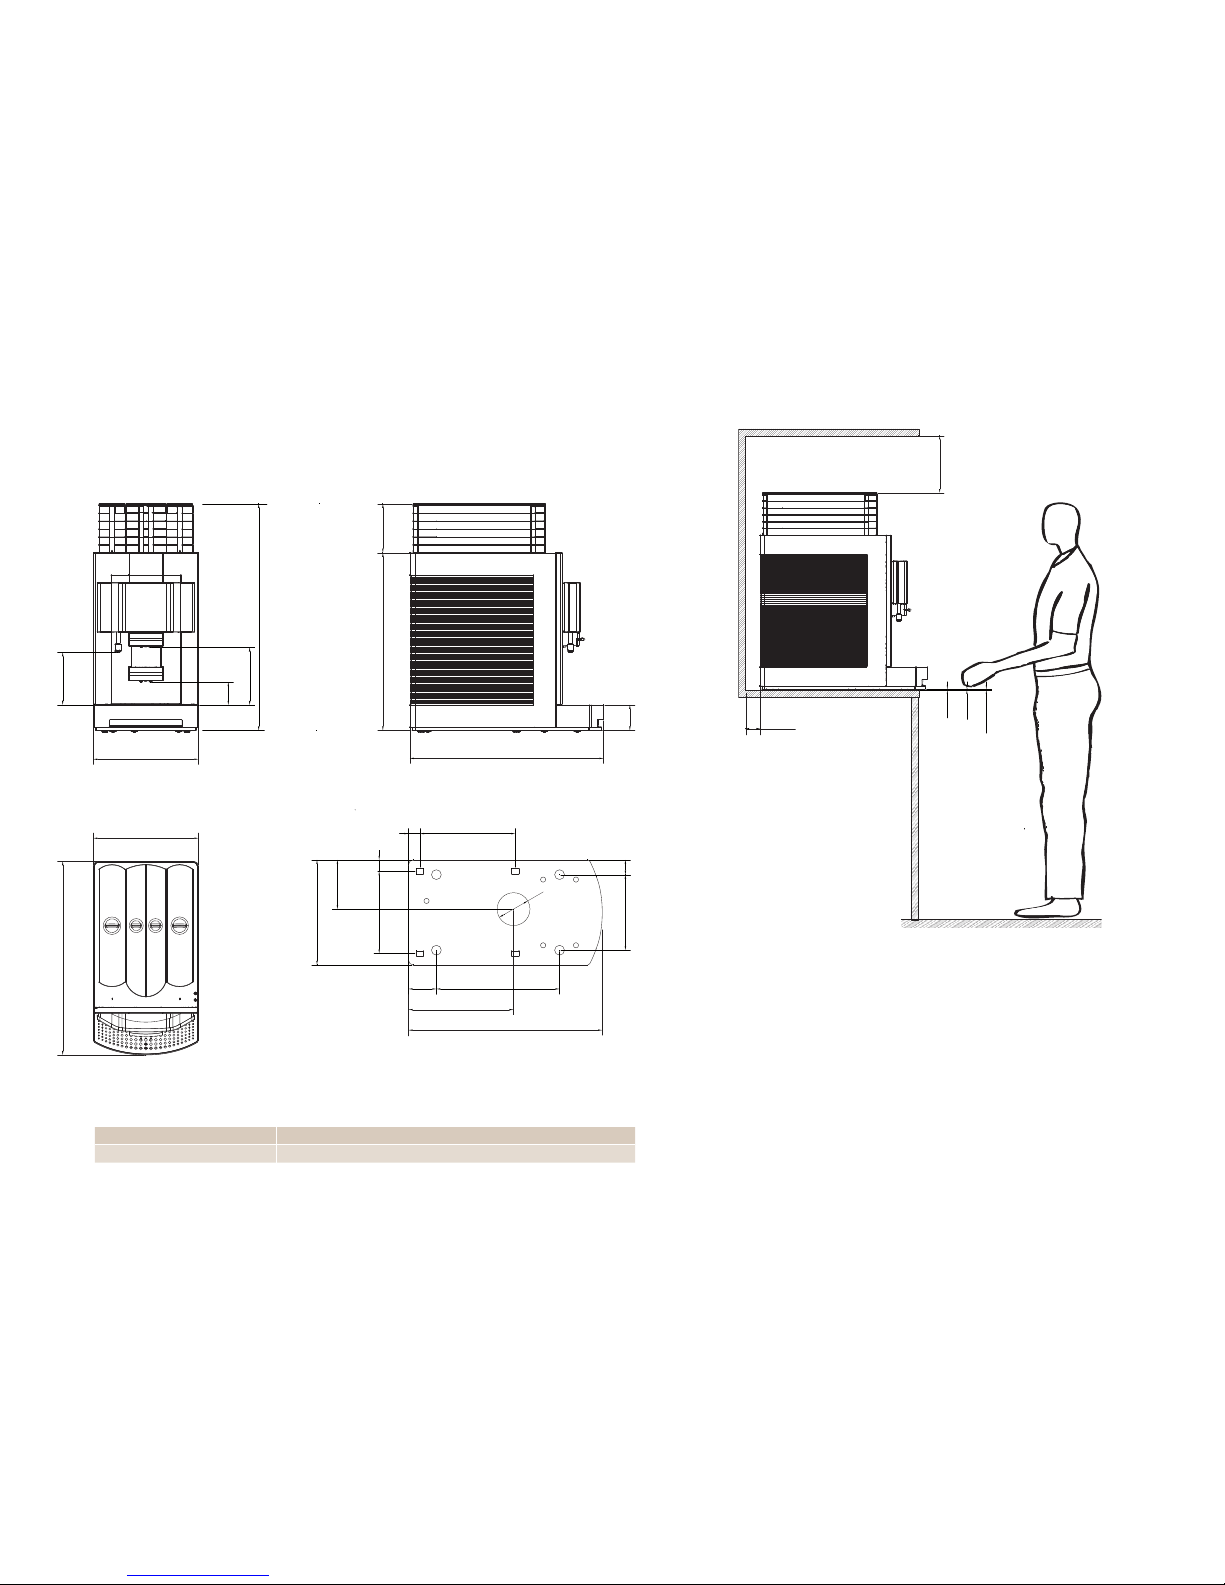
Minimum distance 50 mm,
with water connection 75 mm.
40 mm foot (h2) 691 mm + 53 mm = 744 mm
100 mm foot (h3) 691 mm + 109 - 118 mm = 800 - 809 mm
Adjustable feet (optional)
Cross-section from above (grommet hole)Top view
Side viewFront view
Prepare a stable, ergonomic surface (min. load capacity: 150 kg). The control unit
should be at eye level.
Distance to the wall must be at least 50 mm. When used with a water
connection, we recommend a distance of 75 mm to the wall. Clearance
above the machine must be at least 200 mm.
Adjustable feet (optional) can be used to compensate for unevenness
or height differences.
If optional add-on units are installed, up to an additional 355 mm may
be required per add-on unit.
Observe the connection requirements of the add-on units.
see page 18.
Installation dimensions of the PuraDimensions of the Pura
Page 20

min 50
min 200
h1 = 7
h2 = 40
h3 = 100-109
225
453
453
466
330
225
Installation and technical data
Page 18
Top viewSide viewFront view
Refrigeration unit dimensions (as an example)
Milk container 5 liters
Capacity up to 80 cups (depending on size)
Electrical connection 220 - 240 V1L N PE160 - 170 W50/60 Hz Fuse: 10 A
Electric cable 1800 mm
Ambient conditions Humidity: max. 80%
Ambient temperature: 5 - 32 °C
Weight approx. 40 kg
Width 334 mm
Depth 471 mm
Height
1
540 mm
Chill & Cup technical data
1
Height without adjustable feet.
40 mm foot (h2) 330 mm + 40 mm = 370 mm
100 mm foot (h3) 330 mm + 100 - 109 mm = 430 - 439 mm
Adjustable feet (optional)
Capacity up to 180 cups (depending on size)
Electrical connection 200 - 240 V1L N PE170 W50/60 HzFuse: 10 A
Electric cable 1800 mm
Weight approx. 10 kg
Width 320 mm
Depth 490 mm
Height
1
540 mm
Milk container 5 liters
Electrical connection 220 - 240 V1L N PE88 W50/60 HzFuse: 10 A
Electric cable 1800 mm
Ambient conditions Humidity: max. 80%
Ambient temperature: 5 - 32 °C
Weight approx. 13 kg
Width 225 mm
Depth 453 mm
Height
1
330 mm
Cup warmer technical data
Technical data for the refrigeration unit
Place the add-on units in line with the Pura and at eye level.
Distance to the wall must be at least 50 mm. Clearance above the machine must be at least 200 mm.
Adjustable feet (optional) can be used to compensate for unevenness or
height differences.
If optional add-on units are installed, up to an additional 355 mm may be
required per add-on unit.
Add-on unit installation dimensions
Page 21
!
4
4
4 4
4
4
05
080706
4
02
4
01
i
4
04
03
Start-up, Filling and Emptying
Page 19
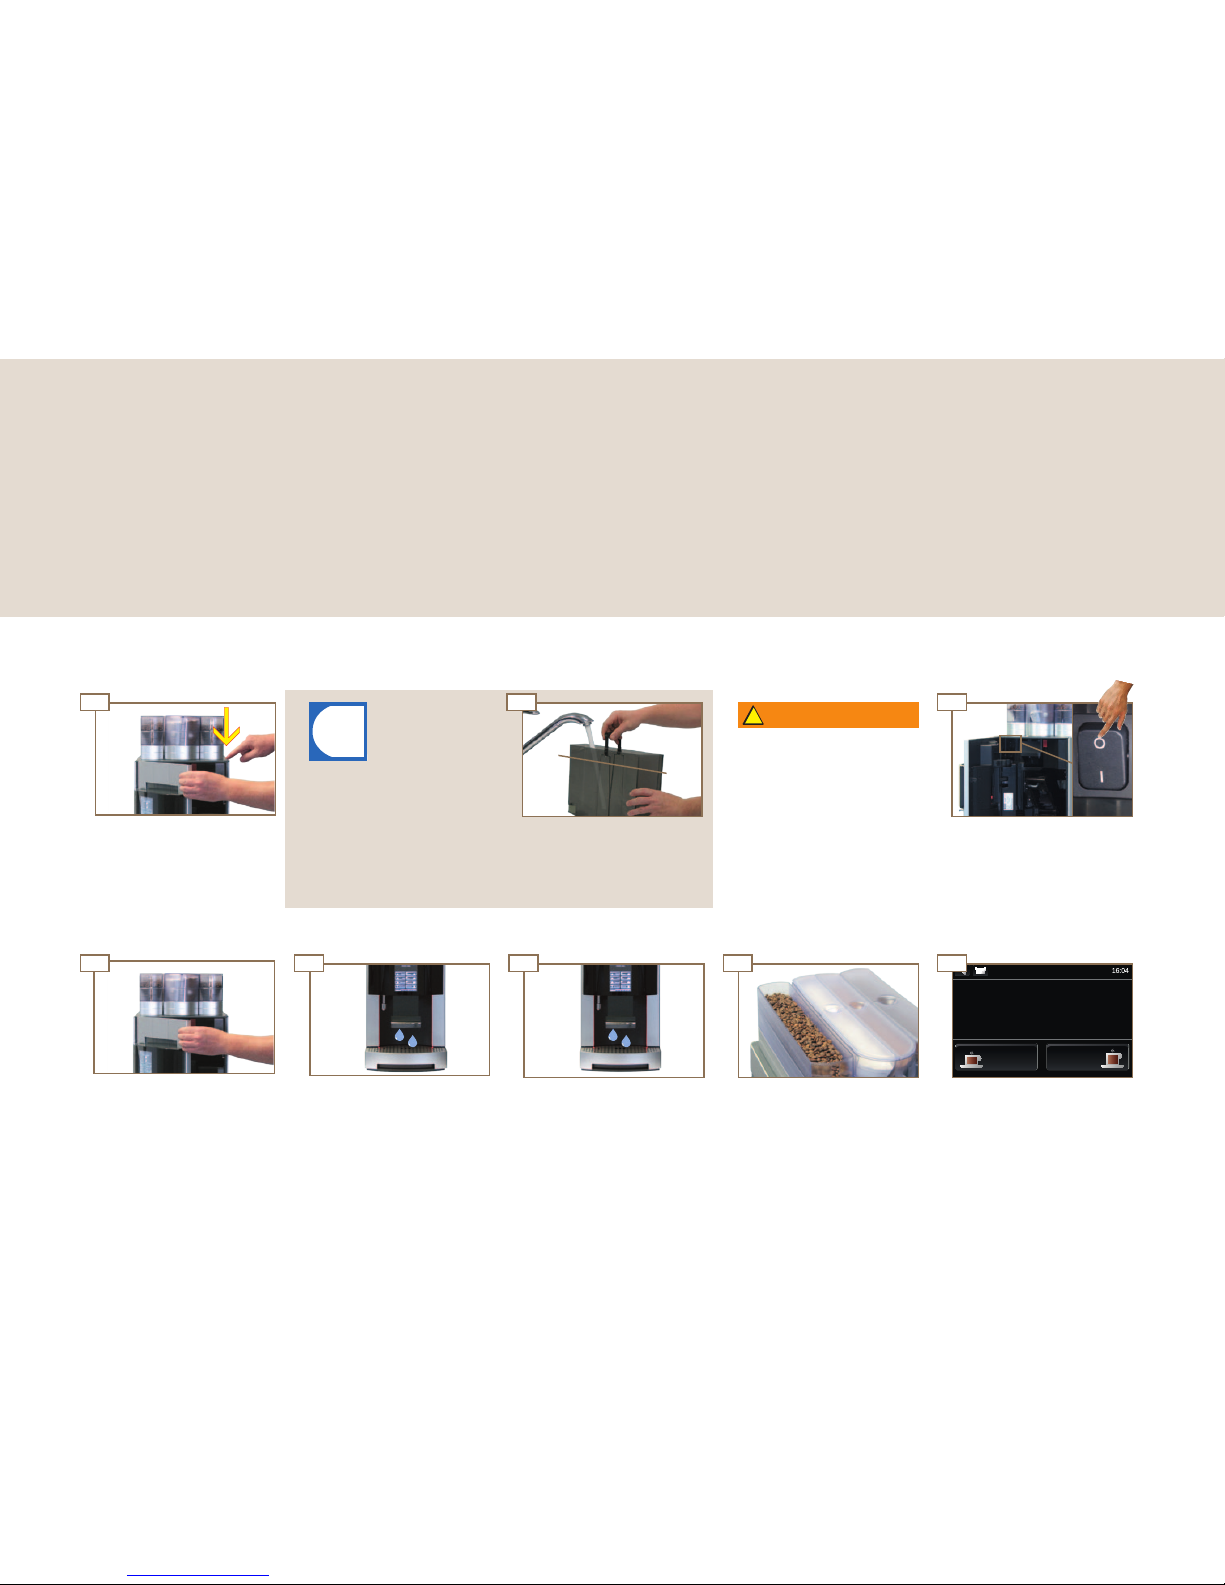
Close the door.
Press touch display for 2
seconds.
Machine starts.
Coffee
Coffee
small
Select product
Operation with water tank is
indicated with a symbol in the
status display.
See page 4.
Machine automatically rinses
coffee and powder systems.
Fill water tank up to fill mark.
See page 21.
Add coffee beans, powder and
milk, if necessary.
See page 20.
The machine is ready.
WARNING
Risk of scalding!
from hot water, splatters and
hot steam.
Do not touch the outlets or the
area under the outlets.
The machine automatically
vents the boiler system while
heating.
Switch on the coffee machine
using the On/Off switch.
Press the release button and
open the door.
In this chapter you will learn how to start up your Pura coffee machine for the first time. In addition to the startup procedure, you will learn about processes that take place automatically during start-up and about additional
preparations. Get primed for a busy day!
Start-up, Filling and Emptying
Daily start-up of Pura
Page 22
02
4 4 4
01
4 44
0302
01 03
!
!
Start-up, Filling and Emptying
Page 20
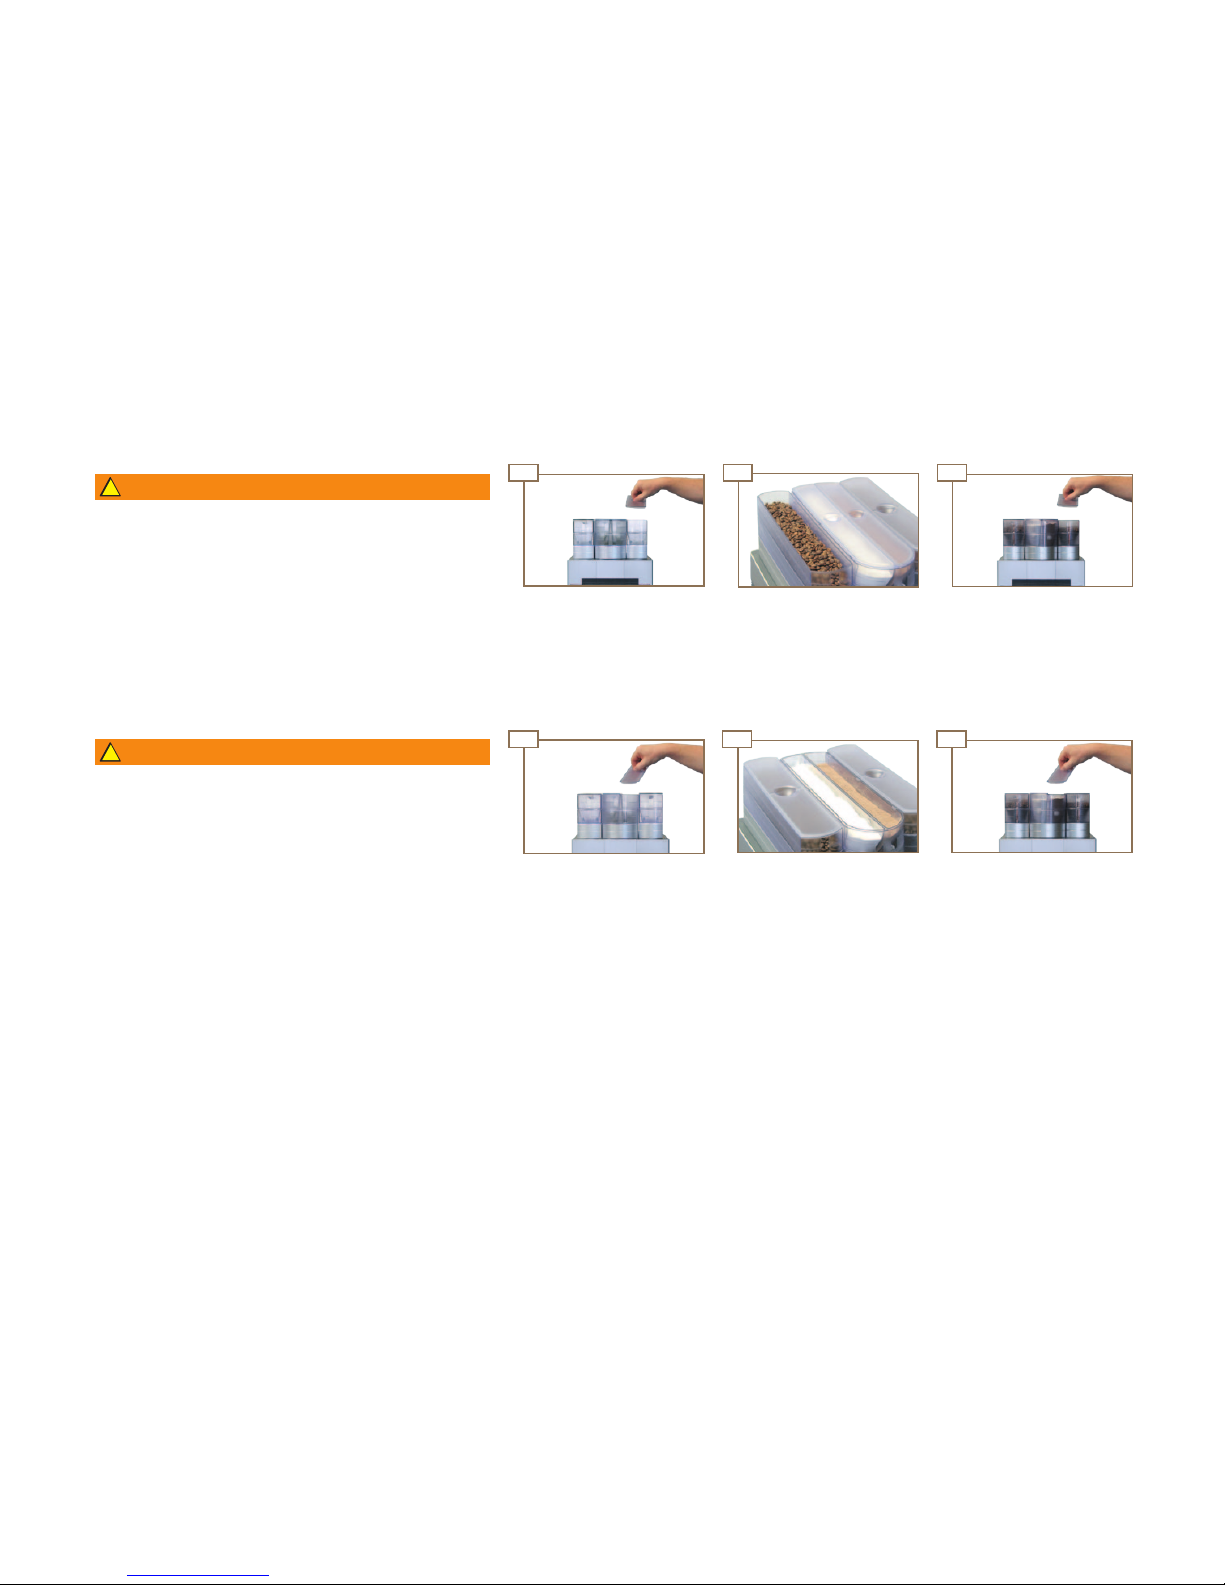
WARNING
WARNING
Risk of injury, eye injury and damage to the machine!
Objects in the powder container may splinter and be ejected, leading
to damage to the machine or injury.
Never put anything into the powder container.
Never poke any object around in the powder container.
Risk of injury, eye injury and damage to the machine!
Objects in the bean hopper or grinder may splinter and be ejected,
leading to damage to the machine or injury.
Never put any objects in the coffee bean hopper or grinder.
Never poke around in the coffee bean hopper or grinder with any
object.
Close powder container.Pour in powder (milk powder on
the left and cocoa powder on
the right).
Open powder container.
Close the coffee bean hopper.Pour in coffee beans.Open the coffee bean hopper.
Add powder
Filling the coffee bean hopper
Filling the Pura
Page 23
01
0603 04
4 4
02
0807
05
!
4
4
4
4 4
4 4 4
4
i
Start-up, Filling and Emptying
Page 21
Information on inserting and
replacing the water filter can be
found in the chapter „Cleaning,
rinsing and servicing“.
WARNING
Risk of injury!
Reaching into the machine may result in abrasions or crushing injuries from interior components.
Exercise care and caution when working in an open machine.
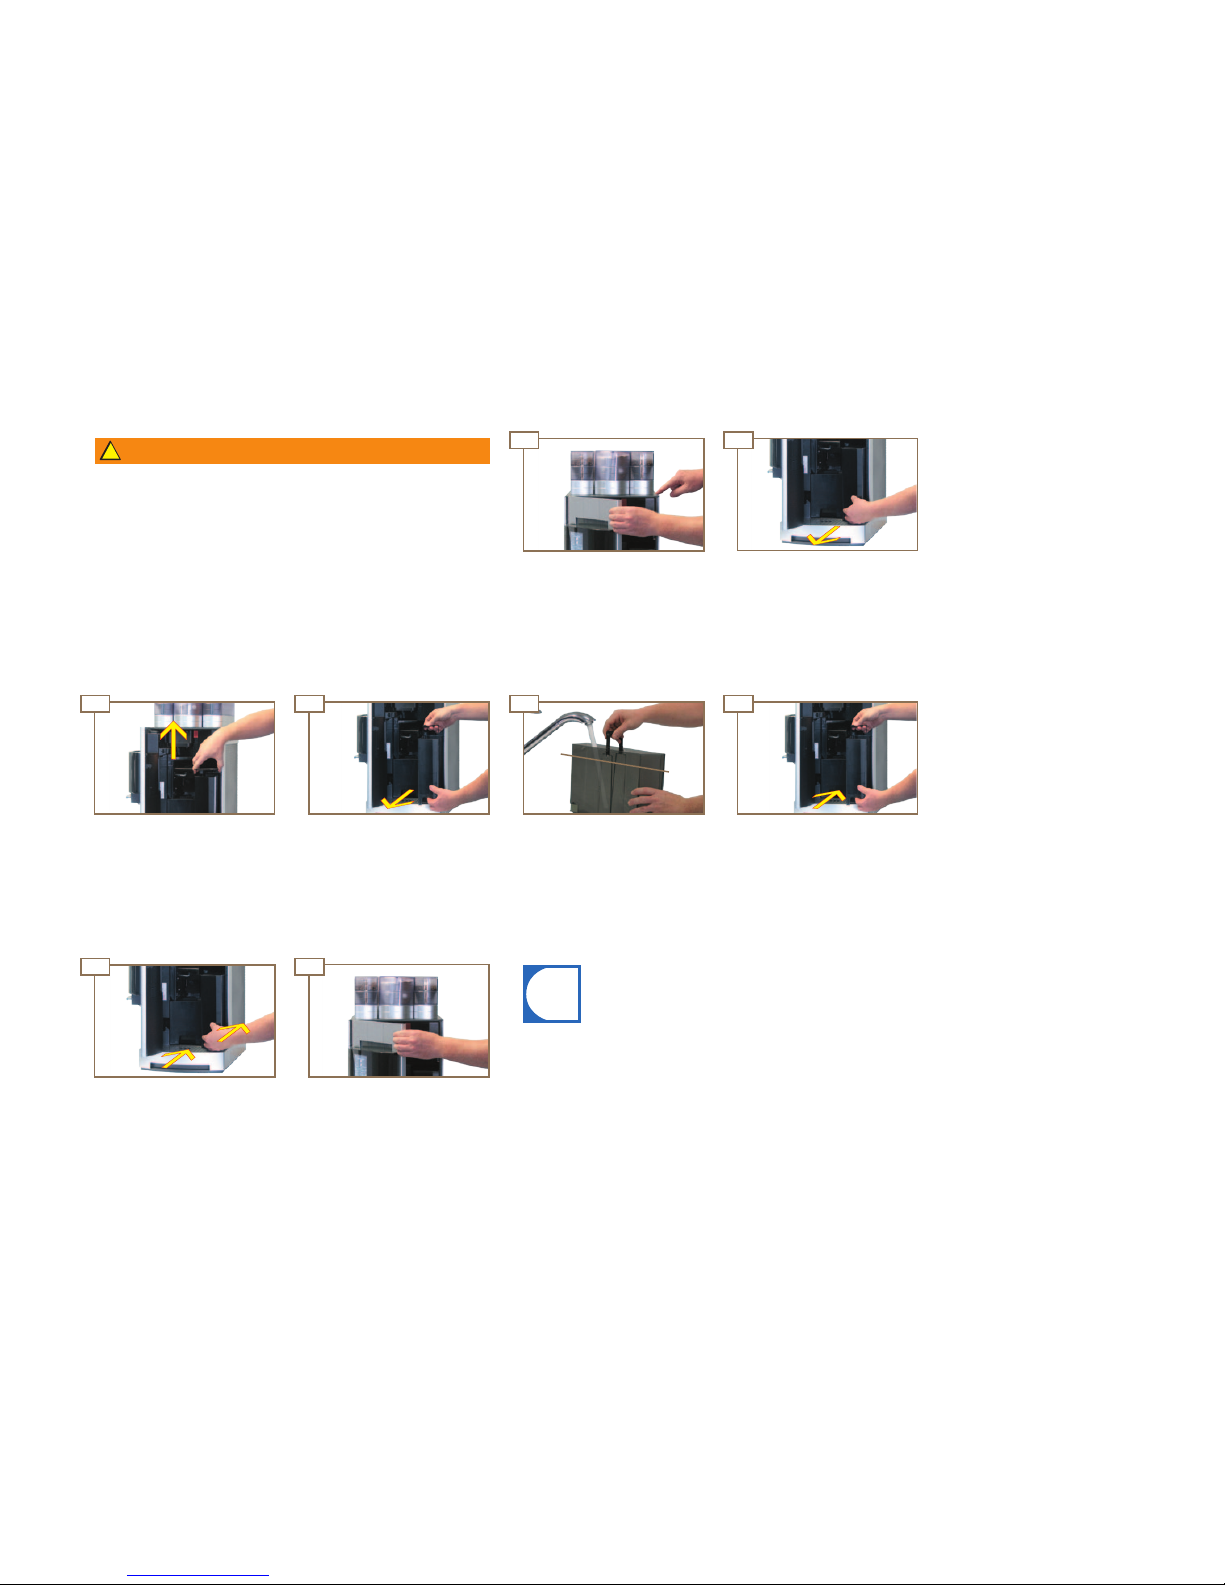
Close the door.
Fill water tank up to fill mark.
Push the water tank into the
machine until it hits the stop.
Fold open the handle.
Remove water tank.
Remove the cover. Insert the water tank to the
half-way point and seal with the
cover.
Pull the water tank forward until
it is halfway removed.
Press the release button and
open the door.
Filling the water tank (optional)
Page 24
4
4
4
44
4 4
01 02 03
04
01
4
02
03
!
4
05
Start-up, Filling and Emptying
Page 22
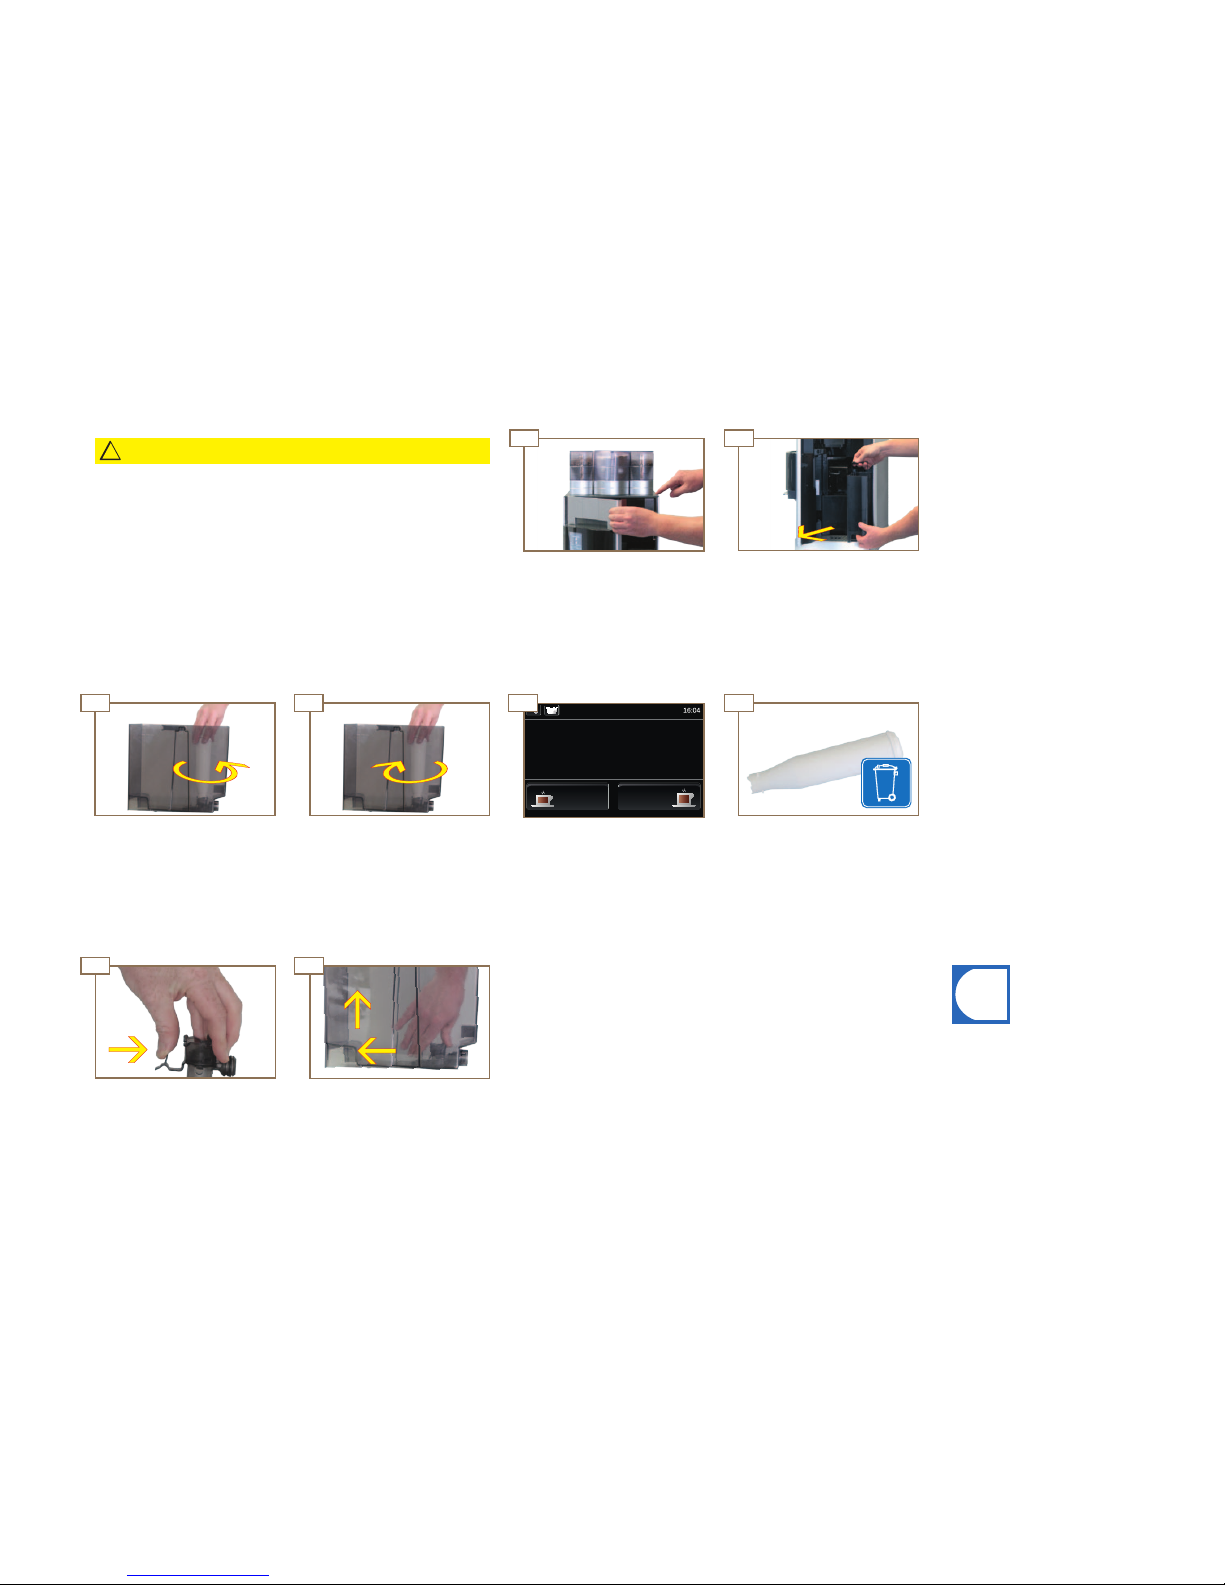
Close the door.
Risk of injury!
Reaching into the machine may result in abrasions or crushing injuries from interior components.
Exercise care and caution when working in an open machine.
WARNING
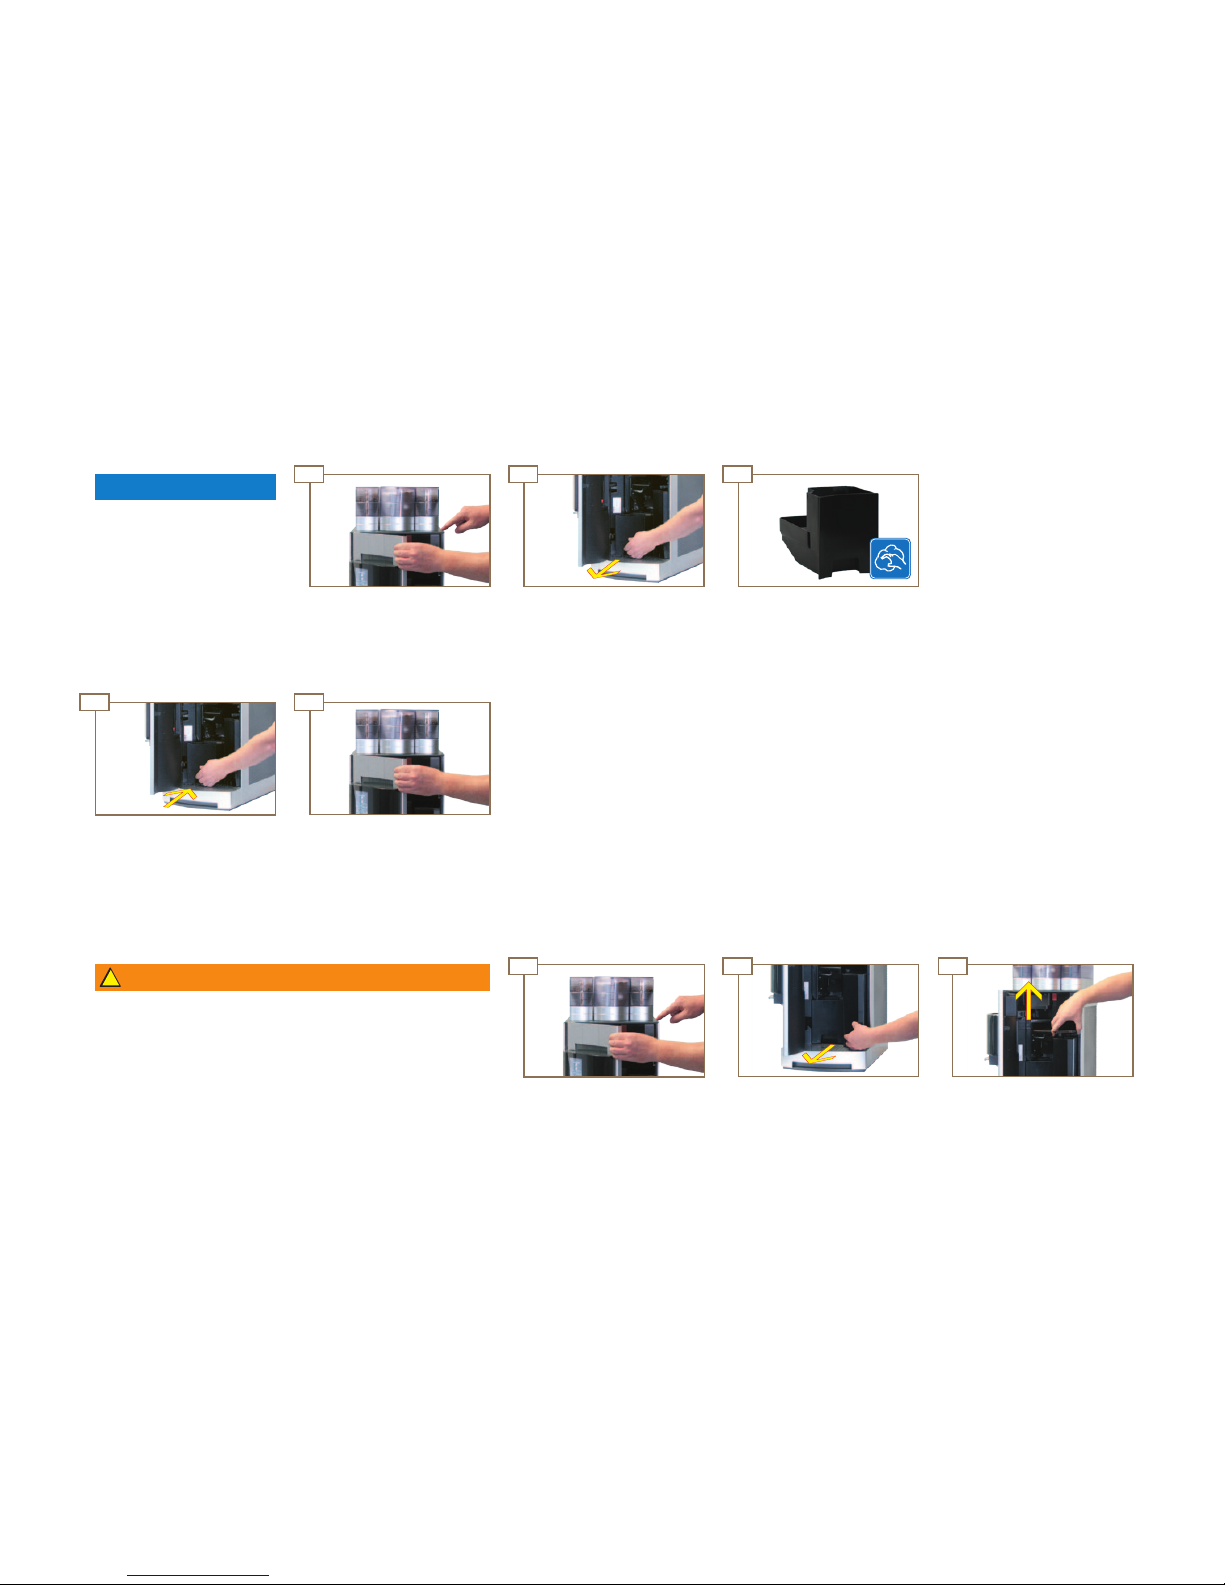
Remove the cover.
Pull the water tank forward until
it is halfway removed.
Press the release button and
open the door.
Formation of mildew due to
coffee residue!
Empty and clean the grounds
container at least once daily.
NOTICE
Empty grounds container
Emptying the water tank (optional)
Replace the grounds container.
Empty, clean and dry the
grounds container.
Remove grounds container.Press the release button and
open the door.
Emptying the Pura
Page 25
4
4
4
44 4 4
01 02 03
05 06
04
07
4
04 05 0807
4 4 4 4
06
4
Start-up, Filling and Emptying
Page 23
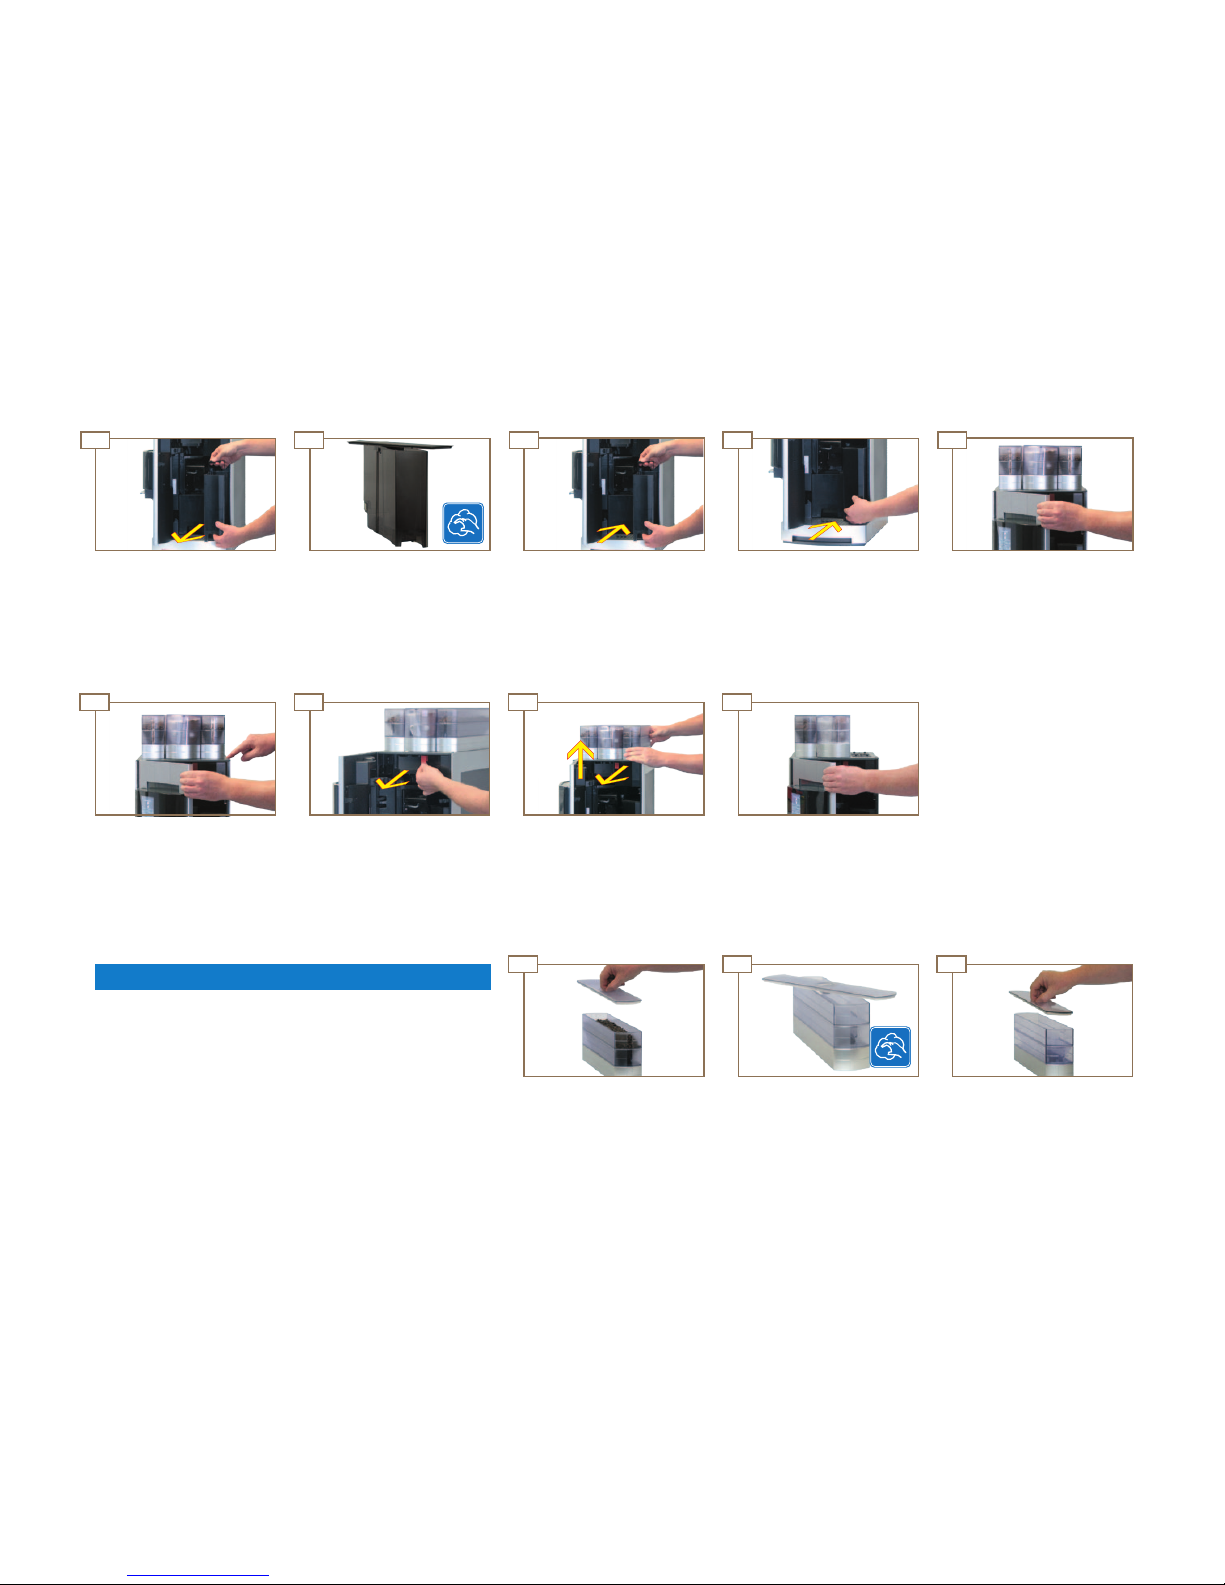
Close the door.Push the water tank into the
machine until it hits the stop.
Insert the water tank to the
half-way point and seal with the
cover.
Empty, clean and dry the water
tank.
Fold open the handle.
Remove water tank.
Emptying the coffee bean hopper
NOTICE
The quality of the coffee may be impaired!
Dry the coffee bean hopper well after cleaning it.
There must not be any residue from cleaning agents.
Emptying the water tank (cont.)
Seal the coffee bean hopper
with the cover.
Close the door.
Empty, clean and dry the bean
hopper.
Remove the cover.
Push powder container forward
to limit stop and remove by
pulling straight up.
Pull red unlocking lever forward.
Press the release button and
open the door.
Page 26
01
4
4
4 44
4 4 4
02 03
4
05
4
04
4
!
09
i
08
Start-up, Filling and Emptying
Page 24
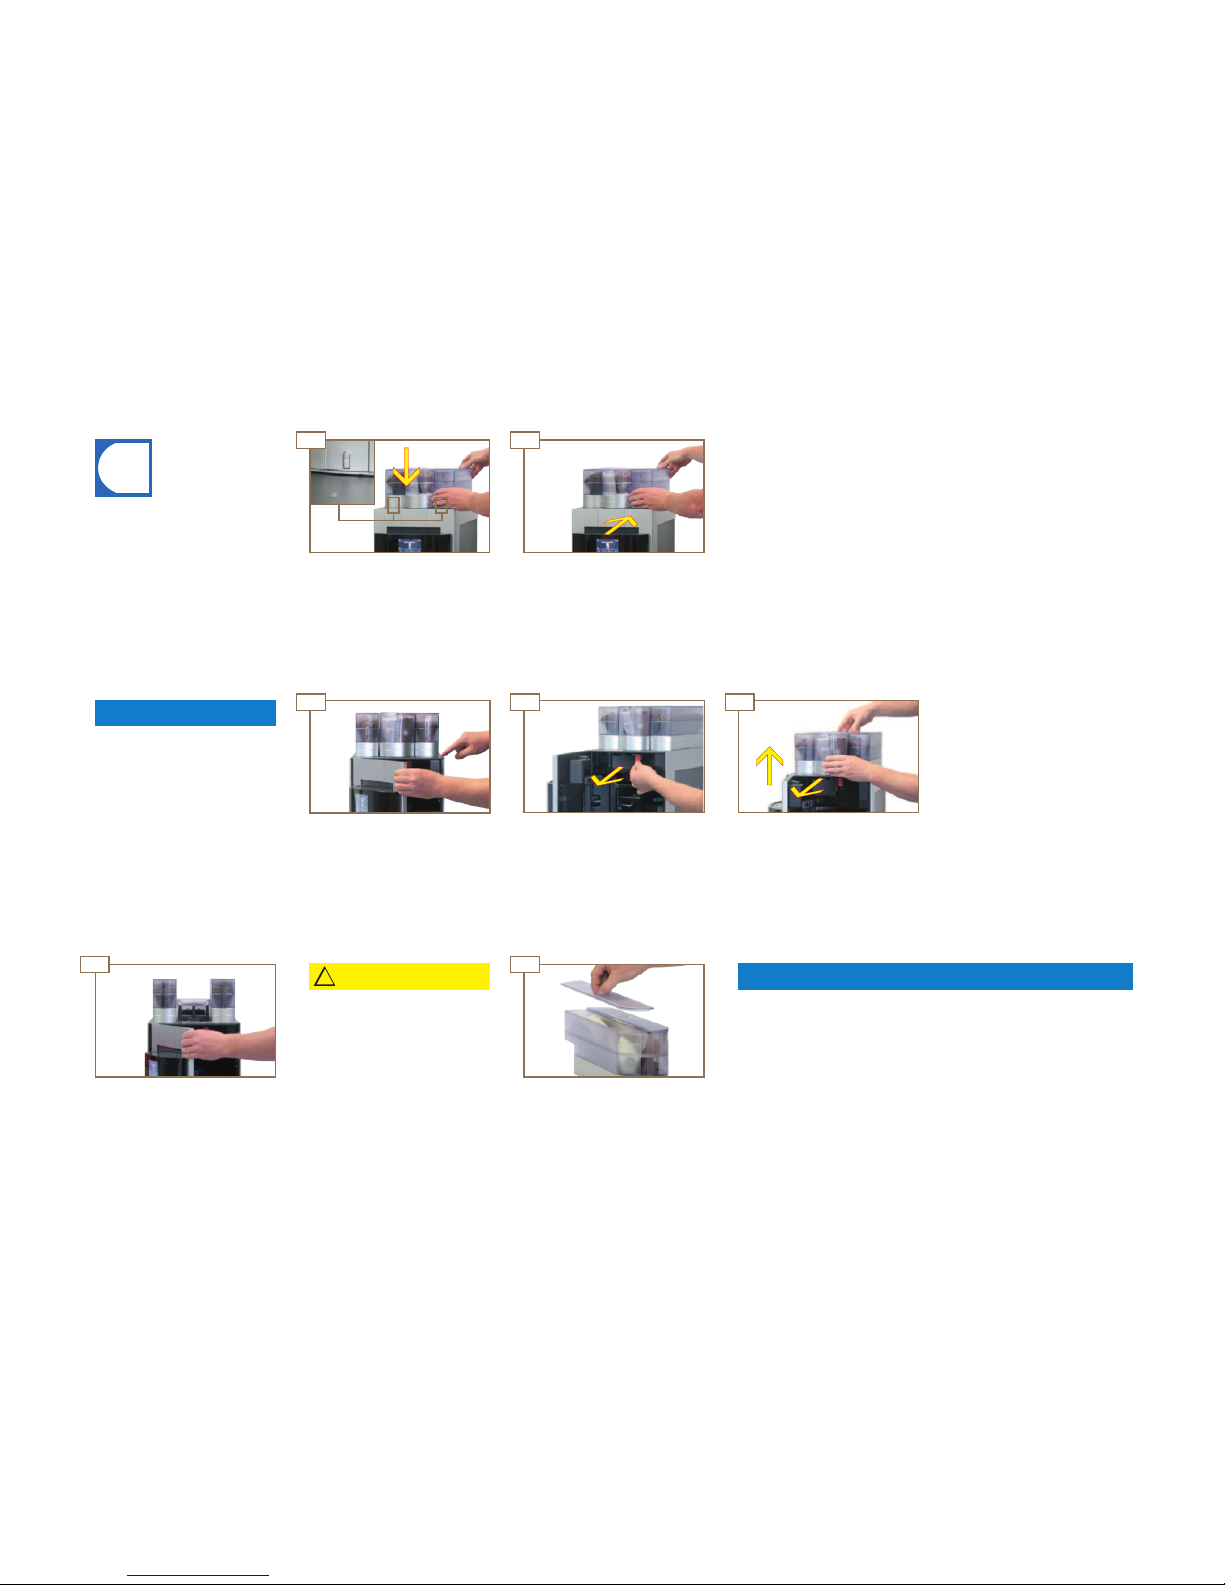
Emptying the coffee bean hopper (cont.)
The machine will only function if both bean hoppers are
installed correctly.
Slide the coffee bean hopper
back to the limit stop.
Place the coffee bean hopper on the machine (observe
marking).
Close the door.
NOTICE
The quality of drinks may be impaired.
Dry the powder container well after cleaning it.
There must not be any residues from cleaning agents.
Remove the cover.
NOTICE
CAUTION
Risk of injury!
From the powder container's
screw conveyor.
Exercise care when cleaning
the powder container.
Push powder container forward
to limit stop and remove by
pulling straight up.
Pull red unlocking lever forward.
Press the release button and
open the door.
Powder may escape.
Always transport the powder
container closed in an upright
position.
Emptying the powder container
Page 27
4
4 4
4 4 4
4
4 4 4 44
02 03 04
!
0706
08
09
i
01
05
Start-up, Filling and Emptying
Page 25
Empty powder container (cont.)
If the powder container is
not properly installed on the
machine, the message Please
replace powder container! will
be displayed.
Slide powder container back to
limit stop.
Place the powder container on
the machine.
Empty, clean and dry the powder container.
Seal powder container with
cover.
WARNING
Risk of scalding!
from hot water and splatters.
Transport carefully and allow to cool down, if necessary.
Empty slowly and carefully.
NOTICE
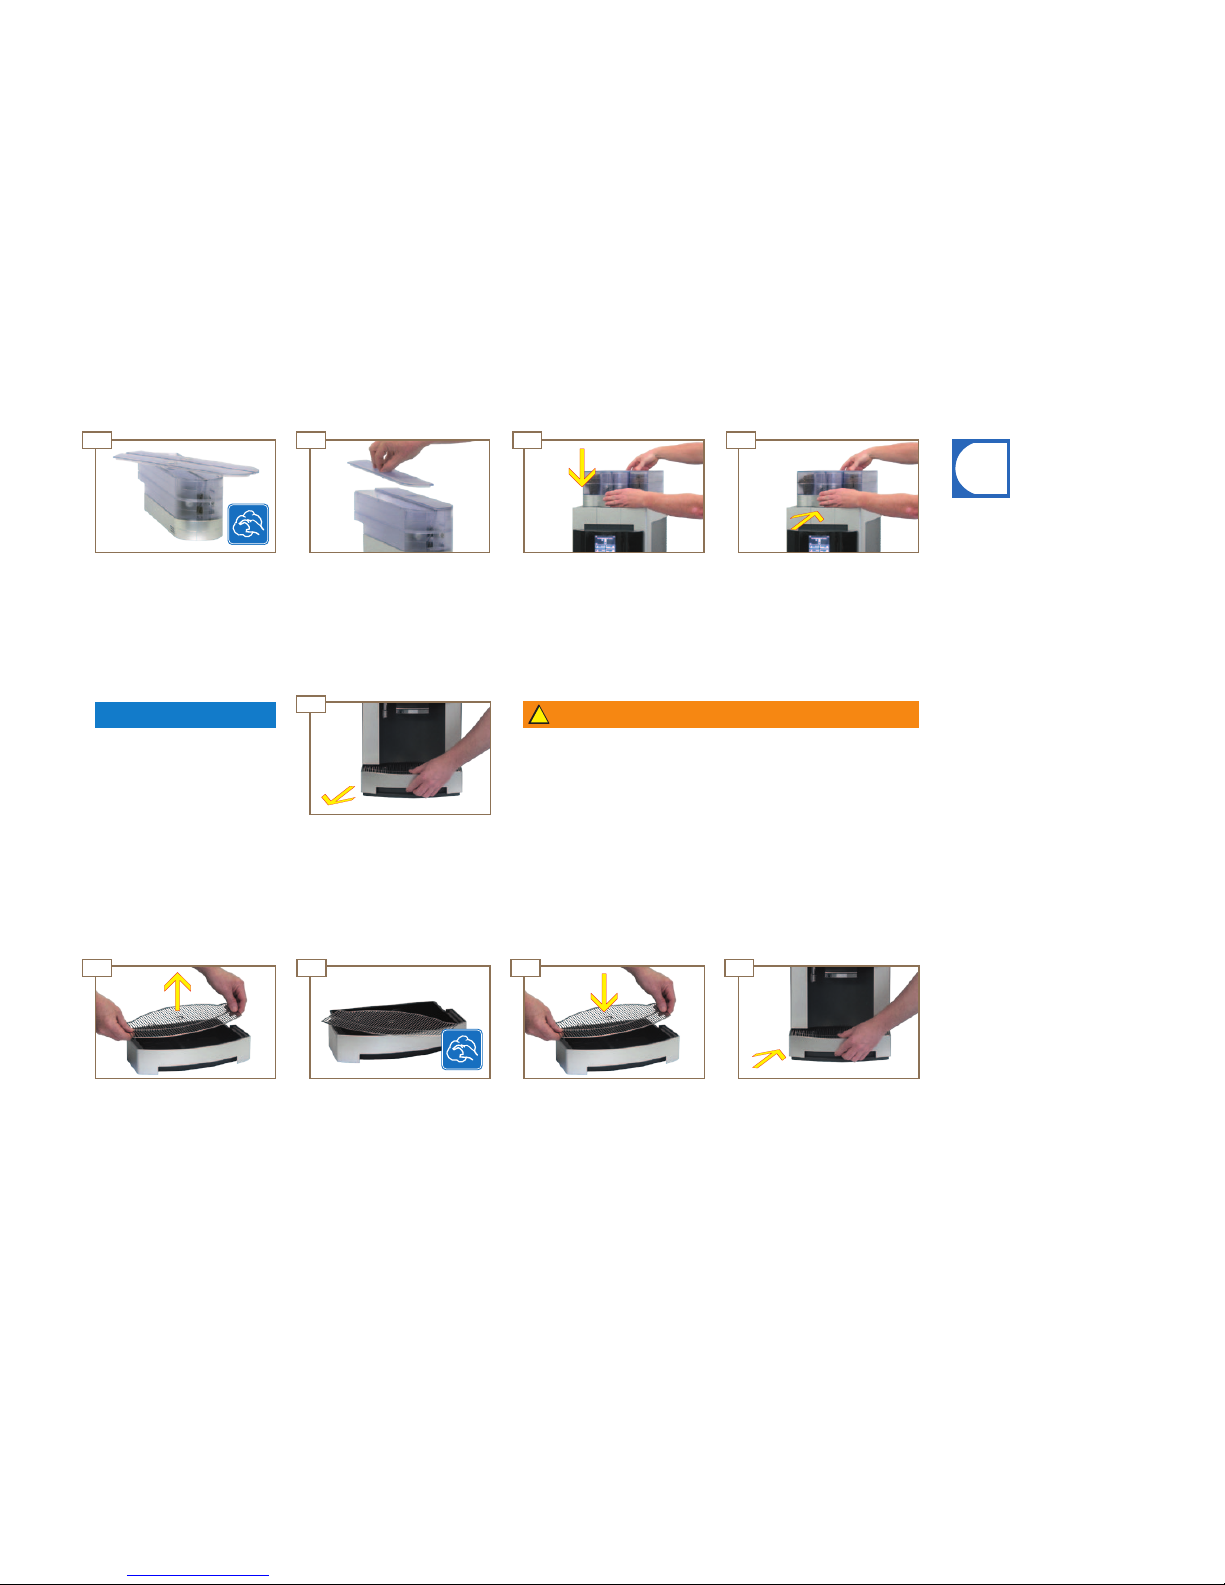
Replace drip tray.Insert the drip grid.Clean and dry the drip tray and
drip grid.
Remove the drip grid and empty
the drip tray.
Remove the drip tray.
Water may spill out!
Always transport the drip tray
horizontally.
Emptying the drip tray (optional)
Page 28
01
44
4
4 4
4
4 4
02 03
03
i
16:04
16:04
01 02
04
i
Start-up, Filling and Emptying
Page 26
Select product
Coffee
Coffee
small
Machine switches to Product
level.
The machine is ready.
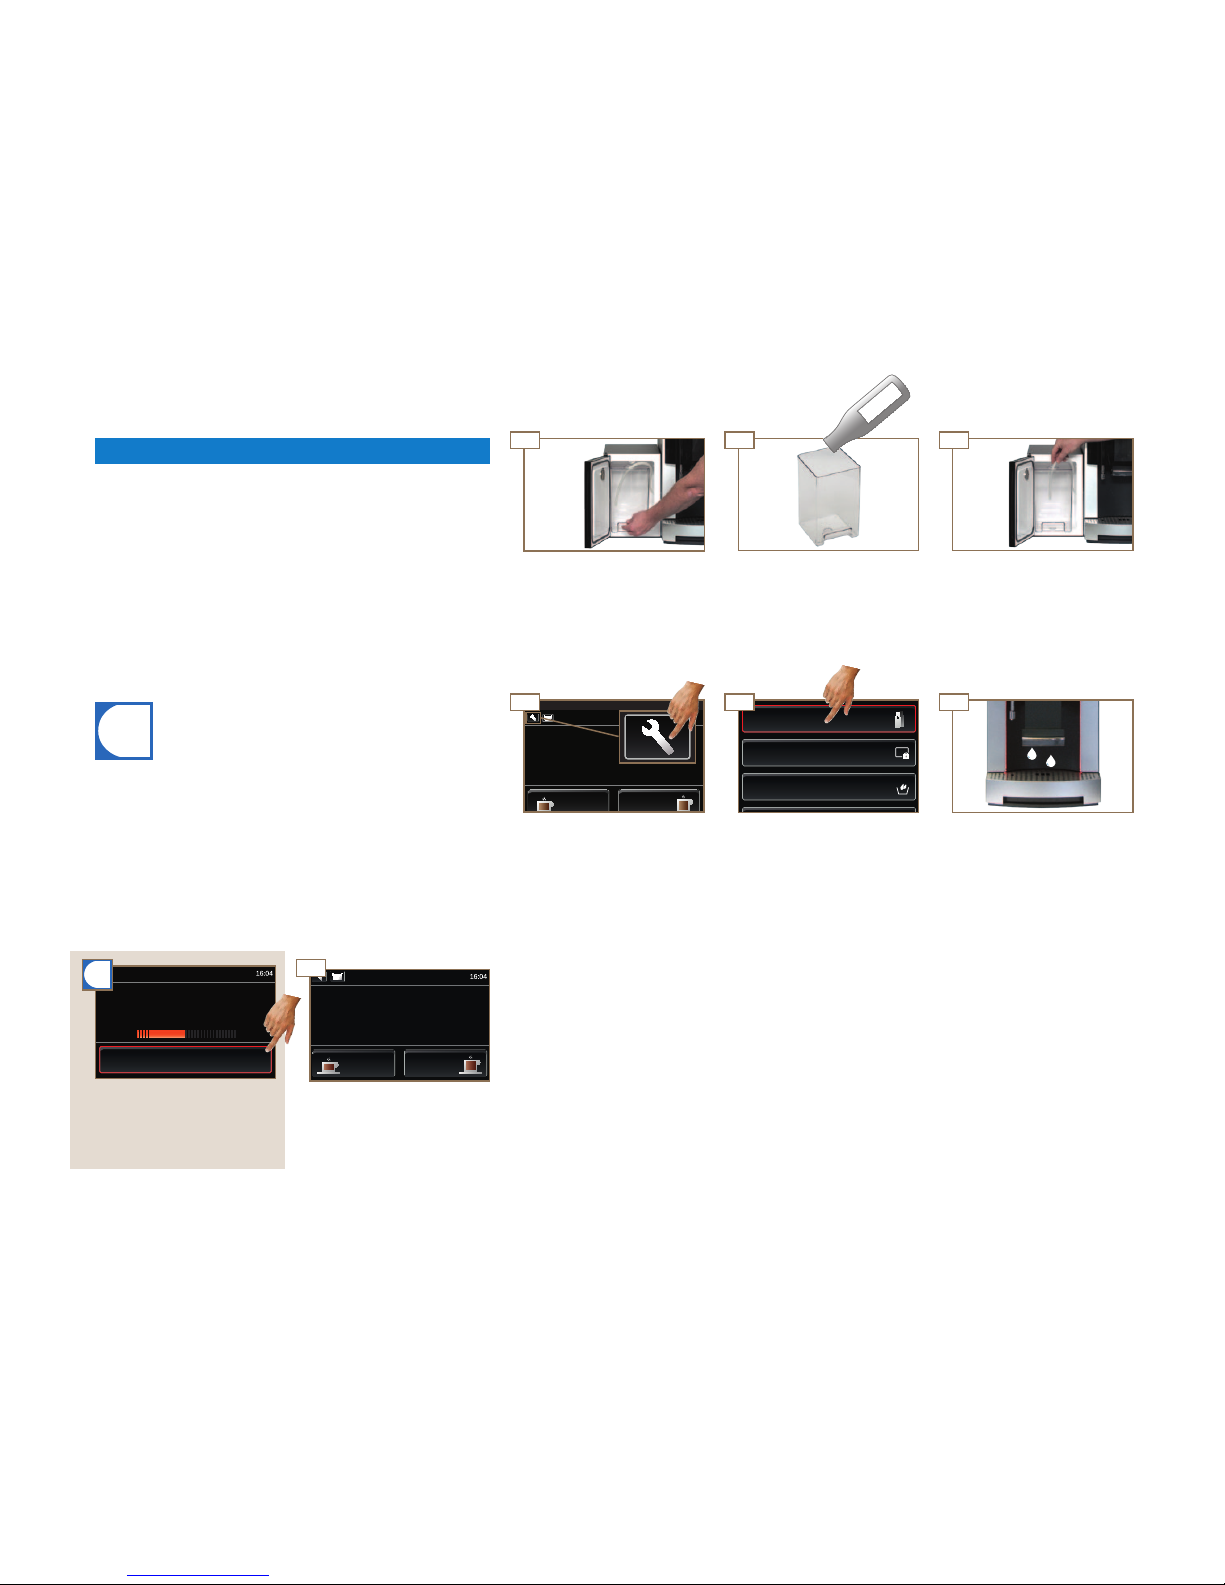
Prepare milk system (prime)
Maintenance
Stop
Rinse
Prepare milk pump (prime)
Activate wipe protection
Espresso Coffee
Select product
Priming milk
For optimum drink quality, there must be milk in the feed lines from
the start.
You must prime the machine so that milk is drawn back into the
lines after each replacement and after cleaning.
Prepare milk pump (prime)
NOTICE
The priming can be interrupted
with Stop.
The Pura starts Priming milk.
Insert the milk container.
Insert the suction tube through
the opening in the cover.
Close the door.
Select Prepare milk pump
(prime).
Remove the cover.
Fill the milk container with milk
and seal it with the cover
Switch to the Maintenance
level.
Open the door.
Remove the intake hose and
pull the Milk container out to
the front.
The quality of the milk may be impaired!
Only use pre-cooled milk.
Only touch the intake hose after sanitizing your hands, or wear
disposable gloves.
Filling the milk container (optional)
Page 29
IV
4 4
III
4 4
II
V
i
i
I
erstellt: 05.11 Artikelnummer: 1N 330 018/B Je nach Ausführung kann sich Ihre Maschine von der hier gezeigten Maschine unterscheiden.
Reinigungsanleitung Pura fresco - Einleitung
Teile gründlich spülen.Grobe Verschmutzungen mit
Bürste entfernen.
Teile auswaschen.Teile in Wasser mit mildem
Reinigungsmittel einweichen.
Teile trocknen.
Ihre Verantwortung für perfekten Kaffeegenuss
Perfekter Kaffeegenuss setzt eine perfekt gereinigte Kaffeemaschine voraus. Steigern Sie Ihre Produktqualität!
Reinigen Sie Ihre Kaffeemaschine mindestens einmal täglich und bei Bedarf häufiger.
Beachten Sie die 5-Schritte-Methode für alle entnehmbaren Teile.
5-Schritte-Methode für entnehmbare Teile
Benötigtes Zubehör:
• Reinigungstabletten
• Milchreiniger
• Mikrofasertuch
Tipp:
• Wir empfehlen einen zusätzlichen Milchbehälter als Reinigungsbehälter.
Informationen:
• Handlungsaufforderungen werden als Liste im Display angezeigt.
• Braun hinterlegte Handlungsschritte stellen eine Option dar. Sie müssen je nach Ausführung der
Maschine durchgeführt werden.
• Erledigte Aufgaben werden nicht mehr angezeigt oder müssen mit OK bestätigt werden.
• Bei einer Installation mit Wasseranschluss, Tropfschalenabfluss oder Satzabwurf, kann es zu
Abweichungen im Reinigungsablauf kommen.
• Sind seit der letzten Reinigung keine Produkte mit Pulver oder Frischmilch bezogen worden,
erscheinen die entsprechenden Handlungsaufforderungen nicht.
• Bürstenset
• Reinigungspinsel
02
0403
4
44
4
05
06 07
4
4 4
!
01
4
Start-up, Filling and Emptying
Page 27
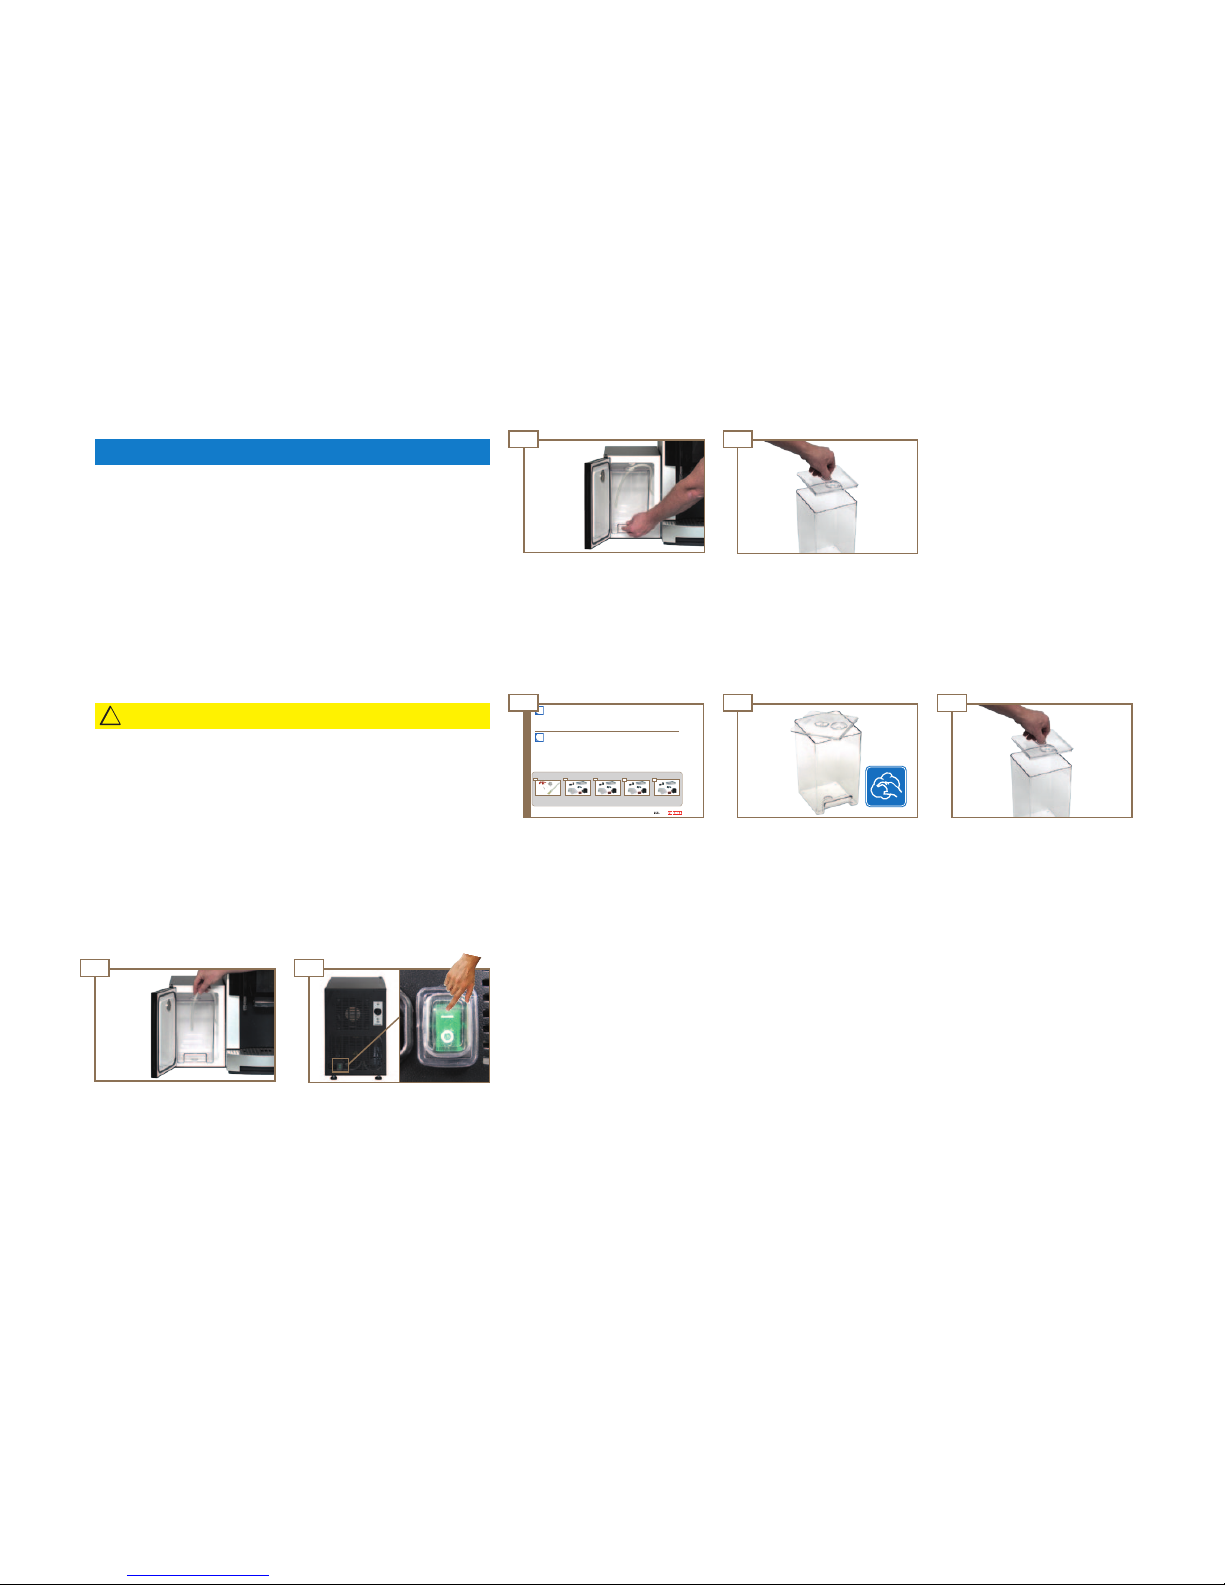
NOTICE
Clean the milk container and
the refrigeration unit.
The refrigeration unit may not be used to store milk!
Remove the milk when the machine is not in use.
Press On/Off to switch the
refrigeration unit off.
Insert the milk container.
Insert the suction tube through
the opening in the cover.
Close the door.
CAUTION
Health risks due to spoiled milk!
If the machine is not cleaned regularly, milk residue may accumulate
in the machine, clog the dispensers or find its way into drinks.
Clean the refrigeration unit and milk system at least once daily.
Seal the milk container with the
cover.
Clean the Pura milk system.
See Pura fresco cleaning
instructions.
Remove the cover.
Store the milk in a refrigerator
or dispose of it, if necessary.
Open the door.
Remove the intake hose and
pull the Milk container out to
the front.
Emptying the milk container (optional)
Page 30
!
16:04
16:04
16:04
16:04
4 4
4
4
44
4
01 02
03
04 05
4
16:04
16:04
i
Preparing drinks
Page 28
Coffee
Coffee
small
Product is canceled
Tea mug
Coffee
Coffee
Latte
2
Latte
Coffee
small
Coffee
small
2 Coffee
small
Coffee
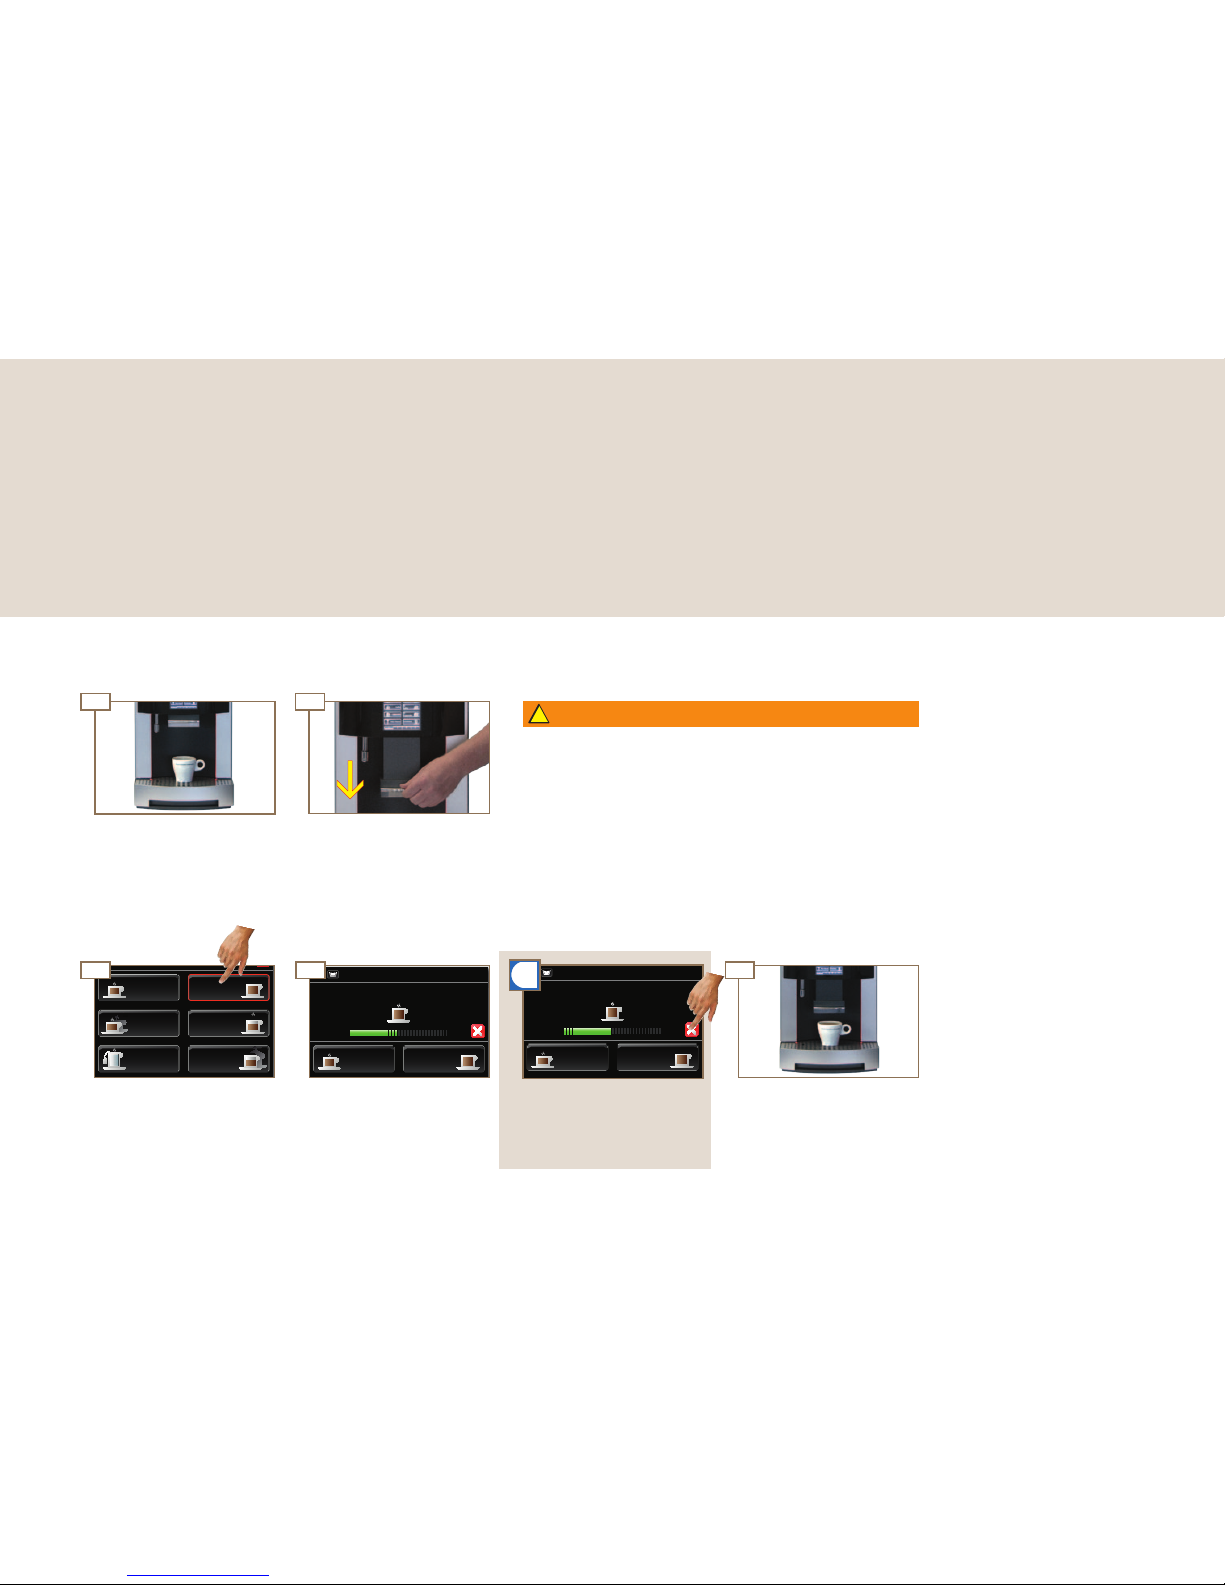
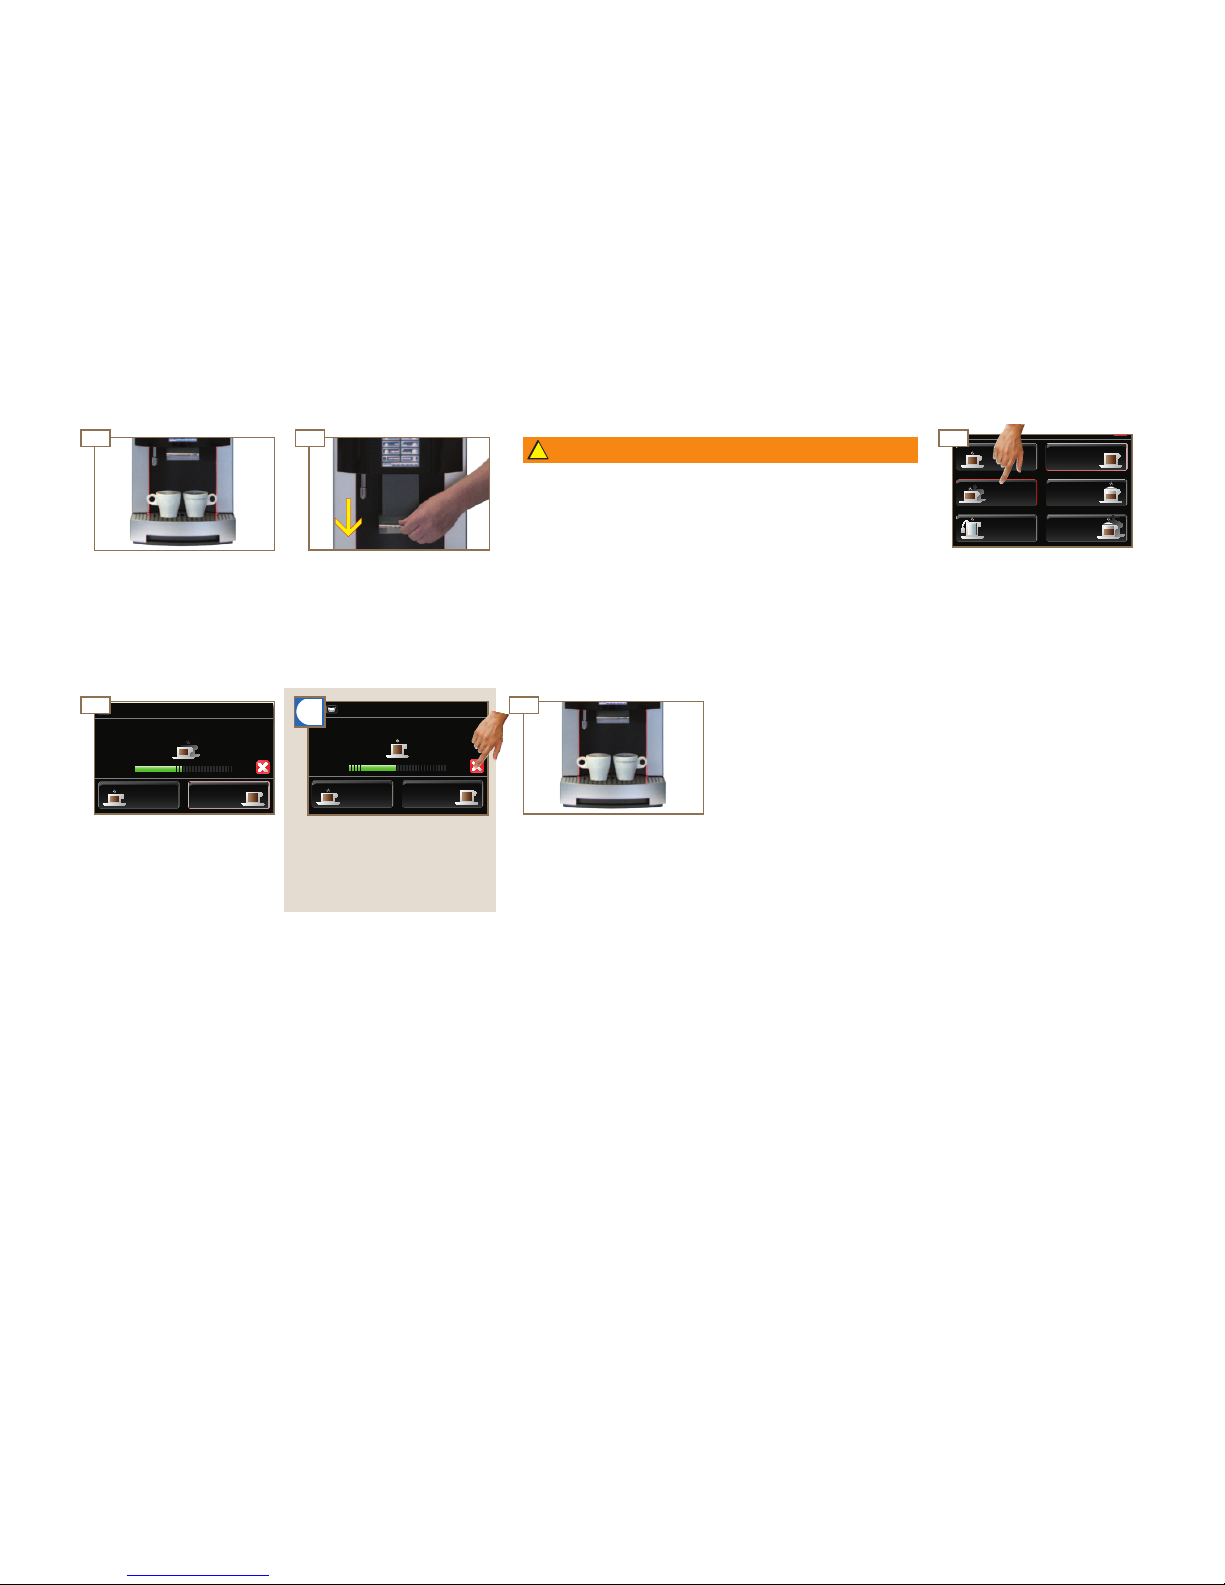
Preparation of the drink can be
canceled by pressing Cancel.
Press product button desired.
The drink is ready.Preparation begins.
Place an appropriate cup or
glass under the outlet.
Setting outlet height.
Risk of scalding or burning!
The dispensers and drinks are hot.
Do not touch the area under the outlets.
In case of scalding or burns, immediately cool the affected area
and, depending on the severity of the injury, consult a doctor.
Preparing drinks
Preparing a standard drink
You chose the Pura because you love coffee and want to offer your customers something special. You
will find information about preparing drinks and the variations possible for your specialty drinks here.
WARNING
Page 31
!
4 4 4
01 02
16:04
16:04
16:04
16:04
4
03
04 05
4
16:04
16:04
i
4
Preparing drinks
Page 29
Preparing two drinks at once
Coffee
Coffee
small
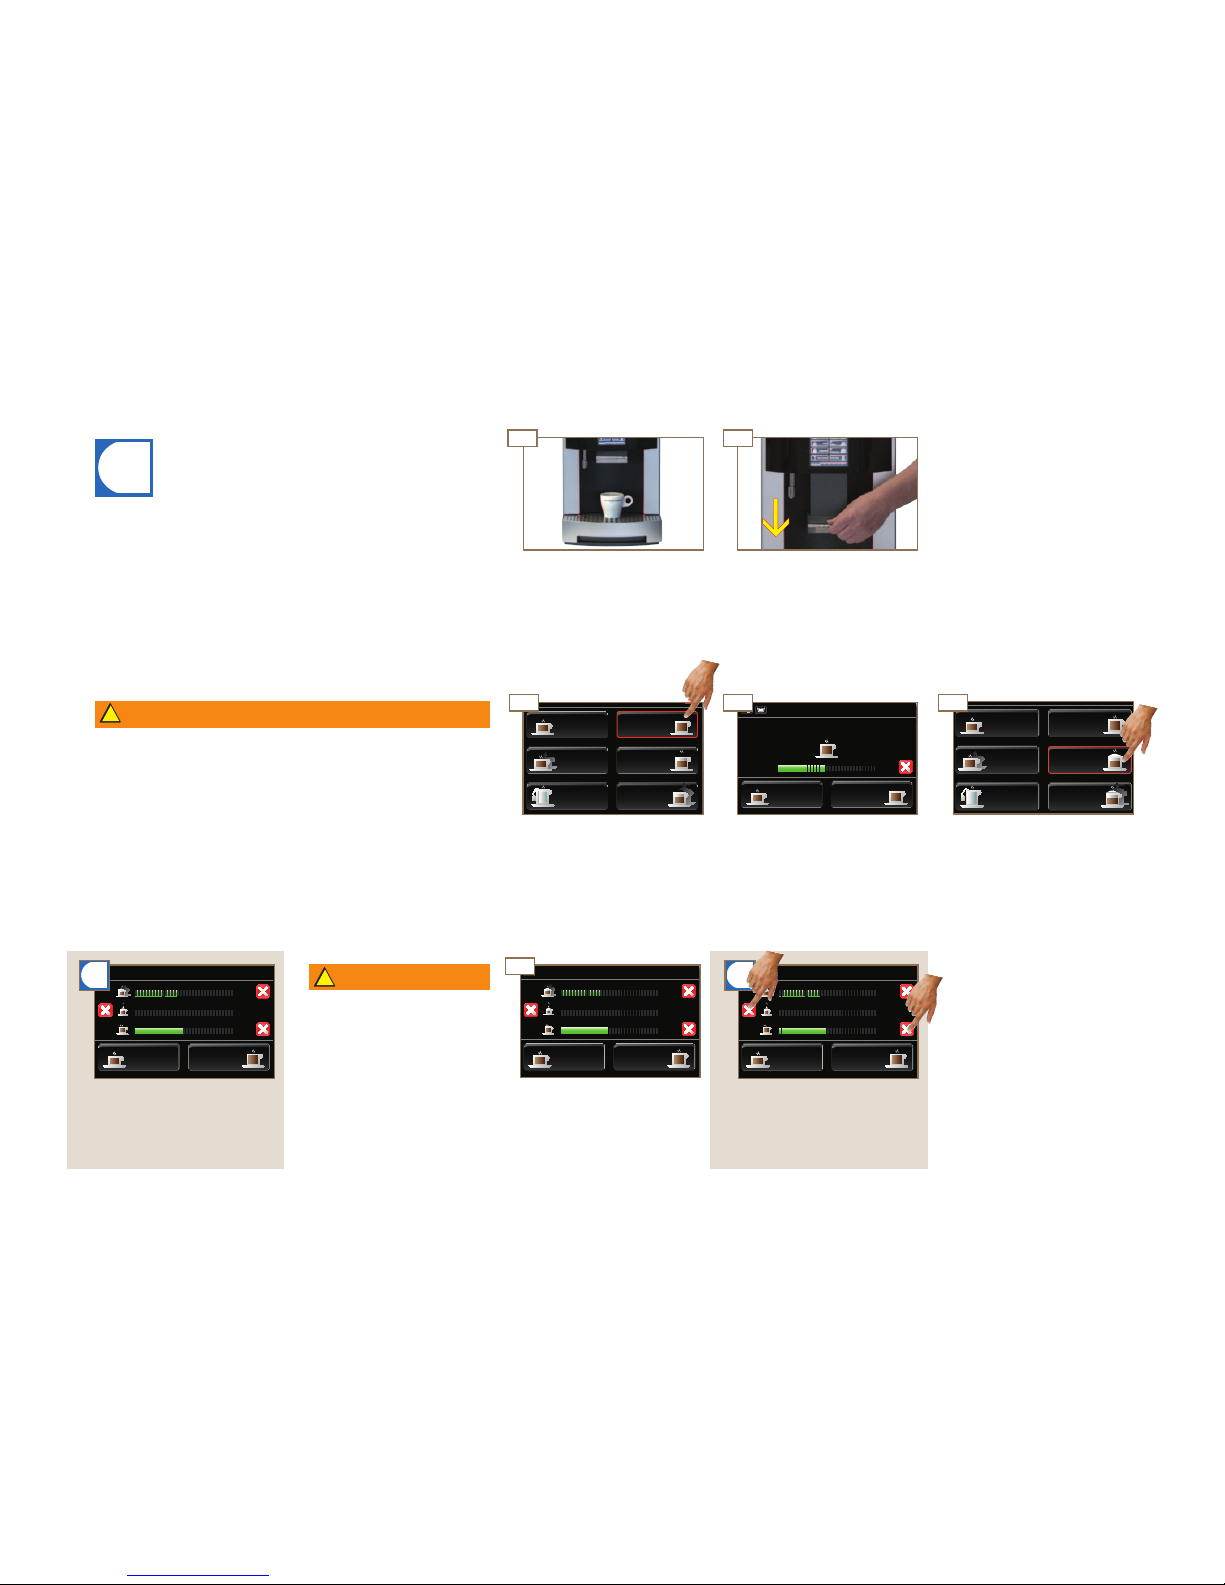
Product is canceled
Preparation of the drink can be
canceled by pressing Cancel.
Coffee
Coffee
small
2 Coffee small
Tea mug
Coffee
Latte
2
Latte
2 Coffee
small
Press product button desired.
The drinks are ready.Preparation begins.
Place two appropriate cups or
glasses under the outlet.
Setting outlet height.
Risk of scalding or burning!
The dispensers and drinks are hot.
Do not touch the area under the outlets.
In case of scalding or burns, immediately cool the affected area
and, depending on the severity of the injury, consult a doctor.
WARNING
Page 32
16:04
16:04
16:04
16:04
!
4 44
4
4
02
4 4
05
06
!
4
16:04
16:04
4 4
03
16:04
16:04
04
01
i
4
16:04
16:04
16:04
16:04
i
i
Preparing drinks
Page 30
Coffee CoffeeCoffee
Coffee
small
Coffee
small
Coffee
small
2 Latte Product is canceled2 Latte
Latte LatteLatte
Coffee Product is canceledCoffee
Preparation of the drink can be
canceled or products removed
from the queue by pressing
Cancel.
The preselected drinks are
listed in the display.
The current drink is listed at the
bottom.
Coffee
Coffee
small
Coffee
Tea mug
Tea mug
Coffee
Coffee
Latte
Latte
2
Latte
2
Latte
Coffee
small
Coffee
small
2 Coffee
small
2 Coffee
small
Preparation begins.
Press product button desired.
Place an appropriate cup or
glass under the outlet.
Keep appropriate cups and
glasses handy for additional
drinks.
Setting outlet height.
WARNING
Risk of scalding!
The next drink starts automatically.
Pay attention and work carefully.
Next preparation begins.
Other drinks can be preselected while the drink is being
prepared.
Risk of scalding or burning!
The dispensers and drinks are hot.
With the queue function, the next product starts automatically.
Do not touch the area under the outlets.
In case of scalding or burns, immediately cool the affected area
and, depending on the severity of the injury, consult a doctor.
WARNING
You can start the preparation of up to 11 products using the queue
function. Pay attention and work carefully to avoid scalds. Drink
preparation with preselection must be enabled.
Only an authorized service technician can enable preprogrammed
settings.
Contact your service technician.
Drink preparation using the queue function (if enabled)
Page 33
!
Kaee
klein
2
2
4 4
4 4 4
02
4 4
4
Kaee
klein
2
Kaee
klein
2
03
04
01
16:04
16:04
16:04
16:04
05
i
i
i
Preparing drinks
Page 31
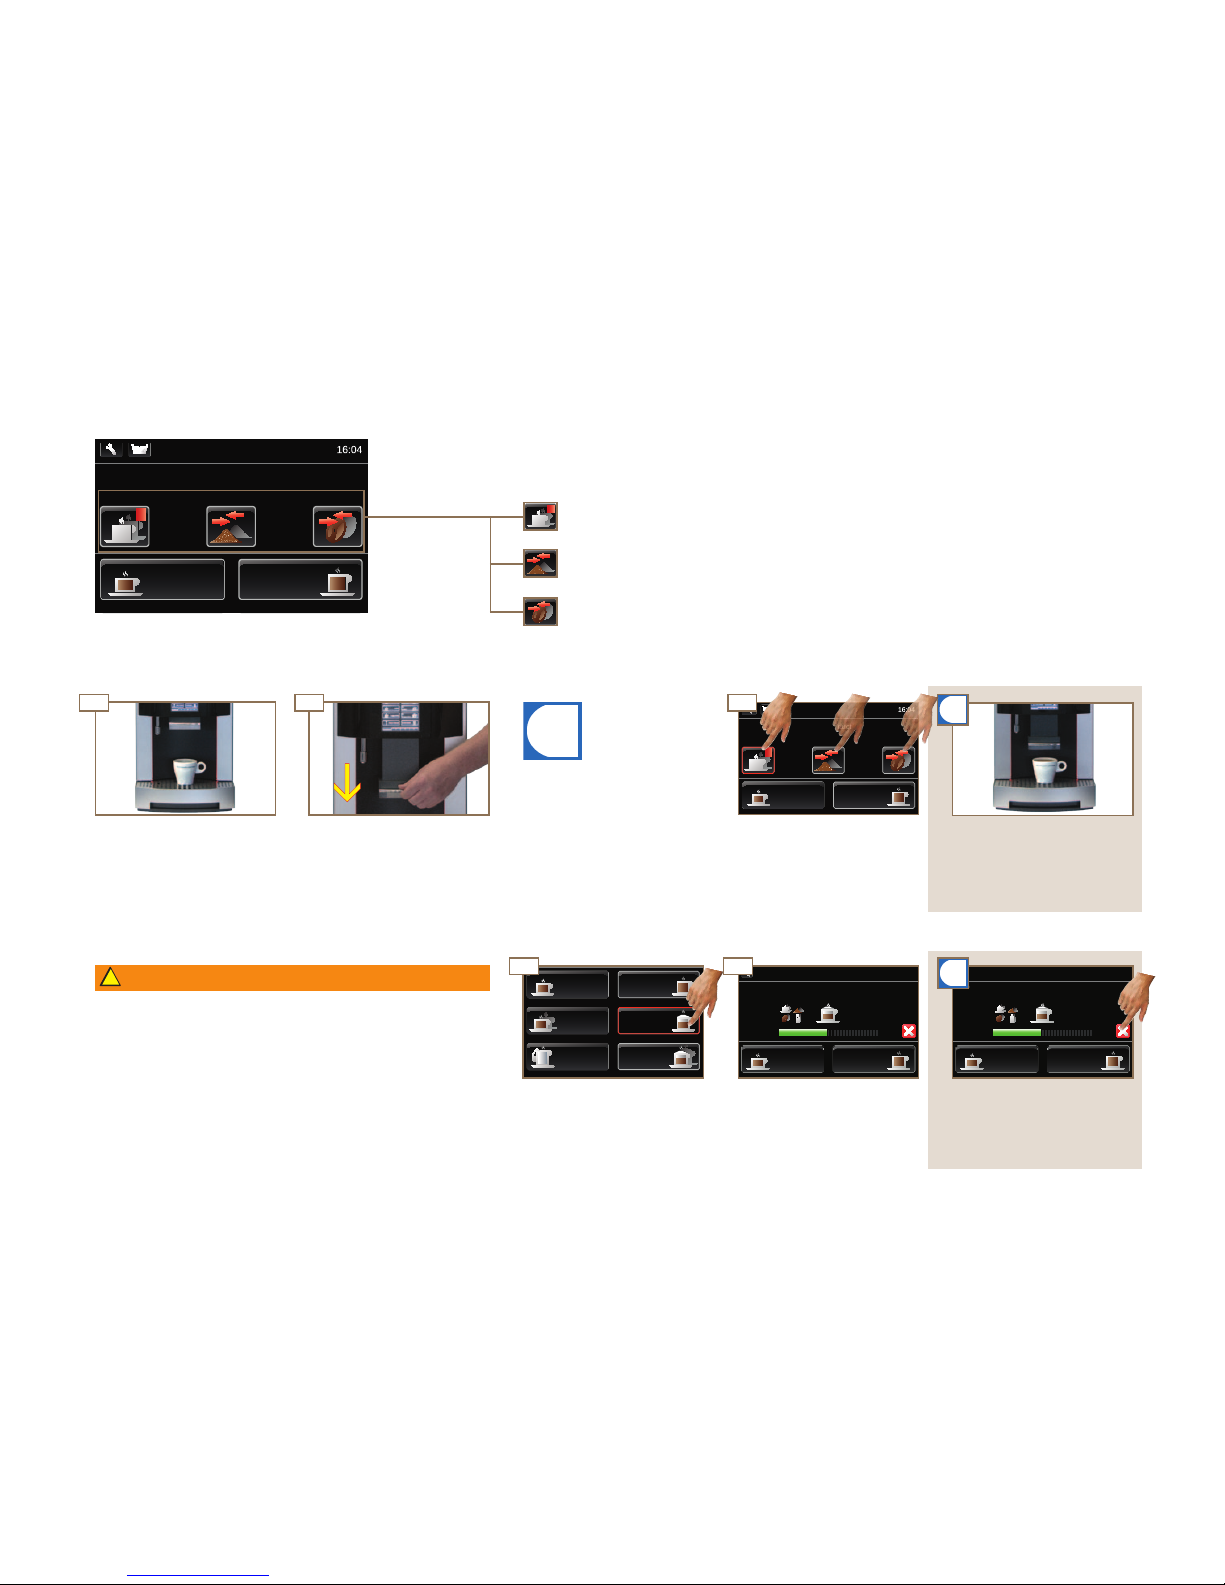
You may select one or more
preselection functions.
CoffeeCoffee
Coffee
small
Coffee
small
LatteLatte
When 2x is preselected, have
appropriate cup or glass ready.
Preparation of the drink can be
canceled by pressing Cancel.
Preparation begins.
2x Powder
Select product
Coffee
2
Latte
Tea mug
2 Coffee
small
Milk
Coffee
Coffee
Coffee
Coffee
small
Coffee
small
Press product button desired.
Press preselection button
desired.
Place an appropriate cup or
glass under the outlet.
Setting outlet height.
Coffee: Preselection of coffee type.
Powder: Preselection of powder type.
The Pura makes the following preselection possibilities available:
2x: Selected product is prepared twice. Serial preparation.
2x Powder Coffee
Coffee
Coffee
small
Select product
Risk of scalding or burning!
The dispensers and drinks are hot.
When product repetition is preselected, the second product starts
automatically.
Do not touch the area under the outlets.
In case of scalding or burns, immediately cool the affected area
and, depending on the severity of the injury, consult a doctor.
Pay attention and work carefully.
WARNING
Example of use of preselection
Drink preparation with preselection (if enabled)
Page 34
!
16:04
VIIIII II
16:04
I
III IV
II
4 4
01
02
444
16:04
16:04
16:04
16:04
i
i
03
4
Preparing drinks
Page 32
If the simultaneous drink preparation function is not activated, all
other products are blocked during hot water dispensing.
Only an authorized service technician can enable preprogrammed
settings.
Contact your service technician.
Coffee Coffee
Coffee
small
Coffee
small
Product is canceled Product is canceled
Hot waterTeacup
Tea mug
Latte
2
Latte
small
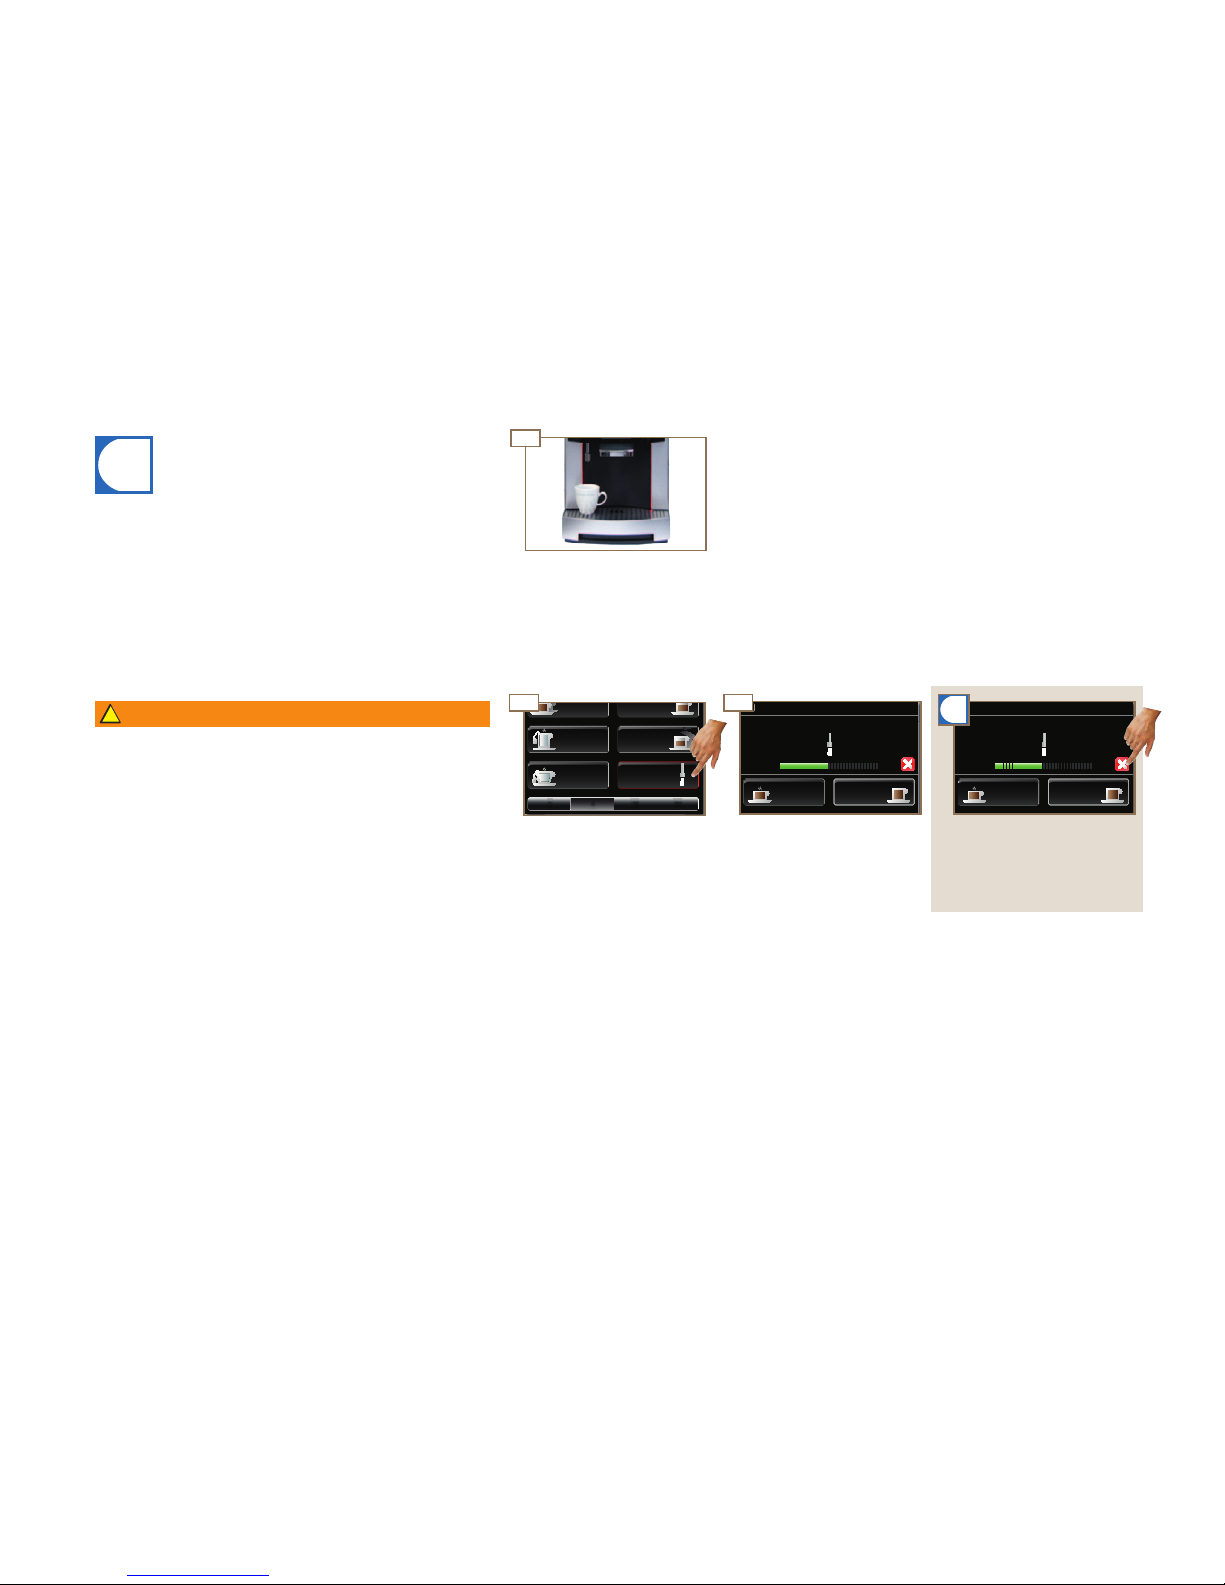
Place an appropriate cup or
glass under the hot water
outlet.
Preparation begins.
Preparation of the drink can be
canceled by pressing Cancel.
Press the Hot water product
button.
Risk of scalding or burning!
The dispensers and drinks are hot.
Do not touch the area under the outlets.
In case of scalding or burns, immediately cool the affected area
and, depending on the severity of the injury, consult a doctor.
WARNING
Hot water dispenser
Page 35
IV
4 4
III
4 4
II
V
i
I
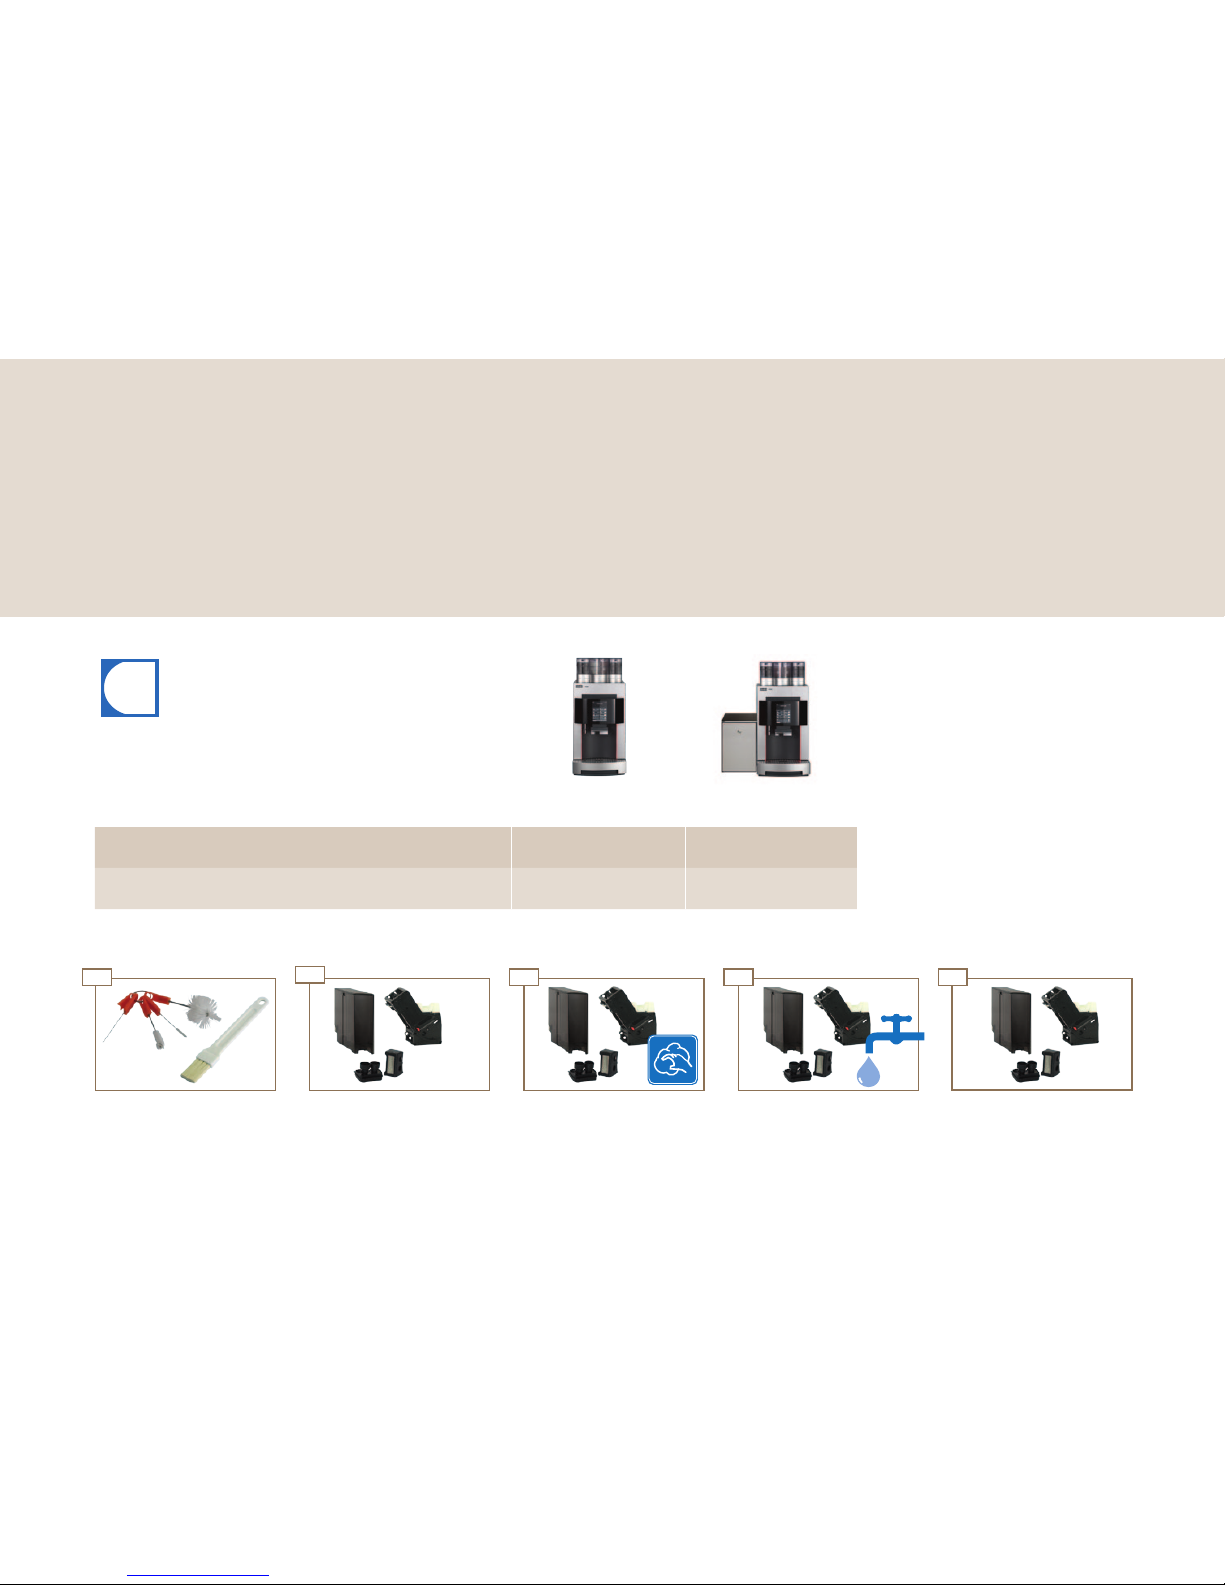
Cleaning, rinsing and servicing
Page 33
1
for USA and Canada.
5-step method for removable parts
Dry the parts.Soak parts in water with a mild
detergent.
Wash parts.
Remove coarse dirt with brush.
Rinse parts thoroughly.
Select the correct cleaning and descaling instructions for
your system, taking the functions of your coffee machine
into consideration.
Pura pronto Pura fresco
Cleaning Instructions (for daily cleaning of the coffee system) 1N 330 014 1N 330 019/1N 330 587
1
Descaling Instructions 1N 330 029 1N 330 029
Overview of the separate instructions for cleaning and descaling
Even a coffee machine like the Pura must be cared for. To ensure high-quality flavor, the Pura must be cleaned at
least once daily and serviced at regular intervals. To keep you from spending too much time cleaning your machine,
we developed our Clean & Clever cleaning system.
Cleaning, rinsing and servicing
Page 36
4
44
4
4
4
4
02
0605
01
4
03
04
!
4
i
Cleaning, rinsing and servicing
Page 34
When operating with a water
filter, the filter must be removed
from the water tank before
cleaning.
See page 42.
Risk of injury!
Reaching into the machine may result in abrasions or crushing injuries from interior components.
Exercise care and caution when working in an open machine.
WARNING
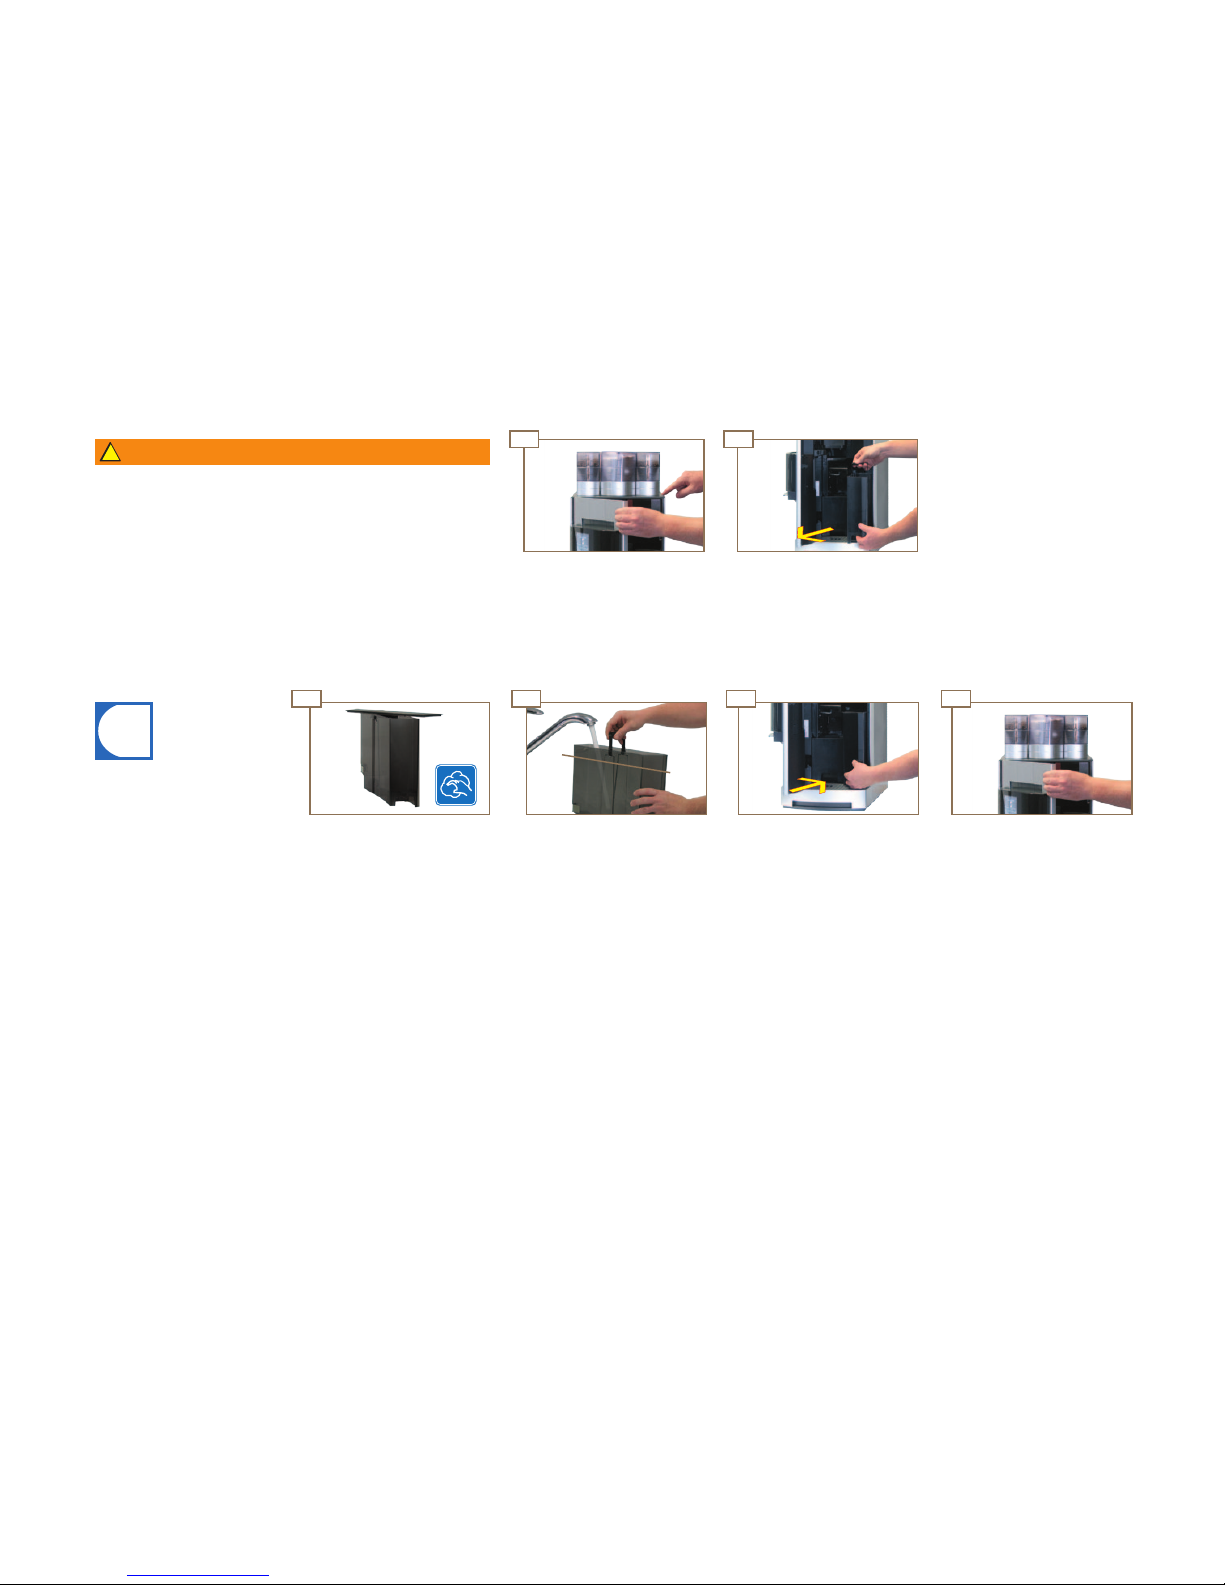
Fill water tank up to fill mark.
Clean the water tank using the
5-step method.
Press the release button and
open the door.
Replace water tank. Close the door.
Remove and empty the water
tank.
Cleaning the water tank (weekly and additionally as needed, if tank operation)
Page 37
4
444
4 4 4
4
04
08
05
09
!
030201
4 4 4
4
07
11
4
4
10
06
12
Cleaning, rinsing and servicing
Page 35
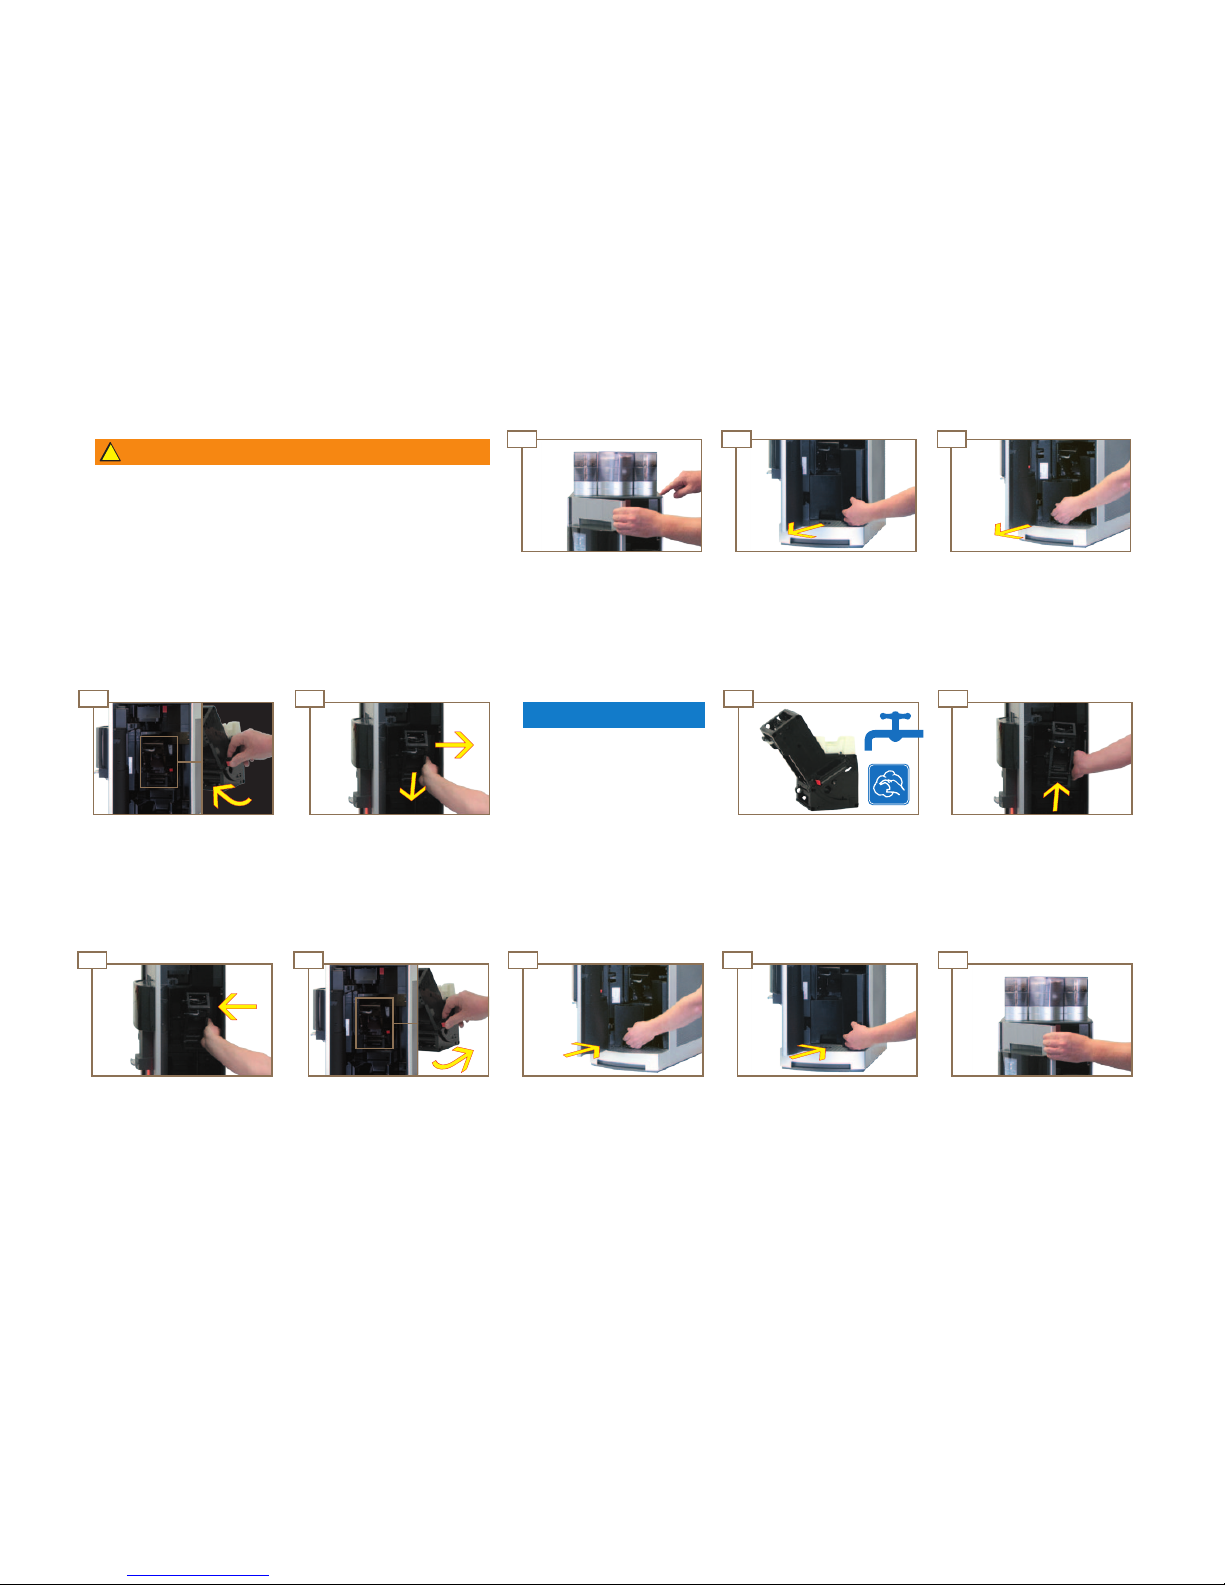
Close the door.
NOTICE
Brewing unit is not dishwashersafe.
Always rinse out the brewing
unit under a water tap.
Replace grounds container.
Rinse the brewing unit from
all sides and clean using the
5-step method.
Replace water tank.
Insert brewing unit, white parts
facing upward.
Risk of injury!
Reaching into the machine may result in abrasions or crushing injuries from interior components.
Exercise care and caution when working in an open machine.
WARNING
Press and hold down the red
button while at the same time
turning the lever to the rear
until it hits the stop.
The brewing unit is locked.
Pull the brewing unit right and
forward to remove.
Push the brewing unit to the
left.
Press and hold down the red
button while at the same time
turning the lever forward.
Brewing unit is unlocked.
Press the release button and
open the door.
Remove water tank.
Remove grounds container.
Clean the brewing unit (weekly and additionally, as required).
Page 38
!
02
01
03 04
04b
(Ë) (Ë) (Ë)
7
2
8
3
4
5
6
1
2
8
5
3
6
4
1
7
4
4
4
04c 04d
Cleaning, rinsing and servicing
Page 36
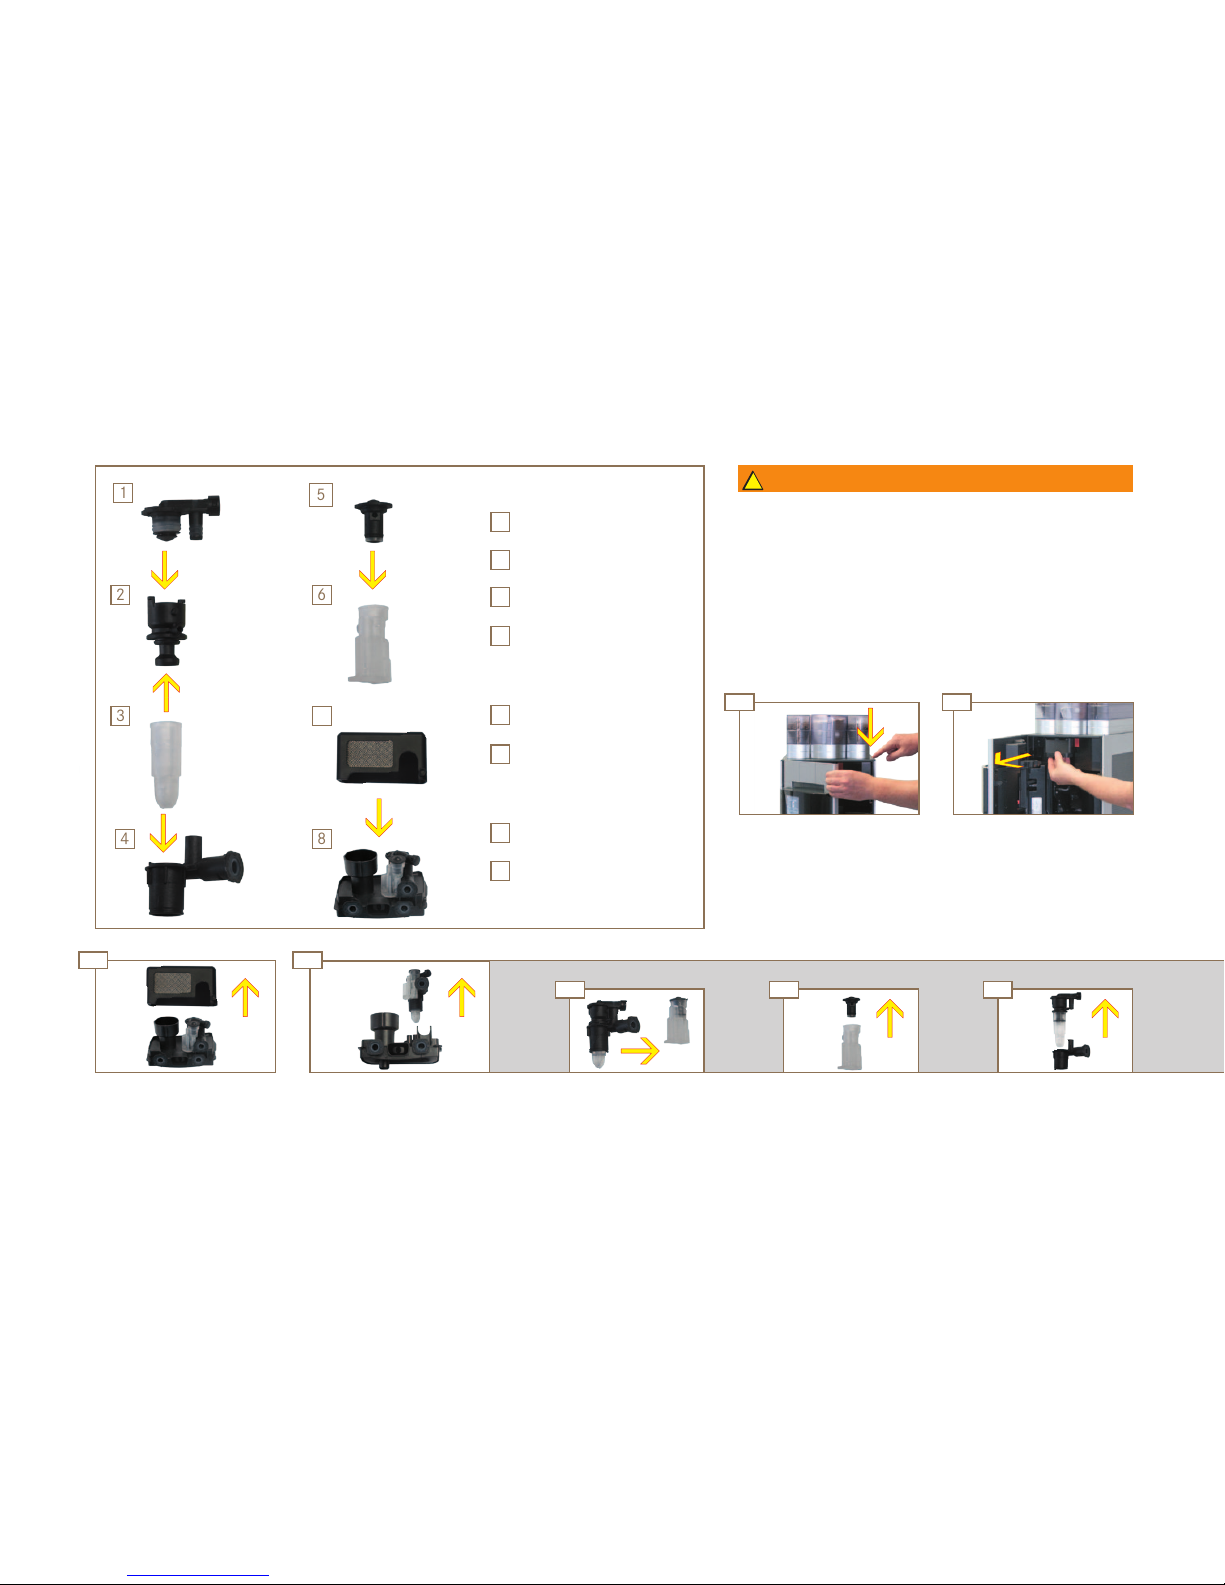
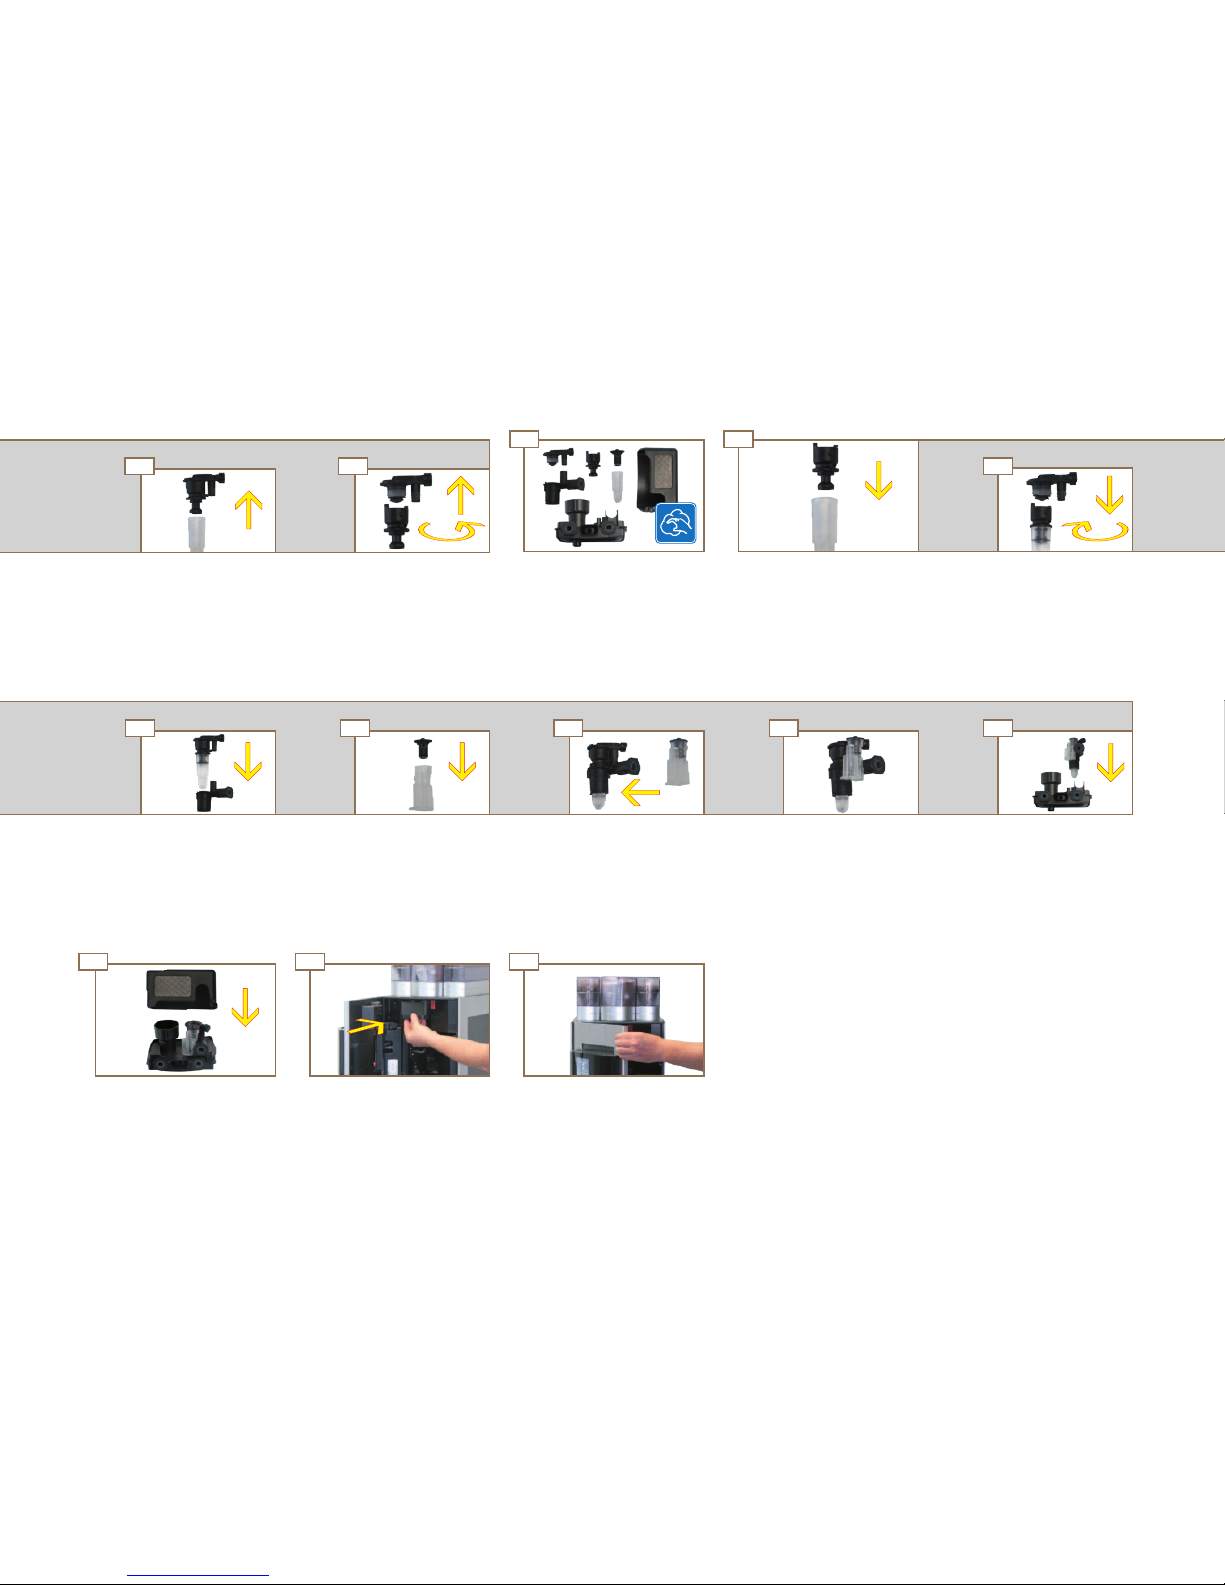
Mixing chamber
Air supply
Milk foamer
Remove the check valve from
the air supply.
Remove the steam nozzle from
the milk feed.
Mixing chamber components
Housing cover
Steam nozzle
Milk feed
Air supply
Mixer
Check valve
Housing base
Frothing aid
WARNING
Health risks and damage to the machine!
Powder left in the mixing chamber can cause clogging and lead to
the formation of germs.
Clean the mixing chamber weekly and additionally, as required.
Clean the powder container every two months and additionally, as
required if the machine is used frequently.
Lift the mixing chamber cover
up to remove.
Disconnect air supply from milk
foamer.
Remove the milk foamer from
the lower part of the housing.
Unlock the mixing chamber at
the bottom and pull forward to
remove.
Press the release button and
open the door.
Pura fresco - Clean the mixing chamber (weekly and additionally, as required).
Page 39
06f
06
04e 04f
05
4 4
06b
06g
08
(Ë) (Ë)(Ë)(Ë)(Ë)
(Ë) (Ë)(Ë)
09
44 4
06c
06d 06e
07
Cleaning, rinsing and servicing
Page 37
Close the door.
Clean mixing chamber components using the 5-step method.
Unlock the bayonet lock.
Remove the steam nozzle from
the frothing aid.
Remove the frothing aid from
the mixer.
Insert the frothing aid in the
mixer.
Correctly assembled milk
foamer.
Insert the steam nozzle in the
frothing aid.
Lock the bayonet lock.
Insert the milk foamer in the
lower part of the housing.
Reassemble mixing chamber.
Place air feed on milk foamer.
Insert the mixing chamber up
to limit stop.
The mixing chamber will lock
into place with an audible
click.
Replace check valve in air
supply.
Insert the steam nozzle in the
milk feed.
Continued: Pura fresco - Clean the mixing chamber (weekly and additionally, as required).
Page 40
01 02
444 4
0504
03
4 4
4 4 4
4
!
i
i
16:04
16:04
16:04
16:04
01
01
02 03
Cleaning, rinsing and servicing
Page 38
Select product
Select product
Espresso
Espresso
Coffee
Coffee
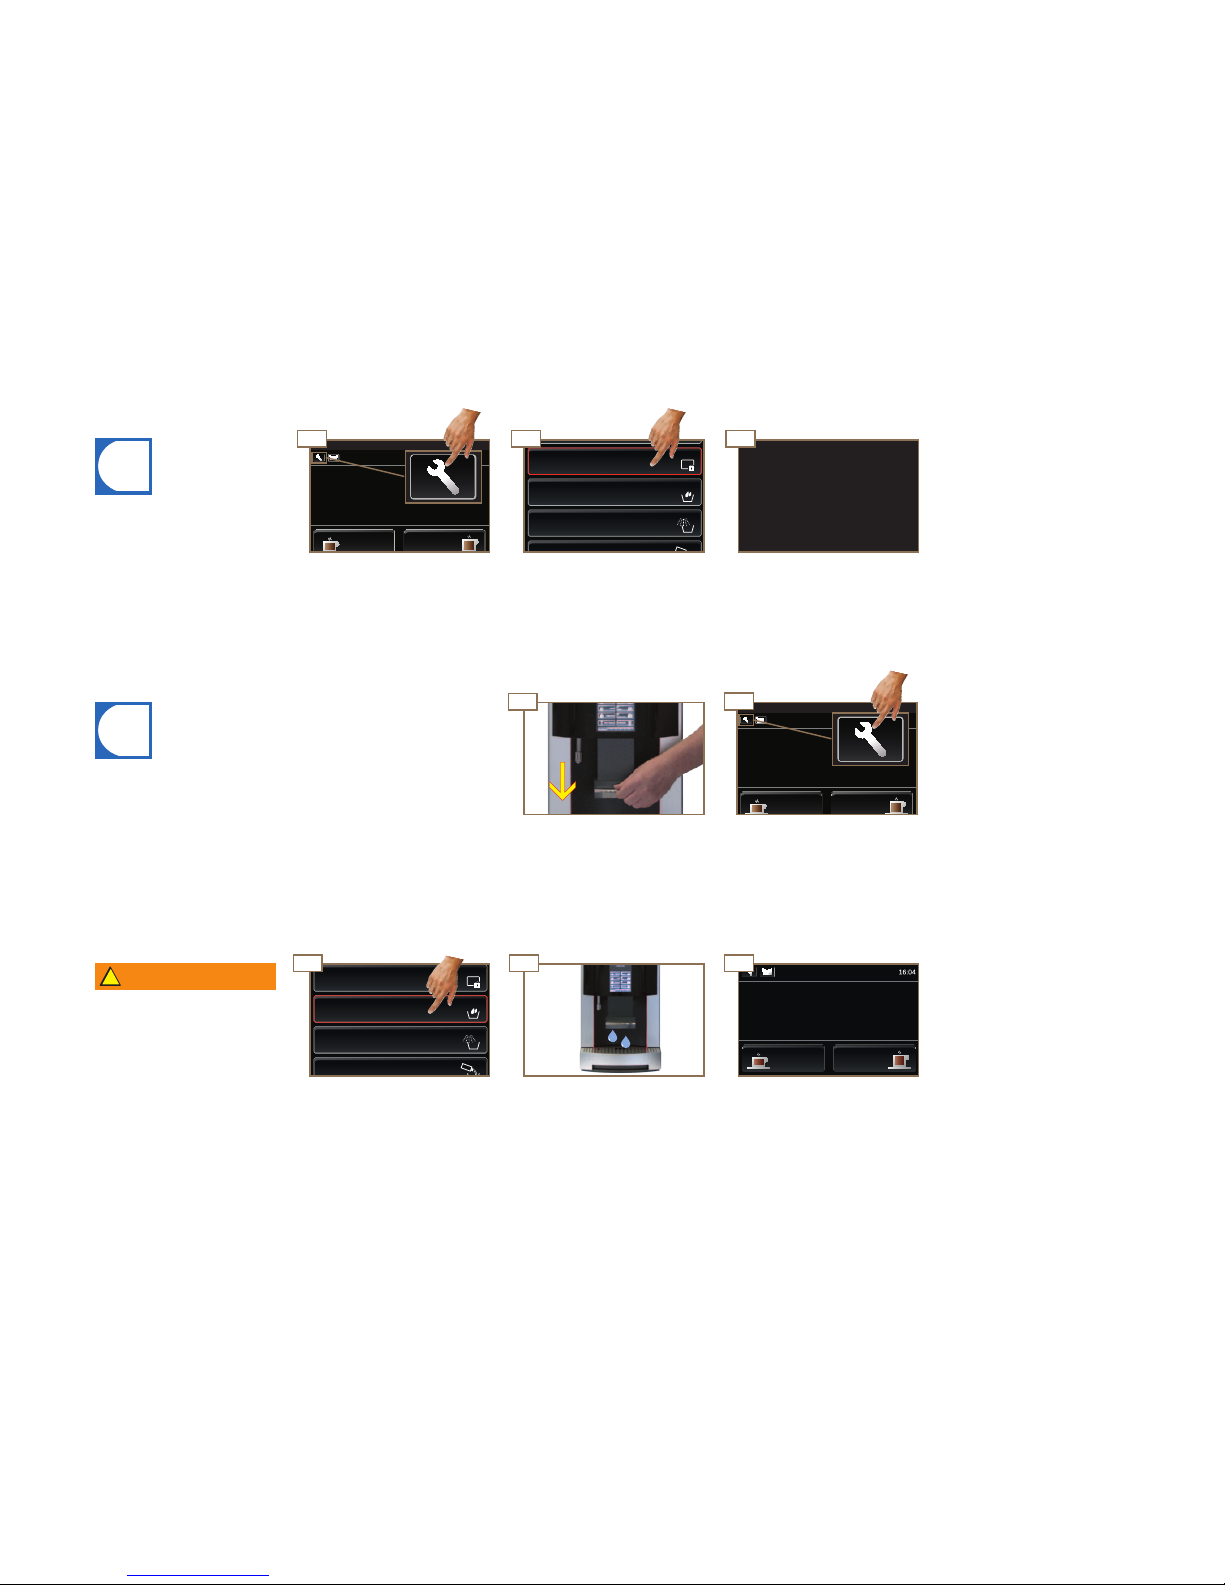
Activate wipe protection
You may clean the display.
20 sec
Rinse
Clean
Clean
Activate wipe protection
Rinse
Coffee
Coffee
small
Select product
The wipe protection function
deactivates the touch display
for 20 seconds so it can be
safely cleaned.
• Rinsing is no substitute for daily cleaning! Cleaning is necessary
to prevent residue build-up in the coffee and milk areas!
• If the technician has programmed it, the machine automatically
rinses after certain time intervals, as well as when it is switched
on or off.
• The machine should be rinsed before initial use, when not in use
for extended periods (more than 2 days) as well as after cleaning
and descaling.
WARNING
Risk of scalding!
from hot water.
Do not touch the outlets or the
area under the outlets.
Select Rinse
Machine rinses.
Wipe protection is active.
Touch display can now be
cleaned.
Machine switches to Product
level.
Rinsing is ending.
Select Activate wipe protection.
Switch to the Maintenance
level.
Switch to the Maintenance
level.
Pull outlet down till it comes to
a stop.
Rinsing the coffee and powder system manually
Activate wipe protection
Page 41
i
4
4
4
03a
03b
4
4
0401 02 05
06
Cleaning, rinsing and servicing
Page 39
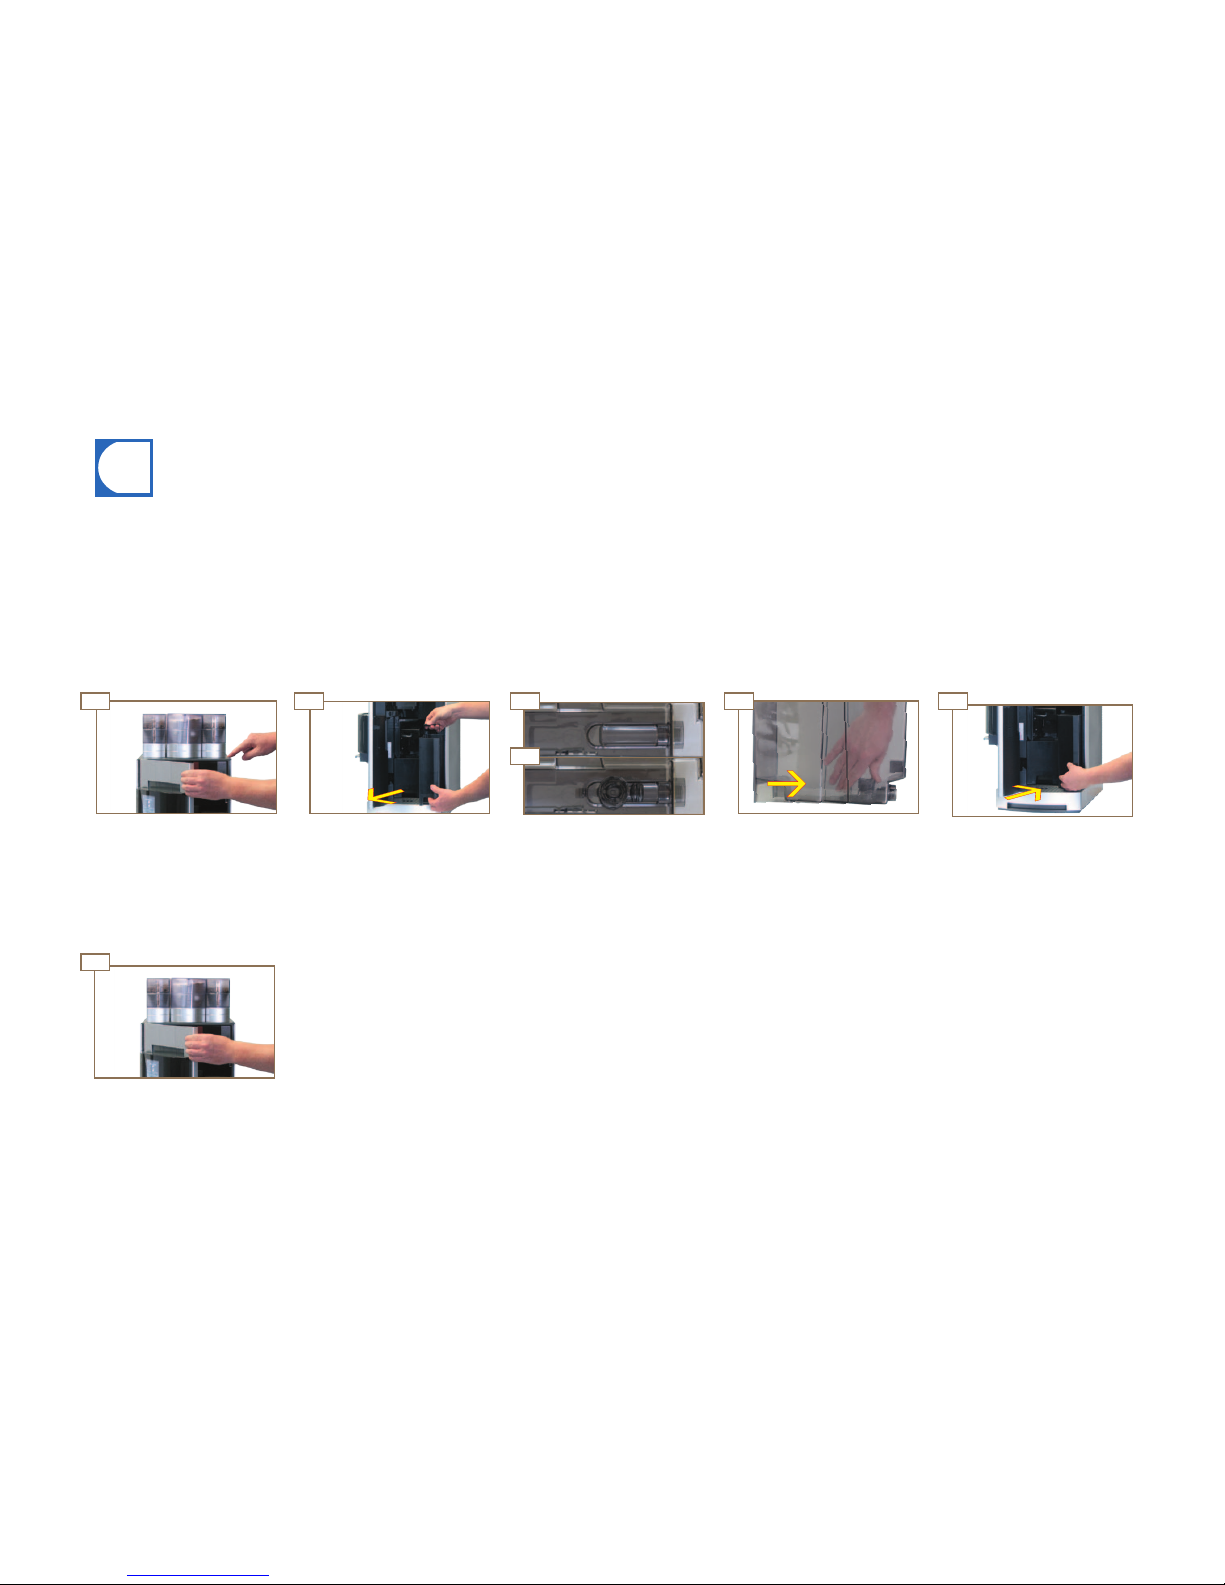
Close the door.
Replace water tank.
Remove and empty the water
tank.
Press the release button and
open the door.
Slide adapter into opening.
The adapter will lock into place
with an audible click.
Insert water filter, see page 40.
The water filter ensures for consistently optimal water quality.
Using an upflow filtration design ensures
a long service life.
Inserting the adapter in the water tank
Set the adapter on the channel
in the water tank (view from
above into the water tank).
Water filter
Page 42
4
4
4
4
4
4
0403
05
4
4
06
4
01 02
08
444
4
1109
07
16:04
16:04
12
Cleaning, rinsing and servicing
Page 40
Next page
Previous page
Select product
Espresso Coffee
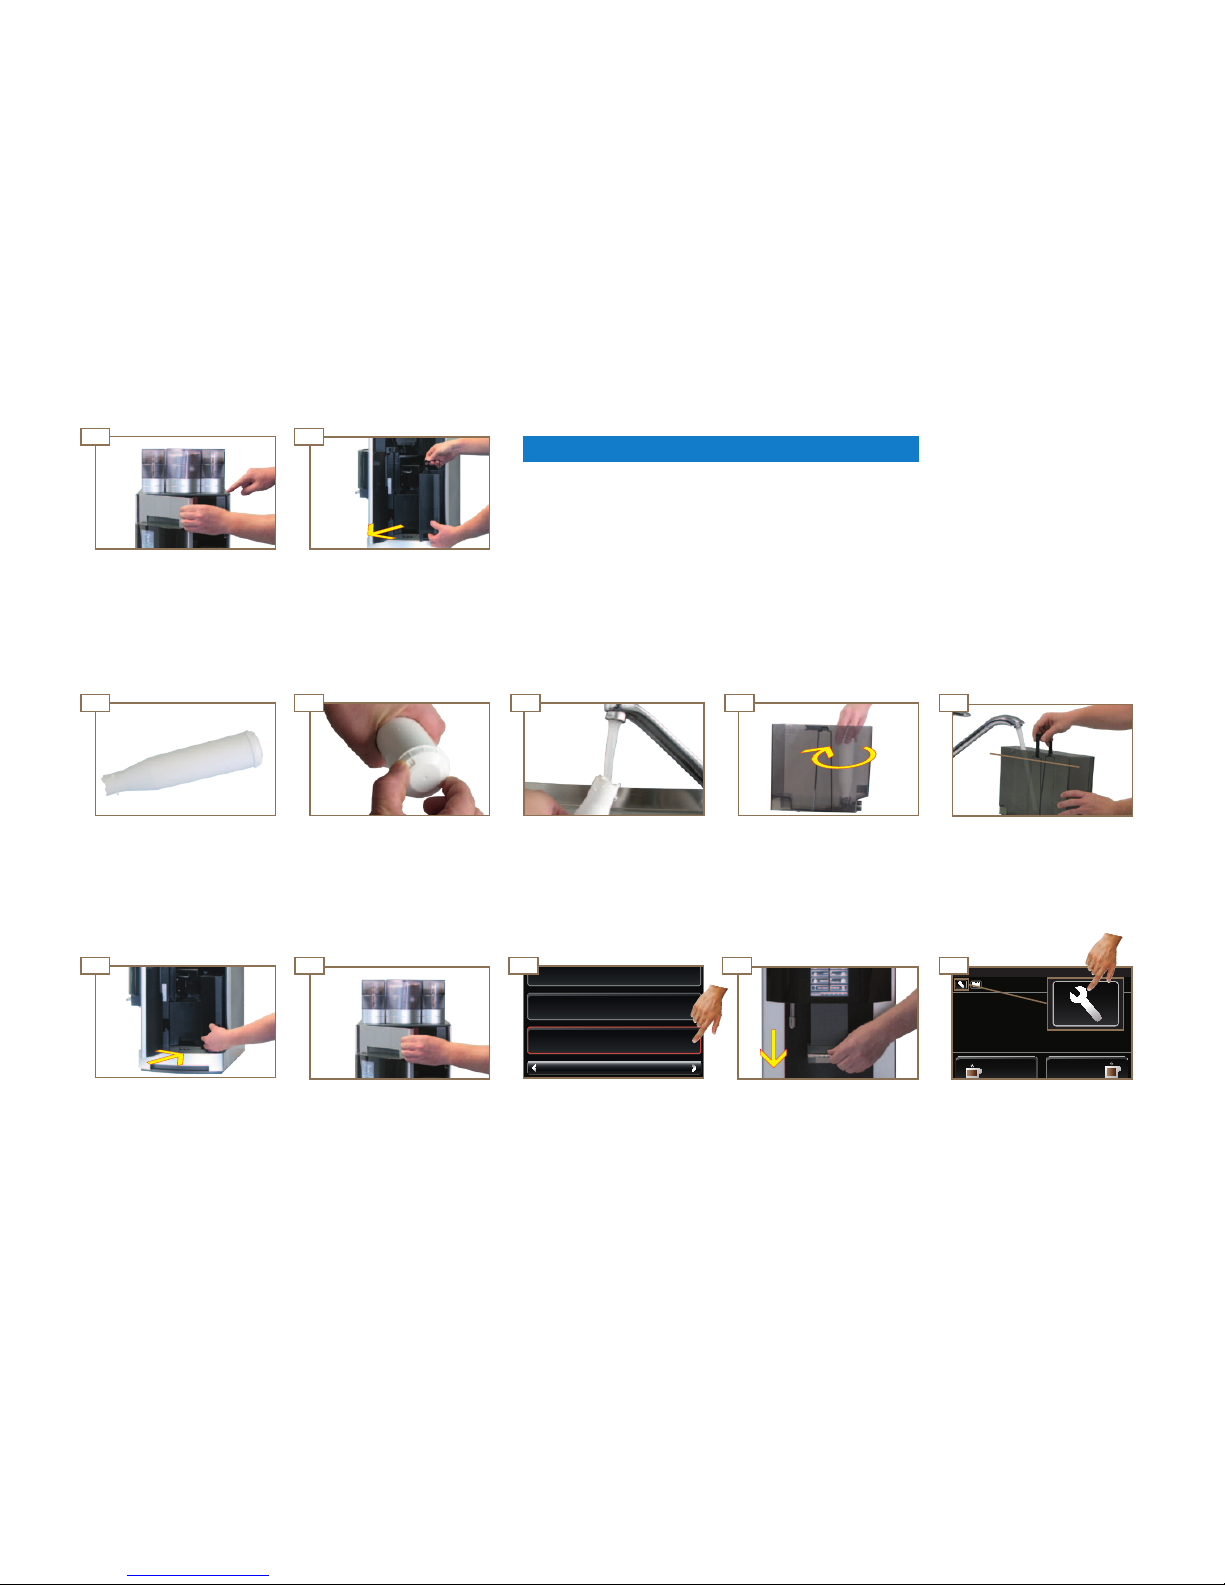
Fill water tank up to fill mark.
Close the door. Pull outlet down till it comes to
a stop.
Switch to the Maintenance
level.
Inserting the water filter
5 Counters
3 temperatures
4 Operating mode
Reset the water filter counter.
See page 50.
Replace water tank.
NOTICE
Damage to the machine may result from improper handling
or installation.
The water filter must be installed correctly.
Remove and empty the water
tank.
Press the release button and
open the door.
Insert the water filter into the
adapter and rotate it clockwise
until it hits the stop.
Water filter is installed.
Fill the water filter with water.
Unpack the water filter. Twist the filter cap to dis-
play the month the filter was
installed.
10
Page 43
4
4
4
44
!
4
4
17
19
4
4
21
... bitte WÄHLEN ...
Einstellungen
O
14
4
13 15
2322
18 20
44
16
Cleaning, rinsing and servicing
Page 41
Replace water tank.Remove and empty the water
tank.
Select function
(2/2)
Select product
Coffee
Coffee
small
Rinse water lter
Rinse water lter
Empty drip tray
Open door
A list with subsequent steps is
displayed.
Maintenance Maintenance
Info
Rinse water lter
Select Rinse water filter.
No
Yes
Are you sure you want to rinse the water lter?
Confirm the prompt Rinse water filter by pressing Yes.
Water filter is rinsed.
Close the door.Fill water tank up to fill mark.
Press the release button and
open the door.
Remove, empty and replace the
drip tray.
Machine switches to Product
level.
The machine is ready.
Risk of scalding!
from hot water and hot steam.
Do not touch the outlets or the
area under the outlets.
WARNING
Inserting the water filter (cont.)
Page 44
05
!
4 4
4
01 02
i
4 4
4
06
4
4
01
03
02
04
Cleaning, rinsing and servicing
Page 42
Pull the adapter out of the
opening and remove from the
water tank.
Press the locking clip forward.
Removing the adapter
Dispose of the used water filter.
Release and remove the water
filter by turning it counterclockwise.
Insert new water filter.
See page 40.
During occasional periods
when it is not in use, store the
water filter in a glass of water in
the refrigerator.
Remove and empty the water
tank.
Press the release button and
open the door.
Illness due to bacteria build-up!
Using a water filter for too long can lead to build-up of algae.
Replace the water filter as described in the maintenance list.
CAUTION
Removing the water filter
Coffee
Coffee
small
Select product
The machine is ready.
Page 45

Cleaning, rinsing and servicing
Page 43
Maintenance plan
Frequency Task Information Completed
Daily Clean machine See Cleaning Instructions ( 1N 330 014 Pura pronto, 1N 330 019/1N 330 587
1
Pura fresco)
Daily Rinse the machine See page 38
Weekly and additionally, as required Clean water tank See page 34
Weekly and additionally, as required Clean brewing unit See page 35
Weekly and additionally, as required Clean mixing chamber (Pura fresco) See page 36
Monthly Clean the coffee bean hopper See page 23
Monthly Clean the powder container See page 24
Every 2 months, or as necessary Change water filter See page 39
Annually, after every 30,000 products, or as necessary Maintenance by service technician Contact a service technician.
As necessary Descale machine See Descaling Instructions (1N 330 029)
1
for USA and Canada.
Page 46
i
16:04
VIIIII II
16:04
I
III IVII
4 4 4
4
II III IV VI
Configuration
Page 44
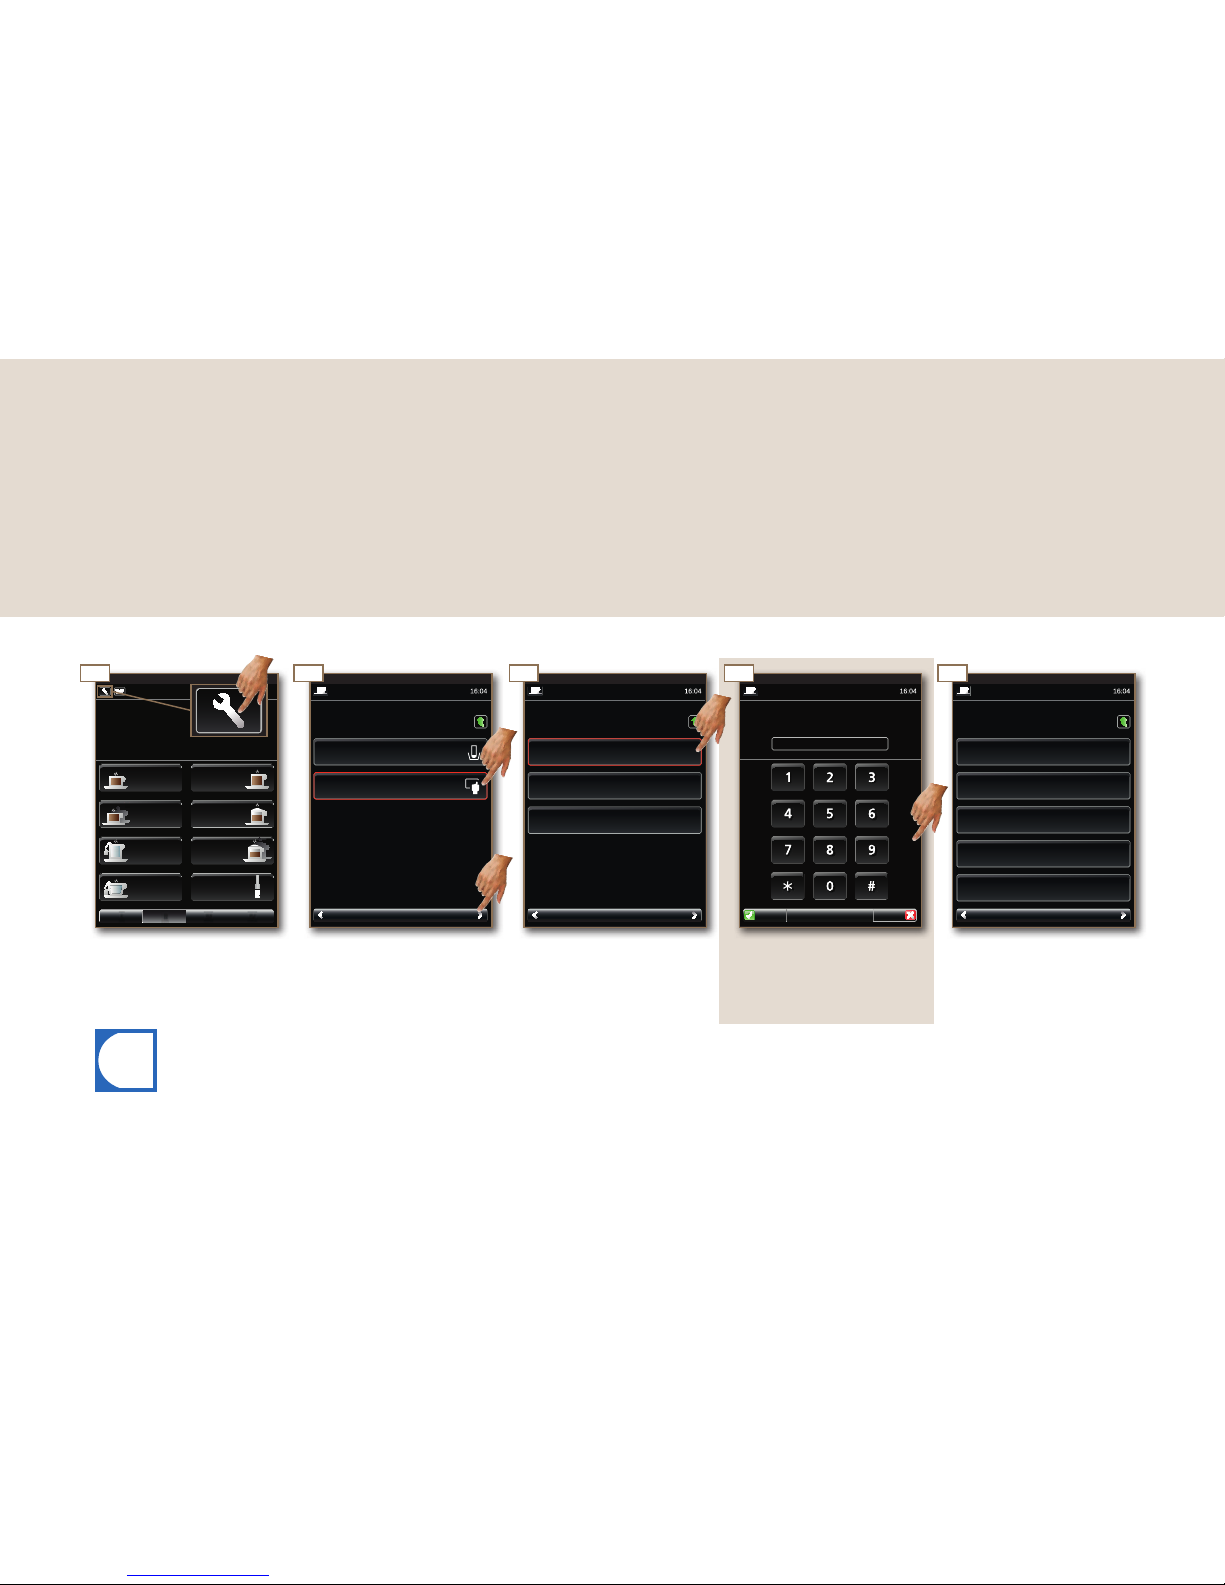
The Program menu appears.
Enter PIN and confirm by pressing OK (if programmed).
Select User A menu.Press Next page to scroll to the
second page.
Select Program.
Switch to the Maintenance
level.
CLEAR EXITNext page Next pageNext page DELOKPrevious page Previous pagePrevious page
Technician menu
User C menu
5 Counters
4 Operating mode
3 Temperatures
2 ClockProgram
User A menu 1 ProductsRinse water lter
MaintenanceMaintenance Customer menuMaintenance
(1/1) (1/2)(2/2)
Please enter PIN
2010-01-01
Program Select menu itemSelect function
Teacup Hot water
Latte
Coffee
Tea mug
2 Milk
Coffee
2 Coffee
small
Coffee
small
Select product
Your Pura is completely and individually programmable — so that the Pura is just as flexible as you. We have
kept the programming simple to make your job easier. Try it for yourself.
Configuration
Introduction to programming
• All programming menu items are shown on the following pages. Some of these menu items may not feature on
your Pura depending on the configuration.
• Information on the symbols and controls can be found in the chapter „Explanation of symbols“.
Page 47
i
16:04
VIIIII II
16:04
I
III IVII
Configuration
Page 45
1/1
1/1
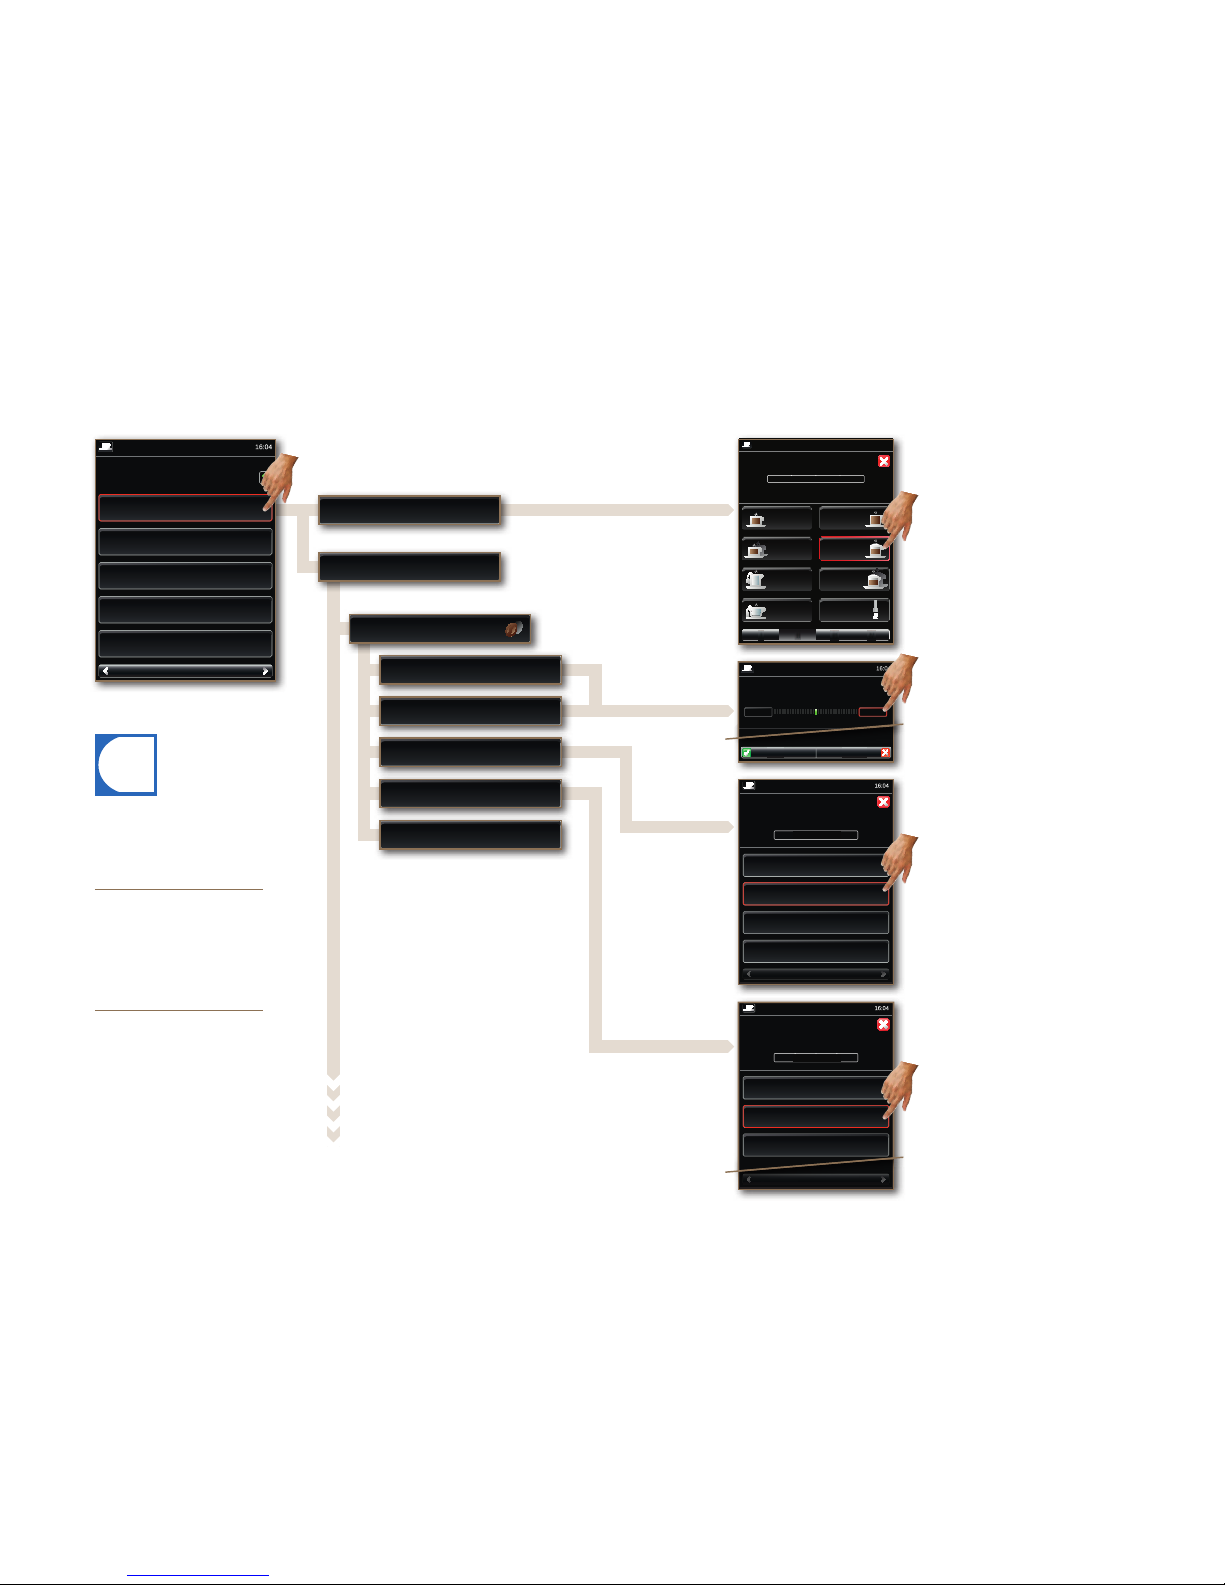
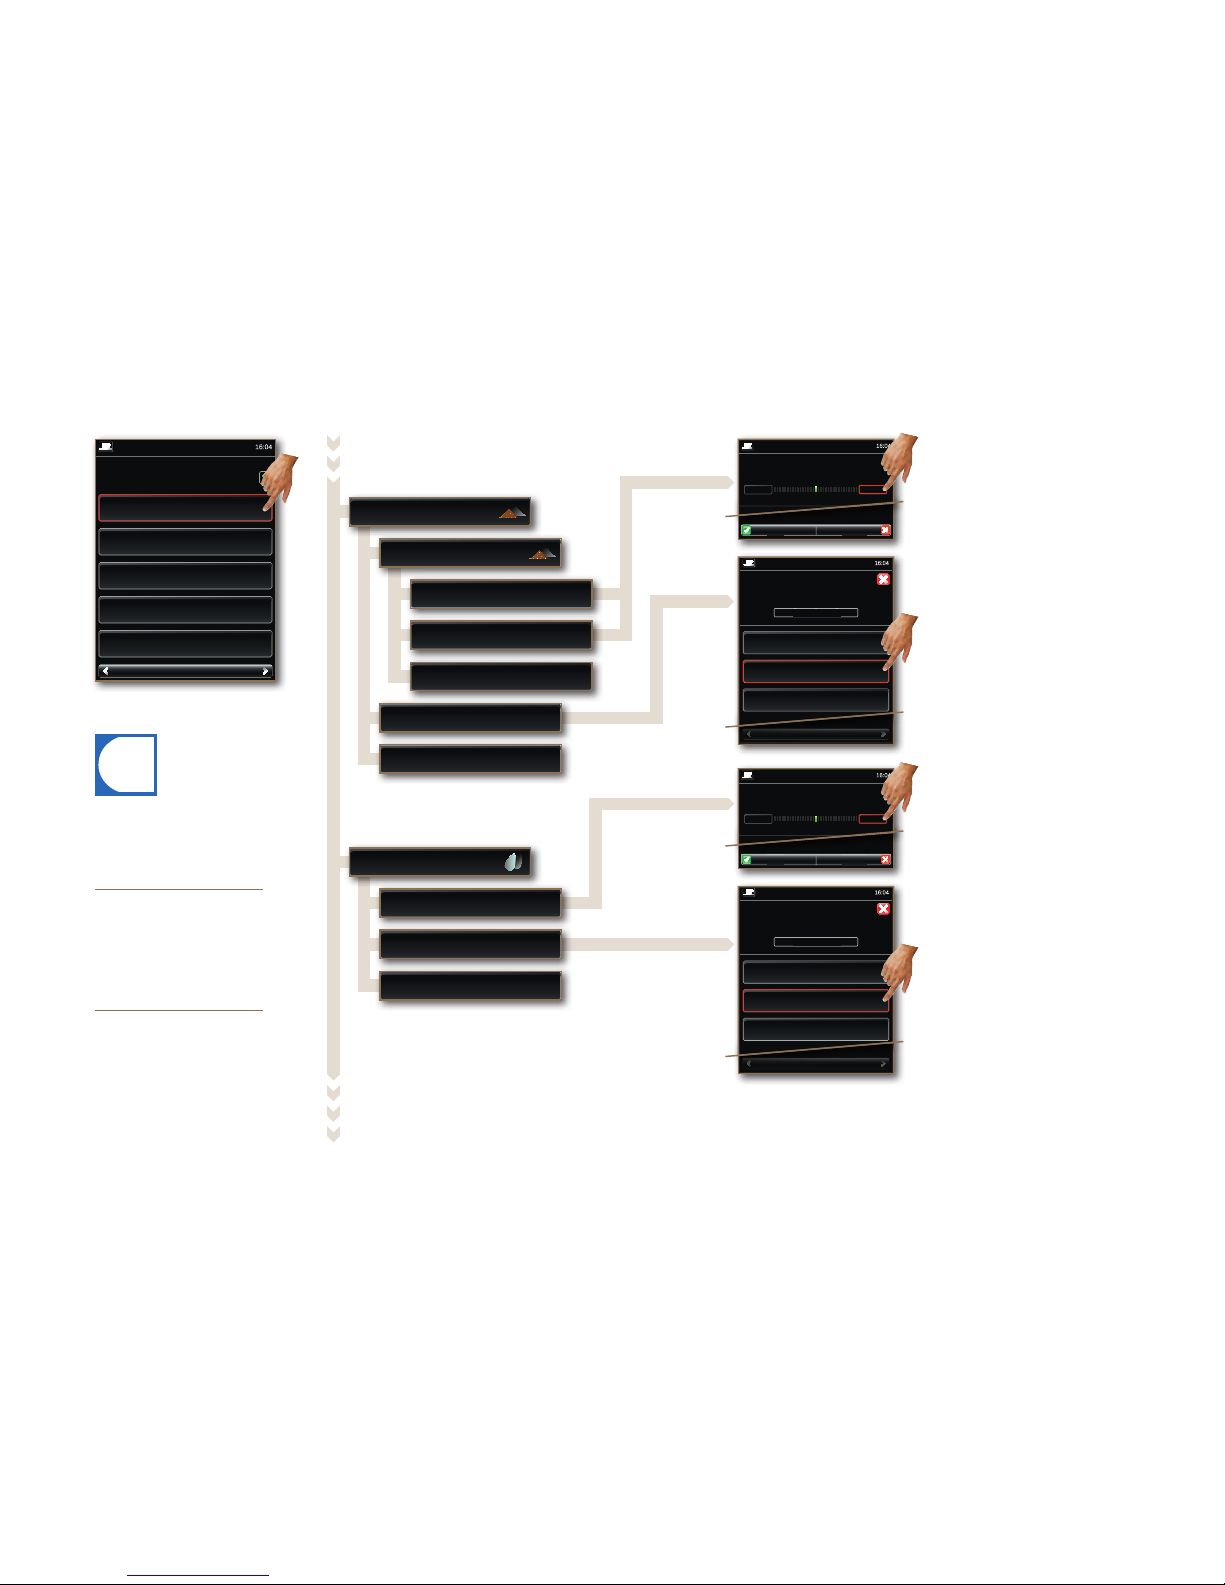
Before you can adjust the product setting, you must select a product
under the menu item 1.1 Select product key.
Continued on next page.
4 Select parameter.
• Boiler temperature correction.
• Low: - approx. 5 °C.
• Normal: No correction.
• High: + approx. 5 °C.
4 Select parameter.
• Wait time between pre-injection
and actual brewing process.
• None: No pre-injection.
• Short: Wait time 1.0 second.
• Medium: Wait time 1.5 seconds.
• Long: Wait time 2.0 seconds.
4 Adjust the quantity using +/- .
• Correction of the brewing water
and grind quantity.
• Max. adjustment +/- 20% of set
value.
4 Select product.
Changes can be checked
without leaving the menu
by pressing Prepare test
product.
The source of supply is always shown under the menu
item Grind quantity coffee
type left. Depending on the
configuration, the source of
supply may vary.
Confirm changes by pressing
OK. Changes are canceled
by pressing EXIT.
Next page
Next page
EXIT
Teacup
Tea mug
2
Latte
Hot water
Long
High
Medium
Normal
Short
Low
None
Latte
Previous page
Previous page
OK
Coffee
2 Coffee
small
Coffee
small
Prepare test product
Temperature
Pre-inject
Grind quantity coffee type left
Brewing water quantity
Basic product coffee
1.2 Modify product settings
1.1 Select product key
Next pagePrevious page
5 Counters
4 Operating mode
3 Temperatures
2 Clock
1 Products
Normal
Short
14 (Latte)
+-
Brewing water quantity
Coffee temperature
Pre-inject
Select product key
Customer menu
Customer menu
Customer menu
Customer menu
Customer menu
(1/2)Select menu item
1 Products
Page 48
i
Configuration
Page 46
1/1
1/1
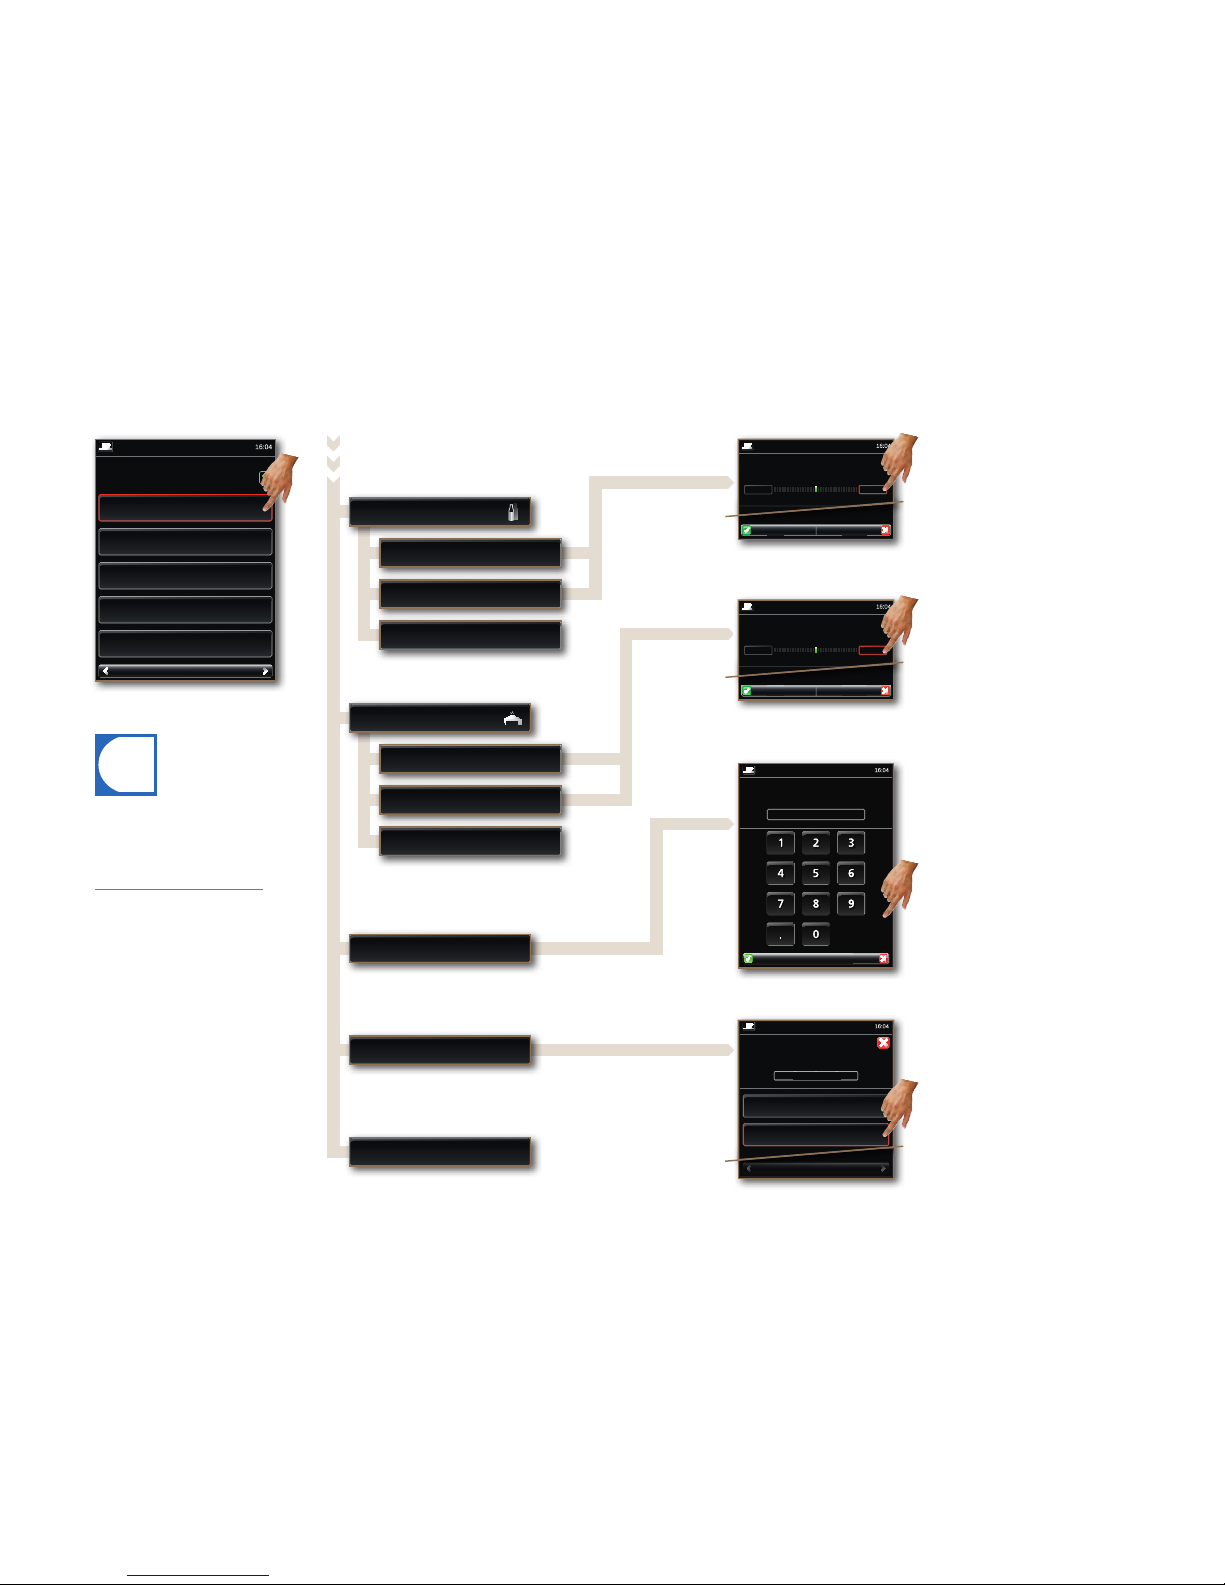
Continued on next page.
4 Select parameter.
• Boiler temperature correction.
• Low: - approx. 5 °C.
• Normal: No correction.
• High: + approx. 5 °C.
4 Select parameter.
• Boiler temperature correction.
• Low: - approx. 10 °C.
• Normal: - approx. 5 °C.
• High: No correction.
4 Adjust the quantity using +/- .
• Correction of the water quantity.
• Max. adjustment +/- 20% of set
value.
4 Adjust the quantity using +/- .
• Correction of the powder and
water quantity.
• Max. adjustment +/- 20% of set
value.
Changes can be checked
without leaving the menu
by pressing Prepare test
product.
The source of supply is
always shown under the
menu item Basic product
powder left. Depending on
the configuration, the source
of supply may vary.
Confirm changes by pressing
OK. Changes are canceled
by pressing EXIT.
Next page
Next page
EXIT
EXIT
High
High
Normal
Normal
Low
Low
Previous page
Previous page
OK
OK
Prepare test product
Temperature
Prepare test product
Water quantity
Prepare test product
Temperature
Powder quantity
Water quantity
Basic product powder left
Basic product hot water
Basic product powder
Next pagePrevious page
5 Counters
4 Operating mode
3 Temperatures
2 Clock
1 Products
Normal
Normal
+
+
-
-
Water quantity
Powder quantity left
Hot water temperature
Temperature
Customer menu
Customer menu
Customer menu
Customer menu
Customer menu
(1/2)Select menu item
1 Products, continued
Page 49
i
Configuration
Page 47
1/1
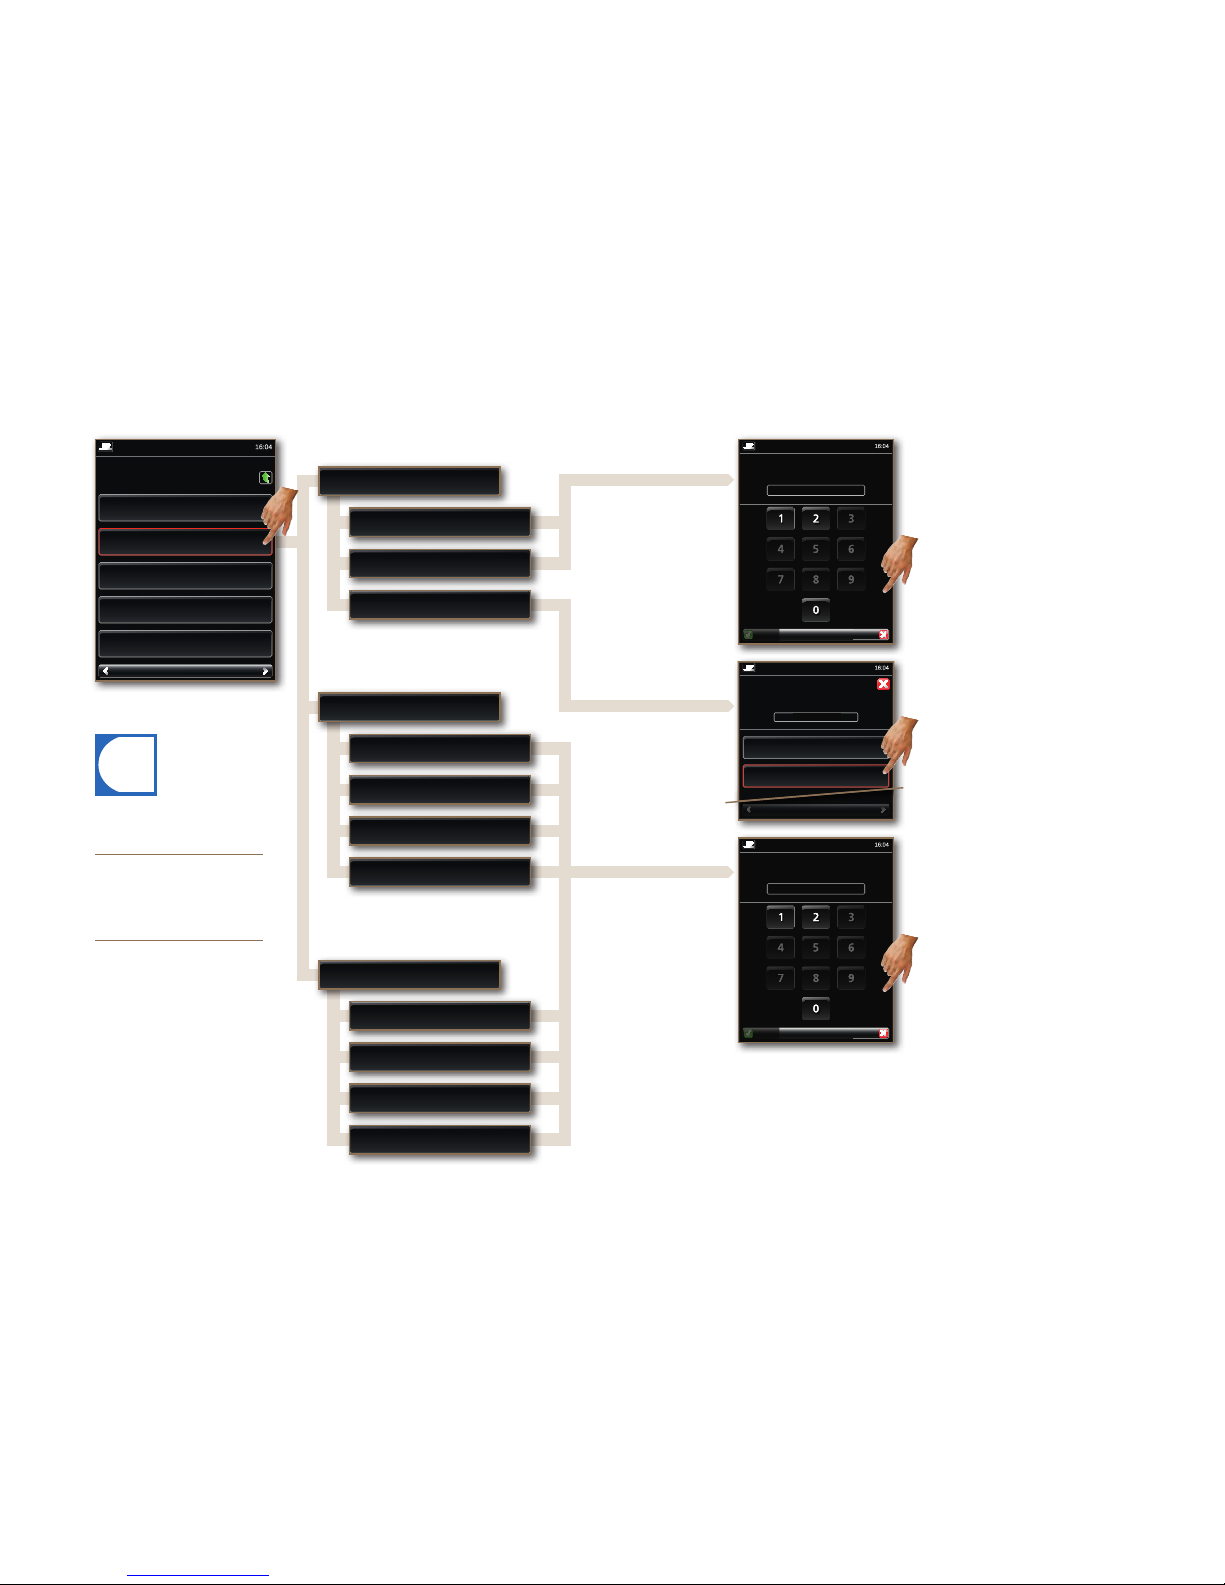
4 Select parameter.
• Yes: Product is not entered in
accounting.
• Free appears on the Product
button (if accounting system
is activated under 4 Operating
mode).
Next page
Yes
No
Previous page
Yes
Price
Customer menu
Price
[0.00 .. 655.35]
DEL CLEAR EXITOK
0.00
Customer menu
4 Enter price.
• Price appears on the Product
button (if accounting system
is activated under 4 Operating
mode).
Pura fresco only
Pura fresco only
4 Adjust quantity and tempera-
ture using +/-.
• Boiler temperature and foam
quantity correction.
• Max. adjustment +/- 20% of set
value.
4 Adjust quantity and tempera-
ture using +/-.
• Boiler temperature and milk
quantity correction.
• Max. adjustment +/- 20% of set
value.
Changes can be checked
without leaving the menu
by pressing Prepare test
product.
Confirm changes by pressing
OK. Changes are canceled
by pressing EXIT.
EXIT
EXIT
OK
OK
Prepare test product
Temperature
Prepare test product
Temperature
Foam quantity
Milk quantity
Prepare test product
Free
Price
Basic product milk foam
Basic product milk
Next pagePrevious page
5 Counters
4 Operating mode
3 Temperatures
2 Clock
1 Products
+
+
-
-
Foam quantity
Milk quantity
Customer menu
Customer menu
Customer menu
(1/2)Select menu item
1 Products, continued
Page 50
i
Configuration
Page 48
1/1
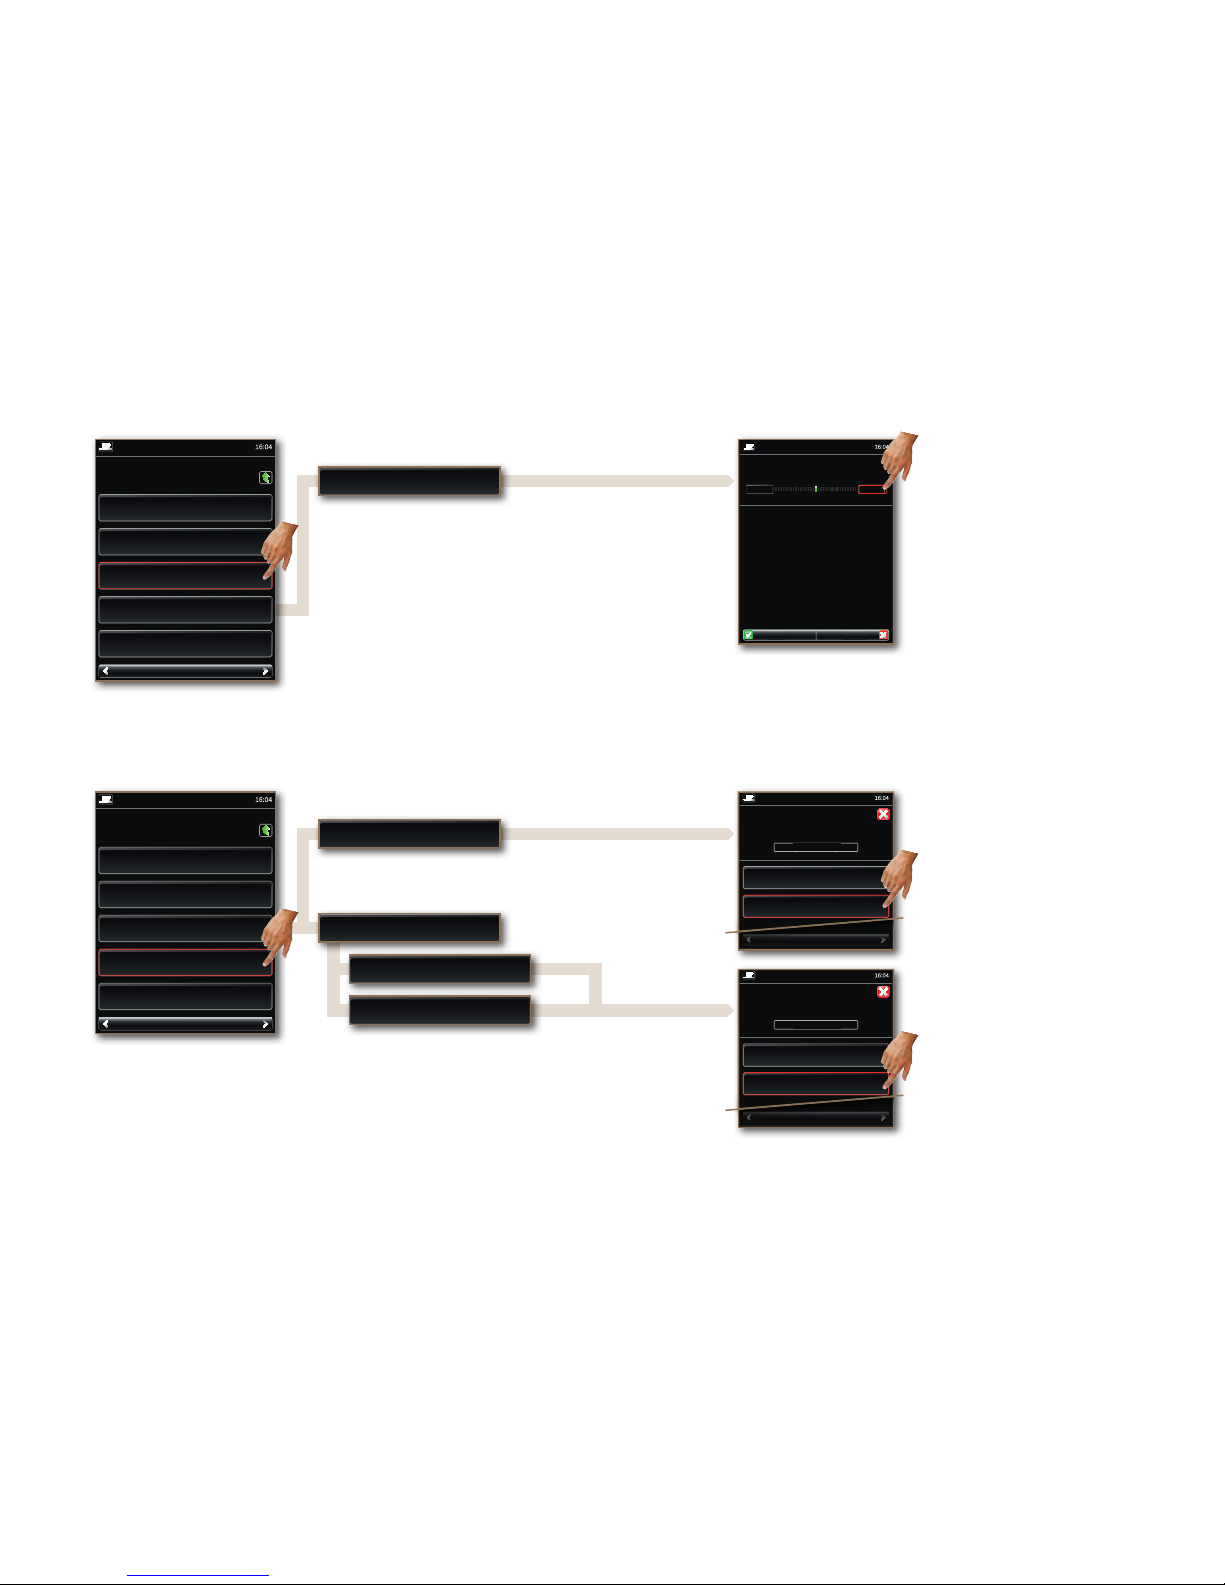
4 Select parameter.
• Standard Time: Clock falls back
one hour.
• Daylight Saving Time: Clock
springs ahead one hour.
4 Set the timer.
• Machine switches on/off automatically.
• First entry = Monday.
• Last entry = Sunday.
• 0 = Machine on.
• 1 = Machine off.
4 Set the date and time.
• Set Daylight Saving Time/
Standard Time before setting
the time.
Always press CLEAR before
entering a value.
Using the date and time as
well as the timer function,
the Pura can be automatically switched on or off.
Confirm changes by pressing
OK. Changes are canceled
by pressing EXIT.
Next page
DEL
DEL
CLEAR
CLEAR
EXIT
EXIT
Daylight Saving Time
Standard Time
Previous page
OK
OK
Weekdays Off
Weekdays Off
Time Off
Time Off
Daylight Saving Time/Standard Time
Weekdays On
Weekdays On
Date
Time On
Time On
Time
2.3 Timer 2
2.2 Timer 1
2.1 Date/time
Next pagePrevious page
8 Control panel
5 Counters
4 Operating mode
2 Clock
1 Products
Daylight Saving Time
1111100
16:04
Select Daylight Saving Time or Standard Time
Enter days of week to switch off
[MTWTFSS] (0=off, 1=on)
Time
hh:mm
Customer menu
Customer menu
Customer menu
Customer menu
(1/2)Select menu item
2 Clock
Page 51
Configuration
Page 49
1/1
1/1
4 Select parameter.
• Select operating mode.
4 Select parameter.
• Activate accounting system (if
programmed).
Next page
Next page
Water connection
Yes
Water tank
No
Previous page
Previous page
Water connection
Water tank
Activate accounting system?
Select water supply
Next pagePrevious page
5 Counters
4 Operating mode
3 Temperatures
2 Clock
1 Products
Water connection
No
Select water supply
Activate accounting
Customer menu
Customer menu
Customer menu
(1/2)Select menu item
4 Operating mode
+-
EXITOK
4 Adjust temperature with +/- .
• Correction of the milk temperature for all products.
• Max. adjustment +/- 20% of set
value.
Correction milk pump 1
Customer menu
3 Temperatures
3.1 Correction milk pump 1
Next pagePrevious page
5 Counters
4 Operating mode
3 Temperatures
2 Clock
1 Products
Customer menu
(1/2)Select menu item
Page 52
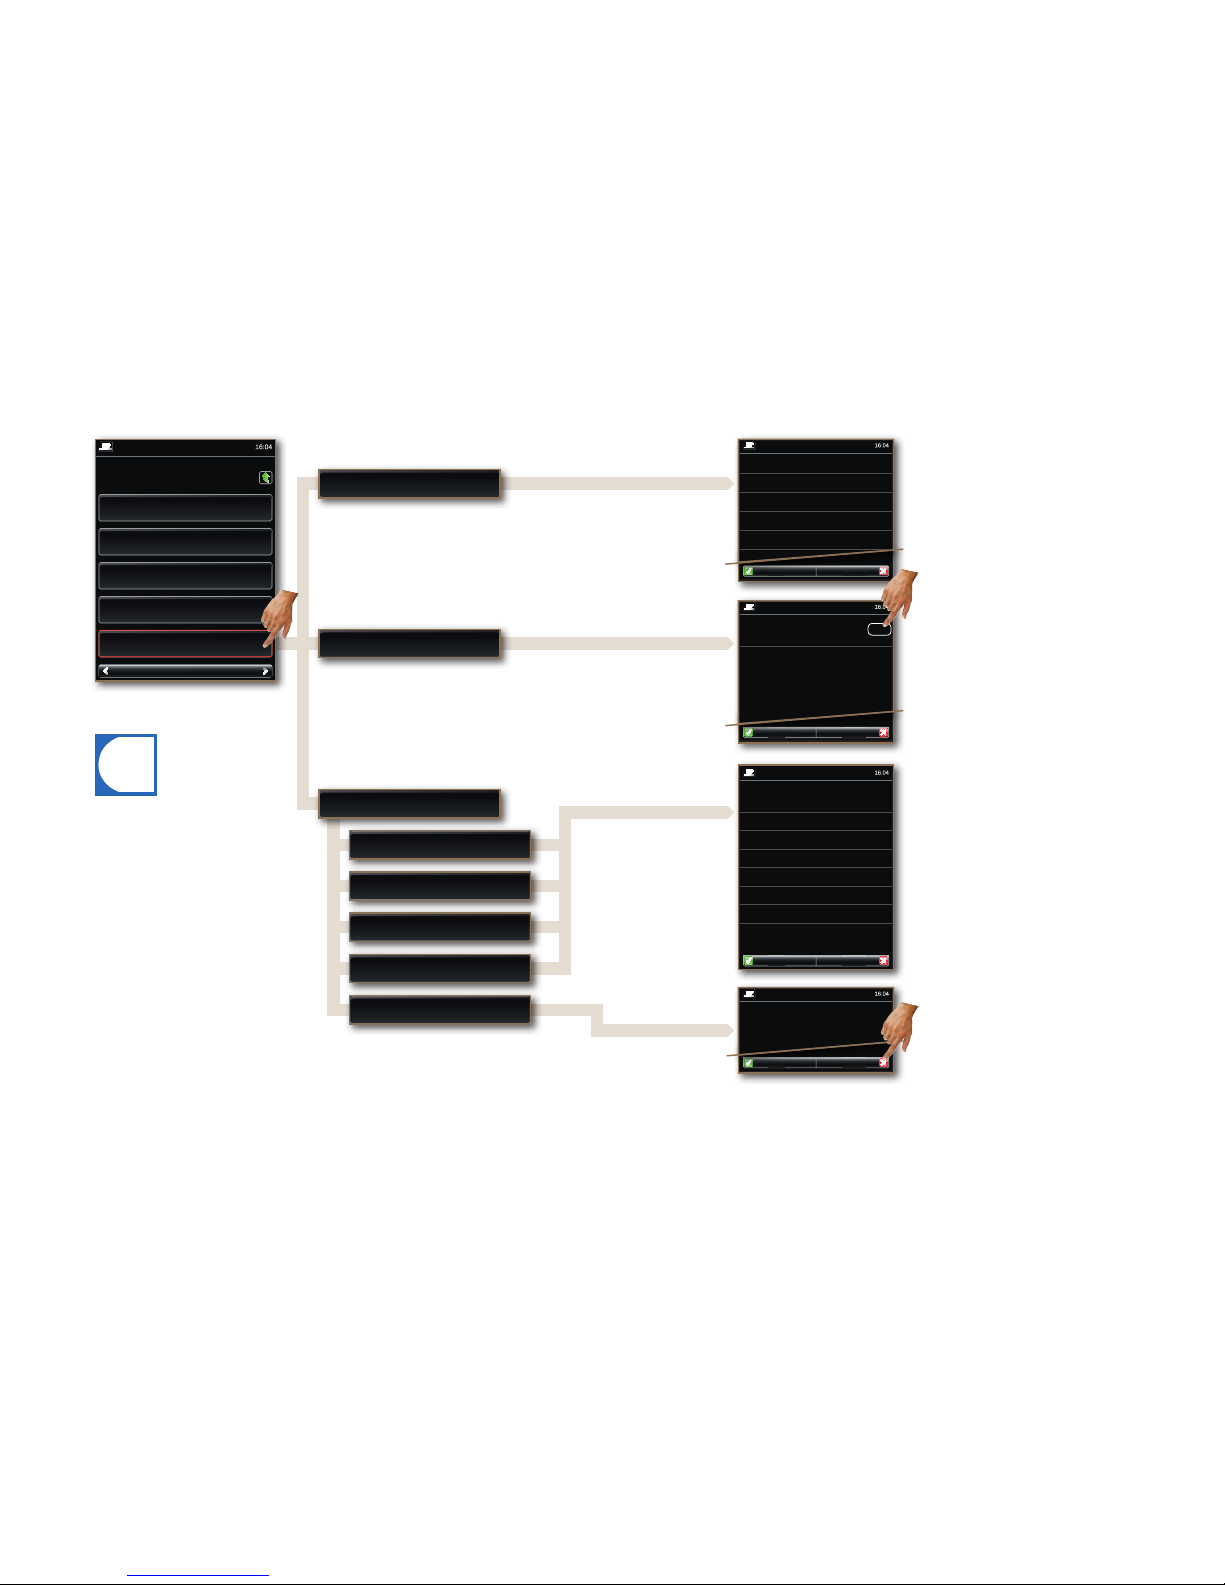
i
Configuration
Page 50
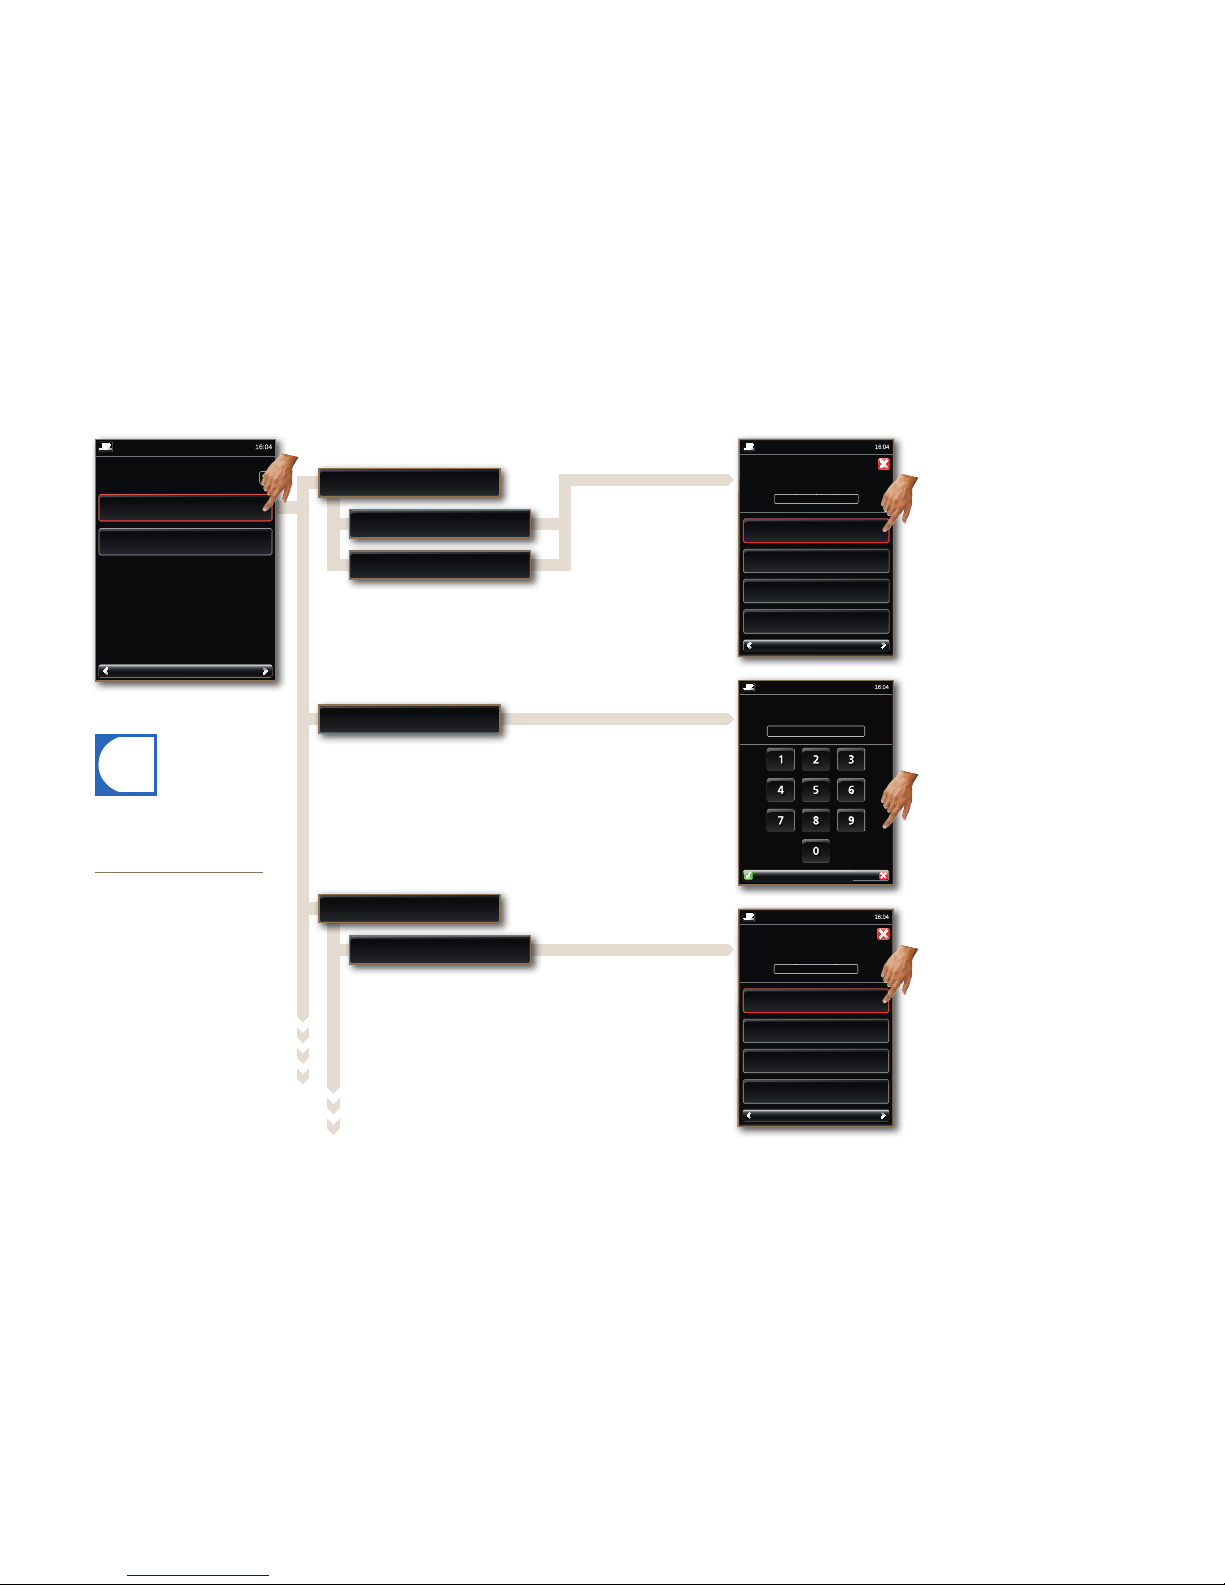
Confirm changes by pressing
OK. Changes are canceled
by pressing EXIT.
4 Counter status of the products
is displayed.
4 Press OK to reset product
counters or press EXIT to cancel the procedure.
EXIT
OK
Conrm reset of product counters by pressing OK
(or cancel by pressing EXIT).
Customer menu
Last reset: 2010-01-01
Espresso
Counter: 2
Coffee
Counter: 10
Cappuccino
Counter: 2
Hot water
Counter: 25
2x Espresso
Counter: 20
2x Coffee
Counter: 10
2x Cappuccino
Counter: 0
Hot chocolate
Counter: 10
EXIT
OK
Customer menu
Resetting product counters
Products 25 - 32
Products 17 - 24
Products 9 - 16
Products 1 - 8
5.3 Individual products
4 Counter status of the product
groups is displayed.
4 Reset Maintenance counter by
pressing CLEAR.
EXIT
EXIT
Quantity of ltered water [l] Counter: 10000
Last reset: 2010-01-01
Cleanings performed Counter:
0
Last cleaning on: 2010-01-01
Number of drinks prepared Counter:
360
Number of coffee products Counter:
353
Number of milk products Counter:
0
Number of water products Counter:
25
Number of powder products
Counter: 86
OK
CLEAR
OK
5.2 Maintenance
5.1 Product groups
Next pagePrevious page
5 Counters
4 Operating mode
3 Temperatures
2 Clock
1 Products
Customer menu
Customer menu
Customer menu
(1/2)Select menu item
5 Counters
Page 53
i
Configuration
Page 51
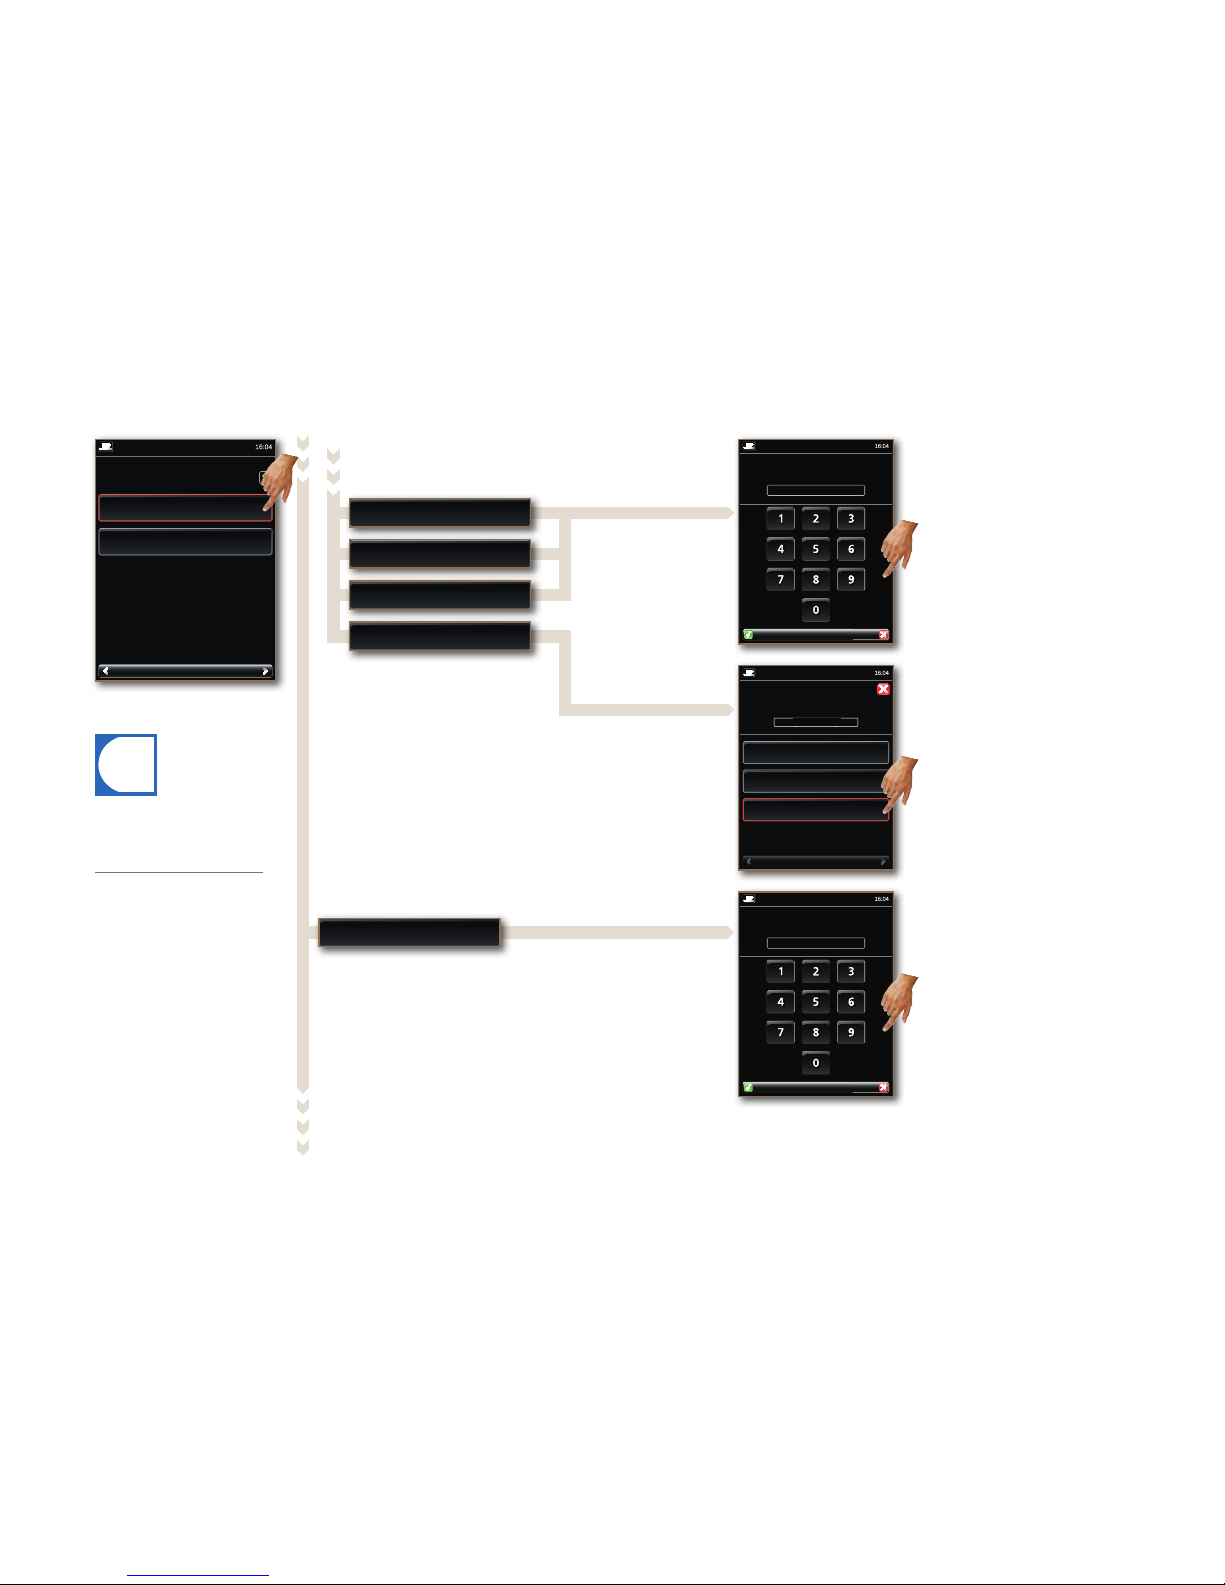
Next page
Previous page
Customer menu
Color
8.3 Edge lighting
4 Select parameter.
• Set the color of the edge lighting.
• Off: No edge lighting.
(1/3)
Blue
Green
Red
Off
Off
Select edge lighting
You can use Next page
and Previous page to scroll
through the menu levels.
Confirm changes by pressing
OK. Changes are canceled
by pressing EXIT.
DEL CLEAR EXITOK
4 Sets the brightness of the
display.
• 15%: Display dark.
• 100%: Display bright.
8.2 Display brightness
15
Set brightness [%]
[15 .. 100]
Customer menu
Continued on next page.
4 Select parameter.
• Set language for Maintenance
and Product level.
Next page
Français
Nederlandse
English
Deutsch
Previous page
Language for product level
Language for maintenance level
8.1 Language
1/2
English
Select Language for maintenance level
Customer menu
8 Control panel
Next pagePrevious page
9 PINs
8 Control panel
Customer menu
(2/2)Select menu item
Page 54
i
Configuration
Page 52
1/1
DEL CLEAR EXITOK
8.4 Water hardness
4 Set the water hardness.
• Water hardness in German degrees
(°dH) and grains per gallon (gpg).
• 1: Water hardness up to 8 °dH (gpg).
• 2: Water hardness up to 15 °dH (gpg).
• 3: Water hardness up to 23 °dH (gpg).
• 4: Water hardness up to 29 °dH (gpg).
1
Enter water hardness
[1 .. 4]
Customer menu
Brightness
4 Select parameter.
• Set the brightness of the edge
lighting.
Next page
High
Medium
Low
Previous page
High
Select the brightness of the edge lighting
Customer menu
Next pagePrevious page
9 PINs
8 Control panel
Customer menu
(2/2)Select menu item
You can use Next page
and Previous page to scroll
through the menu levels.
Confirm changes by pressing
OK. Changes are canceled
by pressing EXIT.
If you select Custom in the Color menu, the following additional menu items are displayed.
Blue component of color
Green component of color
Red component of color
4 Set user-defined color of the
edge lighting.
• Free selection of the edge lighting color.
DEL CLEAR EXITOK
0
Red component [%]
[0 .. 100]
Customer menu
8 Control panel, continued
Continued on next page.
Page 55
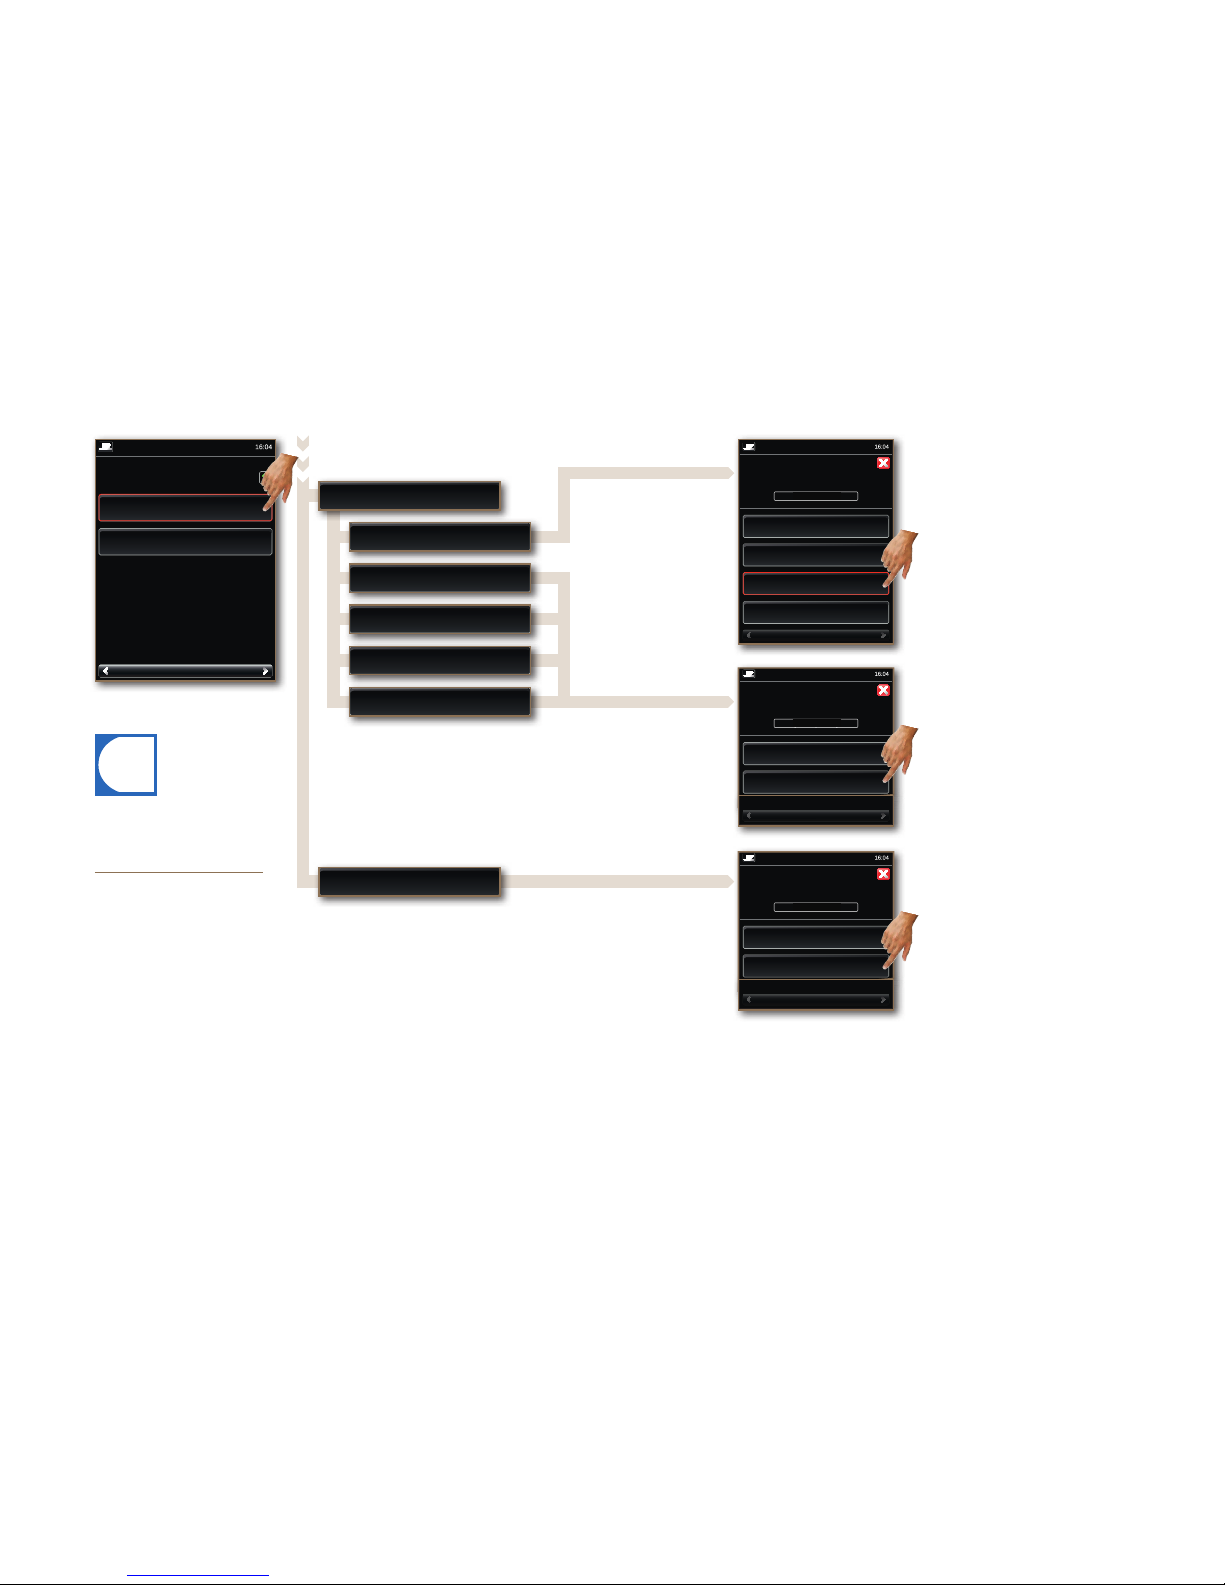
i
Configuration
Page 53
8.6 Cleaning dialog
1/1
Next pagePrevious page
4 Select parameter.
• Select display mode for cleaning process.
Expert
Basic
Basic
Display mode
Customer menu
1/1
Next pagePrevious page
4 Select parameter.
• Select tone for messages, processes and prompts.
• No: No tone.
Yes
No
Yes
Tone for system messages
Customer menu
Activate cleaning process
Activate prompts
Activate rinsing process
Activate system messages
Next pagePrevious page
9 PINs
8 Control panel
Customer menu
(2/2)Select menu item
1/1
You can use Next page
and Previous page to scroll
through the menu levels.
Confirm changes by pressing
OK. Changes are canceled
by pressing EXIT.
4 Select parameter.
• Select the type of key tone
• Off: No tone.
• Tone 1: Deep tone.
• Tone 2: High tone.
• Ton 3: Dual tone (deep, high).
Next page
Tone 2
Tone 3
Tone 1
Off
Previous page
Key tone
8.5 Acoustic signals
Tone 1
Select key tone
Customer menu
8 Control panel, continued
Page 56
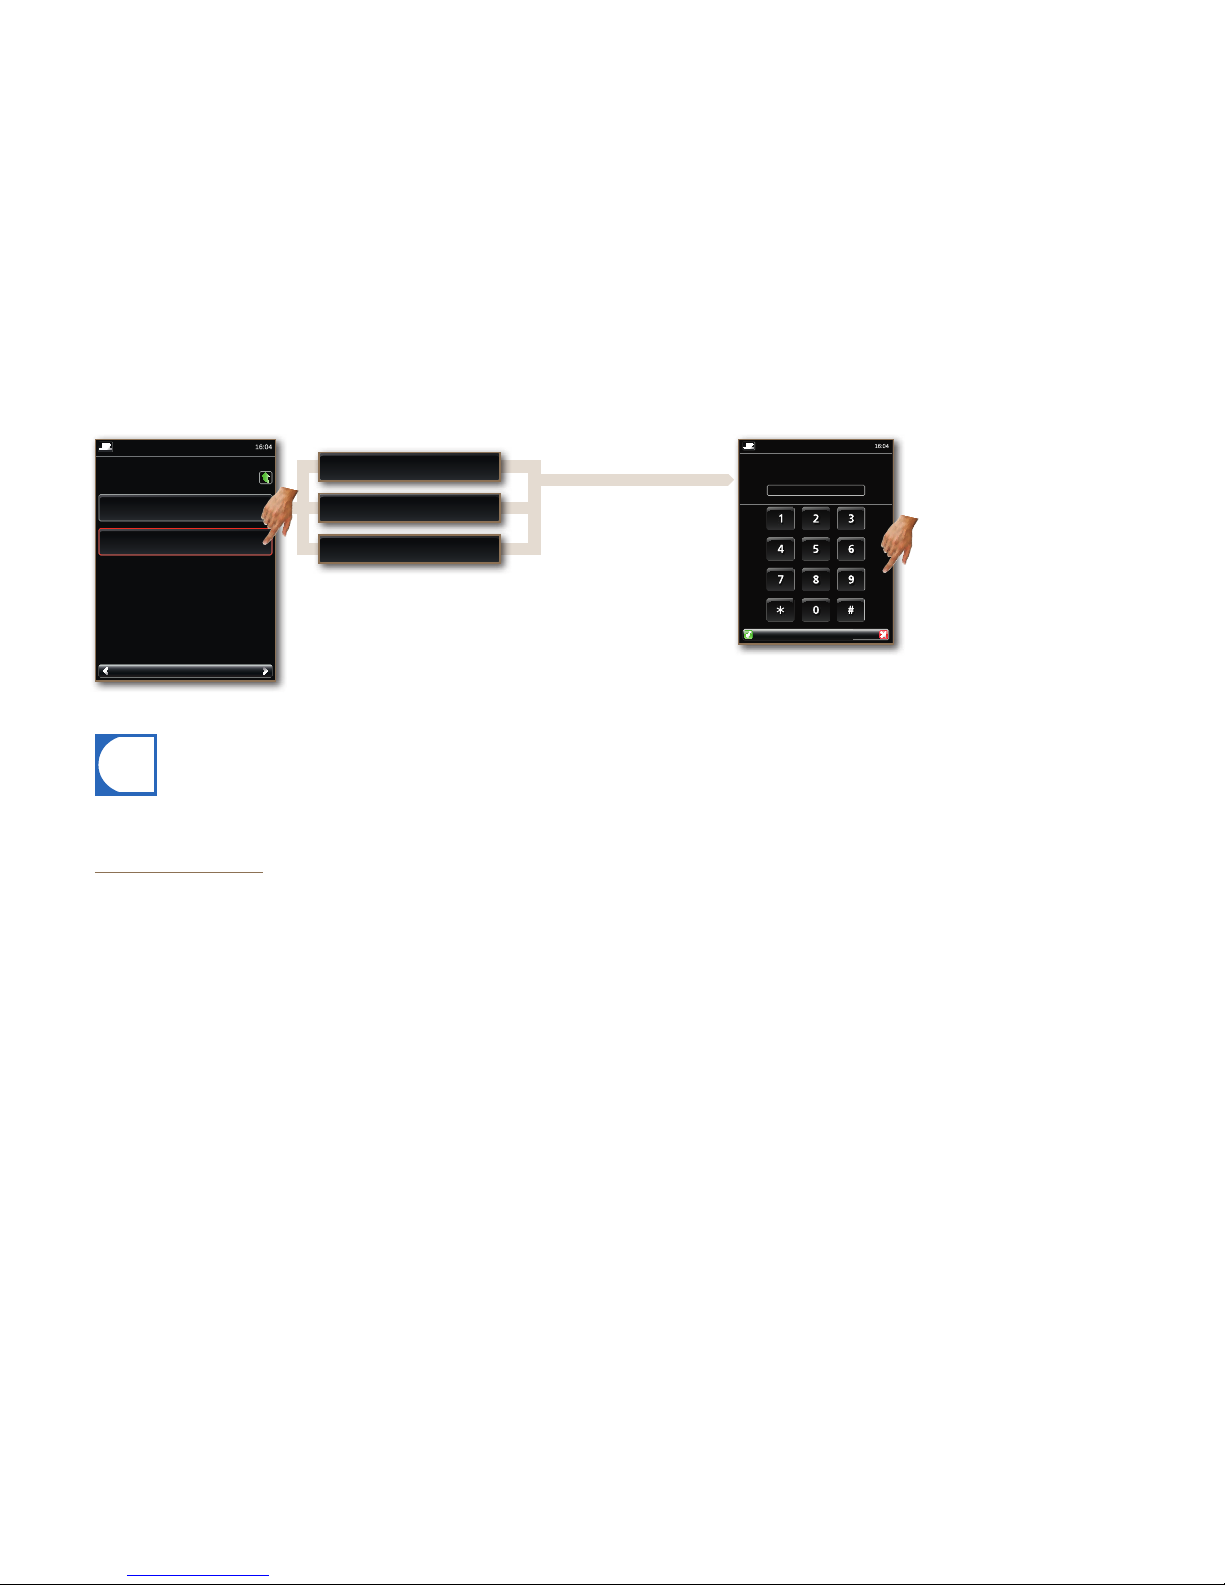
i
Configuration
Page 54
You can use Next page
and Previous page to scroll
through the menu levels.
Confirm changes by pressing
OK. Changes are canceled
by pressing EXIT.
Change maintenance PIN
Change User B PIN
Change User A PIN
4 Set or change PIN.
• Max. 6 characters.
DEL CLEAR EXITOK
Next pagePrevious page
9 PINs
8 Control panel
User A PIN
Customer menu
Customer menu
(2/2)Select menu item
9 PINs
Page 57
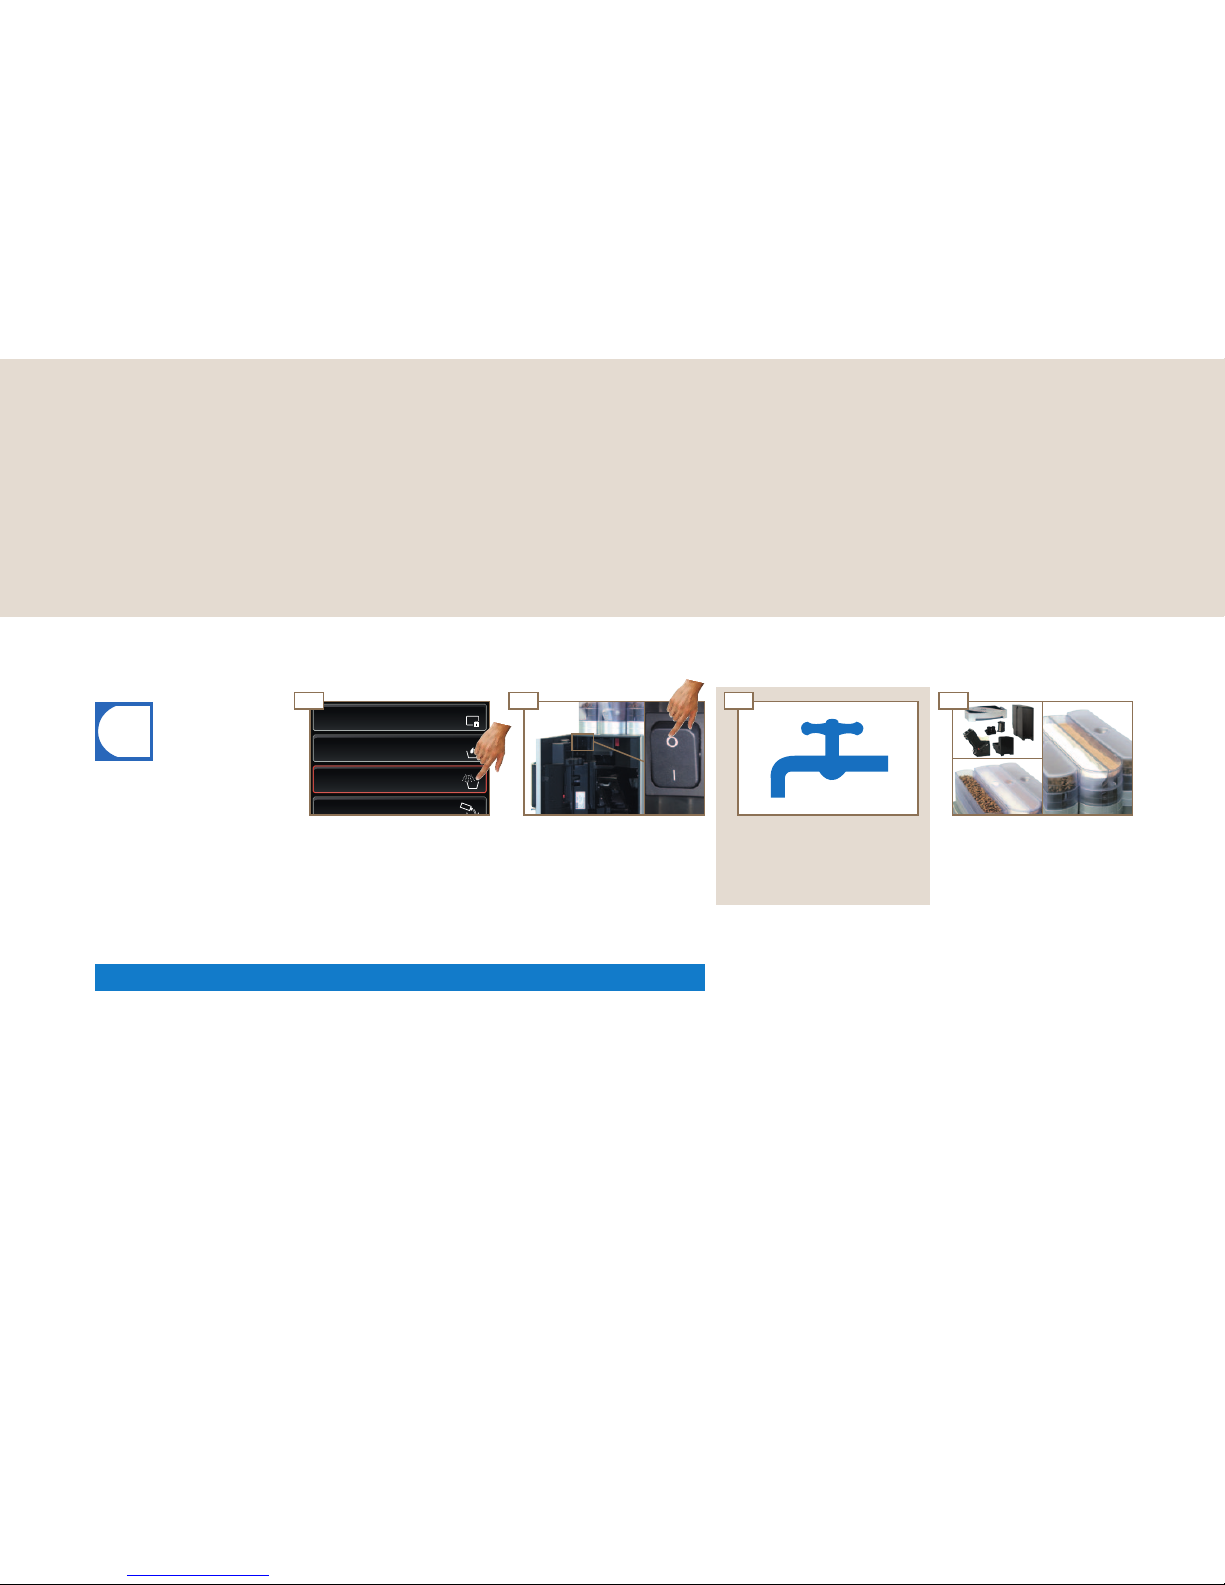
4
01 02 03
44
4
04
i
Shut down and disposal
Page 55
Descale
Clean
Rinse
Activate wipe protection
Remove all food residue from
the coffee machine.
Turn off the water feed and
empty the water tank if there
is one.
Turn off the coffee machine and
unplug the power supply cable.
Clean the coffee machine
and its components using the
cleaning instructions.
If you plan to take your coffee
machine out of service for a
longer period of time, take
advantage of our service.
Risk of damage to the machine!
Contact your FRANKE service team for proper storage.
Observe the storage conditions and drain your coffee machines.
Storage temperatures: -10 °C to +50 °C
Humidity: max. 80%
If you plan to start using your machine again later, taking advantage of our service is essential.
The coffee machines must be maintained, installed and cleaned prior to drink preparation.
Proper functioning of the coffee machine cannot be ensured otherwise.
NOTICE
Disposing of consumable materials
Observe local disposal regulations when disposing of consumable
materials and waste.
Disposing of the coffee machine
You can return your coffee machine directly to your retailer at no
charge. We will take care of the rest for you. For environmental protection reasons, we ask you not to dispose of the machine yourself.
Disposal
Shut down and disposal
Do you want to shut down your Pura for longer periods or take it out of service? Contact our service
department. We recycle our coffee machines at a rate of nearly 100%, in order to protect the environment and resources.
Decommissioning
Shut-down for longer periods and storage
Page 58
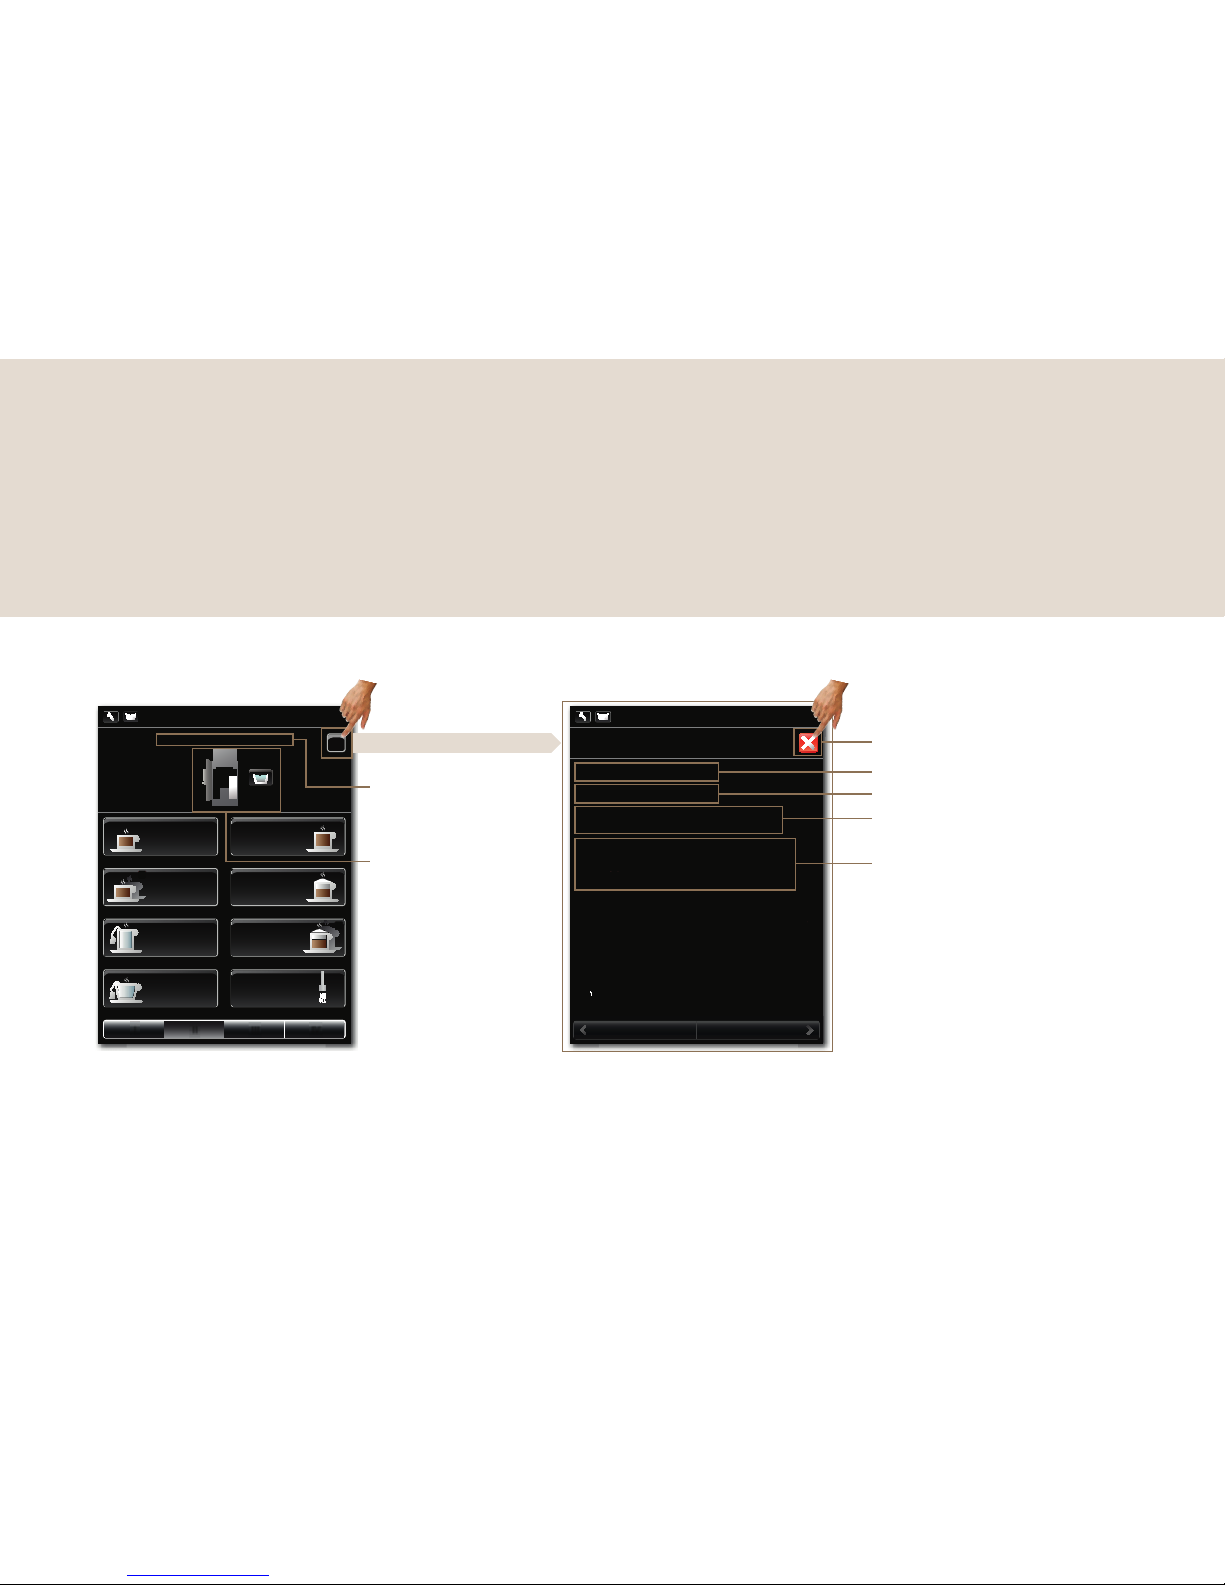
16:04
VIIIII II
I
III IVII
i
16:04
i
Troubleshooting
Page 56
Information about event
Solution
Event description
Event no.
Back to Product level
Event text
Event text
Event localization
(appears only when the
Selection keys function is
deactivated).
(1/1)Information on eventsPlease ll water tank.
Teacup Hot water
Next page
Tea mug
Previous page
Coffee
Latte
2
Latte
Please ll water tank.
Event no.: 160
Description:
The water tank must be lled...
Remedy:
Open door, remove water tank, ll water tank with
fresh water, replace water tank, close door.
Coffee
small
2 Coffee
small
Troubleshooting
If a problem occurs, your Pura coffee machine will give you instructions. Events and information are
shown on the display. Should you be unable to resolve a problem despite all best efforts, please contact
our service department.
II - InformationI - Event
In the event of machine errors
Page 59

Troubleshooting
Page 57
Event no. Event text Solution Instructions
1-99 Various events and information Contact a service technician.
129 Please close door. Close the door.
130 Please replace bean hopper. Replace coffee bean hopper. see page 24
131 Please replace powder container. Replace powder container. see page 25
132 Please replace mixing chamber. Insert mixing chamber. see page 37
133 Please replace brewing unit. Replace brewing unit. see page 35
134 Please replace water tank. Replace water tank. see page 21
135 Please replace grounds container. Replace grounds container. see page 22
136 Please replace drip tray. Replace drip tray. see page 25
158/159 Please fill bean hopper. Pour in coffee beans. see page 20
160 Please fill water tank. Add water. see page 21
161 Please fill powder container. Add milk powder. see page 20
162 Please fill powder container. Add chocolate powder. see page 20
163 Milk container 1 is empty... Add milk. see page 26
164 Please fill milk container 1. Add milk. see page 26
165 The water tank is empty... Add water. see page 21
166 Please empty drip tray. Empty drip tray. see page 25
167 The grounds container is full... Empty grounds container. see page 22
168 Please empty grounds container. Empty grounds container. see page 22
169 The brewing unit is empty... Contact a service technician.
170 The brewing unit is full... Contact a service technician.
178/179 Boiler 2/1 temperature too low If this error message is visible for an extended period,
contact a service technician.
180/181 Boiler 2/1 heating If this error message is visible for an extended period,
contact a service technician.
188 Machine must be cleaned... Clean machine (request). see Cleaning Instructions
189 Please clean the machine. Clean machine (force). see Cleaning Instructions
190 Please replace the water filter. Insert water filter. see page 42
191 Please descale the machine. Descale machine. see Descaling Instructions
192 Please service the machine. Contact a ser vice technician.
193 Please calibrate water flow. Contact a service technician.
194 Please calibrate milk pump. Contact a service technician.
196 Repeat cleaning. Repeat cleaning cycle. see Cleaning Instructions
197 Repeat descaling. Repeat descaling cycle. see Descaling Instructions
198-200 Please rinse machine. Rinse the machine. see page 38
250 Energy Saver Mode is activated. Contact a service technician.
251 The ceramic valve is not ready... Contact a service technician.
Help with Machine Errors
Page 60

Troubleshooting
Page 58
Coffee tastes sourCoffee tastes strange
Possible causes Solution
Too sweet
Use less powder
Use more water
Not sweet enough
Use more powder
Use less water
Strange taste Clean the powder system
Possible causes Solution
Viscous
Use less powder
Use more water
Watery
Use more powder
Use less water
Lumpy Clean the powder system
Taste of powder productsConsistency of powder products
Possible causes Solution
Temperature too low Increase coffee temperature
Roast too light Change coffee
Grind too coarse Select a finer grind
Possible causes Solution
Temperature too high Decrease coffee temperature
Grind too fine Select a coarser grind
Too little powder Increase amount of coffee
Roast too dark Change coffee
Coffee tastes bitter
Possible causes Solution
Poor grind quality Contact customer service
Minimal coffee usage Load smaller amount of coffee
Coffee beans bad Replace coffee beans
Residual cleaning solution Rinse the machine
Cup dirty Check dishwasher
Water (chlorine, hardness, ...) Have water quality checked
Possible causes Solution
Grind too coarse Select a finer grind
Too little powder Increase amount of coffee
Temperature too low Increase temperature
Coffee is too old Store coffee properly
Tasteless coffee
Help with problems concerning product quality
Page 61
Index
Page 59
emPtying milk
. . . . . . . . . . . . . . . . . . . . 27
emPtying the Powder Container
. . . . . . . 24
exPlanation of symbols
. . . . . . . . . . . . . . 3
oPerating instruCtions
. . . . . . . . . . . . 3
software
. . . . . . . . . . . . . . . . . . . . . . 4
F
filling
. . . . . . . . . . . . . . . . . . . . . . . . . 20
Coffee beans and Powder
. . . . . . . . . 20
water tank
. . . . . . . . . . . . . . . . . . . . 21
G
grounds Container
. . . . . . . . . . . . . . . . 13
H
hot water disPenser
. . . . . . . . . . . . . . . 32
I
identifiCation
. . . . . . . . . . . . . . . . . . . . 11
identifiCation Code
. . . . . . . . . . . . . . . . 11
installation
. . . . . . . . . . . . . . . . . . . . . 16
D
daily start-uP
. . . . . . . . . . . . . . . . . . . . 19
deClaration of Conformity
. . . . . . . . . . . 6
deCommissioning
. . . . . . . . . . . . . . . . . . 55
desCale
. . . . . . . . . . . . . . . . . . . . . . . . 33
desCriPtion of the maChine
. . . . . . . . . . 12
ComPonents
. . . . . . . . . . . . . . . . . . . 13
Pura
. . . . . . . . . . . . . . . . . . . . . . . . 12
touCh disPlay
. . . . . . . . . . . . . . . . . . 14
dimensions
. . . . . . . . . . . . . . . . . . . . . . 17
adjustable feet
. . . . . . . . . . . . . . 17, 18
Pura
. . . . . . . . . . . . . . . . . . . . . . . . 17
refrigeration unit
. . . . . . . . . . . . . . . 18
disPenser head
. . . . . . . . . . . . . . . . . . . 13
disPosal
. . . . . . . . . . . . . . . . . . . . . . . . 55
E
eleCtriCal ConneCtion
. . . . . . . . . . . . . . 16
emPtying
. . . . . . . . . . . . . . . . . . . . . . . . 22
Coffee bean hoPPer
. . . . . . . . . . . . . . 23
driP tray
. . . . . . . . . . . . . . . . . . . . . 25
grounds Container
. . . . . . . . . . . . . . 22
milk
. . . . . . . . . . . . . . . . . . . . . . . . 27
water tank
. . . . . . . . . . . . . . . . . . . . 22
A
adaPter
. . . . . . . . . . . . . . . . . . . . . . . . 10
installing
. . . . . . . . . . . . . . . . . . . . . 39
removing
. . . . . . . . . . . . . . . . . . . . . 42
adding milk
. . . . . . . . . . . . . . . . . . . . . 26
add-on units
. . . . . . . . . . . . . . . . . . . . . 15
add Powder
. . . . . . . . . . . . . . . . . . . . . 20
B
brewing unit
. . . . . . . . . . . . . . . . . . . . . 13
C
Chill & CuP
. . . . . . . . . . . . . . . . . . . . . 15
Clean
. . . . . . . . . . . . . . . . . . . . . . . . . . 33
brewing unit
. . . . . . . . . . . . . . . . . . . 35
mixing Chamber
. . . . . . . . . . . . . . . . 36
Clean water tank
. . . . . . . . . . . . . . . . . 34
CloCk
. . . . . . . . . . . . . . . . . . . . . . . . . . 48
Commissioning
. . . . . . . . . . . . . . . . . . . 19
Configuration
. . . . . . . . . . . . . . . . . . . . 44
Control Panel
. . . . . . . . . . . . . . . . . . . 51
Counters
. . . . . . . . . . . . . . . . . . . . . . . 50
CuP warmer
. . . . . . . . . . . . . . . . . . . . . 15
Index
Page 62

Index
Page 60
telesCoPiC outlet
. . . . . . . . . . . . . . . . . 13
temPerature
. . . . . . . . . . . . . . . . . . . . . 49
touCh disPlay
. . . . . . . . . . . . . . . . . . . . 14
troubleshooting
. . . . . . . . . . . . . . . . . . 56
tyPe Plate
. . . . . . . . . . . . . . . . . . . . . . . 11
W
water filter
. . . . . . . . . . . . . . . . . . . . . 39
inserting
. . . . . . . . . . . . . . . . . . . . . 40
inserting the adaPter
. . . . . . . . . . . . 39
removing
. . . . . . . . . . . . . . . . . . . . . 42
removing the adaPter
. . . . . . . . . . . . 42
water tank
. . . . . . . . . . . . . . . . . . . . . . 13
weight
. . . . . . . . . . . . . . . . . . . . . . . . . 16
wiPe ProteCtion
. . . . . . . . . . . . . . . . . . . 38
ProduCt quality
. . . . . . . . . . . . . . . . . . 58
Coffee tastes bitter
. . . . . . . . . . . . . 58
Coffee tastes sour
. . . . . . . . . . . . . . 58
Coffee tastes strange
. . . . . . . . . . . . 58
ConsistenCy of Powder ProduCts
. . . . 58
tasteless Coffee
. . . . . . . . . . . . . . . . 58
taste of Powder ProduCts
. . . . . . . . . 58
ProduCt setting
. . . . . . . . . . . . . . . . . . 45
Q
queue
. . . . . . . . . . . . . . . . . . . . . . . . . 30
R
refrigeration unit
. . . . . . . . . . . . . . . . . 15
rinse
. . . . . . . . . . . . . . . . . . . . . . . . . . 33
rinse Coffee system
. . . . . . . . . . . . . . . . 38
rinse Powder system
. . . . . . . . . . . . . . . 38
S
safety
. . . . . . . . . . . . . . . . . . . . . . . . . . 6
sCoPe of delivery
. . . . . . . . . . . . . . . . . . 9
serviCe
. . . . . . . . . . . . . . . . . . . . . . . . . 33
T
tablet insert
. . . . . . . . . . . . . . . . . . . . . 13
teChniCal data
. . . . . . . . . . . . . . . . . . . 16
Chill & CuP
. . . . . . . . . . . . . . . . . . . 18
CuP warmer
. . . . . . . . . . . . . . . . . . . 18
Pura
. . . . . . . . . . . . . . . . . . . . . . . . 16
refrigeration unit
. . . . . . . . . . . . . . . 18
installation dimensions
. . . . . . . . . . . . . 17
add-on units
. . . . . . . . . . . . . . . . . . 18
Pura
. . . . . . . . . . . . . . . . . . . . . . . . 17
item number
. . . . . . . . . . . . . . . . . . . . . 11
M
maChine errors
. . . . . . . . . . . . . . . . . . 56
maChine number
. . . . . . . . . . . . . . . . . . 11
maintenanCe Plan
. . . . . . . . . . . . . . . . . 43
mixing Chamber
. . . . . . . . . . . . . . . . . . . 13
model Code
. . . . . . . . . . . . . . . . . . . . . 11
N
noise emission
. . . . . . . . . . . . . . . . . . . 16
O
on/off switCh
. . . . . . . . . . . . . . . . . . . 13
add-on units
. . . . . . . . . . . . . . . . . . 15
Pura
. . . . . . . . . . . . . . . . . . . . . . . . 13
P
Pins
. . . . . . . . . . . . . . . . . . . . . . . . . . . 54
Powder Chute
. . . . . . . . . . . . . . . . . . . . 13
Powder drawer
. . . . . . . . . . . . . . . . . . . 13
PrePare milk PumP
. . . . . . . . . . . . . . . . . 26
PreParing drinks
. . . . . . . . . . . . . . . . . . 28
PreParing two drinks at onCe
. . . . . . . . . 29
PreseleCtion
. . . . . . . . . . . . . . . . . . . . . 31
ProduCt CanCel
. . . . . . . . . . . . . . . . . . 14
Page 63

Page 64
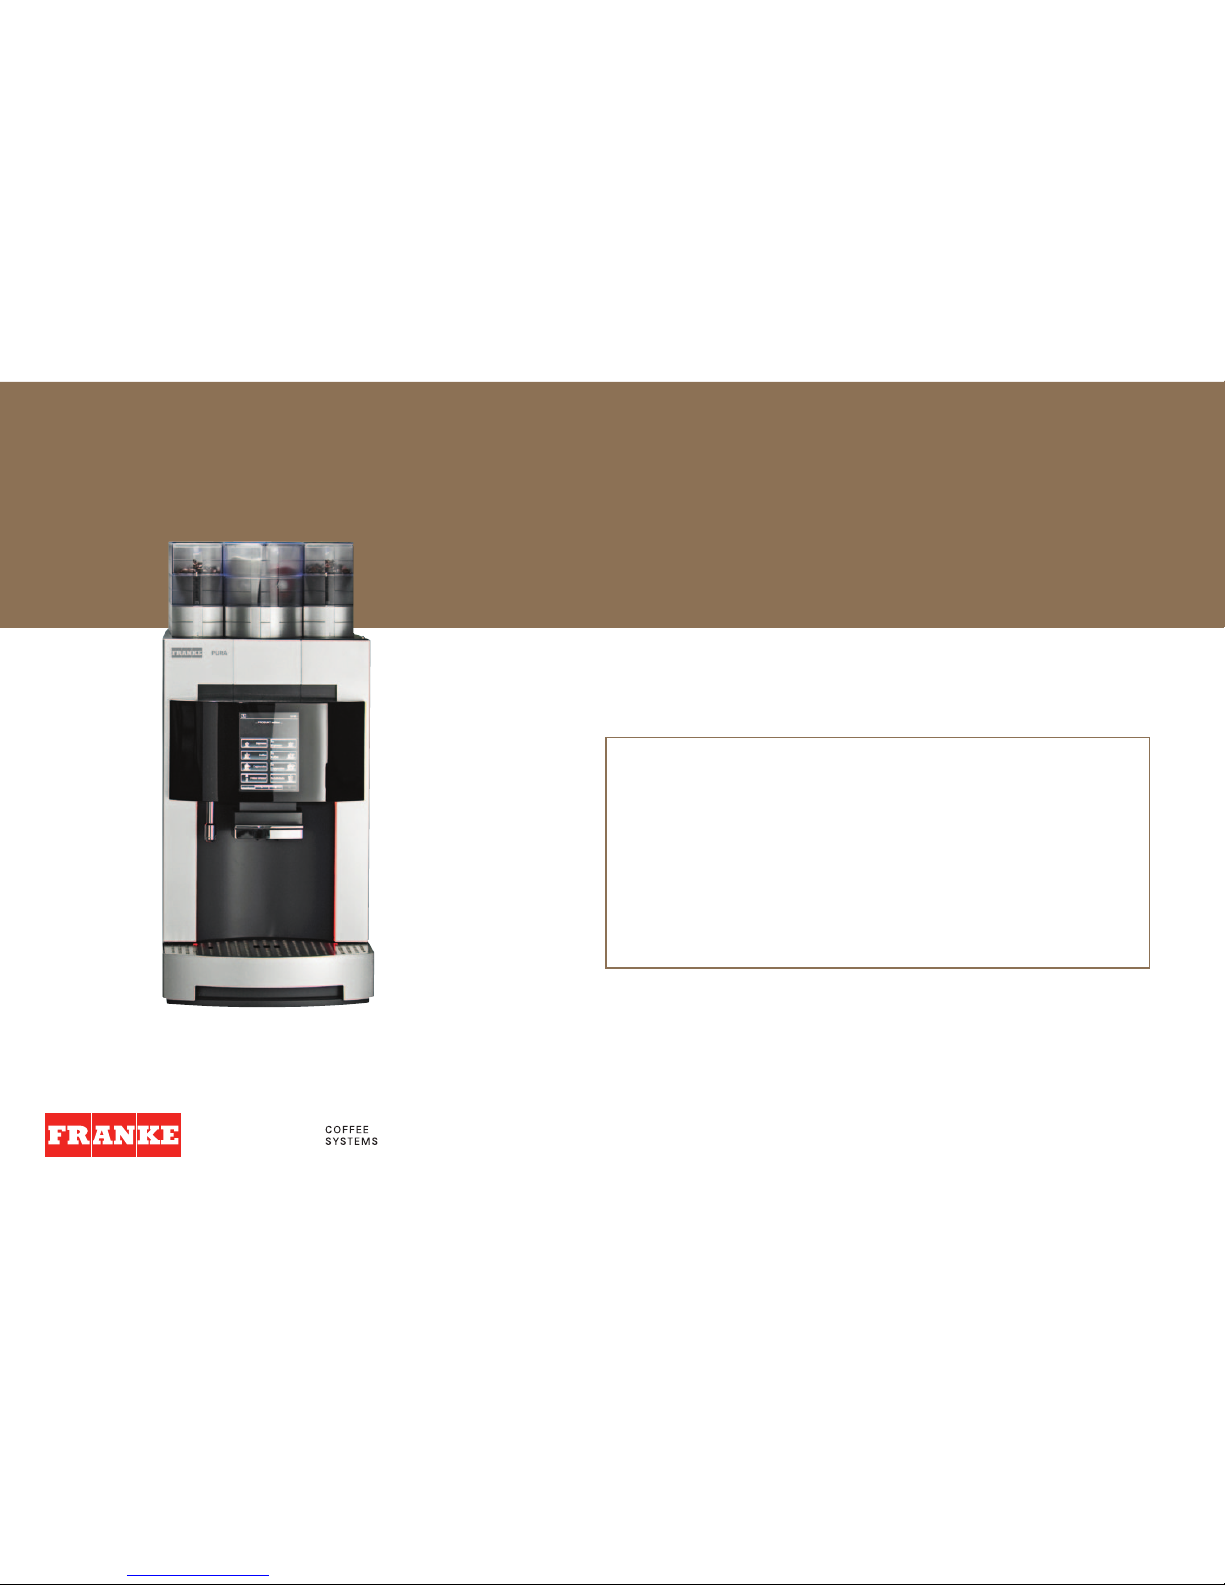
Your distribution partner:
Franke Kaffeemaschinen AG
Franke-Strasse 9
4663 Aarburg – Switzerland
Tel. +41 (0) 62 787 36 07
www.franke.com
Issued: 05.11 / order number: 1N 330 004 / revision A
 Loading...