

Page 1
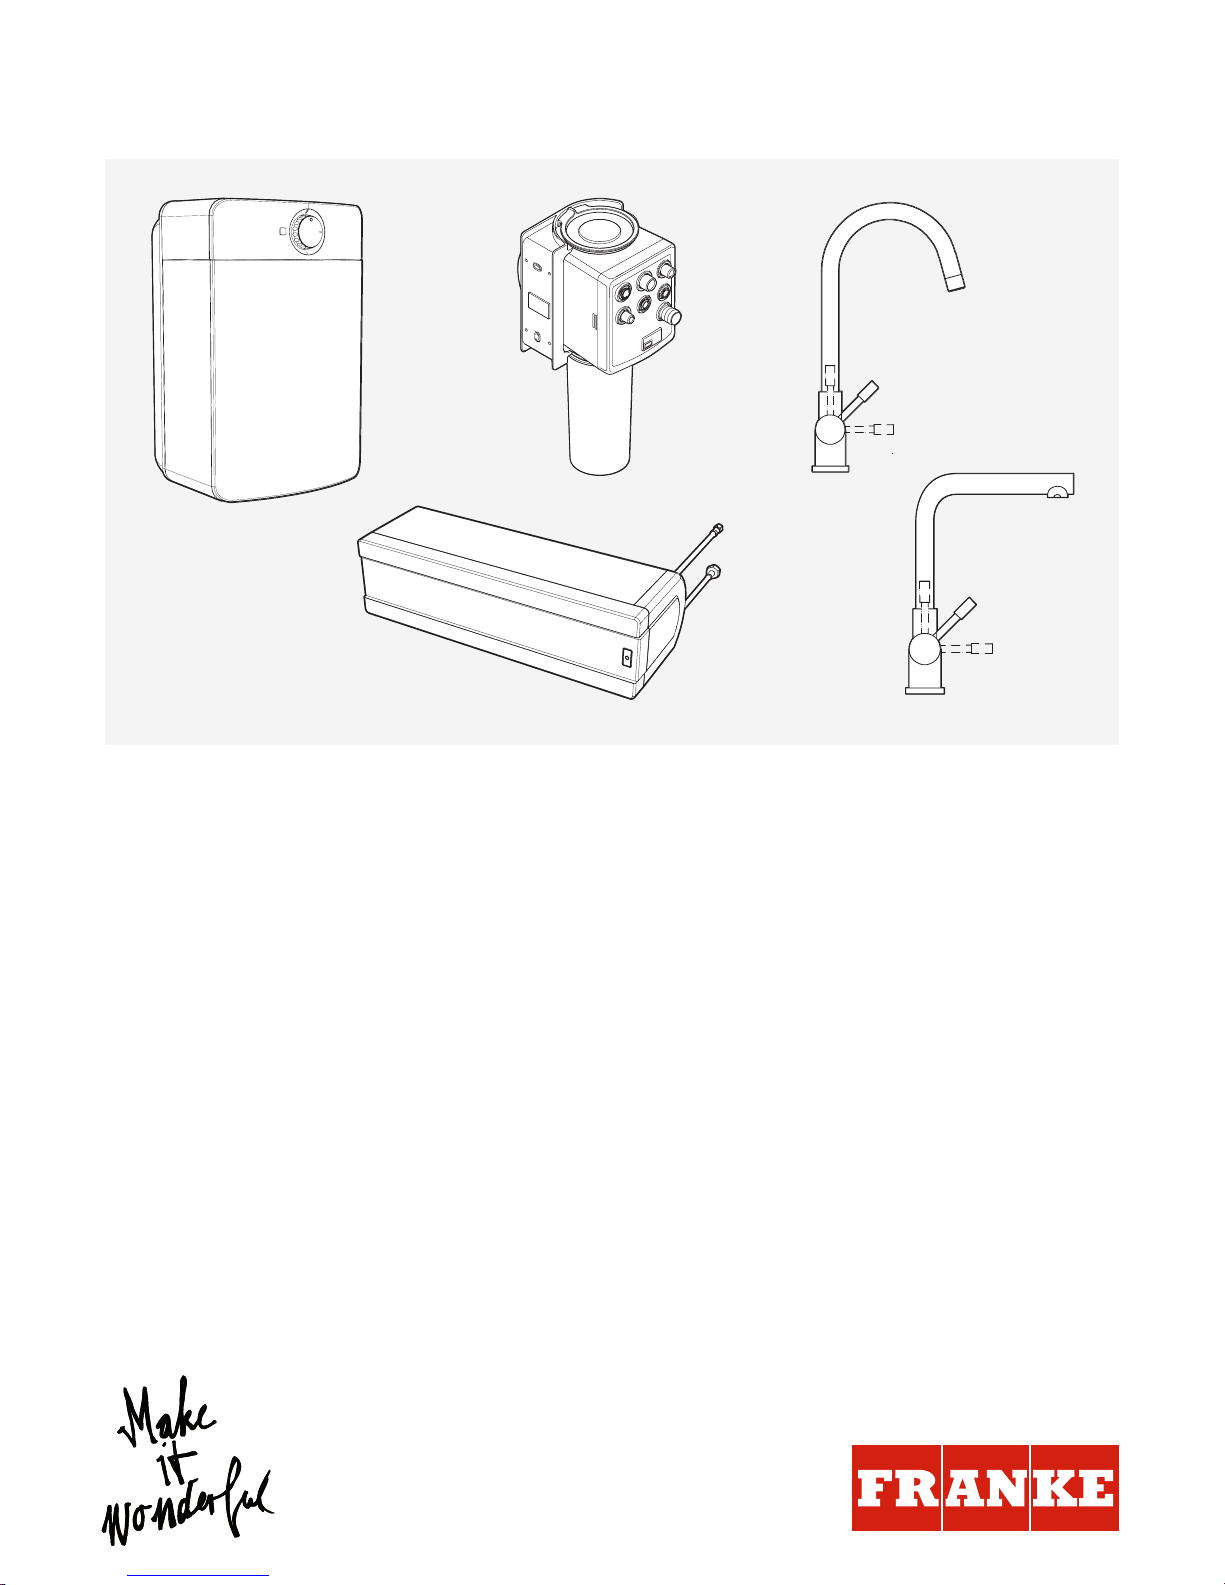
3-IN-1 INSTANT BOILING WATER SYSTEM
EN
3-in-1 Instant boiling water system
Installation and user manual
Page 2

EN
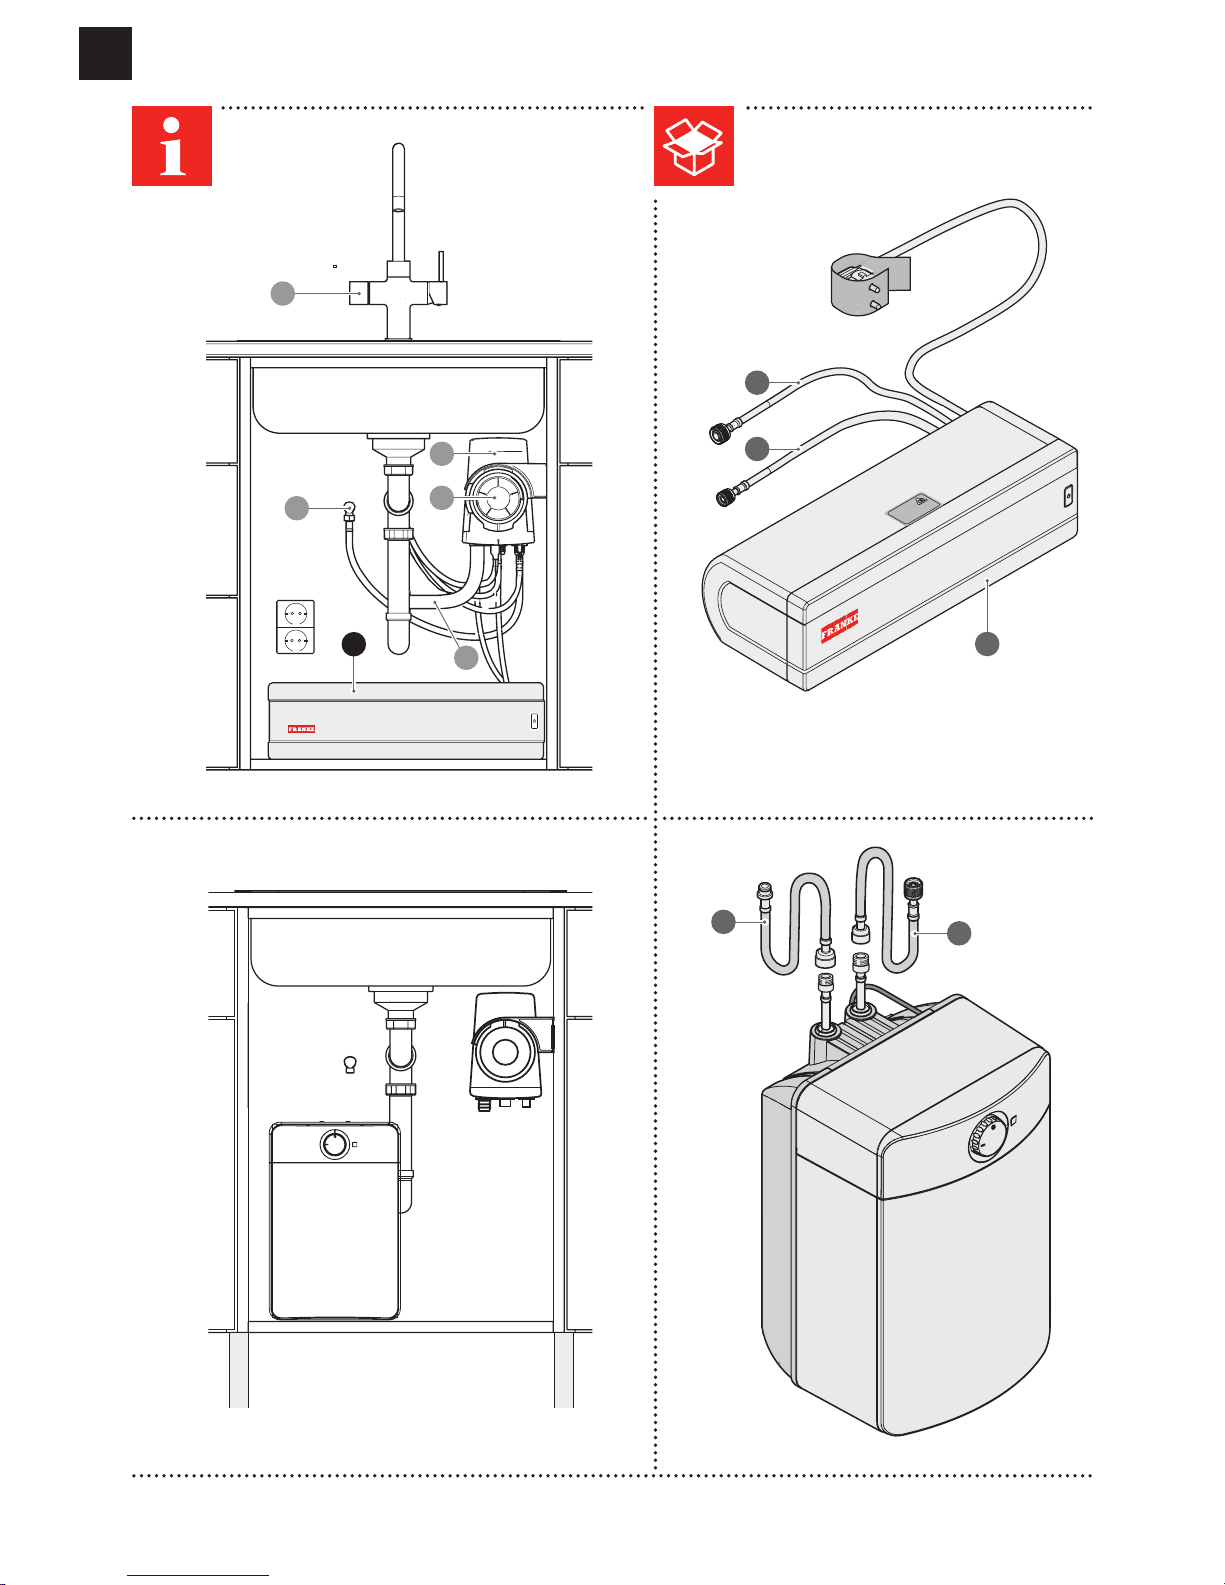
2
3x
A
B F
H
J
I
C G
D E
1
2
6
5
4
3
Page 3
EN
H
I
J
J
J
1
2 3
4
< 10 mm
3x
> 10 mm
3x
RVS
min 30 mm
min 40 mm
Ø 35 mm
Chroom
min 30 mm
min 60 mm
Ø 35 mm
min 30 mm min 30 mm
min 40 mm min 60 mm
RVS Chrome
∅ 35 mm ∅ 35 mm
B
C
F
F
D
G
G
E
E
Page 4
EN
>10 cm
> 2 cm
> 10 cm
> 2 cm
>10 cm
> 2 cm
1
2
6
5
4
3
M
M
M
L
K
Page 5
EN
M
M
M
> 6 cm
1
2
4
5 6
3
4x
> 2 cm
L
K
K
M
M
M
H
Page 6
EN
DEZE ZIJDE BOVEN
THIS SIDE UP
DIESE SEITE NACH OBEN
CE CÔTÉ VERS LE HAUT
1
2
6
5
4
3
N
O
P
N
O
Page 7
EN
TYPE- & SERIENUMMER
TYPE- & SERIENUMMER
TYPE- & SERIENUMMER
TYPE- & SERIENUMMER
TYPE- & SERIAL NUMBER
TYPE- & SERIENUMMER
TYPE- & SERIENUMMER
TYPE- & SERIAL NUMBER
TYPE- & SERIAL NUMBER
Ø 60 mm
> 150 mm
Page 8
EN
I
DEZE ZIJDE BOVEN
THIS SIDE UP
DIESE SEITE NACH OBEN
CE CÔTÉ VERS LE HAUT
DEZE ZIJDE BOVEN
THIS SIDE UP
DIESE SEITE NACH OBEN
CE CÔTÉ VERS LE HAUT
VUL EERST DE BOILER MET WATER!
ZUERST DEN SPEIGER MIT WASSER FÜLLEN!
FIRST FILL THE WATER HEATER WITH WATER!
REMPLIR D’ABORD LE BOILER AVEC L’ EAU!
DEZE ZIJDE BOVEN
THIS SIDE UP
DIESE SEITE NACH OBEN
CE CÔTÉ VERS LE HAUT
VUL EERST DE BOILER MET WATER!
ZUERST DEN SPEIGER MIT WASSER FÜLLEN!
FIRST FILL THE WATER HEATER WITH WATER!
REMPLIR D’ABORD LE BOILER AVEC L’ EAU!
DEZE ZIJDE BOVEN
THIS SIDE UP
DIESE SEITE NACH OBEN
CE CÔTÉ VERS LE HAUT
TYPE- & SERIAL NUMBER
TYPE- & SERIENUMMER
TYPE- & SERIENUMMER
P
Page 9
EN
1 2
N
N
N
O
O
O
Page 10

EN
I
DEZE ZIJDE BOVEN
THIS SIDE UP
D
IESE SEITE NACH OBEN
CE CÔTÉ VERS LE HAUT
1
2
Option
1
1
2
6
5
4
3
R
Q
Q
Q
Q
I
J
H
Page 11
EN
H
I
DEZE ZIJD
E BOV
EN
THIS
SIDE UP
D
IE
SE SEIT
E
N
AC
H
O
BEN
CE C
Ô
TÉ
V
ERS LE
H
AU
T
Option
2
3
I
I
J
J
H
H
Page 12

EN
R
R
DEZE ZIJD
E
BOV
EN
THIS
SID
E U
P
DIE
SE
SEIT
E NAC
H
O
BEN
CE C
Ô
TÉ
V
ERS
LE
H
AU
T
R
1
2
H
H
J
J
I
I
R
R
Page 13

EN
> 12 cm
1
1
2
6
5
4
3
T
V
U
S
Page 14

EN
32
5
6
4
T
V
U
U
S
S
Page 15

EN
1
2
3
4
120.0305.558
W
W
1
2
6
5
4
3
W
Page 16

EN
5
Page 17

EN
TABLE OF CONTENTS
About this manual 19
Safety information 19
Gener a l 19
3-in-1 tap 20
Boiler 20
M Box 20
Filter cartridge 20
Water quality requirements 20
Installation instructions 20
Product Information 21
Syste m 21
3-in-1 tap 21
Boiler 22
M-Box 22
Installation instructions for push fitting 23
Icon legend 23
Installation 24
General starting points for installation 24
Installation video 24
Installation steps 24
Switching on for the first time 25
Flushing 25
Operation 26
Operation of mixer lever 26
5 litre boiler status indicator LED 26
Boiler ECO mode 27
Emptying boiler 27
Messages and Malfunctions 28
Boiler messages 28
Reset maximum protection of 10 litre boiler 28
Page 18

EN
Troubleshooting 29
Maintenance 31
General maintenance 31
Replacing filter cartridge 31
Descaling tap sieve 31
M- Box 31
Disposal 32
Declaration of Conformity 32
Page 19

EN
ABOUT THIS MANUAL
This manual contains important information on the
safe and proper installation and commissioning of
the product.
FRANKE reserves the right to make modifications
to the product without prior notice. All information
correct at time of issuance.
Carefully read the user manual before using the
device.
Keep the user manual.
Use the device described in this user manual only
according to the intended use.
Symbol
Meaning
Warning symbol. Warning against risks of
injury.
Actions in safety and warning notes to
avoid injury or damage.
Action step. Specifies an action to be done.
Result. Result of one or more action steps.
Precondition that has to be fulfilled before
performing the following action.
SAFETY INFORMATION
General
Install the product as described in this manual and
in accordance with the applicable installation, safety
and local water supply regulations!
Do not use the product for purposes other than
those for which it is intended as described in this
manual.
The product must not be modified.
This product and/or system may be operated by
children above the age of 12 and by persons with
reduced physical, sensory or mental capacities, or
who lack the necessary experience or knowledge,
only under supervision or after being instructed
in the safe use of the product and when they are
aware of the hazards that may arise from the use
of the product and/or system.
Cleaning and maintenance by the user must not
be performed by children or by persons with
reduced physical, sensory or mental capacities, or
who lack the necessary experience or knowledge,
without supervision.
Prevent children from playing with the product
and/or system.
This product and or system is intended for use in
domestic and similar environments, such as:
- Staff kitchens in stores, offices and other
working environments;
- By guests in hotels, motels and other similar
residential environments;
- Bed and breakfast accommodation and
other similar residential environments.
Use in other environments in consultation with the
manufacturer of the product and/or system.
If the power lead with plug is damaged, it must be
replaced by the manufacturer, the manufacturer’s
customer service or a qualified person in order to
avoid risks.
If necessary, lubricate O-rings only with silicone
oil.
In order to avoid freezing, the product may only
be installed in frost-free rooms.
Safety instructions must be observed in order
to avoid physical injury and/or damage to the
product and/or system.
Maintenance instructions must be observed in
order to avoid damage and excessive wear.
As a result of the ongoing improvement of our
products and/or systems, illustrations in this
document may differ from the appliance as
delivered.
If available, you can download the latest version of
the manual via our website: www.franke.com
Franke cannot be held responsible for costs,
damage or personal injury if the product is not
operated in accordance with the instructions
given in this manual.
Tap, M-Box and boiler model may differ from the
model illustrated in the manual.
Ensure there is sufficient ventilation for the tank
to avoid overheating
Page 20

EN
3-in-1 tap
Avoid burns and scalding and pay attention when
using hot water. The temperature of the hot water
may be higher than 55°C.
Avoid burns and scalding and pay attention when
using boiling water. The temperature of the water
may be higher than 100°C.
Tiled and stone sinks will not withstand boiling
water; the difference in temperature can cause
these to crack. Always open the cold water tap
when pouring out boiling water and preferably
pour the boiling water directly into the drain.
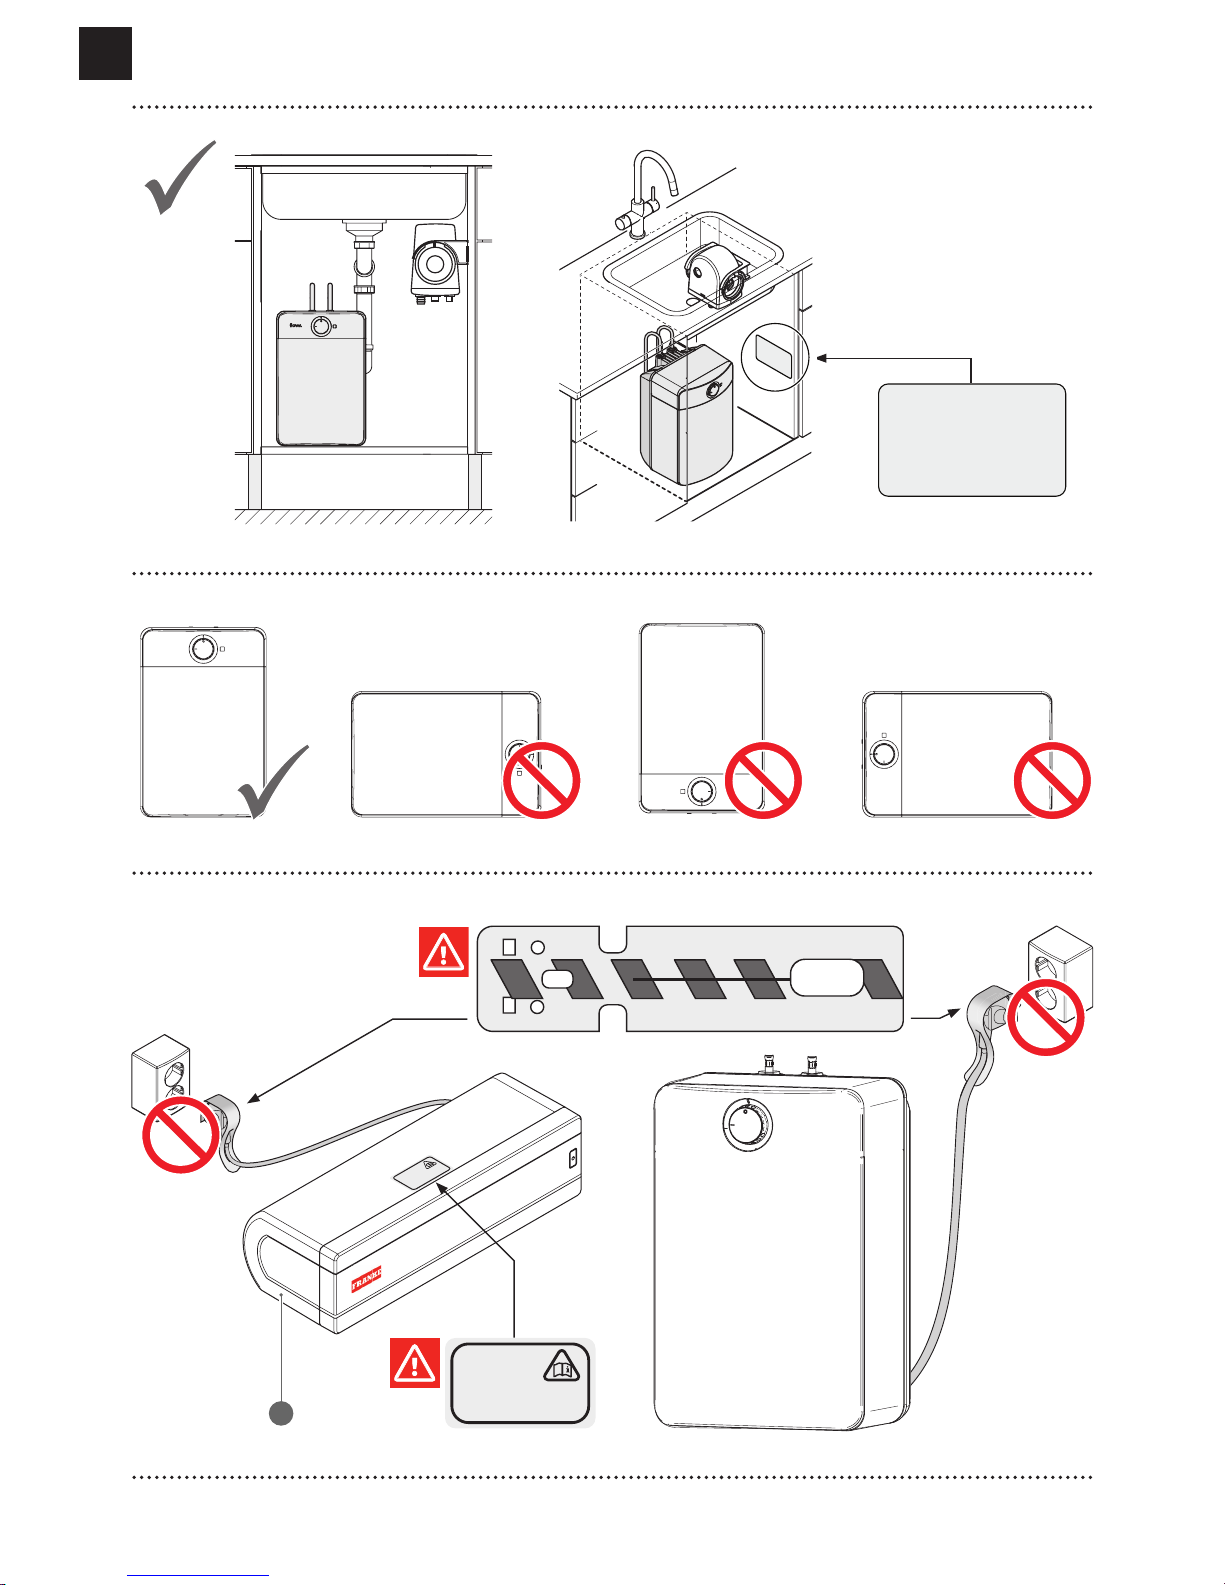
Boiler
Before commissioning, ensure that the boiler is
filled with water.
Never pick up or carry the boiler with the hoses or
the mains lead.
M Box
The appliance is not intended for connection to
the hot water supply (hot-fill).
The drain hose must be connected with a
steady down gradient in order to ensure the
correct function of the siphon in the M-Box. The
connection point of the drain hose should be
downline of the sink siphon.
Filter cartridge
The use of a water filter is mandatory to protect
the product against lime scale deposits.
After storage at a temperature of 0°C, the
filter must first be stored for 24 hours at room
temperature before it is installed.
The filter cartridge must not be opened or
damaged.
The filter cartridge and the system must be
intensively flushed after a prolonged standstill
period and/or during maintenance work (2 litres
of flushing water after 1 week standstill; 10 litres
of flushing water after 4 weeks’ standstill).
The filter cartridge must be replaced if, after
commissioning, it has not been in operation for 3
months.
Water quality requirements
pH value
7 – 9.5
Iron content (Fe)
< 0.2 mg/l
Chlorine content (Cl)
< 150 mg/l
Conductivity
< 125 mS/m
Chemical additions
Not permitted
Installation instructions
NEVER use serrated tools in order to avoid
damage. Where necessary, always use the
appropriate tools for tightening the coupling.
Minimum bending radius after installation
∅
min.
∅
min :
DN 6 = ∅ 50 mm
DN 8 = ∅ 60 mm
DN10 = ∅ 70 mm
DN13 = ∅ 90 mm
min. 2 ∅ e
Without bends after installation
Without bend immediately after connection
Without tension after installation
Without torsion after installation
Page 21

EN
PRODUCT INFORMATION
System
Water supply pressure (min.)
200 kPa
/
29 psi / 2 bar
Water supply pressure (max.)
400 kPa
/
58 psi / 4 bar
Flow rate boiling water 2 - 4 l/min *
Flow rate cold water 5 - 9 l/min *
Flow rate
hot water 5 - 9 l/min *
* The flow rate varies, depending on the water supply pressure and the type of tap.
3-in-1 tap
158
171
117
190
234,5
334,5
59 59
8078
52
MAX
34min
80
59 59
362,5
78
52
MAX
34min
239,5
15
189
171
110
158
Irena 3-in-1
80
59 59
362,5
78
52
MAX
34min
239,5
15
189
171
110
158
Minerva 3-in-1
191
407
276
96
∅35
96
181 29
ø
25
63,5
73
25º
200
330
304
96
∅35
96
180
63,5
73
25º
ø25
190
234,5
59 59
52
MAX
34min
Heli x 3 -in -1
200
330
304
96
∅35
96
180
63,5
73
25º
ø25
158
171
117
190
234,5
334,5
59 59
8078
52
MAX
34min
80
59 59
362,5
78
52
MAX
34min
239,5
15
189
Mondial 3-in-1
Page 22

EN
Boiler
203
218
300
452
299
145
522
200
188
406
5 litre boiler
191
96
∅35
96
181 29
ø
25
63,5
73
25º
203
218
300
452
299
188
406
10 litre boiler
Boiler
5 litre 10 litre
Dimensions [H x W x D] 145 x 522 x 200 mm
452 x 300 x 285 mm
Contents 4.7 l
10 l
Voltage 230 VAC
230 VAC
Power 1500 W
2200 W
Load 7.0 A
10 A
Energy consumption at standstill 25 W 28 W
IP classification IP 24D IP 24D
Storage temperature 115°C 108°C
Delivered water temperature 60° (±5)* and 100°C
60° (±5)* and 100°C
Heating time [ΔT 100 K] 23 min 35 min.
Operating pressure (max.) 600 kPa / 87 psi / 6 bar 600 kPa / 87 psi / 6 bar
Suitable for hot-fill ** No No
** The system must always be connected to a cold water supply.
M-Box
191
407
276
96
96
181 29
ø
25
63,5
73
25º
180
63,5
73
25º
ø25
203
218
188
406
M-box
Temperature of mixed water 55°C
Maximum water pressure 400 kPa / 58 psi / 4 bar
Filter system Franke Pro M filter
Filter cartridge dimensions [h x w] 245 x 95 mm
Ambient temperature 4 - 30°C
Please note that some parts may not be available in your country.
Page 23

EN
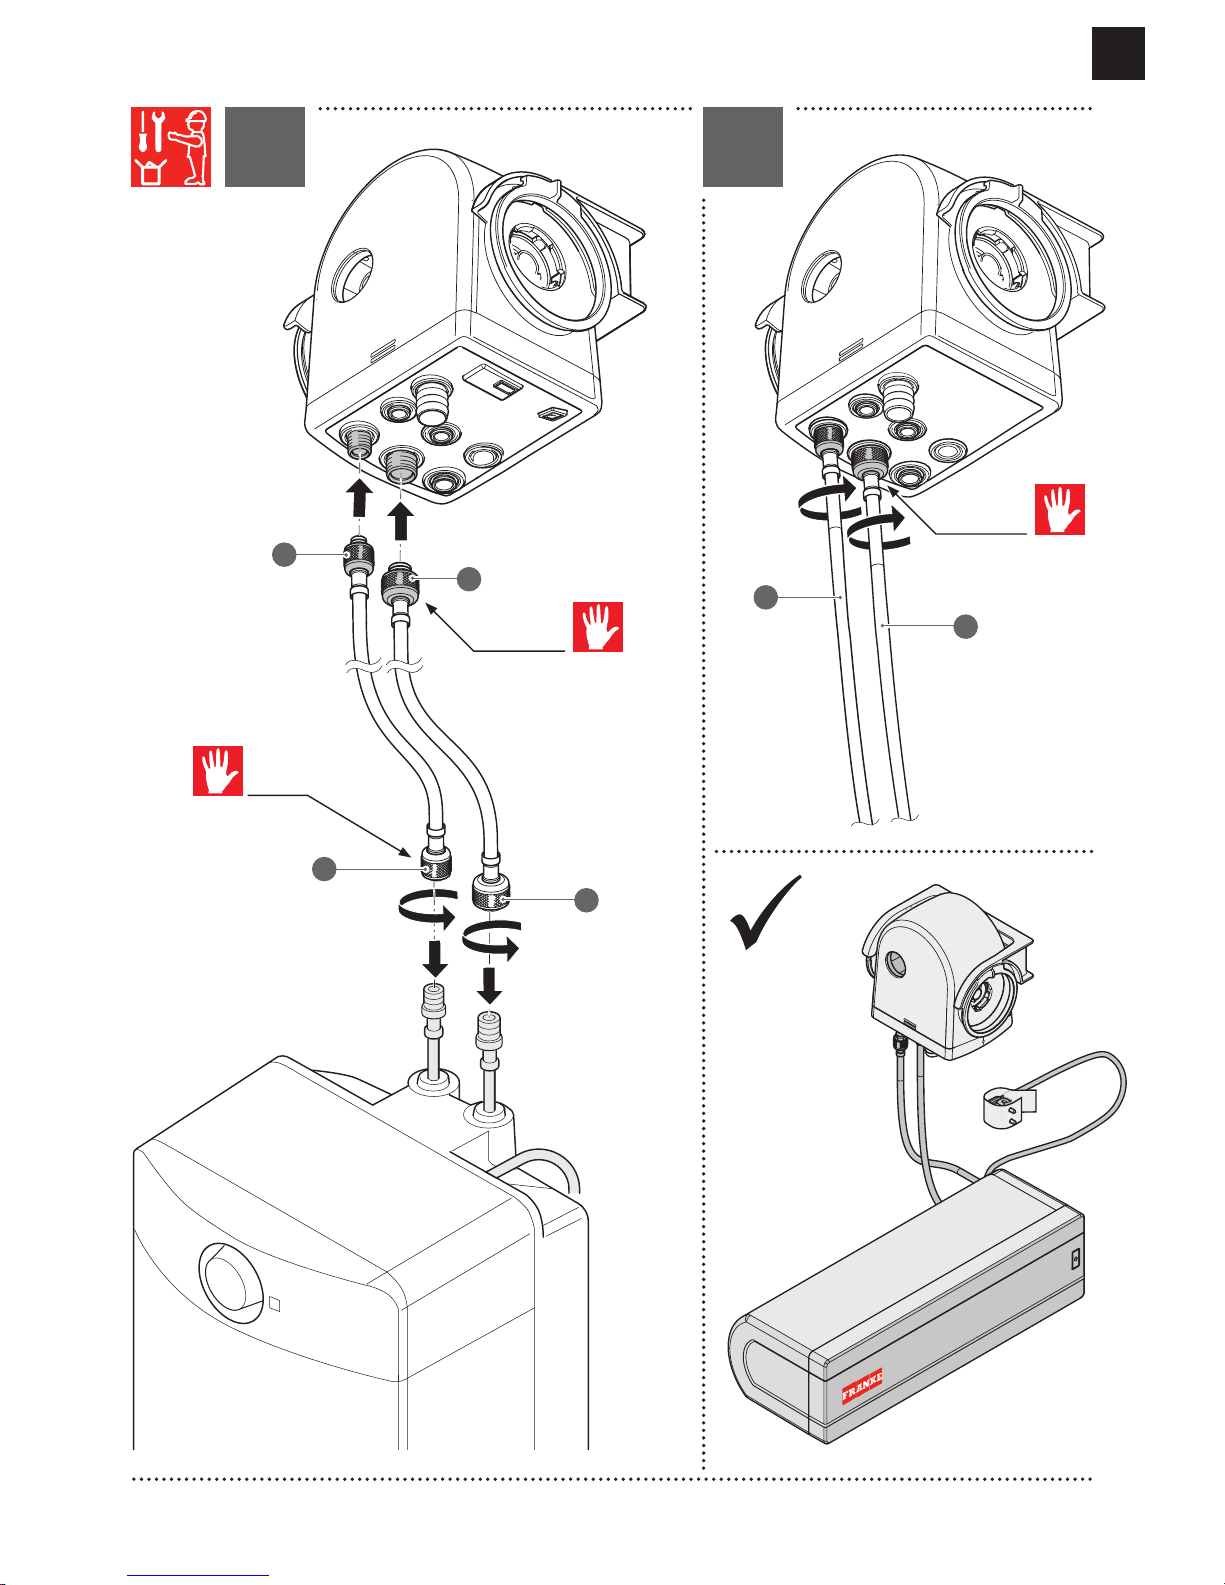
Installation instructions for push fitting
Installing the push fitting
Push the hose into the push fitting (fig. 2A).
Pull the hose carefully up and down and check
whether it is fitted securely (fig. 2B).
2A 2B
Remove the push fitting
Push in the ring on the push fitting (fig. 1C).
Pull the hose out of the push fitting (fig. 1D).
2C 2D
Icon legend
Product information
Scope of Delivery
Montage
Tooling Equipment
Do not use tools
Measure
Drill
Screw
Spanner
Cut
Tighten finger-tight
Check push fitting
Warning Sign / Caution / Hazard
Inspect
Determine position
Open
Close
Discard
Do not / Forbidden result
Do, OK! / Result
Installation step successfully completed
url / video link
Page 24

EN
INSTALL ATION
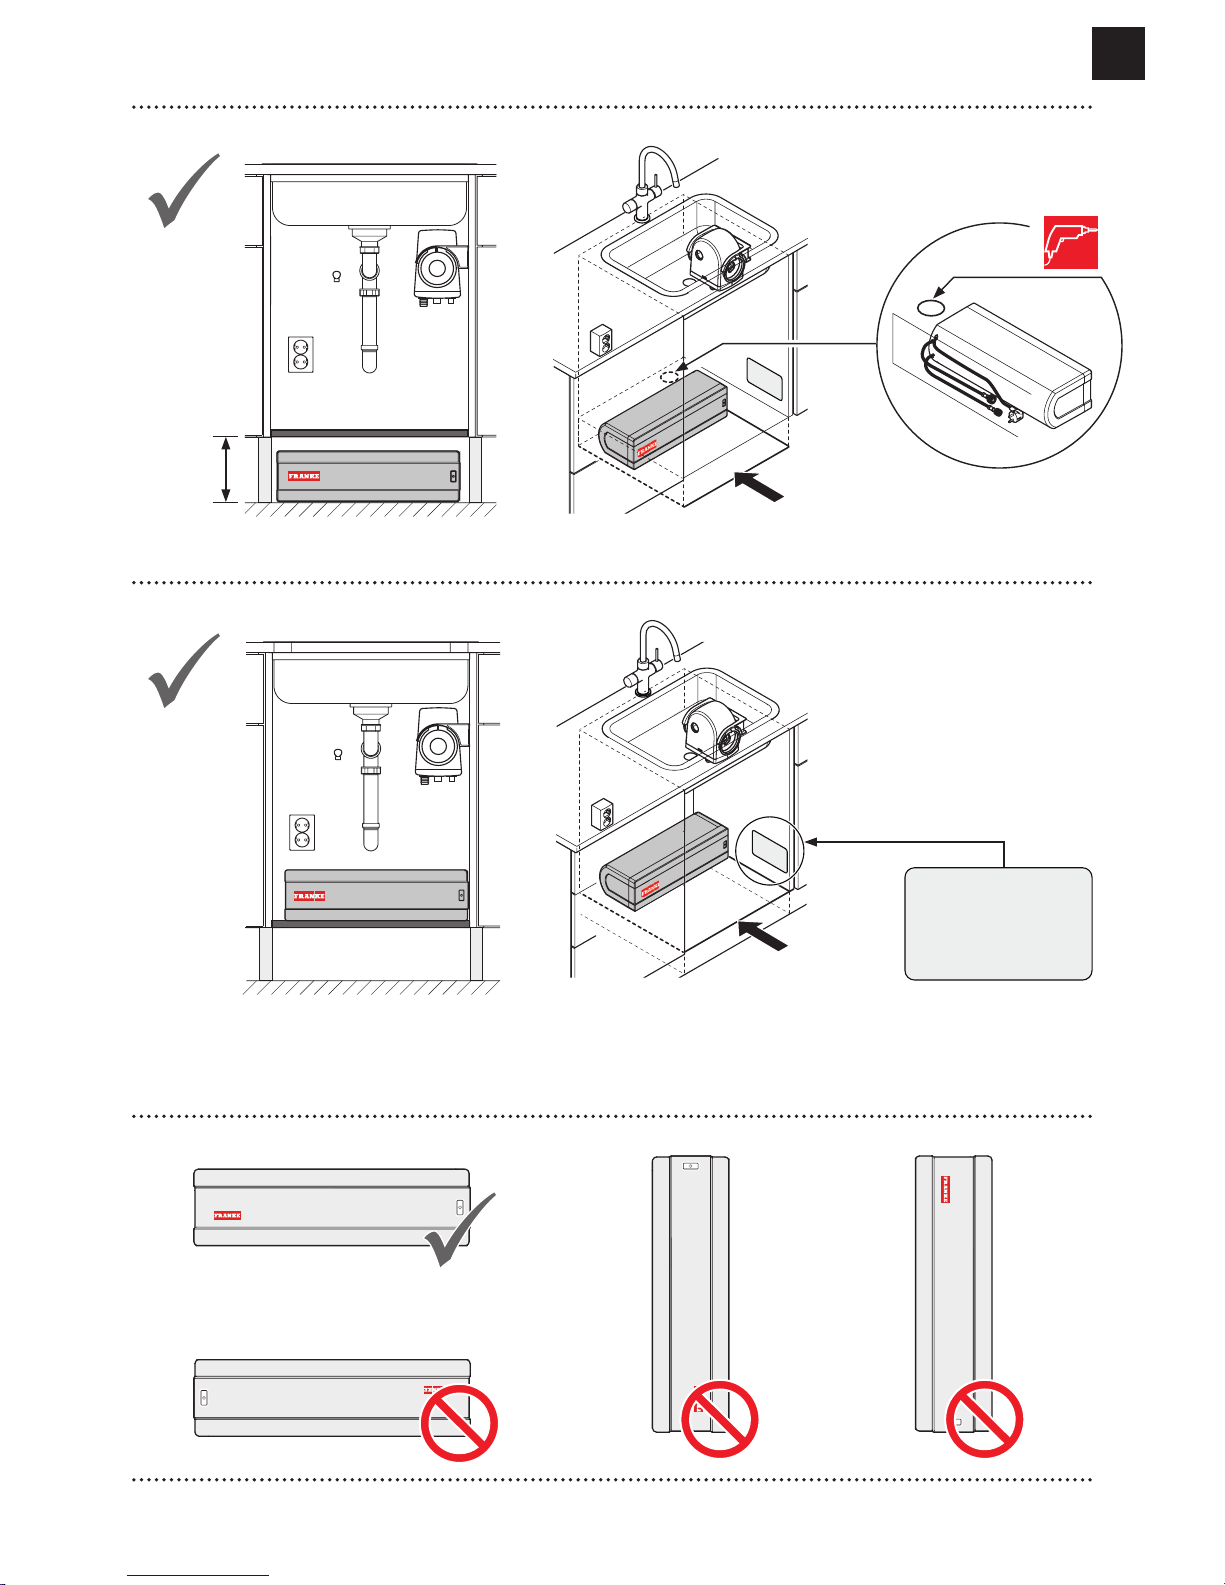
General starting points for installation
Perform the following steps before starting installation.
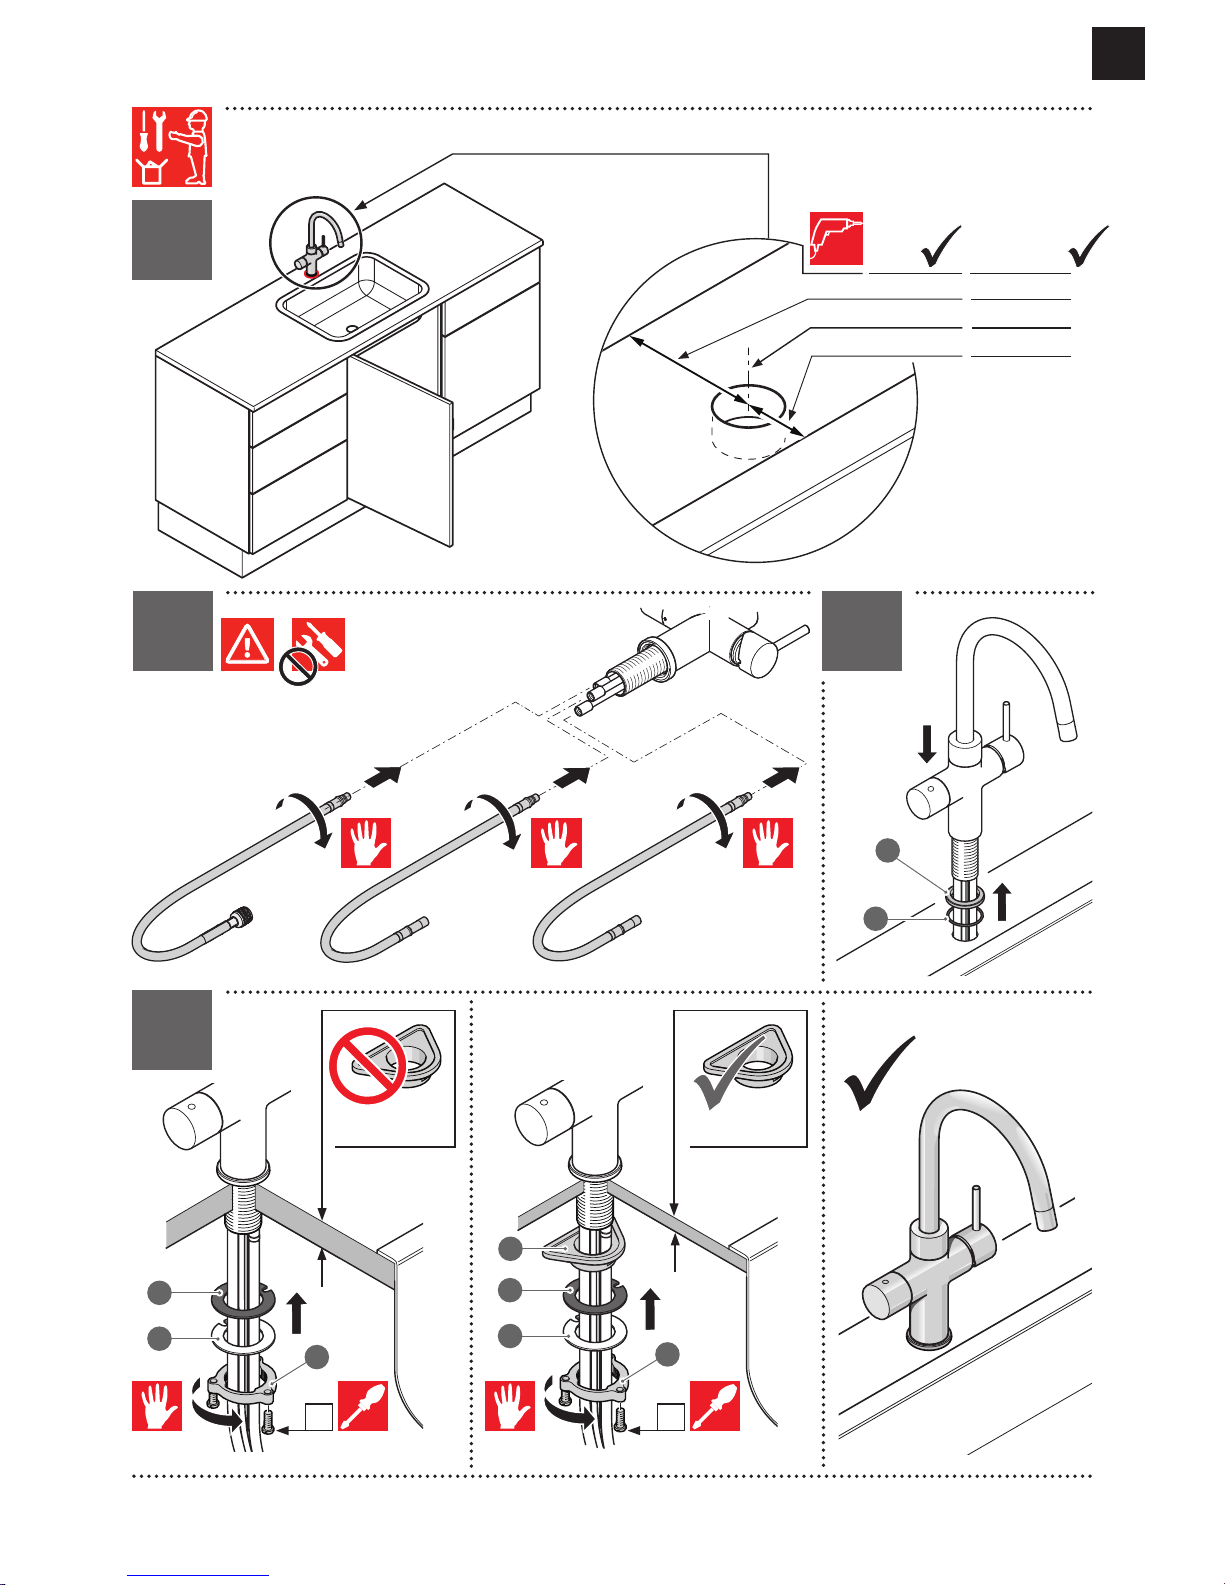
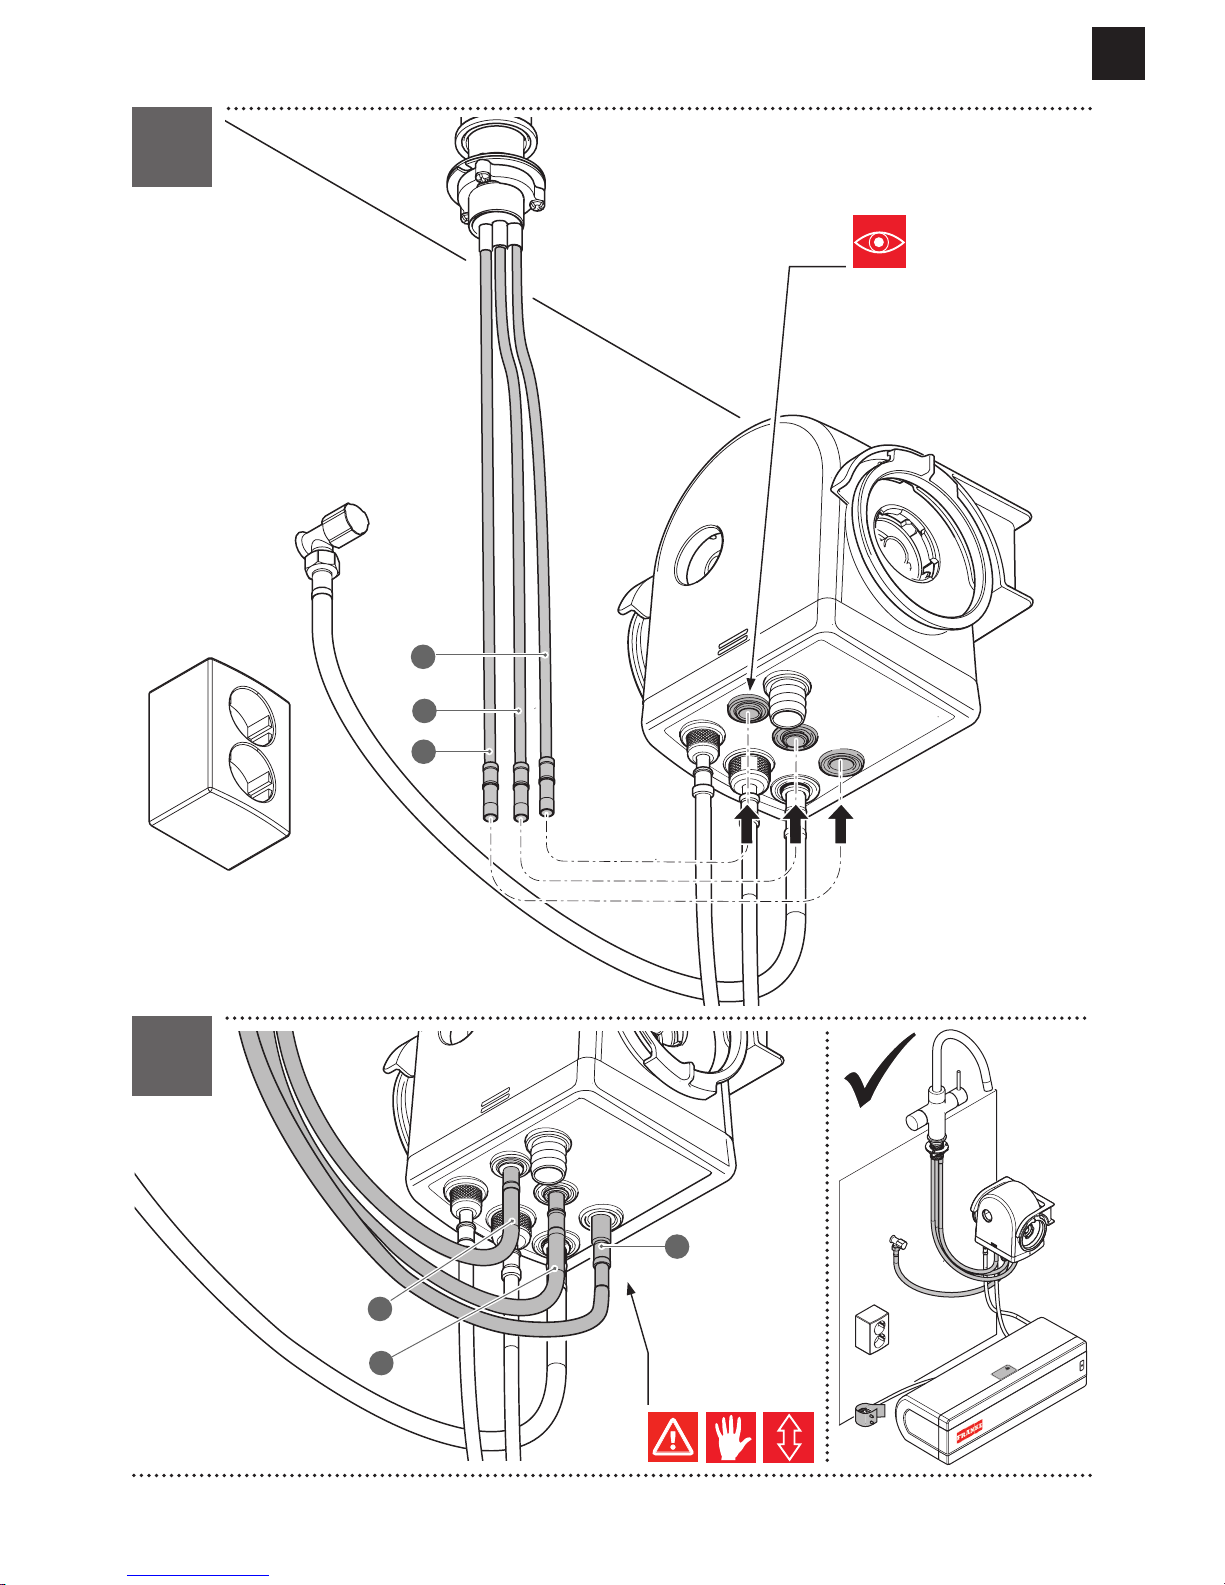
Stop valves must already be installed. See Option at page 9/10, if stop valves have not been installed.
Close the stop valves.
In existing installations, remove the tap, hoses and boiler if still in place.
Mark the existing cold and hot water connection.
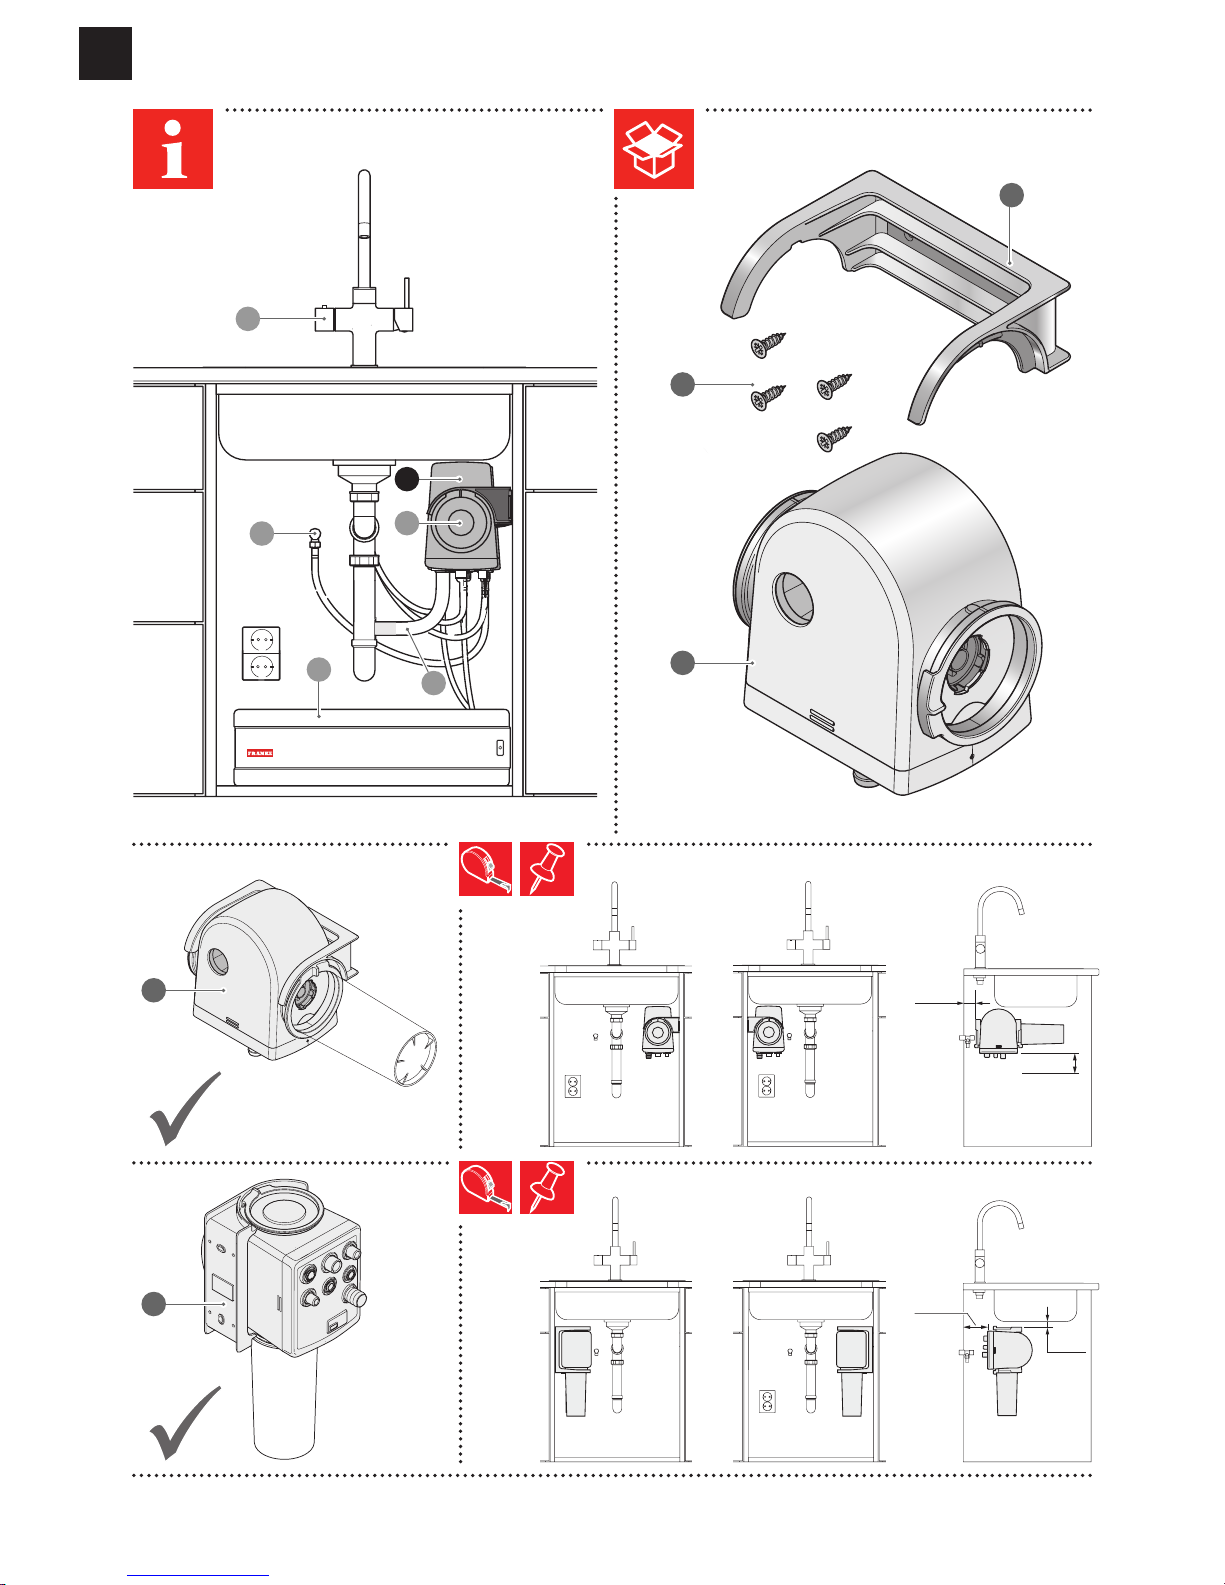
Do not connect the M-Box to a hot water pipe.
There must be two wall plug sockets available for connection.
Installation video
https://youtu.be/4KPGVG_MoZg
Installation steps
Installing 3-in-1 tap (see page 2)
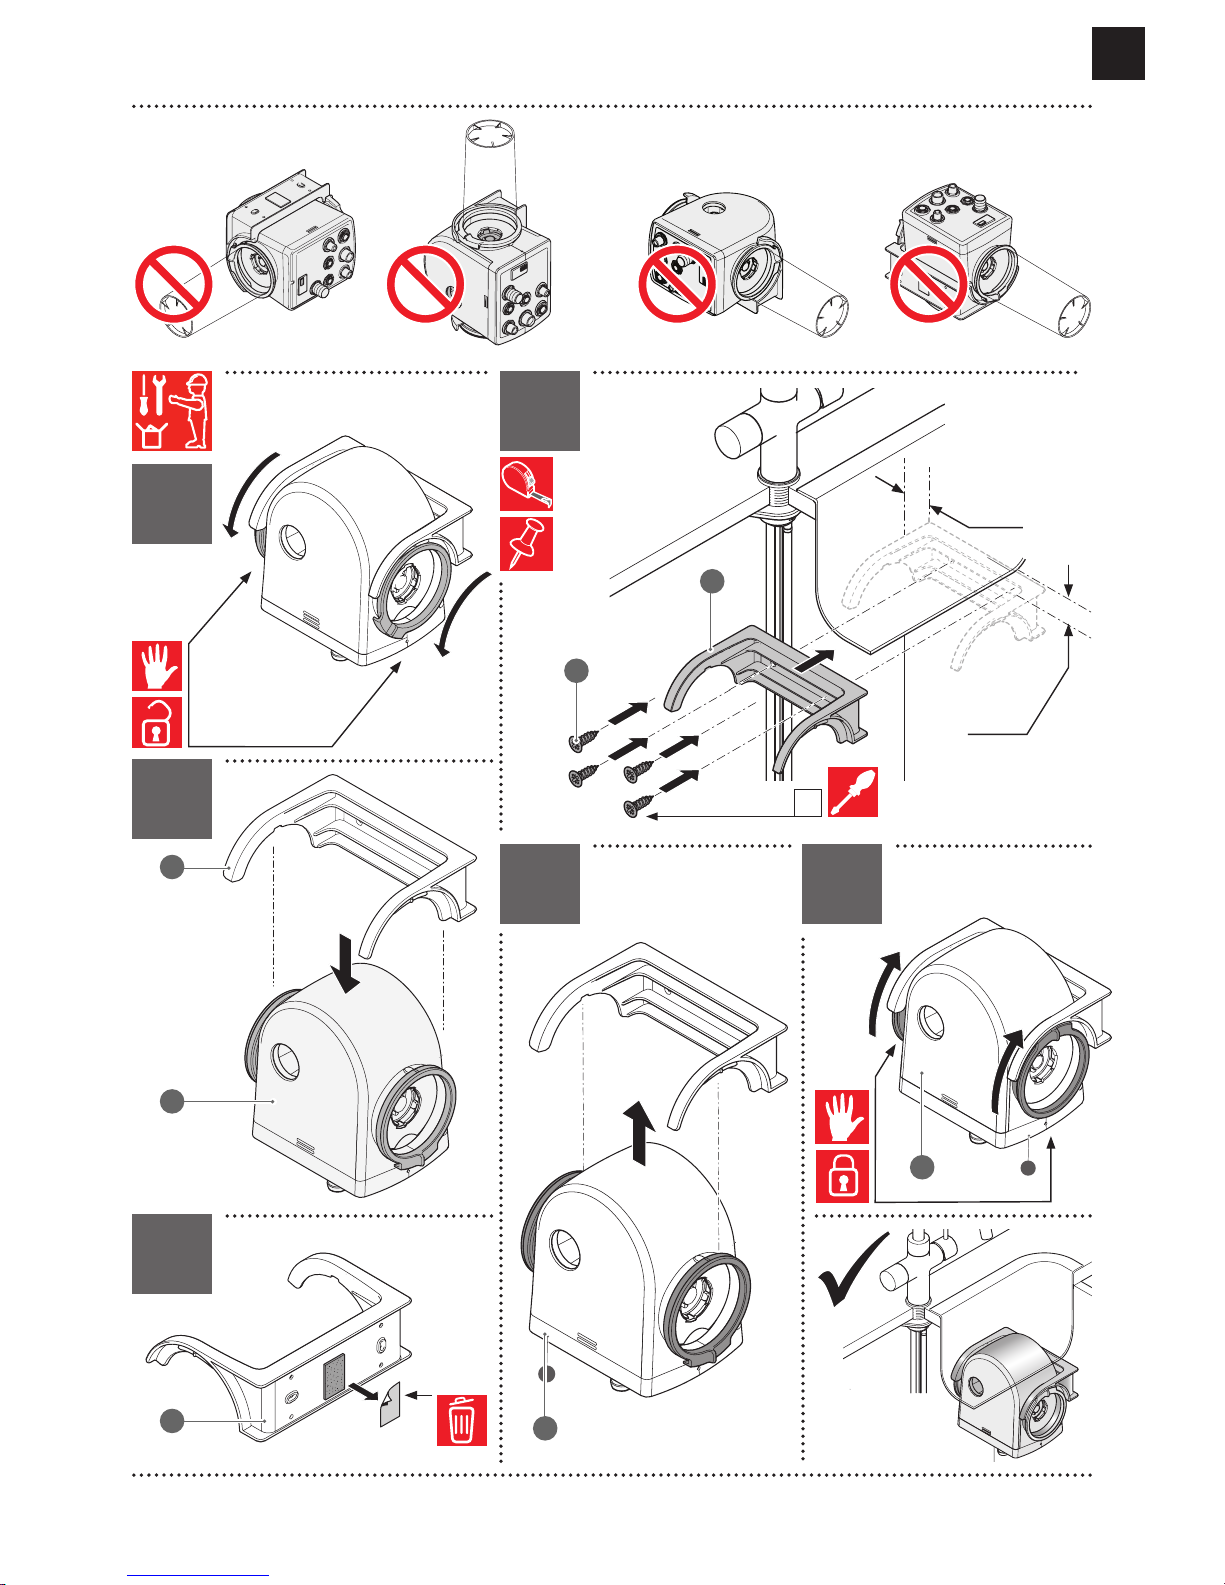
Installing M-BOX (see page 4)
Installing 5 or 10 litre boiler (see page 6)
Connecting 3-in-1 tap (see page 9)
Connecting 3-in-1 tap with hot water out of existing pipe (see page 11 )
Connecting the drain line (see page 12)
Commissioning (see page 14)
Page 25

EN
SWITCHING ON FOR THE FIRST TIME
Flushing
9 Ensure that the boiler is filled with water!
5 litre boiler
Operate the mixer tap and flush with warm water
for 1 minute (fig.3A).
Insert the plug into the wall plug socket, the LED
lights up white (fig. 3B).
Switch on the boiler, the LED lights up blue (fig. 3C).
3C3B
3A
9 Water reaches boiling temperature after 25 minutes.
Push and turn the selector knob and flush with
boiling and filtered water (fig. 3D; see ‘Operation
of selector knob‘)
Inspect the installation for leaks after
commissioning (fig. 3E).
3D 3E
WARNING: If, during heating, no expansion
water has escaped after 10 minutes:
Switch off the power supply immediately and turn on
the boiling water tap to relieve the water pressure.
Flush hot water for 1 minute.
Flush boiling water until the water is cold.
Repeat the process three times to flush the
complete system.
10 litre boiler
Operate the mixer tap and flush with warm water
for 1 minute (fig.3A).
Insert the plug into the wall plug socket.
Turn the ON/OFF knob to position „I” (fig. 3F)
to switch the boiler ON. The water will now be
heated.
3F
The status of the boiler is
signalled by a lamp alongside
the rotary knob. When the
water is being heated, this
lamp lights up red.
9 Water reaches boiling temperature after 35 minutes.
Push and turn the selector knob and flush with
boiling and filtered water (fig. 3D; see ‘Operation
of selector knob‘)
Inspect the installation for leaks after
commissioning (fig. 3E).
WARNING: If, during heating, no expansion
water has escaped after 10 minutes:
Switch off the power supply immediately and turn on
the boiling water tap to relieve the water pressure.
Flush hot water for 1 minute.
Flush boiling water until the water is cold.
Repeat the process three times to flush the
complete system.
Page 26

EN
OPERATION
Operation of mixer lever
Select cold water (fig. 4A).
4A
Select hot water (fig. 4B).
4B
Turn on mixer tap (fig. 4C).
4C
Operation of selector knob
Hold the object to be filled close to the tap so
that the object surrounds the delivery opening
of the tap. This will prevent (hot) water from
splashing.
For the optimum result when making coffee or
tea, allow around 1 cup of water to run out before
filling the pot. In this way the air bubbles in the
water disappear so that no foam forms on the
surface of the tea.
5 litre boiler status indicator LED
LED colour
(normal)
LED colour
(ECO mode)
LED
action
Boiler status Description
White White Steady Boiler OFF Wait mode
Blue Pale blue Steady Boiler ON - water cold Water temperature < 45 °C
Orange Violet Steady Boiler ON - water hot 45°C < Water temperature < 103°C
Red Pink Steady Boiler ON - water boiling Water temperature > 103°C
Green Green Steady ECO mode Water is not heated unless
water temperature is < 50°C
Page 27

EN
Boiler ECO mode
Switch on ECO mode:
- Hold depressed for 4 seconds, LED is green.
Switch off ECO mode:
- Hold depressed for 10 seconds, LED is not
green.
4E
4D
When the boiler is switched on, the temperature
of the water is automatically held constant so that
boiling water is available at any time of the day. In
order to prevent the temperature of the boiler being
unnecessarily held constant, you can use the energysaving ECO mode. After activation, ECO mode comes
into operation every day at the same time. The
duration of ECO mode is 6 hours and the LED should
light up green during this time.
If using a Switch, the setting of the ECO mode should
be cancelled when the boiler is switched off. ECO
mode then has to be set again.
Note: Before commissioning the boiler, see
"Flushing".
Switching off the boiler
5 litre boiler:
Press the ON/OFF knob; the LED lights up white
(fig 4D).
Remove the plug from the plug socket.
10 litre boiler:
Turn the ON/OFF knob to the „○” position
(fig 4E).
Remove the plug from the plug socket.
Emptying boiler
9 Remove the plug of the boiler from the wall plug
socket.
9 Turn on the boiling water tap.
9 Wait until cold water runs out.
9 Turn off the boiling water tap.
9 Close the stop valve.
9 Turn on the boiling water tap.
9 Wait until water no longer runs out.
9 Turn off the boiling water tap.
9 Disconnect the lines from the boiler.
Remove the boiler.
Allow the water from the hoses and the boiler to
drain into the sink.
Page 28

EN
MESSAGES AND MALFUNCTIONS
Boiler messages
Boiler malfunction LED
LED colour LED action Description
Red 1 second on / 1 second off Hardware fault
Red / white 1 second red / 1 second white Hardware fault - sensor is defective
Red / yellow 1 second red / 1 second yellow Boiled dry - no water in the boiler
Red / green 1 second red / 1 second green Boiler is upside down or installed upright
Red / orange 1 second red / 1 second orange Maximum protection has tripped - boiler too hot (*)
*) Switch off the boiler and contact Customer Services.
Reset maximum protection of 10 litre
boiler
9 This work may only be carried out on instruction
from Franke.
9 If the boiler was switched on while it was not filled
with water, you must not reset the boiler. In this
case the thermostat and the maximum protection
device must be replaced. Contact Franke or your
installation company.
9 Switch the boiler OFF.
9 Remove the plug of the boiler from the wall plug
socket.
9 Remove the ON/OFF knob by pulling it forwards
(fig. 5A).
9 Loosen the screw behind the ON/OFF knob
(fig 5B).
9 Remove the protective cap by carefully pushing
forwards (fig. 5C).
9 Reset the maximum protection device by pressing
the button (fig. 5D)
9 Carefully fit the protective cap again. Take care
that the wiring is not trapped.
9 Insert and tighten the screw.
9 Push the ON/OFF knob onto the shaft again.
9 Ensure that the boiler is filled with water.
Insert the plug into the plug socket.
Switch the boiler ON.
5A
5C
5B
5D
Reset message of 5 litre boiler
Reset the boiler if an error message is displayed.
Hold the ON/OFF knob depressed for 5 seconds.
The message is reset and the boiler switches OFF.
Now turn the boiler ON again.
If the same error message appears again, switch off
the boiler and contact Franke or your installation
company.
Page 29

EN
TROUBLESHOOTING
Water leaks
Cause Remedy
Connection leaking Inspect the coupling(s) and re tighten, if necessary
Hose(s) leaking Inspect the hose(s) and replace the leaking hose(s)
Boiler leaking
Remove the plug of the boiler from the wall plug socket. Shut off the
water supply. Contact Franke.
Tap leaking Shut off the water supply. Contact Franke.
M-Box leaking
Remove the plug of the M-Box and the boiler from the wall plug socket.
Shut off the water supply. Contact Franke.
Tap supplies no water
Cause Remedy
Hose(s) kinked Inspect the hose(s) and straighten the kinked hose(s)
The main water valve is closed Open the main water valve
The stop valve in the kitchen cabinet
is closed
Open the stop valve.
Filter not installed in M-Box Install filter in the M-Box.
Tap supplies no boiling water
Cause Remedy
Hose(s) kinked Inspect the hose(s) and straighten the kinked hose(s)
The M-Box is defective Contact Franke.
The water from the tap is not boiling
Cause Remedy
The plug of the boiler has not been
inserted into a wall plug socket.
Insert the plug into an earthed wall plug socket.
The wall plug socket has no power
supply
Check the electricity grid and repair the interruption.
The electric circuit has failed due to an excessive load. The boiler
cannot be connected to the same electric circuit as a dishwasher.
The boiler is OFF (wait mode) Switch the boiler ON.
The boiler has not heated up
completely.
Wait until the boiler has heated up.
The boiler has a fault. Reset the boiler.
The boiler is defective Contact Franke.
The M-Box is defective. Contact Franke.
Page 30

EN
Tap supplies no hot water
Cause Remedy
Hose(s) kinked. Inspect the hose(s) and straighten the kinked hose(s).
Boiler not functioning. See table “The water from the tap is not boiling”
Hot water appliance not functioning.
(if hot water is not being used from
the M-Box)
Consult the manual of your hot water appliance.
The boiler causes a short-circuit
Cause Remedy
There is a short-circuit in the electric
wiring or the heater element of the
bo iler.
Remove the plug of the boiler from the wall plug socket.
Contact Franke.
The boiler causes a short-circuit.
No expansion water from the M-Box
Cause Remedy
No water in the boiler. Fill the boiler with water.
The boiler is OFF (wait mode) Switch the boiler ON.
The boiler has a fault. Reset the boiler.
The boiler is defective Contact Franke.
Pressure relief valve in the M-Box is
defective.
Remove the plug of the M-Box and the boiler from the wall plug socket.
Shut off the water supply. Contact Franke.
Page 31

EN
MAINTENANCE
General maintenance
Clean the tap only with a little detergent and a
damp cloth. Then rinse the tap with some water
and wipe it down with a dry cloth.
Do not use cleaning agents containing a solvent
or acid, such as lime scale removers, household
vinegar or cleaning agents with acetic acid. These
substances damage the surface. The tap will
become matt and scratched.
Lime scale deposits can be prevented by drying
the tap after use.
If lime scale deposits nevertheless occur, remove
these using a citric acid-based cleaning agent.
Check regularly whether water drips out of the
inlet combination. This dripping is a sign that the
inlet combination is (still) working correctly.
Always use original Franke parts for maintenance
or repair. This guarantees the safety and proper
function of the product and safeguards any
warranty claims.
Replacement or repair of parts may only be
carried out by an approved servicing company or
by Franke Service.
Replacing filter cartridge
Filter (120.0305.558) lifespan
Water hardness (˚DH) Months
<10˚DH 12
10 -18˚DH 9
>18˚DH 6
The filter cartridge must be changed at regular
intervals. Neglecting to change the filter as
indicated by this manual may invalidate your
warranty.
Descaling tap sieve
Always use a citric acid-based descaling agent.
Other substances will damage the material!
Loosening and tightening can be made easier by
wrapping an elastic band around the sleeve of
the tap sieve. Take care that the sleeve of the tap
sieve is not damaged by the use of tools.
Over the course of time, lime scale deposits will
appear on and alongside the tap sieve (aerator).
Unscrew the sleeve of the tap sieve (fig. 7A ).
Clean the tap sieve using a suitable descaling
agent (fig. 7B).
Place the tap sieve into the sleeve (fig. 7C).
Place the gasket onto the tap sieve (fig. 7D) and
screw on the sleeve finger-tight (fig. 7E).
7B
7C
7A
7D
7E
M-Box
Check regularly whether water drips out of the
pressure relief valve. This dripping is a sign that
the inlet combination is (still) working correctly
(fig. 7I).
7F
Page 32

EN
DISPOSAL
The symbol on the product or on the
packaging indicates that the device must
not be disposed of in the domestic waste.
By disposing of the device in a proper
way you help to avoid harmful consequences to
environment and health.
Further information about recycling the device is
available from the competent authority, the local
refuse disposal service or the vendor of the device.
Dispose of the device, which is to be discarded,
via a specialised waste collection point for
electronic and electrical devices.
In accordance with the article of Legislative Decree
no. 15 dated 25 July, Implementation of Directive
2002/96/EC regarding the reduction of the
hazardous substances used in in electrical and
electronic appliances, and waste disposal”. The
barred dustbin symbol on the appliance indicates
that at the end of its working life the product must
not be disposed of as household waste.
Consequently, when the appliance has reached
the end of its working life the user must take it
to a suitable recycling centre for electronic and
electrotechnical waste, or return it to the dealer
when purchasing a new appliance of equivalent type.
Proper separate waste collection of the scrapped
appliance for subsequent recycling, treatment and
environmentally-friendly disposal helps prevent a
potentially negative impact on the environment and
health and facilitates recycling of the materials used
in appliance construction.
DECLARATION OF CONFORMITY
Franke declares that the following products:
Boiler 5 litres and Boiler 10 litres are in conformity
with the following specifications:
EN 60335-1:2002 incl. A1:2004, A11:2004
A12:2006 en/ et A2:2006
EN 60335-2-21: 2003, incl A1 en A2:2008
EN 62233: 2008
Degree of protection: IP24D (EN 60529)
These products are in conformity with the rules
of the low voltage guideline 2006/95/EC
and EMC guideline 2004/108/EC
Page 33

Page 34

Page 35

Page 36

www.franke.com
Argentina
Industrias Spar San Luis S.A.
Buenos Aires 1008
Phone +54 11 4311 7655
Belgium
Franke N.V.
9400 Ninove
Phone +32 54 310 111
Brazil
Franke Sistemas de Cozinhas do Brasil Ltda.
89219-512 Joinville, SC
Phone +55 47 3431 0501
Canada
Franke Kindred Canada Limited
Midland, ON L4R 4K9
Phone +1 866 687 7465
China
Franke (China) Kitchen Systems Co., Ltd.
Heshan, Guangdong, 529700
Hotline 400 882 9898
Czech Republic
Franke s.r.o.
190 00 Praha 9
Phone +420 281 090 411
Denmark
Franke Kitchen Systems Denmark
8520 Lystrup
Phone +45 8624 9024
Egypt
Franke Kitchen Systems Egypt S.A.E.
6th of October City
Hotline 16828
Finland
Franke Finland Oy
76850 Naarajärvi
Phone +358 15 341 11
France
Franke France S.A.S.
60230 Chambly
Phone +33 130 289 400
Germany
Franke GmbH
79713 Bad Säckingen
Phone +49 7761 52 0
Greece
Franke Hellas S.A.
19003 Markopoulo Attikis (Athens)
Phone +30 22991 500 00
Hong Kong SAR
Franke Asia Hong Kong Office
Causeway Bay
Phone +852 3184 1900
India
Franke Faber India Limited
Aurangabad - 431 136
Phone 1800 209 3484
Italy
Franke S.p.A.
37019 Peschiera del Garda
Numero Verde 800 359 359
Kazakhstan
Franke Kazakhstan Ltd.
040918 Almaty City
Phone +7 727 297 3812
Morocco
Franke Kitchen System SARL
21 000 Casablanca
Phone +212 522 674 200
Norway
Franke Kitchen Systems Norway
8520 Lystrup, Denmark
Phone +47 35 566 450
Poland
Franke Polska Sp. z o.o.
05-090 Raszyn
Phone +48 22 711 6700
Portugal
Franke Portugal S.A.
2735-531 Cacém
Phone +351 21 426 9670
Romania
Franke Romania SRL
Pantelimon 077145
Phone +40 21 350 1550
Russia
Franke Russia GmbH
199106 St. Petersburg
Phone +7 812 703 1540
Slovak Republic
Franke Slovakia s.r.o.
010 01 Žilina
Phone +421 41 733 6200
South Africa
Franke South Africa
Durban 4052
Phone +27 31 450 6300
Spain
Franke España S.A.U.
08174 Sant Cugat del Vallès
Phone +34 93 565 3535
Sweden
Franke Futurum AB
930 47 Byske
Phone +46 912 405 00
Switzerland
Franke Küchentechnik AG
4663 Aarburg
Phone +41 800 583 243
Thailand
Franke (Thailand) Co., Ltd.
Bangkok 10110
Phone +66 2 013 7900
The Netherlands
Franke Nederland B.V.
5700 AD Helmond
Phone +31 492 585 111
Tur ke y
Franke Mutfak ve Banyo
Sistemleri Sanayi ve Ticaret A.S.
41400 Gebze Kocaeli
Phone +90 262 644 6595
Ukraine
Franke Ukraina LLC
02081 Kyiv
Phone +38 044 492 0015
United Arab Emirates
Franke LLC
Ras Al Khaimah
Phone +971 7 203 4700
United Kingdom
Franke UK Ltd.
Manchester M22 5WB
Phone +44 161 436 6280
USA
Franke Kitchen Systems LLC
Smyrna, TN 37167
Phone 800 626 5771
 Loading...