

Page 1
FSM 45 MW
EN User manual Compact Combi Oven with Microwave
DE Bedienungsanleitung Kompakter Kombi-Backofen mit Mikrowelle
FR Manuel de l’utilisateur Four combi compact avec micro-ondes
IT Manuale d’uso Forno combinato compatto con microonde
ES Manual de usuario Horno microondas combi compacto
PT Manual do utilizador Forno Combi Compacto com Micro-ondas
PL Podręcznik użytkownika Kompaktowy piekarnik połączony z funkcją kuchenki mikrofalowej
Page 2

LANGUAGES
Sprachen / Langues / Lingue / Idiomas / Idiomas / Języki
EN USER MANUAL �������������������������������������������������������������������������������������������������������������������������������������������������������������������������������� 3
DE BEDIENUNGSANLEITUNG ���������������������������������������������������������������������������������������������������������������������������������������������������������14
FR MANUEL DE L'UTILISATEUR ������������������������������������������������������������������������������������������������������������������������������������������������������ 25
IT MANUALE D'USO ���������������������������������������������������������������������������������������������������������������������������������������������������������������������������36
ES MANUAL DE USUARIO ����������������������������������������������������������������������������������������������������������������������������������������������������������������47
PT MANUAL DO UTILIZADOR �������������������������������������������������������������������������������������������������������������������������������������������������������� 58
PL PODRĘCZNIK UŻYTKOWNIKA ������������������������������������������������������������������������������������������������������������������������������������������������� 69
Page 3

EN
TABLE OF CONTENTS
OVERVIEW ���������������������������������������������������������������������������������������������������������������������������������������������������������������������������������� 4
CONTROL PANEL ����������������������������������������������������������������������������������������������������������������������������������������������������������������������4
DESCRIPTION OF THE DISPLAY ������������������������������������������������������������������������������������������������������������������������������������������� 5
ACCESSORIES ���������������������������������������������������������������������������������������������������������������������������������������������������������������������������� 5
FUNCTIONS �������������������������������������������������������������������������������������������������������������������������������������������������������������������������������6
FIRST TIME USE ������������������������������������������������������������������������������������������������������������������������������������������������������������������������� 7
DAILY USE ����������������������������������������������������������������������������������������������������������������������������������������������������������������������������������� 8
USEFUL TIPS ���������������������������������������������������������������������������������������������������������������������������������������������������������������������������� 10
COOKING TABLE ��������������������������������������������������������������������������������������������������������������������������������������������������������������������� 11
TESTED RECIPES ��������������������������������������������������������������������������������������������������������������������������������������������������������������������� 12
CLEANING AND MAINTENANCE ���������������������������������������������������������������������������������������������������������������������������������������� 13
TROUBLESHOOTING ������������������������������������������������������������������������������������������������������������������������������������������������������������� 13
SUPPORT ���������������������������������������������������������������������������������������������������������������������������������������������������������������������������������� 13
3
Page 4
USER GUIDE
OVERVIEW
1
2
3
4
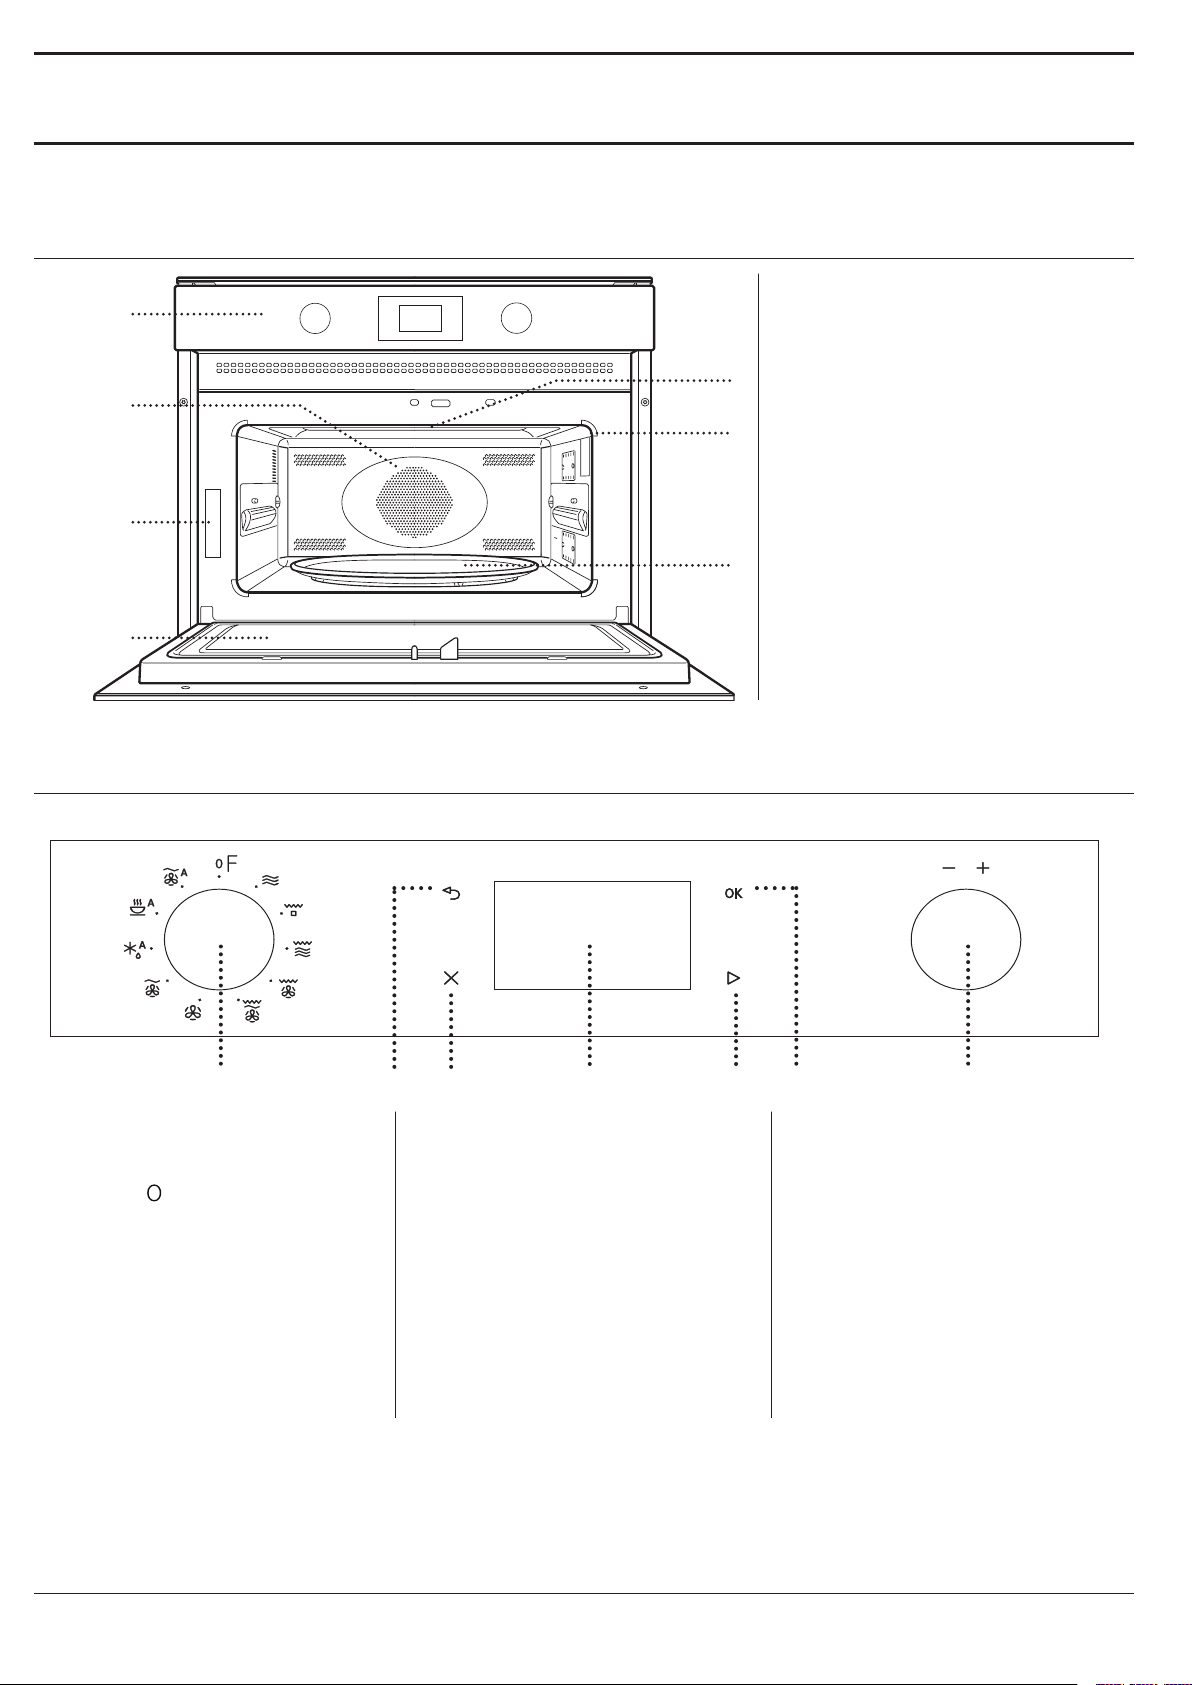
1. Control panel
2. Circular heating element
(not visible)
3. Identification plate
5
(do not remove)
4. Door
6
5. Upper heating element/grill
6. Light
7. Glass Turntable
7
CONTROL PANEL
1 7
1. SELECTION KNOB
For switching the oven on by
selecting a function�
Turn to the
oven off�
2. BACK
For returning to the previous
settings menu�
position to switch the
2
3
3. STOP
For interrupting an active function
at any time� Press twice to stop
the function and put the oven on
stand-by�
4. DISPLAY
5. START
For starting functions and
confirming settings� When the
oven is switched off, it activates
the microwave function�
4 5
6
6. CONFIRM
For confirming a function selection
or a set value�
7. ADJUSTMENT KNOB
For scrolling through the menus
and applying or changing settings�
4
Page 5
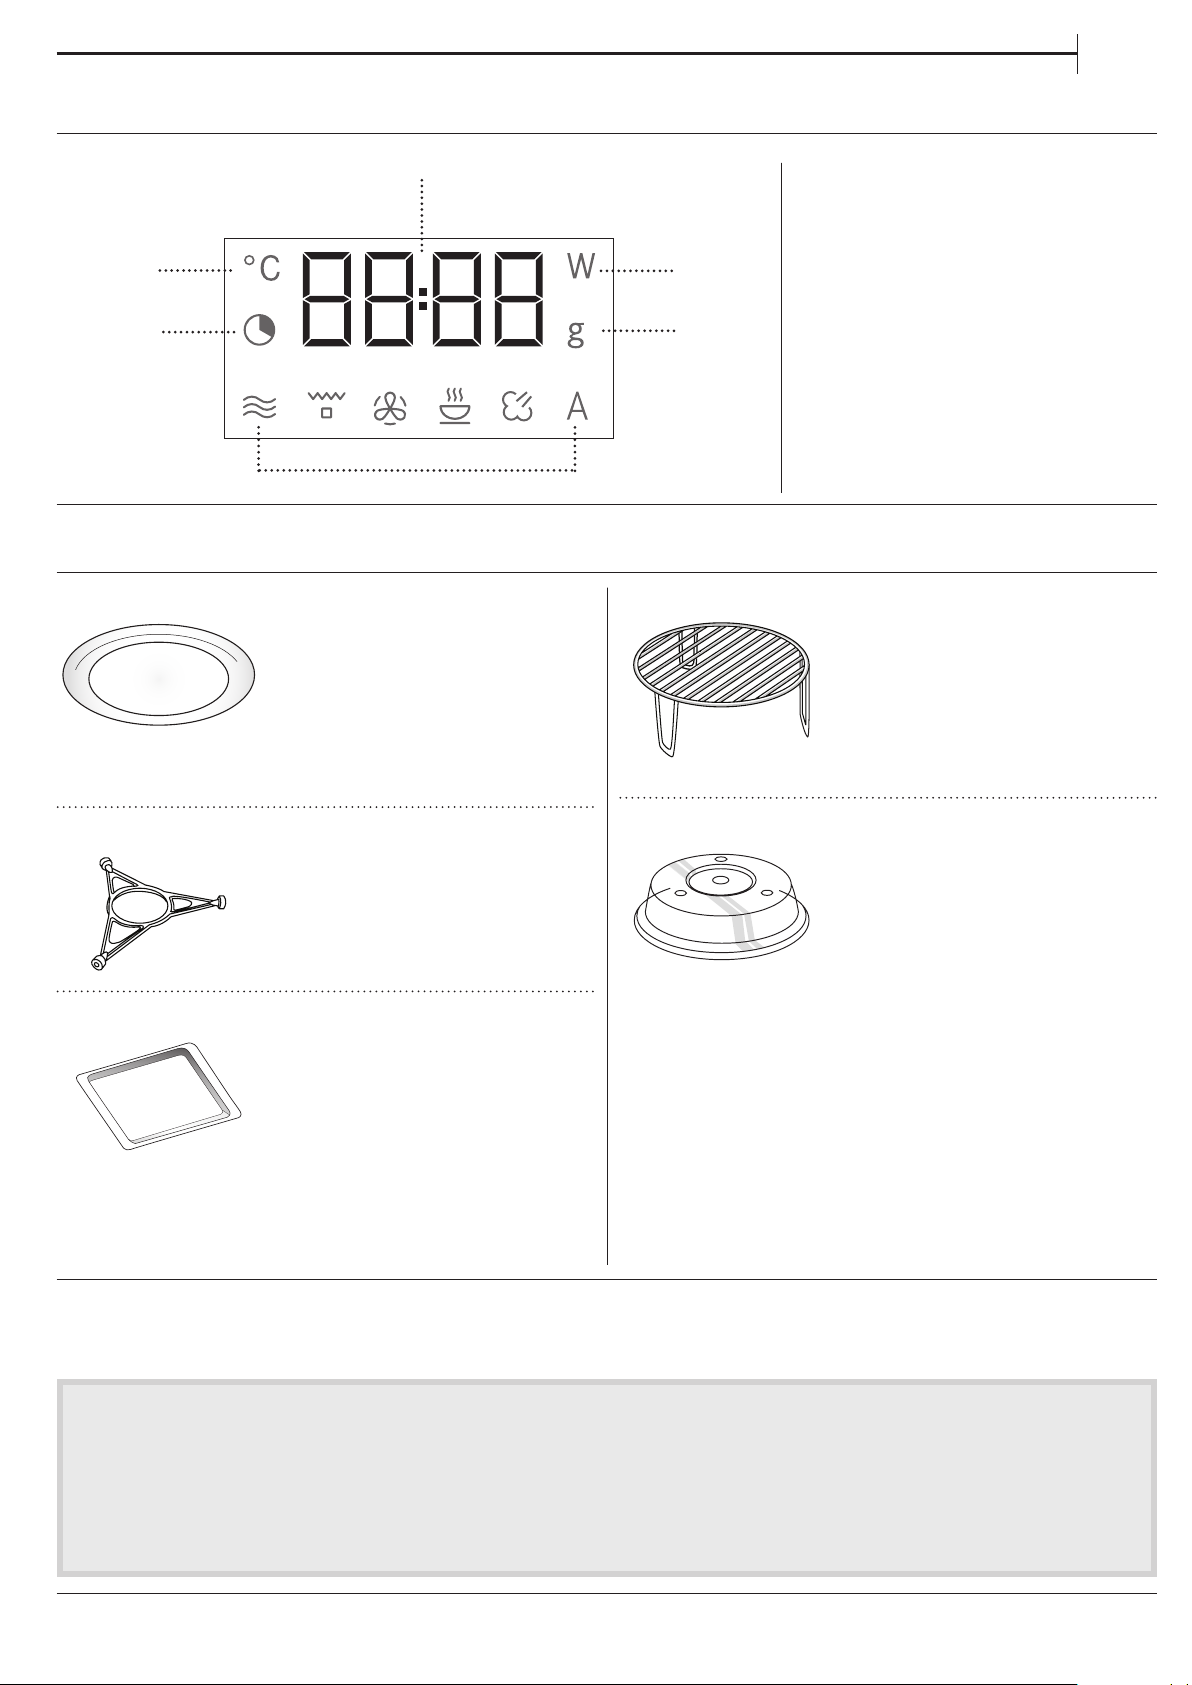
DESCRIPTION OF THE DISPLAY
EN
5
1
2
6
ACCESSORIES
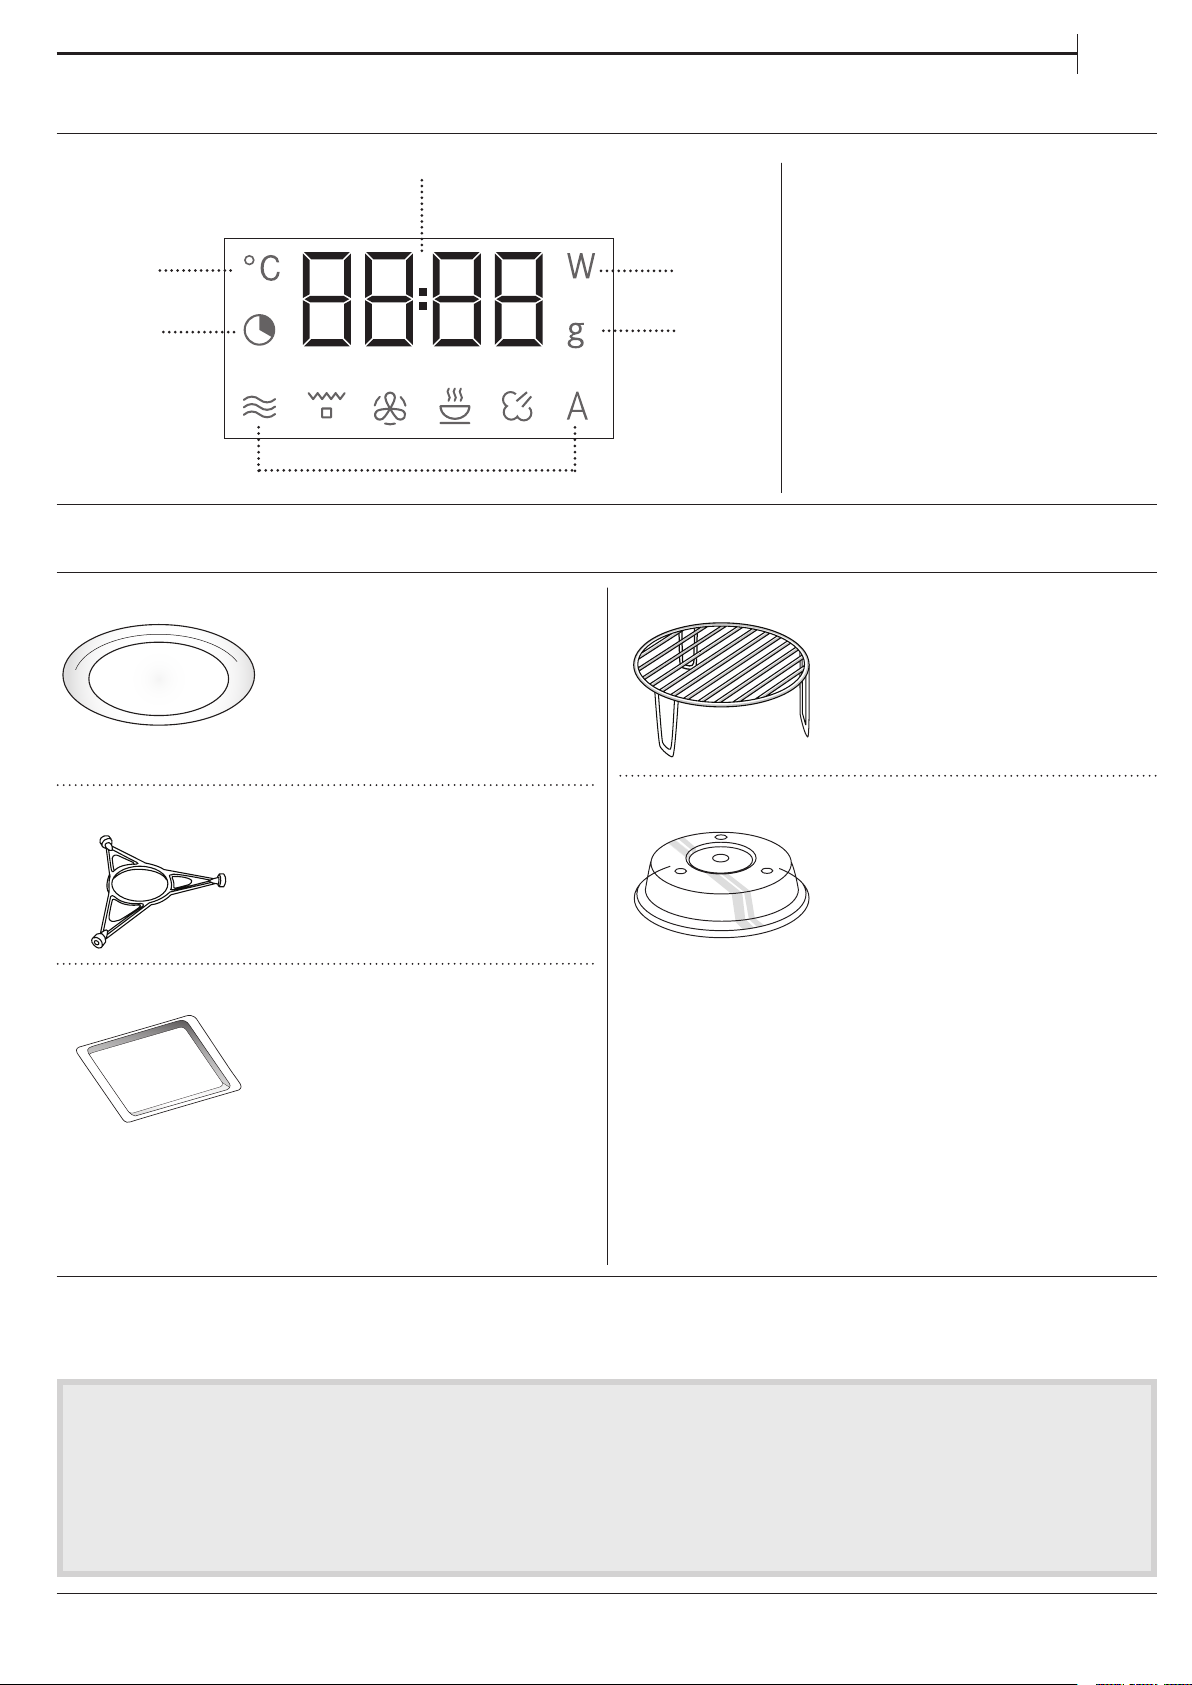
GLASS TURNTABLE
Placed on its support, the glass
turntable can be used with all
cooking methods�
The turntable must always
be used as a base for other
containers or accessories, with
the exception of the rectangular baking tray�
3
4
WIRE RACK
1. Temperature settings
2. Time and function duration
settings
3. Microwave power selection
4. Weight selection
5. Clock, informations and
function duration
6. Symbols for the selected
function
This allows you to place food
closer to the grill, for perfectly
browning your dish� Place the
wire shelf on the turntable�
TURNTABLE SUPPORT
Only use the support for the
glass turntable� Do not rest other
accessories on the support�
RECTANGULAR BAKING TRAY
Only use the baking plate
with functions that allow for
convection cooking; it must
never be used in combination
with microwaves� Insert the plate
horizontally, resting it on the rack
in the cooking compartment�
Please note: You do not need to remove the turntable and its
support when using the rectangular baking plate.
The number and type of accessories may vary according to which model is purchased.
Other accessories that are not supplied can be purchased separately from the After-sales Service.
COVER
Useful for covering food while
it is cooking or heating in the
microwave� The cover reduces
splashes, keeps foods moist and
can also be used to create two
cooking levels�
It is not suitable for use in convection cooking or with
any of the grill functions�
There are a number of accessories available on
the market. Before you buy, ensure they are
suitable for microwave use and resistant to oven
temperatures.
Metallic containers for food or drink should never
be used during microwave cooking.
Always ensure that foods and accessories do not
come into contact with the inside walls of the oven.
Always ensure that the turntable is able to turn
freely before starting the oven. Take care not to
unseat the turntable whilst inserting or removing
other accessories.
5
Page 6
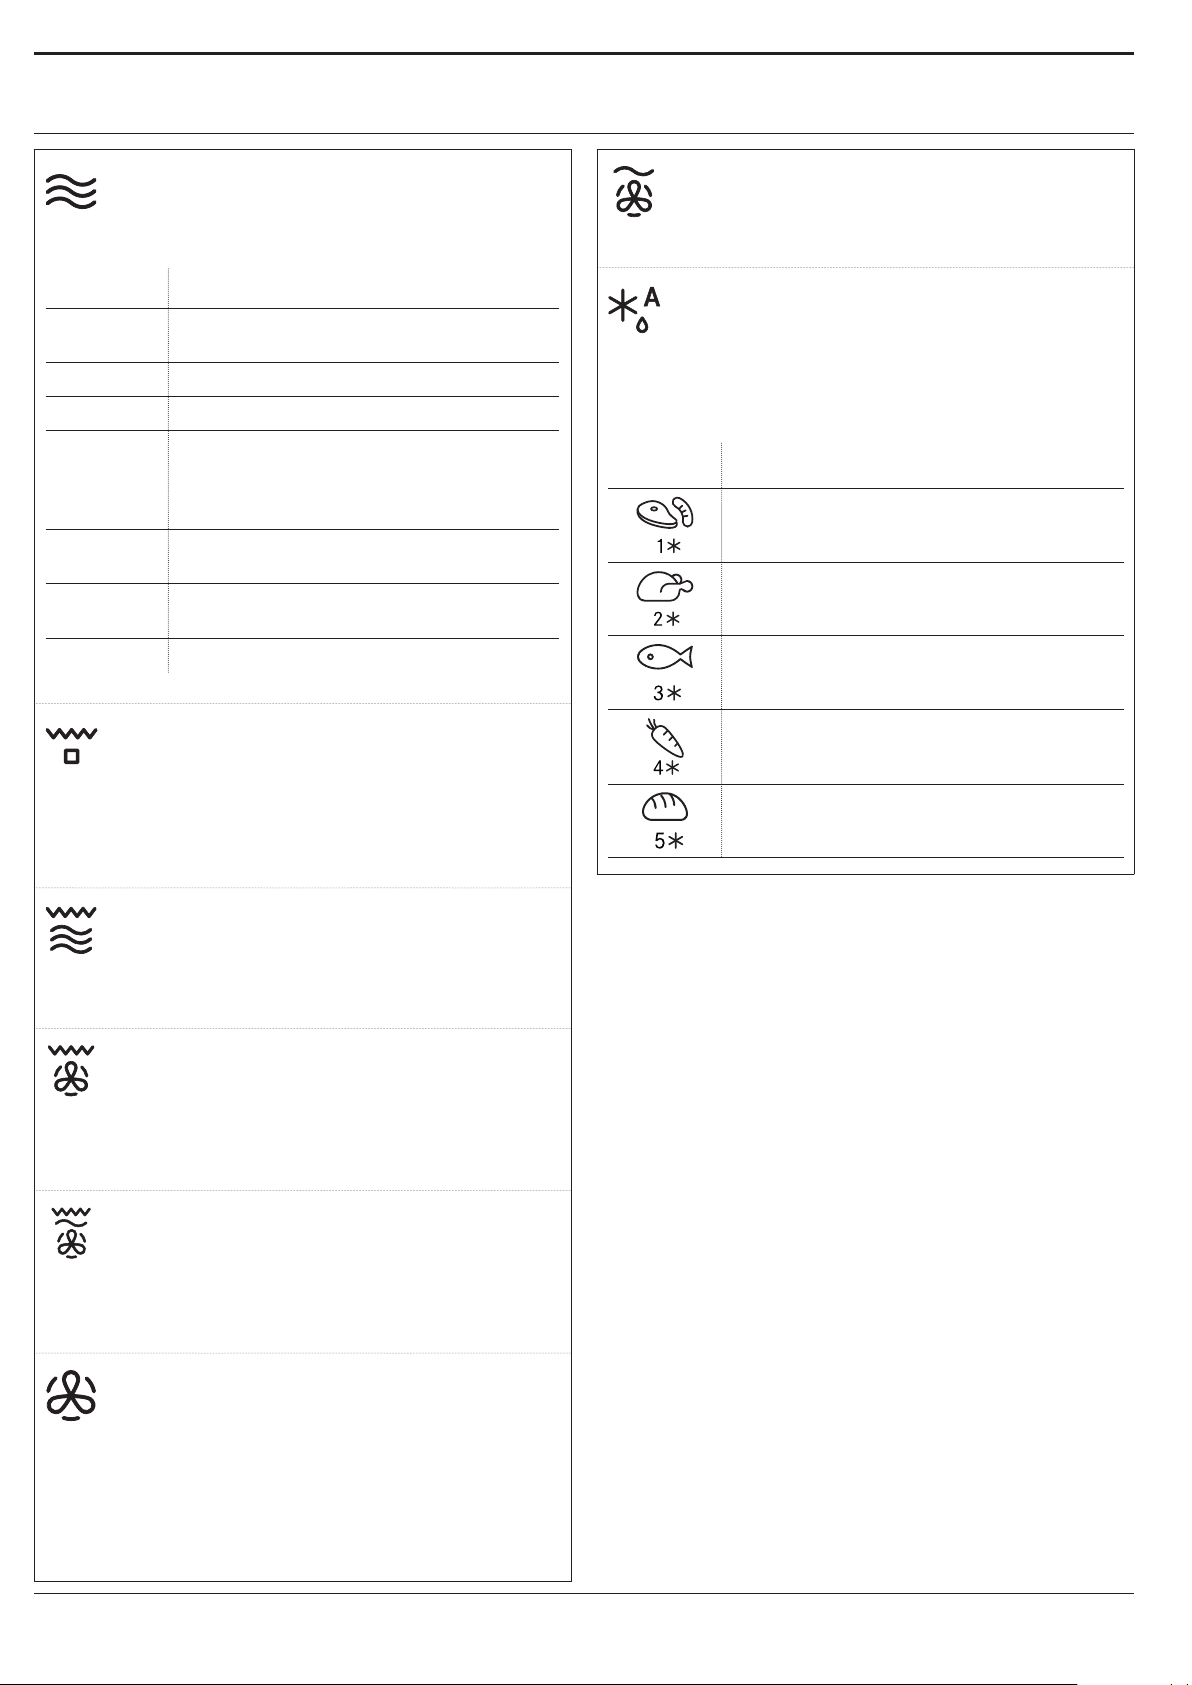
FUNCTIONS
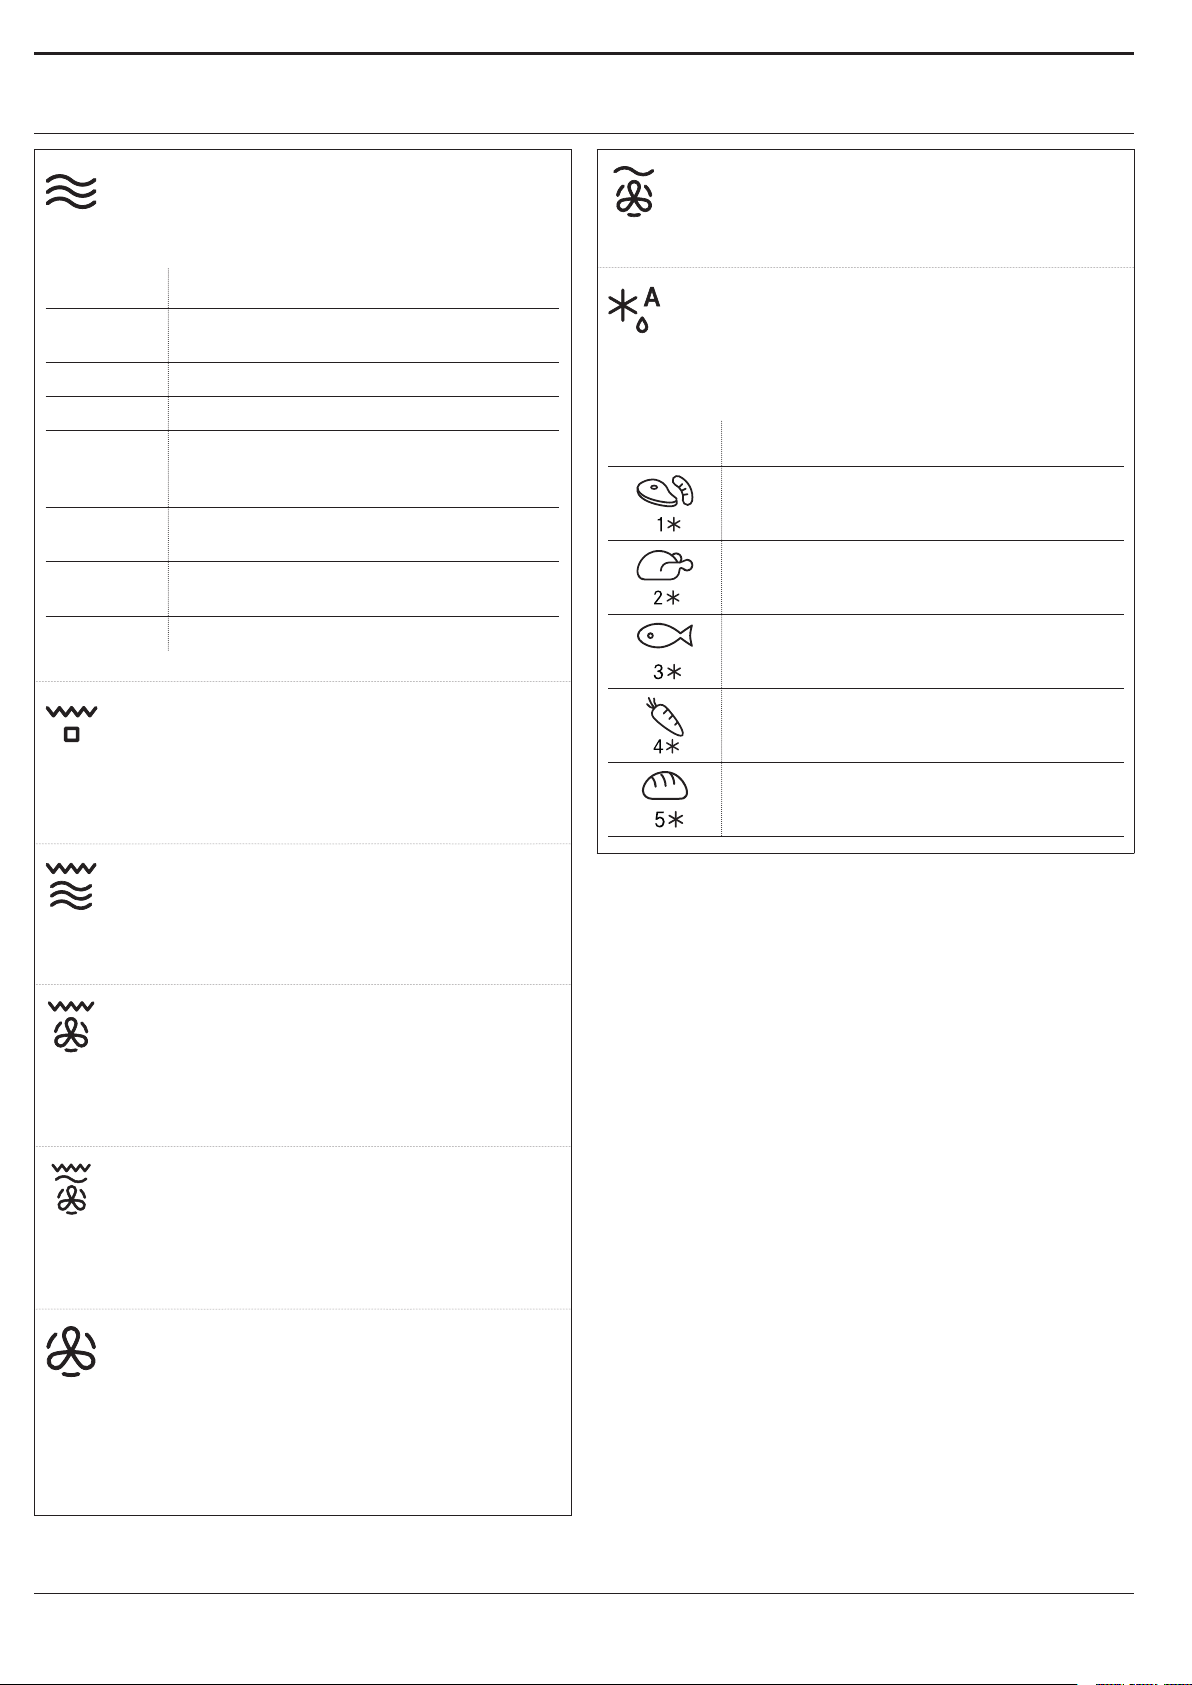
MICROWAVE
For quickly cooking and reheating food or
drinks�
POWER RECOMMENDED FOR
900 W
750 W
650 W
500 W
350 W
160 W
90 W
GRILL
For browning, grilling and gratins� We
recommend turning the food during cooking�
For best results, preheat the grill for 3-5 minutes�
Recommended accessories: High wire rack
Quickly reheating drinks or other foods
with a high water content
Cooking vegetables
Cooking meat and sh
Cooking meaty sauces, or sauces
containing cheese or egg. Finishing o
meat pies or pasta bakes
Slow, gently cooking. Perfect for melting
butter or chocolate
Defrosting frozen foods or softening
butter and cheese
Softening ice cream
FORCED AIR + MICROWAVE
To prepare oven dishes in a short time�
Recommended accessories: Low wire rack
AUTO DEFROST *
For quickly defrosting various different types
of food simply by specifying their weight�
Food should be placed directly on the glass
turntable� Turn the food when prompted�
CATEGORY FOOD WEIGHT
MEAT
(mince, cutlets, steaks, roasting
joints)
POULTRY
(whole chicken, pieces, llets)
FISH
(whole, steaks, llets)
VEGETABLES
(mixed vegetables, peas, broccoli,
etc.)
BREAD
(loaves, buns, rolls)
100 g - 2 kg
100 g - 2.5 kg
100 g - 1.5 kg
100 g - 1.5 kg
100 g - 1 kg
GRILL + MICROWAVE
For quickly cooking and gratinating dishes,
combining the microwave and grill functions�
Recommended accessories: High wire rack
TURBO GRILL
For perfect results, combining the grill and
convection functions� We recommend turning the
food during cooking�
Recommended accessories: High wire rack
TURBO GRILL + MICROWAVE
For quickly cooking and browning your food,
combining the microwave, grill and convection
oven functions�
Recommended accessories: High wire rack
FORCED AIR
For cooking dishes in a way that achieves
similar results to using a conventional oven� The
baking plate or other cookware that is suitable for
oven use can be used to cook certain foods�
Recommended accessories: Low wire rack / Rectangular
baking tray
6
Page 7
EN
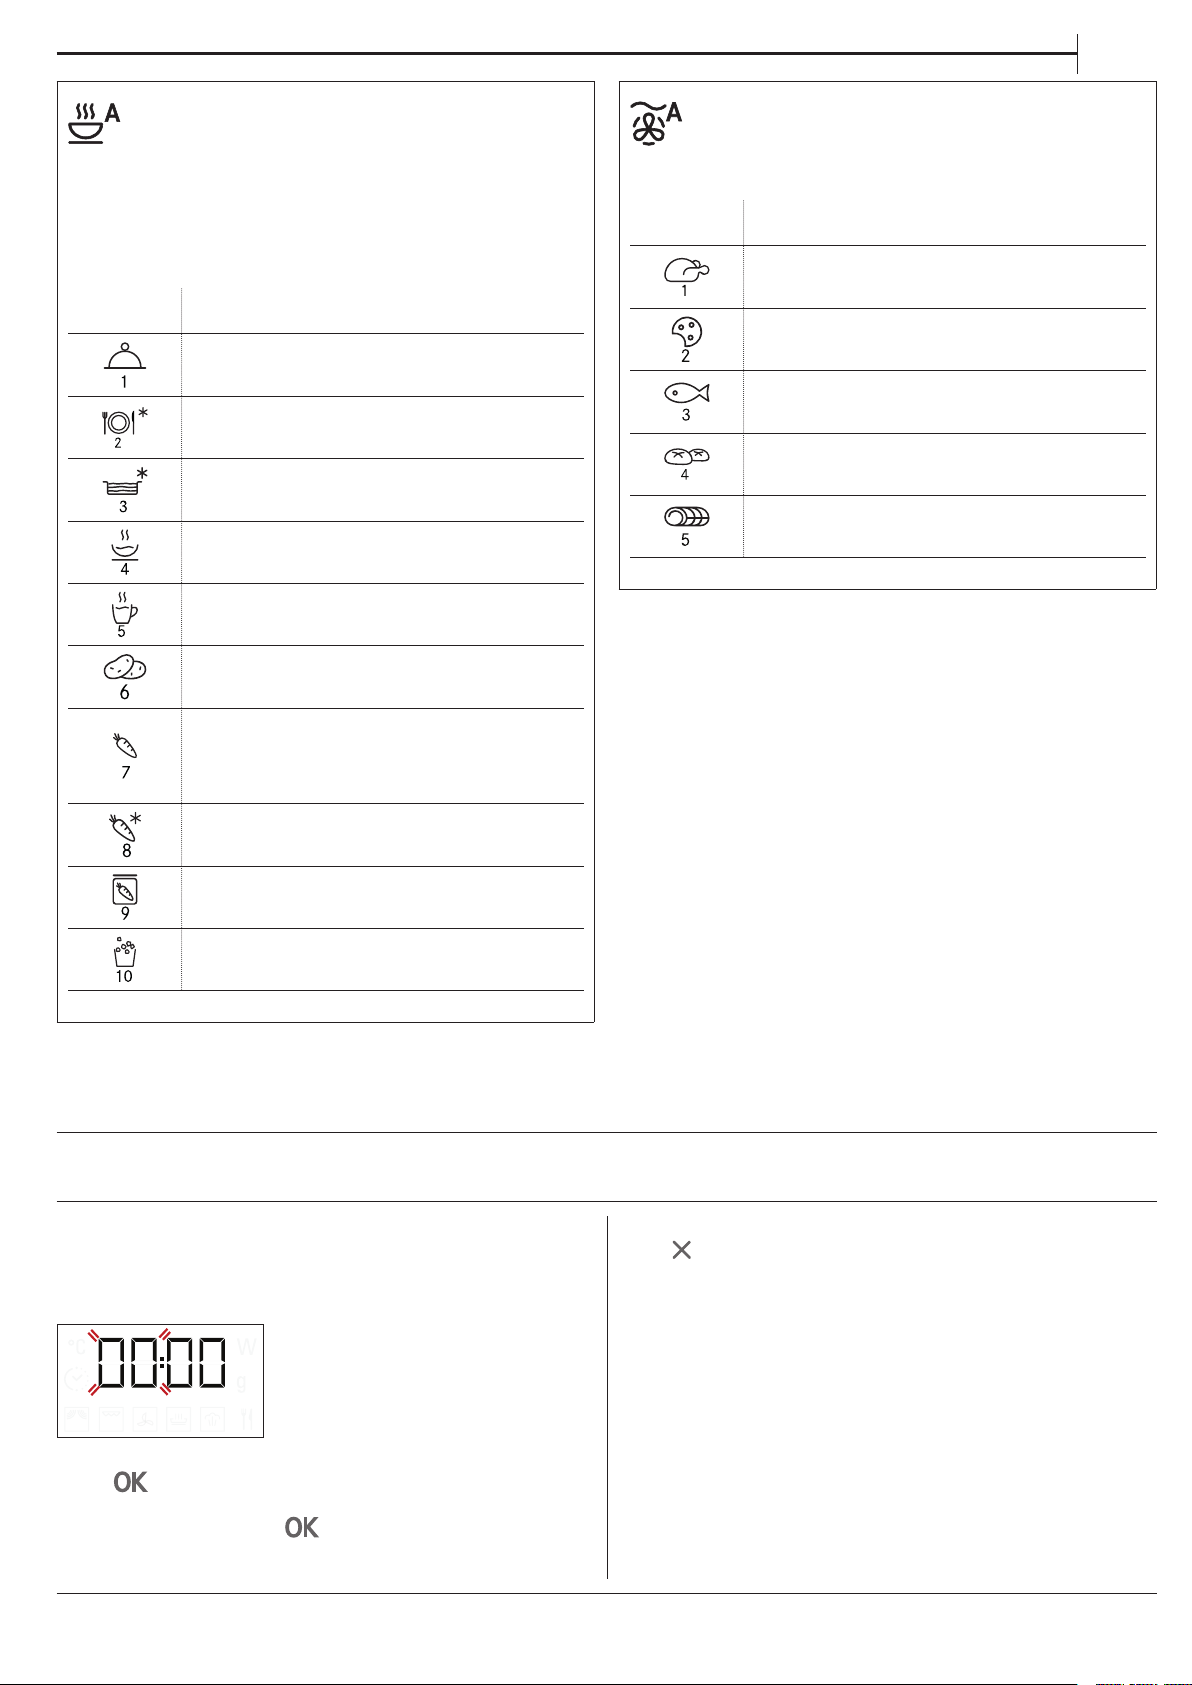
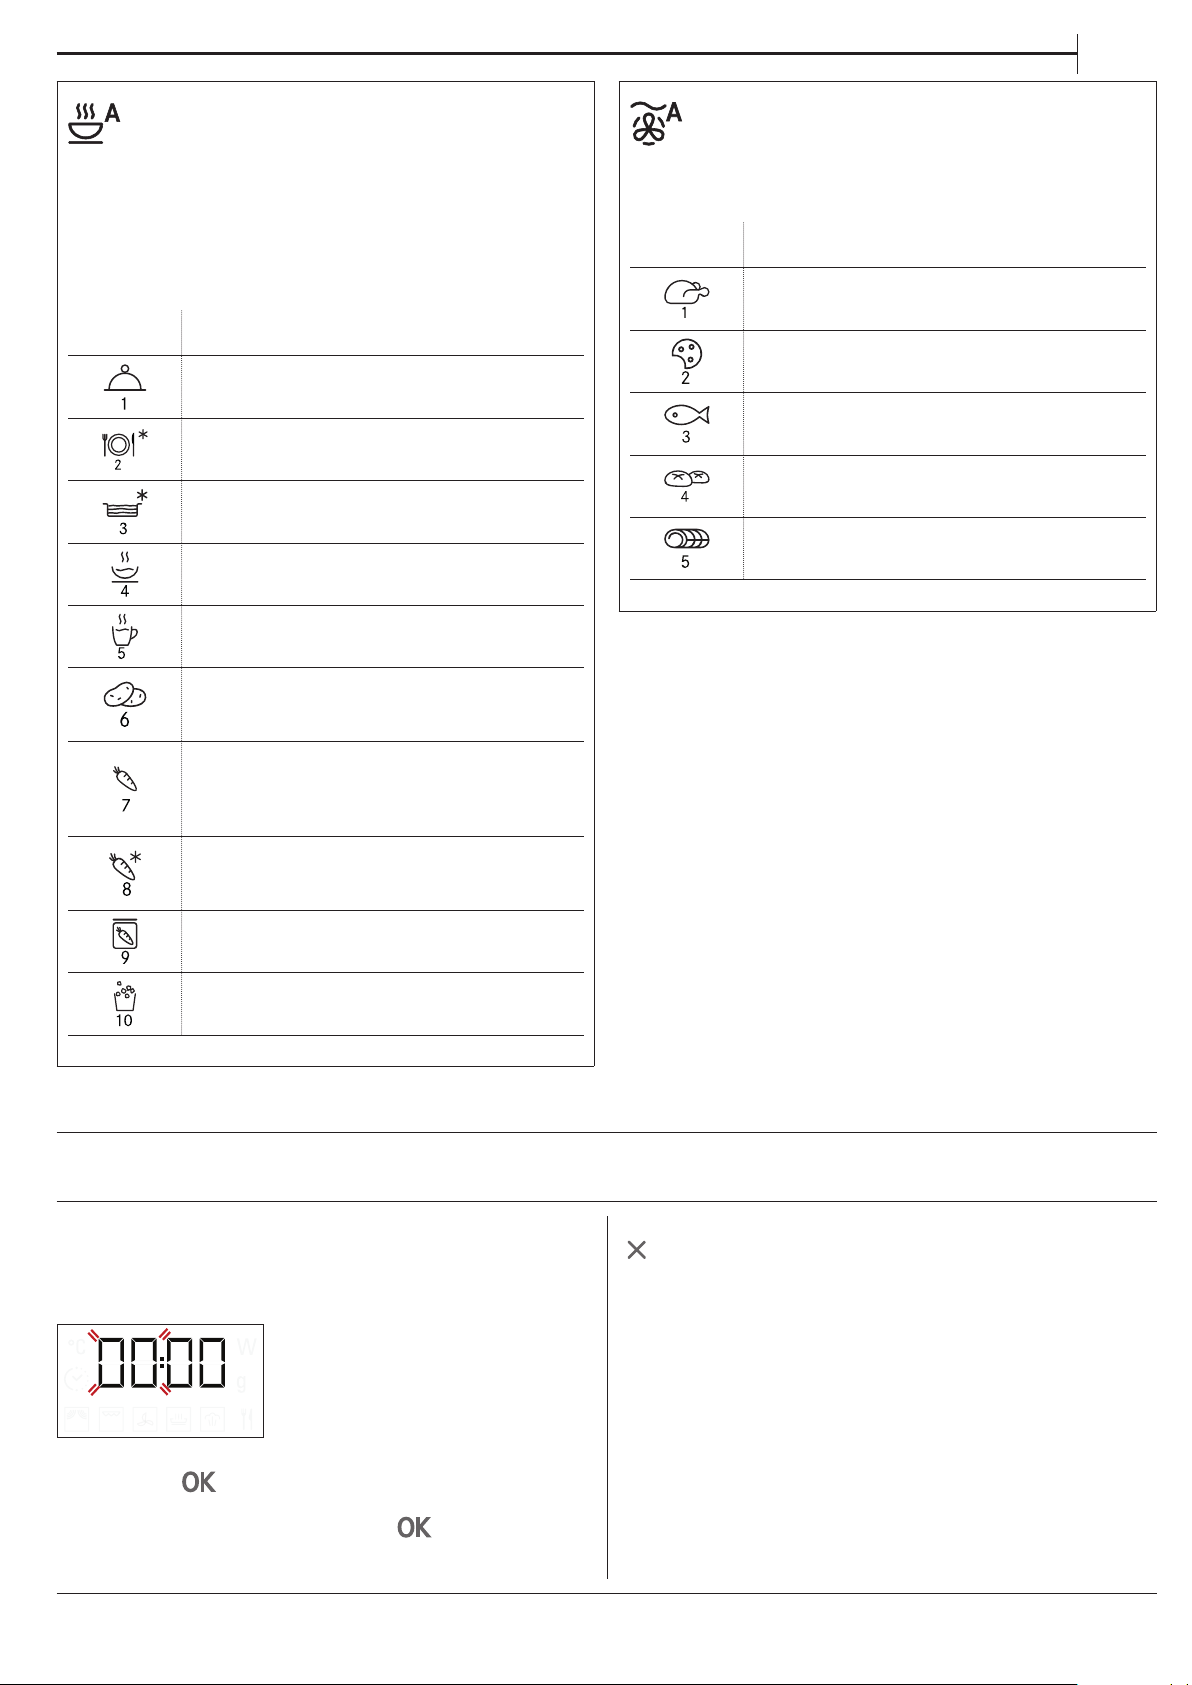
AUTO REHEAT / COOK *
For reheating ready-made food that is either
frozen or at room temperature and cooking foods
quickly, achieving optimal results�
The oven automatically calculates the settings
required to achieve the best results in the shortest
amount of time� Place food on a microwave-safe
and heatproof dinner plate or dish�
CATEGORY FOOD WEIGHT
DINNER PLATE 250 - 500 g
FROZEN PORTION 250 - 500 g
FROZEN LASAGNA 250 - 500 g
SOUPS 200 - 800 g
BEVERAGES 100 - 500 g
BAKED POTATOES
(Turn when prompted)
FRESH VEGETABLES
(Cut into pieces of equal size and
add 2 to 4 tablespoons of water.
Cover)
200 g - 1 kg
200 - 800 g
AUTO FORCED AIR + MICROWAVE *
For oven-cooking foods quickly and achieving
optimal results� Use cookware that is suitable for
oven cooking and resistant to microwaves�
CATEGORY FOOD WEIGHT
ROAST CHICKEN 800 g - 1.5 kg
COOKIES 300 g
WHOLE FISH 600 g - 1.2 kg
POTATOES GRATIN 800 g - 2 kg
ROASTBEEF 800 g - 1.5 kg
* With the automatic functions, simply select the type
and weight or the quantity of the food items to obtain
the best results. The oven will automatically calculate the
optimum settings and continue to change them as cooking
progresses. Turn or stir the food when prompted.
FROZEN VEGETABLES
(Turn when prompted. Cover)
CANNED VEGETABLES 200 - 600 g
POPCORN 100 g
200 - 800 g
FIRST TIME USE
. SET THE TIME
You will need to set the time when you switch on
the appliance for the first time: The two digits for the
hour will flash on the display�
Please note: to change the time at a later point, press and
hold for at least 3seconds while the oven is o and
repeat the steps above.
You may need to set the time again following lengthy power
outages.
Turn the adjustment knob to set the correct hour and
press
to confirm� The two digits for the minutes
will start flashing� Turn the adjustment knob to set the
correct hour and press
to confirm�
7
Page 8
DAILY USE
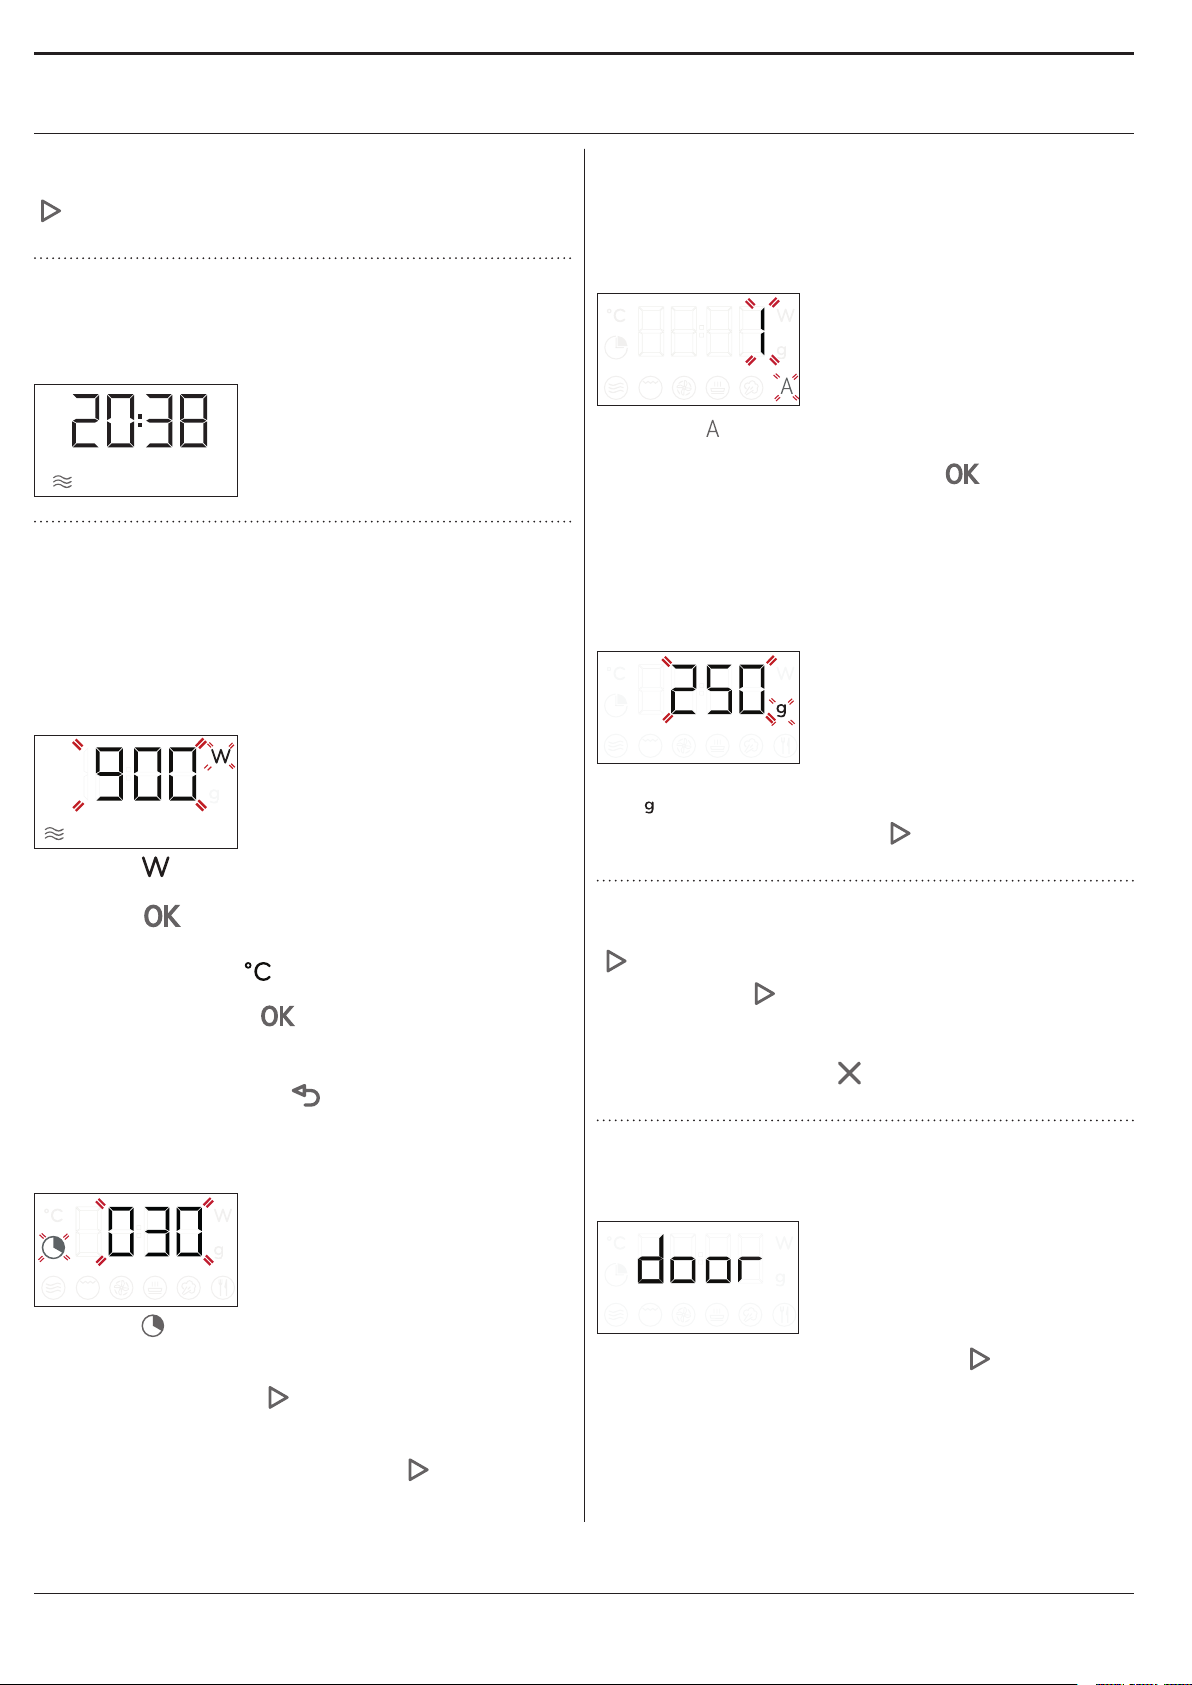
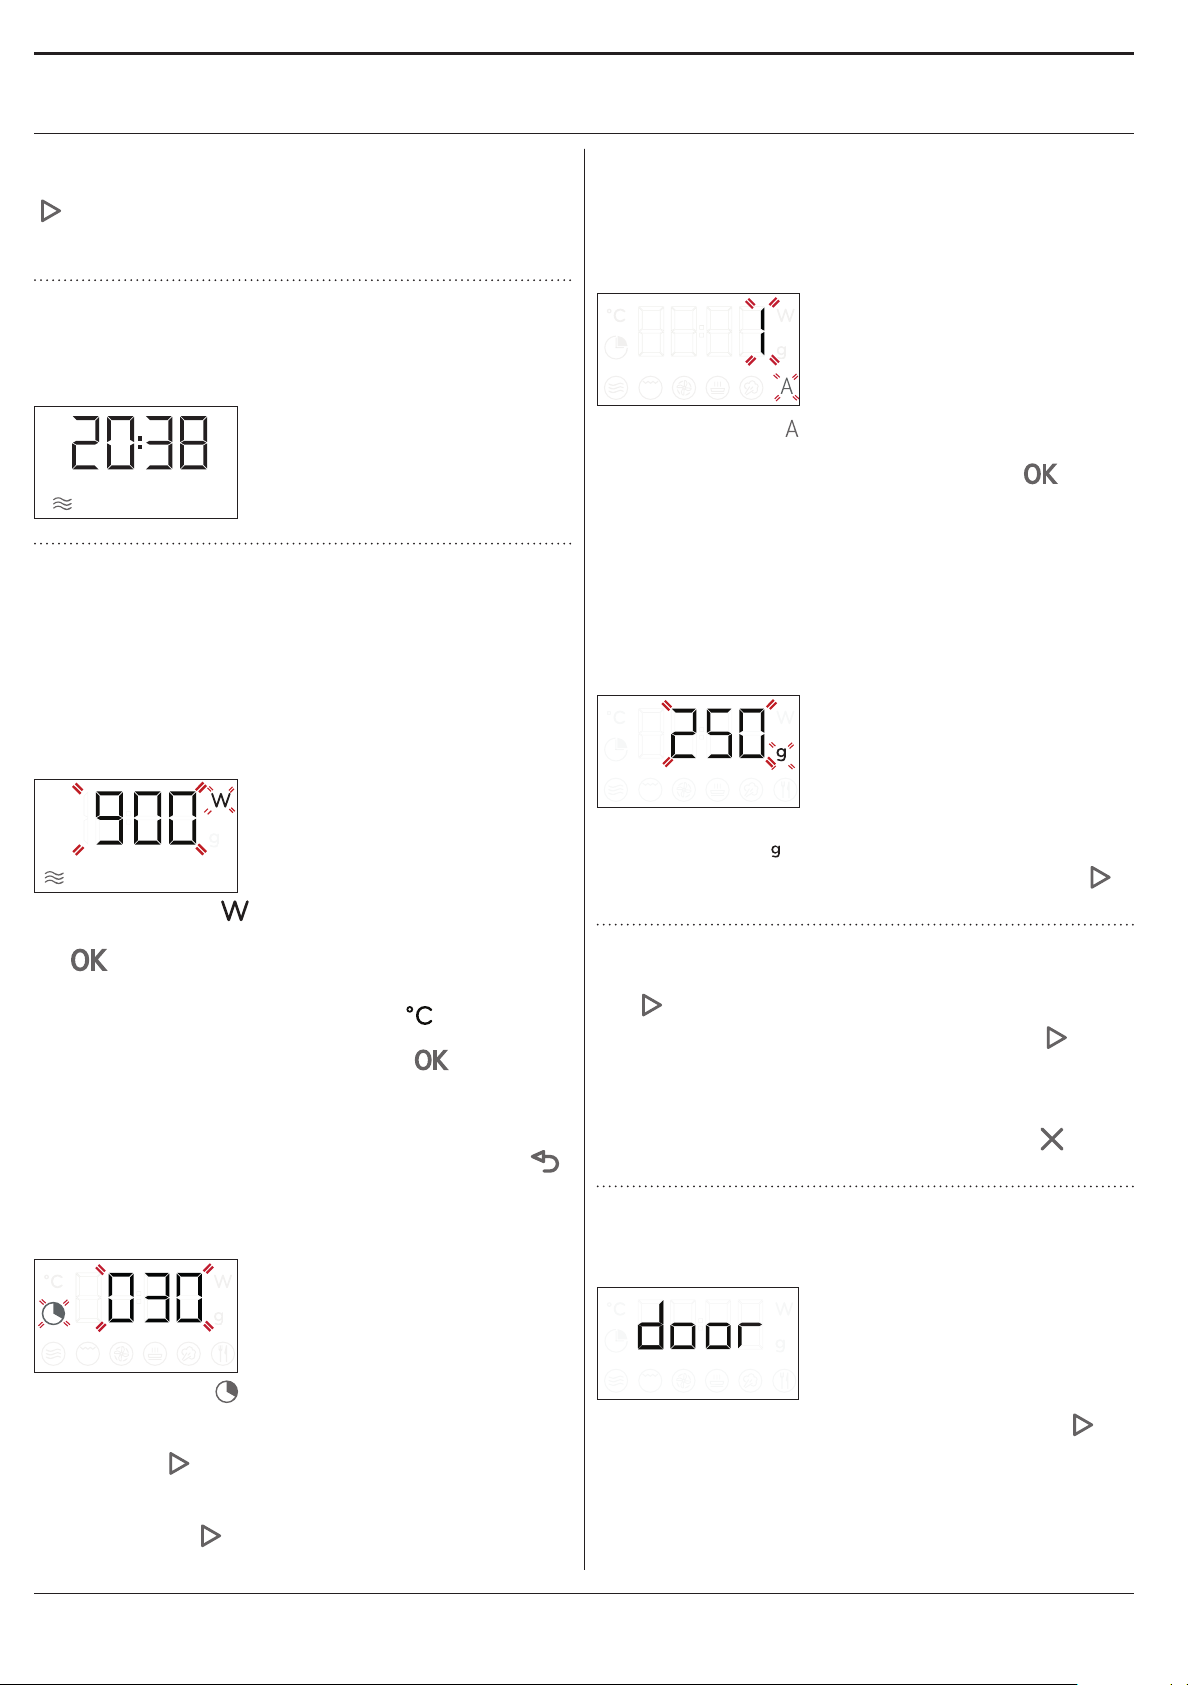
. JET START
When the oven is switched off, it is possible to press
to activate cooking with the microwave function
set at full power (900W) for 30seconds�
1. SELECT A FUNCTION
When the oven is off, only the time is shown on the
display� Turn the selection knob to select one of the
available functions�
2. SET THE FUNCTION
. MANUAL FUNCTIONS
After having selected the function you require, you
can change its settings�
The display will show the settings that can be
changed in sequence�
MICROWAVE POWER / TEMPERATURE
. AUTOMATIC FUNCTIONS / AUTO DEFROST
CATEGORIES
Once you have chosen one of the automatic
functions, you will need to select a category for the
food you are cooking�
When the icon flashes on the display, turn the
adjustment knob to select the digit that corresponds
to the desired category, then press
WEIGHT
To achieve the best results, the automatic functions
require you to enter the weight of the food, selecting
from amongst the default settings: the oven will
calculate the ideal length of time for the function to
run for each category of food�
to confirm�
When the icon flashes on the display, turn the
adjustment knob to adjust the power setting and
then press
settings that follow (if possible)�
In the same way the
turn the adjustment knob to adjust the temperature
setting and then press
alter the settings that follow�
Please note: once the function has been activated, the power
can be changed by pressing two times to access the
power settings menu, then turning the adjustment knob to
change the setting.
DURATION
When the icon flashes on the display, turn the
adjustment knob to set the desired duration�
Once the displayed cooking time corresponds with
what you desire, press
function�
Please note: During cooking, you can adjust the cooking time
by turning the knob; each time you press the cooking
time increases by 30seconds.
to confirm and continue to alter the
icon flashes on the display,
to confirm and continue to
to confirm and start the
When the default setting appears on the display and
the
enter the weight, then press
the function�
icon flashes, turn the adjustment knob to
to confirm and start
3. ACTIVATE THE FUNCTION
Once you have applied the settings you require, press
to activate the function�
Every time the
the cooking time will be increased by a further
30seconds (only for manual functions)�
Please note: You can press twice at any time to stop the
function that is currently active.
button is pressed again,
. SAFETY LOCK
This function is automatically activated to prevent the
oven from being switched on accidentally�
Open and close the door, then press to start the
function�
8
Page 9
4. PAUSE
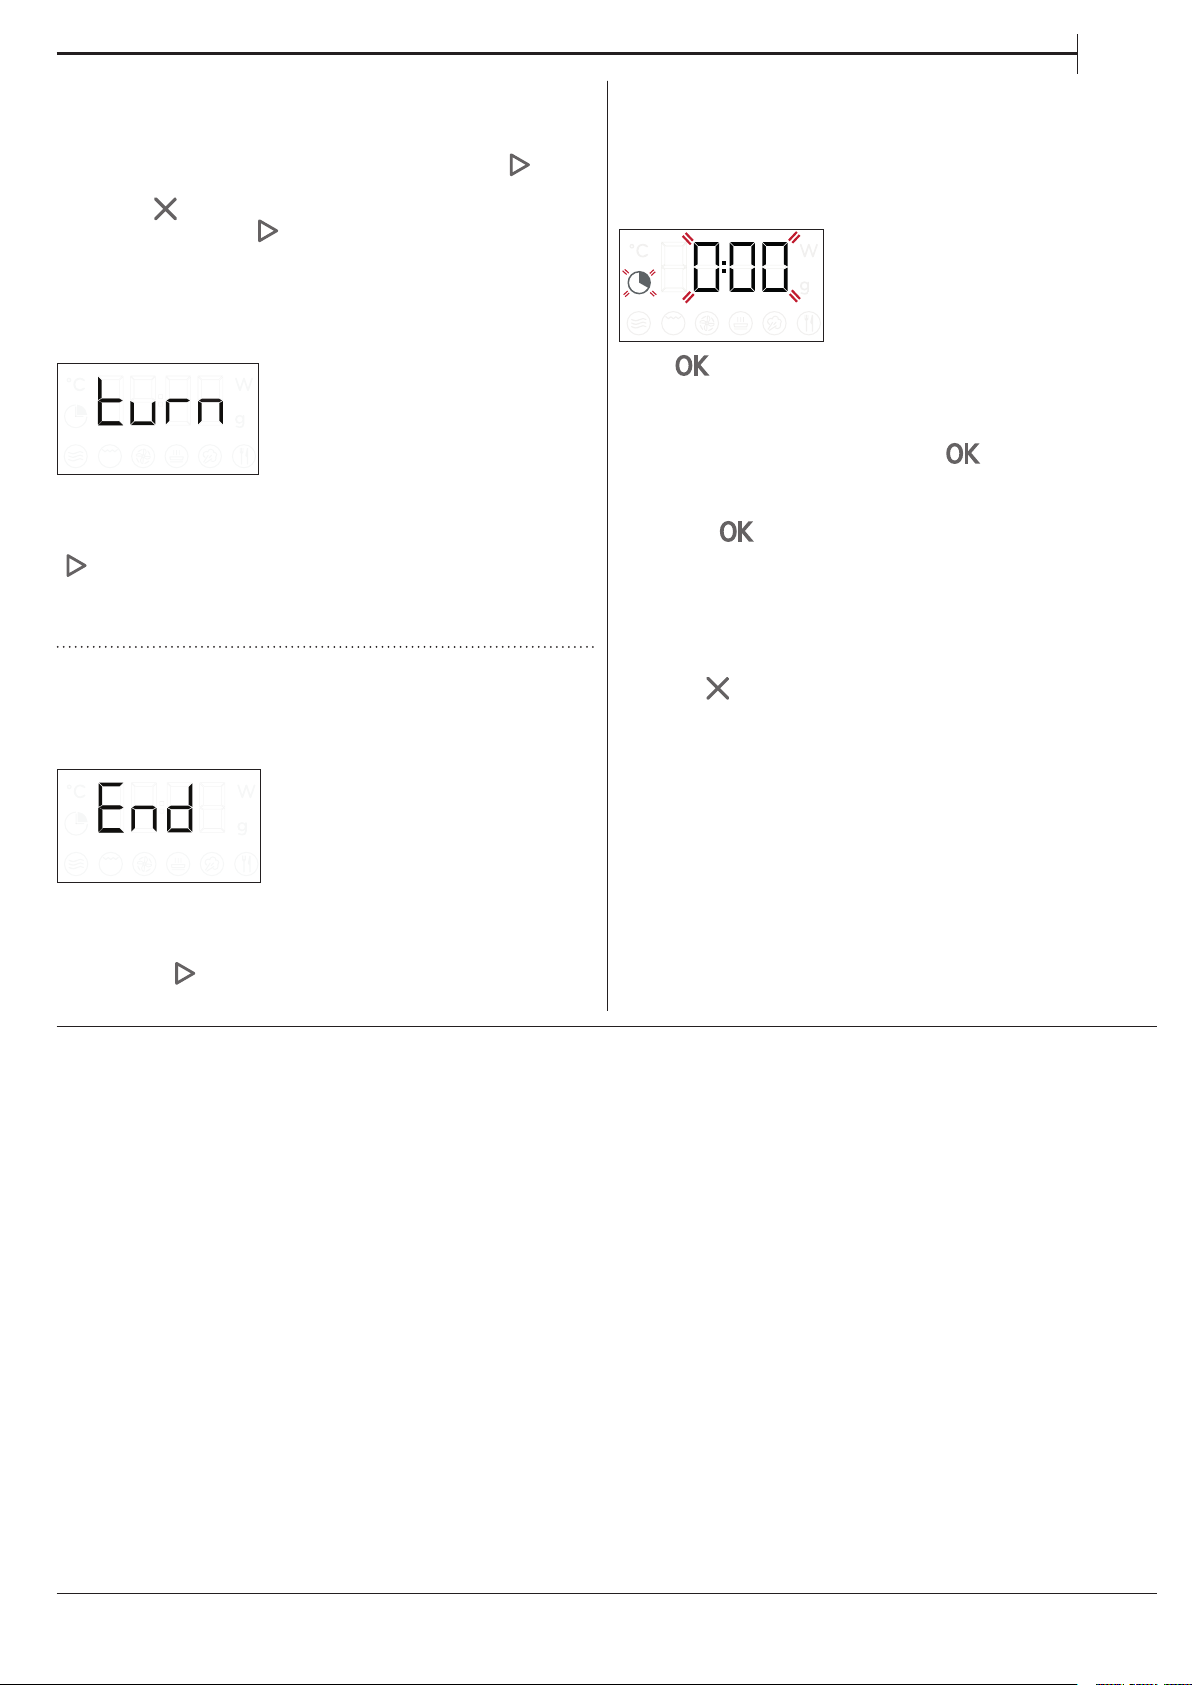
For pausing an active function, for example to stir or
turn the food, simply open the door�
To start it up again, close the door and press
It is also possible to temporarily pause cooking by
pressing
the door and press
AUTOMATIC PAUSE
(STIR OR TURN THE FOOD)
Certain functions will pause to allow you to turn or
stir the food�
When the oven pauses the cooking and “Turn food”
or “Stir Food” appear on the display, open the door
to turn or stir the food, then close the door and press
to start cooking again�
Please note: after 2minutes, even if the food has not been
turned or stirred, the function will start again automatically.
� To resume the cooking process, close
�
�
5. END OF COOKING
An audible signal will sound and “End” will appear
on the display to indicate that a cooking function is
complete�
EN
. TIMER
When the oven is switched off, the display can be
used as a timer� The timer does not activate any of the
cooking cycles�
To activate the function and set the cooking time you
require, turn the adjustment knob�
Press to activate the timer� An audible signal will
sound and the display will indicate once the timer has
finished counting down the selected time� To make a
change to the timer once it has been activated, turn
the adjustment knob, then press
To interrupt it or return to the current time display,
turn the adjustment knob until 0:00 is on the display
and press
Please note: Once the timer has been activated, you can
activate a function as well: The timer will continue to count
down the selected time automatically without having any
eect on the function. To go back to viewing the timer,
wait for the function to nish or stop the oven function by
pressing .
�
to confirm�
For some functions, it is possible to delay cooking
while maintaining previously established settings:
turn the adjustment knob to set a new cooking time,
then press
�
9
Page 10

USEFUL TIPS
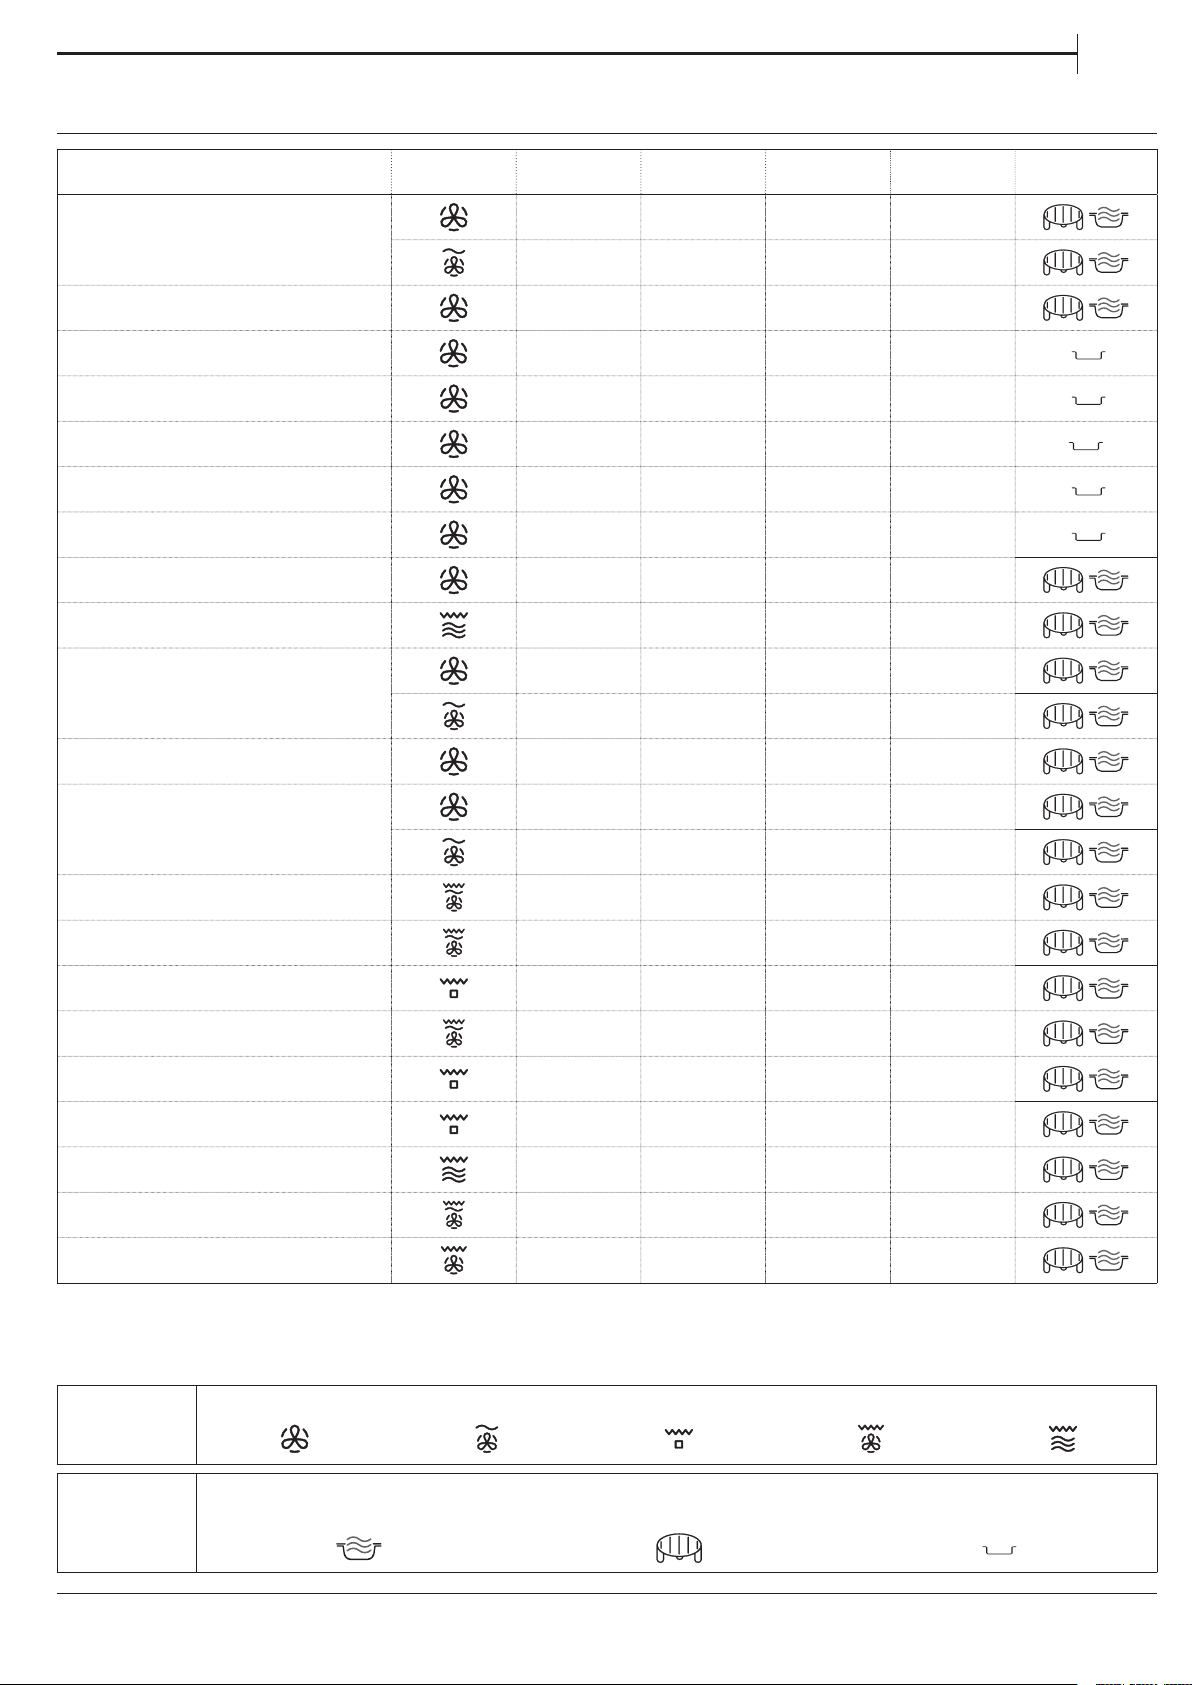
HOW TO READ THE COOKING TABLE
The table indicates the best functions to use for any
given food�
The cooking times refer to the cooking cycle for the
food inside the oven, excluding the preheating phase
(where required)�
The settings and cooking times are approximate
and depend on the amount of food and the type of
accessory/ies used�
Always cook food for the minimum cooking time
given and check that it is cooked through�
For best results, follow the recommendations in the
cooking table carefully when selecting accessories�
MICROWAVE COOKING TIPS
Microwaves only penetrate food to a certain depth;
you should therefore space the food out as much as
possible when cooking multiple items at the same
time�
Smaller items cook more quickly than larger items: To
ensure uniform cooking, cut food into pieces of equal
size�
Moisture evaporates during the microwave cooking
process: Using a microwave-resistant cover helps to
reduce moisture loss�
When you remove food from a microwave, it will
often continue cooking for some time afterwards� We
therefore recommend always allowing a couple of
minutes of standing time once the cooking cycle has
finished�
It is a good idea to stir food when cooking it in the
microwave, as this brings the more well-cooked parts
at the outside edges towards the middle and vice
versa�
Place thin slices of meat one on top of the other or
overlapping� Thicker slices, such as meat loaf and
sausage, should be placed next to one another�
CLING FILM AND PACKAGING
Remove any twist ties from paper or plastic bags
before placing them in the oven for microwave
cooking�
Plastic film should be scored or perforated with a fork
in order to relieve the pressure and prevent bursting
due to the steam building up during cooking�
LIQUIDS
Liquids may overheat beyond boiling point without
visibly bubbling�
This could cause hot liquids to suddenly boil over�
To prevent this possibility:
� Avoid using containers with narrow necks�
� Stir the liquid before placing the container in the
microwave oven and leave the teaspoon in the
container�
� After heating, stir again before carefully removing
the container from the microwave oven�
FROZEN FOOD
For best results, we recommend defrosting food
directly on the glass turntable� You can also use
a lightweight, microwave-safe plastic container if
needed�
Boiled foods, stews and meat-based sauces will
defrost better if stirred occasionally while defrosting�
Separate food once it starts to defrost: the separated
portions will defrost more quickly�
FOOD FOR INFANTS
When heating food or liquids in a baby bottle or a
baby food jar, always stir and check the temperature
before serving�
This will ensure that the heat is evenly distributed and
avoid the risk of scalding or burns�
Make sure the lid and the teat are removed before
heating�
MEAT AND FISH
To obtain perfect surface browning quickly while
keeping the inside of the meat or fish soft and
juicy, we recommend using the “Grill + Microwave”
function� For best results, set the microwave power to
between 160 and 350 W�
10
Page 11
COOKING TABLE
FOOD FUNCTION HE ATING UP GRILL LEVEL POWER (W) TIME (MIN) ACCESSORIES
EN
- 160 - 180 - 30-60
Leavened cakes
- 160 - 180 90 25-50
Filled pies
(cheesecake, strudel, apple tart)
Yes 160-190 - 35-70
Cookies Yes 170-180 - 10-20
Meringues Yes 100 -120 - 40-50
Rolls Yes 210-220 - 10-12
Bread Loaf
Yes 180-200 - 30-35
Pizza / Pie Yes 190 -220 - 20-40
Savoury pies
(vegetable pie, quiche Lorraine)
Yes 180-190 - 40-55
Lasagna / Baked pasta - 350-500 15-40
Roast lamb / Veal /Roastbeef
(1.3-1.5 kg)
- 170-180 - 70-80*
- 160-180 160 50-70*
Roastbeef - medium (1.3-1.5 kg) - 170-180 - 40-60*
Roast Chicken / Rabbit / Duck
(whole 1-1.2 kg)
Chicken / Rabbit / Duck
(llets/pieces 0.4-1 kg)
- 210-220 - 50 -70*
- 210-220 350 45-60*
- - 350-500 20-40*
Baked sh (whole) - - 160-350 20-40
Fish llets / slices Yes - - 15-30*
Stued vegetables
(tomatoes, courgette, aubergines...)
- - 500-650 25-50
Toast - - - 3-6
Sausages / Kebabs / Spare ribs /
Hamburgers
Baked potatoes
- - - 20-40*
- - 350-500 20-40*
Baked fruit - - 160-350 15-25
Vegetable gratin - - - 15-25
* Turn the food halfway through cooking.
The table of tested recipes, are compiled for the certication authorities in accordance with the standards IEC 60705 and IEC
60350.
Forced air
FUNCTIONS
Forced air + Microwave Grill Turbo Grill Grill + Microwave
ACCESSORIES
Heatproof plate/container
suitable for use in microwaves
Wire rack Rectangular baking tray
11
Page 12
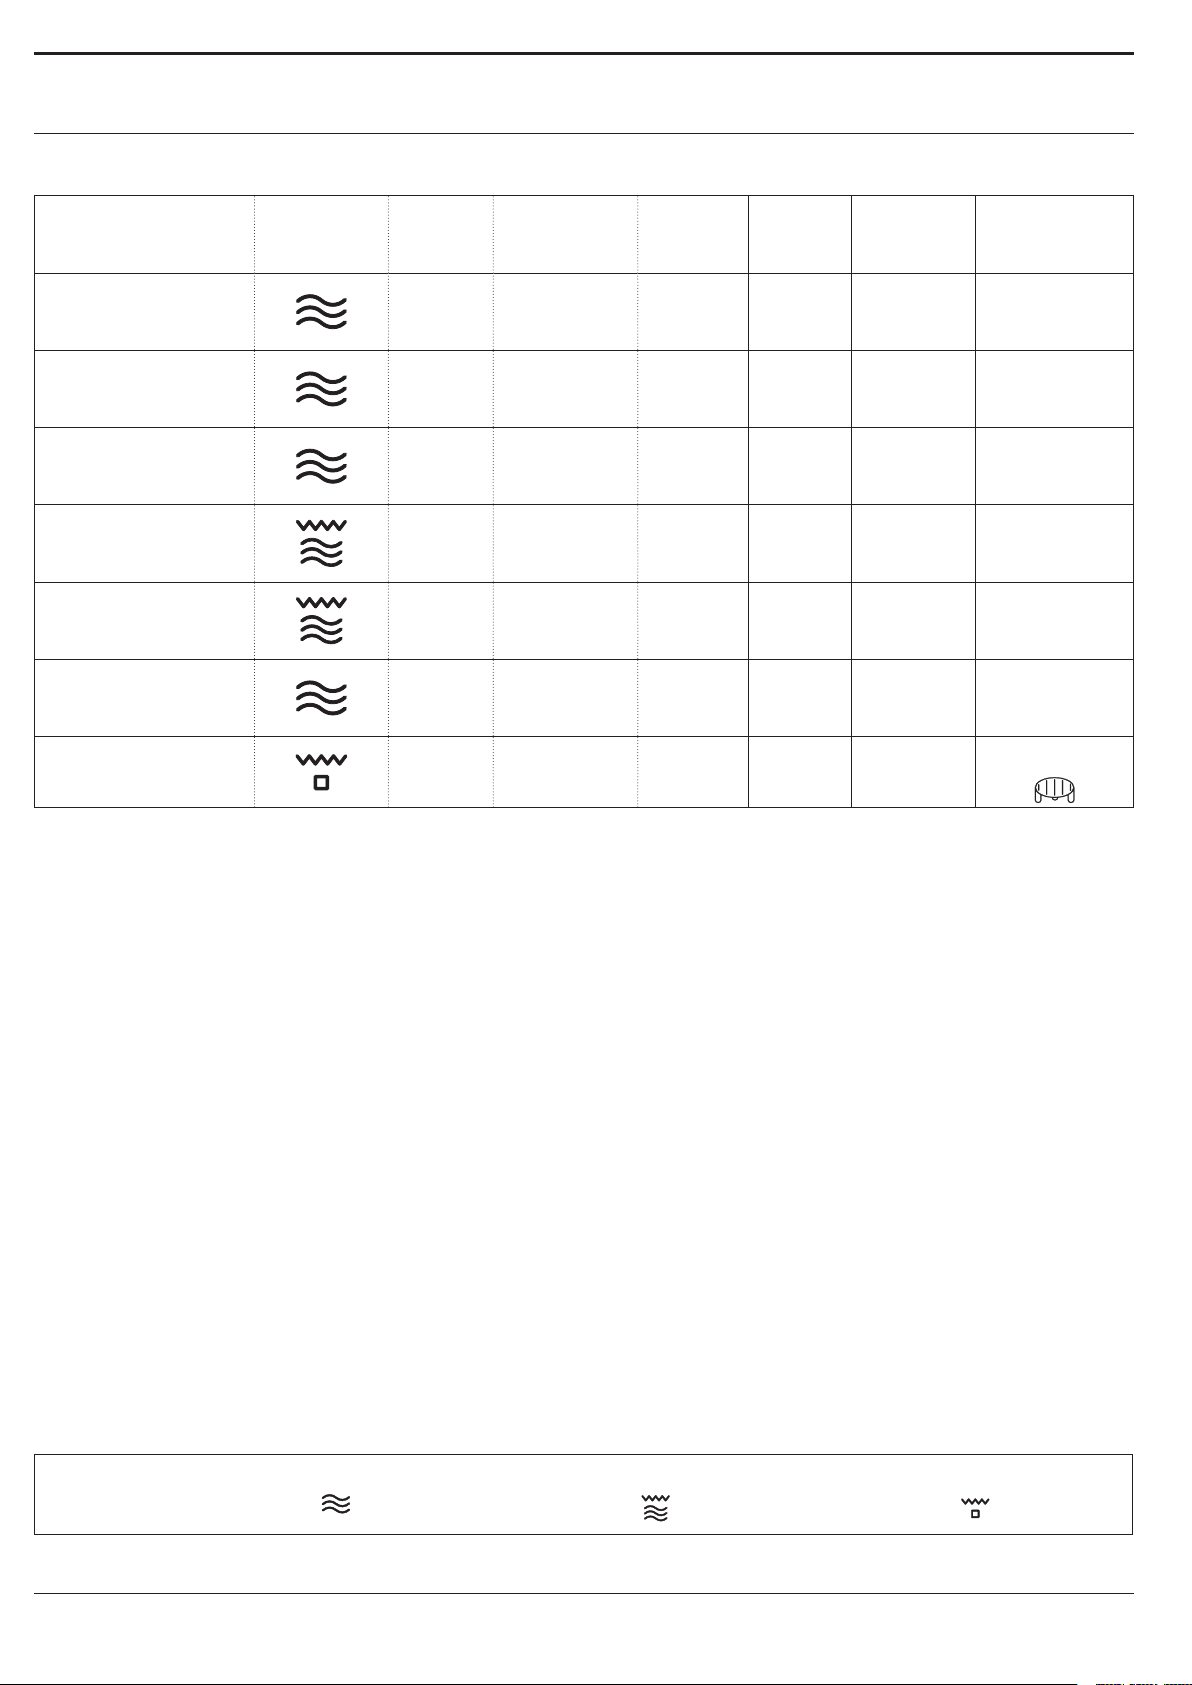
TESTED RECIPES
Compiled for the certication authorities in accordance with the standards IEC 60705 and IEC 60350-1.
FOOD FUNCTION
Pastry cream
Sponge cake
Meat loaf
Potato gratin
Chicken
Defrosting meat
(turn halfway through
the defrosting process)
Toast
WEIGHT
(g)
1000 12:00 - 13:00 - 650 -
475 8:00 - 10:00 - 750 -
900 13:00 - 14:00 - 750 -
110 0 28:00 - 30:00 190 350 -
1200 35:00 - 40:00 210 350 -
500 10:30 - 160 - Turntable
- 4:00 - 6:00 3 - Yes
COOKING
TIME
(min:sec)
TEMP./
GRILL
LEVEL
POWER
(W)
PREHEAT. ACCESSORIES
Microwave-
safe container
(Pyrex 3�227)
Microwave-
safe container
(Pyrex 3�827)
Microwave-
safe container
(Pyrex 3�838)
Microwave-
safe container
(Pyrex 3�827)
Microwave-
safe container
(Pyrex 3�220)
Wire shelf
FUNCTIONS
12
Microwave Grill + Microwave Grill
Page 13
CLEANING AND MAINTENANCE
EN
Make sure that the appliance has cooled down
before carrying out any maintenance or cleaning.
Do not use steam cleaners.
INTERIOR AND EXTERIOR SURFACES
• Clean the surfaces with a damp microfibre cloth�
If they are very dirty, add a few drops of pH-neutral
detergent� Finish off with a dry cloth�
Do not use wire wool, abrasive scourers or abrasive/
corrosive cleaning agents, as these could damage
the surfaces of the appliance.
ACCESSORIES
All accessories are dishwasher safe� For stubborn dirt,
rub gently with a cloth� Always leave the accessories
to cool down before cleaning�
• Clean the glass in the door with a suitable liquid
detergent�
• At regular intervals, or in case of spills, remove the
turntable and its support to clean the bottom of the
oven, removing all food residue�
• The grill does not need to be cleaned as the intense
heat burns away any dirt� Use this function on a
regular basis�
TROUBLESHOOTING
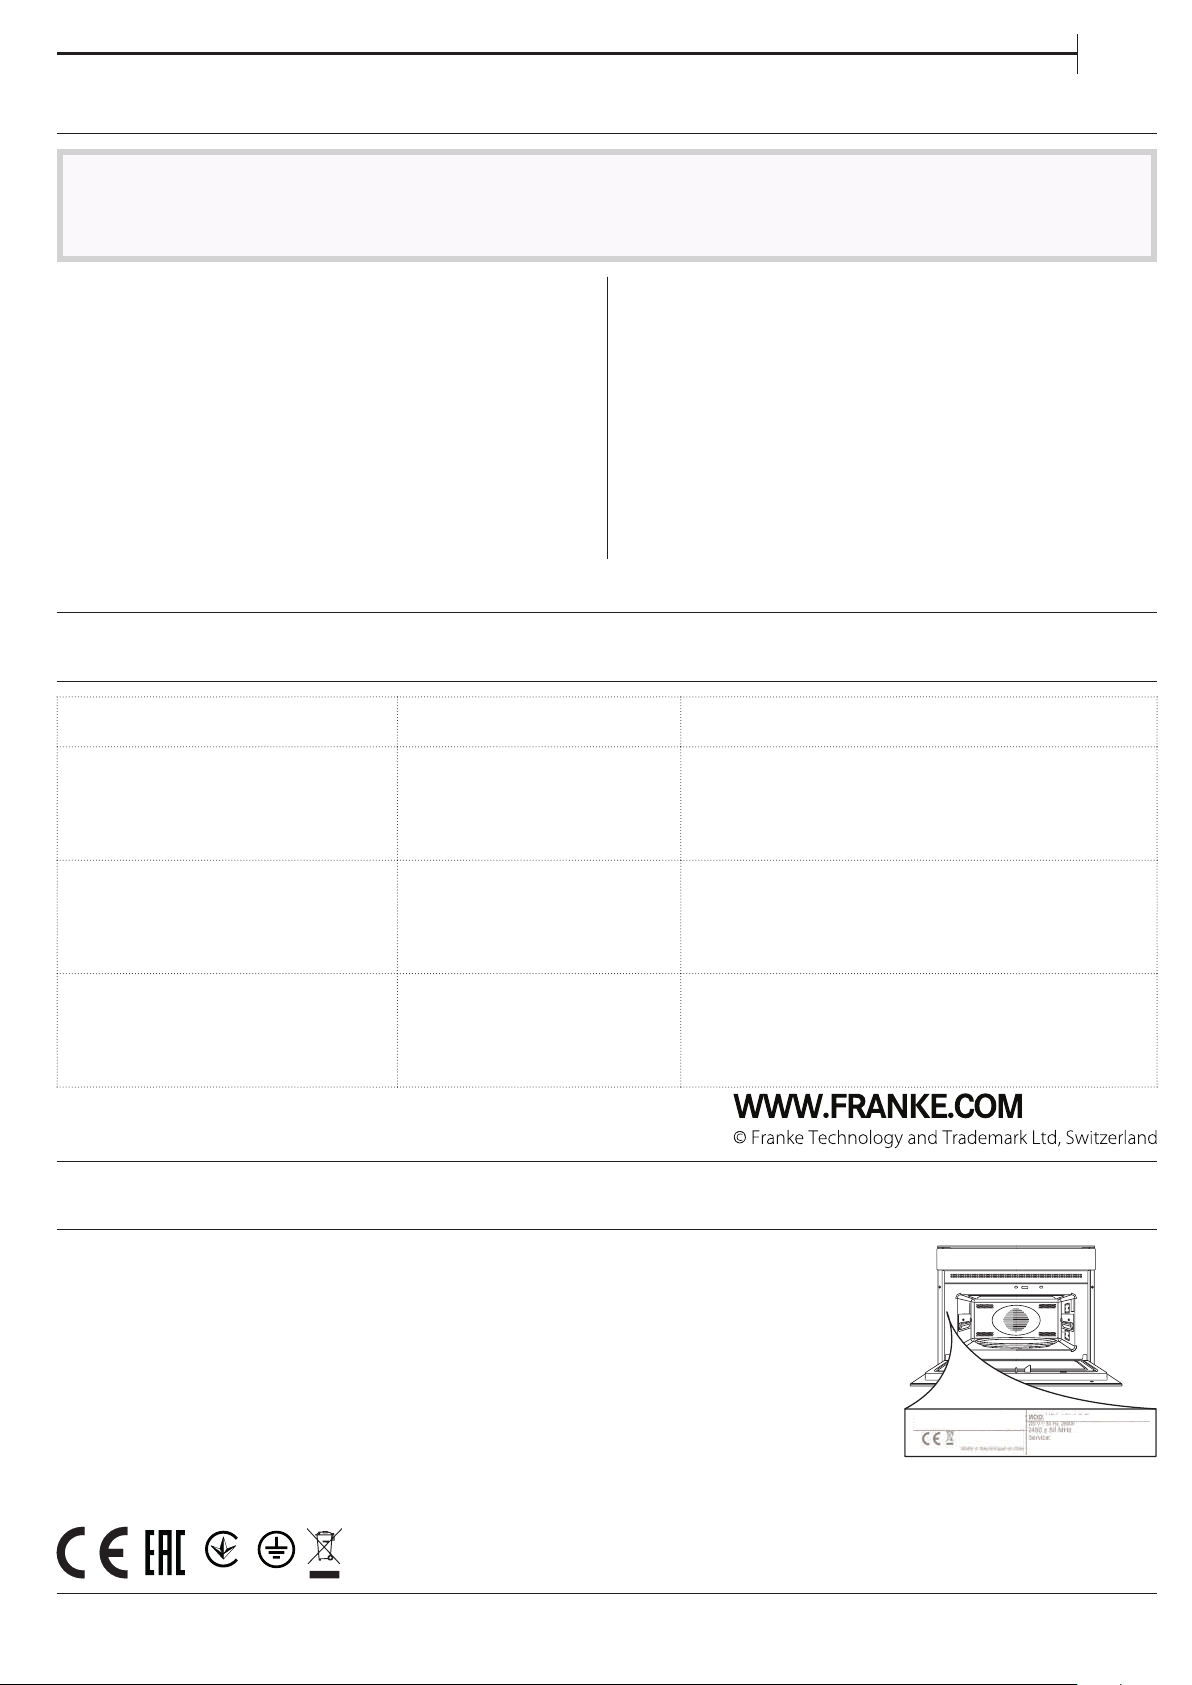
Problem Possible cause Solution
The oven is not working�
The oven makes noises, even
Power cut.
Disconnection from the
mains.
Cooling fan active. Open the door or wait until the cooling process has
when it is switched off�
The display shows the letter “F”
Software fault. Contact you nearest Client After-sales Service
followed by a number�
SUPPORT
In the event of any operation problems, contact a Franke
Technical Service Centre�
Never use the services of unauthorized technicians�
Specify:
- the type of fault
- the appliance model (art�/Code)
- the serial number (S�N�) on the rating plate, located
on the right hand edge of the oven cavity (visible
when the oven door is open)�
Check for the presence of mains electrical power
and whether the oven is connected to the
electricity supply. Turn o the oven and restart it to
see if the fault persists.
nished.
Centre and state the number following the letter
“F ”.
When contacting our
Service Centre, please
state the codes provided
on your product's
identification plate�
XXXXXXXXXXXX
XXXXXXXXXXXX
XXX/XXX
001
13
Page 14

INHALT
ÜBERSICHT �������������������������������������������������������������������������������������������������������������������������������������������������������������������������������15
BEDIENFELD ���������������������������������������������������������������������������������������������������������������������������������������������������������������������������� 15
BESCHREIBUNG DES DISPLAYS ������������������������������������������������������������������������������������������������������������������������������������������16
ZUBEHÖRTEILE ����������������������������������������������������������������������������������������������������������������������������������������������������������������������� 16
FUNKTIONEN �������������������������������������������������������������������������������������������������������������������������������������������������������������������������� 17
ERSTER GEBRAUCH ��������������������������������������������������������������������������������������������������������������������������������������������������������������� 18
TÄGLICHER GEBRAUCH �������������������������������������������������������������������������������������������������������������������������������������������������������� 19
HILFREICHE TIPPS ������������������������������������������������������������������������������������������������������������������������������������������������������������������ 21
GARTABELLE ����������������������������������������������������������������������������������������������������������������������������������������������������������������������������22
ERPROBTE REZEPTE ��������������������������������������������������������������������������������������������������������������������������������������������������������������23
REINIGUNG UND PFLEGE ����������������������������������������������������������������������������������������������������������������������������������������������������� 24
LÖSEN VON PROBLEMEN �����������������������������������������������������������������������������������������������������������������������������������������������������24
SUPPORT ����������������������������������������������������������������������������������������������������������������������������������������������������������������������������������24
14
Page 15
GEBRAUCHSANLEITUNG
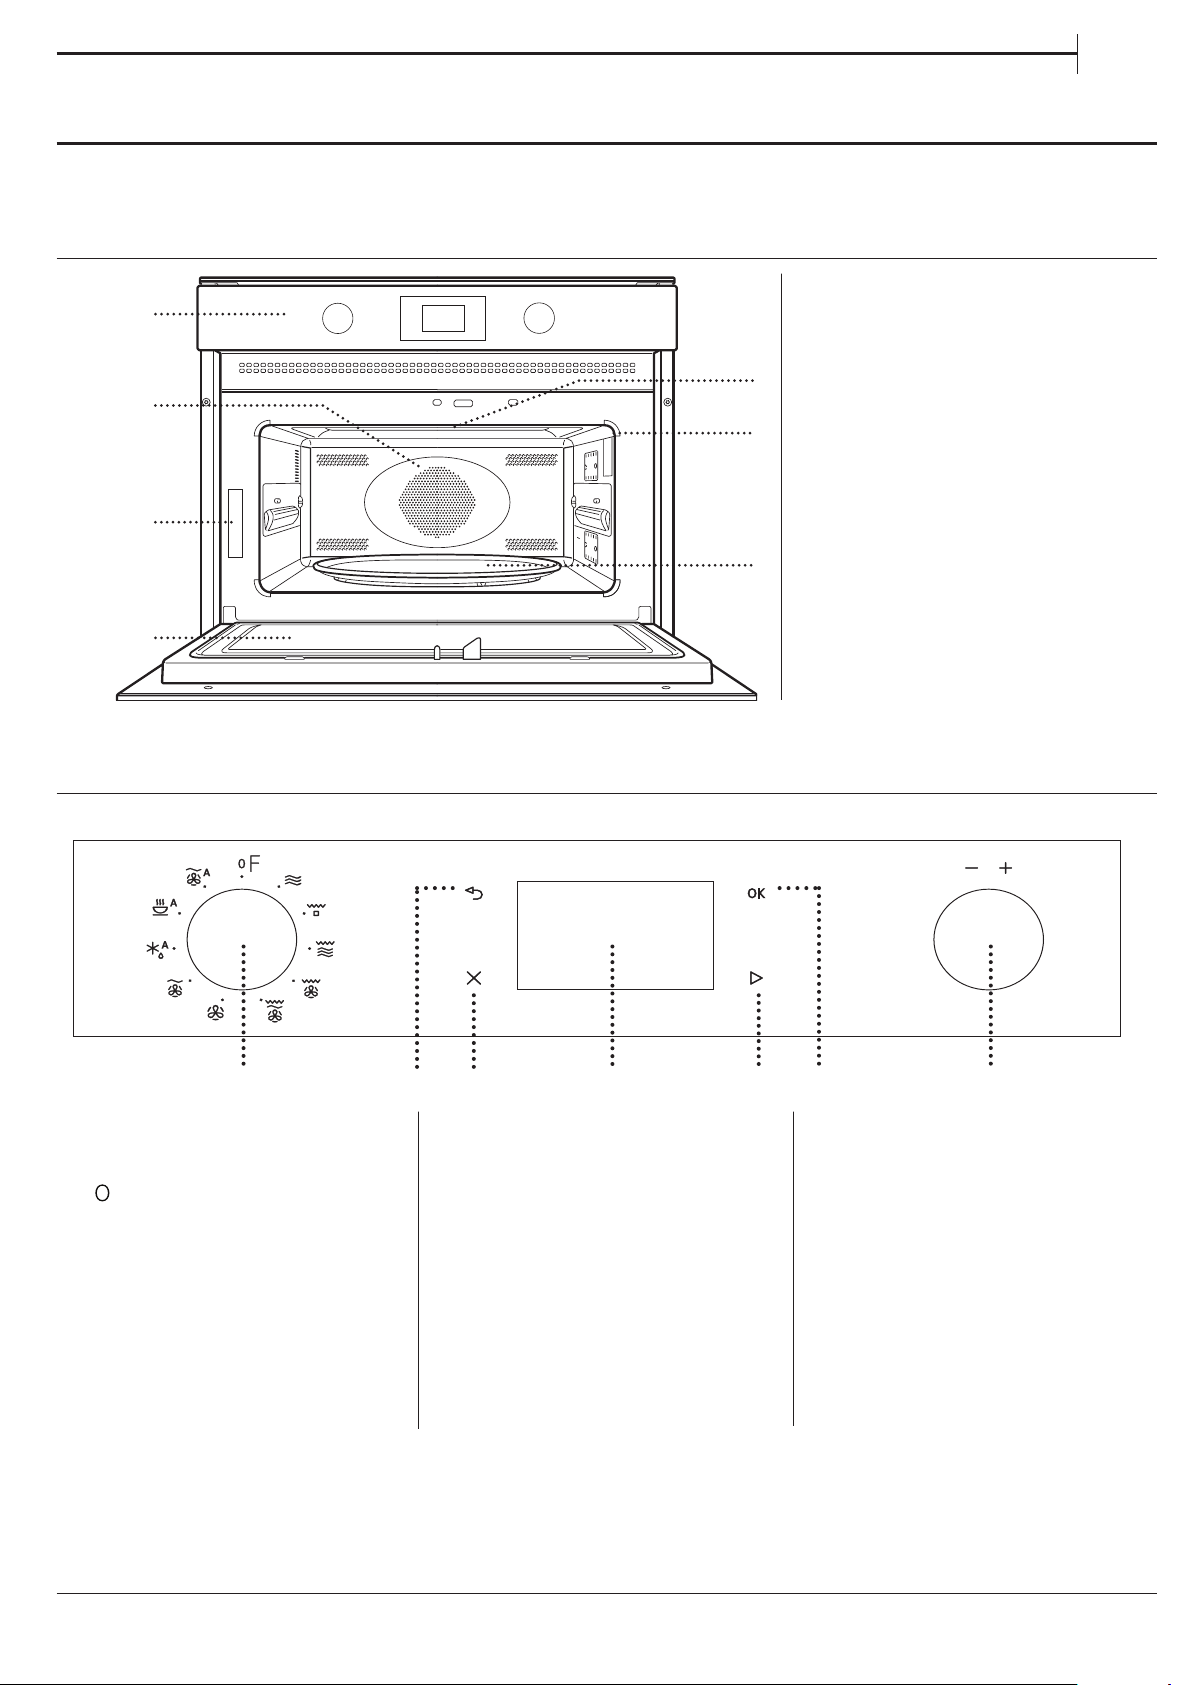
ÜBERSICHT
1
2
3
4
1. Bedienfeld
2. Rundes Heizelement
(nicht sichtbar)
3. Typenschild
5
(nicht entfernen)
4. Tür
6
5. Oberes Heizelement/Grill
6. Beleuchtung
7. Glasdrehteller
7
DE
BEDIENFELD
1 7
1. AUSWAHLKNOPF
Zum Einschalten des Ofens durch
Funktionsauswahl�
drehen, um den Ofen
Auf
auszuschalten�
2. ZURÜCK
Für die Rückkehr zum vorherigen
Einstellungsmenü�
2
3
3. STOPP
Um eine aktive Funktion jederzeit
zu unterbrechen� Zweimal drücken,
um die Funktion zu stoppen und
den Ofen auf Standby zu schalten�
4. DISPLAY
5. START
Für den Start von Funktionen
und die Bestätigung von
Einstellungen� Bei ausgeschaltetem
Ofen aktiviert diese Taste die
Mikrowellenfunktion�
4 5
6
6. BESTÄTIGEN
Zum Bestätigen einer
Funktionsauswahl oder der
Einstellung eines Wertes�
7. EINSTELLKNOPF
Zum Blättern durch die Menüs und
zum Einsetzen oder Ändern der
Einstellungen�
15
Page 16
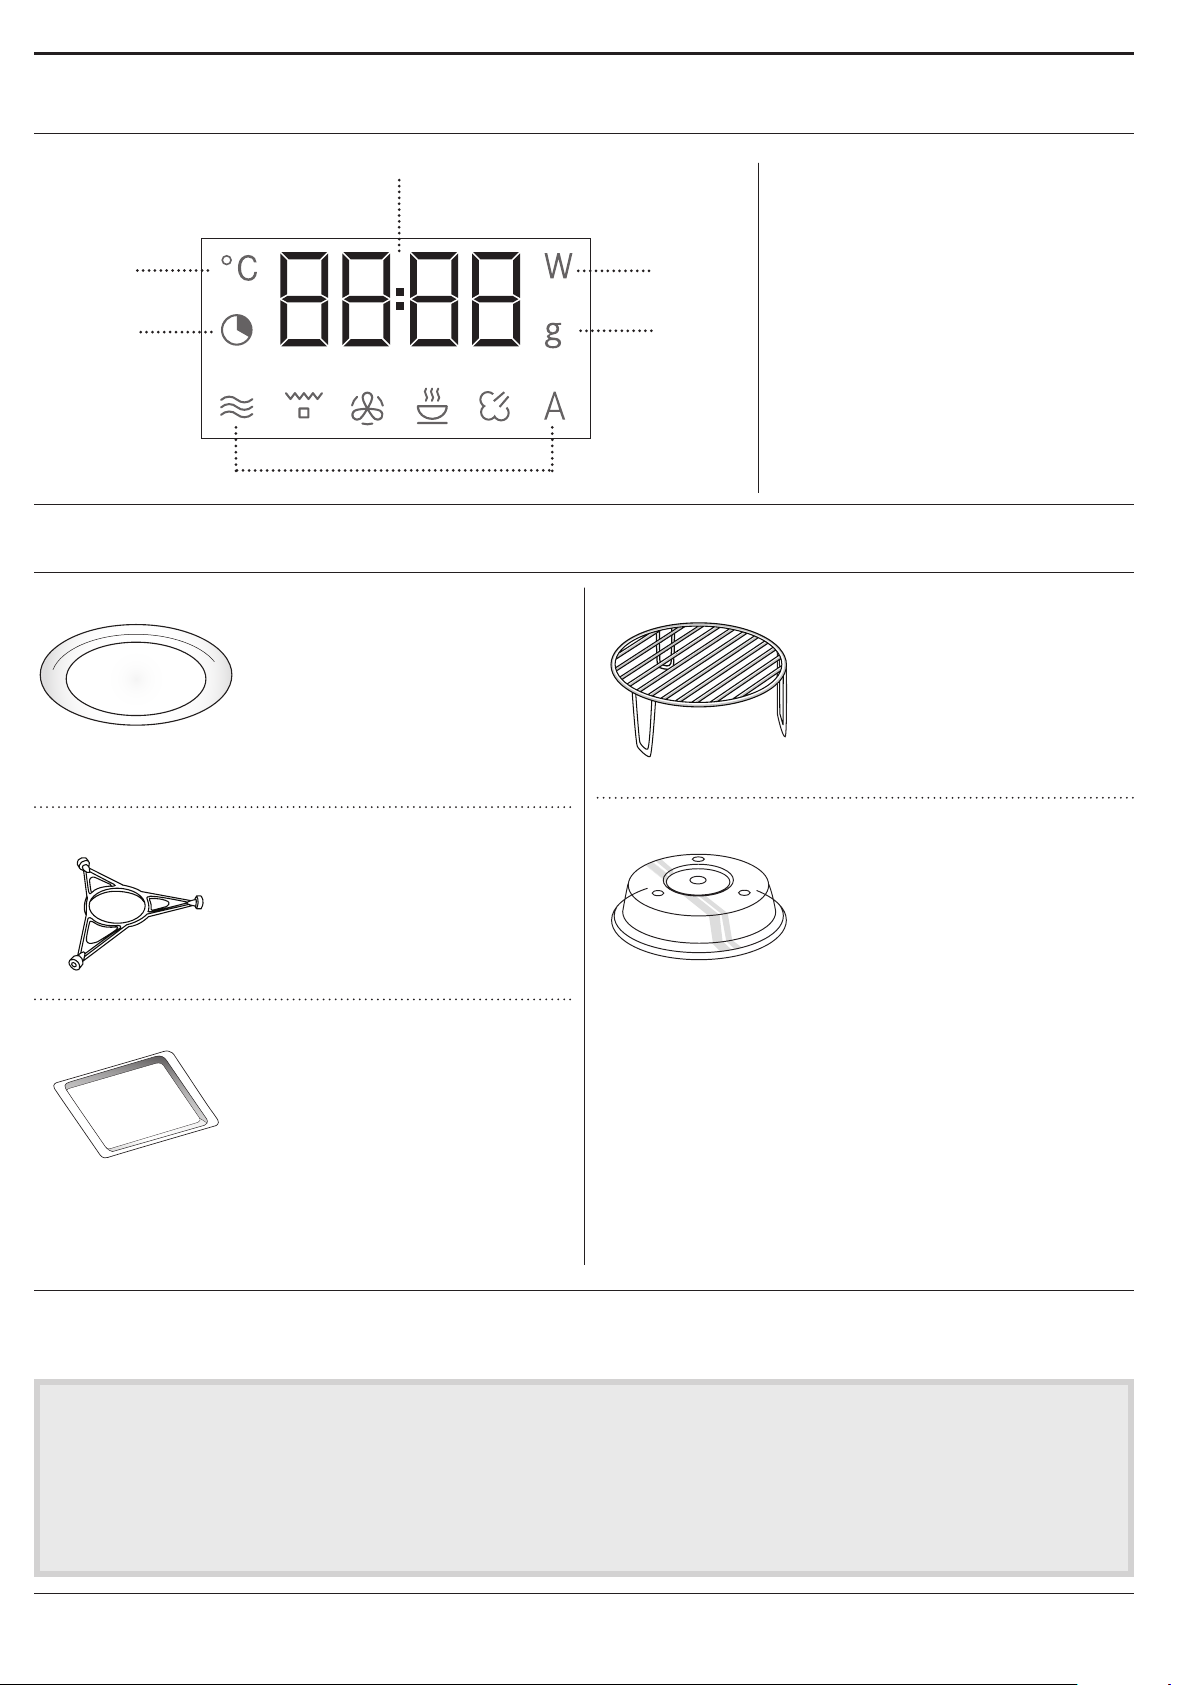
BESCHREIBUNG DES DISPLAYS
5
1
2
6
ZUBEHÖRTEILE
GLASDREHTELLER
Auf seiner Auflage platziert,
kann der Drehteller bei allen
Garmethoden verwendet
werden�
Mit Ausnahme des rechteckigen
Backblechs, muss der Drehteller
stets als Basis für andere Behälter oder Zubehörteile
verwendet werden�
3
4
GRILLROST
1. Temperaturkontrolle
2. Zeit- und Funktionsdauer-
Einstellungen
3. Mikrowellen-Leistungsstufen-
Auswahl
4. Gewichtsauswahl
5. Uhr, Informationen und
Funktionsdauer
6. Symbole für die ausgewählte
Funktion
Dadurch kann die Speise, für eine
perfekte Bräunung des Gerichts,
näher an den Grill gestellt
werden� Legen Sie den Rost auf
den Drehteller�
DREHTELLER AUFLAGE
Die Auflage nur für den
Glasdrehteller verwenden� Keine
anderen Zubehörteile auf die
Auflage stellen�
RECHTECKIGES BACKBLECH
Das Backblech ausschließlich für
Funktionen verwenden, die ein
Umluftgaren ermöglichen; es darf
niemals im Kombinationsbetrieb mit
der Mikrowelle verwendet werden�
Das Backblech horizontal einsetzen,
indem es auf den Rost im Garraum gestellt wird�
Bitte beachten: Bei der Verwendung des rechteckigen Backblechs
müssen der Drehteller und seine Auage nicht entfernt werden.
Die Anzahl und Art der Zubehörteile kann je nach gekauftem Modell unterschiedlich sein.
Nicht mitgelieferte Zubehörteile sind separat über den Kundendienst erhältlich.
Eine Reihe von Zubehörteilen kann käuich
erworben werden. Vor dem Kauf überprüfen, ob
sie für die Verwendung in der Mikrowelle geeignet
und ofenfest sind.
Metallbehälter für Speisen oder Getränke dürfen
niemals zum Mikrowellengaren verwendet werden.
ABDECKHAUBE
Zum Abdecken der Speise
während des Garvorgangs oder
zum Erwärmen in der Mikrowelle�
Durch die Abdeckung werden
Spritzer reduziert und die Speise
feucht gehalten; außerdem kann
sie zur Erstellung zweier Garstufen verwendet werden�
Sie ist weder zum Umluftgaren noch für
Grillfunktionen geeignet�
Stets sicherstellen, dass Speisen und Zubehörteile
die Innenseiten des Geräts nicht berühren.
Bevor Sie den Ofen einschalten, prüfen Sie stets,
ob sich der Drehteller ungehindert drehen kann.
Darauf achten, den Drehteller beim Einsetzen
oder Entnehmen anderer Zubehörteile nicht
abzunehmen.
16
Page 17
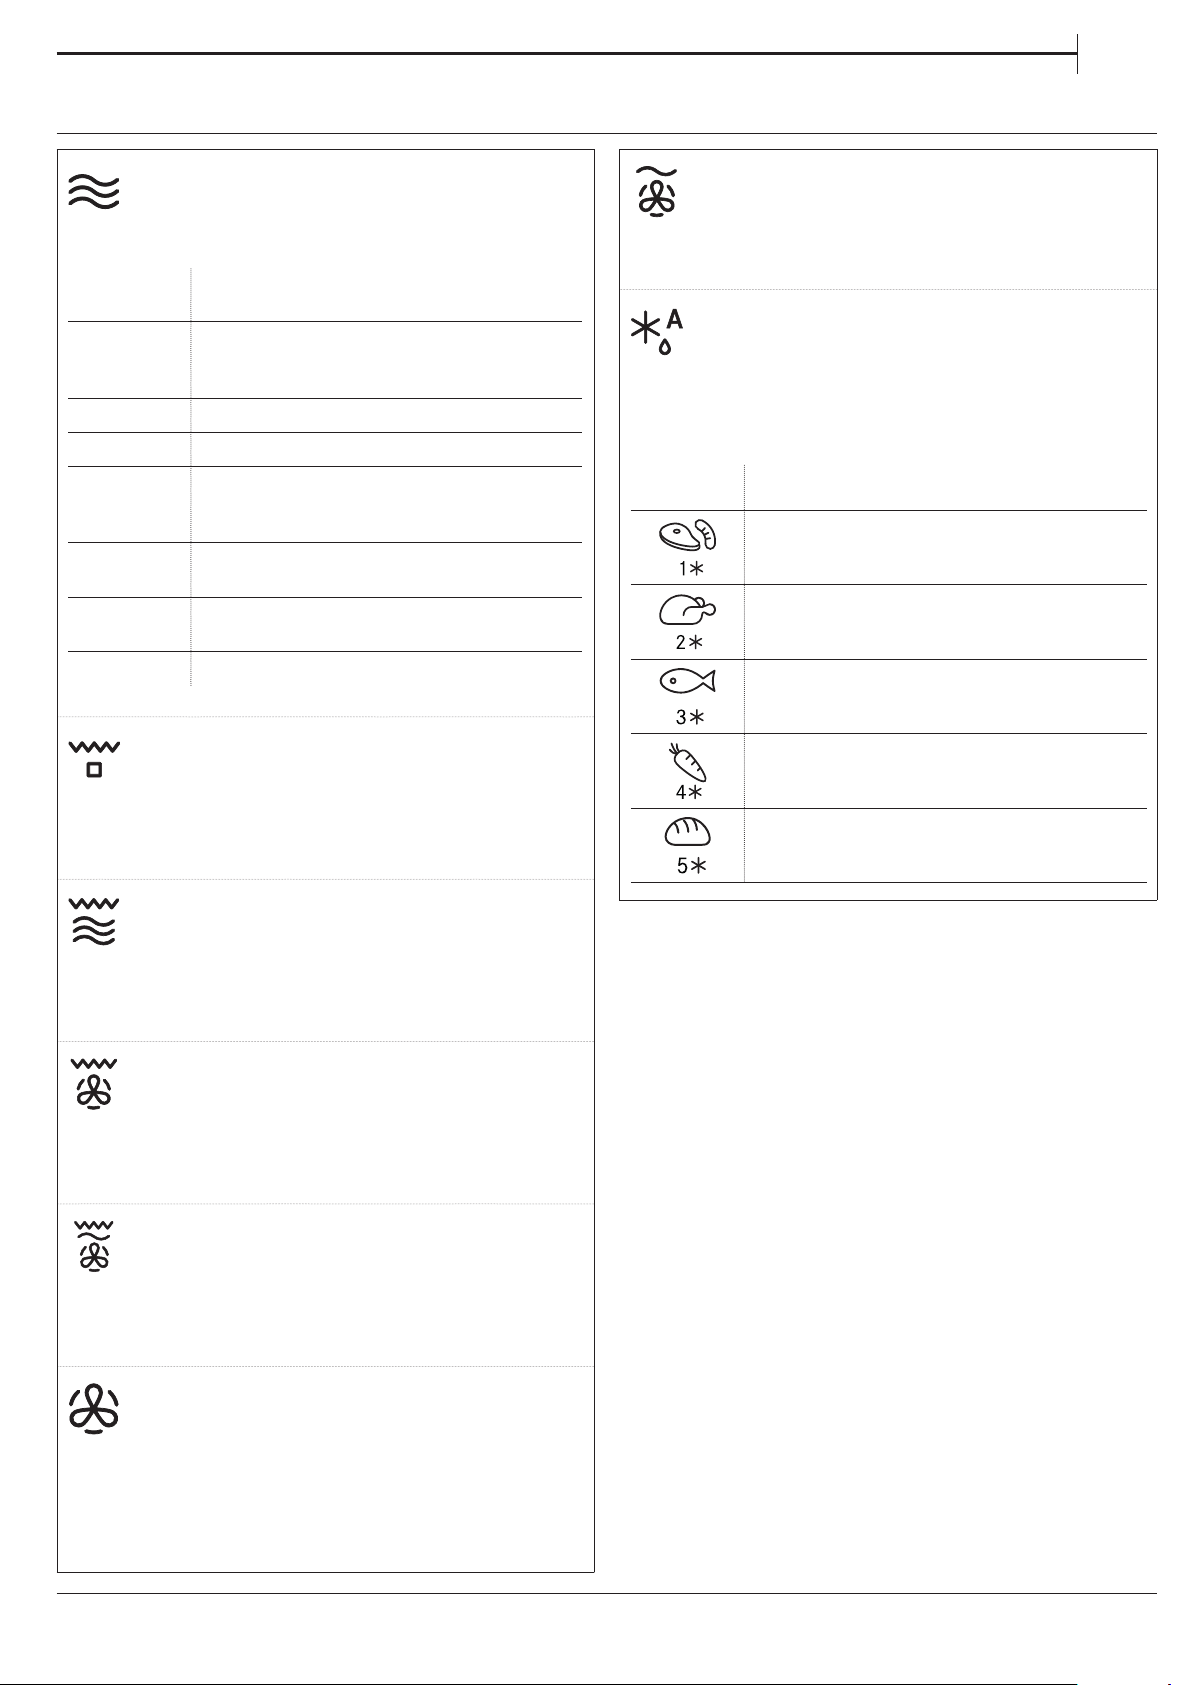
FUNKTIONEN
DE
MIKROWELLE
Zum schnellen Garen und Aufwärmen von
Speisen und Getränken�
LEISTUNGS-
STUFE
Schnelles Aufwärmen von Getränken
900 W
oder anderen Speisen mit einem hohen
Wassergehalt
750 W
650 W
Garen von Gemüse
Garen von Fleisch und Fisch
Garen von Fleischsoßen, käse- oder
500 W
eierhaltigen Soßen. Fertiggaren von
Fleischpasteten oder Nudelauauf
350 W
160 W
90 W
Langsames, schonendes Garen. Perfekt zum
Schmelzen von Butter oder Schokolade
Auftauen tiefgekühlter Speisen oder
Aufweichen von Butter und Käse
Aufweichen von Eiscreme
GRILL
Zum Bräunen, Grillen und Gratinieren� Wir
empfehlen, die Speisen während des Garens zu wenden�
Für optimale Ergebnisse, den Grill für 3 -5 Minuten vorheizen�
Empfohlene Zubehörteile: Hoher Grillrost
EMPFOHLEN FÜR
HEISSLUFT + MIKROWELLE
Für die schnelle Zubereitung von
Ofengerichten�
Empfohlene Zubehörteile: Niedriger Grillrost
AUTO DEFROST *
Zum schnellen Auftauen verschiedener
Speisen, einfach durch Angabe ihres Gewichts�
Die Speise muss direkt auf den Glasdrehteller
gestellt werden� Wenden Sie die Speise nach
Aufforderung�
KATEGORIE SPEISE GEWICHT
FLEISCH
(Gehacktes, Koteletts, Steaks,
Bratenstücke)
GEFLÜGEL
(ganze Hähnchen,
Hähnchenstücke, Hähnchenlets)
FISCH
(ganzer Fisch, Fischsteaks,
Fischlets)
GEMÜSE
(Mischgemüse, Erbsen, Brokkoli
usw.)
BROT
(Brotlaibe, süße Teilchen oder
Brötchen)
100 g - 2 kg
100 g - 2,5 kg
100 g - 1,5 kg
100 g - 1,5 kg
100 g – 1 kg
GRILL + MIKROWELLE
Zum schnellen Garen und Gratinieren von
Gerichten durch Kombination der Mikrowellen- und
Grillfunktionen�
Empfohlene Zubehörteile: Hoher Grillrost
TURBO GRILL
Für optimale Ergebnisse durch Kombination
der Grill- und Umluftfunktionen� Wir empfehlen, die
Speisen während des Garens zu wenden�
Empfohlene Zubehörteile: Hoher Grillrost
GRILL + HEISSLUFT + MIKROWELLE
Zum schnellen Garen und Bräunen von
Speisen durch Kombination der Mikrowellen-, Grillund Umluftfunktionen�
Empfohlene Zubehörteile: Hoher Grillrost
HEISSLUFT
Zum Garen von Speisen mit ähnlichen
Ergebnissen eines herkömmlichen Ofens� Das
Backblech oder anderes ofenfestes Kochgeschirr kann
zum Garen bestimmter Speisen verwendet werden�
Empfohlene Zubehörteile: Niedriger Grillrost /
Rechteckiges Backblech
17
Page 18
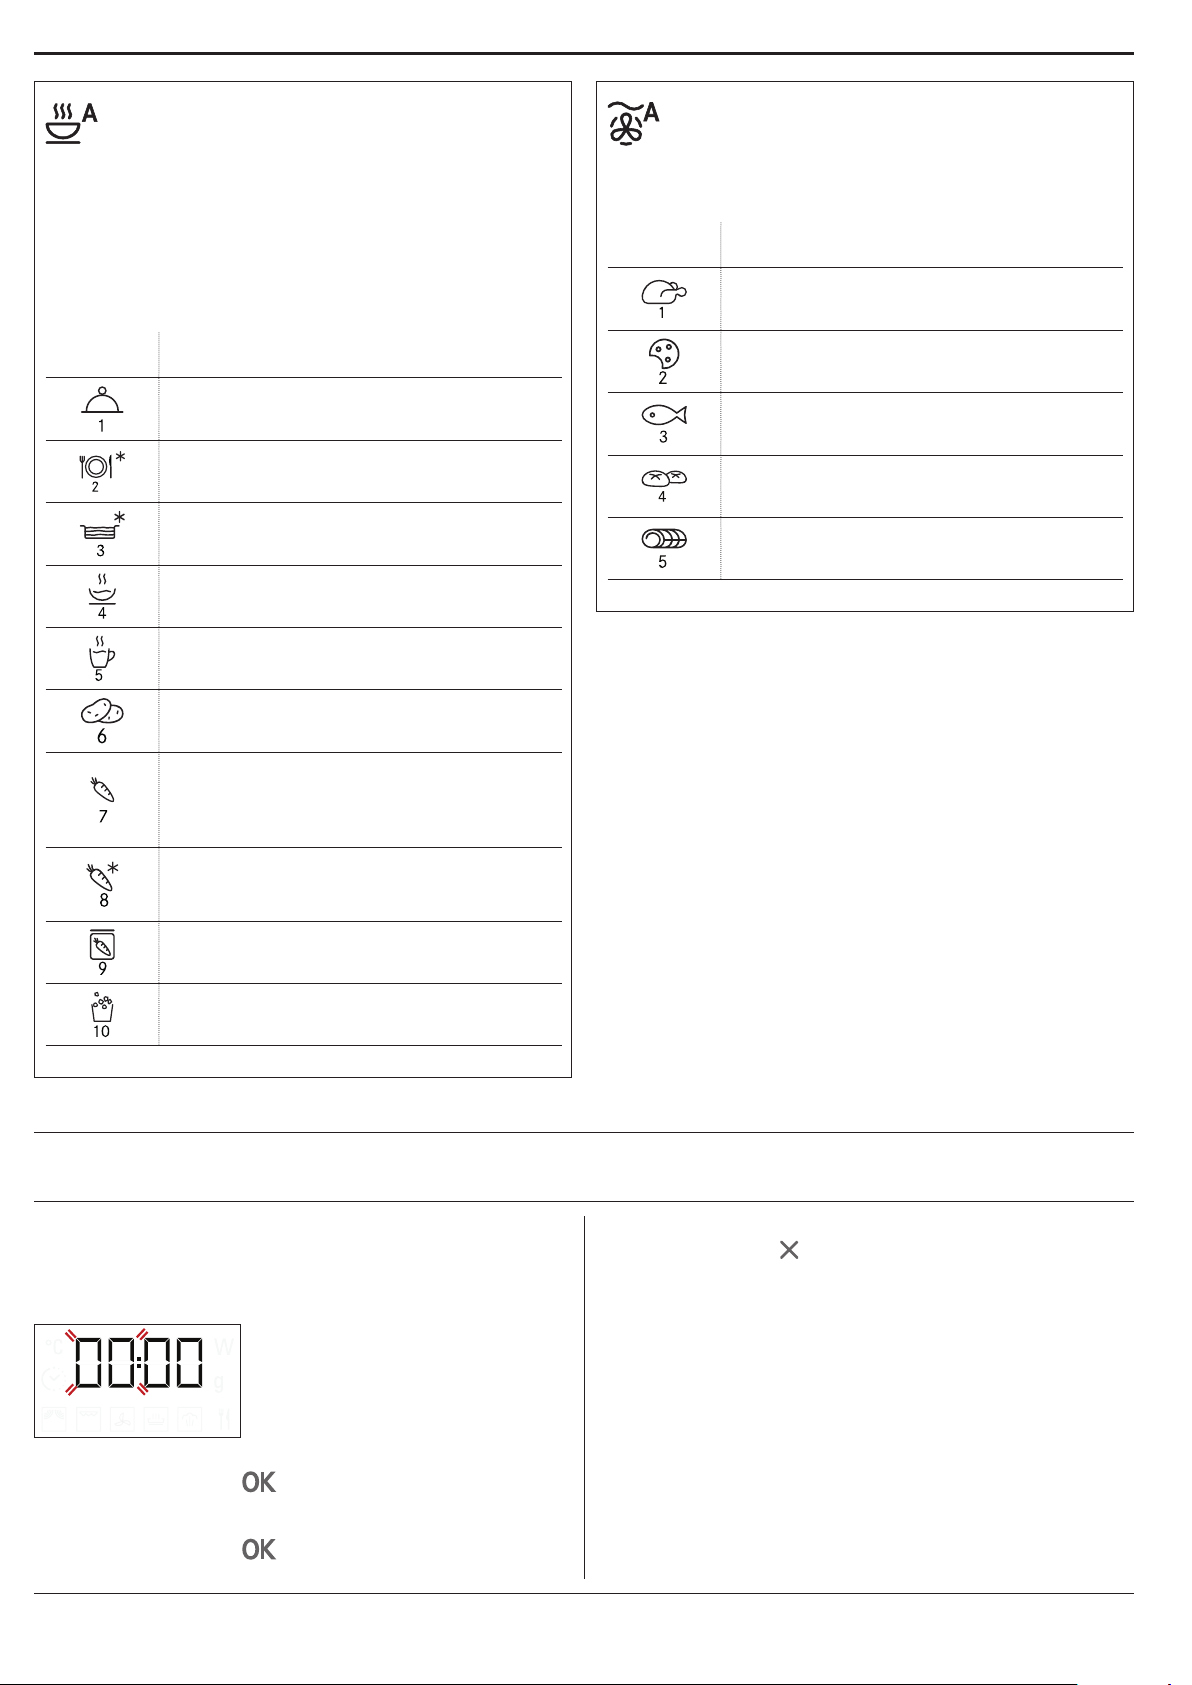
AUTO AUFWÄRMEN / GAREN *
Zum Aufwärmen von tiefgekühlten oder
raumtemperierten Fertiggerichten und für
schnelles Garen von Lebensmitteln und für beste
Ergebnisse�
Der Ofen berechnet automatisch die
Einstellungen für die bestmöglichen Ergebnisse
in kürzester Zeit� Geben Sie das Gargut auf einen
mikrowellengeeigneten und hitzebeständigen
Essteller oder in ein entsprechendes Kochgeschirr�
AUTO HEISSLUFT + MW *
Für schnell im Ofen gebackene Lebensmittel
und für beste Ergebnisse� Verwenden Sie
Kochgeschirr, das für die Mikrowelle geeignet und
ofenfest ist�
KATEGORIE SPEISE GEWICHT
BRATHÄHNCHEN 800 g - 1,5 kg
KATEGORIE SPEISE GEWICHT
SPEISETELLER 250-500 g
GEFRORENE PORTIONEN 250-500 g
TIEFGEFR. LASAGNE 250-500 g
SUPPEN 200-800 g
GETRÄNKE 100-500 g
OFENKARTOFFELN
(Drehen, nach Auorderung)
FRISCHES GEMÜSE
(In gleich große Stücke
geschnitten und 2 bis 4 Teelöel
Wasser zugefügt. Abdeckhaube)
TIEFGEFR. GEMÜSE
(Drehen, nach Auorderung.
Abdeckhaube)
200 g - 1 kg
200-800 g
200-800 g
PLÄTZCHEN 300 g
GANZER FISCH 600 g - 1,2 kg
KARTOFFELGRATIN 800 g - 2 kg
ROASTBEEF 800 g - 1,5 kg
* Bei den Automatikfunktionen einfach die Art und das
Gewicht oder die Menge der Lebensmittel auswählen,
um beste Ergebnisse zu erhalten. Der Ofen berechnet
automatisch die optimalen Einstellungen und ändert diese
während den Garprozessen. Wenden Sie die Speise nach
Auorderung.
GEMÜSE AUS KONSERVEN 200-600 g
POPCORN 100 g
ERSTER GEBRAUCH
. EINSTELLEN DER ZEIT
Wenn den Ofen zum ersten Mal eingeschaltet wird,
muss die Zeit eingestellt werden: Auf dem Display
blinken die beiden Stundenziffern�
Den Einstellknopf drücken, um die korrekte Uhrzeit
einzustellen und mit
Ziffern für die Minuten beginnen zu blinken� Den
Einstellknopf drücken, um die korrekte Uhrzeit
einzustellen und mit
bestätigen� Die beiden
bestätigen�
Bitte beachten: Zur Änderung der Zeit zu einem
späteren Zeitpunkt, für mindestens 3 Sekunde bei
ausgeschaltetem Ofen gedrückt halten und die oben
stehenden Schritte wiederholen.
Nach einem längeren Stromausfall muss die Zeit unter
Umständen erneut eingestellt werden.
18
Page 19
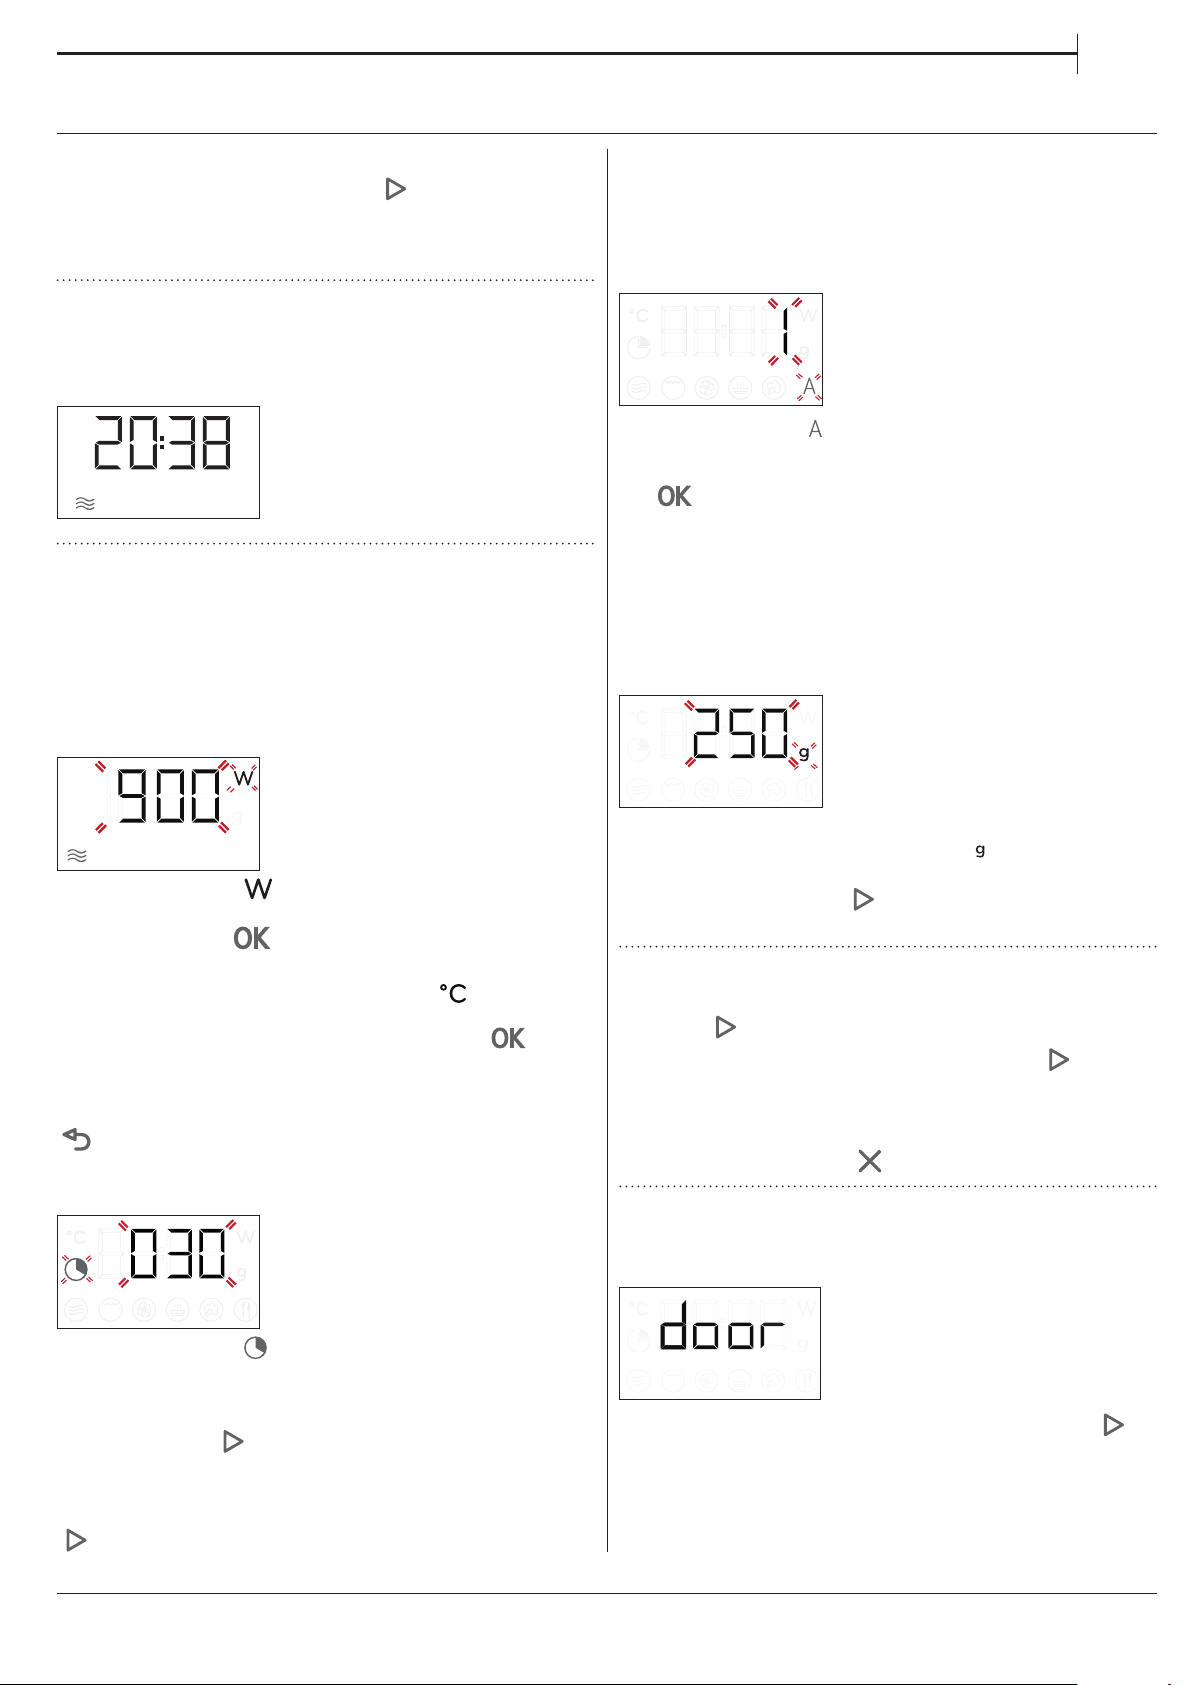
TÄGLICHER GEBRAUCH
DE
. JET START
Bei ausgeschaltetem Ofen, kann zur Aktivierung
des Garvorgangs bei voller Leistungsstufe der
Mikrowellenfunktion (900W) für 30 Sekunden
gedrückt werden�
1. AUSWÄHLEN EINER FUNKTION
Bei ausgeschaltetem Ofen wird nur die Zeit auf dem
Display angezeigt� Den Auswahlknopf drehen, um
eine dieser Funktionen auszuwählen�
2. DIE FUNKTION EINSTELLEN
. MANUELLE FUNKTIONEN
Nach Auswahl der gewünschten Funktion, können Sie
die Einstellungen ändern�
Das Display zeigt die Einstellungen an, die
nacheinander geändert werden können�
MIKROWELLENLEISTUNGSSTUFE / TEMPERATUR
. AUTOMATIKFUNKTIONEN / AUTO DEFROST
KATEGORIEN
Sobald Sie eine der Automatikfunktionen ausgewählt
habe, müssen Sie eine Kategorie für die zu garenden
Lebensmittel auswählen�
Wenn das Symbol auf dem Display blinkt, den
Einstellknopf drehen, um die Ziffer auszuwählen, die
mit der gewünschten Kategorie übereinstimmt, dann
mit
GEWICHT
Um beste Ergebnisse zu erreichen, müssen Sie für die
Automatikfunktionen das Gewicht des Lebensmittels
eingeben, das Sie unter den werkseitigen
Einstellungen auswählen können: der Ofen berechnet
die ideale Zeitdauer für die zu verwendende Funktion
für jede Lebensmittelkategorie�
bestätigen�
Wenn das Symbol auf dem Display blinkt, den
Einstellknopf drehen, um die Leistungsstufe zu
ändern; dann mit
Einstellungen ändern (wenn möglich)�
Auf dieselbe Weise, wenn das Symbol
Display blinkt, den Einstellknopf drehen, um die
Temperatureinstellung zu ändern; dann mit
bestätigen und die folgenden Einstellungen ändern�
Bitte beachten: Wenn die Funktion aktiviert wurde, kann die
Leistung geändert werden durch zweimaliges Drücken von
, um das Menü der Leistungsstufen aufzurufen, dann
den Einstellknopf drehen, um die Einstellung zu ändern.
DAUER
Wenn das Symbol auf dem Display blinkt, den
Einstellknopf drehen, um die gewünschte Dauer
einzustellen�
Sobald die angezeigte Garzeit mit der gewünschten
übereinstimmt,
Funktion starten�
Bitte beachten: Während dem Garen können Sie die Garzeit
durch Drehen des Knopfes anpassen; Bei jedem Drücken von
wird die Garzeit um 30 Sekunden verlängert.
bestätigen und die folgenden
auf dem
zur Bestätigung drücken und die
Wenn die werkseitige Einstellung auf der
Anzeige erscheint und das Symbol
den Einstellungsknopf drehen, um das Gewicht
einzustellen, dann mit
Funktion starten�
bestätigen und die
blinkt,
3. DIE FUNKTION AKTIVIEREN
Nachdem die erforderlichen Einstellungen getätigt
wurden,
Bei jedem erneuten Tastendruck der Taste
die Garzeit um weitere 30 Sekunden erhöht (nur für
manuelle Funktionen)�
Bitte beachten: Die aktive Funktion kann jederzeit durch
zweimaliges Drücken von gestoppt werden.
drücken, um die Funktion zu aktivieren�
, wird
. SICHERHEITSSPERRE
Diese Funktion wird automatisch aktiviert, um ein
versehentliches Einschalten des Ofens zu vermeiden�
Die Tür öffnen und schließen und anschließend
zum Start der Funktion drücken�
19
Page 20
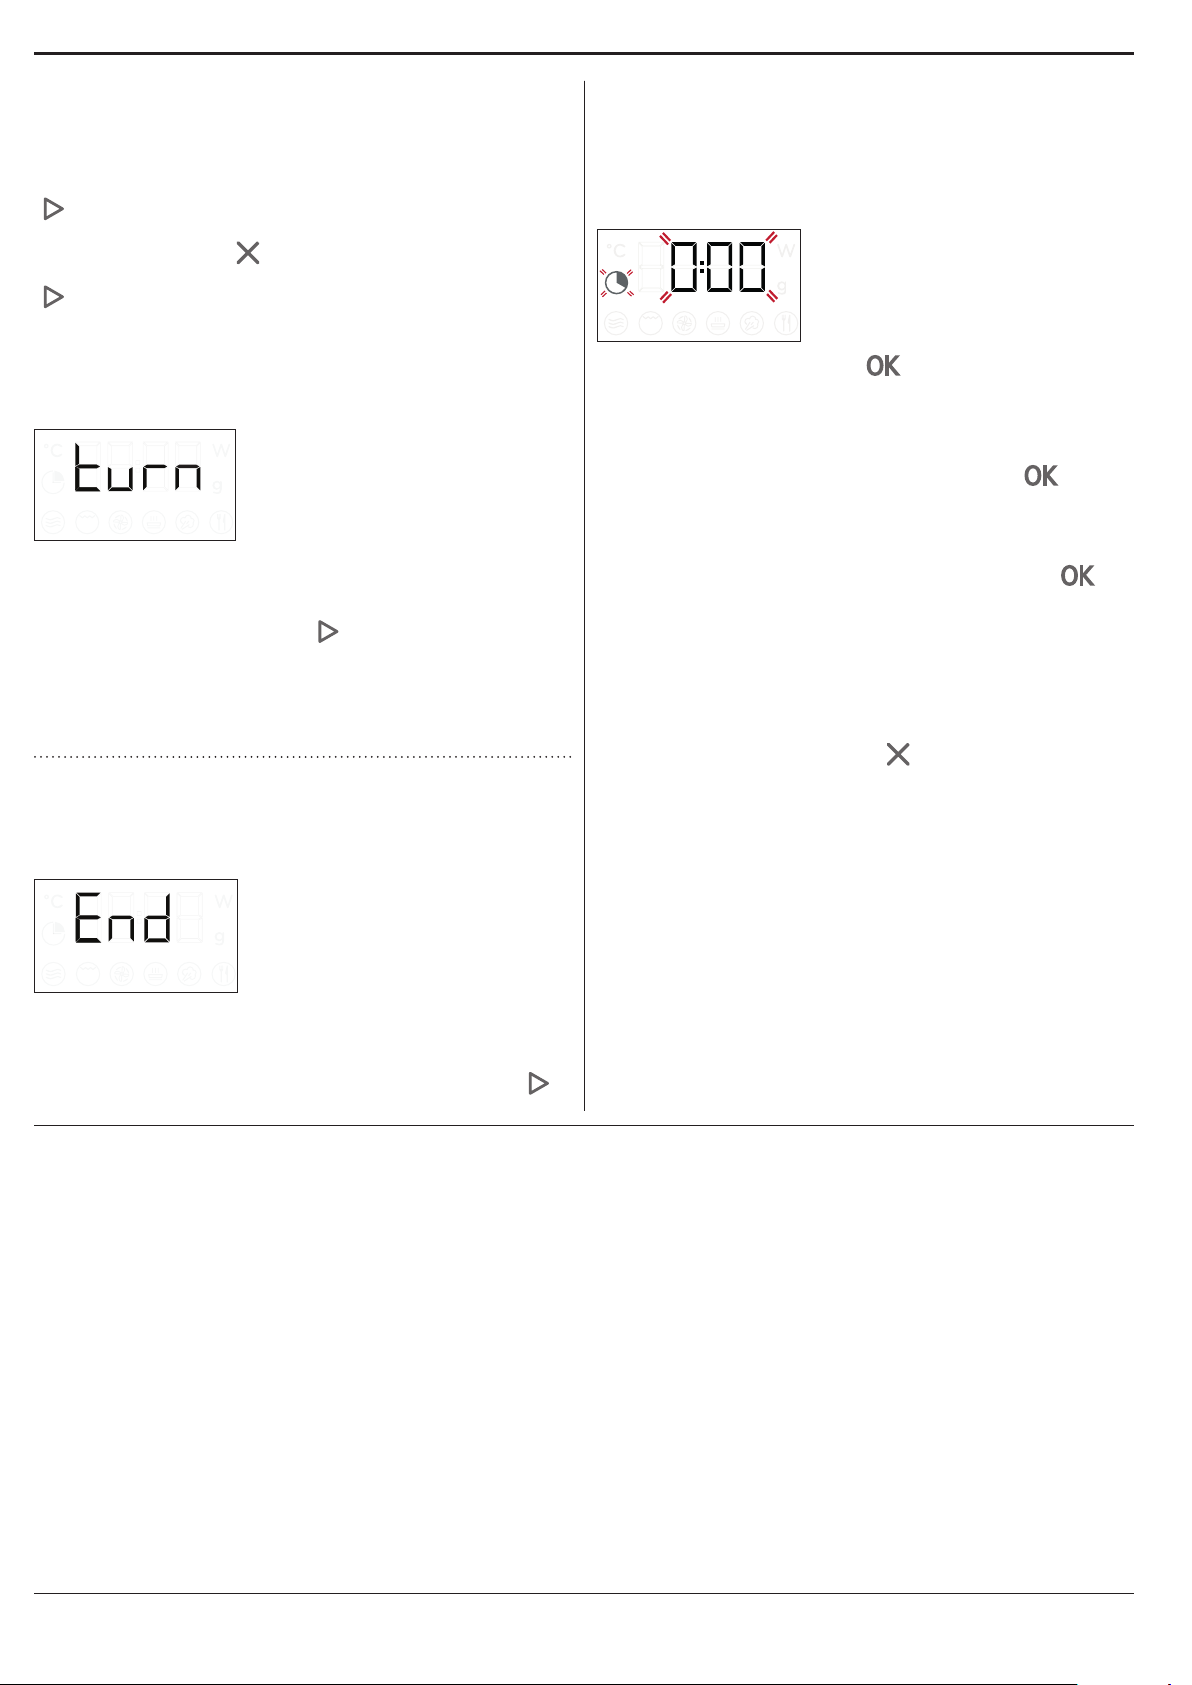
4. PAUSE
Zum Unterbrechen einer aktiven Funktion, z�B� zum
Umrühren oder Wenden der Speise, einfach die Tür
öffnen�
Zum Fortsetzen der Funktion, die Tür schließen und
drücken�
Das Garen kann auch zeitweise unterbrochen werden
durch Drücken von
� Um den Kochvorgang wieder
aufzunehmen, schließen Sie die Tür und drücken Sie
�
AUTOMATISCHE PAUSE
(RÜHREN SIE DAS GARGUT UM ODER WENDEN SIE ES)
Gewisse Funktionen halten den Garvorgang an, damit
Sie die Speise wenden oder umrühren können�
Wenn der Ofen das Garen unterbricht und "Turn food"
oder "Stir Food" auf dem Display erscheint, die Tür
öffnen, um die Speise zu wenden oder umzurühren,
dann die Tür schließen und
drücken, um das
Garen wieder zu starten�
Bitte beachten: nach 2 Minuten, selbst wenn die Speise
nicht gewendet oder umgerührt wurde, startet die Funktion
automatisch erneut.
. TIMER
Bei ausgeschaltetem Ofen kann das Display als
Timer verwendet werden� Der Timer aktiviert keinen
Garzyklus�
Um die Funktion einzuschalten und die gewünschte
Garzeit einzustellen, den Einstellknopf drehen�
zur Aktivierung des Timers drücken� Es ertönt
ein akustisches Signal und eine Anzeige auf dem
Display erscheint, sobald der Timer das Rückzählen
der ausgewählten Zeit beendet hat� Um Änderungen
an dem Timer vorzunehmen, nachdem er aktiviert
wurde, den Einstellknopf drehen, dann mit
bestätigen�
Um dies zu unterbrechen oder zu der aktuellen
Zeitanzeige zurückzugelangen, den Einstellknopf
bis 0:00 auf dem Display erscheint drehen und
drücken�
Bitte beachten: Sobald der Timer aktiviert wurde, können Sie
auch eine Funktion aktivieren: Der Timer zählt automatisch
die ausgewählte Zeit weiter runter, ohne die Funktion zu
beeinussen. Um zurück zur Ansicht des Timers zu gehen,
abwarten, bis die Ofenfunktion beendet ist oder die Funktion
ausschalten durch Drücken von .
5. ENDE DES GARVORGANGS
Es ertönt ein akustisches Signal und das Display
zeigt "End" an, um anzugeben dass der Garvorgang
beendet ist�
Bei einigen Funktionen kann das Garen verzögert
werden während die zuvor eingestellten
Einstellungen erhalten bleiben: den Einstellknopf
drehen, um eine neue Garzeit einzustellen, dann
drücken�
20
Page 21

HILFREICHE TIPPS
DE
LESEN DER GARTABELLE
Die Tabelle zeigt die optimalen Funktionen für ein
bestimmtes Lebensmittel an�
Die Garzeiten beziehen sich auf den Garzyklus für die
Lebensmitte im Ofen, ohne die Vorheizphase (wenn
erforderlich)�
Die Einstellungen und Garzeiten sind nur Richtwerte
und sind von der Menge des Garguts und von den
verwendeten Zubehörteilen abhängig�
Garen Sie die Speisen immer nur mit der
angegebenen Mindestgarzeit und prüfen Sie dann, ob
sie durchgegart sind�
Für ein optimales Ergebnis befolgen Sie bitte
sorgfältig die Hinweise in der Gartabelle für die
Auswahl der einzusetzenden Zubehörteile�
TIPPS FÜR DIE BENUTZUNG DES
MIKROWELLENGERÄTS
Mikrowellen durchdringen die Lebensmittel bis auf
eine bestimmte Tiefe;
Sie sollten daher die Speise so gut wie möglich
verteilen, wenn Sie mehrere Lebensmittel gleichzeitig
garen�
Kleine Stücke garen schneller als große Stücke:
Schneiden Sie für gleichmäßiges Garen die
Lebensmittel in gleich große Stücke�
Beim Garen mit Mikrowelle verdampft Feuchtigkeit:
Die Verwendung einer mikrowellengeeigneter
Abdeckung hilft dabei die Feuchtigkeitsverdampfung
zu reduzieren�
Bei Entnahme der Speise aus der Mikrowelle, gart sie
häufig danach noch etwas weiter� Daher empfehlen
wir, die Speise einige Minuten stehen zu lassen, wenn
der Garzyklus beendet ist�
Es ist empfehlenswert, die Speisen beim Garen in der
Mikrowelle umzurühren, da die besser gegarten Teile
am Außenrand in die Mitte gebracht werden und
umgekehrt�
Dünnere Fleischscheiben übereinander legen oder in
Schichten anordnen� Dickere Stücke wie Hackbraten
und Bratwurst sollten nebeneinander angeordnet
werden�
KUNSTSTOFFFOLIE UND VERPACKUNG
Entfernen Sie alle Metallteile (z�B� Verschlüsse) von
Papier- oder Plastikbeuteln, bevor diese zum Garen in
die Mikrowelle gelegt werden�
Kunststofffolie vor dem Garen mit einer Gabel oder
einem Zahnstocher einstechen, damit der sich
aufbauende Druck entweichen kann und die Folie
durch den entstehenden Dampf nicht platzt�
FLÜSSIGKEITEN
Flüssigkeiten können ohne vorherige Blasenbildung
überhitzen�
Dies kann zum plötzlichen Überkochen von heißen
Flüssigkeiten führen�
Um dies zu vermeiden:
� Vermeiden Sie die Verwendung von Behältern mit
engen Hälsen�
� Rühren Sie die Flüssigkeit um, bevor Sie das Gefäß in
den Mikrowellengarraum stellen, und lassen Sie einen
Teelöffel im Gefäß�
� Nehmen Sie nach dem Erwärmen den Behälter
vorsichtig aus dem Mikrowellengerät und rühren Sie
vorsichtig um�
TIEFGEFRORENES
Für beste Ergebnisse empfehlen wir, Lebensmittel
direkt auf dem Glasdrehteller aufzutauen�
Bei Bedarf können Sie auch einen leichten,
mikrowellengeeigneten Kunststoffbehälter
verwenden�
Gekochte Speisen, Geschmortes und Fleischsoßen
tauen besser auf, wenn sie während des
Auftauvorgangs bisweilen umgerührt werden�
Trennen Sie die Lebensmittel, wenn sie beginnen
aufzutauen: die getrennten Portionen werden
schneller abtauen�
BABYNAHRUNG
Babynahrung in Gläsern oder Getränke in
Babyfläschchen müssen nach dem Erwärmen immer
umgerührt und auf die richtige Temperatur überprüft
werden�
Dadurch wird eine gleichmäßige Wärmeverteilung
sichergestellt und das Risiko des Verbrühens oder
Verbrennens vermieden�
Nehmen Sie den Deckel bzw� Sauger unbedingt vor
dem Erwärmen ab�
FLEISCH UND FISCH
Für eine rasche und perfekte Oberflächenbräunung,
während das Innere von Fleisch oder Fisch weich und
saftig bleibt, empfehlen wir, die „Grill + Mikrowellen“
Funktion zu verwenden� Stellen Sie die Mikrowellen
zwischen 160 und 350 W ein, um beste Ergebnisse zu
erzielen�
21
Page 22
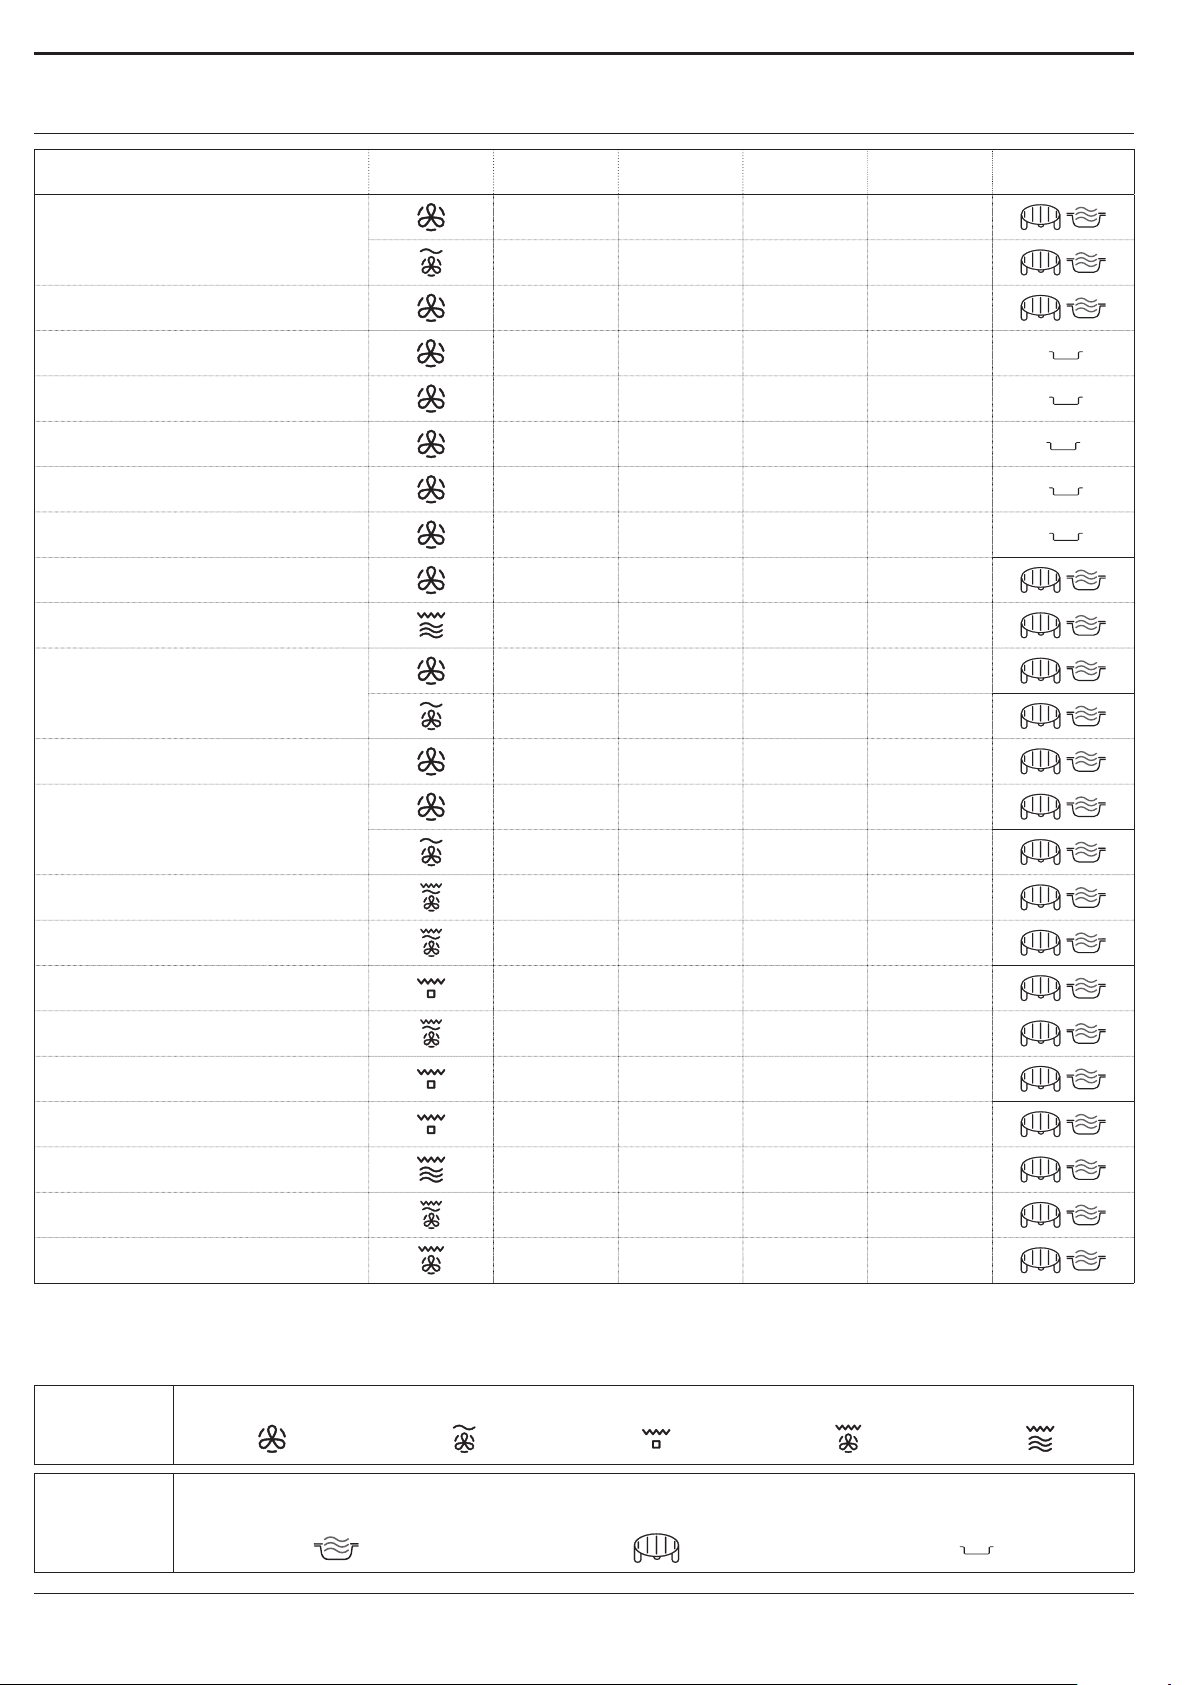
GARTABELLE
SPEISE FUNKTION VORHEIZEN
LEISTUNG
GRILL
LEISTUNGS-
STUFE (W)
ZEIT (MIN.) ZUBEHÖRTEILE
- 160 - 180 - 30-60
Hefekuchen
- 160 - 180 90 25-50
Gefüllte Kuchen
(Käsekuchen, Strudel, Obstkuchen)
Ja 160 -190 - 35-70
Plätzchen Ja 170 -180 - 10-20
Meringen Ja 100-120 - 40-50
Brötchen Ja 210-220 - 10-12
Brotlaib
Ja 180-200 - 30-35
Pizza / Quiche Ja 190-220 - 20-40
Quiches
(Gemüsetorte, Quiche Lorraine)
Lasagne / Überbackene
Nudelgerichte
Lammbraten/Kalbsbraten/
Roastbeef
(1,3 - 1,5 kg)
Ja 180 -190 - 40-55
- 350-500 15-40
- 170-180 - 70-80*
- 160-180 160 50-70*
Roastbeef – Medium (1,3 - 1,5 kg) - 170 -180 - 40-60*
Brathähnchen / Kaninchen /
(ganz 1-1,2 kg)
Ente
Hähnchen / Kaninchen / Ente
(Filets/Stücke 0,4-1 kg)
- 210-220 - 50 -70*
- 210-220 350 45-60*
- - 350-500 20-40*
Gebackener Fisch (ganz) - - 160-350 20-40
Fischlets/Scheiben Ja - - 15-30*
Gefülltes Gemüse
(Tomaten, Zucchini, Auberginen...)
- - 500-650 25-50
Toast - - - 3-6
Bratwürste / Grillspieße /
Rippchen / Hamburger
Ofenkartoeln
- - - 20-40*
- - 350-500 20-40*
Backobst - - 160-350 15-25
Gemüsegratin - - - 15-25
* Die Speise nach halber Garzeit wenden.
Die Tabelle der erprobten Rezepte wurde für die Zertizierungsstellen in Übereinstimmung mit den Normen IEC 60705 und
IEC 60350 zusammengestellt.
FUNKTIONEN
ZUBEHÖRTEILE
22
Heissluft
Hitzebeständige Platte/geeigneter Behälter
für die Verwendung in Mikrowellen
Heißluft + MW Grill Turbo Grill Grill + MW
Grillrost Rechteckiges Backblech
Page 23
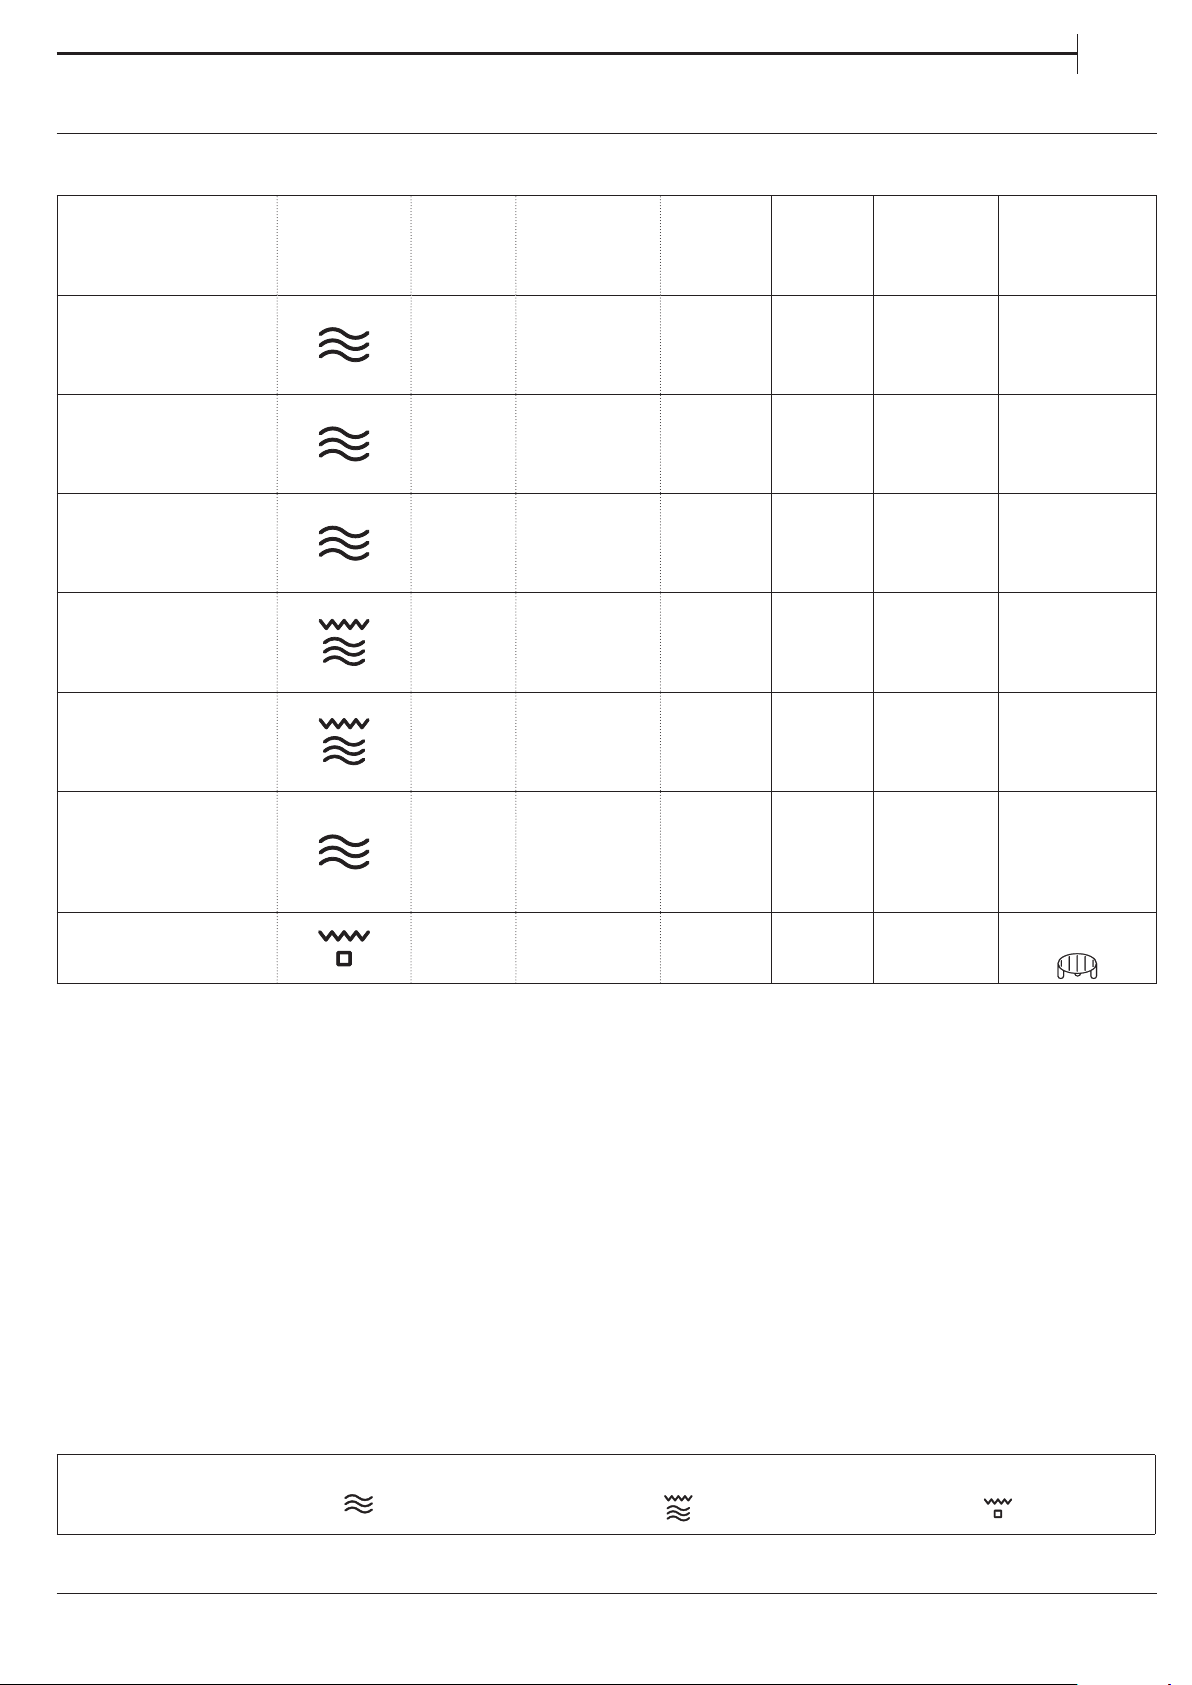
ERPROBTE REZEPTE
Für die Zertizierungsstellen in Übereinstimmung mit den Normen IEC 60705 und IEC 60350 -1 zusammengestellt.
DE
SPEISE FUNKTION
Konditorcreme
Biskuitkuche
Hackbraten
Kartoelgratin
Hähnchen
Auftauen von
Fleisch
(nach halbem
Auftauvorgang
wenden)
GE-
WICHT
(g)
1000 12:00 - 13:00 - 650 -
475 8:00 - 10:00 - 750 -
900 13:00 - 14:00 - 750 -
110 0 28:00 - 30:00 190 350 -
1200 35:00 - 40:00 210 350 -
500 10:30 - 160 - Drehteller
GARZEIT
(min:sec)
TEMP./
GRILL-
STUFE
LEIS-
TUNGS-
STUFE
(W)
VORHEI-
ZEN
ZUBEHÖR-
TEILE
Mikrowellen-
geeignete
Behälter
(Pyrex 3�227)
Mikrowellen-
geeignete
Behälter
(Pyrex 3�827)
Mikrowellen-
geeignete
Behälter
(Pyrex 3�838)
Mikrowellen-
geeignete
Behälter
(Pyrex 3�827)
Mikrowellen-
geeignete
Behälter
(Pyrex 3�220)
Toast
FUNKTIONEN
- 4:00 - 6:00 3 - Ja
Mikrowelle Grill + Mikrowelle Grill
Ofenrost
23
Page 24
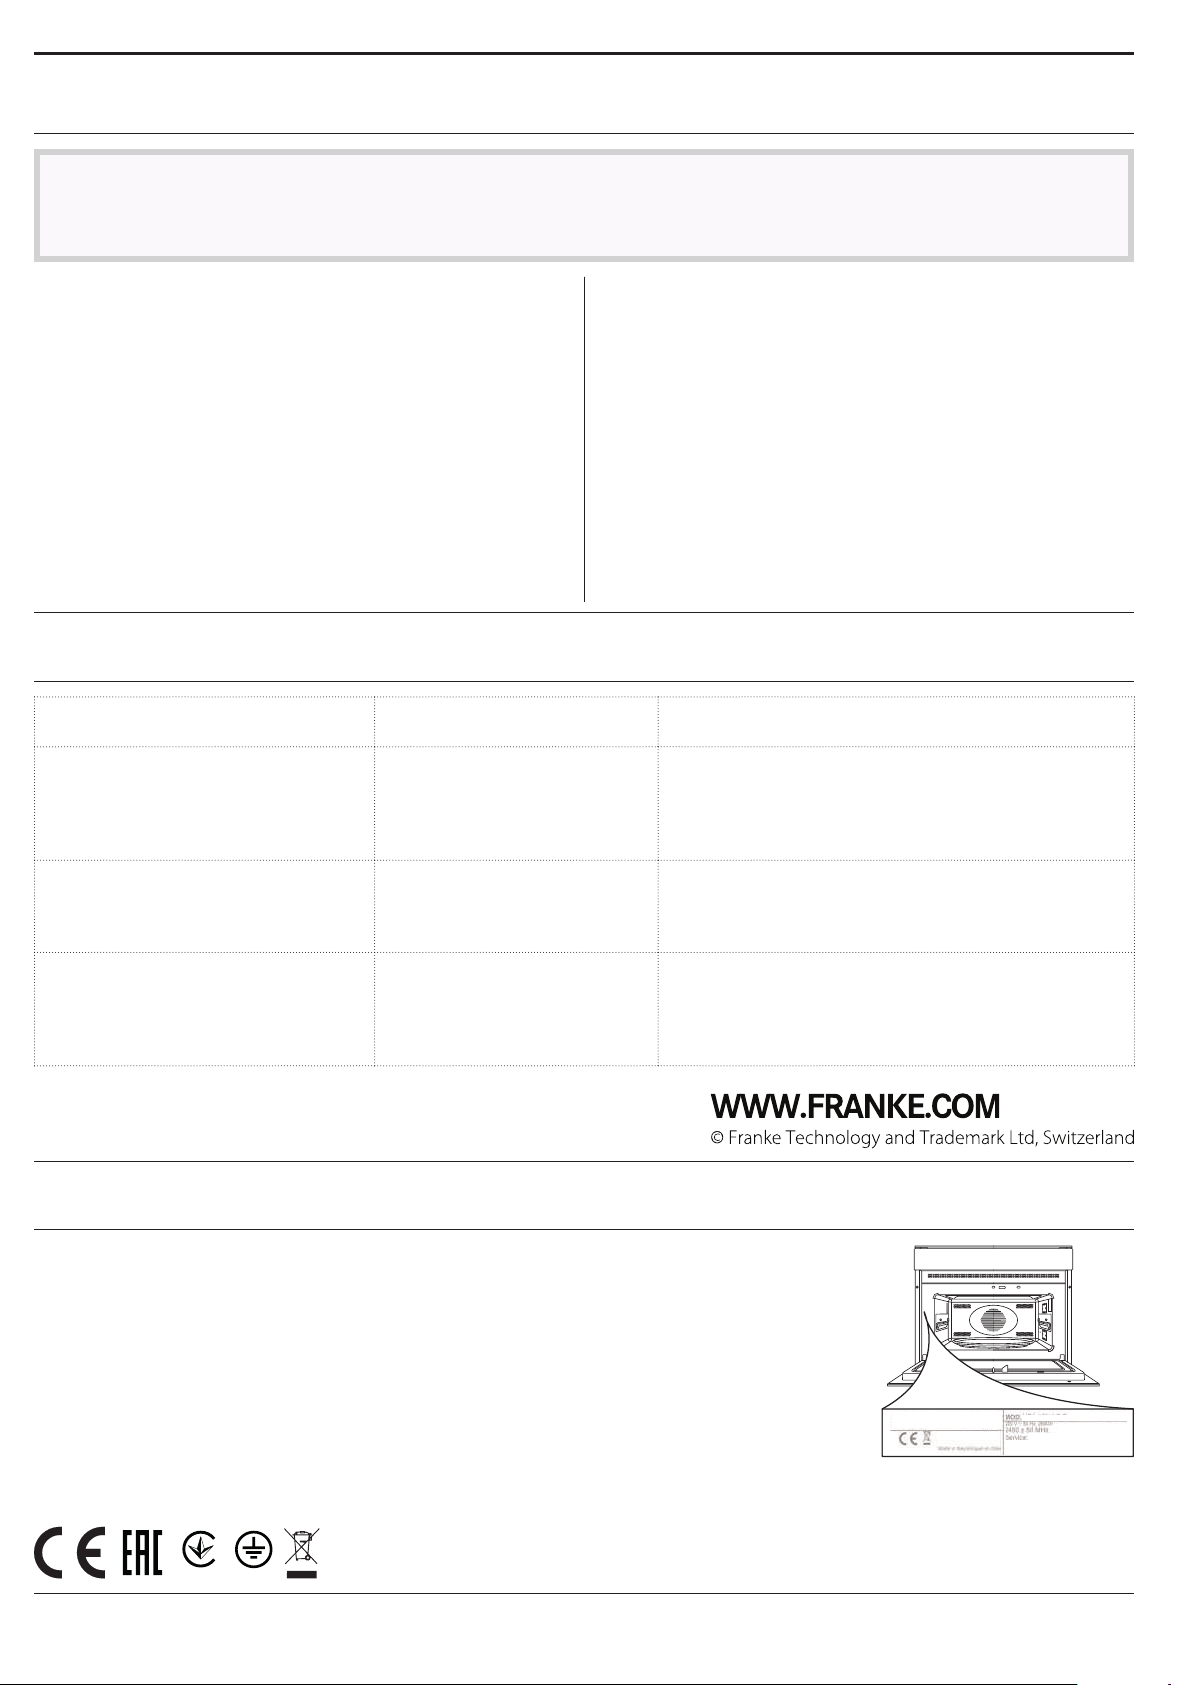
REINIGUNG UND PFLEGE
Vor dem Ausführen beliebiger Wartungs- oder Reinigungsarbeiten sicherstellen, dass das Gerät abgekühlt ist.
Keine Dampfreiniger verwenden.
INNEN UND AUSSENFLÄCHEN
• Reinigen Sie die Flächen mit einem feuchten
Mikrofasertuch� Sollten sie stark verschmutzt sein,
einige Tropfen von pH-neutralem Reinigungsmittel
verwenden� Reiben Sie mit einem trockenen Tuch nach�
Keine Stahlwolle, Scheuermittel oder aggressive/ätzende
Reinigungsmittel verwenden, da diese die Flächen des
Gerätes beschädigen können.
ZUBEHÖRTEILE
Das gesamte Zubehör ist spülmaschinenfest�
Hartnäckige Verschmutzungen durch sanftes
Scheuern mit einem Tuch entfernen� Die Zubehörteile
vor dem Reinigen immer erst abkühlen lassen�
• Das Glas der Backofentür mit einem geeigneten
Flüssigreiniger reinigen�
• In regelmäßigen Abständen oder beim Verschütten
von Speisen, den Drehteller und seine Auflage zur
Reinigung des Gerätebodens abnehmen und alle
Speiserückstände entfernen�
• Der Grill muss nicht gereinigt werden, da die starke
Hitze Verschmutzungen verbrennt� Diese Funktion
regelmäßig verwenden�
LÖSEN VON PROBLEMEN
Problem Mögliche Ursache Abhilfemaßnahme
Der Ofen funktioniert nicht�
Beim Ausschalten des Ofens
Stromausfall.
Trennung von der
Stromversorgung.
Kühlgebläse aktiv. Die Tür önen und warten bis der
produziert dieser Geräusche�
Das Display zeigt ein „F“ gefolgt
Softwarefehler. Den nächsten Kundendienst kontaktieren und die
von einer Nummer an�
SUPPORT
Bei Betriebsstörungen wenden Sie sich bitte an einen
Franke Technischen Kundenservice�
Nehmen Sie nie die Dienste nicht autorisierter
Techniker in Anspruch�
Machen Sie bitte folgende Angaben:
- Art des Fehlers
- Gerätemodell (Art�/Code)
- Seriennummer (S�N�) auf dem Typenschild an der
rechten Kante des Backofeninnenraums (bei offener
Backofentür sichtbar)�
Überprüfen, ob das Stromnetz Strom führt und
der Backofen an das Netz angeschlossen ist.
Schalten Sie den Backofen aus und wieder ein, um
festzustellen, ob die Störung erneut auftritt.
Abkühlungsvorgang beendet ist.
Nummer angeben, die dem Buchstaben „F“ folgt.
Wird unser Kundendienst
kontaktiert, bitte
die Codes auf dem
Typenschild des Produkts
angeben�
XXXXXXXXXXXX
XXXXXXXXXXXX
XXX/XXX
24
001
Page 25

FR
SOMMAIRE
APERÇU ������������������������������������������������������������������������������������������������������������������������������������������������������������������������������������� 26
PANNEAU DE COMMANDE �������������������������������������������������������������������������������������������������������������������������������������������������26
DESCRIPTION DE L'ÉCRAN ��������������������������������������������������������������������������������������������������������������������������������������������������27
ACCESSOIRES �������������������������������������������������������������������������������������������������������������������������������������������������������������������������� 27
FONCTIONS ����������������������������������������������������������������������������������������������������������������������������������������������������������������������������� 28
PREMIÈRE UTILISATION ��������������������������������������������������������������������������������������������������������������������������������������������������������29
USAGE QUOTIDIEN ���������������������������������������������������������������������������������������������������������������������������������������������������������������� 30
CONSEILS UTILES ������������������������������������������������������������������������������������������������������������������������������������������������������������������� 32
TABLEAU DE CUISSON ����������������������������������������������������������������������������������������������������������������������������������������������������������33
RECETTES TESTÉES ���������������������������������������������������������������������������������������������������������������������������������������������������������������� 34
NETTOYAGE ET ENTRETIEN �������������������������������������������������������������������������������������������������������������������������������������������������35
GUIDE DE DÉPANNAGE �������������������������������������������������������������������������������������������������������������������������������������������������������� 35
ASSISTANCE ����������������������������������������������������������������������������������������������������������������������������������������������������������������������������� 35
25
Page 26
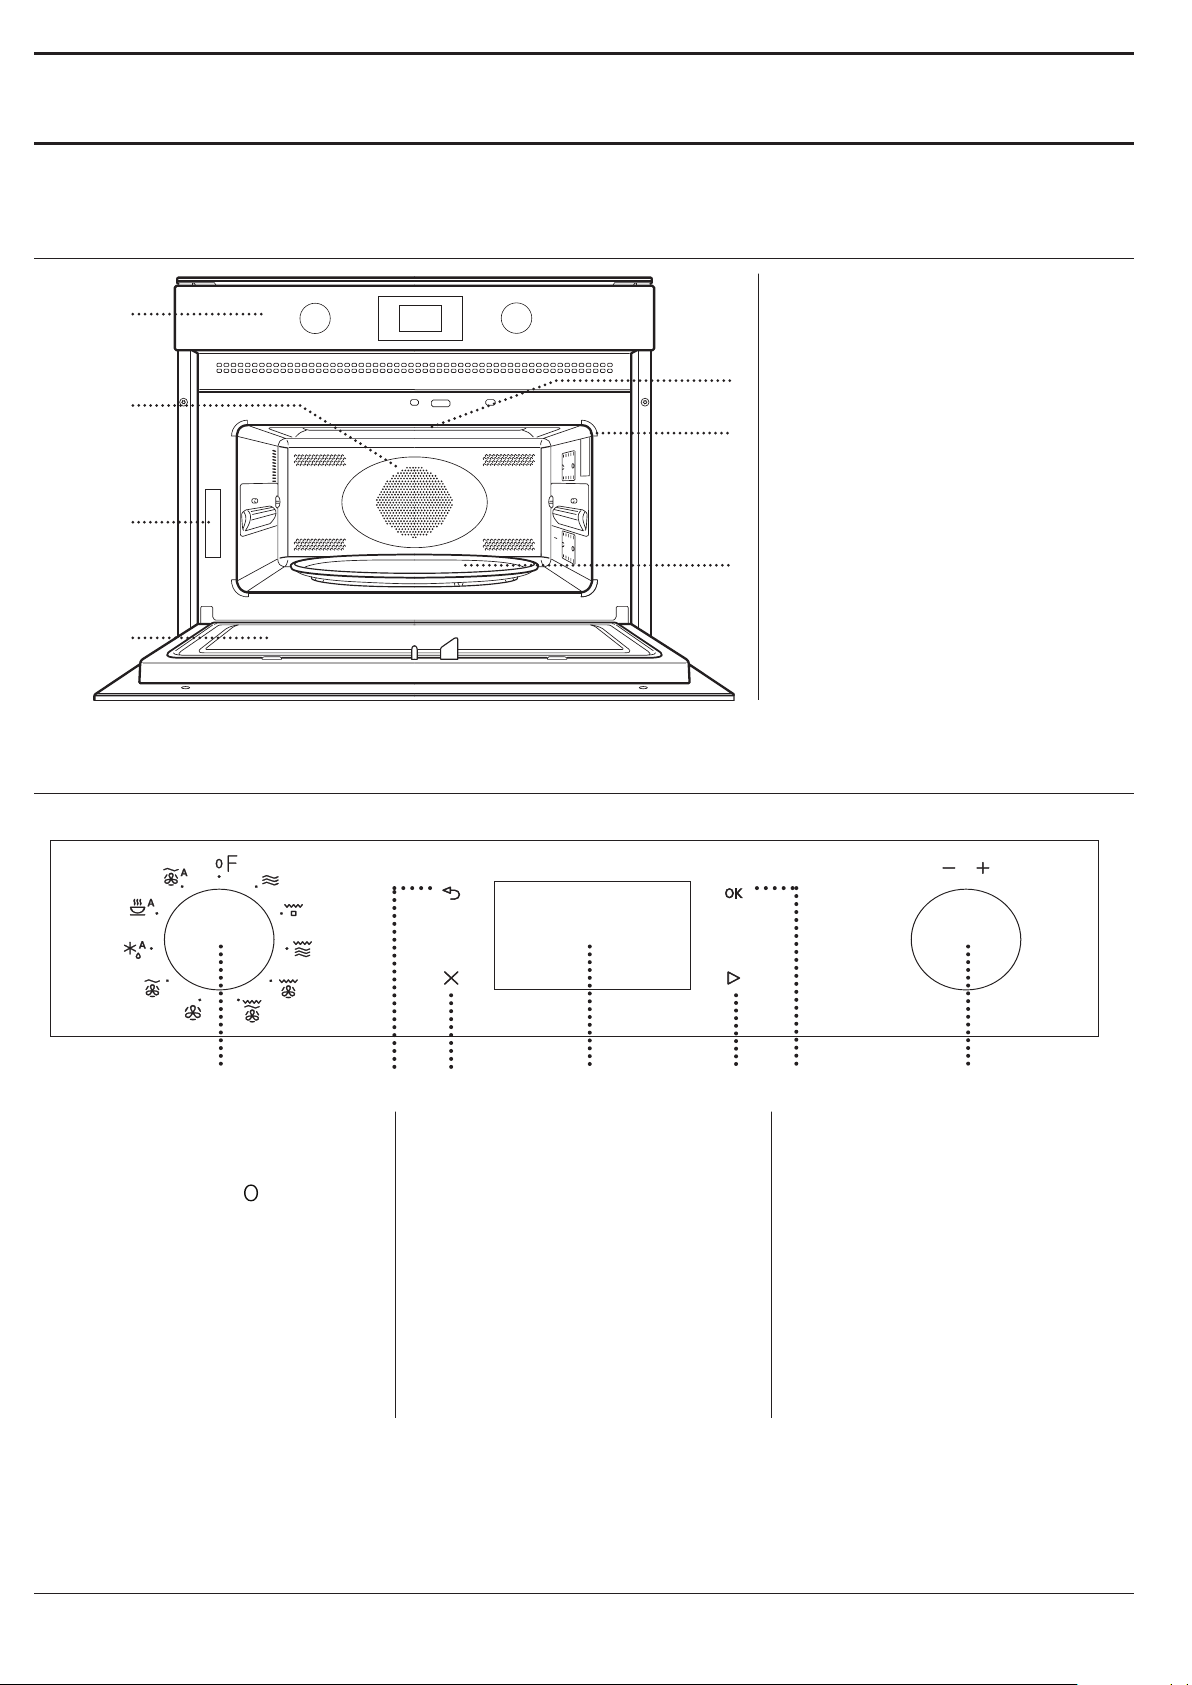
GUIDE DE L'UTILISATEUR
APERÇU
1
2
3
4
1. Panneau de commande
2. Élément chauffant rond
(invisible)
3. Plaque signalétique
5
(ne pas enlever)
4. Porte
6
5. Élément de chauffage
supérieur/grill
6. Éclairage
7. Plaque Tournante En Verre
7
PANNEAU DE COMMANDE
1 7
1. BOUTON DE SÉLECTION
Pour allumer le four en
sélectionnant une fonction�
Tournez à la position
2. RETOUR
Pour retourner au menu précédent�
pour
2
3
3. ARRÊT
Pour interrompre une fonction en
cours à tout moment� Appuyez
deux fois pour interrompre la
fonction et placer le four en attente�
4. ÉCRAN
5. AU DÉMARRAGE
Pour lancer les fonctions et
confirmer les réglages� Lorsque
le four est éteint, elle active la
fonction du four à micro-ondes�
4 5
6
6. CONFIRMER
Pour confirmer la sélection d'une
fonction ou le choix d'une valeur�
7. BOUTON DE RÉGLAGE
Pour naviguer à travers les menus
et confirmer ou changer les
réglages�
26
Page 27
DESCRIPTION DE L'ÉCRAN
FR
5
1
2
6
ACCESSOIRES
PLAQUE TOURNANTE EN VERRE
Installée sur son support, la
plaque tournante en verre peut
être utilisée avec toutes les
méthodes de cuisson�
La plaque tournante doit
toujours être utilisée comme
base pour les autres récipients ou accessoires, à
l’exception de la plaque de cuisson rectangulaire�
1. Contrôle températures
2. Réglages de l'heure et de la
3
4
3. Sélection de la puissance du
4. Sélection du poids
5. Horloge, informations et durée
6. Symboles pour la fonction
GRILLE MÉTALLIQUE
durée de la fonction
micro-ondes
de la fonction
sélectionnée
Elle vous permet de placer les
aliments plus prêt de la grille
pour un dorage parfait de votre
plat� Placez la grille métallique
sur la plaque tournante�
SUPPORT DU PLATEAU TOURNANT
Utilisez le support uniquement
pour la plaque tournante en
verre� Ne placez pas d’autres
accessoires sur le support�
PLAQUE DE CUISSON RECTANGULAIRE
Utilisez la plaque à pâtisserie
uniquement avec les fonctions
pour la cuisson par convection; elle
ne doit jamais être utilisée avec
la fonction four à micro-ondes�
Insérez la plaque à l’horizontale en
la plaçant sur la grille du compartiment de cuisson�
Veuillez noter : Vous n’avez pas besoin d’enlever la plaque
tournante et son support lorsque vous utilisez la plaque à
pâtisserie rectangulaire.
Le nombre et le type d'accessoires peuvent varier en fonction du modèle acheté.
Pour les accessoires qui ne sont pas fournis, il est possible de les acheter séparément auprès du Service Après-Vente.
De nombreux accessoires sont disponibles sur le
marché. Avant d’en acheter un, assurez-vous qu’il est
adapté pour la cuisson au four à micro-ondes et qu’il
est résistant à la chaleur du four.
Ne jamais utiliser de récipients métalliques pour
aliments ou boissons pendant la cuisson au microonde.
COUVRIR
Utile pour couvrir les aliments
lors de la cuisson ou lorsqu’on les
réchauffe dans le four à microondes� Le couvercle réduit les
éclaboussures, garde les aliments
tendres, et peut aussi être utilisé
pour créer un deuxième niveau de cuisson�
Ne l’utilisez pas pour la cuisson à convection ou
toutes les fonctions avec le gril�
Toujours s’assurer que les aliments et les accessoires
ne touchent pas aux parois internes du four.
Toujours vous assurer que la plaque tournante peut
tourner librement avant de mettre l'appareil en
marche. Assurez-vous de ne pas déplacer la plaque
tournante lorsque vous insérez ou retirez des
accessoires.
27
Page 28
FONCTIONS
MICROONDES
Pour rapidement cuire ou réchauffer des
aliments ou des breuvages�
PUISSANCE RECOMMANDÉ POUR
900W
750W
650W
Rapidement réchauez les boissons ou les
aliments avec une forte teneur en eau
Cuisson de légumes
Cuisson de la viande et du poisson
Cuisson de sauces à la viande, ou les
500W
sauces contenant du fromage ou des
œufs. Terminer la cuisson des pâtés à la
viande et les pâtes cuites
350W
160 W
90W
Cuisson lente et délicate. Idéal pour faire
fondre le beurre ou le chocolat
Décongélation des aliments surgelés ou
ramollir le beurre et le fromage
Ramollissement de crèmes glacées
GRILL
Pour dorer, griller, et gratiner� Nous vous
conseillons de retourner les aliments durant la cuisson�
Pour de meilleurs résultats, préchauffez le gril de 3
à 5 minutes�
Accessoires recommandés: Grille supérieure
AIR PULSÉ + MO
Pour préparer des plats en peu de temps�
Accessoires recommandés: Grille inférieure
AUTO DEFROST *
Pour rapidement décongeler différents types
d'aliments en précisant leur poids�
Placez les aliments directement sur la plaque
tournante en verre� Retournez les aliments lorsque
qu'indiqué�
CATÉGORIE ALIMENTS POIDS
VIANDE
(mince, côtelettes, biftecks, rôtis)
VOLAILLE
(poulet entier, morceaux, lets)
POISSON
(entier, darnes, lets)
LÉGUMES
(macédoine de légumes, petits
pois, brocolis, etc.)
PAIN
(pains, petits pains, brioches)
100 g - 2 kg
100 g - 2,5 kg
100 g - 1,5 kg
100 g - 1,5 kg
100 g - 1 kg
GRIL + MICROONDES
Pour rapidement cuire et gratiner les plats en
combinant les fonctions de four à micro-ondes et grill�
Accessoires recommandés: Grille supérieure
TURBO GRILL
Pour des résultats parfaits en combinant les
fonctions gril et convection� Nous vous conseillons
de retourner les aliments durant la cuisson�
Accessoires recommandés: Grille supérieure
TURBO GRIL + MO
Pour rapidement cuire et dorer vos aliments
en combinant les fonctions de four à micro-ondes,
gril, et convection�
Accessoires recommandés: Grille supérieure
CHALEUR PULSÉE
Pour cuire des plats de façon à obtenir des
résultats comparables à la cuisson avec un four
conventionnel� Vous pouvez utiliser la plaque à
pâtisserie ou d’autre plat de cuisson résistant à la
chaleur pour cuire certains aliments�
Accessoires recommandés: Grille métallique basse /
plaque de cuisson rectangulaire
28
Page 29
FR
RÉCHAUFFAGE / CUISSON AUTO *
Pour réchauffer les repas préparés surgelés
ou à la température de la pièce et cuire rapidement
des aliments pour obtenir les meilleurs résultats�
Le four détermine automatiquement les réglages
nécessaires pour les meilleurs résultats, le plus
rapidement possible� Disposez les aliments sur un
plat résistant à la chaleur et adapté au four à microondes�
CATÉGORIE ALIMENTS POIDS
ASSIETTE À DÎNER 250 - 500 g
PLAT SURGELÉ 250 - 500 g
LASAGNES SURGELÉES 250 - 500 g
SOUPES 200 - 800 g
BOISSONS 100 - 500 g
POMMES DE TERRES CUITES
(Tournez lorsque vous y être
invités)
LÉGUMES FRAIS
(Coupez en morceaux de taille
identique et ajoutez 2 à 4
cuillerées à souple d'eau. Couvrir)
LÉGUMES SURGELÉS
(Tournez lorsque vous y êtes
invité. Couvrir)
200 g - 1 kg
200 - 800 g
200 - 800 g
CHALEUR PULSÉE + MO*
Pour cuire des aliments dans le four
rapidement tout en obtenant d'excellents résultats�
Utilisez des plats de cuisson qui sont résistants à la
chaleur et adaptés au four à micro-ondes�
CATÉGORIE ALIMENTS POIDS
POULET RÔTI 800 g - 1,5 kg
COOKIES 300g
POISSON ENTIER 600 g - 1,2 kg
GRATIN DE POMMES DE TERRE 800 g - 2 kg
RÔTI DE BOEUF 800 g - 1,5 kg
* Avec les fonctions automatiques, simplement sélectionnez
le type et le poids, ou la quantité d'aliments, pour obtenir les
meilleurs résultats. Le four détermine automatiquement les
meilleurs réglages et les ajuste tout au long de la cuisson.
Retournez les aliments lorsque qu'indiqué.
LÉGUMES EN CONSERVE 200 - 600 g
POPCORN 100g
PREMIÈRE UTILISATION
. RÉGLER L'HEURE
Vous devez régler l'heure lorsque vous allumez
l'appareil pour la première fois : Les deux chiffres
indiquant l'heure clignotent à l'écran�
Tournez le bouton de réglage pour régler l'heure et
appuyez sur
minutes clignotent� Tournez le bouton de réglage
pour régler l'heure et appuyez sur
pour confirmer� Les deux chiffres des
pour confirmer�
Veuillez noter: Pour changer l'heure plus tard, appuyez sur
pour au moins 3 seconde alors que le four est éteint et
répétez les étapes décrites plus haut.
Vous pourriez avoir à régler l'heure à la suite d'une panne de
courant prolongée.
29
Page 30
USAGE QUOTIDIEN
. JET START
Lorsque le four est éteint, vous pouvez appuyer sur
pour activer la cuisson avec la fonction four à
micro-ondes à pleine puissance (900W) pendant 30
secondes�
1. SÉLECTIONNER UNE FONCTION
Lorsque le four est éteint, seul l'heure est affichée
à l'écran� Tournez le bouton de réglage pour
sélectionner une des fonctions disponibles�
2. RÉGLER UNE FONCTION
. FONCTIONS MANUELLES
Après avoir sélectionné la fonction désirée, vous
pouvez changer les réglages�
L'écran affiche en séquence les réglages qui peuvent
être changés�
PUISSANCE DU FOUR À MICRO-ONDES /
TEMPÉRATURE
. FONCTIONS AUTOMATIQUES / AUTO DEFROST
CATÉGORIES
Une fois que vous avez choisi une des fonctions
automatiques, vous devrez sélectionner une catégorie
pour les aliments que vous cuisez�
Lorsque le voyant clignote à l'écran, tournez le
bouton de réglage pour sélectionner le numéro de
la catégorie désirée et appuyez ensuite sur
confirmer�
POIDS
Pour obtenir les meilleurs résultats, vous devez
indiquer le poids des aliments pour les fonctions
automatiques en choisissant parmi les paramètres
par défaut : le four calculera la durée idéale de
fonctionnement de la fonction pour chaque catégorie
d'aliment�
pour
Lorsque le voyant à l'écran, tournez le bouton de
réglage pour ajuster la puissance et appuyez ensuite
sur
réglages qui suivent (si possible)�
De la même façon, lorsque le voyant
l'écran, tournez le bouton de réglage pour ajuster
la température et appuyez ensuite sur
confirmer et continuer de modifier les réglages qui
suivent�
Veuillez noter : une fois que la fonction a été activée, la
puissance peut être modiée en appuyant deux fois sur
pour accéder au menu de réglage de la puissance, puis en
tournant le bouton de réglage pour modier la valeur.
DURÉE
Lorsque le voyant clignote à l'écran, tournez le
bouton de réglage pour régler la durée désirée�
Une fois que le temps de cuisson désiré est affiché,
appuyez sur
Veuillez noter: Pendant la cuisson, vous pouvez ajuster le
temps de cuisson en tournant le bouton ; chaque fois que
vous appuyez sur le temps de cuisson augmente de 30
secondes.
pour confirmer et continuer de modifier les
clignote à
pour
pour confirmer et lancer la fonction�
Lorsque le paramètre par défaut apparaît à l'écran
et que le voyant
réglage pour régler le poids, appuyez ensuite sur
pour confirmer et lancer la fonction�
clignote, tournez le bouton de
3. ACTIVER LA FONCTION
Une fois que vous avez terminé les réglages, appuyez
sur
Chaque fois que vous appuyez sur la touche
la durée de cuisson augmente de 30 secondes
supplémentaires (seulement pour les fonctions
manuelles)�
Veuillez noter: Vous pouvez appuyer deux fois sur à tout
moment pour interrompre la fonction en cours.
pour lancer la fonction�
. VERROU DE SÉCURITÉ
Cette fonction est activée automatiquement pour
empêcher d'allumer le four accidentellement�
Ouvrez et fermez la porte, appuyez ensuite sur
pour lancer la fonction�
30
Page 31
4. PAUSE
Pour interrompre une fonction en cours (pour brasser
ou retourner les aliments par exemple), ouvrez
simplement la porte�
Pour redémarrer la fonction, fermez la porte et
appuyez sur
Il est aussi possible d'interrompre temporairement
la cuisson en appuyant
processus de cuisson, fermez la porte et appuyez sur
�
INTERRUPTION AUTOMATIQU
(BRASSER OU TOURNER LES ALIMENTS)
Certaines fonctions vont s'interrompre pour vous
permettre de tourner ou de brasser les aliments�
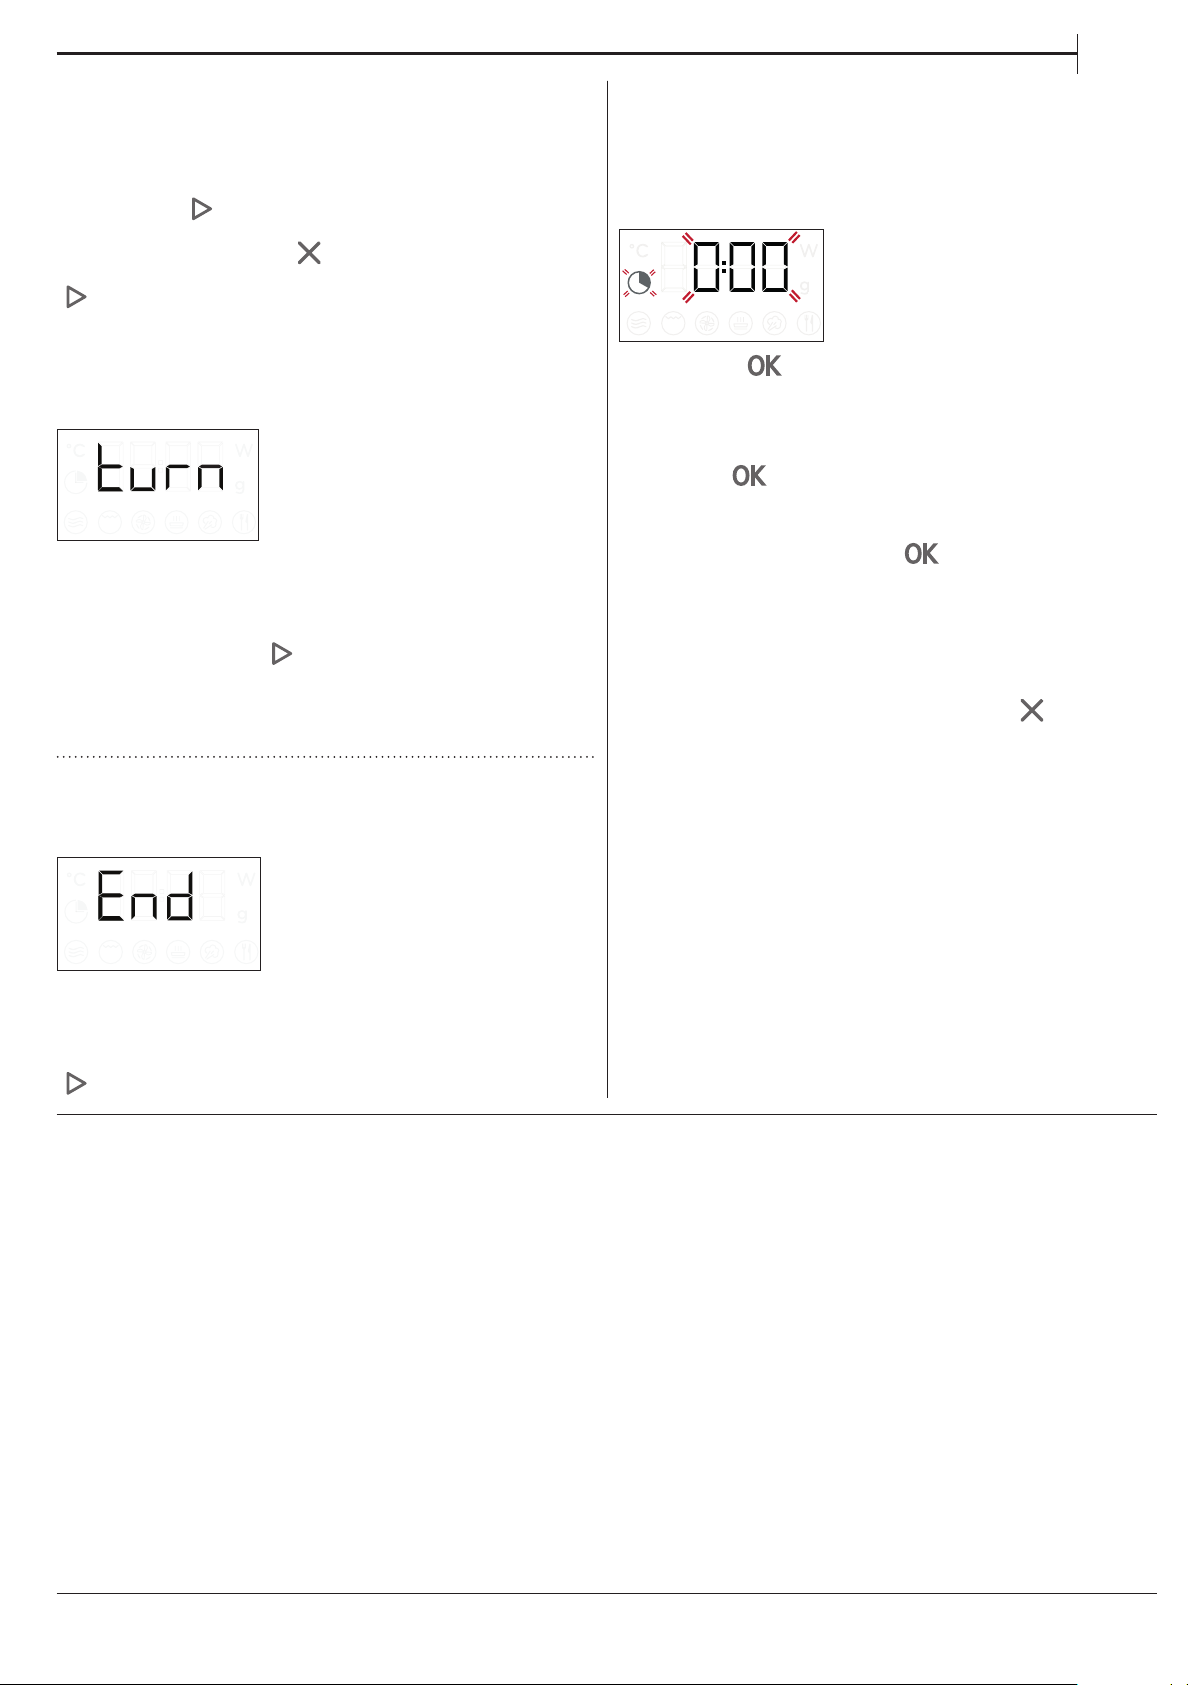
Lorsque le four interrompt la cuisson, « Turn Food
(tournez les aliments) » ou « Stir Food (Brasser les
aliments) » apparaît à l'écran; ouvrez la porte pour
tourner ou brasser les aliments, fermez ensuite la
porte et appuyez sur
Veuillez noter : après deux minutes, même si les aliments
n'ont pas été tournés ou brassés, la fonction démarre de
nouveau automatiquement.
�
� Pour retourner au
pour relancer la cuisson�
FR
. TIMER
Lorsque le four est éteint, l’écran peut être utilisé
comme minuterie� Le minuteur ne démarre pas de
cycle de cuisson�
Pour lancer la fonction et régler le temps de cuisson,
vous devez tournez le bouton de réglage�
Appuyez sur pour lancer la minuterie� Un signal
sonore se fait entendre et une indication apparaît
à l’écran lorsque la minuterie a terminé le compte à
rebours� Pour modifier la minuterie une fois quelle
est active, tournez le bouton de réglage et appuyez
ensuite sur
Pour l'interrompre ou retourner à l'affichage de
l'heure, tournez le bouton de réglage pour afficher
0:00 à l'écran et appuyez sur
Veuillez noter: Une fois que la minuterie a commencé
le compte à rebours, vous pouvez aussi utiliser une
fonction : La minuterie va continuer son compte à rebours
automatiquement, sans conséquence sur la fonction.
Pour acher la minuterie de nouveau, attendez la n de la
fonction ou éteindre le four en appuyant sur .
pour confirmer�
�
5. FIN DE CUISSON
Un signal sonore se fait entendre et le mot « End »
apparaît à l'écran lorsque la cuisson est terminée�
Pour certaines fonctions, il est possible de différer
la cuisson tout en maintenant les réglages déjà
déterminés : tournez le bouton de réglage pour régler
le nouveau temps de cuisson, appuyez ensuite sur
�
31
Page 32

CONSEILS UTILES
COMMENT LIRE LE TABLEAU DE CUISSON
Le tableau indique les meilleures fonctions à utiliser
avec les différents aliments�
Les temps de cuisson font référence au cycle de
cuisson des aliments à l'intérieur du four, excluant la
phase de préchauffage (lorsque requise)�
Les réglages et temps de cuisson sont approximatifs
et dépendent de la quantité d'aliments et du type
d'accessoire(s) utilisé(s)�
Laissez toujours cuire les aliments pendant le temps
de cuisson minimum spécifié et contrôlez si la cuisson
est suffisante�
Pour de meilleurs résultats, suivez soigneusement les
recommandations dans le tableau de cuisson lorsque
vous sélectionnez des accessoires�
CONSEILS POUR LA CUISSON AU FOUR À MICRO
ONDES
Les micro-ondes pénètrent les aliments jusqu'à une
certaines profondeur;
vous devriez donc espacer le plus possible les
aliments lorsque vous en cuisez plusieurs en même
temps�
Les petits morceaux cuisent plus rapidement que les
gros: Pour une cuisson uniforme, coupez les aliments
en morceaux de même taille�
L'humidité s'évapore pendant la cuisson aux microondes: Utilisez un couvercle allant au four à microondes pour réduire la perte d'humidité�
Lorsque vous retirez les aliments du four à microondes, ils vont normalement continuer à cuire
pendant un certain temps� Nous vous conseillons
donc de toujours permettre un temps de repos de
quelques minutes une fois le cycle de cuisson terminé�
Il est conseillé de brasser les aliments durant la
cuisson au four à micro-ondes; les morceaux plus
cuits, qui se trouvent sur les bords l'extérieur sont
déplacés vers le centre et vice versa�
Placez les tranches de viande fines les unes sur les
autres ou entrelacez-les� Les tranches plus épaisses,
comme le pain de viande et la saucisse, doivent être
placées une à côté de l'autre�
PELLICULE AUTOCOLLANTE ET EMBALLAGE
Enlevez les fermetures métalliques des sachets en
papier ou en plastique avant de les placer dans le four
à micro-ondes�
La pellicule plastique doit être perforée avec une
fourchette pour diminuer la pression et éviter une
explosion causée par l'accumulation de vapeur lors de
la cuisson�
LIQUIDES
Les liquides peuvent chauffer au-delà du point
d'ébullition sans générer de bulles visibles�
Les liquides chauds risquent par conséquent de
déborder brusquement�
Afin d'empêcher cela:
� Évitez les récipients avec un goulot étroit�
� Remuez le liquide avant de placer le récipient dans le
four et laissez la petite cuillère dans le récipient�
� Une fois le liquide chauffé, remuez-le une nouvelle
fois avant de le sortir prudemment du four à microondes�
SURGELÉ
Pour de meilleurs résultats, nous vous conseillons de
décongeler les aliments directement sur le plateau
tournant en verre� Au besoin, vous pouvez aussi
utiliser un récipient en plastique léger, adapté au four
à micro-ondes�
Les aliments bouillis, les ragoûts, et les sauces à base
de viande se décongèlent mieux s'ils sont remués
durant la décongélation�
Séparez les morceaux dès qu'ils commencent à se
décongeler: les portions séparées décongèlent plus
rapidement�
NOURRITURE POUR BÉBÉS
Après avoir réchauffé des aliments pour bébé
(biberons, petits pots), remuez toujours et vérifiez la
température avant de servir�
Cela permet de répartir correctement la chaleur et
d'éviter ainsi des risques de brûlure�
Enlevez la tétine et le couvercle avant de réchauffer�
VIANDES ET POISSONS
Pour obtenir un dorage parfait en surface et tout en
maintenant l'intérieur de la viande ou du poisson
tendre et juteux, nous vous recommandons d'utiliser
la fonction « Grill + MO»� Pour de meilleurs résultats,
réglez la puissance du four à micro-ondes entre 160 et
350 W�
32
Page 33
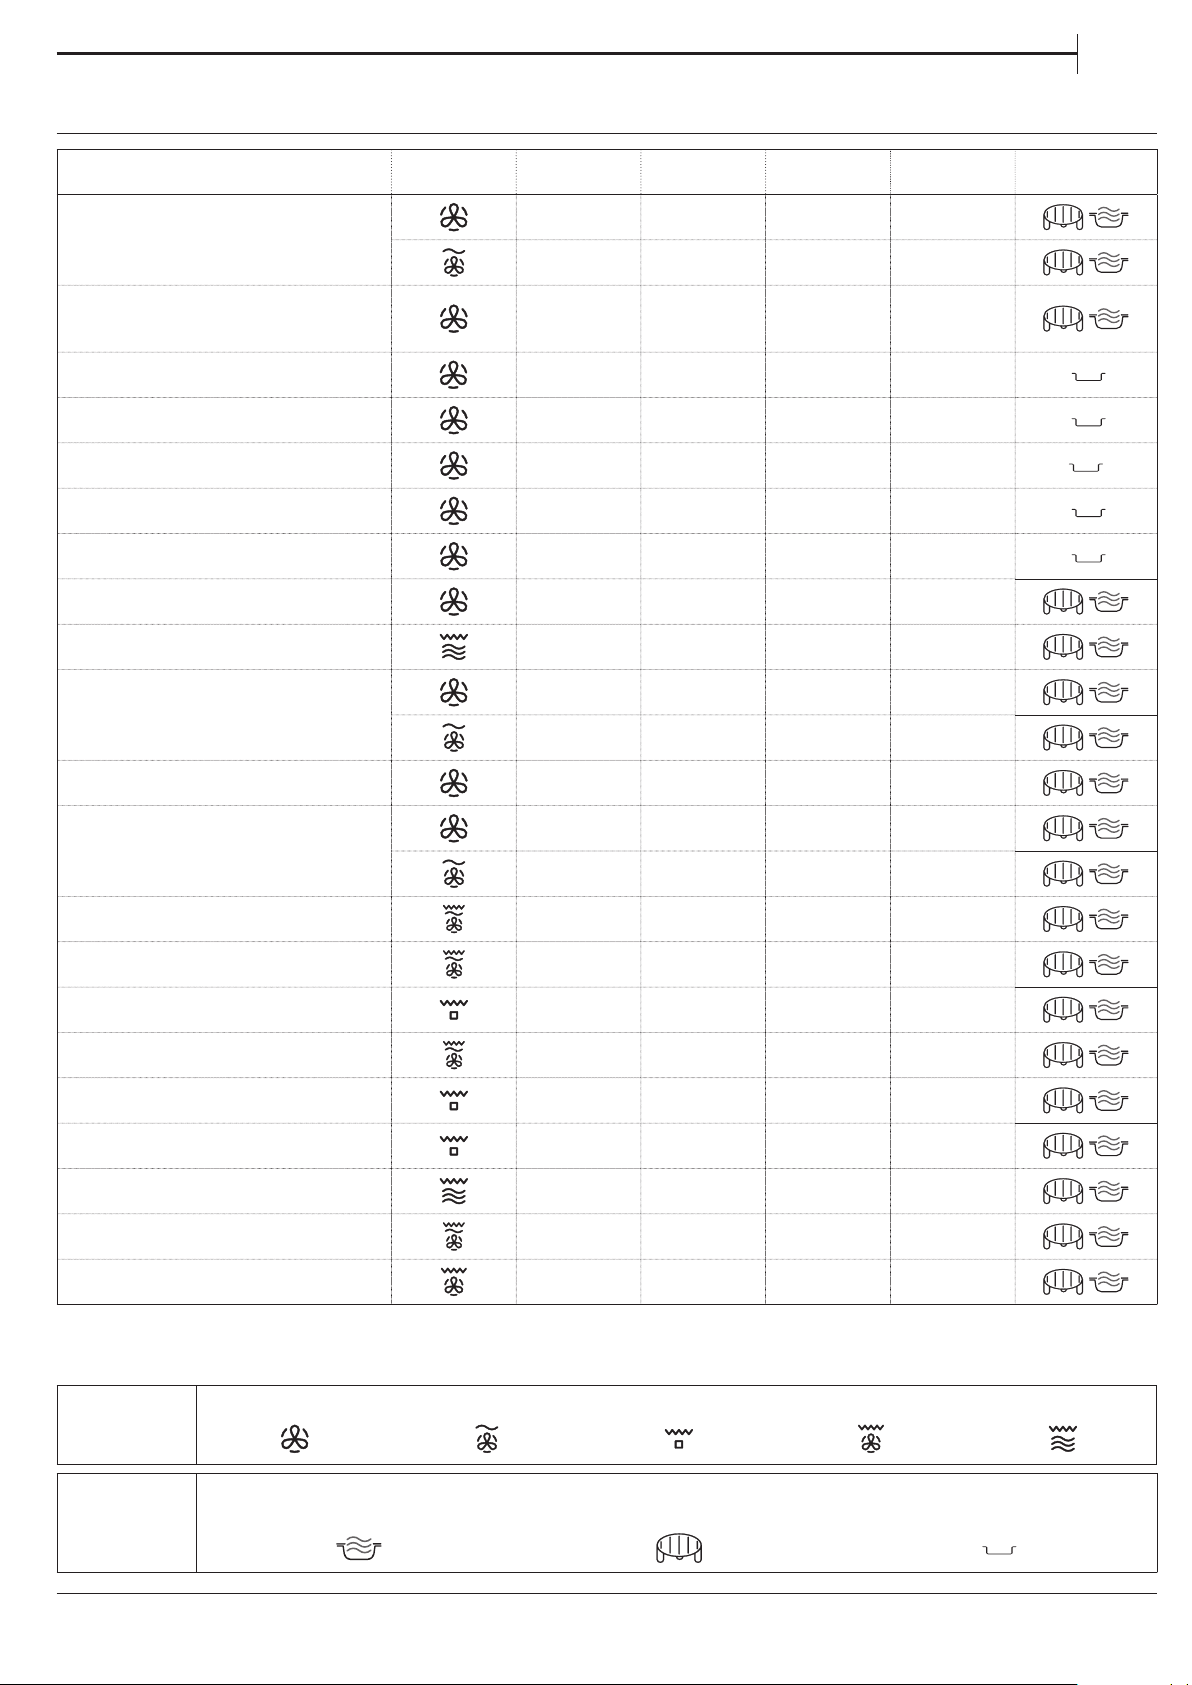
TABLEAU DE CUISSON
FR
ALIMENTS FONCTION CHAUFFAGE
NIVEAU DU
GRILL
PUISSANCE
(W)
TEMPS (MIN) ACCESSOIRES
- 160 - 180 - 30-60
Gâteaux à pâte levée
- 160 - 180 90 25-50
Tartes garnies
(gâteau au fromage, strudel, tarte aux
pommes)
Oui 160-190 - 35-70
Cookies Oui 170 -180 - 10-20
Meringues Oui 100-120 - 40-50
Petits pains Oui 210-220 - 10 -12
Pain Oui 180-200 - 30-35
Pizza / Tarte Oui 190-220 - 20-40
Tartes salées (tarte aux légumes,
quiche lorraine)
Oui 180-190 - 40-55
Lasagnes/pâtes au four - 350-500 15-40
Rôti d'agneau ou de veau / Rôti
de bœuf
(1,3 - 1,5 kg)
- 170-180 - 70-80*
- 160-180 160 50-70*
Rôti de bœuf - à point (1,3-1,5 kg) - 170-180 - 40-60*
Poulet rôti/lapin/canard
(entier 1-1,2 kg)
Poulet / lapin / canard
(lets / morceaux 0,4 - 1 kg)
- 210-220 - 50 -70*
- 210-220 350 45-60*
- - 350-500 20-40*
Poisson au four (entier) - - 160-350 20-40
Filets/tranches de poisson Oui - - 15-30*
Légumes farcis
(tomates, courgettes, aubergines...)
- - 500-650 25-50
Pain grillé - - - 3-6
Saucisses / brochettes / côtes
levées / hamburgers
Pommes de terre au four
- - - 20-40*
- - 350-500 20-40*
Fruits cuits - - 160 -350 15-25
Gratin de légumes - - - 15-25
* Tournez les aliments à mi-cuisson.
Les tableaux des recettes testées sont compilés pour les autorités de certication, conformément aux normes CEI 60705 et CEI 60350.
FONCTIONS
ACCESSOIRES
Chaleur pulsée
Plat résistant à la chaleur/récipient allant au
four à micro-ondes
Chaleur pulsée + MO Grill Turbo grill Grill + MO
Grille métallique Plaque de cuisson rectangulaire
33
Page 34
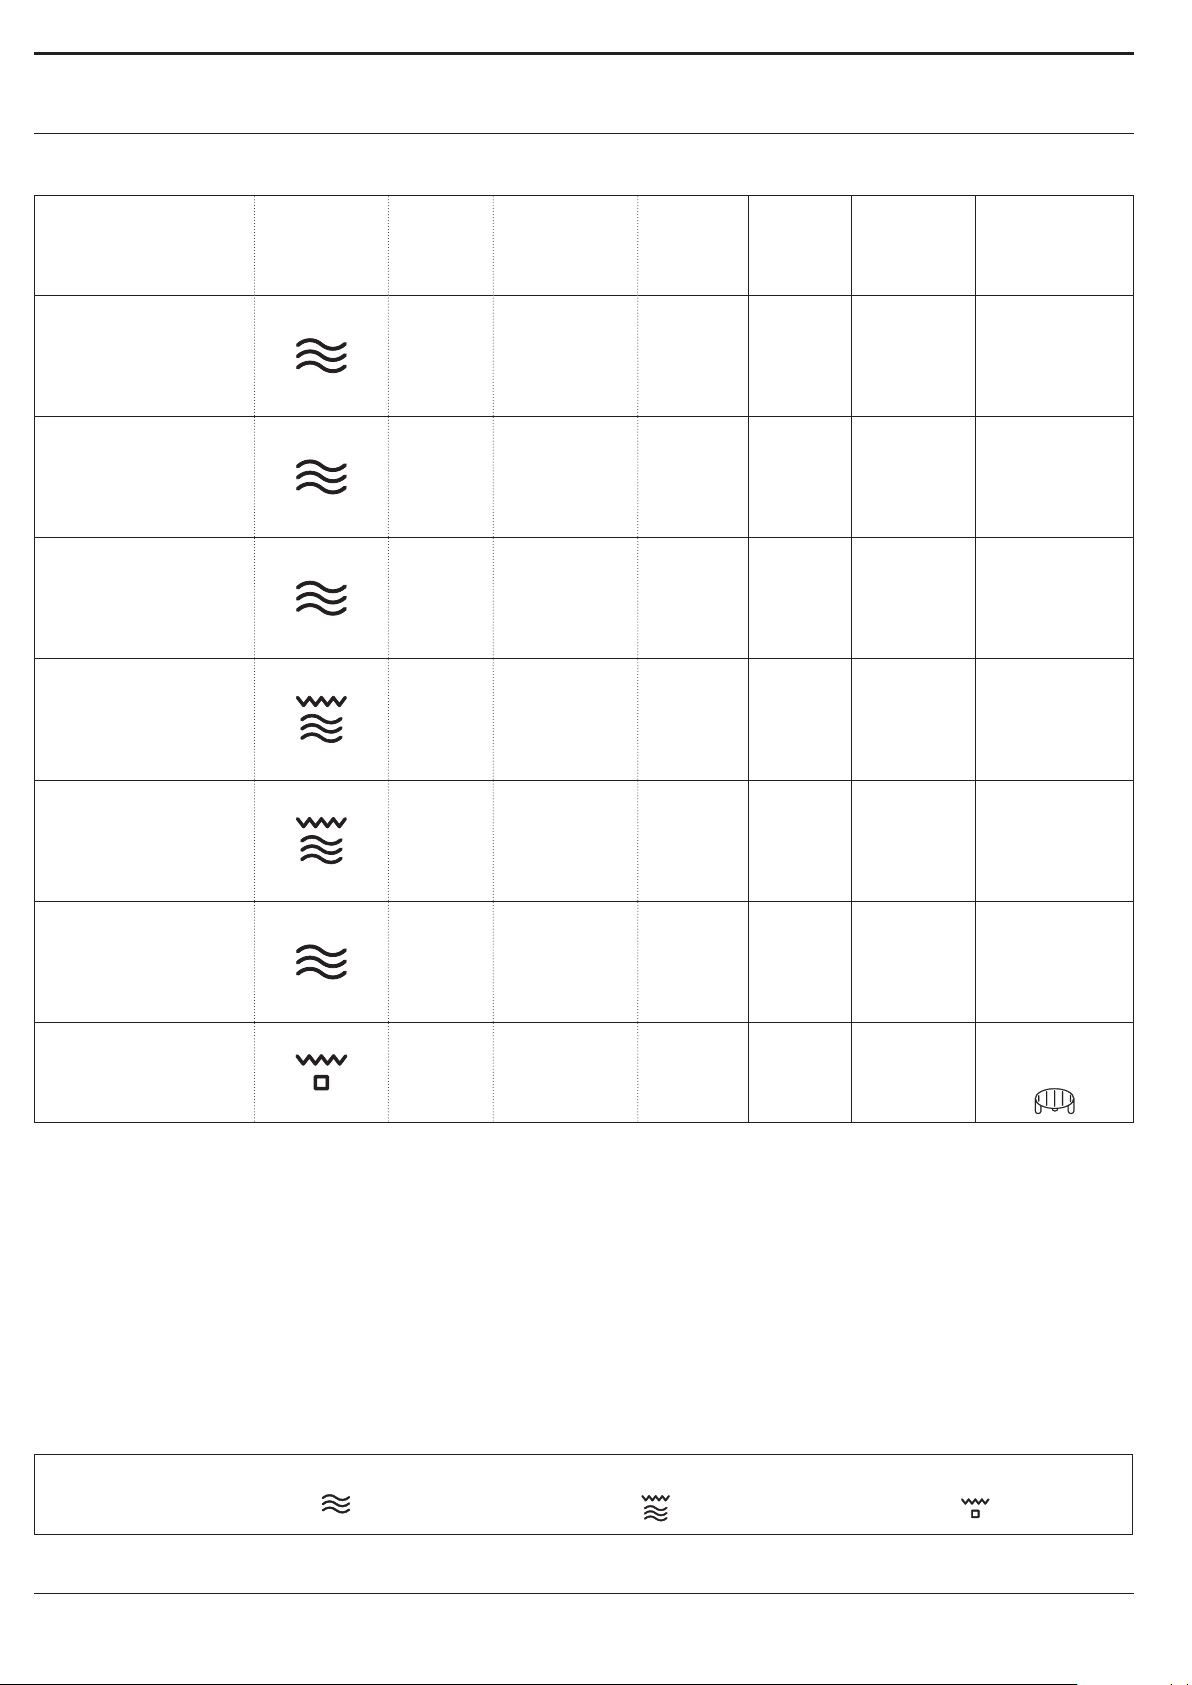
RECETTES TESTÉES
Compilées pour les autorités de certication, conformément aux normes CEI 60705 et CEI 60350-1.
ALIMENTS FONCTION
Crème pâtissière
Génoise
Pain de viande
Gratin de pomme
de terre
Poulet
Décongélation de la
viande
(Retournez à la moitié
du processus de
décongélation)
TEMP/
NIVEAU
DE LA
GRILLE
PUIS-
SANCE
(W)
CHAUFFER
POIDS
(g)
TEMPS DE
CUISSON
(min:sec)
1000 12:00 - 13:00 - 650 -
475 8:00 - 10:00 - 750 -
900 13:00 - 14:00 - 750 -
110 0 28:00 - 30:00 190 350 -
1200 35:00 - 40:00 210 350 -
500 10:30 - 160 -
PRÉ-
ACCESSOIRES
Récipient
allant au
four à micro-
ondes
(Pyrex 3�227)
Récipient
allant au
four à micro-
ondes
(Pyrex 3�827)
Récipient
allant au
four à micro-
ondes
(Pyrex 3�838)
Récipient
allant au
four à micro-
ondes
(Pyrex 3�827)
Récipient
allant au
four à micro-
ondes
(Pyrex 3�220)
Plaque
tournante
Pain grillé
FONCTIONS
34
- 4:00 - 6:00 3 - Oui
Micro-ondes Gril + Micro-ondes Grill
Grille
métallique
Page 35
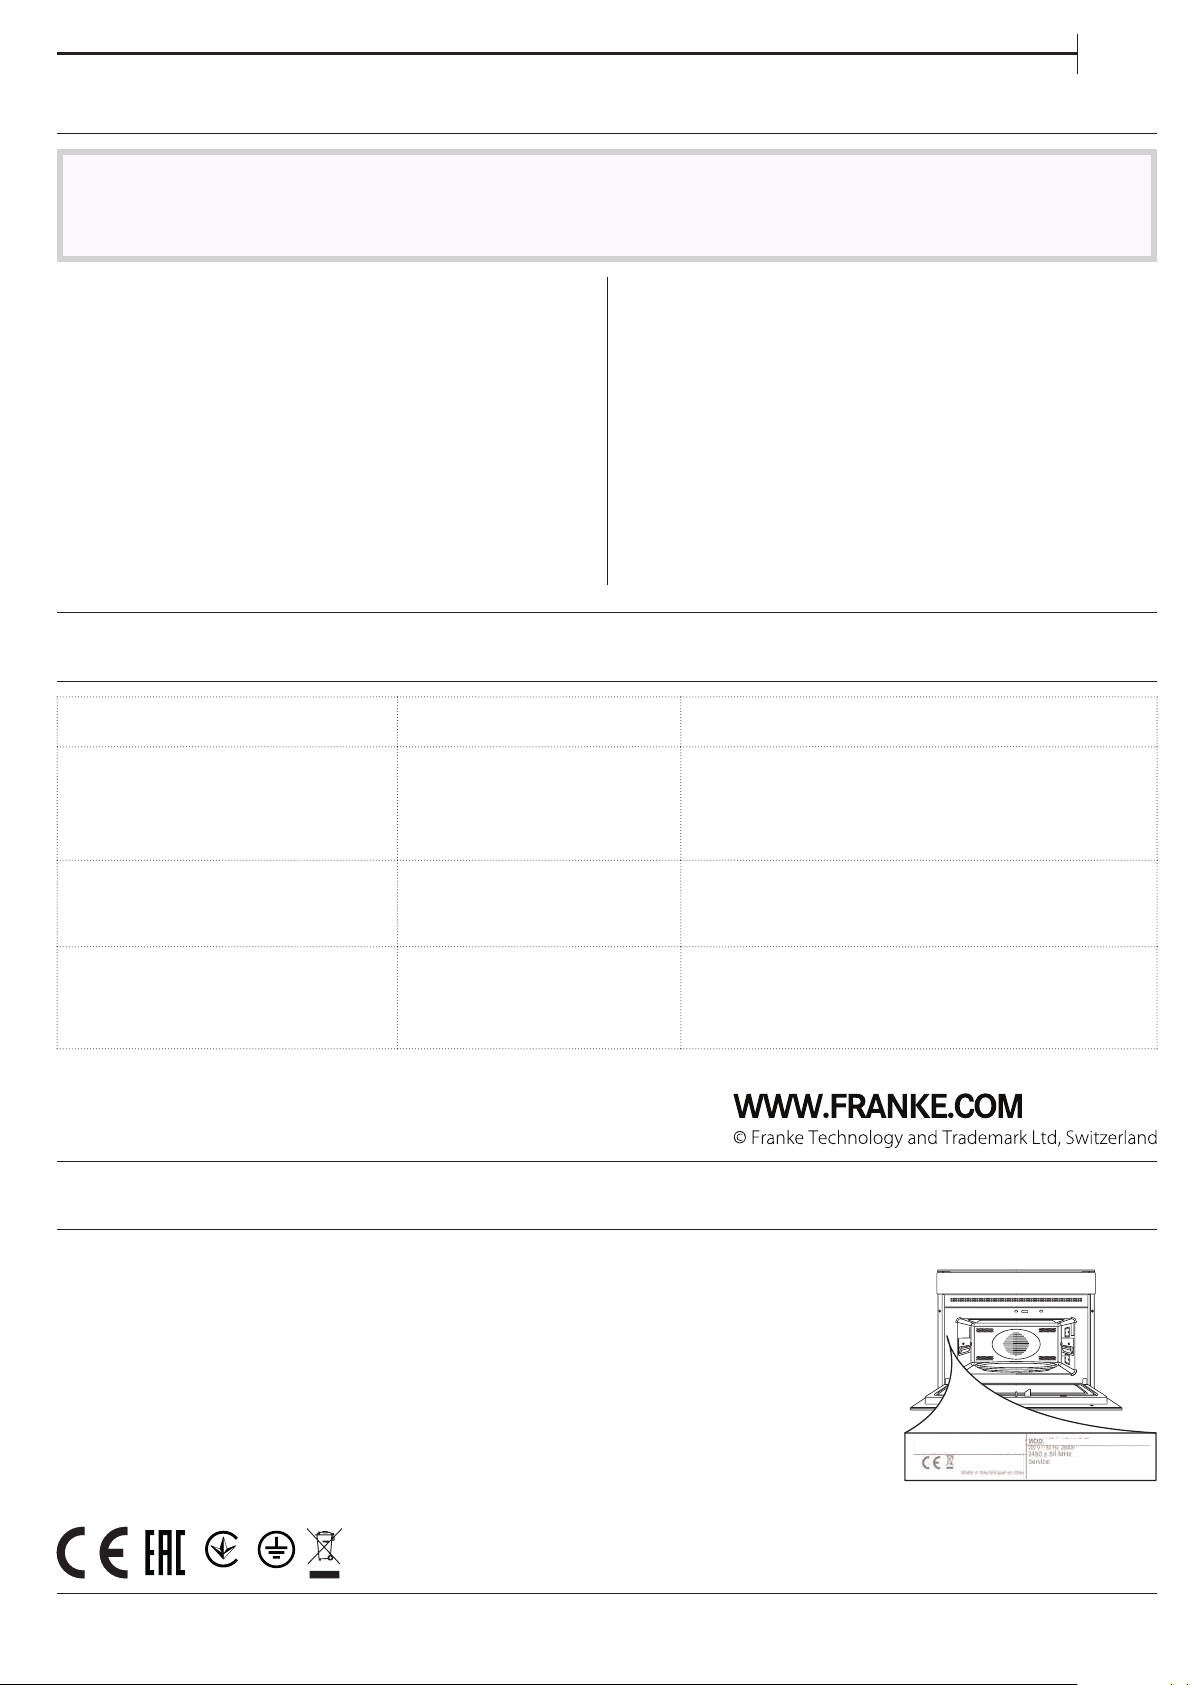
NETTOYAGE ET ENTRETIEN
FR
Assurez-vous que l’appareil est froid avant de le
nettoyer ou eectuer des travaux d’entretien.
N'utilisez pas de nettoyeurs vapeur.
SURFACES INTÉRIEURES ET EXTÉRIEURES
• Nettoyez les surfaces à l’aide d’un chiffon en
microfibre humide� Si elles sont très sales, ajoutez
quelques gouttes de détergent à pH neutre� Essuyez
avec un chiffon sec�
N’utilisez pas de laine d’acier, de tampons à récurer
abrasifs, ou des détergents abrasifs ou corrosifs, ils
pourraient endommager les surfaces de l’appareil.
ACCESSOIRES
Tous les accessoires conviennent au lave-vaisselle�
Pour les taches tenaces, frottez délicatement avec un
chiffon� Laissez toujours refroidir les accessoires avant
de les nettoyer�
• Nettoyez le verre de la porte avec un détergent
liquide approprié�
• À intervalles réguliers, ou en cas d'éclaboussures,
enlevez la plaque tournante et son support pour
nettoyer la base du four pour enlever tous les résidus
d'aliment�
• Le grill n'a pas besoin d'être nettoyé, la chaleur
intense brûle la saleté� Utilisez cette fonction de façon
régulière�
GUIDE DE DÉPANNAGE
Problème Cause possible Solution
Le four ne fonctionne pas�
Le four fait du bruit, même
Coupure de courant.
Débranchez de l'alimentation
principale.
Le ventilateur fonctionne. Ouvrez la porte ou attendez que le processus de
lorsqu'il est éteint�
L’écran affiche la lettre « F »
Erreur de logiciel. Prenez en note le numéro qui suit la lettre « F » et
suivi d’un numéro�
ASSISTANCE
En cas de problèmes de fonctionnement, contactez un
Centre de Maintenance technique Franke�
Ne faites jamais appel aux services de techniciens
non-agréés�
Communiquez:
- le type de panne
- le modèle d'appareil (art�/Code)
- le numéro de série (S�N�) la plaque signalétique),
situé sur le bord droit de la cavité du four (visible
quand la porte du four est ouverte)�
Assurez-vous qu'il n'y a pas de panne de courant et
que le four est bien branché. Éteignez puis rallumez
le four pour voir si le problème persiste.
refroidissement soit terminé.
contactez le Service Après-vente le plus près.
Lorsque vous contactez
notre Centre de service,
indiquez les codes
fournis sur la plaque
d'identification de votre
produit�
XXXXXXXXXXXX
XXXXXXXXXXXX
XXX/XXX
001
35
Page 36

SOMMARIO
DESCRIZIONE GENERALE�����������������������������������������������������������������������������������������������������������������������������������������������������37
PANNELLO COMANDI ����������������������������������������������������������������������������������������������������������������������������������������������������������� 37
DESCRIZIONE DEL DISPLAY ������������������������������������������������������������������������������������������������������������������������������������������������38
ACCESSORI ������������������������������������������������������������������������������������������������������������������������������������������������������������������������������� 38
FUNZIONI ��������������������������������������������������������������������������������������������������������������������������������������������������������������������������������� 39
PRIMO UTILIZZO ��������������������������������������������������������������������������������������������������������������������������������������������������������������������40
USO QUOTIDIANO ����������������������������������������������������������������������������������������������������������������������������������������������������������������� 41
CONSIGLI UTILI �����������������������������������������������������������������������������������������������������������������������������������������������������������������������43
TABELLA DI COTTURA ���������������������������������������������������������������������������������������������������������������������������������������������������������� 44
RICETTE TESTATE ������������������������������������������������������������������������������������������������������������������������������������������������������������������� 45
PULIZIA E MANUTENZIONE ������������������������������������������������������������������������������������������������������������������������������������������������ 46
RISOLUZIONE DEI PROBLEMI ���������������������������������������������������������������������������������������������������������������������������������������������46
ASSISTENZA ����������������������������������������������������������������������������������������������������������������������������������������������������������������������������46
36
Page 37
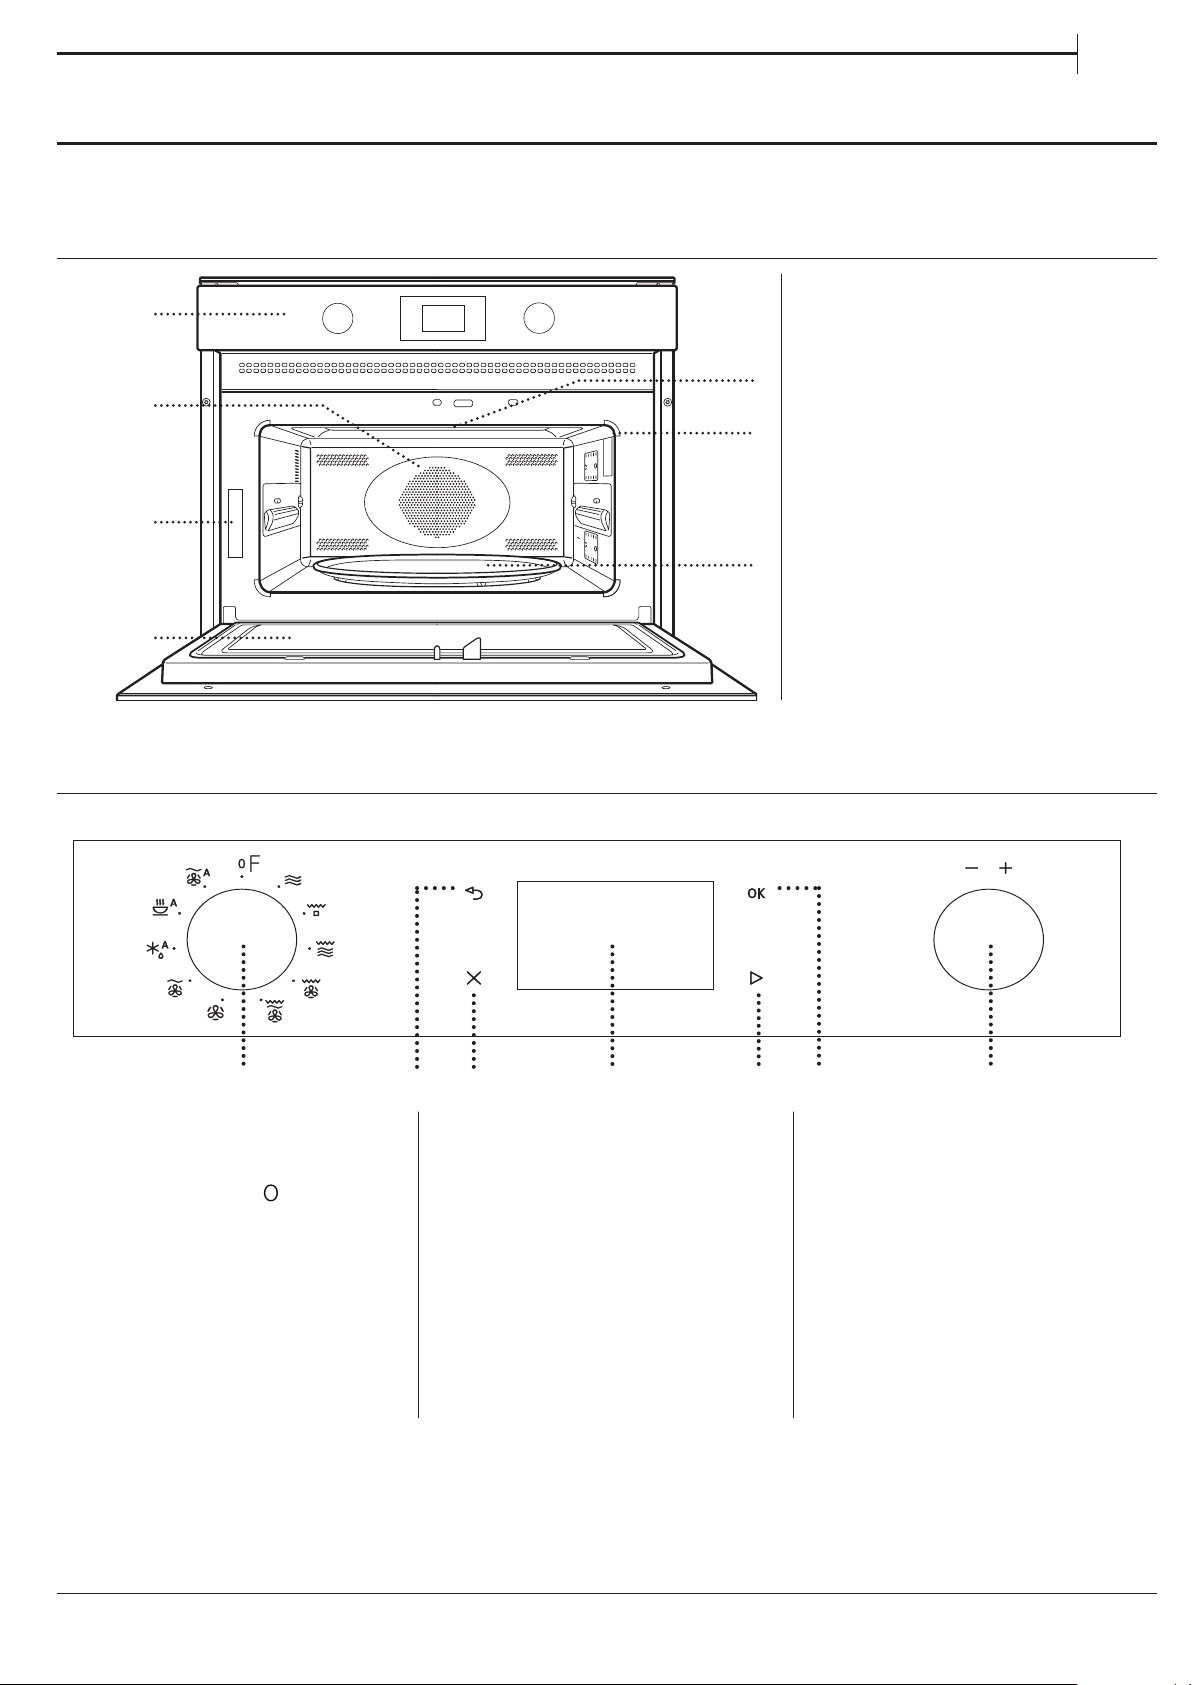
ISTRUZIONI PER L'USO
DESCRIZIONE GENERALE
1
2
3
4
1. Pannello comandi
2. Resistenza circolare
(non visibile)
3. Targhetta matricola
5
(da non rimuovere)
4. Porta
6
5. Resistenza superiore / grill
6. Luce
7. Piatto rotante in vetro
7
IT
PANNELLO COMANDI
1 7
1. MANOPOLA DI SELEZIONE
Per accendere il forno
selezionando una funzione�
Ruotare in posizione
spegnere il forno�
2. INDIETRO
Per tornare alla schermata di
impostazione precedente�
per
2
3
3. STOP
Per interrompere una funzione in
qualsiasi momento� Premere due
volte per interrompere la funzione
e mettere il forno in standby�
4. DISPLAY
5. AVVIO
Per avviare le funzioni e
confermare i valori impostati� A
forno spento, avvia la funzione
microonde�
4 5
6
6. CONFERMA
Per confermare la selezione di una
funzione o un valore impostato�
7. MANOPOLA DI
REGOLAZIONE
Per scorrere i menu, impostare o
modificare i valori�
37
Page 38
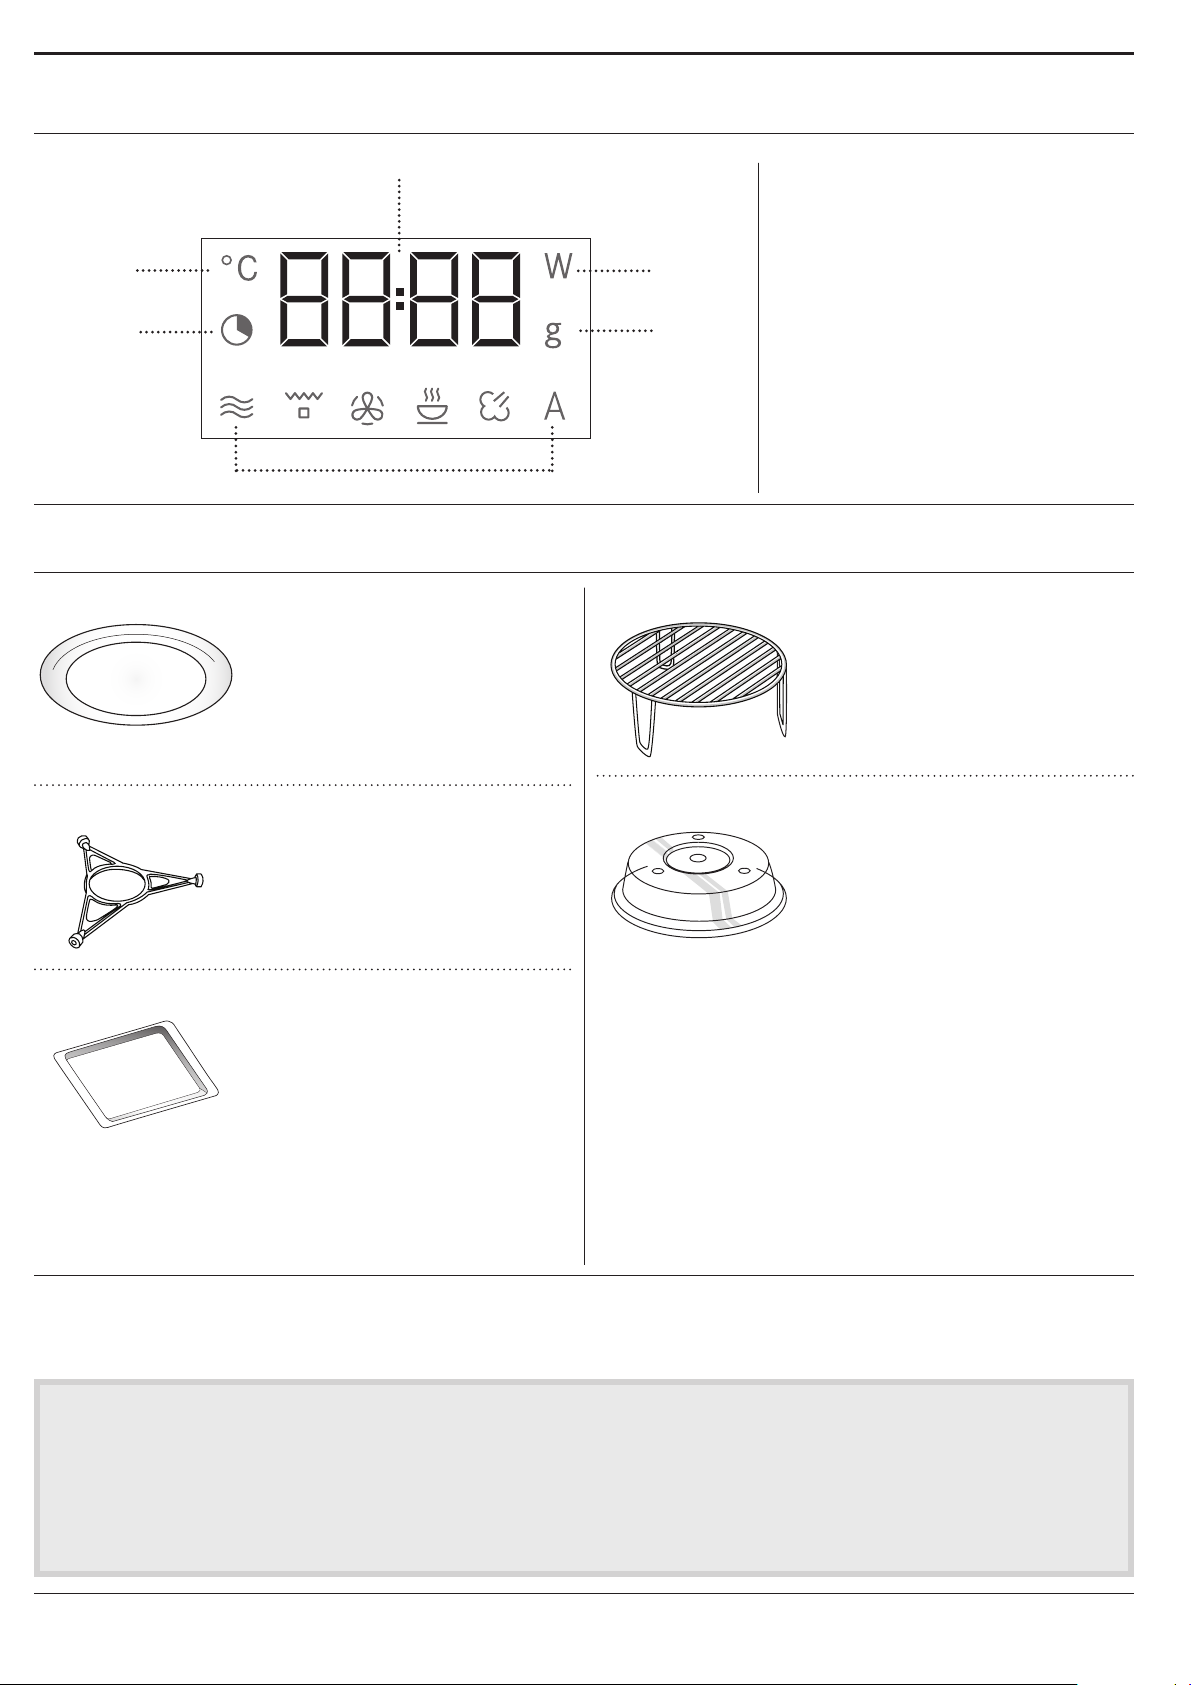
DESCRIZIONE DEL DISPLAY
5
1
2
6
ACCESSORI
PIATTO ROTANTE IN VETRO
Appoggiato sull’apposito
supporto, il piatto rotante in
vetro può essere utilizzato in
tutte le modalità di cottura�
Il piatto rotante va sempre usato
come base per altri contenitori o
accessori ad eccezione della teglia rettangolare�
1. Controllo temperature
2. Impostazione dell'ora e della
3
4
3. Selezione della potenza delle
4. Selezione del peso
5. Orologio; informazioni e durata
6. Simboli delle funzioni
GRIGLIA METALLICA
durata delle funzioni
microonde
delle funzioni
Permette di avvicinare il cibo al
grill, assicurandone una piacevole
doratura� Disporre la griglia sul
piatto rotante�
SUPPORTO PER PIATTO ROTANTE
Utilizzare il supporto soltanto
per il piatto rotante in vetro� Non
appoggiare altri accessori sul
supporto�
TEGLIA RETTANGOLARE
Utilizzare la teglia soltanto con
le funzioni che consentono
la cottura ventilata; non
usarla mai in combinazione
con le microonde� Inserirla
orizzontalmente, appoggiandola
sopra l’apposita guida nella cavità�
Nota: non è necessario togliere il piatto rotante e il suo
supporto durante l’utilizzo della teglia rettangolare.
Il numero e il tipo di accessori possono variare a seconda del modello acquistato.
Gli altri accessori non in dotazione possono essere acquistati separatamente presso il Servizio Assistenza Tecnica.
COPERCHIO
Utile per coprire i recipienti
durante la cottura e il
riscaldamento a microonde� Il
coperchio permette di ridurre gli
schizzi, trattenere l’umidità degli
alimenti e può essere utilizzato
anche per creare due livelli di cottura�
Non è adatto alle cotture ventilate o che attivano il
grill�
In commercio sono disponibili diversi accessori.
Prima di acquistarli, accertarsi che siano idonei alla
cottura a microonde e in forno.
I recipienti metallici per alimenti o bevande non
vanno mai usati per la cottura a microonde.
38
Vericare che alimenti e accessori non entrino a
contatto con le pareti interne del forno.
Prima di avviare il forno, assicurarsi sempre che
il piatto rotante possa ruotare liberamente. Fare
attenzione a non spostare il piatto rotante dalla
sua sede mentre si inseriscono o rimuovono altri
accessori.
Page 39
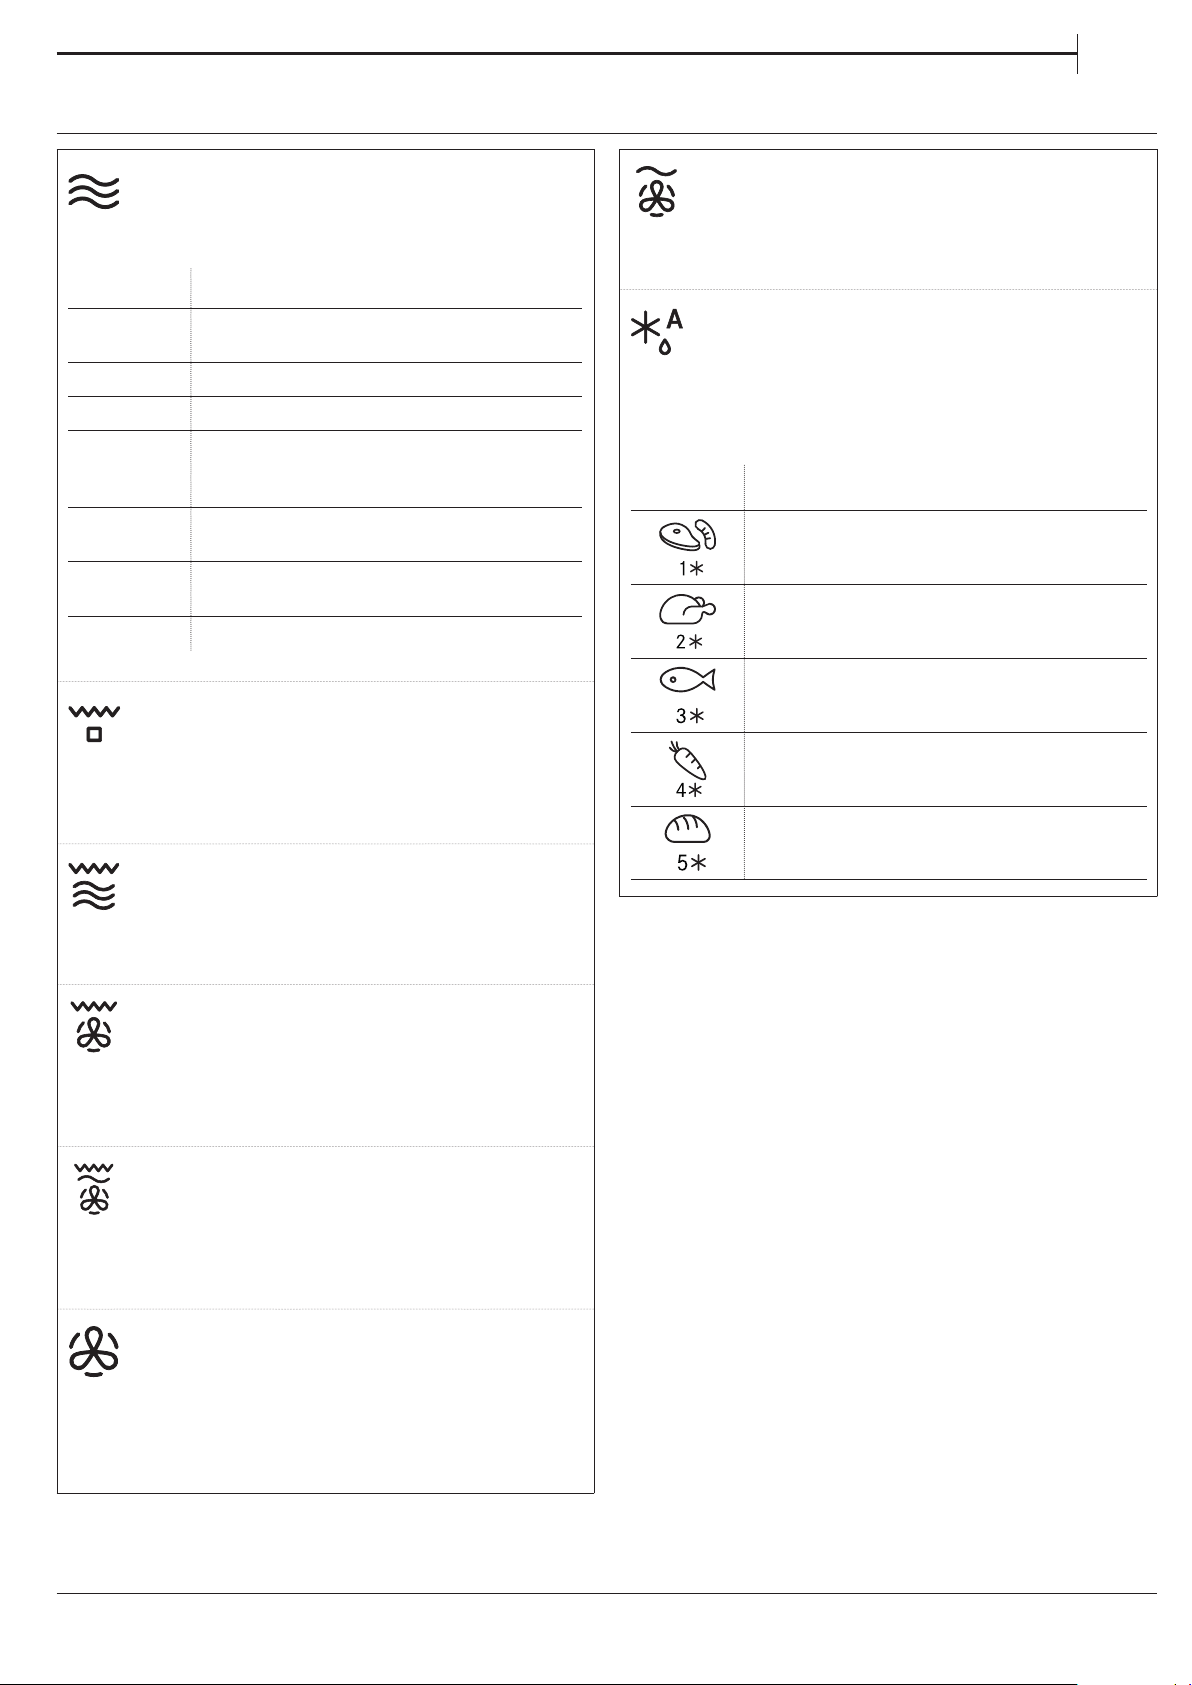
FUNZIONI
IT
MICROONDE
Per cuocere e riscaldare rapidamente alimenti
o bevande�
POTENZA CONSIGLIATA PER
900 W
750 W
650 W
500 W
350 W
160 W
90 W
GRILL
Per dorare, grigliare o gratinare le pietanze� Si
consiglia di girare gli alimenti durante la cottura�
Si raccomanda di preriscaldare il grill per 3-5 minuti�
Accessori consigliati: Griglia alta
GRILL + MICROONDE
Per cuocere e gratinare rapidamente le
pietanze combinando le microonde con il grill�
Accessori consigliati: Griglia alta
Riscaldamento rapido di bevande o altri
alimenti ad alto contenuto di acqua
Cottura di vegetali
Cottura di carne e pesce
Cottura di sughi di carne, salse con
formaggio o uova. Finitura di sformati di
carne o paste al forno
Cotture lente e delicate. Per fondere burro
o cioccolato
Scongelare alimenti surgelati o
ammorbidire burro e formaggi
Ammorbidire il gelato
VENTILATO + MICROONDE
Per preparare pietanze al forno in breve
tempo�
Accessori consigliati: Griglia bassa
AUTO DEFROST *
Per scongelare rapidamente diverse categorie
di alimenti specificandone solamente il peso�
Si consiglia di disporre gli alimenti direttamente sul
piatto rotante in vetro� Quando richiesto, girare gli
alimenti�
CATEGORIA ALIMENTO PESO
CARNE
(macinato, cotolette, bistecche,
arrosti)
POLLAME
(pollo intero, a pezzi, letti)
PESCE
(Intero, tranci, letti)
VERDURE
(Verdure miste, piselli, broccoli...)
PANE
(Pagnotte, focaccine, panini)
100 g - 2 kg
100 g - 2,5 kg
100 g - 1,5 kg
100 g - 1,5 kg
100 g - 1 kg
TURBO GRILL
Per risultati perfetti, combinando l'azione del
grill e del forno ventilato� Si consiglia di girare gli
alimenti durante la cottura�
Accessori consigliati: Griglia alta
TURBO GRILL+MICROONDE
Per cuocere e dorare velocemente il cibo
combinando l’azione delle microonde, del grill e del
forno ventilato�
Accessori consigliati: Griglia alta
VENTILATO
Per cuocere le pietanze con risultati analoghi
a quelli di un forno statico� Per la cottura di alcuni
alimenti è possibile usare la teglia o utilizzare
recipienti adatti alla cottura in forno�
Accessori consigliati: Griglia bassa / Teglia rettangolare
39
Page 40
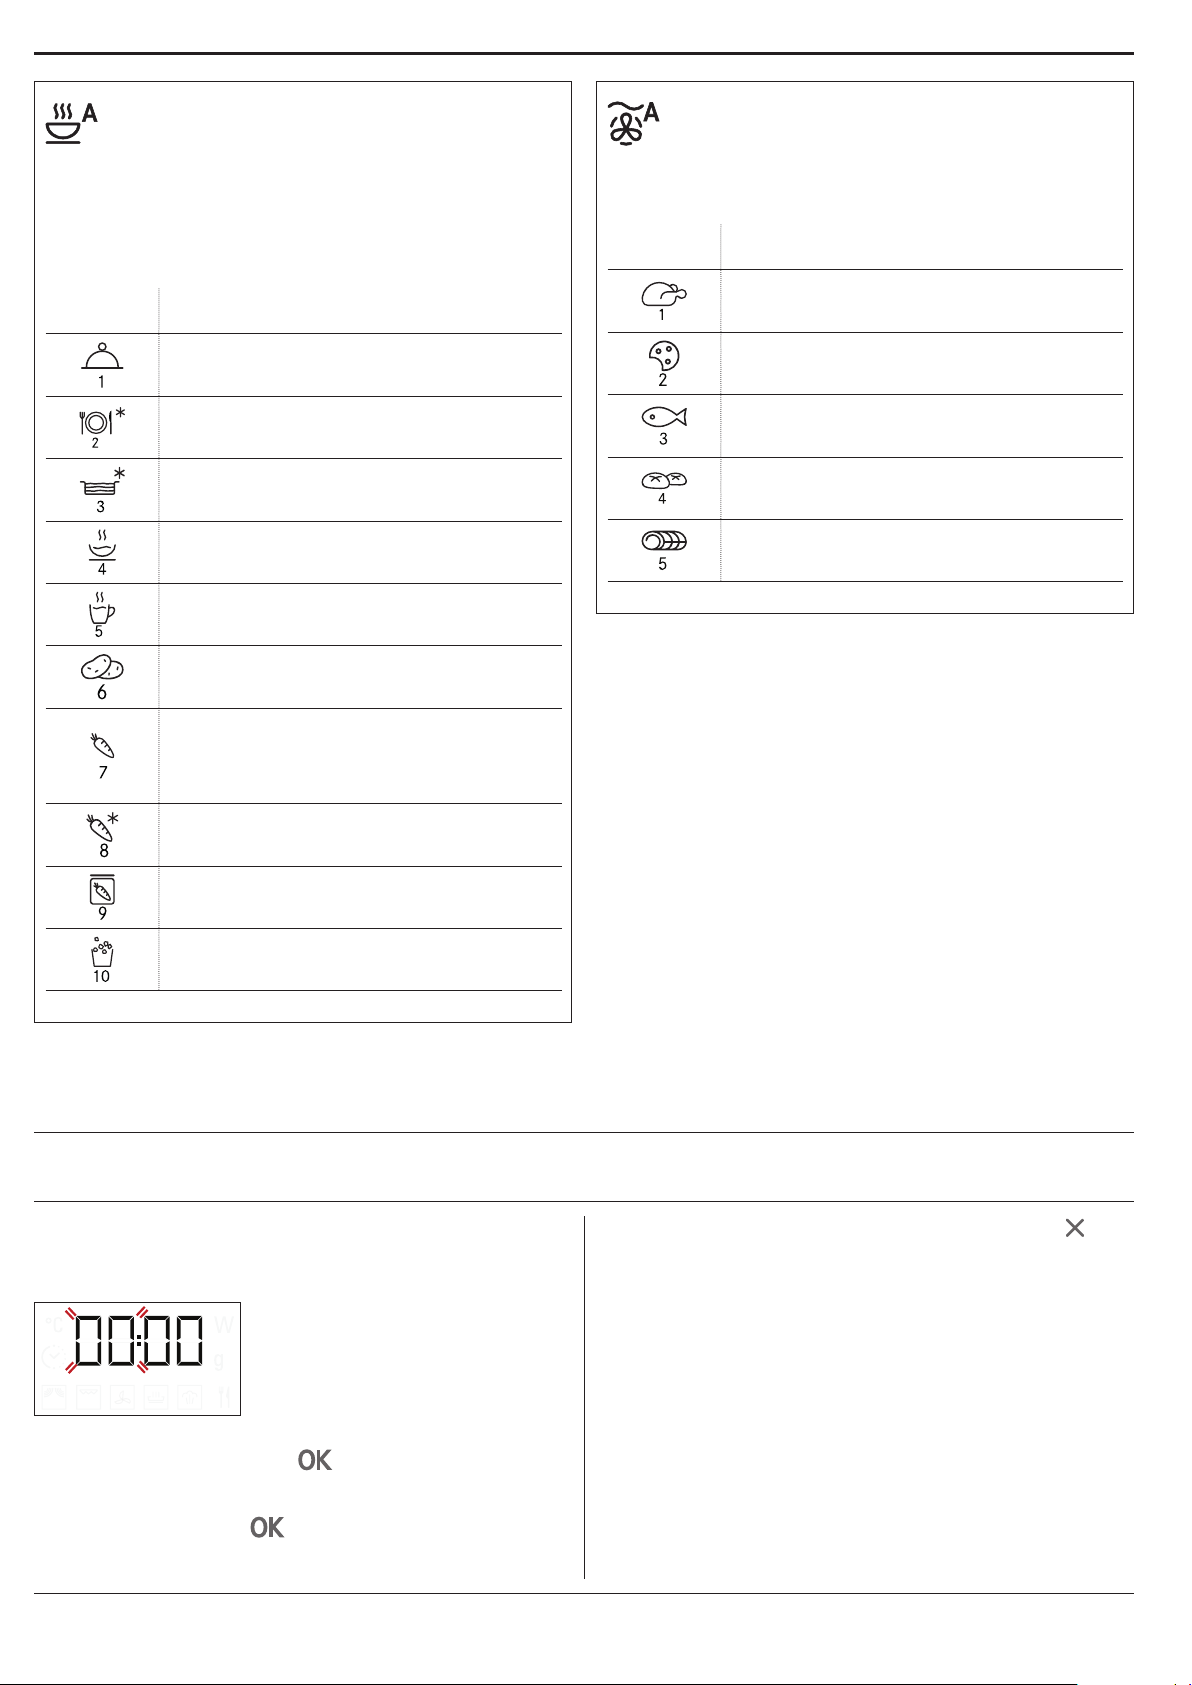
AUTO RISCALDAM. / COTTURA *
Per riscaldare cibi pronti, sia surgelati che a
temperatura ambiente e cuocerli rapidamente con
ottimi risultati�
Il forno calcolerà automaticamente i valori necessari
per ottenere i migliori risultati possibili nel minor
tempo� Disporre il cibo su un piatto da portata
resistente al calore e alle microonde�
CATEGORIA ALIMENTO PESO
VENTILATO AUTOMATICO + MICROONDE
*
Per ottenere una rapida e ottimale cottura al
forno degli alimenti� Usare un recipiente adatto alla
cottura in forno e resistente alle microonde�
CATEGORIA ALIMENTO PESO
POLLO ARROSTO 800 g - 1,5 kg
PIATTI PRONTI 250 - 500 g
PORZIONI SURGELATE 250 - 500 g
LASAGNE SURGELATE 250 - 500 g
MINESTRE 200 - 800 g
BEVANDE 100 - 500 g
PATATE AL FORNO
(girare quando viene richiesto)
VERDURE FRESCHE
(tagliare a pezzi di pari dimensioni
e aggiungere da 2 a 4 cucchiai di
acqua. Coprire)
VERDURE SURGELATE
(girare quando richiesto. Coprire)
VERDURE IN SCATOLA 200 - 600 g
200 g - 1 kg
200 - 800 g
200 - 800 g
BISCOTTI 300 g
PESCE INTERO 600 g - 1,2 kg
GRATIN DI PATATE 800 g - 2 kg
ROASTBEEF 800 g - 1,5 kg
* Con le funzioni automatiche è suciente selezionare il tipo
e il peso o la quantità degli alimenti per ottenere un risultato
ottimale. Il forno calcolerà automaticamente i valori ideali,
adattandosi continuamente alla cottura in corso. Girare o
mescolare gli alimenti quando viene richiesto.
POPCORN 100 g
PRIMO UTILIZZO
.IMPOSTARE L’ORA
Alla prima accensione, è necessario impostare l’ora:
sul display lampeggiano le due cifre relative all’ora�
Ruotare la manopola di regolazione per impostare
l’ora desiderata e premere
display lampeggiano le due cifre dei minuti� Ruotare
la manopola di regolazione per impostare l’ora
desiderata e premere
per confermare� Sul
per confermare�
Nota: per modicare successivamente l’ora, premere
per almeno 3 secondi a forno spento e ripetere le operazioni
sopra descritte.
Dopo una prolungata interruzione di corrente potrebbe
essere necessario impostare nuovamente l’ora.
40
Page 41
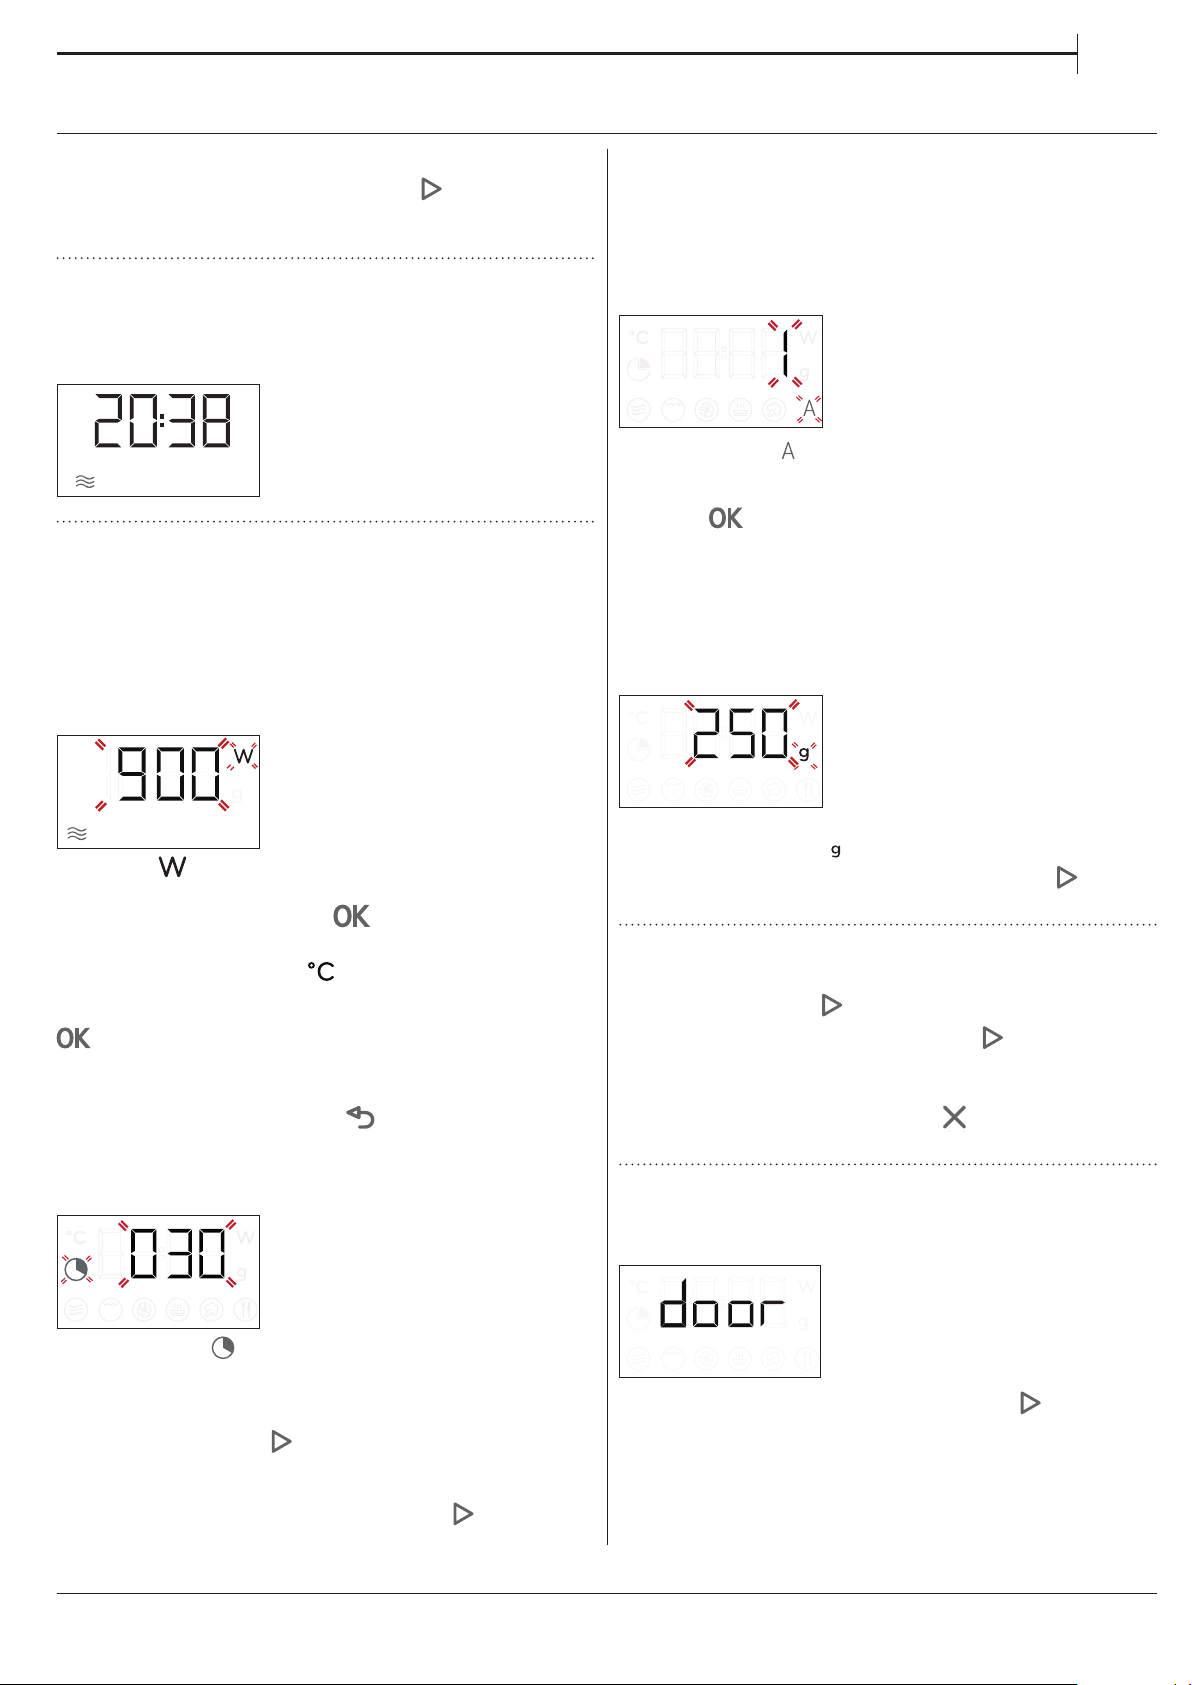
USO QUOTIDIANO
IT
. JET START
A forno spento, è possibile premere per avviare
la cottura con la funzione microonde impostata alla
potenza massima (900W) per 30 secondi�
1. SELEZIONARE UNA FUNZIONE
Quando il forno è spento, è visualizzato solo
l’orologio� Ruotare la manopola di selezione per
selezionare una delle funzioni disponibili�
2. IMPOSTARE LA FUNZIONE
. FUNZIONI MANUALI
Dopo avere selezionato la funzione desiderata è
possibile modificarne le impostazioni�
Il display mostra in sequenza i valori che è possibile
modificare�
POTENZA MICROONDE / TEMPERATURA
. FUNZIONI AUTOMATICHE / SCONGELAMENTO
AUTOMATICO
CATEGORIE
Dopo avere selezionato una funzione automatica,
occorre selezionare la categoria di alimenti
appropriata�
Quando l'icona lampeggia sul display, ruotare la
manopola di regolazione per selezionare il numero
corrispondente alla categoria desiderata, quindi
premere
PESO
Per ottenere risultati ottimali con le funzioni
automatiche, è necessario inserire il peso degli
alimenti scegliendo tra le impostazioni predefinite: il
forno calcolerà la durata ideale della funzione per la
categoria di alimenti selezionata�
per confermare�
Quando l' icona lampeggia sul display, ruotare
la manopola di regolazione per impostare il livello
di potenza, quindi premere
procedere con le impostazioni seguenti (se possibile)�
Analogamente quando l'
display, ruotare la manopola di regolazione per
impostare il livello di temperatura, quindi premere
per confermare e procedere con le impostazioni
seguenti�
Nota: dopo avere attivato la funzione, la potenza può essere
modicata premendo due volte per accedere al menu
delle impostazioni di potenza e ruotando la manopola di
regolazione per cambiare il valore impostato.
DURATA
Quando l'icona lampeggia sul display, ruotare
la manopola di regolazione per impostare la durata
richiesta�
Quando il tempo di cottura visualizzato è quello
desiderato, premere
funzione�
Nota: durante la cottura, è possibile regolarne la durata
ruotando la manopola; ad ogni pressione di il tempo di
cottura aumenta di 30 secondi.
per confermare e avviare la
per confermare e
icona lampeggia sul
Quando sul display compaiono le impostazioni
predefinite e l'icona
manopola per impostare il peso e premere
confermare e avviare la funzione�
lampeggia, ruotare la
per
3. AVVIARE LA FUNZIONE
Una volta che i valori corrispondono a quelli
desiderati, premere
Ogni pressione successiva del tasto
tempo di cottura di 30 secondi (soltanto per funzioni
manuali)�
Nota: è possibile premere due volte per arrestare in ogni
momento la funzione attivata.
per avviare la funzione�
aumenterà il
. BLOCCO DI SICUREZZA
Questa funzione si attiva automaticamente per
prevenire un avvio involontario del forno�
Aprire e chiudere la porta, poi premere per
avviare la funzione�
41
Page 42
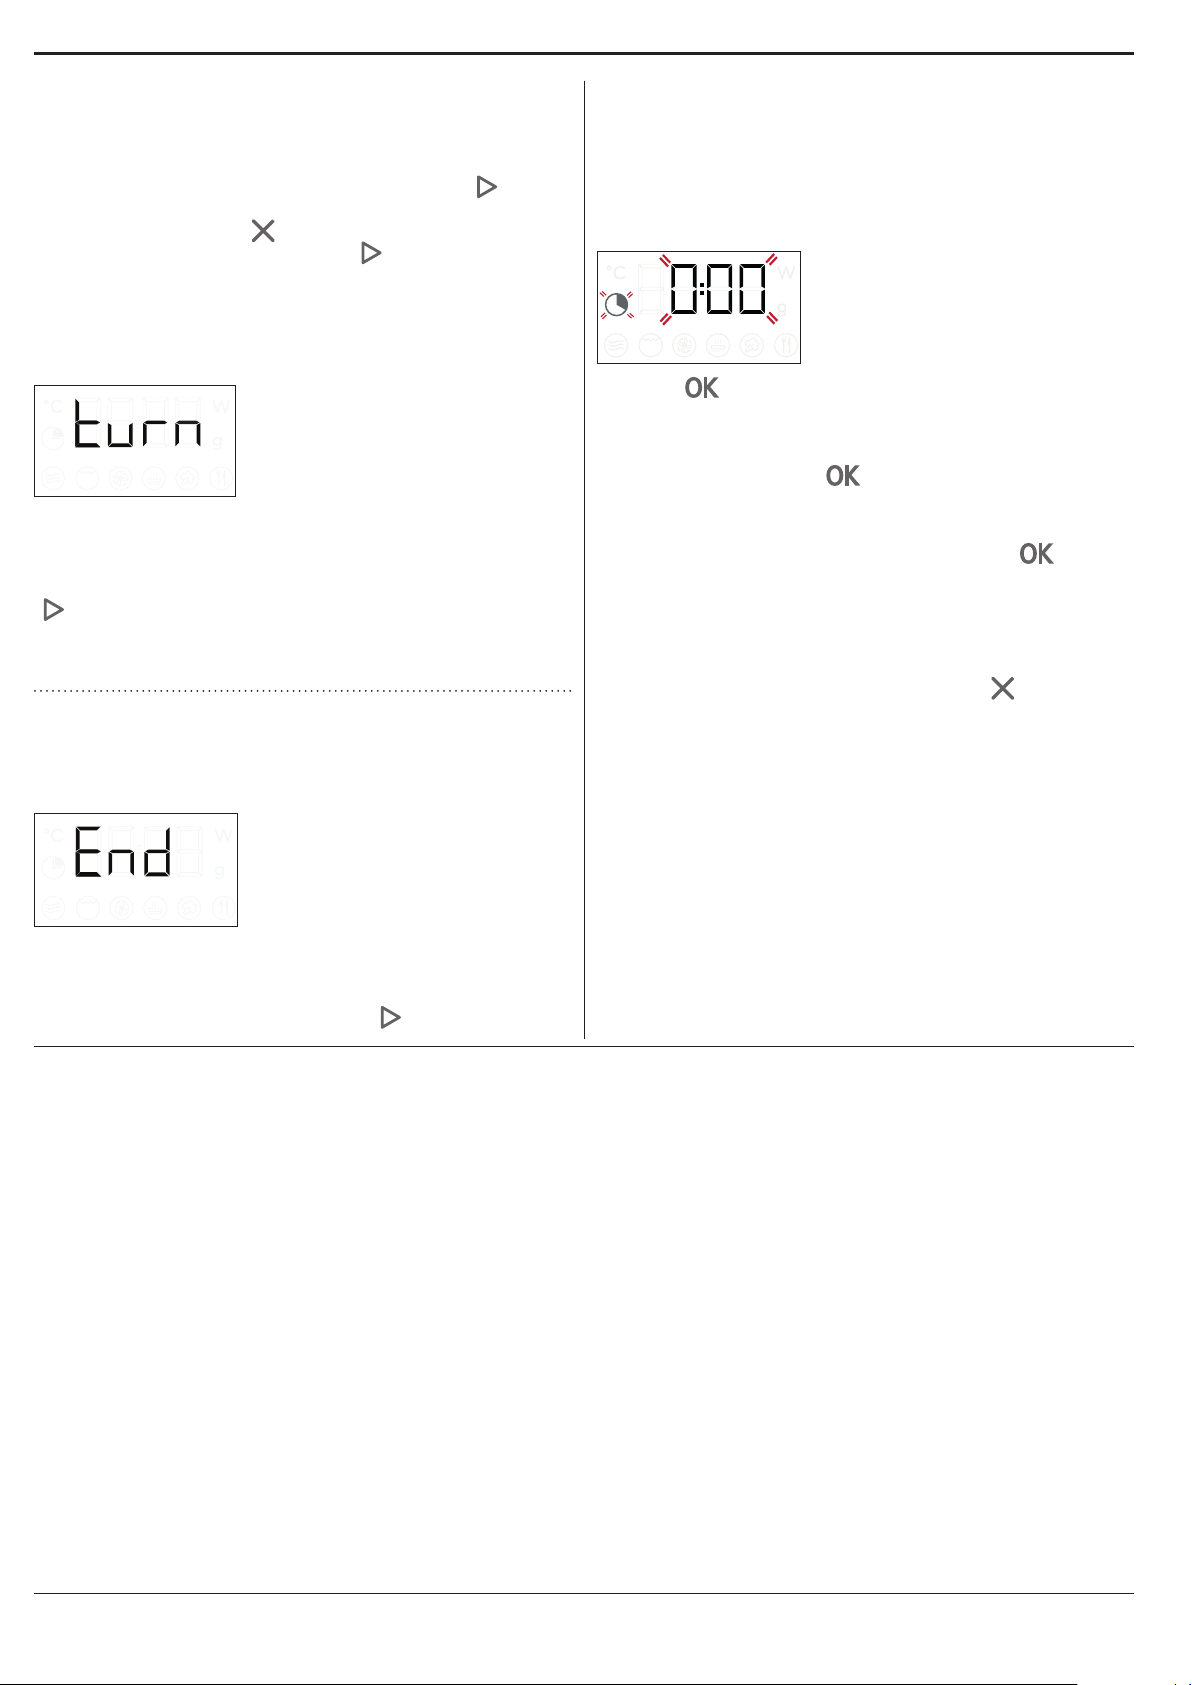
4. PAUSA
Per sospendere una funzione attiva, ad esempio per
mescolare o girare gli alimenti, è sufficiente aprire lo
sportello�
Per riprendere, chiudere sportello, premere
�
È anche possibile mettere in pausa temporaneamente
la cottura premendo
chiudere lo sportello e premere
� Per riprendere la cottura,
�
PAUSA AUTOMATICA
(MESCOLARE O GIRARE GLI ALIMENTI)
Alcune funzioni prevedono una pausa per consentire
di girare o mescolare gli alimenti�
Quando la cottura si interrompe e sul display compare
il messaggio “Turn food” (girare) o “Stir Food”
(mescolare), aprire lo sportello per girare o mescolare
gli alimenti, quindi chiudere lo sportello e premere
per riprendere la cottura�
Nota: dopo 2 minuti, il forno si riavvia automaticamente
anche se gli alimenti non sono stati girati o mescolati.
. TIMER
Solo quando il forno è spento, è possibile utilizzare il
display come contaminuti� il timer non attiva nessun
ciclo di cottura�
Per attivare la funzione e impostare il tempo
di cottura desiderato, ruotare la manopola di
regolazione�
Premere per avviare il timer: Un segnale acustico
e il display avviseranno del termine del conto alla
rovescia� Per modificare il valore impostato sul
timer dopo averlo attivato, ruotare la manopola di
regolazione e premere
per confermare�
Per interrompere l'operazione o tornare a visualizzare
l'ora corrente, ruotare la manopola di regolazione
finché sul display compare 0:00 e premere
Nota: Una volta attivato il timer, è possibile attivare una
funzione: il timer continuerà autonomamente il conto
alla rovescia senza interferire sulla funzione. Per tornare a
visualizzare il timer, attendere il termine della funzione o
interrompere la funzione il forno premendo .
�
5. FINE COTTURA
Per indicare la fine di una funzione di cottura viene
emesso un segnale acustico e sul display compare
l'indicazione "End" (Fine)�
Con alcune funzioni è possibile prolungare la cottura
mantenendo le impostazioni originarie: ruotare la
manopola di regolazione per impostare un nuovo
tempo di cottura, quindi premere
�
42
Page 43

CONSIGLI UTILI
IT
COME LEGGERE LA TABELLA DI COTTURA
La tabella indica le funzioni più indicate per i diversi
tipi di alimenti�
I tempi di cottura, si riferiscono al ciclo di cottura degli
alimenti nel forno, esclusa la fase di preriscaldamento
(ove richiesto)�
I valori e i tempi di cottura sono indicativi e
dipendono dalla quantità di alimenti e dal tipo di
accessori utilizzati�
Usare sempre il tempo minimo indicato e verificare
che la cottura sia completa�
Per ottenere risultati ottimali, seguire attentamente i
consigli riportati nella tabella di cottura per la scelta
degli accessori�
CONSIGLI PER LA COTTURA A MICROONDE
Poiché le microonde penetrano negli alimenti solo
fino a una certa profondità,
è consigliabile distribuirli il più possibile in larghezza
per esporre la massima superficie alle microonde�
I pezzi più piccoli cuociono più velocemente di quelli
grandi: per ottenere una cottura uniforme, tagliare gli
alimenti in pezzetti di uguale grandezza�
L’umidità evapora durante la cottura a microonde:
l’uso di un coperchio resistente alle microonde può
ridurre la perdita di umidità�
Dopo la cottura a microonde, la maggior parte degli
alimenti continua a cuocere per un certo tempo� Si
raccomanda perciò di lasciare sempre riposare gli
alimenti per un paio di minuti dopo che il ciclo di
cottura è terminato�
Durante la cottura a microonde è consigliabile
mescolare gli alimenti� Questo consente di portare le
parti esterne più cotte verso il centro e viceversa�
Sistemare le fettine sottili di carne l’una sopra l’altra,
oppure inframmezzate� Sistemare le fette più spesse,
ad esempio fette di polpettone e salsicce, una accanto
all’altra�
PELLICOLE E CONFEZIONI
Togliere i ferretti di chiusura dai sacchetti di plastica
o di carta prima di introdurli nel forno per la cottura a
microonde�
Forare o incidere le pellicole con una forchetta
per liberare la pressione ed evitare scoppi dovuti
all’accumulo di vapore durante la cottura�
LIQUIDI
I liquidi possono riscaldarsi oltre il punto di
ebollizione senza che si formino bollicine visibili�
Questo può causare l’improvviso traboccamento di
liquidi bollenti�
Per prevenire questa eventualità:
� Evitare l’uso di contenitori a collo stretto�
� Mescolare il liquido prima di introdurre il recipiente
nel forno a microonde e lasciarvi immerso un
cucchiaino�
� Dopo il riscaldamento, mescolare nuovamente prima
di estrarre il recipiente dal forno�
ALIMENTI SURGELATI
Per ottenere risultati ottimali, si raccomanda di far
scongelare gli alimenti direttamente sul piatto rotante
in vetro� Se necessario, usare un recipiente di plastica
leggero e resistente alle microonde�
Gli alimenti lessati, gli stufati e i ragù di carne si
scongelano meglio se vengono mescolati di tanto in
tanto durante il processo�
Quando gli alimenti iniziano a scongelarsi, separarli: le
porzioni separate si scongelano più rapidamente�
ALIMENTI PER NEONATI
Quando si riscaldano alimenti per neonati nei
biberon, oppure in contenitori per omogeneizzati,
agitare e controllare sempre la temperatura prima di
servire�
Questo permette di ottenere una distribuzione più
omogenea del calore e di evitare scottature�
Togliere il coperchio e la tettarella dal biberon prima
di riscaldarlo�
CARNE E PESCE
Per ottenere in breve tempo una perfetta doratura
della superficie mantenere succoso e morbido
l’interno di carne o pesce, si consiglia di utilizzare la
funzione “Grill + microonde”� Per ottenere risultati
ottimali, regolare la potenza delle microonde tra 160
e 350 W�
43
Page 44
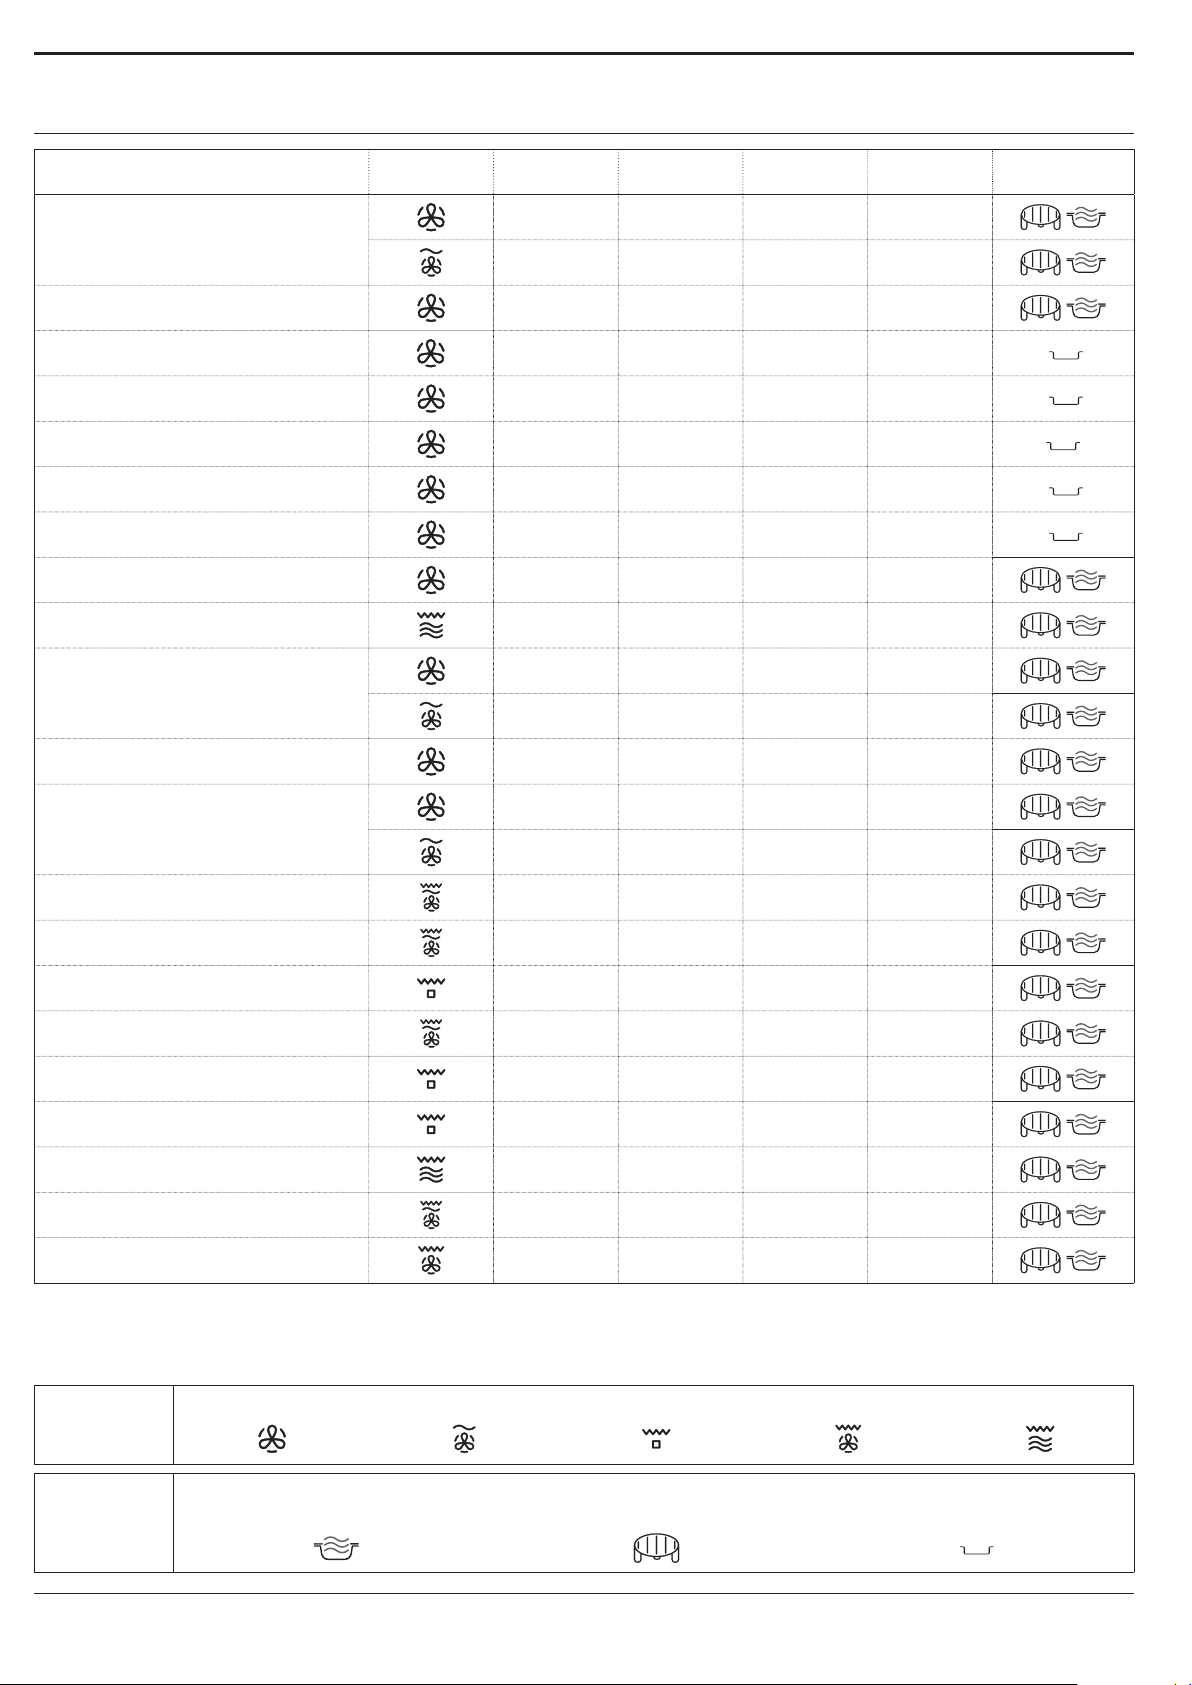
TABELLA DI COTTURA
ALIMENTO FUNZIONE PRERISCALD. LIVELLO GRILL POTENZA (W) TEMPO (MIN.) ACCESSORI
- 160 - 180 - 30-60
Torte a lievitazione
- 160 - 180 90 25-50
Torte ripiene
(cheese cake, strudel, torta di mele)
Sì 160-190 - 35-70
Biscotti Sì 170-180 - 10-20
Meringhe Sì 100 -120 - 40-50
Panini Sì 210-220 - 10-12
Pagnotta
Sì 180-200 - 30-35
Pizza / Focaccia Sì 190-220 - 20-40
Torte salate
(torta di verdura, quiche)
Sì 180-190 - 40-55
Lasagne / Pasta al forno - 350-500 15-40
Arrosto di agnello / Vitello /
Roastbeef
(1,3-1,5 kg)
Roastbeef - media cottura
(1,3-1,5 kg)
- 170-180 - 70-80*
- 160-180 160 50-70*
- 170-180 - 40-60*
Pollo arrosto / Coniglio / Anatra
(intera 1-1,2 kg)
Pollo / Coniglio / Anatra
(letti/pezzi 0,4-1 kg)
- 210-220 - 50 -70*
- 210-220 350 45-60*
- - 350-500 20-40*
Pesce al forno (intero) - - 160-350 20-40
Filetti / tranci di pesce Sì - - 15-30*
Verdure ripiene
(pomodori, zucchine, melanzane...)
- - 500-650 25-50
Toast - - - 3-6
Salsicce / Spiedini / Costine /
Hamburger
Patate al forno
- - - 20-40*
- - 350-500 20-40*
Frutta cotta - - 160-350 15-25
Verdure gratinate - - - 15-25
* Girare gli alimenti a metà cottura.
La tabella delle ricette testate è stata compilata per gli istituti di valutazione secondo le norme IEC 60705 e IEC 60350.
FUNZIONI
ACCESSORI
44
Ventilato
Piatto / contenitore adatto alle microonde e
al calore
Ventilato + Micr� Grill Turbo Grill Grill + Microonde
Griglia metallica Teglia rettangolare
Page 45
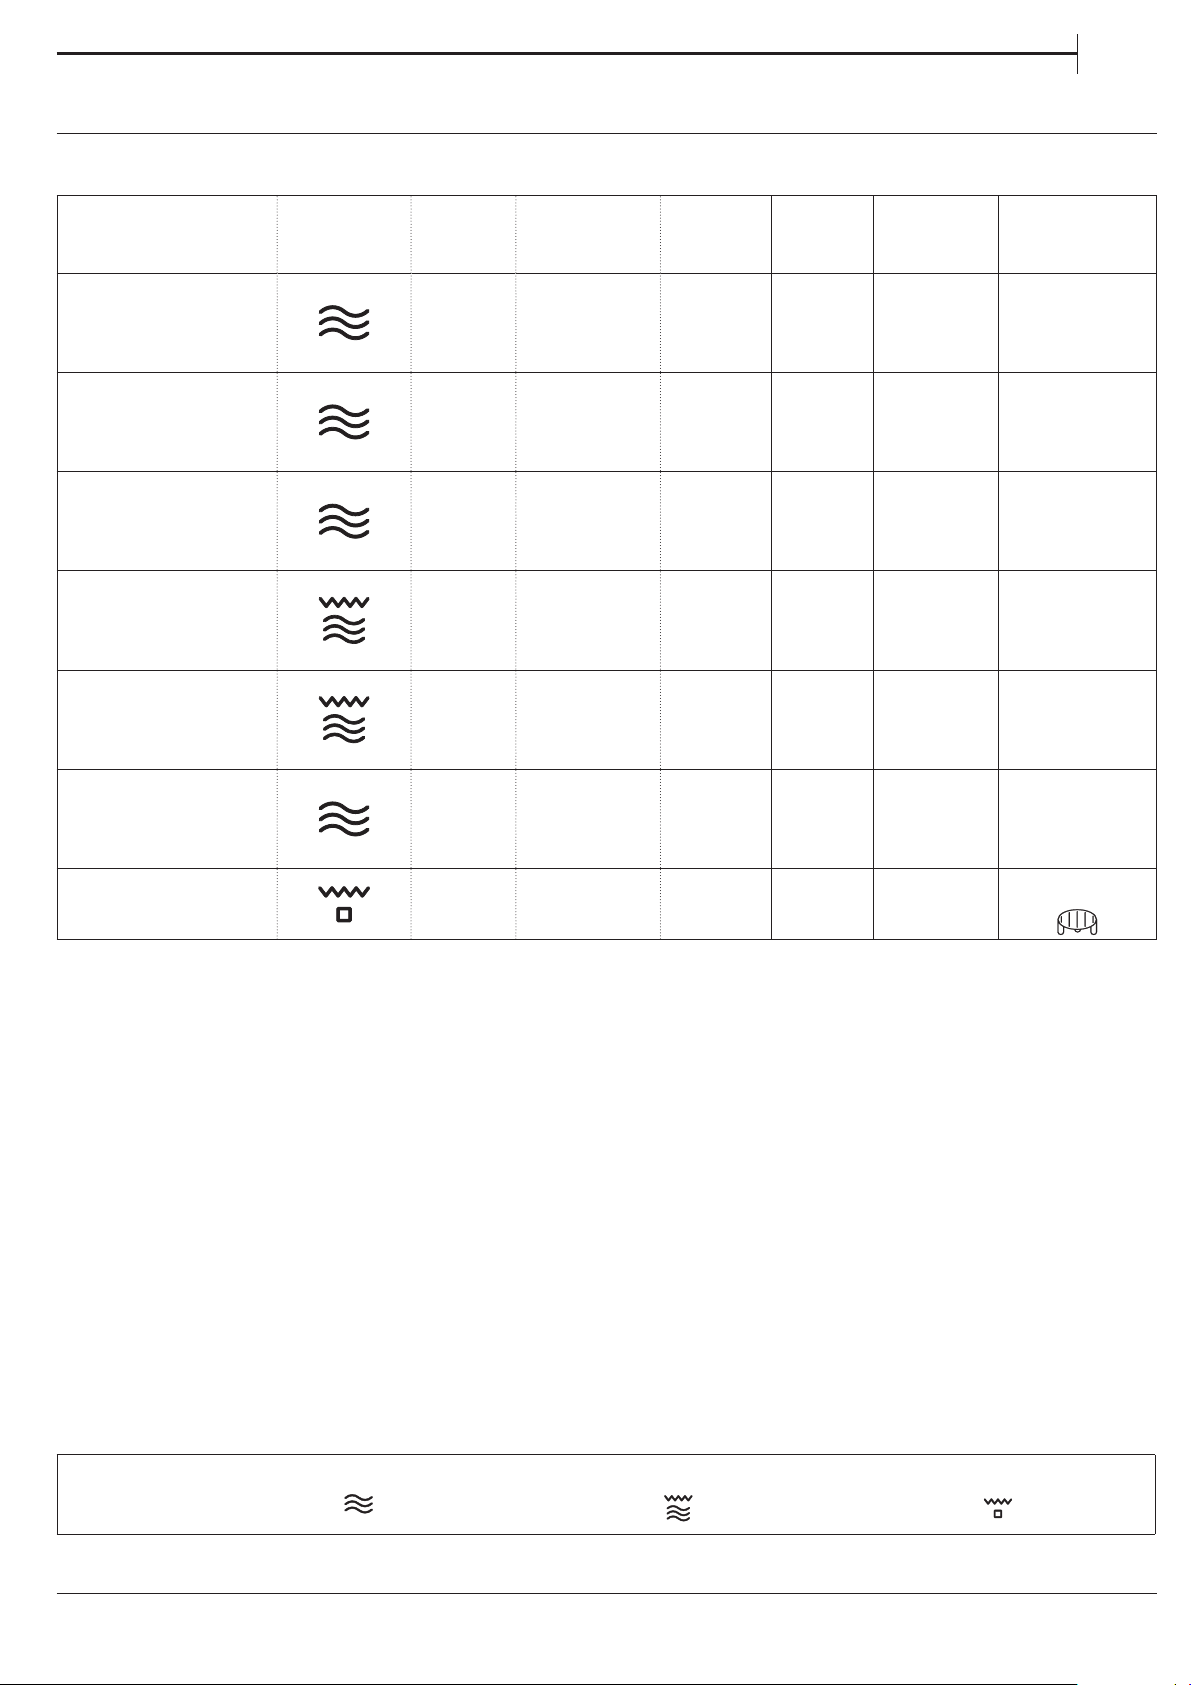
RICETTE TESTATE
Compilate per gli istituti di valutazione secondo le norme IEC 60705 e IEC 60350-1.
IT
ALIMENTO FUNZIONE
Crema pasticcera
Pan di spagna
Polpettone
Patate gratinate
Pollo
Scongelamento
carne
(girare a metà
scongelamento)
PESO
(g)
1000 12:00 - 13:00 - 650 -
475 8:00 - 10:00 - 750 -
900 13:00 - 14:00 - 750 -
110 0 28:00 - 30:00 190 350 -
1200 35:00 - 40:00 210 350 -
500 10:30 - 160 - Piatto rotante
TEMPO
COTTURA
(min:sec)
TEMP. /
LIV.
GRILL
POTEN-
ZA
(W)
PRERISC. ACCESSORI
Recipiente
idoneo alle
microonde
(Pyrex 3�227)
Recipiente
idoneo alle
microonde
(Pyrex 3�827)
Recipiente
idoneo alle
microonde
(Pyrex 3�838)
Recipiente
idoneo alle
microonde
(Pyrex 3�827)
Recipiente
idoneo alle
microonde
(Pyrex 3�220)
Toast
FUNZIONI
- 4:00 - 6:00 3 - Sì
Microonde Grill + Microonde Grill
Griglia
45
Page 46
PULIZIA E MANUTENZIONE
Assicurarsi che l’apparecchio si sia rareddato
prima di eseguire ogni operazione.
Non utilizzare apparecchi a vapore.
SUPERFICI INTERNE ED ESTERNE
• Pulire le superfici con un panno in microfibra umido�
Se molto sporche, aggiungere qualche goccia di
detergente neutro� Asciugare con un panno asciutto�
• Pulire i vetri della porta con detergenti liquidi
Non usare pagliette metalliche, panni abrasivi
e detergenti abrasivi o corrosivi che possano
danneggiare le superci.
ACCESSORI
Tutti gli accessori sono lavabili in lavastoviglie� Per
lo sporco più tenace, strofinare delicatamente con
un panno� Lasciare sempre raffreddare gli accessori
prima di lavarli�
specifici�
• A intervalli regolari o in caso di traboccamenti,
togliere il piatto rotante e il suo supporto per pulire la
base del forno, rimuovendo tutti i residui di cibo�
• Il grill non necessita di alcuna pulizia perché il calore
intenso brucia direttamente lo sporco� attivare la
funzione a intervalli regolari�
RISOLUZIONE DEI PROBLEMI
Problema Possibile causa Soluzione
Il forno non funziona�
Il forno fa rumore anche se
spento�
Il display mostra la lettera “F”
Interruzione di corrente
elettrica.
Disconnessione dalla rete
principale.
Ventola di rareddamento
attiva.
Guasto software. Contattare il più vicino Servizio Assistenza Clienti e
seguita da un numero�
ASSISTENZA
In caso di problemi di funzionamento, contattare un
Centro Assistenza Tecnica Franke�
Non rivolgersi a tecnici non autorizzati�
Comunicare:
- il tipo di difetto
- il modello di apparecchio (codice art�)
- il numero di serie (S�N� sulla targhetta matricola),
posto sul bordo interno destro della cavità del forno
(visibile a porta aperta)�
Vericare che ci sia tensione in rete e che il forno
sia collegato all’alimentazione elettrica. Spegnere e
riaccendere il forno e vericare se l’inconveniente
persiste.
Aprire la porta o attendere la ne del
rareddamento.
specicare il numero che segue la lettera “F”.
Quando si contatta
il Centro Assistenza,
comunicare i codici
presenti sulla targhetta
matricola del prodotto�
XXXXXXXXXXXX
XXXXXXXXXXXX
XXX/XXX
46
001
Page 47

ES
ÍNDICE
DESCRIPCIÓN GENERAL ������������������������������������������������������������������������������������������������������������������������������������������������������48
PANEL DE CONTROL �������������������������������������������������������������������������������������������������������������������������������������������������������������48
DESCRIPCIÓN DE LA PANTALLA ���������������������������������������������������������������������������������������������������������������������������������������� 49
ACCESORIOS����������������������������������������������������������������������������������������������������������������������������������������������������������������������������49
FUNCIONES �����������������������������������������������������������������������������������������������������������������������������������������������������������������������������50
PRIMER USO ���������������������������������������������������������������������������������������������������������������������������������������������������������������������������� 51
USO DIARIO ����������������������������������������������������������������������������������������������������������������������������������������������������������������������������� 52
CONSEJOS ÚTILES �����������������������������������������������������������������������������������������������������������������������������������������������������������������54
TABLA DE COCCIÓN �������������������������������������������������������������������������������������������������������������������������������������������������������������� 55
RECETAS PROBADAS �������������������������������������������������������������������������������������������������������������������������������������������������������������56
LIMPIEZA Y MANTENIMIENTO �������������������������������������������������������������������������������������������������������������������������������������������57
RESOLUCIÓN DE PROBLEMAS �������������������������������������������������������������������������������������������������������������������������������������������57
ASISTENCIA �����������������������������������������������������������������������������������������������������������������������������������������������������������������������������57
47
Page 48
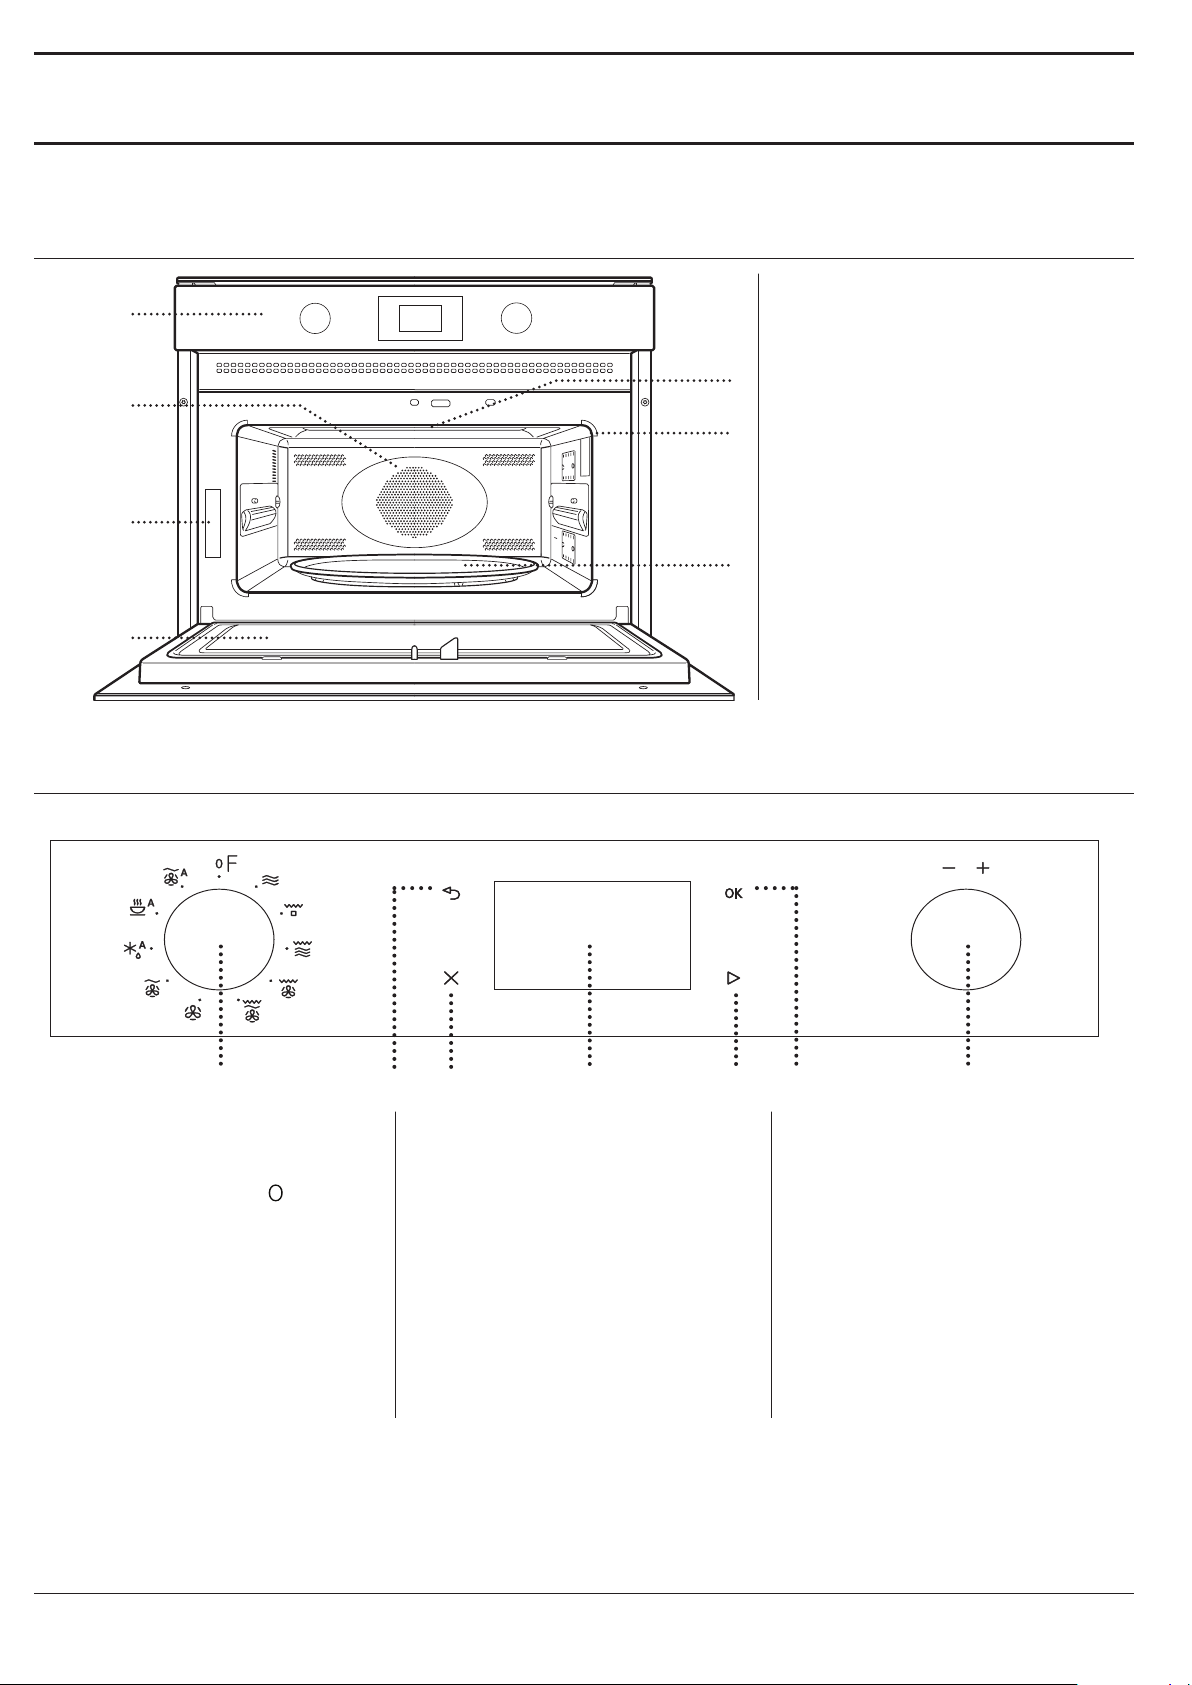
GUÍA DEL USUARIO
DESCRIPCIÓN GENERAL
1
2
3
4
1. Panel de control
2. Resistencia circular
(no visible)
3. Placa de características
5
(no debe retirarse)
4. Puerta
6
5. Resistencia superior/grill
6. Ligera
7. Plato giratorio de cristal
7
PANEL DE CONTROL
1 7
1. SELECTOR
Para encender el horno
seleccionando una función�
Gírelo hasta la posición
apagar el horno�
2. ATRÁS
Sirve para volver al menú de
configuración anterior�
para
2
3
3. TOPE
Para interrumpir una función activa
en cualquier momento� Pulse dos
veces para detener la función y
poner el horno en espera�
4. PANTALLA
5. INICIAR
Para iniciar funciones y confirmar
los ajustes� Cuando el horno está
apagado, activa la función del
microondas�
4 5
6
6. CONFIRMAR
Para confirmar la selección de una
función o un valor definido�
7. SELECTOR DE AJUSTE
Para desplazarse por los
menús y aplicar o cambiar las
configuraciones�
48
Page 49
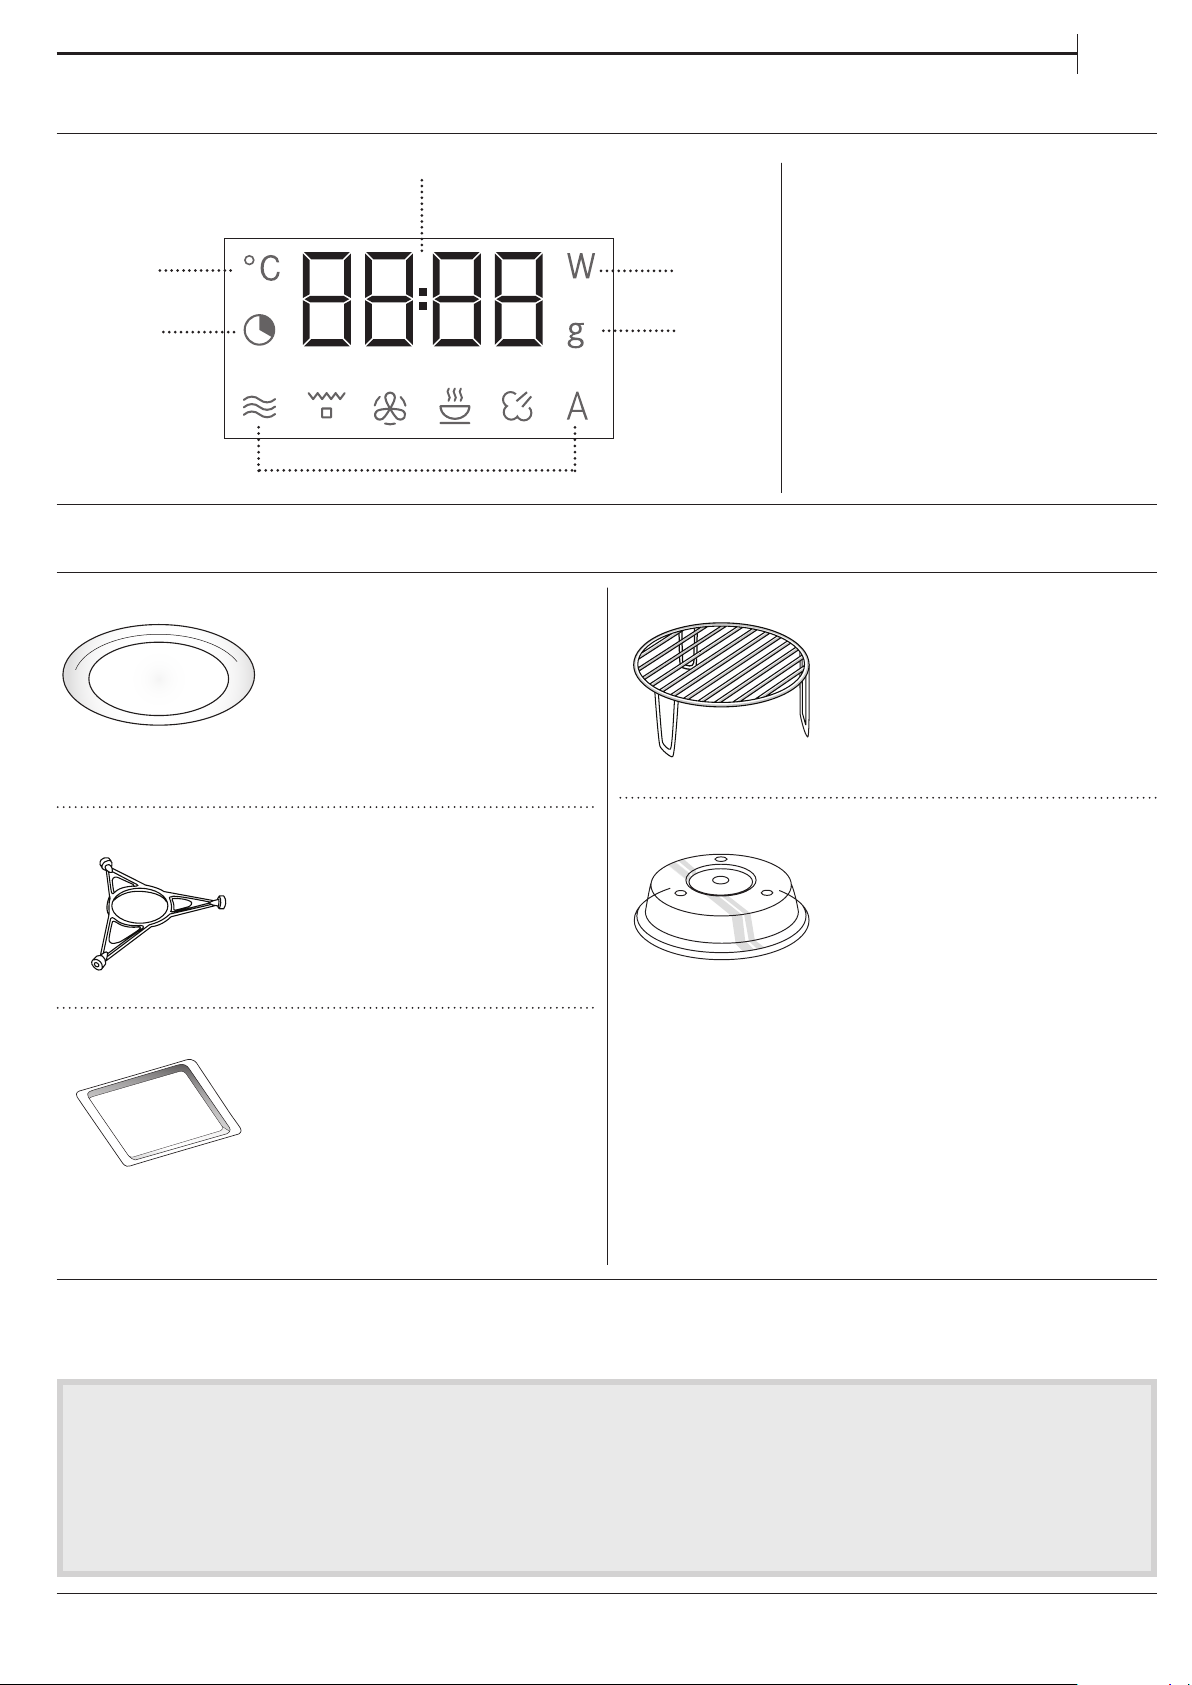
DESCRIPCIÓN DE LA PANTALLA
ES
5
1
2
6
ACCESORIOS
PLATO GIRATORIO DE CRISTAL
El plato giratorio debe estar
colocado en su soporte y puede
utilizarse en todos los métodos
de cocción�
El plato giratorio se tiene que
usar siempre como base para
otros recipientes o accesorios, a excepción de la
bandeja pastelera rectangular�
3
4
PARRILLA
1. Control de temperaturas
2. Configuración de tiempo y
duración de la función
3. Potencia de microondas
4. Selección de peso
5. Reloj, informaciones y duración
de la función
6. Símbolo para la función
seleccionada
Con ella podrá colocar los
alimentos más cerca del grill para
obtener un dorado perfecto�
Coloque la rejilla en el plato
giratorio�
SOPORTE DEL PLATO GIRATORIO
Utilice el soporte solamente para
el plato giratorio de cristal� No
coloque otros accesorios en el
soporte�
BANDEJA PASTELERA RECTANGULAR
Utilice el plato para hornear
rectangular exclusivamente con las
funciones que permiten la cocción
por convección; No lo utilice nunca
en combinación con el microondas�
Introduzca el plato horizontalmente,
apoyándolo en la rejilla del compartimento de cocción�
Nota: No es necesario que quite el plato giratorio ni su
soporte cuando utilice el plato para hornear.
El número y el tipo de accesorios puede variar de un modelo a otro.
Los accesorios no incluidos pueden adquirirse aparte en el Servicio Postventa.
Hay varios accesorios disponibles en el mercado.
Antes de adquirirlos, asegúrese de que son aptos
para el microondas y resistentes a las temperaturas
del horno.
Los contenedores metálicos para alimentos o
bebidas no deben utilizarse nunca para la cocción
con el microondas.
TAPA
crear dos niveles de cocción�
No es adecuada para la cocción por convección ni con
ninguna de las funciones de grill�
Asegúrese siempre de que ni los alimentos ni los
accesorios entren en contacto con las paredes
internas del horno.
Compruebe siempre que el plato giratorio gira sin
problemas antes de poner en marcha el horno.
Tenga cuidado de no desencajar el plato giratorio
cuando introduzca o saque otros accesorios.
Es útil para cubrir los alimentos
cuando se cocina o se calienta
en el microondas� La tapa reduce
las salpicaduras, mantiene la
humedad de los alimentos y
también se puede utilizar para
49
Page 50
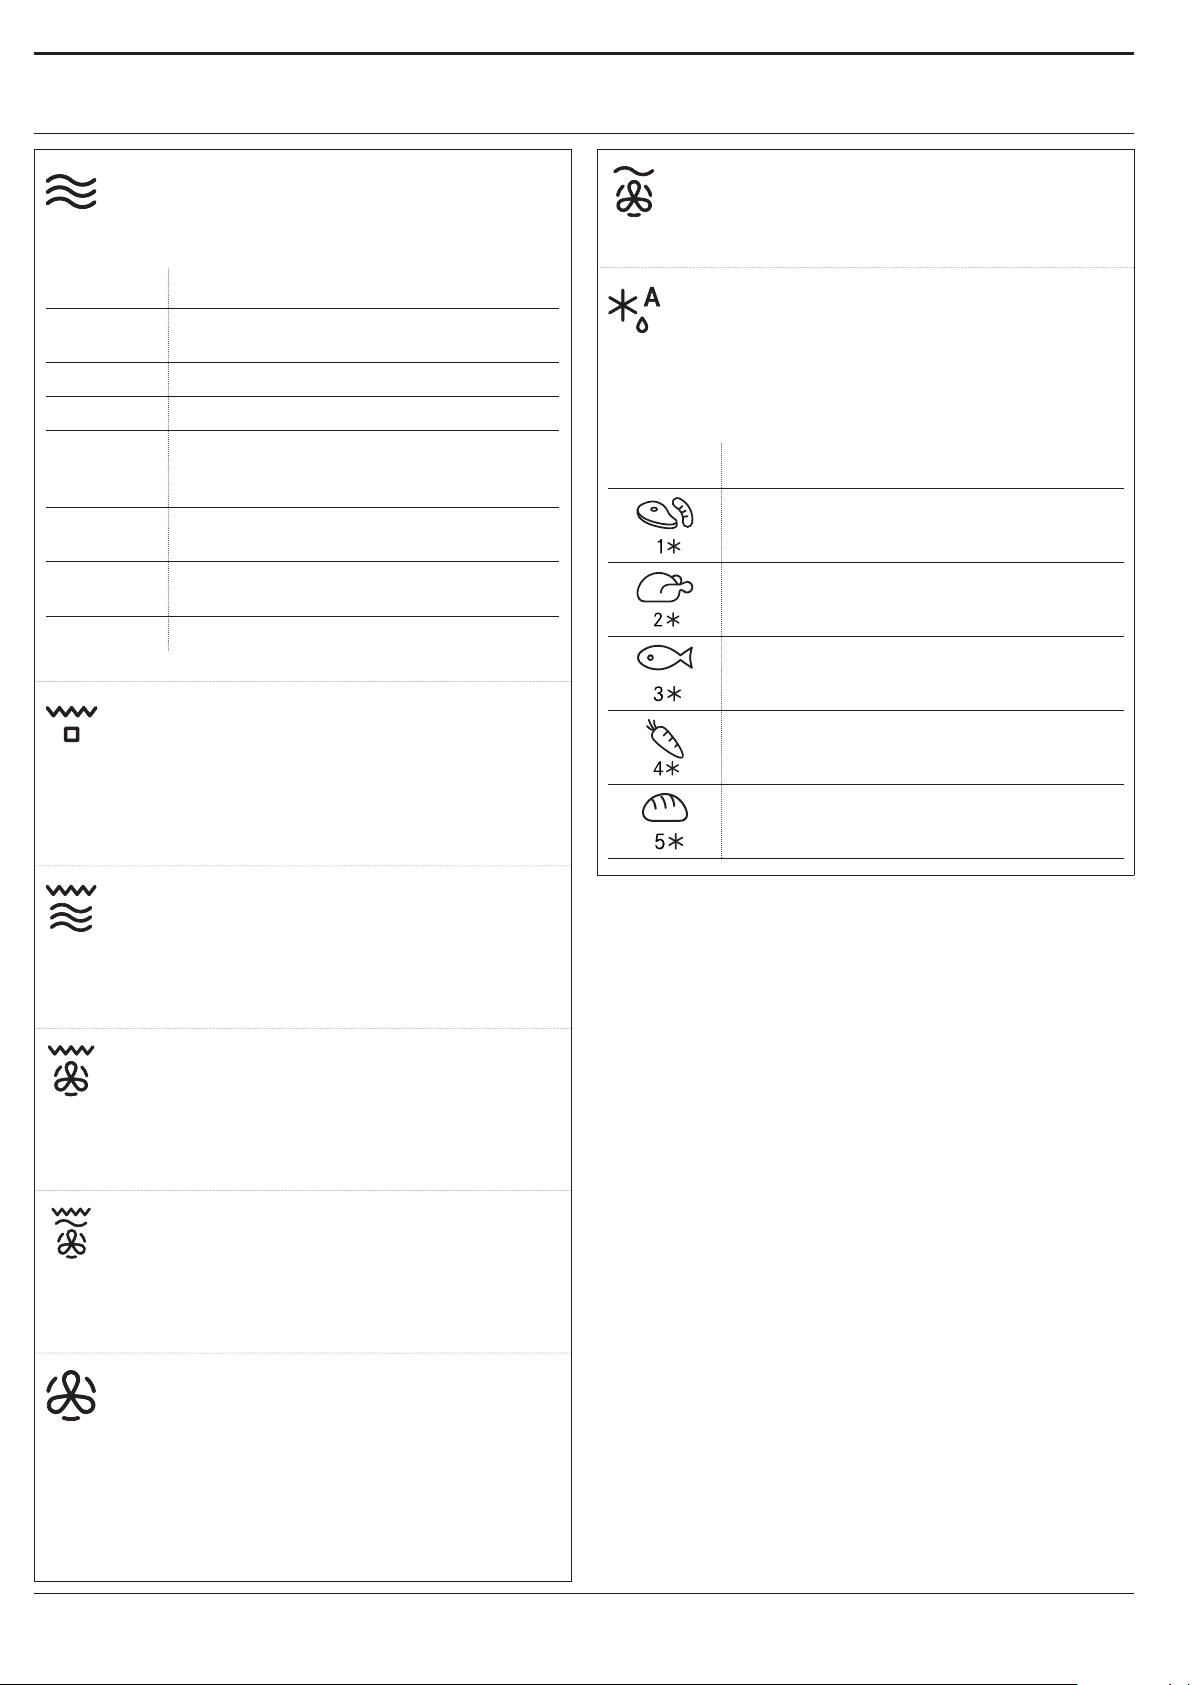
FUNCIONES
MICROONDAS
Para cocinar y recalentar alimentos o bebidas
con rapidez�
POTENCIA RECOMENDADA PARA
900 W
750 W
650 W
500 W
350 W
160 W
90 W
GRILL
Para dorar y gratinar� Es recomendable girar
los alimentos durante la cocción�
Para obtener los mejores resultados, precaliente el
grill durante 3-5 minutos�
Accesorios recomendados: Parrilla superior
Calentar rápidamente bebidas u otros
alimentos con alto contenido en agua
Cocción de verduras
Cocción de carne y pescado
Cocción de salsas con carne, o salsas que
contengan queso o huevo. Acabado de
pasteles de carne o pasta al horno
Cocción lenta y suave. Perfecta para
derretir mantequilla o chocolate
Descongelar alimentos o ablandar
mantequilla o queso
Ablandar helados
AIRE FORZADO + MICROONDAS
Para preparar platos de horno en poco tiempo�
Accesorios recomendados: Rejilla inferior
AUTO DEFROST *
Para descongelar rápidamente diversos tipos
de alimentos simplemente especificando su peso�
Los alimentos deben colocarse directamente en el
plato giratorio� Remueva los alimentos cuando lo
indique�
CATEGORÍA ALIMENTO PESO
CARNE
(carne picada, chuletas, letes,
asados)
AVES
(pollo entero, en trozos o letes)
PESCADO
(entero, lomos, letes)
VERDURAS
(verduras variadas, guisantes,
brócoli, etc.)
PAN
(cortado, panes, bollos)
100 g-2 kg
100 g-2,5 kg
100 g-1,5 kg
100 g-1,5 kg
100 g-1 kg
GRILL + MICROONDAS
Para cocinar y gratinar rápidamente,
combinando las funciones de microondas y las de
grill�
Accesorios recomendados: Parrilla superior
TURBO GRILL
Para lograr un resultado perfecto, combinando
las funciones de grill y convección� Es recomendable
girar los alimentos durante la cocción�
Accesorios recomendados: Parrilla superior
TURBO GRILL + MO
Para cocinar y dorar rápidamente,
combinando las funciones de microondas, grill y
convección�
Accesorios recomendados: Parrilla superior
AIRE IMPULSADO
Sirve para cocinar platos y obtener un
resultado similar al de un horno convencional� Para
cocinar ciertos alimentos, se puede emplear el plato
para hornear u otros recipientes de cocción aptos
para uso en el horno�
Accesorios recomendados: Rejilla inferior/Bandeja
pastelera rectangular
50
Page 51
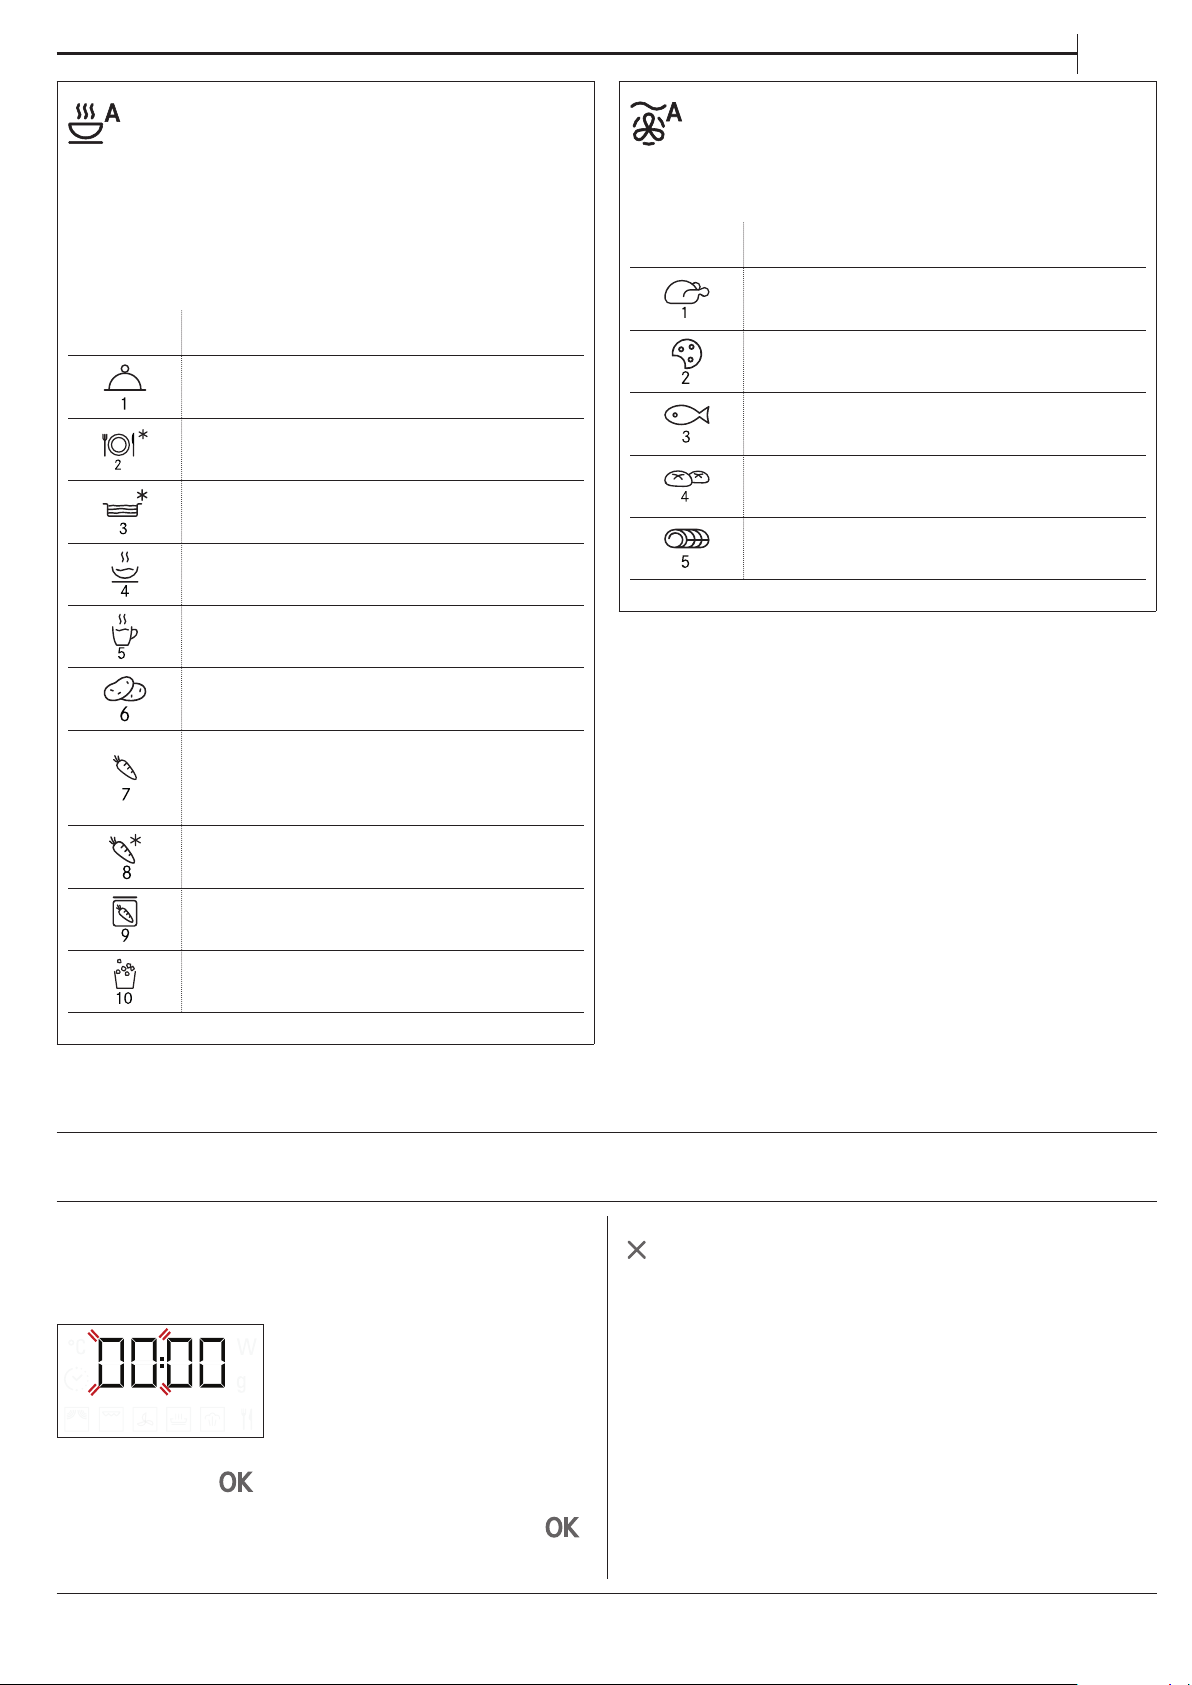
ES
RECAL. / COCCIÓN AUTOMÁTICOS *
Sirve para calentar alimentos precocinados
que estén congelados o a temperatura ambiente y
para cocer alimentos de forma rápida, y consigue
unos resultados óptimos�
El horno calcula automáticamente la configuración
requerida para obtener los mejores resultados en
el menor tiempo posible� Coloque los alimentos en
una bandeja o plato aptos para microondas�
CATEGORÍA ALIMENTO PESO
BANDEJA DE CENA 250-500 g
PORCIÓN CONGELADA 250-500 g
LASAÑA CONGELADA 250-500 g
SOPAS 200-800 g
BEBIDAS 100-500 g
PATATAS AL HORNO
(Gírelas cuando se indique)
VERDURAS FRESCAS
(Córtelas a trozos del mismo
tamaño y añada de 2 a 4 cucharas
de agua. Tape)
200 g - 1 kg
200-800 g
AUTO AIRE FORZADO + MICROONDAS
Para cocer rápidamente alimentos al horno
y conseguir unos resultados óptimos� Utilice
recipientes de cocción aptos para el horno y
resistentes a las microondas�
CATEGORÍA ALIMENTO PESO
POLLO ASADO 800 g-1,5 kg
GALLETAS 300 g
PESCADO ENTERO 600 g-1,2 kg
PATATAS GRATINADAS 800 g-2 kg
ROSBIF 800 g-1,5 kg
* Con las funciones automáticas, simplemente seleccione
el tipo y el peso o la cantidad de alimentos para obtener
los mejores resultados. El horno calculará automáticamente
la conguración óptima y seguirá cambiándola a lo largo
del proceso de cocción. Remueva los alimentos cuando lo
indique.
VERDURAS CONGELADAS
(Gire cuando se indique. Tape)
VERDURAS EN LATA 200-600 g
PALOMITAS 100 g
200-800 g
PRIMER USO
. CÓMO CONFIGURAR LA HORA
La primera vez que encienda el aparato, tendrá que
ajustar la hora: En la pantalla parpadean las dos cifras
de la hora�
Nota: para cambiar la hora más adelante, mantenga pulsado
durante como mínimo 3 segundos con el horno
apagado y repita el procedimiento anterior.
Después de un corte de suministro prolongado, es posible
que tenga que volver congurar la hora.
Gire el selector de ajuste para establecer la hora
correcta y pulse
para confirmar� Los dos dígitos de
los minutos empezarán a parpadear� Gire el selector
de ajuste para establecer la hora correcta y pulse
para confirmar�
51
Page 52
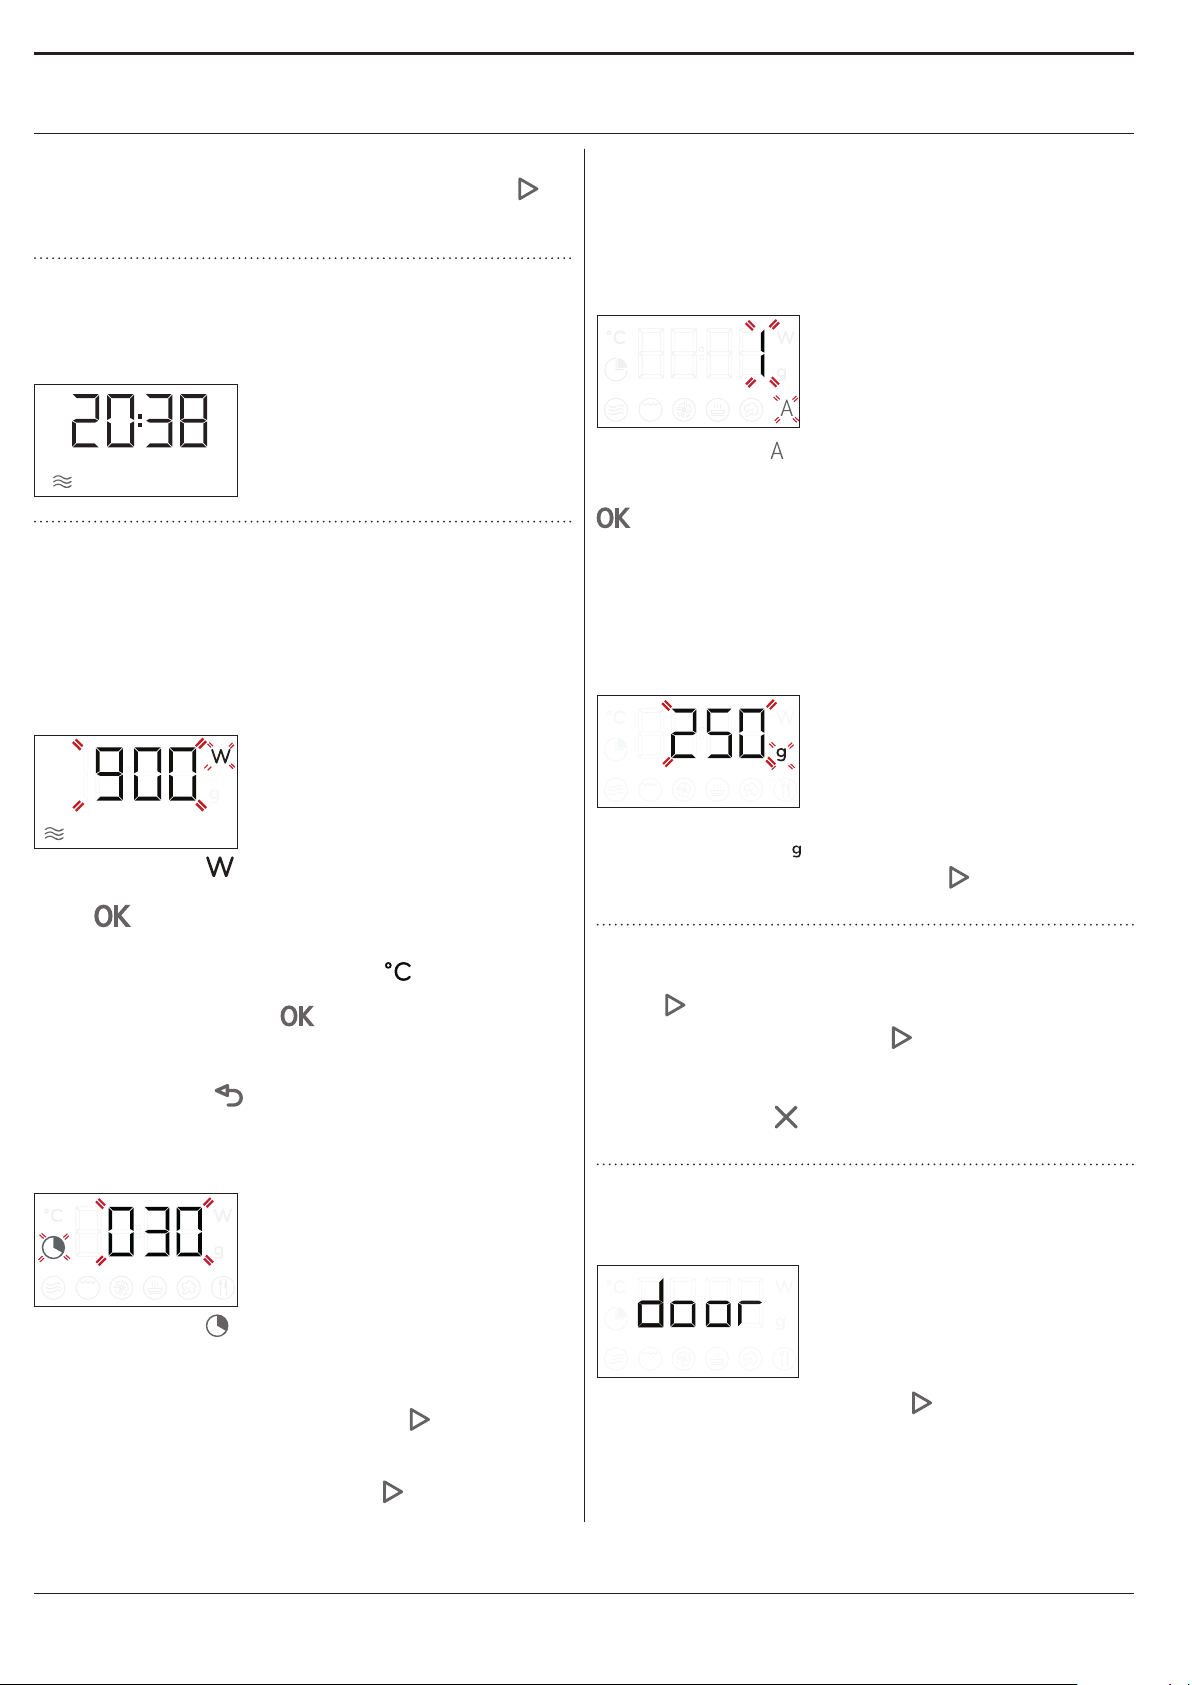
USO DIARIO
. INICIO RÁPIDO
Cuando el horno está apagado, se puede pulsar
para activar la cocción con la función microondas a la
potencia máxima (900W) durante 30 segundos�
1. SELECCIONAR UNA FUNCIÓN
Cuando el horno está apagado, la pantalla solo
muestra la hora� Gire el selector de ajuste para elegir
una de las funciones�
2. AJUSTAR LA FUNCIÓN
. FUNCIONES MANUALES
Cuando haya seleccionado la función que desee,
puede cambiar la configuración correspondiente�
En la pantalla aparecerá la configuración que se
puede cambiar por orden�
POTENCIA / TEMPERATURA DEL MICROONDAS
. FUNCIONES AUTOMÁTICAS / DESCONGELACIÓN
AUTOMÁTICA
CATEGORÍAS
Cuando escoja una de las funciones automáticas,
tendrá que seleccionar una categoría para los
alimentos que cocine�
Cuando el icono parpadee en la pantalla, gire el
selector de ajuste para seleccionar el dígito que se
corresponda con la categoría deseada, después pulse
para confirmar�
PESO
Para conseguir los mejores resultados, las funciones
automáticas requieren que introduzca el peso
de los alimentos seleccionando entre los ajustes
preestablecidos: el horno calculará la duración ideal
de la función en uso para cada tipo de alimento�
Cuando el icono parpadee en la pantalla, gire el
selector para ajustar la configuración de potencia,
pulse
configuración siguiente (si es posible)�
Del mismo modo, cuando el icono
pantalla, gire el selector para ajustar la configuración
de la temperatura, pulse
modificando la configuración siguiente (si es posible)�
Nota: una vez activada la función, la potencia se puede
modicar pulsando dos veces para acceder al menú de
conguración de alimentación y después girando el selector
para cambiar la conguración.
DURACIÓN
Cuando el icono parpadee en la pantalla, gire
el selector de ajuste para establecer la duración
deseada�
Cuando se muestre el tiempo de cocción que se
corresponda con el que desea, pulse
confirmar e iniciar la función�
Nota: Durante la cocción, puede ajustar la conguración
girando el selector cada vez que pulse
aumenta en 30 segundos.
para confirmar y siga modificando la
parpadee en la
para confirmar y siga
para
, el tiempo
Cuando los valores preestablecidos aparezcan en
pantalla y el icono
introducir el peso y después pulse
e iniciar la función�
parpadee, gire el selector para
para confirmar
3. ACTIVAR LA FUNCIÓN
Una vez que haya aplicado la configuración deseada,
pulse
Cada vez que pulse el botón
cocción se incrementará en otros 30 segundos (solo
para funciones manuales)�
Nota: Puede pulsar dos veces en cualquier momento
para parar la función que esté activada en ese momento.
para activar la función�
, el tiempo de
. BLOQUEO DE SEGURIDAD
Esta función se activa automáticamente para evitar la
activación accidental del horno�
Abra y cierre la puerta, y pulse para activar la
función�
52
Page 53
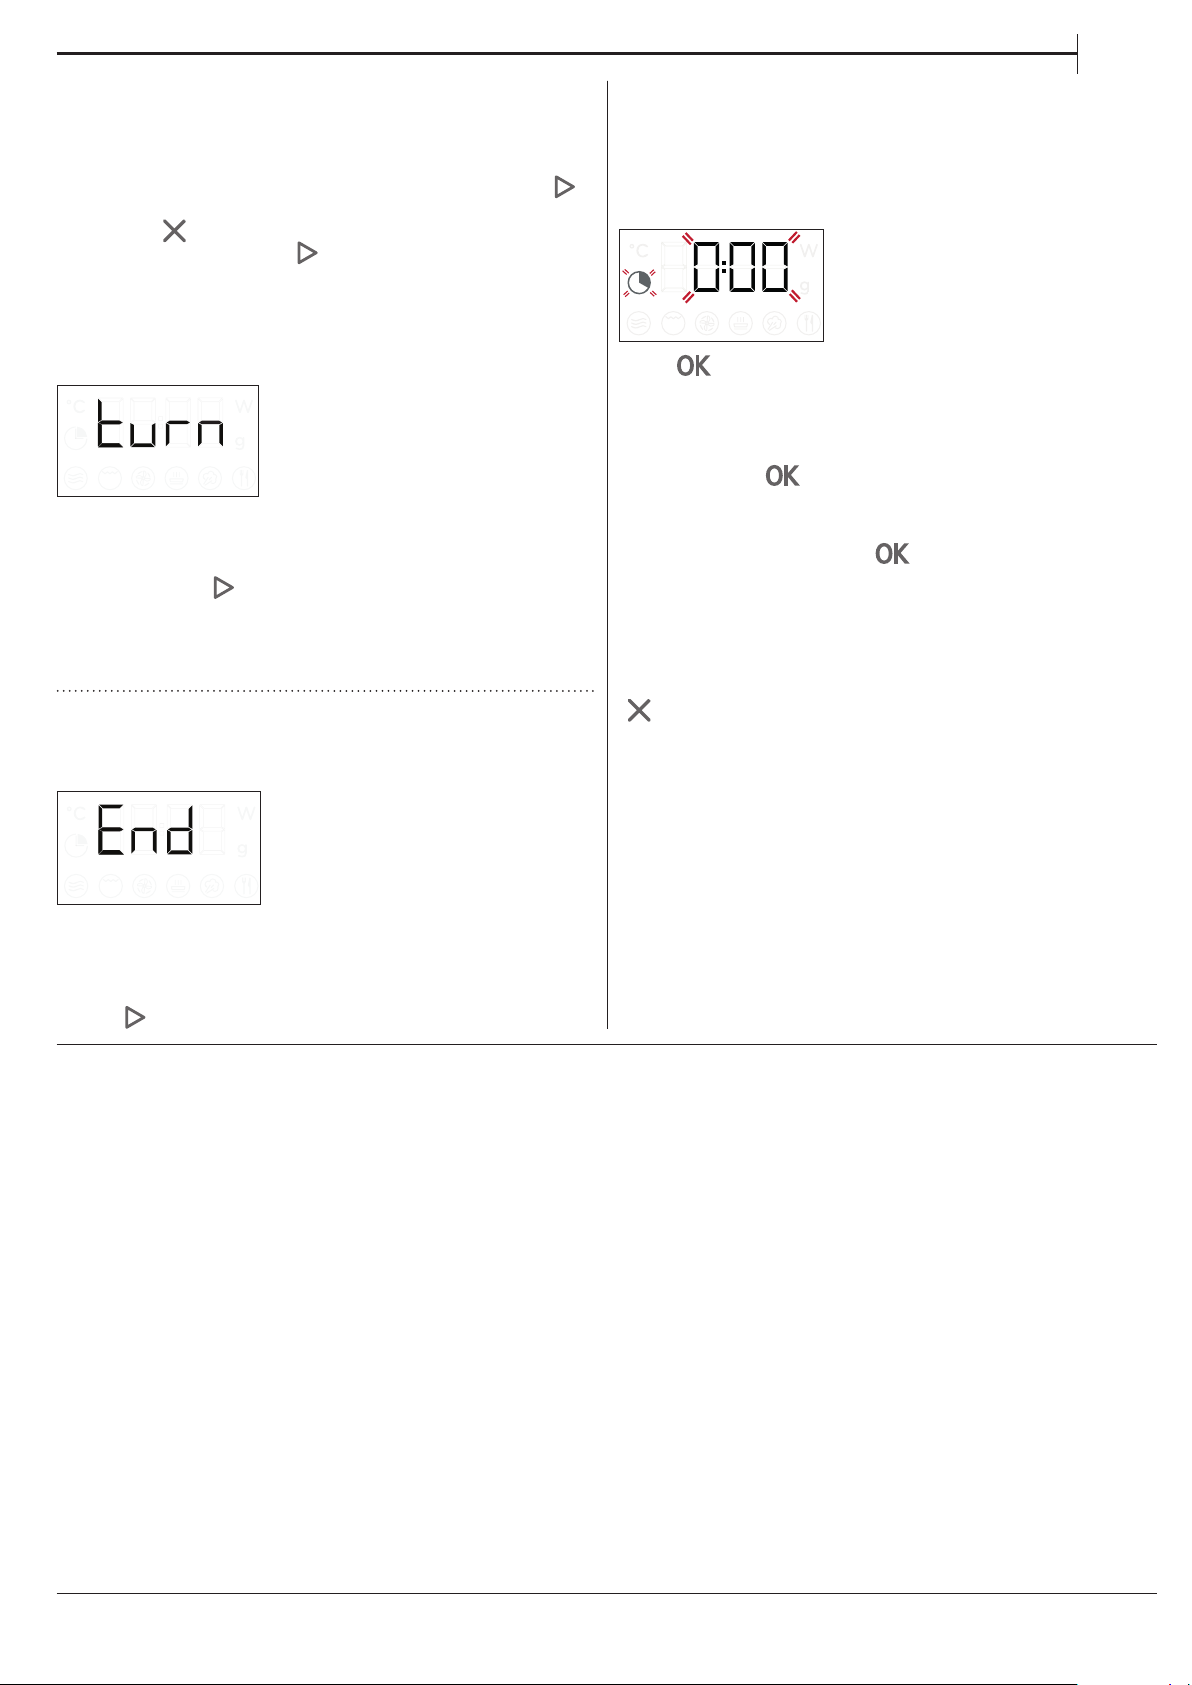
4. PAUSA
Para pausar una función activa, por ejemplo para
mover o girar la comida, solamente tendrá que abrir la
puerta�
Para reanudar la función, cierre la puerta y pulse �
También puede pausar temporalmente la cocción
pulsando
cierre la puerta y pulse
PAUSA AUTOMÁTICA
(REMOVER O GIRAR LOS ALIMENTOS )
Algunas funciones se detendrán para que pueda
remover o girar los alimentos�
Cuando el horno pause la cocción y en la pantalla
aparezca «Turn food» o «Stir Food», abra la puerta
para girar o mover los alimentos, después cierre la
puerta y pulse
Nota: pasados 2 minutos, incluso si los alimentos no se
han girado o movido, la función volverá a comenzar
automáticamente.
� Para reanudar el proceso de cocción,
�
para iniciar la cocción de nuevo�
5. FINAL DE COCCIÓN
Sonará una señal acústica y en la pantalla aparecerá
«End» para indicar que la cocción ha terminado�
ES
. TEMPORIZADOR
Cuando el horno está apagado, la pantalla puede
utilizarse como temporizador� El temporizador no
activa ninguno de los ciclos de cocción�
Para activar la función y establecer el tiempo
necesario, gire el selector de ajuste�
Pulse para activar el temporizador� Una vez
que haya finalizado la cuenta atrás del tiempo
seleccionado sonará una señal acústica y la pantalla
lo indicará� Para hacer un cambio en el temporizador
una vez se ha activado, gire el selector de ajuste,
después pulse
Para interrumpirlo o volver a la pantalla de tiempo
actual, gire el selector de ajuste hasta que aparezca
0:00 en la pantalla y pulse
Nota: Cuando se haya activado el temporizador, también
podrá activar una función: El temporizador proseguirá la
cuenta atrás automáticamente sin que ello tenga ningún
efecto sobre la función. Para volver a ver el temporizador,
espere a que la función termine o pare el horno pulsando
.
para confirmar�
�
Para algunas funciones, es posible aplazar la
cocción manteniendo la configuración establecida
anteriormente: gire el selector de ajuste para
establecer un nuevo tiempo de cocción, después
pulse
�
53
Page 54

CONSEJOS ÚTILES
CÓMO UTILIZAR LA TABLA DE COCCIÓN
La tabla indica las funciones más adecuadas para cada
tipo de alimento�
El tiempo de cocción se refiere al ciclo de cocción de
los alimentos dentro del horno, excluyendo la fase de
precalentamiento (en caso que sea necesaria)�
La configuración y los tiempos de cocción son
orientativos y dependen de la cantidad de alimentos y
del tipo de accesorio utilizado�
Cocine siempre los alimentos durante el tiempo de
cocción mínimo especificado y compruebe que se ha
cocinado el interior�
Para obtener unos resultados mejores, siga las
recomendaciones de la tabla de cocción cuando
seleccione los accesorios�
CONSEJOS PARA COCINAR CON MICROONDAS
Las microondas sólo penetran en los alimentos hasta
cierta profundidad;
separe los alimentos tanto como sea posible cuando
cocine diferentes alimentos al mismo tiempo�
Las piezas pequeñas se cocinan más rápidamente que
las grandes: Corte los alimentos en piezas de igual
tamaño para obtener una cocción uniforme�
La humedad se evapora durante la cocción con
microondas: utilizar una tapa resistente a las
microondas ayuda a reducir la pérdida de humedad�
Cuando saque los alimentos del microondas, seguirán
cocinándose durante un tiempo� Por esa razón,
recomendamos dejar dos minutos de reposo una vez
finalizado el ciclo de cocción�
Se recomienda remover los alimentos cuando se
cocine en el microondas para trasladar las partes más
cocinadas de los márgenes hacia el centro y viceversa�
Coloque los filetes de carne finos uno encima de otro
o entrelazados� Los trozos más gruesos, como las
porciones de carne o las salchichas, se deben colocar
uno al lado del otro�
PELÍCULA DE PLÁSTICO Y BOLSAS
Quite los cierres de alambre de las bolsas de papel
o de plástico antes de introducirlas en el horno con
funciones de cocción con microondas�
La película de plástico debe perforarse o pincharse
con un tenedor para liberar la presión y evitar que
reviente a medida que se genere el vapor durante la
cocción�
LÍQUIDOS
Los líquidos pueden llegar a superar el punto de
ebullición sin la presencia de burbujas visibles�
Esto puede hacer que los líquidos calientes se
desborden de forma repentina�
Para prevenir esa posibilidad:
� Evite usar recipientes con el cuello estrecho�
� Remueva el líquido antes de colocar el recipiente en
el horno y deje la cucharilla en el recipiente�
� Una vez caliente, vuelva a remover el líquido con
cuidado antes de retirar el recipiente del horno�
ALIMENTOS CONGELADOS
Para obtener buenos resultados, se recomienda
descongelar los alimentos directamente sobre el plato
giratorio de cristal� Si es necesario, también puede
utilizar un recipiente ligero de plástico apto para
microondas�
Los alimentos hervidos, guisos y salsas para carne
se descongelan mejor si se remueven durante la
descongelación�
Separe los alimentos una vez que empiecen
a descongelarse: las porciones separadas se
descongelarán más rápidamente�
COMIDA PARA NIÑOS
Cuando caliente alimentos infantiles o líquidos
en biberones o potitos, no olvide removerlos y
comprobar su temperatura antes de servirlos�
Así se asegura la distribución homogénea del calor y
evitará el riesgo de quemaduras�
No olvide retirar la tapa y la tetina antes de calentar el
biberón�
CARNE Y PESCADO
Para obtener un dorado perfecto de la superficie y
mantener el interior de la carne o el pescado tierno
y jugoso, recomendamos usar la función «Grill +
Microondas»� Para obtener los mejores resultados,
programe la potencia del microondas entre 160 y 350
W�
54
Page 55
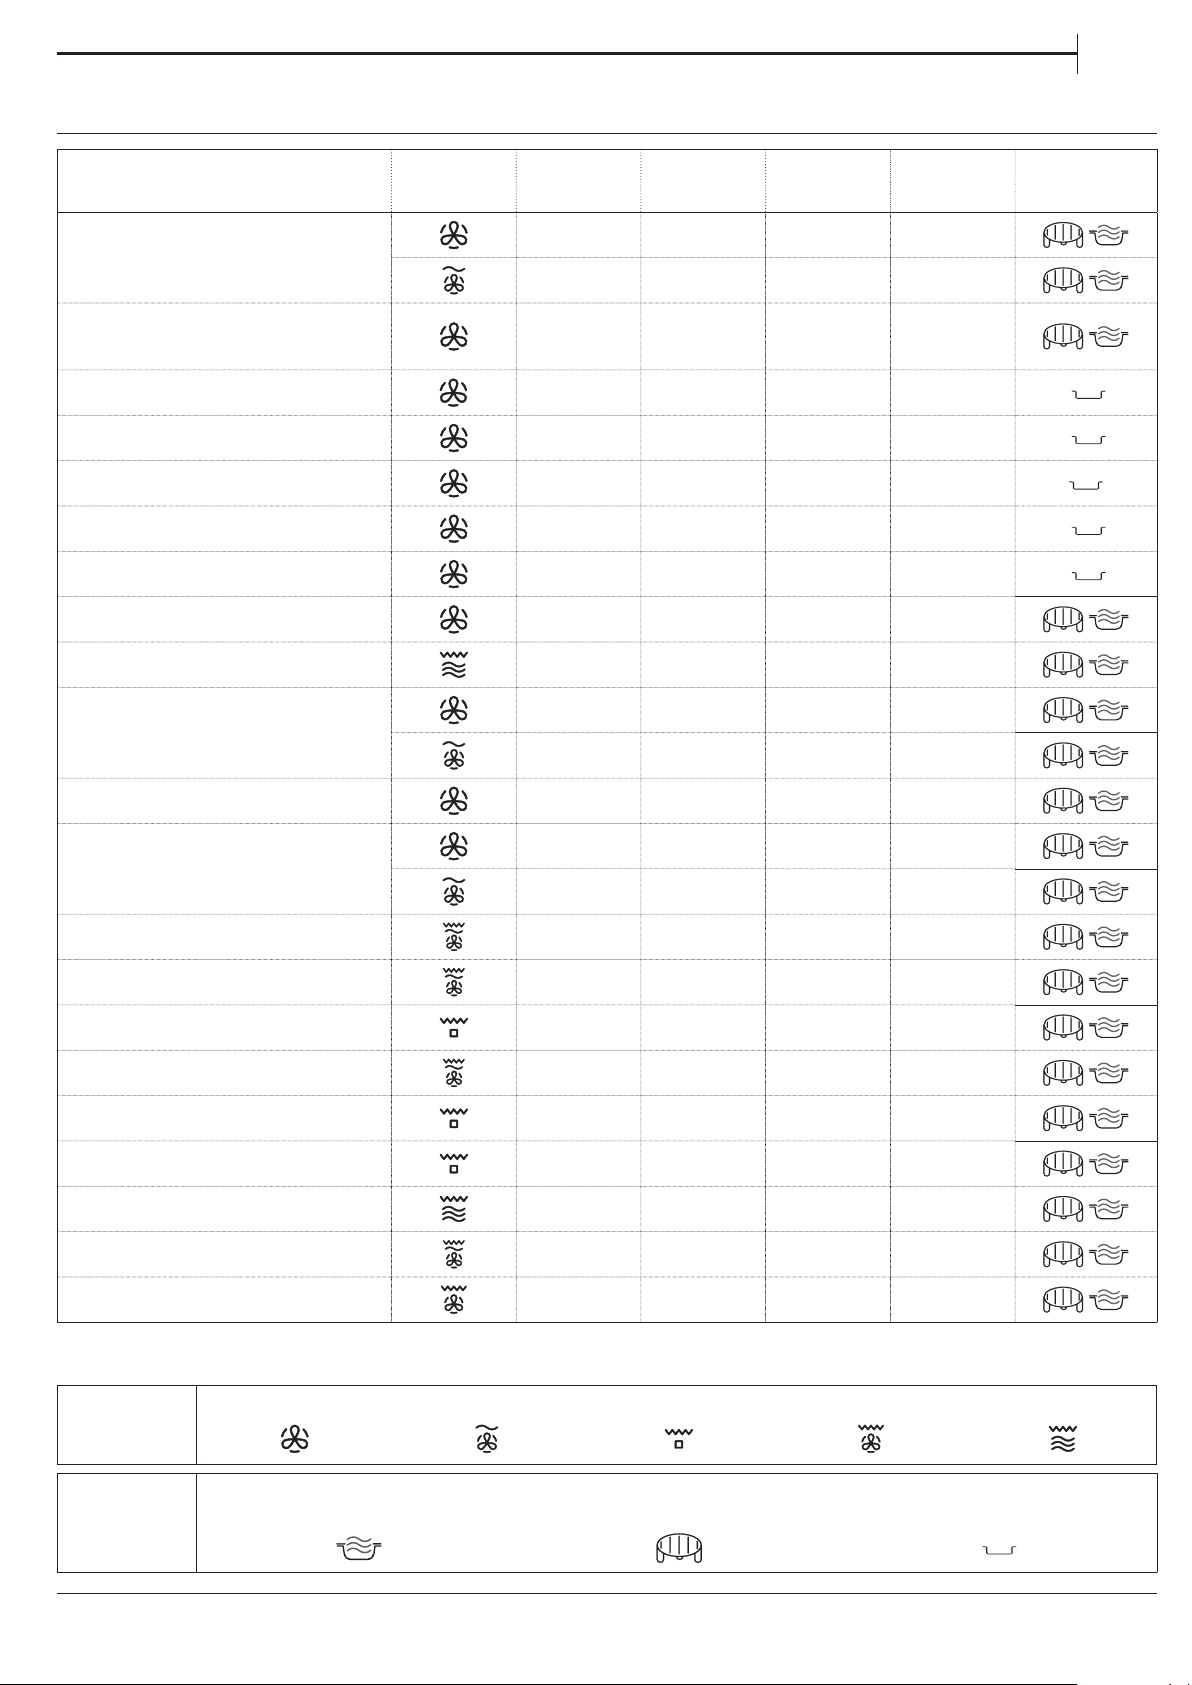
TABLA DE COCCIÓN
ALIMENTO FUNCIÓN CALENTANDO
NIVEL DE
POTENCIA DE
GRILL
ES
POTENCIA (W) TIEMPO (MIN) ACCESORIOS
- 160 - 180 - 30-60
Bizcochos
- 160 - 180 90 25-50
Tartas rellenas
(tarta de queso, strudel, tarta de
manzana)
Sí 160-190 - 35-70
Galletas Sí 170 -180 - 10-20
Merengues Sí 10 0 -120 - 40-50
Bollos Sí 210-220 - 10 -12
Barra de pan
Sí 180 -200 - 30-35
Pizza/Empanada Sí 190 -220 - 20-40
Tartas saladas
(tarta de verdura, quiche)
Sí 180-190 - 40-55
Lasaña / Pasta al horno - 350-500 15-40
Cordero o ternera asados/Rosbif
(1,3-1,5 kg)
- 170-180 - 70-80*
- 160-180 160 50-70*
Rosbif: al punto (1,3-1,5 kg) - 170-180 - 40-60*
Pollo asado / Conejo / Pato
(entero 1-1,2 kg)
Pollo/Conejo/Pato
(letes/piezas 0,4-1 kg)
- 210-220 - 50 -70*
- 210-220 350 45-60*
- - 350-500 20-40*
Pescado al horno (entero) - - 160-350 20-40
Filetes/rodajas de pescado Sí - - 15-30*
Verduras rellenas
(tomates, calabacines, berenjenas...)
- - 500-650 25-50
Tostada - - - 3-6
Salchichas / Kebab / Costillas /
Hamburguesas
Patatas asadas
- - - 20-40*
- - 350-500 20-40*
Fruta asada - - 160-350 15-25
Verduras gratinadas - - - 15-25
* Dar la vuelta al alimento a mitad de la cocción.
Tabla de recetas cumplimentada por los órganos de certicación de conformidad con las normas IEC 60705 y IEC 60350.
Aire impulsado
FUNCIONES
Aire impuls� + MO Grill Turbo Grill Grill + Microondas
ACCESORIOS
Plato resistente al calor/contenedor apto
para el microondas
Parrilla Bandeja pastelera rectangular
55
Page 56
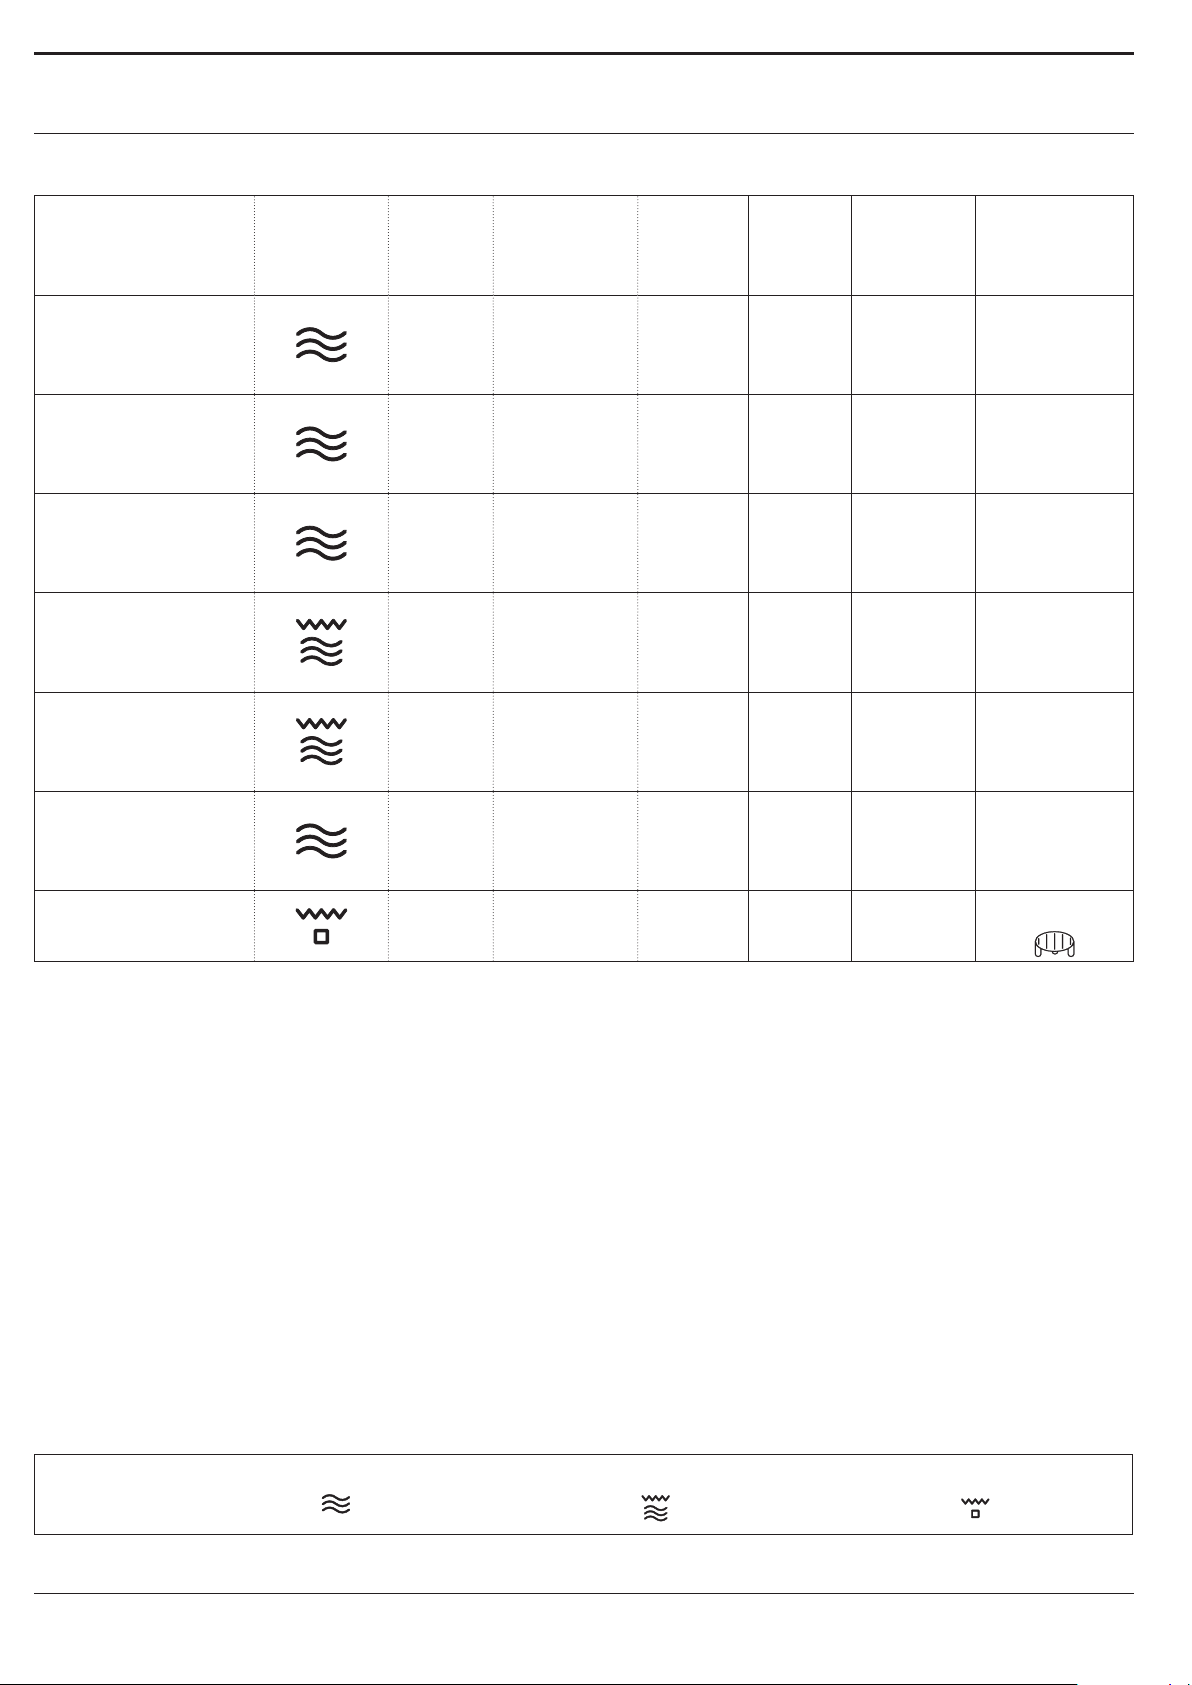
RECETAS PROBADAS
Compiladas por los órganos de certicación de conformidad con las normas IEC 60705 y IEC 60350-1.
ALIMENTO FUNCIÓN
Crema pastelera
Bizcocho
Pastel de carne
Patatas gratinadas
Pollo
Descongelación de
carne
(girar a la mitad del
proceso de cocción)
PESO
(g)
1000 12:00 - 13:00 - 650 -
475 8:00 - 10:00 - 750 -
900 13:00 - 14:00 - 750 -
110 0 28:00 - 30:00 190 350 -
1200 35:00 - 40:00 210 350 -
500 10:30 - 160 - Plato giratorio
TIEMPO DE
COCCIÓN
(min:seg)
TEMP./
NIVEL
DEL
GRILL
POTEN-
CIA
(W)
PRECA-
LENTAR.
ACCESORIOS
Recipiente
apto para
microondas
(Pyrex 3�227)
Recipiente
apto para
microondas
(Pyrex 3�827)
Recipiente
apto para
microondas
(Pyrex 3�838)
Recipiente
apto para
microondas
(Pyrex 3�827)
Recipiente
apto para
microondas
(Pyrex 3�220)
Tostada
FUNCIONES
- 4:00 - 6:00 3 - Sí
Microondas Grill + Microondas Grill
Rejilla
56
Page 57
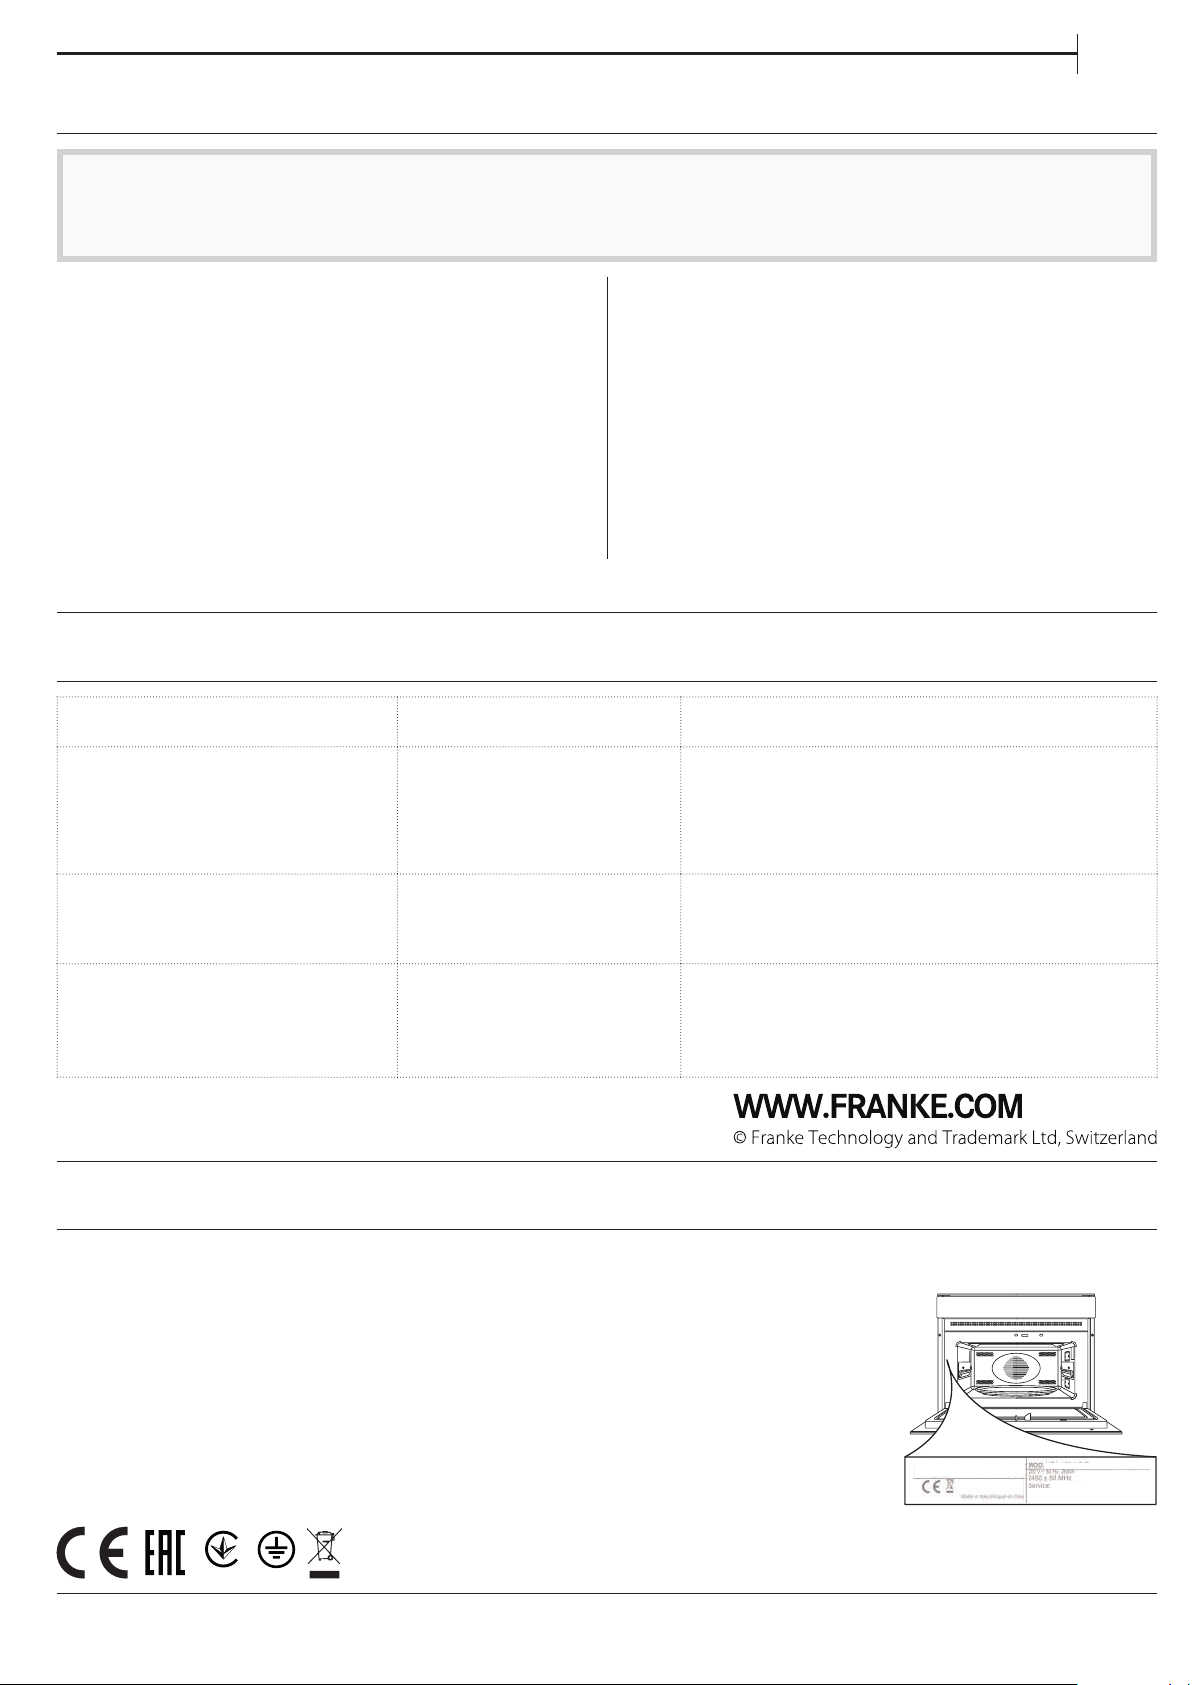
LIMPIEZA Y MANTENIMIENTO
ES
Asegúrese de que el aparato se haya enfriado antes de
llevar a cabo las tareas de mantenimiento o limpieza.
No utilice productos de lavado con vapor.
SUPERFICIES INTERNAS Y EXTERNAS
• Limpie las superficies con un paño húmedo de
microfibra� Si están muy sucias, añada unas gotas de
detergente neutro al agua� Seque con un paño seco�
• Limpie el cristal de la puerta con un detergente
No utilice estropajos de acero, estropajos abrasivos
ni productos de limpieza abrasivos/corrosivos, ya que
podrían dañar las supercies del aparato.
ACCESORIOS
Todos los accesorios son aptos para el lavavajillas�
Para la suciedad más resistente, frote suavemente con
un paño� Deje enfriar siempre los accesorios antes de
limpiarlos�
líquido adecuado�
• Con regularidad, o en caso de salpicaduras, quite
el plato giratorio de su soporte para limpiar la parte
inferior del horno y eliminar todos los restos de
comida�
• No es necesario limpiar el grill ya que la alta
temperatura que genera quema toda la suciedad�
Utilice esta función con regularidad�
RESOLUCIÓN DE PROBLEMAS
Problema Posible causa Solución
El horno no funciona�
El horno hace ruido, incluso
cuando está apagado�
En la pantalla aparecerá la letra
Corte de suministro.
Desconexión de la red
eléctrica.
Ventilador de refrigeración
activado.
Fallo del software. Póngase en contacto con el Servicio Postventa más
«F» seguida de un número�
ASISTENCIA
En caso de problemas de funcionamiento, póngase en
contacto con un Centro de Asistencia Técnica de Franke�
No solicite nunca los servicios de técnicos no
autorizados�
Indique:
- el tipo de fallo
- el modelo del aparato (art�/código)
- el número de serie (S/N), indicado en la placa de
características, que se encuentra en el borde derecho
del interior del horno (visible con la puerta del horno
abierta)�
Compruebe que haya corriente eléctrica en la
red y que el horno esté enchufado a la toma
de electricidad. Apague el horno y vuelva a
encenderlo para comprobar si se ha solucionado el
problema.
Abra la puerta o espere a que nalice el proceso de
enfriamiento.
cercano e indique el número que aparece detrás de
la letra «F».
Cuando se ponga en
contacto con nuestro
Centro de Asistencia,
deberá indicar los
códigos que figuran en
la placa de características
de su producto�
XXXXXXXXXXXX
XXXXXXXXXXXX
XXX/XXX
001
57
Page 58

ÍNDICE
VISÃO GERAL ���������������������������������������������������������������������������������������������������������������������������������������������������������������������������59
PAINEL DE CONTROLO ��������������������������������������������������������������������������������������������������������������������������������������������������������� 59
DESCRIÇÃO DO VISOR ���������������������������������������������������������������������������������������������������������������������������������������������������������60
ACESSÓRIOS ����������������������������������������������������������������������������������������������������������������������������������������������������������������������������60
FUNÇÕES ���������������������������������������������������������������������������������������������������������������������������������������������������������������������������������� 61
UTILIZAR PELA PRIMEIRA VEZ �������������������������������������������������������������������������������������������������������������������������������������������62
UTILIZAÇÃO DIÁRIA �������������������������������������������������������������������������������������������������������������������������������������������������������������� 63
CONSELHOS ÚTEIS ����������������������������������������������������������������������������������������������������������������������������������������������������������������65
TABELA DE COZEDURA ��������������������������������������������������������������������������������������������������������������������������������������������������������66
RECEITAS TESTADAS �������������������������������������������������������������������������������������������������������������������������������������������������������������67
LIMPEZA E MANUTENÇÃO ��������������������������������������������������������������������������������������������������������������������������������������������������68
RESOLUÇÃO DE PROBLEMAS ���������������������������������������������������������������������������������������������������������������������������������������������68
SUPORTE ����������������������������������������������������������������������������������������������������������������������������������������������������������������������������������68
58
Page 59
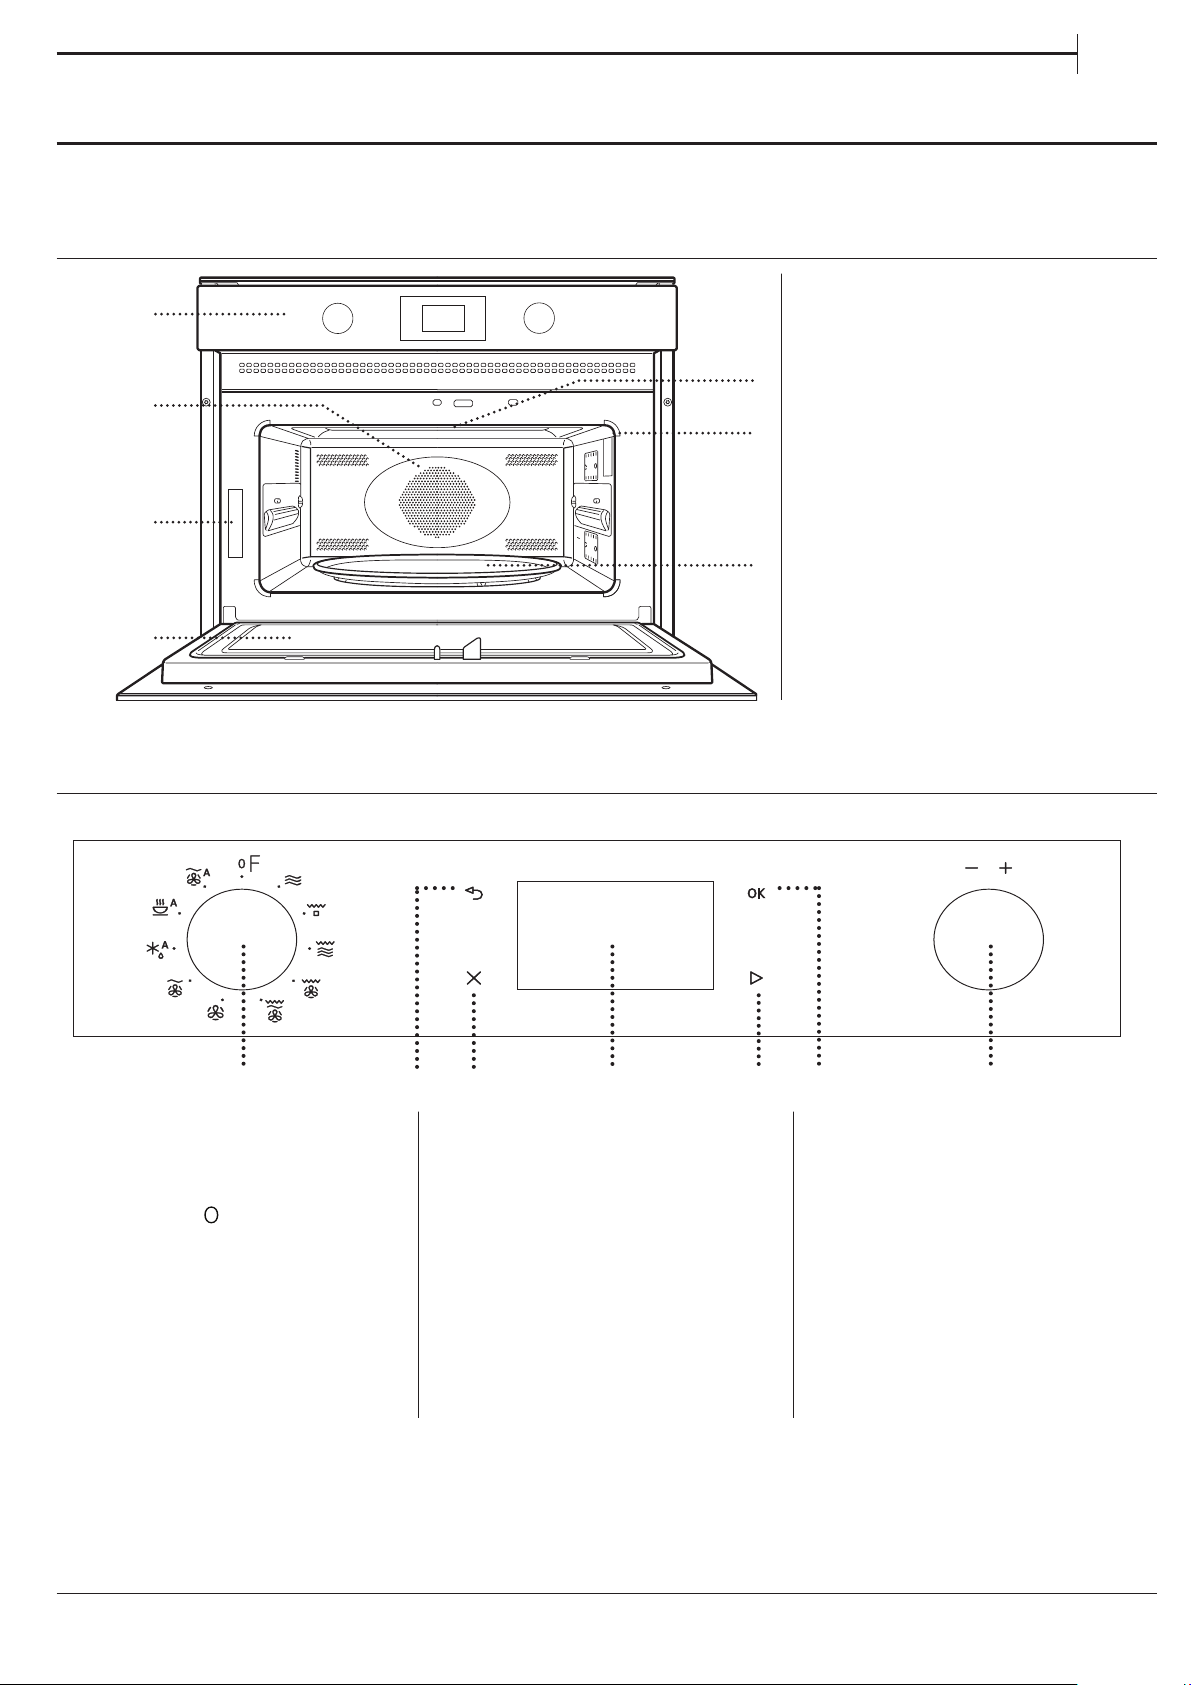
GUIA DO UTILIZADOR
VISÃO GERAL
1
2
3
4
1. Painel de controlo
2. Resistência circular
(não visível)
3. Placa de identificação
5
(não remover)
4. Porta
6
5. Resistência superior/grill
6. Luz
7. Prato rotativo de vidro
7
PT
PAINEL DE CONTROLO
1 7
1. BOTÃO SELETOR
Para ligar o forno selecionando
uma função�
Para desligar o forno, rode o botão
para a posição
2. RETROCEDER
Para regressar ao menu das
definições�
�
2
3
3. STOP
Para interromper uma função ativa
a qualquer momento� Prima duas
vezes para parar a função e colocar
o forno em stand-by�
4. VISOR
5. INÍCIO
Para iniciar funções e confirmar
definições� Se o forno estiver
desligado, ativa a função do microondas�
4 5
6
6. CONFIRMAR
Para confirmar a seleção de uma
função ou um valor definido�
7. BOTÃO DE AJUSTE
Para percorrer os menus e aplicar
ou alterar as definições�
59
Page 60
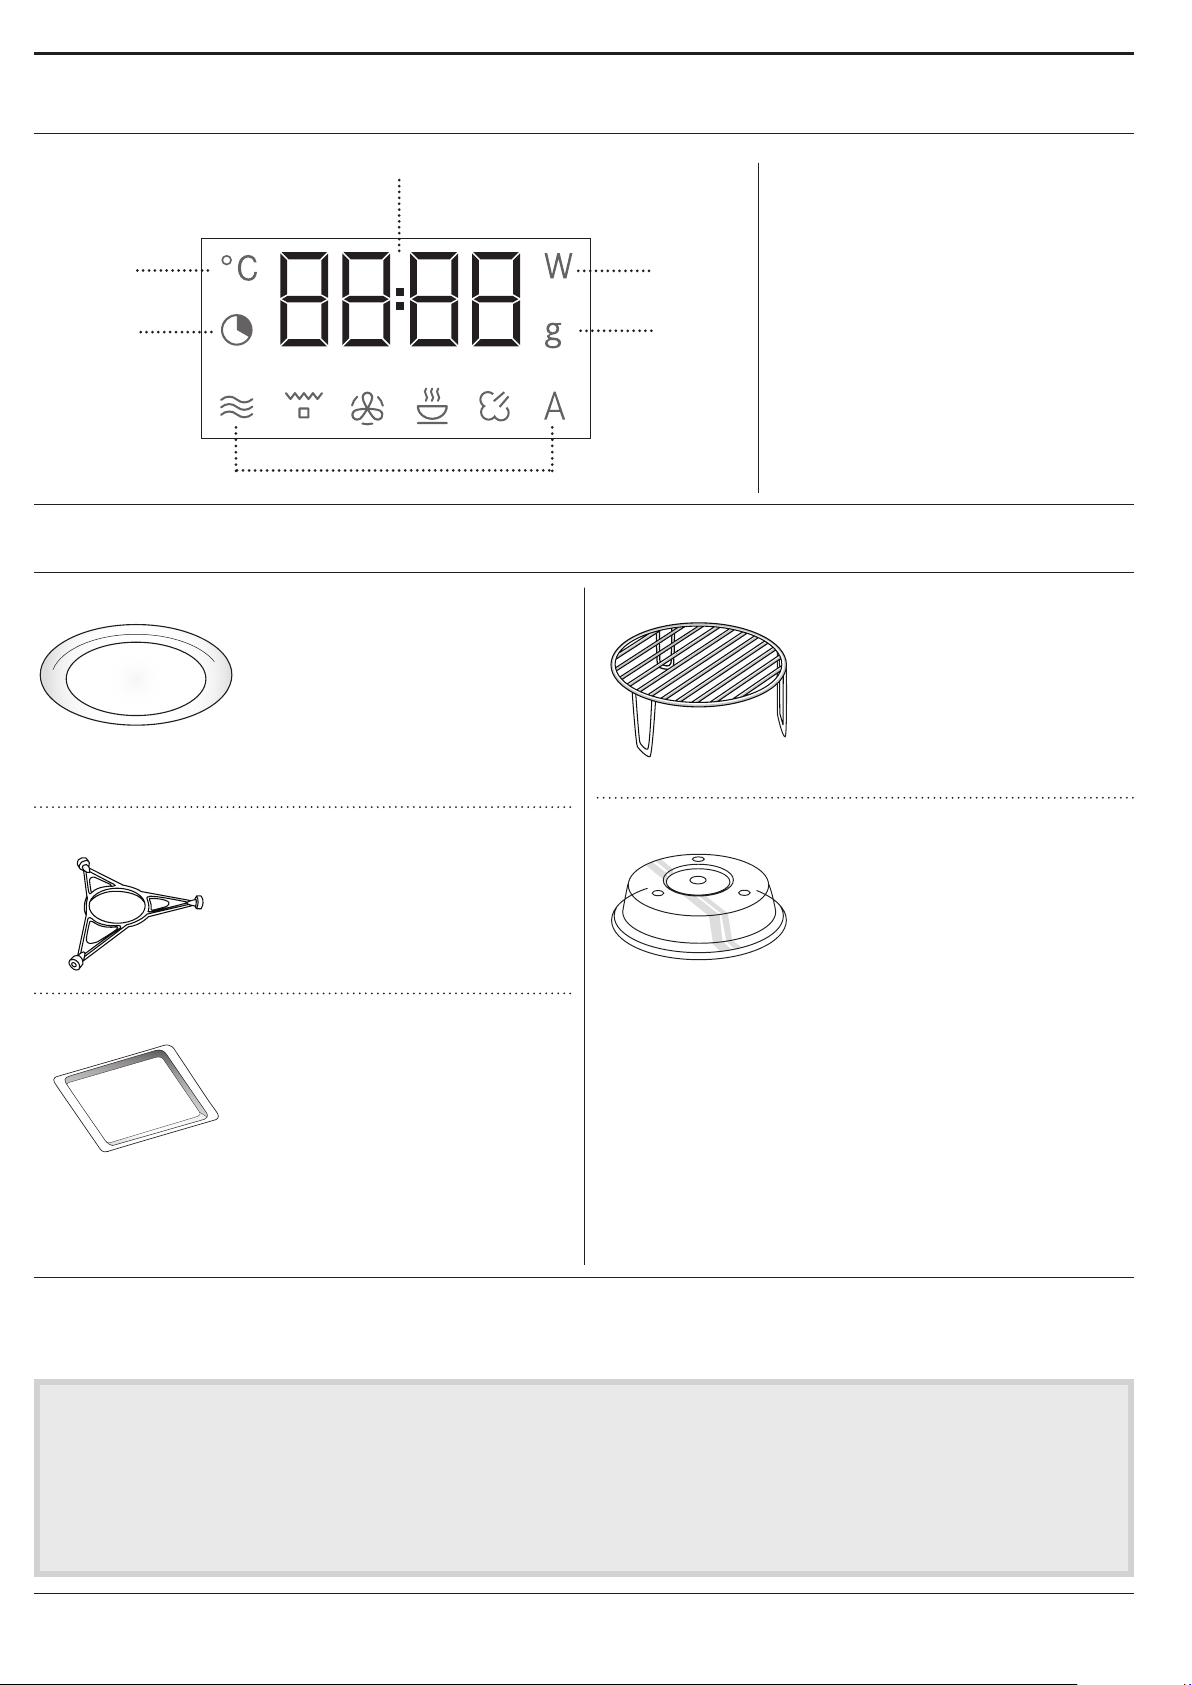
DESCRIÇÃO DO VISOR
5
1
2
6
ACESSÓRIOS
PRATO ROTATIVO DE VIDRO
Colocado no respetivo suporte, o
prato rotativo de vidro pode ser
utilizado com todos os métodos
de cozedura�
O prato rotativo tem sempre
de ser utilizado como base
para outros recipientes ou acessórios, à exceção do
tabuleiro de assar retangular�
3
4
GRELHA METÁLICA
1. Controlo das temperaturas
2. Definições de tempo e duração
das funções
3. Seleção da potência do micro-
ondas
4. Seleção do peso
5. Relógio, informações e duração
das funções
6. Símbolos das funções
selecionadas
Permite colocar os alimentos
mais próximos do grelhador para
obter um prato perfeitamente
dourado� Coloque a grelha
metálica no prato rotativo�
SUPORTE DO PRATO ROTATIVO
Utilize apenas o suporte para
o prato rotativo de vidro� Não
apoie outros acessórios no
suporte�
TABULEIRO DE ASSAR RETANGULAR
Utilize o tabuleiro de assar
apenas com funções que
permitam a cozedura de
convexão; este nunca deve
ser utilizado em combinação
com a função de micro-ondas�
Introduza o tabuleiro na horizontal, apoiando-o no
suporte do compartimento de cozedura�
Nota: Não é necessário retirar o prato rotativo e o respetivo
suporte quando utilizar o tabuleiro de assar retangular.
O número e o tipo de acessórios podem variar de acordo com o modelo adquirido.
Pode adquirir separadamente no Serviço de Assistência Técnica quaisquer outros acessórios que não venham fornecidos.
Existem vários acessórios disponíveis no mercado.
Antes de os comprar, certique-se de que estes são
adequados para serem utilizados no micro-ondas e
que são resistentes às temperaturas do forno.
Os recipientes metálicos para alimentos ou bebidas
nunca devem ser utilizados na função de microondas.
TAPE
Útil para tapar alimentos
enquanto estes cozinham ou
aquecem no micro-ondas� A
tampa reduz os salpicos, mantém
a humidade dos alimentos e
também pode ser utilizada para
criar dois níveis de cozedura�
Não é adequada na utilização na cozedura de
conveção ou com as funções do grelhador�
Certique-se sempre de que os alimentos e os
acessórios não entram em contacto com as paredes
interiores do forno.
Antes de ligar o forno certique-se sempre de que
o prato rotativo consegue rodar livremente. Tenha
cuidado para não retirar o prato rotativo da posição
correta ao introduzir ou retirar outros acessórios.
60
Page 61
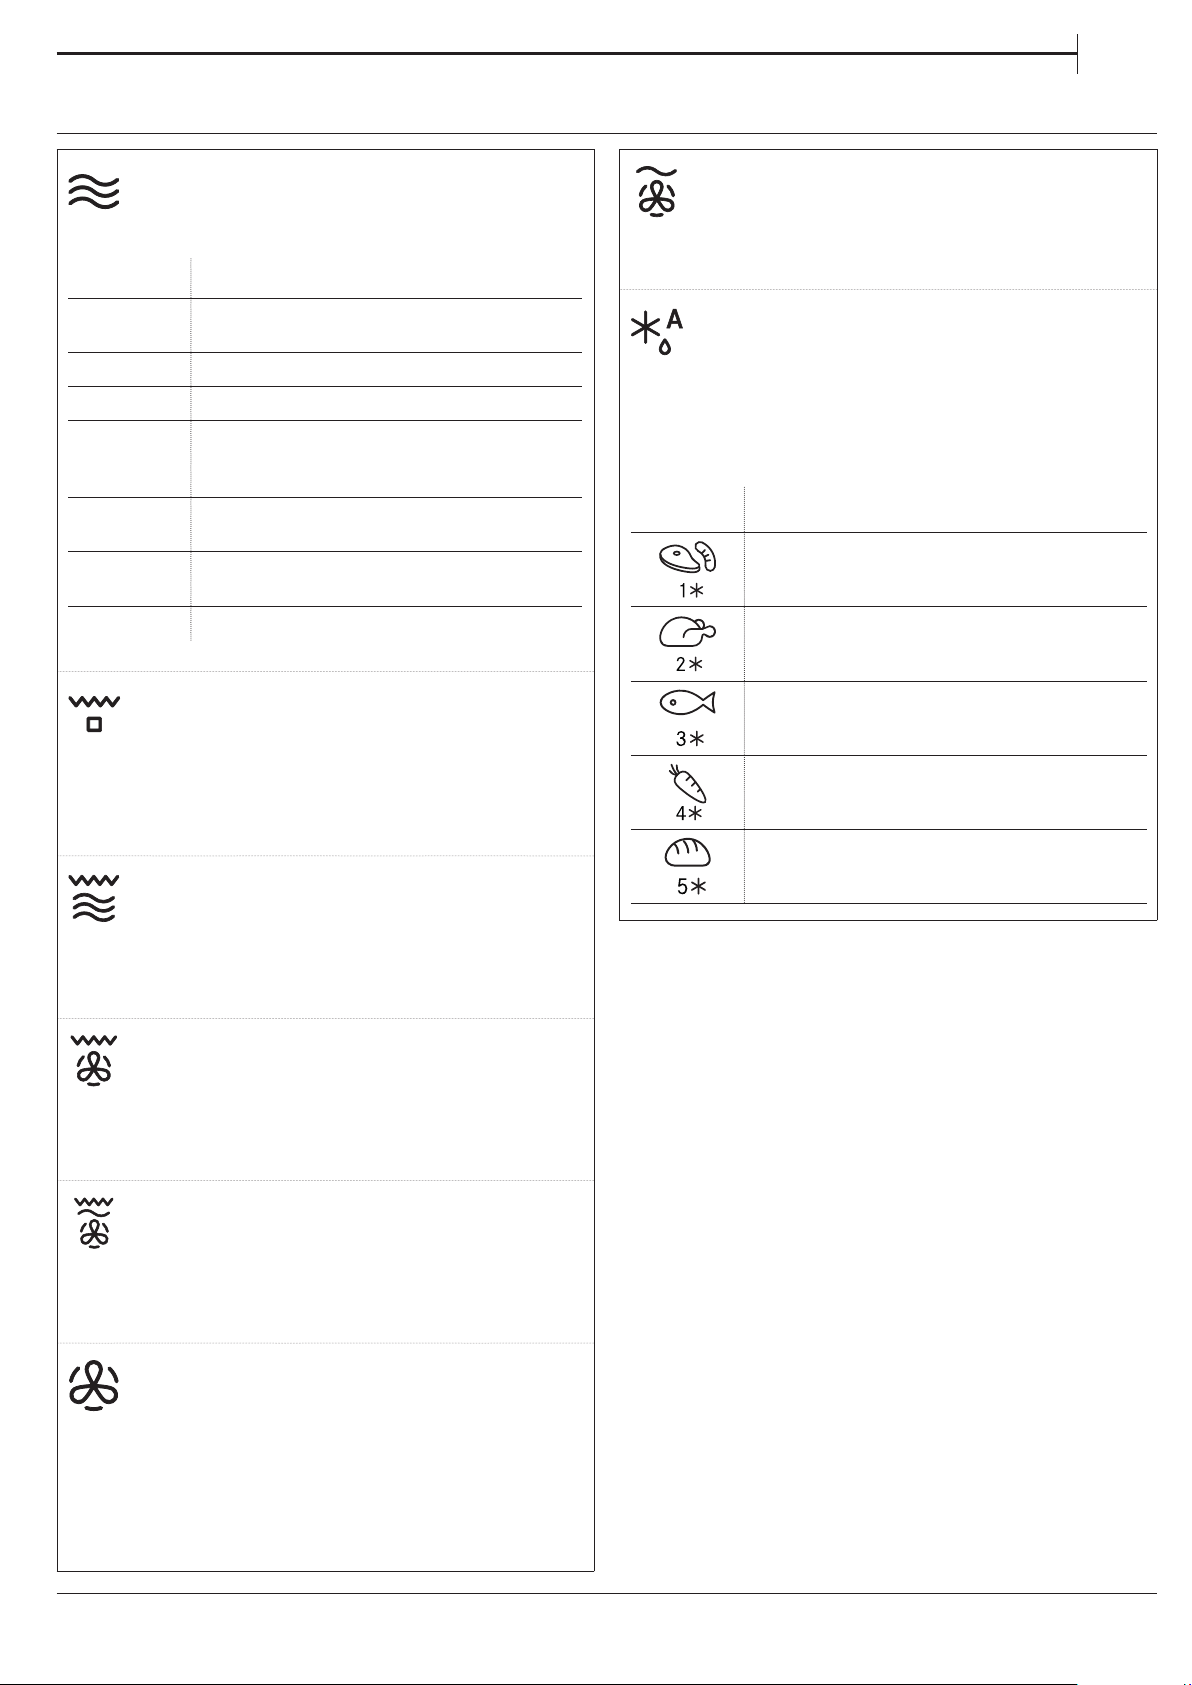
FUNÇÕES
PT
MICROONDAS
Para cozinhar rapidamente e aquecer
alimentos ou bebidas�
POTÊNCIA RECOMENDADA PARA
900 W
750 W
650 W
500 W
350 W
160 W
90 W
GRILL
Para alourar, grelhar e gratinar� Recomendamos
que vire os alimentos durante a cozedura�
Para obter os melhores resultados, preaqueça o
grelhador durante 3-5 minutos�
Acessórios recomendados: Cesto de arame elevado
GRELHADOR + MO
Para cozinhar rapidamente e para gratinar
pratos, combinando as funções de micro-ondas e
de grelhador�
Acessórios recomendados: Cesto de arame elevado
Aquecimento rápido de bebidas ou outros
alimentos com elevado teor de água
Cozinhar legumes
Cozinhar carne e peixe
Cozinhar molhos para carne ou molhos
que contenham queijo ou ovos. Terminar
empadas ou gratinados de massa
Cozedura lenta. Perfeito para derreter
manteiga ou chocolate
Descongelar alimentos congelados ou
amolecer manteiga e queijo
Amolecer gelados
AR FORÇADO + MO
Para preparar pratos de forno num curto
período de tempo�
Acessórios recomendados: Cesto de arame baixo
AUTO DEFROST *
Para a descongelação rápida de diferentes
tipos de alimentos, bastando para tal especificar o
seu peso�
Os alimentos devem ser colocados diretamente no
prato rotativo de vidro� Vire os alimentos quando
lhe for solicitado�
CATEGORIA ALIMENTO PESO
CARNE
(carne picada, costeletas, bifes,
peças de carne recheadas)
AVES
(frango inteiro, em pedaços ou
em letes)
PEIXE
(postas inteiras ou letes)
VEGETAIS
(legumes variados, ervilhas,
brócolos, etc.)
PÃO
(pães, bolos)
100 g - 2 kg
100 g - 2,5 kg
100 g - 1,5 kg
100 g - 1,5 kg
100 g - 1 kg
TURBO GRILL
Para obter resultados perfeitos, combinando as
funções de grelhador e de conveção� Recomendamos
que vire os alimentos durante a cozedura�
Acessórios recomendados: Cesto de arame elevado
TURBO GRILL + MO
Para cozinhar rapidamente e dourar pratos,
combinando as funções de micro-ondas, grelhador
e forno de conveção�
Acessórios recomendados: Cesto de arame elevado
AR FORÇADO
Para cozinhar refeições de forma a
obter resultados semelhantes ao de um forno
convencional� O tabuleiro de assar ou outro
recipiente para forno podem ser utilizados para
cozinhar determinados alimentos�
Acessórios recomendados: Cesto de arame baixo/
Tabuleiro de assar retangular
61
Page 62
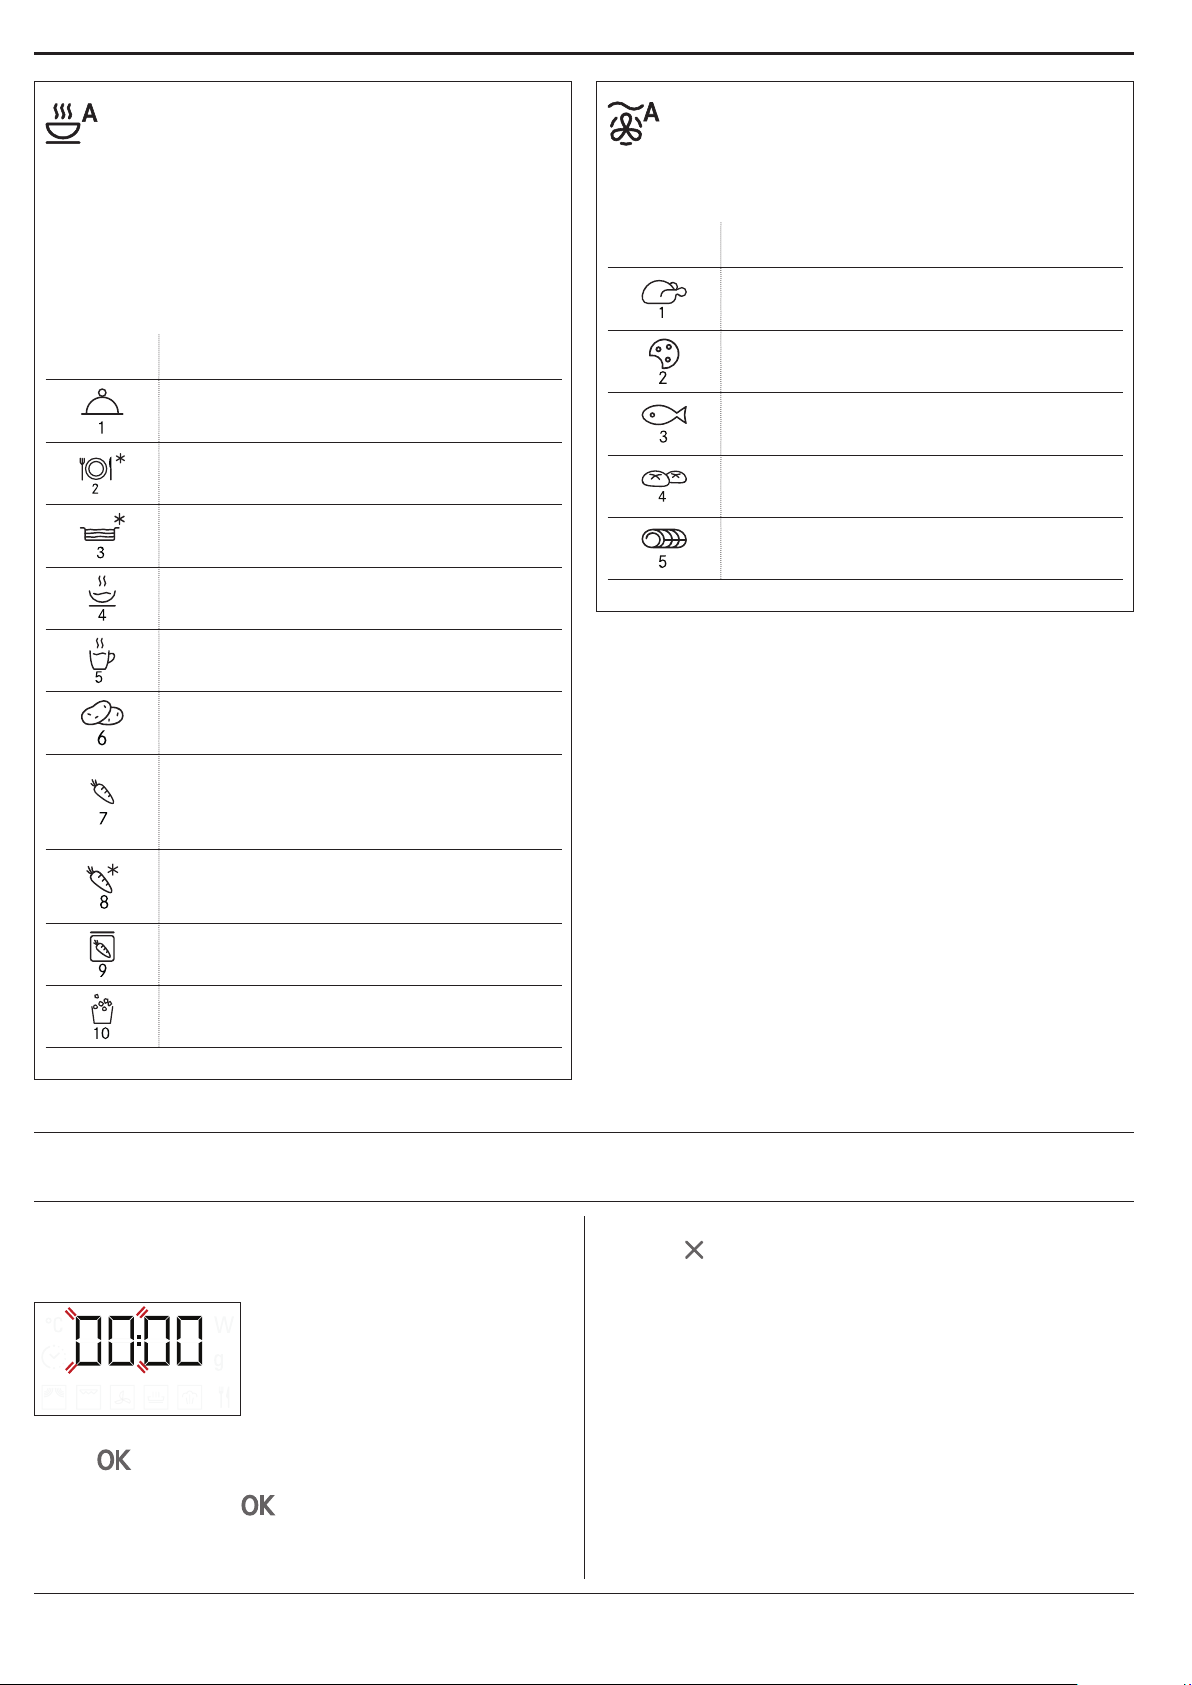
AQUECIMENTO AUTOMÁTICO/ COZEDURA
AUTOMÁTICA*
Para reaquecer refeições prontas congeladas,
refrigeradas ou à temperatura ambiente de forma
rápida e atingir ótimos resultados�
O forno calcula automaticamente os valores
necessários para obter os melhores resultados no
menor tempo possível� Coloque os alimentos numa
travessa ou num prato resistente ao calor adequado
para fornos micro-ondas�
AR FORÇADO AUTOMÁTICO + MO *
Para alimentos cozinhados no forno
rapidamente e atingir ótimos resultados� Utilize
um tabuleiro adequado para fornos e resistente às
micro-ondas�
CATEGORIA ALIMENTO PESO
FRANGO ASSADO 800 g - 1,5 kg
CATEGORIA ALIMENTO PESO
PRATO RASO 250 - 500 g
PORÇÃO CONGELADA 250 - 500 g
LASANHA CONGELADA 250 - 500 g
SOPAS 200 - 800 g
BEBIDAS 100 - 500 g
BATATAS ASSADAS
(Vire quando tal lhe for solicitado)
LEGUMES FRESCOS
(Corte em pedaços de tamanhos
iguais e adicione 2 a 4 colheres de
sopa de água. Tape.)
LEGUMES CONGELADOS (Vire
quando tal lhe for solicitado.
Tape.)
200 g - 1 kg
200 - 800 g
200 - 800 g
BISCOITOS 300 g
PEIXE INTEIRO 600 g - 1,2 kg
GRATINADO DE BATATAS 800 g - 2 kg
CARNE DE VACA ASSADA 800 g - 1,5 kg
* Com as funções automáticas, basta selecionar o tipo e o
peso ou a quantidade de alimentos para obter os melhores
resultados possíveis. O forno irá calcular automaticamente
as denições ideais e continuar a alterá-las à medida que a
cozedura progride. Vire ou mexa os alimentos quando lhe for
solicitado.
LEGUMES ENLATADOS 200 - 600 g
PIPOCAS 100 g
UTILIZAR PELA PRIMEIRA VEZ
. ACERTAR A HORA
Ao ligar o aparelho pela primeira vez, terá de definir a
hora: No visor piscam os dois dígitos relativos à hora�
Rode o botão seletor para definir a hora correta e
prima
começam a piscar� Rode o botão seletor para definir a
hora correta e prima
para confirmar� Os dois dígitos dos minutos
para confirmar�
Nota: Para alterar a hora posteriormente, mantenha-o
premido durante, pelo menos, 3 segundos com o forno
desligado e repita os passos acima.
Poderá ter de acertar novamente a hora após um longo corte
de energia.
62
Page 63
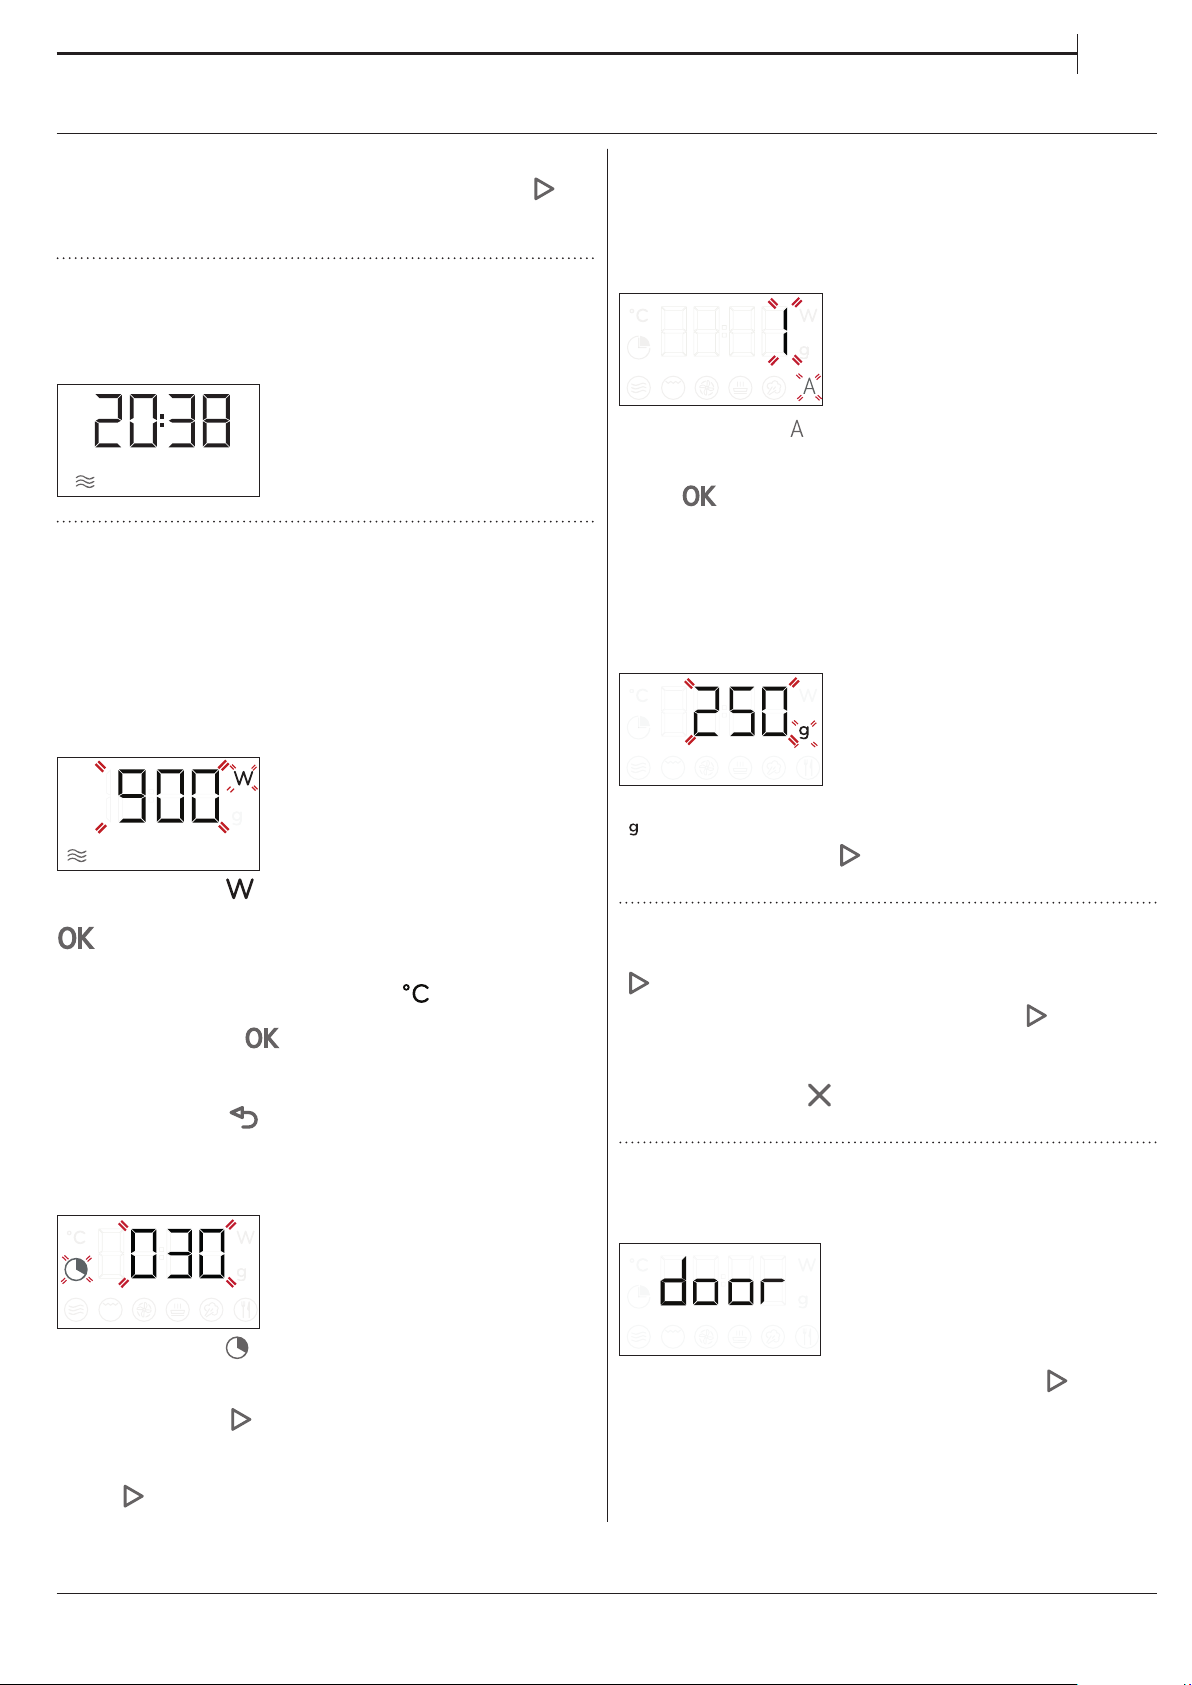
UTILIZAÇÃO DIÁRIA
PT
. JET START
Quando o forno estiver desligado, pode premir
para ativar a cozedura com a função de micro-ondas
na potência máxima (900W) durante 30 segundos�
1. SELECIONAR UMA FUNÇÃO
Quando o forno está desligado, só aparece a hora no
visor� Rode o botão de ajuste para selecionar uma das
funções disponíveis�
2. DEFINIR UMA FUNÇÃO
. FUNÇÕES MANUAIS
Após selecionar uma função, é possível alterar as suas
definições�
O visor irá apresentar as definições que podem ser
alteradas em sequência�
NÍVEL DE POTÊNCIA/TEMPERATURA DO MICROONDAS
. FUNÇÕES AUTOMÁTICAS / AUTO DEFROST
CATEGORIAS
Uma vez seleciona uma função automática é
necessário selecionar a categoria dos alimentos que
irá cozinhar�
Quando o ícone começar a piscar no visor,
rode o botão seletor para selecionar o dígito que
corresponde à categoria pretendida e, em seguida,
prima
PESO
Para obter os melhores resultados, as funções
automáticas requerem que introduza o peso dos
alimentos selecionando de entre as predefinições: o
forno calcula a duração de cozedura ideal para cada
categoria de alimentos�
para confirmar�
Quando o ícone piscar no visor, rode o botão
seletor para ajustar a potência e, em seguida, prima
para confirmar e continuar a alterar as definições
seguintes (se possível)�
Da mesma forma, quando o ícone
rode o botão seletor para ajustar a temperatura e,
em seguida, prima
alterar as definições seguintes�
Nota: Uma vez ativada a função, a potência pode ser
alterada premindo duas vezes para aceder ao menu
das denições de potência e, em seguida, rodando o botão
seletor para alterar a denição.
DURAÇÃO
Quando o ícone piscar no visor, rode o botão
seletor para definir a duração pretendida�
Assim que o tempo de cozedura corresponda ao que
pretende, prima
Nota: Durante a cozedura é possível regular o tempo de
cozedura rodando o botão seletor; cada vez que premir o
botão
, o tempo de cozedura aumenta em 30 segundos.
para confirmar e continuar a
para confirmar e iniciar a função�
piscar no visor,
Quando as predefinições surgirem no visor e o ícone
piscar, rode o botão seletor para definir o peso
e, em seguida, prima
função�
para confirmar e iniciar a
3. ATIVAR A FUNÇÃO
Após aplicar todas as definições pretendidas, prima
para ativar a função�
Sempre que premir novamente o botão
de cozedura aumenta mais 30 segundos (apenas nas
funções manuais)�
Nota: Poderá premir em qualquer altura para
interromper a função que estiver ativada nessa altura.
, o tempo
. BLOQUEIO DE SEGURANÇA
Esta função é ativada automaticamente para evitar
que o forno seja ligado inadvertidamente�
Abra e feche a porta e, em seguida, prima para
iniciar a função�
63
Page 64
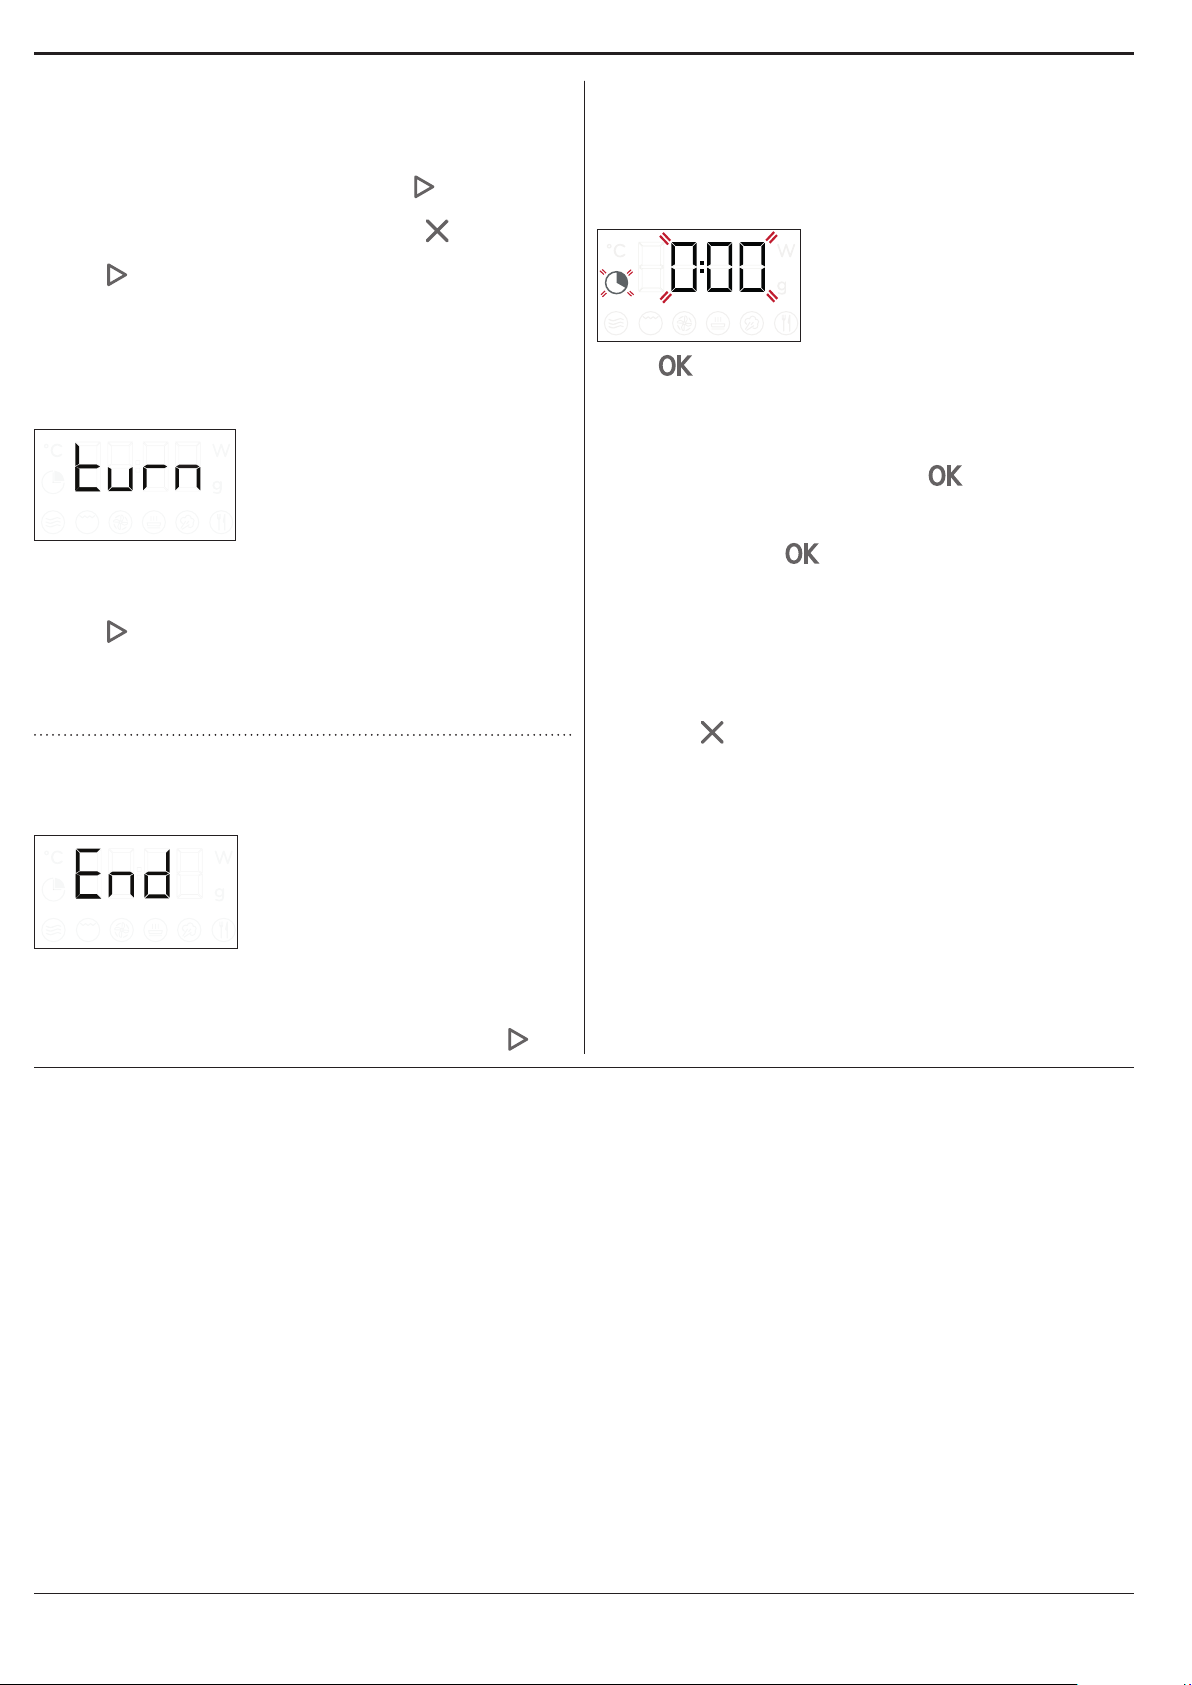
4. PAUSA
Para colocar em pausa uma função ativa, por
exemplo, para poder mexer os alimentos ou virá-los,
basta abrir a porta�
Para continuar, feche a porta e prima
�
Também é possível colocar a cozedura
temporariamente em pausa premindo
� Para
concluir o processo de cozedura, feche a porta e
prima
�
PAUSA AUTOMÁTICA
(MEXA OU VIRE OS ALIMENTOS)
Algumas funções são interrompidas automaticamente
para permitir que mexa ou vire os alimentos durante a
cozedura�
Quando o forno interromper a cozedura e surgir no
visor "Turn food" ou "Stir Food", abra a porta para virar
ou mexer os alimentos e, em seguida, feche a porta e
prima
Nota: Após 2 minutos, mesmo que os alimentos não
tenham sido virados ou mexidos, a função recomeçará
automaticamente.
para continuar a cozedura�
. TEMPORIZADOR
Quando o forno é desligado, o visor pode ser utilizado
como um temporizador� O temporizador não ativa
nenhum dos ciclos de cozedura�
Para ativar a função e definir o tempo de cozedura
pretendido, rode o botão seletor�
Prima para desativar o temporizador� Quando o
temporizador terminar a contagem decrescente do
tempo programado, ouvir-se-á um sinal sonoro e esta
informação será apresentada no visor� Para efetuar
alterações ao temporizador após a sua ativação, rode
o botão seletor de ajuste e prima
para confirmar�
Para interrompê-lo ou voltar à visualização da hora
atual, rode o botão seletor até surgir 0:00 no visor e,
em seguida, prima
Nota: Uma vez ativado o temporizador, poderá ativar a
função também: O temporizador irá continuar a realizar
automaticamente uma contagem decrescente do tempo
selecionado sem que isso tenha quaisquer implicações para
a função. Para visualizar o temporizador novamente, aguarde
até que a função termine ou interrompa a função do forno,
premindo .
�
5. FIM DA COZEDURA
É emitido um sinal sonoro e aparece "End" no visor
para indicar que a função de cozedura foi concluída�
Em algumas funções, é possível atrasar a cozedura
enquanto se mantêm as definições previamente
programadas: Rode o botão seletor para definir um
novo tempo de cozedura e, em seguida, prima
�
64
Page 65

CONSELHOS ÚTEIS
PT
COMO EFETUAR A LEITURA DA TABELA DE
COZEDURA
A tabela indica as melhores funções a utilizar para
qualquer alimento�
Os tempos de cozedura dizem respeito ao ciclo
de cozedura dos alimentos no interior do forno,
excluindo a fase de preaquecimento (quando
necessária)�
As definições e os tempos de cozedura são
aproximados e dependem da quantidade de alimento
e do tipo de acessório(s) utilizado(s)�
Cozinhe sempre os alimentos durante o tempo de
cozedura mínimo indicado e verifique se ficam bem
cozinhados�
Par obter os melhores resultados, siga as instruções
contidas na tabela de cozedura cuidadosamente ao
selecionar os acessórios�
SUGESTÕES DE COZEDURA COM MICROONDAS
As micro-ondas apenas penetram nos alimentos até
um certo grau;
como tal, deverá dispor os alimentos espaçadamente
durante a cozedura de vários alimentos em
simultâneo�
Os itens mais pequenos cozinham mais rapidamente
do que os itens maiores: Corte os alimentos em
pedaços de igual tamanho para uma cozedura
uniforme�
A humidade evapora durante o processo de cozedura
com micro-ondas: a utilização de uma tampa
resistente às micro-ondas ajuda a reduzir a perda de
humidade�
O processo de cozedura dos alimentos prolonga-se
durante algum tempo mesmo depois de os retirar do
micro-ondas� Deste modo, recomendamos que deixe
os alimentos repousar durante alguns minutos após a
conclusão do ciclo de cozedura�
Recomendamos que mexa os alimentos durante a
cozedura no micro-ondas, pois tal permite que as
extremidades dos mesmos cozinhem melhor em
direção ao interior e vice versa�
Coloque fatias de carne finas umas por cima das
outras ou interlace-as� As fatias mais grossas como,
por exemplo, rolos de carne e salsichas, devem ser
colocadas lado a lado�
PELÍCULA ADERENTE E EMBALAGENS
Retire quaisquer fios ou laços do papel ou de sacos de
plástico antes de os colocar no forno para cozedura
com micro-ondas�
A película plástica deve ser cortada ou picada com
um garfo, para libertar a pressão e evitar que rebente,
dado que se acumula vapor durante o processo de
cozedura�
LÍQUIDOS
Os líquidos podem sobreaquecer além do ponto de
ebulição, sem borbulhar�
Isto pode levar a que os líquidos transbordem
subitamente�
Para evitar esta situação:
� Evite utilizar recipientes com gargalos estreitos��
� Mexa o líquido antes de colocar o recipiente no
micro-ondas e deixe a colher de chá no recipiente�
� Após aquecer, volte a mexer antes de remover
cuidadosamente o recipiente do forno micro-ondas�
ALIMENTOS CONGELADOS
Para melhores resultados, recomendamos a
descongelação diretamente no prato rotativo de
vidro� Também pode utilizar um recipiente de plástico
leve e adequado para micro-ondas, se necessário�
Os alimentos cozidos, guisados e os molhos de carne
descongelam melhor se mexidos ocasionalmente
durante o processo de descongelação�
Separe os alimentos quando começarem a
descongelar: as porções separadas irão descongelar
mais rapidamente�
ALIMENTOS PARA CRIANÇAS
Ao aquecer comida ou líquidos num biberão ou num
recipiente de comida para bebé, mexa e verifique
sempre a temperatura antes de servir�
Isto permite assegurar que o calor é bem distribuído e
evitar o risco de escaldões ou queimaduras�
Assegure-se de que a tampa e a tetina são retiradas
antes de aquecer�
CARNE E PEIXE
Para obter uma superfície perfeitamente dourada
rapidamente, mantendo o interior da carne ou do
peixe suculento, recomendamos que utilize a função
"Grelhador + Micro-ondas"� Para obter os melhores
resultados, defina a potência do micro-ondas entre
160 e 350 W�
65
Page 66
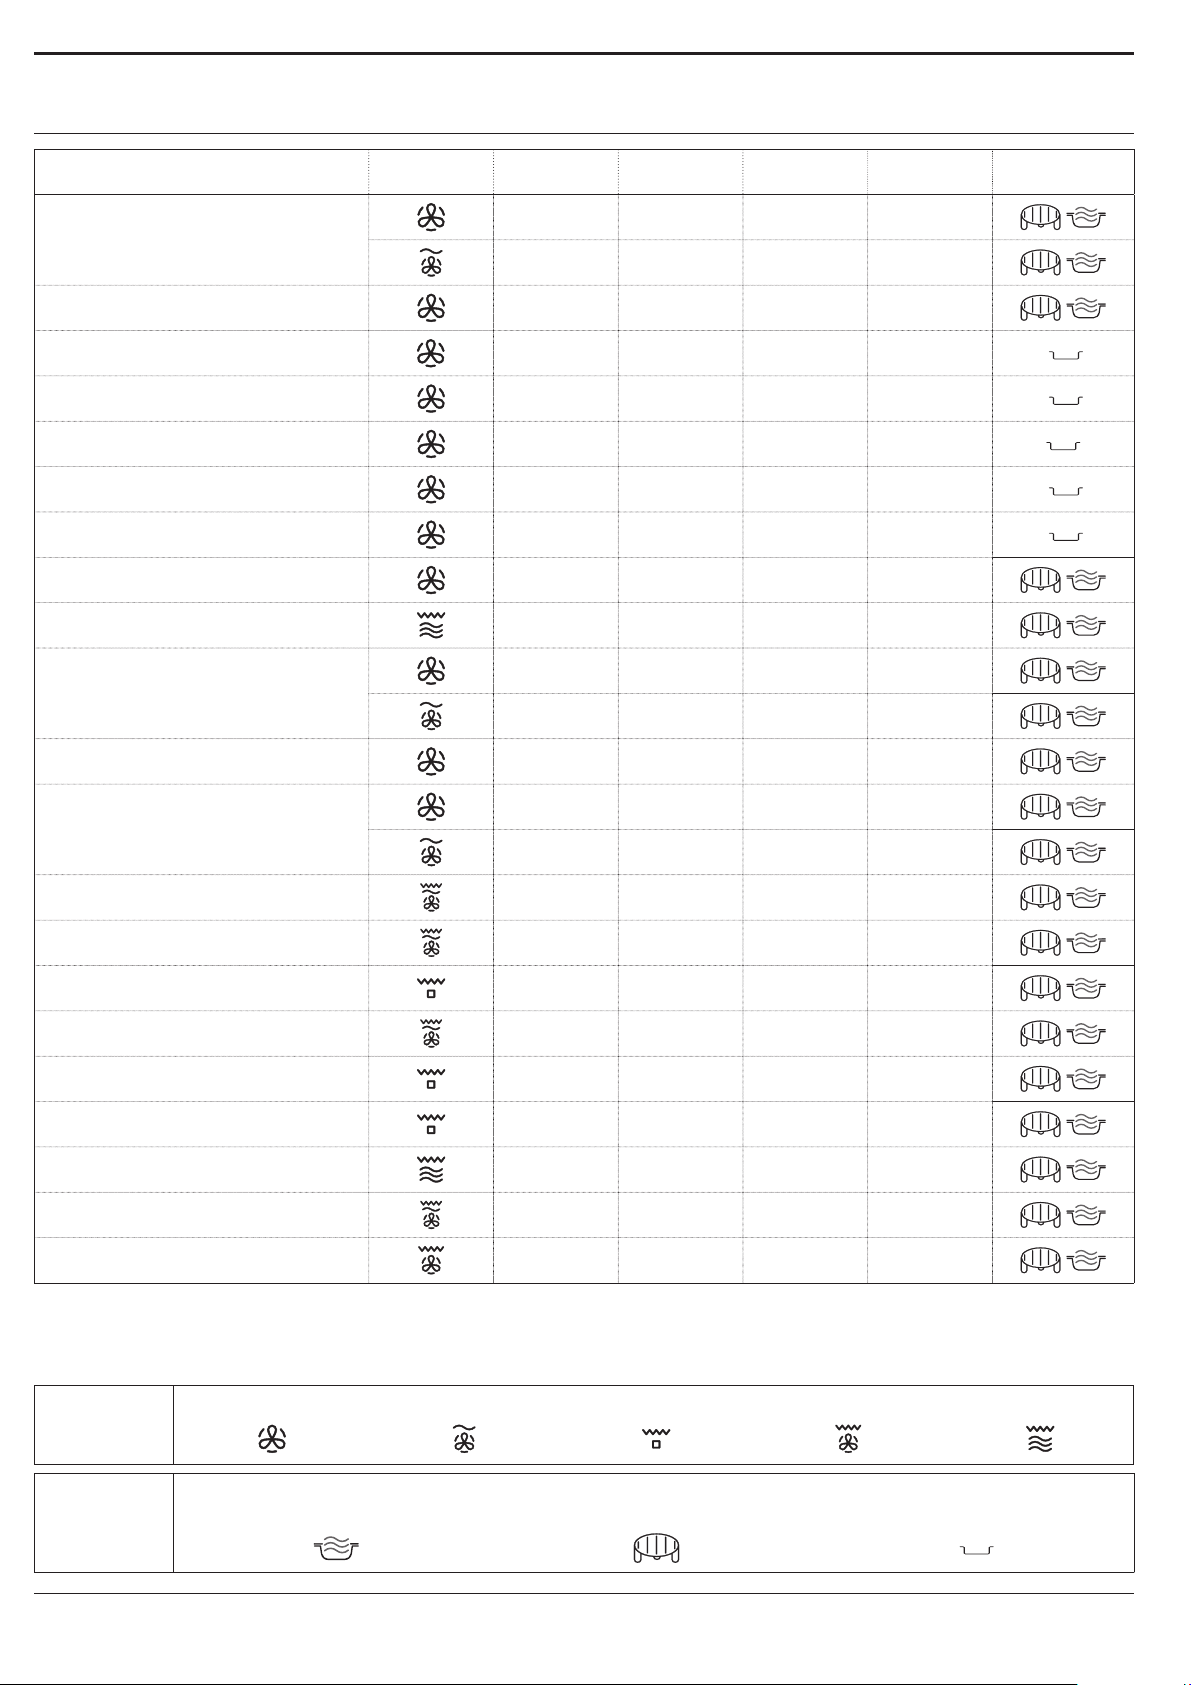
TABELA DE COZEDURA
ALIMENTO FUNÇÃO A AQUECER
NÍVEL DO
GRILL
POTÊNCIA (W) TEMPO (MIN.) ACESSÓRIOS
- 160 - 180 - 30-60
Bolos com levedura
- 160 - 180 90 25-50
Tartes recheadas
(cheesecake, strudel, tarte de maçã)
Sim 160 -190 - 35-70
Biscoitos Sim 170-180 - 10-20
Merengues Sim 100 -120 - 40-50
Pãezinhos Sim 210-220 - 10-12
Pão de forma
Sim 180-200 - 30-35
Pizza / Tarte Sim 190-220 - 20-40
Tartes salgadas
(tarte de legumes, quiche)
Sim 180 -190 - 40-55
Lasanha/massa gratinada - 350-500 15-40
Borrego assado/vitela assada/
- 170-180 - 70-80*
Carne de vaca assada
(1,3-1,5 kg)
Carne de vaca assada, média
(1,3 - 1,5 kg)
- 160-180 160 50-70*
- 170-180 - 40-60*
Frango assado/coelho/pato
(inteiro 1 - 1,2 kg)
Frango/Coelho/Pato
(letes/pedaços de 0,4-1 kg)
- 210-220 - 50 -70*
- 210-220 350 45-60*
- - 350-500 20-40*
Peixe assado (inteiro) - - 160-350 20-40
Filetes/postas de peixe Sim - - 15-30*
Legumes recheados
(tomates, curgetes, beringelas, etc.)
- - 500-650 25-50
Tostas - - - 3-6
Salsichas/Espetadas/Costeletas/
Hambúrgueres
Batatas assadas
- - - 20-40*
- - 350-500 20-40*
Fruta assada - - 160 -350 15-25
Gratinado legumes - - - 15 -25
* Vire o alimento a meio da cozedura.
A tabela de receitas testadas foi compilada para as autoridades de certicação de acordo com as normas IEC 60705 e IEC 60350.
FUNÇÕES
ACESSÓRIOS
66
Ar forçado
Prato resistente ao calor/recipiente
adequado para utilização no micro-ondas
Ar forçado + MO Grill Turbo Grill Grill + MO
Grelha metálica Tabuleiro de assar retangular
Page 67
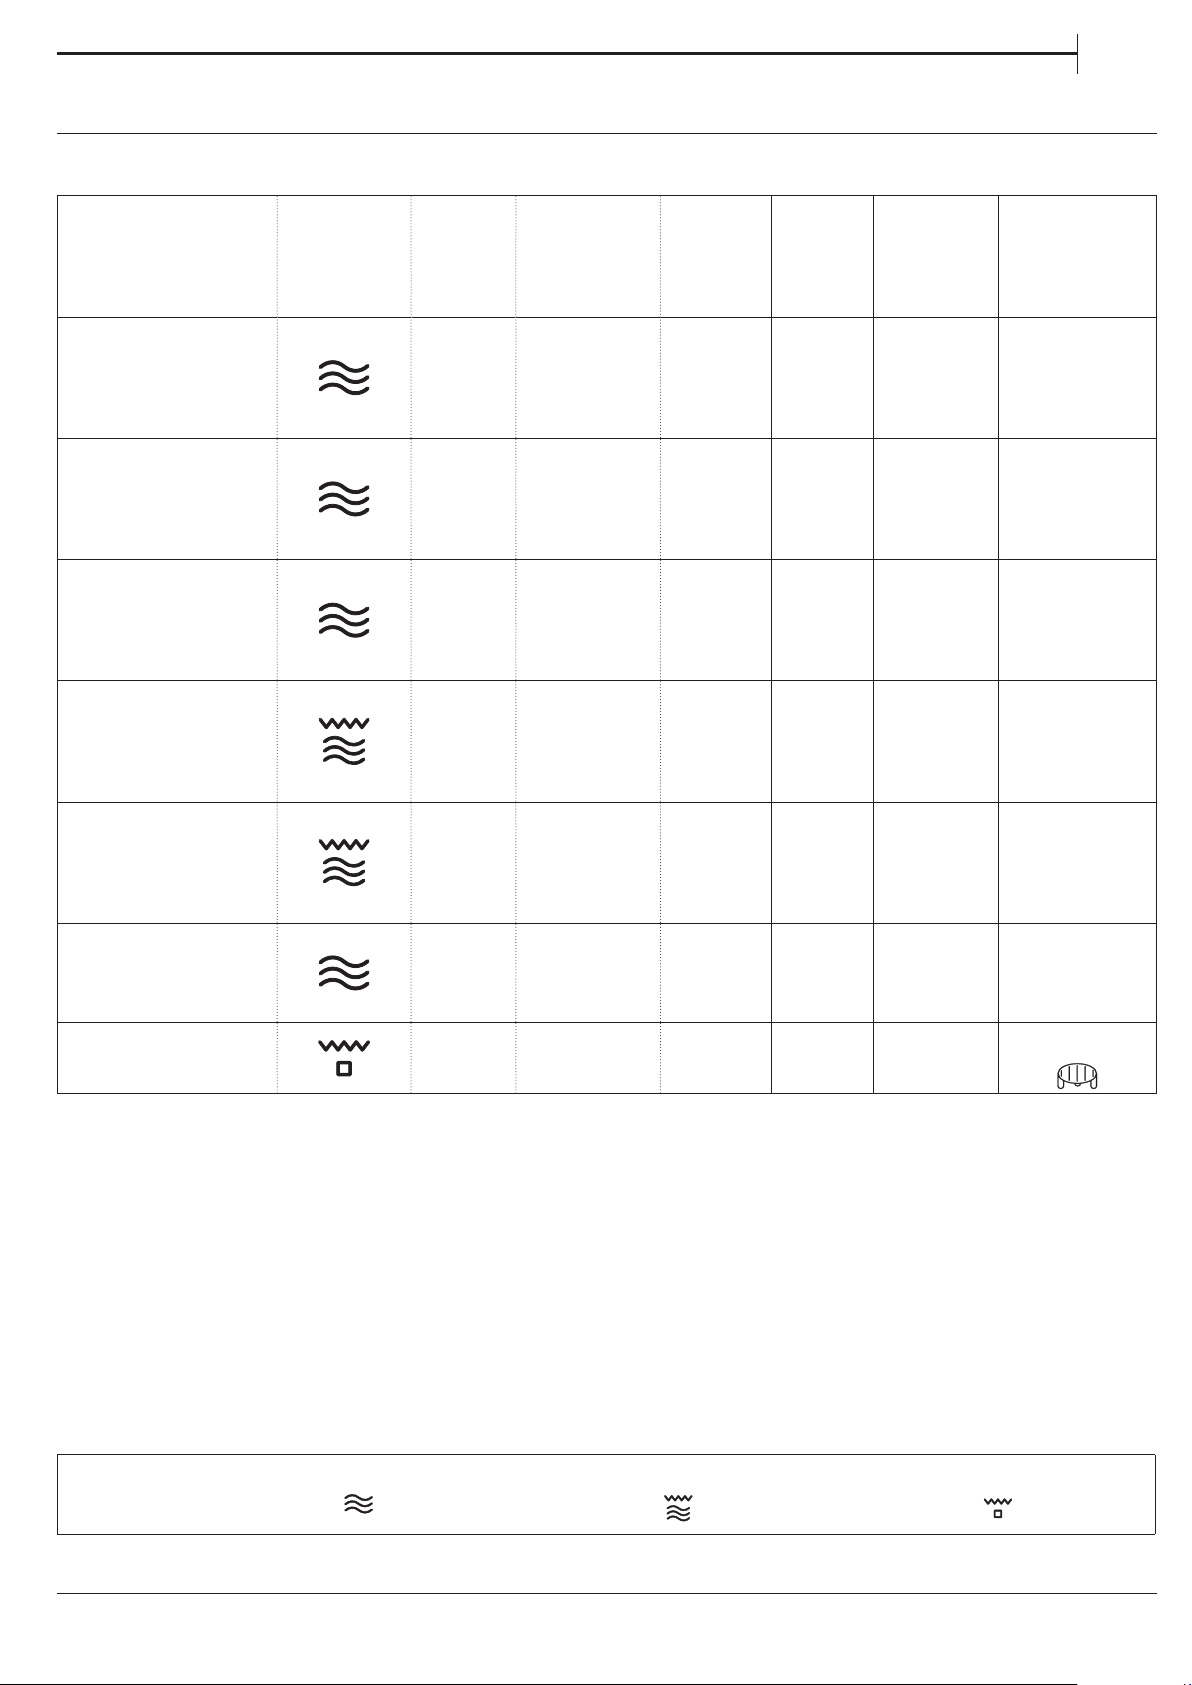
RECEITAS TESTADAS
Compiladas para as autoridades de certicação de acordo com as normas IEC 60705 e IEC 60350-1.
TEMP./
ALIMENTO FUNÇÃO
Creme pasteleiro
Pão-de-ló
Rolo de carne
Batatas gratinadas
Frango
Descongelar carne
(vire a meio do
processo de
descongelação)
PESO
(g)
1000 12:00 - 13:00 - 650 -
475 8:00 - 10:00 - 750 -
900 13:00 - 14:00 - 750 -
110 0 28:00 - 30:00 190 350 -
1200 35:00 - 40:00 210 350 -
500 10:30 - 160 - Prato rotativo
TEMPO DE
COZEDURA
(min.:seg.)
NÍVEL
DO
GRELHA-
DOR
POTÊN-
CIA
(W)
PREAQUE-
CIM.
PT
ACESSÓRIOS
Recipiente
adequado
para micro-
ondas
(Pirex 3�227)
Recipiente
adequado
para micro-
ondas
(Pirex 3�827)
Recipiente
adequado
para micro-
ondas
(Pirex 3�838)
Recipiente
adequado
para micro-
ondas
(Pirex 3�827)
Recipiente
adequado
para micro-
ondas
(Pirex 3�220)
Tostas
FUNÇÕES
- 4:00 - 6:00 3 - Sim
Micro-ondas Grelhador + MO Grill
Grelha
67
Page 68
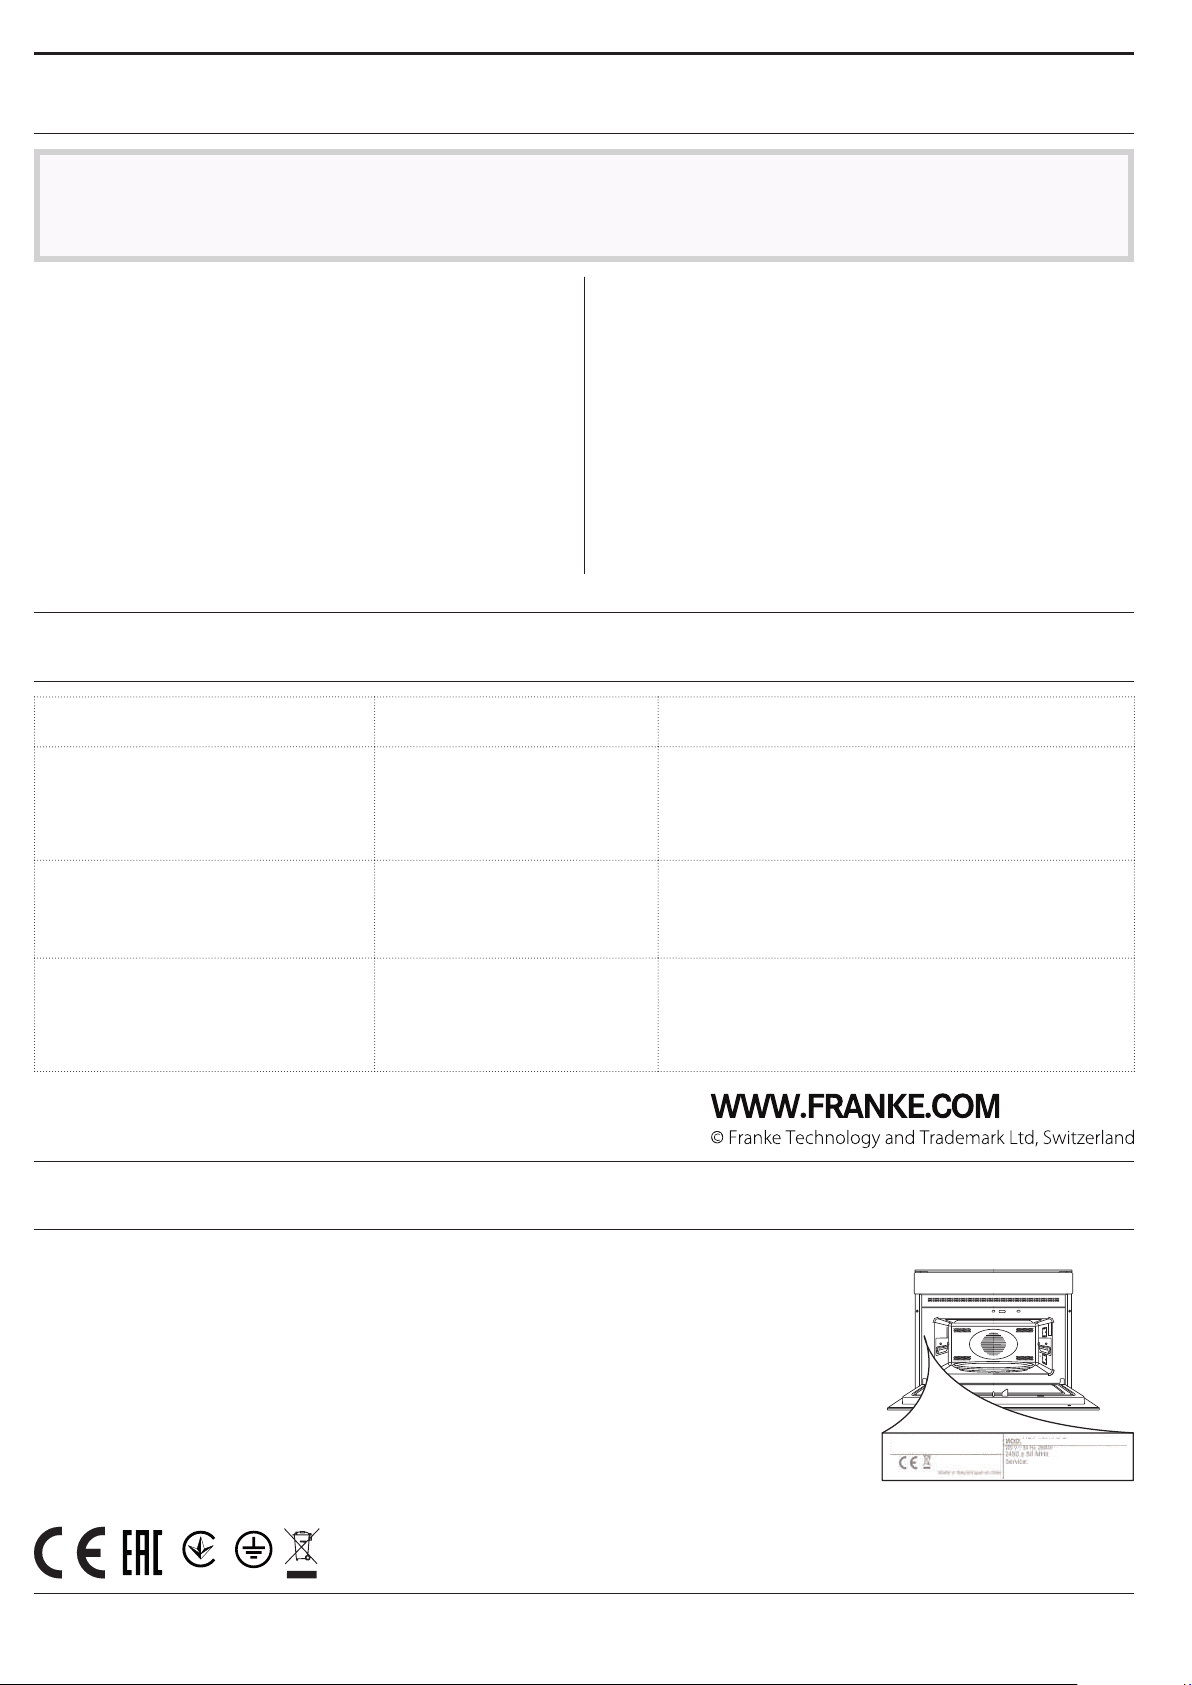
LIMPEZA E MANUTENÇÃO
Assegure-se de que o aparelho arrefece antes de
executar qualquer operação de manutenção ou limpeza.
Não utilize produtos de limpeza ao vapor.
SUPERFÍCIES INTERIOR E EXTERIOR
• Limpe as superfícies com um pano de microfibra
húmido� Se estiverem muito sujas, acrescente alguns
pingos de detergente com PH neutro� Termine a
limpeza com um pano seco�
Não utilize palha de aço, esfregões abrasivos ou
produtos de limpeza abrasivos/corrosivos, uma vez
que estes podem danicar as superfícies do aparelho.
ACESSÓRIOS
Todos os acessórios podem ser lavados na máquina
de lavar louça� Para sujidade difícil, esfregue
suavemente com um pano� Deixe sempre que os
acessórios arrefeçam antes de o limpar�
• Limpe o vidro da porta com um detergente líquido
adequado�
• Periodicamente, ou quando houver derrames, retire
o prato rotativo e o respetivo suporte para limpar o
fundo do forno, retirando todos os restos de alimentos�
• O grelhador não precisa de ser limpo, uma vez que
o calor intenso queima qualquer sujidade� Utilize esta
função regularmente�
RESOLUÇÃO DE PROBLEMAS
Problema Causa possível Solução
O forno não está a funcionar�
O forno emite ruídos, mesmo
quando está desligado�
O visor apresenta a letra
Corte de energia.
Desconexão da rede elétrica.
O ventilador de refrigeração
está ativado.
Falha de software. Contacte o seu Serviço Técnico de Pós-Venda mais
apresenta a letra "F", seguida de
um número�
SUPORTE
Na eventualidade de quaisquer problemas de
funcionamento, contacte o Centro de Assistência Técnica
Franke�
Nunca recorra aos serviços de técnicos não autorizados�
Indique:
- o tipo de avaria;
- o modelo do aparelho (art�/código);
- o número de série (S�N�) indicado na placa de
caraterísticas, localizada na extremidade do lado
direito da cavidade do forno (visível com a porta do
forno aberta)�
Verique se existe energia elétrica proveniente da
rede e se o forno está ligado à tomada elétrica.
Desligue e volte a ligar o forno, para vericar se o
problema cou resolvido.
Abra a porta ou aguarde que o processo de
arrefecimento esteja concluído.
próximo e indique o número que acompanha a
letra "F".
Quando contactar o
Centro de Assistência,
forneça os códigos
contidos na placa de
caraterísticas do seu
produto�
XXXXXXXXXXXX
XXXXXXXXXXXX
XXX/XXX
68
001
Page 69

PL
SPIS TREŚCI
INFORMACJE OGÓLNE ��������������������������������������������������������������������������������������������������������������������������������������������������������� 70
PANEL STEROWANIA ������������������������������������������������������������������������������������������������������������������������������������������������������������� 70
OPIS WYŚWIETLACZA ����������������������������������������������������������������������������������������������������������������������������������������������������������71
AKCESORIA ������������������������������������������������������������������������������������������������������������������������������������������������������������������������������ 71
FUNKCJE ����������������������������������������������������������������������������������������������������������������������������������������������������������������������������������� 72
PIERWSZE UŻYCIE ������������������������������������������������������������������������������������������������������������������������������������������������������������������ 73
CODZIENNA EKSPLOATACJA����������������������������������������������������������������������������������������������������������������������������������������������� 74
PRAKTYCZNE PORADY ��������������������������������������������������������������������������������������������������������������������������������������������������������� 76
TABELA GOTOWANIA ������������������������������������������������������������������������������������������������������������������������������������������������������������77
SPRAWDZONE PRZEPISY �����������������������������������������������������������������������������������������������������������������������������������������������������78
CZYSZCZENIE I KONSERWACJA ����������������������������������������������������������������������������������������������������������������������������������������� 79
ROZWIĄZYWANIE PROBLEMÓW ��������������������������������������������������������������������������������������������������������������������������������������� 79
WSPARCIE TECHNICZNE ������������������������������������������������������������������������������������������������������������������������������������������������������79
69
Page 70
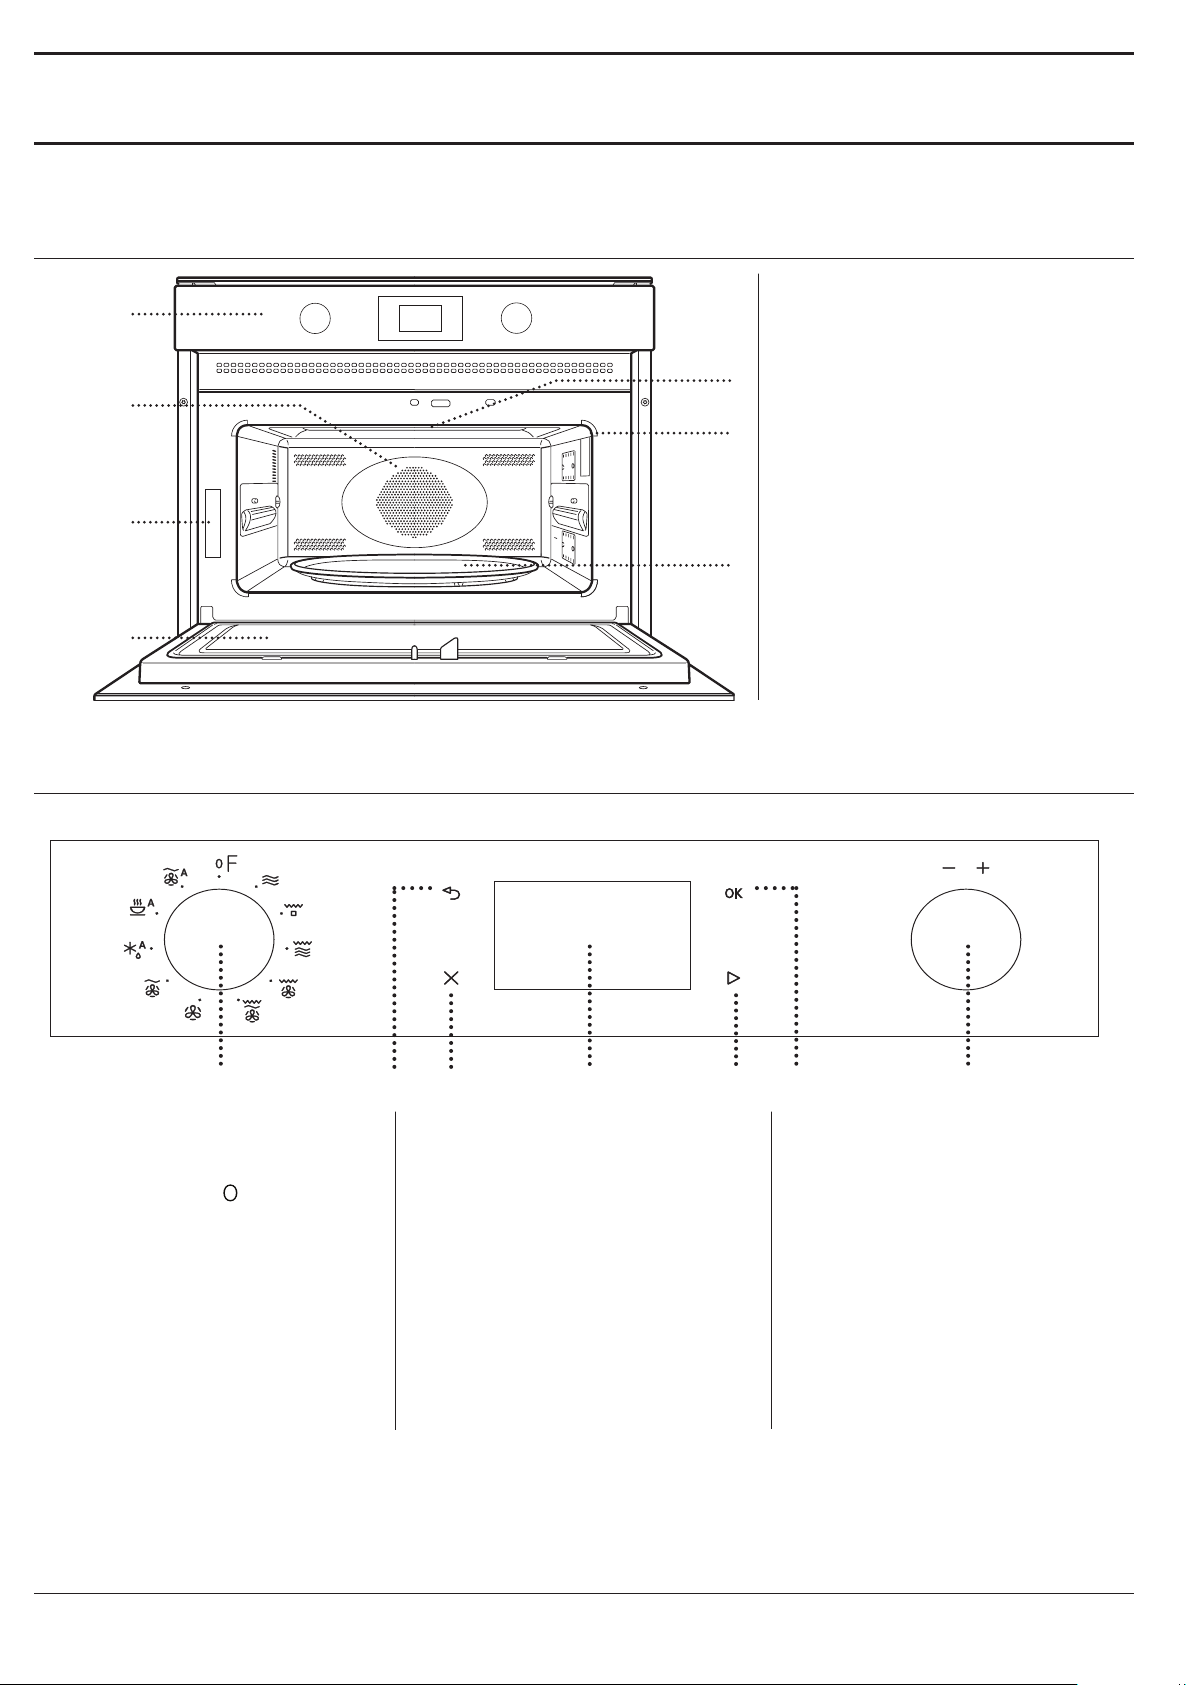
INSTRUKCJA OBSŁUGI
INFORMACJE OGÓLNE
1
2
3
4
1. Pulpit sterujący
2. Grzałka okrągła
(niewidoczna)
3. Tabliczka znamionowa
5
(nie usuwać)
4. Drzwiczki
6
5. Grzałka górna / grill
6. Oświetlenie
7. Szklany talerz obrotowy
7
PANEL STEROWANIA
1 7
1. POKRĘTŁO WYBORU
Służy do włączania urządzenia
poprzez wybranie funkcji�
Obrócić do pozycji
urządzenie�
2. POWRÓT
Do powracania do poprzedniego
menu ustawień�
, by wyłączyć
2
3
3. WYŁĄCZNIK
Aby przerwać aktywną funkcję w
dowolnym momencie� Nacisnąć
dwukrotnie, aby zatrzymać funkcję
i przełączyć kuchenkę na tryb
czuwania�
4. WYŚWIETLACZ
5. OPÓŹNIENIE
Aby wybierać funkcje i
potwierdzać ustawienia� Kiedy
kuchenka jest wyłączona,
uruchamia funkcję mikrofali�
4 5
6
6. POTWIERDZIĆ
Służy do potwierdzania wyboru
danej funkcji lub ustawień�
7. POKRĘTŁO USTAWIEŃ
Służy do nawigacji między
ekranami menu i dokonywania
ustawień lub ich zmiany�
70
Page 71
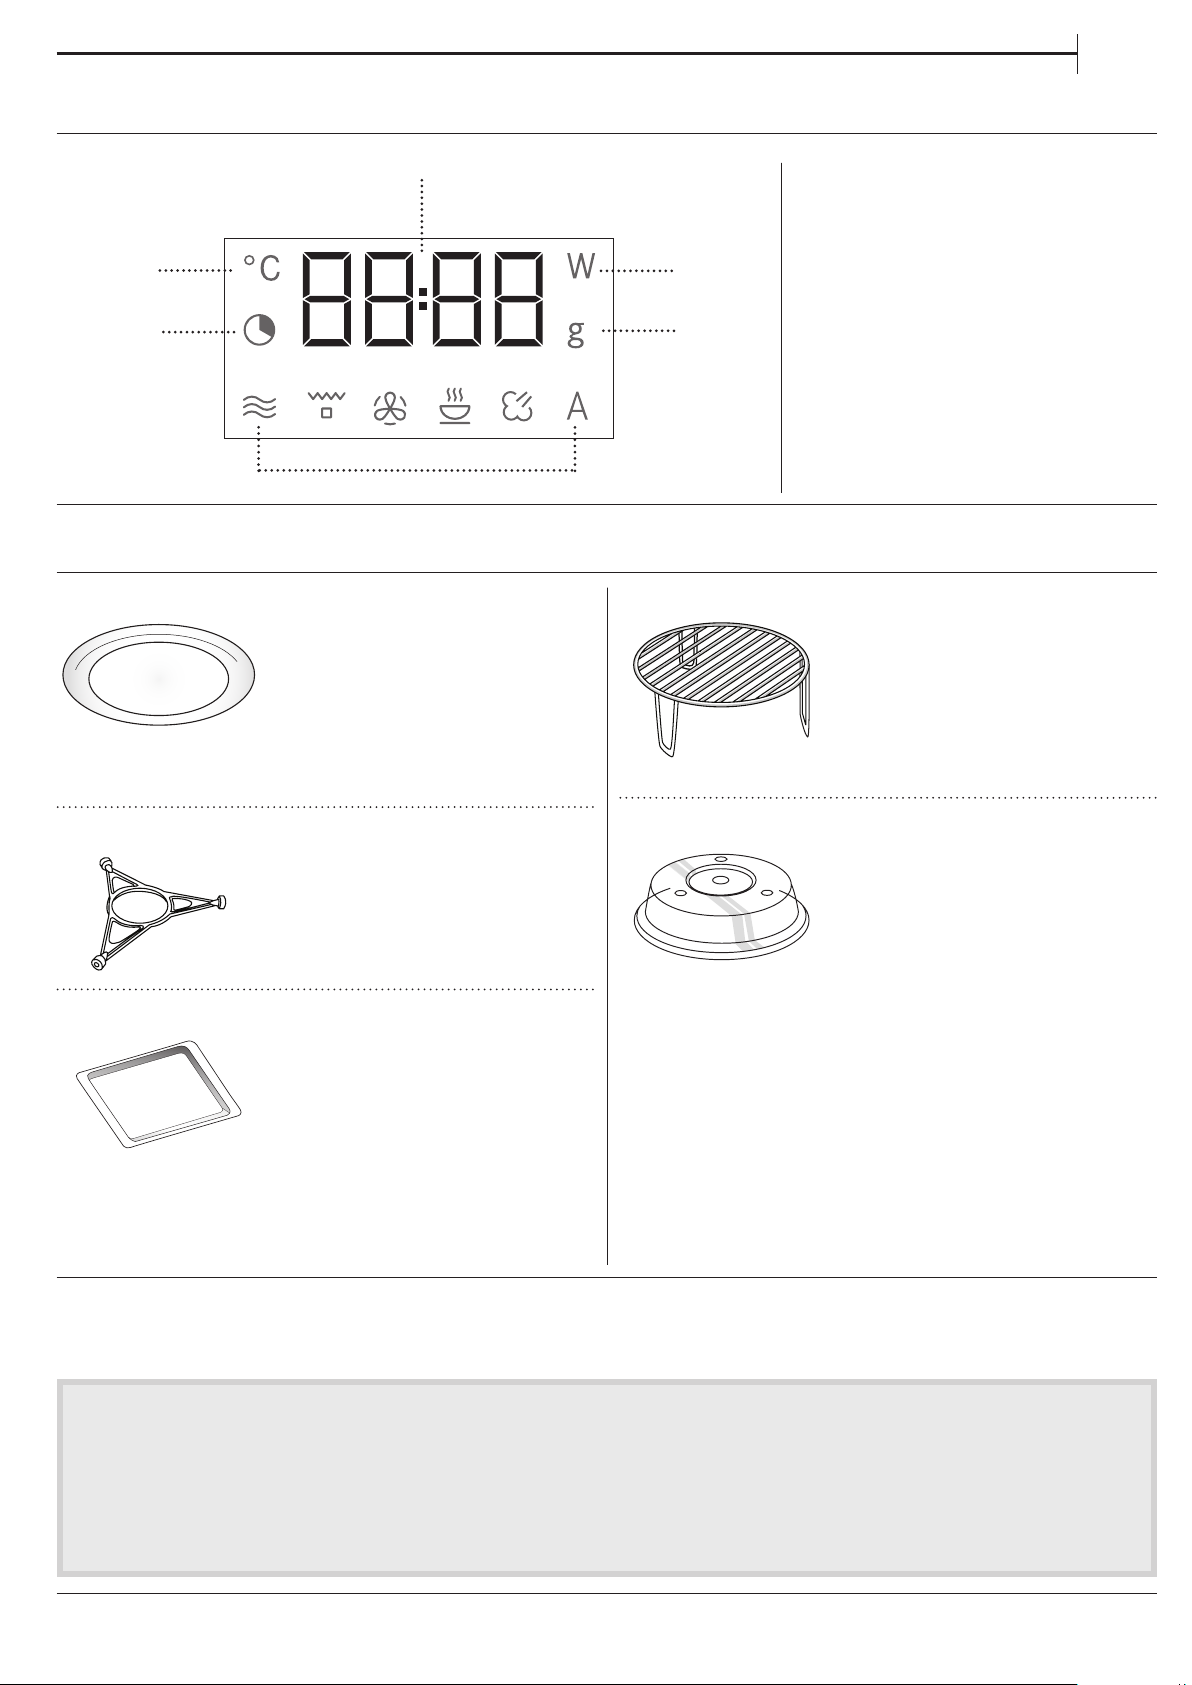
OPIS WYŚWIETLACZA
PL
5
1
2
6
AKCESORIA
SZKLANY TALERZ OBROTOWY
Umieszczony na podstawce,
szklany talerz obrotowy może
być używany do wszystkich
metod gotowania�
Talerz obrotowy musi zawsze
stanowić podstawę dla innych
pojemników lub akcesoriów, z wyjątkiem prostokątnej
blachy do pieczenia�
RUSZT
1. Regulacja temperatury
2. Ustawienia czasu i ustawienia
czasu trwania funkcji
3
4
3. Wybór mocy kuchenki
mikrofalowej
4. Wybór wagi
5. Zegar, informacje i czas trwania
funkcji
6. Symbole dla wybranych funkcji
Pozwala umieścić potrawę bliżej
grilla, ułatwiając jej doskonałe
przypieczenie� Umieścić
podstawę drucianą na talerzu
obrotowym�
PODSTAWKA POD TALERZ OBROTOWY
Podstawki należy używać tylko ze
szklanym talerzem obrotowym�
Na podstawce nie należy
umieszczać innych akcesoriów�
PROSTOKĄTNA BLACHA DO PIECZENIA
Blachy do pieczenia należy
używać tylko z funkcjami
umożliwiającymi pieczenie
konwekcyjne; nigdy w połączeniu
z mikrofalami� Włożyć talerz
poziomo, umieszczając go na
ruszcie wewnątrz komory piekarnika�
Uwaga: Używając prostokątnej blachy do pieczenia nie
trzeba wyjmować talerza obrotowego i jego podstawki.
Liczba i rodzaj akcesoriów może się różnić w zależności od zakupionego modelu.
Akcesoria dodatkowe, które nie są dołączone do zestawu, można zakupić oddzielnie w punkcie serwisu posprzedażnego.
Na rynku dostępnych jest wiele akcesoriów. Przed
zakupem należy upewnić się, czy dane akcesoria nadają
się do użycia w kuchence mikrofalowej i czy są odporne
na działanie temperatur panujących w jej komorze.
Podczas gotowania w kuchence mikrofalowej nigdy
nie powinno się używać metalowych pojemników na
jedzenie lub napoje.
POKRYWKA
Służy do przykrywania potraw
gotowanych lub podgrzewanych
w kuchence mikrofalowej�
Przykrywka zmniejsza ilość
zabrudzeń, zachowuje
odpowiednią wilgotność potraw i
umożliwia tworzenie dwóch poziomów gotowania�
Nie nadaje się do użycia w przypadku pieczenia
konwekcyjnego lub zastosowania jakiejkolwiek funkcji
grilla�
Należy zawsze upewnić się, że ani jedzenie, ani
akcesoria nie stykają się z wewnętrznymi ściankami
kuchenki mikrofalowej.
Przed uruchomieniem kuchenki należy zawsze sprawdzić,
czy talerz obrotowy może się swobodnie obracać. Przy
wkładaniu lub wyjmowaniu naczyń należy uważać, aby
talerz obrotowy nie wypadł ze swojego położenia.
71
Page 72
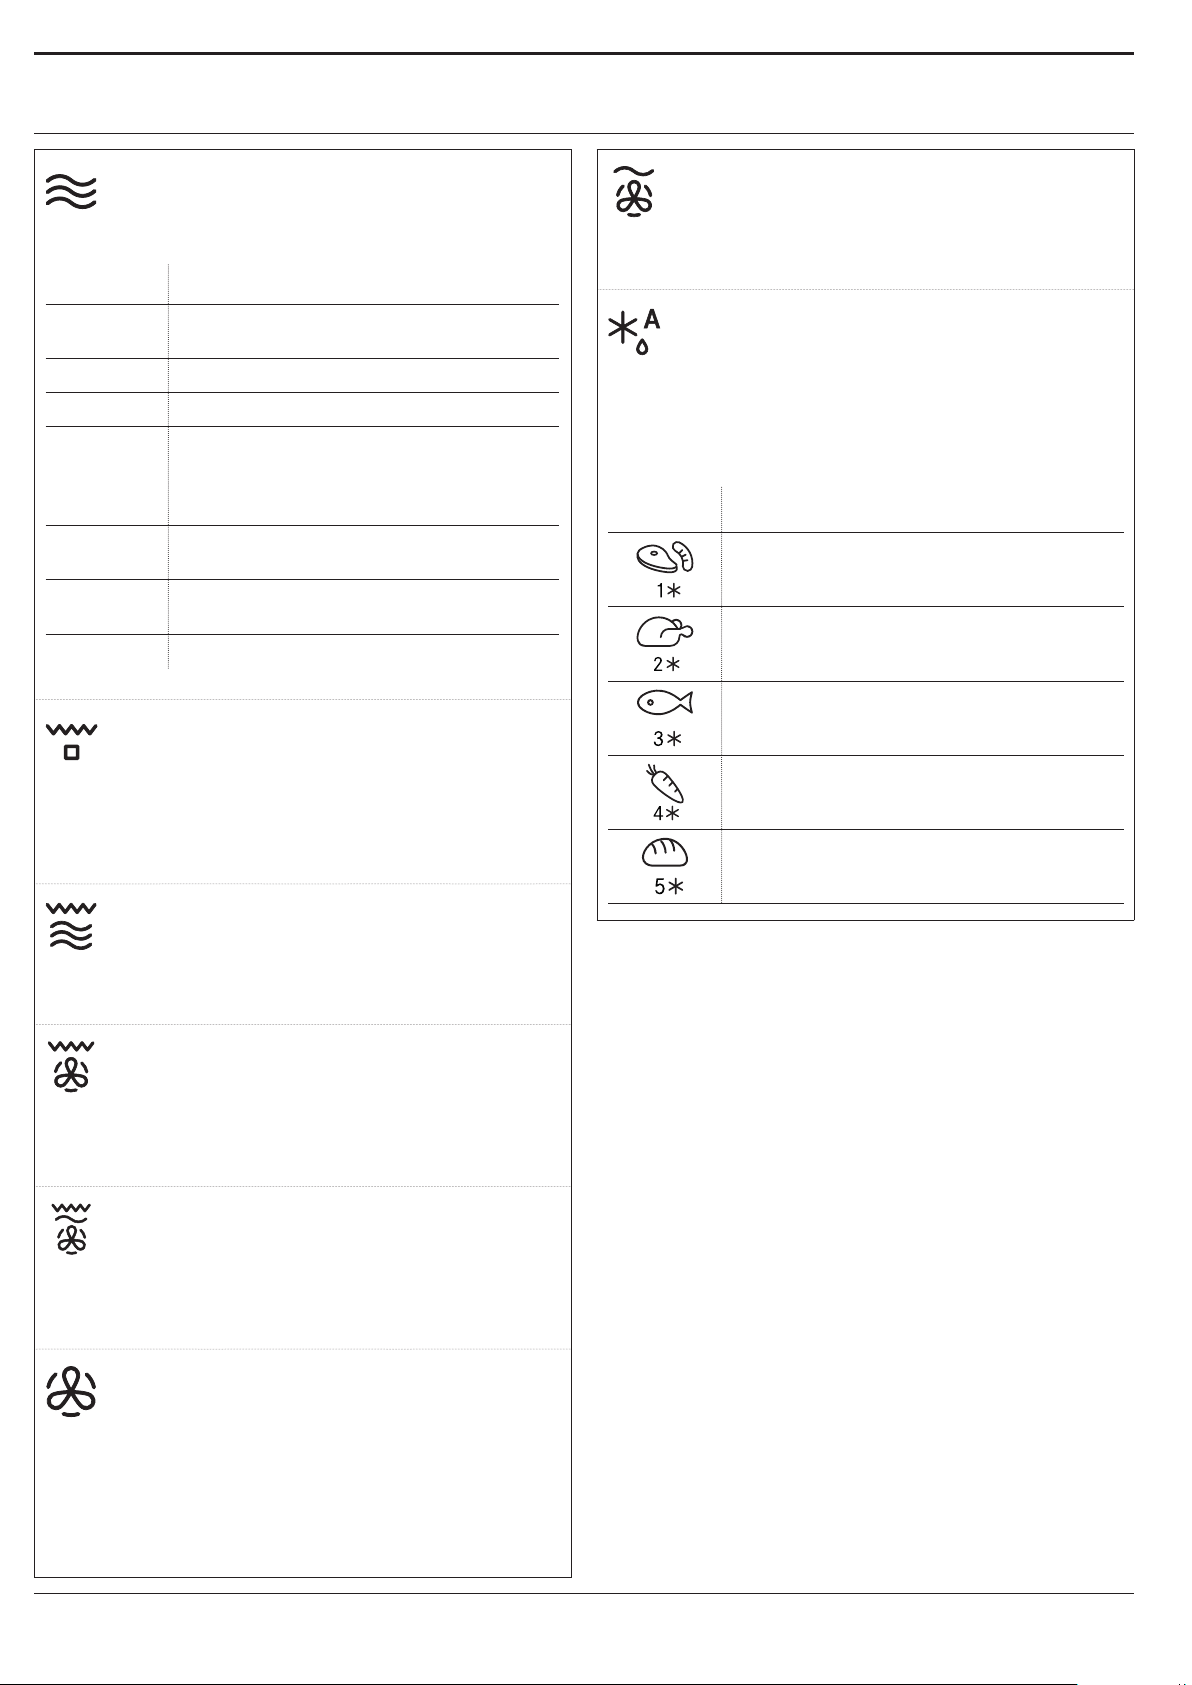
FUNKCJE
MIKROFALE
Służy do szybkiego gotowania oraz
podgrzewania potraw lub napojów�
MOC ZALECENIA
900 W
750 W
650 W
500 W
350 W
160 W
90 W
GRILL
Do przypiekania, grillowania i zapiekania�
Zaleca się obracać potrawy podczas pieczenia�
Dla uzyskania najlepszych rezultatów zalecamy
wstępne nagrzewanie grilla przez 3-5 minut�
Zalecane akcesoria: Wysoka podstawka druciana
Szybkie podgrzewanie napojów lub
potraw o dużej zawartości wody
Gotowanie warzyw
Pieczenie mięsa i ryb
Gotowanie sosów mięsnych lub sosów
zawierających ser lub jaja. Dogotowywanie
tart mięsnych lub zapiekanych
makaronów
Powolne, delikatne gotowanie. Doskonałe
do rozpuszczania masła lub czekolady
Rozmrażanie mrożonych owoców lub
zmiękczanie masła i sera
Zmiękczanie lodów
TERMOOBIEG + MIKROFALE
Służy do przygotowywania dań pieczonych w
krótkim czasie�
Zalecane akcesoria: Niska podstawka druciana
AUTO DEFROST *
Do szybkiego rozmrażania różnych rodzajów
żywności, na podstawie określenia ich wagi�
Potrawy powinny być umieszczone bezpośrednio
na szklanym talerzu obrotowym� Po pojawieniu się
odpowiedniego komunikatu obrócić potrawę na
drugą stronę�
KATEGORIA POTRAWA WAGA
MIĘSO
(mielone, kotlety, steki, kawałki
pieczeni)
DRÓB
(kurczak w całości, w kawałkach,
lety)
RYBA
(w całości, steki, lety)
WARZYWA
(warzywa mieszane, groszek,
brokuły itp.)
CHLEB
(chleb, bułki, rogaliki)
100 g - 2 kg
100 g - 2,5 kg
100 g - 1,5 kg
100 g - 1,5 kg
100 g - 1 kg
GRILL + MIKROFALE
Służy do szybkiego gotowania i zapiekania
potraw, dzięki połączeniu funkcji mikrofal i grilla�
Zalecane akcesoria: Wysoka podstawka druciana
TURBO GRILL
Dla uzyskania najlepszych rezultatów, łącząc
funkcje grilla i pieczenia konwekcyjnego� Zaleca się
obracać potrawy podczas gotowania/pieczenia�
Zalecane akcesoria: Wysoka podstawka druciana
TURBO GRILL + MIKROFALE
Do szybkiego pieczenia i przypiekania
potraw, łącząc funkcje mikrofal, grilla i pieczenia
konwekcyjnego�
Zalecane akcesoria: Wysoka podstawka druciana
TERMOOBIEG
Do pieczenia potraw w sposób pozwalający
uzyskać podobne rezultaty, co w przypadku
zwykłego piekarnika� Do przygotowywania
potraw można używać blach lub innych naczyń do
pieczenia, odpowiednich do użytku w piekarniku�
Zalecane akcesoria: Niska podstawka druciana /
Prostokątna tacka do pieczenia
72
Page 73
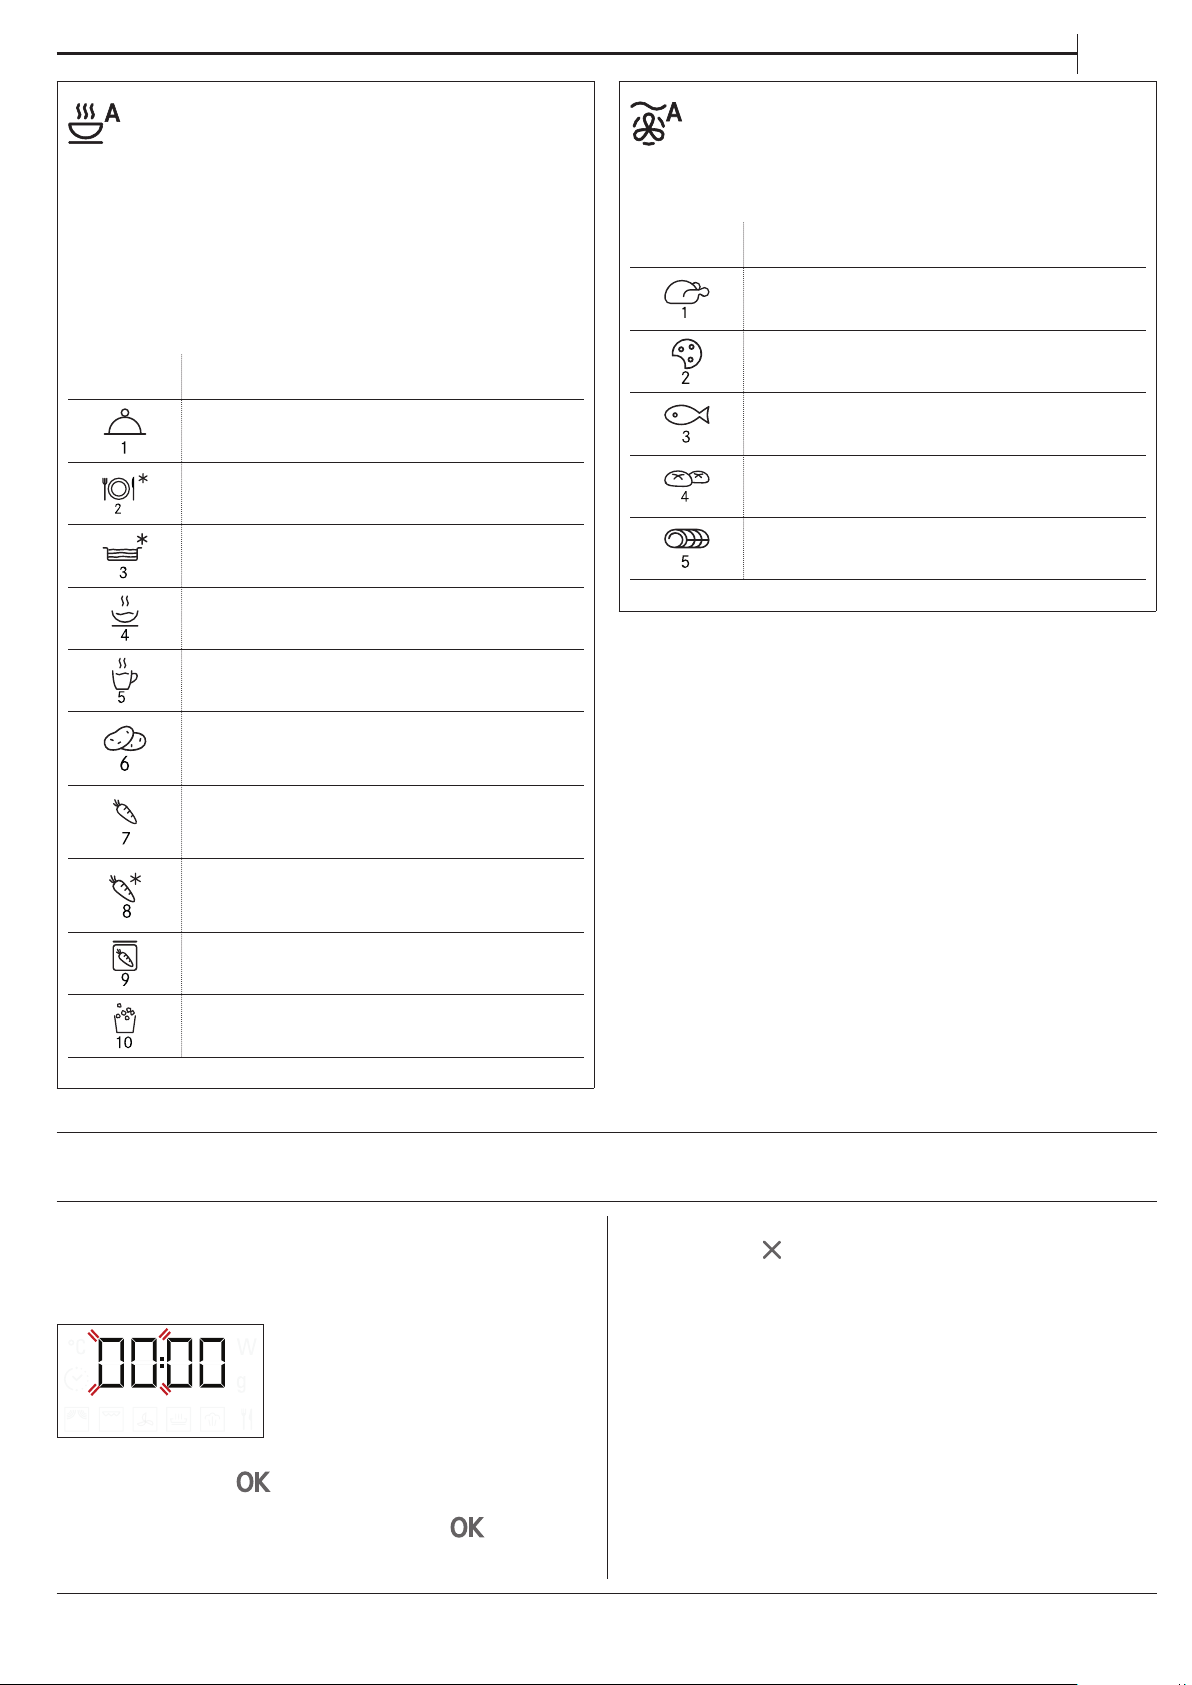
PL
AUTOMATYCZNE ODGRZEWANIE *
Do odgrzewania gotowych potraw –
zamrożonych lub w temperaturze pokojowej
oraz szybkiego gotowania potraw z uzyskaniem
optymalnych rezultatów�
Urządzenie automatycznie oblicza wartości
ustawień potrzebne do osiągnięcia najlepszych
możliwych rezultatów w jak najkrótszym czasie�
Potrawę należy umieścić na żaroodpornym
talerzu lub naczyniu przeznaczonym do kuchenek
mikrofalowych�
KATEGORIA POTRAWA WAGA
GOTOWE DANIE OBIADOWE 250 - 500 g
MROŻONE DANIE 250 - 500 g
MROŻ. LASAGNE 250 - 500 g
ZUPY 200 - 800 g
NAPOJE 100 - 500 g
PIECZONE ZIEMNIAKI
(Obrócić, gdy pojawi się
odpowiedni komunikat)
ŚWIEŻE WARZYWA
(Pokroić na równe kawałki i dodać
2-4 łyżki stołowe wody. Przykryć)
MROŻONE WARZYWA
(Obrócić, gdy pojawi się
odpowiedni komunikat. Przykryć)
200 g - 1 kg
200 - 800 g
200 - 800 g
AUTOMATYCZNY TERMOOBIEG + MIKROFALE
Do szybkiego gotowania/pieczenia
potraw z uzyskaniem optymalnych rezultatów�
Używać naczyń odpowiednich do stosowania w
piekarnikach i odpornych na mikrofale�
KATEGORIA POTRAWA WAGA
PIECZONY KURCZAK 800 g - 1,5 kg
CIASTKA 300 g
RYBA W CAŁOŚCI 600 g - 1,2 kg
ZAPIEKANKA ZIEMNIACZANA 800 g - 2 kg
PIECZEŃ WOŁOWA 800 g - 1,5 kg
* Stosując jeden z trybów automatycznych, wystarczy
wybrać rodzaj, wagę lub ilość potrawy, by osiągnąć najlepsze
możliwe rezultaty. Kuchenka mikrofalowa automatycznie
obliczy optymalne ustawienia, a następnie będzie je
odpowiednio dostosowywać w trakcie gotowania. Po
pojawieniu się odpowiedniego komunikatu obrócić lub
zamieszać potrawę.
WARZYWA KONSERWOWE 200 - 600 g
PRAŻONA KUKURYDZA 100 g
PIERWSZE UŻYCIE
. USTAWIENIE CZASU
Przy pierwszym uruchomieniu urządzenia należy
ustawić czas: Na wyświetlaczu będą migać dwie cyfry
godziny�
Obrócić pokrętło regulacyjne, aby wybrać właściwą
godzinę i wcisnąć
dwie cyfry minut� Obrócić pokrętło regulacyjne,
aby wybrać właściwą godzinę i wcisnąć
potwierdzić�
, aby potwierdzić� Zaczną migać
, aby
Uwaga: Aby zmienić ustawienie godziny w późniejszym
czasie, wcisnąć i przytrzymać przez co najmniej 3
sekundy przy wyłączonej kuchence i powtórzyć kroki
przedstawione powyżej.
W przypadku dłuższej przerwy w dostawie prądu może zajść
potrzeba ponownego ustawienia czasu.
73
Page 74
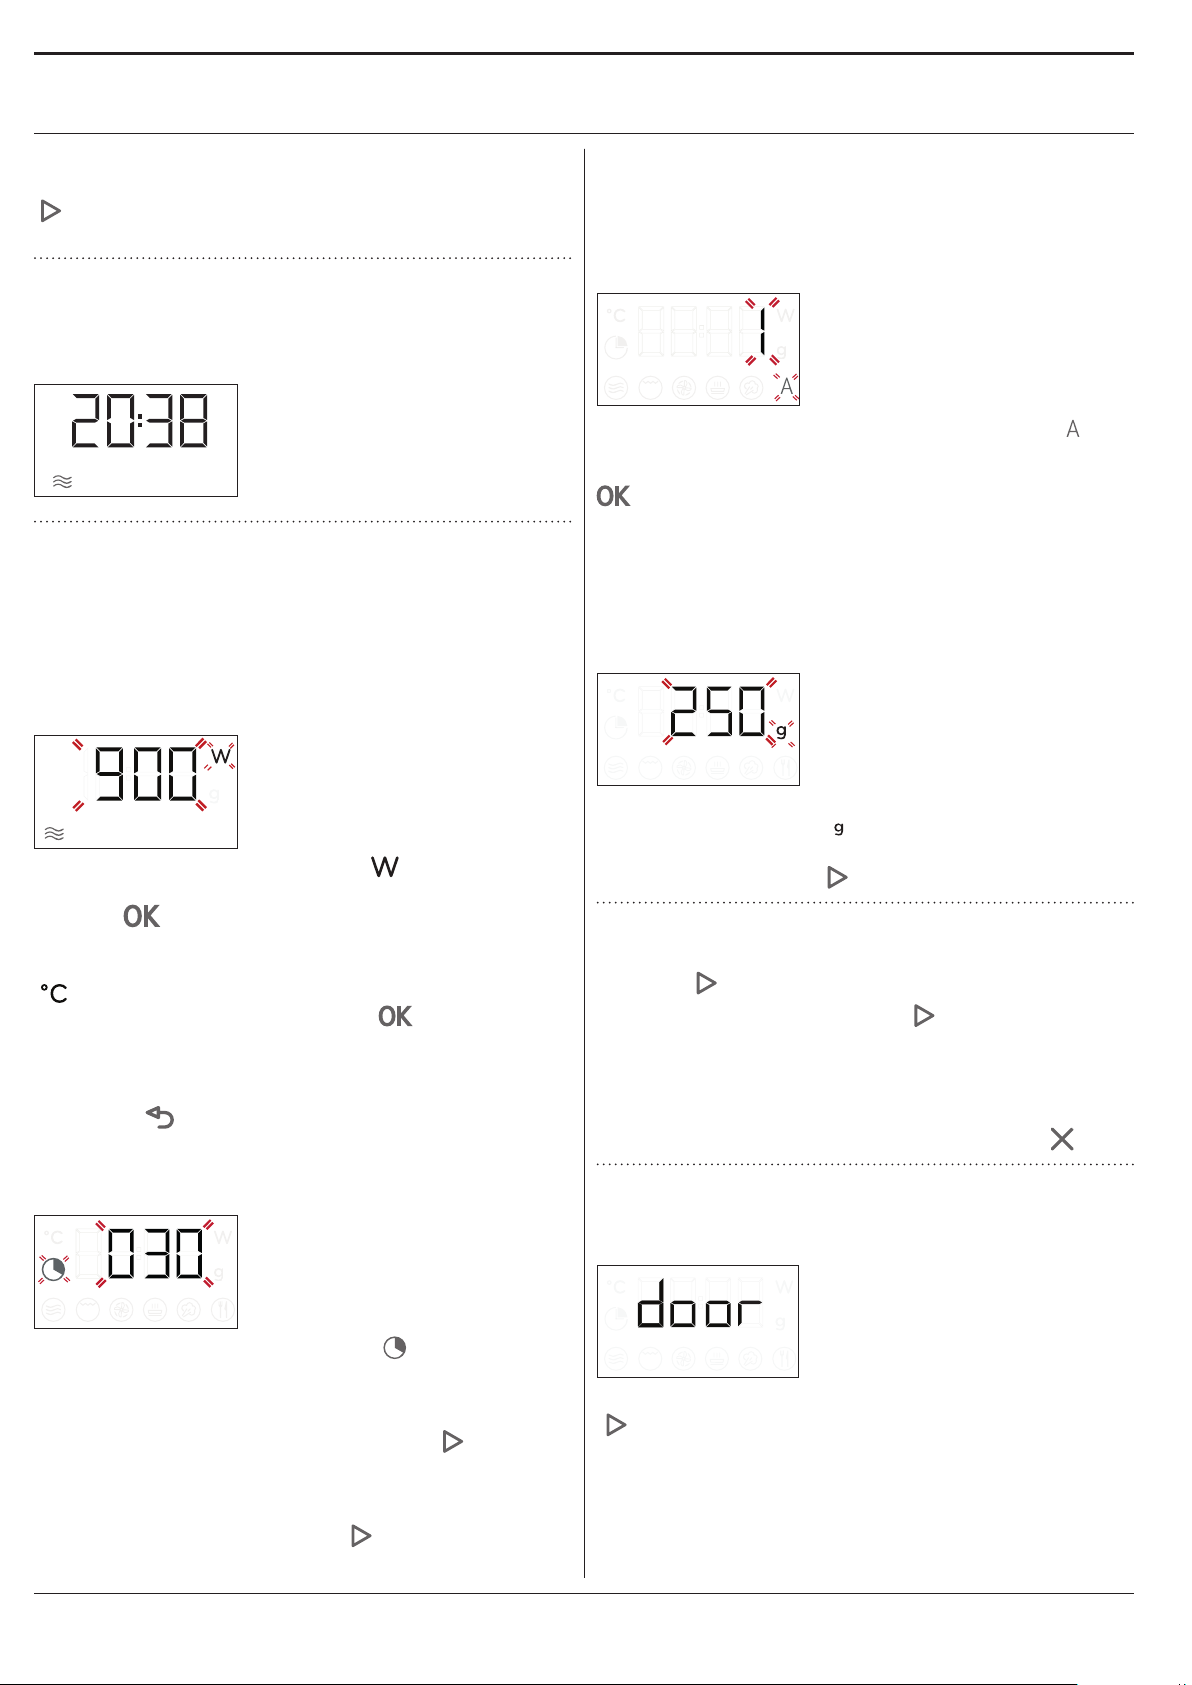
CODZIENNA EKSPLOATACJA
. JET START
Kiedy kuchenka mikrofalowa jest wyłączona, nacisnąć
, aby na 30 sekund uruchomić pracę urządzenia z
funkcją mikrofal o pełnej mocy (900W)�
1. WYBRAĆ FUNKCJĘ
Jeżeli kuchenka jest wyłączona, na wyświetlaczu
pokazany jest tylko bieżący czas� Obrócić pokrętło
wyboru, aby wybrać jedną z dostępnych funkcji�
2. USTAWIENIE FUNKCJI
. FUNKCJE USTAWIANE RĘCZNIE
Po wybraniu żądanej funkcji istnieje możliwość
zmiany jej ustawień�
Na wyświetlaczu będą pojawiać się kolejno
ustawienia, które można zmieniać�
MOC KUCHENKI MIKROFALOWEJ/ TEMPERATURA
. FUNKCJE AUTOMATYCZNE / AUTO DEFROST
KATEGORIE
Podczas używania niektórych funkcji
automatycznych, konieczne będzie wybranie
kategorii przygotowywanej potrawy�
W momencie gdy na wyświetlaczu miga ikona
, obrócić pokrętło regulacyjne ,aby wybrać cyfrę
odpowiadającą żądanej kategorii, następnie wcisnąć
, aby potwierdzić�
WAGA
Aby uzyskać najlepsze rezultaty, funkcje
automatyczne wymagają wprowadzenia wagi
potrawy, którą należy wybrać z ustawień domyślnych:
kuchenka obliczy właściwy czas trwania funkcji dla
potrawy danej kategorii�
Kiedy na wyświetlaczu miga ikona , obrócić
pokrętło regulacyjne, aby ustawić moc, a następnie
nacisnąć
aby zmienić kolejne ustawienia (jeśli to możliwe)�
W podobny sposób na wyświetlaczu miga ikona
, obrócić pokrętło regulacyjne, aby ustawić
temperaturę, a następnie nacisnąć
potwierdzić� Powtarzać te czynności, aby zmienić
kolejne ustawienia�
Uwaga: po włączeniu funkcji można zmienić moc, wciskając
dwukrotnie , aby uzyskać dostęp do ustawień menu,
a następnie obrócić pokrętło regulacyjne , aby zmienić
ustawienie.
CZAS TRWANIA
Kiedy na wyświetlaczu miga ikona , obrócić
pokrętło regulacyjne, aby ustawić żądany czas
gotowania�
Gdy wyświetlany czas gotowania odpowiada
żądanemu czasowi gotowania, nacisnąć
potwierdzić i włączyć wybraną funkcję�
Uwaga: Obracając pokrętło, można dostosować czas
gotowania także, gdy proces gotowania już się rozpoczął;
każde kolejne naciśnięcie przycisku wydłuża czas
gotowania o 30 sekund.
, aby potwierdzić� Powtarzać te czynności,
, aby
, aby
Gdy na wyświetlaczu pojawia się ustawienie
domyślne i miga ikona
regulacyjne, ustawiając wagę potrawy, a następnie
potwierdzić, wciskając
, obrócić pokrętło
, aby włączyć funkcję�
3. WŁĄCZANIE FUNKCJI
Po wprowadzeniu wszystkich żądanych ustawień
nacisnąć
Za każdym razem, gdy przycisk
ponownie wciśnięty, czas podgrzewania wydłuży się
o kolejne 30 sekund (tylko dla funkcji ustawianych
ręcznie)�
Uwaga: Aby wstrzymać wykonywanie bieżącej funkcji, w
dowolnym momencie można wcisnąć dwukrotnie .
, aby włączyć funkcję�
zostanie
. BLOKADA BEZPIECZEŃSTWA
Ta funkcja jest aktywowana automatycznie, aby
zapobiec przypadkowemu włączeniu się kuchenki�
Otworzyć i zamknąć drzwiczki, a następnie nacisnąć
, aby włączyć wybraną funkcję�
74
Page 75
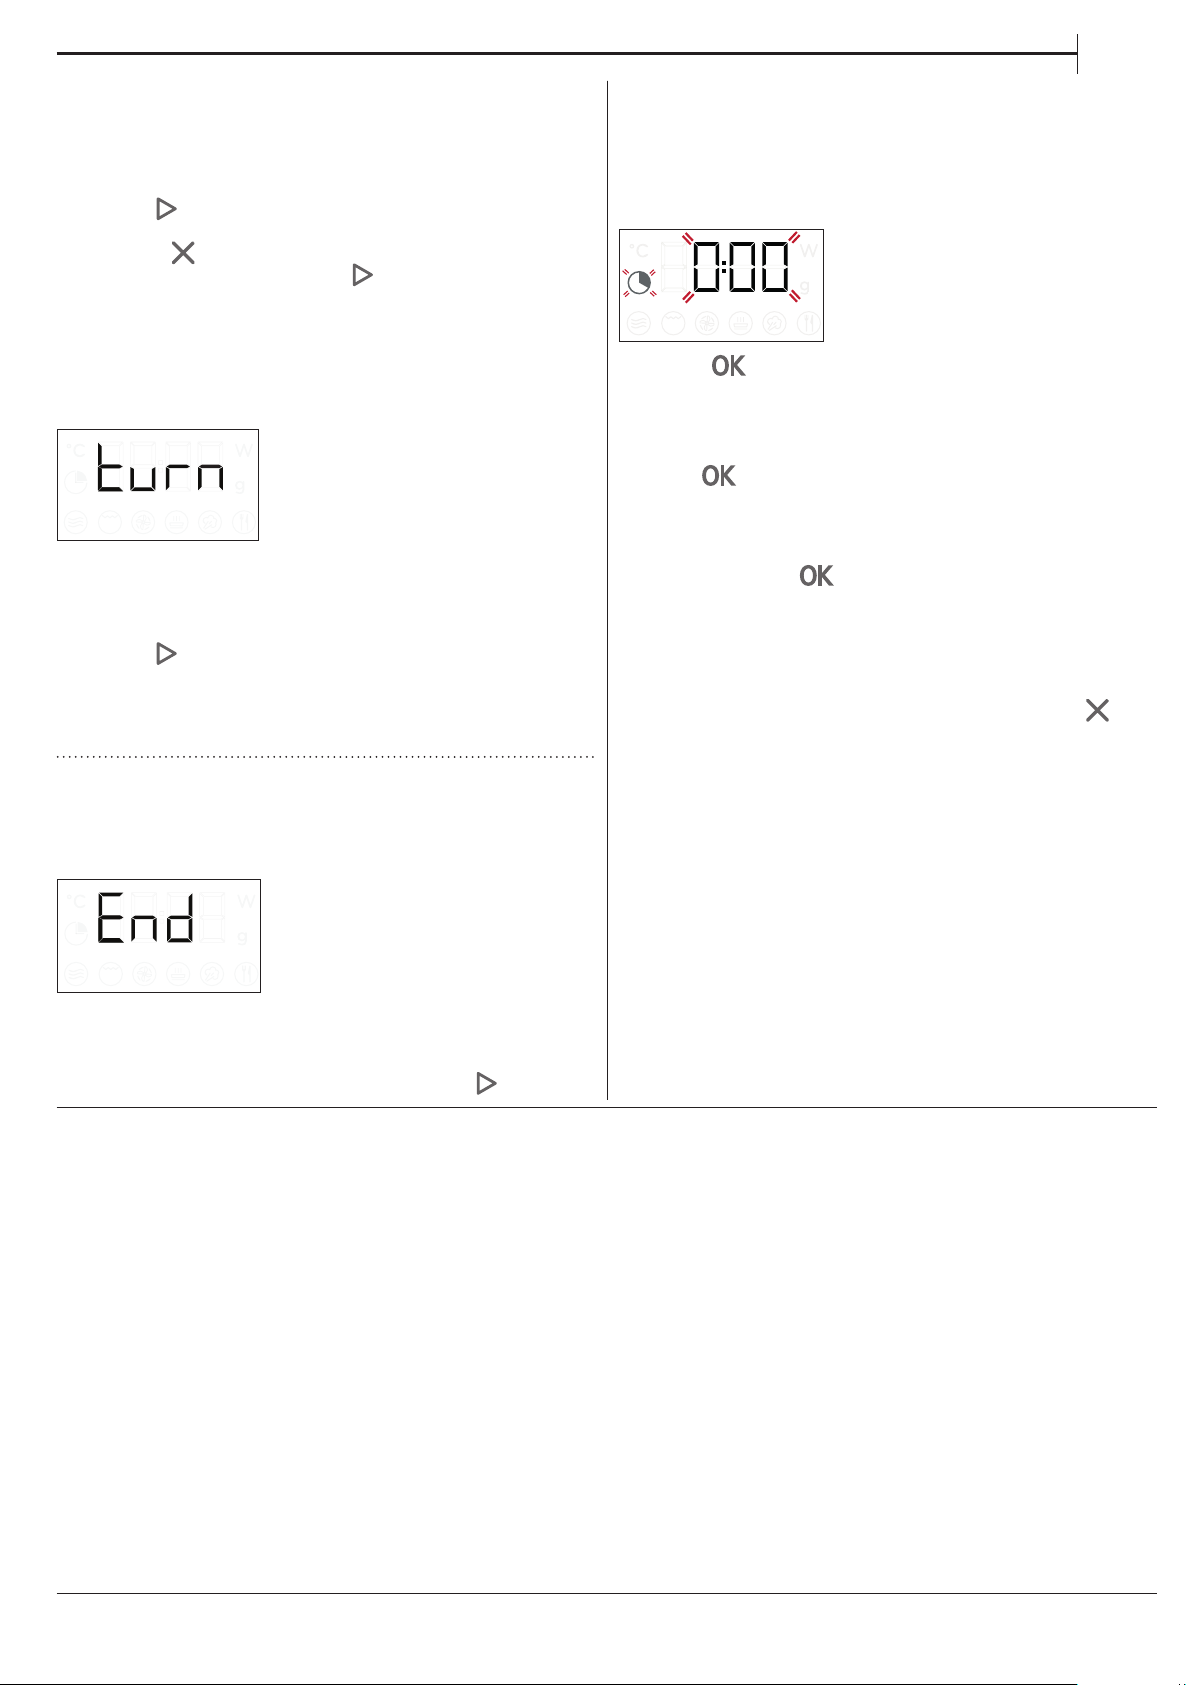
4. PAUZA
Aby zatrzymać aktywną funkcję, na przykład w celu
zamieszania lub obrócenia potrawy na drugą stronę,
należy po prostu otworzyć drzwiczki urządzenia�
Aby włączyć ją ponownie, zamknąć drzwiczki i
nacisnąć
Można na pewien czas zatrzymać gotowanie poprzez
wciśnięcie
zamknąć drzwiczki i wcisnąć
AUTOMATYCZNA PAUZA
(ZAMIESZANIE LUB OBRÓCENIE POTRAWY)
Wykonywanie niektórych funkcji automatycznych
zostanie wstrzymane, aby umożliwić obrócenie lub
zamieszanie potrawy�
W momencie gdy kuchenka zatrzyma gotowanie, a
na wyświetlaczu pojawi się komunikat „Turn food”
lub „Stir Food”, otworzyć drzwiczki, aby obrócić lub
zamieszać potrawę, a następnie zamknąć drzwiczki i
nacisnąć
Uwaga: po upływie 2 minut, nawet jeśli potrawa nie została
obrócona, ani zamieszania, funkcja automatycznie włączy się
ponownie.
�
� Aby rozpocząć proces gotowania,
�
, aby ponownie rozpocząć gotowanie�
PL
. TIMER
Kiedy urządzenie jest wyłączone, wyświetlacz może
być używany jako timer� Timer nie włącza żadnego z
cykli gotowania�
Aby uruchomić funkcję i ustawić wymagany czas
gotowania, obrócić pokrętło regulacyjne�
Nacisnąć , aby włączyć timer� Gdy tylko zakończy
się odliczanie wybranego czasu, na wyświetlaczu
pojawi się komunikat i rozlegnie się sygnał
dźwiękowy� Aby zmienić ustawienia timer po jego
włączeniu, obróć pokrętło regulacyjne, a następnie
wcisnąć
Aby przerwać lub powrócić do wyświetlania
aktualnego czasu, obrócić pokrętło regulacyjne, aż
do momentu pojawienia się 0:00 na wyświetlaczu, a
następnie wcisnąć
Uwaga: Gdy timer jest aktywny, można także włączyć funkcję:
timer będzie kontynuował odliczanie wybranego czasu
automatycznie, bez żadnego wpływu na działanie funkcji.
Aby powrócić do wyświetlania timera, należy poczekać do
zakończenia funkcji lub wyłączyć funkcję, naciskając .
, aby potwierdzić�
�
5. KONIEC GOTOWANIA
Rozlegnie się sygnał dźwiękowy, a na wyświetlaczu
pojawi się komunikat „End”, wskazując, że gotowanie
zostało zakończone�
W przypadku niektórych funkcji można opóźnić
rozpoczęcie gotowania przy zachowaniu poprzednich
ustawień: obrócić pokrętło regulacyjne, aby ustawić
nowy czas gotowania, następnie wcisnąć
�
75
Page 76

PRAKTYCZNE PORADY
JAK POSŁUGIWAĆ SIĘ TABELĄ PIECZENIA
Tabela wskazuje funkcje, które będą najlepsze do
przygotowania danej potrawy�
Czas gotowania odnosi się do cyklu gotowania
potrawy w kuchence mikrofalowej, z wyłączeniem
etapu wstępnego podgrzewania (jeśli jest
wymagany)�
Ustawienia oraz czasy pieczenia są orientacyjne i
zależą od ilości potrawy lub od rodzaju akcesoriów�
Przygotowywać potrawy, ustawiając minimalny
podany czas i sprawdzając, podczas gotowania, czy są
już gotowe�
Aby uzyskać lepsze wyniki, wykonać starannie
zalecenia podane w tabeli gotowania, dotyczące
wyboru akcesoriów�
WSKAZÓWKI DO GOTOWANIA W KUCHENCE
MIKROFALOWEJ
Promieniowanie mikrofalowe przenika potrawy tylko
do pewnej głębokości;
Dlatego w przypadku podgrzewania kilku potraw
jednocześnie należy je umieszczać w możliwie jak
największej odległości od siebie�
Mniejsze kawałki produktów gotują się lub pieką
szybciej niż większe: Aby potrawa ugotowała się lub
upiekła równomiernie, pokroić produkt na kawałki
równej wielkości�
Podczas gotowania w kuchence mikrofalowej, woda
z potraw jest odparowywana: Używanie odpornej na
mikrofale pokrywki pomaga zredukować utratę wody�
Po wyjęciu posiłku z kuchenki pozostaje on w stanie
wrzenia jeszcze przez pewien czas� Dlatego zalecamy
odczekanie, aż potrawa nieco ostygnie�
Podczas gotowania w kuchence mikrofalowej warto
zamieszać potrawę, ponieważ pozwala to przesunąć
na środek lepiej ugotowane kawałki znajdujące się
przy brzegach i odwrotnie�
Ułożyć cienkie plastry mięsa jeden na drugim lub
częściowo nałożyć na siebie� Cieńsze plastry, takie jak
pieczeń i kiełbaski, powinny być ułożone obok siebie�
FOLIA SPOŻYWCZA I OPAKOWANIE
Należy usunąć zapięcia z papierowych lub
plastikowych torebek, zanim zostaną włożone do
kuchenki mikrofalowej w celu ugotowania potrawy�
Plastikową folię należy naciąć lub nakłuć widelcem,
aby umożliwić uwolnienie ciśnienia i zapobiec
rozerwaniu folii na skutek gromadzenia się pary
podczas gotowania�
PŁYNY
Płyny mogą podgrzewać się powyżej punktu wrzenia
bez widocznych pęcherzyków�
Może to spowodować nagłe wykipienie gorącego
płynu�
Aby temu zapobiec, należy:
� Unikać używania pojemników z wąską szyjką�
� Zamieszać płyn przed wstawieniem naczynia do
kuchenki mikrofalowej i pozostawić w naczyniu
łyżeczkę�
� Po podgrzaniu ponownie wymieszać, a następnie
ostrożnie wyjąć pojemnik z komory kuchenki�
PRODUKTY MROŻONE
Aby uzyskać najlepsze rezultaty, zalecamy
rozmrażanie potraw bezpośrednio na szklanym
talerzu obrotowym� W razie potrzeby można
również użyć lekkiego pojemnika plastikowego,
dostosowanego do kuchenek mikrofalowych�
Potrawy gotowane, gulasze i sosy mięsne rozmrożą
się lepiej, gdy je czasami zamieszamy�
Podzielić potrawę na części, gdy zacznie się
rozmrażać: rozdzielone części rozmrożą się szybciej�
POTRAWY DLA DZIECI
Podgrzewając potrawy dla dzieci w słoiczku albo
płyny w butelce dla niemowląt, należy zawsze
wymieszać zawartość i sprawdzić temperaturę przed
podaniem�
Zapewni to równomierne rozprowadzenie ciepła i
pozwoli uniknąć ryzyka poparzeń�
Przed podgrzaniem należy zadbać o to, by pokrywka i
smoczek zostały zdjęte�
MIĘSO I RYBY
Aby uzyskać szybko doskonale przypieczoną
powierzchnię, a jednocześnie zachować środek mięsa
lub ryby miękki i soczysty, zalecamy użycie funkcji
„Grill + Mikrofale”� W celu osiągnięcia najlepszych
efektów, ustawić moc kuchenki na zakres od 160 do
350 W�
76
Page 77
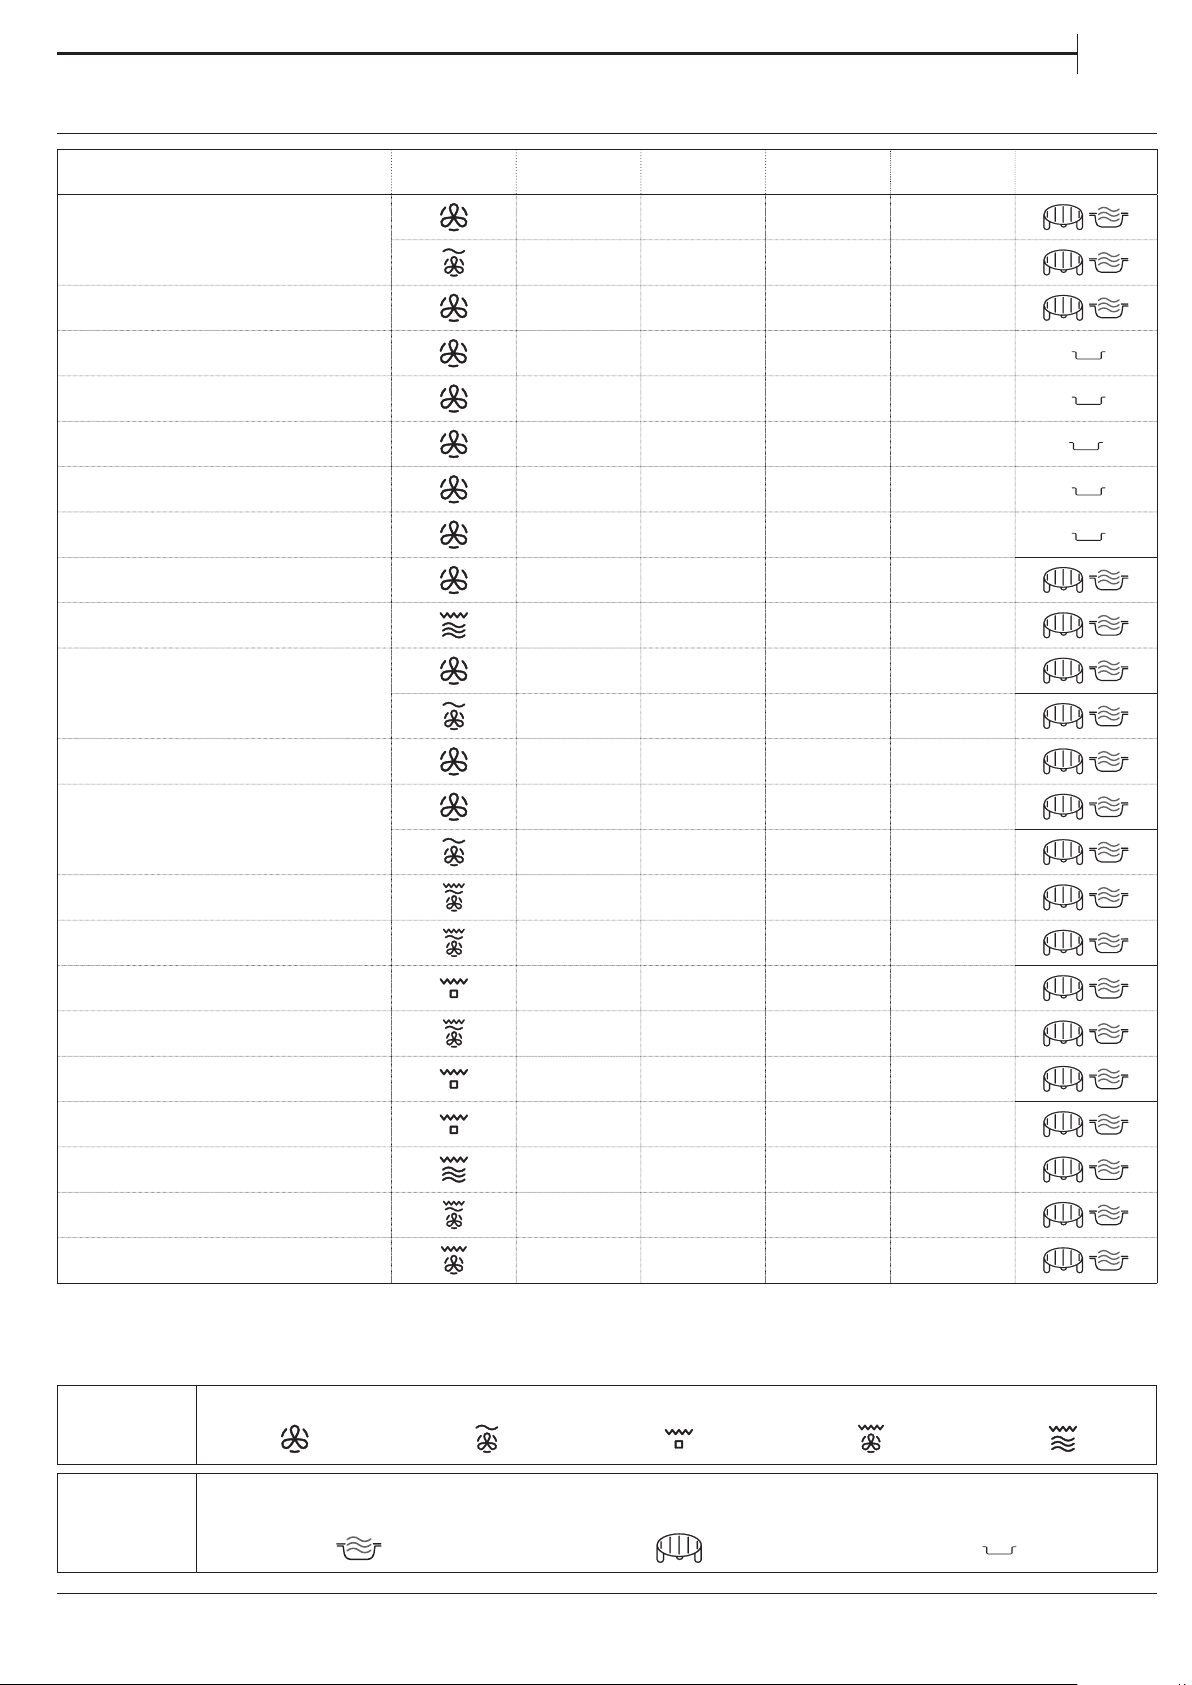
TABELA GOTOWANIA
PL
POTRAWA FUNKCJA NAGRZEWANIE
POZIOM
GRILLOWANIA
MOC (W) CZAS (MIN) AKCESORIA
- 160 - 180 - 30-60
Ciasta drożdżowe
- 160 - 180 90 25-50
Ciasta z nadzieniem
(sernik, strucla, szarlotka)
Tak 160-190 - 35-70
Ciastka Tak 170 -180 - 10-20
Bezy Tak 100-120 - 40-50
Bułki Tak 210-220 - 10 -12
Bochenek chleba
Tak 180-200 - 30-35
Pizza / Placek Tak 190-220 - 20-40
Tarty wytrawne
(tarta warzywna, placek z nadzieniem)
Tak 180-190 - 40-55
Lasagne / Zapiekany makaron - 350-500 15-40
Pieczona jagnięcina/ Cielęcina /
- 170-180 - 70-80*
Pieczeń wołowa
(1,3-1,5 kg)
Pieczeń wołowa - średnia
(1,3-1,5 kg)
- 160-180 160 50-70*
- 170-180 - 40-60*
Pieczony kurczak/ Królik /
Kaczka
(w całości 1-1,2 kg)
Kurczak / Królik / Kaczka
(lety/kawałki 0,4-1 kg)
Pieczona ryba (w całości) - - 160-350 20-40
Filety rybne/kawałki Tak - - 15-30*
Nadziewane warzywa
(pomidory, cukinia, bakłażany...)
Tost y - - - 3-6
Kiełbaski / szaszłyki / żeberka /
hamburgery
Zapiekane ziemniaki
Pieczone owoce - - 160 -350 15-25
Zapiekanka warzywna - - - 15 -25
* Obrócić potrawę po upływie połowy czasu gotowania.
Tabela ze sprawdzonymi przepisami została opracowana zgodnie z wymaganiami certykacji i stosownie do norm IEC 60705 i
IEC 60350.
- 210-220 - 50 -70*
- 210-220 350 45-60*
- - 350-500 20-40*
- - 500-650 25-50
- - - 20-40*
- - 350-500 20-40*
FUNKCJE
AKCESORIA
Wymuszony nadmuch
Talerz żaroodporny/pojemnik nadający się
do użycia w kuchenkach mikrofalowych
Termoobieg + Mikrofale Grill Turbogrill Grill + Mikrofale
Podstawka druciana Prostokątna tacka do pieczenia
77
Page 78
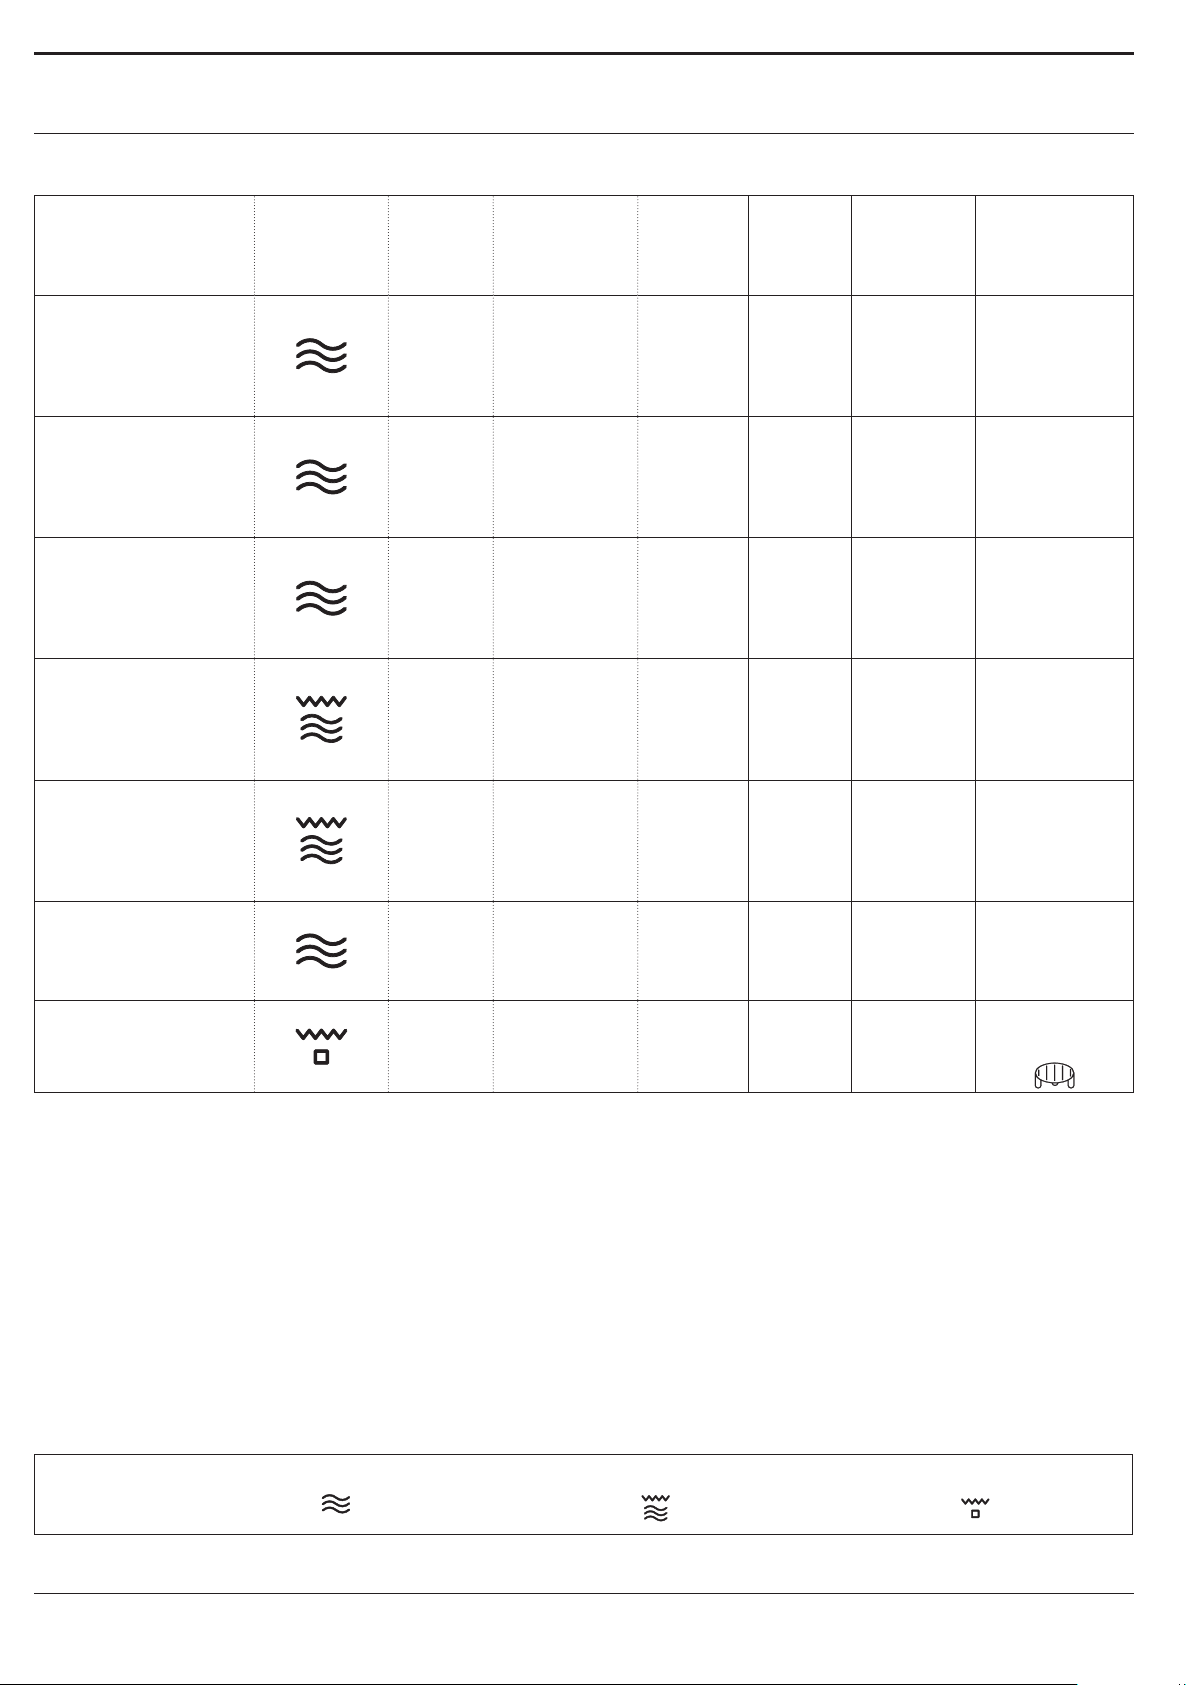
SPRAWDZONE PRZEPISY
Zgodne z wymaganiami certykacji stosownie do norm IEC 60705 oraz IEC 60350-1.
POTRAWA FUNKCJA
Krem do ciast
Biszkopt
Pieczeń rzymska
Zapiek. ziemn.
Kurczak
Rozmrażanie mięsa
(odwrócić na drugą
stronę w połowie
procesu rozmrażania)
TEMP./
POZIOM
GRILLO-
WANIA
MOC
(W)
PODGRZE-
WANIE
WAGA
(g)
CZAS GOTO-
WANIA
(min:s)
1000 12:00 - 13:00 - 650 -
475 8:00 - 10:00 - 750 -
900 13:00 - 14:00 - 750 -
110 0 28:00 - 30:00 190 350 -
1200 35:00 - 40:00 210 350 -
500 10:30 - 160 -
AKCESORIA
Pojemnik
odpowiedni
do kuchenki
mikrofalowej
(Pyreks 3,227)
Pojemnik
odpowiedni
do kuchenki
mikrofalowej
(Pyreks 3�827)
Pojemnik
odpowiedni
do kuchenki
mikrofalowej
(Pyreks 3,838)
Pojemnik
odpowiedni
do kuchenki
mikrofalowej
(Pyreks 3�827)
Pojemnik
odpowiedni
do kuchenki
mikrofalowej
(Pyreks 3,220)
Talerz
obrotowy
Tost y
FUNKCJE
- 4:00 - 6:00 3 - Tak
Mikrofale Grill + Mikrofale Grill
Ruszt
druciany
78
Page 79
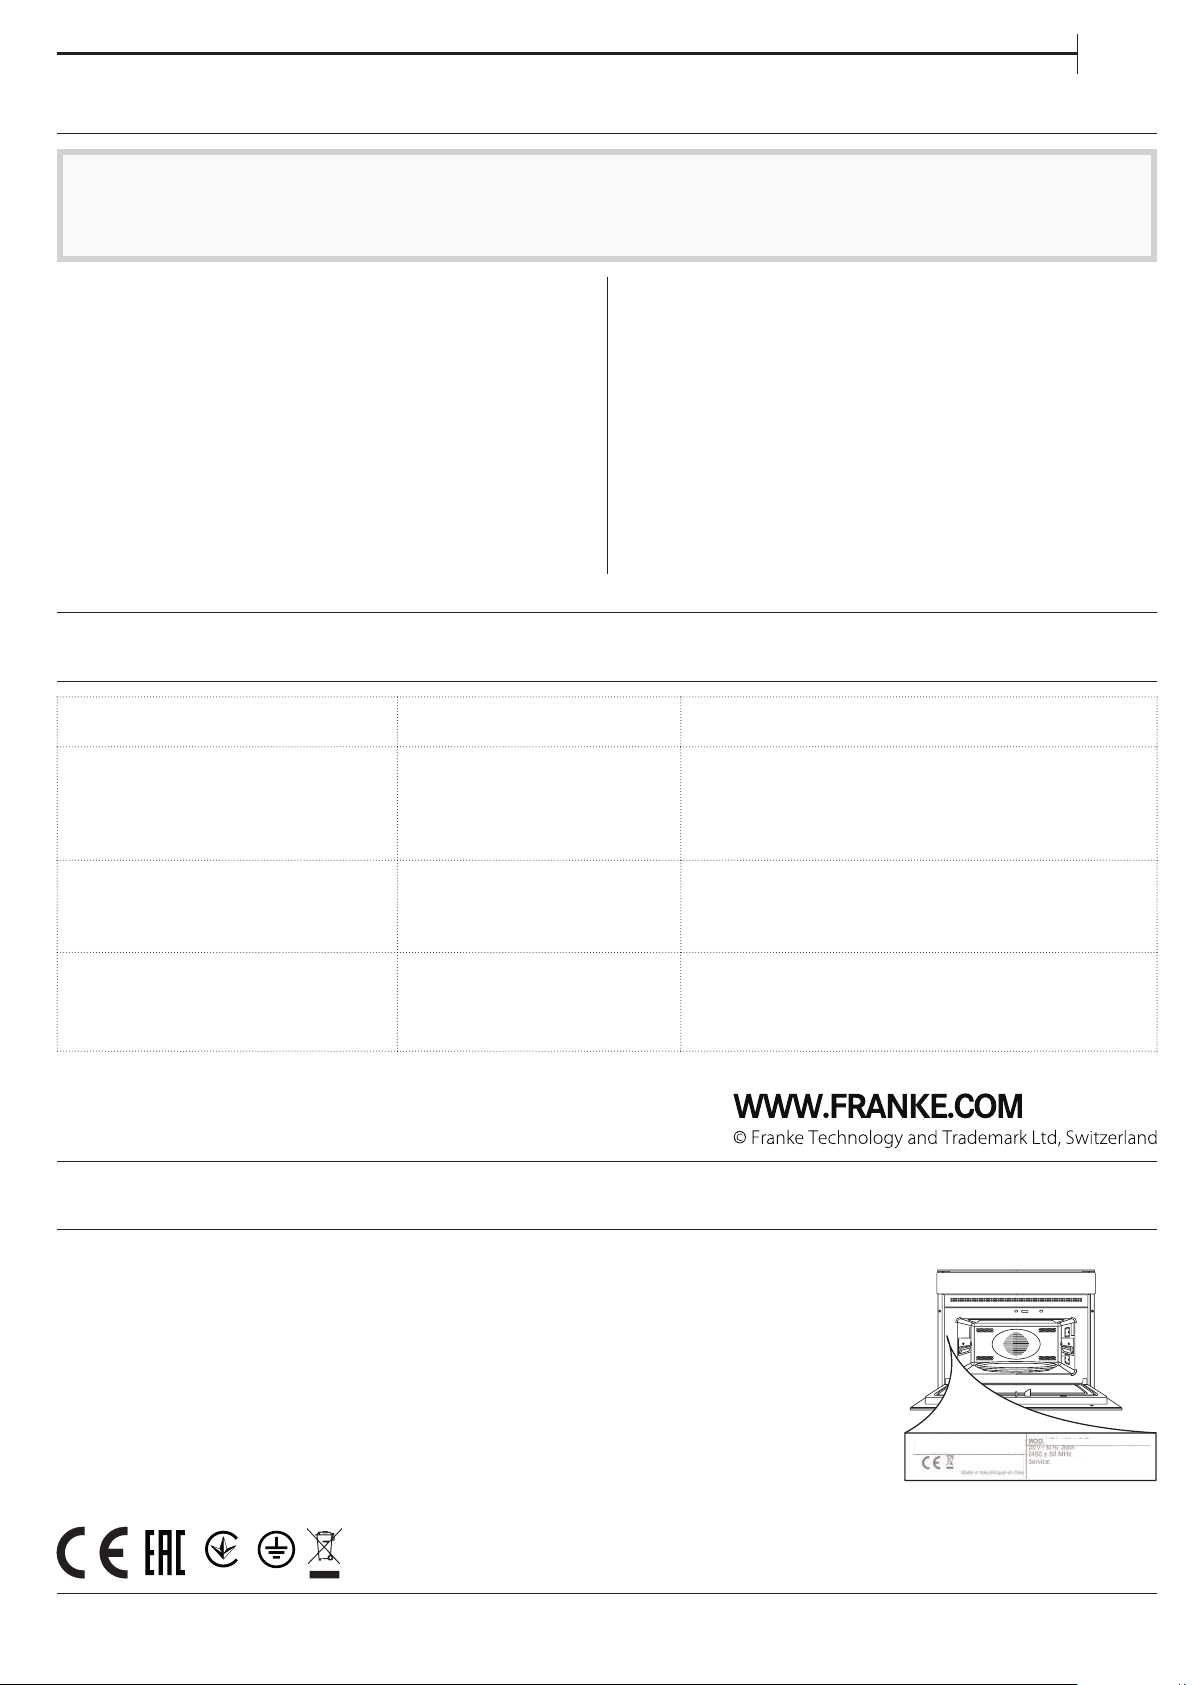
CZYSZCZENIE I KONSERWACJA
PL
Przed przystąpieniem do jakichkolwiek czynności
serwisowych lub czyszczenia, upewnić się, że
urządzenie ostygło.
Nie stosować urządzeń czyszczących parą.
POWIERZCHNIE WEWNĘTRZNE I ZEWNĘTRZNE
• Powierzchnie należy czyścić wilgotną ściereczką
z mikrobry� Jeśli są silnie zabrudzone, dodać kilka
kropel detergentu o neutralnym pH� Wytrzeć do sucha
ściereczką�
Nie stosować wełny szklanej, szorstkich gąbek lub
ściernych/żrących środków do czyszczenia, ponieważ
mogą one uszkodzić powierzchnie urządzenia.
AKCESORIA
Wszystkie akcesoria nadają się do mycia w
zmywarkach� Uporczywe zabrudzenia delikatnie
zetrzeć ściereczką� Przed czyszczeniem akcesoriów
należy zawsze odczekać, aż całkowicie ostygną�
• Wyczyścić szybę drzwiczek odpowiednim płynem do
mycia�
• Regularnie, w szczególności po wylaniu się płynów,
należy wyjąć talerz obrotowy oraz jego podstawkę i umyć
dno urządzenia, usuwając ewentualne resztki potraw�
• Grill nie wymaga czyszczenia, gdyż wysoka
temperatura powoduje spalanie wszelkich zabrudzeń�
Zaleca się regularne korzystanie z tej funkcji�
ROZWIĄZYWANIE PROBLEMÓW
Problem Możliwa przyczyna Rozwiązanie
Urządzenie nie działa�
Piekarnik wydaje głośne
dźwięki, nawet jeśli jest
Awaria zasilania.
Urządzenie odłączone od
zasilania.
Wentylator chłodzący jest
włączony.
wyłączony�
Wyświetlacz pokazuje literę „F”,
Błąd oprogramowania. Skontaktować się z najbliższym Biurem Obsługi
po której następuje liczba�
WSPARCIE TECHNICZNE
W przypadku wszelkich problemów z działaniem należy
skontaktować się z Centrum Obsługi Technicznej Franke�
Nigdy nie należy korzystać z usług
nieautoryzowanych techników�
Należy podać:
- typ usterki
- model urządzenia (art�/kod)
- numer seryjny (SN) na tabliczce znamionowej,
umieszczonej na prawej krawędzi komory piekarnika
(widocznej po otwarciu drzwiczek piekarnika)�
Sprawdzić, czy działa zasilanie i czy kuchenka
jest prawidłowo podłączona do sieci. Wyłączyć
urządzenie i włączyć je ponownie, sprawdzając czy
usterka nie ustąpiła.
Otworzyć drzwiczki lub odczekać, aż kuchenka
mikrofalowa zakończy proces chłodzenia.
Klienta i podać numer następujący po literze „F".
Kontaktując się z naszym
Centrum Serwisowym,
prosimy podać kody
znajdujące się na
tabliczce znamionowej
Państwa produktu�
XXXXXXXXXXXX
XXXXXXXXXXXX
XXX/XXX
001
79
Page 80

www.franke.com
400011521714
EN DE FR IT ES PT PL
 Loading...