

Page 1
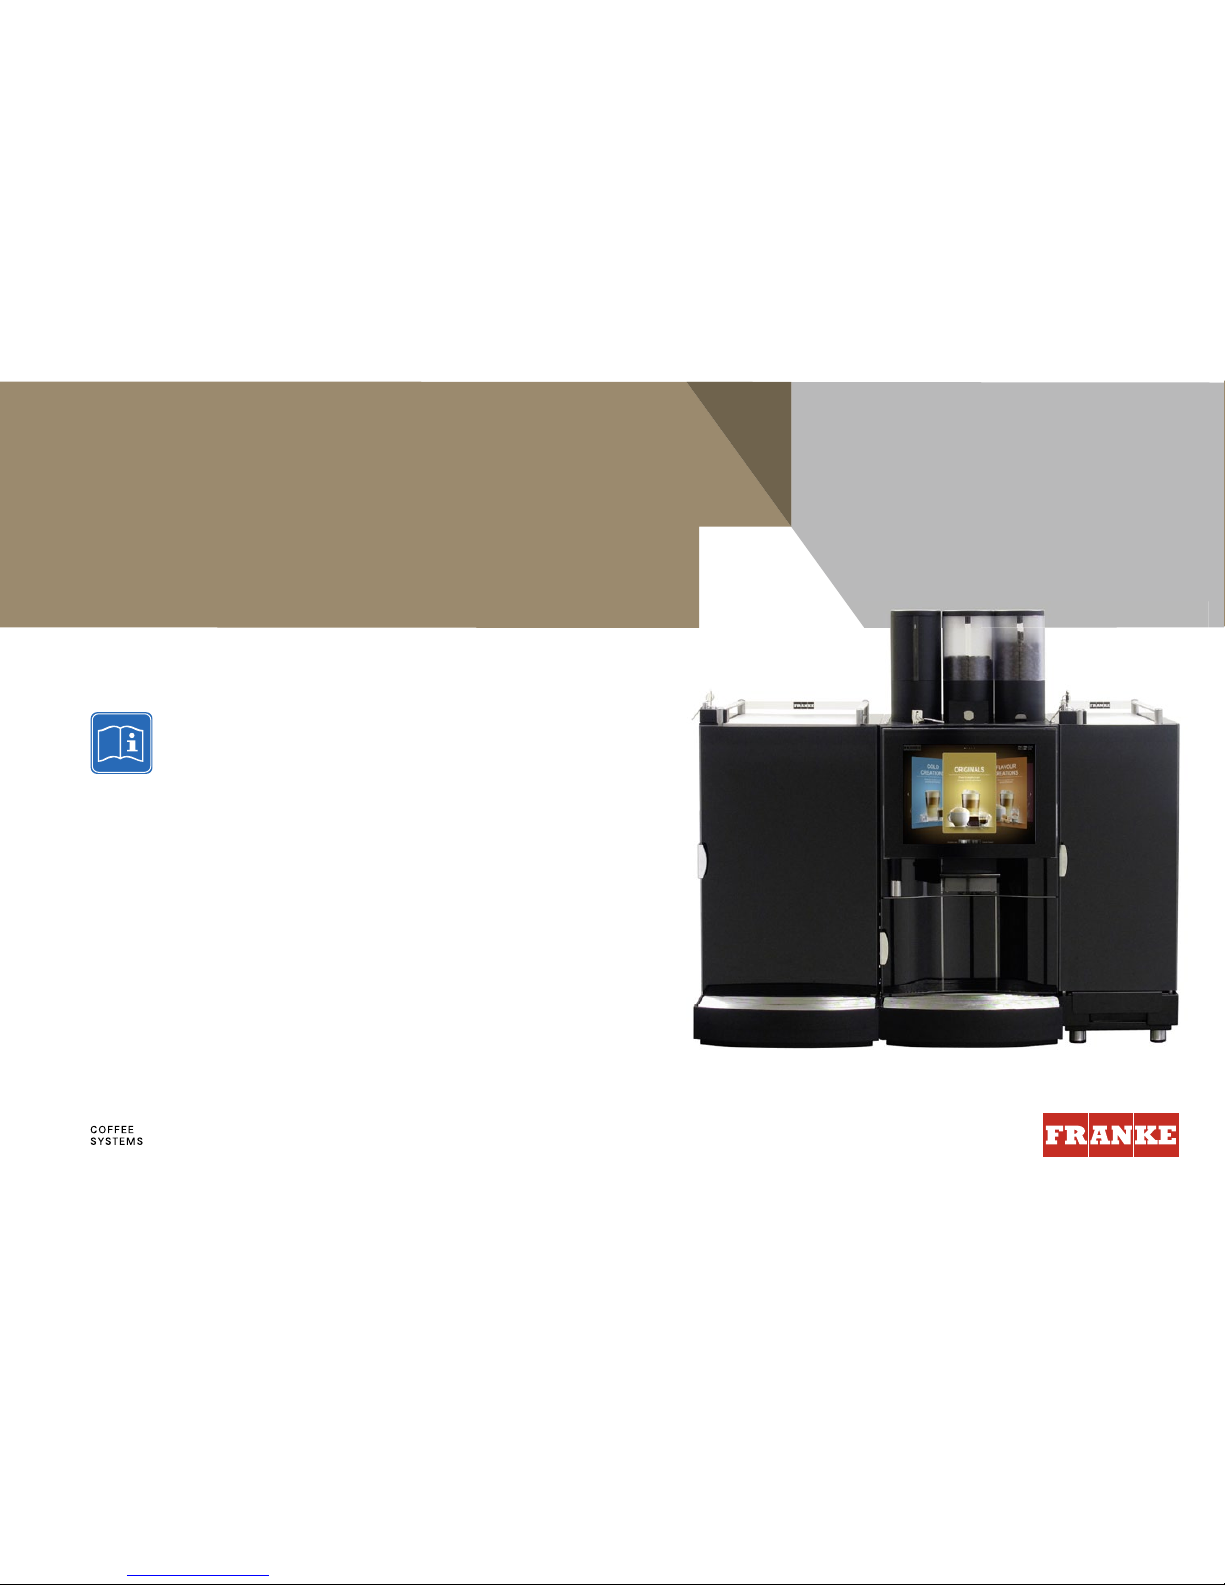
FM800
Original Operating Instructions
Read the operating instructions and the chapter on safety
information before operating the machine. Keep the operating
instructions near the machine.
Page 2

Page 3

Dear Customer
Page 1
Congratulations on your purchase of an FM800 coffee machine. We appreciate your confidence in us.
The FM800 is a powerful and space-saving coffee machine
perfectly adaptable to your needs. With the FM800, you
can quickly prepare high-quality, customized coffee specialties. Your customers will be impressed.
We hope you enjoy your coffee machine and that it will
bring you many happy customers.
Sincerely, Franke Kaffeemaschinen AG
Dear Customer
Page 4

Table of contents
Page 2
PreParing drinks
. . . . . . . . . . . . . . . . . . . . . . . . . . . . . . . . . . . . . 24
PreParing drinks with Quick select
. . . . . . . . . . . . . . . . . . . . . 24
PreParing drinks with cash register
. . . . . . . . . . . . . . . . . . . . 25
PreParing drinks with insPire Me
. . . . . . . . . . . . . . . . . . . . . . . 26
drink PreParation with ground coffee
. . . . . . . . . . . . . . . . . . . 27
steaM disPenser (autosteaM)
. . . . . . . . . . . . . . . . . . . . . . . . . 28
care of the fM800
. . . . . . . . . . . . . . . . . . . . . . . . . . . . . . . . . . . 29
introduction to autoMatic cleaning
. . . . . . . . . . . . . . . . . . . . . 29
rinsing the fM800 Manually
. . . . . . . . . . . . . . . . . . . . . . . . . 31
cleaning the control Panel
. . . . . . . . . . . . . . . . . . . . . . . . . . . 31
Maintenance Plan
. . . . . . . . . . . . . . . . . . . . . . . . . . . . . . . . . . 32
rePlacing the frother
. . . . . . . . . . . . . . . . . . . . . . . . . . . . . . . 32
rePlacing the refrigeration unit intake hose
. . . . . . . . . . . . . . . 32
configuring
. . . . . . . . . . . . . . . . . . . . . . . . . . . . . . . . . . . . . . . . 33
introduction to PrograMMing
. . . . . . . . . . . . . . . . . . . . . . . . . 33
My settings
. . . . . . . . . . . . . . . . . . . . . . . . . . . . . . . . . . . . . . 34
decoMMissioning and disPosal
. . . . . . . . . . . . . . . . . . . . . . . . . . . 38
decoMMissioning
. . . . . . . . . . . . . . . . . . . . . . . . . . . . . . . . . . 38
disPosal
. . . . . . . . . . . . . . . . . . . . . . . . . . . . . . . . . . . . . . . . 39
troubleshooting
. . . . . . . . . . . . . . . . . . . . . . . . . . . . . . . . . . . . . 40
overview of Machine errors
. . . . . . . . . . . . . . . . . . . . . . . . . . 40
helP with Machine errors
. . . . . . . . . . . . . . . . . . . . . . . . . . . . 41
helP with ProbleMs concerning Product Quality
. . . . . . . . . . . . 42
index
. . . . . . . . . . . . . . . . . . . . . . . . . . . . . . . . . . . . . . . . . . . . . 43
table of contents
. . . . . . . . . . . . . . . . . . . . . . . . . . . . . . . . . . . . . 2
exPlanation of syMbols
. . . . . . . . . . . . . . . . . . . . . . . . . . . . . . . . . 3
syMbols used in the oPerating instructions
. . . . . . . . . . . . . . . . 3
syMbols used in the software
. . . . . . . . . . . . . . . . . . . . . . . . . . 4
dePiction of error Messages
. . . . . . . . . . . . . . . . . . . . . . . . . . . 4
color code for error Messages
. . . . . . . . . . . . . . . . . . . . . . . . 4
for your safety
. . . . . . . . . . . . . . . . . . . . . . . . . . . . . . . . . . . . . . 5
ProPer use
. . . . . . . . . . . . . . . . . . . . . . . . . . . . . . . . . . . . . . . 5
general safety concerns when using the fM800
. . . . . . . . . . . . 6
scoPe of delivery and identification
. . . . . . . . . . . . . . . . . . . . . . . . 8
scoPe of delivery
. . . . . . . . . . . . . . . . . . . . . . . . . . . . . . . . . . . 8
identification
. . . . . . . . . . . . . . . . . . . . . . . . . . . . . . . . . . . . . . 9
descriPtion of the Machine
. . . . . . . . . . . . . . . . . . . . . . . . . . . . . 10
fM800 coffee Machine
. . . . . . . . . . . . . . . . . . . . . . . . . . . . . . 10
add-on units
. . . . . . . . . . . . . . . . . . . . . . . . . . . . . . . . . . . . . 11
the control Panel
. . . . . . . . . . . . . . . . . . . . . . . . . . . . . . . . . 12
overview of oPerating Modes
. . . . . . . . . . . . . . . . . . . . . . . . . . 13
overview of oPerating levels
. . . . . . . . . . . . . . . . . . . . . . . . . . 14
installation and technical data
. . . . . . . . . . . . . . . . . . . . . . . . . . 15
installation
. . . . . . . . . . . . . . . . . . . . . . . . . . . . . . . . . . . . . . 15
coMMissioning
. . . . . . . . . . . . . . . . . . . . . . . . . . . . . . . . . . . . . . 18
initial coMMissioning of the fM800
. . . . . . . . . . . . . . . . . . . . . 18
daily coMMissioning of the fM800
. . . . . . . . . . . . . . . . . . . . . 18
filling and eMPtying
. . . . . . . . . . . . . . . . . . . . . . . . . . . . . . . . . . 19
beans and Powder
. . . . . . . . . . . . . . . . . . . . . . . . . . . . . . . . . . 19
Milk
. . . . . . . . . . . . . . . . . . . . . . . . . . . . . . . . . . . . . . . . . . . 21
syruPs (oPtional)
. . . . . . . . . . . . . . . . . . . . . . . . . . . . . . . . . . 23
Table of contents
Page 5
!
!
!
01
4
i
4
01
Explanation of symbols
Page 3
Steps on a colored background
are optional. They must be
performed depending on the
model of your machine.
Explanation of symbols
So that you can get the most out of your FM800we would like to familiarize you with the symbols used in the Operating
Instructions and software. For us, thorough information and open communication go without saying. ,
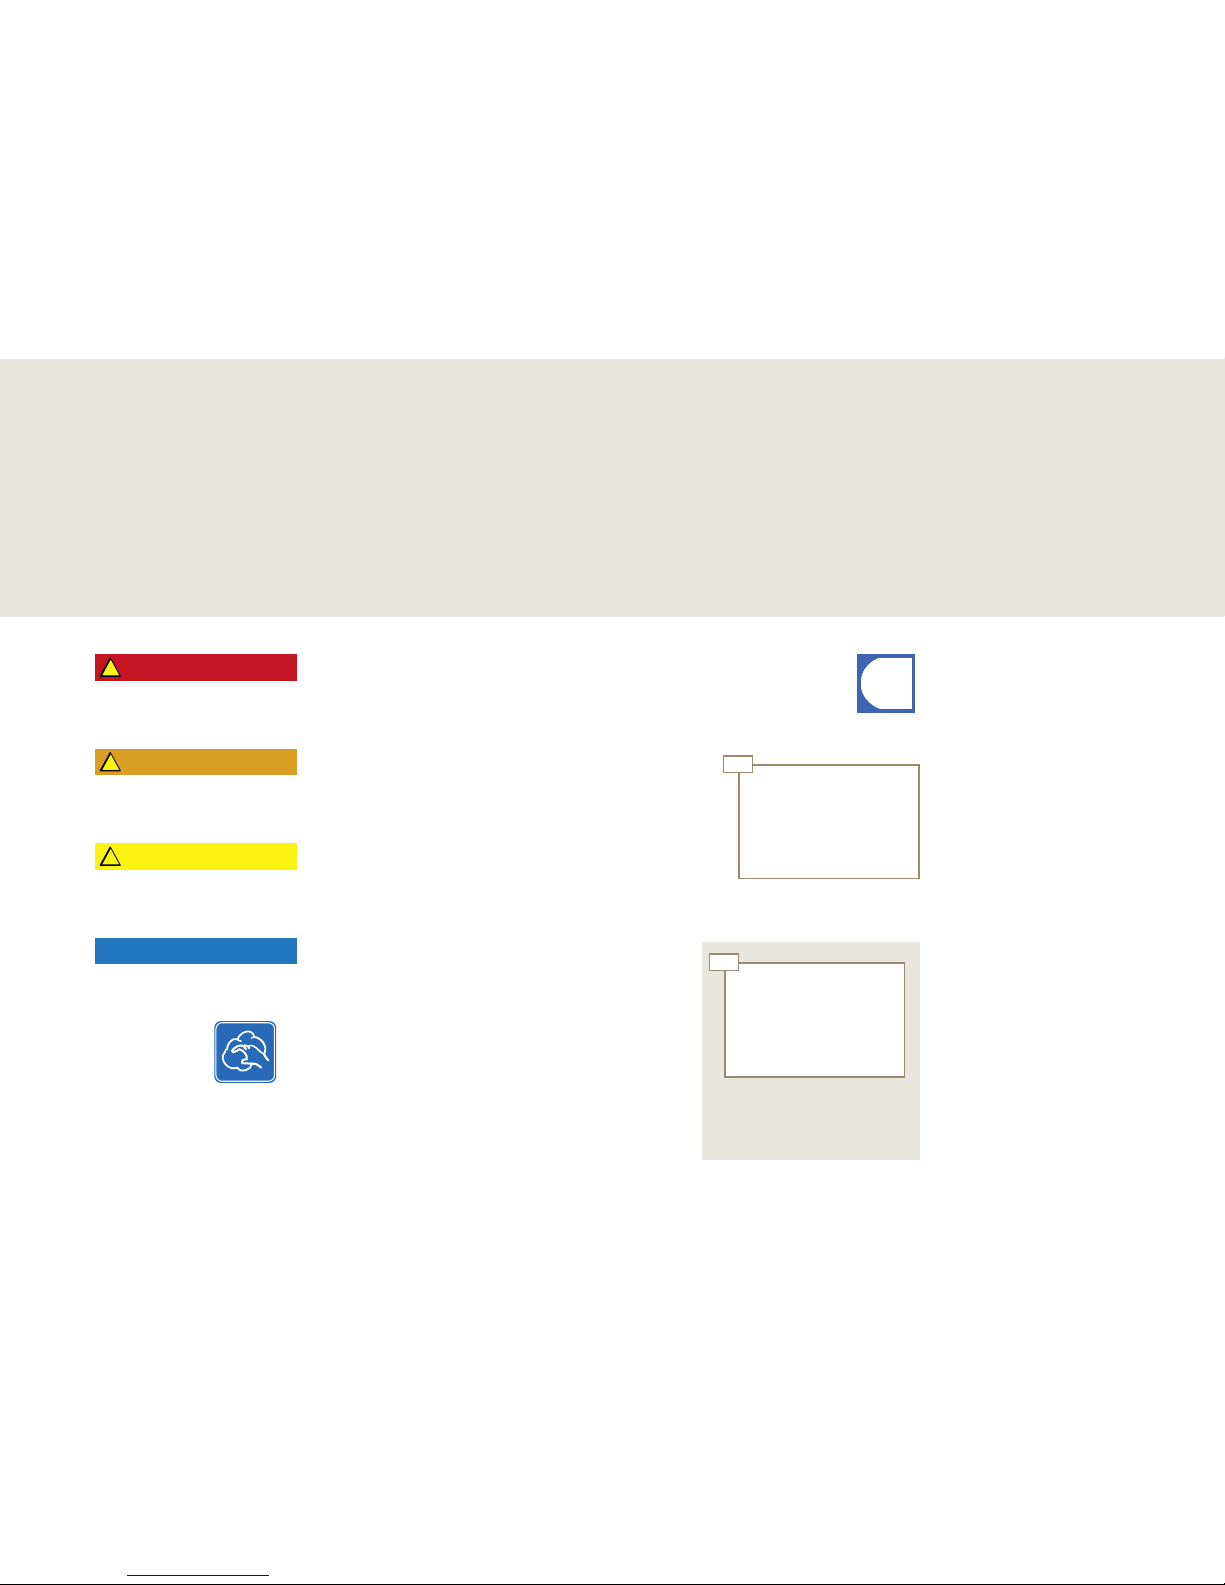
Symbols used in the Operating Instructions
This symbol indicates tips, shortcuts
and additional information.
"Cleaning" the add-on unit or
individual components.
Describes in text and pictures a
step that you must perform.
DANGER
NOTE
WARNING
CAUTION
NOTICE INDICATES POSSIBILITY OF
DAMAGE TO THE MACHINE.
DANGER INDICATES POTENTIALLY
LIFE-THREATENING DANGER OR
GRAVE INJURY.
CAUTION INDICATES RISK OF MINOR
INJURY.
WARNING INDICATES RISK OF
INJURY.
Page 6
Schliessen
Tür off en
Personal informieren.
Explanation of symbols
Page 4
If the entire system is aff ected by an
error, then the error message will appear
automatically.
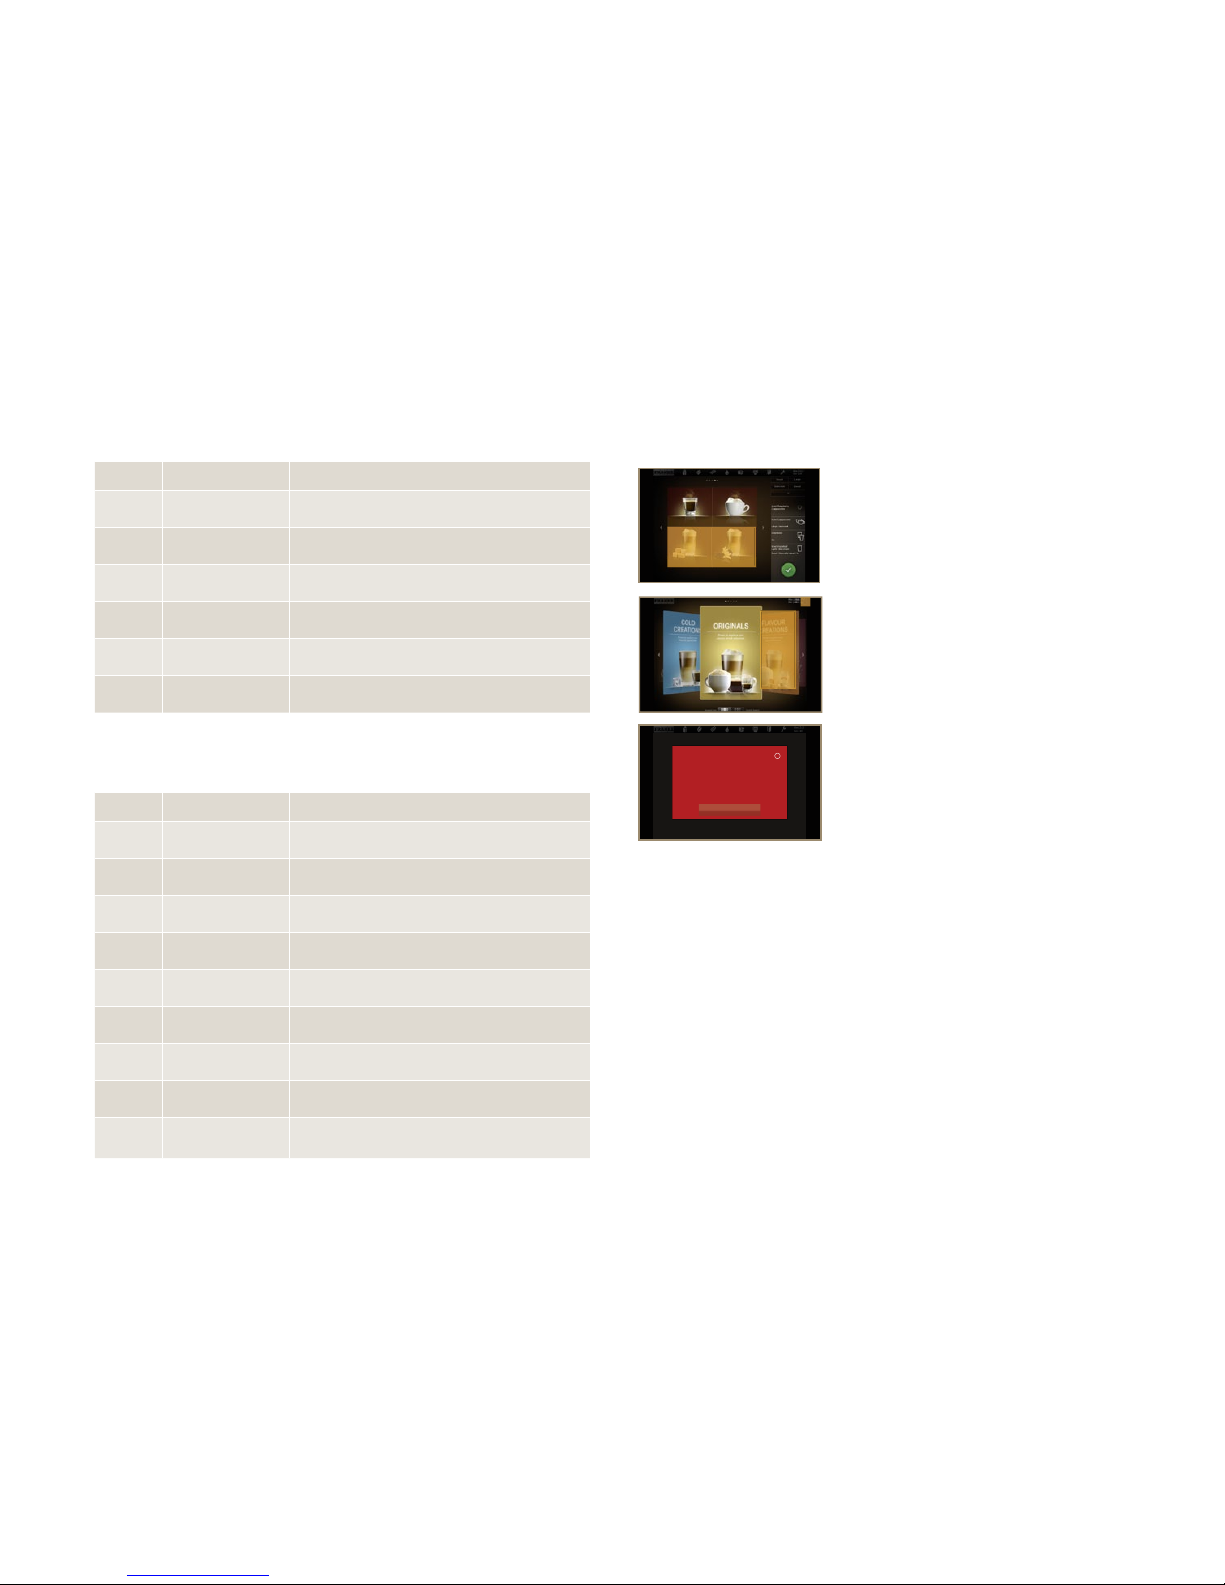
Depiction of error messages
System functions with
limitations.
System still fully functional.
System is not functioning.
Temporary interruption.
Color code for error messages
If a symbol lights up on the dashboard, then
additional information and instructions are
displayed when the symbol is tapped.
Help in the event of an error is available in
the Troubleshooting chapter.
Marked products cannot be prepared.
The error message can be accessed via
the banderole in the corner.
Marked products cannot be prepared.
The error message can be accessed via
the glowing symbol on the dashboard.
Symbols on the dashboard (non-self-service mode)
Symbol Designation Description
Franke Switch between maintenance level and product level
Milk The milk container is empty or not installed correctly.
Coff ee bean The coff ee bean hopper is empty or not installed correctly.
Chocolate The powder container is empty or not installed correctly.
Drop Flavour Station is empty or must be cleaned.
Grounds container Grounds container must be emptied.
Cleaning and Maintenance
Maintenance must be performed on the machine.
Grounds door Grounds door is open.
Screw wrench Service technician must be contacted.
Navigating
Symbol Designation Description
Cancel button Cancel preparation
Start button Start preparation
Back Up one level
Selection frame Selected option
Next page/Previous
page
Scroll through menus with multiple pages
Back Up one level on maintenance level
Symbols used in the software
Page 7
i
For your Safety
Page 5
Do you have any questions
or problems that are not
addressed in these instructions? Please do not hesitate to
contact Customer Service or
your service technician.
FM800
The FM800 is a coffee machine for use in food service, offices and
similar environments. It is designed to process whole coffee beans,
powder and fresh milk.
Your coffee machine is designed exclusively for preparing coffee
drinks,
powder drinks and hot water in accordance with these
instructions and the technical specifications.
For your Safety
The Flavour Station is intended only for the automatic pumping of
syrups and other liquid aromas for the preparation of drinks.
The Flavour Station is not designed to pump viscous fluids such as
sauces (e.g. chocolate sauce).
Refrigeration unit
A refrigeration unit is part of your FM800. It is to be used only to
cool milk in conjunction with preparing coffee drinks with an FM800
coffee machine.
Only use pre-cooled milk (2 - 5 °C or 36 - 41°F). Only use the
FRANKE clean solution. Other cleaning agents may leave residue in
the milk system.
Cup warmer (optional)
The cup warmer is an optional add-on unit for your FM800 coffee
machine. It is intended only for warming coffee cups and glasses
used for preparing drinks.
The cup warmer is not designed to dry dish towels or other cloths. It
is not necessary to cover the cups to warm them.
Flavour Station (optional)
Both you and the coffee machine are important to us. Therefore, we would like to provide you with detailed safety information. For us, a high degree of safety goes without saying. Protect yourself against
residual risks arising from the functions of the machine.
Proper use
Page 8
!
For your Safety
Page 6
Important
•Do not operate the coffee machine or add-on units until you
have completely read and understood these instructions.
•Keep these instructions near your coffee machine.
•The FM800 is intended for use by trained personnel. Each
operator of the FM800 must have read and understood the
instructions. This does not apply for utilization in the selfservice sector. Machines in the self-service sector must be
continuously monitored to protect the users.
•Children under 8 years of age and physically or mentally
challenged persons must never be allowed to be alone at the
machine and must always be supervised. Children are not allowed to play with the machine. Children are not permitted to
perform cleaning on the machine. The machine is not appropriate for children under 8 years old.
•Have the machine serviced at the scheduled intervals. Regular
maintenance will ensure the safe operation and high performance of your FM800.
•If the machines are sold or transferred to a third party, give the
operating instructions to the next user.
•The configuration of your coffee machine may differ from that
shown in the instructions. Please refer to your purchase agreement. Additional accessories may be obtained directly from
your retailer or from FRANKE Kaffeemaschinen AG in Aarburg,
Switzerland.
Risk of death by electrocution!
•Never operate a machine that has been damaged or has a damaged power supply cable.
•If you suspect damage to the machine (for instance, a hot or
burning odor), immediately unplug the machine from the outlet
and contact your service technician.
If the power supply cable to this machine is damaged, it must be
replaced by a special power supply cable.
•Only a qualified service technician should replace the power
supply cable.
•Ensure that the machine and power supply cable are not near
any hot surfaces such as gas or electric stoves or ovens.
•Ensure that the power supply cable is not pinched and does
not rub against sharp edges. The machine contains electrically
conductive parts. Opening the machines can pose risk of death.
•Never open or attempt to repair the machine yourself.
•Do not make any modifications to the machine that are not
described in the operating instructions.
•Repairs should only be made by your service technician using
original replacement and accessory parts.
DANGER
General safety concerns when using the FM800
Page 9

! !
For your Safety
Page 7
Risk of injury!
Reaching into the machine may result in abrasions or crushing injuries from interior components.
•Only open the machine when daily work requires it (e.g. to clean
the powder system, to empty the grounds container or to fill/
empty the water tank).
•Exercise care and caution when working in an open machine.
•Only service personnel should open the machine for any other
reason.
Risk of injury, eye injury and damage to the machine!
Objects in the bean hopper, powder container or grinder may splinter
and be ejected, leading to damage to the machine or injury.
•Never put anything into the bean hopper, powder container or
grinder!
•Never poke any object around in the bean hopper, powder
container or grinder.
Danger of burns!
The coffee and milk dispensers and the hot water dispenser are hot.
•Do not touch the outlets or nozzles.
The surfaces of the cup warmer are hot.
•Do not touch these surfaces.
Danger of scalding!
During cleaning, hot water and steam are released repeatedly.
•Keep hands away from the vicinity of the outlets.
When drinks are dispensed, the products themselves pose a risk of
scalding.
•Always be careful with hot drinks!
WARNING
Damage from water jets!
The coffee machine is not protected against water jets.
•Do not use water jets or high-pressure cleaners to clean the machine.
Damage to the machine!
•Set the machine up out of the reach of children.
•Do not expose the machine to the elements, such as rain, frost or direct sunlight.
The power supply cable can pose a risk of tripping or be damaged.
•Never let the power supply cable hang loose.
Blockage in the powder system caused by incorrect raw materials!
•Take care to ensure that powder and beans are added to the correct containers. Observe machine
equipment.
Risk of spoiled food residue!
If the machine is not cleaned regularly, milk and coffee residue may accumulate in the machine, clog the
outlets or find its way into drinks.
•Clean the coffee machine and add-on units at least once a day.
•Read the chapter "Care of the FM800".
Risk of contamination!
When the machine is not in use for extended periods, residue may accumulate.
•Rinse the coffee machine and add-on units before initial use and when not in use for extended
periods (more than 2 days).
CAUTION
NOTE
Page 10
Scope of delivery and identification
Page 8
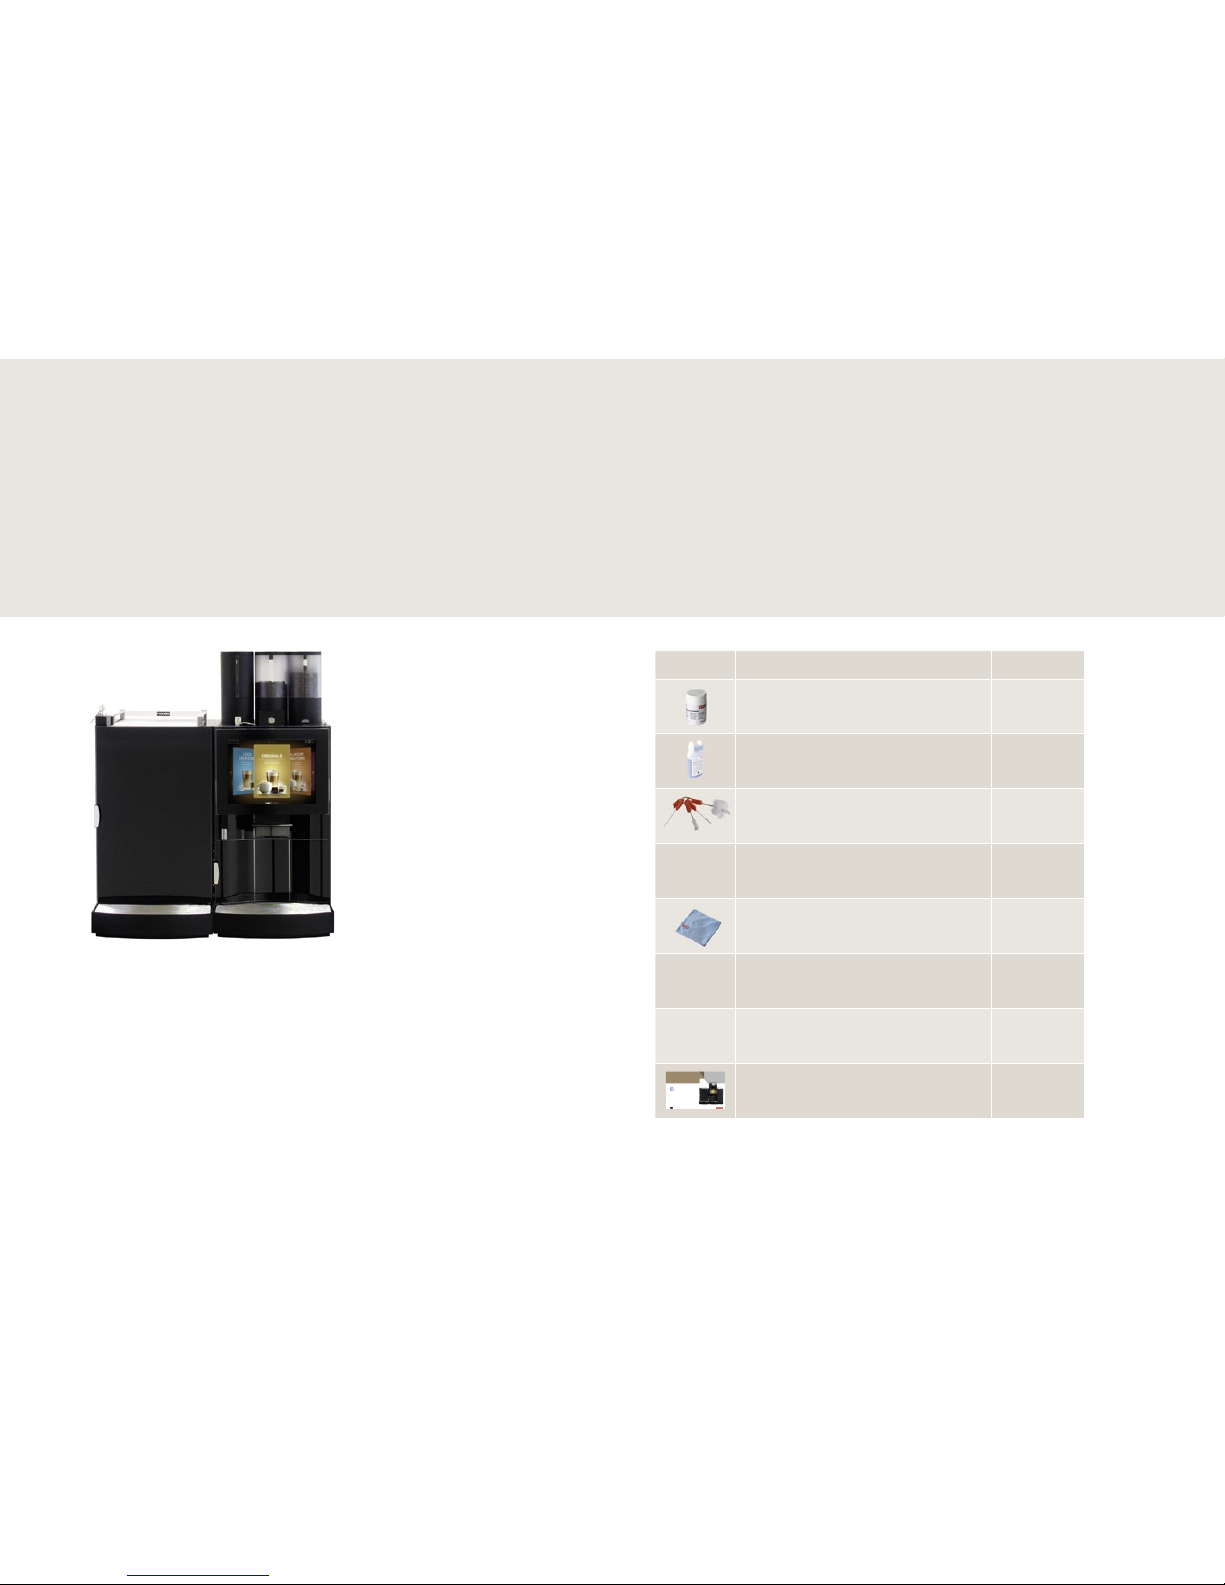
The confi guration of your coff ee machine may diff er from that shown
in the instructions. Please refer to your purchase agreement.
Additional accessories may be obtained directly from your retailer or
from FRANKE Kaff eemaschinen AG in Aarburg, Switzerland.
Item Designation Item no.
Cleaning tablets (25 pcs.)
BK 328 399
Milk cleaner
1L 301 219
Cleaning brushes
1L 301 376
Cleaning brush
1L 301 160
Microfi ber cloth
1H 325 974
Key
(for the locking mechanism of the door)
—
Cleaning container
Lesen Sie die Betriebsanleitung und das Kapitel Sicherheitshinweise,
bevor Sie an der Maschine arbeiten. Bewahren Sie die
Betriebsanleitung bei der Maschine auf.
FM800
Originalbetriebsanleitung
Operating instructions
1H 328 703
FM800 Basic model.
Scope of delivery
Scope of delivery and identification
The FM800 is a powerful coff ee machine. Its modern operating concept will help you keep your cool in any situation.
Listed below are ways to identify your machine and what is included in the standard scope of delivery.
Page 11
Franke Kaff eemaschinen AG
Franke-Strasse 9
CH – 4663 Aarburg
Switzerland
Boiler: Coff ee Water/Steam
Water capacity: 0.9l 0.9l
Operating pressure: 1.0MPa 0.2MPa
Name: FCS4026 (FM800)
(Commercial Coff ee Machine)
Serial-No.: 00054321
Install-No.: 466282
ID-No.: 39.000.001
Type: 2M 1P H FM FS
Voltage: 400V 3L N PE
Frequency: 50 / 60 Hz
Power: 7500 W
Fuse Protection: 16 A
Max. Inlet pressure: 0.8MPa
1
2
3
Franke Kaffeemaschinen AG
Franke-Strasse 9
CH-4663 Aarburg
Switzerland
Name:
Serial-No.
Install-No.:
ID-No.
Type:
Class:
Voltage:
Frequency:
Power:
Input current
Refrigerant
Charge
Refrierator KE320
(to Commercial Coffee Machine)
00056321
468689
40.000.001
KE320 1C1M FM
N
220 - 240 V
50/60 Hz
25 W
1.0 A
R134a
50 g
3
4
5
1
6
9
2
Scope of delivery and identification
Page 9
9
8
6
5
4
3
2
1
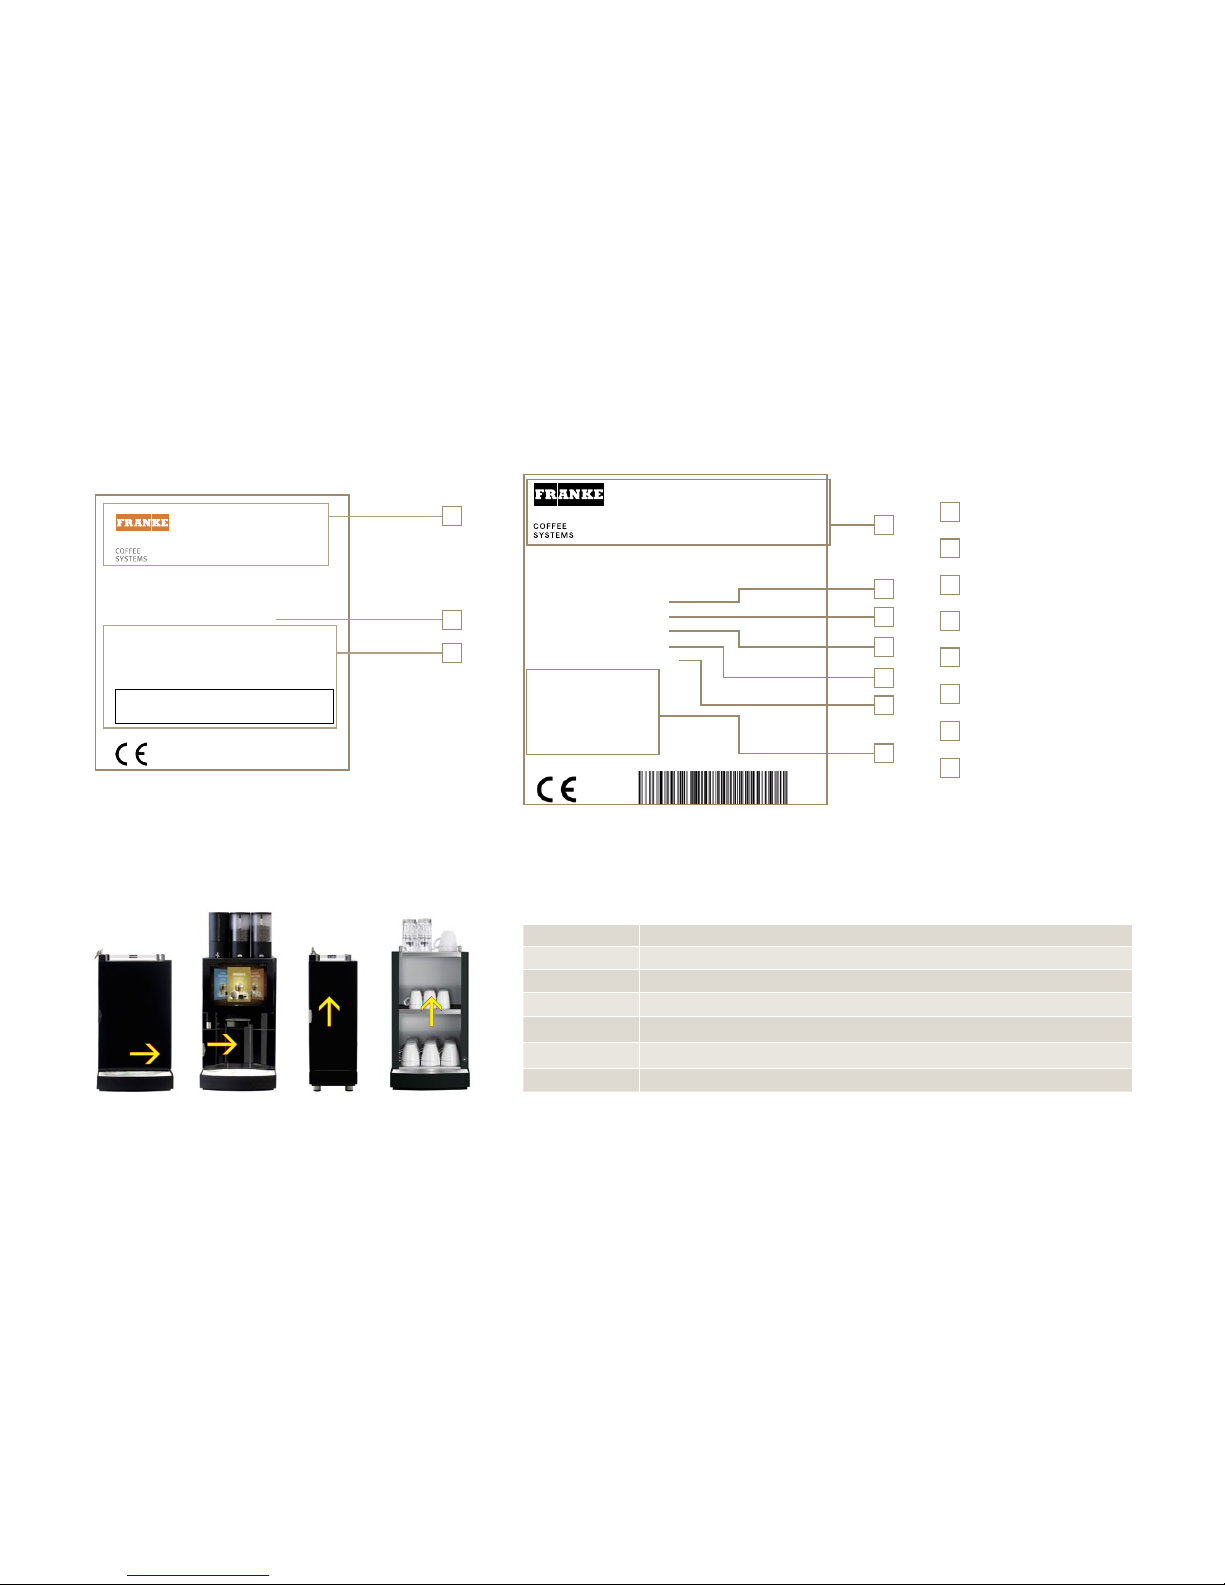
Technical data
Model
(for model codes, see below)
Machine number
Item number
Climate zone
Apparatus number
Identification code
Manufacturer
Model code Component
FM800 Machine name
2M Number of grinders
(max. 3)
2P Number of powder containers
H Hot water
FM Warm and cold milk foam, warm and cold milk
TW Cup warmer
(optional)
Model codesPosition of type plate
Type plate KE (as an example for add-on units)Type plate (example)
Identification
Page 12
Description of machine
Page 10
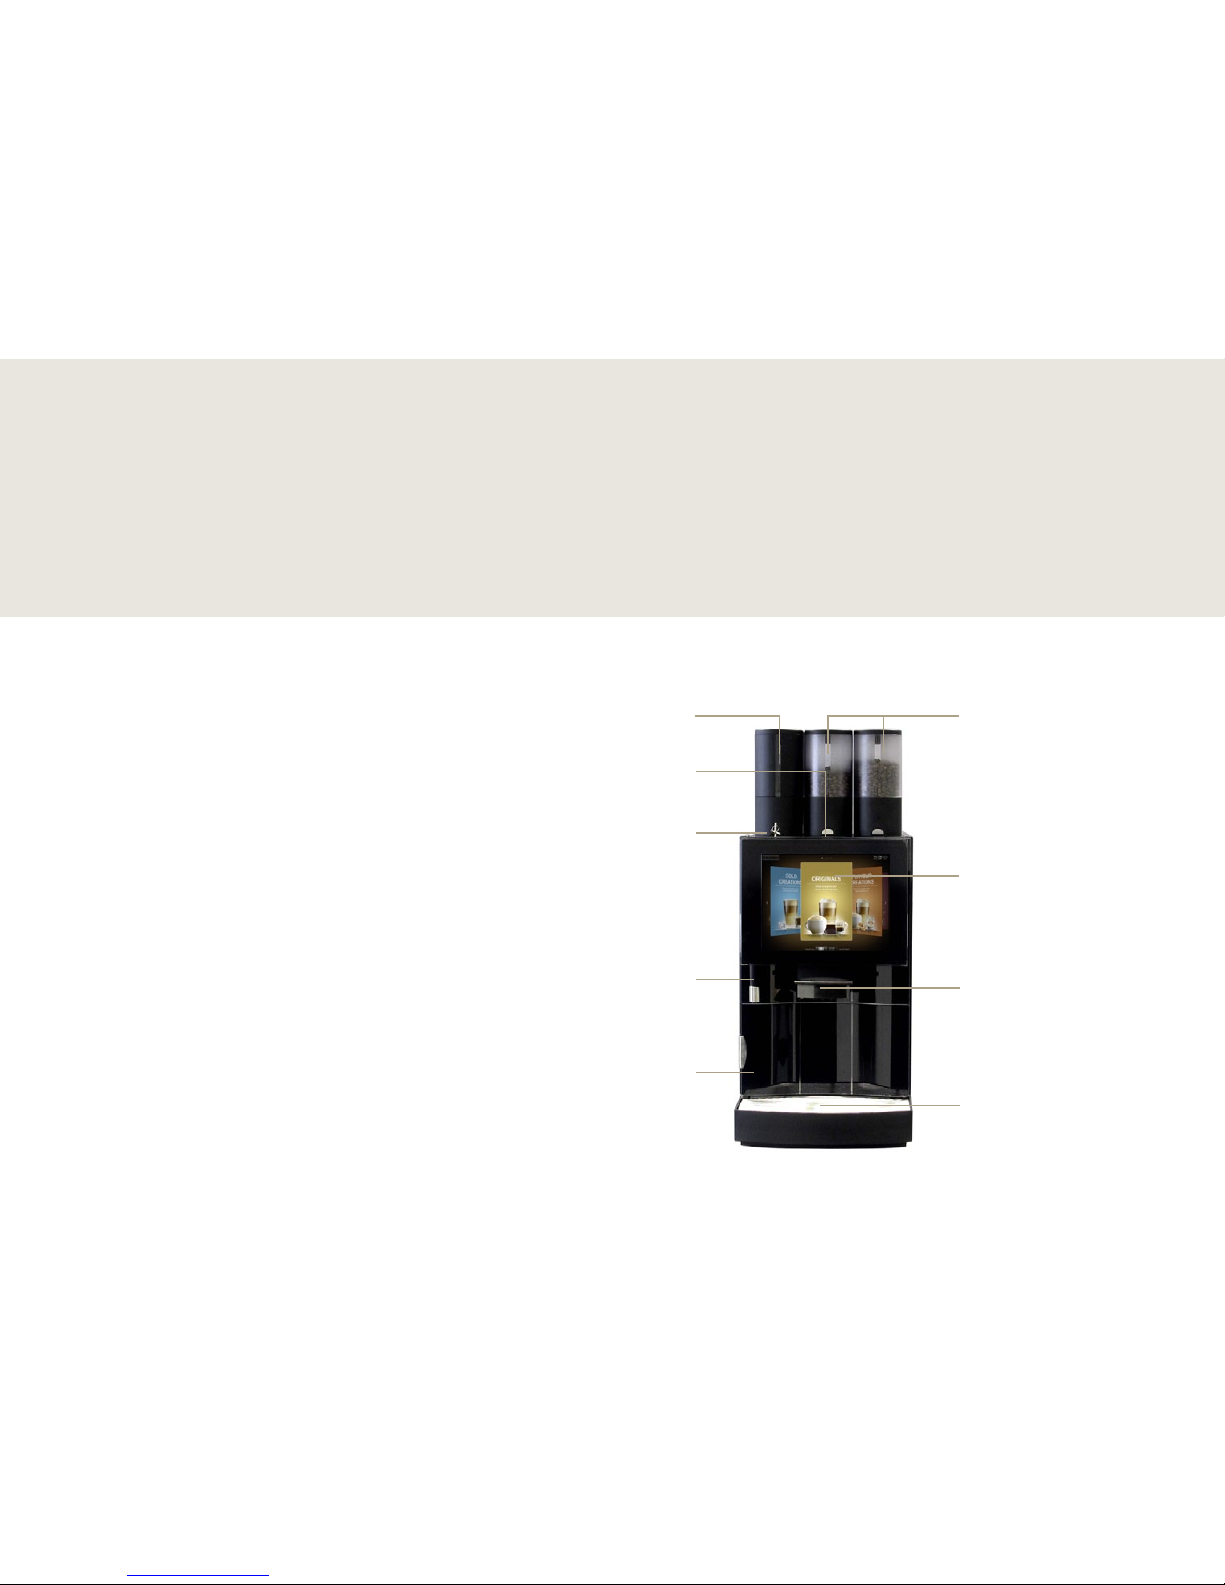
Operator panel
Drip tray with drip grid
Dispenser with automatic
height adjustment
Bean hopper
(up to 3 pieces)
Powder container
(Option)
Lock for front door
Hot water dispenser
Grounds door
Powder lid
Introduction
The coff ee machine has numerous options. To give you an overview
of your machine, below is illustrated a sample confi guration.
Please note that your coff ee machine may look diff erent from the
confi guration shown here.
FM800 coff ee machine
You have chosen enjoyment of every single coff ee with the FM800. In this section you will learn more about
the functions and options of your coff ee machine and where the controls are located.
Description of machine
Page 13
Description of machine
Page 11
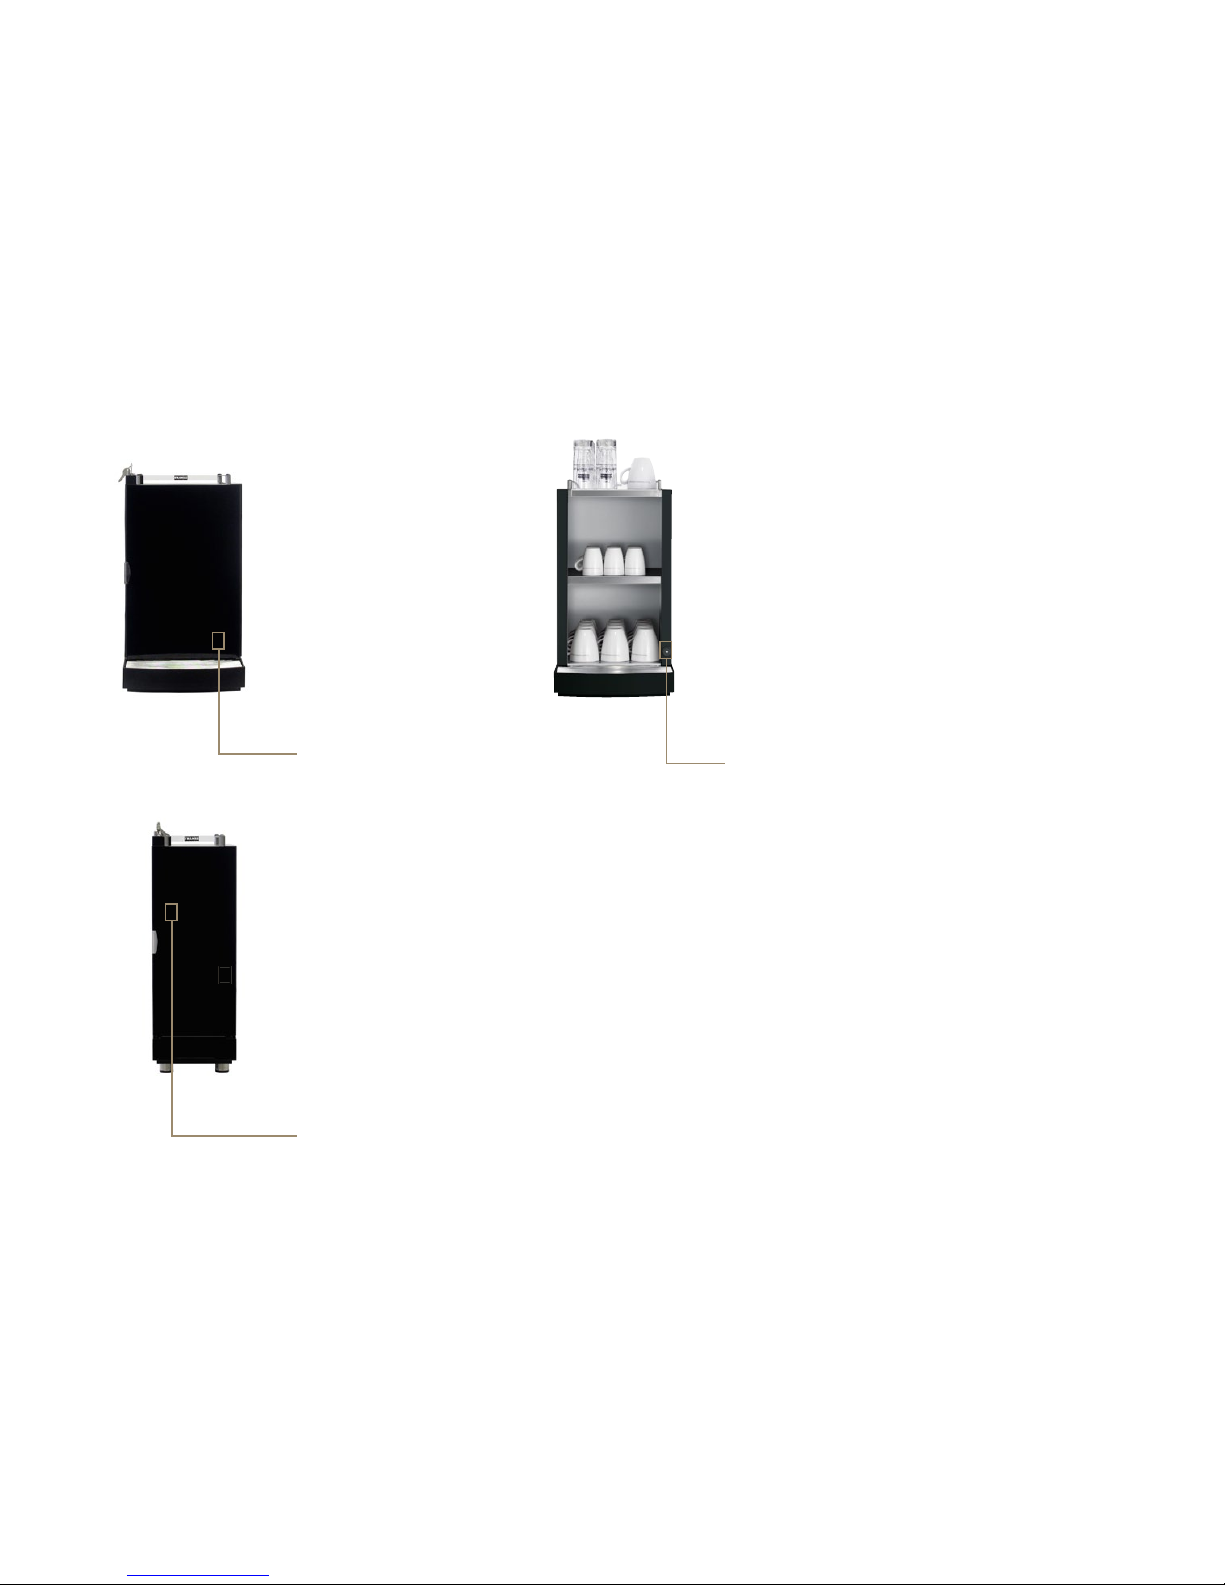
On/Off switch
On/Off switch
(behind the door)
Cup warmer (optional)
To enjoy coff ee at its best, you
need pre-heated cups. The cup
warmer fi ts perfectly on your
FM800.
Refrigeration unit
In many regions, milk is part of
a good cup of coff ee. You can
connect the refrigeration unit
directly to the FM800 to make
sure the milk doesn't spoil.
Flavour Station (optional)
Our Flavour Station is available
to you as an option for unusual
creations. You can use the
Flavour Station to extend your
off erings with up to three diff erent fl avors.
On/Off switch
(on the inside of
the rear panel)
Add-on units
Page 14
4
01 02
i
4
Description of machine
Page 12
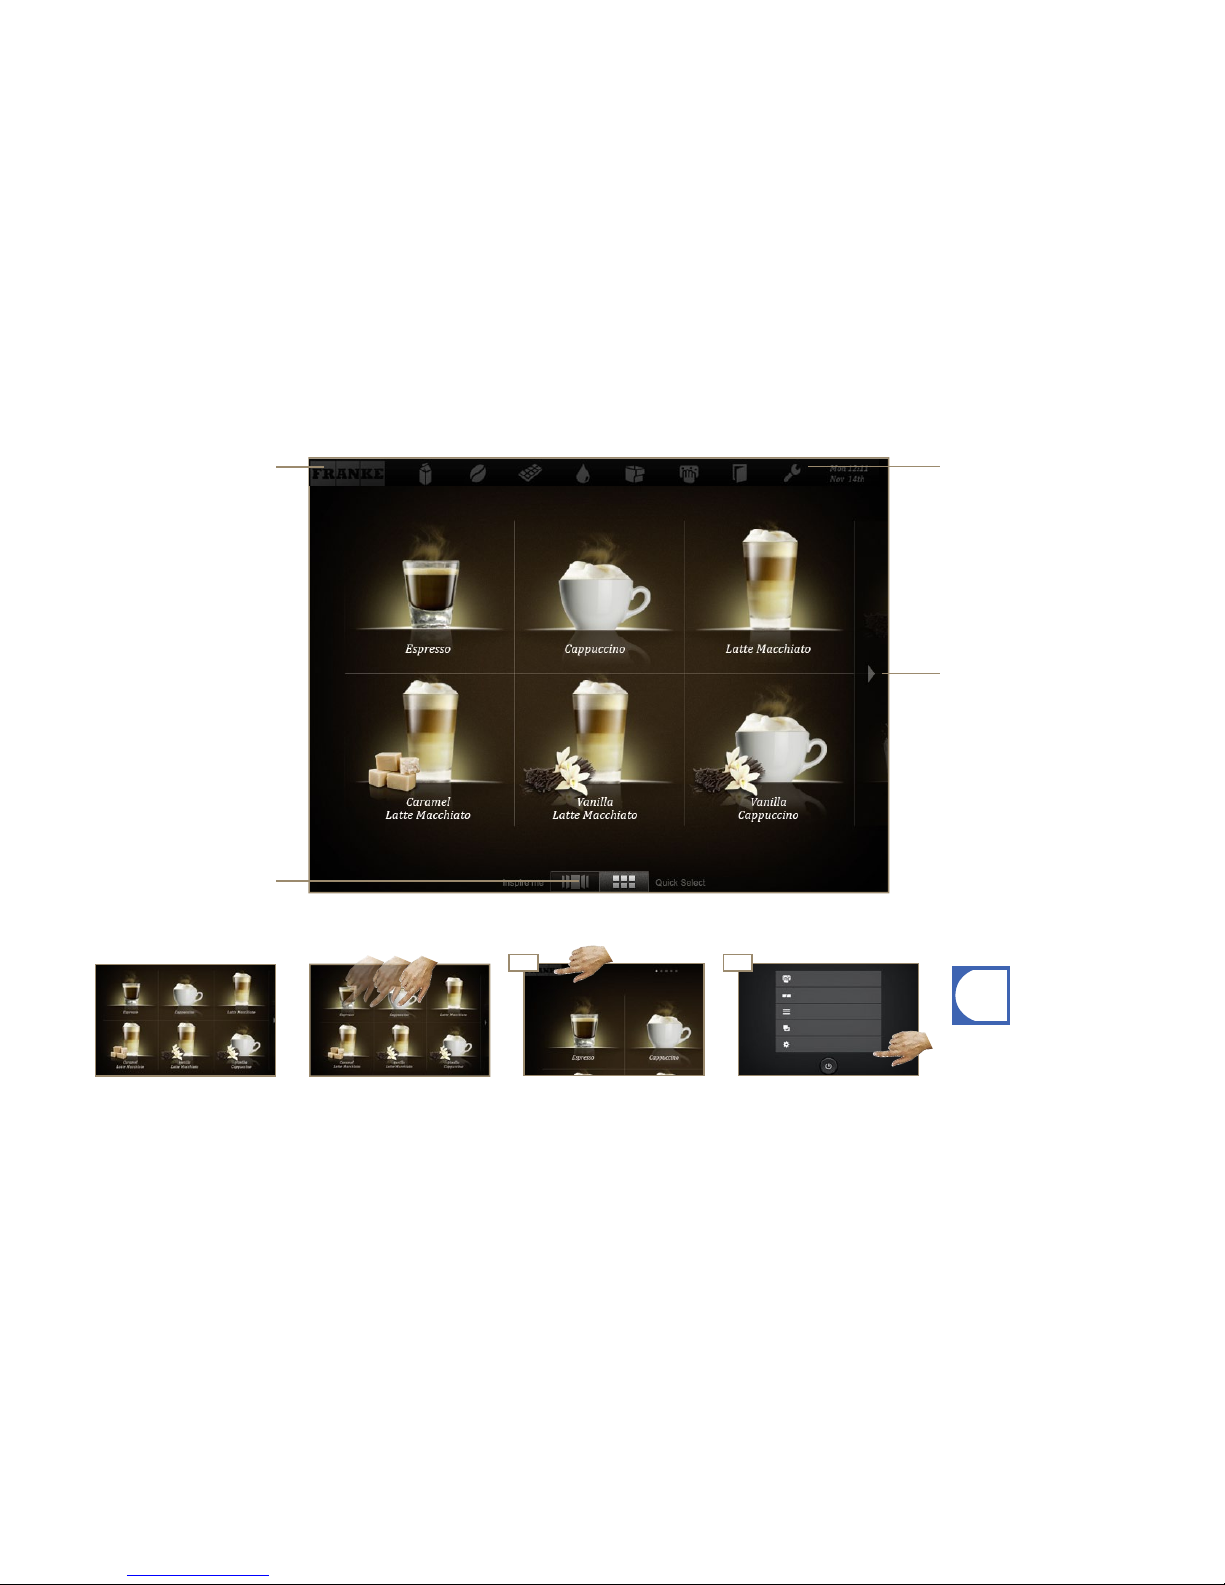
Switch between the operating
modes Inspire Me and Quick
Select.
Stroke a fi nger across the control panel for scrolling.
The control panel
Scroll forwards or backwards,
respectively. As an alternative,
you can also use your fi nger to
stroke to the right or to the left.
Symbols
(in Cash Register mode and
Quick Select mode) indicate absent
raw materials or errors.
FRANKE switches back and
forth between maintenance
level and product level.
Tap on the control panel to exit
the Energy saver mode.
Select and confi rm q button.Switch to the maintenance
level.
Switch to Energy saver mode
To select an option, tap on the
respective fi eld.
Menu items on the control panel, with Quick Select as an example
Navigating
Page 15
Description of machine
Page 13
Self-serviceNon-self-service and/or self-service
Non-self-service
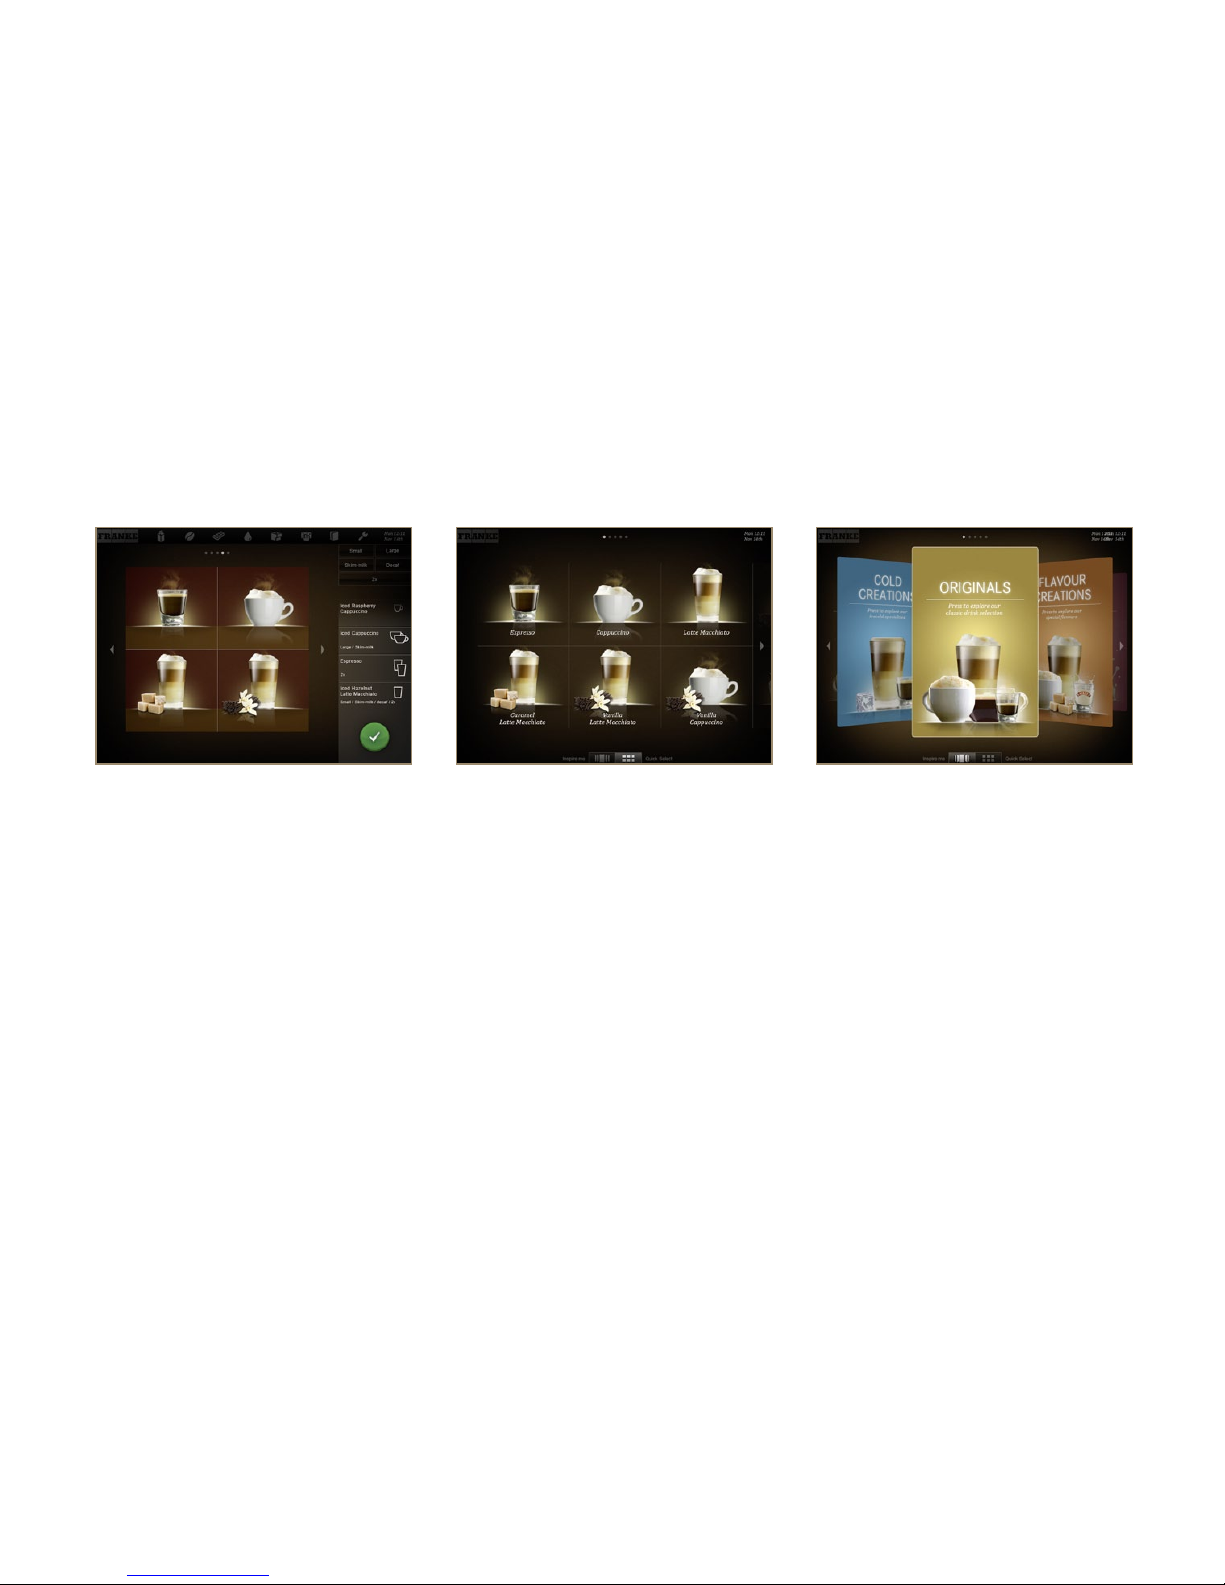
Structure of the control panel:
•Level 1: Menu cards with prefiltered selection
•Level 2: Product selection
•Level 3: Drink Selection status
Individual adjustments:
•Option for switching between the operating modes
Quick Select and Inspire Me.
The Inspire Me operating mode is particularly suitable
in the self-service sector.
It inspires your customers to find perfect products to
suit them.
Inspire Me
Structure of the control panel:
•Level 1: Product selection
•Level 2: Drink Selection status
Structure of the control panel:
•Level 1: Product selection. Column with the possible options, the production status and the waiting list
Individual adjustments:
•Display: 2x2 / 3x3 / 4x4 products per page
Individual adjustments:
•Display: 2x3 / 3x4 / 4x5 products per page
•Activate Credit Mode
The Quick Select operating mode is the standard version. It is suitable for both non-self-service utilization and
the self-service sector.
Once you have selected a product, the possible options
that can be added to that product will appear.
Quick Select
(optional with Credit Mode)
The Cash Register operating mode is particularly suitable for non-self-service utilization.
While your coffee machine is preparing one drink, add
additional orders to the queue.
Cash Register
Overview of operating modes
Page 16
i
Description of machine
Page 14
Credit: 6.00 CHF
Vanilla milk coffee
4.50 CHF
Vanilla Macchiato
5.50 CHF
Caramel Macchiato
5.50 CHF
Milk coffee
4.00 CHF
Macchiato
5.00 CHF
Ristretto
3.00 CHF
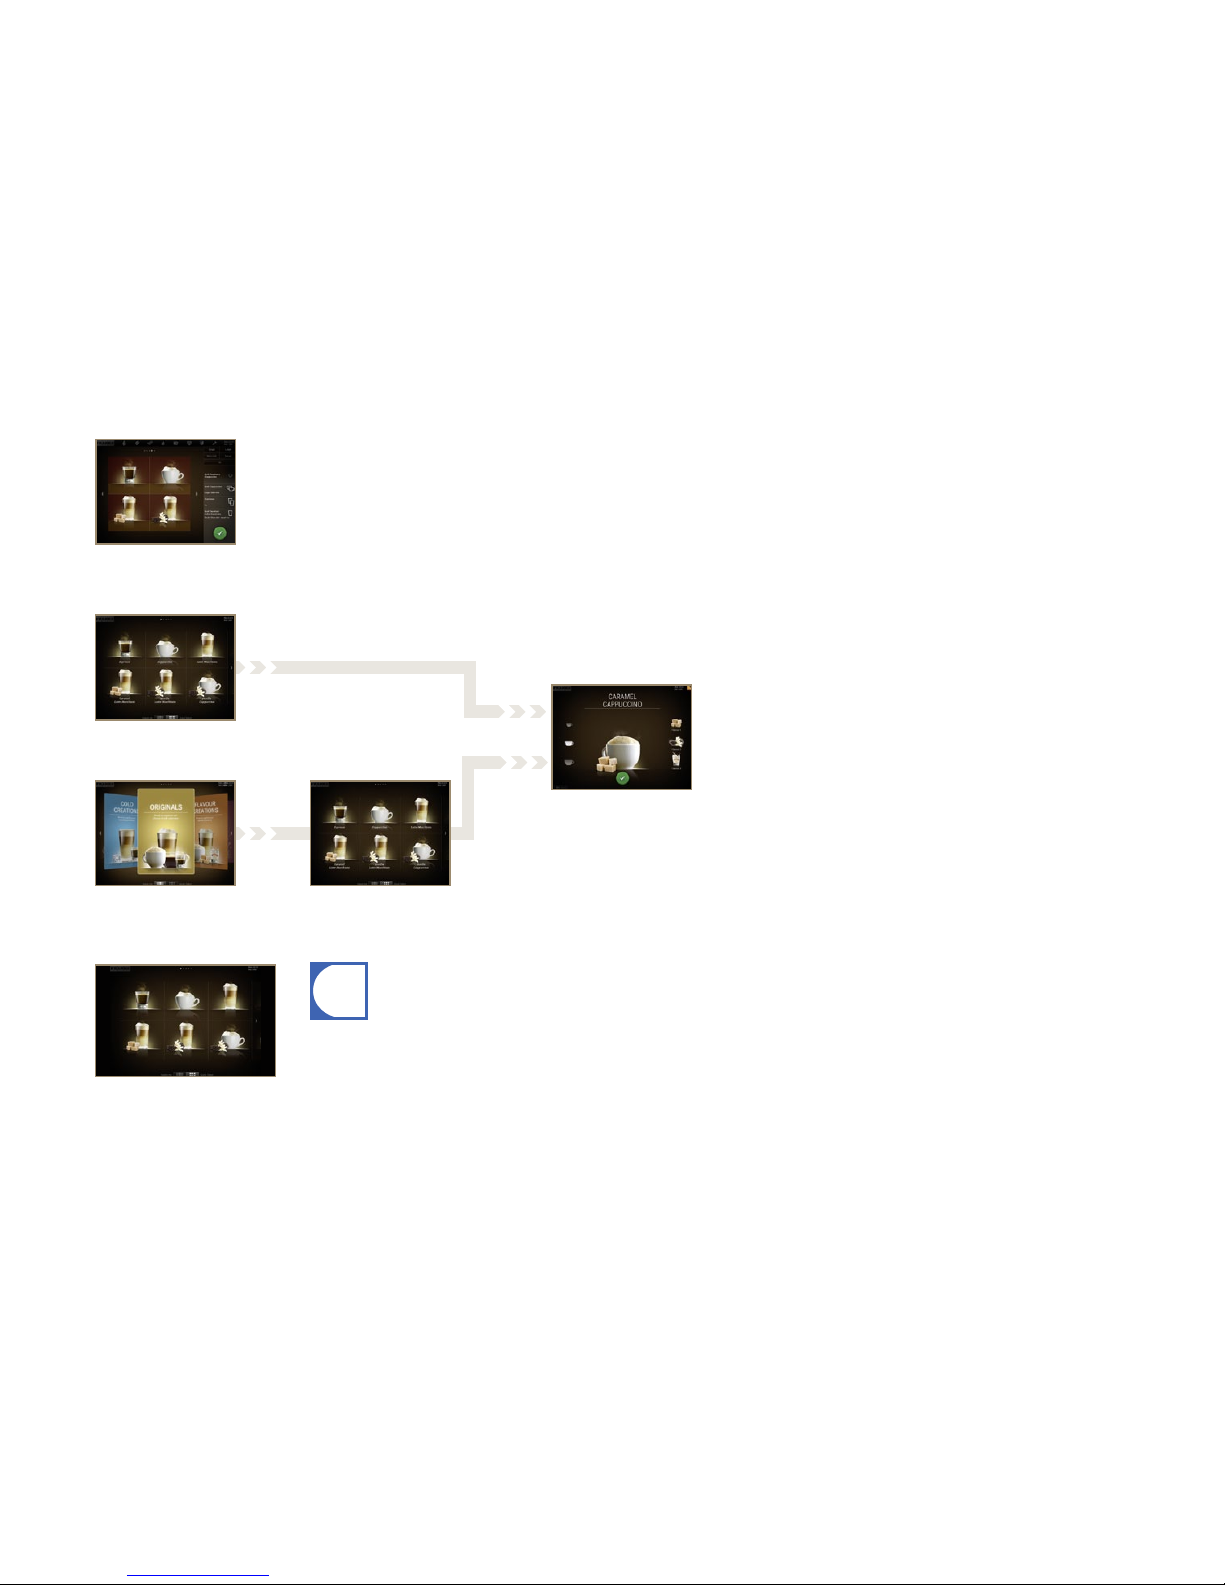
The suitable operating mode is
dependent on your utilization of
the coffee machine, your product
range and the preferences of your
customers.
Your service technician will
be happy to help you set the
operating mode suitable for you.
Product selection
Product selection
Product selection
Menu cards
Drink Selection status (if activated)
Inspire Me
Quick Select
Cash Register
Overview of operating levels
•No drink options can be added in the Drink Selection status when
using a setting with Credit Mode.
•Credit Mode is activated in the My settings menu under 1 Set
Machine, 1.5 Accounting. Select Activate accounting.
Function:
•Product preview
•Display product options
•Start preparation
Credit Mode in the Quick Select operating mode
Display:
•Product prices
•Credit
•Missing credit
Page 17

Installation and technical data
Page 15
Technical data of the FM800
Bean hopper 1.2 kg per grinder
Powder container 1 kg per container2 x 0.5 kg
(optional double powder dosing unit)
Grounds container 45 cakes (optional: coffee ground chute)
Boiler volume Coffee 0.9 liters at 2.5 kW
Hot water/steam 0.9 liters at 2.5 kW
Thermoblock 2 kW
Electrical connection 400 V3L N PE7.5 kW50/60 Hz Fuse: 16 A
220–240 V1L N PE4.5 kW-5.4 kW50/60 Hz Fuse: 30 A
(locked)
200–240 V3L PE3.6 kW-5.4 kW50/60 Hz Fuse: 30 A (locked)
Noise emission < 70 dB (A)
Weight approx. 55 kg per machine
Cold water connection
(optional) G 3/8 " external thread
Water pressure 80 - 800 kPa (0.8 - 8.0 bar)
Shut-off cock with check valve and filter
Water hardness max. 70 mg CaO/1 l water (7 dH, 13 °fH)
Ideal pH value 7
Funnel d = 50 mm (2") with siphon
Drain pipe dmin = 1"
Ambient conditions Humidity: max. 80%
Ambient temperature: 10 - 35 ° C
Preparations
•The power connection for the coffee machine must be protected
by a ground fault circuit interrupter (GFCI).
•Each terminal of the power supply must be able to be interrupted
by a switch.
•The water connection must have a shut-off with a check valve and
filter and must meet the requirements of the technical data. (Only
when being used with a water connection)
•If your coffee machine has an electrical connection other than
the one described in the table opposite, you will have received
additional information regarding the installation with your order
confirmation.
•The water connection to your coffee machine must be accomplished with the hose set that is supplied with it. Do not use any
other water hoses that happen to be present.
Installation
You must have completed these preparations before your service
technician can install the coffee machine at your location.
Your service technician will install your coffee machine and put it into
operation for the first time. The technician will walk you through the
basic functions.
Your FM800 must be properly installed so that you can operate it correctly – your service technician will do that for
you. You'll have to take care of a few things first. You'll find the prerequisites for problem-free enjoyment of your coffee
machine here.
Installation and technical data
Installation
Page 18
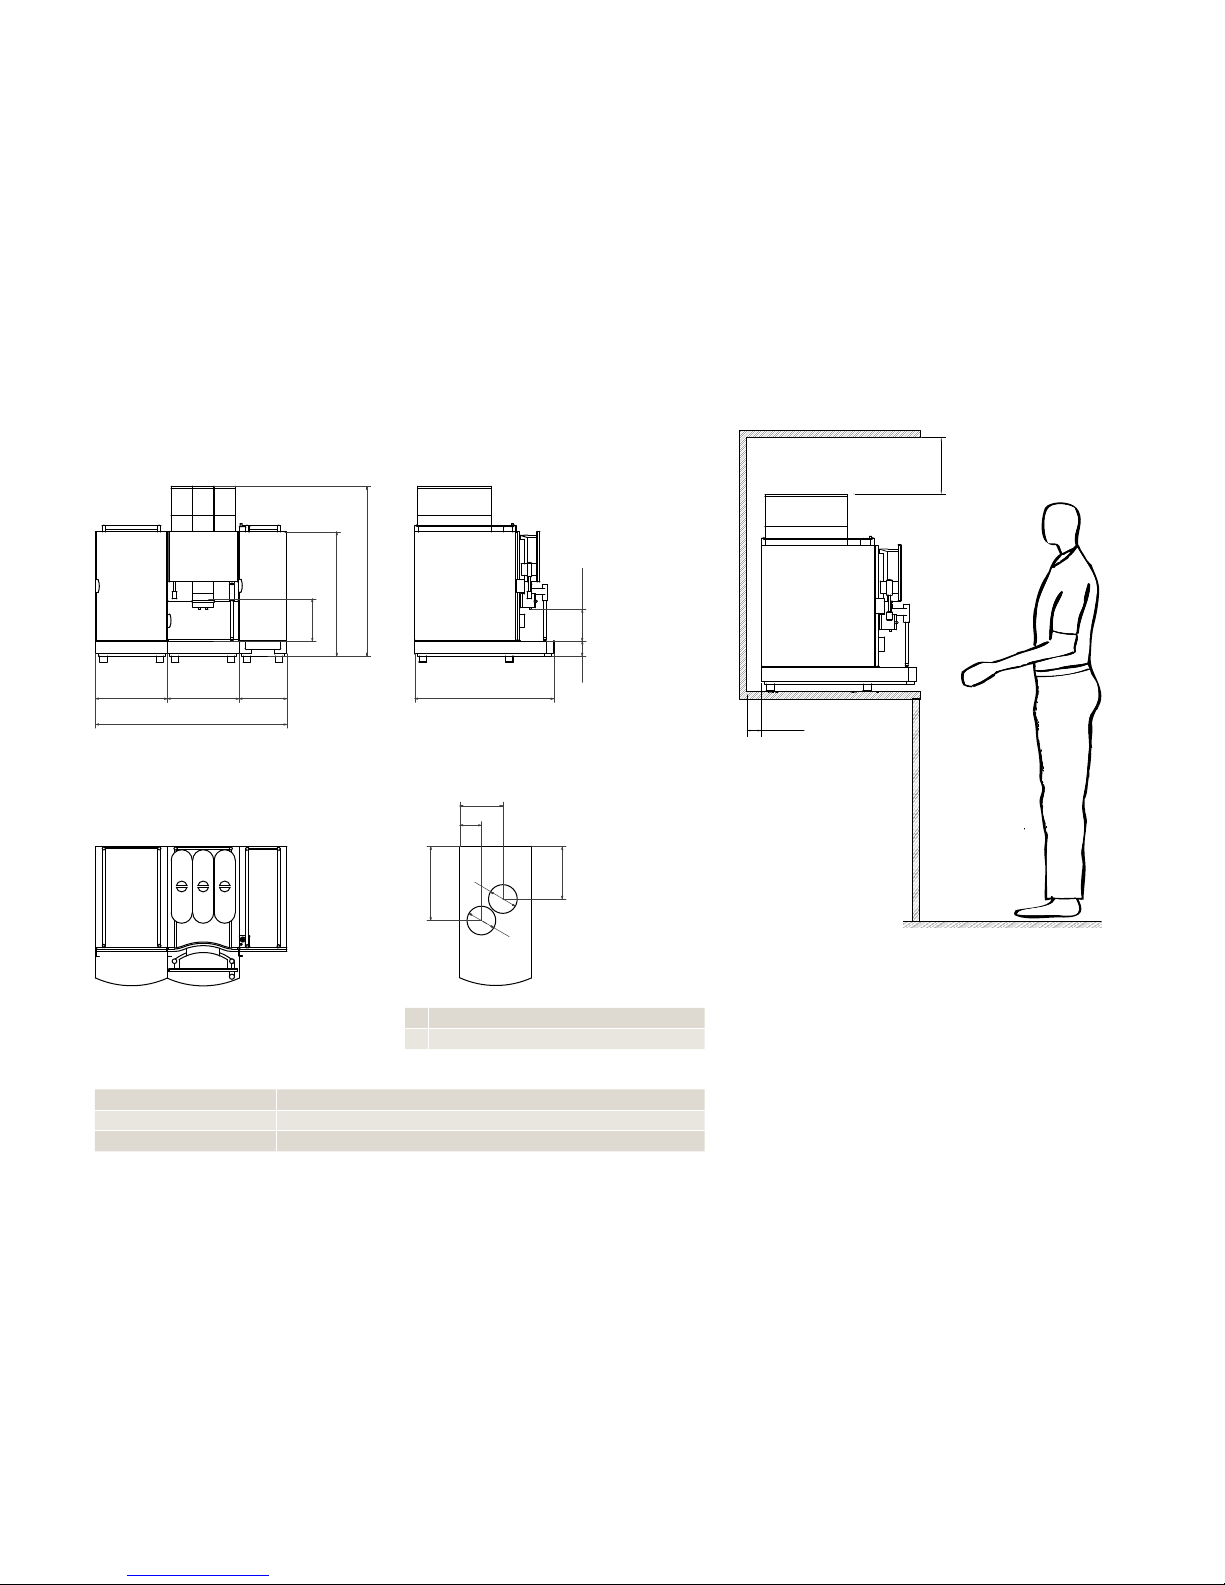
min 50
min 200
711
62.5
70 - 180
520
178
300
200
300
800
582
62.5
70 - 180
582
711
62.5
310
220
70 - 180
520
178
300
200
300
800
582
180
90
d2
d1
62.5
310
220
70 - 180
582
180
90
d2
d1
Installation and technical data
Page 16
40 mm foot 520 mm + 40 mm = 560 mm
70 mm foot 520 mm + 70 mm = 590 mm
100-mm (4") foot 520 mm + 100 mm = 620 mm
d1 Bore hole for cable and feed lines 120 mm
d2 Bore hole for grounds ejection 120 mm
Adjustable feet (optional)
Cross-section from above (Buffet feed-through)Top view
Side viewFront view
The dimensions are specified in millimeters.
Prepare a stable, ergonomic surface (min. load capacity: 150 kg
or 330.7 lb). The operator panel should be at eye level.
Distance to the wall must be at least 50 mm. Clearance above the
machine must be at least 200 mm.
Adjustable feet (optional) can be used to compensate for unevenness or height differences.
If optional add-on units are installed, up to an additional 300 mm
may be required per add-on unit.
Observe the connection requirements of the add-on units.
Installation dimensions of the FM800Dimensions of the FM800
Page 19
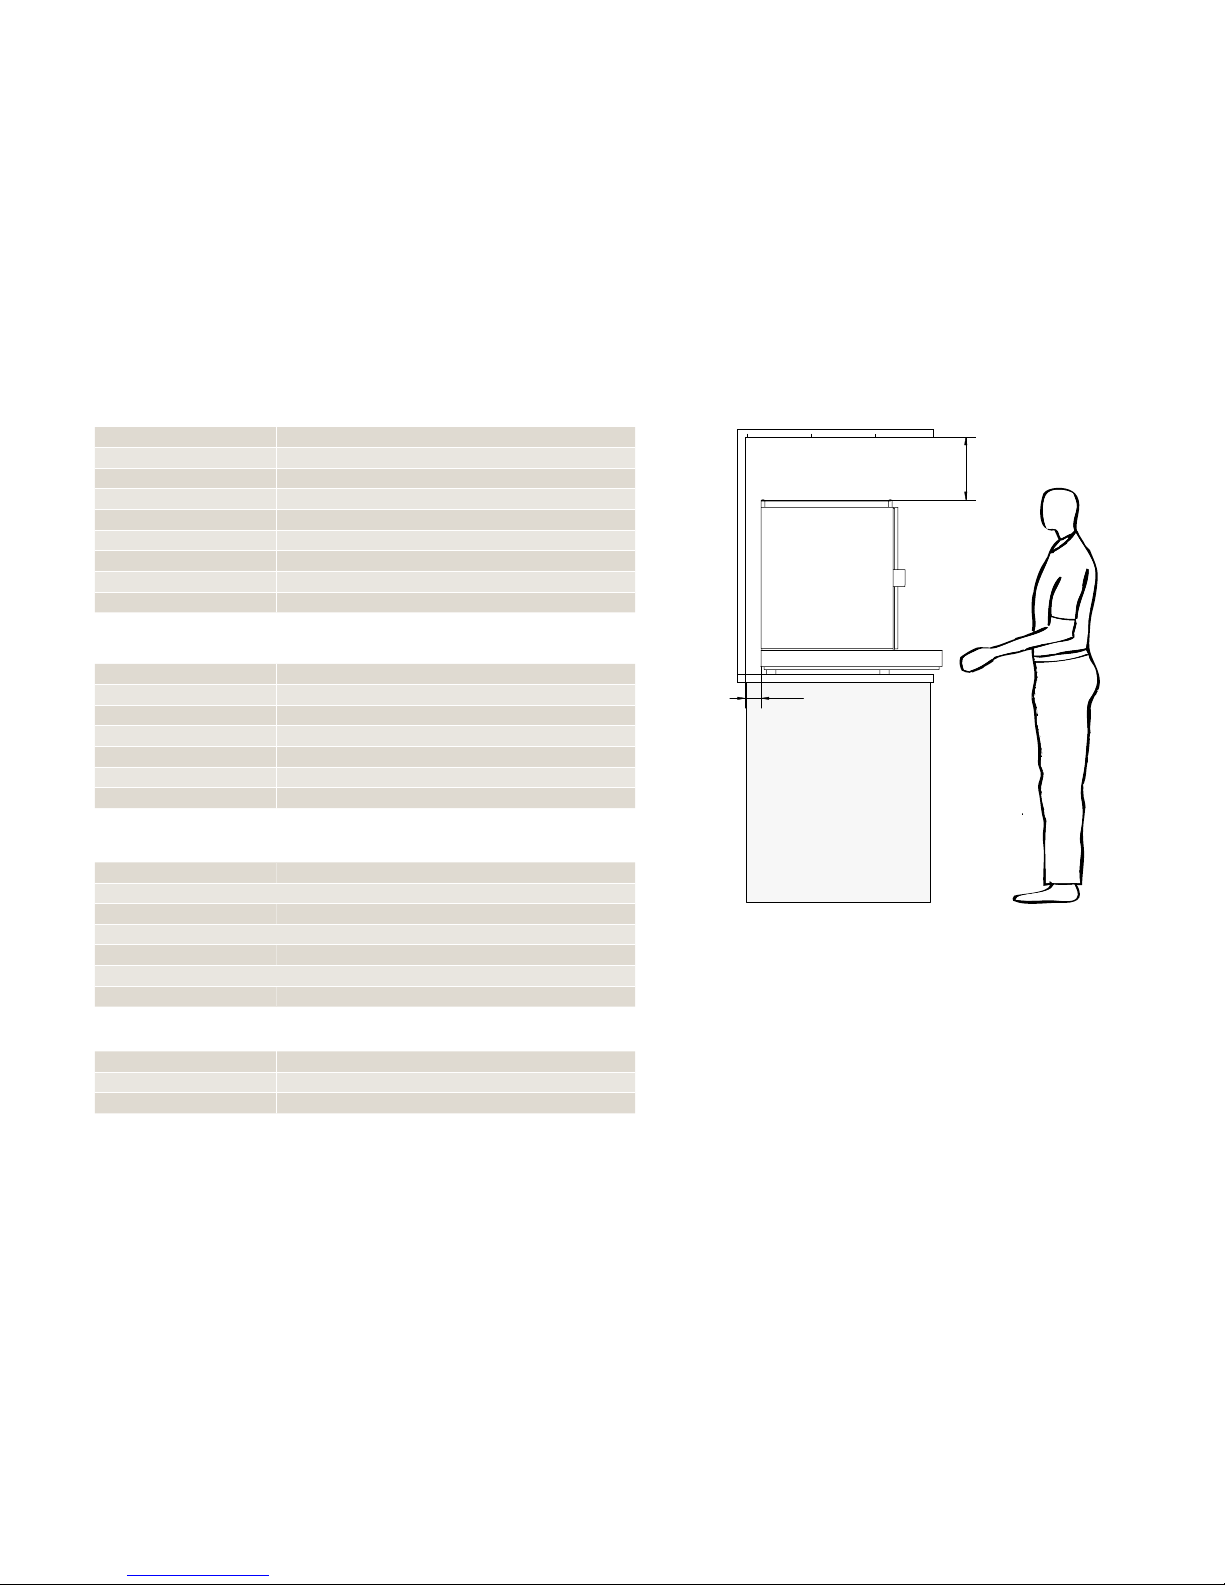
min 50
min 200
Installation and technical data
Page 17
40 mm foot 520 mm + 40 mm = 560 mm
70 mm foot 520 mm + 70 mm = 590 mm
100-mm (4") foot 520 mm + 100 mm = 620 mm
Capacity Up to 3 varieties of syrup
Electrical connection 100 - 240 V1L N PE75 W50/60 Hz Fuse: 10 A
Electric cable 2000 mm
Weight 20.4 kg
Width 200 mm
Depth 456 mm
Height 553 mm
Adjustable feet (optional)
Technical data for the Flavour Station (optional)
Capacity Up to 120 cups (depending on cup size)
Electrical connection 200 - 240 V1L N PE300 W50/60 Hz Fuse: 10 A
Electric cable 2000 mm
Weight 17 kg
Width 300 mm
Depth 580 mm
Height 545 mm
Milk container 10 liters or 2 x 4.5 liters
Electrical connection 200 - 240 V1L N PE100 W50/60 Hz Fuse: 10 A
Electric cable 2000 mm
Ambient conditions Humidity: max. 80%
Ambient temperature: 5 - 32 °C
Weight Approx. 24 kg
Width 300 mm
Depth 580 mm
Height 545 mm
Technical data for the cup warmer (optional)
Technical data for the refrigeration unit (optional)
Place the add-on units in line with the machine name and at eye
level.
Distance to the wall must be at least 50 mm. Clearance above the
machine must be at least 200 mm.
Adjustable feet (optional) can be used to compensate for unevenness or height differences.
If optional add-on units are installed, up to an additional 300 mm
may be required per add-on unit.
Add-on unit installation dimensions
Page 20
WARNUNG
02 03
4
i
4 44
01
Commissioning
Page 18
Energy saver mode
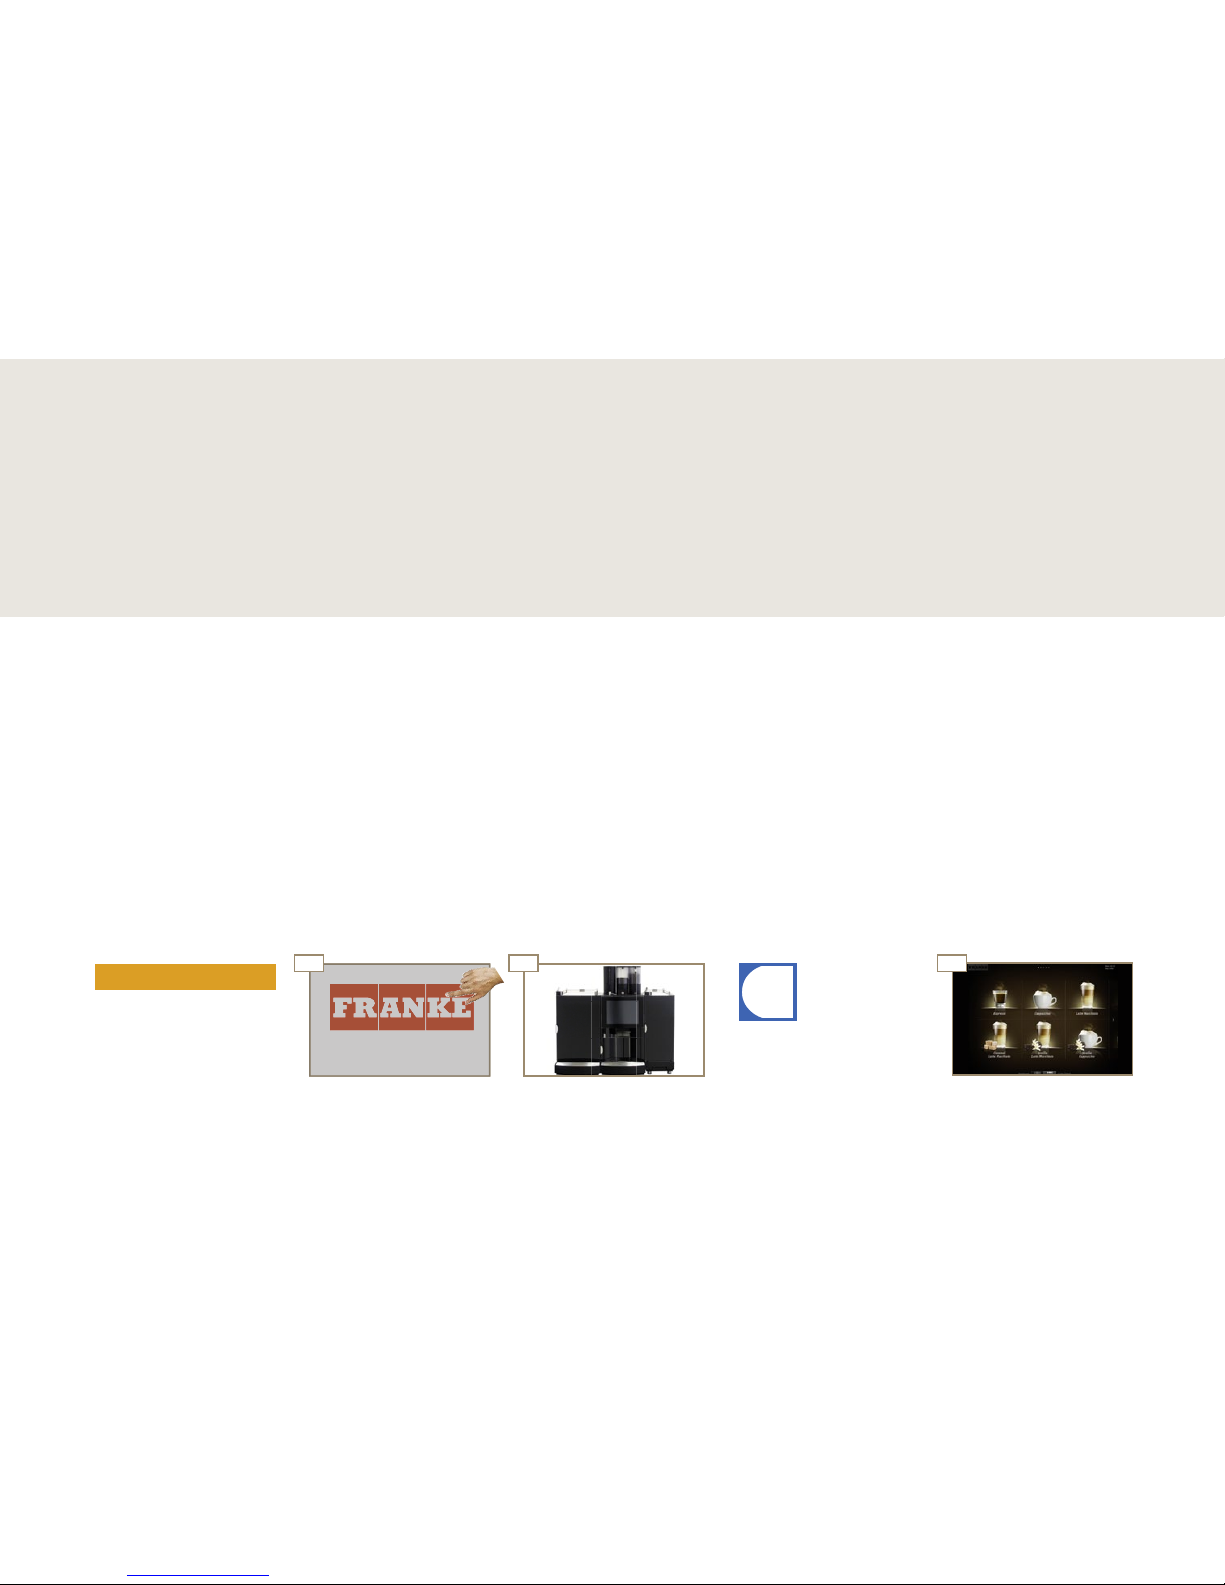
Your service technician will put your coffee machine in operation for
the first time and instruct you in its operation.
Any recommissioning tasks will also be carried out by your service
technician.
Initial commissioning of the FM800
Add coffee beans, powder, milk
and syrup, if necessary.
Coffee machine is ready for
operation.
The coffee machine vents
the boiler system and rinses
automatically while heating.
Danger of scalding!
From hot water, splatters and
hot steam.
Do not touch the machine
below the outlets or the
outlets themselves.
Tap on the control panel.
In this chapter you will learn how to start up your FM800 coff ee machine for the fi rst time. In addition to the start-up
procedure, you will furthermore learn about processes that take place automatically during commissioning.
Commissioning
Daily commissioning of the FM800
Page 21
01 02
03
4
4
4 4
!
i
Filling and emptying
Page 19
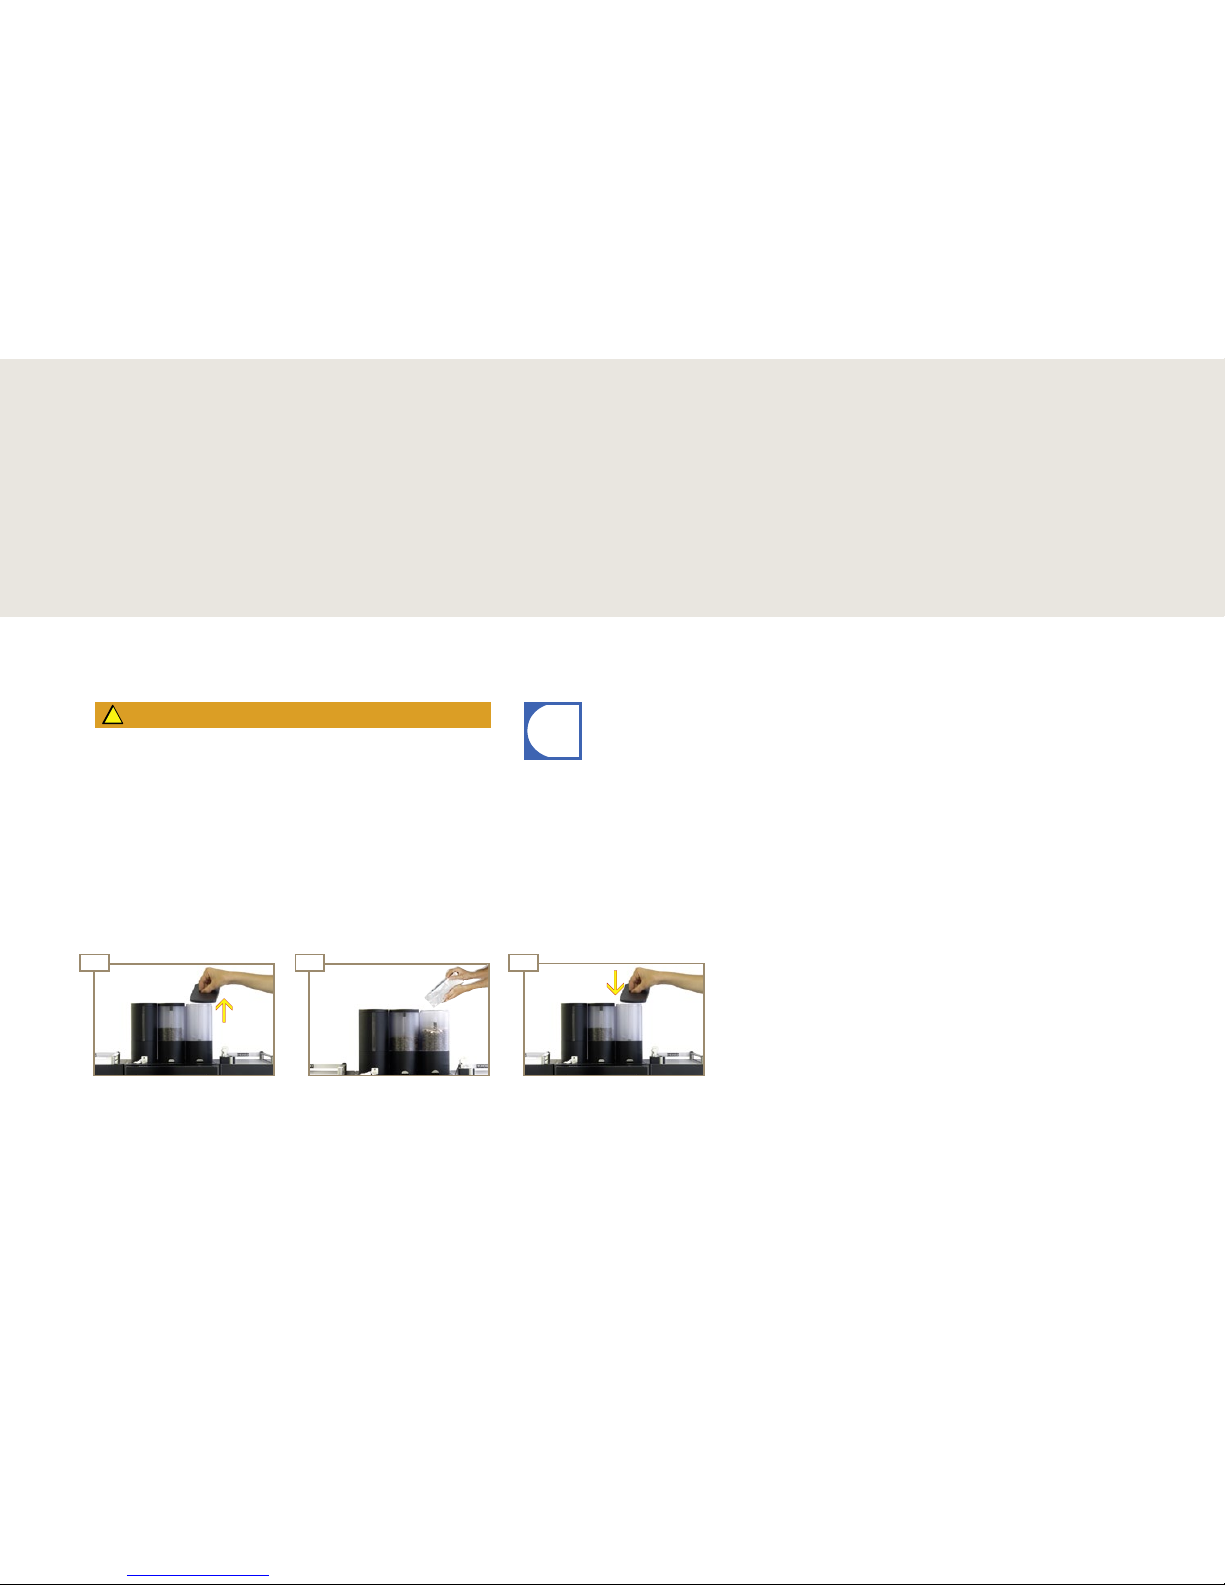
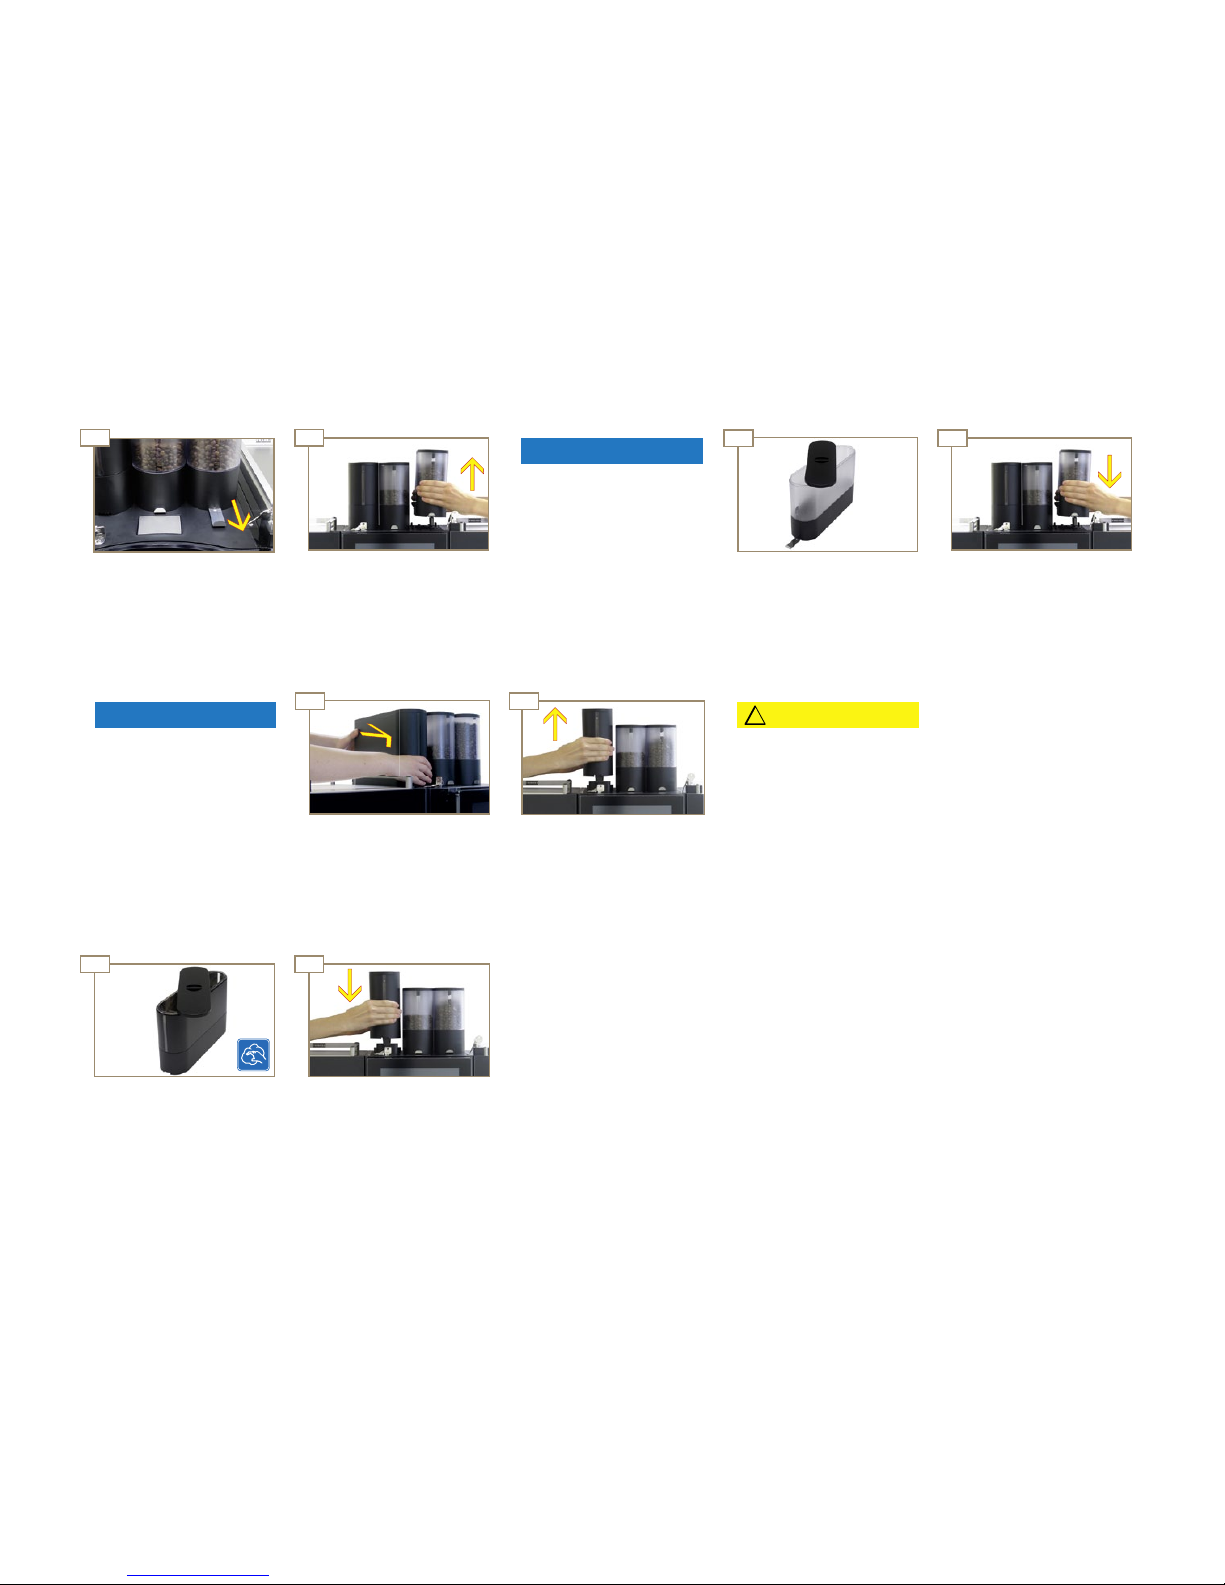
Observe your machine confi guration when fi lling the containers.
A possible composition can be found in the Machine description
chapter.
Depending on the machine
equipment, fi ll with coff ee
beans or powder.
Attach cover.
WARNING
Risk of injury, eye injury and damage to the machine!
Objects in the bean hopper or grinder may splinter and be ejected,
leading to damage to the machine or injury.
Never put any objects in the coff ee bean hopper or grinder.
Never poke around in the bean hopper or grinder with any object.
Filling the coff ee bean and powder containers
Raise the cover.
Ensure that all ingredients are always available. That way you will able to off er your customers the wide assortment of
your product range at all times. Get primed for a successful day.
Filling and emptying
Beans and powder
Page 22
01
4
03
44
04
02
01 02
44
4
4
4 4
03 04
!
Filling and emptying
Page 20
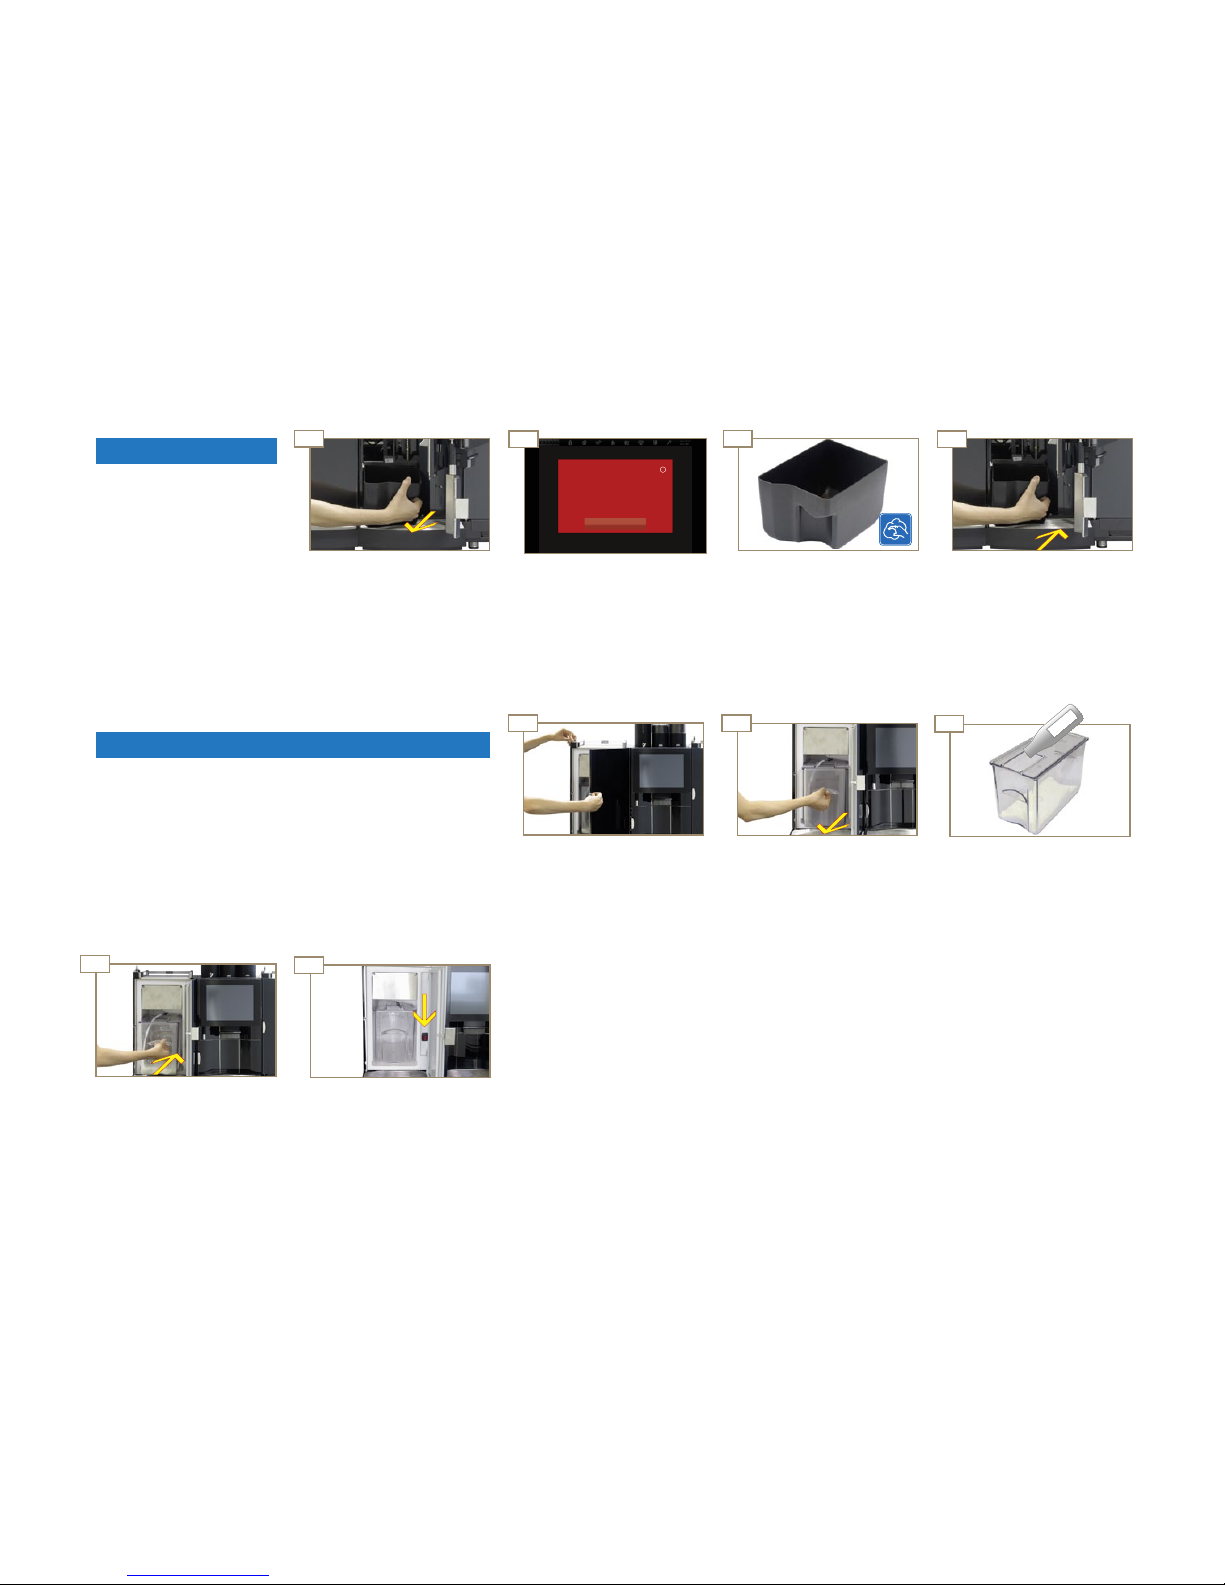
CAUTION
Attach powder container and
slide it back until it engages.
Empty, clean and dry the powder container.
Risk of injury!
From the powder container's
screw conveyor.
Exercise care when cleaning
the powder container and dry
it well.
Remove the powder container
straight up.
Powder may escape!
Always transport the powder
container closed in an upright
position.
NOTE
Slide the powder container
forward approx. 2 cm.
Emptying the powder container
NOTE
The quality of the coff ee
may be impaired!
Dry the bean hopper well after
cleaning it. There must not
be any residue from cleaning
agents.
Replace the bean hopper.
Slide the safety slide back to
end stop.
Empty, clean and dry the bean
hopper.
Remove the coff ee bean hopper
straight up.
Press the safety slide downwards and pull it away towards
the front until it engages.
Emptying the bean hopper
Page 23
01 03
04
4 4 44
4
01
4
4
02
03
04
05
4
4
Schliessen
Tür off en
Personal informieren.
02
Filling and emptying
Page 21
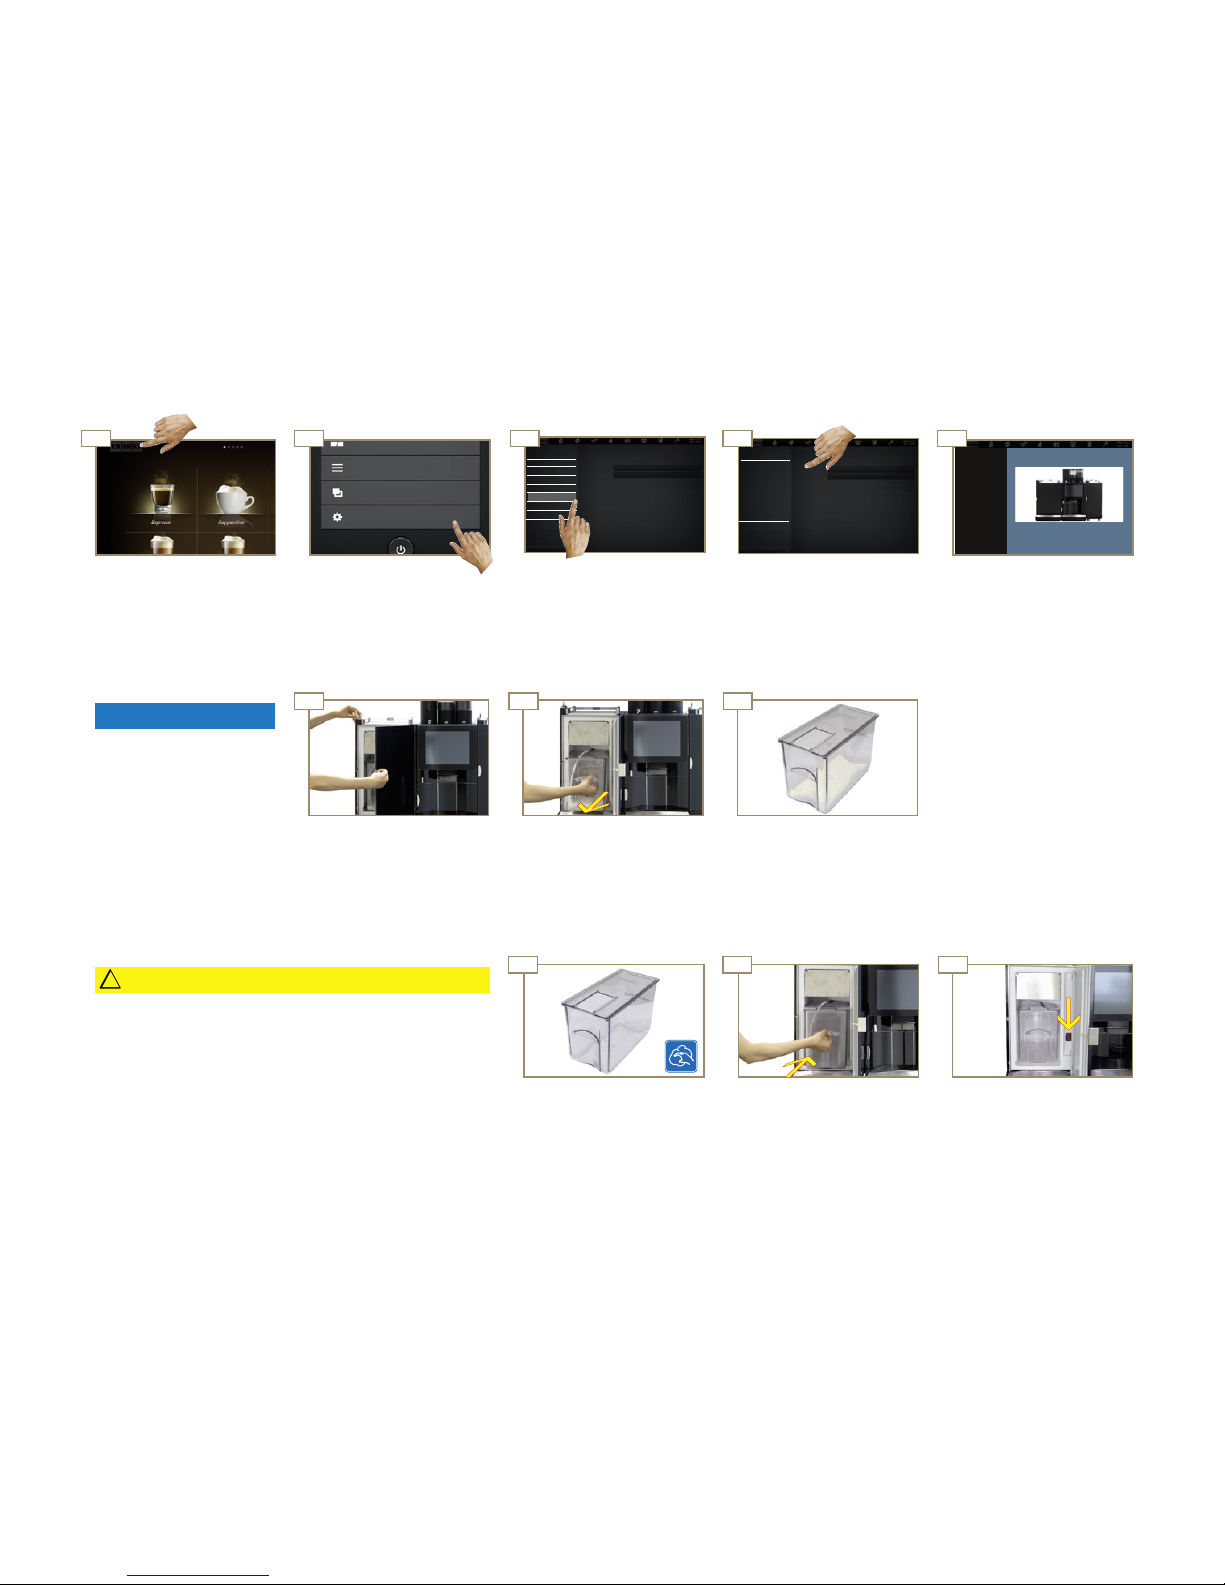
The message Door open appears on the control panel.
Make sure that the refrigeration
unit is switched on.
Close the refrigeration unit.
Slide the milk container back to
end stop.
Fill milk.
Remove the intake hose and
pull away the milk container to
the front.
Unlock the door as necessary.
Press the release button and
open the refrigeration unit.
NOTE
The quality of the milk may be impaired!
Only use pre-cooled milk
Touch the intake hose only after sanitizing hands or wear disposable gloves.
Filling the refrigeration unit
Milk
Replace the grounds container
and close the grounds container door.
Empty, clean and dry the
grounds container.
Open the grounds container
door and remove the grounds
container.
Formation of mildew due to
coff ee residue!
Empty and clean the grounds
container at least once daily.
NOTE
Emptying the grounds container
Page 24
01 02 03
4 4
4
04 05 06
4 4 4
4
01 02 04 05
4 4 44
03
!
Filling and emptying
Page 22
Wipe protection
Prepare syrup system
Prepare milk system
Rinse coffee machine
Clean Flavour Station
Clean coffee machine
ERROR LOG files
Starting...
Starting...
Type 2
Type 1
Wipe protection
Prepare syrup system
Prepare milk system
Rinse coffee machine
Clean Flavour Station
Clean coffee machine
ERROR LOG files
Starting...
Starting...
Type 2
Type 1
Wipe protection
Prepare syrup system
Prepare milk system
Rinse coffee machine
Clean Flavour Station
Clean coffee machine
ERROR LOG files
Cleaning and Maintenance
Media/Data down- and upload
My Settings
Milk type 1 being prepared.
Observe instructions on the
control panel.
When used with two types,
repeat steps 4 and 5.
Select and confi rm Star t.
Select Prepare milk system.Select Cleaning and Mainte-
nance.
Switch to the maintenance
level.
Prepare milk system
Press On/Off to switch off
the refrigeration unit when no
longer needed.
Close the refrigeration unit.
Insert milk container and guide
the intake hose through the
opening in the cover.
Clean the milk container and
the refrigeration unit.
CAUTION
Health risks due to spoiled milk!
If the machine is not cleaned regularly, milk residue may accumulate
in the machine, clog the dispensers or fi nd its way into drinks.
Clean the refrigeration unit and the milk system at least once a day
using the automatic cleaning program
NOTE
The refrigeration unit may
not be used to store milk!
Remove the milk when the refrigeration unit is not in use.
Store the milk in a refrigerator
or dispose of it, if necessary.
Take out the intake hose and
pull away the milk container to
the front.
Unlock the door as necessary.
Press the release button and
open the refrigeration unit.
Emptying the refrigeration unit
Page 25
4
4
4
44
4
4 4
01
4
i
02
03
04
05
030201
0201
4
03 04
Filling and emptying
Page 23
Type 3Type 3
Starting...Starting...
Type 2Type 2
Clean Flavour StationClean Flavour StationClean Flavour Station
Clean coffee machineClean coffee machineClean coffee machine
Starting...Starting...
Starting...Starting...
Type 1Type 1
Wipe protectionWipe protectionWipe protection
Prepare syrup systemPrepare syrup systemPrepare syrup system
Prepare milk systemPrepare milk systemPrepare milk system
Rinse coffee machineRinse coffee machineRinse coffee machine
ERROR LOG filesERROR LOG filesERROR LOG files
Cleaning and Maintenance
Media/Data down- and upload
My Settings
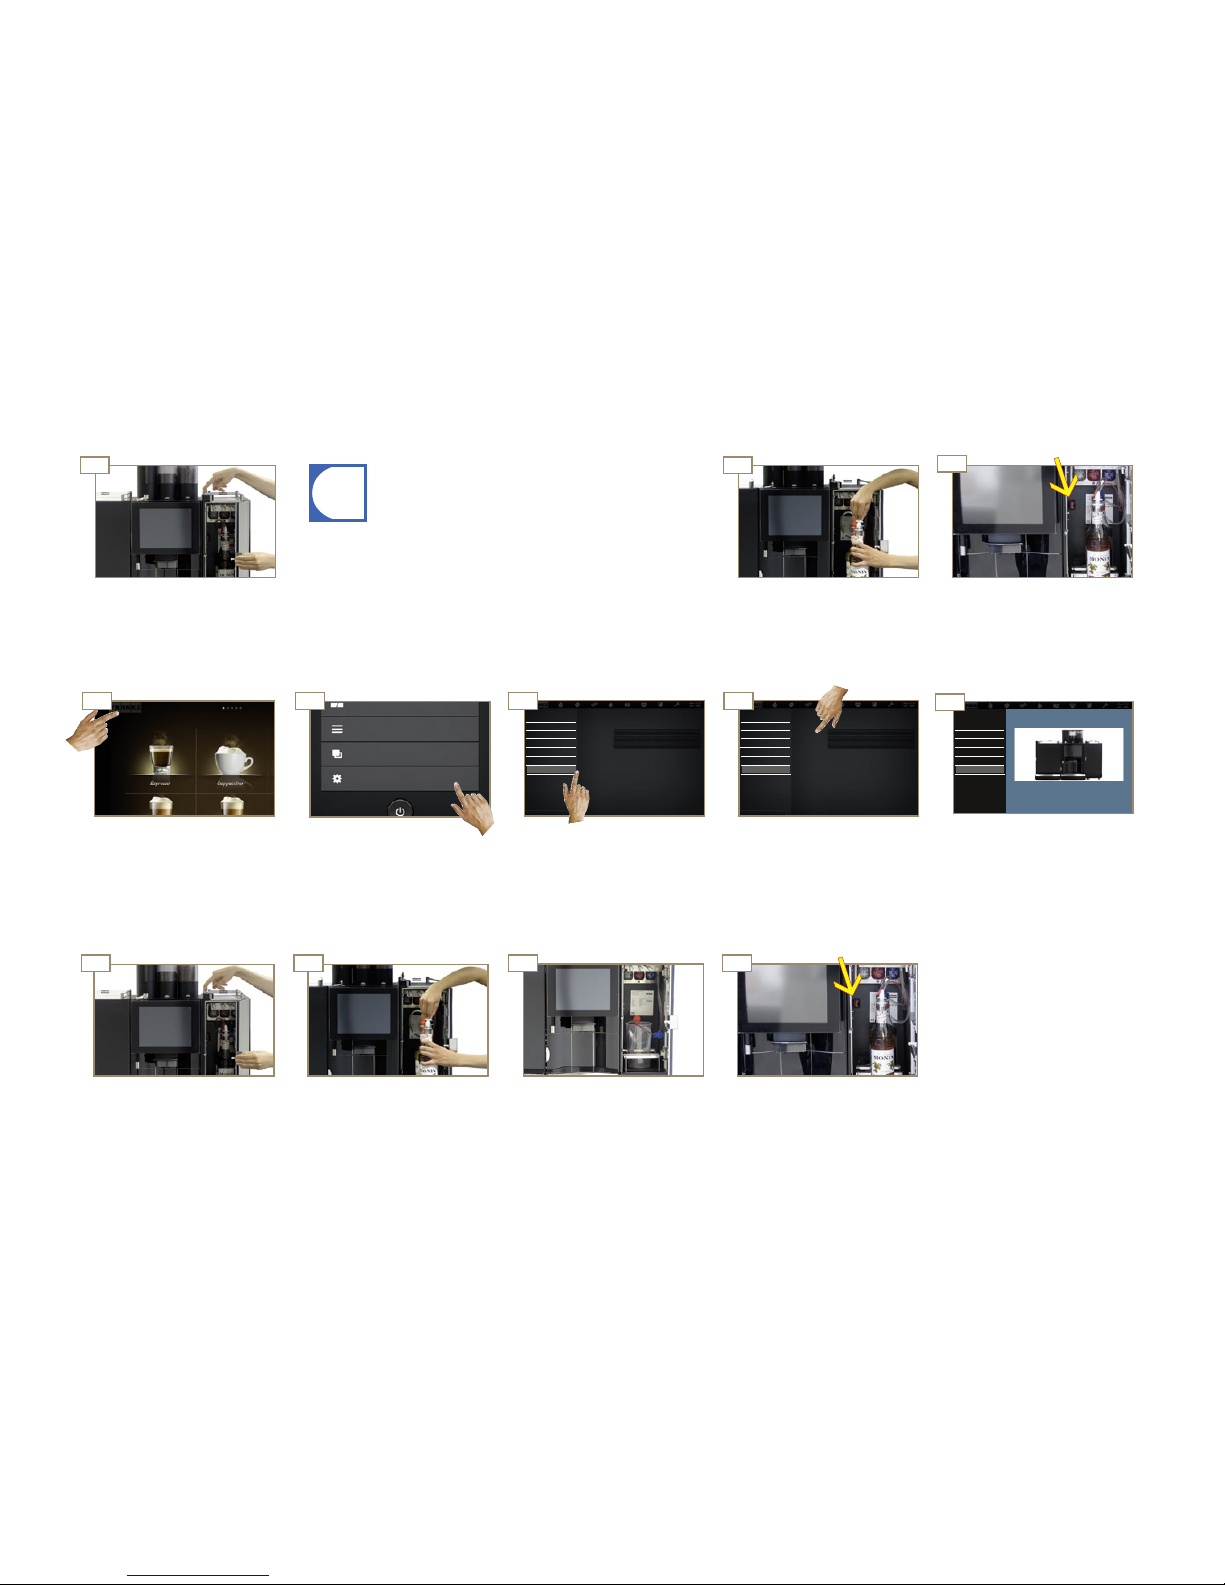
Preparing the Flavour Station
Emptying the Flavour Station
When you assign a new syrup type to a pump, do not forget to
update the assignment in Adjust menu A under ... .
Press On/Off to switch on the
Flavour Station if needed.
Close the Flavour Station.
Place syrups in Flavour Station
and insert all tubes.
Press the release button and
open the Flavour Station.
Filling the Flavour Station
Syrups (optional)
Switch to the maintenance
level.
Press the release button and
open the Flavour Station.
Select Cleaning and Mainte-
nance.
Remove the hose and remove
the syrup for the required type
of syrup.
Select Prepare Flavour Station
Clean the syrup system if
necessary.
Syrup type being prepared.
Observe instructions on the
control panel.
When used with several types,
repeat steps 4 and 5.
Select and confi rm Star t.
Press On/Off to switch off the
Flavour Station when no longer
needed.
Close the Flavour Station.
Page 26
4
4
01
02
05
04
4
i
i
4
4
4 4
03
!
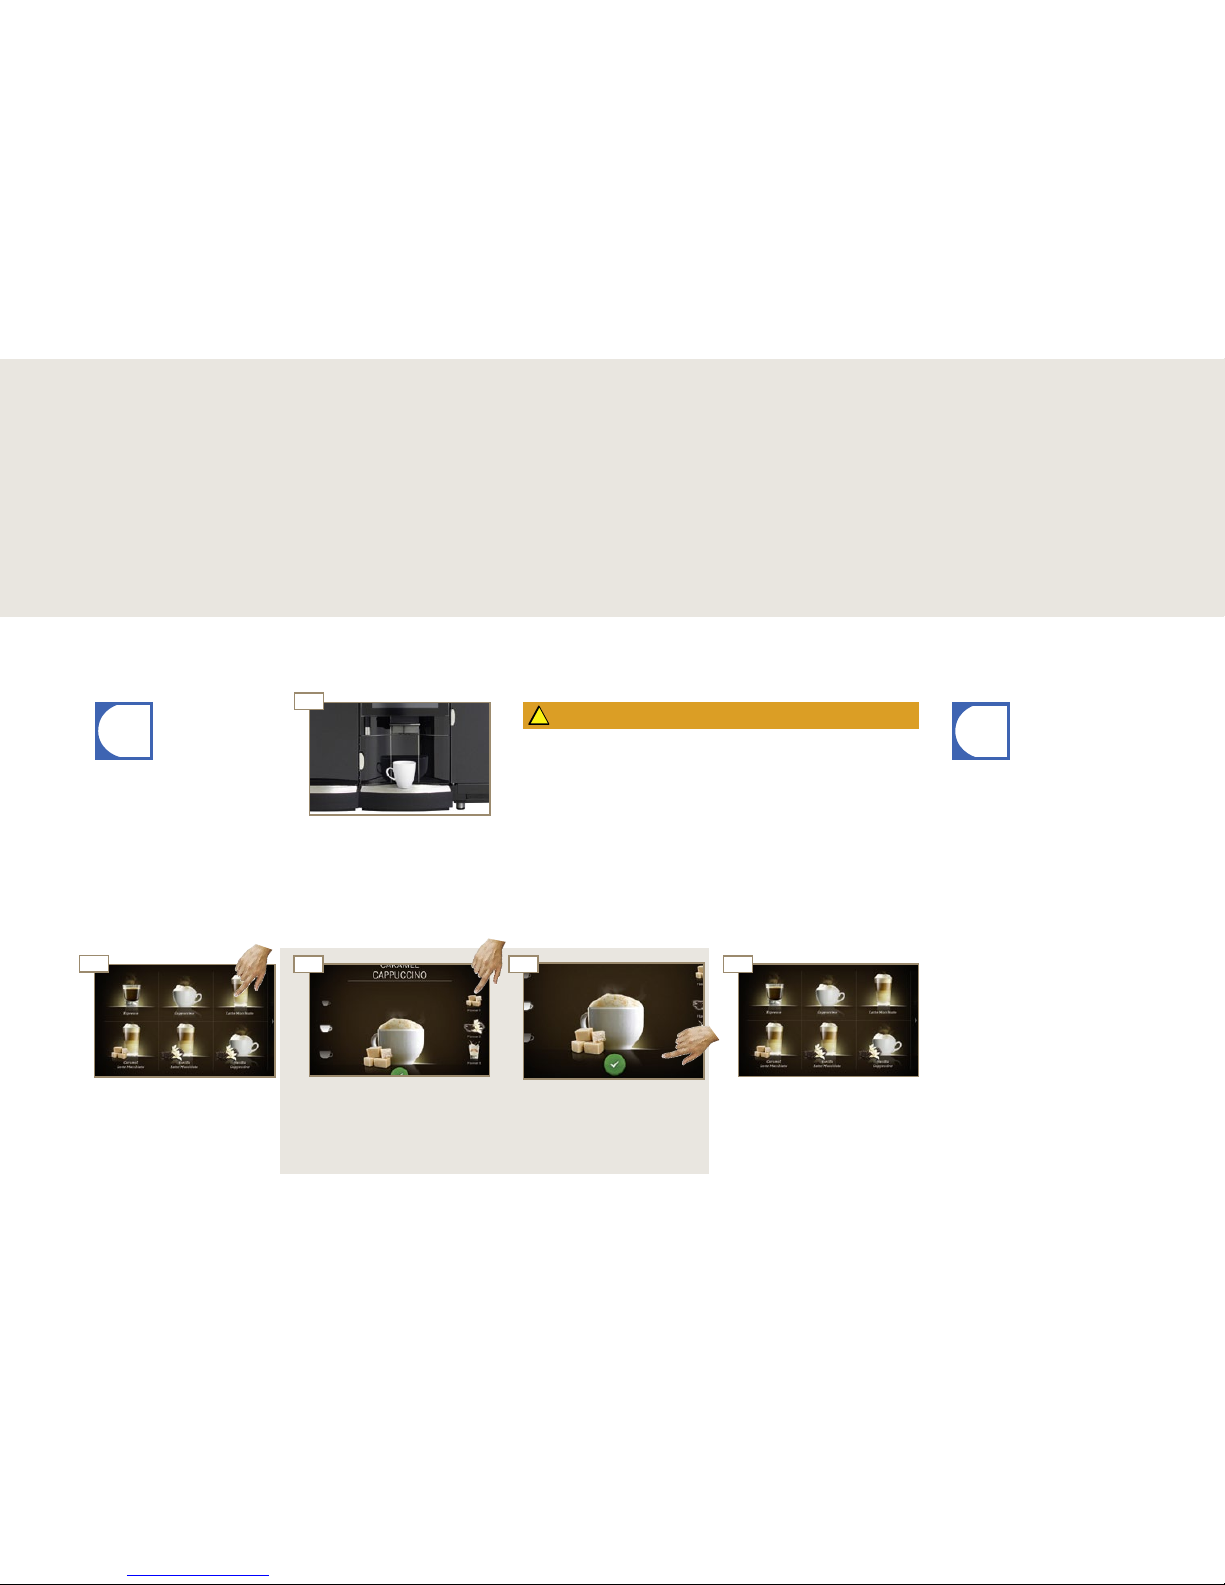
Preparing drinks
Page 24
The Drink Selection product
preview appears.
Select Product options.
Start preparation with
button.
The preparation can be interrupted with the button. The
button appears as soon as
preparation is started.
Risk of scalding or burning!
The dispensers and drinks are hot.
Do not touch the area under the outlets.
In case of scalding or burns, immediately cool the aff ected area
and, depending on the severity of the injury, consult a doctor.
WARNING
Use the hot water outlet for
obtaining hot water.
The outlet moves downward.
Preparation begins.
Product selection appears.
The drink is ready.
Place an appropriate cup or
glass under the outlet.
Select product.
Preparing drinks
Preparing drinks with Quick Select
You chose the FM800 because you love coff ee and want to off er your customers something special. In this section you
will fi nd information about preparing drinks and the variations possible for your specialty drinks.
Page 27
i
44
i
01
4
02
05
04
4
06
4
03
4 4
!
Preparing drinks
Page 25
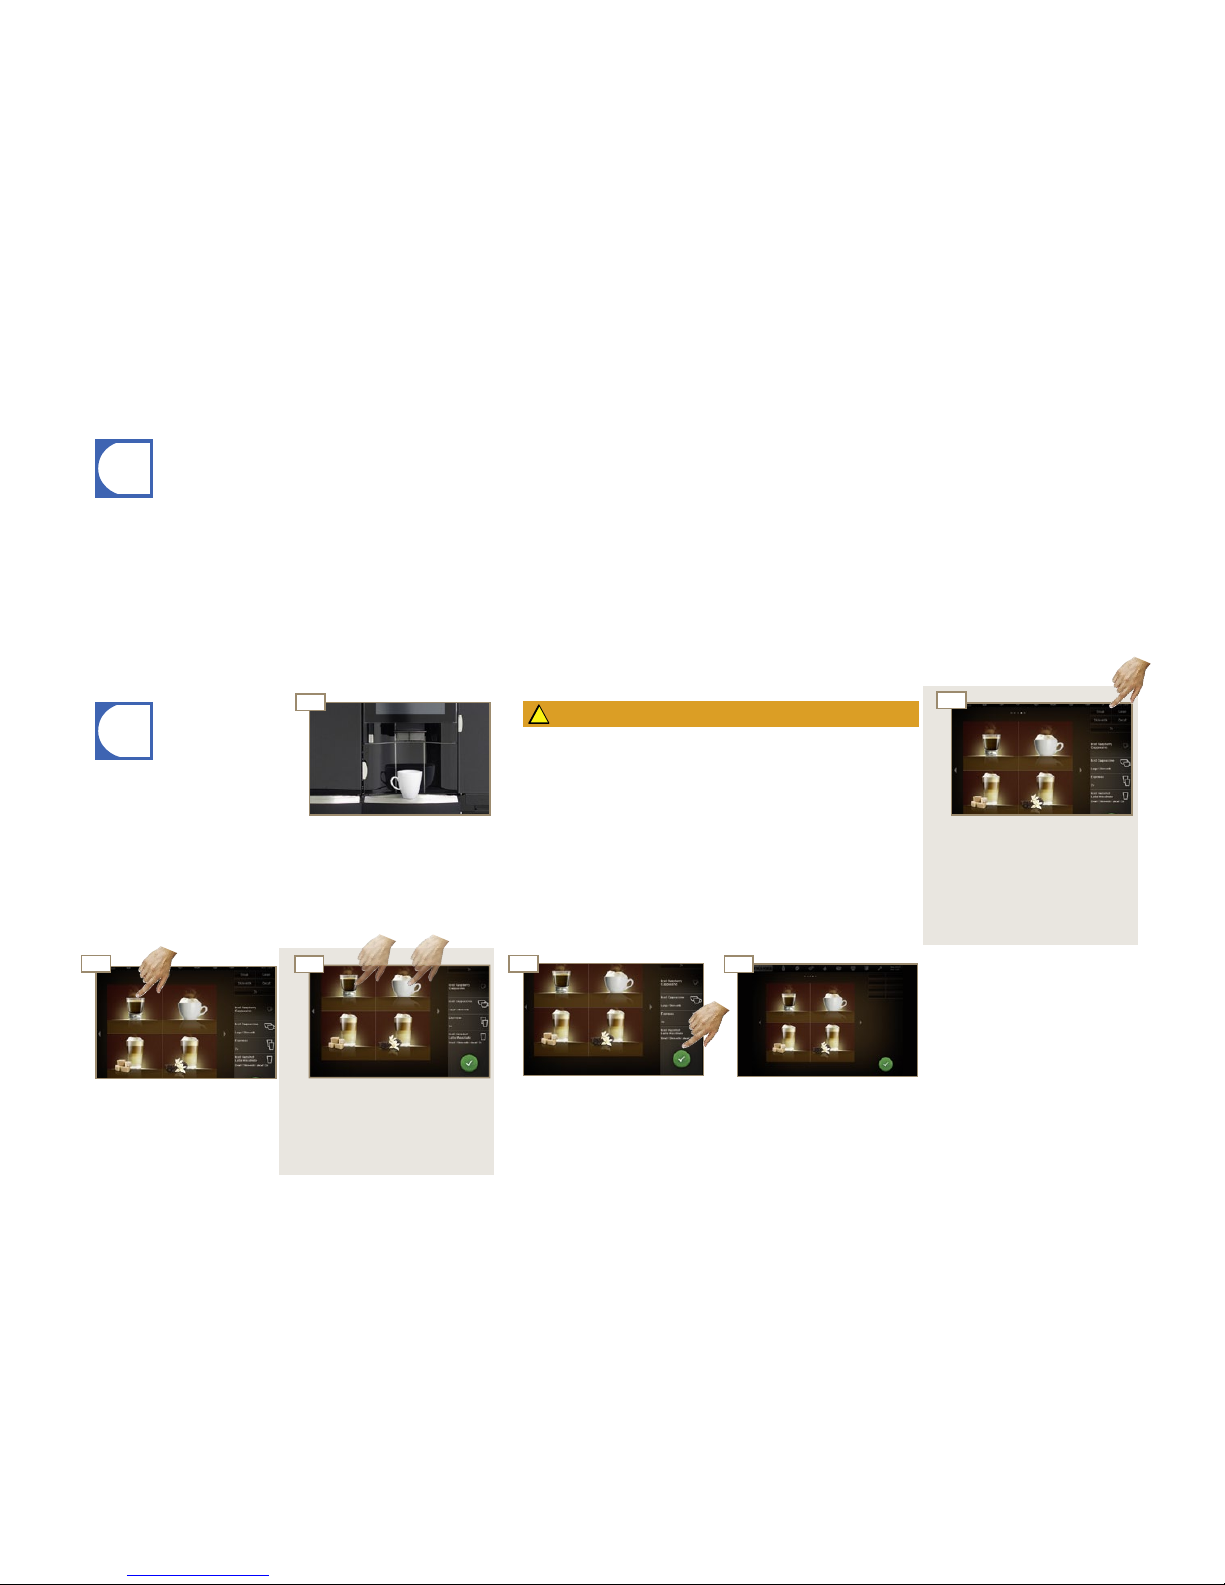
Select product.
Preparation begins.
Product selection appears.
All drinks are ready.
Include additional drinks in the
waiting list if necessary.
Start each subsequent preparation with the button.
The outlet moves downward.
Next preparation begins.
Select Product options.
Risk of scalding or burning!
The dispensers and drinks are hot.
Do not touch the area under the outlets.
Pay attention and work carefully
In case of scalding or burns, immediately cool the aff ected area
and, depending on the severity of the injury, consult a doctor.
WARNING
Use the hot water outlet for
obtaining hot water.
Place an appropriate cup or
glass under the outlet.
When you prepare several drinks in succession, please observe the following:
•Have a sufficient number of glasses or cups ready to hand.
•You can include new products in the waiting list on a continuous basis during the preparation stage.
•Drinks can be selected and deleted in the waiting list.
•The current preparation can be interrupted with the button. The waiting list will not be deleted as a
result.
Preparing drinks with Cash Register
Page 28
i
02
4
03
4
04
01
4
4
07
4
05
4
4
06
4
i
4
!
Preparing drinks
Page 26
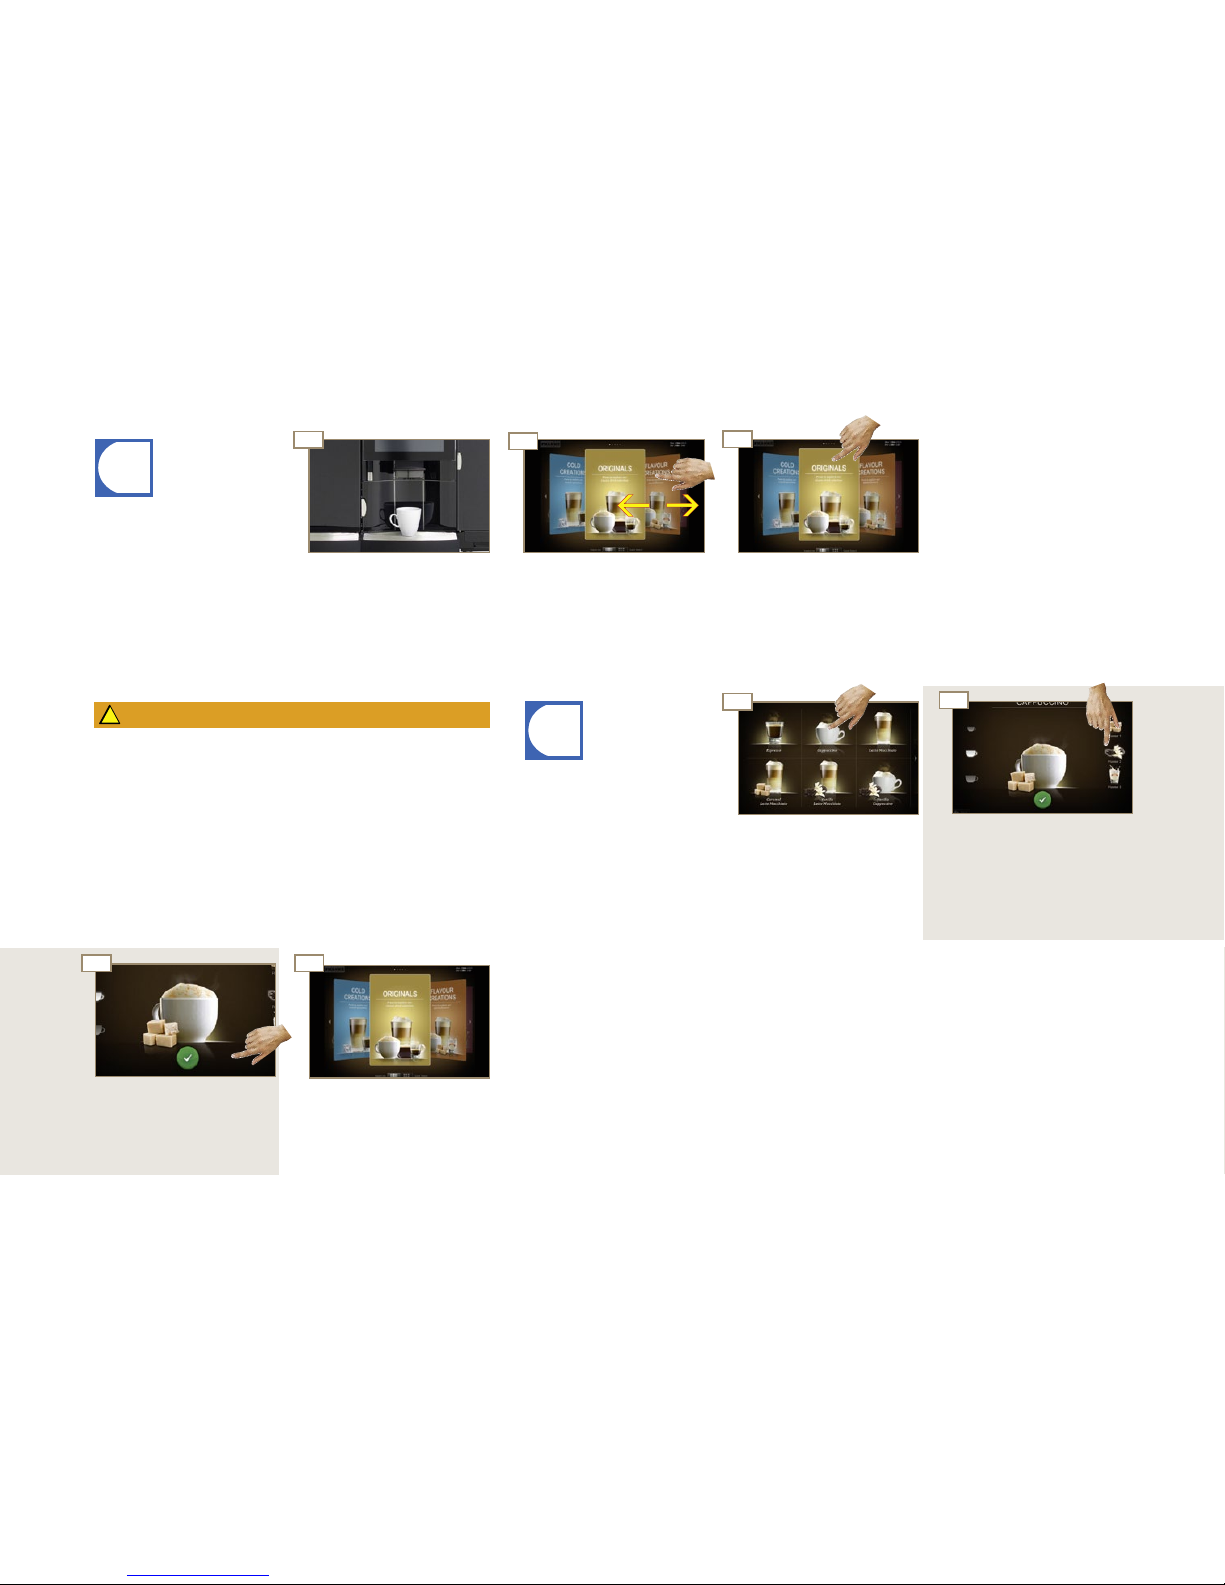
The Drink Selection product
preview appears.
Select Product options.
Start preparation with
button.
The preparation can be interrupted with the button. The
button appears as soon as
preparation is started.
Risk of scalding or burning!
The dispensers and drinks are hot.
Do not touch the area under the outlets.
In case of scalding or burns, immediately cool the aff ected area
and, depending on the severity of the injury, consult a doctor.
WARNING
The outlet moves downward.
Preparation begins.
Menu cards appear.
The drink is ready.
Place an appropriate cup or
glass under the outlet.
Select product.
Use your fi nger to tap on the
desired menu card.
Drink overview appears.
Scroll through the menu cards.
Use the hot water outlet for
obtaining hot water.
Preparing drinks with Inspire Me
Page 29
!
4 4 4
03 04 05
444
01
02
07
06
4
i
4
Preparing drinks
Page 27
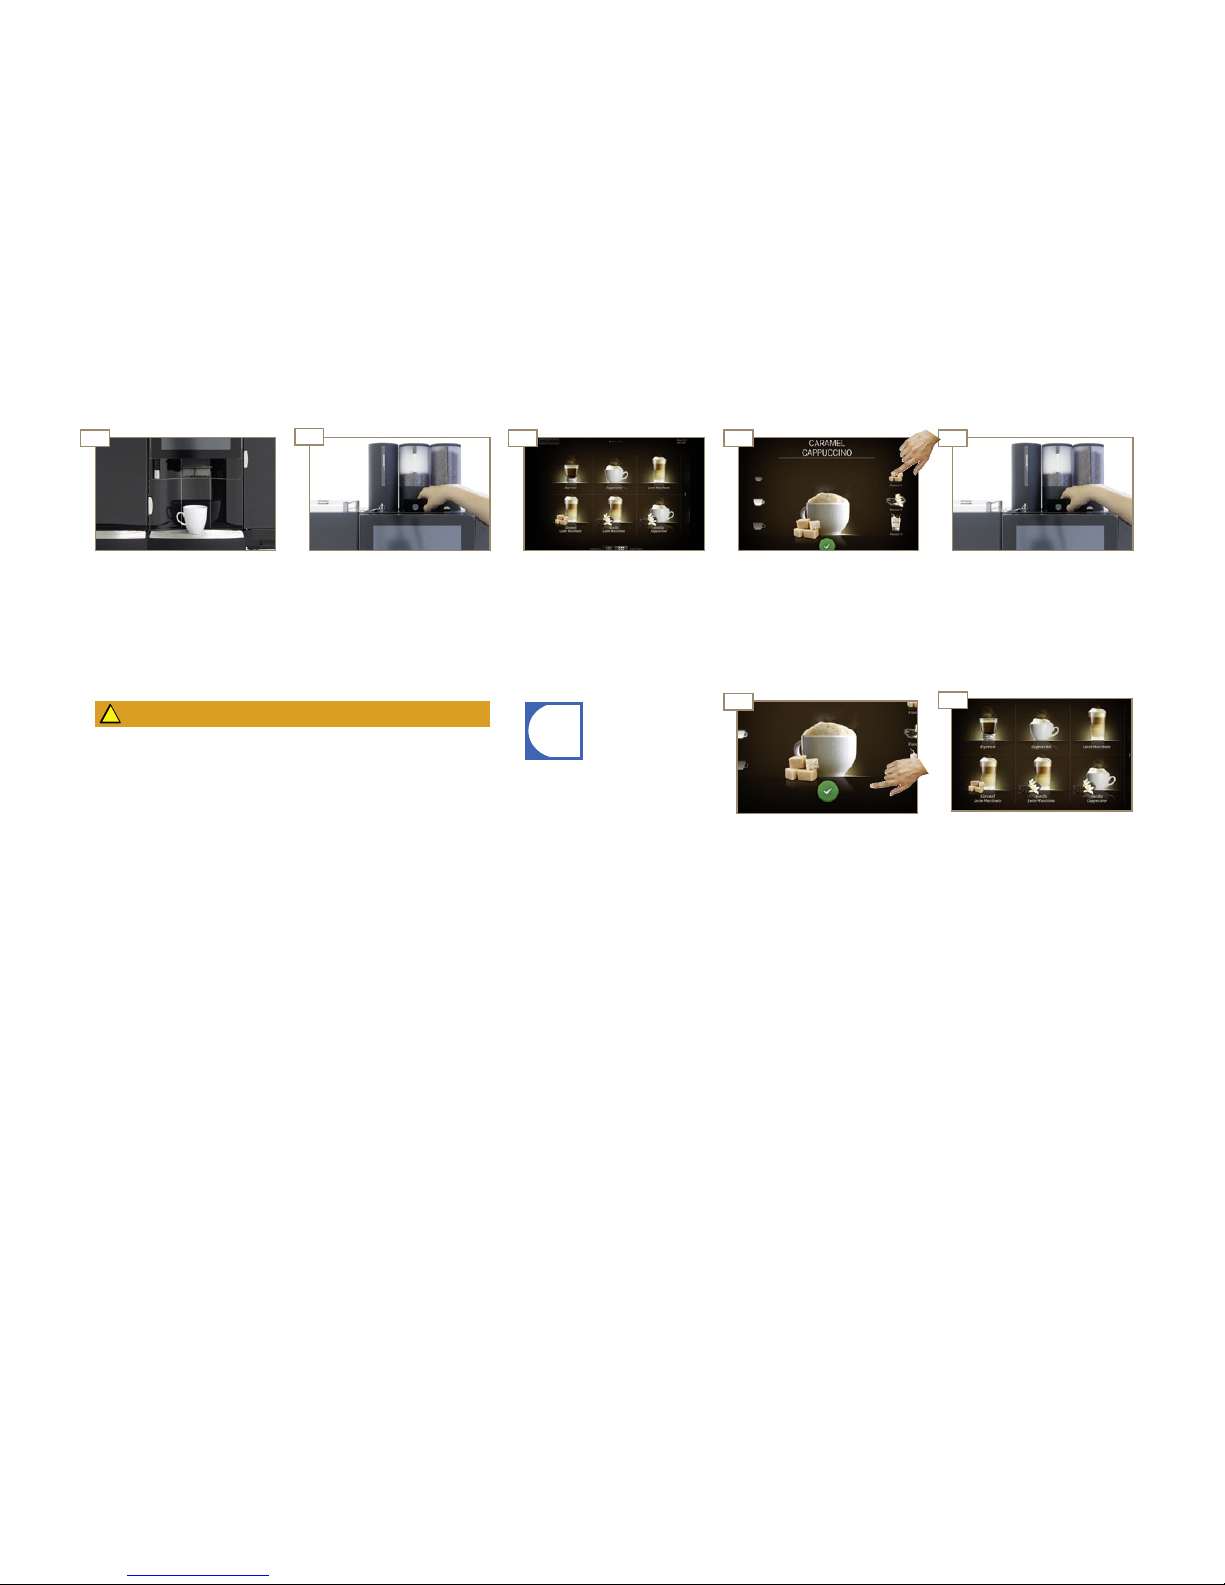
Start preparation with .
The outlet moves downward.
Preparation begins.
Drink overview appears.
The drink is ready.
The preparation can be interrupted with the button. The
button appears as soon as
preparation is started.
Open powder lid.Place an appropriate cup or
glass under the outlet.
Add powder.
Close powder lid.
Select Product options.Select product.
Risk of scalding or burning!
The dispensers and drinks are hot.
Do not touch the area under the outlets.
In case of scalding or burns, immediately cool the aff ected area
and, depending on the severity of the injury, consult a doctor.
WARNING
Drink preparation with ground coff ee, using Quick Select as an example
Page 30
4
01 02
4
03
4
04
4
05
4
4
4
i
i
!
Preparing drinks
Page 28
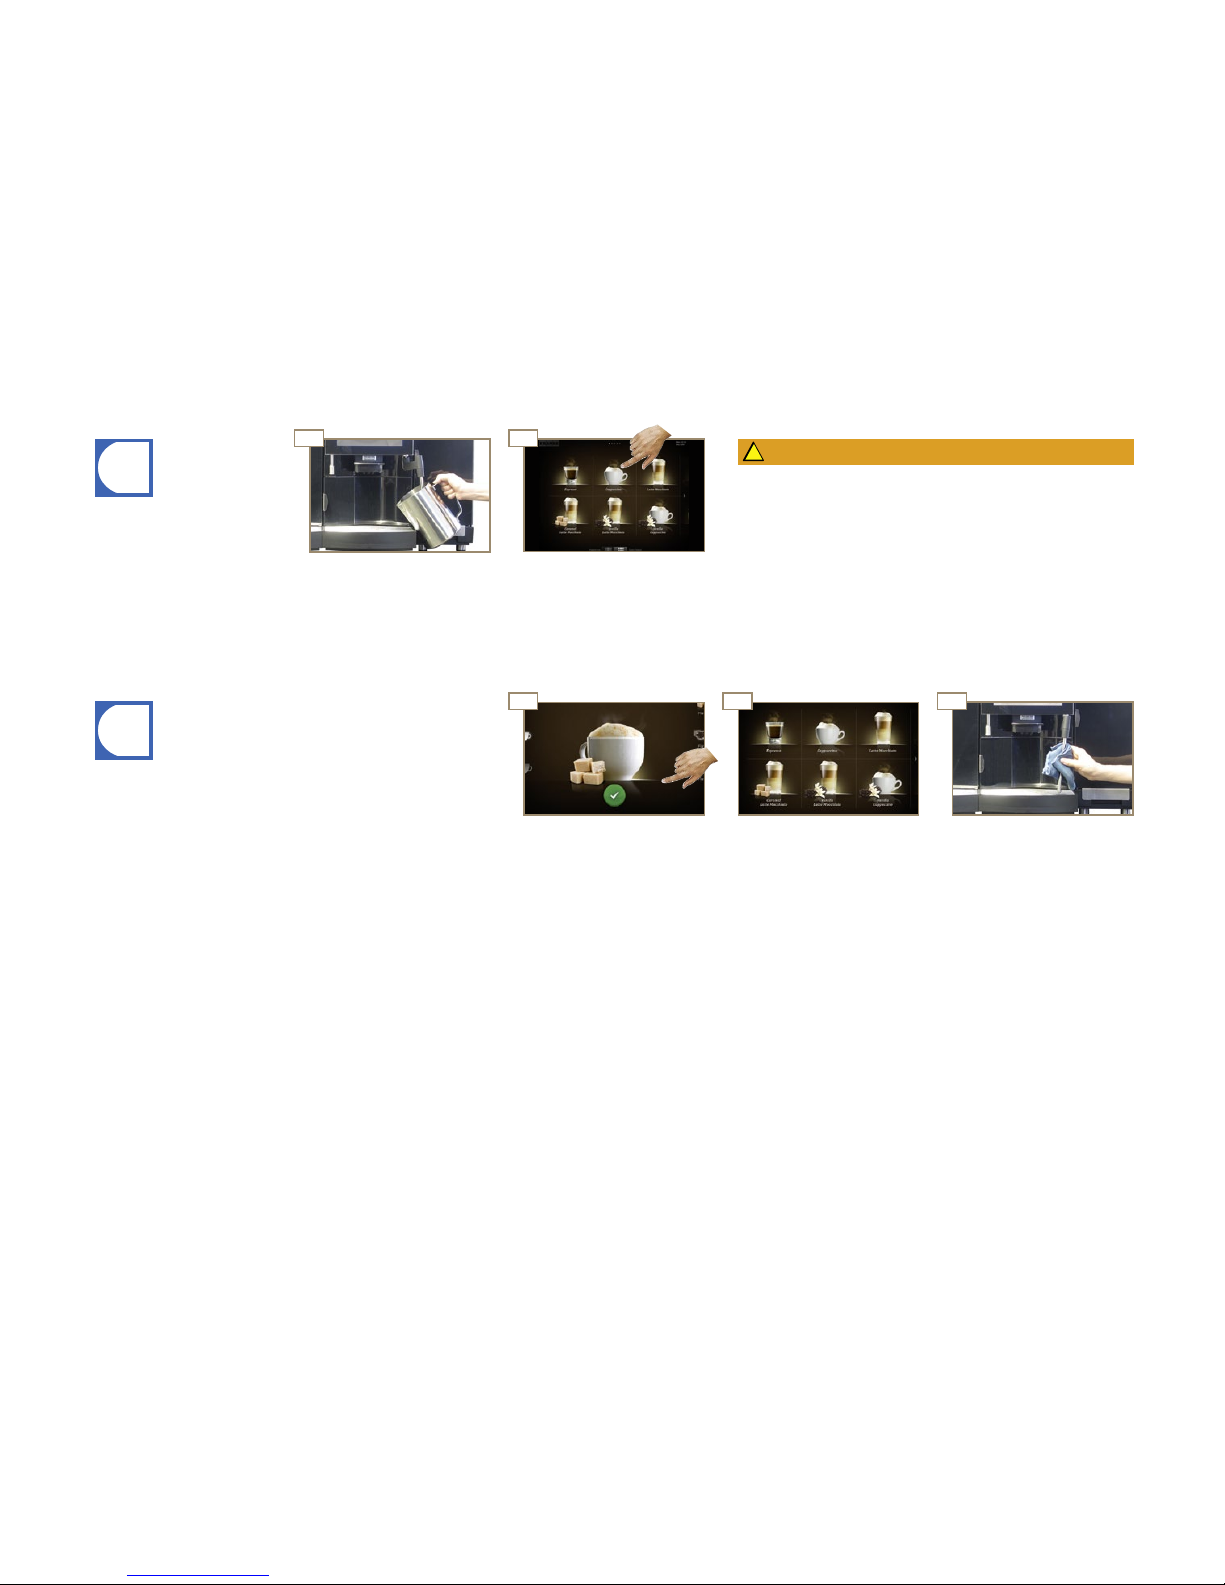
Your Autosteam Pro is suitable
for manual heating and foaming
of milk and for heating up other
drinks.
Wipe off the steam outlet after
each use with a damp cloth.
The product has reached a
certain temperature.
Overview panel appears.
Start preparation with .
Preparation begins.
•Preparation continues until your drink has achieved a certain
temperature.
•The preparation can be interrupted with the button. The button
appears as soon as preparation is started.
Risk of scalding or burning!
The dispensers and drinks are hot.
Do not touch the area under the outlets.
In case of scalding or burns, immediately cool the aff ected area
and, depending on the severity of the injury, consult a doctor.
WARNING
Steam dispenser (Autosteam), using Quick Select as an example
Hold suitable vessel under the
steam outlet.
Select Autosteam product
selection.
Page 31
IV
4 4
III
I
4 4
II
V
i
Care of the FM800
Page 29
Accessories required:
•Cleaning tablets
•Microfi ber cloth
•Brush set
•Cleaning container
Your responsibility for the perfect coff ee experience
The perfect coff ee experience depends on a perfectly cleaned coff ee machine. Increase the quality of your
products!
Clean your coff ee machine at least once a day and more frequently if necessary.
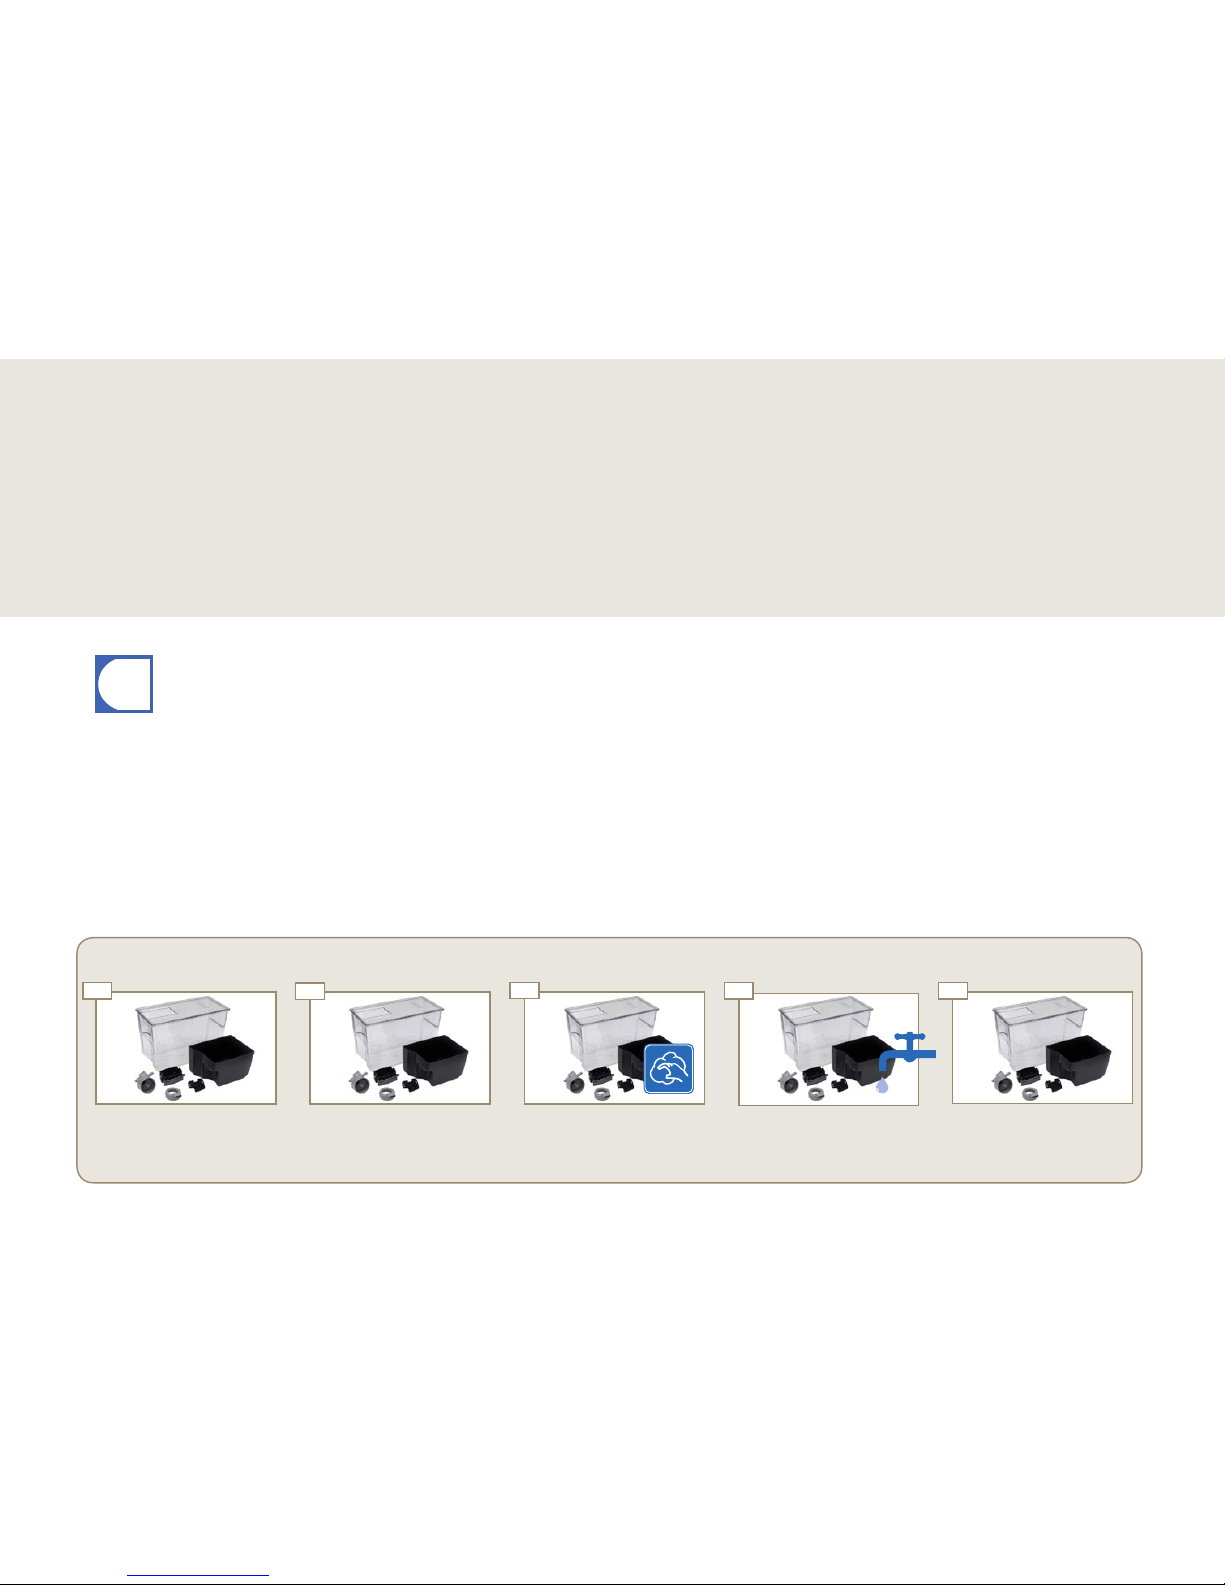
Follow the 5-step method for all removable parts.
5-step method for removable parts
Dry the parts.Soak the parts in water with a
mild detergent.
Wash the parts.Remove coarse dirt with a
brush.
Rinse the parts thoroughly.
Introduction to automatic cleaning
Even a coff ee machine like the FM800 must be cared for. To ensure high-quality fl avor, the FM800 must be cleaned at
least once a day and serviced at regular intervals.
Care of the FM800
Page 32
4 4
4
4
i
01 02
03 04
01 02
03 04
01 02
!
04
05
i
4
03
i
4
Care of the FM800
Page 30
The PIN Code is set at the
factory to 0000. You can
change the PIN Code together
with your service technician.
Clean Flavour Station
Clean coffee machine
Wipe protection
Prepare syrup system
Prepare milk system
Rinse coffee machine
ERROR LOG files
Media/Data down- and
upload
Cleaning and Maintenance
During cleaning, do not open the grounds container door unless the
machine prompts you to do so; otherwise malfunctions could occur
and the cleaning will have to be restarted.
WARNING
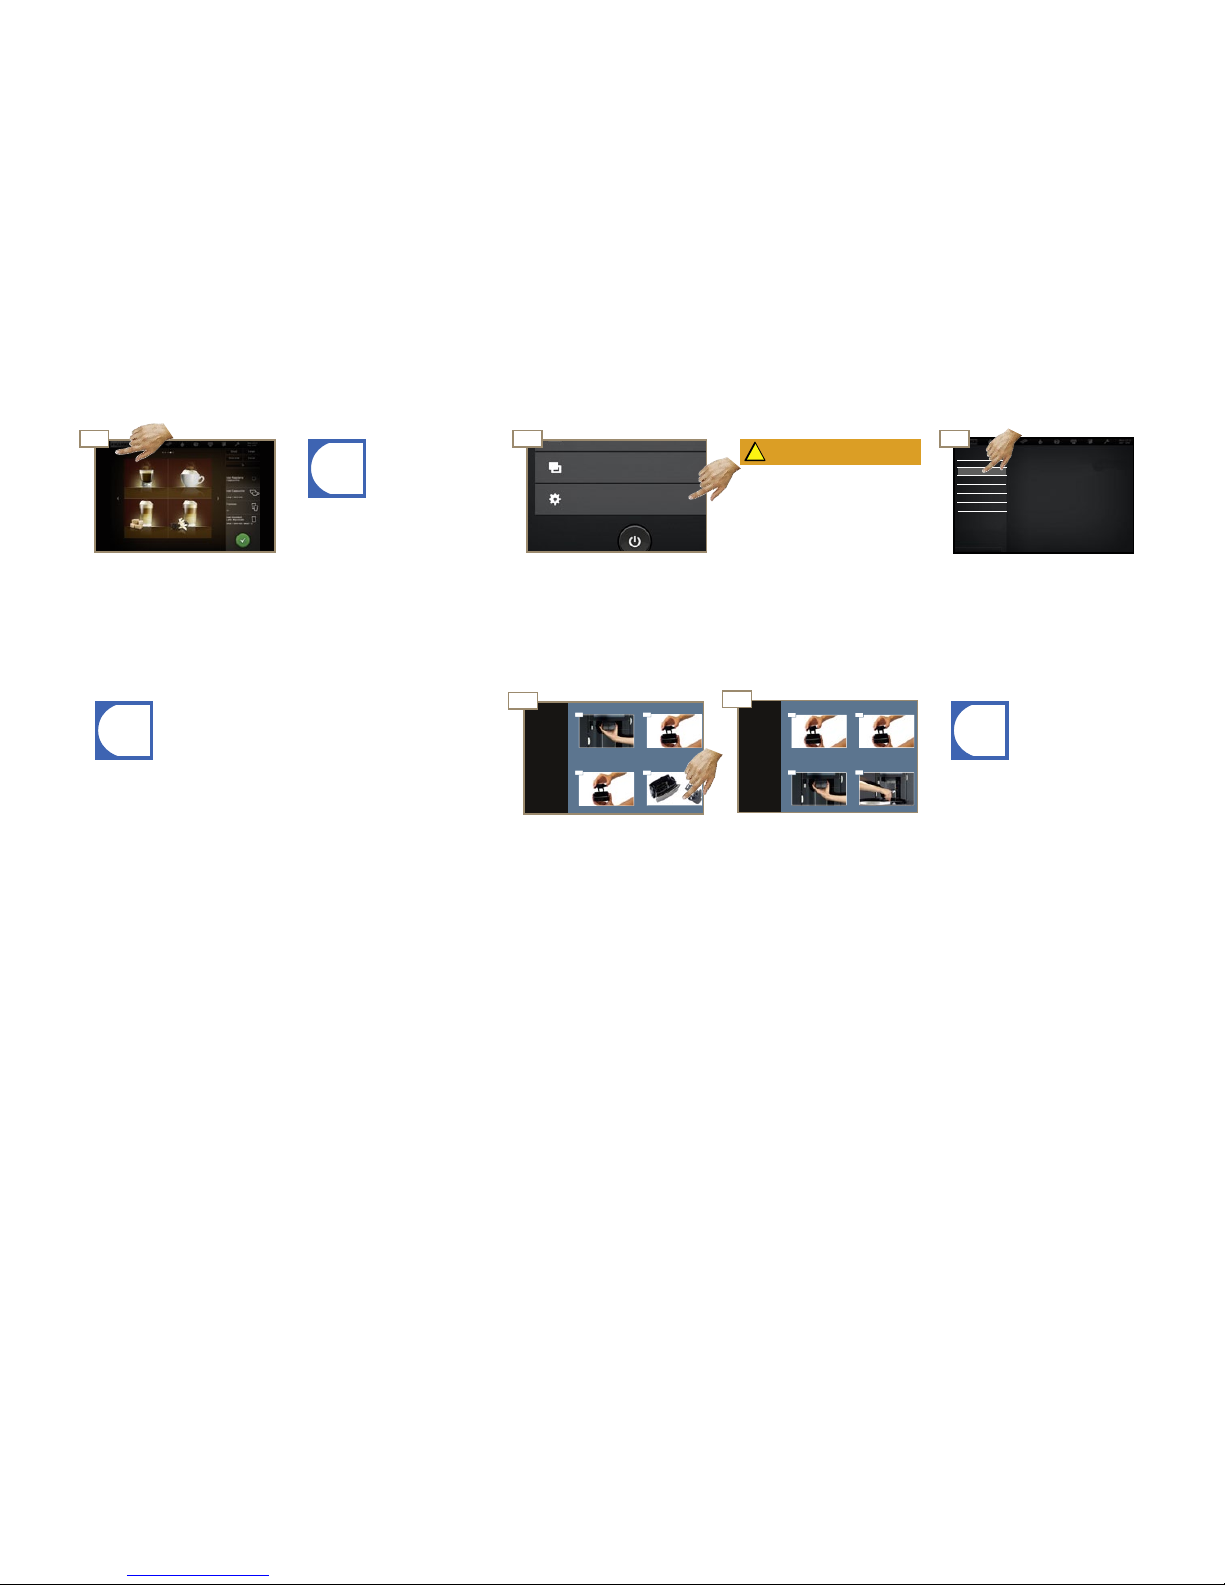
This is how the automatic cleaning is started
The machine guides you to the
next step.
The machine can switch either
back to the maintenance level
or into Energy saver mode.
Your service technician can
adjust this option for you.
Follow the instructions on the
control panel and confirm with
Continue.
Select Clean coff ee machine
and confi rm.
Danger of scalding!
From hot water and hot
steam Do not touch the machine below the outlets or the
outlets themselves.
Select Cleaning and
Maintenance.
Switch to the maintenance
level. Verify with PIN Code if
necessary.
Page 33
4
4 4
!
i
4
i
44
04
4
i
4
01 02
01 02
4
03
03
4
Care of the FM800
Page 31
Cleaning and Maintenance
Media/Data down- and upload
My settings
Service Menu
Clean Flavour Station
Clean Flavour Station
Clean coffee machine
Clean coffee machine
Wipe protection
Wipe protection
Prepare syrup system
Prepare syrup system
Prepare milk system
Prepare milk system
Rinse coffee machine
Rinse coffee machine
ERROR LOG files
ERROR LOG files
Cleaning and Maintenance
Media/Data down- and upload
My settings
Cleaning and Maintenance
Media/Data down- and upload
My settings
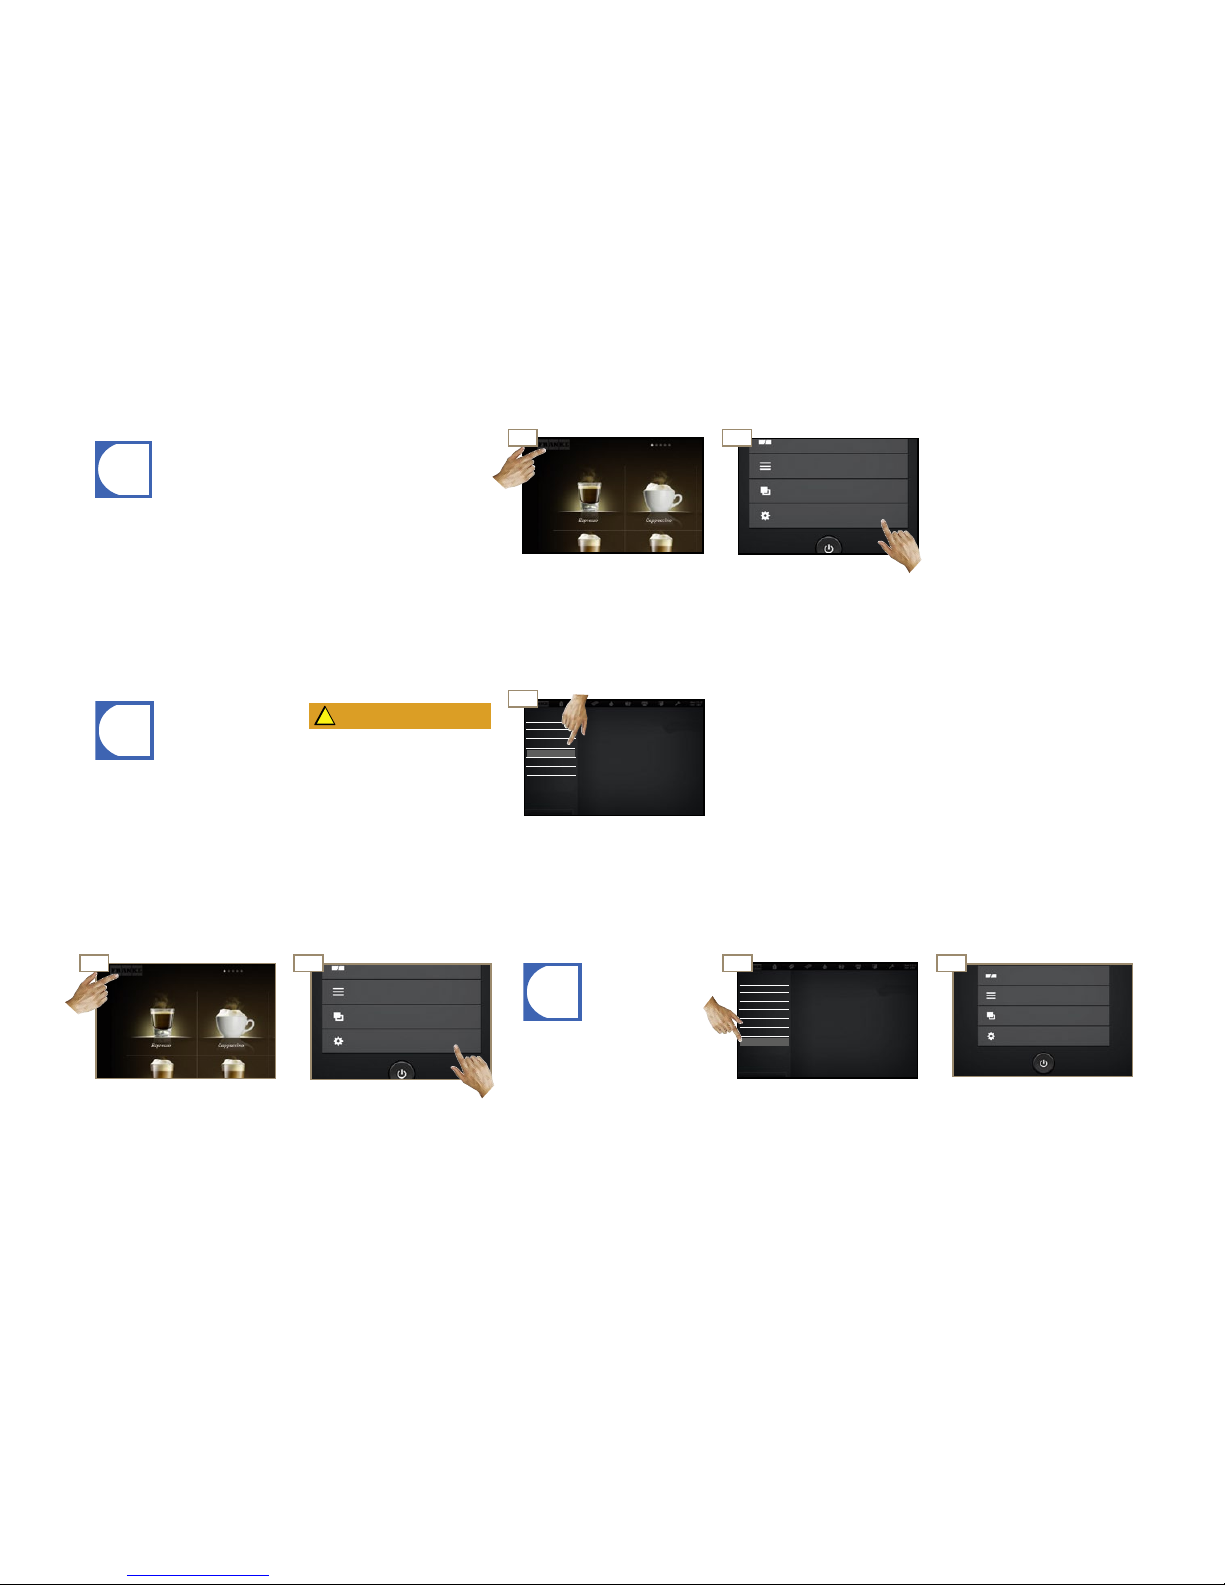
Clean the monitor.
Service level appears.
Select Cleaning and Mainte-
nance.
Select Wipe protection
Control panel is blocked for 20
seconds.
The control panel block cannot
be canceled. The control panel
block lasts 20 seconds.
Switch to the maintenance
level.
Cleaning the control panel
Select Rinse coffee machine
and confi rm.
FM800 is being rinsed.
Rinsing can be canceled with
the button.
•Rinsing is no substitute for daily cleaning! Rinsing is necessary to
prevent residue build-up in the coffee and milk systems!
•The FM800 automatically rinses after certain time intervals, as
well as when it is switched on or off.
•The machine should be rinsed before initial use and when not in
use for extended periods (more than 2 days).
WARNING
Danger of scalding!
From hot water.
Do not touch the machine
below the outlets or the outlets themselves. Do not place
anything on the drip grid.
Select Cleaning and Mainte-
nance.
Switch to the maintenance
level.
Rinsing the FM800 manually
Page 34
i
0302
02
4
03
4
4
4
4
01
01
Care of the FM800
Page 32
Cleaning and Maintenance
Media/Data down- and upload
My settings
Service Menu
Cleaning and Maintenance
Media/Data down- and upload
My settings
Service Menu
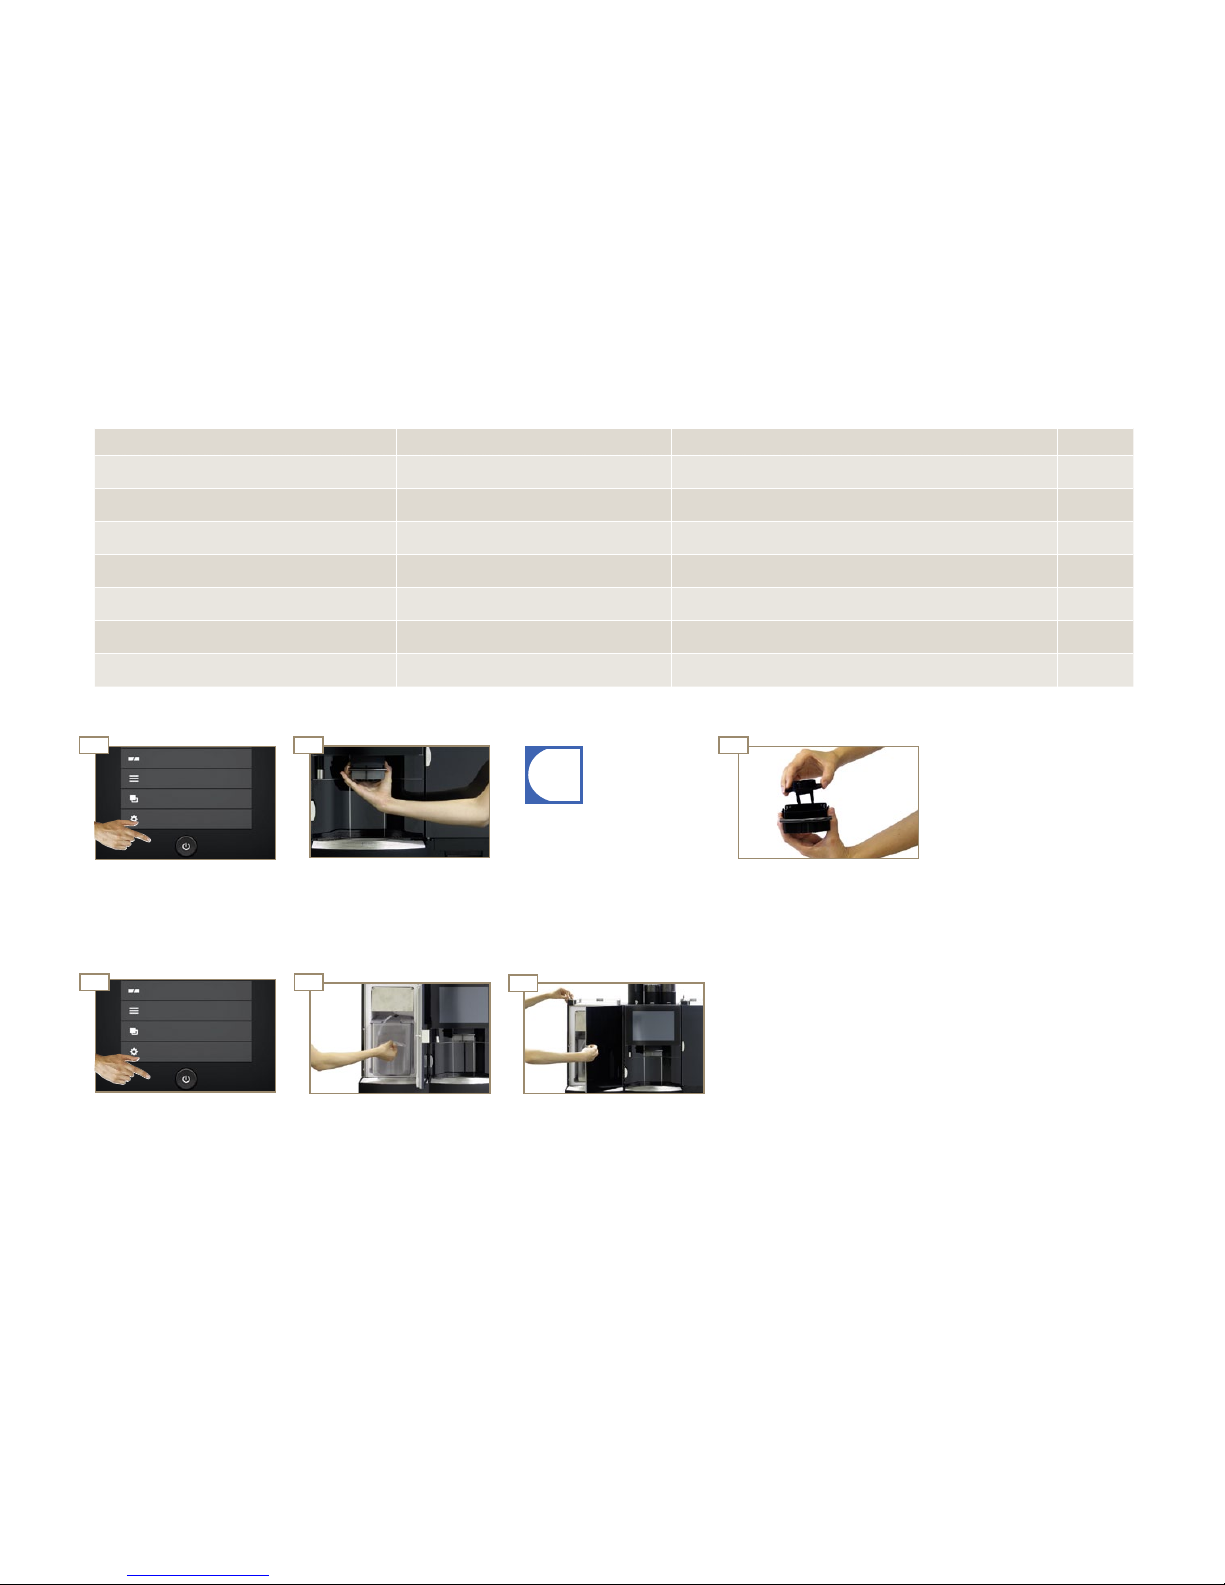
Insert the milk container and
close the refrigeration unit.
Open the refrigeration unit,
remove the milk container and
replace the intake hose.
Switch to Energy saver mode.
Replacing the refrigeration unit intake hose
Remove the dispenser head.
Replace the frothing head and
insert the dispenser head.
Make sure that an FM logo is
visible on the frother when it is
replaced.
Switch to Energy saver mode.
Replacing the frother
Maintenance plan
Frequency Task Information Completed
Daily Clean the FM800 See page 30
Daily Rinse the FM800 See page 31
Monthly Clean the coffee bean hopper See page 20
Monthly Clean the powder container See page 20
Every six months Replace the frother See page 32
Every six months Replace the refrigeration unit intake hose See page 32
Every six months, after 40,000 drinks, or as necessary Maintenance by service technician Contact a service technician.
Page 35
i
4
i
Configuration
Page 33
Service Menu
My settings
Media/Data down- and upload
Cleaning and Maintenance
Shall be introduced in the
chapter Care of the FM800.
Shall be introduced in this
chapter.
Shall be introduced in this
chapter.
The service technician sets
the access rights for the My
Settings menu for you.
Used only by your service
technician
Cleaning and Maintenance
Media/Data down- and upload
Service Menu
My settings
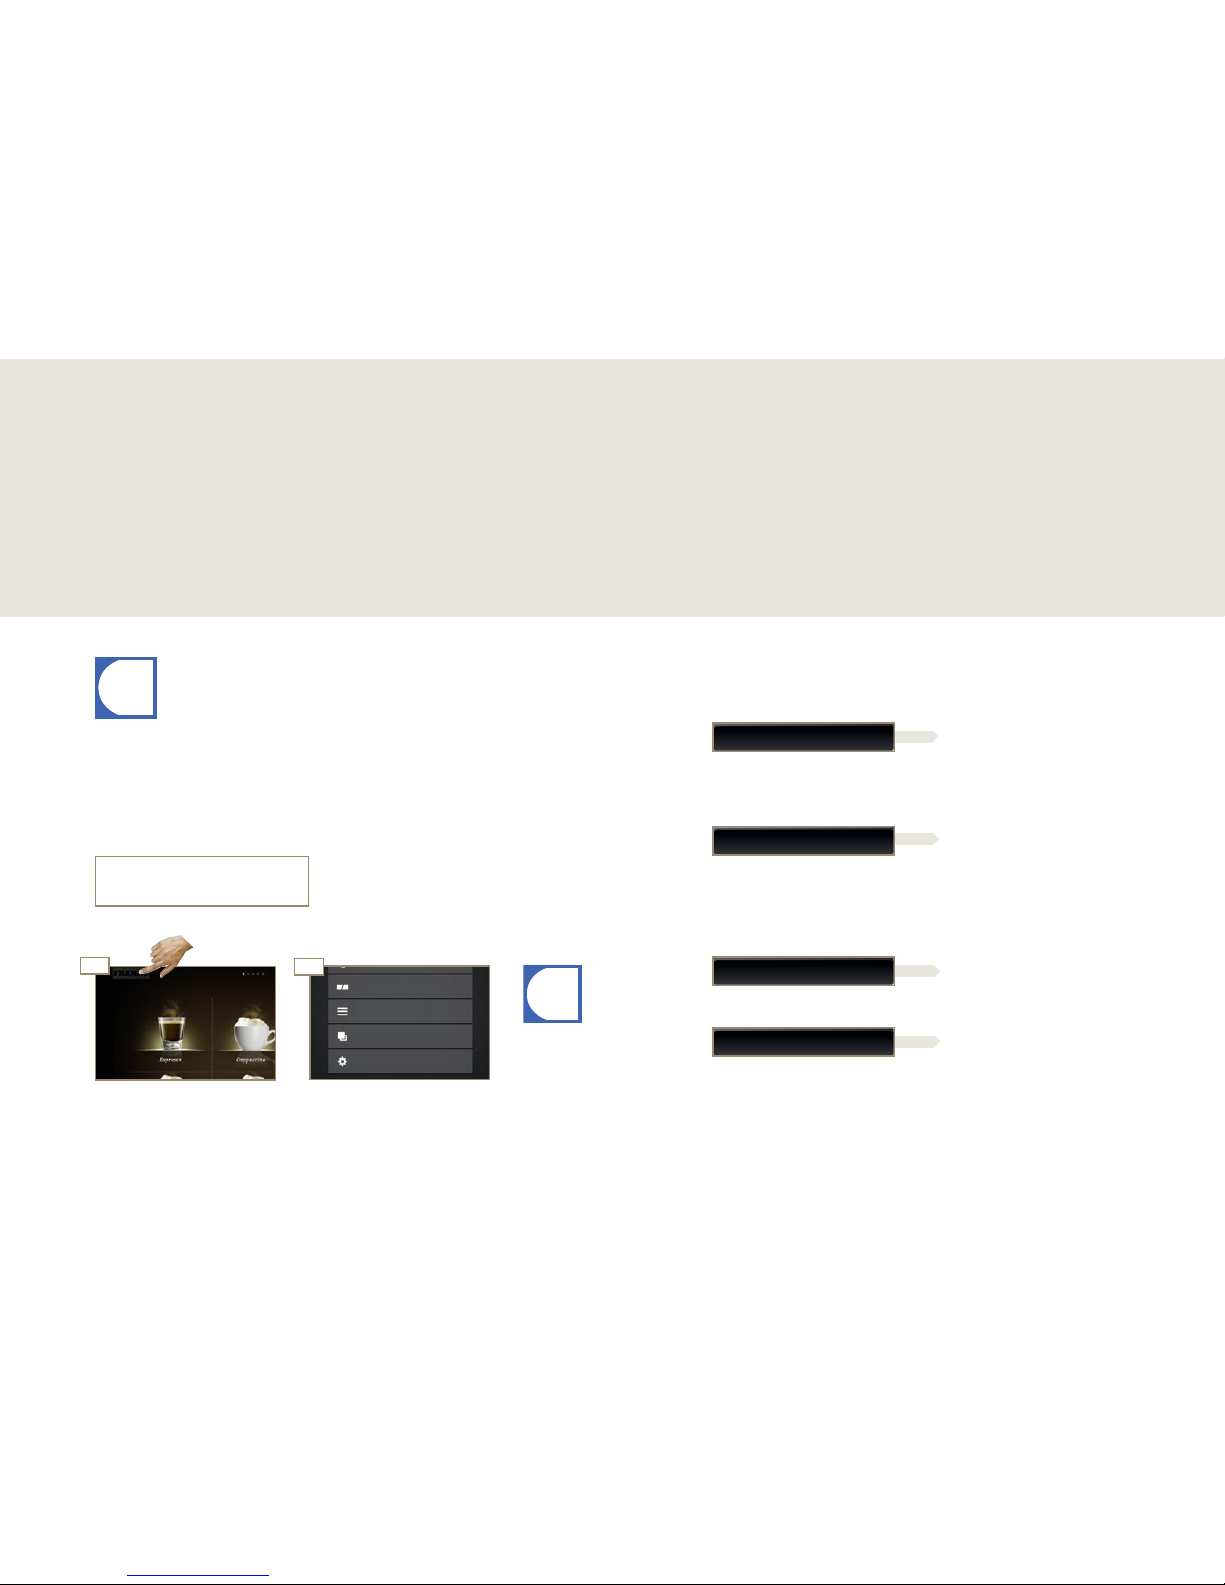
Menu tree Maintenance
Your FM800 is completely and individually programmable — which means the coffee machine is just as flexible as you are. We have kept the programming simple to make your job easier. Try it for yourself.
Configuration
Introduction to programming
Save the changes in each case
with Save.
Select Menu.
02
Switch to the maintenance
level.
01
•All programming menu items are shown on the following pages. Some of these menu items
may not feature on your FM800, depending on the configuration.
•You determine the Pin Code for the My Settings menu together with your service technician
at the time of commissioning. The PIN Code is set at the factory to 1111. We recommend
that you make a note of the Pin Code for the My Settings menu here:
Page 36
Configuration
Page 34
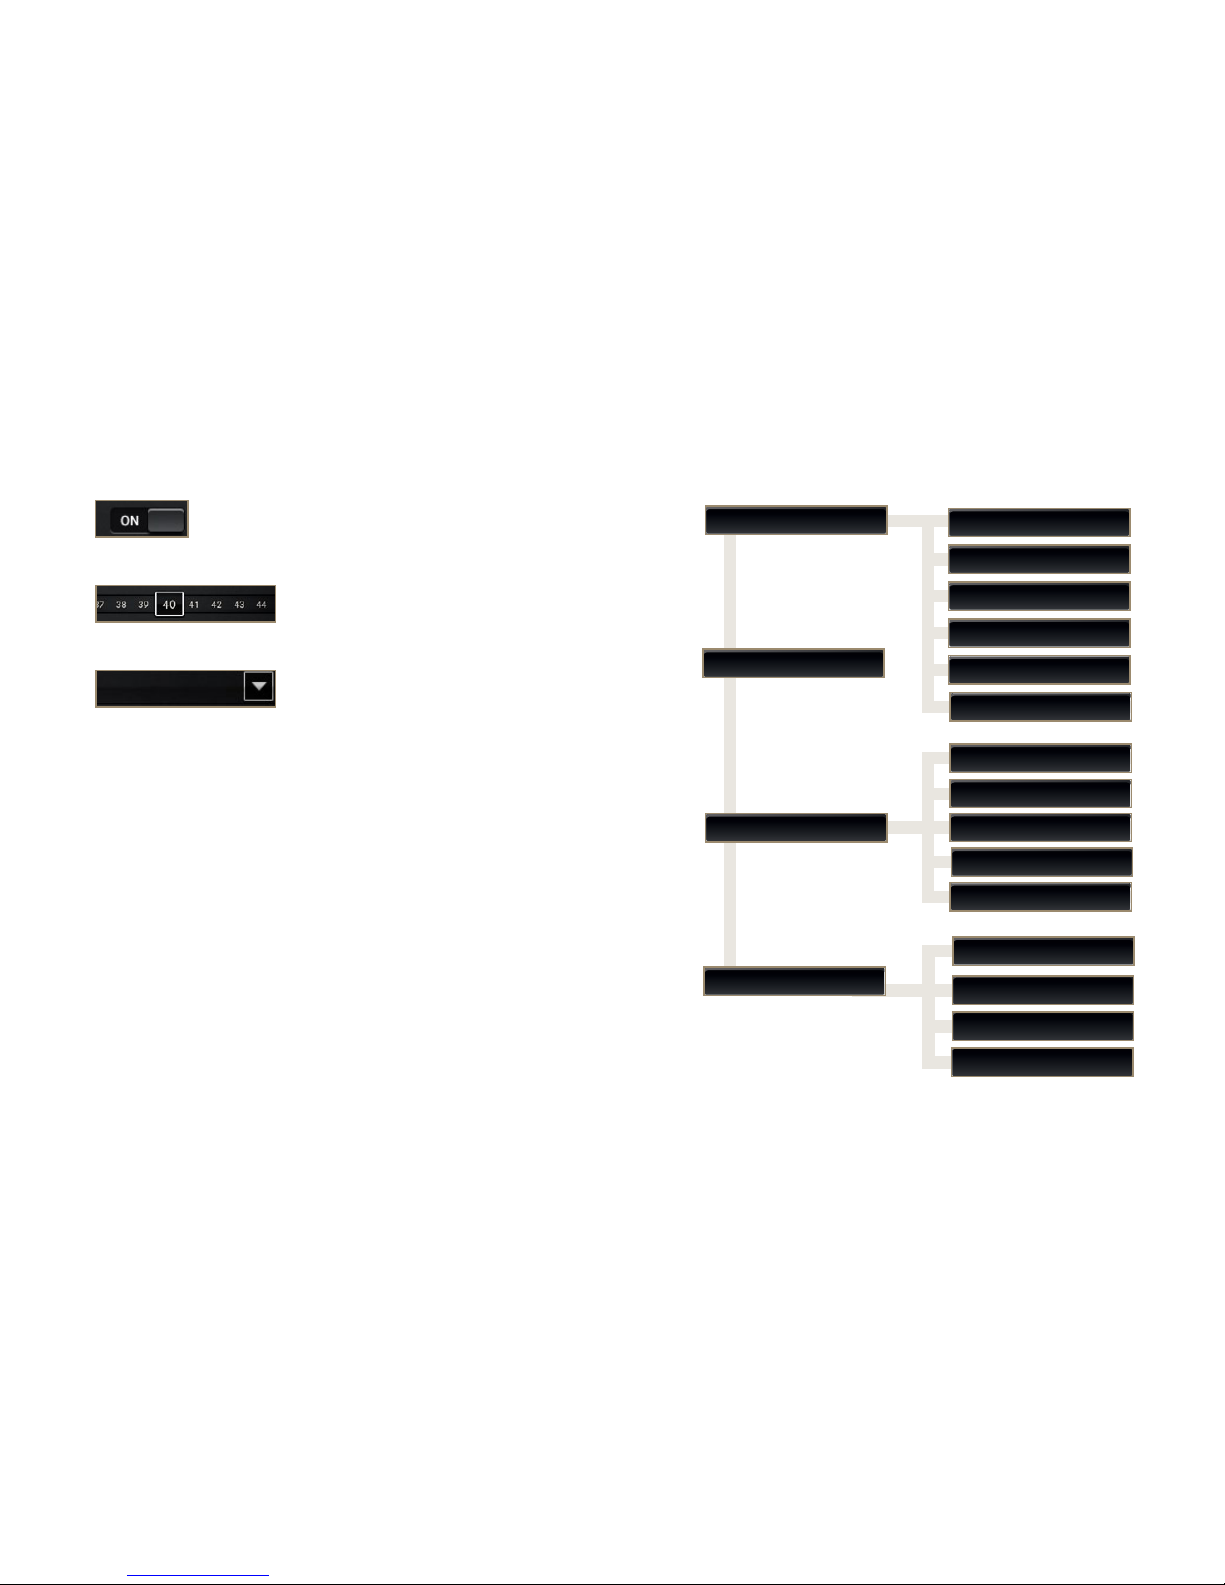
Menu tree My settings
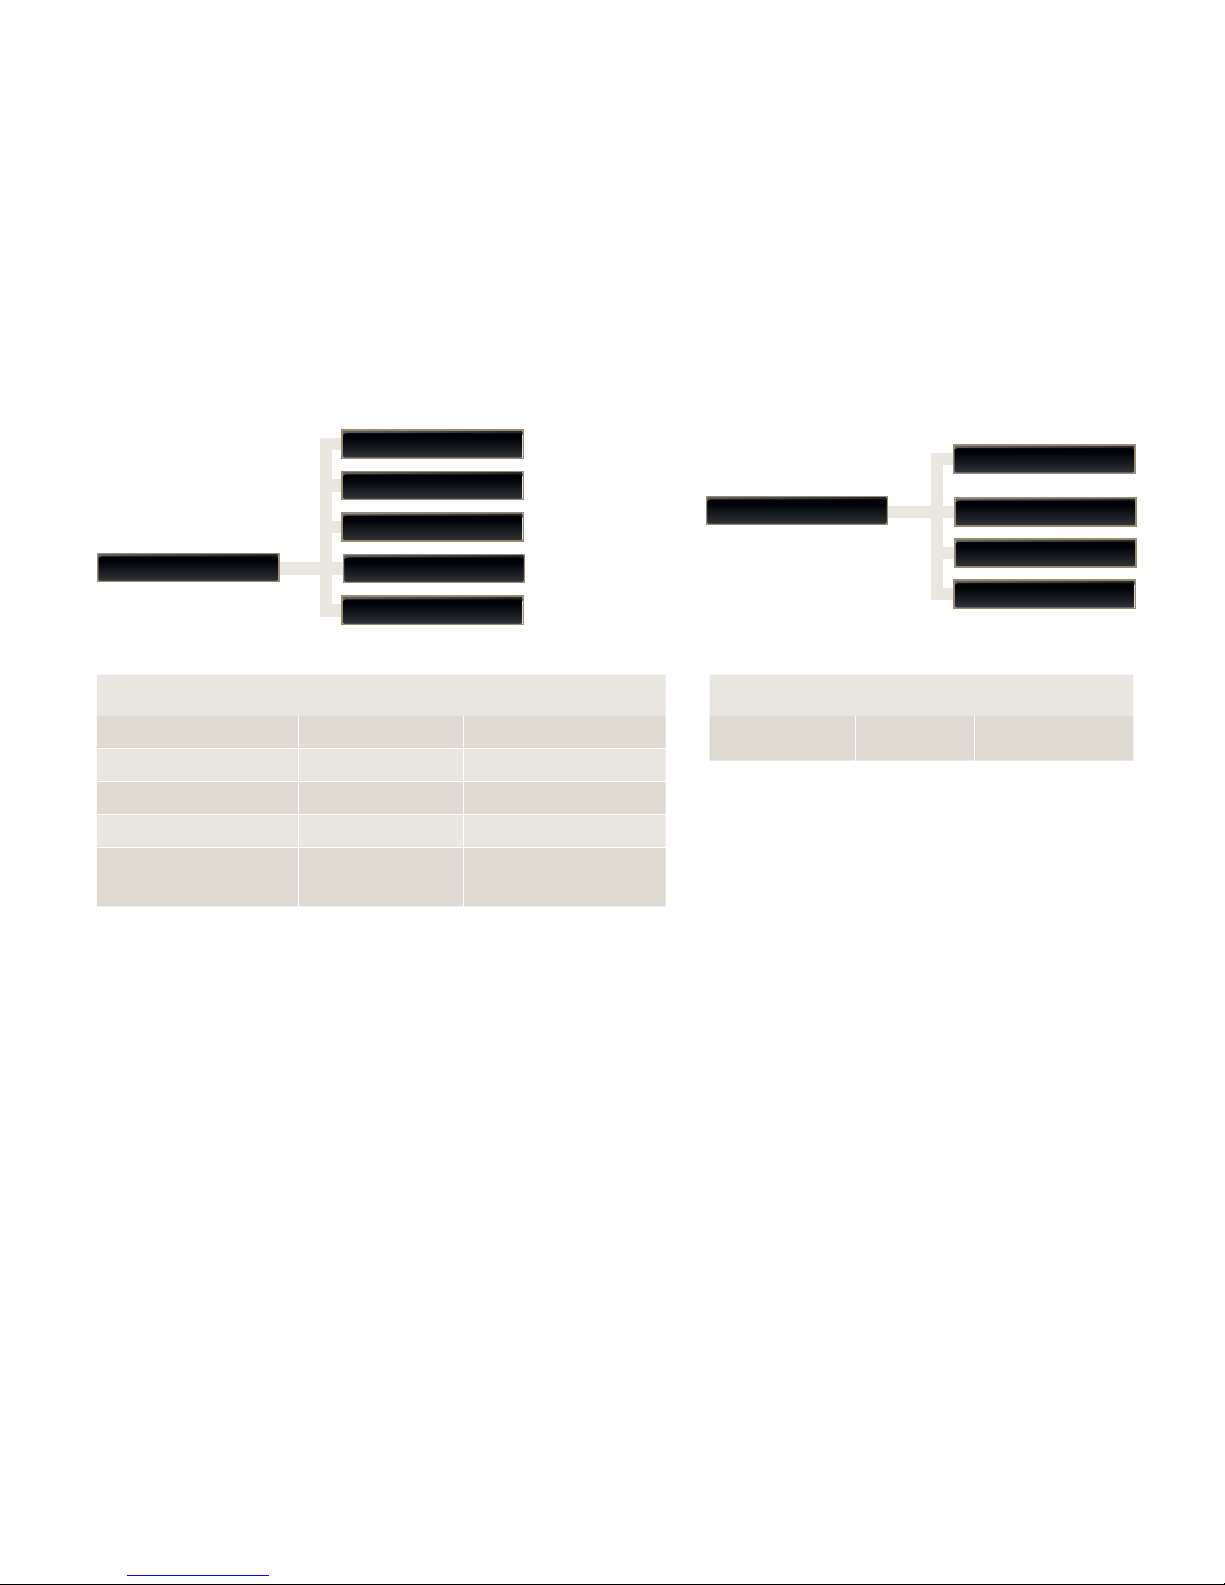
Tap in the arrow to display
selection and to select.
Parameters can be shifted
by dragging. The value in the
frame is active.
Yes/No or On/Off can be
changed by tapping on them.
The visible value is active.
Confi guring options
7. ON/OFF Machine
7.6 Key (secured) products
7.5 Maintenance
3.6 Timer 4
3.5 Timer 3
3.3 Timer 1
3.2 Date/Time
3.4 Timer 2
My settings
1 Confi gure machine
2 Confi gure products
3 Date and time
7 PIN Code
7.2 My settings/ Media / Download
1.2 Operating mode
1.1 Language
1.3 Temperatures
1.5 Accounting
1.12 Edge Lightning
1.15 Cleaning options
Page 37
Configuration
Page 35
SaveBack
1.15 Cleaning options
1.12 Edge Lightning
1.5 Accounting
1.3 Temperatures
1.2 Operating mode
1.1 Language
Language
Language
Desired action Menu item Information / Instruction
Selecting the language Language Determine language with Select.
Changing number of products per page Operating mode Change Products per page.
Switching button tones On/Off Operating mode Confirm with Yes/No.
Changing the drink temperature Temperatures
Modify temperature in percent, starting
from configured value.
Configuring Accounting Accounting Confirm with On/Off.
Changing color of Edge Lightning Edge Lightning
Select color progression or configure
exact RGB color value.
Selecting Cleaning reminder Cleaning options Switch Buzzer On/Off.
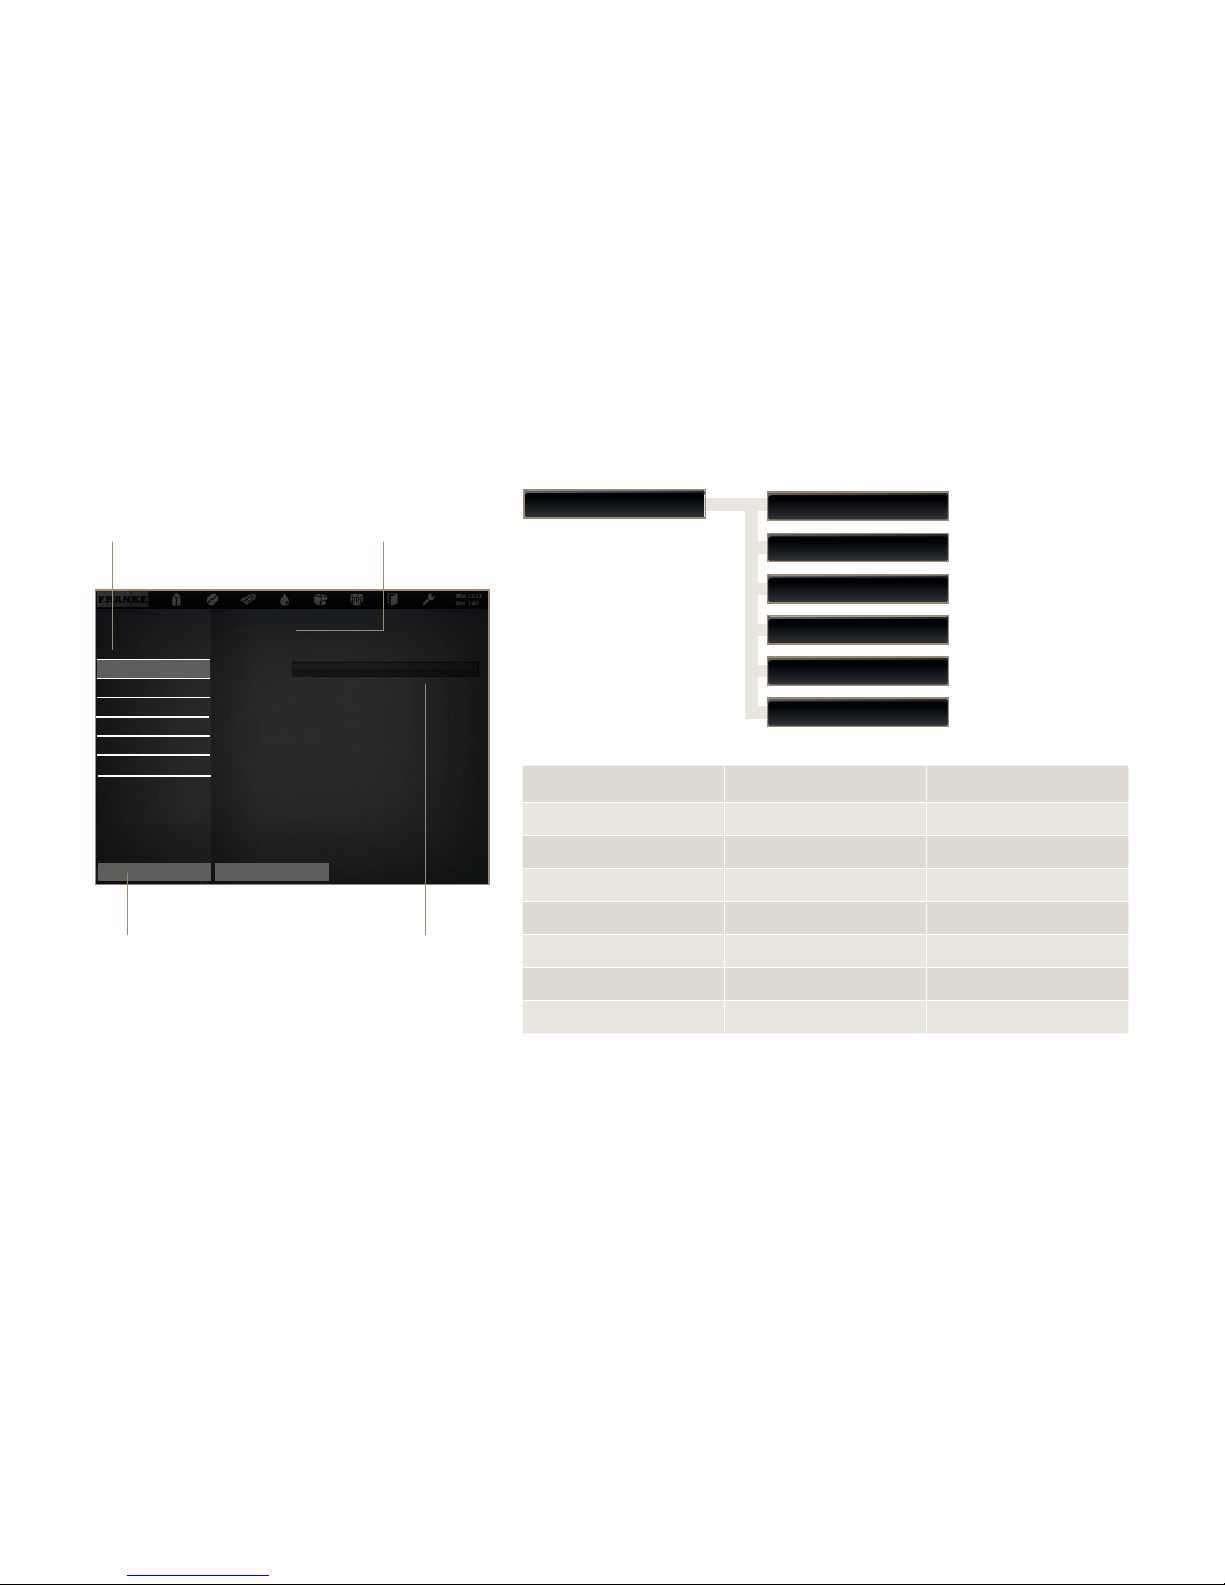
Confi guring the machine
1 Confi gure machine
1.2 Operating mode
1.1 Language
1.3 Temperatures
1.5 Accounting
1.12 Edge Lightning
1.15 Cleaning options
Configurable options.
Language
(example) displays the
menu item that can be edited.
Back goes up one level.
The left column shows the
different menu items of the
current level.
Structure of the control panel
Page 38
i
Configuration
Page 36
Water quantity
Back Save
Coffee Milk
General
Define products
Cappuccino cold
Coffee
Selection
Test
Desired action Menu item Information / Instruction
Reference
number
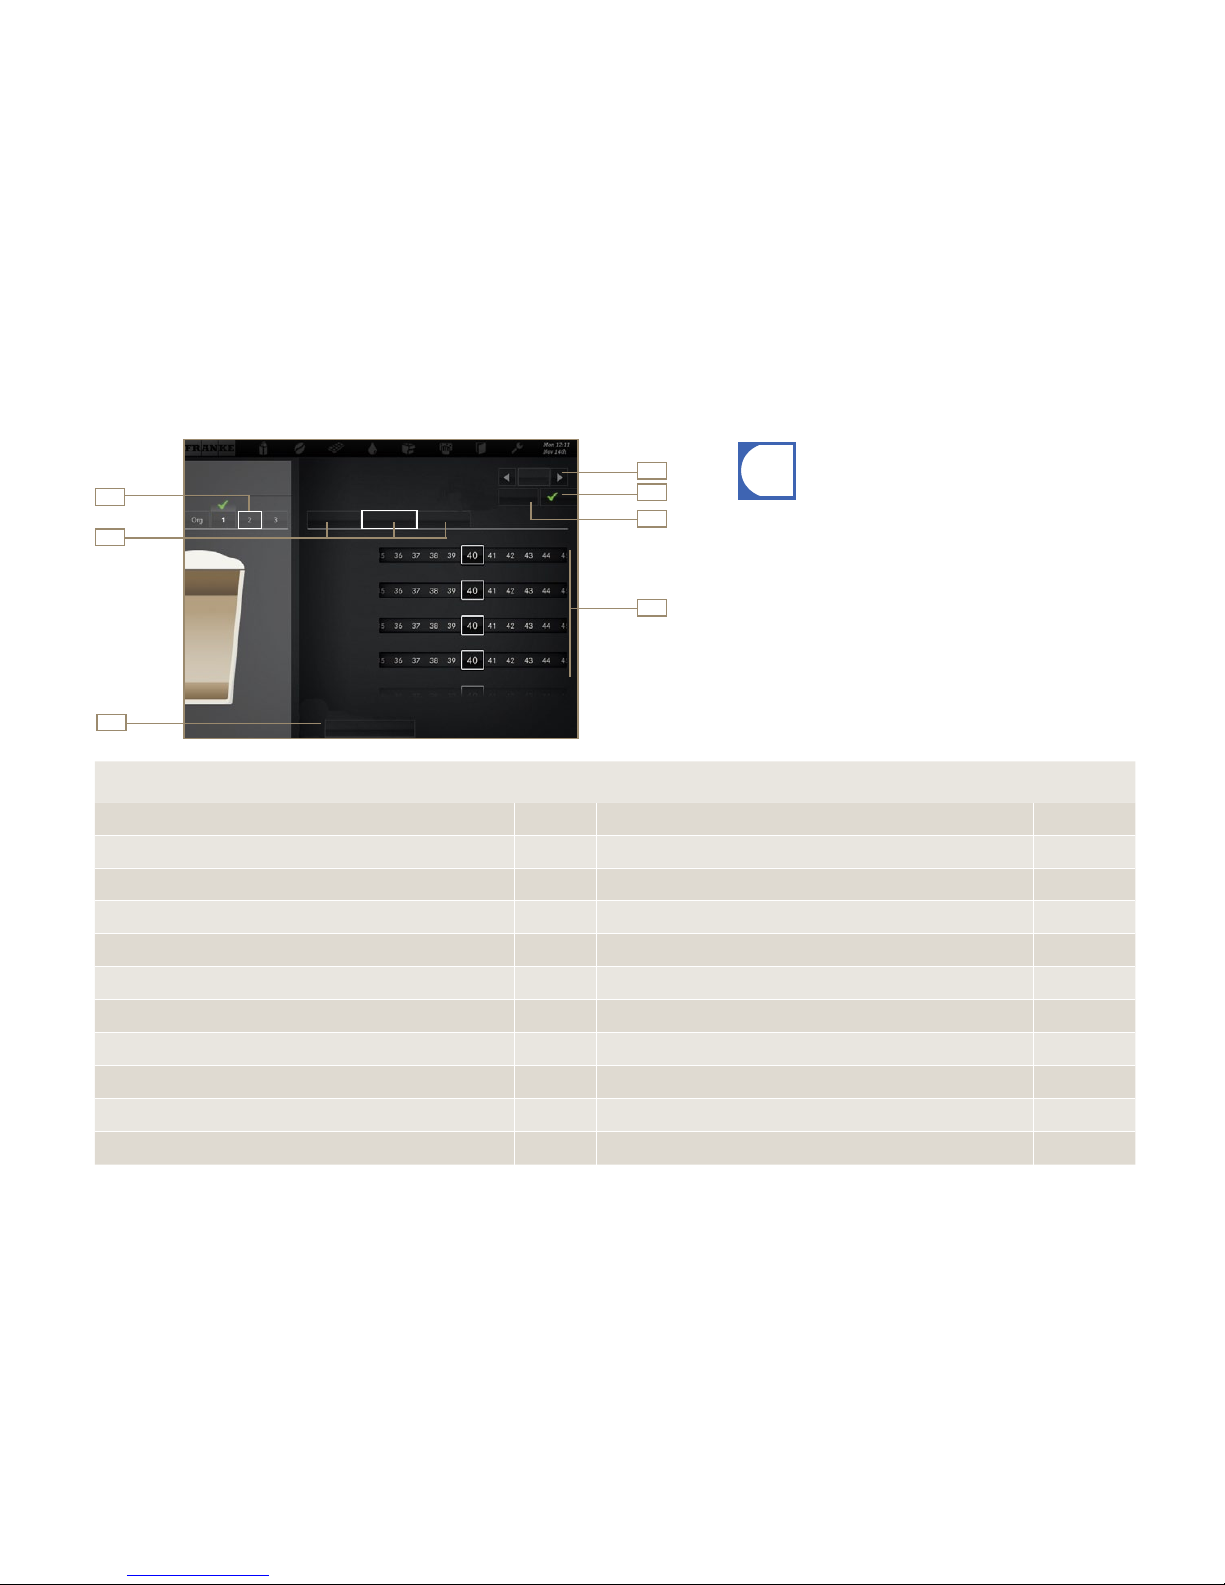
Selecting a product Select the product to be defined with Select, then select the variant to be processed. 4, 1
Changing product designation and product text General Enter product designation and select product text. 2, 7
Determining price General Determine PLU, price and token, select Free option.
Modifying Coffee quant., Grinders, Pre-inject quantity and Pressure Coffee Adjust parameters. 2, 7
Configuring milk quantity Milk Adjust milk quantity in percent. 2, 7
Configuring foam quantity Foam Adjust foam quantity in percent. 2, 7
Changing powder options Powder Adjust Water quantities 1 and 2, Powder quantities 1 and 2 in percent. 2, 7
Adding, removing syrups Flavour Adjust syrup quantities of the various flavours in percent. 2, 7
Preparing test product Test Use Test to prepare the selected product using the modified settings. 6
Determining drink variation that is to be prepared under this name Mark variation, then confirm with a checkmark. 1, 5
Saving drink settings Save Save the drink setting with Save. 3
1
3
2
4
5
6
7
•You can save each product three times according to user
specifications. The original cannot be changed.
•The only parameters displayed are the ones that the products
contains.
•Specifications in percent always proceed from a preset value.
•Tips for configuring the parameters can be found in the chapter
Help with problems concerning product quality.
Confi guring products
Page 39
Configuration
Page 37
Desired action Menu item Functionality
Change Pin Code.
The menu for which
the Pin Code is to be
changed.
Select grid in order to change
the Pin Code.
7.7 On/Off Machine
7.6 Key (secured) products
7.5 Maintenance
7 PIN Code
7.2 My settings/ Media / Download
3.6 Timer 4
3.5 Timer 3
3.3 Timer 1
3.2 Date and time
3.4 Timer 2
Date and time
Desired action Menu item Information / Instruction
Selecting between 12 h and 24 h display Date/Time Select with Select.
Configuring the date and time Date/Time
Configure parameters for Day, Month,
Year, Hour and Minute.
Configuring day to change between
Standard Time and Daylight Savings Time
Date/Time Configure the day to change with Select.
Configuring time to change between
Standard Time and Daylight Savings Time
Date/Time
Configure changeover time in minutes
after midnight.
Configuring timers
Timer 1
Timer 2
Timer 3
Timer 4
Activate timer with On/Off.
Configure the switch-on and switch-off
times.
Configure active days of week.
PIN CodeDate and Time
Page 40
4
02 03
4
01
04 05 06
4 4
4
Decommissioning and disposal
Page 38
Install menu
My settings
Cleaning and Maintenance
Media/Data down- and upload
With each decommissioning
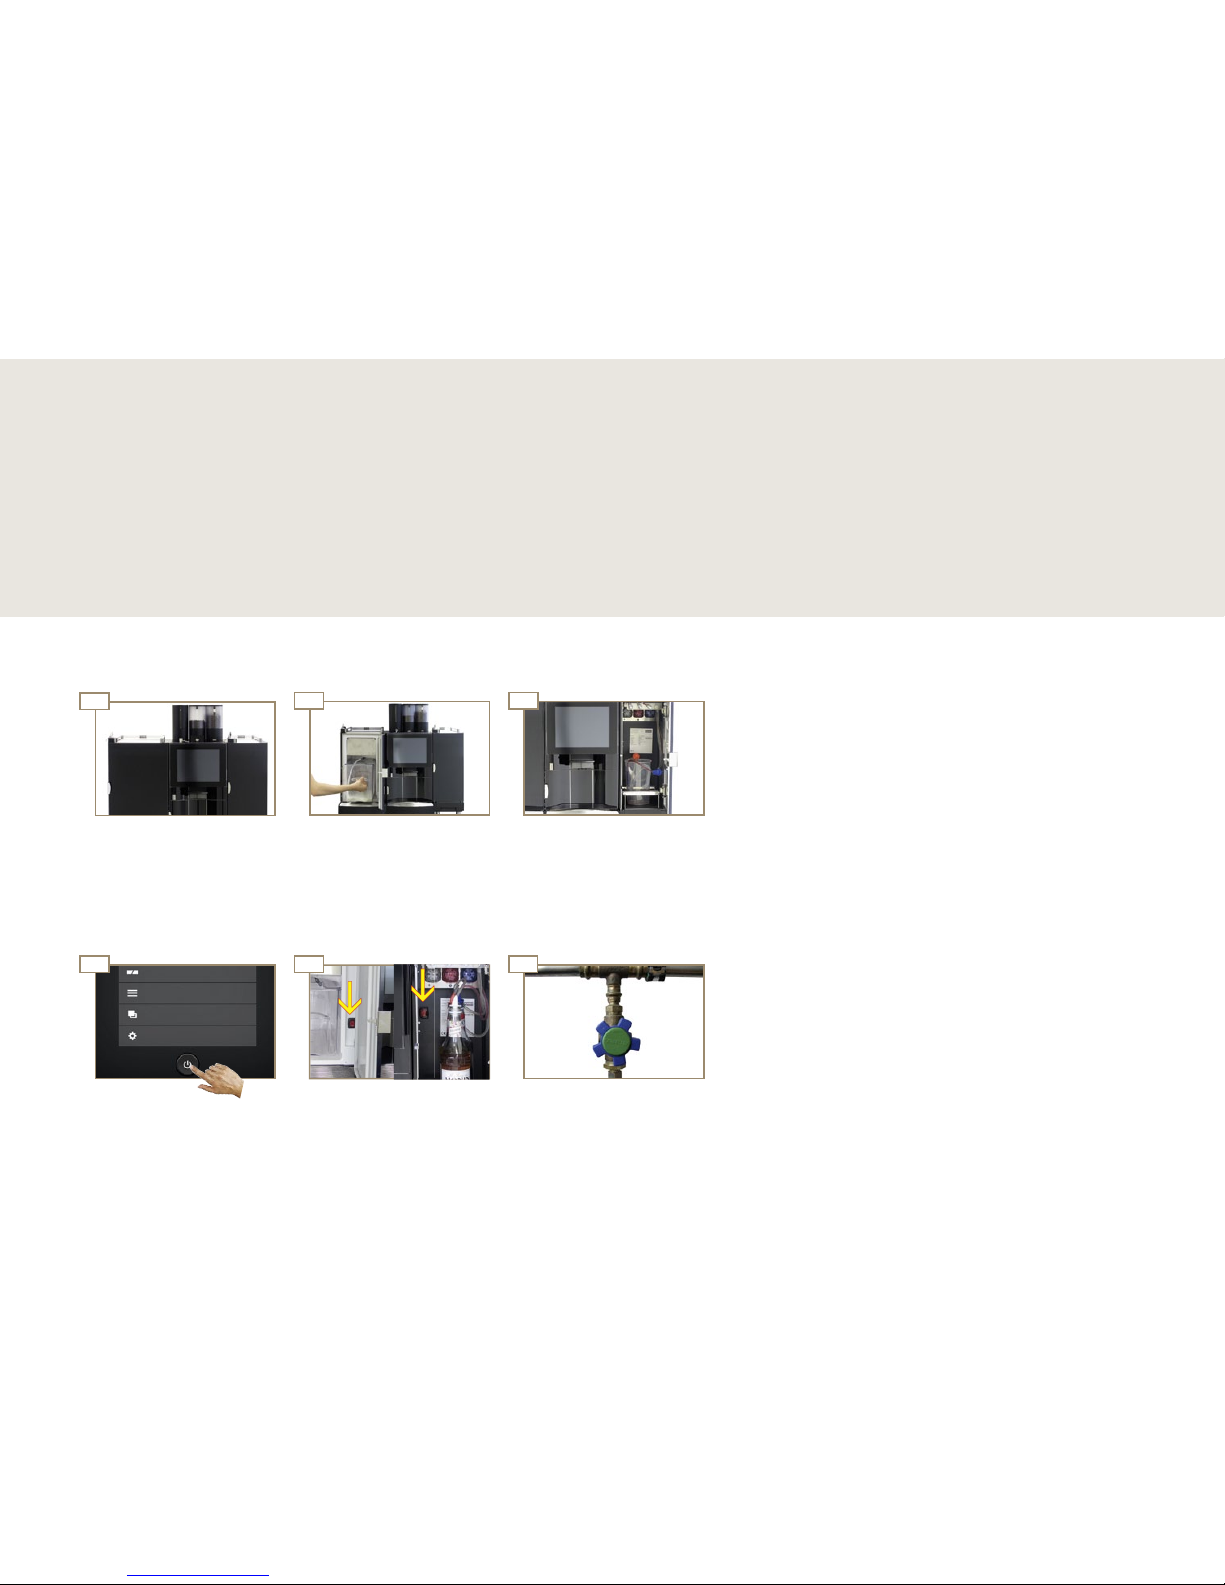
For decommissioning for a maximum of three weeks, continue with
step 4.
For a longer or a permanent decommissioning, please follow the
instructions under Note.
Turn off the water supply and
empty the water tank if there
is one.
Switch off the add-on units
and disconnect them from the
power supply.
Call up Energy saver mode and
disconnect the machine from
the power supply.
Temporary decommissioning
Clean the coffee machine and
its components. Help for this
can be found in the chapter
Care of the FM800.
Empty the Flavour Station.Empty the bean hopper and
powder container.
Empty the milk container.
Decommissioning and disposal
Do you want to shut down your FM800 coff ee machine for longer periods or dispose of it? Take advantage of
our service. We recycle your coff ee machine at a rate of nearly 100%, in order to protect the environment and
resources.
Decommissioning
Page 41

Decommissioning and disposal
Page 39
Long-term decommissioning and storage
Secure functional capability!
Contact your FRANKE service team for proper decommissioning and storage.
Have the service technician drain the coffee machine and observe proper storage conditions:
Storage temperatures: -10 °C to +50 °C
Humidity: max. 80%
If you plan to start using your machine again later, taking advantage of our service is essential.
The coffee machine must be maintained, installed and cleaned prior to drink preparation.
Proper functioning of the coffee machine cannot be ensured otherwise.
NOTE
Disposing of consumable materials
•Beans, powder and coffee grounds can be used for compost.
•Milk, water and syrup can be disposed of in the waste-water system.
•Cleaning tablets, clean solution and descaling agents should not be
permitted to enter sewage lines. Dispose of in accordance with official
regulations.
Disposing of the coffee machine
You can return your coffee machine directly to your retailer at no
charge. We assume responsibility for disposal for you in order to ensure
environmental protection and conservation of resources.
Disposal
Page 42
i
Schliessen
Pulverbehälter
ist fast leer!
Bitte Pulver füllen.
Schliessen
Bohnenbehälter
ist fast leer!
Personal informieren.
Troubleshooting
Page 40
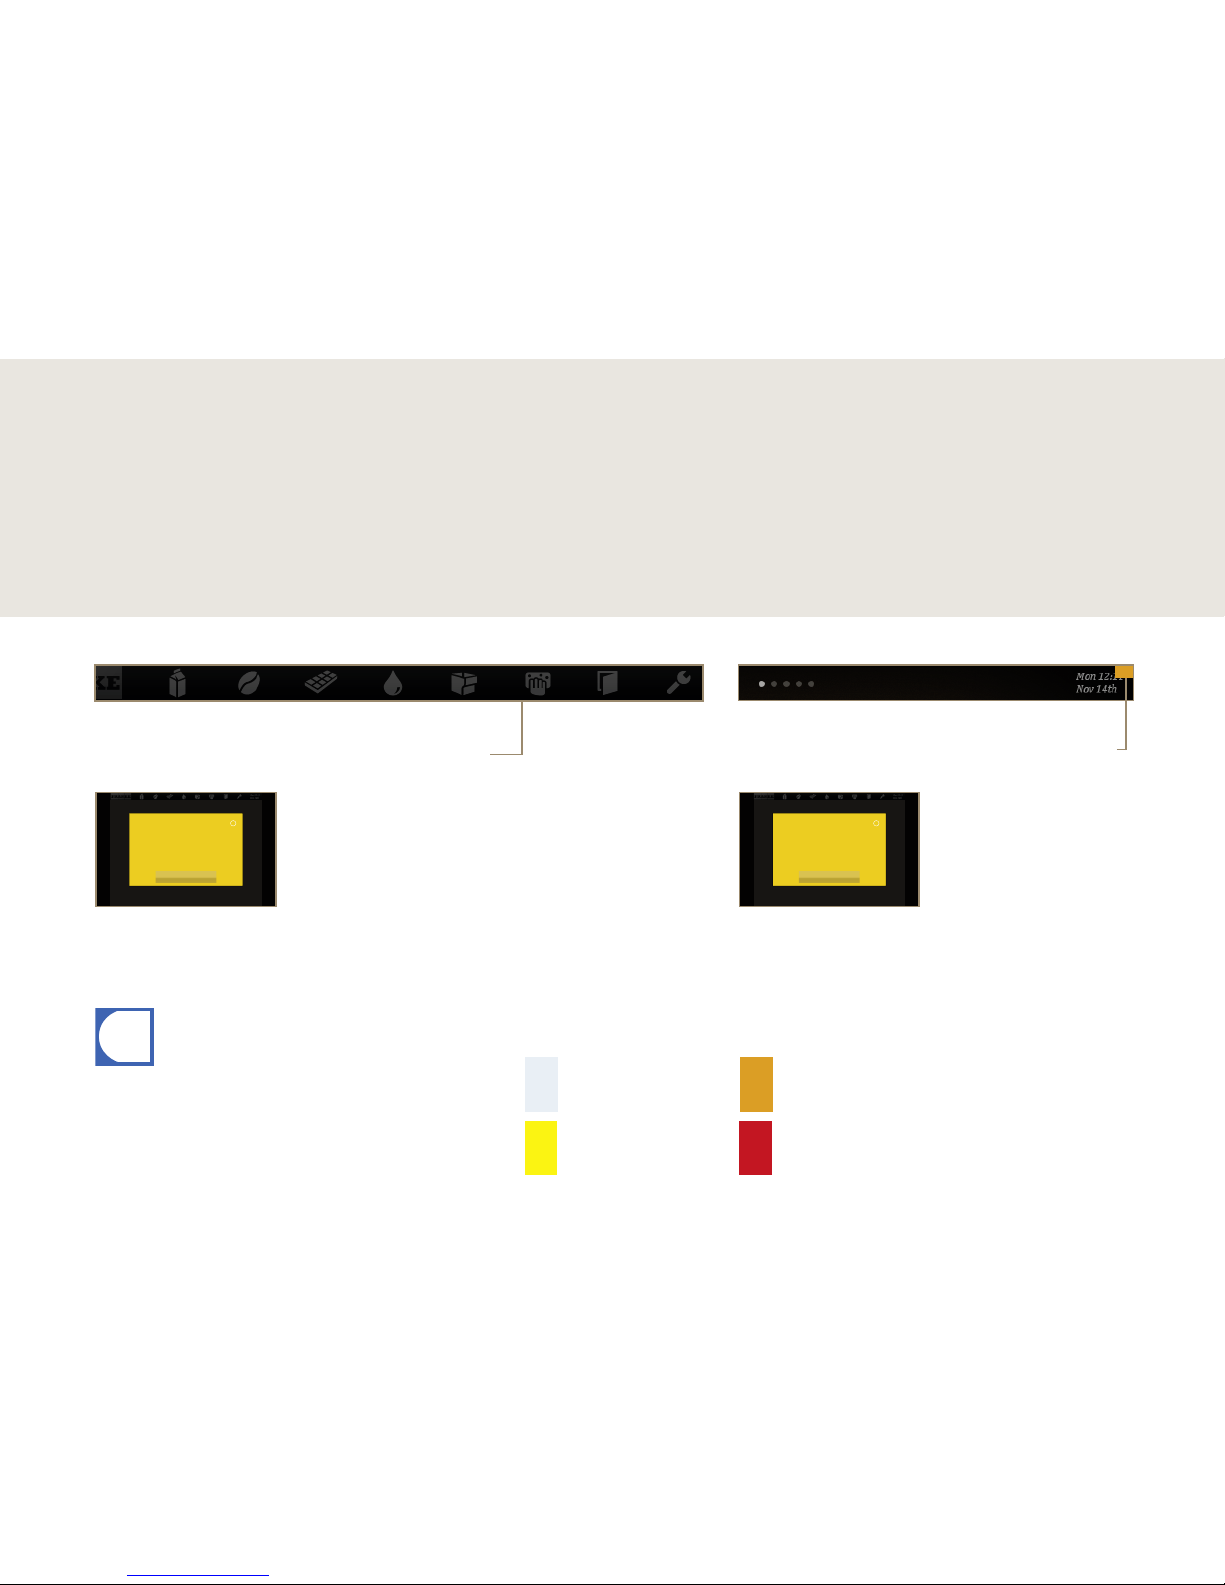
Color code for error messages
System functions with
limitations
System still fully functional
System is not functioning.
Temporary interruption.
•The color codes for the error messages can be found in the
Symbols chapter.
•If the entire system is affected by an error, then error messages
will appear automatically.
Troubleshooting
If a problem occurs, your FM800 coff ee machine will give you instructions. Events and information are
shown on the display. Should you be unable to resolve a problem despite all best eff orts, please contact
our service department.
Message with an instruction for
your customer
Self-service mode
Message with an instruction.
Non-self-service mode
In self-service mode, an
error is displayed by means
of a colored corner
In non-self-service mode, an
error is displayed by means
of a glowing symbol.
Overview of machine errors
Page 43

Troubleshooting
Page 41
Help with machine errors
Event no. Event text Solution/instructions
002 Door open Close door.
003 to 072 Restart the machine. If the error is not cleared, contact customer service.
090 Maintenance required Perform maintenance according to maintenance plan. Reset counters.
099 Water filter Contact customer service.
100 Grounds container full Empty grounds container.
101 Empty grounds container Empty grounds container.
110 Flowmeter error 1 Restart machine or select additional product.
112 Clean agitator Clean mixer chamber.
114 Flowmeter error 2 Restart or select additional product.
119 Center powder container Add powder.
120 No ground coffee Add coffee beans or powder and select the product again or cancel.
121 Fill left container Refill beans in left container.
122 Fill center container Refill beans in center container.
123 Fill right container Refill beans in right container.
125 Powder lid open Close powder lid.
126, 127 Brewing chamber open Select next product.
130 Add cold milk Fill milk tank.
131 Milk empty Fill milk tank.
132 Fill cold milk container 2 Fill milk tank.
133 Milk container 2 empty Fill milk tank.
160 Battery low Contact customer service.
170 Check water tank Fill fresh water tank. Empty waste water tank.
200 to 211 Accounting CS Restart the machine. If the error is not cleared, contact customer service.
221 Communication FS Contact customer service.
222, 223 Communication FM Contact customer service.
226 Cleaning recommended Perform cleaning.
227 Cleaning required Perform cleaning.
228 Flavour cleaning Clean the Flavour Station.
229 Flavour cleaning Clean the Flavour Station.
230 Priming Flavour Perform priming.
231 Priming milk Perform priming.
Page 44

Troubleshooting
Page 42
Possible causes Solution
Too sweet
Use less powder
Use more water
Not sweet enough
Use more powder
Use less water
Strange taste Clean the powder system
Taste of powder products
Possible causes Solution
Viscous
Use less powder
Use more water
Watery
Use more powder
Use less water
Lumpy Clean the powder system
Consistency of powder products
Possible causes Solution
Temperature too low Increase coffee temperature
Roast too light Change coffee
Grind too coarse Select a finer grind
Coffee tastes sour
Possible causes Solution
Temperature too high Lower coffee temperature
Grind too fine Select a coarser grind
Too little powder Increase amount of coffee
Roast too dark Change coffee
Coffee tastes bitter
Possible causes Solution
Poor grind Contact customer service
Minimal coffee usage Load smaller amount of coffee
Coffee beans bad Replace coffee beans
Residual cleaning solution Rinse the machine
Cup dirty Check dishwasher
Water (chlorine, hardness, etc.) Have water quality checked
Coffee tastes strange
Possible causes Solution
Grind too coarse Select a finer grind
Too little powder Increase amount of coffee
Temperature too low Increase temperature
Coffee is too old Store coffee properly
Tasteless coffee
Help with problems concerning product quality
Page 45

Index
Page 43
Not available for zero series
Index
Page 46

Page 47

Item Order number
Cleaning tablets (25 pcs.) BK 328 399
Cleaning tablets
(100 pcs.) BK 328 400
Milk cleaner 1L 301 219
Frother 1H328465
Consumable materials
Page 48
Your distribution partner:
Franke Kaff eemaschinen AG
Franke-Strasse 9
4663 Aarburg – Switzerland
Tel. +41 (0) 62 787 31 31
www.franke.com
Issued 09.2012 / order number: 1H 328 762 / revision 0
 Loading...