

Page 1

FRANKE PROFESSIONAL SERIES
DUAL FUEL COOKTOP OPERATION MANUAL
FIXG905B1 N/L
FIXG903B1 N/L
FIXG9041B2 N/L
Page 2

5 YEAR CUSTOMER CARE WARRANTY
Australian Consumer Guarantees
Our goods come with guarantees that cannot be excluded under the Australian Consumer Law. You are entitled to a replacement or refund for a major failure and
compensation for any other reasonably foreseeable loss or damage. You are also entitled to have the goods repaired or replaced if the goods fail to be of acceptable
quality and the failure does not amount to a major failure.
Express Warranty Details
As well as your consumer guarantees under the Australian Consumer Law, PR Kitchen and Washroom Systems Pty Ltd ACN 138 663 279 (PRKS) offers original
purchasers of the Products (Customer or you) the additional express warranty described in this document (Express Warranty) in respect of Franke Professional
Appliances used in a domestic/residential setting (Product).
The benefits provided under this Express Warranty are additional to other rights and remedies available to the Customer under the Australian Consumer Law and do
not derogate or reduce your rights under the Australian Consumer Law.
The conditions, limitations and exclusions that apply to this Express Warranty are set out in this document. This Express Warranty is not transferable and is given to
Customers when the Product is used in a domestic or residential setting.
This Express Warranty is not transferable and is given to Customers when the Product is used in a domestic or residential setting.
Term of the Express Warranty
The Express Warranty is valid for 5 Years from date of purchase of the Product (Warranty Period).
Express Warranty
Subject to the terms set out in this document, PRKS warrants to Customers that the Product will be free from defects in materials and workmanship during the
Warranty Period.
If the Product fails to operate or is defective during the Warranty Period under normal operating conditions as a result of a defect in materials or workmanship,
subject to the exceptions set out under the heading Conditions below, PRKS will, at its discretion either:
• replace the Product or a component of the Product; or
• repair the Product or a component of the Product using new, used or refurbished replacement parts,
Conditions
This Express Warranty does not cover and expressly excludes: damage to the Product or a defect in or failure of the Product resulting directly or indirectly from any of
the following:
• alteration, modification or disassembly of the Product;
• the Product being used in a way for which it was not designed or in a manner contrary to the instructions provided with the Product (including in respect
of maintenance of the Product);
• abuse, misuse, negligence, willful damage neglect or vandalism;
• corrosion from environmental conditions or chemical treatments;
• fire, accident or theft;
• damage caused while the Product is being
• external sources, including but not limited to blown fuses, power failure, faulty installation;
• natural disasters, or other ‘acts of God’, including but not limited to damage from flooding, drought, lightning, hurricanes, hail, windstorms, earthquakes,
• tornadoes, gales, cyclones or other causes beyond the control of PRKS; or
• normal wear and tear;
• scratching, denting, rusting, spotting, discolouration or tampering with the Product. Any imperfections in the finishes or in the natural materials used should not
be considered as faults but a typical characteristic of these crafted products;
FRANKE PROFESSIONAL
*T&C’s apply
2
Page 3

APPLIANCE OPERATION MANUAL
CONTENTS PG
GENERAL INFORMATION 4
SAFETY WHEN IN USE 5
SAFETY 6-7
ELECTRICAL AND GAS CONNECTION 8
INSTALLATION INSTRUCTIONS 9-10
LEGEND AND MANUAL IGNITION FOR GAS BURNERS 11
GENERAL ASSEMBLY PROCEDURE FOR INSTALLATION 12
TO USE YOUR NEW FRANKE COOKTOP 13
ELECTRIC INDUCTION COOKING 14-16
DESCRIPTION OF THE APPLIANCE 17-18
STARTING-UP AND APPLIANCE MANAGEMENT 18-23
COOKING ADVICE 24-25
MAINTENANCE AND CLEANING 25
WHAT TO DO IN CASE OF A PROBLEM 25-26
ENVIRONMENT PRESERVATION 26
CARE AND MAINTENANCE 27
FAULT FINDING / ABNORMAL OPERATION 28
MODELS COVERED
FIXG905B1 N/L
FIXG903B1 N/L
FIXG9041B2 N/L
3
Page 4

GENERAL INFORMATION
PLEASE KEEP AND READ FOR FUTURE REFERENCE
The Franke range of cooktops are state of the art appliances featuring the latest in flame auto safety shut-off. Should the flame on any burner be
extinguished accidentally then the gas flow to that burner will automatically cease to flow, ensuring no hazardous build up of flammable gas from the
cooktop can then occur.
This appliance is not intended for use by children or persons with reduced physical, sensory or mental capabilities or lack of experience and
knowledge, unless they have been given supervision or instruction concerning use of the appliance by a person responsible for their safety.
The appliances feature easy to clean ceramic or stainless steel cooktops together with brass forged burners and cast iron pan supports.
They are available in Natural Gas or LP Gas configurations.
Choice of mixed energy gas and induction models offer the best in performance from simmer to high speed using FullSpectrum gas burners, or the
fantastic induction heating.
Various sizes and numbers of burners in the Franke cooktop range allows you to choose the appliance or number of appliances to meet your cooking
needs
NOTE: ALL MATERIAL SURROUNDING THE INSTALLATION MUST BE ABLE TO WITHSTAND TEMPERATURES OF
95˚C DURING PERIODS OF OPERATION. CERTAIN MATERIALS (VINYL WRAP) MAY SUFFER DAMAGE WHEN HEATED
FROM AN APPLIANCE.
This appliance has been constructed and distributed in compliance with the essential requirements of the following EEC DIRECTIVES, EUROPEAN
NORMS, Australian & New Zealand Standards.
CE Marking – 93/68 Low Voltage – 73/23 EMC – 89/336; Materials that can touch food – 89/109;
Safety Standards – EN 60 335 – 2 – 6 ASNZS3350-1, ASNZS3350-2-6
When first used an odor may be emitted by any residual protective finish or moisture, which will cease after a short period of time
FOR YOUR SAFETY
_______________________________________________________________________________________________________________________
We have taken care to ensure that this appliance operates safely by way of meeting and exceeding all Australian Safety and Performance Standards
applied to this type of product. You should read and understand the safety issues to avoid the possibility of an accident.
IF YOU SMELL GAS
_______________________________________________________________________________________________________________________
Open windows and doors, and extinguish any open flame. Do not touch electrical switches and call your gas supplier immediately.
4
Page 5

SAFETY WHEN IN USE
1. Remember this appliance produces heat and therefore some parts will get hot. Let pan supports and other surfaces cool down before
touching them.
2. Do not leave children unattended near the appliance when it is hot or in use.
3. Do not store or use petrol or other flammable vapours or liquids in the vicinity of this or any other gas appliance.
4. Do not use the burners as a room heater.
5. Do not allow clothing to pass over or near to the flame.
6. Do not leave handles of saucepans protruding out into the room or over adjacent burners. Always check that the pot is stable and will not be
likely to tip its contents before you release your grip.
7. Do not store items of interest to children in the cabinets above the appliance. Children climbing or standing on the appliance could result in
serious injury.
8. Do not position pans off-centre to the burner. Adjust the flame to remain under the pan.
GAS CONTROLS - LIGHTING PROCEDURE
_______________________________________________________________________________________________________________________
NOTE: ALWAYS ENSURE ALL PARTS ARE CLEAN AND DRY PRIOR TO OPERATING ANY BURNER.
It is important that the burner assembly sequence on the previous page is performed prior to initial operation of the cook
top or light back may occur which could affect the burner.
WHEN INSTALLED IN A CARAVAN OR MARINE CRAFT DO NOT USE THIS APPLIANCE AS A SPACE HEATER. DO NOT
PLACE COMBUSTIBLE MATERIAL OR PRODUCTS ON THIS APPLIANCE AT ANY TIME. DO NOT USE AEROSOLS NEAR
THIS APPLIANCE WHILST IT IS IN OPERATION.
5
Page 6

SAFETY
PRECAUTIONS BEFORE USING
• Unpack all the materials.
• The installation and connection of the appliance must be done by approved and qualified specialists. The manufacturer cannot be
responsible for damage caused by installation or connection errors.
• When used, the appliance must be correctly installed in a kitchen unit and an adapted and approved work surface.
• This domestic appliance is exclusively for the cooking of food, to the exclusion of any other domestic, commercial or industrial use.
• Remove all labels and self-adhesives from the ceramic glass.
• Do not change or alter the appliance.
• The cooking plate cannot be used as freestanding unit or as a working surface.
• The appliance must be grounded and connected in compliance with local standards.
• Do not use any extension cable to connect the cooktop.
• The appliance cannot be used above a dishwasher or a tumble dryer: steam may damage the
electronic appliances.
• The appliance is not intended to be operated by means of external timer or separate remote control system.
USING THE APPLIANCE
• Switch the heating zones off after use.
• Keep an eye on the cooktop when cooking with grease or oils as they may quickly ignite.
• Be careful not to burn yourself during or after using the appliance.
• Make sure no cable of any fixed or moving appliance makes contact with the glass or the hot saucepan.
• Magnetic objects (credit cards, floppy disks, calculators) should not be placed near the appliance when in use.
• Metallic objects such as knives, forks, spoons and lids should not be placed on the cooktop surface as they can get hot.
• In general, do not place any metallic object except heating containers on the glass surface. In case of untimely activation or residual heat,
they may heat, melt or even burn.
• Never cover the appliance with a cloth or a protection sheet. This may become very hot and catch fire.
• This appliance is not intended for use by persons (including children) with reduced physical, sensory or mental capabilities, or lack
of experience and knowledge, unless they have been given supervision or instruction concerning use of the appliance by a person
responsible for their safety.
• Children should be supervised to ensure that they do not play with the appliance.
• This appliance is not intended to be operated by means of an external timer or separate remote-control system.
6
Page 7

SAFETY
PRECAUTIONS NOT TO DAMAGE THE APPLIANCE
• Raw pan bottoms or damaged saucepans (not enameled cast iron pots) may damage ceramic glass.
• Sand or other abrasive materials may damage ceramic glass.
• Avoid dropping objects, even little ones, on the vitroceramic.
• Do not hit the edges of the glass with saucepans.
• Make sure that the ventilation of the appliance is in accordance with the manufacturer’s instructions.
• Do not put or leave empty saucepans on the vitroceramic cooktops.
• Sugar, synthetic materials or aluminum sheets must not come into contact with the heating zones. These may break or damage the
vitroceramic glass when cooling: switch on the appliance and take them immediately out of the hot heating zone (be careful not to burn
yourself).
• WARNING: Danger of fire: do not store items on the cooking surface.
• Never place any hot container over the control panel.
• If a drawer is situated under the installed appliance, make sure the space between the contents of the drawer and the base of the
appliance is large: at least (2 cm). This is essential to guarantee correct ventilation.
• Never put flammable objects (ex. sprays) into the drawer under the vitroceramic cooktop. Cutlery drawers must be resistant to heat.
PRECAUTIONS IN CASE OF APPLIANCE FAILURE
• If a defect is noticed, switch off the appliance and turn off the electrical supply.
• If the ceramic glass is cracked or fissured, you must unplug the appliance and contact after sales service.
• Servicing must be done by specialists. Do not open the appliance by yourself.
• WARNING: If the surface is cracked, switch off the appliance to avoid the possibility of electric shock.
• If the supply cord is damaged, it must be replaced by the manufacturer or its service agent or similarly qualified
person in order to avoid a hazard.
OTHER PROTECTIONS
• Ensure that the pot or pan is always centred on the cooking zone. The bottom of the pan must cover as much of the
• cooking zone as possible.
• For the users of pacemaker, the magnetic field could influence its operating. We recommend discussing this with the retailer or a doctor.
• Do not to use aluminum or synthetic material containers: they could melt on cooking zones that are still hot.
• NEVER try to extinguish a fire with water, but switch off the appliance and then cover flame
e.g. with a lid or a fire blanket.
DO NOT USE INTERMEDIATE REMOVABLE
ACCESSORIES TO HEAT PANS WHICH ARE NOT
ADAPTED TO INDUCTION.
THIS RISKS BURNS AND DETERIORATION OF THE COOKTOP.
7
Page 8

ELECTRICAL CONNECTION
• The installation of this appliance and the connection to the electrical network should be entrusted only to an electrician following the
normal regulations.
• Protection against the parts under tension must be ensured after the building-in.
• The information on connections necessary are on the stickers. Place them on the cooktop casing near the connection box.
• Connection to the mains must be made using an earthed plug, which must be accessible after installation, or via an omnipolar circuit
breaking device with a contact opening of at least 3 mm.
• The electrical circuit must be separated from the network by adapted devices, for example: circuit breakers, fuses or contactors.
• If the appliance is not fitted with an accessible plug, a disconnecting means must be incorporated in the fixed installation, in accordance
with the installation regulations.
• The inlet hose must be positioned so that it does not touch any of the hot parts of the cooktop or oven.
This appliance must only be connected to a 230V ~ 50/60Hz. Network
Type Total Power
FIXG903 3700 W 2 zones 100mm
FIXG905 5500 W 1 zone 100mm
FIXG9041B2 7400 W 4 zones 100mm
GAS CONNECTION
.
Number of
the induction
heating zone
Minimal pan
detection
An appliance suitable for gas connection must only be installed by an authorised person.
The installation must comply with these instructions, any local regulations and the requirements of AS/NZ 5601.
GENERAL INFORMATION
• The gas connection is ½ in copper compression mounted horizontally facing the rear of the appliance,
the connection point is 300mm from the left-hand side of the cut out and 100mm back from the front edge
of cut out.
• Where fitted the regulator must be located so that it is accessible after installation.
• This appliance is not intended for us by children or persons with reduced physical, sensory or mental capabilities or lack of experience and
knowledge, unless they have been given supervision or instruction concerning use of the appliance by a person responsible for their safety.
• IF YOU SMELL GAS - Open windows and doors and extinguish any open flame. Do not touch electrical switches and call your gas supplier
immediately.
SAFETY WHEN IN USE
• Remember this appliance produces heat and therefore will get hot. Let pan supports and other surfaces cool down before touching them.
• Do not leave children unattended near the appliance when it is hot or in use.
• Do not store or use petrol or other flammable vapours or liquids in the vicinity of this or any other gas appliance.
8
Page 9
INSTALLATION INSTRUCTIONS
m
m
The installation comes under the exclusive responsibility of service. The installer must respect the legislation and the standards enforce in his
home country.
• The bench top or the support in which the cooktop is to be fitted, as well as the edges of the furniture, the laminates coatings and the glue
used to fix them, must be able to resist temperatures of up to 100°C.
• Do not install the cooktop to the top of a non ventilated oven or dishwasher.
• The underside of the cooktop requires a clearance of 20mm from the under side of the induction unit to ensure good air circulation of the
electronic device.
• If a drawer is placed under the unit, do not put flammable objects (for examples sprays) or non heat resistant objects inside.
• The over head clearance should be 750mm unless the over head surface is non combustible or the range hood is rated for lower clearance
taking into account the installation requirements of AS/NZ 5601
where applicable.
• Where the appliance is supplied to be plugged into a GPO the plug must not be removed.
• Where the appliance is supplied with two power leads the GPO’s must be rated to suit the plug or greater.
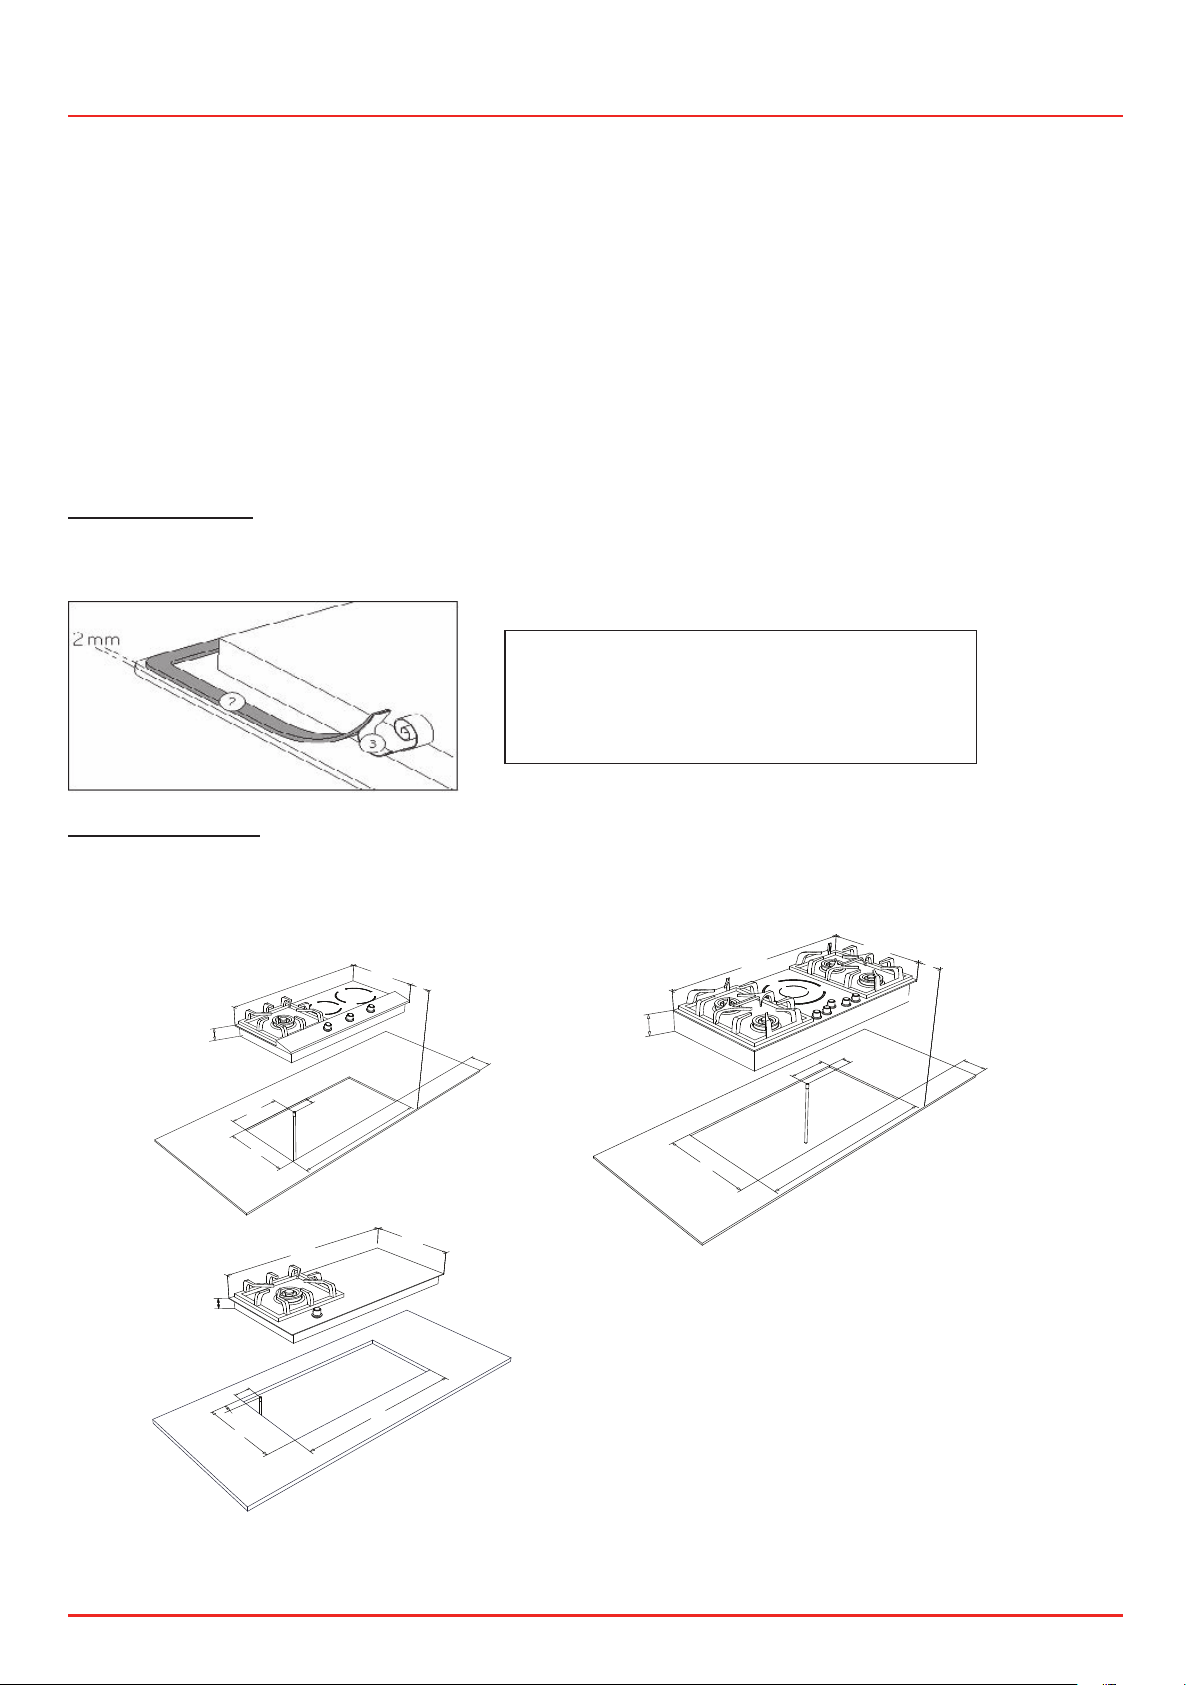
How to stick the gasket
The gasket supplied with the cooktop avoids all infiltration of liquids in the cabinet. Installation has to be done carefully, in conformity of the
following drawing.
Fitting - installation:
• The cut out sizes are:
FIXG905B1 N/L, FIXG903B1 N/L, FIXG9041B2 N/L
58mm
817
405mm
mm
A
60mm
305mm
378mm
mm
850
FIXG903
960mm
520mm
Stick the gasket (2) two millimeters from the
external edge of the glass, after removing
the protection sheet (3).
230
960
mm
mm
505mm
55mm
A
A+20m
1,015mm
125mm
A
+
5
m
470mm
FIXG905
50mm
mm
60
70mm
480mm
920mm
FIXG9041B2
Respective locations of gas inlet and power supply
9
Page 10

INSTALLATION INSTRUCTIONS
NOTE: CONNECTION OF THE APPLIANCE TO THE GAS SUPPLY MUST BE IN ACCORDANCE WITH THE REQUIREMENTS OF ASNZ5601. A ½ INCH
BSP CONNECTION AT THE INLET IS RECOMMENDED AND THE GAS SUPPLY LINE TO THE APPLIANCE MUST BE OF ADEQUATE LENGTH TO
ALLOW SUFFICIENT WITHDRAWAL OF APPLIANCE FOR SERVICE
OR DISCONNECTION.
CONNECT USING ANNEALED COPPER PIPE OR A FLEXIBLE HOSE CAN BE USED PROVIDING THAT:
• Assembly acceptable by the local authority and complying with requirements of AS1869, Class B and ASNZ5601
• Length of hose is kept to a minimum.
• The hose connection starts below the protective barrier (where required) installed 60 mm below the appliance.
• The hose is not subject to kinking abrasion or sharp edges.
NOTE: THE COOKER MUST BE INSTALLED WITH PROVISION TO ALLOW THE GAS TO BE TURNED OFF AND DISCONNECTED FOR SERVICING
AND REMOVAL
1. For the LP Gas model the gas supply must be regulated to 2.75kPa; for Natural Gas regulated to 1kPa . A manual shut off valve must be
installed in the gas supply line in an accessible position so that gas supply can be turned off in an emergency or for service. The cooktop data
plate gives details of injector sizes and gas rates.
2. After installing the gas supply ensure that all gas controls are in the off position , then check all connections thoroughly for leaks
3. Plug the electrical connection in.
Turn each gas control on and adjust to obtain a clear blue flame with no yellow tipping. For adjustments refer to the attached servicing
instructions. The first time you ignite the burners they may not ignite immediately. This is due to air in the gas lines that should clear within a
few seconds. If satisfactory performance cannot be obtained contact the local gas authority for advice and assistance.
Fill in the warranty model details in this book taking information from the data plate where necessary.
Instruct the owner in safe operation of the appliance and ensure that these instructions are left with the appliance.
10
Page 11

GAS CONNECTION
• Do not use as a room heater.
• Do not allow clothing to pass over or near to the flame.
• Do not leave handles of saucepans protruding out into the room or over adjacent burners. Always check that the pot is stable and will not
be likely to tip its contents before you release your grip.
• Do not store items of interest to children in the cabinets above the appliance. Children climbing or standing on the appliance could result
in serious injury.
• Do not position pans off centre to the burner. Adjust the flame to remain under the pan.
ABNORMAL OPERATION
If you are aware of any change in the operation of the appliance consult a qualified service person. This could be such things as noisy flame due
to burner lit back or part being dislodged during cleaning. Do not use the appliance if the ceramic surface is accidentally damaged, contact your
local service agent.
WARNING: IF THE CERAMIC IS CRACKED, SWITCH OFF TO AVOID THE POSSIBILITY OF ELECTRICAL SHOCK.
LEGEND AND MANUAL IGNITION FOR GAS BURNERS
SELECTED MODELS ONLY
LEGEND - GAS CONTROL GRAPHICS - WOK BURNER
MAX - Both inner and outer burners are operating at maximum output.
MED - The inner burner remains on full output, but the outer burner is on minimum output.
LOW - The inner burner is on full output and the outer burner is extinguished.
MIN - The inner burner is on minimum output and the outer burner remains extinguished.
---------------------------------------------------------------------------------------------------------------------------------------------------------------------------------------------------------------------------
LEGEND - GAS CONTROL GRAPHICS - ‘A’ ‘B’ AND ‘C’ BURNERS
MAX - the burner is operating at maximum output.
MED - the burner is operating at medium output.
SIMMER - The burner is operating at lowest output setting.
---------------------------------------------------------------------------------------------------------------------------------------------------------------------------------------------------------------------------
MANUAL IGNITION GAS
If there is no power to the appliance or your area is experiencing a power black-out simply strike a match or spark igniter next to the required burner
and follow steps in chapter 4 above
NOTE: THE FLAME FAILURE SYSTEM IS INDEPENDENT OF POWER AND WILL STILL OPERATE WITHOUT A
POWER SOURCE.
Should your cooktop fail to ignite after the manual procedure has been followed check to see that the gas supply to the appliance has not been
turned off.
11
Page 12

GENERAL ASSEMBLY PROCEDURE FOR INSTALLATION
PLEASE KEEP AND READ FOR FUTURE REFERENCE
GENERAL ASSEMBLY PROCEDURE FOR INSTALLATION
_______________________________________________________________________________________________________________________
Ensure all packaging, including polystyrene, plastic and cardboard has been removed from around the appliance and burner
area.
Ensure that all burner(s), trivets, grates and panels are correctly located and supported.
ABNORMAL OPERATION
_______________________________________________________________________________________________________________________
If you are aware of any change in the operation of the appliance consult a qualified service person. This could be such things
as: Noisy flame due to burner being lit back or parts being dislodged during cleaning. Do not use the appliance if the ceramic
surface is accidentally damaged, contact your local service agent
WARNING: IF THE CERAMIC SURFACE IS CRACKED, SWITCH OFF TO AVOID THE POSSIBILITY OF ELECTRICAL SHOCK.
THE GAS OPERATION
_______________________________________________________________________________________________________________________
Assembly of the FullSpectrum burner
1. Ensure that the locating pin `A` on the distributor
ring is securely located in the recess hole of the
FullSpectrum burner body. This is easily achieved by
placing the distributor ring on the FullSpectrum body
and then rotating the distributor until the locating
bezzle `A` drops into the recess with a firm level fit
being then accomplished.
2. The black dress ring should then be fitted over the
top of the distributor ring.
3. The outer burner cap should then be placed onto the
distributor ring with the locating pin `B` securely
locating in the location recess `B` of the distributor
ring. When correctly assembled the cross over on the
outer cap should lie adjacent to the spark electrode
protruding from the burner body.
4. Finally, gently place the inner burner cap into position
in the centre of the FullSpectrum burner.
12
Page 13

TO USE YOUR NEW FRANKE COOKTOP (GAS BURNERS ONLY)
PLEASE KEEP AND READ FOR FUTURE REFERENCE
1. Select the control knob corresponding to the gas burner you wish to use, press down and turn the knob to the position shown below.
NOTE: BURNERS WILL IMMEDIATELY BEGIN SPARKING VIA THE ELECTRONIC IGNITION SYSTEM WHEN ANY OF THE GAS CONTROLS ARE
DEPRESSED. IF THERE IS NO IGNITION SPARK THEN THE APPLIANCE MAY NOT HAVE THE POWER TURNED ON. CHECK THE POWER POINT
AND CONFIRM THE UNIT HAS POWER.
MAXIMUM POSITION- WOK BURNER
2.
Press and hold the control knob down firmly for a full 5 seconds to ensure the flame failure device engages. If the flame goes out after you release the
CONTROLS
MAXIMUM POSITIONA, B AND C BURNER
CONTROLS
knob then the flame failure device did not engage – simply press down the knob firmly again turn to max position and keep pressing for a full 5 seconds.
ADJUSTMENT RANGE FOR
OUTER BURNER OPERATION-
WOK BURNER
ADJUSTMENT RANGE FOR
INNER BURNER OPERATION-
WOK BURNER
ADJUSTMENT RANGE FOR
BURNER OPERATION-
A, B AND C BURNERS
13
Page 14

ELECTRIC INDUCTION COOKING (FIXG903B1, FIXG905B1)
USE OF THE COOKTOP - INDUCTION
___________________________________________________________________________________________________
• Do not use the appliance until the installation is complete.
• Ensure that the appliance is switched OFF when not in use, switch off the cooktop element by it’s control and do not rely on the pan detector.
• Never leave the cooktop unattended when being used, and use the correct size pans for the zone, never use pans that are unstable or
defective in any way, the pans must be suitable for INDUCTION HEATING.
• Never use plastic or aluminum foil dishes on the appliance.
• This appliance has been manufactured for domestic use only and is therefore not suitable for use in a commercial kitchen.
• Only turn the cooking zone ON when a saucepan is on the cooking zone. Never store flammable material such as aerosols and detergents in
drawers or cupboards under the cooktop.
• Do not drop saucepans or cooking utensils onto the ceramic cooking surface.
• Never use the ceramic surface as a storage or worktop area.
• Do not use the appliance if the ceramic surface is accidentally damaged, contact your local service agent.
• Only clean the cooktop in accordance with the cleaning and maintenance instructions.
• Never allow sugar or acidic food stuffs to be spilled onto the ceramic cooking surface as it eats into the glass and can be difficult to remove
once it has cooled.
• Do not install this appliance next to soft furnishings or curtains.
• Metallic objects such as knives, forks, spoons and lids should not be placed on the cooktop surface as they can get hot.
• Do not use a steam cleaner on or with this cooktop.
• For safety reasons the induction element will not engage on very small light pans (less then 180 mm surface contract).
14
Page 15

ELECTRIC INDUCTION COOKING (FIXG903B1, FIXG905B1)
EELLEECCTTRRIICC IINNDDUUCCTTIIOONN CCOOOOKKIINNGG ((FFIIXXGG990033BB11,, FFIIXXGG990055BB11))
The ceramic Inducon hob fully complies with current legislaon regarding electro-magnec interference and is designed
not to interfere with other electronic appliances providing these comply with the same legislaon.
As the hob generates magnec elds in the immediate vicinity, Pacemakers and Acve Heart Implants must be designed
to comply with relevant regulaons. If in doubt, you should consult the manufacturer of your device or your Doctor.
OOPPEERRAATTIIOONN IINNSSTTRRUUCCTTIIOONN
__________________________________________________________________________________________________
The inducon cooking method rapidly transfers the energy needed for cooking directly to the pan, so the cooktop surface
remains cool but does build up some residual heat as the pan heats up. The result is a fast, cost eecve and accurate
cooking method. Inducon compable vessels must be used.
SSAAFFEETTYY CCUUTT--OOUUTT IINNDDUUCCTTIIOONN
________________________________________________________________________________________________________________
If the inducon burner is accidentally le on, the control automacally turns it o aer a certain me has elapsed. The
table below indicates the me interval, which depends on the power level seng.
The ceramic induction cooktop fully complies with current legislation regarding electro-magnetic interference and is designed not to interfere with
other electronic appliances providing these comply with the same legislation.
As the hob generates, magnetic fields in the immediate vicinity, pacemakers and active heart implants must be designed to comply with relevant
regulations. If in doubt, you should consult the manufacturer of your device or your doctor.
OPERATION INSTRUCTION
_______________________________________________________________________________________________________________________
The induction cooking method rapidly transfers the energy needed for cooking directly to the pan, so the cooktop surface remains cool but does build
up some residual heat as the pan heats up. The result is a fast, cost effective and accurate cooking method. Induction compatible vessels must be
used.
MAX
SAFETY CUT-OUT INDUCTION
_______________________________________________________________________________________________________________________
If the induction burner is accidentally left on, the control automatically turns it off after a certain time has elapsed. The table below indicates the time
interval, which depends on the power level setting.
TO AVOID THE AUTOMATIC CUT-OUT BEING TRIPPED, SIMPLY TURN THE KNOB UP OR DOWN BEFORE
THE TIME RUNS OUT
RESIDUAL HEAT INDICATOR - INDUCTION
_______________________________________________________________________________________________________________________
As long as the temperature remains high enough to cause injury, the display corresponding to the burner shows the ‘H’ symbol (residual heat)
alternatively with the ‘O’ symbol. This indication only disappears when there is no longer any danger (60˚C)
15
Page 16

ELECTRIC INDUCTION COOKING (FIXG903B1, FIXG905B1)
PROCEDURE TO START PARBOILING - INDUCTION
_______________________________________________________________________________________________________________________
Automatic parboiling is activated by turning the knob anti clockwise briefly, the `A` symbol will appear. The required on-boiling stage is selected by
turning knob clockwise which is shown on the display. The `A` symbol appears after 1 second upon releasing the knob.
The on-boiling stage can be adjusted within 15 seconds after activation without cutting off the parboiling boost. If another selection is made after 15
seconds the knob can be used to select an even lower on-boiling stage which however cuts off the Automatic parboiling function at the same time.
Turning the knob higher on boiling stage (even after the above 15 seconds) can be selected. This leads to the parboiling time being automatically
brought in line with the currently selected on-boiling stage.
Once the parboiling has ended only the selected cooking stage is indicated on the display.
BOOSTER FUNCTIONS - INDUCTION
_______________________________________________________________________________________________________________________
The `Booster` function for the burner is enabled by turning the knob clockwise. When this function is enabled, the display shows the letter `P`.
By means of this function the cooking zone is enabled to receive power > 100%.
The Boosting time is limited to 10 minutes to protect cooking utensils. After the booster is switched off automatically, the cooking zone continues
operation on nominal power. The booster can be reactivated provided that the temperature sensors in the electronics and if the coils have the
capacity.
When a pan is removed from the cooking zone during boosting, the no pan symbol is displayed and boosting time continues to count down. When a
pan is replaced within the boost time it will reactivate.
If the booster temperature limit of the electronics or coil on the boosted cooking zone is exceeded, the booster is cut off automatically and reset to
nominal power. While one of the two temperature limits remains exceeded the booster cannot be activated. In this case the booster is indicated when
the knob is turned clockwise which is followed by an automatic reduction on the display.
CHILD LOCK – INDUCTION
_______________________________________________________________________________________________________________________
Child lock function on FIXG905B1 is activated by turning control knob anti-clockwise until an “L” symbol appears. Repeat this process to unlock.
This process is the same for the FIXG903B2 using the far right control knob.
PAN DETECTION - INDUCTION
_______________________________________________________________________________________________________________________
This feature is able to recognise the presence of a pan that according to the scale of the EN standards is one size smaller than the nominal diameter
of the burner. If no pan is detected or if an unsuitable pan is detected the no pan symbol is displayed. If the no pan symbol appears when a pan is
actually on the burner this generally means that the size or shape of the pan concerned is unsuitable. In this case check whether the type of pan is
suitable for induction cooking.
16
Page 17

DESCRIPTION OF THE APPLIANCE (FIXG9041B2)
CONTROL PANEL
Display Designation Description
0 Zero The heating zone is activated
1...9 Power level Selection of the cooking level
U No pan detection No pan or inadequate pan
A Heat accelerator Automatic cooking
E Error message Electronic failure
H Residual heat The heating zone is hot
P Boost The Boost is activated
U Keep warm Maintain automatically of 42, 70 or 94°C
|| Stop&Go The cooktop is in pause
17
Page 18

STARTING-UP AND APPLIANCE MANAGEMENT (FIXG9041B2)
VENTILATION
The cooling system is fully automatic. The cooling fan starts with a low speed. The ventilation starts with a high speed when the cooktop is
intensively used. The cooling fan reduces speed and stops automatically when the electronic circuit is cooled.
BEFORE THE FIRST USE
Clean your cooktop with a damp cloth and dry the surface thoroughly. Do not use detergent which risks causing blue-tinted colour on the glass
surface.
INDUCTION PRINCIPLE
An induction coil is located under each heating zone. When it is engaged, it produces a variable electromagnetic field which produces inductive
currents in the ferromagnetic bottom plate of the pan. The result is a heating-up of the pan located on the heating zone.
Of course the pan has to be magnetic:
• All ferromagnetic pans are recommended (please verify by using a small magnet): cast iron and steel pans, enameled pans, stainless-steel
pans with ferromagnetic bottoms.
• Exclusions: copper, pure stainless-steel, aluminum, glass, wood, ceramic, stoneware. The induction heating zone adapts automatically to
the size of the pan. If the diameter is too small, the pan doesn’t work.
This diameter will vary the function of the heating zone diameter. If the pan is not adapted to the induction cooktop the display will show
[ U ].
SENSITIVE TOUCH
Your ceramic cooktop is equipped with electronic controls with sensitive touch keys. When your finger presses the key, the corresponding
command is activated. This activation is validated by a control light, a letter or a number in the display and/or a “beep” sound. In the case of a
general use press only one key at a time.
18
Page 19

POWER SELECTION ZONE “SLIDER” AND TIMER SETTING ZONE
To select the power with the slider, slide your finger on the “SLIDER” zone. You can directly access if you put your finger directly on the chosen
level.
STARTING-UP
Start up/switch off the cooktop:
Action Control panel Display
To start press key [ 0/I ] [ 0 ]
To stop press key [ 0/I ] nothing or [ H ]
Start up/switch off the cooktop:
Action Control panel Display
To set slide on the “SLIDER” [ 1 ] to [ P ]
(adjust the power) to the right or to the left
To stop slide to [ 0 ] on “SLIDER” [ 0 ] to [ H ]
If no action is made within 20 second the electronics return to the waiting position.
PAN DETECTION
This cooktop is fitted with an interactive control system that makes it very easy and comfortable to use. After switching on the cooktop, when you
put a cookware on the glass, the control system automatically detects it. This system also automatically indicates you which slider control to use
by displaying a [ 0 ] over it. You then just have to set the expected cooking level.
The pan detection ensures perfect performance. The induction will not work if:
• There is no pan on the heating zone or if this pan is not adapted to the induction. In this case it is impossible to increase the power and
the display shows [ U ]. This symbol disappears when a pan is put on the heating zone that is compatible.
• The pan is removed from the heating zone the operation is stopped. The display shows [ U ].
The symbol [ U ] disappears when the pan is put back to the heating zone. The cooking continues with the power level set before.
After use, switch the heat element off : don’t leave the pan detection [ U ] active.
19
Page 20

RESIDUAL HEAT INDICATION
After the heating zone is turned off, or the complete stop of the cooktop, the heating zones are still hot and
indicates [ H ] on the display. The symbol [ H ] disappears when the heating zones may be touched without danger.
When the residual heat indicators are on, don’t touch the heating zones and don’t put any heat sensitive object on them. There are risks of burn
and fire.
BOOSTER FUNCTION
The Booster function [ P ] grants a boost of power to the selected heating zone.
If this function is activated the heating zones work for 10 minutes with an ultra high power. Booster is needed for example to heat up large
quantities of water rapidly, like for noodles
Start up/stop the booster function:
Action Control panel Display
Start up the Booster slide to the end of the “SLIDER” [ P ]
or press directly on the end of
the “SLIDER”
Stop the Booster slide on the “SLIDER” [ 9 ] to [ 0 ]
If the selected heating levels for both zones exceed the maximum available amount of power, the power management function is automatically
reducing the power from one of these zones. The display of this zone is first blinking; the level is then automatically reduced to the highest
suitable position.
Heating zone selected The other heating zone: (example: power level 9)
[ P ] is displayed [ 9 ] goes to [ 8 ] and blinks
It is possible to activate the booster function on several cooking zones at the same time, for this it is necessary to use the zones in a discriminant
way (A-B).
20
Page 21

TIMER
The timer is able to be used simultaneously with all heating zones with different time settings
(from 0 to 999 minutes) for each heating zone.
Setting and modification of the cooking time:
Action Control panel Display
Select the power level slide to the end of the “SLIDER” [ P ]
Select the timer press simultaneously key [ - ] and [ + ] Timer display on
from the timer until the
desired display is on
Decrease the time press key [ - ] from the timer [ 60 ] to 59, 58...
Increase the time press key [ + ] from the timer Time increase
After a few seconds, the [ min ] display stops with blinking. The time is confirmed and the timer starts.
To stop cooking time:
Action Control panel Display
Select the timer press simultaneously key [ - ] and [ + ] Timer display on
from the timer until the
desired display is on
Stop the time press key [ - ] from the timer [ 000 ]
If several timers are activated, repeat the process.
Egg timer function:
Egg timer is an independent function. It stops as soon as a heating zone starts up. If the egg timer is on and the cooktop is switched off, the timer
continues until time runs out.
Action Control panel Display
Activate the cooktop press display [ 0/I ] [ 0 ]
Select the timer press simultaneously key [ - ] and [ + ] Timer display on
from the timer
Decrease the time press key [ - ] from the timer [ 60 ] to 59, 58...
Increase the time press key [ + ] from the timer Time increase
After a few seconds, the [ min ] display stops with blinking.
The time is confirmed and the timer starts.
Automatic stop at the end of the cooking time:
As soon as the selected cooking time is finished the timer display blinks [ 000 ] and a sound rings.
To stop the sound and the blinking, press the key [ - ] and [ + ].
21
Page 22

AUTOMATIC COOKING
All the cooking zones are equipped with an automatic cooking device. The cooking zone starts at full power for a certain time, and will then
reduce automatically the power on the pre-selected level.
Start up:
Action Control panel Display
Power level selection slide on the “SLIDER” to [ 7 ] [ 7 ] is blinking with [ A ]
(for example << 7 >>) and hold 3s
Switching off the automatic cooking:
Action Control panel Display
Power level selection slide on the “SLIDER” [ 0 ] to [ 9 ]
Stop&Go function:
This function stops all the cooktop’s cooking temporarily and then allows restarting with the same settings.
Star up/stop the pause function:
Action Control panel Display
Engage pause press [ II ] [ II ] and control light on
Stop the pause press [ II ] “Slider” animated
Press on the animated “slider” previous settings
RECALL FUNCTION
After switching off the cooktop [ 0/I ], it is possible to recall the last settings.
• cooking stages of all cooking zones (Booster)
• minutes and seconds of programmed cooking zone-related timers
• Keep warm function
The recall procedure is following:
• Press the key [ 0/I ]
• Then press [ II ] before the light stops blinking.
The previous settings are again active.
<< KEEP WARM >> FUNCTION
This function allows liquids to reach and maintain automatically a temperature of 42°C or 70°C. This will avoid liquids overflowing and fast
burning the bottom of the pan.
To engage, to start the function << Keep warm >>:
Action Control panel Display
42°C to engage press once on key [
70°C to engage press twice on key [
94°C to engage press 3 times on key [
To stop slide on the “SLIDER” [ 0 ] to [ 9 ]
or press key [
The maximum duration on keep warm is 2 hours.
] [ U ] and [ ]
] [ U ] and [ ]
] [ U ] and [ ]
] until [ 0 ] [ 0 ]
22
Page 23

BRIDGE AND AUTOMATIC BRIDGE FUNCTION
This function allows the use of 2 cooking zones at the same time with the same features as a single cooking zone. With this function the Booster
function is allowed on the left and center zones.
Action Control panel Display
Activate the cooktop Press key [ 0/I ] [ 0 ]
Activate the bridge Press the zeros
[ 0 ] of the 2 cooking zones [ 0 ] and [
or
put a great pan on the 2 zones [
Increase bridge Slide on the “SLIDER” which indicates
the power [ 1 ] to [ 9 ]
Stop the bridge Press the zeros
[ 0 ] of the 2 cooking zones [ 0 ]
] blink
]
CONTROL PANEL LOCKING
To avoid the activation of the cooking zones, in particular during cleaning, the control panel can be locked (with exception to the On/Off key [ 0/I
]).
Action Control panel Display
Locking the cooktop Press [
Unlock the cooktop Press [
] during 6s locking light off
] during 6s locking light on
23
Page 24

COOKING ADVICE
PAN QUALITY
Accepted materials: steel, enameled steel, cast iron, ferromagnetic stainless-steel, aluminum with
ferromagnetic bottom.
Not accepted materials: aluminum and stainless-steel without ferromagnetic bottom, copper, brass, glass,
ceramic, porcelain.
The manufacturers specify if their products are compatible induction.
To check if pans are compatible :
• Put a little water in a pan placed on an induction heating zone set at level [ 9 ].This water must
heat in a few seconds.
• A magnet sticks on the bottom of the pan.
Certain pans can make noise when they are placed on an induction cooking zone. This noise doesn’t mean any failure on the appliance and
doesn’t influence the cooking operating.
PAN DIMENSION
The cooking zones are, up to a certain limit, automatically adapted to the diameter of the pan. However the bottom of this pan must have a
minimum of diameter according to the corresponding cooking zone.
To obtain the best efficiency of your cooktop, please place the pan in the centre of the cooking zone.
24
Page 25

COOKING ADVICE
EXAMPLES OF COOKING POWER SETTING
The values below are indicative
1 to 2 Melting, reheating The heating zone is activated
2 to 3 Simmering, defrosting Selection of the cooking level
3 to 4 Steam No pan or inadequate pan
4 to 5 Water Automatic cooking
6 to 7 Medium cooking, simmering Electronic failure
7 to 8 Cooking The heating zone is hot
9 Frying, roasting, boiling water The Boost is activated
MAINTENANCE AND CLEANING
Switch-off the appliance before cleaning.
Do not clean the cooktop if the glass is too hot because there is a risk of burn.
• Remove light marks with a damp cloth with washing up liquid diluted in a little water. Then rinse with cold water and dry the surface
thoroughly.
• Highly corrosive or abrasive detergents and cleaning equipment likely to cause scratches must absolutely be avoided.
• Do not ever use any steam-cleaner or pressure washer.
• Do not use any object that may scratch the ceramic glass.
• Ensure that the pan is dry and clean. Ensure that there are no grains of dust on your ceramic cooktop or on the pan. Sliding rough
saucepans will scratch the surface.
• Spillages of sugar, jam, jelly, etc. must be removed immediately. This will prevent the surface being damaged.
• Do not use a steam cleaner to clean the appliance.
WHAT TO DO IN CASE OF A PROBLEM
The cooktop or the cooking zone doesn’t start up:
• The cooktop is badly connected on the electrical network.
• The protection fuse cut-off.
• The locking function is activated.
• The sensitive keys are covered with grease or water.
• An object is put on a key.
The control panel displays [ U ]:
• There is no pan on the cooking zone.
• The pan is not compatible with induction.
• The bottom diameter of the pan is too small.
The control panel displays [ E ]:
• The electronic system is defective.
• Disconnect and replug the cooktop.
25
Page 26

One or all cooking zone cut-off:
• The safety system has actioned.
• You forgot to cut-off the cooking zone for a long period of time.
• One or more sensitive keys are covered.
• The pan is empty and its bottom overheated.
• The cooktop also has an automatic reduction Booster level to avoid overheating
Continuous ventilation after cutting off the cooktop:
• This is not a failure, the fan continuous to protect the electronic device.
• The fan cooling stops automatically.
The automatic cooking system doesn’t start-up:
• The cooking zone is still hot [ H ].
• The highest Booster level is set [ 9 ].
The control panel displays [ U ]:
• Refer to the section “Keep warm“.
The control panel displays [ II ]:
• Refer to the section “Stop&Go“.
The control panel displays [
• Refer to the section “Grill Function”.
The control panel displays [
• An object or liquid covers the control keys. The symbol disappear as soon as the key is released or cleaned.
The control panel displays [ E2 ]:
• The cooktop is overheated, let it cool and then turn it on again.
The control panel displays [ E8 ]:
• The air inlet of the ventilator is obstructed, release it.
The control panel displays [ U400 ]:
• The cooktop is not connected to the network. Check the connection and reconnect the cooktop.
The control panel displays [ Er47 ]:
• The cooktop is not connected to the network. Check the connection and reconnect the cooktop.
]:
] or [ Er03 ]:
If one of the symbols above persists, contact Franke service on 03 9700 9100.
ENVIRONMENT PRESERVATION
• The packing materials are ecological and recyclable.
• The electronic appliances are composed of recyclable, and sometimes harmful materials for the environment, but are necessary for the
good running and the safety of the appliance.
• Don’t throw your appliance out with the household refuses
• Get in touch with the waste collection centre that specialises
in the recycling of the household appliances.
26
Page 27

CARE & MAINTENANCE
SELECTED MODELS ONLY
CARE & MAINTENANCE :
_______________________________________________________________________________________________________________________
1. Do not use excessively large vessels on your cooktop as damage and or hazard may occur.
2. Always remove food spills, dirt and grease spatters from your cooktop ( see cleaning instructions)
Should you experience any problems with your appliance please call Franke Customer Care 1300511072
CLEANING GENERAL
_______________________________________________________________________________________________________________________
1. PAN SUPPORTS, TRIVETS: These are made from cast iron and coated in a vitreous enamel to provide a resilient mat finish. These can be
placed in the dishwasher (on a gentle cycle) or alternatively cleaned with a soft bristled brush in warm soapy water.
2. BURNERS: The burner caps are solid brass with a black chrome finish to avoid discoloration of the brass. NOTE: The black chrome will
eventually burn off with time however this will not affect the performance of the burners. The burners can be re- chromed with Franke`s
exchange program, for a nominal fee. The burner cap can be removed and cleaned with a soft bristled brush and warm soapy water or they
can be placed in the dishwasher.
NOTE: AFTER CLEANING (ESPECIALLY IN A DISHWASHER) PLEASE ENSURE THAT THE PORTS (BURNER HOLES) ARE FREE OF ANY FOOD,
WATER OR DEBRIS. THESE ARE EASILY CLEARED WITH A TOOTHPICK OR NEEDLE.
NOTE: DO NOT UNSCREW ANY PART OF THE BURNER SYSTEM.
3. STAINLESS STEEL: Should be cleaned with a commercially available stainless cleaner.
NOTE: DO NOT USE ABRASIVE POWDERS OR SCOURER PADS AS THESE WILL SCRATCH THE SURFACE OF THE STAINLESS STEEL.
NOTE: DO NOT USE AGGRESSIVE CHEMICAL CLEANERS LIKE AMMONIA OR OVEN CLEANERS AS THESE MAY ETCH OR DISCOLOUR THE
SURFACE.
4. CERAMIC GLASS: After cooking it is recommended that the ceramic glass be cleaned with a commercially available glass cleaner (eg Windex)
to remove any light spills or grease.
NOTE: STUBBORN STAINS AND BURNT FOOD SHOULD BE CLEANED WITH A CERAMIC GLASS CREAM AND REMOVED WITH A RAZOR
SCRAPPER. DO NOT USE SCOURING PADS OF ANY KIND. WE RECOMMEND APPLYING THE CREAM WITH A DRY CLOTH AND APPLYING IN A
CIRCULAR RUBBING MOTION TO REMOVE THE STAIN/FOOD.
MAINTENANCE SCHEDULE
_______________________________________________________________________________________________________________________
The appliance should be kept in a clean condition and you should ensure that removable parts are correctly reassembled. If the
appliance has not been used for a long period of time check the appearance and the general performance of the burners. If the
supply cord is damaged, it must be replaced by the manufacturer, its service agent or authorized person in order to avoid a hazard.
In any event the appliance should be checked by a qualified person every five years and / or you should contact your dealer for any
recommended maintenance.
27
Page 28

FAULT FINDING / ABNORMAL OPERATION
FAULT FINDING / ABNORMAL OPERATION
_______________________________________________________________________________________________________________________
FAU LT POSSIBLE SOLUTION(S)
BURNER LIGHTS, BUT GOES OUT WHEN CONTROL IS RELEASED
(GAS)
UNIT OCCASIONALLY EMITS A SPARK EVEN WHEN NOT BEING
OPERATED (GAS)
FLAME ON WOK BURNER PRESENT UNDER SKIRT AND LARGE
BILLOWING FLAME IN MIDDLE OF BURNER. (GAS)
CONTROL KNOB IS TO BE PRESSED DOWN FIRMLY, AND HELD
FIRMLY, DURING IGNITION PROCEDURE FOR 5 SECONDS.
CONTROL KNOB IS BOTTOMING OUT ON THE CONTROL PANEL AND
NOT ENGAGING THE FLAME FAILURE DEVICE
– HOLE IN KNOB NEEDS PACKING.
IF THIS IS A FAULT PRESENT ON THE WOK BURNER, REFER TO THE
CORRECT ASSEMBLY INSTRUCTIONS.
THIS USUALLY MEANS SOME MOISTURE ON THE SWITCHING
MECHANISM DUE TO SPILLAGE OR STEAM. IT SHOULD SELF RECTIFY
FullSpectrum BURNER IS INCORRECTLY ASSEMBLED OR FOOD HAS
BLOCKED PORTS. REFER TO ASSEMBLY INSTRUCTIONS. OR CLEAN.
CONTINUED OPERATION IN THIS CONDITION MAY CAUSE DAMAGE.
RECTIFY IMMEDIATELY
28
Page 29

293031
Page 30

Page 31

Page 32

PR Kitchen & Washroom Systems Pty Ltd.
83 Bangholme Road
Dandenong South
VIC 3175
Australia
Phone +61 3 9700 9100
Fax +61 3 9700 9191
info@prks.com.au
www.franke.com.au
FRANKE PROFESSIONAL
*T&C’s apply
 Loading...