

Page 1

COOKTOP OPERATION MANUAL
Page 2

TO USE YOUR NEW FRANKE COOKTOP
OFF
MED LOW
MINMAX
1 Push down on the knob to engage ignition system.
2 Turn to the ‘max’ position to activate gas.
3 Continue pressing down on knob firmly, holds this position for 2-3 seconds
2
Page 3

5 YEAR CUSTOMER CARE WARRANTY
All FRANKE professional series appliances come with a 5 year parts and labour warranty. FRANKE will correct, free of charge,
any defects in material or workmanship for the period of 5 years, subject to the terms of our warranty stated below. At FRANKE
we place great importance on customer satisfaction and that is why we have established a dedicated and experienced customer
support team that you can rely on.
Should you ever need to make a warranty related enquiry about your FRANKE product simply call 03 9700 9100 to speak with our
friendly customer service consultants. We suggest you have the following information close at hand to make the process as easy as
possible.
1. Model number of your appliance
2. Serial number of your appliance
3. A copy of your original purchase receipt
4. Address details of where the appliance is installed
This warranty will be null and void if the appliance is used for outdoor and commercial purposes. Some examples of outdoor and
commercial purposes but not limited to, include restaurants, cafés, schools, clubs, alfresco areas with open walls or hoods used
above barbecues.
Please note: The benefits provided by this warranty are in addition to all other rights and remedies in respect to the product
which the consumer has under the Australian competition and Consumer Act 2010.
1. This warranty only applies for products installed by a qualified person and when provided with a certificate of compliance in accordance
with State/Territory laws.
2. This product must be used in accordance with the manufacturer’s instructions. This warranty does not apply should the defect in or failure
of the product be attributable to misuse, abuse, accident or non-observation of the manufactures instructions on the part of the user.
FRANKE appliances does not accept liability for any direct or consequential loss, damage or other expense caused by or arising out of any
failure to install or use the product in accordance with the manufacturer’s instructions.
3. The warranty does not cover normal wear and tear, insect or vermin infestation, cosmetic changes, excessive spillage, incorrect or
incomplete installation, power surges, incorrect or improper operation, inadequate care and warranty claims.
4. FRANKE Appliances, at its own discretion may replace or repair any defective component(s) to affect a repair due to any faulty
workmanship and material. The warranty does not cover breakage of outer glass panels attributed to external damage.
5. The warranty provided is a “Repair Warranty” and in an extreme event if a repair can not take place, a replacement will be provided of an
equivalent current model where the balance of the warranty period from the original date of purchase will take affect.
6. This warranty is immediately void if the serial or model number label is removed, defaced, serviced or repaired by a unauthorised/
unqualified personal or used for industrial/commercial purposes.
7. Warranty will be only provided when a proof of the original purchase is presented to an authorised dealer or reseller before or at the time
of service.
8. This warranty does not cover any corrosion or defect as a result of the product being installed in an environment in which the appliance is
protected from the weather.
9. It is the responsibility of the customer to ensure the appliance is easily accessible for a service technician to carry out required repairs.
Any obstruction prohibiting access to the product by building materials of any kind will be required to be removed and reinstalled by
the customer.
10. This warranty covers the first 50km travelled by a repair technician to the appliance location and return. Any travel in excess of 50km
each way is not covered by the warranty.
FRANKE has a service network in all metropolitan areas and most regional areas. Where the warranty claim has been made outside
a radius of 50km from any store where the product can be purchased, the customer is responsible for the cost of delivery to the
nearest service agent or the travel cost for a technician to travel to a location outside the 50km radius.
YOUR STATUTORY RIGHTS
FRANKE products fully assures all customers that our goods come with guarantees that cannot be excluded under the Australian Consumer
Law. You are entitled to have the goods repaired or replaced if the goods fail to be of acceptable quality and the failure does not amount to a
major failure. You are also entitled to a replacement or refund for a major failure and for compensation for any other reasonably foreseeable
loss or damage. The benefits under FRANKE’s warranty are in addition to other rights you have at law in relation to the appliances or services
to which the warranty relates.
3
Page 4

APPLIANCE OPERATION MANUAL
CONTENTS PG
GENERAL INFORMATION 5
SAFETY WHEN IN USE 6
GENERAL ASSEMBLY 7-8
ELECTRIC INDUCTION COOKING 9-13
LEGEND AND MANUAL IGNITION FOR GAS BURNERS
CARE AND MAINTENANCE 15
FAULT FINDING / ABNORMAL OPERATION 16
INSTALLATION INSTRUCTIONS 17-18
SERVICING INSTRUCTIONS 19-21
PROCEDURE FOR CONVERTING NATURAL GAS TO LP GAS 22
14
MODELS COVERED
FIG301S1 N/L & FIG301B1 N/L
FIG604S1 N/L & FIG604B1 N/L
FIG903S1 N/L & FIG903B1 N/L
FIG906S1 N/L & FIG906B1 N/L
FIG905B1 N/L
FIXG905B1 N/L
FIXG903B1 N/L
4
Page 5

GENERAL INFORMATION
PLEASE KEEP AND READ FOR FUTURE REFERENCE
The Franke range of cooktops are state of the art appliances featuring the latest in flame auto safety shut-off. Should the
flame on any burner be extinguished accidentally then the gas flow to that burner will automatically cease to flow, ensuring no
hazardous build up of flammable gas from the cooktop can then occur.
This appliance is not intended for use by children or persons with reduced physical, sensory or mental capabilities or lack of
experience and knowledge, unless they have been given supervision or instruction concerning use of the appliance by a person
responsible for their safety.
The appliances feature easy to clean ceramic or stainless steel cooktops together with brass forged burners
and cast iron pan supports.
They are available in Natural Gas or LP Gas configurations.
Choice of mixed energy gas and induction models offer the best in performance from simmer to high speed using FullSpectrum
gas burners, or the fantastic induction heating.
Various sizes and numbers of burners in the Franke cooktop range allows you to choose the appliance or number of appliances
to meet your cooking needs
NOTE: ALL MATERIAL SURROUNDING THE INSTALLATION MUST BE ABLE TO WITHSTAND TEMPERATURES OF 95`C
DURING PERIODS OF OPERATION. CERTAIN MATERIALS (VINYL WRAP) MAY SUFFER DAMAGE WHEN HEATED FROM
AN APPLIANCE.
This appliance has been constructed and distributed in compliance with the essential requirements of the following EEC
DIRECTIVES, EUROPEAN NORMS, Australian & New Zealand Standards.
CE Marking – 93/68 Low Voltage – 73/23 EMC – 89/336; Materials that can touch food – 89/109;
Safety Standards – EN 60 335 – 2 – 6 ASNZS3350-1, ASNZS3350-2-6
When first used an odor may be emitted by any residual protective finish or moisture, which will cease after a short period of
time
FOR YOUR SAFETY
_______________________________________________________________________________________________________________________
We have taken care to ensure that this appliance operates safely by way of meeting and exceeding all Australian Safety
and Performance Standards applied to this type of product. You should read and understand the safety issues to avoid the
possibility of an accident.
IF YOU SMELL GAS
_______________________________________________________________________________________________________________________
Open windows and doors, and extinguish any open flame. Do not touch electrical switches and call your gas supplier
immediately.
5
Page 6

SAFETY WHEN IN USE
1. Remember this appliance produces heat and therefore some parts will get hot. Let pan supports and other surfaces cool
down before touching them.
2. Do not leave children unattended near the appliance when it is hot or in use.
3. Do not store or use petrol or other flammable vapours or liquids in the vicinity of this or any other gas appliance.
4. Do not use the burners as a room heater.
5. Do not allow clothing to pass over or near to the flame.
6. Do not leave handles of saucepans protruding out into the room or over adjacent burners. Always check that the pot is
stable and will not be likely to tip its contents before you release your grip.
7. Do not store items of interest to children in the cabinets above the appliance. Children climbing or standing on the
appliance could result in serious injury.
8. Do not position pans off centre to the burner. Adjust the flame to remain under the pan.
6
Page 7
GENERAL ASSEMBLY PROCEDURE FOR INSTALLATION
PLEASE KEEP AND READ FOR FUTURE REFERENCE
GENERAL ASSEMBLY PROCEDURE FOR INSTALLATION
_______________________________________________________________________________________________________________________
Ensure all packaging, including polystyrene, plastic and cardboard has been removed from around the appliance and burner
area.
Ensure that all burner(s), trivets, grates and panels are correctly located and supported.
ABNORMAL OPERATION
_______________________________________________________________________________________________________________________
If you are aware of any change in the operation of the appliance consult a qualified service person. This could be such things
as: Noisy flame due to burner being lit back or parts being dislodged during cleaning. Do not use the appliance if the ceramic
surface is accidentally damaged, contact your local service agent
WARNING: IF THE CERAMIC SURFACE IS CRACKED, SWITCH OFF TO AVOID THE POSSIBILITY OF ELECTRICAL SHOCK.
THE GAS OPERATION
_______________________________________________________________________________________________________________________
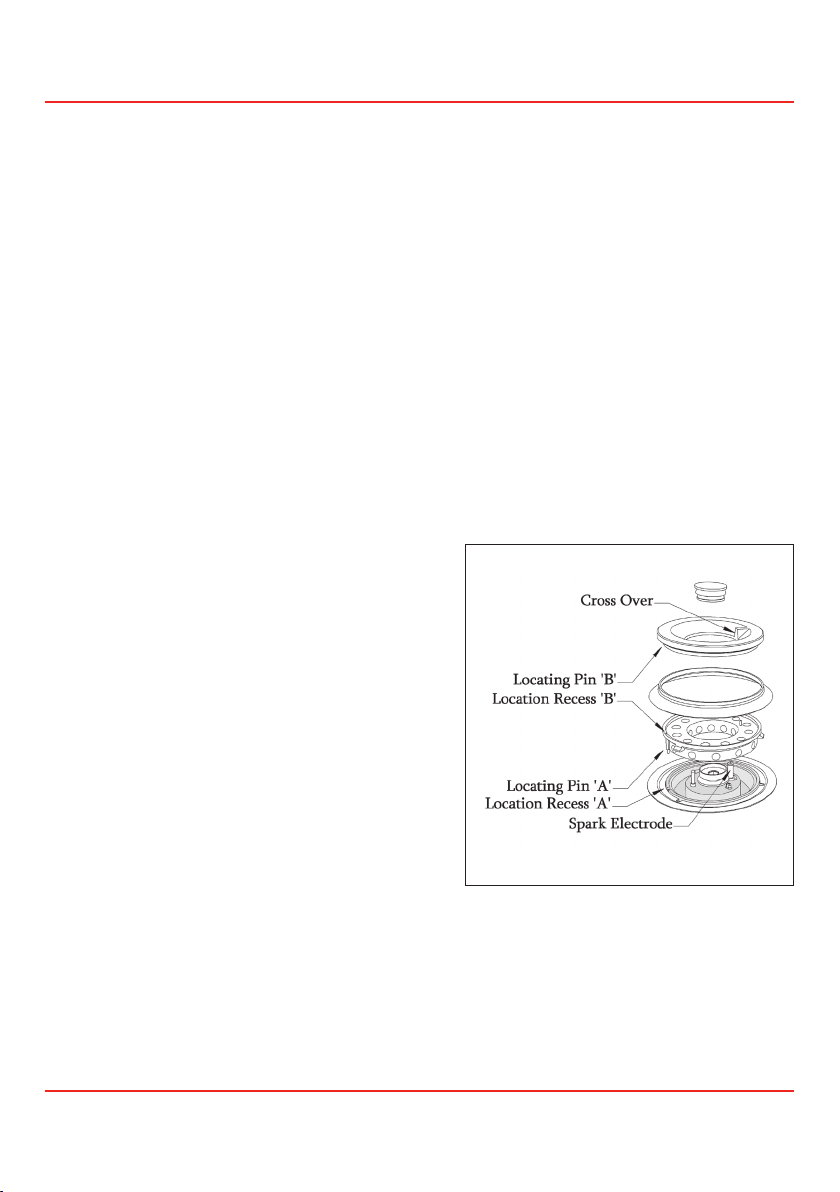
Assembly of the FullSpectrum burner
1. Ensure that the locating pin `A` on the distributor
ring is securely located in the recess hole of the
FullSpectrum burner body. This is easily achieved by
placing the distributor ring on the FullSpectrum body
and then rotating the distributor until the locating
bezzle `A` drops into the recess with a firm level fit
being then accomplished.
2. The black dress ring should then be fitted over the
top of the distributor ring.
3. The outer burner cap should then be placed onto the
distributor ring with the locating pin `B` securely
locating in the location recess `B` of the distributor
ring. When correctly assembled the cross over on the
outer cap should lie adjacent to the spark electrode
protruding from the burner body.
4. Finally, gently place the inner burner cap into position
in the centre of the FullSpectrum burner.
7
Page 8
GENERAL ASSEMBLY PROCEDURE FOR INSTALLATION
MAXIMUM POSITION- FULLSPECTRUM
BURNER CONTROLS
ADJUSTMENT RANGE FOR
OUTER BURNER OPERATION-
FULLSPECTRUM BURNER
ADJUSTMENT RANGE FOR
INNER BURNER OPERATION-
FULLSPECTRUM BURNER
MAXIMUM POSITIONA, B AND C BURNER
CONTROLS
ADJUSTMENT RANGE FOR
BURNER OPERATION- A, B
AND C BURNERS
8
Page 9

ELECTRIC INDUCTION COOKING
SELECTED MODELS ONLY
The ceramic Induction hob fully complies with current legislation regarding electro-magnetic interference and is designed not to
interfere with other electronic appliances providing these comply with the same legislation.
As the hob generates magnetic fields in the immediate vicinity, Pacemakers and Active Heart Implants must be designed to
comply with relevant regulations. If in doubt, you should consult the manufacturer of your device or your Doctor.
OPERATION INSTRUCTION
_______________________________________________________________________________________________________________________
The induction cooking method rapidly transfers the energy needed for cooking directly to the pan, so the cooktop surface
remains cool but does build up some residual heat as the pan heats up. The result is a fast, cost effective and accurate cooking
method. Induction compatible vessels must be used.
SAFETY CUT-OUT INDUCTION
_______________________________________________________________________________________________________________________
If the induction burner is accidentally left on, the control automatically turns it off after a certain time has elapsed. The table
below indicates the time interval, which depends on the power level setting.
LEVEL TIME LIMIT (HOURS) PARBOILING LIMIT (MIN)
1 6 8
2 6 2.4
3 5 3.8
4 5 5.2
5 4 6.8
6 1.5 2
7 1.5 2
8 1.5 3.6
9 1.5 2
TO AVOID THE AUTOMATIC CUT-OUT BEING TRIPPED, SIMPLY TURN THE KNOB UP OR DOWN BEFORE
THE TIME RUNS OUT
RESIDUAL HEAT INDICATOR - INDUCTION
_______________________________________________________________________________________________________________________
As long as the temperature remains high enough to cause injury the display corresponding to the burner shows the `H`
symbol(residual heat) alternatively with `O` symbol. This indication only disappears when there is no longer any danger (60◦C).
9
Page 10

ELECTRIC INDUCTION COOKING
SELECTED MODELS ONLY
USE OF THE COOKTOP - INDUCTION
___________________________________________________________________________________________________
• Do not use the appliance until the installation is complete.
• Ensure that the appliance is switched OFF when not in use, switch off the hob element by it’s control and do not rely on
the pan detector.
• Never leave the hob unattended when being used, and use the correct size pans for the zone, never use pans that are
unstable or defective in any way, the pans must be suitable for INDUCTION HEATING.
• Never use plastic or aluminum foil dishes on the appliance.
• This appliance has been manufactured for domestic use only and is therefore not suitable for use in a commercial
kitchen.
• Only turn the cooking zone ON when a saucepan is on the cooking zone. Never store flammable material such as
aerosols and detergents in drawers or cupboards under the hob.
• Do not drop saucepans or cooking utensils onto the ceramic cooking surface.
• Never use the ceramic sur face as a storage or worktop area.
• Do not use the appliance if the ceramic sur face is accidentally damaged, contact your local service agent.
• Only clean the hob in accordance with the cleaning and maintenance instructions.
• Never allow sugar or acidic food stuffs to be spilled onto the ceramic cooking surface as it eats into the glass and can be
difficult to remove once it has cooled.
• Do not install this appliance next to soft furnishings or cur tains.
• Metallic objects such as knives, forks, spoons and lids should not be placed on the hob surface as they can get hot.
• Do not use a steam cleaner on or with this hob.
• For safety reasons the induction element will not engage on very small light pans (less then 180 mm surface contract).
TURNING OFF THE COOKTOP - INDUCTION
_______________________________________________________________________________________________________________________
The cooktop can be turned off at any time by means of the knob.
The display shows a “H” as long as the temperature
AUTOMATIC PARBOILING (SELECTABLE AS PER TABLE) - INDUCTION
_______________________________________________________________________________________________________________________
When automatic parboiling is activated, the power of the cooking zone is switched to 100% for a period of time depending on
the selected onboiling stage. As soon as the parboiling time is over, the preselected onboiling stage is valid again.
10
Page 11

ELECTRIC INDUCTION COOKING
SELECTED MODELS ONLY
PROCEDURE TO START PARBOILING - INDUCTION
_______________________________________________________________________________________________________________________
Automatic parboiling is activated by turning the knob anti clockwise briefly, the `A` symbol will appear. The required on-boiling
stage is selected by turning knob clockwise which is shown on the display. The `A` symbol appears after 1 second upon
releasing
the knob.
The on-boiling stage can be adjusted within 15 seconds after activation without cutting off the parboiling boost. If another
selection is made after 15 seconds the knob can be used to select an even lower on-boiling stage which however cuts off the
Automatic parboiling function at the same time.
Turning the knob higher on boiling stage (even after the above 15 seconds) can be selected. This leads to the parboiling time
being automatically brought in line with the currently selected on-boiling stage.
Once the parboiling has ended only the selected cooking stage is indicated on the display.
BOOSTER FUNCTIONS - INDUCTION
_______________________________________________________________________________________________________________________
The `Booster` function for the burner is enabled by turning the knob clockwise. When this function is enabled, the display
shows the letter `P`.
By means of this function the cooking zone is enabled to receive power > 100%.
The Boosting time is limited to 10 minutes to protect cooking utensils. After the booster is switched off automatically, the
cooking zone continues operation on nominal power. The booster can be reactivated provided that the temperature sensors in
the electronics and if the coils have the capacity.
When a pan is removed from the cooking zone during boosting, the no pan symbol is displayed and boosting time continues to
count down. When a pan is replaced within the boost time it will reactivate.
If the booster temperature limit of the electronics or coil on the boosted cooking zone is exceeded, the booster is cut off
automatically and reset to nominal power. While one of the two temperature limits remains exceeded the booster cannot be
activated. In this case the booster is indicated when the knob is turned clockwise which is followed by an automatic reduction
on the display.
Child lock function on HIXG905B1 is activated by turning control knob clockwise until an “L” symbol appears. Repeat this
process to unlock.
This is the same process for the HIXG903B1 using the far right control knob.
11
Page 12

ELECTRIC INDUCTION COOKING
SELECTED MODELS ONLY
SYSTEM TEMPERATURE CONTROL - INDUCTION
_______________________________________________________________________________________________________________________
• Sensors situated inside the top constantly measures the temperature of the generator`s electronic circuits. In the event
of these circuits overheating the system reacts as follows:
• When the first temperature is exceeded the system automatically switches off the booster. If activated, this initiates a
flashing `P` on the respective display showing that the booster cannot be responded to at the moment. When exceeding
a second medium temperature limit, the induction system reduces the power outlet to avoid any temperature increase.
When the temperature of the cooking zone exceeds a third temperature limit, the cooking zone is cut off automatically
from the induction system. The corresponding display indicates a flashing error code E2, possibly alternating with `H`.
The overheating of the circuits definitely indicates an anomaly, and means that the cook top has not been installed
properly or the openings for air circulation are not large enough.
ERROR TABLE
_______________________________________________________________________________________________________________________
CODE DESCRIPTION POSSIBLE CAUSE ERROR CLEANING
ER 22 Key evaluation defective,
control unit cuts off after
3.5-7.5 sec
ER 47 Communication error
between knob control and
induction
ER 31 Configuration data incorrect Configuration of induction
U400 Secondary voltage of the
power unit to high
(Primary>300v) Control unit
cuts off after 1 sec releasing
a permanent tone.
E2 Overheating of the induction
coils
E5 Error on filter board Exchange filter board
Short circuit or
discontinuation in the range of
the key evaluation
None or faulty
communication. Ensure that
connection cable is plugged
on correctly.
necessary
Control unit is wrongly
connected
Cooling down necessary
Exchange control unit
Connect to correct mains
voltage
12
E6 Error on Power board Exchange power unit Exchange control unit
ER 20 Flash failure Exchange temperature sensor
E9 Coil temperature sensor
defective
Exchange temperature sensor
Page 13

ELECTRIC INDUCTION COOKING
SELECTED MODELS ONLY
PAN SENSOR - INDUCTION
_______________________________________________________________________________________________________________________
This feature is able to recognize the presence of a pan that according to the scale of the EN Standards is one size smaller than
the nominal diameter of the burner. If no pan is detected or if an unsuitable pan is detected the no pan symbol is displayed.
If the no pan symbol appears when a pan is actually on the burner this generally means that the size or shape of the pan
concerned is unsuitable.In this case check whether the type of pan is suitable for induction cooking.
13
Page 14

LEGEND AND MANUAL IGNITION FOR GAS BURNERS
SELECTED MODELS ONLY
LEGEND - GAS CONTROL GRAPHICS - FullSpectrum BURNER
_______________________________________________________________________________________________________________________
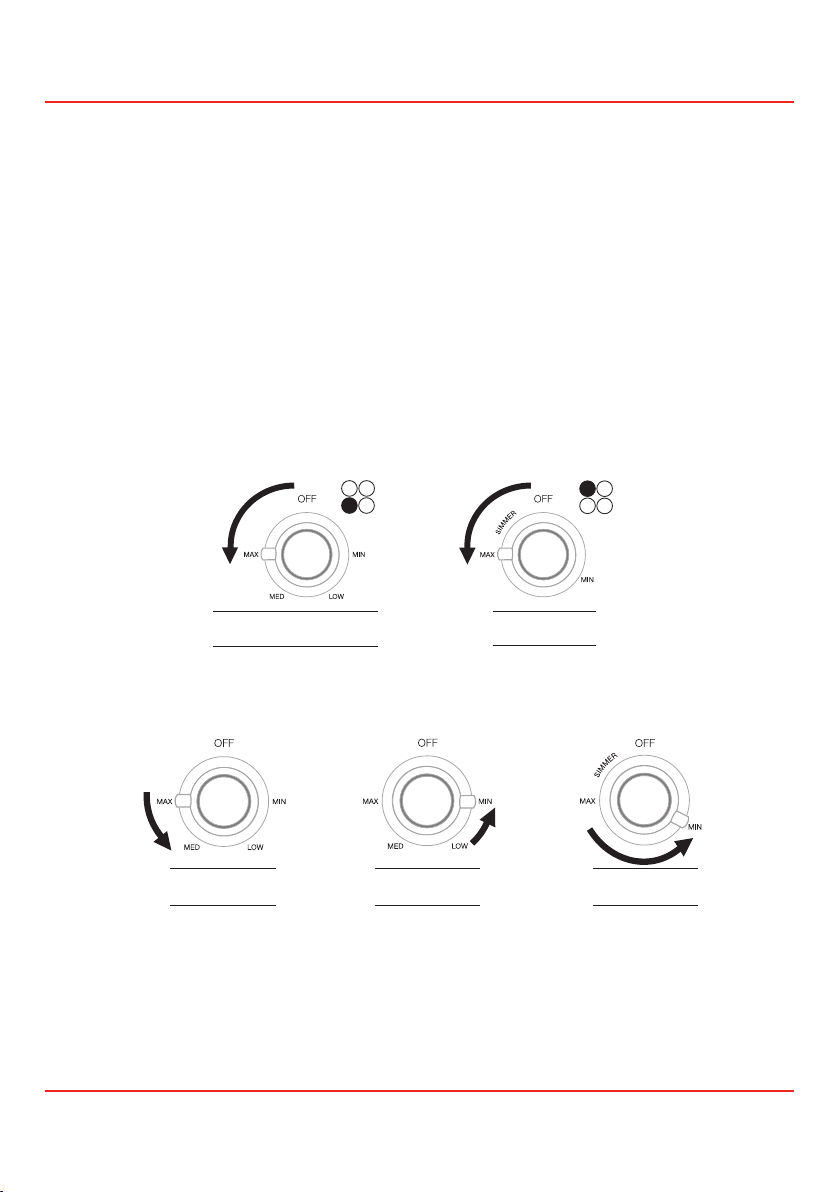
MAX - Both inner and outer burners are operating at maximum output.
MED - The inner burner remains on full output, but the outer burner is on minimum output.
LOW - The inner burner is on full output and the outer burner is extinguished.
MID - The inner burner is on minimum output and the outer burner remains extinguished.
LEGEND - GAS CONTROL GRAPHICS - ‘A’ ‘B’ AND ‘C’ BURNERS
_______________________________________________________________________________________________________________________
MAX - The burner is operating at maximum output.
MED - The inner burner remains on full output, but the outer burner is on minimum output.
SIMMER - The burner is operating at lowest output setting.
LEGEND - GAS CONTROL GRAPHICS - ‘A’ ‘B’ AND ‘C’ BURNERS
_______________________________________________________________________________________________________________________
MAX - the burner is operating at maximum output.
MED - the burner is operating at medium output.
SIMMER - The burner is operating at lowest output setting.
MANUAL IGNITION GAS
_______________________________________________________________________________________________________________________
If there is no power to the appliance or your area is experiencing a power black-out simply strike a match or spark igniter next
to the required burner and follow steps in chapter 4 above
NOTE: THE FLAME FAILURE SYSTEM IS INDEPENDENT OF POWER AND WILL STILL OPERATE WITHOUT A
POWER SOURCE.
Should your cooktop fail to ignite after the manual procedure has been followed check to see that the gas supply to the
appliance has not been turned off.
14
Page 15

CARE & MAINTENANCE
SELECTED MODELS ONLY
CARE & MAINTENANCE :
_______________________________________________________________________________________________________________________
1. Do not use excessively large vessels on your cooktop as damage and or hazard may occur.
2. Always r emove food spills, dir t and grease spatters fr om your cooktop ( see cleaning instr uctions)
Should you experience any problems with your appliance please call Franke Customer Care 1300511072
CLEANING GENERAL
_______________________________________________________________________________________________________________________
1. PAN SUPPORTS, TRIVETS: These are made from cast iron and coated in a vitreous enamel to provide a resilient mat
finish. These can be placed in the dishwasher (on a gentle cycle) or alternatively cleaned with a soft bristled brush in
warm soapy water.
2. BURNERS: The burner caps are solid brass with a black chrome finish to avoid discoloration of the brass. NOTE: The
black chrome will eventually burn off with time however this will not affect the performance of the burners. The burners
can be re- chromed with Franke`s exchange program, for a nominal fee. The burner cap can be removed and cleaned
with a soft bristled brush and warm soapy water or they can be placed in the dishwasher.
NOTE: AFTER CLEANING (ESPECIALLY IN A DISHWASHER) PLEASE ENSURE THAT THE PORTS (BURNER HOLES) ARE
FREE OF ANY FOOD, WATER OR DEBRIS. THESE ARE EASILY CLEARED WITH A TOOTHPICK OR NEEDLE.
NOTE: DO NOT UNSCREW ANY PART OF THE BURNER SYSTEM.
3. STAINLESS STEEL: Should be cleaned with a commercially available stainless cleaner.
NOTE: DO NOT USE ABRASIVE POWDERS OR SCOURER PADS AS THESE WILL SCRATCH THE SURFACE OF THE
STAINLESS STEEL.
NOTE: DO NOT USE AGGRESSIVE CHEMICAL CLEANERS LIKE AMMONIA OR OVEN CLEANERS AS THESE MAY ETCH OR
DISCOLOUR THE SURFACE.
4. CERAMIC GLASS: After cooking it is recommended that the ceramic glass be cleaned with a commercially available
glass cleaner (eg Windex) to remove any light spills or grease.
NOTE: STUBBORN STAINS AND BURNT FOOD SHOULD BE CLEANED WITH A CERAMIC GLASS CREAM AND REMOVED
WITH A RAZOR SCRAPPER. DO NOT USE SCOURING PADS OF ANY KIND. WE RECOMMEND APPLYING THE CREAM
WITH A DRY CLOTH AND APPLYING IN A CIRCULAR RUBBING MOTION TO REMOVE THE STAIN/FOOD.
15
Page 16

FAULT FINDING / ABNORMAL OPERATION
FAULT FINDING / ABNORMAL OPERATION
_______________________________________________________________________________________________________________________
FAU LT POSSIBLE SOLUTION(S)
BURNER LIGHTS, BUT GOES OUT WHEN CONTROL IS
RELEASED (GAS)
CONTROL KNOB IS TO BE PRESSED DOWN FIRMLY, AND
HELD FIRMLY, DURING IGNITION PROCEDURE FOR 5
SECONDS.
CONTROL KNOB IS BOTTOMING OUT ON THE CONTROL
PANEL AND NOT ENGAGING THE FLAME FAILURE DEVICE
– HOLE IN KNOB NEEDS PACKING.
IF THIS IS A FAULT PRESENT ON THE WOK BURNER, REFER
TO THE CORRECT ASSEMBLY INSTRUCTIONS.
UNIT OCCASIONALLY EMITS A SPARK EVEN WHEN NOT
BEING OPERATED (GAS)
FLAME ON WOK BURNER PRESENT UNDER SKIRT AND
LARGE BILLOWING FLAME IN MIDDLE OF BURNER.
(GAS)
THIS USUALLY MEANS SOME MOISTURE ON THE
SWITCHING MECHANISM DUE TO SPILLAGE OR STEAM. IT
SHOULD SELF RECTIFY
FullSpectrum BURNER IS INCORRECTLY ASSEMBLED
OR FOOD HAS BLOCKED PORTS. REFER TO ASSEMBLY
INSTRUCTIONS. OR CLEAN. CONTINUED OPERATION
IN THIS CONDITION MAY CAUSE DAMAGE. RECTIFY
IMMEDIATELY
16
Page 17

INSTALLATION INSTRUCTIONS
INSTALLATION INSTRUCTIONS - THIS APPLIANCE MUST BE INSTALLED BY AN AUTHORISED PERSON.
_______________________________________________________________________________________________________________________
Your Franke cook top must be installed in accordance with the installation requirements of the local gas and electrical
authorities and the appropriate installation requirements of ASNZ5601, wiring regulations of ASNZS3000 and any other
building requirements.
The electrical connection for the 240V AC supply is by plug to a switched GPO. Franke models with induction must be wired to
a 15 Amp switched GPO socket. Do not remove plug and fix wire.
◦
A 60 mm gap is to be provided around base of unit and models noted as having base surface temperatures above 95
have a removable barrier fitted below to prevent accidental contact.
The appliance is not intended to be operated by means of an external timer or separate remote control system.
Respective locations of gas inlet and power supply
1. Determine the position where your Franke cooktop is to be installed ensuring no structural members interfere with the
space requirements.
C must
Clearances: For gas cooktops with a FullSpectrum burner (due to the high heat output), ensure that there is at least 700
mm clearance between the benchtop and the rangehood above, or in cases without a rangehood, at least 800 mm between
the benchtop and any overhead downward facing combustible surface located above the cooktop. For induction cooktops,
please ensure a minimum clearance of 600 mm above the benchtop (for both rangehood and any overhead downward facing
combustible surface located above the cooktop).
Ensure that there is a minimum gap of a least 100 mm from the outer edge of the installed cooktop to any nearby combustible
surface.
2. Ensure that both gas and electrical outlets are accessible paying particular attention to the routing of the gas supply line.
Ensure that there will be a minimum of 60 mm clearance around the underside of the installed cooktop for ventilation.
3. Mark out the required opening in your bench top using the dimensions shown. Ensure that there is a minimum 630 mm
clearance above the cooktop. Once the opening has been cut out install the appliance and fix into position using the
supplied clamping brackets as shown.
NOTE: DO NOT OVER TIGHTEN BRACKETS AS THIS MAY DISTORT THE APPLIANCE
17
Page 18

INSTALLATION INSTRUCTIONS
_______________________________________________________________________________________________________________________
NOTE: CONNECTION OF THE APPLIANCE TO THE GAS SUPPLY MUST BE IN ACCORDANCE WITH THE REQUIREMENTS
OF ASNZ5601. A ½ INCH BSP CONNECTION AT THE INLET IS RECOMMENDED AND THE GAS SUPPLY LINE TO THE
APPLIANCE MUST BE OF ADEQUATE LENGTH TO ALLOW SUFFICIENT WITHDRAWAL OF APPLIANCE FOR SERVICE
OR DISCONNECTION.
CONNECT USING ANNEALED COPPER PIPE OR A FLEXIBLE HOSE CAN BE USED PROVIDING THAT:
• Assembly acceptable by the local authority and complying with requirements of AS1869, Class B and ASNZ5601
• Length of hose is kept to a minimum.
• The hose connection star ts below the protective barrier (where required) installed 60 mm below the appliance.
• The hose is not subject to kinking abrasion or sharp edges.
NOTE: THE COOKER MUST BE INSTALLED WITH PROVISION TO ALLOW THE GAS TO BE TURNED OFF AND
DISCONNECTED FOR SERVICING AND REMOVAL
1. For the LP Gas model the gas supply must be regulated to 2.75kPa; for Natural Gas regulated to 1kPa . A manual shut
off valve must be installed in the gas supply line in an accessible position so that gas supply can be turned off in an
emergency or for service. The cooktop data plate gives details of injector sizes and gas rates.
2. After installing the gas supply ensure that all gas controls are in the off position , then check all connections thoroughly
for leaks
3. Plug the electrical connection in.
Turn each gas control on and adjust to obtain a clear blue flame with no yellow tipping. For adjustments refer to the
attached servicing instructions. The first time you ignite the burners they may not ignite immediately. This is due to air in
the gas lines that should clear within a few seconds. If satisfactory performance cannot be obtained contact the local gas
authority for advice and assistance.
Fill in the warranty model details in this book taking information from the data plate where necessary.
Instruct the owner in safe operation of the appliance and ensure that these instructions are left with the appliance.
18
Page 19

SERVICING INSTRUCTIONS
NOTE: SERVICING IS ONLY TO BE CONDUCTED BY AN AUTHORIZED AGENT.
CONSULT DATA PLATE FOR DETAILED WIRING DIAGRAM.
The gas valves, injectors, venturis, ignition system and burners are accessed by removing the hob from the appliance.
Always disconnect the power supply from the unit before commencing work.
For the Ceran Glass models the base fixing clamps need to be removed from below so that the appliance can be raised out of
the opening and the screws removed around the sides.
The stainless steel hob can be removed by taking off the dome nuts and lifting the hob up.
Remove the burner caps and venturis as shown in the following image. Unscrew the retaining rings in the burners and then
remove the burner bases. Disconnecting the spark electrode leads in the process. Remove the three screws that hold the
FullSpectrum sealing ring in place, and remove the sealing ring.
19
Page 20

SERVICING INSTRUCTIONS
For models with a stainless steel hob, the hob can be unscrewed by removing the dome nuts from the top, the two middle front
nuts do not need to be removed. Lift the hob off the appliance as shown in the following diagram. (The black sealing tape may
present some resistance).
For models with the ceramic glass/stainless steel hobs unscrew as shown in the following diagram. (The black sealing tape
may present some resistance and care should be taken not to overstress the ceramic glass). For ceran glass hobs without
stainless steel surrounds the hob can be removed after the burners have been removed.
20
Page 21

SERVICING INSTRUCTIONS
GAS VALUE ADJUSTMENT AND MINIMUM SETTING
___________________________________________________________________________________________________
SHOULD YOU EXPERIENCE ANY PROBLEMS WITH YOUR APPLIANCE PLEASE CALL
FRANKE 03 9700 9100
This large FullSpectrum burner is fitted with 2 X bypass screws that are accessed by removing the switch harness retaining
clip and then removing the switch harness. There are two separate bypass screws - these screws are not adjustable and are
supplied with specific orifices for each gas. The left hand screw operates the minimum setting of the main outer burner ring.
Whereas the right hand screw operates the minimum setting of the auxiliary inner burner ring.
The other valves feature a single adjustable screw which can only be accessed by removing the switch harness retaining clip
and then removing the harness.
The outer burner and inner burner injectors for the FullSpectrum burner can only be accessed by removing the hob from the
appliance. Adjustment of the main burner Venturi can be affected by loosening the fixing screw shown. Ensure that the fixing
screw is re-tightened following adjustment.
BURNER NATURAL GAS LP GAS
FullSpectrum
A (CENTRE)
B (MEDIUM)
C (LARGE)
2.2 mm
0.68 mm
1.15 mm 0.72 mm
1.35 mm 0.8 mm
1.45 mm 1.0 mm
1.22 mm
0.48 mm
21
Page 22

PROCEDURE FOR CONVERTING YOUR FRANKE COOKTOP
FROM NATURAL GAS TO LP GAS
NOTE: IT IS RECOMMENDED THIS PROCEDURE IS DONE BY THE AUTHORISED FACTORY AND NOT IN
DOMESTIC SITUATIONS
1. Ensure that the correct LP gas test point has been fitted and that there is a ready supply of LP gas to enable you to
correctly set the flames on each of the burners.
2. Follow the instructions for removal of the hob as detailed in the servicing instructions. Ensure the Natural gas regulator is
replaced with an LP gas regulator usually supplied at the cylinder.
3. To convert the burner you will need to replace the main injector, auxiliary injector and the bypass screw. See above table
for sizes.
The bypass screws for the FullSpectrum requires replacing to achieve the correct minimum settings. Remove the bypass screws
and replace as follows
0.9 mm goes to 0.52 mm main burner.
0.45 mm goes to 0.3 mm auxiliary burner
The turn down setting for the A<B and C burners is adjusted through the screw in the top of valve.
Assemble and test.
22
Page 23

Page 24

PR Kitchen & Washroom Systems Pty Ltd.
83 Bangholme Road
Dandenong South
VIC 3175
Australia
Phone +61 3 9700 9100
Fax +61 3 9700 9191
info@prks.com.au
www.franke.com.au
 Loading...