

Page 1
OPERATION MANUAL
Page 2

TABLE OF CONTENTS
Safety 2
General 3
Key Components 3
Function Buttons 4
Daily Operations 5
Operating Controls 5
Handle Colors 6
How to Make a Craft Beverage 7
Preheat the Brew Cylinder 7
Make a Beverage 8
Brew Cylinder Removal 11
Brew Cylinder Installation 12
Purge Valve Installation 13
Splash Guard Removal 13
Daily Cleaning 14
External Surfaces and Accessories 14
Weekly Cleaning 15
Brew Cylinder and Components 15
Purge valves 16
Quarterly Cleaning 17
Descaling 17
Troubleshooting 18
Error Messages on User Interface Screen 18
General Troubleshooting 18
Accessories 19
Warranty 20
of 201
Page 3
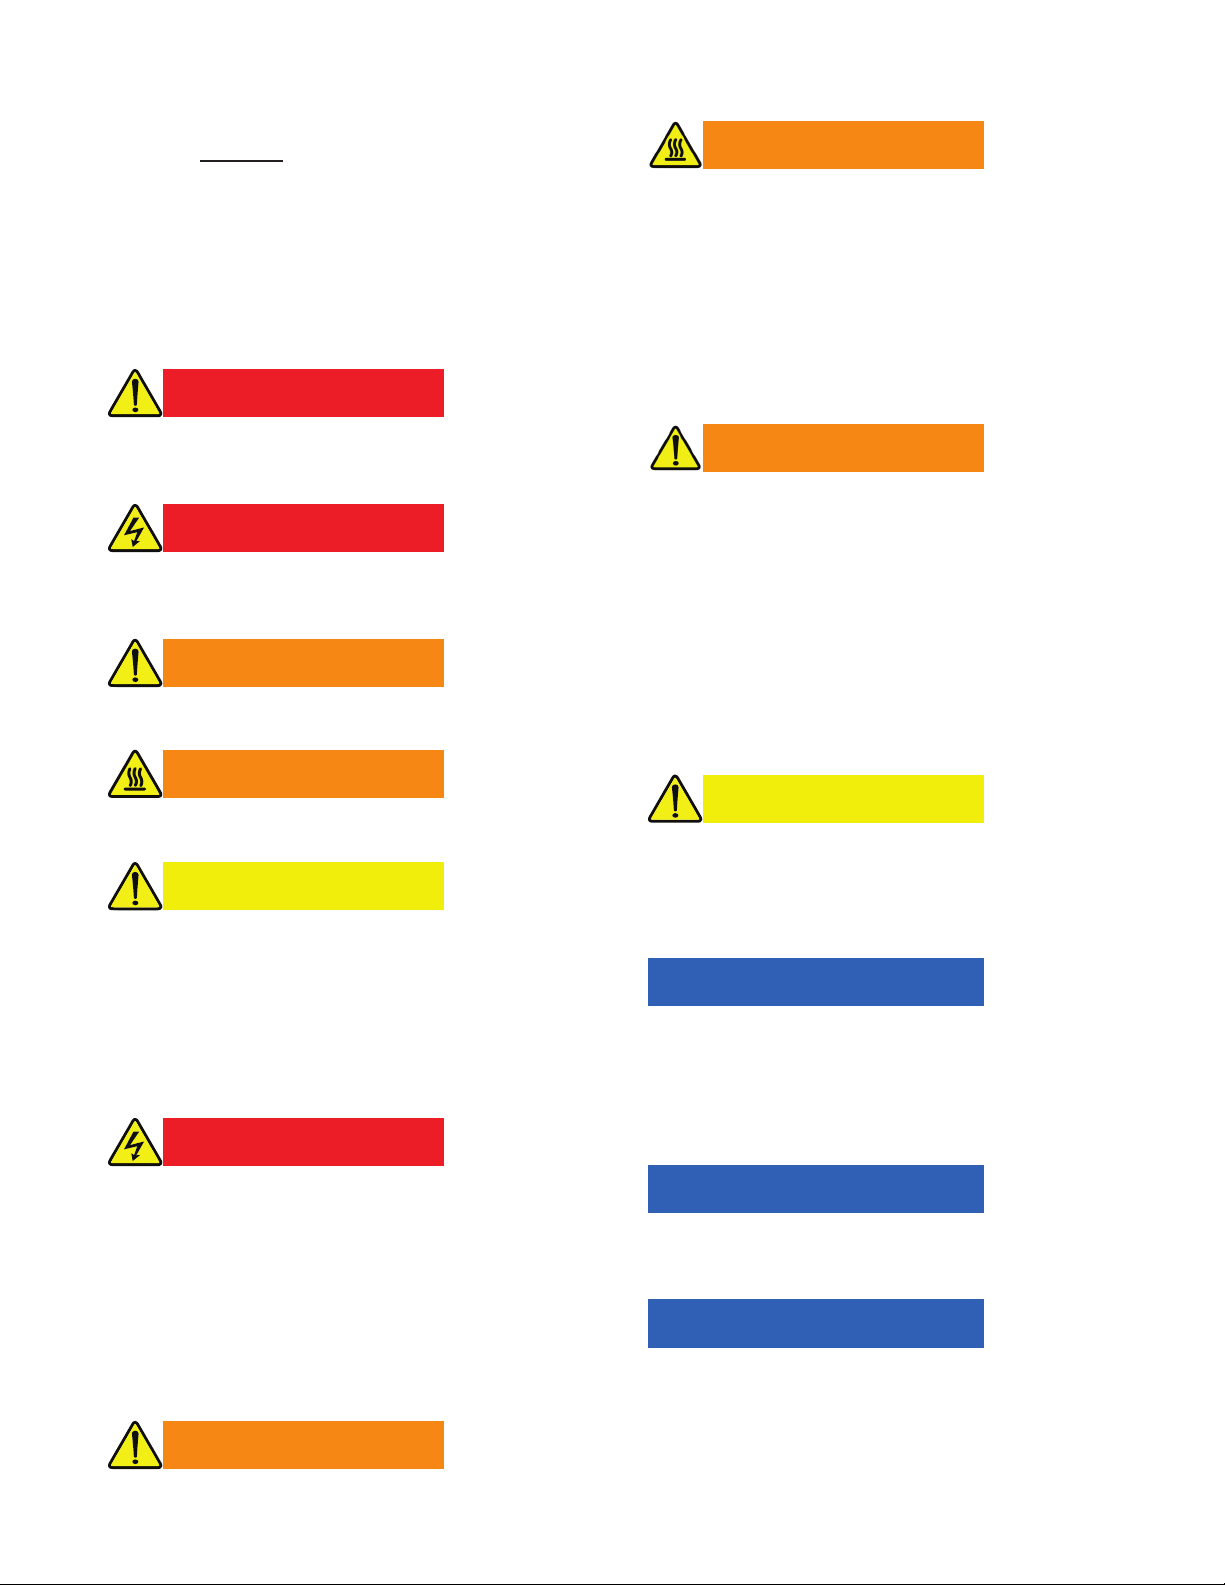
SAFETY
READ AND UNDERSTAND THE CONTENTS OF THIS
MANUAL BEFORE ATTEMPTING TO OPERATE.
This operation manual contains important instructions
and safety information about the BKON™ Craft Brewer.
Observe the following dangers, warnings, cautions and
notices when operatinging the BKON Craft Brewer:
EXPLANATION OF SAFETY SYMBOLS
DANGER
Indicates potentially life-threatening danger or grave
injury.
DANGER
Indicates potentially life-threatening danger or grave
injury from electrocution.
WARNING
Indicates risk of injury.
WARNING
Indicates risk of injury from Heat / Hot Surface.
CAUTION
Indicates risk of minor injury.
WARNING
Risk of burning or scalding
- Hot water and steam are released repeatedly during
the cleaning cycle.
- Keep hands away from the outlet (purge valve) while
in operation.
- The glass cylinder may be HOT to the touch.
- Do not disconnect “Hot Water” line before purging
lines of hot water or allowing sufcient time for water
in lines to cool.
WARNING
Risk of injury and / or damage to the machine
Making improper changes in the form of modications or
unauthorized repairs can lead to injury or damage to the
machine.
- Programming and settings may only be preformed
by authorized service technicians.
- Retrots and repairs may only be preformed by
authorized service technicians.
- Do not make any modications to the machine that
are not authorized by documentation provided by
Franke Foodservice Solutions, Inc.
CAUTION
Possible health hazard from heavy lifting
Lifting heavy objects can cause injury.
- Do not lift or move the machine without appropriate
help or equipment.
FOR YOUR SAFETY
This documentation has been created exclusively for
training the use of, and operating, the BKON Craft
Brewer..
DANGER
Electrical System
- Energized electrical circuits present a potentially life
threatening hazard.
- Ensure all electrical power circuits connected to the
unit and supply outlets or connections are completely
de-energized before performing any installation work
around power outlets or connections.
- Follow all lockout / tagout procedures for all electrical
circuits.
WARNING
Hot Water System
NOTICE
Improperly transporting the machine can cause faults or
damage.
- Always transport in an upright position.
- Transport the machine so that it is protected from
the elements, such as rain and moisture.
NOTICE
Using inappropriate tools can damage components of
the machine.
NOTICE
General Reminders.
- Do not discard any loose parts as they may be
required for proper installation and operation.
of 202
Page 4
GENERAL
The BKON™ Craft Brewer is designed for high volume use, for the creation of “quick serve / on demand” drinks prepared by a Barista
(operator). The machine ships from the factory in two parts: tower and supply center. The tower is where the product is brewed and
dispensed. A brew handle is used to hold product during a brew cycle.
Cold water should be supplied to the unit. During a cycle, 8 to 20 oz. of water passes through a process that will ultimately deliver
an expertly crafted beverage. A water supply connection is located on the front of the supply center and should be connected by the
certied installer per national and local municipality codes and regulations.
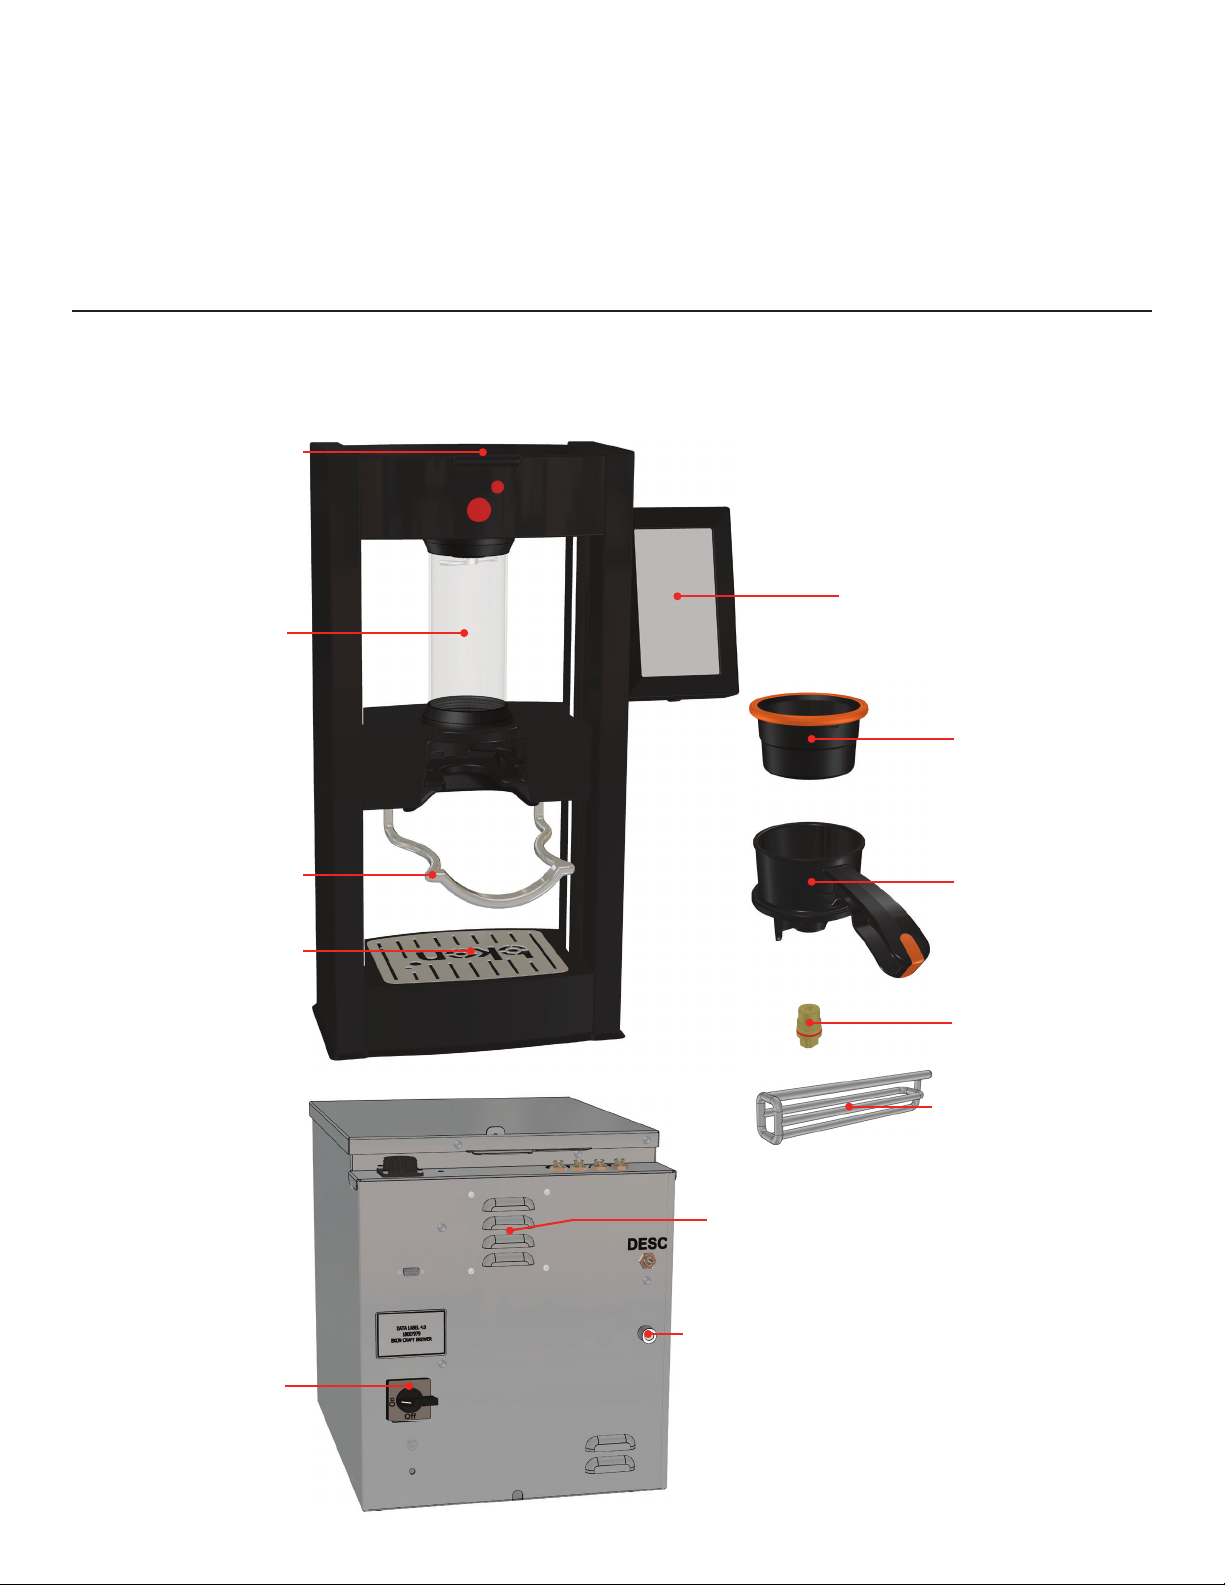
KEY COMPONENTS
Cylinder
Latching
Handle
Brew Cylinder
Brew Basket
Locking Handle
Drain Tray
Tower
User Interface Screen
Brew Basket
Brew Handle
Power Switch
Purge Valve
Supply Center (WVSC)
Purge Valve Tool
Exhaust Fan
Water Inlet
of 203
Page 5
Function Buttons
i
Green Tea White Tea
Black Tea
Spirits
Chai / Rooibos
Oolong Tea
Herbal / Fruit
Coffee
17:30
i
17:30
i
17:30
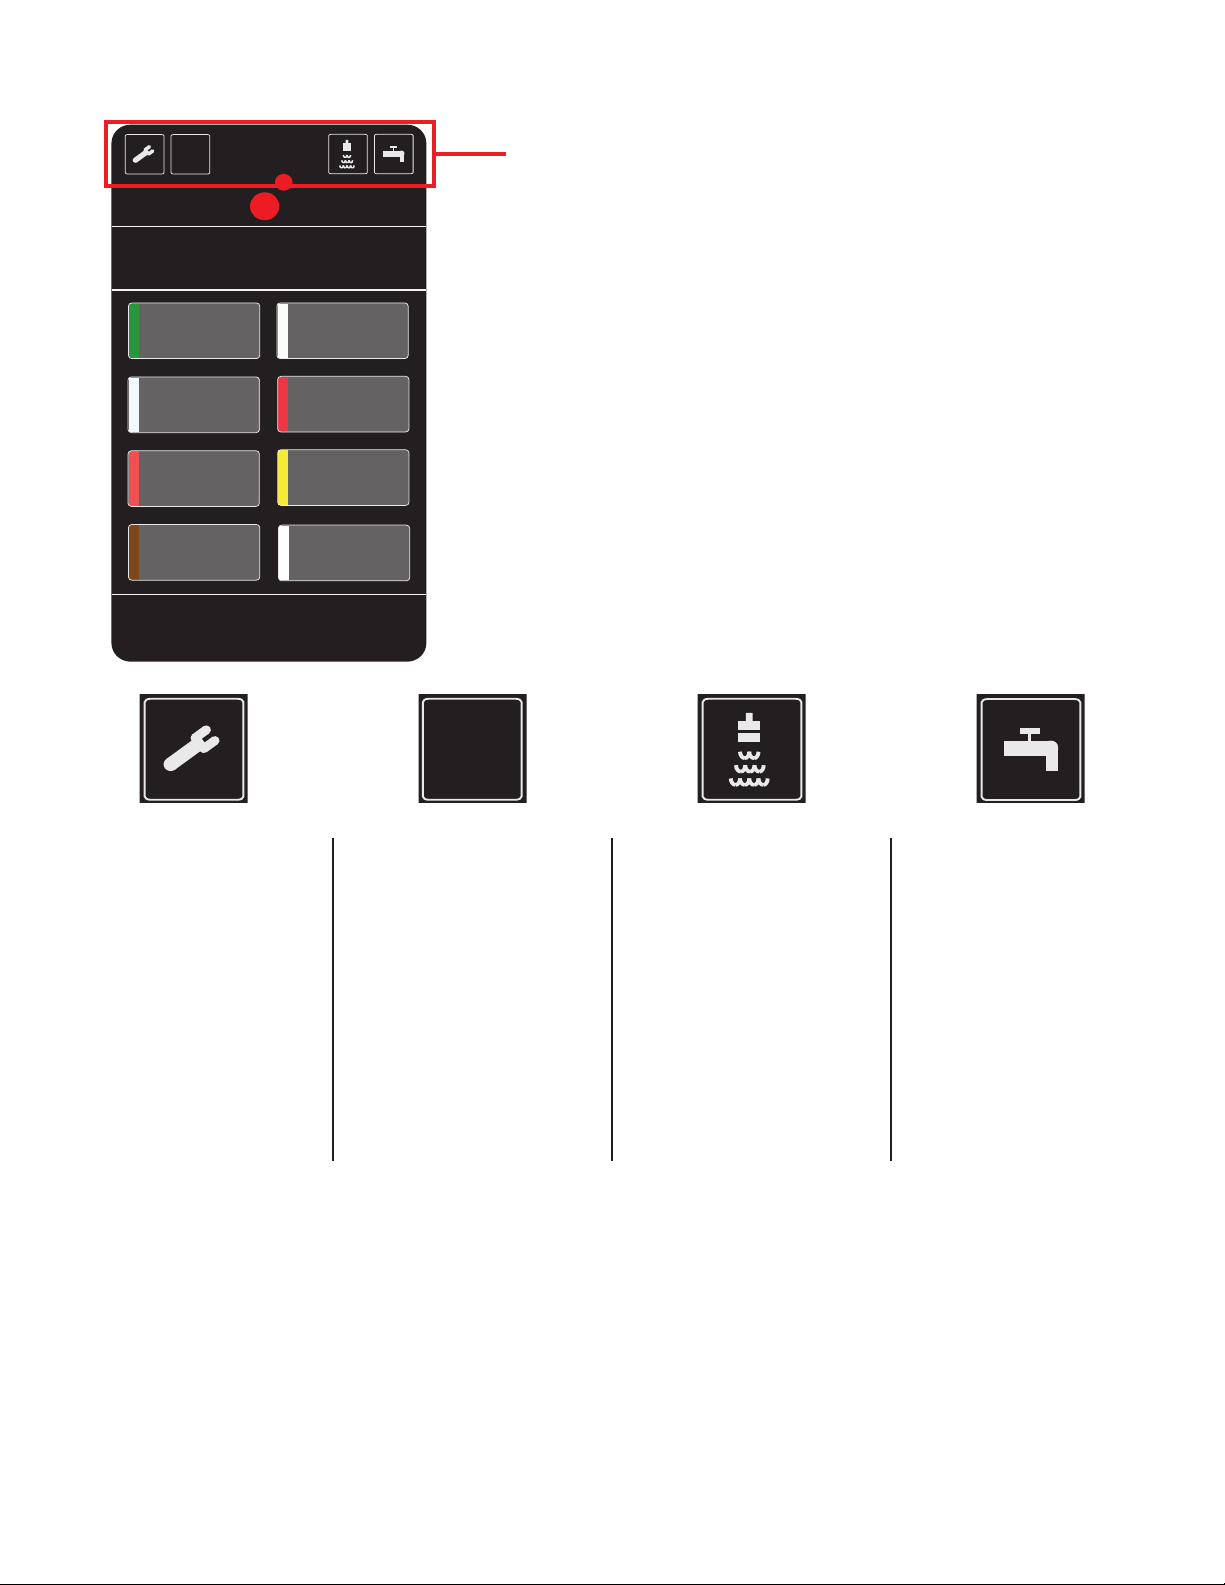
FUNCTION BUTTONS
Wrench Icon
Is used to access the
Maintenance / Service
menu. This menu provides
the means to:
Perform Cleaning
Test Tea Recipes
Update/Export Tea Recipes
Update Time and Date
Descale
Information Icon
This icon will list the follow
information:
BKON version number
Software versions
Menu le name
Brew counts
Rinse Icon
This function is used to
perform a manual rinse.
If the automatic rinse was
unable to remove some
beverage ingredients
from the side of the brew
cylinder, press the rinse
button to perform an
addition rinse to remove
ingredients.
Purge Icon
This function is used to
perform a manual purge.
If the automatic purge
was unable to remove all
the liquid from the brew
cylinder, press the manual
purge to perform an
addition purge to push out
the liquid.
of 204
Page 6
DAILY OPERATIONS
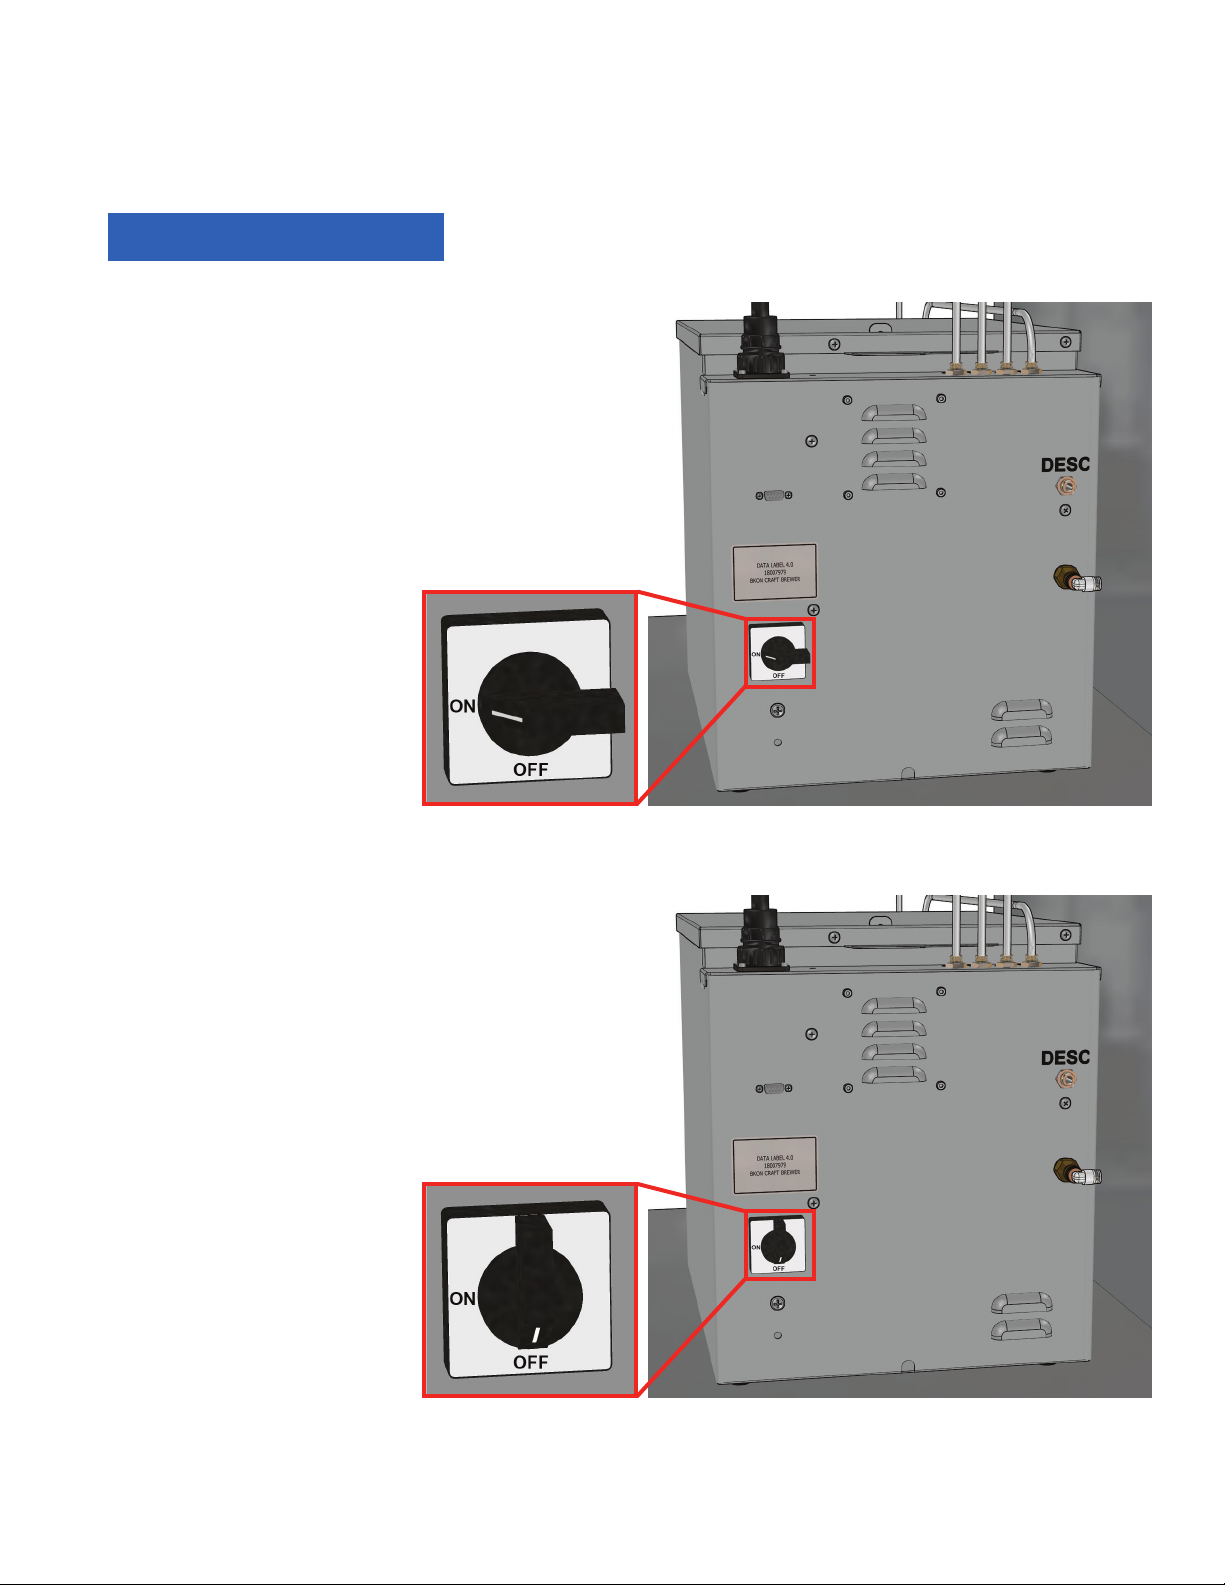
Operating Controls
1. Power - Start Up
NOTICE
The BKON™ Craft Brewer has a power On/Off switch
mounted on the front of the Supply Center.
Rotate the black handle clockwise from the “OFF” to the
“ON” position. The craft brewer now has power. Once
power is turned on, the initialization sequence must
nish before drink preparation is possible.
When turning on machine, it is necessary to have the Brew Basket
and Brew Handle out of the machine until the User Interface is ready
and menus are available.
2. Power - Shut Down
The BKON™ Craft Brewer has a power On/Off switch
mounted on the front of the Supply Center.
When turning off, it is necessary to have the Brew
Basket and Brew Handle in the tower and the and
locking handle in the UP / UNLOCKED position.
Rotate the black handle counter clockwise from the
“ON” to the “OFF” position.
of 205
Page 7
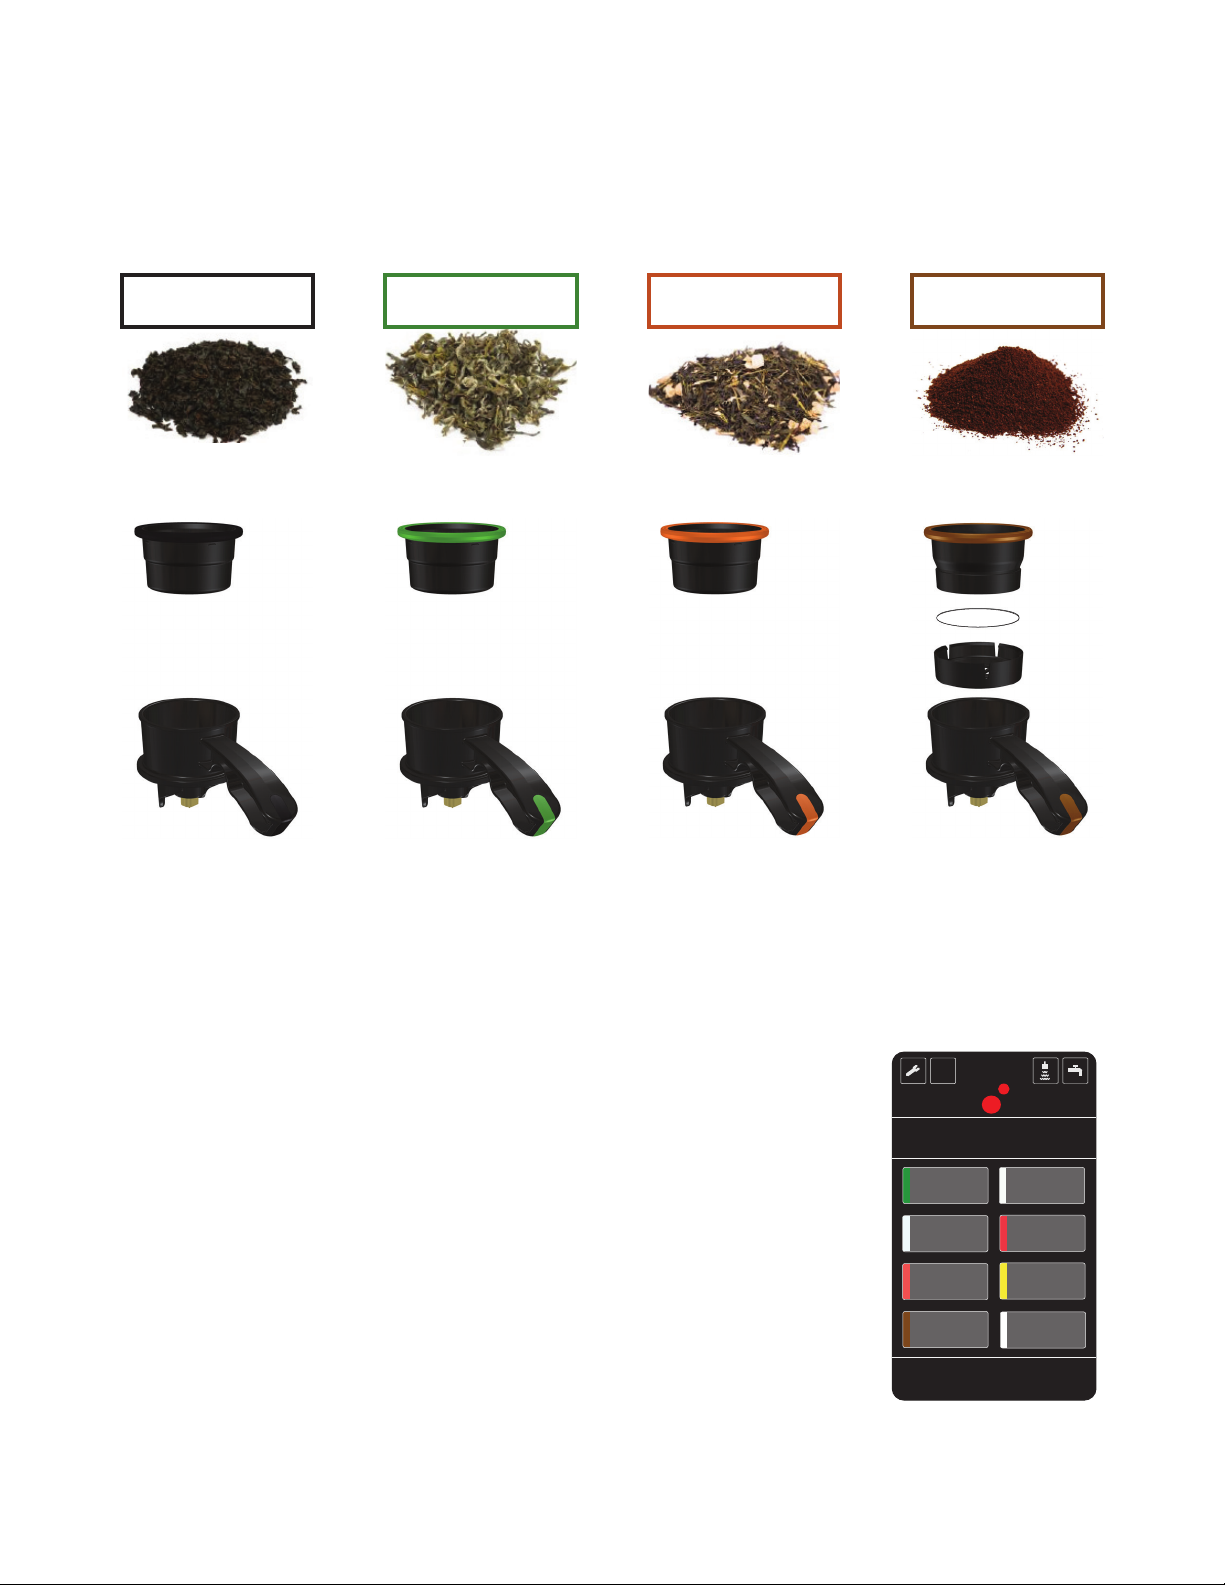
HANDLE COLORS
i
Green Tea White Tea
Black Tea
Spirits
Chai / Rooibos
Oolong Tea
Herbal / Fruit
Coffee
17:30
BKON™ Color Method
Important: A color-coding system has been created to help ease workow and to avoid cross-contamination when
brewing with materials that may carry avors over to other products. Below is a color method applied to a
tea program. The same logic may be used for a coffee and tea program or for any other means to separate
products by colors.
Black / Oolong
PURE
Green / White
PURE
Other
FLAVORED
Coffee
Four colored brew handles and baskets are provided with each BKON brewer. Black, Green and Orange can
be used for tea and other craft brew beverages. The Brown handle and baskets should be used for Coffee.
The color of the touch screen buttons can also be customized to identify which basket should be used for a
particular product. This can be adjusted during recipe development within the Craft Cloud.
Disclaimer: Screen appearance will vary according to customer-specic
menus.
of 206
Page 8

i
Green Tea White Tea
Black Tea
Spirits
Chai / Rooibos
Oolong Tea
Herbal / Fruit
Coffee
17:30
HOW TO MAKE A CRAFT BEVERAGE
If the craft brewer has been idle or the brew chamber has been left open, a rinse cycle should be preformed to
preheat the brew cylinder before preparing a craft beverage.
Preheat the Brew Cylinder
1.
and handle
Insert a pitcher under the brew
handle
3.2.Insert an empty brew basket
Lower the brew handle locking
handle
4..
Select the manual rinse icon
5.
Raise the brew handle locking
handle
of 207
6.
Remove pitcher and brew
handle, empty pitcher
Brew cylinder is now preheated
Page 9

How to make a craft beverage
Make a Beverage
1.
Prepare purge valve. Lightly
press tip handle into valve to
clear debris
Ensure the basket and
handle colors match
Craft
Beverage Coffee
Place measured product in
2.
brew basket and place brew
basket with measured product
inside the brew handle
Paper
Coffee
Filter
Insert new brew handle into
3.
tower (with product)
Place cup under outlet
4.
5. 6.
Lower locking handle fully to
seal brewing cylinder
17:30
i
Green Tea White Tea
Oolong Tea
Herbal / Fruit
Coffee
Select beverage type
Black Tea
Chai / Rooibos
Spirits
of 208
Page 10

Coffee
Spirits
Chai / Rooibos
i
I
<
II III IV
Select Recipe...
17:30
Recipe
1
Recipe
2
Recipe
3
Recipe
5
Recipe
4
How to make a craft beverage
i
Select Recipe...
Fruit Tisane
small particle
Fruit Tea Blend s
Chamomile
Coffee
<
I
7.
Select beverage recipe Select drink size
8. 9.
17:30
Recipe 1
small
Fruit Tisane
large particle
medium
Fruit Tea Blend l
Chai / Rooibos
large
X
II III IV
Spirits
17:30
i
Recipe 1
Size: small
Brewing Process...
Chai / Rooibos
Coffee
Brew process begins
Spirits
X
10.
Beverage dispenses into cup
17:30
i
Recipe 1
Size: small
Brewing Complete
Chai / Rooibos
Coffee
<
11. 12.
Brew process is complete
Spirits
Raise locking handle
(unlocked)
of 209
Page 11

How to make a craft beverage
Hot
Surfaces
Serve beverage Remove brew handle from
13.
14. 15.
tower
16. 17. 18.
Empty product into knock box
Rinse brew basket Rinse brew handle
Remove brew basket from
handle
of 2010
Page 12

BREW CYLINDER REMOVAL
Raise cylinder locking handle -
1. 2.
- Raise cylinder locking handle
to release upper O-ring
Raise locking handle -
- Raise locking handle to
provide more space to
remove cylinder
3. Remove brew basket and
handle -
- Remove the brew basket and
handle if one is in place
Lower cylinder -
4.
- Lower glass cylinder from
upper O-ring
Angle and remove cylinder -
5. Lower locking handle
- Carefully angle back and lift
up cylinder
of 2011
6.
- Lower locking handle to
provide more space to angle
and remove cylinder
Page 13

8.
Remove rubber anges -
- Remove both rubber anges
- Clean the glass cylinder and rubber anges
Brew Cylinder Removal
7.
Lower locking handle
- Lower locking handle to
provide more space to angle
and remove cylinder
9.
Reassemble -
- Allow glass cylinder and rubber anges to dry
- Reattach the anges to the cylinder
- Reinstall cylinder in reverse order of removal
BREW CYLINDER INSTALLATION
1. Raise cylinder locking handle -
- Raise cylinder locking handle
Raise locking handle -
2. 3. Angle and insert cylinder -
- Raising locking handle will
provide more space to insert
brew cylinder
of 2012
- Carefully insert glass cylinder
in place from the customer
side of brew tower
Page 14

Brew Cylinder Installation
Raise cylinder -
4. Insert a brew basket and
- Raise cylinder in place to
ensure a tight seal on top
5. Lower locking handle
handle -
- Combine handle and basket,
insert under cylinder
6.
- Lower locking handle to seal
lower cylinder in place
Splash Guard RemovalPurge Valve Installation
7. 1.
Lower cylinder locking handle -
- Lower cylinder locking handle
to complete installation
Insert purge valves into brew
handles -
- Secure the purge valve into
the brew handle using the
purge valve tool
of 2013
1.
Press sides and lower splash
guard -
- A.) Lightly press sides of
splash guard inward
- B.) Lower spalsh guard
- Install in reverse order
Page 15

DAILY CLEANING
i
Green Tea White Tea
Black Tea
Spirits
Chai / Rooibos
Oolong Tea
Herbal / Fruit
Coffee
17:30
i
17:30
External Surfaces and Accessories
EXTERNAL
SURFACES AND
ACCESSORIES:
1. Insert brew
basket and handle
with purge valve
seated in place in
the handle.
2. Lower locking
handle.
3. Run manual rinse
cycle twice.
(Repeat steps 1-3
for each brew
handle).
4. Wipe exterior
surfaces (4a4d) with a clean,
damp cloth.
(Do not use
excessive
moisture. Ensure
screen (4d) is dry
after cleaning.)
4a
4b
4c
1
3
X 2
Per Brew
Handle
2
5
4d
5. Wash accessories.
(Parts shown are
dishwasher safe.
After washing,
rinse and sanitize
all parts, and
allow to air
dry prior to
reassembly.)
OR
For video instruction, go to the link below:
https://youtu.be/T4RLtptseIs
of 2014
Page 16

WEEKLY CLEANING
Brew Cylinder and Components
BREW CYLINDER AND
COMPONENTS:
1
32 oz
32
4
STEP 1/4: CLEANING
Operator attention is required to empty
the pitcher when prompted.
1-Insert brew basket in brew handle.
2-Place one BKON Cleaning Tablet
in the basket.
3-Insert brew handle and lock in place.
4-Place a 32 oz (950 ml) pitcher
under outlet and press Continue..
CANCEL
CLEANING COMPLETE
CAUTION: WATER is extremely hot.
Empty and clean pitcher.
Clean basket and brew handle.
Continue with the daily cleaning tasks.
Press Finish..
CONTINUE
Follow the on-screen instructions
STEP 2/4: RINSE 1 OF 2
CAUTION: WATER is extremely hot.
Empty pitcher and return under outlet.
Make sure the lock handle is in the
down position.
Press Continue when ready..
CONTINUE
NOTICE: On-screen instructions may vary by software version. Follow instructions on screen.
Emptying and Replacing Pitcher
(as described in on-screen instructions)
STEP 3/4: RINSE 2 OF 2
CAUTION: WATER is extremely hot.
Empty pitcher and return under outlet.
Make sure the lock handle is in the
down position.
Press Continue when ready..
CONTINUE
STEP 4/4: SANITIZE
CAUTION: WATER is extremely hot.
Empty pitcher and return under outlet.
Make sure the lock handle is in the
down position.
Press Continue when ready..
CONTINUE
FINISH
NOTICE:
Failure to perform cleaning
or descaling procedures, as
indicated per instructions,
may void warranty.
of 2015
Page 17

Purge valves
PURGE VALVES:
1. After wash cycle is
complete, remove purge
valves from all brew
handles using the purge
valve tool.
1 2
Weekly Cleaning
3
2. Make cleaning solution
by placing one (1) BKON
cleaning tablet into one
(1) 32 oz pitcher of hot
wa ter.
3. Poke each purge valve
with the purge valve tool.
4. Place purge valves into
cleaning solution, and
allow to soak overnight.
5. After soaking overnight,
thoroughly rinse cleaning
solution from purge
valves.
6. Using the purge valve
tool, insert purge valves
into brew handles.
(Do not overtighten.)
4
32 oz
5
32 oz
6
of 2016
Page 18

QUARTERLY CLEANING
i
17:30
Descaling
DESCALING:
1. Install suction cap and
tubing to descaling bottle,
and connect suction tube
to descaling port (as
shown). Leave the main
water line connected.
2. Insert an empty brew
basket and handle. Place
pitcher under purge valve.
Lower brew basket locking
handle.
3. Select the “WRENCH”
icon.
4. Select “Descaling”.
Note: For the remainder
of the descaling process,
follow the on-screen
instructions. Entire
descaling process may
take up to 20 minutes
and will require periodic
operator interaction.
5. Empty and wash the
brew handle, basket, and
pitcher.
CAUTION
on descaling label before performing this process. Use only BKON recommended descaling
products. Make sure pitcher is in place under brew basket during entire descaling process.
Wash pitcher thoroughly after use.
Read and understand the safety and rst aid instructions
Descaling Supplies
1
DESCALER
32 oz
DESCALER
2
3
17:30
i
Green Tea White Tea
Oolong Tea
Herbal / Fruit
Coffee
Black Tea
Chai / Rooibos
Spirits
6. Remove descaling bottle,
and dispose of properly.
To disconnect tubing,
press in the retaining ring,
and remove the tubing.
WARRANTY REQUIREMENT:
Run descaling cycle at least once
every 3 months.
NOTICE:
Failure to perform cleaning or
descaling procedures, as indicated
per instructions, may void warranty.
17:30
i
4 5 6
Maintenance / Service
Clean in Place
Time/Date
Update
Recipe File
Descaling
Load and Run
Dev Tea
Export to
Recipe File
of 2017
Page 19

TROUBLESHOOTING
Error Messages on User Interface Screen
Error Code Possible Cause Solution
Brew Chamber Glass
C:1 M:5
Brew Handle
C:2 M:5
Chamber Not Sealed
C:3 M:5
Temp. Sensor
C:11 M:5
thru
C:22 M:5
Flow Meter
C:40 M:5
Brew Chamber not installed correctly
Brew Handle not detected
Purge valve may be struck open or
clogged with debris
Brew chamber not sealed 4. Call for service
Temperature check failed
No water ow detected
Air in water lines
1. Remove and reinstall Brew Chamber.
2. Call for service.
1. Ensure brew handle and basket are in place when brewing.
2. Call for service.
1. Poke purge valve with purge valve tool to ensure ball
moves and is free of debris. Try a different purge valve or
brew handle.
2. Ensure brew handle and basket are in place and free of
debris.
3. Ensure brew basket locking handle is down and in place.
1. Restart machine and try again.
2. Call for service.
1. Check supply water.
2. Ensure drain from tower and drain from WVCS are not
connected to each other. Both should be connected to store
drain.
3. Cycle power and allow machine to reboot, purging air from
lines. Repeat up to 4 times.
4. Call for service.
General Troubleshooting
Symptom Possible Cause Solution
User Interface not on
Water leak
Did not purge drink Purge valve is stuck in the closed position
Purge or dripping during
brew cycle
Beverage level is
incorrect
Consistent poor
beverage quality
Main power off
Communication cable disconnected 3. Call for service.
Leak Between Tower and WVSC 1. Check water line connections
Drain lines leak
Leaking from inside WVSC 3. Call for service
Debris in purge valve
Purge valve spring has become too weak 3. Call for service.
Corrupt recipe 1. Try a different recipe in the same size.
Flowmeter malfunction 2. Call for service.
Wrong amount of tea / coffee 1. Check recipe and product measurement.
Poor incoming water quality 2. Make sure incoming water is in spec.
Corrupt recipe 3. Check recipe.
Chamber was locked during startup (result in
calibration error)
Beverage too hot or cold
of 2018
1. Check power cord and breaker.
2. Check connection on tower and WVSC.
2. Check drain line connections on Tower, WVSC and
store drain
1. Use manual purge or remove purge valve per
instructions, using purge valve tool. Once valve is
removed, use manual purge.
2. Punch with purge valve opener from inside brew
handle.
3. Try a different purge valve. Call for service
1. Use purge valve tool to remove debris from purge ball.
2. Replace purge valve.
4. Restart machine and ensure brew basket and handle
are not installed during start up.
5. Check recipe.
6. Call for service.
Page 20

ACCESSORIES
19006590
Brew Chamber
(Glass Only)
18007897
Brew Chamber Assembly
(glass and rings)
19006265
Silicone Ring
27801749
Purge Valve Tool
19006722
Drip Tray
Screen
19006993
Brew Basket
Black
19006996
Brew Basket
Green
19006994
Brew Basket
Orange
19006802
Coffee Basket
19006803
Coffee Cap
19006364
Brew Handle
(no color clip)
19006305
Purge Valve
19007372
Cleaning Tablets
18008739
Coffee Filters
(500 pcs)
18009328
Brew Handle Clips
(Black, Green,
Orange, Brown)
18008925
Descale Kit
(liquid and tube)
151044
Cleaning Brush
20.210001283
Drip Tray Cover
19006258
Plunger Gasket
x3
x3
x100
18008316
Coffee Brew Kit
19006351
Splash Guard
of 2019
Page 21

Franke Limited Warranty
Franke Foodservice Solutions (“Franke”) warrants new equipment manufactured in Franke’s own facilities and
installed in the United States and Canada to be free of defects due to poor materials or workmanship for the period
of time listed below (following the date of original installation):
Franke-Manufactured Equipment
- 1 Year Parts and Labor
Exclusions: Certain Franke parts that are expendable by nature and that need to be replaced frequently may
not be covered. Franke is not liable under these warranties for repairs or damages due to improper
operation, attempted repairs or installation by unauthorized persons, alterations, water quality, abuse,
re, ood or acts of God.
Additionally, this warranty may be voided in the case of:
- Failure to follow Franke instructions for use, care or maintenance
- Removal, alteration or defacing of the Franke-afxed serial number
- Service by a non-authorized service company
- Use of non-OEM (Original Equipment Manufactured) parts
WARRANTY
This warranty is conditional upon Franke receiving notice of any defect subject to this warranty within thirty (30)
days of its original discovery by the Buyer.
of 2020
Page 22

For Support, please call:
Tel + 1-800-5-FRANKE, opt. 2
(1-800-537-2 6 5 3, opt. 2)
Franke Foodservice Solutions Inc.
800 Aviation Parkway
Smyrna, TN 37167
www.frankeamericas.com
Franke Group, which includes both Franke Foodservice Solutions and Coffee Systems divisions, is one of the worlds leading suppliers of fully
automatic coffee machines and innovative, out-of-home hot-beverage solutions. Franke is BKON's exclusive global partner, providing engineering,
manufacturing, distribution and support for commercial systems that use BKON's patented Reverse Atmospheric Infusion
© 2016 Franke Foodservice Solutions, Inc. This media is the condential property of Franke Foodservice Solutions, Inc. and shall not be
reproduced in any form of media without the express written permission of Franke. BKON, BKON Craft Brewer, RAIN, Reverse Atmospheric
Infusion, and the red dot logo are trademarks of Bkon LLC. Franke mark used under license Franke Technology and Trademark Ltd., Switzerland.
Due to continuous product development, Franke Foodservice Solutions Inc. reserves the right to make changes in design and specications
without prior notice.
™
brewing technology.
(19006370 Rev. C, March 21, 2016)
 Loading...